

Page 1

ESP
5000 Series
Your Entertainment Storage Player
All your Music, Video, Photo & more in the Palm of your
Hand
Portable Media Player with Built-in 7-in-1 Memory Card Reader
User Manual
Version 1.0
Revision Date: July 1, 2006
Page 2

TABLE OF CONTENTS
Description Page
FCC Certification 3
Warranty Information 3
Package Checklist 4
Features 4
Specifications 5-6
Key Pad Function 7-8
Charging the Battery 9
Turning your ESP On and Off 9
Home Screen 9-10
Inserting and removing Memory Cards 10-12
View and Copy Files from Memory Card 13-14
Connecting the ESP to the Computer 15-16
Managing Files and Folders On the ESP Using Your Computer 16-18
Unplugging the ESP From the Computer 18
Operating the ESP in Stand Alone Mode 19
Music Play Mode 19
Picture Play Mode 20-22
Video Play Mode 22
Audio Recording Mode 23
Video Recording Mode 24
FM Radio 24
Option Mode 25
System Functions 25
Display Settings & Version 26
Formatting ESP Hard Drive 27
File and Folder Operation 27-28
Replacing the Battery 28
Reset Button 28
Firmware and Manual Updates 29
Technical and Warranty Support 29
Appendix A Playlist & I-Tune Support 30
2
Page 3

FCC Certifications
This equipment has been tested and found to co mply with the limits o f a Class B digital d evice, p ursua nt to
Part 15 of the FCC Rules. These limits are designed to provide reasonable protection against harmful
interference in a residential installation.
This equipment generates, uses and can radiate radio frequency energy and, if not installed and used in
accordance with the instructions, may cause harmful interference to radio communications.
However, there is no guarantee that interference will not occur in a particular installation. If this equipment
does cause harmful interference to radio or television reception, which can be determined by turning the
equipment off and on, the user is encouraged to try to correct the interference by one or more of the
following measures:
Reorient or relocate the receiving antenna.
Increase the separation between the equipment and receiver
Connect the equipment into an outlet on a circuit different from that to which the receiver is connected.
Warning:
Warranty will be void if mishandled. Please take care in handling the Wolverine Device:
• Do not dro p or handle too aggressively a s it may cause damage to the device.
• Do not allow the device to come into contact with water or other liquids. In the event that water or
other liquids enters the interior, immediately turn off the device. Continued use of the device may
result in fire or electrical shock. Please consult your product distributor or the closest support center.
• Do not handle with wet hands. Doing so may cause electr i cal shock and damage the unit.
• Do not place the device close to any equipment generating strong electromagnetic fields. Exposure to
strong magnetic fields may cause malfunction or corrupt data .
• Do not expose the device to extreme temperatures, humidity or vibrations, which may cause damage to
the device.
• Do not open the outer case. If battery needs replacement please, follow the instructions in this manual
on how to replace the battery and take caution not to damage the components inside the unit.
• Do not move or disconnect the device from the computer while the device is reading/writing data.
This may cause damage to the data and/or the device.
• Under no circumstances should the user try to repair the device. Doing so may cause electrical shock
and void the warranty.
IMPORTANT WARRANTY INFORMATION
WOLVERINE DATA IS NOT RESPONSIBLE FOR CONSEQUENTIAL
DAMAGES, INCLUDING LOSS OF DATA. ALWAYS BACK UP ALL DATA.
FOR FULL WARRANTY STATEMENT CONTACT WOLVERINE DATA.
Wolverine Data has no obligation to repair, replace or issue refunds without a Return Merchandise
Authorization (RMA) number and the receipt of the defective product.
Repairs or replacement service will not be offered to Products that were misused, repaired without
authorization or by other reasons beyond the range of intended use.
Products replacement may be either new or refurbished, provided that it has functionality at least eq ual to
that of the product being replaced.
Wolverine Data is not responsible for any data stored on the returned Product, please backup any data prior
to shipping the unit.
The limited warranty for accessories (included battery) is valid for 6 months from the date of purchase.
All OUT OF WARRANTY repairs maybe subject to a normal repair fee. Please contact your dealer or
Wolverine Data for current charges
3
Page 4

1 - PACKAGE CHECKLIST
Main unit
Earphone
Audio & Video cables
USB cable
User's guide
CD-ROM containing digital copy of this manual and Windows 98 and Mac 9.x Drivers
Power Adapter (100-240V auto switched)
2 - FEATURES
• Store and play thousands of music, video, photos, digital recordings and save any
computer data on the Wolverine ESP portable mass storage device
• 3.6” high resolution TFT LCD Color display to view picture, video and manage
contents
• Transfer digital pictures directly to the ESP through the built-in 7 different type of
Memory Cards reader/write without a computer:
1. Compact Flash Type I/II (CF)
2. Smart Media (SM)
3. Memory Stick (MS)
4. MS Pro
5. Secure Digital Card (SD)/MMC
6. MicroDrive
7. xD Card
• Read additional type of cards using adapters (not provided): Mini-SD; RS-MMC; MS
Duo; MS Pro Duo.
• NTSC/PAL TV out
• Use it as an External Hard Drive to backup all your computer data or as a memory
card reader / writer
• Battery powered – high capacity rechargeable and replaceable Li-ion internal battery
allows up to 15GB of memory cards data transfer or 8 hours of music playback
(continuous with the screen turned off) or 3 hours of photo or video playback on a
single charge
• Copy, Paste, Delete and organize files without a computer
• High speed USB 2.0 connection (backward compatible with USB1.1)
• Convenient universal AC/DC (100V-240V) adapter
• System Compatibility:
PC: MS Windows 98, ME, 2000, XP
Mac: OS 9.x, OS 10.x
Linux: 2.4x
• Warranty : 1-Year
• Dimensions: (LxWxH) 5.25 x 3.00 x 1.00 inches
• Weight 10.3 oz.
4
Page 5

• Optional: Record directly from a TV or DVD using the optional cradle and firmware
upgrade (not included with base model)
3 - SPECIFICATIONS
AVI: Motion-JPEG in AVI format, 320x240@30fps with PCM audio
Video playback and Resolution
(Up to 3 hours from full charge)
MOV: Motion-JPEG in MOV format, 320x240@30fps with PCM audio
MPEG-1
Resolution: 352x288@30fps
Bit Rate: 1.5Mbps
Audio: MPEG-1 Layer II/III
Format: MPG/DAT, VCD
MPEG-4
Resolution : 720x480@25fps
640x480@30fps
720x480 @ 10 fps(4MV)
640x480 @ 15 fps (4MV)
Bit Rate : 4Mbps
Audio : AAC
Format : MP4, Simple Profile without 4MV
MPEG-4:ISO standard per Moving Picture Experts Group
Audio playback
(Up to 8 hours from a full chargeScreen turned off)
Photo viewer
XviD
Resolution : 720x480@25fps
640x480@30fps
Bit Rate : 4Mbps
Audio : MP3, PCM
Format : AVI
WMV9
Resolution: 352x240 @ 25 fps
320x240 @ 30 fps
Bit Rate: 1.1 Mbps
Audio : WMA
Format : WMV
Remark: WMV 7/8 is unsupported
MP3: MPEG-1 Layer I/II/III, sample rate up to 48KHz, bitrate
16~384kbps, CBR and VBR, Stereo or Mono, .MP3 file format
WMA: WMA version 7, 8, and 9, sample rate up to 44KHz, Bitrate
32~192kbps CBR. Stereo or Mono. WMA file format
AAC: MPEG4-AAC, sample rate up to 48KHz, bitrate 16~320kbps,
CBR, VBR, and ABR, Stereo or Mono, .M4A or .AAC file format
WAV: sample rate up to 48KHz, Stereo or Mono, un-compressed 8 or
16bits PCM in MS-RIFF WAV (.WAV) file format
CDA: CD-Audio (16bits 44.1KHz stereo)
Support M3U Playlist type files (m3u extension file)
JPEG: Baseline YUV
TIFF: 1 and 8 bits grayscale, 8 bits indexed-color, 8 and
16 bits true color
BMP: Monochrome, 8 bits indexed-color, RGB, RLE8
GIF
5
Page 6
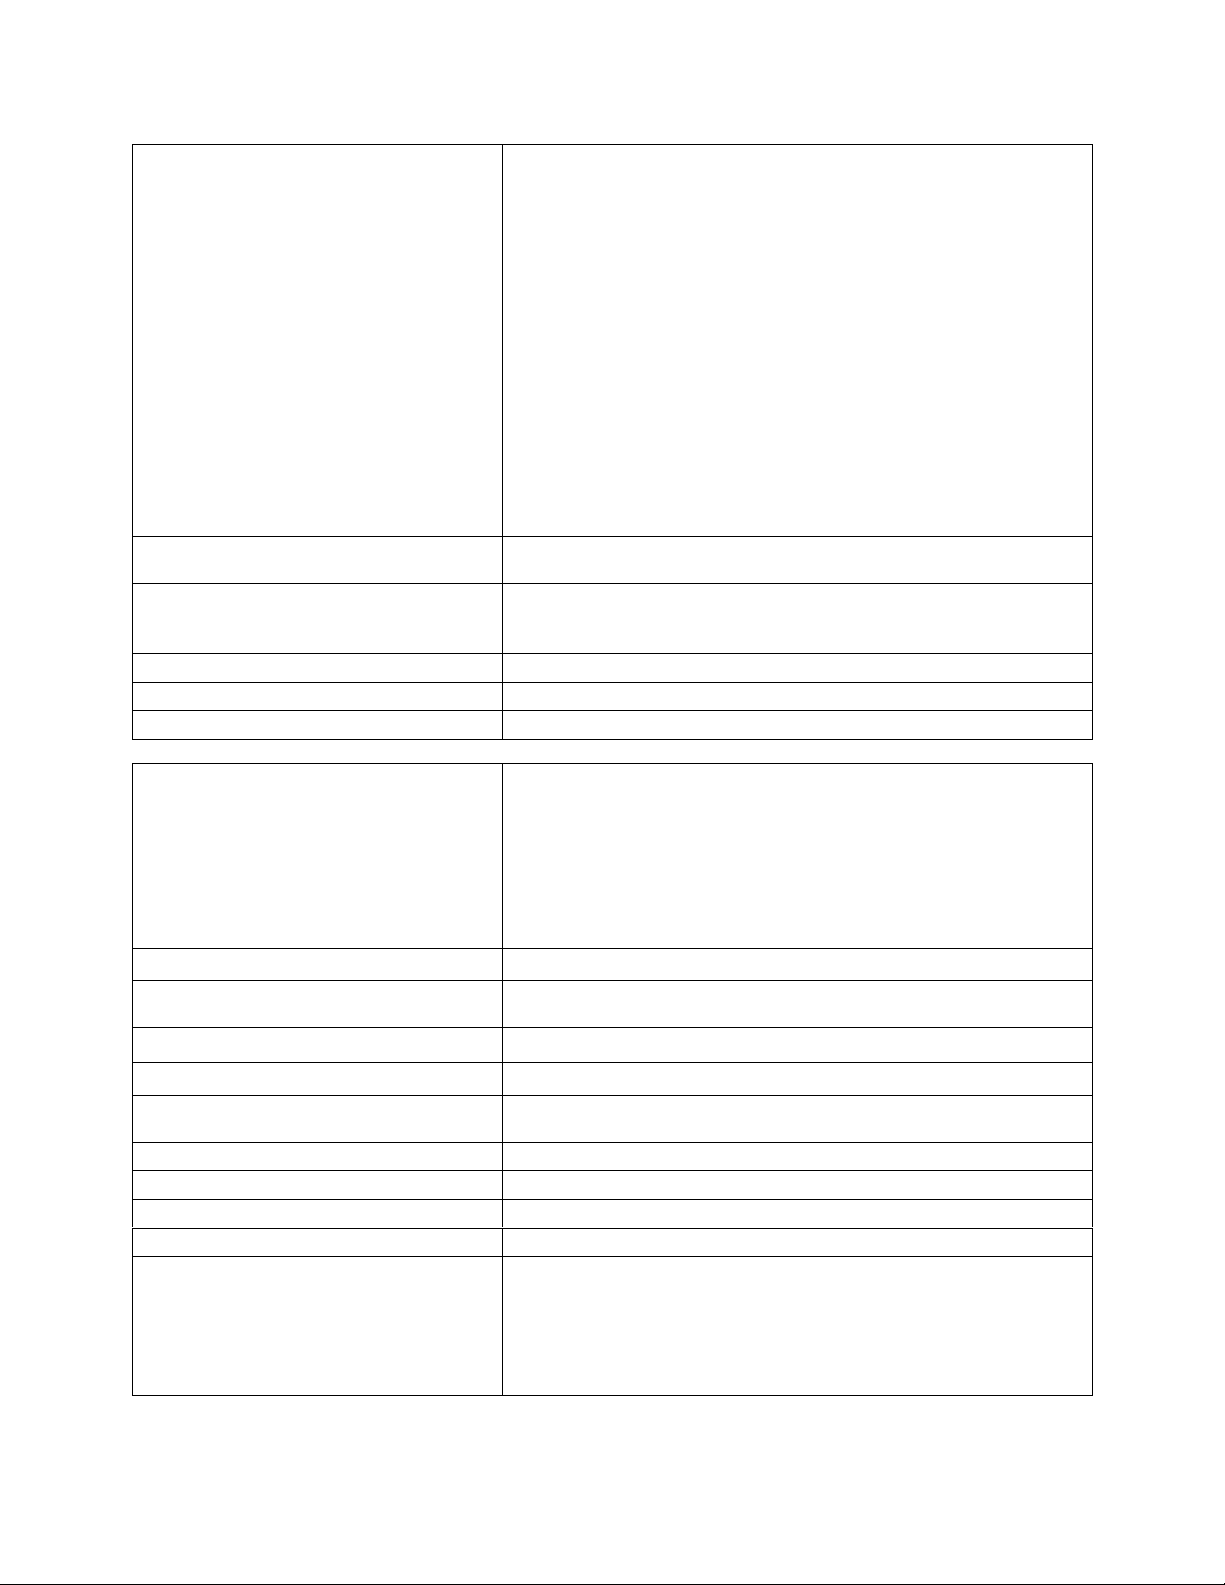
Voice Recording
Video Recording (require optional
cradle and firmware upgrade)
FM Radio
Direct Printing
Built-in Speaker
RAW files supported cameras (may require upgrade to the latest
firmware from Wolverine Data Support webpage):
Canon: 1Ds Mark-II, 1D Mark-II N, 1Ds, 1D-II, 1D,5D,10D,20D,
300D(Digital Rebel, Kiss Digital), D30, Power Shot G1/G2/G3/G5/G6,
EOS 350D, Digital Rebel XT, EOS 5D
Nikon: D200,D100, D70, D1X, D1, D2X, D50,D1H
Fujifilm: FinePix S2Pro, FinePix S3Pro, FinePix S5500, FinePix E900
Olympus: E-1, E-300, E-500
Kodak: DSC Pro SLR/c, DSC Pro SLR/n, DSC Pro 14n
Pentax camera RAW (.PEF), istD & isdtDL, isiDs
Minolta A1, A2 , A200, DYNAX D7
Minolta Maxxum 5D Konica Minolta 7D (MRW).
Panasonic DMC-FZ30
Zoom IN/Out -Rotate
EXIF data
Slideshow with background music
Voice recording from built-in microphone or line-in Aux source.
Output: MPEG-4 Audio- AAC format
Resolution: 352x240 @ 30 fps
Audio: AAC
Format: MP4
87.5 MHz – 108 MHz
PictBridge Compliant
8 Ohm, 400mW Max.
Compact FlashTM Card type I/type II (CF)
Supported Memory Cards
(Transfer up to 20GB of data from a
full charge)
Hard Disk Size
AV device
Display
Interface
Power
TV system
Remote Control (Optional)
Memory Stick® (MS) and MS/Pro
Secure Digital Card (SD)
MultiMedia Card (MMC)
MicroDrive
xD
Mini-SD, RS-MMC, MS Duo, MS Pro Duo require adapter (not
included).
2.5 inch, Laptop style hard drive (user upgradeable)
Analog AV-OUT composite RCA jack
Stereo earphone jack
3.6” TFT high resolution LCD, 320x240 pixels, backlight Adjustable
USB 2.0 (compatible USB 1.1)
5V/2.5A DC IN, Li-ion 3.7V 2300 mAh battery
Model : NP-100
PAL / NTSC
IrDA, (Lithium Battery CR2025 3V x1)
Dimensions (LxWxH) 5.25 x 3.00 x 1.00 inches
Weight
System OS
10.3 ounces ( Included 2.5” HDD & battery pack )
Windows98/98SE with driver
Windows ME/Win 2000 SP3 or above/XP
Linux Kernel version 2.4 or above without driver
Mac OS 10.01 or above without driver
Note: ESP unit doesn’t support Windows 2000 SP1 , SP2 ,
please upgrade to SP3 or above.
6
Page 7
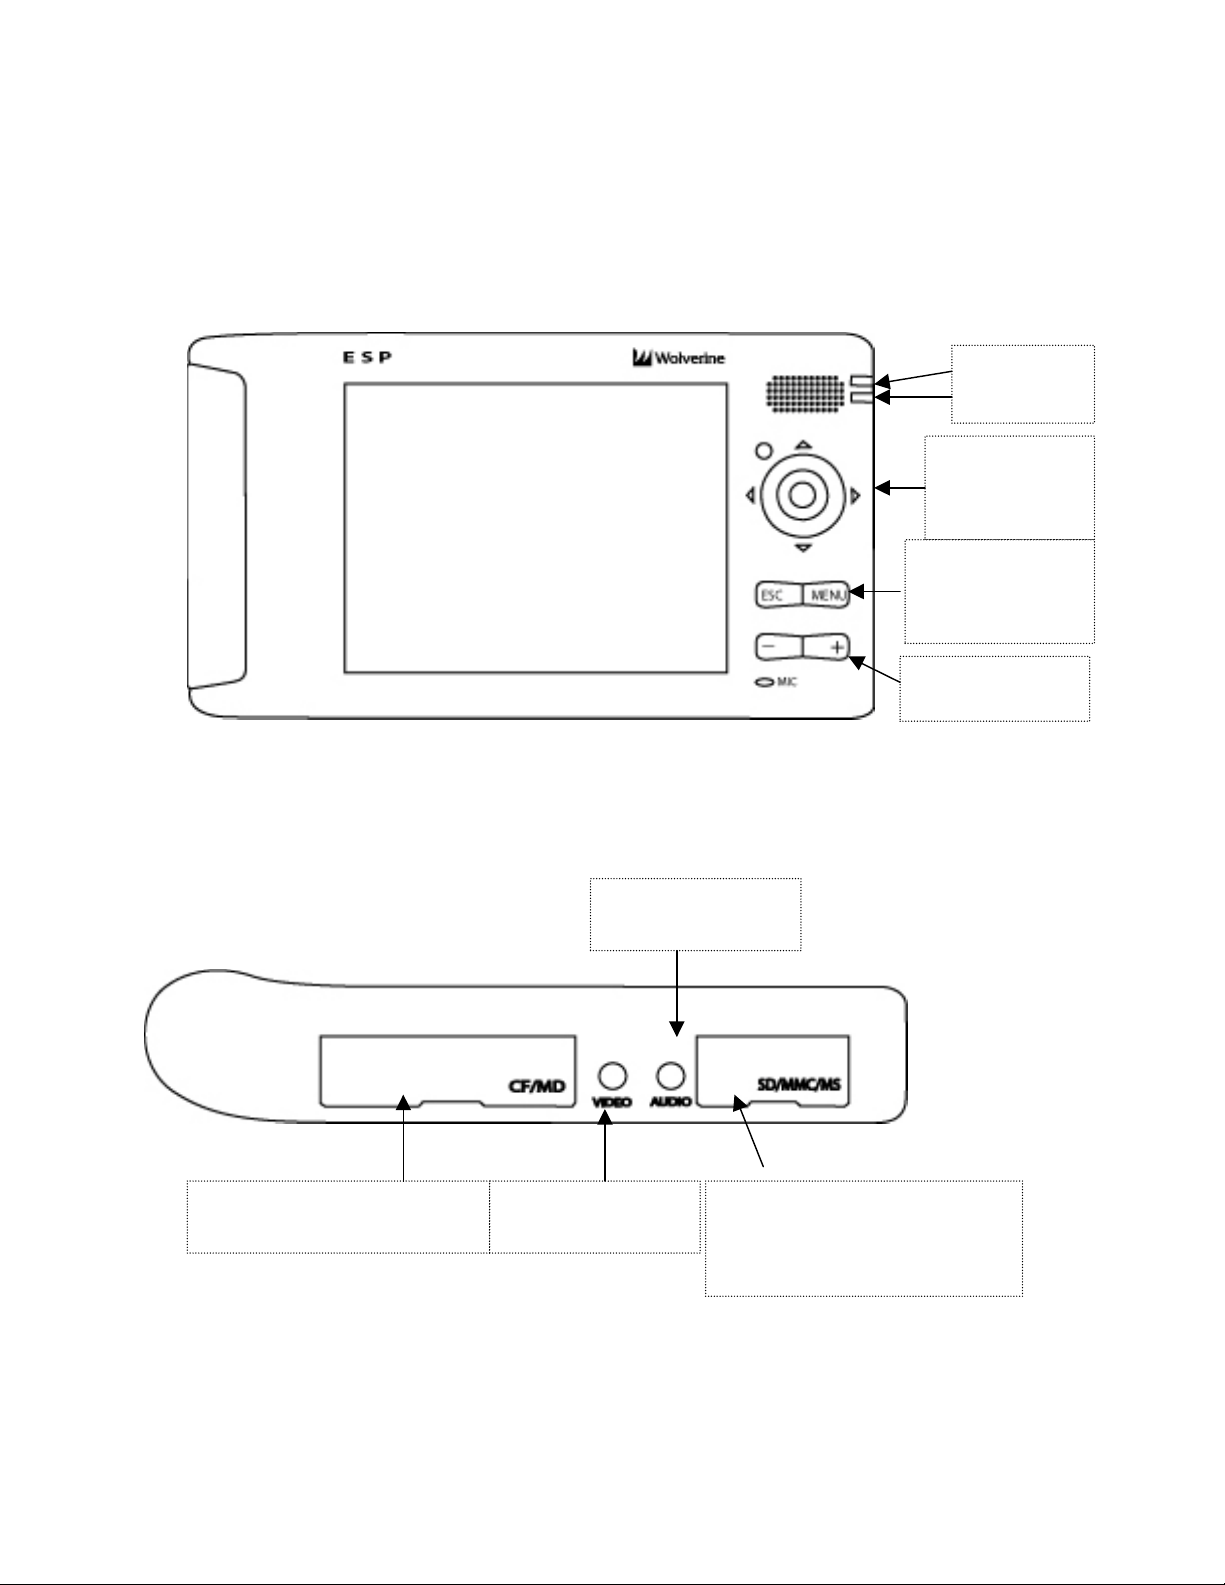
4 - KEY PAD FUNCTIONS
p
FRONT VIEW
TOP VIEW
PWR LED
CHRG LED
JOYSTICK:
Point and Press
down to Select
<ESC>: Exit or
Back
<MENU>:
Available O
Volume and
Picture Zoom
tions
TOP VIEW
Compact Flash (CF) and
MicroDrive Card Slot
Headphone/TV
Audio-out Jack
TV- Video-Out Jack
Secure Digital (SD)/Multi Media
Card (MMC)/Sony Memory Stick
(MS)/Sony Memory Stick Pro(MSPro)/XD Card Slot
7
Page 8
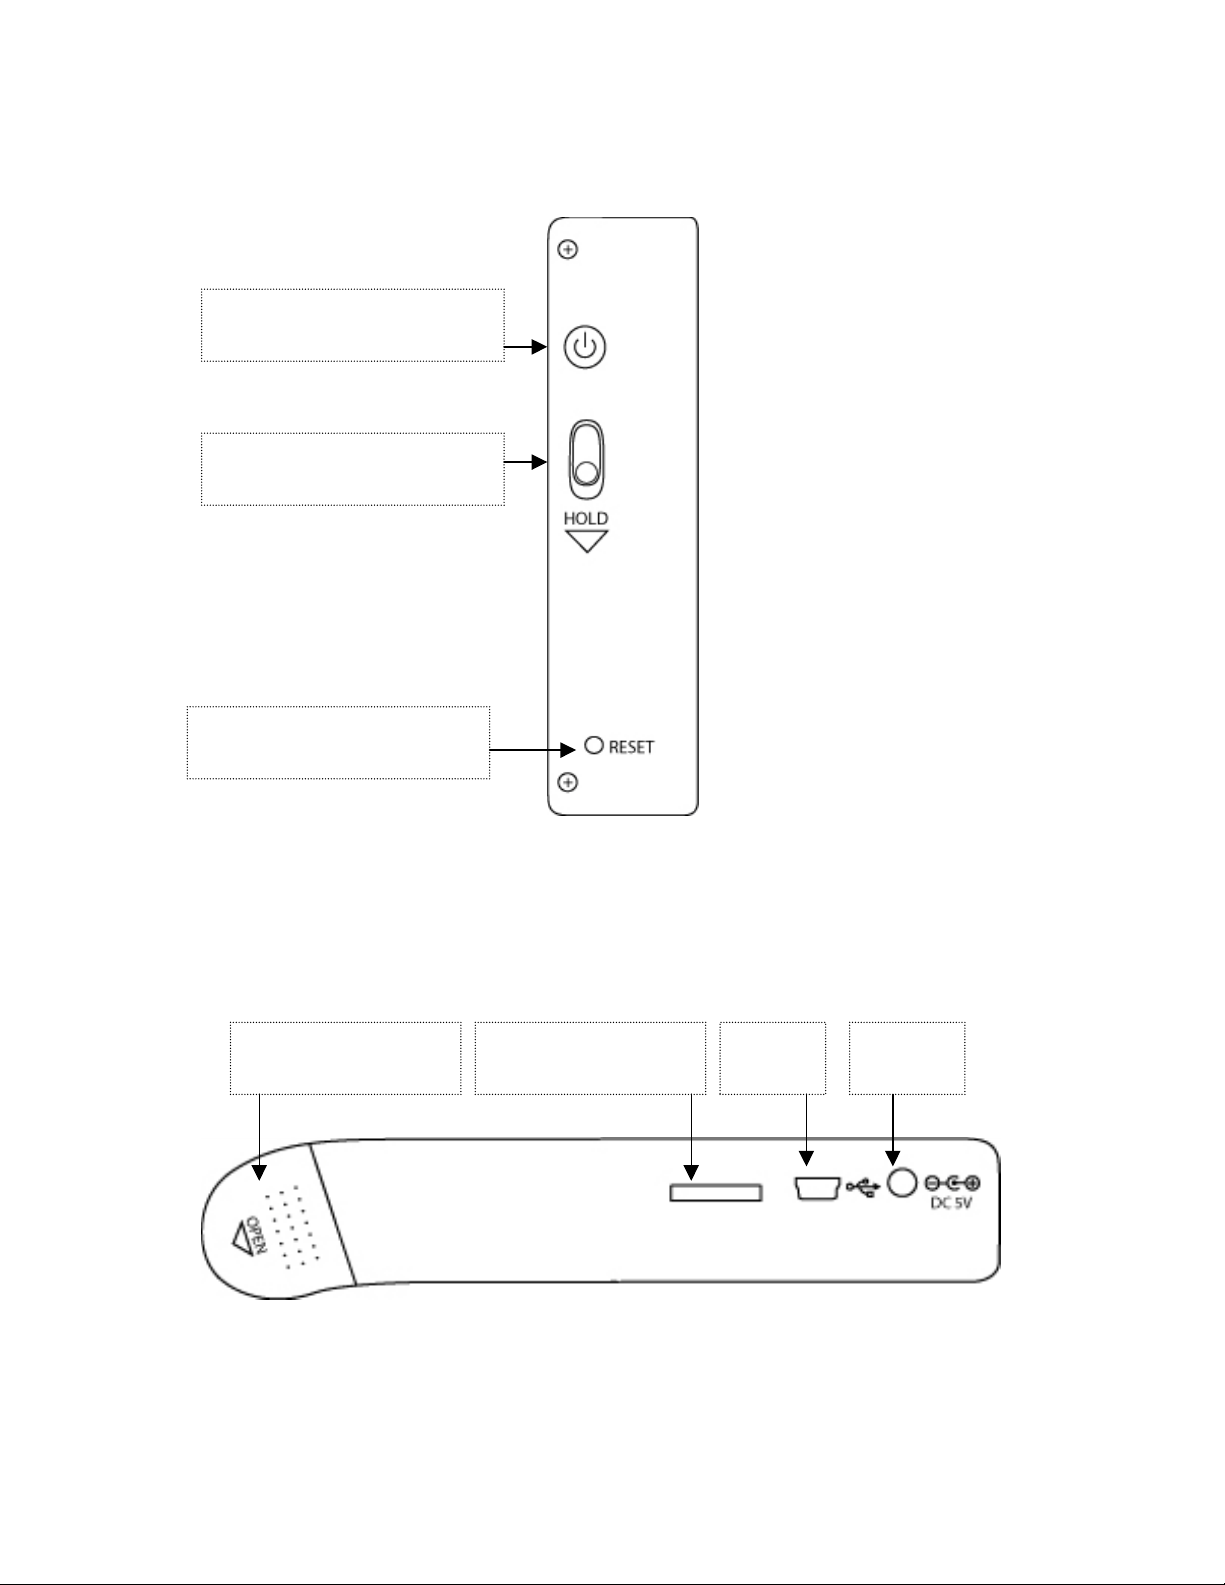
Side View
Power Button
Power Button Lock
Reset Button
Bottom view
Battery Door
Cradle (Optional Sold
Separately) Input Jack
USB
Jack
5V DC-in
Jack
8
Page 9

5 - CHARGING THE BATTERY
Before initial u se charge the ESP internal battery u sing the AC adapter for at least
6-10 hours with the unit’s p ower off. To charge the battery, connect the AC adapter’s
cable into the DC 5V inlet and plug the AC adapter into an electrical outlet. The AC
adapter is a universal automatic voltage-switching adapter that works from 110V-240V
electrical outlets.
The charge LED lights RED while the battery is charging. The charge LED light turns
OFF when battery is fully charged.
6 - TURNING YOUR ESP ON AND OFF
To turn on the ESP, press and hold the power button for 2-3 seconds (or until the
blue screen shows up) and release. The GREEN power LED light turns on.
To turn off the ESP, press and hold the power button for 3-4 seconds and release. The
GREEN power light turns off.
Sliding the <Power Button Lock> to the “Hold” position prevents accidental ON or OFF
switching of the ESP. Recommended during travel.
7 - HOME SCREEN
When you turn on the ESP Home screen appears. You can return to the Home screen at
any time by pressing and holding the <ESC> button until you reach the Home screen.
General Rule:
Any item icon on the screen is executed using the directional Joystick to highlight and
then <PRESS> Joystick to select.
Home Screen Page “1”
9
Page 10
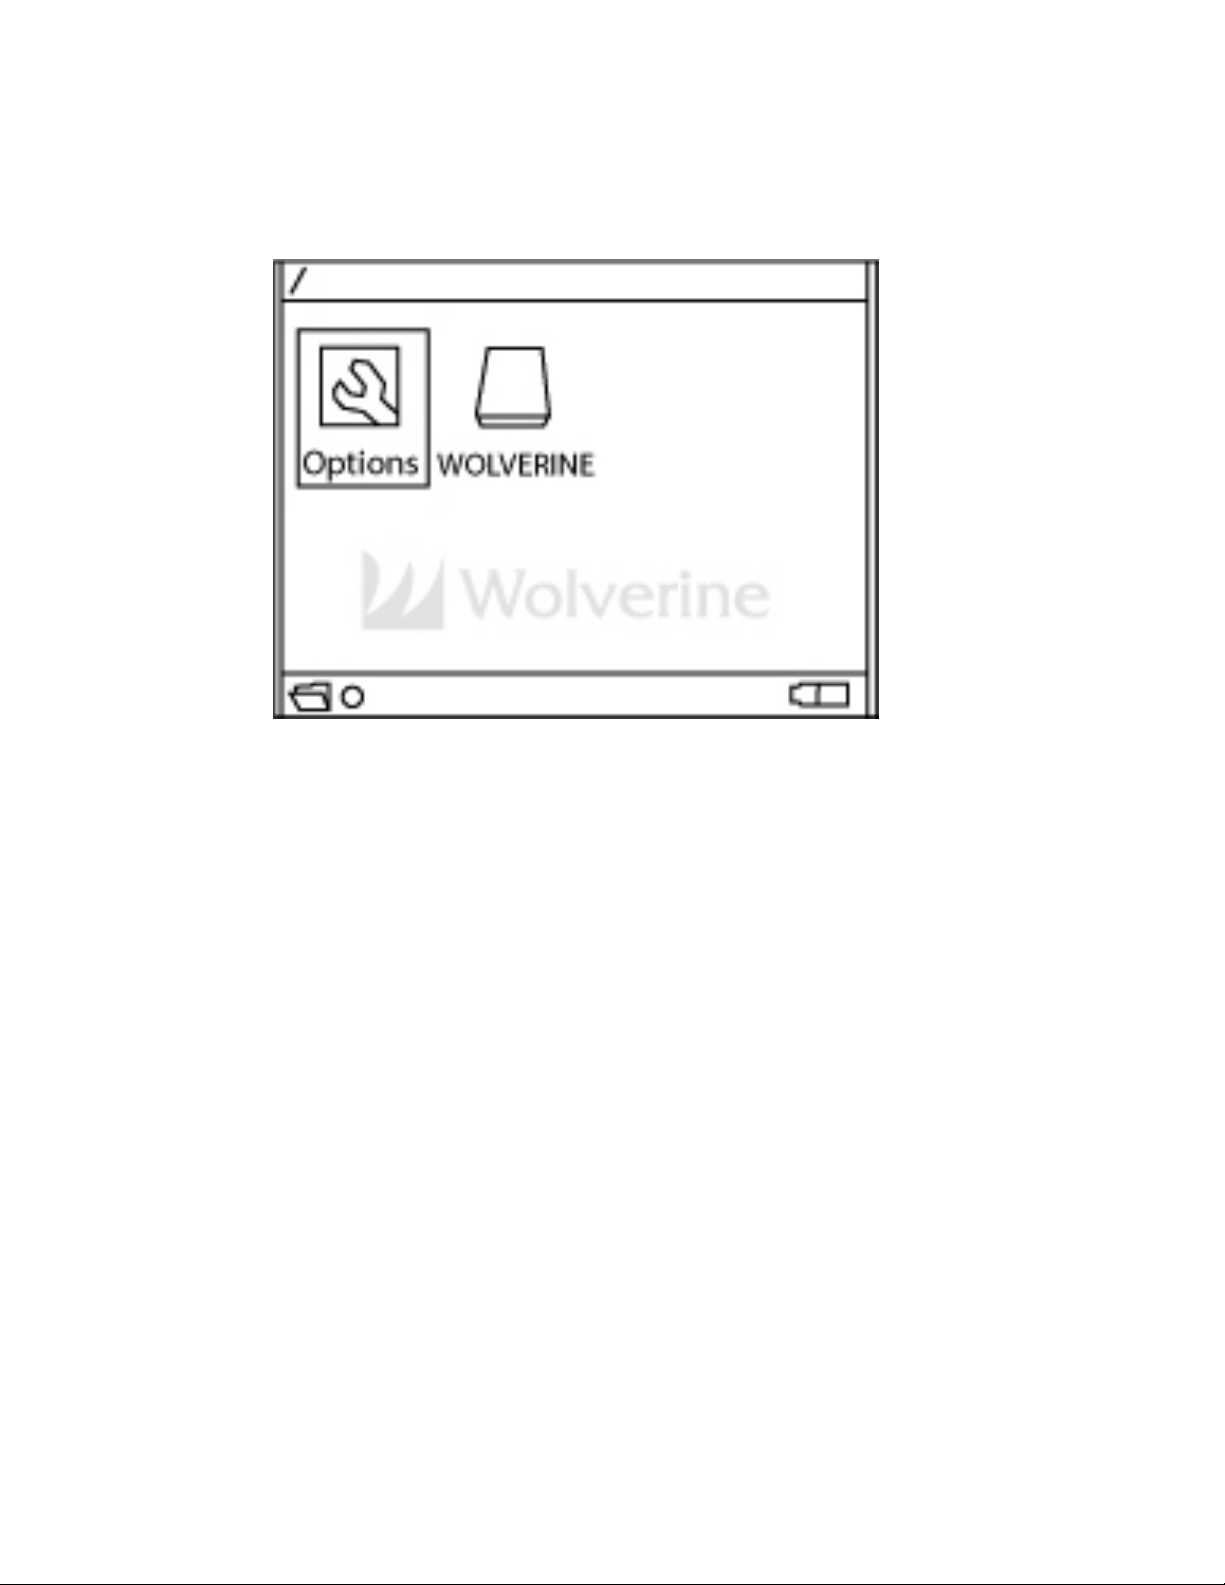
Home Screen Page “2” Slide Joystick Down to Select
8 - Inserting and Removing Memory Cards
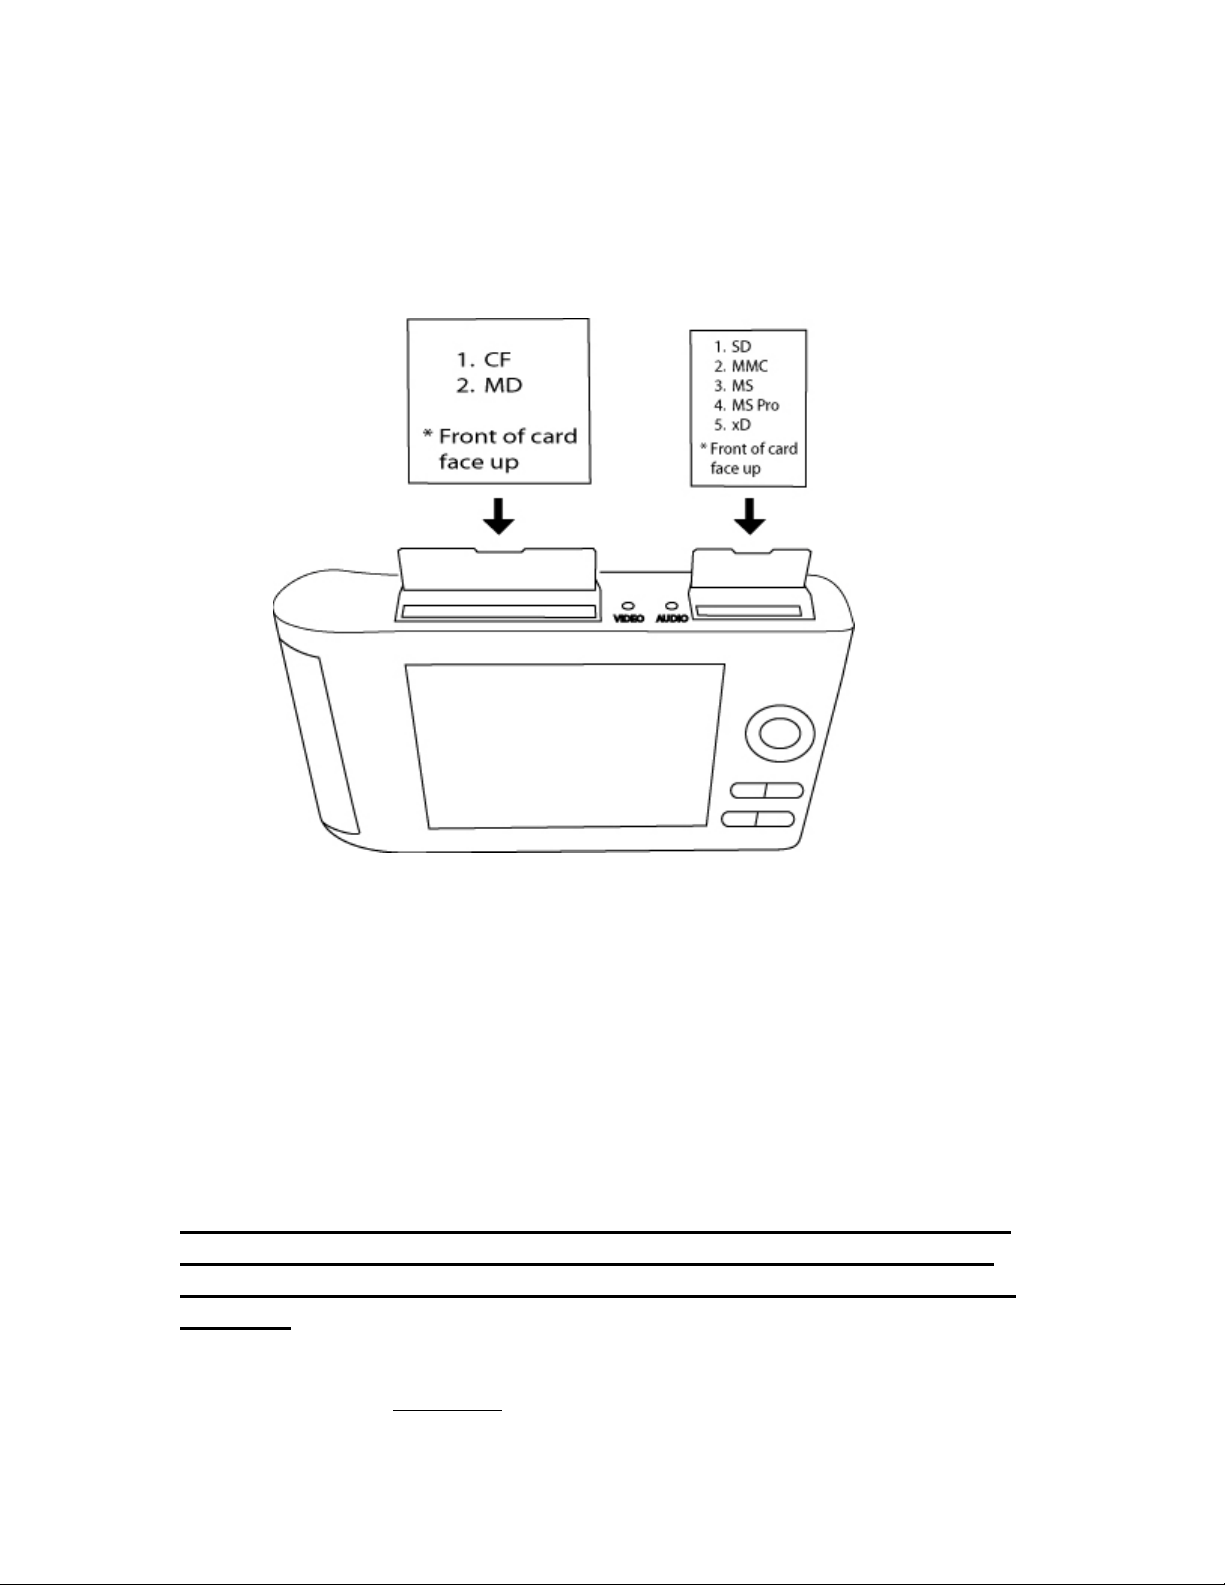
The ESP has two memory card slots.
The C/F Card slot supports the following cards:
• CompactFlash, Type I and II
• Microdrive ™ (3.3V)
The SD/MMC/MS/XD Card slot supports the following cards:
• SD card (Secure Digital)
• MultiMedia card (MMC V 2.1 or later)
• Sony Memory Stick (MS)
• Sony Memory Stick Pro (MS Pro), Duo Cards Require the use of MS-Adapter
(not included, provided by Memory card manufacturer or Sony)
• XD Card
You can also use the following types of memory cards with a CompactFlash or any other
type adapter (not included):
• Mini SD
• RS-MMC
• MS Duo
• MS Pro Duo
10
Page 11
Caution:
Never remove a memory card while it is being accessed. Doing so may cause files to be
lost or Card damage. Do not put labels or stickers on memory cards. The sticker may
peel off, preventing the card from being ejected and damaging the ESP unit.
MEMORY CARD PROPER INSERTION ORIENTATION
USING THE COMPACT FLASH CARD SLOT
Open the C/F card door. Insert the memory card into the slot with the front of the card
facing the screen. Push memory card slowly straight into the slot. Do not insert card
angled. If you are using a Compact Flash adapter, place memory card into the adapter
fist then insert adapter into the slot.
Caution:
Make sure you inse rt memory card in the correct orientation, straight in
and pull it straight out. Otherwise, the card an d ESP will be dama ge d.
Damaging memory card slot due to wrong insertion is not covered under
warranty.
To remove a card from the C/F Card slot, first make sure the card is not being accessed.
Pull the memory card straight out to remove the card.
11
Page 12

Note:
If you are using a CompactFlash adapter, remove the adapter from the ESP; do not
remove only the memory card.
USING THE SD/MMC/MS/XD CARD SLOT
Insert the memory card into the slot with the front of the card facing the screen. Push the
memory card into the slot.
Caution:
Make sure you insert memory cards in the correct orientation. Otherwise, the card and
ESP will be damaged.
To remove a card from the Card slot, first make sure the card is not being accessed. Pull
out to remove the card.
Caution:
Sony Duo Cards require the use of MS/MS-Pro Adapter (not included).
Do not insert the Duo card with out an adapter. Inserting th e Duo card
without an adapter will result in the inability to remove the card and
damaging of the ESP. Damaging the ESP unit due to the use of
unsupported memory cards is not covered under warranty
12
Page 13
9 - View and Copy Files from a Memory Card
After inserting a memory card into the ESP, you can browse the files or copy them to the
ESP. Insert memory cards as described previously. Type of memory card or card name
will show on the ESP Home screen.
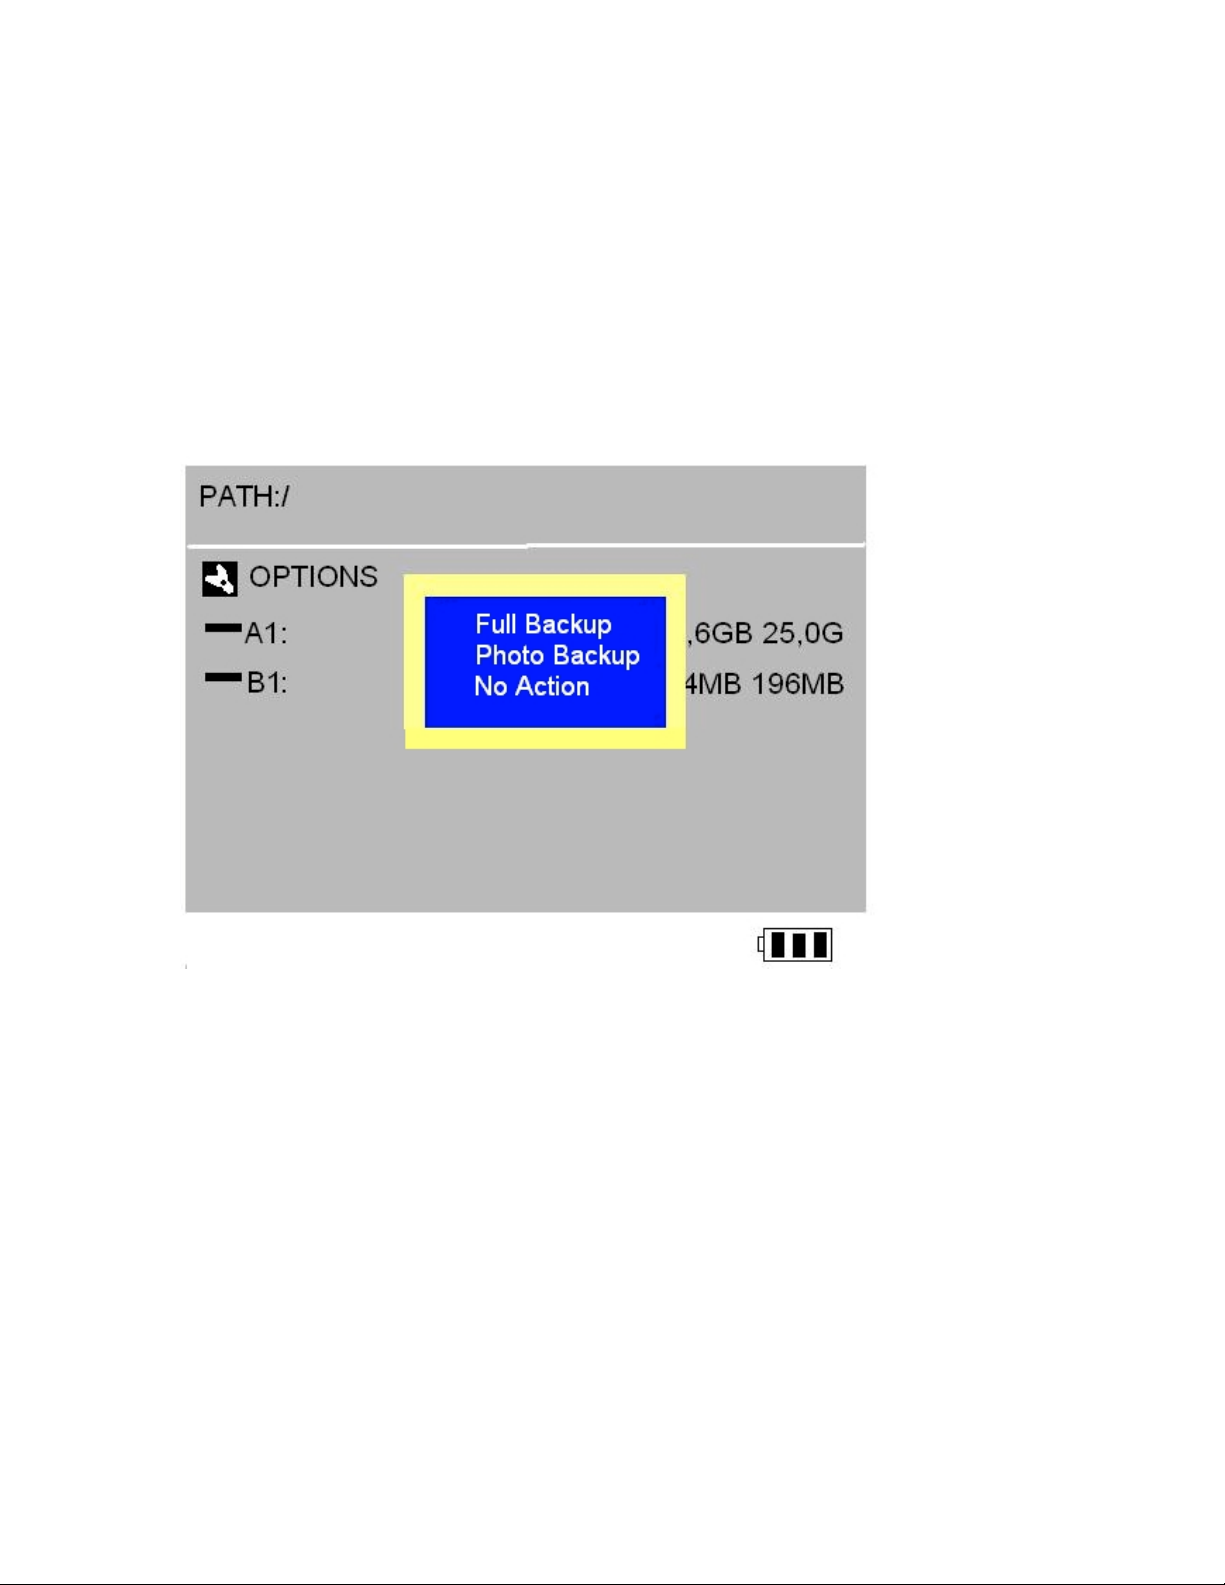
ESP will display a pop window with three options:
- Full Backup
- Photo Backup
- No Action
Use Joystick to highlight an option and <PRESS> to select.
“Full Backup” will create an exact duplicate copy of whatever information found on the
memory card into the [BACKUP] folder on the ESP
“Photo Back” will copy folders and images found under the memory card typical digital
camera DCIM folder into the [BACKUP] folder on the ESP
“No Action” allow user to view contents of the memory card without copying to the ESP.
To view contents of a memory card, highlighting memory card and <PRESS> Joystick.
Folder and files on memory card will be displayed in an Icon view or List view mode
toggled using the <Menu> button.
After choosing “No Action” or at any other time to copy the contents of the memory card
to the ESP internal Hard Drive perform the following:
13
Page 14
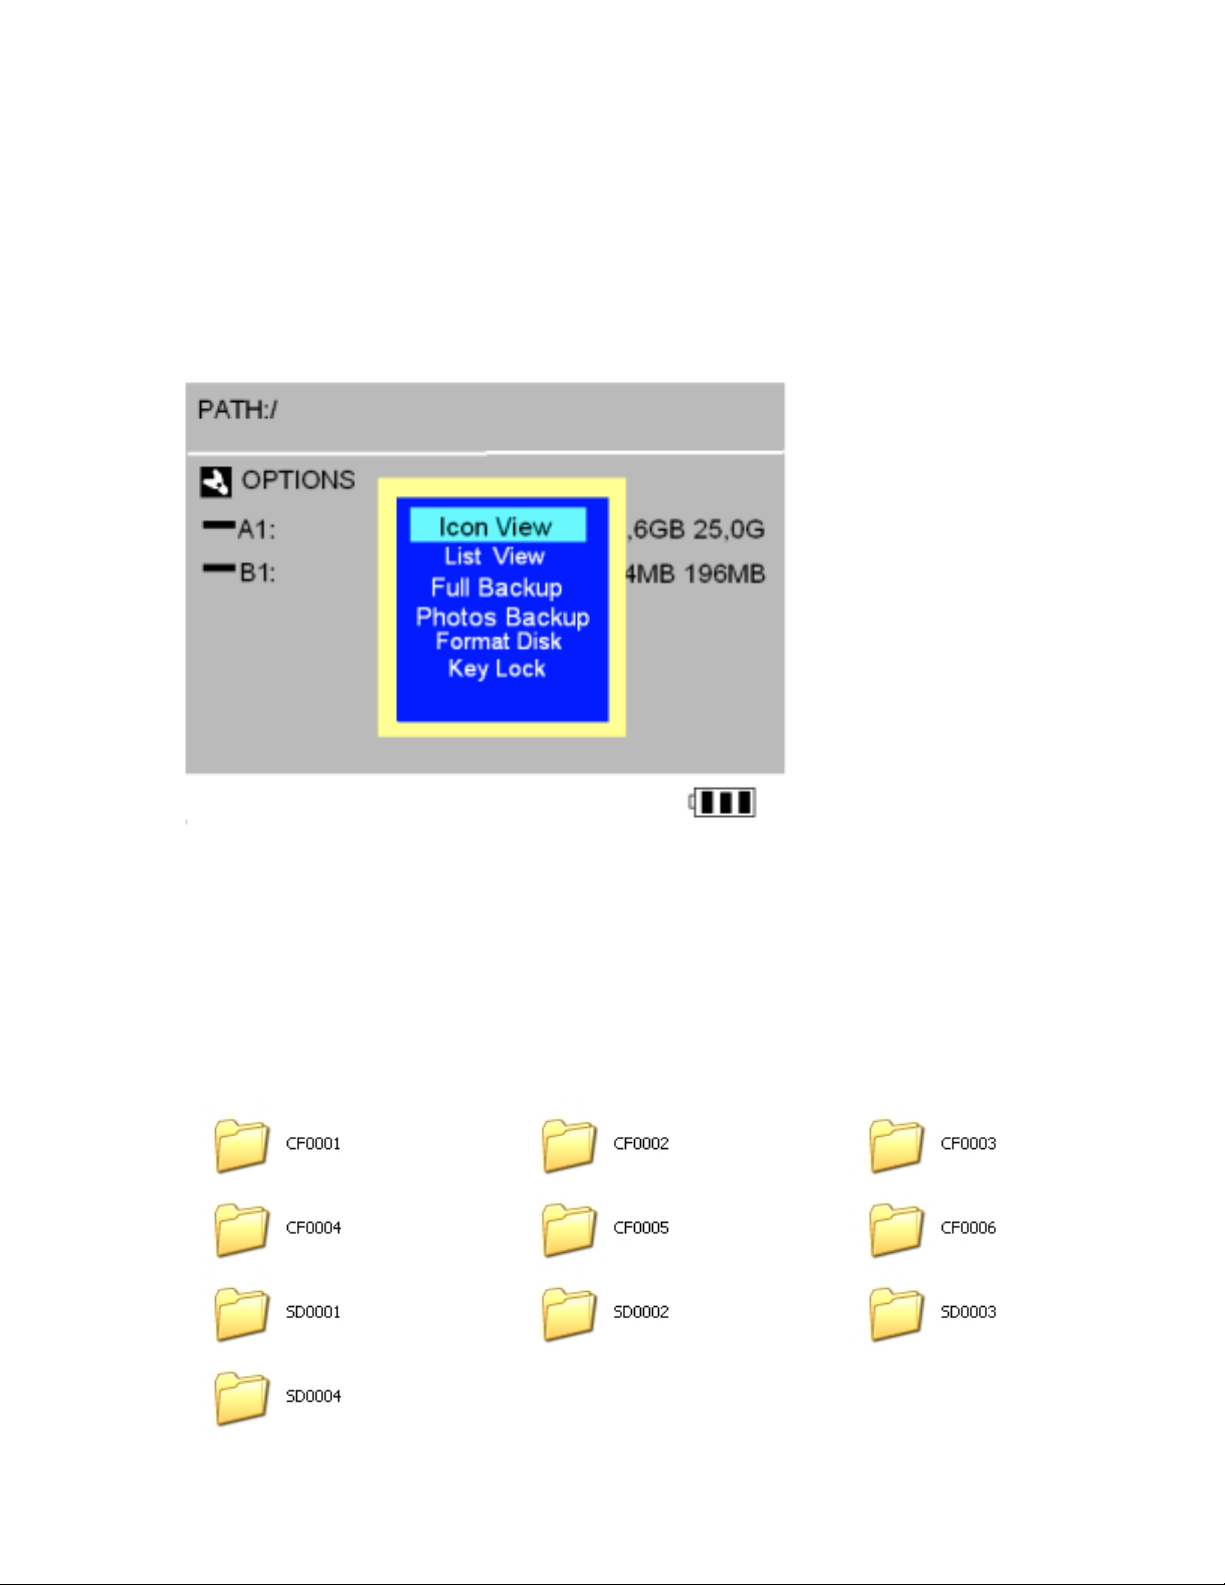
• Highlight Memory card using the Joystick.
• Select <MENU>
• Choose either Full or Photo Backup and <PRESS> Joystick
• To Cancel press <OK>
Memory card data will be copied to the [Backup] Folder on the ESP Home Screen. Data
from Memory cards are stored in separate sub-folders. The folders are assigned
alphanumeric names dependent on the type of memory card used; i.e. CF0000, C F00001,
CF0002 …. CF9999 are files copied from CF type of memory card as seen in the figure
below. The same naming structure is true for all other types of memory cards, i.e;
SD0001, MS0001 etc.
14
Page 15
To view the contents of the copied data from the Home Screen select the folder
[BACKUP] and <PRESS> down Joystick . Select Folder and <PRESS> Joystick.
Please note; even if the same card is copied twice, the same data will be copied to two
separate folders, eliminating the possibility of overwriting existing data.
10 - CONNECTING THE ESP TO THE COMPUTER
Windows ME, Windows XP Home Edition/Professional Edition, Win2000 Professional
SP3 and above, Mac OS 10.1.x and above do not require installation of any Drivers. The
Operating system will automatically detect the ESP and install needed Drives. For
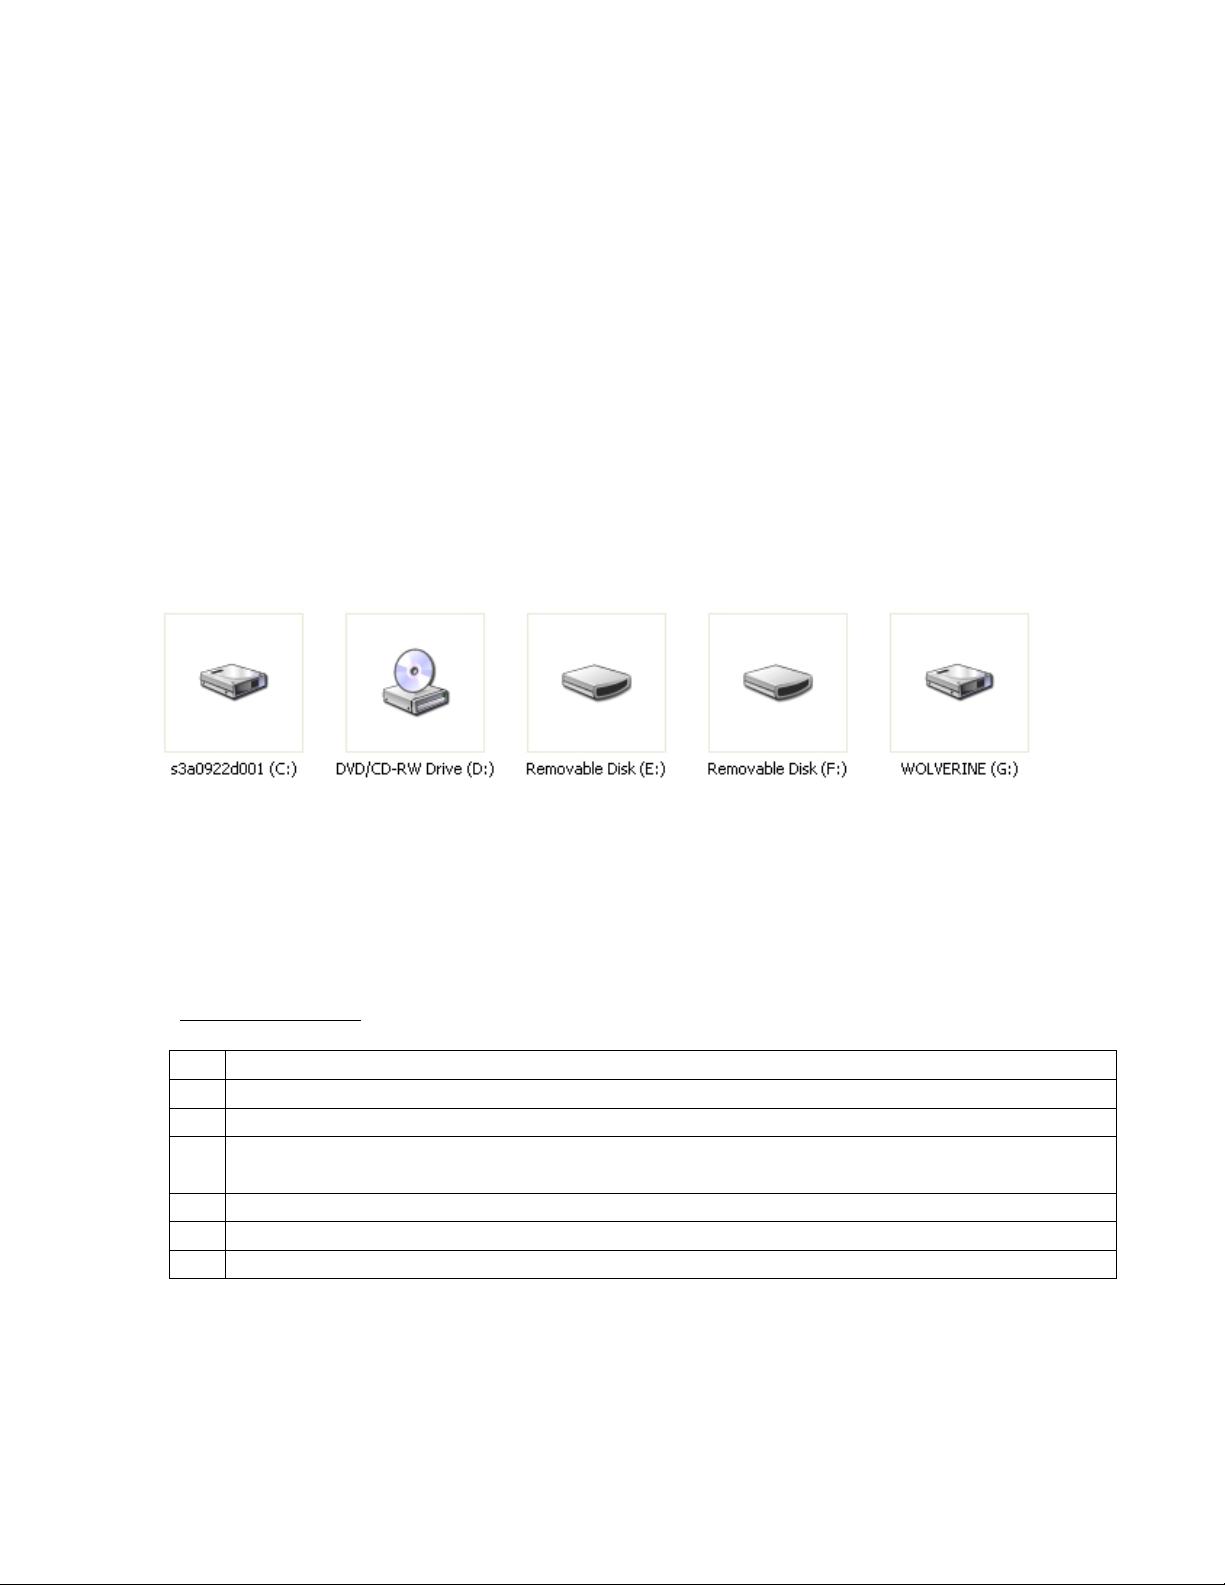
Windows operating systems three drives will appear under “My Computer” as seen
below.
Drive letters are assigned by the operating system based on the next available free driver
letter.
On a Mac system the Wolverine Drives will automatically appear on the Desktop.
Double click to access the contents of the drives.
Windows 98/98SE
BEFORE CONNECTING THE ESP UNIT
1. Insert the included CD into the CD-ROM Drive
2. From “My Computer” double click on the CD-ROM drive
3. Select Windows Folder
4. Double click on “Setup.exe” to begin Driver installation. Press “Next” and follow on
screen instructions
5. Restart computer after installation is complete
6. Connect the ESP to your computer
7. Three new drives as shown in above figure should appear under “My Computer”
15
Page 16
Note For Windows 98 and ME users:
If only two drives appear under “My Computer” then perform the following:
• Go to “Start”
• Select “Control Panel”
• Select “System”
• Select “Device Manager”
• Double click on “Disk Drives”
• Double click on each of the Wolverine drives
• Click on “Settings” Tab
• Make sure the box beside “Removable” is checked. Click on the Box to check and
press "ok” to exit.
Restart computer when instructed.
Macintosh MacOS 9.x
1. Insert CD into the CD-ROM drive
2. Browse the CD contents for the location of MacOS Drivers
3. Double click on file and follow installation instructions
4. Restart your computer after installation is complete
5. Connect the ESP to the computer
11 - MANAGING FILES AND FOLDERS ON THE ESP
USING YOUR COMPUTER
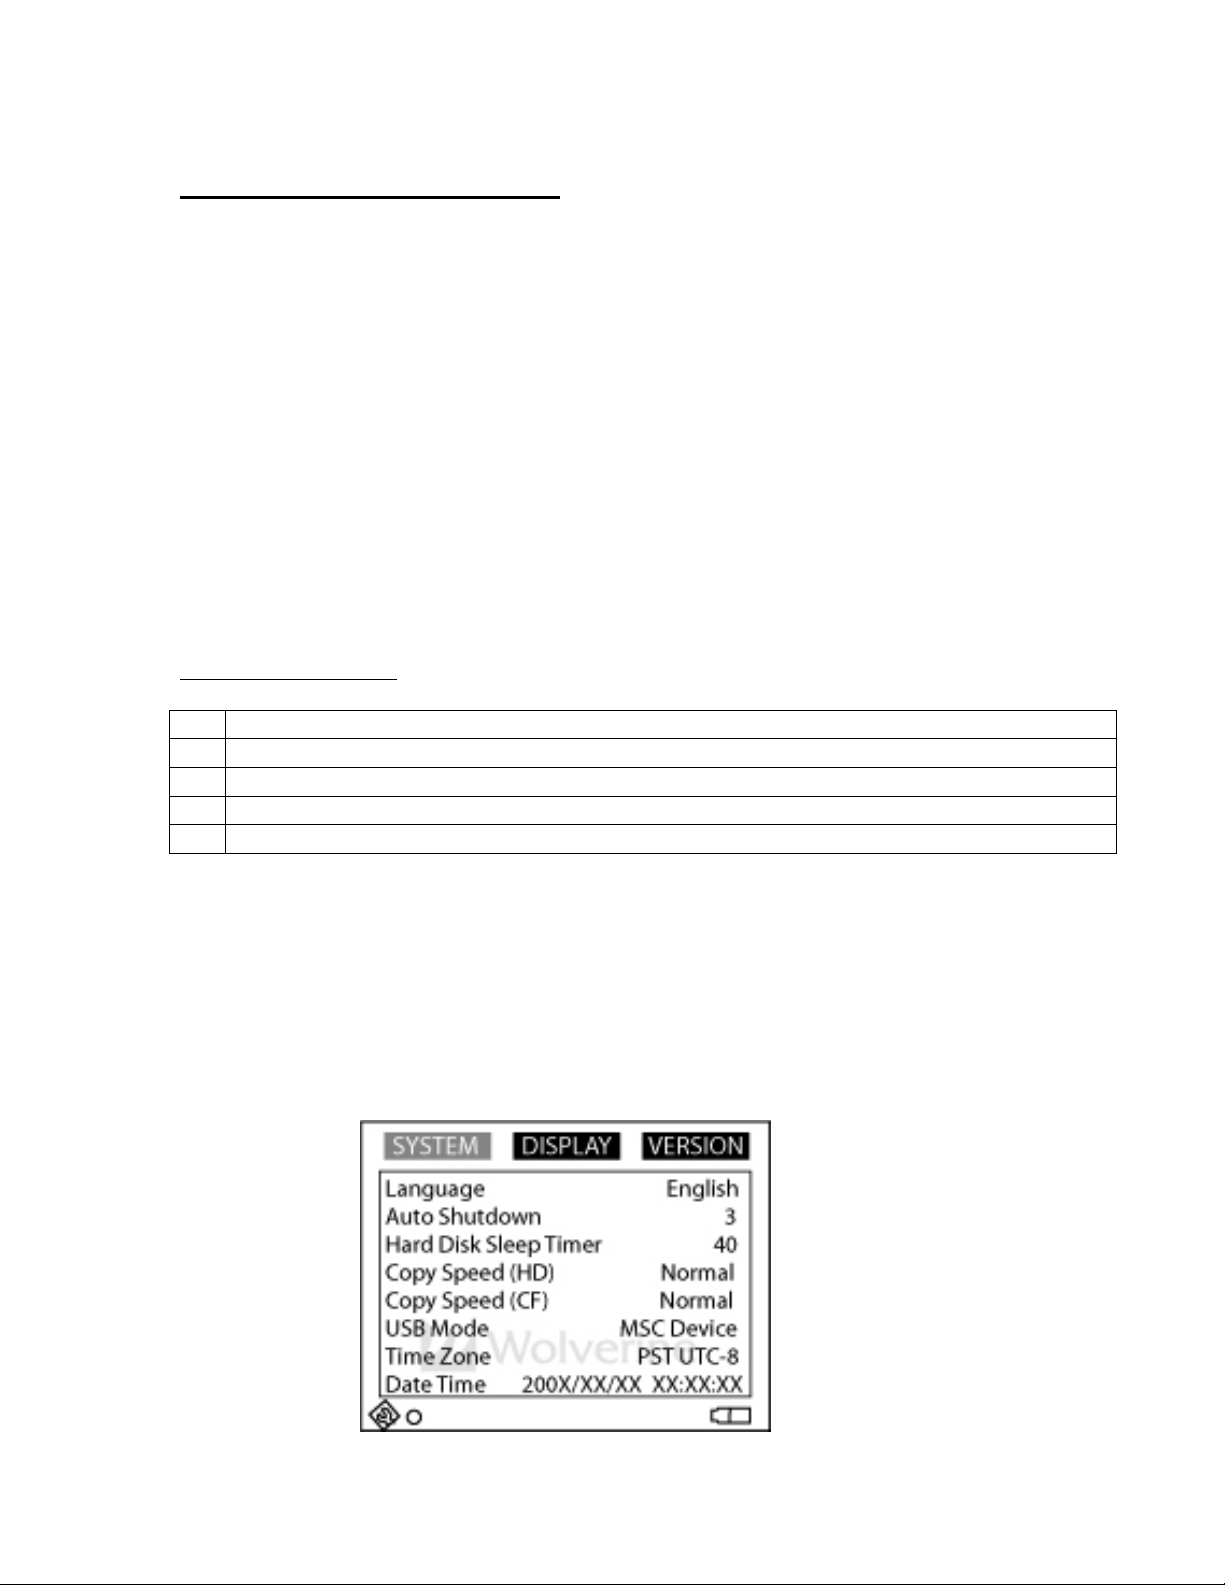
To access the ESP as an external USB mass stora ge device make sure t he USB Mode is
set to MSC Device under “Options” > “Display” as pictured below:
16
Page 17
Ready to view, edit, print or transfer your data to a computer or from the computer to the
ESP, simply connect the ESP’s USB cable (provided) mini jack into the ESP USB port
and the other jack to any computer USB port.
Connect directly to USB ports that are attached to the computer’s motherboard.
Do not use USB ports from hubs, Docking stations or Front USB ports
Turn on the ESP by pressing and holding the power button for 2-3 seconds. At initial
usage the computer system will cycle through installing three new drivers (in windows
XP a message that the hardware is ready for use will appear indicating that the device is
installed and ready).
• In Windows double click on “My Computer”. For Mac. The ESP drives will appear
on the Desktop screen
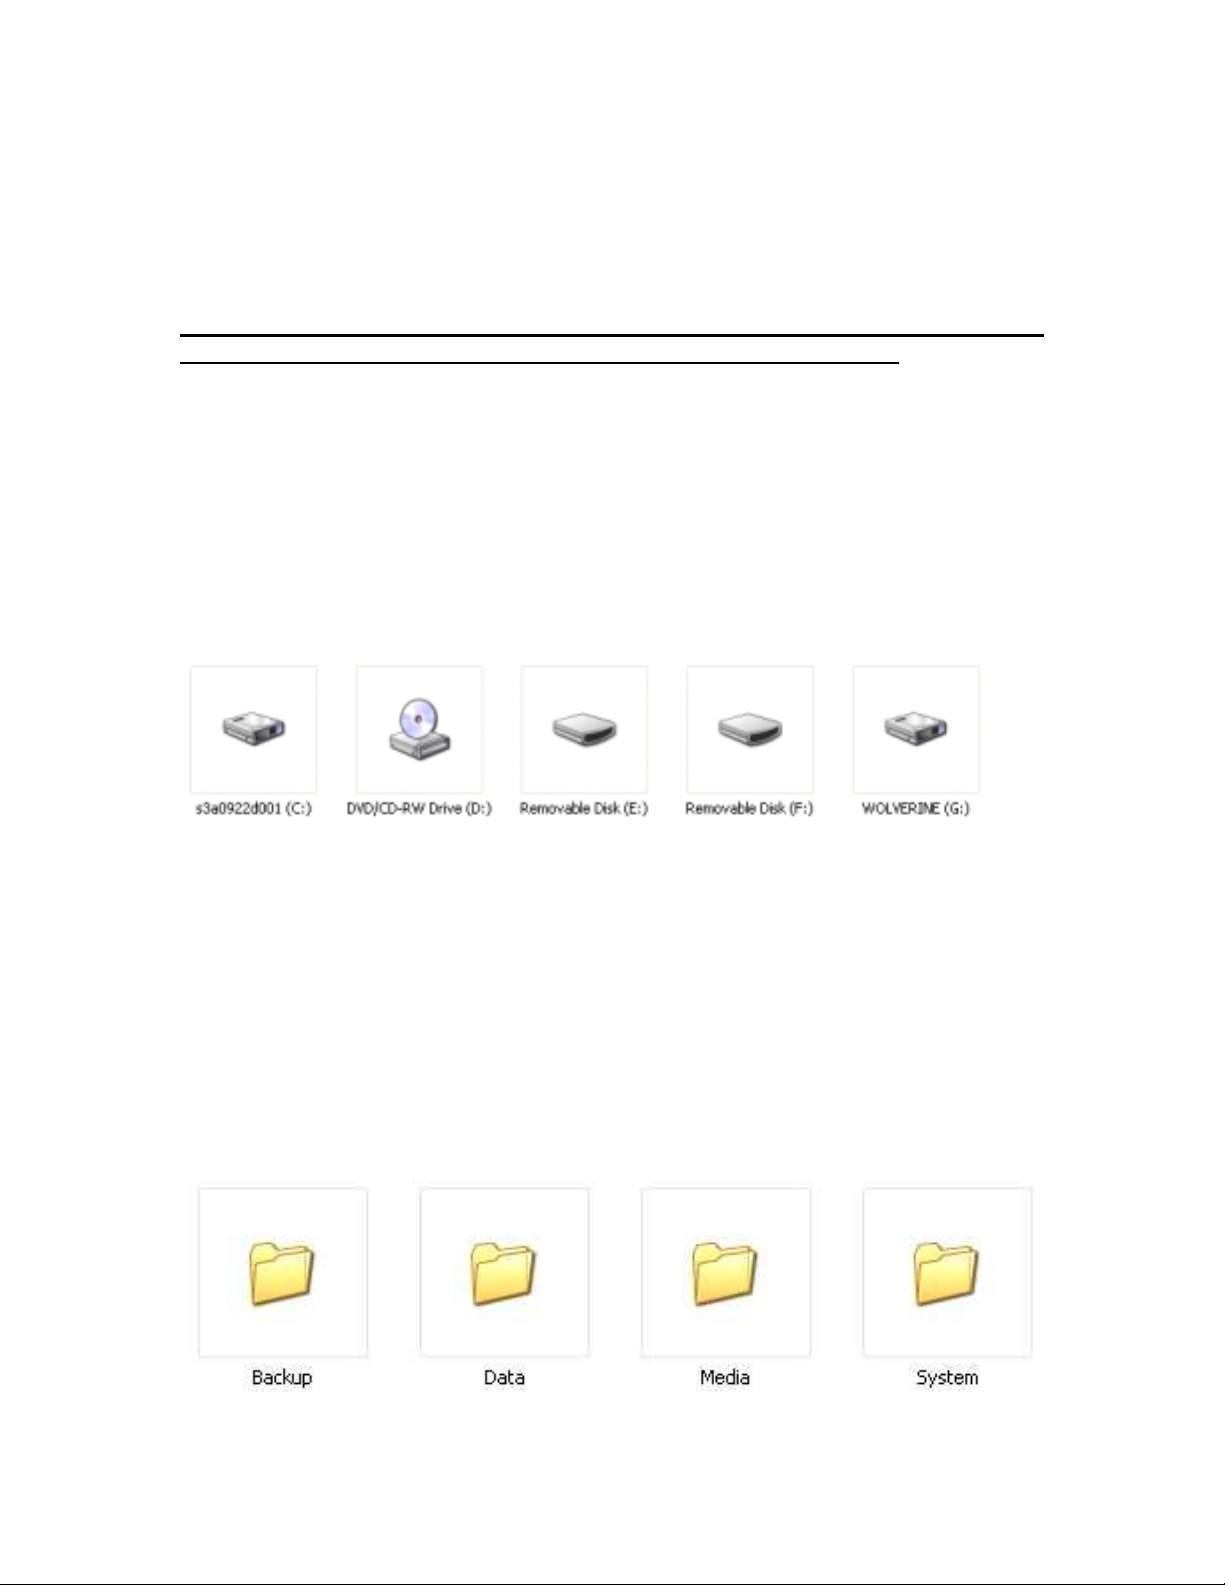
• Under “My Computer” the ESP will show three new drives as shown below
Please, note that drive letters are assigned by your computer operating system and are
dependent on the next available unused driver letter. Example above shows the
Wolverine labeled as drive (G:) represents the ESP’s internal hard drive and the
Removable drives (E:) and (F:) represent the two built-in memory card slots.
• Double Click on the Wolverine Drive to access the contents of the ESP hard drive
• The ESP hard drive is organized in the following folders structure (NEVER DELETE
THESE FOLDER):
17
Page 18
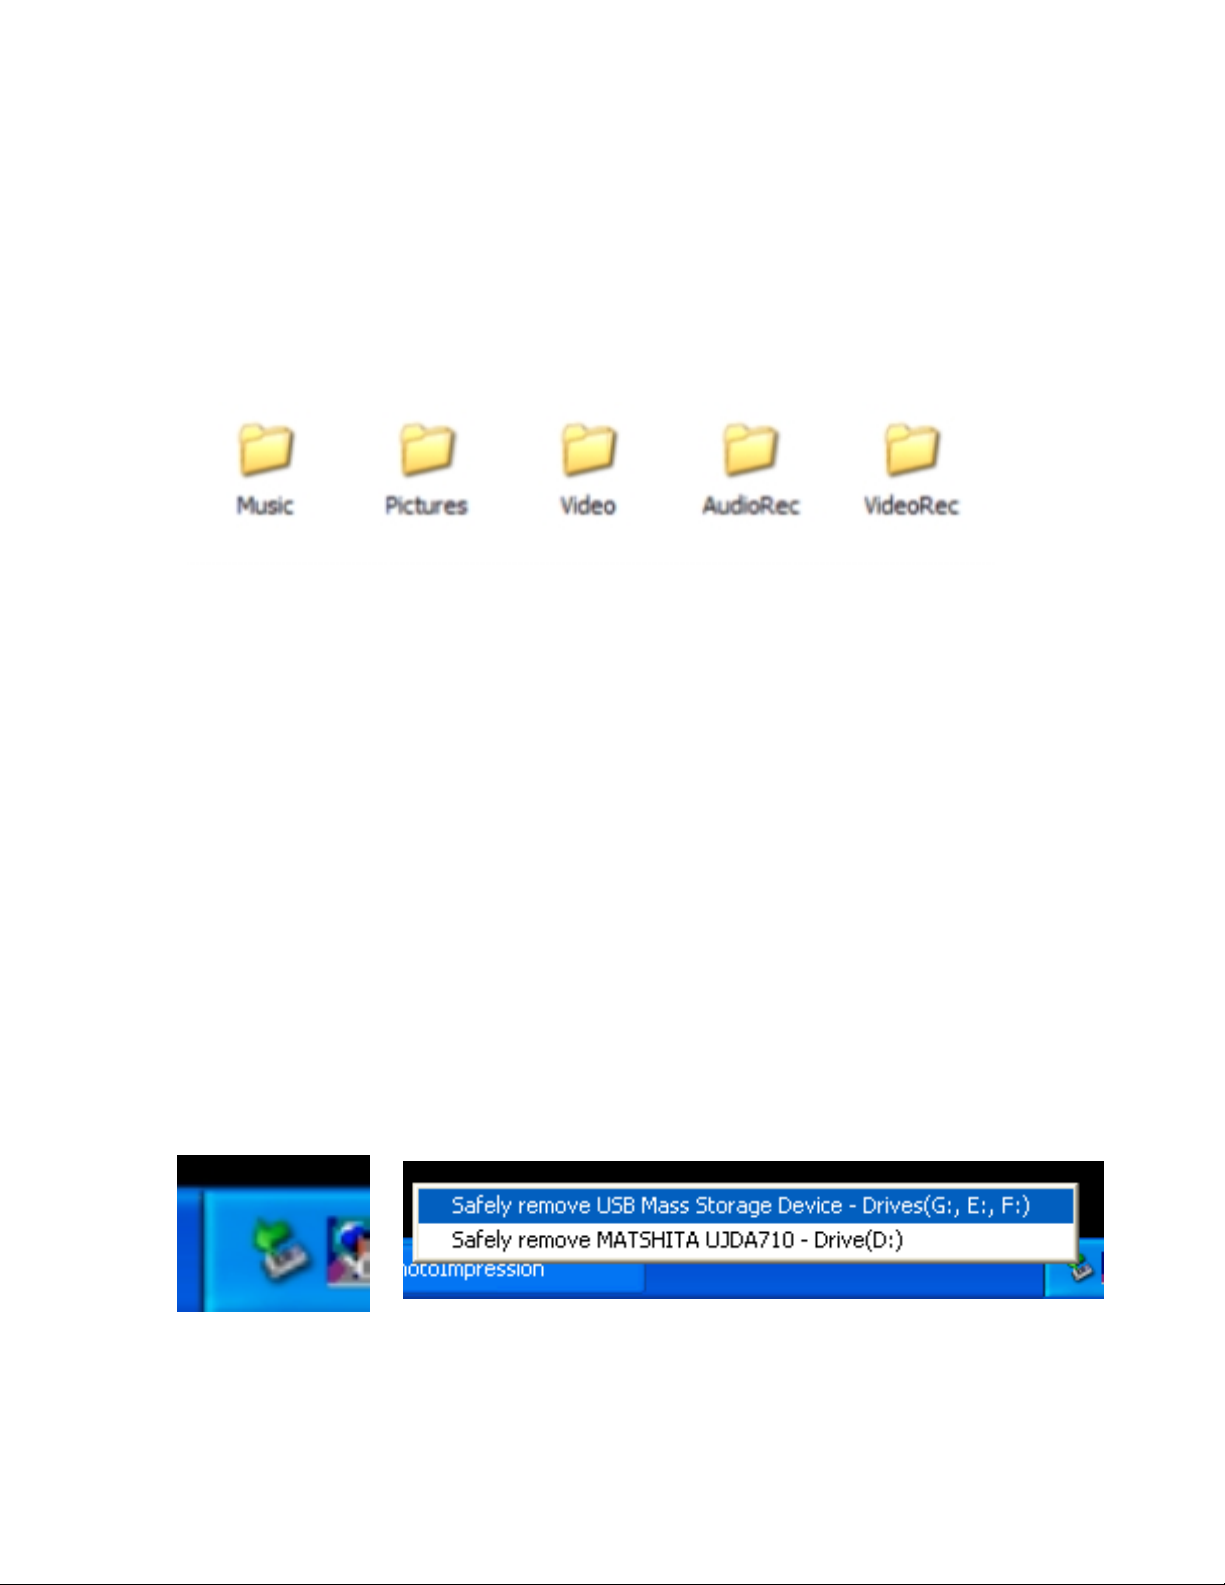
• [Backup] folder is where all files are stored when copying directly from memory
cards to the ESP
• Use the [Data] folder to save or copy any computer data type of files from the
computer to the ESP
• Use the [Media Folder] where it is divided into Sub-Folders to store Music, Pictur e,
Video and Audio Recordings and Video Recording (Only can be activated with the
optional video recording ESP Cradle)
To transfer information from the computer to the ESP simply, drag & drop or copy and
paste files from the computer into the appropriate ESP folders.
To transfer a folder or the contents of a folder to your computer use the computer’s
operating system Copy and Paste commands or Drag and Drop to copy folder/files from
the ESP to the computer’s hard drive.
To delete folders or files access the ESP hard drive from under “My Computer”,
highlight the files or folders and choose “Delete”. Empty Computer’s T rash Bin before
disconnecting the ESP to permanently delete file or folders.
The ESP also doubles as a Card Reader/Writer when connected to a computer. Insert any
type of Memory Card into its slot to view content, copy, delete or add data.
Unplugging the ESP from the Computer
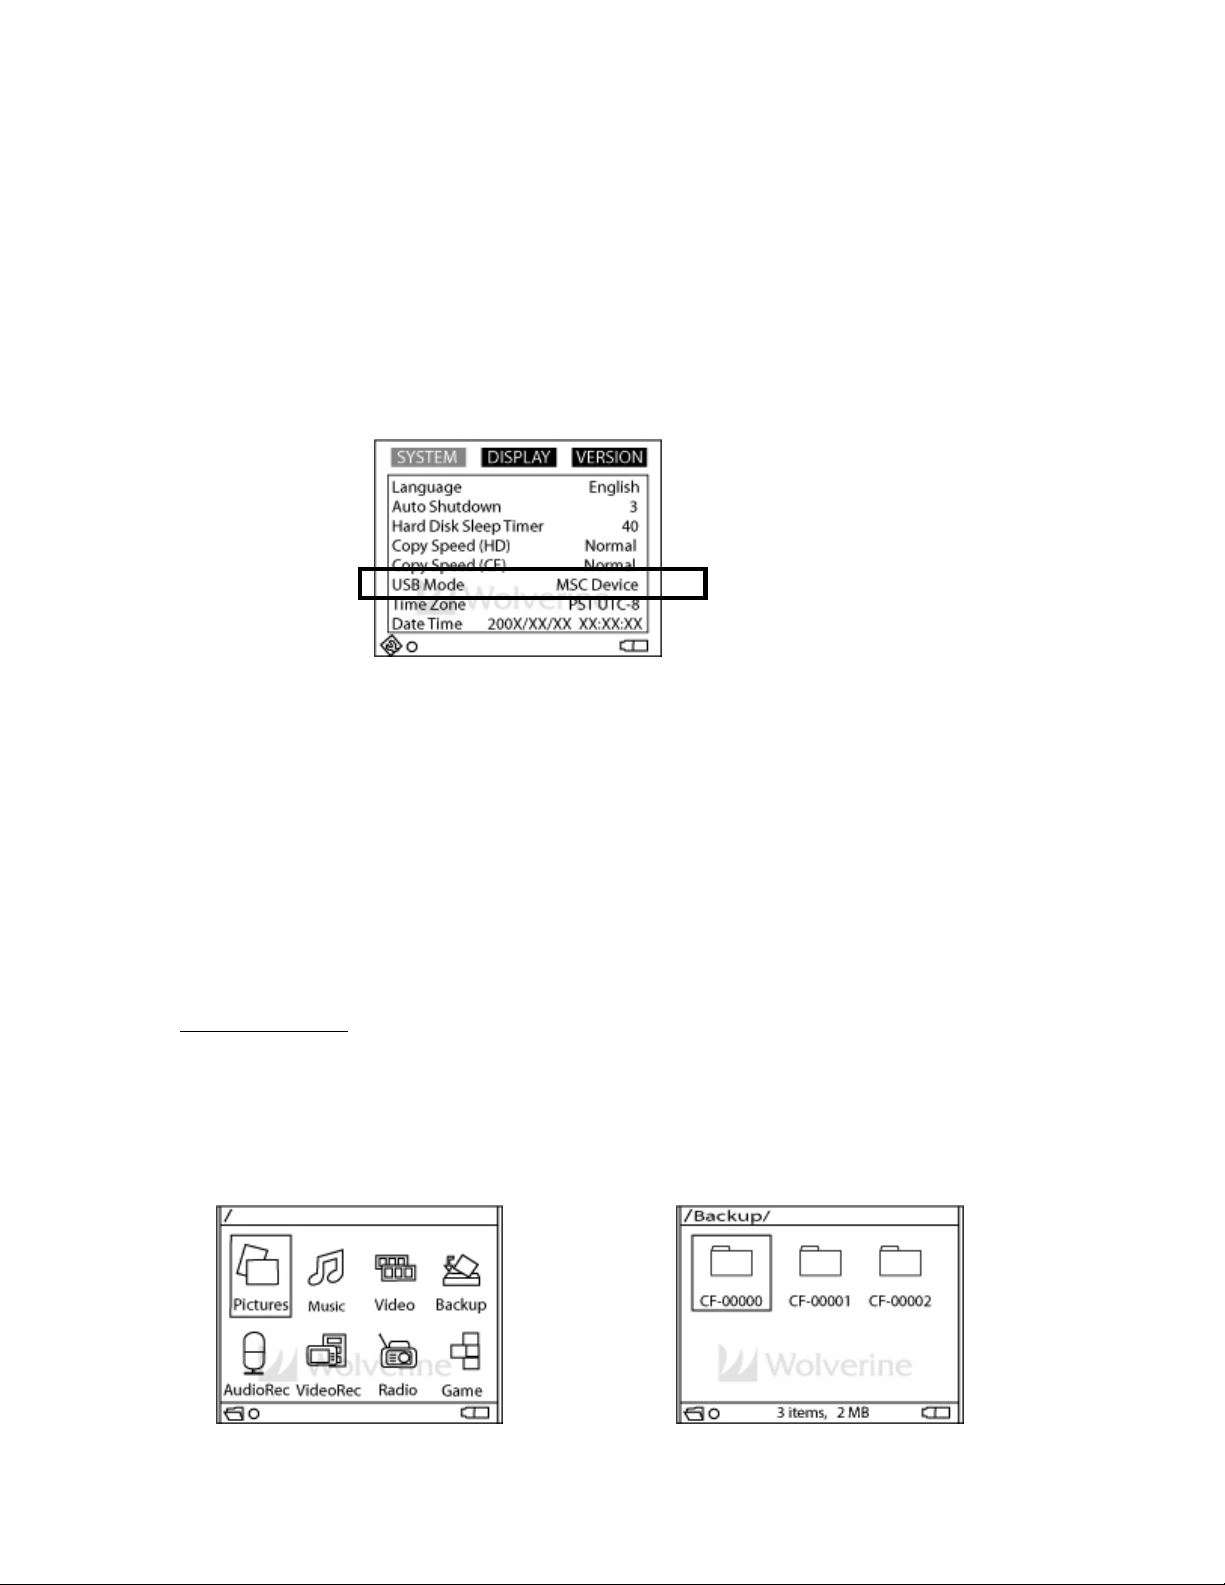
For Windows ME/2000/XP- Before turning off or unplugging the ESP from your
computer click first on the “safely Remove Ha rdware” icon locat ed on the Quick Launch
area
Click once on the “Safely Remove Hardware” icon and then click once on the USB Mass
Storage Device listed.
Mac User- Drag and drop all ESP Drives into the Trash Bin
18
Page 19

12 - OPERATING THE ESP IN STAND ALONE MODE
MUSIC PLAY
The ESP can play several audio file formats (please, see detail specifications at the
beginning of this manual).
Music files could be stored under the Music Folder using multiple folders and subfolder:
• Using Joystick Highlight the Music Folder on the Home Screen
• <PRESS> down Joystick
• Files/Folders can be displayed as a “List View” or “Icon View” by pressing the
<MENU> button
• Highlight a music file to play using the joystick and <PRESS>
• To Fast Forward push Joystick to the right “ “
• Fast Reverse push Joystick to the left “ “
• Next Song, push Joystick down “ “
• Previous Song push Joystick up “ “
• Use Volume (+)/(-) button on the front of the ESP to increase or decrease volume
Pressing the <MENU> while in play mode provide user with following options:
To select any option highlight option using the Joystick and <PRESS>.
Playlist
Repeat
Segment On
Repeat
Segment
Stop
Repeat
Segment Off
Sequence > Shuffle – Random song selection
Equalizer > Select from seven preset EQ’s or define own
Key Lock Deactivate all buttons and joystick. To deactivate press <MENU>
Play in
Background
• Press <ESC> to exit play mode
• Press and hold <ESC> to exit to the Home Screen
Please see Appendix A for more discussion on Playlist options
To repeat a short segment of a song. Select Repeat Se gment On as
the starting point where the music to repeat
End point of music repeat
Turn off the repeat segment
Repeat All – Repeat all songs
Repeat Single – Repeat same song
Play All – Plays song “1” to “last” and stop
then <ESC>
Use this function to play music in background while in picture view
mode or to add songs to a the Playlist as detailed in Appendix “A”
19
Page 20
HOW TO COPY MUSIC TO THE ESP
The ESP has two options to copy music.
Option 1 as “MSC Device”:
You can connect the ESP as “MSC Device”, in this manner the ESP hard drive will show
on the computer as a computer device. Drag and drop or copy and past music from the
computer music folders to the ESP “Music” folder. You could copy folders that contain
multiple music files or one song at a time. Supported music formats are non protected
MP3, WMA, AAC(m4a), WAV and CDA.
Option 2 as Media Player:
Switching the ESP to Media Player option allows the ESP to Sync with Windows Media
Player. To switch to Media Player option:
• Highlight “Options” and <PRESS> Joystick
• Highlight USB Mode and <PRESS> Joystick
• Push Joystick left (<) or right (>) and choose “PictBridge/Media Player”
• <PRESS> Joystick to select
PICTURE PLAY
Pictures could be viewed from the (I) ESP pre-designated [P ictures] folder i f pictures are
copied from the computer to the ESP [Pictures] folder, (II) from the [Backup] folder i f
pictures are copied directly from memory cards or (III) directly from memory cards if
memory cards are inserted into the ESP.
20
Page 21
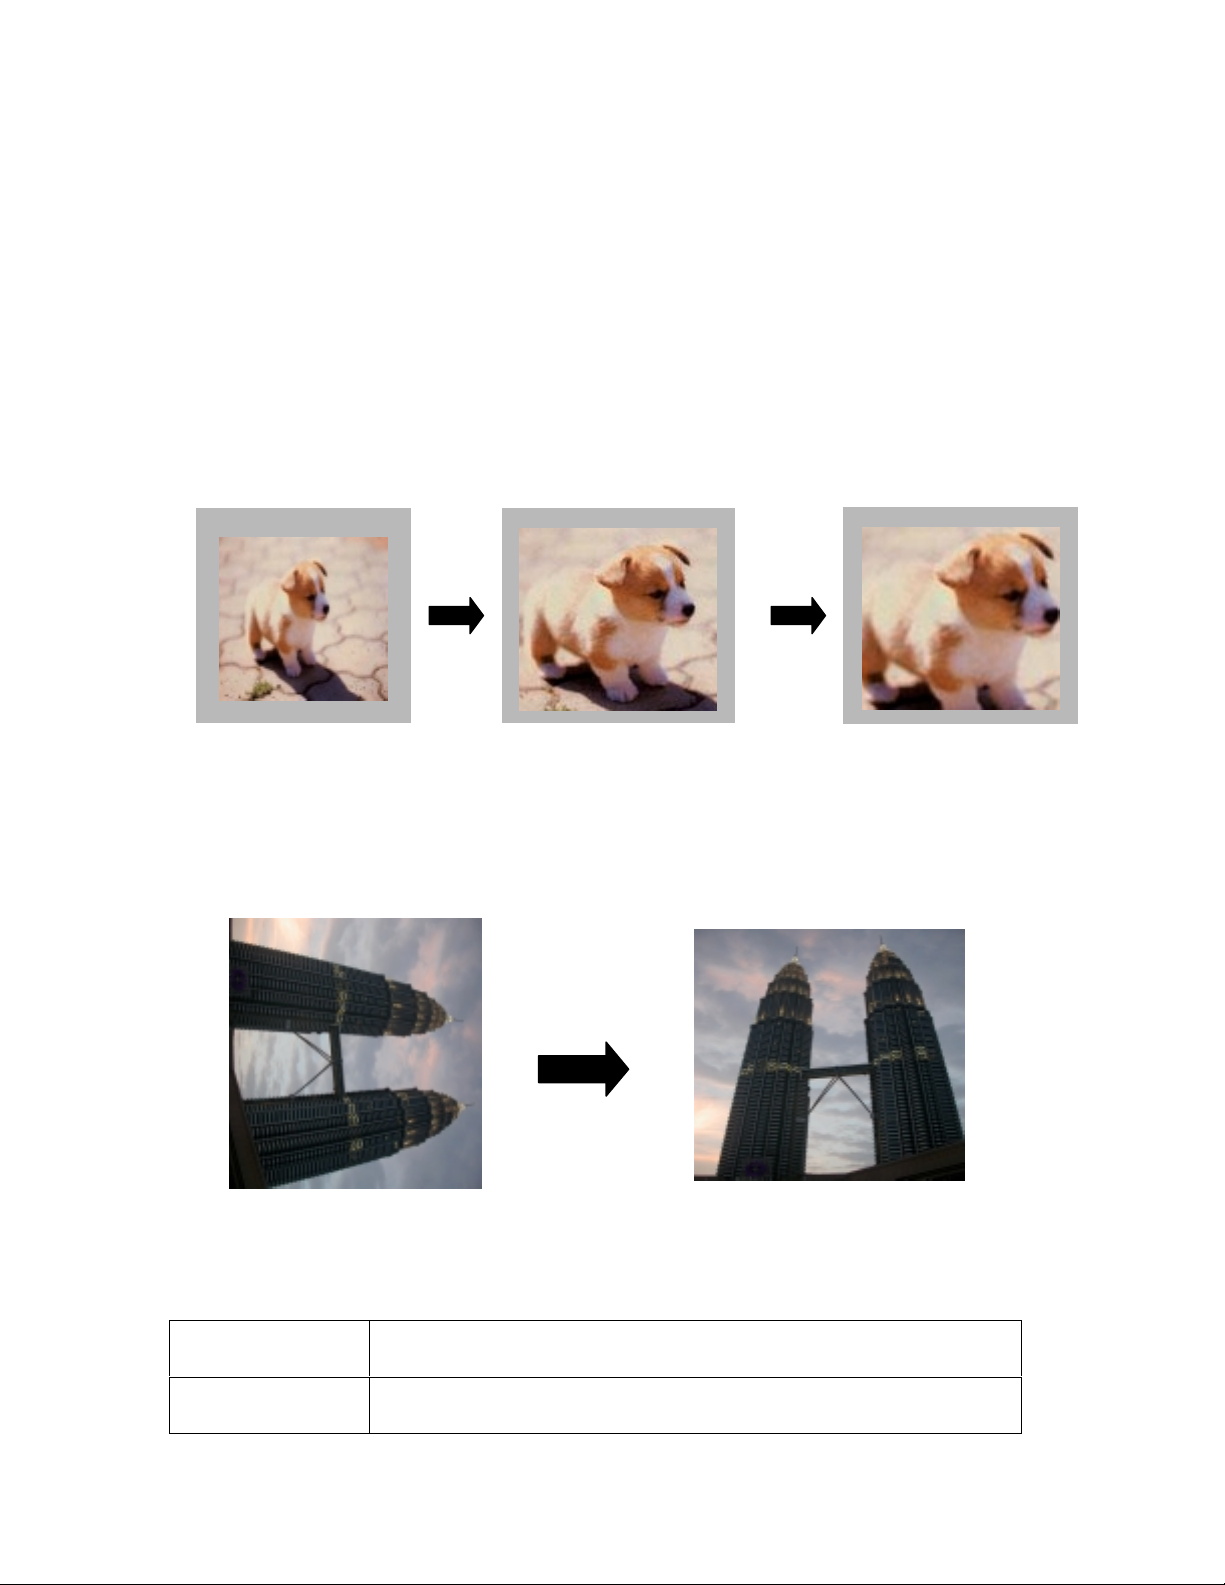
To display pictures on the ESP
• Locate picture files from aforementioned locations
• Press <MENU> to choose Icon View or List View
• Highlight picture file using Joystick
• <PRESS> Joystick
• Push Joystick right (>) or down for next picture
• Push Joystick left (<) or up for previous picture
• Press the Volume Button (+) to zoom in , use Joystick to pan
• Press Volume button (-) to zoom out
• Press <ESC> to return to full picture display
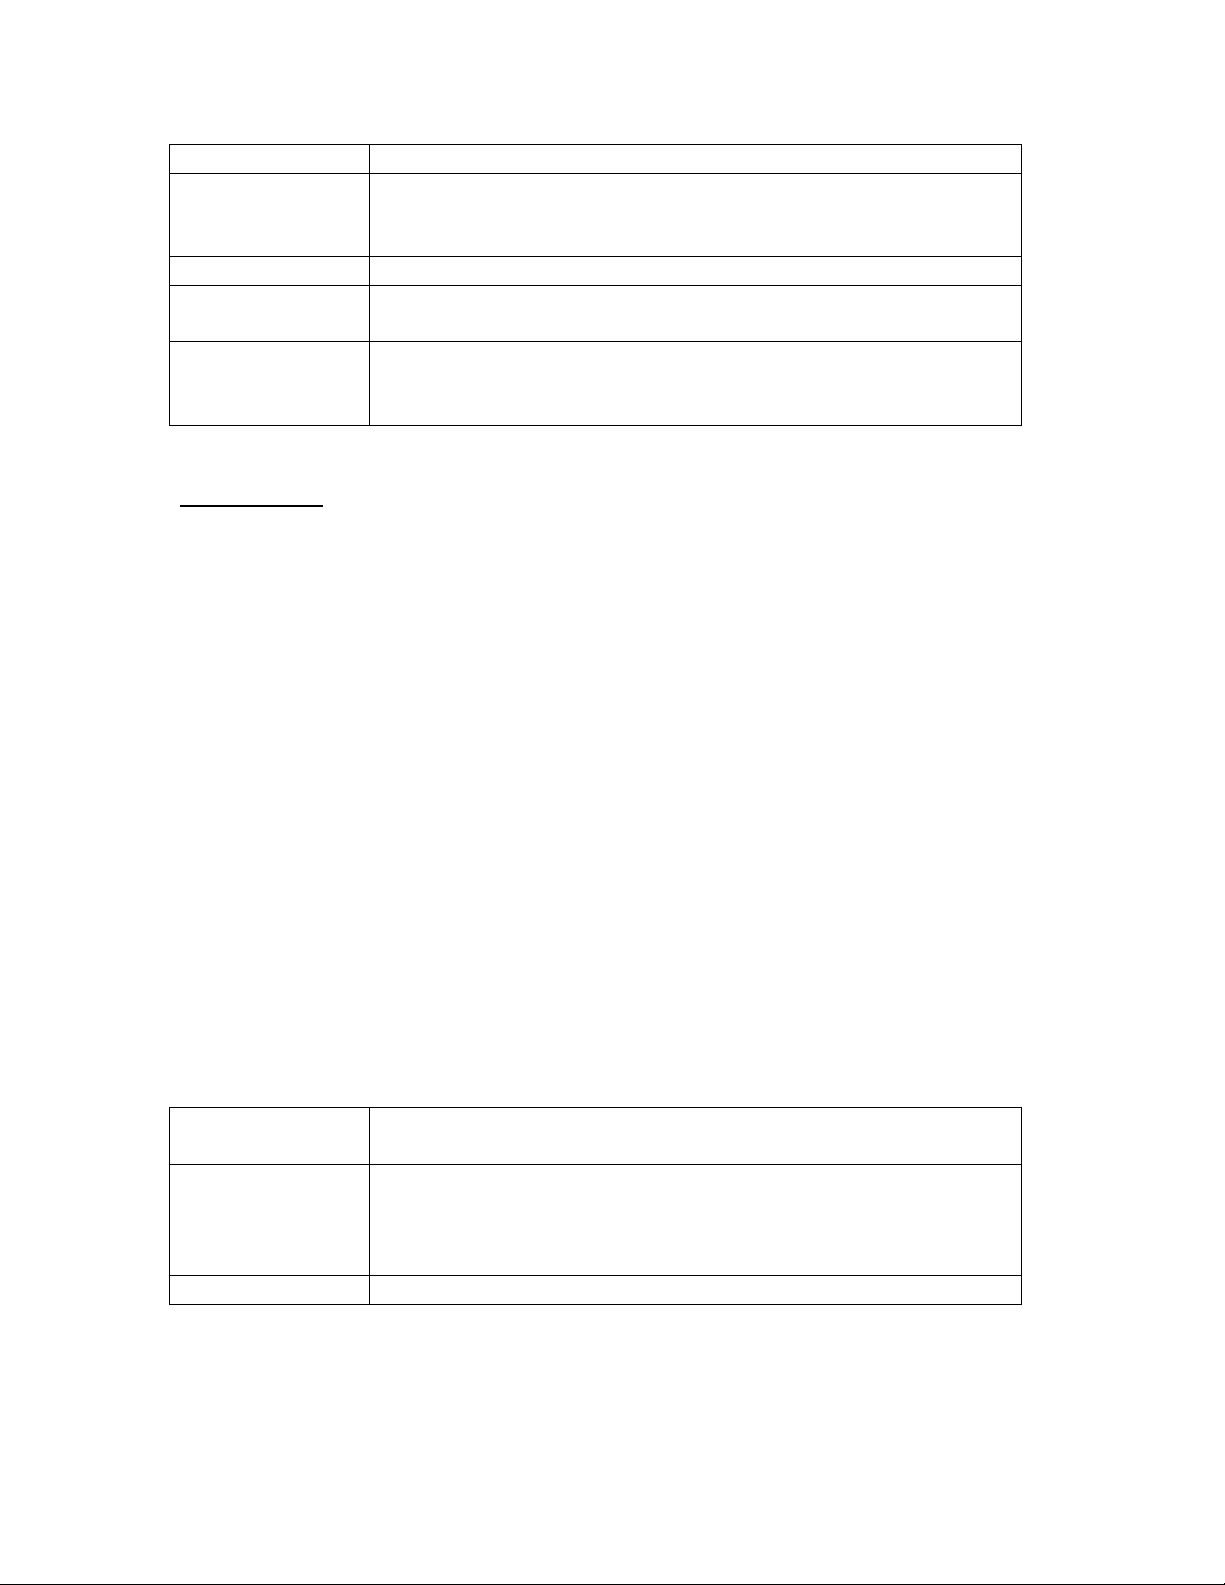
• <Press> Joystick to rotate pictures at 90 degrees intervals
Pressing <MENU> while in picture display mode provide the following options:
View Mode > Highlight and <PRESS> Joystick to select, “Fit Screen”, “Max
Visible”, “Actual Size” or “Fit Width”
Display Settings > Select or deselect EXIF Information
Select or deselect to show File counter
21
Page 22
Select or deselect Show Status Bar
Slide Show Runs pictures in a folder in a slide show mode. Slide show
timing could be decreased by pushing the Joystick left (<) or
increased by pushing the Joystick right (>)
Delete Erase current displayed picture
Print The ESP has limited printing capability using PictBridge
supported printer
Set as
Background
Set picture to display on the ESP as a screen background. To
switch back to default background go to “Options” “Display”
mode and select “Reset Background”
VIDEO PLAY
Videos could be played from (I) the ESP pre-desi gnated “Video” folder if copied from
the computer to the ESP’s “Video ” folder or (II) from the “Back up” folder if videos are
copied directly from memory cards. The ESP will only play supported video type files
per the Specifications section beginning of the manual.
To display Videos on the ESP
• locate Video files from aforementioned locations
• Press <MENU> to choose Icon View or List View
• Highlight Video file
• <PESS> Joystick to run
• Push Joystick right (>) for fast forward (may not work on all type files)
• Push Joystick left (<) for fast backward (may not work on all type files)
• Push Joystick Up (∧) for Frame By Frame fast forward
• Push Joystick Down (∨) for Frame by Frame fast backward
• <Press> Joystick to pause
• Press Volume button (+) to increase volume
• Press Volume button (-) to decrease volume
Pressing <MENU> while in video playing mode will provide the following options:
Playlist <Press> Joystick to display and select all video files available to
play in a specific folder
Play Mode > Play Single: Play only video currently running
Play All: Play all videos in current folder or playlist
Repeat Single: Loop playing same video
Repeat All: Play and loop all videos in current folder or playlist
Audio Mode > Select between Stereo, Left Channel or Right Channel Audio
• Press <ESC> to exit video
22
Page 23
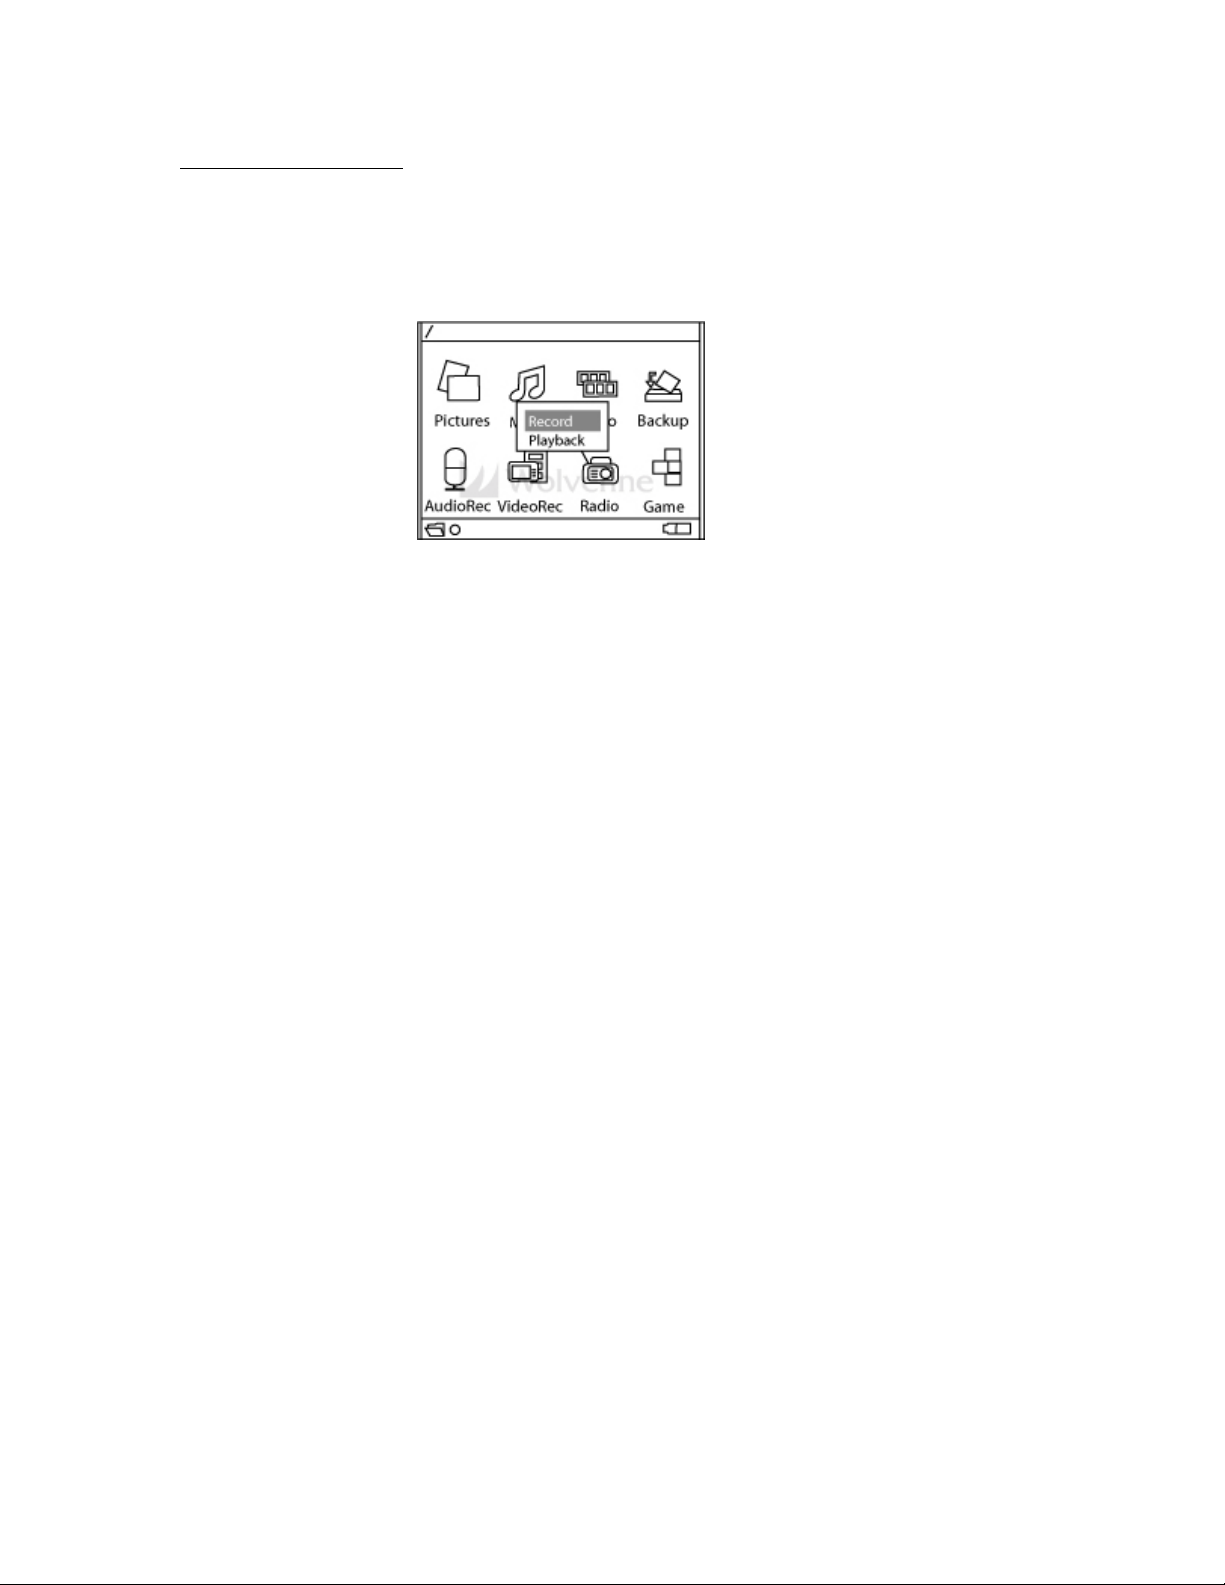
AUDIO RECORDING
From the Home Screen highlight [AudioRec] icon and <Press> Joystick
• Select Record or Playback already recorded files and <Press> Joystick
1. Press <Menu> to choose from [Mic-In] to record using the built-in
microphone or [Line-In] to record from an auxiliary source using the line-in
cable. <Press> Joystick to select. Quality of recording or disable Audio Out
(AOUT) function is also selected from this list.
2. Use the Joystick to highlight and <Press> [Quality] option. Use Joystick to
choose recording quality and press <Press> to select
3. Use Joystick to highlight [Disable AOUT] or [Enable AOUT] and <Press> to
select to disable or enable listening to the recording through headphones
• <PESS> Joystick to start recording where the green circle showing at the lower left
corner of the screen will turn red indicating recording
• <Press> Joystick again to pause recording. <Press> Joystick to resume recording
• To finish and save recording press <ESC>
To list or listen to recorded file:
• Press and hold <ESC> until you reach the Home Screen
• Highlight the ESP hard drive using the Joystick and <Press>
• Highlight Folder [Media] using the Joystick and <Press>
• Highlight the Folder [AudioRec] and <Press>
• Highlight file and <Press> Joystick to play
Voice Playback uses the same functions and options as the Audio Play Mode described
previously.
23
Page 24
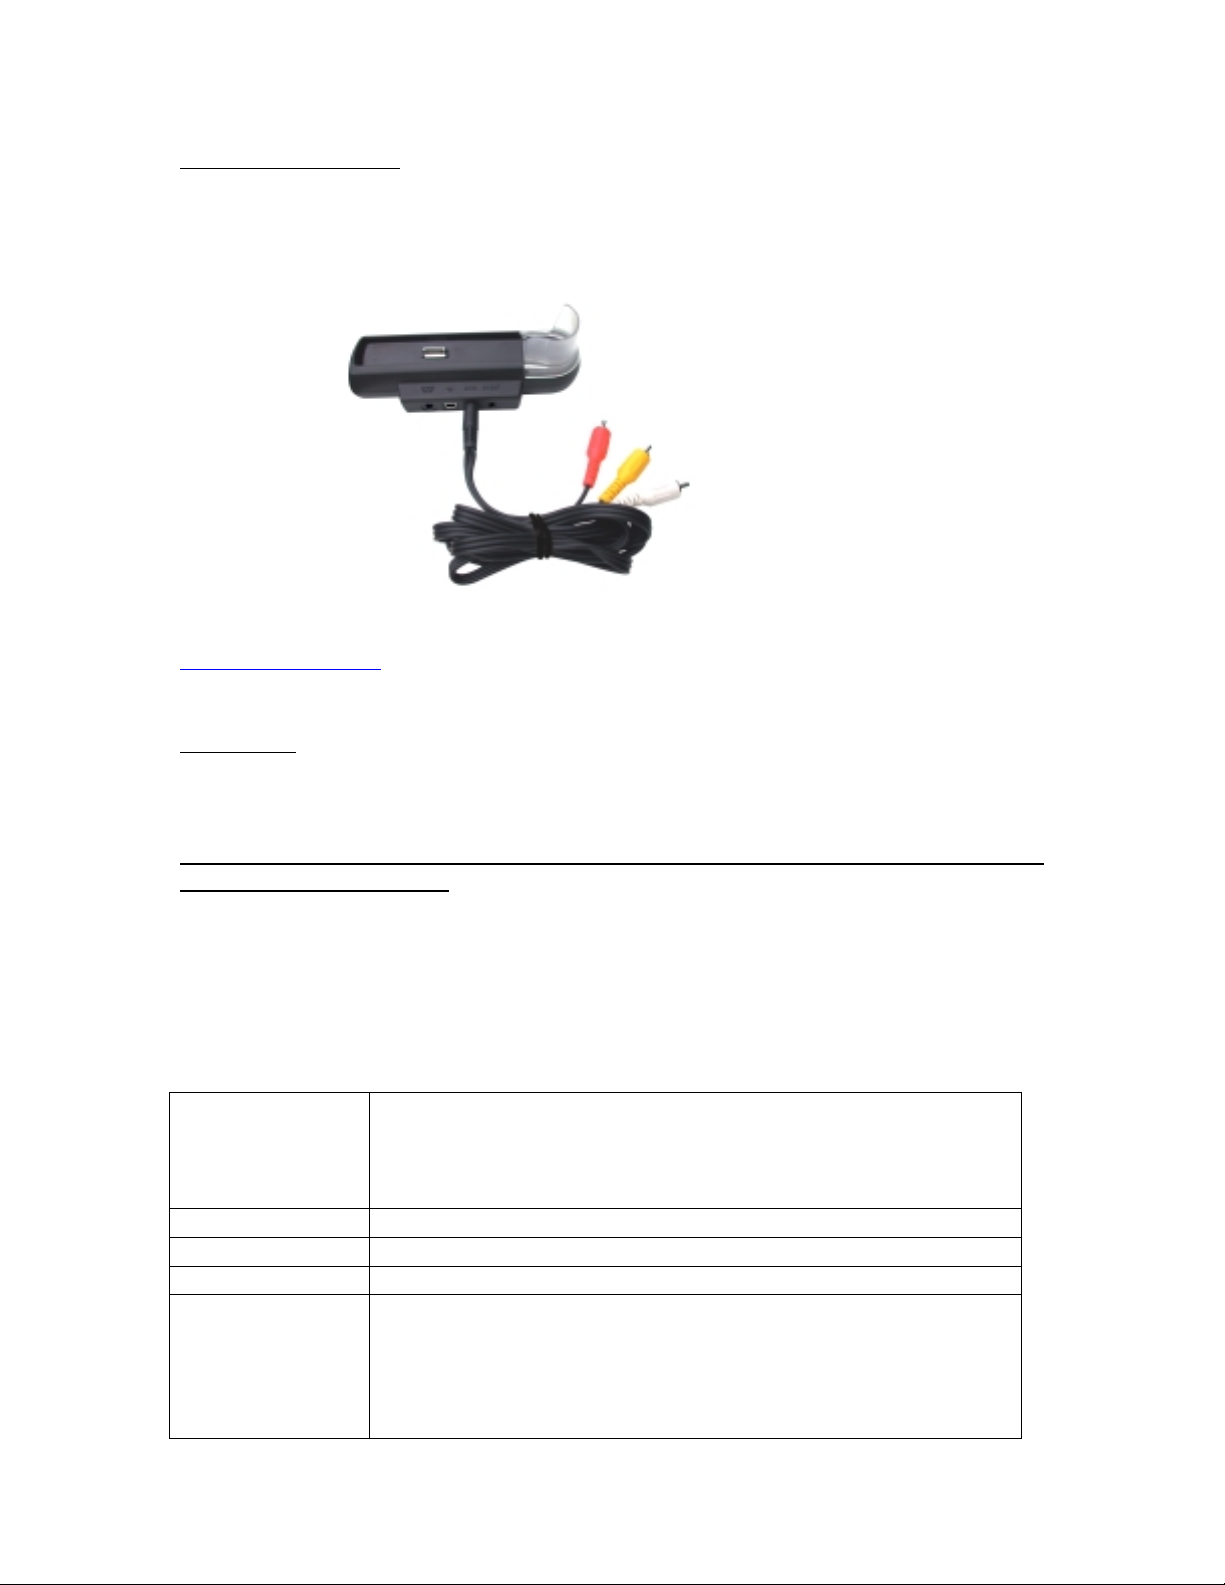
VIDEO RECORDING
The ESP has the capability to Video Record (DVR) directly from a TV, DVD or Video
Cassette player. Directly recording video to the ESP require the optional Wolverine ESP
Cradle System. Please, check ESP Accessories either on-line at
www.wolverinedata.com or included Cradle Accessories brochure for details.
FM RADIO
To select the FM Radio Tuner, highlight “Radio” icon and <PRESS> Joystick.
FM Radio, require the attachment of the Earp hone cable wh ere it uses this cab le as
a signal reception antenna.
• Push Joystick to the right (>) to select higher FM radio frequencies
• Push Joystick to the left (<) to select lower FM radio frequencies
• Push Joystick down (∨) or up (∧) to select preset channels
Pressing <MENU> while in Radio display mode will provide the following options:
Record
• <Press> Joystick to start recording from a FM radio channel
to the ESP hard drive.
• <Press> Joystick while in record mode pauses recording
• Press <ESC> to exit recording and save recording to disk
Scan & Save Scan and save in the 9 preset channels strongest signals found
Save > Manually save a radio station into channels 1 through 9
Group 1 Toggle between two groups of nine (9) user set channels
Play in
Background
• Use this function to play radio in Background while in
picture view mode.
• When playing in Background mode the “Key Lock” f unction
could be invoked for uninterrupted listening or recording
• Press <MENU> to select return to “Radio”
24
Page 25
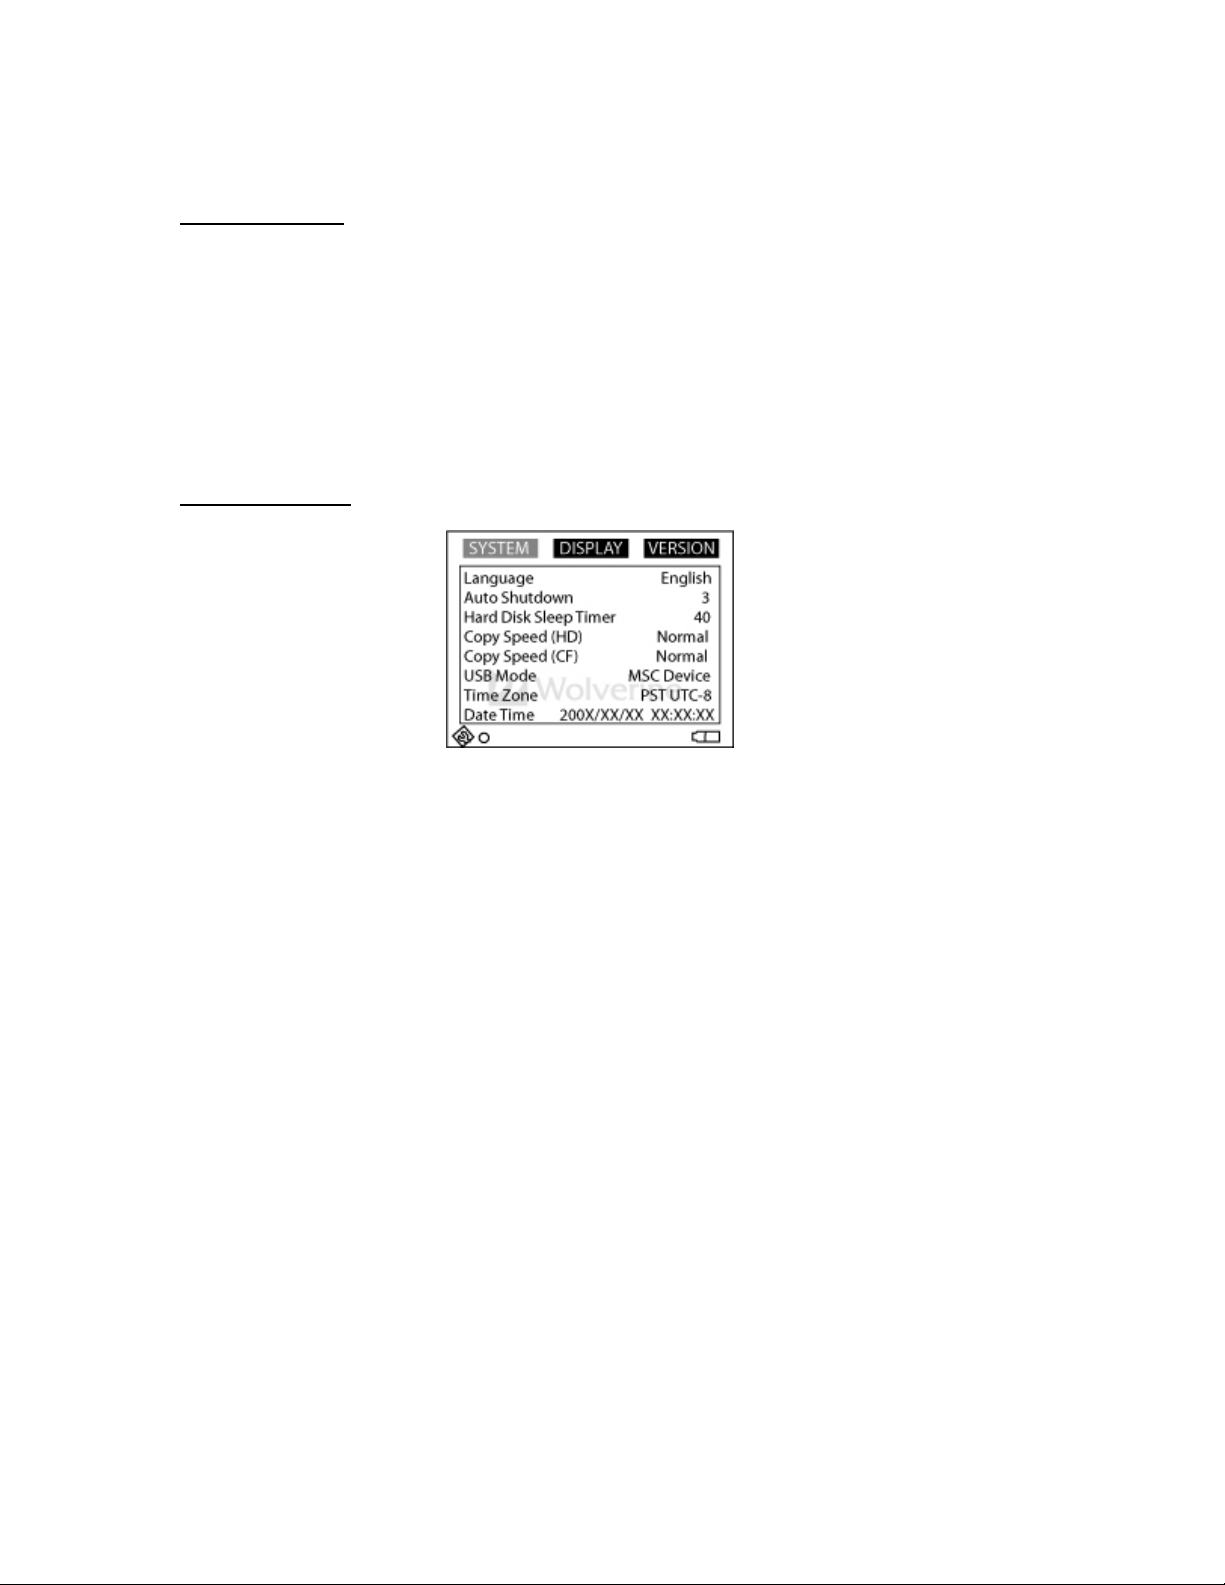
OPTION MODE
The option mode is used to manage the ESP “System” functions, “Display” options and
to display firmware “Version”.
To access the Option Mode
• From the Home Screen highlight [Options]
• <Press> Joystick
• Press the <MENU> button to toggle between “System”, “Display” and “Version”
System Functions
Use Joystick to highlight function and <Press> to choose:
• Language – use the volume dial (+) or (-) or joystick left of right to choose from 11
different languages – <Press> Joystick to select
• Auto Shutdown Timer – use the volume button to set auto shut down time from 1-30
min. – <Press> Joystick to select. Auto Shutdown will turn the unit off if not used for
the specified time
• Copy Speed (HD) – use volume dial to choose between Normal, High and Ultra
speed – <Press> Joystick to select
• Copy Speed (CF) – use volume dial to choose between No rmal, Hi gh and Ultra sp eed
– <Press> Joystick to select. Low speed memory cards cannot take advantage of
these settings
• USB Mode – Toggle between “Mass Storage Device” mode to connect the ESP to the
computer as a USB device or “PictBridge/Media Player” to print directly from
PictBridge supported printer or to Sync with Windows Media Player
• Time Zone – Select your time location from preset world location
• Date Time – Set Date and Time, use Joystick to select date and time field and use
Volume button (+) or (-) to select.
25
Page 26
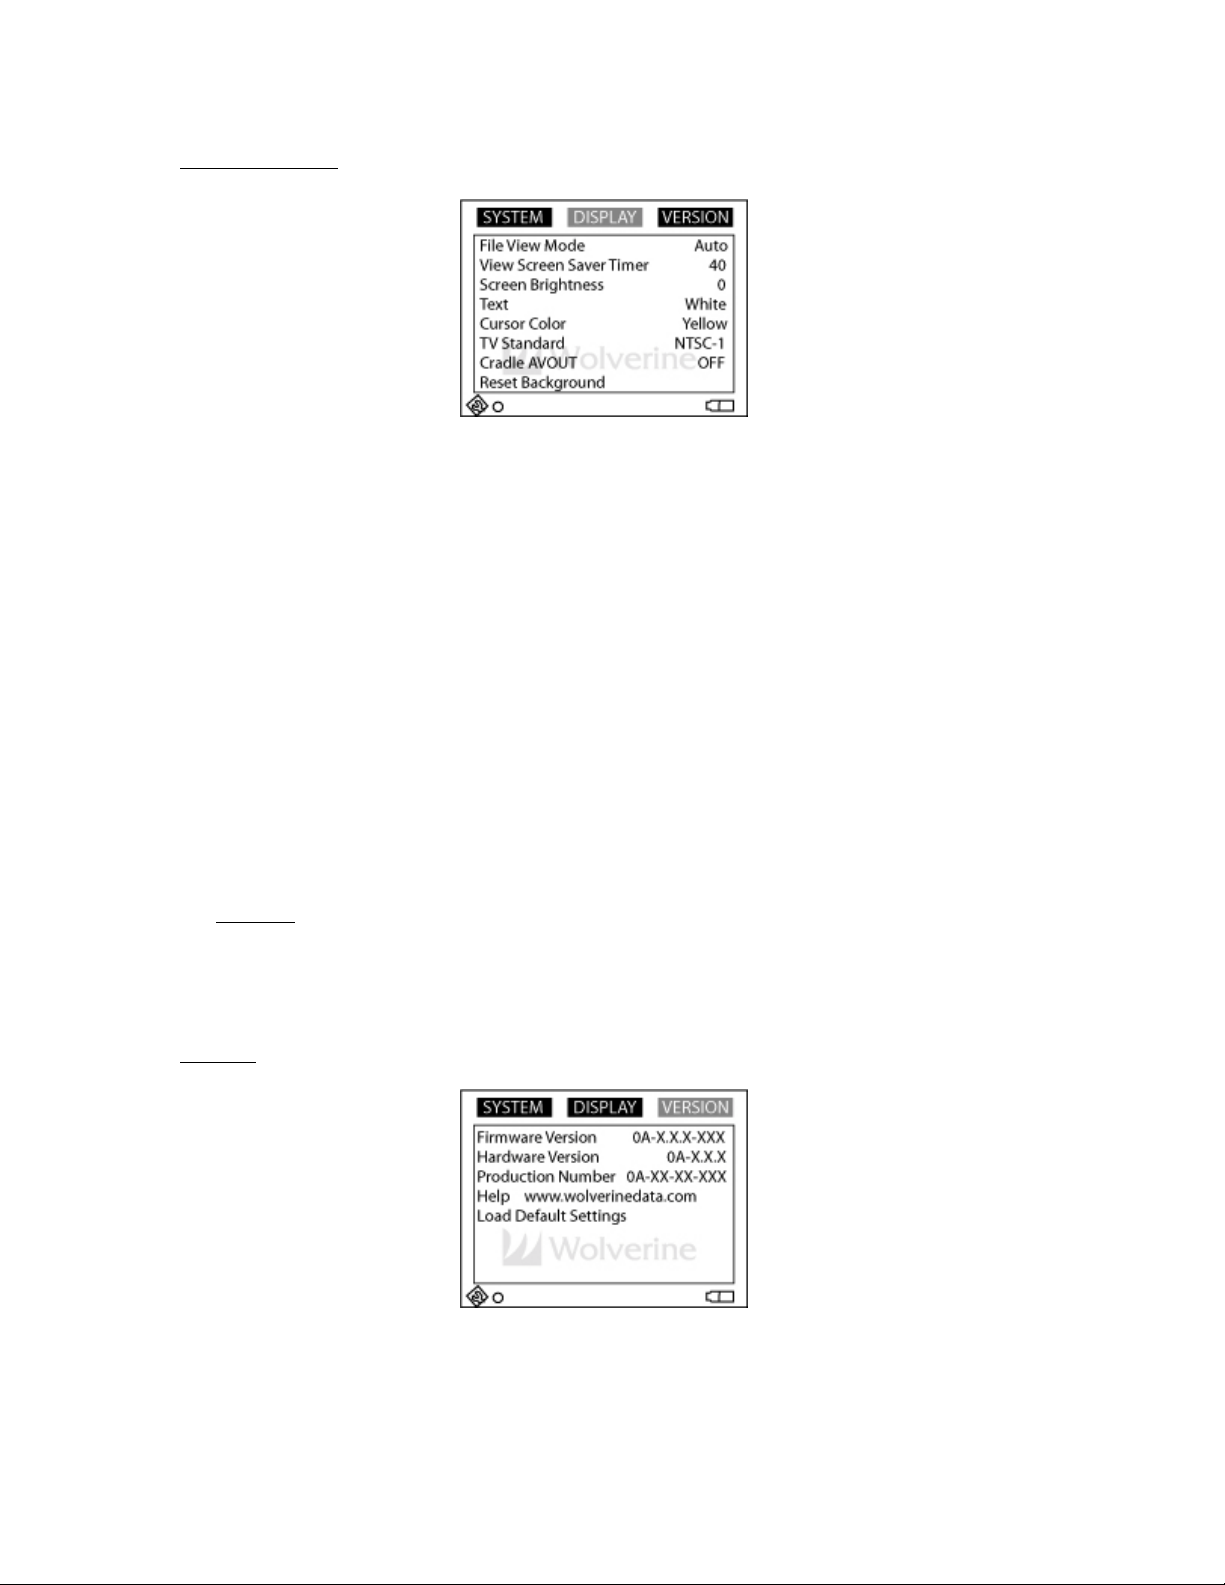
Display Settings
From with in “Options” mode Press <MENU> to select “Display”. Use the Joystick to
highlight option and <Press> Joystick to select from the following:
• File View Mode – use the volume dial to choose from Auto View, Icon View and List
View – <Press> Joystick to select
• Screen Saver Timer – use the volume dial to set auto screen shut down from Off to
180 seconds – <Press> Joystick to select
• Screen Brightness – use the volume dial to set the screen brightness – <Press>
Joystick to select
• Text Color – use the volume dial to set text colors
• Cursor Color – use the volume dial to set Cursor colors
• TV Standard – use the volume dial to choose TV output signal as NTSC or PAL
(Interlaced or progressive) – <Press> Joystick to select
• Cradle AVOUT – use to connect the ESP Audio/Video signal to a TV through the
optional Cradle accessory
• Reset Background – Reset Background screen to default
Version
In “Version” the ESP provide information on installed Firmware version and to Load
Back Default Settings.
26
Page 27

13 - FORMATTING ESP HARD DRIVE
Formatting the ESP hard drive should only be performed using the ESP Formatting
option. Do not use Windows or Mac. operating systems to reformat the ESP Hard drive.
WARNING
Formatting the ESP hard drive will DELETE ALL information stored into the ESP
hard drive. Backup needed data from the ESP before formatting.
To Format ESP Hard drive:
• Press <ESC> and hold until you reach the Home Screen
• Highlight ESP Hard Drive (do not Press)
• Press <MENU>
• Use Joystick to highlight “Format Disk”
• <Press> Joystick
• Follow Screen confirmation and wait until formatting is complete
Do not turn off the ESP or choose any other options until formatting is complete.
14 - FILE AND FOLDER OPERATION
The ESP has a unique feature where you could copy, paste and delete files or folders on
the ESP hard drive or memory card when inserted into the ESP. Files or folders could be
copied and pasted into other locations on the ESP hard drive or to memory cards.
To Delete any file or folder
• Highlight file or folder to be deleted
• Press <MENU>
• Use the Joystick to highlight [DELETE]
• <Press> Joystick
• Confirm
To Copy and Paste file or folder
• Highlight file or folder to be copied
• Press <MENU>
• Use the Joystick to highlight [COPY]
• <Press> Joystick
• <Press> “yes” to confirm to copy to clipboard
To Paste copied file
• Use navigation keys to reach desired folder where to paste
27
Page 28
• Press <MENU>
• Use Joystick to highlight [PASTE]
• <Press> Joystick
• Choose <YES> to paste file from clipboard to current on screen location
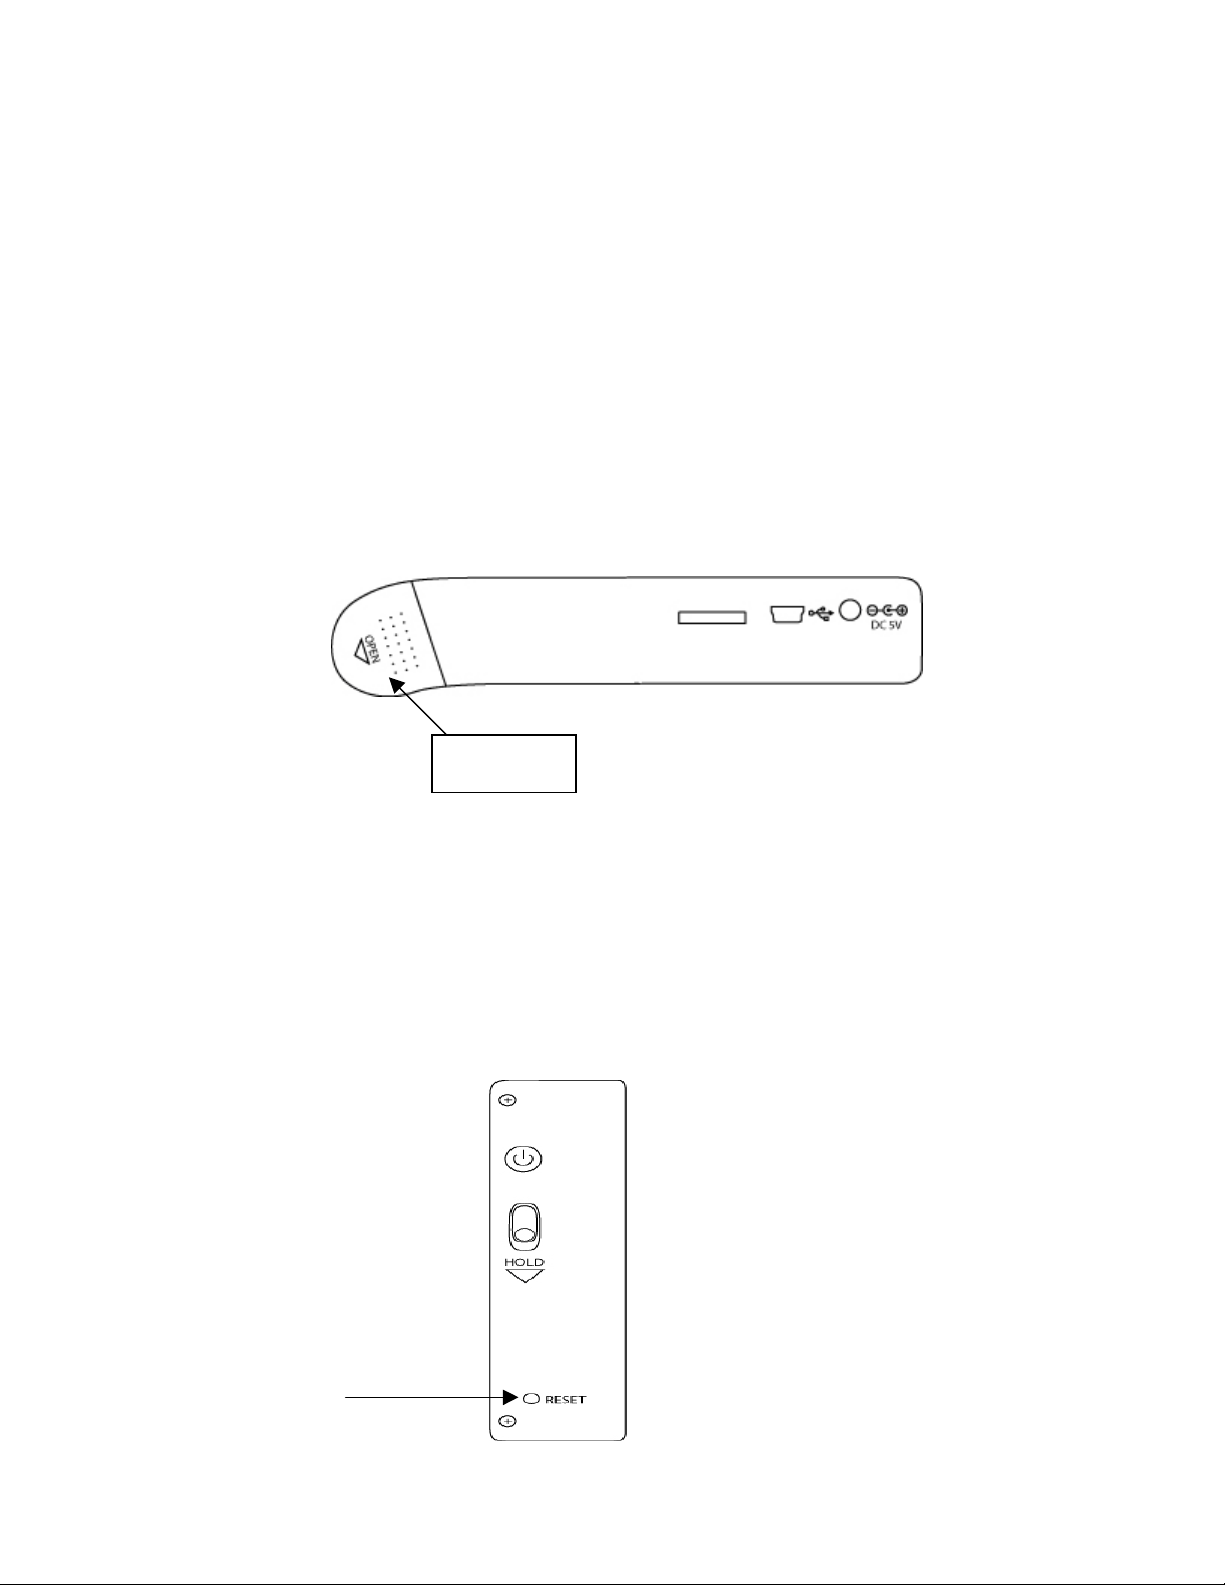
15 - REPLACING BATTERY
Use Sanyo-UR18650F or FUJI NP-100 2300mAh 3.7V rechargeable Li-ion battery to
replace the ESP battery.
To replace the ESP battery, slide out and remove battery door compartment and slide out
battery. Pull gently the battery out of the ESP and replace with new.
Battery Door
16 - RESET BUTTON
A small reset hole is located right side of the ESP. With a thin paper clip press the reset
button and release to shut the ESP in case you experience any erroneous errors or the
ESP stop responding to commands.
*** Data saved on the ESP will not be affected by pressing the Reset button ***
28
Page 29

17 - FIRMWARE AND MANUAL UPDATES
The ESP is a firmware upgrade-able unit. From time to time Wolverine Data may
publish new firmware for the ESP to add new features. All Firmware updates are
available on the website www.wolverinedata.com under Downloads on the Support
webpage.
18- TECHNICAL SUPPORT
For technical support, warranty service, or paid service please contact Wolverine Data at
[email protected] or by calling 949-251-9888 M-F 9:00-5:00 PST
29
Page 30

APPENDIX A
PLAYLIST
The ESP has two options for Playlist. You could either organize the Playlist on the
computer by generating an M3U type of Playlist and saving it on the ESP or a temporary
Playlist that is generated by the ESP when you play any song from a specific folder on
the ESP .
M3U Playlist:
Creating M3U type of playlist will require Windows Media Player, WinAmp or similar
programs. You load in the songs FROM the ESP into the computer Media Player, create
a playlist, add the songs you want, save the playlist as M3U type of playlist on the ESP
Music Folder root directory (or any other location).
When you unplug the ESP from the computer the playlist.m3u type of file will show in
the music folder. Highlight Playlist file and <Press> Joystick and the playlist will load in
all the songs from the different folders and subfolders you have on the ESP.
ESP temporary Playlist:
If you are playing any song from a specific folder all the songs in the folder will be
loaded in the ESP created Playlist. If you would like to add more folders or songs to the
current playing Playlist then while the song is playing press <MENU>, select "Play in the
Background". This action will take you back to the folders and file listings. At this point
highlight any folder or file you want to add to the playlist, press <MENU> and select "
Add to Playlist".
Playing i-Tune Music Files:
The ESP can play i-Tune m4a type of files directly without converting them back to MP3
or WMA type of files. From the i-Tune screen or i-Tune folder just drag and drop the
songs or folders into the ESP music folder or other folders and play.
30
 Loading...