

Page 1
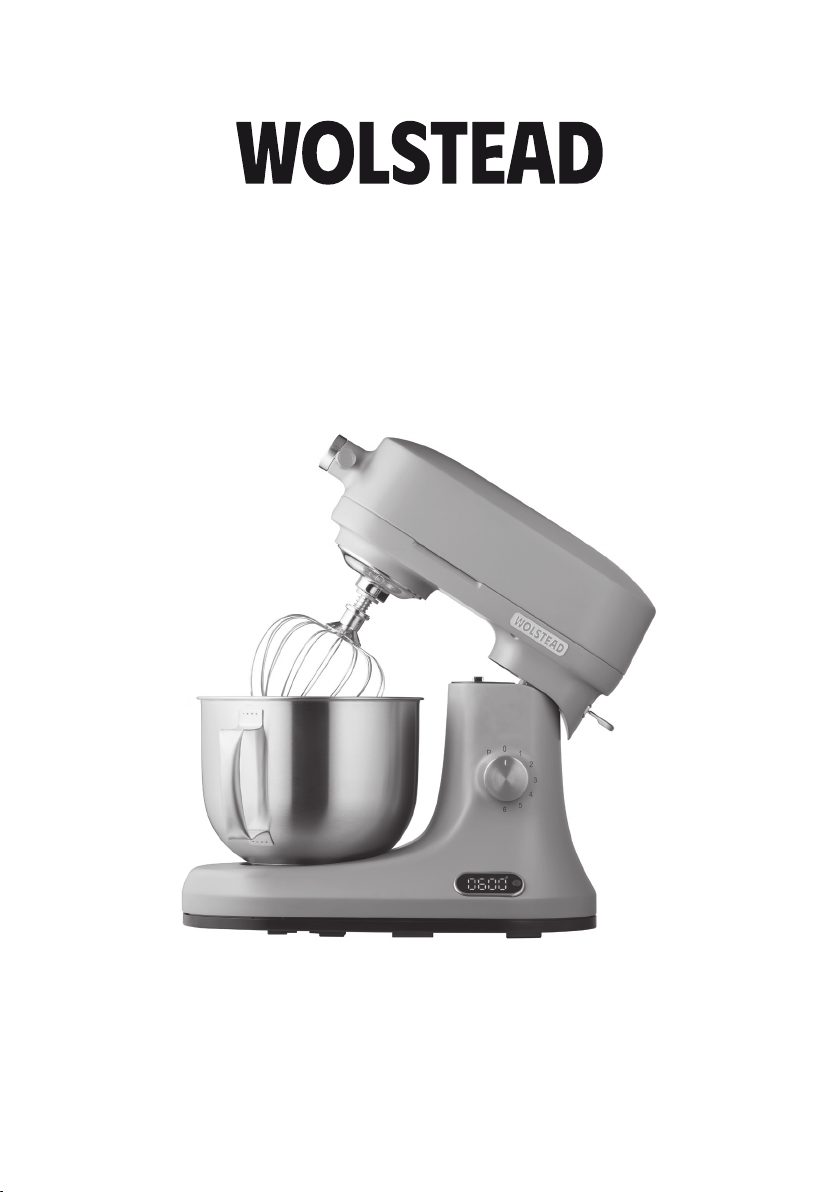
Palette
Stand Mixer
Owner’s Manual
IMPORTANT:
Read and follow all warnings and instructions before assembling and using the appliance. Keep this
manual for future reference.
WOLSTEAD Palette Stand Mixer
667884 / 667885 / 667886 / 667887 / 667888 / 667889 / 667890 / 667891 / 667892 / 667893
Page 2

SPECIFICATIONS
Model: 667884 / 667885 / 667886 / 667887 / 667888 / 667889 / 667890 / 667891 / 667892 /
667893
Voltage: 220-240V ∿ 50-60Hz
Power consumption: 1200W
Bowl capacity: 5L
Maximum flour weight in single operation: 1kg
PRODUCT FEATURES
This versatile stand mixer is a powerful appliance that automates mixing, beating, whipping, and
kneading, allowing you to handle heavy doughs, delicate batters, and everything in between with
ease—perfect for baking, frosting, and even preparing savoury dishes like mashed potatoes.
• Features six speeds via an adjustable speed control knob
• Four pole motor with overheat protection
• Built-in scale with LED display
• Includes five accessories: a brushed stainless steel five litre mixing bowl, a beater, a splash
guard, a dough hook and a wire whisk
• Dual cooling system allows the motor to work steadily for long periods
• Tilt-head enables easy access and adding of ingredients to the bowl
• Detachable parts and attachments for easy cleaning
SAFETY PRECAUTIONS
When using this electrical appliance, basic safety precautions should always be followed to
reduce the risk of fire, electric shock, and/or injury, including the following:
1. Read all instructions before using.
2. Ensure the voltage is compliant with the voltage range stated on the rating label.
3. If the electrical cord is damaged, it must be replaced by the manufacturer or its service agent
or a similarly qualified person in order to avoid a hazard.
4. Always stop the stand mixer from running before you unplug it.
5. This stand mixer is not intended for use by persons (including children) with reduced
physical, sensory or mental capabilities, or lack of experience and knowledge, unless they
have been given supervision or instruction concerning use of the appliance by a person
responsible for their safety.
6. Children should be supervised to ensure that they do not play with the stand mixer.
Wolstead Palette Stand Mixer OWNER’S MANUAL2
Page 3

7. This stand mixer is intended to be used in household and similar applications such as:
a. Staff kitchen areas in shops, offices and other working environments.
b. Farmhouses.
c. By clients in hotels, motels and other residential type environments.
d. By bed and breakfast type environments.
8. To protect against risk of electric shock, do not place cord, plug or the base of the stand mixer in
water or any other liquid.
9. Unplug the stand mixer after using, before cleaning and storing.
10. Keep the stand mixer 30cm from other objects and the wall to ensure heat is easily released.
11. Do not use attachments or accessories which are not recommended by the manufacturer.
12. Do not use the stand mixer close to flames, hot plates or stoves.
13. Do not use outdoors.
14. Never clean with scouring powders or hard implements.
15. While the stand mixer is in operation at any speed, avoid contact with the moving shaft to prevent
mechanical hazards. Keep fingers, skin, clothing, hair, and accessories, such as jewellery, away
from the moving parts.
16. The stand mixer head must be closed before use; otherwise, the machine will not start for safety
reasons.
17. Kneading should only be done at speeds 1 to 3. Speeds above 3 or the ‘P’ setting are not suitable
for kneading. Using speeds above 3 while kneading may cause the stand mixer to overload and
get damaged, which is not covered under warranty.
18. Before using the stand mixer for kneading or stirring, you should install the splash guard. During
use, keep hands away from the mixing attachments and the inside of the mixing bowl.
19. Pay special attention when opening and closing the stand mixer head. Follow the steps in the
section titled ‘how to test the stand mixer’ for instructions.
20. Always use the stand mixer on a smooth, sturdy/solid surface to prevent vibrations.
21. When installing or removing the whisk attachment, always hold the metal joint part; do not hold
the steel wire to avoid damage.
22. If the stand mixer is connected to power and the machine is in working status, raising the head
will stop the stand mixer. To resume operation, you will need to lower the head and turn the speed
control knob to your desired speed again.
23. The stand mixer features a power feedback system that automatically adjusts output power
and speed based on load conditions. This results in a brief delay when turning it on or adjusting
speeds. The speed may not remain constant when operating under different conditions; this delay
is normal.
24. The stand mixer has an overheating protection feature. Continuous operation for more than 20
minutes is not recommended. If this occurs, allow the stand mixer to cool down for 3 to 5 minutes.
25. Always switch off the stand mixer before changing attachments.
26. Exercise caution when installing attachments, using, or cleaning the machine to avoid injury from
sharp parts.
27. Use the recommended speed settings for specific tasks to prevent damage to the machine or
injury. See the ‘speed operation guide’ section of this manual.
28. When lifting or closing the head, do not place your fingers in the gap.
Wolstead Palette Stand Mixer OWNER’S MANUAL 3
Page 4
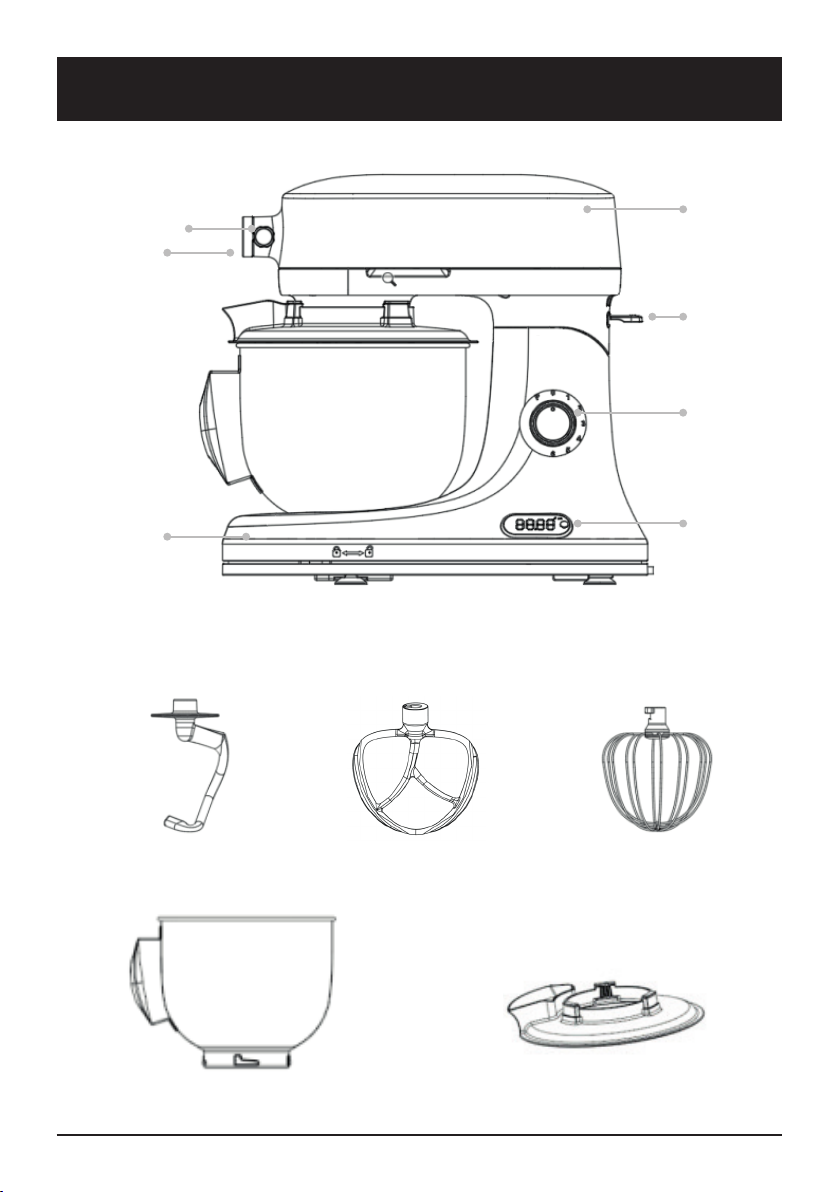
GET TO KNOW THE WOLSTEAD PALETTE STAND MIXER
Attachment
knob
Attachment
hub cover
Base
Stand mixer
head
Tilt head
lever
Speed
control
Built-in
scale
Dough hook Beater Whisk
Splash guardMixing bowl
Wolstead Palette Stand Mixer OWNER’S MANUAL4
Page 5
BEFORE FIRST USE
Before first use, clean the bowl and attachments with warm soapy water and a non-abrasive
sponge and dry completely. Install the splash guard. It is also recommended you run a test on the
stand mixer before first use.
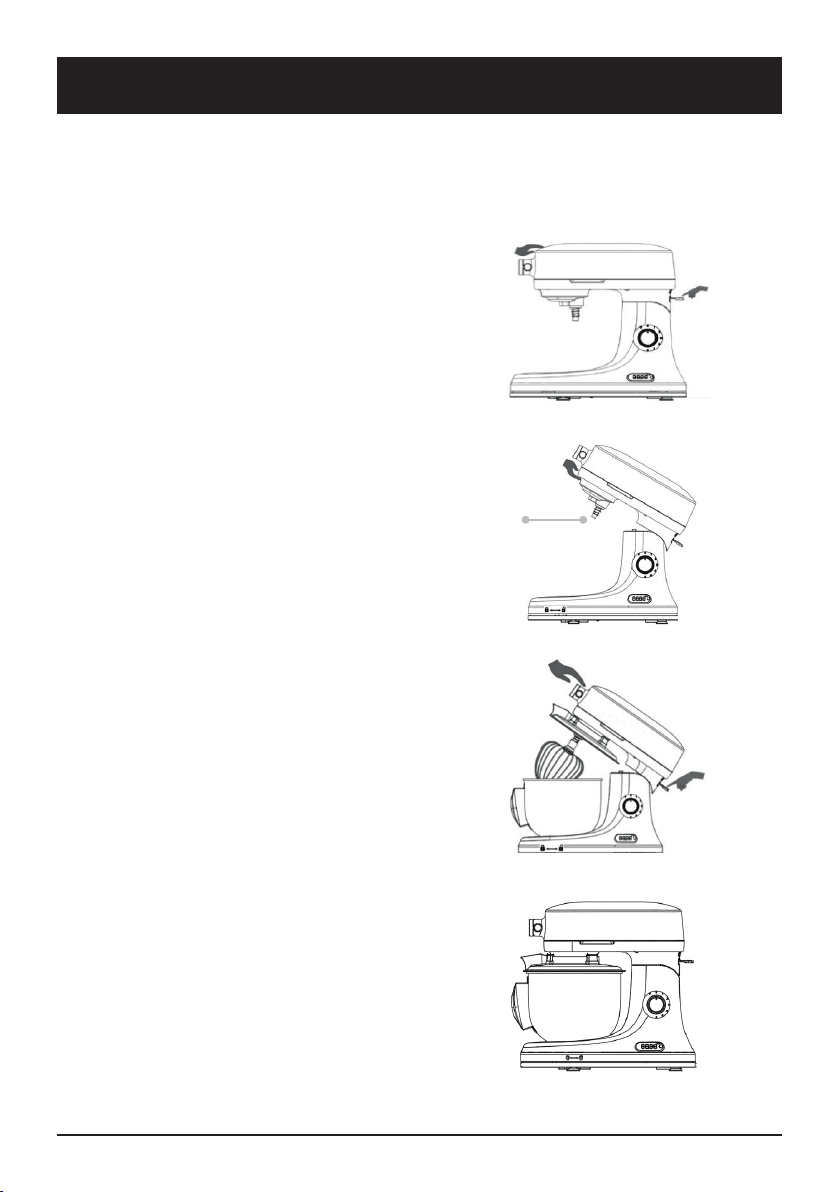
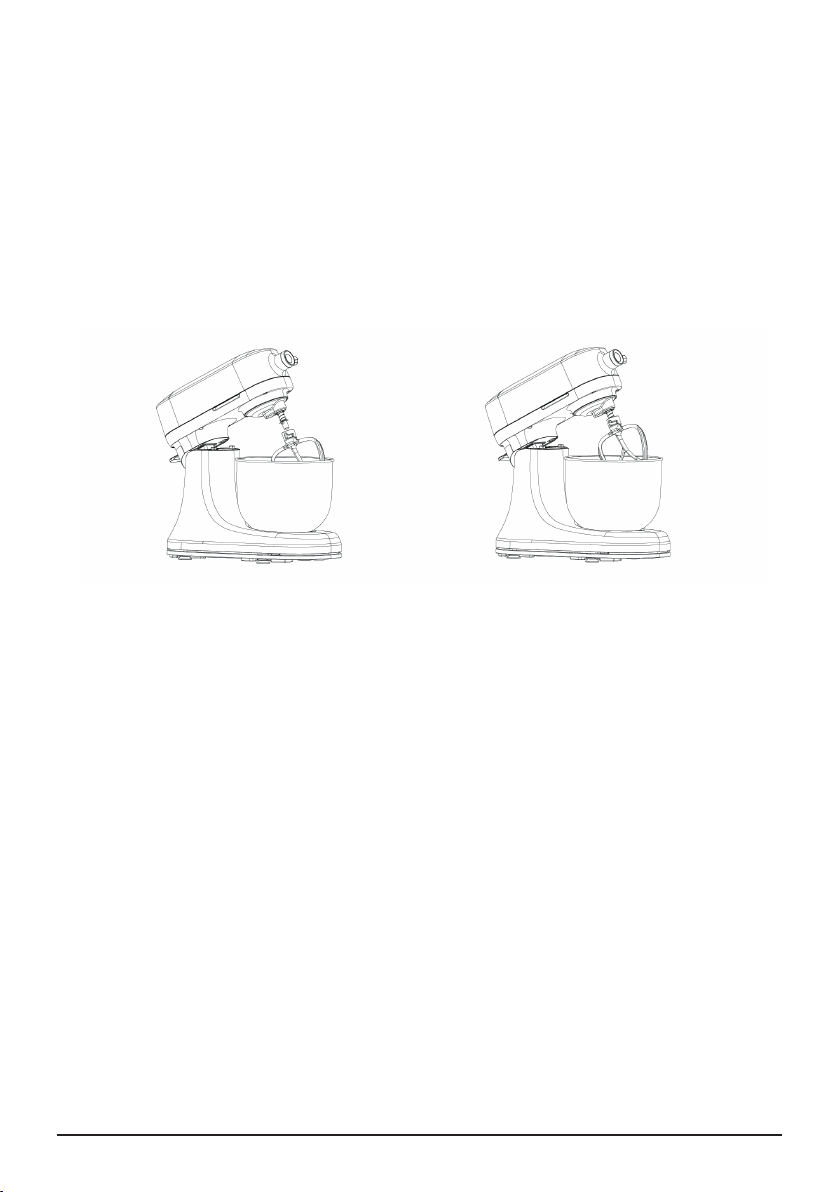
How to test the stand mixer
1. Place the stand mixer on a stable surface
and press the tilt head lever to lift the
mixer head (Figure 1). Gently push the
head up until it clicks; the stand mixer is
now fully opened and locked (Figure 2).
2. With the head raised, place the bowl into
the base and turn it clockwise to secure
it (refer to the mixing bowl installation
instructions in the ‘operating instructions’
section of this manual below).
3. Insert the whisk, dough hook or beater
onto the beater shaft by slipping the
attachment onto the shaft and pressing
upward as far as possible against the
spring. Then, turn the attachment to the
right, hooking the attachment over the
pin on the shaft (refer to beater/dough
hook/whisk installation instructions in
the ‘operating instructions’ section of this
manual below).
4. Press the tilt head lever to lower the head
(Figure 3). Release the tilt head lever to
secure and lock the head in place (Figure
4).
5. Connect the stand mixer to power. After
connecting the power, the stand mixer will
emit three beeps, and the power knob will
start to flash.
6. Rotate the knob to speed 1 and let it run
for 3 to 5 seconds. For short operations
turn and hold the knob on ‘P’.
7. Once testing is complete, turn the knob to
0 and unplug it from the power.
Beater
shaft
Figure 1
Figure 2
Figure 3
Figure 4
Wolstead Palette Stand Mixer OWNER’S MANUAL 5
Page 6
OPERATING INSTRUCTIONS
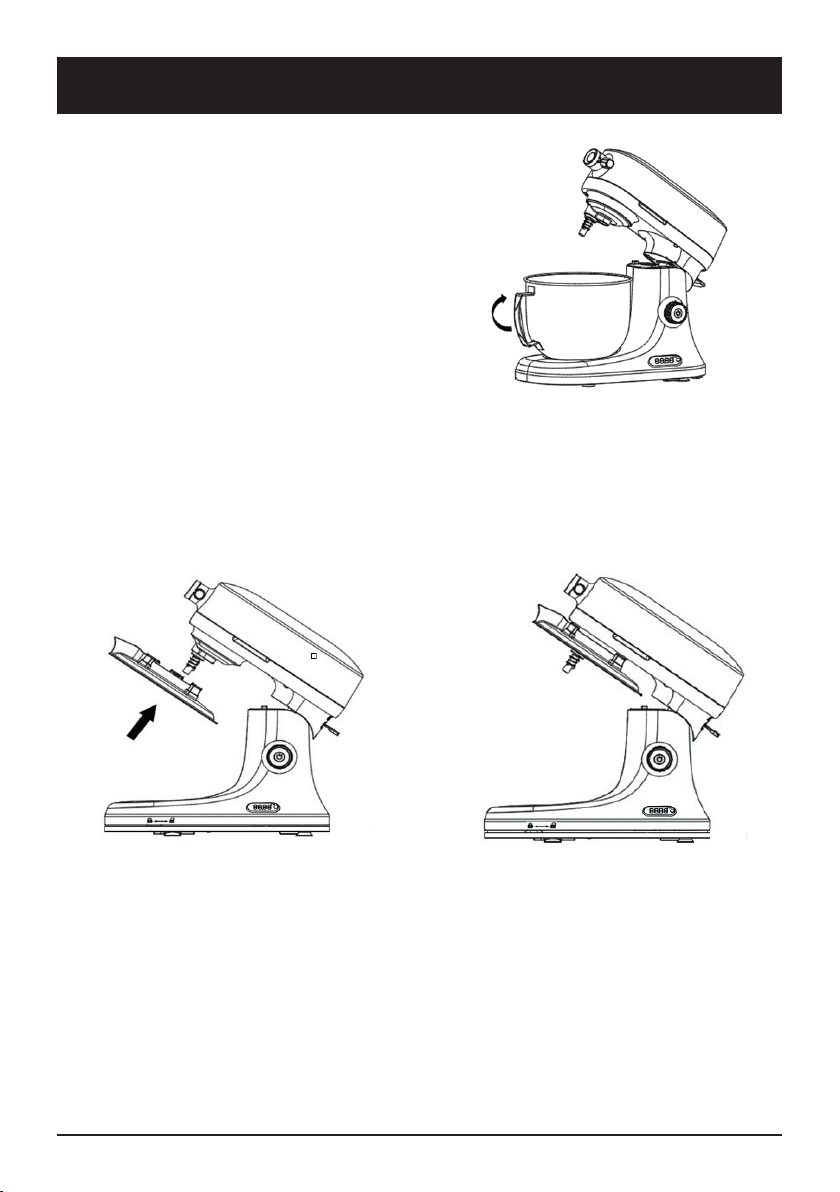
Mixing bowl installation instructions
Place the mixing bowl onto the base and
turn it clockwise to secure. To release, turn it
anticlockwise.
The machine will not operate until the mixing
bowl is securely locked into place.
Splash guard installation instructions
When kneading or stirring, install the splash guard by pushing it onto the stand mixer head as
shown in Figure 1 and Figure 2 below, with the opening positioned at the front of the machine. For
ingredients greater than 300g, it is recommended to always use the splash guard.
Figure 1 Figure 2
Wolstead Palette Stand Mixer OWNER’S MANUAL6
Page 7
Beater/dough hook/whisk installation instructions
Disconnect the stand mixer from power before installing attachments. During installation, the head
should be lifted. After installing attachments, lower the head.
Lift the head of the mixer and insert the beater attachment (or dough hook/whisk) onto the beater
shaft and press upward as far as possible against the spring (see Figure 1 below). Then, turn the
attachment to the right, hooking it over the pin on the shaft (see Figure 2 below). Lower the stand
mixer head to the lock position.
To remove the attachment, lift the stand mixer head and press the attachment upward into the
beater shaft as far as possible against the spring and turn it to the left, then pull it off the beater
shaft.
Figure 1 Figure 2
Optional attachments
Wolstead offers three optional attachments to fit the Wolstead Palette Stand Mixer:
1. Stainless Steel Pasta Rollers
2. Cutter
3. Grinder/Mincer
Optional attachment installation
1. To attach these to the stand mixer, first turn the machine off. Then loosen the attachment knob
by turning it anticlockwise. Remove the attachment hub cover.
2. Insert the attachment shaft housing into the attachment hub and rotate back and forth until the
attachment slots into place. The pin on the attachment shaft will line up and fit into the notch on
the hub.
3. Tighten the attachment knob by turning it clockwise until the attachment is properly secured to
the stand mixer attachment hub.
4. Before removing attachments, make sure you turn the stand mixer off.
5. Then loosen the attachment knob by turning it anticlockwise then rotate the attachment back
and forth to pull out.
6. Replace the attachment hub cover and tighten the attachment knob.
Wolstead Palette Stand Mixer OWNER’S MANUAL 7
Page 8
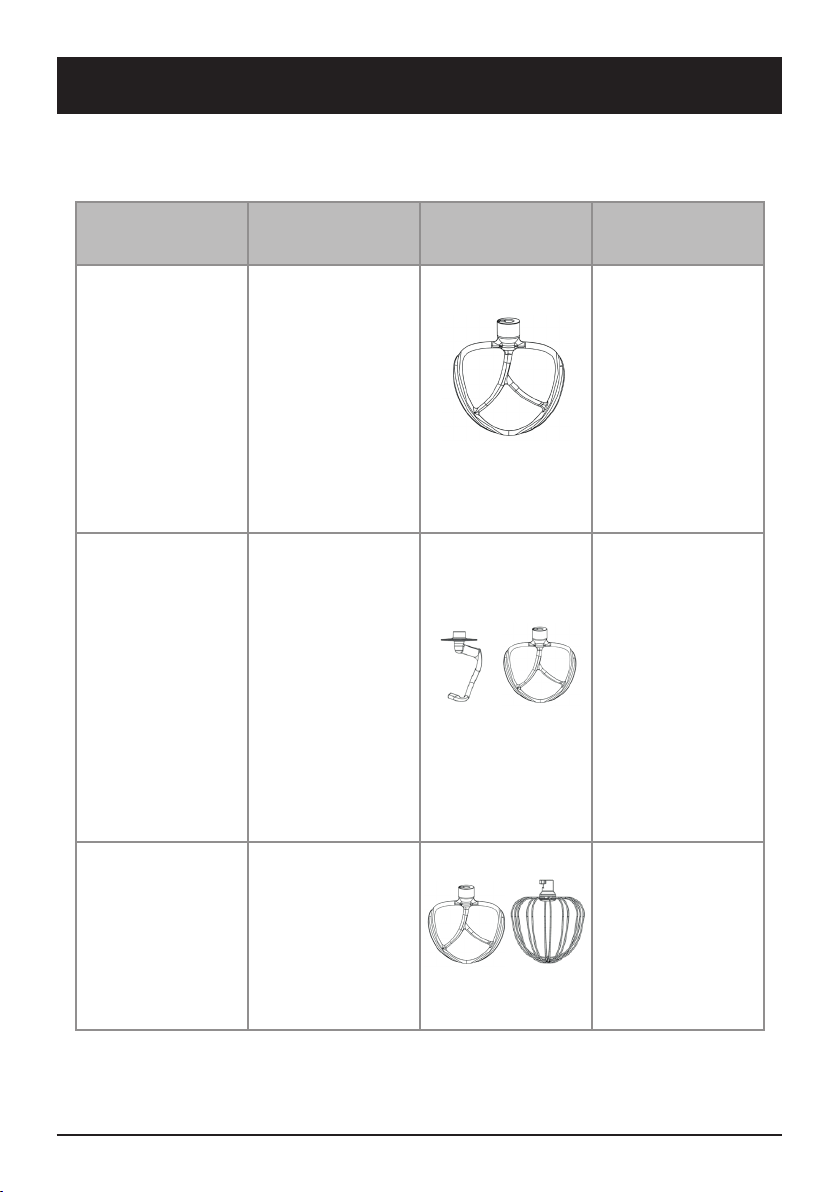
SPEED OPERATION GUIDE
Note: Always set the stand mixer speed to the lowest speed setting to start, then gradually
increase the speed to avoid splashing ingredients out of the bowl. See the below table for a guide
to speed settings and attachments.
Recommended
speed
Speed 1 Stirring
Speed 2 to 3
Slow mixing and
kneading, stirring
Function Attachment
Beater
Doug hook and
beater
Operation
instructions
Speed 1 is ideal
for slow stirring,
combining, mashing.
Can also use it to
add flour and dry
ingredients to batter,
and to add liquids to
dry ingredients.
Not recommended
for mixing or
kneading yeast
doughs
For slow mixing,
kneading, mashing or
faster stirring.
Use speed 2 to mix
and knead yeast
doughs, heavy
batters, mash
potatoes or other
vegetables, cut
shortening into flour
and mix thin batters.
Warning: Do not set
the speed above 3
when kneading.
Speed 4 Mixing and beating
Wolstead Palette Stand Mixer OWNER’S MANUAL8
Beater and whisk
For mixing semiheavy batters, such
as biscuit batters.
Use to combine sugar
and shortening and
to add sugar to egg
whites for meringues.
Medium speed for
cake mixes.
Page 9
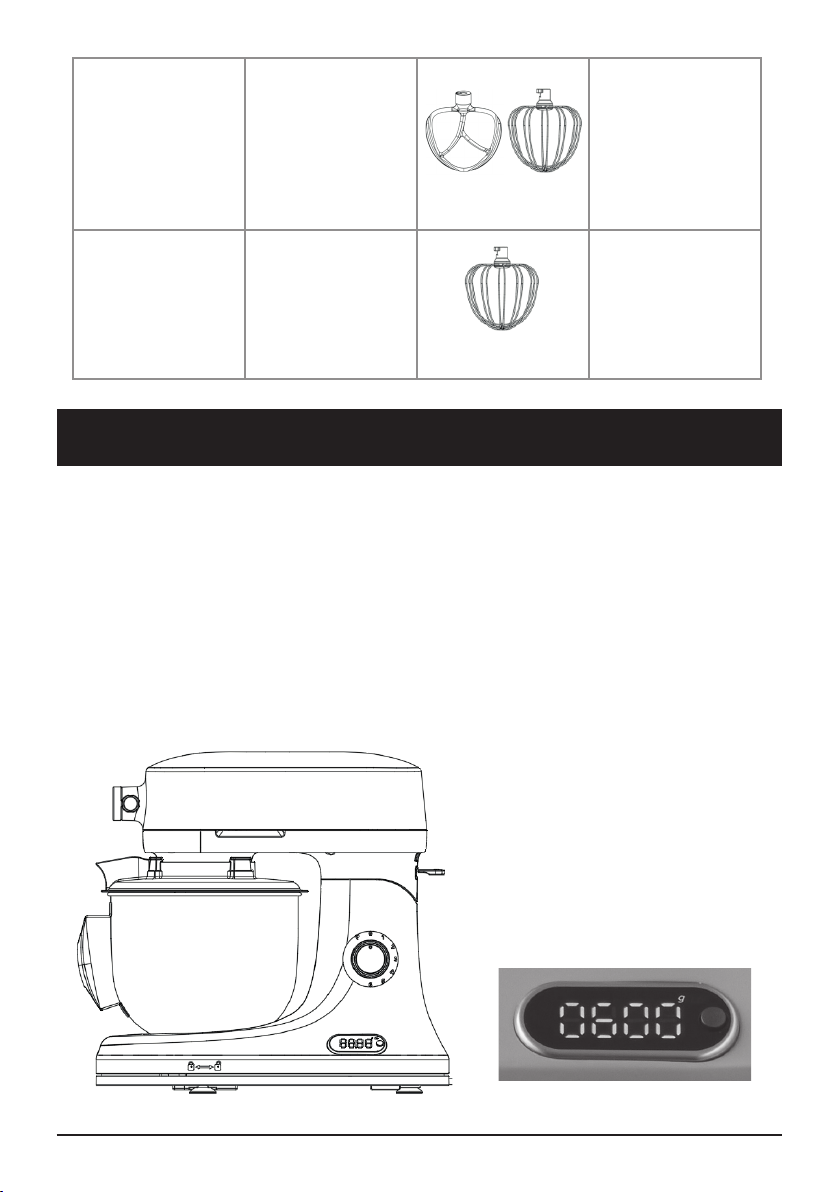
For medium to fast
beating, creaming or
whipping. Use speed
Speed 5 Beating and creaming
Speed 6
Fast beating and
whipping
Beater and whisk
Whisk
5 to finish mixing
cake and other
batters. High speed
for cake mixes.
For whipping cream,
egg whites, and
meringue, or for final
whipping of mashed
potato and other
vegetables.
SPEED OPERATION GUIDE
1. When the stand mixer is plugged in and the speed control knob is set to 0 (with the power
indicator blinking, indicating the machine is in standby mode), press the black button on the
built-in scale screen to start the weighing function.
2. Press the button once to clear the electronic weight and reset to 0. Be sure to install the
mixing bowl before entering weighing mode and clearing the weight simultaneously.
3. The default weight unit for electronic weighing is grams (g). The maximum weight is 5kg and
the accuracy is 1g.
4. When the scale is in use, the stand mixer cannot perform other tasks. At this time, the stand
mixer can only carry out weighing operations, and if the speed control knob is rotated, the
stand mixer will not respond.
5. After entering weighing mode, press the button for 2 seconds to exit the weighing mode. At
this point, when the speed control knob is turned, the stand mixer will begin to work.
Wolstead Palette Stand Mixer OWNER’S MANUAL 9
Page 10

TROUBLESHOOTING GUIDE
Malfunction Solution
The machine does not work.
The machine produces abnormal sounds
(mixing attachments hitting the bowl).
The machine shakes excessively.
• Ensure the stand mixer is plugged in.
• Check that the head is locked in place.
• Turn off the stand mixer for 10 to 15
seconds, then turn it back on. If the mixer
still does not start, allow it to cool for 30
minutes before turning it back on.
• Verify that the mixing bowl is correctly
locked into place.
• Ensure the mixing attachments are
securely connected.
• Check whether the rubber feet on the
base are intact.
• Ensure the machine is placed on a flat,
stable countertop.
• If using the dough hook to knead, do not
set the speed above 3.
Over time, the mixer head may loosen. To
The mixer head moves excessively
during use.
adjust, press the head lever down and lift the
head fully to expose the mixer head screw.
Then, rotate the screw counterclockwise to
tighten. Avoid overtightening.
CLEANING AND MAINTENANCE
1. Always unplug the stand mixer before cleaning.
2. Wait for the stand mixer to cool down before cleaning.
3. Do not immerse the body of the stand mixer or the power cord in water.
4. Use a damp cloth and a non-abrasive detergent to clean the exterior body of the stand mixer.
5. Clean plastic parts with clean water and a general detergent. Do not use abrasive or specialty
detergents.
The mixing bowl, dough hook, whisk and beater can be cleaned with a general cleaning agent, but
do not use abrasive agents or specialty detergents.
Wolstead Palette Stand Mixer OWNER’S MANUAL10
Page 11

WARRANTY
Get in touch with Customer Service
If you experience any issues with your
Wolstead Palette Stand Mixer, get in touch
with our Customer Service team by email at
[email protected].
au or by phone on 1800 332 934 between the
hours of 9am and 7pm (AEST) Monday to Friday.
Alternatively you can use the Live Chat function
on our website by visiting
www.kitchenwarehouse.com.au/contact-us
90 day money back guarantee
We promise you a full refund within 90 days
if your Wolstead product does not fulfil your
expectations. This guarantee applies to qualified
purchases of all Wolstead branded products
from participating stockists online and in-store
from eligible delivery locations. The qualified
product must be returned within 90 days from
the date of purchase. We shall issue a full refund
when the customer presents proof of purchase.
We shall issue a store credit when proof of
purchase is unavailable. The product packaging
is not required to avail of the refund. The amount
refunded will be the price of the products in the
currency shown on the proof of purchase.
Exclusions
This warranty does not apply if proper care
and/or usage instructions are not followed.
This warranty does not cover scratches, stains,
discoloration or damage caused by misuse.
How to claim
If a fault/defect is identified cease using the
Product immediately. To make a claim on this
guarantee, take the Product, proof of purchase
and full details of the alleged defect to any
Kitchen Warehouse store.
Limitations
We make no express warranties or
representations other than as set out in this
guarantee. The replacement of the Product or the
refund of the purchase price is the absolute limit
of our liability under this guarantee.
Warranty
Our goods come with guarantees that cannot
be excluded under the Australian Consumer
Law. You are entitled to a replacement or refund
for a major failure and for compensation for any
other reasonably foreseeable loss or damage.
You are also entitled to have the goods repaired
or replaced if the goods fail to be of acceptable
quality and the failure does not amount to a major
failure.
The benefits of this warranty are in addition to
any rights and remedies imposed by Australian
State and Federal legislation that cannot be
excluded. Nothing in this warranty excludes,
restricts or modifies any State or Federal
legislation applicable to the supply of goods
which cannot be so excluded, restricted or
modified.
Guarantee
We warrant that, subject to the exclusions and
limitations below, the Product will be free from
defects in materials and workmanship under
normal domestic household use for the five
year warranty period. The warranty period
commences on the date of sale by the original
retailer to the original purchaser. The warranty
applies only while the Product is owned by the
original purchaser.
Use of the Product in a commercial capacity
will void this warranty. If a defect appears in the
Product before the end of the warranty period
and we find the Product to be defective in
materials or workmanship, we will replace the
Product with a product comparable in quality and
value.
We reserve the right to change or discontinue our
product ranges at any time without notice and
without liability.
Wolstead Palette Stand Mixer OWNER’S MANUAL 11
Page 12

Distributed by Kitchen Warehouse.
Wolstead is a registered trademark of Kitchen Warehouse Pty
Ltd. The printed material appearing in this document and related
packaging is protected by copyright.
Kitchen Warehouse Pty Ltd
1 Pensioner Guard Road
North Fremantle, WA, 6159
www.kitchenwarehouse.com.au
1800 332 934
 Loading...