

Page 1
INSTRUCTIONS
INSTRUCTIONS
BEDIENUNGSANLEITUNG
BEDIENUNGSANLEITUNG
VZ-8light³ / VZ-8plus³
VZ-8light³ / VZ-8plus³
R
ENGLISH / DEUTSCH
Check out our internet homepage for additional information
www.wolfvision.com/support
Page 2
Precautions
ENGLISH
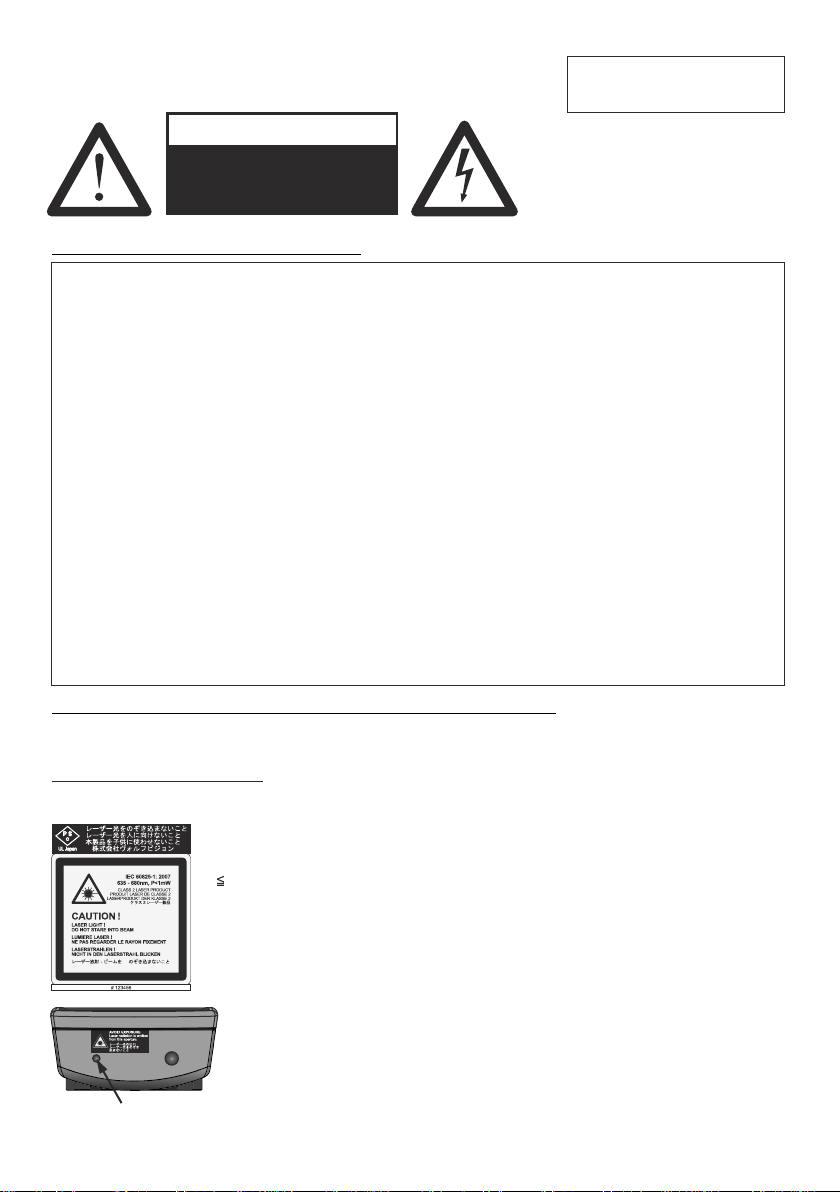
WARNING!
Risk of electric shock
Dangerous voltage inside
Please observe the following:
Use this Visualizer only with the correct voltage as shown on the type label !
Do not expose the Visualizer to heat or moisture !
Protect the Visualizer from excessive shocks !
Make sure that sufficient air circulation for cooling the Visualizer is possible!
If there is any abnormality (abnormal noise, smell, smoke etc.) disconnect the Visualizer from
mains immediately and contact your Visualizer dealer!
Do not use a damaged power supply / power cord. This may cause short circuits or electrical
shocks!
To prevent danger, do not modify the Visualizer or operate without the cover panel firmly in
place!
Do not expose the Visualizer to water, metallic objects or any flammable material.
Avoid installing the Visualizer in locations exposed to strong magnetic fields or electrical
currents.
Avoid installing the Visualizer in environments where there is radiation. This could cause
monitor image distortion or damage to the CCD camera.
Do not pull the plug from the power socket with wet hands!
If the Visualizer is not used for a long time, disconnect it from mains!
The external power supply has to be approved by CSA or UL in accordance to CSA 22.2-60950
or UL 1950. The outputs have to be LPS (limited power source) rated!
Precautions for laser pointer on the remote control:
Laser light - Do not stare into beam!
Do not modify the laser! Do not view the laser beam with optical instruments!
Information for laser pointer
FDA accession number: 9912688-00
This device complies with 21 CFR 1040.10 and 1040.11
Technical data:
λ=635 - 680nm
P<1mW
Θ 2mrad
This label will be found on the underneath of the remote control.
The laser beam exits the remote control through the smaller (left) opening on the
front.
1
Page 3
Approval
C
Marks on the unit:
Tested to complywith
FCC standards for
home or office use
L
D
I
S
E
T
9902476
US
FCC information:
This device complies with part 15 of the FCC rules. Operation is subject to the following two
conditions: (1) this device may not cause harmful interference, and (2) this device must accept
any interference received, including interference that may cause undesired operation.
Note:
This equipment has been tested and found to comply with the limits for a class B digital device,
pursuant to part 15 of the FCC rules.
Information to user:
The user manual or instruction manual for an intentional or unintentional radiator shall caution
the user that changes or modifications not expressly approved by the party responsible for
compliance could void the user's authority to operate the equipment.
This product is built according to Directive EMC and to Directive electrical equipment.
Inspections, tests and evaluation are according to UL 60950. CSA 22.22-60950
Inspections, tests and evaluation are according to the CB-Scheme
Inspections, tests and evaluation are according to the PCT-Scheme
Worldwide Patents
US 7,035,011 TW I 226969
KR 0576806 and others
RU 2265284
Copyright Information
Copyright © by WolfVision. All rights reserved.
WolfVision, Wofu Vision and are registered trademarks of
WolfVision Holding AG, Austria.
No part of this document may be copied, reproduced, or transmitted by any means, without
prior written permission from WolfVision. Except documentation kept by the purchaser for
backup purposes.
In the interest of continuing product improvement, WolfVision reserves the right to change
product specifications without notice.
Information in this document may change without notice.
Disclaimer: WolfVision shall not be liable for technical or editorial errors or omissions.
The units are "MADE IN EU/AUSTRIA”
Printed in Austria, July 2010
2
Page 4
#5
#9
#8
#12
#1
#13
#2
#7
#10
#4
#14
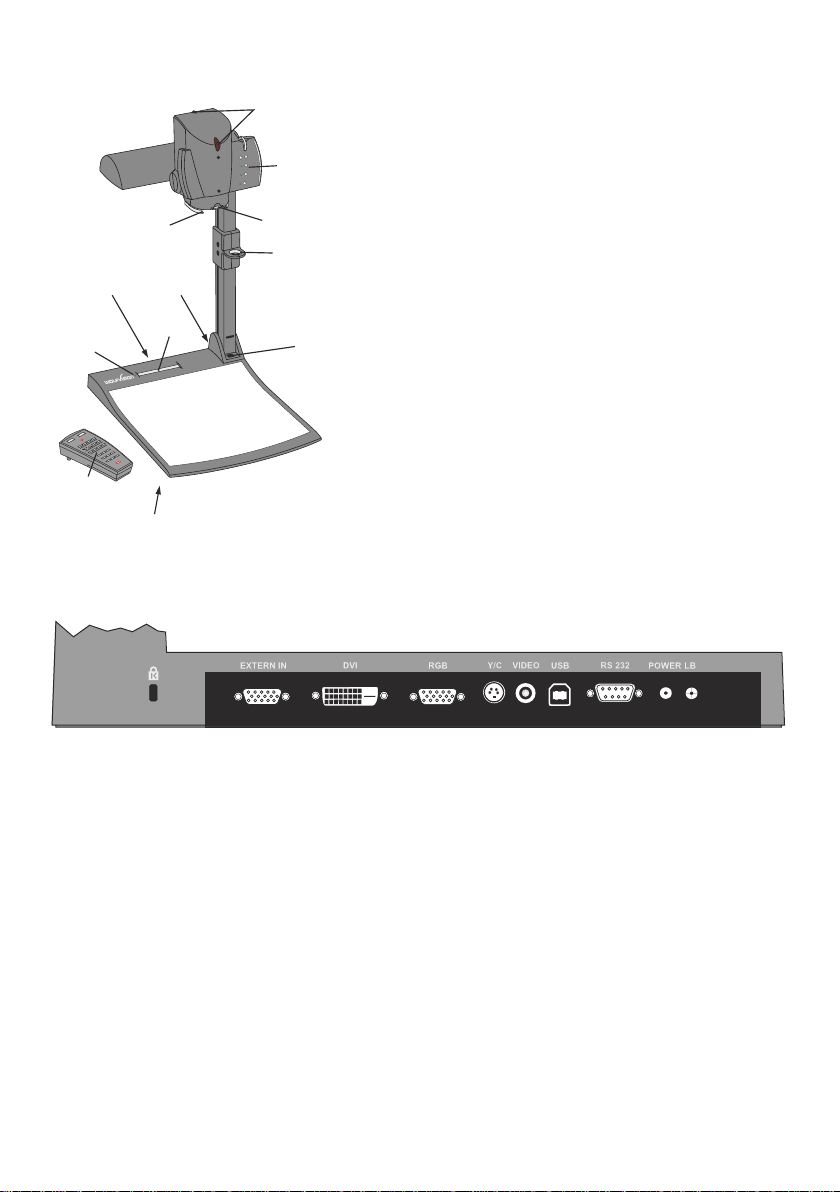
Connectors (#1)
#3
#11
#6
#5
#15 #19#18
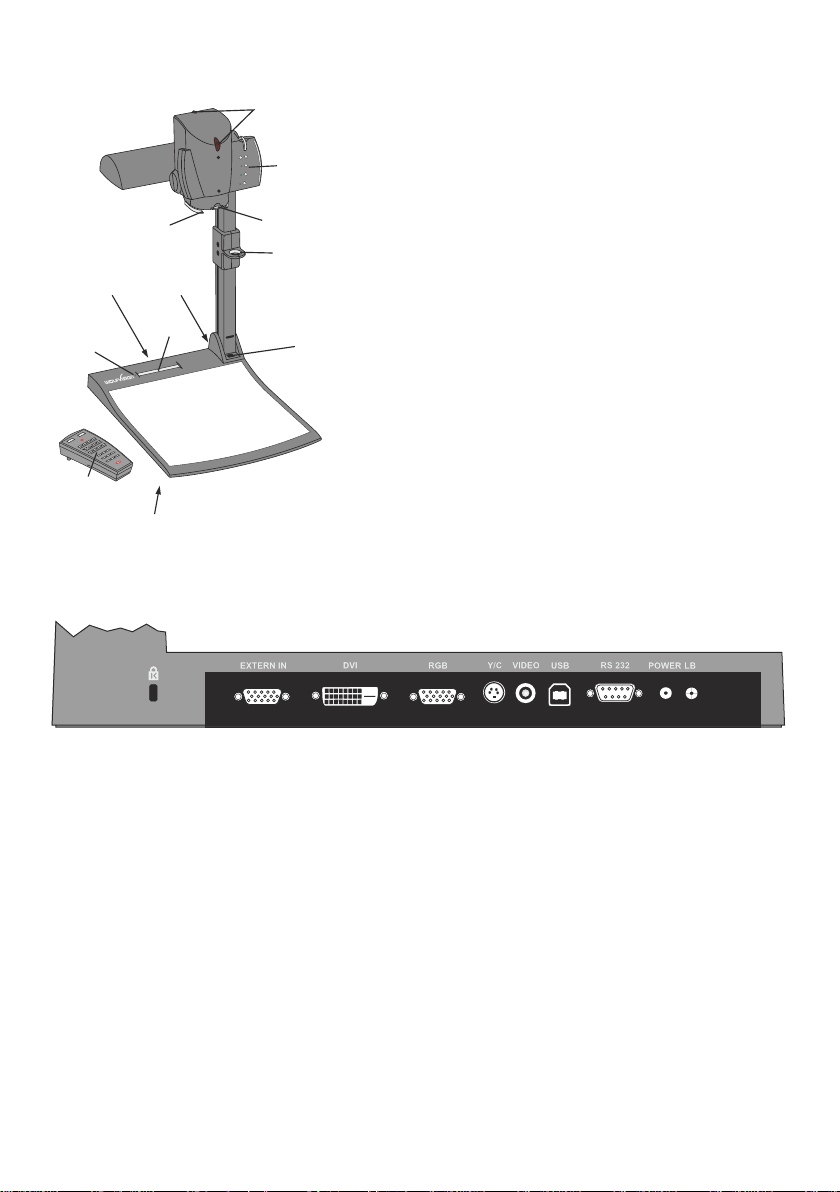
#1 Connectors
(on the back as shown below)
#2 Power and light on/off key (see page 4)
#3 Camera keys, zoom wheel (see page 4)
#4 IR-remote control VZ-8plus³ only
(see page 5)
#5 IR-receiver VZ-8plus³ only
(2 receivers on camera head and 1 on base)
#6 Pull pad to lift the arm up/down (see page 6)
#7 Power indication LED
#8 Camera head (see pages 4, 6 and 7)
#9 Light (see pages 4, 6 and 7)
#10 Working surface (see page 6)
#11 Close up lens for camera (see page 7)
#12 Slide drawer VZ-8plus³ only
(see page 7)
#13 Slot for Kensington lock®
(on the back)
#14 Alternative Antitheft security
(found underneath the unit
as shown on page 10)
#16
#17#13 #21
#20
#22 #23
#13 Slot for Kensington lock® (see page 10)
#15 External input for computers (see page 10)
#16 DVI output (see pages 10-11)
#17 RGB output (see page 10)
#18 PAL/NTSC Y/C (S-Video) output VZ-8plus³ only (see page 12)
#19 PAL/NTSC composite VIDEO output VZ-8plus³ only (see page 12)
#20 USB port (see page 12)
#21 RS-232 serial control input (see page 12)
#22 Power connection 12V
#23 DC-output for lightbox (see page 6)
3
Page 5
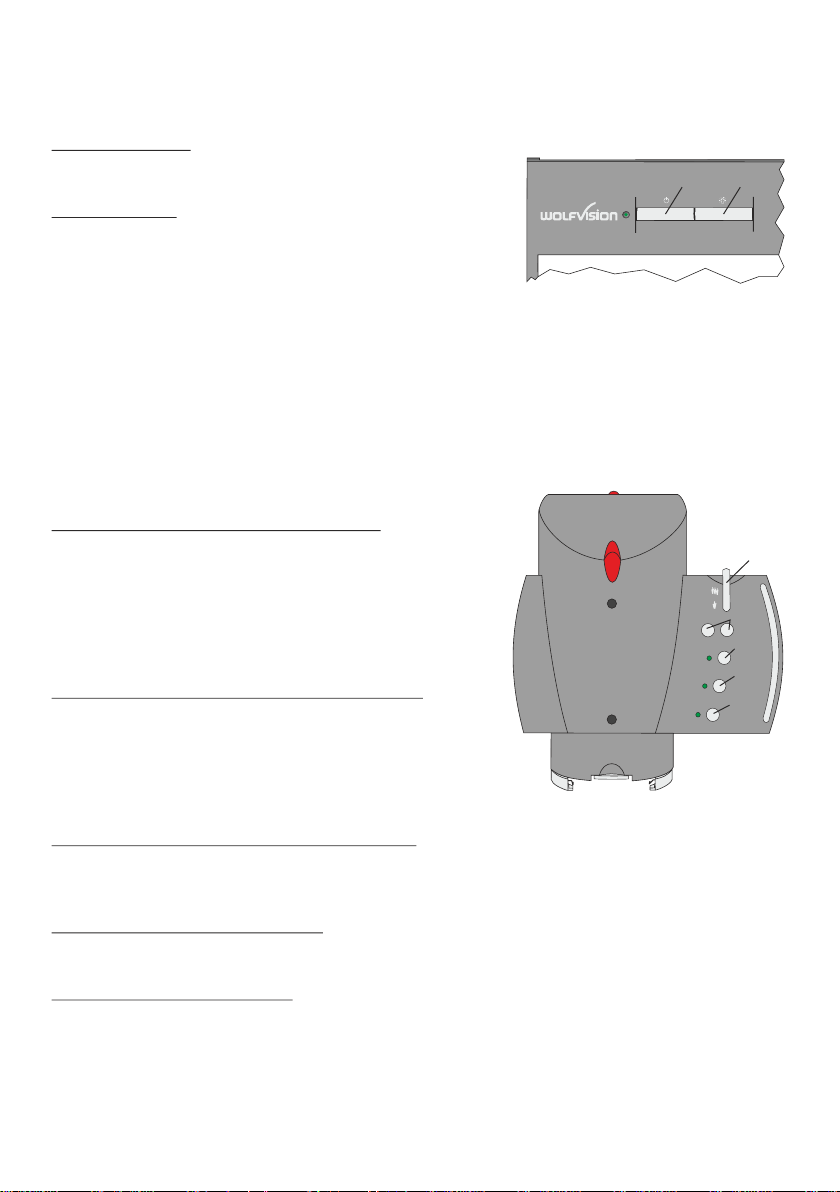
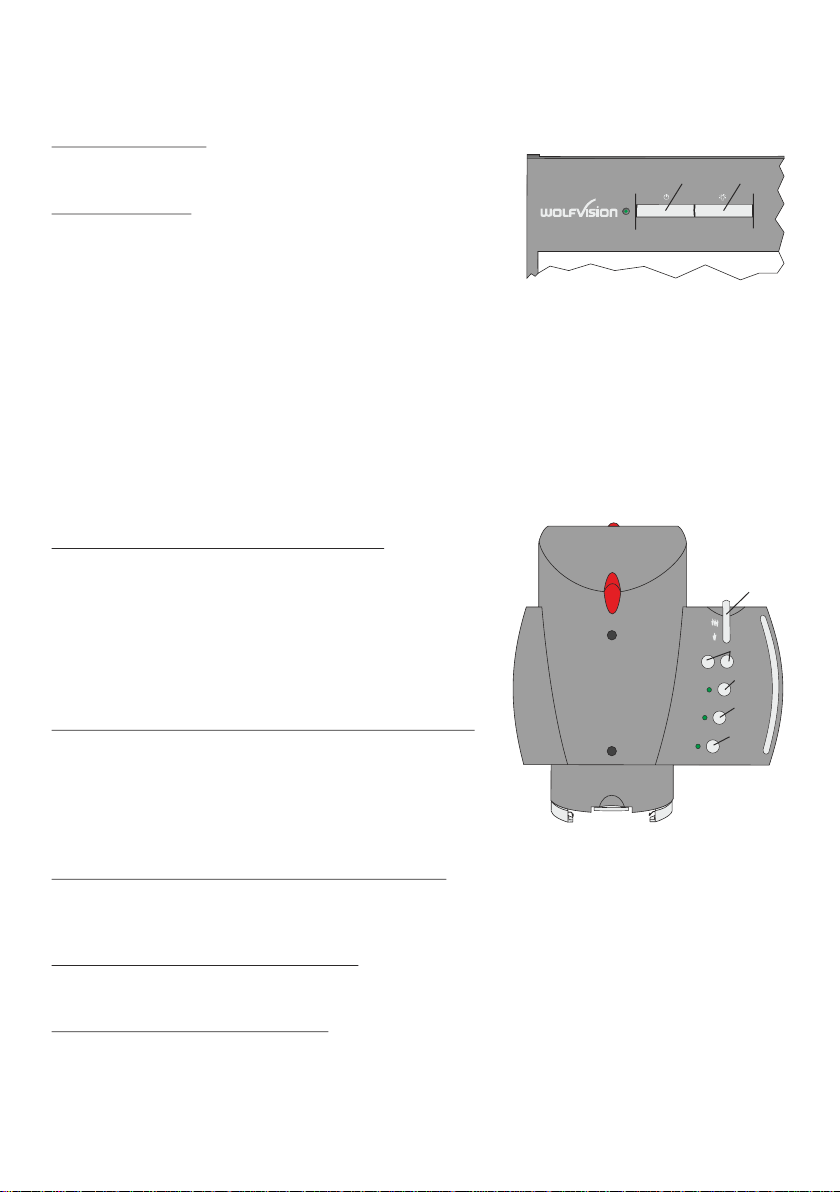
Keys on the Visualizer
Base
#24 POWER key
Switches the unit on and off. When switching the unit on
#24
the Visualizer automatically runs power-on preset.
#25 LIGHT key
Switches the top light on and off.
#25
WHITE
If a separate optional WolfVision light box is connected,
the LIGHT switch toggles between top light, external
WolfVision light box and light off.
The LIGHT key also works as ONE PUSH WHITE
BALANCE key if pressed for 2 seconds (see page 8).
Camera Head
One of the great features of WolfVision's Portable Visualizers is that only the most necessary
keys are on the unit itself. Therefore anyone can use it without instructions.
For more experienced users there are some additional functions on the remote control of the
VZ-8plus³. Nearly all functions on the remote control can also be controlled through the keys on
the camera head:
#26 ZOOM WHEEL / menu: scroll wheel
Turn the wheel down to zoom in (TELE), and up to
zoom out (WIDE). The more you turn the ZOOM
WHEEL, the faster the zooming works.
Using the ZOOM keys (wheel) also switches auto iris
on again.
When on-screen menu is activated, it works as scroll
wheel for navigating through the on-screen menu.
#27 Manual FOCUS keys / menu: select keys
When the Manual FOCUS keys are pressed the
AUTO
FREEZE
EXTERN
Visualizer switches off the autofocus function.
Using the AF-key switches the autofocus function on
again.
When on-screen menu is activated, it functions as
select keys.
#28 AUTO FOCUS (AF) key / menu: help key
Switches the auto focus on and off. The AF light indicates if the AF is switched on. When onscreen menu is activated, it functions as Help key.
Pressing this key for 2 seconds resets the selected menu item.
#29 FREEZE key / PRESET 1 key
Freezes the current image. The FREEZE light indicates if the FREEZE-mode is activated.
By pressing the FREEZE key for 2 seconds, preset 1 will be recalled. (see page 8).
#30 EXTERN key / MENU key
Switches between Visualizer image and external input (for more details - see page 10).
The EXTERN light indicates that a signal from the external input is shown.
Pressing this key for 1 second activates the on-screen menu (see page 13).
ZOOM
MAN
FOCUS
#26
< >
#27
<
#28
HELP
#29
PRESET 1
#30
MENU
>
4
Page 6
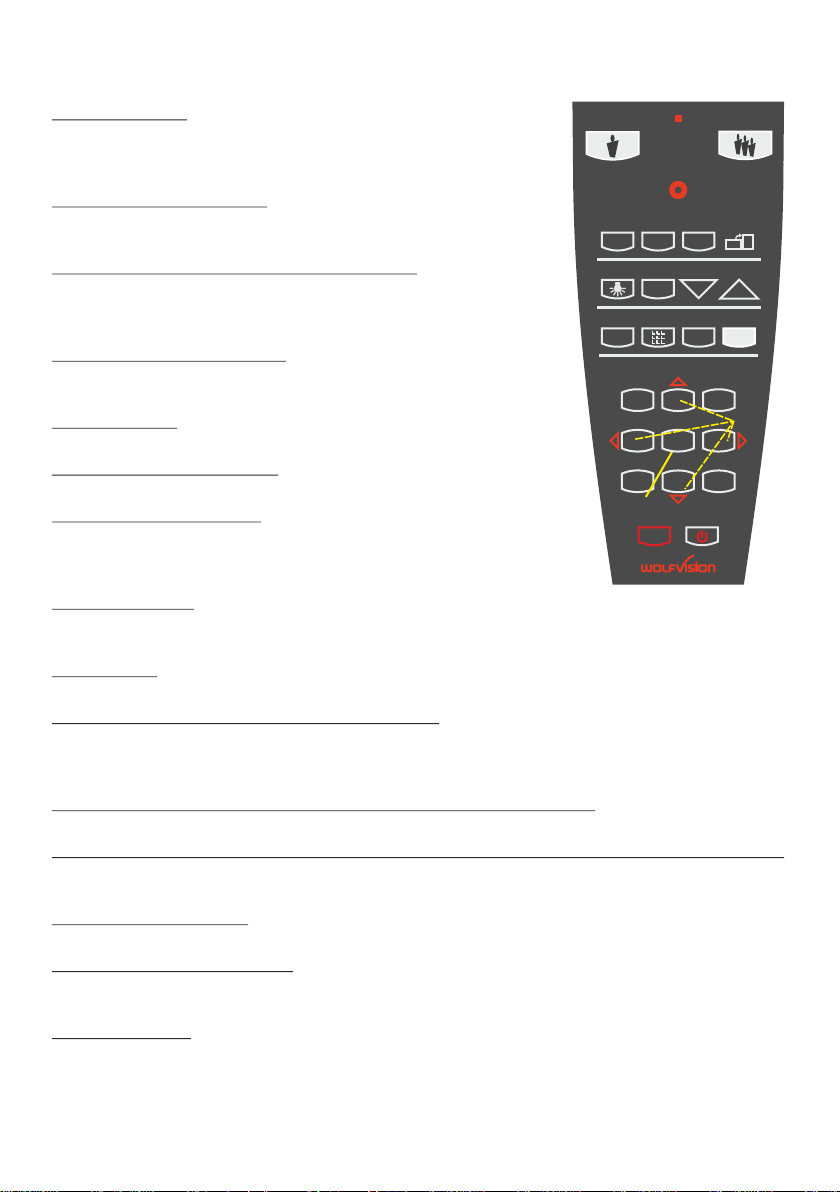
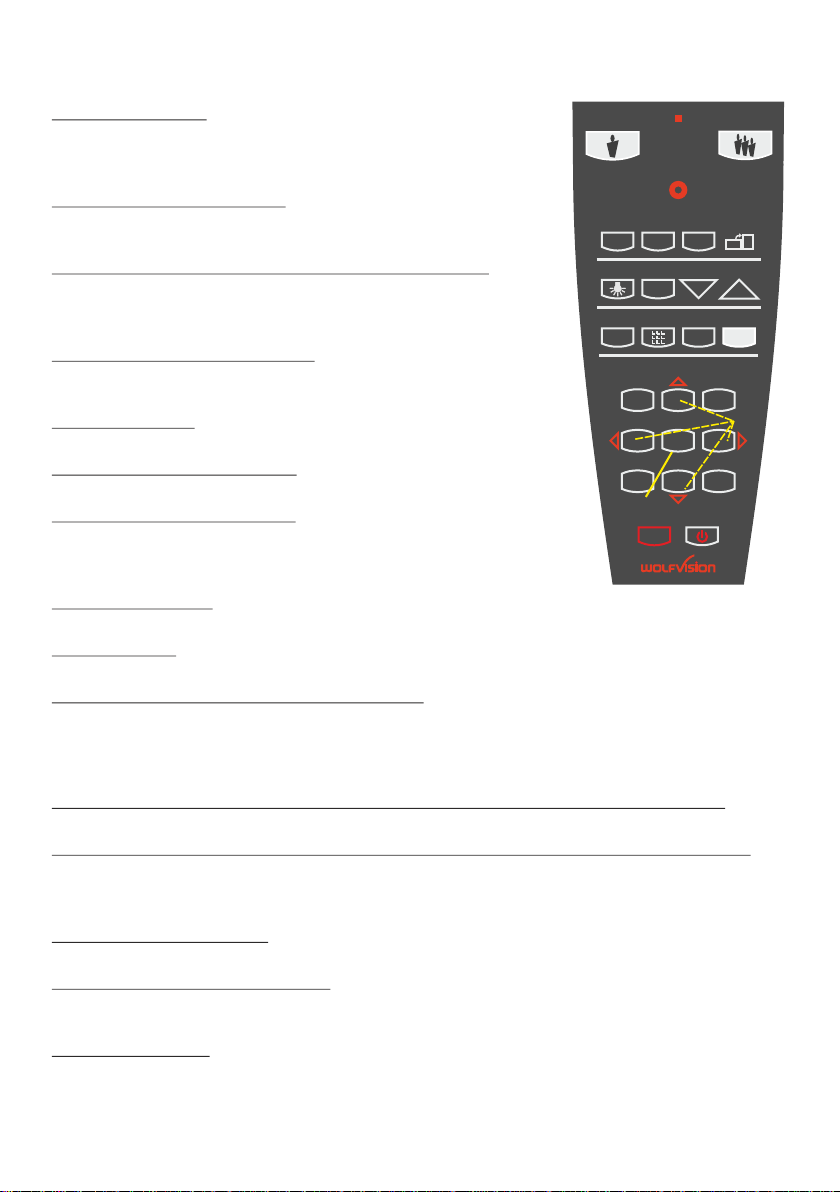
Infrared Remote Control VZ-8plus³ only
#31 ZOOM keys
The ZOOM keys work like the ZOOM WHEEL on the camera
#31
head of the Visualizer. Using the ZOOM keys (wheel) also
PRESETS
2 3
AF
ALL
1
LASER
#36
#39
MEMORY
2
#32
switches auto iris on again.
#32 LASER POINTER key
Important: Do not stare directly into the beam.
This is hazardous for your eyes!
#33 PRESET keys (programmable settings)
For storing a preset, press one of the PRESET keys for more
than 2 seconds. For recalling a preset, press the PRESET key
quickly (see page 8).
#34 IMAGE TURN mode key
For picking up vertical (portrait) pages with higher resolution
(see page 9).
#35
TELE
#33
FREEZE
#38
1
LIGHT
WHITE
#35 LIGHT key
5
#42
#44
4
7
EXTERN
MENU
HELP
8
POWER
Switches the light on and off.
#36 AUTO FOCUS (AF) key
Switches the auto focus on and off.
#37 Manual FOCUS keys
When the FOCUS keys are pressed the Visualizer switches off
the autofocus function. The next time the AF-key is pressed,
autofocus is switched on again.
#38 FREEZE key
Freezes the current image. The FREEZE light indicates if the
FREEZE-mode is activated.
#39 ALL key
For displaying all 9 pictures of the memory as split image (see page 9).
#40 Manual IRIS keys (brightness adjustment)
When the IRIS keys are pressed, the Visualizer switches off the Auto iris function.
The next time the ZOOM keys/wheel are used the auto iris is switched on again.
For specialists: The overall iris level can be changed in the on-screen menu (see page 13).
#41 SELECT keys (double function of MEMORY keys 2, 4, 6 and 8)
For navigating through the on-screen menu (see page 13).
#42 HELP/RESET key for on-screen menu (double function of MEMORY key 5)
While you are in the on-screen menu you can activate the on-screen help by pressing the
number 5 key. Pressing this key for 2 seconds resets the selected menu item (see page 13).
#43 MEMORY keys 1 - 9
For saving and recalling pictures (see page 9).
#44 EXTERN key / MENU key
This switches between Visualizer image and external input (see page 10).
Pressing this key for 1 second activates the on-screen menu (see page 13).
#45 POWER key
Pressing this key switches the unit on and off. When switching on the unit, the Visualizer runs
the power-on preset.
WIDE
IMAGE TURN
A
FOCUS
IRIS
3
#41
6
9
#43
#45
#31
#34
A
#37
#40
5
Page 7
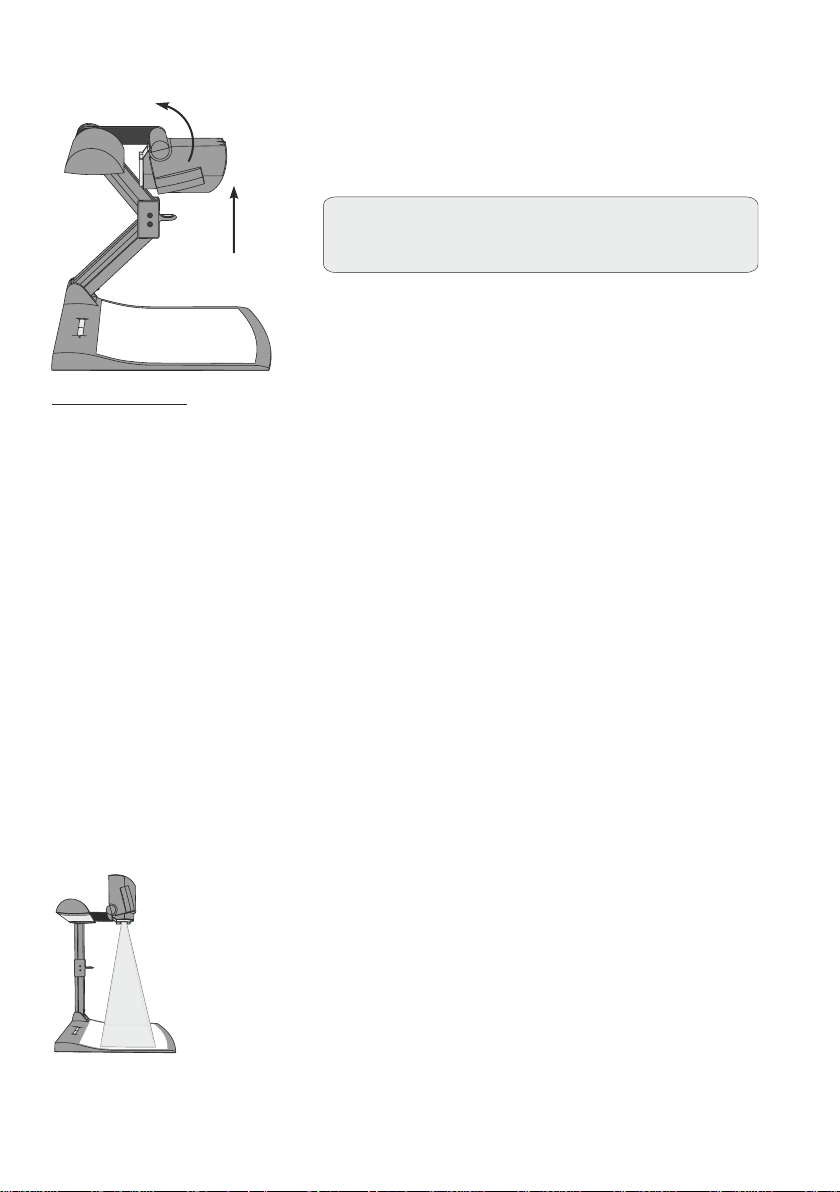
Setting Up the Visualizer
1. Connect the power pack to the power-input (#22).
2. Connect your display device (projector, monitor, video
conferencing unit etc.) to the appropriate output of the
Visualizer (#16, #17, #18, #19 or #20).
IMPORTANT:
For choosing the right output please read the
detailed description on page 11!
3. Pull the arm upwards by using the pull pad (#6).
4. Turn the camera head to working position.
5. Switch on the Visualizer with the power key.
Power-on preset:
The power-on preset is automatically activated when switching on the unit.
The settings are: zoom size: approx. 20 x 15 cm (DIN A5), autofocus: on, auto iris: on.
Working Surface
The working surface of the Visualizer (#10) has a special crystalline white color, which is
especially designed for perfect reproduction of transparencies.
In the following cases, an optional lightbox is recommended:
- If the transparency is very dark
- If the transparency is very wavy and causes reflections
- If the room light causes reflections on a transparency
External WolfVision Lightboxes (optional)
Connect the power cord of the WolfVision lightbox to the lightbox connector (#23) on the back
of the Visualizer. The LIGHT key (#25) of the Visualizer can now be used to switch between
the light of the Visualizer and the light of the WolfVision lightbox.
When using a lightbox with a separate power supply be sure that the light of the Visualizer is
switched off to prevent reflections.
Shooting Area on the Working Surface
Eliminating reflections
In order to eliminate reflections (on high gloss photographs etc.) just
move the recorded object or document and rotate the camera head to
center the desired pick-up area.
It is also possible to turn the camera arm with the light up or down
wards and rotate the camera head to the center of the desired pick-up
area to eliminate reflections.
Please note that reflections can also be caused by general room
lighting conditions.
6
Page 8
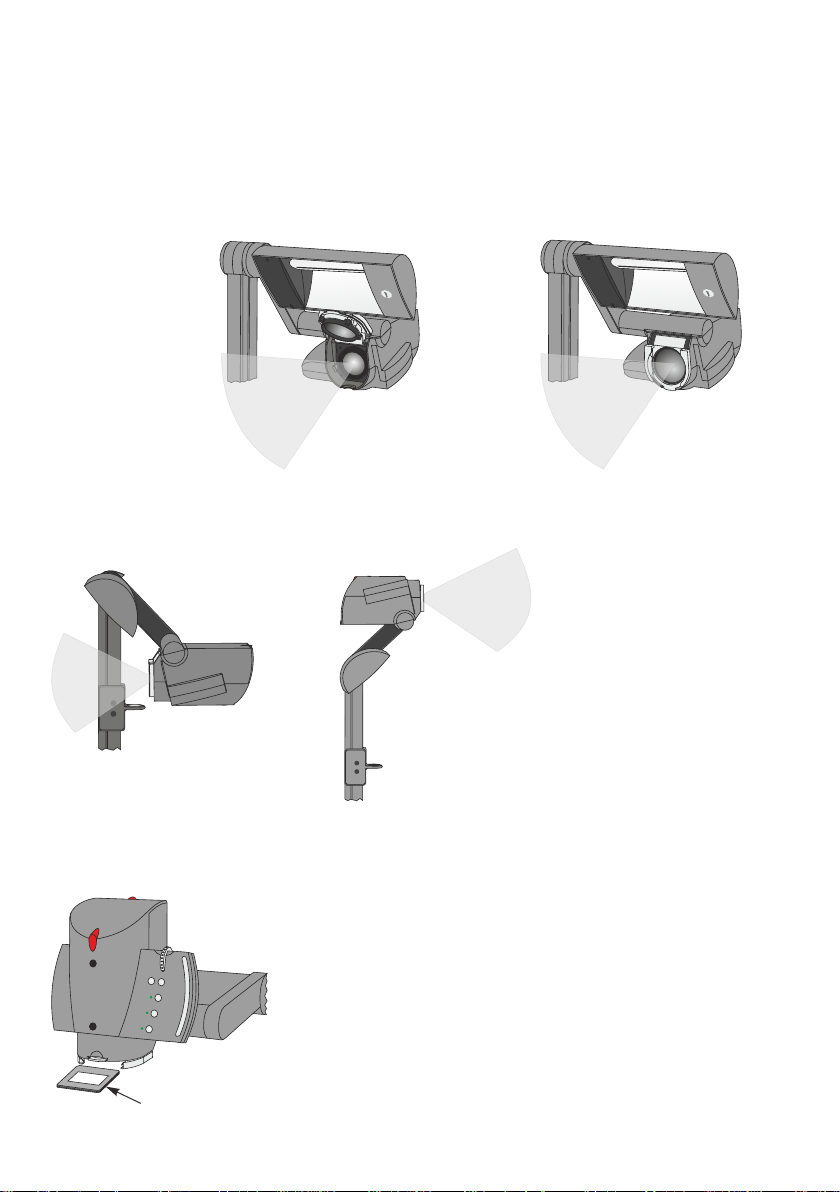
Shooting Area Outside of the Working Surface
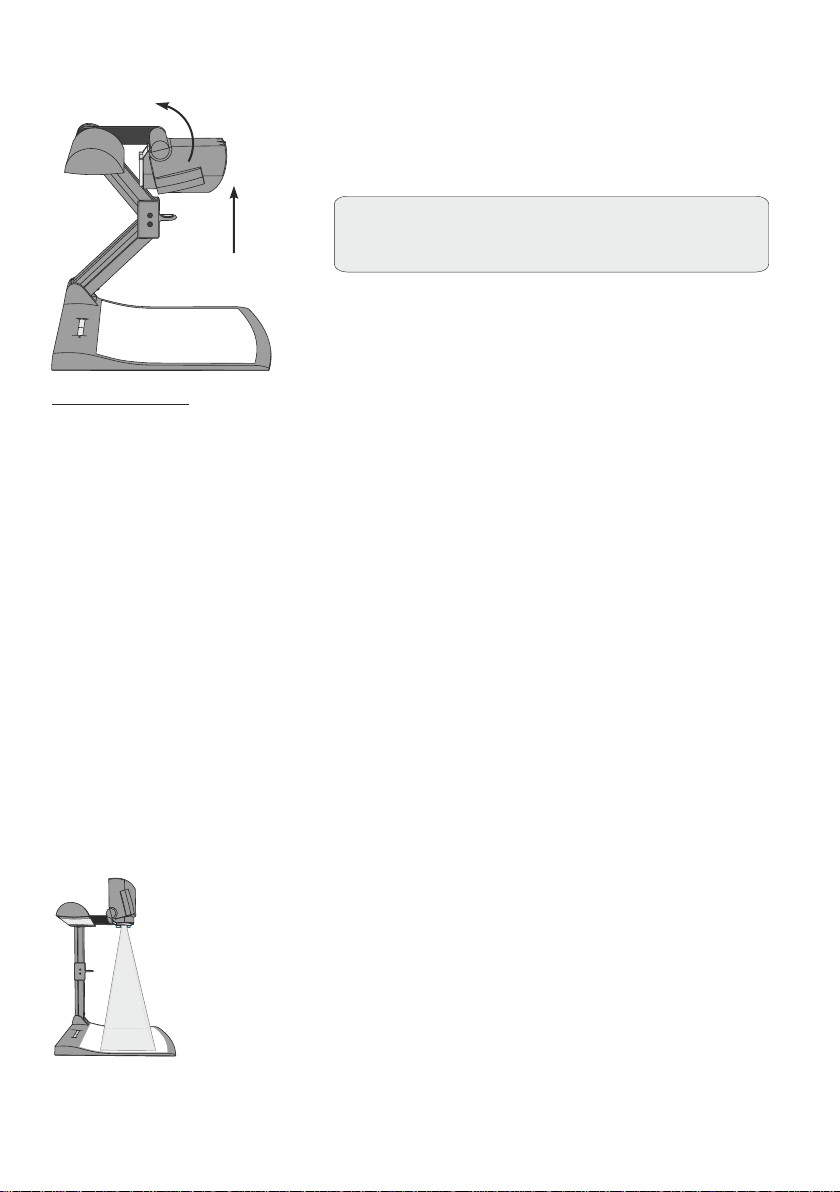
Close-up adaptor lens
For shooting an object outside of the working surface, the close up lens (#5) has to be removed.
In this case just hinge the lens away from the camera head. It is impossible to remove the lens
completely from the unit and therefore can not get lost.
When using the Visualizer to again record on the working surface, put the close up lens back to
its original position.
up to 45mm
distance from
∞
Turning the camera arm downwards or upwards
In order to enable recordings with illumination outside of the working surface, the camera arm
and also the light of the Visualizer can be turned vertically.
close-up lens
to the object
Image Flip
By turning the camera head to record in
front of the Visualizer, the image will be
automatically turned 180 degrees
(”image flip”). This feature is very useful
for recording the face of the presenter or
objects hanging on the wall behind the
unit.
Slide Drawer VZ-8plus³ only
First make sure that you remove any object from the working
surface (very important!). Then insert a slide in the slide
drawer. The camera automatically recognizes the slide and
focuses on it.
In case the slide is out of focus:
- Make sure that the slide is firmly in place
- Make sure that the ZOOM is not in the maximum
tele position (=smallest picture).
Use the ZOOM-keys/wheel (#26 or #31).
Slide
7
Page 9
Autofocus
Please note that objects with very low contrast (like blank sheet of paper) are difficult to focus. If
the autofocus does not work just move the object slightly.
For special applications the autofocus can also be switched off using the on/off switch (#28 or
#36). The autofocus is also switched off when the manual FOCUS keys (#27 or #37) are used.
Digital Zoom
Please note that the Visualizer has an optical 12x zoom. The digital 2x zoom increases the
overall zoom range to a 24x zoom. The smallest pickup size on the working surface without
digital zoom is 23 x 31mm (0.91" x 1.22"). When you zoom in further the digital zoom is
automatically activated and the smallest pickup size is 12 x 16mm (0.48" x 0.62"). However
please be aware that when the digital zoom is used, the resolution of the picture is not as high
as before. The default setting displays a message on-screen when you are in the digital zoom
mode.
Still pictures in the memory can also be digitally zoomed.
You can change the behavior of the Visualizer in the digital zoom mode in the on-screen menu (see page 13).
.
White Balance
Correct white balance adjustment is important for exact color reproduction.
"Auto Tracking" is the default white balance setting when the Visualizer is shipped. This
means that the white balance is continuously adjusted automatically.
For an exact white balance, 10% of the recorded image should be white (measurement area is
in the center of the image).
For a precisely fixed white balance adjustment use the "One Push" white balance. This can be
done by completely zooming in on a white sheet of paper on the working surface and pressing
the LIGHT key (#25) for 2 seconds. When the white balance is stored, an on-screen message
appears. Setting a "One Push" white balance switches off the "Auto Tracking" mode (when the
unit is switched off and on again the "Auto Tracking" mode will be reactivated). When the
lighting conditions change (e.g. light box, sunlight or different room light) the white balance
should be readjusted!
For specialists: The Visualizer can be switched between "Auto Tracking", "One Push" and "Manual" white
balance mode in the on-screen menu (see page 13) If you work with negative transparencies and a light box, use a
blank (black in the image) piece of the negative film for white balance adjustment!
The “One Push” white balance will be separately adjusted and stored for top light and external light box (if
available).
Preset Function
The Visualizer offers the possibility to store the current settings as a preset
and recall them by just pressing the respective PRESET key (#33) on the
remote control.
The Preset 1 can be recalled by pressing the FREEZE key (#29) on the camera head for 2
seconds.
For storing a reset adjust y function as required and then PRESET key
on the remote control or more will
p
reset is stored.
The presets can also be stored in the on-screen menu.
As mentioned above, when presets are stored all current settings like zoom, focus, iris etc. are
also stored. Contrary to this, a user also has the opportunity to assign only specific functions
such as "Negative", "Negative/Blue", "Black/White" etc. to a PRESET key in the on-screen
menu of the Visualizer (see page 13).
p : an press any one of the s
for 2 seconds . An on-screen message inform you when the
8
Page 10
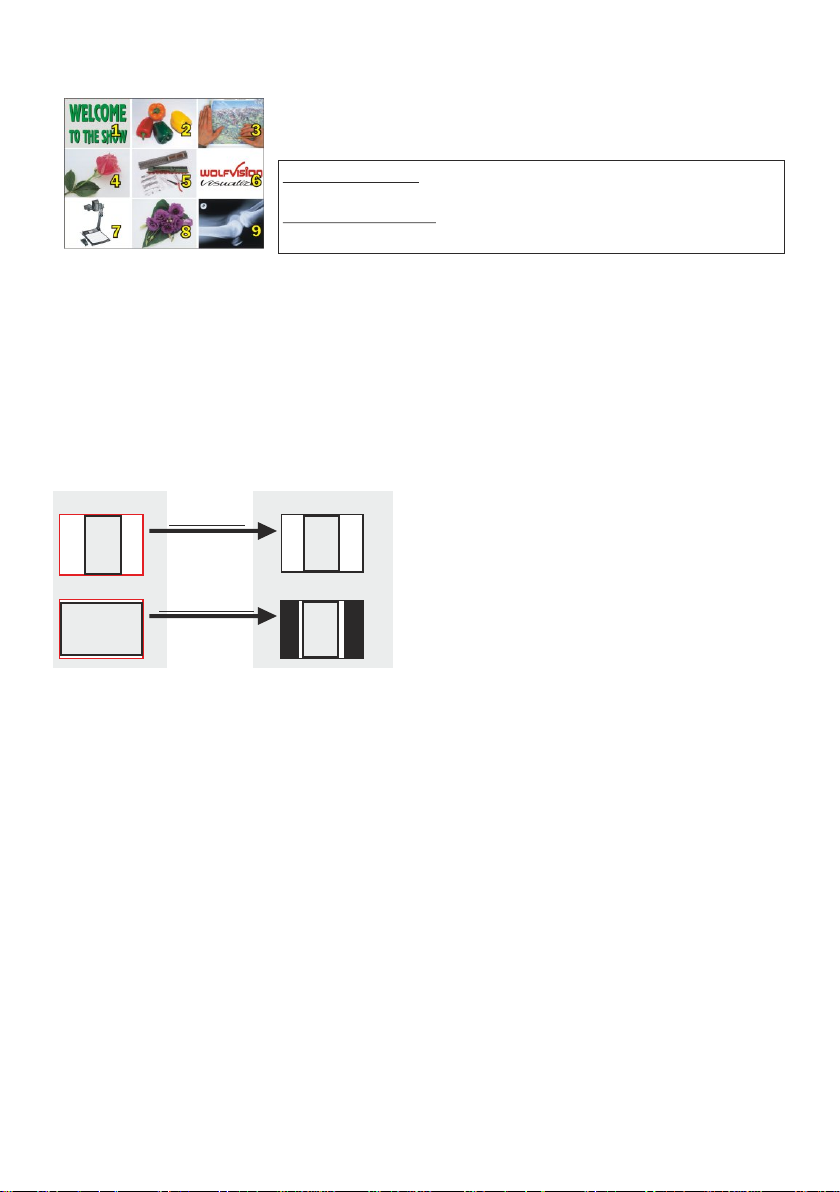
Image Memory for 9 images VZ-8plus³ only
You can store 9 images and recall them by just pressing one of
the numerical keys (#43) on the infrared remote control:
Storing an image: Press one of the MEMORY keys (#43)
for 2 seconds or more
Recalling an image: Press one of the MEMORY keys (#43)
Split image of 9 picture memory
By pressing the "All" key (#39) a split image with all 9 pictures of the memory can be displayed.
When pressing the ALL key (#39) for 4 seconds, a menu appears on the screen asking if you
would like to erase all stored pictures (black picture) or if you would like to fill the memory with
“snapshots”. When choosing “snapshot” the Visualizer stores a new image every second until
all 9 memory locations are full. The VZ-8plus³ is equipped with a memory backup battery. If the
power supply has been disconnected any pictures in the memory will be stored for up to 4
weeks.
The functional settings of memory erasing can be changed in the on-screen menu.
quickly
Image Turn Mode (for a higher resolution) VZ-8plus³ only
Working surface:
A
A
Normal mode:
Only 50% of the
pixels are used to
pick up the document
Image turn mode:
90% of the pixels
are used to pick
up the document
Output picture:
A
A
Picking up a complete vertical (portrait)
document or A4 page has always been a critical
issue for a Visualizer because the image
always picked up in a horizontal (landscape)
format.
The camera could only use 50% of its pixels to
pick up a vertical (portrait) page. WolfVision's
"Image turn" mode solves this problem.
was
Just place your document (or other vertical object)
zoom in on it completely, so that approx. 90% of the pixels of the built-in camera are used to pick
up the document, then press the IMAGE TURN key (#34). The Visualizer turns the picture
electronically 90 and outputs correctly with a much higher resolution than in normal mode.
The left and right margins will be black.
º
on the working surface horizontally and
Text Enhancement
For improving the readability of text, sketches or x-rays, the text mode can be activated by
pressing the programmed PRESET-key (#33).
This mode enhances the contrast of the picture. Please note that the colors are now darker
than usual. To switch off the text enhancement mode, press the programmed PRESET-key
again. When the text enhancement mode is in use, the message "TEXT" is permanently
displayed on the output.
This should remind the user to switch off the text mode when it is no longer required. It should
also prevent users trying to correct dark colors by opening the iris, resulting in a poorly adjusted
picture.
9
Page 11
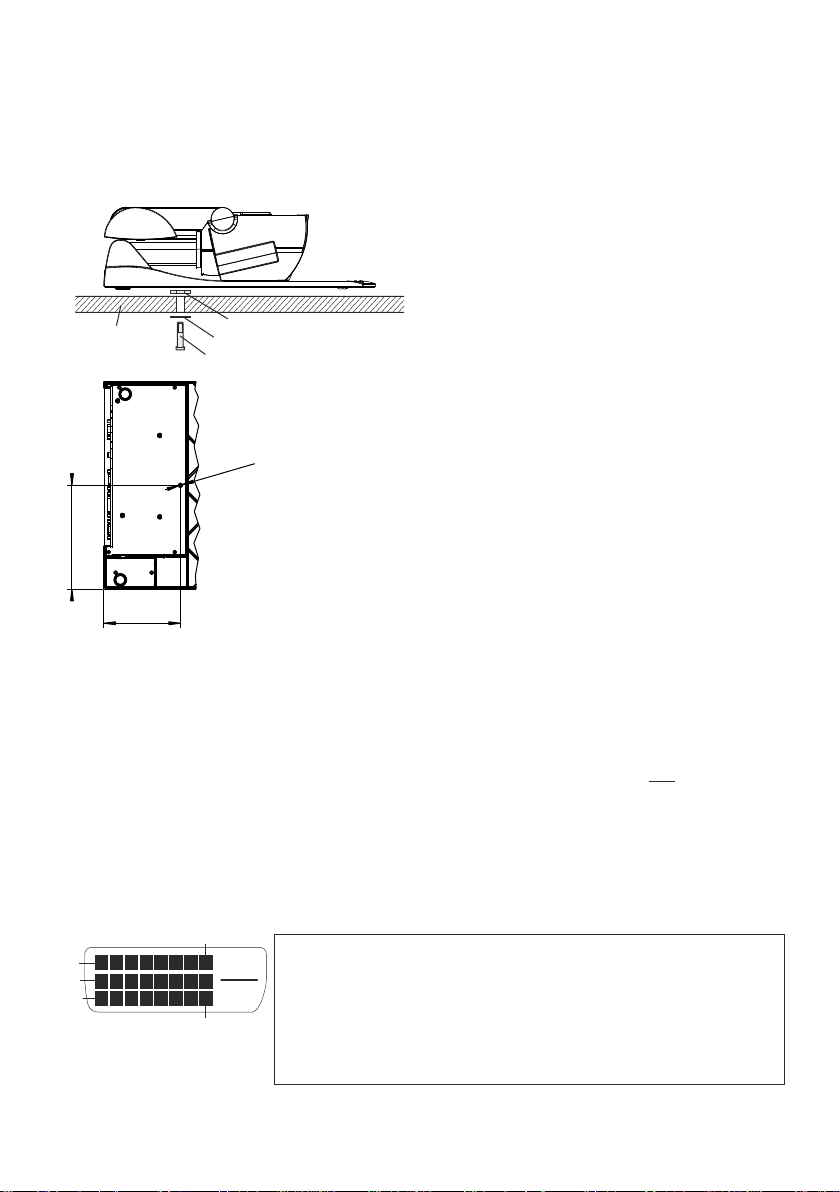
Anti-theft device 1: T-bar lock
The Visualizer can be fixed with a , so that it can
security cable T-bar lock (Kensington Lock)
not be stolen. Follow the instructions from the cable lock manual.
®
Anti-theft device 2: table lock bolt
Please note that the usable depth
of thread is 8mm, do not screw in
more than this.
table
(sectional view)
"]
8
1
156
[6 /
115
1
[4 /2"]
washer 6.4/17x3
washer 6.4/12x1.6
screw M6
M6
The Visualizer can also be fixed onto a table with the
supplied table lock bolt in order to minimize the risk of theft.
The thread to fix the bolt is on the bottom of the unit.
Supplied accessories for anti-theft device (part number):
Socket head cap wrench 5mm (101684)
Screw DIN 912, M6x35 Zn (101689)
Screw DIN 912, M6x50 Zn (101690)
Washer DIN 125A 6.4/12x1.6 (101691)
Washer DIN 7349 6.4/17x3 (101692)
Assembly instructions VZ-8³ (101693)
EXTERNAL INPUT - EXTERN
A computer can be connected to the External RGB input (#15) of the Visualizer. With the
EXTERN switch (#30 or #44) a user can switch between the Visualizer image and the image
of the external input to be displayed to the audience.
The signal from the computer is only looped through the Visualizer and is not processed in
any way. In order to avoid that your projector or monitor adjusts itself when switching, it is
recommended that you set the output of the computer to the same signal format and vertical
frequency as the Visualizer.
Please note that the image from the External RGB input (#15) can be displayed on the RGB output (#17) only.
DVI PORT
Pin 8
Pin 1
Pin 9
Pin 17
Pin 24
1 - T.M.D.S. Data2- 9 - T.M.D.S. Data1- 17 - T.M.D.S. Data02 - T.M.D.S. Data2+ 10 - T.M.D.S. Data1+ 18 - T.M.D.S. Data0+
3 - T.M.D.S. Data2/4 Shield 11 - T.M.D.S. Data1/3 Shield 18 - T.M.D.S. Data0+
4 - T.M.D.S. Data4- (*) 12 - T.M.D.S. Data3- (*) 19 - T.M.D.S. Data0/5 Shield
5 - T.M.D.S. Data4+(*) 13 - T.M.D.S. Data3+ (*) 20 - T.M.D.S. Data5- (*)
6 - DDC Clock 14 - +5V Power 21 - T.M.D.S. Data5+ (*)
7 - DDC Data 15 - Ground (return for +5V, 22 - T.M.D.S. Clock+
8 - Analog Vertical Sync (**) HSync and Vsync) 23 - T.M.D.S. Clock-
**...not available
16 - Hot Plug Detect 24 - Analog Vertical Sync (**)
*...not used
10
Page 12

Choosing the Correct Output Mode
The DVI- and RGB-output (#16 and #17) can output signals in the following formats:
VZ-8light³
- XGA (4:3 - 1024x768 pixels) at 60Hz
- SXGA- (4:3 - 1280x960 pixels) at 60Hz - native image
- WXGA (16:9 Widescreen - 1360x768 pixels) at 60Hz
- WXGA* (16:10 Widescreen - 1280x800 pixels) at 60Hz - native image
- 720p (16:9 Widescreen HD - 1280x720 pixels) at 60Hz - native image
VZ-8plus³
- SVGA (4:3 - 800x600 pixels) at 60Hz
- XGA (4:3 - 1024x768 pixels) at 60Hz
- SXGA- (4:3 - 1280x960 pixels) at 60Hz - native image
- SXGA ( - 1280x1024 pixels) at 60Hz
- SXGA+ (4:3 - 1400x1050 pixels) at 60Hz
- XGA 16:9 (special format for non-HD capable 16:9-Plasma displays) at 60Hz
- WXGA (16:9 Widescreen - 1360x768 pixels) at 60Hz
- WXGA* (16:10 Widescreen - 1280x800 pixels) at 60Hz - native image
- WXGA+ (16:10 Widescreen - 1440x900 pixels) at 60Hz
- 720p (16:9 Widescreen HD - 1280x720 pixels) at 60Hz - native image
The "Auto resolution" function is activated by default. In this mode the Visualizer contiously
checks which devices are connected to the RGB (#17) and DVI output (#16) and automatically
sets the optimal output mode for each connected device separately.
Visualizer can not check the possible resolution, if the connected units or the cables* are not
"Plug and Play" compatible. If the Visualizer can not detect the resolution of the connected
device, the output is set to the default of XGA (1280x960)/60Hz.
(*Cables with plug and play compatibility must have a 15-pin plug on both ends with all pins connected, pin 9 is not used).
If you can not use the "Auto resolution" function, you can select the output mode manually in the
on-screen menu of the Visualizer (see page 13).
In order to achieve the best picture quality you must set the outputs of the Visualizer to match
the native resolution of your display unit (e.g. LCD or DLP projector or monitor).
Important: What matters is the native resolution of the projector or monitor, not the maximum
resolution that it can display (in compressed mode). The native resolution is the actual number
of pixels of the built-in LCD display or DLP chip of a projector or monitor. Most LCD or DLP
projectors can also display higher resolutions than their native resolution, but only in
compressed mode and with inferior picture quality.
Do NOT set the output of the Visualizer to a higher standard than the native resolution of
your display unit!
5:4
Please note that the
S -
Do not use a higher refresh rate than your monitor or projector can display, otherwise
the monitor or projector can be damaged!
Follow the instructions in the user manual of the connected units.
11
Page 13

PAL/NTSC Video Output VZ-8plus³ only
Please note, that the PAL/NTSC video outputs (composite and s-video) are switched OFF by
default. This is because the picture quality of these outputs is MUCH LOWER then the quality of
the DVI and RGB outputs, due to the limitations of the PAL/NTSC video technology. WolfVision
wants to prevent that customers accidentally use an output with lower picture quality as the
main image output. If you want to use the PAL/NTSC video outputs, switch them on with the
following key combination:
PAL: Simultaneously press both FOCUS keys (#27) on the camera head and the
Preset 1 key (#33) on the remote control
NTSC: Simultaneously press both FOCUS keys (#27) on the camera head and the
Preset 2 key (#33) on the remote control.
The video outputs can also be switched between PAL, NTSC and OFF in the on-screen menu.
USB Port
The USB device port can be used for direct connections between the Visualizer and a
computer. This way, a Visualizer can be controlled and can be used as a scanner for 3dimensional objects. Images in JPG, TIF or BMP format can be taken in a fraction of a second much faster than with a desktop scanner.
WolfVision's USB Software (Connectivity Software) works under Windows 2000, XP, Vista and
7 (32 and 64-bit) as well as Apple Macintosh. It is fully TWAIN/WIA compatible. This is important
when using Visualizers in connection with graphic programs such as Photoshop, or for
connecting them to Interactive Whiteboards (Smart Boards).
The fast USB 2.0 port can also output live motion. WolfVision‘s Connectivity Software can store
AVI files and includes a video capture driver. You can view and save the live image from the
Visualizer on your computer in almost every modern video editing software.
Please download the latest version of the WolfVision Connectivity Software from:
www.wolfvision.com/support.
(#20)
RS-232, Serial Control Input
The serial port (#21) can be used to control the Visualizer through an external device, such as a
room control system that are used to integrate conference rooms.
9-pin D-Sub connector
The complete serial protocol can be found on our internet website under:
www.wolfvision.com/support
592
481
3
6
7
on unit male
(front side)
Pins: 2: RX, 3: TX, 5: GND
Baud Rate: 9200, 19200, 38400, 57600 or 115200 (selectable)
databits: 8, stopbit: 1, parity: no
The baud rate can be changed in the on-screen extra menu (see page 13).
12
Page 14

The following chapter is for experienced users only:
ON-SCREEN MENU / ON-SCREEN HELP
For regular use of the WolfVision Visualizer, it is not necessary to go into the Visualizer's menu
and change settings. Inexperienced users should not make any adjustments here.
To enter the on-screen menu press the MENU-key (#30 or #44) for one second. Settings of the
Visualizer's basic functions and the built-in camera can be made here using the 4 SELECTkeys on the remote control (the numerical keys with red arrows - #41) or the ZOOM-wheel (#26)
and FOCUS-keys (#27) on the camera head.
Please note that some basic settings in the menu can only be changed if you set the menu item
"Format protect" to "OFF" first.
If more information on a function in the on-screen menu is required, set the cursor in the
respective line and press the HELP key (#42, this is a dual function of the Number 5 key) or the
AF-key (#28) on the camera head. A detailed description of this function appears on the screen.
If you want to reset the selected item to the default setting, press the HELP-key (#42 or #28) for
2 seconds.
By pressing the MENU-key for 4 seconds the Extra Menu appears.
In the Extra Menu, settings like baud rate can be changed.
The functions of the on-screen menu are not described in detail in this user manual since the
HELP menu is an integrated part of the Visualizer's software (firmware). The information you
see on your screen always belongs to the current Visualizer firmware.
Switching To Negative, Negative/Blue and Black/White
The output image of the Visualizers can be switched from positive to negative in the on-screen
menu. In addition, the background of a negative image can be switched to blue for better
readability of text. You can also switch between color or black and white in the on-screen menu.
TIP: If you often switch to negative, negative/blue or black/white images, you can assign this
function to one of the Preset keys (see page 8) in the on-screen menu.
Changing the Standard Contrast (Color) Settings
If the picture or the colors on your screen appear to be too dark, you can lower the overall
contrast of the picture in the "Color Settings" menu of the on-screen menu. The settings can be
made separately for the normal mode and the text mode.
Auto Power-off
In the "Power Control" settings of the on-screen menu you can select that the Visualizer will be
automatically switched off after a certain amount time.
Reset On-Screen Menu Settings
All settings in the on-screen menu can be set back to the factory defaults. "Reset" is a category
in the on-screen menu. In case you can not read the menu on a screen you can also set the unit
back to the factory defaults by simultaneously pressing both FOCUS-keys on the camera head
(#27) and the Number 4-key (back-arrow, #41) on the remote control (VZ-8plus only).
If you only want to reset the item that is currently selected to the default setting, press the HELP-
key for 2 seconds!
13
Page 15
Firmware Upgrades
The software (firmware) of your Visualizer (including the o ) can easily be
upgraded to the latest version.
The firmware update can be done via USB or RS232.
n-screen HELP
Firmware update files can be downloaded for free at:
www.wolfvision.com/wolf/fware.html
Updates via USB can be made with the WolfVision USB Software and updates via RS232 can
be made with WolfVision's Firmware Update Utility. Both programs can also be found under the
same link.
For the RS232 connection, use a crossed serial RS232 cable (Null modem cable).
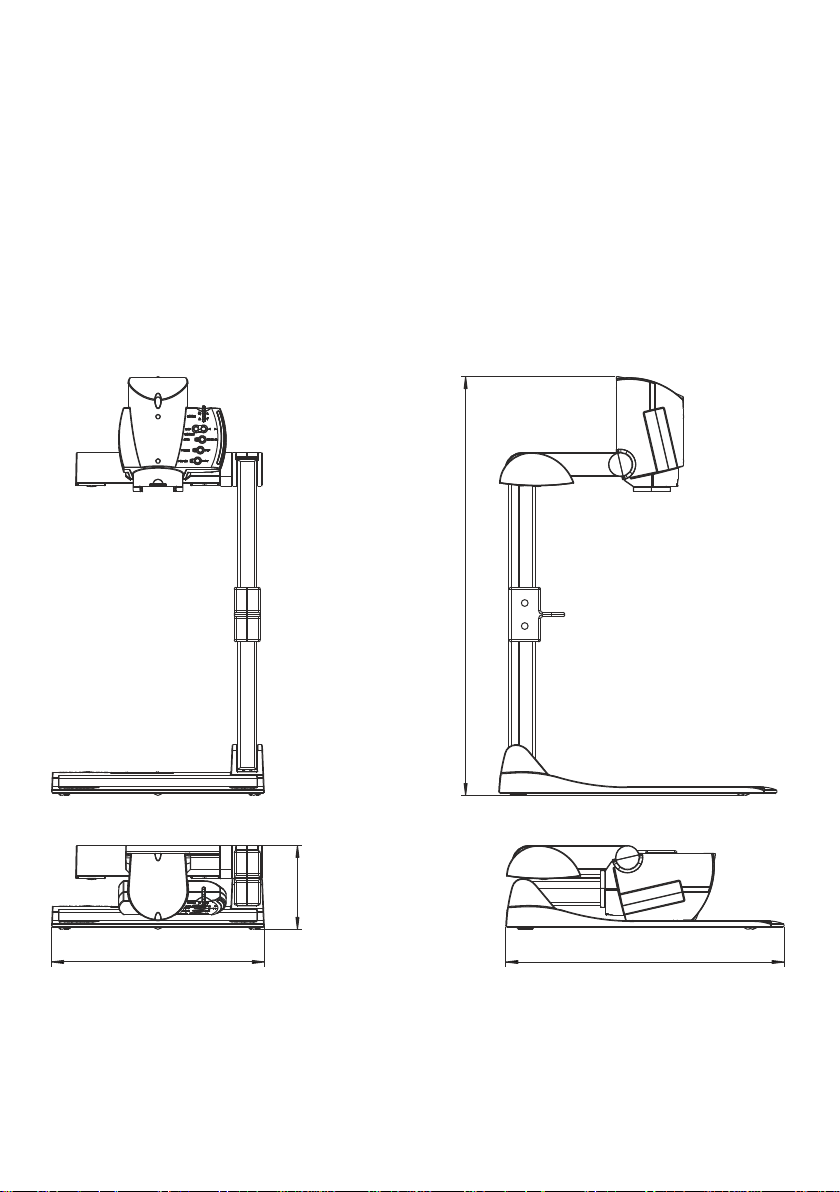
Dimensions
open
"]
4
1
615
[24 /
0"
.
0
+¼"
+5
" ]
8
7
123
[4 /
312
1
[12 /
"]
4
All measurements in millimeters and [Inch]
closed
408
1
"]
[16 /
8
14
Page 16
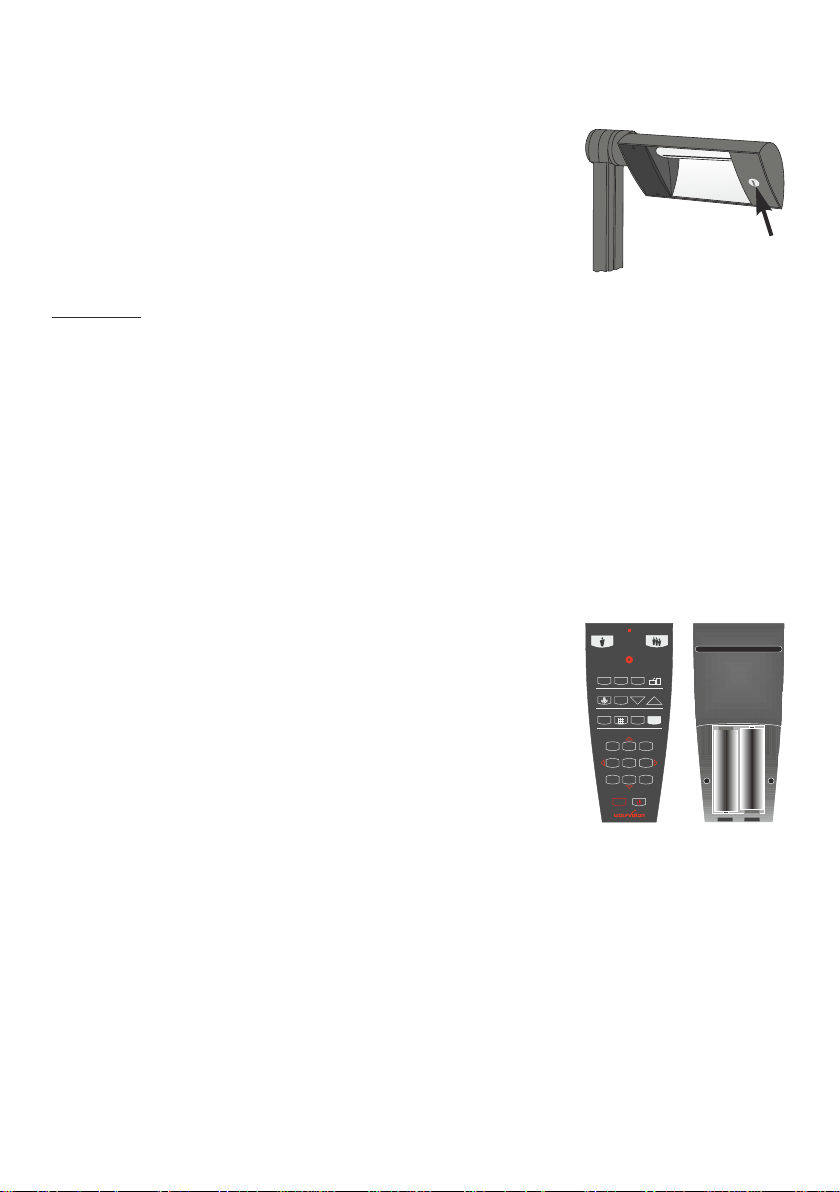
MAINTENANCE
Changing the Lamp of the Visualizer
1. Remove the power cord of the Visualizer
2. Open the cover screw by using a coin
3. Turn down the lamp inclusive lamp cover
4. Change the lamp
Place the new lamp very carefully into the
socket
CAUTION: LAMP CAN BE HOT!
5. Mount the lamp cover in reverse order (3 to 1).
Lamp type:High Frequency Lamp 9W at 10'000 h average burning life.
WolfVision part no. 100040
Cleaning
Cabinet: Clean the cabinet by gently wiping it with a soft, lint freecloth.
Lenses: Clean the lenses by gently wiping with a soft, lint free cloth (do not use a paper
tissue!). Clean by breathing on the lens to create moisture then wipe with lint free
cloth (If need be, use a special optical cleaner only!).
Never use strong cleaning agents such as acetone or benzene!
These substances can damage the surface and the anti-reflex coating!
Infrared Remote Control VZ-8plus³ only
Please note that an infrared remote control can only be used up to a certain distance from the
unit. Objects situated between the Visualizer and the infrared remote control, and weak
batteries, interfere with reception.
If the Visualizer can only be controlled from a close
distance, or if it cannot be controlled at all with the infrared
remote control, you may have to change the batteries.
Open the cover on the back of the remote control and
replace the two 1.5 V AA batteries with new ones.
Check the polarity of the batteries!
LASER
WIDE
TELE
PRESETS
IMAGE TURN
A
2 3
1
A
AF
LIGHT
FOCUS
WHITE
IRIS
FREEZE
ALL
MEMORY
1
3
2
5
6
4
HELP
7
9
8
POWER
EXTERN
MENU
front back (open)
X
+
-
+
X
-
Different IR Codes VZ-8plus³ only
If you want to work with more than one Visualizer in the same room, the units should be set to
different infrared codes, in order to control them all individually.
To change the IRcode, enter the "Misc. Settings" and set the "IR Code"
to A, B, C or D (code A is default). To change the IR code on the remote control, simultaneously
press PRESET 1, PRESET 2 and ZOOM TELE
used, the code switches from A to B, C, D ... A ...in the given order.
For resetting the remote control to code A, simultaneously p
ZOOM WIDE
The LED shows the selected code (it flashes one time for code A, two times for code B, three
times for code C and four times for code D).
on-screen menu, go to
(#33) (#31). Each time this key combination is
ress PRESET 1, PRESET 2 and
.
15
Page 17

Technical data
Camera / Technology
Pictures per second (as picked up by the camera)
Effective Pixel (=pixels actually used for image information)
Total pixels of CCD
Pixels processed per second
(=effective pixels x frames per second)
Color reproduction
Native signal output
Output signals
Resolution (measured)
Resolution in Image Turn mode (measured)
Image Turn mode (for increased resolution when
picking up complete portrait pages) / Image rotation
Vertical image-frequency
Horizontal image-frequency
Signal format
Iris
Shutter
White balance adjustment
Autofocus (Speed) / Manual focus
Text enhancement function (in color)
On-screen menu and on-screen help
Upgradeable firmware
Lens / Zoom
Max object height on working surface
Max. pick-up area on working surface
Max. pick-up area on working surface in Image Turn mode
Min. pick-up area on working surface
(in full resolution, withoptical zoom)
Min. pick-up area on working surface (with digital zoom)
Max. pick-up area outside of working surface
Depth of focus on small object (42 x 33 mm)
Depth of focus on large object (360 x 270 mm)
Blinding of audience or speaker
Light source
Connectivity software for image capturecontrolling and
Reflection free area on working surface
Recordings outside of the working surface
Image flip
Intelligent folding system
User programmable presets
Special working surface for transparencies
Bottom light
Slide pick-up
Computer input / Input switch
Image memory
Show all function (displays all 9 pictures of
current memory as one split image)
Alternative Image display
PAL / NTSC video output
RGB (=data RGB) output
DVI output / HDMI output
USB port / standard
RS232 port and serial protocol with position setting
and status report
12V output
Dimensions in operation (L x W x H)
Dimensions folded (L x W x H)
Weight
Infrared remote control
Power (external power pack)
Operating temperature / Relative Humidity
Dust cover / Carrying case
Anti-theft device
Warranty
Made in
VZ-8light³ VZ-8plus³
1-CCD 1/3" Progressive Scan camera
30 frames (=full pictures)
1280 x 960 (=1,228,800)
1,320,000
36,864,000
SXGA- (1280x960), WXGA* (1280x800) and HD 720p (1280x720)
HD 720p / WXGA / SXGA- / XGA (switchable),
automatic (manual in on-screen menu) automatic and manual
1 (plus 2 progammable and 8 fixed presets trough
USB 2.0
not available 960 lines
not available
Progressive Scan: 60 Hz
Progressive Scan: 45 – 60 kHz
non-interlaced non-interlaced and interlaced
24 x zoom(12 x optical + 2 x digital), 2-speed zoom wheel
230mm (9.1") in tele position, 370mm (14.6") in wide position
not available 370mm x 276mm (14.6" x 10.9")
long life high frequency fluorescent lamp, 9W, 10'000 hours average lamp lifetime
included (for Windows and Macintosh, Twain compatible, with video capture driver
RS232)
with optional external light box trough slide drawer on camera head
1 image freeze 9 pictures (with battery backup), 1 image freeze
not available yes
negative image / negative-blue image / black and white image
not available
408mm x 312mm x 615mm (16 1/8" x 12 1/4" x 24 1/4")
408mm x 312mm x 125mm (16 1/8" x 12 1/4" x 4 7/8")
not available yes (with laserpointer)
LPS (limited power source) multi range 100-240V / 60W, weight: 0.3kg (0.6lbs)
0°C to +40°C (+32°F to +104°F) / 40 - 85%rel (no-condensation)
sRGB, very good colors
HD 720p / WXGA / SXGA+ / SXGA / WXGA+ /
SXGA- / XGA / SVGA (switchable),
PAL / NTSC (switchable), USB 2.0
750 lines
yes / 90, 180 and 270 degrees
Progressive Scan: 60 Hz
PAL: 50 Hz / NTSC: 60 Hz (switchable)
Progressive Scan: 37.9 – 65.2 kHz,
PAL/NTSC: 15.7 kHz
automatic, manual and flickerless
automatic and manual
yes (continuously working, high speed) / yes
276mm x 370mm (10.9" x 14.6")
yes (to the back and to the front of the unit)
yes (for recordings to the front of the unit)
yes (15-pin D-Sub plug), loop through
DVI-D (digital) / yes, when using a DVI-HDMI cable
T-Lock (Kensington Lock®) and table lock bolt
yes
yes
via serial (RS232) or USB
33mm x 25mm (1.3" x 1")
17mm x 13mm (0.7" x 0.5")
unlimited
10mm (0.4")
260mm (10.2")
none
whole working surface
pneumatic arm, 2-step set up
3 (plus 8 fixed presets trough RS232)
yes
with optional external light box
composite video on RCA-plug and S-video (Y/C) on
15-pin D-Sub-plug
9-pin Sub-D plug
for external lightbox
5kg (11lb) / portable
included / optional
Austria (European Union)
4-pin plug (converted Progressive Scan)
USB 2.0
3 years
Specifiactions and availability are subject to change!
16
Page 18
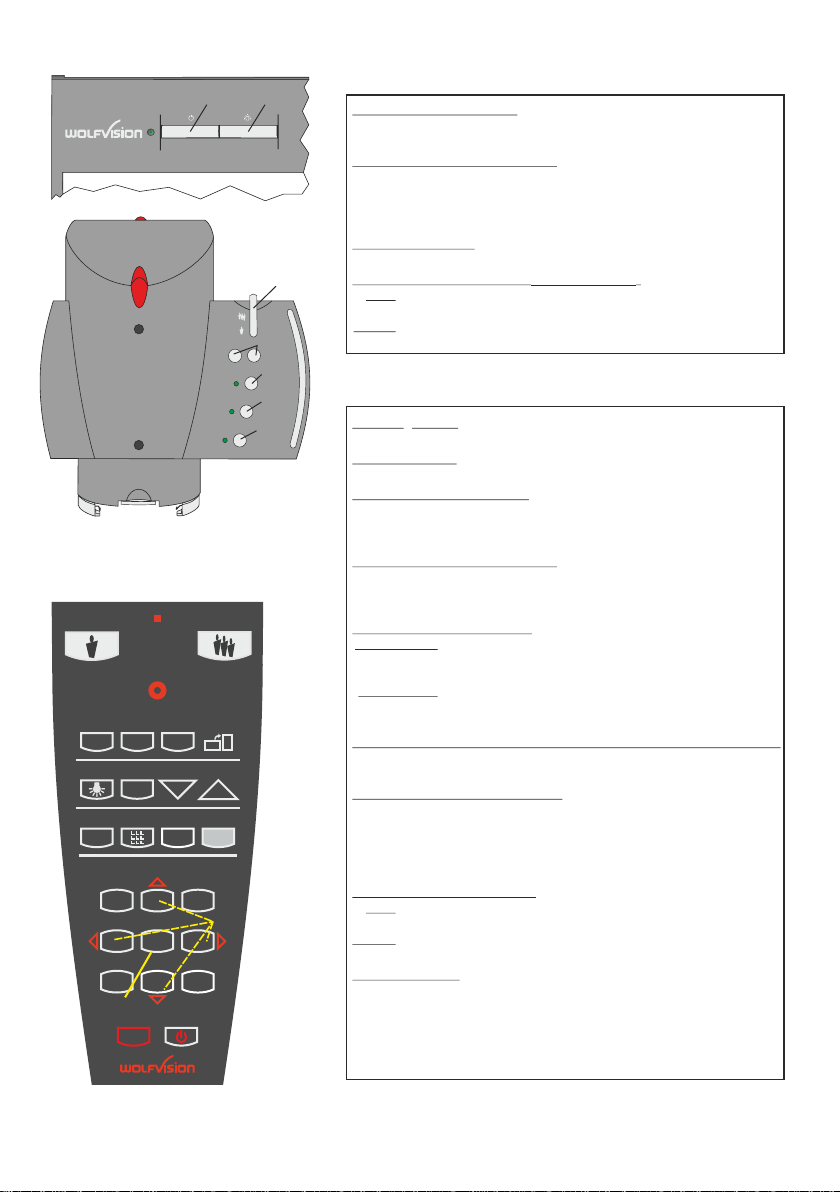
#24
FOCUS
AUTO
FREEZE
EXTERN
Remote Control
VZ-8plus³ only
#31
PRESETS
1
4
7
#42
EXTERN
2 3
AF
#36
ALL
#39
MEMORY
MENU
HELP
2
5
8
LASER
#32
POWER
IMAGE TURN
FOCUS
IRIS
3
6
9
#43
#45
#35
TELE
#33
#38
1
LIGHT
WHITE
FREEZE
#44
ZOOM
MAN
WIDE
A
A
#37
#40
#41
#31
#34
WHITE
#25
#26
#27
<
#28
HELP
#29
PRESET 1
#30
MENU
CODES
One Push White Balance:
Press the LIGHT key (#25) for 2 seconds to perform one push white
balance.
Activating the on-screen menu:
Press the MENU key (#30) (EXTERN-key) on the camera head for 2
seconds to activate the on-screen menu. Use the ZOOM-wheel (#26)
and the FOCUS keys (#27) to navigate. For the help function, press the
AF key (#28).
Recalling Preset 1:
Press the PRESET 1 key (#29) on the camera head for 2 seconds.
Video output (PAL or NTSC) VZ-8plus³ only:
PAL: Simultaneously press both FOCUS keys (#27) and the
FREEZE key (#29) on the camera head.
< >
>
NTSC: Simultaneously press both FOCUS keys (#27) and the
EXTERN key (#30) on the camera head.
CODES IR-Remote VZ-8plus³ only
Storing presets:
Press one of the PRESET keys (#33) for 2 seconds.
Storing images:
Press one of the MEMORY keys (#43) for 2 seconds.
Filling the memory quickly:
Press the ALL key (#39) for more than 4 seconds then follow the
instructions of the on-screen menu (Press MEMORY 1 (#43) for
snapshot or MEMORY 3 (#43) to erase the memory).
Activating the on-screen menu:
Press the MENU key (#44) for 1 seconds to activate the on-screen
menu. Use the Number keys (#41) to navigate. For the help function,
press the Number 5 key (#42).
Switching the output mode:
Higher mode: Simultaneously press both FOCUS keys (#27) on the
Lower mode: Simultaneously press both FOCUS keys (#27) on the
Resetting the output mode to the default of "auto resolution":
Simultaneously press both FOCUS keys (#27) on the camera head and
the Number 5 key (#42) on the remote control.
Resetting the Visualizer's menu:
For resetting the whole menu simultaneously press both FOCUS keys
(#27) on the camera head and the Number 4 key (back arrow) (#41) on
the remote control.
For resetting only the selected item press the Number 5 key (#42) on
the remote control for 2 seconds.
Video output (PAL or NTSC):
PAL: Simultaneously press both FOCUS keys (#27) on the camera
NTSC: Simultaneously press both FOCUS keys (#27) on the camera
Change IR code:
Change the IR code in the "Misc. Settings" (code A is
default).
s (#33) (#31) to
imultaneously PRESET 1, PRESET 2 and ZOOM TELE
switch from code A to B, C, D ... A ...in the order given. For resetting the
remote control to code A simultaneously p
(#33) (#31) (on the remote control).
2 and ZOOM WIDE
camera head and the Number 2 key (arrow-up) (#41)
on the remote control.
camera head and the Number 8 key (arrow-down)
(#41) on the remote control.
head and the Preset 1 key (#33) on the remote control
head and the Preset 2 key (#33) on the remote control.
Change the IR code on the remote control too by pressing
on-screen menu
ress PRESET 1, PRESET
17
Page 19
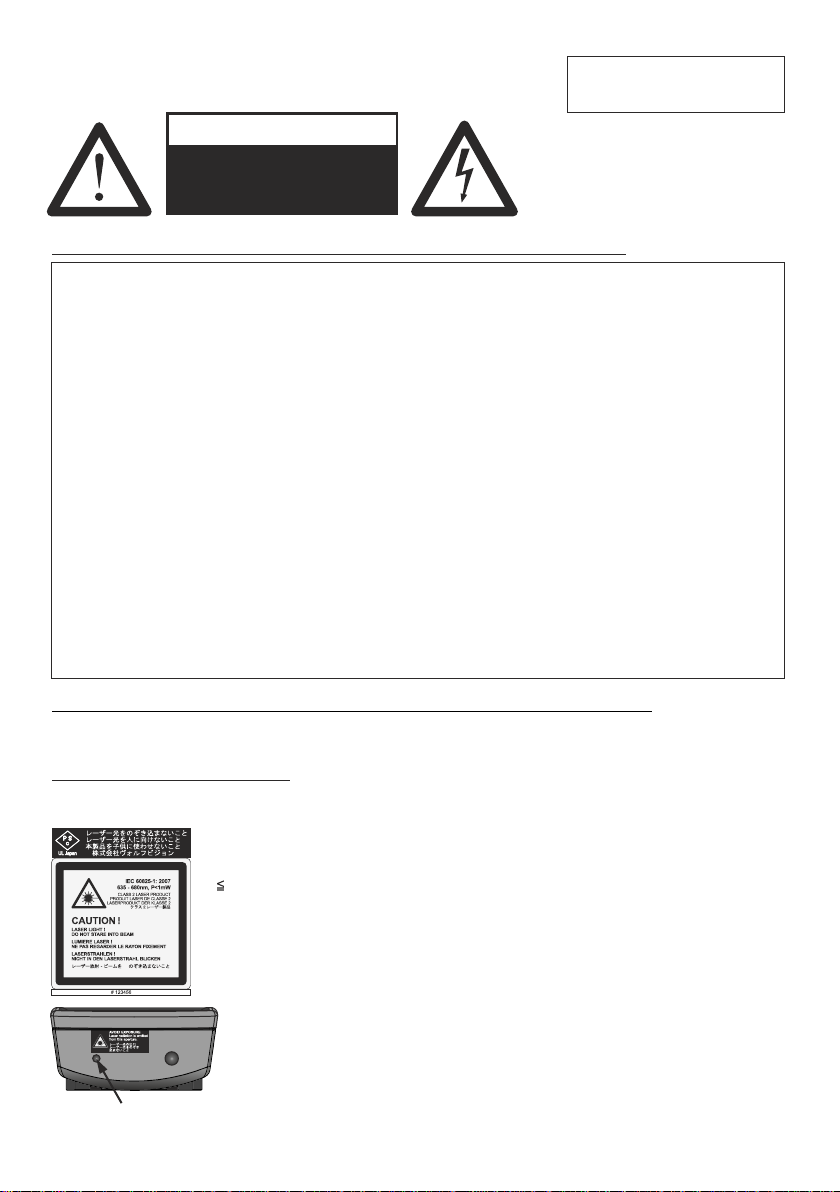
Vorsichtsmaßnahmen
DEUTSCH
WARNUNG!
Elektroschockrisiko
gefährliche Spannungen
im Geräteinneren
Angeführte Vorsichtsmaßnahmen unbedingt beachten:
Das Gerät nur mit der auf dem Typenschild angegebenen Spannung betreiben!
Das Gerät vor Hitze und Feuchtigkeit schützen!
Das Gerät vor Erschütterung schützen!
Bitte darauf achten, dass eine ausreichende Luftzirkulation zur Kühlung des Gerätes möglich ist!
Bei jeder Art von Störungsanzeichen (abnormale Geräusche, Geruch, Rauchentwicklung, etc.)
das Gerät abschalten. Setzen Sie sich mit Ihrem Visualizer-Händler in Verbindung!
Niemals ein beschädigtes Netzkabel / Netzteil verwenden. Andernfalls kann es zu Kurzschlüssen
und zu elektrischen Schlägen kommen!
Am Gerät keinerlei Umbauten vornehmen und das Gerät niemals ohne Gehäusedeckel in Betrieb
nehmen!
Keine entflammbaren oder metallischen Gegenstände oder Flüssigkeiten in das Geräteinnere
dringen lassen!
Das Gerät nicht im Bereich von starken Magnetfeldern und elektrischen Feldern in Betrieb
nehmen!
Das Gerät nicht im Wirkungsbereich von Röntgenstrahlung betreiben. Dadurch können Teile der
Kamera beschädigt werden.
Das Netzkabel und den Netzstecker niemals mit feuchten Händen berühren!
Wird das Gerät längere Zeit nicht benutzt, so ziehen Sie bitte den Netzstecker!
Das verwendete Netzteil benötigt eine europäische Zertifizierung nach EN 60950 oder von
CSA/UL nach UL60950 oder Ul1950. Das Netzteil muss LPS (Limited Power Source - mit
begrenzter Leistung) einhalten!
Vorsichtsmaßnahmen für den Laserpointer der Fernbedienung:
Laserstrahlen - Nicht direkt den Laserstrahl blicken!
Laser nicht modifizieren! Laserstrahl nicht mit optischen Instrumenten betrachten!
Information für den Laserpointer
FDA Zugriffsnummer: 9912688-00
Entspricht den Vorschriften: 21 CFR 1040.10 und 1040.11
Technische Daten:
λ=635 - 680nm
P<1mW
Θ 2mrad
Dieser Aufkleber befindet sich auf der Unterseite der Fernbedienung.
Die kleinere Öffnung (links) an der Frontseite der Fernbedienung ist die
Laserstrahl-Austritts-Öffnung.
1
Page 20
Prüfungen
C
Aufkleber am Gerät:
Tested to complywith
FCC standards for
home or office use
L
D
I
S
E
T
9902476
US
FCC information (original Text):
This device complies with part 15 of the FCC rules. Operation is subject to the following two
conditions: (1) this device may not cause harmful interference, and (2) this device must accept
any interference received, including interference that may cause undesired operation.
Note:
This equipment has been tested and found to comply with the limits for a class B digital device,
pursuant to part 15 of the FCC rules.
Information to user:
The user manual or instruction manual for an intentional or unintentional radiator shall caution
the user that changes or modifications not expressly approved by the party responsible for
compliance could void the user's authority to operate the equipment.
Dieses Gerät entspricht der EMC-Verordnung und der Verordnung für elektrische Geräte.
Prüfungen, Tests und Untersuchungen wurden nach UL 60950. CSA 22.22-60950
durchgeführt.
Prüfungen, Tests und Untersuchungen wurden nach dem CB-Schema durchgeführt.
Prüfungen, Tests und Untersuchungen wurden nach dem PCT-Schema durchgeführt.
Weltweite Patente
US 7,035,011 TW I 226969
KR 0576806 und weitere
RU 2265284
Copyright Information
Copyright © WolfVision. Alle Rechte vorbehalten.
WolfVision, Wofu Vision und sind registrierte Warenzeichen der WolfVision
Holding AG, Austria.
Dieses Dokument darf ohne vorherige schriftliche Zustimmung von WolfVision weder als
Ganzes noch in Teilen mit irgendwelchen Mitteln kopiert, reproduziert oder übertragen werden.
Ausgenommen sind Kopien, die vom Benutzer zu Sicherungszwecken aufbewahrt werden.
Im Interesse einer ständigen Produktverbesserung behält sich WolfVision das Recht vor, die
Produktspezifikationen ohne Ankündigung zu ändern.
Änderungen an diesem Dokument bleiben vorbehalten.
Haftungsausschlusserklärung: WolfVision ist nicht haftbar für technische und redaktionelle
Fehler und Unvollständigkeit.
Die Geräte sind "MADE IN EU/AUSTRIA”
Gedruckt in Österreich, Juli 2010
2
Page 21
#5
#9
#8
#12
#1
#13
#2
#7
#10
#4
#14
Anschlüsse (#1)
#3
#11
#6
#5
#15 #19#18
#1 Anschlüsse
(auf Geräterückseite, siehe unten)
#2 Power und Licht ein/aus Taste (siehe Seite 4)
#3 Kameratasten, Zoomrad (siehe Seite 4)
#4 IR-Fernbedienung nur VZ-8plus³
(siehe Seite 5)
#5 IR-Empfänger nur VZ-8plus³
(2x am Kamerakopf und 1x am Arm, unten)
#6 Ziehvorrichtung für den Arm (siehe Seite 6)
#7 Betriebsstatus LED
#8 Kamerakopf (siehe Seite 4, 6 und 7)
#9 Licht (siehe Seite 4, 6 und 7)
#10 Arbeitsplatte (siehe Seite 6)
#11 Nahlinse für die Kamera (siehe Seite 7)
#12 Diahalter nur VZ-8plus³
(siehe Seite 7)
#13 Schlitz für T-Lock (Kensington lock®)
(an der Geräterückseite)
#14 Alternative Diebstahlsicherung
(auf der Geräteunterseite, siehe Seite 10)
#16
#17#13 #21
#20
#22 #23
#13 Schlitz für T-Lock (Kensington Lock®) (siehe Seite 10)
#15 Externer Eingang für Computer (siehe Seite 10)
#16 DVI-Ausgang (siehe Seite 10 und 11)
#17 RGB-Ausgang (siehe Seite 11)
#18 PAL/NTSC Y/C-Ausgang (S-Video) nur VZ-8plus³ (siehe Seite 12)
#19 PAL/NTSC Composit VIDEO-Ausgang nur VZ-8plus³ (siehe Seite 12)
#20 USB-Anschluss (siehe Seite 12)
#21 Serielle Schnittstelle RS232 (siehe Seite 12)
#22 DC Eingang 12V
#23 DC-Ausgang für externe Lichtbox (siehe Seite 6)
3
Page 22
Tasten am Visualizer
Basis
#24 POWER Taste
Schaltet das Gerät ein und aus. Beim Einschalten wird der
#24
Power-on Preset ausgeführt.
#25 LICHT Taste
Die LICHT-Taste schaltet das Oberlicht ein und aus.
#25
WHITE
Falls eine externe optionale WolfVision Lichtbox angeschlossen ist, schaltet die LICHT-Taste um zwischen
Oberlicht, externer WolfVision Lichtbox und Licht aus.
Durch Drücken der LICHT-Taste für 2 Sekunden wird ein One Push Weißabgleich
durchgeführt (siehe Seite 8).
Kamerakopf
Das Bedienkonzept der portablen WolfVision Visualizer sieht vor, dass sich am Gerät selbst
nur die wichtigsten Tasten befinden. Dadurch kann jeder den Visualizer sofort auch ohne
Einschulung bedienen. Für erfahrene Anwender gibt es zusätzliche Funktionen auf der
Fernbedienung beim VZ-8plus³.
Beinahe alle Funktionen der Fernbedienung können durch die Doppelfunktion der Tasten am
Gerät aufgerufen werden.
#26 ZOOM-Rad / Menü Navigations-Rad
Durch Drehen des ZOOM-Rades nach unten zoomt der
Visualizer in Richtung Tele-Position, nach oben in
Richtung Weitwinkel-Position. Je weiter das ZOOMRad gedreht wird, umso schneller zoomt der Visualizer.
Beim Zoomen schaltet sich die
Auto Iris ein (falls vorher abgeschaltet).
Bei aktiviertem On-Screen Menü arbeitet das ZOOMRad als Menü Navigations-Rad.
#27 Manual FOCUS-Tasten / Menü Auswahl-Tasten
Sobald die FOKUS-Tasten gedrückt werden, schaltet
AUTO
FREEZE
EXTERN
der Visualizer den Autofokus ab.
Beim nächsten Betätigen der AF-Taste wird der Auto
Fokus wieder eingeschaltet.
Bei aktiviertem On-Screen Menü arbeiten die FOKUSTasten als Menü Auswahl Tasten.
#28 AUTO FOCUS (AF)-Taste / Menü Help-Taste
Schaltet den Autofokus ein und aus. Die AF-LED zeigt ob der AF eingeschaltet ist.
Bei aktiviertem On-Screen Menü arbeitet die AF-Taste als Hilfe Taste.
Durch Drücken für 2 Sekunden wird die ausgewählte Einstellung zurückgesetzt.
#29 FREEZE-Taste / PRESET 1-Taste
Friert das aktuelle Bild ein. Die FREEZE-LED zeigt ob der FREEZE-Modus aktiv ist.
Durch Drücken der FREEZE-Taste für 2 Sekunden wird der Preset 1 aufgerufen (siehe Seite 7).
#30 EXTERN-Taste / MENU-Taste
Zum Umschalten zwischen Visualizer-Bild und externem Eingang (siehe Seite 10).
Die EXTERN-LED leuchtet, wenn ein Bild vom externen Eingang gezeigt wird.
Durch Drücken der EXTERN-Taste für 1 Sekunde wird das On-Screen Menü aktiviert (siehe
Seite 13).
ZOOM
MAN
FOCUS
#26
< >
#27
<
#28
HELP
#29
PRESET 1
#30
MENU
>
4
Page 23
Infrarot Fernbedienung nur VZ-8plus³
#31 ZOOM-Tasten
Die ZOOM-Tasten arbeiten wie das ZOOM-Rad am
#31
Kamerakopf des Visualizers. Durch Drücken einer der ZOOMTasten (Rad) wird die Autoiris wieder aktiviert.
TELE
LASER
#32 LASER POINTER-Taste
Wichtig: Blicken Sie nicht direkt in den Laserstrahl!
Dies wäre schlecht für Ihre Augen!
#33 PRESET-Tasten (programmierbare Einstellung)
Kurzes Drücken = Preset abrufen
Mehr als 2 Sekunden drücken = Preset speichern
(siehe Seite 8).
#34 IMAGE TURN Modus-Taste
Um hochformatige Dokumente mit höherer Auflösung
darzustellen (siehe Seite 9).
#35
#33
FREEZE
#38
1
LIGHT
WHITE
PRESETS
2 3
AF
ALL
1
#36
#39
MEMORY
2
#35 LIGHT-Taste
5
#42
#44
4
7
EXTERN
MENU
HELP
8
POWER
Schaltet das Licht ein und aus.
#36 AUTO FOKUS (AF)-Taste
Schaltet den Autofokus ein und aus.
#37 Manuelle FOKUS-Tasten
Sobald die FOKUS-Tasten gedrückt werden, schaltet der
Visualizer die Autofokus-Funktion ab. Beim nächsten Betätigen
der AF-Taste wird der Autofokus wieder eingeschaltet.
#38 FREEZE-Taste
Friert das aktuelle Bild ein. Die FREEZE-LED zeigt ob der FREEZE-Modus aktiv ist.
#39 ALL-Taste
Zur gleichzeitigen Darstellung aller im Speicher befindlichen Bilder (siehe Seite 9).
#40 Manuelle IRIS-Tasten (manuelle Blende)
Wenn die IRIS-Tasten gedrückt werden, schaltet der Visualizer die Autoiris-Funktion ab. Beim
nächsten Betätigen von ZOOM-Tasten oder ZOOM-Rad wird die Autoiris-Funktion wieder
eingeschaltet.
Für Spezialisten: Das Basis-Iris-Level kann im On-Screen Menü geändert werden (siehe Seite 13).
#41 MENÜ NAVIGATIONS-Tasten (Doppelfunktion der Memory-Tasten 2, 4, 6 und 8)
Zum Navigieren innerhalb des On-Screen Menüs (siehe Seite 13).
#42 HELP/RESET Taste für das ON-SCREEN Menü (Doppelfunktion der Memory-Taste 5)
Im On-Screen Menü Modus erhält man bei Betätigen der HELP-Taste eine Erklärung zum
gerade aktiven Menü-Punkt (auf Englisch). Wenn diese Taste 2 Sekunden gedrückt wird, stellt
sich der ausgewählte Menüpunkt auf den Standardwert zurück (siehe Seite 13).
#43 MEMORY-Tasten 1 - 9
Zum Speichern und Aufrufen von Bildern (siehe Seite 9).
#44 EXTERN-Taste / MENU-Taste
Zum Umschalten zwischen Visualizer-Bild und externem Eingang (siehe Seite 10).
1 Sekunde lang drücken aktiviert das On-Screen Menü (siehe Seite 13).
#45 POWER-Taste
Schaltet das Gerät ein und aus. Beim Einschalten wird der Power-on Preset ausgeführt.
#32
FOCUS
#31
WIDE
IMAGE TURN
A
A
#37
IRIS
#40
3
#41
6
9
#43
#45
#34
5
Page 24
Aufstellen des Visualizers
1. Netzgerät am Power-Eingang (#22) anschließen.
2. Ausgabegerät (Projektor, Monitor, Videokonferenzanlage,
etc.) an den passenden Ausgang des Visualizers (#16, #17,
#18, #19 oder #20) anschließen.
WICHTIG:
Lesen Sie bitte unbedingt die Hinweise zur
Auswahl des richtigen Ausganges auf Seite 11!
3. Arm mit der Ziehvorrichtung (#6) nach oben ziehen.
4. Kamerakopf in die richtige Arbeitsposition drehen.
5. Visualizer mit der POWER-Taste einschalten.
Power-on Preset:
Beim Einschalten des Visualizers werden automatisch folgende Einstellungen hergestellt:
Aufnahmefläche ca. 20 x 15 cm (DIN A5), Autofokus an, Autoiris an.
Arbeitsplatte
Die Arbeitsplatte des Visualizers (#10) hat eine besondere kristallin-weiße Oberfläche, welche
speziell für die Wiedergabe von Folien ausgelegt ist.
Für folgende Anwendungen empfiehlt sich jedoch die Verwendung einer
Lichtbox:
- Wenn die Overheadfolien sehr dunkel sind
- Wenn die Overheadfolien sehr wellig sind und Reflexionen verursachen
- Wenn das Raumlicht Reflexionen auf der Overheadfolie verursacht
Externe WolfVision Lichtboxen (optional)
Schließen Sie das Stromkabel der WolfVision Lichtbox an den DC-Ausgang (#23) auf der
Rückseite des Visualizers an. Mit der LIGHT-Taste (#25) kann nun zwischen dem Licht für die
Arbeitsfläche und dem Licht der WolfVision Lichtbox umgeschaltet werden.
Falls eine Lichtbox mit separatem Netzteil verwendet wird, muss das Licht des Visualizers
abgeschaltet werden um Reflexionen zu vermeiden.
Aufnahmen auf der Arbeitsfläche
Vermeidung von Reflexionen
Um Reflexionen (auf glänzendem Material wie z.B. Photos) zu
vermeiden, muss oft nur das aufgenommene Objekt bzw. Dokument
verschoben und die Kamera gedreht werden.
Es ist auch möglich, den Kameraarm nach oben/unten zu schwenken
und die Kamera zu drehen um das gewünschte Bild reflexionsfrei
aufzunehmen.
Bitte beachten Sie, dass auch das normale Raumlicht Reflexionen
verursachen kann.
6
Page 25
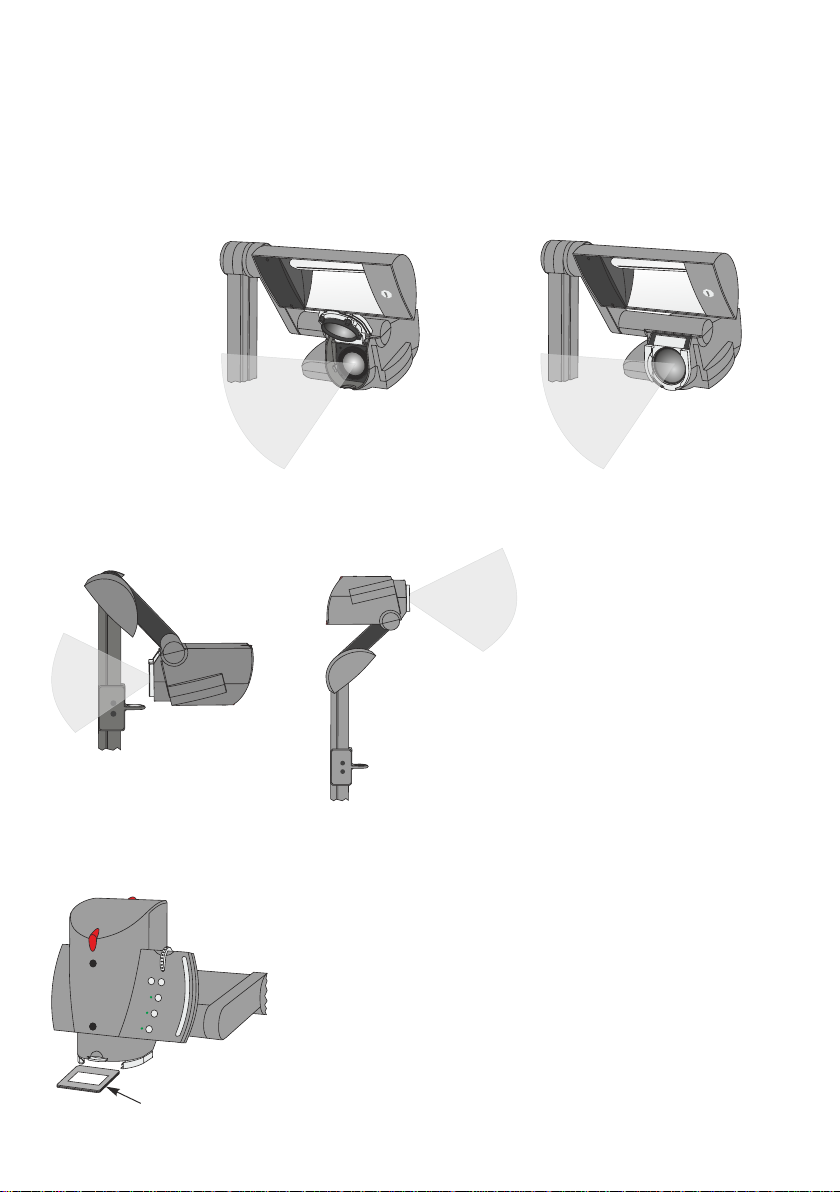
Aufnahmen außerhalb der Arbeitsfläche
Nahlinse
Um Objekte außerhalb der Arbeitsfläche aufzunehmen, muss die Nahlinse (#5) entfernt
werden. In diesem Fall klappen Sie die Nahlinse vom Kamerakopf weg. Es ist nicht möglich, die
Linse komplett zu entfernen, somit kann diese nicht verloren gehen. Um wieder Aufnahmen auf
der Arbeitsfläche machen zu können, klappen Sie die Nahlinse wieder in die ursprüngliche
Position (vor der Kameraoptik).
bis zu 45mm
∞
Drehung der Beleuchtungseinheit nach oben
Um das Arbeiten mit Beleuchtung auch außerhalb der Arbeitsfläche zu ermöglichen, kann der
Kameraarm inklusive Licht vertikal geschwenkt werden.
Abstand von
der Nahlinse
zum Objekt
Bilddrehung “Image Flip”
Sobald die Kamera des Visualizers gedreht
wird um vor dem Gerät aufzunehmen, wird das
Bild automatisch um 180 Grad gedreht (”Image
Flip”) damit es nicht auf dem Kopf steht. Dieses
Feature ist sehr nützlich wenn z.B. das Gesicht
des Vortragenden oder Objekte an der Wand
aufgenommen werden sollen.
Diahalter nur VZ-8plus³
Zu Beginn vergewissern Sie sich, dass sich kein Objekt auf der
Arbeitsfläche befindet (sehr wichtig).
Legen Sie anschließend das Dia in die Halterung.
Die Kamera erkennt und fokussiert das Dia automatisch.
Sollte das Dia nicht fokussiert werden, überprüfen Sie:
- Dass das Dia exakt eingelegt wurde
- Dass das Zoom nicht auf die maximale Tele-Position
eingestellt ist (= kleinstes Bild).
Verwenden Sie die die Zoom-Tasten/Rad
Slide
(#26 oder #31).
7
Page 26
Autofokus
Bitte beachten Sie, dass kontrast-schwache Objekte (z.B. ein leeres Blatt Papier) einem
Autofokus immer Probleme bereiten. In einem solchen Fall bewegen Sie das Objekt leicht.
.
Für spezielle Anwendungen kann der Autofokus mit der AF-Taste (#28 oder #36) abgeschaltet
werden. Der Autofokus wird ebenfalls abgeschaltet, sobald die manuellen FOKUS-Tasten (#27
oder #37) verwendet werden.
Digitales Zoom
Der Visualizer verfügt über ein optisches 12-fach Zoom, der Zoombereich wird durch ein
digitales 2-fach Zoom auf ein 24-fach Zoom erweitert. Der kleinste Aufnahmebereich auf der
Arbeitsfläche ist 23 x 31 mm ohne Digital-Zoom. Beim weiteren Hineinzoomen wird das DigitalZoom automatisch aktiviert. Der kleinste Aufnahmebereich ist dann 12 x 16 mm.
Bitte beachten Sie, dass im digitalen Zoombereich die Auflösung nicht mehr so hoch ist wie im
optischen Zoombereich. Bei Standardeinstellung erscheint eine Meldung am Bildschirm, sobald
sich der Visualizer im digitalen Zoombereich befindet.
Auch Standbilder aus dem Bildspeicher können digital eingezoomt werden.
Sie können das Verhalten des Visualizers im digitalen Zoombereich im On-Screen Menü ändern (siehe Seite 13).
Weißabgleich
Eine korrekte Weißabgleich-Einstellung ist sehr wichtig für eine exakte Farb-Wiedergabe! Die
Werkseinstellung beim Visualizer ist "Auto Tracking"- Weißabgleich. Das heißt, dass der
Weißabgleich ständig automatisch nachjustiert wird. Damit der Weißabgleich korrekt ausgeführt
werden kann, sollten 10% des aufgenommenen Bildes weiß sein (die Messung erfolgt in der
Bildmitte).
Für eine präzise, fixe Weißabgleich-Einstellung, verwenden Sie den "One Push"-Weißab-gleich
(=Weißabgleich auf Tastendruck). Hierfür legen Sie ein weißes Blatt Papier auf die Arbeitsfläche,
zoomen es ein und drücken dann die LICHT-Taste (#25) für 2 Sekunden. Nach Dem Speichern
des neuen Weißwertes erscheint eine Meldung im Bild. Durch verwenden des "One Push"Weißabgleichs wird der "Auto Tracking"-Modus abgeschaltet (nach Aus- und Einschalten des
Gerätes wird "Auto Tracking" wieder aktiviert). Sobald sich die Lichtbedingungen ändern (z.B.
Lichtbox, Sonnenlicht oder unterschiedliche Raumbeleuchtung), sollte ein Weißabgleich
durchgeführt werden!
Für Spezialisten: Im On-Screen Menü des Visualizers (siehe Seite 13) kann zwischen den Weißabgleich-Arten
"Auto Tracking", "One Push" und "Manual" umgeschaltet werden. Wenn Sie mit negativen Filmen auf einer
Lichtbox arbeiten, benutzen sie einen leeren (dunkel im Bild) Teil des Filmes für den Weißabgleich. Der “One Push”Weißabgleich wird für das Oberlicht und die externe Lichtbox (falls verfügbar) separat eingestellt und gespeichert.
Preset Funktion
Der Visualizer bietet die Möglichkeit, die augenblicklichen Einstellungen
des Visualizers als Preset abzuspeichern und über die entsprechende
PRESET-Taste (#33) der Fernbedienung abzurufen.
Preset 1 kann auch durch Drücken der FREEZE-Taste (#29) für 2 Sekunden am Kamerakopf
aufgerufen werden.
Um eine Preset-Einstellung zu programmieren, stellen Sie zuerst alle gewünschten Einstellungen
ein und drücken dann die entsprechende PRESET-Taste der Fernbedienung für mehr als 2
Sekunden. Am Bildschirm erscheint eine Meldung, sobald die Einstellungen gespeichert sind. Die
Presets können auch im On-Screen Menü gespeichert werden.
Im Gegensatz zu der hier erwähnten Preset Speicherung, bei der alle augenblicklichen
Einstellungen wie Zoom, Fokus oder Iris mitgespeichert werden, können den PRESET-Tasten
auch nur einzelne Funktionen wie z.B. "NEGATIV", "NEGATIV / BLAU", "SCHWARZ / WEISS",
etc. im On-Screen Menü zugewiesen werden (siehe Seite 13).
8
Page 27
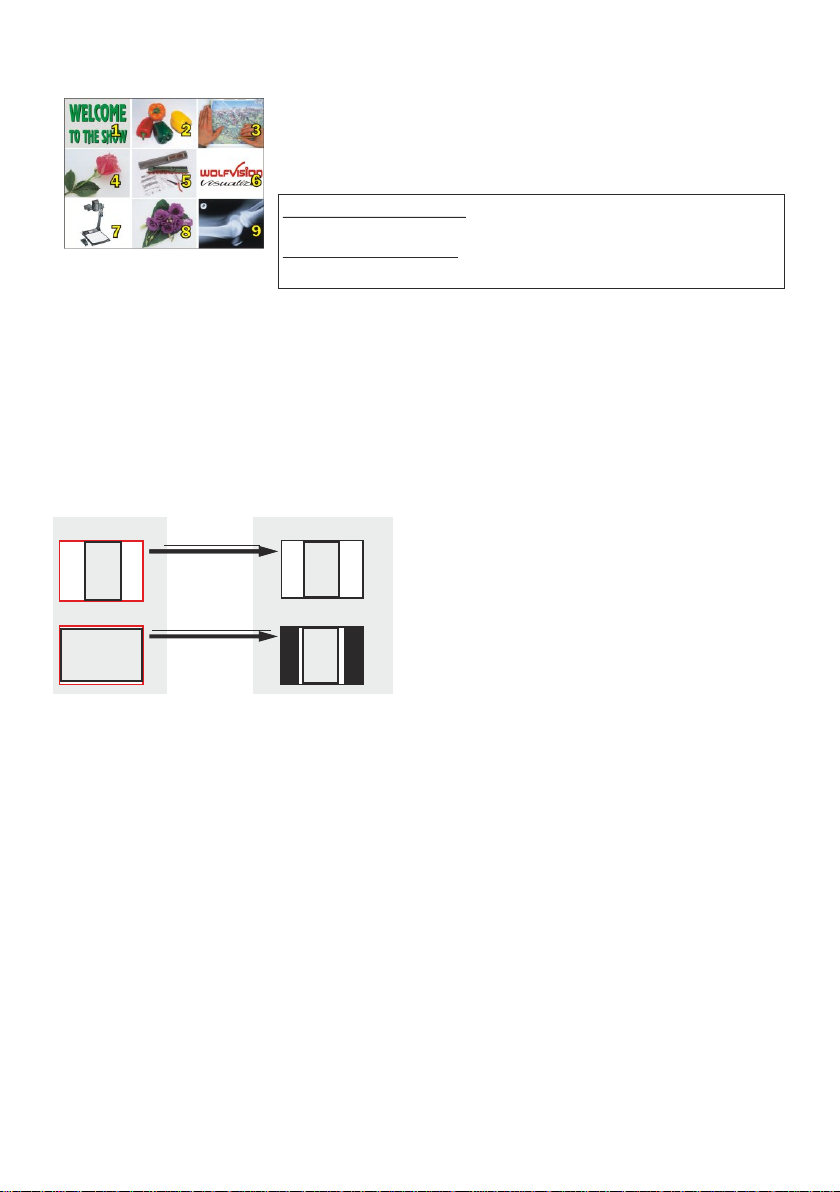
Bildspeicher für 9 Bilder nur VZ-8plus³
Sie können bis zu 9 Bilder einspeichern und diese durch kurzes
Drücken einer der Nummern-Tasten (#43) der Fernbedienung
abrufen:
Speichern eines Bildes: Drücken Sie eine der Nummern-
Tasten (#43) länger als 2 Sekunden
Schnellansicht von 9 gesp. Bildern
Durch Drücken der ALL-Taste (#39) werden alle 9 Bilder als Split-Bild angezeigt.
Durch Drücken der ALL-Taste (#39) für 4 Sekunden wird im Bild ein Menü angezeigt, das Sie
fragt, ob Sie alle gespeicherten Bilder löschen (erase) wollen oder ob Sie den Bildspeicher
(memory) mit “Snapshots” (Schanppschüssen) füllen wollen. Wenn Sie hier Snapshot wählen,
wird jede Sekunde ein Bild gespeichert bis der Speicher voll ist.
Der VZ-8plus³ ist mit einer Backup-Batterie ausgestattet, welche die gespeicherten Bilder 1-4
Wochen erhält.
Das Verhalten beim Löschen von gespeicherten Bildern kann im On-Screen Menü geändert werden.
Aufrufen eines Bildes: Drücken Sie kurz die gewünschte
Nummern-Taste (#43)
Bilddrehmodus "Image Turn" (für höhere Auflösung) nur VZ-8plus³
Arbeitsfläche:
A
A
Normaler Modus:
Nur 50% der Pixel
werden verwendet
um die Vorlage
darzustellen.
Image Turn Funktion:
90% der Pixel
werden verwendet
um die Vorlage
darzustellen.
Ausgegebenes Bild:
A
A
Die Abtastung einer hochformatigen A4 Seite
(Portrait) war immer schon eine kritische
Anforderung für einen Visualizer, da die
Bildwiedergabe stets im Breitformat erfolgt. So
konnten nur etwa 50% der Pixel der Kamera für
die Abtastung der hochformatigen A4 Seite
verwendet werden. WolfVisions "Image Turn"
(Bilddreh-) Modus löst dieses Problem.
Platzieren Sie Ihre hochformatige Vorlage (z.B. Brief) einfach in horizontaler Richtung auf der
Arbeitsfläche und zoomen Sie diese komplett ein. Nun werden ca. 90% der Pixel der
eingebauten Kamera zur Abtastung der Vorlage verwendet. Durch Drücken der IMAGE
TURN-Taste dreht der Visualizer das Bild elektronisch um 90° und sendet es mit einer
wesentlich höheren Auflösung an das Ausgabegerät. Der rechte und linke Rand bleibt dabei
schwarz.
(#34)
Text Modus (Kontrastanhebung für Text)
Um die Lesbarkeit von Texten, Zeichnungen und Röntgenbilder zu verbessern, kann durch
Drücken der programmierten PRESET-Taste (#33) die Kontrastanhebung eingeschaltet
werden. Beachten Sie, dass in diesem Modus die Farben etwas dunkler dargestellt werden.
Um die Kontrastanhebung wieder auszuschalten, drücken Sie die programmierte PRESETTaste erneut. Wenn der Text Modus aktiv ist, wird die Meldung “TEXT” permanent im Bild
angezeigt. Dies soll den Benutzer daran erinnern, den TEXT-Modus wieder abzuschalten,
wenn er nicht mehr benötigt wird.
Dies soll verhindern, dass Anwender versuchen, zu dunkle Farben durch Öffnen der Iris zu
korrigieren. Denn das würde eine verfälschte Bildwiedergabe bewirken.
9
Page 28
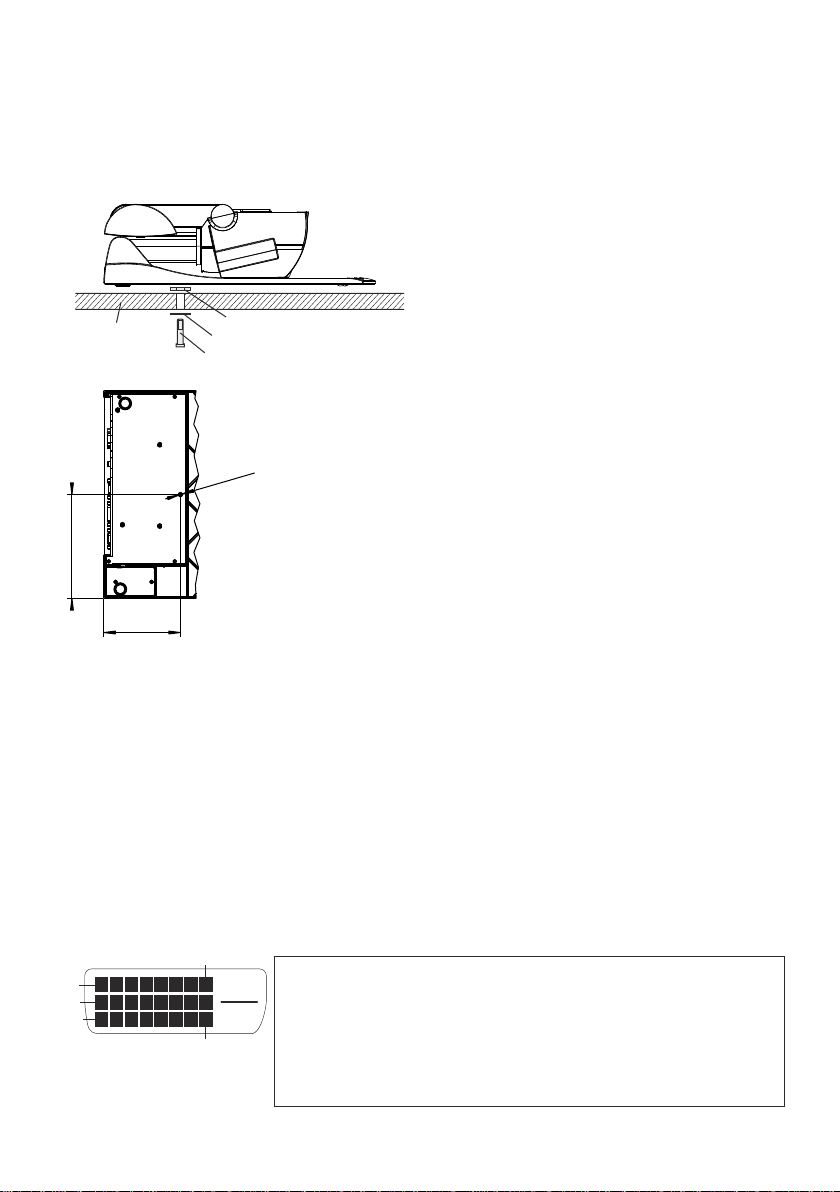
Diebstahlschutz 1: T-Lock
Der Visualizer kann mit einem Kabel T-Lock vor Diebstahl geschützt
(Kensington Lock)
werden. Folgen Sie den Anweisungen des Schloss-Herstellers.
®
Diebstahlschutz 2: Tisch Fixiereinheit
Bitte beachten Sie die maximale
Einschraubtiefe von 8mm!
We i t e r e s E i n s c h r a u b e n
beschädigt das Gerät.
Arbeitstisch
(Schnitt-Zeichnung)
156
115
Scheibe 6.4/17x3
Scheibe 6.4/12x1.6
Schraube M6
Der Visualizer kann mit der mitgelieferten Tisch-Fixiereinheit
an einem Tisch festgeschraubt werden um das Risiko eines
Diebstahls zu minimieren. Das Gewinde für die Tisch-
M6
Fixiereinheit befindet sich auf der Unterseite des Gerätes.
Mitgeliefertes Zubehör der Tisch-Fixiereinheit ( A r t i k e l nummern):
Stiftschlüssel Sechskant 5mm (101684)
Schraube DIN 912, M6x35 Zn (101689)
Schraube DIN 912, M6x50 Zn (101690)
Scheibe DIN 125A 6.4/12x1.6 (101691)
Scheibe DIN 7349 6.4/17x3 (101692)
Montageanleitung VZ-8³ (101693)
EXTERNER EINGANG - EXTERN
Ein Computer kann über den Externen Eingang (#15) mit dem Visualizer verbunden werden.
Mit der EXTERN-Taste (#30 oder #44) können Sie zwischen Visualizer und Computer
wechseln um Bilder abwechselnd von beiden Medien zu präsentieren. Die Daten vom
Computer werden durch den Visualizer nur durchgeschleift und in keiner Weise verändert. Um
zu verhindern, dass sich Ihr Projektor oder Monitor beim Umschalten neu justiert, empfehlen
wir, das Ausgangssignal Ihres Computers auf dasselbe Signalformat und die selbe vertikale
Frequenz wie die des Visualizers einzustellen.
Bitte beachten Sie, dass das Bild vom Externen Eingang (#15) nur am RGB-Ausgang (#17) ausgegeben werden
kann.
DVI Anschluss
Pin 1
Pin 9
Pin 17
Pin 8
Pin 24
1 - T.M.D.S. Data2- 9 - T.M.D.S. Data1- 17 - T.M.D.S. Data02 - T.M.D.S. Data2+ 10 - T.M.D.S. Data1+ 18 - T.M.D.S. Data0+
3 - T.M.D.S. Data2/4 Shield 11 - T.M.D.S. Data1/3 Shield 18 - T.M.D.S. Data0+
4 - T.M.D.S. Data4- (*) 12 - T.M.D.S. Data3- (*) 19 - T.M.D.S. Data0/5 Shield
5 - T.M.D.S. Data4+(*) 13 - T.M.D.S. Data3+ (*) 20 - T.M.D.S. Data5- (*)
6 - DDC Clock 14 - +5V Power 21 - T.M.D.S. Data5+ (*)
7 - DDC Data 15 - Ground (return for +5V, 22 - T.M.D.S. Clock+
8 - Analog Vertical Sync (**) HSync and Vsync) 23 - T.M.D.S. Clock-
**...not available
16 - Hot Plug Detect 24 - Analog Vertical Sync (**)
*...not used
10
Page 29

Auswahl des richtigen Ausgangs-Modus
Der DVI- und RGB-Ausgang (#16 and #17) kann folgende Signalformate ausgeben:
VZ-8light³
- XGA (4:3 - 1024x768 Pixel) bei 60Hz
- SXGA- (4:3 - 1280x960 pixels) at 60Hz - tatsächliche Auflösung
- WXGA (16:9 Widescreen - 1360x768 Pixel) bei 60Hz
- WXGA* (16:10 Widescreen - 1280x800 pixels) at 60Hz - tatsächliche Auflösung
- 720p (16:9 Widescreen HD - 1280x720 Pixel) bei 60Hz
- tatsächliche Auflösung
VZ-8plus³
- SVGA (4:3 - 800x600 Pixel) bei 60Hz
- XGA (4:3 - 1024x768 Pixel) bei 60Hz
- SXGA- (4:3 - 1280x960) bei 60Hz) - tatsächliche Auflösung
- SXGA ( - 1280x1024) bei 60Hz
- SXGA+ (4:3 - 1400x1050) bei 60Hz
- XGA 16:9 (spezielles Format für nicht HD-kompatible 16:9-Plasmas) bei 60Hz
- WXGA (16:9 Widescreen - 1360x768 Pixel) bei 60Hz
- WXGA* (16:10 Widescreen - 1280x800 pixels) at 60Hz - tatsächliche Auflösung
- WXGA+ (16:9 Widescreen - 1440x900 Pixel) bei 60Hz
- 720p (16:9 Widescreen HD - 1280x720 Pixel) bei 60Hz
- tatsächliche Auflösung
Ab Werk ist die "Auto Resolution" Funktion aktiviert. Hier prüft der Visualizer ständig, welche
Geräte am RGB- (#17) und DVI-Ausgang (#16) angeschlossen sind und stellt automatisch den
am besten geeigneten Standard für beide Ausgänge separat ein.
Bitte beachten Sie, dass der Visualizer die mögliche Auflösung nicht feststellen kann, wenn die
angeschlossenen Geräte oder Kabel* nicht “Plug and Play” kompatibel sind. Wenn der
Visualizer die mögliche Auflösung der angeschlossenen Geräte nicht feststellen kann, wird die
Auflösung automatisch auf den Standard von SXGA- (1280x960) bei 60Hz gestellt
(*Plug and Play kompatible Kabel haben an beiden Enden 15-Pol Stecker und alle Pins sind angeschlossen, Pin 9 wird
nicht benutzt).
Falls “Auto Resolution” nicht benutzt werden kann, kann die Auflösung im On-Screen Menü
des Visualizers manuell auf den gewünschten Wert gestellt werden (siehe Seite 13).
Um die bestmögliche Bildqualität zu erreichen, muss das beim Visualizer gewählte
Signalformat mit der tatsächlichen Auflösung (native Resolution) Ihres Ausgabegerätes (z.B.
LCD/DLP-Projektor oder Monitor) übereinstimmen.
Wichtig: Ausschlaggebend ist die tatsächliche Auflösung des Projektors oder Monitors, nicht
die maximale Auflösung die dieser (im komprimierten Modus) darstellen kann. Die tatsächliche
Auflösung ist die effektive Pixel-Anzahl des eingebauten LCD-Displays oder des DLP-Chips
Ihres Projektors oder Monitors. Die meisten LCD- oder DLP-Projektoren können auch höhere
Bildauflösungen, welche ihre tatsächliche Pixel-Anzahl überschreiten, darstellen - jedoch nur
im komprimierten Modus mit weit schlechterer Bildqualität.
Stellen Sie den Visualizer nicht auf ein Signalformat ein, das höher ist als die
tatsächliche Auflösung Ihres Projektors oder Monitors!
5:4
.
Wenn eine höhere Bildwiederholfrequenz als Ihr Monitor oder Projektor darstellen kann
gewählt wird, kann Ihr Monitor oder Projektor beschädigt werden!
Beachten Sie hierzu die Hinweise in der Bedienungsanleitung des angeschlossenen
Gerätes.
11
Page 30
PAL/NTSC Video Ausgänge nur VZ-8plus³
Bitte beachten Sie, dass die PAL/NTSC Video-Ausgänge (Composit und S-Video) ab Werk
ausgeschaltet sind. Dies deswegen, weil die Bildqualität dieser Ausgänge aufgrund der
Limitationen von PAL/NTSC-Video wesentlich schwächer ist, als die des DVI und RGBAusganges. WolfVision möchte damit verhindern, dass diese Anschlüsse versehentlich als
Hauptausgang verwendet werden.
Wenn Sie die PAL/NTSC Video-Ausgänge benützen möchten, schalten Sie diese mit folgender
Tastenkombination ein:
PAL: Drücken Sie gleichzeitig beide FOKUS-Tasten (#27) am Kamerakopf und die
Preset 1-Taste (#33) der Fernbedienung.
NTSC: Drücken Sie gleichzeitig beide FOKUS-Tasten (#27) am Kamerakopf und die
Preset 2-Taste (#33) der Fernbedienung.
Die Video-Ausgänge können auch im On-Screen Menü zwischen PAL, NTSC und OFF
umgeschalten werden.
USB-Anschluss
Der USB Computeranschluss kann für direkte Verbindungen zwischen dem Visualizer und
einem Computer verwendet werden. Hier kann der Visualizer als Scanner für 3-dimensionale
Objekte verwendet werden. Bilder im JPG-, TIF- oder BMP-Format können in Bruchteilen einer
Sekunde aufgenommen werden - wesentlich schneller als mit einem Desktop Scanner.
WolfVisions USB-Software (Connectivity Software) arbeitet unter Windows 2000, XP, Vista
und 7 (32 und 64-bit) sowie Apple Macintosh und ist voll TWAIN/WIA kompatibel. Dies ist
wichtig, wenn der Visualizer mit Grafikanwendungen wie Photoshop verwendet, oder an
Interaktiven Whiteboards (Smart Boards) angeschlossen wird.
Der schnelle USB 2.0 Anschluss ermöglicht die Ausgabe bewegter Bilder. Die WolfVision
Connectivity Software kann AVI-Dateien abspeichern und beinhaltet einen Video Capture
Treiber. Damit kann das Livebild der Visualizer mit nahezu jedem modernen
Videoschnittprogramm verarbeitet und gespeichert werden
Bitte downloaden Sie die aktuellste Version der WolfVision Connectivity Software von unserer
Homepage unter: www.wolfvision.com/support-d..
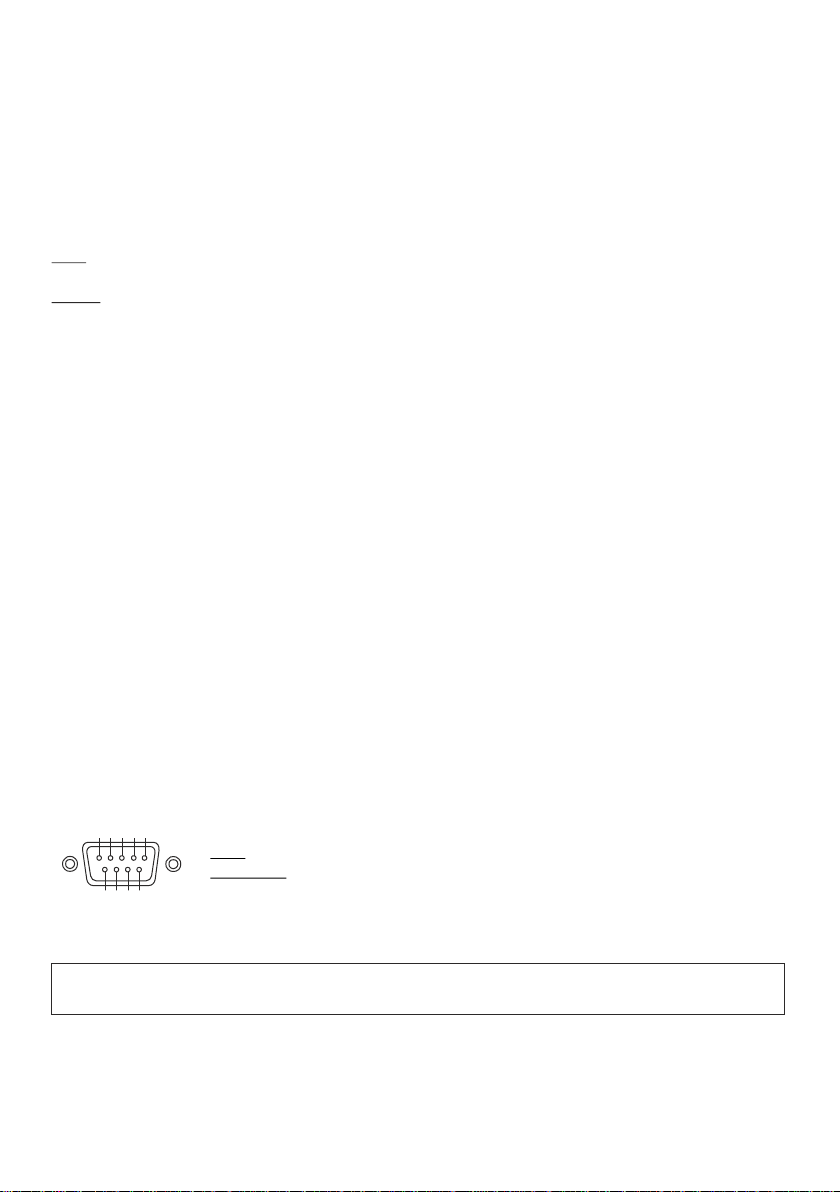
RS 232, Serieller Steuereingang
Mit dem RS-232 Anschluss (#21) kann der Visualizer über einen Computer bzw. eine
Raumsteuerung eines Konferenzraumes gesteuert werden.
592
481
3
6
7
9-Pol D-Sub
Stecker am Gerät
(Ansicht von vorne)
Das komplette Serielle Protokoll finden Sie auf der WolfVision Homepage unter
www.wolfvision.c
Pins: 2: RX, 3: TX, 5: GND
Baud rate: 9200, 19200, 38400, 57600 oder 115200 (einstellbar)
Datenbit: 8, Stopbit: 1, Parität: keine
Die Baudrate kann im On-Screen Menü, Extra Menü eingestellt
werden (siehe Seite 13).
:
om/support-d
12
Page 31

Die nachfolgenden Kapitel sind nur für technisch versierte Anwender:
ON-SCREEN MENÜ (Kamera Menü) / ON-SCREEN HILFE
Für Standardanwendungen des WolfVision Visualizers ist es nicht notwendig, Einstellungen
im On-Screen Menü vorzunehmen. Unerfahrene Anwender sollten hier keine Änderungen
durchführen.
Drücken Sie die MENU-Taste eine Sekunde lang um in das On-Screen Menü
zu gelangen. Einstellungen können nun mit den 4 Menü-Navigations-Tasten
vorgenommen werden oder mit dem ZOOM-Rad (#26) und den FOKUS-Tasten (#27) am
Kamerakopf. Bitte beachten Sie, dass einige Werte sicherheitshalber nur dann verändert
werden können, wenn vorher der Menüpunkt "Format Protect" auf "OFF" gestellt wird.
Wenn Sie weitere Informationen über eine Funktion im On-Screen Menü benötigen, dann
setzen Sie den Cursor in die entsprechende Zeile und drücken die HELP-Taste (#42 -
Doppelfunktion der Nummer 5-Taste) oder die AF-Taste (#28) am Kamerakopf. Eine genaue
Beschreibung der Funktion erscheint dann im Bild. Wenn Sie den gerade angewählten
Menüpunkt auf den Standardwert zurücksetzen wollen, drücken Sie die HELP-Taste (#42 oder
#28) 2 Sekunden lang
Durch Drücken der MENU-Taste für 4 Sekunden erscheint das Extra Menü. Im Extra Menü
können Einstellungen wie z.B. die Baudrate geändert werden.
Die einzelnen Funktionen im Menü sind in dieser Bedienungsanleitung nicht im Detail
beschrieben, da das Hilfemenü ein integrierter Bestandteil der Visualizer Software ist. Die
eingeblendeten Hilfetexte entsprechen der jeweiligen Version der Geräte-Firmware.
!
(#30 oder #44)
(#41)
NEGATIV, NEGATIV / BLAU und SCHWARZ / WEISS Modus
Das vom Visualizer ausgegebene Bild kann im On-Screen-Menü von Positiv auf Negativ
umgeschaltet werden. Zusätzlich kann der Hintergrund einer negativen Vorlage zur besseren
Lesbarkeit Blau dargestellt werden. Auch Schwarz / Weiß Darstellungen sind über das OnScreen Menü möglich.
TIPP: Wenn Sie die Bilddarstellungen "Negativ", "Negativ / Blau" oder "Schwarz / Weiß” öfters
benötigen, können Sie diese Funktion auch einer Preset-Taste zuteilen (siehe Seite 8). So
können Sie das Aufrufen des On-Screen Menüs vermeiden.
Ändern der Standard Kontrast (Farb) Einstellungen
Falls Ihnen das Bild auf Ihrem Bildschirm zu dunkel erscheint, können Sie den grundlegenden
Kontrast des Bildes in den "Color settings" des On-Screen Menüs verändern. Diese
Einstellungen können für den Normalen Modus und für den Text Modus separat eingestellt
werden.
Auto Power off - Automatische Abschaltfunktion
Im Menüpunkt "Power control", kann die automatische Abschaltfunktion aktiviert werden.
Sobald der Visualizer für die Dauer der voreingestellten Zeit nicht benutzt wird, schaltet er
automatisch in den Bereitschaftsmodus (Standby).
Zurücksetzen von ON-SCREEN Menü-Einstellungen
Alle Einstellungen im On-Screen Menü können auf die Werkseinstellungen zurückgesetzt
werden. "Reset" ist ein Punkt im On-Screen Menü. Sollten Sie das Menü auf dem Bildschirm
nicht sehen können, drücken Sie gleichzeitig beide FOKUS-Tasten auf dem Kamerakopf (#27)
und die Nummer 4 (Zurück-Pfeil)-Taste (#41) auf der Fernbedienung (nur VZ-8plus³). Wenn
Sie nur den gerade angewählten Menüpunkt auf den Standardwert zurücksetzen wollen,
drücken Sie die HELP-Taste 2 Sekunden lang!
13
Page 32
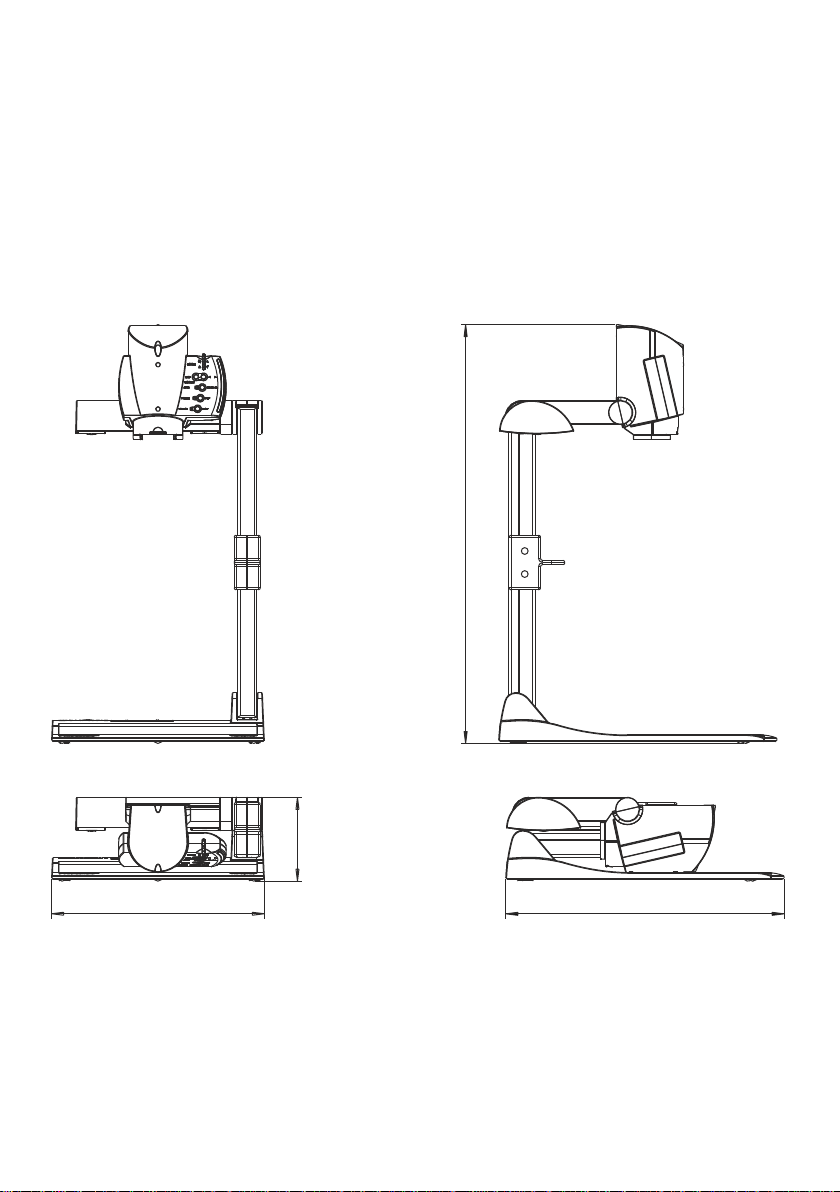
Firmware Updates
Die Firmware (Geräte-Software) Ihres Visualizers (inklusive On-Screen Hilfe-Texte) kann
einfach auf die neueste Version aktualisiert werden. Die Firmware kann über die USB- oder
RS232-Schnittstelle aktualisiert werden.
Firmwareupdates können gratis unter www.wolfvision.com/support herunter geladen
werden. Für ein Update über USB benötigen Sie die WolfVision Connectivity Software und für
ein Update über RS232 das WolfVision Firmware Update Utility. Beide Programme finden Sie
ebenso auf der WolfVision Homepage.
Abmessungen
hochgeklappt
615
312
Alle Maße in Millimeter
geschlossen
0
+5
123 .
408
14
Page 33
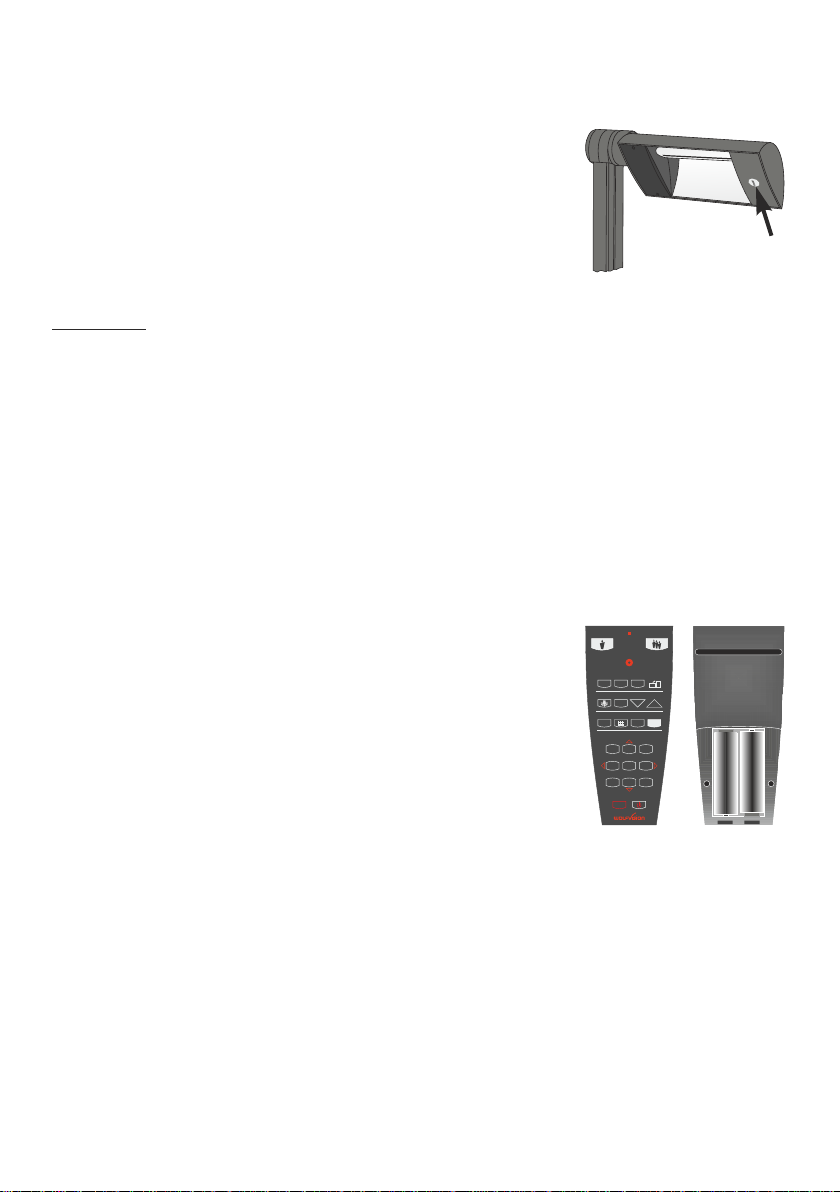
WARTUNG
Wechseln der Lampe des Visualizers
1. Entfernen Sie den Netzstecker des Visualizers
2. Lösen Sie die Schraube mit Hilfe einer Münze
3. Schwenken Sie die Lampe samt Abdeckung nach unten
4. Wechseln Sie die Lampe
Setzen Sie die Lampe vorsichtig in den Sockel
Achtung: Die Lampe kann sehr heiß sein!
5. Montieren Sie die Lampenabdeckung in umgekehrter
Reihenfolge (3 bis 1).
Lampentyp:Hochfrequenzlampe mit 9W bei einer mittleren Lebensdauer von 10.000 h
WolfVision Artikelnummer: 100040
Reinigung
Gehäuse: Staub und Schmutz mit einem weichen Tuch abwischen.
Linsen: Staub und Schmutz mit einem weichen, fusselfreien Tuch abwischen (keine
Papiertücher!). Normalerweise reicht eine Trockenreinigung (ggf. zusammen mit
Anhauchen oder mit einem speziellen Optikreiniger).
Keine scharfen Reinigungsmittel wie Aceton, Benzin oder Ähnliches verwenden! Diese
Substanzen können die (Anti-Reflex-) Beschichtung beschädigen!
Infrarot Fernsteuerung nur VZ-8plus³
Bitte beachten Sie, dass eine IR-Fernbedienung nur bis zu einer gewissen Distanz zum Gerät
einsetzbar ist.
Gegenstände, welche die Sichtverbindung zwischen
Fernbedienung und Visualizer verstellen sowie schwache
Batterien beeinträchtigen die Steuerung.
Wenn der Visualizer nur noch aus nächster Nähe bzw.
überhaupt nicht mehr mit der Fernbedienung zu steuern ist,
müssen meist nur die Batterien ersetzt werden.
Öffnen Sie händisch die Abdeckung der Fernbedienung auf der
Rückseite und ersetzen Sie beide 1,5V AA Batterien durch neue.
Auf richtige Polung der Batterien achten!
LASER
WIDE
TELE
PRESETS
IMAGE TURN
A
2 3
1
A
AF
LIGHT
FOCUS
WHITE
IRIS
FREEZE
ALL
1
4
7
EXTERN
MENU
MEMORY
2
5
HELP
8
vorne
3
6
9
POWER
-
+
X
+
hinten (offen)
X
-
Verschiedene IR-Codes nur VZ-8plus³
Wenn Sie mit mehreren Visualizern im selben Raum arbeiten möchten, sollten die Geräte auf
unterschiedliche IR-Codes gestellt werden, um die Geräte einzeln ansteuern zu können.
Um den IR-Code zu ändern, muss im On-Screen Menü unter “Misc. Settings” der neue Code
angewählt werden. Auf der Fernbedienung selbst ändern Sie den Code durch gleichzeitiges
Drücken von PRESET 1, PRESET 2 nd ZOOM TELE
Tastenkombination gedrückt wird, wechselt der Code von A zu B, C, D und A, usw. Mit der
Tastenkombination wird die Fernbedienung wieder
PRESET 1, PRESET 2 und ZOOM WIDE
auf Code A zurückgesetzt.
Die LED zeigt den gewählten Code durch Blinken an (einmal Blinken für Code A, zweimal für
Code B, dreimal für Code C und viermal für Code D).
(#33) u (#31). Jedes Mal, wenn diese
15
Page 34
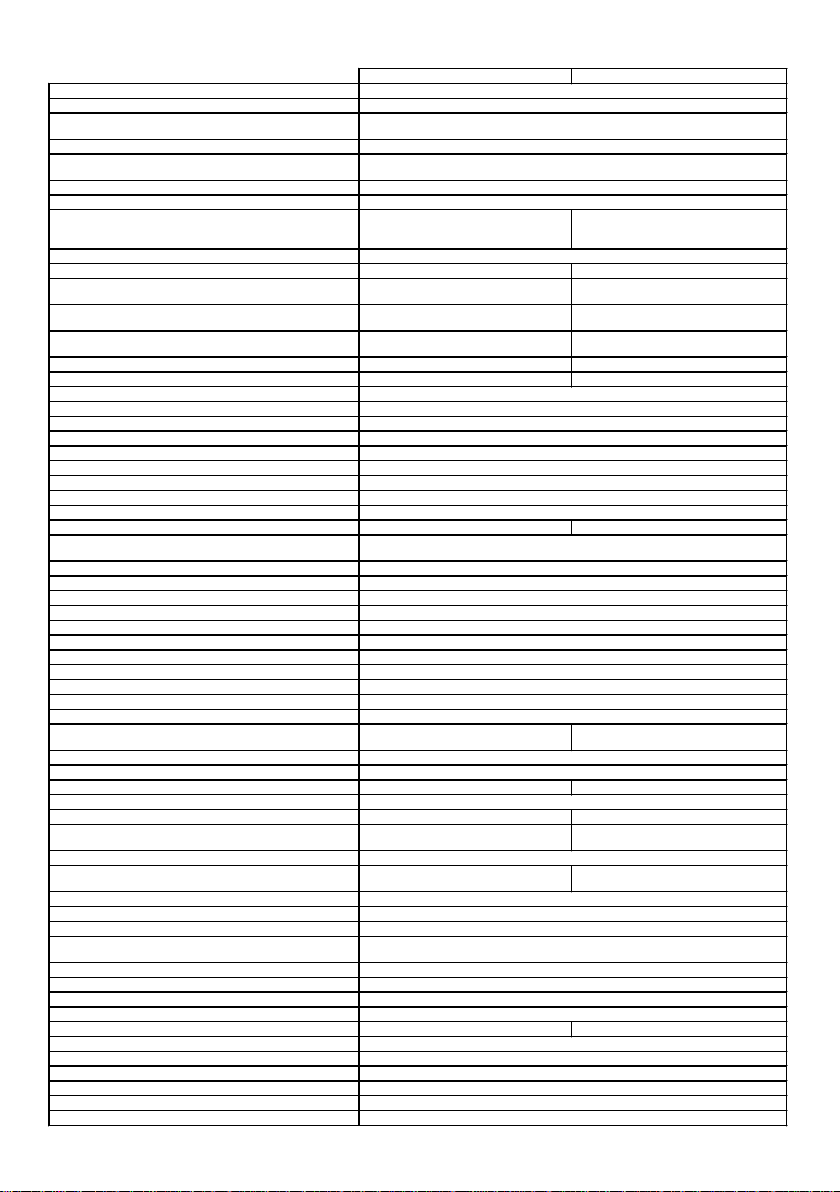
Technische Daten
Kamera / Technologie
Bilder pro Sekunde (von der Kamera aufgenommen)
Effektive Pixel (=Pixel, die tatsächlich für die Bildinformation
verwendet werden)
Gesamte Pixel auf dem CCD
Verarbeitete Pixel pro Sekunde (=Effektive Pixel x Bilder pro
Sekunde)
Farbwiedergabe / Präzision
Original Ausgangssignal der Kamera (Native)
Ausgangssignal
Auflösung (gemessen)
Auflösung im Image Turn Modus (gemessen)
Image Turn Modus (für höhere Auflösung bei der Abtastung von
kompletten Hochformat-Seiten) / Image rotation (Bilddrehung)
Vertikale Bildfrequenz
Horizontale Bildfrequenz
Signalformat
Iris (Blende)
Shutter
Weißabgleich
Autofokus (Geschwindigkeit) / Manueller Fokus
Text Enhance (Kontrastanhebung bei farbigen Texten)
On-Screen Menü und On-Screen Hilfe
Firmware Updates über
Linse / Zoom
Max. Objekthöhe auf der Arbeitsfläche
Max. Abtastbereich auf der Arbeitsfläche
Max. Abtastbereich auf der Arbeitsfläche im Image Turn
Min. Abtastbereich auf der Arbeitsfläche (in voller Auflösung,
mit optischem Zoom)
Min. Abtastbereich auf der Arbeitsfläche (mit dig. Zoom)
Max. Abtastbereich außerhalb der Arbeitsfläche
Tiefenschärfe bei kleinen Objekten (42 x 33 mm)
Tiefenschärfe bei großen Objekten (360 x 270 mm)
Blenden von Publikum oder Vortragendem
Lichtquelle
Connectivity Software zur BildspeicherungSteuerung und
Reflexionsfreier Bereich auf der Arbeitsfläche
Aufnahmen außerhalb der Arbeitsfläche
Automatische Bildumkehr (Image Flip)
Intelligentes Faltsystem
Anwender programmierbare Presets
Spezielle Arbeitsfläche für Overheadfolien
Unterlicht
Dia Aufnahme
Externer Eingang für Computer / Eingangswahlschalter
Bildspeicher
"Show all" Funktion
(Anzeige von allen 9 gespeicherten Bildern als Split-Bild)
Alternative Bildanzeige
PAL / NTSC Video Ausgang
RGB (=Daten RGB) Ausgang
DVI Ausgang / HDMI Ausgang
USB Anschluss / Standard
RS232 Anschluss und serielles Protokoll mit absoluter
Positionierung und Rückmeldung
12V Ausgang
Abmessungen in Arbeitsposition (L x W x H)
Abmessungen gefaltet (L x W x H)
Gewicht
Infrarot Fernbedienung
Stromanschluss (externes Netzteil)
Betriebstemperatur / relative Luftfeuchtigkeit
Staubschutz / Tragekoffer
Diebstahlschutz
Garantie
Hergestellt in
VZ-8light³
1-CCD 1/3" Progressive Scan Kamera
30 Bilder (=Vollbilder)
1280 x 960 (=1.228.800)
1.320.000
36.864.000
sRGB, sehr gute Farben
SXGA- (1280x960), WXGA* (1280x800) und HD 720p (1280x720)
HD 720p / WXGA / SXGA- /
XGA (umschaltbar), USB2.0
nicht verfügbar
nicht verfügbar
Progressive Scan: 60 Hz
Progressive Scan: 45 –
automatisch (manuell im On-Screen Menü)
1 (plus 2 programmierbare und 8 fixe Presets
LPS (limited power source - begrenzte Stromquelle) Multi Range 100-240V / 60W, Gewicht: 0,3kg
non-interlaced
24 x Zoom (12 x optisch + 2 x digital), Zoom-Rad mit 2 Geschwindigkeiten
nicht verfügbar
Long Life Hochfrequenz Neonlicht, 9W, 10.000 Stunden mittlere Lampenlebensdauer
inkludiert (für Windows und Macintosh, Twain kompatibel, mit Video Capture Treiber
durch RS232)
mit optionaler externer Lichtbox
1 Bild Freeze
nicht verfügbar
nicht verfügbar
nicht verfügbar
60 kHz
automatisch, manuell und flackerfrei (flickerless)
automatisch und manuell
ja (ständig arbeitend, sehr hohe Geschwindigkeit) / ja
seriellen- (RS232) oder USB-Anschluss
230mm in Tele Position, 370mm in Wide Position
ja (vor und hinter dem Gerät)
ja (um Personen vor dem Gerät aufzunehmen)
pneumatischer Arm, 2-Schritte "Set up"
mit optionaler externer Lichtbox
ja (15-pol D-Sub Buchse), durchgeschleift
Negativ Bild - Negativ/Blau Bild - Schwarz/Weiß Bild
DVI-D (digital) / über ein DVI-HDMI Kabel
408mm x 312mm x 615mm
408mm x 312mm x 125mm
0°C bis 40°C / 40 - 85%rel (nicht kondensierend)
T-Lock (Kensington Lock®)) und Tisch-Fixiereinheit
Austria (Europäische Union
SXGA / SXGA- / XGA / SVGA (umschaltbar),
750 Linien
PAL: 50 Hz / NTSC: 60 Hz (umschaltbar)
ja
ja
276mm x 370mm
33mm x 25mm
17mm x 13mm
unbegrenzt
10mm
260mm
keines
gesamte Arbeitsfläche
ja
9 Bilder (mit Back-up Batterie), 1 Bild Freeze
Composit Video an RCA-Buchse und S-video
(Y/C) an 4-pol Buchse (konv. Progressive Scan)
15-pol D-Sub Buchse
USB 2.0
9-pol Sub-D Stecker
für externe Lichtbox
5kg / tragbar
inkludiert / optional
3 Jahre
16
VZ-8plus³
HD 720p / WXGA+ / WXGA / SXGA+ /
PAL / NTSC (umschaltbar), USB 2.0
960 Linien
ja / 90, 180 und 270 Grad
Progressive Scan: 50 Hz
Progressive Scan: 37,9 – 65,2 kHz
PAL/NTSC: 15,7 kHz
non-interlaced und interlaced
automatisch und manuell
370mm x 276mm
3 (plus 8 fixe Presets durch RS232)
durch Diahalter am Kamerakopf
ja
ja (mit Laserpointer)
Technische Änderungen vorbehalten!
Page 35
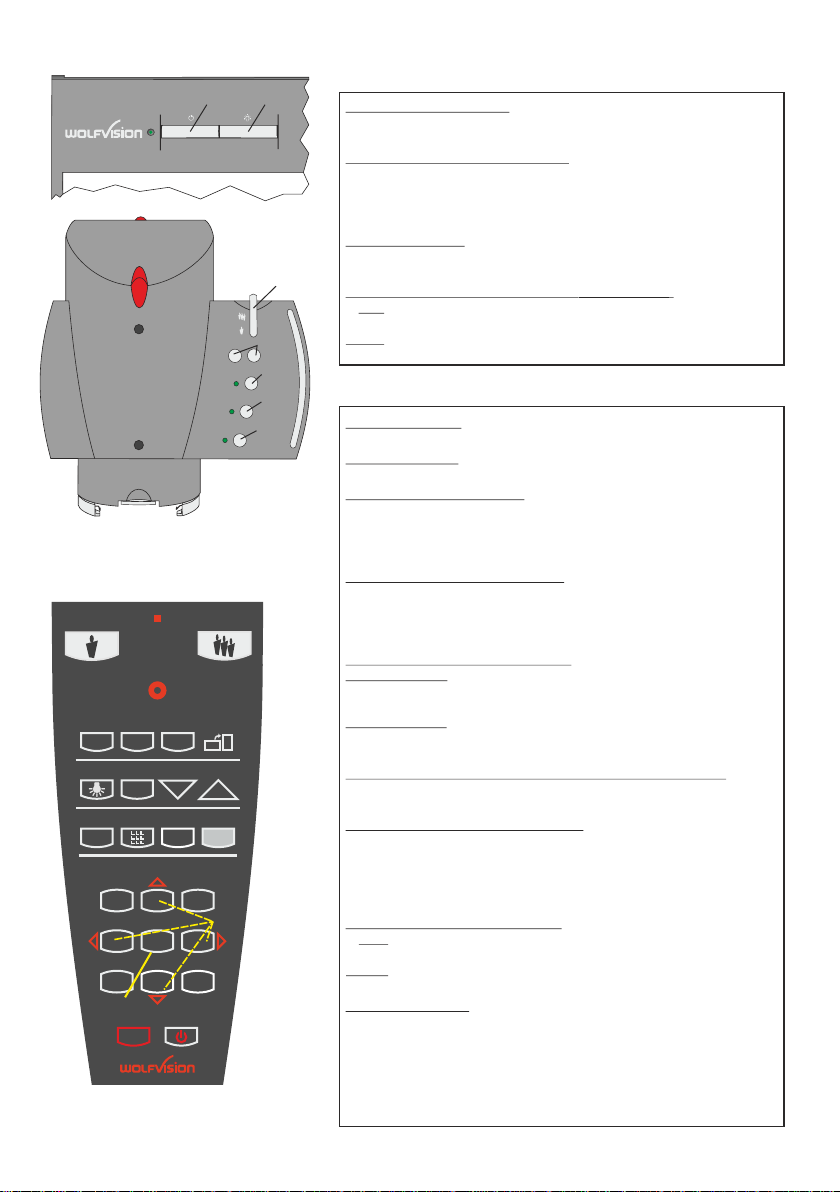
#24
EXTERN
Fernbedienung
nur VZ-8plus³
#31
PRESETS
1
4
7
#42
EXTERN
2 3
AF
#36
ALL
#39
MEMORY
MENU
HELP
2
5
8
LASER
#32
IMAGE TURN
FOCUS
IRIS
3
6
9
POWER
#45
#35
TELE
#33
#38
1
LIGHT
WHITE
FREEZE
#44
FOCUS
AUTO
FREEZE
#43
ZOOM
MAN
WIDE
A
A
#37
#40
#41
#31
#34
WHITE
#25
#26
#27
<
#28
HELP
#29
PRESET 1
#30
MENU
CODES
One Push Weißabgleich:
Drücken Sie die LICHT-Taste (#25) für 2 Sekunden um einen OnePush-Weißabgleich durchzuführen.
Aktivieren des On-Screen Menüs:
Drücken Sie die MENU-Taste (#30) (EXTERN-Taste) am Kamerakopf
für 2 Sekunden um das On-Screen Menu zu aktivieren. Verwenden
Sie das ZOOM-Rad (#26) und die FOKUS-Tasten (#27) zum
Navigieren. Für die Hilfefunktion drücken Sie die AF-Taste (#28).
Preset 1 aufrufen:
Drücken Sie die PRESET 1-Taste (#29) am Kamerakopf für 2
Sekunden.
Video Ausgang (PAL oder NTSC) nur VZ-8plus³:
PAL: Drücken Sie gleichzeitig beide FOKUS-Tasten (#27) und die
< >
>
FREEZE-Taste (#29) am Kamerakopf.
NTSC: Drücken Sie gleichzeitig beide FOKUS-Tasten (#27) und die
EXTERN-Taste (#30) am Kamerakopf.
CODES - Fernbedienung nur VZ-8plus³
Preset speichern:
Drücken Sie eine der PRESET-Tasten (#33) für 2 Sekunden.
Bilder speichern:
Drücken Sie eine der MEMORY-Tasten (#43) für 2 Sekunden.
Bildspeicher schnell füllen:
Drücken Sie die ALL-Taste (#39) für mehr als 4 Sekunden. Dann folgen
Sie den Anweisungen des On-Screen Menüs (MEMORY 1-Taste (#43)
für “Snapshot” oder die MEMORY 3-Taste (#43) um den kompletten
Speicher zu löschen).
Aktivieren des On-Screen Menüs:
Drücken Sie die MENU-Taste (#44) für 1 Sekunde um das
On-Screen Menü zu aktivieren. Benutzen Sie die Nummern-Tasten
(#41) zum Navigieren. Für die Hilfefunktion drücken Sie die Nummer 5-
Taste (#42).
Umschalten des Ausgangsmodus:
Höherer Modus: Gleichzeitiges Drücken beider FOKUS-Tasten (#27)
am Kamerakopf und der Nummer 2-Taste (Pfeil nach oben) (#41) an der
Fernbedienung.
Niedriger Modus: Gleichzeitiges Drücken beider FOKUS-Tasten
(#27) am Kamerakopf und der Nummer 8-Taste (Pfeil nach unten) (#41)
an der Fernbedienung.
Zurücksetzen des Ausgangsmodus auf “Auto” (Standard):
Drücken Sie beide FOKUS-Tasten (#27) am Kamerakopf und die
Nummer 5-Tasten (#42) an der Fernbedienung gleichzeitig.
Zurücksetzen des Visualizer-Menüs:
Drücken Sie beide FOKUS-Tasten (#27) am Kamerakopf und die
Nummer 4-Taste (#41) der Fernbedienung.
Um nur einen Menüpunkt zurückzusetzen, wählen Sie im Menü den
betreffenden Punkt und drücken dann die Nummer 5-Taste (#42)
der Fernbedienung für 2 Sekunden.
Video Ausgang (PAL oder NTSC):
PAL: Drücken Sie gleichzeitig beide FOKUS-Tasten (#27) am
Kamerakopf und die Preset 1-Taste (#33) der Fernbedienung.
NTSC: Drücken Sie gleichzeitig beide FOKUS-Tasten (#27) am
Kamerakopf und die Preset 2-Taste (#33) der Fernbedienung.
IR-Code wechseln:
Ändern Sie im On-Screen Menü "Misc. Settings", den IR-Code (Code A
ist Standard). Ändern Sie auch den IR-Code der Fernbedienung durch
gleichzeitiges Drücken der Tasten PRESET 1, PRESET 2 und
ZOOM TELE
schalten. Um die Fernbedienung auf Code A zurückzusetzen, drücken
Sie (#33) (#31)
die Tasten PRESET 1, PRESET 2 und ZOOM WIDE
gleichzeitig (auf der Fernbedienung).
(#31) um den Code von A nach B, C, D ... A usw. zu
17
(#33)
Page 36
R
CONTACTS
Manufacturer / Worldwide Distribution
WolfVision GmbH
International Distribution Offices
USA
WolfVision Inc.
Duluth Tel: +1(770)931-6802, 877-873-WOLF, Fax: +1(770)931-9606
(Atlanta) E-Mail: [email protected]
Burlingame
(San Francisco) E-Mail: [email protected]
Asia
WolfVision Asia
Singapore Tel: +65(6366)-9288 +65(6366)-9280
Canada
WolfVision Canada Inc.
Ottawa Tel: +1(613)741-9898, Toll free: 877-513-2002, Fax: +1(613)741-3747
Japan
WolfVision Co Ltd.
Tokyo Tel: +81(0)3-3360-3231, Fax: +81(0)3-3360-3236
United Kingdom
WolfVision UK Limited
Manchester Tel: +44(161)435-6081, Fax: +44(161)-435-6100
Tel: +1(650)648-0002, Toll free: 800-356-WOLF, Fax: +1(650)648-0009
E-mail: [email protected]
E-Mail: [email protected]
E-mail: [email protected]
E-Mail: [email protected]
Toll free:
, Fax:
Internet Homepage: www.wolfvision.com
E-Mail to technical support: [email protected]
Printed in Austria - July 2010
 Loading...