

Page 1

LED TV
IMPORTANT
Please read this manual carefully before installing
and operating the TV.
Keep this manual handy for further reference
USER MANUAL
MODEL NO.:
WLED39DLED
Page 2

Table Of Contents
Safety Information.................................................................................................................2
Preparations Guide
Important Safety Precautions.................................................................................................3
Installed And Connected TV
TV Bracket assemble.............................................................................................................4
TV Buttons And Terminal Interface........................................................................................ 5
External device connection diagram................................................................... 6
Install And Connect TV...........................................................................................................7
TV rating.........................................................................................................12
Parent Control................................................................................................ 10
Hotel Menu.....................................................................................................12
Select Input Source................................................................................................................8
TV Menu
Channel Menu........................................................................................................................8
Picture Menu..........................................................................................................................8
Sound Menu.......................................................................................................................... 9
Time Menu.............................................................................................................................9
Option Menu.........................................................................................................................10
PC Menu
Screen Menu........................................................................................................................13
Media Menu
Media Menu.........................................................................................................................13
1
Other Information
Help......................................................................................................................................14
Specifications.......................................................................................................................15
TV Stand installation Instructions.......................................................................7
This user manual for reference only
Page 3
Safety Information
2
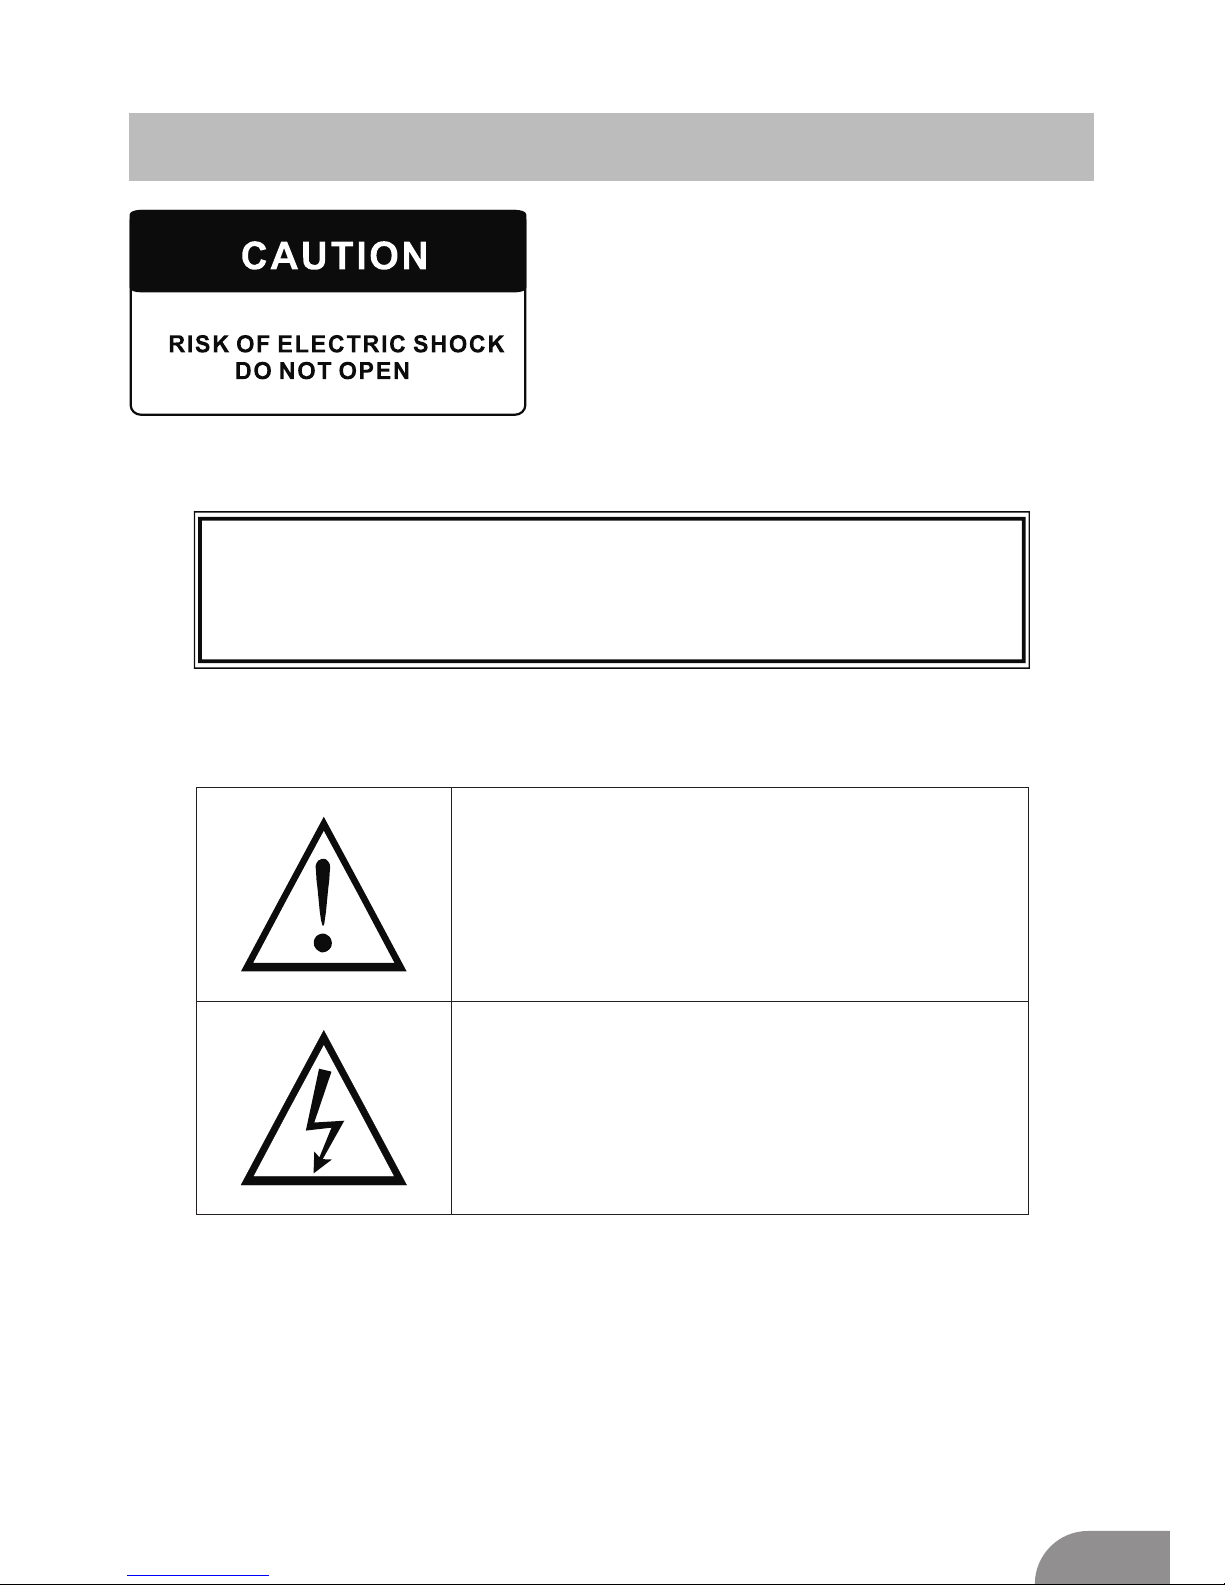
High voltages are used in the operation of
this product.to reduce the risk of electric
shock,do not remove cover of the cabinet,
refer servicing to qualified service personal
If the TV any changes or coarse adjustment, electric shocks
to be hurt, do not attempt to open a machine-maintenance,
customer contact centres needed overhaul.
The exclamation point within an equilateral
triangle is intended to alert the user to the
presence of important operting in the
literature accompanying the appliance.
Warning
The lightning flash with arrowhead symbol
within an equilateral triangle,is inten ded to
alert the user to the presence of uninsulated
dangerous voltage within the products
enclosure that may be of sufficient magnitude
to constitute a risk of electric shock to persons.
Page 4

3
Important Safety Precautions
1. Read these instructions.
2. Keep these instructions.
3. Heed all warnings.
4. Follow all instructions.
5. Do not use this apparatus near water.
6. Clean only with dry cloth.
7. Do not block any ventilation openings. Install in accordance with the
manufacturer’s instructions.
8. Do not install near any heat sources such as radiators, heat registers, stoves, or
other apparatus (including amplifiers) that produce heat.
9. Do not defeat the safety purpose of the polarized or grounding-type plug. A
polarized plug has two blades with one wider than the other. A grounding type plug
has two blades and third grounding prong. The wide blade or third prong are
provided for your safety. When the provided plug does not fit into your outlet,
consult an electrician for replacement of the obsolete outlet.
10. Protect the power cord from being walked on or pinched, particularly at plugs,
convenience receptacles, and the point where they exit from the apparatus.
11. Only use attachments/accessories specified by the manufacturer.
12. Use only with the cart, stand, tripod, bracket, or table specified by the
manufacturer, or sold with the apparatus. When a cart is used caution when
moving the cart/apparatus combination to avoid injury tip-over.
13. Unplug this apparatus during lightning storms or when unused for long periods
of time.
14. Refer all servicing to qualified service personnel. Servicing is required when the
apparatus has been damaged in any way, such as power-supply cord or plug is
damaged, liquid has been spilled or objects have fallen into the apparatus, the
apparatus has been exposed to rain or moisture, does not operate normally, or has
been dropped. Warning to reduce the risk of fire or electric shock, do not expose
this apparatus to rain or moisture.
15. The apparatus shall be disconnected from the mains by placing the power/standby
switch in the standby position and unplugging the power cord of the apparatus from
the AC mains receptacle.
16. The socket-out shall be installed near the equipment and shall be easily accessible.
17. This product should never be placed in a built-in installation such as a bookcase
or rack unless proper ventilation is provided or the manufacturer's instructions have
been adhered to.
18. Apparatus shall not be exposed to dripping or splashing.
19. Do not place any sources of danger on the apparatus (e.g. liquid filled objects,
lighted candles).
20. Wall or Ceiling Mounting - The appliance should be mounted to a wall or ceiling
only as recommended by the manufacturer.
21. Never place the TV, remote control or batteries near naked flames or other
heat sources, including direct sunlight. To prevent the spread of fire, keep
candles or other flames away from the TV, remote control and batteries at
all times.
22. The USB terminal should be loaded with 0.5 A under normal operation.
Page 5
4
TV Bracket assemble
SOURCEMENUCH+
-
CH
-
VOLVOL+
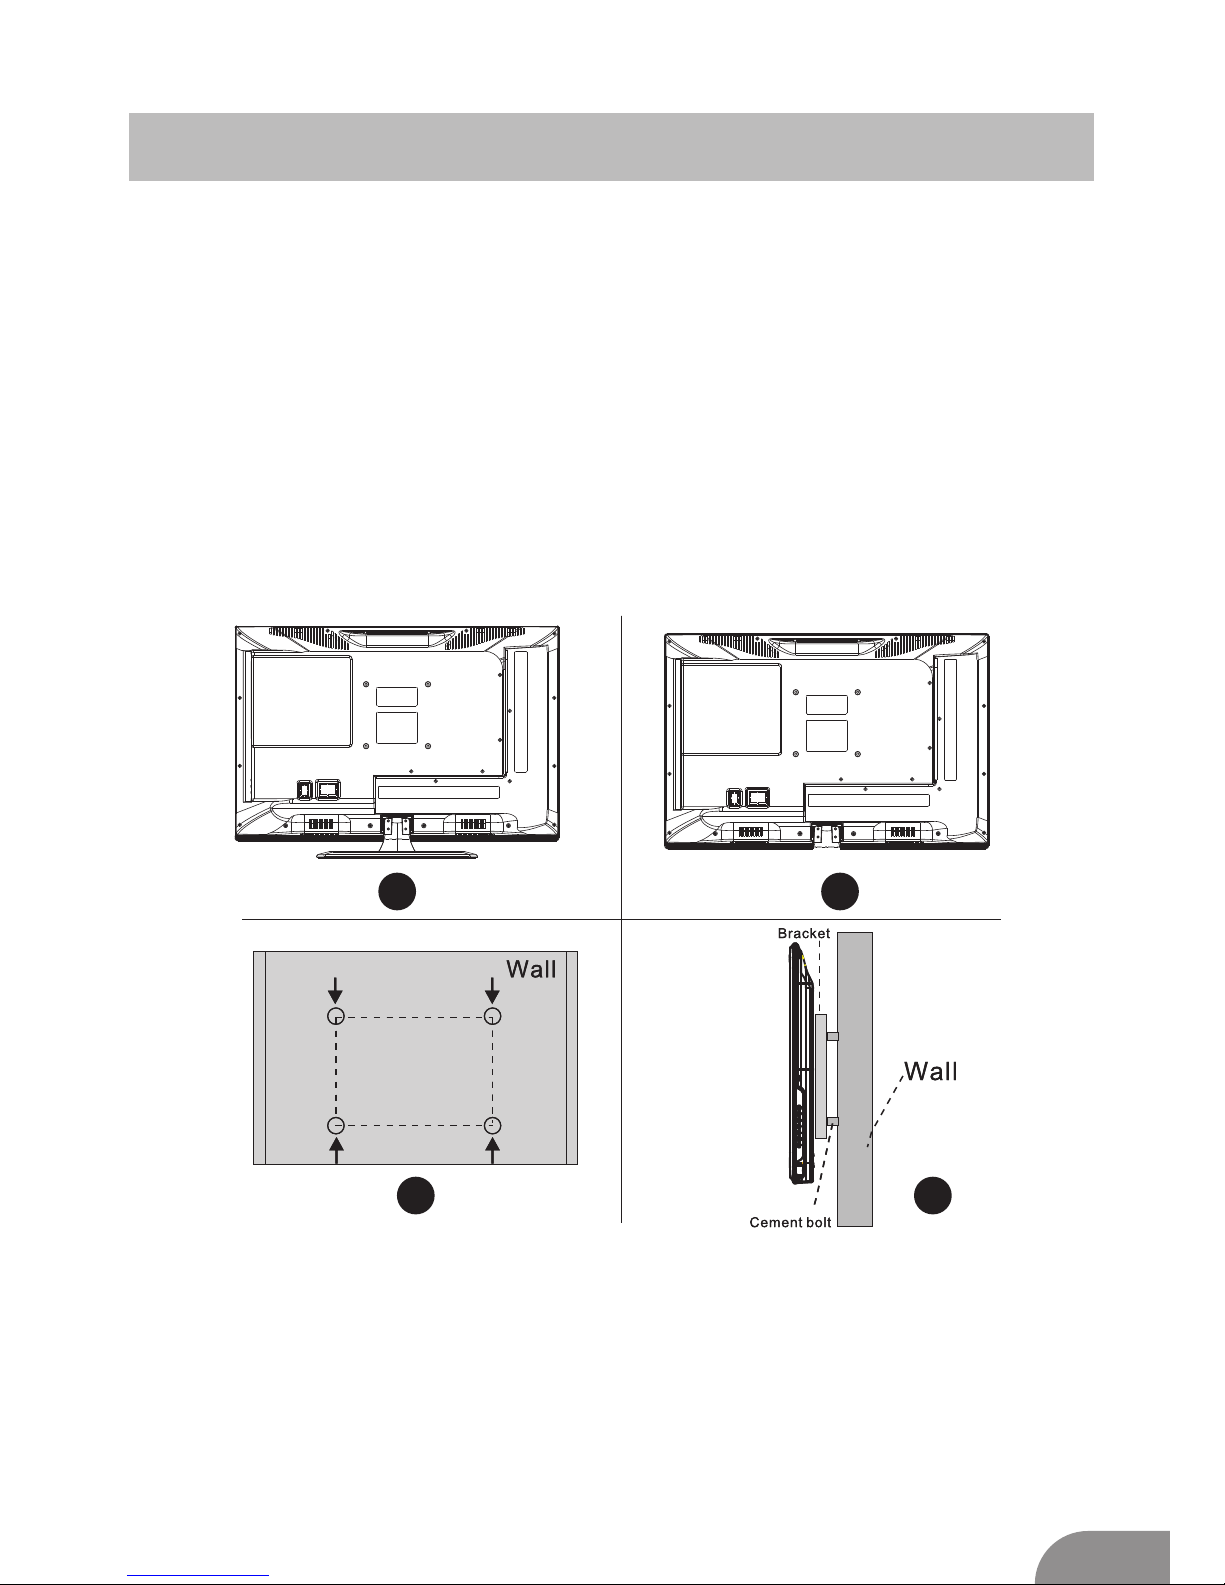
Fix the TV on the wall
1.First,put the TV on the table smoothly and put some soft cloth on the table to avoid
scratching the screen.
2.User the screw driver to take off the screws which are fixed on the bottom stand
(the direction of the arrow, refer to the ptoto1).And take off the bottom stand(please
take off the screws and bottom stand carefully).
3.Make one bracket which can fix on the wall according to the size of arrow direction
of photo2 and photo3.
4.Drill four holes properly on the wall (the size only for reference) and put into four
screws.(optional parts) Drill four holes properly on the wall (the size only for reference)
and put into four screws.(optional parts)
5.according to the step 4,use the screwdriver to lock the screw on the back of the TV.
then hang the TV on the wall.
1 2
3
4
Note:
1.The bracket fixed on the wall is optional part.
2.when you assemble the TV, there should be no other articles on the around and front
and please keep the distance from other articles.
3.When assemble the TV, please ask the career man to fix in order to avoid the danger.
4.The fixing picture is only for reference.
5.Please follow the use manual about bracket assemble to fix the TV.
6.Attach the mounting bracket from the VESA compatible wall mounting kit.
Page 6
TV Buttons And Terminal Interface
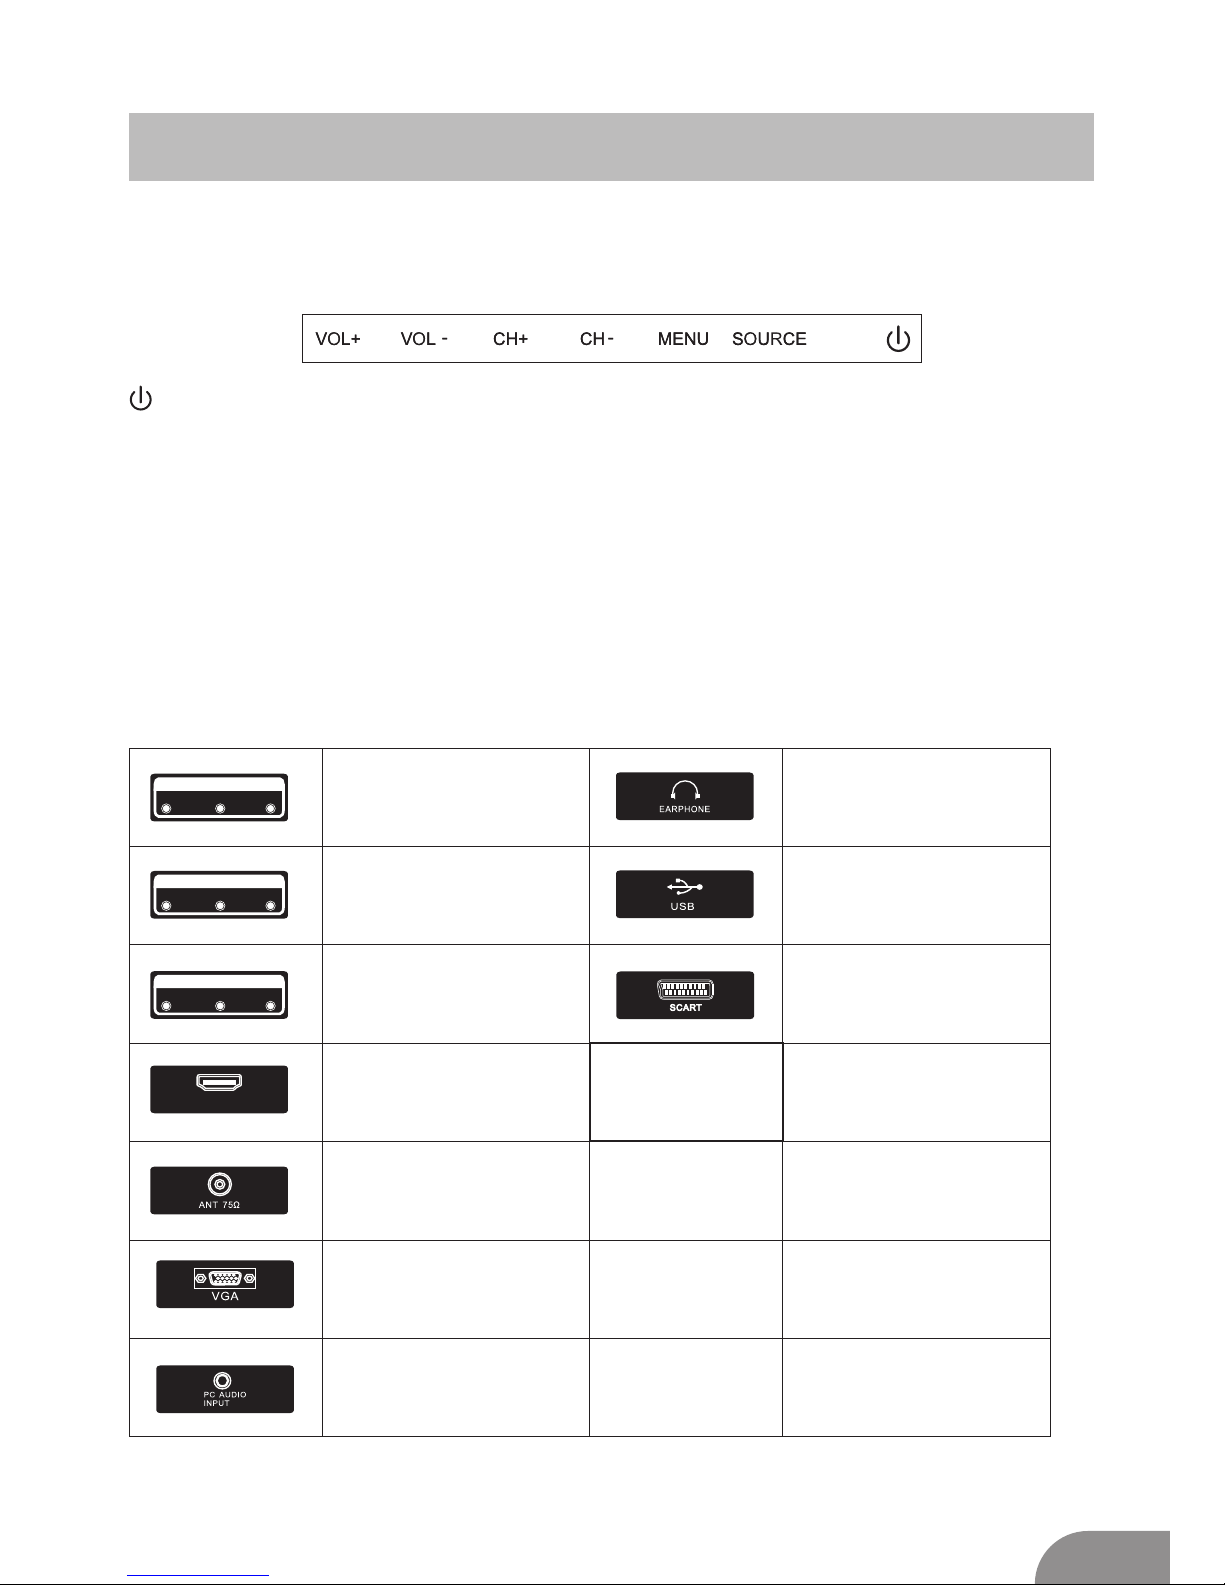
TV Buttons
:Turn ON/OFF Power.
SOURCE:External Signal Input Selection.
MENU:Display Main MENU And Confirm MENU Item Selection.
CH+/-:Selecting Channel.
VOL+/-:Adjusting Volume.
Note: The following is only functional schematic, And the actual position and
arrangement of different models may be different.
Terminal Interface
Note: The following are the various terminal interface, the actual position and
arrangement, the number of different models may be different.
VID EO R L
INP UT
VID EO R L
OUT PUT
Y Pb Pr
INP UT
HDM I
AV input
External AV Signal Input And
Relevant Rith/Left Sound Channel
AV output
External AV Signal output And
Relevant Right/Left Sound Channel
(Some models without this interface)
Y Pb Pr input
Connect to the composite terminal of
your DVD/VCR
(Some models without this interface)
HDMI input
Digital signal input from HDMI video
connector.
ANT 75
Connect the antennal/cadle tv input
(75/VHF/UHF)
VGA in put
PC analog signal input
PC AU DIO I NPU T
VGA input and audio input when VGA
input
EARPHONE output
When earphones are plugged in,
speakers are disabled
USB input
Connect a USB device here to play
its media files or to recordprograms
via the PVR function.
SCART input
standard,it supports composite and
RGBsignal input.lt is a connection
for european
(Some models without this interface)
5
Page 7
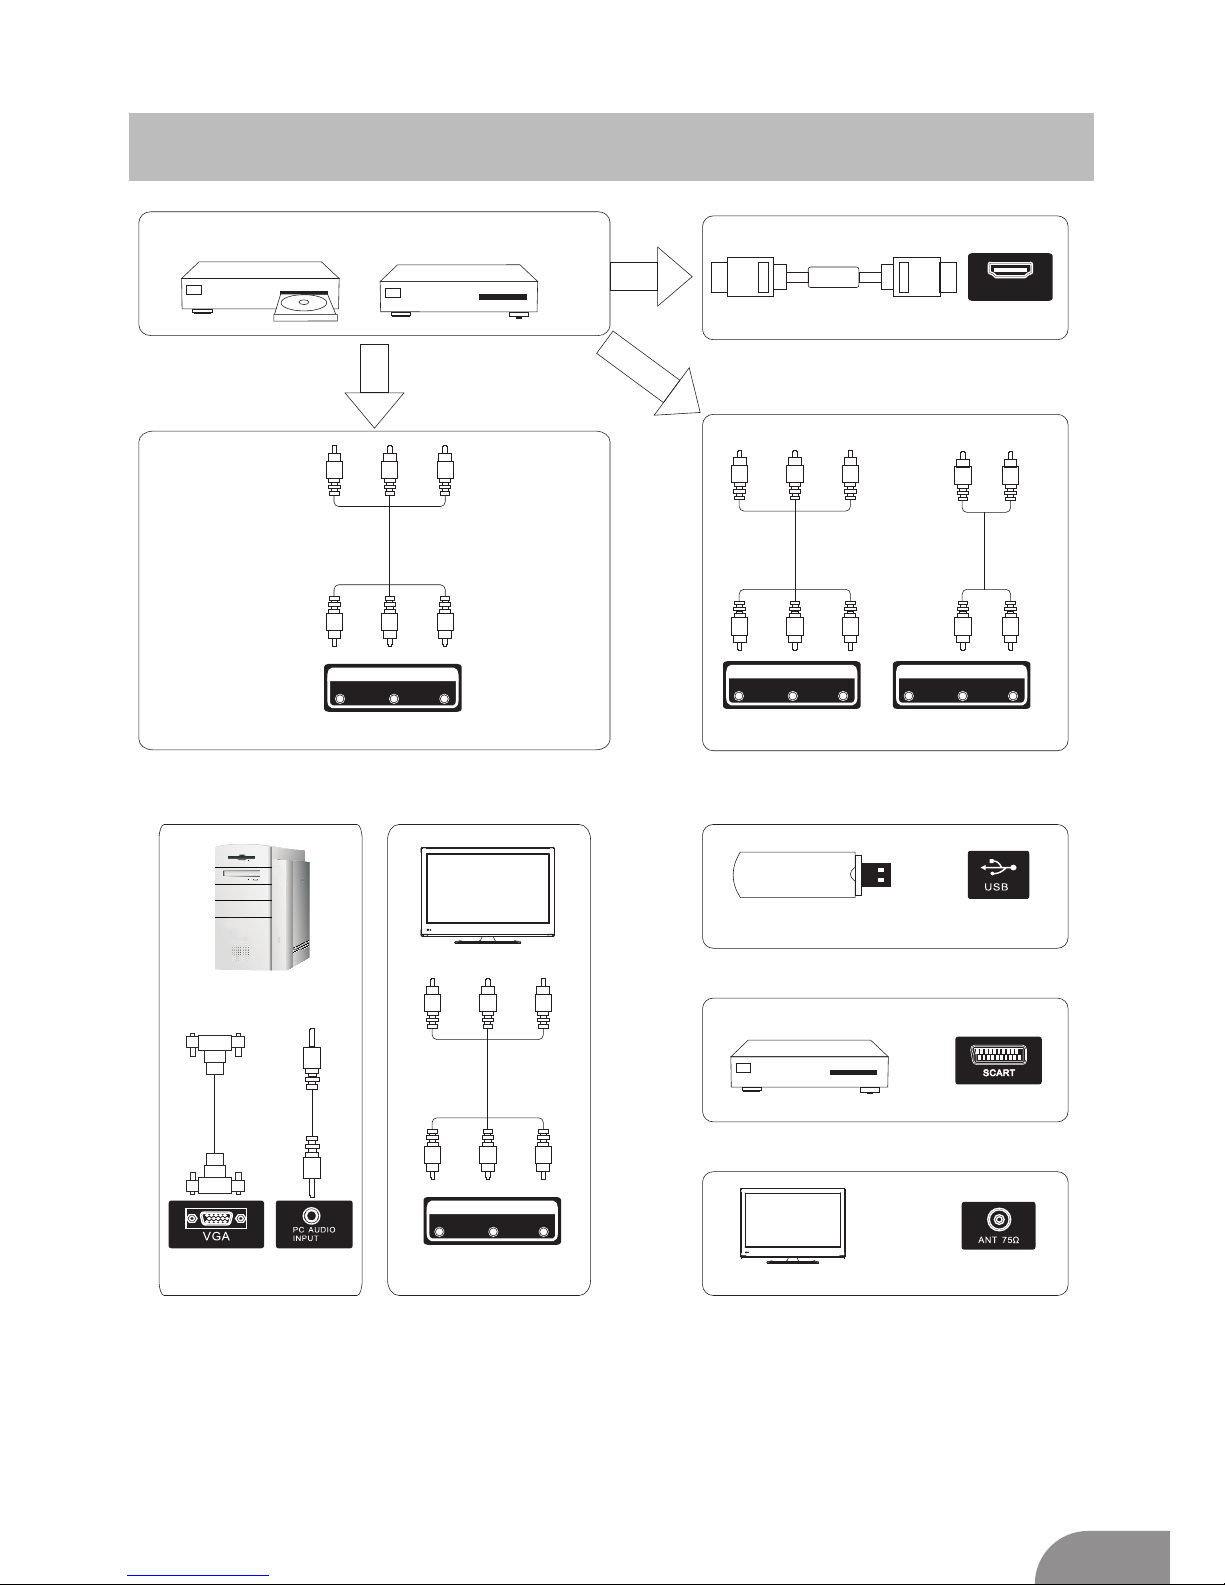
External device connection diagram
DV D
Set-t op bo xes
HDMI
HD MI
VID EO R L
OUT PUT
HDMI in put c onnectio n
VID EO R L
INP UT
AV input conn ect ion
AV output con nec tion
VID EO R L
INP UT
Y Pb Pr
INP UT
AV input conn ect ion
USB con nec tion
TV conn ect ion
Set-t op bo xes
SCART connection
6
AV input conn ect ion
Page 8
1
3
2
4
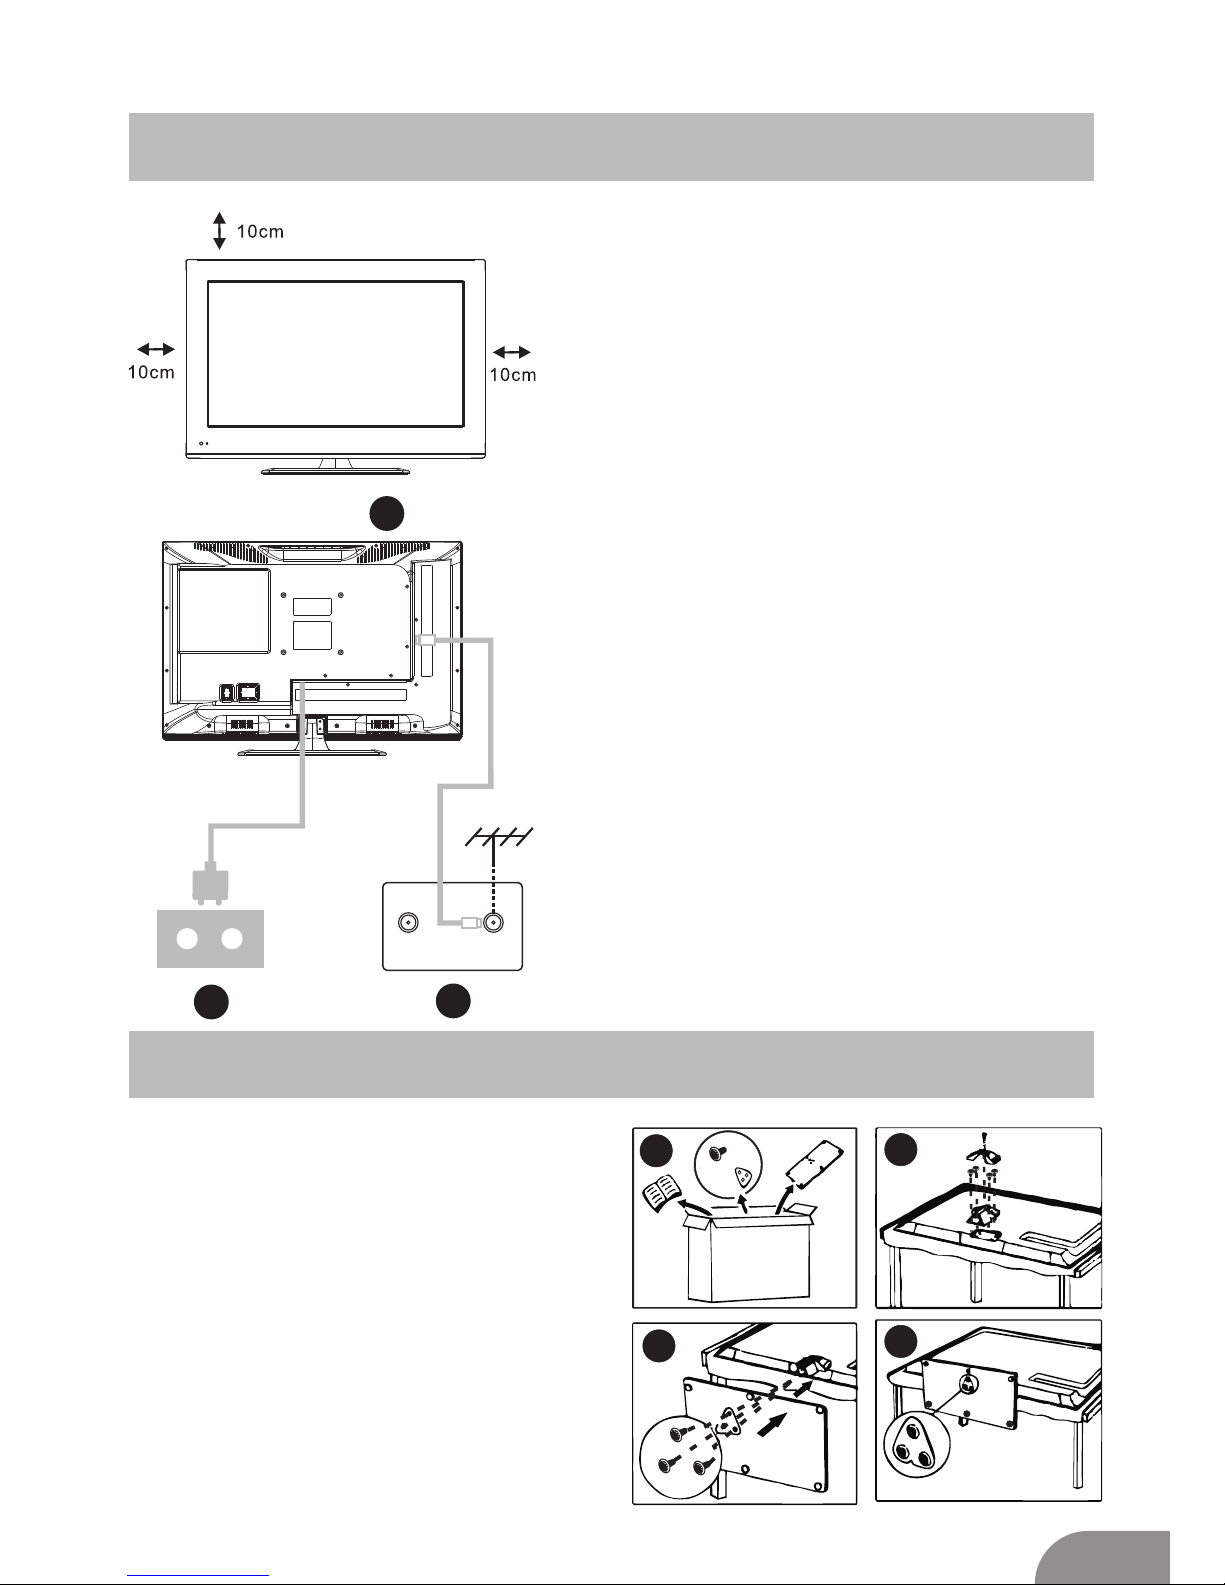
Install And Connect TV
7
TV ANT
FM ANT
TV sign al ou tpu t
Set your TV
To put your TV in a firm place which can
bear the weight of the TV.
To avoid danger, please don’t expose the
TV near water or heating place (such as
light, candle, heating machine),do not block
the ventilation at the back of TV.
Connect antenna and power
1.Connect the antenna cable to the antenna
socket on the back of the TV.
2.To plug the power cord of TV (AC 100 240V~ 50/60Hz).
1
3
Turn on TV
3.Press the power button of the TV the
indication light will turn to green. if it is
on standby mode (the light is red),press
the power button on the remote control
to turn on the TV.
Note:
Picture for reference purposes only.
2
TV Stand Installation Instructions
1.Open the carton and remove the TV
and scattered accessories and base
(some models without base).
2.to avoid the injury of the TV, covered
with a soft mattress, put it on the table, face
down on a soft mattress, the base of the
neck is fixed on the TV with screws.
3.screw the base and connected to the TV.
4. the installation is complete.
Page 9
TV Menu
8
PC
AV
Media
Input Source
TV
YPbPr
Ent er
Ent er
ENTE R
HDMI
SCART
Input Source
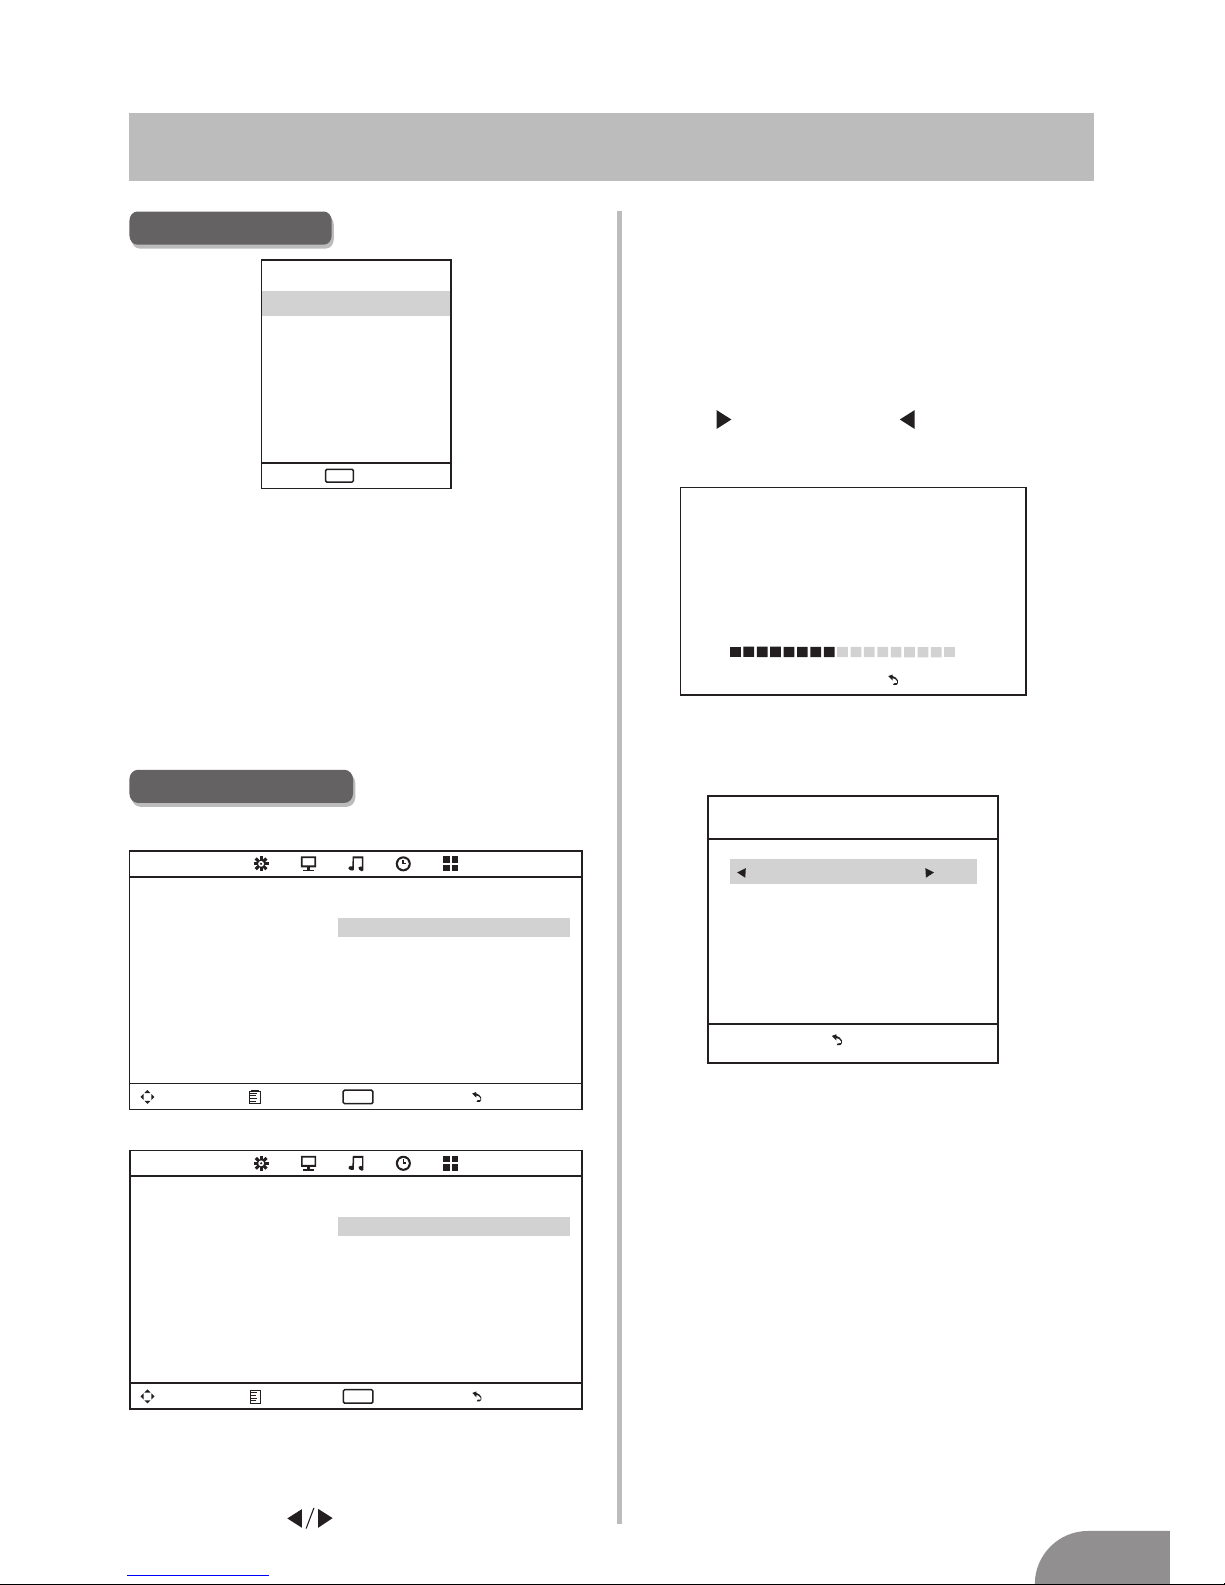
Press SOURCE to display the input source list.
Press ▼/▲ to highlight the input source
and press ENTER to confirm.
Press EXIT to hide the On-Screen menu,
or it will disappear after seconds. (The way
to set the disappeared time: MENU - TIME
Menu - OSD Timer)
Note: The Channel Menu is available only
in TV mode, and the item is the default
when pressing MENU, if you want view
the Picture/Sound/Time/Option Menu,
please press to select.
Tune Type
Cable/Air
Channel Menu
Move Menu Enter
Exit
ENTE R
CHANNEL
Tun e Type Air
Auto Tuni ng
NTSC Channel Menu
PAL Channel Menu
Move Menu Enter
Exit
ENTE R
CHANNEL
Auto Tuni ng
ATV Ma nual Tunin g
Progra mme Ed it
ATV Ma nua l Tunin g
-
Col or Syst em PAL
Sou nd Syst em DK
Fin e-Tun e 49.7 5MHZ
AFC O ff
Sea rch
+
Cur rent CH 1
Menu
Current CH
Set the channel number
Color system
Select the color system(PAL/SECAM/
NTSC)
Sound System
Select the sound system(DK/BG/I)
Fine-Turn
Adjust the frequency of the channel finely.
AFC
Automatic Fine tuning.
Search
Press ENTER to search down from the current
frequency, and press ENTER to search up.
Auto Tuning
Auto Tuning will sear c h f o r a v ailable
chann e ls a nd p rograms . Pr e ss▼/▲ to
selec t Auto Tuning, then pre s s OK to
start aut o se a rch. If y ou w ant to s top
searc h ing, press MEN U or EXIT, an d
press to conf i rm o r to can c el.
Chann el Tuning
TV : 5 Prog ramme(s)
44%.. . 433.75MH Z (TV )
Menu
ATV Manual Tuning
Note: The above is for reference only, to
prevail any kind
Page 10
TV Menu
9
Medium
Gives white colors a neutral tint.
Warm
Gives white colors a red tint.
Noise Reduction
Off/Low/Middle/High
You can clear up the input signal by setting
the item.
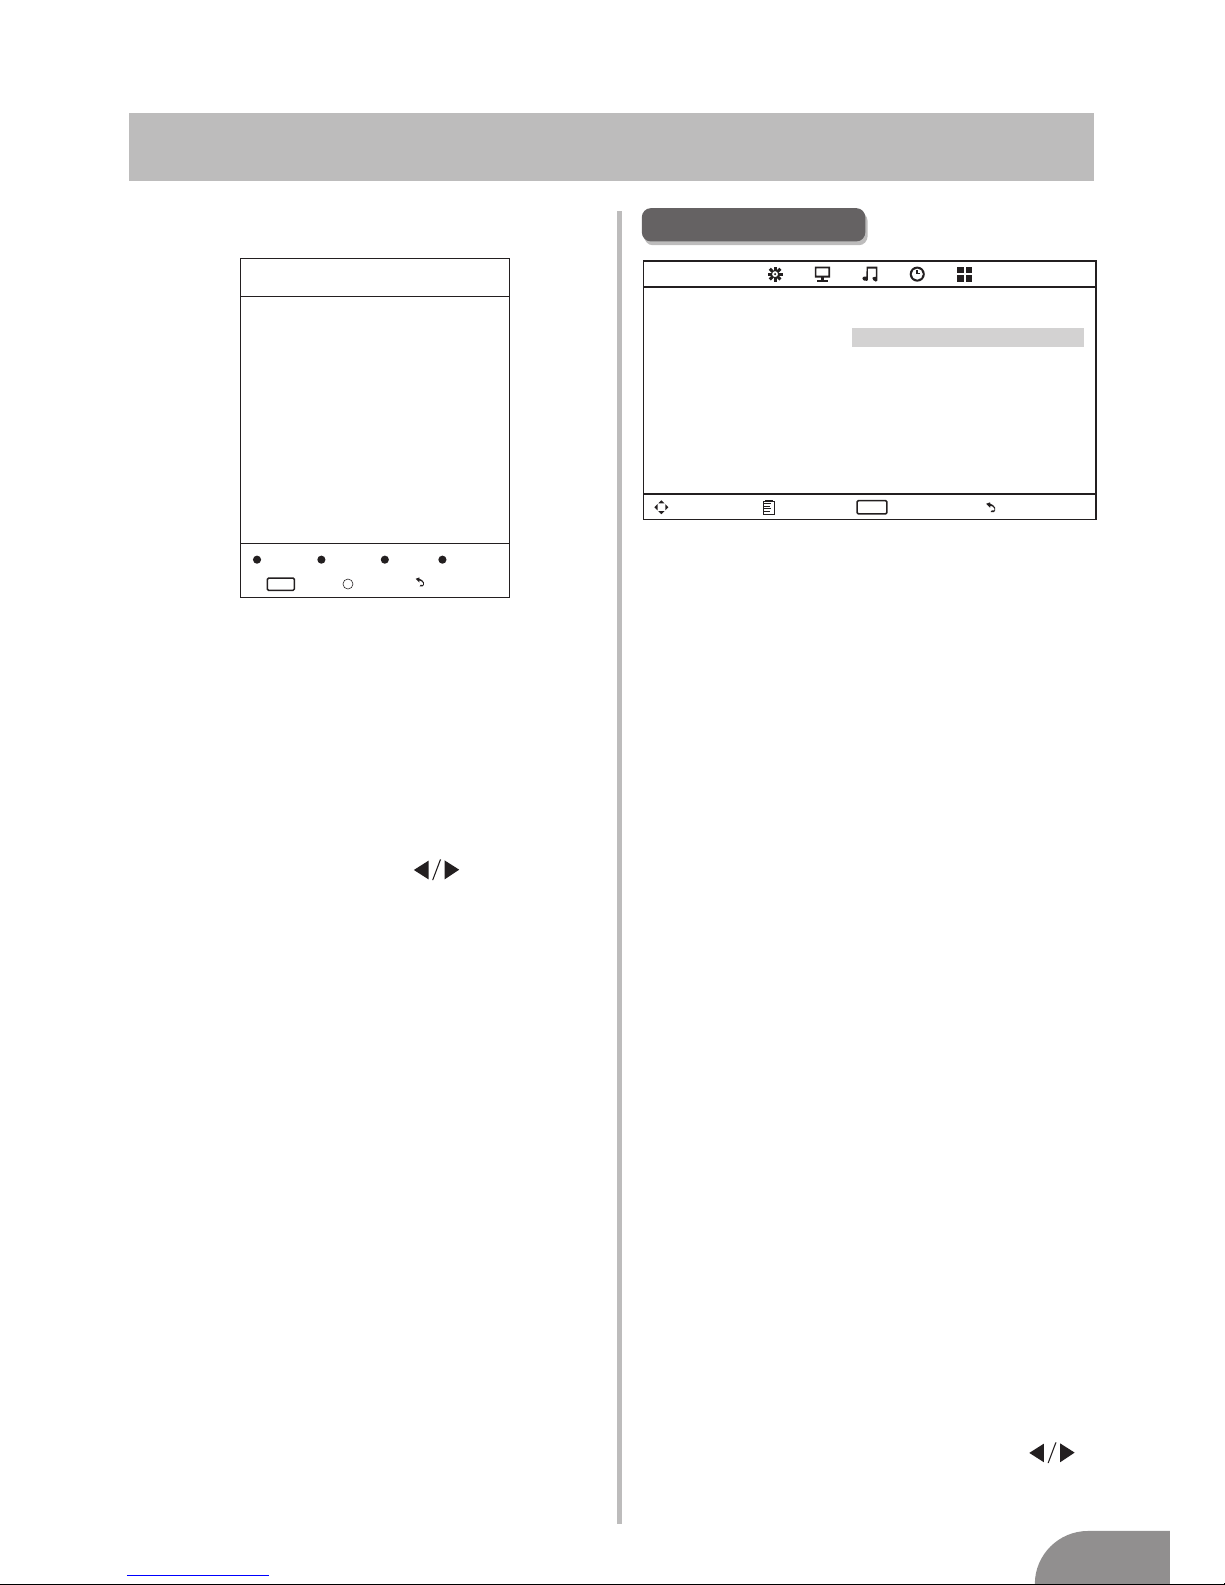
Sound Menu
Sound Mode
Standard/Music/Movie/Sports/User/Only
in this mode, Treble and Bass can be
adjusted.)
Bass
Adjust the low frequency sounds.
Treble
Adjust the high frequency sounds.
Balance
Adjust the level of sound coming from
the left and right speakers.
Auto Volume
Press L/R to set or cancel. When set
on, it will level out the sound being heard
when sudden changes in volume
occur during commercial breaks or
channel changes.
Adjusting the Bass/Treble/Balance
1 Select Sound Mode as User.
2 Highlight the item and press ▼/▲ to
display the sub-menu, then press
to adjust the value.
Move Menu Enter
Exit
ENTE R
SOUND
Sound Mo de Sta ndard
Tre ble 50
Bass 50
Balanc e 0
Auto Volu me Off
Programm Edit
The four colored key is the shortcut key for
programming the channel.
First press ▼/▲ to highlight the channel
you want to delete or rename or move or
skip, then:
Press the Red button to delete the channel.
Press the Green button to enter the
rename state, thenpress to select the
word you want to change, and ▼/▲ to
select word.
Press the Yellow button to set the channel
to mo ving state.then press ▼/▲ to mo ve
it to the position you want to put.
Press the Blue button to skip the select
channel. (Your TV set will skip the channel
automatically when using CH+/- to view
the channels.)
Fav Add or Delete the channel to your faver
ate list.
Dele te Ren ame Mov e
Skip
FAV
Fav
Men u
Programm Edit
Ent er
Men u
Ent er
ENTE R
FAV
Fav
Page 11
TV Menu
10
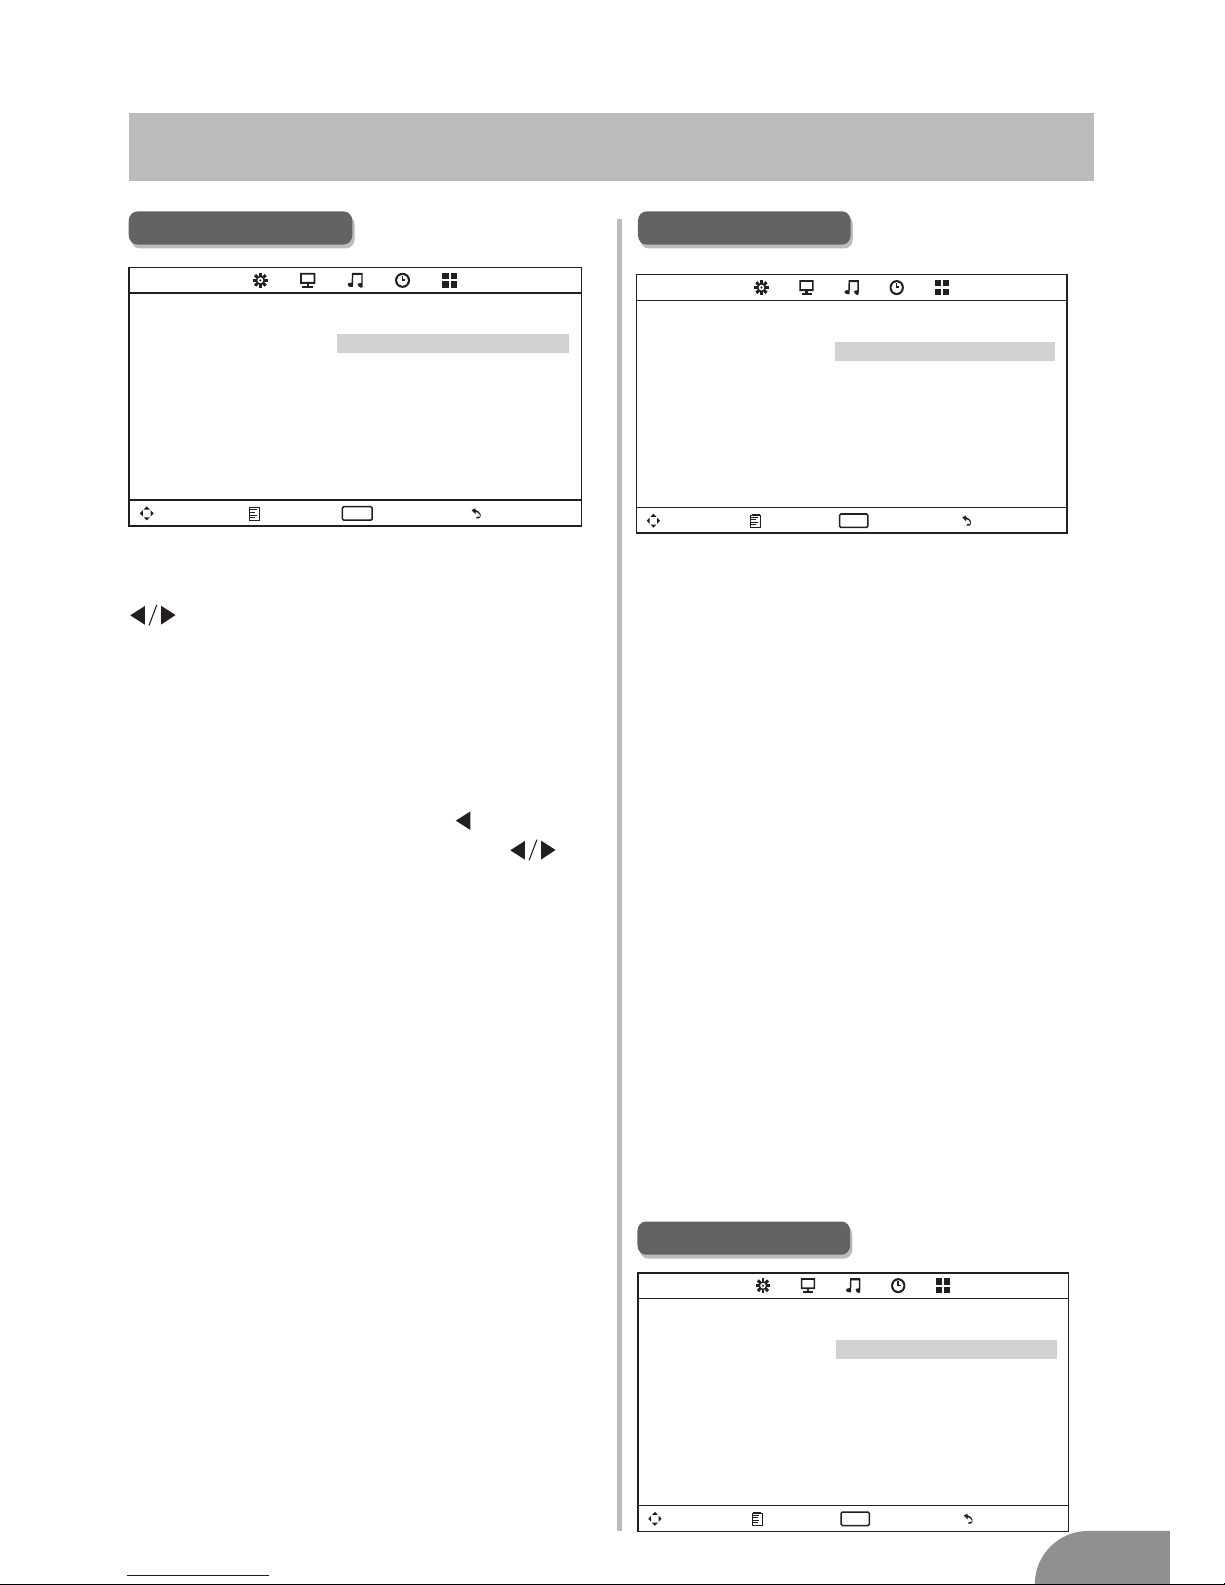
Option Menu
Move Menu Enter
Exit
ENTE R
OPTION
OSD Lang uage En glis h
Aspect Ra tio 16 :9
Blue Scr een Off
Key Lock Of f
Captio n Off
Parent Co ntro l
Reset
Softwa re Upd ate (USB)
Move Menu Enter
Exit
ENTE R
TIME
Sleep Tim er Off
OSD Timer 10 s
Auto Slee p Off
Sleep Time r
Select the time in minutes(off,10min,
20min,30min,60min,90min,120min,
180min,240min) that you want the
TV to shut off automatically after you
set the time. Cancel by setting it to Off
Auto Sleep
Select the time in hours(off,3h,4h,5h)
that you want the TV to remain on after
your last operation. Cancel by setting it
to Off.
OSD Timer
Select the time in seconds(5s,10s,15s,
20s,25s,30s,) that you want the On-
Screen Men remain display after your last
operation.
Time Menu
Picture Mode
Highlight the item and Press ENTER or
to enter the sub-menu, that sho ws
the picture mode you can choose:
Dynamic/Standard/Mild/User
Press PMODE on the remote control
to select picture mode directly.
Contrast/Brightness/Color/Tint
(NTSC only)/Sharpness
Highlight the item and press , and a
process bar appears, then press
to adjust the value.
Press MENU or EXIT to hide the
on-screen menu.
Note: Those setting s can be adjusted
only when the Picture Mode is set to User.
Color Temperature
Select the color temperature that you feel
comfortable.
Cool
Gives white colors a blue tint.
Contrast
Brightness
Color
Tint
Sharpness
Adjust the white level of the picture
Adjust darkness of black sections in the
picture.
Adjust the color intensity of the picture.
Adjust the hue(Red,Green,Blue) of the
picture.
.
Object edges are enhanced for picture d
etail.
Picture Menu
Move Menu Enter
ENTE R
PICTURE
Pictur e Mode Stan dard
Contra st 50
Bright ness 50
Color 50
Tin t 50
Sharpn ess 50
Color Temperat ure Med ium
Noise Re duct ion Middle
Exit
Page 12
TV Menu
11
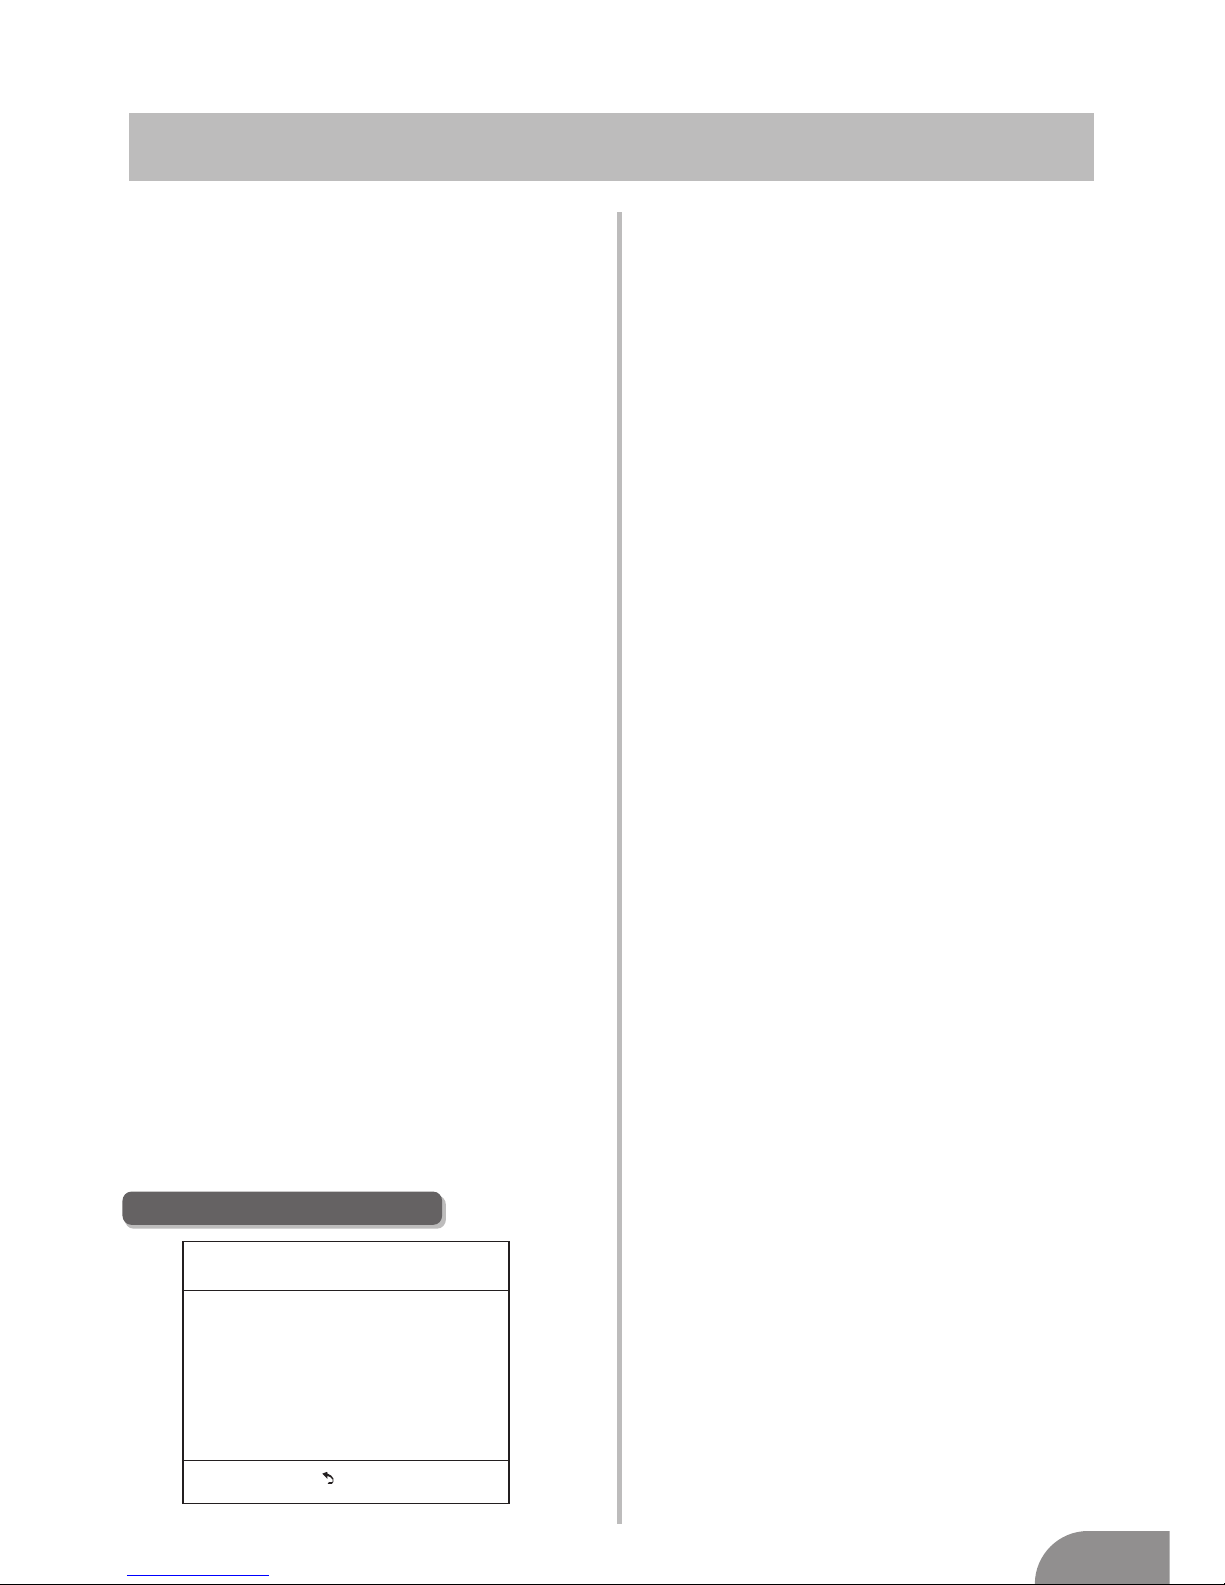
Set P assw ord Fi rst you s hould enter
the c orre ct old p assword then enter new
pas sword twice.
Loc k Syst em
Set t he lock s ystem ON or OFF.
TV
The TV rati ng com pose o f t wo asp ects:
age -based and c ontent-base d. Pag e 9
MAP P
Thi s syst em def ines t he rating contro l
whi ch com e from M PAA ru les.
G
Gen eral a udience . All a ges ad mitted
PG
Par ental guidanc e
PG- 13
Par ents s trongly c autioned . Some
mat erial may be i nappropr iate f or
chi ldren under 13.
R
Res tricted . Chil dren u nder 1 7 r equire
acc ompanyi ng par ent or ad ult gu ardian.
NC- 17
No one 1 7 and und er a admitte d.
X
Adu lt aud ience only
Can ada En glish The r atin gs are fo r
pro grams which are using Englis h rating
sys tem.
C
Chi ldren
C8+
Chi ldren 8 year s and old er
G
Gen eral p rogramm ing
PG
Par ental guidanc e
14+
Vi ewers 14 and ol der
18+
Adu lt pro grammin g
Canada French
The r atin gs are f or prog rams w hich a re
usi ng Fre nch ra ting s yste m.
G
Gen eral
8 ans+
Not r ecom mended for y oung er chi ldren
13 ans+
Not r ecom mended for c hild ren un der
age 1 3
16 ans+
Not re commend ed for ag es und er 16
18 ans+
Thi s prog ram is r estricte d to adults
OSD Lang u age
Set the OSD disp l ay l anguag e .
Aspe c t R a tio
Sele c t t h e s u itable asp e ct R ation . (4 : 3/
16:9 / Zoom1/ Z oom2).
Blue Scr e en
Set the background color to blue or black
when hav i ng n o i n put signal .
Key Lock
Set to prevent it from being used by young
chil d ren, or other unex p ected usin g.
Capt i on
Select from below closed-caption modes .
CC1,2,3,4 Displays corresponding caption
channe l s o f a anal o g p r ogram. (Us ually
be set to Cc1 for most progr a ms.)
Text1, 2,3,4 Dis plays cor respond ing text
serv i ce c hannel of a analog pro g ram.
Pare n t C o ntrol
For deta i l p l ease refer to page 7.
Rese t
Reca l l t h e d e fault sett i ng.
Soft w are Update ( USB)
Update your TV set. Select the software in
the root of your USB mem o ry, a n d p r ess
ENTE R l.
Menu
Set Password
Lock System ON
TV
MPAA R
Canada English PG
Canada French G
Parent Control(NTSC)
Page 13
TV Menu
12
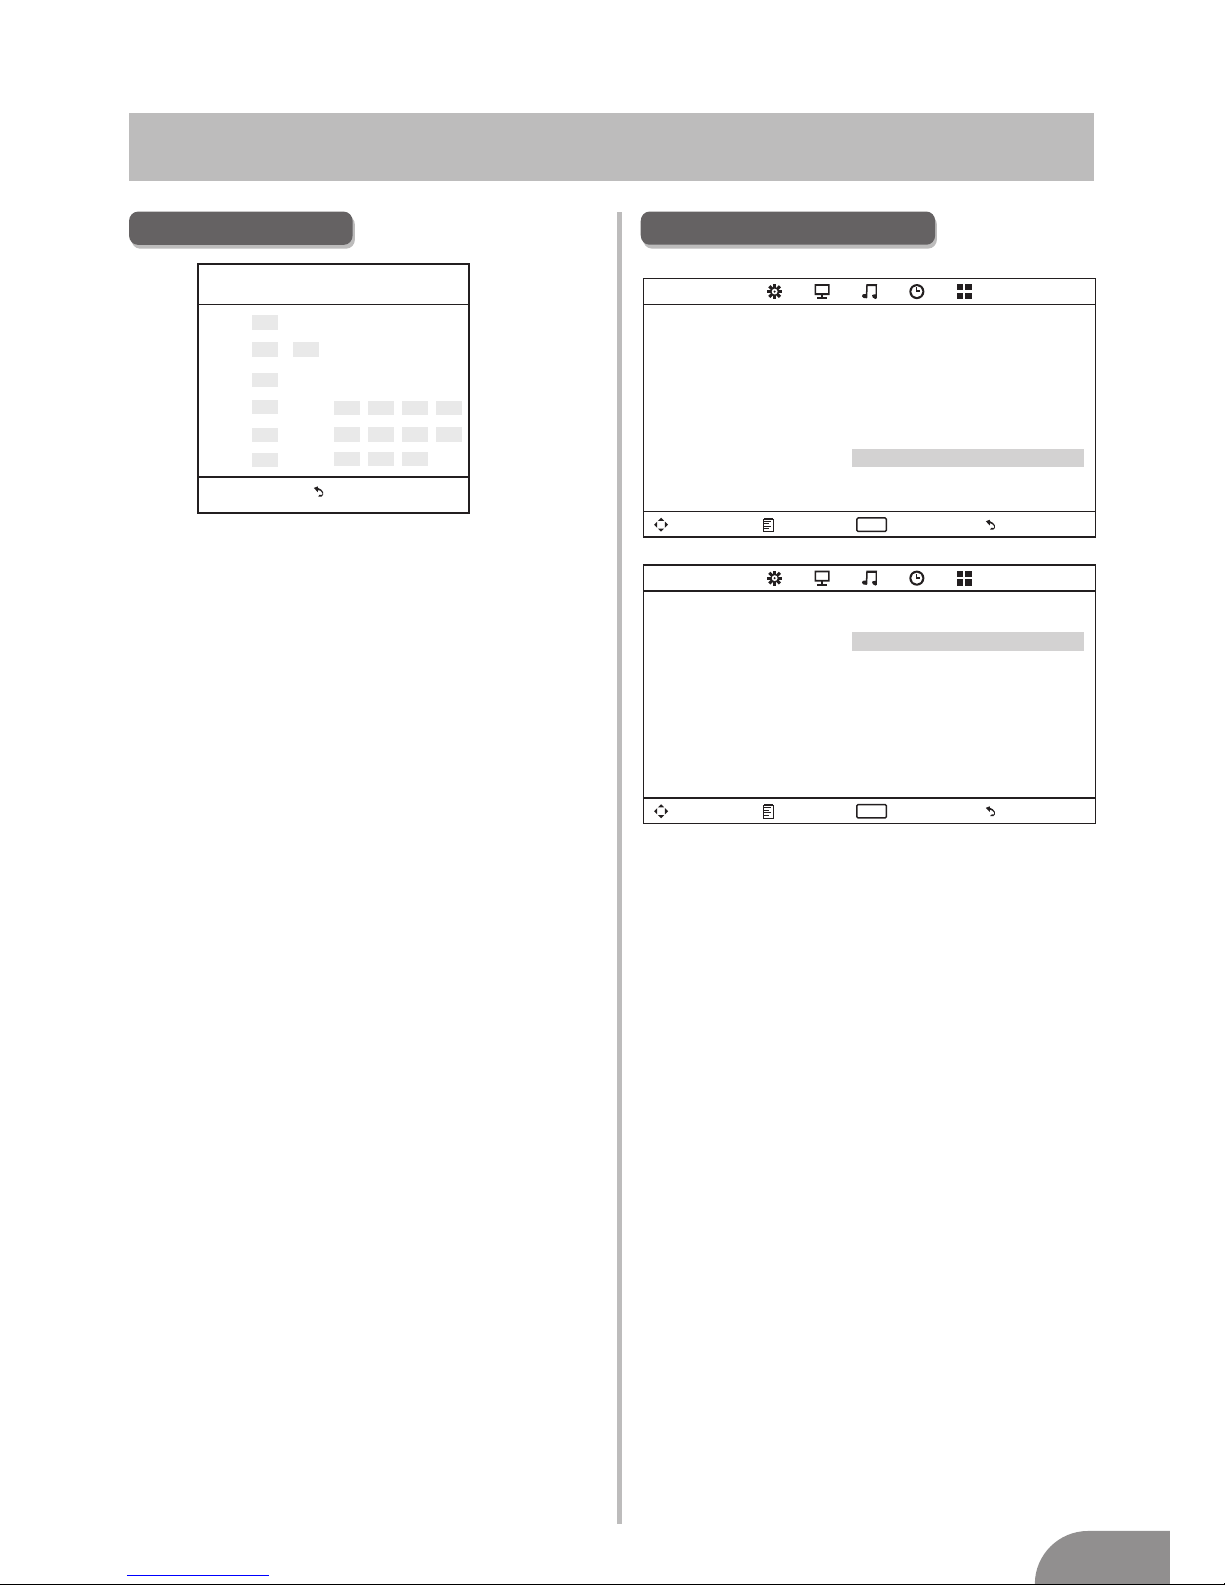
Hotel Mode
Source Lock
Default Source
Default Prog
Max Volume
Channel lock
Default Volume
Clear Lock
Set Password
Set hotel mode ON or OFF.
Note: The follow ing settings work only
when Hotel Mode is set to be ON.
Lock the input source which you want.
Set the default input source when turning
on your TV.
Set the default program when turning on
your TV.
Set the max volume that you can adjust.
Lock the channel which you prefered.
Set the default volume for every time you
open the TV, the default volume is 20.
Recall the default settings in hotel mode.
Set the password as you like.
Move Menu Enter
Exit
ENTE R
HOTEL
Hotel Mo de On
Source L ock
Defaul t Sour ce Off
Defaul t Prog 1
Max Volum e 100
Channe l lock O ff
Defaul t Volum e 20
Clear Lo ck
Set Pass word
Move Menu Enter
Exit
ENTE R
OPTION
OSD Lang uage E nglish
Aspect R atio 1 6:9
Blue Scr een Of f
Key Lock O ff
Captio n Off
Parent C ontr ol
Hotel Mo de
Reset
Softwa re Upd ate (USB )
Hotel Menu(Optional)
TV rating(NTSC)
TV-Y
Gen eral audie nce
TV-Y7
Par ental guid ance suggested
TV-G
Par ents stron gly cautioned
TV-PG
Res tricted
TV-14
No one 17 a nd under admi tted
TV-MA
Adu lt audienc e o nly
FV
Fan tasy viole nce
D
Sug gestive di alog ue
L
Str ong langua ge
S
Sex ual situat ions
V
Violen ce
N o t e: T h e c o n t e n t r a ti n g s w i l l increase depending on the level of the
age-b ased rating. For exa mple,
a progr am with a TV-PG V(v iolence)
rating may contain moderate violence,
while a TV-1 4 V(violence)
rating may contain inten se violence.
So lock ing a higher level opti on will
automatic ally locking the
options that has more sensitive level.
Menu
S
TV ratin g
TV-Y
TV-Y7
TV-G
TV-PG
TV-14
TV-MA
ALL
ALL
ALL
ALL
ALL
ALL
V
L
D
V
S
L
D
V
S
L
FV
Page 14
PC Menu
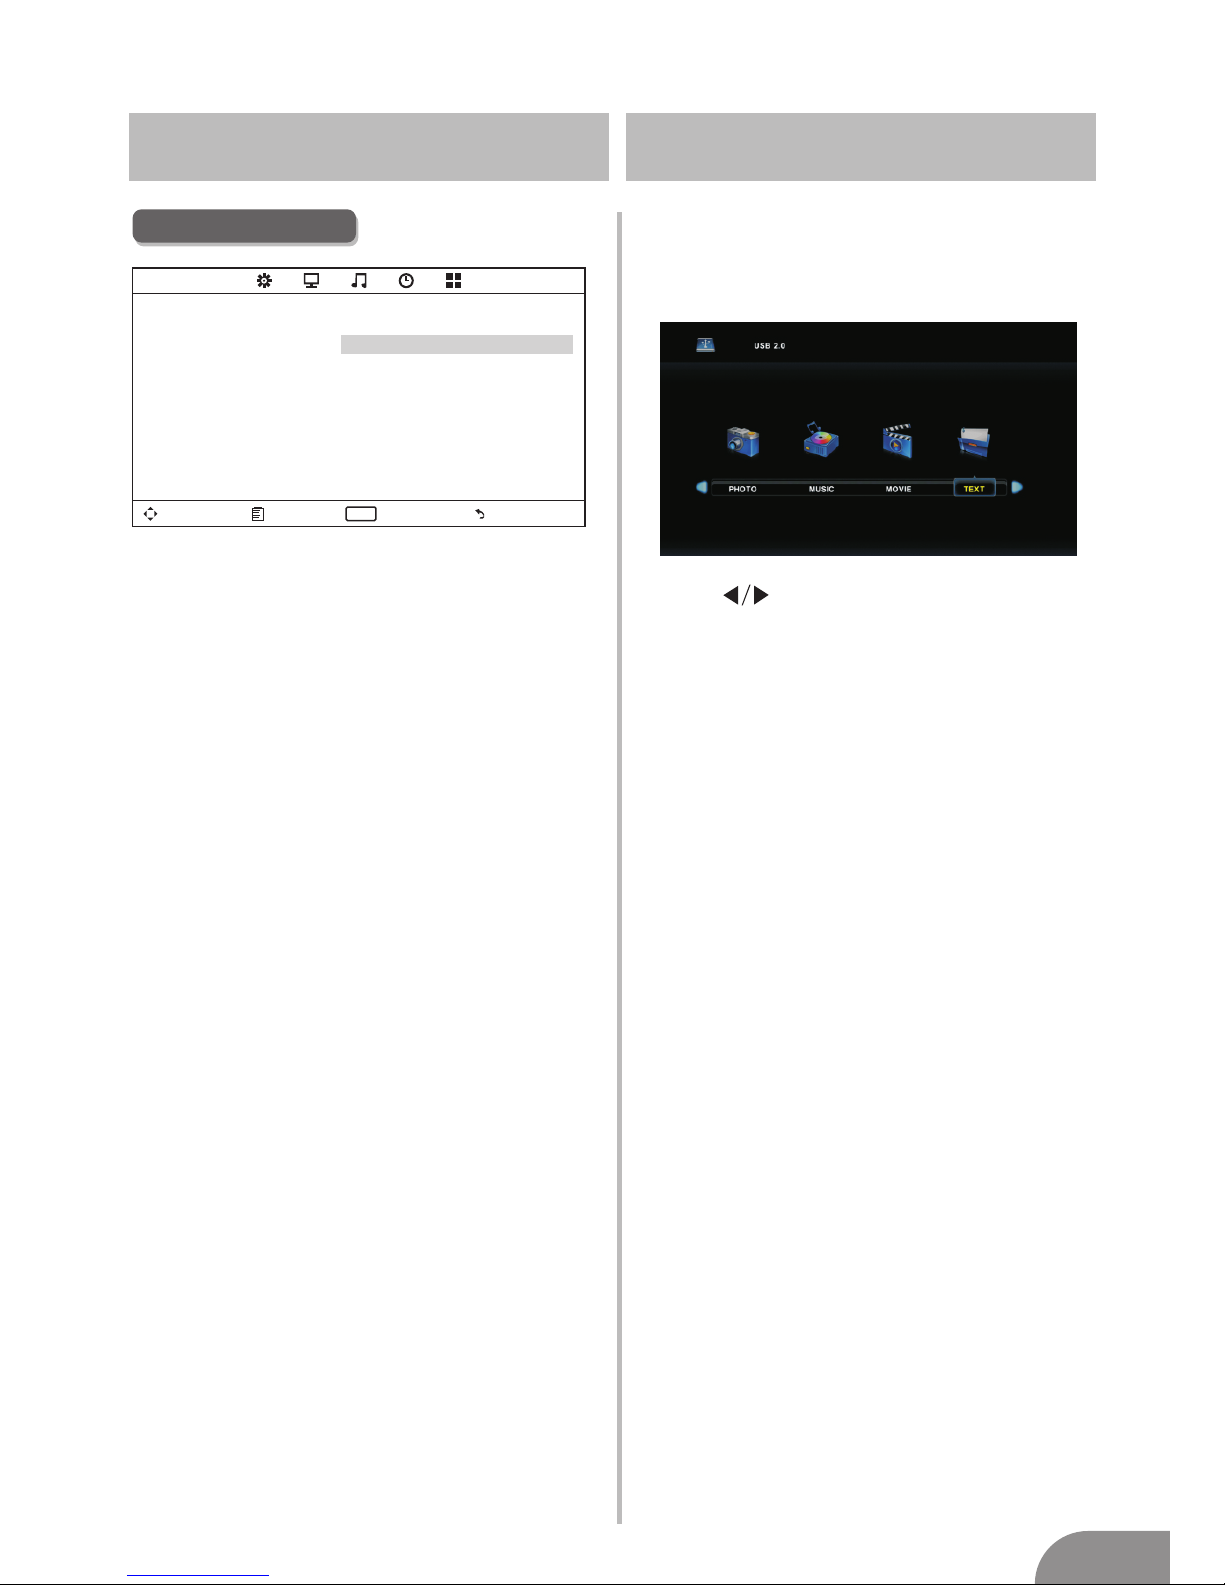
Screen Menu
Move Menu Enter
Exit
ENTE R
SCREEN
Aut o Adjus t
Hor izo ntal Pos . 50
Vertica l Pos. 50
Clock 50
Pha se 99
Auto Adjust
Automatically adjust Clock, Phase,
H-Position, and V-Position settings.
Horizontal Pos.
Shift the screen up or down.
Vertical Pos.
Shift the screen left or right.
Clock
Adjust the internal sampling clock rate.
Phase
Adjust the internal signal phase.
Media Menu
The color of the icon means whether
your TV has detected a USB memory or
not. Bule: Yes; Gray: No;
Press
Movie/Text icon and ENTER to enter
the USB memory.
to select Photo/Music/
13
Page 15
Help
14
Page 16
Machine Technical Specifications
Screen Si ze
16”
19”
22”
24”
32”
39”/40”
39”/40”
42”
46”
50”
TV System
PAL/NTSC
Preset Channel s
PAL: 0-1 99,NTSC :AI R 2-6 9
CABLE1 -12 5
Speaker O utput
power Con sump tion
(LE D)
PAL/NTSC
PAL/NTSC
PAL/NTSC
PAL/NTSC
PAL/NTSC
PAL/NTSC
PAL/NTSC
PAL/NTSC
5W+5W
5W+5W
5W+5W
5W+5W
10W+10W
10W+10W
10W+10W
10W+10W
10W+10W
24W
36W/48W
48W
56W/65W /100W
70W/75W
85W
110W
160W
36W/48W
36W
48W/60W
60W
100W/13 5W
135W
175W
280W
48W/60W
Screen Si ze
16”
19”
22”
24”
32”
42”
46”
55”
power Con sump tion
(LCD)
100W
26”
Main acce ssories
User's manual x1
Remote controller x1
Power cord x1
AAA Batteries x2
15
PAL: 0-1 99,NTSC :AI R 2-6 9
CABLE1 -12 5
PAL: 0-1 99,NTSC :AI R 2-6 9
CABLE1 -12 5
PAL: 0-1 99,NTSC :AI R 2-6 9
CABLE1 -12 5
PAL: 0-1 99,NTSC :AI R 2-6 9
CABLE1 -12 5
PAL: 0-1 99 NTSC:A IR 2- 69
CABLE1 -12 5
PAL: 0-1 99,NTSC :AI R 2-6 9
CABLE1 -12 5
PAL: 0-1 99,NTSC :AI R 2-6 9
CABLE1 -12 5
PAL: 0-1 99,NTSC :AI R 2-6 9
CABLE1 -12 5
 Loading...