

Wolf Garden CSE 2035, CSE 2240 operation manual
CSE 2035
CSE 2240

2
1
CSE 2035
7
1
CSE 2240
4
6
5
3
2
9
17
8
15
10
8
12
11
14
13
16
3
“1”
“0”
STOP
2
14
13
4
4
3
5
9
6
8
5/32" (4 mm)
7
1
30°
3
85°
1 mm
50°
5
2
4
0.6 mm
10
30°
6
11
B
A
5
12
13
14
16
6
15

# La casa produttrice si riserva la possibilità di variare le caratteristiche e i dati del seguente manuale in qualunque momento e senza preavviso.
# The manufacturers reserve the right to modify characteristics and data in this manual at any
moment and without prior notice.
# Le fabricant se réserve le droit de modifier à tout moment et sans préavis les caractéristiques et
les informations de ce manuel.
# Der Hersteller behält sich die Möglichkeit zur Änderung der Eigenschaften und Daten des vorliegenden Handbuchs jederzeit und ohne Vorankündigung vor.
# La casa constructora, se reserva la posibilidad de variar algunas características y datos del
presente manual en cualquier momento y sin preaviso.
# De fabrikant behoudt zich het recht voor om de eigenschappen en de gegevens die in deze handleiding staan op elk gewenst moment en zonder voorafgaande kennisgeving te wijzigen.
# A casa produtora reserva-se a possibilidade de variar as características e dados do seguinte
manual em qualquer momento e sem aviso prévio.
# Producent zastrzega sobie mozliwosc zmiany,w kazdej chwili i bez uprzedzenia, cech charakterystycznych oraz danych zawartych w niniejszym podreczniku.
# Da bi zagotovili natancnost informacij zbranih v tem prirocniku, smo se potrudili v najvecji možni
meri s tega vidika in z vidika lastne nenehne razvojne politike, si konstruktor pridržuje pravico do
izvedbe potrebnih sprememb brez predhodne objave.
# Proizvajalno podjetje si pridržuje možnost v katerem koli trenutku in brez predhodnega sporoèila,
spremeniti lastnosti in podatke tega priroènika.
# Poduzete su sve moguce mjere kako bi se osigurala tocnost informacija sadržanih u ovom prirucniku: imajuci to u vidu te politiku stalnog usavršavanja, proizvodac zadržava pravo potrebnih
izmjena bez prethodne obavijesti.
# Za obezbeduvawe na to~na informacija vo ovoj prira~nik bea napraveni maksimalni napori. Vo
ovoj kontekst i vo kontekst na svojata sopstvena politika za postojano usovr{uvawe, dizajnerot si
go ~uva pravoto da pravi neophodni promeni bez bilo kakvo predupreduvawe.
# Is bu kullaným kýlavuzunda içerilen bilgilerin kusursuz bir sekilde olmasýný garantilemek için
mümkün olan tüm çabalar sarf edilmistir, bu görüs açýsýndan ve sürekli kendi iyilestirme politikasýndan dolayý üretici önceden herhangi bir uyarýda bulunmadan gerekli degisiklikler yapma
hakkýný saklý tutar.
# Производителот го задржува правото на внесување измени на карактеристиките и податоците
во овој прирачник во било кој момент и без претходно известување.
# Proizvodac pridržava pravo izmjene karakteristika i podataka u ovim uputama u svakom trenutku
i bez prethodne obavijesti.
# Výrobce si vyhrazuje možnost měnit charakteristiky a údaje tohoto manuálu v kterémkoliv oka-
mžiku a bez předchozího upozornění.
# Výrobca si vyhradzuje možnosť meniť charakteristiky a údaje tohto manuálu v ktoromkoľvek
okamihu a bez predchádzajúceho upozornenia.
# Производителят си запазва правото във всеки момент и без предупреждение да променя характеристиките и
данните, съдържащи се в този наръчник.
# Výrobce si vyhrazuje možnost kdykoliv změnit parametry a údaje uvedené v tomto návodu bez předchozího
upozornění.
# Producenten forbeholder sig ret til ændring af karakteristikaene og oplysningerne i manualen på
et hvilket som helst tidspunkt uden forudgående meddelelse herom.
#Tootja jätab endale õiguse muuta kasutusjuhendis toodud jooniseid ja tehnilisi andmeid igal
ajahetkel .
# Valmistaja pidättää oikeuden tehdä muutoksia tässä oppaassa esitettyihin ominaisuuksiin ja
tietoihin milloin tahansa ilman ennakkovaroitusta.
# A gyártó cég fenntartja magának a jogot az alábbi kézikönyv jellemzőinek és adatainak bármikor,
előzetes értesítés nélkül történő módosításához.
# Ražotājs patur tiesības jebkurā brīdī un bez iepriekšēja brīdinājuma mainīt šajā rokasgrāmatā
norādītos raksturlielumus un datus.
# Gamintojas pasilieka teisę bet kuriuo metu be atskiro perspėjimo keisti šio vadovo aprašymus
ir duomenis.
# Produsenten forbeholder seg rett til å utføre endringer i karakteristikkene og dataene beskrevet
i denne veiledningen uten forvarsel.
# Producătorul îşi rezervă dreptul de a modifica caracteristicile şi informaţiile din manualul de mai
jos în orice moment şi fără preaviz.
# Произвођачка кућа задржава могућност да измени карактеристике и податке, који су садржани
у овом приручнику, и то у било ком тренутку и без најаве.
# Tillverkaren förbehåller sig möjligheten att när som helst och utan föregående meddelande ändra
på egenskaperna och datan i denna handbok.
# Výrobca si vyhradzuje právo na zmenu vlastností a údajov v tejto príručke a to v ktoromkoľvek
okamihu a bez predchádzajúceho upozornenia.
7
8
9
10
11

SOMMARIO IT
ISTRUZIONI ORIGINALI
1. Informazioni generali ............................................................16
2. Simboli ..................................................................................16
3. Norme di sicurezza generali .................................................17
4. Norme di sicurezza elettrica .................................................19
5. Descrizione delle parti della macchina .................................19
6. Montaggio di barra e catena .................................................19
7. Sistema di lubrificazione .......................................................20
8. Sistema freno di sicurezza ...................................................20
9. Avviamento e arresto ............................................................20
10. Manutenzione .....................................................................20
11. Consigli di massima per il taglio .........................................21
12. Dati tecnici ..........................................................................23
SOMMAIRE FR
TRADUIT DU MODE ORIGINAL
1. Informations générales .........................................................34
2. Symboles ..............................................................................34
3. Consignes générales de sécurité.......................................... 35
4. Consignes de sécurité électrique .........................................37
5. Description des éléments de l’appareil .................................37
6. Montage du guide et de la chaîne ........................................38
7. Système de lubrification .......................................................38
8. Frein de chaîne de sécurité ..................................................38
9. Mise en marche et arrêt ........................................................38
10. Entretien .............................................................................39
11. Conseils généraux pour la coupe .......................................39
12. Caractéristiques techniques ...............................................41
ÍNDICE ES
TRADUCIDO DEL INSTRUCCIONES ORIGINALES
1. Informaciones generales ......................................................54
2. Símbolos ...............................................................................54
3. Normas de seguridad generales ..........................................55
4. Normas de seguridad eléctrica .............................................57
5. Descripción de las partes de la máquina ..............................57
6. Montaje de barra y cadena ...................................................57
7. Sistema de lubricación .........................................................58
8. Sistema freno de seguridad ..................................................58
9.Puesta en marcha y parada ..................................................58
10. Mantenimiento ....................................................................58
11. Consejos generales para el corte .......................................59
12. Datos técnicos ....................................................................60
SUMMARY GB
TRANSLATE OF THE ORIGINAL INSTRUCTIONS
1. General informations ............................................................26
2. Symbols ................................................................................26
3. General safety norms ...........................................................26
4. Electrical safety ....................................................................29
5. Description of machine parts ...............................................29
6. Bar and chain assembly .......................................................29
7. Lubrification system ..............................................................29
8. Safety chainbrake .................................................................30
9. Switching on/off ....................................................................30
10. Maintenance .......................................................................30
11. General suggestions for cutting ..........................................31
12. Technical data .....................................................................32
INHALT DE
ÜBERSETZUNG DER ORIGINALBETRIEBSANLEITUNG
1. Allgemeine Informationen .....................................................44
2. Symbole ................................................................................44
3. Allgemeine Sicherheitsvorschriften .......................................45
4. Vorschriften zur elektrischen Sicherheit ...............................47
5. Beschreibung des Lieferumfangs .........................................47
6. Montage von Schwert und Kette ..........................................48
7. Schmiersystem .....................................................................48
8. System Sicherheitsbremse ...................................................48
9. Start und Stopp .....................................................................49
10. Wartung ..............................................................................49
11. Allgemeine Hinweise zum Schneiden .................................49
12. Technische Daten ...............................................................51
INHOUD NL
VERTAALD UNIT DE OORSPRONKELIJKE GEBBRUIKSAANWIJZING
1. Algemene informatie .............................................................62
2. Symbolen ..............................................................................62
3. Algemene veiligheidsvoorschriften .......................................63
4. Elektrische veiligheidsvoorschriften ......................................65
5. Beschrijving van de onderdelen van de machine .................65
6. Monteren van het zaagblad en de ketting ............................66
7. Smeersysteem ......................................................................66
8. Veiligheidsremsysteem .........................................................66
9. Aan- en uitzetten ...................................................................67
10. Onderhoud ..........................................................................67
11. Stelregels voor het zagen ...................................................67
12. Technische gegevens .........................................................69
SUMÁRIO PT
TRADUZIDO DO INSTRUÇÕES ORIGINAL
1. Informações gerais ...............................................................72
2. Símbolos ...............................................................................72
3. Normas de segurança gerais ...............................................73
4. Normas de segurança eléctrica ............................................75
5. Descrição das partes da máquina ........................................75
6. Montagem da barra e corrente .............................................75
7. Sistema de lubrificação ........................................................76
8. Sistema de travagem de segurança .....................................76
9. Arranque e parada ................................................................76
10. Manutenção ........................................................................76
11. Conselhos de máxima para o corte ....................................77
12. Dados técnicos ...................................................................78
12
ΠΕΡΙΕΧΟΜΕΝΑ GR
Μετάφραση από τις αρχικές οδηγίες
1. Γενικέσ πληροφορίεσ ............................................................80
2. Σύμβολα ...............................................................................80
3. Γενικοί κανόνεσ ασφαλείασ ..................................................81
4. Ηλεκτρικοί κανόνεσ ασφαλείασ ............................................83
5. Περιγραφή των τμημάτων τησ μηχανήσ ................................83
6. Συναρμολόγηση μπάρασ και αλυσίδασ ................................84
7. Σύστημα λίπανσησ ...............................................................84
8. Σύστημα φρένου ασφαλείασ ................................................84
9. Εκκίνηση και σταμάτημα ......................................................85
10. Συντήρηση ..........................................................................85
11. Γενικέσ συμβουλέσ κοπήσ .................................................. 86
12. Τεχνικά στοιχεία .................................................................87

SPIS TREŚCI PL
TŁUMACZONE Z ORYGINALNEJ INSTRUKCJI
1. Ogólne informacje ................................................................90
2. Symbole ................................................................................90
3. Ogólne normy bezpieczeństwa ............................................91
4. Normy bezpieczeństwa elektrycznego .................................93
5. Opis części urządzenia .........................................................94
6. Montaż prowadnicy i łańcucha .............................................94
7. System smarowania .............................................................94
8. System hamulca bezpieczeństwa ........................................95
9. Włączanie i wyłączanie .........................................................95
10. Konserwacja .......................................................................95
11. Ogólne wskazówki dotyczące cięcia ...................................96
12. Dane techniczne .................................................................98
СОДЕРЖАНИЕ RUS
В ПЕРЕВОДЕ С ОРИГИНАЛЬНОЙ ИНСТРУКЦИИ
1. Общая информация .........................................................108
2. Символы ............................................................................108
3. Общие правила техники безопасности ...........................109
4. Нормы электрической безопасности............................... 111
5. Описание частей машины ................................................ 111
6. Монтаж шины и цепи ........................................................ 111
7. Система смазки.................................................................112
8. Система аварийных тормозов .........................................112
9. Приведение в действие и остановка ............................... 112
10. Уход .................................................................................112
11. Общиe совeты для рacпилoвки ..................................... 113
12. Технические данные ....................................................... 115
ÝÇÝNDEKÝLER TR
1. Genel bilgiler .......................................................................126
2. Semboller ...........................................................................126
3. Genel emniyet kurallarý ......................................................126
4. Elektrik emniyet kurallarý ....................................................128
5. Makine aksamlarýnýn tanýmý ............................................128
6. Pala ve zincir montajý .........................................................128
7. Yaðlama sistemi..................................................................128
8. Emniyet freni sistemi ..........................................................129
9. Çalýþtýrma ve durdurma ....................................................129
10. Bakým ...............................................................................129
11. Genelde kesim tavsiyeleri .................................................130
12. Teknik veriler .....................................................................131
SLOVENŠÈINAVSEBINA SI
PREVEDENI IZ IZVIRNIH NAVODIL
1. Splošne informacije ............................................................100
2.Simboli .................................................................................100
3. Splošna varnostna pravila ..................................................100
4. Doloèila elektriène varnosti ................................................102
5. Opis delov naprave .............................................................102
6. Montaža meèa in verige .....................................................103
7. Sistem mazanja ..................................................................103
8. Sistem varnostne zavore ....................................................103
9. Zagon in zaustavitev ...........................................................103
10. Vzdrževanje ......................................................................104
11. Splošni nasveti za rezanje ................................................104
12. Tehnièni podatki ................................................................106
SADRŽAJ HR
PREVEDENO IZ IZVORNE UPUTE
1. Opæe informacije ...............................................................118
2. Simboli ................................................................................118
3. Opæi sigurnosni propisi ...................................................... 118
4. Sigurnosni propisi za elektriène ureðaje .............................120
5. Opis dijelova ureðaja ..........................................................121
6. Namještanje vodilice i lanca ...............................................121
7. Sustav podmazivanja .........................................................121
8. Sustav sigurnosne koènice .................................................121
9. Pokretanje i zaustavljanje ...................................................122
10. Održavanje .......................................................................122
11. Nekoliko kratkih savjeta za rezanje ..................................122
12. Tehnièki podaci .................................................................124
СОДРЖИНА MK
1. Општи информации ..........................................................132
2. Симболи ............................................................................132
3. Општи норми за безбедност ............................................133
4. Норми за елекрична безбедност .....................................135
5. Опис на деловите на електричната пила .......................135
6. Монатажа на лостот и ланецот........................................135
7. Систем за подмачкување .................................................136
8. Безбедносен систем за кочење .......................................136
9. Вклучување и исклучување .............................................136
10. Одржување ......................................................................137
11. Основни совети за сечење .............................................137
12. Технички податоци .........................................................139
СЪДЪРЖАНИЕ BG
Преведено от оригиналните инструкции
1. Обща информация ...........................................................140
2. Символи ............................................................................140
3. Общи норми за безопасност ............................................141
4. Норми за електрическа безопасност ..............................143
5. Описание на частите на машината .................................144
6. Монтаж на направляващата шина и на веригата ..........144
7. Смазочна система ............................................................145
8. Система на предпазна спирачка .....................................145
9.Пускане и спиране .............................................................145
10. Поддръжка.......................................................................145
11. Общи указания за рязането ...........................................146
12. Технически данни ...........................................................148
OBSAH CZ
PŘELOŽENO Z PŮVODNÍHO NÁVODU
1. Všeobecné informace .........................................................150
2. Symboly ..............................................................................150
3. Všeobecné bezpečnostní normy ........................................150
4. Normy elektrické bezpečnosti .............................................153
5. Popis částí stroje ................................................................153
6. Montáž lišty a řetězu ...........................................................153
7. Mazací systém ....................................................................154
8. Systém bezpečnostní brzdy ...............................................154
9. Spuštění a zastavení ..........................................................154
10. Údržba ..............................................................................154
11. Obecné rady pro řezání ....................................................155
12. Technické údaje ................................................................156
13

INDHOLDSFORTEGNELSE DK
OVERSAT FRA DEN OPRINDELIGE BRUGSANVISNING
1. Generelle oplysninger .........................................................158
2. Symboler ............................................................................158
3. Generelle sikkerhedsforskrifter ...........................................158
4. Sikkerhedsforskrifter vedrørende elektrisk udstyr ..............161
5. Beskrivelse af redskabets dele ...........................................161
6. Montering af sværd og kæde ..............................................161
7. Smøresystem .....................................................................162
8. Kædebremse med sikkerhedsfunktion ...............................162
9. Start og afbrydelse .............................................................162
10. Vedligeholdelse ................................................................162
11. Grundlæggende råd vedrørende savning .........................163
12. Tekniske data ....................................................................164
YHTEENVETO FI
KÄÄNTÄNYT ALKUPERÄISET OHJEET
1. Yleistä tietoa .......................................................................174
2. Symbolit ..............................................................................174
3. Yleiset turvallisuusmääräykset ...........................................174
4. Sähköturvallisuusmääräykset .............................................177
5. Koneen osien kuvaus .........................................................177
6. Terälevyn ja -ketjun asentaminen .......................................177
7. Voitelujärjestelmä ...............................................................178
8. Turvajarrujärjestelmä ..........................................................178
9. Käynnistäminen ja pysäyttäminen ......................................188
10. Huolto ...............................................................................178
11. Yleisiä sahausohjeita ........................................................179
12. Tekniset tiedot ...................................................................180
SATURA RĀDĪTĀJS LV
VERTIMAS IŠ ORIGINALIOS INSTRUKCIJOS
1. Vispārēja informācija ..........................................................190
2. Simboli ................................................................................190
3. Vispārēji drošības noteikumi ...............................................190
4. Elektriskās drošības noteikumi ...........................................193
5. Mašīnas sastāvdaļu apraksts .............................................193
6. Sliedes un ķēdes montāža .................................................193
7. Eļļošanas sistēma ...............................................................194
8. Drošības bremzes sistēma .................................................194
9. Iedarbināšana un apturēšana .............................................194
10. Tehniskā apkope ...............................................................194
11. Vispārēji padomi zāģēšanai ..............................................195
12. Tehniskie dati ....................................................................196
SISUKORD EE
TÕLGITUD ALGUPÄRASED JUHENDID
1. Üldine informatsioon ...........................................................166
2. Sümbolid .............................................................................166
3. Üldised ohutusnormid .........................................................166
4. Elektriohutusnormid ............................................................169
5. Masina osade seletus .........................................................169
6. Juhtplaadi ja keti paigaldamine ..........................................169
7. Määrde süsteem .................................................................169
8. Ohupiduri süsteem .............................................................170
9. Käivitamine ja seiskamine ..................................................170
10. Hooldus ............................................................................170
11. Parimad soovitused lõikamiseks .......................................171
12. Tehnilised andmed ............................................................172
TARTALOMJEGYZÉK HU
FORDÍTOTTA AZ EREDETI HASZNÁLATI UTASÍTÁST
1. Általános információk .........................................................182
2. Jelölések .............................................................................182
3. Általános biztonsági normák ...............................................183
4. Elektromos biztonsági normák ...........................................185
5. A gép részeinek leírása ......................................................185
6. A vezetőlemez és a lánc felszerelése .................................185
7. Kenőrendszer .....................................................................186
8. Biztonsági fék rendszer ......................................................186
9. Indítás és leállítás ...............................................................186
10. Karbantartás .....................................................................186
11. Általános tanácsok a vágáshoz ........................................187
12. Műszaki adatok .................................................................188
TURINYS LT
TULKOTS NO INSTRUKCIJAS ORIĢINĀLVALODĀ
1. Bendroji informacija ............................................................198
2. Simboliai .............................................................................198
3. Bendrieji saugos reikalavimai .............................................198
4. Bendrieji elektrinės saugos reikalavimai .............................201
5. Prietaiso dalių aprašymas ..................................................201
6. Juostos ir grandinės surinkimas .........................................201
7. Tepimo sistema ...................................................................202
8. Apsauginio stabdžio sistema ..............................................202
9. Paleidimas ir sustabdymas .................................................202
10. Techninė priežiūra ............................................................202
11. Rekomendacijos optimaliam pjovimui ...............................203
12. Techniniai duomenys ........................................................204
INNHOLDSFORTEGNELSE NO
OVERSATT FRA ORIGINAL BRUKSANVISNING
1. Generell informasjon ..........................................................206
2. Symboler ............................................................................206
3. Generelle sikkerhetsregler ..................................................206
4. Elektriske sikkerhetsregler ..................................................209
5. Beskrivelse av redskapets deler .........................................209
6. Montering av sverdet og kjeden .........................................209
7. Smøresystem .....................................................................209
8. Kjedebremse med sikkerhetsfunksjon ................................210
9. Start og stopp .....................................................................210
10. Vedlikehold .......................................................................211
11. Råd angående kutting .......................................................211
12. Tekniske data ....................................................................212
14
CUPRINS RO
TRADUS DIN INSTRUCŢIUNI ORIGINAL
1.Informaţii generale ...............................................................214
2.Simboluri ..............................................................................214
3.Norme generale de siguranţă ..............................................215
4.Norme de siguranţă electrică ...............................................217
5.Descrierea părţilor componente ..........................................217
6.Montajul barei şi al lanţului ..................................................218
7.Sistem de lubrifiere ..............................................................218
8.Sistemul frână de siguranţă .................................................218
9.Pornire şi oprire ...................................................................218
10.Intreţinere ..........................................................................219
11.Recomandări generale pentru tăiere .................................219
12.Date tehnice ......................................................................221

САДРЖАЈ SR
ТРАНСЛАТЕД ФРОМ ОРИГИНАЛ УПУТСТВО
1. Опште информације .........................................................224
2. Симболи ............................................................................224
3. Општи сигурносни прописи ..............................................225
4. Електрична сигурност .......................................................227
5. Опис делова уређаја ........................................................227
6. Монтирање вођице и ланца .............................................228
7. Систем подмазивања .......................................................228
8. Сигурносна кочница ланца ..............................................228
9. Укључивање и искључивање ...........................................228
10. Одржавање .....................................................................229
11. Општа упутства за резање .............................................229
12. Технички подаци .............................................................231
OBSAH SK
PRELOŽENÉ Z PÔVODNÉHO NÁVODU
1. Všeobecné informácie ........................................................242
2. Symboly ..............................................................................242
3. Všeobecné bezpečnostné normy .......................................242
4. Normy elektrickej bezpečnosti ............................................245
5. Opis častí prístroja ..............................................................245
6. Montáž lišty a reťaze ..........................................................245
7. Systém mazania .................................................................246
8. Systém bezpečnostnej brzdy ..............................................246
9. Spustenie a zastavenie ......................................................246
10. Údržba ..............................................................................246
11. Všeobecné rady pre rezanie .............................................247
12. Technické údaje ................................................................248
INNEHÅLLSFÖRTECKNING SE
ÖVERSATT FRÅN DE URSPRUNGLIGA BRUKSANVISNINGEN
1. Allmänna informationer .......................................................234
2. Symboler ............................................................................234
3. Allmänna säkerhetsnormer .................................................234
4. Elsäkerhetsnormer .............................................................237
5. Beskrivning av maskindelarna ............................................237
6. Montering av stång och kedja .............................................237
7. Smörjsystem .......................................................................237
8. Bromssystem ......................................................................238
9. Start och stopp ...................................................................238
10. Underhåll ..........................................................................238
11. Råd för beskärning ...........................................................238
12. Tekniska egenskaper ........................................................240
15
Prima di utilizzare il vostro utensile è necessario leggere attentamente le istruzioni
contenute in questo manuale
ITALIANO
1. INFORMAZIONI GENERALI
Gentile cliente, vogliamo congratularci con
Lei per avere scelto un nostro prodotto per il
giardino.
L’elettrosega è stata costruita tenendo conto
delle norme di sicurezza vigenti a tutela del
consumatore.
In questo manuale sono descritte e illustrate le
varie operazioni di montaggio, di uso ed interventi di manutenzione, necessari per mantenere in perfetta efficienza la Sua elettrosega.
PER FACILITARE LA LETTURA
Le illustrazioni corrispondenti al montaggio
e alla descrizione della macchina si trovano
all’inizio del presente fascicolo.
Consultare queste pagine durante la lettura
delle istruzioni di montaggio e di utilizzo.
Nel caso la Vostra elettrosega necessitasse di
assistenza o riparazione, Vi preghiamo di non
cercare di riparare il malfunzionamento e di
rivolgervi al nostro rivenditore, o ad un Centro
di Assistenza Tecnica Autorizzato.
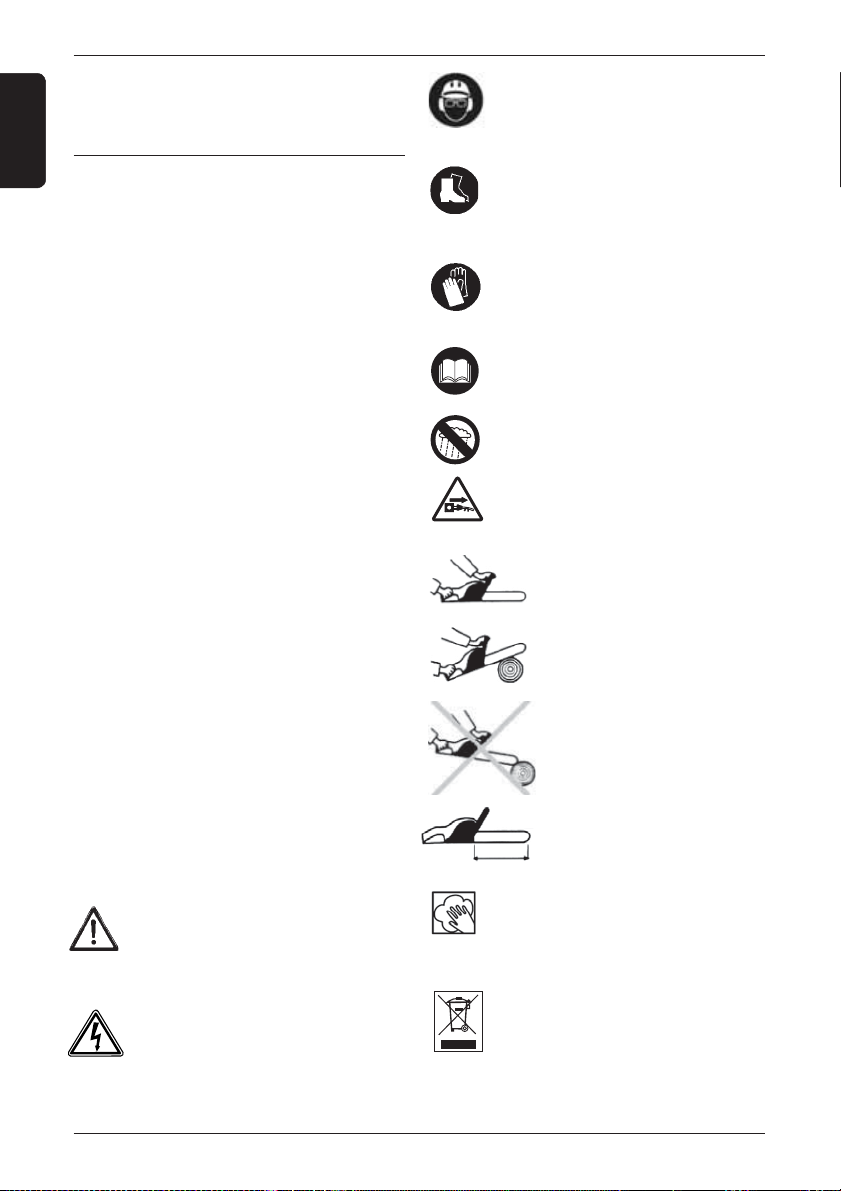
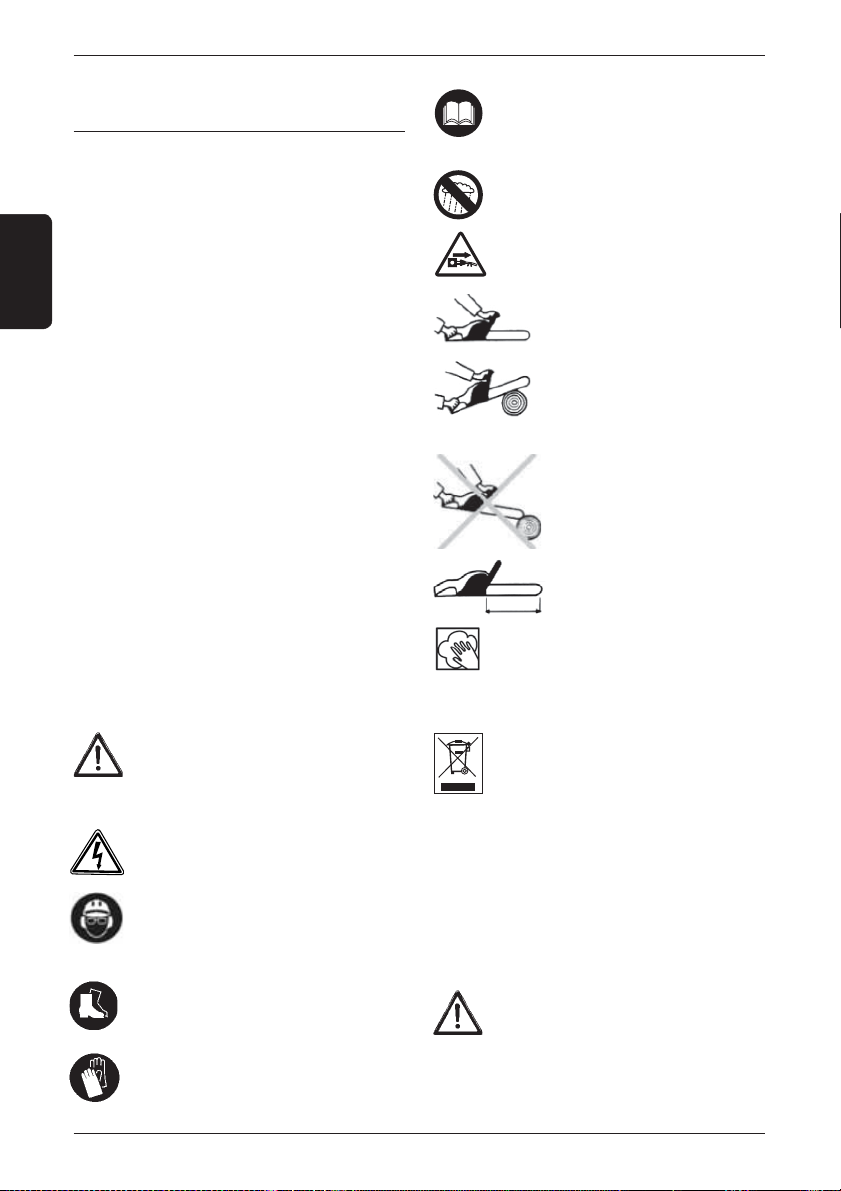
Usare sempre il casco di protezione,
cuffie antirumore, occhiali o visiera
protettiva.
Usare sempre scarpe robuste non
sdrucciolevoli.
Indossare guanti robusti.
Leggere il manuale.
Non esporre alla pioggia.
Staccare la spina dalla corrente se il
cavo è danneggiato o tagliato.
Tenere sempre l’elettrosega
con due mani.
Modalità di taglio consigliata.
Pericolo di contraccolpi.
2. SIMBOLI
I seguenti simboli vengono utilizzati nel presente manuale. Prima di procedere nella lettura è
necessario apprenderne il significato.
Indica pericolo di infortunio, pericolo di
morte o danno all’apparecchio qualora
non ci si attenga alle istruzioni contenute nel seguente manuale.
Pericolo di scossa elettrica.
16
Massima lunghezza di barra
Pulitura.
Indica la figura alla quale si fa riferimento nel testo.
Gli apparecchi elettrici dismessi sono
materiali riciclabili, perciò non vanno
gettati nei rifiuti domestici.

3. NORME DI SICUREZZA GENERALI
Prima di utilizzare l’elettrosega si deve leggere
attentamente il manuale di istruzioni e manutenzione e familiarizzare completamente con i
comandi per un uso corretto dell’apparecchio,
inoltre bisogna conservare il presente manuale
per consultazioni future.
Non permettere l’uso dell’elettrosega
ai bambini e persone che non siano
completamente a conoscenza delle
presenti istruzioni.
Usando utensili elettrici si devono seguire
sempre le precauzioni di sicurezza base per
ridurre il rischio di incendi, scosse elettriche e
ferite alle persone.
Proteggersi da scosse elettriche e evitare il
contatto del corpo con superfici messe a terra
o a massa.
Riporre l’utensile inutilizzato. Quando non lo
si usa, l’utensile dovrebbe essere riposto in un
luogo asciutto e in posizione elevata e chiusa,
fuori dalla portata dei bambini.
Non forzare l’utensile. Esso eseguirà il lavoro
meglio e in modo più sicuro alla velocità per la
quale è stato previsto.
# Ambienti e banchi di lavoro sporchi possono
favorire l’insorgere di incidenti.
# Non esporre l’utensile all’umidità . Non usare
gli utensili in luoghi con atmosfera gassosa o
infiammabile.
# Per utilizzare l’elettrosega si deve essere
in buona forma. Non utilizzare l’elettrosega in
condizioni di stanchezza, di malessere o sotto
l’effetto di droghe.
# In fase di avviamento e durante il funzionamento, tenere sempre l’elettrosega a debita
distanza dal corpo e dagli abiti dell’operatore.
# Non avviare l’elettrosega quando questa è
capovolta.
# Assicurarsi che non ci sia nulla a contatto con
la catena in fase di avviamento.
# Ricordarsi che al momento dello spegnimento
l’elettrosega funziona ancora per qualche
istante.
# Fare attenzione al materiale proiettato dal
dispositivo di taglio.
# Non mettere in moto e non utilizzare l’elettrosega in prossimità di persone, animali o cose.
# Durante il funzionamento si racco-
10 m
manda una distanza minima di 10 m
tra la macchina e altre persone.
# Sostenere l’apparecchio sempre con ambedue le mani.
# Assumere una posizione stabile e sicura
sulle gambe.
# Movimentare l’elettrosega per mezzo delle
impugnature, evitare di trascinarla per il cavo
di alimentazione, evitare di trasportarla quando
è collegata alla presa di corrente e con le dita
sull’interruttore.
# Evitare l’accensione involontaria dell’utensile. Prima d’inserire la spina nella presa,
controllare che l’interruttore sia su Off.
Il trasporto dielettroutensili tenendo le dita
sull’interruttore oppure l’inserimento della
spina di alimentazione di un elettroutensile con
l’interruttore di accensione su On, aumenta il
rischio di incidenti.
# Proteggere il cavo da fonti di calore, oli e
corpi taglienti.
# In fase di taglio non superare l’altezza delle
proprie spalle.
# L’operatore è responsabile in caso di incidenti
o pericoli occorsi ad altre persone o alle loro
cose.
# Non utilizzare l’elettrosega su un albero.
L’utilizzo dell’elettrosega sopra un albero può
causare infortuni
# Vestirsi adeguatamente. Evitare di indossare indumenti larghi o gioielli.
Tenere capelli, vestiti e guanti lontani da
pezzi in movimento.
Vestiti larghi, gioielli o capelli lunghi potranno
impigliarsi nei componenti in movimento.
ITALIANO
17
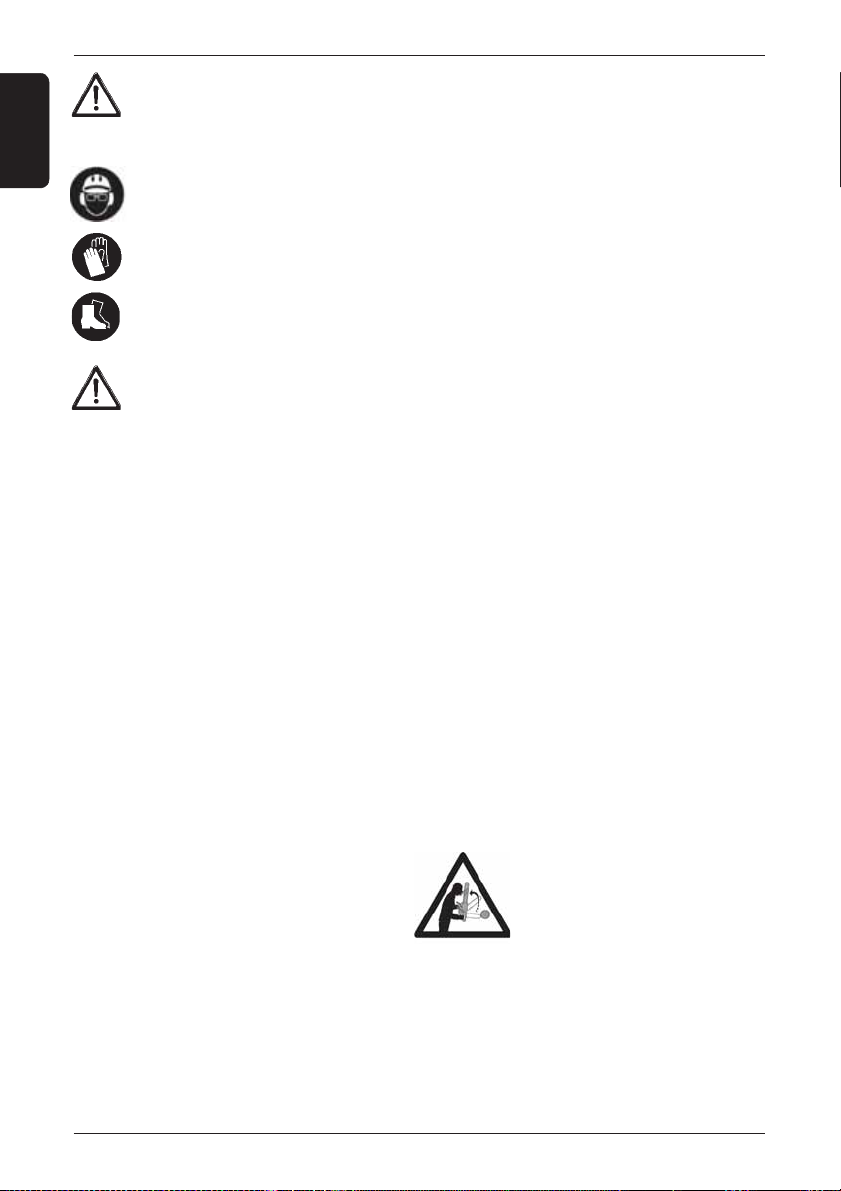
Indossare un abbigliamento ed un
equipaggiamento di sicurezza adatto
all’utilizzo dell’elettrosega.
ITALIANO
In particolare si consiglia di utilizzare:
# casco di sicurezza
# le cuffie auricolari protettive
# gli occhiali o la visiera di protezione
# i guanti con protezione antitaglio
# i pantaloni di sicurezza con protezio-
ne antitaglio
# scarpe robuste antisdrucciolevoli
Il cavo di prolunga deve essere ad
elevato isolamento ed a norma.
# Se l’elettroutensile viene adoperato
all’aperto, usare esclusivamente prolunghe
omologate per l’impiego all’esterno.
Un cavo adatto per uso esterno riduce il rischio
di scosse elettriche.
# In fase di avviamento dell’elettrosega si deve
controllare che il cavo d’alimentazione e della
prolunga siano fuori dalla zona di taglio e che
non presentino difetti di isolamento come tagli
ed abrasioni.
# I cavi danneggiati vanno sostituiti immediatamente, da personale autorizzato.
#Togliere la spina dalla presa prima di effettuare
qualsiasi regolazione, servizio o manutenzione.
# Per ragioni di sicurezza l’utensile deve essere
collegato ad una presa di elettricità protetta da
un interruttore differenziale con una corrente
max di 30 mA.
# Controllare che non vi siano componenti
danneggiati. Prima di usare la motosega, controllare attentamente se vi sono componenti
danneggiati (ad esempio la protezione), per
determinare se sono in grado di svolgere la
loro funzione. Controllare l’allineamento delle
parti mobili e che non vi siano grippaggi, danni
ai componenti o ai supporti e/o altre condizioni
che possano compromettere il funzionamento
dell’utensile. La riparazione o sostituzione di
eventuali componenti danneggiati, ad esempio
una protezione o altro, devono essere affidate a
un centro di assistenza tecnica autorizzato. Non
adoperare la motosega se non è possibile ac-
cenderla e spegnerla mediante l’interruttore.
# Si raccomanda la massima attenzione verso
possibili pericoli che non possano essere uditi
a causa del rumore dell’apparecchio.
# Eliminare qualsiasi pericolo, dalla zona di
lavoro e controllare che non ci siano pericoli
come alberi in posizione pericolose, strade,
ferrovie, cavi elettrici.
# Impiegare l’ELETTROSEGA solamente per
il taglio del legno. Non impiegare l’apparecchio
per scopi diversi.
# L’utilizzo prolungato dell’apparecchio può
causare disturbi di circolazione sanguigna alle
mani (malattia delle dita bianche) attribuibili
alle vibrazioni.
Fattori che influiscono sulla manifestazione dei
disturbi possono essere:
- Predisposizione personale dell’operatore ad
una scarsa irrorazione sanguigna delle mani.
- Utilizzo dell’apparecchio a basse temperature
(si consigliano pertanto guanti caldi).
- Lunghi tempi di utilizzo senza interruzioni (si
consiglia un utilizzo ad intervalli).
- In caso di manifestazione di formicolio e
intorpidimento si raccomanda di consultare
un medico.
# PERICOLO DERIVANTE DA CONTRACCOLPO (KICKBACK)
Il contraccolpo può causare ferite di
taglio mortali.
In caso di contraccolpo l’ elettro
sega viene scagliata violentemente
contro l’operatore.
Questa reazione può avvenire nei seguenti
casi:
1) Inizio del taglio con la punta della barra.
2) Contatto accidentale con altri rami, tronchi,
corpi solidi, reti metalliche.
3) Taglio con la parte superiore della barra.
18
- Tenere l’arpione contro il legno
mentre si taglia (fig. 11).
- Tagliare con catena ben affilata e
tesa.
- In un taglio già iniziato inserire la catena alla massima velocità e con molta
attenzione.
- Estrarre la barra dal taglio solo con catena
in movimento.
# l’ elettrosega deve essere impugnata con
la mano sinistra sull’impugnatura anteriore
e la destra sull’impugnatura posteriore
(anche per i mancini) .
I dispositivi di sicurezza sono stati
studiati per funzionare secondo tale
disposizione delle mani.
# La Vostra elettrosega è provvista dei
seguenti dispositivi di sicurezza:
- BLOCCAGGIO ACCELERATORE (fig.1 ,
part. 2)impedisce l’azionamento accidentale
della leva dell’acceleratore.
- LEVA ACCELERATORE(fig 1 , part. 3): Attenzione la catena di taglio continua a girare per
un certo tempo dopo che la leva acceleratore
viene rilasciata.
- FRENO CATENA DI SICUREZZA (fig 1 ,
part. 10) La Vostra elettrosega è provvista di un
freno catena di sicurezza al fine di bloccare la
catena (in caso di contraccolpo) in una frazione
di secondo.
# Prima di ogni utilizzo verificare che tutti i
dispositivi di sicurezza siano perfettamente
funzionanti.
# Presa di alimentazione: si deve utilizzare
una presa di alimentazione di potenza adeguata.
ITALIANO
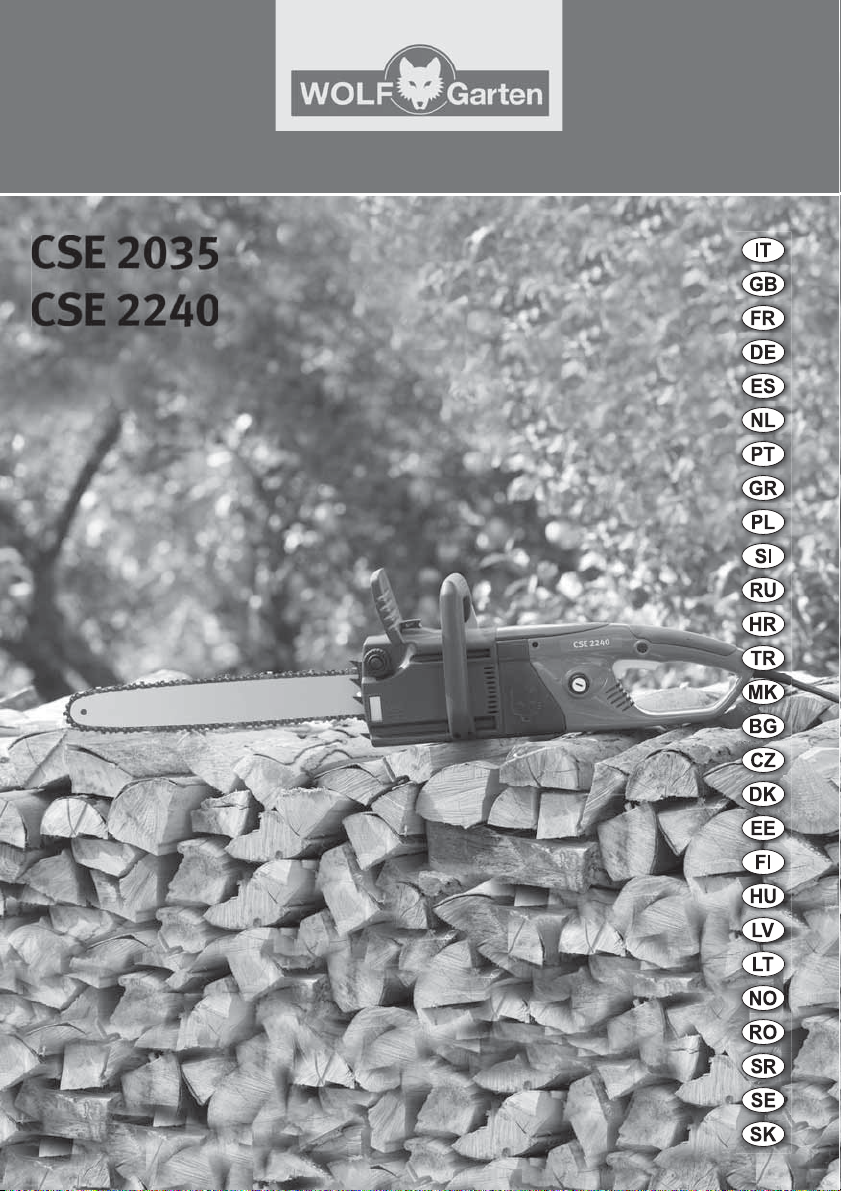
5. DESCRIZIONE DELLE PARTI DELLA
MACCHINA
FIG. 1
Il contenuto dell’imballo è il seguente:
1. Impugnatura posteriore
2. Pulsante di sicurezza lock off
3. Leva di avviamento
4. Serbatoio olio catena
5. Barra con pignone dentato
6. Catena
7. Impugnatura anteriore
8. Prese d’aria
9. Cavo di alimentazione con spina
10. Leva innesto freno-paramano
11. Carter catena
12. Volantino fissaggio barra + volantino
regolazione tensione catena
13. Perno fissaggio barra
14. Pignone catena
15. Calibro verifica serbatoio olio
16. Arpione
17. Passacavo
NOTA: Accertarsi che l’utensile, i componenti o
gli accessori non abbiano subito danni durante
il trasporto.
NOTA: Leggere a fondo, con calma e con la
massima attenzione il presente manuale prima
di mettere in funzione l’utensile.
4. NORME DI SICUREZZA ELETTRICA
# Tensione: la tensione di rete e quello riportato
sull’etichetta dati.
# Corrente: l’elettrosega funziona a corrente
alternata.
# Spine e cavi di prolunga: si raccomandano
prese protette, cavi e spine in PVC o gomma
omologata.
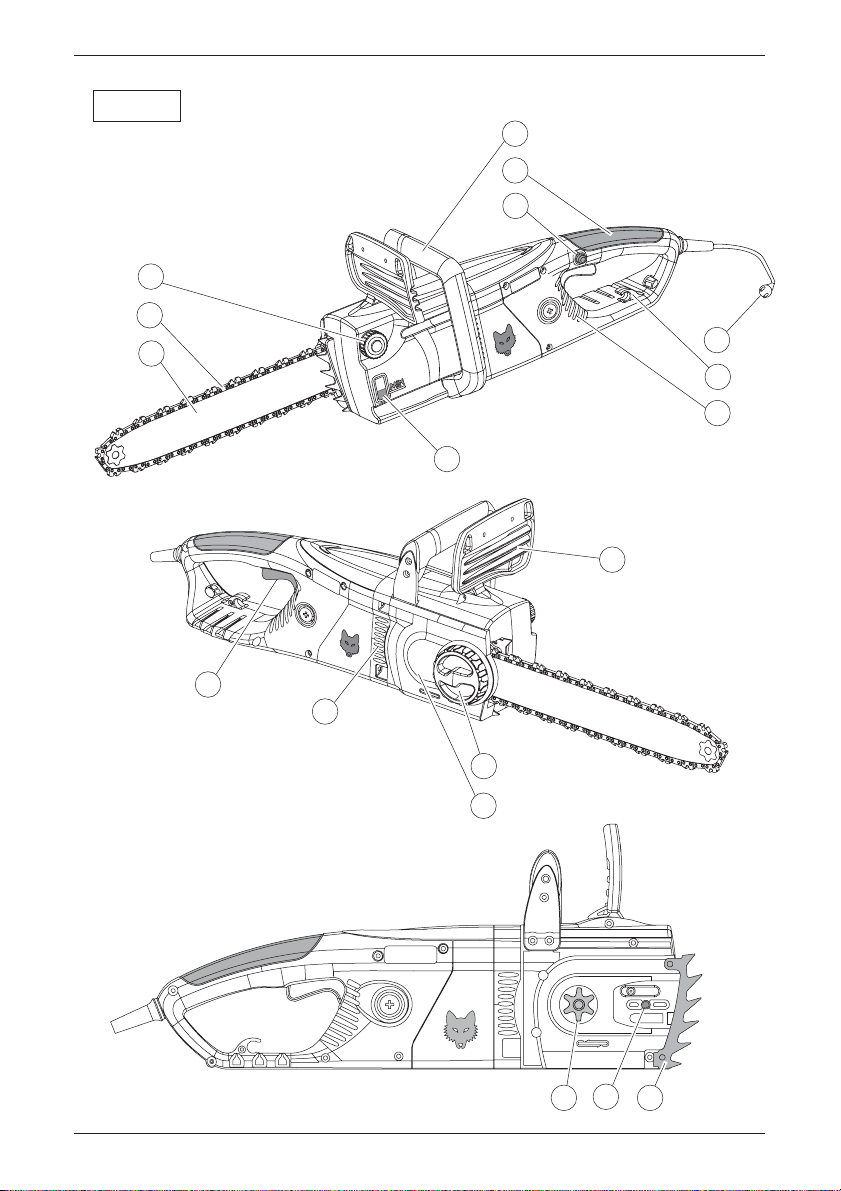
6. MONTAGGIO DI BARRA E CATENA
FIG. 1-2-3-4-5-6
# Controllare che il freno (10) della catena non
sia attivato, leva freno in posizione ‘1’.
# Svitare il volantino di fissaggio (12) della
barra, togliendo anche il carter catena (11).
19

# Montare la barra (5) sul perno di fissaggio
(13). Ruotare la flangia di regolazione nel
senso indicato dalla freccia di fig. 5, e portare
quindi la barra indietro al massimo verso il
ITALIANO
pignone (14).
# Far passare la catena (6) nella scanalatura
della barra, cominciando dalla parte superiore,
facendo in modo che il taglio dei denti sia rivolto
in avanti, sul lato superiore della lama.
# Montare la catena attorno al pignone (14).
# Montare il carter catena e avvitare leggermen-
te il volantivo di fissaggio barra (12) serrandolo
a mano fig.6.
# Tendere la catena agendo sul volantino
regolazione tensione catena (12), fig. 7.
La tensione è corretta quando la catena rimane
nella scanalatura intorno alla barra. Inoltre la
catena deve poter essere fatta scorrere con le
dita. A questo punto si deve serrare a fondo il
volantivo di fissaggio barra, fig. 8.
# Una tensione eccessiva della catena riduce la
durata della stessa, della barra e del motore.
# Una tensione limitata della catena può farla
cadere dalla barra, generando un pericolo per
l’utilizzatore.
7. SISTEMA DI LUBRIFICAZIONE
FIG. 10
# La lubrificazione della catena è assicurata da
una pompa automatica.
# Si raccomanda di utilizzare olio nuovo per
catene. La scelta della viscosità dell’olio dipende dalla temperatura dell’aria. Non utilizzare
mai olio di recupero o di qualità scadente che
potrebbe danneggiare la pompa, la lama e la
catena.
# Per la scelta dell’olio contattare un Centro di
Assistenza Tecnica Autorizzato.
# Non usare mai la catena senza olio. Controllare regolarmente il livello dell’olio, rabboccare
l’olio ogni qualvolta il livello scende a meno di
un quarto.
# In caso di malfunzionamento del sistema
di lubrificazione, verificare la pulizia del filtro
olio all’interno del serbatoio ed eventualmente
portare l’elettrosega ad un Centro di Assistenza
Tecnica Autorizzato.
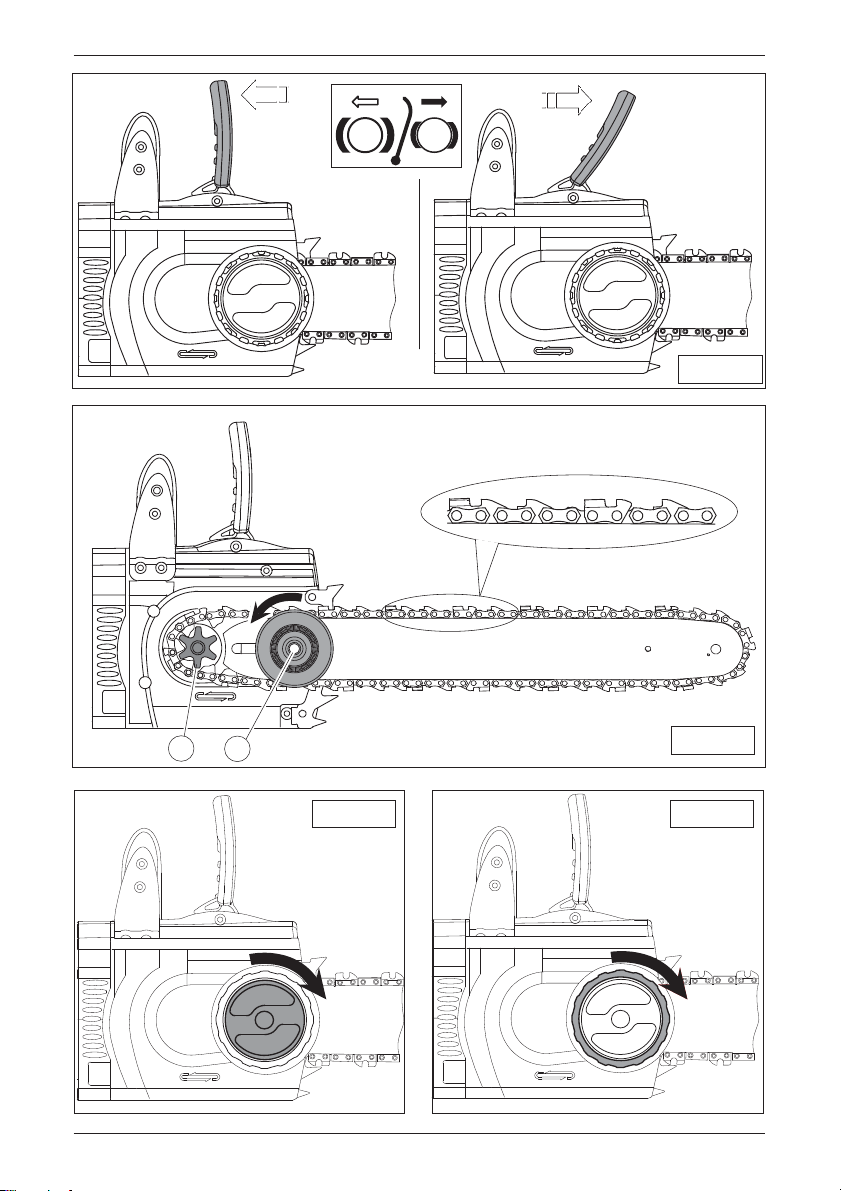
8. SISTEMA FRENO DI SICUREZZA
FIG. 2 - 9
# Quando l’elettrosega lavora in questa zona
(fig. 9), c’è un’alta probabilità di contraccolpi.
# In caso si verifichi un contraccolpo, la mano
sinistra va in contatto con la leva del freno,
che incorpora uno specifico interruttore elettrico per togliere la corrente al motore ed un
pattino per l’arresto istantaneo della catena
(posizione “0”).
# Per riarmare il freno catena dopo l’intervento
si deve lasciare l’interruttore, attendere l’arresto
del motore e portare la leva completamente
indietro (posizione “1”).
# Controllare la tensione della catena prima di
riavviare l’elettrosega.
9.AVVIAMENTO E ARRESTO
- AVVIAMENTO -
Afferrare l’impugnatura anteriore con la mano
sinistra e quella posteriore con la destra.
Premere il pulsante di sicurezza lock off (2)
con il pollice e premere sul pulsante di avviamento (3).
- ARRESTO -
L’elettrosega si arresta rilasciando il pulsante
di avviamento.
10. MANUTENZIONE
Seguono alcuni consigli per la manutenzione
quotidiana dell’elettrosega. In caso di dubbi
o quesiti, contattare il Centro di Assistenza
Autorizzato.
20

FIG. 1-2-6-8-10
# Controllare l’integrità del cavo e della spina
di alimentazione (9).
# Controllare lo stato della presa d’aria (8).
# Controllare che il sistema di lubrificazione per
la catena (6) e la barra (5) sia sufficiente.
# Pulire il freno della catena e controllarne il
buon funzionamento.
# Girare giornalmente la barra in modo da
usurarla uniformemente.
# Controllare l’usura della barra.
# Controllare che il foro di lubrificazione per-
metta il passaggio dell’olio.
# Pulire la guida della catena.
# Controllare la tensione della catena, affilare
la lama e controllarne lo stato eliminando
eventuali irregolarità.
# Controllare lo stato della rotella della catena.
# Controllare che il serbatoio e il filtro dell’olio
siano puliti.
Il presente elettroutensile è conforme alle
principali norme di sicurezza vigenti; per evitare pericolo di infortuni le riparazioni devono
essere effettuate esclusivamente da personale
qualificato dei Centri di Assistenza Tecnica
Autorizzati.
AFFILATURA DELLA CATENA
FIG. 8
# Sfilare la spina dalla presa di corrente.
# Indossare i guanti di lavoro.
# Verificare che la catena sia tesa in modo che
non si muova in fase di affilatura.
# Bloccare la catena spostando la leva
freno(10) in avanti.
# Utilizzare una lima con diametro 1.1 volte
l’altezza del dente di taglio.
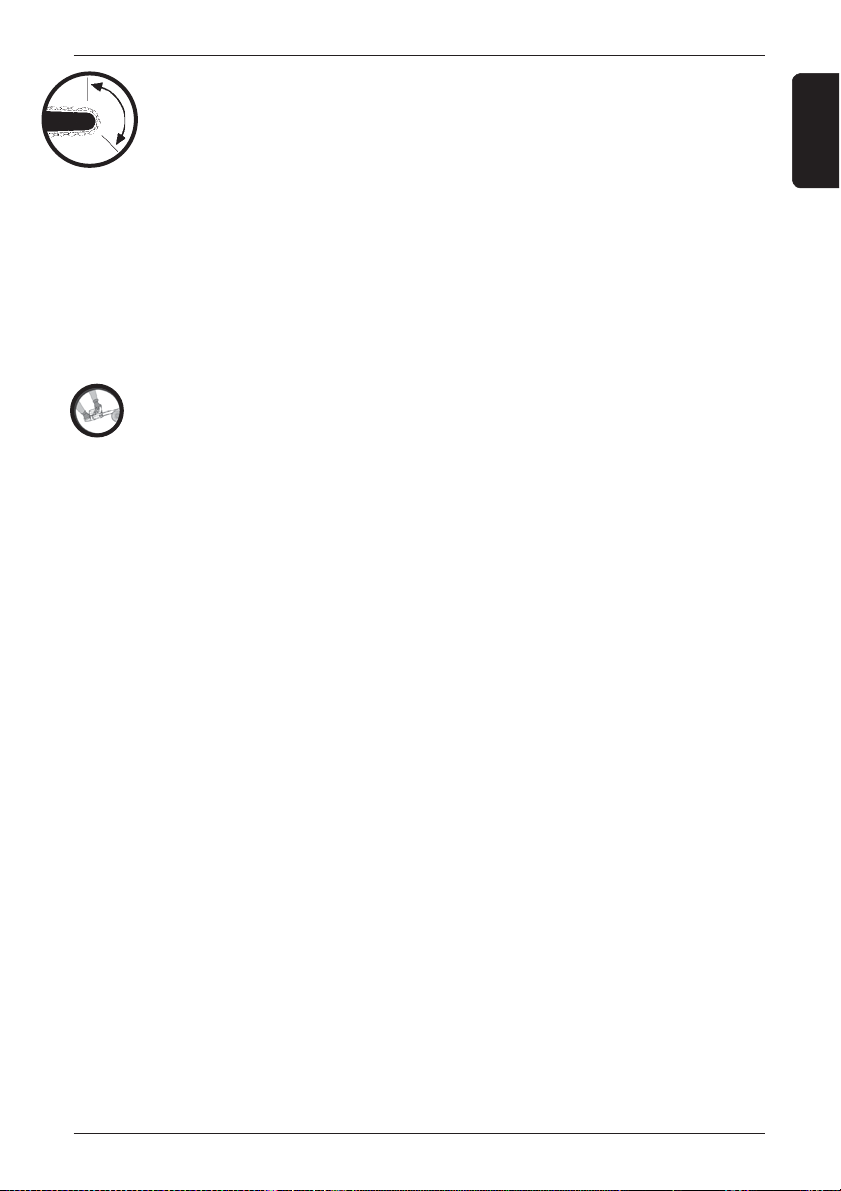
# Limare inclinando orizzontalmente la lima
di 30° rispetto alla barra eseguendo passate
dall’interno del dente verso l’esterno.
# Per ottenere un’affilatura uniforme impartire
a ciascun dente un uguale numero di colpi di
lima.
# Angolo orizzontale: limate perpendicolarmente rispetto al piano barra.
# Mediamente ogni 5 affilature verificare la
differenza fra le altezze del tagliente e il delimitatore di profondità di taglio; è consigliato
l’utilizzo del calibro.
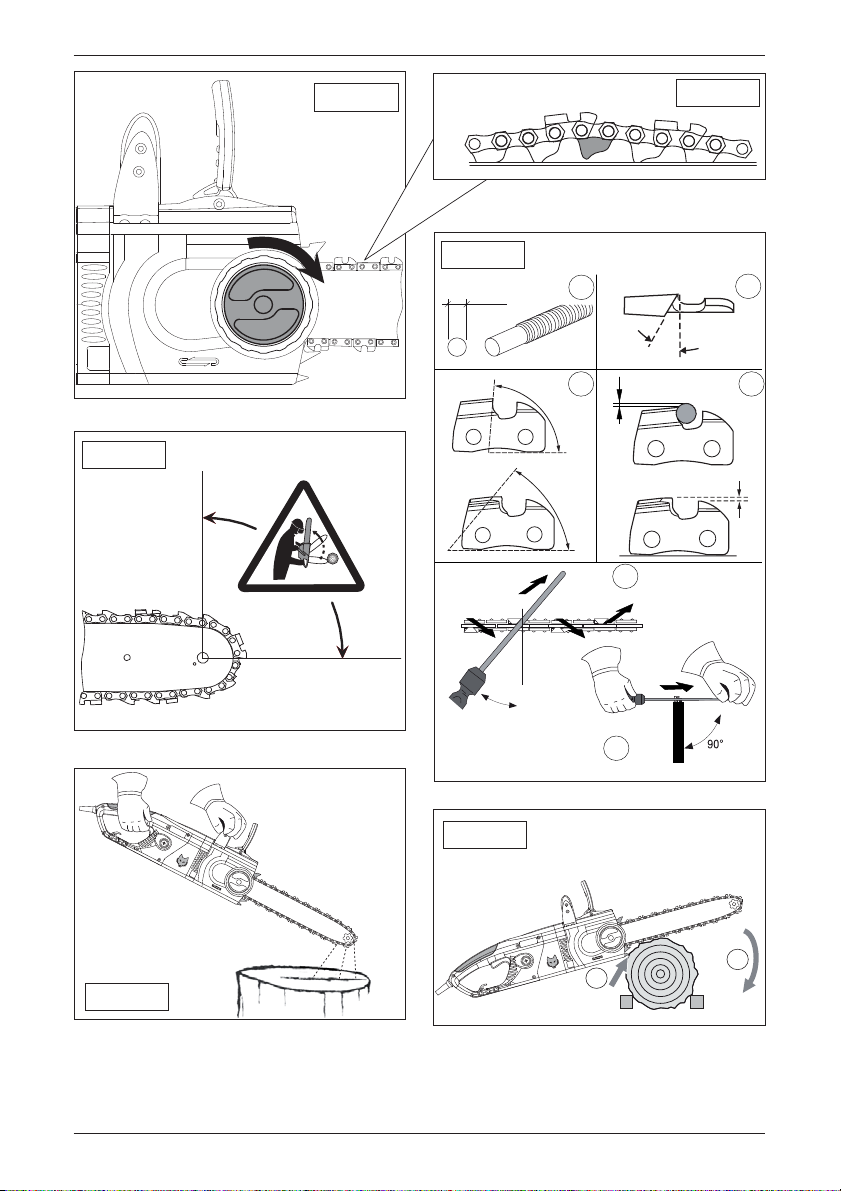
11.CONSIGLI DI MASSIMA PER IL
TAGLIO
Si consiglia di tagliare utilizzando la parte inferiore della lama, tecnica della catena a tirare,
in questo modo l’elettrosega tende a muoversi
verso il tronco diminuendo il pericolo per l’operatore. Al contrario se si tagliasse con la parte
superiore della lama, tecnica della catena a
spingere, l’elettrosega tenderebbe a muoversi
verso l’operatore.
# Fare attenzione alla lunghezza di taglio.
# Evitare il taglio di rametti sottili e di cespugli.
I rametti possono essere afferrati dalla catena,
posti in rotazione e cauare lesioni.
# Fare particolare attenzione a rami in tensione:
possono essere pericolosi per l’operatore.
# Fare particolare attenzione lavorando su
terreni in pendenza, irregolari e scivolosi.
# Non tagliare reti metalliche.
# Non procedere a lavori particolari senza aver
fatto prima la necessaria esperienza.
In caso di dubbi e insicurezza, consultate un
esperto.
# Si consiglia di tagliare tronchi su cavalletti o
morse per acquisire esperienza.
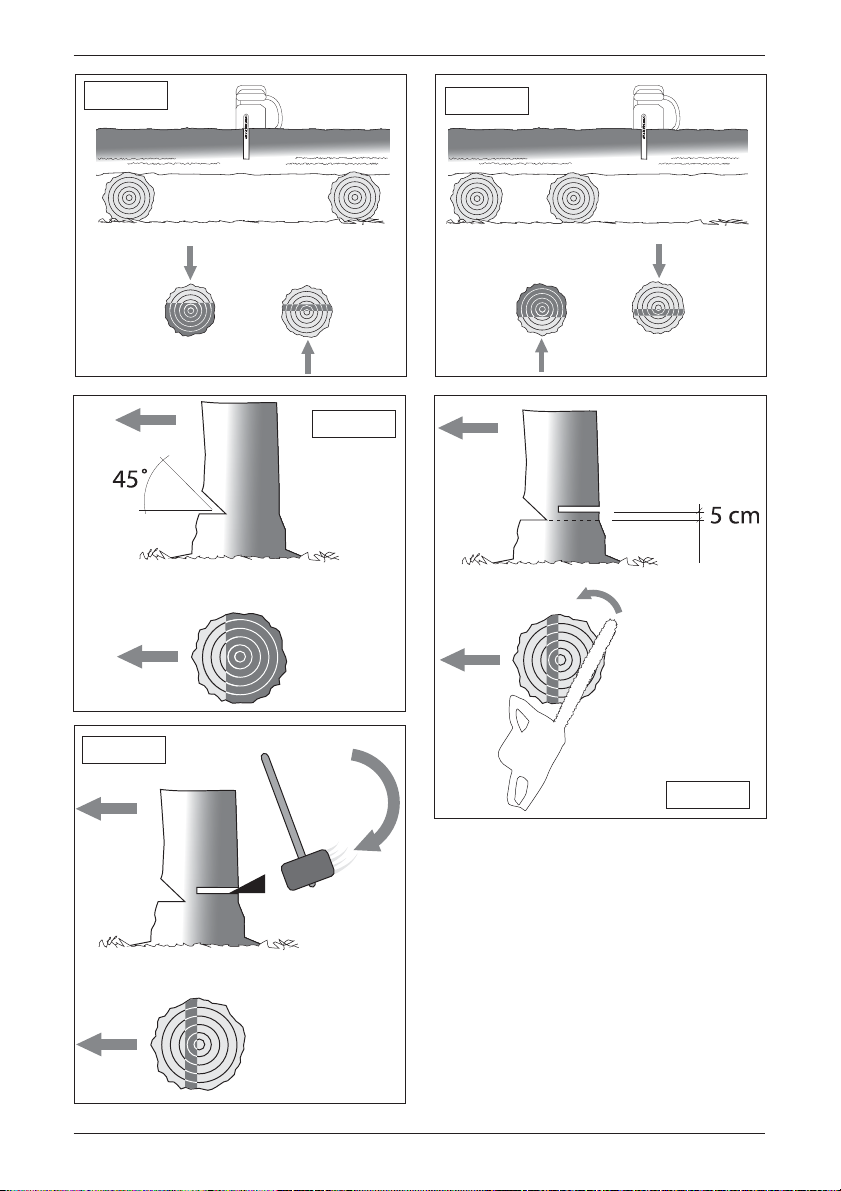
TAGLIO DI UN TRONCO IN SEZIONI
Tronco appoggiato a due estremi
FIG. 12
# Per evitare che la barra rimanga incastrata,
si taglia per 1/3 del diametro dall’alto in basso
e la restante parte dal basso.
ITALIANO
21
Tronco appoggiato a un cavalletto o con
un’estremità libera
FIG. 13
ITALIANO
# Si taglia per 1/3 del diametro dal basso in
alto e la restante parte dall’alto.
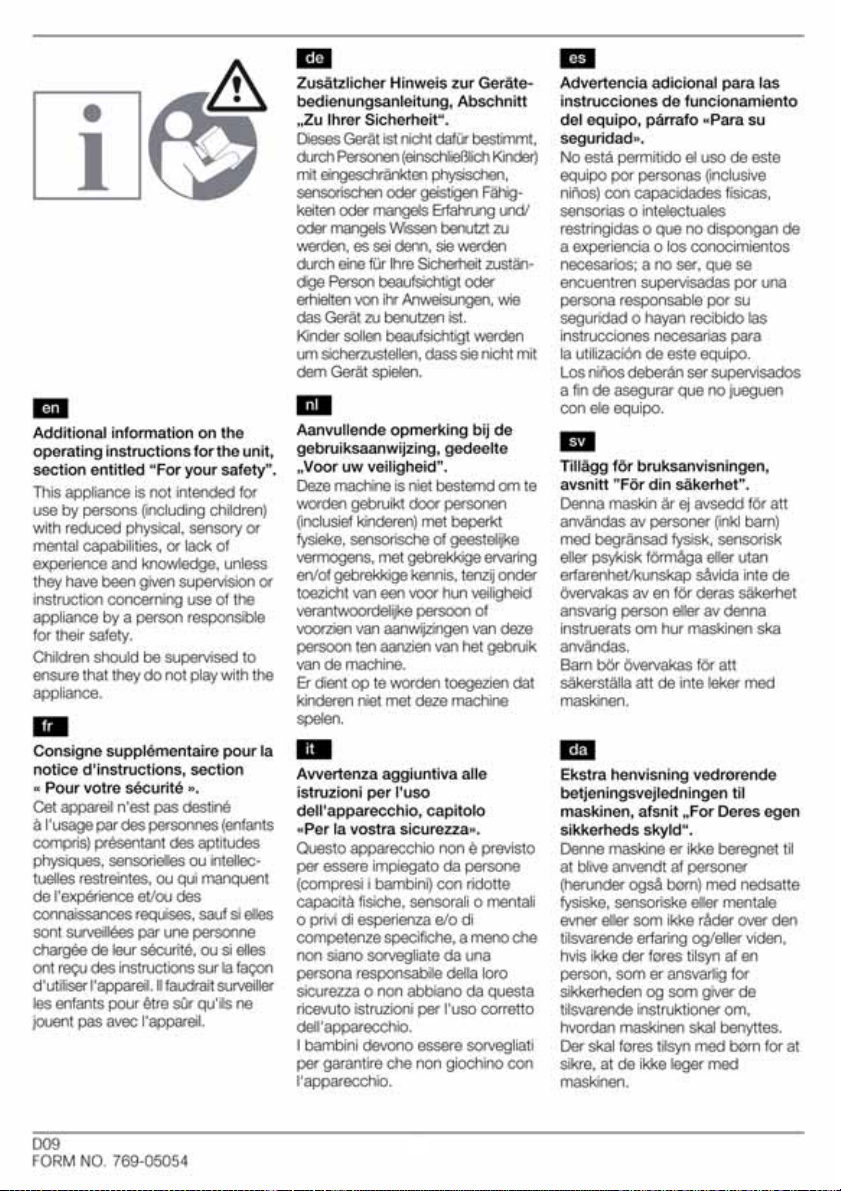
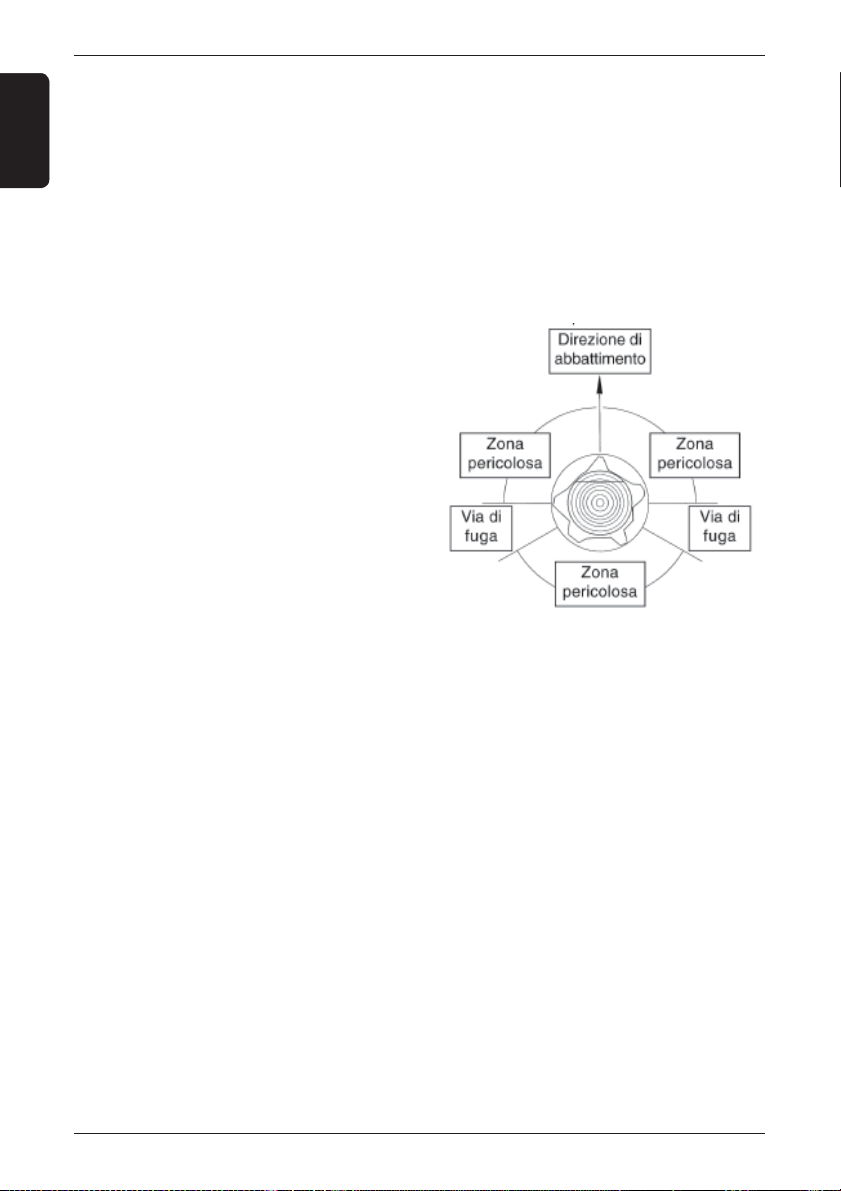
ABBATTIMENTO DI UN ALBERO
# Per effettuare correttamente il taglio di un
albero si devono valutare tutte le condizioni,
ad esempio la direzione scelta per la caduta
dell’albero, la sua naturale inclinazione, eventuali ostacoli circostanti e la direzione e la
velocità del vento.
Taglio direzionale
FIG. 14
# Effettuare una tacca sul lato verso cui
l’albero va abbattuto. L’operazione consiste
nell’eseguire prima la parte superiore del taglio
direzionale, poi la parte inferiore del taglio direzionale che deve andare a finire dove termina
la parte superiore.
# La profondità del taglio direzionale deve
essere di ¼ del diametro del tronco, con un
angolo fra il taglio superiore e quello inferiore
di almeno 45°.
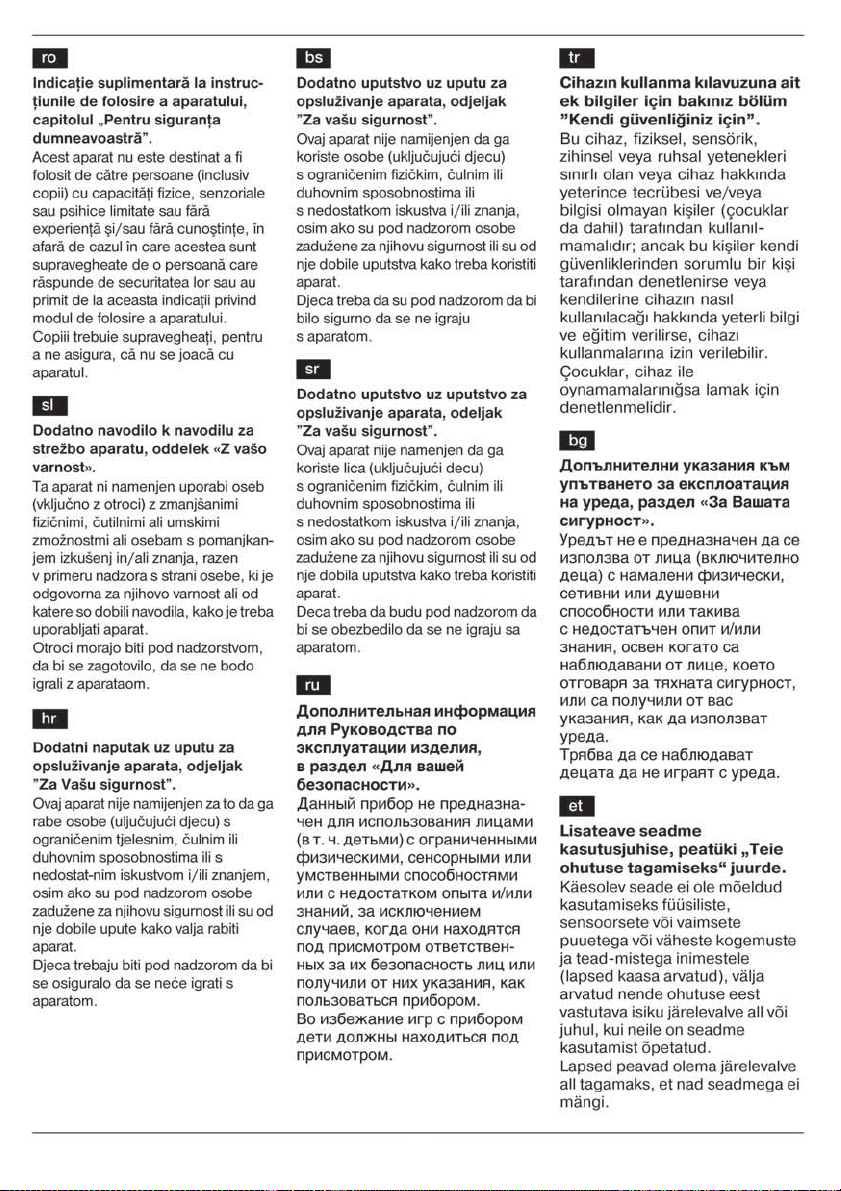
# La linea intersezione fra il piano di taglio
superiore e inferiore è chiamata linea del taglio
direzionale. La linea deve essere perfettamente
orizzontale e a 90° rispetto alla direzione di
caduta.
# Il taglio di abbattimento deve finire parallelo
alla linea di taglio direzionale, con una distanza tra i due di almeno 1/10 del diametro del
tronco. La parte di tronco non tagliata è detta
fulcro ed è la cerniera che guida l’albero nella
sua caduta.
# La distanza di sicurezza dell’albero da abbattere è 2.5 volte l’altezza dell’albero stesso. Fare
attenzione che non vi sia nessuno nella zona di
pericolo prima e durante l’abbattimento.
TAGLIO DELLE ASSI
# Per tagliare delle assi è sufficiente bloccarle
fissandole con morse o imbracature
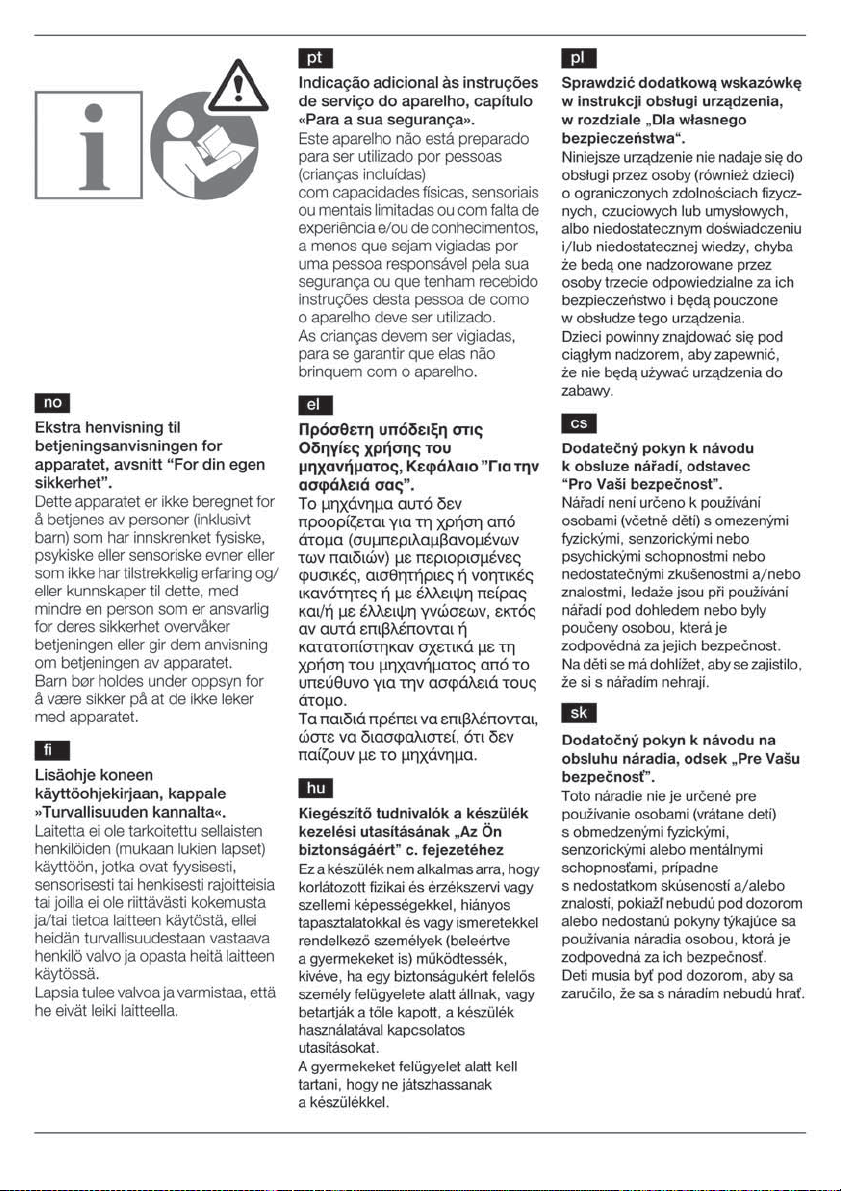
Taglio di abbattimento
FIG. 15 - 16
# Effettuare il taglio di abbattimento sull’altro
lato, 3-5 cm sopra la linea del taglio direzionale.
# Usare dei cunei per aiutare il controllo dell’abbattimento e prevenire così il bloccaggio della
barra durante il taglio.
22
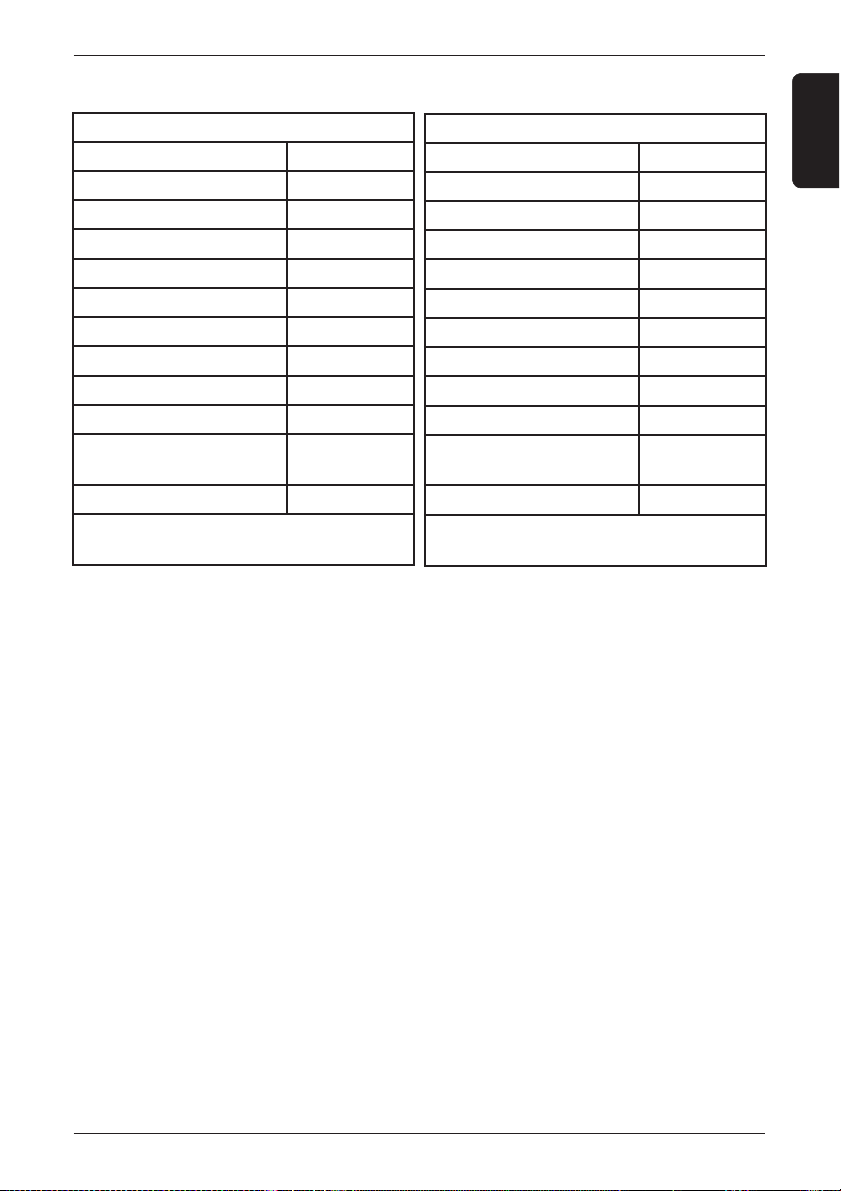
12. DATI TECNICI
CSE 2035
Tensione - Potenza 230 V - 2000 W
Frequenza di rete 50 Hz
N° di giri pignone (a vuoto) 7600 min
-1
Lunghezza barra 35 cm
Lunghezza di taglio 300 mm
Catena passo 3/8”/9.53
inch/mm
Catena (spessore dente guida) 0,05”/1.27 mm
Pignone motore 6 denti
Massa 4,6 kg
Potenza sonora misurata Lwa 106,3 dB(A)
Potenza sonora Garantita
109 dB(A)
K=3
Lwa (2000/14/EC)
Vibration 4,7 m/s2 K=1,5
Bar: Oregon 140SDEA041
Chain: Oregon 91PJ052X
CSE 2240
Tensione - Potenza 230 V - 2200 W
Frequenza di rete 50 Hz
N° di giri pignone (a vuoto) 7600 min
-1
Lunghezza barra 40 cm
Lunghezza di taglio 350 mm
Catena passo 3/8”/9.53
inch/mm
Catena (spessore dente guida) 0,05”/1.27 mm
Pignone motore 6 denti
Massa 4,7 kg
Potenza sonora misurata Lwa 106,1 dB(A)
Potenza sonora Garantita
109 dB(A)
K=3
Lwa (2000/14/EC)
Vibration 5,3 m/s2 K=1,5
Bar: Oregon 160SDEA041
Chain: Oregon 91PJ057X
ITALIANO
23

MANUTENZIONE PERIODICA :
Questo prospetto di manutenzione periodica si riferisce ad un normale
utilizzo. Per condizioni di utilizzo particolarmente gravose ed intense, gli
intervalli di manutenzione devono essere conseguentemente ridotti.
SEGUIRE LE SPECIFICHE ISTRUZIONI CONTENUTE NEL
PRESENTE MANUALE
Controllo visivo X
Macchina
Freno catena
Leva accelleratore; blocco
accelleratore; interruttore
arresto.
Viti
Catena
Pignone catena
Barra
Pulizia generale X
Pulizia feritorie aria di raffreddamento X
Controllo funzionamento X
Controllo presso centro assistenza X
Controllo funzionale X
Controllo Serraggio:
- delle viti accessibili
- delle viti degli elementi ammortizzanti
delle impugnature
Controllo lubrificazione X
Controllo affilatura X
Controllo tensione X
Sostituzione X
Controllo usura e danni. Controllo e lubrificazione cuscinetto.
Sostituzione X
Pulizia X
Controllo usura e danni X
Sostituzione X
Ogni 50 ore
Dopo ogni lavoro
Prima di ogni lavoro
X
Ogni anno
Ogni 100 ore
danni
Anomalie; usure;
X
24

notenote
25
Before using your power tool read carefully
the manual instructions
1. GENERAL INFORMATIONS
Dear client, may we congratulate you for having
chosen one of our products for your garden.
The chainsaw has been manufactured in
accordance with the current safety regulations
which protect the consumer.
This manual describes and illustrates the
ENGLISH
various operations for assembly, use and
maintenance which are required in order to
keep your chain saw in perfect condition.
TO FACILITATE READING
The illustrations about the assembly are to be
found at the beginning of this booklet. Keep
this pages open while reading the assembly
instructions.
Should your chainsaw need servicing or repair,
please contact your retailer or an authorised
service centre.
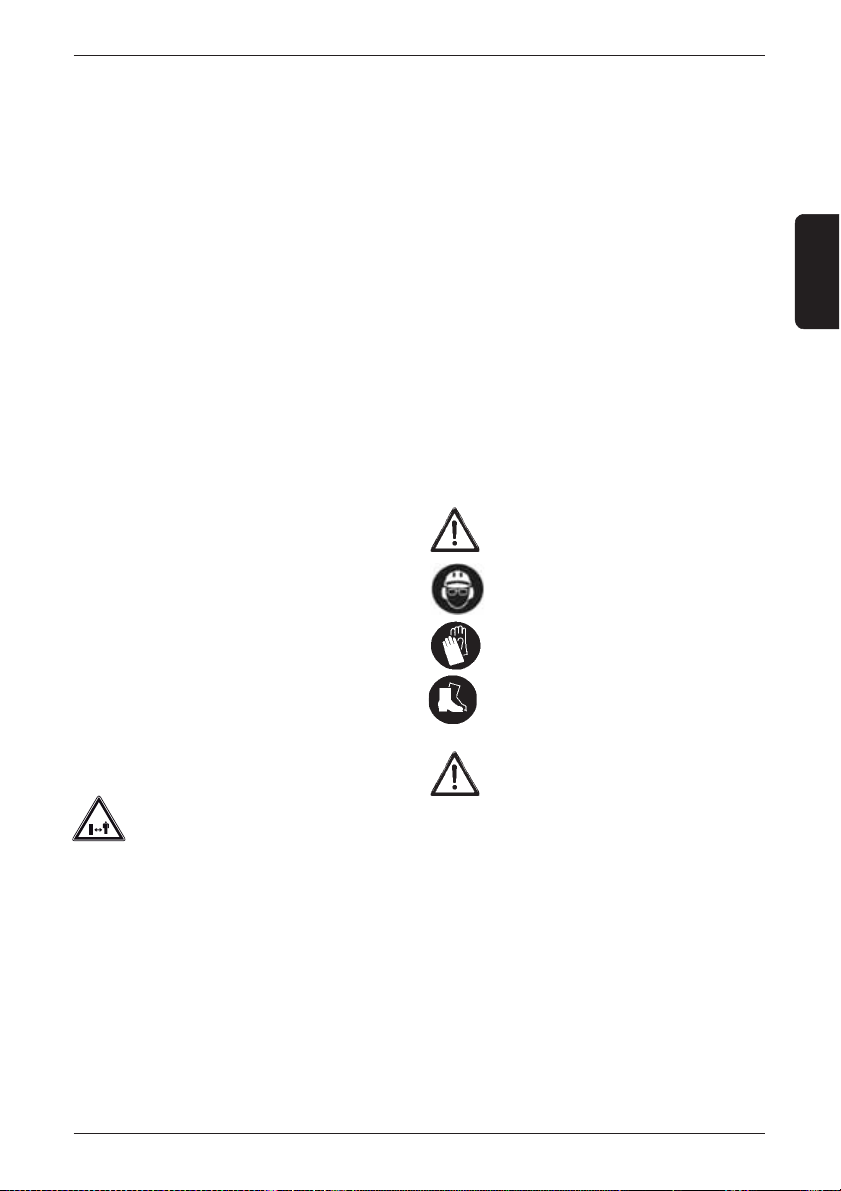
Read the instruction manual.
Do not expose to rain.
Remove plug from the mains
immediately if cable is damaged or
cut.
Hold the chain saw with both
hands.
Suggested way of operating.
Danger of kickback.
Maximum guide bar length
utilizable.
2. SYMBOLS
The following symbols are used throughout this
manual. Before read it they must be known.
Denotes risk of personal injury, loss
of life or damage to the tool in case of
non observance of the instruction in
this manual.
Denotes risk of electric shock
Use always: safety helmet,
noisedamping earplugs, protective
gagglers or visor
Use always sturdy shoes not sliding.
Use always protective gloves.
26
Cleaning.
Shows the picture linked with the
manual’s text
Discarded electrical appliances contain
recyclable materials and should
therefore not be disposed of along
with household waste.
3. GENERAL SAFETY NORMS
All users of the chain saw must first carefully
read the maintenance and operating manual
and familiarise themselves fully with all controls
for correct operation of the device.
Do not let children come into contact
with the tool. Keep all the people away
from the work area
# Using electric tools, basic safety precautions
should always be followed to reduce the risk of
fire,electric shock and personal injury.
# Guard against electic shock. Avoid body
contact with earthed or grounded surfaces.
# Store idle tool. When not in use the tools
should be stored in a dry, hight or locked up
place, out of reach of children.
# Do not force the tools. It will do the job better
safer at the rate for which it was intended.
# Cluttered areas and benches can cause
accident.
# Read the following safety instruction and
tool’s labels before attempting to operate this
product. Be aware of tool’s operation range and
limitations as well as its dangers.
#When not in use, power tools must be stored
in a dry place and locked up securely, out of
reach of children.
# Never allow the chain saw near your body or
your clothing when starting or using it.
# Do not switch your machine on when it is
upside down.
# When starting the chain saw ensure the chain
is not touching anything.
# Remember that the machine continues to run
for a short period after it is switched off.
# Beware of objects hurled by the line head.
# Do not use and do not start up and do not
use the chain saw near people, other animals
or obtrusive objects.
# During operation we recommend
10 m
keeping a minimum distance of 10
m between the machine and other
people.
# Always hold the device with both hands.
# Stand in a safe and steady position on both
legs.
# Never carry the chainsaw by the cable or
when it is connected to the mains or with your
fingers on the trigger.
# Avoid accidental starting. Ensure the
switch is in the off position before plugging
in.
Carrying power tools with your finger on the
switch or plugging in power tools that have the
switch on invites accidents.
# Keep the cable away from heat sources, oils
or sharp edges.
# When sawing, do not use chainsaw above
shoulder height.
# The operator is responsible for any accidents
or hazards that may occur to other persons or
their belongings.
# Do not operate a chain saw in a tree.
Operation of chain saw while up a tree may
resultin personal injury.
# Dress properly. Do not wear loose clothing
or jewellery. Keep your hair, clothing and
gloves away from moving parts.
Loose clothes, jewellery or long hair can be
caught in moving parts.
Wear clothing and safety gear suitable
for chain saw cutters operations.
We suggest wearing:
# safety helmet
# noise-damping earplugs
# protective goggles or visor
# protective gloves
# protective trousers
# sturdy shoes not sliding
Always use an extension cable with
high insulation characteristics and
which meets all current legislation
requirements.
# When operating a power tool outdoors,
use an extension cord suitable for outdoor
use.
Use of a cord suitable for outdoor use reduces
the risk of electric shock.
# Before starting the motor, ensure that the
extension cable is clear of the cutting zone.
# Any damaged cable must be replaced
immediately by authorized staff.
# Remove the plug from the sacket before
ENGLISH
27

carrying out any adjustment, servicing or
maintenance.
# For safety reasons, the socket used to power
the unit should be backed up by a residual
current device-operated (FI) circuitbreaker
which can be tripped by a max. current of
30mA.
# Check damaged parts. Before further use
ENGLISH
of your chainsaw, a guard or other part that
is damaged should be carefully checked to
determine whether it will operate properly
and perform its intended function. Check for
alignment of moving parts, binding of moving
parts, breakage of parts, mounting and any
other conditions that may affect its operation.
A guard or other part that is damaged should be
properly repaired or replaced by an authorised
service agent. Do not use your chainsaw if the
switch does not turn it on and off.
# Maximum attention is urged towards any
possible dangers, warning signs of which
may not be heard because of the noise of the
equipment.
# Eliminate any hazards from the work zone
and check that there are no hazards such as
trees in dangerous positions, roads, railways
or electric cables.
# Use the ELECTRIC CHAINSAW only for
cutting wood.
Do NOT use the equipment for any other
purpose
# Prolonged use of the equipment may cause
disturbances to blood circulation in the hands
(white finger disease) attributable to the vibrations.
Factors that influence the appearance of this
condition include the following:
- Personal predisposition of the operator to
reduced blood flow in the hands.
- Use of the equipment in cold conditions (warm
gloves are therefore recommended).
- Long periods of uninterrupted use (use at
intervals is recommended).
- It is recommended that a doctor be consulted
in the event of tingling or numbness.
# DANGER FROM KICKBACKS
Kickbacks can cause lethal wounds.
In a kickback, the chainsaw is thrown
violently against the operator.
This reaction may occur in the fol
lowing cases.
1) Start of the cut with the point of the bar.
2) Accidental contact with other branches,
trunks, solid bodies, or metalwork.
3) Cut with the top part of the bar.
- Keep the spike (Fig.11 ) against
the wood while cutting.
- Cut with the chain sharp and taught.
- Into a cut that has already been started, insert
the chain at top speed and very attentively.
- Extract the bar from the cut only with the chain
in movement.
# The chainsaw must be held with the left
hand on the front handle and the right on
the rear handle (this applies to left handed
people, too).
The safety devices have been de-
signed to function with the hands
in those positions.
Your chainsaw is provided with the following safety devices.
# THROTTLE TRIGGER LOOK-OUT (fig. 1
, det. 2) prevents accidental operation of the
throttle trigger.
# THROTTLE TRIGGER DANGER (fig. 1 , det.
3): Warning. The cutting chain may continue to
rotate for a certain time after the throttle trigger
has been released.
# SAFETY CHAIN BRAKE (fig. 1 , det. 10)
Your chainsaw is provided with a safety chain
brake which can stop the chain in a fraction of
a second (in the event of a kickback).
# On each occasion, before use check that
all the safety devices function perfectly.
28

4. ELECTRICAL SAFETY
# Voltage: make sure your machine is correct
for your mains supply
# Current: your machine is suitable for AC
supply only.
# Plugs/extension leads: we recommend the
use of PVC or rubber covered plugs, connectors
and leads with your machine.
# Power point: the machine must be connected
to a power point and not a lighting
socket.
5. DESCRIPTION OF MACHINE PARTS
The package contains the following items:
1. Rear handle
2. Lock off safety button
3. Start lever
4. Chain oil tank
5. Bar with toothed pinion
6. Chain
7. Front handle
8. Air intakes
9. Power supply cable with plug
10. Brake-hand guard engaging lever
11. Chain guard
12. Bar locking hand wheel + chain tension
adjustment hand wheel
13. Bar locking pin
14. Chain pinion
15. Oil tank inspection gauge
16. Spiked bumper
17. Cable strain relief
NOTE: make sure that the power tool and
accessories in the package are not damaged
NOTE: read these operative instructions
carefully before attempting to operate the drill
6. BAR AND CHAIN ASSEMBLY
FIG. 1 - 2 - 3 - 4 -5 - 6
# Check that the chain brake (10) has not been
engaged, and the brake lever is in position ‘1’.
# Unscrew the bar locking hand wheel (12) and
also remove the chain guard (11).
# Fit the bar (5) onto the locking pin
(13). Turn the adjustment flange in the direction
shown by the arrow of fig. 5, then push the bar
back all the way toward the pinion (14).
# Slide the chain (6) through the bar slot,
starting from the top section, making sure that
the teeth cutting edge is facing forward, on the
blade top side.
# Fit the chain around the pinion (14).
# Fit the chain guard and partly tighten the bar
locking hand wheel (12) by hand, as shown
in fig.6.
# Tension the chain by using the chain tension
adjustment hand wheel (12), fig. 7.
The tension is correct when the chain remains
inside the slot around the bar and can be turned
with the fingers. At this stage, fully tighten the
bar locking hand wheel, as shown in fig. 8.
# Too much tension on the chain will reduce the
life of the chain, the bar and the engine.
# Too little tension of the chain may cause
the chain to fall from the bar, and create a
dangerous condition for the user.
7. LUBRIFICATION SYSTEM
FIG. 10
# An automatic pump allows the chain
lubrication.
# Use only new oil for chains. The choice of the
oil viscosity depends on the air temperature.
Never use waste oil or second rate oil that could
damage the pump, the bar and the chain.
# Contact an authorised service centre in order
to choose good oil.
# Never use the chainsaw without oil. Check oil
level regularly, refill if less than ¼ full.
# If the lubrication system doesn’t work properly,
check that the oil filter is clean, eventually
contact an authorised service centre.
ENGLISH
29

8. SAFETY CHAINBRAKE
FIG. 2-9
# This area shows the part of chainsaw most
likely to cause kickback (fig. 9).
# In the event of kickback, the left hand will
come into contact With chain brake lever, that
incorporates a separate electrical switch to cut
out the current to the motor, stopping the chain
ENGLISH
immediately (‘O’ position).
# To reset after operation of the chain brake,
disconnect from power supply and release
the brake by pulling the brake lever into the
rearward position (‘1’ position).
# Check chain tension before restarting.
9.SWITCHING ON/OFF
- SWITCH ON -
Hold the front handle with the left hand and the
rear handle with the right hand.
Press the lock off safety button (2) with the
thumb and press the start button (3).
- SWITCH OFF -
To stop the chainsaw, release the trigger.
ELECTRIC MOTOR SAFETY SYSTEM
This chainsaw has a device that protects the
motor by disconnecting it when the effort is too
high. To restart, release the trigger.
Check that the chain is able to rotate.
Push the trigger and the lock-off button to start
again.
10. MAINTENANCE
The following suggestions deal with the daily
maintenance of the chainsaw. If they could not
be exhaustive, contact an authorised service
centre.
FIG. 1 - 2 - 6 - 8 - 10
# Ensure that the electric power lead (9) is not
damaged.
# Ensure that the motor and air slots (8) are
free and unobstructed.
# Check that the lubrication system is
adequate.
# Clean the chain brake and ensure that it
works properly.
# Turn the bar over everyday.
# Check the bar wear.
# Ensure that the oil flow hole is
unobstructed.
# Clean the chain guide on the bar.
# Check the chain tension, sharpen the blades
and check their conditions eventually removing
irregularities.
# Check the guide bar sprocket conditions.
# Ensure that the oil reservoir and the oil filter
are clean.
This chainsaw meets all current legislation
requirements; in order to avoid injuries while
repairing, every repairing has to be done by
qualified staff in an authorized service centre.
CHAIN SHARPENING
FIG. 8
# Disconnect the cord from the mains supply.
# Wear protective gloves.
# Ensure the chain is correctly tensioned and
not too loose.
# Engage the chain brake (10) to block the
chain on the bar when sharpening.
# Use a round file for chain sharpening,
diameter equivalent to 1.1 times the cutting
tooth depth.
# File at a horizontal angle, 30° to the bar.
# File from inside towards outside of the tooth
only.
# Sharpen each tooth equally by using the same
number of strokes.
# File at an angle of 90° to the bar.
# Check the safety depth gauge height
every 5 chain sharpenings. Use depth gauge
measuring instrument to check the height of
the depth gauge.
30
 Loading...