

Wolfgang Puck CCJE0020 Use And Care Manual

LIFE IS ABOUT BALANCE
AND EATING WELL
Automatic Low-Speed Juice Press
I M P O R TA N T N O T I C E
If you have any problems with this unit, contact
Consumer Relations for service PHONE: 1-800-275-8273
or visit our website at wphousewares.com
Please read operating instructions before using this
product. Please keep original box and packing materials
in the event that service is required.
W.P. APPLIANCES, INC. Toll Free (800) 275-8273
Model CCJE0020 Printed In China REV 1.0
All trademarks, service marks and trade names (collectively the “Marks”) are
proprietary to Wolfgang Puck World Wide.
USE AND CARE

IMPORTANT SAFEGUARDS
SAVE THESE INSTRUCTIONS
HOUSEHOLD USE ONLY
Please read carefully before using and follow instructions to avoid
injury.
To protect against risk of electrical shock, do not put the Motor Base,
cord or plug of the appliance in water or other liquid.
This appliance should not be used by children and care should be
taken when used near children.
Turn unit off and unplug from outlet when not in use, before putting
on or taking off parts, and before cleaning. To disconnect, turn unit
off, grasp plug, and pull from the wall. Never yank on cord.
Avoid contact with moving parts. Keep hands, hair, clothing as well as
spatulas and other utensils away from all moving parts and out of the
food Hopper, Juice Spout, or Pulp Chute while the Motor Base is on to
prevent severe injury or damage to the unit.
Do not operate any appliance with a damaged cord or plug or after
the appliance malfunctions or is dropped or damaged in any manner.
Return the appliance to an authorized service facility for examination,
repair, or electrical or mechanical adjustment.
The use of attachments not recommended or sold by the W.P.
Appliances, Inc. may cause fire, electric shock, or injury.
Do not let cord hang over edge of table or counter or touch hot
surfaces, including the stove.
Do not use this appliance for other than intended use.
Do not operate in the presence of explosive and/or flammable fumes.
1
2
3
4
5
6
7
8
9
Additional Safety Information
This appliance has a polarized plug (one blade is wider than the other).
As a safety feature, this plug will fit in a polarized outlet only one way. If
the plug does not fit fully in the outlet, reverse the plug. If it still does not
fit, contact a qualified electrician. Do not attempt to defeat this safety
feature.
Before Your First Use
Your Wolfgang Puck Juice Press comes assembled straight out of the
box. We suggest disassembling and washing the parts according to the
Care and Cleaning section of this manual.
Introduction To Your Juice Press
The Wolfgang Puck Juice Press differs from high RPM juice extractors by
allowing you to juice soft fruits and vegetables in addition to hard fibrous
types. The traditional Juice Extractor method uses a high-speed rotation
method. The heat generated by the friction of blades rotating at high
speed can change the quality of various food nutrients and too much air
can be mixed in, thus accelerating oxidation. The Slow Grinding Juicer
features a breakthrough design in juicing technology by utilizing lowspeed Auger that presses the food to extract the juice.
2 3

Wolfgang Puck,
owner of the famous
Spago restaurants and
one of the most influential
chef-restauranteurs in
America, is credited with
reviving California’s rich
culinary heritage. His
cooking innovations, a
result of blending fresh
California ingredients
with his classical French
techniques, are enjoyed by
world leaders, stars and fellow chefs alike. He established other
trend-setting restaurants like Postrio in San Francisco, Chinois
on Main in Santa Monica, Trattoria del Lupo, Cut, and his latest
creation, Jai, an Asian fusion restaurant in San Diego. Home chefs
can also share Mr. Puck’s talents through his cookbooks, cutlery,
cookware and, of course, through his appliances!
Table of Contents
Important Safeguards
Additional Safety Information
Before Your First Use
Introduction To Your Juice Press
About Wolfgang Puck
Know Your Juice Press
Assembling Your Juice Press
Using Your Juice Press
Using Your Juice Press for Frozen Fruit
Slow Juicing Tips
Care and Cleaning
Troubleshooting
Recipes
Limited Warranty
Contact Information
2
2
3
3
4
6
8
9
10
11
12
14
15
27
Back
4 5

Know Your Juice Press
Actual product may differ slightly from images on this page
1. Hopper
2. Bowl
3. Pulp Chute
4. Juice Spout
5. Rotating Brush
6. Scrapers
7. Auger
8. Juice Strainer
9. Frozen Fruit Strainer
10. Pusher
11. Motor Base
12. Pulp Container
13. Safety Interlock
14. Power Button
15. Cleaning Brush
7
8
11
12
13
14
15
2
3
4
9
6 7
10
1
5
6
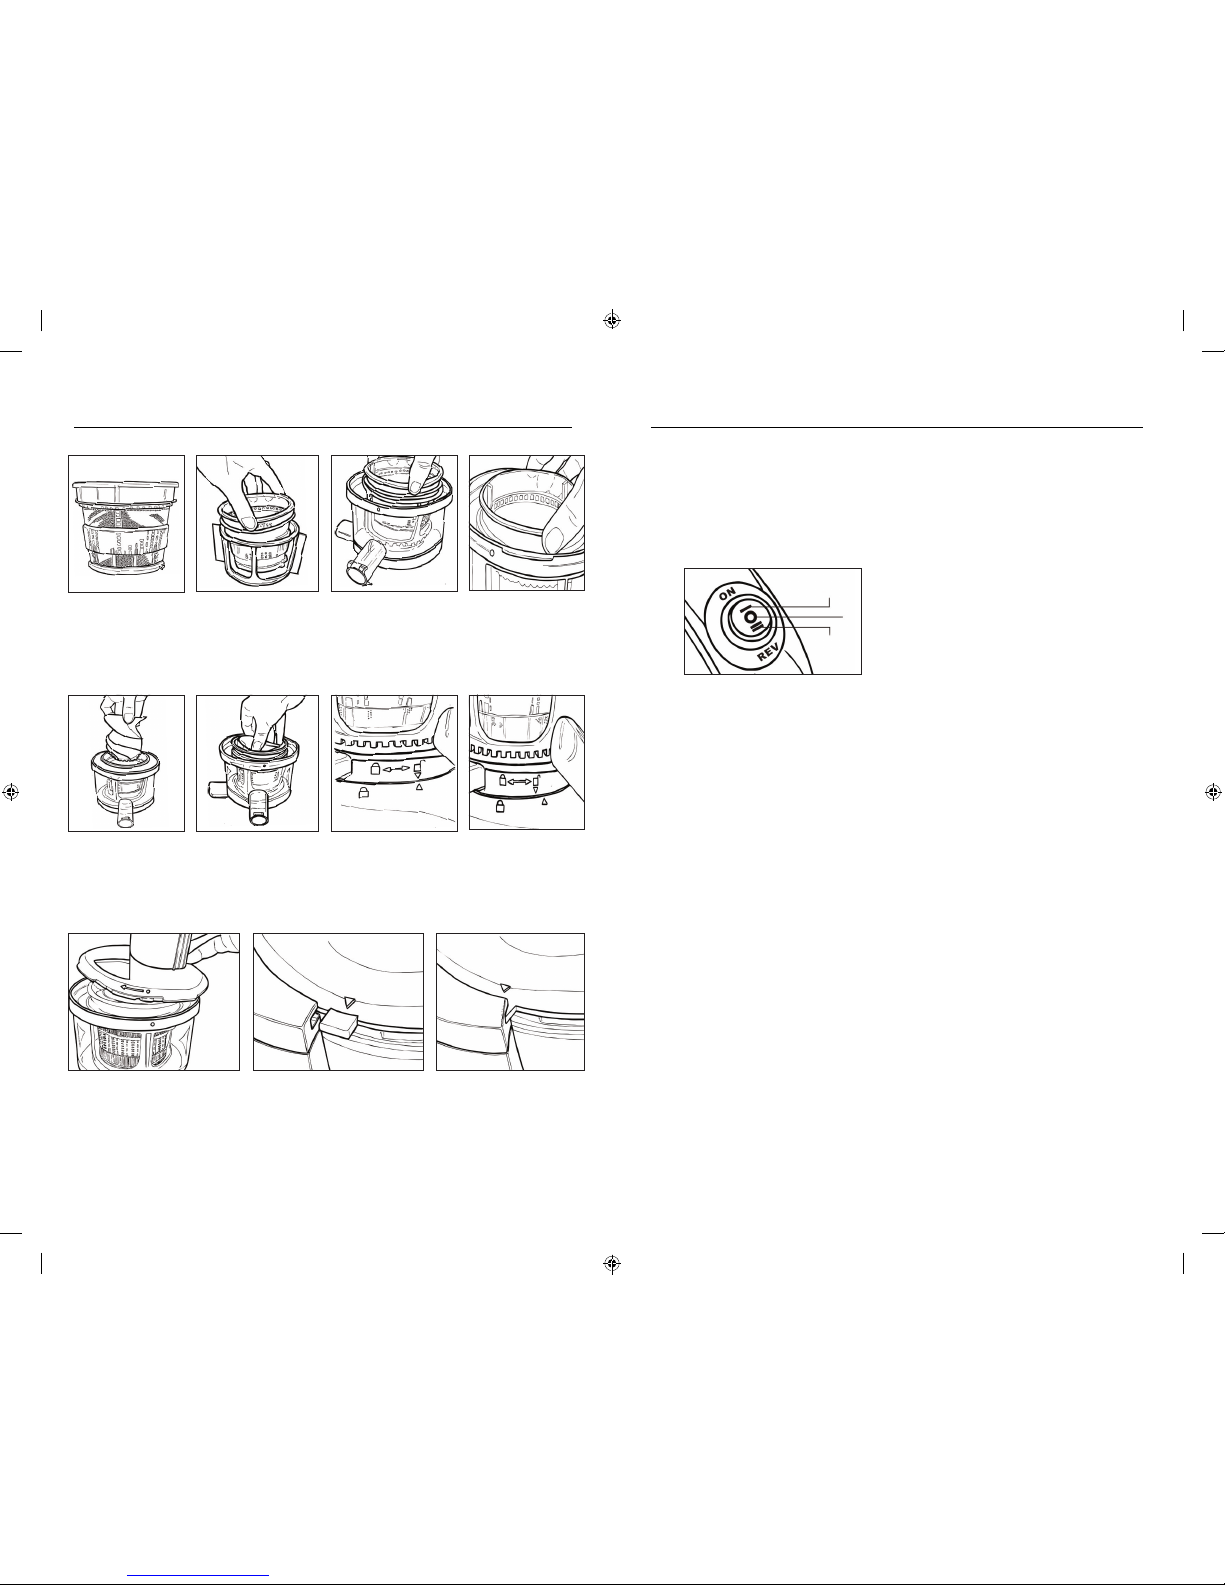
Assembling Your Juice Press Using Your Juice Press
Start with the
Strainer.
Insert the Strainer
into the Rotating
Brush.
Insert the Strainer
and Rotating Brush
into the Bowl.
Tip - Make sure
the red dot on the
Strainer is aligned
with the red dot on
the Bowl.
Insert the Auger
into the Strainer.
Push down until
the Auger is flush
with the Strainer.
Place the Bowl onto the Juice Press
Motor Base. Lock the unit in place from
right to left.
Place the Hopper on top of the unit, making sure to align the red dot on the
Strainer with the red dot on the Hopper. Slide the Hopper from right to left,
locking the Bowl in place.
Once all parts are securely in place, plug the power cord into a
standard 120v AC outlet.
Place the Pulp Container under the Pulp Chute and a container to
accept juice under the Juice Spout.
The Juice Press Power Button has 3 settings:
Before placing food in the Juice Press, make sure the food has been
thoroughly washed. Cut food to appropriate size to fit within the
Hopper. Make sure to remove any large, hard seeds or pits, such
as cherry or plum pits, as it will not process in the Juicer and can
damage the Auger.
When food is placed in the Hopper, the Auger will automatically pull
the food in and begin juicing immediately. To avoid overheating the
motor, DO NOT push, force, or overstuff the Hopper. The Pusher
provided with the Juice Press should only be used if food is not
progressing down the Hopper.
It is best to insert food at a slow pace, allowing all pulp to be
extracted from the fruit or vegetable completely.
NOTE: Make sure to switch the Juice Press off when juicing is
complete. Do not run the Juice Press without any food inside for
longer than 1 minute as this could overheat the motor.
To rinse the Juice Press between different types of juices keep the
Pulp Container in place and put an empty container under the Juice
Spout. Pour water through the Hopper while the unit is on. This
will rinse most of the remaining residue from your last juicing cycle.
When the water from the Juice Press begins to run clear, the unit is
rinsed and ready to make a new juice recipe.
NOTE: This process is not an alternative to a complete cleaning of
each disassembled part once all juicing has been completed.
When using the Juice Press for juice, make sure to leave the Spout
Cap open and use the appropriate strainer.
a. ON - this starts the motor for juicing
b. OFF - this stops the opration
c. REV - this moves the Auger in
the opposite direction
a
b
c
1
2
3
4
5
6
7
8
8 9
 Loading...