

Page 1
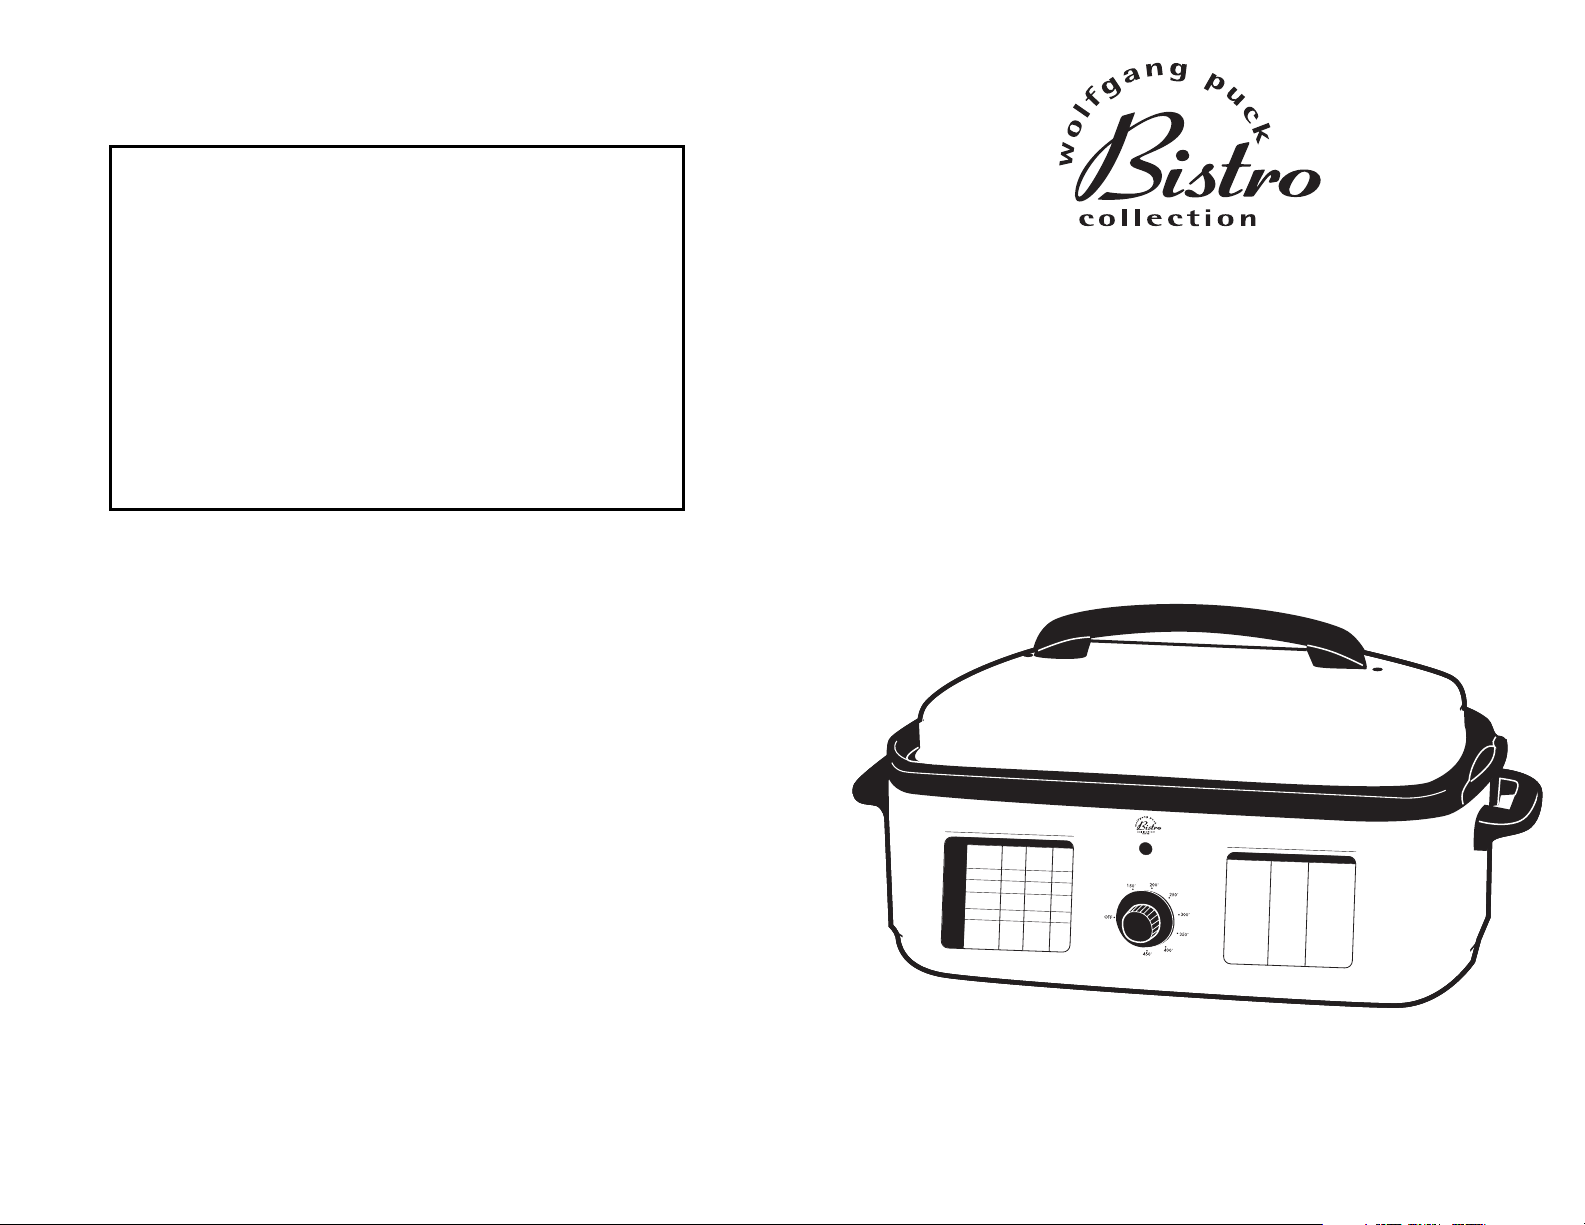
18-Quart
Portable Oven
with Buffet Server Set
HOUSEHOLD USE ONLY Model BRON0118
BRON0118 - November 2001 Printed in China
W. P. APPLIANCES, INC.
Toll Free (800) 275-8273
Email address: wpappliances@ss2000.com
Website: www.wolfgangpuck-kitchenware.com
All trademarks, service marks, and trade names (collectively the "Marks") are
proprietary to Wolfgang Puck Inc. or other respective owners that have granted
Wolfgang Puck Inc. the right and license to use such Marks.
IIMMPPOORRTTAANNTT NNOOTTIICCEE
PPLLEEAASSEE DD OO NNOOTT RREE TTUURRNN TTOO SSTTOORREE ..
IIff yyoouu hhaa vvee aannyy pprroobblleemmss wwii tthh tthh iiss uunniitt,,
ccoonnttaacc tt CC oonnssuummeerr RReell aattii oonnss ffoo rr ss eerrvvii ccee
PPHHOONNEE:: 11--880000--22 7755 --88227733..
PPlleeaassee rr ee aadd ooppeerraattiinngg iinn ssttrruucc ttiioonnss
bbeeffoorree uussii nngg tthhiiss pprroodduucc tt..
PPlleeaassee kk ee ee pp oorriiggiinnaall bb ooxx aanndd ppaa cckkii nn gg
mm aattee rriiaa llss iinn tthhee eevveenntt tthhaa tt
sseerr vviiccee iiss rreeqquuiirr eedd..
R
o
a
s
t
in
g
G
u
id
e
MM
EEAA
TT
WW
EE
IIGG
HH
TT
((LL
BBSS
..)) TT
EE
MM
PP
EE
RR
AA
TT
UU
RR
EE
MM
IINN
..//
LLBB..
BB
EE
EE
FF
S
ta
n
d
in
g
R
ib
R
o
a
st 4
-6
3
2
5
˚2
0
-2
5
S
irlo
in
T
ip
3
-5
3
5
0
˚2
0
-2
5
T
e
n
d
e
rlo
in
3
.5
- 4
4
5
0
˚8
-1
2
P
o
t R
o
a
st 4
-6
3
0
0
˚3
0
-4
0
LL
AA
MM
BB
L
e
g
5
-8
3
5
0
˚2
5
S
h
o
u
ld
e
r, b
o
n
e
le
ss 3
-4
3
5
0
˚2
5
PP
OO
RR
KK
L
o
in
R
o
a
st 3
-5
3
5
0
˚2
5
-3
0
C
h
o
p
s4
-5
3
2
5
˚1
5
-2
0
SS
MM
OO
KK
EE
DD
H
am
, b
o
n
e
in
1
0
-1
5
3
2
5
˚2
0
-2
5
PP
OO
RR
KK
H
a
m
, b
o
n
e
le
ss 8
-1
2
3
2
5
˚1
5
-2
0
H
a
m
, c
o
o
k
ed
5
-1
0
3
2
5
˚1
3
-2
8
VV
EE
AA
LL
L
o
in
4
-6
3
2
5
˚3
0
-3
5
S
h
o
u
ld
e
r3
-5
3
2
5
˚3
0
-3
5
PP
OO
UU
LL
TT
RR
YY
C
h
ic
k
e
n
, w
h
o
le 3
.5
- 5
3
5
0
˚1
5
-1
7
C
h
ick
e
n
, w
h
o
le
6
-8
3
5
0
˚1
8
-2
0
C
h
ic
k
e
n
, p
ie
ce
s6
-8
3
5
0
˚8
-1
0
C
o
rn
ish
H
e
n
s(4
)3
.5
-4
.5
4
0
0
˚1
5
-2
0
T
u
rk
e
y
, fre
sh
1
0
-1
4
3
5
0
˚1
5
-2
0
FF
OOOODD
TT
EE MMPPEE RR AA TTUURR EE MMIINN UUTT EESS
B
a
k
ed
P
o
tato
e
s3
5
0
-4
0
0
˚5
0
-6
0
W
in
te
r S
q
u
ash
4
0
0
˚4
5
-6
0
B
a
k
e
d
A
p
p
le
s3
5
0
˚3
5
-4
5
M
u
ffin
s4
2
5
˚1
5
-2
0
Q
u
ic
k
B
re
a
d
3
7
5
°6
5
-7
5
Y
e
a
st B
re
a
d
4
0
0
˚4
0
-4
5
Y
e
a
st R
o
lls 4
0
0
˚1
8
-2
0
B
ro
w
n
ie
s3
5
0
˚2
5
-3
0
C
o
o
k
ies 3
5
0
˚1
1
-1
3
S
h
e
e
t C
ak
e3
5
0
˚4
0
-4
5
C
h
e
e
se
c
a
k
e
3
2
5
˚5
0
-6
0
C
u
sta
rd
P
ie
3
5
0
˚5
0
-6
0
F
ru
it P
ie
4
2
5
˚4
5
-5
0
P
astry
S
h
ell 4
2
5
˚1
0
-1
3
P
iz
z
a
(9
-in
c
h
)4
2
5
˚2
0
-2
5
B
a
k
in
g
G
u
id
e
Page 2

3
Your oven is equipped with a polarized plug (one blade is wider than the
other). To reduce the risk of electric shock, this plug must fit into a polarized
outlet only one way. If plug does not fully fit into the outlet, reverse the plug.
If does not fit, contact a qualified electrician. Do not attempt to defeat this
safety feature.
A short cord is provided to reduce the hazard resulting from becoming
entangled in or tripping over a longer cord. An extension cord may be used
if you are careful in its use:
1. The electrical rating of the extension cord should be at least as great as
the electrical rating of the appliance.
2. An extension cord with the power cord must be arranged so that it will
not drape over the countertop or tabletop where they can be pulled on
by children or tripped over accidentally.
Table of Contents
Important Safeguards . . . . . . . . . . . . . . . . . . . . . . . . . . . . . . . . . . . . . . . . . . . . . . . . .2
Know Your Portable Oven . . . . . . . . . . . . . . . . . . . . . . . . . . . . . . . . . . . . . . . . . . .4-5
Before Your First Use . . . . . . . . . . . . . . . . . . . . . . . . . . . . . . . . . . . . . . . . . . . . . . . . .6
Using Your Portable Oven . . . . . . . . . . . . . . . . . . . . . . . . . . . . . . . . . . . . . . . . . . . . .7
Cooking Tips . . . . . . . . . . . . . . . . . . . . . . . . . . . . . . . . . . . . . . . . . . . . . . . . . . . . . .8-9
Cooking Guide . . . . . . . . . . . . . . . . . . . . . . . . . . . . . . . . . . . . . . . . . . . . . . . . . . . . .10
Baking Guide . . . . . . . . . . . . . . . . . . . . . . . . . . . . . . . . . . . . . . . . . . . . . . . . . . . . . .11
Recipes . . . . . . . . . . . . . . . . . . . . . . . . . . . . . . . . . . . . . . . . . . . . . . . . . . . . . . . .12-23
Recipe Notes . . . . . . . . . . . . . . . . . . . . . . . . . . . . . . . . . . . . . . . . . . . . . . . . . . . .24-25
Care and Cleaning . . . . . . . . . . . . . . . . . . . . . . . . . . . . . . . . . . . . . . . . . . . . . . . . . .26
Limited Warranty . . . . . . . . . . . . . . . . . . . . . . . . . . . . . . . . . . . . . . . . . . . . . . . . . . .27
2
IMPORTANT SAFEGUARDS
When using electrical appliances, basic safety precautions should always
be followed, including the following:
1. Read all instructions.
2. Do not touch hot surfaces. Use handles or knobs.
3. To protect against electric shock, do not immerse this appliance, the
cord or plug in water or other liquid.
4. Close supervision is necessary when any appliance is used by or near
children.
5. Unplug from outlet when not in use and before cleaning. Allow to cool
before putting on or taking off parts, and before cleaning the appliance.
6. Do not operate any appliance with a damaged cord or plug or after the
appliance malfunctions, or has been damaged in any manner. Return
appliance to the nearest authorized service facility for examination,
repair or adjustment.
7. The use of accessory attachments not recommended by the appliance
manufacturer may cause injuries.
8. Do not let cord hang over the edge of table or counter, or touch hot
surfaces.
9. Do not place on or near a hot gas or electric burner, or in a heated oven.
10. Extreme caution must be used when moving an appliance containing
hot oil or other hot liquids.
11. Always plug appliance cord into the wall outlet, then adjust temperature
control to the desired temperature. To disconnect, turn temperature
control to the OFF position, then remove plug from wall outlet.
12. Do not use outdoors.
13. Use only with plug provided.
14. Do not use appliance for other than intended use.
15. Do not use metal scouring pads on the exterior surface of the appliance.
Pieces can break off the pad and touch electrical parts creating a shock
hazard.
16. Always operate the appliance on a non-flammable, heat-resistant
surface. Never place it on carpet, furniture of other combustible
materials. Always operate in a well-ventilated area away from walls
and other combustible materials.
17. Use caution when removing the cover of the appliance as the steam that
escapes is hot and can cause burns.
18. This appliance is for HOUSEHOLD USE ONLY.
SAVE THESE INSTRUCTIONS
Page 3
5
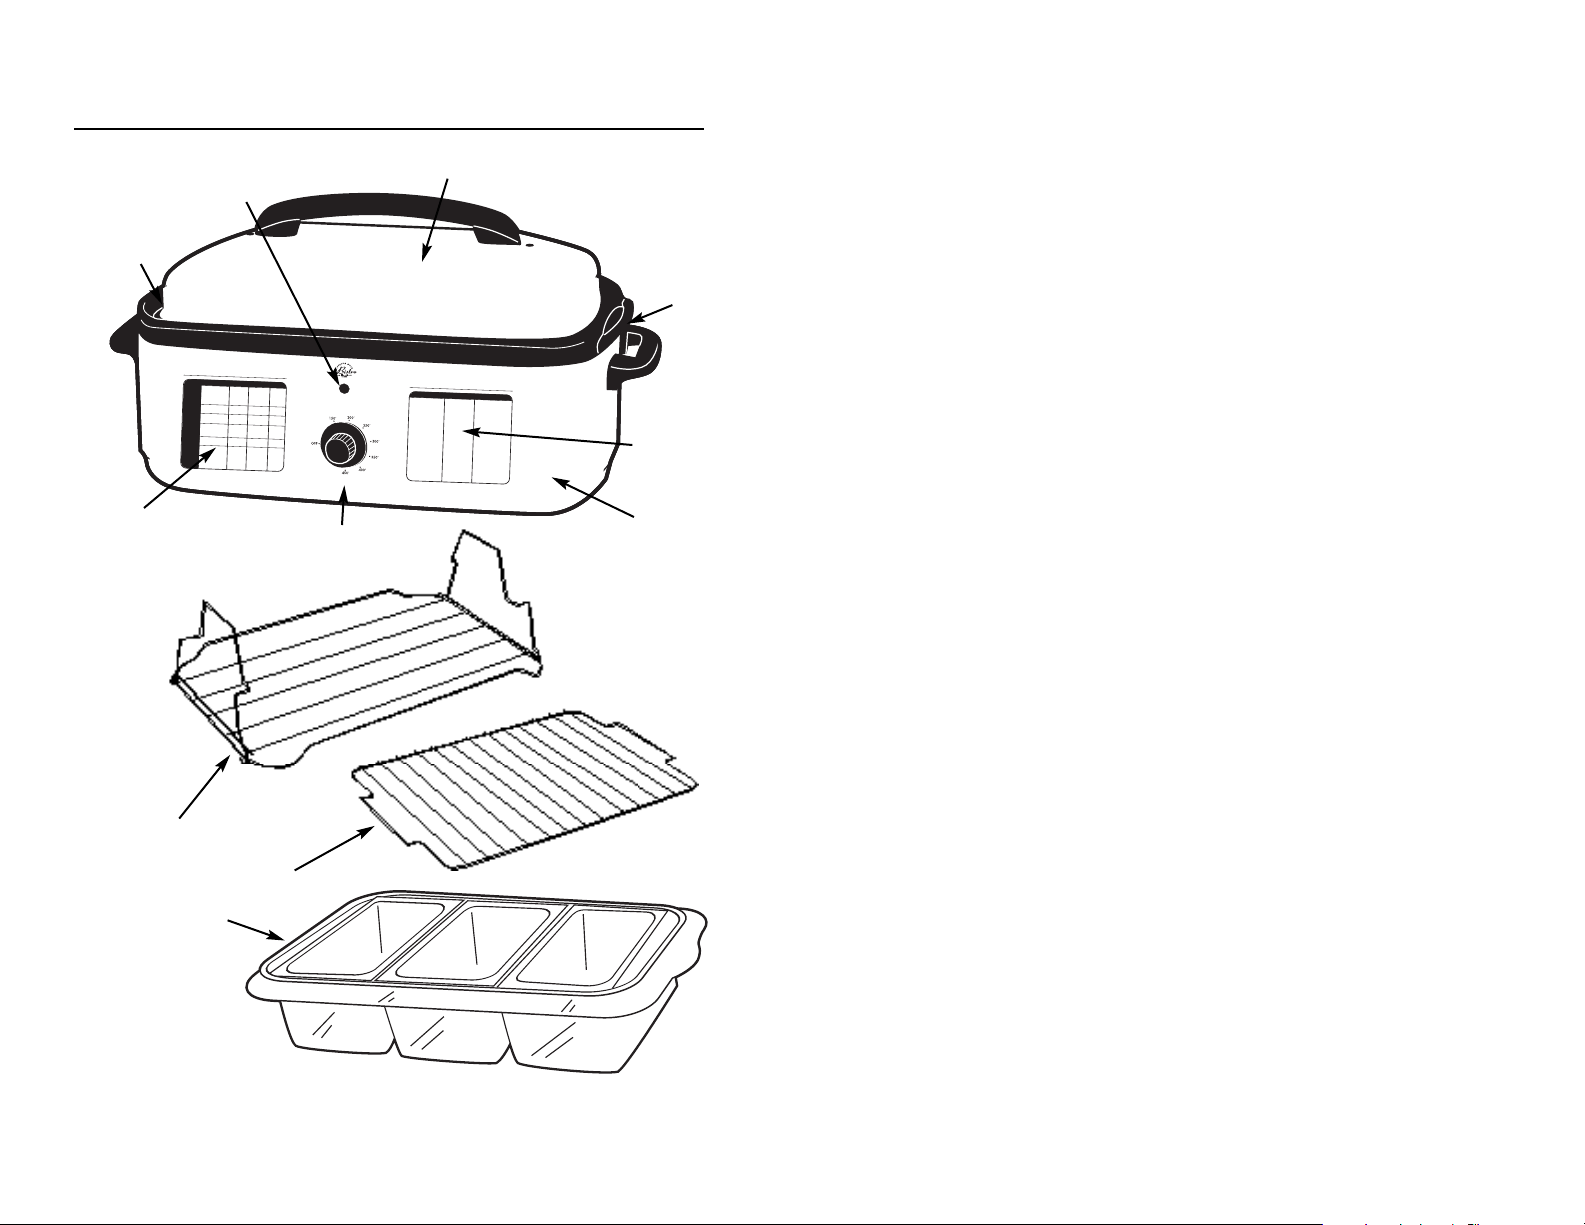
High-Dome Cover is designed to control heat and moisture efficiently.
Important: When removing the cover from the oven during or after cooking,
lift the cover away to avoid contact with escaping steam.
Lid Rests, located on each of the side handles of the oven body, provide a
convenient place for the cover when foods are being added to the oven.
The cover will fit on either lid rest in a horizontal or vertical position.
Oven Pan is coated enamel-on-steel. It has an 18-quart capacity and is
removable for easy cleaning in the dishwasher or the sink. Food can be
stored in the oven pan with the cover and refrigerated.
Oven Body holds the oven pan for cooking. Its double-wall construction
and wrap-around heating elements provide for even cooking and insulation
to hold in heat and keep kitchen cool. Important: Do not place food directly
in the oven body.
Oven Rack With Handles is chrome-plated and fits into oven pan for most
cooking. Handles are convenient for removing large items from the oven
pan and fold down for compact storage.
Flat Oven Rack can be used in combination with the oven rack with handles
in the oven pan. The flat rack slides on top of the the handles of the oven
rack with handles for two level cooking. If space allows, baked goods should
be placed on the flat rack fitted on the handles of the oven rack with handles
so that they are positioned in the center of the oven. For best results, do not
cook two levels of baked goods at the same time.
Temperature Control has adjustable temperatures from 150° to 450°. The
thermostat automatically cycles on and off to maintain the selected setting
inside the portable oven.
Power-On Light is illuminated when the unit is plugged in and stays onuntil
the unit is unplugged.
Cooking Chart and Baking Chart are printed directly on the oven body as a
quick reference for cooking and baking a variety of foods. More detailed
information is provided in this manual.
Steam and Serve Set converts your Portable Oven into a professional steam
and serve table. The four-piece set includes three 4-quart stainless steel pans
and a frame.
Roasting Guide
MM
EE
AA
TT WW
EEIIGGHHTT
((LLBBSS
..)) TTEE
MM
PP
EERR
AA
TT
UURREE
MM
IINN
..//LLBB..
BB
EE
EE
FF
S
t
a
n
d
i
n
g
R
i
b
R
o
a
s
t
4
6
3
2
5
˚
2
0
2
5
S
i
r
l
o
i
n
T
i
p
3
5
3
5
0
˚
2
0
2
5
T
e
n
d
e
r
l
o
i
n
3
.
5
4
4
5
0
˚
8
1
2
P
o
t
R
o
a
s
t
4
6
3
0
0
˚
3
0
4
0
LL
AA
MM
BB
L
e
g
5
8
3
5
0
˚
2
5
S
h
o
u
l
d
e
r
,
b
o
n
e
l
e
s
s
3
-
4
3
5
0
˚
2
5
PP
OO
RR
KK
L
o
i
n
R
o
a
s
t
3
-
5
3
5
0
˚
2
5
3
0
C
h
o
p
s
4
-
5
3
2
5
˚
1
5
2
0
SS
MM
OO
KK
EE
DD
H
a
m
,
b
o
n
e
i
n
1
0
-
1
5
3
2
5
˚
2
0
2
5
PP
OO
RR
KK
H
a
m
,
b
o
n
e
l
e
s
s
8
1
2
3
2
5
˚
1
5
2
0
H
a
m
,
c
o
o
k
e
d
5
1
0
3
2
5
˚
1
3
2
8
VV
EE
AA
LL
L
o
i
n
4
6
3
2
5
˚
3
0
3
5
S
h
o
u
l
d
e
r
3
5
3
2
5
˚
3
0
3
5
PP
OO
UU
LL
TT
RR
YY
C
h
i
c
k
e
n
,
w
h
o
l
e
3
.
5
-
5
3
5
0
˚
1
5
1
7
C
h
i
c
k
e
n
,
w
h
o
l
e
6
8
3
5
0
˚
1
8
2
0
C
h
i
c
k
e
n
,
p
i
e
c
e
s
6
8
3
5
0
˚
8
1
0
C
o
r
n
i
s
h
H
e
n
s
(
4
)
3
.
5
4
.
5
4
0
0
˚
1
5
2
0
T
u
r
k
e
y
,
f
r
e
s
h
1
0
1
4
3
5
0
˚
1
5
2
0
FF
OO
OO
DD
TT
EE
MM
PP
EE
RR
AA
TT
UU
RR
EE
MM
II
NN
UU
TT
EE
SS
B
a
k
e
d
P
o
t
a
t
o
e
s
3
5
0
4
0
0
˚
5
0
6
0
W
i
n
t
e
r
S
q
u
a
s
h
4
0
0
˚
4
5
6
0
B
a
k
e
d
A
p
p
l
e
s
3
5
0
˚
3
5
4
5
M
u
f
f
i
n
s
4
2
5
˚
1
5
2
0
Q
u
i
c
k
B
r
e
a
d
3
7
5
°
6
5
7
5
Y
e
a
s
t
B
r
e
a
d
4
0
0
˚
4
0
4
5
Y
e
a
s
t
R
o
l
l
s
4
0
0
˚
1
8
2
0
B
r
o
w
n
i
e
s
3
5
0
˚
2
5
3
0
C
o
o
k
i
e
s
3
5
0
˚
1
1
-
1
3
S
h
e
e
t
C
a
k
e
3
5
0
˚
4
0
-
4
5
C
h
e
e
s
e
c
a
k
e
3
2
5
˚
5
0
-
6
0
C
u
s
t
a
r
d
P
i
e
3
5
0
˚
5
0
-
6
0
F
r
u
i
t
P
i
e
4
2
5
˚
4
5
-
5
0
P
a
s
t
r
y
S
h
e
l
l
4
2
5
˚
1
0
1
3
P
i
z
z
a
(
9
i
n
c
h
)
4
2
5
˚
2
0
2
5
Baking Guide
Know Your Portable Oven
4
High-Dome Cover
Oven Pan
Cooking Chart
Baking
Chart
Lid Rest
Power-On Light
Temperature Control
Rack With
Handles
Flat Rack
Oven Body
Steam and
Serve Set
Page 4

7
7. When food is done, turn the temperature control to OFF and unplug the
cord from the outlet.
8. Carefully remove the food using pot holders or oven mitts. Allow the
portable oven to cool before cleaning. Caution: The portable oven body,
pan, cover and rack will be hot. Always lift the cover away from you to
avoid steam.
Using the Oven Racks
Two racks are included for two-level cooking (such as meat on the bottom
rack with vegetables on the top) and to elevate baked goods. Use the oven
rack with handles alone inside the oven pan for fat-free cooking. (Prepare
soups and stews without the oven rack.)
For two-level cooking, place food on the oven rack
with handles, then fit the flat rack on the handles.
(See illustration for assembly.) Place the additional
food on the flat rack. Two-level cooking is not
recommended for baked goods.
If space allows, baked goods such as pies, cakes, cookies and casseroles
should be placed on the flat rack fitted on the oven rack with handles. This
will position them in the center of the oven and improve heat circulation.
Using the Steam and Serve Set
A four-piece Steam and Serve Set is included to convert your Portable Oven
into a professional steam and serve table. The set includes three 4-quart
stainless steel pans and a frame. You can keep up to three different foods
warm for serving.
Place the oven pan into portable oven. Pour 2 1/2 quarts of hot water into
the oven pan. Place frame securely on the rim of the oven pan, and insert
stainless steel pans into frame. Cover and preheat portable oven to 450°.
Uncover and add hot, cooked foods to pans up to 1 inch from rim. Reduce
heat to 400° and keep covered to warm foods for up to 2 hours. Adjust
temperature setting if necessary. If warming foods for longer than 2 hours,
check and add more hot water. For best results, stir foods occasionally.
NOTE: All containers should be in place when using the Steam and Serve
Set. When warming foods that may stick, coat pans with nonstick cooking
spray before filling.
Before Your First Use
Read all instructions. Carefully unpack the portable oven and remove all
packaging materials. Place your oven on a level surface such as a
countertop or table. Be sure the sides, back and top of the oven are at least
four inches away from any walls, cabinets or objects on the counter or table.
Remove all stickers from the oven except the rating label located on the
bottom. Wipe the exterior surfaces with a clean, damp cloth or sponge and
dry with another cloth. Remove the oven pan, steam and serve set, cover
and racks and wash in hot, sudsy water or in the dishwasher. Rinse and dry
thoroughly. Caution: Do not immerse the cord in water or any other liquid.
We recommend a “trial run” at a high temperature to eliminate any
protective substance or oil that may have been used for packing and
shipping. Place the portable oven in a well ventilated area. Be sure that the
temperature control is in the OFF position. Plug the cord into a 120-volt
AC outlet. Set the temperature control to 450°. Operate the portable oven
empty for about 60 minutes until odor and smoke disappear. Turn the
temperature control to OFF, unplug the unit and allow to cool.
To avoid scratching, marring, discoloration or fire hazard, do not store
anything on top of the oven, especially during operation.
Using Your Portable Oven
1. Be sure that the temperature control is in the OFF position. Plug the cord
into a 120 volt, AC outlet.This appliance requires 1440 watts and
should be the only appliance operating on the circuit.
2. Place the oven pan in the portable oven body. Place the cover on the
oven pan.
3. Always preheat the portable oven prior to use. Set the temperature
control to the desired temperature and preheat for 10 minutes.
4. Remove the cover and store it on the lid rest. Use caution as the cover
will be hot.
5. Using pot holders or oven mitts, place the food in a pan on an oven rack
and then place in the oven pan OR place the food directly in the oven
pan. Replace the cover.
Important: Never place food or liquid directly in the oven body.
6. Cook according to recipe instructions.
6
Page 5

9
1 - 12-cup muffin pan
1 - 6-cup jumbo muffin pan
2 - 12-cup mini muffin pans
1 - 8-, 9- or 10-inch pie plate
1 - 14”x 8”x1/2” baking sheet
1 - 13”x9”x2” baking dish
1 - 8- or 9-inch square baking pan
1 - 10-inch bundt pan or angel food pan
• Metal pans are preferable to glass for baking because they reflect and
transfer heat better. Glass can be used if desired, but the bottom crust
will not be as brown.
Steaming
• Steaming is an easy way to cook tasty, nutritious and healthy foods
without added fats.
• Preheat portable oven to 450°. Pour 1 quart of boiling water in bottom
of oven pan. Place food in a pan placed on the oven rack. Steam
according to recipe directions.
Slow Cooking
• For slow cooking, brown meat and vegetables in a separate skillet
before adding to portable oven. Add liquid and set the portable oven
temperature to 250°.
• Always keep food covered; stirring is not necessary.
• Cut meat and vegetables into uniform-size pieces for even cooking.
• Little moisture escapes from the portable oven during cooking, so add
liquid sparingly.
• To convert a standard recipe to slow cooking, double the time and
decrease the oven temperature to 250°.
• When slow cooking meats and poultry, it is not necessary to use the
rack. The low temperature will keep the meat from sticking to the pan.
Warming
• Use the steam and serve set for warming foods and serving buffet-style.
(See detailed instructions, page 7.)
8
Cooking Tips
This Portable Oven cooks and bakes at approximately the same temperatures and in the same time as a standard oven. Use the charts and recipes
given as a guide to make similar-type recipes. Check 5 to 10 minutes
before estimated finishing time to insure perfect results. Make notes of any
needed adjustments for the next time.
General Cooking
• For best results, dry-cook tender cuts of meat. Do not add liquid until
the last 30 minutes of cooking.
• Simmering less tender cuts of meat will make them more tender.
Adding a gravy or sauce will provide extra flavor.
• Because meat and poultry vary in size and shape, use a meat
thermometer to achieve the desired degree of doneness.
• As with all covered portable ovens, meats will not brown during the
cooking process. To achieve browning, sear meat in a separate skillet
on your stovetop prior to cooking in your portable oven. Add a small
amount of oil or butter to the skillet and sear meat for a few minutes
per side until lightly browned.
Baking
• Always place baking pans or casserole dishes on one of the racks and
then in the oven pan. Never place pans on the bottom of the oven pan.
• If space allows, use the flat rack fitted on the handles of the oven rack
with handles to position casserole dishes and baking pans in the center
of the oven for more even baking.
• You can bake two loaves of bread or cook a meat and a vegetable at
one time.
• The oven pan will easily accommodate three 1 1/2-quart casserole
dishes. This is ideal for preparing a complete meal such as meat,
potatoes and a vegetable.
• To make clean-up easier, place foods that may boil over (like fruit pies
and casseroles) on a cookie sheet before positioning on the rack.
• Convenience foods can be baked in the portable oven. Place container
on the oven rack with handles or the flat rack fitted on the handles of
the oven rack. Follow package directions.
• The portable oven accommodates the following size baking pans:
Page 6

11
FFoooodd TT ee mmpp eerr aattuu rr ee
**
MM ii nnuu tt eess
Baked Potatoes 350-400˚ 50-60
Sweet Potatoes 350-400˚ 55-65
Scalloped Potatoes 350˚ 75-90
Winter Squash 400˚ 45-60
Baked Apples 350˚ 35-45
Muffins 425˚ 15-20
Quick Bread 375° 65-75
Yeast Bread 400˚ 40-45
Yeast Rolls 400˚ 18-20
Brownies 350˚ 25-30
Cookies 350˚ 11-13
Cupcakes 350˚ 20-25
Bundt Cake 350˚ 50-60
Pound Cake 350˚ 50-60
Sheet Cake 350˚ 40-45
Cheesecake 325˚ 50-60
Custard Pie 350˚ 50-60
Fruit Pie 425˚ 45-50
Pastry Shell 425˚ 10-13
Pizza (9-inch) 425˚ 20-25
Baking Guide
*always preheat prior to baking
10
MMee aa tt WWee ii gg hh tt((llbbss..)) TTeemmppeerr aatt uurree**MMii nn.. //llbb..
BB EE EE FF
Standing Rib 4-6 325˚ 20-25
Sirloin Tip 3-5 350˚ 20-25
Tenderloin 3
1
/
2
- 4 450˚ 8-12
Pot Roast 4-6 300˚ 30-40
LL AA MM BB
Leg 5-8 350˚ 25
Shoulder, boneless 3-4 350˚ 25
PP OO RR KK
Loin Roast 3-5 350˚ 25-30
Rolled Shoulder 4-6 350˚ 35-40
Chops 4-5 325˚ 15-20
Country-Style Ribs 8-10 450˚ to brown
SSMM OO KK EE DD
Ham, bone in, 10-15 325˚ 20-25
PP OO RR KK
shankless
Ham, boneless 8-12 325˚ 15-20
Ham, fully cooked 5-10 325˚ 13-28
VV EE AALL
Loin 4-6 325˚ 30-35
Shoulder 3-5 325˚ 30-35
PPOO UU LL TTRRYY
Chicken, whole 3
1
/
2
- 5 350˚ 15-17
Chicken, whole 6-8 350˚ 18-20
Chicken, pieces 6-8 350˚ 8-10
Cornish Hens (4) 3
1
/
2
-4
1
/
2
400˚ 15-20
Duck 4-5 425˚ 20-25
Turkey, prebasted 10-14 375˚ 12-17
Turkey, prebasted 14-22 375˚ 13-18
Turkey, fresh 10-14 350˚ 15-20
Cooking Guide
*always preheat prior to cooking
Page 7

13
BUTTERMILK BISCUITS
Makes 20 to 22 biscuits
INGREDIENTS
2 3/4 cups all-purpose flour
1 1/2 tablespoons sugar
1 tablespoon plus 1 teaspoon baking powder
2 teaspoons salt
1/4 teaspoon baking soda
10 tablespoons (5 ounces) chilled unsalted butter, cut into small pieces
1/4 cup minced onion
1 tablespoon chopped fresh or 2 teaspoons dried thyme
1 cup buttermilk
1 or 2 tablespoons milk or cream
1/4 cup grated Parmesan cheese, optional
METHOD
1. In a food processor fitted with the steel blade, combine the flour, sugar,
baking powder, salt, and baking soda. Add the butter, onion, and thyme,
and process until the mixture resembles fine meal. With the machine
running, pour the buttermilk through the feed tube, just until the dough
comes together.
2. Turn out onto a well-floured work surface and knead lightly into a round
ball. Roll out the dough to about 1-inch thickness, and with a 2-inch
cookie cutter, cut out as many biscuits as you can. Repeat this procedure
until you have used all the dough, giving you 20 to 22 biscuits. Arrange
the biscuits, as cut, on two parchment-lined baking trays. Refrigerate for
at least 1 hour, up to 24 hours.
3. Preheat the portable oven to 350°.
4. Brush the top of each biscuit with milk or cream and sprinkle with the
Parmesan cheese, if desired. Bake one layer at a time for 25 to 35
minutes, until lightly golden. Serve warm.
PRESENTATION
Delicious by themselves, these biscuits are great with soup or served with butter and
honey, or your favorite preserves.
12
CORN MUFFINS WITH JALAPEÑO
PEPPERS AND FRESH ROSEMARY
Makes 12 muffins
INGREDIENTS
1 medium ear of corn
16 tablespoons (8 ounces) unsalted butter
3 small jalapeño peppers, finely chopped
2 teaspoons chopped fresh rosemary
2 packed tablespoons light brown sugar
1 egg
1 teaspoon salt
1 teaspoon baking soda
1 cup all-purpose flour
1 cup stoneground cornmeal
1 1/4 cups buttermilk
METHOD
1. Preheat the portable oven to 425°.
2. Cut the kernels from the ear of corn. Set aside.
3. In a saucepan, melt 1 1/2 tablespoons of the butter. Brush medium-size
muffin tins with some of the butter and set aside. Add the jalapeño
peppers to the remaining butter in the pan and cook slowly for 1 minute.
Remove from the heat. Add the corn and rosemary to the pan with the
peppers and set aside.
4. In the bowl of an electric mixer, cream the remaining butter with the
sugar, then add the egg and mix well. Scrape down the sides of the mixer
as necessary. The mixture should be light and fluffy.
5. Mix together the salt, baking soda, flour and cornmeal. Add to the mixer
a quarter of the flour mixture, then a quarter of the buttermilk, mixing well
after each addition. Continue with alternate additions of flour and
buttermilk until all has been used.
6. Stir in the jalapeño and corn mixture.
7. Spoon the batter into the muffin tins until they are three-quarters full and
bake for 18 to 20 minutes. Atoothpick inserted in the center will come
out clean.
8. Let the muffins rest in the tins for about 5 minutes, then remove them
from the pan.
PRESENTATION
Place in a napkin-lined basket or bowl. Serve hot with fresh unsalted butter.
Page 8

14 15
WOLFGANG’S FAVORITE
CHOCOLATE CAKE
Makes one 10-inch cake
INGREDIENTS
8 ounces bittersweet chocolate, cut into small pieces
4 ounces unsalted butter, cut into small pieces
5 large eggs, separated
Pinch of salt
2/3 cup sugar
METHOD
1. Preheat portable oven to 325°. Butter, flour and line the base of a 10-inch
round cake pan with parchment.
2. Combine chocolate and butter in a bain marie or in a bowl over
simmering water.
3. Whisk together the egg yolks and all but 3 tablespoons of the sugar. Stir
melted chocolate into egg yolks until thoroughly combined.
4. With an electric mixer, on medium speed, beat egg whites and salt until
soft peaks form. Gradually beat in the remaining sugar and continue to
whip until egg whites are stiff but not dry.
5. Carefully fold chocolate mixture into egg whites. Pour into prepared pan.
6. Bake for about 45 minutes. Turn out onto a rack immediately. As the cake
cools, the center will sink and crack - do not worry.
PRESENTATION
Dust the cake with powdered sugar and serve with unsweetened whipped cream.
BLACK PEPPER SCONES
Makes 18 scones
INGREDIENTS
4 cups plus 1 tablespoon all purpose flour
1/2 cup sugar
2 1/2 teaspoons baking powder
1/2 teaspoon salt
13 tablespoons (6 1/2 ounces) unsalted butter, cut into small pieces and chilled
1 1/2 tablespoons medium grind black pepper
2 1/2 teaspoons finely chopped lemon peel
1 1/2 cups heavy cream plus 2 tablespoons for brushing
METHOD
1. Into a large bowl, sift together the flour, sugar, baking powder and salt.
Using two knives or a pastry blender, cut in the butter until the mixture
resembles coarse meal. Gently stir in the pepper and lemon peel. Add
the 1 1/2 cups cream all at once and mix until the dough just comes
together.
2. Turn out onto a lightly floured surface and knead the dough into a ball.
For a flakier consistency, do not knead the dough into a smooth ball. If
smooth, the scone will be more cakelike. Wrap in plastic wrap and refrigerate for at least 30 minutes, up to overnight.
3. Cut the dough into three equal pieces. Working with one piece at a time,
keeping the other two pieces covered, roll out to a circle, 6 inches in
diameter and 1/2 inch thick.* Cut the circle into 6 wedges and arrange
the wedges on one or two baking trays lined with parchment paper.
Repeat with the remaining dough.
4. Preheat the portable oven to 350°. Lightly brush the scones with the
remaining 2 tablespoons of cream and bake until golden, about 10-12
minutes.
* The scones can be cut out with a 2 1/2 inch cookie cutter if desired. Roll out the
dough, cut, and place on a baking tray. Reroll the dough and continue cutting out
circles. Proceed as in step 4.
PRESENTATION
Serve warm with butter, and jam if you like it.
Page 9

17
KEY LIME PIE
Makes one 9-inch pie
INGREDIENTS
1/3 recipe Sugar Dough (see separate recipe, page 16)
4 eggs
4 egg yolks
2/3 cup sugar
1 cup Key lime juice
6 tablespoons (3 ounces) unsalted butter, cut into small pieces
1 to 2 tablespoons sugar for carmelizing
METHOD
1. Preheat the portable oven to 375°.
2. With the Sugar Dough, line a 9-inch fluted tart tin with a removable
bottom. Line the shell with coffee filters or parchment paper, then fill with
pie weights or dry beans. Bake the shell for 20 minutes, or until golden
brown around the edges. Cool the shell and remove pie weights or beans
and papers.
3. Combine the eggs, and egg yolks in a large stainless steel bowl. Whisk
in the sugar thoroughly, then whisk in the lime juice.
4. Place the bowl over hot but not boiling water. Whisk vigorously until the
mixture is light and thick. It should mound on itself when a little of it is
dropped from the whisk.
5. Remove the bowl from the heat and distribute the butter over the top of
the filling. When the butter has melted, fold it into the filling.
6. Turn the mousse into the tart shell and smooth the top with a long metal
spatula. Chill.
PRESENTATION
Sprinkle the additional sugar over the top of the pie and carmelize the pie under a
very hot broiler or with a small blow torch. Remove the pie from its ring and transfer it
to a flat serving dish, removing the metal bottom. Cut into wedges and serve.
SUGAR DOUGH
Use this recipe with the following pie recipe.
Makes about 1 1/2 pounds or two 9-inch tart shells
INGREDIENTS
2 1/3 cups cake or pastry flour
1/3 cup sugar
1/2 pound (2 sticks) unsalted butter, chilled, cut into small pieces
2 egg yolks
1 or 2 tablespoons heavy cream
METHOD
1. In a food processor fitted with the steel blade, combine the flour and
sugar. Add the butter and process until the texture resembles fine meal.
2. In a small bowl, whisk together the yolks and 1 tablespoon of the cream.
Scrape into the machine and process until a ball begins to form, using
the additional tablespoon of cream, if necessary . Remove the dough from
the machine, and on a lightly floured surface, press down into a circle.
Wrap in plastic wrap and refrigerate for at least 1 hour.
3. Use as needed.
16
Page 10

19
HEARTY BOLOGNESE SAUCE
Makes about 14 cups
INGREDIENTS
12 tablespoons extra-virgin olive oil
2 pounds lean ground beef
2 teaspoons salt
1/2 teaspoon freshly ground black pepper
4 teaspoons minced shallots
2 teaspoons minced garlic
1 cup dry red wine
10 pounds Roma tomatoes, cored, blanched, peeled, seeded and chopped
4 tablespoons tomato paste
6 tablespoons sugar
1 bouquet garni made up of 2 sprigs each rosemary, basil, parsley,1 sprig oregano,
2 bay leaves, 1 tablespoon black peppercorns
2 medium onions, finely diced
2 medium carrots, finely diced
2 medium celery stalks, finely diced
4 cups chicken stock
METHOD
1. Preheat portable oven to 450°. In a large skillet on your stovetop, heat 6
tablespoons of olive oil. Add ground beef and sauté until browned,
breaking up the large chunks of meat as they cook. Season with salt and
pepper. Add shallots and garlic, continue cooking for about 3 more
minutes or until shallots are soft.
2. Add red wine and deglaze pan, reduce until almost all liquid has been
absorbed. Pour meat mixture into oven pan and place in portable oven.
3. Add chopped tomatoes, tomato paste, sugar and bouquet garni. Bring
mixture to a boil. Cover and reduce heat to 350°. Simmer for about 45
minutes, stirring frequently.
4. Meanwhile, in a small skillet, heat remaining 6 tablespoons olive oil. Add
onion, carrot and celery. Sauté for about 4 minutes or until onion is
translucent.
5. Add sautéed vegetables along with chicken stock to meat sauce and
simmer for another 30 minutes until meat sauce is rich and thickened.
Season to taste, if necessary.
NOTE: Beef bolognese sauce can be made ahead and refrigerated in a covered
container for 2 to 3 days in refrigerator or frozen for up to 3 months.
POACHED SALMON
INGREDIENTS
2 medium carrots, sliced
2 stalks celery, sliced
1 leek cleaned & sliced
1 sprig fresh thyme or pinch dried thyme
1 bay leaf
1 teaspoon salt
1/2 teaspoon ground pepper
2 quarts water
2 cups dry white wine
1 5- to 6-pound whole salmon
METHOD
1. Place carrots, celery, and leeks in an 8-quart stock pot. Add remaining
ingredients, except salmon, and bring to a boil. Boil for 20 minutes;
remove from heat.
2. Preheat portable oven to 350°. Add poaching liquid to oven pan. Place
salmon on rack and carefully lower into liquid. Cover and poach salmon
for 30 minutes (cooking time should equal 10 min/inch of thickness of
salmon at its thickest point). Liquid should never come to a boil.
18
Page 11

BEEF GOULASH
Serves 6
INGREDIENTS
1 tablespoon caraway seeds
2 tablespoons extra-virgin olive oil
2 large onions, thinly sliced
1 tablespoon sugar
3 garlic cloves, minced
3 tablespoons sweet Hungarian parika
1 teaspoon hot Hungarian paprika
2 tablespoons minced marjoram
1 teaspoon minced thyme
1 bay leaf
3 tablespoons tomato paste
4 cups chicken stock or canned low-sodium broth
2 1/2 pounds trimmed boneless chuck, cut into 2-inch pieces
Salt and freshly ground pepper
METHOD
1. In a small skillet, toast the caraway seeds over moderate heat until
darkened and fragrant, about 1 minute. Transfer the caraway seeds to a
spice grinder and let cool completely, then grind to a powder.
2. Preheat portable oven to 450°. Pour in olive oil and heat. Add the onions
and sugar and cook, stirring occasionally , until the onions are carmelized.
Add the garlic and ground caraway and cook, stirring, for 1 minute. Add
the sweet paprika, hot paprika, marjoram, thyme and bay leaf and cook,
stirring, until fragrant, about 2 minutes.
3. Stir in the tomato paste and then the chicken stock. Add the meat, season
with salt and pepper. Cover and reduce heat to 350°. Simmer until the
meat is very tender, about 2 hours.
4. Skim off the fat, season the goulash with salt and pepper, and serve.
NOTE: The goulash can be made ahead and refrigerated in a covered container for
up to 2 days.
21
TORTA REGINA
Makes 8 to 10 servings
INGREDIENTS
8 ounces hazelnuts, roasted and peeled
8 ounces bittersweet chocolate
8 eggs, separated
1/2 cup sugar
Cocoa powder or melted chocolate, for decoration
METHOD
1. Preheat oven to 350 °.
2. Butter a 10 by 2-inch cake pan.
3. In a food processor, pulse the nuts until coarsely chopped. Reserve.
Process the chocolate until coarsely chopped. Add to the chopped nuts.
4. In a mixing bowl, combine the egg yolks and 1/4 cup sugar. Beat until
light and ribbony.
5. In another mixing bowl, beat the egg whites to soft peaks. Slowly add the
remaining 1/4 cup of sugar and continue to beat until stiff peaks form.
6. Fold the nuts and chocolate into the egg yolk mixture. Carefully fold the
egg white into the yolk mixture. Fill the cake pan 2/3 full. Bake for 20
minutes or until center is springy. Remove from the oven and cool on a
baking rack. Dust with cocoa powder or decorate with chocolate
drawings.
20
Page 12

2. Heat a large skillet over medium high heat and add the butter and
vegetable oil. Sauté the chicken for 2-3 minutes, until lightly browned but
not cooked through. With slotted spoon, remove chicken to bowl.
3. In the same pan over medium-high heat sauté the carrots, celery and
mushrooms 5 minutes. With slotted spoon, remove vegetables to another
bowl. Stir thawed pearl onions and peas into vegetables.
4. Prepare the sauce: In the same pan, melt the butter over medium heat.
Add the flour and whisk until the mixture is bubbling and smooth, about
2 minutes. Remove from heat and gradually whisk in stock, cream, and
thyme. Return skillet to heat, bring to a simmer, stirring constantly. Cook
for 2 minutes until sauce has thickened and is smooth. Season with salt
and pepper. Stir in reserved chicken and vegetables. Set aside to cool
for about 20 minutes.
5. Preheat the portable oven to 400°. Spoon cooled chicken and vegetable
mixture into a 10-inch deep-dish pie plate. On a lightly floured surface,
roll out the pastry into a circle 11-inches in diameter. Place pastry on top
of chicken mixture. Trim pastry edge, fold overhang under and press
gently all around baking dish to make a decorative edge. Reroll any
trimmings and cut out to make a decorative design for top of pie. Brush
pastry with beaten eggwash. Using a knife, cut 3 slits in center of pie.
6. Bake 25 to 30 minutes or until pastry is golden brown, chicken and
vegetables are tender and filling is heated through.
23
WOLFGANG’S
CLASSIC CHICKEN POT PIE
Serves 6
INGREDIENTS
Pastry:
2 cups all-purpose flour
2 tablespoons snipped chives
3/4 cup unsalted butter, chilled, cut into small pieces
1 cup shredded sharp Cheddar cheese
2 egg yolks
5 or 6 tablespoons heavy cream
Chicken and Vegetables:
2 tablespoons unsalted butter
1 tablespoon vegetable oil
1 pound skinless, boneless chicken breasts, cut into 1-inch pieces
2 medium carrots, cut into 1/2-inch slices
1 stalk celery, cut into 1/2-inch slices
1/2 pound crimini or shiitake mushrooms, sliced
1 x 10 ounce package frozen pearl onions, thawed
3/4 cup frozen petite peas, thawed
Sauce:
6 tablespoons unsalted butter
1/4 cup all-purpose flour
1 1/2 cups chicken stock (see separate recipe)
1/2 cup heavy cream
1 teaspoon minced fresh thyme
Salt
Freshly ground black pepper
1 egg with 1 tablespoon water, beaten
METHOD
1. Prepare the pastry: Place the flour and chives in a bowl. Using a pastry
blender or your fingertips, work in the butter until mixture resembles
coarse crumbs. Add the cheese and work in until just blend. In a small
bowl, whisk together the yolks and 5 tablespoons of the cream. Sprinkle
the yolk mixture over the pastry dough, a little at a time, stirring with a
fork until pastry comes together. Add remaining cream if necessary.
Knead lightly until just combined. Press pastry into a circle. Wrap in
plastic wrap and refrigerate until needed.
(Continued next page.)
22
Page 13

RECIPE NOTES
25
RECIPE NOTES
24
Page 14

27
LIMITED WARRANTY
This warranty covers all defects in workmanship or materials in the mechanical and
electrical parts, arising under normal usage and care, in this product for a period of
12 months from the date of purchase provided you are able to present a valid proofof-purchase. A valid proof-of-purchase is a receipt specifying item, date purchased,
and cost of item. A gift receipt with date of purchase and item is also an acceptable
proof-of-purchase. Product is intended for household use only. Any commercial use
voids the warranty.
This warranty covers the original retail purchaser or gift recipient. During the
applicable warranty period within normal household use, we will repair or replace,
at our discretion, any mechanical or electrical part which proves defective, or
replace unit with a comparable model.
To obtain service under the terms of this warranty, call Toll Free (800) 275-8273.
THIS LIMITED WARRANTY COVERS UNITS PURCHASED AND USED WITHIN
THE UNITED STATES AND DOES NOT COVER:
* Damages from improper installation.
* Defects other than manufacturing defects.
* Damages from misuse, abuse, accident, alteration, lack of proper care and
maintenance, or incorrect current or voltage.
* Damage from service by other than an authorized dealer or service center.
This warranty gives you special legal rights and you may also have other rights to
which you are entitled which may vary from state to state.
Care & Cleaning
After using, unplug the power cord from the outlet. Before cleaning, allow
the unit to cool completely.
Remove the cover, the oven pan and the racks and steam and serve set (if
used). Wash in warm, sudsy water or in the dishwasher.
Do not use scouring pads or harsh cleaners on any part of the appliance.
Remove cooked-on foods by using a non-abrasive cleaning pad or a nylon
brush and non-abrasive cleaners such as Soft Scrub® or Bon Ami®. Do not
use abrasive cleansers or steel wool as they may scratch the finish.
To easily remove baked-on food from the oven pan, fill the oven pan with
hot water. Cover and heat at 350° for 30 minutes.Turn temperature control
to the OFF position and allow to cool before cleaning.
Wipe the outside surfaces of the portable oven with a damp cloth and dry.
The oven pan is coated with a finish that is easy to clean. It may chip if
dropped on a hard surface. Water spots or mineral deposits (characterized
by a white film on the surface) may be removed with household vinegar or
a non-abrasive cleaner.
Caution: Do not immerse the oven body or power cord in water or other
liquid.
26
 Loading...