

Page 1
®
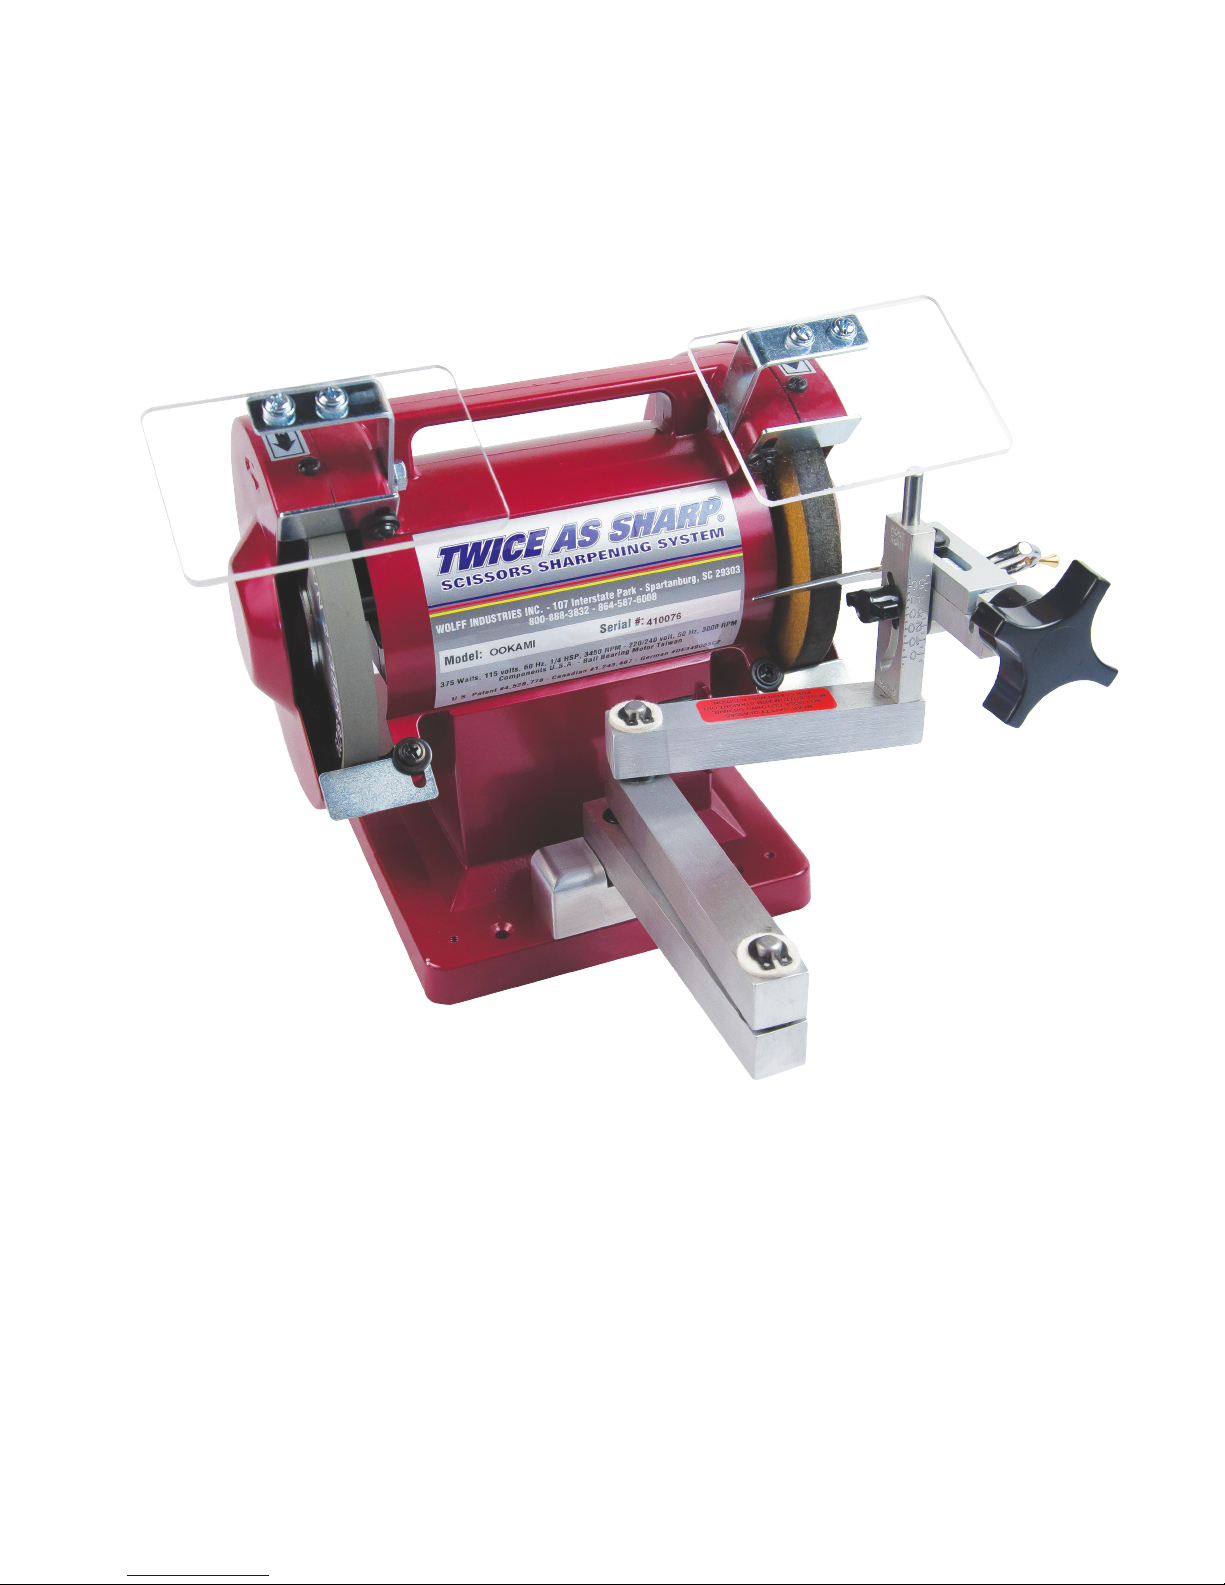
OOKAMI GOLD
SCISSORS SHARPENING SYSTEM
OPERATORS MANUAL
CUSTOMER SERVICE 1-800-888-3832
Developed and manufactured in the USA
by Wolff Industries for sharpening
the world’s nest scissors and shears.
Part # 13000
Revision 1/11/16
Page 2

BACKGROUND INFORMATION ON LEE WOLFF & WOLFF INDUSTRIES
1930 - 1996
In 1957 Lee Wolff, (Inventor of Twice as Sharp®) started a sewing machine sales and service business.
Fabrics and a complete line of sewing needs were added in 1963, and the number of employees grew to 25
to handle the volume. During those years, Lee did a great deal of scissors sharpening and repair and made
important modications on the available scissors sharpening equipment.
In 1971 Lee and Mary Wolff became the rst major importer and distributor of plastic handled scissors in
the United States. They started to manufacture sewing scissors in 1973 under the trade name of KNIP. A
U.S. patent was granted on the KNIP.
The scissors factory was sold to American Scissors Corp. in 1980 and moved to the south. Lee set up the
factory and innovated many new manufacturing processes. The July 1983 Consumers Reports rates the
American Scissors designed and produced by Lee Wolff as a best buy. He also designed a full line of unique
plastic handled scissors with interchangeable parts.
Lee worked on the perfecting of scissors sharpening equipment for many years. It is necessary to accurately
control the cutting angles, reduce burr formation during sharpening, and do deburring and micro-sharpening
as a nal process. This method produces scissors that are normally twice as sharp, hence the name Twice
as Sharp®. A United States patent has been granted as well as several foreign patents.
Wolff Industries has grown rapidly with many new products for scissors sharpeners. In 1990 a new tech-
nical department and additional equipment were added so that we will always be able to bring to you the
most advanced scissors sharpening equipment.
Technical support is available Monday through Friday 8:00 AM to 5:00 PM eastern standard time.
Call with your sharpening questions. If it is regarding a specific shear, please have the shear in
hand. If your question is regarding a problem with the sharpener please have the sharpener nearby.
WOLFF®, TWICE AS SHARP®, HIRA-TO® and OOKAMI GOLD® are registered trade marks of
WOLFF INDUSTRIES, INC. and may only be used in regard to items sharpened by using the equip-
ment and methods described in this manual. Any other uses are forbidden without written permission from
Wolff Industries, Inc.
Please send us any comments, suggestions, or newsworthy ideas, that we may include in our newsletter.
US Patent # 4,528,778 German Patent # DE3490065C2 Canadian Patent # 1 243 487
2
Page 3

TABLE OF CONTENTS
SUBJECT PAGE
Background, Technical Support, and Trademark Usage ........................................................... 2
Table of contents ................................................................................................................. 3
A-1-OGU conversion kit installation instructions ....................................................................4
Installing Diamond sharpening wheel ................................................................................4
Installing OOKAMI GOLD® polishing wheel .................................................................4
Part names for Scissors and Shears Sharpener .........................................................................5
Set up and safety .......................................................................................................................5
Machine maintenance ...............................................................................................................6
How to change the wheels ........................................................................................................7
Steps to sharpen OOKAMI GOLD® style convex shears
Step 1: Taking shears apart ................................................................................................. 7
Step 2: Installing the clamp ................................................................................................. 8
Step 3: Clamping scissors ...................................................................................................8
Step 4: Setting cutting angle ...............................................................................................8
Step 5: Sharpening each blade on the diamond wheel ........................................................ 8
Step 6: Deburring ................................................................................................................9
Step 7: Polishing the blades ................................................................................................9
Step 8: Assembling the shears ............................................................................................12
Step 9: Polishing the shears ................................................................................................13
Step 10: Testing the shears ................................................................................................... 13
Step 11: Checking the set of the blades ...............................................................................14
Step 12: Balancing the shears ..............................................................................................15
Step 13: Sizing the blades ....................................................................................................15
Step 14: Matching the tips ....................................................................................................16
Step 15: Cleaning and lubricating the shears .......................................................................16
How much to charge ................................................................................................................17
Special instructions for left handed shears ...............................................................................17
Corrugating instructions ...........................................................................................................18
Frequently asked questions ...................................................................................................... 19
Convexing a bevel edge shear ..................................................................................................21
Converting from 110 volt to 220 volt, with existing switch ....................................................22
Converting from 110 volt to 220 volt, with new switch ..........................................................23
Scissors and shears terms dictionary ........................................................................................24
Parts included with the OOKAMI GOLD® sharpening system .............................................. 29
OOKAMI GOLD® special tools ..............................................................................................30
Parts list for clamps .................................................................................................................. 31
Parts list for OOKAMI GOLD® scissors sharpener ................................................................ 32
Limited Warranty, Disclaimer, and Guarantee ......................................................................... 34
3
Page 4
OOKAMI GOLD®
Scissors Sharpening System
A-1-OGU Upgrade Kit Installation Instructions
NOTE: These steps are to install the A-1-OGU kit only. Go to safety instructions on page 8 for all other
systems. This conversion kit will t all the Twice as Sharp® Models or the Foley Belsaw #327. See how
to change the wheels on page 10.
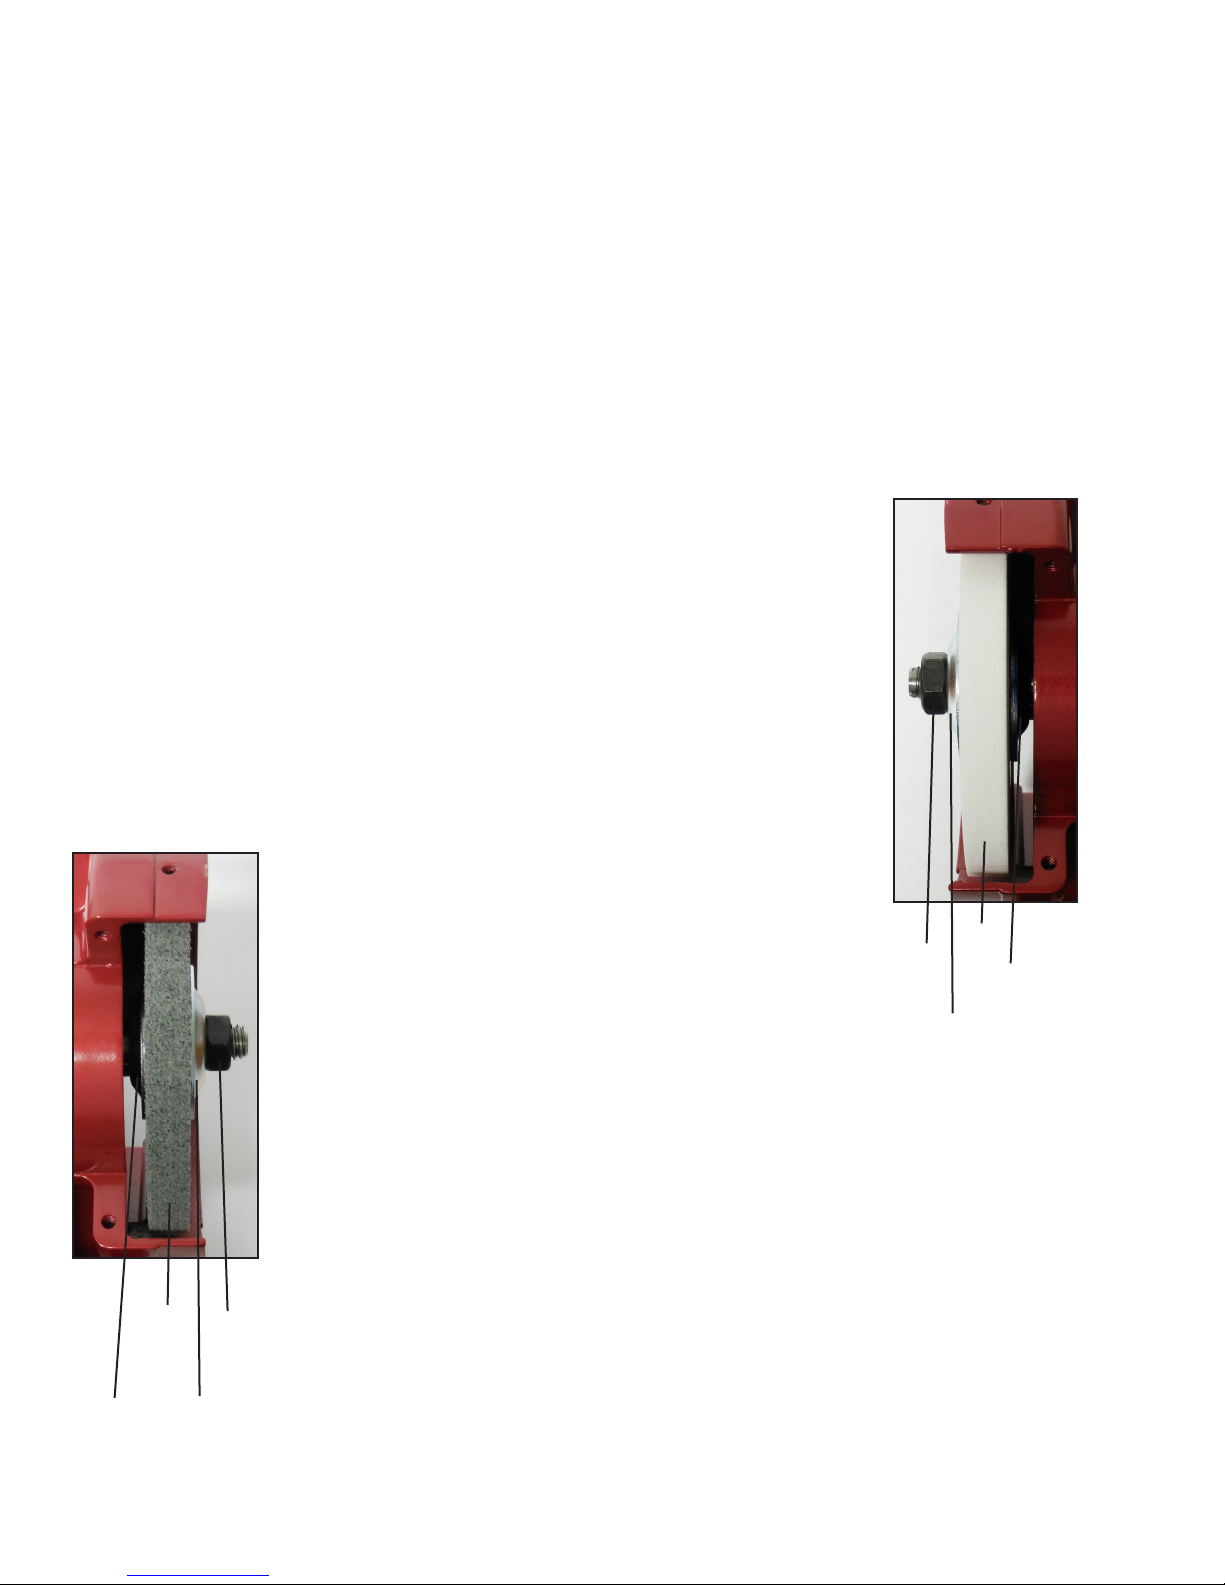
Diamond Sharpening Wheel Installation:
The diamond wheel has been pretested at the factory. Follow the installation instructions to insure smooth
sharpening.
1. Remove the left hand wheel cover and three screws with a #2 phillips screwdriver.
2. Using a 3/4” wrench, hold onto the wheel with one hand and turn the wrench
clockwise (left handed thread) with the other hand.
3. Remove the nut, two anges and sharpening wheel and wipe the shaft clean.
4. Put the blue ange (supplied with the kit) on the shaft rst. Slide the diamond
wheel (supplied with the kit) on the shaft next to the blue ange. Put one of the
anges removed in step 3 on the shaft. Install and tighten the nut rmly (counter
clockwise).
5. Spin the wheel by hand. If side to side movement is more than about 1/8”, loosen
the nut and rotate the wheel about 900 on the shaft. Tighten the
nut rmly and recheck the wheel for side to side movement.
Repeat this step until side to side movement is acceptable.
6. Replace the wheel cover and three screws.
OOKAMI GOLD® Polishing Wheel Installation:
The OOKAMI GOLD® polishing wheel has been broken-in
at the factory to save you time and ensure smooth running
(notice the edge is black or gray in color).
1. Remove the right hand wheel cover and three screws with a phillips screwdriver.
2. Using a 3/4” wrench, hold onto the wheel with one hand and turn the wrench counter
clockwise (right handed thread) with the other hand.
Left hand Nut
Flange
Diamond Wheel
Blue Flange
3. Remove the nut, two anges and bufng or honing wheel and wipe the shaft
clean.
Flange
OOKAMI GOLD®
Polishing Wheel
Flange
Right Hand Nut
4
Page 5
4. Put one of the anges from step 3 on the shaft rst. Slide the OOKAMI GOLD® Polishing Wheel
(supplied with the kit) on the shaft next to the ange. Put the other ange removed in step 3 on the
shaft. Install and tighten the nut rmly (clockwise).
5. Replace the wheel cover and three screws.
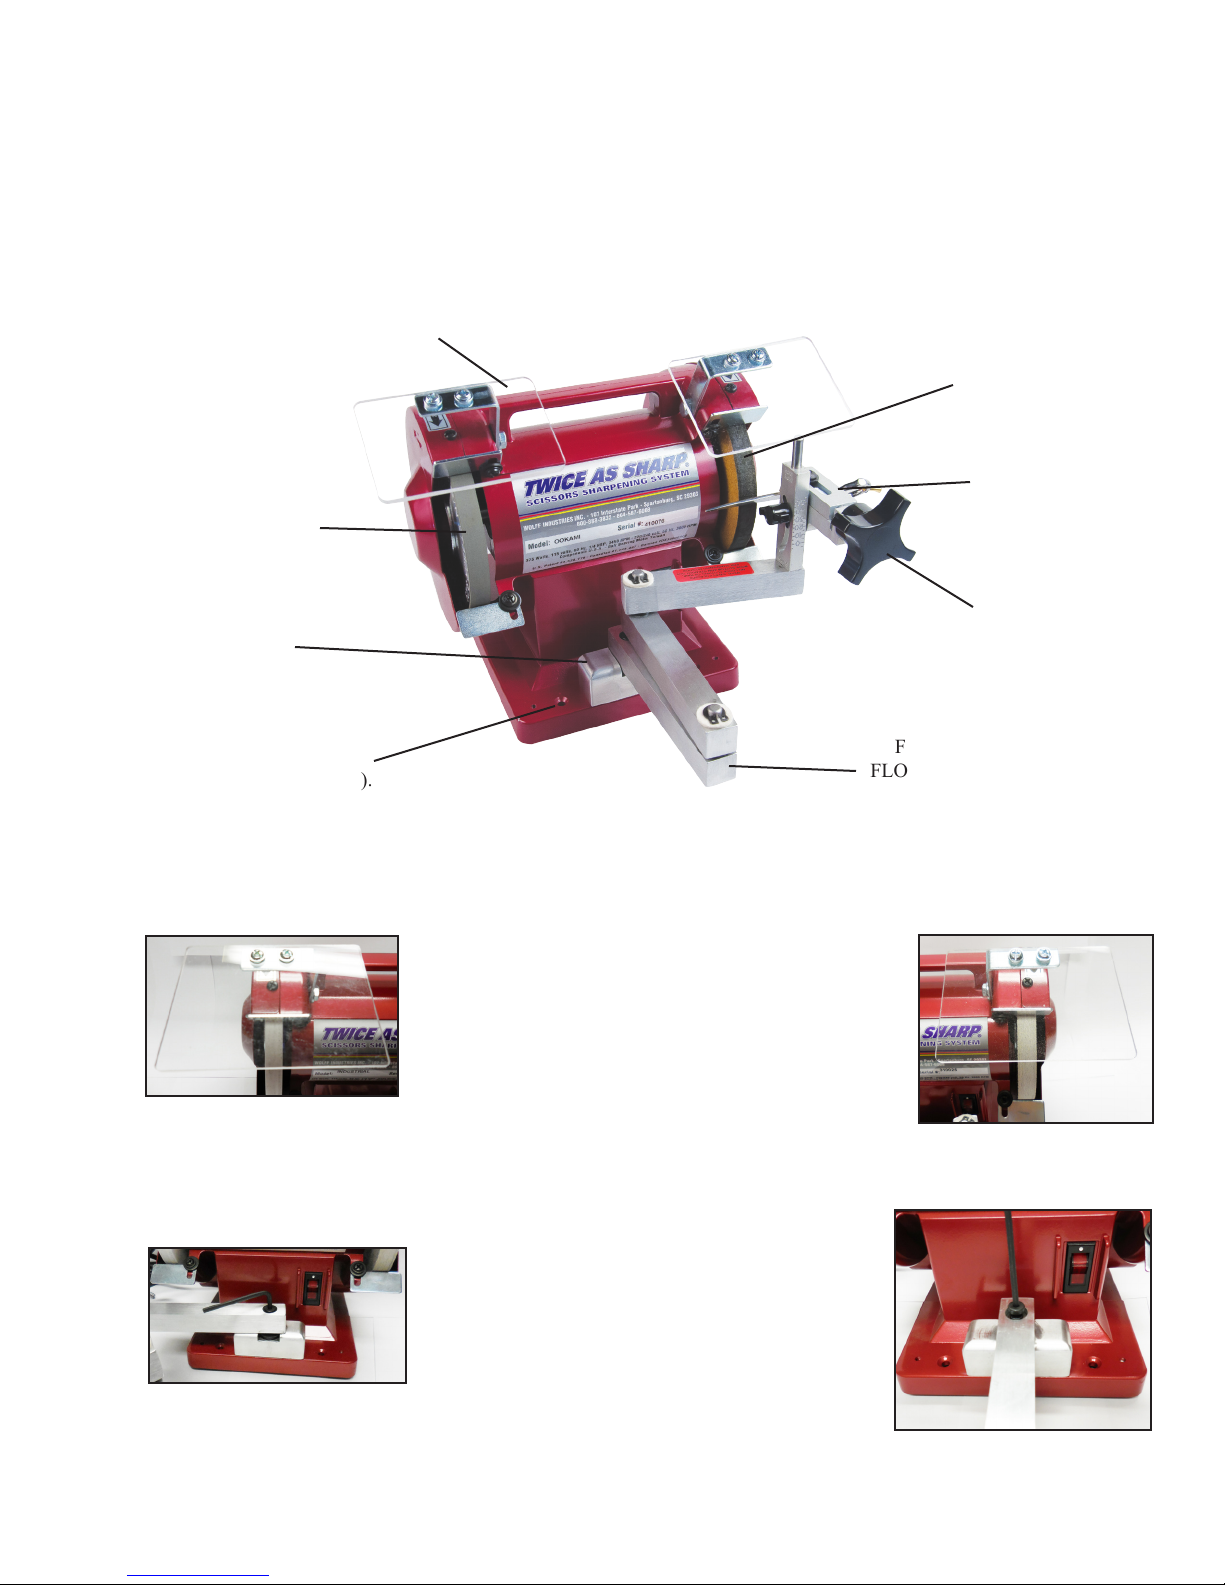
PART NAMES FOR SCISSORS AND SHEARS SHARPENER:
SAFETY SHIELDS
DIAMOND
SHARPENING
WHEEL
RISER
BLOCK
MOUNTING HOLE
Machine may be bolted
to table (4 holes provided).
FREE
FLOATING
ARM
SET UP AND SAFETY
Inspect machine for shipping damage. Look for
broken or bent parts. Notify freight carrier if damaged. Assemble plastic eye shields as pictured. Attach to the machine with screws provided. NEVER
OPERATE MACHINE WITHOUT EYE SHIELDS
IN PLACE.
OOKAMI GOLD
POLISHING WHEEL
SCISSORS
CLAMP
CLAMP
KNOB
®
Bottom arm set is fastened to the machine with a
socket head hex screw. Loosen screw and move
the arm set straight forward into the sharpening
position. Tighten the hex screw until the arm is
tight and does not move.
5
Page 6
SAFETY CONTINUED
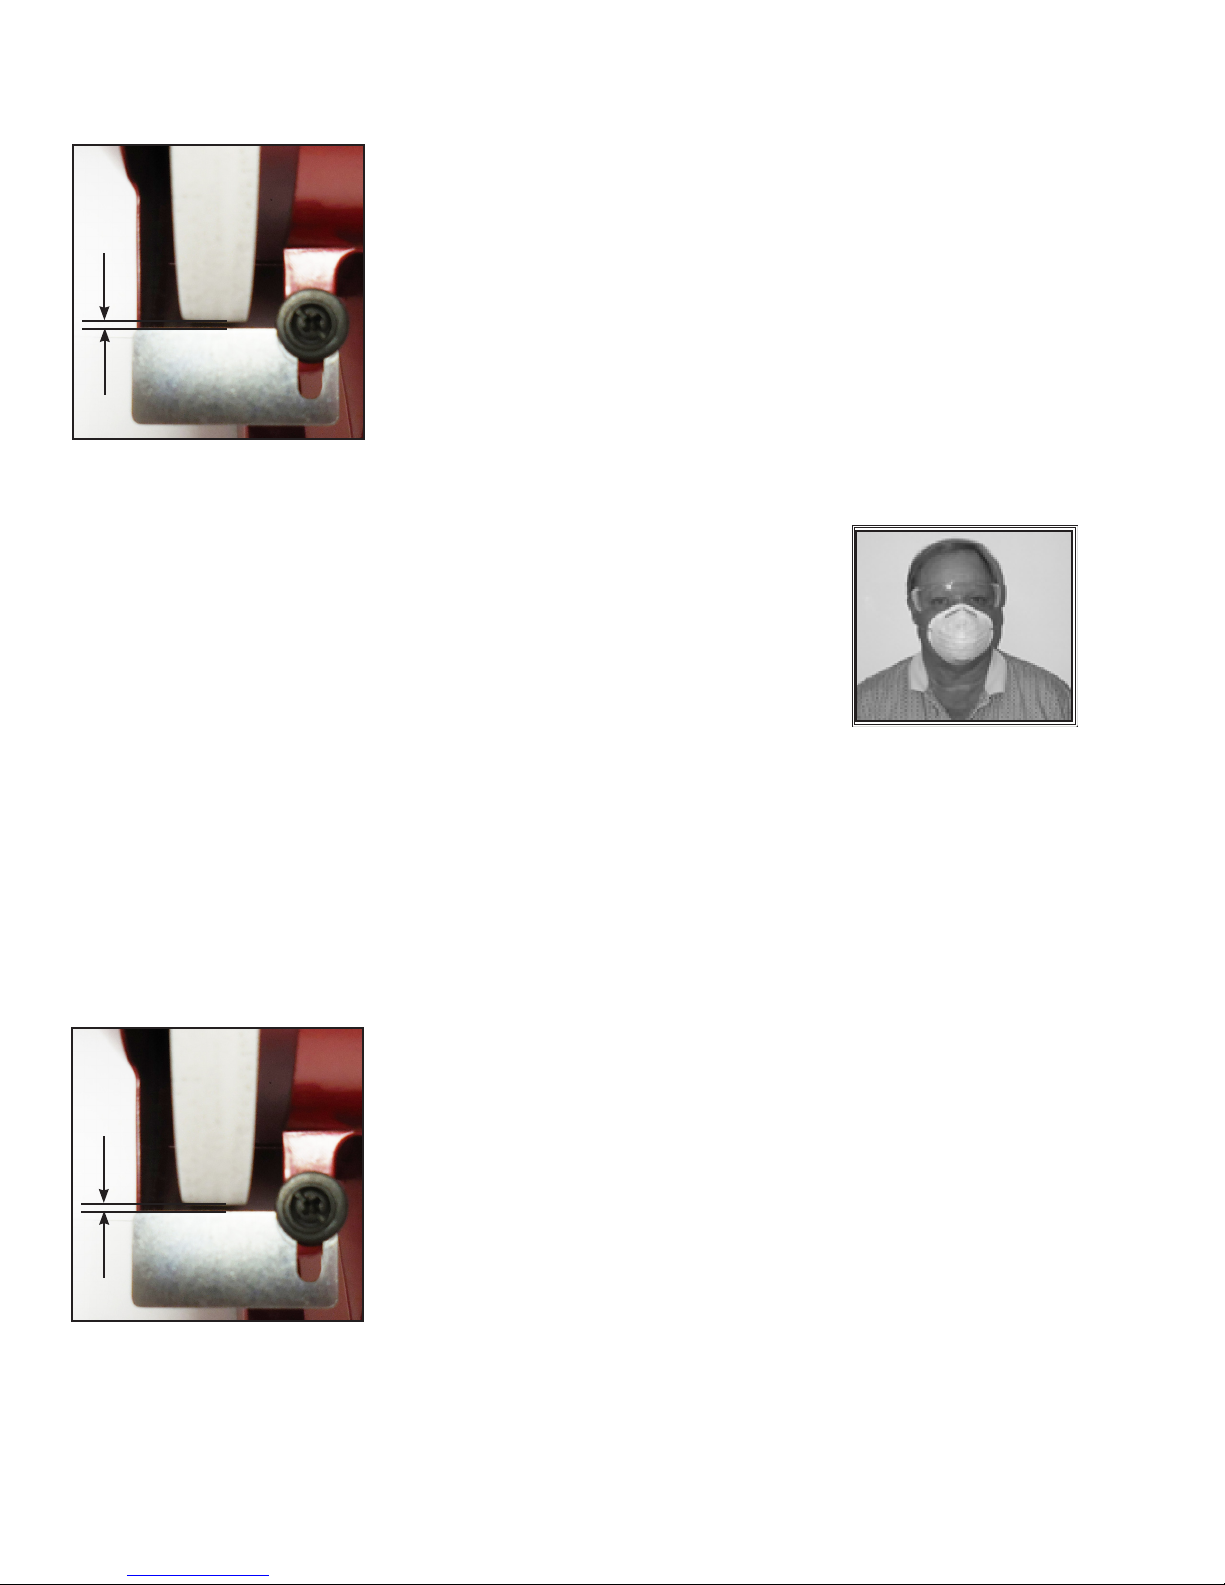
Be sure both wheels are tight and there are no chips in the left wheel (your
original sharpening wheel on the Twice As Sharp® or included with the
OGC-TAS OOKAMI GOLD® scissors sharpening system). Damaged
wheels can y apart and cause serious injury. Adjust the two nger and
two tongue guards to a maximum of 1/16 inch clearance between the wheel
1/16” MAX
(1.6 mm)
CLEARANCE
and the guards.
Plug machine into a 3 wire grounded receptacle only. Stand aside and let it run for one minute before using
it the rst time. Follow this step also after replacing a grinding wheel.
Use safety glasses and face mask to catch dust and grit. Provided safety glasses
meet or exceed all requirements of ANSI Z87.1 CSA certied.
MACHINE MAINTENANCE
NEVER OIL any part of your scissors sharpening machine. Motor bearings are
sealed ball bearings. Arm bearings are self lubricating and need no lubrication. Brush off grit as necessary.
To replace worn wheels, see page 7. If clamp movement becomes stiff or difcult, loosen angle knob and
clean the grit out.
CONVERTING FROM 110 VOLT TO 220 VOLT:
See Page 22 of this Operators Manual to convert the OGC-TAS, OGA-TAS or OGS-TAS OOKAMI GOLD®
sharpening systems to run on 220 - 240 volts.
As the wheels wear adjust the two nger and two tongue guards to maintain
the maximum 1/16 inch between the wheels and the guards.
1/16” MAX
(1.6 mm)
CLEARANCE
After changing wheels, dressing wheels or adjusting the two nger and
two tongue guards, make sure eye shields are in place and securely fastened.
6
Page 7
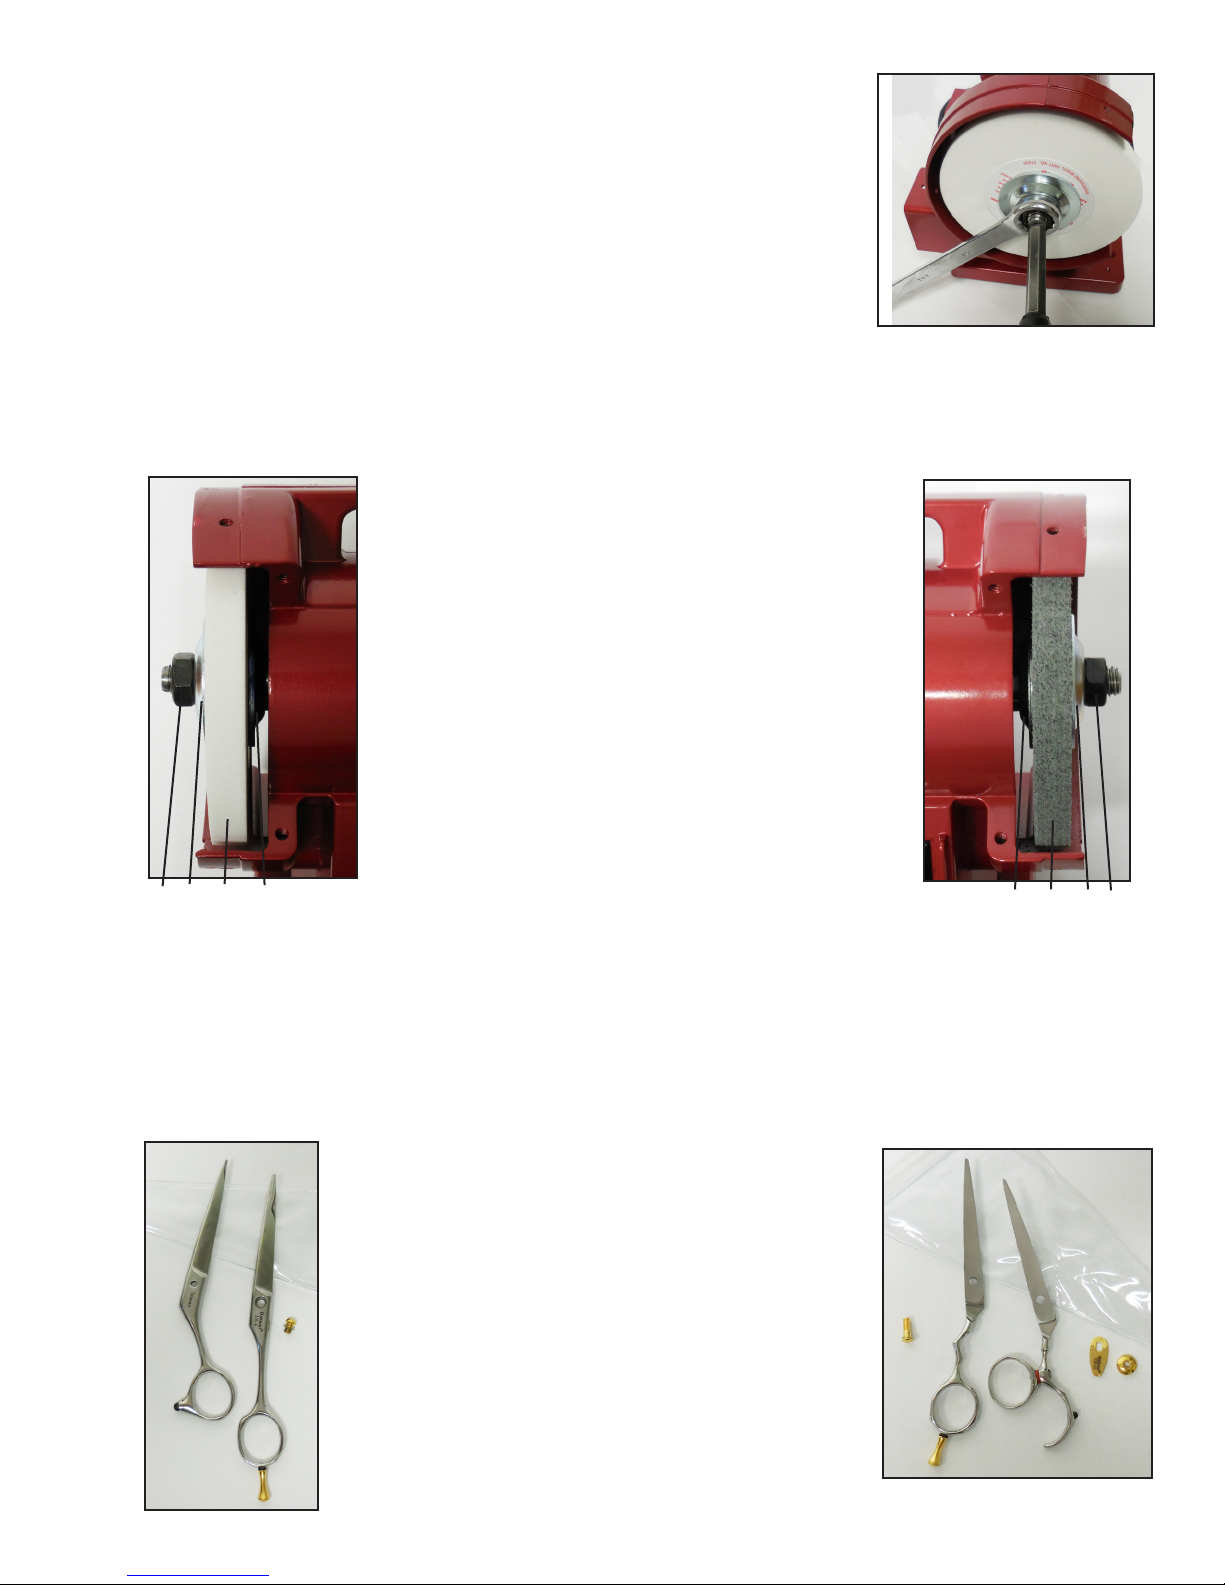
HOW TO CHANGE THE WHEELS
Remove the three screws holding the end cover with a #2 Phillips screwdriver. Take cover off. Loosen the nut holding the wheel with a ¾” wrench.
Hold the wheel between your ngers when loosening or tightening, never
put side pressure against the wheel. (The left wheel has a left hand nut and
loosens clockwise.) Remove wheel and replace with factory wheel. Paper
blotters must be on each side of standard sharpening wheel, part number
#27000. Never use without blotters. Tighten nut rmly and turn by hand.
If wheel has too much side movement, loosen, rotate and retighten until you
get the least amount of side movement. Replace cover and screws. (Never
run sharpener without covers on). A new wheel must be allowed to run for
at least one minute before using. Do not stand in front of sharpener during
the rst minute.
Never use cracked or chipped wheels.
Standard sharpening wheel #27000 and Professional honing wheel #25200 are included in the OOKAMI GOLD®
OGC package or installed on your original TWICE AS
SHARP® professional scissors sharpening system.
Using a screwdriver in the slot
on the left end of the motor
shaft to tighten/loosen the
wheels.
Flange
Blue Flange
Left Hand Nut
Sharpening Wheel
Diamond or Standard
Screw & Washer
STEPS TO SHARPEN AN OOKAMI GOLD®
STYLE CONVEX SHEAR
STEP 1: TAKING SHEARS APART
Using the scissors screw pliers, Wolff part number #20940
or a screw driver take the shears completely apart. Set
the screw and washer (also nut if shear is a self adjuster)
in a safe place.
Flange
Self Adjuster
Wheel
Flange
Right Hand Nut
or Professional Honing
OOKAMI Gold® Polishing
7
Page 8
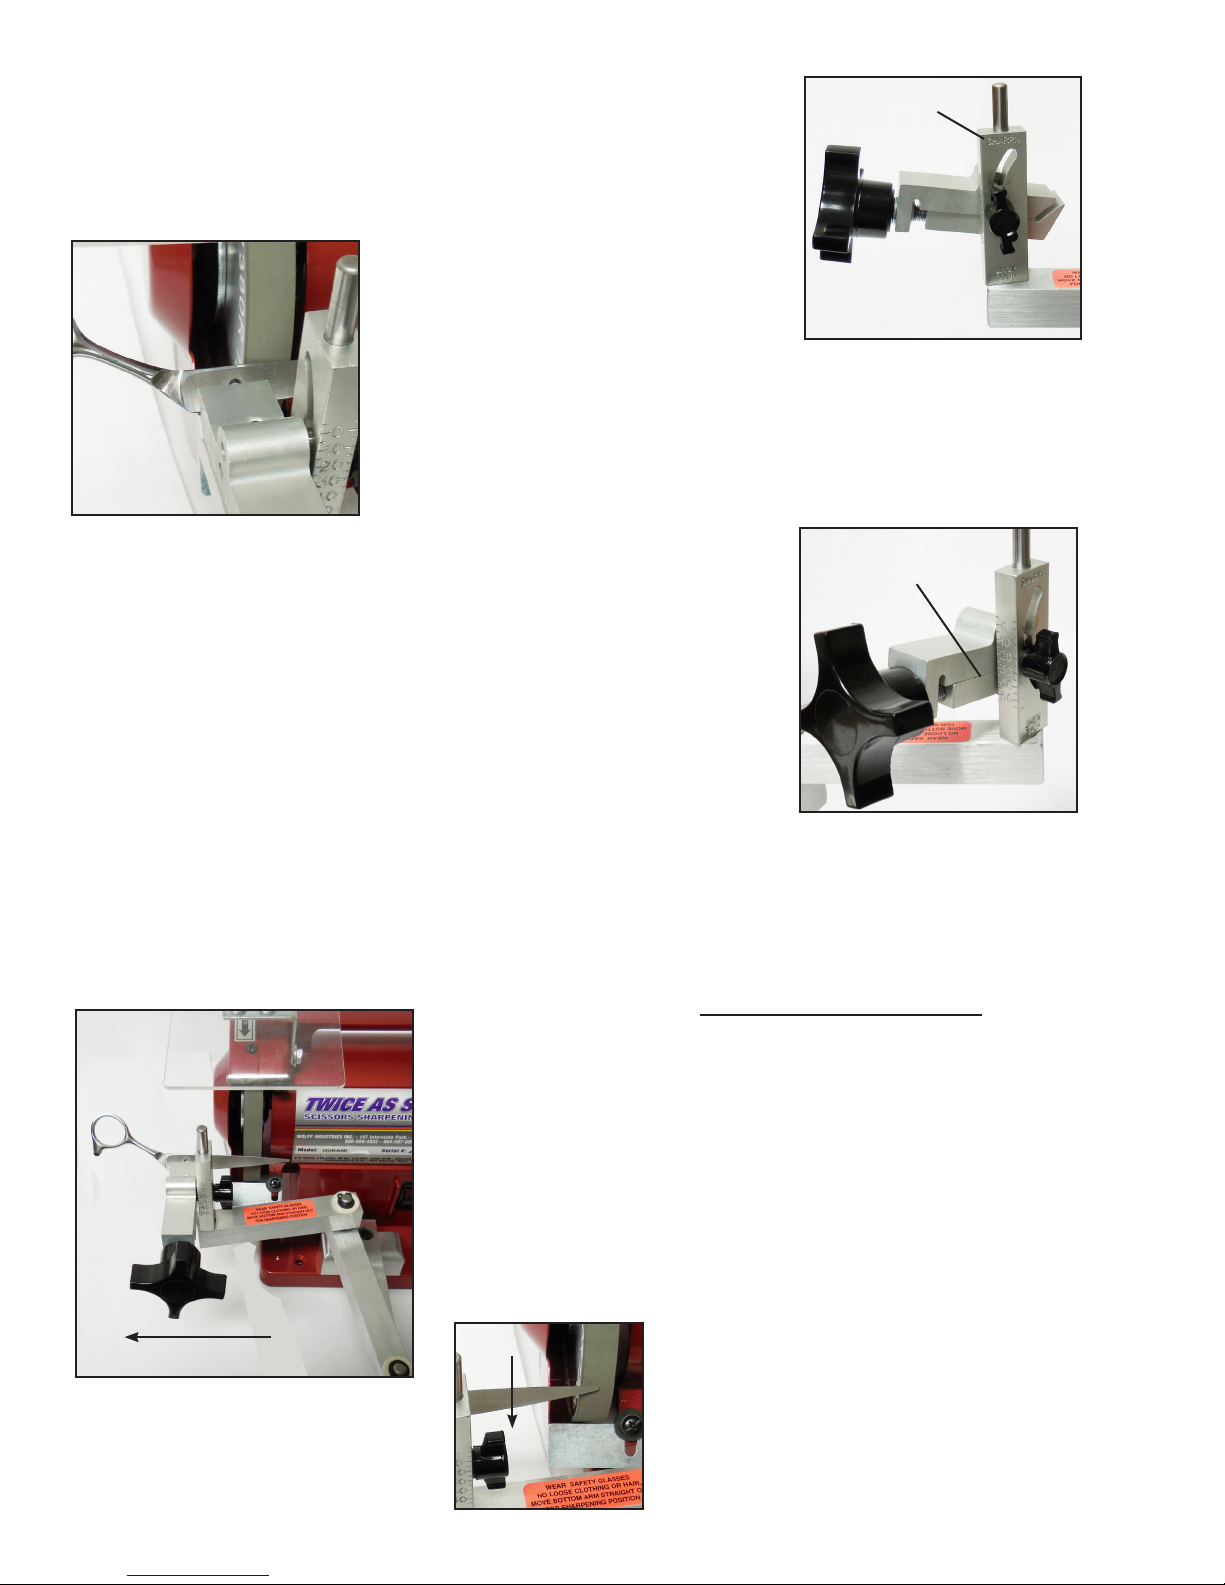
STEP 2: INSTALLING CLAMP
Place scissors clamp in the hole in the top arm. The word sharpen must be
on top as pictured.
STEP 3: CLAMPING SCISSORS
Place one of the blades in the clamp, move the blade until 1/2 of the screw
hole is covered by the jaw of the clamp. Tighten large black knob until the
blade is held rmly.
STEP 4: SETTING CUTTING ANGLE
Determine the angle by the following method:
SHARPEN
Set angle by
this line
1. Set the clamp angle at 40o, hold the scissors blade against the diamond wheel (motor off) and turn the wheel by hand. Look at the
line created by the wheel, increase or decrease the angle to match
existing cutting edge. A few degrees off either way will make little
change in cutting performance.
NOTE: It is critical to match the angle as closely as possible to avoid removing excess metal.
STEP 5: SHARPENING EACH BLADE ON THE DIAMOND WHEEL
WARNING: Use VERY LIGHT PRESSURE
because diamond wheels cut rapidly.
Slide blade across the LEFT wheel slowly with very light pressure.
Keep arms in the position shown and move xture from right to
left. Release pressure from the wheel when the blade tip reaches the
center of the wheel. Feel for the burr by sliding your nger towards
the cutting edge. If you feel a burr STOP SHARPENING. Test for a
burr after each pass on the LEFT hand wheel. It will only take 1 - 2
passes if you have matched the angle correctly. If you do not have a
burr recheck the angle setting on the clamp.
8
Remove the blade from the diamond wheel
when the tip of the blade is in the middle
of the wheel.
Page 9
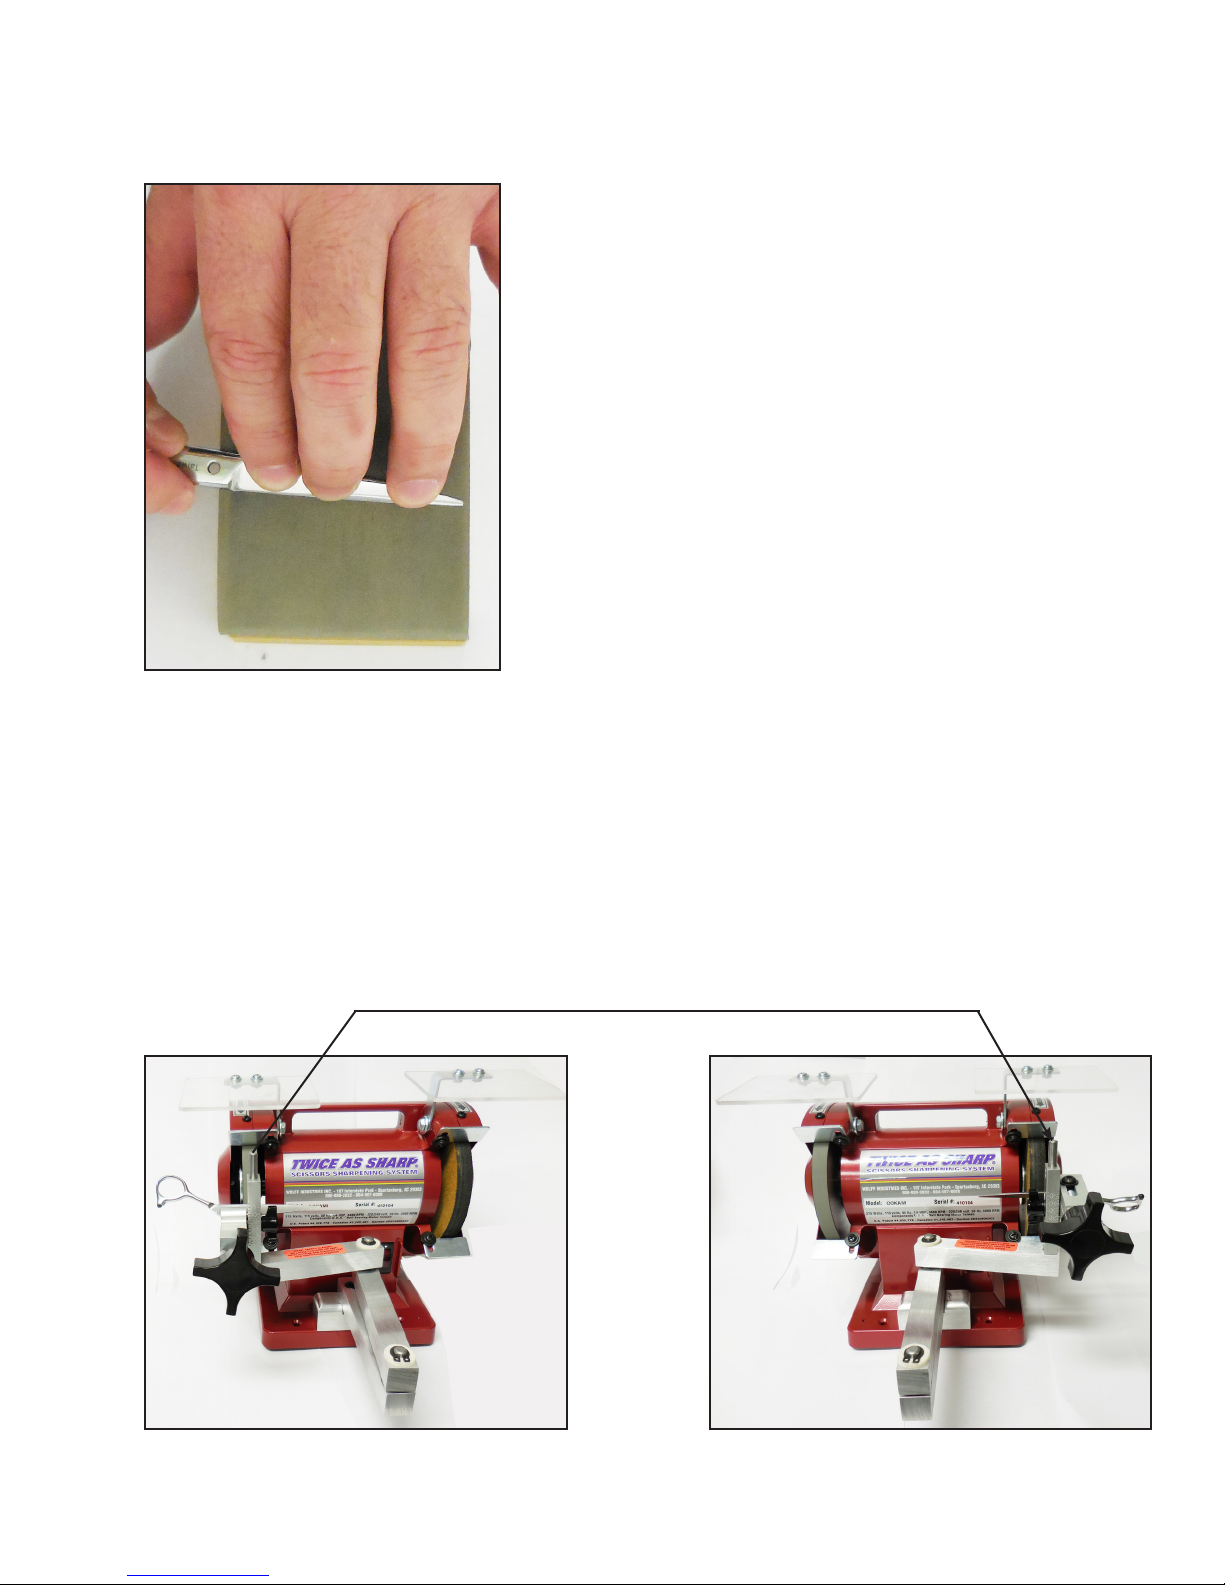
STEP 5: SHARPENING EACH BLADE ON THE DIAMOND WHEEL - CONTINUED
Remove the blade and sharpen the other blade following the exact same procedure.
STEP 6: DEBURRING
Remove the burrs from the inside of the blades. These steps are also
important if the ride area is rough or damaged.
Using the OOKAMI GOLD® Honing Block :
a. Using the OOKAMI® deburr paper, angle the shears
blade to match the set or twist. DO NOT hone on a plastic
ride.
b. Hone until you see a line on the inside of the blade all
along the cutting edge.
c. Now repeat steps a & b on OOKAMI® nish paper.
STEP 7: POLISHING THE BLADES (UNASSEMBLED)
a. See Step 3 to install the blade in the clamp. Lift the clamp out of the bearing hole, invert it and insert
it back into the arm. Swing top arm to polish on the right hand wheel.
INVERT CLAMP
LIFT CLAMP
INSERT CLAMP
9
Page 10
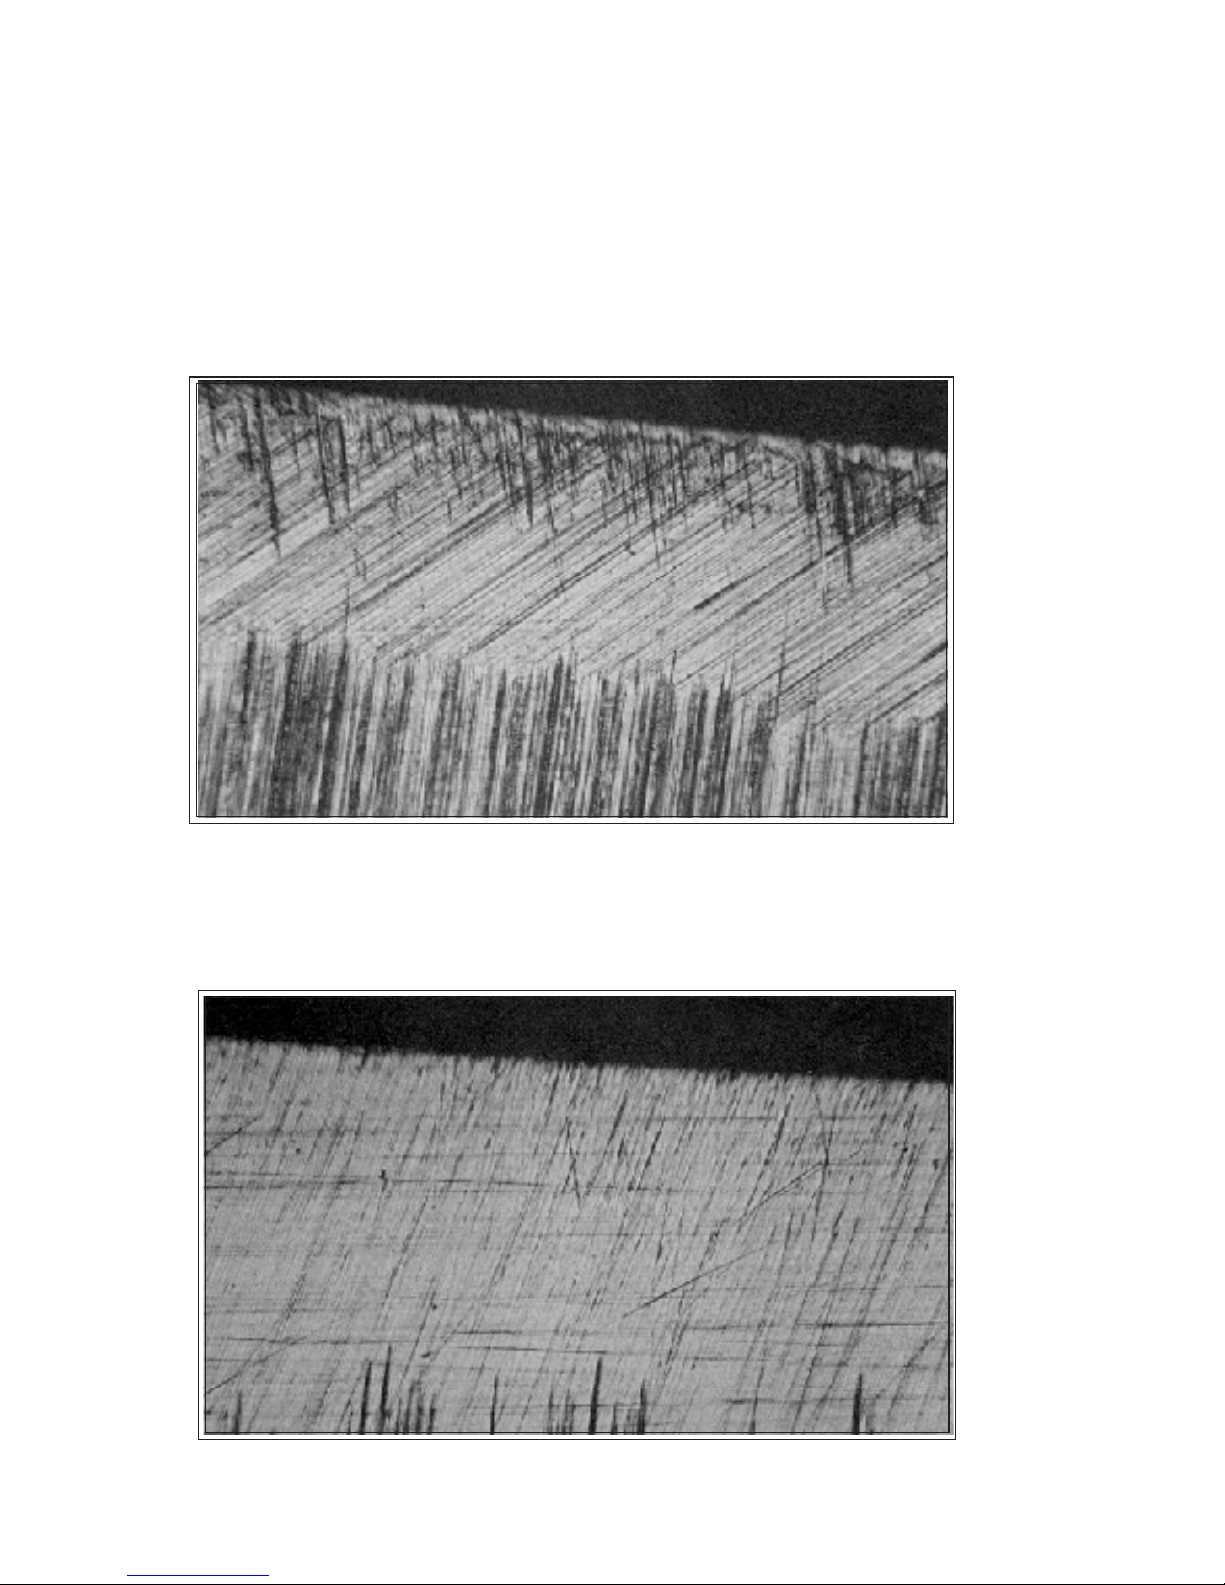
These are enlargements (approximately 120x) of the inside of the cutting edge on a pair of
medium priced beauty shears made in Japan.
Before honing (factory nish)
The same blade after honing on the OOKAMI® Deburr paper
and then 8 - 10 strokes on the OOKAMI® Finish paper.
There is a much improved feel and sound.
10
Page 11
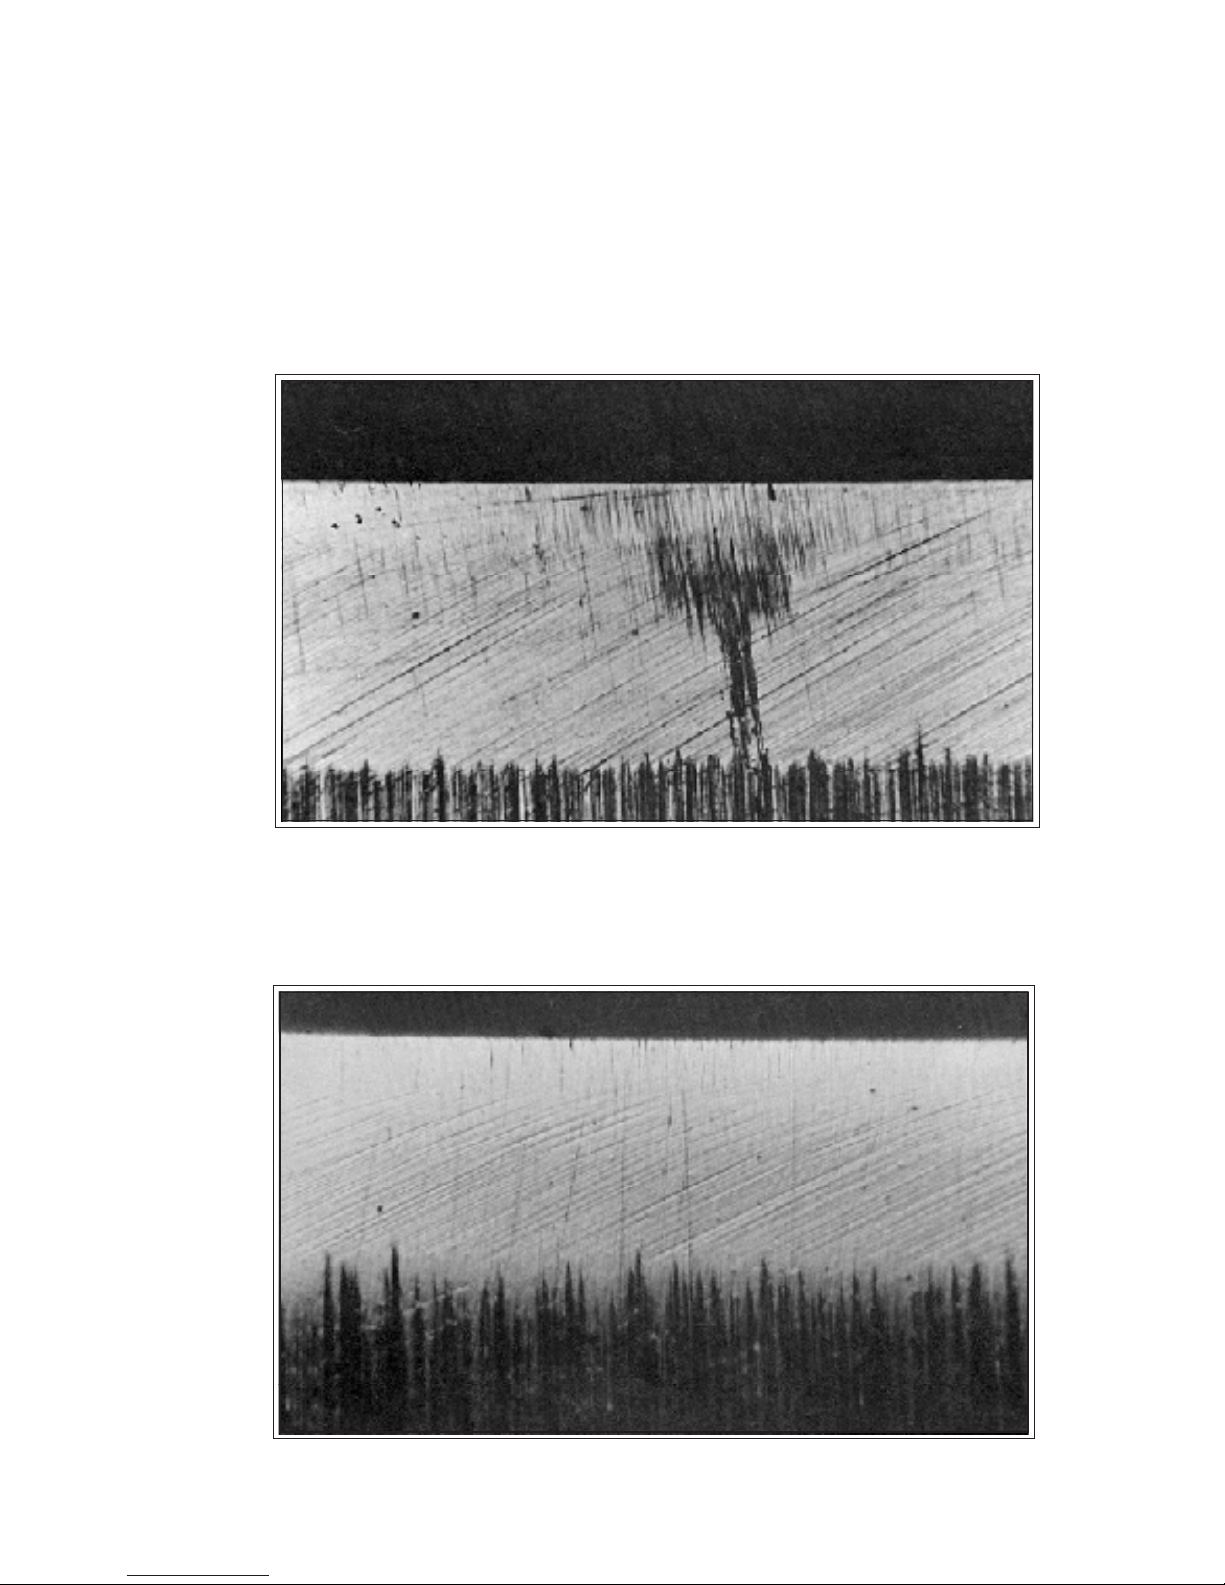
These are enlargements (approximately 120x) of the inside of the cutting edge on a pair of
higher priced beauty shears made in Japan.
Before honing (factory nish)
The same blade after honing on the OOKAMI® Deburr paper
and then 8 - 10 strokes on the OOKAMI® Finish paper.
There is a much improved feel and sound.
11
Page 12
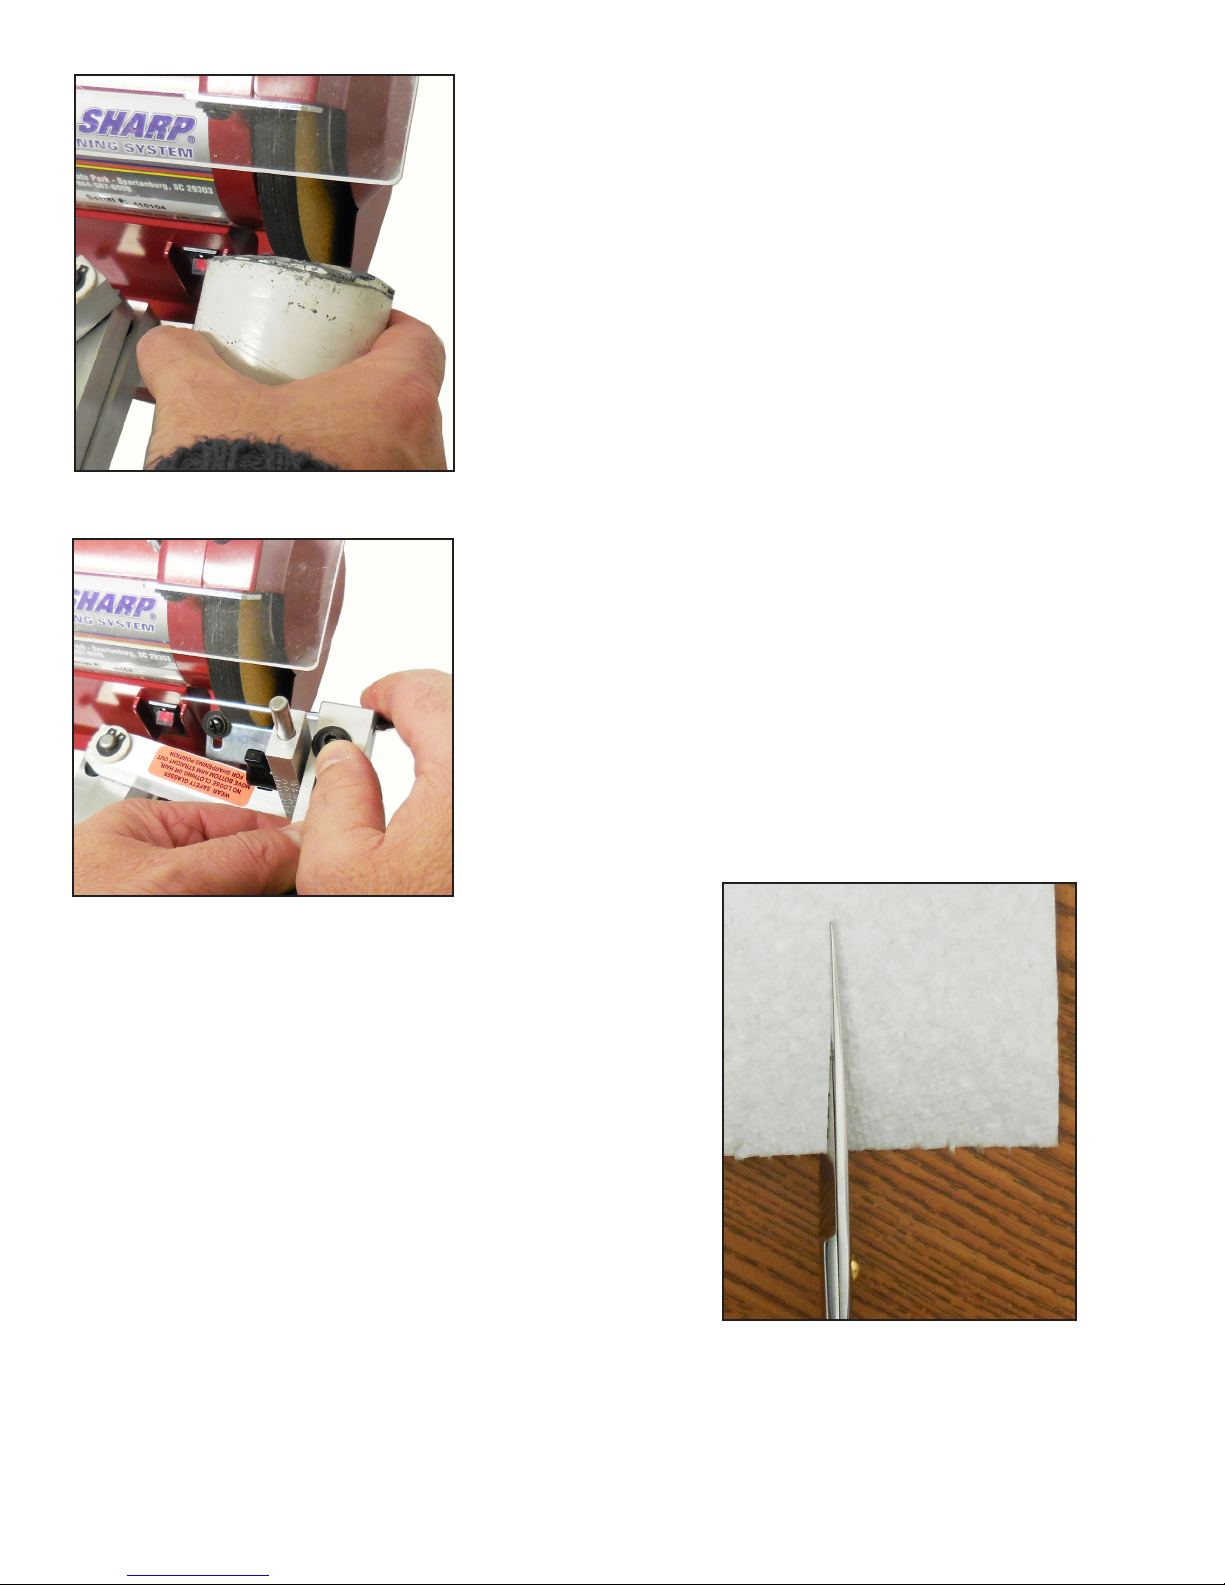
Apply a small amount of compound.
STEP 7: POLISHING THE BLADES - Continued
Note: Put a slight amount of compound on the OOKAMI
GOLD® wheel each time you polish a blade.
a. While the sharpener is running, apply the compound to the
OOKAMI GOLD® wheel (a light 1 second touch is all that is
needed).
b. Slide the blade back and forth against the polishing wheel with
rm pressure. Repeat until the blade is polished and the grind
lines are gone.
Warning: The blade is very sharp and will cut through a rag,
use extreme caution while wiping the blades off.
c. Remove the blade, wipe off the polishing compound and insert
the second blade into the clamp. Polish the second blade as in
Step b.
d. Remove the second blade from the clamp and wipe off the
polishing compound.
Polish on the right hand wheel.
STEP 8: ASSEMBLING THE SHEARS
Warning: Assemble the shears in the open position.
a. Assemble the shears in the open position using the parts removed
in Step 1.
b. Close the shears on a paper towel and cut the burr off.
Note: DO NOT SPREAD the blades apart while closing.
Cut the burr off on paper towel.
Dirt and grit in the pivot area will make the shears feel tight or stiff. This needs to be cleaned out before
assembling the shears.
12
Note:
Page 13
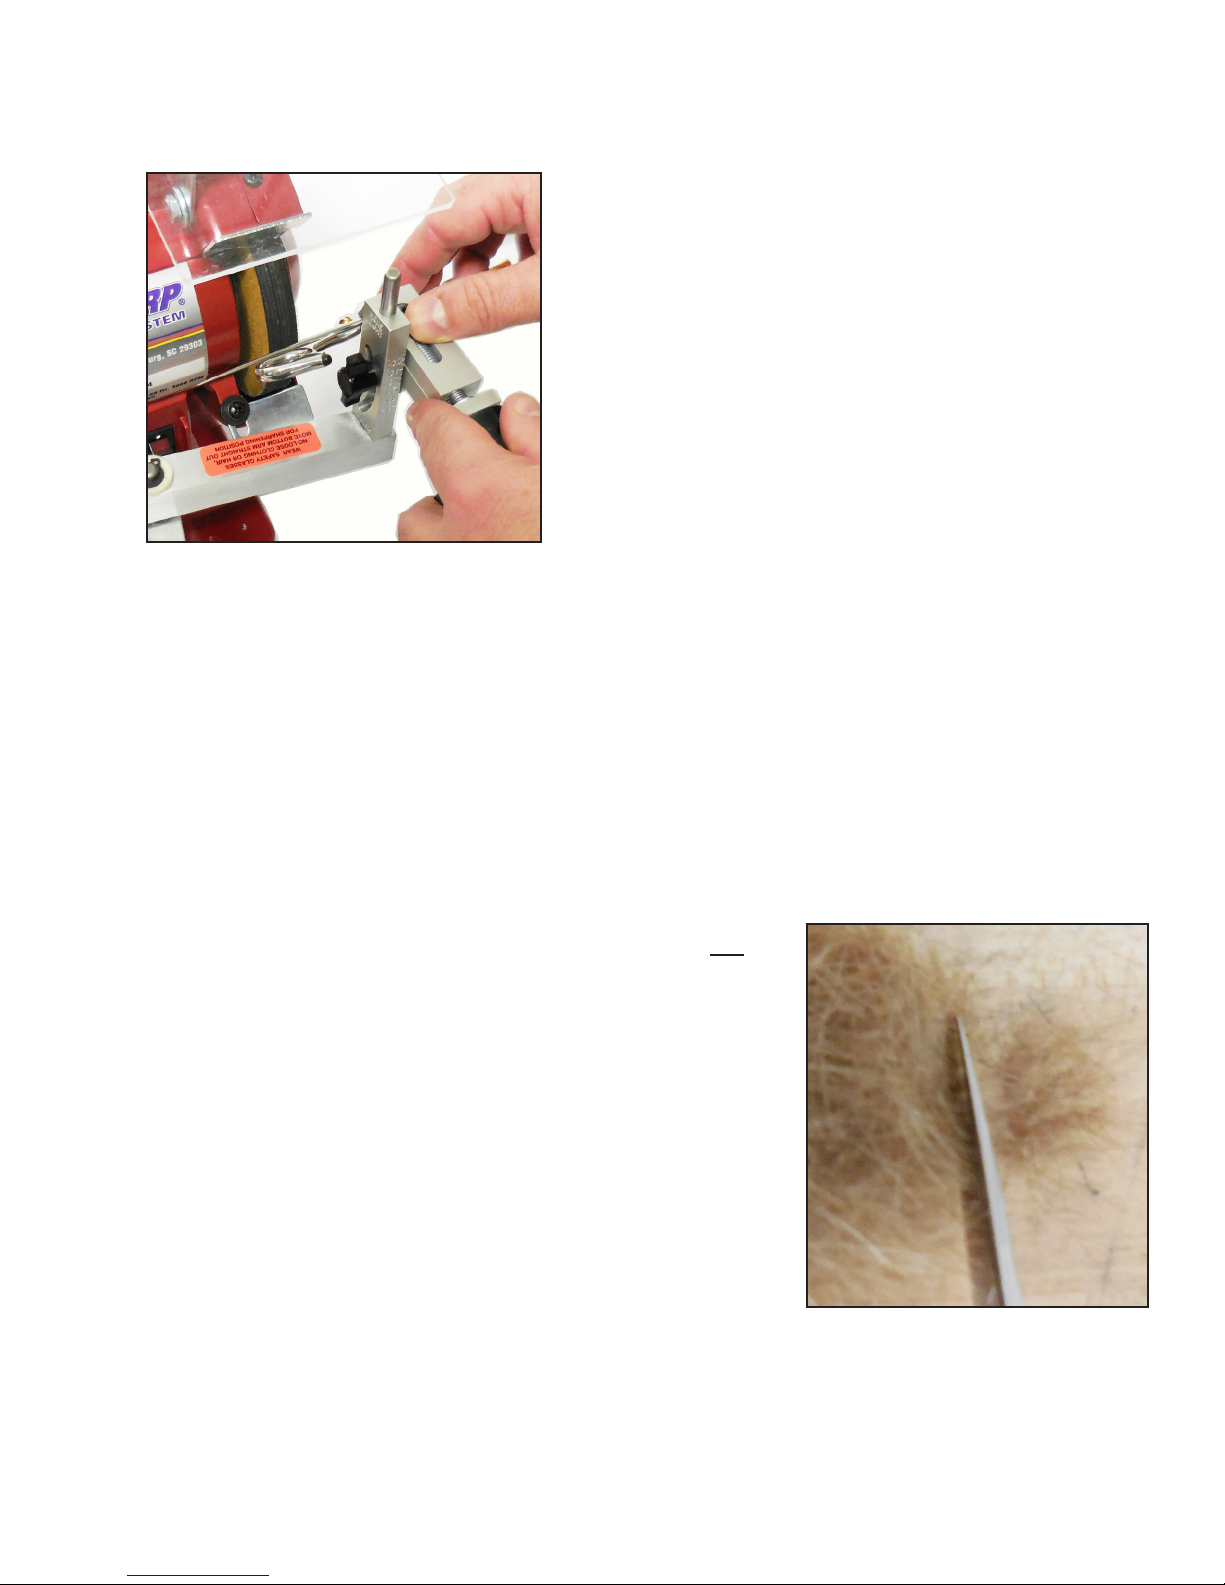
STEP 9: POLISHING THE SHEARS (ASSEMBLED)
Note: Put a slight amount of compound on the OOKAMI GOLD® wheel each time you polish a
blade.
a. Insert one blade of the assembled shear back into the
clamp.
b. Slide the blade back and forth against the polishing wheel
with rm pressure. Repeat until the blade has a mirror nish.
Warning: Polish one blade, cut the burr off, polish the
second blade and cut the burr off.
c. Close the shear on a paper towel and cut the burr off.
d. Repeat steps a - c for the second blade.
e. The cutting edge should be shiny with the grind lines removed. If not check the following.
1. Did you use enough pressure on the wheel?
2. Did you use enough compound on the wheel?
3. Are you using OOKAMI® compound? OOKAMI GOLD® compound has been specially formulated to work with the OOKAMI GOLD® wheel and other compounds cannot be guaranteed to
give the same excellent results.
4. Does the wheel need cleaning?
The OOKAMI GOLD® wheel can build up compound if it is put on too thickly. Hold the end of
the Diamonite hone hard against the wheel while the sharpener is running. This will quickly clean
off any build-up. This should be done periodically to keep wheel from loading up.
STEP 10: TESTING THE SHEARS
Use one if not all of the following test methods. Apply NO side
pressure to the handles as you test. The shears must cut cleanly
and feel smooth.
a. Hair is one of the best test materials, as this is what your customer
is really cutting. Washed hair can be saved by one of your customers.
Pull a small amount of hair out of your bundle and cut. Watch for
hair slide or folding. The cut should feel smooth with no pulling
or tearing of the hair.
Also test using the method in Step b. This will ensure that the
burrs are completely removed.
Note: We discourage shaving as a test for scissors sharpness. Shears may shave with one or both blades
individually and still not cut when used together. Scissors tested the way scissors are used ensures proper
sharpness. Cut and bleeding arms do not prove your scissors are sharp!
13
Page 14
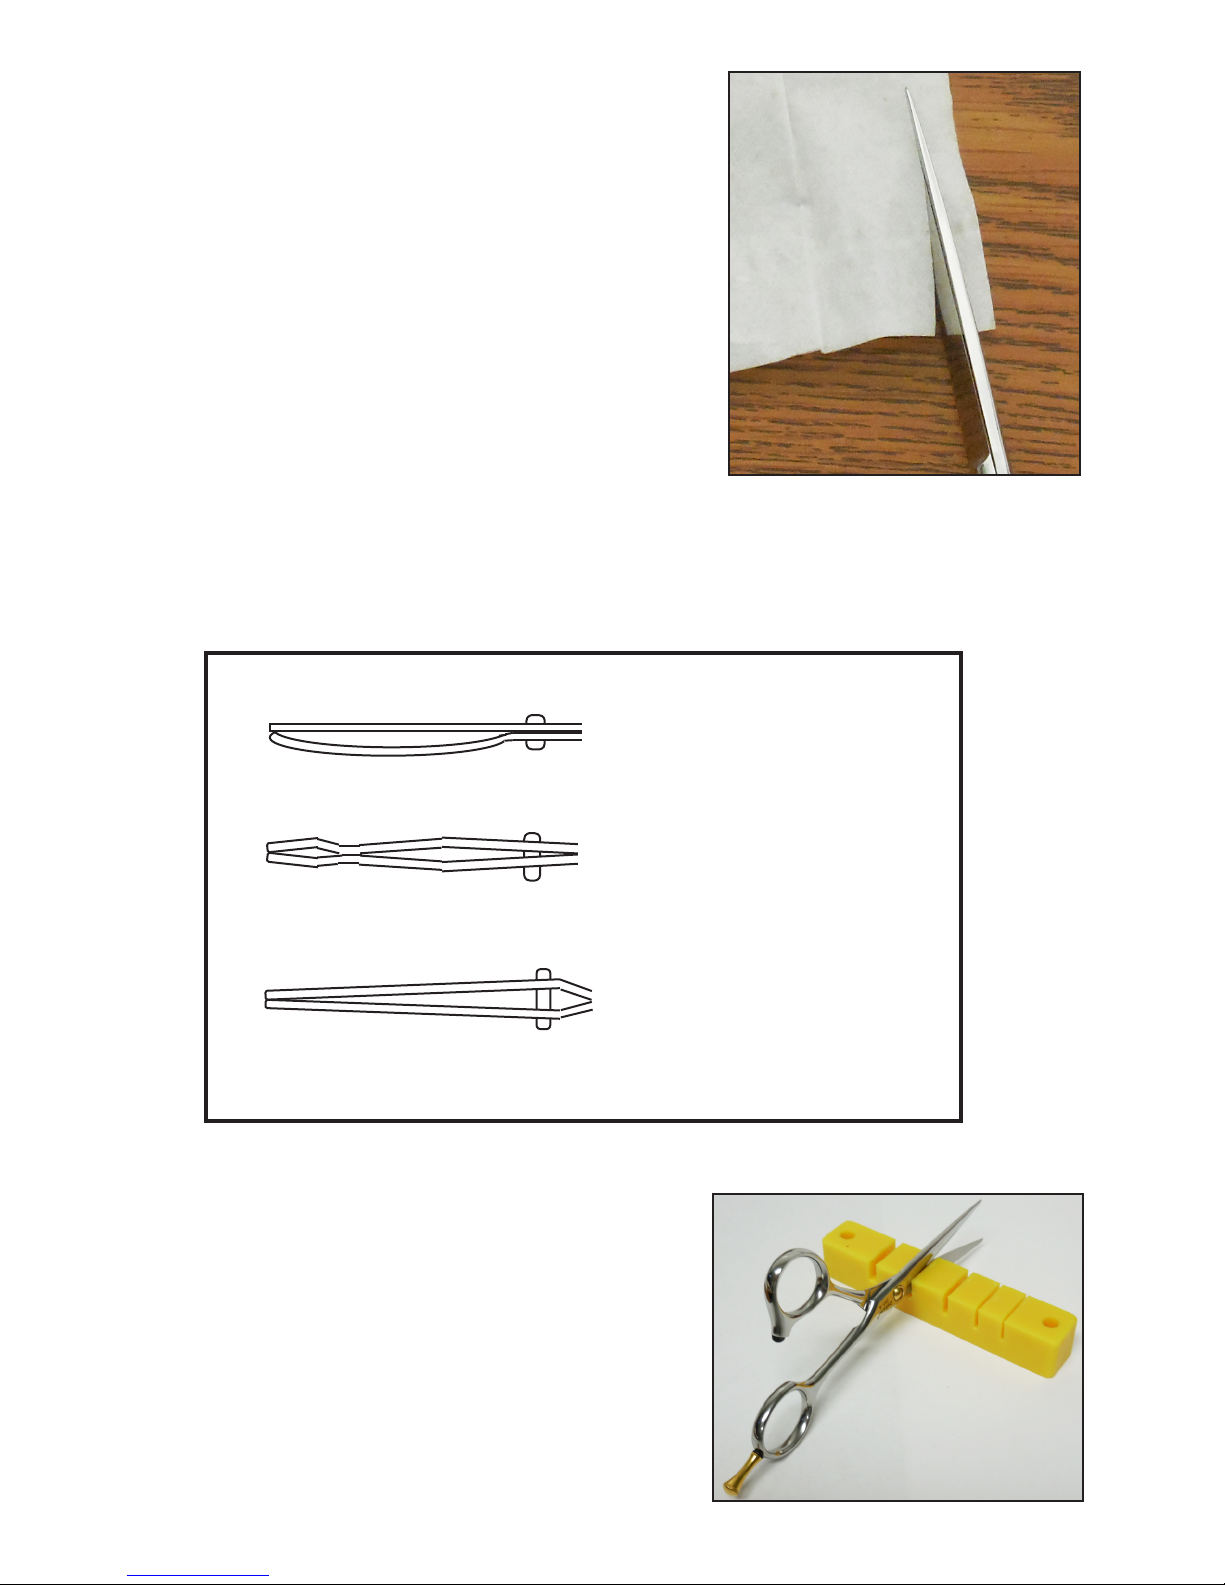
b. Facial tissue (Kleenex®) separated into single sheets will show
any burrs or dull spots with a tear or fold.
Hang the end of the tissue over the table or from your hand. Hold
the scissors without any side pressure and cut.
If they do not cut cleanly, repeat step 9.
STEP 11: CHECKING THE SET OF THE BLADES
Do this step only if the shears failed step 10 “Testing the Shears”.
a. With the shears closed there should be daylight between the blades; only the tips and ride are touch-
ing.
NO GOOD - No gap under the pivot, one blade is
straight, the other has too
much set.
NO GOOD - Blades come
together in the middle and
leave a gap near the tips that
will not cut.
GOOD - Gap under the pivot
and proper set to the tips.
Gap = .006” - .012” (2-4
sheets of paper)
b. The blades should also ow in a positive curve; no dips or
kinks.
c. Any problems with the set of the blades should be adjusted
and the shears re-tested following step 10. If still not cutting
properly, repeat step 9.
Adjusting the set takes some practice, but with the OOKAMI
GOLD® Set Adjusting Tool you are less likely to damage the
scissors blades or the sharpened edges.
14
Page 15
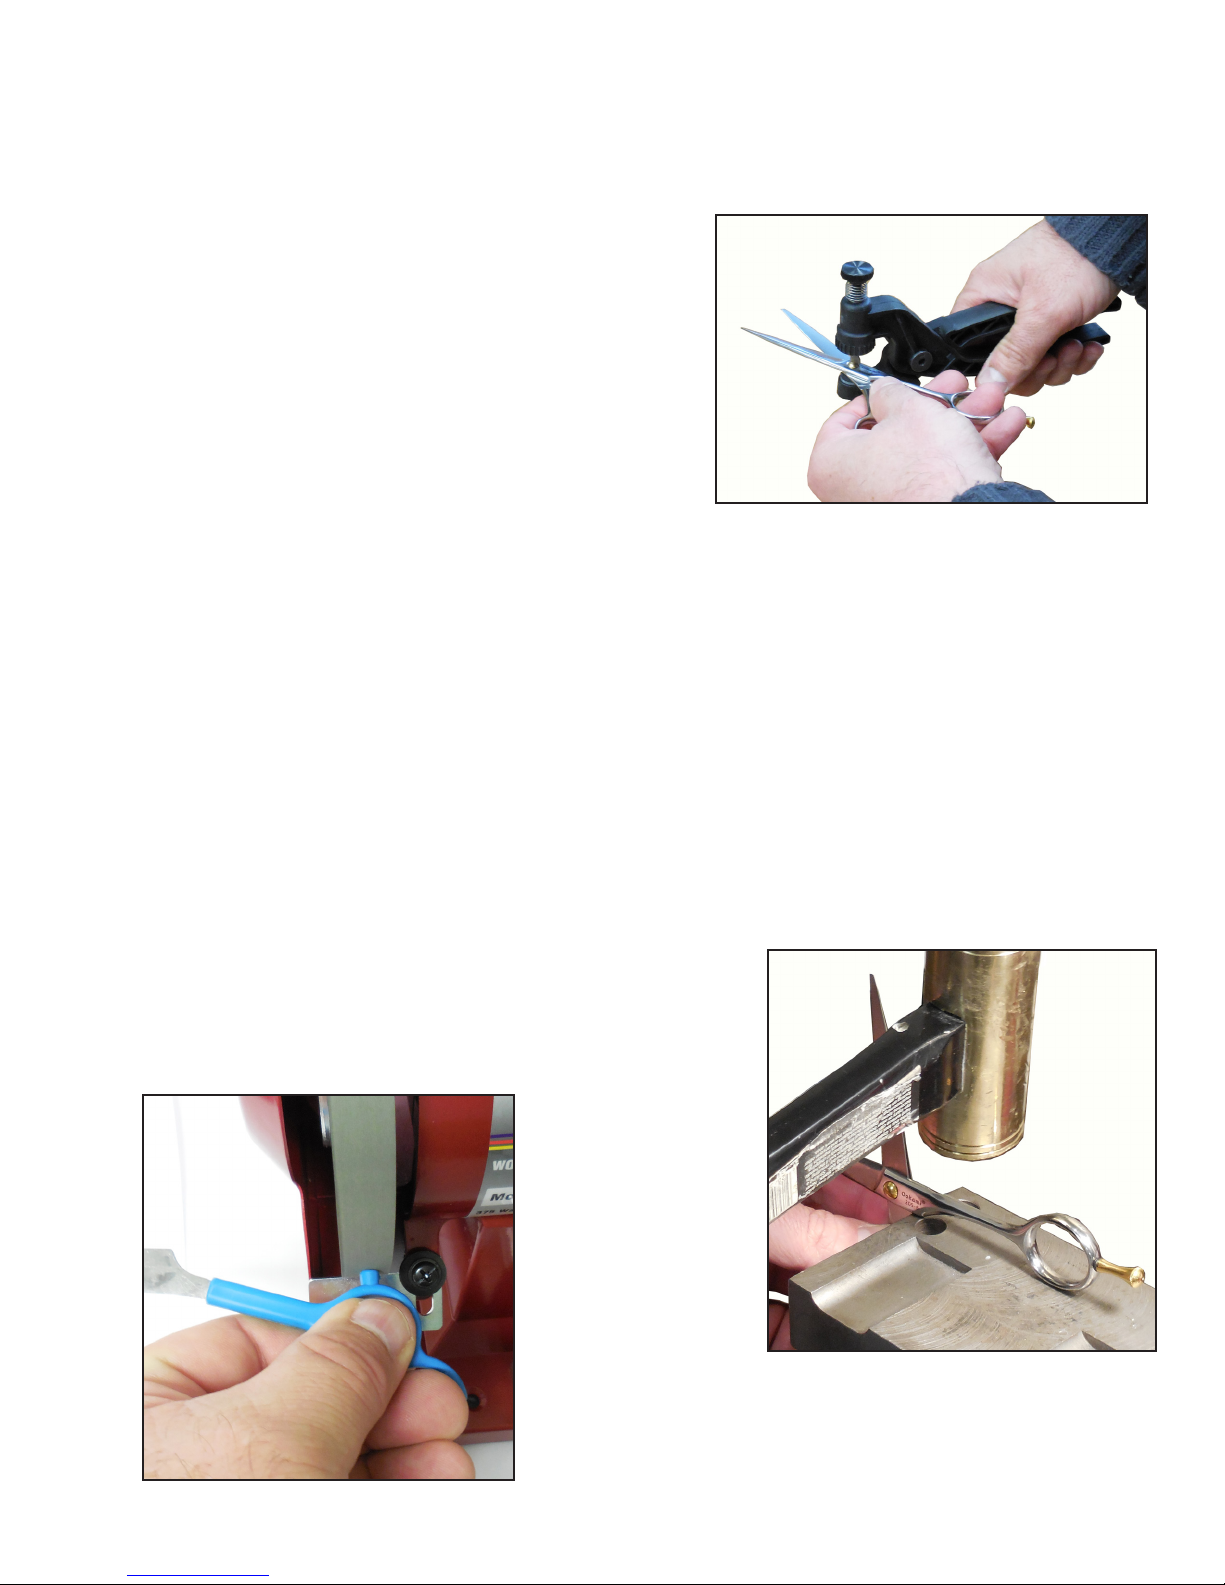
STEP 12: BALANCING THE SHEARS
Setting blade free fall. Salon and barber shears are set with more free fall than cloth shears. Normally
blades should begin to interfere or touch 1/2 to 3/4 of the way up the blades. It is best to set them about
the same as you received them.
a. Using the Wolff set screw pliers adjust the free fall. The
set screw pliers hold from both sides of the shears and
provide more leverage to prevent damage to the screw
head.
b. If the screw loosens up after adjusting free fall:
1. On split screw, remove screw from shear and open
the split.
2. Turn the shears thread side up and put a drop of
thread locker on the screw threads. Allow the thread
locker to wick into the threads for a minimum of 15
minutes. Wipe off the excess thread locker.
Note: The thread locker is self-wicking and anaerobic, which means that the locker will penetrate its
way into the threads and only the locker inside will harden. Full hardening takes 24 hours.
Note: Instant gel adhesive (cyanoacrylate) may be used for quick setting up, but can be messy. Use solvent
to clean. You can purchase this instant gel adhesive from your local hardware or home store.
STEP 13: SIZING THE BLADES
The blades must cross each other all the way to the tips.
Note: Test for metal hardness before bending, by ling behind pivot screw. If the handles are hard or
made of cast metal fastened to the blades, grind off tips slightly. See “Match the Tips”.
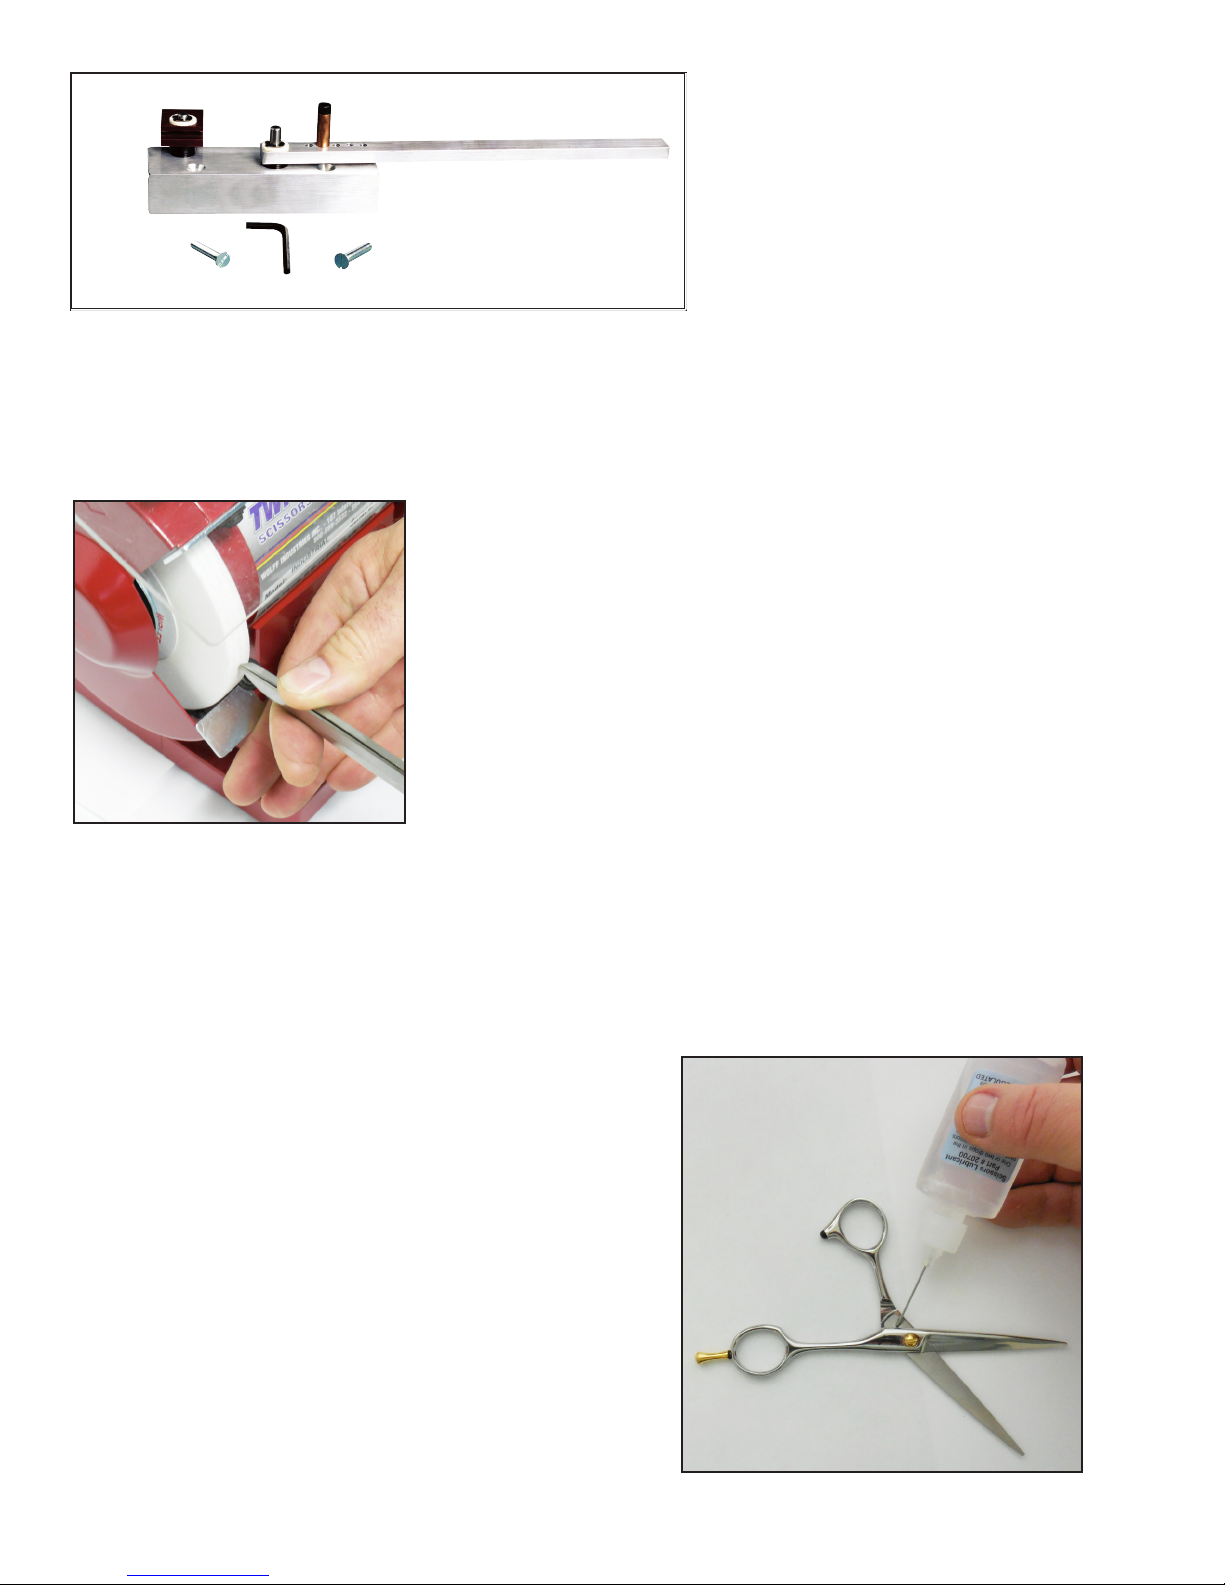
a. One piece metal shears - bend the handles apart slightly with
the brass hammer. See page 16 for information on the Wolff
Handle Bender.
b. Plastic handle shears - grind away the sizing knob between the
handles slightly until the blades cross.
15
Page 16
STEP 14: MATCHING THE TIPS
The tips of the shears should be the same length.
a. While holding the blades closed, grind away the tips until they are
the same length. Use short strokes to prevent burning the tips.
b. Open the blades a little and round off the back of the tips. NEVER
put your ngers between the blades.
c. Polish the back of the tips to remove any burrs (the side away from
the cutting edge).
Handle Bender - the best way to bend the
handles to make the tips cross properly.
Wolff Part # HB-01
STEP 15: CLEANING AND LUBRICATING THE SHEARS
Dirt and grit in the pivot area will make the shears feel tight or stiff. This needs to be cleaned out before
setting the shears free-fall.
a. Open the shears and put a drop or two of scissors lubricant
in the pivot area and along the blades.
b. Open and close the shears several times to force any grit out
from between the blades.
Warning: The shears are very sharp and will cut through a
rag, use extreme caution while wiping the blades off.
c. Wipe off grit and excess lubricant. The lubricant dries
quickly and will not leave a lm. Do not use oil to lubricate
the blades, oil leaves a lm behind and will attract dirt and
grit.
16
Page 17
HOW MUCH TO CHARGE
The usual charges for sharpening and reconditioning of barber and beauty scissors and shears should range
from $20.00 to $40.00. This, of course, will vary depending on how much work is needed.
Lower priced scissors ($100.00 or less) are better sharpened on the Twice As Sharp® scissors sharpening
system using the Standard Sharpening Wheel and the Professional Honing Wheel. This will take you less
time and you can charge a little less.
SPECIAL INSTRUCTIONS FOR LEFT HANDED SHEARS
Right hand shears
True
left
hand
shears
blades
are
reversed
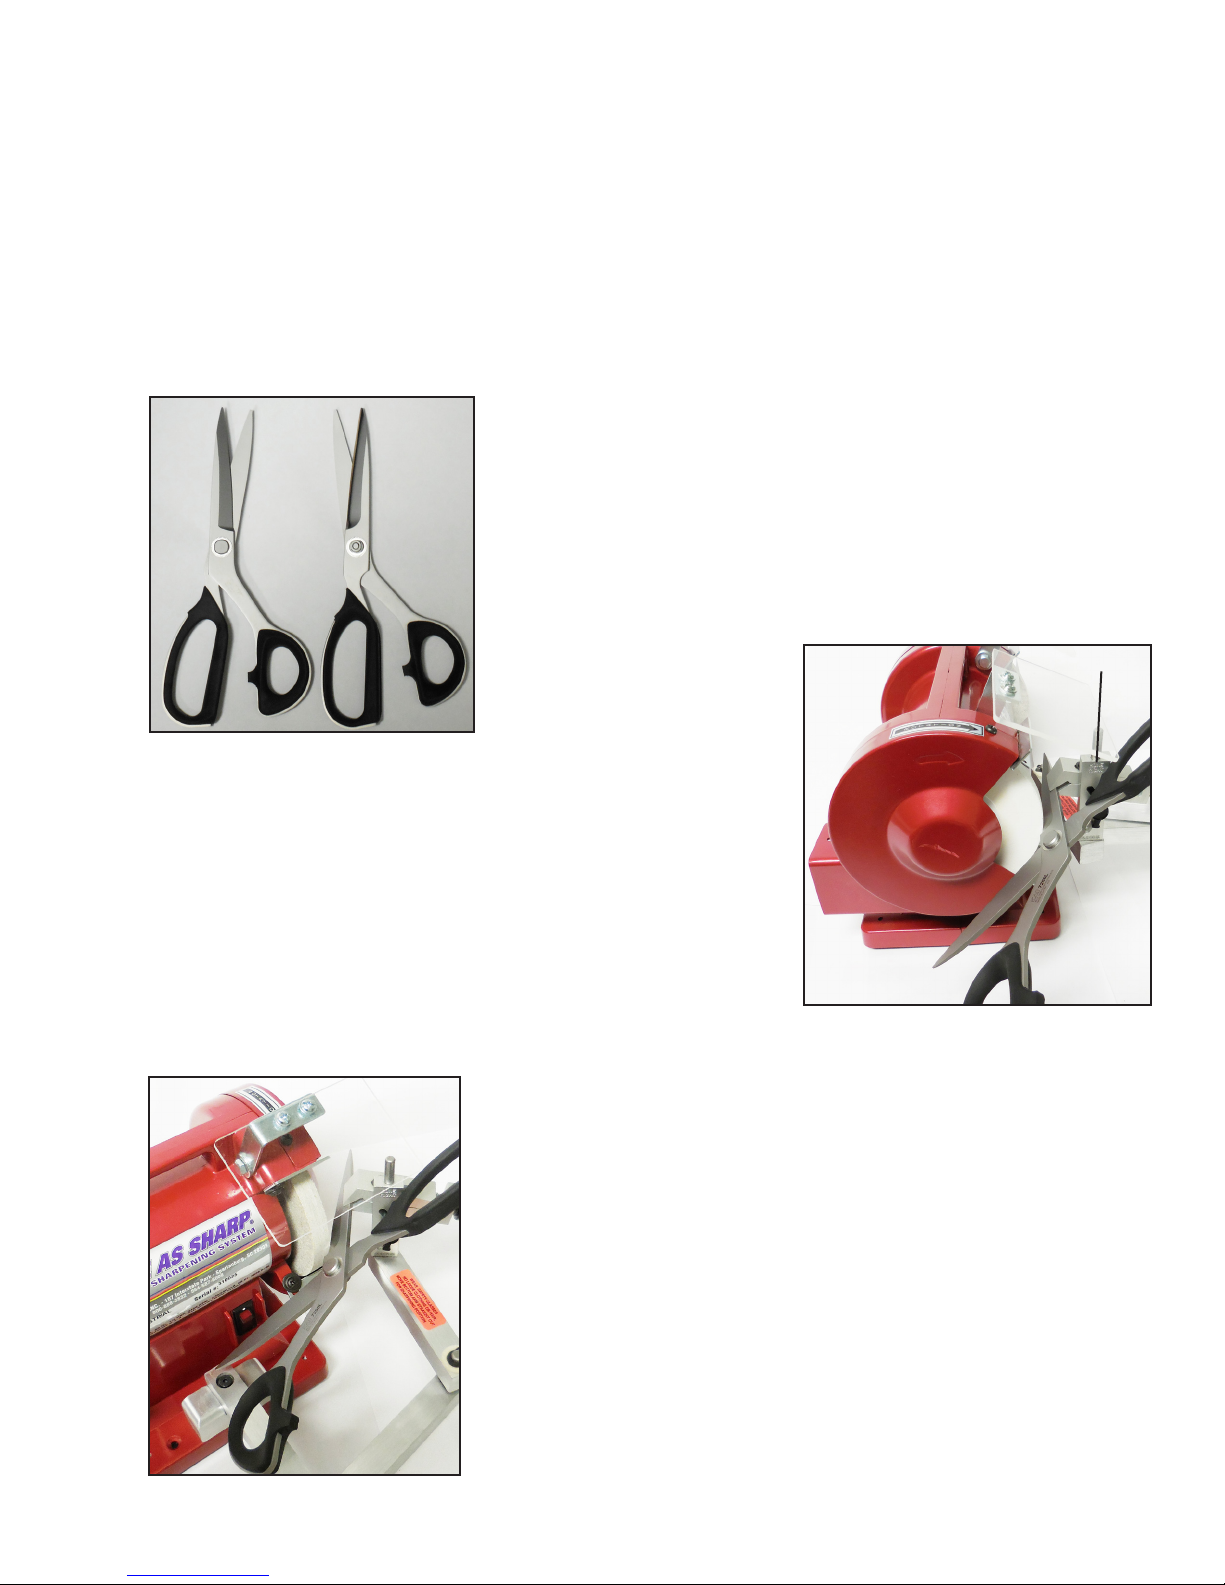
On true left handed shears the blades are reversed. The thumb blade
is on the right side of the nger blade.
Note: Be careful of some scissors that claim to be lefts, but are really
right hand blades with left hand handles.
1. Set the angle at which the scissors are to be sharpened and put
the clamp in the “hone” position (the word “HONE” is up and
readable).
2. Clamp the scissors with the outside of the blade facing upward
(handles to the left).
3. Sharpen the blades and remove the burrs as you would with right
hand scissors.
Hone
4. Leave the clamp in the “Hone” position when you move to the
polishing wheel.
5. Hone the blades on the right hand corner of the honing wheel, with
your left hand.
6. Test the scissors and perform nishing steps.
Note - Another way to Sharpen Left Handed Scissors:
You can reverse the wheels to sharpen left handed scissors. Put the
diamond wheel on the right hand side and the polishing wheel on the
left hand side of the machine. This reverses the sharpening process and
puts the blades in the correct alignment to the wheels.
17
Page 18
CORRUGATING INSTRUCTIONS
Corrugations or serrations on the blade are put on a scissors or shears to help prevent hair slide. Scissors and shears sharpened on the OOKAMI GOLD® or Twice as Sharp® scissors sharpening systems
do not need to be corrugated.
Follow these steps to corrugate scissors when your customer insists
on it.
1. Sharpen the blade that is to be corrugated on the left hand sharpening wheel. Make sure the old corrugations are completely removed.
The usual angle is 250.
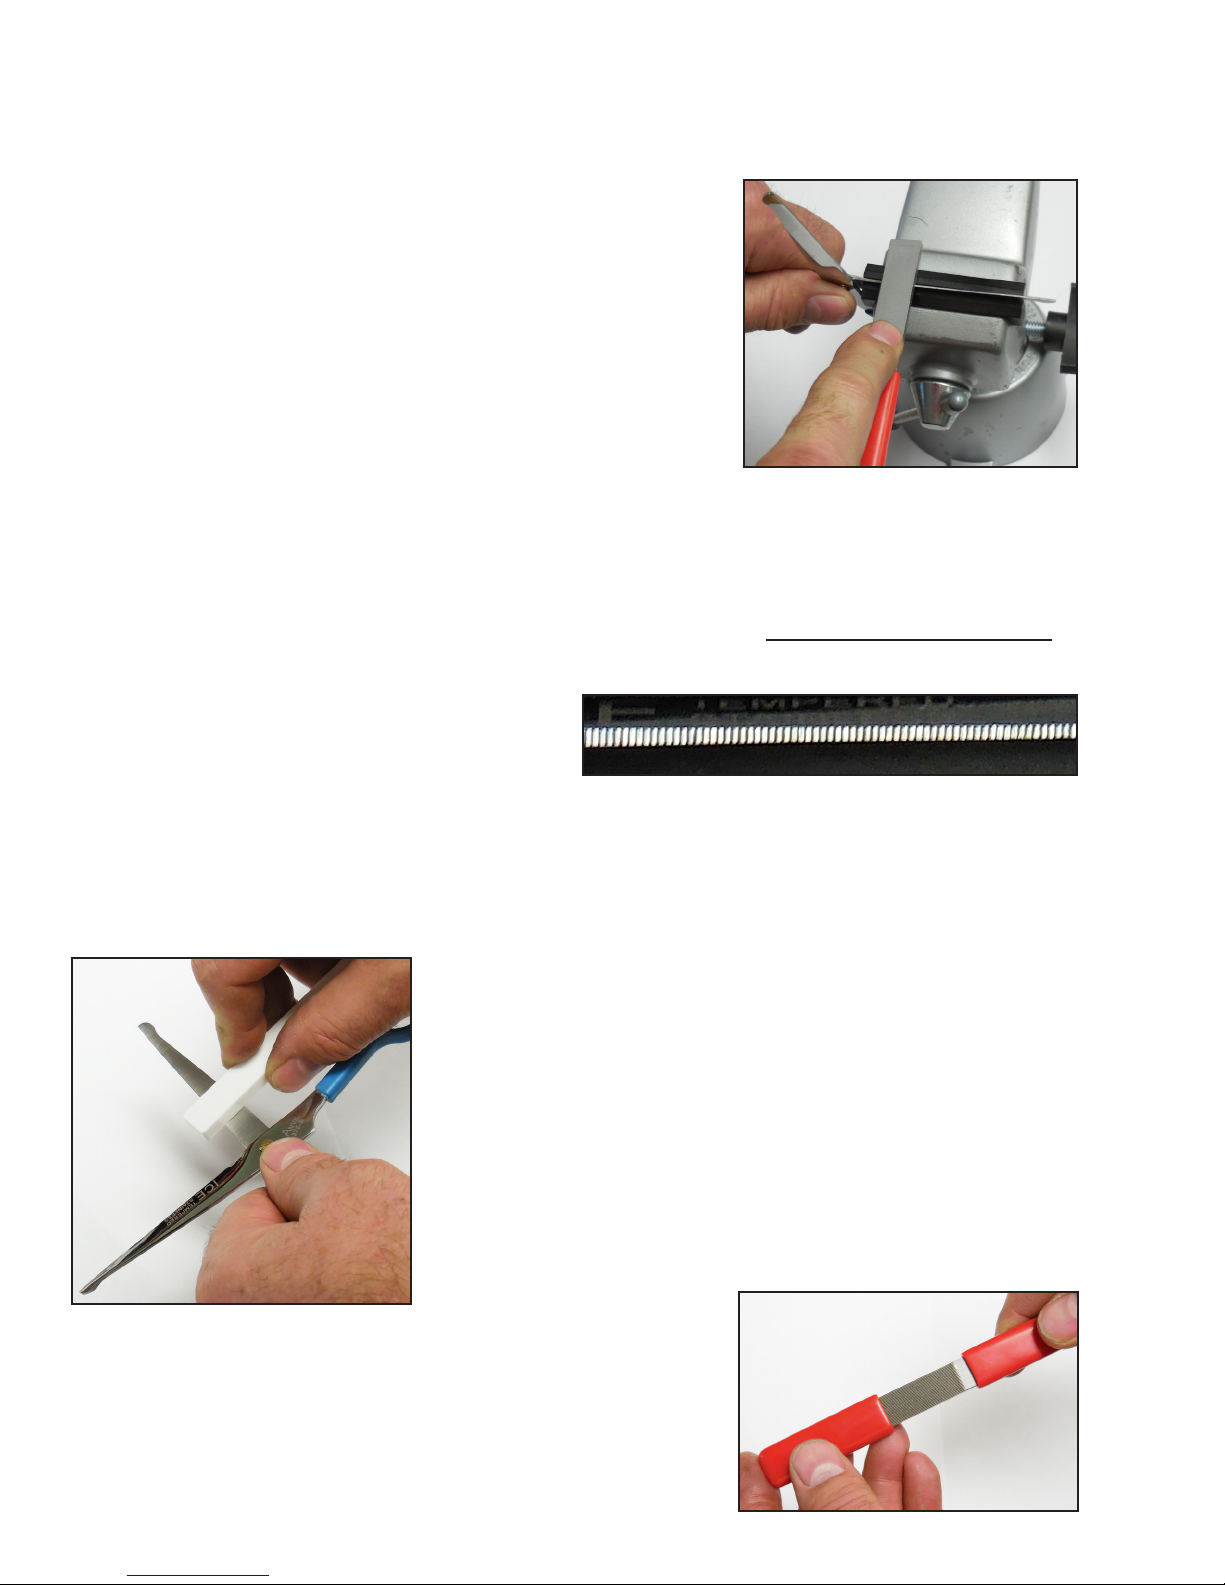
2. Clamp the blade in a nylon jaw vise (Wolff part number
#23400).
3. Hold the le at approximately the same angle as the newly sharpened edge.
4. Begin close to the pivot, holding your thumb against the side of the le to help guide it straight.
NOTE: When using the Wolff Diamond File, part number #22200 use VERY LIGHT PRESSURE to
prevent damage to the le! Diamonds cut freely and only a few ounces of hand pressure are needed.
5. Push the le forward and back in a sawing motion
5 to 6 times. Lift the le to see if the teeth are
created evenly.
6. Move the le about 1/4” down the blade so that 1/2 of the le is aligned with the teeth just created and
le new teeth.
7. Continue this process to the tip of the blade.
8. With the hone almost at hone the inside of the blade with a ceramic
hone 1 - 2 passes until the large burrs are removed.
9. Close the scissors without spreading the blades apart and cut off
any remaining burr.
10. Sharpen the other blade as normal.
11. Test the scissors for hair slide and ease of cut.
NOTE: To keep your le in top condition and prevent damage always
keep the cap on when it is not in use. If the le fails to cut, wash it
with detergent and water.
18
Page 19

FREQUENTLY ASKED QUESTIONS
Is there only one way to sharpen shears?
No. There are many methods to sharpen shears. We at Wolff Industries strive to achieve the follow-
ing:
• Sharpest edge possible
• Longest life
• Smooth feel
• Reduce slide of hair
• Good appearance
• The easiest way to obtain all of the above
The OOKAMI GOLD® sharpening system gives you all of this and for a reasonable price.
What is sharp and how is it measured?
Sharp is: When your customer is pleased with the performance of the shears. The shears must cut
tissue cleanly and hair easily.
What is sharpening by hand?
Claims of sharpening “by hand” usually mean “free hand”, or without xtures. It does not mean
without machinery. The results of free hand sharpening vary considerably. Fixtured sharpening
gives precise angles and repeatable results.
Is underwater sharpening necessary?
No, sharpening underwater is done by manufacturers and occasionally during resharpening, when
abrasives other than diamond are used. Diamonds grind cooler and do not need water cooling.
Honing cannot be done underwater.
What is the best angle for barber and beauty shears?
For your customers that are used to European shears, 35o provides an excellent cut and a nice feel.
For customers using more expensive Japanese shears, 40o or higher should be standard
What does COBALT mean on the scissors blade?
Along with iron, carbon, chromium, molybdenum and manganese, cobalt may be added. This can
improve wear life and give a smoother feel. This has no effect on sharpening..
19
Page 20

FREQUENTLY ASKED QUESTIONS - CONTINUED
Why sharpen with the diamond wheel?
Stainless steel has 16% to 18% chromium, which forms chromium carbides and iron carbides.
Stainless steel hardness is usually RC 56 to RC 60 (Rockwell “C: hardness scale). Carbide grains
found in the steel can be as hard as RC 88 to RC 92. Diamonds are the sharpest, hardest abrasives
known. Diamond sharpening cuts these carbides better than aluminum oxide or silicon carbide.
Sharpening away for the cutting edge with diamonds reduces the grain breakout or pullout. This
gives a sharper smoother edge before polish.
Why polish with the OOKAMI GOLD® polishing wheel?
All sharpening creates burrs, so polishing is necessary to remove the large sharpening burrs. Polish-
ing also removes grind lines to produce a mirror nish on the cutting edge. The OOKAMI GOLD®
polishing wheel was specially designed to hold the polishing compound and produce extremely
sharp, smooth, mirror-nish shears. The OOKAMI GOLD® wheel will also sharpen convex edges,
while clamped to produce a straight, smooth cutting edge.
What does ICE mean on the scissors blade?
Good quality shears made of carbon steel or stainless steel have small particles of soft austenite steel
still in the metal after heat treatment. They must be cooled slowly to about -100o. This converts
retained austenite to hard martensite, completing the hardening process. ICE has no effect on the
sharpening of shears. All good quality shears are ice tempered, even if not marked.
How does Titanium coating effect scissors life?
Many scissors are being coated with a thin layer of titanium to give them additional hardness. The
sharpening process removes this thin coating, in fact the scissors have to be sharpened immediately
after coating because the cutting edge is rounded off. Wolff tested many different coatings at a factory with hard to cut materials (Kevlar) and found no difference in edge longevity between coated
and non-coated scissors.
Why balance or nish shears?
• Keep the customer happy.
• Shears too loose do not cut.
• Shears too tight wear rapidly and cause fatigue.
• If tips do not cross, they won’t cut and will pull hair.
• Burrs at the tips will scratch skin and catch hair.
• The feel of balanced shears will indicate the quality of your sharpening.
20
Page 21
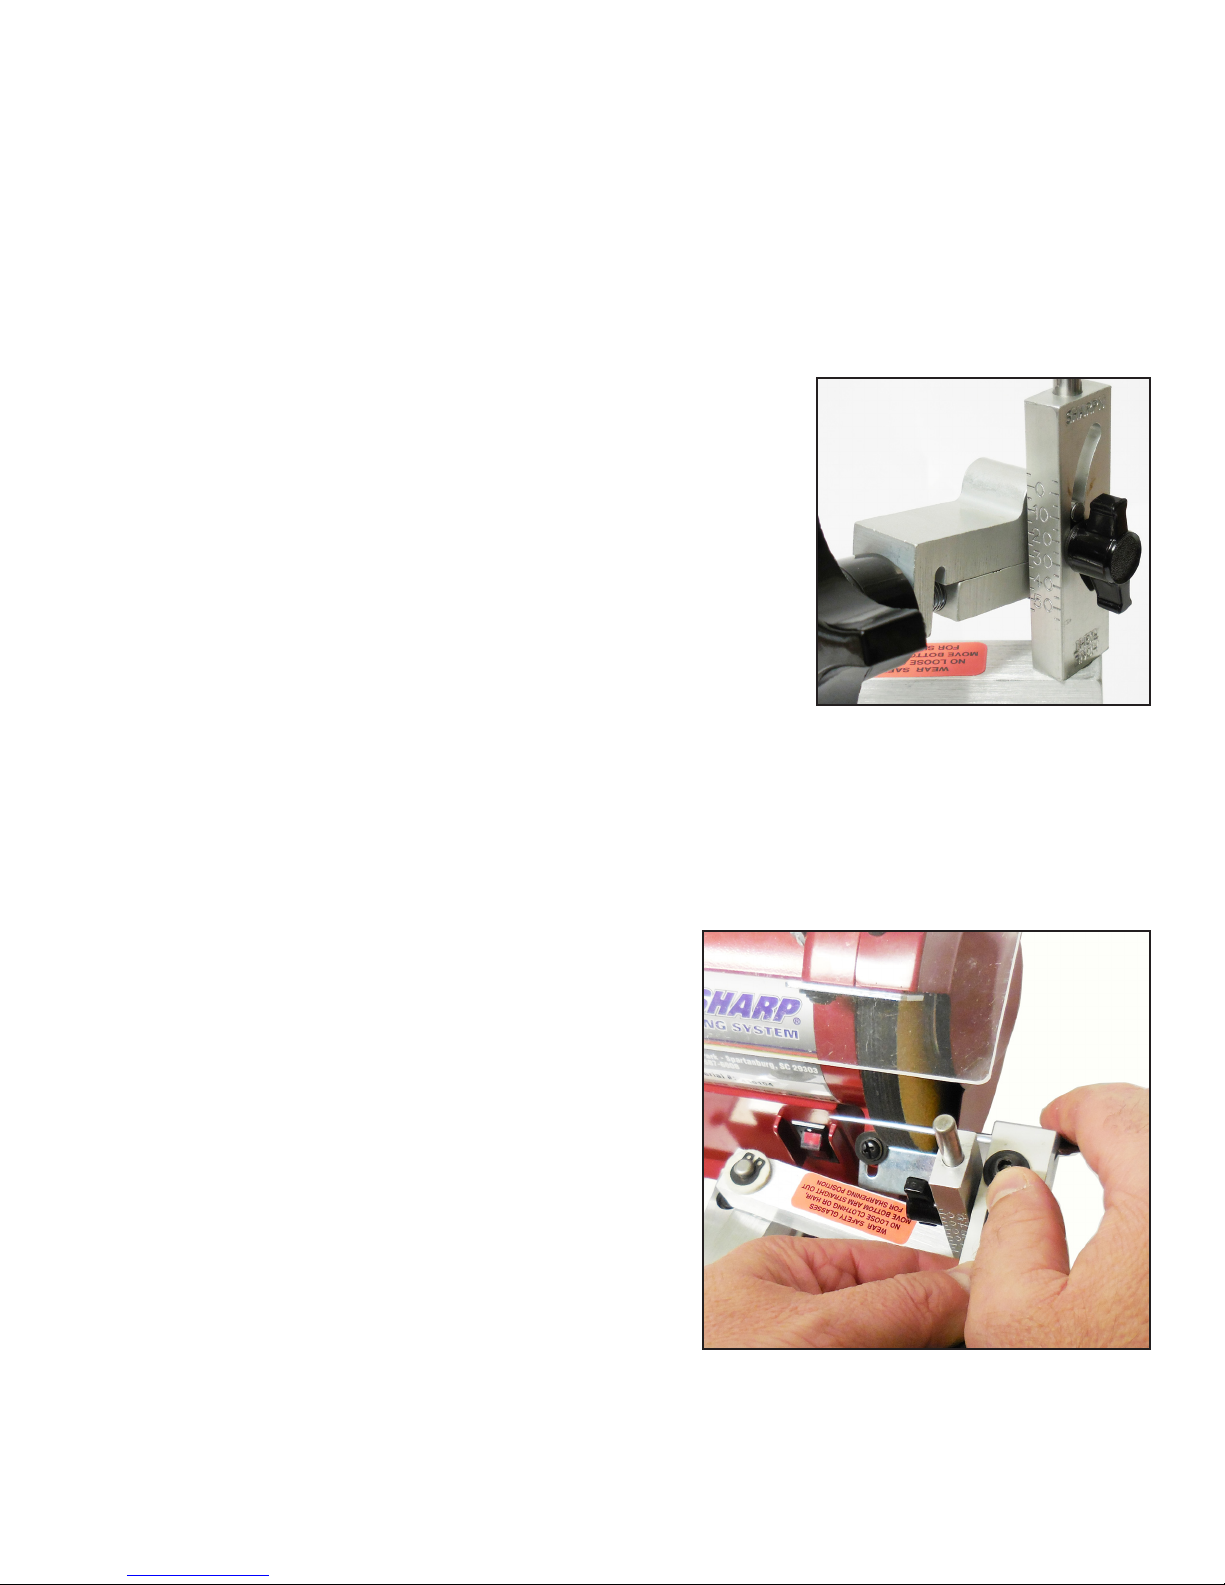
CONVEXING A BEVEL EDGE SHEAR USING THE STANDARD CLAMP
Follow these steps if you receive a shear to sharpen that should be convex but has a bevel edge from
another sharpener. This procedure will help you convert a bevel edge into a convex edge. You will need
the OOKAMI GOLD® sharpening system and the Twice as Sharp® professional honing wheel.
The steps that are referenced in this procedure are from the “STEPS TO SHARPEN AN OOKAMI
GOLD® STYLE CONVEX SHEAR” starting on page 11.
a. Do the following steps:
STEP 1: TAKING SHEARS APART - on page 7
STEP 2: INSTALLING CLAMP - on page 8
STEP 3: CLAMPING SCISSORS - on page 8
STEP 4: SETTING CUTTING ANGLE - on page 8
b. Slide the blade across the LEFT (diamond) wheel slowly with very
light pressure. Feel for the burr by sliding your nger towards the
cutting edge. If you feel a burr STOP SHARPENING. Test for a
burr after each pass on the left hand wheel.
c. Leave the blade in the clamp, remove the clamp from the arm
and increase the angle by 5o (if you sharpened on 40o then set to
45o).
Adjust angle by loosening the knob
and move in 5o increments
NOTE: We recommend using two machines for this process, the professional wheel cuts slower than
the diamond wheel. You can use the diamond wheel in place of the professional wheel, but you need to
use VERY VERY VERY light pressure.
d. Install the clamp in the honing position on a sharpener
with the professional honing wheel installed.
e. Slide the blade one time across the RIGHT (honing)
wheel slowly with light pressure.
f. Leave the blade in the clamp, remove the clamp and
increase the angle by 5o. Repeat steps d & e, increasing the angle until you have reached the limit of the
clamp.
g. Remove the blade from the clamp (do not change the
angle setting) and do the following step:
STEP 7: DEBURRING - on page 9
Using the right hand honing wheel
21
Page 22

CONVEXING A BEVEL EDGE SHEAR USING THE STANDARD CLAMP - CONTINUED
h. Insert the blade back into the clamp. Install the clamp into the honing position on the OOKAMI
GOLD® polishing wheel.
i. Polish the blade, see: STEP 7: POLISHING THE BLADES - on page 9
j. Remove the clamp, reduce the angle on the clamp by 5o (if was at 55o, then set to 50o). Install the
clamp back onto the sharpener and polish the blade as in step 9.
k. Remove the clamp, reduce the angle on the clamp by 5o. Install the clamp back onto the sharpener and
polish the blade as in step 9.
l. Remove the blade, wipe off the polishing compound and set it aside.
m. Repeat steps b - l for the other blade.
n. Do: STEP 8: ASSEMBLING THE SHEARS - on page 12
o. Do: STEP 10: TESTING THE SHEARS - on page 13
22
Page 23
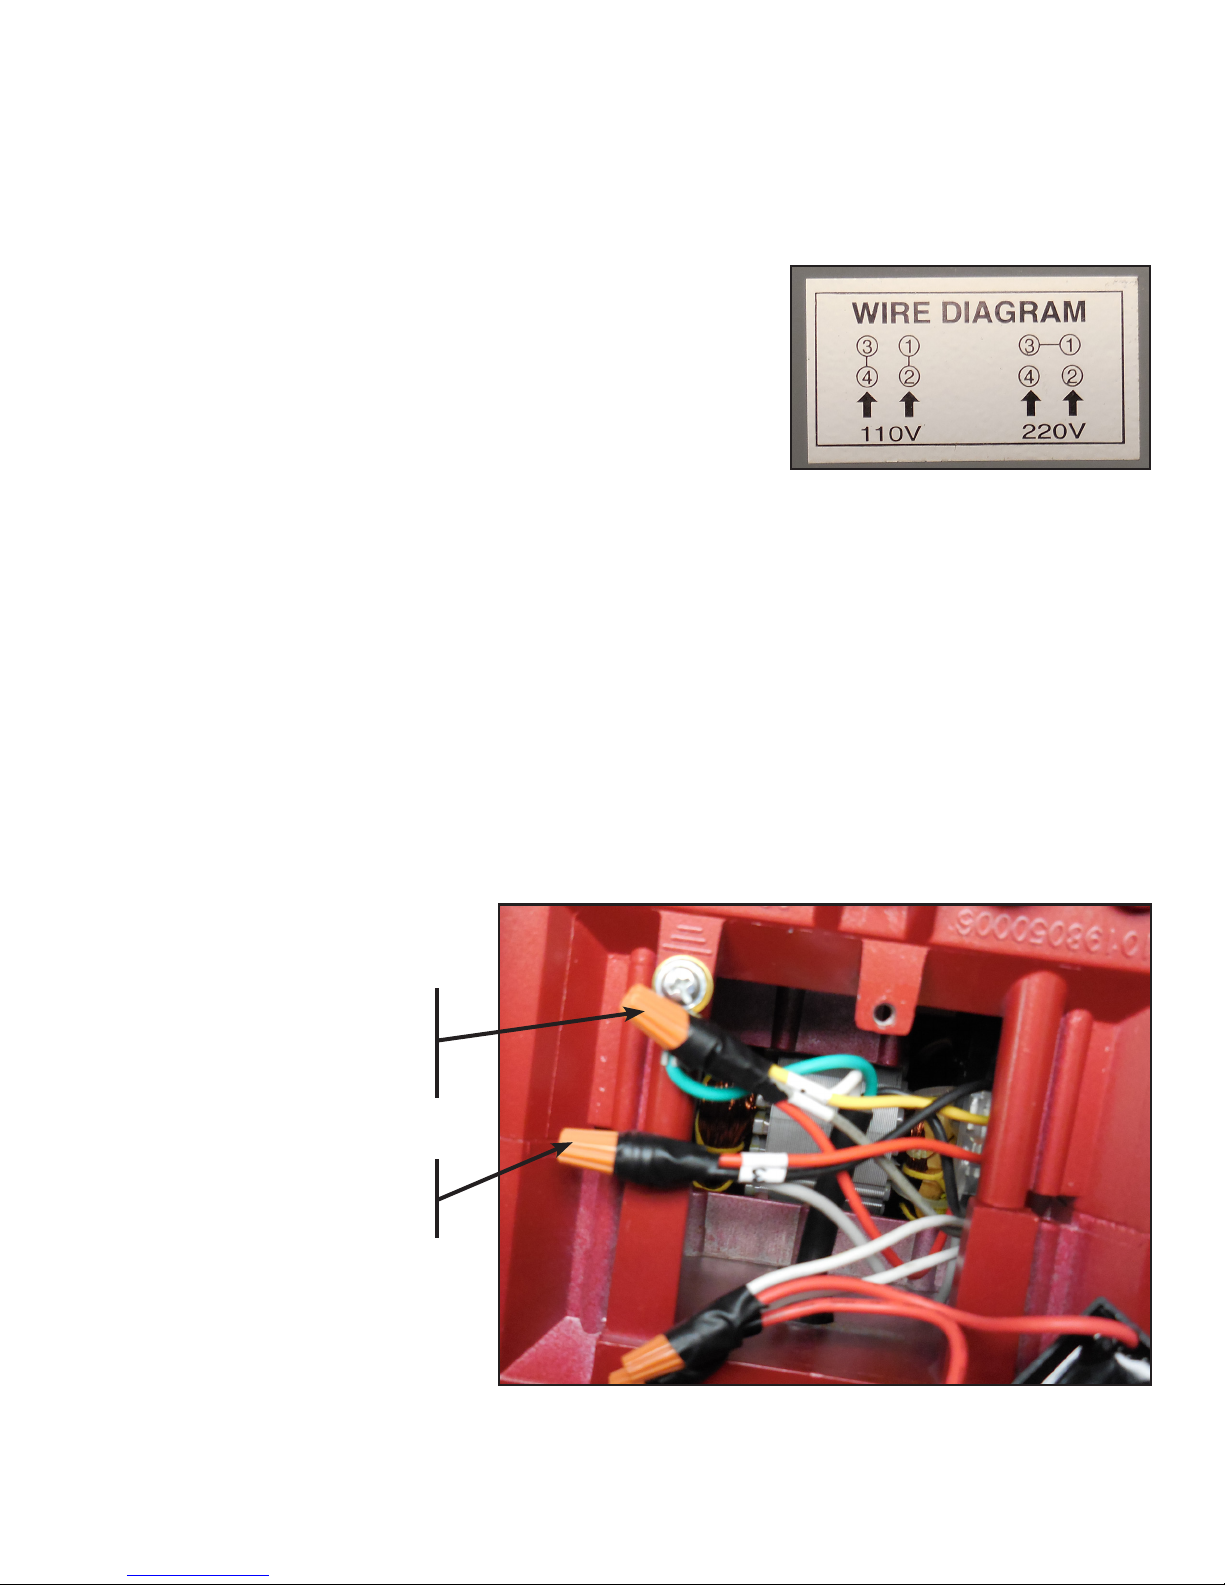
CONVERTING FROM 110 VOLT TO 220 VOLT
* * * * WARNING * * * *
UNPLUG THE SHARPENER FROM POWER SOURCE
BEFORE ATTEMPTING TO CHANGE THE SETTINGS.
To convert the Twice as Sharp® scissors sharpening system from
110 volts to 220 volts.
1. Turn the sharpener on its back. Remove the four feet from the bottom of the sharpener. Remove the
base plate to expose the current connections.
2. Find the wire marked with # 1, loosen the wire nut and remove wire # 1, reconnect the other wires.
3. Find the wire marked with # 3, loosen the wire nut and remove wire # 3, reconnect the other wires.
4. Connect the # 1 wire from step 2 and the # 3 wire from step 3 together with a new wire nut.
5. Install the base plate and four feet. Plug machine into a 3 wire grounded receptacle only and check out
the sharpener for proper operation.
Wired for 110 Volts
Yellow 1
Gray 2
Red from switch
White from power cord
Black 3
Red 4
Gray from switch
* * * * New Machines may be ordered and setup for 220 volts. * * * *
23
Page 24
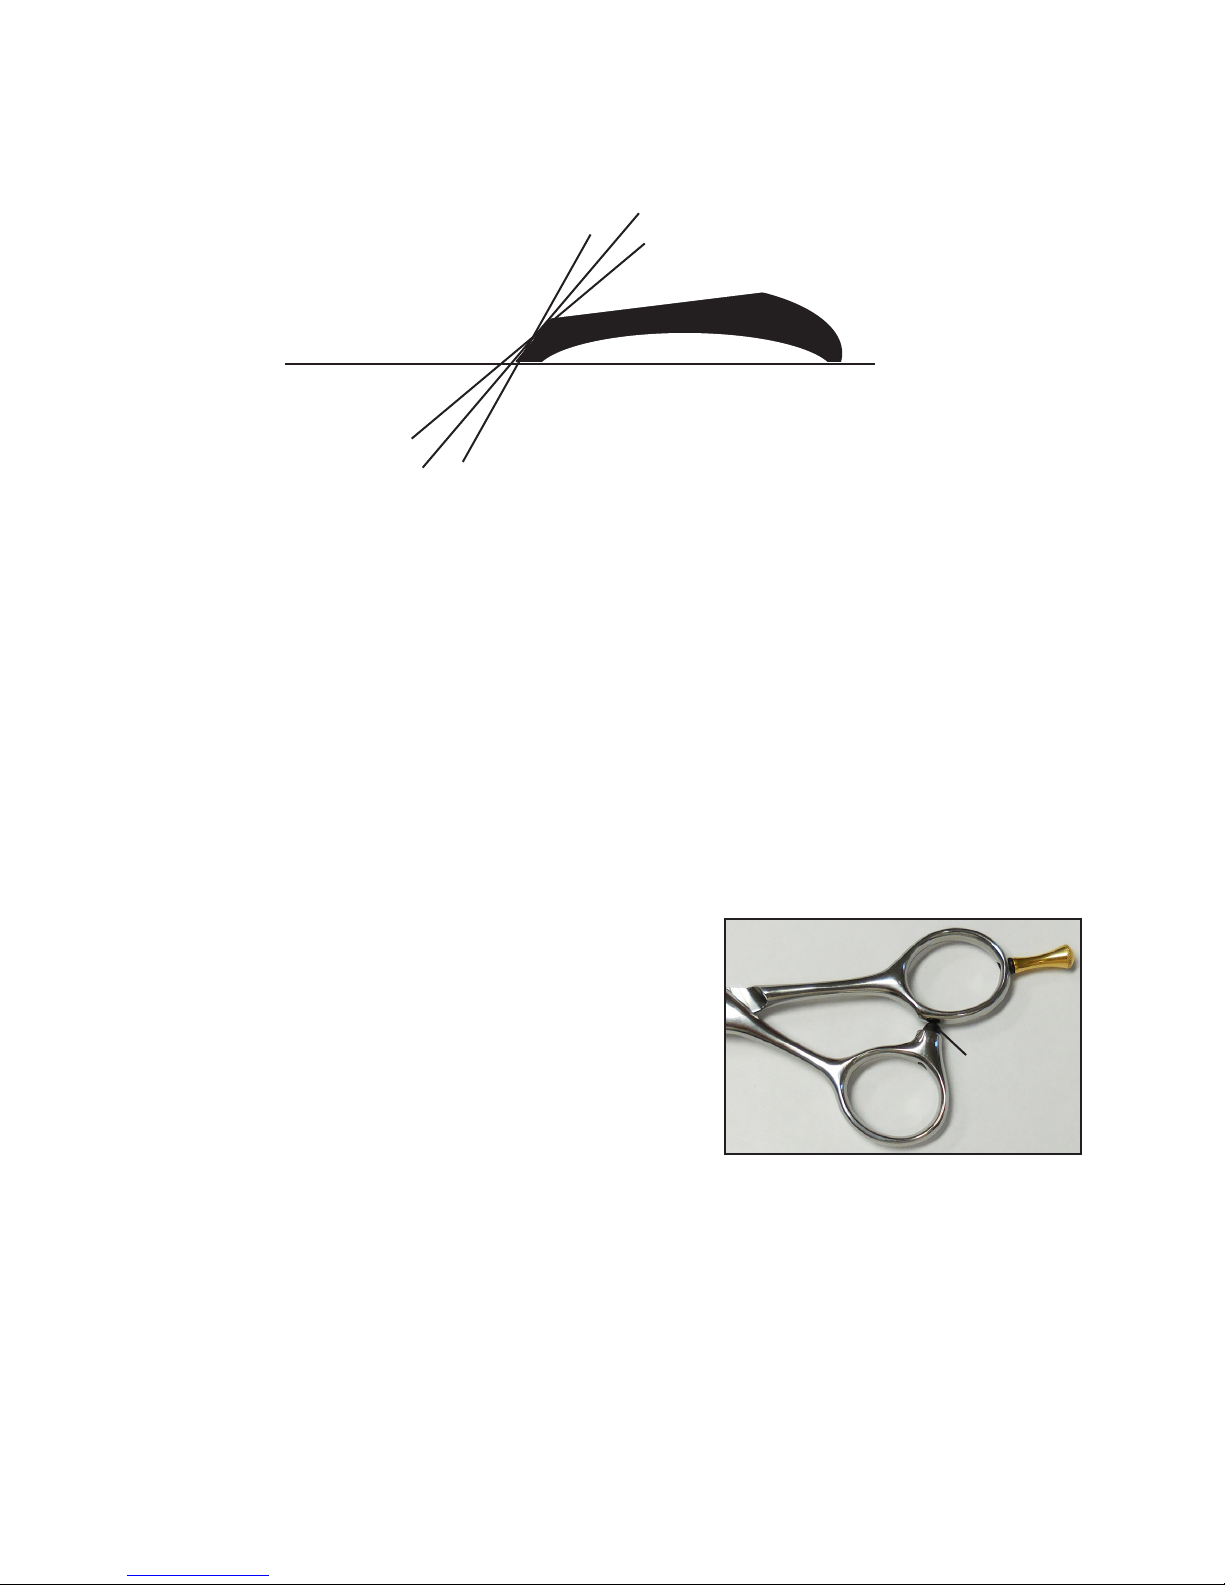
SCISSORS AND SHEARS
TERMS DICTIONARY
Angle:
USA angle measurements
30
o
40
o
o
50
Convex edge
Hollow Grind
o
40
o
50
o
60
Japanese angle measurements
Balance: The nal adjustment steps of scissors and shears sharpening are referred to as balancing
or nishing.
They include the following:
• Lubricate and clean the shears.
• Free fall: set the tightness of the pivot.
• Sizing: make the tips overlap.
• Match the tips: make both blades the same length.
• Adjust the set (if needed).
Bamboo: (see EDGE STYLES)
Bearing: Any material between the screw and the blade it pivots on is a bearing. This may be a
nylon washer or a tiny ball bearing.
Bow: (see SET)
Bumper: Between the handles (at the point they touch) of
Tang
ne barber and beauty shears, there is often a small
rubber or plastic shock absorber, called a silencer
Bumper
or bumper. This serves as a stop for the shears and
keeps them quiet as the handles come together.
Sharpening Note: These are replaceable parts.
Instant gel adhesive (cyanoacrylate) works well for sealing bumpers in place. You may
also use a soldering iron to melt and ow the end.
Carbide: Carbide is ne particles of metal combined with carbon. It is harder and more brittle than
hardened steel. Because of its hardness, it is used for masonry drill bits and metal cutting
saws.
Carbon Steel: Carbon steel is iron (Fe) with about .5 % - .8 % carbon added for hardening. A carbon
content that is too high causes extreme brittleness.
24
Page 25
Cast: Casting is metal poured into molds while heated to a liquid state. Many of the beauty shears
from Taiwan are cast.
Ceramic: Ceramic is a porcelain like material, (usually with a high alumina content), pressed from a
powder and fused at a high temperature. Ceramics are very hard and have a long wear life,
but are also brittle and subject to breakage and chipping. Ceramic shears are best returned
to the importer for sharpening.
Clamshell: (See CONVEX)
Convex Blade: The outside of a convex blade ows (rounded) into the cutting edge without an obvious
bevel. This adds strength to the blade and cutting edge.
Sharpening Note: It is not easy to determine the angle of the convex
sharpened blade. Start at 40o and adjust as necessary.
Corrugation: Corrugations are small teeth on the scissors cutting edge (one or both
blades) that provide holding power to keep the material (hair, fabric,
etc.) from sliding. These are found mostly on pet grooming and low
priced barber and beauty scissors.
Sharpening Note: If the corrugations on the blade are not damaged, then sharpen and
polish the other blade. The corrugated blade may only need to be honed on the inside
edge.
Crescent: (see RIDE)
Cut Length: The length of cut is measured form the pivot to the tip on scissors and shears.
Cutting Angle: (see ANGLE)
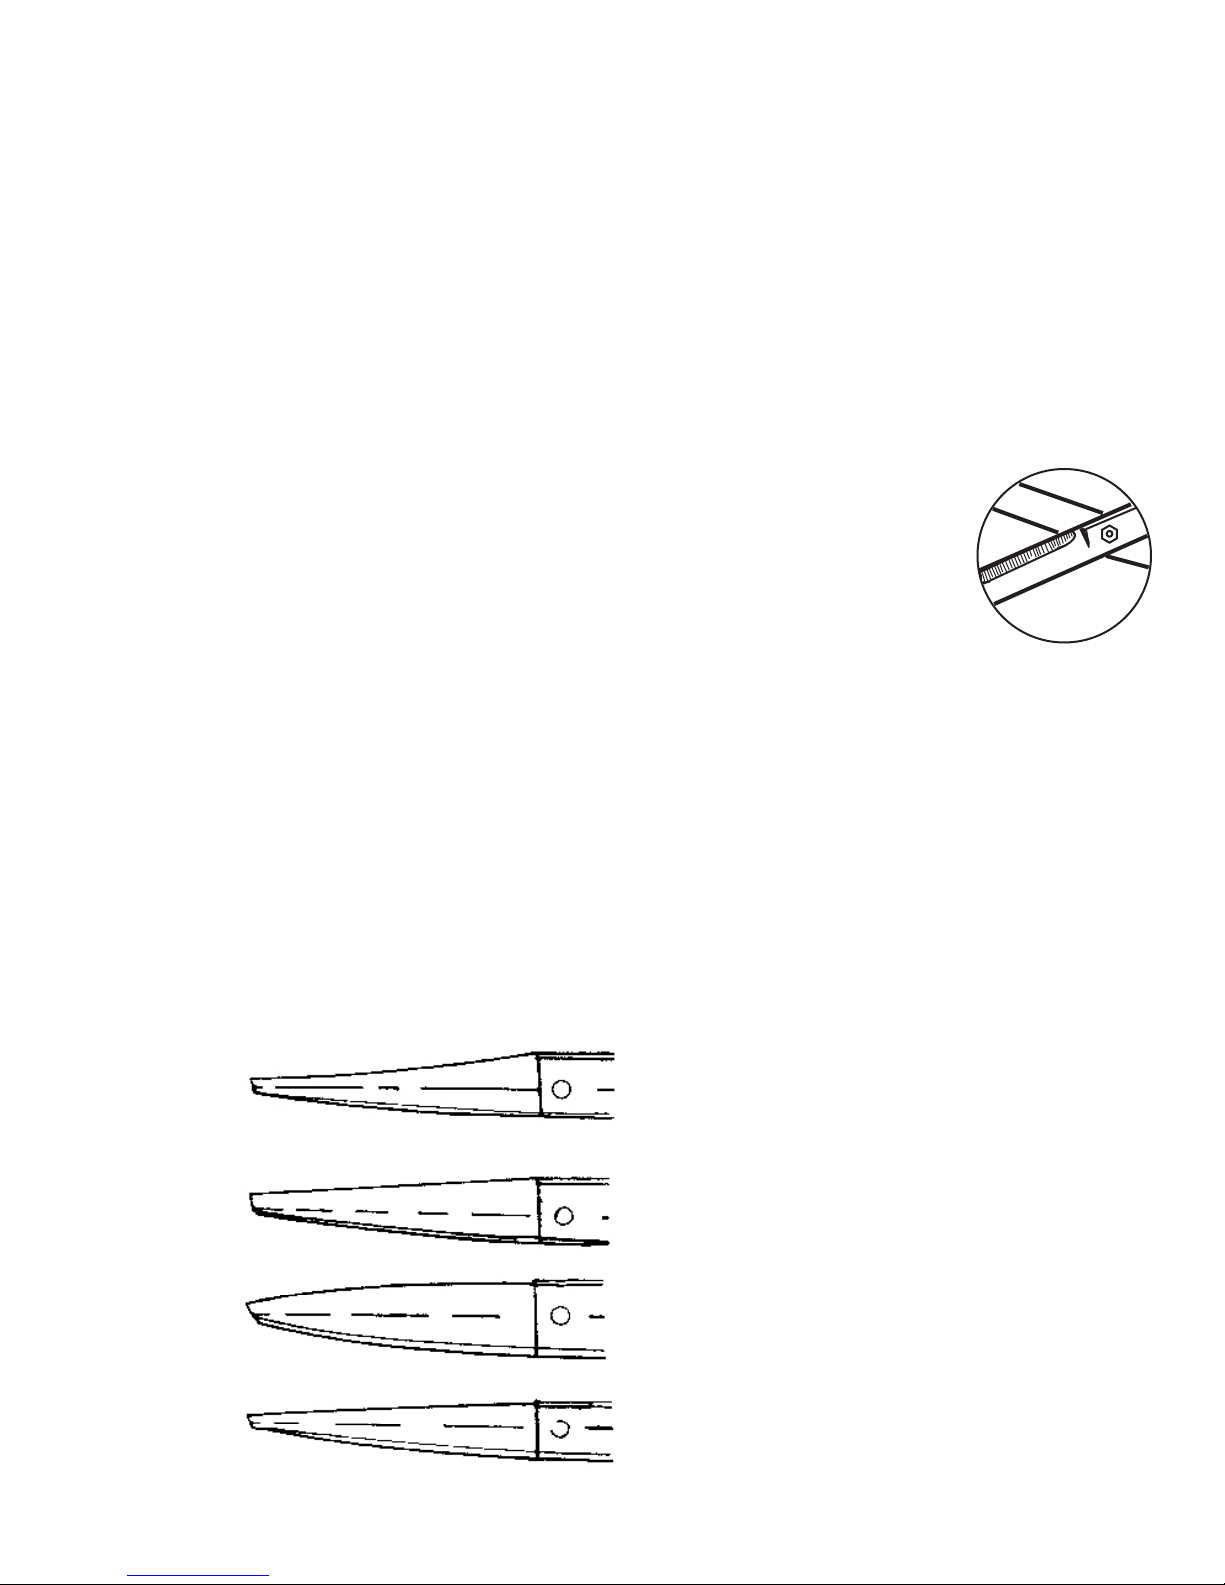
Edge Styles:
Sickle shaped blade - This shape catches the hair well
without slipping, but the hair jumps up at the top portion of the blade where more strength is needed. Suited
only for heavy duty shears that cut a volume of hair.
Straight blade - Though not as excessive, similar to
the sickle blade.
Bamboo leaf shaped blade - This shape causes hair
to slide when cut.
Willow leaf shaped blade - This is the most ideal
shaped blade. The cut hair does not slide or jump up.
25
Page 26

Forged: Forged shears are stamped to shape while the metal is red hot (soft). This produces high
carbon shears that are good to high quality. Most large tailor and industrial shears are made
this way.
Free Fall: Free fall is the measurement of how far the scissors close while holding one blade tip
pointed up and letting the other handle drop. This may be considered the point where the
blades contact each other.
Sharpening Note: Setting the free fall is an important step in balancing shears. Too loose,
and the shears will fold hair between the blades. Too tight, and the hand will become fatigued.
Half-Moon: (see RIDE)
Hamaguri-Ba: (see CONVEX)
Hardening: 1. Martensitic steels are heated to 1550oF for carbon steel and 1950oF - 1975oF for stain-
less.
2. They are then quenched rapidly.
3. Carbon steel is usually cooled in salt pots, by immersing blades to just past the ride.
This leaves the handles soft, so that they can be bent to size the tips.
4. Stainless steel is often done the same way.
5. When stainless is hardened in a vacuum oven, the entire blade and handle are hardened.
It is hard to bend these handles without breaking them (brands like NICS and Taiwanese
made beauty shears are totally hardened).
6. After quenching, blades are cooled to about -100o F. This converts retained austinite
(soft) particles to hard martensites.
7. The steel is now very hard, but extremely brittle and must be drawn in an oven at 375o
- 400oF for about 1 hour to make it exible (ductile).
Hardness: Metal hardness is measured using the Rockwell C scale.
Shears 54 - 60 (occasionally 61 - 62)
Files 60 - 62
Drill Bits 52 - 55
Haura-Ichban: (see LINED INSIDE EDGE)
Hineri: (see TWIST)
Hinzoko: (see HOLLOW GRIND)
Hollow Grind: The inside of a hollow ground scissors blade, from the cutting edge to the back of the
blade, is concave or hollowed-out. This hollowed-out area produces a lined inside edge
which gives a smoother feeling cut. (Less metal to rub.) Most ner, high quality, barber
and beauty shears are ground this way.
Sharpening Note: The hollow ground scissors also have a shorter life span. You cannot
sharpen too far down in to the hollow before removing the lined inside edge.
26
Page 27

Ice: This is a metal hardening process. Stainless steel is heated to almost 20000F and then cooled
to about -1000 F. All quality shears are ice tempered, even if not marked.
Left Hand
Shears: True left hand shears have the blade reversed. The thumb blade is on the right hand side of
the nger blade.
Sharpening Note: These scissors require special sharpening. See page 24 of this manu-
al.
Some scissors claim to be left hand, but are really true right hand shears with handles made
to t the left hand.
Sharpening Note: These shears are sharpened as right hand shears.
Length: Scissors and shears are measured overall from tip to the end of the handle (including any
tang).
Lined Inside
Edge: The lined inside edge is located on the inside of the scissors blade at the cutting edge.
This area is usually very smooth and is found on hollow ground shears. (see HOLLOW
GRIND)
OOKAMI GOLD®: OOKAMI GOLD® is the perfection of a scissors sharpening method.
Overlap: The blades must cross one another (overlap) all the way to the tip to perform the cutting
action. (see SIZING)
Pivot: A pivot can be any fastening device that holds the scissors blades together.
Ride: The ride is the area just behind the pivot and where the two blades come together. (see
SET)
Sharpening Note: The ride area may be soft and subject to wear. Use the hone to smooth
damaged area.
Scissors: Scissors are usually smaller than shears and only have room for one nger and the
thumb.
27
Page 28
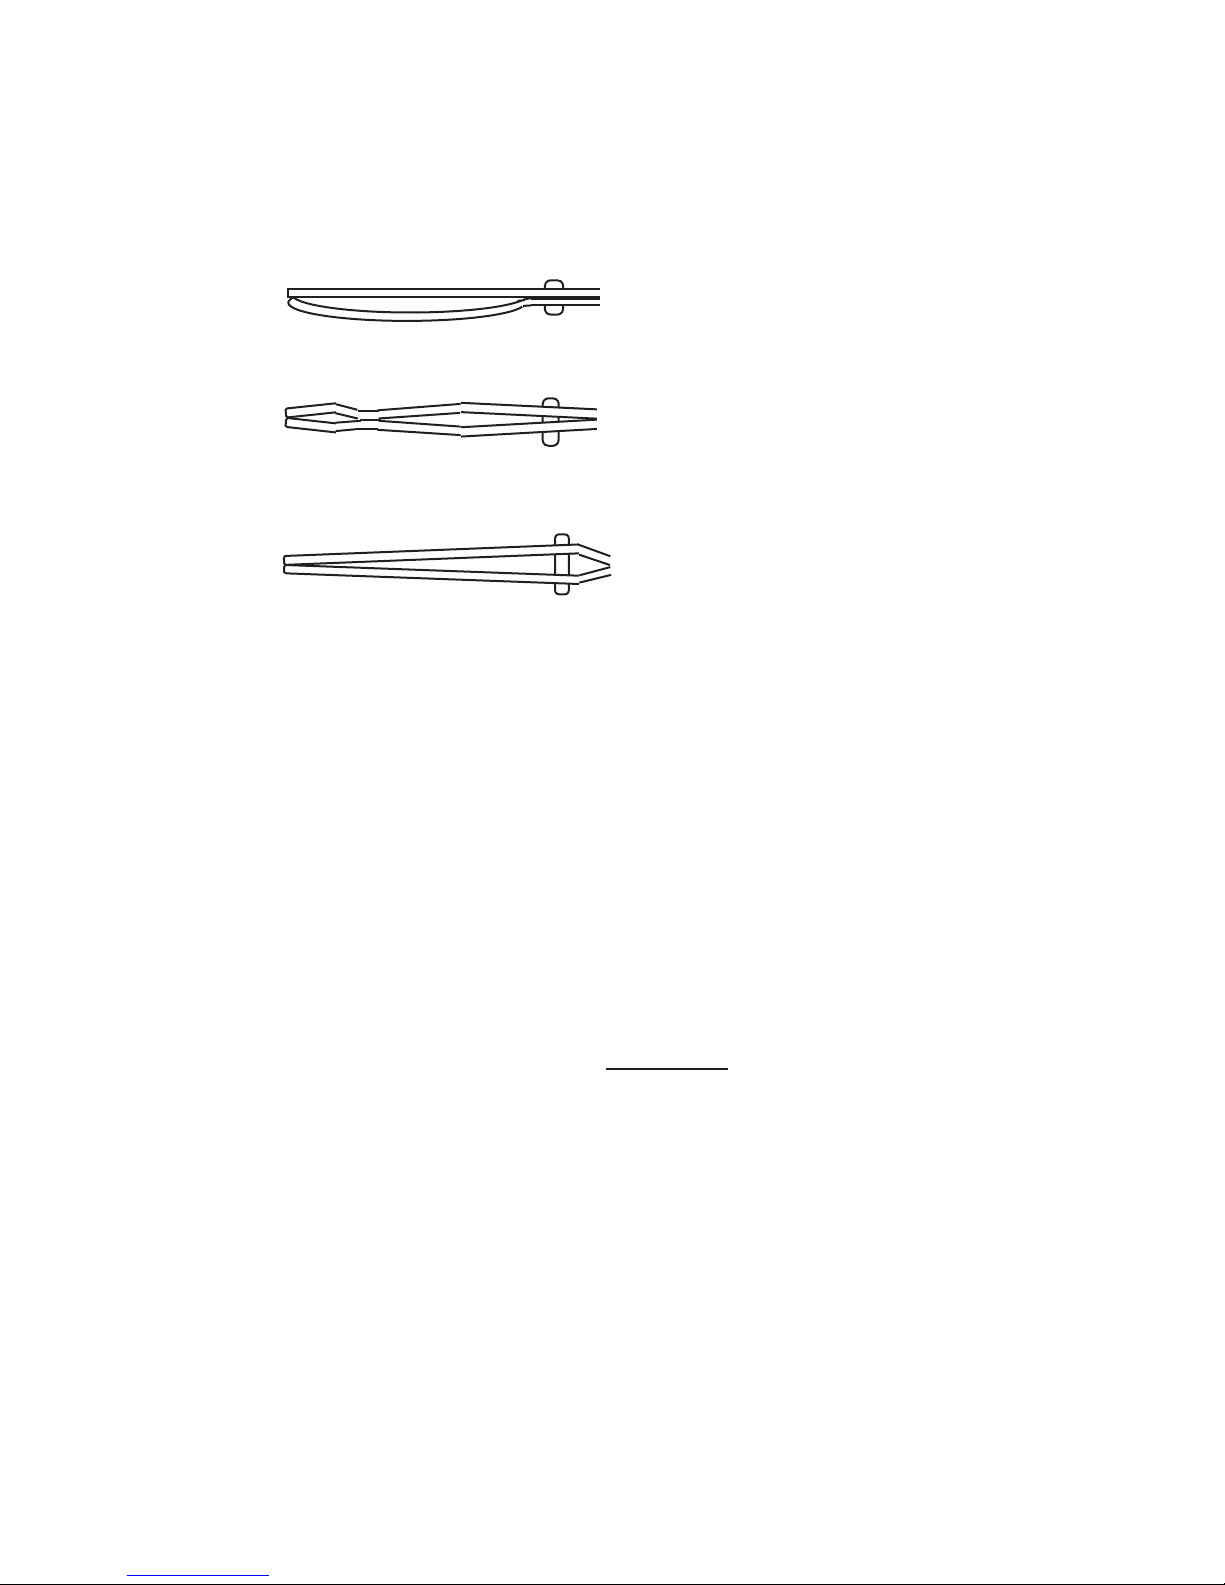
Set: The set of the scissors is the amount of gap between the blades. With the blades closed,
only the tips and the ride actually touch. The set provides the spring pressure that causes
the blades to stay touching during the cutting action. Too much set and the blades cut
into one another or are very tight. Too little, and the material being cut folds between the
blades.
Shears: Shears are usually larger than scissors and have room for more than one nger and the
NO GOOD - No gap under the pivot,
one blade is straight, the other has
too much set.
NO GOOD - Blades come together
in the middle and leave a gap near the
tips that will not cut.
GOOD - Gap under the pivot and
proper set to the tips. Gap = .006”
- .012” (2-4 sheets of paper)
thumb.
Silencer: (see BUMPER)
Sintered Metal: Made in a powdered form, scissors are pressed to shape, then hot isostatic pressed to form
a solid piece of metal.
Sizing: Sizing is setting the overlap of the blades, especially the tips.
Sharpening Note: Bend the handles on all metal shears or grind away the sizing knob (lo-
cated at the point where the handles come together) on plastic or cast iron shears, so that
the blades overlap completely to the tip.
Before bending all metal shears it is a good idea to le behind the pivot screw and determine
if the handles are hardened. If they are, do not bend. Grind away the sizing knob.
Sori: (see SET)
Stainless Steel: Stainless steel is made from steel with 11% to 18% chromium added for high quality and
hardness. (Stainless steel shears have about 16% to 18% chromium.) Also, the addition of
manganese and molybdenum add hardness and toughness. Cobalt may also be added for
improved feel and toughness.
28
Page 29
Stamped: The shears blades are stamped from rolled steel using a formed die. These are the lowest
cost shears to produce and are often very durable, but may not be as smooth feeling. Most
plastic handle fabric shears are made this way.
Steel: Iron with carbon and other elements added.
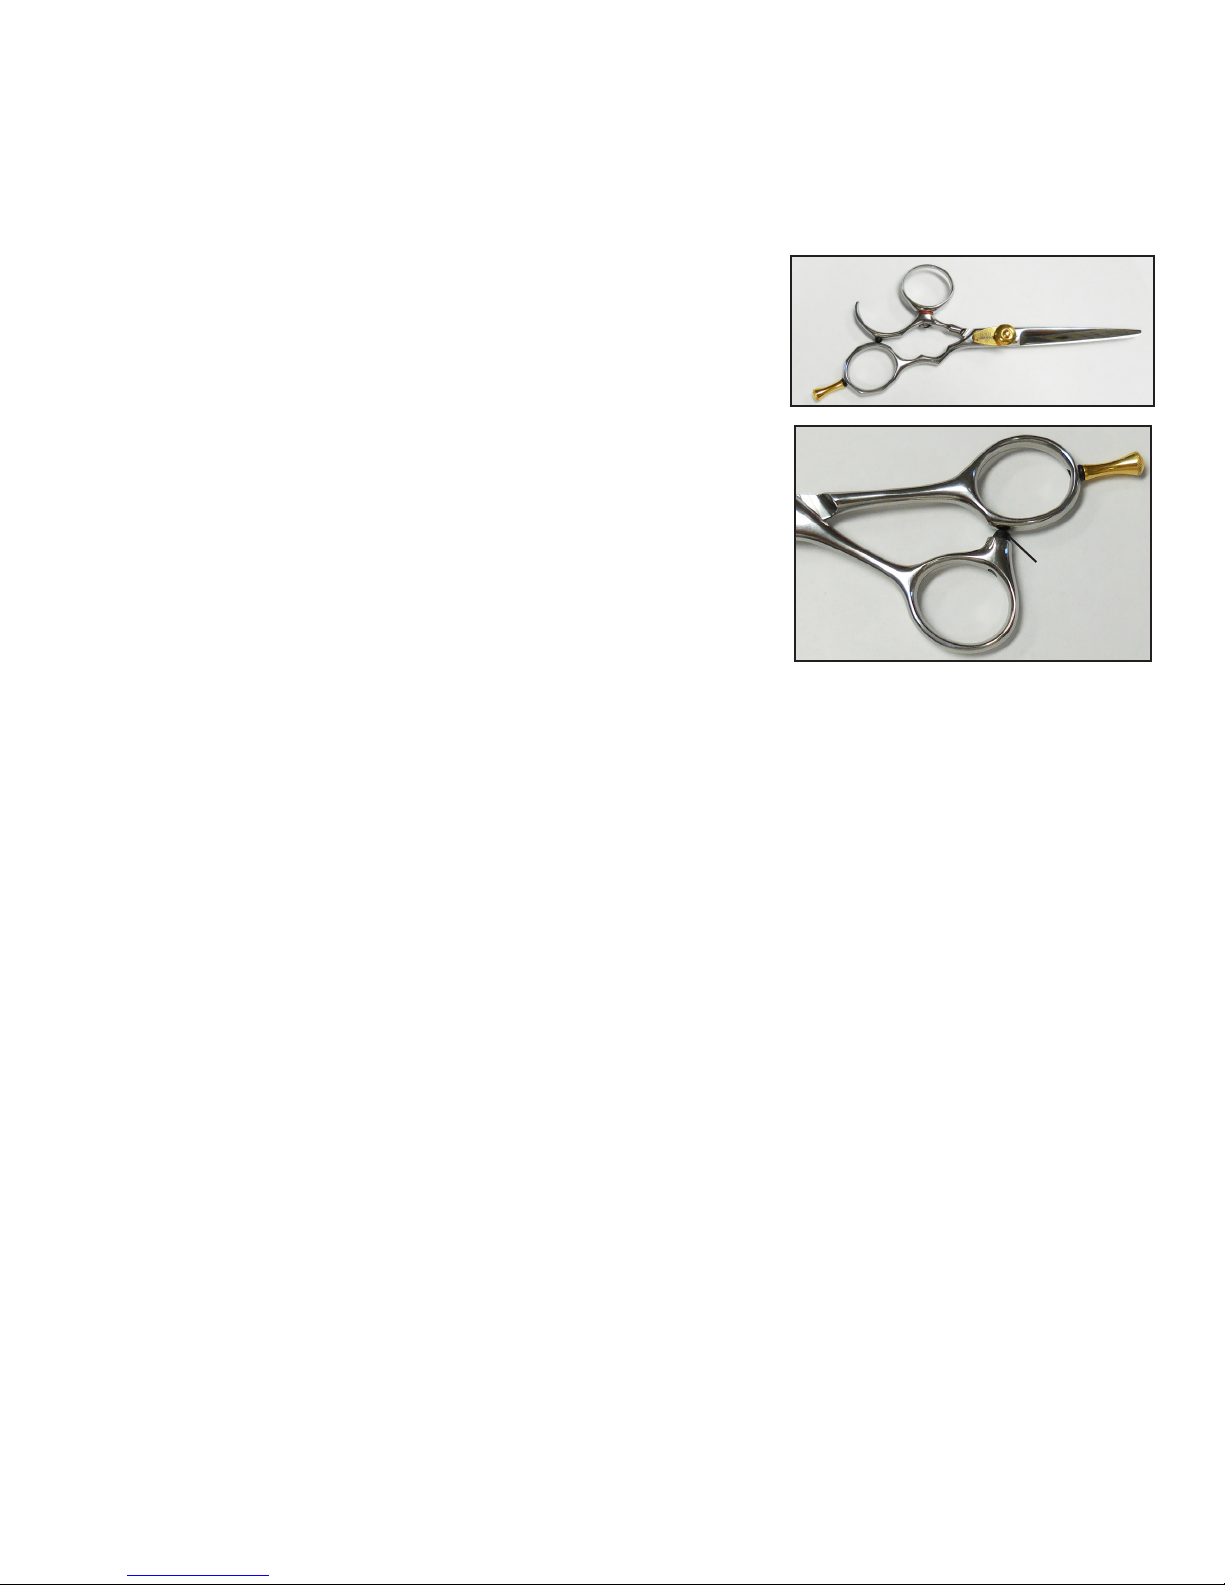
Swivel Thumb: Swivel thumb shears are an ergonomic improve-
ment in some applications because they keep the
hand in proper alignment allowing the blades to
move in a different cutting plain.
Tang: An extension beyond the end of a scissors handle
Tang
that provides a nger rest would be considered a
tang. Some tangs are removable. (see SCISSORS,
SHEARS)
Bumper
Titanium: Titanium is a gold or multi colored microscopic coating added to shears to improve wear
life.
Sharpening Note: This coating will be removed at the cutting edge during the sharpening
process. There is no way to avoid this.
Twist: In some scissors the set of the blades is provided by twisting the blades toward one another.
This is common in many European scissors. (see SET)
Sharpening Note: Holding the shears to the light will often show defects in the scissors
blade. You cannot correct all defects built in by the manufacturer.
29
Page 30
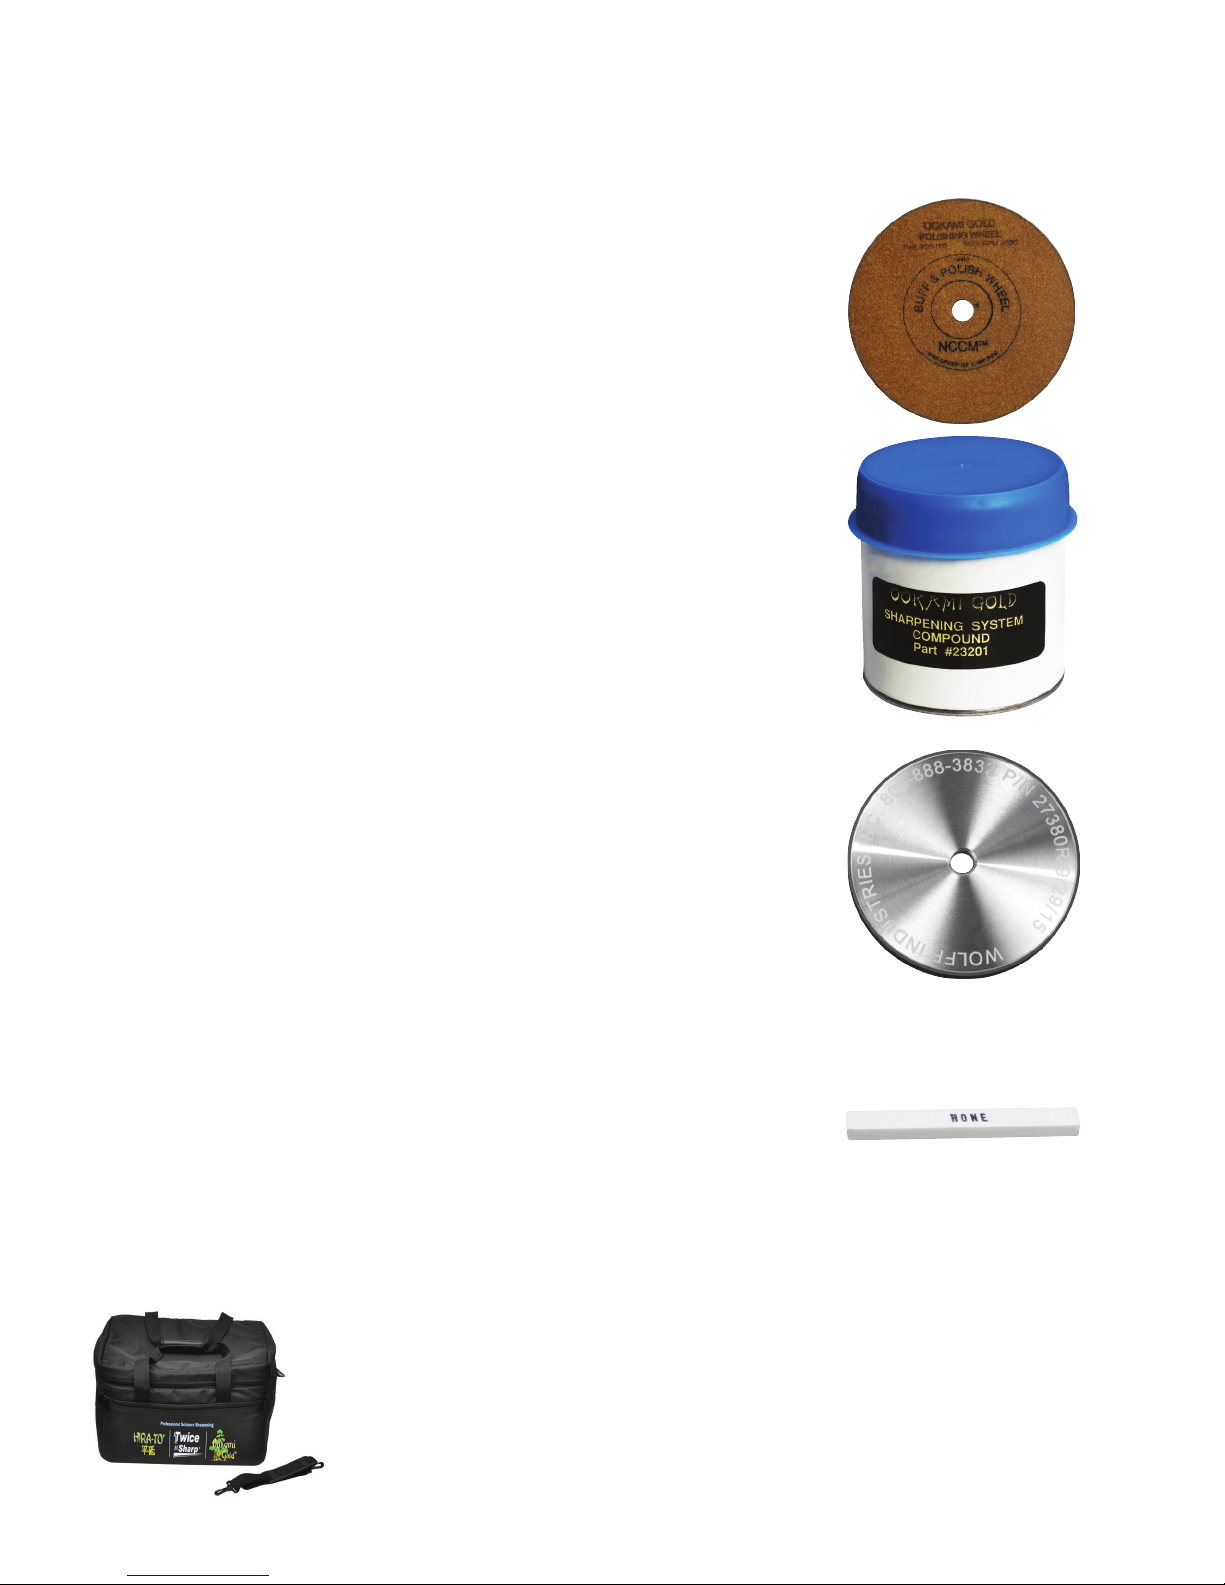
PARTS INCLUDED WITH THE OOKAMI GOLD® SHARPENING SYSTEM
OOKAMI GOLD
®
Polishing Wheel
Part #25100
This is the replacement polishing wheel for the OOKAMI GOLD® sharpening
system.
OOKAMI GOLD
®
Polishing Compound
Part #23201
This one pound container of white polishing compound is used on the OOKAMI
GOLD® Polishing wheel.
OOKAMI GOLD
®
Diamond Wheel
Part #27380
This 800 grit diamond wheel is for the most expensive, nely nished barber
and beauty shears. It must be followed by the OOKAMI GOLD® polishing
wheel for best results.
Hone (white)
Part #20601
This ne white hone removes sharpening burrs without damaging the cutting
edge. A must for removing large nicks from high quality barber and beauty shears
before sharpening.
OOKAMI GOLD® Optional Equipment
Wolff Carrying Case
Part #24950
Made of reinforced ballistic material with foam insert which can be custom-
ized to your requirements. Additional storage pockets are inside the case.
30
Page 31
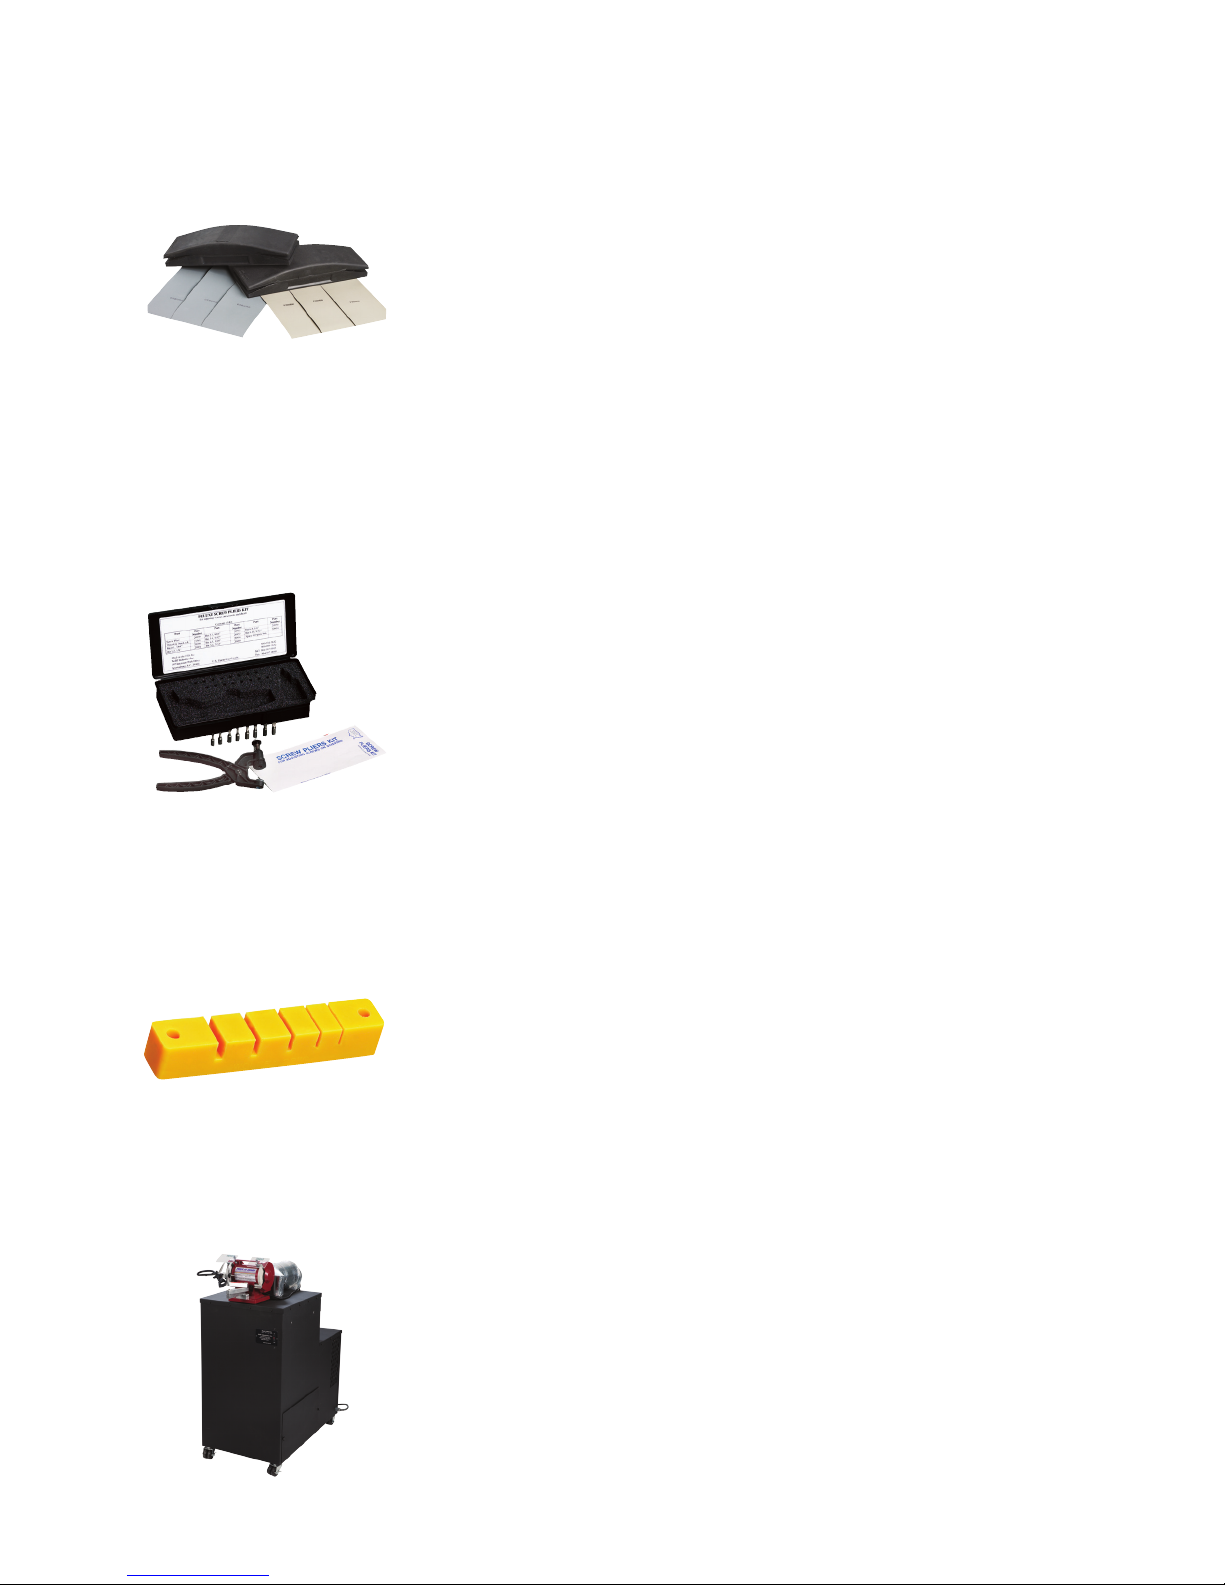
OOKAMI GOLD® Speciality Tools
OOKAMI GOLD
®
Honing Block Kit
Part #20651
This Honing Block Kit comes with 2 blocks, 3 DEBURR and 3 FINISH cloths
for honing the inside of the shears blades of high quality hollow ground barber
and beauty shears. Create a Haura-Ichaban (lined inside) edge on hollow ground
shears with the OOKAMI GOLD® Honing Block Kit! Removes inside damage, repairs rough ride, provides silky feel.
OOKAMI GOLD
®
Deburr Cloth Finish Cloth
Part #20660 Part #20665
Deluxe Pliers Kit
Part #20940
The Deluxe Pliers Kit contains 8 bits and comes in a protective plastic case. It
also contains a bottle of Thread & Nut lock, part #23301 which is used to keep
the screw from loosening up. Use these pliers to adjust the balance of shears
after sharpening.
Set Adjusting Tool
Part #23110
This is the perfect tool for adjusting the set (spring, bow or curve) of smaller
scissors blades. Made of polyurethane for durability and toughness, this set tool
will not damage the nish or newly sharpened edges. Screw it to your work
bench or carrying case (not for free-hand use).
OOKAMI GOLD® Optional Equipment
Wolff Dust Collector
Part #DC-1000
Made in the USA of powder coated steel. Includes a two stage ltration system
(1st stage cyclonic and 2nd stage is a MERV 8 lter) and two blowers which
provide unparalleled suction. Allows front or side mounting to t in any shop
and runs on 110Vac.
31
Page 32
PARTS LIST FOR CLAMPS
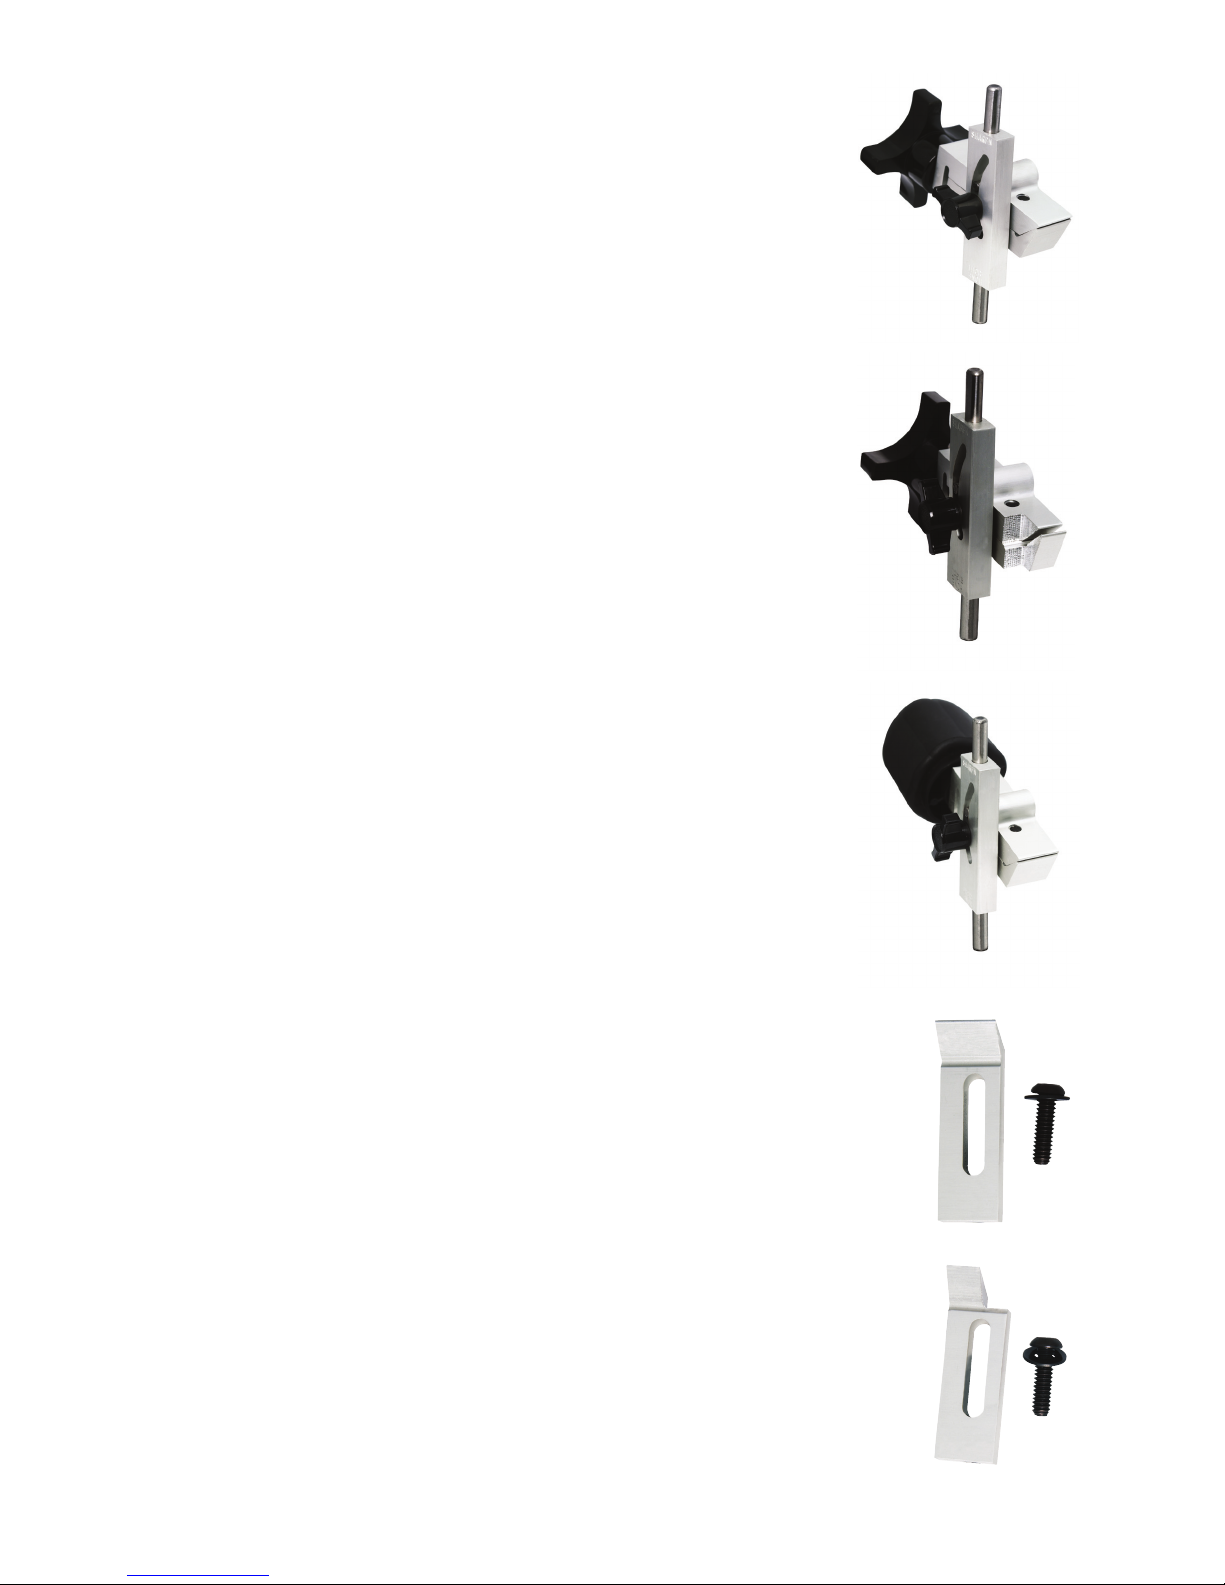
Shears-Lock Clamp
Part #30004
This is the clamp that comes with your OOKAMI GOLD® scissors sharpening
system. It will adjust to the various tapers of scissors blades and hold them tightly
while sharpening.
Narrow Clamp
Part #30005
This clamp is a great accessory if you sharpen very small surgical and embroidery
scissors. The smaller clamping jaw also holds small curved scissors without slipping.
Shears-Lock Clamp
With Ergonomic Knob
Part #30007
This ergonomic knob is covered with a soft rubber, ts comfortably in your hand
and requires less pressure to tighten. The clamp width is the same as standard
shears-lock.
Narrow Clamp
With Ergonomic Knob
Part #30008
The clamp width is the same as narrow clamp.
Replacement Lower Jaw for:
Shears-Lock Clamp
Part #33004
The lower jaw often gets ground down too far to hold scissors properly. This part is easily
replaced and comes with a new screw and washer.
Lower Jaw for Narrow Clamp
Part #33005
32
Page 33
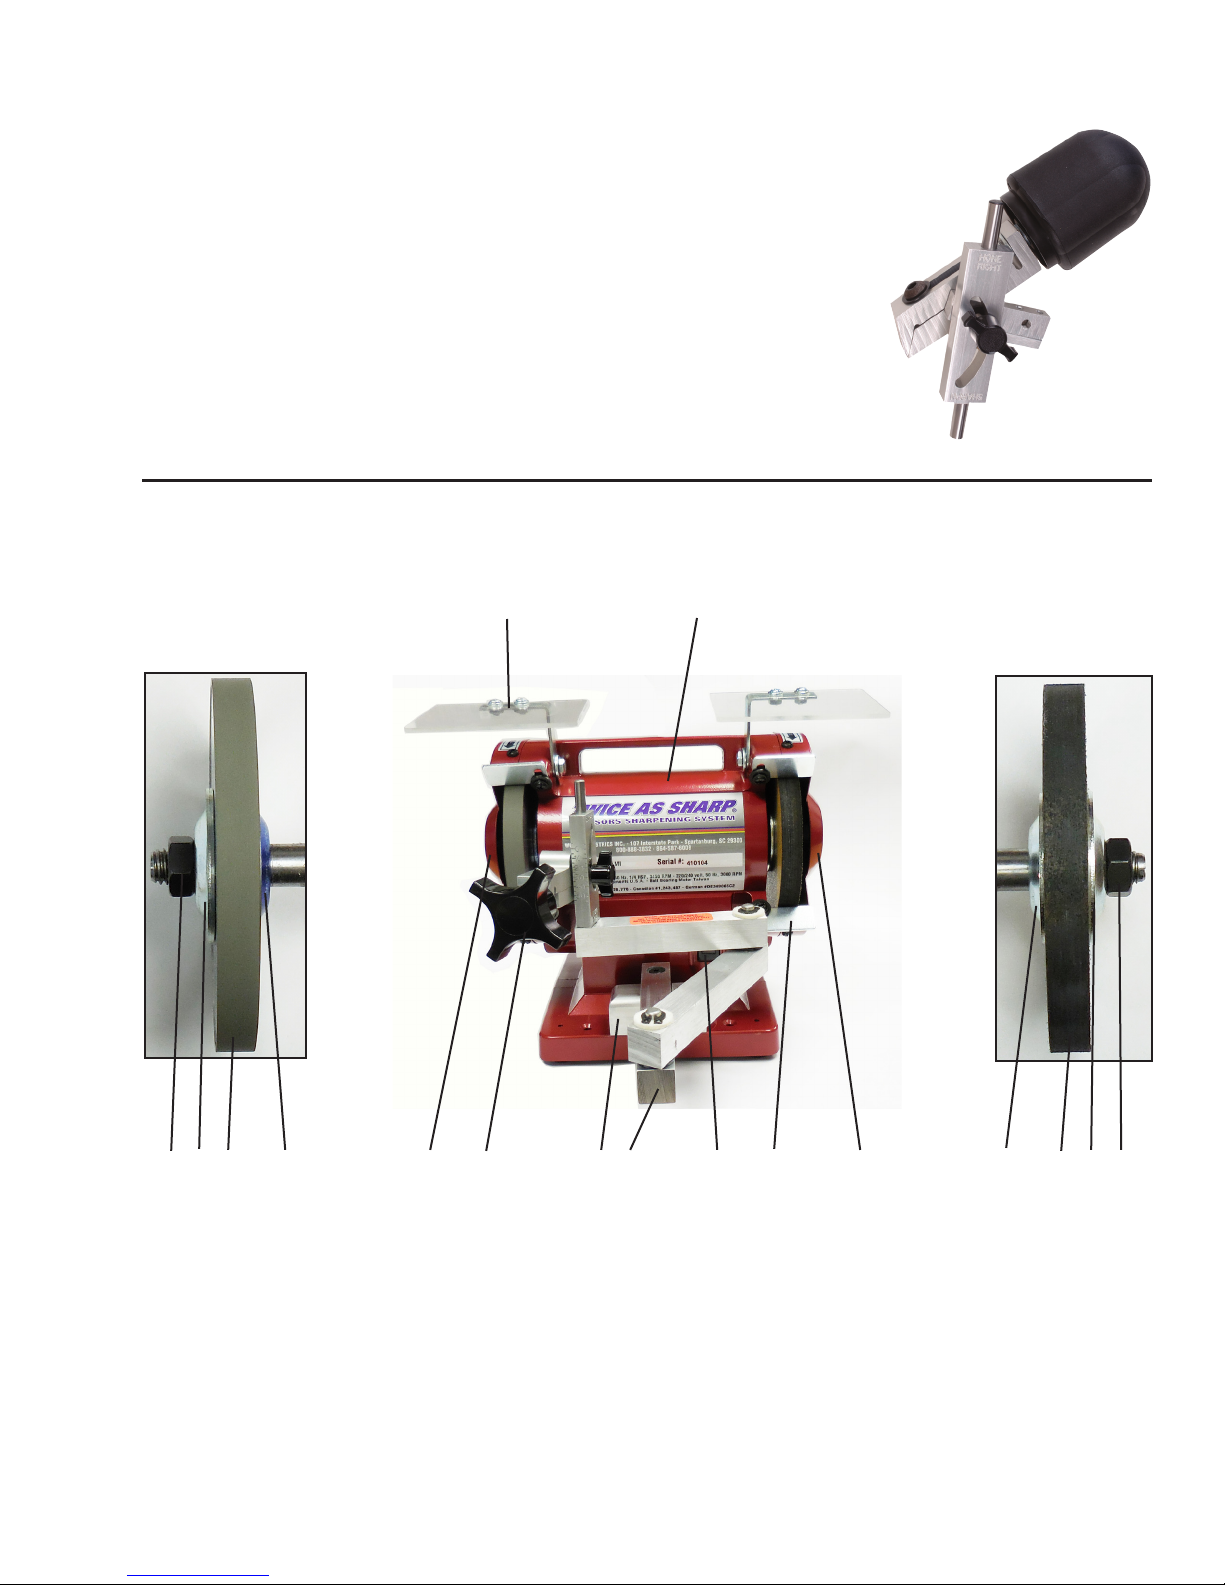
Convexing Clamp With Ergonomic Knob
Part #30009
The convexing clamp helps speed up the polishing process when sharpening
OOKAMI GOLD® convex edge beauty and grooming shears. A xed angle
is set with the upright, when the clamp is moved out of the detent postion allows full movement to polish the back edge of the blade.
PARTS LIST FOR OOKAMI GOLD® SCISSORS SHARPENER
Convexing Clamp
Eye Shield
98-20100
Motor
98-20000
Wheel Flange - 10200
Wheel Nut Left - 10700
Blue Flange - 10201
Diamond Wheel - 27380
Riser Block - 43200
Standard Clamp - 30004
Left Wheel Cover - 98-10211
Rocker Switch - 10400
Arm Assembly - 40000-15
Safety Guard Set - 98-10140
Wheel Flange - 10200
Wheel Flange - 10200
Polishing Wheel - 25100
Wheel Nut Right - 10600
Right Wheel Cover - 98-10210
33
Page 34

LIMITED WARRANTY
Two year warranty from date of purchase against defective parts or workmanship with the exception of the sharpening and polishing wheels. Warranty limited to replacement of parts. Buyer must
return warranty card to manufacturer for coverage of warranty. This warranty covers only the
original purchaser. Use of non-factory parts voids any warranty. This warranty gives you specic
rights. You may also have other rights which vary from state to state. Some states do not allow
limitations or implied warranties or consequential damages, so these may not apply to you.
DISCLAIMER
There is no expressed warranty other than limited warranty stated above. There is no implied war-
ranty for the merchantability or for tness for a particular purpose. Wolff Industries, Inc., will not
be responsible for any consequential damages. Damages are limited to the replacement of defec-
tive parts.
GUARANTEE
If you are not satised during the rst thirty (30) days, return the merchandise for a complete refund, less shipping.
(800) 888-3832
(864) 587-6008
fax (864) 587-0660
107 Interstate Park customerservice@wolfnd.com
WOLFF
INDUSTRIES, INC
Spartanburg, SC 29303, USA www.wolfndustries.com
 Loading...