

Page 1
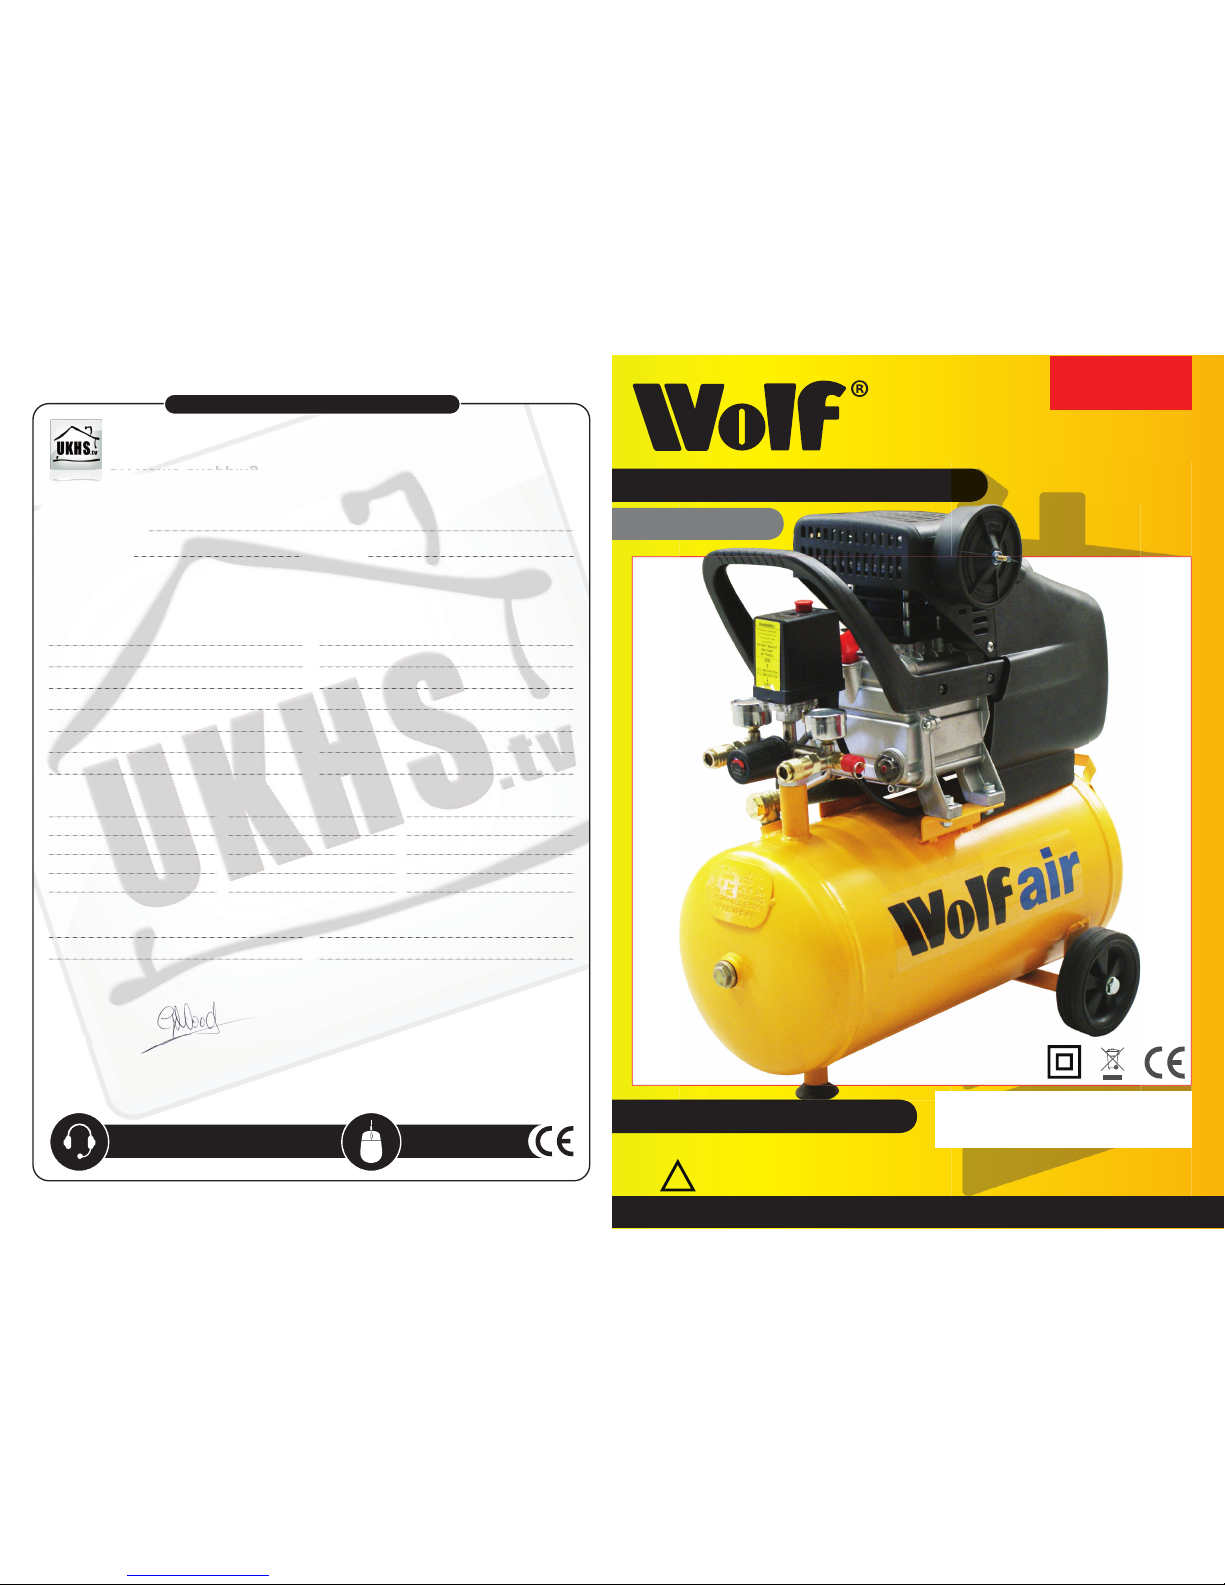
User Guide & Manual
Article No. 100171
Original Instructions
SIOUX 25 AIR COMPRESSOR
WARNING: Do not use the machine without reading the instruction manual.
!
No. 100171
IMPORTANT! - Before starting the machine
remove all the travel plugs and attach the Air
Filter and the Crank Case Breather Plug.
UKUK HHomme ShoppingUUUKUKUKUKUK HHHHHHoomomomomome eeee ShShShShShopopopopoppipipipipingngngngngU
Authorised signatory and technical file holder.
Date: 01/01/12
Signature:_______________________________Name: G. Wood
Technical Department
UK Home Shopping Ltd, 20 Hamilton Way, Oakham Business Park, Mansfield, Nottinghamshire, NG18 5BU
_____________________________________________ ______________
HELPLINE: 08448 092 592 www.ukhs.tv
EC DECLARATION OF CONFORMITY
We the importers into the UK, hereby declare that the equipment described below
Description and function:
Wolf Sioux 25 Air Compressor
Year of Manufacture:
2012
Serial Number:
00034
Manufacture’s authorised representative within the EC:
UK Home Shopping Ltd, 20 Hamilton Way,
Oakham Business Park, Mansfield, Nottinghamshire, NG18 5BU
Conforms to the requirements of the following Directives, as indicated.
And the following harmonised standard(s)
Additional technical standards and specification (if applicable):
UK Home Shopping
2006/42/EC - Machinery Directive
2004/108/EC - EMC Directive
2006/95/EC - Low Voltage Directive
87/404/EEC - The simple pressure vessel regulations
97/23/EC - Pressure equipment directive
EN 55014-1:2006
EN 55014-2/A2:2008
EN 61000-3-2:2006
EN 60204-1:2006+A1:2009
IEC 60204-1:2005+A1:2008
EN 1012-1:1996
EN 60204-1:2006+A1:09
EN ISO 12100-1:2003/A1:2009
EN ISO 12100-2:2003/A1:2009
EN ISO 14121-1:2007
EN 1012-1:1996 Part 1
EN 60745-1:2009
EN 60745-2-4/A1:2009
Page 2
02 15
Wolf products are manufactured to high quality
standards and they are safe and fi t for purpose at
time of sale, but all tools can be dangerous if the correct precautions are not taken.
Compressors are quick and effi cient and provide a
pressurised air source, which is useful for driving
air tools and spraying applications. They are safe if
used with care, always follow these instructions, do
not carry out the operation until you are sure you can
do so in safety Ensure that you adhere to the instructions for your air tools.
Remember to consider the work environment for safe
operation of the compressor and any attached tools.
PRODUCT SPECIFICATION:
--------------------------------------------------------------------ITEM:
MAX. WORKING PRESSURE:
PUMP AIR DISPLACEMENT:
AIR RECEIVER (TANK) CAPACITY:
MOTOR CAPACITY:
MOTOR ROTATION SPEED:
POWER SUPPLY VOLTAGE:
MOTOR HP:
NOISE LEVEL:
WEIGHT:
1 - PERSONAL SAFETY
--------------------------------------------------------------------Symbols used on the air compressor.
Read the operator instructions
Warning shock hazard
Warning high temperature parts
Warning the compressor is automatic and
can start unexpectedly
Warning!
When using compressors, basic safety
precautions should always be followed to
reduce the risk of fi re, electric shock and
personal injury. Read all these instructions
before attempting to operate this product.
!
!
!
Keep these instructions with the compressor save
these instructions for future reference.
NOTE: THIS IS AN OIL-LUBRICATED COMPRESSOR. BEFORE RUNNING, PLEASE FILL SUMP TO
THE CORRECT LEVEL WITH
Recommended Oil
FUCHS Renolin AC Compressor Oil
IMPORTANT
Do not attempt to operate this machine until you have
ensured that it is fi lled to the correct level with the recommended oil and you have installed the crankcase
breather plug. Serious damage to the machine and
personal injury may result if this is ignored.
SIOUX 25 AIR COMPRESSOR
WARNING
Please note that under no circumstances
should the air compressor be left unattended. If you must walk away from the air
compressor or have fi nished using the air
compressor ensure you switch it off and
remove the plug from the mains.
WARNING
DO NOT operate the air compressor on
any fl ammable surfaces. DO NOT operate
the compressor near or around fl ammable
substances. Flammable items / substances must be far away from the compressor.
Wolf Sioux 25
8 bar / 116PSI
9.5CFM
24 Litre
1.87KW
2850rpm
230V/50HZ
2.5HP
97 dB-A
28Kg
Notes:
FOR INDOOR USE ONLY
Page 3

14 03
General Safety Rules
Warning
Read and understand all instructions. Failure to follow all instructions listed below
may result in electric shock, fi re and/or serious personal injury.
SAVE THESE INSTRUCTIONS
Work Area
Keep your work area clean and well lit. Cluttered benches and dark areas invite accidents.1.
Do not operate power tools in explosive atmospheres, such as in the presence of fl ammable liquids, 2.
gases, or dust. Power tools create sparks which may ignite the dust or fumes.
Keep bystanders, children, and visitors away while operating a power tool. Distractions can cause you 3.
to lose control.
Electrical safety
Grounded tools must be plugged into an outlet properly installed and grounded in accordance with 4.
all codes and ordinances. Never remove the grounding prong or modify the plug in any way. Do not
use any adaptor plugs. Check with a qualifi ed electrician if you are in doubt as to whether the outlet is
properly grounded. If the tools should electrically malfunction or break down, grounding provides a low
resistance path to carry electricity away from the user.
Avoid body contact with grounded surfaces such as pipes, radiators, ranges and refrigerators. There is 5.
an increased risk of electric shock if your body is grounded.
Do not expose power tools to rain or wet conditions. Water entering a power tool will increase the risk 6.
of electric shock.
Do not abuse the cord. Never use the cord to carry the tools or pull the plug from an outlet. Keep cord 7.
away from heat, oil, harp edges or moving parts. Replace damaged cords immediately. Damaged cords
increase the risk of electric shock.
Personal safety
Stay alert, watch what you are doing and use common sense when operating a power tool. Do not use 8.
tool while tired or under the infl uence of drugs, alcohol, or medication. A moment of inattention while
operating power tools may result in serious personal injury.
Dress properly. Do not wear loose clothing or jewellery. Contain long hair. Keep your hair, clothing, and 9.
gloves away from moving parts. Loose clothes, jewellery, or long hair can be caught in moving parts.
Avoid accidental starting. Be sure switch is off before plugging in. Carrying tools with your fi nger on the 10.
switch or plugging in tools that have the switch on invites accidents.
Remove adjusting keys or wrenches before turning the tool on. A wrench or a key that is left attached 11 .
to a rotating part of the tool may result in personal injury.
Do not overreach. Keep proper footing and balance at all times. Proper footing and balance enables 12.
better control of the tool in unexpected situations.
Use safety equipment. Always wear eye protection. Dust mask, non-skid safety shoes, hard hat, or 13.
hearing protection must be used for appropriate conditions. Ordinary eye or sun glasses are NOT eye
protection.
!
Warning: As with all tools keep away from children
Warranty
----------------------------------------------------------------------------------------------------------------------------------------------Congratulations! Y
ou have made an excellent choice with the purchase of this Quality product. Our commitment to quality also includes our service. Should you, contrary to expectations, experience defects due
to material or manufacturing faults during private use within 12 months of the date of purchase we shall be
liable for warranty in accordance with statutory warranty regulations, provided that: - The device was not put
to any use other than the intended.- Was not overloaded. - Was not used with the wrong accessories. - Repairs were not carried out by any other than the authorised workshop. The warranty is only valid in connection with the original receipt. Please keep in a safe place. The warranty does not affect your statutory rights.
The product is guaranteed for a period of 12 months beginning on the day of purchase. Keep your purchase
receipt safe as proof of the date of purchase. The guarantee period can only be extended for the duration of
any repair required.
During the warranty period, defective devices can be sent FREIGHT PREPAID to the service address stated
at the end of this booklet. We will, at our discretion either repair or exchange the device in accordance with
warranty legislation.
Please include the Proof of purchase when sending in your product for repair.
After the warranty has expired you can still send defective devices for repairs FREIGHT PREPAID to the
address at the end of this booklet. Quotes as well as repairs after warranty period are to be paid for in all
cases.
Ensure the product is sent well packed as no responsibility can be accepted for items lost or damaged in
transit. This warranty does not affect your statutory rights.
HELPLINE
----------------------------------------------------------------------------------------------------------------------------------------------For any questions relating to operational or safety matters contact:
UKHS Customer Helpline on: 08448 092 592
Monday-Friday: 8.30am - 6.00pm
Saturday: 9am - 1pm
Page 4

04 13
Tool use & care
Use clamps or other practical way to secure and support the work area to a stable platform. Holding the 1.
work by hand or against your body is unstable and may lead to loss of control.
Do not force tool. Use the correct tool for your application. The correct tool will do the job better and 2.
safer at the rate for which it is designed.
Do not use tool if switch does not turn it on or off. Any tool that cannot be controlled with the switch is 3.
dangerous and must be repaired.
Disconnect the plug from the power source before making any adjustments, changing accessories, or 4.
storing the tool. Such preventive safety measures reduce the risk of starting the tool accidentally.
Store idle tools out of reach of children and other untrained persons. Tools are dangerous in the hands 5.
of untrained users.
Maintain tools with care. Keep cutting tools sharp and clean. Properly maintained tools with sharp cut-6.
ting edges are less likely to bind and are easier to control.
Check for misalignment or binding of moving parts, breakage of parts, and any other condition that may 7.
affect the tools operation. If damaged, have the tool serviced before using. Many accidents are caused
by poorly maintained tools.
Use only accessories that are recommended by the manufacturer for your model. Accessories that may 8.
be suitable for one tool, may become hazardous when used on another tool.
Service
Tool service must be performed only by qualifi ed repair personnel. Service or maintenance performed 1.
by unqualifi ed personnel could result in a risk of injury.
When servicing a tool, use only identical replacement parts. Follow instructions in the Maintenance 2.
section of this manual. Use of unauthorised parts or failure to follow Maintenance instructions may create a risk of electric shock or injury.
USE CORRECT SUPPLY VOLTAGE: The power supply voltage must match the information
quoted on the tool identifi cation plate.
USE PROPER EXTENSION CORD: Use only proper extension cords that accept the tool’s plug.
Make sure your extension cord is in good condition. Replace or repair damaged or worn cord
immediately. When using an extension cord, be sure to use one heavy enough to carry the
current your product will draw. An undersized cord will cause a drop in line voltage resulting
in loss of power and overheating. If in doubt, use the next heavier gage.
EXTENSION CABLES
This machine should be plugged directly into a ring main or fused spur supply of adequate capacity to accommodate the machine’s starting and running load.
If you need to use an extension cable, you must use 3 core fl ex which has a minimum of 2.5mm dia. cross
sectional area and not exceed 15 metres in length.
DO NOT BE CONFUSED: Whilst some extension cable manufacturers will quote an amperage rating for
their cables, this does not necessarily mean that they are suitable for your appliance. A 13amp power cable
may carry 13 amps but will not have the start up loading surge capacity required by this machine.
If in doubt consult us / Visit our website and search order code: 100551.
Please note: that under no circumstances should the air compressor be left unattended. If you must walk
away from the air compressor or have fi nished using the air compressor ensure you switch it off and remove
the plug from the mains.
NO PART QTY
1 Bolt M8 x 110 4
2 Cylinder head 1
3 Cylinder head gasket 1
4 Valve plate 1
5 Valve gasket 1
6 Cylinder 1
7 Cylinder gasket 1
8 Piston ring 3
9 Piston 3
10 Cir-clip 2
11 Connecting rod 1
12 Crankcase 1
13 Crank 1
14 Bolt M8x22-right 1
15 Robber gasket 1
16 Breath pipe 1
17 Crank case cover 1
18 Screw M5x14 6
19 Oil leveller washer 1
20 Oil leveller 1
21 Unilateralist valve 1
22 Pressure switch 1
23 Pressure gauge 2
24 Outlet valve 2
NO PART QTY
25 Switch bracket 1
26 Release pipe 1
27 Safety valve 1
28 Nut 8 1
29 Washer foot 1
30 Bolt M8x25 1
31 Washer 8 1
32 Drain cock 1
33 Wheel 2
34 Air tank 1
35 Discharge pipe 1
36 Motor 1
37 Bearing 6202 RS 1
38 Motor bracket 1
39 Bolt M5x105 4
40 Fan 1
41 Cir-clip 1
42 Bearing 6204 RS 1
43 Sealing ring 1
44 Capacitance 1
45 Nut M8 1
46 Gudgeon pin 1
47 Fan fi lter 1
48 Handle 1
PARTS LIST
-----------------------------------------------------------------------------------------------------------------------------------------------
Page 5
12 05
Read This Manual
In order to ensure working safety, read
this manual and thoroughly under
stand how to turn the compressor on and
off and to control the airfl ow.
Use Personal Protection Safety Equipment
The compressor ejects high-pressure. air
Always wear protective eye goggles and
avoid contact with air outlets.
Protect eyes with safety glasses or
goggles - use safety glasses or goggles
which conform to BSEN136 or CE
equivalent that provide protection from
the front and side. Approved safety foot
wear and headgear should be worn as
approx priate, for example on building
works, when heavy weights or overhead
working are involved.
Do not operate this machine or its
accessories near other people unless
they are wearing appropriate safety
equipment also.
Dress Properly
Do not wear loose clothing or jewellery it
can get caught in moving parts. Non-skid
safety footwear is recommended when
working outdoors.
Stay Alert
Watch what you are doing. Use common
sense. Do not operate the compressor or
any air tool when tired or after taking
alcohol or prescription/ non-prescription
drugs.
2 - OPERATIONAL SAFETY
---------------------------------------------------------------------
What You Must Not Do...
Do not allow routine to lead to mistakes. Do not allow
routine, which occurs when using the machine frequently to lead to mistakes. Remember that a slight
lack of concentration can result in serious injuries in
a split second. Do not use air tools on ladders Do
not use air tools , whilst on ladders. Ensure correct
platforms are used. Do not eat, drink or smoke in the
work area Do not eat, drink or smoke while using this
machine or in the work area. Do not touch the compressor cylinder head During operation the cooling
fi ns of the cylinder head and the delivery pipe will become very hot. Even after use these will remain hot
for some time. Avoid coming into contact with these.
Do not leave infl ammable objects near the compressor
Do not let children or pets in the work area
Do not let children or pets come into contact with the
compressor, high pressure hose, air tools, mains cable or work area.
Do not use the product for excessive time periods
It will work better and safer at the rate for which it
was intended. See section 5 Maintenance, Care and
Repair. Please note that these compressors are designed for the DIY, hobbyist and enthusiast for applications where a convenient portable source of air
is required.
Do not abuse the hose/cable
Never pull the compressor by the air hose or electrical cable. Keep hose/cable a way from heat and
sharp edges. Do not touch the metal plug pins when
connecting or removing the electrical plug.
Do not run the compressor in damp conditions The
compressor should never be used in an area where
it could be exposed to water or excessively damp
conditions.
Do not direct any air jet towards people or animals
High-pressure air jets can be dangerous and air jets
must not be directed towards people or animals.
Do not make any alterations to the air receiver (tank)
The air receiver (tank) is made to conform to the
relevant European safety standards and the air receiver must never be altered by welding or any other
means.
What You Must Do
Disconnect the compressor from power supply when
maintaining Before carrying out any maintenance on
the compressor. Always switch off and unplug the
compressor from the power supply. Ensure that all
the compressed air has been released from the air
receiver.
Maintenance of electrical components
You must ensure that a suitably qualifi ed person carries out repairs and maintenance of electrical components.
Avoid unintentional starting of the compressor
When the machine is not in use please depress the
pressure switch, to ensure that it doesn’t start up unexpectedly.
!
!
!
!
WARRANTY TERMS AND CONDITIONS
--------------------------------------------------------------------Wolf air products are covered by a 12 month •
warranty from the date of purchase. This warranty applies to all material defects, which may
arise . No further claims are possible, of whatever nature, direct or indirect, relating to people
and/or materials.
In the event of a problem or defect, you should •
in the fi rst instance consult your Wolf dealer or
the UKHS help line. In most cases solutions will
be provided, which will solve the problem or correct the defect.
This warranty excludes components, which are •
subject to normal wear and tear
Repairs or replacement parts will not extend the •
original warranty period.
Defects, which have arisen as a result of im-•
proper use or wear, are not covered by the warranty. Damage caused by a blocked air fi lter is
not covered by this warranty.
The warranty stipulations apply in combination •
with our terms of sale and delivery.
The warranty does not cover any collection or •
redelivery costs to and from the service centre.
Contact must be made with the help line before
a claim can be processed.
Products, which are poorly packaged, will not be •
accepted by UKHS.
Warranty claims can only be processed if the •
following conditions are met:
Proof of the purchase date can be provided in 1.
the form of a sales receipt.
No repairs or replacements have been carried 2.
out by third parties.
The tool has not been subject to improper use.3.
A description of the complaint is enclosed and 4.
any payment relating to the carriage costs, of
which details can be obtained from the help
line.
ELECTRICAL INFORMATION
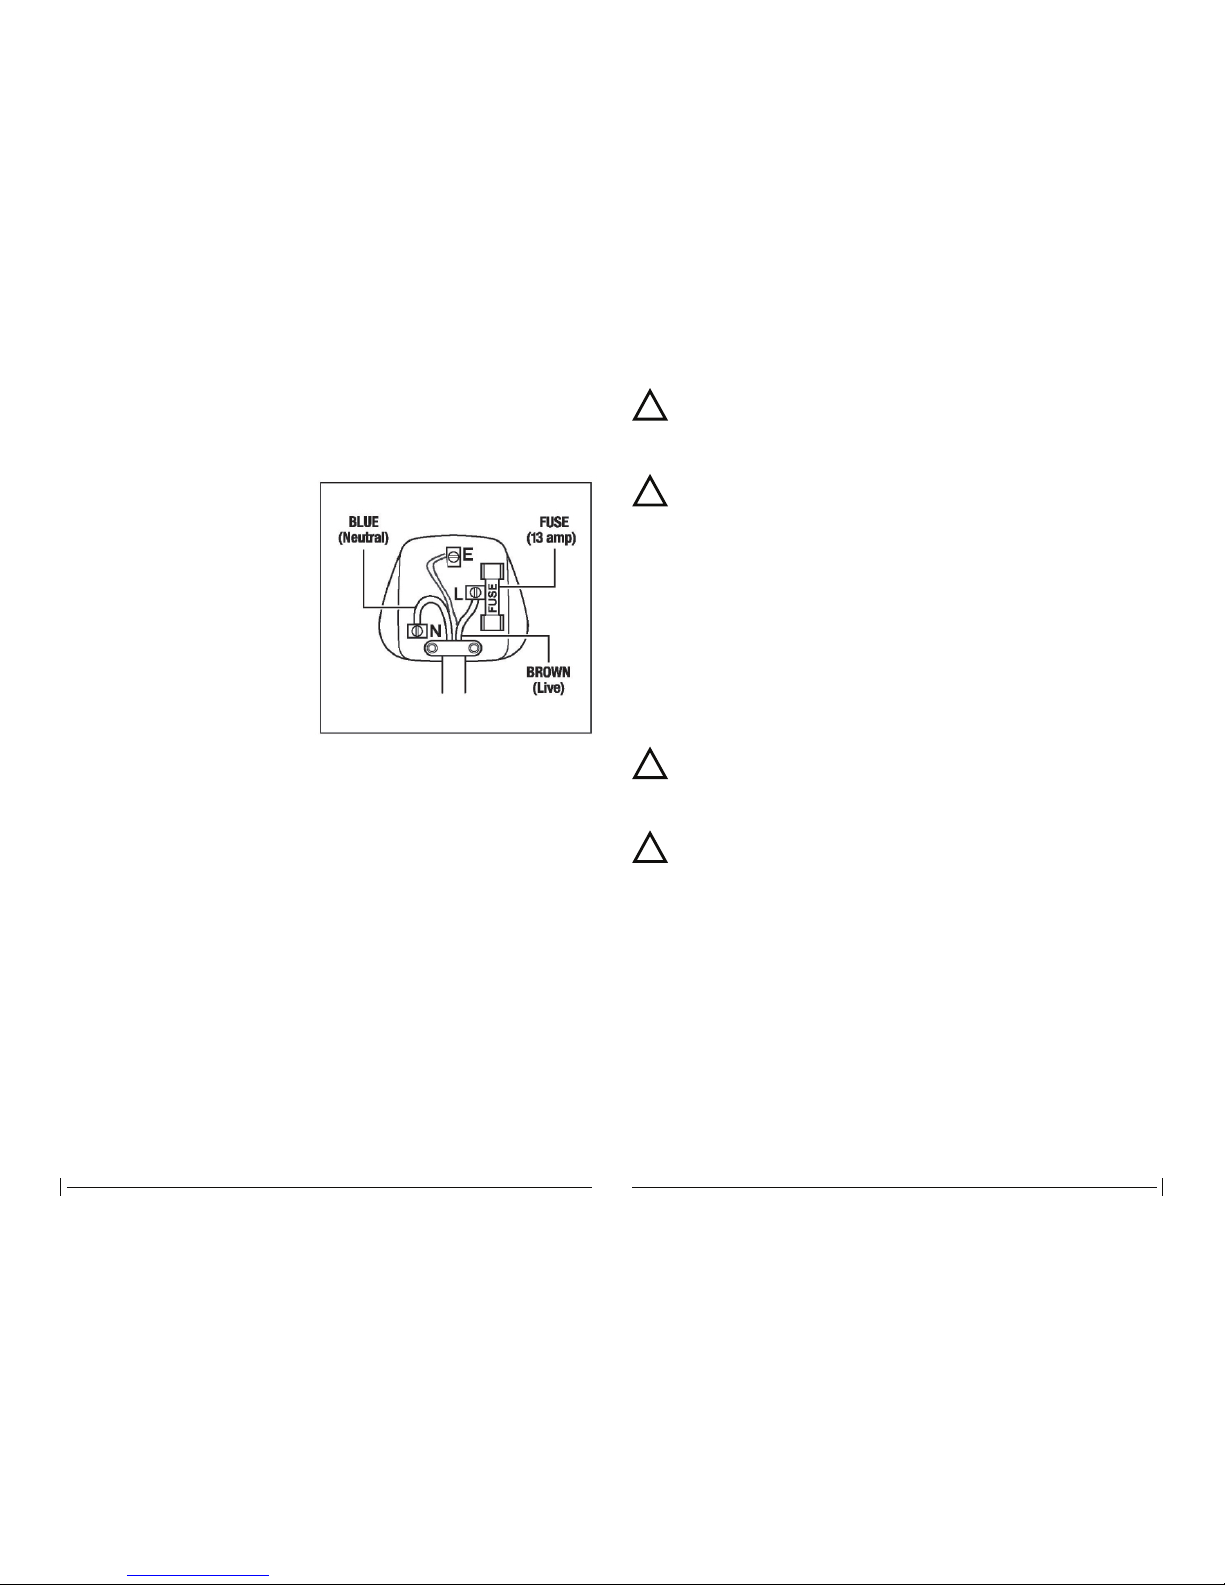
--------------------------------------------------------------------It is supplied with a pre-wired mains plug, if the plug
needs replacing follow these instructions.
Wire correctly The wires in the mains lead are coloured in the following way:
BLUE Neutral (N)
BROWN Live (L)
GREEN/ YELLOW Earth (E)
Secure wires carefully and fi rmly to the correct terminals Secure the mains cable in the plug cord grip
fi rmly . Fit a 13-amp fuse. If a 13amp (BS1363) plug
is used a (BS 1362) ASTA approved 13-amp fuse
must be fi tted. If in doubt always consult a qualifi ed
electrician.
Recycle/Dispose of old plug and cable To prevent
inadvertent connection to socket and risk of electric
shock.
Page 6

06 11
Using extension cables
See Section 3 Setting up the Compressor
WARNING! Use recommended high
pressure hoses and couplings High
pressure hoses, fi ttings and couplings are
important for the safety of the appliance.
Use only hoses, fi ttings and couplings de
signed for usage with air compressors.
Before disconnecting the air hose from the compressor For safety discharge residual pressure in the air
hose before disconnecting.
Using the compressor with your air tools Before using the compressor and your air tools, CHECK every
time that the connections are fully tightened and that
there are no broken or worn parts. Always adhere to
the processes and safety warnings, which are stated
in the instructions of your air tools.
Guard against electric shock
Use an RCD (residual current device) to provide protection against electrical shock. Consider the work
environment
Make sure the area is clear of obstacles, which could
cause you to trip and fall.
Before moving the compressor
The compressor air receiver must be discharged before the machine is transported.
Keep work area clean
Cluttered areas invite injuries.
3 - SETTING UP THE COMPRESSOR
---------------------------------------------------------------------
Important: Only use the compressor for the
purpose for which it was designed.
The compressor is designed for use as stated only;
do not attempt to adapt it for other purposes .The
manufacturer assumes no responsibility for any
damages resulting from improper use for noncompliance with the instructions described in this
manual. The compressor is for use by competent
persons only.
Before Operation
Check package contents
Check for damage
Before using this item check each part is undamaged. Check all pipes are fi rmly connected. Check
plastic covers for damage. Inspect the air receiver
(tank) to ensure that it has not been damaged.
Save packaging
Save major packaging for return of product in the
event of service or repair.
Electrical supply
Before using the air compressor please check that
you have a suitable electrical supply to support the
requirements of the motor unit. Please ensure your
mains power supply corresponds to the power rating
on the data label on the machine.
Electrical Cables
Ensure that all cables are damage free before connecting to the power supply.
Using Extension Cables
Use an extension cable, which is no more than
10metres long and has a conductor cross-section
of at least 1.5mm2 i.e. a heavy-duty cable. Using
an excessively long or thin-wired extension cable
will cause severe damage to the motor Always fully
unwind extension cables. If using extension cables
outdoors always use a cable , which is marked for
outdoor use.
Always maintain a clear area around the compressor It is very important that the compressor is positioned so that there is an adequate airfl ow around
the machine. The compressor should be situated so
that it has 50cm of obstacle free space around its air
receiver (tank) and pump/motor unit.
!
TROUBLESHOOTING GUIDE (CONT)
-----------------------------------------------------------------------------------------------------------------------------------------------
Symptom Possible Cause (s) Corrective Action
-----------------------------------------------------------------------------------------------------------------------------------------------
Compressor runs 1. Excessive air usage compressor 1. Decrease usage or purchase
continuously and air output is too small unit with higher air delivery (CFM)
lower than normal/low 2. Clogged intake fi lter 2. Clean or replace
discharge pressure 3. Air leaks in piping (on machine 3. Replace leaking components
or in outside system) or tighten as necessary
4. Broken inlet valves 4. Replace compressor valves
5. Piston ring worn 5. Replace piston and cylinder
-----------------------------------------------------------------------------------------------------------------------------------------------
Excessive moisture in 1. Excessive water in tank 1. Drain tank
discharge air 2. High humidity 2. Move to area of less humidity; use
air line fi lter
NOTE: Water condensation is not
caused by a malfunction in the
compressor
-----------------------------------------------------------------------------------------------------------------------------------------------
Compressor runs continuously 1. Defective pressure switch 1. Replace switch
and safety valve opens as 2. Defective safety valve 2. Replace safety valve with genuine
pressure rises replacement part
-----------------------------------------------------------------------------------------------------------------------------------------------
Excessive starting and Excessive condensation in tank Drain more often
stopping (auto start)
-----------------------------------------------------------------------------------------------------------------------------------------------
Air leaking from unloader No-return valve stuck in an Remove and replace no-return valve
on pressure switch open position DANGER! Do not disassemble non return
valve with air in tank; bleed tank fi rst
Page 7
10 07
Ensure that the compressor draws clean
air
For the correct function and longevity of your air compressor it is important that the air, which is drawn into
the compressor is clean. The compressor should not
be used in an area, where the air is contaminated
with dust or over-spray from spraying applications.
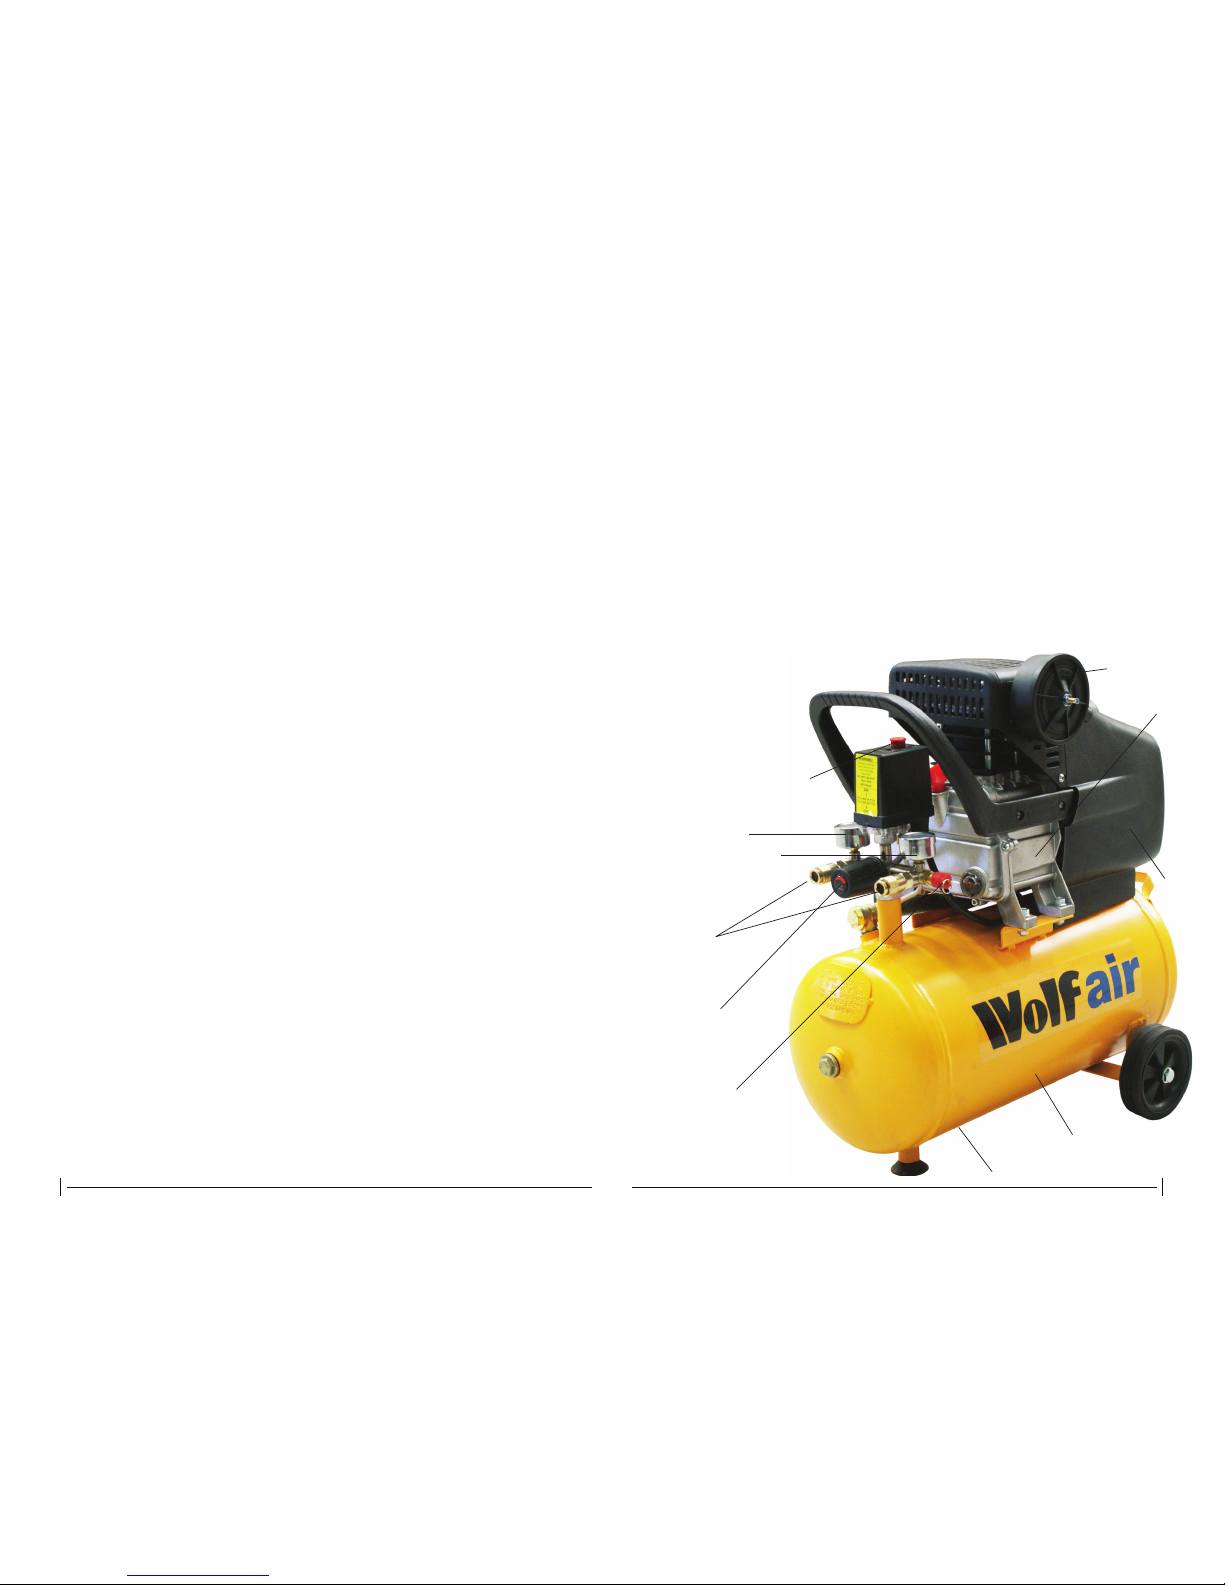
Component parts (Refer to Fig 1)
1. Motor and Pump Unit
2. Air Filter Cover
3. Fan (inside cover)
4. Air Receiver (tank)
5. Drain Valve
6. Air Receiver (tank) Pressure Gauge
7. Air Outlet Pressure Gauge
8. Air Outlets
9. Air Outlet Pressure Regulator
10. Pressure Switch (on/off)
11. Safety Valve
Securing the wheels to the frame
The wheels are secured to the lower frame on the
underside of the air receiver. To fi x the wheels to the
frame, put the fi xing bolt through each wheel and
then through the hole in the frame. Secure by means
of the washer and nut. The positioning of the wheel
can be seen in Fig 1.
The safety blow off valve
The compressor is equipped with a safety valve (see
fi g 1). If the pump were to continue operating passed
the maximum pressure, due to a defective pressure
switch, the safety valve would open and eject air from
the air receiver. If the safety valve discharges air,
please turn off the compressor and contact the helpline. The safety valve is either located to the side of
the pressure switch as in Fig 1 or directly screwed
into the air receiver.
1
2
4
5
6
10
11
8
9
7
3
TROUBLESHOOTING GUIDE
-----------------------------------------------------------------------------------------------------------------------------------------------
Symptom Possible Cause (s) Corrective Action
-----------------------------------------------------------------------------------------------------------------------------------------------
Compressor will not run 1. No electrical power 1. Plugged in? Check fuse/breaker
2. Blown fuse or motor overload
3. Breaker open 2. Replace blown fuse
4. Thermal overload open 3. Reset, determine cause of problem
5. Pressure switch faulty / 4. Motor will restart when cool
broken 5. Replace
-----------------------------------------------------------------------------------------------------------------------------------------------
Motor hums but cannot 1. Defective no-return valve 1. Replace or repair
run or runs slowly or unloaded 2. Check connections, eliminate
2. Poor contacts, line voltage low extension lead if used, check circuit
3. Shorted or open circuit motor with voltmeter
winding 3. Replace motor
DANGER! Do not disassemble non return
valve with air in tank; bleed tank fi rst
-----------------------------------------------------------------------------------------------------------------------------------------------
Fuses blow/circuit breaker 1. Incorrect size fuse, circuit 1. Check for proper fuse, use time-delay
trips repeatedly overloaded fuse. Disconnect other electrical
CAUTION! Never use an 2. Defective no-return valve or appliances from circuit or operate
extension cord with this unloader compressor on its own branch circuit
product 2. Replace or repair
DANGER! Do not disassemble non return
valve with air in tank; bleed tank fi rst
-----------------------------------------------------------------------------------------------------------------------------------------------
Thermal overload protector 1. Low voltage 1. Eliminate extension cord, check with
cuts out repeatedly 2. Clogged air fi lter voltmeter
3. Lack of proper ventilation/room 2. Clean fi lter (see Maintenance section)
temperature too high 3. Move compressor to well ventilated
4. No-return valve malfunction area
5. Compressor valves failed 4. Replace
5. Replace valve assembly
DANGER! Do not disassemble non return
valve with air in tank; bleed tank fi rst
-----------------------------------------------------------------------------------------------------------------------------------------------
Knocks, rattles, excessive 1. Loose bolts, tank not level 1. Tighten bolts, move tank to level
vibration 2. Defective bearing on eccentric position
or motor shaft 2. Replace
3. Cylinder or piston ring is worn 3. Replace or repair as necessary
or scored
-----------------------------------------------------------------------------------------------------------------------------------------------
Tank pressure drops when 1. Loose drain cock 1. Tighten
compressor shuts off 2. No-return valve leaking 2. Disassemble no-return valve
3. Loose connections at pressure assembly, clean or replace
switch or regulator 3. Clean all connections with soap
and water solution and tighten
Page 8
08 09
Check the oil level regularly
The level of the oil has to be visible in the sight glass
between the red check-point mark and the upper
edge of the sight glass. The fi rst oil change should
be carried out after 100 operating hours. There after,
drain the oil and replace it with new oil at intervals of
500 operating hours.
Changing the oil
Switch off the motor and remove the power plug
from the socket outlet . Release any remaining air
pressure and then unscrew the oil drain plug from
the compressor pump and remove. To prevent the
oil from escaping out of control, hold a small piece of
metal guttering underneath the drain plug and direct
the oil into an appropriate container If any oil still remains, tilt the compressor slightly.
IMPORTANT - take the old oil to an offi cial old oil disposal station. When all the old oil has been removed,
screw the oil drain plug/sight glass into place. Use
a screwdriver to remove the cap of the oil fi lter plug
and pour oil in until the level of oil in the sight glass
reaches the red mark. Replace the cap back on the
oil fi ller plug.
Cleaning
Clean the items with a soft brush or a wipe moistened
with a suitable biodegradable solvent. Do not use infl ammable liquids like petrol or alcohol, they are a fi re
risk and will damage the fi nish and plastic parts.
Faults
Have the air compressor repaired by a competent
person. Use only genuine replacement parts, which
are available from the Helpline. Do not use modifi ed
or non-genuine parts.
Maintain tools with care
Keep the air compressor clean for better and safer
performance. Follow instructions for changing accessories. Inspect the air compressor and extension
cables/hoses occasionally; have them repaired by a
qualifi ed person or authorised service body.
Check for damaged parts
Do not use the air compressor with damaged parts.
Before further use a damaged air compressor must
be carefully checked by a qualifi ed person to determine that it will operate properly. Check for breakage of parts mountings and other conditions that
may affect its operation. An authorised service centre
should properly repair a damaged part, unless indicated otherwise in the instruction manual.
Have your tool repaired by an expert
This appliance is manufactured in accordance with
relevant safety standards. Only experts must carry
out repairing of electrical appliances, otherwise considerable danger for the user may result.
Storing the air compressor
When not in use the air compressor should be stored
in the dry, out of reach of children and in a frost free
environment.
Cleaning/ changing the air fi lter (Monthly)
Please note :This compressor should not be used in
a heavily dusty atmosphere. The warranty does not
cover damage caused by a blocked air fi lter. The air
fi lter must be cleaned or replaced monthly or more
frequently if the compressor is in regular use. The
air fi lter can be accessed easily by unscrewing the
air fi lter cover (wing-nut) on side of the pump/motor
cowling.
To clean a lightly soiled air fi lter, use soapy water and
leave to dry thoroughly.
If in doubt please consult the help line for details on
the servicing of this air compressor.
Do not operate the compressor without
the air fi lter installed. Operating the
compressor without the air fi lter will cause
severe damage to the pump unit.
!
4 - USING THE COMPRESSOR
---------------------------------------------------------------------
Starting the Air Compressor
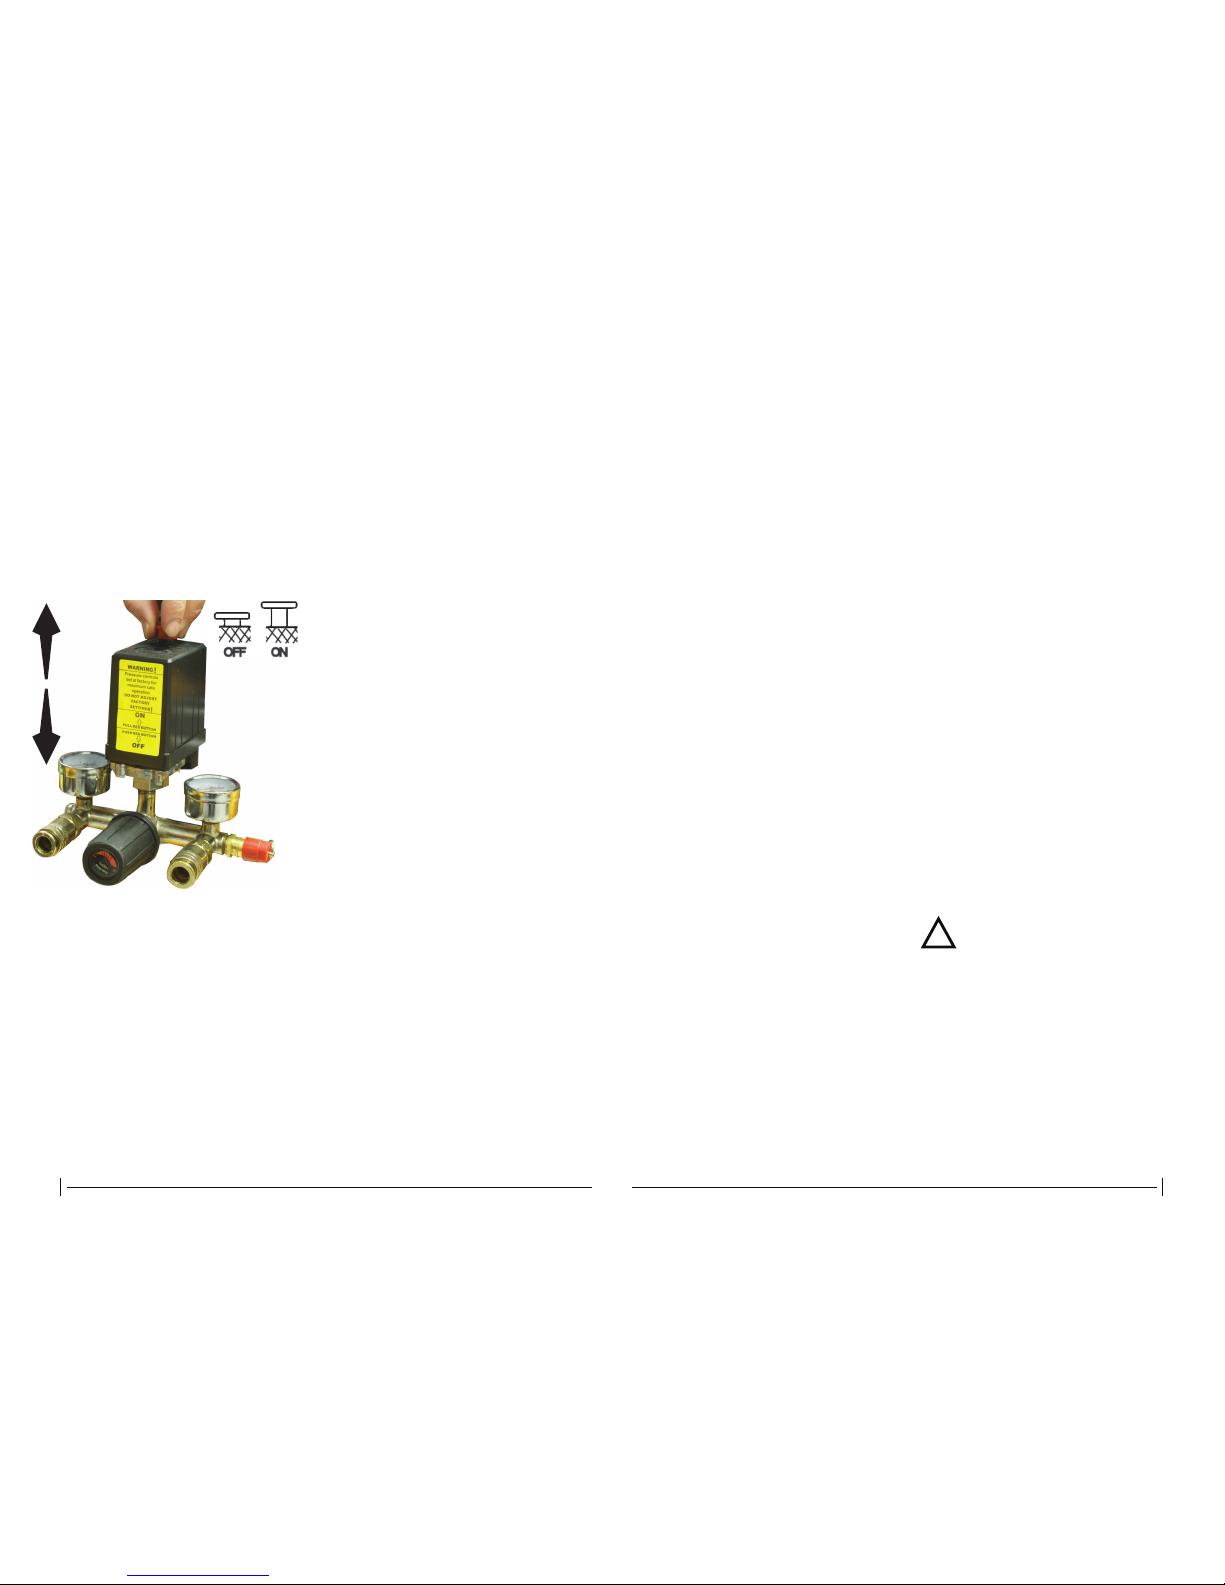
Important: Before plugging into the mains, ensure
that the button on the top of the pressure switch is in
the off position.
Once the air compressor is connected to the mains
supply it is now ready for use as follows:
a) Pull up the button on the pressure switch (10). This
will ‘click’ up into position. See below for more detail.
The motor / pump unit will now start to run.
b) Check that the motor/pump unit automatically stops
when the pressure inside the air receiver reaches approximately (115PSI / 8bar) (read gauge part No. 6).
Rotate the air regulator to the desired outlet pressure
and plug in hose with chosen air tool connected to
the other end. The air is now ready for use.
c) Check that the motor/ pump unit automatically
starts, when the pressure falls by approximately
2bar.
Under normal use when the compressor is running
correctly you would hear the following:
a) When the air compressor starts from no pressure
within the tank there is a whistle of ‘leaking’ air from
the pressure switch for about 10-20 seconds.
b) Whenever the motor stops there would be a quick
sudden discharge of air. (This is the motor start and
stop air unloading system being activated).
Shutting down the Air Compressor
Never stop the compressor by unplugging it. The
pressures witch must always be used as this ensures
that air is discharged from the head. This makes the
starting easier for the motor and prevents motor damage.
5 - MAINTENANCE, CARE AND REPAIR
--------------------------------------------------------------------Ensure the items are disconnected from the electrical
supply and cannot operate accidentally when, servicing or cleaning.
Oil-lubricated pump unit and expected usage This air
compressor has been specially designed and manufactured to meet the demands of the DIY hobbyist or
enthusiast, who require a portable supply of air. It is
recommended that the compressor duty cycle never
exceeds 50% and its continuous running operation
does not exceed 15 minutes.
Drain the air receiver (tank) weekly Compressing air
causes moisture, which is present in the air to condensate on the inside of the air receiver. This water
can damage your air tools and produce a poor fi nish
when spraying paint. It also damages the inside of
your compressor and reduces its performance .It is
important that the air receiver is drained weekly Unscrew the brass thumbscrew (fi g 1 part 5) anti clockwise on the underside of the air receiver. Any water
present in the air receiver should now fl ow out.
NOTE: Reduce pressure in the receiver by switching off the machine and using a blow gun (or other)
fi tted to the outlet adaptor.
ON
OFF
 Loading...