

Wolf WGSM100 Use & Care Guide
USE & CARE GUIDE
GUIDE D’UTILISATION ET D’ENTRETIEN
GUIA DE USOS Y CUIDADOS
Le invitamos a leer cuidadosamente este instructivo antes de usar su aparato.

WOLF GOURMET STAND MIXER
Welcome
Thank you for your purchase of this Wolf Gourmet product.
We look forward to being part of your kitchen for years to
come. Wolf is a third-generation family-owned company
that has a personal stake in the preparation of your food.
With family ownership comes a great attention to detail
and an uncompromised dedication to creating exceptional
products. Wolf built its business and reputation on helping
home cooks achieve the best results possible. With Wolf
Gourmet’s precise control, the dish you envision will be the
dish you serve.
2

Contents
4
Safety Precautions
6
Wolf Gourmet Stand Mixer
Parts and Features
7
Getting Started
8
Using the Stand Mixer
10
Stand Mixer Tips
11
Care Recommendations
11
Troubleshooting
12
Wolf Gourmet Warranty
13
Accessories
Customer Care
As a Wolf Gourmet owner, you
can count on our support. Our
customer care center is staed by
product experts at our headquarters
in Madison, Wisconsin. Should the
need arise, simply call 800-222-7820
to speak with one of our product
experts. We are confident this guide
will answer any questions about the
features, operation, and maintenance
of your Wolf Gourmet product, but if
you have additional questions, please
contact us by phone or visit us online
at wolfgourmet.com.
Register Your Product
We strongly encourage you
to register your Wolf Gourmet
appliance. It’s important to us
that you get the most out of your
products. By registering you will:
• Become a Wolf Gourmet culinary
insider.
• Have ongoing support from Wolf
Gourmet.
• Activate your warranty and record
your purchase.
• Be alerted to any service updates.
• Receive occasional emails to
help you maintain and enjoy your
appliances.
To register, visit wolfgourmet.com
/registration or call 800-222-7820.
3

SAFETY PRECAUTIONS
IMPORTANT SAFEGUARDS
When using electrical appliances, basic safety precautions should always be
followed to reduce the risk of fire, electric shock, and/or injury to persons,
including the following:
• Read all instructions.
• This appliance is not intended for use by persons with reduced physical,
sensory, or mental capabilities, or lack of experience and knowledge, unless
they are closely supervised and instructed concerning use of the appliance
by a person responsible for their safety.
• This appliance shall not be used by children. Keep the appliance and its cord
out of reach of children.
• Close supervision is necessary when any appliance is used near children.
Children should be supervised to ensure that they do not play with the
appliance.
• To protect against risk of electric shock, do not put cord, plug, or mixer
body in water or other liquid.
• Turn the appliance OFF ( ), then unplug from outlet when not in use, before
putting on or taking o parts, and before cleaning. To unplug, grasp the plug
and pull from the outlet. Never pull from the power cord.
• Avoid contacting moving parts. Keep hands, hair, and clothing, as well as
spatulas and other utensils, away from attachments during operation to
reduce risk of injury to persons and/or damage to mixer.
• Remove attachments from mixer before washing.
• Do not let cord hang over edge of table or counter or touch hot surfaces,
including stove.
• Do not operate any appliance with a damaged supply cord or plug, or
after the appliance malfunctions or has been dropped or damaged in any
manner. Supply cord replacement and repairs must be conducted by the
manufacturer, its service agent, or similarly qualified persons in order to
avoid a hazard. Call the provided customer service number for information
on examination, repair, or adjustment.
• The use of attachments not recommended or sold by the appliance
manufacturer for use with this model may cause fire, electric shock, or
injury.
• Do not use outdoors.
• Do not place on or near a hot gas or electric burner, or in a heated oven.
• Check that the appliance is OFF ( ) before plugging cord into wall outlet. To
disconnect, turn the control to OFF ( ); then remove plug from wall outlet.
To unplug, grasp the plug and pull from the outlet. Never pull from the
power cord.
• Do not use appliance for other than intended purpose.
• CAUTION! In order to avoid a hazard due to inadvertent resetting of the
thermal cut-out, this appliance must not be supplied through an external
switching device, such as a timer, or connected to a circuit that is regularly
switched on and o by the utility.
SAVE THESE INSTRUCTIONS
4

SAFETY PRECAUTIONS
Other Consumer Safety Information
This appliance is intended for household use only.
WARNING
a grounded (3-prong) plug to reduce the risk of electric shock. The plug fits
only one way into a grounded outlet. Do not defeat the safety purpose of the
plug by modifying the plug in any way or by using an adapter. If the plug does
not fit into the outlet, have an electrician replace the outlet.
The length of the cord used on this appliance was selected to reduce the
hazards of becoming tangled in or tripping over a longer cord. If a longer
cord is necessary, an approved extension cord may be used. The electrical
rating of the extension cord must be equal to or greater than the rating of the
appliance. Care must be taken to arrange the extension cord so that it will not
drape over the countertop or tabletop where it can be pulled on by children
or accidentally tripped over.
Electrical Shock Hazard: This appliance is provided with
WARNING
injury, always unplug mixer before inserting or removing attachments.
Moving Parts Hazard. To reduce the risk of personal
Wattage/Peak Power Information
The maximum rating is based on the Dough hook attachment that draws the
greatest load (power or current) and that other recommended attachments
may draw significantly less power or current.
Peak power is an average of the maximum wattage a stand mixer may
consume during initial operation at high speed.
5
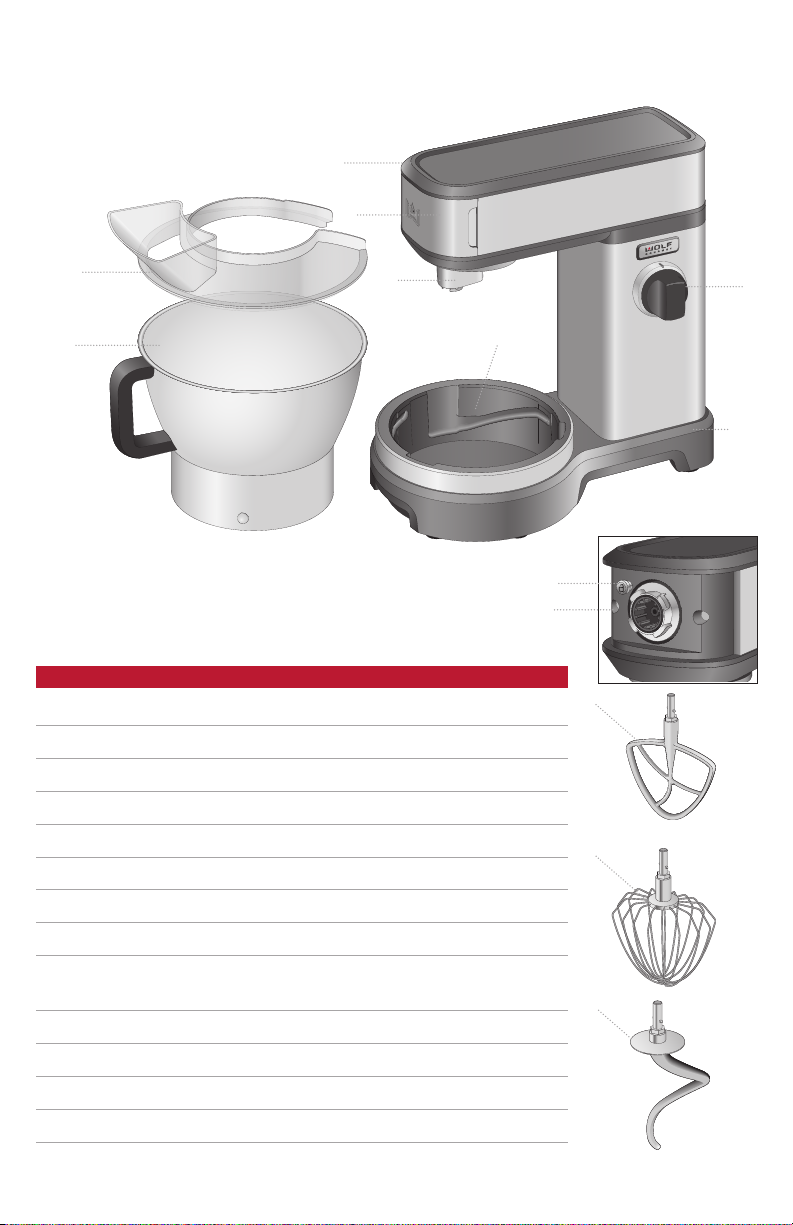
Wolf Gourmet Stand Mixer Parts and Features
1
2
3
8
Wolf Gourmet
Stand Mixer
4
Behind Removable Magnetic
Accessory Cover
PARTS AND FEATURES
1 Mixer Head
2 Removable Magnetic Accessory Cover
3 Splash/Pouring Shield
4 Attachment Coupling
5 Speed Control
6 Bowl Lift
7 Mixer Base
8 Bowl
9
Accessory Lock Release Button (behind Magnetic Accessory
Cover)
10 Specialty Attachment Area
11 Flat Beater
12 Whisk
13 Dough Hook
6
5
6
7
9
10
11
12
13
GETTING STARTED
Before First Use
Wash bowl and attachments in warm, sudsy water; rinse and dry. Always unplug
stand mixer from electrical outlet before inserting or removing attachments. Dry
thoroughly. Wipe base with a damp cloth or sponge. DO NOT IMMERSE BASE IN
WATER. Refer to cleaning recommendations in "Care Recommendations."
WARNING
Entanglement Hazard. Unplug mixer before inserting or
removing attachments. Failure to do so can result in broken bones or cuts.
Using Attachments
Before inserting or removing attachments, always make sure stand mixer is unplugged
and setting control is set to OFF ( ).
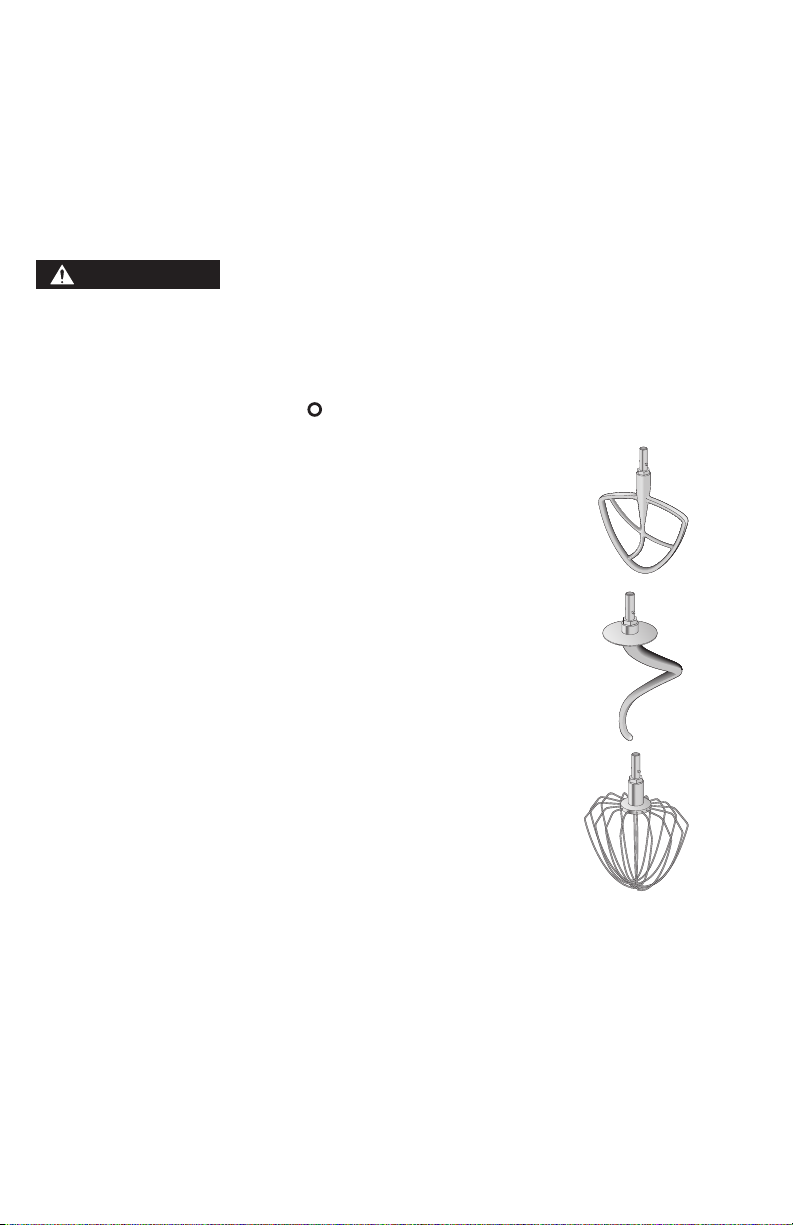
FLAT BEATER
Use the flat beater for most of your mixing needs, from
normal to heavy consistency. The flat beater should be
used with items such as cake batters, biscuits, pastries,
icing, fudge, cookie dough and potatoes.
DOUGH HOOK
The Dough Hook should be used for heavy pastries and a
heavier dough that requires kneading.
WHISK
The whisk is designed to whip liquids, such as egg whites,
cream and light cake batters. Use the whisk to incorporate
air for whipped cream and meringues. Do not use the whisk
for mixing thick mixtures, such as dough, fudge, or mashed
potatoes, as they could damage the whisk.
• Your stand mixer is designed to whisk a minimum of 2 large
egg whites or 1/2 cup (120 ml) of cream. Mixing performance
is enhanced as the tip of the whisk is immersed into the
liquid.
7
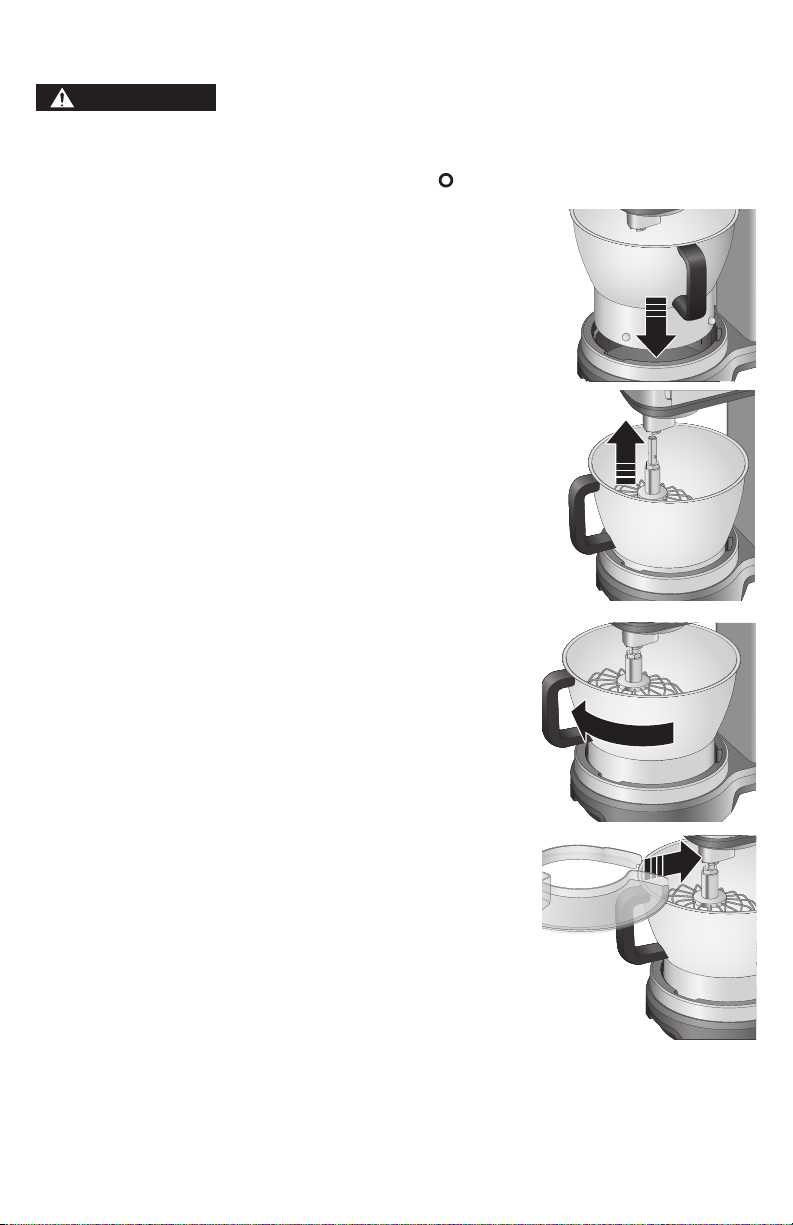
Using the Stand Mixer
WARNING
removing attachments. Failure to do so can result in broken bones or cuts.
1. Before inserting or removing attachments, always make sure stand mixer is
unplugged and setting control is set to OFF ( ).
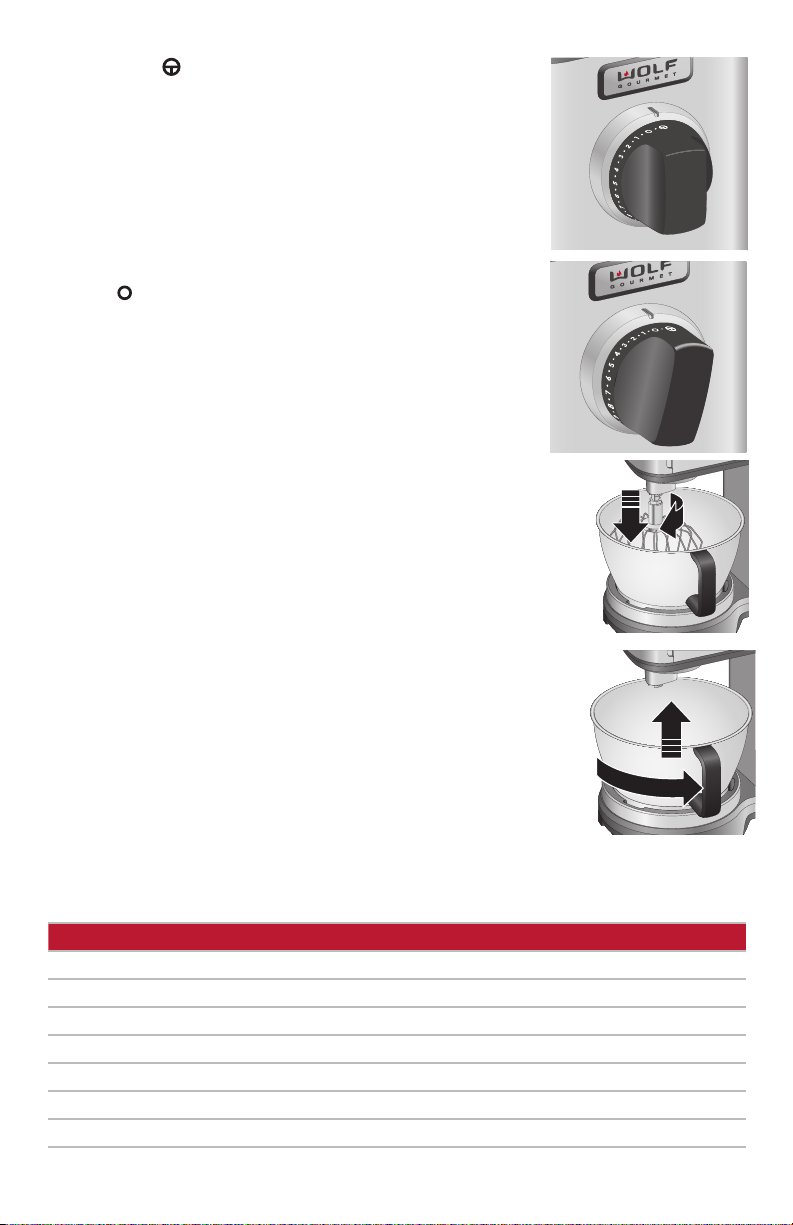
2. Place the bowl into bowl lift. Rotate the handle
counterclockwise until it lowers into place.
3. Select desired attachment for recipe. See "Mixing
Guide" on page 9. Insert the attachment into the
attachment coupling and press upward. Turn the
attachment counterclockwise until it locks into place
on the attachment coupling.
4. To raise the bowl, rotate the bowl handle clockwise
until it lifts and locks into the raised, mixing position.
Entanglement Hazard. Unplug mixer before inserting or
5. Attach the splash/pouring shield on the bowl by
positioning the open end around the attachment and
placing it securely on the bowl.
6. Plug stand mixer into wall outlet.
7. Rotate the speed control dial to the desired setting.
8
USING THE STAND MIXER
8. Use Pulse ( ) to incorporate unmixed ingredients
or loosely disperse dried fruits, chocolate morsels,
candies, or nuts in a batter or dough. The Pulse
feature can also be used to slightly move the
attachment when needed to thoroughly scrape down
the sides of the mixing bowl.
9. When finished mixing, rotate the speed control to
OFF ( ). Unplug from the wall outlet.
10. Remove the attachments by pushing attachment
upwards into the attachment coupling. Turn the
attachment clockwise until it unlocks. Pull down and
remove.
11. To remove the bowl, lift and slide the splash/pouring
shield off the bowl and set aside. Rotate the bowl
handle counterclockwise until it lowers and stops. Lift
the bowl out of the bowl lift.
MIXING GUIDE
The following mixing guide is a suggestion for selecting mixing speeds. Begin on
setting 1 and increase to desired speed, depending on the recipe consistency.
ATTACHMENT FOOD SETTINGS
Dough Hook Bread 1–3
Flat Beater Cakes (mixes and from scratch) 2–5
Flat Beater Cookie dough 2–5
Flat Beater Mashed potatoes 4–6
Flat Beater Frosting 4–6
Whisk Egg whites (for meringues, etc.) 8–10
Whisk Whipped cream 10
9

STAND MIXER TIPS
GENERAL MIXING TIPS
• Place liquid ingredients in bowl first and then add dry ingredients.
• Always stay near stand mixer during use.
• To begin mixing, use the lower speed settings until the ingredients are thoroughly
combined. This will reduce splattering.
• Always add ingredients as close to the sides of the bowl as possible, not directly into the
moving attachment.
• Mixtures containing large amounts of liquid ingredients should be mixed at lower speeds
to avoid splashing. Increase speed only after the mixture has thickened.
• When mixing thin batters, use medium speeds and frequently stop the mixer to scrape
the sides of the bowl with a spatula.
• Have butter or margarine at room temperature.
• Add ingredients one at a time, thoroughly mixing after each addition.
• Add flour one cup at a time.
• If a spoon or other tool is accidentally caught in an attachment or the motor stalls, turn
the setting control to OFF ( ), then unplug.
EGG WHITES
Place egg whites in a clean, dry mixing bowl. Attach bowl and whisk. To avoid splashing,
gradually turn speed control to desired speed. See chart below.
AMOUNT SETTING
2 to 8 egg whites up to 10
10 or more egg whites up to 8
Your stand mixer whips egg whites quickly. Watch carefully to avoid overwhipping. Here
is what to expect:
Frothy: Large, uneven air bubbles.
Begins to hold shape: Air bubbles are fine and compact; product is white.
Soft peak: Tips of peaks fall over when the whisk is removed.
Almost sti: Sharp peaks form when whisk is removed, but whites are still soft.
Sti but not dry: Sharp, sti peaks form when whisk is removed. Whites are uniform in
color and glisten.
Sti and dry: Sharp, sti peaks form when whisk is removed. Whites are specked and
dull in appearance.
WHIPPED CREAM
Pour cold whipping cream into chilled bowl. Attach bowl and whisk. To avoid splashing,
gradually turn to designated speed and whip to desired stage. See chart below.
AMOUNT SETTING
up to 2 pints (946 ml) up to 10
2+ pints up to 8
Your stand mixer whips cream very quickly. Watch cream closely during whipping
because there are just a few seconds between whipping stages. Look for these
characteristics:
Begins to thicken: Cream is thick and custard-like.
Holds its shape: Cream forms soft peaks when whisk is removed. Can be folded into
other ingredients when making desserts and sauces.
Sti: Cream stands in sti, sharp peaks when whisk is removed. Use for topping on
cakes or desserts, or filling for cream pus.
10

Care Recommendations
WARNING
BEFORE CLEANING
1. Make sure stand mixer is unplugged and speed control is set to OFF ( ).
2. Remove the attachments by pushing the attachment upwards into the attachment
coupling. Turn the attachment counterclockwise until it unlocks. Pull down and
remove.
CLEANING
Base, Control
Panel, Cord
Bowl
Flat Beater,
Dough Hook,
Whisk, Splash/
Pouring Shield
Electrical Shock Hazard. Do not immerse mixer, cord,
or plug in water or any other liquid.
Wipe with a damp cloth or sponge. Do not use abrasive or corrosive cleaners.
For best results, we recommend hand-washing the bowl. Rinse and dry thoroughly
These items can be washed in a dishwasher.
NOTE: The splash/pouring shield is only dishwasher-safe, top-rack only. DO
NOT use the “SANI” setting when washing in the dishwasher. “SANI” cycle
temperatures could damage product. Parts may also be washed with hot,
soapy water. Rinse and dry thoroughly.
Troubleshooting
Food is not mixed.
• Place liquid ingredients in bowl before adding dry ingredients.
• Stop stand mixer and scrape sides of bowl.
• Increase speed.
.
Food splatters during mixing.
• Mixtures containing large amounts of liquid ingredients should be mixed at lower speeds
to avoid splashing. Increase speed only after the mixture has thickened.
Stand mixer "walks" (moves) on counter during mixing.
• Reduce speed.
• Reduce quantity of ingredients in bowl.
• Make sure countertop is clean. This allows the mixer feet to grip countertop and reduce
stand mixer movement.
Stand mixer shuts o during use.
• There is a 30-minute auto shut-off feature.
• Stand mixer has overheated. Turn off, unplug, and wait 15 minutes before using.
• Mixing implements have become obstucted. Turn off, unplug, and remove obstruction.
Wolf, Wolf & Design, Wolf Gourmet, W & Design and the color red as applied to knobs are registered trademarks and
service marks of Wolf Appliance, Inc. Sub-Zero, Sub-Zero & Design, Dual Refrigeration, The Living Kitchen, Great American
Kitchens, The Fine Art of Kitchen Design, and Ingredients are registered trademarks and service marks of Sub-Zero, Inc. All
other trademarks or registered trademarks are property of their respective owners in the United States and other countries.
11

Wolf Gourmet Residential Limited Warranty
FOR RESIDENTIAL USE
LIMITED FIVE YEAR WARRANTY
This Wolf Gourmet product warranty applies only to appliances. Wolf Gourmet warrants
appliances to be free from defects in materials or workmanship for a period of five (5) years
from the date of original purchase.
LIFETIME LIMITED WARRANTY
This Wolf Gourmet product warranty applies only to cookware and cutlery products. Wolf
Gourmet warrants cookware and cutlery to be free of defects in materials or workmanship
for the lifetime of the product. Minor imperfections and discolorations are normal and are not
considered defects.
TERMS APPLICABLE TO EACH WARRANTY
This Wolf Gourmet Residential Limited Warranty applies to appliances, cookware and cutlery
purchased and used in the United States or Canada. This is the only express warranty for this
product and is in lieu of any other warranty.
During the warranty period, your exclusive remedy is repair or replacement of the product or
any component found to be defective, at our option. All service provided by Wolf Gourmet
under this warranty must be performed by Wolf Gourmet factory-certified service, unless
otherwise approved in advance by Wolf Gourmet, and all service will be provided during
normal business hours.
This warranty does not cover wear from normal use, use not in conformity with the printed
directions, or damage to the product resulting from negligence, accident, alteration, abuse,
misuse, or improper service or repair. This warranty is void if the product is used for other than
residential use or subjected to any voltage or waveform other than as specified on the rating
label (e.g., 120V ~ 60 Hz). This warranty extends only to the original consumer purchaser or
initial gift recipient.
Wolf Gourmet excludes all claims for special, incidental, and consequential damages caused
by breach of express or implied warranty. All liability is limited to the amount of the purchase
price. EVERY IMPLIED WARRANTY, INCLUDING ANY WARRANTY OF MERCHANTABILITY OR
FITNESS FOR A PARTICULAR PURPOSE, IS DISCLAIMED EXCEPT TO THE EXTENT PROHIBITED
BY LAW, IN WHICH CASE SUCH WARRANTY IS LIMITED TO THE DURATION OF THIS WRITTEN
WARRANTY. This warranty gives you specific legal rights. You may have other legal rights that
vary depending on where you live. Some states do not allow limitations on implied warranties
or special, incidental or consequential damages, so the foregoing limitations may not apply
to you.
To make a warranty claim and receive the name of the Wolf Gourmet factory-certified service
personnel nearest to you, please contact Wolf Appliance, Inc., P.O. Box 44848, Madison, WI
53744; or visit the contact & support section of our website at wolfappliance.com; or email us
at customerservice@subzero.com; or call 800-222-7820. For faster service, please locate the
model, type and series numbers on your product’s rating label.
12
 Loading...