

Page 1
USE & CARE GUIDE
GUIDE D’UTILISATION ET D’ENTRETIEN
GUIA DE USOS Y CUIDADOS
1
Page 2

WOLF GOURMET MULTI-FUNCTION COOKER
Welcome
Thank you for your purchase of this Wolf Gourmet product.
We look forward to being part of your kitchen for years to
come. Wolf is a third-generation family-owned company that
has a personal stake in the preparation of your food. With
family ownership comes a great attention to detail and an
uncompromised dedication to creating exceptional products.
Wolf built its business and reputation on helping home cooks
achieve the best results possible. With Wolf Gourmet's
precise control, the dish you envision will be the dish you
serve.
2
Page 3

Contents
4
Safety Precautions
6
Wolf Gourmet Multi-Function Cooker
Parts and Features
8
Getting Started
10
Using Cooking Modes
25
Care Recommendations
26
Troubleshooting
27
Wolf Gourmet Warranty
Customer Care
As a Wolf Gourmet owner, you can
count on our support. Our customer
care center is available 24 hours a
day, seven days a week and staffed by
product experts at our headquarters in
Madison, Wisconsin. Should the need
arise, simply call 800.222.7820 to
speak with one of our product
experts. In Mexico, please contact
the customer service center at
01.800.400.4372 Monday through
Friday from 9:00 a.m. to 7:00 p.m. We
are condent this guide will answer
your questions about the features,
operation, and maintenance of your
Wolf Gourmet product. If you have
additional questions, please contact
us by phone or visit us online at
wolfgourmet.com.
Register Your Product
We strongly encourage you to register
your Wolf Gourmet appliance. It’s
important to us that you get the most out
of your products. By registering you will:
• Become a Wolf Gourmet culinary
insider.
• Have ongoing support from Wolf
Gourmet.
• Activate your warranty and record
your purchase.
• Be alerted to any service updates.
• Receive occasional emails to
help you maintain and enjoy your
appliances.
To register, visit wolfgourmet.com/
registration or call 800.222.7820. In
Mexico, please visit wolfgourmet.com
.mx or call 01.800.400.4372.
3
Page 4

SAFETY PRECAUTIONS
IMPORTANT SAFEGUARDS
When using electrical appliances, basic safety precautions should always
be followed to reduce the risk of fire, electric shock, and/or injury to
persons, including the following:
• Read all instructions.
• This appliance is not intended for use by persons (including children) with
reduced physical, sensory, or mental capabilities, or lack of experience and
knowledge, unless they are closely supervised and instructed concerning
use of the appliance by a person responsible for their safety.
• Close supervision is necessary when any appliance is used by or near
children. Children should be supervised to ensure that they do not play with
the appliance.
• Do not touch hot surfaces. Use oven mitts.
• To protect against electric shock, do not immerse cord, plug, or base in
water or other liquid.
• Unplug from outlet when not in use and before cleaning. Allow to cool
before putting on or taking off parts.
• Do not operate any appliance with a damaged supply cord or plug, or
after the appliance malfunctions or has been dropped or damaged in any
manner. Supply cord replacement and repairs must be conducted by the
manufacturer, its service agent, or similarly qualied persons in order to
avoid a hazard. Call the provided customer service number for information
on examination, repair, or adjustment.
• The use of accessory attachments not recommended by the appliance
manufacturer may cause injuries.
• Do not use outdoors.
• Do not let cord hang over edge of table or counter, or touch hot surfaces,
including stove.
• Do not place on or near hot gas or an electric burner, or in a heated oven.
• Extreme caution must be used when moving an appliance containing hot oil
or other hot liquids.
• To disconnect multi-function cooker, turn OFF; then remove plug from wall
outlet.
• Intended for countertop use only.
• WARNING! Spilled food can cause serious burns. Keep appliance and cord
away from children. Never drape cord over edge of counter, never use outlet
below counter, and never use with an extension cord.
• This appliance is not intended for deep-frying foods.
• Do not use appliance for other than intended use.
SAVE THESE INSTRUCTIONS
4
Page 5

SAFETY PRECAUTIONS
Other Consumer Safety Information
This appliance is intended for household use only.
WARNING
with a grounded (3-prong) plug to reduce the risk of electric shock. The plug
fits only one way into a grounded outlet. Do not defeat the safety purpose of
the plug by modifying the plug in any way or by using an adapter. If the plug
does not fit into the outlet, have an electrician replace the outlet.
A short power-supply cord is used to reduce the risk resulting from it being
grabbed by children, becoming entangled in, or tripping over a longer cord.
Electrical Shock Hazard: This appliance is provided
5
Page 6
WOLF GOURMET MULTI-FUNCTION COOKER PARTS AND FEATURES
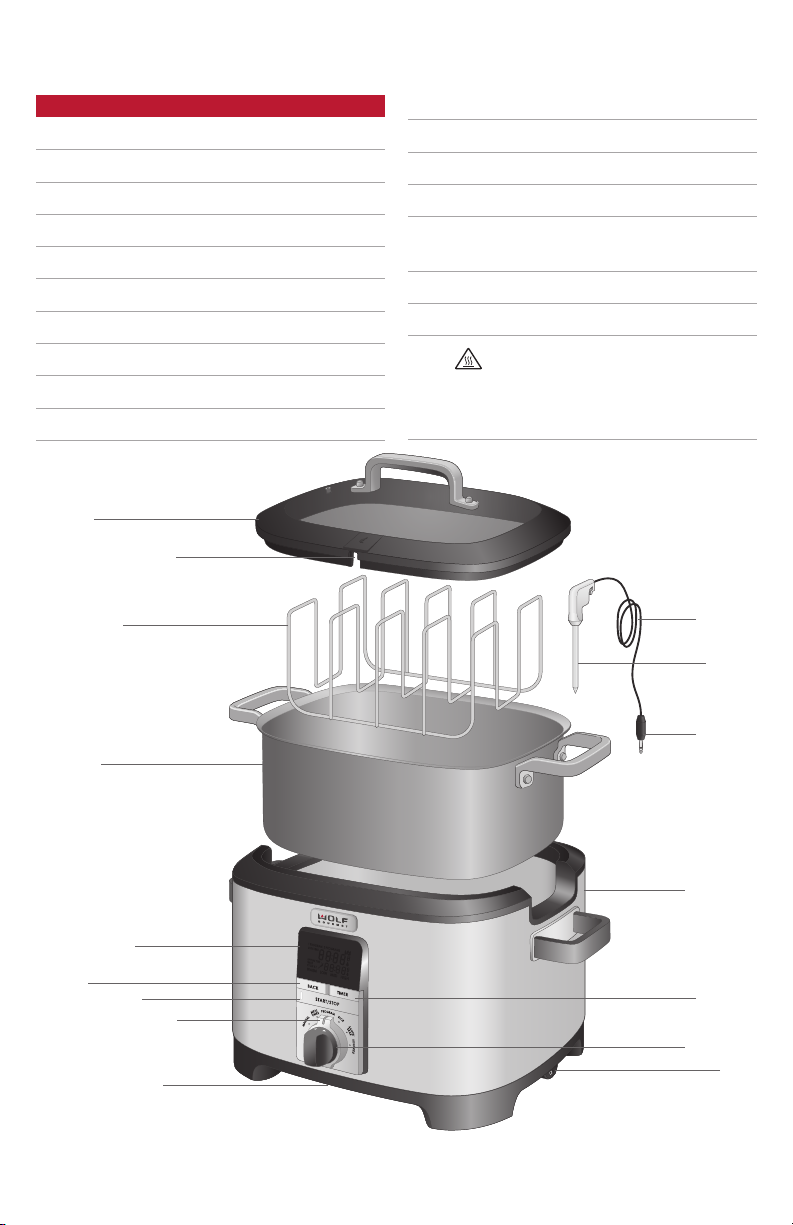
PARTS AND FEATURES
1
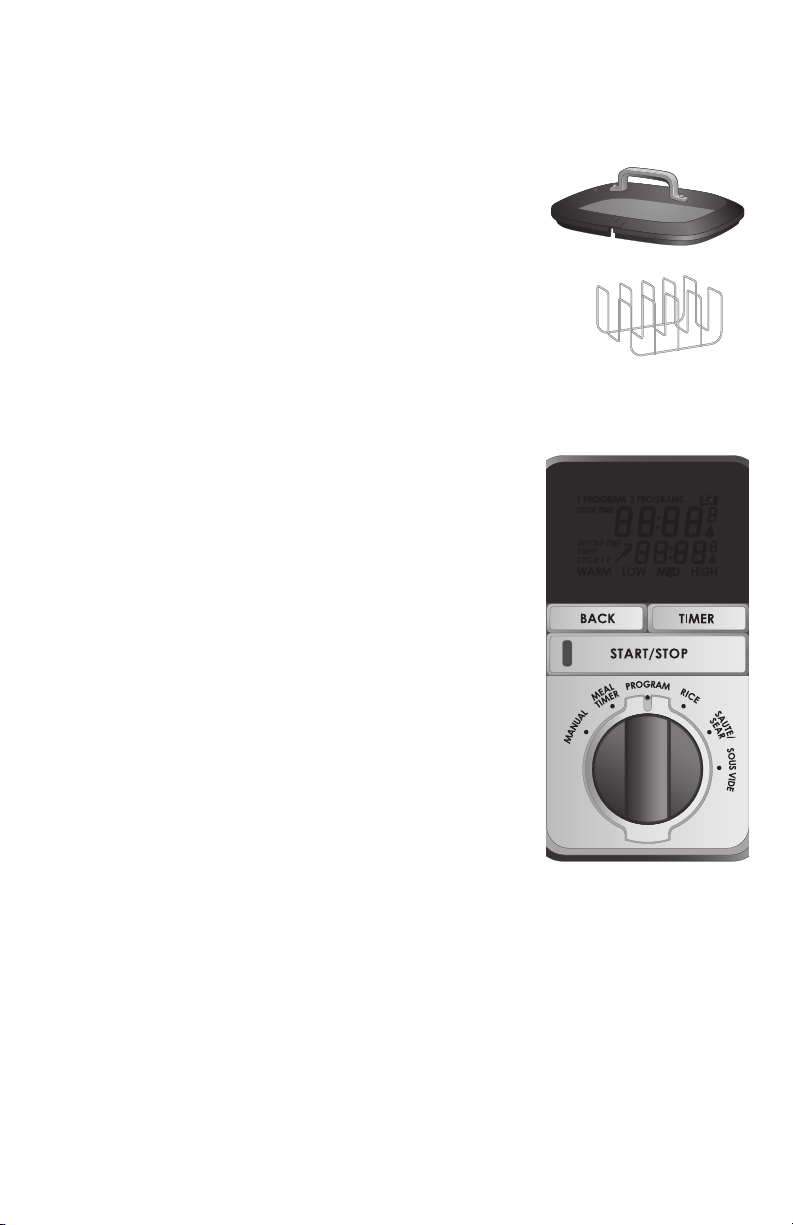
Lid
1a Probe Opening
2
Sous Vide Rack
3
Stainless Steel Vessel
4
Control Panel Display
5
Back Button
6
Start/Stop Button
7
Mode Selector Bezel
8
Rating Plate
9
Time/Temperature Knob
1
1a
10
Timer Button
11
Base
12
Probe
12a Temperature Probe – Insert Into Food
or Water
12b Plug End – Insert Into Probe Jack
13
Probe Jack
CAUTION: HOT SURFACE. Exterior
surfaces and handles get hot. Use oven
mitts or allow unit to cool completely
before moving or removing parts.
2
3
4
5
6
7
8
Wolf Gourmet
Multi-Function Cooker
12
12a
12b
11
10
9
13
6
Page 7
Parts and Features
1. Lid: The lid must be used in MANUAL, MEAL TIMER, PROGRAM, RICE, and SOUS VIDE
modes. The lid can be used in SAUTE/SEAR mode during
preheat, or to prevent splatter. The lid is dishwasher-safe and
oven-safe for temperatures up to 450°F (232°C).
a. Probe Opening: The probe opening is where the probe
should be positioned when using the probe in Sous Vide
mode and in some slow cook applications.
2. Sous Vide Rack: The removable Sous Vide rack is used in SOUS
VIDE mode, if desired, to separate individual bags of sealed food
and ensure proper water heating.
3. Stainless Steel Vessel: The stainless steel vessel must be in place
for the cooker to function. The vessel may also be used in an oven or on a gas, electric, or
induction stovetop. It is oven-safe for temperatures up to
450°F (232°C) and is dishwasher-safe.
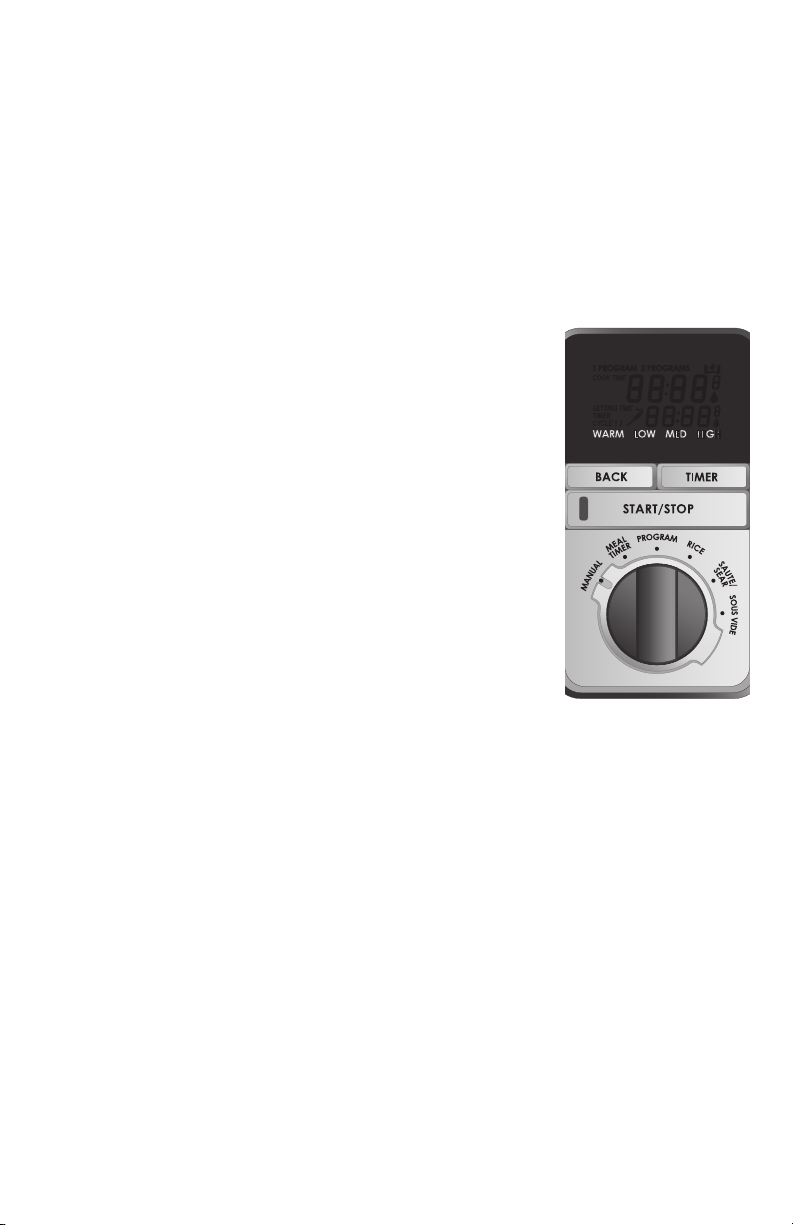
4. Control Panel Display: The display will show temperature and
time settings, probe temperature settings, error messages,
icons for probe, and the Wolf Gourmet logo when in sleep
mode.
5. Back Button: Press the BACK button to go back one step and
undo the last setting entered.
6. Start/Stop Button: Press the START/STOP button to start and
to turn OFF the mode selected. The light will be illuminated in
red and a chime will sound when the cycle is started. START/
STOP also is used to engage or turn off the timer.
7. Mode Selector Bezel: Rotate selector bezel to desired cooking
mode: MANUAL, MEAL TIMER, PROGRAM, RICE, SAUTE/
SEAR, or SOUS VIDE.
8. Rating Plate: Model number and rating information can be
found on the bottom of the base of the multi-function cooker.
9. Time/Temperature Knob: Use this knob to set the time and
temperature in different cooking modes.
10. Timer Button: The TIMER button may be used in PROGRAM
mode or SOUS VIDE mode.
11. Base: Stainless steel vessel must be placed in base in order for multi-function cooker to
function.
12. Probe:
a. Temperature Probe – The long, thin pointed end of the probe is the temperature probe
which is inserted into the water in SOUS VIDE mode, or to measure internal temperature
and ensure perfectly cooked food in PROGRAM mode.
b. Plug End – The plug end of the probe should be inserted into the probe jack on the right
side of the multi-function cooker.
13. Probe Jack: The probe jack is on the bottom-right side of the multi-function cooker and is
where the plug end of the probe should be inserted.
7
Page 8

Getting Started
CHOOSING A COOKING MODE
Slow Cooker Modes:
1. MANUAL mode functions like a standard, nonprogrammable slow cooker with
four heat settings: WARM, LOW, MEDIUM, or HIGH. The timer counts up and the
multi-function cooker will stay on until the START/STOP button is pressed, or will
automatically turn off after 24 hours.
NOTE: WARM should not be used for cooking. It can be used once cooking is
complete to keep foods warm.
2. MEAL TIMER mode allows you to set the number of hours to cook based on
when you want to serve the meal, regardless of recipe instructions. No heat level
is selected. MEAL TIMER adjusts the temperature based on the serve time. This
feature is well-suited to recipes that will cook for a long period of time such as
large meats, meat and vegetable combinations, or soups and stews. MEAL TIMER
automatically switches to WARM at the end of the cook cycle.
3. PROGRAM mode has three options that allow for a customized cooking
experience. All three options automatically switch to WARM at the end of the cook
cycle.
a. 1 PROGRAM – Select one heat and time setting for the entire cooking session.
b. 1 PROGRAM WITH PROBE – Select one heat setting and use the probe
to cook food to the desired internal temperature. This setting is best when
cooking foods that may be at risk for overcooking, such as lean cuts of meat,
or any time food temperature is the desired test for doneness. The cooker will
automatically switch to WARM when the desired temperature is reached.
c. 2 PROGRAMS – Select two different heat settings and time durations in one
cooking session. For example, program to cook on HIGH for 4 hours, then
LOW for 3 hours. Ideal for shortening the cooking time of items such as pot
roasts to heat quickly on HIGH and then allow to tenderize on LOW.
Other Cooking Modes:
4. RICE mode has two settings: 1 and 2. Setting 1 is used for white rice. Setting 2 is used for
brown rice. See rice cooking chart on page 18 under “Using Cooking Modes.”
5. SAUTE/SEAR mode has three heat settings: LOW, MEDIUM, and HIGH. Use this mode to
saute before slow cooking, to sear after Sous Vide, or for recipes that require saute or sear
as the only cooking mode. It has a maximum cook time of 45 minutes, including preheat.
6. SOUS VIDE is a cooking method in which sealed food is cooked in a precisely
temperature-controlled water bath, at a setting between 100°F (38°C) and 200°F (93°C).
The temperature probe is used to control the temperature of the water. This method
ensures even and predictable results and protects against overcooking. In this mode,
the foods are seasoned and then sealed in heat-safe bags or jars. The vessel is lled
with warm water and the sealed foods are added to the water bath when the desired
temperature is reached.
8
Page 9

at End of Cycle
Shifts to WARM
Time
User Selects
Heat Setting
User Selects
foods that you plan to monitor or that
benet from a long cooking time. Cooks
X X
X
until Start/Stop is pressed, or for up to
24 hours. Warm setting can be used to
keep cooked foods warm.
setting to choose. Choose the cook time
and the cooker automatically adjusts the
heat to prevent overcooking. Ideal for
large cuts of meat or poultry, and meat
X X X
and vegetable combinations.
level and time. Ideal for smaller pieces
of meat, poultry or sh, side dishes,
X X
casseroles, and desserts.
temperature, such as chicken, certain
cuts of pork and beef.
or preferences. For example, when you
want to speed up the cooking time and
X X X
still have the benet of low, slow heat for
tenderizing, set Program 1 on HIGH for
2 hours and Program 2 on LOW for
6 hours.
Description Best For
SLOW COOK MODES
Manual Select Warm, Low, Medium, or High Traditional slow cooker recipes, and for
Select desired food temperature Foods that should be cooked to a precise
Meal Timer Select number of hours until serving Taking the guesswork out of which heat
1 Program Set 1 heat and time cycle Following a recipe with a specic heat
1 Program
With Probe
2 Programs Set 2 heat and time cycles Customizing recipes to your schedule
9
Page 10
Using Cooking Modes
MANUAL
MANUAL mode functions like a standard nonprogrammable slow cooker with four heat
settings: WARM, LOW, MEDIUM, and HIGH. The timer counts up and the multi-function
cooker will stay on until the START/STOP button is pressed, or will turn off automatically after
24 hours.
NOTE: WARM should not be used for cooking. It can be used once cooking is complete to
keep foods warm.
1. Add food to vessel and cover with lid.
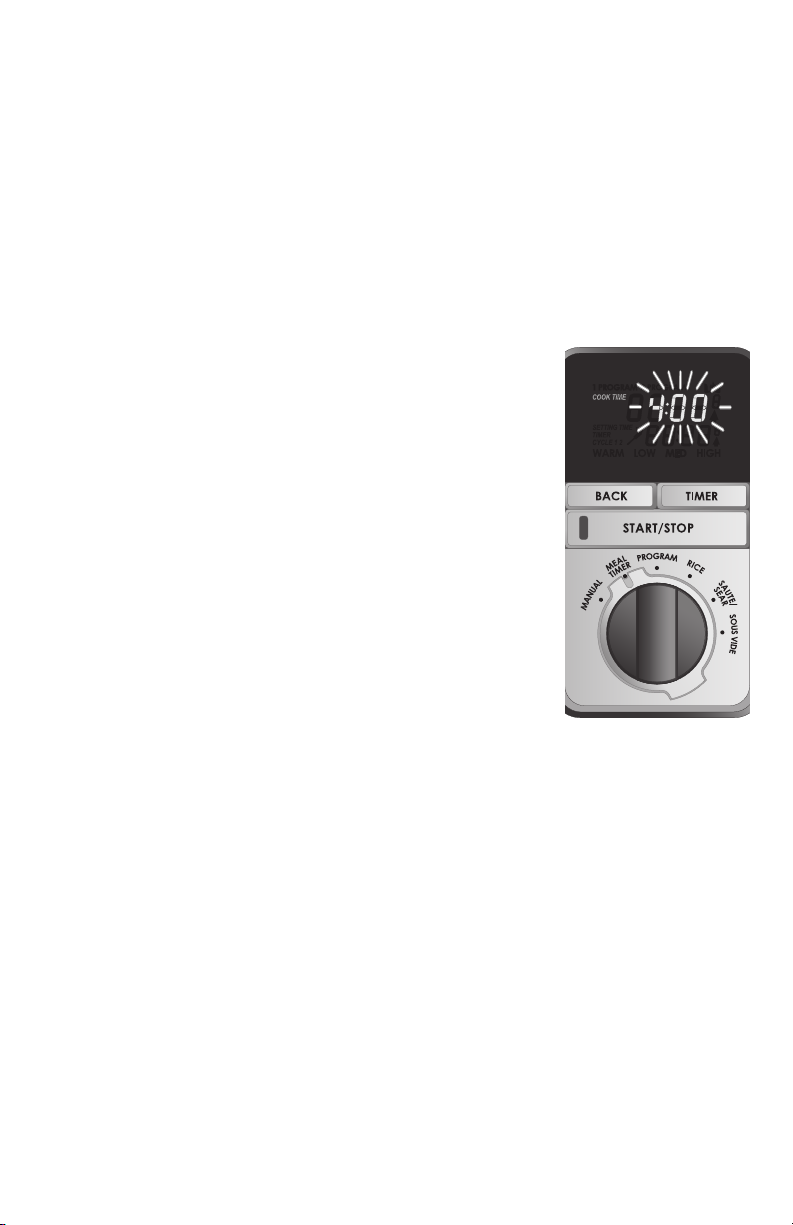
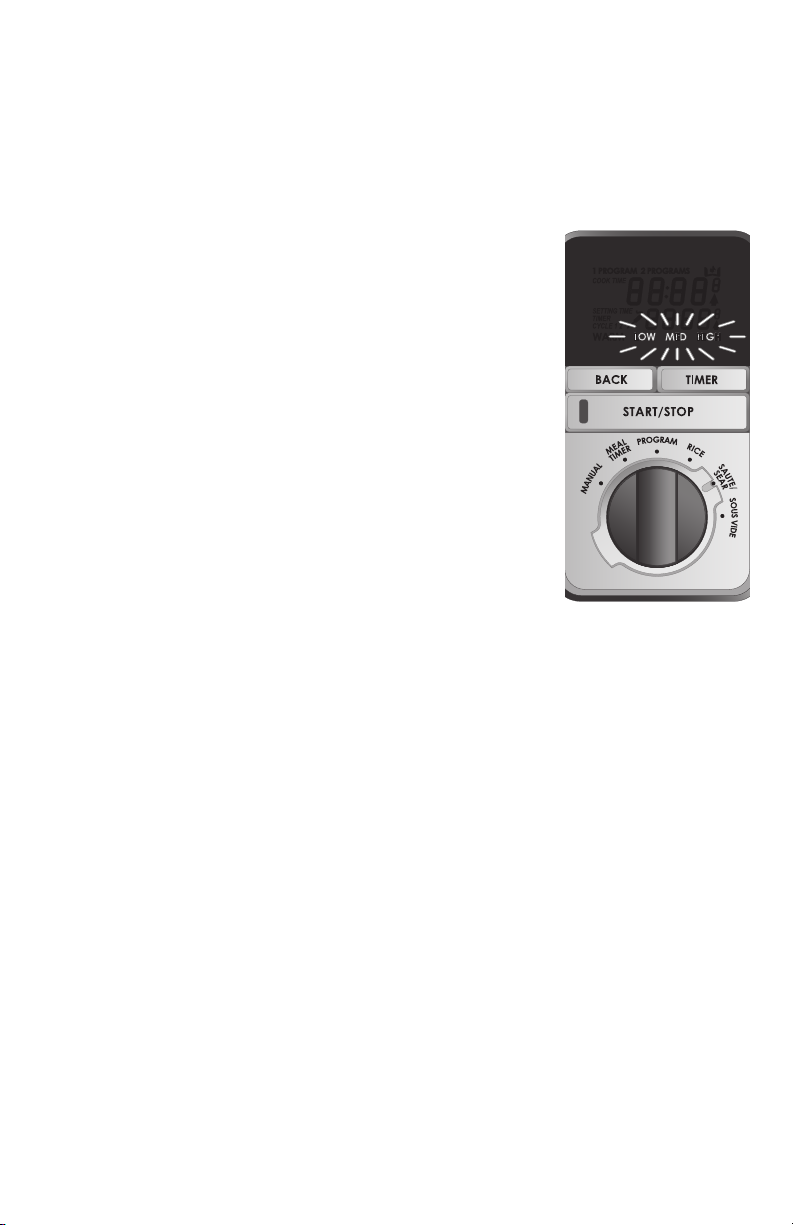
2. Turn selector bezel to MANUAL. The LCD screen displays
the ashing heat settings: “WARM LOW MED HIGH.”
3. Turn the knob to the left or right to select a heat setting.
Release the knob when the heat setting is selected. The
setting and START/STOP button will start to ash.
4. Press the START/STOP button to start cooking. A long
chime will sound and the START/STOP button will stay
illuminated. The selected heat setting becomes solid and the
timer will count up.
NOTE: During the cycle, the user can adjust the heat setting
at any time by turning the knob. The new selected setting will
ash three times before it becomes solid and the temperature
adjusts. There is no need to press the START/STOP button.
5. Press the START/STOP button at any time to end cooking
and turn off the unit. “OFF” will ash in the display and the cooker will chime three
times.
10
Page 11
MEAL TIMER
MEAL TIMER mode allows you to select the number of hours of cooking based on when
the meal will be served, regardless of recipe instructions. No heat level is selected. MEAL
TIMER adjusts the temperature based on the serve time. This feature is well-suited to
recipes that will cook for a long period of time such as large meats, meat and vegetable
combinations, or soups and stews. MEAL TIMER automatically switches to WARM at the
end of the cook cycle.
1. Add food to vessel and cover with lid.
2. Turn the selector bezel to MEAL TIMER.
3. The LCD screen displays the ashing default minimum cook
time of 4 hours with a maximum cooking time of 12 hours.
4. Adjust the cook time by turning the knob to the right to
increase the cook time or to the left to decrease the cook
time. The time adjusts in 30-minute increments with a
minimum cooking duration of 4 hours and a maximum
cooking duration of 12 hours.
5. Release the knob once a cook time is set; then the cook
time display and the START/STOP button will start to ash.
6. Press the START/STOP button to start cooking. A long
chime will sound and the START/STOP button will stay
illuminated. The selected cook time becomes solid and the
timer will count down.
7. When cook time is complete, a long chime will sound.
“COOK TIME” and “00:00” will disappear. The unit will
switch to the "WARM" heat setting and the timer will begin
to count up. After 4 hours on WARM, the unit will shut off automatically.
8. Press the START/STOP button at any time to end cooking and turn off the unit. “OFF”
will ash in the display and the cooker will chime three times.
11
Page 12

USING COOKING MODES
PROGRAM MODES
There are 3 slow cook options in PROGRAM mode: 1) Program one heat and time cycle in one
cook session. 2) Program two heat and time cycles in one cook session. 3) Use the Probe to
set the desired end temperature.
1 PROGRAM
Select one heat and time setting for the entire cooking session. It will switch automatically to
WARM at the end of the cook cycle.
1. Add food to vessel and cover with lid.
2. Turn selector bezel to PROGRAM. The LCD screen displays
ashing setting of “1 PROGRAM" and “2 PROGRAMS.”
3. Turn the knob to the left to select 1 PROGRAM. Release the
knob once 1 PROGRAM is selected. The setting will ash three
times before it becomes solid.
NOTE: If the START/STOP button is pressed before the display
stops ashing, the program will go to the next step in the setting
process.
4. Once “1 Program” becomes solid, the ashing heat settings
of “LOW MED HIGH” will display. Turn the knob left or right to
select LOW, MEDIUM, or HIGH heat. WARM is not an option.
Release the knob once a heat setting is selected; then the
setting will ash three times before it becomes solid.
NOTE: To access the previous setting at any time, press the BACK
button once.
5. Once selected heat setting becomes solid, the ashing
“COOK TIME” and “00:00” will display. Adjust the time setting
by turning the knob to the right to increase or to the left to
decrease the time. The time adjusts in 30-minute increments,
with a minimum time of 30 minutes and a maximum of 12 hours.
Release the knob once the time is set. The time and START/
STOP button will start to ash.
6. Press the START/STOP button to start cooking. A long chime
will sound and the START/STOP button will stay illuminated.
The selected cook time becomes solid and the timer will count
down.
7. When cook time is complete, a long chime will sound. “COOK
TIME” and “00:00” will disappear. The unit will switch to the
"WARM" heat setting and the timer will begin to count up. After
4 hours on WARM, the unit will shut off automatically.
8. Press the START/STOP button at any time to end cooking and
turn off the unit. “OFF” will ash in the display and the cooker
will chime three times.
NOTE: During the cycle, the heat setting may be adjusted at any
time by turning the knob. The new selected setting will ash three
times before it becomes solid and the temperature adjusts. There
is no need to press the START/STOP button. The time setting
may be adjusted at any point by pressing the TIMER button to
reactivate time to a ashing display, and the knob may be turned
to adjust the cook time.
12
Page 13
2 PROGRAMS
Select two different heat settings and time durations in one cooking session. For
example, program to cook on HIGH for 4 hours, then LOW for 3 hours. Ideal for
shortening the cooking time of items such as pot roasts to heat quickly on HIGH and then
allow to tenderize on LOW. It will automatically switch to WARM at the end of the cook
cycle.
1. Add food to vessel and cover with lid.
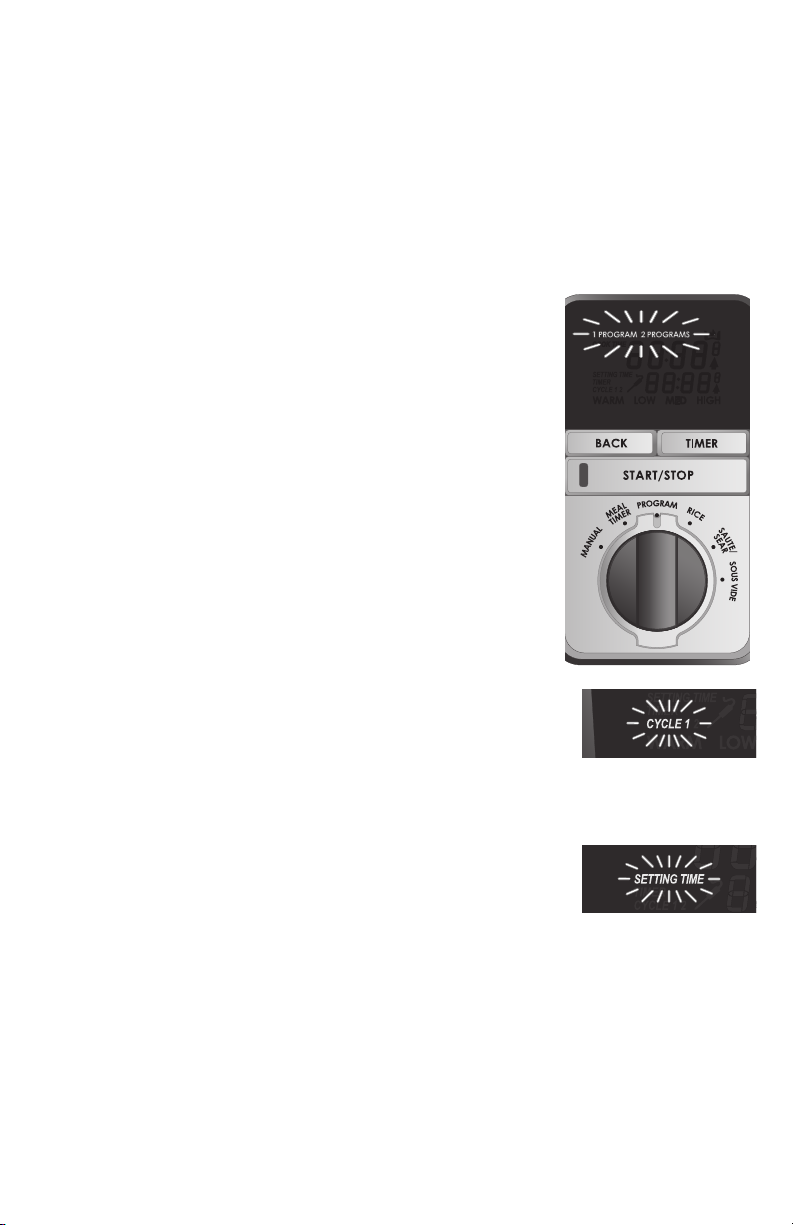
2. Turn selector bezel to PROGRAM. The LCD screen displays
ashing setting of “1 PROGRAM” and “2 PROGRAMS.”
3. Turn the knob to the right to select “2 PROGRAMS.” Release
the knob once “2 PROGRAMS” is selected. The setting
will ash three times before it becomes solid. NOTE: If the
START/STOP button is pressed before the display stops
ashing, it will go to the next step in the setting process.
4. Once “2 PROGRAMS” becomes solid, ashing “CYCLE 1”
and the heat settings will display. Turn the knob left or right to
select LOW, MEDIUM, or HIGH heat. WARM is not an option.
Release the knob once a heat setting is selected; then the
setting will ash three times before it becomes solid.
NOTE: To access the previous setting at any time, press the BACK button once.
5. Once the display becomes solid, the ashing “SETTING TIME”
and “00:00” will display. Adjust the time setting by turning the
knob to the right to increase or to the left to decrease the time.
The time adjusts in 30-minute increments, with a minimum
time of 30 minutes and a maximum of 24 hours. Release the knob once the time is set
and the time will ash three times before becoming solid.
13
Page 14
USING COOKING MODES
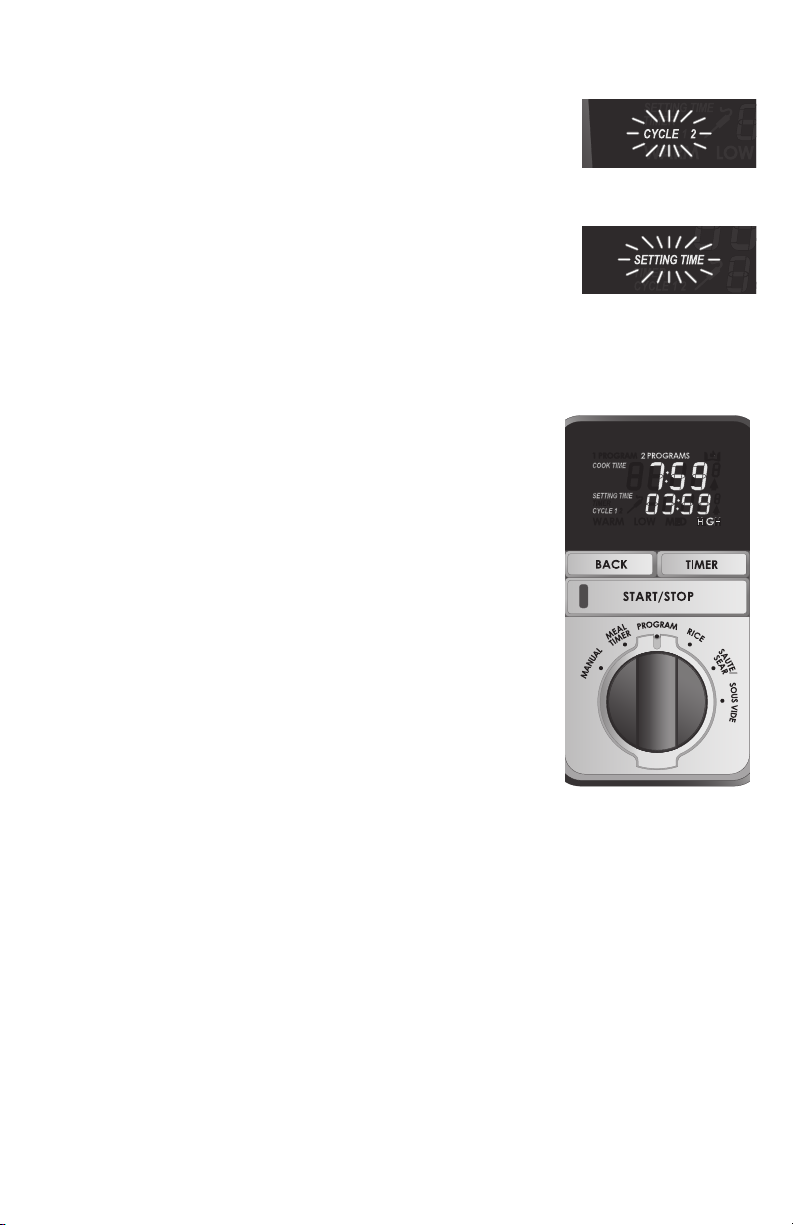
6. Once the display becomes solid, ashing “CYCLE 2” and the
heat settings of “WARM LOW MED HIGH” will display. Turn
the knob left or right to select WARM, LOW, MEDIUM, or HIGH
heat. Release the knob once a heat setting is selected; then
the setting will ash three times before it becomes solid.
7. Once the display becomes solid, the ashing “SETTING TIME”
and “00:00” will display. Adjust the time setting by turning the
knob to the right to increase or to the left to decrease the time.
The time adjusts in 30-minute increments, with a minimum
time of 30 minutes and a maximum of 24 hours. Release the knob once the time is
set. The time and START/STOP button will start to ash.
NOTE: The total maximum combined cooking time for Cycle 1 and Cycle 2 is 24 hours.
8. Press the START/STOP button to start cooking. A long
chime will sound and the START/STOP button will stay
illuminated. The screen will display “CYCLE 1,” the selected
heat setting, and both the cycle cook time and the total
cook time.
9. When the Cycle 1 cook time is complete, a short chime
will sound indicating the end of Cycle 1. The unit will then
switch to Cycle 2, and the heat and time settings will adjust
to the Cycle 2 settings.
10. When Cycle 2 is complete, a long chime will sound. “COOK
TIME” and “00:00” will disappear. The unit will switch to the
“WARM” heat setting and the timer will begin to count up.
After 4 hours on WARM, the unit will shut off automatically.
11. Press the START/STOP button at any time to end cooking
and turn off the unit. "OFF" will ash in the display and the
cooker will chime three times.
NOTE: During the cycle, the heat setting may be adjusted at any time by turning the
knob. The new selected setting will ash three times before it becomes solid and the
temperature adjusts. There is no need to press the START/STOP button. The time setting
may be adjusted at any point by pressing the TIMER button to reactivate time to a
ashing display, and the knob may be turned to adjust the cook time.
14
Page 15
PROGRAM WITH PROBE
Use the probe to cook food to the desired internal temperature. For many foods, such as large
cuts of meat, food temperature is the best test for doneness. The temperature probe takes the
guesswork out of cooking. Select the desired internal food temperature, and the cooker will
automatically switch to WARM when the desired temperature is reached.
Probe feature may only be used with 1 PROGRAM.
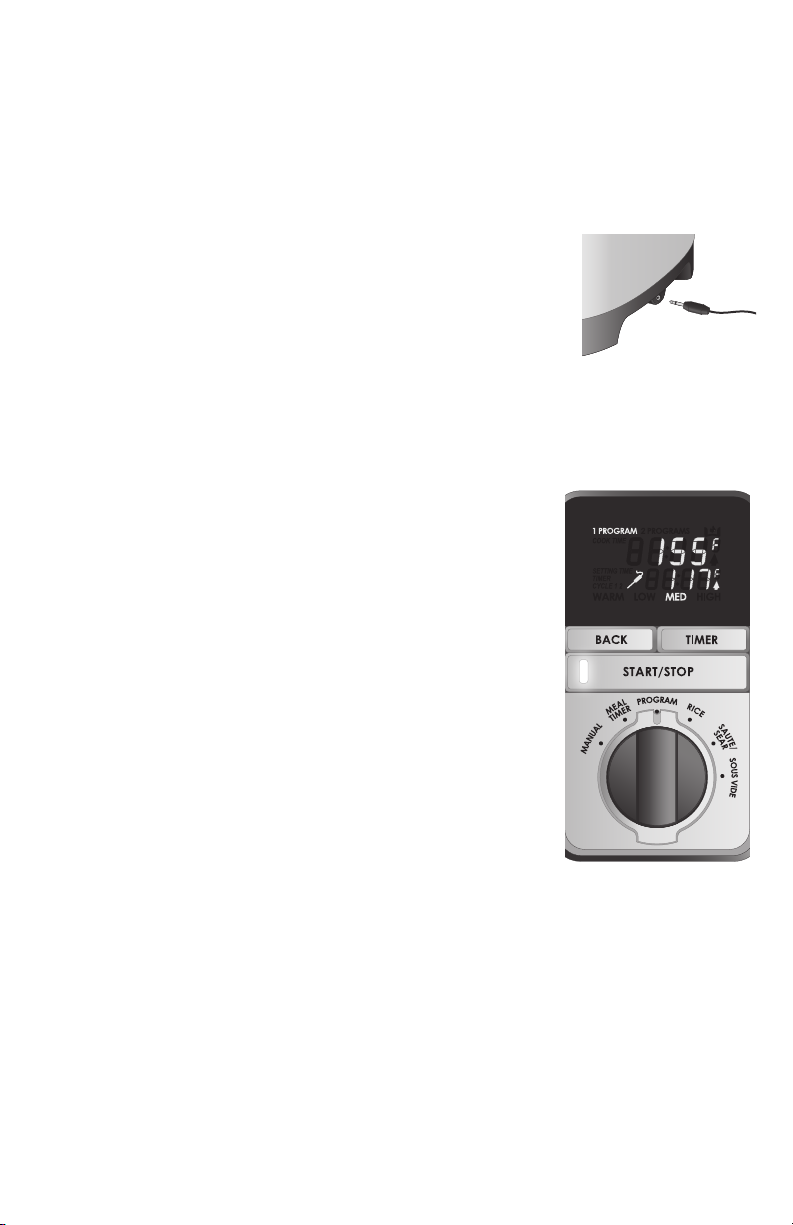
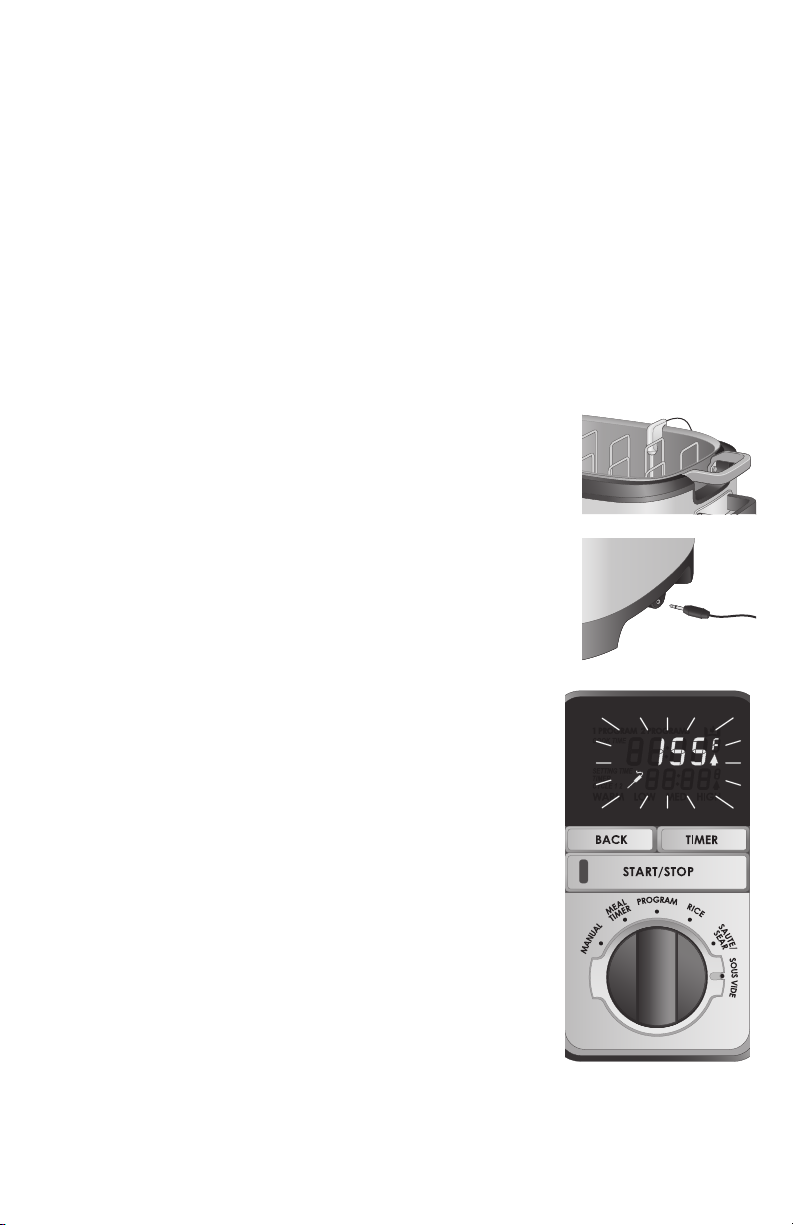
1. Insert the plug end of the probe into the probe jack on the right
side of the multi-function cooker. Insert temperature probe into the
thickest part of the food. Cover the vessel with the lid, taking care
to position the probe wire in the probe opening on the lid.
2. Turn selector bezel to PROGRAM. The LCD screen displays
ashing setting of “1 PROGRAM.”
3. Once “1 PROGRAM” becomes solid, the ashing heat settings of
“LOW MED HIGH” will display. Turn the knob left or right to select LOW, MEDIUM, or HIGH
heat. Release the knob once a heat setting is selected; then the setting will ash three times
before it becomes solid.
NOTE: To access the previous setting at any time, press the BACK button once.
4. Once selected heat setting becomes solid, the ashing
probe icon and the default temp of “155F” will display. Adjust
the temperature setting by turning the knob to the right to
increase or to the left to decrease the desired temperature. The
temperature range is 100°–200°F. Release the knob once the
probe temperature is set, and the display and the START/STOP
button will start to ash and beep.
NOTE: If the probe is not plugged in, the screen will display
“COOK TIME” and “00:00.”
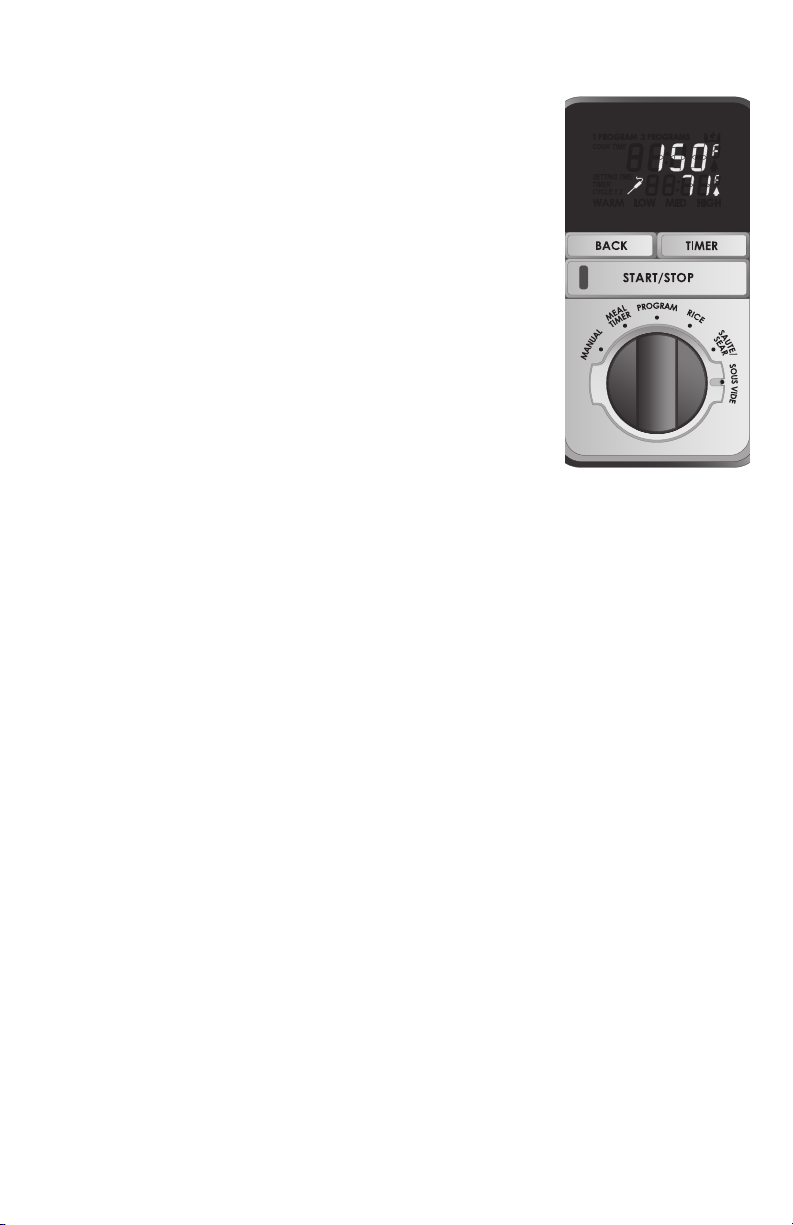
5. Press the START/STOP button to start cooking. A long chime
will sound and the START/STOP button will stay illuminated.
Once the cycle starts, the desired temperature setting is
displayed, along with the current temperature reading of the
probe with the up arrow icon.
6. When the desired temperature is reached, a long chime will
sound. The probe settings will disappear. The unit will switch to
the “WARM” heat setting and the timer will begin to count up.
After 4 hours on WARM, the unit will shut off automatically.
7. Press the START/STOP button at any time to end cooking and
turn off the unit. "OFF" will ash in the display and the cooker
will chime three times.
NOTE: During the cycle, the desired temperature may be adjusted at any time by turning the
knob. The new selected probe temperature will ash three times before it becomes solid.
There is no need to press the START/STOP button.
15
Page 16

USING COOKING MODES
Tips
SLOW COOKING
• Choose from MANUAL, MEAL TIMER, or PROGRAM modes. See pages 10–15 for
complete descriptions.
• The High temperature setting is best for foods that require high heat and don’t tend to
overcook, such as potatoes, beans, casseroles, chili, soups, and when “baking” in one of
the slow cook modes. It is a good choice when you don’t have time for a long, slow cook
time. 1 hour on High is equivalent to 1 1/2–2 hours on Low.
• The Medium temperature setting is a good choice for chicken, lean cuts of pork, and foods
that risk overcooking or drying out.
• The Low temperature setting is best for large or tough cuts of meat that require a long,
slow cook time and occasions when you need to leave a recipe cooking for a long period
of time, such as overnight or during a workday.
• The Warm temperature setting is not intended for cooking food. It should only be used for
keeping cooked food warm.
• The vessel should be at least half-lled for best results. If less than half-lled, check for
doneness 1 to 2 hours earlier than recipe indicates.
• Thaw any meat or poultry before slow cooking.
• Do not slow cook without some liquid in the vessel. At least 1 inch (2.5 cm) of liquid at the
bottom
of the vessel is recommended.
• When cooking meat, the higher the fat content, the less liquid is needed. To decrease the
amount of excess fat in a recipe, trim as much visible fat as possible and remove skin from
poultry.
• Very little liquid evaporates from a recipe when slow cooking. When making your favorite
soup or sauce, reduce the liquid called for in the recipe by a half to a full cup (118–237 ml).
If recipe is too thick, liquid can be added later.
• Root vegetables such as potatoes and carrots should be cut into pieces no larger than
2 inches (5.1 cm) to ensure complete cooking.
• Some foods are not suited for extended slow cooking. Pasta, seafood, milk, cream, or sour
cream should be added no more than 2 hours before serving.
• Stirring is usually not necessary when slow cooking. Removing the lid results in heat loss
and extends the cooking time. When cooking a recipe on High, some occasional stirring
may be recommended.
• Visit www.foodsafety.gov for more information on safe internal cooking temperatures.
16
Page 17
RICE
Always use recommended ratios in the Rice Cooking Chart on page 18.
1. Add rice and water to the vessel in the quantities recommended in the rice chart.
Cover with lid.
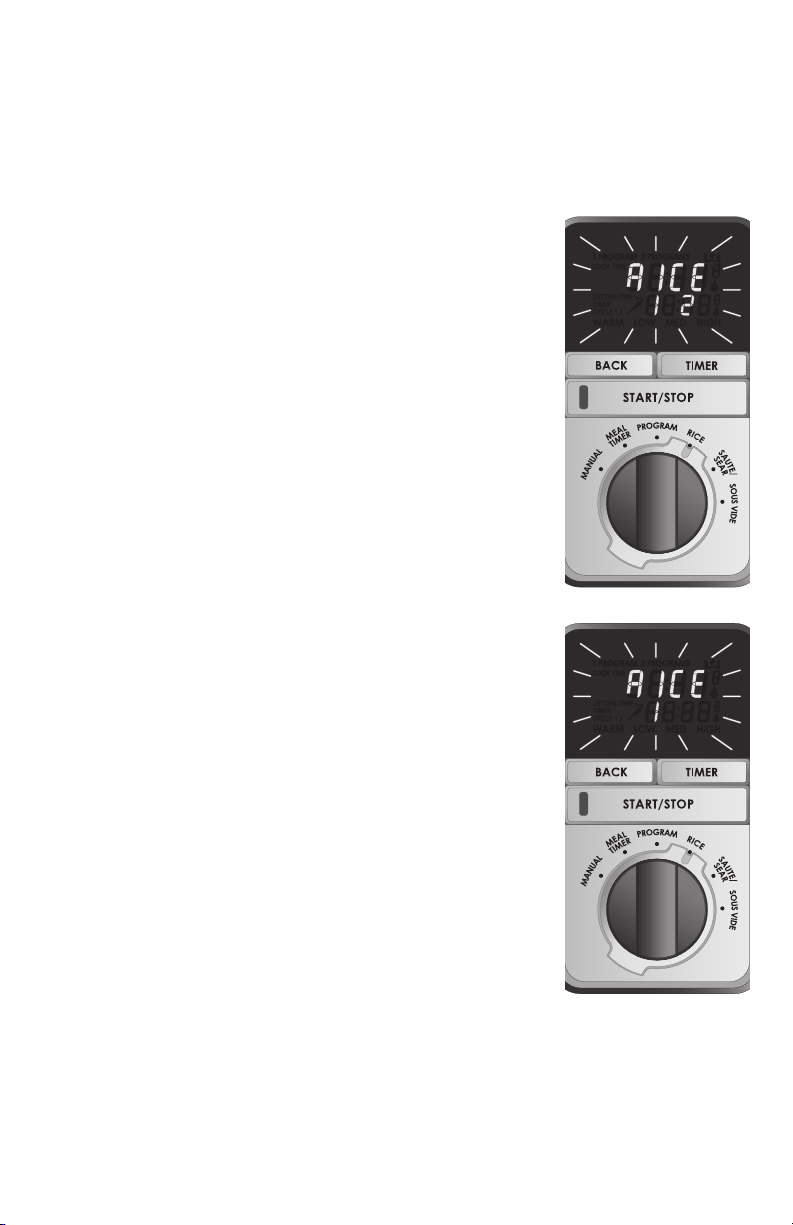
2. Turn selector bezel to RICE. The LCD screen displays
“RICE” and ashes “1” and “2.”
3. Turn the knob to the left or right to select Setting 1 for white
rice or Setting 2 for brown rice. Release the knob once the
setting is selected. It will ash three times before becoming
solid.
4. The LCD screen will display “00:00” and the START/STOP
button will start to ash.
5. Press the START/STOP button to start the cooking cycle.
A chime will sound and the START/STOP button will stay
illuminated.
6. The timer will count up by minutes.
7. Once the cycle is complete, a long chime will sound. The
unit will then switch to the “WARM” heat setting and the
timer will count up.
8. Press the START/STOP button at any time during cooking to
turn off the unit.
NOTE: If the START/STOP button is not pressed during the cooking cycle or “WARM”
setting, the unit will stay on for a maximum of 6 hours and then will turn off automatically.
17
Page 18

USING COOKING MODES
RICE COOKING CHART
SETTING 1: WHITE RICE (30- to 35-minute cook time)
Amount of Rice* Amount of Water Yield
2 cups (473 ml) 2 3/4 cups (651 ml) 6 cups (1.4 L)
3 cups (710 ml) 4 cups (946 ml) 9 cups (2.1 L)
4 cups (946 ml) 5 cups (1.2 L) 12 cups (2.8 L)
5 cups (1.2 L) 7 cups (1.7 L) 18 cups (4.3 L)
SETTING 2: BROWN RICE (50- to 55-minute cook time)
Amount of Rice* Amount of Water Yield
2 cups (473 ml) 3 1/2 cups (828 ml) 6 1/2 cups (1.5 L)
3 cups (710 ml) 4 1/2 cups (1.1 L) 9 cups (2.1 L)
4 cups (946 ml) 6 cups (1.4 L) 13 cups (3.1 L)
16–17 cups
5 cups (1.2 L) 7 1/2 cups (1.8 L)
(3.8–4.0 L)
*When using converted (parboiled) rice, use an additional 1/4 cup (59 ml) water per cup
of rice.
*Cooked brown rice should rest on WARM for 5 to 10 minutes before serving.
*Charts based on measuring with an 8-ounce (237-ml) dry measuring cup.
18
Page 19
SAUTE/SEAR
Use this mode to saute vegetables or brown meat before slow cooking; to sear steaks,
chicken, or sh after Sous Vide; or for recipes that require saute or sear as the only
cooking mode. It has a maximum cook time of 45 minutes, including preheat. The lid can
be used during preheat or to prevent splatter.
1. Turn selector bezel to SAUTE/SEAR. The LCD screen will
ash “LOW MED HIGH.”
2. Turn knob to the right or left to select a heat setting. Release
the knob once a heat setting is set. The selected heat
setting and the START/STOP button will start to ash.
3. Press the START/STOP button to start cooking. A long chime
will sound and the START/STOP button will stay illuminated.
4. The screen will display the selected heat setting with the up
arrow icon indicating the temperature is rising.
5. When the selected heat setting is reached, a long chime will
sound.
6. Add food to the vessel and saute or sear to desired
doneness.
7. Press the START/STOP button at the end of cooking to turn
off the unit, or select another mode if additional cooking is desired.
8. The unit will stay on in SAUTE/SEAR mode for a maximum time of 45 minutes.
NOTE: The heat setting can be adjusted at any time during cooking by turning the knob.
The new selected heat setting will ash three times before becoming solid.
Tips
SAUTE/SEAR
• Make sure vessel has fully preheated before adding food. This may take up to
10 minutes.
• When browning meat, be sure not to crowd the vessel. Cook large amounts in
batches if needed.
• If browned meats produce excess grease, carefully drain off the fat before slow
cooking.
19
Page 20
USING COOKING MODES
SOUS VIDE
SOUS VIDE is a cooking method in which sealed food is cooked in a precisely
temperature-controlled water bath, at a setting between 100°F (38°C) and 200°F (93°C).
The temperature probe is used to control the temperature of the water. This method
ensures even and predictable results and protects against overcooking. In this mode,
the foods are seasoned and then sealed in heat-safe bags or jars. The vessel is lled
with warm water and the sealed foods are added to the water bath when the desired
temperature is reached. The removable rack may be used when cooking multiple bags at
once. For best results, proteins may be seared before and/or after Sous Vide for a nicely
browned exterior. Solid foods should be sealed in a heat-safe bag that is labelled safe for
Sous Vide. Eggs or custards may be cooked in tightly sealed glass jars.
1. Add water to the vessel, allowing for food and at least 1-inch
(2.5-cm) clearance between top of water and top of vessel. Place
the vessel in the cooker base.
side of the vessel, aligning with the probe icon,
Clip the temperature probe to the
and cover with
the lid. Take care to align probe with the opening in the lid.
2. Plug in the plug end of the probe into the probe jack on the
right side of the multi-function cooker. The probe is in the water
to control the water temperature during the Sous Vide mode.
3. Turn selector bezel to SOUS VIDE. (If probe is not plugged in,
the LCD screen displays “Prb.”)
4. The LCD screen will display the ashing probe icon and
default probe temperature of “155F.”
20
Page 21
5. Turn the knob to the right to increase or to the left to
decrease the temperature. It will adjust in 1°F increments,
and the temperature range is 100°–200°F. Release the knob
once the probe temperature is set, and the display and the
START/STOP button will start to ash.
6. Press the START/STOP button to start cooking. A long
chime will sound and the START/STOP button will stay
illuminated. Once the cycle starts, the desired temperature
setting is displayed, along with the current temperature
reading of the probe with the up arrow icon.
7. When the desired temperature is reached, a long chime
will sound. Add the sealed food to the water bath at this
time and place lid on the vessel, aligning probe opening
with the probe. The unit will continue to display the probe
temperature for the remainder of the cook time.
8. If desired, set the timer. Press TIMER to begin the count-up
timer. The LCD screen will display “00:01” and begin counting up. Timer can only be
started after the probe temperature has been reached. Timer can be turned off at any
time by pressing the Timer button.
9. Press the START/STOP button at any time during cooking to turn off the unit. The
START/STOP button light will then turn off and the screen will ash “OFF” three times
along with three short chimes. Then “OFF” will become solid.
NOTES:
• If the START/STOP button is not pressed during cooking, the unit will stay on for a
maximum of 72 hours and then turn off automatically.
• The probe temperature can be adjusted at any time by turning the knob. The new
selected probe temperature will ash three times before it becomes solid.
21
Page 22

USING COOKING MODES
Tips
SOUS VIDE
• Most foods cooked Sous Vide are sealed in bags using a vacuum sealer, though a vacuum
sealer is not required for cooking Sous Vide. Sealed glass jars may also be used for
cooking Sous Vide and are especially well-suited for recipes that require a lot of liquid or
fat, such as egg or custard mixtures, beans, grains, yogurt, pickles, puddings, and other
desserts.
• If using a vacuum sealer, use heat-safe bags labeled as suitable for Sous Vide. Follow
vacuum sealer manufacturer directions for sealing.
• Any foods cooked for less than 8 hours can be sealed in heat-safe resealable plastic bags
without a vacuum sealer, using the water displacement method:
• Place food in bag and remove as much air as possible.
• Close bag leaving 1-inch (2.5-cm) opening at the top.
• Carefully submerge the bottom of bag in water until food is covered. The pressure of
the water will squeeze the air out of the bag.
• Do not allow any water to enter the bag.
• Gently squeeze any remaining air out of bag and seal.
• Any foods cooked with more than a small amount of liquid should not be vacuum-sealed.
Liquid could be sucked into vacuum sealer and cause damage.
• When cooking sh, do not vacuum bags tightly. About 75% vacuum is desirable, or use the
water displacement method.
• Food may be sealed in bags in advance and stored in the refrigerator overnight, or in the
freezer, to save time before cooking.
• To reduce the time required to heat the water to the proper temperature, ll the vessel with
warm tap water. If cooking at higher temperatures, ll the vessel with hot tap water. The
probe will provide a constant temperature reading of the water in the display. If the water is
hotter than selected temperature, add ice cubes to lower the water temperature.
• Frozen foods may be cooked Sous Vide without thawing rst, but adding frozen foods to
the water bath will lower water temperature. In general, an extra hour should be added to
total cooking time to allow food to fully thaw and reach the desired temperature.
• Food safety: Cooking Sous Vide is just as safe as traditional cooking methods even though
food is cooked at a lower temperature than in other cooking methods.
• The times and temperatures provided in the chart on pages 23–24 are what is
necessary for pasteurization.
• Food safety is determined by a combination of what you are cooking, how long you
cook it, and at what temperature.
• To minimize any risk of foodborne illness, always start with the freshest possible
foods and use safe handling practices.
• For more information on safe internal cooking and pasteurization temperatures,
consult www.foodsafety.gov or fsis.usda.gov.
22
Page 23

SOUS VIDE CHART
NOTES:
• For thicker meat, chicken, and fish, cooking time will be longer.
• Visit www.foodsafety.gov or fsis.usda.gov for more information on safe internal cooking
temperatures.
FOOD AND DONENESS TEMPERATURE TIME
Steak (1 to 1 1/4-inch [2.5- to 3.1-cm] thick)
Very rare to rare 125°F (52°C) 1 to 3 hours
Medium-rare
Medium 140°F (60°C) 1 to 4 hours
Medium-well 150°F (66°C) 1 to 4 hours
Well-done 155°F (68°C) 1 to 4 hours
Pork
Shoulder/Boston Butt, well-done, 3–4 pounds
(1.4–1.8 kg)
Tenderloin, medium, 1 1/2–2 pounds (0.7–0.9 kg) 145°F (63°C) 2 to 4 hours
Loin, medium, 2–3 pounds (0.9–1.4 kg) 150°F (66°C) 3 to 4 hours
Boneless chops, medium, 3/4-inch [1.9-cm] thick 140°F (60°C) 1 to 2 hours
Bone-in chops, medium, 1-inch [2.5-cm] thick 145°F (63°C) 1 to 2 hours
Bone-in ribs, 1 full rack, 3–4 pounds (1.4–1.8 kg) 165°F (74°C) 12 to 14 hours
Chicken, boneless white meat
(5 to 6 ounces [142–170 g])
Very soft and juicy 140°F (60°C) 1 to 3 hours
Tender and juicy 150°F (66°C) 1 to 3 hours
Firm and juicy 160°F (71°C) 1 to 3 hours
130°–135°F (54°–57°C)
185°F (85°C) 8 to 10 hours
1 to 4 hours
Chicken, boneless dark meat
(5 to 6 ounces [142–170 g])
Tender and juicy
167°–170°F (75°–77°C)
1 1/2 to 3 hours
23
Page 24

USING COOKING MODES
FOOD AND DONENESS TEMPERATURE TIME
Fish (5 to 6 ounces [142–170 g])
Very lightly cooked, medium-rare and tender
Medium, tender and flaky
Well-done, firm and flaky
Vegetables
Asparagus spears 185°F (85°C) 10 minutes
Beets, cut into 2-inch (5.1-cm) pieces 185°F (85°C) 2 1/2 to 3 hours
Broccoli (small flowerets) 185°F (85°C) 30 to 40 minutes
Carrots, cut into 2-inch (5.1-cm) pieces 185°F (85°C) 30 to 45 minutes
Cauliflower (small flowerets) 185°F (85°C) 1 to 1 1/2 hours
Cherry or grape tomatoes, halved 185°F (85°C) 20 to 30 minutes
Corn-on-the-cob 185°F (85°C) 30 to 45 minutes
Mushrooms, halved 195°F (91°C) 1 hour
Onions, cut into 2-inch (5.1-cm) pieces 185°F (85°C) 1 to 1 1/2 hours
Potatoes, cut into 2-inch (5.1-cm) pieces 185°F (85°C) 2 to 2 1/2 hours
Spinach leaves 185°F (85°C) 5 minutes
Squash, cut into 2-inch (5.1-cm) pieces 185°F (85°C) 1 to 1 1/2 hours
Tomatoes, halved 185°F (85°C) 20 to 30 minutes
Fruits
Apples, halved and cored 185°F (85°C) 1 1/2 hours
Pears, halved and cored 185°F (85°C) 1 1/2 hours
110°–120°F (43°–49°C)
122°–130°F (50°–54°C)
135°–140°F (57°–60°C)
30 to 40 minutes
30 to 40 minutes
30 to 40 minutes
24
Page 25

Care Recommendations
WARNING
Electrical Shock Hazard:
Do not clean with metal scouring pads. Pieces can break off pad and touch electrical
parts, causing a risk of electric shock.
Your multi-function cooker should be cleaned regularly for best performance and long
life. Regular cleaning will also reduce the risk of re hazard.
BEFORE CLEANING
1. Unplug multi-function cooker and let cool.
CLEANING
Control Panel
Display
Stainless Steel
Exterior
Non-Stainless
Steel Exterior
Interior of
Multi-Function
Cooker
Stainless Steel
Vessel
Probe Clean the probe with warm, soapy water. Rinse and dry thoroughly with a clean
Wipe with a slightly damp sponge. Protect display when cleaning any other
surfaces.
Use a nonabrasive stainless steel cleaner, such as Signature Polish, and apply
with a soft lint-free cloth. To bring out the natural luster, lightly wipe surface
with a water-dampened microber cloth followed by a dry polishing cloth.
Always follow the grain of stainless steel. Signature Polish can be ordered via
their website at www.signaturepolishonline.com.
Wipe outside of multi-function cooker with a damp cloth or spray with allpurpose cleaner. Wipe clean with a lint-free cloth. Do not use abrasive cleaners
or metal scouring pads.
Wipe inside walls and bottom of multi-function cooker with a damp, soapy
cloth.
Allow vessel to cool before washing. Hand-wash in warm soapy water with a
sponge, dishcloth, or plastic pad after each use, or wash in dishwasher.
Avoid using steel wool, steel scouring pads, or harsh detergents.
The vessel is dishwasher-safe.
High temperatures and harsh detergents can discolor the vessel.
Gold-brown or blue heat tints may result from overheating and/or mineral
residue. To clean, make a paste with water and a nonabrasive stainless
steel cleaner or baking soda. DO NOT USE A CLEANER THAT CONTAINS
CHLORINE BLEACH. Apply the paste to the vessel with a sponge or cloth
while it is still warm and rub in one direction. Wash again, rinse, and dry.
Although stainless steel is very durable, it is not indestructible. Pitting may
result if undissolved salt is allowed to remain in the bottom of the vessel. Do
not allow acidic foods or foods that have been seasoned to remain in cookware
for long periods of time.
cloth.
25
Page 26

Troubleshooting
“Prb” is flashing.
• Probe is not inserted. Please check connection.
“Err 1” is flashing.
• Probe is broken. Contact our customer care center.
“Err 3” is flashing.
• Probe is plugged in during MANUAL, MEAL TIMER, RICE or SAUTE/SEAR modes.
Remove probe.
“Err 4” or “Err 5” is flashing.
• Cooking temperature control is broken. Contact our customer care center.
“Err 6” is flashing.
• Cooking vessel is not in place or not seated correctly. Insert vessel or adjust in cooking
unit.
Wolf, Wolf & Design, Wolf Gourmet, W & Design and the color red as applied to knobs are registered trademarks and service marks of
Wolf Appliance, Inc. Sub-Zero, Sub-Zero & Design, Dual Refrigeration, The Living Kitchen, Great American Kitchens, The Fine Art of
Kitchen Design, and Ingredients are registered trademarks and service marks of Sub-Zero, Inc. (collectively, the “Company Marks.” )
All other trademarks or registered trademarks are property of their respective owners in the United States and other countries.
26
Page 27

Wolf Gourmet Residential Limited Warranty
FOR RESIDENTIAL USE
LIMITED FIVE YEAR WARRANTY
This Wolf Gourmet product warranty applies only to appliances. Wolf Gourmet warrants
appliances to be free from defects in materials or workmanship for a period of ve (5)
years from the date of original purchase.
LIFETIME LIMITED WARRANTY
This Wolf Gourmet product warranty applies only to cookware and cutlery products.
Wolf Gourmet warrants cookware and cutlery to be free of defects in materials or
workmanship for the lifetime of the product. Minor imperfections and discolorations
are normal and are not considered defects.
TERMS APPLICABLE TO EACH WARRANTY
This Wolf Gourmet Residential Limited Warranty applies to appliances, cookware
and cutlery purchased and used in the U.S. This is the only express warranty for this
product and is in lieu of any other warranty.
During the warranty period, your exclusive remedy is repair or replacement of the
product or any component found to be defective, at our option. All service provided
by Wolf Gourmet under this warranty must be performed by Wolf Gourmet factorycertied service, unless otherwise approved in advance by Wolf Gourmet, and all
service will be provided during normal business hours.
This warranty does not cover wear from normal use, use not in conformity with the
printed directions, or damage to the product resulting from negligence, accident,
alteration, abuse, misuse, or improper service or repair. This warranty is void if the
product is used for other than residential use or subjected to any voltage or waveform
other than as specied on the rating label (e.g., 120 V ~ 60 Hz). This warranty extends
only to the original consumer purchaser or initial gift recipient.
Wolf Gourmet excludes all claims for special, incidental, and consequential damages
caused by breach of express or implied warranty. All liability is limited to the amount of
the purchase price. EVERY IMPLIED WARRANTY, INCLUDING ANY WARRANTY OF
MERCHANTABILITY OR FITNESS FOR A PARTICULAR PURPOSE, IS DISCLAIMED
EXCEPT TO THE EXTENT PROHIBITED BY LAW, IN WHICH CASE SUCH WARRANTY
IS LIMITED TO THE DURATION OF THIS WRITTEN WARRANTY. This warranty gives
you specic legal rights. You may have other legal rights that vary depending on
where you live. Some states do not allow limitations on implied warranties or special,
incidental or consequential damages, so the foregoing limitations may not apply to you.
To make a warranty claim and receive the name of the Wolf Gourmet factorycertied service personnel nearest to you, please contact Wolf Appliance, Inc., PO
Box 44848, Madison, WI 53744; or visit the contact & support section of our website
at wolfgourmet.com/warranty; or email us at customerservice@subzero.com; or call
800.222.7820. For faster service, please locate the model, type and series numbers on
your product’s rating label.
27
Page 28

MIJOTEUSE MULTIFONCTIONS WOLF GOURMET
Bienvenue
Nous souhaitons vous remercier d’avoir fait l’achat de ce
produit Wolf Gourmet. Nous serions ravis de faire partie
de votre cuisine pour les années à venir. Wolf appartient
à la troisième génération d’une entreprise familiale qui a
un intérêt particulier dans la préparation de vos aliments.
Puisqu’il s’agit d’une question de famille, Wolf porte une
attention spéciale aux détails et se dévoue à la création
de produits exceptionnels sans aucun compromis. Nous
avons bâti notre entreprise et notre réputation sur le soutien
que nous apportons aux cuisiniers à la maison, an qu’ils
obtiennent les meilleurs résultats possible. Grâce au contrôle
précis qu’offre Wolf Gourmet, le plat que vous projetez est le
plat que vous servirez.
28
Page 29

Table des matières
30
Précautions de sécurité
32
Caractéristiques et pièces de
lamijoteuse multifonctions Wolf
Gourmet
34
Entrée en matière
37
Utilisation des modes de cuisson
53
Recommandations d’entretien
55
Dépannage
56
Garantie Wolf Gourmet
Service à la clientèle
En tant que propriétaire d’un appareil
Wolf Gourmet, vous pouvez compter
sur notre appui. Notre centre de
service à la clientèle est ouvert à toute
heure du jour et de la nuit, et ce, toute
la semaine. En outre, il compte sur
des experts des produits se trouvant à
notre siège de Madison au Wisconsin.
Si le besoin se fait sentir, vous n’avez
qu’à composer le 800.222.7820
pour parler à un de nos experts. Au
Mexique, veuillez appeler le service
à la clientèle au 1 800 400-4372,
du lundi au vendredi, de 9 h à 19 h.
Nous sommes certains que le présent
manuel répondra aux interrogations
que vous pourriez avoir concernant
les fonctions, l’utilisation et l’entretien
de votre produit Wolf Gourmet.
Toutefois, si vous avez d’autres
questions, veuillez nous contacter par
téléphone ou nous visiter en ligne sur
wolfgourmet.com.
Enregistrement de votre
produit
Nous vous encourageons fortement à
enregistrer votre appareil Wolf Gourmet.
Il est important pour nous que vous
puissiez tirer le meilleur de vos produits.
En vous enregistrant, vous pourrez :
• Devenir un initié culinaire Wolf
Gourmet.
• Obtenir un soutien continu de Wolf
Gourmet.
• Activer votre garantie et enregistrer
votre achat.
• Être alerté en cas de mises à jour du
service.
• Recevoir des courriels occasionnels
pour vous aider à prendre soin et à
proter de vos appareils.
Pour enregistrer votre produit, visitez le
site wolfgourmet.com/registration ou
appelez au 800.222.7820. Au Mexique,
veuillez visiter le site wolfgourmet.com
.mx ou appelez au 01 800 400 4372.
29
Page 30

PRÉCAUTIONS DE SÉCURITÉ
PRÉCAUTIONS IMPORTANTES
Pour utiliser un appareil électroménager, vous devez toujours prendre
des mesures élémentaires de sécurité pour réduire le risque d’incendie,
d’électrocution et/ou de blessure corporelle, en particulier les mesures
suivantes :
• Lire toutes les instructions.
• Cet appareil n’est pas destiné à être utilisé par des personnes (y compris
les enfants) dont les capacités physiques, sensorielles ou mentales sont
réduites, ou manquant d’expérience et de connaissance, sauf si elles sont
étroitement surveillées et instruites sur l’utilisation de l’appareil par une
personne responsable de leur sécurité.
• Une surveillance étroite est requise pour tout appareil utilisé par ou près des
enfants. Surveiller que les enfants ne jouent pas avec l’appareil.
• Ne pas toucher aux surfaces chaudes. Utiliser des gants de cuisinier.
• Pour éviter l’électrocution, ne pas immerger le cordon, la che, ni la base
dans l’eau ou tout autre liquide.
• Débrancher de la prise de courant à la n de l’utilisation et avant le
nettoyage. Laisser refroidir avant d’insérer ou d’enlever des pièces.
• Ne pas faire fonctionner un appareil électroménager avec un cordon ou une
che endommagée, ou lorsque l’appareil ne fonctionne pas bien ou a été
échappé ou endommagé d’une manière quelconque. Le remplacement et la
réparation du cordon d’alimentation doivent être faits par le fabricant, son
agent de service ou toute personne qualiée de façon à éviter tout danger.
Appeler le numéro de service à la clientèle fourni pour des renseignements
concernant l’examen, la réparation ou l’ajustement.
• L’utilisation d’accessoires non recommandés par le fabricant de l’appareil
représente un risque de blessures.
• Ne pas utiliser à l’extérieur.
• Ne pas laisser le cordon pendre du bord d’une table ou d’un comptoir, ou
toucher des surfaces chaudes y compris la cuisinière.
• Ne pas placer l’appareil sur ou près d’un brûleur chaud à gaz ou électrique
ou dans un four chauffé.
• Faire preuve d’une prudence extrême lors du déplacement d’un appareil
contenant de l’huile chaude ou d’autres liquides chauds.
• Pour débrancher la mijoteuse multifonctions, appuyer sur le bouton START/
STOP (marche/arrêt) pour l’éteindre puis débrancher la che de la prise de
courant.
• Utiliser uniquement sur un comptoir.
• AVERTISSEMENT ! Les aliments renversés peuvent causer des brûlures
graves. Garder l’appareil et son cordon éloignés des enfants. Ne jamais
disposer le cordon près du bord d’un comptoir et ne jamais utiliser une prise
de courant sous le comptoir et ne jamais utiliser de rallonge.
• Cet appareil n’est pas conçu pour frire les aliments.
• Ne pas utiliser l’appareil autrement que pour l’usage auquel il est destiné.
CONSERVER CES INSTRUCTIONS
30
Page 31

PRÉCAUTIONS DE SÉCURITÉ
Autres consignes de sécurité pour le
consommateur
Cet appareil est conçu pour un usage domestique seulement.
AVERTISSEMENT
fourni avec une fiche à prise de terre (3 broches) pour réduire le risque de
choc électrique. La fiche ne tient que dans un sens dans une prise mise à
la terre. Ne pas transformer le dispositif de sécurité de la fiche en modifiant
celle-ci de quelconque façon ou en utilisant un adaptateur. Si vous ne pouvez
pas insérer la fiche dans la prise, faire remplacer la prise par un électricien.
Risque de choc électrique : Cet appareil est
31
Page 32

CARACTÉRISTIQUES ET PIÈCES DE LA MIJOTEUSE MULTIFONCTIONS WOLF GOURMET
PIÈCES ET CARACTÉRISTIQUES
1
Couvercle
1a Ouverture pour sonde
2
Support pour cuisson sous vide
3
Récipient en acier inoxydable
4
Afcheur du panneau de commande
5
Bouton BACK
6
Bouton de Start/Stop (marche/arrêt)
7
Sélecteur de mode
8
Plaque signalétique
9
Bouton de durée/température
10
Bouton de minuterie
11
Base
12
Sonde
12a Sonde de température – insérée
dans l’aliment ou l’eau
12b Fiche – insérée dans la prise pour sonde
13
Prise pour sonde
ATTENTION : SURFACE CHAUDE.
Les surfaces extérieures et les poignées
deviendront chaudes. Utiliser des
gants de cuisinier ou laisser refroidir
complètement l’appareil avant de
déplacer ou retirer des pièces.
1
1a
32
2
3
4
5
6
7
8
Mijoteuse multifonctions
Wolf Gourmet
12
12a
12b
11
10
9
13
Page 33

Pièces et caractéristiques
1. Couvercle : Le couvercle doit être utilisé avec les modes
MANUAL (manuel), MEAL TIMER (minuterie de cuisson),
PROGRAM (programme), RICE (riz) et SOUS VIDE. Ce
couvercle peut être utilisé avec le mode SAUTE/SEAR
(sauter/saisir) pendant le préchauffage ou pour éviter les
éclaboussures. Ce couvercle est lavable au lave-vaisselle
et sécuritaire pour le four jusqu’à une température de
450 °F (232 °C).
a. Ouverture pour sonde : L’ouverture pour sonde est l’endroit
où la sonde doit être placée si l’on utilise la sonde avec le
mode sous vide et certains modes de cuisson lente.
2. Support pour sous vide : Le support pour cuisson sous vide est amovible et utilisé avec le
mode SOUS VIDE, si désiré, pour séparer les sacs hermétiques individuels d’aliments et
assurer un chauffage adéquat de l’eau.
3. Récipient en acier inoxydable : Le récipient en acier inoxydable
doit être inséré dans la mijoteuse pour que ce dernier
fonctionne. Le récipient peut aussi être utilisé dans un four ou
sur une cuisinière à gaz, électrique ou à induction. Ce récipient
est sécuritaire jusqu’à une température de 450 °F (232 °C) et
lavable au lave-vaisselle.
4. Afcheur du panneau de commande : L’afcheur indique
les réglages de température et de durée, les réglages de
température de la sonde, les messages d’erreur, les icônes
de la sonde et le logo Wolf Gourmet lorsque l’appareil est en
mode de veille.
5. Bouton BACK : Appuyer sur le bouton BACK pour retourner à
l’étape précédente et modier le dernier réglage enregistré.
6. Bouton Start/Stop : Appuyer sur le bouton START/STOP
(marche/arrêt) pour mettre l’appareil en marche ou annuler
le mode sélectionné. Le témoin s’allumera en rouge et un
signal sonore se fait entendre dès que le cycle commence. Ce
bouton est aussi utilisé pour activer ou désactiver la minuterie.
7. Sélecteur de mode : Tourner le sélecteur jusqu’au mode
de cuisson désiré : MANUAL (manuel), MEAL TIMER (minuterie de cuisson), PROGRAM
(programme), RICE (riz), SAUTE/SEAU (sauter/saisir) ou SOUS VIDE.
33
Page 34

8. Plaque signalétique : Le numéro de modèle et les informations de caractéristiques
nominales se trouvent sous la base de la mijoteuse multifonctions.
9. Bouton Time/Temperature : Ce bouton est utilisé pour régler la durée et la température des
différents modes de cuisson.
10. Bouton Timer : Le bouton TIMER (minuterie) est utilisé avec les modes PROGRAM
(programme) et SOUS VIDE.
11. Base : Le récipient en acier inoxydable doit être déposé dans la base an que la mijoteuse
multifonctions fonctionne.
12. Sonde :
a. Sonde de température – Cette sonde longue avec une extrémité pointue est une sonde
de température qui doit être insérée dans l’eau avec le mode SOUS VIDE ou pour
lire la température interne et assurer une cuisson parfaite avec le mode PROGRAM
(programme).
b. Fiche – La che de la sonde doit être branchée dans la prise pour sonde située sur le
côté droit de lamijoteuse multifonctions.
13. Prise pour sonde : La prise pour sonde est située au bas et à droite de la mijoteuse
multifonctions et c’est à cet endroit que la sonde doit être branchée.
Entrée en matière
CHOIX D'UN MODE DE CUISSON
Modes de cuisson lente :
1. Le mode MANUAL (manuel) fonctionne comme une mijoteuse non programmable
classique et offre quatre réglages d’intensité de chaleur : WARM (CHAUD), LOW
(basse), MEDIUM (moyenne) ou HIGH (élevée). La minuterie indique le compte à
rebours et la mijoteuse multifonctions reste en marche tant que le bouton START/
STOP (marche/arrêt) n’est pas enfoncé ou s’éteint automatiquement après
24 heures.
REMARQUE : WARM (chaud) ne doit pas être utilisé pour la cuisson. Il peut être
utilisé seulement lorsque la cuisson est terminée an de garder les aliments au
chaud.
2. Le mode MEAL TIMER (minuterie de cuisson) permet de régler le nombre d’heures
de cuisson selon le repas à servir et sans égard aux instructions de recette.
Aucune intensité de chaleur n’est sélectionnée. Ce mode règle la température
selon l’heure du service. Cette caractéristique est bien adaptée aux recettes à
longue durée de cuisson lente comme pour les gros morceaux de viande, les
combinaisons de viande et légumes, les soupes et les ragoûts. Ce mode passe
automatiquement à WARM (chaud) à la n du cycle de cuisson.
34
Page 35

3. Le mode PROGRAM (programme) offre trois options permettant de personnaliser
l’expérience de cuisson. Il est idéal lorsque vous êtes à l’extérieur de la maison
lorsque les aliments sont cuits. La mijoteuse passera automatiquement à WARM
(chaud) après l’une ou l’autre de ces trois options.
a. 1 PROGRAM – Pour sélectionner une intensité de chaleur et une durée pour
un cycle complet de cuisson.
b. PROGRAMME AVEC SONDE –Sélectionner une intensité de chaleur et la
sonde pour cuire des aliments selon une température interne donnée. Cette
méthode est parfaite pour cuire des aliments pouvant surcuire facilement
comme les coupes maigres de viande ou pour effectuer la lecture de la
température an de vérier le stade de cuisson. La mijoteuse passera
automatiquement au mode WARM dès que la température désirée est atteinte.
c. 2 PROGRAMMES – Sélectionner deux intensités de chaleur et de durées
différentes pour un cycle de cuisson. Par exemple, programmer la cuisson à
intensité HIGH (élevée) pendant 4 heures puis à intensité LOW (basse) pendant
3 heures. Cette méthode est idéale pour diminuer la durée de cuisson des
aliments comme les viandes à braiser an de les réchauffer rapidement à
intensité HIGH (élevée) puis d’attendrir la viande à intensité LOW (basse).
Autres modes de cuisson :
4. Le mode RICE (riz) offre deux réglages : 1 et 2. Le réglage 1 est utilisé pour le riz blanc.
Le réglage 2 est utilisé pour le riz brun. Consulter le tableau de cuisson du riz à la page 46
sous « Utilisation des modes de cuisson ».
5. Le mode SAUTE/SEAR (sauter/saisir) offre trois réglages de température : LOW (basse),
MEDIUM (moyenne), et HIGH (élevée). Utiliser ce mode pour sauter des aliments avant la
cuisson lente et après la cuisson sous vide ou pour les recettes demandant de faire sauter
ou saisir les aliments comme seul mode de cuisson. La durée de cuisson maximum est de
45 minutes, y compris le préchauffage.
6. Le mode SOUS VIDE est méthode de cuisson pour des aliments ensachés sous vide
selon une température précise dans un bain d’eau et un réglage de température entre
100 et 200 °F (38 et 93 °C). La sonde de température est utilisée pour contrôler la
température de l’eau. Cette méthode assure des résultats uniformes et prévisibles tout en
évitant la surcuisson. Avec ce mode, les aliments sont assaisonnés puis emballés dans
des sacs ou des pots à l’épreuve de la chaleur. Le récipient est rempli d’eau chaude et les
aliments scellés sont mis dans le bain d’eau lorsque la température désirée est atteinte.
35
Page 36

du cycle
(chaud) à la n
Passe à WARM
durée par
l’utilisateur
Sélection de
X X
Sélection
l’utilisateur
chaleur par
intensité de
Description Idéal pour
X
Les recettes traditionnelles à cuisson
lente, les aliments à surveiller ou pour
proter d’une cuisson longue. Cuisson
jusqu’à ce que le bouton START/STOP
(marche/arrêt) soit enfoncé pour jusqu’à
24 heures. Utiliser le réglage Warm (chaud)
pour garder les aliments au chaud.
Pour éliminer l’incertitude du réglage
de température à choisir. Choisir la
durée de cuisson et la mijoteuse règlera
automatiquement la chaleur an d’éviter
la surcuisson. Idéal pour les gros
morceaux de viande ou de volaille et les
combinaisons de viande et légumes.
X X X
Respecter l’intensité de chaleur et la
durée spéciques d’une recette. Idéal
pour les petites pièces de viande, de
volaille ou de poisson, les entrées,
X X
casseroles et desserts.
Les aliments à cuire selon une
température précise comme le poulet et
certaines coupes de porc et de boeuf.
Pour personnaliser les recettes selon
un horaire ou préférence. Par exemple,
X X X
pour accélérer la durée de cuisson et
proter en même temps des avantages
d’une cuisson lente pour attendrir la
viande – sélectionner « 1 Program » à
intensité HIGH (élevée) pendant 2 heures
et « 2 Program » à intensité LOW (basse)
pendant 6 heures.
(basse), Medium (moyenne) ou High
(élevée)
MODES DE CUISSON LENTE
36
Manual Sélectionner Warm (chaud), Low
Sélectionner le nombre d’heures
jusqu’au service
Minuterie de
cuisson
du cycle
1 programme Régler 1 intensité de chaleur et durée
Sélectionner la température d’aliments
désirée.
1 programme
avec sonde
2 programmes Sélectionner 2 intensités de chaleur et
durées de cycles
Page 37

Utilisation des modes de cuisson
MANUAL (manuel)
Le mode MANUAL (manuel) fonctionne comme une mijoteuse non programmable classique et
offre quatre réglages d’intensité de chaleur : WARM (chaud), LOW (basse), MEDIUM (moyenne)
ou HIGH (élevée). La minuterie indique le compte à rebours et la mijoteuse multifonctions
reste en marche tant que le bouton START/STOP (arrêt/marche) n’est pas enfoncé ou s’éteint
automatiquement après 24 heures.
REMARQUE : WARM (chaud) ne doit pas être utilisé pour la
cuisson. Il peut être utilisé seulement lorsque la cuisson est
terminée an de garder les aliments au chaud.
1. Mettre les aliments dans le récipient et couvrir avec le
couvercle.
2. Tourner le sélecteur jusqu’à MANUAL (manuel). Les réglages
d’intensité de chaleur WARM LOW MED HIGH (chaud,
basse, moyenne, élevée) clignoteront à l’afcheur ACL.
3. Tourner le bouton vers la gauche ou la droite pour
sélectionner l’intensité de chaleur. Relâcher le bouton
lorsque l’intensité de chaleur a été sélectionnée. Le réglage
et le bouton START/STOP (marche/arrêt) clignoteront.
4. Appuyer sur le bouton START/STOP (marche/arrêt) pour
commencer la cuisson. Un long signal sonore se fera
entendre et le bouton START/STOP (marche/arrêt) reste
allumé. Le réglage de température sera xe et la minuterie
commencera le comptage progressif.
REMARQUE : Pendant le cycle, l’utilisateur peut régler l’intensité de chaleur en tout
temps en tournant le bouton. Le nouveau réglage sélectionné clignotera trois fois puis
deviendra xe et la température se réglera. Il n’est pas nécessaire d’appuyer sur le
bouton START/STOP (marche/arrêt).
5. Appuyer sur le bouton START/STOP (marche/arrêt) en tout temps pour terminer
la cuisson et éteindre l’appareil. Le mot « OFF » (arrêt) clignotera à l’afcheur et la
mijoteuse émettra trois signaux sonores.
37
Page 38

UTILISATION DES MODES DE CUISSON
MEAL TIMER (minuterie de cuisson)
Le mode MEAL TIMER (minuterie de cuisson) permet de régler le nombre d’heures de
cuisson selon le repas à servir et sans égard aux instructions de recette. Aucune intensité
de chaleur n’est sélectionnée. Ce mode règle la température selon l’heure du service.
Cette caractéristique est bien adaptée aux recettes à longue durée de cuisson lente
comme pour les gros morceaux de viande, les combinaisons de viande et légumes, les
soupes et les ragoûts. Ce mode passe automatiquement à WARM (chaud) à la n du
cycle de cuisson.
1. Mettre les aliments dans le récipient et couvrir avec le couvercle.
2. Tourner le sélecteur jusqu’à MEAL TIMER (minuterie de cuisson).
3. La durée de cuisson minimum de 4 heures et maximum de
12 heures par défaut clignotera à l’afcheur ACL.
4. Régler la durée de cuisson en tournant le bouton vers
la droite pour augmenter la durée ou vers la gauche
pour diminuer la durée de cuisson. La durée se règle par
incréments de 30 minutes et selon une durée de cuisson
entre un minimum de 4 heures et un maximum de 12 heures.
5. Relâcher le bouton dès que la durée de cuisson est réglée.
La durée de cuisson sera afchée et le bouton START/STOP
(marche/arrêt) clignotera.
6. Appuyer sur le bouton START/STOP (marche/arrêt) pour
commencer la cuisson. Un long signal sonore se fera
entendre et le bouton START/STOP (marche/arrêt) restera
allumé. La durée de cuisson sélectionnée sera xe et la
minuterie commencera le compte à rebours.
7. Lorsque la durée de cuisson est écoulée, un long signal
sonore se fera entendre. « COOK TIME » (durée de cuisson) et « 00:00 » s’éteindront.
L’appareil passera au réglage d’intensité « WARM » (chaud) et la minuterie
commencera le comptage progressif. Après 4 heures au réglage WARM (chaud),
l’appareil s’éteindra automatiquement.
8. Appuyer sur le bouton START/STOP (marche/arrêt) en tout temps pour terminer
la cuisson et éteindre l’appareil. Le mot « OFF » (arrêt) clignotera à l’afcheur et la
mijoteuse émettra trois signaux sonores.
38
Page 39

MODES DE PROGRAMMES
Le mode PROGRAM offre 3 options de cuisson lente : 1) Programmer un réglage de
température et de durée de cuisson pour 1 cycle et 2) Programmer pour deux réglages de
température et de durées de cuisson et 3) avec la sonde pour régler la température nale
désirée.
1 PROGRAM (1 programme)
Sélectionner un réglage de température et de durée pour tout le cycle de cuisson. Ce mode
passera automatiquement à WARM (chaud) à la n du cycle.
1. Mettre les aliments dans le récipient et couvrir avec le couvercle.
2. Tourner le sélecteur jusqu’à PROGRAM (programme). Les mots
« 1 PROGRAM » et « 2 PROGRAMS » clignoteront à l’afcheur
ACL.
3. Tourner le bouton vers la gauche pour sélectionner « 1
PROGRAM ». Relâcher le bouton dès que « 1 PROGRAM » est
sélectionné. Le réglage clignotera trois fois avant de devenir
xe.
REMARQUE : Si le bouton START/STOP [marche/arrêt] est
enfoncé avant la n du clignotement, le programme passera à la
prochaine étape de procédure de réglage.
4. Dès que le mot « 1 Program » est xe, les réglages de
température « LOW MED HIGH » (basse, moyenne, élevée)
clignoteront à l’afcheur. Tourner le bouton vers la gauche ou la
droite pour sélectionner le réglage d’intensité de température
désiré, soit LOW MEDIUM ou HIGH (basse, moyenne ou
élevée). Relâcher le bouton dès que le réglage de température
est sélectionné et le réglage sélectionné clignotera trois fois
avant de devenir xe.
REMARQUE : Pour retourner au réglage précédent en tout temps,
appuyer une fois sur le bouton BACK.
5. Dès que le réglage de température sélectionné est xe, les mots
« COOK TIME » (durée de cuisson) et « 00:00 » s’afcheront.
Régler la durée de cuisson en tournant le bouton vers la droite
pour augmenter la durée ou vers la gauche pour diminuer
la durée de cuisson. La durée se règle par incréments de
30 minutes et selon une durée de cuisson entre un minimum de
4 heures et un maximum de 12 heures. Relâcher le bouton dès
que la durée est réglée. La durée et le bouton START/STOP
(marche/arrêt) clignoteront.
6. Appuyer sur le bouton START/STOP (marche/arrêt) pour
commencer la cuisson. Un long signal sonore se fera entendre
et le bouton START/STOP (marche/arrêt) reste allumé. La durée
de cuisson sélectionnée sera xe et la minuterie commencera le
compte à rebours.
7. Lorsque la durée de cuisson est écoulée, un long signal sonore
se fera entendre. « COOK TIME » (durée de cuisson » et « 00:00
» s’éteindront. L’appareil passera au réglage « WARM »(chaud)
et la minuterie commencera le comptage progressif. Après
4 heures au réglage WARM (chaud), l’appareil s’éteindra
automatiquement.
39
Page 40

UTILISATION DES MODES DE CUISSON
8. Appuyer sur le bouton START/STOP (marche/arrêt) en tout temps pour terminer la cuisson
et éteindre l’appareil. Le mot « OFF » (arrêt) clignotera à l’afcheur et la mijoteuse émettra
trois signaux sonores.
REMARQUE : Pendant le cycle, l’utilisateur peut régler l’intensité de chaleur en tout temps
en tournant le bouton. Le nouveau réglage sélectionné clignotera trois fois puis deviendra xe
et la température se réglera. Il n’est pas nécessaire d’appuyer sur le bouton START/STOP
(marche/arrêt). Le réglage de durée peut être modié en tout temps en appuyant sur le bouton
TIMER (minuterie) an de réactiver la durée clignotante à l’afcheur et en tournant le bouton
pour régler la durée de cuisson.
2 PROGRAMS (2 programmes)
Sélectionner deux réglages de température et de durées de cuisson pour un cycle de
cuisson. Par exemple, programmer la cuisson à intensité HIGH (élevée) pendant 4 heures
puis à intensité LOW (basse) pendant 3 heures. Ce programme est idéal pour écourter
la durée de cuisson des aliments comme les viandes à braiser à chauffer rapidement à
intensité HIGH (élevée) puis passer à intensité LOW (basse) pour attendrir la viande.
1. Mettre les aliments dans le récipient et couvrir avec le couvercle.
2. Tourner le sélecteur jusqu’à PROGRAM (programme). Les mots « 1 PROGRAM » et « 2
PROGRAMS » clignoteront à l’afcheur ACL.
3. Tourner le bouton vers la gauche pour sélectionner
« 2 PROGRAMS ». Relâcher le bouton dès que
« 2 PROGRAMS » est sélectionné. Le réglage clignotera
trois fois avant de devenir xe. REMARQUE : Si le bouton
START/STOP [marche/arrêt] est enfoncé avant la n du
clignotement, le programme passera à la prochaine étape
de procédure de réglage.
40
Page 41

4. Dès que le mot « 2 PROGRAMS » est xe, les mots « CYCLE
1 » clignoteront à l’afcheur et les réglages de température
s’afcheront. Tourner le bouton vers la gauche ou la droite
pour sélectionner le réglage de température désiré, soit LOW,
MEDIUM ou HIGH (basse, moyenne ou élevée). Relâcher le bouton dès que le réglage
de température est sélectionné et le réglage sélectionné clignotera trois fois avant de
devenir xe.
REMARQUE : Pour retourner au réglage précédent en tout temps, appuyer une fois sur
le bouton BACK.
5. Dès que le réglage de température sélectionné est xe,
les mots « SETTING TIME » (réglage de durée) et « 00:00 »
s’afcheront. Régler la durée de cuisson en tournant le bouton
vers la droite pour augmenter la durée ou vers la gauche pour
diminuer la durée de cuisson. La durée se règle par incréments de 30 minutes et selon
une durée de cuisson maximum de 12 heures. Relâcher le bouton dès que la durée
est réglée et la durée clignotera trois fois avant de devenir xe.
6. Dès que l’afcheur cesse de clignoter, le mot « CYCLE 2 »
et les réglages de température « WARM LOW MED HIGH »
(chaud, basse, moyenne, élevée) apparaîtrontà l’afcheur.
Tourner le bouton vers la gauche ou la droite pour sélectionner
l’intensité de chaleur WARM (chaud), LOW (basse), MEDIUM (moyenne) ou HIGH
(élevée). Relâcher le bouton dès que le réglage de température est sélectionné; le
réglage clignotera trois fois avant de passer au xe.
7. Dès que le réglage de température sélectionné est xe,
les mots « SETTING TIME » (réglage de durée) et « 00:00 »
s’afcheront. Régler la durée de cuisson en tournant le bouton
vers la droite pour augmenter la durée ou vers la gauche
pour diminuer la durée de cuisson. La durée se règle par
incréments de 30 minutes et selon une durée de cuisson
maximum de 12 heures. Relâcher le bouton dès que la
durée est sélectionnée. Le mot TIME (durée) et le bouton
START/STOP (marche/arrêt) clignoteront.
REMARQUE : La durée de cuisson maximum des cycles 1 et 2
est de 24 heures.
8. Appuyer sur le bouton START/STOP (marche/arrêt)
pour commencer la cuisson. Un long signal sonore
retentira et le bouton START/STOP (marche/arrêt) restera
allumé. L’afcheur indiquera « CYCLE 1 », le réglage de
température sélectionné ainsi que la durée du cycle de
cuisson et la durée de cuisson totale.
41
Page 42

UTILISATION DES MODES DE CUISSON
9. Lorsque la durée du cycle 1 est écoulée, un court signal sonore retentira pour indiquer
la n du cycle 1. L’appareil passera au cycle 2 et les réglages de température et de
durée s’adapteront aux réglages du cycle 2.
10. Un long signal sonore retentira dès la n du cycle 2. Les mots « COOK TIME » (durée
de cuisson) et « 00:00 » disparaitront. L’appareil passera au réglage WARM (chaud)
et la minuterie commencera le compte à rebours. Après 4 heures à WARM (chaud),
l’appareil s’éteindra automatiquement.
11. Appuyer sur le bouton START/STOP (marche/arrêt) en tout temps pour terminer
la cuisson et éteindre l’appareil. Le mot « OFF » (arrêt) clignotera à l’afcheur et la
mijoteuse émettra trois signaux sonores.
REMARQUE : Pendant le cycle, l’utilisateur peut régler l’intensité de température en
tout temps en tournant le bouton. Le nouveau réglage sélectionné clignotera trois fois
puis deviendra xe et la température s’ajustera. Il n’est pas nécessaire d’appuyer sur
le bouton START/STOP (marche/arrêt). Le réglage de durée peut être modié en tout
temps en appuyant sur le bouton TIMER (minuterie) an de réactiver la durée clignotant à
l’afcheur et en tournant le bouton pour régler la durée de cuisson.
42
Page 43

PROGRAMME AVEC SONDE
Utiliser la sonde pour cuire des aliments selon une température interne donnée. Pour plusieurs
aliments, comme les gros morceaux de viande, la température des aliments est la meilleure
méthode pour obtenir une cuisson parfaite. Sélectionner la température interne désirée des
aliments et la mijoteuse passera automatiquement à WARM (chaud) dès que la température
est atteinte.
La cuisson avec sonde ne peut être utilisée qu’avec 1 PROGRAMME.
1. Insérer la che de la sonde dans la prise pour sonde située sur
le côté droit de la mijoteuse multifonctions. Insérer la sonde de
température dans la partie la plus épaisse de l’aliment. Couvrir le
récipient avec le couvercle en prenant soin de faire passer le l de
la sonde dans l’ouverture du couvercle.
2. Tourner le sélecteur jusqu’à PROGRAM (programme). L’afcheur
ACL indiquera le réglage « 1 PROGRAM » (1 programme).
3. Dès que le mot « 1 PROGRAM » est xe, les réglages de température « LOW MED HIGH »
(basse, moyenne, élevée) clignoteront à l’afcheur. Tourner le bouton vers la gauche ou
la droite pour sélectionner le réglage de température désiré, soit LOW, MEDIUM ou HIGH
(basse, moyenne ou élevée). Relâcher le bouton dès que le réglage de température est
sélectionné et le réglage sélectionné clignotera trois fois avant de devenir xe.
REMARQUE : Pour retourner au réglage précédent en tout temps, appuyer une fois sur le
bouton BACK.
4. Dès que le réglage de température est xe, l’icône de la sonde
clignotera et la température de « 155F » par défaut s’afchera.
Régler la température en tournant le bouton vers la droite pour
augmenter ou vers la gauche pour diminuer la température
désirée. L’échelle de température est de 100 à 200 °F. Relâcher
le bouton dès que la température de la sonde est réglée et
l’afcheur et le bouton START/STOP (marche/arrêt) clignoteront
et émettront un signal sonore.
REMARQUE : Les mots « COOK TIME » (durée de cuisson) et
« 00:00 » apparaîtront à l’afcheursi la sonde n’est pas branchée.
5. Appuyer sur le bouton START/STOP (marche/arrêt) pour
commencer la cuisson. Un long signal sonore se fera entendre
et le bouton START/STOP (marche/arrêt) reste allumé. Dès
que le cycle commence, le réglage de température, la lecture
de température actuelle de la sonde et une èche vers le haut
s’afcheront.
6. Lorsque la température désirée est atteinte, un long signal
sonore se fait entendre. Les réglages de la sonde disparaitront.
L’appareil passera à WARM (chaud) et la minuterie commencera
le comptage progressif. Après 4 heures à WARM (chaud),
l’appareil s’éteint automatiquement.
7. Appuyer sur le bouton START/STOP (marche/arrêt) en tout temps pour arrêter la cuisson et
éteindre l’appareil. Le mot « OFF » (arrêt) clignotera à l’afcheur et la mijoteuse émettra 3
signaux sonores.
REMARQUE : Durant le cycle, la température peut être réglée en tout temps en tournant le
bouton. Le nouveau réglage de température sélectionné de la sonde clignotera 3 fois avant de
devenir xe. Il n’est pas nécessaire d’appuyer sur le bouton START/STOP (marche/arrêt.)
43
Page 44

UTILISATION DES MODES DE CUISSON
Conseils
CUISSON LENTE
• Sélectionner les modes MANUAL (manuel), MEAL TIMER (minuterie de cuisson) ou
PROGRAM (programme). Consulter les pages 37 à 43 pour lire les descriptions.
• Le réglage de température HIGH (élevée) est le meilleur pour les aliments demandant une
chaleur élevée et sans surcuisson comme les pommes de terre, les haricots, casseroles,
chilis, soupes et lorsque « BAKING » (cuisson) est l’un des modes de cuisson lente. Ce
mode est un bon choix lorsque le temps manque pour une cuisson lente et longue.
• Le réglage de température MEDIUM (moyenne) est un bon choix pour le poulet, les coupes
de porc maigres et les aliments tolérant mal la surcuisson ou l’assèchement.
• Le réglage de température LOW (basse) est le meilleur pour les coupes volumineuses de
viande moins tendres nécessitant une cuisson lente et longue ou les occasions où la durée
de cuisson d’une recette est longue, comme pendant la nuit ou une journée de travail.
• Le réglage de température WARM (chaud) n’est pas conçu pour cuire les aliments. Il ne
doit être utilisé que pour garder les aliments au chaud.
• Le récipient doit être rempli jusqu’à la moitié an d’obtenir des résultats optimaux. L’état
de cuisson dans un récipient rempli sous la moitié devra être vérié 1 à 2 heures avant la
n de la cuisson prévue par la recette.
• Décongeler toute viande ou volaille avant de la faire cuire lentement.
• Ne pas utiliser la cuisson lente sans avoir mis un peu de liquide dans le récipient. Il est
est recommandé d’ajouter au moins 1 po (2,5 cm) de liquide dans le récipient.
• Pour la cuisson de la viande, une viande contenant plus de gras exigera une moins grande
quantité de liquide. Pour diminuer la quantité de gras d’une recette, découper le plus de
gras visible et retirer la peau de la volaille.
• Très peu de liquide s’évapore d’une recette à cuisson lente. Pour faire des soupes ou des
sauces, réduire la quantité de liquide d’une recette d’une demie à une tasse pleine (118 à
237 ml). Si le mélange est trop épais, ajouter du liquide plus tard.
• Les légumes racines comme les pommes de terre et les carottes doivent être coupés en
morceaux de moins de 2 po (5,1 cm) pour assurer une cuisson complète.
• Certains aliments ne sont pas adaptés à la cuisson lente. Les pâtes, fruits de mer, le lait,
la crème et la crème sure doivent être ajoutés seulement 2 heures avant le service.
• Le remuage des aliments n’est pas nécessaire pendant une cuisson lente. L’ouverture du
couvercle provoque une perte de chaleur et prolonge la durée de cuisson. Il est
recommandé toutefois de remuer occasionnellement les aliments lorsqu’ils sont cuits à
température HIGH (élevée).
• Visiter le site www.foodsafety.gov pour obtenir des renseignements concernant la
température interne de cuisson des aliments pour en préserver l’innocuité.
44
Page 45

RICE (RIZ)
Toujours utiliser les quantités recommandées au tableau de cuisson du riz à la page 46.
1. Mettre le riz et l’eau dans le récipient selon les quantités recommandées au tableau de
cuisson du riz. Couvrir avec le couvercle.
2. Tourner le sélecteur jusqu’à RICE (riz). L’afcheur ACL
indiquera « RICE » (riz) et les chiffres « 1 » et « 2 »
clignoteront.
3. Tourner le sélecteur vers la gauche pour sélectionner le
réglage « 1 » pour le riz blanc ou réglage « 2 » pour le riz
brun. Relâcher le bouton dès que le réglage est sélectionné.
Le réglage clignotera trois fois avant de devenir xe.
4. L’afcheur ACL indiquera « 00:00 » et le bouton START/
STOP (marche/arrêt) clignotera.
5. Appuyer sur le bouton START/STOP (marche/arrêt) pour
commencer le cycle de cuisson. Un signal sonore se fera
entendre et le bouton START/STOP (marche/arrêt) restera
allumé.
6. La minuterie commencera le comptage progressif en
minutes.
7. Un long signal sonore se fera entendre dès la n du cycle.
L’appareil passera au réglage de température WARM (chaud)
et la minuterie commencera le compte à rebours.
8. Appuyer sur le bouton START/STOP (marche/arrêt) en tout
temps pendant le cycle de cuisson pour éteindre l’appareil.
REMARQUE : Si le bouton START/STOP (marche/arrêt) n’est pas enfoncé pendant le
cycle de cuisson ou sous « WARM » (chaud), l’appareil restera en marche pendant un
maximum de 6 heures puis s’éteindra automatiquement.
45
Page 46

UTILISATION DES MODES DE CUISSON
TABLEAU DE CUISSON DU RIZ
RÉGLAGE 1 : RIZ BLANC – Durée de cuisson de 30 à 35 minutes
Quantité de riz Quantité d’eau Rendement
2 tasses (473 ml) 2 3/4 tasses (651 ml) 6 tasses (1,4 L)
3 tasses (710 ml) 4 tasses (946 ml) 9 tasses (2,1 L)
4 tasses (946 ml) 5 tasses (1,2 L) 12 tasses (2,8 L)
5 tasses (1,2 L) 7 tasses (1,7 L) 18 tasses (4,3 L)
RÉGLAGE 2 : RIZ BRUN – Durée de cuisson de 50 à 55 minutes
Quantité de riz Quantité d’eau Rendement
2 tasses (473 ml) 3 1/2 tasses (828 ml) 6 1/2 tasses (1,5 L)
3 tasses (710 ml) 4 1/2 tasses (1,1 L) 9 tasses (2,1 L)
4 tasses (946 ml) 6 tasses (1,4 L) 13 tasses (3,1 L)
5 tasses (1,2 L) 7 1/2 tasses (1,8 L) 16 à 17 tasses (3,8–4,0 L)
*Pour du riz étuvé (précuit), ajouter 1/4 tasse (59 ml) d’eau de plus par 1 tasse (237 ml)
de riz.
*Le riz brun cuit doit reposer de 5 à 10 minutes à WARM avant de servir.
*Tableaux basés sur une tasse à mesurer de 8 onces (237 ml).
46
Page 47

SAUTE/SEAR (sauter/saisir)
Utiliser ce mode pour sauter des légumes ou griller la viande avant la cuisson lente, pour
saisir les biftecks, le poulet ou le poisson après la cuisson sous vide ou pour des recettes
dont le mode de cuisson n’est que pour sauter ou saisir. Ce mode de cuisson a une
durée maximum de 45 minutes y compris le préchauffage. Le couvercle peut être utilisé
pendant le préchauffage ou éviter les éclaboussures.
1. Tourner le sélecteur jusqu’à SAUTE/SEAR (sauter/saisir).
L’afcheur ACL indiquera « LOW MED HIGH » (basse,
moyenne, élevée.)
2. Tourner le bouton vers la droite ou la gauche pour
sélectionner le réglage de température. Relâcher le
bouton dès que le réglage est sélectionné. Le réglage
de température sélectionné et le bouton START/STOP
(marche/arrêt) clignoteront.
3. Appuyer sur le bouton START/STOP (marche/arrêt) pour
commencer la cuisson. Un long signal sonore se fera
entendre et le bouton START/STOP (marche/arrêt) restera
allumé.
4. L’afcheur indiquera le réglage de température sélectionné
et une èche vers le haut indiquera l’augmentation de la
température.
5. Un long signal sonore se fera entendre dès que la température sélectionnée est atteinte.
6. Mettre les aliments dans le récipient et faire sauter ou saisir jusqu’à la cuisson désirée.
7. Appuyer sur le bouton START/STOP (marche/arrêt) à la n de la cuisson pour éteindre
l’appareil ou sélectionner un autre mode pour poursuivre la cuisson.
8. L’appareil restera en marche au mode SAUTE/SEAR (sauter/saisir) pendant un
maximum de 45 minutes.
REMARQUE : Le réglage de température peut être modié en tout temps pendant la
cuisson en tournant le bouton. Le nouveau réglage de température sélectionné clignotera
trois fois puis deviendra xe.
Conseils
SAUTE/SEAR (sauter/saisir)
• S’assurer que le récipient a été préchauffé complètement avant d’y mettre les
aliments. Ce préchauffage peut prendre jusqu’à 10 minutes.
• S’assurer de ne pas remplir excessivement le récipient pendant le brunissage de la
viande. Cuire en plusieurs lots si nécessaire.
• Prendre soin d’égoutter tout excès de graisse produit par le brunissement des
viandes avant de poursuivre la cuisson lente.
47
Page 48

UTILISATION DES MODES DE CUISSON
SOUS VIDE
Le mode SOUS VIDE est méthode de cuisson pour des aliments ensachés sous vide
selon une température précise dans un bain d’eau et un réglage de température entre
100 et 200 °F (38 et 93 °C). La sonde de température est utilisée pour contrôler la
température de l’eau. Cette méthode assure des résultats uniformes et prévisibles tout
en évitant la surcuisson. Avec ce mode, les aliments sont assaisonnés puis emballés
dans des sacs ou des pots à l’épreuve de la chaleur. Le récipient est rempli d’eau chaude
et les aliments scellés sont mis dans le bain d’eau lorsque la température désirée est
atteinte. Le support amovible peut être utilisé pour cuire plusieurs sacs à la fois. Le
support amovible peut être utilisé pour cuire plusieurs sacs à la fois. Pour des résultats
optimaux, les protéines doivent être saisies avant et/ou après la cuisson sous vide an
d’obtenir une belle couleur brune. Les aliments solides doivent être mis sous vide dans
des sacs à l’épreuve de la chaleur et approuvés pour une cuisson sécuritaire sous vide.
Les oeufs ou les crèmes anglaises peuvent être cuits dans des pots en verre fermés
hermétiquement.
1. Mettre l’eau dans le récipient en laissant un espace de 1 po
(2,5 cm) entre le dessus de l’eau et le bord du récipient. Mettre le
récipient dans la base de la mijoteuse. Fixer la sonde sur le côté
du récipient en l’alignant avec l’icône de sonde et couvrir avec
le couvercle. Prendre soin d’aligner la sonde avec l’ouverture du
couvercle.
2. Brancher l’autre extrémité de la sonde dans la prise pour sonde
située à la droite de la mijoteuse multifonctions. La sonde est
dans l’eau an de contrôler la température pendant la cuisson
au mode sous vide.
3. Tourner le sélecteur jusqu’à SOUS VIDE. (L’afcheur ACL
indiquera « Prb. » si la sonde n’est pas branchée.)
4. L’afcheur ACL indiquera l’icône de sonde clignotante et la
température de sonde par défaut de « 155F ».
48
Page 49

5. Tourner le bouton vers la droite pour augmenter la
température ou vers la gauche pour diminuer la température.
Le réglage s’effectue par incréments de 1 °F et l’échelle
de température se situe entre 100 et 200 °F. Relâcher le
bouton dès que la température de la sonde est sélectionnée.
L’afcheuret le bouton START/STOP (marche/arrêt)
clignoteront.
6. Appuyer sur le bouton START/STOP (marche/arrêt)
pour commencer la cuisson. Un long signal sonore se
fera entendre et le bouton START/STOP (marche/arrêt)
restera allumé. Dès que le cycle commence, le réglage de
température sélectionné s’afche et la lecture actuelle de la
température de la sonde est indiquée par une èche vers le
haut.
7. Un long signal sonore se fera entendre dès que la
température sélectionnée est atteinte. Mettre les aliments
scellés dans le bain d’eau à ce momentet remettre le
couvercle sur le récipient en alignant l’ouverture du
couvercle avec la sonde. L’appareil indiquera la température
de la sonde durant la durée de cuisson restante.
8. Régler la minuterie, si désiré. Appuyer sur TIMER (minuterie) pour commencer le
compte progressif. L’afcheur ACL indiquera « 00:01 » et le compte se poursuivra. La
minuterie ne peut être activée que lorsque la température de la sonde est atteinte. La
minuterie peut être désactivée en tout temps en appuyant sur le bouton Timer.
9. Appuyer sur le bouton START/STOP (marche/arrêt) en tout temps pendant la cuisson
pour éteindre l’appareil. Le bouton START/STOP (marche/arrêt) s’éteindra et l’afcheur
ACL indiquera « OFF » (arrêt) après 3 secondes et produira trois courts signaux
sonores. Le mot « OFF » (arrêt) sera xe.
REMARQUES :
• L’appareil restera en marche pendant un maximum de 72 heures si le bouton START/
STOP (marche/arrêt) n’est pas enfoncé pendant le cycle de cuisson puis s’éteindra
automatiquement.
• La température de la sonde peut être modiée en tout temps en tournant le bouton.
La nouvelle température sélectionnée de la sonde clignotera trois fois avant de
devenir xe.
49
Page 50

UTILISATION DES MODES DE CUISSON
Conseils
SOUS VIDE
• La plupart des aliments cuits sous vide sont scellés dans des sacs à l’aide d’une scelleuse
sous vide. Cet appareil n’est toutefois pas requis pour la cuisson sous vide. Des pots de
verre scellés peuvent aussi être utilisés pour la cuisson sous vide et sont spécialement
bien adaptés pour les recettes à base de grande quantité de liquide ou de gras, comme
les mélanges d’oeufs et crèmes anglaises, les haricots, les grains, yogourts, cornichons,
poudings et autres desserts.
• Utiliser une scelleuse sous vide avec des sacs à l’épreuve de la chaleur et adaptés à la
cuisson sous vide. Suivre les instructions de mise sous vide du fabricant.
• Tous les aliments cuits pendant moins de 8 heures peuvent être scellés dans des sacs en
plastique à l’épreuve de la chaleur et réutilisables sans utiliser de scelleuse sous vide et en
utilisant la méthode par déplacement d’eau :
• Mettre les aliments dans le sac et éliminer le plus d’air possible.
• Fermer le sac en laissant une ouverture de1 po (2,5 cm) sur le dessus.
• Submerger soigneusement le fond du sac dans l’eau de manière à couvrir les
aliments. La pression d’eau évacuera l’air hors du sac.
• Éviter que l’eau n’entre dans le sac.
• Presser doucement tout l’air résiduel hors du sac et sceller.
• Tous les aliments cuits dans une petite quantité de liquide ne doivent pas être mis sous
vide. Le liquide pourrait être aspiré dans la scelleuse sous vide et l’endommager.
• Ne pas sceller excessivement les sacs de poisson à cuire. Un taux d’aspiration de 75 %
est souhaitable ou utiliser la méthode par déplacement d’eau.
• Les aliments peuvent être scellés à l’avance et stockés au réfrigérateur pendant la nuit ou
au congélateur pour accélérer le refroidissement avant de procéder à la cuisson.
• Pour minimiser la durée de chauffage de l’eau à une bonne température, remplir le
récipient avec de l’eau tiède du robinet. Pour la cuisson à des températures plus élevées,
remplir le récipient avec de l’eau chaude du robinet. La sonde effectuera une lecture de
température constante de l’eau et l’indiquera à l’afcheur. Si l’eau est plus chaude que la
température sélectionnée, ajouter des glaçons pour abaisser la température de l’eau.
• Les aliments congelés peuvent être cuits sous vide sans les décongeler, mais l’ajout
d’aliments congelés dans le bain d’eau abaissera la température de l’eau. En général, il
faut une heure de plus à la durée totale de cuisson pour permettre la décongélation entière
des aliments et d’atteindre la température désirée.
• Innocuité des aliments : La cuisson sous vide est une méthode aussi sécuritaire que la
cuisson traditionnelle même si les aliments sont cuits à une température inférieure à celles
des méthodes traditionnelles.
• Les durées et températures indiquées au tableau ci-dessous et aux pages 51 et 52
sont nécessaires à la pasteurisation.
• L’innocuité des aliments est déterminée par une combinaison des pièces à cuire, la
durée de cuisson et de température.
• Pour réduire tous les risques associés aux maladies d’origine alimentaire,
commencer toujours par choisir des aliments le plus frais possible et d’utiliser des
méthodes de manipulations saines.
• Visiter le site www.foodsafety.gov ou fsis.usda.gov pour obtenir des
renseignements
concernant la température interne de cuisson des aliments et de pasteurisation pour
préserver l’innocuité.
50
Page 51

TABLEAU DE CUISSON SOUS VIDE
REMARQUES :
• La durée de cuisson sera plus longue pour les coupes épaisses de viande, poulet et de
poulet.
• Visiter le site www.foodsafety.gov ou fsis.usda.gov pour obtenir des renseignements
concernant la température interne de cuisson des aliments pour en préserver l’innocuité.
ALIMENT ET DEGRÉ DE CUISSON TEMPÉRATURE DURÉE
Bifteck (1 à 1 1/4 po [2,5 à 3 cm] épais)
Trèssaignant à saignant 125°F (52°C) 1 à 3 heures
Mi-saignant
À point 140°F (60°C) 1 à 4 heures
À point-bien cuit 150°F (66°C) 1 à 4 heures
Bien cuit 155°F (68°C) 1 à 4 heures
Porc
Épaule/soc, bien cuit, 3 à 4 lb (1,4 à 1,8 kg) 185°F (85°C) 8 à 10 heures
Filet, à point, 1,5 à 2 lb (0,7 à 0,9 kg) 145°F (63°C) 2 à 4 heures
Longe, à point, 2 à 3 lb (0,9 à 1,4 kg) 150°F (66°C) 3 à 4 heures
Côtelettes désossées, à point, 3/4 po (1,9 cm)
épais.
Côtelettes avec os, à point, 1 po (2,5 cm) épais. 145°F (63°C) 1 à 2 heures
Côtes avec os, complètes, 3 à 4 lb (1,4 à 1,8 kg) 165°F (74°C) 12 à 14 heures
Poulet, désossé, poitrine (5 à 6 oz [142 à 170 g])
Très tender et juteuse 140°F (60°C) 1 à 3 heures
Tendre et juteuse 150°F (66°C) 1 à 3 heures
Ferme et juteuse 160°F (71°C) 1 à 3 heures
130°–135°F (54°–57°C)
140°F (60°C) 1 à 2 heures
1 à 4 heures
Poulet, désossé, cuisse (5 à 6 oz [142 à 170 g])
Tendre et juteux
167°–170°F (75°–77°C)
1 1/2 à 3 heures
51
Page 52

UTILISATION DES MODES DE CUISSON
ALIMENT ET DEGRÉ DE CUISSON TEMPÉRATURE DURÉE
Poisson (5 à 6 oz [142 à 170 g])
Très légèrement cuit, mi-saignant et tendre
À point, tendre et moelleux
Bien cuit, ferme et moelleux
Légumes
Turions d’asperge 185°F (85°C) 10 minutes
Betteraves, enmorceaux de 2 po (5,1 cm) 185°F (85°C) 2 1/2 à 3 heures
Brocoli (petites fleurettes) 185°F (85°C) 30 à 40 minutes
Carottes, enmorceaux de 2 po (5,1 cm) 185°F (85°C) 30 à 45 minutes
Choufleur (petites fleurettes) 185°F (85°C) 1 à 1 1/2 heure
Tomates cerises ou en grappe, moitiés 185°F (85°C) 20 à 30 minutes
Épi de maïs 185°F (85°C) 30 à 45 minutes
Champignons, moitiés 195°F (91°C) 1 heure
Oignons, enmorceaux de 2 po (5,1 cm) 185°F (85°C) 1 à 1 1/2 heure
Pommes de terre, en morceaux de 2 po (5,1 cm) 185°F (85°C) 2 à 2 1/2 heures
Épinards 185°F (85°C) 5 minutes
Courge, enmorceaux de 2 po (5,1 cm) 185°F (85°C) 1 à 1 1/2 heure
Tomates, moitiés 185°F (85°C) 20 à 30 minutes
Fruits
Pommes, moitiés, sans coeur 185°F (85°C) 1 1/2 heure
Poires, moitiés, sans coeur 185°F (85°C) 1 1/2 heure
110°–120°F (43°–49°C)
122°–130°F (50°–54°C)
135°–140°F (57°–60°C)
30 à 40 minutes
30 à 40 minutes
30 à 40 minutes
52
Page 53

Recommandationsd’entretien
AVERTISSEMENT
Risque de choc électrique :
Ne pas utiliser de tampons métalliques pour nettoyer l’appareil. Des morceaux
peuvent se détacher du tampon et toucher les pièces électriques et représenter un
risque d’électrocution.
Votre mijoteuse multifonctions doit être nettoyée périodiquement an de conserver sa
performance optimale et prolonger sa durée de vie. Un nettoyage fréquent diminue
également le risque d’incendie.
AVANT LE NETTOYAGE
1. Débrancher et laisser refroidir la mijoteuse multifonctions.
NETTOYAGE
Afficheur Essuyer avec une éponge légèrement humide. Protéger l’afcheur pendant le
nettoyage des autres surfaces.
Extérieur
en acier
inoxydable
Extérieur
sans acier
inoxydable
Intérieur de
la mijoteuse
multifonctions
Utiliser un nettoyant non abrasif pour l’acierinoxydable, comme Signature
Polish, et l’appliquer sur un linge doux et non pelucheux. Pour raviver le lustre
naturel, essuyer légèrementla surface avec un linge en microbre légèrement
imbibé d’eau puis polir à sec. Toujours suivre les grains de l’acier inoxydable.
Nettoyer avec un nettoyant doux et non abrasif pour l’acier inoxydable comme
un poli de marque Signature. Appliquer sur un linge doux et ne laissant
aucune peluche. Le poli Signature peut être commandé par le site internet de
l’entreprise : www.signaturepolishonline.com.
Essuyer l’extérieur de la mijoteuse multifonctions avec un linge humide ou
vaporiser un nettoyant tout usage. Bien essuyer avec un linge non pelucheux.
Ne pas utiliser de nettoyants abrasifs ou de tampons à récurer métalliques.
Essuyer les parois intérieures et le fond de la mijoteuse multifonctions avec un
linge imbibé d’eau savonneuse.
53
Page 54

NETTOYAGE
Récipient
en acier
inoxydable
Sonde Nettoyer la sonde avec de l’eau savonneuse tiède. Rincer et sécher
Laisser refroidir le récipient avant de le laver. Laver dans de l’eau savonneuse
tiède avec une éponge, un linge ou un tampon en plastique après chaque
utilisation ou laver au lave-vaisselle.
Laisser refroidir le récipient avant de le nettoyer. Laver à la main dans de l’eau
savonneuse tiède et une éponge, linge à vaisselle ou un tampon en plastique
après chaque utilisation ou laver au lave-vaisselle. Éviter d’utiliser un tampon
de laine d’acier, des tampons à récurer métalliques ou les détergents puissants.
Le récipient est lavable au lave-vaisselle.
Les températures élevées et les détergents puissants peuvent décolorer le
récipient.
La surchauffe et/ou des résidus de minéraux peuvent produire une couleur
dorée brunâtre ou des teintes de bleu. Pour nettoyer, faire une pâte avec de
l’eau et un nettoyant non abrasif pour acier inoxydable ou du bicarbonate de
soude. NE PAS UTILISER DE NETTOYANT CONTENANT UN JAVELLISANT.
Appliquer la pâte sur le récipient avec une éponge ou un linge pendant qu’il est
tiède et frotter dans un seul sens. Laver à nouveau, rincer et sécher.
Bien que l’acier inoxydable soit un matériau durable, il n’est toutefois pas
indestructible. Les piqûres se forment à cause du sel non dissout resté dans le
fond du récipient. Ne pas laisser reposer les aliments acides ou assaisonnés
dans le récipient pendant de longue période.
complètement avec un linge propre.
54
Page 55

Dépannage
Les lettres « Prb » clignotent.
• La sonde n’est pas branchée. S’assurer que la sonde est bien branchée.
Les lettres « Err 1 » clignotent.
• La sonde ne fonctionne plus. Communiquer avec le service à la clientèle.
Les lettres « Err 3 » clignotent.
• La sonde est branchée pendant les modes MANUAL (manuel), MEAL TIMER (minuterie
de cuisson) ou SAUTE/SEAR (sauter/saisir). Débrancher et retirer la sonde.
Les lettres « Err 4 »ou « Err 5 » clignotent.
• La commande de température de cuisson ne fonctionne plus. Communiquer avec le
service à la clientèle.
Les lettres « Err 6 » clignotent.
• Le récipient n’est pas inséré ou ne repose pas correctement. Insérer le récipient ou
replacer le récipient dans l’appareil de cuisson.
Wolf, Wolf & Design, Wolf Gourmet, W & Design et la couleur rouge telle qu’elle est appliquée aux boutons sont
des marques de commerce et des marques de service de Wolf Appliance, Inc. Sub-Zero, Sub-Zero & Design,
Dual Refrigeration, The Living Kitchen, Great American Kitchens, The Fine Art of Kitchen Design et Ingredients
sont des marques déposées des marques de service de Sub-Zero, Inc. Toutes les autres marques de commerce
ou marques déposées appartiennent à leur propriétaire respectif aux États-Unis et dans d’autres pays.
55
Page 56

Garantie résidentielle limitée Wolf Gourmet
POUR UN USAGE RÉSIDENTIEL
GARANTIE LIMITÉE DE CINQ ANS
La garantie de ce produit Wolf Gourmet s’applique uniquement aux électroménagers. Wolf Gourmet
garantit que les électroménagers sont exempts de vices de matériaux ou de fabrication pendant une
période de cinq (5) ans à compter de la date d’achat d’origine.
GARANTIE À VIE LIMITÉE
La garantie de ce produit Wolf Gourmet s’applique uniquement aux produits relatifs aux ustensiles
de cuisson et de coutellerie. Wolf Gourmet garantit que l’ustensile de cuisson pour la coutellerie est
exempt de vice de matériaux ou de fabrication pour la durée de vie du produit. Les imperfections
mineures et les décolorations sont normales et ne sont pas considérées comme étant des vices.
CONDITIONS APPLICABLES À CHACUNE DES GARANTIES
Cette garantie résidentielle limitée Wolf Gourmet s’applique aux électroménagers, aux ustensiles de
cuisson et à la coutellerie achetés et utilisés aux É.-U. Il s’agit de la seule garantie formelle pour ce
produit et elle prévaut sur toute autre garantie.
Pendant la période de garantie, votre seul recours constitue la réparation ou le remplacement du
produit ou de tout composant se révélant défectueux, à notre discrétion. Tout service fourni par
Wolf Gourmet en vertu de cette garantie doit être réalisé par un centre de réparation certié Wolf
Gourmet, à moins d’une entente préalable approuvée par Wolf Gourmet. Par ailleurs, tout service
sera offert pendant les heures d’ouverture normale.
Cette garantie ne couvre pas l’usure découlant d’un usage normal, un usage non conforme aux
instructions imprimées ou des dommages subis par le produit en raison d’une négligence, d’un
accident, d’une altération, d’un abus, d’une utilisation incorrecte, d’un service inadéquat ou d’une
réparation inadéquate. La présente garantie est déclarée nulle si le produit est utilisé pour un usage
autre résidentiel ou s’il est soumis à toute tension ou forme d’onde autre que celle spéciée sur la
plaque signalétique (p. ex., 120 V ~ 60 Hz). Cette garantie est octroyée uniquement à l’acheteur
d’origine ou au destinataire initial d’un cadeau.
Wolf Gourmet rejette toutes les réclamations pour des dommages particuliers, accessoires et
immatériels causés par une violation de la garantie formelle ou implicite. La responsabilité se
limite au montant de l’achat. TOUTE GARANTIE IMPLICITE, Y COMPRIS TOUTE GARANTIE DE
QUALITÉ MARCHANDE OU DE CONFORMITÉ À UN USAGE PARTICULIER, EST DÉCLINÉE,
SAUF DANS LA MESURE OU LA LOI L’INTERDIT, DANS QUEL CAS, LA GARANTIE SE LIMITE À
LA DURÉE DE LA GARANTIE ÉCRITE. Cette garantie vous confère des droits reconnus par la loi.
Il est possible que vous ayez d’autres droits légaux variant selon l’endroit où vous vivez. Certains
États, certaines provinces et certains territoires ne permettent pas les limitations sur les garanties
implicites ou sur les dommages particuliers, accessoires ou immatériels, il est donc possible que
les limitations précédentes ne s’appliquent pas à vous.
Pour faire une réclamation en vertu de la garantie et pour connaitre le nom du personnel de service
certié Wolf Gourmet le plus près de chez vous, veuillez contacter Wolf Appliance, Inc., PO Box
44848, Madison, WI 53744; ou visitez la section contact & support de notre site Web à l’adresse
wolfgourmet.com/warranty; ou envoyez-nous un courriel à l’adresse électronique customerservice
@subzero.com; ou appelez au 800.222.7820. Pour obtenir un service plus rapide, veuillez repérer le
modèle, le type et les numéros de série sur la plaque signalétique de votre produit.
56
Page 57

OLLA MULTIFUNCIÓN WOLF GOURMET
Bienvenido
Gracias por haber adquirido este producto Wolf Gourmet.
Esperamos formar parte de su cocina durante muchos años.
Wolf es la tercera generación de una compañía familiar con
un interés personal en la preparación de sus alimentos. Al
ser una empresa familiar, prestamos mucha atención a los
detalles y brindamos una dedicación excepcional a crear
productos de extrema calidad. Wolf ha basado su éxito
comercial y su reputación en ayudar a que los cocineros
hogareños logren los mejores resultados posibles. A través
del control preciso de Wolf Gourmet, el plato que imagina
será el plato que servirá en su mesa.
57
Page 58

Contenidos
59
Precauciones de seguridad
61
Piezas y características de la olla
multifunción Wolf Gourmet
63
Inicio
65
Cómo usar los modos de cocción
80
Recomendaciones sobre los cuidados
81
Detección y solución de problemas
82
Garantía Wolf Gourmet
Atención al cliente
Como propietario de un producto
Wolf Gourmet, usted puede conar
en nuestra asistencia. Nuestro centro
de atención al cliente se encuentra
disponible las 24 horas del día, los
siete días a la semana, atendido
por personal experto en nuestra
sede central localizada en Madison,
Wisconsin. Si surgiera la necesidad,
simplemente llame al 800.222.7820
para hablar con uno de nuestros
expertos. En México, tenga a bien
comunicarse con el centro de atención
al cliente al 01 800 400 4372 de
lunes a viernes de 9:00 a.m. a
7:00 p.m. Estamos seguros de que
esta guía responderá todas sus
preguntas sobre características,
funcionamiento y mantenimiento de
su producto Wolf Gourmet. Si usted
tiene consultas adicionales, tenga
a bien comunicarse con nosotros
por teléfono o visitarnos online en
wolfgourmet.com.
Registre su producto
Le recomendamos enfáticamente
que registre su electrodoméstico Wolf
Gourmet. Es muy importante para
nosotros que usted obtenga el máximo
de sus productos. Al registrarse, usted:
• Pasará a formar parte del grupo
culinario de Wolf Gourmet.
• Tendrá apoyo constante de Wolf
Gourmet.
• Activará su garantía y registrará su
compra.
• Estará al tanto de actualizaciones
de servicio.
• Recibirá correos electrónicos
ocacionales que lo ayudarán
a mantener y disfrutar sus
electrodomésticos.
Para registrarse, visite wolfgourmet
.com/registration. En México, tenga
a bien visitar wolfgourmet.com.mx o
llame al 01 800 400 4372.
58
Page 59

PRECAUCIONES DE SEGURIDAD
SALVAGUARDIAS IMPORTANTES
Cuando utilice artefactos eléctricos, siempre deben seguirse precauciones
de seguridad básicas a fin de reducir el riesgo de incendio, descarga
eléctrica, y/o lesiones a personas, incluyendo las siguientes:
• Lea todas las instrucciones.
• Este aparato no se destina para utilizarse por personas (incluyendo niños)
cuyas capacidades físicas, sensoriales o mentales sean diferentes o estén
reducidas, o carezcan de experiencia o conocimiento, a menos que dichas
personas reciban una supervisión o capacitación para el funcionamiento del
aparato por una persona responsable de su seguridad.
• Se requiere de una estrecha supervisión cuando el aparato se use cerca de
niños. Los niños deben supervisarse para asegurar que ellos no empleen los
aparatos como juguete.
• Verique que el voltaje de su instalación corresponda con el del producto.
• No toque las supercies calientes. Utilice guantes de cocina.
• Para evitar el peligro de descargas eléctricas, no sumerja el cable, el
enchufe o la base en agua u otro líquido.
• Desenchufe del tomacorriente cuando no esté en uso y antes de limpiar.
Deje enfriar antes de colocar o quitar piezas.
• No opere ningún aparato con cables o enchufe dañados o después de
que el aparato funcione mal o se caiga o dañe de cualquier manera. El
reemplazo del cable de suministro y las reparaciones deben ser efectuadas
por el fabricante, su agente de servicio, o personas igualmente calicadas
para poder evitar un peligro. Llame al número de servicio al cliente
proporcionado para información sobre examinación, reparación o ajuste.
• El uso de accesorios no recomendados por el fabricante del aparato puede
provocar lesiones.
• No lo utilice al aire libre.
• No permita que el cable cuelgue sobre el borde de la mesa o mostrador, o
que toque supercies calientes, como la estufa.
• No lo coloque sobre o cerca de un quemador caliente eléctrico o a gas, o
dentro de un horno caliente.
• Debe tenerse mucho cuidado cuando se traslade un artefacto que contenga
aceite caliente u otros líquidos calientes.
• Para desconectar la olla multifunción, gire la perilla a OFF (apagado); luego
quite el enchufe del tomacorriente.
• Concebido sólo para uso en mostrador.
• ¡ADVERTENCIA! El derrame de alimentos puede provocar quemaduras
graves. Mantenga el artefacto y el cable alejados de los niños. Nunca deje
colgar el cable sobre el borde del mostrador, nunca utilice un tomacorriente
ubicado por debajo del mostrador y nunca utilice el artefacto con un cable
de extensión.
• Este artefacto no está diseñado para freír alimentos.
• Sólo utilice el artefacto con el objetivo para el que fue diseñado.
GUARDE ESTAS INSTRUCCIONES
59
Page 60

PRECAUCIONES DE SEGURIDAD
Otra Información de Seguridad para el
Cliente
Este aparato ha sido diseñado solamente para uso doméstico.
ADVERTENCIA
es provisto con un enchufe con conexión a tierra (3 clavijas) para reducir el
riesgo de una descarga eléctrica. El enchufe calza únicamente en una dirección
dentro de un tomacorriente con conexión a tierra. No elimine el propósito de
seguridad del enchufe modificando el enchufe de ninguna manera o usando
un adaptador. Si el enchufe no entra en la toma, haga que un electricista
reemplace la toma.
Se utiliza un cable eléctrico corto para reducir los riesgos de enredarse o
tropezar con un cable más largo o de que sea jalado por niños.
Riesgo de Descarga Eléctrica: Este producto
60
Page 61

PIEZAS Y CARACTERÍSTICAS DE LA OLLA MULTIFUNCIÓN WOLF GOURMET
PIEZAS Y CARACTERÍSTICAS
1
Tapa
1a Abertura de la sonda
2
Rejilla de sous vide
3
Recipiente de acero inoxidable
4
Pantalla del panel de control
5
Botón Back (atrás)
6
Botón Start/Stop (iniciar/detener)
7
Bisel selector de modo
8
Placa de clasicación
9
Perilla de tiempo/temperatura
10
Botón Timer (temporizador)
11
Base
12
Sonda
12a Sonda de temperatura - Introdúzcala
dentro de los alimentos o agua
12b Extremo - Introdúzcalo en el enchufe
de la sonda
13
Enchufe de la sonda
PRECAUCIÓN: SUPERFICIE
CALIENTE. Las supercies externas y
las manijas se calientan. Utilice guantes
de cocina o permita que la unidad se
enfríe por completo antes de trasladar o
quitar piezas.
1
1a
2
3
4
5
6
7
8
Olla Multifunción
Wolf Gourmet
12
12a
12b
11
10
9
13
61
Page 62

Piezas y características
1. Tapa: La tapa debe usarse en los modos MANUAL, MEAL TIMER (temporizador de
comidas), PROGRAM (programa), RICE (arroz) y SOUS VIDE.
La tapa puede usarse en el modo SAUTE/SEAR (saltar/sellar)
durante el precalentamiento, o para evitar las salpicaduras.
La tapa es apta para lavavajillas y apta para horno para
temperaturas de hasta 450°F (232°C).
a. Abertura de la sonda: La abertura de la sonda es donde
la sonda debe colocarse, utilizándola en el modo Sous
Vide y en algunas aplicaciones de cocción lenta.
2. Rejilla de sous vide: La rejilla removible de sous vide se utiliza
en el modo SOUS VIDE, si así se lo desea, para separar bolsas
individuales de alimentos sellados y garantizar un calentamiento
del agua adecuado.
3. Recipiente de acero inoxidable: El recipiente de acero inoxidable debe estar en su lugar
para que funcione la olla. El recipiente también puede usarse en un horno o en una estufa a
gas, eléctrica o de inducción. Es apto para hornos a temperaturas de hasta 450°F (232°C) y
es apto para el lavavajillas.
4. Pantalla del panel de control: La pantalla muestra las
conguraciones de temperatura y tiempo, las conguraciones
de temperatura de la sonda, mensajes de error, íconos para
sonda y el logo de Wolf Gourmet cuando se activa el modo
suspensión.
5. Botón Back (atrás): Presione el botón BACK (atrás) para volver
atrás un paso y deshacer la última conguración ingresada.
6. Botón Start/Stop (iniciar/detener): Presione el botón de START/
STOP (iniciar/detener) para iniciar y para apagar el modo
seleccionado. La luz roja se iluminará y sonará una campanilla
cuando el ciclo se inicie. START/STOP (iniciar/detener)
también se utiliza para activar o apagar el temporizador.
7. Bisel selector de modo: Gire el bisel selector hasta el modo de
cocción deseado: MANUAL, MEAL TIMER (temporizador de
comidas), PROGRAM (programa), RICE (arroz), SAUTE/SEAR
(saltar/sellar), o SOUS VIDE.
8. Placa de clasicación: El número de modelo y la información
de clasicación pueden encontrarse en la parte inferior de la
base de la olla multifunción.
9. Perilla de tiempo/temperatura: Utilice esta perilla para
congurar el tiempo y la temperatura en diferentes modos de
cocción.
10. Botón Timer (temporizador): El botón TIMER (temporizador) puede usarse en el modo
PROGRAM (programa) o en el modo SOUS VIDE.
11. Base: El recipiente de acero inoxidable debe colocarse en la base para que la olla
multifunción pueda funcionar.
12. Sonda:
a. Sonda de temperatura: El extremo largo, no y puntiagudo de la sonda es la sonda
de temperatura que se introduce en el agua en el modo SOUS VIDE, o para medir
la temperatura interna y garantizar alimentos perfectamente cocidos en el modo
PROGRAM (programa).
b. Extremo: El extremo de la sonda debe introducirse en el enchufe de la sonda ubicado
en el lado derecho de la olla multifunción.
13. Enchufe de la sonda: El enchufe de la sonda se encuentra en el lado inferior derecho de la
olla multifunción y es donde el extremo de la sonda debe introducirse.
62
Page 63

INICIO
ELEGIR UN MODO DE COCCIÓN
Modos de la olla de cocción lenta:
1. El modo MANUAL funciona como una olla de cocción lenta normal no
programable con cuatro conguraciones de calor: WARM (calentar), LOW (baja),
MEDIUM (media) o HIGH (alta). El temporizador hace una cuenta ascendente y la
olla multifunción permanecerá encendida hasta que se presione el botón START/
STOP (iniciar/detener), o se apagará en forma automática después de 24 horas.
NOTA: WARM (calentar) no debe utilizarse para cocinar. Puede utilizarse cuando la
cocción haya terminado para mantener calientes los alimentos.
2. El modo MEAL TIMER (temporizador de comidas) permite congurar la cantidad
de horas de cocción en base a cuándo desea usted servir la comida, sin importar
las instrucciones de la receta. No se selecciona nivel de calor. MEAL TIMER ajusta
la temperatura en base a la hora de servicio. Esta característica se ajusta bien a
recetas que se cocinarán por un período prolongado, tales como carnes grandes,
combinaciones de carne y vegetales, o sopas y estofados. MEAL TIMER cambia
automáticamente a WARM (calentar) al nal del ciclo de cocción.
3. PROGRAM MODE (modo programa) tiene tres opciones que permiten una
experiencia de cocción a medida. Las tres opciones cambian automáticamente a
WARM (calentar) al nal del ciclo de cocción.
a. 1 PROGRAM (1 programa): Seleccione una conguración de calor y tiempo
para toda la sesión de cocción.
b. 1 PROGRAM WITH PROBE (1 programa con sonda): Seleccione una
conguración de calor y use la sonda para cocinar alimentos hasta la
temperatura interna deseada. Esta conguración es mejor cuando se cocinan
alimentos que pueden tener un riesgo de sobrecocción, como los cortes de
carne magros, o cuando la temperatura del alimento es la prueba deseada
de nivel de cocción. La olla cambia en forma automática a WARM (calentar)
cuando se alcanza la temperatura deseada.
c. 2 PROGRAMS (2 programas): Seleccione dos conguraciones de calor y
duraciones de tiempo diferentes en una sesión de cocción. Por ejemplo,
programe para cocinar en HIGH (alta) durante 4 horas, luego en LOW (baja)
por 3 horas. Ideal para acortar el tiempo de cocción de elementos como
estofados para calentar rápido en HIGH (alta) y luego permitir que se ablande
en LOW (baja).
Otros modos de cocción:
4. RICE (arroz) tiene dos conguraciones: 1 y 2. La conguración 1 se usa para arroz blanco.
La conguración 2 se usa para arroz integral. Ver la tabla de cocción de arroz de la página
73 bajo “Cómo usar los modos de cocción”.
5. El modo SAUTE/SEAR (saltar/sellar) tiene tres conguraciones de calor: LOW (baja),
MED (media) y HIGH (alta). Utilice este modo para saltar alimentos antes de la cocción
lenta, para sellar después de sous vide, o para recetas que requieren el saltado o sellado
como el único modo de cocción. Tiene un tiempo máximo de cocción de 45 minutos,
incluyendo el precalentamiento.
6. SOUS VIDE es un método de cocción en el que los alimentos sellados se cocinan en
un baño de agua a temperatura precisamente controlada, en una conguración de
entre 100°F (38°C) y 200°F (93°C). La sonda de temperatura se usa para controlar la
temperatura del agua. Este método asegura resultados parejos y predecibles y evita la
sobrecocción. En este modo, los alimentos se condimentan y luego se sellan en bolsas o
frascos resistentes al calor. El recipiente se llena con agua tibia y los alimentos sellados se
agregan al baño de agua cuando se alcanza la temperatura deseada.
63
Page 64

Cambia
a WARM
(calentar) al
tiempo
elige el
El usuario
nalizar el ciclo
X X
elige la
de calor
El usuario
conguración
Descripción Mejor para
X
Recetas de olla de cocción lenta
tradicionales, y para alimentos que usted
planea controlar o que se benecian de
un tiempo de cocción prolongado. Se
cocina hasta que se presiona Start/Stop
(iniciar/detener), o por hasta 24 horas. La
conguración Warm (calentar) puede usarse
para mantener calientes los alimentos.
Elimina tener que estar pensando qué
conguración de calor utilizar. Elija
el tiempo de cocción y la olla ajusta
el calor automáticamente para evitar
la sobrecocción. Ideal para cortes
grandes de carne de res y de ave, y
X X X
combinaciones de carne y vegetales.
tiempo especícos. Ideal para trozos más
pequeños de carne de res, ave o pescado,
acompañamientos, estofados y postres.
X X
Alimentos que deben cocinarse a una
temperatura precisa, como el pollo,
ciertos cortes de cerdo y res.
Hacer recetas a medida de acuerdo a
X X X
sus horarios y preferencias. Por ejemplo,
cuando usted desea acelerar el tiempo
de cocción y todavía tiene el benecio
de un calor bajo y lento para ablandar,
congure Program 1 (programa 1) en
HIGH (alta) por 2 horas y Program 2
(programa 2) en LOW (baja) por 6 horas.
64
(baja), MEDIUM (media) o HIGH (alta).
MODOS DE COCCIÓN LENTA
Manual Selecciona WARM (calentar), LOW
Selecciona la cantidad de horas hasta
el servicio
Meal Timer
(temporizador
de comidas)
Congura 1 ciclo de calor y de tiempo Seguir una receta con un nivel de calor y
1 Program
(1 programa)
Selecciona la temperatura deseada de
los alimentos
1 Program with
Probe
(1 programa
Congura 2 ciclos de calor y de
tiempo
con sonda)
2 Programs
(2 programas)
Page 65

Cómo usar los modos de cocción
MANUAL
El modo MANUAL funciona como una olla de cocción lenta normal no programable con cuatro
conguraciones de calor: WARM (calentar), LOW (baja), MEDIUM (media) y HIGH (alta). El
temporizador hace una cuenta ascendente y la olla multifunción permanecerá encendida hasta
que se presione el botón START/STOP (iniciar/detener), o se apagará en forma automática
después de 24 horas.
NOTA: WARM (calentar) no debe utilizarse para cocinar. Puede
utilizarse cuando la cocción haya terminado para mantener
calientes los alimentos.
1. Agregue los alimentos al recipiente y cubra con la tapa.
2. Gire el bisel selector a MANUAL. La pantalla de LCD
muestra las conguraciones de calor: “WARM LOW MED
HIGH” (calentar, baja, media, alta).
3. Gire la perilla hacia la izquierda o derecha para seleccionar
una conguración de calor. Libere la perilla cuando haya
seleccionado la conguración de calor. La conguración y el
botón START/STOP (iniciar/detener) comenzarán a destellar.
4. Presione el botón START/STOP (iniciar/detener) para
comenzar la cocción. Sonará una companilla larga y el
botón START/STOP (iniciar/detener) permanecerá iluminado.
La conguración de calor seleccionada queda ja y el
temporizador empieza una cuenta ascendente.
NOTA: Durante el ciclo, el usuario puede ajustar la
conguración de calor en cualquier momento girando la perilla. La nueva conguración
seleccionada destellará tres veces antes de quedar ja y que la temperatura se ajuste.
No hace falta presionar el botón START/STOP (iniciar/detener).
5. Presione el botón START/STOP (iniciar/detener) en cualquier momento para nalizar
la cocción y para apagar la unidad. Aparecerá "OFF" (apagado) en la pantalla y la olla
hará sonar una campanilla tres veces.
65
Page 66

CÓMO USAR LOS MODOS DE COCCIÓN
MEAL TIMER (temporizador de comidas)
El modo MEAL TIMER (temporizador de comidas) permite seleccionar la cantidad
de horas de cocción en base a cuándo desea usted servir la comida, sin importar
las instrucciones de la receta. No se selecciona nivel de calor. MEAL TIMER ajusta la
temperatura en base a la hora de servicio. Esta característica se ajusta bien a recetas
que se cocinarán por un período prolongado, tales como carnes grandes, combinaciones
de carne y vegetales, o sopas y estofados. MEAL TIMER cambia automáticamente a
WARM (calentar) al nal del ciclo de cocción.
1. Agregue los alimentos al recipiente y cubra con la tapa.
2. Gire el bisel selector a MEAL TIMER (temporizador de
comidas).
3. La pantalla de LCD muestra el tiempo de cocción mínimo
predeterminado de 4 horas con un tiempo máximo de
cocción de 12 horas.
4. Ajuste el tiempo de cocción girando la perilla hacia la
derecha para aumentar el tiempo de cocción o hacia la
izquierda para reducirlo. El tiempo se ajusta en unidades de
30 minutos con una duración de cocción mínima de 4 horas
y una duración máxima de 12 horas.
5. Libere la perilla una vez que haya congurado un tiempo de
cocción; luego destellarán el tiempo de cocción y el botón
START/STOP (iniciar/detener).
6. Presione el botón START/STOP (iniciar/detener) para
comenzar la cocción. Sonará una companilla larga y el
botón START/STOP (iniciar/detener) permanecerá iluminado.
El tiempo de cocción seleccionado queda jo y el temporizador empieza una cuenta
regresiva.
7. Cuando el tiempo de cocción haya nalizado, sonará una campanilla larga. “COOK
TIME” (tiempo de cocción) y “00:00” desaparecerán. La unidad cambiará a la
conguración de calor "WARM" (calentar) y el temporizador comenzará una cuenta
ascendente. Después de 4 horas en WARM (calentar), la unidad de apagará en forma
automática.
8. Presione el botón START/STOP (iniciar/detener) en cualquier momento para nalizar
la cocción y para apagar la unidad. Aparecerá "OFF" en la pantalla y la olla hará sonar
una campanilla tres veces.
66
Page 67

MODOS DE PROGRAMA
Existen 3 opciones de cocción lenta en el modo PROGRAM (programa): 1) Se programa un ciclo de
calor y de tiempo en una sesión de cocción. 2) Se programan dos ciclos de calor y de tiempo en una
sesión de cocción. 3) Se usa la sonda para congurar la temperatura nal deseada.
1 PROGRAM (1 programa)
Seleccione una conguración de calor y tiempo para toda la sesión de cocción. Cambiará
automáticamente a WARM (calentar) al nal del ciclo de cocción.
1. Agregue los alimentos al recipiente y cubra con la tapa.
2. Gire el bisel selector a PROGRAM (programa). La pantalla de
LCD muestra la conguración de “1 PROGRAM" (1 programa)
y “2 PROGRAMS” (2 programas).
3. Gire la perilla hacia la izquierda para seleccionar 1 PROGRAM
(1 programa). Libere la perilla una vez que se haya seleccionado
1 PROGRAM. La conguración destellará tres veces antes de
quedar ja.
NOTA: Si el botón START/STOP (iniciar/detener) se presiona antes de
que la pantalla deje de destellar, el programa irá al paso siguiente en el
proceso de conguración.
4. Una vez que “1 Program” queda jo, aparecerán las conguraciones
de calor de “LOW MED HIGH” (baja, media, alta). Gire la perilla
hacia la izquierda o derecha para seleccionar LOW (baja), MEDIUM
(media) o HIGH (alta). WARM (calentar) no es una opción. Libere la
perilla una vez que haya seleccionado una conguración de calor;
luego, la conguración destellará tres veces antes de que quede
ja.
NOTA: Para acceder a la conguración previa en cualquier momento,
presione el botón BACK (atrás) una vez.
5. Una vez que la conguración de calor seleccionada queda ja,
podrán verse destellando “COOK TIME” (tiempo de cocción) y
“00:00”. Ajuste la conguración de tiempo girando la perilla hacia
la derecha para aumentar el tiempo de cocción o hacia la izquierda
para reducirlo. El tiempo se ajusta en unidades de 30 minutos, con
un tiempo mínimo de 30 minutos y un máximo de 12 horas. Libere
la perilla una vez que se haya congurado el tiempo. El tiempo y el
botón START/STOP (iniciar/detener) comenzarán a destellar.
6. Presione el botón START/STOP (iniciar/detener) para comenzar
la cocción. Sonará una companilla larga y el botón START/STOP
(iniciar/detener) permanecerá iluminado. El tiempo de cocción
seleccionado queda jo y el temporizador empieza una cuenta
regresiva.
7. Cuando el tiempo de cocción haya nalizado, sonará una
campanilla larga. “COOK TIME” (tiempo de cocción) y “00:00”
desaparecerán. La unidad cambiará a la conguración de calor
"WARM" (calentar) y el temporizador comenzará una cuenta
ascendente. Después de 4 horas en WARM (calentar), la unidad de
apagará en forma automática.
8. Presione el botón START/STOP (iniciar/detener) en cualquier
momento para nalizar la cocción y para apagar la unidad.
Aparecerá "OFF" en la pantalla y la olla hará sonar una campanilla
tres veces.
NOTA: Durante el ciclo, la conguración de calor puede ajustarse
en cualquier momento girando la perilla. La nueva conguración
seleccionada destellará tres veces antes de quedar ja y que
la temperatura se ajuste. No hace falta presionar el botón START/STOP (iniciar/detener). La
conguración de tiempo puede ajustarse en cualquier momento presionando el botón TIMER
(temporizador) para reactivar el tiempo y que destelle, y la perilla puede girarse para ajustar el
tiempo de cocción.
67
Page 68

CÓMO USAR LOS MODOS DE COCCIÓN
2 PROGRAMS (2 programas)
Seleccione dos conguraciones de calor y duraciones de tiempo diferentes en una
sesión de cocción. Por ejemplo, programe para cocinar en HIGH (alta) durante 4 horas,
luego en LOW (baja) por 3 horas. Ideal para acortar el tiempo de cocción de elementos
como estofados para calentar rápido en HIGH (alta) y luego permitir que se ablande en
LOW (baja). Cambia automáticamente a WARM (calentar) al nal del ciclo de cocción.
1. Agregue los alimentos al recipiente y cubra con la tapa.
2. Gire el bisel selector a PROGRAM (programa). La pantalla de LCD muestra la
conguración de “1 PROGRAM” (1 programa) y “2 PROGRAMS” (2 programas).
3. Gire la perilla hacia la derecha para seleccionar
“2 PROGRAMS” (2 programas). Libere la perilla una vez
que se haya seleccionado “2 PROGRAMS” (2 programas).
La conguración destellará tres veces antes de quedar ja.
NOTA: Si el botón START/STOP (iniciar/detener) se presiona
antes de que la pantalla deje de destellar, el programa irá al
paso siguiente en el proceso de conguración.
4. Una vez que “2 PROGRAMS” (2 programas) queda jo, podrán
verse destellantes “CYCLE 1” (ciclo 1) y las conguraciones de
calor. Gire la perilla hacia la izquierda o derecha para seleccionar
LOW (baja), MEDIUM (media) o HIGH (alta). WARM (calentar) no
es una opción. Libere la perilla una vez que haya seleccionado una conguración de
calor; luego, la conguración destellará tres veces antes de que quede ja.
NOTA: Para acceder a la conguración previa en cualquier momento, presione el botón
BACK (atrás) una vez.
5. Una vez que la pantalla queda ja, podrán verse destellando
“SETTING TIME” (congurando tiempo) y “00:00”. Ajuste la
conguración de tiempo girando la perilla hacia la derecha
para aumentar el tiempo o hacia la izquierda para reducirlo. El
tiempo se ajusta en unidades de 30 minutos, con un tiempo mínimo de 30 minutos y
un máximo de 24 horas. Libere la perilla una vez que haya congurado el tiempo y el
tiempo destellará tres veces antes de que quede jo.
68
Page 69

6. Una vez que la pantalla queda ja, podrán verse destellantes
“CYCLE 2” (ciclo 2) y las conguraciones de calor de “WARM
LOW MED HIGH” (calentar, baja, media, alta). Gire la perilla
hacia la izquierda o derecha para seleccionar WARM (calentar),
LOW (baja), MEDIUM (media) o HIGH (alta). Libere la perilla una vez que haya
seleccionado una conguración de calor; luego, la conguración destellará tres veces
antes de que quede ja.
7. Una vez que la pantalla queda ja, podrán verse destellando
“SETTING TIME” (congurando tiempo) y “00:00”. Ajuste la
conguración de tiempo girando la perilla hacia la derecha
para aumentar el tiempo o hacia la izquierda para reducirlo. El
tiempo se ajusta en unidades de 30 minutos, con un tiempo mínimo de 30 minutos y
un máximo de 24 horas. Libere la perilla una vez que se haya congurado el tiempo. El
tiempo y el botón START/STOP (iniciar/detener) comenzarán a destellar.
NOTA: El tiempo de cocción total máximo combinado para el ciclo 1 y ciclo 2 es de 24 horas.
8. Presione el botón START/STOP (iniciar/detener) para
comenzar la cocción. Sonará una companilla larga y el
botón START/STOP (iniciar/detener) permanecerá iluminado.
En la pantalla podrá verse “CYCLE 1” (ciclo 1), la
conguración de calor seleccionada y el tiempo de cocción
del ciclo y el tiempo de cocción total.
9. Cuando el tiempo de cocción del ciclo 1 haya nalizado,
sonará una campanilla corta indicando la nalización del ciclo
1. La unidad cambiará al ciclo 2 y las conguraciones de calor
y tiempo se ajustarán a las conguraciones del ciclo 2.
10. Cuando el ciclo 2 haya nalizado, sonará una campanilla larga.
“COOK TIME” (tiempo de cocción) y “00:00” desaparecerán.
La unidad cambiará a la conguración de calor “WARM”
(calentar) y el temporizador comenzará una cuenta ascendente.
Después de 4 horas en WARM (calentar), la unidad de apagará
en forma automática.
11. Presione el botón START/STOP (iniciar/detener) en cualquier momento para nalizar la
cocción y para apagar la unidad. Aparecerá destellante “OFF” en la pantalla y la olla hará
sonar una campanilla tres veces.
NOTA: Durante el ciclo, la conguración de calor puede ajustarse en cualquier momento
girando la perilla. La nueva conguración seleccionada destellará tres veces antes de
quedar ja y que la temperatura se ajuste. No hace falta presionar el botón START/STOP
(iniciar/detener). La conguración de tiempo puede ajustarse en cualquier momento
presionando el botón TIMER (temporizador) para reactivar el tiempo y que destelle, y la
perilla puede girarse para ajustar el tiempo de cocción.
69
Page 70

CÓMO USAR LOS MODOS DE COCCIÓN
PROGRAMA CON SONDA
Use la sonda para cocinar alimentos a la temperatura interna deseada. Para muchos
alimentos, como cortes grandes de carne, la temperatura de los alimentos es la mejor
prueba para vericar el grado de cocción. La sonda de temperatura evita tener que
adivinar. Seleccione la temperatura interna de los alimentos deseada, y la olla cambiará
automáticamente a WARM (calentar) cuando se alcance la temperatura deseada.
La sonda sólo puede ser usada con 1 PROGRAM (1 programa).
1. Introduzca el extremo de la sonda en el enchufe de la sonda
ubicado en el lado derecho de la olla multifunción. Introduzca la
sonda de temperatura dentro de la parte más gruesa del alimento.
Cubra el recipiente con la tapa, cuidando de colocar el cable de la
sonda en la abertura de la tapa.
2. Gire el bisel selector a PROGRAM (programa). La pantalla de LCD
muestra la conguración destellante “1 PROGRAM" (1 programa).
3. Una vez que “1 PROGRAM” queda jo, aparecerán las
conguraciones de calor de “LOW MED HIGH” (baja, media, alta). Gire la perilla hacia la
izquierda o derecha para seleccionar LOW (baja), MEDIUM (media) o HIGH (alta). Libere la
perilla una vez que haya seleccionado una conguración de calor; luego, la conguración
destellará tres veces antes de que quede ja.
NOTA: Para acceder a la conguración previa en cualquier momento, presione el botón BACK
(atrás) una vez.
4. Una vez que la conguración de calor seleccionada queda ja, podrán verse el ícono de la
sonda destellando y la temperatura predeterminada de “155F”.
Ajuste la conguración de temperatura girando la perilla hacia
la derecha para aumentar la temperatura o hacia la izquierda
para reducirla. El rango de temperatura es de 100°–200°F.
Libere la perilla una vez que haya congurado la temperatura
de la sonda; luego destellarán y emitirán sonidos la pantalla y el
botón START/STOP (iniciar/detener).
NOTA: Si la sonda no se ha enchufado, en la pantalla podrá verse
“COOK TIME” (tiempo de cocción) y “00:00”.
5. Presione el botón START/STOP (iniciar/detener) para comenzar
la cocción. Sonará una companilla larga y el botón START/
STOP (iniciar/detener) permanecerá iluminado. Una vez que
el ciclo se inicia, puede verse la conguración de temperatura
deseada, junto con la lectura de temperatura actual de la sonda
con el ícono de echa ascendente.
6. Cuando se alcanza la temperatura deseada, sonará
una campanilla larga. Las conguraciones de la sonda
desaparecerán. La unidad cambiará a la conguración de calor
"WARM" (calentar) y el temporizador comenzará una cuenta
ascendente. Después de 4 horas en WARM (calentar), la unidad
de apagará en forma automática.
7. Presione el botón START/STOP (iniciar/detener) en cualquier momento para nalizar la
cocción y para apagar la unidad. Aparecerá destellante "OFF" en la pantalla y la olla hará
sonar una campanilla tres veces.
NOTA: Durante el ciclo, la temperatura deseada puede ajustarse en cualquier momento
girando la perilla. La nueva temperatura de la sonda seleccionada destellará tres veces antes
de quedar ja. No hace falta presionar el botón START/STOP (iniciar/detener).
70
Page 71

Consejos
COCCIÓN LENTA
• Elija los modos MANUAL, MEAL TIMER (temporizador de comidas), o PROGRAM
(programa). Ver las páginas 65–70 para descripciones completas.
• La conguración de temperatura alta es mejor para alimentos que requieren calor alto
y no tienden a sobrecocerse, tales como papas, frijoles, estofados, chile, sopas, y cuando
se “hornea” en uno de los modos de cocción lenta. Es una buena opción cuando usted
no tiene tiempo para una cocción lenta prolongada. 1 hora en High (alta) es equivalente a 1
1/2–2 horas en Low (baja).
• La conguración de temperatura media es una buena opción para pollo, cortes magros de
cerdo y alimentos que pueden sobrecocerse o secarse.
• La conguración de temperatura baja es mejor para cortes de carne grandes o duros que
requieren un tiempo de cocción prolongado y en ocasiones en las que se necesita dejar
una comida cocinándose por un tiempo prolongado, como durante la noche o durante un
día de trabajo.
• La conguración de temperatura "Warm" (calentar) no está concebida para cocinar
alimentos. Debe usarse para mantener calientes los alimentos ya preparados.
• Para mejores resultados, el recipiente debe estar lleno por lo menos hasta la mitad de su
capacidad. Si se llena menos de la mitad, verique el nivel de cocción de 1 a 2 horas
antes de lo señalado en la receta.
• Descongele toda la carne de res o de ave antes de la cocción lenta.
• No utilice la cocción lenta sin algo de líquido en el recipiente. Se recomienda por lo menos
1 pulgada (2.5 cm) de líquido en el fondo del recipiente.
• Cuando cocine carne de res, cuanto mayor el contenido de grasa, menor la cantidad de
líquido necesario. Para reducir la cantidad de grasa en la cocción, recorte la mayor
cantidad de grasa visible y quite la piel del ave.
• Muy poco líquido se evapora durante una cocción lenta. Cuando prepare su sopa o salsa
favorita, reduzca el líquido indicado en la receta de media a una taza entera (118–237 ml).
Si la cocción es muy espesa, puede agregarse líquido más tarde.
• Los vegetales de raíz como las papas y zanahorias deben cortarse en trozos no mayores a
2 pulgadas (5.1 cm) para asegurar una cocción completa.
• Algunos alimentos no son adecuados para una cocción lenta prolongada. Las pastas,
frutos de mar, leche, crema y crema agria deben agregarse no más de 2 horas antes de
servir.
• Usualmente no es necesario mezclar los alimentos durante la cocción lenta. Quitar la tapa
genera la pérdida de calor y prolonga el tiempo de cocción. Cuando cocine una comida en
High (alta), se recomienda mezclar de vez en cuando.
• Para obtener más información sobre temperaturas seguras de cocción interna, visite
www.foodsafety.gov.
71
Page 72

CÓMO USAR LOS MODOS DE COCCIÓN
ARROZ
Siempre utilice las medidas recomendadas en la Tabla de cocción de arroz de la página 73.
1. Agregue el arroz y el agua al recipiente en las cantidades recomendadas en la tabla de
arroz. Cubra con la tapa.
2. Gire el bisel selector a RICE (arroz). En la pantalla de LCD se
verá “RICE” (arroz) y destellan “1” y “2”.
3. Gire la perilla hacia la izquierda o derecha para seleccionar
la conguración 1 para arroz blanco y la conguración
2 para arroz integral. Libere la perilla una vez que haya
seleccionado la conguración. Destellará tres veces antes
de quedar jo.
4. La pantalla de LCD mostrará “00:00” y el botón START/
STOP (iniciar/detener) comenzará a destellar.
5. Presione el botón de START/STOP (iniciar/detener) para
iniciar el ciclo de cocción. Sonará una companilla y el botón
START/STOP (iniciar/detener) permanecerá iluminado.
6. El temporizador hará una cuenta ascendente en minutos.
7. Cuando el ciclo haya nalizado, sonará una campanilla
larga. La unidad cambiará a la conguración de calor
“WARM” (calentar) y el temporizador comenzará una cuenta
ascendente.
8. Presione el botón START/STOP (iniciar/detener) en cualquier
momento durante la cocción para apagar la unidad.
NOTA: Si el botón START/STOP (iniciar/detener) no se presiona durante el ciclo de
cocción o de la conguración “WARM” (calentar), la unidad permanecerá encendida por
un máximo de 6 horas y luego se apagará en forma automática.
72
Page 73

TABLA DE COCCIÓN DE ARROZ
CONFIGURACIÓN 1: ARROZ BLANCO (tiempo de cocción de 30 a 35 minutos)
Cantidad de arroz* Cantidad de agua Rendimiento
2 tazas (473 ml) 2 3/4 tazas (651 ml) 6 tazas (1.4 L)
3 tazas (710 ml) 4 tazas (946 ml) 9 tazas (2.1 L)
4 tazas (946 ml) 5 tazas (1.2 L) 12 tazas (2.8 L)
5 tazas (1.2 L) 7 tazas (1.7 L) 18 tazas (4.3 L)
CONFIGURACIÓN 2: ARROZ INTEGRAL (tiempo de cocción de 50 a 55 minutos)
Cantidad de arroz* Cantidad de agua Rendimiento
2 tazas (473 ml) 3 1/2 tazas (828 ml) 6 1/2 tazas (1.5 L)
3 tazas (710 ml) 4 1/2 tazas (1.1 L) 9 tazas (2.1 L)
4 tazas (946 ml) 6 tazas (1.4 L) 13 tazas (3.1 L)
5 tazas (1.2 L) 7 1/2 tazas (1.8 L) 16–17 tazas (3.8–4.0 L)
*Cuando utilice arroz procesado (parbolizado), use 1/4 taza (59 ml) de agua adicional por
taza de arroz.
*El arroz integral cocido debe permanecer en WARM (calentar) por 5 a 10 minutos antes
de servir.
*Tablas basadas en medidas hechas con una taza medidora de 8 onzas (237 ml).
73
Page 74

CÓMO USAR LOS MODOS DE COCCIÓN
SAUTE/SEAR (saltar/sellar)
Utilice este modo para saltar vegetales o dorar carne antes de la cocción lenta, para
sellar letes, pollo o pescado después de la cocción sous vide, o para recetas que
requieren el saltado o sellado como el único modo de cocción. Tiene un tiempo máximo
de cocción de 45 minutos, incluyendo el precalentamiento. La tapa puede usarse durante
el precalentamiento o para evitar las salpicaduras.
1. Gire el bisel selector a SAUTE/SEAR (saltar/sellar). Destellará
en la pantalla LCD “LOW MED HIGH” (baja, media, alta).
2. Gire la perilla hacia la derecha o izquierda para seleccionar
una conguración de calor. Libere la perilla cuando se haya
establecido una conguración de calor. La conguración de
calor seleccionada y el botón START/STOP (iniciar/detener)
comenzarán a destellar.
3. Presione el botón START/STOP (iniciar/detener) para
comenzar la cocción. Sonará una campanilla larga y el botón
START/STOP (iniciar/detener) permanecerá iluminado.
4. La pantalla mostrará la conguración de calor seleccionada
con el ícono de la echa ascendente indicando que la
temperatura está elevándose.
5. Cuando se alcanza la conguración de calor seleccionada,
sonará una campanilla larga.
6. Agregue los alimentos al recipiente y salte o selle hasta el nivel de cocción deseado.
7. Presione el botón START/STOP (iniciar/detener) al nalizar la cocción para apagar la
unidad, o seleccione otro modo si desea una cocción adicional.
8. La unidad permanecerá en el modo SAUTE/SEAR (saltar/sellar) por un tiempo máximo
de 45 minutos.
NOTA: La conguración de calor puede ajustarse en cualquier momento durante la
cocción girando la perilla. La nueva conguración de calor seleccionada destellará tres
veces antes de quedar ja.
Consejos
SAUTE/SEAR (saltar/sellar)
• Asegúrese de que el recipiente se haya precalentado por completo antes de agregar
10 minutes.
• Cuando dore carne, asegúrese de no llenar de más el recipiente. Cocine grandes
cantidades en tandas, si fuera necesario.
• Si dorar carnes produce grasa excesiva, elimine la grasa con cuidado antes de la
cocción lenta.
74
Page 75

SOUS VIDE
SOUS VIDE es un método de cocción en el que los alimentos sellados se cocinan en
un baño de agua a temperatura precisamente controlada, en una conguración de
entre 100°F (38°C) y 200°F (93°C). La sonda de temperatura se usa para controlar la
temperatura del agua. Este método asegura resultados parejos y predecibles y evita la
sobrecocción. En este modo, los alimentos se condimentan y luego se sellan en bolsas o
frascos resistentes al calor. El recipiente se llena con agua tibia y los alimentos sellados
se agregan al baño de agua cuando se alcanza la temperatura deseada. Puede usarse
la rejilla removible cuando cocine varias bolsas a la vez. Para mejores resultados, las
proteínas pueden dorarse antes y/o después de la cocción sous vide para lograr un
exterior bien dorado. Los alimentos sólidos deben sellarse en una bolsa resistente al
calor que esté clasicada como apta para sous vide. Los huevos o natillas pueden
cocerse en frascos de vidrio herméticos.
1. Agregue agua al recipiente, dejando un espacio libre de por lo
menos 1 pulgada (2.5 cm) entre la parte superior del agua y la
parte superior del recipiente. Coloque el recipiente en la base
de la olla. Enganche la sonda de temperatura en el costado del
recipiente, alineando con el ícono de la sonda, y cubra con la
tapa. Verique de alinear la sonda con la abertura de la tapa.
2. Introduzca el extremo de la sonda en el enchufe de la sonda
ubicado en el lado derecho de la olla multifunción. La sonda
se encuentra en el agua para controlar la temperatura del agua
durante el modo Sous Vide.
3. Gire el bisel selector a SOUS VIDE. (Si la sonda no está
enchufada, en la pantalla podrá verse “Prb.”)
4. La pantalla de LCD mostrará el ícono de la sonda
destellante y la temperatura predeterminada de la sonda
de “155F”.
75
Page 76

CÓMO USAR LOS MODOS DE COCCIÓN
5. Gire la perilla hacia la derecha para aumentar la temperatura
o hacia la izquierda para reducirla. Se ajustará en unidades
de 1°F, y el rango de temperatura es de 100°–200°F. Libere
la perilla una vez que haya congurado la temperatura de la
sonda; luego destellarán la pantalla y el botón START/STOP
(iniciar/detener).
6. Presione el botón START/STOP (iniciar/detener) para
comenzar la cocción. Sonará una campanilla larga y
el botón START/STOP (iniciar/detener) permanecerá
iluminado. Una vez que el ciclo se inicia, puede verse la
conguración de temperatura deseada, junto con la lectura
de temperatura actual de la sonda con el ícono de echa
ascendente.
7. Cuando se alcanza la temperatura deseada, sonará una
campanilla larga. Agregue los alimentos sellados al baño de
agua en este momento y coloque la tapa en el recipiente,
alineando la abertura de la sonda con la sonda. La unidad seguirá mostrando la
temperatura de la sonda por el resto del tiempo de cocción.
8. Si así lo desea, congure el temporizador. Presione TIMER (temporizador) para
comenzar la cuenta ascendente. La pantalla de LCD mostrará “00:01” y comenzará
la cuenta ascendente. El temporizador sólo puede iniciarse después de que se haya
alcanzado la temperatura de la sonda. El temporizador puede apagarse en cualquier
momento presionando el botón Timer.
9. Presione el botón START/STOP (iniciar/detener) en cualquier momento durante la
cocción para apagar la unidad. La luz del botón START/STOP (iniciar/detener) se
apagará y la pantalla destellará “OFF” (apagado) tres veces junto con tres campanillas
cortas. Luego “OFF” quedará jo.
NOTAS:
• Si el botón START/STOP (iniciar/detener) no se presiona durante la cocción, la
unidad permanecerá encendida por un máximo de 72 horas y luego se apagará en
forma automática.
• La temperatura de la sonda puede ajustarse en cualquier momento girando la perilla.
La nueva temperatura de la sonda destellará tres veces antes de quedar ja.
76
Page 77

Consejos
SOUS VIDE
• La mayoría de los alimentos cocidos con sous vide se sellan en bolsas utilizando una
selladora de vacío, aunque ésta no es necesaria para cocinar con sous vide. También
pueden usarse frascos de vidrio herméticos para la cocción sous vide y resultan muy
adecuados para recetas que requieren mucho líquido o grasa, tales como mezclas de
huevo o natilas, frijoles, granos, yogurt, pickles, y otros postres.
• Si usa una selladora de vacío, use bolsas resistentes al calor clasicadas para sous vide.
Siga las instrucciones del fabricante de la selladora al vacío para el sellado.
• Cualquier alimento que se cocina por menos de 8 horas puede sellarse en bolsas plásticas
resellables resistentes al calor sin una selladora de vacío, mediante el método de
desplazamiento de agua:
• Coloque los alimentos en una bolsa y quite la mayor cantidad posible de aire.
• Cierre la bolsa dejando una abertura de 1 pulgada (2.5 cm) en la parte superior.
• Con cuidado sumerja la parte inferior de la bolsa en agua hasta cubrir los alimentos.
La presión del agua hará salir el aire de la bolsa.
• No permita que ingrese agua a la bolsa.
• Suavemente presione la bolsa para eliminar el aire restante y selle.
• Cualquier clase de alimento cocido con más de una pequeña cantidad de líquido no
debería sellarse al vacío. El líquido podría ingresar a la selladora de vacío y provocar
daños.
• Cuando cocine pescado, no selle las bolsas al vacío rmemente. Resulta deseable
alrededor de un 75%, o utilice el método de desplazamiento de agua.
• Los alimentos pueden sellarse en bolsas por anticipado y almacenarse en el refrigerador
durante la noche, o en el congelador, antes de la cocción para ahorrar tiempo.
• Para reducir el tiempo requerido para calentar el agua a la temperatura adecuada, llene el
recipiente con agua tibia de grifo. Si va a cocinar a temperaturas más elevadas, llene
el recipiente con agua caliente del grifo. La sonda brindará una lectura constante de la
temperatura del agua en la pantalla. Si el agua está más caliente que la temperatura
seleccionada, agregue cubitos de hielo para bajar la temperatura.
• Los alimentos congelados pueden cocerse con sous vide sin descongelarse primero, pero
agregar alimentos congelados al baño de agua bajará la temperatura del agua. En general,
debe agregarse una hora extra al tiempo de cocción total para dejar que los alimentos se
descongelen por completo y alcancen la temperatura deseada.
• Seguridad de los alimentos: Cocinar con sous vide es tan seguro como hacerlo con los
métodos de cocción tradicionales aunque los alimentos se cocinan a una temperatura más
baja que con otros métodos de cocción.
• Los tiempos y temperaturas provistas en la tabla de las páginas 78–79 son lo
necesario para la pasteurización.
• La seguridad de los alimentos está determinada por una combinación de qué
alimentos está cocinando, el tiempo de duración de la cocción y la temperatura.
• Para minimizar el riesgo de enfermedades provocadas por alimentos, siempre utilice
los alimentos más frescos posibles y utilice prácticas de manipulación seguras.
• Para más información sobre temperaturas seguras de cocción interna y de
pasteurización, consulte www.foodsafety.gov o fsis.usda.gov.
77
Page 78

CÓMO USAR LOS MODOS DE COCCIÓN
TABLA SOUS VIDE
NOTAS:
• Para carnes de res, pollo y pescado más gruesas, los tiempos de cocción serán mayores.
• Para obtener más información sobre temperaturas seguras de cocción interna, visite
www.foodsafety.gov o fsis.usda.gov.
ALIMENTO Y NIVEL DE COCCIÓN TEMPERATURA TIEMPO
Filete (grosor de 1 a 1 1/4 pulgada [2.5 a 3 cm])
Muy poco cocido a poco cocido 125°F (52°C) 1 a 3 horas
Jugoso
A punto 140°F (60°C) 1 a 4 horas
Cocido 150°F (66°C) 1 a 4 horas
Bien cocido 155°F (68°C) 1 a 4 horas
Cerdo
Paleta/paleta estilo Boston, bien cocido, 3–4 libras
(1.4–1.8 kg)
Filete de lomo, a punto, 1 1/2–2 libras (0.7–0.9 kg) 145°F (63°C) 2 a 4 horas
Lomo, a punto, 2–3 libras (0.9–1.4 kg) 150°F (66°C) 3 a 4 horas
Chuletas sin hueso, a punto, grosor de 3/4 pulgada
(1.9 cm)
Chuletas con hueso, a punto, grosor de 1 pulgada
(2.5 cm)
Costillas con hueso, 1 costillar entero, 3–4 libras
(1.4–1.8 kg)
130°–135°F (54°–57°C)
185°F (85°C) 8 a 10 horas
140°F (60°C) 1 a 2 horas
145°F (63°C) 1 a 2 horas
165°F (74°C) 12 a 14 horas
1 a 4 horas
Pollo, carne blanca sin hueso (5 a 6 onzas
[142–170 g])
Muy tierna y jugosa 140°F (60°C) 1 a 3 horas
Tierna y jugosa 150°F (66°C) 1 a 3 horas
Firme y jugosa 160°F (71°C) 1 a 3 horas
Pollo, carne oscura sin hueso (5 a 6 onzas
[142–170 g])
Tierna y jugosa
78
167°–170°F (75°–77°C)
1 1/2 a 3 horas
Page 79

ALIMENTO Y NIVEL DE COCCIÓN TEMPERATURA TIEMPO
Pescado (5 a 6 onzas [142–170 g])
Cocido muy ligeramente, jugoso y tierno
A punto, tierno y se deshace
Bien cocido, firme y se deshace
Vegetales
Tallos de espárragos 185°F (85°C) 10 minutos
Remolachas cortadas en trozos de 2 pulgadas
(5.1 cm)
Brócoli (flores pequeñas) 185°F (85°C) 30 a 40 minutos
Zanahorias cortadas en trozos de 2 pulgadas
(5.1 cm) 185°F (85°C) 30 a 45 minutos
Coliflor (flores pequeñas) 185°F (85°C) 1 a 1 1/2 horas
Tomates cherry o uva en mitades 185°F (85°C) 20 a 30 minutos
Mazorca de maíz 185°F (85°C) 30 a 45 minutos
Hongos en mitades 195°F (91°C) 1 hora
Cebollas cortadas en trozos de 2 pulgadas (5.1 cm) 185°F (85°C) 1 a 1 1/2 horas
Papas cortadas en trozos de 2 pulgadas (5.1 cm) 185°F (85°C) 2 a 2 1/2 horas
Hojas de espinaca 185°F (85°C) 5 minutos
Calabaza cortada en trozos de 2 pulgadas (5.1 cm) 185°F (85°C) 1 a 1 1/2 horas
Tomates en mitades 185°F (85°C) 20 a 30 minutos
Frutas
Manzanas en mitades sin centro 185°F (85°C) 1 1/2 horas
Peras en mitades sin centro 185°F (85°C) 1 1/2 horas
110°–120°F (43°–49°C)
122°–130°F (50°–54°C)
135°–140°F (57°–60°C)
185°F (85°C) 2 1/2 a 3 horas
30 a 40 minutos
30 a 40 minutos
30 a 40 minutos
79
Page 80

Recomendaciones de los cuidados
ADVERTENCIA
Riesgo de descarga eléctrica:
No limpiar con esponjillas de metal. Pueden desprenderse pedazos de la esponjilla y
tocar partes eléctricas, provocando un riesgo de descarga eléctrica.
Su olla multifunción debe limpiarse regularmente para un mejor desempeño y una
prolongada vida útil. La limpieza regular también reduce el riesgo de incendio.
ANTES DE LIMPIAR
1. Desenchufe la olla multifunción y déjela enfriar.
LIMPIEZA
Pantalla del
panel de control
Exterior
de acero
inoxidable
Exterior que
no es de acero
inoxidable
Interior
de la olla
multifunción
Recipiente
de acero
inoxidable
Sonda Limpie la sonda con agua tibia jabonosa. Enjuague y seque por completo con
Limpie con una esponja ligeramente húmeda. Proteja la pantalla cuando limpie
otras supercies.
Utilice un limpiador de acero inoxidable no abrasivo, como Signature Polish,
y aplique con un paño suave libre de pelusas. Para resaltar el lustre natural,
limpie la supercie suavemente con un paño de microbra humedecido con
agua seguido de un paño para lustrar seco. Siempre siga la veta del acero
inoxidable. Signature Polish puede solicitarse por su sitio Web:
www.signaturepolishonline.com.
Limpie la parte exterior de la olla multifunción con un paño húmedo o rocíe con
un limpiador multipropósito. Limpie con un paño suave libre de pelusas. No
utilice limpiadores abrasivos o paños de limpieza metálicos.
Limpie las paredes internas y el piso de la olla multifunción con un paño
húmedo jabonoso.
Deje enfriar el recipiente antes de lavarlo. Lave a mano con agua tibia jabonosa
con una esponja, paño de cocina o esponjilla plástica después de cada uso, o
lave en el lavavajillas.
No utilice esponjillas metálicas, de acero o detergentes abrasivos.
El recipiente es apto para lavavajillas.
Las temperaturas elevadas y los detergentes abrasivos pueden decolorar el
recipiente.
Pueden generarse tintes amarronados-dorados o azules por
sobrecalentamiento y/o residuos minerales. Para limpiar, haga una pasta con
agua y limpiador no abrasivo de acero inoxidable o bicarbonato de sodio.
NO UTILICE UN LIMPIADOR QUE CONTENGA CLORO. Aplique la pasta con
una esponja o paño sobre el recipiente mientras todavía está tibio y friegue
ligeramente en una dirección. Lave de nuevo, enjuague y seque.
Aunque el acero inoxidable es muy duradero, no es indestructible. Pueden
provocarse marcas si permanece sal sin disolver en el fondo del recipiente. No
deje alimentos ácidos o alimentos condimentados en el recipiente por períodos
prolongados.
un paño limpio.
80
Page 81

Detección y solución de problemas
Destella “Prb”.
• La sonda no está enchufada. Tenga a bien verificar la conexión.
Destella “Err 1”.
• La sonda está rota. Comuníquese con nuestro centro de atención al cliente.
Destella “Err 3”.
• La sonda se enchufó durante los modos MANUAL, MEAL TIMER (temporizador de
comidas), RICE (arroz) o SAUTE/SEAR (saltar/sellar). Quite la sonda.
Destellan “Err 4” y “Err 5”.
• El control de temperatura de cocción está roto. Comuníquese con nuestro centro de
atención al cliente.
Destella “Err 6”.
• El recipiente de cocción no está en su lugar o no está colocado correctamente.
Coloque el recipiente o ajuste la unidad de cocción.
Wolf, Wolf & Design, Wolf Gourmet, W & Design y el color rojo según se aplica a las perillas son marcas registradas y marcas de servicio
de Wolf Appliance, Inc. Sub-Zero, Sub-Zero & Design, Dual Refrigeration, The Living Kitchen, Great American Kitchens, The Fine Art
of Kitchen Design, e Ingredients son marcas registradas y marcas de servicio de Sub-Zero, Inc. (colectivamente, las “Marcas de la
Compañía”). Todas otras marcas y marcas registradas son propiedad de sus dueños respectivos en los Estados Unidos y otros países.
81
Page 82

NOTAS
82
Page 83

Garantía limitada residencial Wolf Gourmet
SÓLO PARA USO RESIDENCIAL
GARANTÍA LIMITADA DE CINCO AÑOS
Esta garantía de producto Wolf Gourmet corresponde sólo a electrodomésticos. Wolf Gourmet
garantiza que los electrodomésticos se encuentran libres de defectos en cuanto a materiales y
mano de obra durante un período de cinco (5) años desde la fecha de compra original.
GARANTÍA LIMITADA DE POR VIDA
Esta garantía de producto Wolf Gourmet corresponde sólo a recipientes de cocción y cubiertos.
Wolf Gourmet garantiza que los recipientes de cocción y los cubiertos se encuentran libres de
defectos en materiales y mano de obra durante la vida útil del producto. Las imperfecciones
menores y las decoloraciones son normales y no se consideran defectos.
TÉRMINOS APLICABLES PARA CADA GARANTÍA
Esta garantía limitada residencial Wolf Gourmet se aplica a electrodomésticos, recipientes de
cocción, y cubiertos adquiridos y utilizados en los EE.UU. La presente es la única garantía expresa
para este producto y reemplaza a cualquier otra garantía.
Durante el período de garantía, su único recurso es la reparación o reemplazo del producto y
cualquier componente que resulte defectuoso, según nuestro criterio. Todas las reparaciones
provistas por Wolf Gourmet según los términos de esta garantía deben ser efectuadas por personal
certicado por la fábrica Wolf Gourmet, a menos que Wolf Gourmet determine algo diferente por
adelantado, y todas las reparaciones serán efectuadas durante un horario de trabajo normal.
Esta garantía no cubre el desgaste provocado por un uso normal, un uso que no cumpla con las
instrucciones impresas, o daños al producto provocados por negligencia, accidentes, modicación,
maltrato, uso indebido, o atención o reparaciones inadecuadas. Esta garantía pierde su validez si el
producto es utilizado en otro medio que no sea el residencial o se somete a cualquier voltaje o forma
de onda diferente a la especicada en la etiqueta de clasicación (ej., 120 V ~ 60 Hz). La presente
garantía se extiende sólo al comprador consumidor original o recipiente inicial de un regalo.
Wolf Gourmet excluye todos los reclamos debido a daños especiales, incidentales y resultantes
provocados por el imcumplimiento de la garantía expresa o implícita. Toda nuestra responsabilidad se
limita a la suma del precio de compra. SE DECLINAN TODAS LAS GARANTÍAS IMPLÍCITAS, INCLUIDAS
CUALQUIER GARANTÍA DE COMERCIABILIDAD O APTITUD PARA UN OBJETIVO DETERMINADO,
CON EXCEPCIÓN DE QUE SEA PROHIBIDO POR LA LEY, EN CUYO CASO DICHA GARANTÍA SE
LIMITA A LA DURACIÓN DE LA PRESENTE GARANTÍA ESCRITA. Esta garantía le otorga derechos
legales especícos. Usted puede contar con otros derechos legales que varían dependiendo de su
lugar de residencia. Algunos estados no permiten las limitaciones sobre garantías implícitas o los daños
incidentales o resultantes, por lo tanto estas limitaciones pueden no aplicarse en su caso.
Para efectuar un reclamo de garantía y para recibir el nombre de personal de reparación
certicado por la fábrica Wolf Gourmet más cercano a su domicilio, tenga a bien comunicarse
con Wolf Appliance, Inc., PO Box 44848, Madison, WI 53744; o visite la sección de contacto
y apoyo de nuestro sitio Web en wolfgourmet.com/warranty; o envíenos un correo electrónico
a customerservice@subzero.com; o llámenos al 800.222.7820. Para una atención más rápida,
ubique los números de modelo, tipo y serie en la etiqueta de clasicación de su producto.
83
Page 84

Modelo:
WGSC100S
Tipo:
SC68
Características Eléctricas:
120 V~ 60 Hz 1300 W
Los modelos incluídos en el instructivo de Uso y Cuidado pueden ir seguidos
o no por un sujo correspondiente a una o varias letras del alfabeto y sus
combinaciones, separadas o no por un espacio, coma, diagonal, o guión.
Como ejemplos los sujos pueden ser: “Y” y/o “MX” y/o “MXY” y/o “Z”.
84
WOLF APPLIANCE, INC. • P.O. BOX 44848 • MADISON, WI 53744
wolfgourmet.com • 800.222.7820
wolfgourmet.com.mx • 01.800.400.4372
840281800 7/2017
 Loading...