

Page 1

MASTERING YOUR KITCHEN
Cookware and Cutlery
Techniques, Recipes, and More
Page 2

MASTERING YOUR KITCHEN
Cookware and Cutlery
Page 3
4 Welcome to Wolf Gourmet
6 Start Here: Cook Smart
Contents
MAKING THE CUT 8
8 GETTING TO KNOW YOUR KNIVES
12 A FEW WORDS ON KNIFE SAFETY
16 THE DETAILS MAKE THE DIFFERENCE
23 Julienned Zucchini Salad
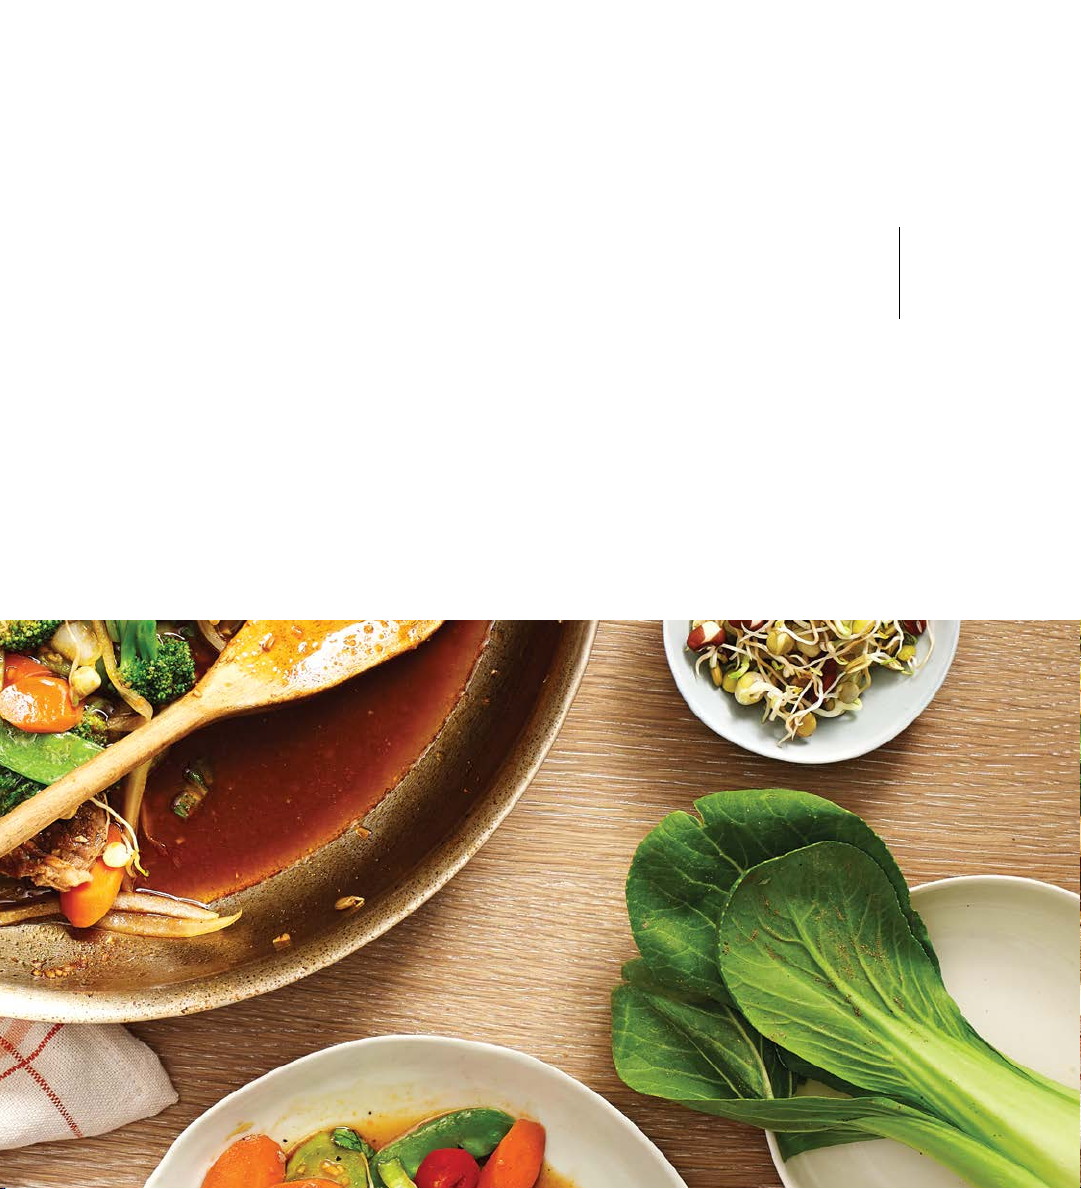
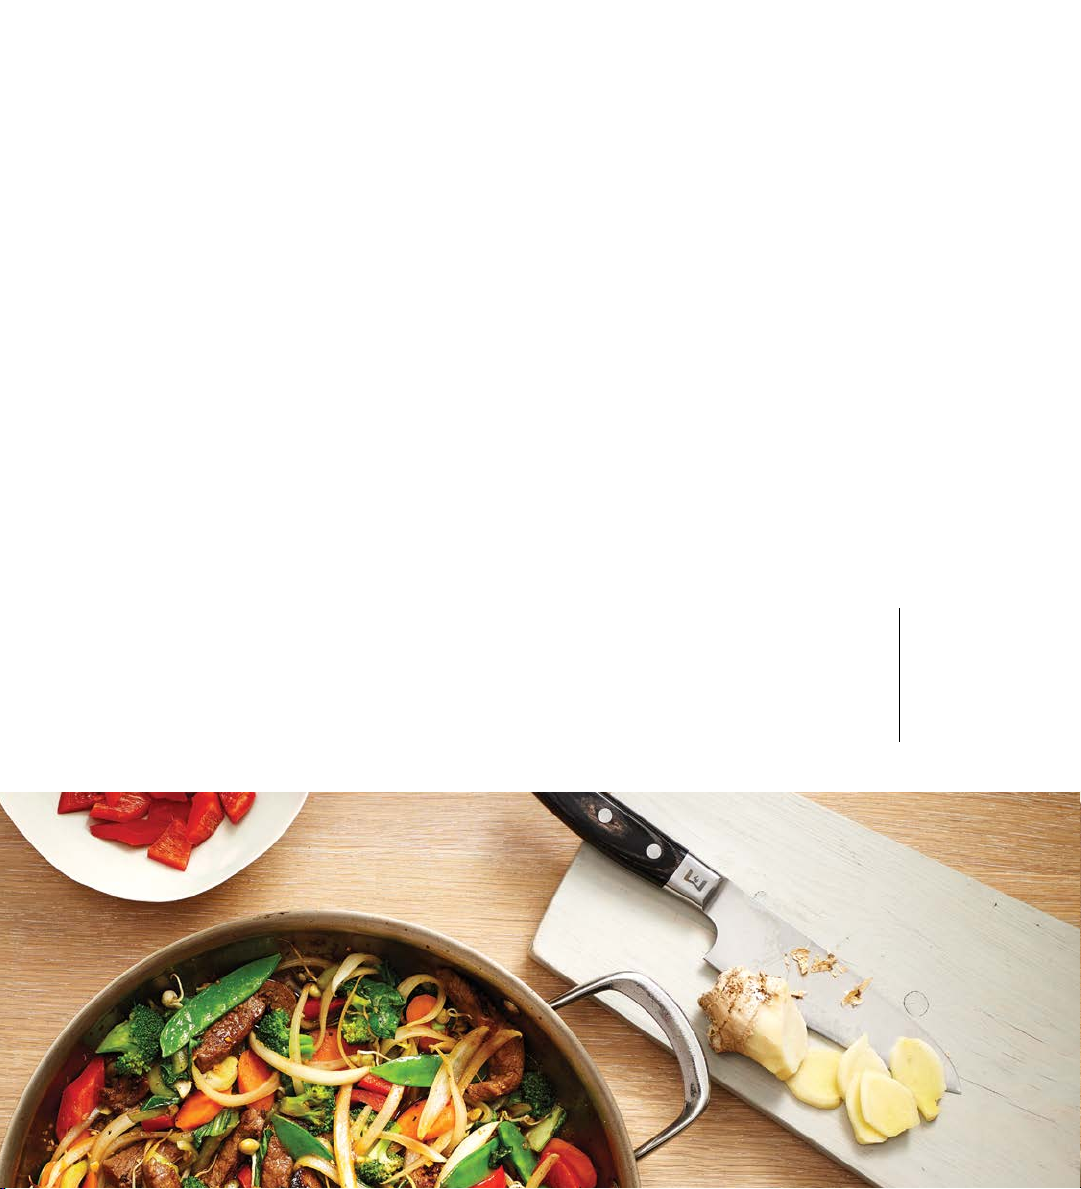
25 Master Stir-Fry
27 Glazed Carrots with Garlic and Ginger
29 Napa Cabbage Salad
30 Yellow Rice with Sofrito
Page 4

32 Basic Chicken Stock
COOKING LIKE A PRO 34
34 WHAT’S IN YOUR COOKWARE SET
36 FAST-MOVING AND FLAVORFUL: SAUTÉING
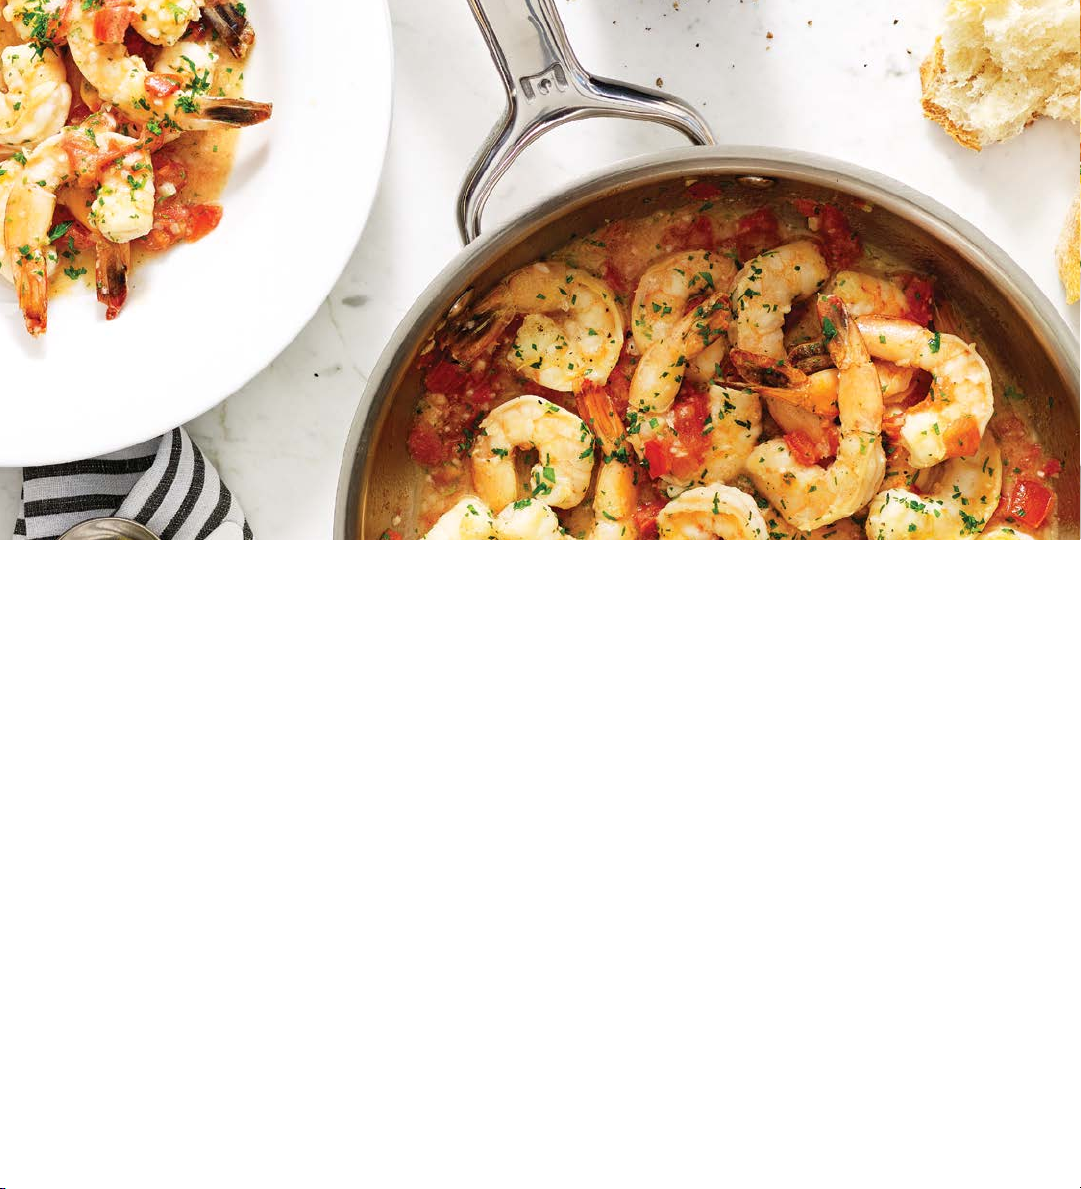
38 Shrimp Scampi
41 Green Beans with Lemon, Garlic, and Pine Nuts
42 GOLDEN-BROWN DELICIOUS: PAN SEARING AND PAN ROASTING
45 Scallops with Garlic-Parsley Butter
46 Pan-Roasted Steak with Gorgonzola-Shallot Butter
50 Chicken and Prosciutto Roulade
52 Pan-Seared Grouper with Tomato-Caper Sauce
54 MAKE IT CRISPY: HOW TO PAN FRY
58 Fried Fish Tacos with Pickled Radishes and Carrots
60 Zucchini Fritters with Smoked Chile–Lime Dipping Sauce
63 Pan-Fried Chicken
64 SO TENDER, SO DELICIOUS: BRAISING AND STEWING
67 Boeuf Bourguignon
69 Dutch Oven Beans
71 Black Bean Soup with Roasted Tomatoes
72 Pasta e Fagioli
74 Chicken and Andouille Gumbo
76 CREATING SPOON SWEETS AND CLASSIC SAUCES
77 Pastry Cream
78 Lemon Curd
81 Béarnaise
Page 5

WELCOME
TO
WOLF
Page 6

Since joining Sub-Zero, a third-generation
family-owned company, in 2000, Wolf has
brought its professional-quality ranges to people
like you: passionate home cooks. We know that
you can think of no better way to spend a day
than preparing a meal for your friends and family.
With Wolf Gourmet, we’re thrilled to bring our
trademark level of workmanship, attention to
detail, and sleek design to other parts of your
kitchen. Through relentless testing and tweaking
by designers and engineers who love to cook as
much as you do, we have created a line of knives,
cookware, and countertop appliances that will
help you cook better and more joyfully than you
ever thought possible.
7
Page 7
START HERE
Better tools allow you to put your concentration
where it belongs: on the food.
High-quality knives and cookware make cooking easier and more fun. Now that you have these tools,
we want to help you use them to their full potential. That’s where this book comes in. Our goal is to give
you the knowledge to put your new knives and cookware to work with even more condence than you
had before.
Page 8

COOK SMART
Mise en place means to chop and measure. This helps streamline your prep and maximizes the
pleasure of making a meal.
The rst step to mise en place is an easy one: read the recipe prior to cooking it. Recipes are road maps,
designed to help you go from a set of disparate ingredients to a stellar, perfectly prepared dish. A great
way to learn how ingredients and the cooking method work together is to follow the recipe to the letter
the rst time you make it. The second time you make the recipe, you can veer from the instructions,
making ingredient substitutions and other changes that reect your preferences and tastes. Since you
have already made the recipe once, you’ll be able to anticipate how the changes you make will inuence
the overall dish.
Here are a few more tips that can help you cook smarter,
more confidently, and more efficiently.
1. Before you begin, read the recipe all the way
through. (It actually doesn’t hurt to read it through
twice!)
2. Mise en place everything you can before you
start cooking. Have your ingredients sliced, diced,
and portioned before you start cooking to ensure
that everything is where you need it, when you
need it.
3. Work cleanly. If you have multiple cutting
boards, use each of them for a dierent type of
food—for example, cut meats on a dishwashersafe plastic board, bread and fruit on a wood
or cork board, and vegetables on another wood or
plastic board. (And if using one cutting board for
all your chopping needs, start with the vegetables
and end with raw meats so you don’t have to wash
the board between ingredients.) Always wipe down
your cutting board and wash your hands between
prep tasks, and wash your board in hot soapy water
when you’re nished. To remove the toughest
odors, give the board a scrub with a lemon half
or some distilled white vinegar, then rinse with hot
soapy water. Stand the board on its edge and allow
it to air-dry between uses. Never return cooked
food to a dirty cutting board. When doing dishes,
wash your cutting board in an empty sink so you
don’t contaminate other dishes or dishwater.
4. Work neatly. If your workspace is cluttered, so
is your mind. Stop every once in a while to clear the
onion skins, carrot peels, and beef trimmings from
your cutting board. (To make this super easy, you
can place a bowl just for trimmings at the top of
the cutting board.) Wipe down the countertops and
clean up any spills as you go. The minute or so it
takes to clear the board and reset your workspace
will reset your brain as well. If you can wash a
couple of dishes while the roast is in the oven and
one or two more while the sauce reduces, even
better. When you clean as you go, you’ll nd you
have little to do at the end of the meal but wash a
COOK SMART | 9
Page 9
MAKING
GETTING TO KNOW YOUR KNIVES
With a chef’s knife, a paring knife, and a bread knife,
you can own the kitchen. There are few tasks you can’t do
if you have these three tools.
Page 10
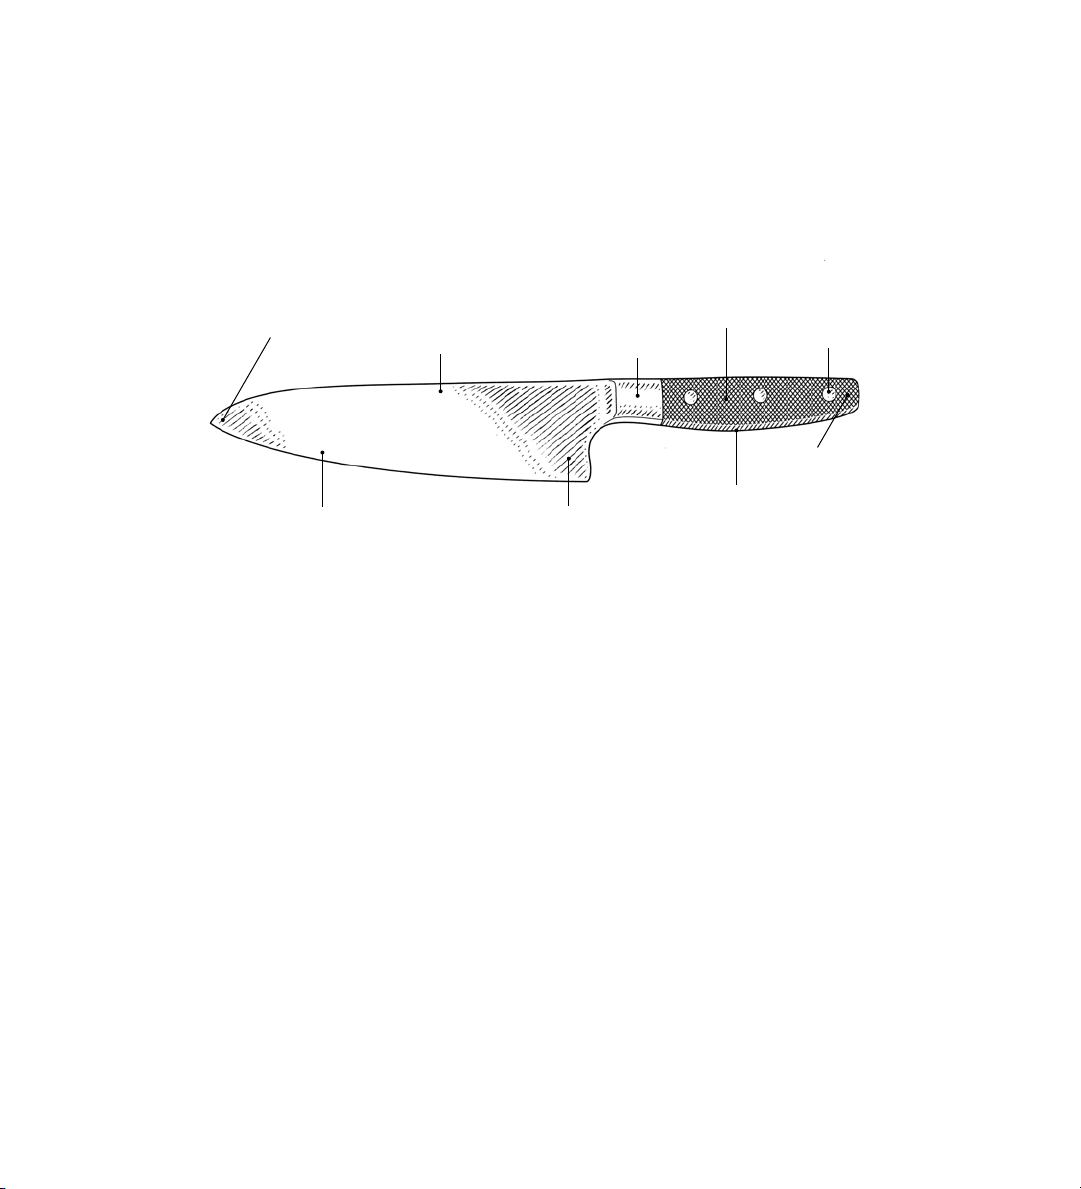
The Chef’s Knife
For many cooks, the chef’s knife is not only the primary knife but also the most essential cooking tool.
If you’ve used one for any amount of time, you know that it’s hard to imagine preparing a meal without
it. Your chef’s knife is suitable for everything, from portioning large cuts of meat to chopping the nest
chionade of basil.
Tip
Spine
Cutting Edge Heel
TIP You’ll use the tip to make vertical cuts on
an onion and for precision work. It also serves
as an anchor, staying on the board when using
the rocking cut (see page 17 for technique) and
when mincing.
CUTTING EDGE The edge works best when
kept as sharp as possible.
HEEL The heel of our knife is weighted to allow
better leverage when the tip rests on the cutting
board. Because it’s balanced, you can chop longer
and without your wrist tiring.
BOLSTER The bolster is the junction of the knife
where the metal blade transitions to the handle and
is where you grip the knife.
Handle
Bolster
Tang
SPINE Use the spine to bruise lemongrass,
Rivet
Butt
crack lobster claws, or scrape food into piles
on your cutting board. (Never scrape food with
your blade’s sharp edge as this will damage your
cutting edge.)
TANG The tang is the section of the blade that’s
covered by the handle. It gives the knife weight
and balance. The blade on these “full tang” knives
goes up the length of the handle, making them
more durable.
RIVET The rivets hold the handle securely in
place.
HANDLE The moisture-resistant pakkawood
handle is functional, beautiful, and comfortable
GETTING TO KNOW YOUR KNIVES | 11
Page 11

Paring Knife
A paring knife has a shorter blade than the chef’s
knife and it’s also much narrower. It’s best for
precise tasks, like hulling strawberries, deveining
shrimp, and scoring tomatoes.
Santoku
This wide-bladed Japanese utility knife is usually shorter than a chef’s knife. The edge is also
straighter than the chef’s knife, making it good for
precise vegetable cuts.
Bread Knife
Bread knives are serrated, with sharp, toothy
points separated by crescents of sharpened steel.
The points provide the bite that keeps the edge
from slipping on a crusty loaf of bread while the
crescents do most of the cutting. Bread knives are
designed to easily slice through the crustiest of
loaves. They also do a superb job of slicing melons,
salami, and pineapples.
Slicer/Carving Knife
Like the bread knife, the slicing knife is long and
slender, making it an especially eective tool for
slicing cooked meat. The narrowness of the blade
keeps moist food from sticking to it, the length
allows a smooth, one-stroke cut, and the sharp tip
enables you to sever joints cleanly and easily.
Utility Knife
The utility knife is longer than a paring knife and narrower than a chef’s knife. It is the go-to tool for those
jobs in the middle, like halving a sandwich or slicing
pepperoni. It can also be a more comfortable option
than a chef’s knife for cooks with small hands.
Boning Knife
This is the knife for anyone who wants serious
control when working with uncooked meat. The
long, slim blade can separate meat right o the
bone and eortlessly trims o fat and silver skin
(the sinewy, tough membranes attached to many
roasts). The sharp, tapered point is ideal for cutting
through tendons and joints.
Shears
Kitchen scissors are innitely useful and not just
for opening plastic packages. Our shears can do
delicate work, like snipping herbs, or tougher jobs,
like removing the backbones from chickens. The
grippers on the inner handles are excellent for
cracking nuts or lobsters and crab shells. Best of
all, after all of this dirty work, they come apart for
easy cleaning.
DID YOU KNOW?
Besides holding your knives, steel, and kitchen
shears, the Wolf Gourmet knife block also has a
resting spot for tablets or magazines so you can
easily view your recipes as you cook.
12 | COOKWARE AND CUTLERY
Page 12
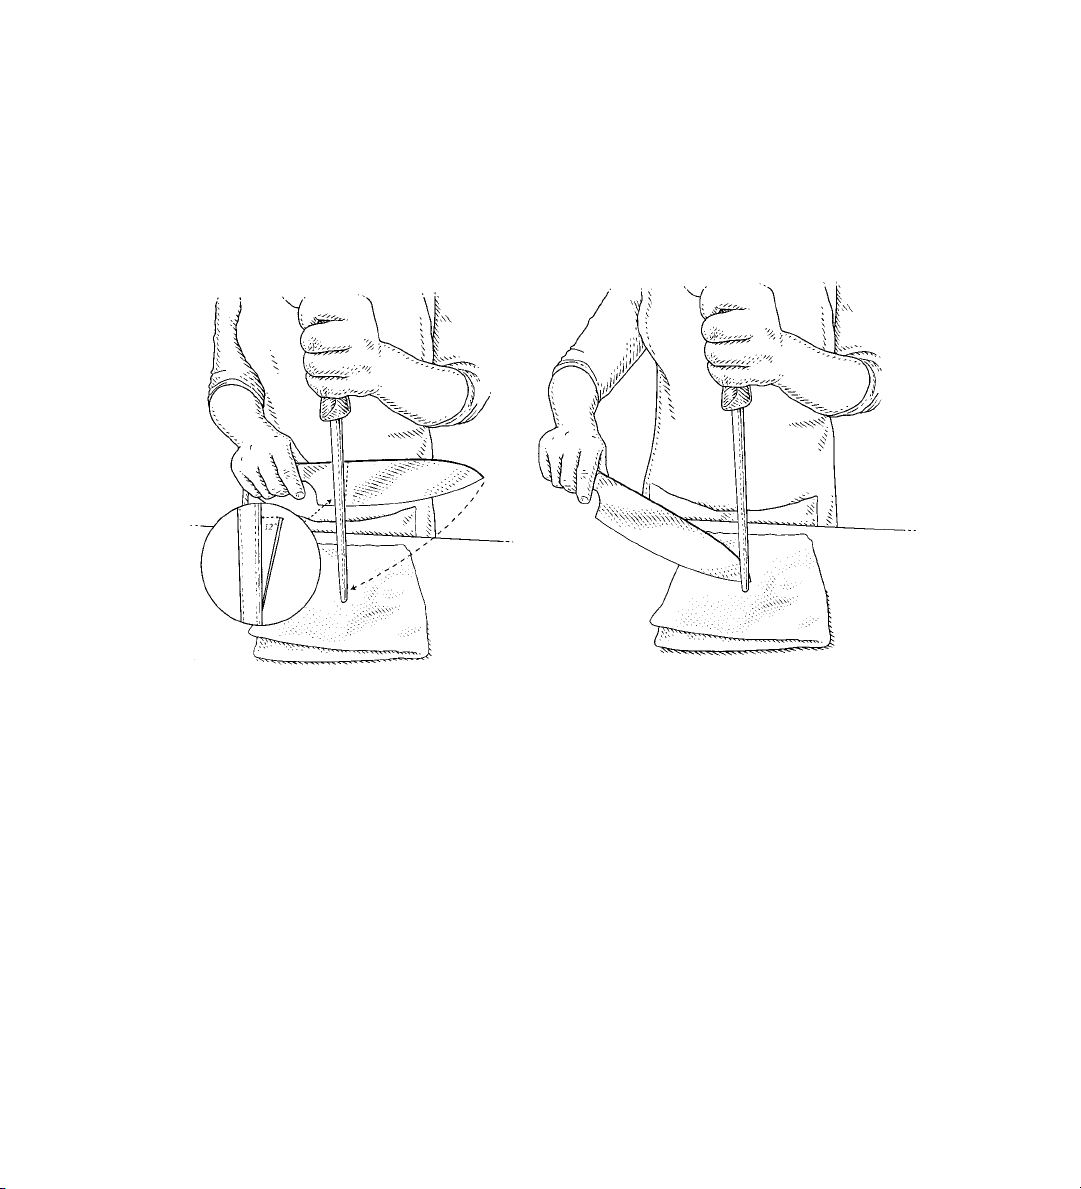
Put Your Honing Steel to Work for You
Pulling the knife blade across a honing steel once a week (or more often if you’re a heavy-duty cook)
will keep the knife edge at peak performance for up to a year between sharpening. As you chop, slice,
and dice, the edge of your knife will start to curl (it’s not visible to the naked eye—this happens on a
microscopic level). The curl is what dulls the blade. To realign the edge, simply follow these steps.
1. KEEP THE STEEL STEADY Place a kitchen
towel on your cutting board or countertop to prevent the steel from slipping.
2. HOLD THE STEEL Grasp the steel with your
guide hand (see The Guide Hand page 14) and set
the tip of the steel on the kitchen towel.
3. FIND THE ANGLE Place the edge of the
knife against the honing steel at the manufacturer’s
recommended angle (12.5 degrees for Wolf
Gourmet knives—about the angle at the tip of a
large carrot). Touch the steel with the knife’s edge
as though cutting a very thin slice. Adjust the
angle of the knife until you barely feel the edge
bite rather than slip down the steel.
4. HONE THE KNIFE Using little more pressure
than the weight of the knife itself, glide the knife
from the heel to the tip while moving the blade down
the steel; keep your wrist locked to maintain the
proper angle. Do this ve or six times on both sides
of the blade, alternating sides each time.
5. REPEAT Do once every week or so for
regular maintenance. As your edges wear, you
might need to hone more often. When honing
stops being eective, it’s time to get your knives
professionally sharpened.
GETTING TO KNOW YOUR KNIVES | 13
Page 13

A FEW WORDS ON KNIFE SAFETY
Our knives are seriously sharp, and that’s a good thing.
Sharper knives are safer knives because they glide
so easily through food.
Knife safety is mostly common sense. Here are a few tips to
keep in mind.
1. STORE KNIVES AWAY Whether you put
your knives in our countertop block, hang them
on a wall-mounted knife magnet, or hide them in a
drawer block, keep knives that are not in use in a
safe place, ensuring they’re out of reach of curious
little hands and paws.
2. WHEN IN USE, KEEP YOUR ATTENTION
ON THE KNIVES AND KEEP THE KNIVES
ON THE CUTTING BOARD
stop midway through chopping to stir a sauce or
grab something from the fridge, swivel your knife
so that the sharp edge points away from you and
the entire knife rests on the cutting board. Or place
the knife o the board entirely, with the sharp edge
tucked under the back of the cutting board.
3. CARRY A KNIFE TIP DOWN In restaurant
kitchens, you’ll sometimes hear chefs say, “Knife
behind!” to alert other chefs that they’re carrying
their blades. Ideally, you won’t have to ever walk
far with your knives, but even for just a few steps,
When you need to
carry the knife tip down and at your side, right next
to your leg, so that the blade doesn’t catch on the
corner of a table or countertop.
4. HAND SOMEONE A KNIFE SAFELY Place
the knife on the cutting board or countertop so he or
she can then safely pick up the knife by the handle.
5. LET FALLING KNIVES FALL It’s a natural
impulse to try to catch something when it falls. In
this case, it’s best to step back and let it happen,
then pick the knife up after it lands.
6. STABILIZE YOUR CUTTING BOARD
Set a wet paper towel or a bit of nonslip shelf liner
under your board to keep it in place.
7. REGULARLY CLEAN YOUR CUTTING
BOARD
surface helps you stay focused and safe. Have a
couple of bowls or containers near the board for
your chopped food and any trimmings.
Working on a clean, well-organized
14 | COOKWARE AND CUTLERY
Page 14
8. KEEP KNIVES OUT OF THE SINK Always
hand wash knives because the heat from the
dishwasher will damage the handles, and the
edges can be damaged if other objects bang up
against them. Keep the knives to the side of the
sink until you can wash them individually; as you
can imagine, a sink full of soapy water is a dangerous place for a knife to hide.
9. KEEP KNIVES SHARP Hone knives
regularly to maintain the edges (see Put Your
Honing Steel to Work for You on page 11 to learn
more), then have them professionally sharpened
about once a year.
10. COVER YOUR KNIVES’ EDGES If
you’re moving or taking your knives with you on
vacation, cover the blades with plastic sheaths and
pack them so that they won’t budge. Better yet,
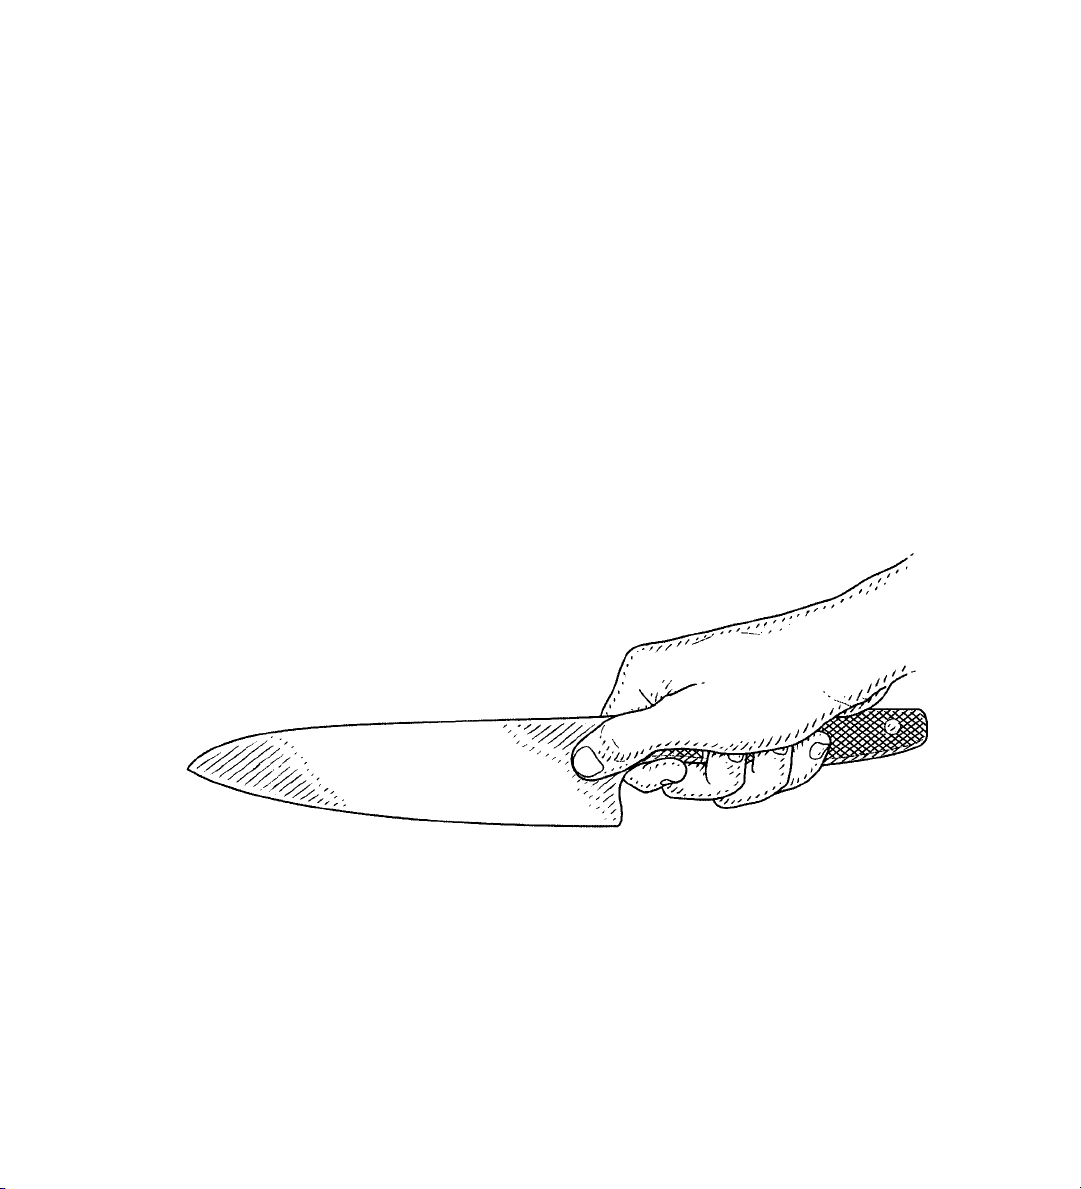
Try it!
1. Grasp your knife blade just above the heel so
it’s pinched between your forenger and thumb.
2. Lay your rst nger at against the blade just
ahead of the bolster.
3. Put your thumb so it’s on the opposite side of
the blade, directly across from the second joint of
your index nger.
4. Curl your index nger back slightly to clear the
GETTING TO KNOW YOUR KNIVES | 15
Page 15
heel of the knife.
The Guide Hand
If you watch chefs on TV, you’ll see that they’re often slicing and dicing while looking at the camera. If
you look closer, you’ll notice that they’re almost always chopping with the knife blade up against the
knuckles of their other hand. That other hand—known as the guide hand—is actually just as important
as the one holding the knife.
Using your guide hand will help you cut food more quickly and safely. When you keep the at of the knife
blade in constant contact with the knuckles of your guide hand’s ngers, you know where the edge is
and where your ngers are at all times. To get a feel for the motion, practice on the cutting board without
trying to cut anything.
Try it!
1. Place the tips of the ngers of your guide hand
on the food to be cut. Press down lightly and
curl your ngertips under. Make it so the front of
your ngers between the rst and second joints
are straight up and down. Depending on the
size of the item you’re cutting, you may need to
bunch your ngers together or spread them out
to hold the food securely.
2. Slide your thumb around behind the wall of
your ngers and use it to anchor the food. The
at side of your knife glides up and down on
the middle joint of your ngers. At rst it will be
tempting to let your thumb drift out from behind
the safety of your ngers, especially when gripping larger pieces. Take care to keep it in place.
3. As you cut, move your guide hand ngers
back along the surface of the food toward
your thumb. This motion will let you control the
thickness of the slice.
4. When your ngers reach your thumb, pause for
a moment to relocate your thumb farther back
and start slicing again.
PRO TIP
We designed our knife’s bolster so it doesn’t
uncomfortably rub against your ngers or
create calluses.
16 | COOKWARE AND CUTLERY
Page 16

Cutting Board Know-How
If you’re just slicing up a few strawberries for a snack, you don’t really need a strategy, but if you’re
chopping a lot of vegetables for a batch of soup, having a consistent workow will make the prep go
much faster.
Stand in front of your cutting board, holding your knife with your guide hand in place. The blade should
point to one far corner of the board while the guide hand is facing the other, forming an imaginary X
directly in front of you. Place your guide hand on the food, with your ngertips curled under and the knife
blade resting on the ats of your knuckles.
When you look straight down, ideally you should see the food that has just been sliced in front of the
knife, where the cutting action is happening. If, instead, you are looking at the spine of the knife and the
food that has not yet been cut, move your hands over just a little or adjust your stance slightly (without
twisting yourself uncomfortably), so you can see your ngers and the work you’re doing.
GETTING TO KNOW YOUR KNIVES | 17
Page 17

The best direction to work is toward your knife hand. So, if you’re right-handed, place uncut food at the
top left of the board. Set the bowl for trimmings at the top of the board in the twelve o’clock position and
a container (or several) for your beautifully portioned food on the right. Have a clean kitchen or paper
towel available for wiping down the board as needed.
To keep your knives in tip-top shape, use a wooden or plastic cutting board. Cutting on surfaces that are
even harder than the knives, like granite, ceramic, or glass, will damage the cutting edges and should
never be done. If you use your knives almost daily, a large wooden cutting board (at least 16 inches
wide) is a great investment.
THE DETAILS MAKE THE DIFFERENCE
Properly cut meats and vegetables
not only look better, but uniform cuts cook more evenly.
As you probably already know, there is more than one way to chop a carrot. A large
dice is great for roasting, tiny cubes cut in brunoise style form the foundation for sauces,
while julienned matchsticks work beautifully in slaws and quick-cooking sautés. Properly cut meats and vegetables not only look better, but uniform cuts cook more evenly,
meaning that all your chopped carrots or julienned zucchini nish cooking at the same
time. In this section you’ll nd lots of tips and insights on slicing and dicing like a pro.
18 | COOKWARE AND CUTLERY
Page 18

The Rocking Cut and Push Cut
There are two basic techniques to know for cutting food on a cutting board: the rocking cut for atter or
softer items and the push cut for tall or hard items. Eventually, you’ll start switching up the techniques
intuitively as you work on a single vegetable. For example, you’ll use the push cut to break down the
head of cabbage and the rocking cut as you shred it. Here are both ways, broken down step by step.
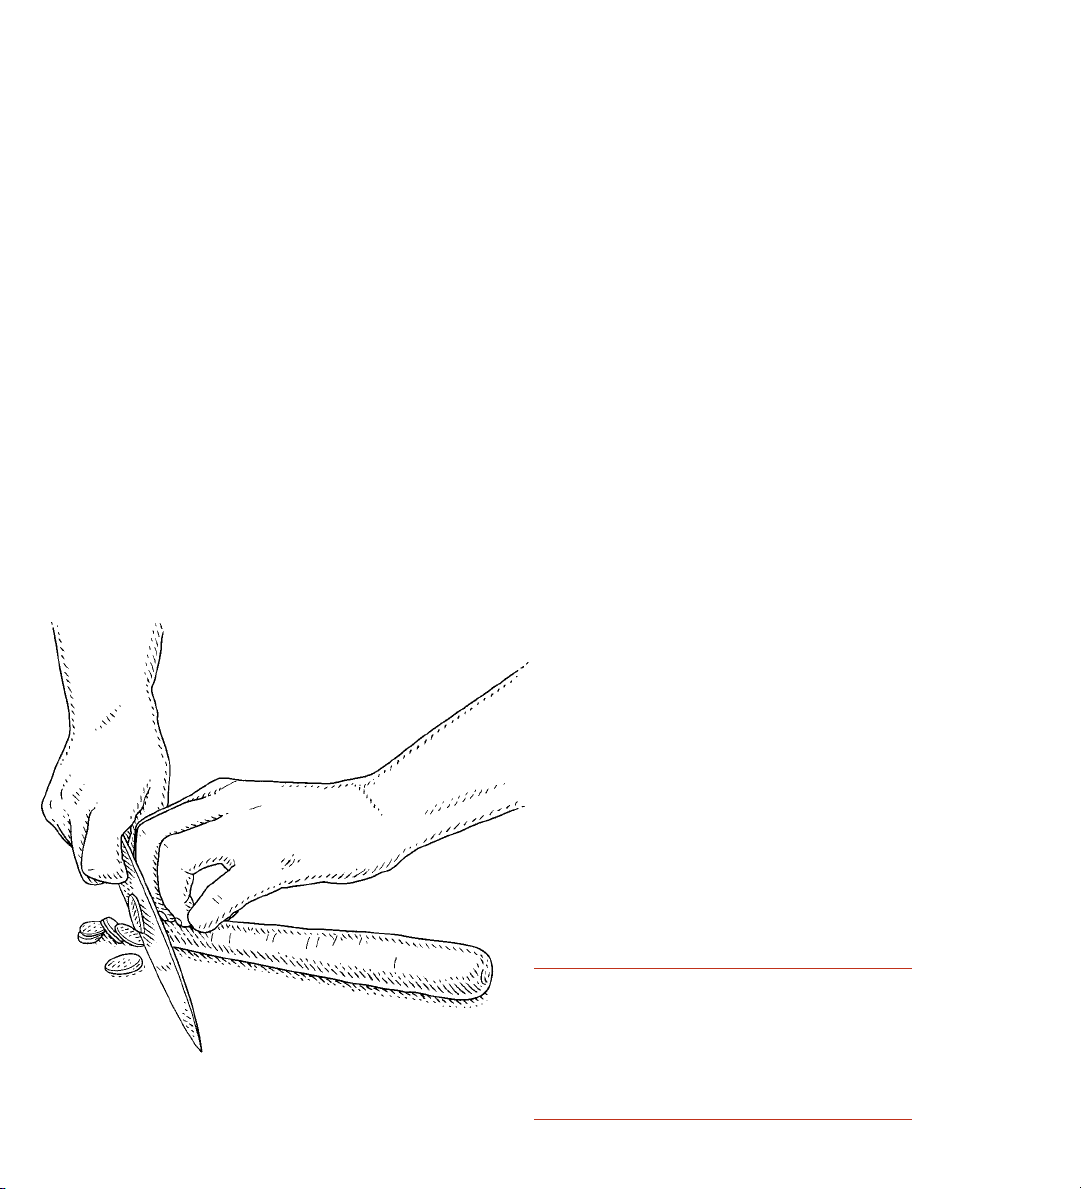
The Rocking Cut
The rocking cut, in which the tip of your knife never
leaves the board, is the one you’ll use for soft or
short items, like scallions, herbs, and vegetables
you’ve already broken down into smaller pieces. With
practice, it’s an extremely fast technique because
the knife never stops moving. In the beginning, your
slices may not be entirely uniform, but you’ll soon be
knocking out mounds of perfect julienne.
1. Set up the knife and guide hand: Place the tip
of the knife on the cutting board and the at of the
blade against your guide hand’s knuckles.
2. Arrange the food: Have the food on the board,
just in front of your knife, with the heel of the knife
just a little higher than the food.
3. Make the cut: Rock the knife forward and
down to make a slice. Move your guide hand back
across the food and rock your knife backward and
up. Reset the knife against your guide hand for the
next stroke, never letting the tip of the knife leave
the board.
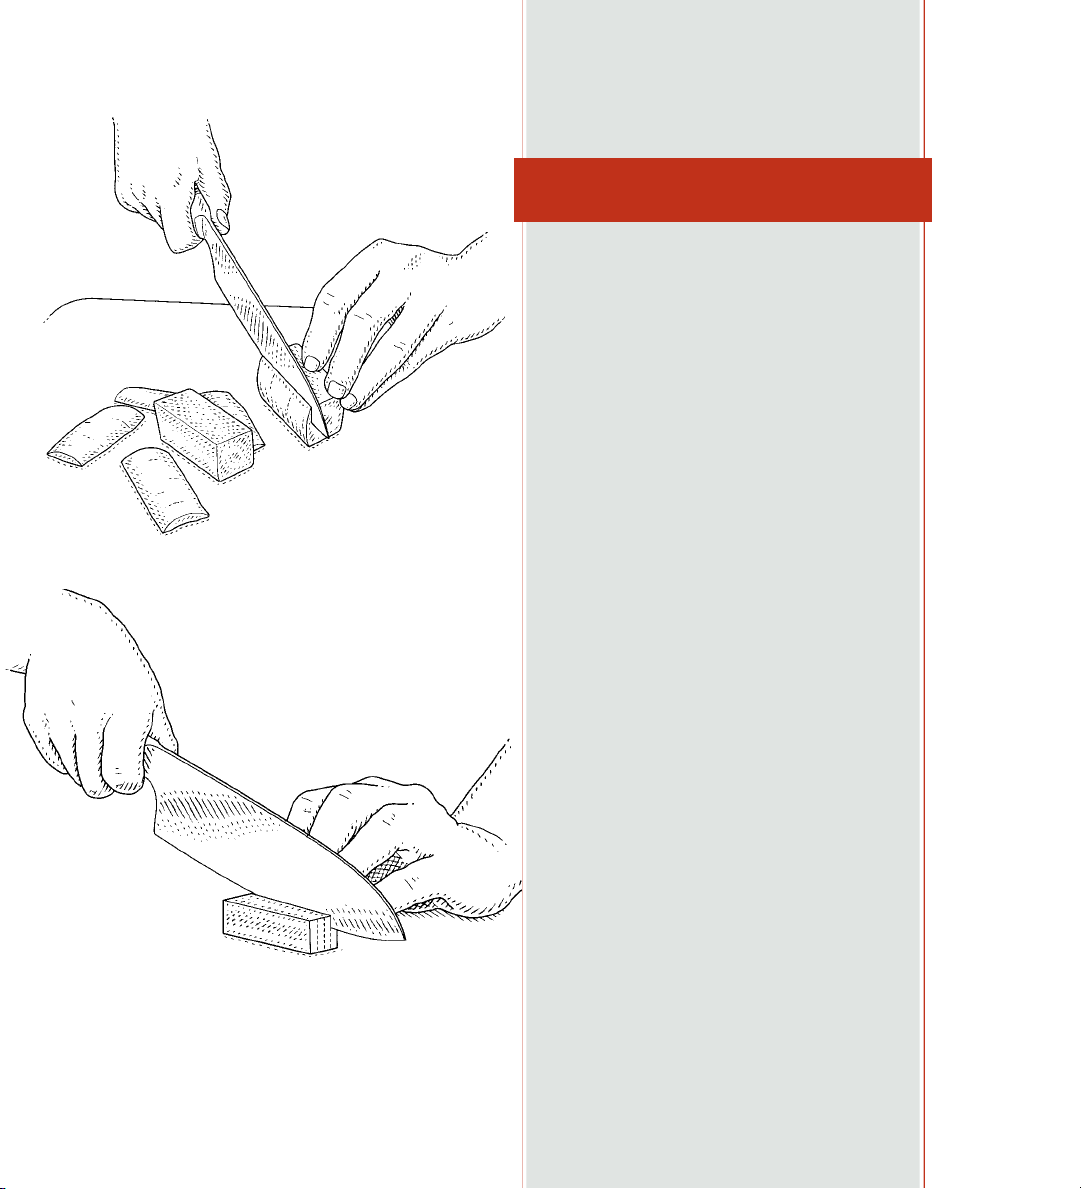
The Push Cut
For larger, rmer items like cabbage, squash, or
beets, it’s best to use the push cut technique. Push
cutting is a little slower than rocking because you
stop to reposition the knife each time, but you have
more control and can produce more even cuts.
1. Arrange the knife on the food: Start with the
front part of the edge of the knife on the vegetable
rather than on the board, positioning the cutting
edge so it’s nearly perpendicular to the board. (The
heel of the knife should be raised slightly.)
2. Make the rst cut: Slice forward and down.
The stroke is similar to the rocking cut but the edge
of the knife should stay nearly perpendicular to the
board. Even after your knife reaches the cutting
board, glide it completely forward to make sure that
you have cut all the way through the food.
3. Reset the knife: Move your guide hand back
along the food, then reset the knife into the starting
position and make another slice.
Planks, Sticks, and Cubes
Most recipes call for fruits and vegetables to be cut into uniform shapes and sizes, say, “chopped into
1
⁄2-inch dice” or “sliced 1⁄4 inch thick.” Food that’s cut evenly cooks more evenly. (Plus, let’s be honest—
it looks better!) More formal dishes or classic French recipes might call for specic cuts like julienne,
bâtonnet, medium dice, small dice, or brunoise. Each cut has a specic denition and size (see page 19).
The great thing about these cuts is they all start the same way: square o the item you’re cutting, create
THE DETAILS MAKE THE DIFFERENCE | 19
Page 19
HOW TO MAKE FRENCH CUTS
Our knives are designed to be as sharp
as Japanese knives and as durable as
German ones so you can make clean,
eortless cuts.
1. Square o the ingredient: Cut the vegetable into as precise a rectangle as you can.
This may seem wasteful, but it doesn’t have
to be. Just do what restaurants do and save
your trimmings, including vegetable peels and
herb stems, for stocks or salads. (If you’re not
chopping a lot at once, just freeze the trimmings in a large resealable plastic bag. When
the bag is full, it’s time to make stock.)
When you’re working with vegetables that
taper from thick to thin, like carrots or parsnips, cut them into manageable 2- to 3-inch
lengths, stand the segments on the wider, at
end, and cut downward, perpendicular to the
cutting board, to remove the curved sections.
2. Cut planks: After you have your rectangular pieces, slice them into planks. The
size of the nal cut you want to make will
determine the thickness of the plank. For example, slice thin 1⁄8 inch planks for brunoise
and julienne and medium-thick ¼ inch
planks for bâtonnets.
20 | COOKWARE AND CUTLERY
3. Cut sticks: After slicing the planks, the
next step is to stack the planks two or three
high, then slice them lengthwise into sticks
that are the same width as the plank.
4. Cut cubes: Finally, if you want to cut cubes,
cut across the sticks—again at the same width
Page 20
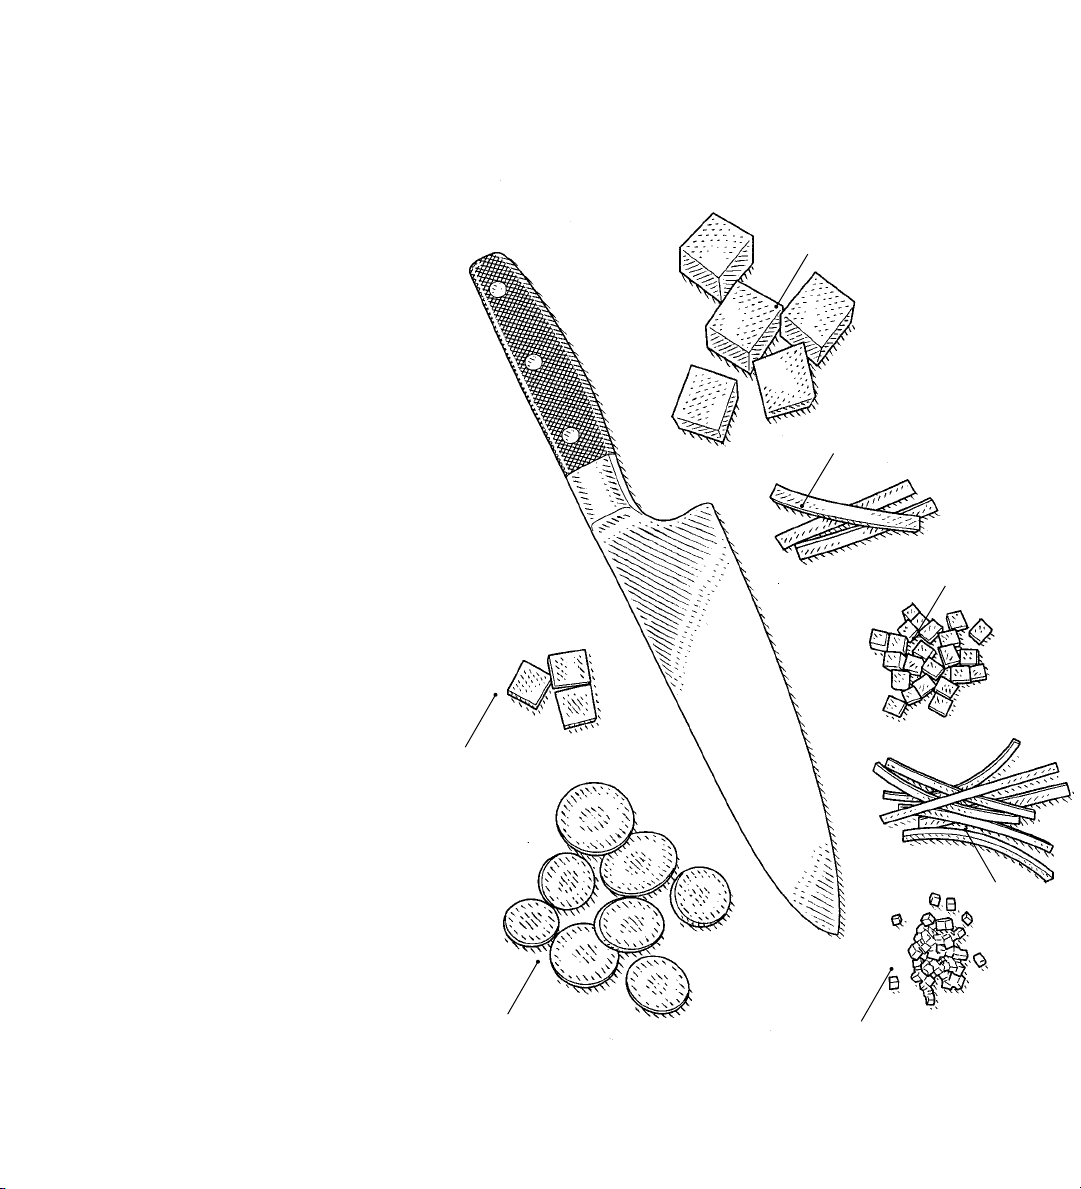
Classic French Cuts
JULIENNE (joo-lee-EHN): Slice
1
⁄8-inch-thick sticks that are each 2 to 3 inches long
BRUNOISE (broon-WAHZ):
Slice julienned strips crosswise
into 1⁄8-inch cubes
BÂTONNET (bah-tow-NAY): Slice
¼-inch-thick planks into 1⁄4-inch-thick
sticks that are 2 to 3 inches long
SMALL DICE: Slice bâtonnets
crosswise into 1⁄4-inch cubes
MEDIUM DICE:
1
⁄2-inch cubes,
cut from 1⁄2-inch-thick sticks (that were
sliced from 1⁄2-inch-thick planks)
LARGE DICE:
3
⁄4-inch-thick sticks (that were sliced from
3
⁄4-inch-thick planks)
RONDELLES (rahn-DELLZ):
3
⁄4-inch cubes cut from
Coin-shaped slices of any thickness
from any round vegetable. Angle the
knife diagonally across the fruit or
vegetable (usually about
45 degrees) and cut on
the bias to make rondelles.
1
⁄8-inch planks into
Medium Dice
Large Dice
Bâtonnet
Small Dice
Rondelles
Julienne
Brunoise
THE DETAILS MAKE THE DIFFERENCE | 21
Page 21
Cutting Tomatoes and Other Fruits
To serve summer’s perfect tomatoes, you only need to slice them and sprinkle with salt. When you
cook sauces or stews with out-of-season tomatoes, however, the tough skins and watery seeds are
usually best removed. The prep takes longer, but the payo is worth it.
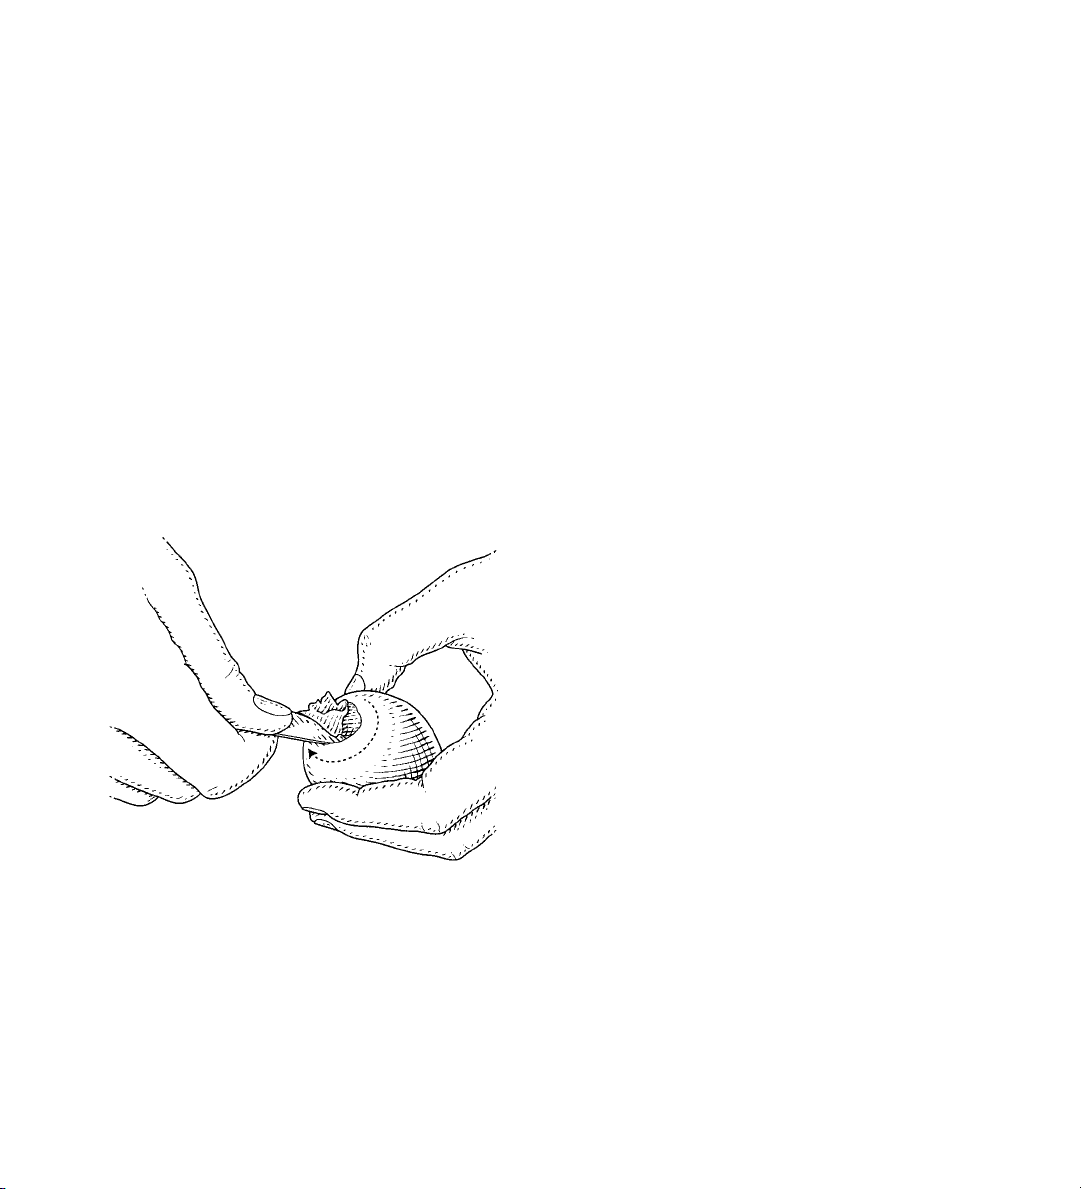
To core
This technique also works for hulling strawberries
and removing blemishes from potatoes.
1. Grip the blade of the paring knife near the tip,
pinching it between thumb and forenger. The length
of knife you allow to protrude is the depth of your cut.
2. Rotate the tomato around the tip of the knife to
remove the core.
To peel
If you are just dicing a single tomato, peel it with
your paring knife or a peeler. Use the following
technique to peel a larger quantity of tomatoes.
You can also use this technique to peel peaches
and plums.
1. Fill a large bowl with ice water and bring a large
saucepan of water to a boil.
2. Use the tip of your paring knife to score a small
X in the skin at the bottom of each tomato.
3. Use tongs to gently drop two or three tomatoes
into the boiling water for about 30 seconds or until
the skin splits. Remove the tomatoes from the
water with tongs and set aside.
4. When the tomatoes are cool enough to handle,
trap the split skin between your thumb and the
blade of the paring knife and it should slip
right o.
To dice
To seed
Cut globe tomatoes across the equator; slice plum
or Roma-style tomatoes lengthwise. Gently squeeze
the tomato halves over a bowl and remove the seeds
and liquid with your ngers.
22 | COOKWARE AND CUTLERY
Lay the cut side of the tomato on the cutting
board and cut into strips. Cut across the strips
to produce a rough dice called concassé. For
ner dice, make three or four horizontal cuts,
then cut strips and dice them.
Page 22

How to Prepare Onions, Garlic, and Other Alliums
Alliums, including onions, garlic, leeks, scallions, shallots, and chives, add an incomparable depth of
avor to food and are the starting point for many dishes in many dierent cuisines. They do have some
unusual characteristics to consider when cutting them.
Here are some points to keep in mind.
1. START WITH THE STEM END Onions and
shallots have a stem end, where the leaves come
together at the top, and a root end, the beard-like
area at the bottom. When prepping either, you
almost always want to start by cutting o the stem
end to make it easier to peel. With onions, you’ll
then usually stand the onion up on the newly at
HOW TO PREPARE LEEKS
Leeks grow in sandy soil and can have dirt
between the layers. To clean and prepare:
1. Trim and halve: Trim o the root end.
Remove the dark green tops and reserve for
stock. (You can also thinly slice these to use
in sautés but they do have a bit of a chew.)
Halve the rest of the leek lengthwise.
2. Remove the grit: Put the halved leek
under cold water and clean well, fanning out
the leaves so the grit can easily wash away.
Alternatively, you can ll a bowl with water and
swish the leeks until the leaves are cleaned.
3. Chop. Or not. For a soup or other preparation in which you want the leeks to get very
soft, thinly slice the leeks crosswise. You can
also leave the halved leeks as is to steam,
braise, or grill and serve as a side dish.
side and slice it in half through the root before
peeling. (In addition to removing the peel, take o
any papery or leathery outer layers.)
2. CUT CROSSWISE FOR THIN SLICES
If a recipe calls for either of these vegetables thinly
sliced, halve the onion or shallot (or leave whole for
rings) and cut crosswise so you have thin slices.
3. CHOP LIKE A PRO If you’re going for a ner
dice on an onion or large shallot, set the palm of
your guide hand on top of the halved and peeled
onion with your ngers ared. This will keep the
onion steady and your ngers out of the way. Make
three to ve horizontal cuts, drawing the knife
smoothly from the at stem end to the root; stop
just before you actually reach the root (so it doesn’t
fall apart). (If you’re working on a small shallot or
going for a rougher chop on an onion, you can skip
this step.)
Move your hand so it’s holding the root end, and
using the tip of your knife, make a series of parallel
cuts that reach from the root end to the stem end;
the wider the space between your slices, the larger
your dice will be.
Still holding the root, cut across the onion or shallot
to produce a uniform dice. If you need to mince,
run the heel of your knife back and forth through
the diced onion, leaving the tip on the board, until
very nely chopped.
THE DETAILS MAKE THE DIFFERENCE | 23
Page 23
Page 24

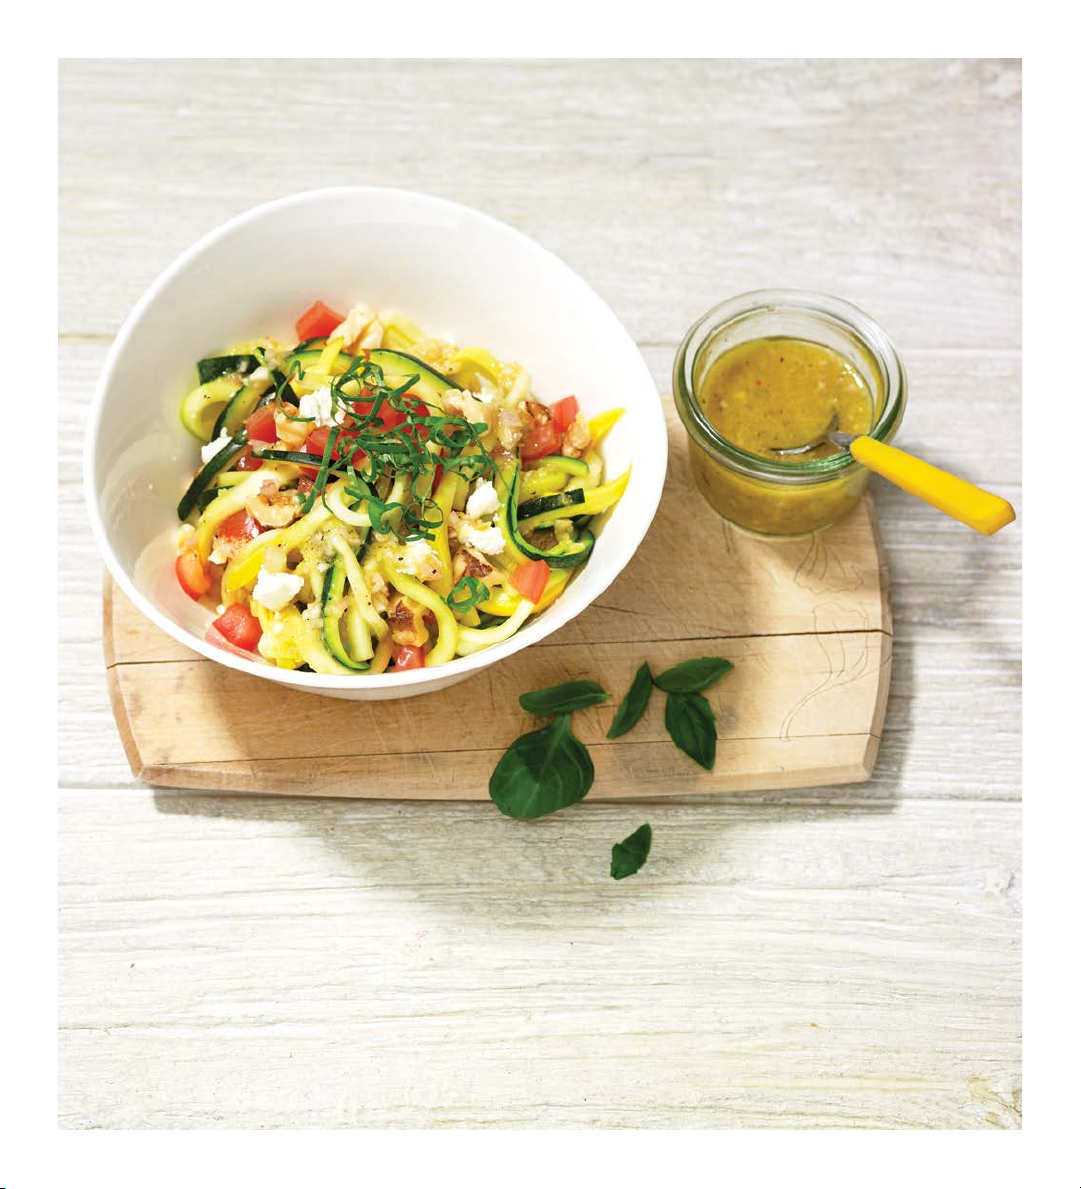
JULIENNED ZUCCHINI SALAD
Serves 4
Equipment: Chef’s knife or santoku; large skillet or sauté pan
This salad is a spectacular way to showcase the summer abundance of zucchini.
It is also a lesson in the power of salt to transform a vegetable. Zucchini,
like cucumbers and eggplant, is a very wet vegetable. Since raw zucchini can weep moisture,
throwing off the balance of the dressing, it’s usually best to salt it in advance.
1
⁄4 cup chopped walnuts or whole pine nuts
2 medium zucchini (or 1 medium zucchini
and 1 medium yellow summer squash),
julienned
Kosher salt
2 teaspoons nely grated lemon zest plus
2 tablespoons fresh lemon juice
1 tablespoon minced shallot
1 teaspoon Dijon mustard
1 garlic clove, minced
3 tablespoons extra-virgin olive oil
Freshly ground black pepper
Grated Parmigiano-Reggiano cheese,
for sprinkling
1. Heat a large dry skillet over medium-high
heat, add the walnuts, and toast them,
shaking the pan often, until they are lightly
browned and fragrant. Transfer the nuts to a
small plate to cool.
2. Place the zucchini in a colander, sprinkle with
1 teaspoon salt, and toss to combine. Set the
colander over the sink to let the zucchini drain
for 30 minutes.
3. Put the zucchini under cold running water to
wash o the excess salt, then turn it out onto a
kitchen towel and pat it dry.
4. Whisk together the lemon zest and juice, shallot,
mustard, and garlic in a small bowl. Whisking
constantly, slowly drizzle in the oil and whisk until
the vinaigrette is thick and emulsied. Season to
taste with salt and pepper.
5. Place the zucchini in a large bowl and toss
with vinaigrette. Sprinkle the toasted nuts and
some Parmigiano-Reggiano cheese over the
top and serve.
VARIATION: ZUCCHINI, TOMATO,
•
AND BASIL SALAD
Add 1 cup diced fresh tomatoes and ¼ cup
fresh basil chionade (page 57) and toss with
the zucchini and vinaigrette. Replace the
Parmigiano-Reggiano with 1⁄3 cup crumbled
feta cheese.
PRO TIP
A vegetable peeler can be used to shave thin
ribbons of zucchini for the salad.
THE DETAILS MAKE THE DIFFERENCE | 25
Page 25
Page 26

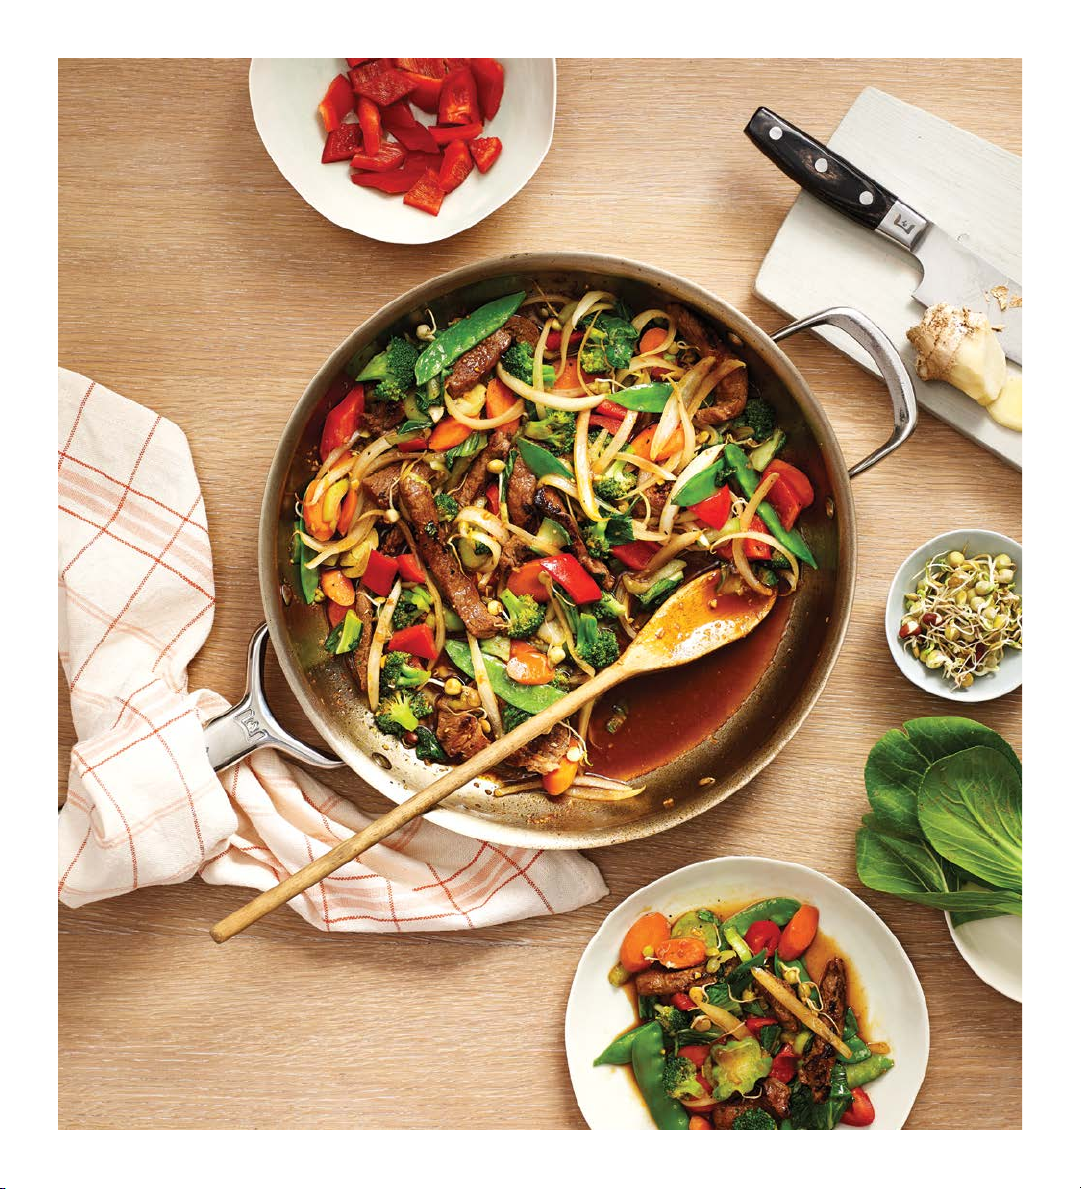
MASTER STIR-FRY
Serves 4
Equipment: Chef’s knife or santoku; large skillet, sauté pan or wok
Stir-fries give you a lot of knife practice because most of the work happens at the
cutting board rather than the stovetop. Have everything prepped before you heat the oil
and set out your ingredients in the order that you’re going to use them so you won’t
have to hunt around for the minced garlic when it’s time to add it to the pan.
STIR-FRY
1 pound boneless, skinless chicken, sirloin
steak tips, peeled and deveined shrimp,
or extra-rm tofu, cut into bite-sized
pieces
1 tablespoon mirin
1 tablespoon soy sauce
3 tablespoons peanut or vegetable oil
2 large carrots, cut ¼-inch thick on the bias
1 small head broccoli, orets cut into
bite-sized pieces, stems peeled and
thinly sliced
4 baby bok choy, ribs thinly sliced, leaves
roughly chopped
1 small yellow onion, quartered and sliced
¼ pound snow peas, ends and strings
removed
1 tablespoon minced garlic
1 tablespoon minced fresh ginger
Cooked rice, for serving
¼ pound bean sprouts
1. Marinate the protein: Toss the chicken (or beef,
shrimp, or tofu) with the mirin and soy sauce in
a medium bowl.
STIR-FRY SAUCE
3 tablespoons mirin or dry sherry
3 tablespoons store-bought or homemade
chicken stock (see Basic Chicken Stock
page 32) or vegetable broth
2 tablespoons oyster sauce
2 tablespoons soy sauce
1 tablespoon Asian chile paste or
Sriracha sauce
1 tablespoon toasted sesame oil
2 teaspoons minced garlic
½ teaspoon cornstarch
½ teaspoon sugar
2 Make the stir-fry sauce: Meanwhile, whisk
together the mirin, chicken stock, oyster sauce,
soy sauce, chile paste, sesame oil, garlic, cornstarch, and sugar in another medium bowl.
continued...
THE DETAILS MAKE THE DIFFERENCE | 27
Page 27

3. Make the stir-fry: Heat 1 tablespoon of the oil
in a large skillet over high heat until shimmering
and wisps of smoke rise from the oil. Add half
of the protein and cook, stirring often, until
lightly browned, about 2 minutes, then transfer
to a plate. Repeat with the remaining protein.
7 STEPS TO STIR-FRYING
Stir-fries are innitely variable. They key is
to cut the ingredients into bite-sized pieces and cook them in the proper order so
everything nishes at the same time.
4. Add 1 tablespoon of the oil to the pan and,
once it shimmers, add the carrots, broccoli, and
¼ cup water. Cover and cook until the broccoli
is bright green, about 1 minute. Uncover and
cook, stirring constantly, for 1 minute.
5. Using a spatula, push the carrots and broccoli
to the edge of the pan. Add the bok choy ribs
and the onion to the center of the pan and
cook, stirring often, for 1 to 2 minutes.
6. Push the bok choy ribs and the onion to the
edge of the pan. Add the bok choy leaves and
snow peas to the center of the pan and cook,
stirring often, for 1 minute.
7. Push the bok choy leaves and snow peas to the
edge of the pan. Add the remaining 1 tablespoon oil, the garlic, and ginger to the center of
the pan and cook until fragrant, 30 to 45 seconds. Stir the garlic and ginger into the vegetable mixture until combined.
8. Return the protein to the pan and toss to com-
bine. Pour the sauce around the edge of the
pan and toss to combine. Serve over rice and
sprinkled with bean sprouts.
PRO TIP
By cutting vegetables on the bias, you
expose more surface area to the heat so
it cooks faster.
1. Sear the protein. Get a good sear on
your protein rst, then transfer it to a plate.
Stir-fries generally call for small pieces of
beef, chicken, or pork, which can overcook if
you keep them in the pan while cooking the
vegetables.
2. Steam the hard vegetables. Hard
vegetables like carrots and broccoli take the
longest time to cook and can benet from
a quick steam. Add them to the pan along
with a little liquid, cover, and cook until
barely tender.
3. Add your tender vegetables. Snow
peas, bell peppers, and leafy greens only
need a minute or so to cook, so add them
when the hard vegetables are just tender.
4. Toss in your aromatics. Minced garlic
and ginger tend to take on a bitter avor if
cooked too long at high heat, so wait to add
them until soon before you add the sauce.
5. Return the protein to the pan. Stir the
browned beef, chicken, or pork back into the
stir-fry and toss with the other ingredients.
6. Add the stir-fry sauce. Drizzle the
sauce around the edge of the pan, then stir
everything together until all of the ingredients
are coated in the sauce. If the sauce has
cornstarch, it will thicken almost as soon as
you add it.
7. Serve. A sprinkle of fresh thinly sliced
scallions, coarsely chopped cilantro, bean
sprouts, chopped peanuts, or a squeeze of
28 | COOKWARE AND CUTLERY
Page 28

GLAZED CARROTS WITH GARLIC AND GINGER
Serves 4 to 6
Equipment: Chef’s knife or santoku; large skillet or sauté pan
These carrots are delicious with steak or any beef dish, thanks to the zip of the ginger.
If you have access to a farmers’ market, look for multicolored carrots, which
make this dish especially beautiful.
1 pound carrots, peeled and cut on the bias
into ¼-inch slices
½ teaspoon kosher salt, plus extra if needed
1 tablespoon unsalted butter, cut into small
bits, or 1 tablespoon extra-virgin olive oil
1 tablespoon honey
1. Place the carrots in a skillet just big enough to
hold them. Sprinkle with the salt and add just
enough water to cover the bottom of the pan.
Add the butter, honey, garlic, and ginger.
2. Set the skillet over medium-high heat, cover,
and cook, stirring occasionally, until the carrots
just barely begin to soften, 5 to 6 minutes.
Remove the cover and continue to cook,
stirring often, until the water mostly evaporates
and the carrots are shiny and just beginning
to brown.
1 tablespoon minced garlic
2 teaspoons minced fresh ginger
Freshly ground black pepper
½ teaspoon nely grated lime zest (optional),
plus lime wedges, for serving
2 teaspoons chopped fresh cilantro (optional)
3. Turn o the heat and season with salt and pep-
per. Squeeze the lime juice over the carrots and
sprinkle with lime zest and cilantro, if desired.
Serve with lime wedges.
PRO TIP
If you don’t have a ruler handy to measure your
cuts, you can use the spine of your chef’s knife
as a guide. Just above the heel (where you
grip the knife, see How to Hold Your Knife: The
Pinch Grip page 13), the spine is about 1⁄8-inch
(3 mm) thick.
THE DETAILS MAKE THE DIFFERENCE | 29
Page 29

Page 30

NAPA CABBAGE SALAD
Serves 4
Equipment: Chef’s knife
This fresh and vibrant cabbage salad was loosely inspired by the Vietnamese
banh mi sandwich, which always includes crunchy, tangy vegetables, some heat from a chile,
and the pop of fresh herbs.
DRESSING
¼ cup tahini (sesame paste)
2 tablespoons rice vinegar (or 1 tablespoon
rice vinegar, plus 1 tablespoon fresh
lime juice)
2 tablespoons soy sauce
1 tablespoon honey or agave syrup
1 tablespoon minced fresh ginger
2 teaspoons Asian chile paste or ½ teaspoon
red pepper akes
2 teaspoons toasted sesame oil
2 teaspoons white miso paste
1. Make the dressing: Using a whisk or a blender,
combine the tahini, rice vinegar, soy sauce,
honey, ginger, chile paste, oil, and miso paste.
Drizzle up to ¼ cup water into the dressing and whisk or blend until it reaches your
desired consistency.
2. Make the slaw: In a large salad bowl, toss
together the cabbages, carrots, cucumber, bell
pepper, and cilantro. Drizzle the dressing over
the top and toss to combine, then sprinkle the
peanuts over the top and serve.
SLAW
1 head napa cabbage, shredded (3 to 4 cups)
1 cup shredded red cabbage
2 carrots, peeled and julienned
1 cucumber, peeled and cut into
¼-inch slices
1 red bell pepper, julienned
1 cup roughly chopped fresh cilantro leaves
½ cup roughly chopped roasted peanuts
VARIATION: CHICKEN SANDWICH
•
Follow the recipe for making the dressing,
but add extra tahini—or use less water—for
a more spreadable consistency. Prepare
the salad ingredients and toss together in a
bowl. Slice a baguette in half lengthwise and
toast until warm. Spread the dressing on the
cut sides of the baguette. Place a generous
amount of roasted or grilled chicken on the
bottom half of the baguette and top with the
undressed salad. Cover, slice across into
quarters, and serve.
THE DETAILS MAKE THE DIFFERENCE | 31
Page 31

YELLOW RICE WITH SOFRITO
Serves 8
Equipment: Chef’s knife or santoku; paring knife; Dutch oven
Sofrito is a mix of chopped vegetables and herbs that is often used in Spanish, Cuban,
Puerto Rican, Caribbean, and Latin American dishes. Each culture (and probably every
family) makes its sofrito slightly differently. All start with finely chopped onions and peppers;
most include garlic. Some, like this one, include tomatoes. There are infinite variations,
so feel free to experiment. This recipe makes more sofrito than you need for the yellow rice
here, but it’s a great thing to add to soups, stews, or other rice dishes. The rice will stay hot for
a long time, so you have plenty of time to get the rest of your meal together. Store the extra sofrito
in the refrigerator or freezer so you have it handy anytime you need an extra boost of flavor.
Page 32

SOFRITO
4 large Cubanelle peppers (or poblano
peppers or green bell peppers), seeded
and minced
4 plum tomatoes, seeded and minced
2 yellow onions, minced
1 head garlic, minced
1 large bunch fresh cilantro, very nely
chopped
YELLOW RICE
1 to 2 tablespoons extra-virgin olive oil
2 cups long-grain or medium-grain white
rice, rinsed well
¼ cup chopped pimiento-stued olives
1 tablespoon brine-packed capers, rinsed
1 teaspoon ground cumin
½ teaspoon sweet paprika
½ teaspoon ground turmeric
1 dried bay leaf
1 teaspoon kosher salt, plus extra if needed
Freshly ground black pepper
3 cups chicken stock (see Basic Chicken
Stock page 32) or water
1. Make the sofrito: Stir together the peppers,
tomatoes, onions, garlic, and cilantro in a large
bowl. Set ½ cup aside. Transfer the remaining
sofrito to an airtight container and refrigerate
for up to 1 week, or divide into ½-cup portions,
store in resealable plastic freezer bags, and
freeze for up to 3 months.
2. Make the yellow rice: Heat enough oil to cover
the bottom of a Dutch oven over medium heat
until shimmering. Add the ½ cup reserved
sofrito and cook, stirring often, until most of
the liquid from the vegetables has evaporated.
Add the rice, stirring to coat with the sofrito,
and cook until the rice smells nutty and is
slightly translucent, about 1 minute. Stir in the
olives, capers, cumin, paprika, turmeric, bay
leaf, salt, and pepper to taste. Add the chicken
stock and bring to a boil.
THE DETAILS MAKE THE DIFFERENCE | 33
Page 33

BASIC CHICKEN STOCK
Makes 1 quart
Equipment: Chef’s knife; Dutch oven or stock pot
The next time you roast a chicken, set aside a moment or two after dinner to remove the
meat from the carcass so you can save the bones for stock. If you don’t have time
after dinner to simmer the stock, you can simply freeze the carcass in a resealable
plastic bag until you’re ready (along with vegetable trimmings, like parsley stems and onion
scraps). This recipe can easily be doubled or tripled depending on the number of
chicken (or Thanksgiving turkey) carcasses you have stashed in the freezer.
Bones and carcass from 1 roast chicken
2 yellow onions, quartered
2 carrots, roughly chopped
2 ribs celery, roughly chopped
1. Place the chicken bones and carcass in a Dutch
oven or stock pot, breaking apart the carcass
if necessary to t. Add enough cold water to
cover by 1 inch, then add the onions, carrots,
celery, bay leaves, and peppercorns.
2. Bring to a simmer over medium-high heat,
skimming o any foam that rises to the surface
of the pot. (Don’t let the water boil—it will make
the stock cloudy.) Move the pot to a back
burner if you prefer, partially cover, lower the
heat to medium-low, and gently simmer for
4 hours.
3. Strain the stock through a ne-mesh sieve or
a colander lined with cheesecloth set over a
large bowl. Let the stock cool, then transfer to
2 dried bay leaves
1 teaspoon roughly cracked
black peppercorns
an airtight container and refrigerate for up to
1 week, or transfer to resealable plastic freezer
bags and freeze for up to 6 months.
PRO TIP
If you are making soup or stew or simply
cutting vegetables for a rustic side dish, you
don’t necessarily have to square o vegetables
for precision cuts. As long as the pieces are
roughly the same size you’ll be ne. This is true
for carrots, celery, and onions or anything else
that will eventually be pureed or strained out
of the nal dish. The rule of thumb: Chop into
larger pieces for longer cooking and smaller
pieces for shorter cooking times.
34 | COOKWARE AND CUTLERY
Page 34

Page 35

COOKING
WHAT’S IN YOUR COOKWARE SET
Much like our cutlery, we designed our cookware with
maximum functionality and comfort in mind.
If a good cook can create spectacular meals using any old pots and pans, imagine
what he or she could do with truly exceptional cookware. Much like our cutlery, our
cookware is designed with maximum functionality and comfort in mind. In the following
pages, we’ll introduce you to each pan and explain the dierences among them. Then
we’ll explore the most common techniques that use these outstanding pans so you can
practice cooking in them.
36 | COOKWARE AND CUTLERY
Page 36

SKILLET A skillet, also known as a frying pan, is
one of the most versatile pans. The wide cooking
area makes it great for searing steaks and chops.
And if you’re going to make a pan sauce after-
ward, it’s even better—the pan’s low, ared walls
encourage fast evaporation when reducing liquids.
Strangely enough, the skillet—instead of the sauté
pan—is also usually the pan of choice for quick
sautés and stir-fries if you don’t have a wok. Why?
A spatula is easier to maneuver in a skillet than in
a sauté pan, and the pan’s ared walls and lighter
weight make it better for shaking and ipping
food like a chef. You’ll also reach for your skillet
when toasting nuts or seeds, cooking bacon, and
pan-roasting chicken.
SAUTÉ PAN With its straight sides, a sauté pan
tends to have about 30 percent more cooking area
than the same-sized skillet, making it a terric tool
for searing a large roast before putting it in the oven
or pan-roasting more steaks or chops than you
can t in your skillet. Those sides also contain liquid
(including oil) better than a skillet, so a sauté pan
is great for shallow frying too. Because it usually
comes with a lid, a sauté pan also works well when
you’re cooking down greens and making some
meat or vegetable braises.
SAUCEPAN True to its name, the saucepan is
one of your choices for preparing sauces, but it
does so much more. It is the pan to grab when
making grains or beans, hot chocolate, boiled or
steamed vegetables, risotto, and smaller batches
of soup. Basically, the saucepan is your tool for
anything that contains a good bit of liquid.
While you want to reserve most sautéing for your
skillet, you can certainly sweat or sauté vegetables
(see Sweating vs. Sautéing page 37) right in the
saucepan when you’re starting a soup, pilaf, or
similar dish. Just be sure not to overcrowd the pan,
because then the vegetables will be steamed rather
than sautéed.
SAUCIER The saucier, more formally known as
a sauteuse evasée or Windsor pan, is very similar
to a saucepan. The gently curved sides and bowl
shape, however, make it even easier to scrape
down the sides of the pan with a whisk.
The ared sides also encourage more evaporation
than the straight-sided saucepan, so stocks and
sauces reduce faster.
DUTCH OVEN The Dutch oven (sometimes
called a casserole) is a short, wide, heavy-duty
pot. It’s the ideal pot for large braises and stews
as well as larger batches of grains or beans. When
braising, you can sear the meat right in the pan
on the stovetop, sauté your vegetables, then add
your liquid, and transfer it to the oven for long, slow
cooking. An ovenproof lid makes the transition
smooth and easy.
The Dutch oven is also the pot to use for deep
frying. When cold foods are dropped into hot oil,
there’s a risk that the oil temperature will drop
too much, resulting in a soggy crust. The walls of
the Dutch oven retain the heat so the oil recovers
quickly and your fried food is crisp.
STOCKPOT Ranging from 6 quarts to 32 quarts
(or even larger in restaurant kitchens), stockpots
are designed to hold large amounts of liquid for
long, slow cooking. Like the Dutch oven, the stockpot has wide handles on the sides for easy lifting.
The most useful size of stockpot for most home
cooks is 8 to 12 quarts (the Wolf Gourmet stockpot
is 8 quarts) because it’s small enough to store in a
kitchen cabinet yet large enough to make several
batches of soup or stock for the freezer.
COOKING LIKE A PRO | 37
Page 37

FAST-MOVING AND FLAVORFUL
You can sauté food in a number of dierent pans,
but when you’re making a dish that’s purely a sauté, you’ll
usually want to reach for a skillet.
The key to sautéing is to cook food for a short time, moving it constantly, over relatively high heat. It’s
the best technique for ingredients that are cut into bite-sized pieces, like vegetables and quick-cooking
proteins, such as shrimp or chicken breast.
If you want to cook larger pieces of meat or sh, they are better when they’re pan-seared and nished in
the oven, a technique known as pan roasting. We’ll cover that in the next chapter.
Secrets to Successful Sautéing
1. PREPARE THE FOOD Pat the meat, sh, or
vegetables dry with paper towels; wet food causes
the oil to spatter and steam to release, which cools
the pan and inhibits browning. In some instances,
a very light dusting of our will help keep the food
dry, create a delicious browned crust, and add to
the body of a pan sauce. Season proteins with salt
and pepper before pan searing (and before coating
in our, if using).
38 | COOKWARE AND CUTLERY
2. PREHEAT THE OIL Because the pans are so
ecient at conducting heat, they won’t need more
than a minute or two to become hot enough for
cooking. Pour in just enough oil so that it covers
the bottom of the pan. When the oil shimmers
(you’ll see visible waves or striations in the oil),
you’re ready to cook.
Page 38

3. ADD THE FOOD When you’re sautéing, don’t
overcrowd the pan, because too much food in a
skillet will cause the ingredients to steam instead
of brown. If it looks like your food won’t t in a
single layer, it’s usually best to nd a bigger pan
or to cook the food in batches. When you want to
achieve deep browning, you need to be even more
vigilant and add the pieces so they don’t touch—
at least for the rst few minutes of cooking.
4. COOK THE FOOD If you’re searing, wait until
the protein is nicely browned before ipping it; the
crust will help the pieces release easily from the
pan when you use tongs to ip them. When you’re
sautéing vegetables or proteins that don’t require
such intense browning, like the shrimp in the
Shrimp Scampi (see recipe page 38), you can stir
and ip them constantly, then pull them o the heat
when they’re browned and cooked to your liking.
Pay particular attention to aromatics like onions
and garlic. They can go from properly softened to
burned and bitter very quickly when you’re working
over high heat.
SWEATING VS. SAUTÉING
Sweating is similar to sautéing because you’re
cooking vegetables in a small amount of fat.
The goal with sweating, however, is to soften
the vegetables over low to medium heat to
avoid browning. Unlike sautéing, when sweating vegetables you may want to encourage a
little steam, so cover the pan between stirring
to cook the vegetables in their own juices.
THE CHEF’S FLIP
The word sauté comes from the French
verb sauter, which means “to jump.” Food
jumps naturally in hot oil, but instead of
stirring with a spatula, you can make food
jump higher by ipping it around the way
you see chefs do on TV.
Flipping food actually has some practical
benets too—it turns the food and
redistributes it so that pieces cook evenly.
1. Use a skillet. The sloped sides will help
push the food up and back into the pan.
2. Practice with dry food. When rst trying
to ip food, grab a handful of uncooked rice,
beans, or even breakfast cereal—you want
something light and easy to sweep up if
pieces fall on the oor.
3. Keep the pan close to the burner.
Flipping food is more of a back and forth
motion than an up and down one.
4. Get the food to the front of the pan.
Slide the pan forward (about half the length
of the burner) and raise your elbow slightly,
pulling the pan up and pushing the food to
the front edge of the pan.
5. And ip! Give the pan a quick ick back-
ward, lowering your elbow and snapping your
wrist a little to get the food moving up and
Page 39

SHRIMP SCAMPI
Serves 4
Equipment: Paring knife; chef’s knife or santoku; large skillet or sauté pan
This garlicky, lemony shrimp dish is a classic best served with plenty of crusty bread
to sop up the sauce. The cooking process moves as quickly as a stir-fry, so you’ll want to
have all your ingredients prepared in advance and ready to go.
2 tablespoons extra-virgin olive oil
1 pound (21 to 25 count) shrimp, peeled
and deveined
3 garlic cloves, minced
2 large plum tomatoes, peeled, seeded,
and diced
2 tablespoons fresh lemon juice
1. Heat the oil in a large skillet or sauté pan over
medium heat until it shimmers, 1 to 2 minutes,
then add the shrimp. Cook, stirring often,
until the shrimp start to curl and turn pink,
1 to 1½ minutes.
2 tablespoons vermouth or dry white wine
2 tablespoons unsalted butter, cut into
4 pieces
2 tablespoons nely chopped fresh parsley
Kosher salt
Freshly ground black pepper
2. Add the garlic and cook until fragrant, about
30 seconds, then add the tomatoes and cook
for 30 seconds more. Turn o the heat and
stir in the lemon juice and vermouth. Add the
butter, stirring it into the sauce until it melts.
Stir in 1 tablespoon of the parsley and season
with salt and pepper. Sprinkle the remaining
1 tablespoon of parsley over the top and serve.
40 | COOKWARE AND CUTLERY
Page 40

Page 41

Page 42

GREEN BEANS WITH LEMON, GARLIC, AND PINE NUTS
Serves 4
Equipment: Chef’s knife or santoku; large saucepan; large skillet or sauté pan
Sautéing vegetables in butter adds richness and depth of flavor to a simple side dish.
If you prefer, substitute pecans, walnuts, or almonds for the pine nuts. While toasting the
nuts isn’t necessary, it does bring out their flavor.
1 pound green beans, trimmed
Kosher salt
¼ cup pine nuts
1 tablespoon unsalted butter
1 tablespoon peanut oil
1. Fill a large bowl with ice water and set aside.
Bring a large saucepan of water to a boil, add
the green beans and a few generous pinches
of salt, and blanch the green beans until their
color brightens, 30 to 60 seconds.
2. Drain the green beans in a colander, then
plunge them into the ice water to stop the
cooking. Drain again and set aside on a paper
towel-lined plate to dry.
3. Place a large skillet over medium heat, add the
pine nuts, and toast them, shaking the pan
often, until they are lightly browned and fragrant.
Transfer the pine nuts to a small plate to cool.
4. Add the butter and oil to the skillet and reduce
the heat to medium-low. Once the butter is
melted, add the blanched green beans. Season
with salt and cook, stirring often, until the green
beans begin to brown in spots, 2 to 3 minutes.
Add the garlic and cook until fragrant, about 30
seconds (don’t let the garlic brown). Turn o the
heat and squeeze the lemon over the beans.
2 garlic cloves, minced
½ lemon
Parmigiano-Reggiano cheese (optional)
Red pepper akes (optional)
5. Transfer the green beans to a platter and serve
sprinkled with toasted pine nuts, cheese, and
red pepper akes (if desired).
PRO TIP
Restaurant chefs love to blanch vegetables in
advance, because they can be sautéed quickly
before serving. The technique also works well
at home, especially for dinner parties, because
having parcooked vegetables handy allows you
to get them to the table faster, giving you more
time with your guests. If you decide to blanch
vegetables, don’t skip shocking them in ice
water, as it sets the green color and stops them
from overcooking. Pat dry with clean towels
before sautéing so they take on a nice sear.
Blanched vegetables can be refrigerated for up
to 2 days before nishing them in a skillet.
SAUTÉING | 43
Page 43

PAN
SEARING
& PAN
GOLDEN-BROWN DELICIOUS
Pan searing is often combined with pan roasting,
a popular restaurant technique in which you brown
both sides of a protein on the stovetop,
44 | COOKWARE AND CUTLERY
Page 44

and then transfer it to the oven to nish cooking.
Pan searing is similar to sautéing: Protein is added to a hot skillet or sauté pan and
cooked in a small amount of oil until the surface is seared and browned. The method
is best for larger pieces of meat or thicker sh llets because they need to stay in place
to get good browning on the exterior. Pan-seared meats, seafood, and vegetables also
develop fond (the French word for “foundation”), the lovely browned bits stuck to the
bottom of the pan that become the basis for spectacular sauces. Pan searing is often
combined with pan roasting, a popular restaurant technique in which you brown both
sides of a protein like a steak, pork chop, or chicken breast on the stovetop, and then
transfer it to the oven to nish cooking.
Secrets to Successful Pan Roasting
1. PREHEAT THE PAN AND OVEN Preheat the
oven to 350°F to 400°F. (Use the lower temperature
for larger cuts of meat, so they cook through without
overbrowning, and sh, which can dry out in mere
minutes. The higher temperature is great for steaks,
chops, and bone-in chicken pieces.)
2. MEANWHILE, PREPARE THE FOOD
Pat the pieces of food—usually meat or sh—dry
with paper towels; wet food causes steam to
release, which cools the pan and inhibits brown-
ing. In some instances, a very light dusting of our
will help keep the food dry, creating a delicious
browned crust, and add to the body of a pan
sauce. Season food with salt and pepper before
pan roasting.
3. ADD THE OIL Add just enough oil to the pan
so that it covers the bottom and set it over medium
heat. When the oil shimmers, add the food in a
single layer, being sure to leave a little bit of space
between pieces.
4. LET IT COOK For the rst few minutes, don’t
move the food at all. (This can be the toughest
part.) The food needs to form a browned crust,
which gives it tons of avor and helps it release
from the pan. When the food is browned on one
side, ip it, and transfer the pan to the hot oven to
nish cooking. (Thin sh llets or pounded cutlets
are best nished on the stovetop.)
5. LET IT REST (USUALLY) Use a potholder
or kitchen towel to grab the handle as you pull
the pan out of the oven. Fish is ready to serve
right away, but other proteins need to rest for
a few minutes so the juices can be redistributed
PAN SEARING AND PAN ROASTING | 45
Page 45

Page 46

SCALLOPS WITH GARLIC-PARSLEY BUTTER
Serves 4
Equipment: Chef’s knife; large skillet or sauté pan
The telltale sign of a beautifully cooked scallop? A gorgeous golden-brown exterior with
a nearly opalescent, medium-rare center. The key to attaining perfectly seared scallops is using
a high-quality pan and dry-packed scallops, which get a much better sear than
those that have been preserved in liquid.
1½ pounds large scallops (about 16),
preferably dry-packed
Kosher salt
2 tablespoons extra-virgin olive oil
1. Use paper towels to pat the scallops dry.
Remove any connective tissues and season
with salt. Heat the oil in a large skillet or sauté
pan over medium-high heat until it shimmers,
1 to 2 minutes, then add half of the scallops.
2. Sear the scallops without moving them until
nicely browned and they easily release from the
pan, about 2 minutes. Use tongs or a spatula
to ip the scallops and cook the other side,
just long enough to warm the scallop through,
11⁄2 to 2 minutes. Transfer to a paper towel–
lined plate and repeat.
3. Use tongs and paper towels to wipe the pan,
then reduce the heat to medium and add the
butter. Once melted, add the parsley and garlic
and cook, stirring, until the garlic is fragrant,
15 to 30 seconds. Transfer the scallops to a
platter, pour the garlic-parsley butter over the
scallops, and serve with lemon wedges.
3 tablespoons unsalted butter
¼ cup chopped fresh parsley
2 garlic cloves, minced
1 lemon, cut into wedges
VARIATION: CHILE-LIME BUTTER
•
Sear the scallops as instructed. Substitute
1 tablespoon Asian chile-garlic sauce and
2 teaspoons nely grated lime zest for the
garlic and parsley. Substitute lime wedges for
lemon wedges. Serve sprinkled with 2 tablespoons thinly sliced scallions.
PRO TIP
To ensure the scallops cook evenly, place
them, one at a time, in the pan starting at the
12 o’clock position. Then add more scallops to
the pan in a clockwise direction, being sure not
to overcrowd them. After the rst scallop has
the proper sear, ip each scallop in the same
order that you placed them in the pan, and
once they are cooked, remove them from the
pan in the same order.
PAN SEARING AND PAN ROASTING | 47
Page 47

PAN-ROASTED STEAK
WITH GORGONZOLA-SHALLOT BUTTER
Serves 4
Equipment: Chef’s knife or santoku; large skillet or sauté pan
A combination of pan searing and pan roasting allows you to cook a steak with a
beautifully browned crust and a pink, juicy interior. For a more formal restaurant-style presentation
(or for storage), place the butter on a sheet of plastic wrap and roll into a cylinder,
twisting the ends. Refrigerate or freeze for at least 30 minutes, then slice into rounds.
GORGONZOLA-SHALLOT BUTTER
1 stick (8 tablespoons) unsalted butter,
softened
2 ounces (about 1⁄3 cup) crumbled
Gorgonzola cheese
2 tablespoons minced shallot
1 teaspoon minced garlic
1 teaspoon chopped fresh parsley
Kosher salt
Freshly ground black pepper
1. Make the butter: Place the butter in a bowl
and beat with a fork until it starts to become
light and airy. Add the cheese, shallot, garlic,
and parsley. Season with salt and pepper to
taste and mix to combine. Cover the bowl and
refrigerate for at least 30 minutes.
2. Make the steak: Pat the steaks dry with paper
towels and liberally season both sides with
salt and pepper. Preheat the oven to 400°F.
Heat the oil in a heavy-bottomed oven-safe
skillet or sauté pan over medium heat until it
shimmers and just barely begins to smoke.
Add the steaks, working in batches if necessary. Sear the steaks without moving them until
STEAK
4 boneless rib-eye or strip steaks, 11⁄4 inches
thick (8 to 10 ounces each)
Kosher salt
Freshly ground black pepper
1 teaspoon peanut oil or canola oil
Chopped fresh herbs, for serving
a golden-brown crust forms, 1 to 11⁄2 minutes.
Flip the steaks and sear on the other side for
1 minute, then transfer the pan to the oven.
3. After 5 minutes, insert an instant-read ther-
mometer into the steaks to check for doneness.
Continue cooking until the desired doneness:
120°F for rare, between 120°F and 125°F for
medium-rare, and 130°F to 135°F for medium.
Use a potholder to hold the pan handle.
Remove the steaks from the oven and transfer
to a large platter or cutting board with a juice
groove. Top each steak with some Gorgonzola
butter and let rest for 5 minutes. Sprinkle with
herbs and serve.
48 | COOKWARE AND CUTLERY
Page 48

Page 49

How to Make a Restaurant-Style Pan Sauce
A glossy pan sauce turns an everyday chicken breast into a restaurant-worthy plate, and thankfully,
pan sauces are simple to master. Not only are they made in the same pan used to pan-roast your
centerpiece ingredient, but they can also be quickly made while it rests. You’ll be able to make a lot of
dierent versions of this easy sauce in mere minutes, giving your chicken breasts, steaks, and sh llets
a whole new avor prole every time.
After pan-roasting the protein and setting it aside to rest:
1. SAUTÉ YOUR AROMATICS Spoon o most
of the fat left in the skillet, then return the pan to
the burner. Add minced shallots or other nely
chopped aromatics (such as garlic, leeks, onions,
or scallions) to the pan and cook until softened,
about 1 minute.
2. DEGLAZE THE PAN Add about ¼ cup of
red or white wine or another acidic liquid (vermouth
and hard cider both work well). It will bubble like
crazy. Use a wooden spoon to scrape up all of
those avorful browned bits in the pan, then cook
until the liquid is reduced by half to allow the alcohol to evaporate.
3. ADD SOME STOCK Add at least ½ cup of
beef or chicken stock and any sturdy herbs, like
rosemary or thyme. Cook until the liquid is reduced
by half or more; it should be somewhat thick.
4. SWIRL IN COLD BUTTER Pull the pan o
the heat and add at least one tablespoon of cold
butter. To make sure your sauce is thick and glossy,
you need to create an emulsion. Swirl or whisk in
the butter, returning the pan briey to the heat if
necessary to help it melt. If you want to thicken and
enrich the sauce even more, add more butter, one
tablespoon at a time, letting it melt and emulsify
between each addition; this gradual process of
adding the butter is called mounting.
5. SEASON THE SAUCE You can strain the
shallots and aromatics out of the sauce if you like
but you don’t have to. Then add any tender herbs,
like basil, parsley, or tarragon, and nally, taste your
sauce. Season with salt and pepper, then spoon
over your centerpiece ingredient.
50 | COOKWARE AND CUTLERY
Page 50

All About Garlic
Garlic is a must-have in a lot of dishes around the world. Here are a few tips and tricks for peeling,
chopping, and using garlic.
Peeling Garlic
1. WITH YOUR CHEF’S KNIFE If you’re going
to mince a clove or two of garlic or make a paste,
you can set the clove on a cutting board, lay the
blade of your chef’s knife at against it, and press
down with the heel of your hand to crush the garlic
and pop the skin loose.
2. SHAKING CLOVES IN A BOWL If you need
to peel a lot of garlic at once, separate the cloves
and transfer them to a small bowl. Cover the bowl
with a plate or cutting board and shake vigorously.
The cloves should pop out of the skins.
DID YOU KNOW?
The wide blade makes a chef’s knife ideal for
smashing garlic, and the length of the knife is
perfect for smoothly shredding cabbage, dicing
onions, thinly slicing vegetables, or slashing
bread dough.
Using Garlic
1. FOR A MILD FLAVOR Thinly slice garlic for
the mildest avor. Use the rocking cut and your
guide hand to make even slices of garlic that are
about 1⁄8 inch thick.
2. FOR A MEDIUM TO HEARTY FLAVOR If a
recipe calls for chopped or minced garlic, start by
making a series of even lengthwise slices through
the clove and then cut across to get a rough dice.
Then run the heel of your knife back and forth
through the garlic, leaving the tip on the board, until
very nely chopped. The ner your chop or mince,
the stronger the garlic avor in the nal dish.
3. FOR THE STRONGEST GARLIC
TASTE
soups, and marinades, yielding the heartiest garlic
avor. After you’ve minced the garlic, sprinkle salt
over it. Scrape the garlic on the cutting board with
the at part of your chef’s knife, pulling the spine
of the knife toward you. Continue pressing and
scraping until a thick paste forms.
Garlic paste simply dissolves into sauces,
PAN SEARING AND PAN ROASTING | 51
Page 51

CHICKEN AND PROSCIUTTO ROULADE
Serves 4
Equipment: Chef’s knife or santoku; large skillet or sauté pan
Chicken roulade is a classic dinner-party dish that starts off on the stovetop
and then finishes in the oven. It’s a stunning main course and frees up your burners
for making last-minute sauces and side dishes.
4 boneless, skinless chicken breasts
Kosher salt
Freshly ground black pepper
4 large slices prosciutto
1. Buttery the chicken breasts: Set the chicken
on a cutting board. Place your knife parallel to
the cutting board and slice the chicken breasts
in half almost all the way through the center,
leaving them connected at 1 side.
2. Set 2 large pieces of plastic wrap on your work
surface and lightly mist them with water. Place
1 butteried chicken breast on top of 1 piece of
plastic wrap and cover with the second sheet
of plastic wrap, moistened side down. Using a
meat mallet, pound the chicken until it’s ¼ inch
thick. Repeat with the remaining chicken
breasts. Discard the plastic wrap.
3. Season the breasts with salt and pepper. Lay
1 piece of prosciutto on top of each breast,
followed by 4 to 6 spinach leaves and
one-quarter of the sun-dried tomatoes. Tuck
the ends of each chicken breast in, then roll it
into a tight cylinder and tie with kitchen twine
(or use toothpicks to fasten the breast shut).
16 to 24 leaves baby spinach
16 sun-dried tomatoes, roughly chopped
2 tablespoons unsalted butter
1 tablespoon vegetable oil
4. Preheat the oven to 400°F. Heat the butter and
oil in a large skillet or sauté pan over mediumhigh heat. Add the chicken roulades and brown
on all sides, about 8 minutes. Transfer to the
oven and roast until an instant-read thermometer inserted into the chicken reads 160°F to
165°F, about 10 minutes (be sure to take the
temperature of the meat and not the lling).
Transfer the chicken to a plate and let rest
for 10 minutes. Remove the twine. Slice into
4 or 5 pieces and serve.
VARIATION: ROASTED PEPPER
•
ROULADE
Substitute shaved Parmigiano-Reggiano
cheese for the prosciutto; and fresh basil
leaves for the spinach, roasted red bell peppers, chopped, for the sun-dried tomatoes.
VARIATION: SMOKY HAM ROULADE
•
Substitute smoked Black Forest ham for the
prosciutto, roughly chopped Swiss chard for
the spinach, and sautéed mushrooms for the
sun-dried tomatoes.
52 | COOKWARE AND CUTLERY
Page 52

Page 53

PAN-SEARED GROUPER WITH TOMATO-CAPER SAUCE
Serves 4
Equipment: Chef’s knife or santoku; large skillet or sauté pan
This bright Mediterranean-style sauce is made right in the skillet, so this recipe is a great
one-pan dish for a weeknight. If you can’t find grouper, this recipe works with any firm,
white-fleshed fish, such as striped bass, snapper, or even catfish. Low-protein flour, such as
Wondra or cake flour, creates a voluminous yet silky sauce, but all-purpose works fine, too.
Page 54

½ cup Wondra or cake our
4 skin-on grouper llets
Kosher salt
1 tablespoon extra-virgin olive oil
1 medium tomato, diced
2 teaspoons brine-packed capers,
rinsed and drained
½ small shallot, nely minced
1 garlic clove, minced
Fresh lemon juice (or white wine vinegar),
for deglazing
Freshly ground black pepper
1. Preheat the oven to 375°F. Add the our to
a shallow dish. Use paper towels to pat the
grouper llets dry. One at a time, dredge a
llet through the our until it’s coated on both
sides. Tap o the excess our and season
both sides with salt.
2. Heat the oil in a large skillet or sauté pan over
medium heat until it shimmers. Place the llets
skin side down and cook without moving them
or shaking the pan until they easily release
from the pan, about 5 minutes (test by sliding a
spatula beneath the llet—you should have no
trouble lifting it up).
3. Flip the llets, then transfer the skillet to the
oven. Cook until the sh is opaque all the
way through and it akes easily with a fork,
8 to 10 minutes. Use a potholder to hold the
pan handle. Remove the skillet from the oven
and transfer the llets to a platter.
DID YOU KNOW?
4. Return the skillet to medium heat and add the
tomato, capers, shallot, and garlic followed by
a splash of lemon juice; use a wooden spoon
or a spatula to scrape up the browned bits
from the bottom of the pan. Cook until the
shallot is translucent and the garlic is fragrant,
about 5 minutes (if the garlic begins to brown,
reduce the heat to medium-low). Season with
salt and pepper. Spoon the sauce over the
llets and serve.
VARIATION: PINEAPPLE-LIME
•
SAUCE
Before dredging the sh in our, season the
our with 1 tablespoon jerk spices. Omit the
capers and substitute 1⁄2 cup chopped pineapple for the tomato. Finish the sauce with lime
juice instead of lemon juice.
VARIATION: MUSHROOM-WINE
•
SAUCE
Substitute 1 cup sliced wild mushrooms for
the tomatoes. Finish the sauce with white wine
instead of lemon juice. Serve sprinkled with
chopped fresh parsley.
A bread knife happens to be a great tool for
peeling and cutting pineapples! The sharp teeth
on the blade make removing the tough skin an
easy job.
PAN SEARING AND PAN ROASTING | 55
Page 55

PAN
MAKE IT CRISPY: HOW TO PAN FRY
With their crisp, shattering crusts, who doesn’t love
perfectly fried foods? The best way to ease into frying
at home is by pan frying, which you can do
in your sauté pan with a relatively small amount of oil.
Pan frying is a great method for cooking thinner pieces of food like sh llets, fritters,
eggplant slices for eggplant Parmesan, pounded veal or chicken cutlets, or even
bone-in chicken pieces (see Pan-Fried Chicken page 63).
56 | COOKWARE AND CUTLERY
Page 56

Secrets to Successful Pan Frying
1. PREPARE THE FOOD Pat dry the food to
be fried and season as desired, then dip it in your
batter or coating.
2. SET UP A LANDING SPOT Set a wire rack
set over a rimmed baking sheet or paper towel–
lined plate next to the stove so you have a place to
transfer the fried food.
3. CHOOSE AND HEAT THE FAT These days,
most people fry with oils that can handle high heat,
like canola oil, pure olive oil, or peanut oil, but you
can also go with shortening or, even more traditional, lard. Add enough oil to reach about halfway
up the sides of the food and heat it to about 350°F,
or until it shimmers. To test the oil, use an instantread thermometer or carefully dip a corner of the
breaded food into the oil. When the oil is at the
right temperature, it will bubble vigorously around
the food.
4. ADD THE FOOD To get the best crust,
carefully add the food to the oil in a single layer
without any pieces touching each other. Work in
batches if necessary.
5. FRY, MAINTAINING THE TEMPERATURE
Fry the rst side of the food until the crust is golden
brown, moving it around if necessary to even out
the cooking. Try to keep the temperature between
325°F and 350°F. If the oil cools too much, the
crust absorbs more oil than it should and becomes
soggy. If the oil gets too hot, the crust can burn
before the food cooks through.
6. FLIP Use tongs or a wire skimmer to gently
turn the food. Fry until the second side is also
golden and the food is cooked through or reaches
the desired temperature. Remember that the food’s
internal temperature will likely rise about 5°F after
you remove it from the oil.
7. DRAIN AND COOL Transfer the food to your
prepared wire rack or plate and let cool slightly
before serving.
PRO TIP
If you need to work in batches, fried foods can
be placed on a wire rack and kept warm in a
200°F oven while you nish cooking. If your
oven has a convection setting, even better. It
PAN FRYING | 57
Page 57

How to Chop Leaves: Shredding and Chiffonade
Shredding
Shredding is most often used for large, round
leafy vegetables, like iceberg lettuce or cabbage.
(You can also shred Brussels sprouts after you
halve them.)
1. START WITH A TIGHT HEAD OF
CABBAGE OR LETTUCE
outer leaves that might be wilted or browned.
2. QUARTER THE HEAD Halve the cabbage or
lettuce through the core, then turn the head on its
at sides and halve through the core again.
3. REMOVE THE CORE Make diagonal cuts to
remove the core from each quarter.
4. SHRED Working with one quarter at a time,
place a at edge of the cabbage or lettuce on the
cutting board and thinly slice the wedges crosswise. Cut very thin shreds for salads and thicker
ones for sautés. If you’d like shorter shreds, halve
the shreds horizontally.
Remove any loose
Chiffonade
Chionade (shif-ə-NAHD) is a ner form of
shredding that is usually reserved for oblong leafy
vegetables, like kale or chard, and even herbs,
like basil.
1. REMOVE STEMS AND RIBS Use your knife
to cut o tough stems and remove ribs.
2. ROLL INTO A CIGAR SHAPE Stack a few
leaves and roll lengthwise into a tight cylinder.
3. SLICE Slice straight across the leaves or on
the bias to create ne ribbons.
58 | COOKWARE AND CUTLERY
Page 58

Breading and Dredging
A crunchy crust is not only delicious, it protects foods, like cutlets, sh llets, and slabs of vegetables, from the
intense heat of the oil. Using the dry-hand and wet-hand method—which has you use your hands strategically
when breading and dredging—prevents messy clumps of our and egg from sticking to your hands as you
work. Here's how:
1. USE TWO OR THREE CONTAINERS
Set up one shallow bowl or container for the liquid
(egg wash, milk, or buttermilk) and another for your
dry coating (our, bread crumbs, crushed potato
chips, or a combination). Some recipes call for an
initial our or cornstarch dredge, so use a separate
container for that as well.
2. DRY AND SEASON FOOD Blot the food dry
with paper towels and season with salt and pepper
and any other spices that might burn if they came
into direct contact with hot oil.
3. DREDGE IN FLOUR OR CORNSTARCH
To do an initial dredge, use one hand—this will now
be called your "dry hand"—to coat both sides of
the food in our or cornstarch, shaking o as much
excess as possible.
PAN FRYING | 59
Page 59

FRIED FISH TACOS
WITH PICKLED RADISHES AND CARROTS
Serves 4
Equipment: Chef’s knife or santoku; large skillet or sauté pan
These Baja-style fish tacos are extra crispy and crunchy thanks to the buttermilk dip and
panko bread crumb dredge. You can use halibut or any other firm, white-fleshed fish, like cod,
scrod, or haddock. The pickled radishes and carrots are inspired by a classic taqueria pickle
but are made using an Asian quick-pickle technique so they can be ready in an hour or two.
Page 60

PICKLED RADISHES
AND CARROTS
½ pound radishes, sliced as thinly as
possible
1 small red onion, halved and thinly sliced
1 large carrot, peeled and sliced as thinly
as possible
2 teaspoons kosher salt
½ teaspoon cumin seeds
¾ cup distilled white vinegar
¾ cup warm water
¼ cup sugar
TACOS
Canola, grapeseed, or vegetable oil,
for frying
8 (6-inch) corn tortillas
1 cup buttermilk
1 cup all-purpose our
1 cup panko
1½ pounds skinless halibut llets, cut into
1-inch by 3-inch strips
1 teaspoon kosher salt
Sour cream, for serving
1 cup shredded iceberg lettuce
½ cup roughly chopped fresh cilantro
Lime wedges, for serving
1. Make the pickled radishes and carrots: Place
the radishes, onion, and carrot in a large bowl,
toss with the salt, and set aside for 30 minutes,
stirring occasionally. Drain the vegetables in a
ne-mesh sieve, then pack into a quart-sized
Mason jar or airtight container. Sprinkle with
the cumin seeds. Whisk together the vinegar,
water, and sugar in a small bowl until the sugar
dissolves, then pour over the vegetables,
pressing down to submerge them. Refrigerate
for at least 1 hour (and up to 1 month).
2. Make the tacos: Line a plate with paper towels.
Pour enough oil to ll a heavy-bottomed skillet
or sauté pan to a ½-inch depth. Heat the oil
over medium-high heat until it reads 325°F to
350°F on an instant-read thermometer.
3. Meanwhile, preheat the oven to 250°F. Wrap
the tortillas in foil and place in the oven to
warm. (Alternately, wrap the tortillas in a damp
paper towel and microwave for 30 seconds just
before assembling the tacos.)
4. Pour the buttermilk into a shallow dish. Com-
bine the our and panko in another shallow
dish. Season the sh with the salt. Dip the
sh in the buttermilk, then dredge it in the
our-panko mixture until it’s coated on all sides.
Carefully place 4 or 5 pieces of sh in the hot
oil and fry until golden brown on all sides, about
4 minutes. Use a slotted spoon to transfer the
sh to the prepared plate and repeat with the
remaining sh.
5. Divide the sh evenly among the tortillas. Top
each taco with sour cream, lettuce, cilantro,
and a generous portion of the pickled radishes
and carrots (either in the taco or on the side).
Squeeze the lime wedges over the top
and serve.
PAN FRYING | 61
Page 61

ZUCCHINI FRITTERS
WITH SMOKED CHILE–LIME DIPPING SAUCE
Makes 10 to 15 fritters
Equipment: Chef’s knife or santoku; large skillet or sauté pan
After you understand the basic formula for these fritters, you’ll find that it’s very easy to vary it
by swapping other vegetables, herbs, or pinches of your favorite spices. The most
time-consuming part of the recipe is waiting for the salted zucchini to release some of its water
(which keeps the fritter from getting soggy), but you can prepare another dish while you wait.
ZUCCHINI FRITTERS
2 large zucchini, grated (about 3 cups)
2 teaspoons kosher salt
½ cup all-purpose our
1 teaspoon baking powder
1 large egg, beaten
½ medium shallot, minced
Whole milk or light beer, for thinning
the batter
Canola, grapeseed, or vegetable oil,
for frying
Flaky salt, for serving
2 tablespoons roughly chopped fresh cilantro
1. Prepare the zucchini: Place the zucchini in a
colander, sprinkle with the salt, and toss to
combine. Set the colander over the sink to let
the zucchini drain for 30 minutes. Squeeze
the excess water out of the zucchini by pressing down on it in the colander or wrapping
it in cheesecloth (or a kitchen towel) and
wringing gently.
2. Make the dipping sauce: Stir together the
mayonnaise, sour cream, chipotle, and lime
DIPPING SAUCE
½ cup mayonnaise
½ cup sour cream
1 chipotle in adobo sauce, nely chopped
1 tablespoon fresh lime juice
Kosher salt
Freshly ground black pepper
juice in a small bowl. Season with salt and
pepper, cover with plastic wrap, and refrigerate
until serving.
3. Make the fritters: Whisk together the our and
baking powder in a large bowl. Stir together
the zucchini, egg, and shallot in a small bowl.
Pour the zucchini mixture into the our mixture
and stir to combine. Add enough milk (or beer)
to the fritter mixture until it is the consistency of
pancake batter.
62 | COOKWARE AND CUTLERY
Page 62

4. Line a platter with paper towels. Pour enough
oil to ll a large skillet or sauté pan to a
depth. Heat the oil over medium heat until
shimmering. Scoop about 2 tablespoons of the
fritter mixture and carefully drop it into the oil.
Use the back of a spoon to gently press the
fritter mixture into a circle. Scoop more fritters
into the pan and press them each into a circle,
being careful not to overcrowd the pan. (You’ll
have to fry the fritters in 2 or 3 batches.)
1
⁄4-inch
5. Fry until golden brown on both sides, 5 to 6
minutes. Transfer the fritters to the prepared
platter and sprinkle with aky salt and cilantro.
Serve with the dipping sauce.
VARIATION: CORN FRITTERS
•
Substitute 21⁄2 cups fresh or frozen corn
kernels for the zucchini and stir into the fritter
batter. Substitute 1 thinly sliced scallion for the
shallot. Add 1 teaspoon ground cumin and
1
⁄2 teaspoon cayenne pepper to the batter. Thin
the batter with beer and lime juice.
continued...
Page 63

Page 64

PAN-FRIED CHICKEN
Serves 6
Equipment: Chef’s knife or santoku; large skillet or sauté pan
Soaking the chicken overnight in buttermilk is ideal, but if you are pressed for time
you can dredge the chicken pieces in seasoned flour, dip in buttermilk, dredge again,
let the chicken rest for 5 to 10 minutes, and then fry.
1 (3- to 3½-pound) chicken, cut into 8 pieces
1 quart buttermilk
2 tablespoons plus 2 teaspoons kosher salt
2 tablespoons sugar
A few fresh herb leaves or sprigs, such as
bay leaves, rosemary, tarragon, or thyme
(optional)
1 tablespoon sweet paprika
1. Place the chicken in a large airtight container.
Mix the buttermilk, 2 tablespoons of the salt,
and the sugar in a medium bowl until the salt
and sugar dissolve. Pour the mixture over the
chicken, add the herbs (if using), cover, and
refrigerate 6 hours or overnight.
2. Stir together the paprika, black pepper, the
remaining 2 teaspoons salt, the garlic powder,
and the cayenne in a small bowl. Combine the
our and baking powder in a 1-gallon resealable plastic bag or a large lidded container.
Seal the bag (or cover the container) and shake
to combine.
3. Drain the chicken in a colander (discard the but-
termilk) and transfer to a baking sheet. Sprinkle
the chicken with the spice blend. Add 1 piece of
chicken to the our mixture, seal the bag, and
shake to coat. Transfer to a plate and repeat.
1 tablespoon freshly ground black pepper
2 teaspoons garlic powder
1 teaspoon cayenne pepper
4 cups all-purpose our
1 tablespoon baking powder
Peanut oil, canola oil, or vegetable
shortening, for frying
4. Pour enough oil to ll a 12-inch heavy-
bottomed skillet to a 1⁄2-inch depth. Heat the oil
until it reads 325°F to 350°F on an instant-read
thermometer. Carefully place the chicken thighs
in the center of the skillet (because they take
the longest to cook) and the legs, breasts, and
wings around the perimeter, being careful not
to overcrowd the pan. (You may have to fry
the chicken in batches.) Fry until the chicken
is golden brown and crisp on both sides, and
an instant-read thermometer inserted into
the chicken reads 165°F for the breasts and
170°F for the drumsticks and thighs. Transfer
the chicken to a wire rack and let cool slightly
before serving.
PAN FRYING | 65
Page 65

BRAISING
SO TENDER, SO DELICIOUS
The dierences between braising and stewing
include the size of the centerpiece ingredient and
the amount of liquid used.
Your Dutch oven is the pot to use for large braises, stews, and soups. The pot’s large
volume and tight lid is perfect for these moist-heat cooking methods, which render
tough cuts of meat, like lamb shanks, pork shoulder, beef brisket, short ribs, or chuck
roast, extremely tender.
66 | COOKWARE AND CUTLERY
Page 66

The word braise generally applies to a larger piece of food, like the beef chuck used for a pot roast,
cooked in relatively little liquid. The word stew usually refers to food that is cut into bite-sized chunks
and cooked in a fair amount of liquid, like the Boeuf Bourguignon on page 67.
Secrets to Successful Braising and Stewing
1. BROWN THE MEAT The braising or stewing
meat should be blotted dry with paper towels, and
then seasoned and seared to develop its color
and avor. If you have a lot of small pieces, brown
them in batches. Transfer the meat to a plate when
you’re done browning.
2. SAUTÉ YOUR AROMATICS Spoon o and
discard all but a few tablespoons of the fat left in
the pan (this step will ensure that your sauce isn’t
greasy) and add your vegetables. Cook them for a
few minutes to brown them a bit, stirring them often.
3. DEGLAZE THE PAN Your pan should be full
of fond, the browned bits that stick to the bottom
of the pan. Fond is what will build character and
backbone in the base sauce for your braise or
stew. Add some wine, beer, or other liquid; scrape
up the browned bits at the bottom of the pan; and
cook until the liquid is slightly reduced.
4. RETURN THE MEAT TO THE PAN, ADD
MORE LIQUID, AND COOK
Put the meat back
in the pan, along with some broth or water. For a
braise, the liquid should reach about halfway up
the meat; for a stew, the liquid can cover the meat.
Bring everything to a boil, then cover and simmer
over moderately low heat until the meat is tender.
5. FINISH AND SEASON When the meat is
fork-tender, check the thickness of the liquid. If you
want the sauce to have more viscosity, you can
remove the meat and boil the liquid to reduce it. Or
you can whisk in a nub of beurre manié—softened
butter mixed with an equal amount of our—and
watch the sauce thicken like magic.
BRAISING & STEWING | 67
Page 67

Page 68

BOEUF BOURGUIGNON
Serves 6
Equipment: Chef’s knife or santoku; Dutch oven
This classic French stew is often made with just red wine, but the addition of beef stock or
store-bought demi-glace (often available near the canned broths in the grocery store)
enhances the meaty flavor. By the time the stew is finished cooking, the vegetables will have
given up all their flavor. They are usually strained out, and the beef is served
just with its liquid over buttered noodles or mashed potatoes. If you prefer to have the
carrots and onions remain in your stew, add them just for the last hour of cooking.
6 fresh parsley sprigs, plus extra chopped
fresh parsley, for serving
3 fresh thyme sprigs
2 dried bay leaves
3 whole, peeled garlic cloves
3 to 4 pounds boneless chuck roast or top
blade roast, cut into 2- to 3-inch pieces
Kosher salt
Freshly ground black pepper
2 tablespoons canola, grapeseed, or
vegetable oil, plus extra if needed
1. Set a 6-inch square of cheesecloth on a cutting
board. Place the parsley sprigs, thyme, bay
leaves, and garlic on the cheesecloth and fold
it over the herbs to make a bouquet garni. Use
butcher’s twine to tie the cheesecloth around
the herb stems. Liberally season the beef with
salt and pepper and set aside.
4 strips thick-cut bacon, cut crosswise into
1-inch pieces
2 medium yellow onions, roughly chopped
2 tablespoons all-purpose our
1 (750 ml) bottle medium-bodied red wine,
such as pinot noir
4 carrots, peeled and cut crosswise into
1-inch lengths
1 to 2 cups beef stock
2 tablespoons unsalted butter, softened
Buttered noodles or mashed potatoes,
for serving
2. Heat the oil in a Dutch oven over medium heat
until shimmering. Add the bacon and cook until
crispy on both sides. Use a slotted spoon to
transfer the bacon to a paper towel–lined plate
(reserve for snacking or for another recipe),
leaving the rendered fat in the pan.
3. Increase the heat to medium-high. Once the
bacon fat just barely begins to smoke, add the
beef, being careful not to overcrowd the pot.
continued...
BRAISING & STEWIN | 69
Page 69

(You’ll probably have to brown the meat in a
few batches.) Sear the meat until browned on
all sides. Transfer the browned beef to a plate
and repeat with the remaining beef, adding
more oil if needed.
4. Reduce the heat to medium, add the onions,
and cook, stirring often, until soft and golden.
Sprinkle the our into the pan and continue to
cook, stirring constantly, about 5 minutes more.
5. Pour 1 cup of the wine into the pot and bring to
a boil, stirring often and scraping any browned
bits up from the bottom of the pot. Return the
beef and any accumulated juices to the pot
along with the remaining wine, the carrots, bouquet garni, and enough stock to cover the meat.
Bring to a boil, reduce the heat to mediumlow, and gently simmer until a fork slips into the
beef with no resistance, 1½ to 2 hours. (You
can also place the covered Dutch oven in a
300°F oven for 1½ to 2 hours.)
6. Turn o the heat and use a slotted spoon to
transfer the beef to a medium bowl. Discard the
bouquet garni. Strain the cooking liquid through
a ne-mesh sieve set over a large bowl.
Reserve the vegetables for serving, or leave the
cooked vegetables in the sieve and press on
them with a spatula to extract as much liquid
as possible, then discard. Return the meat and
the liquid to a clean pot and simmer gently until
the liquid slightly reduces, about 10 minutes.
Add the butter and swirl to combine. Serve
with or without the cooked vegetables and over
buttered noodles or mashed potatoes.
DID YOU KNOW?
70 | COOKWARE AND CUTLERY
Kitchen shears are great for snipping herbs,
trimming pastry dough, slicing pizza, or roughly
chopping whole tomatoes while still in the can.
Page 70

DUTCH OVEN BEANS
Makes 6 cups
Equipment: Chef’s knife or santoku; Dutch oven
A pot of beans can be as simple or as complex as you like. They can be a main dish,
a comforting side dish, or an ingredient that you add to other recipes, like the
soups on the next few pages. High-quality dried beans from specialty shops or farmers’
markets are usually fresher than those you find in the supermarket, so they’re worth
seeking out. Regardless of the type of beans you buy, just be sure they don’t
look especially dry, with wrinkly skin; those will take forever to cook—if they cook at all.
2 tablespoons unsalted butter
1 large carrot, peeled and roughly
chopped (optional)
1 rib celery, roughly chopped (optional)
1. Melt the butter in a Dutch oven over medium
heat. Add the carrot, celery, onion, and garlic (if
using) and cook, stirring occasionally, until soft,
for 8 to 10 minutes.
2. Add the beans and salt and enough cold water
to cover by 1 inch.
3. Bring to a boil over high heat, then reduce
the heat to low. Cook the beans on the stove
top, covered, until tender, 1 to 3 hours, or in
a 350°F oven, covered, until tender, 1 to 2
hours. (The freshness and variety of the bean
will aect the cooking time.) Transfer the beans
and the cooking liquid to an airtight container
and refrigerate for up to 1 week, or freeze them
in resealable freezer bags (either in the liquid or
drained of the liquid) for up to 6 months.
½ large yellow onion, diced (optional)
3 or 4 garlic cloves, smashed (optional)
1 pound dried beans
1 tablespoon kosher salt
TO SOAK OR NOT TO SOAK?
Soaking dried beans for 6 to 8 hours before
cooking (or even overnight) makes them cook
more quickly and more evenly than beans that
have not been soaked. Many people also claim
that if you drain o the soaking liquid and cook
the soaked beans in fresh water, they’ll be
easier to digest. The verdict: While soaking is
not absolutely necessary, it could make a better
pot of beans. Plus, if you soak the beans in the
morning, they’re ready to cook by dinnertime.
Page 71

Page 72

BLACK BEAN SOUP WITH ROASTED TOMATOES
Serves 4
Equipment: Chef’s knife or santoku; Dutch oven
This hearty soup is a great way to use some of the Dutch Oven Beans (see recipe page 69).
5 or 6 whole, peeled garlic cloves
3 tablespoons extra-virgin olive oil
4 or 5 plum tomatoes, halved
1 teaspoon kosher salt, plus extra as needed
2 ribs celery, nely diced
1 large carrot, peeled and nely diced
1 large yellow onion, nely diced
1 tablespoon ground cumin
½ teaspoon red pepper akes
1. Preheat the oven to 400°F. Place the garlic
cloves in the center of a large square of
aluminum foil. Drizzle with 1 tablespoon of oil,
then enclose in a bundle and set on a baking
sheet. Add the tomatoes (cut side up), drizzle
with 1 tablespoon of the oil, and season with
salt. Roast until the tomatoes are soft and
slightly charred, 30 to 40 minutes. Transfer to a
large plate to cool, then squeeze the garlic out
from skins. Chop the garlic and tomatoes.
2. Heat the remaining oil in a Dutch oven over
medium heat until shimmering. Add the celery,
carrot, and onion and cook, stirring often,
until the onion is softened and lightly golden,
10 minutes. Reduce the heat to medium-low
and add the cumin, salt, and red pepper akes.
Cook, stirring, until fragrant, 2 to 3 minutes.
Add the stock and beans.
6 cups chicken stock (see Basic Chicken
Stock page 32)
2 cups cooked black beans (see Dutch Oven
Beans page 69)
Freshly ground black pepper
1 lime, cut into wedges
Sour cream, for serving
Diced avocado, for serving
Chopped fresh cilantro, for serving
3. Bring the soup to a boil over high heat, then
reduce to medium-low. Add the chopped
tomatoes and garlic, season with pepper, and
simmer for 30 minutes. Ladle 11⁄2 to 2 cups of
soup into a blender and purée. Return the soup
to the pot and stir. Serve with the lime wedges,
sour cream, avocado, and cilantro.
PRO TIP
Get teary when chopping onions? Try using a
very sharp knife or try refrigerating your onions
in a bowl of cold water for 30 minutes before
chopping. And if all else fails, put on a pair of
glasses (or sunglasses) to shield your eyes.
BRAISING & STEWING | 73
Page 73

PASTA E FAGIOLI
Serves 6
Equipment: Chef’s knife or santoku; Dutch oven
Pasta e fagioli, which you can make with Dutch Oven Beans (see recipe page 69)
or canned beans, is a comforting Italian vegetable soup that is filling enough to serve as
a full meal, perhaps with a light salad on the side.
4 strips bacon, cut into ½-inch pieces
1 medium yellow onion, diced
1 small carrot, peeled and diced
1 rib celery, diced
2 garlic cloves, minced
1
⁄4 teaspoon red pepper akes
1 quart chicken stock (see Basic Chicken
Stock page 32)
2 (15-ounce) cans cannellini beans or
2½ cups Dutch Oven Beans (page 69)
1. Place the bacon in a Dutch oven over medium-
low heat. Cook until the fat renders and the
bacon is browned, 8 to 10 minutes. Transfer
the bacon to a paper towel–lined plate. Add
the onion, carrot, and celery and cook until the
vegetables are soft, about 8 minutes. Stir in the
garlic and red pepper akes and cook, stirring,
until fragrant, 1 to 2 minutes more.
2. Add the stock, beans, oregano, and the
cheese rind (if using). Increase the heat to high,
bring to a boil, then reduce heat to low, and
simmer for 20 minutes.
1 tablespoon chopped fresh oregano or
11⁄2 teaspoons dried oregano
1 Parmigiano-Reggiano rind (optional), plus
grated cheese, for serving
1 large tomato, seeded and diced
1 cup (8 ounces) small pasta, such as ditalini
Kosher salt
Freshly ground black pepper
¼ cup chopped fresh parsley
2 scallions, thinly sliced on the bias
Extra-virgin olive oil, for drizzling
3. Add the tomato, bacon, and pasta and season
with salt and pepper. Increase the heat to medium-high and cook until the pasta is al dente,
about 10 minutes (or according to package
directions), adding water if necessary to bring
the soup to the desired consistency. Turn o
the heat and let the soup stand for 5 minutes.
4. Stir in 3 tablespoons of the parsley. Serve with
the remaining 1 tablespoon parsley, and the
scallions, black pepper, and a drizzle of olive oil.
Serve with the grated Parmigiano-Reggiano.
74 | COOKWARE AND CUTLERY
Page 74

CHAPTER NAME | 75
Page 75

CHICKEN AND ANDOUILLE GUMBO
Serves 8 to 10
Equipment: Chef’s knife or santoku; Dutch oven
Creating the dark roux used in Cajun and Creole dishes, like gumbo, is time-consuming
but it’s key: Dark roux contributes the signature flavor of these stews.
The darker a roux gets, the more it must be stirred, because it burns easily once it passes
medium brown. Gumbo comes in many forms, including shrimp, crawfish, and okra.
This recipe is a basic meaty gumbo that you can easily adapt.
Page 76

1 pound boneless, skinless chicken thighs,
cut into 1-inch pieces
1 tablespoon Cajun seasoning
4 ribs celery, diced
1 medium yellow onion, diced
1 red bell pepper, seeded and diced
2 teaspoons kosher salt
½ teaspoon cayenne pepper
½ cup vegetable oil
1 pound andouille sausage, cut into
½-inch rounds
1 cup all-purpose our
8 cups store-bought or homemade chicken
stock (see Basic Chicken Stock page 32)
2 dried bay leaves
Cooked rice, for serving
1 bunch scallions, green tops only,
thinly sliced
1. Toss the chicken with the Cajun seasoning in a
medium bowl and set aside. In another medium
bowl, toss together the celery, onion, and bell
pepper with the salt and cayenne; set aside.
2. Heat 2 tablespoons of the oil in a Dutch oven
over medium heat until shimmering. Add the
sausage and cook until the fat begins to render.
Add the chicken and cook until browned on
both sides. (The chicken won’t be cooked
all the way through.) Use a slotted spoon to
transfer the sausage and chicken to a plate and
set aside.
3. Add the remaining 6 tablespoons oil to the
pot and increase the heat to medium-high.
Once the oil shimmers, add the our and stir
in with a wooden spoon. Continue cooking,
stirring often, being sure that the wooden
spoon reaches the edges of the pot so that the
roux doesn’t burn. Once the mixture begins to
turn light brown, reduce the heat to low and
continue cooking, stirring often, until the roux is
deep brown, about 40 minutes.
4. Increase the heat to medium and add the
celery, onion, and bell pepper. The roux will
steam and splatter a little, but continue to cook
the vegetables, stirring often, until softened,
about 5 minutes.
5. Return the sausage and chicken to the pot and
stir to combine. Slowly add the stock, stirring
constantly to incorporate it and making sure
to trail the spoon around the edges of the pot
to ensure nothing is stuck at the bottom. Bring
the liquid to a boil, then add the bay leaves
and reduce the heat to low. Simmer for about
1 hour, skimming o any oil that might rise to
the top. Remove bay leaves, serve over rice,
and sprinkle with scallions.
PRO TIP
When you know you want to thicken a stew
or soup, you can sprinkle our over onions or
aromatic vegetables as you’re sautéing them
to make a cheater roux.
BRAISING & STEWING | 77
Page 77

SWEETS
CREATING SPOON SWEETS AND CLASSIC SAUCES
Start by using these classically derived recipes,
then once you have the method down pat, play around with
the avors and seasonings to create your own versions.
French-style sauces and spoon sweets (such as curds and pastry creams) are known
for their silken, voluminous texture. They are best made in a double boiler since they rely
on egg yolks (which can scramble if exposed to direct heat).
As you make these sauces, you’ll also get practice with a technique called tempering, in which you
slowly heat raw eggs with a hot liquid to prevent them from curdling. You can do this by either gradually adding the hot liquid, such as melted butter, to the egg yolks, or by whisking the yolks with a small
amount of the hot liquid, like warm milk, so the yolks are warm and “tempered” before whisking them
back into the rest of the sauce. Start by using these classically derived recipes, then once you have the
78 | COOKWARE AND CUTLERY
Page 78

PASTRY CREAM
Makes 41⁄2 cups
Equipment: Saucepan or saucier
Pastry cream is a thick vanilla pudding-like sweet cream that you’ll often find piped into éclairs,
Boston cream doughnuts, and cream puffs. You can also spread it in a baked tart shell
and top with fruit, dollop it on top of pavlova (a pie-like meringue), or layer it with
cookies and fruit for a trifle or icebox cake. Instead of vanilla extract, you could substitute
any other extract, such as almond or coconut.
1 cup sugar
5 tablespoons cornstarch
8 large egg yolks
1. Whisk together the sugar and cornstarch in a
medium bowl and make a well in the center.
Whisk together the egg yolks and 2 tablespoons of the milk in another medium bowl,
then add it to the well in the sugar mixture and
whisk until combined.
2. Pour the remaining milk into a heavy-bottomed
saucepan. Add the vanilla extract and warm the
mixture over medium heat (keep an eye on it so
it doesn’t boil over).
3. Prepare a large bowl with ice water and set
aside. Slowly whisk some of the warm milk into
the egg mixture, adding more while whisking
until the bottom of the bowl feels warm. Return
the egg-milk mixture to the saucepan.
4. Cook over medium heat, stirring constantly
with a heat-safe rubber spatula that can get
into the corners of the saucepan, until the
mixture is thick and glossy, tastes sweet, and
1 quart whole milk
1 teaspoon vanilla extract
doesn’t leave a starchy aftertaste. Transfer the
hot pastry cream to a medium heat-safe bowl
and set over the ice water, making sure the ice
water doesn’t get into the pastry cream. Let the
pastry cream cool, stirring occasionally, until it
reaches room temperature. Place a piece of
plastic wrap directly on the pastry cream’s surface to prevent a skin from forming on the top.
Refrigerate until well chilled, for at least 2 hours
or up to 1 week.
DID YOU KNOW?
The beveled edge of the saucepan helps you
easily get into the corners of the pan as you
Page 79

LEMON CURD
Makes about 2 cups, enough to fill a 9-inch tart shell
Equipment: Saucepan or saucier
Lemon curd is amazingly versatile. You can use it to fill a prebaked tart shell,
spread it between layers of cake, or serve a spoonful alongside a cookie or scone.
It is rich and creamy yet tart and refreshing all at once.
2 large eggs plus 2 large yolks
½ cup sugar
2 tablespoons nely grated lemon zest
plus ½ cup fresh lemon juice (from
3 or 4 lemons)
1. Fill a medium saucepan with about 1 inch of
water and bring to a simmer.
2. Meanwhile, whisk together the eggs, egg yolks,
and sugar in a medium heat-safe bowl until
smooth and pale yellow. Add the lemon zest
and juice and the salt. Place the bowl over
the simmering water, making sure the bottom
of the bowl does not touch the water. Use a
wooden spoon to constantly stir the lemon
mixture, scraping down the sides of the bowl
often, until the curd begins to thicken and it
reaches 165°F to 170°F on an instant-read
thermometer, 8 to 12 minutes.
3. Remove the bowl from the saucepan and set
on top of a folded kitchen towel. Add the butter
1 tablespoon at a time, and whisk until incorporated. Set the bowl over the simmering water
again and continue to whisk until the curd is
thick enough to coat the back of a spoon and
it reaches 175°F to 180°F. The whisk’s tines
¼ teaspoon kosher salt
6 tablespoons cold unsalted butter
¼ teaspoon vanilla extract (optional)
should leave a trail that quickly disappears in
the bottom of the pan. (If you overcook the
curd, the whisk will leave a wide trail that
does not ll in quickly.) Stir in the vanilla extract
(if using).
4. For the ultimate in smoothness, pour the warm
curd through a ne-mesh sieve set over a bowl.
Place a piece of plastic wrap directly on the
curd’s surface to prevent a skin from forming on
the top. Refrigerate until chilled, at least 2 hours
and up to 1 week.
PRO TIP
If you don’t have a zester, you can peel the
lemon zest o in strips and pulse it with the
sugar in a mini food processor or spice grinder.
80 | COOKWARE AND CUTLERY
Page 80

CHAPTER NAME | 81
Page 81

Page 82

BÉARNAISE
Makes about 1 cup
Equipment: Chef’s knife or santoku; Saucepan or saucier
Béarnaise sauce is a savory butter emulsion that’s closely related to hollandaise
(which you’ve had on your eggs Benedict), but it’s flavored with shallots and tarragon.
1 teaspoon black peppercorns
1 tablespoon white wine vinegar
1 tablespoon white wine
1 tablespoon minced shallot
¼ cup chopped fresh tarragon
1. Place the peppercorns in a resealable plastic
bag. Use the bottom of a skillet to smash the
peppercorns until they are roughly cracked. In
a small saucepan over medium heat, combine
the peppercorns, vinegar, wine, shallot, and
2 tablespoons of the tarragon. Gently simmer
until the vinegar mixture is reduced by about
half. Strain through a ne-mesh sieve set over
a medium heat-safe bowl, using a spatula to
press on the solids to extract as much liquid as
possible. Discard the solids.
2. Fill a medium saucepan with 1 or 2 inches of
water and bring to a simmer. Place the bowl
with the vinegar mixture over the simmering
water, making sure the bottom of the bowl
does not touch the water. Reduce the heat
to medium-low, then whisk in the egg yolks,
lemon juice, and salt. Whisk until the yolks
triple in volume.
2 large egg yolks
2 tablespoons fresh lemon juice or water
1 teaspoon kosher salt
1½ sticks (12 tablespoons) unsalted butter,
softened
3. Set the bowl on top of a folded kitchen towel.
Add the butter, 1 tablespoon at a time, whisking
until incorporated between additions. Whisk
in the remaining 2 tablespoons tarragon. The
béarnaise should be just a little thinner than
mayonnaise; adjust the thickness and the avor
with a little more lemon juice or water as needed.
BLENDER BÉARNAISE
To make béarnaise in the blender, make the
vinegar mixture (without tarragon) and strain
it into a blender. Add the egg yolks, lemon
juice, and salt and blend until combined. With
the blender on, slowly drizzle in melted butter
(instead of softened) through the opening in the
lid or use an emulsion cup until all of the butter
is added and the sauce is thick, creamy, and
emulsied. Add 2 tablespoons of the tarragon
and blend again. Fold in the remaining 2 tablespoons tarragon and keep warm.
Page 83

Cozy Winter Lunch
Boeuf Bourguignon (page 67)
Green Beans with Lemon, Garlic, and
Pine Nuts (page 41)
Lemon Curd over Store-Bought
Pound Cake (page 78)
Casual Latin Party
Black Bean Soup with Roasted
Tomatoes (page 71)
Fried Fish Tacos with Pickled Radishes and
Carrots (page 58)
Yellow Rice with Sofrito (page 30)
Sliced Fresh Mangoes and Pineapple
Italian-American Dinner Party
Julienned Zucchini Salad (page 23)
Pasta e Fagioli (page 72)
Shrimp Scampi (page 38)
Chicken and Prosciutto Roulade (page 50)
Pastry Cream–Filled Store-Bought
Cannoli Shells (page 77)
Elegant Dinner Party
Zucchini Fritters with Smoked
Chile–Lime Dipping Sauce (page 60)
Pan-Seared Grouper with
Tomato-Caper Sauce (page 52)
Pan-Roasted Steak with
Gorgonzola-Shallot Butter (page 46)
Almond Pastry Cream with
Fresh Seasonal Fruit (page 77)
Comfort Food Supper
Chicken and Andouille Gumbo (page 74)
Pan-Fried Chicken (page 63)
Napa Cabbage Salad (page 29)
Glazed Carrots with Garlic and
Ginger (page 27)
Lemon Curd over Store-Bought Biscuits
with Strawberries (page 78)
84 | COOKWARE AND CUTLERY
Page 84

Caring for Your Pots and Pans
Stainless-steel cookware is incredibly durable and easy to care for. If browned bits of food stick to the bottom
of your pots and pans, you can do what chefs do and deglaze them. Just heat up the pans over moderate
heat, add some liquid, and bring to a boil; the browned bits should scrape right o with a spatula or wooden
spoon. The liquid—which could be wine, juice, vinegar, club soda, broth, or water—could be the base of a
sauce or you can just use the method to help clean the pan. Covering the pan to trap steam while the liquid
simmers helps too.
If your pan is nicely deglazed, you shouldn’t need to do more than wash the pans in hot soapy water. You can
put them in the dishwasher but the detergents tend to discolor the cookware over time, so we recommend
washing by hand.
If you nd that your pans take on a gold-brown or bluish tint (which is caused by overheating or mineral
residue) or white spots (from boiling salted water), washing them with a nonabrasive stainless-steel cleaner
or baking soda can work wonders. Just mix one of these powders into a paste with some water and rub on
the still-warm pans with a sponge or cloth. Rinse, and then wash with hot soapy water and dry with a lint-free
towel, and your pan will look like new.
While hard to destroy, stainless-steel pots and pans aren’t indestructible. For example, steel wool pads can
leave scratches and bleach can cause the metal to corrode. Severe overheating (above 500°F) can cause
permanent discoloration and structural damage, so never leave your cookware set over a high burner for an
MENUS | 85
Page 85

880024000
 Loading...