

Page 1
D UAL F UEL R ANGES
USE &CARE INFORMATION
Page 2

CONTENTS
Wolf Dual Fuel Range 3
Safety Instructions and Precautions 4
Wolf Dual Fuel Range Features 8
Wolf Dual Fuel Range Surface Operation 10
Wolf Dual Fuel Range Oven Operation 20
Wolf Dual Fuel Range Care 43
Wolf Cooking Guide 48
Wolf Troubleshooting Guide 52
Wolf Service Information 54
Wolf Warranty 55
WOLF®is a registered trademark of Wolf Appliance Company, Inc.
As you read this Use & Care Information,
take particular note of the CAUTION and
ARNING symbols when they appear.
W
This information is important for safe and
ficient use of the Wolf equipment.
ef
signals a situation where minor injury or
oduct damage may occur if you do not
pr
follow instructions.
states a hazard that may cause serious
injury or death if precautions are not
followed.
mation may
In addition, this Use & Car
ANT NOTE which highlights
signal an IMPOR
mation that is especially important.
infor
T
e Infor
Page 3

WOLF DUAL FUEL RANGE
THANK YOU
Your purchase of a Wolf dual fuel range
attests to the importance you place upon the
uality and performance of your cooking
q
equipment. We understand this importance
and have designed and built your dual fuel
ange with quality materials and workman-
r
ship to give you years of dependable service.
We know you are eager to start cooking, but
before you do, please take some time to read
this Use & Care Information. Whether you are
a beginning cook or an expert chef, it will be
to your benefit to familiarize yourself with the
safety practices, features, operation and care
recommendations of the Wolf dual fuel range.
If the information in this book is
not followed exactly, a fire or
explosion may result, causing
property damage, personal injury
or death.
IMPORTANT NOTE:
Installation and service must be
performed by a qualified installer,
vice agency or the gas supplier.
ser
CONTACT
INFORMATION
Wolf Customer
Service:
800-332-9513
Website:
wolfappliance.com
We appreciate your choice of a Wolf Appliance product and welcome any suggestions
or comments you may have. To share your
opinions with us, please call 800-332-9513.
Your Wolf dual fuel range is protected by a
warranty that is one of the finest in the
industry. Take a moment to read the warranty
statement on page 55 and refer to it should
service become necessary.
IMPORTANT NOTE:
rating plate located under the control panel
for type of gas. If this appliance does not
correspond to your type of gas (natural or
LP), contact your Wolf dealer.
Check the appliance
Warranty service must be performed
by a Wolf authorized service center.
Do not store or use gasoline or
other flammable vapors and liquids
in the vicinity of this or any other
appliance.
A ventilation hood is recommended
for use with the Wolf dual fuel range.
WHAT TO DO IF YOU SMELL GAS:
Do not try to light any appliance.
Do not touch any electrical switch.
Do not use any phone in your
building.
Immediately call your gas supplier
from a neighbor’s phone. Follow the
gas supplier’
s instr
uctions.
If you cannot reach your gas
supplier
, call the fire department.
DO NOT place any cookwar
e on
oven floor or use aluminum foil
or other material to line the oven
floor or side walls. Failure to
adhere to this notice will damage
the porcelain and will void your
warranty.
3
Page 4

SAFETY INSTRUCTIONS AND PRECAUTIONS
THE RANGE
IMPORTANT NOTE: Read all
instructions before using this
appliance.
Read this Use & Care Information
carefully before using your new dual
fuel range
electric shock or injury to persons.
Ensure proper installation and serv-
icing. This appliance must be
properly installed and grounded by
a qualified technician.
Have your installer show you where
the fuse or junction box is located in
your home. Learn how and where to
turn off the electricity to the oven.
Do not use aluminum foil to line any
part of the range or oven cavity.
Always use dry pot holders when
removing pans from the oven or
range. Wet or damp pot holders can
cause steam burns. Do not use a
towel or bulky cloth in place of pot
holders.
Do not use the appliance to warm
or heat the room.
Do not repair or replace
the range unless specifically recommended in literature accompanying
this appliance. All service should be
referred to a qualified technician.
to reduce the risk of fire,
any part of
Do not store items of interest to
children above or at the back of the
range, as they could climb on the
appliance to reach items and be
injured.
Do not use water on grease fires.
Smother any flames with a lid,
baking sheet or metal tray. Flaming
grease can be extinguished with
baking soda or a multipurpose
chemical or foam extinguisher.
Do not heat unopened food containers as they could burst and cause
injury.
Do not store combustible, flammable or explosive materials near
burners, oven or adjacent cabinets
or let grease or other flammable
substances accumulate on the range.
ELECTRIC OVEN
DO NOT place any cookware on
oven floor or use aluminum foil
or other material to line the oven
floor or side walls. Failure to
adhere to this notice will damage
the porcelain and will void your
war
ranty.
Never leave the range unattended
when in use.
Do not leave children alone
tended in the area where the range
is in use. Never allow children to sit
or stand on any part of the range.
Do not let children play with the
range or oven.
4
or unat-
Use the oven only for cooking tasks
expected of a home oven as outlined
in this book.
Always properly clean and maintain
the oven as recommended in this
book.
Exercise caution when opening the
oven door.
escape before looking or reaching
into the oven.
Let hot air or steam
Page 5

TOP SURFACE BURNERS
Be sure that the oven cool air intake
(located above the door) and the
oven exhaust vent (located below
the door) are unobstructed at all
times.
Position oven racks in desired locations when the oven is cool. If a rack
must be repositioned after the oven
is already hot, be certain the pot
holder does not contact a hot
heating element in the oven.
Before using the Self-Clean mode,
remove the broiler grill and pan,
oven racks, oven rack guides and
any other utensils.
Clean only those parts listed in this
book.
Cooling fan should be operating
during the Self-Clean mode. If you
notice that the cooling fan is not
operating, contact a Wolf authorized
service center before using SelfClean mode again. Cooling fan will
turn on automatically about 10
minutes after Self-Clean mode is
initiated.
Have your installer show you where
the gas supply shut-off valve is
located in your home. Learn how
and where to turn off the gas to the
range.
Before performing any service, turn
off the gas supply by closing the gas
shut-off valve and turn off the electricity to the oven.
Keep igniters clean and dry for
proper lighting and performance of
the burners.
Keep appliance area clear and free
from combustible material.
In the event that a burner goes out
and gas escapes, open a window or
a door. Wait at least five minutes
before using the unit.
Do not obstruct the flow of air. Your
kitchen must have an adequate
supply of fresh air to ensure proper
combustion and ventilation.
When cooking, set burner controls
so that the flame does not extend
beyond the bottom of the pan.
Do not use commercial oven
cleaners
or oven liner protective
coatings on any part of the oven.
Do not use abrasive or caustic
cleaners or detergents on this appliance as these may cause permanent
damage. Do not use aerosol
cleaners as these may be flammable
or cause corrosion of metal parts.
Do not clean the
because r
gasket
ubbing or moving the
may eliminate the required
oven gasket,
tight door seal.
Do not touch heating elements or
interior sur
faces of oven.
Always turn panhandles inward so
they do not extend over adjacent
work areas, burners or the edge of
the range.
Always check the positions of the
control knobs to make certain the
range or top surface burners are off
when you are finished cooking.
5
Page 6

SAFETY INSTRUCTIONS AND PRECAUTIONS
TOP SURFACE BURNERS
When deep fat frying, be certain that
the pan is large enough to accommodate the desired volume of food
without overflow caused by
bubbling of the fat. Never leave a
deep fat fryer unattended. Avoid
deep fat frying of moist or frostcovered foods, as foods with high
water content may cause spattering
or spilling of the hot fat. Heat fat
slowly, and stir together any combinations of oils and fats prior to
applying heat. Utilize a deep fat
frying thermometer to avoid heating
the fat to temperatures above the
flash point.
Always light each burner prior to
placing a pan on the burner grate.
Also, turn the control knob to the
OFF position before removing a pan
from the burner grate.
Start the ventilation hood approximately five minutes before cooking
on the range or top surface burners;
this establishes an air curtain, and
improves the capture of vapor and
moisture.
Do not cover the burners and grates
with anything except properly
selected utensils. Decorative covers
should not be used.
Wear proper apparel. Never let loose
clothing or other flammable materials come in contact with the burners
while in operation. Fabric may ignite
and cause personal injury.
When using the range, do not touch
the grates, burner caps, burner
bases or any other parts in proximity
to the flame. These components
may be hot enough to cause burns.
Do not clean the range while it is
still hot. If using a damp sponge or
cloth, wait until the range has cooled
sufficiently to prevent steam burns.
Also, some cleaners can produce
harmful or unpleasant fumes if
applied to hot surfaces. Refer to
Care Recommendations on pages
45–47.
Keep any ventilation filters clean to
avoid grease fires.
Always set pans gently onto the
grates and center them so that they
are well balanced.
Do not allow aluminum foil, plastic,
paper or cloth to come in contact
with a hot bur
allow pans to boil dr
ner or grate. Do not
y.
If the range is near a window, do
not use long curtains as a window
treatment, as they could blow over
the range and create a fire hazard.
Boilovers and greasy spills may
smoke or ignite.
Do not stor
other flammable vapors and liquids
in the vicinity of this or any other
appliance.
Choose pans with easily grasped
handles that will stay cool while
cooking. Refer to Cookwar
tion on page 43.
e or use gasoline
e Selec
or
-
6
Page 7

SAFETY PRECAUTIONS
TO REDUCE THE RISK OF INJURY
TO PERSONS IN THE EVENT OF
A RANGE GREASE FIRE,
OBSERVE THE FOLLOWING:
Smother flames with a closefitting lid, baking sheet or other
metal tray; then turn off the gas
burner. Be careful to prevent
burns. If the flames do not go out
immediately, evacuate and call
the fire department.
Do not use water on grease fires.
CALIFORNIA PROPOSITION 65
Burning gas cooking fuel generates some by-products that are
on the list of substances known
to cause cancer or reproductive
harm. To minimize exposure to
these substances, always operate
this unit according to the instructions contained in this book and
provide good ventilation.
Never pick up a flaming pan—
you may be burned.
USE AN EXTINGUISHER ONLY IF:
You know you have a Class ABC
extinguisher
and you already know
how to operate it.
The fire is small and contained in
the area where it started.
The fire department is being called.
You can fight the fire with your back
to an exit
(NFPA Fire Safety Tips).
COMMONWEALTH OF
MASSACHUSETTS
Installations and repairs must be
performed by a qualified or
licensed contractor, plumber or gas
fitter,
qualified or licensed by the
state, province or region where this
appliance is being installed.
Use only gas shut-off valves
approved for use
within the state,
province or region where this
appliance is being installed.
A flexible gas connector, when
used, must not exceed 3' (.9 m).
7
Page 8
WOLF DUAL FUEL RANGE FEATURES
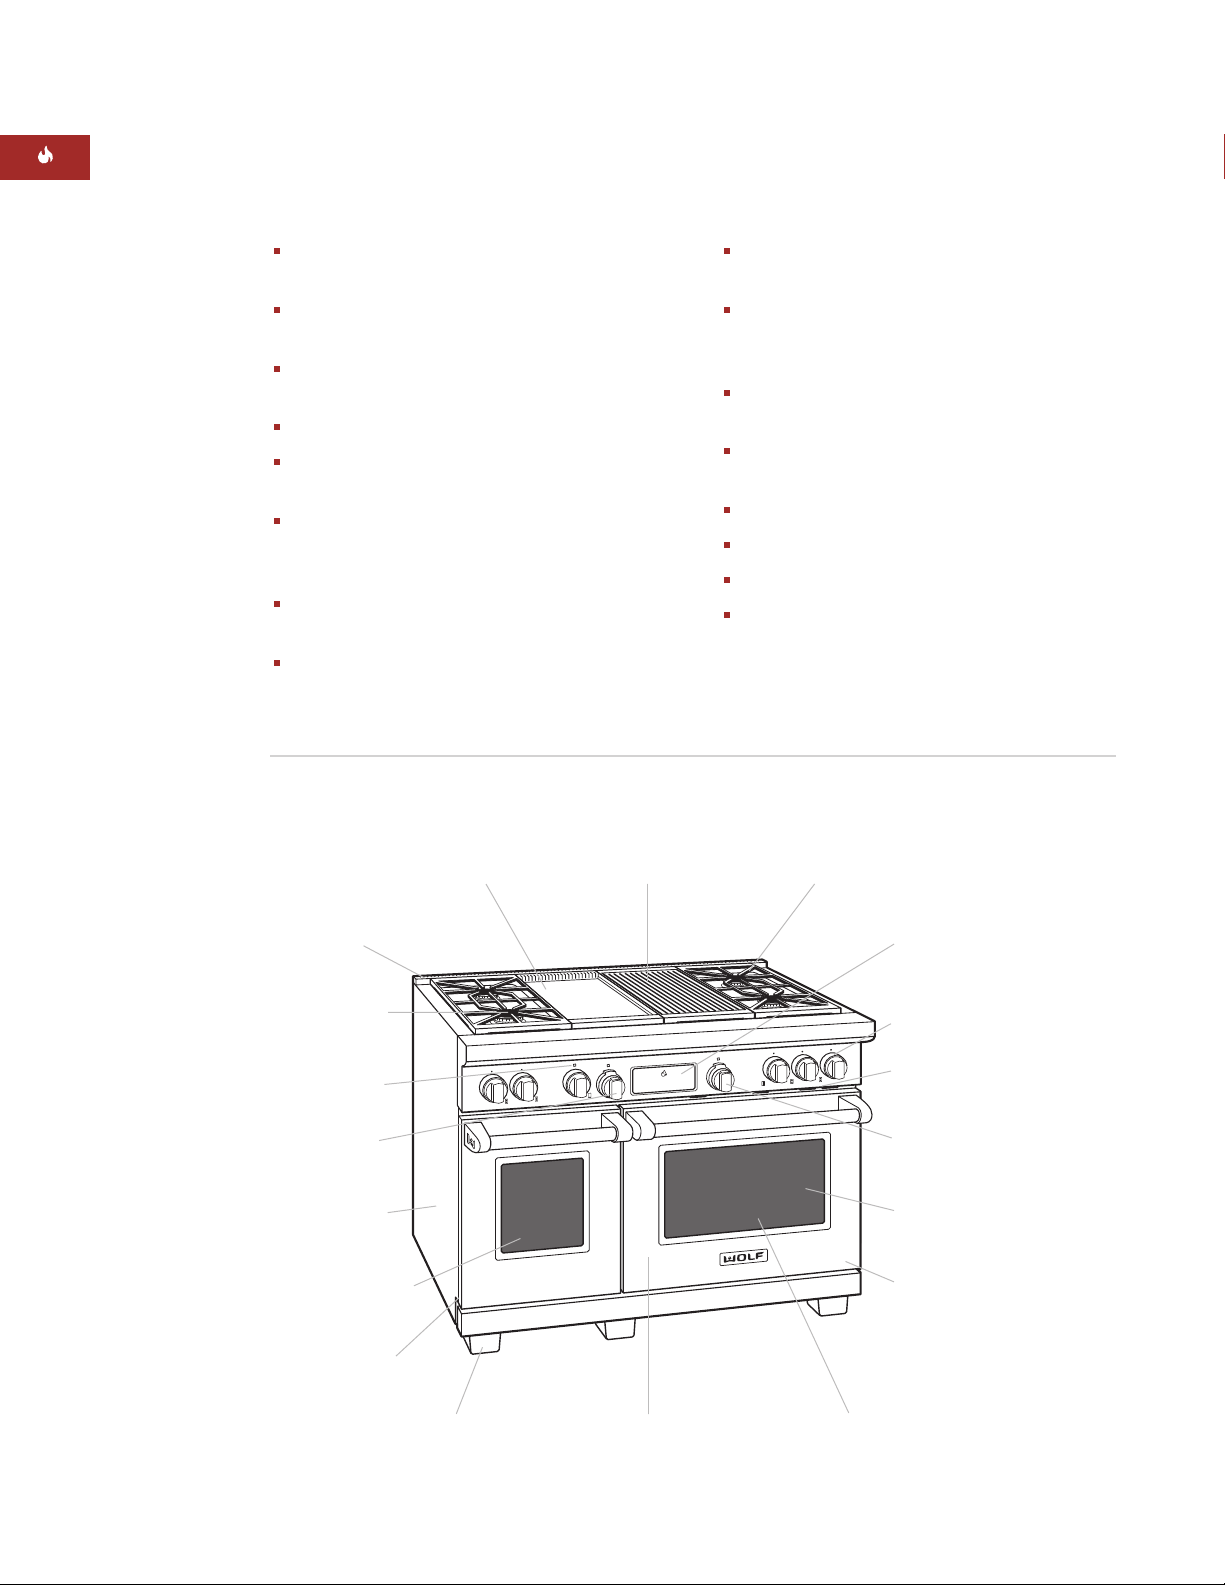
DUAL FUEL RANGE FEATURES
WOLF
WARRANTY
Wolf products are
covered by a two
and five year
residential
warranty (exclusions apply). See
warranty details
at the end of this
guide.
Natural or LP gas rangetop with dual
convection electric oven(s)
18" (457) oven on 48" (1219) range is single
onvection
c
Classic stainless steel exterior finish with
island trim
Distinctive red or black control knobs
Platinum bezels surround all knobs—
chrome or brass bezels optional
Dual-stacked, sealed surface burners, all
with simmer capabilities and automatic
reignition at all settings
15,000 Btu/hr (4.4 kW) burners with 950
Btu/hr (.3 kW) delivered at simmer
9,200 Btu/hr (2.7 kW) burner with 325
Btu/hr (.1 kW) delivered at simmer and melt
feature
DUAL FUEL RANGE
Model DF484CG shown
Optional infrared charbroiler—16,000
Btu/hr (4.7 kW)
Optional infrared griddle or double
riddle—15,000 Btu/hr (4.4 kW) for natural
g
gas and 13,000 Btu/hr (3.8 kW) for LP gas
Optional French Top—15,000 Btu/hr
(4.4 kW)
Porcelain-coated cast iron continuous top
grates
Pivoting, hidden touch control panel
Eight cooking modes
Self-cleaning oven(s)
Coaxial, temperature-displaying oven
selector knob
Stainless steel
island trim
Dual-stacked,
sealed burners
Griddle
indicator light
Coaxial oven
selector knob
Stainless steel
exterior finish
Single convection
oven – 48" (1219)
range only
g/damper
Sprin
door system
Infrared griddle
(optional)
Adjustable fr
ear casters
r
ont legs and
Infrared charbroiler
(optional)
celain oven
Blue por
interiors
Continuous cast
iron top grates
Pivoting, hidden
control panel
Control knobs with
platinum bezels
Location of rating
plate
Coaxial oven
selector knob
Dual halogen
oven lighting
Sprin
door system
Dual convection oven
g/damper
8
Page 9

WOLF DUAL FUEL RANGE FEATURES
DUAL FUEL RANGE ACCESSORIES
Cobalt blue porcelain oven interior
Proof mode for 18" (457) oven on 48" (1219)
range
Temperature probe feature
hree adjustable oven racks with full-exten-
T
sion bottom rack
Hidden bake element and recessed broil
element in oven(s)
Triple-pane oven door window(s) and dual
halogen lighting
Spring/damper door system on oven
door(s)
Adjustable stainless steel legs in front and
adjustable rear casters
CSA certified for US and Canada
Two and five year residential warranty—
exclusions apply—see warranty at the end
of this guide
These optional accessories are available
through your Wolf dealer. To obtain local
ealer information, visit the Locator section of
d
our website, wolfappliance.com.
5" (127) and 10" (254) classic stainless
steel risers
20" (508) classic stainless steel riser with
shelf
Red or black control knobs (must be
ordered with the range)
Bezel accent colors in chrome or brass
Porcelain cast dual wok grate
Porcelain cast dual S-grates
Hardwood cutting board
Additional oven racks
Dehydration accessory
Bake stone accessory
High altitude conversion kit
ACCESSORIES
Optional accessories are available
through your
Wolf dealer. To
obtain local dealer
information, visit
the Locator section
of our website,
wolfappliance.com.
This appliance is certified by Star-K
to meet strict religious regulations in
conjunction with specific instructions
found on www.star-k.org.
VENTILATION OPTIONS
It is recommended that you operate the Wolf
dual fuel range with one of the following Pro
ventilation hoods. Contact your Wolf dealer for
details.
o Wall Hood – 22" (559), 24" (610) or
Pr
27" (686) depths and 30" (762) to 66" (1676)
widths in classic stainless steel.
o Island Hood – 36" (914) to 66" (1676)
Pr
widths in classic stainless steel.
Pro Hood Liner – available in widths to
accommodate 30" (762) to 60" (1524) hood
shells.
All Pro ventilation hoods have welded seams,
sealed halogen lighting and removable, dishwasher-safe stainless steel filters.
Dimensions in parentheses are in
millimeters unless otherwise specified.
9
Page 10
WOLF DUAL FUEL RANGE SURFACE OPERATION
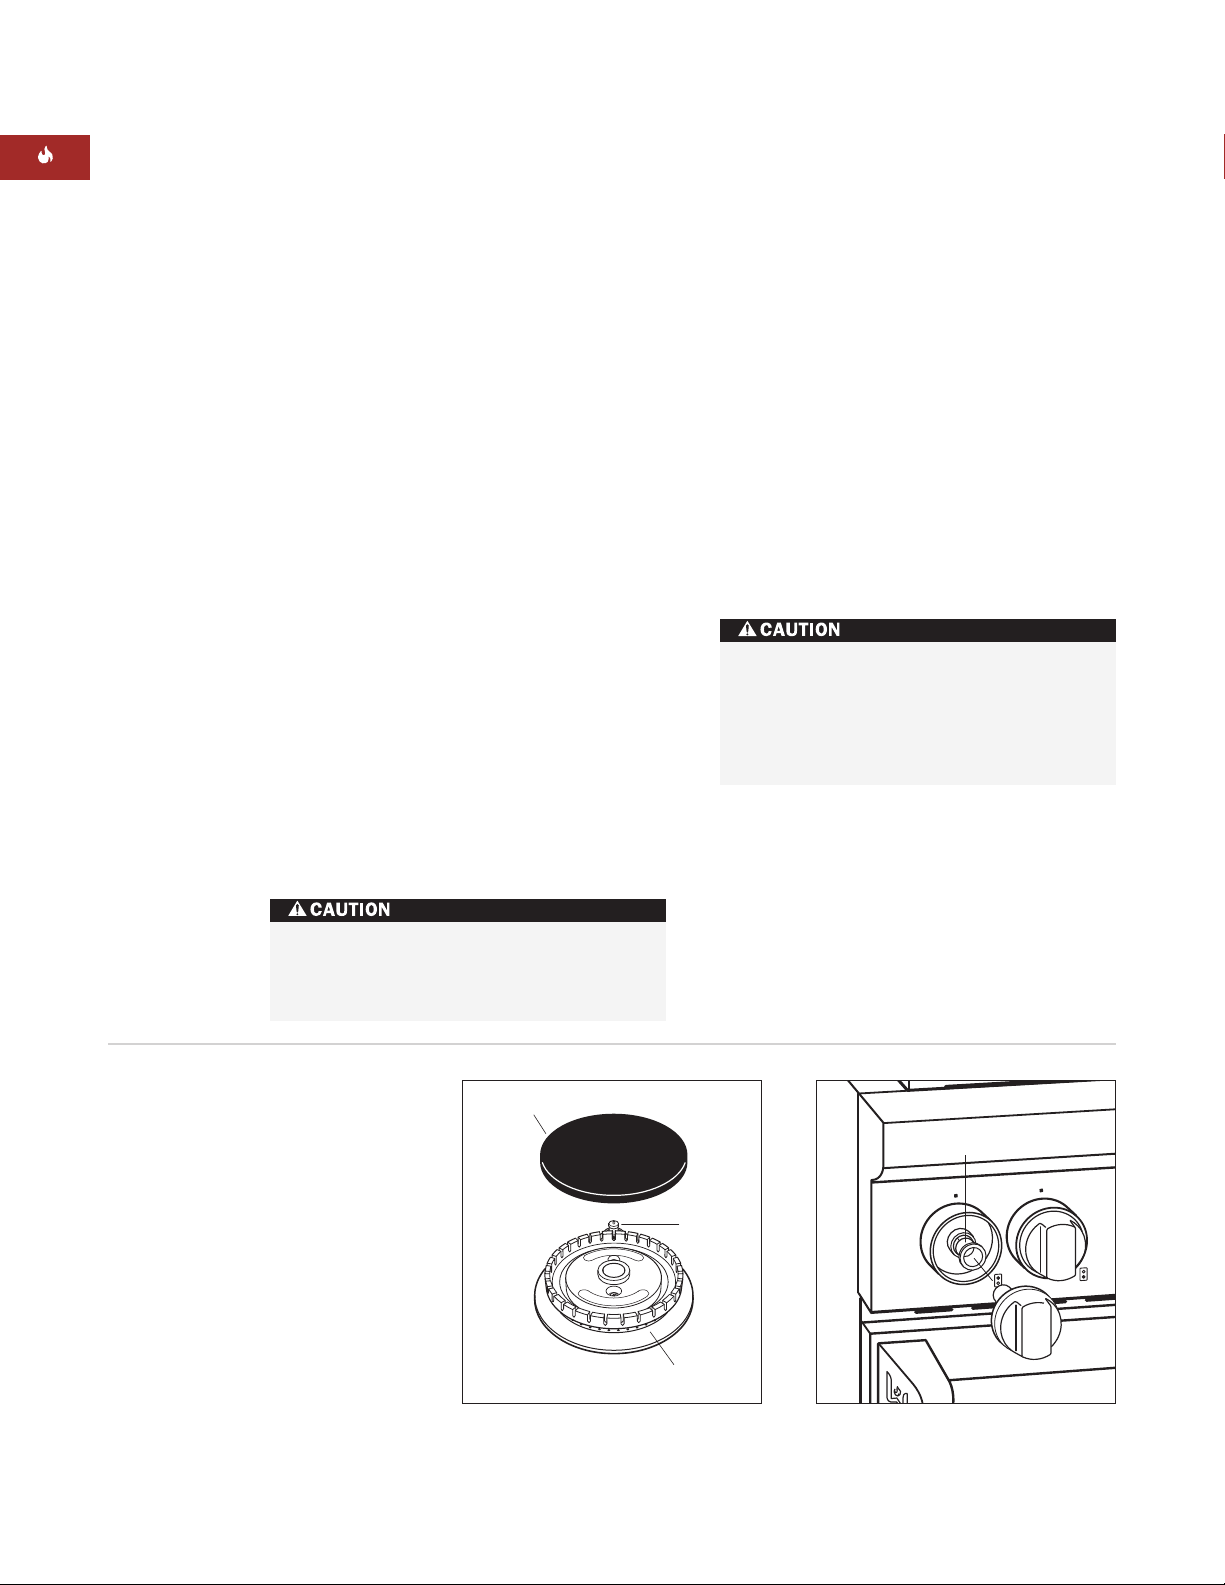
Burner Cap
Igniter
Sealed Burner
Nyliner Insertion
SURFACE BURNERS
A spark electrode ignites each surface burner.
his control eliminates the need for continuous
T
open flame pilots. For added safety and
convenience, each burner is designed with an
lectronic reignition system. This feature
e
enables any burner to relight automatically in
the event it is accidentally extinguished.
Large burners provide a rating of 15,000 Btu/hr
(4.4 kW) on HIGH with 950 Btu/hr (.3 kW) delivered at simmer. The small burner provides a
rating of 9,200 Btu/hr (2.7 kW) on HIGH with
325 Btu/hr (.1 kW) delivered at simmer. All
burners have simmer settings.
A distinguishing feature of Wolf’s low Btu/hr
control is its constant, low heat output without
continuous ignitions. The flame diameter
remains full size; only the heat output is
lowered. This patented dual-stacked burner
design makes it possible to enjoy cooking at
full flame as well as maintain control while
simmering at the lowest flame setting.
In case of a power outage, you can relight the
surface burners manually. Turn the control
knob to HIGH, then use a minimum 6" (152)
igniter to manually light the burner.
DUAL-STACKED BURNER ASSEMBLY
he unique dual-stacked burner design
T
combines all of the burner parts in one
assembly.
After cleaning or removing burner parts for
any reason, it is extremely important that you
reassemble burners correctly.
The burner cap must be seated flatly on the
burner. There is a groove on the bottom of the
burner cap. Adjust the burner cap until it drops
into place and is seated flat on top of the
burner. Failure to do this will result in a poor
flame. Refer to the illustration below.
Failure to position the burner parts
correctly could cause flames or gas to
escape, causing heat damage to your
range, or burn between parts, resulting
in poor combustion.
10
Manually relight each burner individually.
Do not try to manually relight the French
Top, charbroiler or griddle.
Dual-stacked burner assembly
Nyliner insertion
Page 11

WOLF DUAL FUEL RANGE SURFACE OPERATION
CONTROL KNOBS
The control knobs are positioned to correspond to the burners they regulate. The knobs
n the far left regulate the burners on the left
o
side. Conversely, the knobs on the far right
regulate the burners on the right side.
The precision fit of the control knobs requires
he use of a nyliner insertion between the knob
t
and bezel. When removing knobs for cleaning,
place the bearing back inside the bezel for easy
reinstallation of the knobs. Refer to the illustration on page 10.
To light a burner:
push in and turn the corresponding control knob counterclockwise to
HIGH setting. You will hear a clicking sound
and see the burner ignite. Once the burner is
lit, continue turning the knob counterclockwise
to any one of the settings – HIGH through
LOW.
To select a SIMMER setting:
turn the burner
knob to the LOW setting; you will feel a stop
detent in the knob rotation. Push in on the
knob, continuing to turn it counterclockwise.
This moves the flame to the second tier. Now,
select any variation within the SIMMER flame
settings – HIGH through LOW.
Each knob is designed to be a ”push-to-turn”
knob. Although this is a child-safe design,
children should never be left unattended in the
kitchen when the range is in use.
TEMPERATURE SETTING GUIDE
SETTING USES
OW Simmer
L
9,200 Btu/hr (2.7 kW) Melting butter
HIGH Simmer
LOW to MEDIUM Heat
MEDIUM to HIGH Heat
HIGH Heat
15,000 Btu/hr (4.4 kW) Heating broth soups, stocks
elting, holding chocolate
M
Heating, holding delicate sauces
Warming foods
Melting large quantities
Simmering sauces
Steaming rice
Frying eggs
Heating milk, cream sauces and
soups, gravies and puddings
Panfrying
Simmering large quantities
Boiling vegetables in water
Sautéing
Browning
Braising
Fast boiling large quantities
Quick frying
Boiling water
Deep fat frying (to heat oil only)
Never leave pans on a HIGH setting unat
tended. Be par
cooking food in fat or grease. It can
become hot enough to ignite.
Dimensions in parentheses are in
millimeters unless otherwise specified.
ticularly cautious when
-
11
Page 12

WOLF DUAL FUEL RANGE SURFACE OPERATION
FLAME HEIGHT AND APPEARANCE
Select a flame that is just high enough to
maintain the desired cooking speed and is
ized to fit the base diameter of the pan. Never
s
extend the flame beyond the base of the pan.
Smaller diameter pans should be used on the
eft rear burner.
l
he flame on natural gas should be blue with a
T
deeper blue core. There should be minimal
trace of a yellow flame. A yellow flame indicates an improper mixture of air and gas or
impurities in the gas supply to the range. If
this occurs consistently, call a Wolf authorized
service center to adjust the mixture. With LP
gas, some yellow tipping to the flame is
acceptable and may not require an adjustment.
A ”popping” sound may be noticed with LP
gas when the surface burner is turned off. This
is normal.
GRATE PLACEMENT
The low profile, cast iron grates are designed
for a close fit. This enables you to move pans
easily from one burner to another without
having to lift the pan or have it tip over
between the grates. Each grate sets securely
on dimples on each corner of the burner pan.
BEFORE USING YOUR RANGE
Before using for the first time, you should
clean your dual fuel range thoroughly with hot
ater and a mild detergent. Rinse and dry with
w
a soft cloth. This removes any residual oil and
grease left on the surface from the manufac-
uring process. Refer to Care Recommenda-
t
tions on pages 45–47.
IMPORTANT NOTE:
Before using your dual
fuel range, check that the surface burner caps
are positioned correctly.
The optional griddle and French Top needs to
go through a ”burn in” period to clean oils
from the bottom of these assemblies. To
prevent food from sticking and to protect the
surface from moisture, it is necessary to
season the griddle and French Top prior to use.
Refer to the following pages for specific
instructions on using the optional charbroiler,
griddle and French Top.
The use of proper cookware is very important.
Refer to Cookware Selection on page 43 for
cookware recommendations.
12
Continuous grates are interchangeable, excluding the charbroiler grate with bur
ner grate.
Position the porcelain-coated, cast iron grates
over two burners. Rubber pads located under
the grate support legs will match up with the
dimples on the burner pans.
The drip pan holds as much as 21/2 cups (.6 L)
of liquid spillover per two-bur
ner pan.
Page 13

WOLF DUAL FUEL RANGE SURFACE OPERATION
INFRARED CHARBROILER
This optional feature is designed with an
infrared burner to give the highest quality and
ost efficient method of gas grilling. A radiant
m
plate with numerous holes distributes the heat
evenly over the grate. The burner becomes an
range-red color at the surface of the ceramic
o
tile, and when it glows, it transfers an intense
heat to the food. This sears the outside of the
food, leaving the inside tender and juicy.
The infrared burner is designed to operate at
16,000 Btu/hr (4.7 kW) at 100% full heat output.
Before using the charbroiler for the first time,
place the radiant plate slots over the front
deflector of the charbroiler frame. The edges
of the charbroiler grate should line up on top
of the assembly.
CHARBROILER TIPS
urn on the ventilation hood five minutes
T
prior to using the charbroiler.
If the knob is not set fully at HIGH, the
burner may turn blue and the automatic
igniter will begin sparking. Turn the knob
back to HIGH.
Always select lean meat or trim fat before
grilling. Flaming may occur when grilling
meat and poultry with excessive fat.
To minimize flare-ups when grilling chicken
breasts and thighs, remove the skin. Brush
pieces with peanut oil to reduce sticking to
the grate.
If flare-ups occur, quickly move the food to
another place on the grate with long tongs.
Apply basting sauce halfway through
cooking time.
Use a minute timer as a reminder to turn
the food over halfway through cooking
time.
Leave the charbroiler on for approximately
10 minutes after grilling is complete. This
allows for easier cleaning after the charbroiler has cooled sufficiently.
The suggested grilling times in the
Charbroiler Grilling Guide on page 15 are
oximate. Actual
appr
times depend on the
quantity, thickness and starting temperature
of the food.
To prevent flare-ups, you must never
leave the charbroiler unattended during
use.
Dimensions in parentheses are in
millimeters unless otherwise specified.
13
Page 14
WOLF DUAL FUEL RANGE SURFACE OPERATION
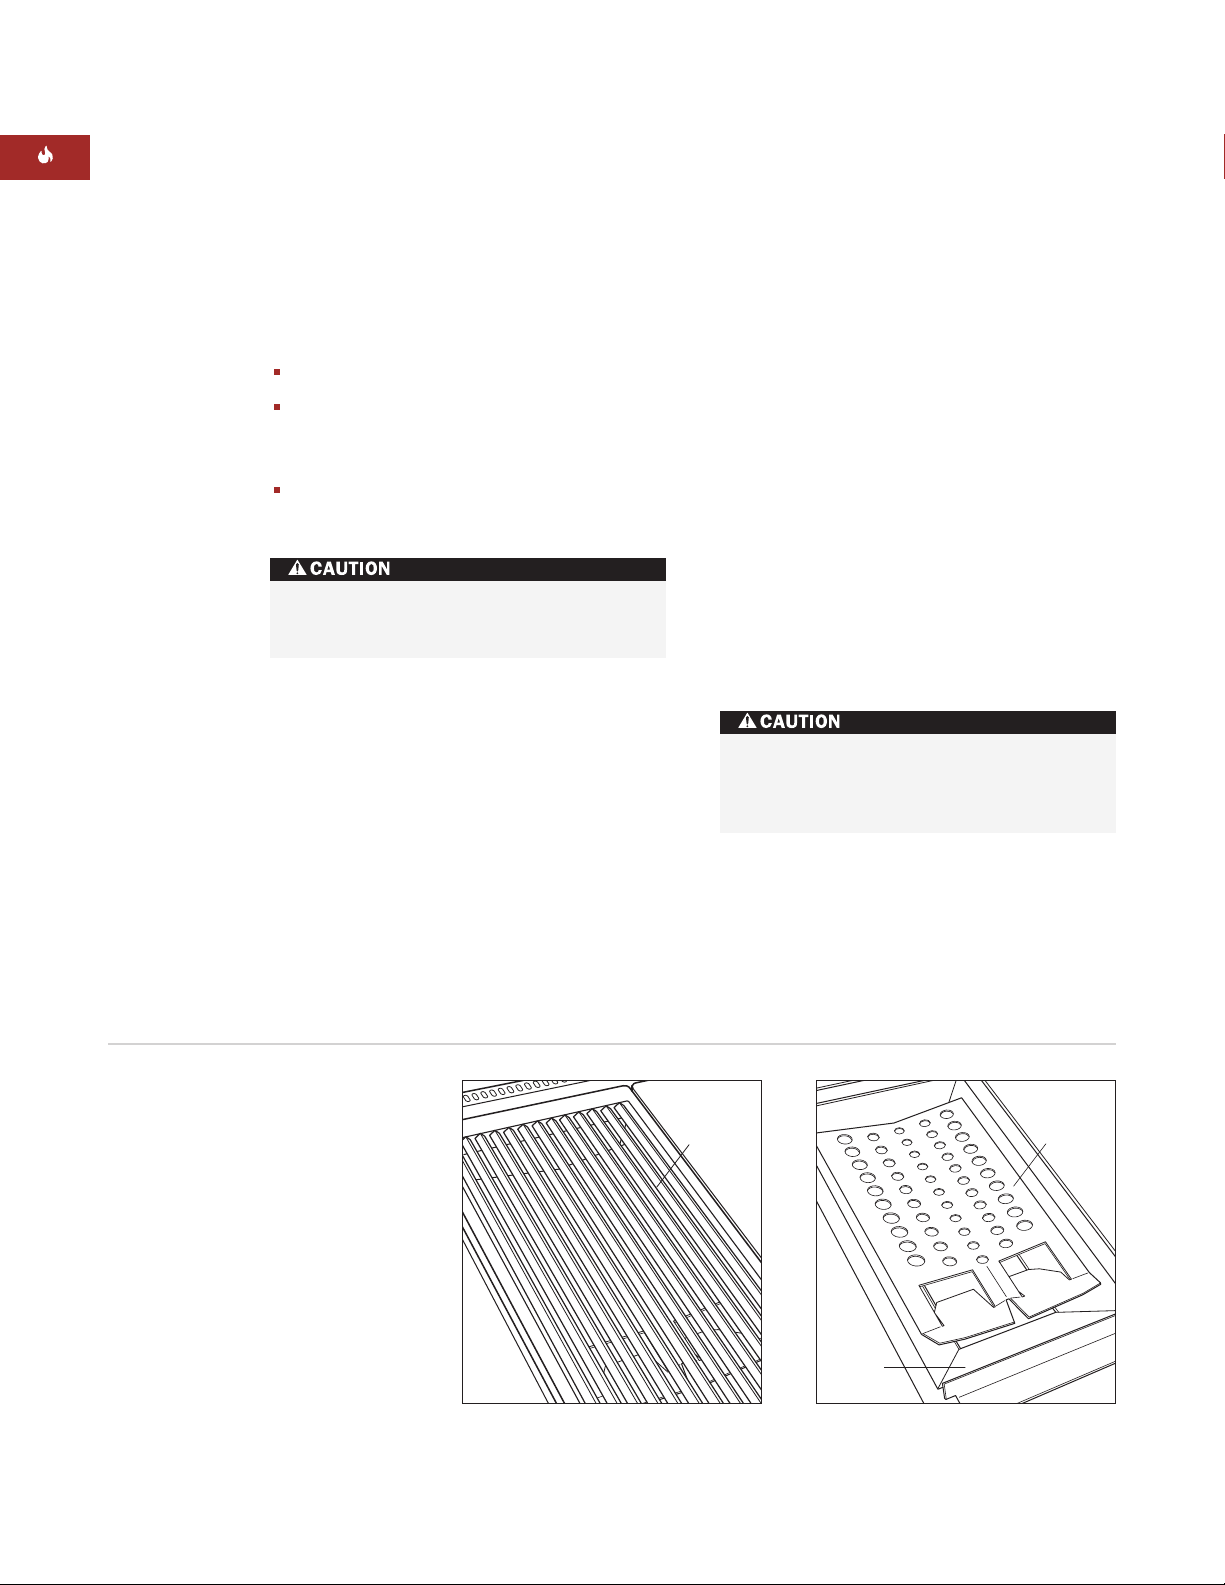
Radiant
Plate
Front
Angle
Charbroiler
Grate
INFRARED CHARBROILER
CHARBROILER OPERATION
MPORTANT NOTE: The stainless steel cover
I
must be removed prior to operation of the
charbroiler.
Turn the knob counterclockwise to HIGH.
reheat charbroiler for about 10 minutes
P
before adding the food. The ceramic tiles
will have an orange-red glow.
To turn the charbroiler off, turn the control
knob clockwise to the OFF position.
Do not use cookware on the charbroiler
grate.
CHARBROILER ASSEMBLY
ollow these steps to disassemble the
F
charbroiler for cleaning:
1)
Remove the charbroiler grate. Refer to the
illustration below.
emove the radiant plate. Refer to the
2)R
illustration below.
3)
Remove the charbroiler frame.
4)
After cleaning, put the charbroiler frame
back in place.
5)
Line up the slots in the front of the radiant
plate with the front angle. The slots should
fit over the front angle and sit flat on the
charbroiler frame.
6)
Reinstall the charbroiler grate.
Be careful when assembling the components. Avoid any contact with the igniter;
it is fragile and can chip or break.
14
Charbroiler grate
Charbroiler radiant plate
Page 15

WOLF DUAL FUEL RANGE SURFACE OPERATION
INFRARED CHARBROILER
CHARBROILER CARE
o keep the charbroiler looking its best, it is
T
recommended that you clean it after every use.
Charbroiler Grate
(porcelain-coated cast
iron): When cool, lift off and set in the sink.
Use a soft bristle brush to remove food
particles from the grate. Pour very hot
water over the cooked-on residue. Cover
with wet dish towels and pour more hot
water over it. Allow the hot, moist conditions to help loosen the residue. Remove
remaining soil with a soap-filled scouring
pad. Rinse and dry.
Charbroiler Frame
(stainless steel):
Remove from the range. Soak in hot water
and dish detergent. Wash thoroughly,
scrubbing with scouring pad, if needed.
Igniter
(ceramic): Avoid contact with the
igniter; it is fragile and can chip or break.
IMPORTANT NOTE:
Do not use any commercial cleaners on any part of the charbroiler
assembly.
Allow the charbroiler surface to cool
sufficiently before cleaning.
CHARBROILER GRILLING GUIDE
FOOD GRILLING TIME
eef
B
Ground beef patties,
1
/4 lb (.1 kg), 1/2" (13) thick 9–10 min (medium well)
1
teaks,
S
/2"
3
–
(13-19) thick 11–13 min (rare)
/4"
14–16 min (medium)
17–18 min (well done)
Chicken
Breasts, boneless and skinless,
1
/2" (13) thick
12–13 min
Breasts, bone in 30–35 min
Thighs, boneless and skinless 25–30 min
Ham
Ham slice, 1/2" (13) thick 4 min
Seafood
Shrimp, 16–20 per 1 lb (.5 kg) 10–12 min
Fresh Vegetables
Bell peppers, whole 20 min
Corn on the cob, husked 20–25 min
Corn on the cob, in the husk 30–35 min
Mushrooms 6 min
Dimensions in parentheses are in
millimeters unless otherwise specified.
Refer to the W
olf Cooking Guide on pages 4
8–51 for additional information.
15
Page 16

WOLF DUAL FUEL RANGE SURFACE OPERATION
INFRARED GRIDDLE
The infrared griddle operates at 15,000 Btu/hr
(4.4 kW) for natural gas and 13,000 Btu/hr
3.8 kW) for LP gas. It is thermostatically
(
controlled, which means once the set temperature is reached, the heat cycles to hold that
emperature. To prevent food from sticking and
t
to protect the surface from moisture, it is
necessary to season the griddle prior to use.
This seasoning process as well as general use
will change the appearance of the griddle.
SEASON THE GRIDDLE
Clean the surface with hot water and a mild
detergent. Rinse and dry.
Turn on the ventilation hood five minutes
prior to using the griddle.
The griddle needs to go through a ”burn
in” period. Turn the griddle on at 350˚F
(175˚C) for 30 minutes to clean oils from the
bottom of the griddle. After 30 minutes,
turn the griddle off and allow it to cool.
To season, pour 1 teaspoon (5 ml) of
peanut or vegetable oil per single griddle in
the center; spread evenly with a paper
towel, avoiding the corners. Be careful not
to apply too much oil. Excess oil will leave
a gummy residue that will have to be
removed.
GRIDDLE OPERATION
MPORTANT NOTE:The stainless steel cover
I
must be removed prior to operation of the
griddle.
Turn on the ventilation hood five minutes
prior to using the griddle.
To heat the griddle, push in the control
knob and turn counterclockwise to the
desired temperature. It is normal to hear a
clicking sound. This is the electronic
ignition lighting the burner. When the
burner is lit, the thermostat will control the
temperature.
When the griddle is preheated, the griddle
indicator light will go out. The light will
cycle on and off as the thermostat requires
more heat to maintain the set temperature.
This will allow heat to be evenly distributed
and the griddle to maintain the set
temperature.
The double griddle has two burners with
separate control knobs that act independently of each other. If only one griddle is
being used, there will be some heat transfer
to the inactive griddle.
To turn the griddle off, turn the control knob
clockwise to the OFF position.
16
Push and turn the control knob to 350˚F
(175˚C). Heat until you see the first signs of
When the
smoke. Tur
n the griddle OFF
.
griddle has cooled and is only slightly
m, wipe off any excess oil. Let the
war
griddle cool completely.
Repeat with another teaspoon of oil. The
brown appearance will darken with use.
Be particularly cautious when cooking
food high in fat. It can become hot
enough to ignite.
Page 17

WOLF DUAL FUEL RANGE SURFACE OPERATION
INFRARED GRIDDLE
GRIDDLE CARE
sing a metal spatula, scrape grease into
U
the grease collection tray.
When the surface has cooled, wipe it with a
paper towel to remove excess grease or oil.
crape the griddle clean. Pour
S
1
/2 c
up (.1 L)
warm water and 1 teaspoon (5 ml) griddle
cleaner onto the griddle and scrape the
grease into the grease collection tray.
Empty the grease collection tray. Rinse the
1
griddle with
/2 cup (.1 L) warm water and
dry with paper towels.
Reapply a small amount of peanut or
vegetable oil to the griddle with a clean
cloth after each cleaning.
Clean the grease collection tray after each
use. Do not allow grease to accumulate in
the tray and become a fire hazard.
To remove the grease collection tray, gently
pull the tray toward you to lift it out. Clean
the tray with soapy water and a clean cloth.
To replace, slide the short edge of the
grease collection tray under the edge of the
griddle and lower into the opening.
GRIDDLE COOKING GUIDE
TEMPERATURE FOOD
00˚F (95˚C)
2
250˚F (120˚C)
350˚F (175˚C)
375˚F (190˚C)
400˚F (205˚C)
Refer to the Wolf Cooking Guide on pages 48–51 for additional information.
old cooked food at serving
H
temperature
Eggs
French toast, pancakes, grilled
sandwiches
Bacon, pork chops, lamb steaks,
sausage, flattened boneless chicken
Vegetables, sliced or grated
Occasionally remove the seasoning, clean
the griddle thoroughly and reapply. To
remove, add either white vinegar and water
or club soda to a slightly war
m surface.
Scrub with a fine wire brush or a fine-grit
griddle brick. Repeat application if necessary. Be certain to apply a light coat of oil
after cleaning for seasoning.
Allow the griddle surface to cool sufficiently before cleaning.
Dimensions in parentheses are in
millimeters unless otherwise specified.
17
Page 18
WOLF DUAL FUEL RANGE SURFACE OPERATION
HIGH
HIGH
HIGH
LOW
LOW
LOW
LOW
MED MED
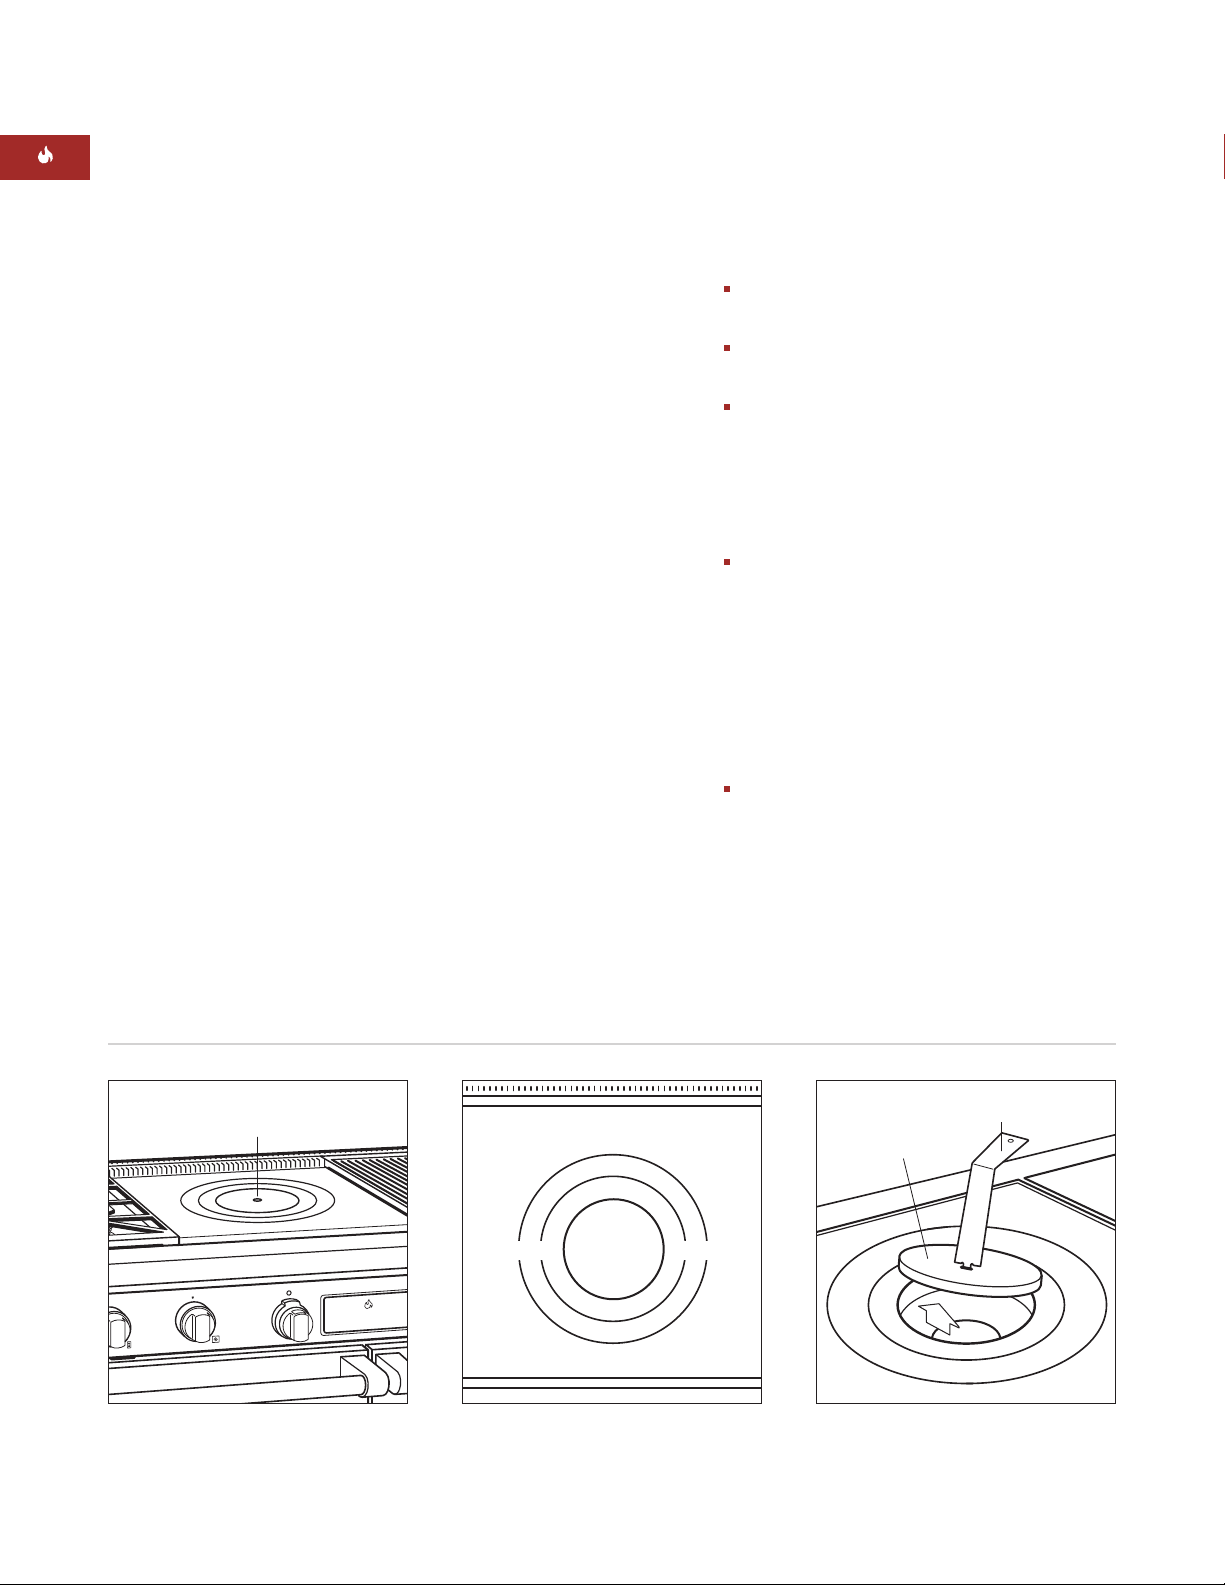
Center Plate Hook
Center Plate
French To p
Center Plate
FRENCH TOP
The 15,000 Btu/hr (4.4 kW) French Top is an
optional feature that provides a 22" (559)
ooking surface with the hottest temperature
c
under the center plate and the lowest temperature near the edges. This design makes it
ossible to use several pans at once for a
p
variety of cooking tasks. For example, fry
chicken toward the center, while simmering a
sauce in one corner and keeping vegetables
warm in a different corner. Place the pan or
pans toward the edge according to their
contents and quantity. Refer to the illustrations
below.
The cooking surface is made of polished cast
iron that is an excellent heat conductor. The
several rings allow for the solid surface to
expand with the heat while remaining flat. The
rings also provide thermal breaks in the cast
iron that distribute the heat in a graduated
intensity, hottest in the center and coolest
around the edges.
To protect the cast iron surface from moisture,
it is necessary to season the French Top prior
to use. This seasoning process as well as
general use will change the appearance of the
French Top.
SEASON THE FRENCH TOP
lean surface with detergent and warm
C
water. Rinse and dry.
Turn on the ventilation hood five minutes
prior to using the French Top.
he French Top needs to go through a
T
”burn in” period. Turn on the French Top
for 30 minutes to clean oils from the
bottom side of the surface. After 30
minutes, turn the French Top off and allow
it to cool.
To season, spread a light coating of peanut
or vegetable oil on a towel or cloth. While
surface is still slightly warm, apply oil
evenly until it is absorbed into the cast iron.
Use oil sparingly; too much oil will smoke
excessively when heated and leave a
gummy coating that will have to be
removed. Avoid using olive oil, it leaves a
gummy residue.
It is normal for the cast iron to darken with
use to a bluish-black color.
When this seasoning technique is applied
correctly, food spatters will not stain and the
surface will be protected from moisture. Its
appearance darkens with use, a sign that the
French Top has been fully tempered and is
properly seasoned. Regular maintenance will
become easier.
French Top center plate
18
French Top heating zones
French Top center plate removal
Page 19

WOLF DUAL FUEL RANGE SURFACE OPERATION
FRENCH TOP
FRENCH TOP OPERATION
MPORTANT NOTE:The stainless steel cover
I
must be removed prior to operation of the
French Top.
Turn on the ventilation hood five minutes
prior to using the French Top.
Turn the knob to HIGH. You will hear a
clicking sound of the igniter lighting the
burner.
Preheat for 25 to 30 minutes before cooking
on the French Top. This allows the solid
cast iron plate to heat thoroughly.
To raise or lower the cooking heat, slide the
pan either toward (higher heat) or away
from (lower heat) the center plate. This
gives you total control over the most
delicate sauces. It is not necessary to adjust
the flame height.
To turn the French Top off, turn the control
knob clockwise to the OFF position.
FRENCH TOP COOKING TIPS
Always cook in pans. Do not cook food
directly on the surface.
FRENCH TOP CARE
t is best to maintain a seasoned surface to
I
protect the cast iron from moisture.
Clean entire surface after each use while it
is slightly warm. Wipe the surface with a
mild detergent (e.g. Dawn) and water. Rinse
and dry.
Maintain the French Top as you would a
cast iron skillet; keep it free from moisture.
Reapply a light coating of peanut or
vegetable oil to the French Top after each
use until a sheen develops.
Periodically, it may be necessary to strip the
oil and stains from the plate. Apply a small
amount of white vinegar and water to the
surface while it is slightly warm. Repeat
until excess oil has been removed.
The French Top burner is located below the
center plate. The plate remains in place
during cooking but it can be lifted off to
check or service the burner. Use the center
plate hook provided with your range as
shown in the illustration on page 18.
Never remove the center plate when
cooking.
When bringing large amounts of water to a
boil, it is fastest to do it on one of the
regular burners.
Never leave pans on a high heat zone
unattended. Be particularly cautious
when cooking food in fat or grease. It can
become hot enough to ignite.
Dimensions in parentheses are in
millimeters unless otherwise specified.
Allow the French Top surface to cool
sufficiently before cleaning.
19
Page 20
WOLF DUAL FUEL RANGE OVEN OPERATION
OVEN FEATURES
COOKING MODES AND FEATURES
DO NOT place any cookware on oven
floor or use aluminum foil or other
material to line the oven floor or side
walls. Failure to adhere to this notice will
damage the porcelain and will void your
warranty.
Eight cooking modes
, each dedicated to
giving the best results for a specific kind of
cooking. This is the ultimate in oven
performance, fine-tuned for your individual
cooking preferences.
Display window
where time and timed
features of the oven are clearly visible.
Large, easy to see
and read graphics on
the knob and control panel.
Large cooking cavity
increases usable
oven capacity for extra-large baking pans
and oversized turkeys.
Bake element
located beneath the oven
floor makes it easy to access any spillover.
Unique, coaxial oven selector knob(s)
make it easy to set oven temperatures in
different modes.
ake Mode – page 24
B
Bake Stone Mode – page 25
(bake stone accessory required)
Broil Mode – page 27
Roast Mode – page 28
Convection Mode – page 29
Convection Bake Mode – page 30
Convection Broil Mode – page 31
Convection Roast Mode – page 32
Proof Mode and Feature – page 33
Dehydration Feature – page 34
(dehydration rack accessory required)
Delayed Start Feature – page 36
Temperature Probe Feature – page 37
Time Cook Feature – page 37
Sabbath Feature – page 40
Self-Clean Mode – page 41
20
Spring/damper door hinge
system
assures smooth opening and closing of the
heavy door.
Bottom rack can be fully extended
onto
the oven door guides, making it easier and
safer to reach food in a hot oven.
A beeping sound
signals that the oven is
preparing to heat as each mode is dialed on
the oven selector knob.
Most cooking modes
have a temperature
setting span of 170˚F (75˚C) to 550˚F (290˚C),
adjustable by 1˚ increments. The exception
is Broil, Convection Broil, Proof feature and
Convection when using the Dehydration
feature.
Page 21

WOLF DUAL FUEL RANGE OVEN OPERATION
OVEN OPERATION
BEFORE USING FOR THE FIRST TIME
efore using your dual fuel range for the first
B
time, clean thoroughly with hot water and a
mild detergent. Rinse and dry with a soft cloth.
efer to Care Recommendations, pages 45–47.
R
Also, before using the oven(s) for the first
time, set the oven(s) to
CONV ROAST
at 500˚F
(260˚C) for one hour. Refer to page 32 for
Convection Roast mode
instructions. Allow
the oven(s) to cool gradually with the door(s)
closed.
This process will burn off any residual oil and
grease used during the manufacturing process.
A small amount of smoke and odor may be
noticed during the initial break-in period. The
oven door(s) can be opened after the oven(s)
have cooled significantly.
The use of proper cookware is very important.
Refer to Cookware Selection on page 43 for
cookware recommendations.
OVEN PREHEAT
uring preheat the oven is heated in a manner
D
unsuitable for cooking. Preheat should be used
for all cooking modes except
onvection Broil modes.In order not to
C
Broil
and
damage food, preheating will not occur once
the oven reaches its set temperature. Increasing oven temperature during cooking will
result in the oven taking a very long time to
reach the new temperature.
To reach a new temperature quickly, touch
OFF
to exit the current mode. Touch ON, then the
desired cooking mode, and enter a new
temperature of at least 50˚F (10˚C) higher than
the previous operating temperature.
IMPORTANT NOTE:
Preheat times will be
greater when the electrical supply is less
than 240 V AC.
AUTOMATIC TURN OFF
Dual fuel range oven(s) will turn off automatically after 12 hours if the dehydration or
Sabbath feature is not in use.
Dimensions in parentheses are in
millimeters unless otherwise specified.
21
Page 22
WOLF DUAL FUEL RANGE OVEN OPERATION
TIME-OF-DAY CLOCK
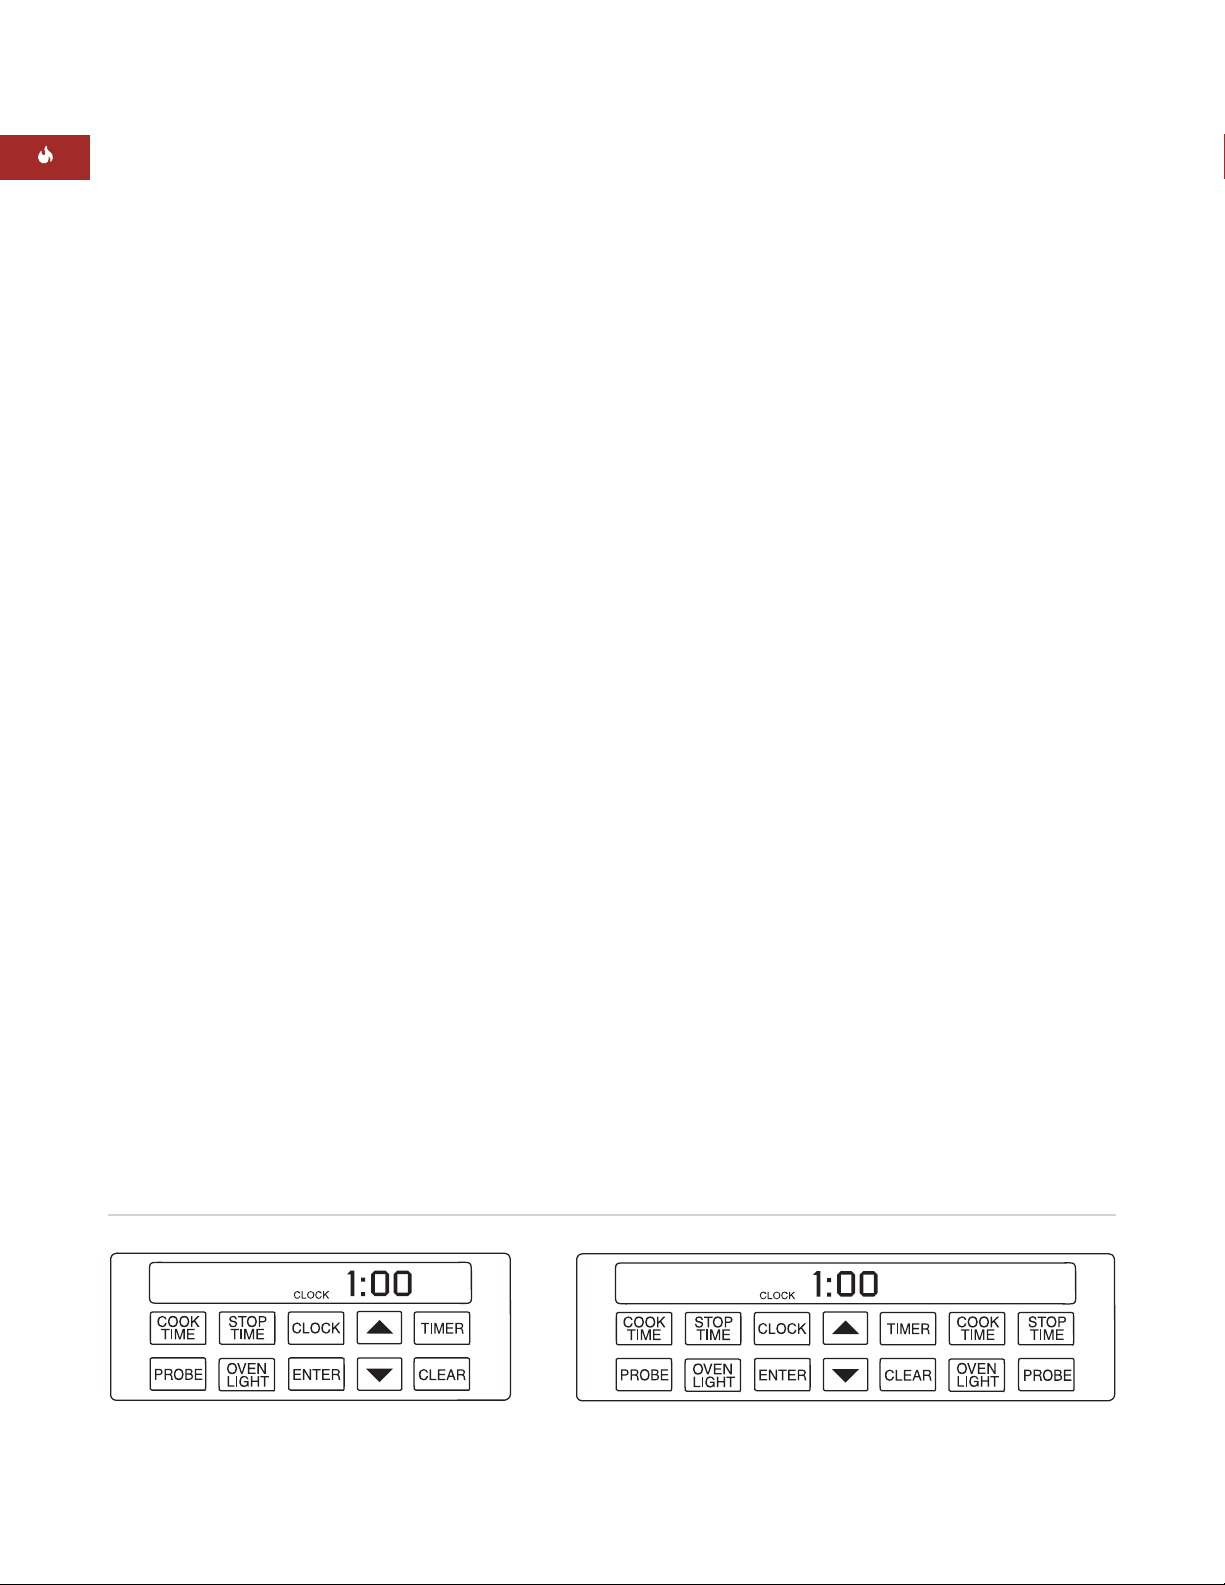
Immediately after the oven is installed, set the
12-hour clock to the current time of day. It
ust be reset after a power failure. The clock
m
is visible on the panel during all modes, except
when timer feature is in use or when the
idden control panel is closed. Refer to the
h
illustrations below.
SETTING CONTROLS
1)
Touch
2)
Touch upor
CLOCK
on the hidden control panel.
down
arrows to increase or
decrease the time. Stop when the correct
time of day is displayed in the control
panel. Time will change from pm to am by
passing the 12:00 mark.
3)
Touch
CLOCK
or
ENTER
to set the clock.
Two beeps will be heard.
CHANGING CLOCK TO 24 HOURS
1)
Touch and hold
CLOCK
on hidden control
panel for 5 seconds.
2)
Touch
CLOCK
to change from 24 hour to 12
hour or vice versa.
3)
Touch
ENTER
or after two seconds the
clock will set by default.
OVEN TIMER
The oven has a Timer that operates independently from the oven controls. Once a time is
et in hours and minutes, the countdown is
s
seen in the display window. Only the last
minute counts down in seconds. The
aximum time that can be set is 9 hours and
m
59 minutes.
An audio signal acts as a reminder when the
amount of time runs out. To stop the signal,
touch
CLEAR
.
SETTING CONTROLS
1)
Touch
2)
Touch upor
TIMER
on the hidden control panel.
down
arrows to increase or
decrease the desired amount of cooking
time in hours and minutes.
3)
Touch
ENTER
or
TIMER
to start timer. Two
beeps will be heard. Oven will chime and
time will flash continually when timing is
complete.
4)
When timing is complete, touch
CLEAR
to
stop signal.
FAHRENHEIT T O CELSIUS
The oven can be changed from Fahrenheit (˚F)
temperature to Celsius (˚C) or vice versa.
SETTING CONTROLS
1)
Touch and hold
control panel for 5 seconds.
ouch
2)
T
3)
Touch
Control panel – single oven models Control panel – double oven models
22
CLOCK
COOK TIME
ENTER
.
on the hidden
to change to ˚F or ˚C.
Page 23
WOLF DUAL FUEL RANGE OVEN OPERATION
6
5
4
3
2
1
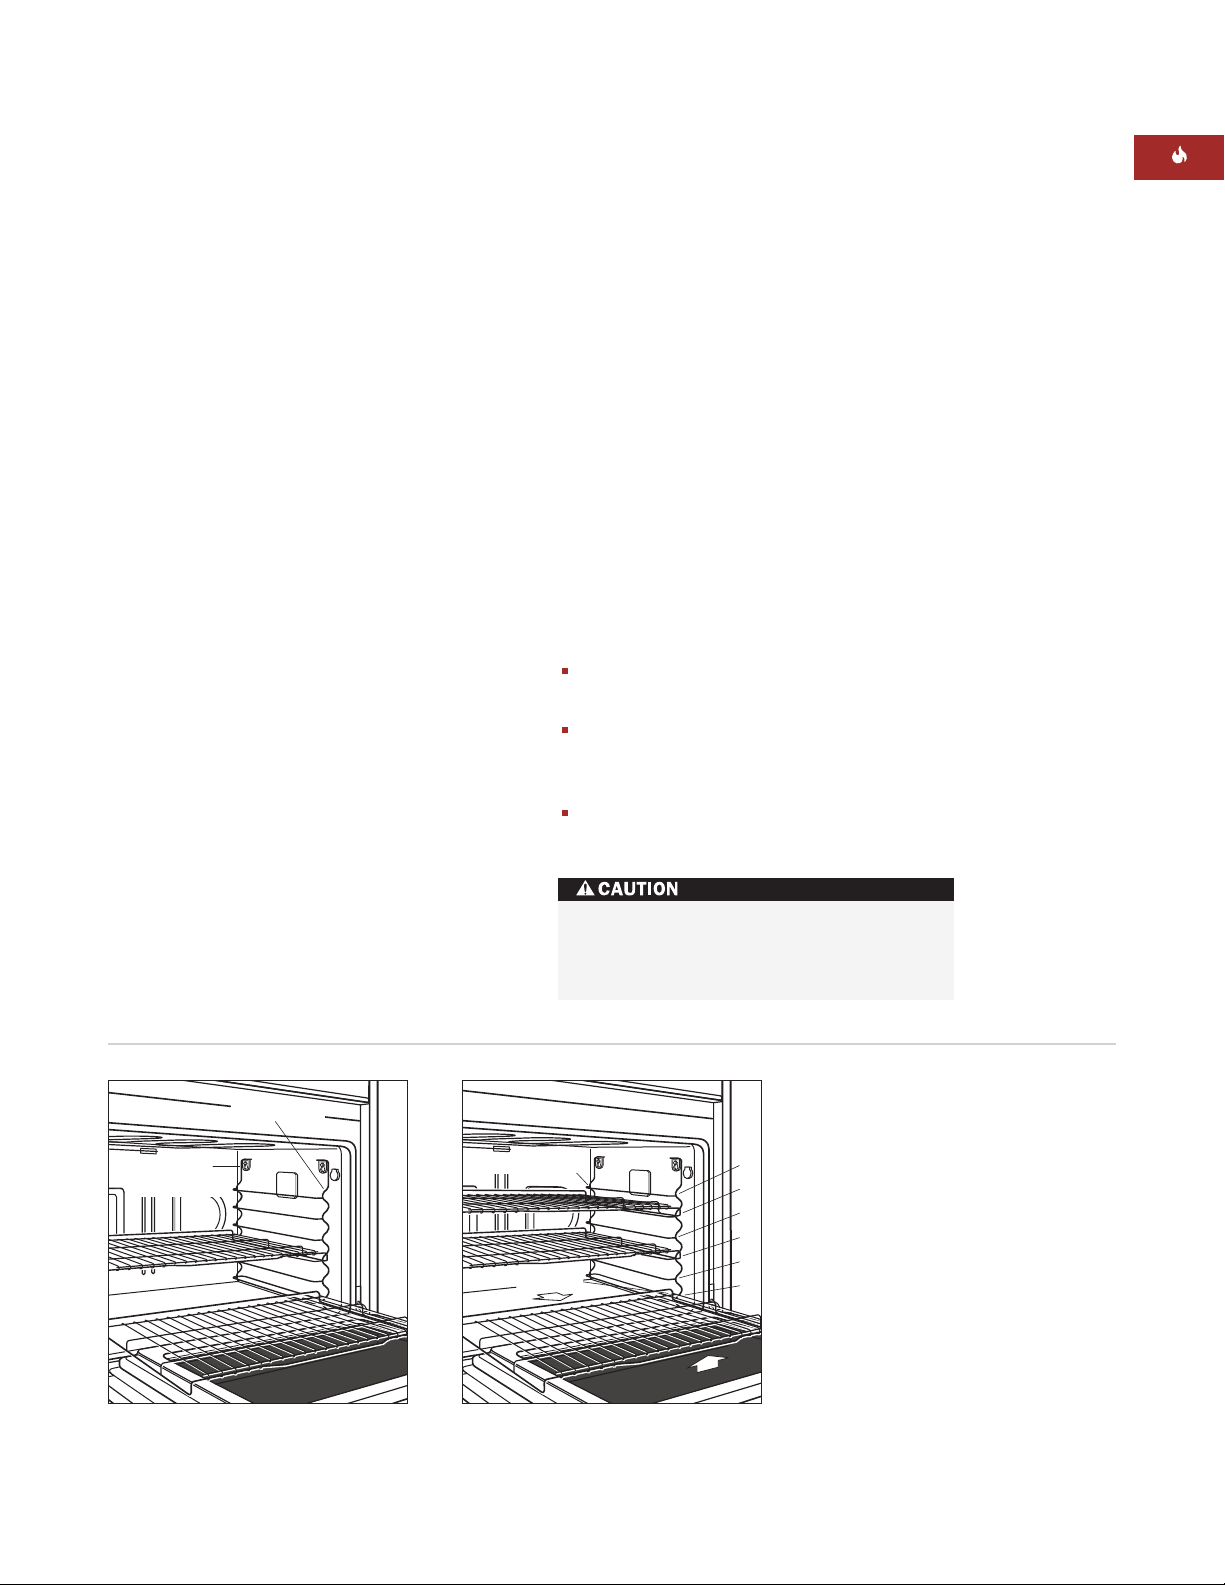
Rack Guide
Anti-Tip Lock
Rack Guide
Mounting Tabs
Rack Guide
OVEN RACKS AND RACK GUIDES
OVEN RACK GUIDES
o insert the rack guides in the oven,locate
T
the screws in the oven side walls. Place the
rack guide mounting tabs over the screw
eads and slide down until the screws are fully
h
seated in the tabs. Refer to the illustration
below.
To remove the rack guides,
pull the rack
guide straight up and then out so that the
mounting tabs clear the screw heads. Remove
the rack guide from the oven.
IMPORTANT NOTE:
and rack guides before using the
. They will discolor if left in the oven
mode
Remove all oven racks
Self-Clean
during this feature.
OVEN RACKS
To insert a rack in the oven,
place the rack
anti-tip lock under the side rack guide rails.
Push the rack toward the back of the oven and
lift up to clear the rack stops. Continue sliding
the rack until it is completely inside the oven.
To remove a rack from the oven,
pull the
rack forward and lift up and out, clearing the
rack stops from the side rack guide rails. Refer
to the illustration below.
The bottom rack of all ovens except the 18"
(457) oven has a full-extension capability. With
he rack in rack guide position 1, slide it into
t
the door guides. Refer to the illustration for
rack guide positions. This adds stability to the
ack when using a heavy pan for large meat
r
and poultry. With the rack fully extended, it is
easier to safely reach the hot food.
OVEN RACK ARRANGEMENT
One of the factors affecting optimum cooking
results is the level of rack placement in the
oven. Rack position 1 is closest to the bottom
and position 6 is closest to the top. The Wolf
Cooking Guide on pages 48–51 reference the
rack positions for optimum results.
When using only one rack, place rack in the
center of the oven.
When using only one rack for roasting
meats, place rack on rack guide position
1, 2 or 3.
When using two or three racks, place at
least one rack position between them.
Use dry pot holders when handling oven
racks. Racks become hot when the oven
is on and hold heat after it is turned off.
Oven rack guide removal
Oven rack guide positions and full
extension bottom rack
23
Page 24
WOLF DUAL FUEL RANGE OVEN OPERATION
B
A
K
E
B
R
O
I
L
R
O
A
S
T
B
R
O
I
L
O
F
F
B
A
K
E
B
R
O
I
L
LO
HI
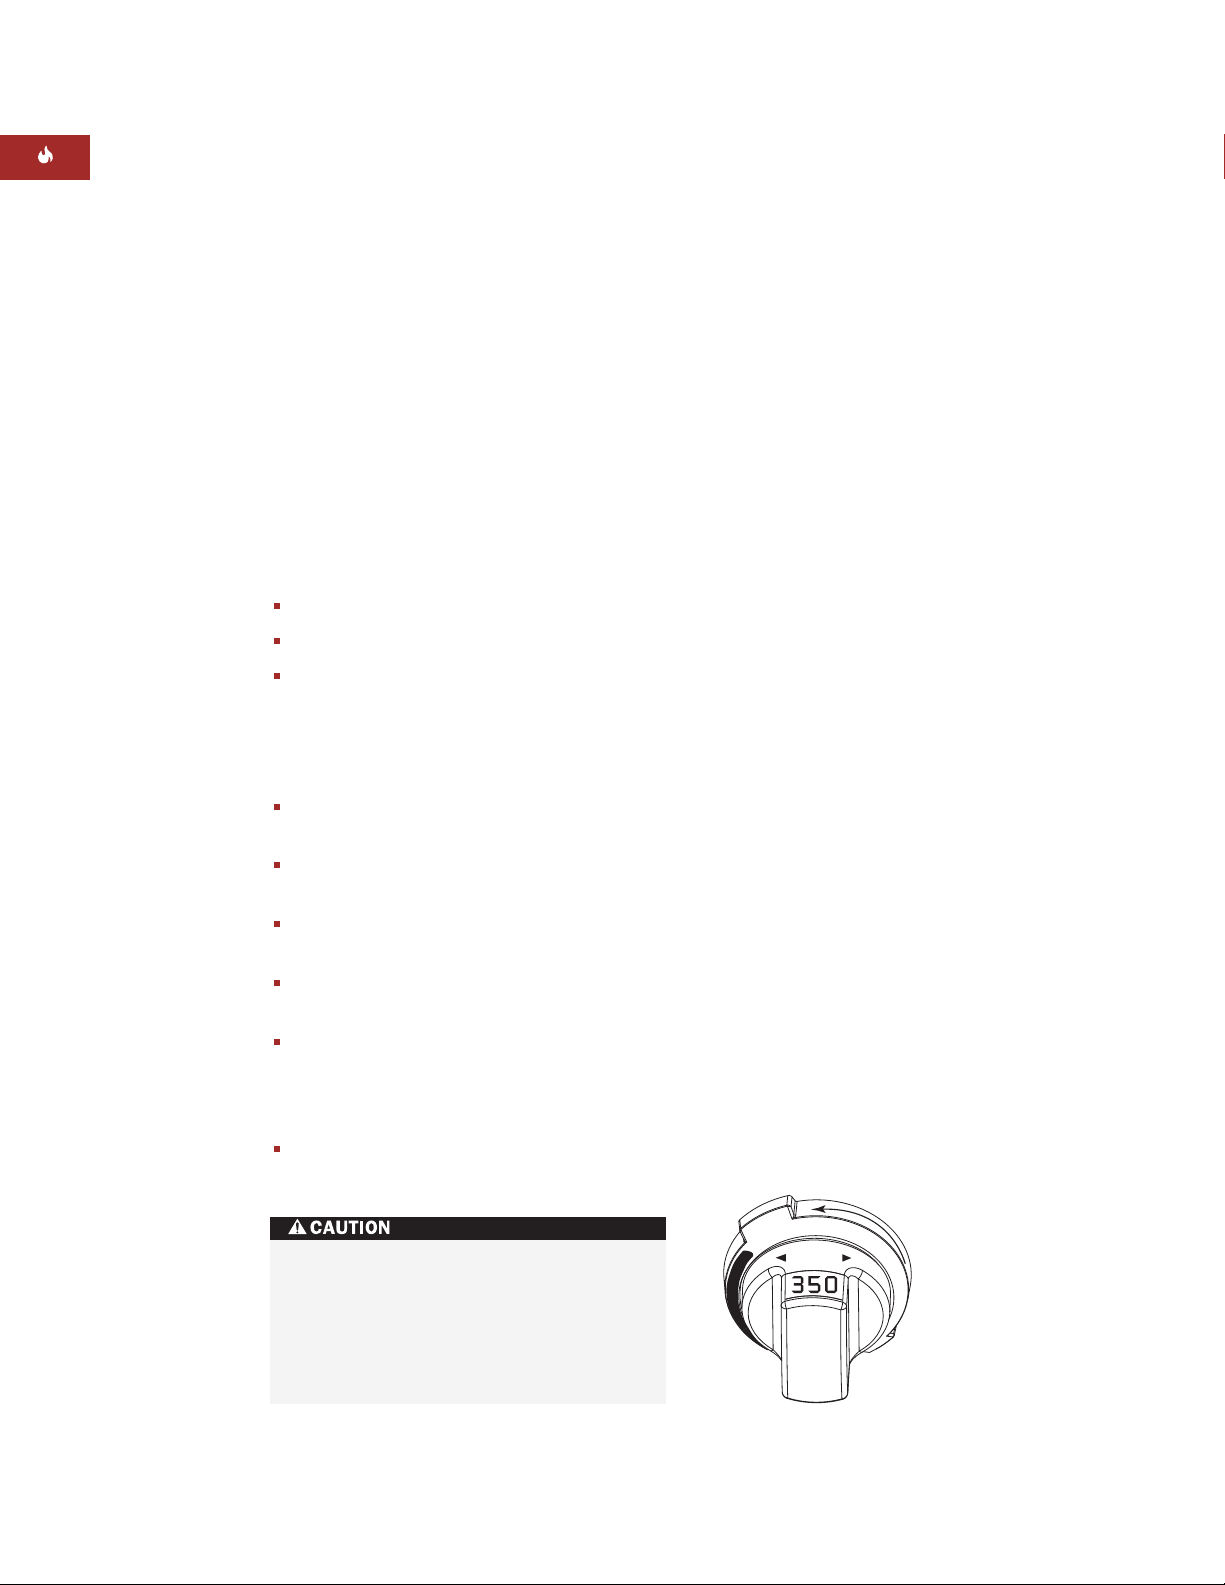
BAKE MODE
How Bake mode works:
Both the hidden bake
element and the broil element are used to heat
he air, and they cycle on and off to maintain
t
temperature. This mode is best for single-rack
cooking, primarily baked foods. Always use
ake modefor your standard recipes. The
B
temperature probe may be used in this mode.
Refer to the Wolf Cooking Guide on pages
48–51. Use cooking times as a guide for other
similar foods.
WOLF TIPS FOR SUCCESS
For Bake mode:
Always preheat for
Bake mode
.
Use only one rack.
A 14" x 16" (356 x 406) baking sheet is an
optimum size for the 30" (762) and 36" (914)
ovens. Optimum size for the 18" (457) oven
is 9" x 13" (229 x 330). Allow at least 1" (25)
between edge of pan and walls of oven.
Size, shape and finish of cookware affects
the baking time.
Food on insulated cookware cooks more
slowly.
Food cooked in dark metal pans may cook
faster than food cooked in shiny pans.
nonstick pan coatings brown more
Dark,
than light,
nonstick
coatings.
Use interior oven light and display window
to check br
owning. Limit door openings to
prevent losing heat and lengthening
cooking time.
Do not cook with a pan on the oven floor or
use aluminum foil to line the oven.
SETTING CONTROLS
or Bake mode:
F
1)
Turn oven selector knob bezel counterclockwise to
BAKE
. Refer to the illustration
below.
ven temperature is preset at 350˚F (175˚C).
2)O
Touch
ENTER
on the hidden control panel
or after two seconds the oven will turn on
by default. Temperature can be adjusted in
1˚ increments.
To change the temperature setting from
350˚F (175˚C), immediately turn the oven
selector knob to the right to increase the
oven temperature or to the left to decrease
the oven temperature. The temperature
display alternates between set temperature
and actual oven temperature. Temperatures
below 150˚F (65˚C) are displayed by the
Lo
word ”
3)
Add food when the chime signals that the
.”
oven has reached preheat temperature.
4)
The temperature probe may be used in this
mode, follow
Temperature Probe feature
directions on pages 37–39.
5)
If the timer is set, the oven will chime when
one minute is left on the timer and will
chime again when cooking time is finished.
If the timer is not clear
ed, it will continue to
chime every 30 seconds.
6)
Remove food. Always use dry pot holders
when r
7)
Turn oven selector knob to
emoving hot pans fr
om the oven.
OFF
to end this
mode.
DO NOT place any cookware on oven
floor or use aluminum foil or other
material to line the oven floor or side
walls. Failure to adhere to this notice will
damage the porcelain and will void your
warranty.
24
Bake mode setting
Page 25
WOLF DUAL FUEL RANGE OVEN OPERATION
S
T
O
N
E
R
O
A
S
T
B
R
O
I
L
C
L
E
A
N
C
O
N
V
R
O
B
A
K
E
LO
HI
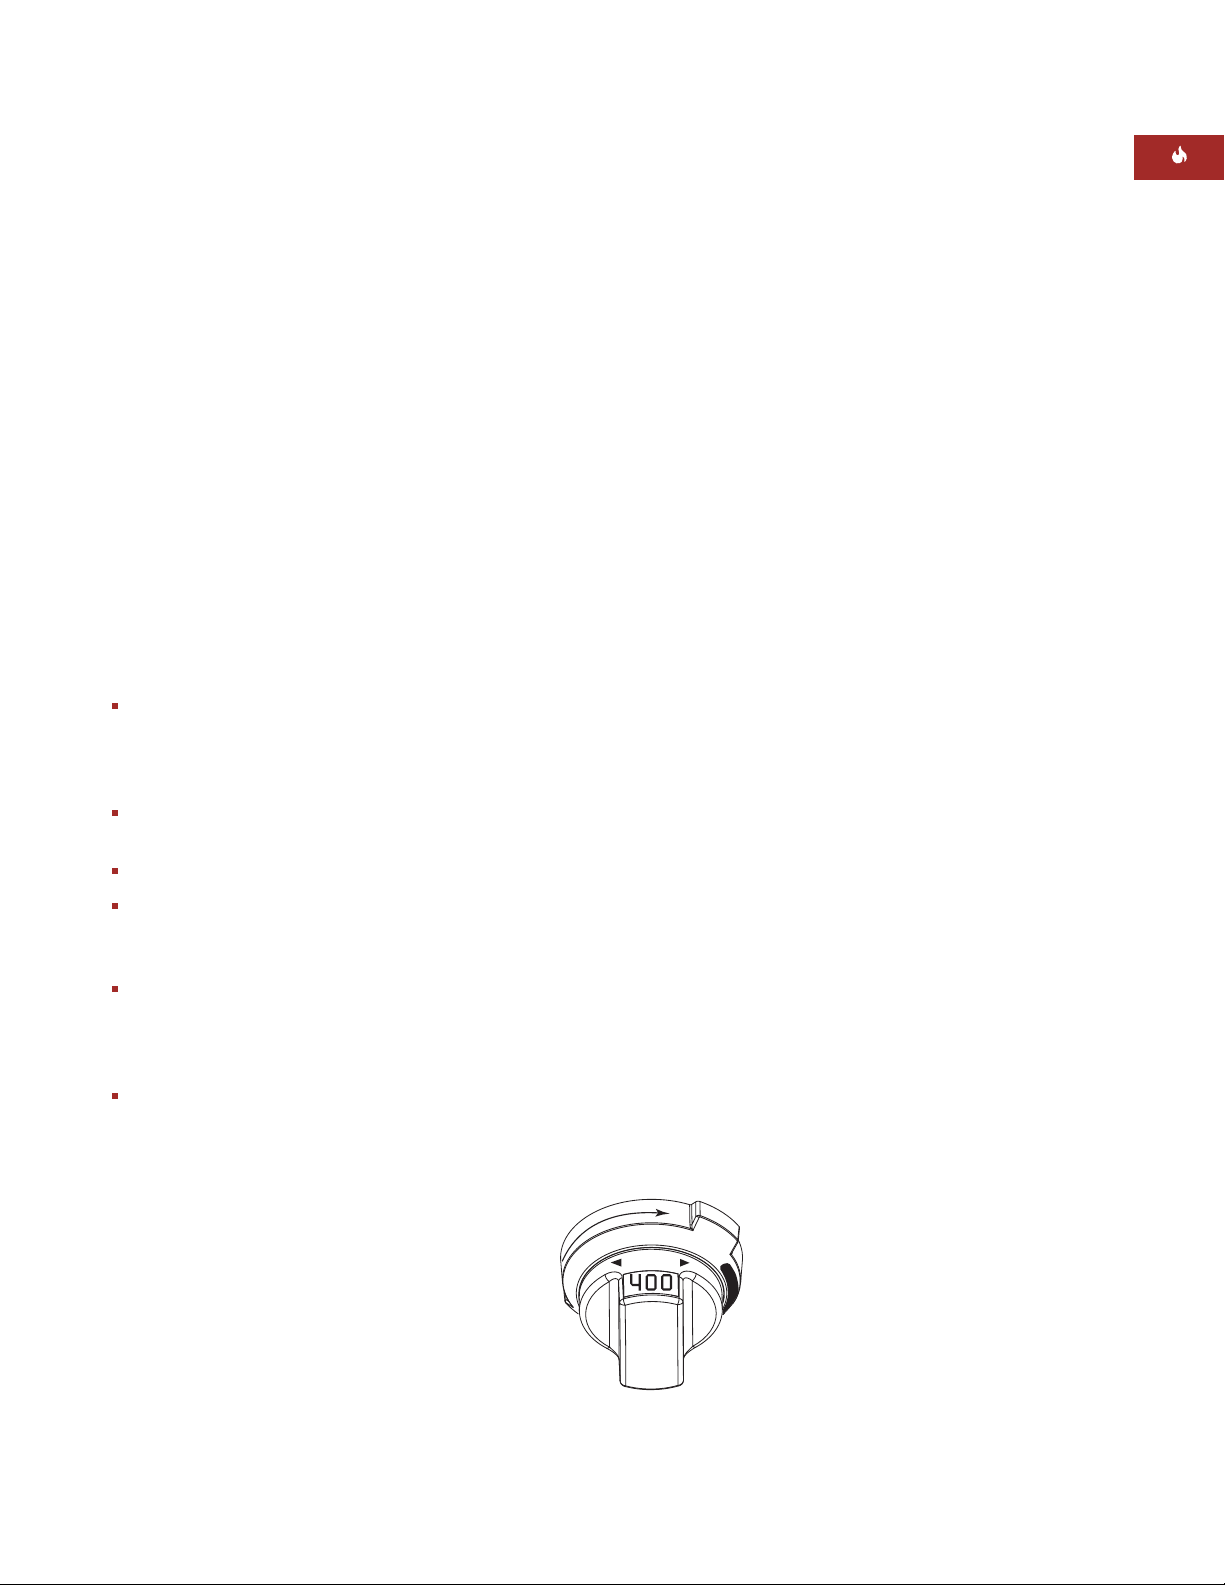
BAKE STONE MODE
1)
How Bake Stone mode works:
A specially
designed rack and bake stone are used for this
ode to assure the food quality expected from
m
this specific form of cooking. To produce a hot
oven environment necessary for baking on a
eramic stone, the heat from all elements
c
creates the perfect “brick oven” effect. Both
convection fans help circulate the air throughout the oven cavity, so even temperatures are
achieved. The temperature probe may be used
in this mode.
Refer to the Wolf Cooking Guide on pages
48–51. Use cooking times as a guide for other
similar foods.
Turn oven selector knob bezel counterclockwise to
b
2)O
Touch
two seconds the oven will turn on by
d
To change the temperature setting from
400˚F (205˚C), immediately turn the oven
selector knob to the right to increase the
oven temperature or to the left to decrease
the oven temperature. The temperature
display alternates between set temperature
and actual oven temperature. Temperatures
below 150˚F (65˚C) are displayed by the
WOLF TIPS FOR SUCCESS
word ”
STONE
. Refer to the illustration
elow.
ven temperature is preset at 400˚F (205˚C).
ENTER
on the control panel or after
efault.
Lo
”.
For Bake Stone mode:
Allow approximately 35 minutes for this
function to reach the set oven temperature.
For best results, preheat oven for one hour
before adding food.
Use only the Wolf bake stone in the
Stone mode
.
Use only one bake stone rack per oven.
Food is usually cooked directly on the
stone. To prevent sticking, apply plenty of
cornmeal or flour to the bottom of the food.
When baking a series of breads or pizzas in
a row, allow five minutes between foods for
the bake stone to return to the proper
temperatur
e.
Bake stone and rack should be removed
after baking and not left in
oven during any
of the other cooking modes.
SETTING CONTROLS
For Bake Stone mode:
Bake
3)
Add food when the chime signals that the
oven has reached preheat temperature.
4)
The temperature probe may be used in this
mode, follow
Temperature Probe feature
directions on pages 37–39.
5)
If the timer is set, the oven will chime when
one minute is left on the timer, and chime
again when cooking time is finished. If the
timer is not cleared, it will continue to
chime every 30 seconds.
6)
Remove food. Always use dry pot holders
when removing hot pans from the oven.
7)
Turn oven selector knob bezel to
OFF
end this mode.
8)
When the oven and bake stone have cooled
completely, remove the bake stone and
special rack.
to
Oven preparation:
Remove all racks from the
oven. Slide the bake stone rack onto rack guide
position 1 and place the bake stone on the rack
with the lip hanging over front edge of rack.
eheat the oven for approximately 35 minutes
Pr
when using
Dimensions in parentheses are in
millimeters unless otherwise specified.
Bake Stone mode
.
Bake Stone mode setting
25
Page 26

WOLF DUAL FUEL RANGE OVEN OPERATION
BAKE STONE MODE
BAKE STONE CARE
ACCESSORIES
Optional accessories are available
through your
Wolf dealer. To
obtain local dealer
information, visit
the Locator section
of our website,
wolfappliance.com.
Avoid cooking foods with a high fat
content on the bake stone. The porous
ceramic material will absorb grease and
discolor the stone. Flare-ups can occur.
BAKE STONE ACCESSORY
The bake stone accessory is available from
your Wolf dealer. To obtain local dealer
mation, visit the Locator section of our
infor
website, wolfappliance.com. Additional
Use & Care Information is provided with the
bake stone accessor
BAKESTONE30
BAKESTONE36
y.
(807143) – 30" (762) oven
(807142) – 36" (914) oven
emove excessive food using a scraper. Brush
R
off any crumbs. Allow the stone to cool
completely before wiping with a wet cloth. Wet
loths on a hot surface can cause steam burns.
c
Do not soak or immerse the bake stone in
water and do not use soap or detergent. The
ceramic stone could absorb the taste and
transmit those flavors to the food.
Stubborn stains may occur on the bake stone.
These will not impair the flavor of the food
being baked.
Allow the bake stone to cool completely before
removing from oven.
IMPORTANT NOTE:
Use care in handling the
bake stone. It will chip or break if dropped.
Allow bake stone to cool completely
before wiping with a wet cloth. Wet
cloths on a hot surface can cause steam
burns.
26
Page 27
B
A
K
E
B
R
O
I
L
R
O
A
S
T
S
T
O
N
E
O
F
F
B
A
K
E
LO
HI
WOLF DUAL FUEL RANGE OVEN OPERATION
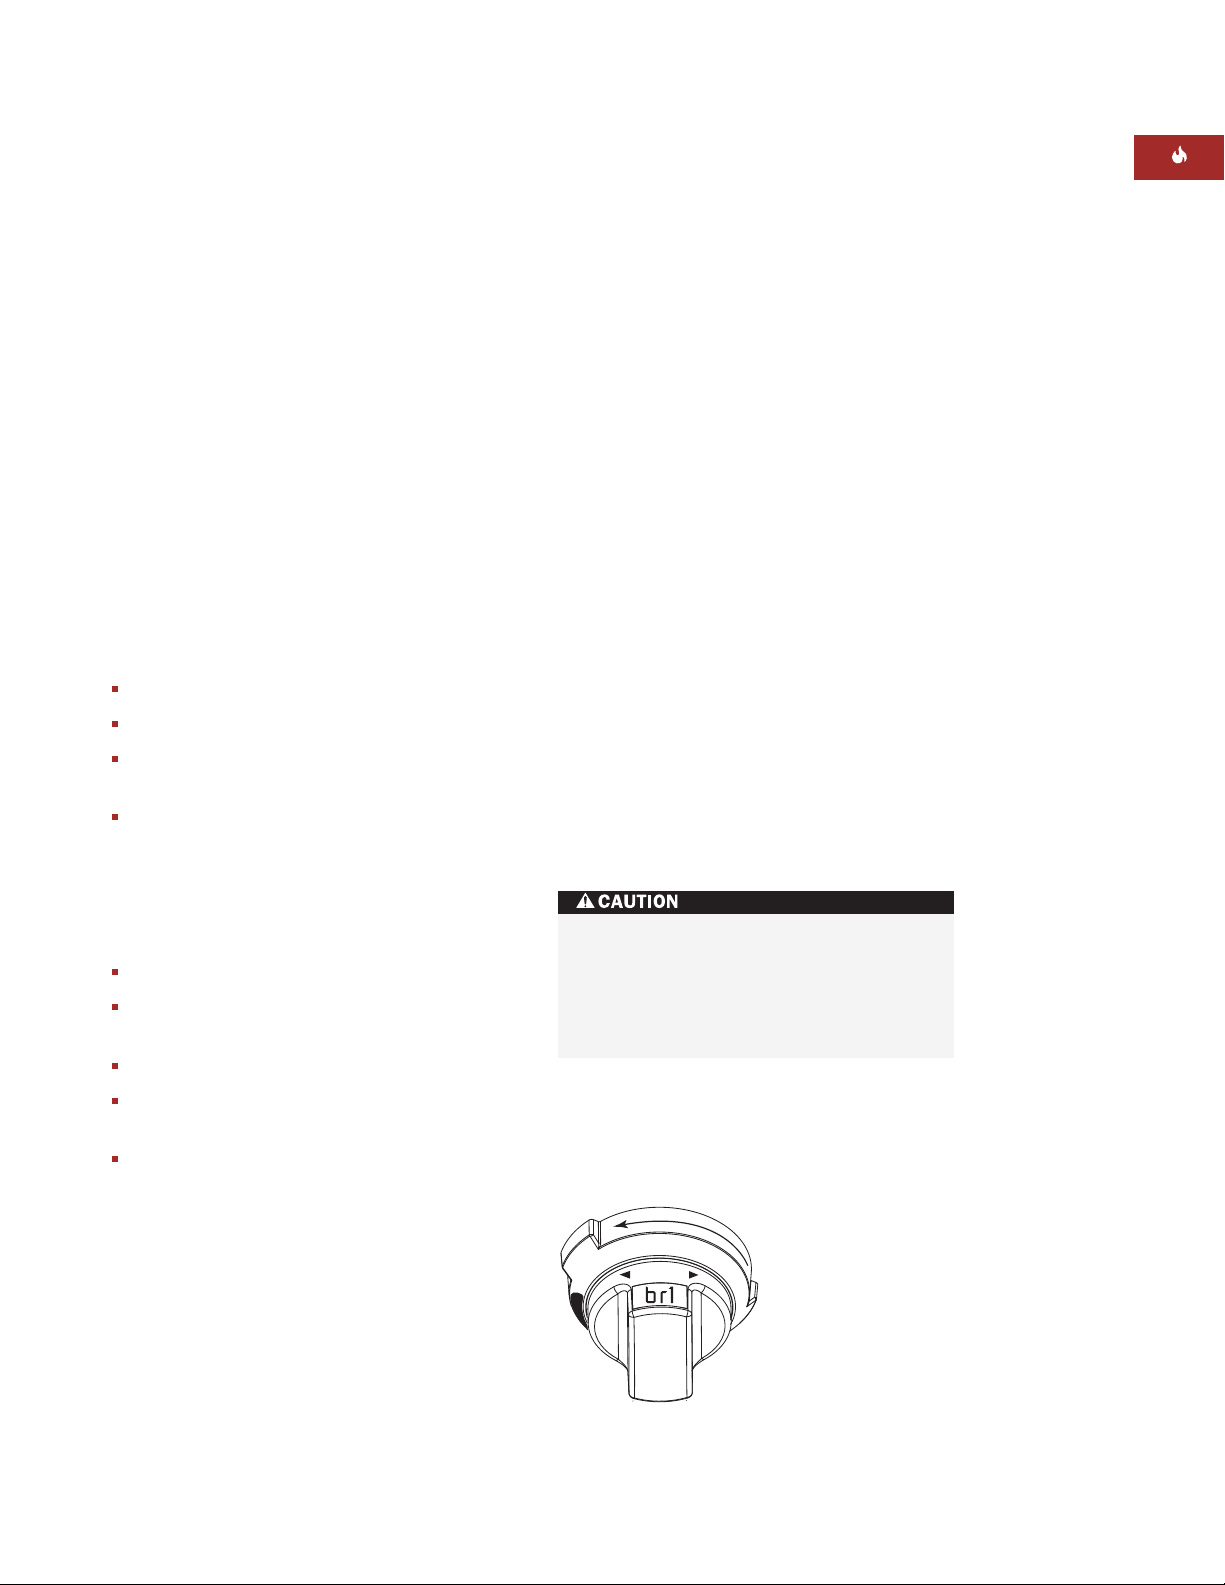
BROIL MODE
How Broil mode works:
The top element is
used to conduct an intense, radiant heat that
rowns one side of the food at a time.
b
roiled foods usually must be turned over to
B
brown the other side and finish cooking. The
high heat cooks quickly and gives a rich,
rown outer appearance. This mode is best for
b
meats, fish and poultry pieces up to 1" (25)
thick. The temperature probe cannot be used
with this mode.
Refer to the Wolf Cooking Guide on pages
48–51. Use cooking times as a guide for other
similar foods.
WOLF TIPS FOR SUCCESS
For Broil mode:
Do not preheat for
Broil mode
.
Broil with oven door closed.
Preferred for meat, fish and poultry pieces
equal to or less than 1" (25) thick.
Always use the two-piece broiler pan
packaged with your oven. Always use
slotted top grid of broiler pan. It allows fat
to drip away from food and from intense
radiant heat. This reduces spattering,
smoking and risk of fire.
Turn food halfway through cooking time.
ush lean meat and fish with peanut oil
Br
before cooking to prevent sticking.
SETTING CONTROLS
or Broil mode:
F
1)
Place food in oven at the correct rack
position. Close oven door.
2)
Turn oven selector knob bezel counterclock-
ise to
w
ROIL.Refer to the illustration
B
below. Oven temperature is preset at ”
for 550˚F (290˚C) – High Broil. Touch
or after two seconds the oven will turn on
by default. To change the setting, immediately turn the oven selector knob to the left
to decrease the oven setting to ”
(230˚C) – Medium Broil or ”
br3
br2
” 350˚F
(175˚C) – Low Broil.
3)
If the timer is set, the oven will chime when
one minute is left on the timer and will
chime again when cooking time is finished.
If the timer is not cleared, it will continue to
chime every 30 seconds.
4)
Remove food. Always use dry pot holders
when removing hot pans from the oven.
5)
Turn oven selector knob bezel to
OFF
end this mode.
When turning food or checking doneness,
open the door carefully. Smoke and
steam may have accumulated. Never use
heatproof glass (e.g. Pyrex) or pottery.
They can shatter.
br1
ENTER
” 450˚F
to
”
t cooking poultry with skin side down.
Star
Begin with cold food directly from the
refrigerator.
The 18" (457) oven broiler pan fits best on
rack guide position 6 with shor
t sides
touching each side.
Dimensions in parentheses are in
millimeters unless otherwise specified.
Broil mode setting
27
Page 28

WOLF DUAL FUEL RANGE OVEN OPERATION
R
O
A
S
T
B
A
K
E
B
R
O
I
L
S
T
O
N
E
C
L
E
A
N
O
F
F
LO
HI
ROAST MODE
How Roast mode works:
Both bake and broil
elements are used to heat the air, and they
ycle on and off to maintain temperature. This
c
mode is designed especially for roasting less
tender cuts of meat that should be covered,
uch as chuck roasts, lamb shanks, pot roasts
s
and stew meat. The temperature probe may be
used in this mode.
Refer to the Wolf Cooking Guide on pages
48–51. Use cooking times as a guide for other
similar foods.
WOLF TIPS FOR SUCCESS
For Roast mode:
Always preheat for
Roast mode
.
Roasting bags may be used.
When roasting a large item, such as a
turkey, the pan should not cover the entire
rack and block heat from circulating
naturally.
Cook stuffed turkeys weighing over 15 lbs
(6.8 kg) in
Roast mode
. Always cook
stuffing to an internal temperature of 165˚F
(75˚C).
SETTING CONTROLS
or Roast mode:
F
1)
Turn oven selector knob bezel counterclockwise to
2)
Oven temperature is preset at 350˚F (175˚C).
T
ROAST
ouch
NTERon the hidden control panel
E
.
or after two seconds the oven will turn on
by default.
To change the temperature setting from
350˚F (175˚C), immediately turn the oven
selector knob to the right to increase the
oven temperature or to the left to decrease
the oven temperature. The temperature
display alternates between set temperature
and actual oven temperature.
3)
Add food when the chime signals that the
oven has reached preheat temperature.
4)
The temperature probe may be used in this
mode, follow
Temperature Probe feature
directions and USDA temperature recommendations on pages 37–39.
5)
If the timer is set, the oven will chime when
one minute is left on the timer and will
chime again when cooking time is finished.
If the timer is not cleared, it will continue to
chime every 30 seconds.
6)
Remove food. Always use dry pot holders
when removing hot pans fr
7)
Turn oven selector knob bezel to
om the oven.
OFF
to
end this mode.
Roast mode setting
28
Page 29
WOLF DUAL FUEL RANGE OVEN OPERATION
C
L
E
A
N
C
O
N
V
R
O
A
S
T
S
T
O
N
E
S
T
O
N
E
LO
HI
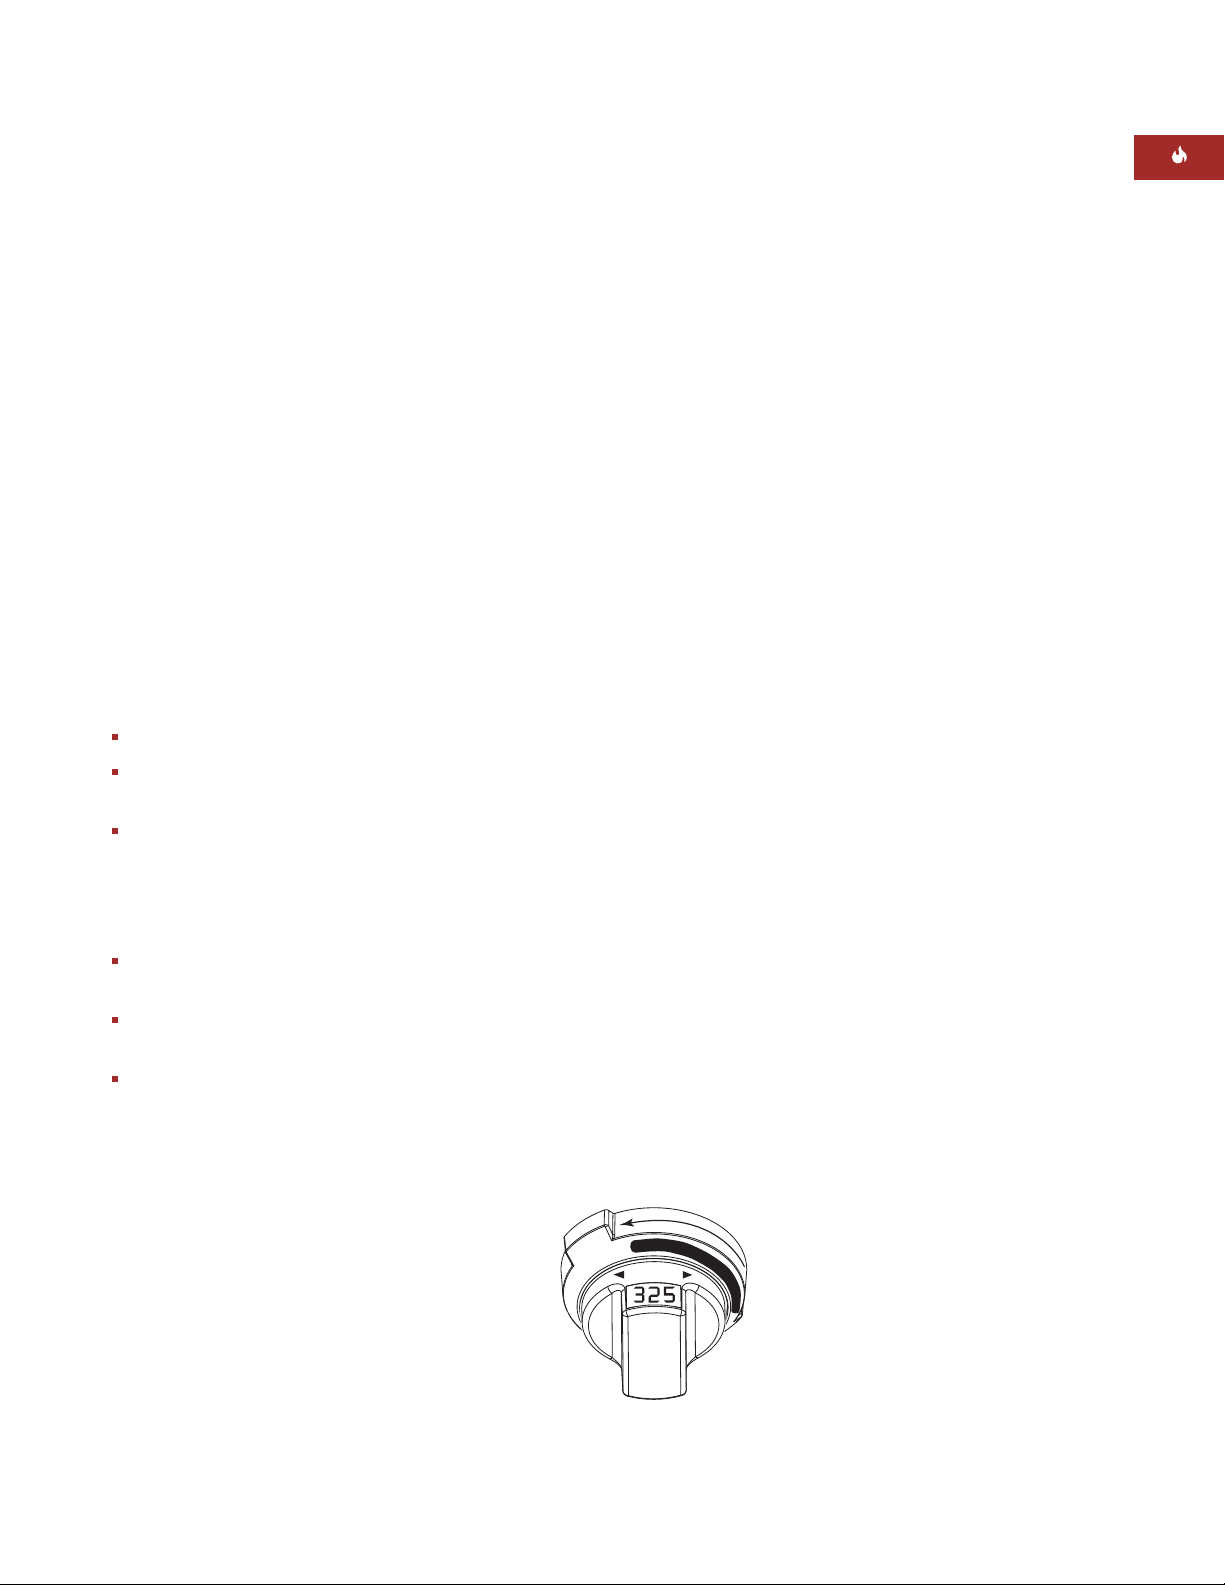
CONVECTION MODE
How Convection mode works:
Dual convec-
tion fans, each with a heating element, operate
rom the back of the oven to move the heated
f
air throughout the entire oven cavity. The 18"
(457) oven has a single convection fan.
niform air movement makes it possible to
U
multi-level rack cook in this mode. The heat is
cycled on and off to maintain the temperature,
resulting in evenly browned food. The temperature probe may be used in this mode.
The convection area of the oven dial is shown
in black on the oven selector knob bezel.
Refer to the Wolf Cooking Guide on pages
48–51. Use cooking times as a guide for other
similar foods.
WOLF TIPS FOR SUCCESS
For Convection mode:
Always preheat for
Convection mode
.
Use low-sided, uncovered pans to cook
foods.
A 14" x 16" (356 x 406) baking sheet is an
optimum size for the 30" (762) and 36" (914)
ovens. Optimum size for the 18" (457) oven
is 9" x 13" (229 x 330). Allow at least 1" (25)
between edge of pan and walls of oven.
Reduce standard recipe temperatures by
in this mode.
25 degr
ees
Pans do not need to be staggered when
cooking on more than one rack.
Baking time may be less than expected;
check doneness 5 to 10 minutes early.
SETTING CONTROLS
or Convection mode:
F
1)
Turn oven selector knob bezel clockwise to
the black area on the dial marked
CONV
Refer to the illustration below.
ven temperature is preset at 325˚F (165˚C).
2)O
Touch
ENTER
on the hidden control panel
or after two seconds the oven will turn on
by default.
To change the temperature setting from
325˚F (165˚C), immediately turn the oven
selector knob to the right to increase the
oven temperature or to the left to decrease
the oven temperature. The temperature
display alternates between set temperature
and actual oven temperature.
3)
Add food when the chime signals that the
oven has reached preheat temperature.
4)
The temperature probe may be used in this
mode, follow
Temperature Probe feature
directions on pages 37–39.
5)
If the timer is set, the oven will chime when
one minute is left on the timer and will
chime again when cooking time is finished.
If the timer is not cleared, it will continue to
chime every 30 seconds.
6)
Remove food. Always use dry pot holders
when removing hot pans fr
7)
Turn oven selector knob bezel to
om the oven.
OFF
end this mode.
.
to
Dimensions in parentheses are in
millimeters unless otherwise specified.
Convection mode setting
29
Page 30

WOLF DUAL FUEL RANGE OVEN OPERATION
B
R
O
I
L
B
A
K
E
R
O
A
S
T
O
F
F
B
A
K
E
B
R
O
I
L
LO
HI
CONVECTION BAKE MODE
How Convection Bake mode works:
This
mode combines heat from two convection
lements with some heat from the bake
e
element that is located beneath the oven floor.
Two convection fans circulate this heat within
he oven cavity. The 18" (457) oven has a
t
single convection element and fan. The added
heat source from the bottom of the oven
makes this mode ideal for pie baking. The
temperature probe may be used in this mode.
The convection area of the oven dial is shown
in black on the oven selector knob bezel.
Refer to the Wolf Cooking Guide on pages
48–51. Use cooking times as a guide for other
similar foods.
WOLF TIPS FOR SUCCESS
For Convection Bake mode:
Always preheat for
.
mode
Convection Bake
Reduce standard recipe temperature by 25
degrees in this mode.
The 30" (762) and 36" (914) ovens can bake
multiple pies on the same rack, rather than
on different racks.
The 18" (457) oven can bake only one pie at
a time.
SETTING CONTROLS
or Convection Bake mode:
F
1)
Turn oven selector knob bezel clockwise to
the black area on the dial marked
BAKE
Refer to the illustration below.
ven temperature is preset at 375˚F (190˚C).
2)O
Touch
ENTER
on the hidden control panel
or after two seconds the oven will turn on
by default.
To change the temperature setting from
375˚F (190˚C), immediately turn the oven
selector knob to the right to increase the
oven temperature or to the left to decrease
the oven temperature. The temperature
display alternates between set temperature
and actual oven temperature.
3)
Add food when the chime signals that the
oven has reached preheat temperature.
4)
The temperature probe may be used in this
mode, follow
Temperature Probe feature
directions on pages 37–39.
5)
If the timer is set, the oven will chime when
one minute is left on the timer and will
chime again when cooking time is finished.
If the timer is not cleared, it will continue to
chime every 30 seconds.
6)
Remove food. Always use dry pot holders
when removing hot pans fr
om the oven.
.
7)
Turn oven selector knob bezel to
OFF
to
end this mode.
30
Convection Bake mode setting
Page 31
WOLF DUAL FUEL RANGE OVEN OPERATION
R
O
A
S
T
B
R
O
I
L
C
O
N
V
O
F
F
B
A
K
E
B
A
K
E
LO
HI
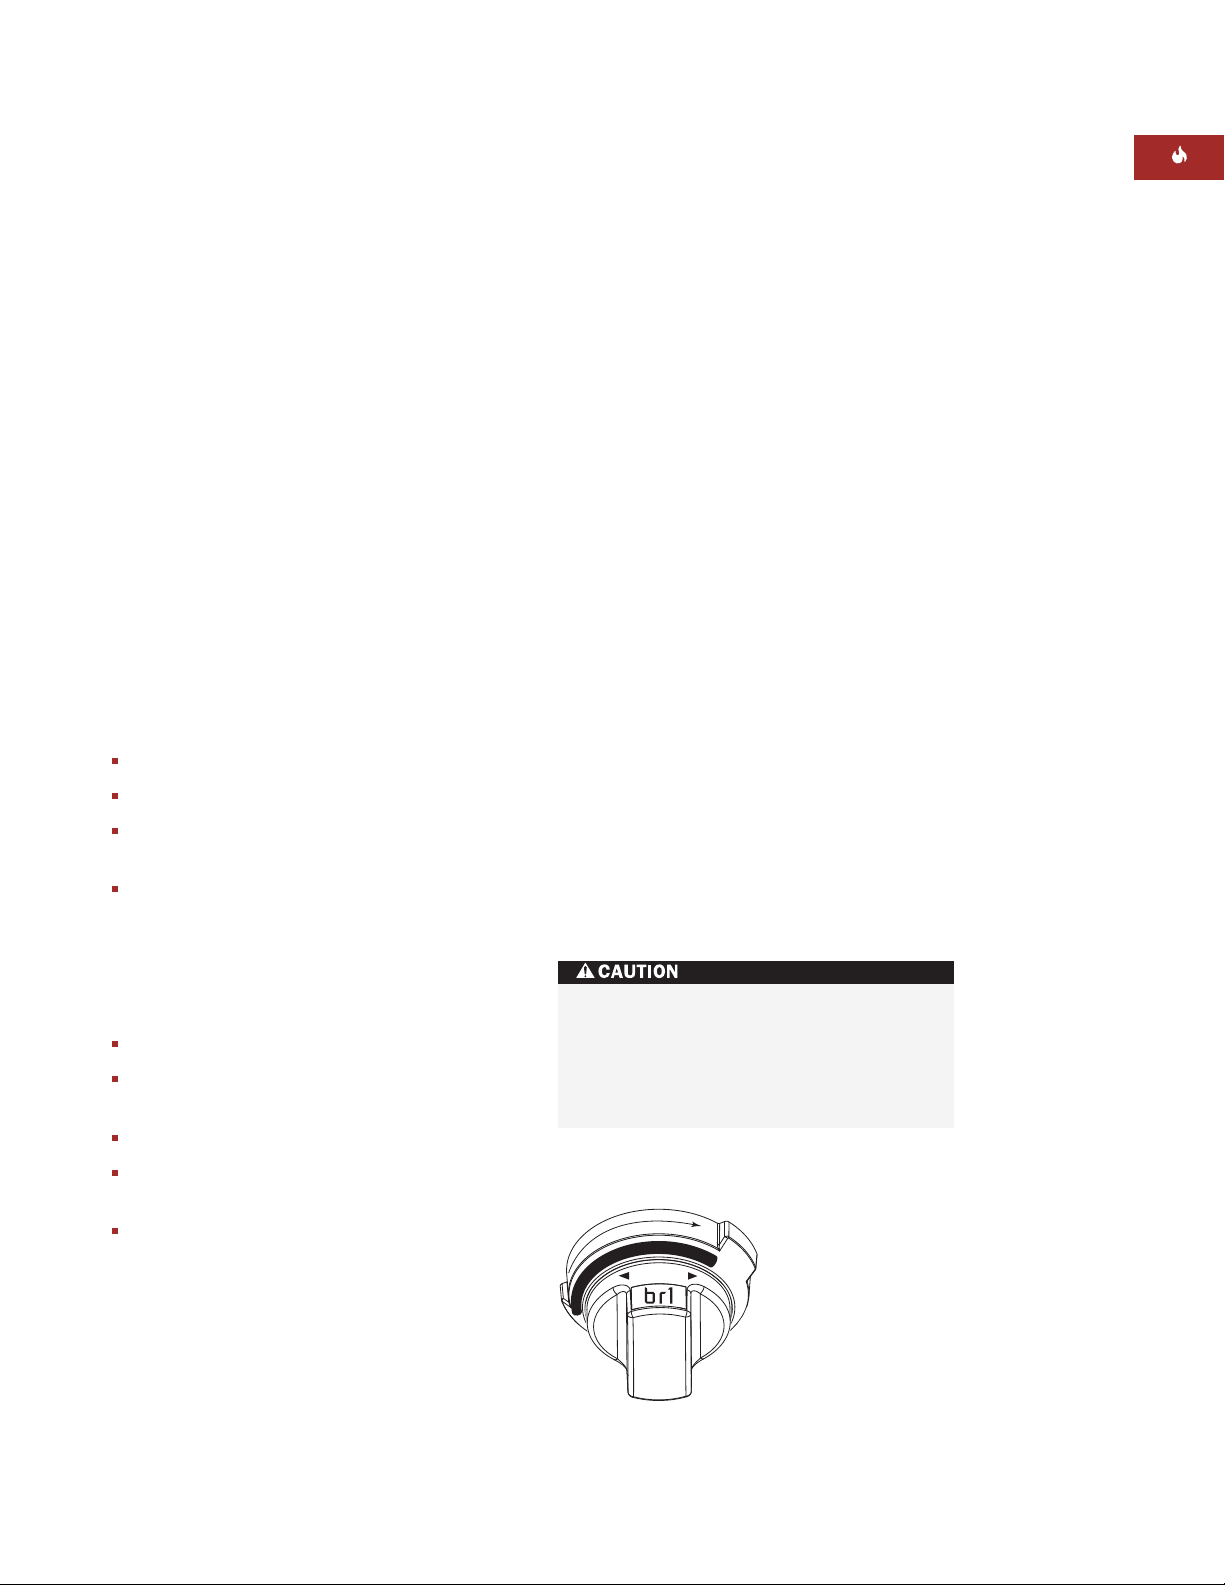
CONVECTION BROIL MODE
How Convection Broil mode works:
Intense
radiant heat from the top element browns and
ears the surface of the food while both
s
convection fans circulate hot air around the
food. The 18" (457) oven has a single convec-
ion fan. This mode shortens broiling times for
t
thicker cuts of meat, fish and poultry. The heat
of the broiler browns the exterior, while the
convection fans keep the interior moist and
juicy. The temperature probe cannot be used
with this mode.
The convection area of the oven dial is shown
in black on the oven selector knob bezel.
Refer to the Wolf Cooking Guide on pages
48–51. Use cooking times as a guide for other
similar foods.
WOLF TIPS FOR SUCCESS
For Convection Broil mode:
Do not preheat for
Convection Broil mode
Convection Broil with oven door closed.
Preferred for meat, fish and poultry pieces
thicker than 1" (25).
Always use the two-piece broiler pan
packaged with your oven. Always use
slotted top grid of broiler pan. It allows fat
to drip away from food and from intense
radiant heat. This r
educes spattering,
smoking and risk of fire.
Turn food halfway through cooking time.
ush lean meat and fish with peanut oil
Br
before cooking to prevent sticking.
SETTING CONTROLS
or Convection Broil mode:
F
1)
Place food in oven at the correct rack
position. Close oven door.
2)
Turn oven selector knob bezel clockwise to
he black area on the dial marked
t
Refer to the illustration below.
3)
Oven temperature is preset at ”
550˚F (290˚C) – High Convection Broil. Touch
ENTER on hidden control panel or after two
seconds the oven will turn on by default.
To change the setting, immediately turn the
oven selector knob to the left to decrease
the oven setting to ”
Medium Convection Broil or ”
(175˚C) – Low Convection Broil.
4)
If the timer is set, the oven will chime when
one minute is left on the timer and will
.
chime again when cooking time is finished.
If the timer is not cleared, it will continue to
chime every 30 seconds.
5)
Remove food. Always use dry pot holders
when removing hot pans from the oven.
6)
Turn oven selector knob bezel to
end this mode.
When turning food or checking doneness,
open the door car
steam may have accumulated. Never use
heatproof glass (e.g. Pyrex) or pottery.
They can shatter.
br2
efully
B
br1
” 450˚F (230˚C) –
br3
” 350˚F
OFF
. Smoke and
ROIL
” for
.
to
t cooking poultry with skin side down.
Star
Begin with cold food directly from the
refrigerator.
The 18" (457) oven broiler pan fits best on
rack guide position 6 with shor
t sides
touching each side.
Dimensions in parentheses are in
millimeters unless otherwise specified.
Convection Broil mode setting
31
Page 32
WOLF DUAL FUEL RANGE OVEN OPERATION
R
O
A
S
T
C
O
N
V
B
R
O
I
L
B
A
K
E
C
L
E
A
N
LO
HI
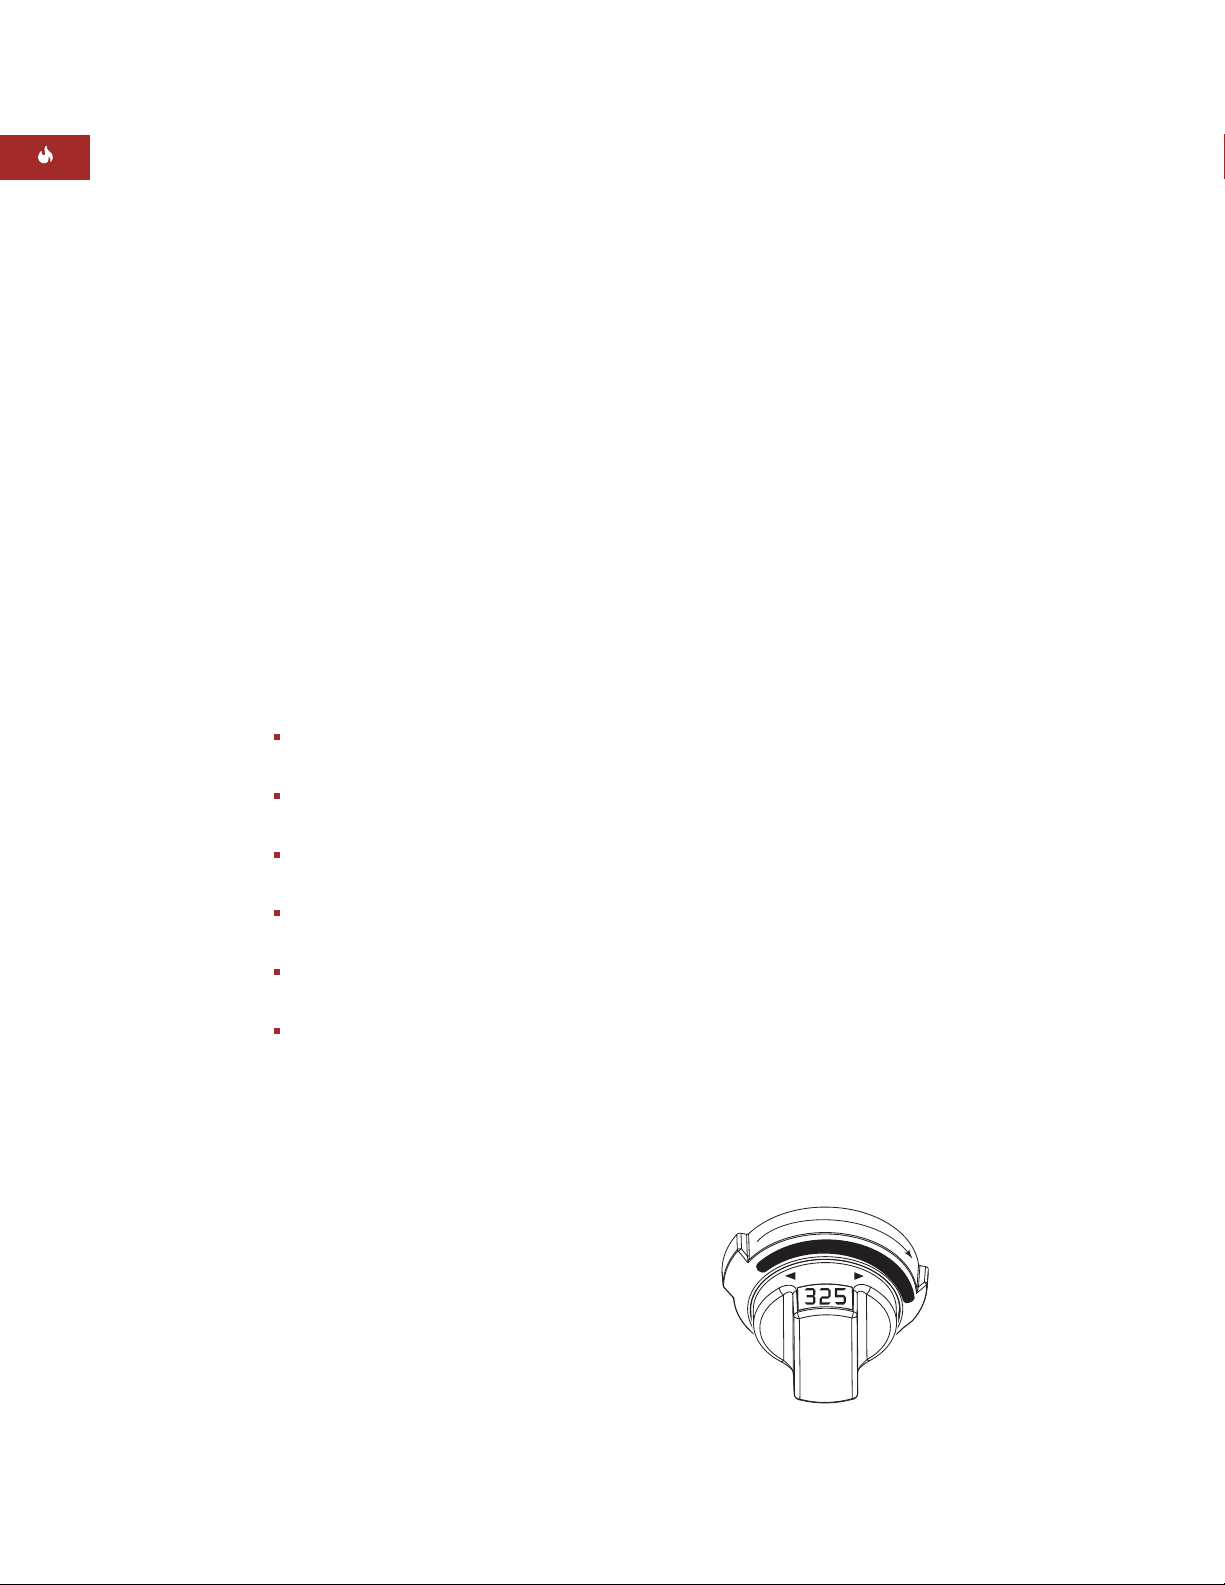
CONVECTION ROAST MODE
How Convection Roast mode works:
Heat
from both convection fans, with additional
eat from the broil element, intensifies the
h
convective and radiant heating in this mode. In
the 18" (457) oven, the single convection fan
orks with the top heat. This combination
w
gently browns the exterior and seals in juices,
making it perfect for roasting tender cuts of
beef, lamb, pork and poultry. The temperature
probe may be used in this mode.
The convection area of the oven dial is shown
in black on the oven selector knob bezel.
Refer to the Wolf Cooking Guide on pages
48–51. Use cooking times as a guide for other
similar foods.
WOLF TIPS FOR SUCCESS
For Convection Roast mode:
Always preheat oven for
.
mode
Convection Roast
Use low-sided, uncovered pans on a roast
rack to cook food.
The lower part of the broiler pan with a
meat rack makes an excellent roasting pan.
Roasting time may be less than expected;
check doneness earlier than usual.
Select foods that are to be roasted
uncover
ed.
Begin with cold food directly from the
refrigerator.
SETTING CONTROLS
or Convection Roast mode:
F
1)
Turn oven selector knob bezel clockwise to
the black area on the dial marked
2)
Oven temperature is preset at 325˚F (165˚C).
ouch
T
NTERon the hidden control panel
E
ROAST
or after two seconds the oven will turn on
by default.
To change the temperature setting from
325˚F (165˚C), immediately turn the oven
selector knob to the right to increase the
oven temperature or to the left to decrease
the oven temperature. The temperature
display alternates between set temperature
and actual oven temperature.
3)
Add food when the chime signals that the
oven has reached preheat temperature.
4)
The temperature probe may be used in this
mode, follow
Temperature Probe feature
directions on pages 37–39.
5)
If the timer is set, the oven will chime when
one minute is left on the timer and will
chime again when cooking time is finished.
If the timer is not cleared, it will continue to
chime every 30 seconds.
6)
Remove food. Always use dry pot holders
when removing hot pans from the oven.
n oven selector knob bezel to
ur
7)
T
OFF
end this mode.
.
to
32
Convection Roast mode setting
Page 33

WOLF DUAL FUEL RANGE OVEN OPERATION
PROOF MODE AND FEATURE
There is a
Proof mode
on the oven selector
knob bezel on the 18" (457) oven. Both the 30"
762) and 36" (914) ovens have a
(
that can be initiated through
How Proof mode and feature work:
roof feature
P
Bake mode
A
.
combination of broil, convection and bake
lements are used to heat and balance the air
e
to maintain temperature. This feature is ideal
for proofing, or rising bread dough.
WOLF TIPS FOR SUCCESS
For Proof mode and feature:
No need to preheat for this feature.
Proof bread until dough has doubled in
bulk.
For best results, place a shallow pan with 1
to 3 cups (.2–.7 L) boiling hot water on rack
position 1 to keep the air moist inside the
oven cavity.
The oven does not allow the temperature to
be set above 110˚F (45˚C) in proof mode or
feature. If the oven temperature is above
130˚F (55˚C), ”
Hot
” will be displayed in the
oven selector knob instead of the actual
temperature. The user should open the
oven door to allow the oven to cool down
below 120˚F (50˚C) to prevent destroying
the yeast.
Allow at least 1" (25) between edge of pan
and walls of oven.
Limit frequent door openings to prevent
losing heat and lengthening proofing time.
SETTING CONTROLS
or Proof mode – 18" (457) Oven:
F
1)
Place dough in oven-safe dish in oven.
2)
Turn oven selector knob bezel to
PROOF
Oven temperature is preset at 85˚F (30˚C).
ouch
T
NTERon the hidden control panel
E
or after two seconds the oven will turn on
by default.
Turn the oven selector knob counterclockwise and scroll the temperature readout to
PrF
.” Turn the oven selector knob counter-
”
clockwise once and it will display 85˚F
(29˚C). To change the temperature setting
from 85˚F (30˚C), immediately turn the oven
selector knob to the right to increase the
oven temperature. The temperature display
alternates between set oven temperature
and ”
PrF
.”
3)
Remove food when proofing is complete.
4)
Turn oven selector knob bezel to
OFF
end this mode.
For Proof feature –
30" (762) and 36" (914) Ovens:
Place dough in oven-safe dish in oven.
1)
2)
Turn oven selector knob bezel counterclockwise to
3)
Hold oven selector knob to the left until
”
BAKE
.
PrF
” is displayed in the knob. This is past
170˚F (75˚C).
4)
Release the knob.
.
to
DO NOT place any cookware on oven
floor or use aluminum foil or other
material to line the oven floor or side
walls. Failur
damage the porcelain and will void your
warranty.
Dimensions in parentheses are in
millimeters unless otherwise specified.
e to adher
e to this notice will
5)
Quickly turn knob to the left. Oven temperature is preset at 85˚F (30˚C). To change the
temperature setting from 85˚F (30˚C), immediately turn the oven selector knob to the
right to increase the oven temperature.
6)
Touch
ENTER
on the hidden control panel
or after two seconds the oven will turn on
by default. The temperature display alternates between set oven temperature and
PrF
.”
”
7)
Remove food when proofing is complete.
8)
Turn oven selector knob bezel to
OFF
end this feature.
to
33
Page 34

WOLF DUAL FUEL RANGE OVEN OPERATION
DEHYDRATION FEATURE
ACCESSORIES
Optional accessories are available
through your
Wolf dealer. To
obtain local dealer
information, visit
the Locator section
of our website,
wolfappliance.com.
How Dehydration feature works:
This
feature allows for slowly drying out food for
reservation and other cooking uses.
p
se the
U
onvection modefor this feature.
C
The Wolf accessory dehydration racks (not
included with the range) are required for this
eature. This feature is suitable for drying a
f
variety of fruits, vegetables, herbs and meat
strips.
Refer to the Dehydration Guide on page 35.
Use cooking times as a guide for other similar
foods.
WOLF TIPS FOR SUCCESS
For Dehydration feature:
Do not preheat when using
feature
.
Dehydration
Multiple racks can be used simultaneously.
Some foods require as many as 14 to 15
hours to fully dehydrate.
Consult a food preservation book for
specific times and handling of various
foods.
SETTING CONTROLS
or Dehydration feature:
F
1)
Place food in oven on dehydration racks.
2)
Place block supplied with accessory
package in proper position to keep oven
oor open. Refer to instructions provided
d
with the accessory kit.
3)
Turn oven selector knob bezel clockwise to
the black area on the dial marked
4)
Hold the oven selector knob to the left until
”
dEH
” is displayed in the knob. This is at
CONV
170˚F (75˚C).
5)
Release the knob.
6)
Quickly turn the oven selector knob to the
left and release. Oven temperature is preset
to 135˚F (60˚C).
To change the setting, immediately turn the
oven selector knob to the right to increase
the oven temperature and to the left to
decrease the oven temperature. The
temperature display alternates between set
dEH
oven temperature and ”
.” Dehydration
temperature is usually 110˚F–160˚F
(45˚C–70˚C).
.
34
Foods must be dried to below .60 water
activity or dry to the touch to be safely
stored with no danger of mold, yeasts or
bacteria gr
drate for the maximum time specified.
owing. When in doubt, dehy
7)
Leave food in the oven until completely dry
to the touch.
8)
Remove food from racks before completely
-
cool for easy r
occurs, place dehydration trays back in the
emoval. If excessive sticking
oven to warm slightly for easier removal.
n oven selector knob bezel to
ur
9)
T
OFF
to
end this feature.
Page 35

WOLF DUAL FUEL RANGE OVEN OPERATION
DEHYDRATION GUIDE
DEHYDRATION RACK ACCESSORY
ehydration racks are available from your
D
Wolf dealer. To obtain local dealer information,
visit the Locator section of our website,
olfappliance.com. Additional instructions are
w
provided with the dehydration rack accessory.
DEHY/DF-18
DEHY/DF-30
DEHY/DF-36
(804893) – 18" (457) oven
(804683) – 30" (762) oven
(804894) – 36" (914) oven
FOOD / PREPARATION TIME / TEMP
pples
A
Slice 1/4" (6) thick. Remove seeds 6–7 hours at 135˚F (60˚C)
and stems. Place on dehydration
racks with no overlapping.
Bananas
1
S
lice
(6) thick. Place on 12–13 hours at 135˚F (60˚C)
/4"
dehydration racks with no
overlapping.
Green Bell Peppers
Wash, seed and stem peppers. 14–16 hours at 135˚F (60˚C)
1
/4" (6) thick or into 1" x 2"
Slice
(25 x 51) chunks. Place on
dehydration racks with no
overlapping.
Tomato Slices
Wash, seed and stem tomatoes. 6–7 hours at 135˚F (60˚C)
1
/4" (6) thick. Place on
Slice
dehydration racks with no
overlapping.
Tomato Chunks
Wash, seed and stem tomatoes. 12–13 hours at 135˚F (60˚C)
Cut each tomato into 16 equal
pieces. Place on dehydration
racks with no overlapping.
Dimensions in parentheses are in
millimeters unless otherwise specified.
35
Page 36

WOLF DUAL FUEL RANGE OVEN OPERATION
DELAYED START FEATURE
How Delayed Start feature works:
This
feature controls the automatic timing of the
ven’s
o
nd OFFfunction. Set a mode to
ONa
start later in the day and turn off when the
cooking is complete or set it to turn off at a
reset time. Use in combination with any
p
cooking mode except
and
Bake Stone
Broil,Convection Broil
.
WOLF TIPS FOR SUCCESS
For Delayed Start feature:
Do not delay the start when preheating is
critical to the cooking results.
When using the
Delayed Start feature
place food directly from the refrigerator into
the oven.
The time-of-day clock must display the
correct time prior to programming a timed
activity.
FOOD SAFETY GUIDELINES
Food safety is important. Adhere to the
following guidelines to avoid potential
illness or spoilage of food:
SETTING CONTROLS
or Delayed Start feature – to start cooking
F
later and automatically turn off heat when
finished:
1)
Add food to the oven directly from the
refrigerator.
2)
Turn oven selector knob bezel to the
desired mode on the bezel. Change preset
temperature if needed.
3)
Open hidden control panel by pressing in
on the flame symbol on the front of the
panel.
4)
Touch
,
STOP TIME
arrows on the hidden control panel to
indicate the desired end time.
. Use the up or down
COOK TIME
will automatically be filled in.
5)
Touch
COOK TIME
. If
COOK TIME
is not
correct, use the up or down arrows on the
hidden control panel to indicate the desired
amount of cooking time.
6)
Touch
ENTER
. The display appears as if the
oven is on. One chime will ring before the
last minute of cooking time. Three chimes
that repeat every 30 seconds signal the end
of cooking time.
7)
The oven will turn itself off.
36
Perishable food should not be left out more
than 2 hours at room temperature; 1 hour
when the temperature is above 90˚F (30˚C).
For mor
e information, see www.usda.com.
Avoid using foods that will spoil before the
cooking cycle begins. These include eggs,
dairy products, cream soups, cooked and
uncooked meats, poultry and fish.
If cooking will not begin immediately
only very cold or fr
ozen food into the oven.
, place
8)
Remove food. Always use dry pot holders
when r
9)
Turn oven selector knob bezel to
emoving hot pans fr
om the oven.
OFF
end this feature.
to
Page 37

WOLF DUAL FUEL RANGE OVEN OPERATION
TIME COOK FEATURE
SETTING CONTROLS
or Time Cook feature – to start cooking
F
now, then automatically turn off heat when
finished:
1)
Turn oven selector knob bezel to the
desired mode on the bezel. Change preset
temperature if needed.
2)
Open hidden control panel by pressing in
on the flame symbol on the front of the
panel.
3)
Touch
STOP TIME
. Use the up or down
arrows on the hidden control panel to
increase or decrease the desired end time.
COOK TIME
4)
Touch
will automatically be filled in.
ENTER
. One chime will ring before
the last minute of cooking time. Three
chimes that repeat every 30 seconds signal
the end of cooking time.
5)
The oven will turn itself off.
6)
Remove food. Always use dry pot holders
when removing hot pans from the oven.
7)
Turn oven selector knob bezel to
OFF
to
end this feature.
TEMPERATURE PROBE FEATURE
How Temperature Probe feature works
: The
probe measures doneness by measuring the
nternal temperature of food without opening
i
the oven door. It is a convenient and accurate
way to achieve the perfect doneness regard-
ess of the type, cut or weight of the food.
l
Calculating a total cooking time by weight is
no longer necessary using this feature. Use
with all modes except
Broil modes
.
Broil
and
Convection
WOLF TIPS FOR SUCCESS
For Temperature Probe feature
Insert sensor into the thickest part of meat
before placing in oven.
To determine the center, hold sensor
outside of the meat with point at center of
cut. Mark length of insertion by placing
your fingers on sensor at top of meat. Move
sensor to thickest part of meat and insert
up to your fingers.
Standing time refers to the 10- to 15-minute
time period the meat rests before being
carved. This helps more juices to be
retained in the meat.
Dimensions in parentheses are in
millimeters unless otherwise specified.
For poultry, insert probe into the thickest
part of the thigh.
Use aluminum foil to cover meat during the
standing time to help keep it hot before
carving.
obe by hand; do not soak or clean
ash pr
W
in the dishwasher.
obe becomes ver
Pr
oven. Handle with an pot holder
y hot while in the
.
37
Page 38

WOLF DUAL FUEL RANGE OVEN OPERATION
TEMPERATURE PROBE FEATURE
USDA RECOMMENDATIONS
he internal temperatures listed in the
T
following chart are recommended carving
temperatures.
Use the
Temperature Probe feature
to
measure internal temperatures. Refer to
page 39 for setting this mode in combination
with
Convection Roast
IMPORTANT NOTE:
and
Roast modes
.
The accuracy of the probe
is decreased for all temperatures below 100˚F
(40˚C). Food taken directly from the refrigerator
could display the incorrect temperature until it
has reached 100˚F (40˚C).
USDA RECOMMENDATIONS
DONENESS INTERNAL TEMP
eef, Lamb and Veal
B
Rare 140˚F (60˚C)
Medium Rare 145˚F (65˚C)
Medium 160˚F (70˚C)
Well Done 170˚F (75˚C)
ork
P
Well Done 170˚F (75˚C)
y
Poultr
Breast, Well Done 170˚F (75˚C)
Thigh, Well Done 180˚F (80˚C)
Stuffing, Well Done 165˚F (75˚C)
38
Page 39

WOLF DUAL FUEL RANGE OVEN OPERATION
TEMPERATURE PROBE FEATURE
SETTING CONTROLS
or Temperature Probe feature with meats:
F
1)
Preheat oven to desired oven temperature
in desired mode.
2)
Place meat on a rack in the roasting pan.
nsert the probe sensor into the thickest
I
part of the meat as described in Tips For
Success on page 37.
3)
When the oven signals that preheat is
completed, use a dry pot holder to lift the
probe sensor cover. Slide the probe connector into the receptacle on the wall of the
oven until it snaps into place. Close the
oven door.
4) PROBE
will be illuminated on the hidden
control panel. The probe temperature is
preset at 160˚F (70˚C).
To change the desired final probe temperature setting from 160˚F (70˚C), immediately
hold the oven selector knob to the right to
increase the probe temperature or to the
left to decrease the probe temperature.
5)
Touch
ENTER
on the hidden control panel
or after two seconds the oven will turn on
by default.
Once the probe set point has been
programmed, the oven knob display will
alternate between the pr
Lo
the word “
” until the internal tempera-
obe set point and
ture reaches 70˚F (20˚C). Then the display
nates between the pr
alter
obe set point and
the actual probe temperature.
6)
When the desir
ed internal temperature has
been reached, the oven will chime. Recheck
the internal temperature by removing and
einserting the probe into the meat.
r
then
7)
Remove probe and food.
8)
Turn oven selector knob bezel to
OFF
end this feature.
IMPOR
T
If the pr
obe connector is
ANT NOTE:
not fully seated into the probe receptacle,
PROBE
r
T
will flash in the display
oubleshooting Guide on page 53.
. Refer to the
to
SETTING CONTROLS
or Temperature Probe feature with breads:
F
1)
Preheat oven to desired oven temperature
in
Bake
or
Bake Stone modes
2)
Place bread on bake stone or in oven in
read pans.
b
3)
Bake 10 minutes at desired oven
.
temperature.
4)
Insert probe sensor into the thickest part
of the bread.
5)
Using a dry pot holder, lift the probe sensor
cover. Slide the probe connector into the
receptacle on the wall of the oven until it
snaps into place. Close the oven door.
6) PROBE
will be illuminated on the hidden
control panel. The probe temperature is
preset at 160˚F (70˚C).
To change the desired final probe temperature setting from 160˚F (70˚C), immediately
turn the oven selector knob to the right to
increase the probe temperature or to the
left to decrease the probe temperature.
Breads are baked to an internal temperature
of 195˚F (90˚C) to 210˚F (100˚C).
7)
Touch
ENTER
on the hidden control panel
or after two seconds the oven will turn on
by default.
Once the pr
obe set point has been
programmed, the oven knob display will
alternate between the probe set point and
the word “
Lo
” until the internal temperature reaches 70˚F (20˚C). Then the display
alternates between the probe set point and
the actual probe temperature.
8)
When the desired internal temperature has
been reached, the oven will chime. Remove
obe and food.
pr
9)
Turn oven selector knob bezel to
end this featur
obe and pr
Pr
very hot. Handle with a dry pot holder.
e.
obe sensor cover become
OFF
to
Dimensions in parentheses are in
millimeters unless otherwise specified.
39
Page 40

WOLF DUAL FUEL RANGE OVEN OPERATION
R
O
A
S
T
B
A
K
E
B
R
O
I
L
S
T
O
N
E
C
L
E
A
N
O
F
F
LO
HI
SABBATH FEATURE
Star-K Certified
How the Sabbath feature works:
This mode
allows for baking or keeping food warm while
till adhering to the ”no work” requirements
s
on religious Sabbath days.
How Time Bake in Sabbath feature works:
This feature allows for baking food in the oven
on the Sabbath and then the oven automatically turns itself off when finished. No sound
will be heard when finished; only the electronic control panel display will flash. Use this
feature only in the
Bake
and
Roast modes
.
On holidays, temperatures may be adjusted
but the display will remain unchanged.
SETTING CONTROLS
For Sabbath feature:
1)
Turn oven selector knob bezel to either
BAKE
or
ROAST
. Change the preset
temperature if needed.
2)
Touch
OVEN LIGHT
to turn oven lights on
or off.
3)
Touch and hold
ENTER
on hidden control
panel for 5 seconds.
4)
Turn oven selector knob to
OFF
to end this
feature. Oven remains on until this mode is
cancelled.
SETTING CONTROLS
or Time Bake in Sabbath feature:
F
1)
Add food to the oven.
2)
Turn oven selector knob bezel to either
BAKE
or
ROAST
emperature if needed.
t
3)
Open hidden control panel by pressing in
. Change the preset
on the flame symbol on the front of the
panel.
4)
Touch
STOP TIME
. Use the up or down
arrows on the hidden control panel to
increase the desired end time.
5)
Touch
COOK TIME
. Use the up or down
arrows on the hidden control panel to
increase or decrease the desired amount of
cooking time.
6)
Touch and hold
panel for 5 seconds. ”
ENTER
on hidden control
SAb
” will be
displayed in the oven selector knob. No
sound will be heard; only the display will
flash.
7)
The oven will turn itself off.
8)
Remove food. Always use dry pot holders
when removing hot pans from the oven.
9)
Turn oven selector knob bezel to
OFF
end this feature.
to
This appliance is certified by Star-K
to meet strict religious regulations in
conjunction with specific instructions
found on www.star-k.org.
40
Sabbath feature setting
Page 41

WOLF DUAL FUEL RANGE OVEN OPERATION
SABBATH FEATURE
CHANGING OVEN TEMPERATURE
o raise oven temperature during Sabbath
T
feature:
Turn oven selector knob bezel to the
right and release; each twist raises the temper-
ture 5 degrees. The oven temperature will
a
rise randomly after user is finished setting the
new temperature. There will be no clicking,
lights or signs of the oven change.
To lower oven temperature during Sabbath
feature:
Turn oven selector knob bezel to the
left and release; each twist lowers the temperature 5 degrees. The oven temperature will
rise randomly after user is finished setting the
new temperature. There will be no clicking,
lights or other signs of the oven change.
OFF
Turn the oven selector knob to
to end this
feature. The oven remains on until this mode
is cancelled.
SELF-CLEAN MODE
How Self-Clean mode works:
The oven is
heated in graduated steps to a preset high
emperature. During this process, food soil is
t
burned off, leaving some white ash residue.
Set in combination with
eature
f
cleaning the oven can be
,
Delayed Start
programmed to start and stop while you sleep.
Refer to
Delayed Start feature
on page 36.
For safety purposes, the door automatically
locks during cleaning and unlocks when the
cavity has cooled completely. Should you
change your mind and stop the mode after
beginning
Self-Clean mode
, the door will still
remain locked until the temperature inside has
cooled to below 300˚F (150˚C).
IMPORTANT NOTE:
and rack guides before using the
mode
. They will discolor if left in the oven
Remove all oven racks
Self-Clean
during this feature. Refer to Oven Racks and
Rack Guides on page 23.
When hand cleaning a spot, use only mild
abrasive cleaners or plastic scrubbers.
IMPORTANT NOTE:
Do not allow food with
high sugar or acid content, such as fruit juice,
milk and tomatoes, to remain on the porcelain
enamel surface. Wipe up immediately with a
dry towel. Failure to do so may cause a permanent dull spot.
IMPORTANT NOTE:
They ar
IMPORT
e not necessary with
ANT NOTE:
ovens, only one oven may be in
mode
at a time and the other oven cannot be
Never use oven cleaners.
Self-Clean mode
For ranges with two
Self-Clean
used for cooking. If the user tries to use the
opposite oven while an oven is in
mode
, the wor
d ”
OPP
” will be displayed in
Self-Clean
the oven selector knob.
During Self-Clean mode, exterior sur
may get hotter than usual, therefore,
children should be kept away.
faces
.
Dimensions in parentheses are in
millimeters unless otherwise specified.
41
Page 42

WOLF DUAL FUEL RANGE OVEN OPERATION
SELF-CLEAN MODE
WOLF TIPS FOR SUCCESS
For Self-Clean mode:
Before using
Self-Clean mode
, remove the
oven racks and oven rack guides. They will
discolor if left in the oven during this mode.
Remove broiler pan and any other utensil
stored inside the oven.
Remove any moist food or grease from
spillovers before starting this mode.
It is normal to see a brief flame-up, depending on the amount and content of the soil.
Use this mode as often as necessary. Do
not wait until heavy soil accumulates.
After the mode is finished and the oven
cavity cools, use a damp sponge or paper
towel to wipe up any ash.
You may hear a popping or ”oil canning”
sound during the operation of the oven.
These sounds are normal and are caused
by the expansion and contraction of the
metal surfaces as they heat up and cool
down.
SETTING CONTROLS
or Self-Clean mode:
F
1)
Open hidden control panel by pressing in
on the flame symbol on the front of the
panel.
emove all oven racks and rack guides
2)R
before using
3)
Turn oven selector knob bezel to
Self-Clean mode
.
CLEAN
The oven will automatically be set to selfclean for 4 hours. The oven will self-clean
for 3 hours and cool down for 1 hour.
4)
Touch
ENTER
on the hidden control panel
or turn the oven selector knob bezel in
either direction until ”
the knob to start
cln
” is displayed in
Self-Clean mode
. The
oven door will lock and remain locked until
the end of the mode or until the temperature has cooled to 300˚F (150˚C).
5)
Turn oven selector knob bezel to
OFF
end this mode.
Self-Clean mode for light cleaning:
For light cleaning,
Self-Clean mode
can be set
for 3 hours. To lower self-cleaning time:
.
to
42
Do not use any commercial oven cleaners
or oven liner pr
around any part of the oven.
The oven gasket is important for a good
seal. Do not hand clean, r
remove.
Never wipe a war
surface with a damp sponge. It may
cause chipping or crazing (tiny hairlike
lines).
otective coatings on or
ub, puncture or
m or hot por
celain
1)
Turn oven selector knob bezel to
2)
Touch
STOP TIME
and hold the
arrow until 3:00 is displayed.
ouch
3)
T
ENTER
4)
Turn the oven selector knob bezel to the
right to start
to set the time.
Self-Clean mode
.
CLEAN
down
.
Page 43

WOLF DUAL FUEL RANGE CARE
COOKWARE SELECTION
For best results, we recommend medium- to
heavy-weight pans that have a flat base, metal
andle and a good-fitting cover.
h
ook for pans that are made of materials with
L
good heat conductivity, such as aluminum and
copper. These metals are sometimes found
sandwiched” between the inner and outer
”
layers of the pan. If present, whether visible
from the outside or not, they aid in evenly
conducting heat.
Use the following guidelines when selecting
cookware for the range surface:
Griddles or open roasters that span two
burners are suitable, providing they are not
warped.
When a large pan is centered over a burner,
the diameter should not exceed 10" (254).
When using pans made of cast iron,
enameled steel or glass ceramic, or coated
with a nonstick finish, select lower flame
settings. High heat applied to such materials will cause ”hot spots,” scorching and
burning.
BAKEWARE SELECTION
Use the following guidelines when selecting
bakeware for the oven(s):
A 14" x 16" (356 x 406) baking sheet is an
ptimum size for the 30" (762) and 36" (914)
o
ovens. Optimum size for the 18" (457) oven
is 9" x 13" (229 x 330). Allow at least 1" (25)
etween edge of pan and walls of oven.
b
Size, shape and finish of bakeware affects
the baking time. Food on insulated
bakeware cooks more slowly. Food cooked
in dark metal pans may cook faster than
food cooked in shiny pans.
Dark, nonstick pan coatings brown more
than light, nonstick coatings.
Cover pans while cooking; covers improve
cooking efficiency. Water boils faster, using
less fuel, and the kitchen stays cooler.
Select high-sided (deep) pans rather than
ones with very wide bases and low sides.
High sides will minimize liquids boiling
over the pan.
Pans with oversize bases that extend
beyond the range frame
should not
be
used. On HIGH settings, heat may be
trapped beneath the pan causing perma
-
nent damage to the surface finish.
Use the front burners for larger pans. The
pans are easier to handle, especially when
hot.
Use a wok with a flat bottom.
Dimensions in parentheses are in
millimeters unless otherwise specified.
43
Page 44

WOLF DUAL FUEL RANGE CARE
SIGNATURE
POLISH
Signature Polish
is available from
Signature Limited
Laboratory,
P.O. Box 13436,
Dayton, Ohio
45413-0436, or
call 877-376-5474
(toll free).
OVEN LIGHT BULB REPLACEMENT
T
urn off electrical power to the oven
before replacing light bulb.
IMPORTANT NOTE:
Allow the oven to cool
sufficiently before replacing the light bulb.
The oven uses a 20-watt halogen light bulb;
replacement part #803816.
To remove the oven light bulb,
remove the
oven rack guides as described on page 23.
Place a hot pad against the oven wall. Using a
flat-head screwdriver, press the screwdriver
against the hot pad and under the edge of the
light cover. Be careful not to scratch the porcelain oven interior. Twisting the screwdriver,
gently pry the edge of the light cover up away
from the wall and remove. Use a paper towel
to handle the light bulb and remove it from the
socket.
To replace the oven light bulb,
avoid direct
contact with the replacement bulb. Use a paper
towel to handle the new light bulb to keep oil
on fingers from touching the bulb. Failure to
do this will cause the bulb to burn out at first
use. Insert the light bulb prongs into the socket
until it snaps into place. Replace the light cover
and oven rack guides. Turn on electrical power
and reset the time-of-day clock.
CLEANING THE RANGE
EXTERIOR CLEANING
leaning the classic stainless steel exterior
C
finish:
Use a soft, nonabrasive stainless steel
cleaner like Signature Polish (see side note)
nd apply with a soft, lint-free cloth. To bring
a
out the natural luster, lightly wipe the surface
with a water-dampened microfiber cloth,
followed with a dry microfiber cloth. All work
should follow the grain direction of the finish.
Better results are obtained by keeping the
cloth in continuous contact with the metal.
Refer to Care Recommendations on the following pages for cleaning specific components of
the dual fuel range.
RANGE CLEANING TIPS
Wait until surfaces are cool before cleaning.
For best results, wipe up spills and spatters
as they occur and immediately after the
range has cooled. If splatters are allowed to
cook on, they may permanently damage or
stain the finish.
If in doubt about using one of your
cleaners, check the label. To check if it is
safe to use on your range, try a small
amount on an inconspicuous area using
very light pressure.
Use caution when spraying cleaners. Some
contain caustic ingredients that can damage
adjacent par
adjacent parts by masking them of
ts and finishes. Protect the
f so that
the overspray is contained to the finish
being cleaned.
44
Do not spray cleaners on electrical controls,
igniters, wires or knob valve stems.
Page 45

WOLF DUAL FUEL RANGE CARE
CARE RECOMMENDATIONS
COMPONENT CARE RECOMMENDATION
Burner Pan
orcelain enamel
P
Burner Cap
Matte-finish
porcelain enamel
Burner Grates
Porcelain-coated
cast iron
Caution! Do not use abrasive cleaners (e.g. Comet); they will permanently scratch the surface.
Resistant to most stains, but not totally impervious to damage. Salt and
ome cooking liquids may pit and stain the surface. Always remove these
s
spills immediately.
General care:
Use a clean cloth or sponge; wipe with warm water and a mild
dish detergent. Rinse and dry immediately.
Spray degreasers:
Spray on a cloth and wipe surface to remove fingerprints
and greasy spatters. Buff dry immediately to avoid streaking.
Protective polish:
Apply to surface to maintain luster and protect from food
stains.
Hard water stains:
General care:
Use white vinegar and water.
Cool first. Remove grate. Wash caps in warm water and liquid
detergent or mild abrasive cleaners. Foods high in acid or sugar content,
such as milk, tomatoes, sauerkraut, fruit juices or pie filling, may pit or craze
the surface. Remove as soon as possible before heating again.
Remove from the range and place on a flat surface near the sink to clean.
Nonabrasive cleaners:
Hot water and liquid detergent, paste of baking soda
and water, plastic pad or sponge.
Mild abrasive and abrasive cleaners:
Control Knobs
Oven Selector Knob
Bezels
Powder-coated die
cast zinc
To remove the knobs, pull the knobs forward off the valve stem (see page 11
on nylon bearing).
General care:
rinse and dr
the finish and may remove the markings. Do not place in dishwasher.
Hand wash all decorative components of your range. This includes the
knobs, bezels, grates and burner caps. A dishwasher should not be used to
clean any of these components.
Spark Igniters
Ceramic
Keep dry; never spray water or cleaner directly on the igniter. When cleaning
around the surface burner, be careful that the cloth does not catch on the
igniter and damage it.
Dimensions in parentheses are in
millimeters unless otherwise specified.
Use sparingly.
Wipe each knob with damp cloth and mild soap and water;
. Never soak in water or use abrasive cleaners; they will scratch
y
45
Page 46

WOLF DUAL FUEL RANGE CARE
CARE RECOMMENDATIONS
COMPONENT CARE RECOMMENDATION
SIGNATURE
POLISH
Signature Polish
is available from
Signature Limited
Laboratory,
P.O. Box 13436,
Dayton, Ohio
45413-0436, or
call 877-376-5474
(toll free).
Range Exterior
nd Riser
a
Classic stainless
steel
Control Panel
Stainless steel
Oven Gasket
Fiberglass netting/
stainless steel wire
Do not use abrasive cleaners; they will permanently scratch the surface.
Resistant to most stains, but not totally impervious to damage. Salt and
some cooking liquids may pit and stain the surface. Always remove these
pills immediately.
s
eneral care: Use a clean cloth or sponge; wipe with warm water and a mild
G
dish detergent. Rinse and dry immediately.
Exterior cleaning:
Use a soft, nonabrasive stainless steel cleaner like Signature Polish (see side note) and apply with a soft, lint-free cloth. To bring out
the natural luster, lightly wipe the surface with a water-dampened microfiber
cloth, followed with a dry microfiber cloth. All work should follow the grain
direction of the finish. Best results are obtained by keeping the cloth in
continuous contact with the metal.
Hard water stains:
Use white vinegar and water.
Use spray cleaners to remove fingerprints and food soils. Spray first on a
cloth before wiping panel.
Do not spray directly on panel or around valve stems or knobs.
Do not hand clean, rub, puncture or remove the oven gasket; this may
compromise the tight door seal.
46
Broiler Pan
Glossy-finish
porcelain enamel
Top:
While slightly warm, place in sink. Lay dish towels on top; pour very hot
water on towels; allow steam to soften cooked-on residue. Clean with hot
water and a mild detergent. Rinse and dry.
Bottom:
Pour grease into disposable can. When cool, wash in hot water and
a mild detergent. Rinse and dry.
Page 47

WOLF DUAL FUEL RANGE CARE
CARE RECOMMENDATIONS
COMPONENT CARE RECOMMENDATION
Oven Cavity and
nterior Door
I
Porcelain enamel
Oven Door Window
Heat-tempered
glass
Oven Light Cover
Heat-tempered
glass
Never wipe a warm or hot porcelain surface with a damp sponge; it
may cause chipping or crazing (tiny hairlike cracks).
Resistant to most stains, but not totally impervious to damage. Salt and
ome cooking liquids may pit and stain the surface. Always remove these
s
spills immediately.
General care:
When cool, clean splatters and spills immediately. Do not
allow food with a high sugar or acid content, such as milk, tomatoes, sauerkraut, fr
uit juices or pie filling, to remain on any porcelain enamel surface.
Failure to remove these foods may cause a permanent dull spot.
Mild abrasive and abrasive cleaners:
Self-Clean mode
can be used.
Use sparingly.
When window is cool, spray glass cleaner on cloth to clean window.
When oven is cool, turn light cover counterclockwise and remove. Wash with
mild abrasive cleaner. Rinse and dry thoroughly. Replace cover over bulb and
turn clockwise to fasten.
A 20-watt halogen oven light bulb replaces the existing bulb (part #803816).
Rack and Rack
Guides
Nickel-plated steel
Dimensions in parentheses are in
millimeters unless otherwise specified.
Before using the
will discolor if left in the oven during this feature. Clean with a mild abrasive
cleaner.
Self-Clean mode
, remove oven racks and rack guides. They
47
Page 48

WOLF COOKING GUIDE
WOLF COOKING GUIDE
Cooking Cooking Rack Total Time Comments/ Time
Food Mode Temperature Position(s) 30"/ 36" Oven 18" Oven*
BAKED GOODS
Bread
Biscuits** Bake 450˚F (230˚C) 4 8–10 min 6–8 min
Convection 425˚F (220˚C) 4 8–10 min 6–8 min
Convection 425˚F (220˚C) 2 and 4 8–10 min 8–10 min
Cinnamon Rolls Bake 350˚F (175˚C) 4 20–25 min 20–25 min
Convection 325˚F (165˚C) 2 and 4 20–25 min 20–25 min
Rolls Bake 350˚F (175˚C) 4 20–25 min 20–25 min
Convection 325˚F (165˚C) 2 and 5 15–20 min 15–20 min
Yeast Bread*** Convection 325˚F (165˚C) 4 25–30 min 25–30 min
Yeast Loaf*** Bake Stone 400˚F (205˚C) 1 10–15 min Not available
Cakes
Angel Food Bake 350˚F (175˚C) 2 37–45 min 37–45 min
multiple (36" oven only) Bake 350˚F (175˚C) 2 37–45 min 37–45 min
Bundt Convection 325˚F (165˚C) 4 40–45 min 40–45 min
Mixes Bake 350˚F (175˚C) 4 30–40 min 30–40 min
Convection 325˚F (165˚C) 2 and 5 25–30 min 8"–9" (203–229) round pan
Cupcakes
Bake 350˚F (175˚C) 4 20–25 min 6-cup muffin pan
Convection 325˚F (165˚C) 2 and 5 18–23 min 6-cup muffin pan
Cookies
Brownies Bake 350˚F (175˚C) 4 20–25 min Use square pan
Convection 325˚F (165˚C) 2 and 4 15–20 min Use square pan
Sugar Bake 350˚F (175˚C) 4 8–12 min 9" x 13" (229x 330) sheet
Convection 325˚F (165˚C) 2 and 5 8–12 min 9" x 13" (229 x330) sheet
Convection 325˚F (165˚C) 2, 4 and 6 8–12 min 9" x 13" (229x 330) sheet
Chocolate Chip Bake 375˚F (190˚C) 4 8–12 min 9" x 13" (229x 330) sheet
Convection 350˚F (175˚C) 2 and 5 8–9 min 9" x 13" (229 x330) sheet
Convection 350˚F (175˚C) 2, 4 and 6 8–9 min 9" x 13" (229 x 330) sheet
Cornbread
Cream Puffs
Convection 375˚F (190˚C) 4 20–25 min Use square pan
Convection 400˚F (205˚C) 4 30–35 min 9" x 13" (229 x 330) pan
Convection 400˚F (205˚C) 2 and 4 30–35 min 9" x13" (229 x330) pan
Custards/Puddings
*If baking time is not listed, use same time as listed for 30" /36" ovens. **For refrigerated biscuits, follow package directions.
***Internal temperature of 195–200˚F (90–95˚C). This chart is a guide; recipe or package directions should take precedence.
NOTE: Oven rack positions listed ar
Bake 350˚F (175˚C) 4 35–40 min Use square pan
e for 30" ovens; rack positions will var
y for 18" and 36" ovens.
48
Page 49

WOLF COOKING GUIDE
WOLF COOKING GUIDE
Cooking Cooking Rack Total Time Comments/ Time
Food Mode Temperature Position(s) 30"/ 36" Oven 18"Oven
BAKED GOODS
Muffins
Bake 425˚F (220˚C) 4 15–20 min 10–15 min (6-cup muffin pan)
Convection 400˚F (205˚C) 4 15–20 min 10–15 min (6-cup muffin pan)
Convection 400˚F (205˚C) 2 and 5 10–15 min 10–15 min (6-cup muffin pan)
Pastry Crust
ies
P
illed Conv Bake 375˚F (190˚C) 4 40–45 min 40–45 min
F
Conv Bake 425˚F (220˚C) 4 10–12 min 10–12 min
Frozen Conv Bake 375˚F (190˚C) 4 50–55 min 50–55 min
Lemon Meringue Broil Low (3) 4 2
1
/2 min 21/2 min
Pumpkin Conv Bake 425˚F (220˚C)/ 325˚F (165˚C) 4 15 min / 1 hr 15 min / 1 hr
Popovers
(single) Bake 450˚F (230˚C) / 350˚F (175˚C) 4 15 min / 20 min Not advised
(multiple) Convection 450˚F (230˚C) / 350˚F (175˚C) 2 and 5 15 min /20 min Not advised
Puff Pastry
Bake 400˚F (205˚C) 4 10–12 min 8–10 min
(single) Convection 375˚F (190˚C) 4 10–12 min 8–10 min
(multiple) Convection 375˚F (190˚C) 2, 4 and 6 10–12 min 8–10 min
Quick Breads
(single) Convection 325˚F (165˚C) 3 40–45 min 40–45 min
(multiple) Convection 325˚F (165˚C) 1 and 4 40–45 min 40–45 min
ENTREES
Calzone
Bake Stone 400˚F (205˚C) 1 9–10 min Not available
Pizza
Frozen Bake Stone 400˚F (205˚C) 1 8–14 min Not available
Homemade Bake Stone 400˚F (205˚C) 1 6–9 min Not available
Quiche
Bake 375˚F (190˚C) 4 40–50 min 40–50 min
(Convection not advised)
Soufflé
This chart is a guide; recipe or package directions should take precedence. NOTE: Oven rack positions listed are for 30" ovens; rack
positions will vary for 18" and 36" ovens.
Dimensions in parentheses are in
millimeters unless otherwise specified.
Bake 375˚F (190˚C) 4 35–40 min 35–40 min
49
Page 50

WOLF COOKING GUIDE
WOLF COOKING GUIDE
Cooking Cooking Rack Total Time* Total Time* Internal
Food Mode Temperature Position 30" / 36" Oven 18" Oven Temperature
MEATS
Beef
Chuck Roast, 2–4 lbs (.9–1.8 kg) Conv Roast 325˚F (165˚C) 3 20–25 min/lb 20–25 min/lb Med, 160˚F (70˚C)
Ground, Patties Broil** High (1) 6 10–12 min 10–12 min Med, 150˚F (65˚C)
Rib Roast, 4–6 lbs (1.8–2.7 kg) Conv Roast 325˚F (165˚C) 3 25–30 min/lb 25–30 min/lb Rare, 140˚F (60˚C)
Sirloin Rump Roast,
4–6 lbs (1.8–2.7 kg) Conv Roast 325˚F (165˚C) 3 30–35 min/lb 30–35 min/lb Rare, 140˚F (60˚C)
Sirloin Tip Roast,
3–5 lbs (1.3–2.3 kg) Conv Roast 325˚F (165˚C) 3 30–35 min/lb 30–35 min/lb Rare, 140˚F (60˚C)
1
Steaks, 1
Steaks, 1" (25) thick Broil** High (1) 5 12–15 min 12–15 min Rare, 140˚F (60˚C)
Tenderloin, 2–3 lbs (.9–1.3 kg) Conv Roast 325˚F (165˚C) 3 20–25 min/lb 20–25 min/lb Rare, 140˚F (60˚C)
Chicken
Bone-in Breasts Conv Broil** Med (2) 5 20–25 min 20–25 min Well,170˚F (75˚C)
Boneless Breasts Broil** Med (2) 6 10–15 min 10–15 min Well, 170˚F (75˚C)
Quarters Conv Broil** Med (2) 5 30–35 min 30–35 min 180˚F (80˚C) in thigh
Thighs Conv Broil** Med (2) 5 20–25 min 20–25 min Well,180˚F (80˚C)
Whole
/2" (38) thick Conv Broil** High (1) 5 20–25 min 20–25 min Rare, 140˚F (60˚C)
Conv Roast 325˚F (165˚C) 3 18–20 min/lb 18–20 min/lb 180˚F (80˚C) in thigh
Cornish Game Hens
Conv Roast 325˚F (165˚C) 3 28–33 min/lb 28–33 min/lb 180˚F (80˚C) in thigh
Roast 350˚F (175˚C) 3 28–33 min/lb 28–33 min/lb 180˚F (80˚C) in thigh
Duck
, 5–7 lbs (2.3–3.2 kg) Conv Roast 325˚F (165˚C) 3 18–20 min/lb Not advised 180˚F (80˚C) in thigh
Goose
, 8–10 lbs (3.6–4.5 kg) Conv Roast
325˚F (165˚C)
2 18–20 min/lb Not advised 180˚F (80˚C) in thigh
Ham
1
/2" (13) thick
Broil** High (1) 6 6–8 min 6–8 min 140˚F (60˚C)
1" (25) thick Broil** High (1) 6 10–12 min 10–12 min 140˚F (60˚C)
Lamb
Chops, 3/4" (19) thick Broil** High (1) 5 8–10 min 8–10 min Med Rare,145˚F (65˚C)
Broil** High (1) 5 11–12 min 11–12 min Med, 160˚F (70˚C)
Leg, 4–6 lbs (1.8–2.7 kg) Conv Roast 325˚F (165˚C) 3 20–25 min/lb 20–25 min/lb Med Rare, 145˚F (65˚C)
15–18 min/lb
own Rack
Cr
*Min/lb indicates specified cook time per pound or .45 kg. **Probe cannot be used in this cooking mode; use a meat thermometer to
check internal temperature. This chart is a guide; recipe or package directions should take precedence. NOTE: Oven rack positions
listed are for 30" ovens; rack positions will vary for 18" and 36" ovens.
Conv Roast
325˚F (165˚C)
1
Not advised Med Rare,145˚F (65˚C)
50
Page 51

WOLF COOKING GUIDE
WOLF COOKING GUIDE
Cooking Cooking Rack Total Time* Total Time* Internal
Food Mode Temperature Position 30" / 36" Oven 18" Oven Temperature
MEATS
Meat Loaf
Pork
Chops, 1" (25) thick Broil** Med (2) 6 10–15 min Not advised Med, 160˚F (70˚C)
Loin, 3–4 lbs (1.3–1.8 kg) Conv Roast 325˚F (165˚C) 3 18–22 min/lb Not advised Med, 160˚F (70˚C)
Steak, 1" (25) thick Broil** Med (2) 5 25–30 min Not advised Med, 160˚F (70˚C)
Conv Roast 325˚F (165˚C) 3 50–60 min 50–60 min 160˚F (70˚C)
ausage
S
roil** Med (2) 5 8–10 min Not advised Med, 160˚F (70˚C)
B
Turkey
Breast, whole Conv Roast 300˚F (150˚C) 2 12–15 min/lb Not advised 170˚F (75˚C) in breast
Pieces Conv Broil** Med (2) 4 40–45 min Not advised 180˚F (80˚C) in thigh
Whole Conv Roast 325˚F (165˚C) 1 11–14 min/lb Not advised 180˚F (80˚C) in thigh
Veal Roast
SEAFOOD
1
, 2–3 lbs (.9–1.4 kg) Conv Roast 300˚F (150˚C) 3 30–35 min/lb Not advised Med Rare, 140˚F (60˚C)
/2" (13) thick Broil** Med (2) 6 5–7 min 5–7 min
1" (25) thick Conv Broil** Med (2) 6 12–17 min 12–17 min
Red Snapper Broil** Med (2) 6 5–7 min 5–7 min
1
Salmon,
Swordfish, 1
VEGETABLES
/2" (13) thick Broil** Med (2) 6 12–15 min 12–15 min
1
/2" (38) thick Broil** Med (2) 6 10–12 min 10–12 min
Potatoes Bake 400˚F (205˚C) 3 45–60 min 45–60 min
Sweet Potatoes Bake 400˚F (205˚C) 3 40–50 min 40–50 min
Winter Squash Convection 350˚F (175˚C) 3 40–45 min 40–45 min
Bake 375˚F (190˚C) 3 50–55 min 50–55 min
OTHER
** Med (2) 5 2–3 min 2–3 min
oil
ench Br
Fr
ead Pizza
Garlic Bread, 1" (25) thick Broil** Med (2) 5 3–3
1
oast,
/2" (13) thick
T
Br
1
/2 min 3–31/2 min
Conv Br
** Med (2) 5 3–3
oil
1
/2 min
3–
Broil** Med (2) 6 2 min 2 min
1
3
/2 min
n/lb indicates specified cook time per pound or .45 kg. **Probe cannot be used in this cooking mode; use a meat thermometer to
Mi
*
check internal temperature. This chart is a guide; recipe or package directions should take precedence. NOTE: Oven rack positions
e for 30" ovens; rack positions will var
listed ar
y for 18" and 36" ovens.
Dimensions in parentheses are in
millimeters unless otherwise specified.
51
Page 52

WOLF TROUBLESHOOTING GUIDE
TROUBLESHOOTING GUIDE
PROBLEM POSSIBLE SOLUTION
urner flame does not
B
burn evenly
ood boils or burns in
F
one area of the pan more
than other areas
Burner fails to ignite
Burners extinguish themselves when using more
than one large roaster or
griddle simultaneously
Food boils over the pan
and into the burner
drip pan
lign the burner cap of the stacked, sealed burner assembly as
A
described on page 10.
an is not centered above the burner.
P
Pan material does not conduct heat evenly.
Base of pan is warped and does not rest flat on the grate, or
handle of pan is too heavy and tips pan toward handle.
Ceramic igniter is damp from a spillover or spray cleaner. Allow
ceramic to dry out completely.
Burner cap ports are blocked. Use a straightened, metal paper clip
to open the blockage.
If a GFCI circuit is used, check to see if it has been tripped.
Good gas combustion requires the correct amount of airflow to
maintain the flame. Using two oversized pans simultaneously
restricts air movement.
Heat setting is too high or pan size is too small for its contents.
52
Water does not come to
a boil fast enough
Food cooks too slowly
when sautéing
Simmer setting does not
maintain constant surface
temperatur
e
Water temperature is colder than usual.
Cover pan for most ef
Diameter of pan is too large or base of pan is warped.
oo much food is added at one time; reduce amount of food and
T
sauté in batches.
Size of food pieces is too large or temperature of food is colder
than usual.
Pan does not conduct heat evenly.
Delicate foods may need a lower simmer setting so that scorching
does not occur.
ficient use of the high setting.
Page 53

WOLF TROUBLESHOOTING GUIDE
TROUBLESHOOTING GUIDE
PROBLEM POSSIBLE SOLUTION
xterior browning is
E
uneven
ven temperature is
O
too hot
Excessive smoke when
broiling
Oven temperature is
not hot enough
Warm air venting into
kitchen after oven has
been turned off
an is too large for good heat circulation or too many pans on
P
a rack.
ood cooked in glass, glass ceramic or dark metal holds more
F
heat than shiny metal pans.
Baking pan is too large for the recipe.
Change rack level or cooking mode.
Oven temperature setting is too high for the recipe.
Using pan other than two-piece broiler pan.
Failure to trim off extra fat.
Lower rack level or shorten time.
Oven is not fully preheated.
Door is opened too often or left open.
Food is wrapped in foil; check mode for tips that give best results.
Pan is too small for the amount of food in it.
Warm air exhaust is a normal oven function, needed to maintain
and cool down oven temperatures. It turns off automatically
when the heat cools to a safe temperature.
PROBE flashes in the
display when using probe
feature.
Touch oven off.
Push probe into probe receptacle completely until it snaps into place.
Reset oven temperature and probe temperature.
Dimensions in parentheses are in
millimeters unless otherwise specified.
53
Page 54

WOLF SERVICE INFORMATION
SERVICE INFORMATION
CONTACT
INFORMATION
Wolf Customer
Service:
800-332-9513
Website:
wolfappliance.com
When requesting information, literature,
replacement parts or service, always refer to
he model and serial number of your dual fuel
t
range. This information is found on the
product rating plate located under the control
anel. Refer to the illustration on page 8.
p
Record the rating plate information below for
future reference.
Model Number
Serial Number
Installation Date
Wolf Authorized Service Center and Phone
Wolf Dealer and Phone
BEFORE CALLING FOR SERVICE
PRODUCT REGISTRATION
egister your new Wolf product today so that
R
we may ensure your satisfaction. You may
register by one of the following options:
1)
Mail in the completed Wolf Product
Registration Card.
2)
Register online at
3)
Register by phone by calling the Wolf
wolfappliance.com
.
Customer Service Department at
800-332-9513
.
The model and serial numbers of your appliance are printed on the enclosed Wolf Product
Registration Card. If you provide us with your
e-mail address, we will send you exciting new
product updates and recipes as they become
available, along with information on special
events.
Before calling your Wolf authorized service
center, refer to the Troubleshooting Guide on
pages 52–53. Check the household fuse or
circuit breaker to see if it has been blown or
tripped and that the electrical connection to
the appliance has not been disconnected. A
power outage may also have caused a disr
tion in ser
vice.
up-
The information and images are the copyright
property of Wolf Appliance Company, Inc.,
an affiliate of Sub-Zero Freezer Company, Inc.
Neither this book nor any information or images
contained herein may be copied or used in
whole or in part without the express written
permission of Wolf Appliance Company, Inc.,
an affiliate of Sub-Zero Freezer Company, Inc.
©Wolf Appliance Company, Inc. all rights
ved.
eser
r
54
Page 55

W OLF A PPLIANCE P RODUCTS
L IMITED W ARRANTY
R
ESIDENTIAL USE ONLY
FULL TWO YEAR WARRANTY*
or two years from the date of original installation, your Wolf Appliance product warranty covers all
F
parts and labor to repair or replace any part of the product that proves to be defective in materials
or workmanship. All service provided by Wolf Appliance Company under the above warranty must
be performed by a Wolf Appliance authorized service center, unless otherwise specified by Wolf
ppliance Company. Service will be provided in the home during normal business hours.
A
LIMITED THIRD THROUGH FIFTH YEAR WARRANTY
From the third through fifth year from the date of original installation, Wolf Appliance Company will
repair or replace the following parts that prove to be defective in materials or workmanship. Labor to
emove and replace defective parts is not covered. Wolf Appliance Company recommends that you
r
use a Wolf Appliance authorized service center to perform such service.
Gas Burners (excluding appearance), Electric Heating Elements, Blower Motors (vent hoods),
Electronic Control Boards, Magnetron Tubes and Induction Generators
LIMITED LIFETIME WARRANTY
For the life of the product, Wolf Appliance Company will repair or replace any BBQ body or BBQ hood
that rusts through due to defective material or workmanship. Labor to remove and replace defective
parts is not covered. Wolf Appliance Company recommends that you use a Wolf Appliance authorized service center to perform such service.
TERMS APPLICABLE TO EACH WARRANTY
The warranty applies only to products installed for normal residential use. The warranty applies only
to products installed in any one of the fifty states of the United States, the District of Columbia or
the ten provinces of Canada. This warranty does not cover any parts or labor to correct any defect
caused by negligence, accident or improper use, maintenance, installation, service or repair.
THE REMEDIES DESCRIBED ABOVE FOR EACH WARRANTY ARE THE ONLY ONES THAT WOLF
APPLIANCE COMP
WARRANTY ARISING BY OPERATION OF LAW. WOLF APPLIANCE COMPANY, INC. WILL NOT BE
RESPONSIBLE FOR ANY CONSEQUENTIAL OR INCIDENTAL DAMAGES ARISING FROM THE
BREACH OF THIS WARRANTY OR ANY OTHER WARRANTY, WHETHER EXPRESS, IMPLIED OR
ATUTORY.
ST
Some states do not allow the exclusion or limitation of incidental or consequential damages, so the
above limitation or exclusion may not apply to you. This warranty gives you specific legal rights and
you may also have other legal rights that vary from state to state.
o receive parts an
T
nearest you, contact Wolf Appliance Company, INC., P.O. Box 44848, Madison, Wisconsin 53744;
check the Locator section of our website, wolfappliance.com, or call 800-332-9513.
Stainless Steel (classic
*
limited 60 day parts and labor warranty for cosmetic defects.
ANY
/or service and the name of the Wolf Appliance authorized service center
d
, platinum and carbon) doors, panels and product frames are covered by a
WILL PRO
, INC.
VIDE, EITHER UNDER THIS WARRANTY OR UNDER ANY
55
Page 56

OLF APPLIANCE COMPANY, INC. P. O. BOX 44848 MADISON, WI 53744 800-332-9513 WOLFAPPLIANCE.COM
W
808734
7/2006
 Loading...