

Page 1

802781, 802782, 802783, 812340, 812341, 812342, 814020, 815837, 820395
Warming Drawer Handle Installation Instructions
812548 / Rev D / October, 2011Page 1 of 4
CONT
AINS:
ITEM
QTY DESCRIPTION
A 4 Bolt, #10-24 x 3/4''
B 4 Bolt, #10-24 x 1''
C 4 Bolt, #10-24 x 1-1/4''
D 4 Bolt, #10-24 x 1-3/4''
E 4 Bolt, #10-24 x 2-1/4''
F 4 Bolt, #8-32 x 5/8''
G 4 Bolt, #8-32 x 1''
NOTES:
• This front panel kit is designed for and approved only for use with Wolf Warming Drawer (WWD30).
• These handle kits are designed for use with a Wolf Integrated Front Panel Kit #808152
• Please read these instructions carefully before beginning installation.
• For any additional information, refer to the Use and Care Information and Installation instructions included
with model WWD30.
AB C D EFGHI JK L
Fastener Reference
802781 Handle, Tubular 23-1/2” Classic
802782 Handle, Tubular 23-1/2” Carbon
802783 Handle, Tubular 23-1/2” Platinum
812340 Handle Curved 26-7/8” Framed
812341 Handle, Curved 29-3/8” Unframed
812342 Handle, Pro 25-7/8”
814020 Tube Handle, 3/4'' Unframed
815837 Tube Handle, 3/4'' Framed
820395 Tube Handle, 3/4'' Black
ITEM QTY DESCRIPTION
H 4 Bolt, #8-32 x 1 1/4''
I 4 Bolt, #8-32 x 1 3/4''
J 4 Bolt, #8-32 x 2 1/2''
K 4 Washer, 1/4 x 5/8''
L 2 Stud, Mounting
1 Instructions
See Fastener Reference Diagram Below:
Page 2
802781, 802782, 802783, 812340, 812341, 812342, 814020, 815837, 820395
Warming Drawer Handle Installation Instructions
812548 / Rev D / October, 2011
INST
ALLATION PROCEDURE:
1” Tubular Handles
(Kits 802781, 802782, 802783):
1. Mark custom panel to locate the drill holes using
the center-line dimensions from Figure 1. Drill
four (4) 7/32'' to 1/4'' holes.
2. Counter bore 5/8'' holes to 5/32'' deep so that you
can completely recess the head of the bolt and
washer (See Figure 2).
3. Insert appropriate length bolts (two 1/4'' bolts, but
may vary depending on panel thickness) with
washer(s) through holes into handle (See Figure
2).
4. Tighten the bolts to secure the handle to cabinet
panel.
5. Proceed with panel attachment instructions included with the WWD flush mount panel kit.
3/4” Tubular Handle Framed & Unframed
(Kits 814020, 815837, 820395):
1. Mark custom panel to locate the drill holes using
the center-line dimensions from Figures 3 or 4.
Drill four (4) 7/32'' to 1/4'' holes.
(CONTINUED ON NEXT PAGE)
Page 2 of 4
C
L
19.310
23.750
C
L
15.310
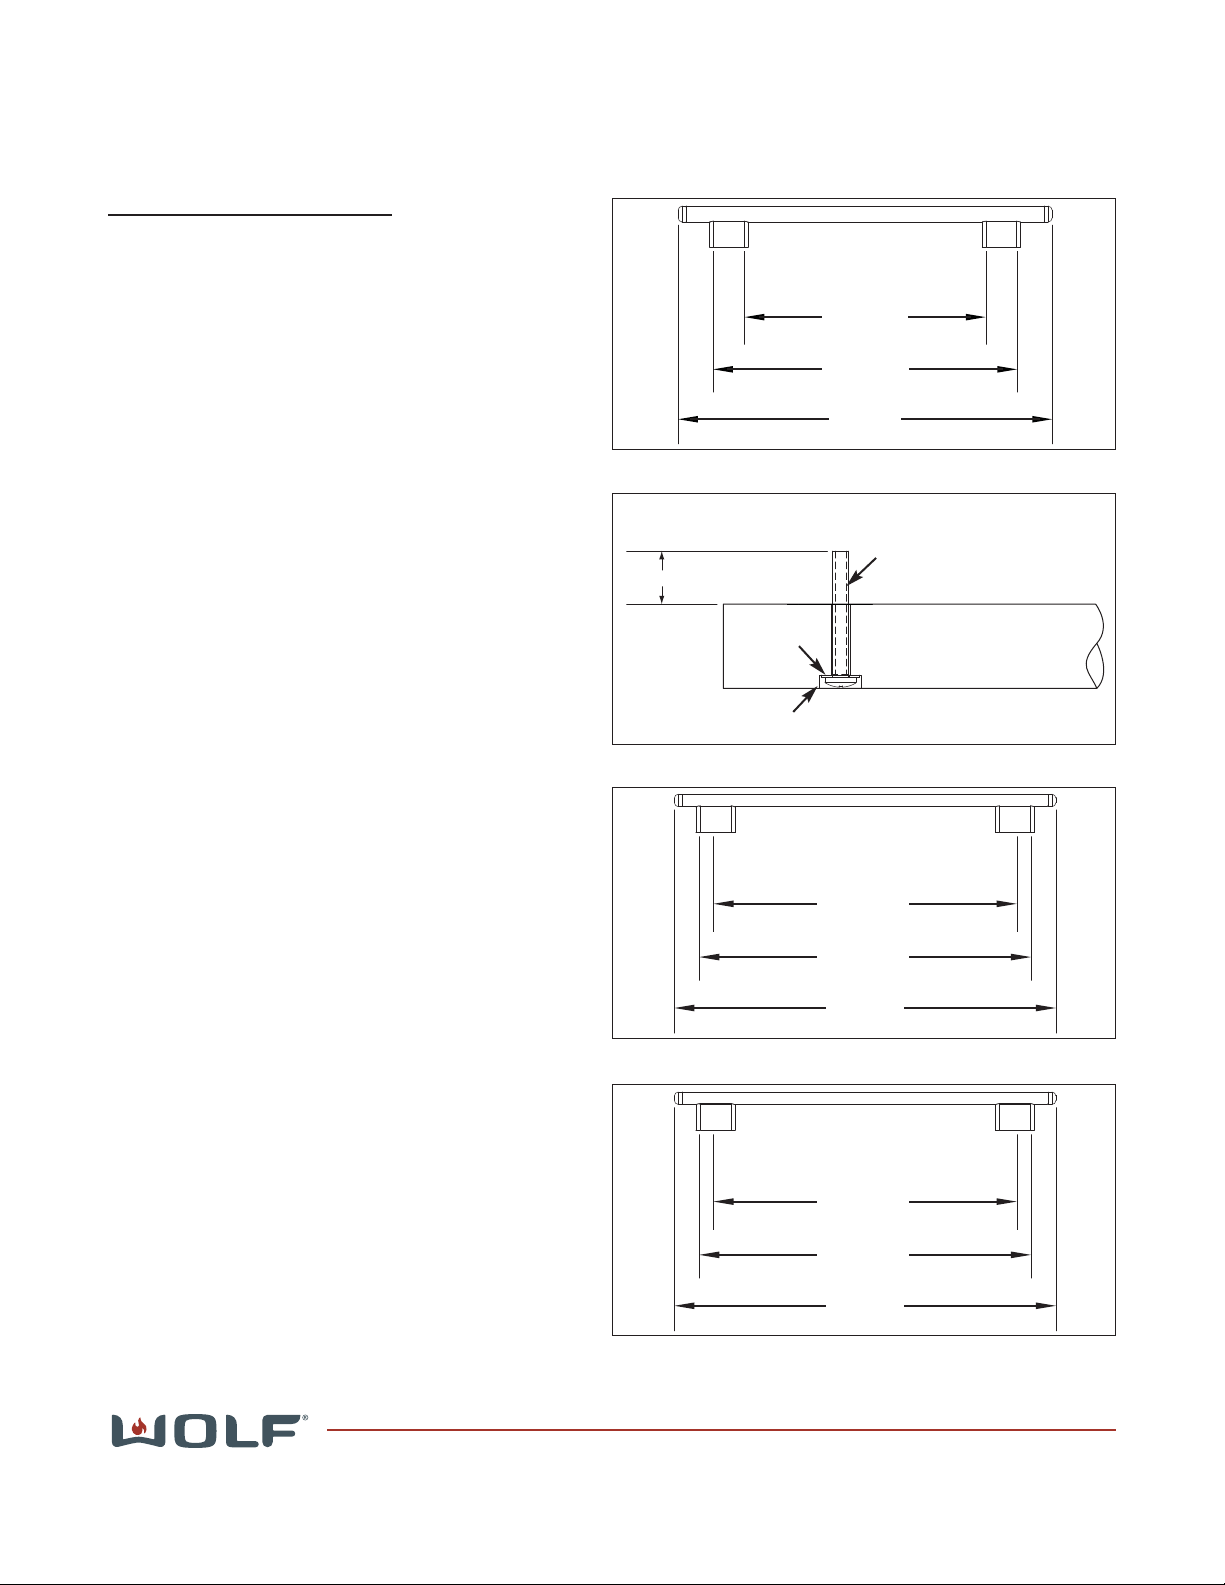
Figure 1. 1'' Handle Dimensions
1-3/8” to 1 3/4”
Figure 2. Decorative Panel Prep for Handle
C
L
26.625
29.375
C
L
25.375
Figure 4. 3/4'' Unframed Handle Dimensions
C
L
24.124
C
L
25.374
26.875
Figure 3. 3/4'' Framed Handle Dimensions
Counter Bore
Bolt
Decorative Panel
(Cross Section View)
Washer
Page 3

802781, 802782, 802783, 812340, 812341, 812342, 814020, 815837, 820395
Warming Drawer Handle Installation Instructions
812548 / Rev D / October, 2011
2. The panel should be counter bored so that when
an appropriate length bolt and washer are put in
the hole, between 1-3/8'' to 1-3/4'' of thread is
exposed on the face side of panel to hold the handle (See Figure 4).
3. Be sure that there is enough material removed
with the counter bore that the bolt head surface is
completely recessed into the cabinet panel (See
Figure 4).
4. A different length bolt or additional washers may
be required to achieve the proper amount of
shown thread depending on the thickness of your
custom panel.
5. Proceed with panel attachment instructions included with the WWD flush mount panel kit.
Pro Series Handle (Kit 812342):
1. Mark custom panel to locate the drill holes using
the center-line dimensions from Figure 5. Drill
two (2) 7/32” to 1/4” holes
2. Counter bore 5/8” holes to 5/32” deep so that you
can completely recess the head of the bolt and
washer (See Figure 6).
3. Insert appropriate length bolts with washer(s)
through holes and thread the mounting studs onto
the bolts (be sure that the bolt is not bottomed out
in the mounting stud) and tighten (See Figure 6).
4. Insert pro series handle onto mounting studs and
secure with the set screws
5. Proceed with panel attachment instructions included with the WWD flush mount panel kit.
Page 3 of 4
C
L
18.717”
1.000
C
L
.375”
#10-32 Tapped Hole
19.967”
Figure 5. Pro Handle Dimensions
1-3/8” to 1 3/4”
Figure 4. Decorative Panel Prep for Handle
Counter Bore
Bolt
Decorative Panel
(Cross Section View)
Washer
Figure 6. Decorative Panel Prep for Handle
Counter
Bore
Bolt
Decorative Panel
(Cross Section View)
Washer
Mounting Stud
Standoff
Page 4

802781, 802782, 802783, 812340, 812341, 812342, 814020, 815837, 820395
Warming Drawer Handle Installation Instructions
812548 / Rev D / October, 2011
.666
.571
.461
.368
Max. Thread Length
Min. Thread Length
Max. Thread Length
Min. Thread Length
Figure 8. Decorative Panel Prep for Handle
C
L
24.124
C
L
25.374
26.875
Figure 7. Curved Framed Handle Dimensions
C
L
26.624
C
L
25.374
29.375
Figure 9. Curved Unframed Handle Dimensions
Curved Handles Framed & Unframed
(Kits 812340, 812341):
1. Mark custom panel to locate the drill holes using
the center-line dimensions from Figures 7 or 9.
Drill four (4) 7/32'' to 1/4'' holes.
NOTE: Countersink procedure is critical for this
application. Damage may occur to the handle if
these instructions are not followed precisely.
2. The handle mounting holes should be counter
bored (5/8'' diameter to 5/32'') so that when an
appropriate length #8-32 bolt and washer are put
in the hole, there will be a proper amount of
thread visible on the face side of the panel to hold
the handle without causing damage (See Figures
8 or 10) for the visible thread requirements.
3. Be sure that there is enough material removed
with the counter bore that the bolt head surface is
completely recessed into the cabinet panel.
4. A different length bolt or additional washers may
be required to achieve the proper amount of
shown thread depending on the thickness of your
custom panel.
5. Proceed with panel attachment instructions included with the WWD flush mount panel kit.
Page 4 of 4
.650
.443
.733
.525
Min. Thread Length
Max. Thread Length
Min. Thread Length
Max. Thread Length
Figure 10. Decorative Panel Prep for Handle
 Loading...