

Page 1

Front Panel Kit Model Numbers:
• 802505 – WDFRONT/S –
Classic Stainless Steel
• 802506 – WDFRONT/B –
Carbon Stainless Steel
• 802507 – WDFRONT/P –
Platinum Stainless Steel
• 802727 – WDFRONT/I –
Integrated Front Panel for
Wood Front
Handle Assemblies Available:
(for use with 802727)
• 802781 – Stainless Handle
Assembly
• 802782 – Black Handle Assembly
• 802783 – Platinum Handle
Assembly
Handle assemblies include handle,
stand-offs and mounting screws.
W OLF W ARMING D RAWER F RONT P ANEL K IT
I NSTALLATION I NSTRUCTIONS
IMPORTANT NOTE: Please read
these instructions carefully
before beginning installation.
Parts Included with Front Panel
Assembly:
• Front panel
• Six color coordinated screws for
front panel.
• Handle and standoffs (not included
with 802727).
• Four handle mounting screws
(not included with 802727).
• Four color coordinated trim pieces
(not included with 802727).
• Six color coordinated trim mount-
ing screws (not included with
802727).
297/8"
(75.9)
23"
(58.4)
101/4"
(26.0)
Warming drawer overall dimensions
*
Dimension may vary
by +
1
/8" (.3 cm)
231/2"
(59.7)
281/2"*
(72.4)
91/4"
(23.5)
107/8"
(27.6)
91/4"
(23.5)
1" min
(2.5)
E
23/8"
(6.0)
2" x 2" anti-tip
block against
rear of cutout
allow for
5
/8" overlap
on all sides
5"
(12.7)
4"
(10.2)
Warming drawer installation specifications
The Wolf Warming Drawer Model
WD30 can be installed above or
below a single wall oven SO30F/S,
SO30U/B, SO30U/P or SO30U/S or
below cooktop CT36E/S, CT36E/B,
CT36E/P, CT36G/S, or CT36G/P.
Please refer to installstion instructions
provided with cooktops for additional
installation information.
The Wolf Warming Drawer can also
be installed next to or above another
Wolf Warming Drawer.
IMPORTANT NOTE: This Front Panel
Kit is designed for and approved only
for use with Wolf Warming Drawer
WD30.
The cabinet or wall opening must be
within the following dimensions:
Height – 9
1
/4"
Width – 28
1
/
2"
Depth – 23
1
/
2"
Refer to the Use and Care Information and Installation Instructions
included with Model WD30.
Page 2
I NSTALLATION I NSTRUCTIONS
• Align side trim and top trim in
upper corner. Insert color coordinated
screw through trim hole. Verify that
your screw will hold both pieces of
trim – side trim and top trim.
• Continue installation of trim to
next corner. Align side trim and top
trim in corner. Insert color coordinated screw through trim hole. Verify
that your screw holds both pieces of
trim – side trim and top trim.
• Proceed to bottom trim installation.
Align side trim and bottom trim in
corner. Insert color coordinated screw
through trim hole. Verify that your
screw holds both pieces of trim – side
trim and bottom trim. Continue to
remaining corner.
• Once all corners have been
installed. Screw in remaining screws,
one along bottom edge of top trim
and the other along top edge of bottom trim. This will keep your trim
secure and prevent sagging or
damage.
STEP TWO –
Installing Front Panel to Drawer
Front:
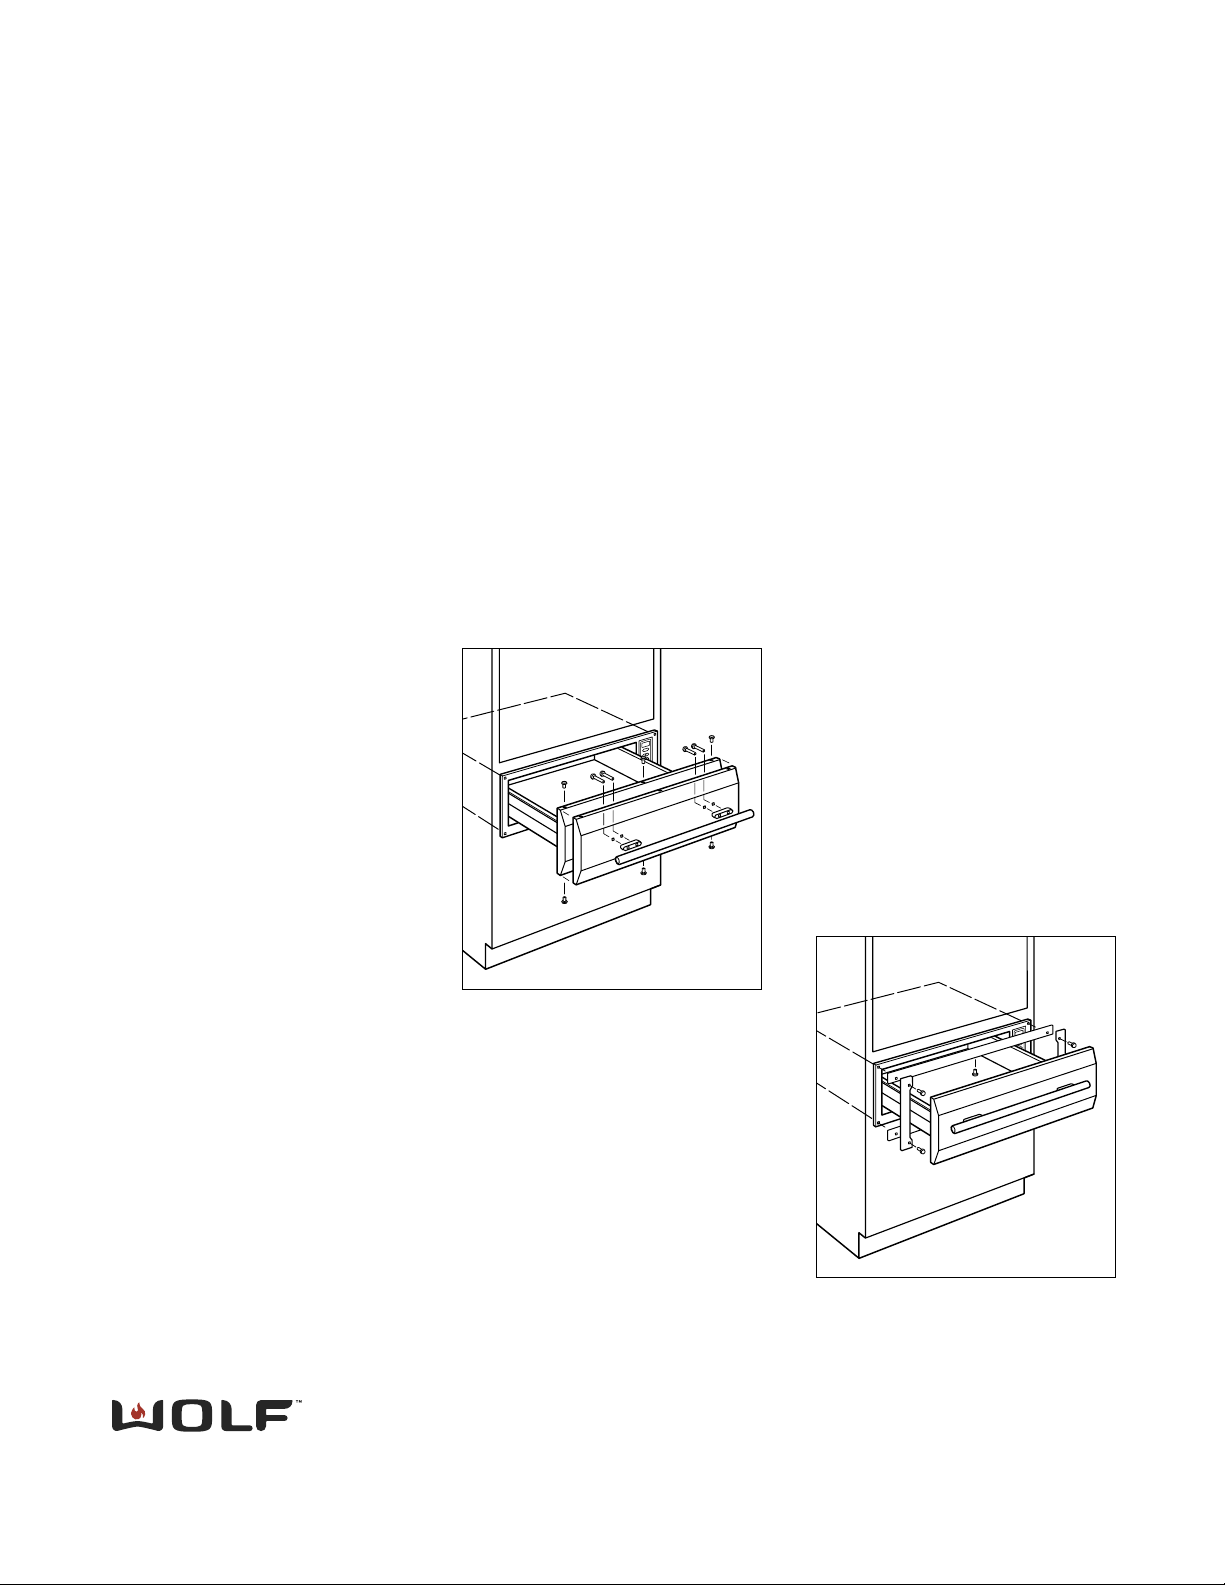
• Slide top lip of front panel over
Warming Drawer door front.
• Insert three (3) screws in top of
front panel lip through door frame
assembly. Use screwdriver to tighten
screws.
• Insert three (3) screws in bottom of
front panel through door frame
assembly. Use screwdriver to tighten
screws.
STEP ONE –
Installing Wolf Handle to Front
Panel:
• Remove all packaging materials sur-
rounding the front panel, handle
assembly and trim kit.
• Gently remove the protective cov-
ering from the stainless steel front
panel or integrated front panel. The
adhesive protective covering should
peel away from the surface cleanly,
but if some residue remains clean surface with a mild detergent.
• Lay front panel on its back surface.
• Line up handle assembly and stand-
offs. Insert handle screws through
holes on front panel. Tighten handle
assembly screws to front panel.
Warming drawer handle and front panel
installation
Warming drawer trim installation
STEP THREE –
Installing Wolf Trim to Warming
Drawer Front:
• Align side trim and warming draw-
er front plate. Verify hole location
from trim corresponds to pre-drilled
hole location on warming drawer
front plate.
• Drill through template holes pro-
vided on front plate through cabinet.
Wolf Appliance Company, LLC • P.O. Box 44848 • Madison, WI 53744 • 800-332-9513 • www.wolfappliance.com
1/02
 Loading...