

Page 1
The Measure of Technology
Manual
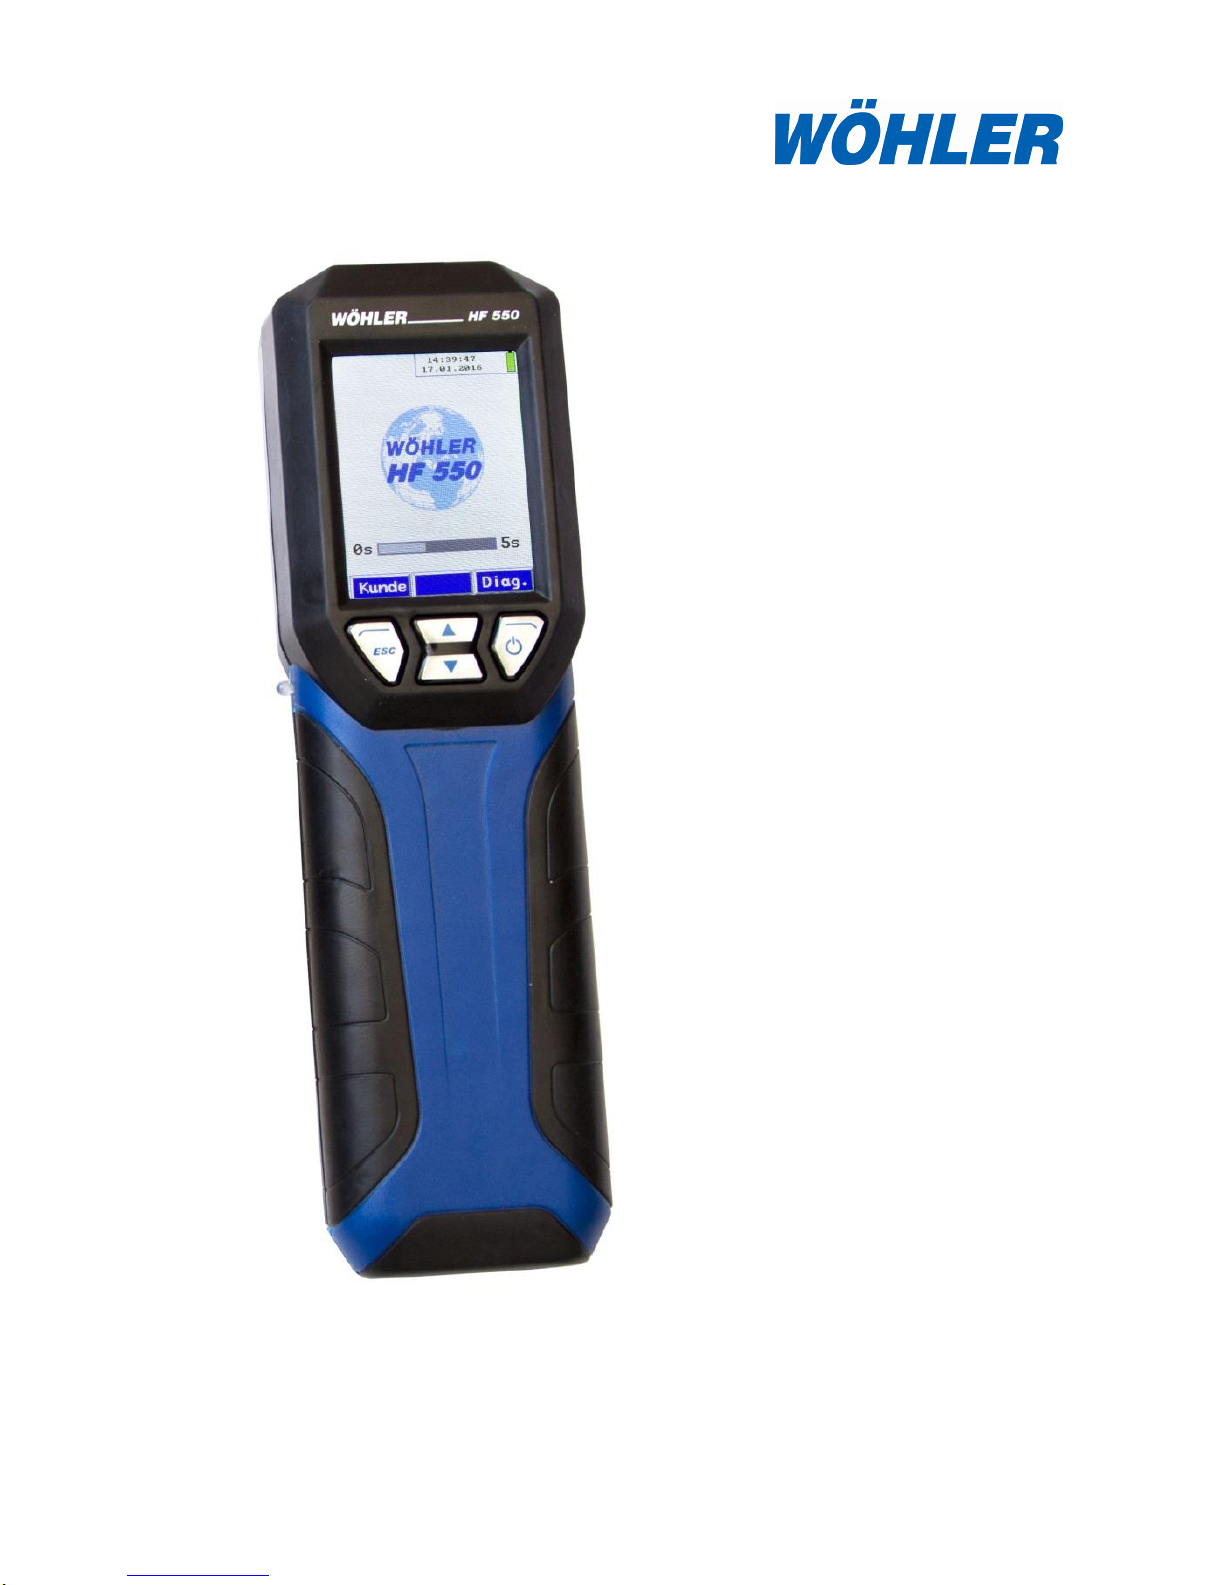
Wood Moisture Meter
Best.-Nr. 23851 – 2016-08-02
Wöhler HF 550
Page 2

Inhalt
2
Contents
1 General Information .............................. 4
1.1 Operation Manual Information ....................... 4
1.2 Notes ............................................................. 4
1.3 Proper use ..................................................... 4
1.4 Transport ....................................................... 5
1.5 Information on disposal ................................. 5
1.6 Manufacturer ................................................. 5
2 Technical Data ....................................... 6
2.1 Wöhler HF 550 Wood Moisture Meter ........... 6
2.2 Wöhler FW 550 Moisture Scale for Bulk
Material ......................................................... 7
3 Device components and connections 8
3.1 Meter ............................................................. 8
3.2 Probes and Moisture Scale .......................... 9
4 Operation ............................................. 10
4.1 Switching the meter on and off .................... 10
5 Check battery status and charge
battery .................................................. 12
6 Measuring the wood moisture of logs ..
.............................................................. 13
6.1 Theoretical background ............................... 13
6.2 Connecting the Probe.................................. 14
6.3 Measuring ................................................... 16
7 Moisture Measurement of bulk material
.............................................................. 22
7.1 Measurement procedure ............................ 22
7.2 Preparation of the measurement ................. 23
7.2.1 Positioning the Moisture Scale .................... 23
7.2.2 Connections ................................ ................ 23
7.3 Measuring ................................................... 24
8 Main menu ........................................... 29
8.1 Moisture Measurement Delete old
measurement .............................................. 29
Page 3

Inhalt
3
8.2 Selection of the material .............................. 30
8.2.1 Log choice (in mode) ................................... 30
8.2.2 Bulk choice (when the Moisture Scale is
connected.) .................................................. 31
8.3 Customer ..................................................... 31
8.4 Save ............................................................ 31
8.5 Print ............................................................. 32
8.6 Select probe................................................. 33
8.7 SETUP ......................................................... 33
8.8 Check HF 550 and calibration HF 550 ......... 34
9 Data administration ............................ 35
9.1 Save records................................................ 35
9.2 Creating a new customer folder ................... 36
9.3 Customer Menu ........................................... 37
10 Maintenance and care ........................ 38
11 Warranty and Service ......................... 39
11.1 Warranty ...................................................... 39
11.2 Service ......................................................... 39
12 Accessories......................................... 40
13 Sales and Service Points ................... 41
Page 4
General Information
4
1 General Information
1.1 Operation Manual In-
formation
This operation manual allows you to work safely
with the Wöhler HF 550. Please keep this manual
for your information.
The Wöhler HF 550 Wood Moisture Meter should
be employed by professionals for its intended use
only.
Liability is void for any damages caused by not
following this manual.
1.2 Notes
WARNING!
Not following this warning can cause injury or
death.
CAUTION!
Not following this note can cause permanent
damage to the meter.
NOTE!
Highlights tips and other useful information.
1.3 Proper use
When the Wöhler HF 550 Wood Moisture Meter is
connected to the Hammer Probe or the Lance
probe, it is suitable for the determination of the
moisture of firewood logs according to VDI 4206,
sheet 4 and the 1. BImSchV. (Federal Immission
Control Act)
When the Wöhler HF 550 Wood Moisture Meter is
connected to the Wöhler FW 550 Moisture Scale,
it is suitable for the determination of the moisture
of bulk material according to the requirements of
VDI 4206, sheet 4.
Page 5
General Information
5
1.4 Transport
CAUTION!
Improper transport can harm the meter, scale and
probes.
Always transport the meter, scale and probes in
the provided carrying case in order to prevent
damage.
WARNING!
Always secure the sharp probe needles with the
protection cap.
1.5 Information on disposal
Electronic equipment does not belong into domestic waste, but must be disposed in accordance
with the applicable statutory provisions.
You may hand in any defective batteries taken out
of the unit to recycling places of public disposal
systems or to selling points of new batteries or
storage batteries.
1.6 Manufacturer
Wöhler Technik GmbH
Schützenstr. 41
33181 Bad Wünnenberg
Tel.: +49 2953 73-100
Fax: +49 2953 73-250
Email: [email protected]
Page 6
Technical Data
6
2 Technical Data
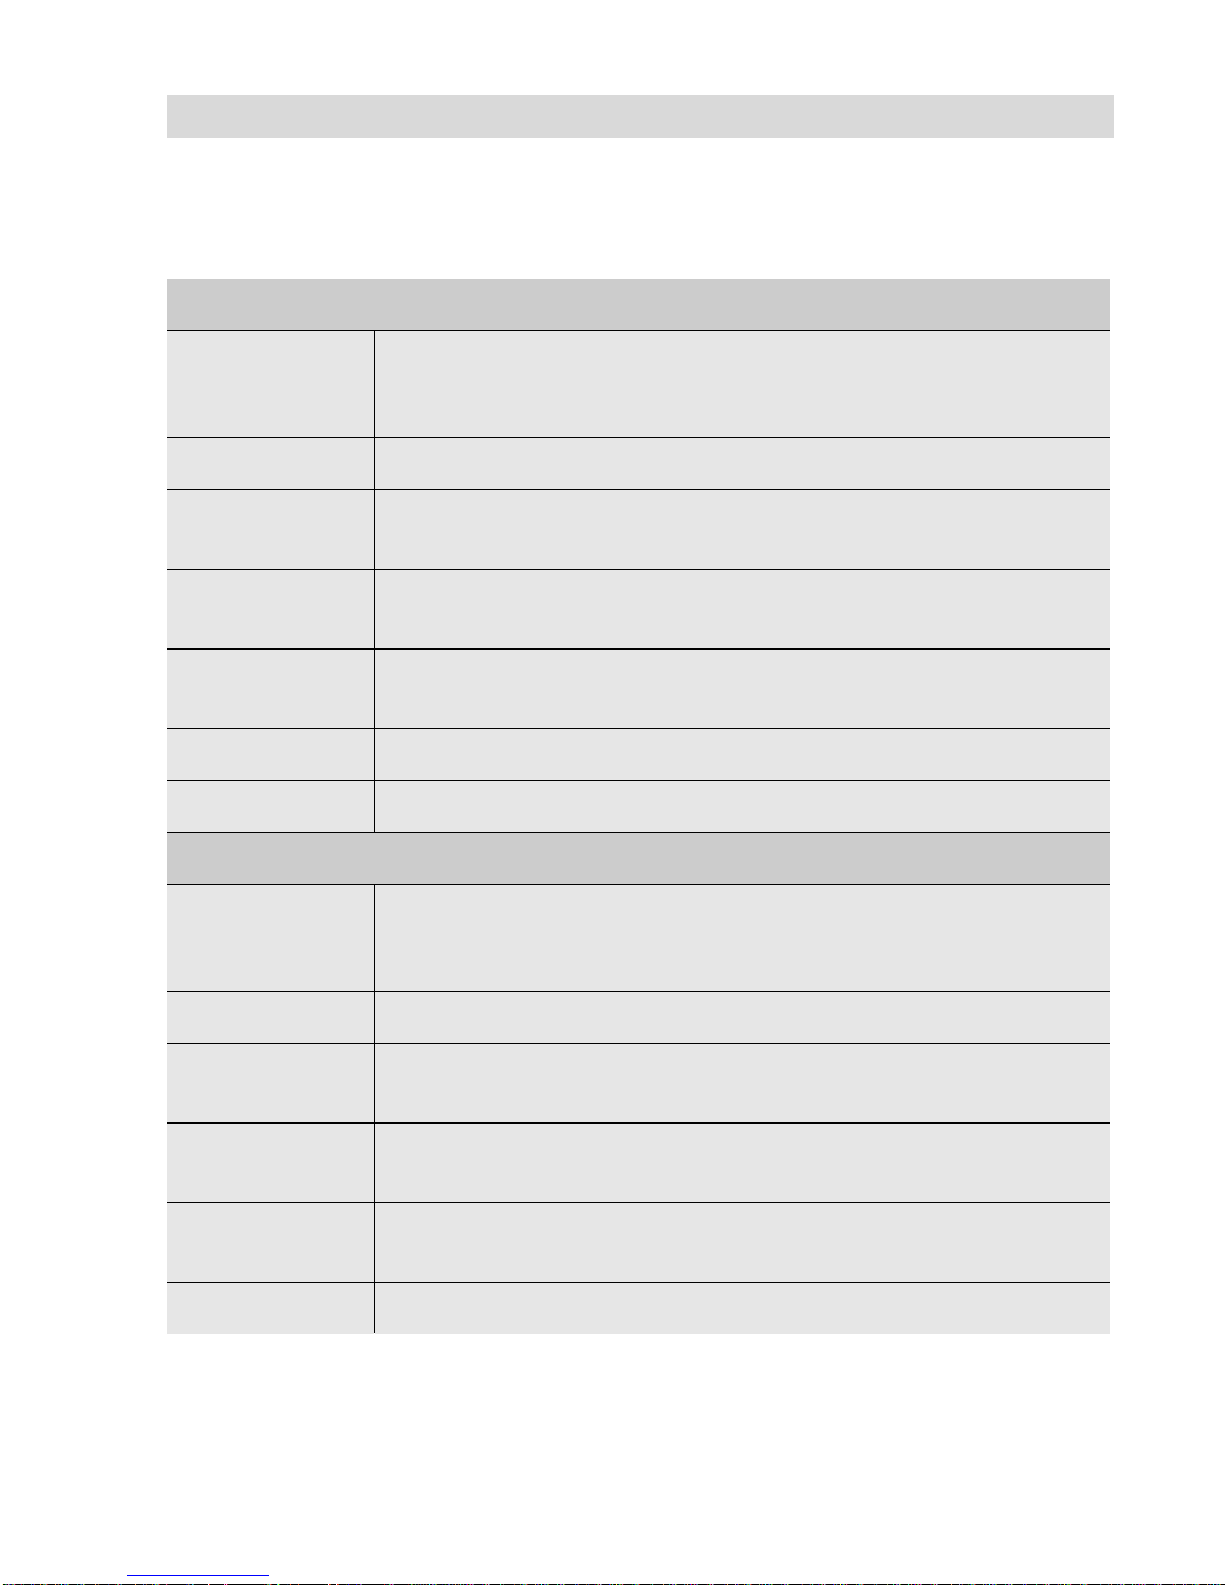
2.1 Wöhler HF 550 Wood Moisture Meter
General technical data
Connections
Wöhler Hammer Probe, Lance Probe,
Wöhler FW 550 Moisture Scale,
Temperature Probe, USB-data transfer
Power supply
Lithium-ion battery 3.6V, 2,250 mAh, charging via USB
Working time
ca. 20 h
(depending on the operating mode and the Display Backlight)
Storage
Temperature
-20°C to +50°C
Operating
temperature
+5°C to +40 °C
Weight
255 g (without probe)
Size
59 x 38 x 200 mm
Moisture measurement of firewood logs
Display
Wood moisture u displayed in % relative to the dry mass of fuel;
user can switch to water content w displayed in % relative to the
moist mass of fuel
Wood species
14 wood species to choose from
Temperature
compensation
Measures temperature of material by means of a temperature
probe
Measurement
principle
Electrical resistance measurement
Range
Moisture: 10.0 % u - 40.0 % u, resolution 0.1 % u
Water content: 9.0 % w - 29.0 % w, resolution 0.1 % w
Accuracy
± 40 % of reading according to VDI 4206 page 4
Page 7
Technical Data
7
2.2 Wöhler FW 550 Moisture Scale for Bulk Material
Moisture Measurement of bulk material
Display
Wood moisture u displayed in % relative to the dry mass of fuel;
user can switch to water content w displayed in % relative to the
moist mass of fuel
The readings are displayed on the HF 550 screen or on the PC
screen
Bulk material
Selectable: wood chips and pellets, as well as six species of grain
Measurement
principle
Dielectric mass measurement
Range
Moisture: 0.1 % u to 70.0 % u, resolution 0.1 % u
Water content: 0.1 % w to 41.0 % w, resolution 0.1 % w
Accuracy
0.1 % u to 5.0 % u, if 2 % u
±40 % of reading in the range 5,0 % u to 70,0 % u
For fuels tested according to the requirements of VDI 4206 Part 4
Page 8
Device components and connections
8
3 Device components and connections
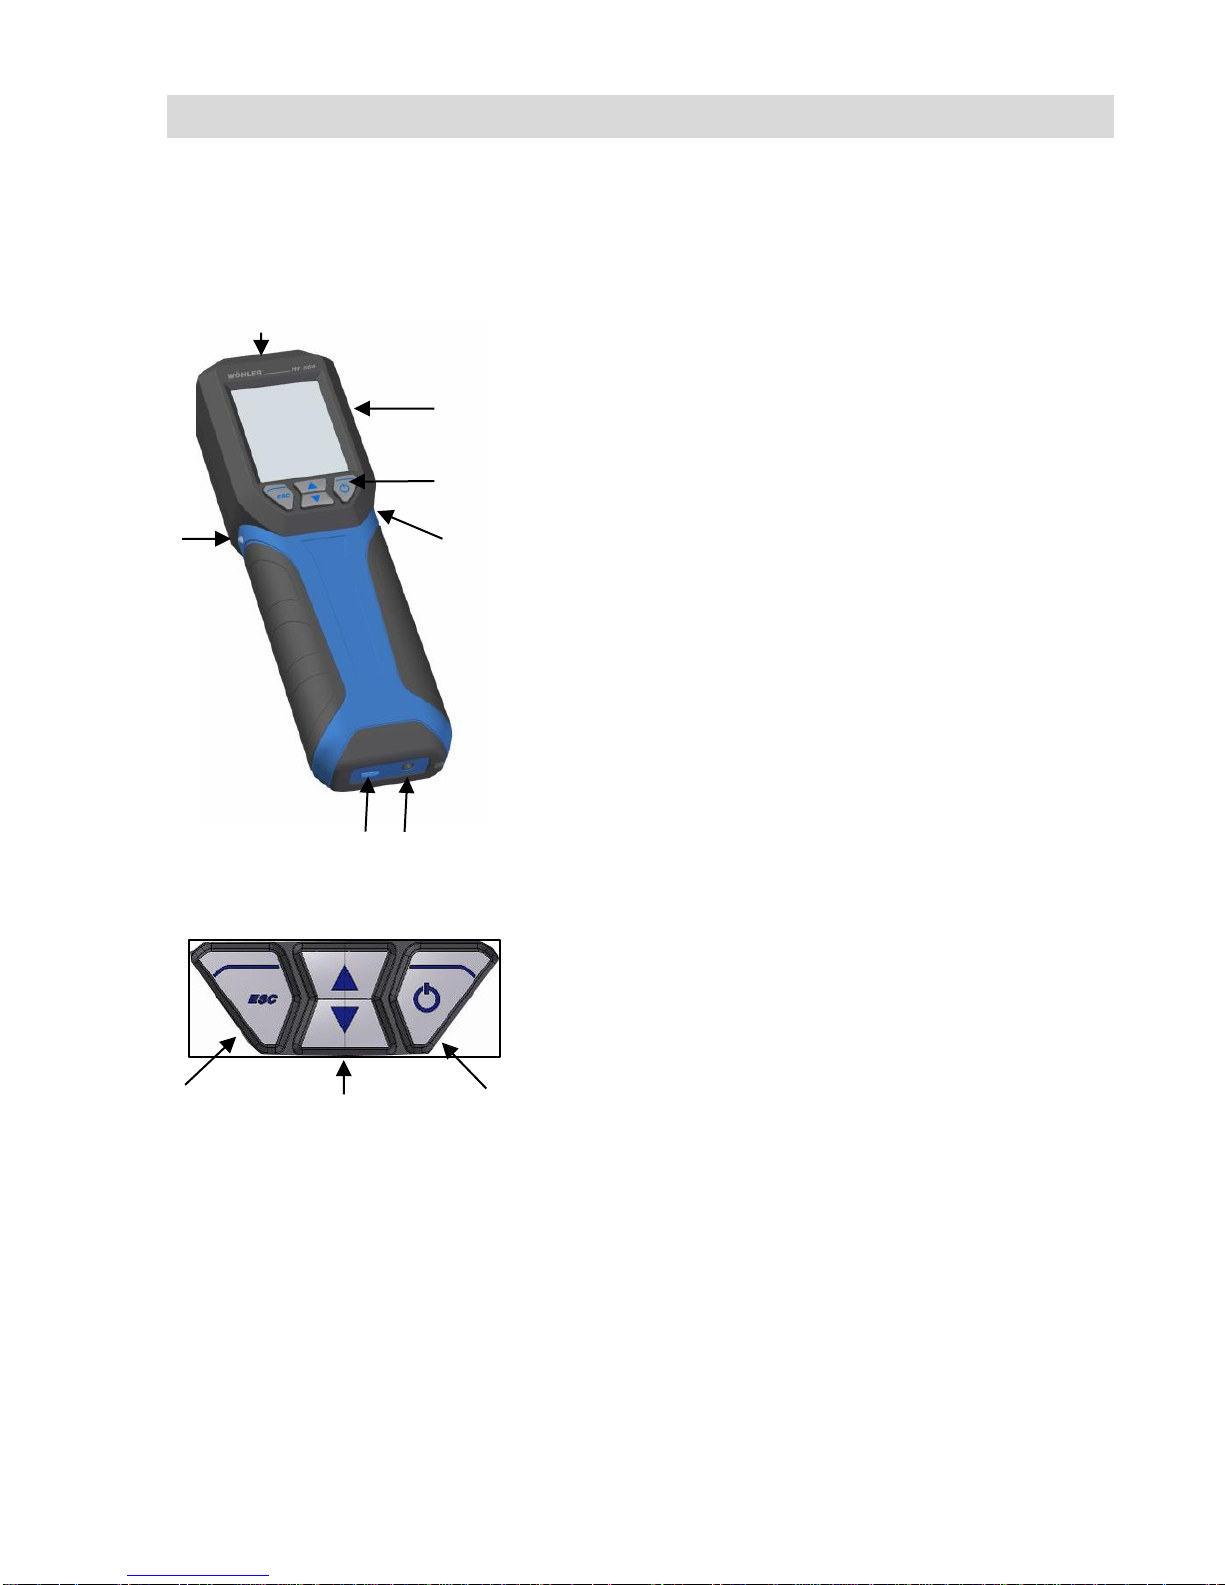
3.1 Meter
Fig. 1: Device components
1. Connection for temperature probe
2. Screen
3. Keypad
4. Infrared port for the data transfer to the
Wöhler TD 100 Thermoprinter
5. Jack connection:
a) Hammer Probe
b) Lance Probe
6. USB port
a) for Charger
b) for Wöhler FW 550 Moisture Scale
7. Transport lock for activating the accu.
Fig. 2: Keypad
1. ESC-key (context-sensitive):
a) cancel the current function
b) go to the main menu
c) return to the measurement menu
2. Arrow-keys:
scroll up and down
3. ON-/Off-key (context sensitive):
a) Switch the meter on and off
(press and hold for 3 seconds)
b) Confirm
c) Save value or delete saved value
1 2 3
4 5 6 7 1 2 3
Page 9
Device components and connections
9
3.2 Probes
and Moisture Scale
CAUTION!
The meter may only be used with the following
Wöhler original accessories:
Firewood logs and bulk material
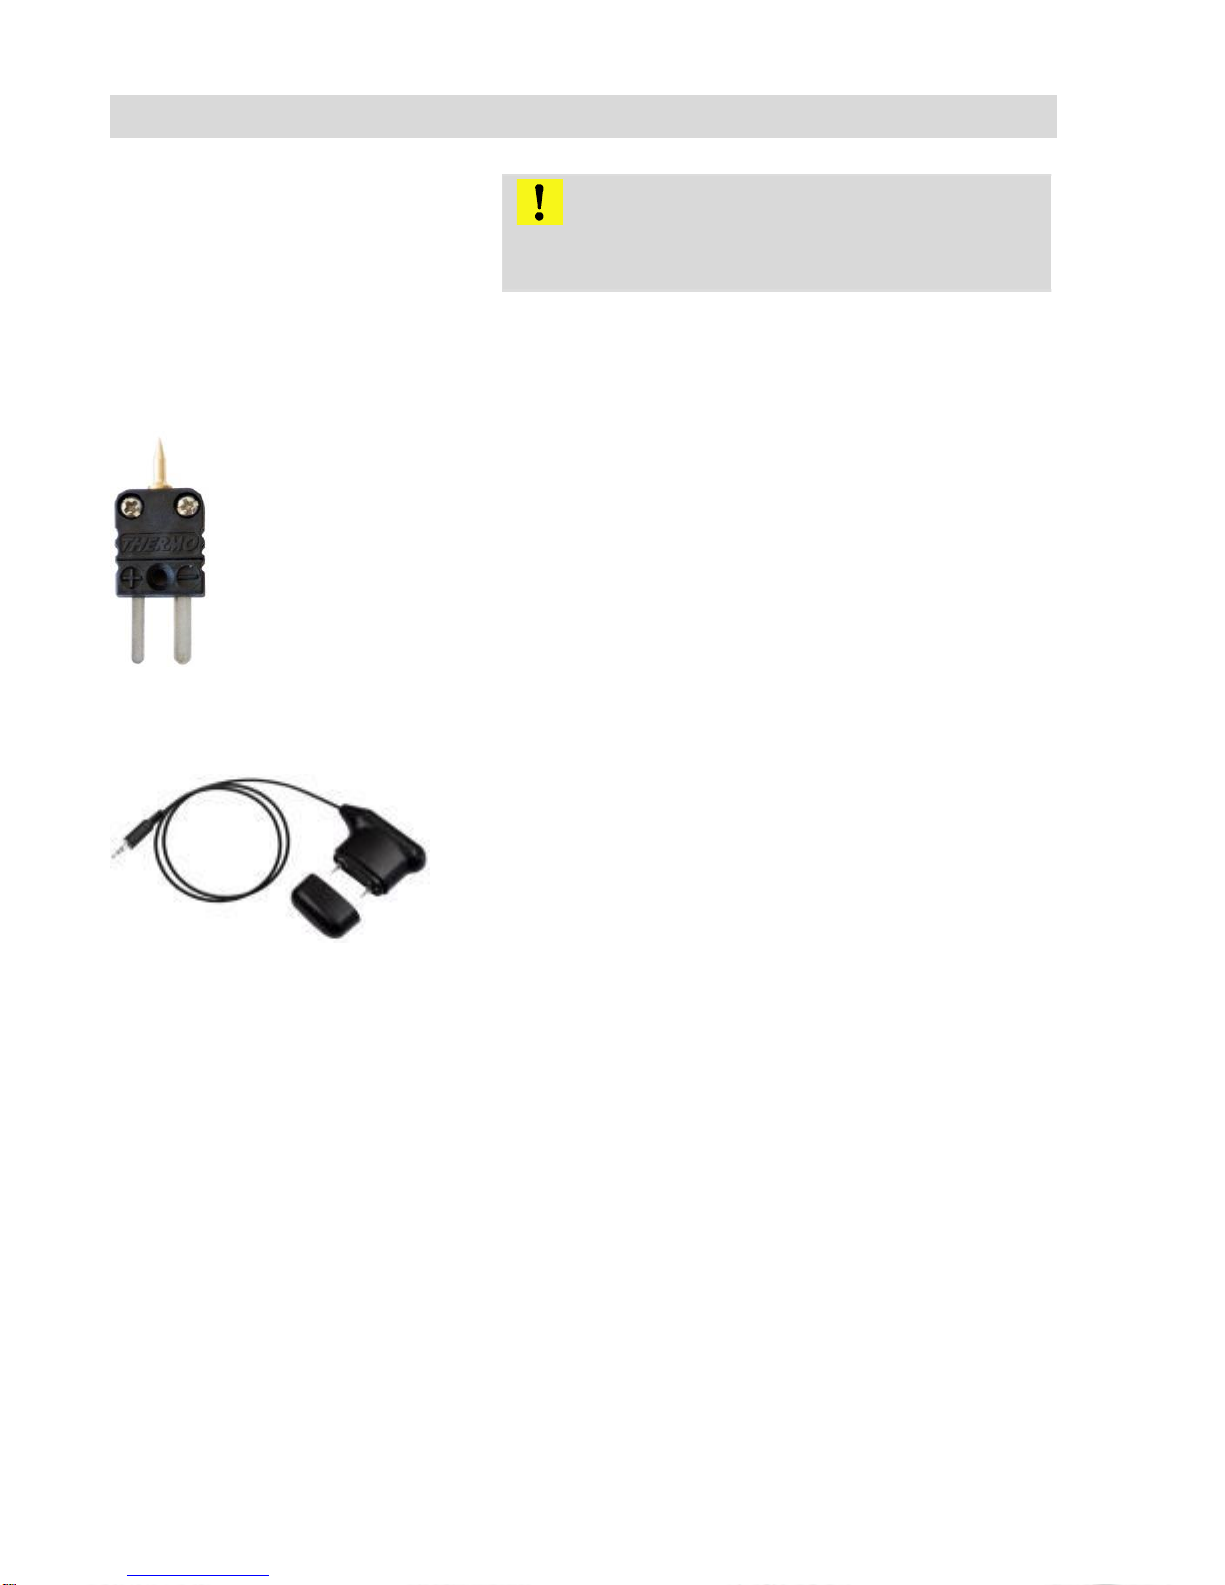
Fig. 3:
Temperature probe Wöhler HF 550
The Temperature probe has to be connected to
the meter for measuring the temperature of the
sample.
Firewood log
Fig. 4: Lance Probe
The Wöhler Hammer Probe or the Lance Probe
have to be connected to meter for measuring the
wood moisture of logs.
Page 10
Operation
10
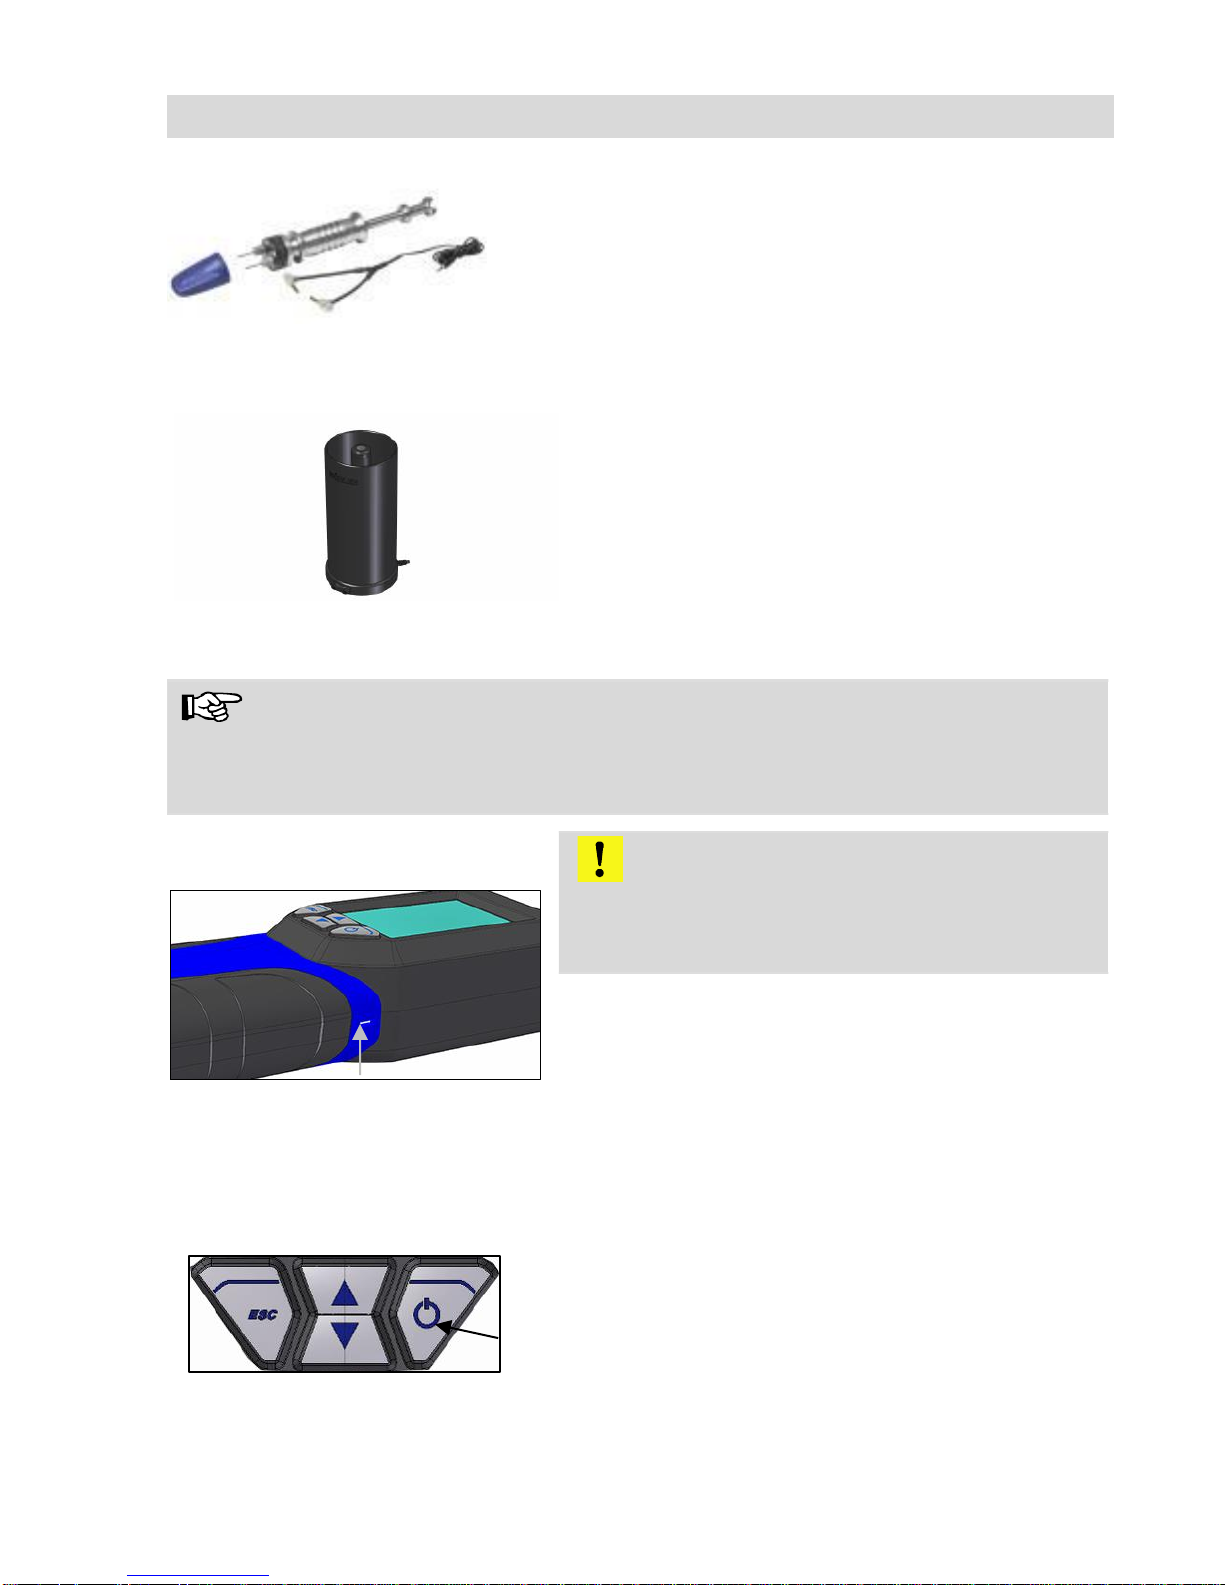
Fig. 5: Wöhler Hammer Probe
The result of the resistance measurement will be
more exact, if the Hammer Probe is used, because the needles of the probe can be inserted
more deeply into the wood, so that humidity can
even be measured inside the wood.
Bulk material
Fig. 6: Wöhler FW 550 Moisture
Scale for Bulk Material
The Wöhler FW 550 Moisture Scale has to be
connected to the meter for measuring the moisture of bulk material.
NOTE!
The meter will automatically detect, if a hammer/lance probe for the measurement of
firewood logs or the moisture scale is connected. The measurement mode for firewood
logs or for bulk material will automatically be displayed in this case.
4 Operation
Fig. 7: Transport lock on the right side of
the meter
CAUTION!
For the transport deactivate the battery with the
transport lock. When the instrument is delivered,
the battery is always deactivated.
Push the transport lock to the left to activate
the battery. Use a pointed object (wire or pen)
for this purpose.
4.1 Switching the meter on and off
Fig. 8: Key pad with on/off-key marked
Turning on the Meter: Press on/off-key shortly
(on the right)
Turning off the meter: Long press the on/off-
key for 3 sec.
Transport lock
Page 11
Operation
11
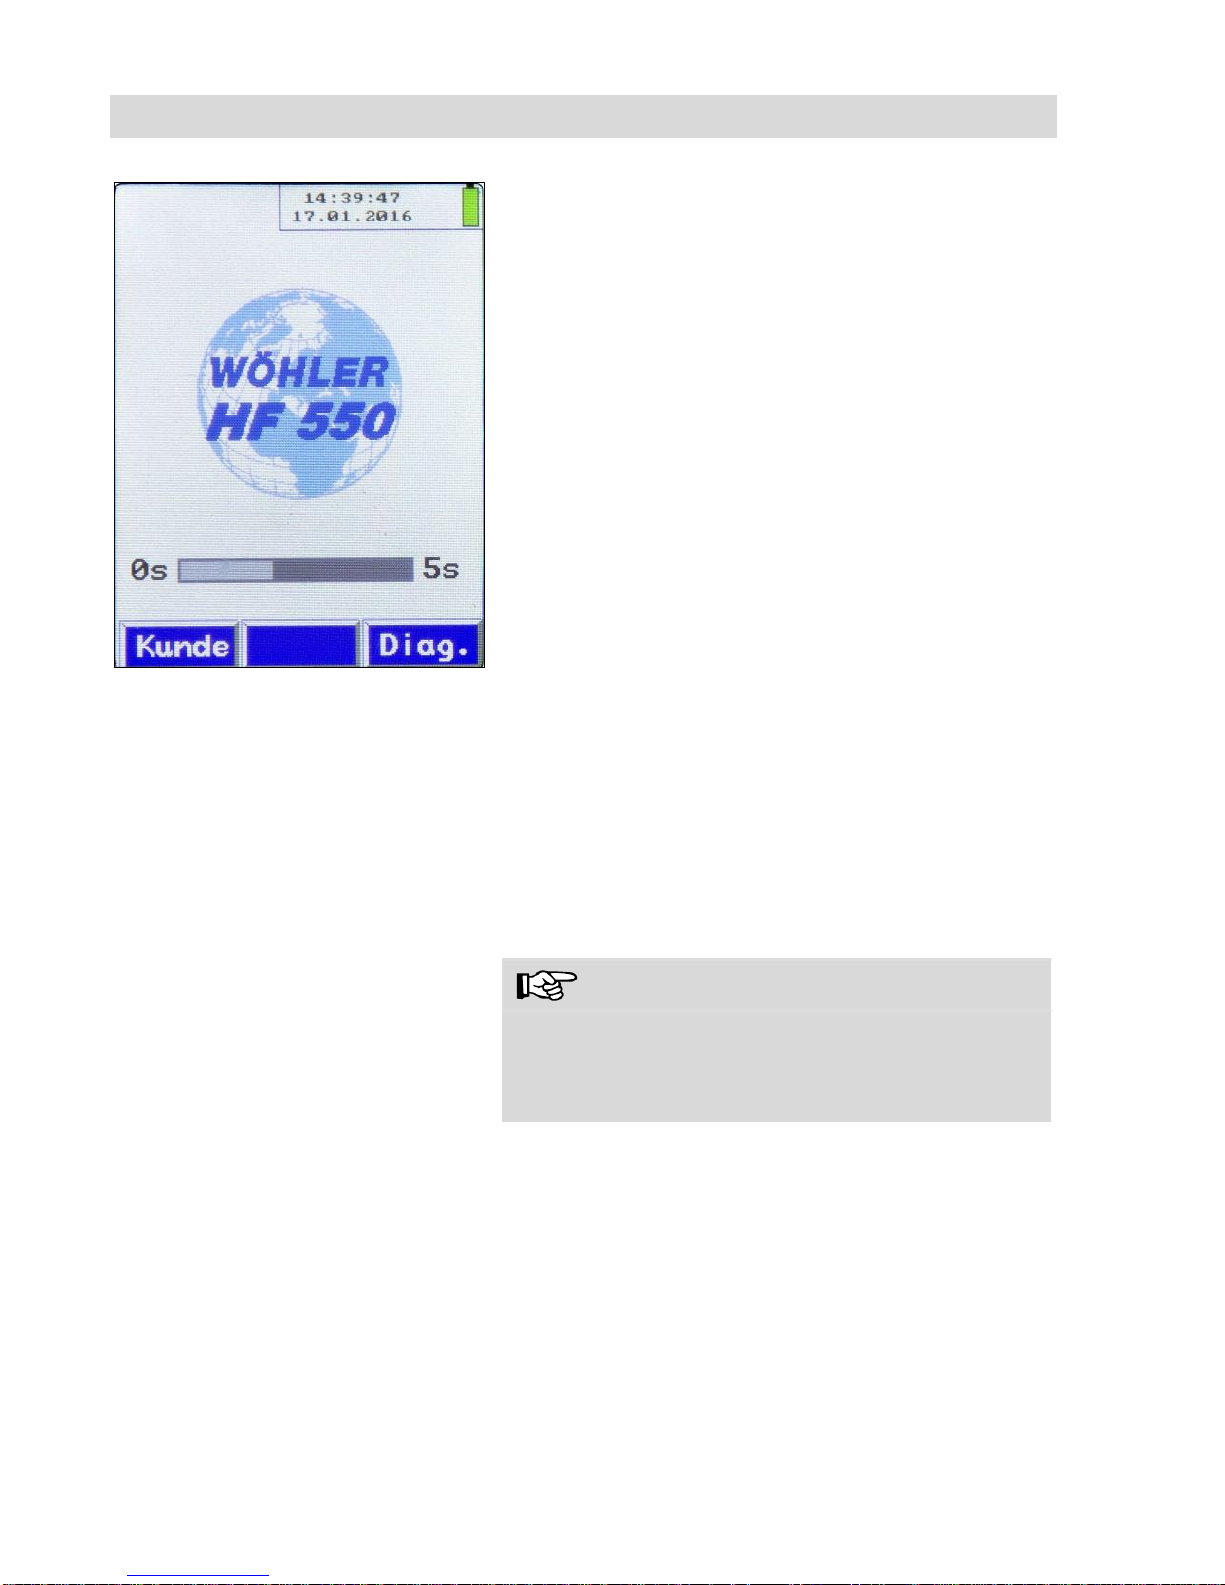
Fig. 9: Initial screen
After the meter has been switched on, a self test
ist carried out for 5 seconds.
During the self test the user has the possibility to
enter the customer menu or the diagnosis menu.
The diagnosis menu shows information about the
firmware, the version of the measurement module,
the serial number of the meter, the calibration
date, the production date and the identification
number of the meter (MIN).
For information about the customer menu, see
chapter 9.2.
After the self test , the measurement screen appears. If the Moisture Scale FW 550 is not connected, the measurement mode “firewood logs”
will appear automatically on the screen. If the
Moisture Scale FW 550 is connected, the measurement screen “bulk material” will appear automatically on the screen.
NOTE!
Only if the Moisture Scale FW 550 is connected to
the meter before the meter is switched on , the
measurement mode “bulk material“ will appear on
screen.
For changing the measurement mode, go to
the main menu and select „Select probe”, see
chapter 8.6.
Page 12
Check battery status and charge battery
12
5 Check battery sta-
tus and charge
battery
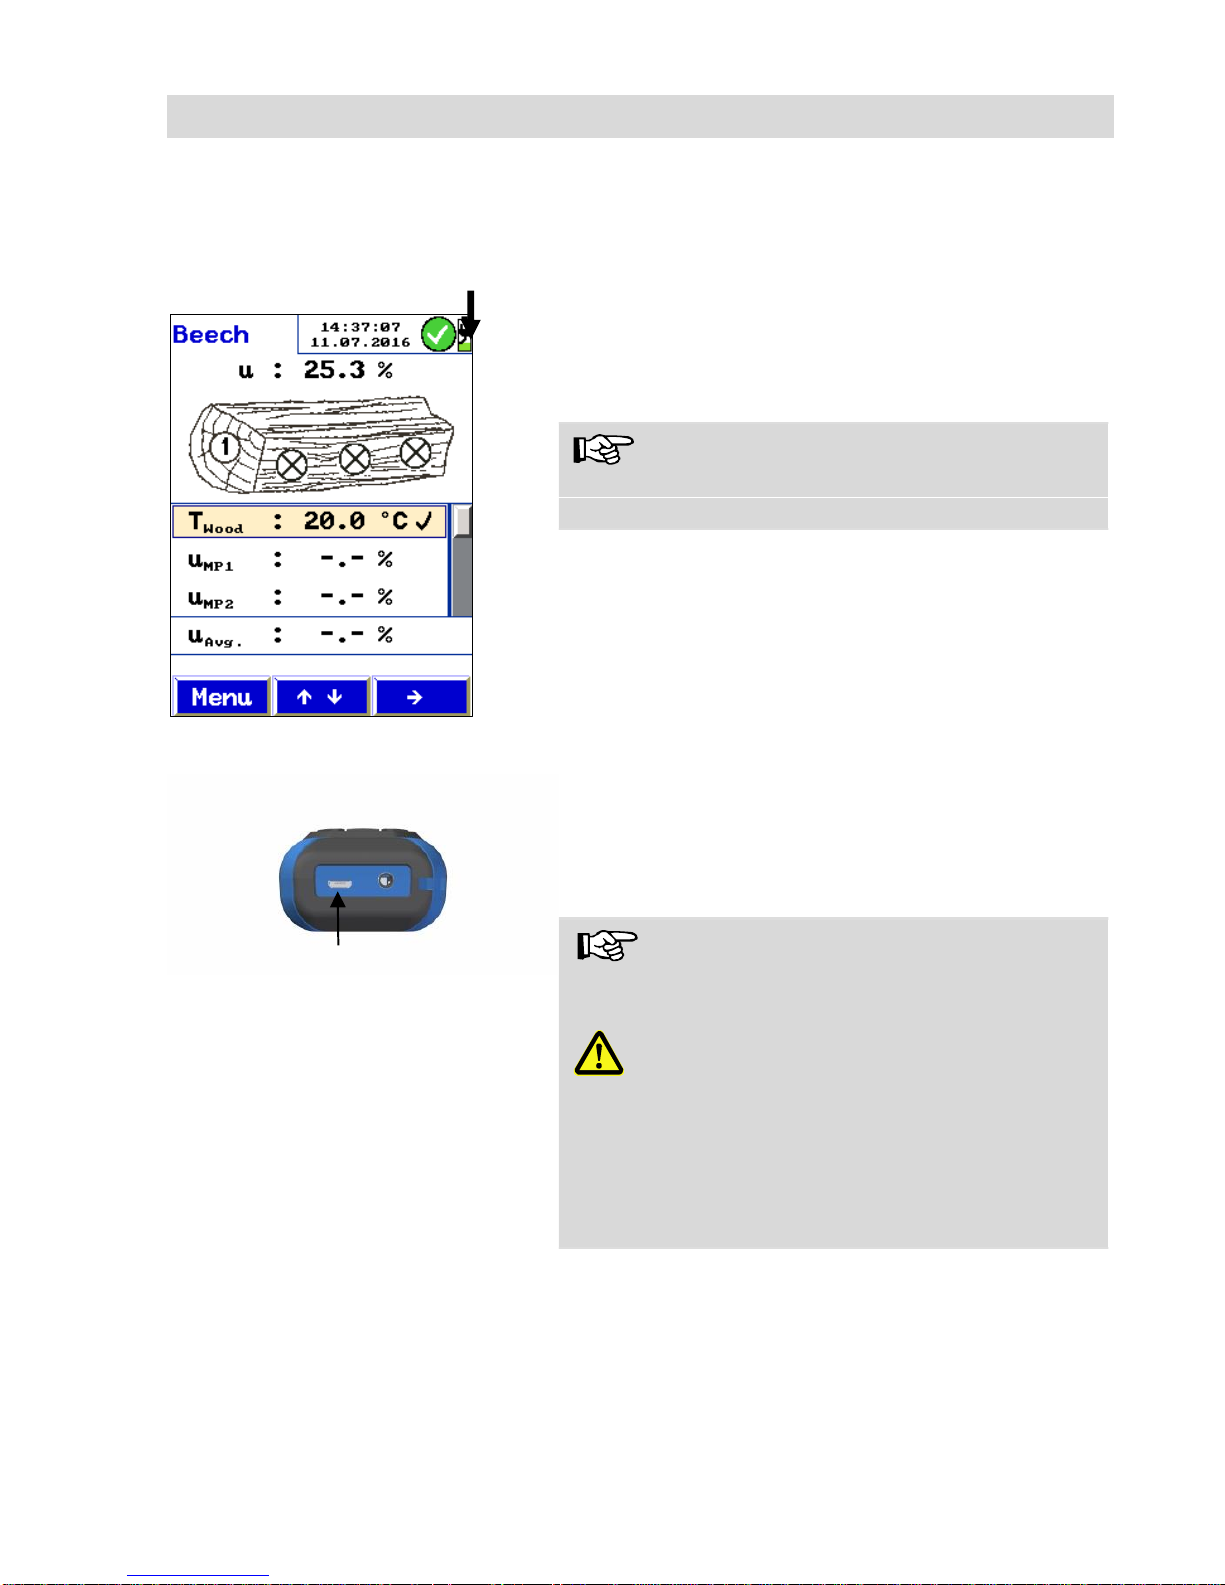
Fig. 10: Battery status
When the device is switched on, the battery status
will be displayed in the upper right hand corner of
the screen. A fully charged battery is shown as a
solid green battery symbol. An empty symbol indicates a discharged battery. When the battery is
almost discharged, only a red line will appear in
the battery icon. In this case, finish the measurement as soon as possible.
NOTE!
It is not possible to remove the battery from the
meter.
Fig. 11: Bottom of the meter with USBport (marked with an arrow)
Plug the USB connector of the recharger into
the USB port at the bottom of the meter.
During the charging process a connector symbol
will appear in the battery icon.
NOTE!
Recharging empty batteries can take up to 4
hours.
WARNING!
Risk of electrical shock!
Never touch a mains plug with wet hands!
Do not expose the power pack to moisture!
Never pull the cable to remove the power pack
from the socket outlet - it could rip out the cable!
Operate the power pack only when the mains
power supply is the same as the voltage stated on
the rating plate!
Page 13

Measuring the wood moisture of logs
13
6 Measuring the wood moisture of logs
The Wöhler HF 550 can measure the wood moisture of logs according to VDI 4206,
part 4. This measurement is based on a resistance measurement. In order to obtain an
exact measurement, the respective material is considered.
The wood moisture depends on the temperature of the material. For this reason, the
wood temperature must be measured at first. The meter will automatically perform a
temperature compensation afterwars.
NOTE!
For measuring the wood moisture of logs the Hammer Probe or the Lance Probe must
be connected to the meter.
6.1 Theoretical background
The resistance measurement uses the needles of the Hammer Probe or the Lance
Probe. The meter will automatically determine the wood moisture u. This is the water
mass mw bound in the fuel and related to the absolute dry fuel mass mB according to
equation (1):
Equation 1
Explanation:
u = wood moisture
mw = water mass bound in the wood
mb = absolute dry fuel mass
NOTE!
According to the above equation the wood moisture may be higher than 100 %.
Page 14

Measuring the wood moisture of logs
14
The wood moisture must not be confused with the water content. The water content is
the water mass related to the total mass of fuel and water (wet basis).
Equation 2
Explanation:
w = water content
mw = water mass bound to wood
mB = absolute dry fuel mass
The wood moisture can be converted to the water content as follows:
Equation 3
Explanation:
w = water content
u = wood moisture
6.2 Connecting the Probe
For the determination of the wood moisture it is necessary to connect two probes to the
meter :
1. Temperature probe, connection at the top of the meter, see figure 1, part 1
2. Wood Moisture Probe (Hammer Probe or Lance Probe), connection at the bottom of the meter, see figure 1, part 5
CAUTION!
Before the meter is used, a visual check of the meter and the probes must ensure that
all functions work properly.
Before start measuring, check that the needles/electrodes of the Hammer Probe or
Lance Probe are not bent. If the electrodes are bent, the distance will not be 25 mm any
more, so that the measurement result may not be correct.
Page 15
Measuring the wood moisture of logs
15
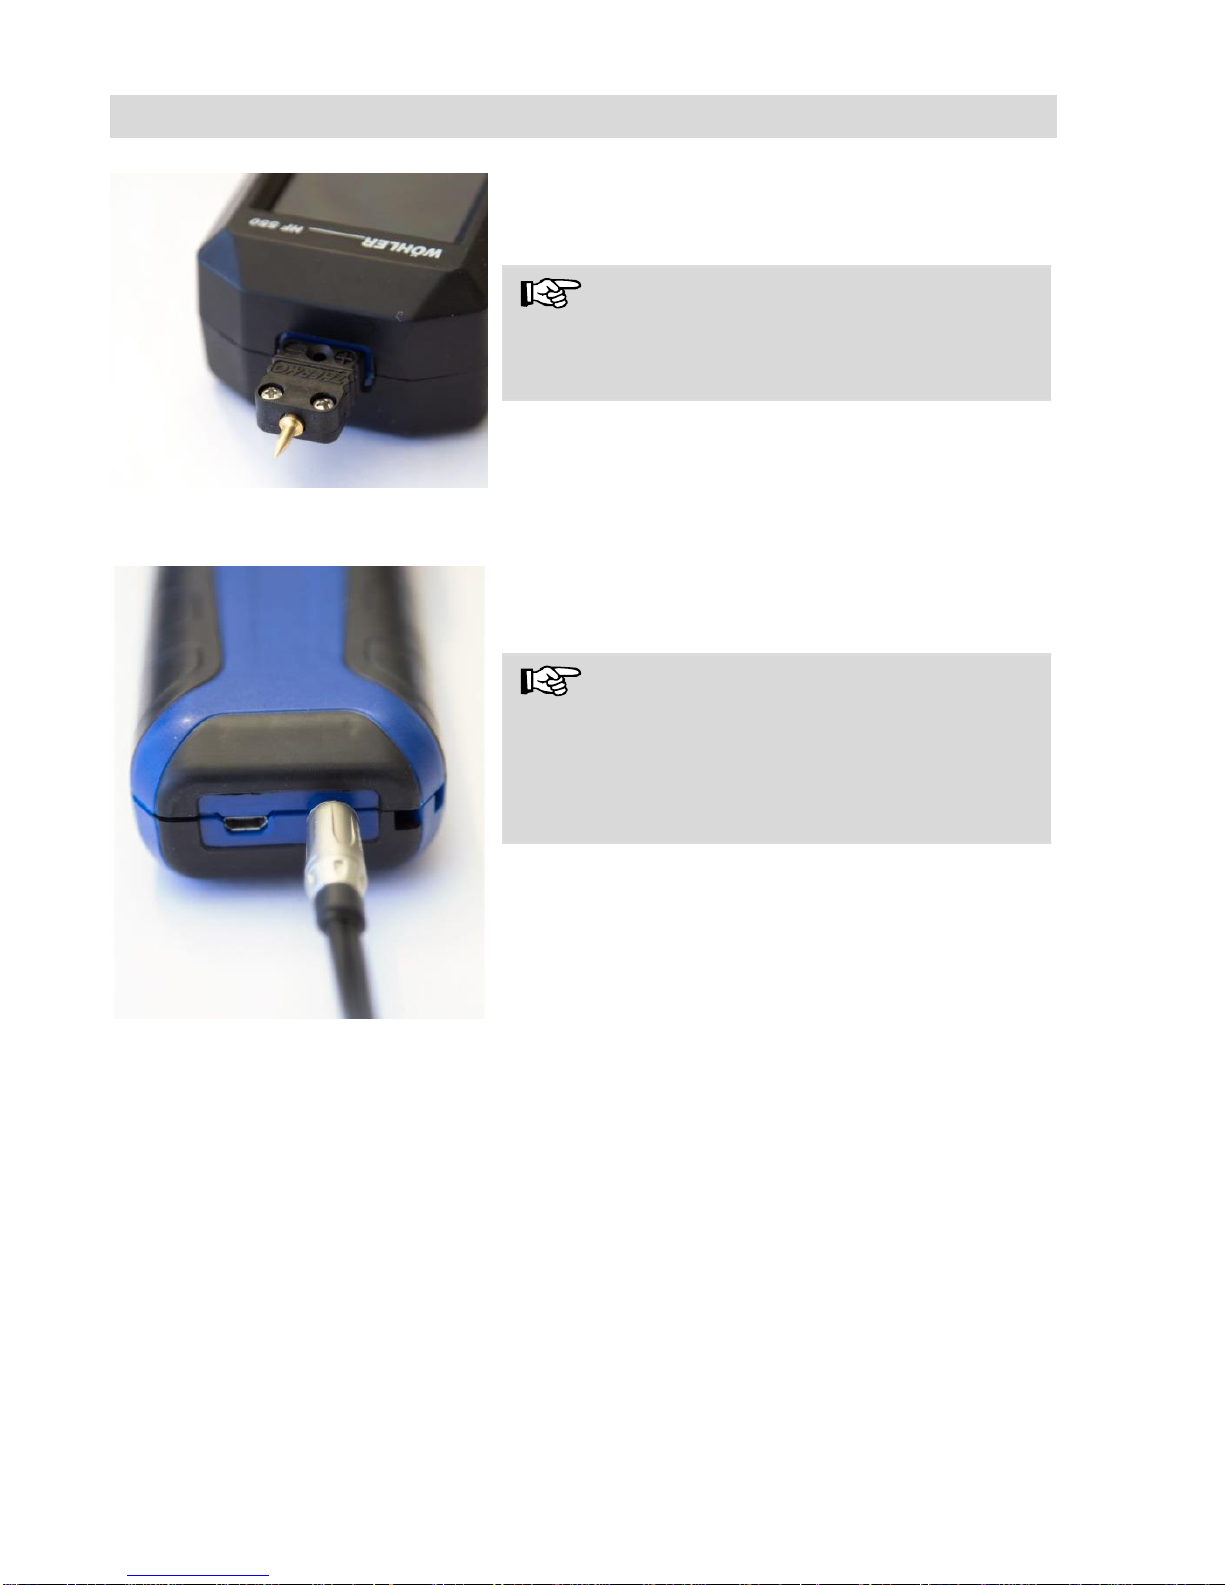
Fig. 12: Top of the meter with temperature probe connected.
Plug the Temperature probe into the corre-
spondent port at the top of the meter,
see figure 1, part 1.
NOTE!
The (+) plug is smaller than the (-) plug. Therefore
it is only possible to plug in the temperature probe
in the correct direction.
Fig. 13: Bottom of the meter with Hammer Probe connected
Plug the jack of the Hammer Probe or the
Lance Probe into the correspondent plug at
the bottom of the meter, see figure 1, part 5.
NOTE!
The result of the resistance measurement will be
more exact, if the Hammer Probe is used, because the needles of the probe can be inserted
more deeply into the wood, so that humidity can
even be measured in the inside of the wood.
For using the Wöhler Hammer Probe please observe the manual of the Hammer Probe.
Page 16

Measuring the wood moisture of logs
16
6.3 Measuring
Switch on the Meter, see chapter 4.1.
After the self test, the meter will automatically
switch to the measuring mode.
NOTE!
If there is no probe connected to the meter, or if
the hammer or lance probe is connected to the
meter, the measurement mode of firewood logs
will automatically appear on screen. If the Wöhler
FW 550 Moisture Scale is connected to the meter,
when the Meter is switched on, go to the main
menu, select “Select Probe” and then select “Log
probe”.
Page 17
Measuring the wood moisture of logs
17
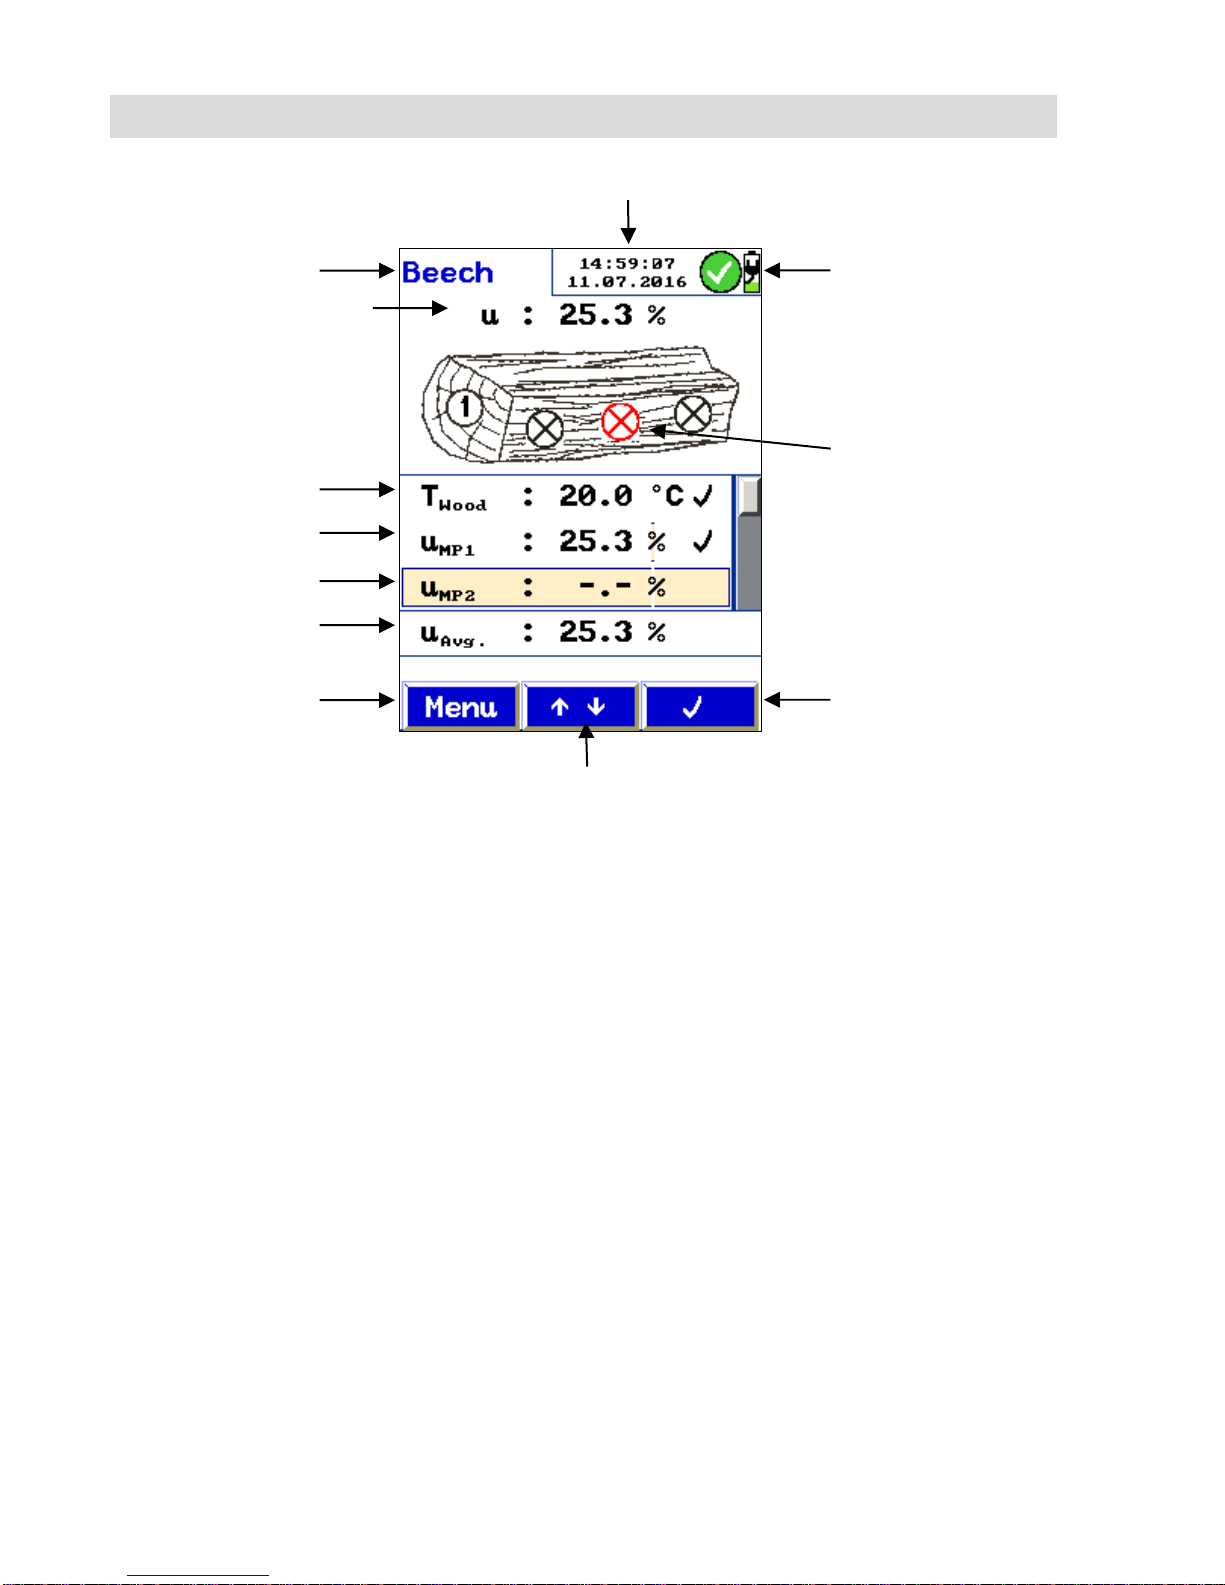
Fig. 14: Measrurement screen: Logs
Explanation
1. Selected type of wood
2. Date and time
3. Battery status
4. Actual reading of the wood moisture u
5. Actual measurement point (red)
6. Wood temperature
7. U-value: measurement point 1, already
saved
8. U-value: Measurement Point 2,
not measured yet
9. Average u-value, calculated from the
u-values that have already been saved.
10. Menu- key
11. Scroll
12. Context sensitive key to save the value ()
or to delete a value that has already been
saved (trash can icon).
1
6
7 3 9
10
12 2 114 8
5
Page 18
Measuring the wood moisture of logs
18
The display is divided into a status, a menu and a
readings segment.
The type of wood is shown in the left status segment. The status window is shown in the right
status segment. It shows the time, the date and
the battery status.
The readings segment shows the measured data
and a drawing where the selected measured point
is shown in red.
The menu segment is situated at the bottom of the
display. It consists of three soft keys.
Selecting the type of wood
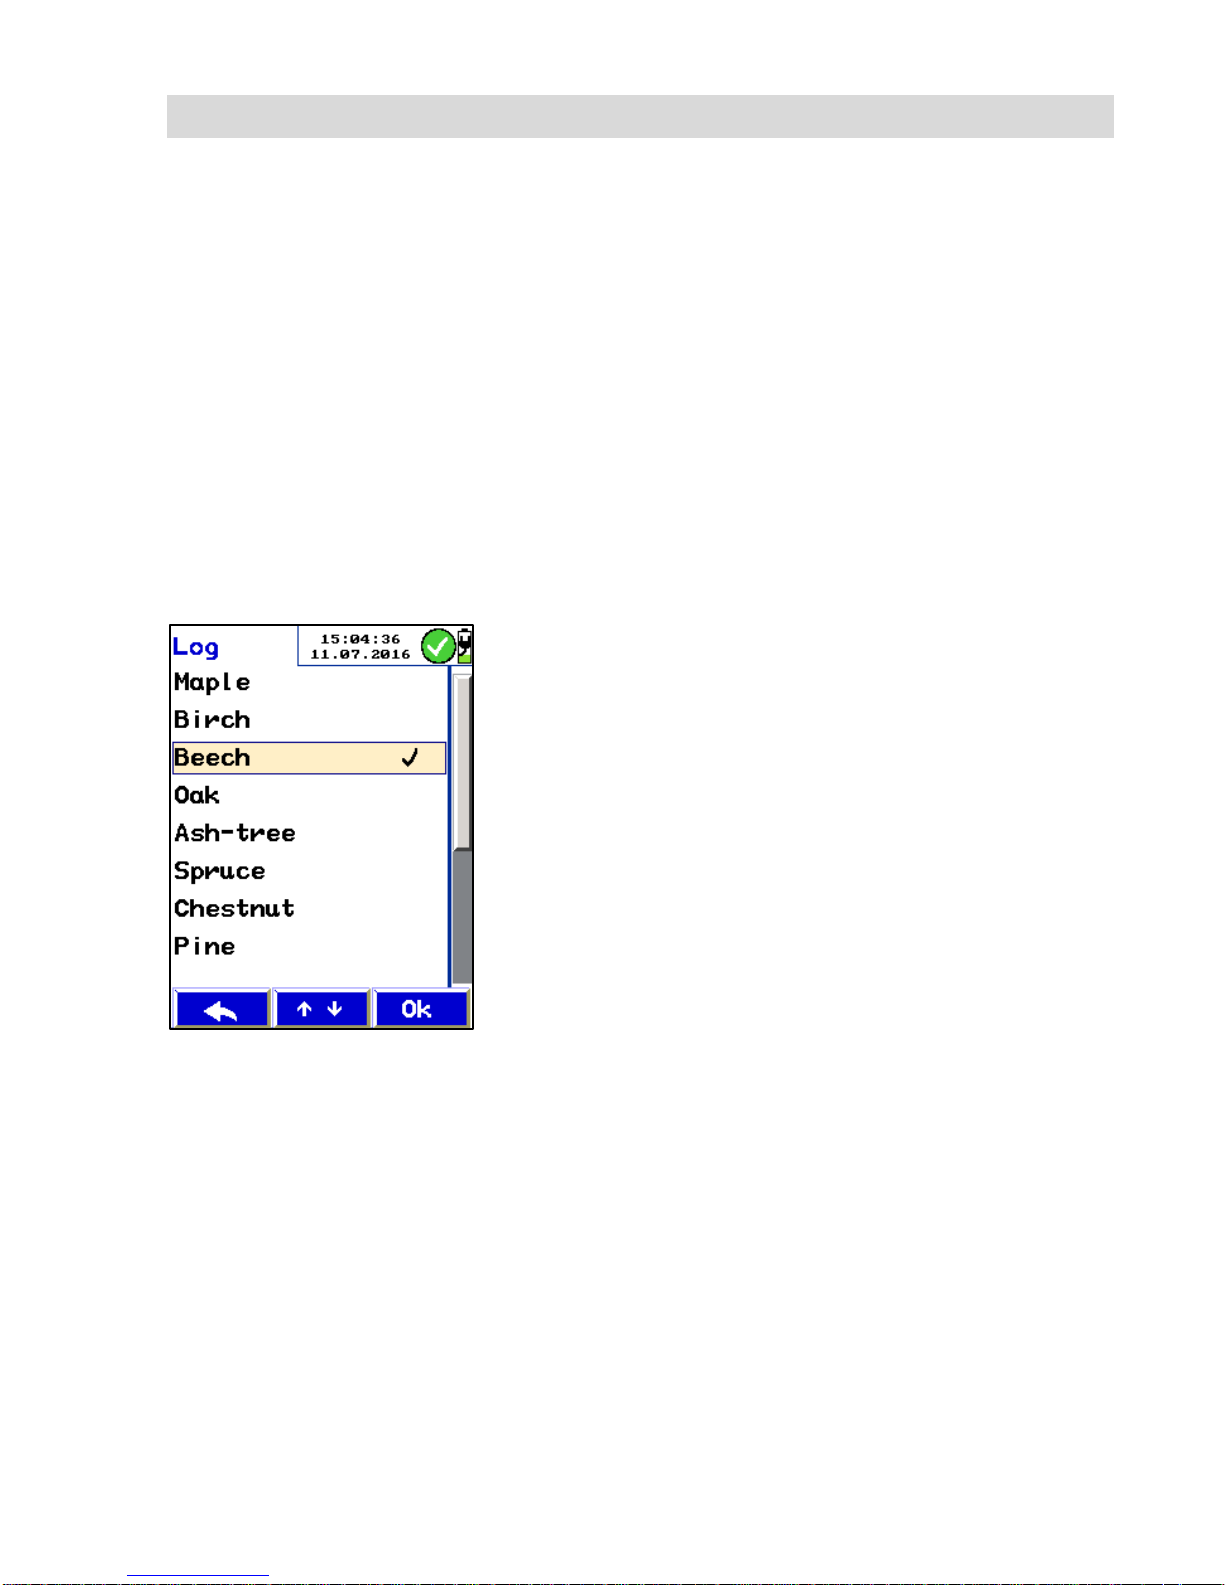
Fig. 15: “Log choice” menu to select the
type of wood
Press the Menu-key to bring up the main
menu.
Select “Log Choice” and confirm with OK.
The user can select between 14 types of wood,see
chapter 8.7.
With the arrow keys go to the selected type of
wood and confirm with OK.
Press the “Escape”-key to exit the “Log
choice”-menu.
Press the “Escape”-key again, to bring up the
measurement menu.
Page 19
Measuring the wood moisture of logs
19
Measuring
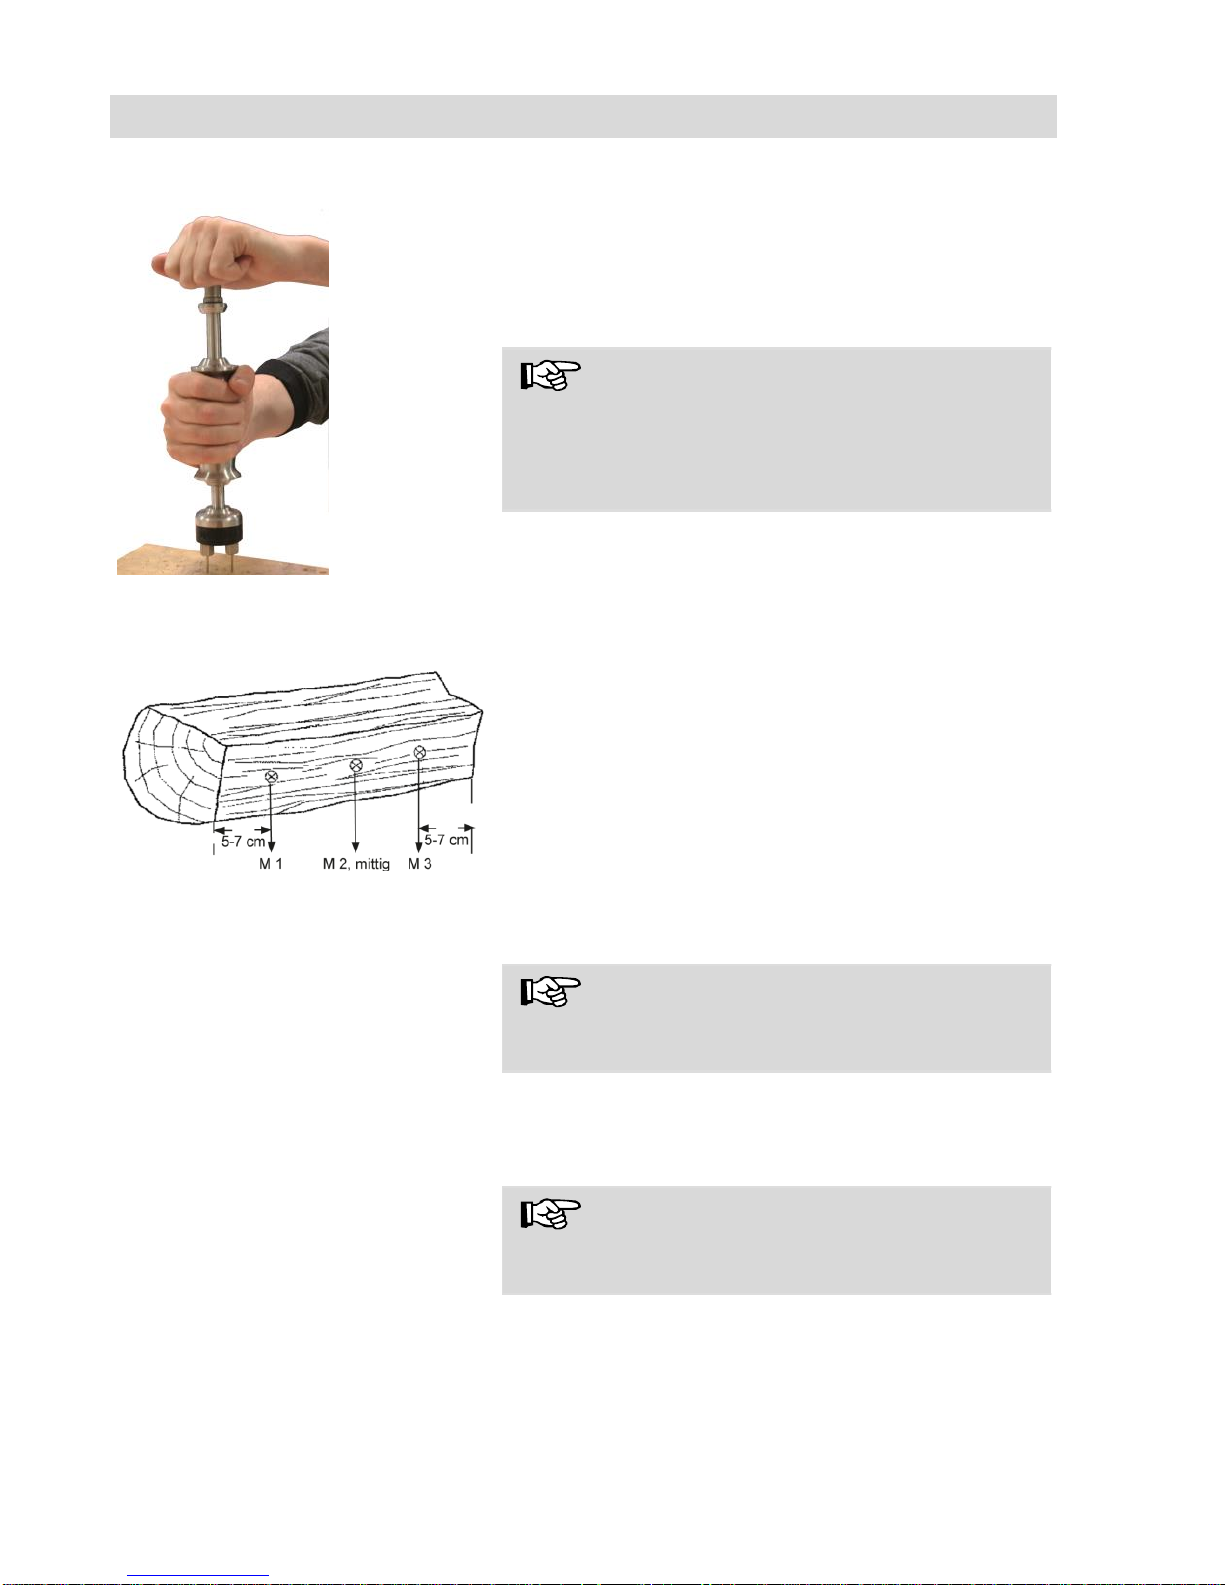
Fig. 16: Driving in the Hammer Probe
Split the wood log in the middle and perform
the measurement immediately at the inside
part of the log.
Drive the electrodes of the Lance Probe or the
Hammer Probe into the material.
NOTE!
Measurements are to be performed diagonally to
the direction of the fibres; in other words, a line
drawn between the measurement needles would
dissect the fibre of the wood.
Average value
Fig. 17 : Situation of the measurement
points at the log
In general the wood moisture should be measured
at three different points (see adjacent figure). The
meter will automatically calculate the average of
the three measurements. For a precise calculation
of the result, this triple measurement has to be
repeated three times. Therefore the meter proposes 9 measurement points in total.
Please note the following points
when performing the measurement:
NOTE!
Chose a measuring point without any knobs, resin
or fissures.
Do not measure at the front side or at the
exterior side of the split log.
NOTE!
The wood to be measured should have a temperature of 0°C to 30 °C.
Temperature Measurement
The Wöhler HF 550 will automatically perform a
temperature compensation when measuring the
wood moisture. Therefore it is necessary to
measure the temperature before measuring the
wood moisture.
Page 20
Measuring the wood moisture of logs
20
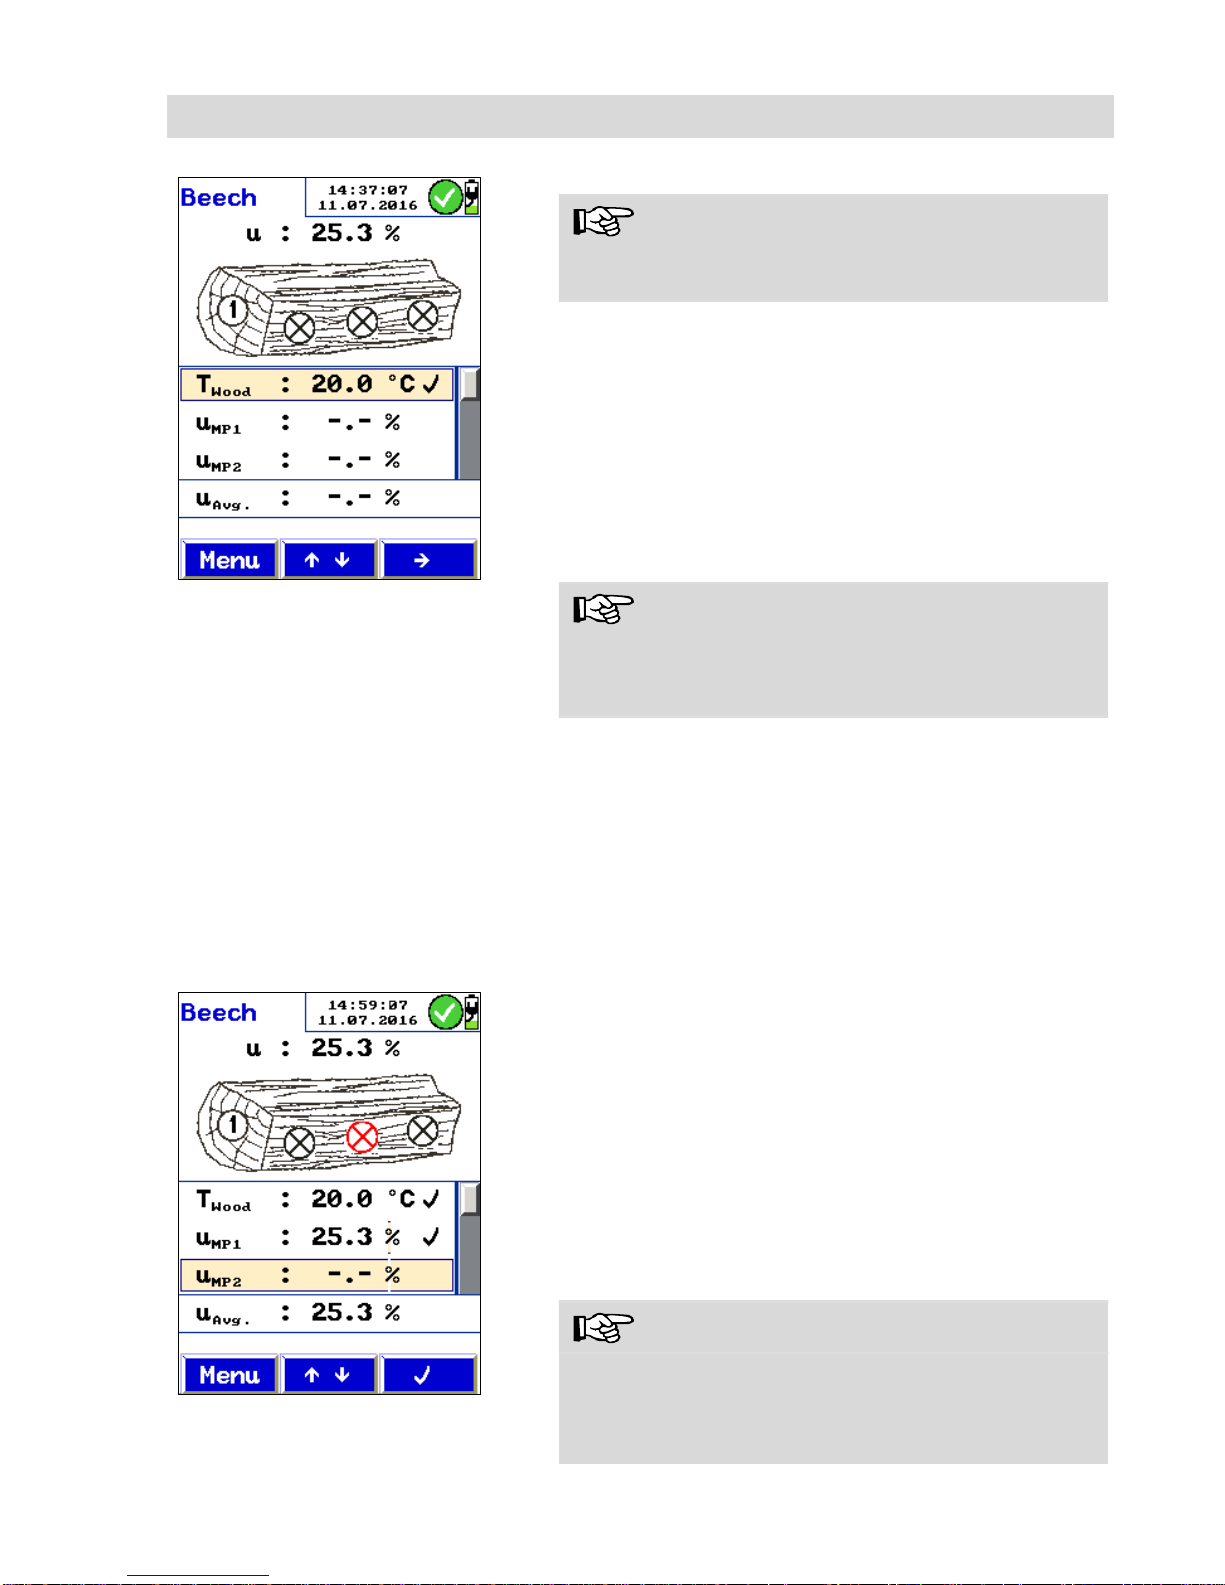
Fig. 18: Temperature Measurement
screen
NOTE!
We recommend to measure the wood temperature at the stock location of the wood.
With the arrow keys scroll to the temperature
line T
wood,
see adjacent figure.
Drive the needle of the temperature probe into
the log.
Wait some seconds until the temperature
value is stable.
Confirm by pressing -key.
NOTE!
You have the possibility to delete a temperature
value that has already been saved by pressing the
right key (trash icon) and to measure it again.
If you do not have a temperature probe, it is possible to enter the temperature value manually:
With the arrow keys scroll to the temperature
line T
wood,
see adjacent figure.
With the right arrow key select the tempera-
ture value and change it with the up and down
arrow keys.
Measurement 1
Fig. 19: The wood moisture value of the
Measurement Point 1 has been saved.
With the up- and down arrow keys scroll to the
first measurement point U
MP1
.
At the first measurement point, drive the nee-
dles of the moisture probe (hammer probe or
lance probe) into the wood.
The screen shows a drawing of a log with the current measurement point marked in red.
The current reading of the wood moisture u will be
shown on screen above the drawing of the wood
Press -key to save the reading of the first
measurement.
NOTE!
You have the possibility to delete a value that has
already been saved by pressing the right key (trash
icon) and to measure it again. The trash icon will
only appear, if you select the correspondent line.
Page 21
Measuring the wood moisture of logs
21
Measurement 2-9
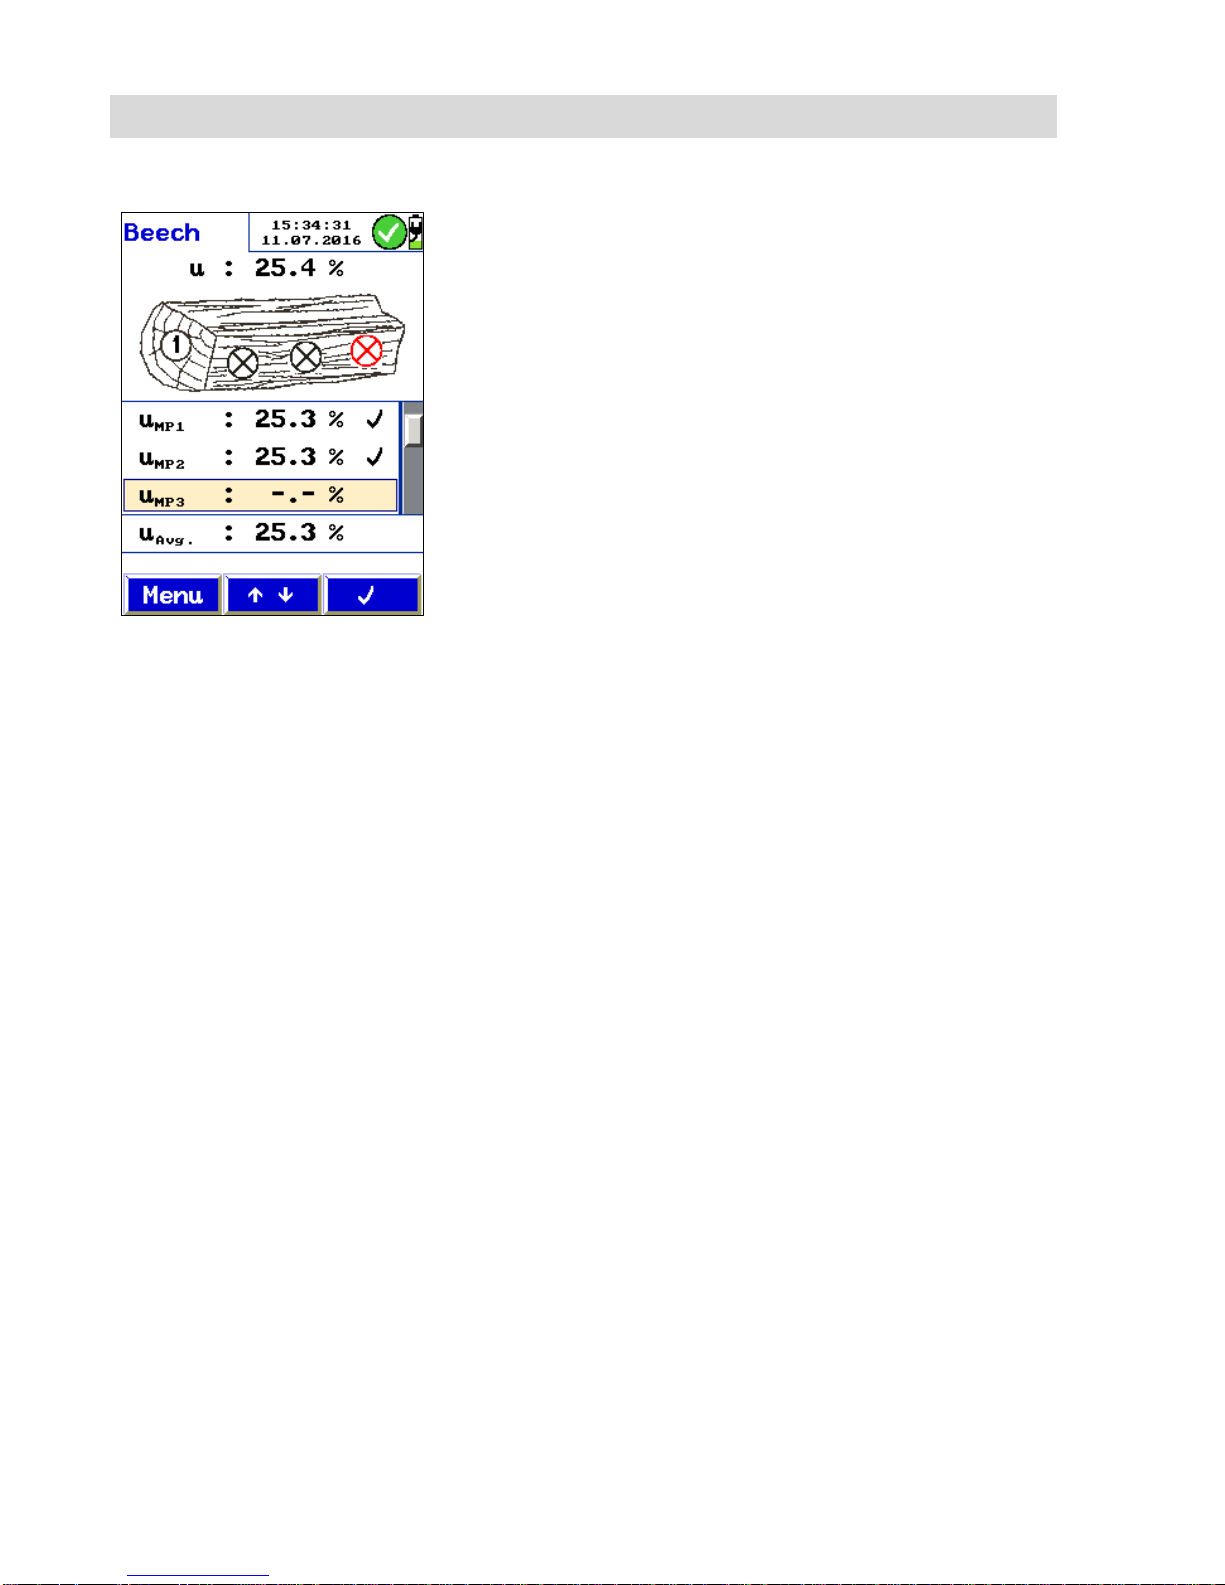
Fig. 20: The wood moisture value of the
Measurement Point 2 has been saved.
With the arrow keys, scroll to the next meas-
urement point
Drive in the electrodes of the probe at the next
measurement point of the log.
Proceed as described for the measurement
point 1.
At the bottom of the readings segment, the average
u-value will be displayed. The meter calculates the
average value automatically from the values that
have already been measured.
After the measurement
After the measurement, the readings can be saved
in a customers file or printed, see chapter 8.5.
Page 22
Moisture Measurement of bulk material
22
7 Moisture Measurement of bulk material
The Wöhler HF 550 can determine the moisture of bulk material (wood chips, pellets and
cereals).
NOTE!
For the moisture measurement of bulk material the Wöhler FW 550 Moisture Scale
must be connected to the meter. If the Wöhler FW 550 Moisture Scale has not been
connected to the meter, when the Meter is switched on, go to the main menu, select
“Select Probe” and then select “Moisture Probe”.
CAUTION!
Always transport the Moisture Scale in the correspondent plastic case Wöhler HF 550
(see accessories).
Otherwise the bottom plate or the surface coating could be damaged. In this case a
correct measurement will not be possible any more.
7.1 Measurement
procedure
First, the user has to select the type of bulk material in the meter. After that he will determine the
mass of the bulk sample with the moisture scale .
The meter will now determine the moisture u or
the water content w.
The user can as well measure the temperature of
the bulk material with the meter for documentation
purposes.
Page 23
Moisture Measurement of bulk material
23
7.2 Preparation of the measurement
7.2.1 Positioning the Moisture Scale
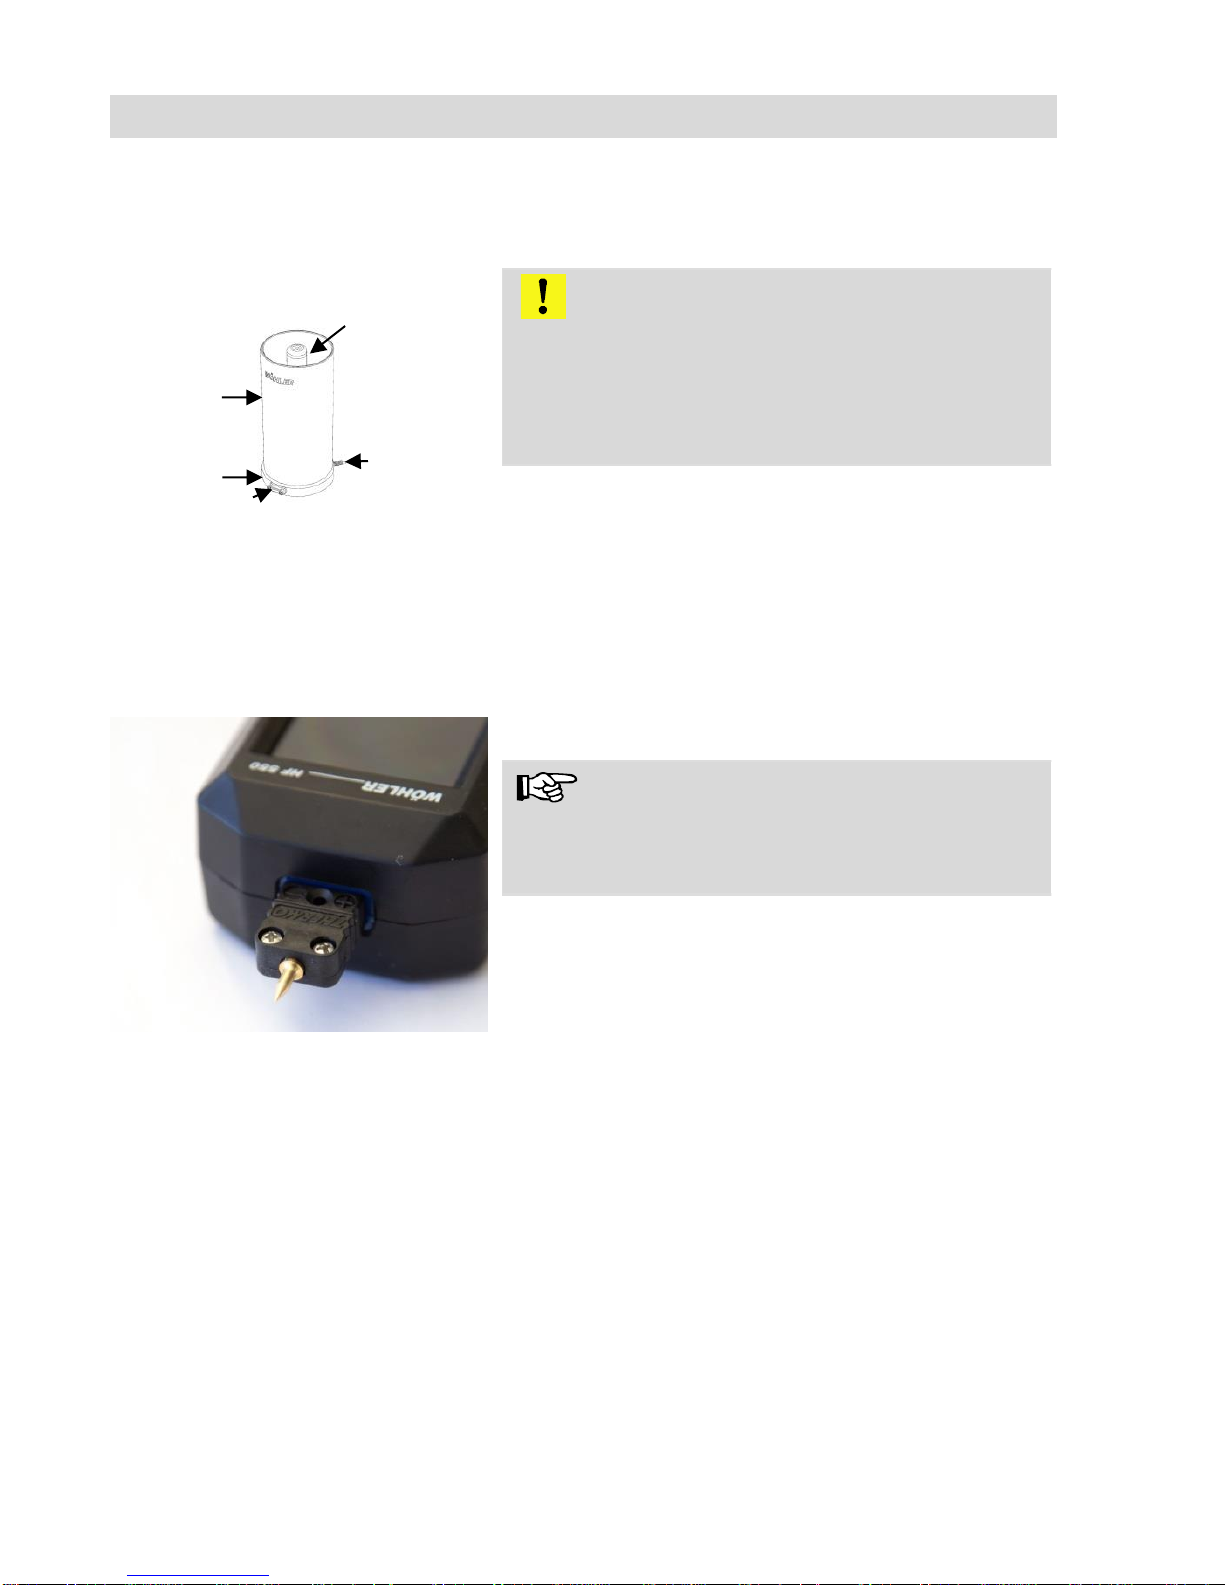
Fig. 21: Wöhler FW 550 Moisture Scale
with cylinder (1), base plate (2), calibration socket for the test laboratory (3).
cable connection (4) and electrode (5).
Place the scale on a flat clean surface.
CAUTION!
The cylinder of the scale has a rugged surface
coating. Nevertheless, take care that the coating
will not be damaged. An undamaged surface coating is absolutely necessary for a correct measurement result.
7.2.2 Connections
Fig. 22: Bottom of the meter with temperature probe connected.
Plug the Temperature probe into the corre-
spondent connection jack at the bottom of the
meter, see figure 1, part 1.
NOTE!
The (+) plug is smaller than the (-) plug. Therefore
it is only possible to plug in the temperature probe
in the correct direction.
1
2 3 4
5
Page 24
Moisture Measurement of bulk material
24
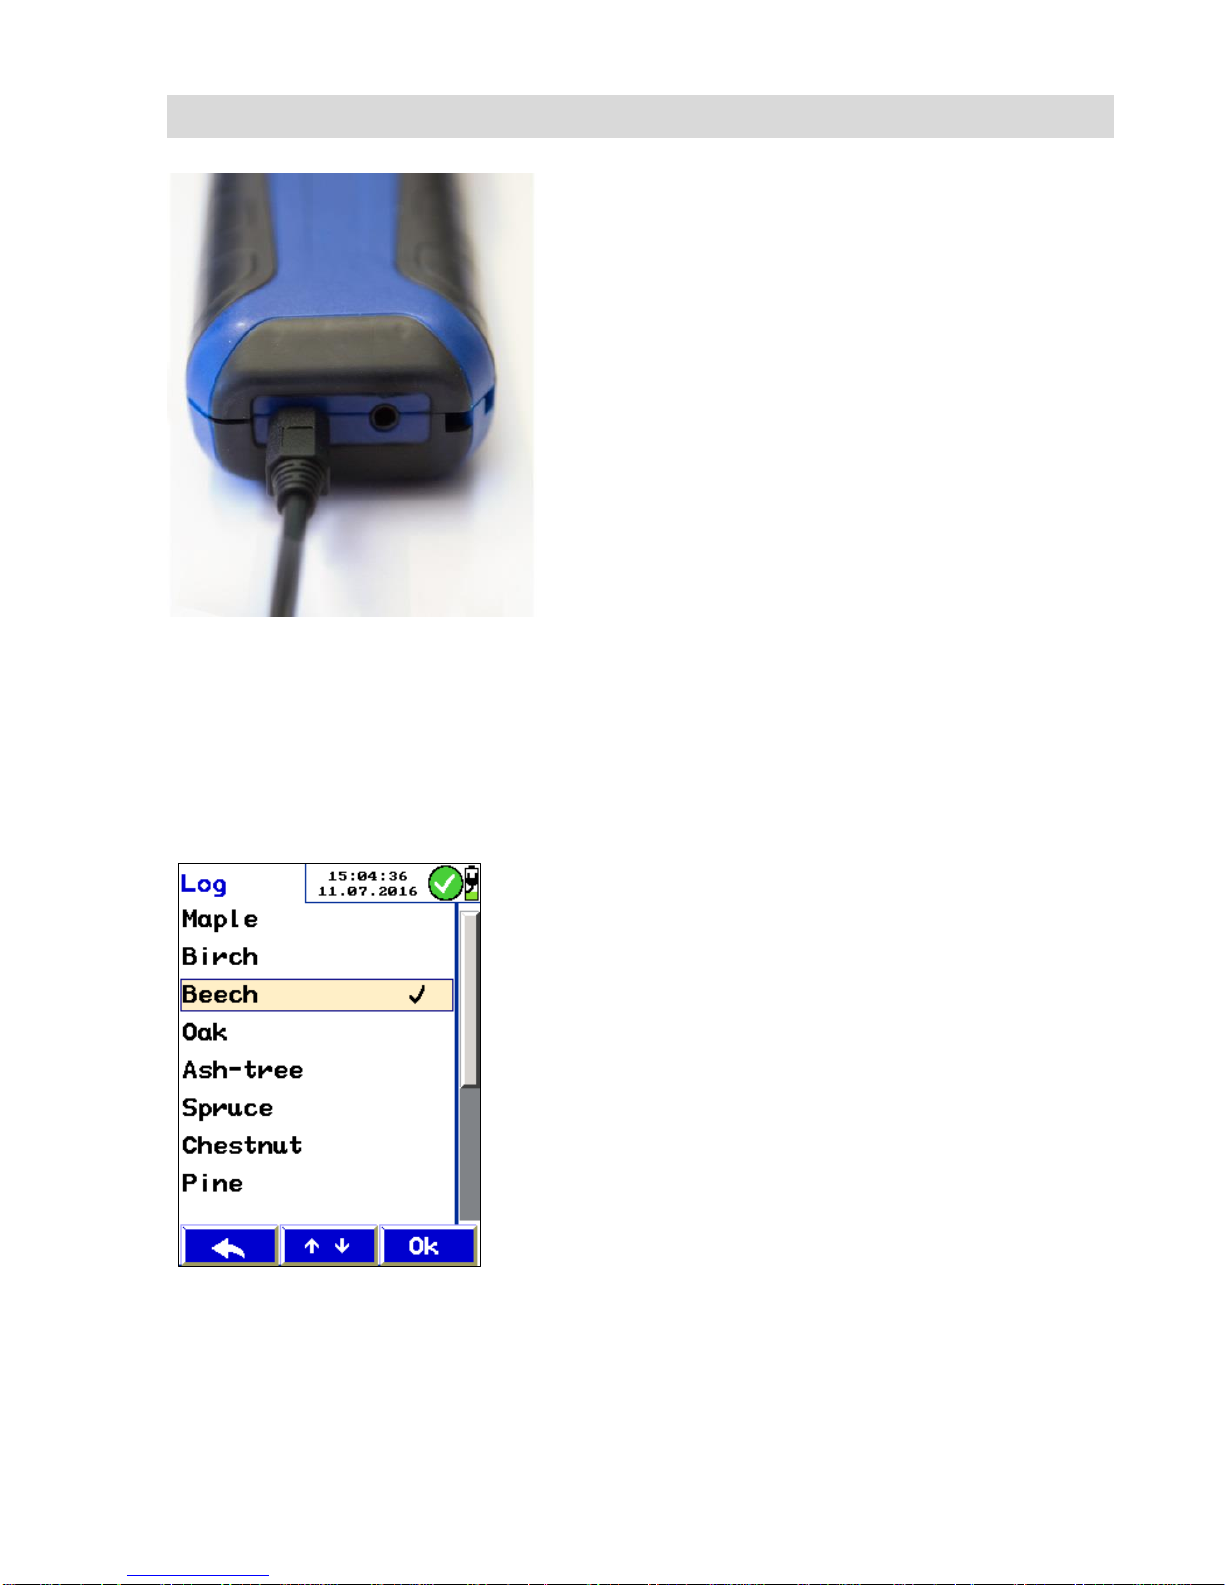
Fig. 23: Bottom of the meter with Moisture Scale connected.
Connect the Wöhler FW 550 Moisture Scale to
the meter. Plug the cable of the Moisture
Scale into the sleeve at the bottom of the meter, see fig. 1, part 5.
7.3 Measuring
Switch on the meter.
After the self-test the meter will automatically display the measurement mode for bulk material, if
the Moisture Scale is connected.
Selection of the bulk material
Fig. 24: Selection of the bulk material
Press the menu key to open the menu.
Select “Bulk choice”.
Select the material: Pellets, woodchip, barley,
oat, maize, rape, rye, triticale or wheat.
Press OK to confirm.
The meter will save your selection and the meas-
urement mode will automatically be displayed.
Page 25
Moisture Measurement of bulk material
25
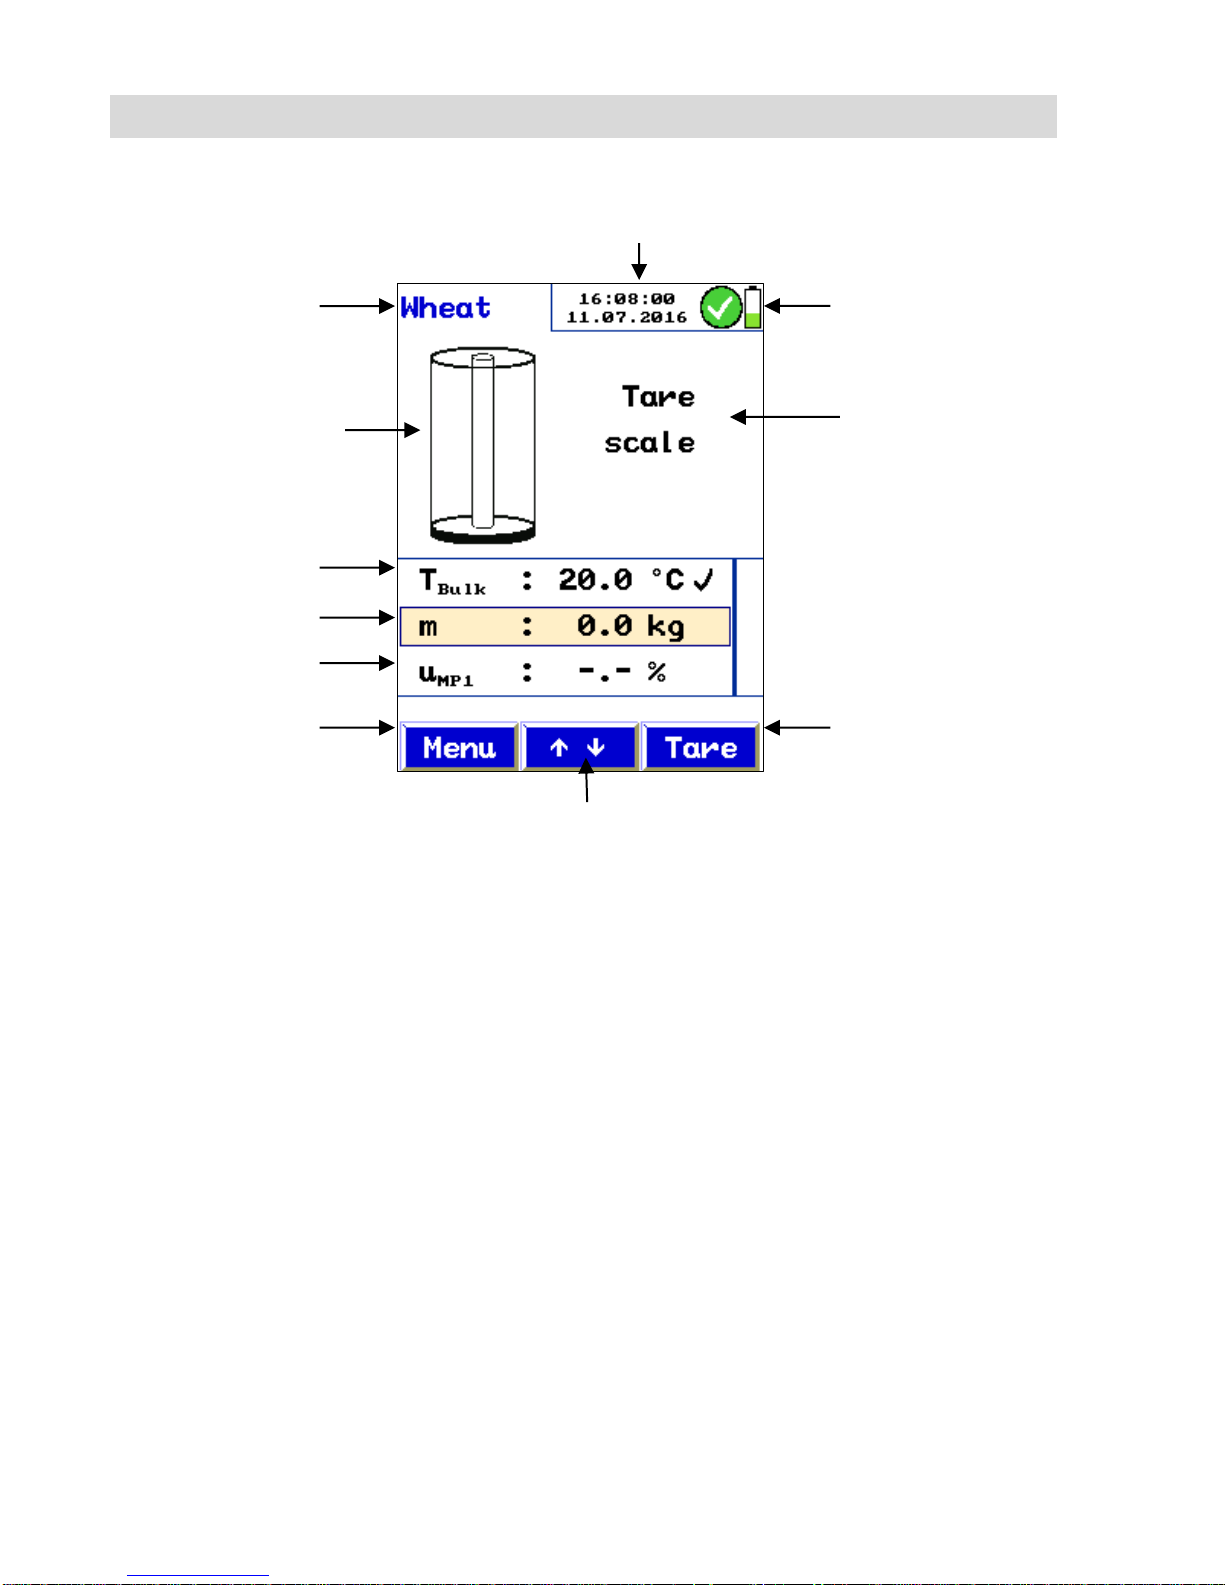
Fig. 25: Measurement mode “bulk material”
Explanation
1. Sample material (woodships, pellets or grain)
2. Date and time
3. Battery condition
4. Charging level of the Moisture Scale
5. Next step
6. Material temperature
7. Mass m of the sample
8. Moisture value of the sample
9. Menu- key
10. Arrow-key for scrolling
11. Context sensitive key to save the value ()
or to delete a value that has already been
saved (trash can icon).
1
6 3 8
9
11
10
4
7 5 2
Page 26
Moisture Measurement of bulk material
26
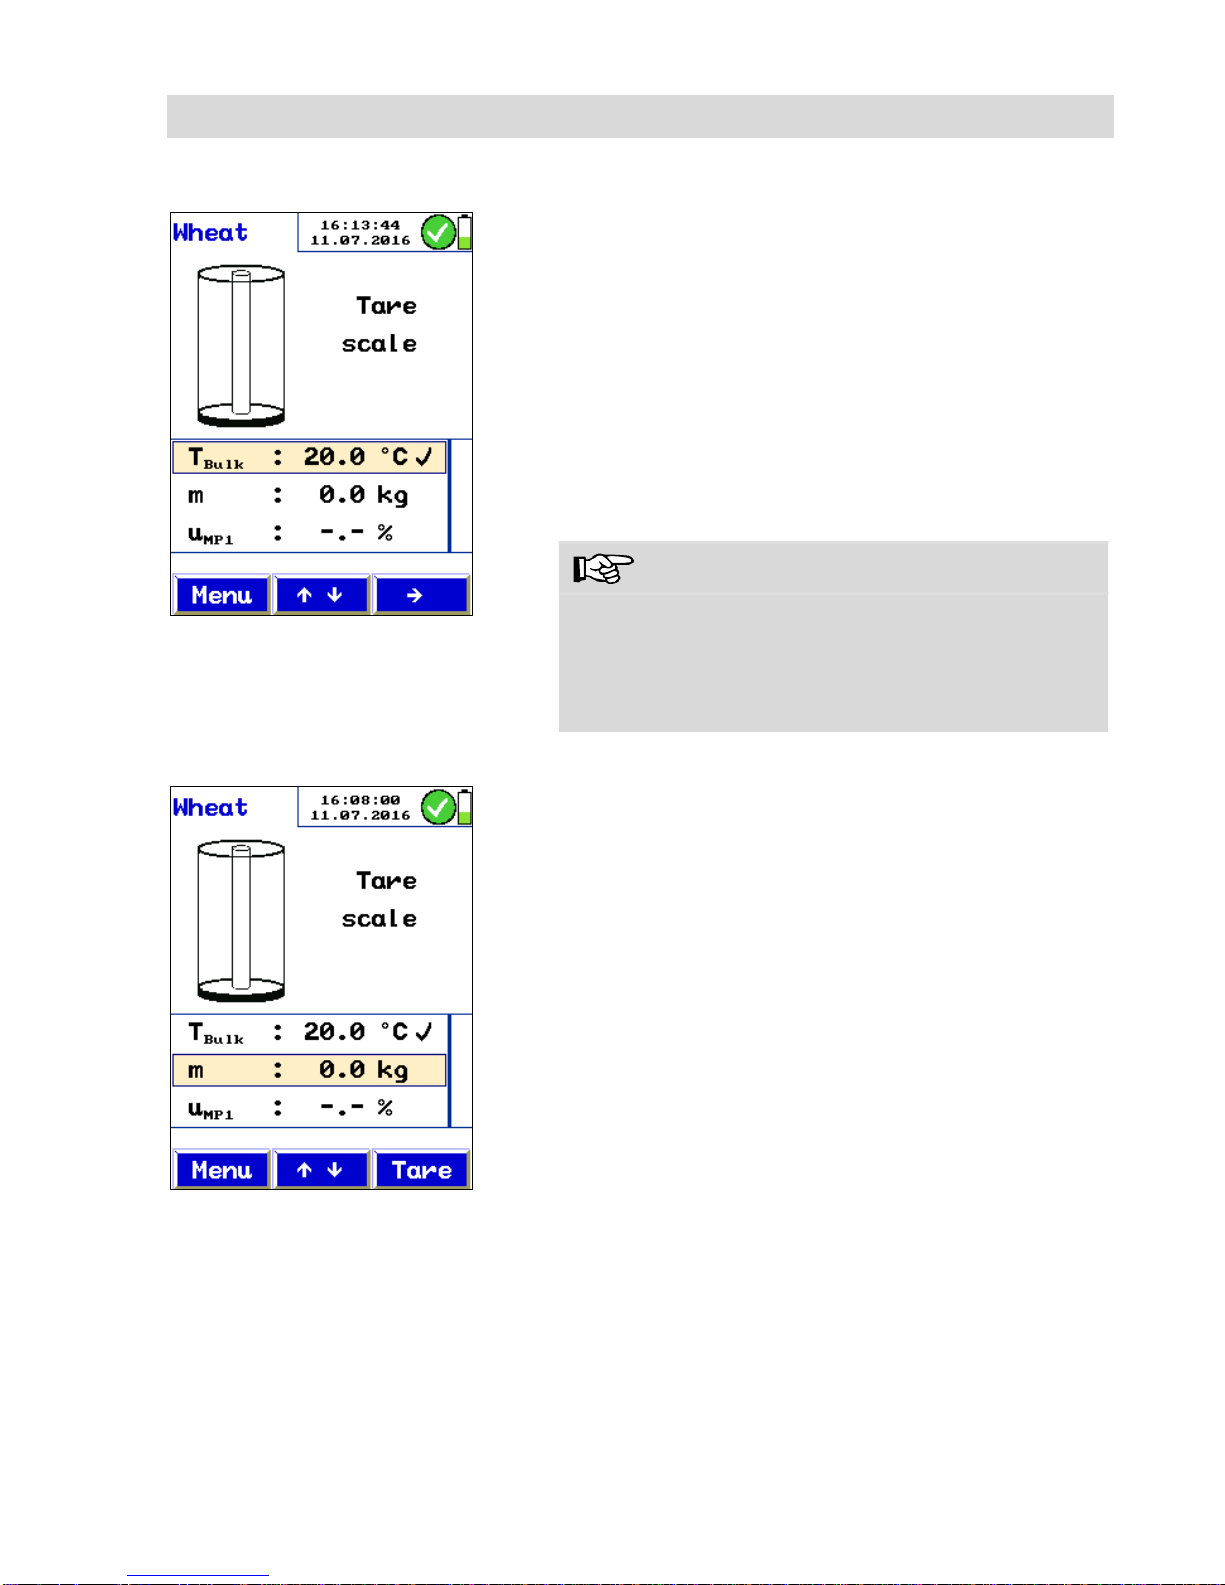
Temperature Measurement
Fig. 26: Temperature Measurement
Use the arrow keys to go to the temperature
line (T
Bulk
).
Place the temperature probe in the bulk mate-
rial.
As soon as the temperature value is shown
stable, confirm the value with the -key.
The meter will save the temperature value T
Bulk
.
On screen a hook will appear next to the temperature value.
The temperature value is used for documentation
purposes.
NOTE!
After the temperature value has been saved, a bin
icon will appear at the right bottom of the corner, if
the temperature line is highlighted. Press the bin
key to delete the temperature value and start a new
temperature measurement.
Determination of the mass
Fig. 27: Zeroing the Moisture Scale with
the tare key.
With the arrow keys go to the second line
(mass m).
Press the tare key to zero the moisture scale.
The Moisture Scale will be adjusted to zero. After
that the message “Fill scale” appears on screen.
Page 27
Moisture Measurement of bulk material
27
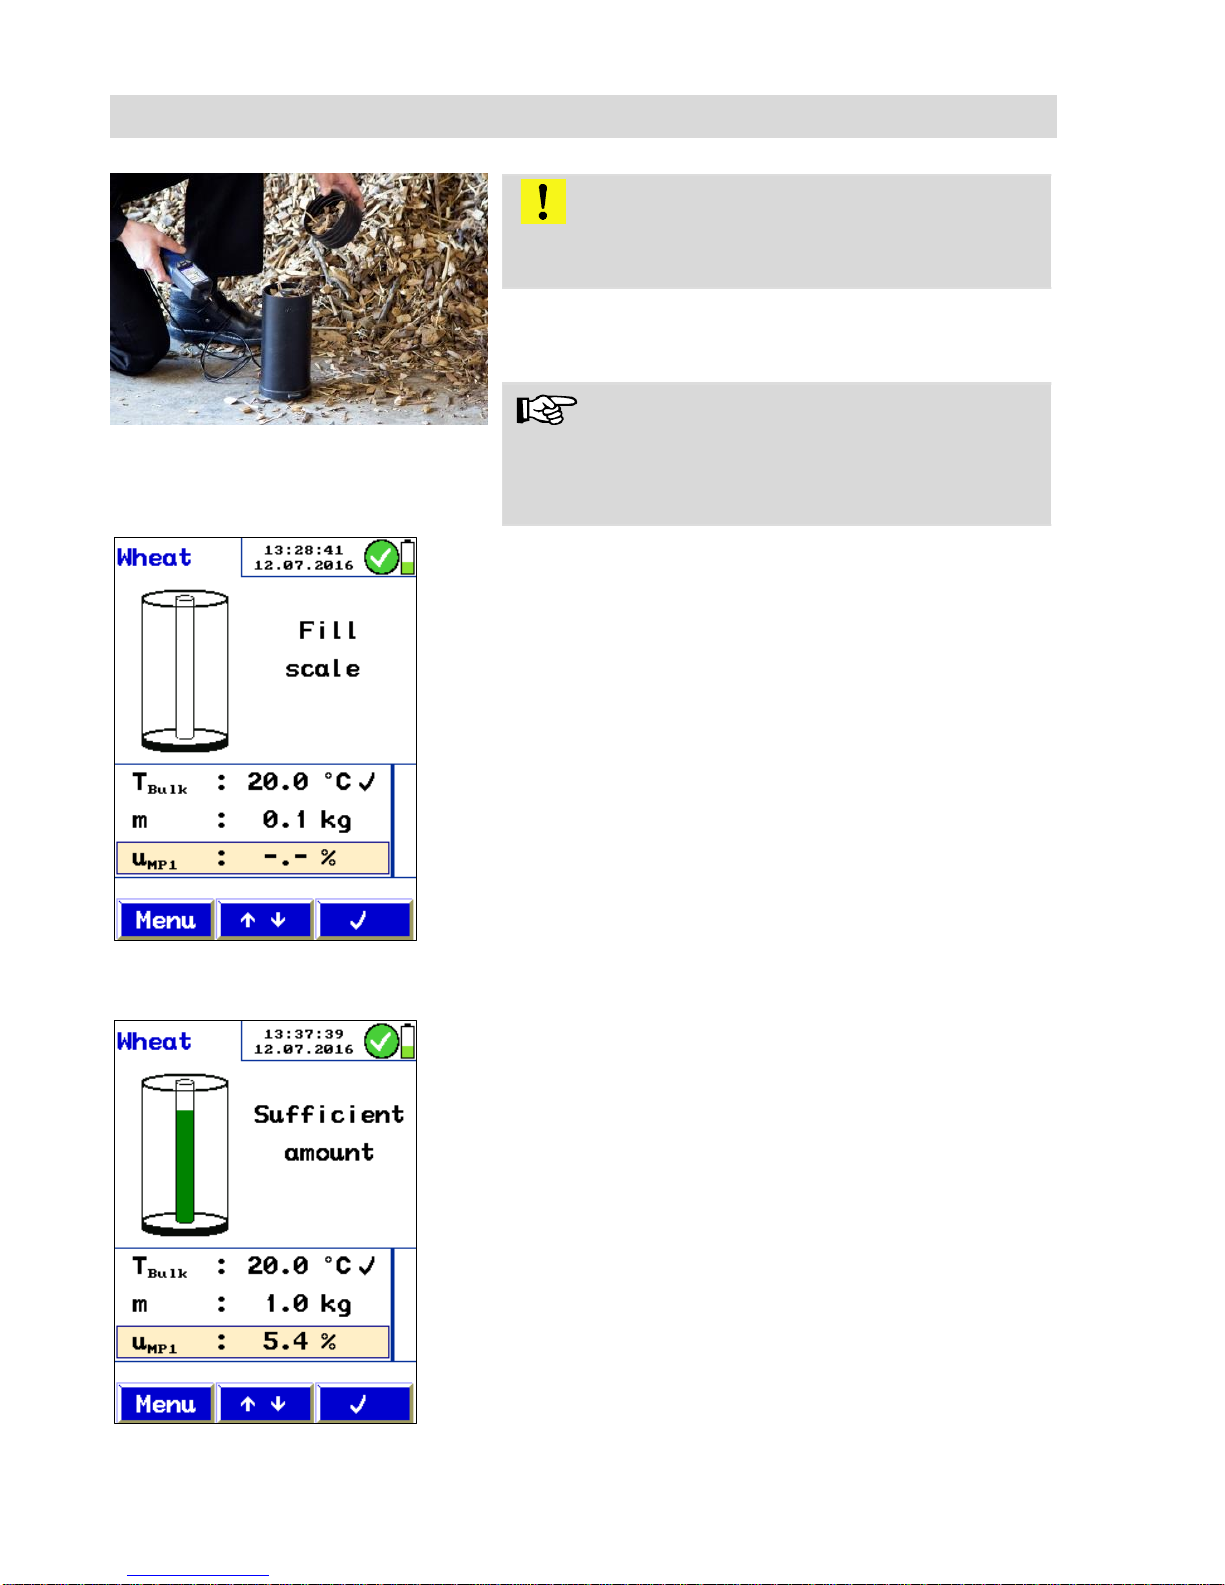
Fig. 28: Filling the Moisture Scale with
the bulk material
CAUTION!
Take care that the cylinder of the scale is dry,
clean and not damaged.
Fill the sample into the cylinder of the Moisture
Scale.
NOTE!
For charging the cylinder, it is possible to use the
filling cup.
Fig. 29: Display after zeroing, when no
material has been filled in.
The display of the meter shows whether sufficient
sample material has been filled in:
Grey bar on the electrode: Increase amount >
More sample material has to be filled into the
scale
Green bar on the electrode: sufficient amount >
the sample is perfect
Red bar on the electrode: Decrease amount >
Reduce sample size
Fig. 30: Reading of the moisture valu u
As soon as sufficient bulk material has been
filled in, a green electrode will appear in the
display. At the same time the moisture value u
will appear in the bottom line of the readings
segment.
Use the arrow keys to go to the u readings
line.
Save the u- value by pressing the -key.
Page 28
Moisture Measurement of bulk material
28
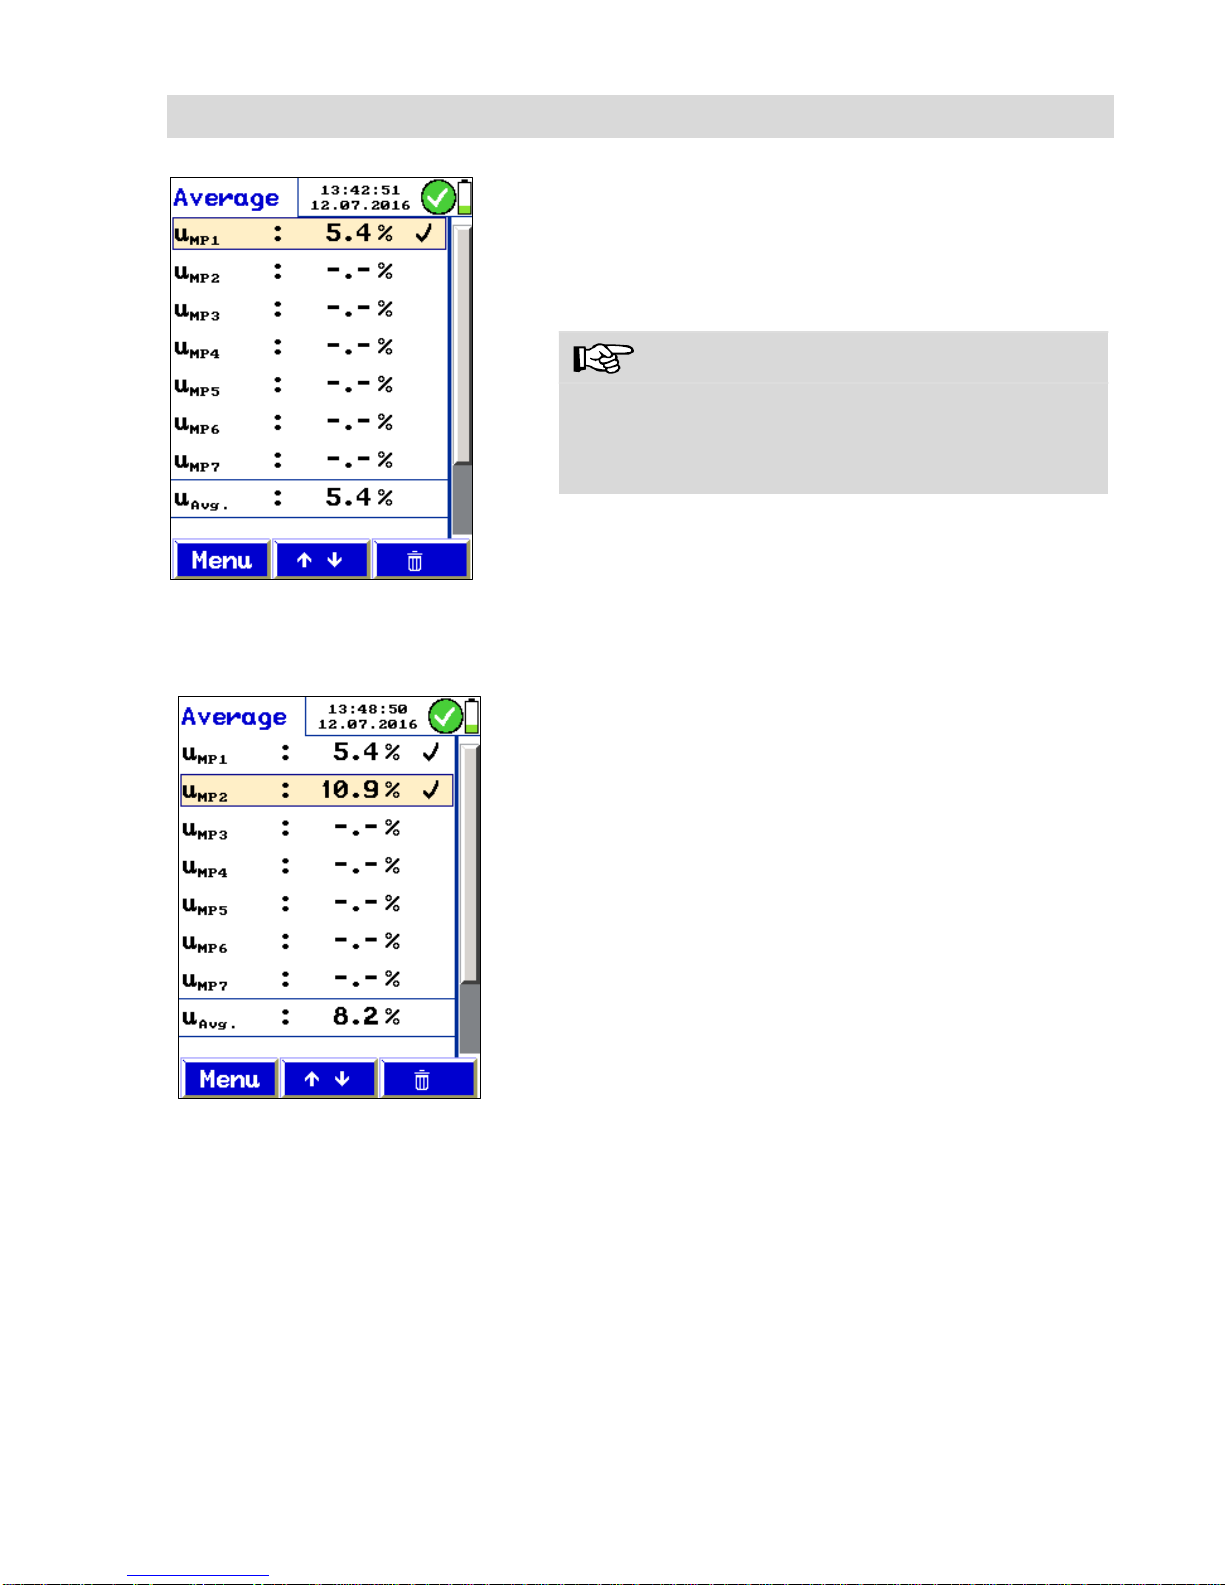
Fig. 31: Displaying the average after the
measurement.
The average screen will appear.
The U
MP1
reading will be marked by a hook.
If you want to repeat the measurement, delete
the value with the right key (bin icon).
NOTE!
For a more representative measurement result,
repeat the measurement serveral times with different samples. The meter will calculate the arithmetic
averate from the readings.
Fig. 32: Average display after two measurements. The average of the measured
values is displayed at the bottom of the
readings segment.
With the arrow-keys go to the next measure-
ment point.
Confirm by pressing -key.
The measurement display will appear.
Perform another measurement with another
representative sample.
After every measurement the average-display will
appear. The last line of the readings segment will
always display the average of the values measured up to that moment.
After the measurement
After the measurement, the readings can be saved
in a customers file and/or they can be printed.
Page 29
Main menu
29
8 Main menu
In measurement mode, press the left key “ Menu” to open the main menu.
With the arrow keys select a sub menu. Confirm with OK to enter the sub menu.
To return from the menu to the measurement mode, press Escape.
NOTE!
The main menu depends on the measurement mode (Log Probe or Moisture Scale).
8.1 Moisture Measurement
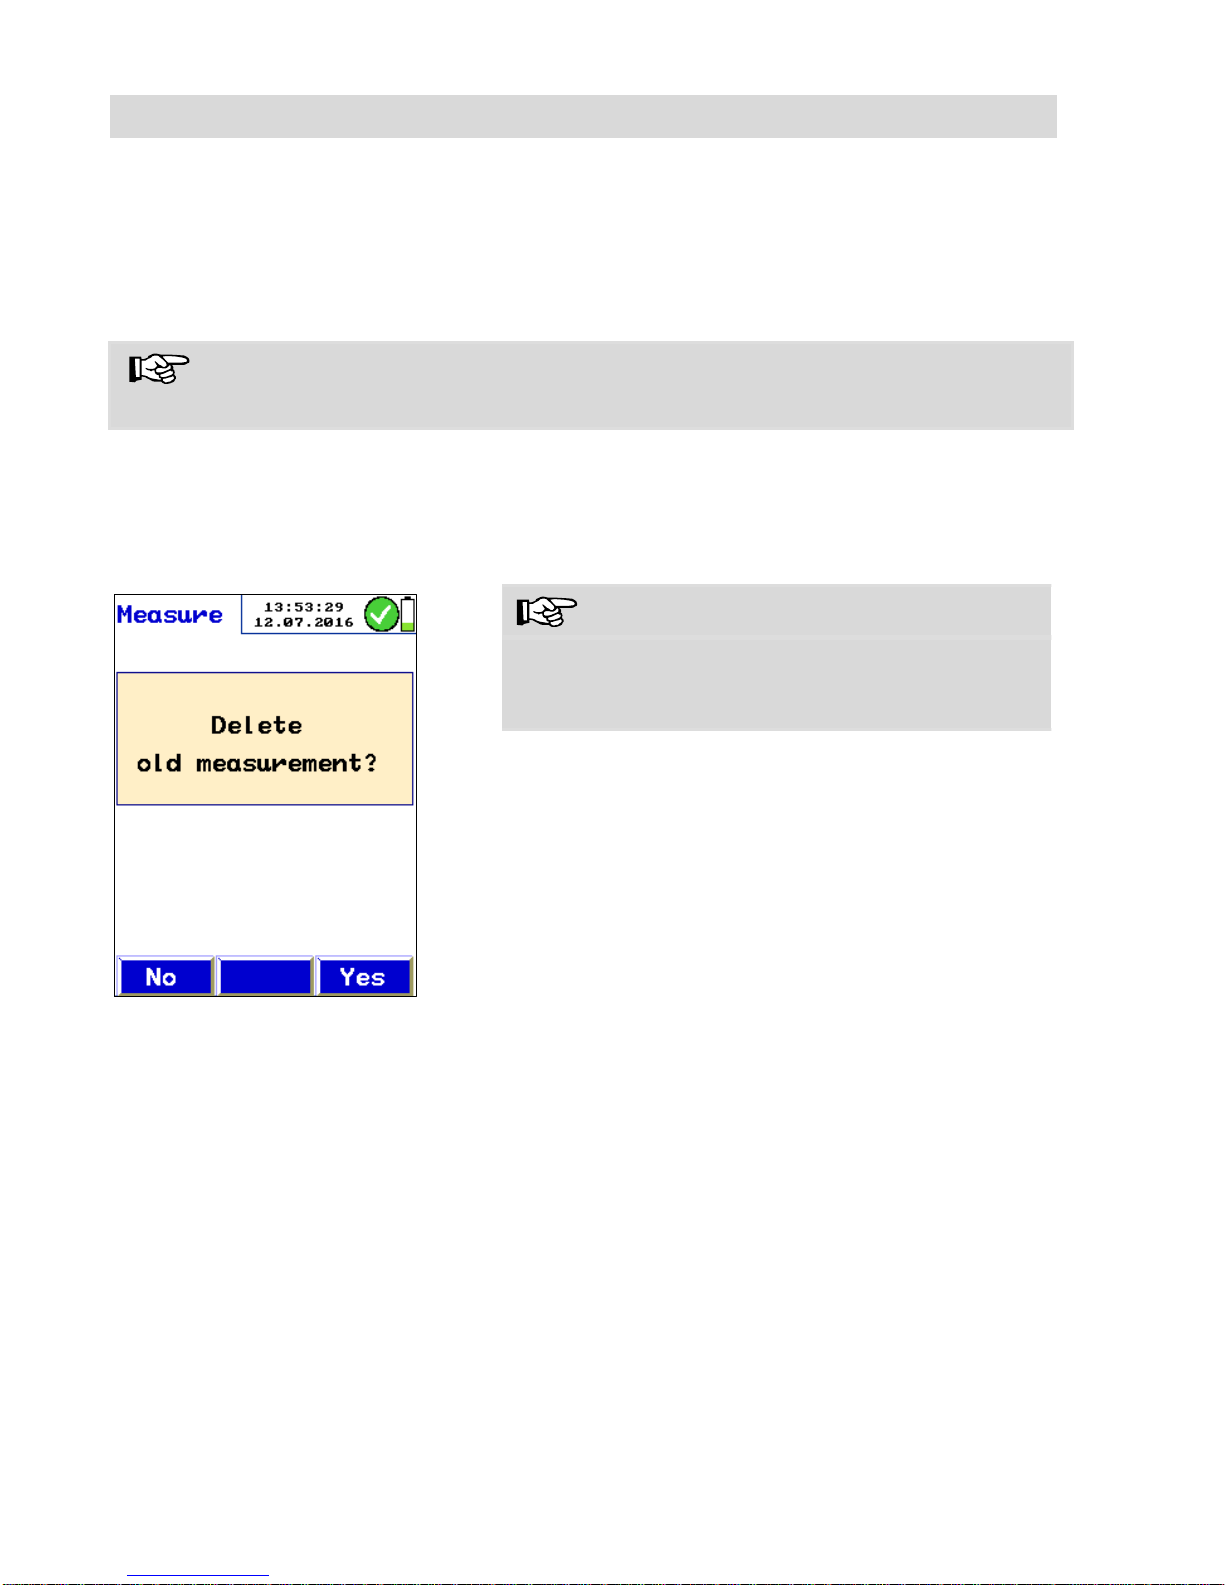
Delete old measurement
Fig. 33: Sub menu “moisture mea-
surement”
The sub menu “Moisture Measurement” offers the
possibility to delete the last measurement completely.
NOTE!
If you only want to delete some readings, you can
do that in the measurement mode with the trash
icon.
Page 30
Main menu
30
8.2 Selection of the mate-
rial
Depending on the selected measurement mode
(Log probe or Moisture scale) the second sub menu
is “Log choice” or “Bulk choice”.
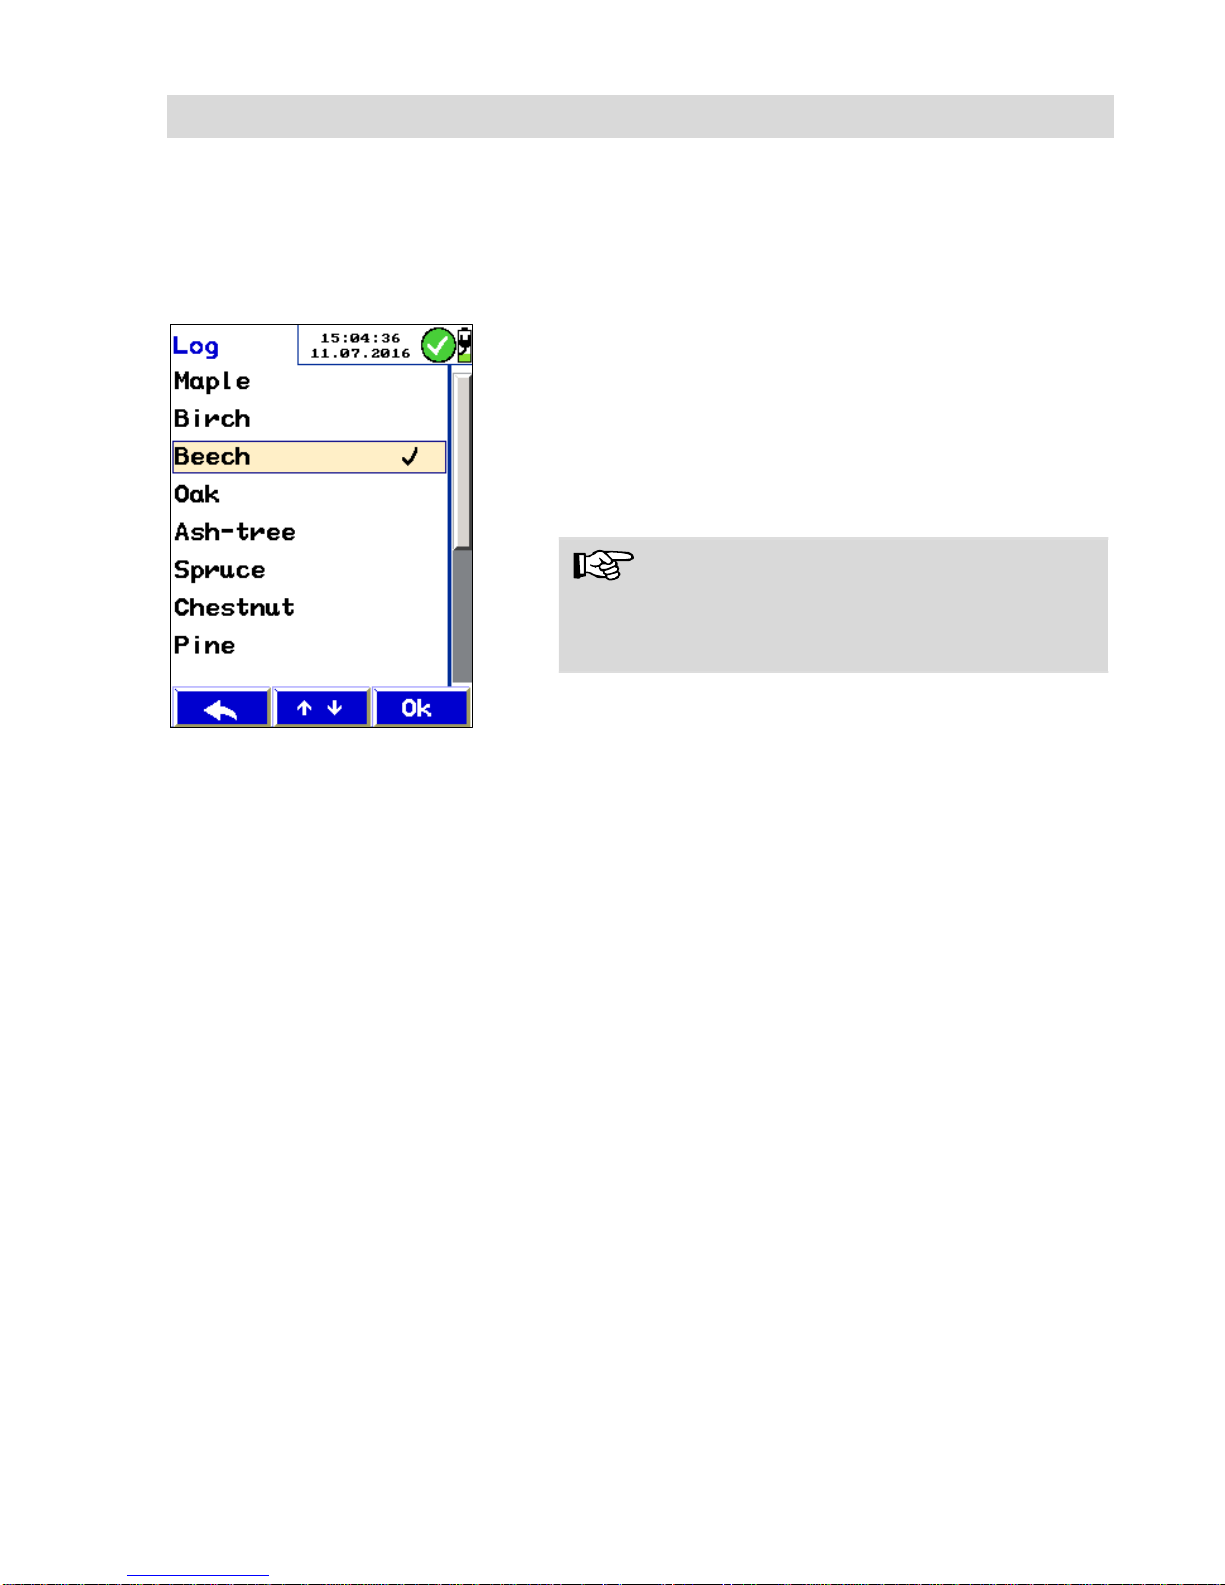
8.2.1 Log choice (in mode)
Fig. 34: Sub menu “Log choice”
Before measuring the moisture of logs, select the
type of wood in the menu “Log choice”.
The following 14 types of wood are available: Maple, birch, beech, oak, ash-tree, spruce, chestnut,
pine, larch, lime, poplar, plane, fir, elm. A hook
appears next to the selected type of wood.
With the arrow keys go to the selected type of
wood and confirm with OK.
NOTE!
After switching on and off the meter, the selected
type of wood will stay active until you select another type of wood.
Press the “Escape”-key to exit the log choice
menu.
Press the “Escape”-key again, to bring up the
measurement menu.
Page 31
Main menu
31
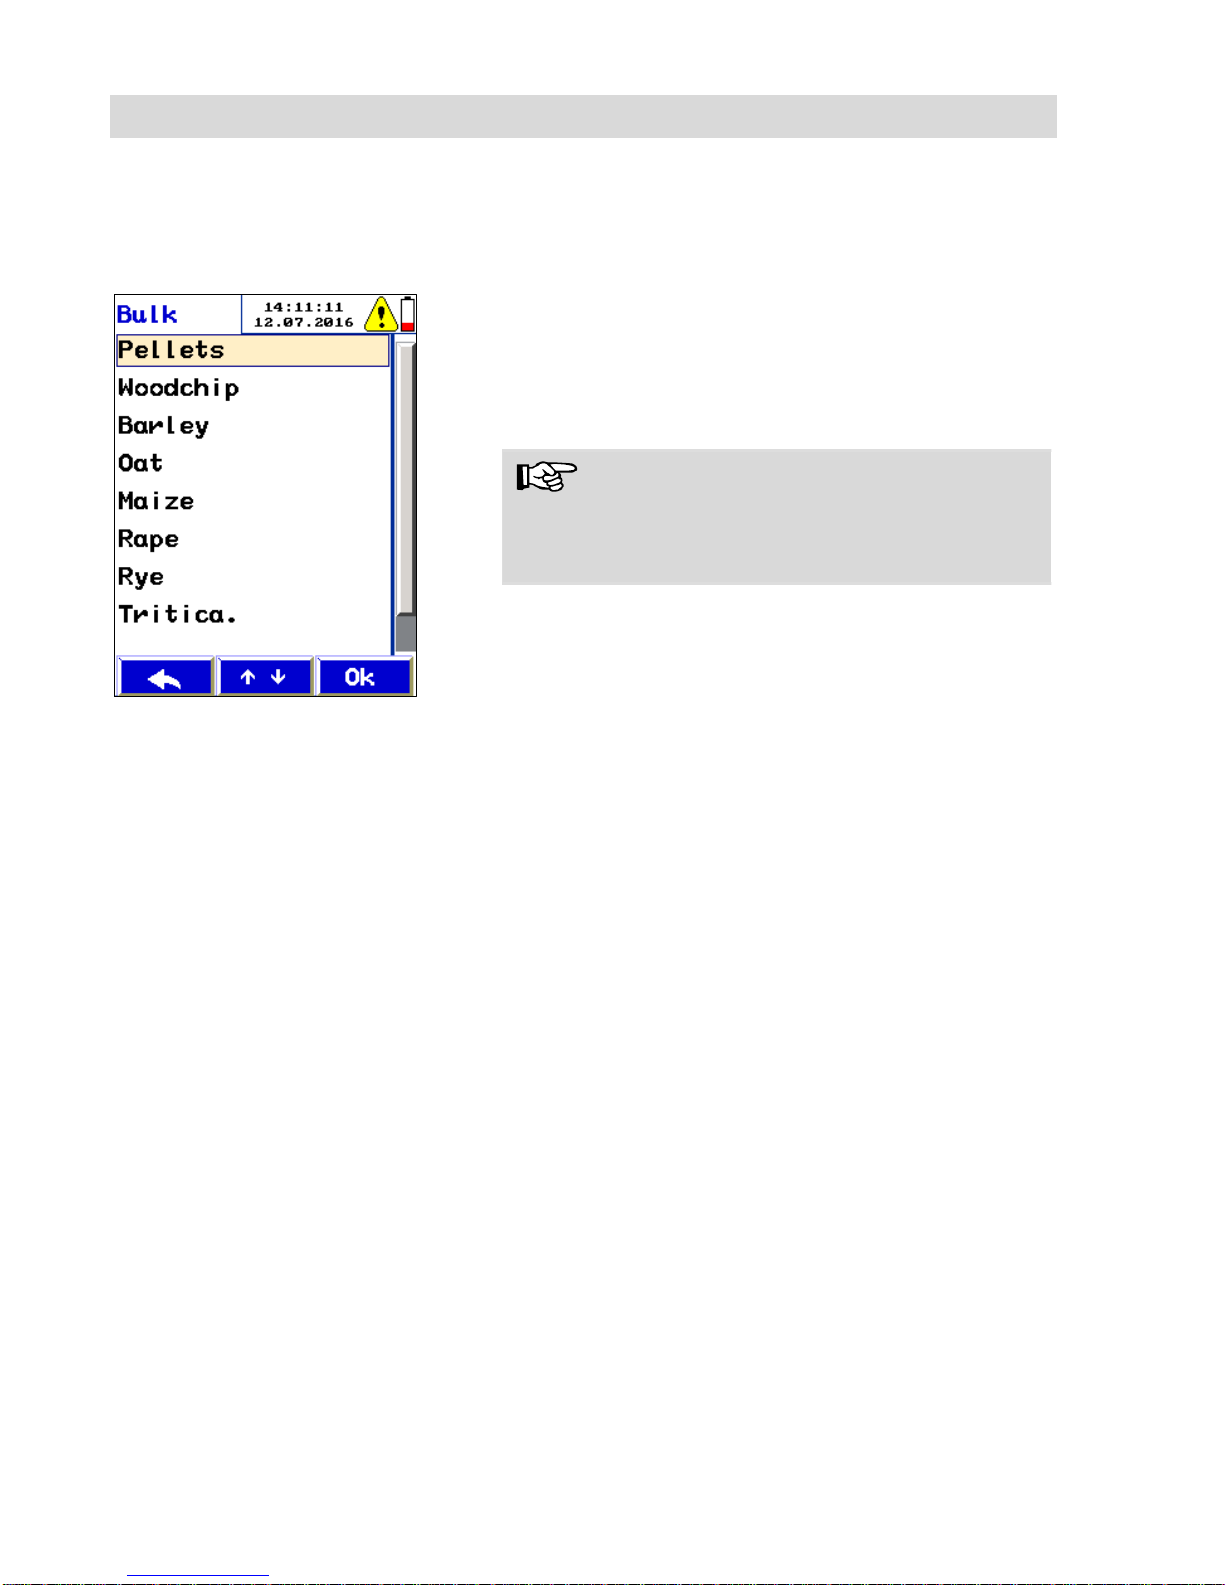
8.2.2 Bulk choice (when the
Moisture Scale is connected.)
Fig. 35: Selection of the bulk material
Before measuring the moisture of bulk material,
select the type of bulk: Pellets, woodchips or grain.
Select “Bulk choice” in the main menu.
With the arrow keys go to the selected type of
bulk and confirm with OK.
The following bulk materials are available: Pellets,
woodchip, barley, oat, maize, rape, rye, triticale or
wheat.
NOTE!
After switching on and off the meter, the selected
bulk material will stay active until you select another type of wood.
Press the “Escape”-key to exit the bulk menu.
Press the “Escape”-key again, to bring up the
measurement menu.
8.3 Customer
In the customer menu you can create new customer folders and administrate the data in a customer
folder, see chapter 10.
8.4 Save
Go to the sub menu “Save” to save the data of the
last measurement.
Page 32
Main menu
32
8.5 Print
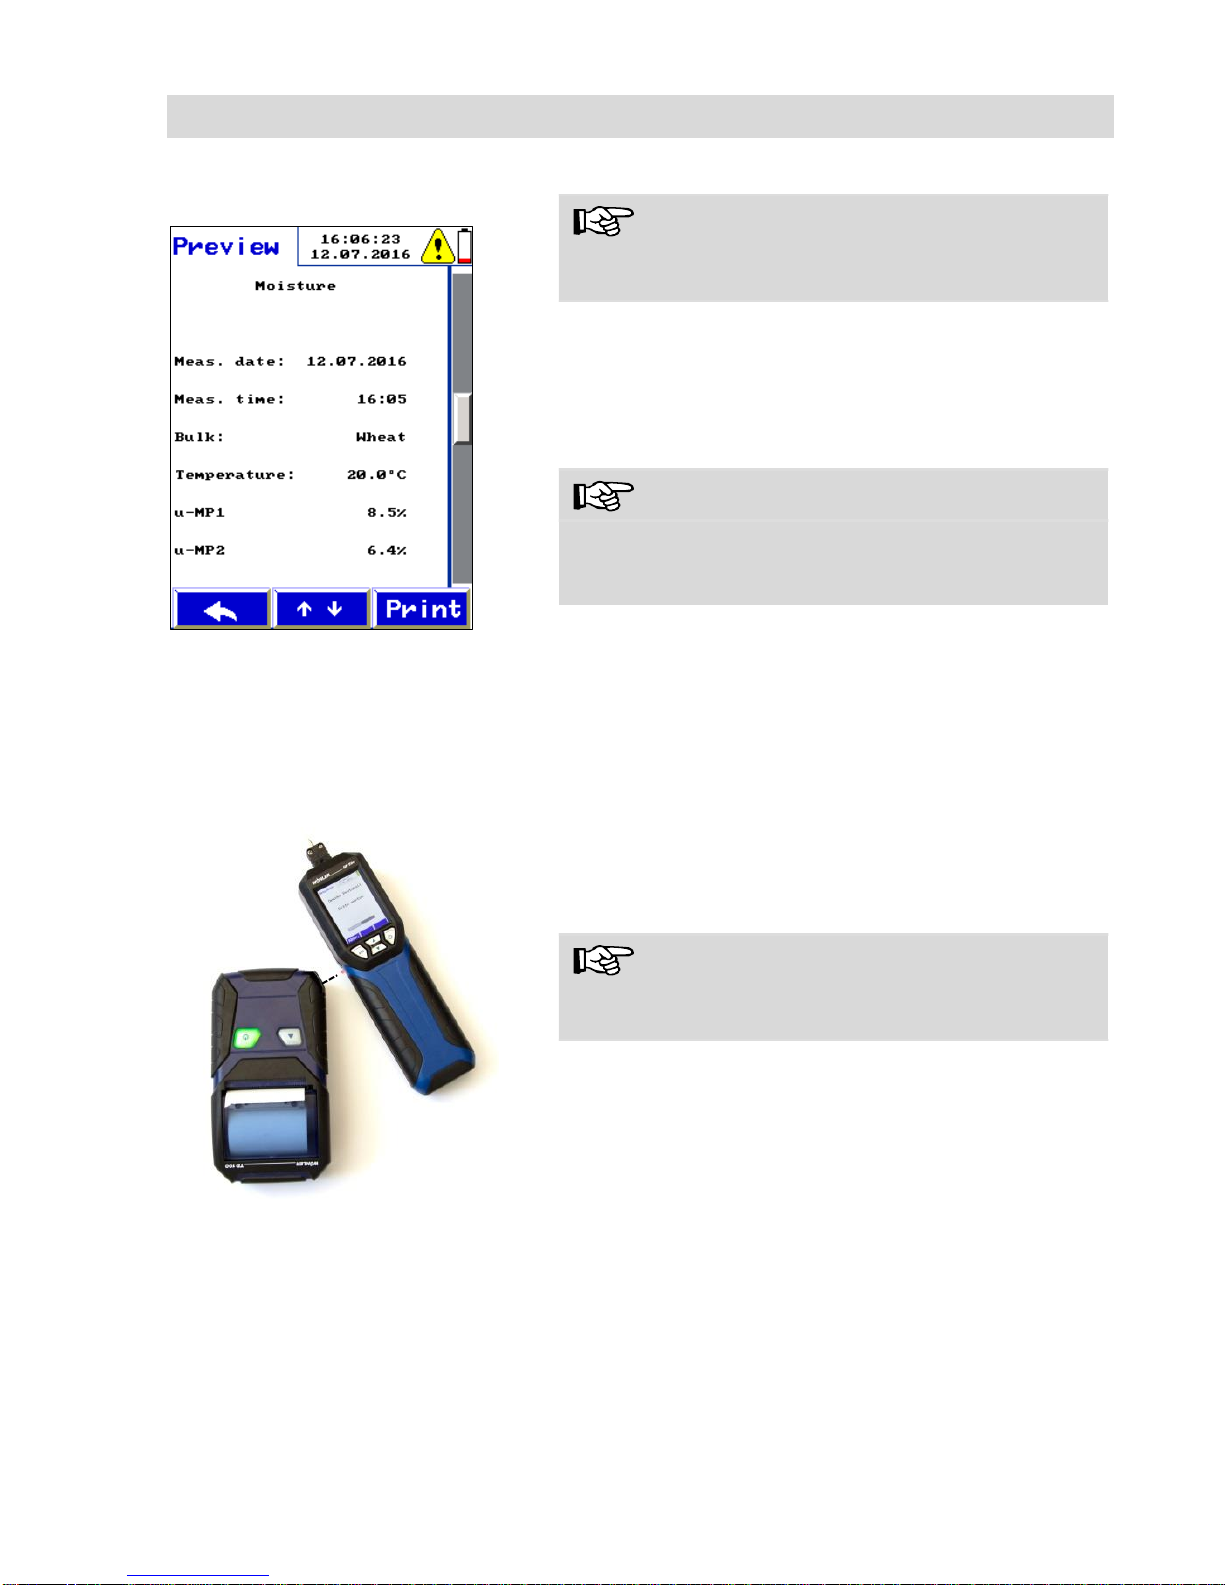
Fig. 36: Print preview
NOTE!
It is only possible to print the measurement data, if
it has been saved before, see chapter 8.4.
Go to the Sub menu “Print” to print all saved
measurement data on the Wöhler TD 100 Thermal Fast Printer. First, a print preview will appear
in the display of the Wöhler HF 550.
NOTE!
Also the company information will appear on the
printout. Enter your company information in the
setup menu > company logo, see chapter 8.7.
The menu options in the preview screen are:
Escape (left key): Cancel the process.
„↓↑“ (central key): Scroll up or down in the
preview. Long pressing the central key scrolls
faster.
“Print” (right key): Start the print out.
Fig. 37: Position of the meter during the
printing process.
When printing is in progress, a status bar will display the current process state. Press "ESC" to
stop the printout.
NOTE!
During the printing process the IR ports of the meter and the printer must lie opposite to each other.
Page 33

Main menu
33
8.6 Select probe
Select, if the measurement mode of logs or of bulk
shall appear on screen. The main menu will
change correspondingly.
8.7 SETUP
Make your personal settings in the setup menu.
To do so, proceed as follows:
With the arrow keys go to the parameter that
you want to change.
Select the parameter with the right arrow.
Change the parameter with the up and down-
arrow-keys.
Confirm the modification with the right key.
The parameter that can be changed appears in
red.
The following parameters can be changed:
Time
Change the current time of the internal clock
(format 00:00)
Date
Change the current date
(format 01.01.2016)
Brightness
Adjust the brightness of the display
(20 % and 100 %)
Temperature-Unit
Toggle between the temperature units °C and °F
Mass-Unit
Toggle between the mass units kg, lb or oz
Moisture
Toggle between the moisture content u (which
refers to the dry matter) and the water content w
(which refers to the wet mass)
Page 34
Main menu
34
Printer logo
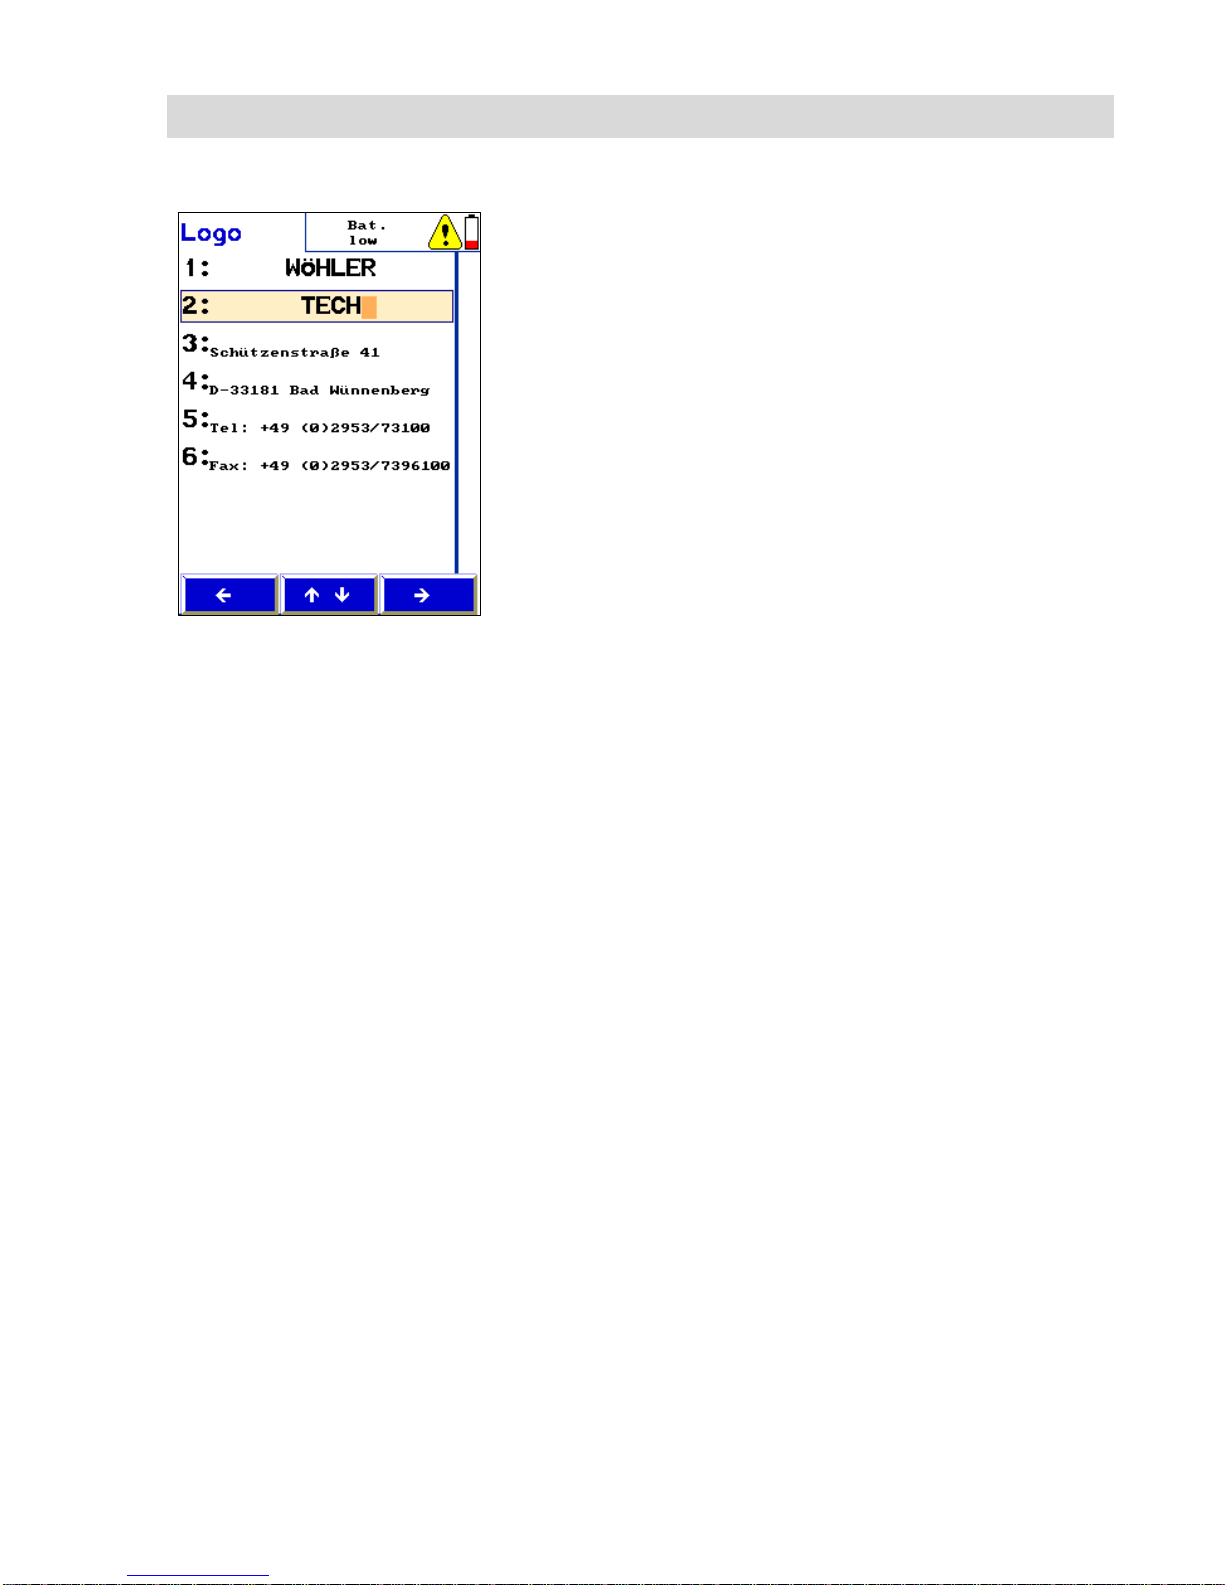
Fig. 38: Changing the company data for
the printout
There are 6 lines to enter the company data that
shall appear on the print out.
With the up and down arrow-keys select the
line to be changed. With the right arrow key
select the letter or number to be changed.
Change the letter or number with the up and
down arrow-keys.
Press the Escape-key to leave the Printerlogo
screen. The new Printerlogo will automatically be
saved.
Factory settings
Reset all the settings to its factory default setting
(except the calibration).
8.8 Check HF 550 and cal-
ibration HF 550
The meter has to be checked by a service point
which is officially authorized. For this reason, these
two submenus are password protected.
Page 35
Data administration
35
9 Data administra-
tion
The Wöhler HF 550 can save and administrate
customer data. The user can create a folder for
every client and assign measured data to a client.
9.1 Save records
For saving one ore more measurement records
under in a customer folder, proceed as follows:
In the main menu select “Save”. Confirm with
“OK”.
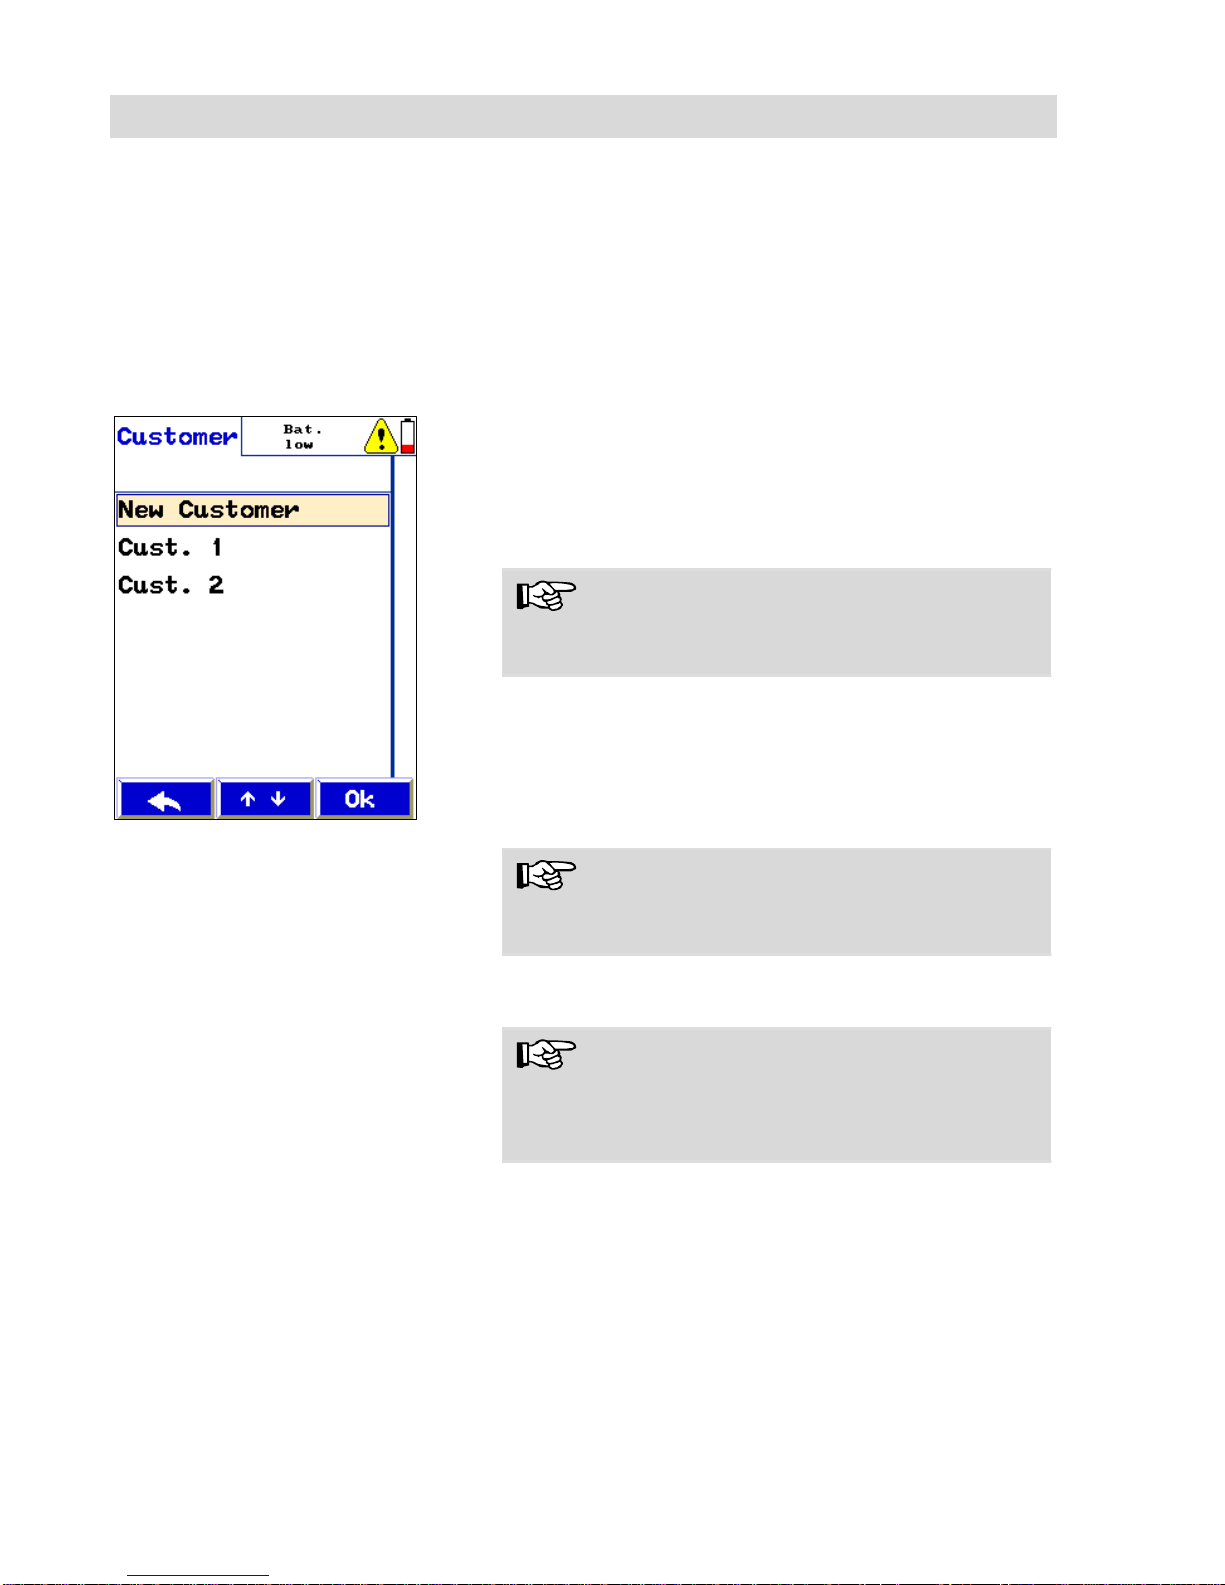
Fig. 39: Customer-Display
The analyzer will enter the customer menu.
Use the arrow keys to select the customer. If
the customer folder does not exist yet, create
the customer folder in the "new customer"
menu (see chapter 9.2).
NOTE!
Keep the up or down key depressed to scroll faster.
Press OK to confirm.
A list of the saved measurement data will appear.
Select "New measurement" to save new readings
in this customer folder.
Press OK to confirm.
NOTE!
The records marked with a tick mark in the main
menu are saved now.
After the records have been successfully saved, a
lock will appear instead of the tick mark.
NOTE!
During the saving process, the data that has already been saved in this measurement folder will
be deleted.
Page 36
Data administration
36
9.2 Creating a new cus-
tomer folder
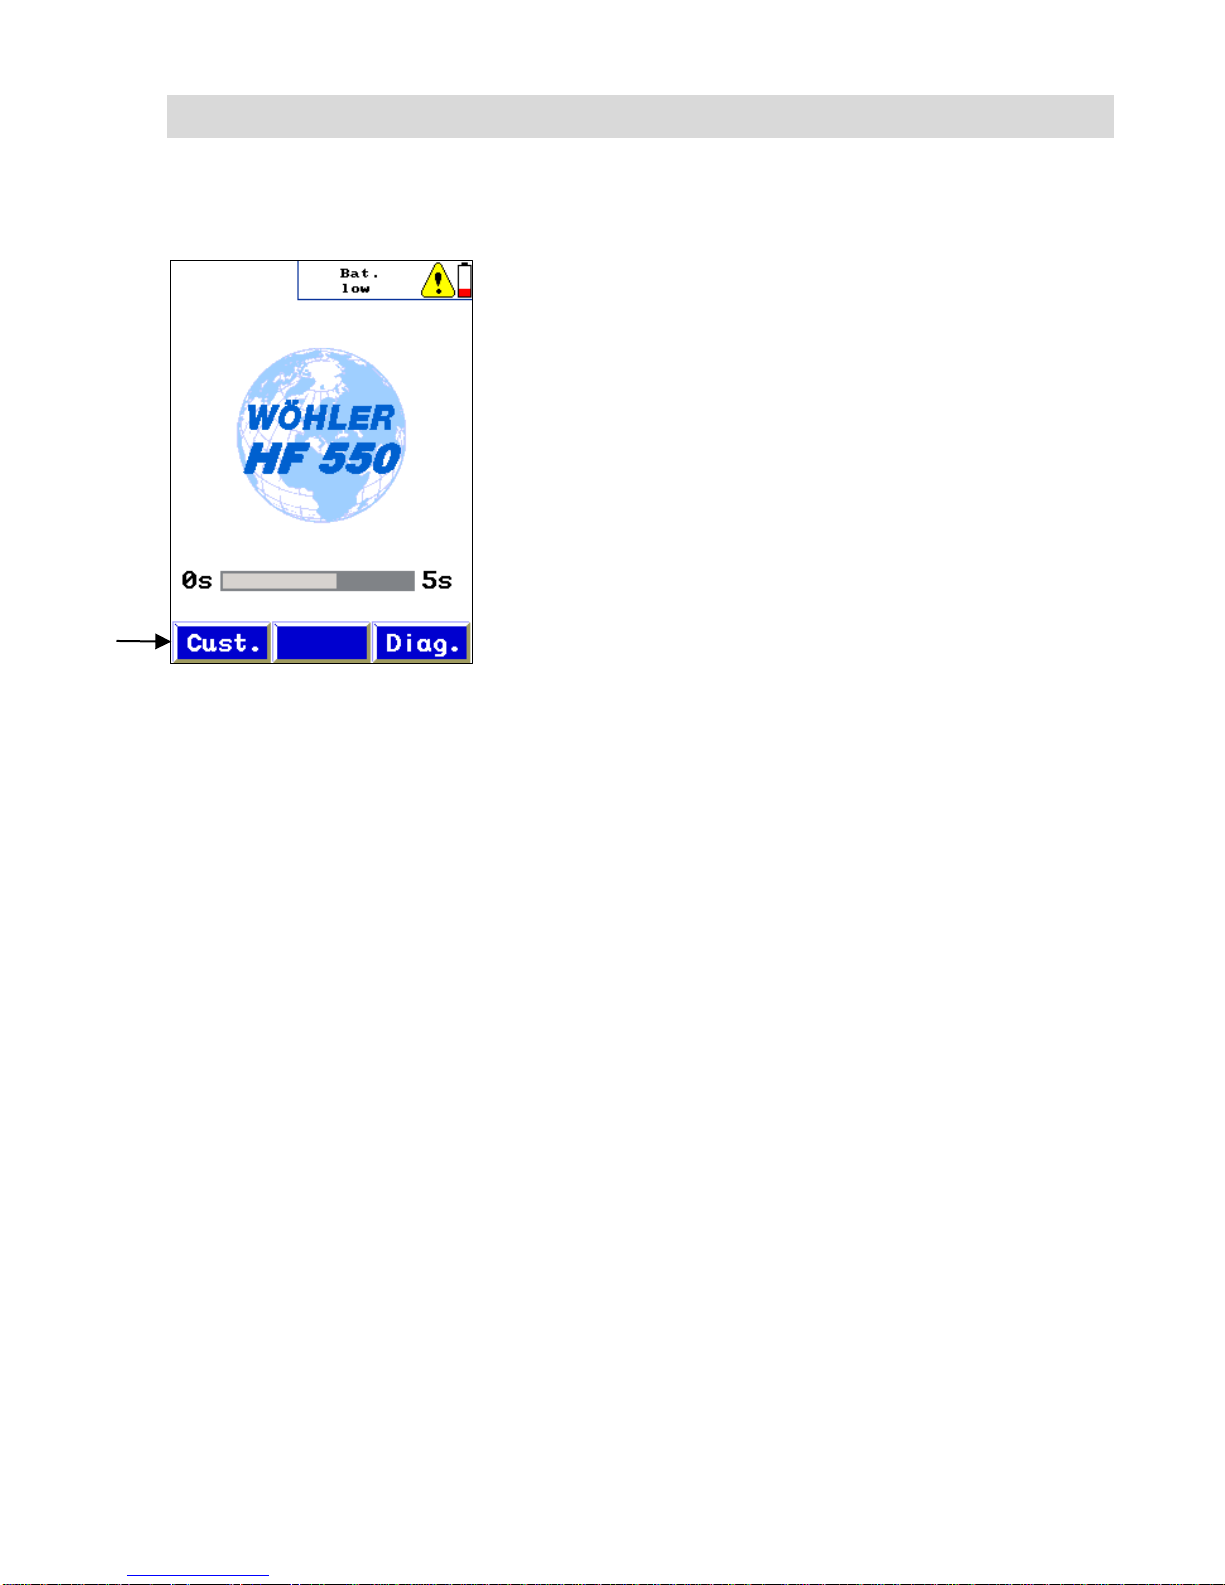
Fig. 40: Opening the customer-menu
directly after switching on the meter
You can create new customer or measurement
folders in the customer menu (open the customer
menu directly after having switched on the meter,)
or after saving the readings. With the arrow keys,
enter the name and the customer number of the
customer.
Page 37
Data administration
37
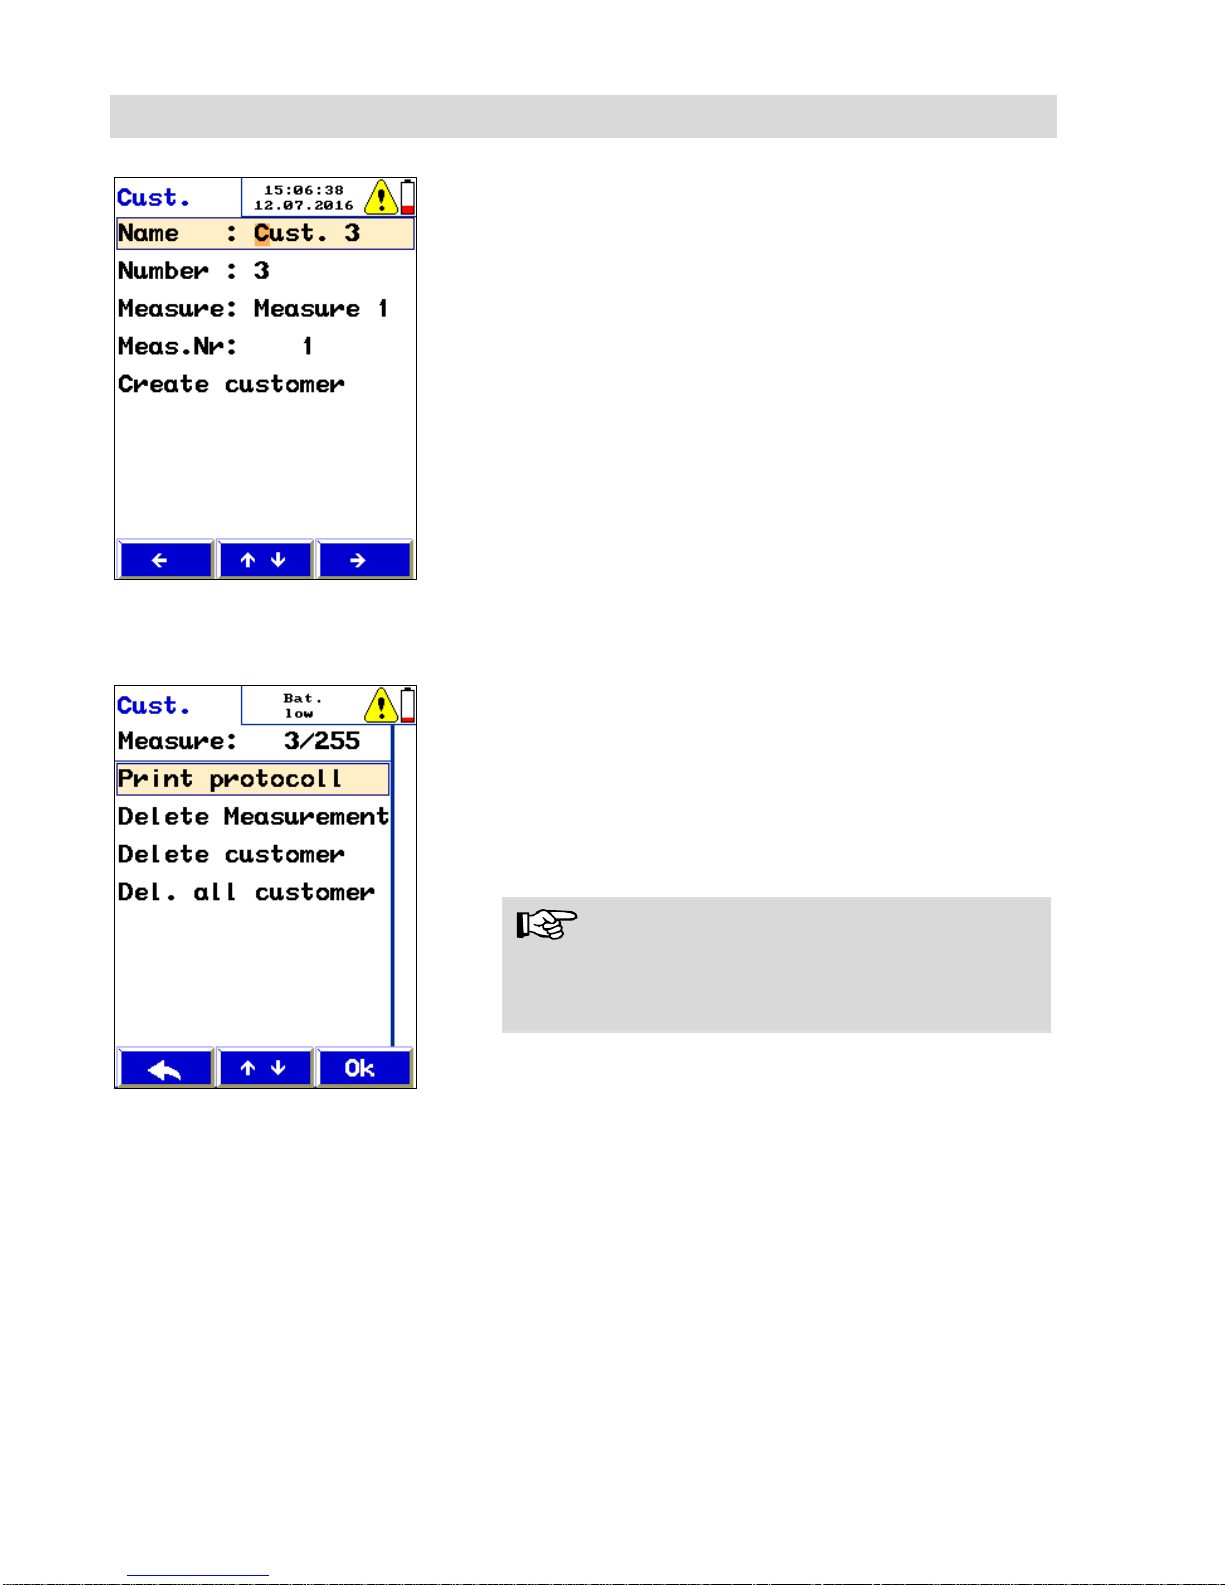
Fig. 41: Entering a customer name
In the customer menu select „New customer“.
If necessary you can overwrite the name. To
do so select the Customer Name with the up
and down arrow keys. Select the letter with
the right key. Change the letter with the up
and down arrow-key.
9.3 Customer Menu
Fig. 42: Customer menu
If you select “Customer” in the main menu, the
adjacent display will be shown, In the first line, the
number of customer folders and the number of
measurement folders will toggle.
- Select "Print protocoll" to print a report of any
saved measurement.
- Select „Delete Measurement“ to delete a single measurement.
NOTE!
If there exists only one measurement in the customer folder, the measurement and the customer
will be deleted.
- Select „Delete customer“ to delete a complete customer folder with all measurements.
- Select „Delete all customers“ to delete all
customer folders.
Page 38

Maintenance and care
38
10 Maintenance and
care
Proper operation of the meter requires regular
control and maintenance:
Interval
Control or Maintenance work
Before each measurement with the Hammer
Probe or Lance Probe.
Check the distance
between the electrodes,
if necessary change the
needles
Before each measurement with the Moisture
Scale
Check the internal coating for damage
After each measurement with the Moisture
Scale
Clean the scale with
compressed air or a wet
cloth. If necessary aspirate dust or rests of
bulk.
Never use soap or solvent based products for
cleaning the scale.
Twice a year
Control and calibration
oft he meter at the factory or at an authorized
service point.
Page 39

Warranty and Service
39
11 Warranty and Service
11.1 Warranty
Each Wöhler HF 550 Wood Moisture Meter will be
tested in all functions and will leave our factory
only after extensive quality control testing.
If used properly, the warranty period for the Wöhler HF 550 Wood Moisture Meter will be twelve
month from the date of sale.
This warranty does not cover the battery, the
freight and packing costs when the device is sent
to the factory for repair.
Service by non authorized personnel or making
modifications to the analyzer voids any warranty.
11.2 Service
Excellent SERVICE is very important to us. It
goes without saying that we are at your side when
the warranty period expires.
When you send your meter to us, we will re-
pair it within a few days and return it via our
trusted parcel carrier.
Immediate help is provided by our technical
staff over the telephone.
Page 40

Accessories
40
12 Accessories
Measuring the wood moisture of logs
Temperature probe Wöhler HF 550
Order no. 1567
Lance Probe
Order no. 5513
Wöhler Hammer Probe
Order no. 2522
Measuring the wood moisture of bulk
Protection cap and chute
Order no. 1127
Wöhler FW 550 Moisture Scale for Bulk Material
Order no. 1139
Extras
Wöhler Thermal Fast Printer TD 100
Order no. 4160
Thermal Paper, 10 rolls
Order no. 4145
Case
Plastic case Wöhler HF 550
Order no. 1534
Page 41

Sales and Service Points
41
13 Sales and Service Points
Deutschland
Wöhler Technik GmbH
Schützenstr. 41
33181 Bad Wünnenberg
Tel.: +49 2953 73-100
Fax: +49 2953 73-96100
[email protected]
www.woehler.de
Wöhler Süd
Gneisenaustr.12
80992 München
Tel.: +49 89 1589223-0
Fax: +49 89 1589223-99
[email protected]
Wöhler West
Castroper Str. 105
44791 Bochum
Tel.: +49 234 516993-0
Fax: +49 234 516993-99
[email protected]
International
USA
Wohler USA Inc.
20 Locust Street, Suite 205
Danvers, MA 01923
Tel.: +1 978 750 9876
Fax.: +1 978 750 9799
www.wohlerusa.com
Italien
Wöhler Italia srl
Corso Libertà 9
39100 Bolzano
Tel.: +390471402422
Fax: +39 0471
[email protected]
www.woehler.it
Tschechien
Wöhler Bohemia s.r.o.
Za Naspern 1993
393 01 Pelhrimov
Tel.: +420 5653 49019
Fax: +420 5653 23078
[email protected]
Frankreich
Wöhler France SARL
16 Chemin de Fondeyre
31200 Toulouse
Tel.: 05 61 52 40 39
Fax: 05 62 27 11 31
[email protected]
www.woehler.fr
 Loading...