

Page 1
62
WMF COFFEE MACHINES
Operating Instructions
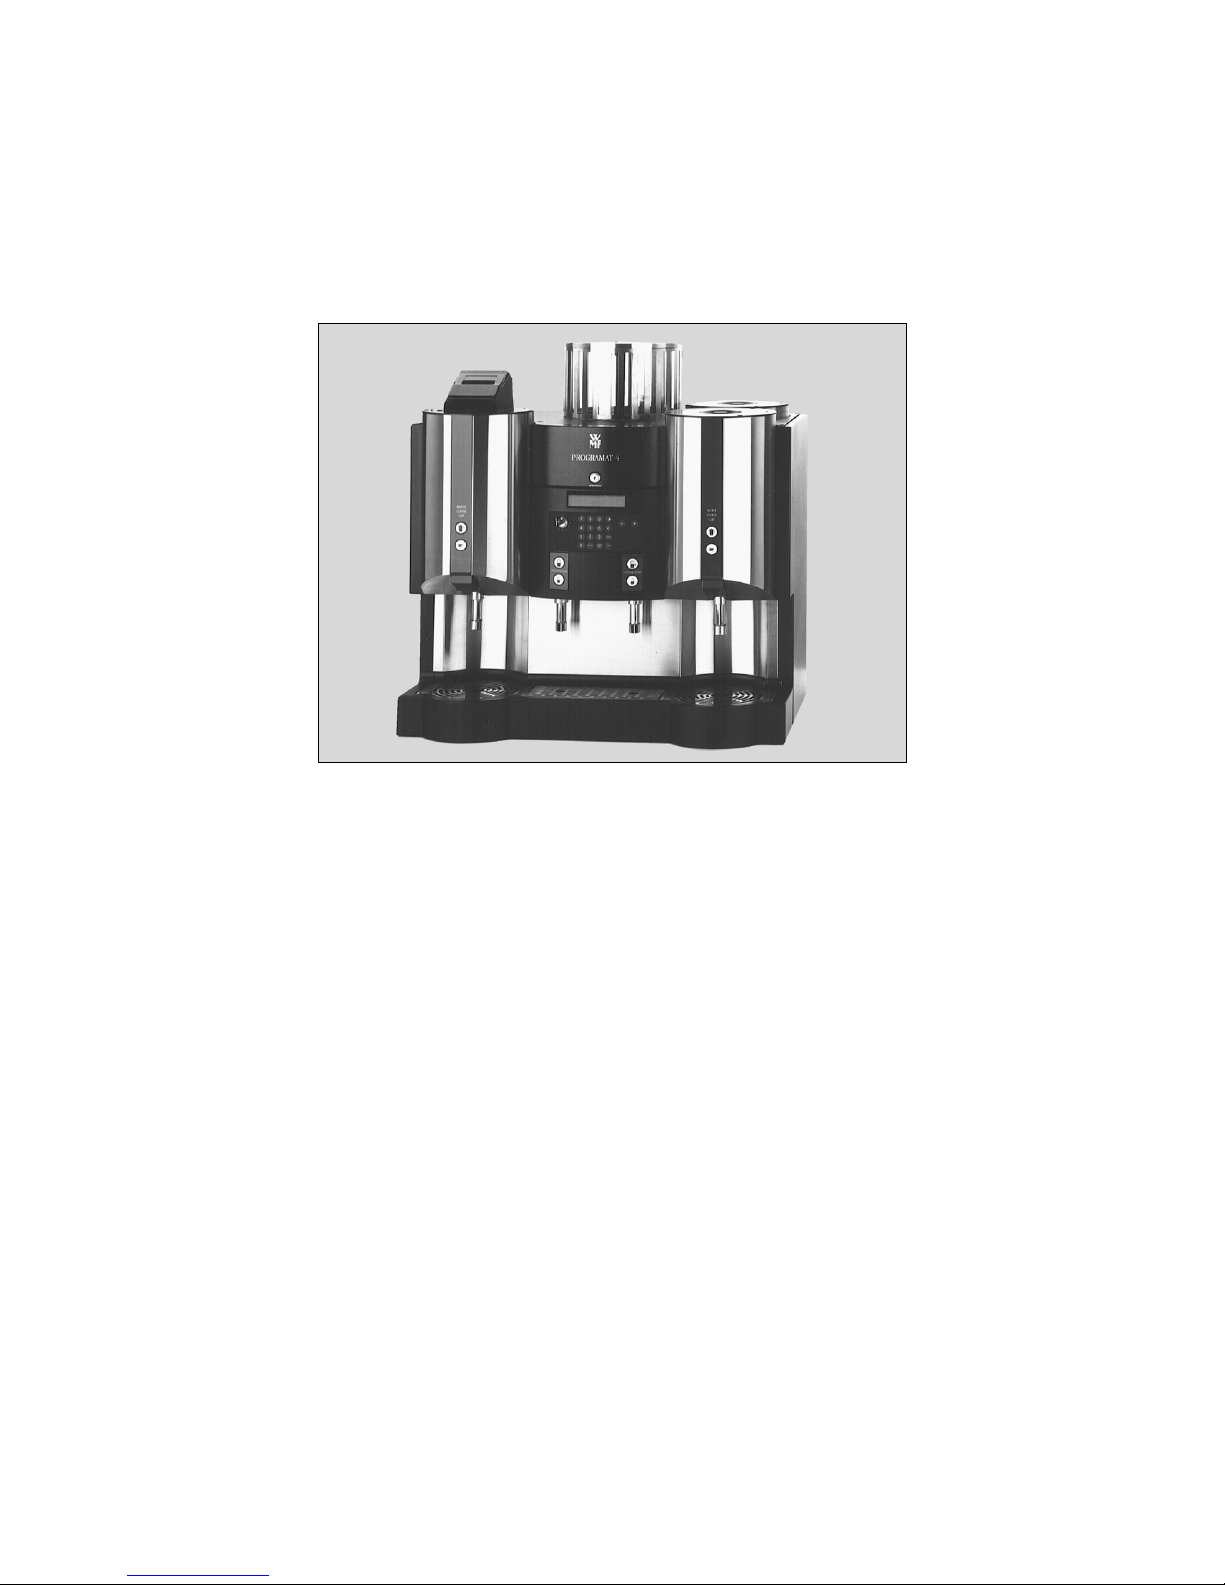
WMF PROGRAMAT 4
Model Series
7500
Edition 6 - Printed in 05.06
Item-No.
33 1459 4000
Page 2

63
Congratulations on the purchase of your
WMF COFFEE MACHINE.
Its advanced technology, long service life,
economic efficiency and especially the quality
of its coffee will delight you.
Please read these operating instructions. You
will get much more out of your
WMF COFFEE MACHINES if you are fully
aware of how to operate the machine.
In your own interests, please follow all
safety cautionary instructions. This will
help avoid accidents and technical
malfunctions.
Never entrust the machine to anybody who
is not familiar with the operating
instructions.
Keep these operating instructions near the
machine. This will allow your operating
personnel easy access to information at any
time, and will enable them to take the
appropriate action should there be any
technical malfunctions.
Page 3

64
TABLE OF CONTENTS
1 WARNINGS .........................................................................................................................................68
2 DESIGNATION OF MACHINE PARTS..........................................................................................66
3 SAFETY INSTRUCTIONS.................................................................................................................69
4 TECHNICAL DATA ...........................................................................................................................70
5 OPERATING INSTRUCTIONS........................................................................................................71
5.1 FUNCTIONAL
CHARACTERISTICS ............................................................................................ 71
5.2 MACHINE
START-UP ...................................................................................................................... 72
5.2.1 MANUAL
START-UP .....................................................................................................................72
5.2.2 START-UP
VIA TIMER ..................................................................................................................73
5.3 SELECTION
OF STORED COFFEE QUANTITY......................................................................... 73
5.3.1 MANUAL
SELECTION OF BREWING CHARGES......................................................................73
5.3.2 AUTOMATIC
SELECTION OF BREW QUANTITIES .................................................................74
5.3.3 SELECTION
OF BREW QUANTITY VIA TIMER ........................................................................75
5.4 GROUND
COFFEE HOPPER (GCH).............................................................................................. 77
5.5 COFFEE
DISPENSING ..................................................................................................................... 78
5.6 HOT
WATER DISPENSING ............................................................................................................. 79
5.7 DISPLAY
OF PORTION TOTALS .................................................................................................. 79
5.8 ONE-PRICE
COIN CHECKER........................................................................................................ 80
5.9 COIN
CHANGER (4 PRICES)............................................................................................................. 80
5.10 MACHINE
SHUTDOWN .................................................................................................................. 80
5.10.1 MANUAL
SHUTDOWN .................................................................................................................80
5.10.2 SHUTDOWN
VIA TIMER...............................................................................................................81
6 PROGRAMMING ...............................................................................................................................81
6.1 PROGRAMMING
TIMER SELECTIONS...................................................................................... 82
6.1.1 PROGRAMMING
TIME / DATE ....................................................................................................82
6.1.2 PROGRAMMING
START-UP AND SHUTDOWN .......................................................................83
6.1.3 PROGRAMMING
CLEANING CYCLE .........................................................................................85
6.1.4 PROGRAMMING
SELECTION OF BREWING QUANTITY .......................................................85
6.2 QUANTITY
PRESELECTION......................................................................................................... 86
6.3 SELECTION
OF GROUND COFFEE QUANTITY ....................................................................... 87
7 PERSONNEL ACCOUNTING SYSTEM WMF MULTICOUNTER............................................88
7.1 GENERAL
FUNCTIONAL CHARACTERISTICS........................................................................ 88
7.2 TECHNICAL
DATA .......................................................................................................................... 89
7.3 PRINTER............................................................................................................................................. 90
7.4 OPERATING
MODES....................................................................................................................... 90
7.4.1 SALES ..............................................................................................................................................90
7.4.2 ACCOUNTING
OPERATION.........................................................................................................93
7.4.3 PROGRAMMING
OPERATION.....................................................................................................99
8 MACHINE CARE..............................................................................................................................105
8.1 DAILY
CLEANING.......................................................................................................................... 105
8.1.1 LIQUID
CLEANING......................................................................................................................105
8.1.2 POWDER
CLEANING...................................................................................................................107
8.2 WEEKLY
CLEANING .................................................................................................................... 108
8.3 GENERAL
MACHINE CLEANING.............................................................................................. 109
Page 4

65
9 MACHINE INSTALLATION ..........................................................................................................110
9.1 PREPARATORY
WORK.................................................................................................................110
9.2 ELECTRICAL
CONNECTION.......................................................................................................110
9.3 FRESH
WATER SUPPLY CONNECTION....................................................................................110
9.4 WASTE
WATER OUTLET..............................................................................................................110
10 CONTROL INDICATORS AND MALFUNCTIONS....................................................................111
11 WMF CUSTOMER SERVICE.........................................................................................................113
12 GUARANTEE....................................................................................................................................114
13 WMF EC DECLARATION OF CONFORMITY FOR COFFEE MACHINES.........................115
Page 5
66
1 WARNINGS
Complete machine safety is an integral WMF product characteristic to which we pay particular
attention.
Despite all our constructive safety measures, however, every machine is potentially dangerous if not
operated properly.
Therefore, for your own safety, we have summarised the warnings below and highlighted them in grey
throughout the instruction manual.
Please also note the “Safety instructions“ (page71).
For your own safety,
please observe the following
Connection of the machine to site services should only
be carried out by WMF customer services technicians.
instructions at all times:
Maintenance and repairs should only be carried out by
trained WMF customer service technicians using
original spare parts.
Built-in safety devices should never be repaired,
bypassed or modified by untrained personnel.
Caution!
In the dispensing area of the hot water spout 8 and coffee
spout 16, there is danger of scalding.
Caution!
Do not reach into the ground coffee hopper 1 or the
brewer unit 30 when machine is on.
Danger of crushing!
Caution!
The cleaning adapters 29 must be plugged in during the
cleaning process. The cleaner is corrosive! Please be sure
to observe safety instructions on cleaner packaging at all
times when using cleaner.
Page 6
67
Standard Optional
Operator Key Switch
O
T
I
W
R
H
A
E
O
T
I
S
C
M
A
P
Off
Timer
On
Select
Cleaning
Manual
Accounting
Programming
Keypad
1
3
4
5
6
7
9
12
13
1514
2
10
11
8
16
Page 7
68
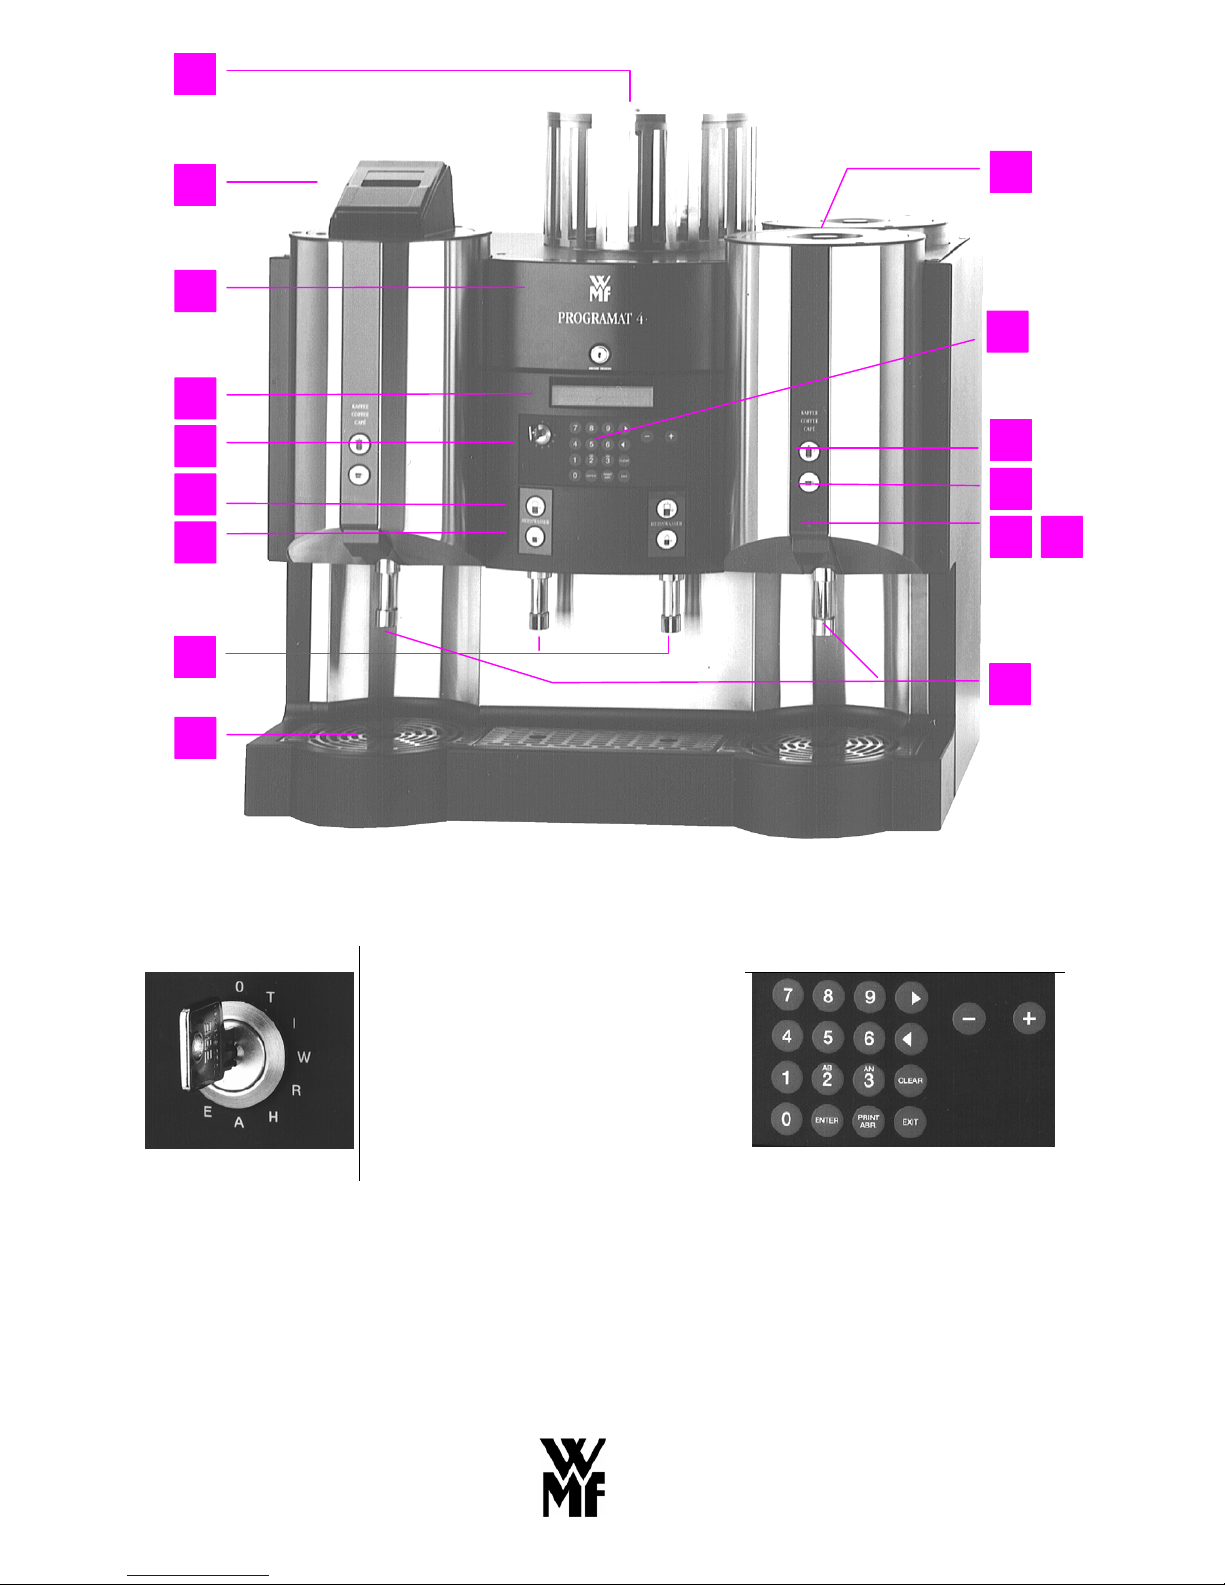
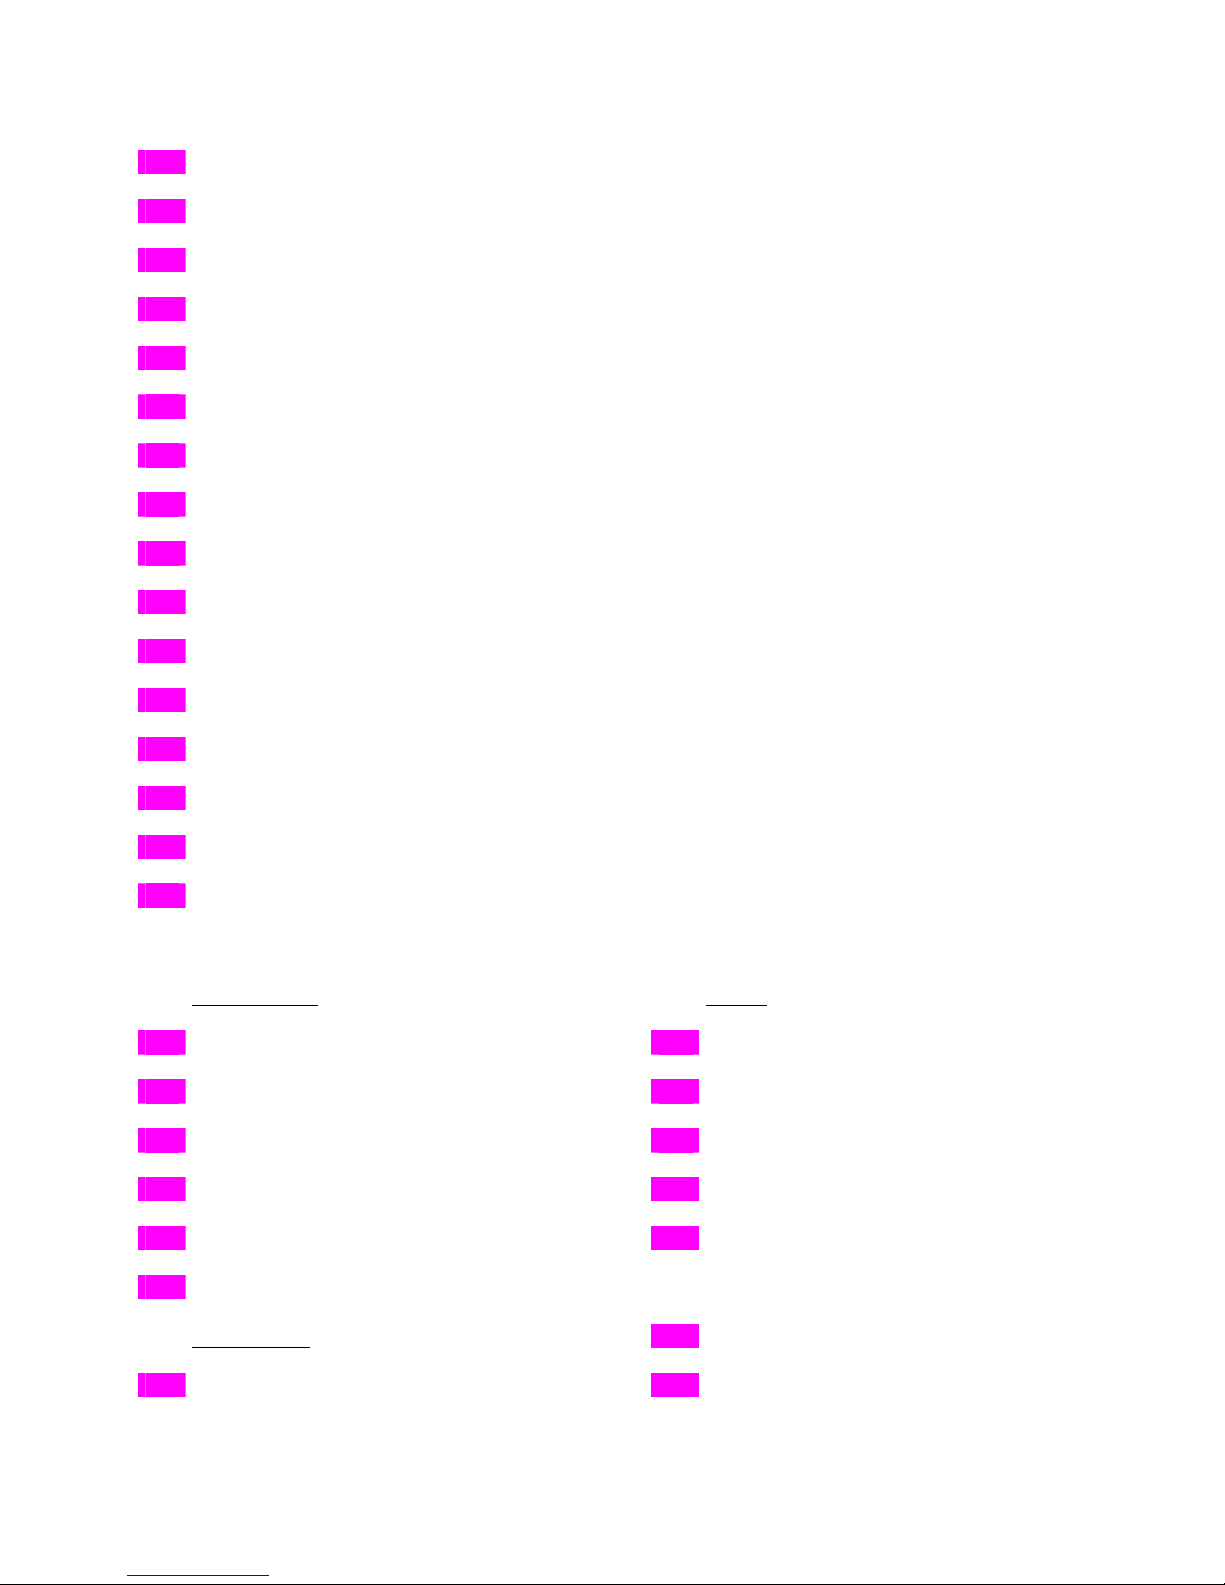
2 DESIGNATION OF MACHINE PARTS
1
Lockable ground coffee hopper
2
Printer
3
Lockable machine door
4
Display
5
Operator key switch
6
Hot water dispensing button “Large Quantity“
7
Hot water dispensing button “Small Quantity“
8
Hot water spout
9
Drip tray
10
Porcelain storage urn
11
Keypad
12
Coffee dispensing button “Pot“
13
Coffee dispensing button “Cup“
14
“Empty“ display “Coffee dispensing blocked“
15
Waiter lock
16
Coffee dispense hea
d
The
f
ollowing numbers only appear in the illustration within the text:
Coin checker
(
s. Fig. 3, page 81) Printe
r
(
s. Fig. 6, page 91)
17
Coin slot
24
Ribbon
18
Coin return chute
25
Pape
r
19
Coin return button
26
Paper holde
r
20
Control indicator “On“
27
Aperture in cover
21
On / Off Switch (inside coin collecting box
)
28
Cove
r
22
Lockable coin collecting box
Multicounter
29
Cleaning adapter (s. Fig. 7, page 107
)
23
Waiter’s
p
en (s. Fig. 5, page 90)
30
Brewin
g
unit (s. Fig. 8, page 109
)
Page 8

69
3 SAFETY INSTRUCTIONS
General instructions
1. Maintenance of the water boiler, including descaling, should only be carried out by trained
technical personnel.
2. Always ensure that the main water supply valve of the machine is opened before start-up and
closed after shutdown.
3. The approved, built-in safety devices prevent excessive pressure and temperature increases in the
water boiler. Should the safety valves respond, the machine must be disconnected immediately in
order to prevent machine damage.
4. Should the seals on the boiler lid leak, they must be replaced. Never tighten the clamping ring.
Deformed clamping rings must be replaced.
Inform WMF customer service and do not switch the machine on until the fault has been eliminated.
Machine shutdown
1. Machine that are shut down for an extended period of time must be drained to prevent frost
damage.
In such cases, WMF customer service must be informed promptly.
2. After several weeks of shutdown, we recommend that the fully automatic cleaning cycle be run at
least twice before start-up of the machine.
Technical boiler data
see machine data plate
The water boiler meets the regulations governing steam boilers as well as the technical rules on steam
boilers. The water boiler does not require registration or a permit. Each water boiler supplied has been
subjected to a water pressure test with 4,2 bar overpressure.
In accordance with the regulations and corresponding technical rules, the operator of these machines is
responsible for the careful maintenance and inspection of the safety devices.
Preventive measures against consequential machine damage
Any technical device, particularly larger fully automatic machines operated without supervision, is a
potential source of danger.
Therefore, we recommended that the operator takes appropriate measures for damage prevention in
accordance with local regulations or existing operating conditions.
For example:
Installation of a stopcock into the site water supply is recommended if the water valve is not turned off
on a regular basis after daily operation.
Page 9

70
This device is subject of the directive on waste electrical and electronic equipment
(WEEE/EU directive) and may not be disposed of as domestic waste. Please contact
your WMF Customer Service for information on proper disposal of the device.
4 TECHNICAL DATA
Model series
7500
Storage urns
2 x 4 lt. / (porcelain reservoir)
Maximum hourly output
(in 1/8 ltr. cups)
520 cups of coffee (17 gallons) and
160 cups of hot water (5.25 gallons)
Dispensing time
1 cup (1/8 lt.)
1 pot ( 2/8 lt.)
appr. 3 sec.
appr. 6 sec.
Ground coffee hopper
3 kg capacity
Electrical connection
3/N/PE 400 V 50 Hz
Fuses
3 x 16 A
Water feed line
minimum DN 15, 0,2 MPa flow pressure at 4 l /min,
max. 1,5 MPa (218 PSI)
Water drain line
hose, DN 40, minimum drop 2 cm/m
External dimensions
Width (without coin checker)
Width (with coin checker)
Height
Depth
800 mm (31.5 inches)
990 mm (39.0 inches)
825 mm (32.5 inches)
610 mm (24.0 inches)
Weight (empty)
approx. 94 kg (208 pound)
Continuous sound pressure
level (Lpa) *
< 70 dB (A)
Subject to technical change without notice
* The A-weighted mean sound pressure level Lpa (slow) and Lpa (impulse) at the operator`s workplace is below 70 dB
(A) in every operating mode.
Page 10

71
5 OPERATING INSTRUCTIONS
5.1 FUNCTIONAL CHARACTERISTICS
The WMF-PROGRAMAT 4 is designed for automatic coffee
and hot water dispensing. Freshly brewed beverages (1, 2 or
4 ltr.) will be piped alternately into one of the two 4 ltr.
capacity porcelain storage urns. The coffee will only be
brewed into a porcelain urn that has been cleaned with hot
water – therefore, freshly prepared coffee is never brewed
into stale beverages or storage containers contaminated with
coffee residues.
The brew volume (brew quantity) may be selected manually
as well as automatically. If the brewing quantity is selected
automatically, it is adjustable to any portion size according to
the dispensing output.
The built-in clock includes the following functions:
1. Start-up / Shutdown of the WMF PROGRAMAT 4
2. Selection of brewing quantity
3. Cleaning cycle (for machines with liquid cleaning cycle)
Coffee and hot water are dispensed in measured portions, the
amount being adjustable to any cup or pot size. Each quantity
(cup of coffee, pot of coffee; hot water “Large Quantity“ and
“Small Quantity“) is registered. Unlimited quantities of
coffee can only be dispensed with the operator key switch 5 :
After daily operation, the automatic cleaning cycle cleans all
components that have come into contact with the coffee.
Series 7500 machines with the personnel accounting system
offer a reliable facility for controlled product dispensing and
accounting.
(see 7 PERSONNEL ACCOUNTING SYSTEM)
All accounting data, such as portions dispensed per beverage,
sales per beverage, sales per waiter etc. are centrally
registered, and can be displayed and printed out instantly.
The WMF PROGRAMAT 4 accounting system allows the
connection of 3 other hot and cold beverage dispensers and
direct connection to other data processing systems (e.g. cash
registers). Upon request, self-service machines may be
equipped with mechanism for coins, tokens or credit card
operation.
The WMF PROGRAMAT 4 is lockable and can only be
started up with a key.
Page 11
72
CAPACITY
The hourly brewing capacity is 65 litres of coffee. In
addition, approx. 20 litres of hot water may be drawn.
Compared to the performance data for semi-automatic coffee
machines, this hourly capacity must be rated as considerably
higher since it does not depend on the operating personnel’s
and skill.
The high brewing capacity together with a starting supply of
up to 8 litres makes it possible for the
WMF PROGRAMAT 4 to handle supply peaks easily.
5.2 MACHINE START-UP
Before the machine start-up, open the main water valve at the
water supply and turn on the main power switch outside the
machine.
5.2.1 MANUAL START-UP
Position “I“ (“ON“ without selection options)
The machine is connected, the water is heated up to brewing
temperature (approx. 10 minutes). The machine is ready to
operate, but the brewing quantity cannot be adjusted.
During warm-up, the display alternates between the
following indications:
Sel: 0L 8:17
Actl: 0.0L 08.01 ↑
-- Warm up --
After the machine is heated- up, the displayed sign “⇑“ and
“Warm-up“ disappear.
Position “W“ (“ON“ with selection options)
If position “W“ is selected for start-up, the machine will go
through the same warm-up phase as in position “I“; however,
selection options are available with the - keys.
The display will indicate:
Sel: 0L 8:17 W
Actl: 0.0L 10.01
Page 12
73
5.2.2 START-UP VIA TIMER
Position “T“ (timer activated)
The timer function permits automatic machine start-up. The
operator may program 3 start-up and shutdown times per day.
The times correspond to weekdays not to dates.
For programming see: 6.1.2 PROGRAMMING START-UP
AND SHUTDOWN
5.3 SELECTION OF STORED COFFEE QUANTITY
The brewing facility of the WMF PROGRAMAT 4 allows
the preparation of brewing quantities (= charges) varying
from 1, 2 or 4 litres of coffee.
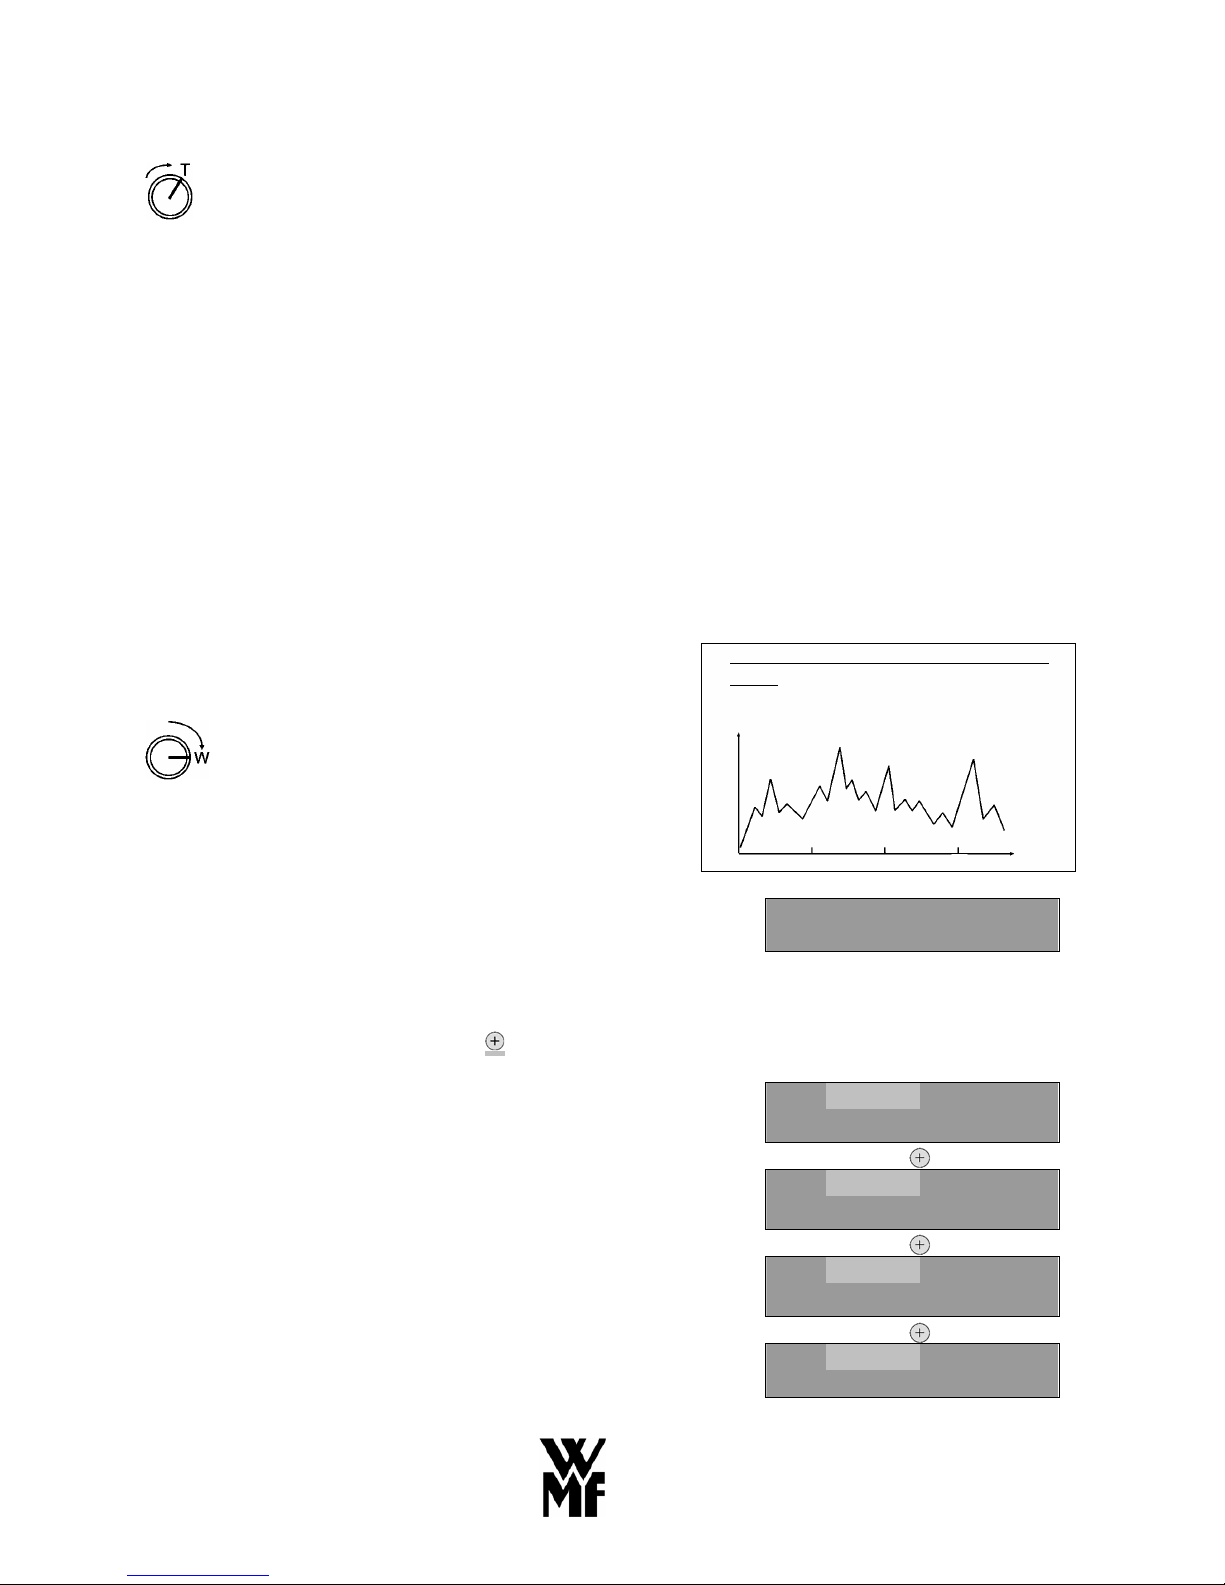
Those quantities can be preselected as follows:
5.3.1 MANUAL SELECTION OF BREWING CHARGES
Usage:
Position “W“ (“ON“ with selection options)
After warm-up phase, the display indicates:
Sel: 0L 8:17 W
Actl: 0.0L 10.01
The preselection is 0 litres (Selection: 0L): there will be no
automatic brewing – remaining coffee may be dispensed
completely.
To change the preselection, press the key:
Selection: 1-2L, as soon as the stored quantity drops below
0.7 litres, the machine automatically brews 1 additional litre.
Sel: 1-2L 8:17 W
Actl: 0.0L 10.01
Selection: 1-3L, as soon as the stored quantity drops below
1 litres, the machine automatically brews 2 additional litres.
Sel: 1-3L 8:17 W
Actl: 0.0L 10.01
Selection: 2-4L, as soon as the stored quantity drops below
2 litres, the machine automatically brews 2 additional litres.
Sel: 2-4L 8:17 W
Actl: 0.0L 10.01
Selection: 4-8L, as soon as the stored quantity drops below
4 litres, the machine automatically brews 4 additional litres.
Sel: 4-8L 8:17 W
Actl: 0.0L 10.01
Constantly changing, unpredictable coffee
output
Output
Time
Page 13
74
To reduce the previous selection, press the key.
Note:
In the case of manual brew quantity selection, choose the
lowest output level needed for operation. Increase stored
quantity only if absolutely necessary. Always adjust the
output according to operating performance – this way storage
time can be reduced and the coffee is fresh at all times.
5.3.2 AUTOMATIC SELECTION OF BREW
QUANTITIES
Usage:
Position “W“ (“ON“ with selection options)
After the warm-up phase or when the operator key switch 5
is in position “W“, the display indicates:
Sel: 0L 8:17 W
Actl: 0.0L 10.01
For automatic selection of brew quantities, press key.
The display indicates:
Auto: 1-2L 8:17 W
Actl: 0.0L 10.01
According to the output of the past few minutes, this
automatic brewing program calculates short-term anticipated
output. Based on this output, the best brew quantity selection
is calculated, set automatically and displayed.
Possible indications:
Auto: 1-2L 8:17 W
Actl: 0.0L 10.01
Auto: 1-3L 8:17 W
Actl: 0.0L 10.01
Auto: 2-4L 8:17 W
Actl: 0.0L 10.01
Auto: 2-8L 8:17 W
Actl: 0.0L 10.01
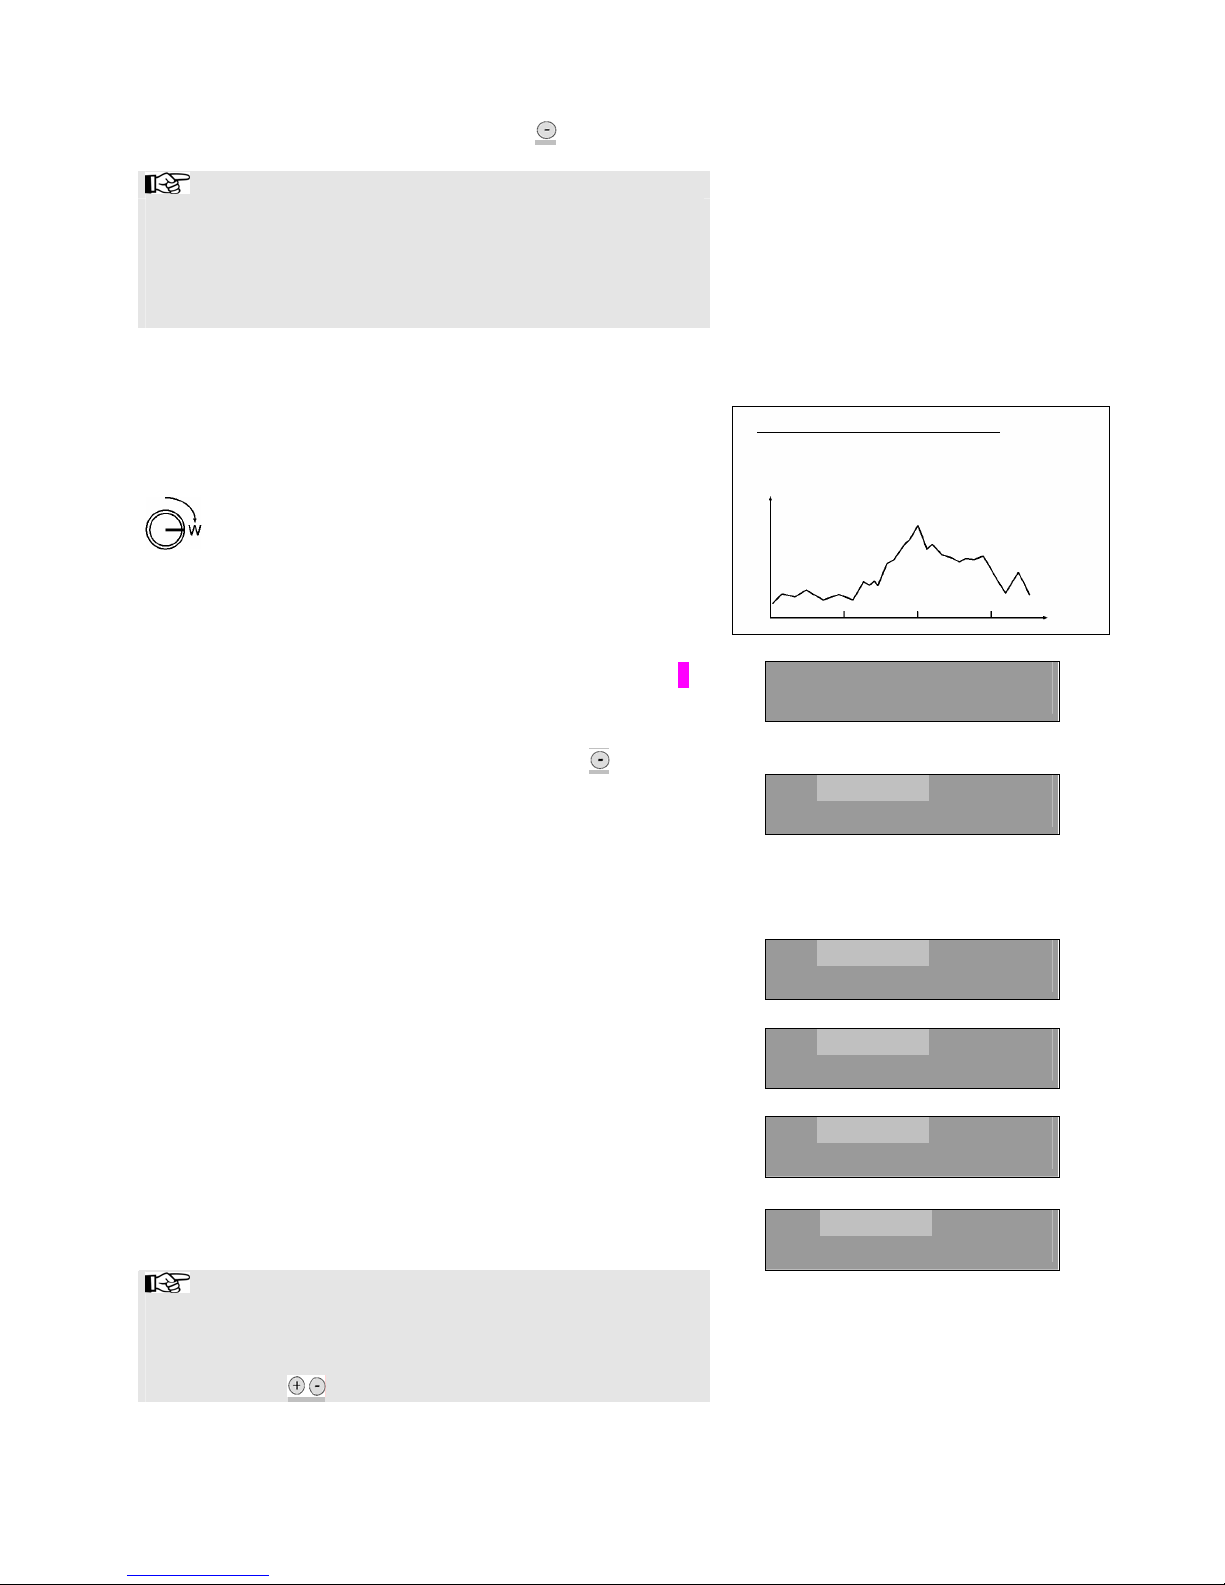
Note:
The automatic brewing charge selection is ideal for
continuously varying degrees of output. Should the output
change at short notice, the selection can be adjusted manually
by pressing the keys.
For continuously varying output
Output
Time
12.00 pm 4.00 pm
Page 14
75
5.3.3 SELECTION OF BREW QUANTITY VIA TIMER
Usage:
Position “T“ (timer activated)
The programming of brew quantities for a specific time does
not depend on whether the machine is in “manual“ (5.3.2) or
“automatic“ (5.3.2) operation.
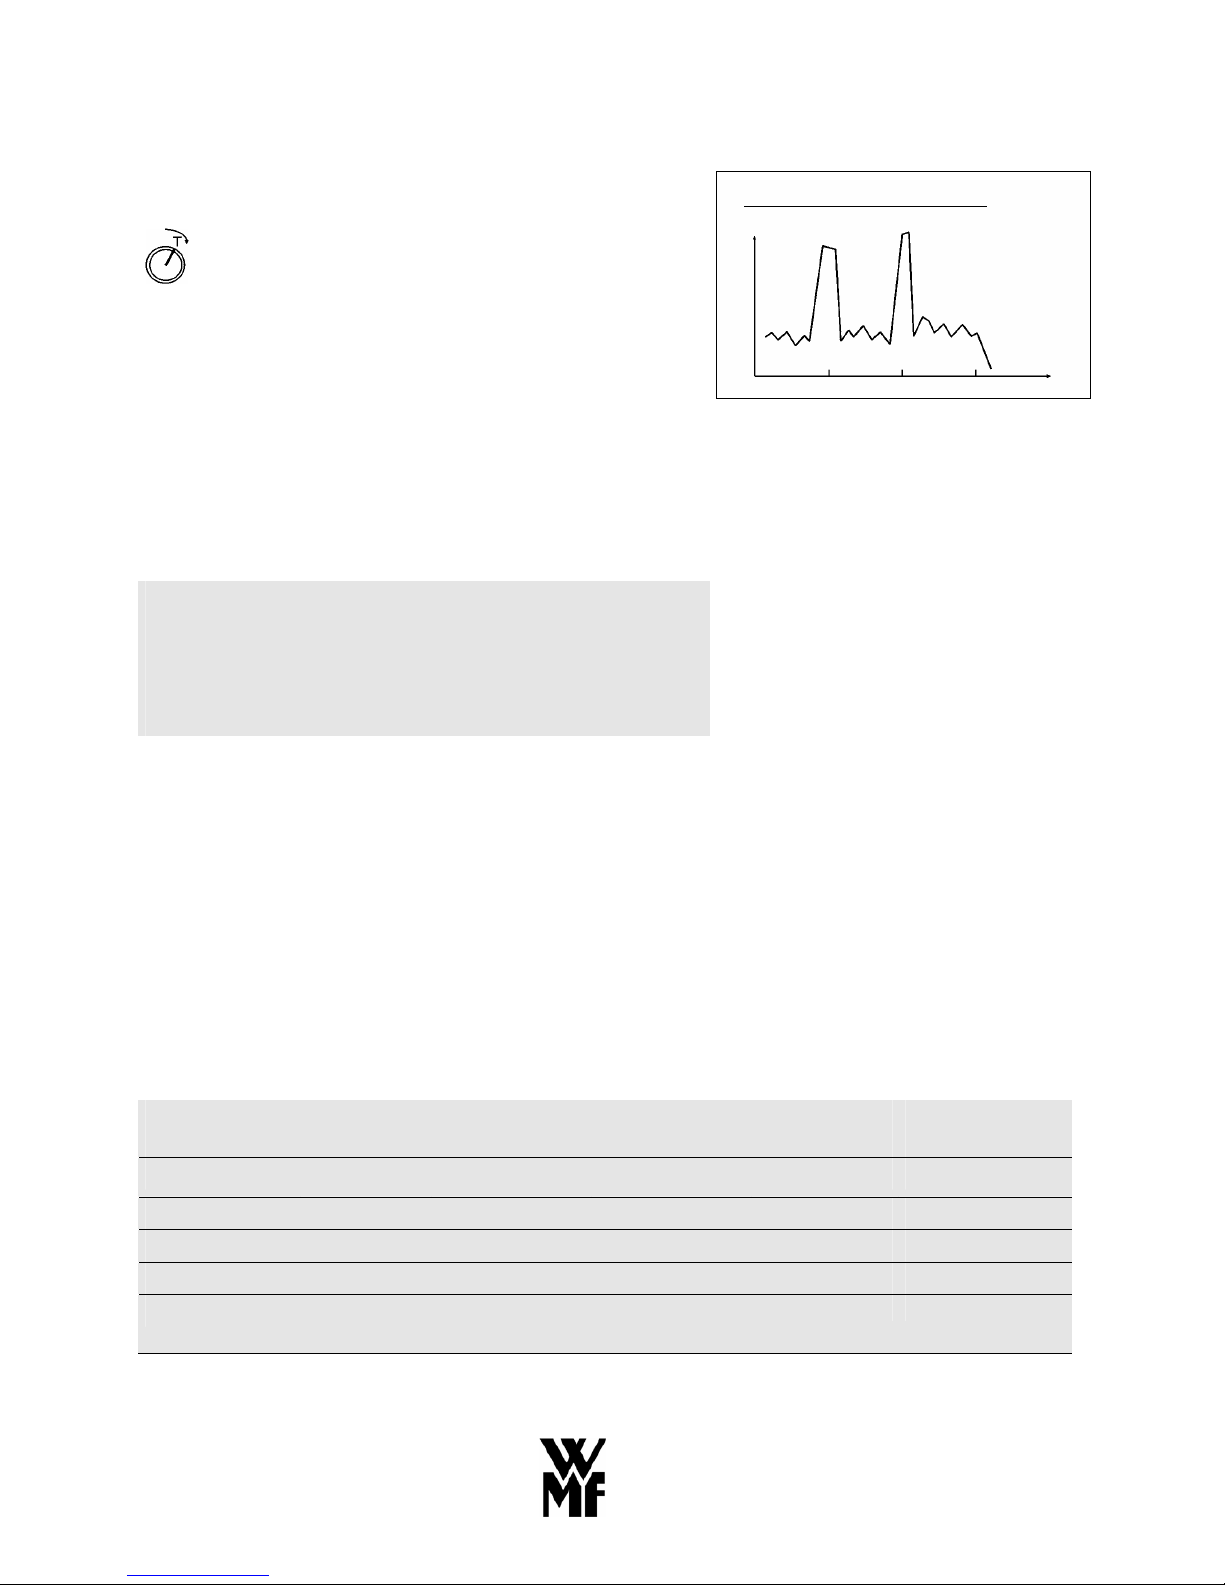
This mode allows the operator to program particular brew
quantities for a specific time.
Example:
At a cafeteria the staff regularly drink coffee at the following
times:
8:00 am – breakfast
12:00 pm – lunch
The cafeteria closes at 4:30 pm The machine should therefore
stop brewing fresh coffee at 4:00 pm.
If the machine is connected automatically, in other words
starting from a shutdown, a warm-up phase (appr. 10
minutes) and brewing time ( max. 4 minutes) must be taken
into consideration.
Supply ready: 8:00 am
Timer setting: 7:45 am
For the exact programming of brew quantity selections via
timer please see section:
6.1.4 PROGRAMMING TIMER FOR BREW QUANTITY
SELECTION:
Performance
levels
Display Brew quantity Initial supply Max. coffee
supply
Min. coffee
supply
High Sel.: 4-8 l 4 ltr. 8 ltr. 8 ltr. 4 ltr.
Medium Sel.: 2-4 l 2 ltr. 4 ltr. 4 ltr. 2 ltr.
Normal Sel.: 1-3 l 2 ltr. 2 ltr. 3 ltr. 1 ltr.
Low Sel.: 1-2 l 1 ltr. 1 ltr. 1,5 ltr. 0,5 ltr.
Zero Sel.: 0 l Ready to brew no additional
brewing
For continuously varying output
Output
Time
12.00 pm 4.00 pm
Page 15

76
acording to
output
Auto:... Brewing charge 1, 2 or 4 ltr. selected automatically
Page 16
77
5.4 GROUND COFFEE HOPPER (GCH)
Caution!
Do not reach into ground coffee hopper 1 when machine is
connected. Danger of crushing!
The lockable ground coffee hopper 1 holds 3 kg of ground
coffee. It should be medium to fine grain and dust-free
(machine ground). WMF customer service will be pleased to
assist you in choosing the appropriate grinding. Portion
quantities can be adjusted to any brew quantity.
See 6.3 PROGRAMMING GROUND COFFEE QUANTITY
When changing coffee varieties, be aware that the specific
weight of ground coffee can fluctuate considerably and that
the portion quantity may require resetting.
When the coffee hopper is empty, beverage preparation is
impossible. The display indicates:
Please Refill Ground
Coffee! / ENTER
After refilling the ground coffee hopper press the
“ENTER“ key to confirm.
Make sure that the ground coffee hopper is always refilled in
time.
If there is not a sufficient amount of ground coffee for a brew
quantity of 4 litres, the machine automatically brews a charge
of 2 litres.
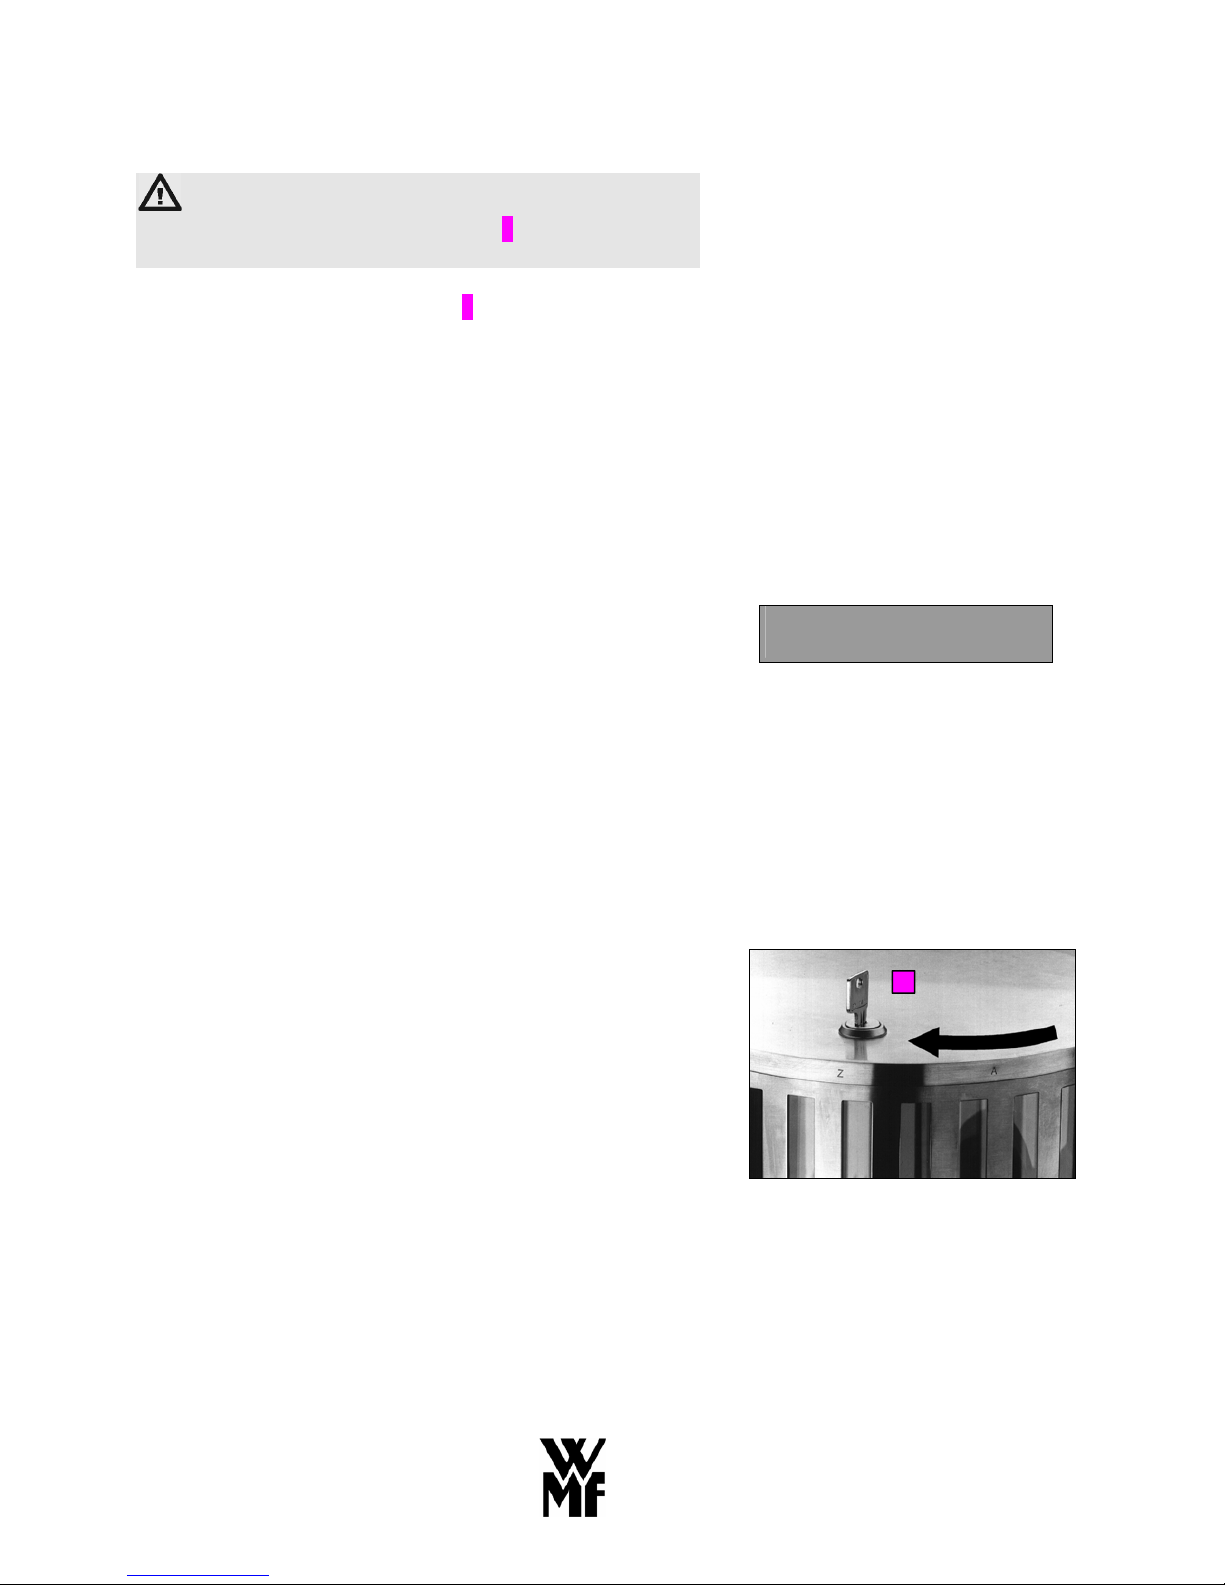
Please remove the GCH lid as follows (see Fig. 1):
1. Open the lock.
2. Turn lid to the left until “A“ is in position “Z“.
3. Remove lid by lifting it off.
Fig. 1
To replace the lid , follow instructions in reverse order.
1
Page 17
78
5.5 COFFEE DISPENSING
Caution!
In the area of the hot water dispense head 8 and the coffee
dispense head 16, there is danger of scalding!
Put a cup or pot under the coffee spout 16on the drip tray 9
and initiate the measuring process by pressing the coffee
dispensing button 12 / 13 .
Please use preheated cups only. WMF offers you an
electrically heated cup stack for 60-90 cups and saucers as an
accessory.
(WMF model series 9016)
If the machine cannot dispense a full portion, coffee
dispensing is blocked and the “empty“ display 14 flashes.
At the time of initial machine start-up, WMF customer
service can program the following operation modes for
dispensing:
1. Pre-portioned
See 6.2 QUANTITY PRESELECTION, page 88
2. Continuous dispensing while pressing the button as
long as coffee dispensing buttons 12 / 13 are pressed.
3. “Start - Stop“ mode, pressing the button once starts
dispensing, pressing it a second time stops it.
Free flow
(only with master key).
Position “H“ (Manual dispensing)
Turn key switch to position “H“. Press any of the coffee
dispensing buttons to start free flow of coffee.
The storage urns will be completely emptied; this dispensing
mode is best for filling large containers. To interrupt
dispensing, press any of the dispensing buttons or turn key
switch.
Note:
For free-flow dispensing with master key in position “H“
select Selection: 0L if there is no need for additional
brewing when the min. coffee level has been reached.
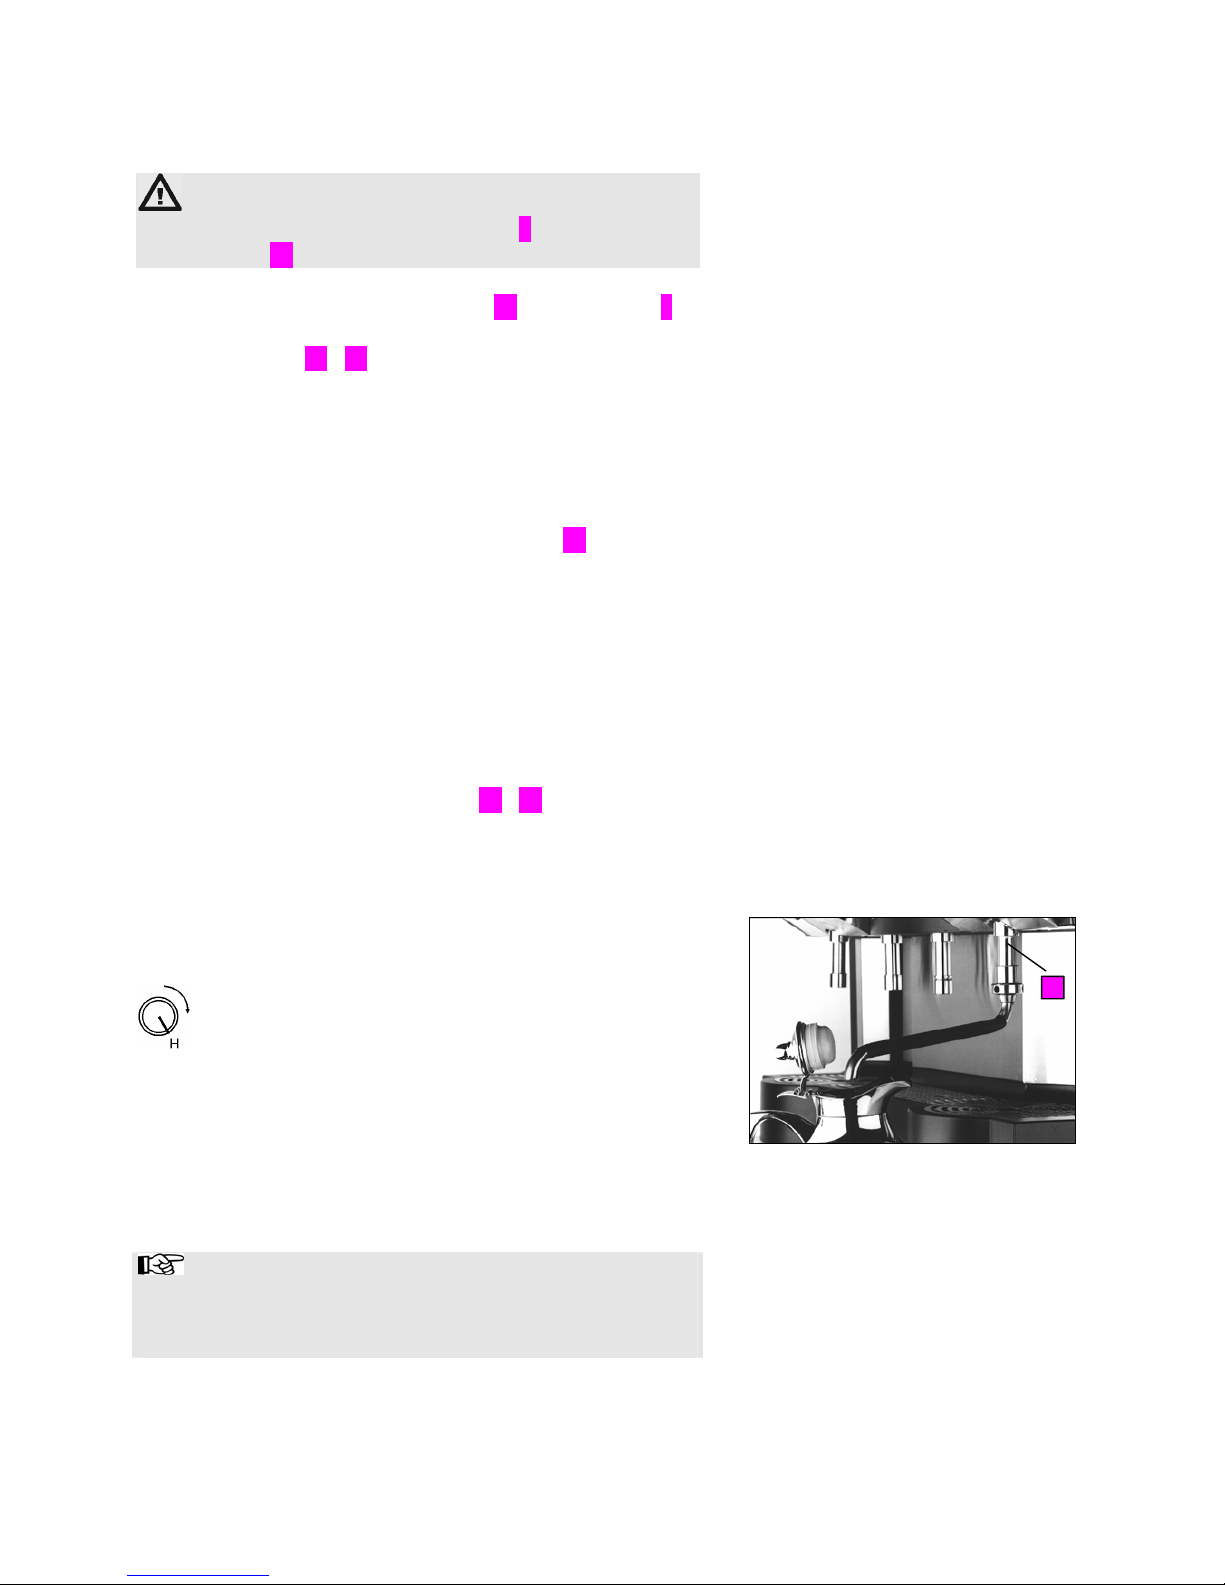
Fig. 2
(special equipment for free flow
dispensing 33.9838.3000)
16
Page 18
79
5.6 HOT WATER DISPENSING
THE WMF PROGRAMAT 4 is equipped with a hot water
spout 8. By pressing the corresponding keys (6 “Large
Quantity” and 7 “Small Quantity“), hot water is dispensed in
portions.
At the time of initial machine start-up, WMF customer
service can program the following operating modes for hot
water dispensing:
1. Pre-portioned
See 6.2 PROGRAMMING PORTION QUANTITY
2. Continuous dispensing while pressing the button as
long as hot water dispensing buttons 6 / 7 are pressed.
3. “Start – Stop“ mode, pressing the button once starts
dispensing, pressing it a second time stops it.
5.7 DISPLAY OF PORTION TOTALS
Without personnel accounting system:
Even without the WMF multicounter, the current portion
totals can be indicated on the display.
Position “A“ (accounting)
Indication Total No.
Bev. Sold / ENTER
The portion totals per product cannot be deleted. To exit the
display mode press “EXIT“ or use key switch.
Cof. l / Cup..12392
EXIT Next / >
With personnel accounting system:
See 7.4.2 ACCOUNTING
Page 19
80
5.8 ONE-PRICE COIN CHECKER
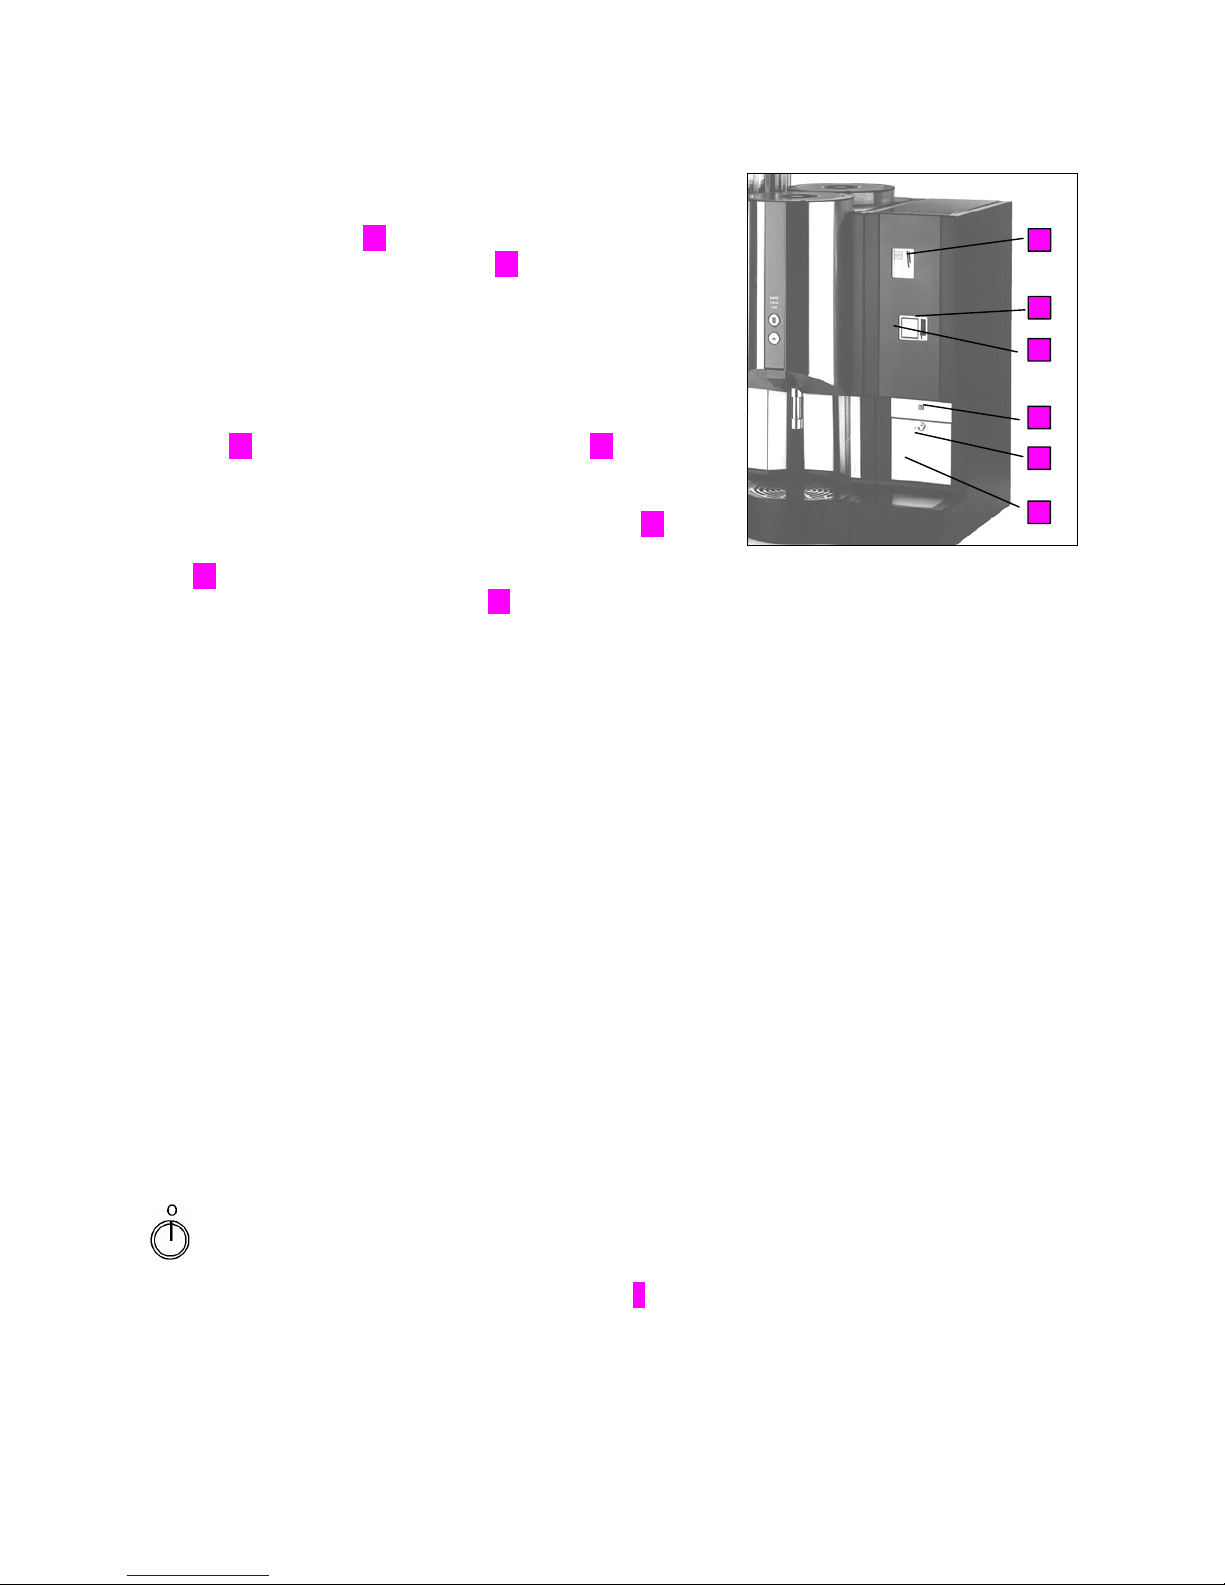
For self-service operation, the WMF PROGRAMAT 4 can
be equipped with a coin checker (Fig. 3). The coin checker is
switched on with switch 22 inside the coin collecting box.
Coins may be inserted when the “ON“ 21 is illuminated.
Indicator “ON“ is lit when the coin checker is switched on
and there is a sufficient amount of ground coffee. If the coin
checker remains turned off, products can be dispensed free of
charge.
The coins or tokens inserted into the coin checker
(coin slot 18 )are collected in a lockable coin box 23 .
The coin checker can be set for various selling prices. If the
coin checker malfunctions, press the coin return button 19.
The money or tokens can then be removed from the return
chute 20. If products cannot be dispensed the coin slot is
automatically locked. Indicator “ON“ 21 is turned off.
Fig. 3
5.9 COIN CHANGER (4 prices)
For operation and programming of the coin changer, see
corresponding instruction.
The coins or tokens inserted into the coin changer are
collected in the lockable coin box.
The coin changer can be set for various selling prices. If the
coin changer malfunctions, press the coin return button. The
money or tokens can then be removed from the coin return
chute. Change is also returned via coin return chute.
5.10 MACHINE SHUTDOWN
As in machine start-up, there are two possibilities for
machine shutdown. Make sure that the daily cleaning cycle’s
completed before disconnecting the machine.
5.10.1 MANUAL SHUTDOWN
Position “0“ (Off)
1. Disconnect the machine using operator key switch 5 ; the
display is turned off.
2. Disconnect electrical isolator outside of machine.
3. Close main water stopcock.
4. Lock WMF PROGRAMAT 4 and remove all keys.
23
22
21
20
19
18
Page 20
81
5.10.2 SHUTDOWN VIA TIMER
If the operator cannot be present at the end of daily operation,
the machine can be disconnected via a timer.
The machine can be programmed with a maximum of 3 startup and shutdown times. The times correspond to weekdays
rather than dates.
For programming see:
6.1.2 EINSTELLEN EIN-/AUSSCHALTZEITEN
Note:
At the time of shutdown, stored coffee will be automatically
drained.
6 PROGRAMMING
The state-of-the-art operation of the WMF PROGRAMAT 4
as well as the simple, user-friendly display allows for easy
programming of various parameters.
For programming use the following keys:
ENTER To enter a particular mode, press the “ENTER“
key.
EXIT To exit a particular mode, press the “EXIT“ key.
To remove within a mode, press keys.
To change standard selections use the keys.
The new selection flashes.
To start programming turn key switch to position “E“.
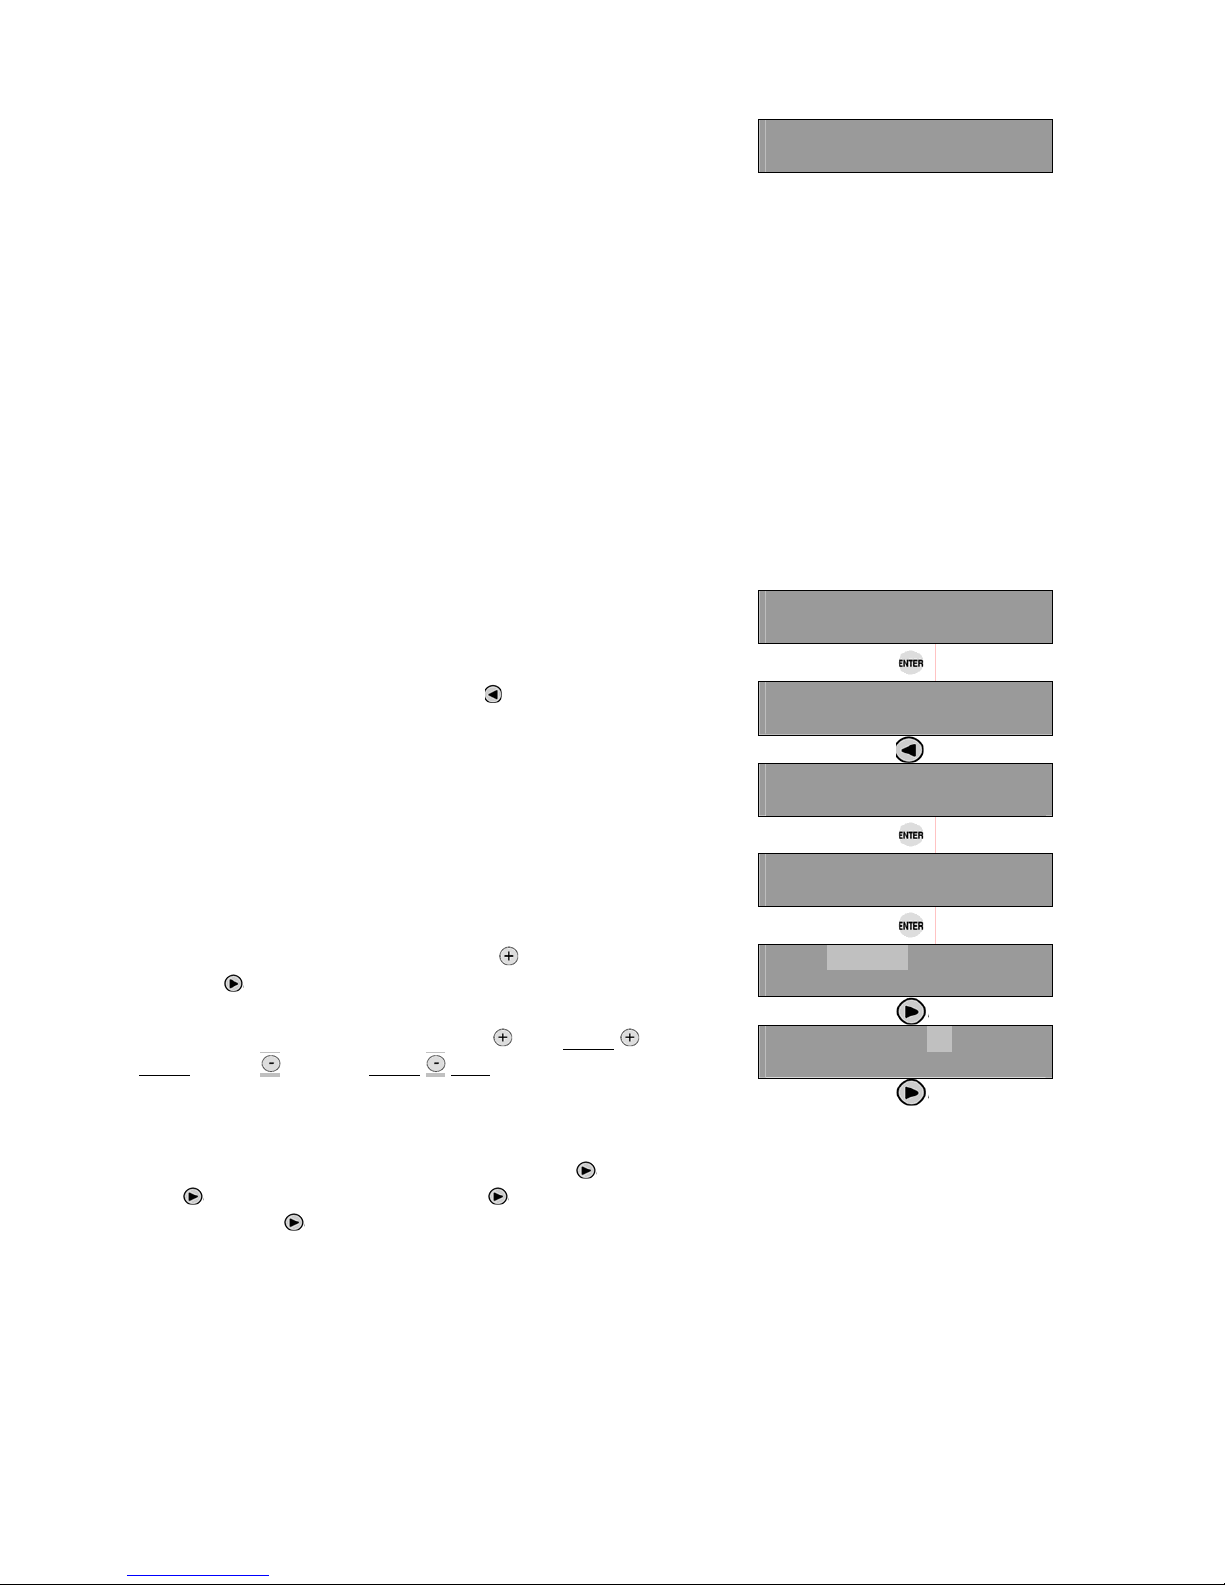
The display indicates:
Position “E“ (programming)
Calibration Mode
[ Info / < ] / ENTER
By pressing the key, the following information appears on
the display:
96°C Nx. Maint. 07.00
Nx. Delim.: 0033/12500
Explanation:
Boiler temp. 96°C/next maintenance July 2000, next
descaling after 12,500 litres of coffee, 33 ltr. already brewed.
Page 21
82
To access the WMF PROGRAMAT 4 programming mode,
press the “ENTER“ key.
Celebration Prog4
/ < / > / ENTER
This display is the starting point for the following
programming options:
6.1 PROGRAMMING TIMER SELECTIONS
The following selections are available:
- Time / Date (see 6.1.1)
- Start-up and shutdown (see 6.1.2)
- Cleaning cycle (see 6.1.3)
- (only with liquid cleaning cycle)
- Selection of brewing charge (see 6.1.4)
6.1.1 PROGRAMMING TIME / DATE
You are in the WMF PROGRAMAT 4 programming mode.
Press “ENTER“ key.
Calibration Prog4
/ < / > / ENTER
To access timer selection mode, press key.
Set Metering Volumes
/ < / > / ENTER / EXIT
To access timer selection press “ENTER“ key.
Set Times & Dates
/ < / > / ENTER / EXIT
To program time and date press “ENTER“ key again.
Set Hour / Date
/ < / > / ENTER / EXIT
Select the appropriate day (e.g. Sunday Monday), then
press the
key to program the hour.
Sunday 10:13
Year: 2000.12.01
To program the current hour, press the (e.g. 10.00
11.00) or the key (e.g. 10.00 9.00).
Sunday 10:13
Year: 2000.12.01
Use the same procedure to program the minutes (13), the
year (Year: 2000), the calendar day (12) and the
calendar month (01).
If the time and date are programmed correctly, turn key
switch to the desired position to exit the programming
sequence.
Page 22
83
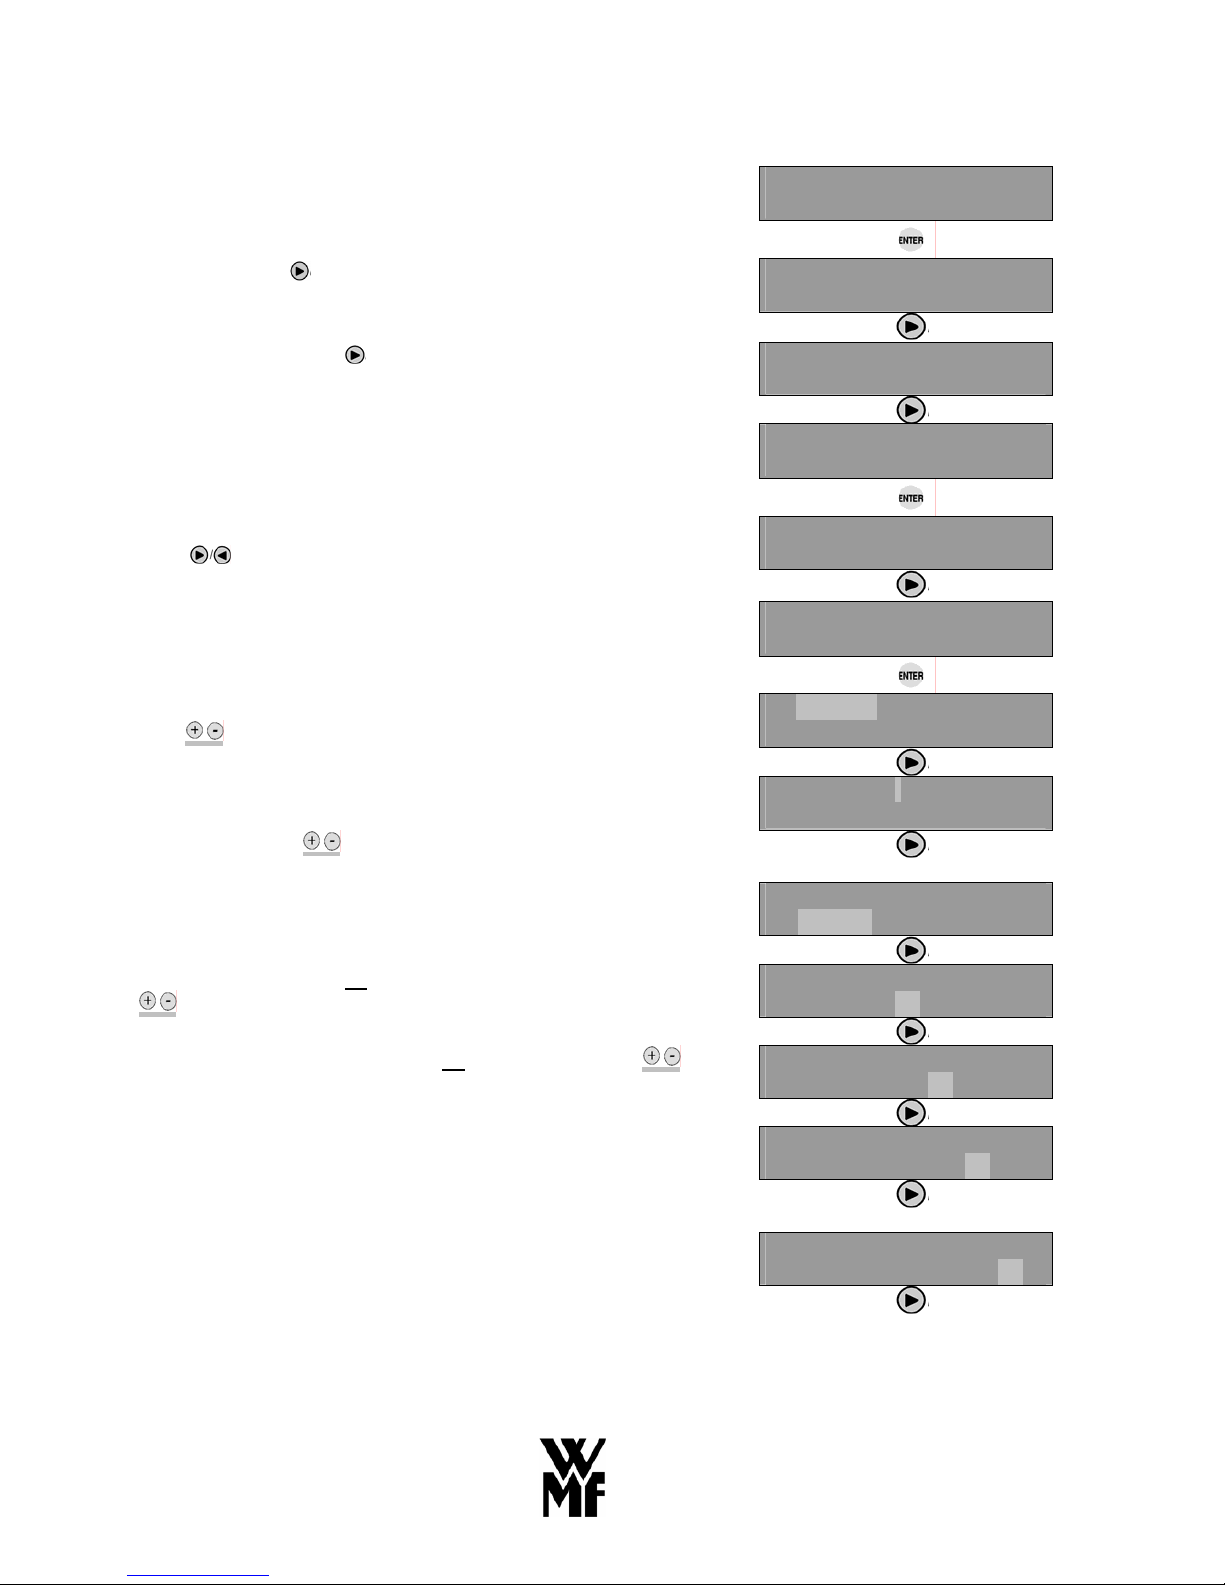
6.1.2 PROGRAMMING START-UP AND SHUTDOWN
To access, press “ENTER“ key.
Calibration Prog4
/ < / > / ENTER
To search, press key.
Set Metering Volumes
/ < / > / ENTER / EXIT
To search again, press key.
Set Coffee Powder
/ < / > / ENTER / EXIT
To access the programming sequence, press “ENTER“.
Set Hour Date
/ < / > / ENTER / EXIT
Timer selections: to move within the timer sequence,
press .
Set Times & Dates
/ < / > / ENTER / EXIT
To access timer selection menu, press “ENTER“.
Set ON / OFF Timer
/ < / > / ENTER / EXIT
Programming day / date: to change flushing selection,
press keys.
Sunday I ON / OFF*
Sel: 0L 00:00 00:00
The machine can be programmed with a maximum of 3 startup and shutdown times per day. Select additional switch
Tuesday I ON / OFF*
Sel: 0L 00:00 00:00
times by pressing keys.
For selection of brew quantities see
6.1.4 SELECTION OF BREW QUANTITIES
Tuesday I ON / OFF*
Sel: 0L 00:00 00:00
To program the hour (00:00) for machine start-up, press
keys.
Tuesday I ON / OFF*
Sel: 1-2L 00:00 00:00
To program the exact minute (00.00) for start-up, press
keys a second time.
Tuesday I ON / OFF*
Sel: 1-2L 07:00 00:00
To program the shutdown time, use the same procedure. The
latest shutdown time in a day is 23:59 (11:59pm). Please note
Tuesday I ON / OFF*
Sel: 1-2L 07:50 00:00
that the machine shuts down automatically only if a
shutdown time
has been selected; the machine will remain switched on if the
display reads 00:00 hours.
Tuesday I ON / OFF*
Sel: 1-2L 07:50 10:00
Page 23
84
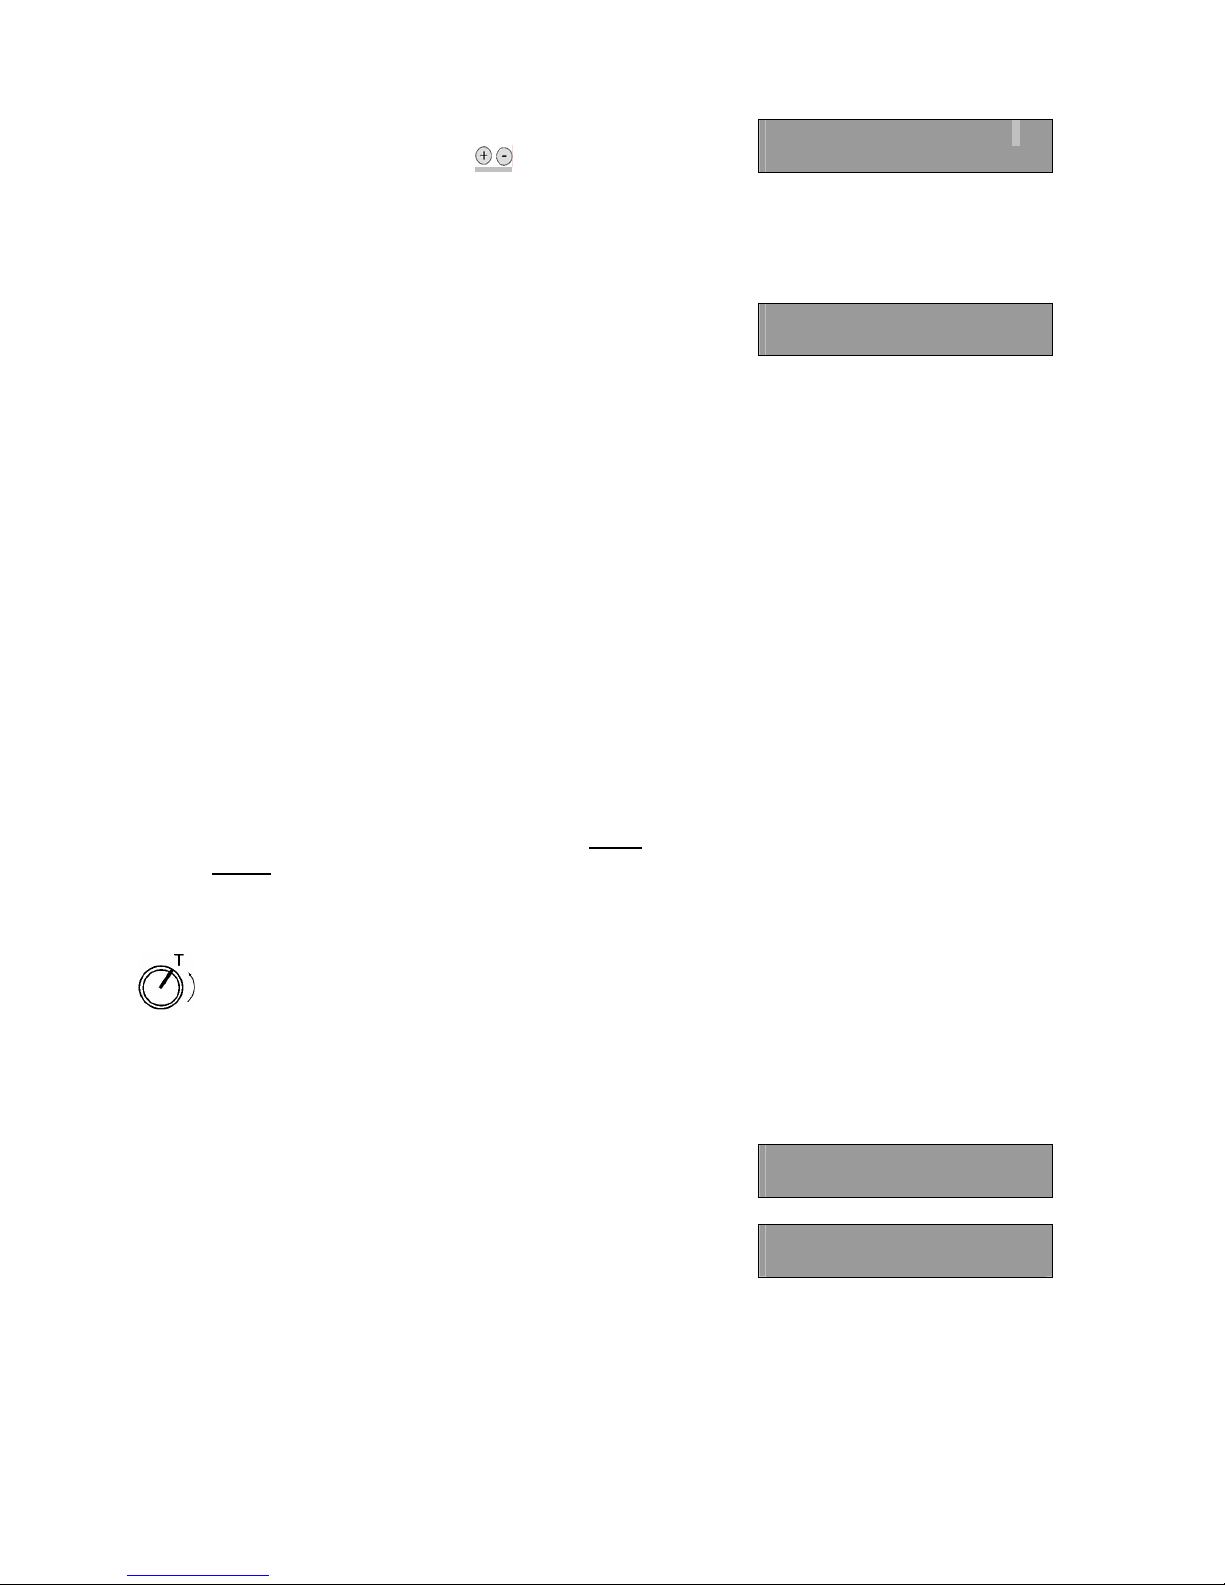
“ * “ means that the machine will shutdown without cleaning.
“R“ will appear on the display if the keys are pressed
Tuesday I ON / OFF*
Sel: 1-2L 07:50 10:30
which means that the cleaning cycle must be performed
before shutdown (only for machines with liquid cleaning
cycle).
See 6.1.3 PROGRAMMING CLEANING CYCLE
You have selected the following:
Tuesday 1 ON / OFF*
Sel: 1-2L 07:50 10:30
Day: Tuesday
Timer select: 1. Start-up / shut-down time
Brewing charge selection: 1 – 2 ltr
Start-up time: 7:50 am
Shutdown time: 10:30 am
The machine will start-up at 7:50 am; after warm-up phase, it
will brew 1 litre and will shutdown at 10:30 am without a
cleaning cycle.
Follow the example to set the times for each day. If the
machine is programmed with 2 or 3 start-up / shutdown
times, the start-up time of the second sequence begins after
the shutdown time of the first one. Therefore, the different
timer selection cannot interfere with each other.
The programmed selections will remain valid until the
operator makes appropriate adjustments.
To erase the programmed start-up / shutdown times, simply
set the first timer selection for each day to “ON“: 00:00
/
“OFF“: 00:00.
TIMER ACTIVATED
To shutdown machine at the next selected shutdown
time, turn key switch to position “T“.
10 minutes before automatic shutdown, the preselection will
change to “Selection: 0L“. At this point, the remaining
coffee may be dispensed.
Tuesday 10:20 T
Year 2000 11.02
Caution! >>>> Timer
Turn OFF Time: 10:30
After machine shutdown, the remaining coffee will be
drained.
Page 24
85
To start machine at the next selected start-up time,
turn key switch to “0“ and then to “T“.
The display indicates:
Ausschaltzeit: 10:30
Turn ON >>>> Timer
Tuesday 07:50 1-2L
6.1.3 PROGRAMMING CLEANING CYCLE
(Only for machines with liquid cleaning cycle)
In order to program the automatic cleaning cycle via timer,
please follow the above procedures 6.1.2 PROGRAMMING
START-UP AND SHUTDOWN, until you reach the display
with flashing “ * “.
0:30 Tuesday 1 ON / OFF*
Sel: 1-2L 07:50 10:30
By pressing the key, the display changes from “ * “ to
“R“: the automatic cleaning cycle will turn on at
programmed shutdown time.
6.1.4 PROGRAMMING SELECTION OF BREWING
QUANTITY
In this sequence the operator can program the time at which
the selected brewing quantity should start.
To program the brewing quantity selection time, follow the
procedures for programming start-up / shutdown time
(see 6.1.2). The “/OFF“ time for “Tuesday/“ will be the
“ON/“ time in the second sequence for “Tuesday/“. Go to the
“ON/“ time and press the key.
Example:
Tuesday 1 ON / OFF*
Sel: 1-2L 07:50 10:30
Dienstag I Ein / Aus*
Wahl: 1-2L 07:50 10:30
Tuesday 2 ON / OFF*
Sel: 2-4L 10:30 12:45
Dienstag I Ein / Aus*
Wahl: 1-2L 07:50 10:30
Tuesday 3 ON / OFF*
Sel: 1-3L 12:45 14:00
Explanation:
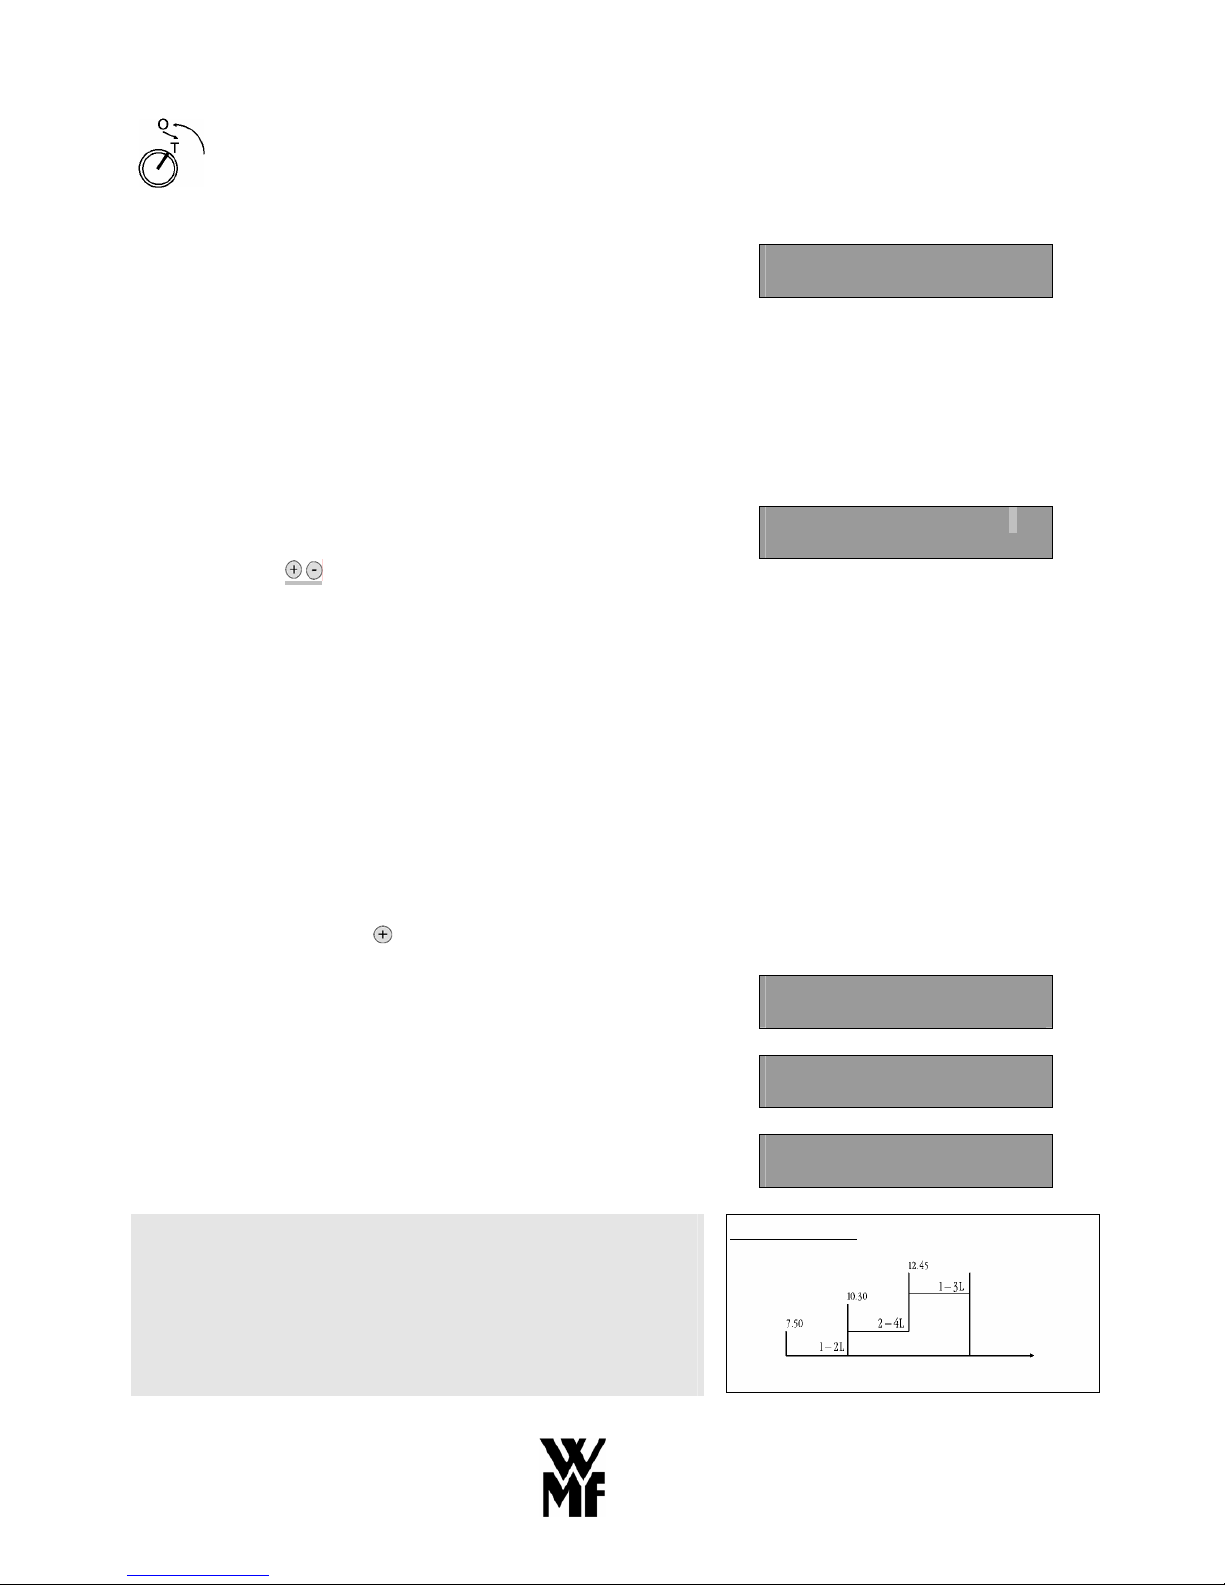
At 7:50, during the first sequence, the brew quantity
selection: 1-2L is selected. At 10:30, the second sequence is
activated and switches automatically to brewing charge
selection: 2-4L. At 12:45, brewing charge selection: 1-3L
starts. The machine is shutdown at 14:00. As long as the key
switch is in position “T“, this program will run whether or
not the machine was connected automatically.
Graph time scale
am On
am On
pm On
2.00 pm Off
Select
Select
Select
Page 25
86
The timer sequence for the brew quantity selection is
activated as follows:
Turn the key switch to position “T“. The machine
changes the brewing charge according to your
selection for the next start-up time.
Turn key switch to position “0“ and then to “T“.
The machine starts-up at the next selected time with
the selected brew quantity.
6.2 QUANTITY PRESELECTION
Position “E“ (Programming)
Calibration Prog4
/ < / > / ENTER
Set Metering Volumes
/ < / > / ENTER / EXIT
For each dispensing button (“Quant 1 / Quant 2“) three in
one programming display which can be accessed by pressing
Cof. 1 Cup Pot
- / + 050 100
the key.
To select quantities for each button in sequence (selected
quantity flashes), press key. The impulse indicators may
be changed by pressing the keys.
Quantity preselection for each product can be programmed as
follows:
The following selections may appear on the display:
Cof: 1 Cup Pot
- / + 050 100
HW.l Small Large
- / + 015 030
Cof: 2 Cup Pot
- / + 050 100
HW.2 Small Large
- / + 015 030
Page 26
87
To make sure that your selections have been programmed
correctly, turn the key switch to position “I“ or “W“ and
check the quantity of dispensed coffee and hot water.
1 impulse = appr. 2,5 cm³ coffee
1 impulse = appr. 8,0 cm³ hot water
6.3 SELECTION OF GROUND COFFEE QUANTITY
Position “E“ (Programming)
Since different kinds of coffee may fluctuate considerably in
density and therefore in specific weight, the
WMF PROGRAMAT 4 can be programmed for ground
coffee quantity.
CHECKING THE PORTIONED GROUND COFFEE
QUANTITY
WMF customer service will be pleased to assist you in
checking the actual gram throw of the portioned ground
coffee. They have the ability to determine the exact weight of
the portioned ground coffee.
GROUND COFFEE SELECTION
Please note that the displayed figures represent impulses and
not actual grams (1 impulse = appr. 0,8 g ground coffee).
Should the coffee be too weak or too strong, correct ground
coffee quantity according to the following instructions:
Calibration Prog4
/ < / > / ENTER
Set Metering Volumes
/ < / > / ENTER / EXIT
Set Coffee Powder
/ < / > / ENTER / EXIT
1L: 072 means that 072 impulses of ground coffee are
portioned to brew 1 litre (1L/ Selection: 1 – 2L). To change
Coffee Throw Weights
1L: 072 2L:108 4L:180
the selection accordingly, press the keys.
In this display the ground coffee quantity 108 for the 2 litre
(2L) brewing charge (Selection: 1 – 3L, Selection: 2 – 4L)
Coffee Throw Weights
1L: 072 2L: 108 4L: 180
can be changed by pressing .
Page 27

88
In the third impulse 180 flashes , the impulse for the 4 litre
brewing charge (Selection: 4-8L) can be changed by
Coffee Throw Weights
1L: 072 2L: 108 4L: 180
pressing the keys.
Note:
Please note that pressing the “ENTER“ key triggers ground
coffee portioning.
To exit the programming sequence, turn key switch to the
desired operation mode.
7 PERSONNEL ACCOUNTING SYSTEM
WMF multicounter
7.1 GENERAL FUNCTIONAL CHARACTERISTICS
The WMF multicounter is a universal beverage accounting
system for personnel self-service. The multicounter is a
monitoring, controlling and accounting system for all
beverage dispensing functions of WMF coffee machines,
accessory units and adjusted units.
When equipped with a multicounter, the functions of the
WMF PROGRAMAT 4 can be expanded by a maximum of
4 additional sales units with a minimum of one
WMF waiter’s terminal each. Each connected unit can be
equipped with 8 product selection keys.
Maximum capacity:
4 x 8 = 32 potential product selection keys.
Page 28
89
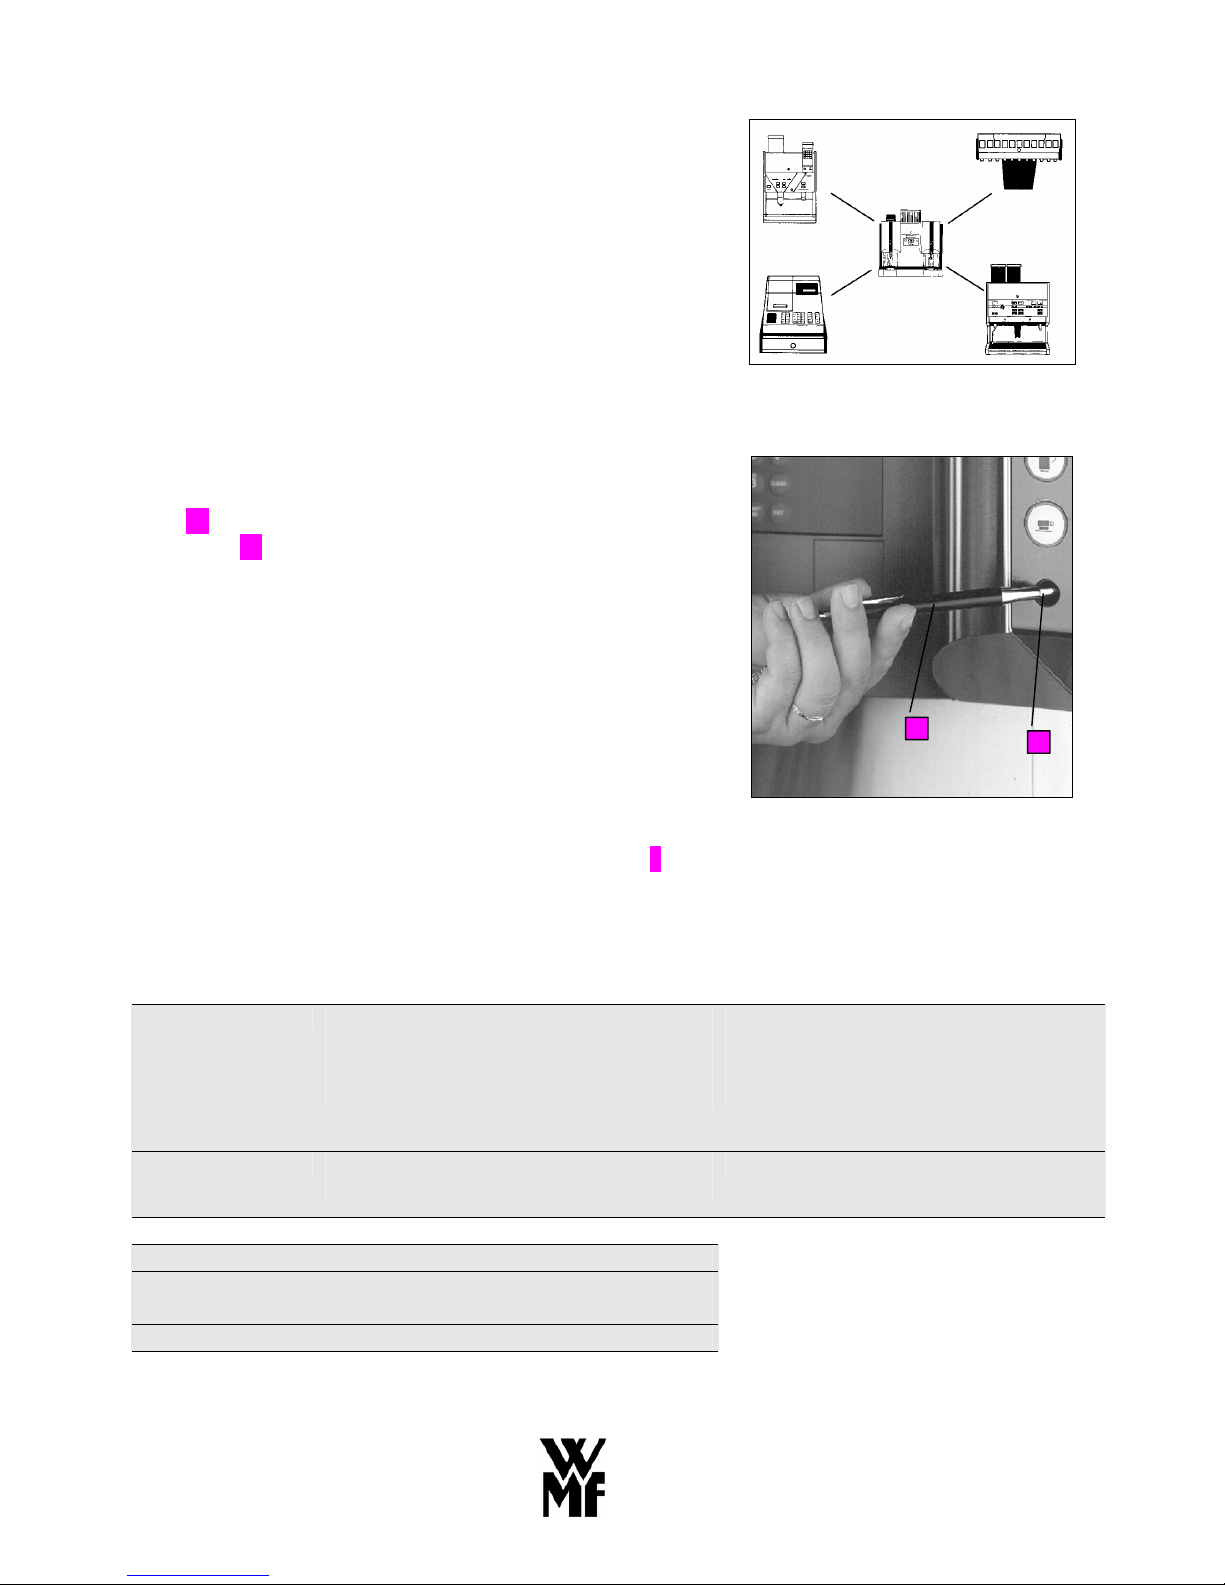
The connection of the sales units is star-shaped: each sales
unit has a separate data connection to the WMF multicounter
(see Fig. 4).
If the WMF multicounter is switched off or malfunctions,
each sales unit remains independently functional. Sales data
for units equipped with a display can be entered and deleted
individually.
Upon installation of the WMF multicounter, registered sales
data can be transferred from the sales units to the
multicounter.
Fig. 4
If the WMF PROGRAMAT 4 is equipped with a
WMF multicounter, the basic model includes 6 waiters
pens 23 which the WMF PROGRAMAT automatically
recognises 15 (Fig.5). At the same time it is then possible to
dispense beverages and the numbers dispensed are registered
in the memory.
Fig. 5
The WMF multicounter comes with a dot matrix printer 2.
7.2 TECHNICAL DATA
- multicounter
Capacity connectable units
number of products per sales unit
memory capacity
memory duration if unit switched off
max. 4
max. 8
65535 per product waiter
30 days
Interface serial RS 232C (V 24) or
current loop (20 mA)
Printer model 6 dot matrix printer
Printing speed
1,6 lines per sec.
24 characters per line
Paper width 58 mm
23
15
Page 29
90
7.3 PRINTER
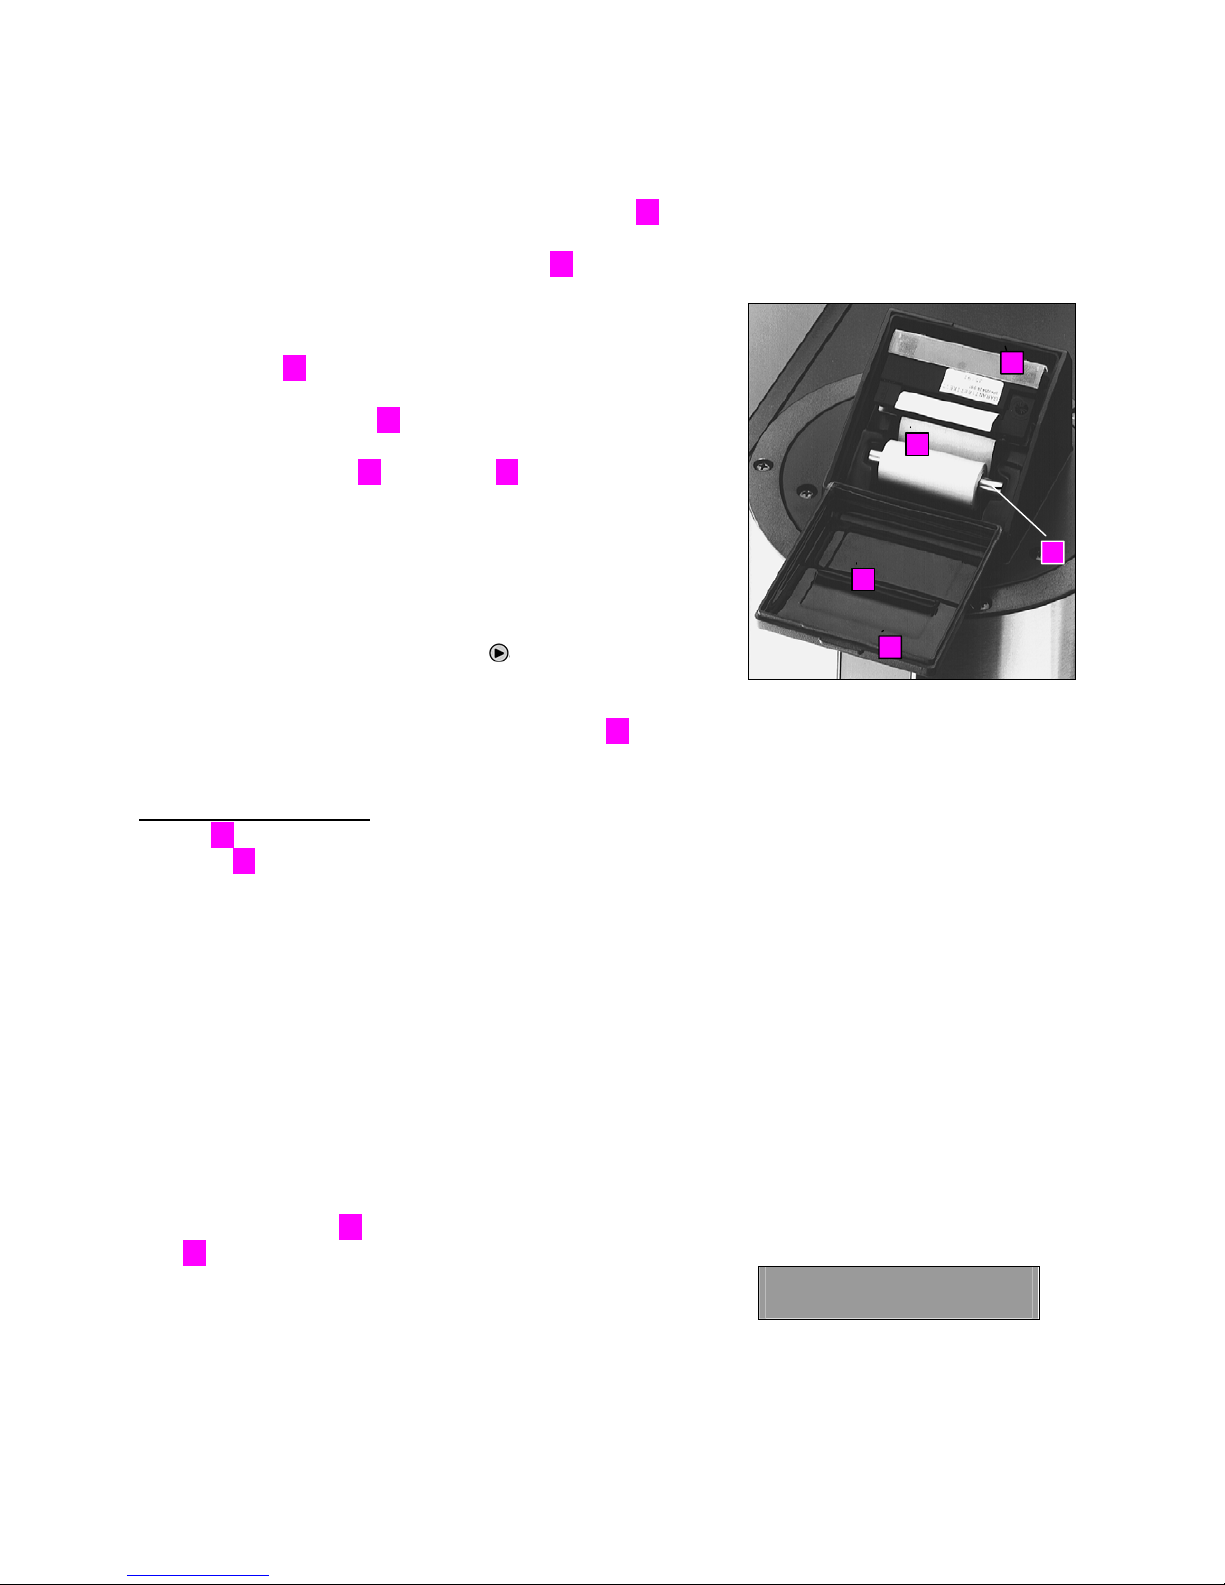
If the WMF PROGRAMAT 4 is equipped with a
multicounter, the basic model includes 6 waiter’s pens 23
which the WMF PROGRAMAT 4 recognise when the
waiter’s pen is inserted into the waiter’s lock 15..
To change paper, please proceed as follows:
1. Open cover 28.
2. Take out paper holder 26 and remove old paper roll.
3. Push new paper roll 25 onto holder 26 and insert in
printer.
Make sure that the loose end of the paper faces up
towards the printer.
4. Cut the end of the paper.
5. Insert paper in guide bar and press
until the paper is
in the printer and is transported 10 cm further.
6. Insert the end of the paper in the cover aperture 27 and
close cover.
Replacement/Spare parts:
Ribbon 24 WMF Order no. 33 1689 8000
Paper roll 25 WMF Order no. 33 1689 9000
Fig. 6
7.4 OPERATING MODES
The WMF multicounter is equipped with 3 different
operating modes:
- SALES
- ACCOUNTING
- PROGRAMMING
7.4.1 SALES
With the waiter’s pen 23 the waiter accesses the waiter‘s
lock 15, which is an integral part of the sales unit. If the unit
is equipped with a display, the waiter’s pen number and the
current daily turnover is automatically displayed.
Sel: 1-2L Wtr 001
Actl: 0.9L 26.50
24
26
25
27
28
Page 30

91
The dispensed product is registered and the programmed
price will be added to the waiter’s current turnover. The
new turnover is indicated on the display of the sales unit.
By pressing the “PRINT“ key, the sales data from the
WMF waiter’s pen is printed and not deleted.
If the machine is not in use, the operation display will
appear.
Sel: 1-2L 14:13 W
Actl: 0.9L 10.01
a) Price groups
For each product (coffee and hot water, cup or pot) the
WMF multicounter can be programmed with two different
selling prices.
Example:
Price group 1 Price group 2
Cup coffee
Waiter
Location
2,60
1-6
restaurant
3,20
7-12
terrace
b) Waiter station
WMF customer service will program the waiter’s pen with
their corresponding price groups. Each established waiter
station will correspond to either price group 1 or 2.
According to the programmed price group, each product
sale will be calculated at the price for group 1 or 2 in the
waiter’s pen.
Example:
There are 12 waiter’s pens and 2 price groups (restaurant
and terrace). The waiter’s pens are designated to two
sections:
wait station 1: waiter’s pens 1-6
wait station 2: waiter’s pens 7-12
c) Sales operation modes
The WMF multicounter is equipped with a selection of
3 sales operation modes:
- personnel registration mode
- time price mode
- waiter-price mode
Note:
All sales operation modes are programmed by WMF
customer service.
Page 31

92
Personnel registration mode
In this operating mode, each programmed WMF waiter’s
pen must be registered in the WMF multicounter in order to
have access to product dispensing.
The waiter’s registration operation is thus designed to
monitor the waiter’s working hours. To “sign on“ proceed
as follows:
1. Put the waiter’s pen 23 in the waiter’s lock 15, until
display indicates waiters number:
Waiter pen
-- No Access --
2. Press “AN 3“ key.
The WMF multicounter memorizes the waiter’s registration
time. At the end of the day, the waiter has to sign off:
1. Put the waiter’s pen 23 in the waiter’s lock 15, until
display indicates waiter number:
2. Press “AB 2“ key.
When the waiter signs out, a short statement including sales
data and registration times will be printed out automatically.
The registered daily turnover for this waiter will not be
deleted. The turnover remains registered until it is deleted
during the accounting process. (see 7.4.2 ACCOUNTING
OPERATION)
The WMF waiter pen can be signed on at any time.
However, the previous registration times will be erased and
the new time will be memorized.
Time-price operation mode
In the time-price mode only one of either price groups is
valid. Only the pen programmed for the valid price group
has access to sales. Price groups can be switched manually
(see 7.4.3 PROGRAMMING) at any time. In this case the
previously valid pen will be cancelled automatically and
those programmed for the new price group activated.
Page 32
93
Waiter-price mode
In this operating mode both of the price groups are activated
at all times. Each registered pen is programmed for one
price group only. When a product is sold, the amount of the
programmed price group will be registered in the
corresponding pen.
Turn key switch to “A“ and press “ENTER“ key. The
display will indicate the programmed sales operation mode:
Waiter Mode
= ON/OFF Duty =
or
Time – Price - Mode
Price Group 1
or
Waiter Mode
= Waiter Price =
Note:
The sales operation modes are programmed by
WMF customer service!
7.4.2 ACCOUNTING OPERATION
key switch “A“ (accounting)
During the accounting process the connected sales units are
blocked: products cannot be dispensed. Sales units equipped
with a display will indicate:
F SP
If sales unit is connected during operation of the accounting
program, the following message will be indicated (only if
equipped with display):
F OF
The multicounter will not recognize the newly connected
sales unit during the accounting process. The unit will only
be initialized after termination of the accounting program.
Accounting options:
a) Short personnel statement
b) Complete statement
c) Display accounting
Page 33
94
Accessing accounting operations
key switch “A“ (accounting)
Display indicates:
- WMF multicounter –
- Accounting - / ENTER
Based on the operating mode selected, the display indicates
for example:
Waiter Mode
= Waiter Price =
In order to avoid unauthorised access, the operator may use
a personnel indication number (PIN) from time to time.
WMF customer service will program the desired operating
mode in the customer service program. Press key. If a
PIN is used for access, the displays indicates:
** Pass Word? **
-- ????? --
After entering the correct combination, the display
indicates:
A1 Short Prt. Out
print / . . . . . . . .
A2 Compl. Prt. Out
print / . . . . . . . .
A3 Display Read
ENTER / . . . . . . . .
If the wrong combination is entered, the operator may
repeat the sequence until the correct PIN is entered or he
can exit the accounting program by using key switch 5 .
Note:
For your own safety, keep your PIN security and ensure that
nobody has access to it.
After entering the PIN, press the key to access either of
the following accounting options:
A1 short print-out
A2 complete print-out
A3 display accounting
The accounting statements vary according to which of the
three sales operation modes has been programmed by WMF
customer service.
Page 34

95
A1 Short statement
After entering the accounting mode, this display will
indicate the following:
A1 Short Prt. Out
print / . . . . . . . .
To print out the short personnel statement, press the
“PRINT“ key.
Short Print Out.
-- print --
All registered sales data of the pens are printed according to
the following examples:
I) Short print-out for time-price mode
II) Short print-out for registration mode
W M F
m u l t i c o u n t e r
Wednesday, 15.01.00
09:46 Hour
Total Account: # 8
Memory Not Cleared
. . . . . . . . . . . . . . . . . . . . . . . . . . . . .
Short Print Out
Waiter Bev. Sales
2 3 3.85
Price Group: 1
6 3 6.44
Price Group: 2
- - - - - - - - - - - - - - - - - - - - - - - - - -
Tot. Num. Bev. 6
Total Sales 10.29
--W-M-F---multicounter--
W M F
m u l t i c o u n t e r
Wednesday, 15.01.00
10:03 Hour
Total Account: # 6
** Memory Cleared **
Off Time **.**= 10.03
. . . . . . . . . . . . . . . . . . . . . . . . . . . . .
Short Print Out
Waiter Bev. Sales
1 6 7.00
Pg 1 ON: 09:57 FM: **:**
2 6 7.53
Pg 1 ON: 09:55 FM: **:**
6 4 9.13
Pg 2 ON: 09:55 FM: **:**
- - - - - - - - - - - - - - - - - - - - - - - - - -
Tot. Num. Bev. 16
Total Sales 23.66
--W-M-F---multicounter—
Page 35
96
Prior to printing, the following instructions appear in the
display:
Finished [ EXIT ]
Cancel [ Clear ]
“EXIT“
Finish short print-out. The registered sales data
are not deleted, no pens are signed off:
W M F
m u l t i c o u n t e r
Wednesday, 15.01.00
09:51 Hour
Control Total Sale: # 10
Memory Not Cleared
. . . . . . . . . . . . . . . . . . . . . . . . . . . . .
Short Print Out
“CLEAR“
Finish short print-out. The registered sales data
are deleted, all pens are signed out and the
accounting time is registered as the signing off
time (only in registration mode):
W M F
m u l t i c o u n t e r
Wednesday, 15.01.00
09:51 Hour
Total Account: # 5
** Memory Cleared **
. . . . . . . . . . . . . . . . . . . . . . . . . . . . .
Short Print Out
A 2 Complete personnel statement
To access accounting option A2, press keys until
display indicates the following:
A2 Compl. Prt. Out
print / . . . . . . . .
To start printing process, press “Print“.
The current print-out is indicated as follows:
Complete Print Out
-- Printing --
All registered sales data of the non-tabulated numbers is
printed:
Page 36
97
I) Complete print-out for time-price and
waiter-price option:
II) Complete print-out for registration mode:
. . . . . . . . . . . . . . . . . . . . . . . . . . .
Statement Waiter 5
Pg 1 ON: 13:28 FM: 13:30
Sort Price Bev. Sales
17 1.17 4 4.68
19 1.19 3 3.57
20 1.20 3 3.60
- - - - - - - - - - - - - - - - - - - - - - - - Total 10 11.85
Statement Waiter 2
Price Group: 1
Sort Price Bev. Sales
25 1.25 1 1.25
29 1.29 1 1.29
31 1.31 1 1.31
- - - - - - - - - - - - - - - - - - - - - - - - -
Total 3 3.85
. . . . . . . . . . . . . . . . . . . . . . . . . . .
Statement Waiter 6
Price Group: 2
Sort Price Bev. Sales
13 2.13 1 2.13
15 2.15 1 2.15
16 2.16 1 2.16
- - - - - - - - - - - - - - - - - - - - - - - - - Total 3 3.85
. . . . . . . . . . . . . . . . . . . . . . . . . . .
Sort Statement
Sort Price Bev. Sales
13 2.13 1 2.13
15 2.15 1 2.15
16 2.16 1 2.16
25 1.25 1 1.25
29 1.29 1 1.29
31 1.31 1 1.31
- - - - - - - - - - - - - - - - - - - - - - - - - -
Total Num. Bev. 6
Total Sales 10.29DM
--W-M-F---multicounter--
This print-out varies from the previous one only in
so far as the registration times for each waiter are
printed out.
Prior to printing completion, the following instructions
will appear on the display:
Finished [ EXIT ]
Cancel [ Clear ]
“EXIT“: Finish short print-out. The registered sales
data are not deleted, no pens are signed off.
“CLEAR“: Finish short print-out. The registered sales
data are deleted, all pens are signed out and
the accounting time is registered as the
signing off time (only in registration mode).
Page 37
98
A3 Display accounting
To access the accounting option A3, press keys until
display indicates the following:
A3 Display Read
ENTER / . . . . . .
To access display accounting options, press “ENTER“.
Press the key.
The display indicates:
Days Sale
151.20
Days Bev Sold
54 Bev
Wai Bev Sales
1 25 70.00
Wai Bev Sales
2 29 81.20
By pressing the key, the total number of items per
product and the current daily turnover of each waiter can
be called up on the display.
To access the waiter-product accounting mode for the
waiter number indicated on the display, (e.g. for waiter 2)
press the “ENTER“ key:
Wai Bev Sales
2 29 81.20
Waiter 2
Sort Statement
After appr. 2 seconds, the number of items and the sales
amount of each product for waiter number 2 are displayed,
starting with product number 1.
The display indicates:
Srt Bev Sales
1 8 22.40
Srt Bev Sales
2 10 52.00
To advance to the next product, press key. Terminate
the waiter-product accounting process for this waiter by
pressing the “EXIT“ key.
Wai Bev Sales
1 25 70.00
Page 38
99
Display accounting is now ready to process other waiters
data. To delete the total number of items per product and
the daily turnover of the displayed waiter, press the
“CLEAR“ key.
The display indicates:
Wai Bev Sales
1 00 00.00
Switch to display accounting for the next WMF
waiter number.
“EXIT“
Terminates display accounting process.
If the total number of items per product and the daily
turnovers of all WMF waiter numbers were deleted, the
display would indicate the following:
Days Sale
0.00
If the total numbers of items per product as well as the
daily turnovers of all WMF waiter numbers were merely
displayed and not deleted, the program would also switch
to daily turnover display. To check the number items press
the key. The display indicates the following:
Days Bev Sold
54 Bev
7.4.3 PROGRAMMING OPERATION
Position “E“ (Programming)
In the programming mode the operator can change the data
for product prices or manually switch price groups. During
the programming process, all connected sales units are
blocked. Sales units equipped with a display will indicate:
F SP
If a sale unit is connected during the programming
process, the following message will be indicated (only if
equipped with display):
F OF
The multicounter will not recognize the newly connected
sales unit during the programming process. The unit will
only be initialised after the termination of the
programming sequence.
Page 39
100
Programming options:
E1 Programming product prices
E2 Programming personnel identification
number (PIN)
E3 Manual price group change
Accessing programming mode
Position “E“ (programming)
The display indicates:
Calibration Mode
[ Info / < ] / ENTER
Calibration-Prog4
/ < / > / ENTER
Set-MC
/ < / > / ENTER
In order to avoid unauthorized access, the operator may
use a personal identification number (PIN) from time to
time. The WMF customer service will program the desired
operation mode in the customer service program. Press the
“ENTER“ key. If a PIN is used for access, the
display indicates:
** Pass Word? **
-- ????? --
If the wrong combination is entered, the operator may
repeat the sequence until the correct PIN is entered or get
out of the programming mode by using key switch 5.
Note:
For your safety, keep your PIN security and ensure that
nobody has access to it!
After entering the correct PIN combination, the
programming menu will appear. To choose from three
different programming options, press the key:
S1 Sort Prices
ENTER / . . . / print
S2 Pass Word
ENTER / . . . / print
S3 Price Group
ENTER / . . . . .
Page 40
101
Before programming, all waiters must be signed off. If this
is not the case, the display will indicate the following:
Display:
Accounting Prior
To Reset / [ ENT ]
“ENTER“
To access accounting mode press “ENTER“.
(see 7.4.2 ACCOUNTING OPERATION)
“EXIT“
The accounting process is not activated,
programming of product prices E1 and price
groups E3 cannot take place.
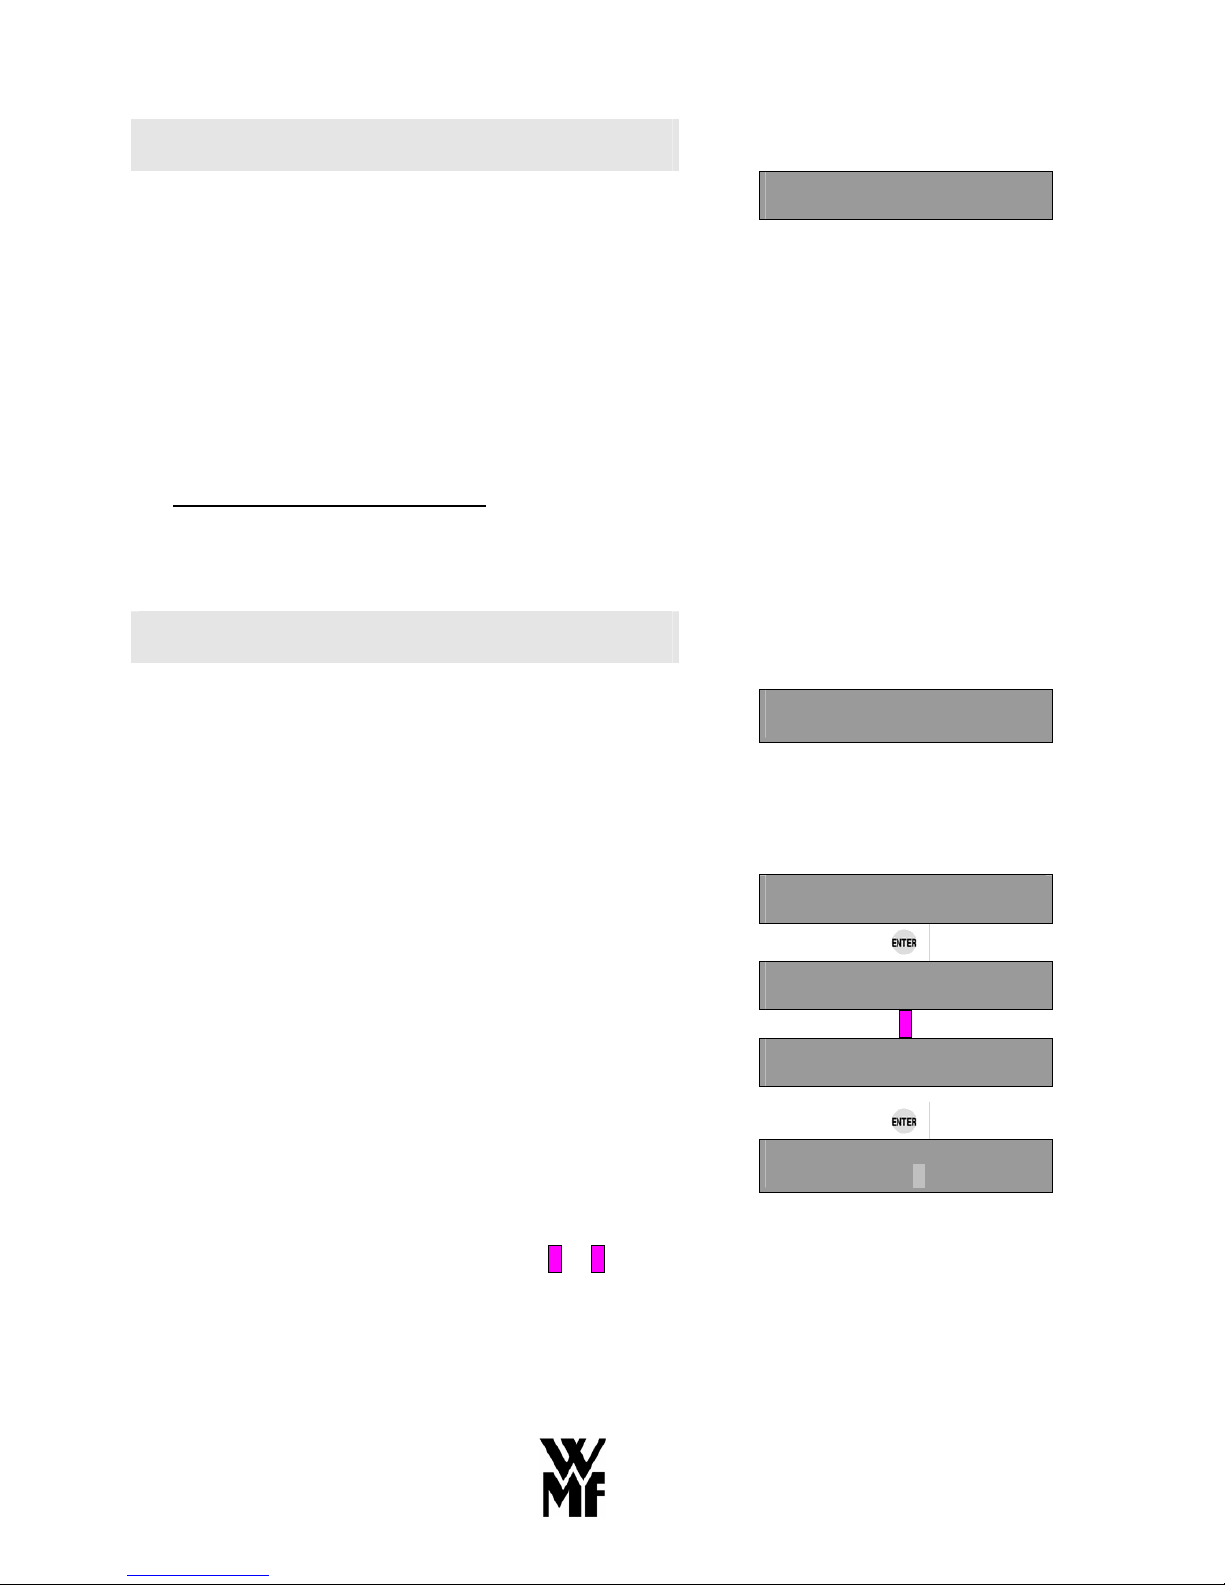
• E1 Programming product prices
This programming sequence is designed to set product
prices for price (Pg1) and (Pg2).
Product prices can also be programmed for products of the
units that are currently switched on.
After accessing the programming sequence the display
indicates:
S1 Sort Prices
ENTER / . . . / Print
“ENTER“ product prices can be programmed.
“PRINT“ current product prices are printed out.
• Programming product prices
S1 Sort Prices
ENTER / . . . / print
Sel. Price Group
Pg 1 [1] Pg 2 [2]
1
Accounting Prior
To Reset / [ENT]
(If accounting terminated display does not appear)
S1 1xRegul. Cup
Pg 1 2.80
To access programming sequence for product prices, press
“ENTER“ . To select the price group in which the
product price needs to be changed, press key 1 or 2 . In
the example above price group 1 (Pg1) was selected.
Page 41
102
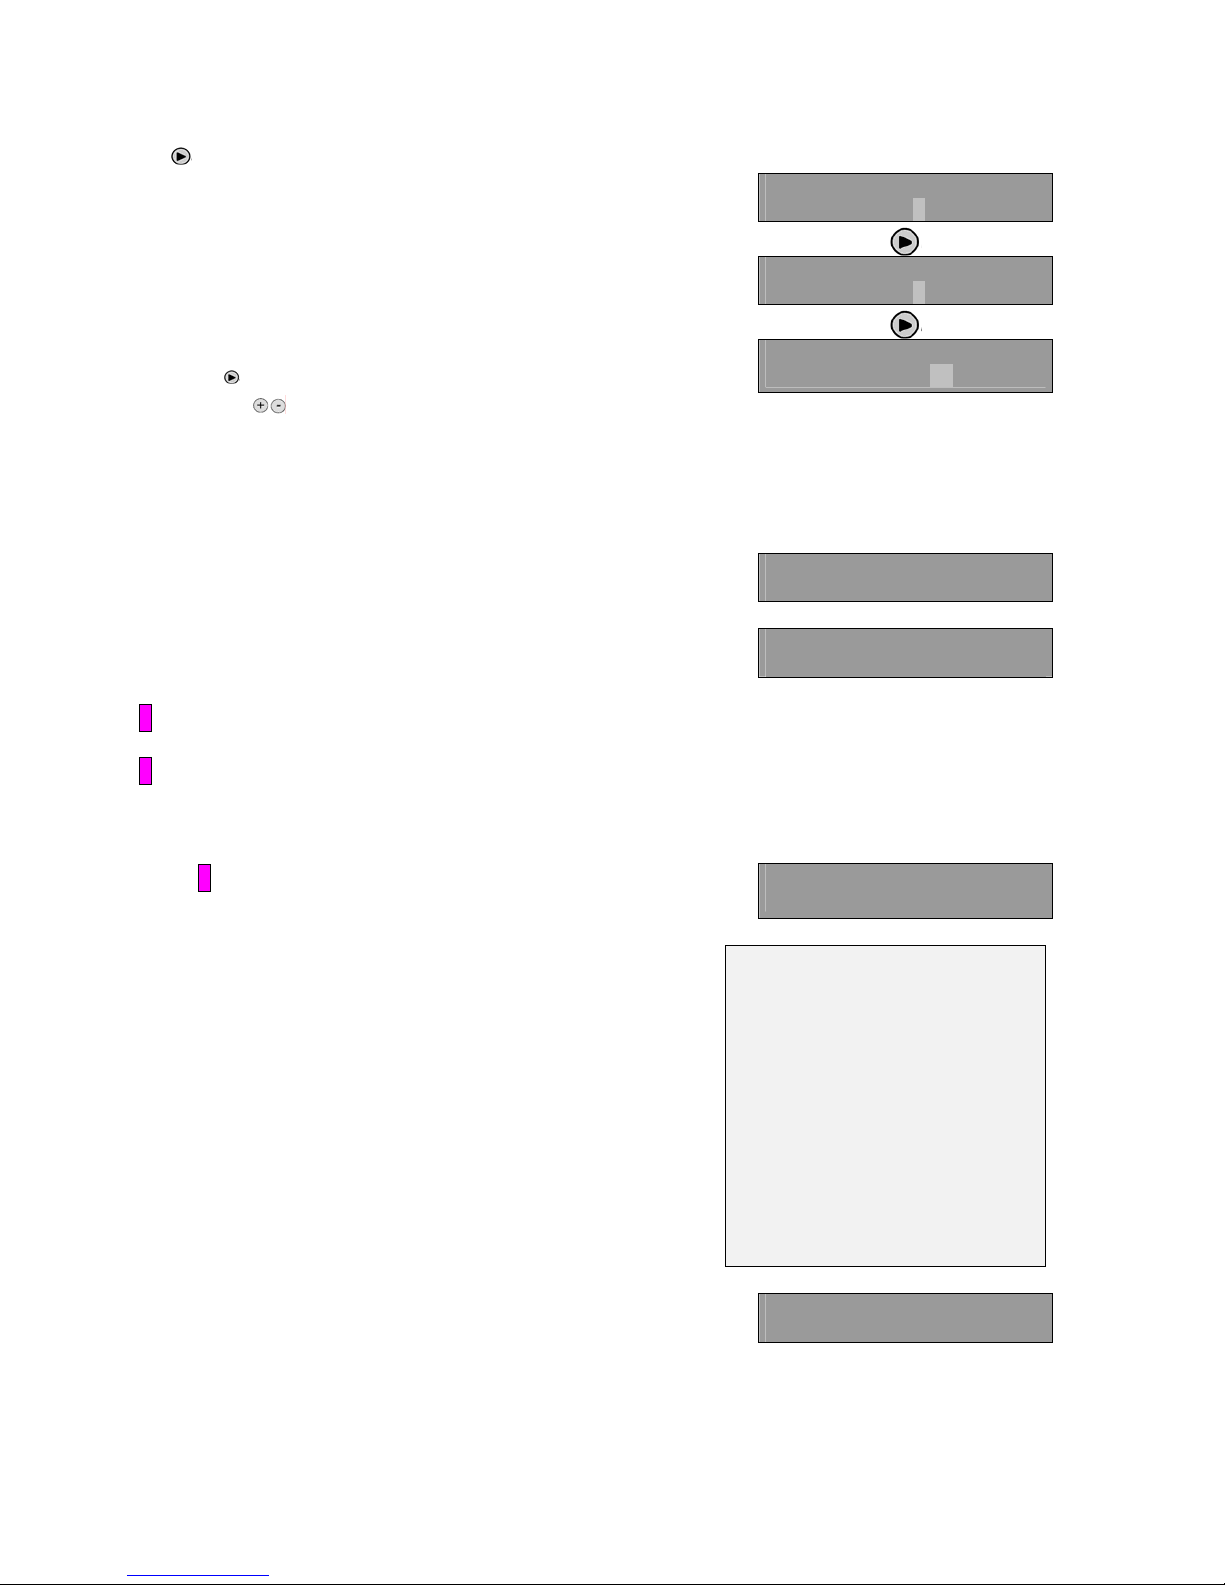
All products in this price group can be accessed by using
the key.
S1 Regul. Cup
Pg 1 2.80
S2 Regul. Pot
Pg 1 5.20
To access a) the units data and b) the “decimals“ data,
press the key. The flashing figure can be changed by
S2 Regul. Pot
Pg 1 5.20
pressing the keys.
etc.
“EXIT“ The programmed data are registered. Exit the
last programming sequence.
• Printing product prices
S1 Sort Prices
ENTER / . . . / print
If “PRINT“ key is pressed, the display indicates:
Sel. Price Group
Pg 1 [1] Pg 2 [2]
1 product prices in price group 1 (Pg1) are printed out.
2 product prices in price group 2 (Pg2) are printed out.
“EXIT“ partial sequence terminated.
If key 1 is pressed in the following example, the ongoing
printing process will be indicated in the display::
Sort Prices Of
Pg 1 * Printing *
W M F
m u l t i c o u n t e r
Wednesday, 15.01.00
10:17 Hour
Price Group 1
Sort Article Price
Programat 4
1 Cup Right 2.80
2 Pot Right 5.20
After printing, the initial display appears:
S1 Sort Prices
ENTER / . . . / Print
Page 42
103
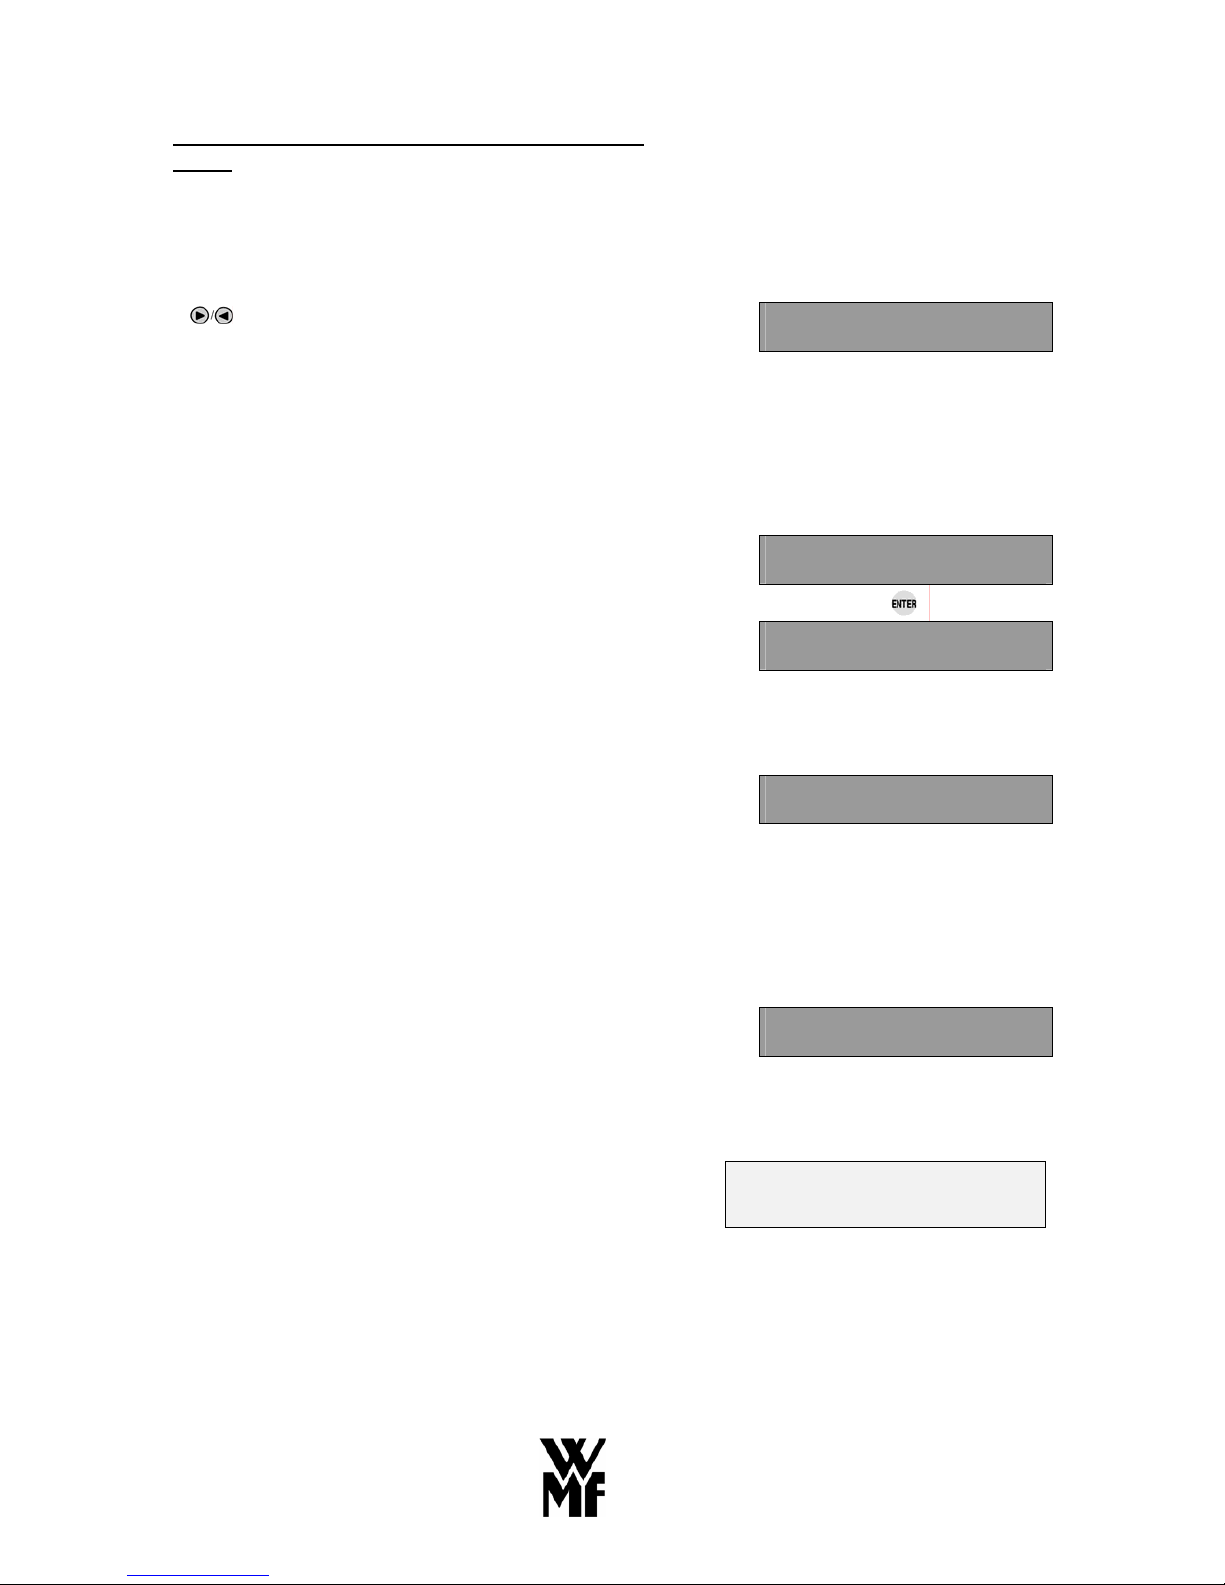
• E2 Programming personal identification number
(PIN).
This sequence is designed to program or print the 5-digit
PIN. This sequence can only be used if WMF customer
service has activated the PIN operation upon installation
of the machine. After accessing this programming option,
press key until the display indicates the following:
S2 Pass Word
ENTER / . . . / print
“ENTER“ PIN can be changed.
“PRINT“ PIN is printed out.
• Changing the PIN
To change the PIN press “ENTER“ key.
The display indicates:
Reset Pass Word?
No [EX] Yes [ENT]
Please Input 5
Symbols: .....
To select the 5-digit PIN, press any of the 16 keys on the
WMF multicounter keyboard. For each entered symbol the
display indicates “#“ . After entering 5 symbols, the new
PIN is automatically registered, and the initial display
appears:
Programming Pin
No [ex] Yes [ent]
“EXIT“ There is no new PIN to be entered. The
previously entered PIN or the existing one is
confirmed.
• Printing the PIN
S2 Pass Word
ENTER / . . . / print
“PRINT“ The current PIN is printed out.
Simultaneously, along with the display, the PIN is printed
as follows:
Codewort 11111
--W-M-F---multicounter--
Page 43
104
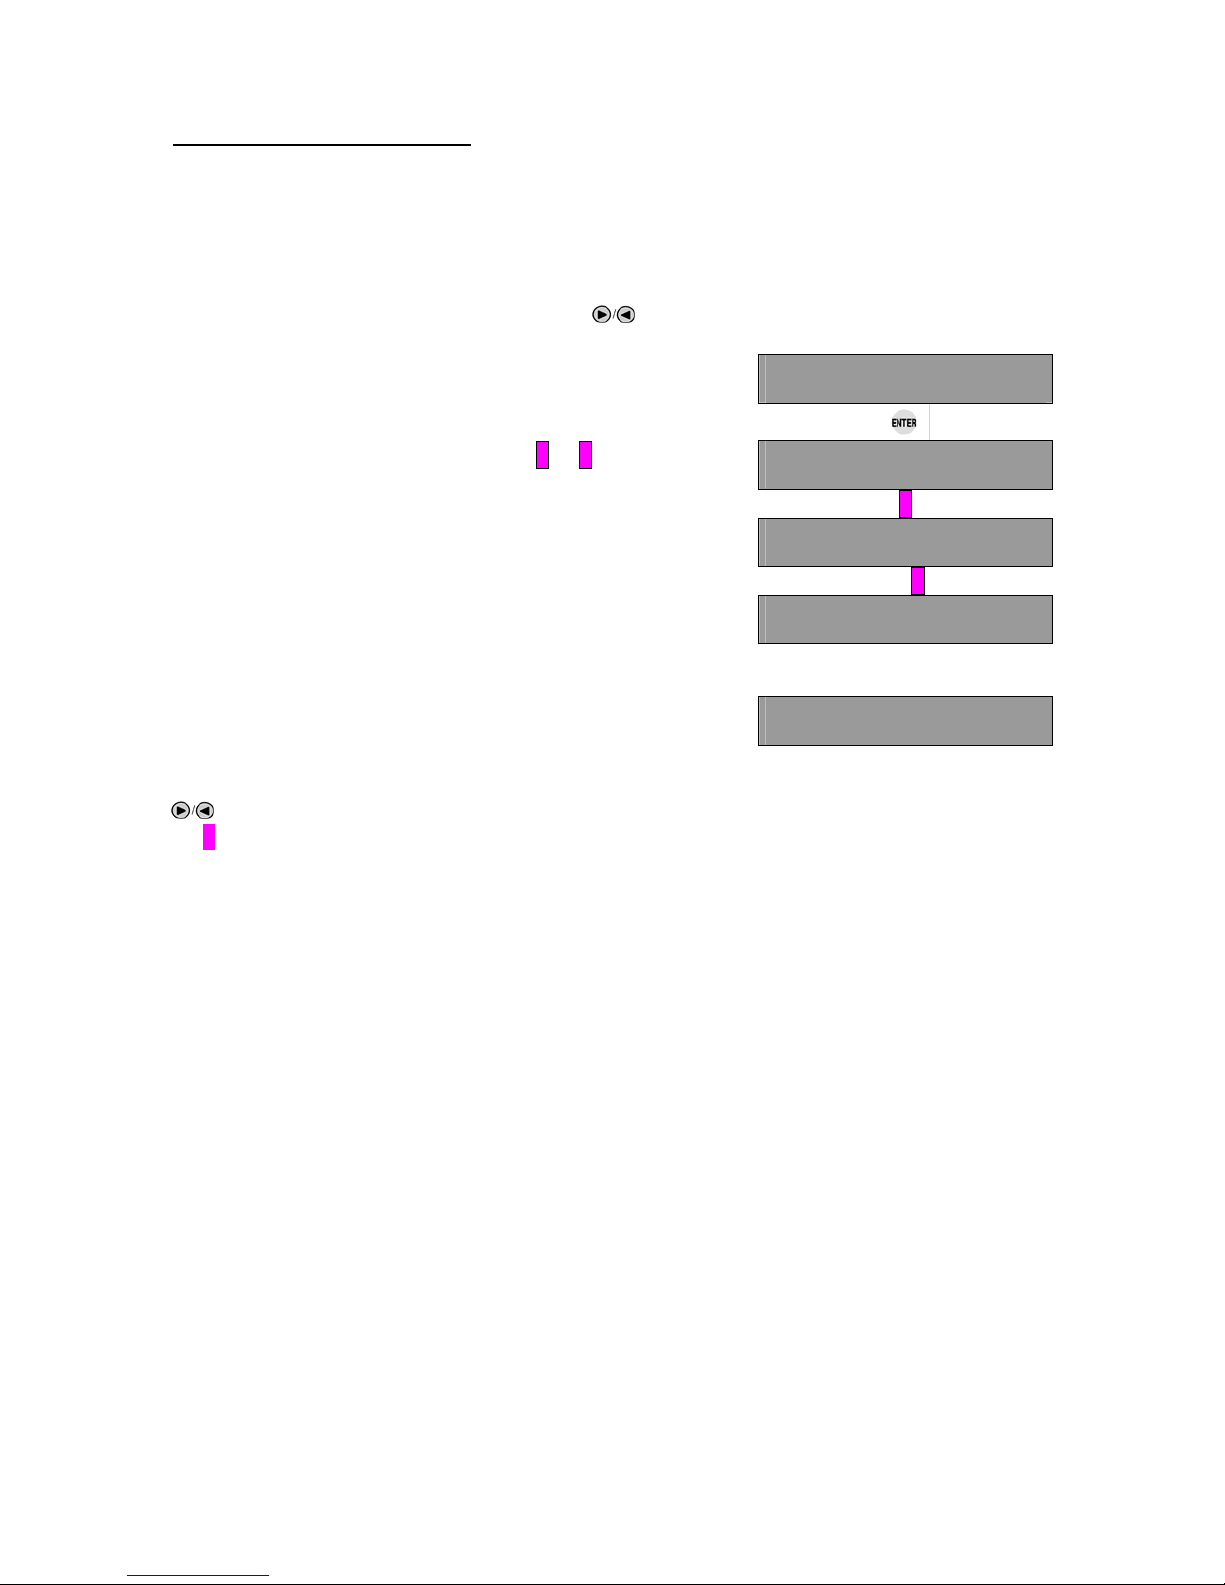
• E3 Manual price group change
This programming option can only be accessed if the timeprice mode has been programmed by the WMF customer
service. This sequence allows the operator to determine
which price group is valid.
After accessing the programming mode, press the
keys to select the following display:
S3 Price Group
ENTER / . . . . .
To select the desired price group, press key 1 or 2 .
Select new Pg!!
Pg1 [1] Pg2 [2]
1
Pg1 Effective!
[EXIT]
or 2
Pg2 Effective!
[EXIT]
By pressing “EXIT“ the WMF multicounter registers the
selected price group and the initial display appears:
S3 Price Group
ENTER / . . . . .
To access a different programming sequence, press
the keys or exit the programming menu with key
switch 5 .
Page 44
105
8 MACHINE CARE
8.1 DAILY CLEANING
A fully automatic cleaning cycle must be used daily in
order to ensure safe functioning and excellent coffee
quality. All components coming into contact with the
coffee are rinsed and cleaned thoroughly.
Your WMF PROGRAMAT 4 model is optional designed
for liquid cleaning: the WMF Special Liquid Cleaner
comes in a 3 liter container and is automatically portioned
by the machine. Naturally, your WMF customer service
would be pleased to adapt the WMF PROGRAMAT 4 to
powder cleaning if required.
Sections “liquid cleaning“ or “powder cleaning“ apply,
depending on machine specifications.
8.1.1 LIQUID CLEANING
The liquid cleaning cycle can be started “manually“ or
via “timer“:
a) MANUAL CLEANING
Caution!
The cleaner is corrosive! If you are in direct contact with
the cleaner, please observe the safety measures on the
packaging and the enclosed safety instruction
“Installation and replacement of the cleaning
container“ at all times.
1. Turn operator key switch 5 to position “W“ and set
brewing charge to Selection: 0L. Wait until current
brewing process is terminated.
2. Dispense remaining coffee with keys 12 / 13 or via key
switch position “H“ (manual dispensing) until the
empty indicator 14 is lit.
3. Turn operator key switch 5 to position “R“.
Position “R“ (cleaning cycle)
Page 45
106
Display:
Cleaning?
Fix Adaptor! / ENTER
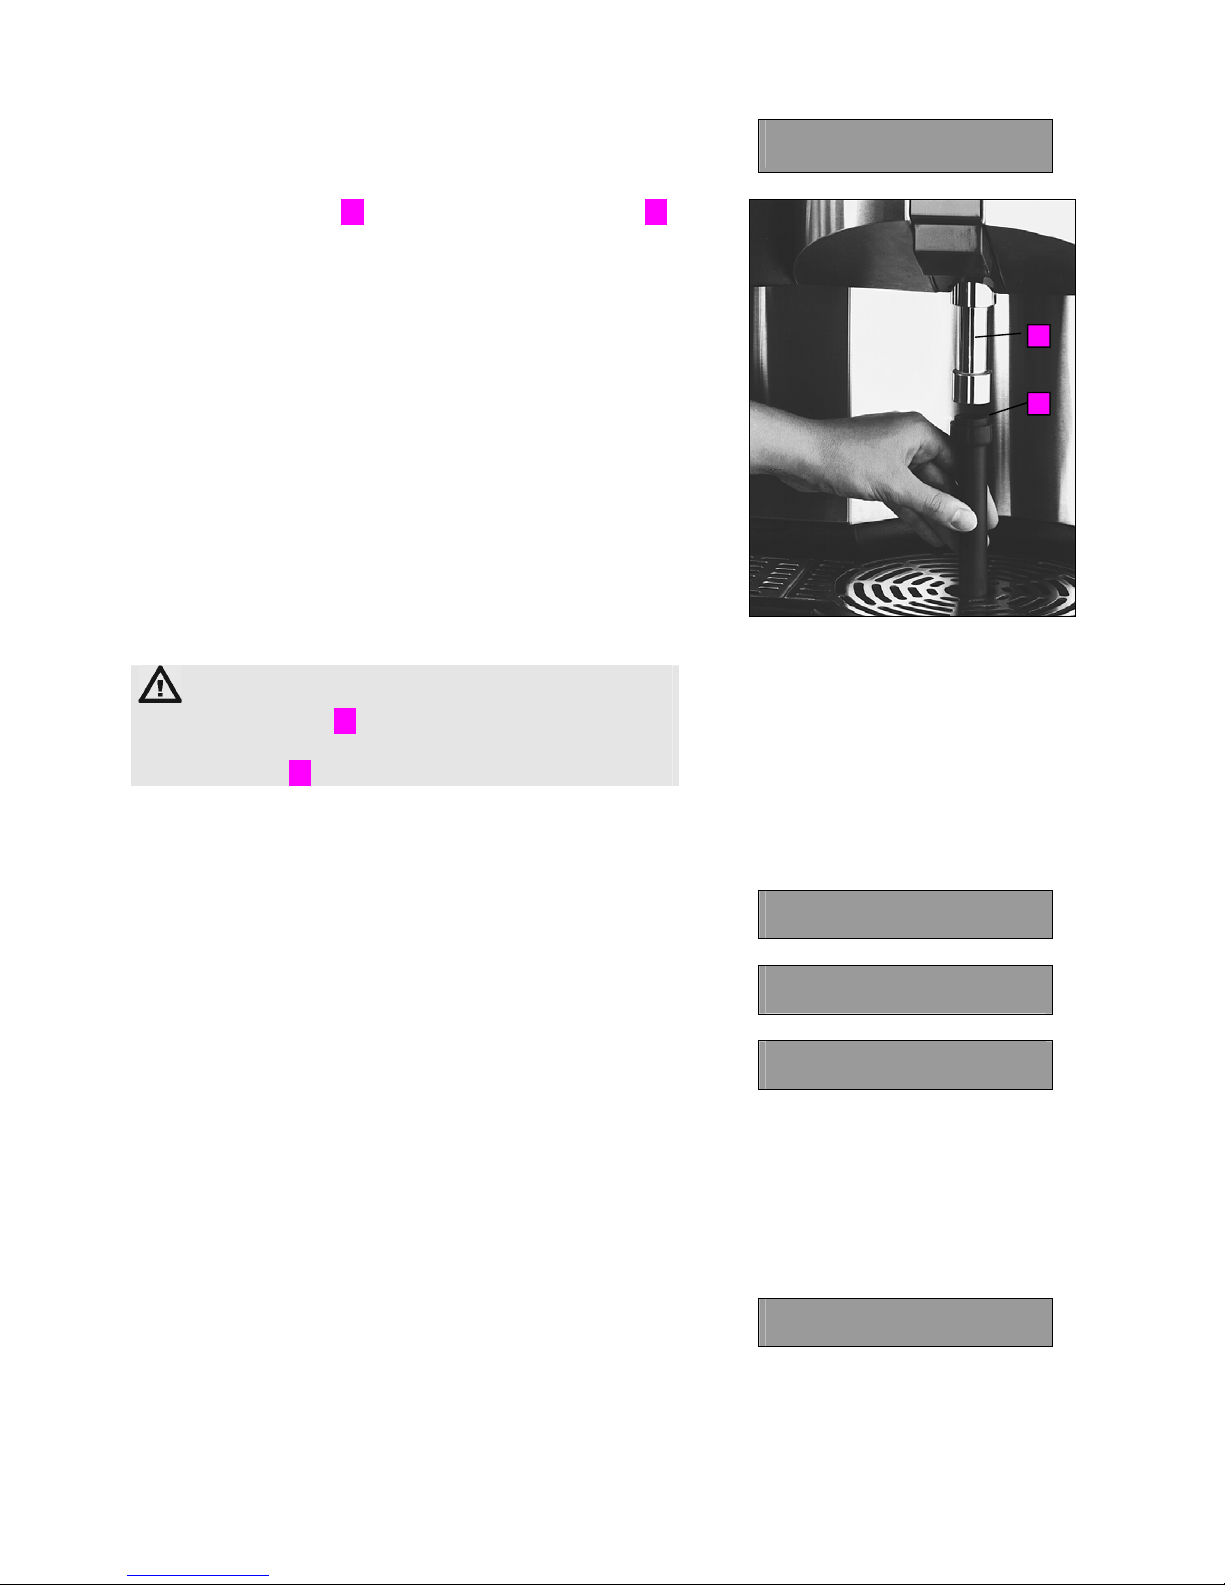
Plug cleaning adaptor 29 in the coffee dispensing spout 16
(Fig. 7) and confirm with “ENTER“.
Fig. 7
Caution!
The cleaning adapter 29 must always be plugged in –
during the cleaning cycle, cleaning solution flows out of
the coffee spout 16!
At this point, the WMF Special Liquid Cleanser is
portioned automatically and the cleaning is fully
automatic. Duration appr. 30 minutes.
Display:
Caution! Cleaning On
-- No Coffee Supply --
Do Not Add
Deliming Powder
If the key switch is in position “R“ after the completion of
the cleaning cycle, the display indicates the following:
Cleaning Prog.
Finished
To disconnect the machine, turn operator key switch to
position “0“ . This can be done after cleaning as well as
immediately after the start of the cleaning cycle.
Both of the storage urns remain filled with clean water
until the next machine start-up.
The contents of the 3 liter cleanser container is constantly
monitored. If it is empty, the display indicates:
Cleaning Fluid Empty
Change Cont.! / ENTER
29
16
Page 46
107
During the replacement of the cleaner container,
please observe the safety measures on the packaging and
the enclosed safety instructions “Installation and
replacement of the cleaning container“ at all times.
b) CLEANING VIA TIMER
Position “T“ (timer activated)
A fully automatic cleaning cycle can be triggered at a
programmed time.
(see 6.3.3 PROGRAMMING CLEANING CYCLE)
Caution!
The cleaning adapter 29 must always be plugged in –
during the cleaning cycle cleaning solution flows out of
the dispensing head 16!
8.1.2 POWDER CLEANING
Caution!
Since the cleaning powder is highly concentrated, careless
use could cause skin and eye irritation.
Powder cleaning requires the same procedures as liquid
cleaning: dispense remaining coffee and then turn operator
switch key switch 5 to position “R“.
Position “R“ (cleaning cycle)
Display:
Cleaning Fluid Empty
Change Cont.! / ENTER
Plug cleaning adapter 29 in the coffee dispensing head 16
(Fig. 7) and confirm with “ENTER“.
Caution!
The cleaning adapter 29 must always be plugged in –
during the cleaning cycle, cleaning solution flows out of
the dispensing head 16!
Page 47
108
Display:
Cleaning Powder
Confirm / ENTER
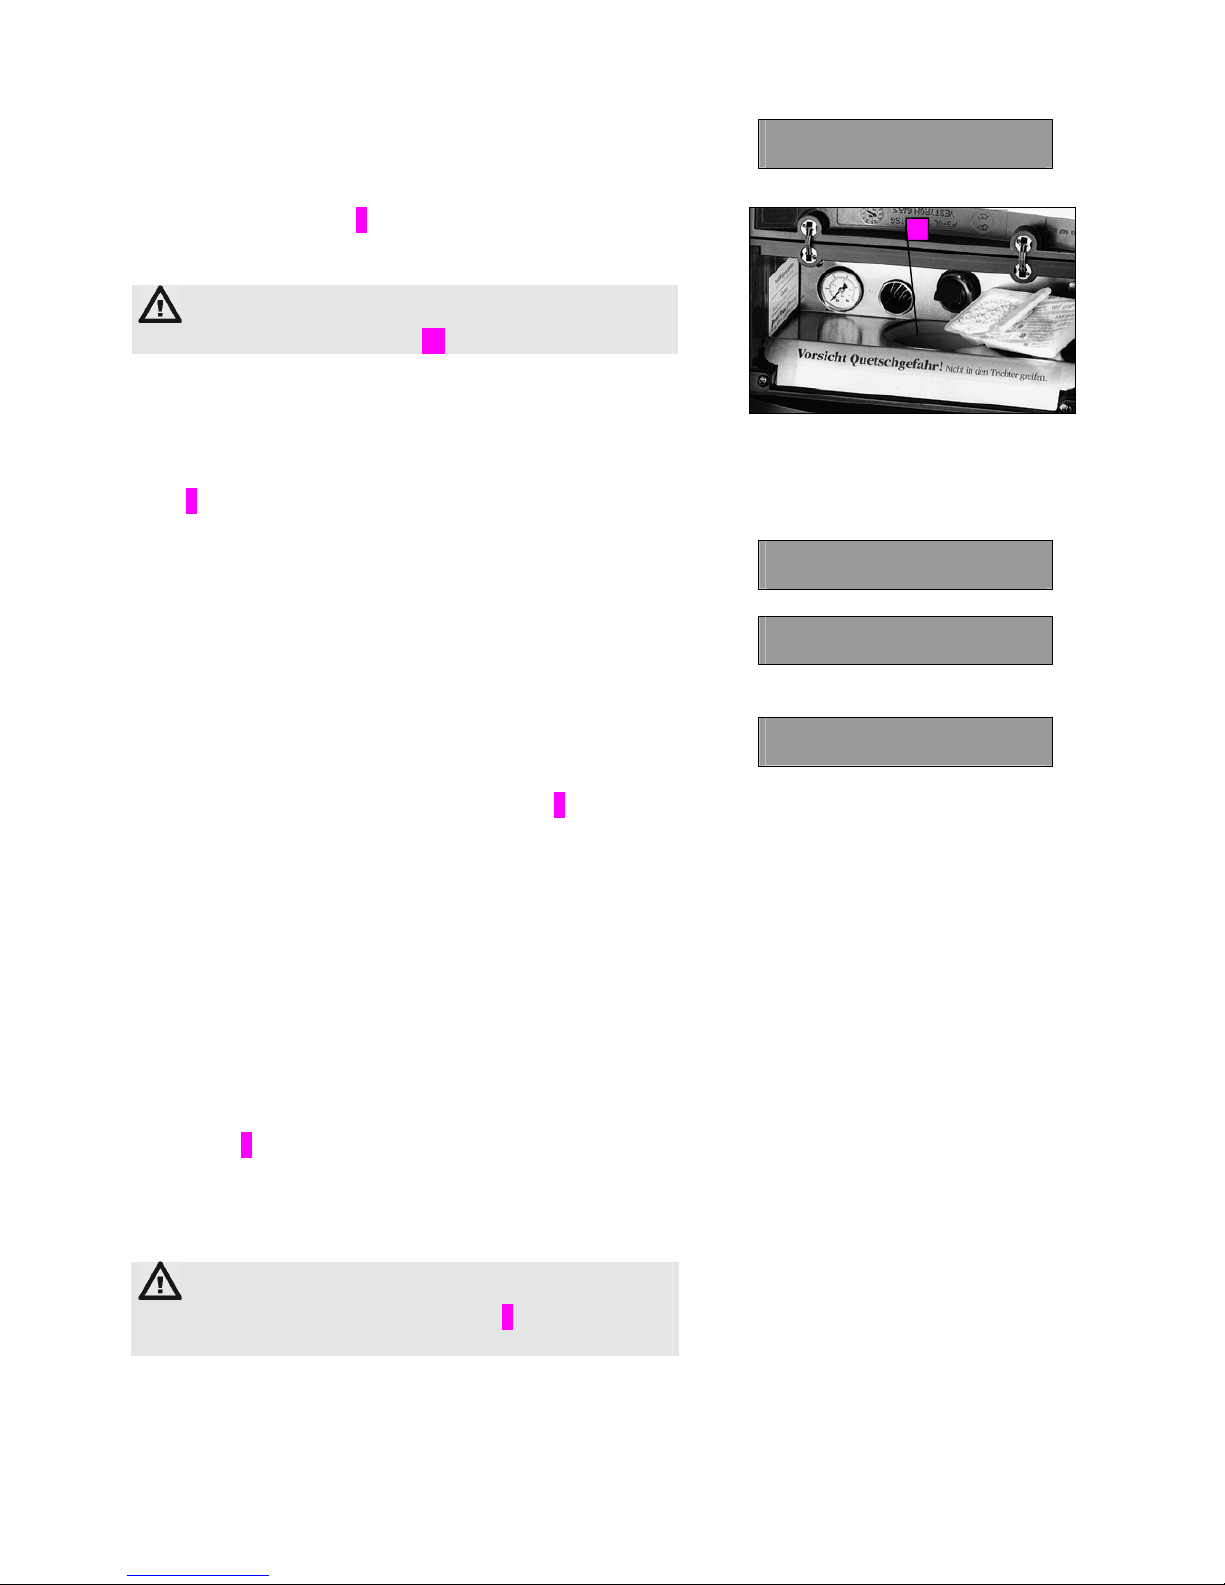
Open the machine door 3 and insert appr. 100 g
WMF Special Cleaning Powder in brewing unit (Fig 8).
Caution!
Do not reach into brewing unit 30. Danger of crushing!
Fig. 8
Once the cleaning powder is inserted, close machine
door 3 and start cleaning cycle with “ENTER“ key.
Display:
Caution! Cleaning On
-- No Coffee Supply --
Do not add
Deliming Powder!
If the key switch is in position "R" after completion of the
cleaning cycle, the display indicates the following:
Cleaning Prog.
Finished
To disconnect the machine, turn operator key 5 to
position “0“. This can be done after cleaning as well as
immediately after the start of the cleaning cycle.
Both of the storage urns remain filled with clean water
until the next machine start-up.
8.2 WEEKLY CLEANING
a) Cleaning of the ground coffee hopper
- Once per week, the filling of the ground coffee
hopper 1 should be monitored closely and the amount
reduced so that there is only very little coffee left at the
end of the day’s operation.
Caution! Danger of crushing!
Do not reach into ground coffee hopper 1 during operation
of the machine.
30
Page 48
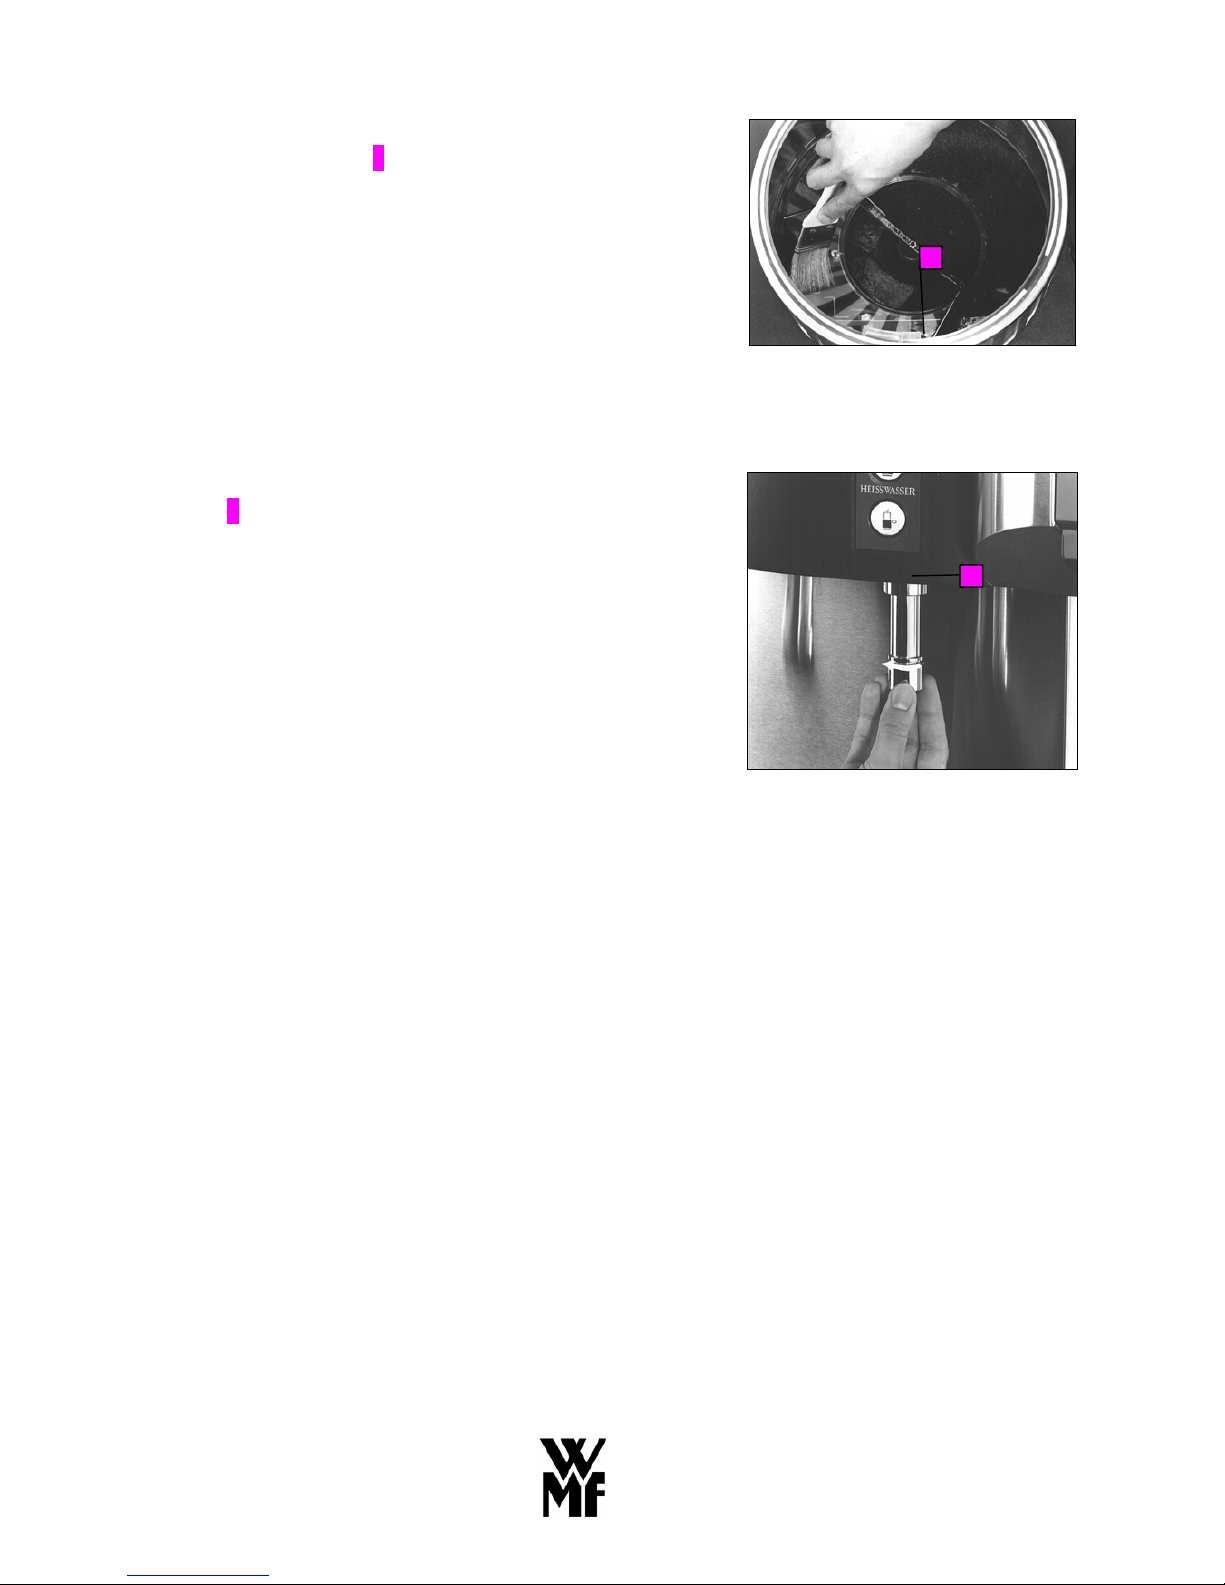
109
- When the machine is disconnected, remove cover from
ground coffee hopper 1 and clean it with a brush or dry
cloth (Fig.9).
Fig. 9
b)
- If necessary, unscrew the steam valve on the hot water
spout 8 (Fig. 10) and descaler with WMF descaler
when machine is shut down and has cooled down.
Put the steam valve in a cup of hot water for 10 minutes
and add one tea spoon of decalcifier. Rinse nozzle
thoroughly.
Fig. 10
8.3 GENERAL MACHINE CLEANING
After the machine has cooled down, clean housing and
drip pan with a damp cloth and then dry with a fine wool
or suede fabric. To prevent scratches, do not use cleaning
powder.
For the maintenance of metal surfaces we recommended:
surface matte and polish: WMF Purargan forte
surface gold-plated: Only with liquid cleaner
and suede fabric!
1
8
Page 49

110
9 MACHINE INSTALLATION
9.1 PREPARATORY WORK
The fresh water supply pipe (min. ½´´ pipe) a drainage pipe for waste water and used grouts
(min. 1½´´) as well as the electrical power line must be attached directly to the machine. The machine
operator must contract this onsite preparatory work out to a licensed plumber / electrician, who must
comply with all general and local regulations.
Openings and drill holes in countertops or lateral surfaces for connecting machine lines, must be
measured so that there can be no outside contact with live components. Special cases require
installation of a coverplate. Our WMF service technicians are only authorized to connect the machine
to on-site connections. They may not carry out on-site installation work and cannot be held responsible
for any such work.
9.2 ELECTRICAL CONNECTION
An easily accessible main switch for disconnecting the machine from positive and negative main lines
must be built in the supply pipe (5 x 2,52). The machine may be connected through a flexible cable with
a corresponding plug or wired directly. The main switch and socket are part of the on-site installation.
9.3 FRESH WATER SUPPLY CONNECTION
The on-site installation is connected directly to the machine via an easily accessible main water valve,
which is in compliance with the corresponding regulations. The on-site supply pipe must measure min.
½´´ (DN15). The machine’s water connection is located below the drip pan within the machine. The
drift filter supplied must be installed in the supply pipe outside the machine and be easily accessible.
Normal water pressure must be min. of 2 bar overpressure, with a maximum output of 4 liters / minute
(shortterm). The flow pressure must not fall below 2 bar overpressure. Admissible maximum pressure
is 15 bar.
9.4 WASTE WATER OUTLET
The machine’s waste water outlet should be connected on-site to a pipe or hose of at least 1 ½´´ (DN
40). In order to prevent blockage, the drain pipe must have a minimum descending gradient of 2 cm/m
at any point. Regardless of local regulations, we recommend that a residue collector be provided if the
descending gradient is lower or the drain pipe’s cross-selection is smaller. Install a pipe siphon as a
drain trap. It must be placed at least 0.5 m below the drain connecting piece of the machine. Otherwise,
an aeration device must be installed in the drain pipe between machine and siphon in order to prevent
any back-up. The fresh water supply, water drain and electrical connections can be installed through the
countertop, the corresponding holes in the back of the unit or on the side through the drip pan.
Page 50

111
10 CONTROL INDICATORS AND MALFUNCTIONS
MALFUNCTIONS
In case of malfunction as indicated below, please notify the appropriate WMF customer service.
For a quick error diagnosis, advise the technician of the error code.
Malfunctions:
Display indicators:
Ground coffee hopper defective
F No Hopper
1 Pluses
Brewing unit defective
F Brewing position
2 Not Reached
Machine scaled, valve defective, brewing sieve clogged.
F Brewing Front Res.
3 Time Exceed
Machine scaled, valve defective, brewing sieve clogged.
F Brewing Back Res.
4 Time Exceeded
Heating unit in boiler defective
F Boiler: Exceed
5 Temperature
Thermostat in boiler defective
F Temperature
6 Sensor Failure
Fluid cleaner defective
Fluied clean.troubled
(17.05) >> WMF-Serv.
MALFUNCTIONS FOR THE OPERATOR
The following displays can be attended to by the operator.
Not enough coffee in GCH refill and confirm with
“ENTER“ key.
Please Refill Ground
Coffee! / ENTER
Liquid cleaner is empty. Replace cleaner container
(observe safety measures!)
Cleaning Fluid Empty
Change Cont.!/ ENTER
Page 51
112
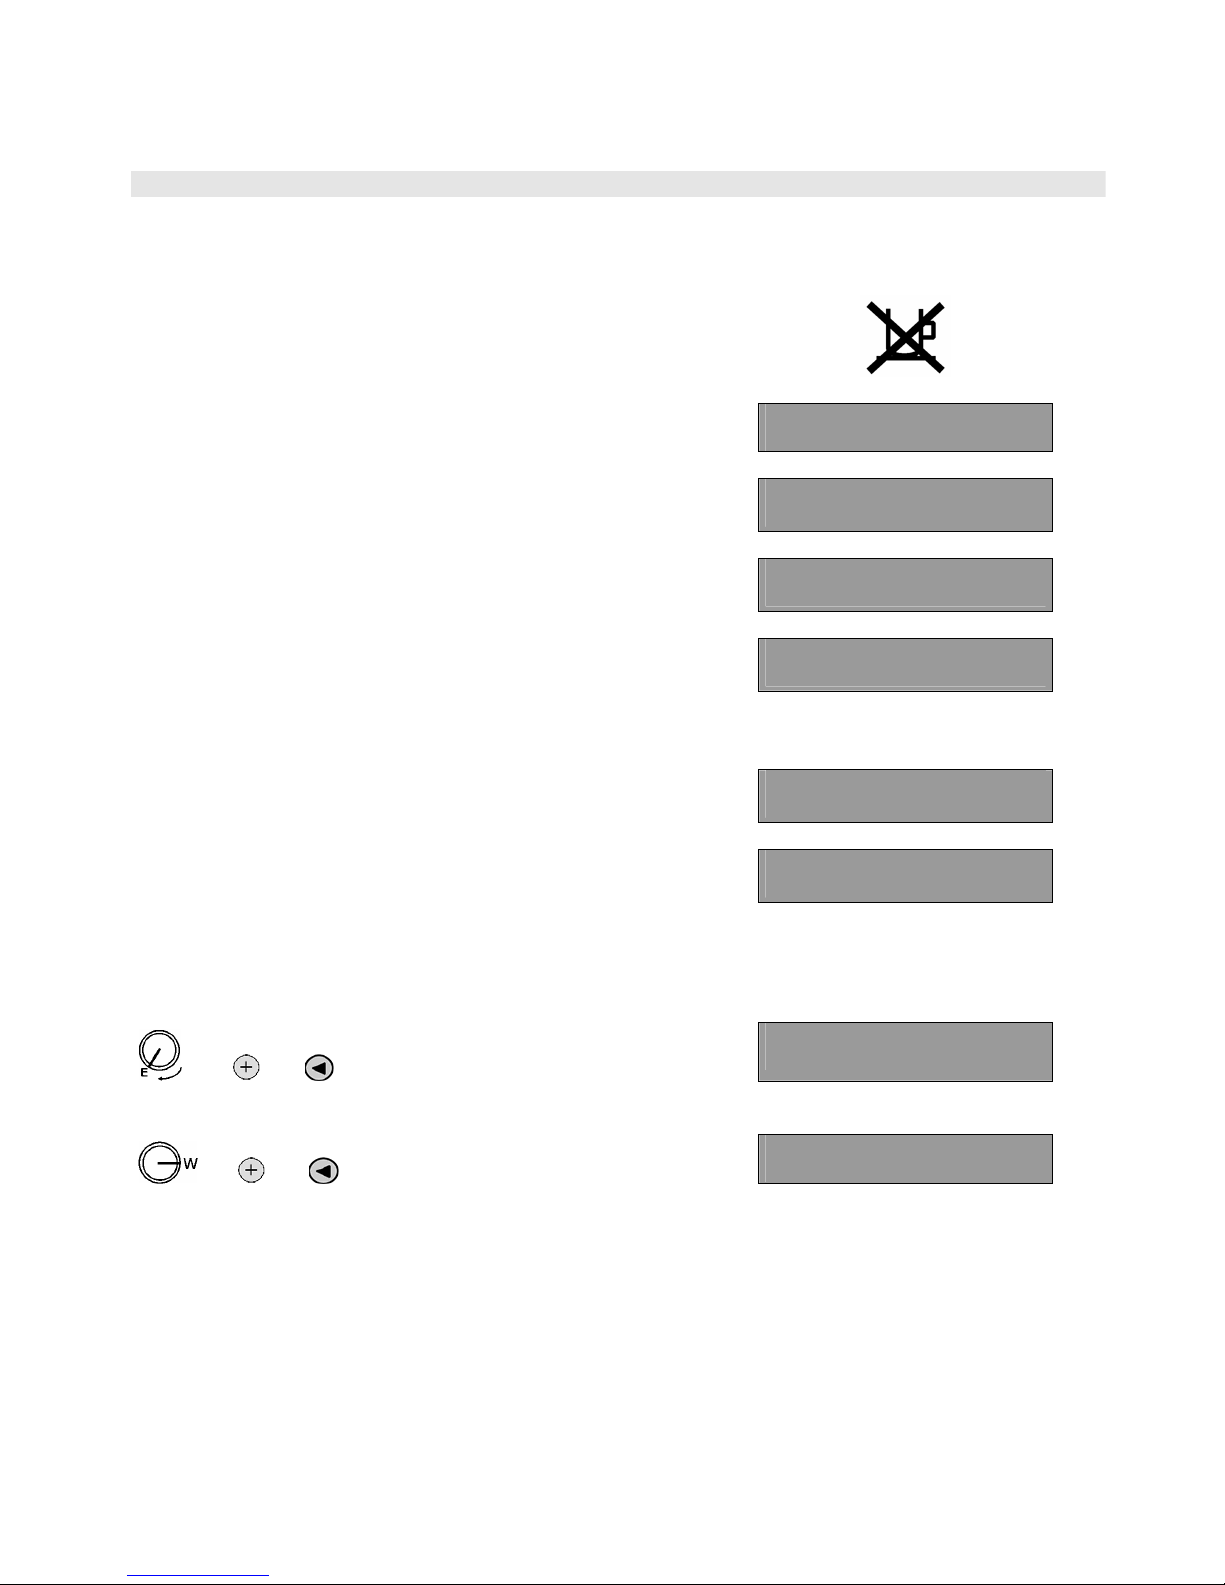
CONTROL INDICATORS
The following control indicators inform the operator about certain operating conditions.
CONDITIONS:
DISPLAYS:
Coffee storage urns empty; no dispensing of full portions;
Coffee dispensing is blocked.
Automatic machine warm-up.
↑
In key position “T“ , the display indicates programmed
shutdown 10 minutes before machine is disconnected.
Caution! >>> Timer
Turn Off Time: 10:30
In key position “T“ , the display indicates programmed
machine start-up.
Turn On >> Timer
Tuesday 07:50 1-2L
This display alternate after switching on if the service
interval or set number of brews has been exceeded.
Maintenance !
> WMF Field Service
WMF PROGRAMAT 4 with multicounter
In the personnel registration mode, display indicates an
unregistered waiter.
Waiter Pen
-- No Access --
During PIN operation, display asks operator to enter
5-digit PIN.
** Pass Word? **
-- ????? --
DISPLAYING DATA:
DISPLAY INDICATORS:
96 C Nx. Maint. 07.00
Nx. Delim.: 00033 / 12500
DISPLAYING PREPARATION TIME
Coffee Storage Time:
Fr: 07 min BR: 10 min
Page 52

113
11 WMF CUSTOMER SERVICE
WMF’s comprehensive service network, covering the major European Countries allows any area to be
reached in a short period of time. Our personnel are experienced experts and carry special tools and
original spare parts at all times so that malfunctions can be eliminated on the spot.
In order to ensure regular machine inspection, we recommend that a regular machine maintenance
contract be arranged with your local WMF service technician.
Order numbers for WMF’s machine care program:
Special cleaner for powder cleaning
Order no. 33 0358 0000
Special cleaner for liquid cleaning
Best.- no. 33 1573 3000
Special cleaner for milk dispensers
Order no. 33 0683 6000
Special boiler cleaner
Order no. 33 0680 8000
Purargan forte
Order no. 14 2831 9990
Page 53

114
12 GUARANTEE
1. WMF warrants to the buyer: that the WMF COFFEE MACHINE PROGRAMAT 4 shall be free
(under normal use) from defects in material or workmanship for a period of time not to exceed
twelve (12) months from the date of purchase. The guarantee period starts on the invoice date.
During this period, defects resulting from faulty material, poor workmanship and inadequate
design will be repaired free of charge by ourselves or our agents, provided that the purchaser
reports all defects to use in writing immediately on discovery and gives our customer service
personnel the opportunity to verify them.
WMF´s obligation under its warranty is limited to the repair or replacement.
2. WMF accepts no liability
For defects caused by incorrect operation, failure to observe the operating instructions, inadequate
maintenance or other fault on the part of the purchaser or the purchaser’s staff, or caused by local
conditions or incorrect mounting, connection and installation;
For parts particularly subject to wear such as seals, etc., and for glass and porcelain components,
control lamps, switches and controls;
For defects and deficiencies on equipment which are attributable to improper repairs or the
installation of spare parts which do not correspond to the original components;
When defects and deficiencies on the equipment result from the mounting of other than WMF or is
agents;
For faults and interruptions to operation attributable to the beverage systems (e.g. cooling, pressure
and pipework up to the dispenser) where these have been connected by the purchaser or a third
party appointed by him;
For defects and faults attributable to fluctuations on the powered supply, overvoltage caused by
lightning or similar natural events and the effects of other equipment.
3. If mounting, connection, installation and repairs of the equipment are carried out by persons other
than the installation and servicing personnel authorised by WMF, the guarantee shall be rendered
null and void from that time onwards.
No other warranty, whether oral, statutory, expressed or implied, including any warranty of
merchantability or fitness for a particular purpose, is made by WMF.
The above warranty is the sole and exclusive remedy of purchaser against WMF.
In no event shall WMF be liable to purchasers for any consequential or incidental damages,
including but not limited to any commercial loss arising out of the use of or inability to use the
WMF COFFEE MACHINE PROGRAMAT 4, or for any claims by any third party. WMF´s
liability to purchasers in any event, shall be limited to the amount paid by purchaser for the WMF
COFFEE MACHINE PROGRAMAT 4.
Page 54

115
13 WMF EC DECLARATION OF CONFORMITY FOR COFFEE MACHINES
EC Declaration of Conformity in accordance with the EC Directives
We WMF Württembergische Metallwarenfabrik Aktiengesellschaft
D-73309 Geislingen/Steige
hereby declare that the design and construction of the machines designated below, as marketed by
WMF, conform to the relevant safety and health requirements of the EC Directives.
This declaration shall not apply to machines modified without WMF approval.
Machine types
Designation Type series
Bistro 8001 – 8274
Cafemat 3113 – 3134, 3234, 3314, 3414
Filterjet 4500 – 4501
Variomat 7100 – 7299
Programat GV 7470
Programat 4 7520 – 7529
Kaffeemühle 9004, 9008
Schoko-Dispenser 9130 – 9133, 9410 – 9429
Zucker-Dispenser 9134, 9440
Espresso 9403, 9404
Serial numbers: See machine type data in the original operating Instructions
Relevant EC Directives:
Directive on the safety of machines
89/392/EEC, 91/368/EEC, 93/44/EEC, 93/68/EEC
Directive on low-voltage installations
73/23/EEC, 93/68/EEC
Directive on electromagnetic compatibility
89/336/EEC, 93/31/EEC, 93/68/EEC
Applicable harmonised EC
standards:
EN 292-1, EN 292-2, EN 50081-1, EN 55082-2, EN 60334-1
Source of the applied
standards:
Beuth-Verlag GmbH, 10772 Berlin
Date: 09.03.99 09.03.99
Manufacturer’s signature:
Head of development
Coffee machines
Head of quality assurance
Coffee machines
 Loading...