

Page 1

Page 2

WMF COFFEE MACHINES
Operating instructions
WMF combiNation F/ F2
Series
8700
Edition 6 - Printed in 03.08
Item-No.
33 0914 3000
73
Page 3

Congratulations on your purchase of a
WMF COFFEE MACHINE.
Its advanced technology, long service life,
economy and above all, the quality of the
coffee will delight you.
Are you one of those people who don’t like
reading operating instructions? Please do so
anyway!
You will get more pleasure from your WMF
COFFEE MACHINE afterwards and will find
it was worth it after all.
In your own interest, please follow all
safety and cautionary instructions. This
will help to avoid accidents and technical
malfunctions.
Never entrust the machine to anyone who
is not familiar with the operating
instructions.
Keep these operating instructions near the
machine. This will allow your operating
personnel easy access to information at any
time and will enable them to take the
appropriate action should any technical
malfunctions occur.
74
Page 4

Contents
1 Designation of machine parts........................................................................................................... 78
2 General description........................................................................................................................... 79
3 Warnings............................................................................................................................................ 80
4 Safety instructions............................................................................................................................. 81
5 Technical data ................................................................................................................................... 83
6 Conditions of use and installation.................................................................................................... 84
7 Operation........................................................................................................................................... 85
7.1 Starting the machine.................................................................................................................... 85
7.1.1 Switching on manually...................................................................................................... 85
7.1.2 Switching on via the timer................................................................................................ 86
7.1.3 Switching on via display (adjustments to be made by the service team).......................... 86
7.2 Filling the ground coffee hopper ................................................................................................. 86
7.3 Beverage key selection and labelling .......................................................................................... 86
7.4 Adjusting the height of the front panel (optional)....................................................................... 87
7.5 Selection of quantity of coffee for storage .................................................................................. 89
7.5.1 Automatic quantity control ............................................................................................... 90
7.5.2 Manual quantity control.................................................................................................... 92
7.5.3 Quantity control using the timer ....................................................................................... 93
7.6 Coffee dispensing (cup/mug/pot/jug).......................................................................................... 93
7.7 Coffee and hot water dispensing ................................................................................................. 94
7.8 Switching off the machine........................................................................................................... 95
7.8.1 Switching off manually..................................................................................................... 95
7.8.2 Switching off via the timer................................................................................................ 95
7.8.3 Switching off via display (adjustments to be made by the service team)......................... 95
8 User guide .......................................................................................................................................... 95
8.1 General symbols.......................................................................................................................... 96
8.2 Info .............................................................................................................................................. 97
8.3 Settings........................................................................................................................................ 98
8.3.1 Setting quantities............................................................................................................... 98
8.3.2 Beverage selection ............................................................................................................ 99
8.3.3 Quantity of ground coffee............................................................................................... 100
8.3.4 Boiler temperature........................................................................................................... 100
8.3.5 Mode (self-service) ......................................................................................................... 101
8.3.6 Setting the date and time................................................................................................. 101
8.4 Access authorisations (PIN code).............................................................................................. 103
8.4.1 System of access authorisations...................................................................................... 103
8.4.2 Changing access authorisations (PIN numbers).............................................................. 104
8.5 Unit number accounting ............................................................................................................ 106
8.6 Manual dispensing..................................................................................................................... 106
8.7 Waiter accounting system.......................................................................................................... 108
8.8 Vending units............................................................................................................................. 109
8.8.1 Coin checker / token checker.......................................................................................... 109
8.8.2 (Chip) card reader ........................................................................................................... 112
8.8.3 Coin changer ................................................................................................................... 113
9 Specific Supplement: WMF combiNation F2............................................................................... 117
75
Page 5

9.1 General description of the functions ..........................................................................................117
9.2 Technical data ............................................................................................................................118
9.3 Selection of storage quantity......................................................................................................119
10 Timer functions................................................................................................................................120
10.1 Timer settings.............................................................................................................................121
10.1.1 Setting the operating times ..............................................................................................121
10.1.2 Setting coffee quantities to be prepared...........................................................................124
10.1.3 Setting the machine cleaning times .................................................................................126
10.1.4 Setting switch-over to self-service mode.........................................................................127
10.2 Timer check................................................................................................................................129
10.3 Making changes to the timer......................................................................................................131
10.3.1 Copying the timer............................................................................................................131
10.3.2 Clearing the timer............................................................................................................132
10.4 Timer information......................................................................................................................133
11 Care of the machine.........................................................................................................................134
11.1 Cleaning the machine.................................................................................................................135
11.1.1 Fully automatic cleaning (using automatic granulate cleaning).....................................135
11.1.2 Semi-automatic cleaning (via the manual input)............................................................138
11.2 Cleaning using the timer ............................................................................................................139
12 Error messages / remedial action...................................................................................................140
13 WMF customer service....................................................................................................................142
14 Liability.............................................................................................................................................142
76
Page 6
1
2
8
3
9
4
12
5
13
10
6 11
7
14
77
Page 7

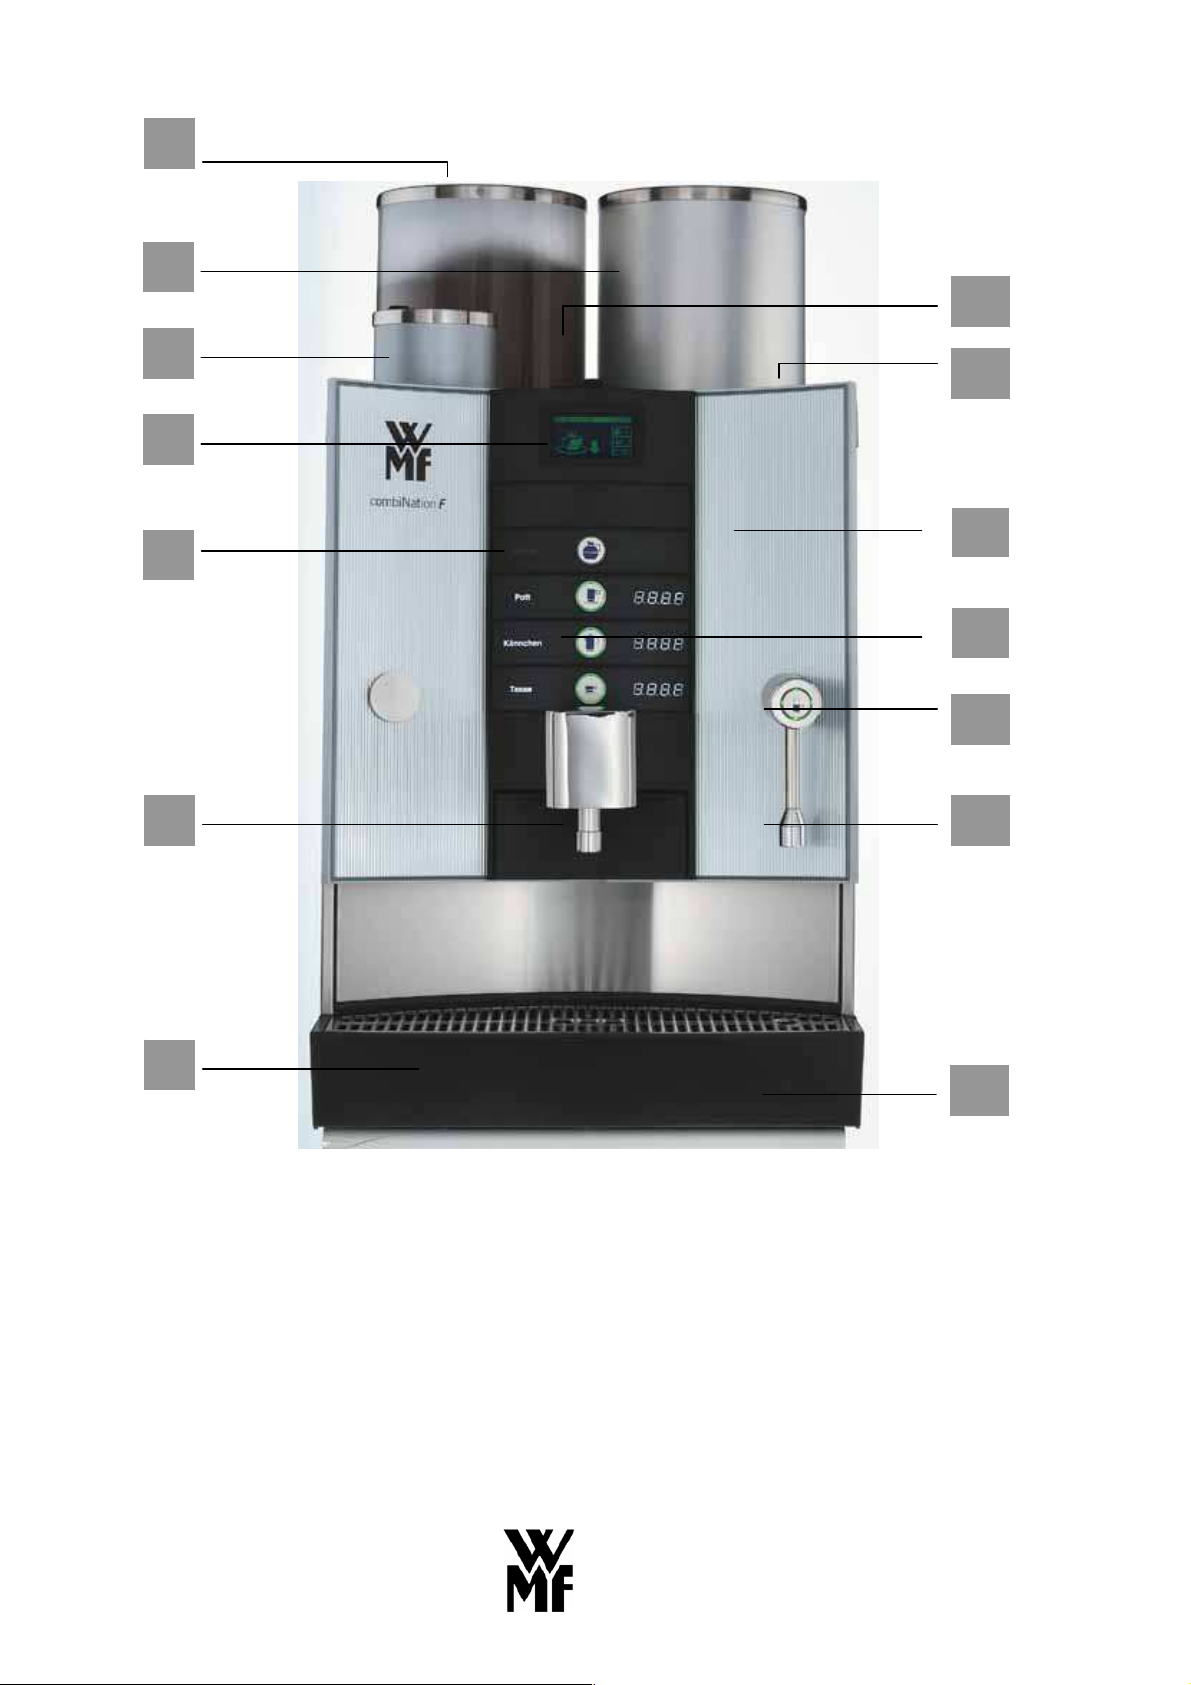
1 Designation of machine parts
Ground coffee hopper
1
Coffee storage urn
2
Granulate cleaning reservoir
3
Touch screen display
4
Control panel
5
Coffee spout
6
Drip tray
7
Input (cover)
8
On/off key switch
9
Hot water key
10
Hot water spout
11
Height-adjustable front panel (optional)
12
Beverage keys
13
Waiter’s lock (optional)
14
78
Page 8

2 General description
The WMF combiNation F is a coffee machine for automatic
preparation of filter coffee and hot water.
Cups, mugs, pots and jugs can be dispensed.
The brewer unit enables 1 and 2 litres of coffee to be prepared.
Each fresh brew is transferred to a storage urn, where it is kept
hot ready for dispensing.
The (optional) height-adjustable front panel enables jugs up to a
height of 280 mm to be filled without any difficulty.
The machine user guide is a graphic touch screen display. By
pressing on particular soft keys in the display, you can activate
certain machine functions or call up information.
79
Page 9

3 Warnings
Maximum machine safety is an integral WMF product characteristic to which we pay particular
attention.
In spite of all our safety precautions, every machine is potentially hazardous if not operated properly.
This is why – for your own safety – we have summarised the warnings below and highlighted them in
grey throughout the instruction manual.
This is why it is important to follow the “Safety instructions” given on page 81.
Important instructions which
must be observed for your
own safety
Connection and commissioning of the coffee machine may
only be undertaken by the WMF customer service team.
Maintenance and repair work on the machine may only be
undertaken by the WMF customer service team using
original spare parts.
Installed safety devices must not be altered for any reason.
No parts of the outside of the machine should be removed.
Caution! Risk of being burned and scalded
At the spout where hot water 11 and coffee 6 comes out
there is a risk of being burned and scalded. Always ensure
that there is container placed under the drinks spout! Ensure
that the container is stable and do not leave it unattended.
After switching on it is possible that hot water comes out of
the hot water- 11 and coffee spout 6 during the warm
brewing phase. Never reach under the spouts while cleaning
is in progress.
Caution! Health hazard!
Follow the precautions on the packaging when using the
cleaning product. The cleaning granulate is an irritant.
Cleaning fluid flows out of the coffee spout 6 while cleaning is
in progress. The protective panel provided should be fitted (see
picture on page 136). Do not leave jugs or cups underneath the
coffee spout 6 while cleaning is taking place. Wait until
prompted by the display before placing cleaner granulate in the
brewer.
Caution! Danger of crushing!
Never put your hand into the ground coffee hopper 1 or the
granulate cleaner reservoir 3 when the machine is in use and
the power is switched on!
Caution! Electric shock hazard!
Moisture can cause short circuits. It is therefore essential not
to allow fluids to enter the inside of the machine housing .
Under no circumstances should the machine be opened up.
Never put your hand inside the machine interior or reach
inside with a tool.
80
Page 10

4 Safety instructions
1 Always ensure that the main water tap in the supply line is closed when the machine is
switched off and that the main power switch outside the machine is off or the mains plug is
disconnected from the socket as there is a risk of water escaping from the machine.
2 The installed component approved safety equipment prevents an impermissibly high pressure
or temperature increase in the hot water boiler. If the safety valve is actuated one-time then
the machine must be switched off at the local main switch and the main stop cock on the
drinking water supply line closed. Switch off the machine if any faults arise on the hot water
boiler. Inform the WMF customer service team and do not switch on the machine again
before the fault has been removed.
3 Do not use the machine in the open air. The water system must be emptied if there is frost.
4 The device must not be sprayed with a water hose. Use of steam cleaning, steam jet devices
and similar equipment for cleaning purposes is not permitted. Clean the surface of the coffee
machine using a soft cloth or by using products from our WMF care range.
5 The device must be set on a flat, level and secure surface.
6 Do not let children near the machine!
7 Do not use the machine if it does not work properly or if has been damaged
Shutting down the machine – company holidays
1 If the machine is to be shut down for an extended period, a general cleaning should be carried
out first and the grouts collector should be emptied. Drain the machine first to prevent frost
damage if there is any risk of freezing. A WMF Customer Service Technician must be called
promptly in such cases.
2 After several weeks of shutdown for holidays, we recommend that the full automatic cleaning
program be run at least twice before the machine is started up again.
Regulations
Refer to rating plate for boiler data.
The hot water boiler complies with the Pressure Equipment Directive 97/23/EC, Category 1,
Module A.
The hot water boiler is subject to neither notification nor licensing. Each hot water boiler is
subjected to hydrostatic tests before delivery to the customer.
The operator of such plants must ensure that the safety devices are carely serviced and inspected.
81
Page 11

The machine complies with all the relevant regulations.
The operator must ensure that the electrical equipment and systems are in safe working order,
(e.g. BGV A3).
This device is subject of the directive on waste electrical and electronic equipment
(WEEE/EU directive) and may not be disposed of as domestic waste. Please contact
your WMF Customer Service for information on proper disposal of the device.
Preventative measures against suffering damage to the machine
• There are always operating dangers associated with every technical device, particularly from
large fully automatic machines which are operating unobserved.
• We therefore recommend that the operator take reasonable measures to prevent damage
occurring to the machine, for example by installing a suitable water hydrant in the drinking
water supply on-site.
• If the water used in the machine has a carbonate hardness above 9°, a WMF water filter must
be fitted in the supply line. Otherwise limescale can cause damage to the machine.
• Maintenance intervals depend on how heavily the machine is used and on local water
conditions, and should be fixed by agreement with your WMF Customer Service Technician.
Even in the case of light use, maintenance should be carried out at least once a year and the
water filter, if fitted, should be replaced.
82
Page 12

5 Technical data
Rated power * 9.3 kW 13.8 kW
Hourly output **
Filter coffee
Storage urn
Hot water output, total
Ground coffee hopper
Granulate cleaning portioner
Electricity supply *
External dimensions:
Width, single-product machine
Width, two-product machine
Height with ground coffee hopper
Depth
Empty weight:
Single-product machine
Two-product machine
Continuous sound pressure level
(Lpa)***
Heat emission
Stand-by
Full load *
Technical data subject to change without notice.
* Values quoted apply to basic version. For special versions, see rating plate.
** The hourly outputs indicated are GUIDELINES and depend, among other things, on the quantity of ground
coffee, coffee product, brewing temperature, brewing aperture size, brewing pressure, water hardness and
general condition of the machine (e.g. limescale, connections, power, water, sequence, wear, etc.)
*** The A-weighted mean sound pressure level Lpa (slow) and Lpa (impulse) at the operator’s workplace is
below 70 dB(A) in every operating mode.
430 cups
4.0 litres each
72 l/h 108 l/h
2.2 kg
1.0 kg
3/N/PE 50 Hz/400 V
450 mm
700 mm
810 mm
590 mm
Approx. 68 kg
Approx. 98 kg
< 70 dB (A)
200 W
9150 W
500 cups
200 W
13650 W
83
Page 13

6 Conditions of use and installation
The machine operator must arrange for the site preparatory work. This should be carried out by
approved contractors in accordance with general and local regulations. WMF customer service
technicians are only permitted to connect the machine to the prepared connections. They are not
authorised to carry out plumbing or wiring work on site and will not be responsible for such
work.
Rated power 9.3 kW 13.8 kW
Connecting cable, site supply *
5 × 2.5
2
5 × 4²
Fuse, site supply
Mains voltage tolerance
3 × 16 A 3 × 25 A
230 V/400 V + 6 % - 10 %
Power cut < 50 ms does not affect machine operation
Water feed line
TW15 (DN 15 /1/2") with dirt filter installed by customer,
min. 0,2 MPa flow pressure at 8 l/min, max. 0,6 MPa
Water quality
If the local water has a carbonate hardness over 9°, a
WMF water filter must be fitted in the supply line.
Water drain line
Ambient temperature
Max. humidity
Protection
Installation clearance
For operating, service and safety reasons the machine should
Min. DN 40 (1 ½"), minimum gradient 2 cm/m
+ 5°C to + 35°C (drain water system in case of frost)
80 % rel. humidity without dewing; do not spray
machine with water; do not use machine out of doors.
IP 30
be installed with clearance of not less than 50 mm from the
back and sides from the building or non-WMF components.
A clear height of 1100 mm from the top of the supporting
surface should be ensured. The height of the supporting
surface from the floor surface should be not less than
700 mm and not more than 900 mm.
If the machine connections are to be routed down through
the counter, remember also to allow space for the
connections. These may restrict the available space below
Water filter installation
dimensions
W × H × D
* The site electrical system must comply with IEC 364. For greater safety, an earth leakage circuit breaker with a
rated fault current of 30 mA to EN 61008 should be fitted in the supply line to the machine. In the vicinity of the
machine, for a single-phase connection a shockproof socket and for a three-phase connection a 5-pole
CEE/CEKON socket to EN 60309 should be fitted. If the power lead to this machine is damaged, it must be
replaced by WMF customer service or a similarly qualified specialist. If the machine is permanently connected
on site, an all-pole circuit breaker (main switch) to EN 60947 with not less than 3 mm contact opening should
preferably be fitted ahead of the machine. In the case of a flexible connection, the circuit breaker is
recommended. The power lead must not be allowed to come into contact with hot components. The main switch
and socket are part of the customer’s system. The machine must not be installed with a fixed site connection if
used with a trolley (mobile station).
the machine.
Standard: 250 × 500 × 400 mm
Jumbo: 290 × 670 × 420 mm
84
Page 14

7 Operation
7.1 Starting the machine
Before the machine is started up, the main shutoff valve in
the fresh water feed line must be opened and the main
electrical switch supplying the machine must be turned on.
7.1.1 Switching on manually
Turn the key switch 9 to position “1” (On).
After switching on, the machine heats up to operating
temperature (about 5 minutes). The first time a quantity of
coffee is selected for storage (see chapter 7.5 on page 89), a
hot rinse program is executed.
Caution!
There is a danger of burning and scalding in the
hot water 11 and coffee 6 dispensing area.
During the heating-up phase, the display shows the
following:
When the machine has warmed up, the display shows the
following:
Coffee cannot be dispensed at this stage. First of all, the
ground coffee hopper has to be filled (see chapter 7.2 on
page 86) and a quantity of coffee selected for storage (see
chapter 7.5 on page 89) before the machine is ready for
operation. Fresh coffee is then brewed into the storage urn,
ready for dispensing.
In the case of coffee machines for self-service use (see
chapter 8.3.5 on page 101), when the machine has warmed
up, the display shows the following:
Coffee cannot be dispensed at this stage.
First of all, the ground coffee hopper has to be filled (see
chapter 7.2 on page 86) and a quantity of coffee selected
for storage (see chapter 7.5 on page 89) before the machine
is ready for operation. Fresh coffee is then brewed into the
storage urn, ready for dispensing.
9
85
Page 15

7.1.2 Switching on via the timer
The coffee machine can be switched on automatically via
the “Timer” function in the machine selection menu.
Times are assigned to the day of the week and are not
controlled by the date.
For settings, refer to chapter 10 Timer functions
on page 120.
7.1.3 Switching on via display (adjustments to be made by the service team)
By touching the Standby Display (WMF-Logo) the switchon soft key
The coffee machine now can be switched on by touching
the soft key
authorisations (PIN numbers) (see chapter 8.4 on page 103)
you will be asked for your PIN number.
appears.
. If you have allocated access
7.2 Filling the ground coffee hopper
To fill the ground coffee hopper 1 remove the hopper lid
and fill the hopper with ground coffee. Then replace the lid
to close the hopper. The ground coffee hopper 1 has a
capacity of approx. 2.2 kg.
Note:
It is important to top up the ground coffee hopper
before it is completely empty, to ensure correct
operation of the coffee machine.
7.3 Beverage key selection and labelling
A total of 4 beverage keys 13 and one hot water key 10 are
at your disposal (see chapter 7.7 on page 94).
You can assign each beverage key individually with your
chosen coffee beverages.
You will find a master for labelling the beverage keys on
our Web site at www.wmf.de. You can use it to design
your own labels and print them out on transparencies.
1
86
Page 16
Note:
We recommend switching off the machine when
changing the labels, to prevent a beverage key being
pressed in error.
Otherwise, there is a danger of burning and
scalding.
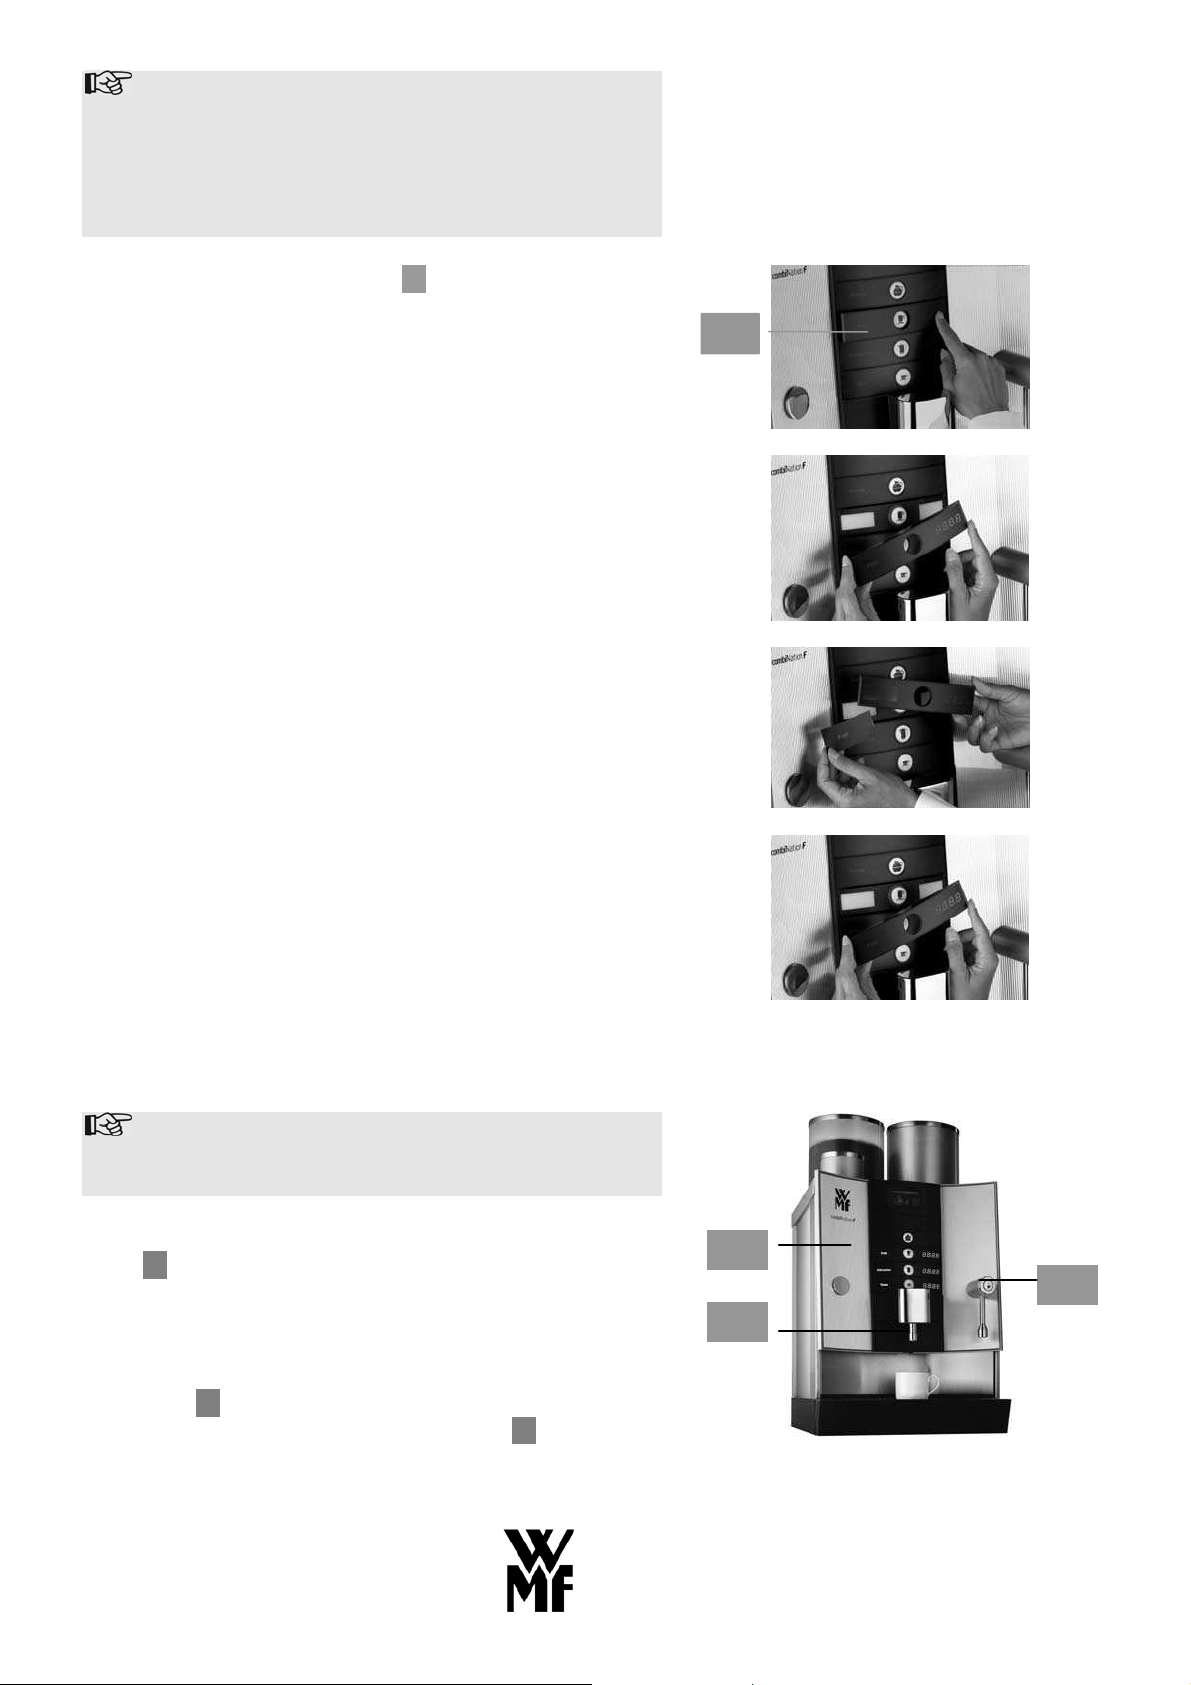
You can label the beverage keys 13 as you choose. To do
this, press on either the left-hand or right-hand side of the
key strip and, while still pressing, slide the key strip out
sideways until the key strip comes out of its holder.
Remove the key strip from its holder.
You can now replace the existing labels with labels which
you have made yourself. You can print your own labels on
plastic, cut to size and insert in place.
13
After changing the plastic labels, replace the key strip. To
do this, insert the key strip into the holder, pressing evenly
on both sides of the key strip until it clicks into position
into the holder.
7.4 Adjusting the height of the front panel (optional)
Note:
Front panel height adjustment is only available
as an option.
When you dispense a cup, pot or mug of coffee, the front
panel 12 remains fully down all the way to the stop. The
key lights in the Cup, Pot and Mug beverage keys are lit,
and the key light for Jugs is extinguished.
To fill jugs and containers over 140 mm high, the complete
front panel 12 has to be pushed fully up all the way to the
top. The key lights in the Jug and Hot water 10 beverage
keys are lit, and the key lights for Cup, Pot and Mug are
extinguished.
12
10
6
87
Page 17

Caution!
There is a danger of burning and scalding in the
hot water 11 and coffee 6 dispensing area.
Grasp the lower part of the front panel and slide it all the
way up to the top, using gentle pressure. This enables the
clear height to be increased to 280 mm.
In addition, the coffee spout 6 can be removed (for
instance, to fill insulated jugs) but this is not possible in the
case of self-service machines.
Caution!
The coffee spout 6 and the hot water spout 11 are hot.
There is a danger of burning. Beware in the coffee 6
and hot water 11 dispensing area: there is a danger
of scalding.
Important:
For safety reasons, it is not possible to dispense a
cup, pot or mug of coffee when the front panel is in
the raised position.
The corresponding keys are disabled. On sliding the
front panel back to the fully down position, the keys
are enabled again.
88
Page 18
7.5 Selection of quantity of coffee for storage
Due to the design of the machine, a quantity for storage has
to be selected before coffee can be brewed and dispensed.
The brewer unit in the WMF combiNation F allows brew
quantities of 1 and 2 litres of coffee to be prepared. One or
more brews are carried out until the urn contains the desired
quantity.
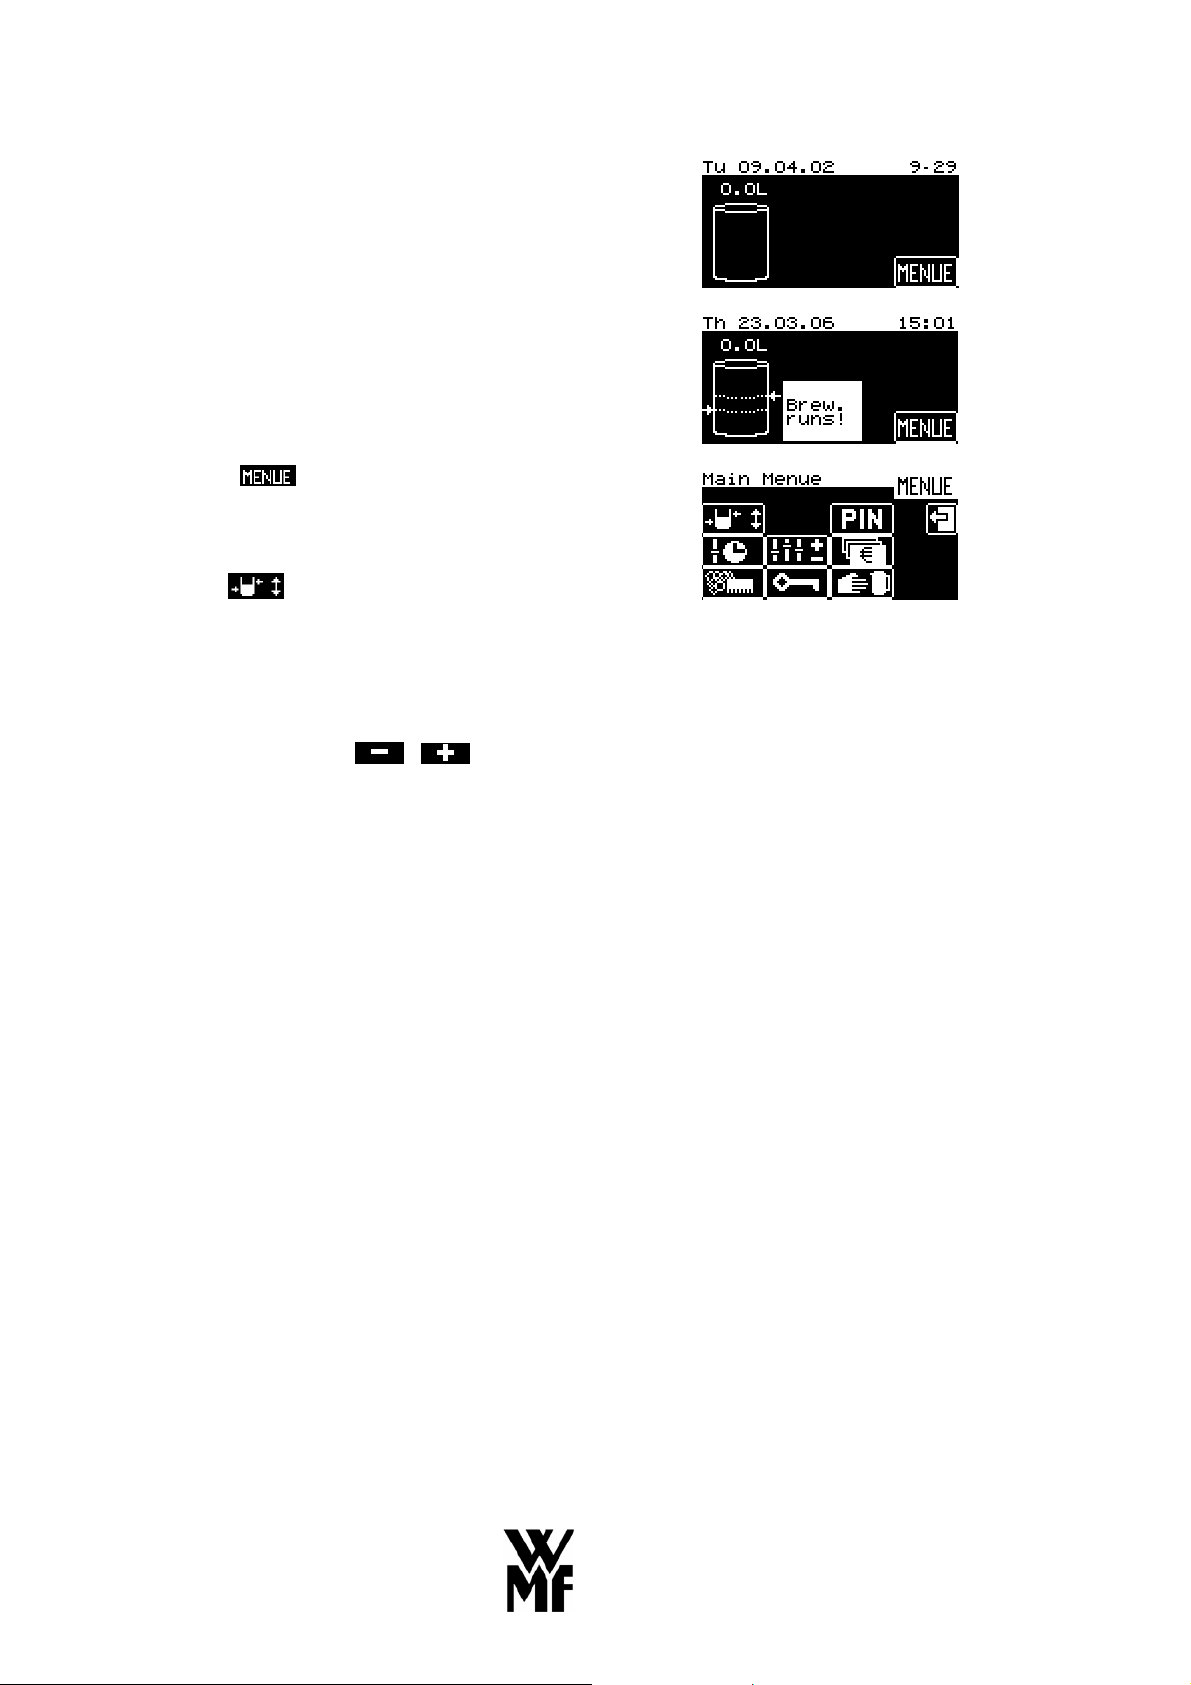
The following actions are shown on the display:
Storage urn emptying
Storage urn flushing taking place
Brewing taking place (see display on the right)
By pressing the
level, where there is a selection menu. The following display
appears:
Now press the soft key to select a quantity of coffee to
be prepared.
You can also go directly into the quantity of coffee selection
by pressing on the storage urn.
The following quantity preselections are available and can
be selected by means of the soft keys:
soft key you can access a second
89
Page 19

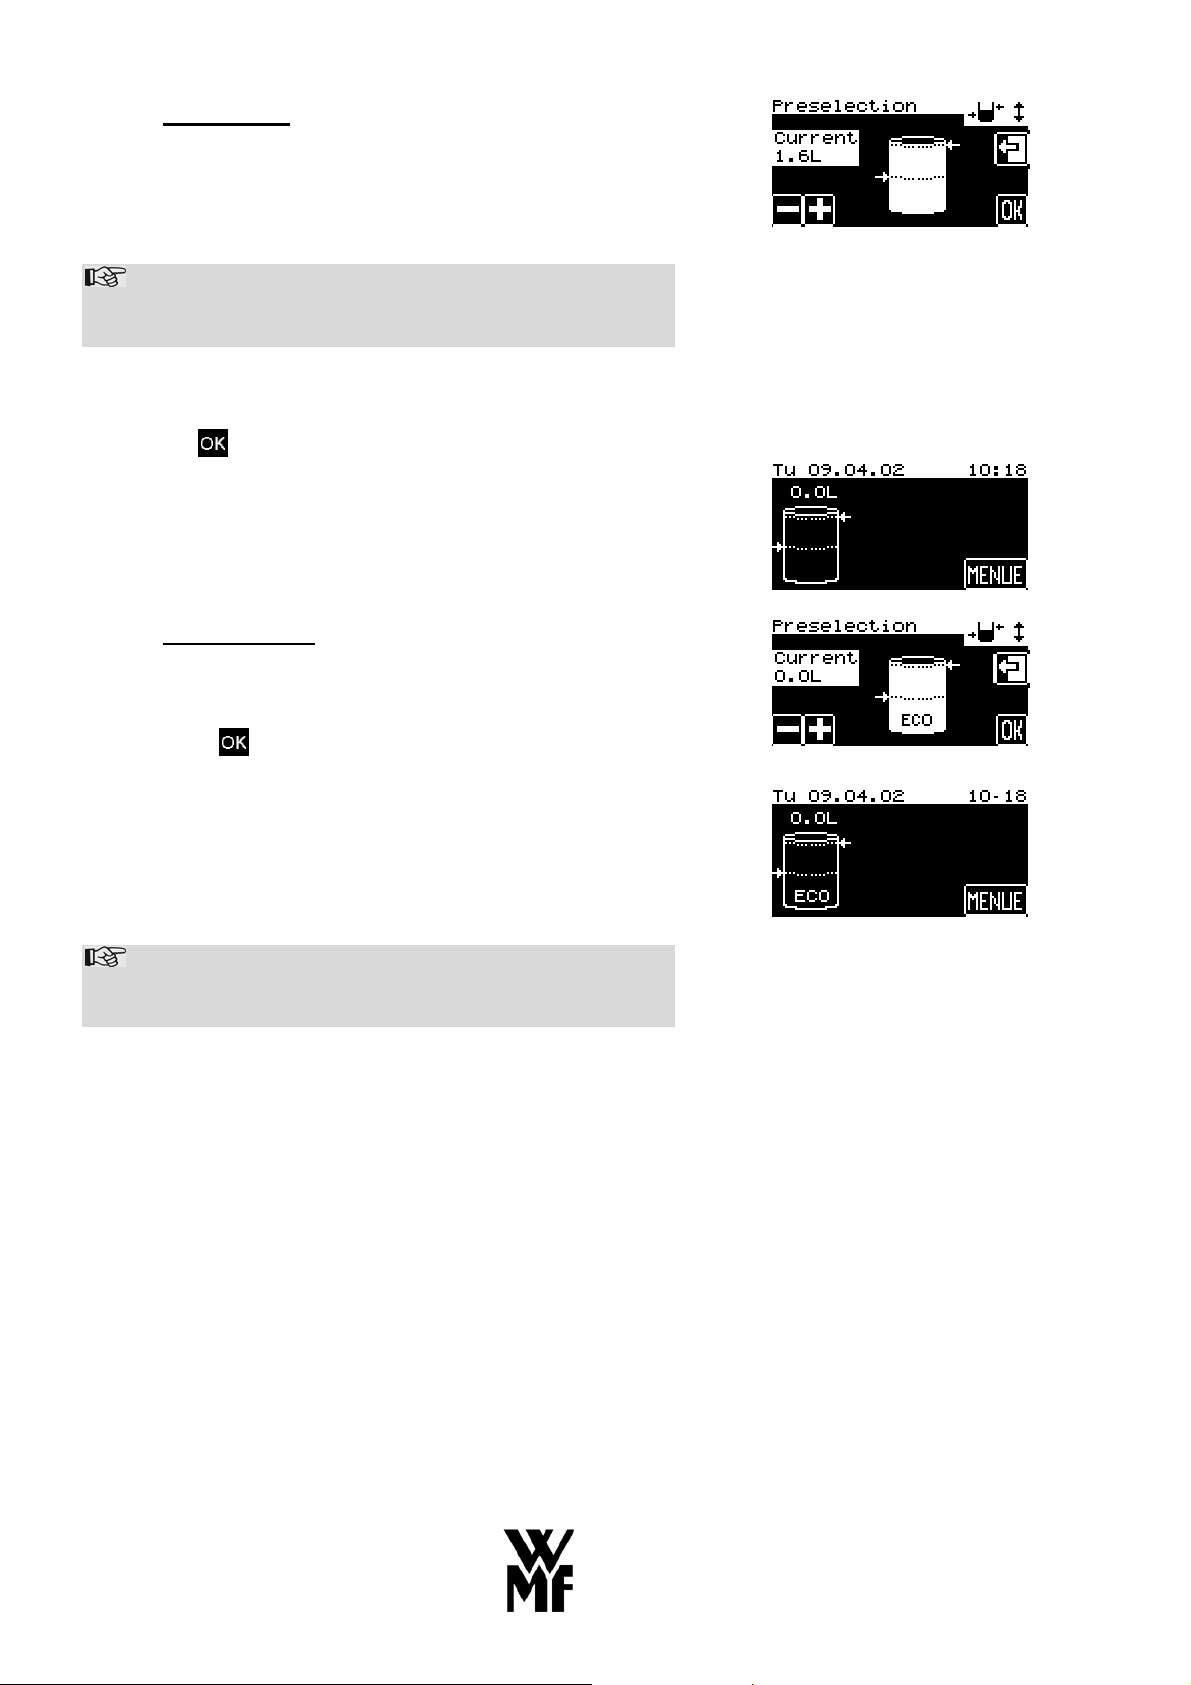
7.5.1 Automatic quantity control
There is a choice of 3 alternatives:
Half full,
Full (economy) and
Full (power)
- Half full
Two litres of coffee are transferred to the storage urn
to begin with. If the coffee level in the urn falls
below 1.5 litres, the WMF combiNation F starts
automatic refill brewing of fresh coffee (1 litre).
Should the coffee level fall below 1.0 litre, coffee
dispensing is disabled. No more coffee will be
dispensed until refill brewing of fresh coffee has
taken place.
Press
to confirm your selection.
If you choose “Half full” as the quantity preselection,
instead of the empty storage urn, the display shows:
If coffee has already been brewed into the storage urn, the
display shows the current level in the urn. In this example,
the urn contains 1.6 litres of coffee:
Note:
The display of the actual contents of the storage urn
has a display tolerance of up to 0.3 litres.
The quantity of coffee currently stored in the urn is
displayed in litres in every quantity preselection stage
(except for coffee machines in self-service operation mode,
see chapter 8.3.5 on page 101).
90
Page 20
- Full (power)
Four litres of coffee are transferred to the storage
urn to begin with. If the coffee level in the urn falls
below 2.1 litres, the WMF combiNation F starts
automatic refill brewing of fresh coffee (2 litres).
Note:
Should the coffee level fall below 1.0 litre, coffee
dispensing is disabled.
No more coffee will be dispensed until refill brewing
of fresh coffee has taken place.
Press . to confirm your selection.
If you choose “Full (power)” as the quantity
preselection, instead of the empty storage urn, the
display shows:
- Full - economy
This is the same version (see “Full power”) with a
lower hourly output and more economical use of the
ground coffee.
Press
If you choose “Full - economy” as the quantity
preselection, instead of the empty storage urn, the
display shows:
. to confirm your selection.
Note:
Coffee dispensing is briefly disabled during refill
brewing.
91
Page 21

7.5.2 Manual quantity control
- 1 litre manual
One litre of coffee is transferred to the storage urn to
begin with. If the coffee level in the urn falls below
0.5 litres, coffee dispensing is disabled. Automatic
refill brewing does not take place. In other words,
each brew has to be started.
Note:
Coffee dispensing is disabled during brewing. The
rest of the coffee can then be removed manually (see
chapter 8.6 on page 106).
Press . to confirm your selection.
If you choose “1 litre manual” as the quantity
preselection, instead of the empty storage urn, the
display shows:
- High-speed brewing
service team)
Brewing of the maximum possible quantity can be
activated manually via the display, if required. This
setting is activated until touching the soft key again.
Important: the quantity preselection must be preset to
an automatic setting. Brewing will start again
automatically just as soon as at least 1 litre of coffee
can be removed.
- Stand-by (zero litres)
This setting should be selected if you want to empty
the storage urn completely and no refill brewing is
required.
Coffee stored in the urn is dispensed until
dispensing is disabled on reaching 0.5 litres.
Press
If you choose “Stand-by (zero litres)” as the quantity
preselection, instead of the empty storage urn, the
display shows:
to confirm your selection.
(adjustments to be made by the
92
Page 22

7.5.3 Quantity control using the timer
You can program different quantities for brewing and
storage at different times as required, by using the Timer
function in the machine selection menu. Times are
assigned to the day of the week and are not controlled by
the date.
For the settings, refer to chapter 10 on page 120.
7.6 Coffee dispensing (cup/mug/pot/jug)
Once the ground coffee hopper has been filled (see chapter
7.2 on page 86), the desired storage quantity has been
selected (see chapter 7.5 on page 89) and a brew has
already taken place and the coffee is in the storage urn 2,
the machine is operational and coffee can be dispensed by
pressing a beverage key. The display shows the empty
storage urn or the symbol for the storage quantity you have
selected (see chapter 7.5 on page 89):
If there is no coffee in the storage urn 2 but, the following
message is displayed:
Caution!
There is a danger of burning and scalding
in the area of the coffee spout 6.
93
Page 23

Example: Dispensing a cup of coffee
1. Place a cup under the coffee spout 6.
2. Press the beverage key labelled Cup on the control
panel 5.
3. While dispensing is taking place, the green LED
(key ring) for the beverage key you have pressed
flashes. The other key lights (rings) are
extinguished.
4. When the dispensing process has been completed,
the machine is ready again for dispensing.
Each cup, mug, pot or jug of coffee is dispensed from the
storage urn.
7.7 Coffee and hot water dispensing
When the machine is operational, coffee or hot water can
be dispensed by pressing one of the beverage keys 13 or
the hot water key 10.
Caution!
There is a danger of burning and scalding in the
area of the coffee spout 6 and the hot water spout 11.
Coffee or hot water can be dispensed in three different
ways via the coffee spout 6 and the hot water spout 11:
4. Measured dispensing
Press one of the beverage keys 13 or the hot water key
10 to start dispensing coffee or hot water. Dispensing
stops automatically when a pre-defined quantity has
been dispensed (see chapter 8.3.1 on page 98).
5. Start-Stop function
Press one of the beverage keys 13 or the hot water key
10 to start dispensing coffee or hot water. Press again to
stop.
13
6
10
11
6. Free flow
Coffee or hot water dispensing continues as long as the
beverage key 13 or the hot water key 10 is pressed.
Your WMF customer service engineer will set your
preferred alternative for you as required.
94
Page 24

7.8 Switching off the machine
Important!
Daily cleaning must be carried out before switching
off the machine (see chapter 11.1, Cleaning the
machine, on page 135).
7.8.1 Switching off manually
Turn the key switch 9 to position “0” (Off).
Important!
After switching off the machine, the main shutoff
valve on the water inlet must be closed and the main
power switch to which the machine is connected
must be switched off.
7.8.2 Switching off via the timer
The coffee machine can be switched off automatically via
the Timer function in the machine selection menu. Times
are assigned to the day of the week and are not controlled
by the date.
For the settings, refer to chapter 10 Timer functions on
page 120.
7.8.3 Switching off via display (adjustments to be made by the service team)
The coffee machine can be switched off via display by
pressing the
key must be pressed for at least 1.5 sec.
If you have allocated access authorisations (PIN numbers)
(see chapter 8.4 on page 103) you will be asked for your
PIN number after pressing the soft key . Required
authorisation: cleaning.
soft key in the main menue. The soft
9
8 User guide
The machine user guide is provided in the form of a touch
screen display 4. When the machine is ready for operation,
the following display is shown, or the display for the
storage setting selected (in this example, the “Half full
setting” with 1.8 litres of coffee in the storage urn):
95
Page 25

However this does not apply to your coffee machine in
self-service mode. In this case, instead of the storage urn,
the display shows a large cup (see chapter 8.3.5 on
page 101).
Pressing on the blank area of the display will produce the
additional symbol
information about the machine, etc.
The symbol additionally appears if a malfunction has
occurred.
Pressing the
where a selection menu is available. If you have allocated
access authorisations (PIN numbers) (see chapter 8.4 on
page 103), on pressing the soft key you will be asked
for your PIN number. Key in your PIN number. When the
correct PIN number is entered, the selection menu is
displayed.
This selection menu allows you to set or alter various
settings, depending on your access authorisations. The
individual menu items are explained step by step in the
following chapters:
Quantity storage (see chapter 7.5 on page 89 )
, which can be used to call up user
soft key takes you into a second level,
Cleaning (see chapter 11 on page 134)
Managing access rights (PIN number) (see chapter 8.4 on page 103)
Settings (see chapter 8.3 on page 98 )
Allocation of access authorisations (PIN code) (see chapter 8.4 on page 103)
Unit number accounting (see chapter 8.5 on page 106)
Manual dispensing (see chapter 8.6 on page 106)
Timer functions (see chapter 10 on page 120)
8.1 General symbols
For general menu control, the following symbols are used
with the following meanings:
Confirm or start a step or
store settings
96
Page 26

Back to a previous menu level or
quit without saving (exit)
Context-sensitive help or additional information
Clear symbol
Increase or reduce settings
Go to beginning or end of list
Scroll up or down one page of list
Scroll back or forwards through dialogues with several
pages
8.2 Info
Push the soft key on the display “Ready to operate“ to call
up
the menu Information.
The main menu Information offers the following
selection options:
Service
• Service centre
• Next servicing date
• Software version
Costumer Care
• Journal
Journal on the last cleaning operation
• Info. about cleaning
Info. about the last cleaning
• Info. about descaling
Info. about the last/next descaling
• Info. about the water softener (optional)
Info about the remaining operating life
Brewtime
• Brewtime of the last beverage delivered or last
brewing
Journal
• Directory of recorded errors and messages
(for providing support by telephone)
Timer
• Info about status of timer (On/Off)
• Info about next switching time.
97
Page 27

8.3 Settings
The machine is ready for operation and the following
display is shown, or the display for the storage setting
selected:
By pressing the
level, where there is a selection menu in which settings can
soft key you can access a second
be made.
If you would like to change the settings for your coffee
beverages, press the
soft key in the selection menu.
In the menu that follows, you are asked to choose whether
you want to alter beverage settings, machine settings, the
First run up, timer program, the date/time or the contrast.
8.3.1 Setting quantities
To alter the quantity of coffee or hot water for your
beverages, in the “Settings” menu:
Start by pressing the Beverages soft key.
The following display appears:
Now select the beverage key 13 on the control panel 5 for
the beverage that you would like to change.
You are now in the setting mode for the beverage selected
(in this example, cup of coffee). You can now alter the
quantity of coffee or hot water.
Press the
soft key to alter the quantity.
98
Page 28

The following display appears:
Press the
from the current setting. The change is displayed both
graphically and as a percentage.
By pressing the
can activate test dispensing to check the selected setting.
The following display appears:
Press the cup coffee soft key to start test dispensing.
If there is no coffee in the storage urn, the following
message is displayed:
Press the soft key to accept the new settings, or press
or soft keys to alter the quantity starting
soft key at any time during setting, you
to quit the setting menu without accepting the changes.
Press the
8.3.2 Beverage selection
To set or alter beverage allocation to a beverage key on the
control panel, press the Beverage soft key.
The following display appears. This list contains standard
beverage settings, which you can allocate to the individual
beverage keys.
Important note:
When you alter the beverage selection, the
If you only want to alter the settings for a beverage
soft key to scroll to the next settings page.
individual settings are overwritten by the default
values for the beverage selected (factory settings).
key that has already been allocated, skip this setting
step.
99
Page 29

If you want to allocate a new beverage name to a beverage
key on the control panel, press the description of your
desired beverage on the list soft key.
In the example shown here, the beverage selected was
“Cup coffee”. Press to quit the setting menu without
accepting the changes.
8.3.3 Quantity of ground coffee
To alter the quantity of ground coffee for your beverages,
in the “Settings” menu:
Start by pressing the Machine soft key.
The following display appears:
Press the Coffeepowder soft key. The following display
appears:
Next, select the brewing quantity for which you wish to set
the quantity of ground coffee, for example 1 Litre .
Settings can be made for the following brewing batches:
1 litre for the setting Half-full and Manual 1 litre
2 litres ECO for the setting Full ECO
2 litres for the setting Full
The following display appears:
Press the
ground coffee, starting from the current setting. The change
is displayed both graphically and as a percentage. It is only
possible to make small changes to quantities. Bigger
changes can only be made by WMF customer service.
8.3.4 Boiler temperature
To alter the boiler temperature, in the “Settings / machine”
menu:
Start by pressing the Temperature soft key.
or soft keys to alter the quantity of
100
Page 30

The following display appears:
Press the
temperature, starting from the current setting. The change
is displayed both graphically and as a percentage.
Maximum deviations of approx. + 2% / - 3% can be set.
Bigger changes can only be made by WMF customer
service.
8.3.5 Mode (self-service)
To change the mode of operation of your coffee machine,
in the “Settings / machine” menu:
Start by pressing the OperatingMode soft key.
The following display appears:
If you would like to operate your coffee machine as a selfservice machine, press the SelfServ.Mode soft key.
If we want the coffee machine to run in self-service mode
but still have the storage urn with its contents shown, press
on soft key SS+StC Display. Note: Settings can then no
longer be altered by pressing in the storage urn. Changes in
this case must be made via the selection menu and storage
stages.
In the following display, you are asked to press
confirm your choice.
or soft keys to alter the boiler
to
In self-service mode, the following display then appears
immediately, in place of the empty storage urn:
8.3.6 Setting the date and time
The machine is ready for operation and the following
display is shown, or the display for the storage setting
selected:
By pressing the
level, where there is a selection menu. Here you can set
the date and time.
soft key, you can access a second
101
Page 31

If you have allocated access authorisations (PIN numbers)
(see chapter 8.4 on page 103), on pressing the
key you will be asked for your PIN number. Key in your
PIN number. When the correct PIN number is entered, the
selection menu is displayed.
To alter the date and time shown in the display, press the
soft key in the selection menu.
To alter the date and time, in the “Settings” menu:
Start by pressing the Time / Date soft key.
In this menu, you can now alter the date (day, month, year,
day of the week) and the time (hour, minute) individually
by pressing the
or soft keys as appropriate.
soft
Then press the
press
to quit the menu without accepting the changes.
soft key to confirm the new settings, or
102
Page 32

8.4 Access authorisations (PIN code)
8.4.1 System of access authorisations
The access authorisation system featured in the
WMF combiNation F restricts access to the selection
menu, if desired. There are 3 levels of access
authorisations:
Level 1 Cleaning
Setting the quantity of coffee to be stored,
switching on / off via display and cleaning .
The corresponding soft keys are available in the
selection menu. The soft key is additionally
displayed. This allows access rights to be
extended by keying in the corresponding PIN
number.
Level 2 Setting
Beverage settings , machine settings
and setting the date/time . The
corresponding soft keys are available in the
selection menu. The soft key is additionally
displayed. This allows access rights to be
extended by keying in the corresponding PIN
number.
Level 3 Accounting
Access authorisations (PIN numbers) , unit
number accounting and manual dispensing
. The corresponding soft keys are available
in the selection menu. The soft key is
additionally displayed. This allows access rights
to be extended by keying in the corresponding
PIN number.
You can allocate your own PIN numbers for levels 1 to 3
(Cleaning, Setting, Accounting). The PIN numbers are
hierarchical in structure. The PIN number for level 2, for
instance, can also be valid for level 1, but not for level 3
(see chapter 8.4.2 on page 104).
103
Page 33

8.4.2 Changing access authorisations (PIN numbers)
The machine is ready for operation and the following
display is shown, or the display for the storage setting
selected:
Pressing the soft key takes you to a second level,
where a selection menu allows you to change the access
authorisations (PIN numbers).
If you have already allocated access authorisations (PIN
numbers), on pressing the
for your PIN number. Key in your PIN number. When the
correct PIN number is entered, the selection menu is
displayed. If access authorisations (PIN numbers) has not
been allocated, the request for the PIN number is skipped
and you enter the selection menu straight away.
If you are authorised to alter or manage the access
authorisations (PIN numbers), the following selection
menu will appear, including the
not have that authorisation, the soft key will not
appear.
On pressing the
appears, showing the PIN numbers currently set for levels
1 to 3 (Cleaning, Setting, Accounting). In the example
shown here, the number is 0000 in each case.
You can allocate your own PIN numbers for levels 1 to 3
(Cleaning, Setting, Accounting). If you wish to change
the PIN number for level 1, press the Cleaning soft key in
the access control menu. The following display will appear,
in which you can key in the new PIN number. The number
keyed in will be displayed in clear. You can correct the
captured number, one digit at a time, by pressing the
soft key, the access control menu
soft key you will be asked
soft key. If you do
soft key. Then press the
settings, or press
the changes.
104
soft key to accept the new
to quit the menu without accepting
Page 34

For example, if you have chosen the PIN number 1234 for
level 1 Cleaning the following display will appear if no
PIN number has been allocated yet for the higher levels 2
and 3. The PIN number for the lower levels is therefore
used for the higher levels. In the example shown here, the
PIN number 1234 has also been used for level 2 Setting
and level 3 Accounting .
If the PIN number for one level is cleared by keying in the
PIN number 0000, the PIN numbers for the lower levels
will also be cleared. If the PIN number 0000 is allocated,
no PIN number is requested for the corresponding level and
access is unrestricted (as a rule, level 1 Cleaning).
If you wish to change the PIN number for level 2, press the
Setting soft key in the access control menu. The
following display will appear, in which you can key in the
new PIN number. The number keyed in will be displayed
in clear. You can correct the number entered, one digit at a
time, by pressing the
accept the new settings, or press
without accepting the changes.
For example, if the PIN number 9876 has been chosen for
level 2 Setting the following display will appear if no
PIN number has been allocated yet for the higher level 3.
If you wish to change the PIN number for level 3, press the
Accounting soft key in the access control menu. The
following display will appear, in which you can key in the
new PIN number. The number keyed in will be displayed
in clear. You can correct the number entered, one digit at a
time, by pressing the
key to accept the new settings, or press
menu without accepting the changes.
For example, you can select the PIN number 7777
for level 3 Accounting.
soft key. Press the soft key to
to quit the menu
soft key. Then press the soft
to quit the
105
Page 35

8.5 Unit number accounting
In order to read off the unit numbers dispensed for each
beverage, press the
soft key in the selection menu.
The following display appears:
You have the choice of reading off the daily counter.
In this display, you can now select the beverage for which
you wish to read off the daily counter. For example, press
the Cup Urn1 soft key.
The following display appears, showing the precise number
of cups of coffee dispensed that day (in this example, 4
cups of coffee):
To reset the daily counter to zero, press the
soft key.
You can also reset all daily counter to zero by pressing the
soft key in the general overview.
You can otherwise leave the menu with the
key
without having deleted the counter for all beverages.
8.6 Manual dispensing
Note:
If your WMF combiNation F does not have a
height-adjustable front panel (optional), it is still
possible to fill a jug of coffee, by using the manual
dispensing mode. To do this, push the coffee spout
cover up out of the way and pull the coffee spout
down to remove it. A jug of coffee can now be
dispensed with the aid of the multi-brew spout
attachment (order no. 33 9838.3000). This does not
apply to self service machines.
106
Page 36

You can use the manual dispensing option
coffee from the storage urn in free flow mode.
Note:
The dispensed amount is not counted.
Caution!
There is a danger of burning and scalding
in the area of the coffee spout 6.
The following display appears:
Press the Start soft key to start the draining process. The
display shows you how many litres of coffee are currently
in the storage urn.
Press the Stop soft key to stop the draining process at any
time.
to dispense
When all the coffee has been drained from the storage urn,
the following display appears:
107
Page 37

8.7 Waiter accounting system
Your WMF combiNation F can be fitted with a WMF
Waiter Accounting System, in conjunction with the WMF
Multicounter or in conjunction with an accounting system
(e.g. WMF bar systems).
The coffee machine is equipped with a waiter lock 14 and
connected to the accounting unit. Beverages are released
by inserting authorised waiter keys and, if table numbers
are in use, by inputting a table number in the machine
display. Beverages dispensed for each waiter or table
number are calculated via the external accounting system.
The following modes are available:
Debit mode (waiter self-service):
The waiter inserts the authorised waiter key and, if
appropriate, enters the table number in order to
dispense beverages. If table numbers are in use, the
following display appears upon inserting the waiter
key:
The table number can now be entered in the display.
Always press OK to confirm the entry. If the table
number is already in use by another waiter, the table
will appear scored through in the display and beverage
dispensing will be disabled:
Press the C key or remove and re-insert the waiter key
to input another table number.
Details of beverages dispensed, the table number (if in
use) and waiter identification are reported to the
accounting system.
108
Page 38

Credit mode:
When working in Credit mode, a credit is indicated in
respect of beverage dispensing from the WMF coffee
machine. In other words, the waiter keys in the
beverage sale information at the till. If the WMF
coffee machine shows a credit for a beverage, the
beverage can be dispensed either freely or by inserting
the appropriate waiter key.
Note:
A credit is indicated by lighting up of the green key
ring.
8.8 Vending units
8.8.1 Coin checker / token checker
Using for the first time
The WMF combiNation F can be equipped with a coin
checker or token checker for self-service mode.
Note:
The coin checker / token checker must only be
connected and put into service by WMF Customer
Service.
Switch on your WMF coffee machine. The coin checker is
now automatically switched on. If the coffee beans hopper
or ground coffee hopper is full, then the machine is ready
for operation. However, the key lights in the individual
beverage keys are not lit. The value of the programmed
selling price first has to be inserted, before the key lights in
the beverage keys released light up and coffee can be
dispensed.
Note:
The coin checker does not give change in case of
overpayment. Coins already collected are retained.
109
Page 39

The ‘manual dispensing’ softkey in the selection menu in
the coffee machine display 4 allows the option of either
releasing all the beverages or only dispensing a single
beverage free, e.g. to dispense a jug of coffee.
Note:
For security purposes, we strongly advise
allocating an accounting PIN number to the Free
key setting or to beverage release.
(see chapter 8.4 Access authorisations on page 103)
To switch off the coin checker, press the Free key in the
display to change over to free dispensing of all beverages.
An alternative is to switch the tip switch in the attached
housing to “free drinks”.
Coins and/or tokens inserted into the coin checker (coin
slot) are collected in the lockable coin box.
The coin checker can be set to 2 different selling prices. If
the coin checker fails to operate, press the orange coin
return key. The coins or tokens can then be removed from
the coin return. If beverage dispensing is disabled, for
instance because machine cleaning is taking place, coin
acceptance is disabled. Any coins inserted drop down
through the return chute.
Note:
In the case of machine malfunction, for example if
there is no water pressure or if machine cleaning is
in progress, coin acceptance is disabled.
Note:
In the case of malfunctions which effect brewing,
such as an empty coffee beans hopper or ground
coffee hopper, coins will still be accepted but
beverage dispensing will not take place.
Note:
In this case, please follow the instructions on your
WMF coffee machine display.
Dimensions (body)
Height
Width
Depth
110
600 mm
170 mm
498 mm
Page 40

Settings
Once the coin checker has been commissioned by WMF
Customer Service, you can program your own selling
prices.
This is done as follows:
First, open the coin box and pull the coin checker housing
towards you. On the left-hand side you can now access the
dip switches, which you need in order to program the
selling prices.
1. Set the dip switches as shown for Price 1 or Price 2:
2. Press the coin return key.
3. Insert coins from the set of coins to the total value
of the selling price you want to set.
4. Press the coin return key again.
A selling price is now set. Repeat the procedure to set a
second price it required. Then set all the dip switches to
“OFF” again.
Carry out some trial sales to check the price or the prices
you have set.
Setting selling price 1
Setting selling price 2
111
Page 41

8.8.2 (Chip) card reader
The WMF combiNation F can be equipped with a card
reader for self-service mode.
The card reader is purchased by the customer and
sent to WMF for fitting. The card reader
manufacturer’s specific instructions should always
be followed.
Switch on your WMF coffee machine. The card reader is
now automatically switched on.
The ‘manual dispensing’ softkey in the selection menu in
the coffee machine display 4 allows the option of either
releasing all the beverages or only dispensing a single
beverage free, e.g. to dispense a jug of coffee.
Note:
For security purposes, we strongly advise
allocating an accounting PIN number to the Free
key setting or to beverage release.
(see chapter 8.4Access authorisations on page 103).
To switch off the card checker, press the Free key in the
display to change over to free dispensing of all beverages.
The card reader can be set up for a varying number of
selling prices (depending on the card reader model).
Note:
Depending on the card reader model, if a
malfunction occurs, the cards may not be accepted.
In this case, please follow the error messages in
your WMF coffee machine display.
Dimensions (body)
Height
Width
Depth
112
600 mm
170 mm
498 mm
Page 42

8.8.3 Coin changer
Starting up
Note:
The coin changer must only be connected and put
into service by WMF Customer Service.
The WMF combiNation Fcan be fitted with a coin changer
for self-service mode.
The attachment described here is an MEI (Mars Electronics
International) CF 7000 ®/TM coin changer with a MDB
interface.
WMF Customer Service will set up the required beverages
and beverage prices and instruct your operating personnel.
You can make changes to the beverages or beverage prices
yourself.
Note:
If faults occur that you cannot correct yourself, call
WMF Customer Service. Do not switch the
machine on again until the fault has been remedied.
Rated voltage 230 V
Dimensions
Height
Width
Depth
Weight approx. 20 kg
The ‘manual dispensing’ softkey in the selection menu in
the coffee machine display 4 allows the option of either
releasing all the beverages or only dispensing a single
beverage free, e.g. to dispense a jug of coffee.
Note:
For security purposes, we strongly advise
allocating an accounting PIN number to the Free
key setting or to beverage release.
(see chapter 8.4 Access authorisations on page 103).
If the coin changer is switched off at the On/Off switch, all
the beverages can also be dispensed free.
655 mm
190 mm
450 mm
113
Page 43

Settings
• Filling the tubes with change
Press the yellow key and the “A” key on the coin
changer and insert coins via the coin checker. The
tubes are filled up to the preset level. Once the levels
have been reached, any further coins will be rejected.
After filling up, press the “A” key to return to normal
mode.
Paying out coins /emptying tubes
On pressing the keys, one coin is paid out of the
corresponding tube each time. If you press the “A”,
“B”, “C”, “D”, “E” key for longer than three seconds,
the coins will be paid out automatically until only a
minimum (the minimum reserve) is left. This
minimum is sufficient to operate the pay-out
mechanism. To empty a tube or box, you may need to
remove the last few coins manually.
Automatic emptying to a preset level
If your coin changer is programmed for this function,
press the keys
“A”, “C”
to pay out coins until the levels in the tubes reach the
preset levels. If the number of coins already in the
tubes is the same as or less than the level, no coins will
be paid out.
Setting the selling prices
There is an input keypad in the coin changer housing.
You can use this keypad to change the following items:
Keys: Display:
PRINT /ABR
Enter number of beverages
(e.g. on the combiNation S)
1 6
ENTER Press key to confirm.
>> (only if a second machine is connected)
Beverage Editor
Bev. No. 36 >>
Beverage Editor
Bev. No. 36 >>
Beverage Editor
Bev. No. 16 >>
Beverages Slave 1
Bev. No. 08 >>
Beverage number 01
>>
114
Page 44

Enter price of beverage 1 e.g. 1.50 €
Price 9999.99 €
0 0 0 1 5 0
Press the ENTER key to save the price input.
Price 0000.00 means this beverage is dispensed free. Price
9999.99 means sales of this beverage are disabled.
If the beverage number is not known, the beverage number
can be displayed by pressing the beverage key on the vending
unit, whereby one can also change over at the same time to the
beverage key whose price should be altered.
Beverage number 02
Enter the price of Beverage 2 and press ENTER once again to
confirm. Repeat this procedure until all the prices have been
input.
Caution!
Beverage number 01
Price 0001.50 €
Price 9999.99 €
Use only the >> key to confirm the following displays.
Do not make any changes to the settings, as this could
cause the coin changer to malfunction. Any changes
must be made by WMF Customer Service only.
>>
>>
>>
>>
>>
Max. Credit
MP[0] 00.00 € >>
Max. return
MP[1] 00.00 € >>
Tube combination
MP[2] 00 >>
Token value[00]
0.00 € >>
BDV6[00] Value
00000000 >>
115
Page 45

With the vending options, only the last two
digits should be altered to your requirements.
1 0 0 1 0 0 1 0
Do not make any
changes! Changes can
lead to malfunction.
If no currency unit is
shown in the display, set
the second digit to 1.
= 1 means currency
display in € (if currency
display is set to “On”)
If an additional machine is connected
ENTER
EXIT
Note:
You can quit this procedure by pressing the “EXIT” key.
All the individual steps which you confirmed by pressing
“ENTER” will be saved.
Machine cleaning
Caution!
Turn off the power supply to the machine before cleaning
the coin changer.
Please follow the manufacturer’s cleaning instructions when
cleaning the coin changer. These instructions can be found in the
enclosed Quick Reference sheet, where all the cleaning steps are
described in detail.
= 0 means that change is given each time a product is
dispensed.
= 1 means that several products can be dispensed until
the value of the coins has been used up.
(multiple sales)
= 0 coins can be changed even without dispensing any
products.
= 1 coin changer is only active after product
dispensing.
(purchase compulsory)
Vending Options
10010010 >>
Slave Option 01
Slave mode >>
No change of money
116
Page 46

9 Specific Supplement: WMF combiNation F2
Attention!
These are supplements to the manual of the
WMF combiNation F.
The safety instructions mentioned in that manual
are also valid for the combiNation F2.
Please also consider all chapters of the manual for
the combiNation F which are not specifically
mentioned for the combiNation F2.
9.1 General description of the functions
The combiNation F2 with its two big ground coffee
hoppers, two 4 litre storage urns and two coffee spouts
substitutes a second coffee machine and makes the brewing
of a second type of filter coffee, e.g. decaffeinated coffee,
possible.
1
2
1 2 ground coffee hoppers
2 2 storage urns
117
Page 47

9.2 Technical data
Rated power * 9,3 kW 13,8 kW
Hourly output **
with starting supply
2 Storage urns
Hot water output, total
2 Ground coffee hoppers
Electricity supply*
External dimensions:
Width, machine for two types of coffee
Height with ground coffee hopper
Depth
Empty weight:
Machine for two types of coffee approx. 98 kg
Continuous sound pressure level (Lpa) ***
Heat emission
Stand-by
Full load *
Technical data subject to change without notice.
* Values quoted apply to basic version. For special versions, see rating plate.
** The hourly outputs indicated are GUIDELINES and depend, among other things, on the quantity of ground
coffee, coffee beverage, brewing temperat u r e, bre wi n g ape rt ure size, brewing pressure, water hardness and
general condition of the machine (e.g. limescale, connections, power, water, sequence, wear, etc.)
*** The A-weighte d mean sound pressu re level Lpa (slow) and Lpa (impulse) at the operator’s workplace is
below 70 dB(A) in every operating mode.
430 cups
490 cups
4,0 litres each
72 l/h 108 l/h
2,2 kg each
3/N/PE 50 Hz/400 V
700 mm
810 mm
590 mm
< 70 dB (A)
200 W
9150 W
500 cups
560 cups
200 W
13650 W
118
Page 48

9.3 Selection of storage quantity
At the combiNation F2 you can choose between four
automatic and two manual brewing programs (see chapter
7.5 Selection of storage quantity in the manual of the
WMF combiNation F on page 89).
Basically the setting and the operation of the quantity
control is the same as with the combiNation F. The only
difference is that two storage urns are shown in the display:
Characteristics:
- Brewing of two types of coffee without any problem
- Controlling of the two storage urns via the touch screen
display
- The height of the front panel can only be adjusted on
the left hand side of the coffee machine
- Dispensing of the second coffee type into jugs is only
possible with a multibrew spout which must be
connected to the normal spout
- Direct filling of containers (jugs) with a height of
maximum 198 mm with removed spout
- Mixing of the coffee types is not possible
119
Page 49

10 Timer functions
The timer in your WMF combiNation F gives you total
independence and flexibility. The timer takes over routine
tasks such as
- Switching the machine on and off
- Changes to the quantity of coffee prepared
- Starting machine cleaning cycle
- Switching over the machine to self-service mode
Up to 16 switching times each day can be programmed in.
The machine is ready for operation and the following
display is shown, or the display for the storage setting
selected:
By pressing the
empty urn symbol in the display, you can access a second
level, where there is a selection menu that contains the
Timer function.
To set the timer, or to alter previous timer settings, or to
call up information about the timer, press the
in the selection menu.
soft key or by pressing directly on the
soft key
The following display appears:
To activate the timer in your coffee machine, press the top
soft key in the display, “Timer status OFF”. Confirm the
interim question by pressing the
key in the display will change to “Timer status ON” and
the timer is now active. The machine will carry out your
preset switching times and actions. Press the “Timer status
ON” soft key again to deactivate the timer after repeated
confirmation of the interim question.
Normally, a small black clock in the display indicates that
the timer is active:
soft key. The soft
120
Page 50

10.1 Timer settings
The following timer settings are available:
- Operating times (switching the machine on and off)
- Setting different quantities of coffee to be prepared
- Carrying out automatic machine cleaning
- Switch over the machine to self-service mode
10.1.1 Setting the operating times
Press the
timer on your coffee machine.
The following display appears:
Then press the Timeradjustment soft key.
soft key in the selection menu to set the
The following display screen appears:
Press the Running Time soft key to program the
switching-on and switching-off times.
In the menu that follows you can set the day, time and the
action you want your coffee machine to carry out.
The column heading “Day” refers to the days of the week.
1 is Monday, 2 is Tuesday, and so on. 1-5 refers to
working days (Monday to Friday), 1-7 the whole week
(Monday to Sunday).
If you touch the 1 soft key, all the days of the week will
appear in the display in ordinary text, with the selected day
highlighted in white.
Now select the day for which you would like to program
the timer by touching the desired day of the week in the
display.
For example, if you choose Wednesday, the number 3 .
will appear in the display, under the column heading Day.
121
Page 51

Alternatively, you can use the Plus and Minus keys to
select the days of the week.
The time (hour/minute) can only be set by using the Plus
and Minus keys.
Note:
The timer is controlled by the date and time set on
the coffee machine. It is therefore important to
ensure that the date and time on your machine are
correctly set. (see chapter 8.3.6 on page 101).
Under the column heading “Action” you can select the
various possible settings for your coffee machine. Touch
the centre of the symbol panel to see all the options that
can be set in Operating Time mode in clear text, with the
function already selected highlighted in white:
In Operating Time mode, you can program:
- Switching-on times
- Switching-off times or
- Switching-off times followed by cleaning.
To do this, touch the setting you want.
122
Page 52

This setting then appears as a symbol in the display:
switch on
switch off
cleaning + off
Press the OK soft key to confirm your selection.
A programmed switching time can be cleared again by
pressing the C soft key (deletion visible in the indicator
--‘--).
If you use the Plus (up arrow) and Minus (down arrow)
keys in the “Action” column, after scrolling through the
setting options in Operating Time mode, you will
automatically move on to the setting options in other
modes, such as Cleaning mode (see chapter 10.1.3 on
page126), Preselection, (see chapter 10.1.2 on page 124) or
Self-service mode (see chapter 10.1.4 on page 127).
The column heading “Prg” denotes the 16 switching times
that can be set for each day. Once you have pressed the OK
soft key to confirm the desired action, all the programmed
switching times will automatically be arranged in
chronological order.
By pressing the
can access the Timer Check directly (see chapter 10.2
Timer check on page 129).
soft key in the display as a check, you
123
Page 53

10.1.2 Setting coffee quantities to be prepared
To set the timer on your coffee machine, press the
soft key in the selection menu.
The following display appears:
Then press the Timeradjustment soft key.
The following symbol appears in the display:
Press the Preselection soft key to program different
quantities of coffee to be prepared, as required.
In the following menu you can set the day, time (for an
example, see chapter 10.1.1 Setting the operating times on
page 121) and the desired action your coffee machine is to
perform.
Under the column heading “Action” you can select the
various possible settings for your coffee machine.
Touch the centre of the symbol panel to see all the options
that can be set in Preselection mode in clear text, with the
function already selected highlighted in white:
In Preselection mode, you can program the storage urn for:
- Empty
- Half full
- Full (economy)
- Full (power)
Use the arrow keys to move to page 2 (Full).
Touch the setting you want to select.
124
Page 54

This setting then appears as a symbol in the display:
empty
half full
full Eco
full
Press the OK soft key each time to confirm your choice.
A programmed switching time can be cleared again by
pressing the C soft key (deletion visible in the indicator
--‘--).
If you use the Plus (up arrow) and Minus (down arrow)
keys in the “Action” column, after scrolling through the
setting options in Preselection mode, you will
automatically move on to the setting options in other
modes, such as Cleaning mode (see chapter 10.1.3 on page
126), Operating time (see chapter 10.1.1 on page 121) or
Self-service mode (see chapter 10.1.4 on page 127).
The column heading “Prg” denotes the 16 switching times
that can be set for each day. Once you have pressed the OK
soft key to confirm the desired action, all the programmed
switching times will automatically be arranged in
chronological order.
By pressing the
can access the Timer Check directly (see chapter 10.2
Timer check on page 129).
soft key in the display as a check, you
125
Page 55

10.1.3 Setting the machine cleaning times
To set the timer on your coffee machine, press the
soft key in the selection menu.
The following display appears:
Then press the Timeradjustment soft key.
The following symbol appears in the display:
Press the cleaning soft key to program automatic cleaning
of your coffee machine.
In the following menu you can set the day, time (for an
example, see chapter 10.1.1 Setting the operating times on
page 121) and the desired action your coffee machine is to
perform.
Under the column heading “Action” you can select the
various possible settings for your coffee machine.
Touch the centre of the symbol panel to see all the options
that can be set in Cleaning mode in clear text, with the
function already selected highlighted in white:
Cleaning mode, you can only program:
- Clean machine without switching off.
To do this, touch the w /o Switching off soft key.
If you want to switch off the machine automatically after
cleaning, you can program this in Operating Time mode.
In that mode, there is a cleaning + off soft key (see
chapter 10.1.1 Setting the operating times on page 121).
Always ensure that the front panel pushed downwards to
clean the machine otherwise the cleaning process will not
start automatically. Always place the protective panel
provided (cleaning adapter) in front of the spouts before
starting cleaning.
126
Page 56

Your chosen setting then appears as a symbol in the
display:
W / o Switching off
Press the OK soft key to confirm your choice.
A programmed switching time can be cleared again by
pressing the C soft key. (deletion visible in the indicator
--‘--).
If you use the Plus (up arrow) and Minus (down arrow)
keys in the “Action” column, after scrolling through the
setting options in Cleaning mode, you will automatically
move on to the setting options in other modes, such as
Preselection mode (see chapter 10.1.2 on page 124),
Operating Time mode (see chapter 10.1.1 on page 121) or
Self-service mode (see chapter 10.1.4 on page 127).
The column heading “Prg” denotes the 16 switching times
that can be set for each day. Once you have pressed the OK
soft key to confirm the desired action, all the programmed
switching times will automatically be arranged in
chronological order.
By pressing the soft key in the display as a check, you
can access the Timer Check directly (see chapter 10.2
Timer check on page 129).
10.1.4 Setting switch-over to self-service mode
To set the timer on your coffee machine, press the
soft key in the selection menu.
The following display appears:
Then press the Timeradjustment soft key.
127
Page 57

The following symbol appears in the display:
Use the arrow keys to move on to the second page at this
level.
Press the SelfService Mod soft key to program automatic
switching on and switching off of your coffee machine in
self-service mode.
In the following menu you can set the day, time (for an
example, see chapter 10.1.1 Setting the operating times on
page 121) and the desired action your coffee machine is to
perform.
Under the column heading “Action” you can select the
various possible settings.
Touch the centre of the symbol panel to see all the options
that can be set in Self-service mode in clear text,
with the function already selected highlighted in white:
In Self-service mode, you can program the self-service
options:
- Switch on or
- Switch off.
To do this, touch the setting you want.
That setting then appears as a symbol in the display:
SelfServ.Mode off
SelfServ.Mode on
Press the OK soft key to confirm your choice.
A programmed switching time can be cleared again by
pressing the C soft key (deletion visible in the indicator
--‘--).
128
Page 58

If you use the Plus (up arrow) and Minus (down arrow)
keys in the “Action” column, after scrolling through the
setting options in Self-service mode, you will automatically
move on to the setting options in other modes, such as
Preselection mode (see chapter 10.1.2 on page 124),
Operating Time (see chapter 10.1.1 on page 121) or
Cleaning mode (see chapter 10.1.3 on page 126).
The column heading “Prg” denotes the 16 switching times
that can be set for each day. Once you have pressed the OK
soft key to confirm the desired action, all the programmed
switching times will automatically be sorted in
chronological order.
By pressing the
can access the Timer Check directly (see chapter 10.2
Timer check on page 129).
10.2 Timer check
To check your programmed switching times in the Timer
Check, press the
soft key in the display as a check, you
soft key in the selection menu.
The following display appears:
Then press the TimerTable soft key.
You can now display the preset operating times or your
programmed preselection settings in the timer check.
129
Page 59

On pressing the Running time soft key, the following
display appears:
You can now select for example, from Mondays to Fridays
(1-5) the machine switches on automatically at 07:00 and
switches off again automatically at 20:00, after carrying out
cleaning. On Saturdays, the machine is operational from
08:00 to 16:00 and on Sundays, from 09:00 to 18:00.
Cleaning is carried out at the end of each day.
On pressing the Preselection soft key, the following
display appears:
You can now select for example, different quantity
preselections programmed for Monday to Friday
(days 1-5). The thickness of the white bar indicates the
level in the storage urn, according to the preselection
chosen. For example, you can select the preselection for a
higher setting between 14:00 and 16:00 each day.
130
Page 60

10.3 Making changes to the timer
10.3.1 Copying the timer
Once a full day’s sequence has been set up, it can easily be
copied to other days. Start from the timer setting mode.
Note:
The Copy function can be accessed from any setting
mode (Operating Time, Preselection, Cleaning or
Self-service mode). In each case, the complete day
is copied, with all the actions set, etc.
Under the column heading “Day”, press the
symbol panel (in this case 1 for example) to access day of
the week selection.
Then use the arrow keys to scroll to page four, and touch
the Copy Day soft key.
Now select the day you would like to copy to other days.
For instance, you have already programmed Monday and
now want to transfer your settings to Thursday.
Start by pressing the Monday soft key.
The day to be copied will now be stored while you carry
out copying. This is shown in the display as follows:
131
Page 61

Next, select the Insert Day option and select the day to
which you want to copy your Monday settings.
In our example, that day is Tuesday.
Touch the Tuesday soft key in the display.
The day you have copied will now be pasted.
All the switching times programmed for Monday have now
been copied to Tuesday, and will immediately apply to
Tuesdays as well. You can also store other days at the same
time. Simply press on the soft key “Add day” and select
further weekdays; the reference day copied over at the
beginning remains in the memory.
10.3.2 Clearing the timer
To clear the switching times for individual days or to clear
the whole timer, in Timer mode use the arrow keys to
scroll to the second page and press the Delete Timer soft
key on that page.
Now select the day to be cleared and touch the appropriate
day of the week in the display:
As a safeguard, you are asked to confirm that you really
want to clear the day selected.
If so, press OK to confirm.
Once cleared, the settings can no longer be recovered.
132
Page 62

10.4 Timer information
The Timer Information function provides information
about the next timer action which is due to be carried out.
In Timer mode, scroll to page two and press the
Timer info soft key.
The machine timer is switched on. The next action that the
timer is due to carry out is to set the preselection to half full
at 16:00.
133
Page 63

11 Care of the machine
Daily cleaning of the coffee machine is very important in
order to ensure correct operation of the machine and
optimum coffee quality. Accordingly, 26 hours after
switching on the machine, a message will appear in the
display 4 reminding you to carry out daily cleaning.
To ensure the cleaning program is carried out, after a
further 24 hours the machine will automatically halt
beverage dispensing if the cleaning program has not yet
been run.
In this case, the cleaning program must be run in order to
operate the machine again.
If the machine is switched off without cleaning after
brewing and if more than 26 hours have elapsed since it
was last cleaned when it is switched on again, then the
machine will remain blocked after warming up.
The cleaning program must be run before the machine can
be operated again.
Caution!
There is a danger of scalding and burning in the area of the
coffee spout 6 and the hot water spout 11, in particular
when the front panel is in the raised position and when the
coffee spout 6 has been removed.
Caution! Health hazard!
Follow the precautions on the pack when using the
cleaning beverage. The cleaner is corrosive. Cleaning fluid
flows out of the coffee spout 6 while cleaning is taking
place. The cleaning adapters must be fitted. Take care not
to leave jugs or cups underneath the coffee spout while
cleaning is in progress.
Wait until prompted by the display before placing cleaner
granulate in the manual input.
134
Page 64

11.1 Cleaning the machine
To clean the machine, start by sliding the front panel 12
down.
Always make sure the front panel is in the lowered position
when cleaning the machine, as otherwise the cleaning
process will not start.
Important!
Always fit the housings provided (cleaning
adapters) over the spouts before starting cleaning.
Never reach under the spouts while cleaning is in
progress.
There is a danger of burning and scalding.
11.1.1 Fully automatic cleaning
(using automatic granulate cleaning)
To fill the granulate cleaning reservoir 3 remove the lid and
fill the reservoir with cleaning granulate (order no.
33.2118.6000). Then replace the lid to close the granulate
reservoir.
12
3
The machine is ready for operation and the following
display is shown, or the display for the storage setting
selected:
Press the
selection menu allows you to run the cleaning program.
soft key to enter a second level, where a
135
Page 65

If you have allocated access authorisations (PIN numbers)
(see chapter 8.4 on page 103), on pressing the
key you will be asked for your PIN number. Key in your
PIN number. When the correct PIN number is entered, the
selection menu is displayed.
If you wish to run the machine cleaning program, press the
soft key in the selection menu.
The following display appears:
Select the Machine soft key in order to clean the machine.
Note:
Always ensure the granulate cleaning reservoir 3 is
full. Only WMF special cleaning granulate should be
used (order no. 33.2118.6000). Take care not to
overfill the reservoir 3, however, as this can block
the granulate meter.
Press the SwitchingOff soft key or the no SwitchingOff
soft key to choose whether the machine is to return to
“ready” mode after cleaning, or to be switched off
automatically after cleaning – in this case, press
SwitchingOff.
After selecting the cleaning mode, you will be asked again
to confirm that you wish to clean the machine. Press the
soft
soft key to confirm your choice, or press
selection without carrying out cleaning.
Any remaining coffee will then be drained from the storage
urn automatically during cleaning.
The following display will appear:
If your coffee machine is connected to the grouts separator
model 9011, you will now be asked to remove the grounds
catcher from the grouts separator...
136
to quit the
Page 66

...empty it...
...clean it...
...and replace it in position.
Before cleaning starts, you will now be asked to fit the
cleaning adapters underneath the spouts.
Important!
Always fit the housings provided (cleaning
adapters) over the spouts before starting cleaning.
Never reach underneath the spouts while cleaning is
in progress.
There is a danger of burning and scalding.
Press
place. The following display appears:
The duration of the cleaning program is approximately
25 minutes. While the cleaning program is running, the
display shows the remaining cleaning time.
to confirm that you have fitted the housing in
137
Page 67

11.1.2 Semi-automatic cleaning
(via the manual input)
The machine is ready for operation and the following
display is shown, or the display for the storage setting
selected:
Press the
selection menu allows you to run the cleaning program.
If you have allocated access authorisations (PIN numbers)
(see chapter 8.4 on page 103), on pressing the
key you will be asked for your PIN number. Key in your
PIN number. When the correct PIN number is input, the
selection menu is displayed
If you wish to run the machine cleaning program, press the
soft key in the selection menu.
The following display appears:
Select the Machine soft key in order to clean the machine.
soft key to enter a second level, where a
soft
Press the SwitchingOff soft key or the no SwitchingOff
soft key to choose whether the machine is to return to
“ready” mode after cleaning, or to be switched off
automatically after cleaning – in this case, press
SwitchingOff.
After selecting the cleaning mode, you will be asked again
to confirm that you wish to clean the machine. Press the
soft key to confirm your choice, or press to quit the
selection without carrying out cleaning.
Any remaining coffee will then be drained from the storage
urn automatically during cleaning. Before cleaning starts,
you will now be asked to fit the cleaning adapters
underneath the spouts.
138
Page 68

Important!
Always fit the housings provided (cleaning
adapters) over the spouts before starting cleaning.
Never reach underneath the spouts while cleaning is
in progress!
There is a danger of burning and scalding.
After selecting the cleaning mode and confirming that you
wish to clean the machine, you will be asked to place
cleaning granulate in the manual input.
Open the input cover 8, and for a single-beverage machine
pour in one level coffee spoon (order no. 33 0742 3000), or
for a two-beverage machine two coffee spoons of WMF
special cleaning granulate and close the input cover again.
Note:
Only WMF special cleaning granulate should be
used to clean the machine.
Order no. 33 2118 6000.
It is important to follow the directions on the
cleaning granulate pack.
The duration of the cleaning program is approximately
25 minutes. While the cleaning program is running, the
display shows the remaining cleaning time.
11.2 Cleaning using the timer
The cleaning times can be programmed and automatically
switched on by using the “Timer” function in the machine
selection menu. Times are assigned to the day of the week
and are not controlled by the date.
For the settings, see chapter 10 Timer functions on page
120.
139
Page 69

12 Error messages / remedial action
Your WMF combiNation F has a built-in diagnostic
program. Any errors occurring will appear in the display 4.
The
the operator’s attention is required.
The following error messages are currently implemented:
The ground coffee hopper 1 is empty.
The following display then appears:
symbol indicates that an error has occurred or that
Refill with ground coffee (see chapter 7.2 on page 86)
and press the soft key
Refill coffee GC Hopper one and confirm.
Press
once more to confirm.
The grouts collector in the grouts separator is full.
Remove the grouts collector, empty it and replace it in
position (see chapter 11 on page 134). Press the soft
key Emptied grounds contain and confirm. If the
message is not confirmed after twenty seconds by
pressing the soft key then one can assume that the
grouts collector was not emptied. The grout contents
counter will not be deleted.
The following indicator appears in the display after
successful confirmation.
Confirm by touching on the appropriate soft key to see
whether the container was really emptied or not.
The granulate cleaning reservoir 3 is empty.
Fill up with cleaning granulate (see chapter 11.1.1 on
page 135) and press the Clean.urn empty please
refill soft key to confirm.
The following display then appears:
Press
140
once more to confirm.
Page 70

No water pressure.
Open the shutoff valve in the water inlet. No
confirmation will be requested in the display. The
message disappears automatically if there is water
pressure present for at least 10 seconds.
Service date exceeded.
Call your WMF customer service. No confirmation
will be requested in the display.
The message will be removed until the machine is
switched on again after confirmation by touching the
soft key.
Moving the panel upwards/downwards
Move the front panel upwards/downwards (a message
appears after pressing a beverage key which requires a
particular position of the front panel:
e.g. front panel lowered - beverage key “Mug” Message “Move panel upwards”
The message disappears automatically after seven
seconds.
No release of accounting
The message appears after the customer has pressed a
beverage key which is not released for use by the
accounting system.
The message disappears automatically after seven
seconds.
Not enough in storage urn
The message appears if the remaining amount in the
storage urn cannot be dispensed completely. Please
note: there must be a residual amount of at least 300
ml. in the storage urn to obtain good mixing with the
next storage urn brew.
The message disappears automatically after seven
seconds.
141
Page 71

13 WMF customer service
WMF’s comprehensive service network allows every area to be reached in a short period of time.
Our personnel are experienced experts and carry special tools and the original spare parts required
at all times, so that malfunctions can be ascertained on the spot.
Note:
Please bear in mind that this is a professional coffee machine, designed for commercial use.
Such a machine requires regular maintenance by WMF customer service.
Maintenance intervals depend on how heavily the machine is used, but maintenance should
be carried out at least once a year as a minimum.
In order to ensure regular inspection of your machine, we recommend that a regular machine
maintenance schedule be arranged with your local WMF service engineer.
14 Liability
WMF shall be liable for legitimate defects as to quality as follows:
Any beverages delivered or any services rendered showing a defect as to quality within the period
of limitation shall be, at WMF’s reasonable discretion, repaired or rendered again, if the cause of
the defect as to quality had already been present when the risk was passed.
Claims for defects as to quality are subject to a limitation period of 12 months. This period shall
start with the day when the risk is passed. The above period shall not apply in case there are longer
periods required by the German Civil Code (BGB), e.g. pursuant to § 479 Sec. 1 BGB (right of
recourse of the contractor), 438 Sec. 1 No. 2 BGB (buildings and things for buildings) and § 634a
BGB (defects of construction).
If putting the machine into operation is delayed for longer than four weeks due to reasons that are
beyond the control of WMF, the warranty period shall begin four weeks after the machine being
delivered to the customer.
The buyer shall immediately give written notice of defects as to quality to WMF. Replaced parts
shall pass into the ownership of WMF.
At first WMF shall always be given the opportunity for a subsequent performance within a
reasonable period. The buyer shall make available the rejected object to WMF.
142
Page 72

We are not liable:
- for any components that are subject to a normal wear and tear. This includes but is not
limited to gaskets and washers, ribbons, and proportioning devices;
- for defects caused by atmospheric influences, deposit of boiler scale, chemical, physical,
electro-chemical or electrical influences, unless these defects are attributed to a fault of WMF;
- if a water filter is dispensed with, although the on-site water regime requires the use of a
water filter, and this results in defects. It is pointed out to the customer in the respective
acknowledgement of order, whether the use of a water filter is required;
- for defects resulting from the failure to comply with the instructions relating to the handling,
maintenance and attendance of the device (e.g. operating and maintenance instructions of
WMF laid down in the operating manual of the respective percolator type);
- for defects resulting from the inappropriate or improper use, from the failure to use WMF
genuine spare parts or from the faulty installation by the buyer or a third party, or from a
faulty or negligent handling; and for consequences from modifications or repair works that
were made improperly and without our consent by the buyer or a third party.
Claims for damages by the buyer, irrespective of their legal grounds, particularly on account of
violations of the contractual obligation and on account of tortious acts, shall be excluded.
The above exclusion shall not apply in so far as there is a mandatory liability, e.g. in case of
giving warranties as to quality or durability, pursuant to the German Beverage Liability Act, in
cases of wilful acts, of gross negligence, of fatal injuries, of bodily injuries or injuries to health, or
in case of any violation of substantive obligations from this contract. A reversal of the burden of
proof to the disadvantage of the buyer is not implied by the above regulations.
143
Page 73

144
Page 74

 Loading...