

Page 1
33
WMF COFFEE MACHINES
Operating Instructions
WMF CAFEMAT
Series
3100/3200
Edition 4 - Printed in 04.02
Page 2

34
Congratulations on your purchase of a
WMF COFFEE MACHINE.
Its advanced technology, long service life,
economy and above all the quality of its
coffee will delight you.
Are you a person who does not like reading
operating instructions? -Please do so anyway!
You will get more pleasure from your
WMF COFFEE MACHINE and will find it
was worth it after all!
In your own interests, please follow all
safety and cautionary instructions and pay
attention to the warning labels placed on
the machine. This will help to avoid
accidents and technical malfunctions.
Never entrust the machine to anyone who
is not familiar with the operating
instructions.
Keep these operating instructions near the
machine. This will allow your operating
personnel easy access to information at any
time, and will enable them to take the
appropriate action should there be any
technical malfunctions.
Page 3

35
TABLE OF CONTENTS
1 Machine feature and components.................................................................................................... 37
2 General description........................................................................................................................... 38
3 Warnings............................................................................................................................................ 39
4 Safety instructions............................................................................................................................. 40
5 Technical data ................................................................................................................................... 41
6 Conditions for installation and operation....................................................................................... 42
7 Operation ........................................................................................................................................... 43
7.1 Starting the machine .................................................................................................................... 43
7.2 Preparation of filter coffee........................................................................................................... 43
7.2.1 Brewing with coffee dispenser.......................................................................................... 43
7.2.2 Brewing with multi-brew arm........................................................................................... 46
7.3 Hot water dispensing ................................................................................................................... 47
7.4 Hot plate ...................................................................................................................................... 47
7.5 WMF CAFEMAT with personnel accounting/ vending unit ...................................................... 48
7.5.1 One-price coin checker ..................................................................................................... 49
7.5.2 Coin changer (4 prices) ..................................................................................................... 49
8 Care of the machine .......................................................................................................................... 50
8.1 Emptying of grouts and water container...................................................................................... 50
8.2 Automatic cleaning...................................................................................................................... 51
8.3 General care................................................................................................................................. 53
9 Breakdowns ....................................................................................................................................... 54
10 Special unit: WMF CAFEMAT JET .............................................................................................. 55
10.1 Technical data.............................................................................................................................. 55
10.2 Operation ..................................................................................................................................... 56
10.3 Special features............................................................................................................................ 56
11 WMF Customer service.................................................................................................................... 57
12 Warranty claims................................................................................................................................ 58
13 WMF EC Declaration of Conformity for coffee machines............................................................ 59
Page 4

36
1
2
23
3
4
5
6
8
11
12
7
9
10
13
14
16
15
17
21
22
18
19
20
Page 5

37
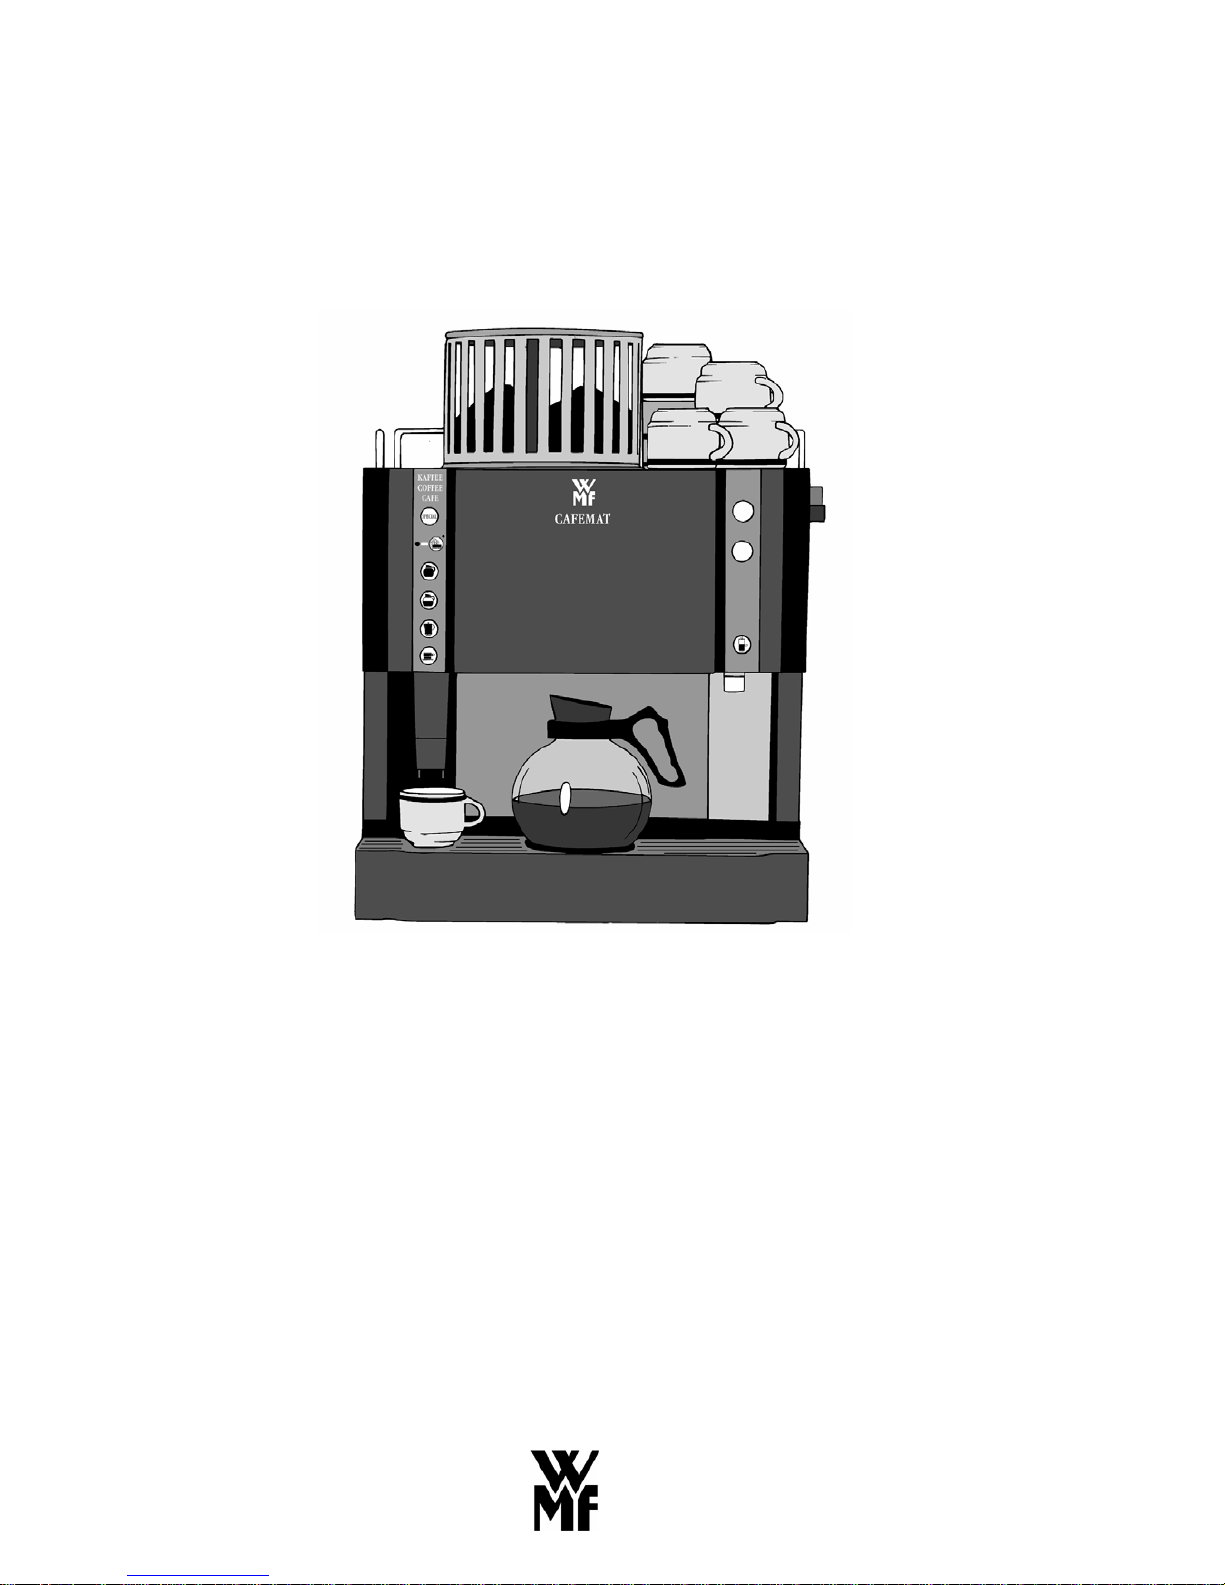
1 Machine feature and components
1
Ground coffee hopper: holds one or two types, depending on model / lockable
2
“SPECIAL” button
3
“1/1 pot” (1.6 litres) button
4
“1/2 pot” (0.8 litres) button
5
Button – “2 cups”
6
Button – “1 cup”
7
Upper machine door (access to brewer and cleaning button)
8
Lower machine door (access to grouts and water container)
9
Swivelling coffee dispenser
10
Pull-out multi-brew arm (on WMF CAFEMAT with vending unit mounted at left)
11
“ON – OFF” switch (on WMF CAFEMAT with vending unit with key switch)
12
“Hot plate” switch
13
“Hot water” button
14
Hot water dispenser
15
Drip tray
16
Hot plate
17
Drip pan (removable)
18
Locking lever
19
Cleaning button
20
Brewer
21
Water container
22
Coffee grouts container
23
Cleaning display
The following numbers appear only on illustrations in the text:
24
Jug tray
25
Release switch
26
Coin slot
27
Coin return chute
28
Coin return button
29
Control indicator “ON”
30
ON / OFF switch (inside the coin box)
31
Lockable coin box
Page 6

38
2 General description
The WMF CAFEMAT is an expert in filter coffee.
In terms of flexibility, its novel system establishes new
standards. Single cups, pots and multi-brews allow
optimum adjustment for varying requirements. Each
quantity is freshly brewed at the push of a button. A hot
plate 16 is provided if coffee has to be stored for a larger
demand or you may brew directly into a coffee urn
using multi-brew arm 10.
The brewing water is heated in a boiler system. Not only
filter coffee but also hot water may be dispensed.
The dry disposal of coffee grouts allows for flexible
locations. Drainage is not necessarily required, although
each unit is equipped with a drain.
Page 7

39
3Warnings
Maximum machine safety is an integral WMF product characteristic to which we pay particular
attention.
In spite of all our safety precautions, however, every machine is potentially hazardous if not
operated properly.
This is why – for your own safety – we have summarised the warnings below and highlighted
them in grey throughout the instruction manual.
Please also follow the “Safety instructions” on page 40.
For your own safety,
please observe the
following instructions
Connection of the machine and starting up for the first
time must only be carried out by WMF customer service
technicians
at all times :
All maintenance and repair work must only be carried
out by WMF customer service technicians or
authorized persons.
Only original parts should be used.
In no circumstances should any alteration be made to
the built-in safety devices.
Caution! Risk of scalding!
Keep away from the hot water dispenser 14 and the
coffee dispensing spouts 9 and 10 to avoid being scalded.
Caution! Risk of scorching!
Do not touch the hotplate 16 or Brewer 20 when the
machine is switched on.
Caution! Risk of crushing!
Never reach into the coffee hopper 1 or brewer 20 when
the machine is switched on.
Caution! Health hazard!
When handling the cleaner, always follow the safety
instructions on the pack. The cleaner is corrosive and
can hurt. Because cleaning fluid flows out of the coffee
dispensing spouts 9 and 10 during cleaning, place a
collection tank below the machine to collect the cleaning
fluid safely (for machines without drain connections
only). Do not use a cup or breaker, for the cleaning fluid,
it is impalatable.
Page 8

40
4 Safety instructions
General notes
1. Always ensure that the water tap is turned off when the machine is no longer in use and that the
master switch outside the machine is switched off and /or the machine unplugged from the mains
supply.
2. The built-in type-tested safety mechanism prevent any impermissible increase in pressure and
temperature in the water boiler. The machine must be switched off immediately if the relief valve
is tripped. Contact the WMF customer service department and do not switch the machine on
again until the fault has been remedied.
3. This machine is not for use out of doors. In case of freezing the machine should be drained
beforehand to prevent frost damage.
4. The machine must never be hosed down with a jet of water or steam. The surface may be cleaned
with a damp cloth or one of the products from the range of WMF care products.
5. The unit must stand safe at a ground level, on a horizontal and stable base.
Machine shutdown - holidays
1. The machine should be cleaned and the coffee grouts container emptied before it is taken out of
service for a longer period of time. It is essential that the machine be drained in order to prevent
frost damage if there is any risk of freezing temperatures. The WMF customer department should
be contacted in good time in such cases.
2. After a shutdown of several weeks, we recommend running the automatic cleaning cycle at least
twice before start-up of the unit.
Hot water boiler data – see rating plate
The hot water boiler complies with the Pressure Equipment Directive 97/23/EC - Category 1,
Module A.
The hot water boiler is subject to neither notification nor licensing. Each hot water boiler is subjected
to hydrostatic tests before delivery to the customer.
The operator of such equipment is responsible for due maintenance and verification of the safety
mechanism.
The machine complies with all the relevant regulations.
The operator is obliged to ensure that electrical plant and equipment is tested to establish that it is in
safe working order.
Page 9

41
Preventive measures to avoid consequential machine damage
Any technical devices, particularly large fully automatic machines, are a potential source of
danger when operated without supervision.
We therefore recommend that the operator takes appropriate action to prevent damage, for
instance installing a suitable water detector in the site water supply line.
If the local water has a carbonate hardness of more than 9° (German hardness), a WMF water
filter must be installed in the supply line to the machine.
Maintenance intervals depend on how heavily the machine is used and on local water conditions,
and should be fixed by agreement with your service engineer. Even in the case of light use,
maintenance should be carried out at least once a year and the water filter, if fitted, should be
replaced.
5 Technical data
Model series 3113 3133 3134
Rated power
*
3.2 kW 6.2 kW
Hourly capacity
**
Filter coffee up to 200 cups
Hot water capacity, total
24 l/h (6.3 gallons/h) 24 l/h (6.3 gallons/h) 48 l/h (12.6 gallons/h)
Ground coffee hopper
1 x 1.2 kg
(1 x 2.6 pound)
2 x 1.2 kg
(2 x 2.6 pound)
2 x 1.2 kg
(2 x 2.6 pound)
Multi-brew arm
- Pull out extension : 200 mm (7.9 inches)
Electricity supply
*
1/N/PE ~
50 / 60 Hz 230 V
1/N/PE ~
50 / 60 Hz 230 V
3/N/PE ~
50 / 60 Hz 400 V
External dimensions
Width
Height
Depth
520 mm (20.5 inches)
700 mm (27.6 inches)
550 mm (21.7 inches)
Working height
Coffee spout 70 mm (2.7 inches) 125 mm (4.9 inches) 175 mm (6.9 inches)
Multi-brew arm
480 mm (18.9 inches)
Weight (empty)
Approx. 49 kg (107 pound)
Continuous sound
pressure level (Lpa)
***
< 70 dB (A)
Subject to technical change without notice.
* See rating plate for special versions. The figures quoted refer to the basic version.
** The hourly outputs indicated are GUIDELINES and depend, among other things, on the quantity of ground
coffee, type of coffee, fineness, brewing temperature, brewing aperture size, brewing pressure, water hardness and
general condition of the machine (e.g. limescale, connections, power, water, sequence, wear, etc.)
*** The A-weighted mean sound pressure level Lpa (slow) and Lpa (impulse) at the operator’s workplace is
below 70 dB(A) in every operating mode.
Page 10

42
6 Conditions for installation and operation
The machine operator must arrange for the site preparatory work. This should be carried out by
approved contractors in accordance with general and local regulations. WMF customer service
technicians are only permitted to connect up the machine to the prepared connections. They are not
authorised to carry out plumbing or wiring work on site and will not be responsible for such work!
Rated power 3.2 kW 6.2 kW
Connecting cable, site supply
*
3 x 1.52 5 x 2.5
2
Fuse, site supply
1 x 16 A 3 x 16 A
Mains voltage tolerance
400 V + 6 % - 10 %
Power cut < 50 ms does not affect machine operation
Water supply line
TW 15 (min. DN 6 or 1/4") with main shutoff valve
and dirt filter installed by customer, 2 bar flow pressure
at 2 l/min, static pressure max. 6 bar
Water quality
If the local water has a carbonate hardness over 9° a
WMF water filter must be fitted in the supply line.
Water drain line
Hose, DN 19, minimum gradient 2 cm/m
Ambient temperature
+ 5°C to + 35°C (drain water system in case of frost)
Max. humidity
80 % rel. humidity without dewing. Do not spray
machine with water. Do not use machine out of
doors!
Installation clearance
For operating, service and safety reasons the machine
should be installed with clearance of not less than 50
mm from the back and sides from the building or nonWMF components.
A clear height of 1100 mm from the top of the
supporting surface should be ensured. The height of
the supporting surface from the floor surface should be
not less than 500 mm and not more than 670 mm.
If the machine connections are to be routed down
through the counter, remember to also allow space for
the connections. These may restrict the available space
below the machine.
Water filter installation dimensions
W x H x D
Standard: 250 x 500 x 400 mm
Jumbo: 290 x 670 x 420 mm
*
The on-site electrical system must comply with IEC 364. An e.l.c.b. switch with 30 mA rated fault current to
EN 61008 should be installed upstream of the unit for increased safety. An earthed socket outlet must be installed
near the unit for one-phase connection. A 5-pole CEE/CEKON socket outlet to EN 60309 must be installed for
three-phase connection. If the mains power cable of this unit is damaged, it must be replaced by our customer
service engineer or a similarly qualified person. If the machine is permanently connected on site, a disconnecting
device (master switch) to EN 60947 acting on all poles and with a contact gap of at least 3 mm must be installed
upstream. The disconnecting device is also recommended for flexible connection. The mains power cable must not
be allowed to come into contact with hot parts of the machine. Master switch and socket outlet are part of the on site installation. The machine must not be installed with permanent on-site connection when mounted on a trolley.
Page 11

43
7 Operation
7.1 Starting the machine
The machine should only be connected and put into
service by a WMF customer service engineer.
Initial start-up
The WMF customer service engineer will set the brewing
and hot water quantities to the required volumes and
instruct your staff accordingly.
Daily usage
Open the main fresh water tap and turn on the main
electrical switch (with three phase current). Then switch on
unit using ON/OFF switch 11. A continuous buzzer will
sound and hot water button 13 will flash to indicate that
grouts container 22 should be emptied (See page 50,
0 Care of the machine).
If the coffee grouts container 22 is already empty, simply
remove the coffee grouts container 22 for a moment and
then replace it in order to continue operation This ensures
that the coffee grouts container 22 is never overfilled.
The hot water button 13 will then flash slowly, indicating
that the warm-up phase (duration approx. 4-6 minutes) is in
progress.
During this time hot water button 13 and buttons 3, 4, 5, 6
for coffee will be locked.
7.2 Preparation of filter coffee
7.2.1 Brewing with coffee dispenser
Caution in the area of the dispenser 9.
Risk of scalding!
Caution!
Never reach into the coffee hopper 1 or the
brewer 20 when the machine is in operation!
Risk of crushing and/or scalding!
Page 12

44
One or two cups, 1/2 pot or 1/1 pot may be placed
underneath swivel coffee dispenser 9 (see Fig. 1).
Figure 1
Left coffee hopper (see Fig. 2)
When pressing buttons 6 for cup, 5 for 2 cups, 4 for 1/2 pot
or 3 for 1/1 pot (selected button will light), the left coffee
hopper will automatically be accessed and coffee will be
dispensed through coffee dispenser 9.
The left coffee hopper has a capacity of 1.2 kg of ground
coffee. To assure consistent quality, check the ground
coffee storage regularly and replenish. Simply remove the
lid to fill the hopper.
Figure 2
Right coffee hopper (see Fig. 3) (i.e. for 2
nd
coffee type)
If the “SPECIAL” button 2 pressed before selecting
buttons 6, 5, 4, and 3, the right coffee hopper will be
´dialed´ and the “SPECIAL” button will illuminate. At the
end of the selected brew cycle, the “SPECIAL” button 2
will extinguish and the left coffee hopper will
automatically be accessed again. (See diagram, Fig. 5).
If the “SPECIAL” button 2 is pressed automatically, its
function can be canceled by pressing the button a second
time. The cancellation will take approximately 10 seconds.
The right coffee hopper also contains 1.2 kg of ground
coffee and likewise needs to be checked and replenished.
Figure 3
Note:
For consistent taste, the stored coffee should be
1
9
Page 13

45
used within 2-3 days.
Manual portioning:
More types of coffee can be used by using the “Manual
portioning” feature.
1. Press “SPECIAL” button 2 – button will illuminate.
2. Open upper door 7.
3. Portion the amount of ground coffee which corresponds
to the desired brewed amount: (see Fig. 4)
1 cup ~ approx 7g
2 cups ~ approx 12 g
1/2 pot ~ approx 32 g
1/1 pot
cannot be brewed using
manual portioning
4. Throw locking lever 18 and then close upper door 7.
5. Select brew cycle according to amount of coffee
portioned.
Figure 4
Note:
For filter coffee, the coffee should be ground
medium to fine and its powder content should be as
low as possible.
Figure 5
20
Left coffee
hopper
Right coffee
hopper
Manual
portioning
Automatic
access
1. Open upper door 7.
2. Portion ground
coffee.
3..Close upper door 7
Page 14

46
7.2.2 Brewing with multi-brew arm
Caution!
Risk of scalding around the multi-brew arm 10.
When a greater amount of coffee is required, larger
quantities of coffee can be brewed by using the multi-brew
arm 10. You can brew directly into coffee urns or a
thermos (see. Fig. 6).
Figure 6
+ =
2,5 litres
(1 litre)
When pulling out multi-brew arm 10, the buttons for “1/2
pot” 4 and for ”1/1 pot” 3 will flash alternately. Press either
button.
+ =
5 litres
(2 litre)
(The value in brackets can be set by the
WMF customer engineer.)
When selecting 4 “1/2 pot”, approx. 2.5 l (1l) of coffee will
be brewed. Double that amount (approx. 5l / 2l) will be
dispensed by pressing button 3 “1/1 pot”. The buttons 6 for
a cup and 5 for 2 cups are locked during this time. Manual
portioning is not possible.
Pull out multi-brew arm 10
Left
coffee hopper
Right
Coffee hopper
Automatic
access
When portioning the ground coffee, the left coffee hopper
will automatically be accessed.
To access the right coffee hopper, select “SPECIAL”
button 2. (Diagram see Fig. 7)
During the brew cycle the selected button will illuminate
and when the cycle ends, both buttons 3 and 4 will blink
alternately until the multi-brew arm 10 is pushed back or
until another volume brew has been selected.
Figure 7
10
Page 15

47
7.3 Hot water dispensing
Caution!
Near the hot water dispenser 14 risk of scalding!
Hot water may be dispensed in order to prepare tea,
chocolate, grog, etc. with a choice between portioned and
unportioned servings.
WMF customer service will adjust the portioned amounts
when dispensing portioned servings. The set volume will
be dispensed by pressing the push button 13.
When dispensing unportioned servings, button 13 will
dispense a maximum of 300 cm³ at one time. Dispensing is
interrupted by pressing the “Hot water” button 13 again.
Hot water can be dispensed only once when a brew cycle is
running. If no brew cycle is running, hot water can be
dispensed several times.
7.4 Hot plate
Caution!
Never touch the hot plate 16 when the machine is
switched on. Risk of burns!
For a short-term storaging of hot drinks there is a hot plate
16 available which can be switched on manually. If the
heating plate is turned on the control lamp above the switch
"hot plate" 12 is burning.
Page 16

48
7.5 WMF CAFEMAT with personnel accounting/
vending unit
The WMF CAFEMAT can be fitted with a vending unit,
e.g. a coin checker or coin changer, to enable the WMF
CAFEMAT to be operated in self-service mode.
If the WMF CAFEMAT is connected to a CMT, every
cup/serving dispensed is recorded. The waiter’s lock for
this accounting mode is in the CMT. A printer can be
connected to allow the daily totals for each waiter to be
printed out (see Fig. 8).
Figure 8
Other special features:
- Instead of the ON/OFF switch there is a key switch 11.
- The ground coffee hoppers have an `empty` warning
and are lockable. The `empty` warning for coffee
hopper 1 is indicated by the “cup” button flashing
slowly. The `empty` warning for hopper 2 is shown by
the “pot” button flashing slowly.
- On the WMF CAFEMAT with vending unit, the
brewing arm is always on the left. The reason is that a
vending unit or CMT is always fitted at the right for
ease of operation.
Figure 9
- Every machine with a brewing arm has a jug tray 24
(Fig. 6; not fitted on basic models) with a locking
mechanism for the brewing arm.
- The customer service engineer can allocate the “pot”
button to the 2
nd
type of coffee, so that in self-service
mode, a normal coffee can be made by pressing the
“cup” button and a mild coffee by pressing the “pot”
button. There is no need to press a “SPECIAL” button
first.
- Every WMF CAFEMAT with a personnel
accounting/vending unit can be used to check the
number of cups or pots (with coin checkers, only the
number of pots or cups can be output). Quantities can
be output free of charge by means of a release switch
25 (Fig. 9). It is not possible to check half and full jugs.
11
25
24
25
24
11
Page 17

49
7.5.1 One-price coin checker
The WMF CAFEMAT can be fitted with a coin checker
(Fig. 10) for self-service operation. The coin checker is
switched on by a switch 30 inside the coin box. Coins may
be inserted when the “ON” lamp 29 is lit. The “ON”
display on the coin checker is illuminated when the checker
is switched on and there is sufficient ground coffee. If the
coin checker is switched off, products can be dispensed
free of charge.
Coins or tokens inserted into the coin checker (coin slot 26)
are collected in the lockable coin box 31.
The coin checker can be set to a single selling price. If the
coin checker malfunctions, press the “Coin return” button
28. The cash or tokens can then be removed from the coin
return chute 27. If products cannot be dispensed, the coin
slot is blocked and the “ON” indicator 29 goes out.
Figure 10
7.5.2 Coin changer (4 prices)
See the separate instructions for operation and setting of
the coin changer. Coins or tokens inserted into the coin
changer are collected in the lockable coin box.
The coin changer can be set to different selling prices. If
the coin changer malfunctions, press the “Coin return”
button. The cash or tokens can then be removed from the
coin return chute. Change is also given via the coin return
chute.
26
27
29
31
30
28
Page 18

50
8 Care of the machine
8.1 Emptying of grouts and water container
The WMF CAFEMAT employs a ground coffee dry
disposal device, i.e. coffee grouts will be collected after the
brew cycle into grouts container 22 inside the unit. At the
same time, expansion water from the boiler will be
collected in water container 21 (see Fig. 11).
If grouts container 22 is full, water container 21 should be
emptied at the same time.
If grouts container 22 is full, the unit will signal as follows:
a) After selecting of a brew cycle, 3 short buzzing sounds
will be audible indicating that
Æthe grouts container is almost full
b) An intermittent buzzer will sound, hot water button 13
will flash and the dispenser will be blocked, this
indicating that
Æ the grouts container is full
The disposal process is as follows:
1. Open doors 7 and 8.
2. Slightly lift up the water container 21 and draw it out to
the front.
3. Push grouts container 22 to the left, lift slightly and
also remove towards the front. Empty out coffee grouts.
4. Reassemble in reverse order, remembering to throw the
locking lever 18 before closing the door.
Figure 11
2221
Page 19

51
8.2 Automatic cleaning
For consistent quality and safety, a fully automated
cleaning cycle should be run daily, so that all parts coming
in contact with the coffee will be cleaned. Proceed as
follows:
1. Wait until warm-up phase or brew cycle is finished.
Make sure that multi-brew arm 10 is pushed in.
2. Open doors 7, 8 and empty containers 21, 22.
(See page 50, 0 Care of the machine)
3. Insert containers 22, 21 into unit.
4. Close door 8.
5. Now press cleaning button 19 until you hear a brief
buzzing sound and the cleaning display 23 flash. (See
Fig. 12)
6. If you move the locking lever 18, briefly close and
reopen the upper door 7, the brewer 20 will move into
cleaning position – the brewer 20 is open.
Figure 12
Caution!
Do not reach into the brewer 20. Risk of crushing!
Do not touch the brewer 20, it is very hot.
Risk of burns!
7. Now place the WMF special cleaning tablet (order no.
33.2036.6000) or 1 measured spoon (approx. 30 g) of
cleaning powder (order no. 33.0680.9000) into the
brewer 20 (see fig. 13).
8. The cleaning program will run automatically when the
upper door 7 is closed again (remember the locking
lever). Program time about 6 minutes.
The “Hot water” button 13 flashes slowly and the
dispensing buttons are disabled during the cleaning
process.
Figure 13
19
20
20
Page 20

52
Caution!
Note the precautions specified on the packaging
when handling the cleaner. The cleaner is corrosive.
Cleaning fluid emerges from the coffee dispensing
spouts 9 and 10 during the cleaning process. This
fluid must be collected in a suitable vessel if a fixed
water drain is not installed. Do not use a cup or
beaker, for the cleaning fluid it is impalatable.
Health hazard!
9. An acoustic signal sounds intermittently at the end of
the cleaning program and the “Hot water” button 13
flashes slowly. The water container 21 and coffee
grouts container 22 must now be emptied (see page 50,
0 Care of the machine).
10. The machine is switched off via the “ON/OFF” switch
11 after being cleaned.
11. If the machine is not connected to a drain, the drip pan
can be removed for cleaning. Simply draw the drip pan
out to the front (see Fig. 14).
Figure 14
Caution!
Note: Hot plate 16 may still be warm! Risk of
burns! The “Hot plate” switch 12 must be switched
off without fail.
When cleaning is necessary
The WMF CAFEMAT records the operating time starting
from the first brewing after cleaning. Once 26 hours have
elapsed, there will be a
Cleaning warning:
Every time the “1 cup” button 6 and the “pot” button 5 is
pressed, these buttons and the cleaning display 23 (on the
button panel) will flash for approx. 2 seconds.
17
Page 21

53
For units in continuous operation, cleaning must be
carried out within the next 24 hours. Otherwise coffee
brewing will be blocked.
For units that are switched off after a operating time of
26 hours, a cleaning cycle must be run upon switching
on the machine. Only after that cleaning program,
brewing are possible.
Cleaning warning:
on switching on, the “cup” button 6 and “pot” button 5 will
flash quickly and continuously.
The cleaning display 23 on the button panel will also flash.
8.3 General care
When unit is switched off and cooled down, wipe casing
and drip pan with a wet cloth and dry with a wool or suede
cloth.
Avoid scouring powders to prevent scratches.
Clean the coffee grouts scraper on the brewer lid.
The waste coffee is scraped off after every brewing cycle.
The scraper on the brewer lid must be cleaned by hand:
1. Switch off the machine and open doors 7 and 8.
2. Clean the scraper with a brush or similar item
(see. Fig. 15).
Figure 15
20
Page 22

54
9 Breakdowns
Maintenance and repair work may only be carried out by WMF customer service engineers
using original WMF spare parts. The built-in safety mechanisms must never be modified in
any way.
Problems/Indication/Signals Cause/Repair
Coffee is too weak
Course grounds – use finer grounds
Grounds in coffee
Defective brew filter –
Contact WMF customer service
Serving sizes too small
Brew filter congested – run cleaning cycle
Serving sizes too large
Set quantity of brew water shifted -
Contact WMF customer service
Brew cycle too long
Brew filter blocked:
a) grounds too fine – use coarser grounds
b) run cleaning cycle with WMF cleaner
Hot water amounts too small
Hot water filter is calcified.
Unscrew filter and decalcify with WMF decalcifier.
Hot water button 13 flashing
a) The upper door 7 or the lower door 8 is open –
throw locking lever 18 and close door
b) Grounds container missing – Please insert
c) Water pressure too low – Please open main
water tap
Hot water button 13 blinking slowly
a) Unit is warming up – Please wait
b) Cleaning cycle running – Please wait.
Intermittent buzzer
The coffee grouts container is full – empty the
water container 21 and coffee grouts container 22.
Cleaning display 23 and coffee buttons 6, 5 will
flash at same time
a) Cleaning has not been carried out for 26 hours.
Start fully automatic cleaning program
b) Brewing time limit exceeded:
- carry out cleaning
Cleaning display 23 and coffee buttons 6, 5 will
flash briefly for 2 seconds
Fully automatic cleaning should be carried out in
the next 24 hours
Buttons 4 “1/2 pot” and 3 “1/1 pot” are
alternately blinking
Brew arm 10 is pulled out –
Please push in brew arm 10 or place coffee urn
underneath
All other malfunctions should only be repaired by trained WMF customer service engineers.
Page 23

55
10 Special unit: WMF CAFEMAT JET
Model 03.3234.0001
Note:
Supplement to WMF Cafemat operator’s
manual. The hazard and safety instructions
given in that manual apply here too.
Figure 16
A Button allocation
B Short coffee spout
10.1 Technical data
Model
Type 3234
Hourly capacity
350 cups filter coffee
Hot water capacity, total
48 litres
Ground coffee hopper
2 x 1.2 kg
Multi-brew arm
Pull-out length 200mm
Nominal wattage
6.2 kW
Power supply
3/N/PE+50/60 Hz 400 V
Fuses, to be provided by customer
3 x 16 A
Power supply
5 x 2,5²
Water supply
Min. DN 15, 2 bar flow pressure at 2 l/min.
Static pressure 15 bar max.
Water drain
Min. DN 19, minimum gradient 2 cm/m
Outside dimensions (W/H/D)
520 mm / 700 mm / 550 mm
Working height: Coffee spout (jug)
170 mm
Multi-brew arm
480 mm
Weight (empty)
approx. 49 kg
Sound pressure level
< 70 dB (A)
Subject to technical change without notice.
B
A
Page 24

56
10.2 Operation
Jet brewing operates by keeping the coffee concentration
relatively constant by means of an admixing valve. This
allows the brewing time to be reduced by about 30%
compared to normal brewing. This saving of time makes
peak demand occurs (for example, at conferences) which
cannot be met with the standard WMF CAFEMAT.
10.3 Special features
- The WMF CAFEMAT JET is fitted with a large brewer
to allow 1.6 litres to be brewed at a time.
- Cup and pot brewing are not possible.
- A short spout is fitted to allow jugs to be filled.
- The quantity of ground coffee can be set separately for
each product button.
- The ground coffee hoppers have an `empty` warning.
The `empty` warning for coffee hopper 1 is indicated
by the 1/2 jug button flashing slowly. The `empty`
warning for hopper 2 is shown by the 1/1 jug button
flashing slowly.
After refilling with ground coffee, confirm by pressing
the button which is flashing.
+ =
2,5 litres
(1 litre)
- The minimum brewing quantity is 0.8 litres (0.5 litres).
- The maximum brewing is 1.6 litres (1.0 litres).
- If the brewing arm is pulled out, the following
quantities may be selected from the quantity program:
+ =
5 litres
(2 litre)
(Values in brackets can be set by the WMF
customer service engineer).
Two types
“SPECIAL” button
Normal brewing,
full jug
Normal brewing,
half jug
JET
Jet brewing,
full jug
JET
Jet brewing,
half jug
With the standard button allocation, the “SPECIAL” button
can be used to select one of two types of coffee. The Jet
function is allocated to the bottom two buttons.
Figure 17
Page 25

57
Two types Left and right ground
coffee hopper
alternately
Automatic access Automatic access
SPECIAL
SPECIAL
JET
JET
Version 1 Version 2
Other options:
1. This allows jet brewing only. There is a choice of two
types of coffee. The chosen button gives direct access
to the ground coffee hopper, with no need to press the
“SPECIAL” button first.
2. This allows jet brewing only, but with only one type of
coffee. Only two buttons are in use (the others are
blanked) and the ground coffee is taken from the two
hoppers alternately.
These options can be set by our WMF customer service
engineer.
Figure 18
Default values:
Brewing quantity (ml)
Product quantity used (g)
Normal brewing (sec.)
Jet brewing (sec.)
800
40
115
80
1.600
70
200
135
500
28
80
60
1.000
52
140
92
(The last two values refer to the setting that can be set by
WMF customer service engineers)
11 WMF Customer service
WMF’s comprehensive service network allows every area to be reached in a short period of time. Our
personnel are experienced experts and carry special tools and the original spare parts required at all
times, so that malfunctions can be remedied on the spot.
Please bear in mind that this is a professional commercial coffee machine. A machine of this type
requires regular maintenance by our WMF Customer Service.
The maintenance interval depends on how heavily the machine is used, but maintenance should be
carried out at least once a year.
Order numbers for WMF maintenance products:
Special cleaner for coffee machines
Order no.: 33 0680 9000
Special cleaner for milk dispensers
Order no.: 33 0683 6000
Special decalcifier
Order no.: 33 0680 8000
Special cleaning tablet 30 g
Order no.: 33 2036 6000
Page 26

58
12 Warranty claims
WMF shall give a warranty for legitimate defects as to quality as follows:
Any products delivered or any services rendered showing a defect as to quality within the period of
limitation shall be, at WMF’s reasonable discretion, repaired or rendered again, if the cause of the
defect as to quality had already been present when the risk was passed.
Claims for defects as to quality are subject to a limitation period of 12 months. This period shall
start with the day when the risk is passed. The above period shall not apply in case there are longer
periods required by the German Civil Code (BGB), e.g. pursuant to § 479 Sec. 1 BGB (right of
recourse of the contractor), 438 Sec. 1 No. 2 BGB (buildings and things for buildings) and § 634a
BGB (defects of construction).
The warranty period is extended to cover a period of 24 months after the risk was passed, if the
buyer, at the time of concluding the sales contract, also enters into a service agreement for a regular
maintenance of the percolator purchased. The extension of the warranty period is only effective, if
the service agreement concluded has a minimum term of two years.
If putting the machine into operation is delayed for longer than four weeks due to reasons that are
beyond the control of WMF, the warranty period shall begin four weeks after the machine being
delivered to the customer.
The buyer shall immediately give written notice of defects as to quality to WMF. Replaced parts
shall pass into the ownership of WMF.
At first WMF shall always be given the opportunity for a subsequent performance within a
reasonable period. The buyer shall make available the rejected object to WMF.
We do not give a warranty:
-
for any components that are subject to a normal wear and tear. This includes but is not limited to
gaskets and washers, ribbons, and proportioning devices;
-
for defects caused by atmospheric influences, deposit of boiler scale, chemical, physical, electro-
chemical or electrical influences, unless these defects are attributed to a fault of WMF;
-
if a water filter is dispensed with, although the on-site water regime requires the use of a water
filter, and this results in defects. It is pointed out to the customer in the respective
acknowledgement of order, whether the use of a water filter is required;
-
for defects resulting from the failure to comply with the instructions relating to the handling,
maintenance and attendance of the device (e.g. operating and maintenance instructions of WMF
laid down in the operating manual of the respective percolator type);
-
for defects resulting from the inappropriate or improper use, from the failure to use WMF
genuine spare parts or from the faulty installation by the buyer or a third party, or from a faulty
or negligent handling; and for consequences from modifications or repair works that were made
improperly and without our consent by the buyer or a third party.
Claims for damages by the buyer, irrespective of their legal grounds, particularly on account of
violations of the contractual obligation and on account of tortious acts, shall be excluded.
The above exclusion shall not apply in so far as there is a mandatory liability, e.g. in case of giving
warranties as to quality or durability, pursuant to the German Product Liability Act, in cases of
willful acts, of gross negligence, of fatal injuries, of bodily injuries or injuries to health, or in case of
any violation of substantive obligations from this contract. A reversal of the burden of proof to the
disadvantage of the buyer is not implied by the above regulations.
Page 27

59
13 WMF EC Declaration of Conformity for coffee machines
EC Declaration of Conformity according to the EC Directives
We, WMF Württembergische Metallwarenfabrik Aktiengesellschaft
D-73309 Geislingen/Steige
hereby declare that the design and construction of the machines designated below, as marketed by
WMF, conform to the relevant safety and health requirements of the EC Directives.
This declaration shall not apply to machines modified without WMF approval.
Machine types:
Designation Series
Bistro 8001 - 8274, 8300 - 8399
Cafemat 3113 - 3134, 3234, 3314, 3414
Filterjet 4500 - 4501
Variomat 7100 - 7299
Programat GV 7470
Programat 4 7520 - 7529
Chocolate dispenser *) 9130 - 9133, 9410 - 9429
Sugar dispenser *) 9134, 9440
CombiNation S 8600
CombiNation F 8700
*) not relevant for Pressure Equipment Directive
Machine number: refer to machine data in the Operating Instructions
Relevant
EC Directives:
EC Machinery Directive
89/392/EEC, 91/368/EEC, 93/44/EEC, 93/68/EEC
EC Low Voltage Directive
73/23/EEC, 93/68/EEC
EC Electromagnetic Compatibility Directive
89/336/EEC, 93/31/EEC, 93/68/EEC
EC Pressure Equipment Directive
97/23/EC - Category 1, Module A
Applied harmonized
EN standards:
EN 292-1, EN 292-2, EN 55014 T1&T2,
EN61000-3-2, EN 61000-3-3, EN 60335-1
Other applied standards: AD 2000
Source of applied
standards:
Beuth-Verlag GmbH, 10772 Berlin
Date: 22.02.02 22.02.02
Signed for manufacturer:
Coffee Machine
Development Manager
Coffee Machine Quality
Assurance Manager
 Loading...