

Page 1

Quicktionary®2 User Manual
Table of Contents
Introduction ...................................................................... 2
Contact and Support Information ................................. 2
Getting Started ................................................................. 3
Familiarizing Yourself with the Pen .............................. 3
The Pen Parts .......................................................... 3
Setting Up Your Pen ................................................ 3
Basic Pen Commands .................................................. 4
Scanning Guidelines ..................................................... 4
Learning to Scan (using the Trainer) ............................ 6
The Quicktionary ............................................................. 7
The Quicktionary Screens ....................................... 7
The Quicktionary Menus .......................................... 9
Editing and Inserting Text ...................................... 12
The Dictionary Entries ........................................... 15
Hear Scanned Text Read Aloud ............................ 19
The Pen Main Menu ....................................................... 21
The Preferences Menu .......................................... 21
The Information Menu ............................................ 23
Additional Information .................................................. 24
Batteries ...................................................................... 24
Safety Points (Batteries) ............................................. 24
Pen Maintenance ........................................................ 24
Product Specification .................................................. 25
1
Page 2

Introduction
Introduction
Congratulations on your choice of the state of the art
Quicktionary
you with reading, understanding and utilizing text.
Use the Quicktionary
by-word translations, and hear scanned words pronounced
aloud.
This manual is divided into three sections:
1. Getting Started - This section provides basic
2. The Quicktionary
3. Additional Information - View additional information
®
2. Our personal, portable scanning Pens assist
®
2 to scan full lines of text, receive word-
information on Pen functions and how to scan.
®
to work with the Pen, including explanations of all the
Pen menu options, applications and different ways of
scanning, inserting and editing text.
such as Pen maintenance information.
2 - This section demonstrates how
Contact and Support Information
Contact us at 888 777 0552 (Toll free in USA) or +1 978 727
0026 or email usa.support@wizcomtech.com
website http://www.wizcomtech.com
section for the Quicktionary
2
to view the FAQ
®
2 and to register your product.
. Visit our
Page 3
Getting Started
Getting Started
Familiarizing Yourself with the Pen
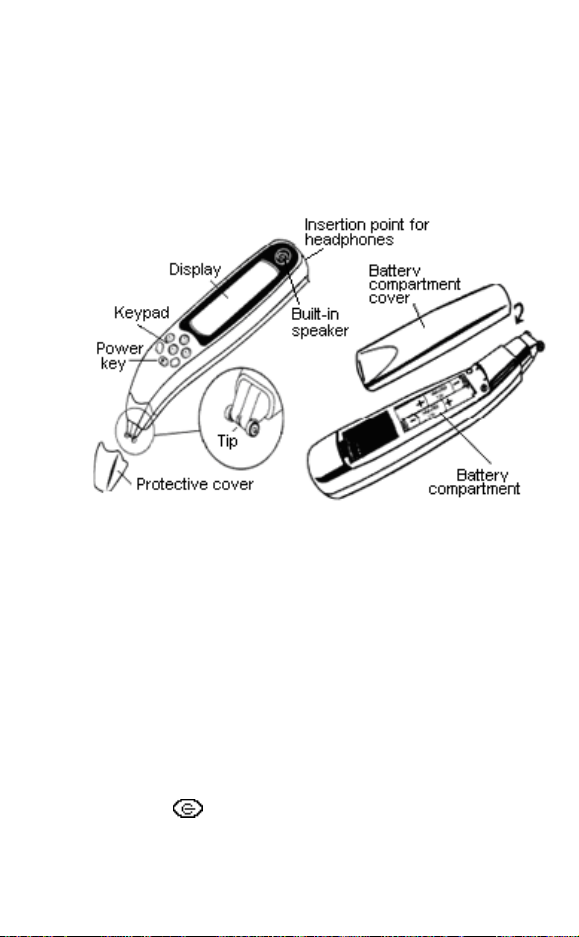
The Pen Parts
Your Pen contains the following parts:
Important: Before using the headphones, please adjust the
volume using the
menu.
Voice Settings
option in the
Preferences
Setting Up Your Pen
To get started:
1. Remove your Pen from its protective case.
2. Remove the battery compartment cover from the back of
the Pen.
3. Insert 2 AAA batteries into the Pen with the positive and
negative terminals corresponding to the markings on the
sides of the battery compartment.
4. Close the battery compartment.
5. Remove the protective cover from the Pen tip.
6. Press
7. The Pen is ready to scan!
Note: If you are left-handed, see Right-/Left-Handed on page
55 to change your Pen to left-handed scanning.
to turn the Pen on.
3
Page 4
Getting Started
Basic Pen Commands
The Pen Keys and their Functions
The keypad contains seven keys for operating your Pen. Use
the keys as follows:
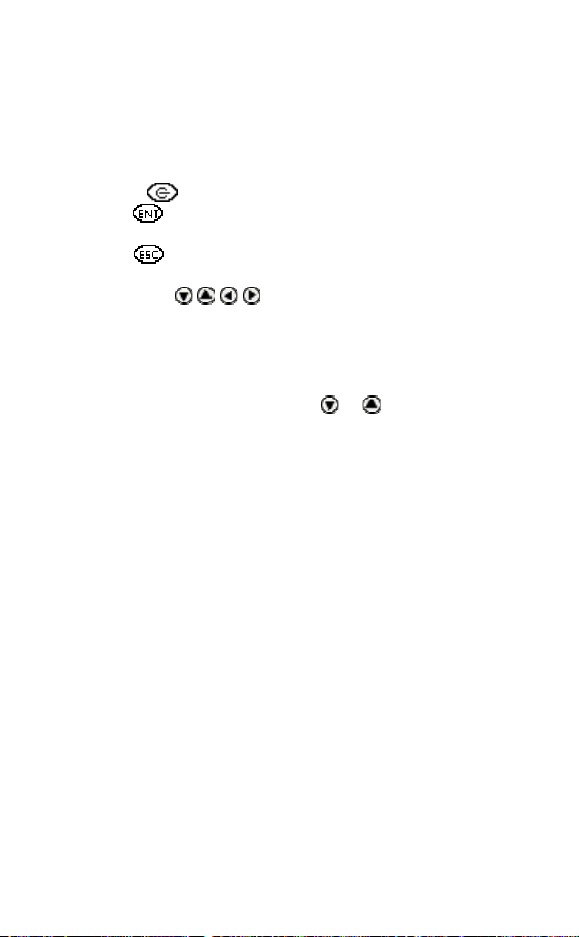
Power key : Turn the Pen on and off.
ENT key : Access submenus or screens, confirm a
selection or perform an operation.
ESC key : Navigate backwards, close a screen, or
cancel an operation.
Direction keys : Scroll through menus and
screens.
Navigating Menus and Lists
To select an item from a menu or a list:
1. Scroll through the menu, using
you want is highlighted.
2. Press ENT.
To select a command key on the display:
1. Use the direction keys to highlight the command key.
2. Press ENT.
To return to a previous menu level from a sub-menu, option
or list, press ESC.
or until the item
Scanning Guidelines
Scanning Mode
The Pen is in scanning mode when the red light at the tip of
the Pen is blinking. Scanning mode is disabled when
accessing menus.
Scanning Direction
Text can be scanned from right to left or from left to right.
Both will produce the same results.
Scanning Restrictions
The Pen scans and recognizes printed text in a wide range of
languages, font types and point sizes (6-22 points, up to 8mm)
4
Page 5
Getting Started
and in a variety of colors on contrasting backgrounds (except
red on white, white on red, blue on black and black on blue).
It does not recognize handwriting, cursive fonts,
mathematical symbols or other profession-specific signs.
Tips for Good Scanning
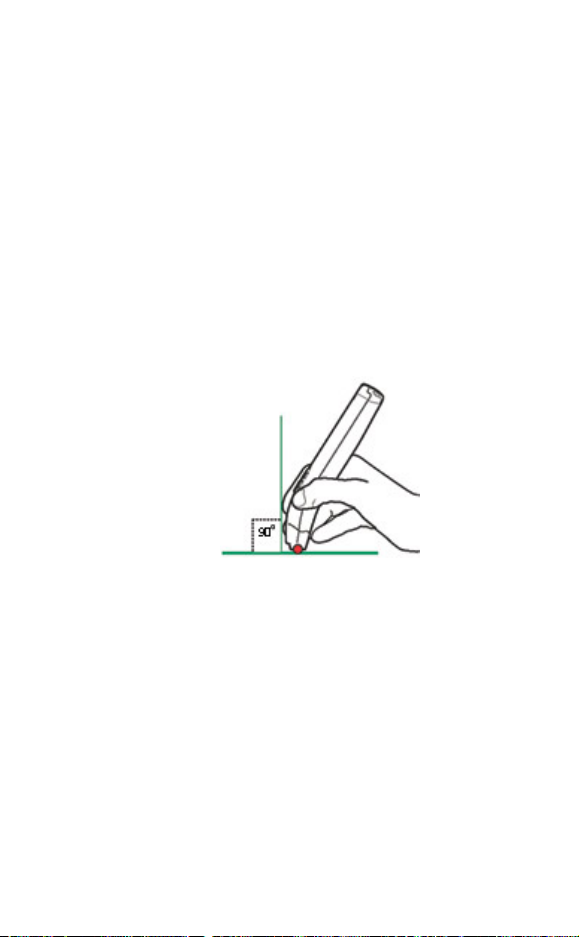
To ensure optimum scanning results:
Hold the Pen at the correct scanning angle.
Place the scanning material on a flat surface.
Ensure scanning material is good quality and pages are
not creased. Poorly photocopied materials may provide
bad results.
Do not scan too fast.
Correct scanning angle of 90°
Poor Character Recognition
Poor character recognition may occur for the following
reasons:
Low quality scanning material.
The scanning settings are not set correctly (e.g. Inverse).
Holding the Pen at the wrong scanning angle.
Scanning too fast.
5
Page 6
Getting Started
Learning to Scan (using the Trainer)
This tutorial uses the Quicktionary application and the
plastic scanning Trainer provided with your Pen.
1. Slide the Trainer onto the tip of the Pen (instead of the
cap) and press into place.
2. Turn the Pen on. The Select Dictionary menu will
appear. Select the English Æ German dictionary.
3. The Input Screen will appear with the message “Scan
in English”. The red light flashing at the tip of the Pen
indicates that the Pen is ready to scan.
4. Position the Pen at a 90° angle and center the following
text between the feet of the trainer. This angle should
be maintained even when scanning without the trainer.
Use the following practice sentence:
This sentence will help me practice scanning.
5. Glide the Pen from right to left in a straight line over the
text. Start scanning 1cm from the end of the text and
finish 1cm after the beginning of the text.
6. The Split Screen will appear, with the scanned text on
the screen. If the text does not appear correctly on the
screen, scan again and the text on screen will be overwritten by the new text.
6
Page 7

The Quicktionary
The Quicktionary
Use the Quicktionary application to scan and translate text
in various languages. Hear scanned text read aloud from
either the Split Screen or the Dictionary Screen. The
Quicktionary opens automatically when turning the Pen on.
You will reach the Input Screen and the red light at the tip
of the Pen will flash. Scan into any screen as long as the red
light is flashing. Scanning is disabled when accessing menus.
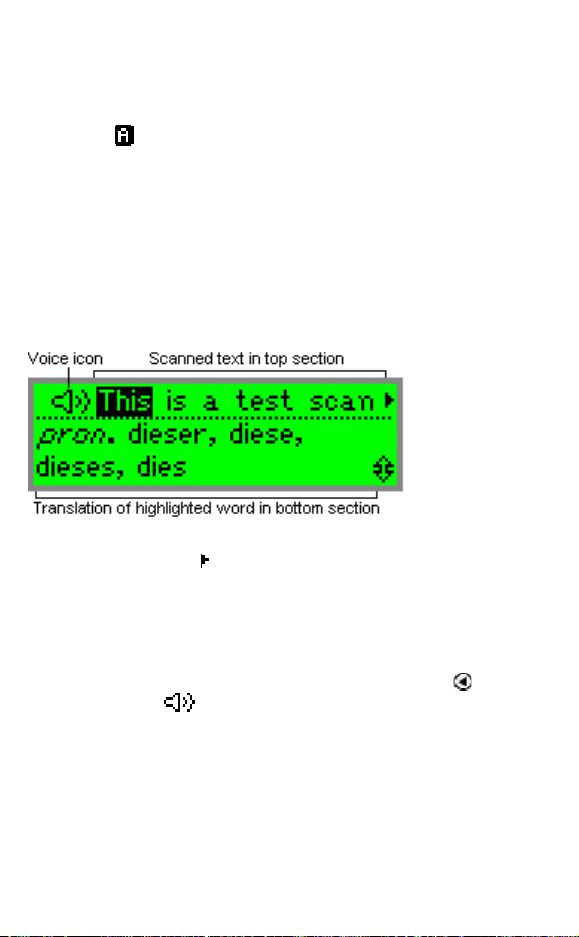
The Quicktionary Screens
The Quicktionary application has three main screens, the
Input Screen, the Split Screen and the Dictionary
Screen. Each screen displays the translation of the selected
words. You can scan into any screen when the red light at the
Pen tip is blinking. Text on screen will be over-written by the
newly scanned text.
The Input Screen
This is the screen that appears when you enter the
Quicktionary application. Scan text directly into this screen.
The "Scan in..." message indicates the source language of
the selected dictionary and the highlighted section shows the
input field.
After scanning, text is displayed in the Split Screen or
the Dictionary Screen.
Insert text using the Character bar or Opticard. See
Editing and Inserting Text
information on these options. After inserting text,
select GO to view the translation in the Split Screen or
the Dictionary Screen.
Press ESC to access the Edit Menu while in Edit Mode.
on page 12 for more
7
Page 8
The Quicktionary
Press ESC from the Input Screen to access the
Quicktionary Menu.
Note: If the
Quicktionary application is set to scan inverse text (light text
on dark background). To change the setting, see
Quicktionary Menu
icon is visible on screen it indicates that the
The
on page 9.
The Split Screen
The Split Screen appears after scanning more than one
word. The scanned text appears on the top of the screen, and
the translation of the highlighted word appears on the bottom
of the screen.
Scroll through the scanned text using the right/left
direction keys. The
right will reveal the rest of the scanned text.
Scroll through the dictionary entry for the highlighted word
using the up/down direction keys.
View the highlighted word in the Dictionary Screen by
pressing ENT.
If the selected dictionary supports reading aloud, use
to scroll to the
the scanned text read aloud. Press ENT to hear the text
read aloud again.
Press ESC to return to the Input Screen.
arrow indicates that scrolling to the
icon (voice). Highlight the icon to hear
The Dictionary Screen
The Dictionary Screen appears after scanning a single
word, or after selecting a word from the Split Screen.
8
Page 9

The Quicktionary
Scroll through the dictionary entry using the up/down
direction keys.
Switch between reduced and full dictionary display using
the left/right direction keys.
If the selected dictionary contains support for reading
aloud, press ENT to hear the word read aloud.
If you have reached the Dictionary Screen after selecting
a word from the Split Screen, press ESC to return to the
scanned text in the Split Screen.
The Quicktionary Menus
The Quicktionary contains two menus: The Quicktionary
Menu and the Edit Menu.
The Quicktionary Menu
To display the Quicktionary Menu, go to the Input Screen
and press ESC. To return to the Input Screen from the
Quicktionary Menu, press ESC.
Dictionary
The Dictionary submenu contains a series of dictionary
tools.
History
This option displays a chronological list of the most
recently displayed words, with the last word you defined at
the top. The history list can store up to 80 words. Once the
list is full, the oldest word is deleted from the list to make
room for the most recent one.
To select one of these words and view its dictionary entry:
1. Select Dictionary and then select History.
2. Scroll through the list to find the word you want.
Press ENT. The word appears in the Dictionary
Screen.
3. Press ESC to return to the history list.
9
Page 10

The Quicktionary
Adjacent Entries
This option displays a list of all the headwords in the
current dictionary, placing you on the last word you
highlighted, or on the last word you selected from the
history list. If you haven't scanned or selected a word
during the current scanning session, it places you on the
first word in the dictionary. Scroll through the list to find a
different word in order to view its definition.
1. Select Dictionary and then select Adjacent
Entries.
2. Scroll to the word you want. Press ENT.
3. The word appears in the Dictionary Screen.
4. Press ESC to return to the adjacent entries list.
Select Dictionary
View a list of the dictionaries on the Pen and change the
selected dictionary. This option is only available if there is
more than one dictionary installed on the Pen.
Reset History
Select this option to erase all History entries.
1. Select Dictionary and then select Reset History.
2. The question, "Are you sure?" appears.
3. Select YES to erase the history and return to the
Input Screen.
4. Select NO to return to the Dictionary submenu
without erasing the history.
Preferences
Use this option to modify the default Quicktionary settings.
To accept changes press ENT. To return to the Preferences
submenu without making changes, press ESC. Toggle
settings on or off by pressing
, or ENT. = on.
Inverse: Select this option to scan inverse text (white
text on dark background). When inverse text mode is
selected, the red light in the tip of Quicktionary blinks
rapidly and the
icon is visible on the Input Screen.
Reduced Display: This preference determines whether
display elements in the current dictionary, such as
phonetics, appear with the translations. When Reduced
Display is selected, certain display elements are hidden.
10
Page 11

The Quicktionary
Auto Speak: When Auto Speak is selected, the
Quicktionary application reads scanned text aloud the
moment you select it for translation.
Line(s) Per Scroll: This preference determines how
many lines the Quicktionary application scrolls at a
time in the Split Screen and Dictionary Screen. To
change the number of lines per scroll, press
Help
Guides and Glossaries
This option is present only when the selected dictionary
contains guides or glossaries, such as the Pronunciation
Guide to assist with understanding special symbols used
in the particular dictionary.
About
View copyright and version information for the
Quicktionary application.
Pen Main Menu
Access the Pen Main Menu.
or .
The Edit Menu
Edit Mode enables editing and inserting of text using the
Character Bar or Opticard. Access the Edit Menu from
the Input Screen by pressing ENT to activate Edit Mode
and then pressing ESC.
The Edit Menu contains three options:
Resume Editing
Return to the current field without making changes. The field
remains in Edit Mode.
Activate Overwrite Mode
Overwrite the existing text. Overwrite mode highlights the first
character after the blinking cursor. Any text that is inserted
overwrites the text starting at the highlighted character. When
Overwrite Mode is activated, the menu option changes to
Activate Insert Mode. Text will be inserted at the site of the
blinking cursor.
Clear Text
Clear the text on screen.
11
Page 12

The Quicktionary
Editing and Inserting Text
To edit or insert text press ENT to activate Edit Mode. The
highlighted text or field will be replaced by regular text, with a
blinking cursor at the beginning of the field. To return to
regular scanning mode press ESC twice.
When the Pen is in Edit Mode, text can be edited or inserted
in two ways:
1. Using the Character Bar.
2. Using the Opticard.
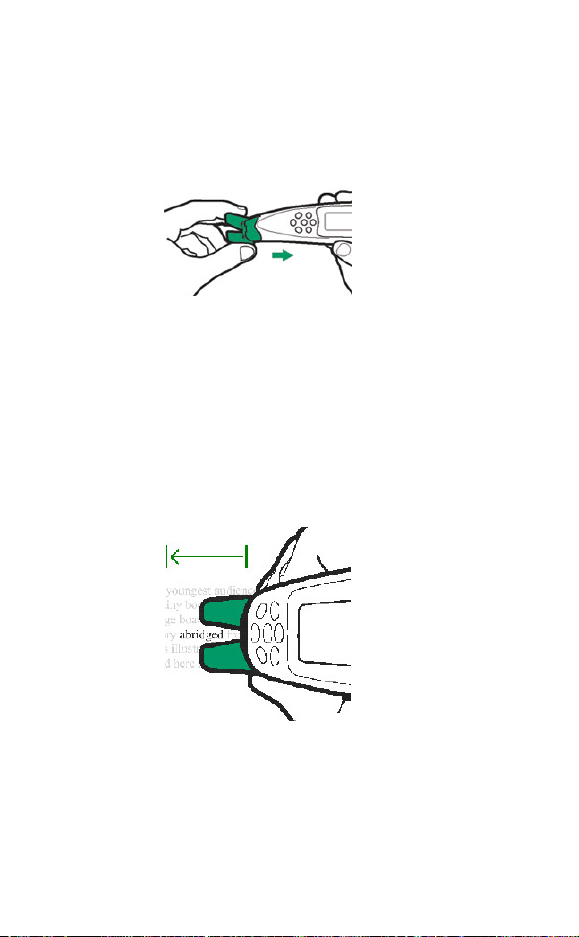
The Character Bar
Use the Character Bar to manually insert or edit text.
The Character Bar is only available when the Pen is in Edit
Mode. Scroll to the field you wish to edit and press ENT to
activate Edit Mode.
Use the direction keys to scroll to the place you wish to insert
text and press ENT to access the Character Bar. Press
ESC to exit the Character Bar.
Using the Character Bar
The Character Bar works in two modes: Insert Mode and
Overwrite Mode which are determined by the setting in the
application's Edit Menu. The default mode is Insert Mode.
In Insert Mode characters are inserted at the site of the
cursor.
In Overwrite Mode each character that is inserted
replaces the highlighted character.
and to scroll to the character you wish to insert and
Use
press ENT. Do the same thing for each character you wish to
insert. When you have finished, press ESC to return to the
previous screen.
12
Page 13

The Quicktionary
Character Bar Options
The default Character Bar contains the twenty six lowercase ABC characters as well as the option to access
numbers, punctuation characters, upper-case and accented
characters and symbols.
Insert Upper-Case Characters
Insert upper case (capital) letters by scrolling to the lowercase character and pressing
case options for the character. Scroll to the character you
wish to insert and press ENT.
Insert Accented Characters or Symbols
Insert accented characters or symbols created using alphabet
characters, such as
character and pressing
available. Scroll to the character you wish to insert and press
ENT.
or by scrolling to the lower-case
Insert Numbers
Scroll to this symbol and press ENT to reveal the numeric
Character Bar.
Insert Punctuation Symbols
Scroll to this symbol and press ENT to reveal the punctuation
Character Bar.
Alphabet
Scroll to this symbol and press ENT to return to the default
alphabetic Character Bar.
to reveal the upper and lower
to reveal the additional characters
Delete
Scroll to this option to delete the highlighted character. If you
enter the Character Bar from a field that has reached its
maximum number of characters, the cursor immediately
jumps to the delete symbol and you will be unable to insert
any characters until you delete a character from the field.
Spacebar
Scroll to this option and press ENT to insert a space between
characters.
13
Page 14

The Quicktionary
Multiple Characters Mode
This symbol indicates that you can enter as many characters
as you wish. Scroll to the character you wish to add and
press ENT. Keep adding characters in this way. To exit the
Character Bar press ESC. Scroll to this symbol and press
ENT to change to Single Characters Mode.
Single Character Mode
This symbol indicates that you can insert one character
before the Character Bar exits. Scroll to this symbol and
press ENT to change to Multiple Characters Mode.
The Opticard
The Opticard is a scanning keyboard found on the back of
the Pen case.
Every letter scanned with the Opticard is identified by its
unique barcode and converted to the correct character on
your Pen.
Use the Opticard to edit scanned text, or to insert text that
cannot be scanned due to scanning limitations.
To use the Opticard:
1. Hold the Pen case horizontally, with the Opticard
facing up and the Opticard title on the right.
2. Scan the Opticard key in the bottom left corner of the
Opticard, from left to right or from right to left, to
activate Opticard Mode. When Opticard Mode is
activated, the light in the tip of the Pen blinks rapidly.
3. Slowly scan the character key, from right to left or from
left to right, or touch the key gently with the tip of your
Pen. The letter appears in the Pen display.
Use the following key combinations to enter the required
characters:
14
Page 15

The Quicktionary
Lower-Case Characters: Scan the character key.
Upper-Case Characters: Scan the Shift key and
then scan the character key.
Caps Lock: To activate/deactivate Caps Lock,
scan Shift twice. Activating Caps Lock enables
you to enter letters in upper case only.
Punctuation Symbols: Scan the Ctrl key and then
scan the symbol.
Accented characters: Scan the Ctrl key, scan the
accent, and then scan the character corresponding
to the accent.
Accented characters in upper-case: Scan the
Ctrl key followed by the Shift key, scan the accent,
and then scan the character corresponding to the
accent.
Space: Scan the spc key.
Delete: Scan the Shift key and then scan the del
key.
4. When you are finished, scan the Opticard key again to
return to normal scanning mode.
The Dictionary
The dictionary entries contain various elements and
indicators. The following examples are taken from the English
to German and German to English dictionaries.
Note: Some dictionaries may not contain all the elements
mentioned.
Entries
15
Page 16

The Quicktionary
Reduced and Full Dictionary Entry Display
Press or to toggle the display of the current entry
between reduced and full display. Reduced Display hides
certain display elements such as phonetics. Full Display
shows the entire dictionary entry.
Scroll Arrows
The scroll arrows on the bottom right of the screen indicate
that you can scroll up and down to view the entire dictionary
entry.
The hollow arrow indicates the entry is being viewed
in Reduced Display.
The full arrow indicates the entry is being viewed in
Full Display.
Word List
The Word List sign appears at the top right of the
Dictionary Screen and indicates that there are additional
entries for the headword on screen. Press ESC to view the
Word List.
The Word List appears:
When the scanned word corresponds to more than one
dictionary entry. For example, if you scan the word
“dressing”, the Quicktionary application enables you to
choose between the dictionary entries “dress” and
“dressing”.
When the scanned word is a homonym, a word that is
the same as another in spelling but different in meaning.
After scanning an idiom or phrasal verb, the
Quicktionary will automatically recognize the entire
phrase from the first word highlighted, and will provide a
Word List containing both the whole idiom and the first
highlighted word.
16
Page 17

Headword
The Quicktionary
The selected word or a derivative of the selected word, may
consist of more than one word. The screenshots here display
the headword "special" and the word "ate", a derivative of the
headword "eat".
Phonetics
The phonetic transcription of the headword. This can be seen
when the dictionary entries are shown in Full Display. The
guide to the phonetic symbols used in the dictionary, is
available from the Guides and Glossaries menu in Help in
the Quicktionary Menu.
Parts of Speech
Categories of words that describe their particular function, e.g.
nouns, verbs, adjectives. Some dictionary entries contain
several parts of speech, such as "land" which is both a noun
(n.) and a verb (v.).
17
Page 18

The Quicktionary
Idioms
Expressions or phrases usually composed of a sequence of
words. They can be identified:
Automatically within a sentence
By scrolling through the translation of the first word of
the sequence.
If you scan text containing an idiom, the Quicktionary
application will automatically display the translation of the
idiom when the first word is highlighted, i.e. the idiom "From A
to Z" displayed from the headword "From".
Split Verbs
If you scan a single word which is part of a split verb:
1. The translation will appear along with the Word List
icon. In the Word List, the SPLIT VERB option
appears allowing you to scan the first part of the split
verb.
2. The message “Scan 1st part” will appear allowing you
to scan the first part of the split verb in order to view the
translation of the entire verb.
If you scan a line of text containing a split verb (e.g., in the
German to English dictionary), the Quicktionary
automatically recognizes the verb and combines the parts.
The dictionary entry for the verb is displayed as soon as you
highlight the first part of the verb that appears in the sentence.
For example, if you scan in the sentence "ihr stellt etwas auf",
the dictionary entry for "aufstellen" appears as soon as you
highlight "stellt".
18
Page 19

Compound Words
The Quicktionary
If you scan a word that is not a dictionary entry, but is a
compound word consisting of existing dictionary entries (e.g.,
in the German to English dictionary), the Quicktionary
separates the compound word into its respective entries.
The translation of the primary word in the compound word
appears first, with the Word List sign next to it.
To display the dictionary entry for another part of the
compound word:
1. Press ENT to go to the Dictionary Screen (if you
scanned more than one word).
2. Press ESC to display the word list.
3. Scroll to the word you want to translate and press ENT.
For example: If you scan the word “Sprachgemeinschaft”, the
entry for “gemeinschaft” appears. Go to the word list and
select “Sprache” to view its translation.
Hear Scanned Text Read Aloud
Scanned text can be read aloud from both the Split Screen
and the Dictionary Screen. Adjust the volume using Voice
Settings in the Preferences menu.
Note: Not all dictionaries have text-to-speech functionality.
Access the Auto Speak option from Preferences in the
Quicktionary Menu.
When Auto Speak is selected:
Scrolling through the text in the Split Screen will cause
the word to be read aloud automatically as it is
highlighted.
Accessing the Dictionary Screen by either scanning a
single word or from the Split Screen will cause the
word to be read aloud automatically.
19
Page 20

The Quicktionary
When Auto Speak is not selected:
Scrolling to the left in the Split Screen until the
icon is highlighted will cause the entire sentence to be
read aloud. Press ENT when the icon is highlighted to
hear the text read aloud again.
Press ENT to hear the word read aloud in the
Dictionary Screen.
H
omogr
A homograph is one of two or more words that have the
same spelling but differ in origin, meaning, and sometimes
pronunciation, such as "fair" (pleasing in appearance) and
"fair" (market) or "wind" (wĭnd) and "wind" (wīnd).
If the selected word is a homonym, Quicktionary will read out
all the options for pronouncing the word.
aph Pronunciation
20
Page 21

The Pen Main Menu
The Pen Main Menu
Use the Pen Main Menu to change default settings and to
view Pen information. The Pen Main Menu contains the
following options: Quicktionary, Preferences and
Information.
To access the Pen Main Menu from the Quicktionary
application press ESC to access the Quicktionary Menu
from the Input Screen, scroll down to Pen Main Menu and
press ENT.
To return to the Quicktionary application scroll to the
Quicktionary option and press ENT.
The Preferences Menu
Modify the default Pen settings using this menu which can be
accessed via the Pen Main Menu. To select an option, scroll
to the required option using
option is highlighted. To return to the previous screen without
making changes, press ESC.
The Preferences menu contains the following options:
Scanning Language
Not applicable for this product.
Interface Language
Use this option to change the language in which menus and
messages appear.
1. Select Interface Language.
2. Scroll to the interface language you want, using
and press ENT.
Communications Settings
Not applicable for this product.
or and press ENT when the
or
Voice Settings
Use this option to adjust the voice settings on the Pen. This
changes the way text is read aloud in the Quicktionary
application.
Volume
Use this option to adjust the volume level of the speaker.
21
Page 22
The Pen Main Menu
1. Select Volume. The adjustment bar appears.
2. Adjust the volume level to the setting you want using
or and press ENT.
Pitch
When auto speak is selected, the Pen automatically
pronounces the word you select or highlight.
1. Select Pitch.
2. Adjust the pitch using
Reading Speed
or and press ENT.
This option enables you to adjust the speed at which the
Pen pronounces words.
1. Select Reading Speed.
2. Adjust the reading speed using
or and press
ENT. The higher the number, the faster the speed.
Auto Shut-Off Time
If the Pen is not in use it will shut down automatically after
two minutes. Use this option to change the automatic shut-off
time.
1. Select Auto Shut-Off Time.
2. Choose the auto shut-off time you want using
or
and press ENT.
Right-/Left- Handed
Use this option to switch between right and left handed
modes. Switching between these modes rotates the text on
the display 180°.
1. Select Right-/Left- Handed.
2. Scroll to the mode you prefer using
or and press
ENT.
Menu Type
Use this option to define whether your Pen menus appear as
text only, icons only, or both text and icons.
1. Select Menu Type.
2. Scroll to the menu type you prefer using
or and
press ENT.
Long-Press Interval
Use this option to adjust the amount of time you need to keep
a button pressed for a long press.
22
Page 23

The Pen Main Menu
1. Select Long-Press Interval. The adjustment bar
appears.
2. Move the slider to the setting you want using
3. Test the setting by pressing and briefly holding down the
key. If the screen flashes the setting is fine. If the
display does not flash, either adjust the setting to a
shorter press, or press longer.
or .
Double-Click Interval
Use this option to adjust the amount of time between the two
clicks for a double click.
1. Select Double-Click Interval. The adjustment bar
appears.
2. Move the slider to the setting you want using
3. Test the setting by double clicking the
screen flashes the setting is fine. If the display does not
flash, either adjust the setting to a shorter press, or
double click faster.
Contrast
Use this option to adjust the brightness of the display.
1. Select Set Contrast; the adjustment bar appears.
2. Adjust the contrast using
higher the number, the darker the display.
or .
key. If the
or and press ENT. The
The Information Menu
The Information menu displays the following Pen
information:
Battery Status
Check how much power is left in the batteries. A diagram
displays the power level.
Memory Status
See how much memory is available on the Pen's extension
card. Not relevant for this product.
Serial Number
View the Pen’s serial number.
About
View Pen version number, copyright information and version
number of the Pen operating system.
23
Page 24

Additional Information
Additional Information
Batteries
Your Pen comes with 2 AAA Alkaline batteries. If the
batteries are low, the "Replace Batteries" message appears
on the Pen. When the batteries are about to run out, the Pen
shuts down automatically.
Many issues may occur on the Pen due to low batteries. If
you encounter strange behavior, check the battery level in the
Information menu and replace batteries if relevant.
Safety Points (Batteries)
CAUTION: Risk of explosion if battery is replaced by an
incorrect type. Use AAA Alkaline batteries only.
Always place 2 fresh batteries in the Pen. It is not
advisable to use the Pen with batteries that are not at
the same voltage level.
Do not combine different types of batteries (e.g.
rechargeable and non-rechargeable).
Dispose of used batteries according to the
manufacturer's instructions.
Pen Maintenance
Your Pen conforms to the highest standards of craftsmanship
and manufacture. To keep your product in good condition,
follow these guidelines:
Store in protective case when not in use.
Keep away from excessive moisture and temperature
extremes.
Clean using a soft, damp cloth.
Avoid exposing to direct sunlight for extended periods
of time.
CAUTION: To reduce the risk of electrical shock or damage
to the internal components, do not spray liquid directly on the
screen or allow excess liquid to drip inside your Pen.
24
Page 25

Additional Information
Product Specification
Feature Description
Display
Information
Keypad Push Buttons -
CPU ARM 7 TDMI
Optical
Scanner
Power 2 x 1.5V AAA Alkaline batteries
Size L x W x H:
Weight 90 grams (3 oz.) without batteries +/-
Safety
Operating
Temperature
Range
Resolution: 122 x 32 pixels
Size: 61mm x 20mm / 2.4” x .8”
Power/ESC/ENT/Up/Down/Left/Right)
128 pixels linear array image
sensor
400 DPI resolution
163 mm x 38 mm x 23 mm
(6.4” x 1.5” x 1”)
flash memory card)
CE
RoHS
UL
FCC class B
0°C - 40°C
25
 Loading...