

Page 1

InfoScan™ TS Elite
User Manual
Page 2

Page 3

Table of Contents
Table of Contents
Introduction ................................................................. 3
Contact and Support Information ............................. 3
Getting Started ............................................................ 4
The Pen Parts .......................................................... 4
The Pen Power Supply ............................................ 5
Unpacking the Pen ................................................... 6
Installing the WizCom Desktop ................................ 6
Learning to Scan (using the Trainer) ........................ 7
The Pen User Interface ............................................... 8
The Pen Keys .......................................................... 8
The Pen Main Menu ................................................. 9
Connect to PC ..................................................... 9
The Preferences Menu ........................................ 9
The Information Menu ....................................... 11
Icons and Indicators ............................................... 11
The Pen Applications ............................................... 13
Notes ..................................................................... 13
The Notes Functions ......................................... 13
The Notes Toolbar ............................................ 13
Toolbar Options ................................................. 14
Notes Tutorial .................................................... 17
Editing and Inserting Text ................................. 23
Scan to PC ............................................................. 25
The Scan to PC Functions ................................ 25
The Scan to PC Toolbar .................................... 26
Toolbar Options ................................................. 26
Scan to PC Tutorial ........................................... 27
The WizCom Desktop ............................................... 32
Introduction to the Desktop .................................... 32
The Desktop Modes .......................................... 32
The Desktop User Interface ..................................... 34
The Desktop Main Menu ........................................ 34
The Desktop Tabs .................................................. 34
The Task Bar Icons and Menu ............................... 36
1
Page 4

Table of Contents
Managing Notes Files Using the Desktop ............. 37
Tips ............................................................................ 39
Changing Scanning Settings ................................. 39
Scanning Guidelines ............................................. 41
Pen Maintenance .................................................. 42
Troubleshooting Pen-PC Communications ........... 42
Product Specification .............................................. 44
Pen Specification................................................... 44
Desktop Specification ............................................ 44
2
Page 5

Introduction
Introduction
Congratulations on your choice of a state-of-the-art scanning
Pen from WizCom Technologies. WizCom makes personal,
portable scanning Pens that assist with reading,
understanding and utilizing text.
Inside the tip of the Pen is a sophisticated electronic eye.
This eye enables you to scan different types of printed
information directly into your Pen. The scanned text can then
be edited and transferred to the PC.
The Pen comes with a touch screen and stylus, allowing
easy manipulation of the Pen user interface and quick
editing of scanned texts with the Virtual Keyboard.
Use this guide to find out about setting up and using your
WizCom product.
Contact and Support Information
Contact us at 888 777 0552 (Toll free in USA) or +1 978 727
0026 or email usa.support@wizcomtech.com
website http://www.wizcomtech.com
to register your product.
. Visit our
3
Page 6
Getting Started
Getting Started
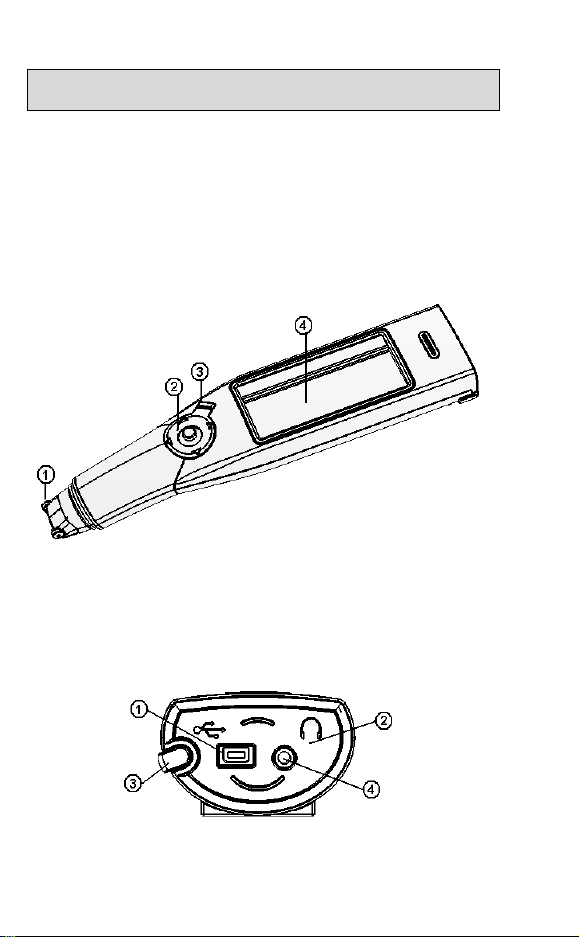
The Pen Parts
On the Front Panel you can see:
1. Pen tip with optical scanning head (beneath the
protective cover)
2. 5-way button (Enter and direction keys)
3. Power/Escape key (red)
4. Touch Screen Display
Pen Front Panel
On the Top Panel you can see:
1. USB Cable Outlet
2. Infrared Screen
3. Stylus Slot
4. Insertion point for headphones
Pen Top Panel
Important: Before using the headphones, adjust the volume
using the Voice Settings option in the Preferences menu.
4
Page 7

Getting Started
On the Back Panel you can see the battery compartment.
Pen Back Panel
The Pen Power Supply
The Pen comes with 2 AAA Alkaline batteries.
Safety Points (Batteries)
CAUTION: Risk of explosion if battery is replaced by an
incorrect type. Use AAA Alkaline batteries only.
Always place 2 fresh batteries in the Pen. It is not
advisable to use the Pen with batteries that are not at
the same voltage level.
Do not combine different types of batteries (e.g.
rechargeable and non-rechargeable).
Dispose of used batteries according to the
manufacturer's instructions.
Preserving Battery Usage
To optimize battery usage, go to Set Auto Shut-Off Time
in Preferences in the Pen Main Menu and modify the
settings according to your needs.
5
Page 8

Getting Started
External Power Supply (using the USB
cable)
Connecting the Pen to the PC using the USB cable
automatically activates the power supply from the PC. This
has the following implications:
The Pen uses the external power supply when
connected to the PC, so batteries last longer.
CAUTION: Unsaved information may be lost if the USB
cable disconnects while using without batteries. It is
very important that the Pen always contains batteries,
even when connected to the PC.
Set Auto Shut-Off Time in Preferences is disabled
when the Pen is connected to the PC.
Unpacking the Pen
To get started:
1. Remove the Pen from the protective case.
2. Lift the battery cover on the back of the Pen by pushing
the tab down and out.
3. Insert the batteries into the Pen with the positive and
negative terminals corresponding to the markings on
the sides of the battery compartment.
Note: Make sure that your Pen always contains
batteries, even when connected to the PC.
4. Close the battery compartment.
5. Remove the protective cover from the Pen tip.
6. Turn the Pen on by pressing the red power key.
The Pen is ready to scan!
Installing the WizCom Desktop
Important: Do not connect the USB cable to the PC before
installing the WizCom Desktop.
To install the WizCom Desktop do the following:
1. Insert the CD-ROM that was supplied with the Pen.
2. The CD-ROM
screen.
3. Click on WizCom Desktop Installation and follow the
instructions for installing the Desktop and the USB
driver.
6
Main Menu will appear on the PC
Page 9

Getting Started
Learning to Scan (using the Trainer)
This tutorial will help you learn to scan using the plastic
Trainer supplied in the package.
1. Slide the Trainer onto the tip of the Pen (instead of the
cap) and press into place.
2. Turn the Pen on by pressing the red Power key. If you
don’t see the Notes screen, select the Notes icon
from the Pen Main Menu by tapping on it with the
stylus or by using the direction keys.
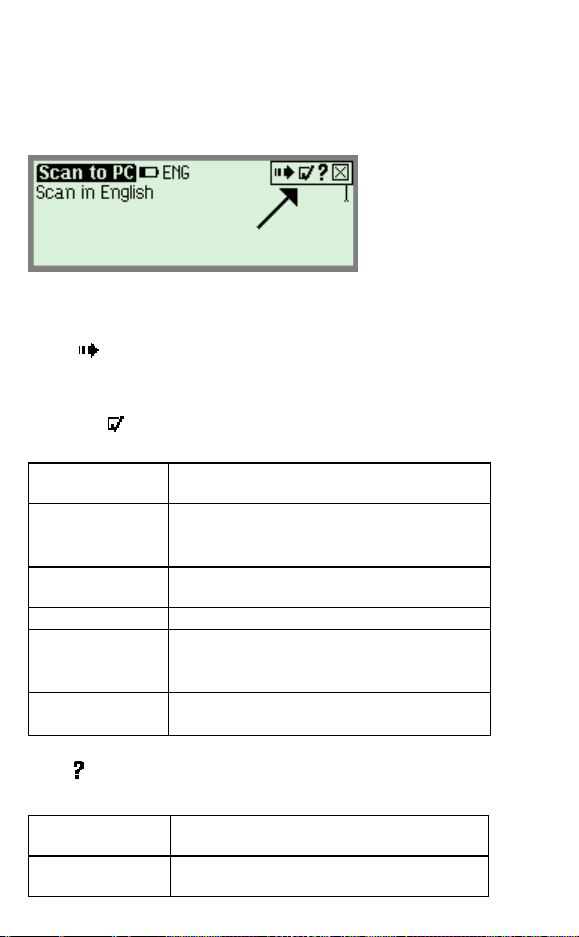
3. The following screen should be visible:
If the scanning language is not set to English, select
from the toolbar by tapping with the stylus or by
pressing ESC (red key) and using the direction keys.
Choose Set Language for New File from the dropdown menu and select English.
4. Place the Trainer at the end of the practice sentence
with the Pen facing the text.
5. Position the Pen so that the text is centered between
the feet of the Trainer.
6. Glide the Pen from right to left in a straight line over the
text. Start scanning 1cm from the end of the sentence
and finish 1cm after.
Use the following English practice sentence:
This sentence will help me practice scanning.
Note: The Pen default is set to right-handed scanning. To
change the Pen display to left-handed scanning, use the Set
Right-/Left- Handed option from Preferences in the Pen
Main Menu.
7
Page 10

The Pen User Interface
The Pen User Interface
The Pen Keys
1. Power/Escape (ESC) Key
a. Power:
Start up – Short press to turn the Pen on
Shut down - Long press to turn the Pen off
Note: To turn the Pen off, hold down the Power key
until the progress bar reaches the end.
b. Escape:
Activate/deactivate toolbar
Close submenus and pop-ups
2. 5-way Button
a. Enter key:
Select highlighted option by pressing the key
Define or translate words within Notes files by
cross-referencing to the selected dictionary
Activate Send in Scan to PC when in non-Auto
Send mode
b. Direction keys:
Activate the direction keys by pushing the 5-way
button in the desired direction
1. Right/Left direction keys:
Scroll right or left
2. Up/Down direction keys:
Scroll up or down
Create a new paragraph in
Down key
8
Notes using the
Page 11
The Pen User Interface
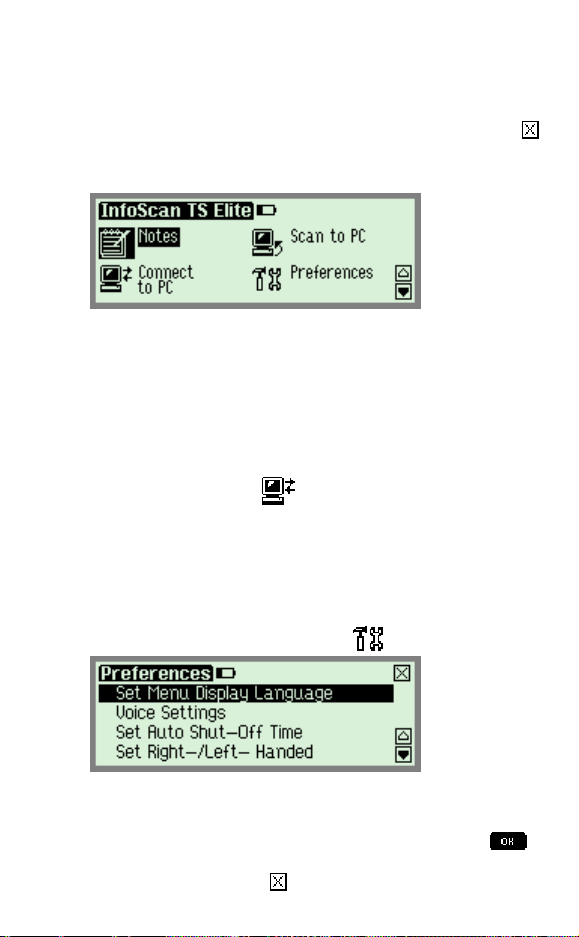
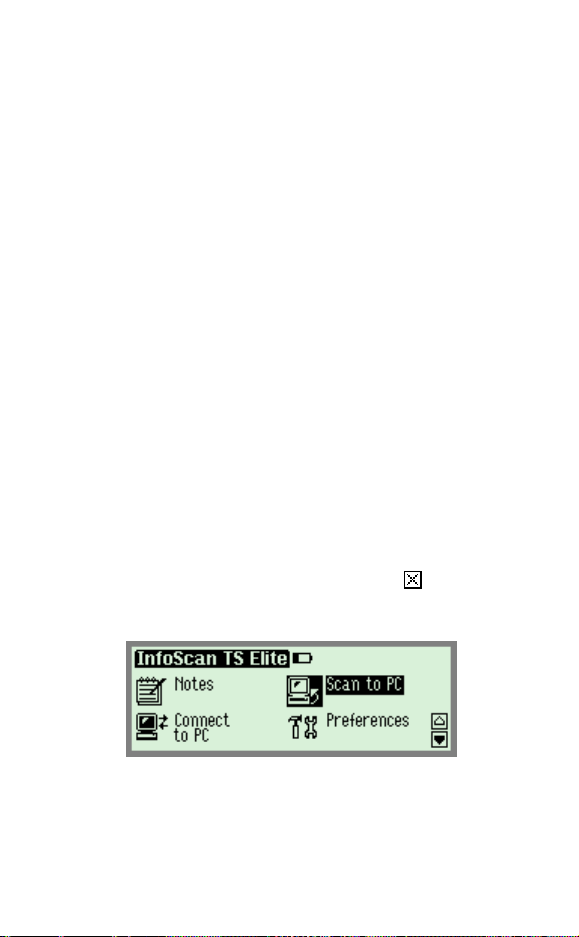
The Pen Main Menu
To access the Pen Main Menu, exit the application you are
currently working in (Notes or Scan to PC), by selecting
from the application toolbar. Use the stylus, or press the
ESC key and scroll with the right/left direction keys.
The Pen Main Menu
The following items appear in the Pen Main Menu:
Notes (See page 13)
Scan to PC (See page 25)
Connect to PC
Preferences
Information
Connect to PC
Use this option to communicate with the WizCom Desktop.
Selecting this option while the WizCom Desktop is running
on the PC will establish Pen-PC Communications and allow
you to move or copy Notes files from the Pen to your PC, or
to delete files currently stored on the Pen.
The Preferences Menu
Modify the default Pen settings using this menu, which can
be accessed via the Pen Main Menu or through the
Preferences option in the Settings menu of each
application. To accept changes press Enter or select
To return to the Preferences menu without making
changes, press ESC or
.
.
9
Page 12

The Pen User Interface
Set Menu Display Language
The menu display language is the language in which the
menus and messages appear (The Pen UI). Use this option
to change the menu display language.
Voice Settings
Use this option to modify the volume, pitch and reading
speed on the Pen. This affects the way text is read aloud in
Notes.
Set Auto Shut-Off Time
If the Pen is not in use it will shut down automatically after
two minutes. Use this option to change the automatic shutoff time setting.
Note: The auto shut-off feature is disabled while the Pen is
connected to the PC.
Set Right-/Left- Handed
Use this option to switch between right and left-handed
scanning. The Pen default is set to right-handed scanning.
Set Screen Contrast
Use this option to adjust the brightness of the display. Move
the slider bar by dragging with the stylus or using the
direction keys.
Calibrate Touch Screen
At times the stylus touch may become inaccurate. If so, the
touch screen will need to be recalibrated.
The touch screen can be calibrated by selecting the option in
the Preferences menu. Follow the instructions to calibrate
the screen. A message will appear if calibration is
successful.
Touch Screen Calibration
10
Page 13

The Pen User Interface
g
T
g
The Information Menu
View Memory Status
Use this option to see how much memory is available on the
Pen for storing new files.
Compact Memory
Maximize free space on the Pen's extension card by
compacting the Pen file system.
Serial Number
Use this option to view the Pen serial number.
About
Use this option to view the Pen version and copyright
information.
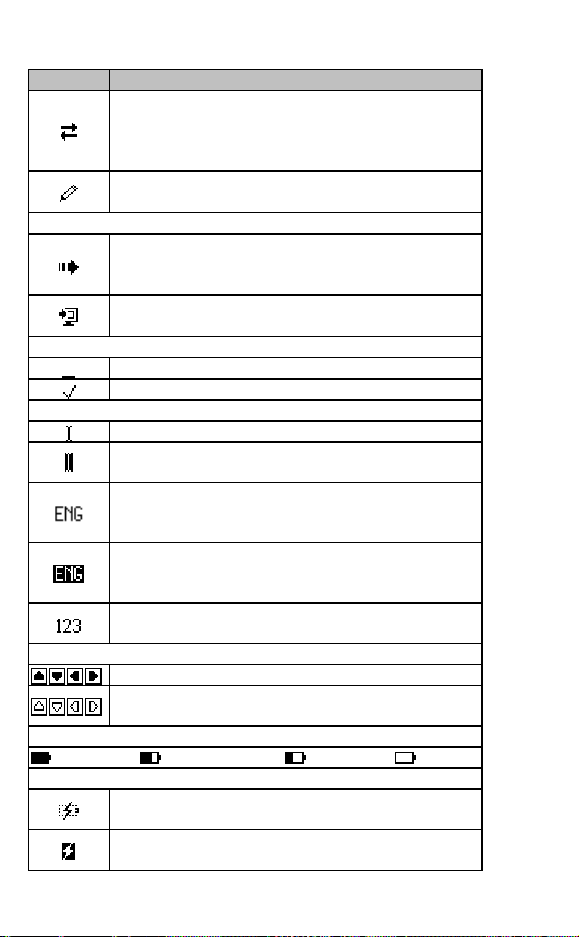
Icons and Indicators
The table below contains a list of icons and graphic
indicators. Icons can be selected by tapping on them with
the stylus, or by using the 5-way button.
Indicators cannot be selected and represent the current state
of the Pen.
Graphic Function
Common Toolbar Icons
Settin
Help: Display the Help menu options.
Pen Main Menu: Exit the application.
The Notes Toolbar
Read Aloud: Hear text on screen read aloud.
words by cross-referencing to the selected
dictionary.
New File: Create a new file.
File Operations: Open, rename or delete
existing files.
Para
an existing one.
s: Display the Settings menu options.
ranslate/Define Word: Define or translate
raph: Create a new paragraph or delete
11
Page 14
The Pen User Interface
g
V
A
A
r
Graphic Function
Beamin
communications. Files can be transferred using
IrOBEX compatible devices, such as PDAs
: Send and receive files via infrared
(Palm, IPAQ etc), or Smartphones.
Edit: Activate the
text.
irtual Keyboard to edit
The Scan to PC Toolbar
Send: When the
disabled, selecting this icon will send the
uto Send function is
scanned line to the PC.
uto Send: Indicates that scanned text will be
sent immediately to the PC.
Settings Menu – toggle options
Indicates that the option is OFF.
Indicates that the option is ON.
Scanning Settings indicators
Indicates ready to scan.
Indicates ready to scan inverse text (white text
on dark background).
Language Indicato
language the Pen is currently set to scan (i.e.
ENG = English).
: Shows the scanning
Inverse Mode: Indicates that the Pen is set to
scan inverse text (white text on dark
background).
Numeric Mode: Indicates that the Pen is set to
scan numbers only.
Scrollbars
Scroll using the stylus.
Inactive scrollbars indicate that there is no text
to scroll through.
Battery Indicators
High Medium Low Empty
External Power Indicators
Indicates that the Pen is powered by the PC but
the Pen contains batteries.
Indicates that the Pen is powered by the PC and
the Pen contains no batteries.
12
Page 15

The Pen Applications
The Pen Applications
Notes
The Notes Functions
Notes is used primarily for scanning text and storing it on
the Pen for future transfer to the PC using the WizCom
Desktop.
Text can also be inserted manually using the Virtual
Keyboard, and files can be transferred using infrared
communications between the Pen and other IrOBEX
compatible devices.
Notes can also be used to define or translate text from
within a file using the dictionaries installed on the Pen.
For a step-by-step guide to using Notes see the
Tutorial
on page 17.
Transferring Files
Files can be transferred from the Pen in two ways:
1. Transferring files using the WizCom Desktop
Files are saved on the Pen and then transferred to the
PC using the WizCom Desktop. For information on how
to manage files using the WizCom Desktop, see
Managing Notes Files using the WizCom Desktop
on page 37.
2. Beaming Files Using Infrared Communications
Files can be beamed and received using infrared
communications. For instructions see
page 15.
Notes
Beaming
on
The Notes Toolbar
The toolbar appears on the top right corner of the screen. It
can be accessed using either the stylus or the Pen keys.
13
Page 16

The Pen Applications
Accessing the Toolbar
Using the Stylus
a. Tap the icon to open the toolbar item. The tool-tip will
appear, followed by the drop down menu.
b. Tap with the stylus to select a menu option or scroll
up/down by activating the scroll bar.
c. To deselect the toolbar, simply tap in a space outside
the menu or toolbar.
Using the Pen Keys
a. Press ESC to access the toolbar. The leftmost toolbar
item will be highlighted.
b. Use the Right/Left direction keys to scroll between the
toolbar items and press Enter to access the desired
menu.
c. Scroll up/down within the menu using the Up/Down
direction keys. Exit the menu by pressing ESC and then
press ESC again to deselect the toolbar.
Toolbar Options
Read Aloud
Hear scanned or inserted text read aloud in supported
languages. This icon does not appear if the selected
dictionary does not contain support for reading aloud.
Translate/Define Word (cross-reference)
Use this function to view the translation or definition of words
within Notes files. The cross-reference function is available
only when the source language of one or more of the
dictionaries installed on the Pen corresponds to the selected
scanning language.
If there is more than one dictionary on the Pen whose source
language is the same as the current scanning language, the
Select Dictionary option appears in
toolbar. Use this option to switch between the dictionaries.
Accessing the cross-reference function:
a. Use the stylus or the direction keys to place the cursor
at the word you wish to view.
b. Select
the dictionary entry.
14
from the Notes toolbar or press ENT to view
on the Notes
Page 17

The Pen Applications
New File
Create a new file. If there is scanned text on the screen,
selecting
default file name.
will automatically save the previous file under a
File Operations
Use this option to open or delete stored files, or to rename
the current file.
Paragraph
Use this option to create or delete paragraphs.
Beaming
Use this option to beam and receive files using infrared
communications. Files can be transferred using IrOBEX
compatible devices, such as PDAs (Palm, IPAQ etc), or
Smartphones.
Note: Only files saved as text files (.txt) can be sent to the
Pen.
Using infrared communications to beam and receive files:
1. Beaming Files
a. In the Notes application, open the Notes file you
wish to beam.
b. Confirm that the infrared port on the receiving
device is enabled to receive.
c. Align the Pen's infrared screen (see
Parts
on page 4) with the infrared component on
the receiving device.
d. Select Beam Current File from
toolbar.
e. Wait for the success confirmation message on the
Pen.
2. Receiving Files
a. Make sure that the sending device is set to send a
text file.
b. Select Receive File from
c. Align the Pen's infrared screen (see
on page 4) with the infrared component on
Parts
the sending device.
in the Notes toolbar.
The Pen
in the Notes
The Pen
15
Page 18

The Pen Applications
g
d. Initiate infrared file sending from the sending
device.
e. Wait for the success confirmation message on the
Pen.
f. The file from the sending device will open on the
Pen screen, and will be saved automatically into
the Notes files system.
Edit
Access the Virtual Keyboard to modify scanned text or to
insert new text. See
23 for information on using the Virtual Keyboard.
Editing and Inserting Text
on page
Settings
The Settings menu contains the following options:
Enlar
ed Font
Inverse
Numeric
Set Language
for New File
Select
Dictionary
Preferences
Change the display setting to enlarged
font.
Scan inverse text (white text on dark
background).
Use this option to scan numbers.
Change the scanning language for the
next new file. See
Language for Scanning
Choose the dictionary you wish to use for
cross-referencing. This option only
appears if there is more than one
dictionary available for the source
language.
Display the Preferences menu (from the
Pen Main Menu).
Selecting a
on page 40.
Help
The Help menu contains the following options:
Icons
Keys
16
An explanation of icons and graphic
indicators.
An explanation of the Pen keys and their
functions.
Page 19

The Pen Applications
Notes Tutorial
This tutorial will take you through the basic use of the Notes
application.
The tutorial has two parts:
Using Notes on the Pen
Transferring Notes files to the PC using the WizCom
Desktop
Using Notes
Press the red power key to turn the Pen on. Make sure you
are in Notes. The following screen should appear:
Note: If you don’t see the
icon from the Pen Main Menu by tapping on it with the
stylus or by using the direction keys.
Select
set to English, select
stylus or by pressing ESC (red key) and using the direction
keys. Choose Set Language for New File from the dropdown menu and select English.
to create a new file. If the scanning language is not
Notes
screen, select the Notes
from the toolbar by tapping with the
1. Scanning a line of text
Scan the following line:
Roll the scanning device over printed words
The following screen should be visible:
17
Page 20

The Pen Applications
2. Inserting and deleting paragraphs
Select from the Notes toolbar. You will see a dropdown menu with two options:
a. Select New Paragraph. The cursor should move
down to the next line.
b. Scan the following line:
and see how the words appear on your Pen.
The following screen should be visible:
c. Go back to and select Delete Paragraph. A
confirmation message should appear. Select
The new paragraph should disappear and the
cursor should return to the end of the first line.
d. Scan the above sentence again.
The following screen should be visible:
.
3. Deleting and Editing text
a. Select to delete the last scan (which is
underlined).
b. Select
following characters using the stylus:
18
to open the Virtual Keyboard. Insert the
Page 21

The Pen Applications
or tap them in.
c. Select to close the Virtual Keyboard.
The edited text should appear on the screen:
4. Cross-referencing words using the installed
dictionaries
a. Using the stylus, tap the word 'device'. The blinking
cursor should appear at the point you tapped.
b. Select
Note:
If this is your first time using this function, and there
is more than one dictionary on the Pen whose
source language matches the current scanning
language, the Select Dictionary pop-up will
appear. Select the AHD Office dictionary. If you
have already used this function, go to
choose Select Dictionary.
If there is only one dictionary corresponding to the
current scanning language, this dictionary will be
selected automatically.
A pop-up similar to the following should be visible. The
dictionary entry will vary depending on which dictionaries
are installed on your Pen.
from the Notes toolbar.
and
c. Scroll through the dictionary entry using and .
d. Select
or press ESC to close the pop-up.
19
Page 22

The Pen Applications
5. Hear scanned text read aloud
Select from the Notes toolbar. The entire sentence
will be read aloud.
Note: This function is only available when the Pen
contains support for reading aloud in the selected
language.
6. Working with files
Select from the Notes toolbar. You will see a dropdown menu with three options:
a. Select Rename Current File. The Virtual
Keyboard will open and the file name 'file001' will
appear highlighted in the editing area. This is the
default file name.
b. Using the stylus, change the name of the file to
'scanning'. Select
c. Select
following text:
to create another file. Scan in the
to accept changes.
This is another scanning example.
d. Go to and select Rename Current File.
Change the file name to 'example'. Select
e. Go back to
that there are now two files on your Pen. Open the
previous file, 'scanning'.
f. Go to
files again. Select the second file and press
when prompted.
Note: All scanned text is automatically saved in the
current file under a default file name. If you have
scanned text on your screen and you choose to create
a new file, you can return to the previous text by
20
and select Open File. You will see
and select Delete File. You will see both
.
Page 23

The Pen Applications
selecting Open File in and scrolling down to the last
file saved.
Select
to the Pen Main Menu.
from the Notes toolbar to close Notes and return
Transferring Notes files to the PC using
the WizCom Desktop
The WizCom Desktop must be installed in order to connect
the Pen to the PC and transfer files.
If you have not yet installed the WizCom Desktop see
Installing the WizCom Desktop
Make sure the USB cable is connected to both Pen and PC.
On the PC:
1. Launch the WizCom Desktop. If the WizCom Desktop
is not already running, it can be activated by doubleclicking on the WizCom Desktop icon on the Windows
Desktop.
2. The WizCom Desktop icon
Windows task bar, in Offline mode (gray).
On the Pen:
From the Pen Main Menu select Connect to PC.
on page 6.
will appear in the
Connect to PC in the Pen Main Menu
The message "Connecting to PC..." will appear.
Note: If the message "Error Connecting to PC" appears,
check that the USB cable is connected to both the Pen and
PC, and that the WizCom Desktop has been installed
correctly and is running on the PC (the gray icon is visible in
the notification area of the Windows taskbar).
21
Page 24

The Pen Applications
Pen-PC Communications:
When the Pen and PC successfully establish
communications, the message "Connected to PC. Press
ESC key on Pen to exit" will appear on the Pen screen.
The WizCom Desktop will appear on the PC screen, and the
icon in the taskbar will change from Offline to Online
(green).
The Pen Files tab on the WizCom Desktop will display the
files currently on the Pen:
A section of the WizCom Desktop showing files currently on the Pen.
Managing Files using the WizCom
Desktop
1. Using the mouse, select the file 'example.txt' and press
. This will copy the file to the PC. A browser window
will appear, allowing you to change the destination
folder.
2. Next, with the same file highlighted, select
delete the file from the Pen and from the WizCom
Desktop. When the confirmation pop-up appears,
select OK.
3. Select the remaining file and press
'scanning.txt' from the Pen to the PC. A browser
window will appear, allowing you to change the
destination folder.
The Pen Files tab in the WizCom Desktop should now be
empty.
Note: Moving or deleting files using the WizCom Desktop will
also delete them from the Pen.
22
. This will
. This will move
Page 25
The Pen Applications
Files can be managed using the WizCom Desktop
buttons or by clicking in the edit menu bar in the WizCom
Desktop Menu. To move all the files on the Pen select the
Move all Pen Files to PC option.
Press the ESC key on the Pen to disconnect the Pen from
the WizCom Desktop. The Pen returns to the Pen Main
Menu and the WizCom Desktop switches back to Offline
mode.
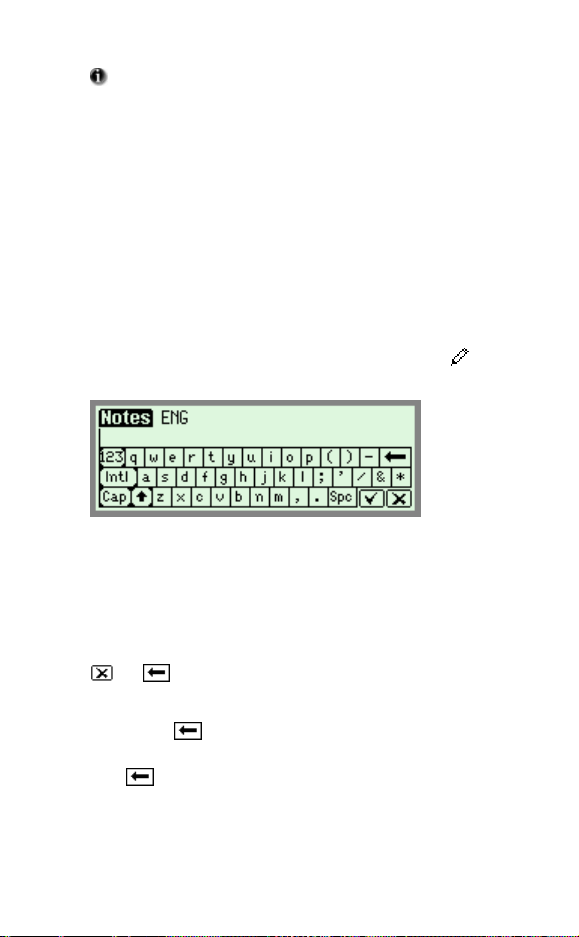
Editing and Inserting Text
Use the Virtual Keyboard to input or edit text with the
stylus. To access the Virtual Keyboard select
application toolbar.
from the
The English Virtual Keyboard
The Editing Area
This is the insertion point for new text, as indicated by the
blinking cursor. Use the stylus to enter or edit new text with
the character keys, or scan text directly into the editing area.
Scanned text is underlined. Tapping any key other than
or will accept the inserted text.
Text can be erased by:
1. Using
2. Highlighting the text with the stylus and either selecting
to delete individual characters.
, or typing/scanning over the highlighted text.
The Keyboard
The keyboard layout corresponds to the selected scanning
language settings.
23
Page 26

The Pen Applications
The Keys:
Backspace
Tap to delete characters to the left of the cursor.
Close and Cancel
or ESC
or Enter
Tap to reject all changes and return to the
application screen.
Close and Save
Tap to accept all changes and return to the
application screen.
Shift
Tap to switch to uppercase characters. The
keyboard will automatically return to the regular
layout after selecting one character.
Caps Lock
Tap to view the upper-case character keyboard.
Tap again to return to regular layout.
International
Tap to switch to the international keyboard. The
keyboard will automatically return to the regular
layout after selecting one character.
Numeric
Tap to view the numeric keyboard. Tap again to
return to regular layout.
24
Page 27

The Pen Applications
Scan to PC
The Scan to PC Functions
Scan to PC is used to scan text and send it directly to the
PC. Text can be scanned into any file or application on the
PC that has a blinking cursor.
The WizCom Desktop must be running and active on the PC
screen. If there is no Scan to PC compatible application
open on screen, the text will still be sent from the Pen, but
will not be accessible on the PC.
For a step-by-step guide to using Scan to PC, see the
to PC Tutorial
on page 27.
Scanning Modes
Scan to PC has two scanning modes:
Auto Send
Scan
When this option is selected in the Scan to PC toolbar
settings menu, any text that is scanned is sent directly into
an open file on the PC that has a blinking cursor.
Non-Auto Send
When the Auto Send option in the Scan to PC toolbar
settings menu is disabled, Scan to PC changes to non-
Auto Send mode. Scanned text is shown on the screen,
and the user can choose whether to send the text or not.
When text is scanned, the Send option is highlighted on the
toolbar. The user can either send the scanned text, or erase
the scanned text by scanning again.
25
Page 28
The Pen Applications
g
A
A
The Scan to PC Toolbar
The toolbar appears on the top right corner of the screen. It
can be accessed using either the stylus or the Pen keys.
See
Accessing the Toolbar
on page 14.
The Scan to PC Toolbar
Toolbar Options
Send
Use this option to send scanned text to the PC when Auto
Send is not selected in the Settings menu.
Settings
The Settings menu contains the following options:
ed Font
Enlar
uto Send
Inverse
Numeric
Change
Scanning
Language
Preferences
Help
The Help menu contains the following options:
Icons
Keys
26
Change the display setting to enlarged
font.
Alternate between
Auto Send modes. See
on page 25.
Modes
Scan inverse text (white text on dark
background).
Use this option to scan numbers.
Change the scanning language for the
next scanned text. See
Language for Scanning
Display the Preferences menu (from the
Pen Main Menu).
An explanation of icons and graphic
indicators.
An explanation of the Pen keys and their
functions.
uto Send and non-
Scanning
Selecting a
on page 40.
Page 29
The Pen Applications
Scan to PC Tutorial
This tutorial will take you through the basic use of Scan to
PC.
Scan to PC is used to scan text and send it directly to the
PC. Text can be scanned into any file or application on the
PC that has a blinking cursor.
The WizCom Desktop must be running in order to use Scan
to PC. If you have not yet installed the WizCom Desktop see
Installing the WizCom Desktop
Establishing Pen-PC Communications
Make sure the USB cable is connected to both the Pen and
PC.
On the PC:
Launch the WizCom Desktop. If the WizCom Desktop is not
already running, it can be activated by double-clicking on the
WizCom Desktop icon on the Windows Desktop.
The WizCom Desktop icon will appear in the Windows task
bar, in Offline mode (gray).
On the Pen:
1. Press the red power key to turn the Pen on. If you do
not see the Pen Main Menu, select
current application and return to the Pen Main Menu.
2. From the Pen Main Menu select Scan to PC.
on page 6.
to exit the
Scan to PC in the Pen Main Menu
The message "Connecting to PC..." will appear.
Note: If the message "Error Connecting to PC"
appears, check that the USB cable is connected to both
the Pen and PC, and that the WizCom Desktop has
27
Page 30

The Pen Applications
been installed correctly and is running (the gray icon is
visible in the notification area of the Windows taskbar).
Pen-PC Communications:
When the Pen and PC successfully establish
communications, the WizCom Desktop icon in the taskbar
will change from offline to Scanning to PC mode (green and
yellow). The Pen will enter the Scan to PC application.
The following screen should be visible:
Scan to PC
Set the scanning language to English as follows:
1. Select
by pressing ESC (red key) and using the direction keys.
2. Choose Set Scanning Language from the drop-down
menu and select English.
from the toolbar by tapping with the stylus or
Using Scan to PC
On the PC:
1. Open a Microsoft Word Document.
2. Set the language to English using the language option
in the Formatting Toolbar.
The Language option in the Formatting Toolbar
3. Make sure that a blinking cursor is visible, indicating
that text can be inserted into the document.
Scan to PC can be used with any computer application
that text can be inserted into (has a blinking cursor), e.g.
most Microsoft Office applications, MSN Messenger and the
address bar of Internet Explorer.
28
Page 31
The Pen Applications
On the Pen:
Scan to PC has two modes: Auto Send and non-Auto
Send. The Pen's default setting is Auto Send.
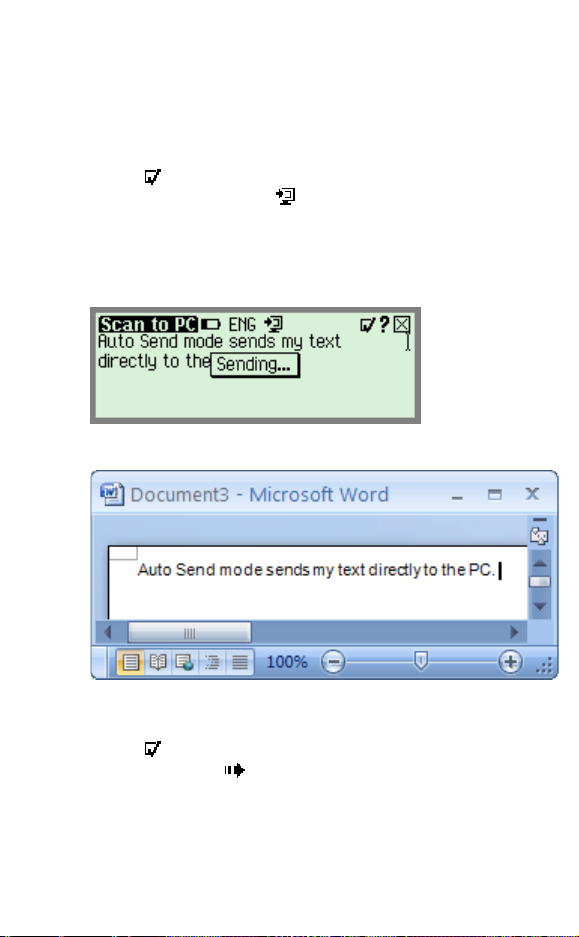
Using Auto Send mode:
confirm that the Auto Send option is on
1. In
(checked), and that
2. Scan the following line:
Auto Send mode sends my text directly to the PC.
The 'Sending...' message appears on the Pen Screen:
appears on the top of the screen.
Sending text to the PC
The scanned text is sent to the PC with the following result:
The scanned text appearing in the MS Word file
Using non-Auto Send mode:
1. In
change the Auto Send option to off (not checked),
and see that
toolbar.
2. Scan the following line:
(the Send icon) is now visible in the
Select Send to send this text to the PC.
29
Page 32

The Pen Applications
The following screen should appear:
Scan to PC in non-Auto Send mode
Scanning Tips: In non-Auto Send mode, if the
scanning results are bad, simply scan again before you send
the text, and the text on screen will be replaced with the
newly scanned text. This is not possible in Auto Send
mode, as the text is sent immediately to the PC.
3. Make sure the same Microsoft Word file as before is
open on the PC and that the blinking cursor is visible.
4. On the Pen select Send by either tapping on it with the
stylus or pressing the Enter key.
5. The
'Sending...' box should appear on the Pen screen.
The scanned text is sent to the PC with the following result:
The scanned text appearing in the MS Word file
30
Page 33

The Pen Applications
Changing Scan to PC Settings in the
WizCom Desktop
The Scan to PC settings in the WizCom Desktop determine
what key is inserted after each line of text is sent to the PC
application. The default setting is Space, meaning that a
space is inserted after each scan appears in the application.
To change the setting:
1. Click on the WizCom Desktop icon
yellow) in the notification area of the Windows taskbar.
A menu list will appear.
2. From the menu list, click on Scan to PC Settings. A
list will appear, showing the four available options. The
current setting is checked.
(green and
Scan to PC Settings in the WizCom Desktop taskbar menu
3. Select the setting you wish to use. This setting will be
applied for the next scans.
To exit Scan to PC, select from the Scan to PC toolbar.
The Pen will return to the Pen Main Menu, and the
WizCom Desktop icon will revert to Offline mode
(grey).
31
Page 34

The WizCom Desktop
The WizCom Desktop
Introduction to the Desktop
The WizCom Desktop has two main functions:
The management of Notes files on the PC
Scanning text to the PC using Scan to PC
Instructions for installing the WizCom Desktop and
establishing Pen-PC Communications can be found on p6.
Launching the Desktop
By default, the Desktop is launched upon startup of
Windows. This setting can be changed in the Settings tab
of the Desktop.
The Desktop icon will appear in the Windows taskbar in
Offline mode
appear:
(gray), and the following message will
If the Desktop is not already running, it can be activated by
clicking on the Desktop icon on the Windows Desktop. The
above message will appear once again, and the Desktop
icon will appear in the taskbar.
The Desktop Modes
The Desktop runs in three different modes:
Offline
Online
Scanning to PC
The current mode can be seen on the Desktop and in the
notification area of the Windows taskbar.
32
Page 35

The WizCom Desktop
Offline
The Desktop runs in Offline mode when Pen-PC
communications have not been established.
The Offline icon
area of the Windows taskbar.
Selecting Open from the taskbar will open the Desktop
in the Settings tab. The Pen Files tab is inaccessible.
The Offline mode indicator
bottom of the Desktop window.
Note: Selecting Connect to PC or Scan to PC from the Pen
Main Menu will switch the working mode.
(gray) appears in the notification
(red) is seen at the
Online
The Desktop is in Online mode when communicating with
the Pen through Connect to PC in the Pen Main Menu.
The Online icon
area of the Windows taskbar.
The Desktop opens on screen in the Pen Files tab.
The Online mode indicator
bottom of the Desktop window.
Note: Exiting Pen-PC Communications by selecting the ESC
key on the Pen will switch the Desktop to Offline mode and
minimize the Desktop.
(green) appears in the notification
(green) is seen at the
Scanning to PC
The Desktop is in Scanning to PC mode when
communicating with the Pen through Scan to PC in the Pen
Main Menu.
The Scanning to PC icon
appears in the notification area of the Windows taskbar.
Selecting Open from the taskbar will open the Desktop
in the Settings tab. The Pen Files tab is inaccessible.
The Scanning to PC mode indicator
at the bottom of the Desktop window.
Note: Exiting Pen-PC Communications by selecting
the Scan to PC toolbar on the Pen will switch the Desktop to
Offline mode.
(green and yellow)
(yellow) is seen
from
33
Page 36

The Desktop User Interface
View
V
The Desktop User Interface
The Desktop Main Menu
The Desktop Main Menu contains four menus:
Menu Options
File
Edit
Help
Exit:
Exits the WizCom Desktop.
Move files from Pen to PC:
Moves the selected files to the PC and deletes
them from the Pen
Copy files from Pen to PC:
Copies the selected files to the PC
Delete files from Pen:
Deletes the selected files from the Pen
Move all Pen files to PC:
Moves all the Pen files to the PC and deletes them
from the Pen
Select all files:
Selects all the files in the Pen Files list
Note: This menu is only available in Online mode
Use this menu to switch between the Desktop tabs:
Pen Files - only available in Online mode
Settings
iew User Manual:
Displays the help file for your Pen
About:
Displays version and copyright information for the
Desktop
The Desktop Tabs
There are two tabs on the Desktop:
1. The Pen Files Tab
Notes files are managed using this tab. The tab is only
available when the Pen is connected to the PC using the
Connect to PC option from the Pen Main Menu.
34
Page 37

The Desktop User Interface
All files currently on the Pen are displayed in the Pen
Files pane, as seen in the following example:
The Memory Status Bar
The Memory Status Bar at the bottom of the Desktop
window, shows the Data Files Memory Status of the
Pen.
Used Space shows the amount of space used by files
currently on the Pen, and Free Space shows how much
space is left for new files.
The Memory Status Bar
2. The Settings Tab
35
Page 38

The Desktop User Interface
Use the Settings tab to do the following:
1. Pen Files folder: Change the default folder for
copying and moving files from the Pen to the PC.
2. Key inserted after each Scan to PC: Select the
key to be inserted after each line of text is sent to
the PC application. There are four options: Space,
Tab, New Line and None.
3. Start Desktop when I start Windows: Change
the default Desktop start-up setting. Deselecting the
box means that the Desktop will only start when its
icon is selected from the Windows Desktop.
Use the buttons in the Settings tab to do the following:
1. Restore Default: Restore the Settings options to
their default settings.
2. Report: Generate a report with information about
the Pen and PC software you are using. The report
is used to assist with technical support and is only
available when the Pen is online.
The Task Bar Icons and Menu
The Desktop icon appears in the notification area of the
Windows taskbar when the Desktop is running. Clicking the
icon will open the Desktop window.
The icon has three modes:
Offline
Online
Scanning to PC
(gray)
(green)
(green and yellow)
The taskbar menu
36
Page 39

The Desktop User Interface
Clicking on the taskbar icon opens the taskbar menu. The
taskbar menu has the following four options:
1. Open: Opens the Desktop window.
2. Scan to PC Settings: Allows you to determine what
key is inserted after each line of text is sent to the PC
application. There are four options: Space, Tab, New
Line and None.
3. Exit: Exits the WizCom Desktop.
4. About: Displays version and copyright information for
the Desktop.
Managing Notes Files Using the
Desktop
Managing Notes files
Files can be moved, copied or deleted from the Pen using
the Desktop. To do this, files must first be selected from the
Pen Files tab.
You can select files using any of the following methods:
1. Select individual files with the mouse.
2. Use the Select all files option in the Edit menu.
3. Select Ctrl+A on the PC keyboard to select all files.
Notes files are managed using the following four options:
Move all Pen files to PC
Use this option to move all Pen files to the PC. All files will
be deleted from the Pen. The option can be accessed in
three ways:
1. From the Edit menu.
2. Using the Move all Pen files to PC icon
Files tab.
3. By selecting Ctrl+V on the PC keyboard.
in the Pen
37
Page 40

The Desktop User Interface
Move files from Pen to PC
Use this option to move selected Pen files to the PC. All
moved files will be deleted from the Pen. The option can be
accessed in three ways:
1. From the Edit menu.
2. Using the Move files from Pen to PC icon
Pen Files tab.
3. By selecting Ctrl+M on the PC keyboard.
in the
Copy files from Pen to PC
Use this option to copy selected Pen files to the PC. Copied
files will not be deleted from the Pen. The option can be
accessed in three ways:
1. From the Edit menu.
2. Using the Copy files from Pen to PC icon
Pen Files tab.
3. By selecting Ctrl+C on the PC keyboard.
in the
Delete files from Pen
Use this option to delete selected Pen files. The option can
be accessed in three ways:
1. From the Edit menu.
2. Using the Delete files from Pen icon
Files tab.
3. By selecting Delete on the PC keyboard.
in the Pen
38
Page 41

Tips
Tips
Changing Scanning Settings
Scanning settings can be modified via the Settings menus
in Notes and Scan to PC.
The Settings menus in Notes and Scan to PC
Changing the Font Size
There are two font sizes to choose from – regular and
enlarged. You can change the font size by selecting or
deselecting the Enlarged Font option in the Settings menu
in the Pen applications.
Note: The default setting is Enlarged Font.
Regular Font
Enlarged Font
39
Page 42

Tips
Inverse
The default scanning setting allows you to scan dark text on
a light background. To enable scanning of light text on a
dark background, select the Inverse option in the Settings
menu.
Numeric
Use this option when scanning numbers only.
Selecting a Language for Scanning
Files can be scanned in various languages.
In Notes, the language setting can be changed through Set
Language for New File. This setting allows you to change
the scanning language for the next new file you open in
Notes.
Note: The scanning language will only change when you
open a new file. The current file will still retain the previous
scanning language setting.
In Scan to PC, the language setting can be changed
through Change Scanning Language.
If you are working in Auto Send mode, the language
change will be applied immediately. If you are working in
non-Auto Send mode and there is unsent text on the
screen, a confirmation message will appear before the
language is changed.
Change Scanning Language confirmation in Scan to PC
40
Page 43

Tips
Scanning Guidelines
Scanning Mode
The Pen is in scanning mode when the red light at the tip of
the Pen is blinking. Scanning mode is disabled when you are
not in Notes or Scan to PC, or when accessing a toolbar
menu.
Scanning Restrictions
The Pen scans and recognizes printed text in a wide range
of languages, font types and point sizes (6-22 points, up to
8mm) and in a variety of colors on contrasting backgrounds
(except red on white, white on red, blue on black and black
on blue).
It does not recognize handwriting, cursive fonts,
mathematical symbols or other profession-specific signs.
Scanning Direction
Text can be scanned from right to left or from left to right.
Both will produce the same results.
Troubleshooting Poor Character
Recognition
Poor character recognition may occur for the following
reasons:
Low quality scanning material.
The scanning settings are not set correctly (e.g.
Inverse).
Holding the Pen at the wrong scanning angle.
Scanning too fast.
Tips for Good Scanning
To ensure optimum scanning results:
Hold the Pen at the correct scanning angle.
Place the scanning material on a flat surface.
Ensure scanning material is good quality and pages are
not creased. Note that poorly photocopied materials
may provide bad results.
Do not scan too fast.
41
Page 44

Tips
Pen Maintenance
To keep your product in good condition, follow these
guidelines:
Store in protective case when not in use.
Keep away from excessive moisture and temperature
extremes.
Clean using a soft, damp cloth.
Do not use soap or other cleaning aids on the touch
screen.
Avoid exposing to direct sunlight for extended periods of
time.
Avoid scratching or damaging the touch screen.
CAUTION: To reduce the risk of electrical shock or damage
to the internal components, do not spray liquid directly on the
screen or allow excess liquid to drip inside your Pen.
Troubleshooting Pen-PC
Communications
If you receive an error message when attempting to select
Connect to PC or Scan to PC from the Pen Main Menu,
please follow the instructions below to confirm that you have
successfully followed the installation procedures.
Confirm that:
1. Both the Desktop and the USB driver have been
successfully installed, as instructed in the CD-ROM. If
they have not been installed, or there were problems
with the installation, insert the CD-ROM and click on the
WizCom Desktop Installation button for instructions
on installing the software and the USB driver.
2. The WizCom Desktop is running.
Click on the WizCom Desktop icon on the Windows
desktop to launch the application. If you fail to launch
the WizCom Desktop, and receive a message indicating
that you should install the WizCom Pen USB driver, do
the following:
a. Connect the USB cable to both Pen and PC.
42
Page 45

Tips
b. The Add New Hardware Wizard should appear.
c. Select the recommended path for installing the
driver.
d. During the installation, a pop up message appears
warning that the driver has 'not passed Windows
Logo testing' - select Continue Anyway.
e. Complete the Add New Hardware Wizard.
3. The PC connector side of the USB cable is connected
to a USB port on your PC
4. The Pen connector side of the USB cable is connected
to the USB outlet on the Pen Top Panel.
If you have followed all the above steps and you are still
having problems, it may be that the WizCom Pen USB
Driver has only been partially
installed. To rectify this:
1. Make sure the Desktop is NOT running (if you can see
the icon
in the notification area of the Windows
taskbar, right-click on it and select Exit to completely
shut down the application).
2. Connect the Pen to the PC with the USB cable as
explained above in steps 3 and 4.
3. Access the Windows Device Manager as follows:
a. Right click the My Computer icon from the
Windows desktop.
b. Select Properties.
c. Select the Hardware tab.
d. Click on Device Manager.
(Alternatively, from the Windows taskbar, go to
Start/Settings/Control Panel and click on
System/Hardware/Device Manager).
4. Open the Imaging Devices folder of the Device
Manager.
5. If the WizCom Pen appears listed - with a yellow
exclamation mark
- it means the driver has not been
successfully installed.
6. Right click this icon and select Update Driver.
43
Page 46

Product Specification
Product Specification
Pen Specification
Feature Description
Display Type Touch Screen Monochromatic FSTN
Keypad Navigation Switch (Enter, Up, Down,
CPU ARM7 ASIC, 16 bit, 80 MHz
Memory
SRAM 64 K x 16 bit
ROM/RAM 8 MB
Optical Scanner 128 pixels linear array image sensor
Communications
IRDA, 115,200 bps Optional
USB1.1 Yes
Power
Internal Power 2 x 1.5V AAA Alkaline batteries
External Power USB cable connected to PC
Current Consumption Idle mode - 42 mA
Size L x W x H:
Weight 77 grams (2.716 oz.) without
Safety CE
Operating Temperature
Range
Resolution: 208 x 65
Size: 61mm x 20mm / 2.4” x .8”
Left, Right)
Push Button - Power/ESC
400 DPI resolution
Max. (Peak) - 212 mA
177.5 mm x 41.5 mm x 33 mm
(7” x 1.62” x 1.3”)
batteries
100 grams (3.527 oz.) with batteries
UL
FCC class B
0°C - 40°C
Desktop Specification
The WizCom Desktop is compatible with Windows XP and
Vista. Installing the Desktop on a PC with an incompatible
operating system may cause it to operate ineffectively.
The PC must have an available USB port.
44
 Loading...