

Page 1
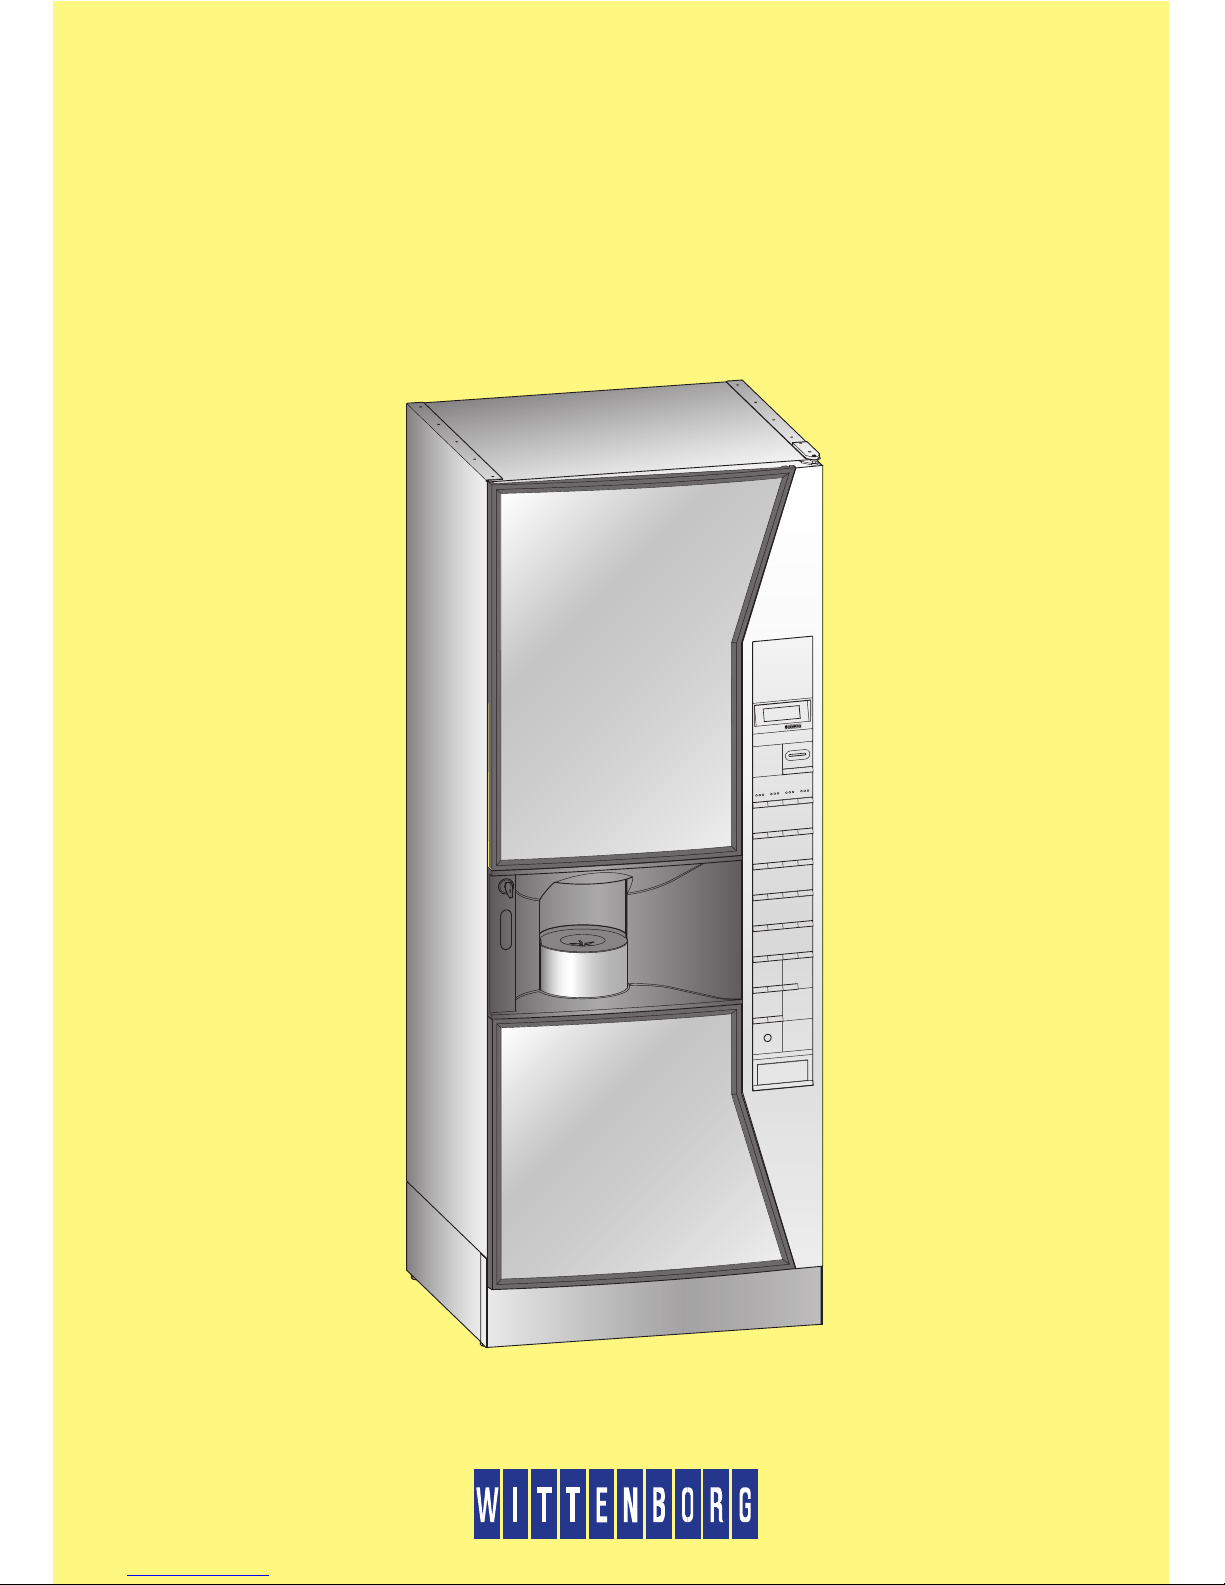
Quick Reference Guide
IN 7600
1
04.01
75517800
Page 2
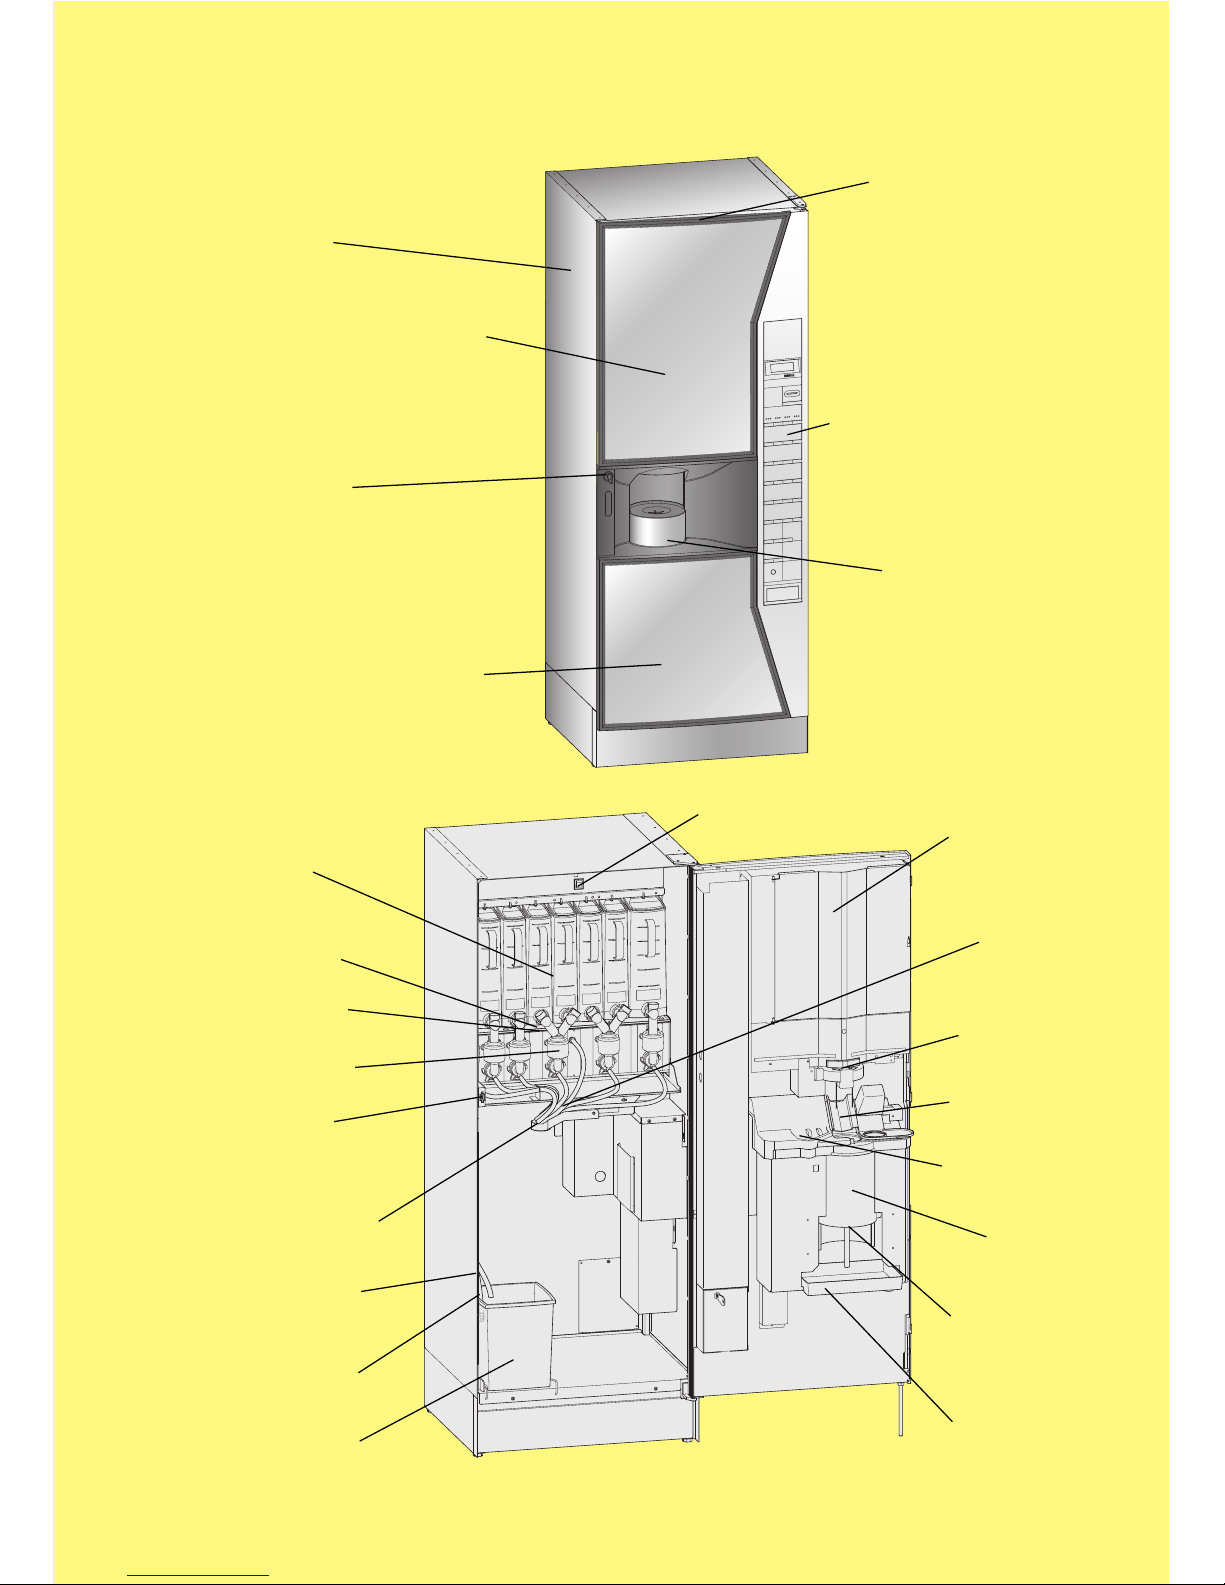
Description of the Machine Components
2
Cabinet door
Operating module
Cup platform
Cabinet
Upper advertising panel
Door lock
Lower advertising panel
Ingredient
canisters
Under trays
Outlet spout
Mixing funnel
Door switch
Distributor head
Overflow drain
hose
Sensor, waste
bucket
Waste bucket
Main switch
Cup
magazine
Outlet
hoses
Cup drop
ring
Cup slide
Drip guide
Cup
station
Release
lever, cup
platform
Drip tray
Page 3
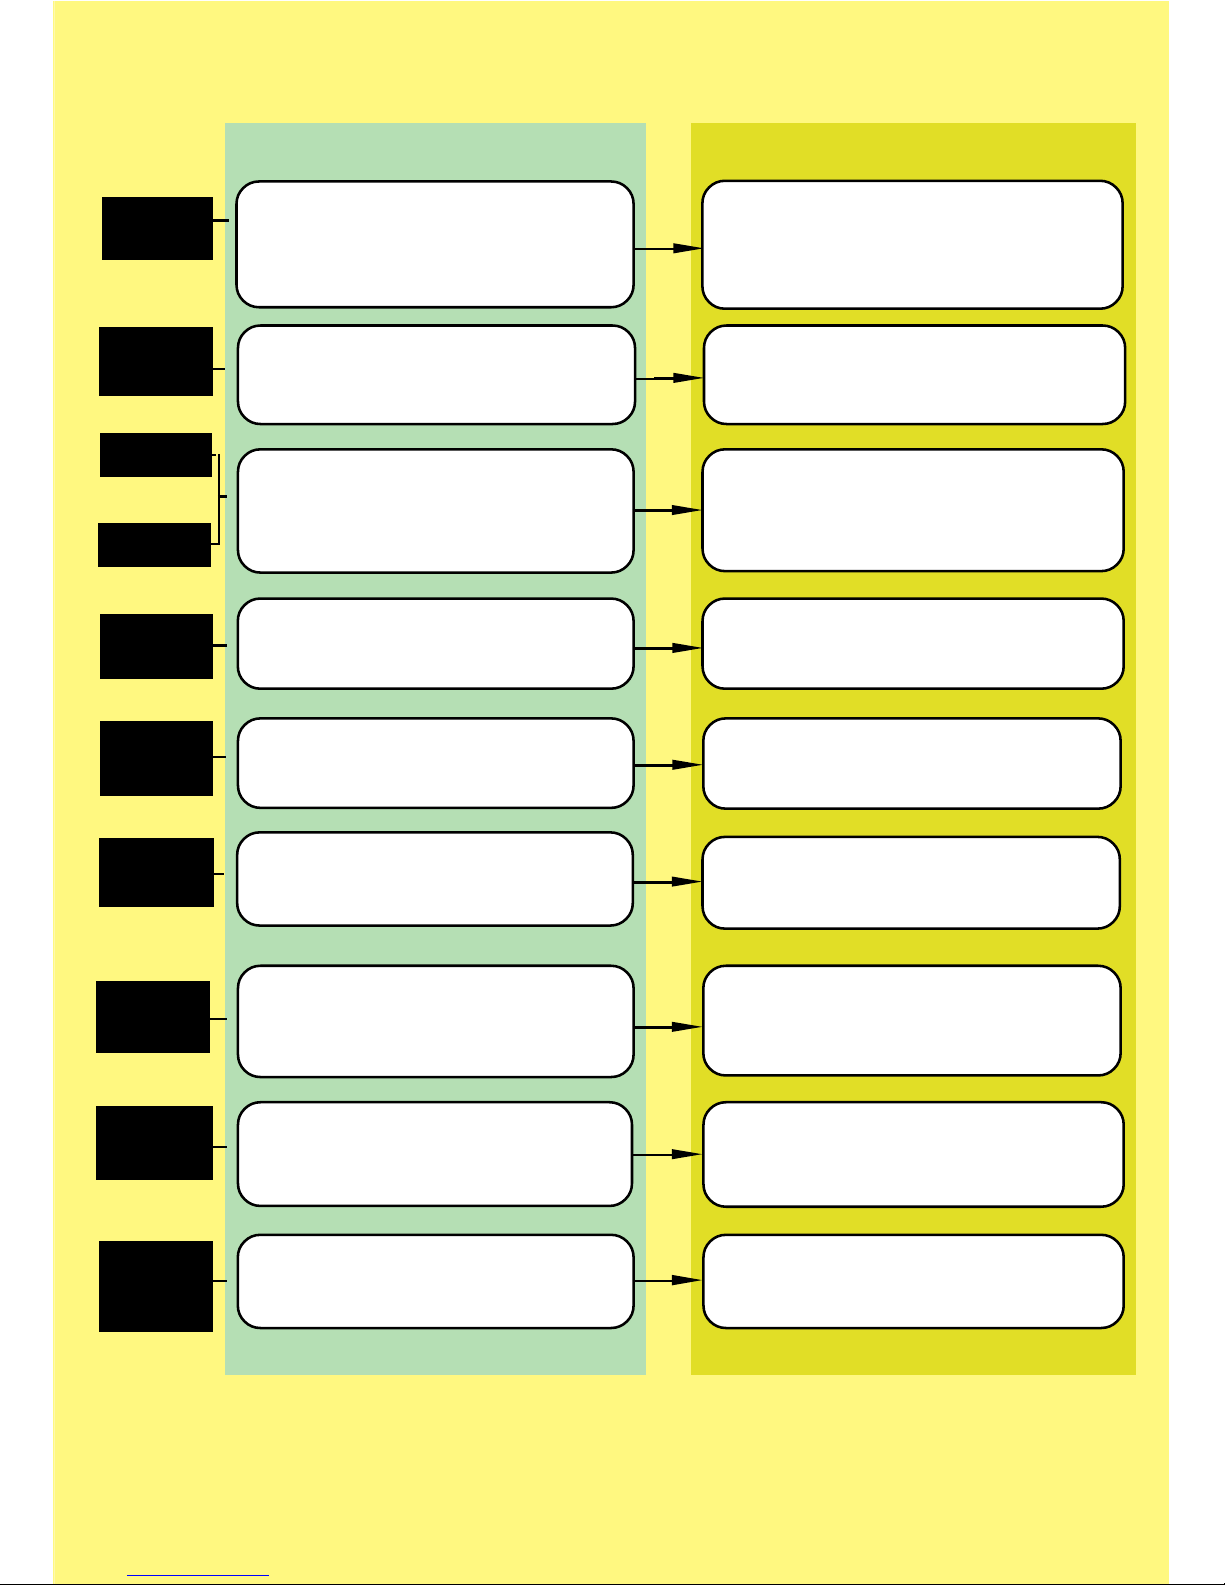
Reference Card Error Types
3
Display Possible cause Possible action
message
Branch
pipe error
Cup
elevator
error
Cup not
delivered
or
Use own
cup
Cup
storage
error
Cup
transport
error
Door open
Waste
bucket full
Temperature
low
Water tank
overboil
Cup blocking the movement of the
branch pipe.
Grease or dirt blocking the movement
of the branch pipe.
Cup on elevator when machine is
switched on.
No more cups.
Dirt or grease blocking cup slide.
No cups in cup magazine
Cup pile blocked.
Cup slide blocked.
Door not closed properly.
Waste bucket full.
Waste bucket sensor soiled.
The machine has been turned on
recently.
Overboil thermostat has triggered.
If it was impossible to remedy the fault, or other type of display message is shown,
please contact the service.
Switch machine OFF and ON.
Remove cup.
Clean cup catcher and cup slide areas.
Remove cup.
Load cups in cup magazine.
Clean cup slide.
Use own cup / load cups in cup
magazine.
Remove blocking cup.
Remove blocking cup.
Close door properly.
Empty waste bucket and wipe dry
sensor.
Clean and wipe dry sensor.
Wait until the water is heated sufficiently
(maximum 13 minutes).
Press reset button.
Page 4
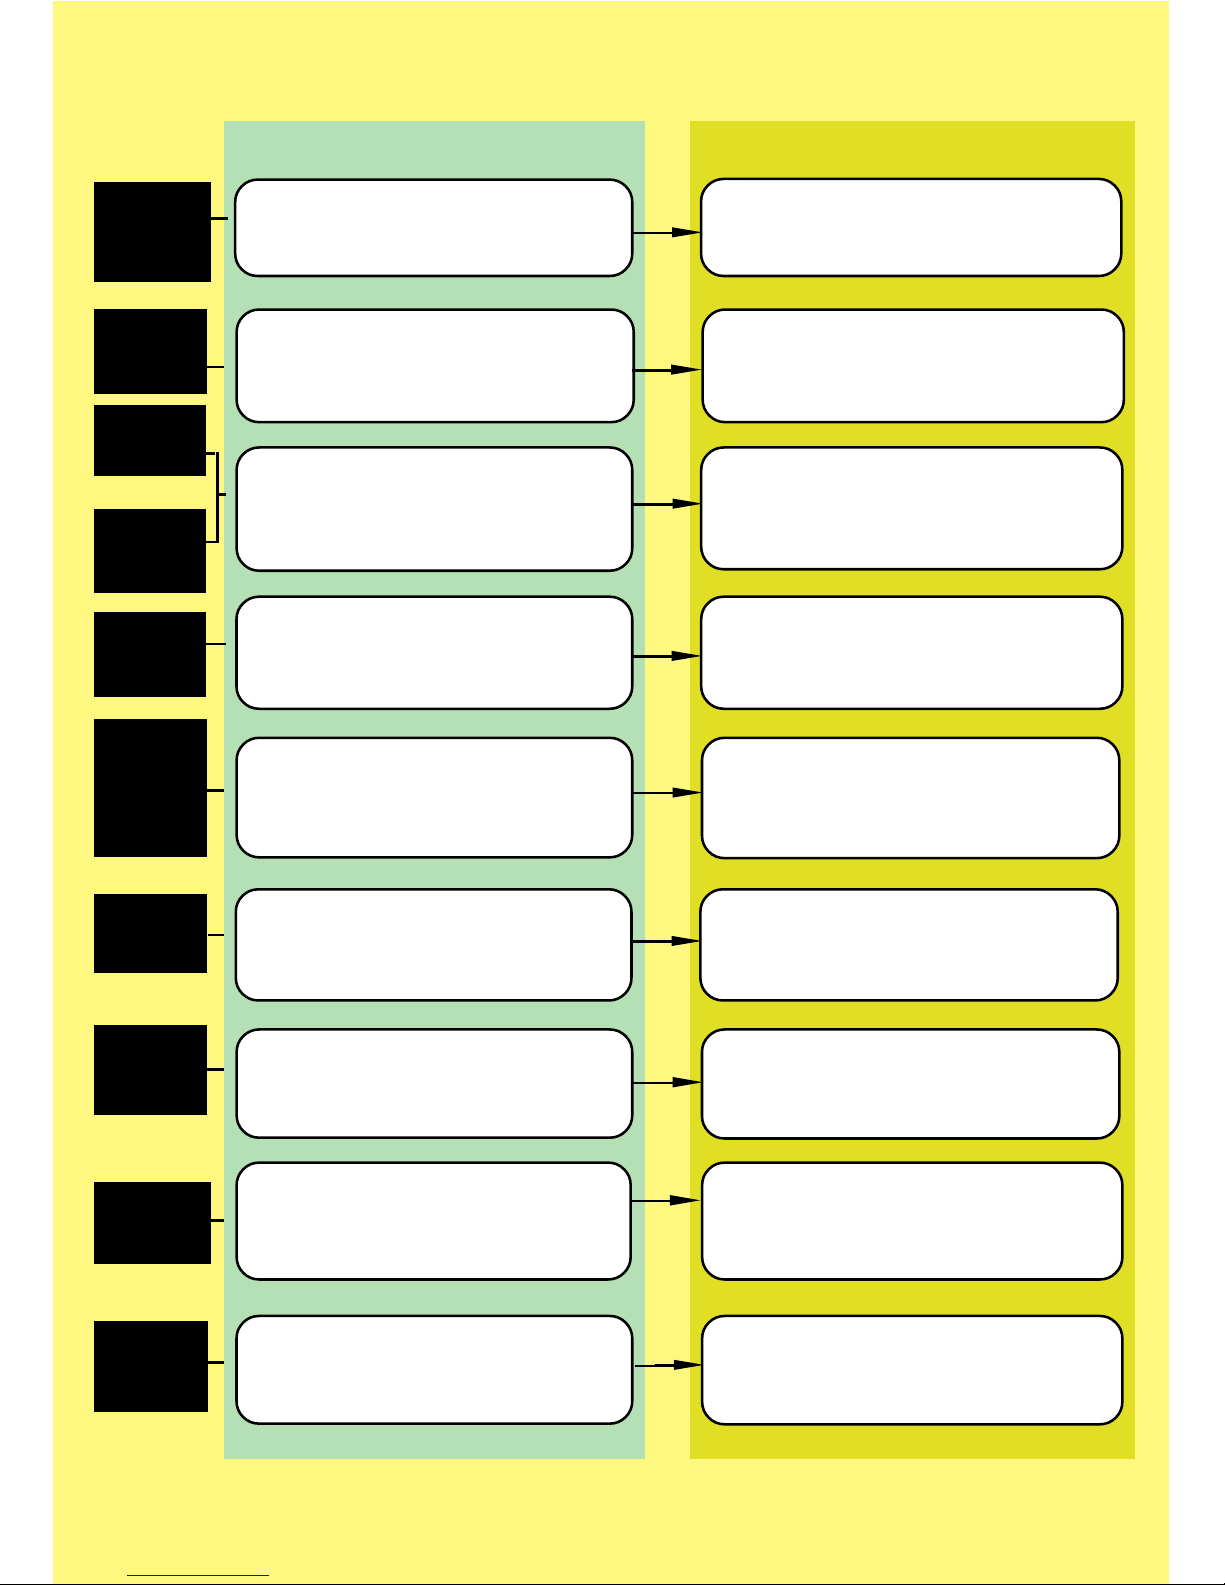
Reference Card Error Types (continued)
Error Possible cause Possible action
types
No display
or machine
not
operating
No
ingredient
Leak in
mixing
system
or
Mixing
system
overflows
Bucket
filled with
water
Machine
does not
shut down
when
bucket is
full
Poor
flavour of
drink
Inadequate
quantity of
drink
Coins
sticking
Machine
dispenses
free drinks
Sensor in waste bucket
is wet.
No power.
Canister empty.
Canister not correctly connected.
Ingredient sticking to auger drive
mechanism.
Mixing funnels/hoses not correctly
connected.
Whipper seal leaking or not installed.
Blockage in mixing funnels or
dispensing tubes.
Water dripping from hot water hoses.
Liquid has been poured into machine.
Foreign body clogging sensor for
bucket.
Sensor not in bucket.
Wrong ingredients.
Dispensing system dirty.
Ingredient residues clogging
dispensing outlet system.
Kink in outlet hose.
Coin mechanism sticking
Coin track dirty, greasy or blocked.
Cup lock function activated.
Price set to 0.00.
Price set to free vend.
Empty bucket and dry sensor.
Check fuses/power cord.
Refill canister.
Reinsert canister correctly.
Remove canister, clean auger drive
mechanism and reinsert.
Reinstall and reconnect components.
Replace whipper seal.
Replace/clean blocked part/s.
Water tank and valves must be
decalcified / replaced.
Instruct customers not to pour liquids
into machine.
Clean sensor.
Reposition sensor correctly in bucket.
Use corrrect ingredients.
Replace/clean components and rinse
thoroughly.
Replace/clean clogged component/s.
Install hose of correct length.
Press coin return button.
Clean coin track. cf. manual of supplier.
Wait for 10 seconds.
Set correct price.
Switch off free vend.
If it was impossible to remedy the fault, or other type of display message is shown,
please contact the service.
4
Page 5
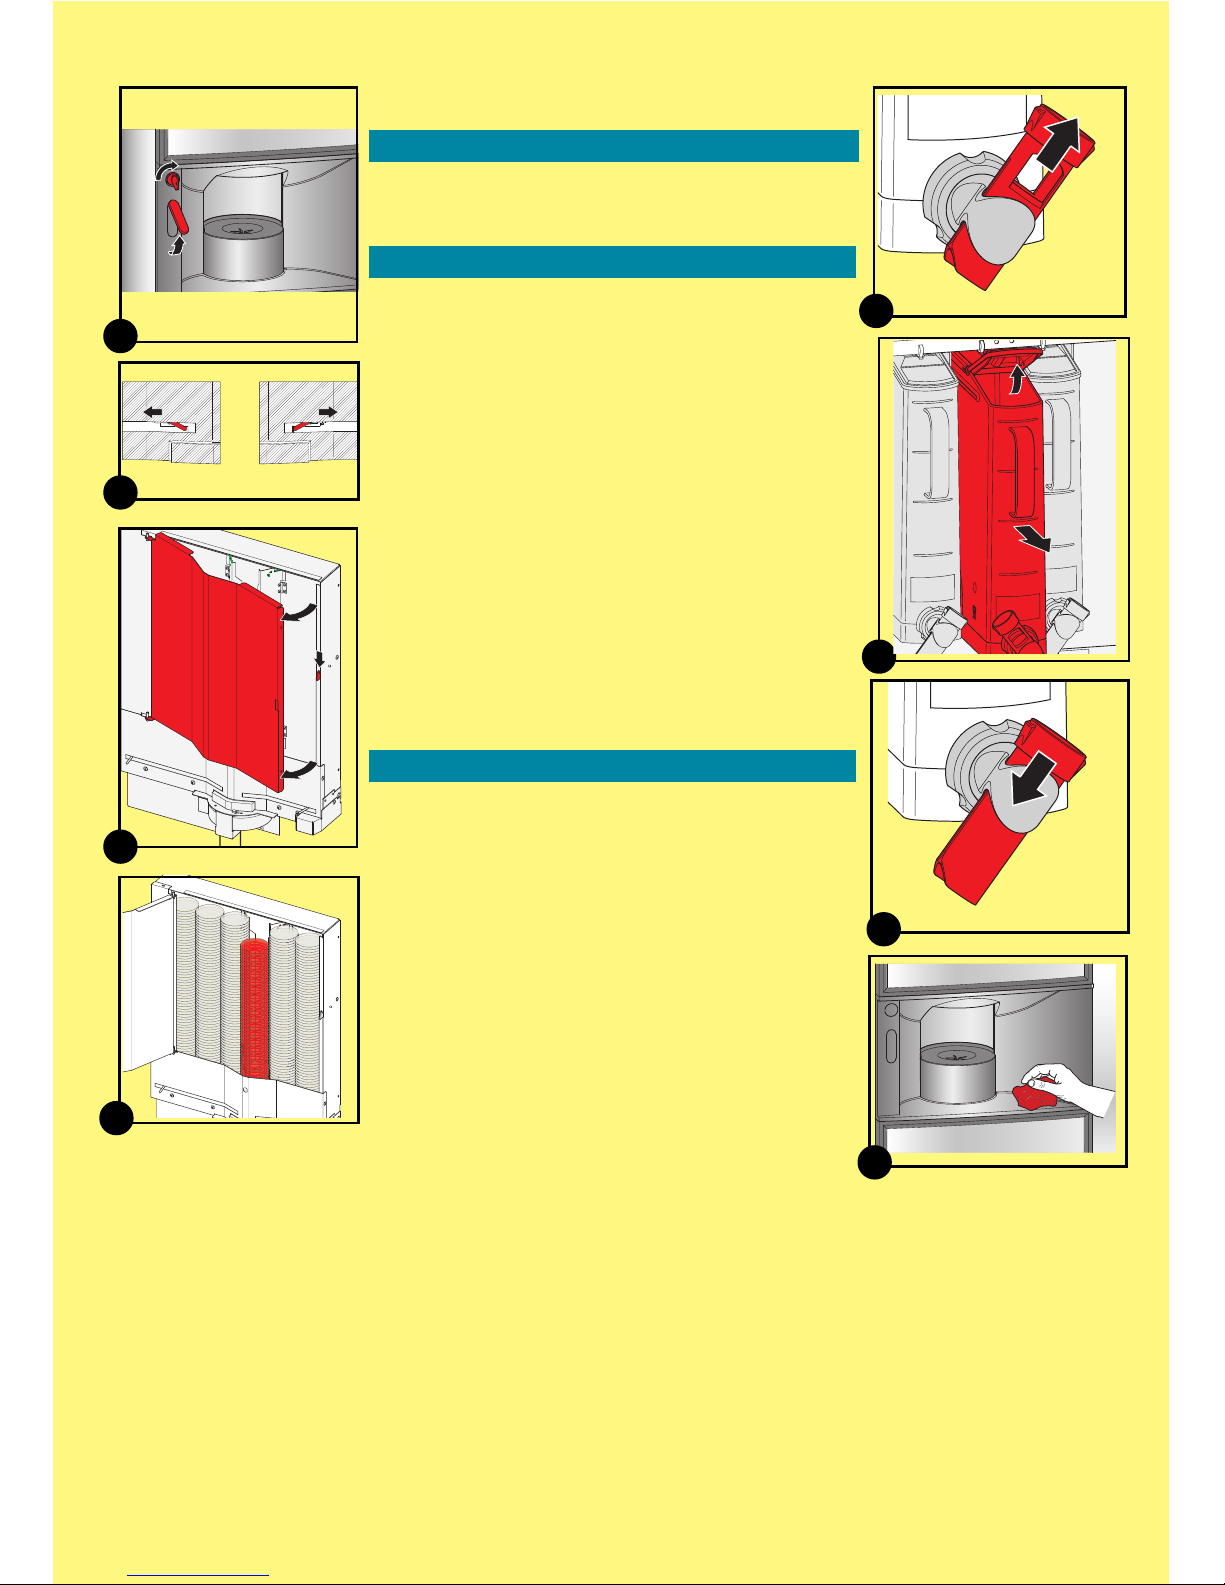
Regular Cleaning *)
Opening and disconnecting
• Turn the door key clockwise in keyhole
(1)
.
• Lift the triggered door handle
(1)
.
The machine is automatically switched off.
Cup magazine and product canisters
Cup magazine
• Push aside the cup conveyors
(2).
• Press down locking latch and open door of
cup magazine
(3)
.
• Place cups in the cup magazine, starting with
the center column
(4)
.
• Close door of cup magazine.
Instant ingredient canisters
• Close the outlet spouts
(5)
of the ingredient
canisters by pushing the outlet tubes
upwards.
• Take the canisters by the handles and pull
them forward
(6)
. The lids are automatically
triggered open
• Fill canisters with ingredients.
• Push back canisters.
• Open the outlet spouts
(7)
of the ingredient
canisters by pushing the tubes downwards.
Cleaning parts
Cup platform
• Clean cup platform
(8)
with a damp cloth.
5
5
(see overleaf)
6
7
3
4
8
2
*) All parts to be cleaned regular are designed
in a light blue colour. All parts of action are
supplied in a green colour.
1
Page 6
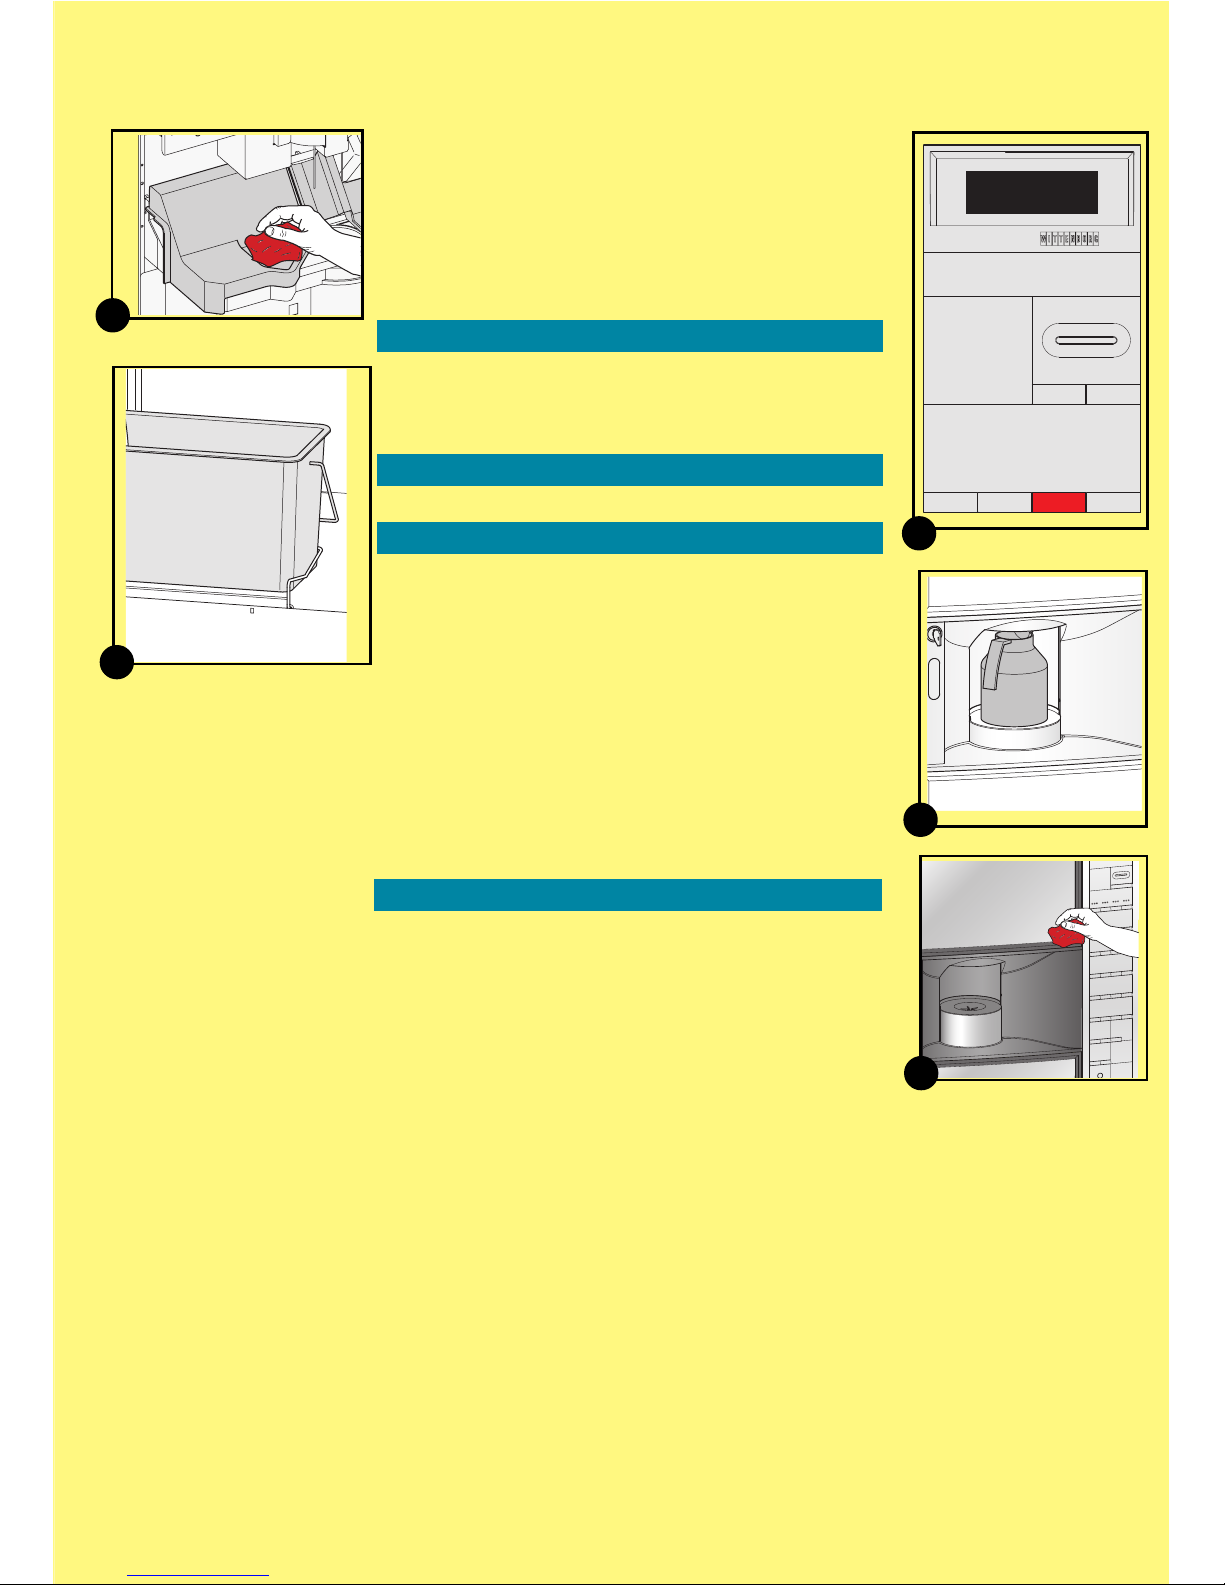
Dispensing area
• Clean drip guide and cup slide with shutter with
a damp cloth
(9)
Waste bucket
•
Lift the waste bucket sensor and take the waste
bucket out of machine
(10)
. Empty and clean
bucket.
Cleaning inside and outside
• Clean the sensor of the waste bucket with a damp
cloth and wipe dry.
• Clean the door and housing inside and outside, and
finally the bottom with a clean, damp cloth.
Mounting the cleaned parts
• Remount all parts.
Rinsing
• Have an empty pot (min. 1.5 l) ready to place
on the cup stand
• Turn to the display and perform a machine
rinse using the preselection buttons
(11)
.
- Press button '1' to enter [Rinse]-function.
- Close door and place pot on cup stand
(12).
- Press 'Sel' to start the rinse function.
Follow the information on display.
• Repeat the rinse procedure min. once more.
• Press the button 'Esc' until the machine leaves
programming mode.
• Remove and empty the pot.
Last check
• Clean the machine with a damp cloth on the
outside
(13)
.
• Perform a test dispensing by pressing a
selection button, eg. coffee with milk and sugar.
Regular Cleaning (continued)
6
10
9
Menu Selection
*Operator
Technician
^ V Sel Esc
12
13
11
Page 7
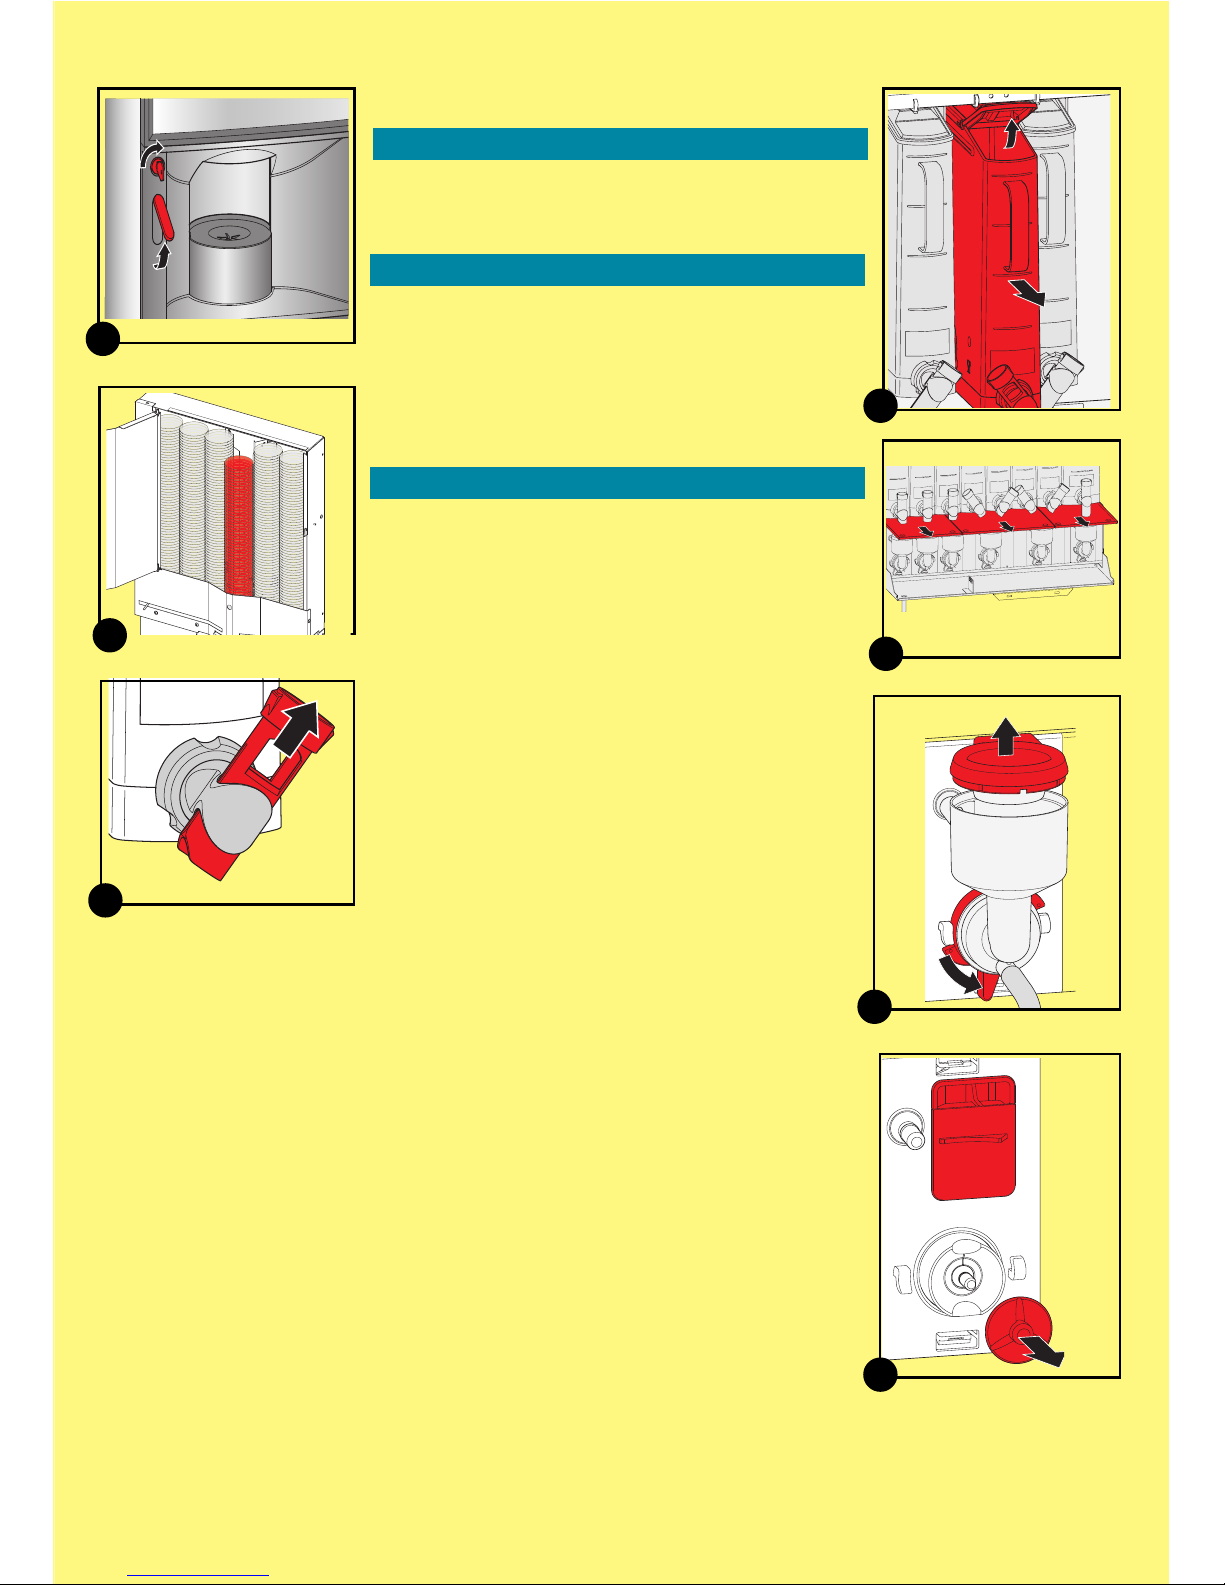
7
Deep Cleaning *)
Opening and disconnecting
• Turn the door key clockwise in keyhole
(1)
.
• Lift the triggered door handle
(1)
.
The machine is automatically switched off.
Cup magazine and product canisters
• Load cups
(2)
(see regular cleaning).
• Close the outlet spouts
(3)
of the ingredient
canisters by pushing the outlet tubes
upwards.
• Fill ingredient canisters with ingredients
(4)
(see regular cleaning).
• Leave the outlet spouts closed.
Cleaning parts
It is recommended to have mixing funnel
hoods, mixing units with whipper wheels and
sealing rings, powder traps distributor head
with outlet tubes and hoses as an exchange
kit (hygiene kit)
.
Soak all parts, which will be disassembled, at
least for 15 minutes in a bucket with hot
water with cleaning agent*.
Instant ingredient mixers
• Remove and clean under trays under
ingredient canisters
(5)
.
• Relocate under trays.
• Remove the mixing hoods
(6a)
.
• Remove mixing units: Loosen locking ring by
pressing release lever
(6b)
anti-clockwise,
and pull out mixing funnel leaving the hoses
back on.
• Pull off the whipper wheels
(7a).
•
Remove and clean the powder traps
(7b)
.
(see overleaf)
3
5
2
1
4
6
*) All parts to be deep cleaned are designed in
a light and dark blue colour. All parts of
action are supplied in a green colour.
For **) cleaning and ***)decalcifying: refer to
the HACCP guidelines.
a
b
7
b
a
Page 8
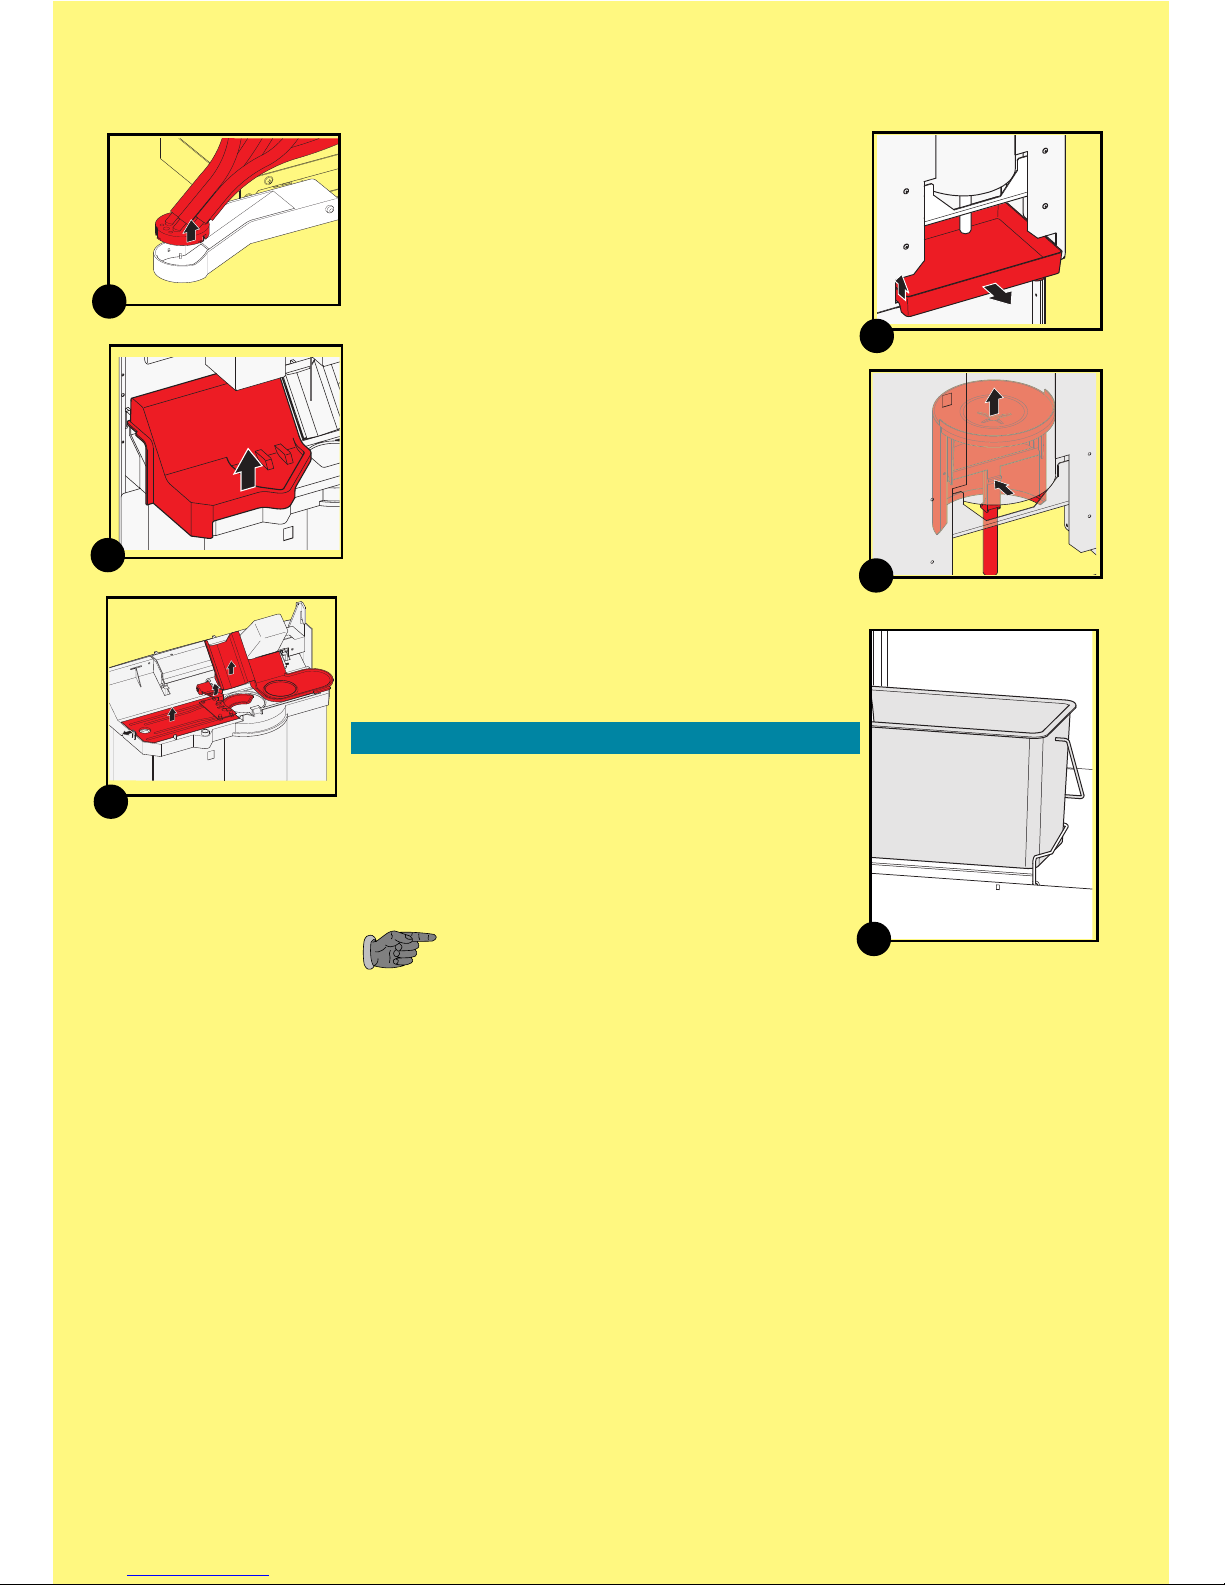
9
Deep Cleaning (continued)
Distributor head
• Unclip the distributor head by pressing
upwards from below
(8)
.
• Disassemble the distributor head, hoses and
mixing funnels. Soak components in hot
water with cleaning agent.
Cleaning the dispensing area
• Remove drip guide
(9)
by pulling it up and
out.
• Unclip cup catcher unit with one hand and
remove it with the other using the hole in the
guiding plate for cup catcher
(10a)
.
• Unclip and remove cup slide with shutter
(10b)
.
Cup platform and drip tray
• Pull up and take out drip tray
(11)
.
• Press release lever of cup platform with your
left hand and pull up the cup platform with
your right hand
(12)
.
• Clean the area around the cup station on
front side of door.
Waste bucket
• Remove, empty and clean waste bucket
(13)
.
Cleaning inside and outside
• Clean the sensor of the waste bucket with a
clean, damp cloth and wipe dry.
• Clean the door and housing inside and
outside, and finally the bottom with a clean,
damp cloth.
• Flush all parts, which have been soaking,
thoroughly with clean and warm water.
Check that no dirt or cleaning agent
remains on the parts.
• Dry all parts with a dry cloth.
(see overleaf)
8
11
8
a
b
13
12
10
Page 9
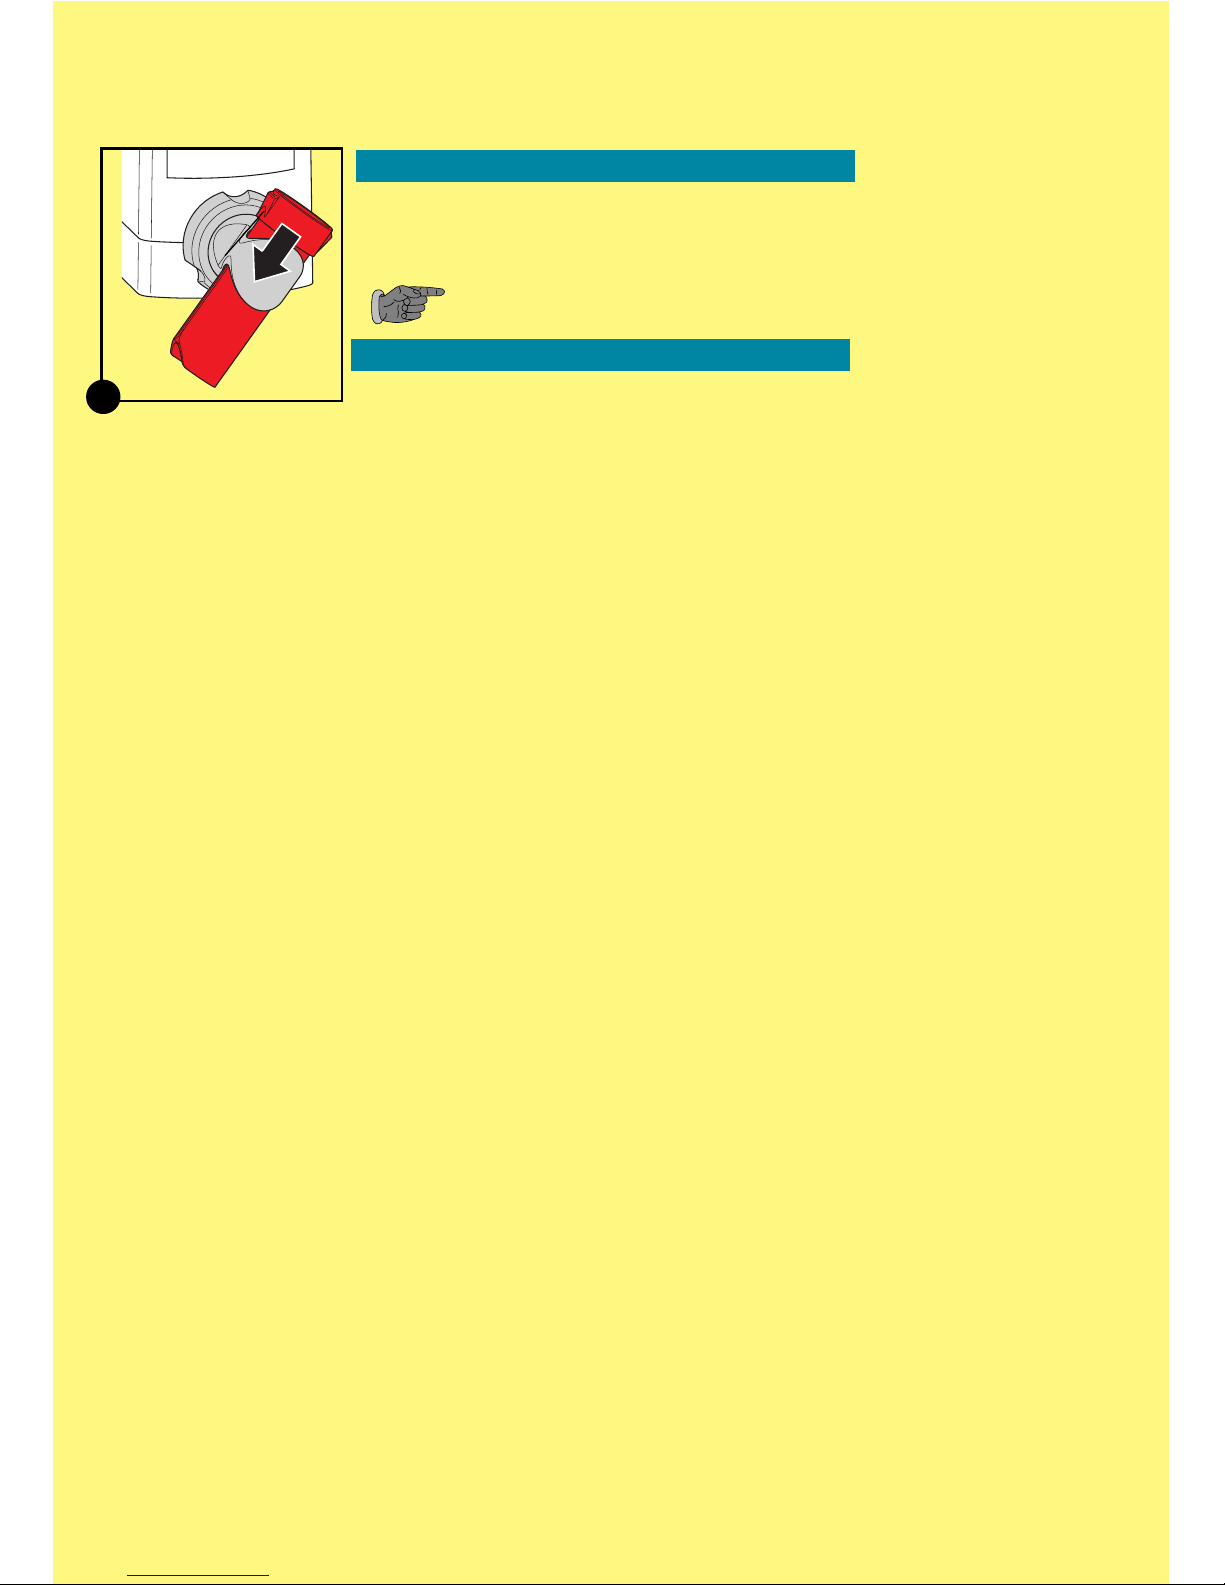
Mounting the cleaned parts
• Remount all parts and relocate canisters.
• Open the outlet spouts
(14)
of the instant
ingredient canisters by pushing the tubes
downwards.
Check that the waste bucket with sensor
is well positioned.
Rinsing and last check
• Close door and place a pot, min. 1.5 l on cup
platform.
• Rinse machine twice (see regular cleaning).
• Clean outside of machine (damp cloth).
• Perform a test dispensing by pressing a
selection button eg. coffee with milk and
sugar.
Deep Cleaning (continued)
9
14
a
Page 10
HACCP Guidelines
Directives
• For correct operation of the machine, at least the
mentioned guidelines must be taken into
consideration. The operator is held responsible for
the correct operation.
HACCP guidelines
Handling of coffee and ingredients
• Ensure hygienic handling:
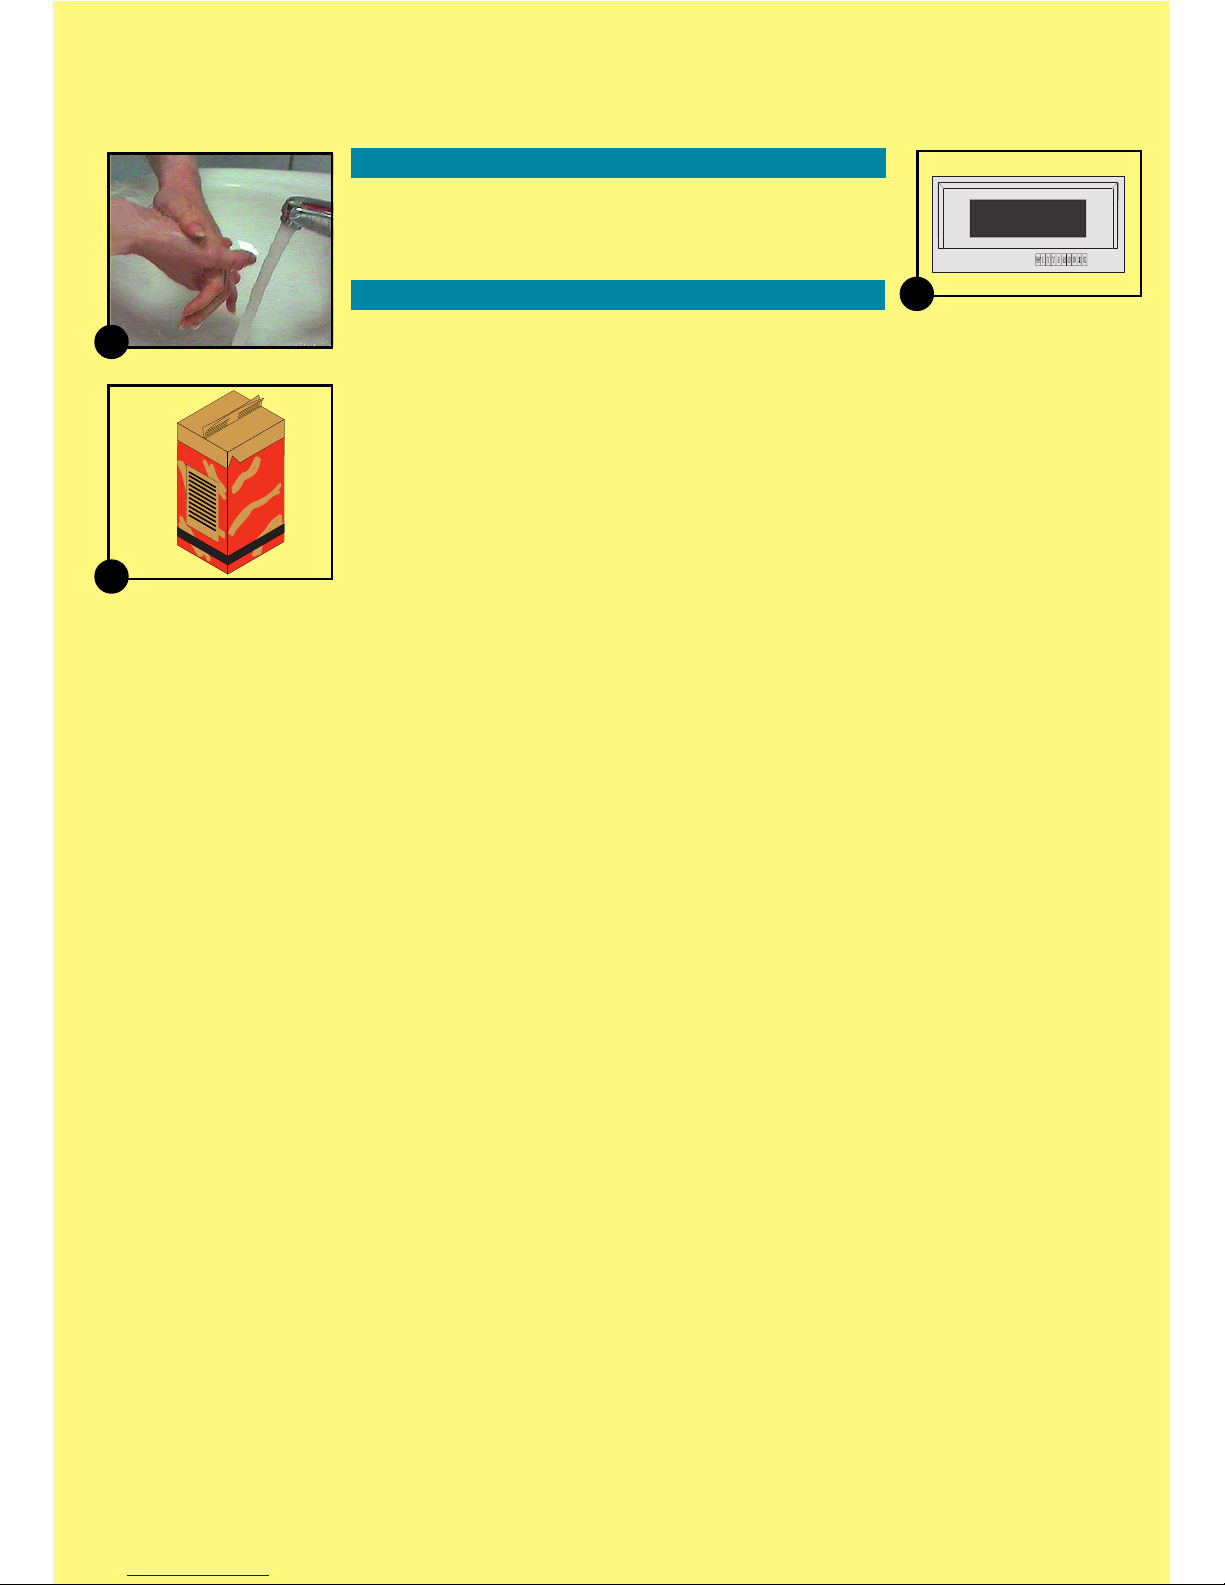
- wash hands, preferably with a disinfectant
(1)
- use hygienic gloves
- after cleaning, do not touch surfaces of parts that
may come into contact with food
- always use a clean cloth when cleaning
- keep the working area tidy.
• Check the package for integrity and damage
(2)
.
• Store the coffee and ingredients dry, cool and
dark.
• Use the packages within the recommended time
period (see the "best before"-date on the
package).
• Always use packages according to the "first-infirst-out"-principle.
• Thoroughly close an opened package to keep the
quality and preventing contamination.
• Coffee and ingredients should be stored separated
from cleaning products.
• The ingredient canister should be cleaned
occasionally (see operating instructions).
• Do not fill more coffee or ingredients than needed
until the next cleaning.
Cleaning the machine
• Observe the cleaning instructions.
• Clean the machine preferably at the end of the
day
• After cleaning, dispense and check a drink (see
"Last check").
• Fill in the cleaning record card.
• When the display indicates an error message
(3)
,
observe the reference card.
• Only use the recommended cleaning agents that
have been approved for the food industry (slightly
disinfecting, preferably liquids, tabs, possibly grains.
Avoid powders).
10
(see overleaf)
2
1
coffee
Welcome!!
Welcome!!
3
Page 11
HACCP Guidelines (continued)
Decalcifying
• Depending on the hardness of water, the metal
parts of the filter plate holder must be cleaned
after approx. 1000 drinks.
Filing
• After opening, write the date of opening on the
package
• File the "best before"-date of the package used to
fill the machine.
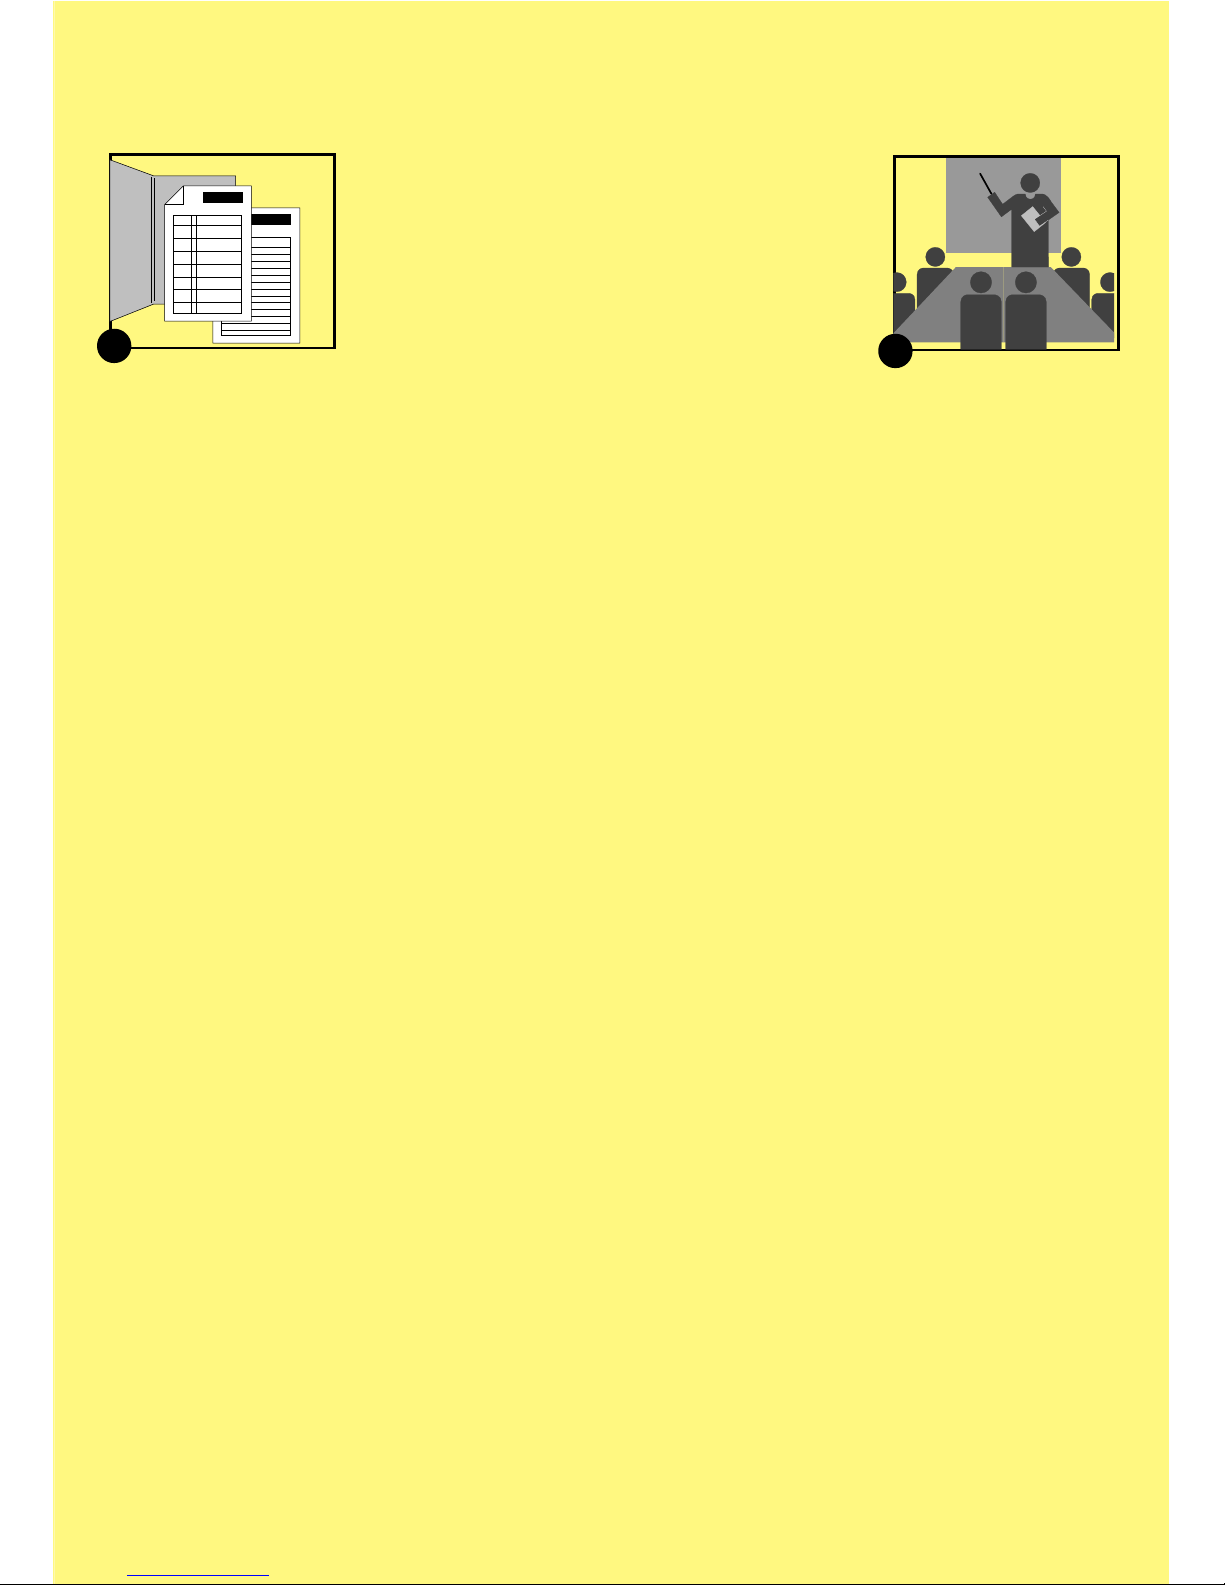
• File completed cleaning record cards
(4)
.
• File service and maintenance reports.
Training
• Train staff on HACCP guidelines
(5)
.
• Keep the reference cards with the machine.
• Implement the activities in the work schedules.
• For further questions please contact your service
representative.
11
4
5
Page 12
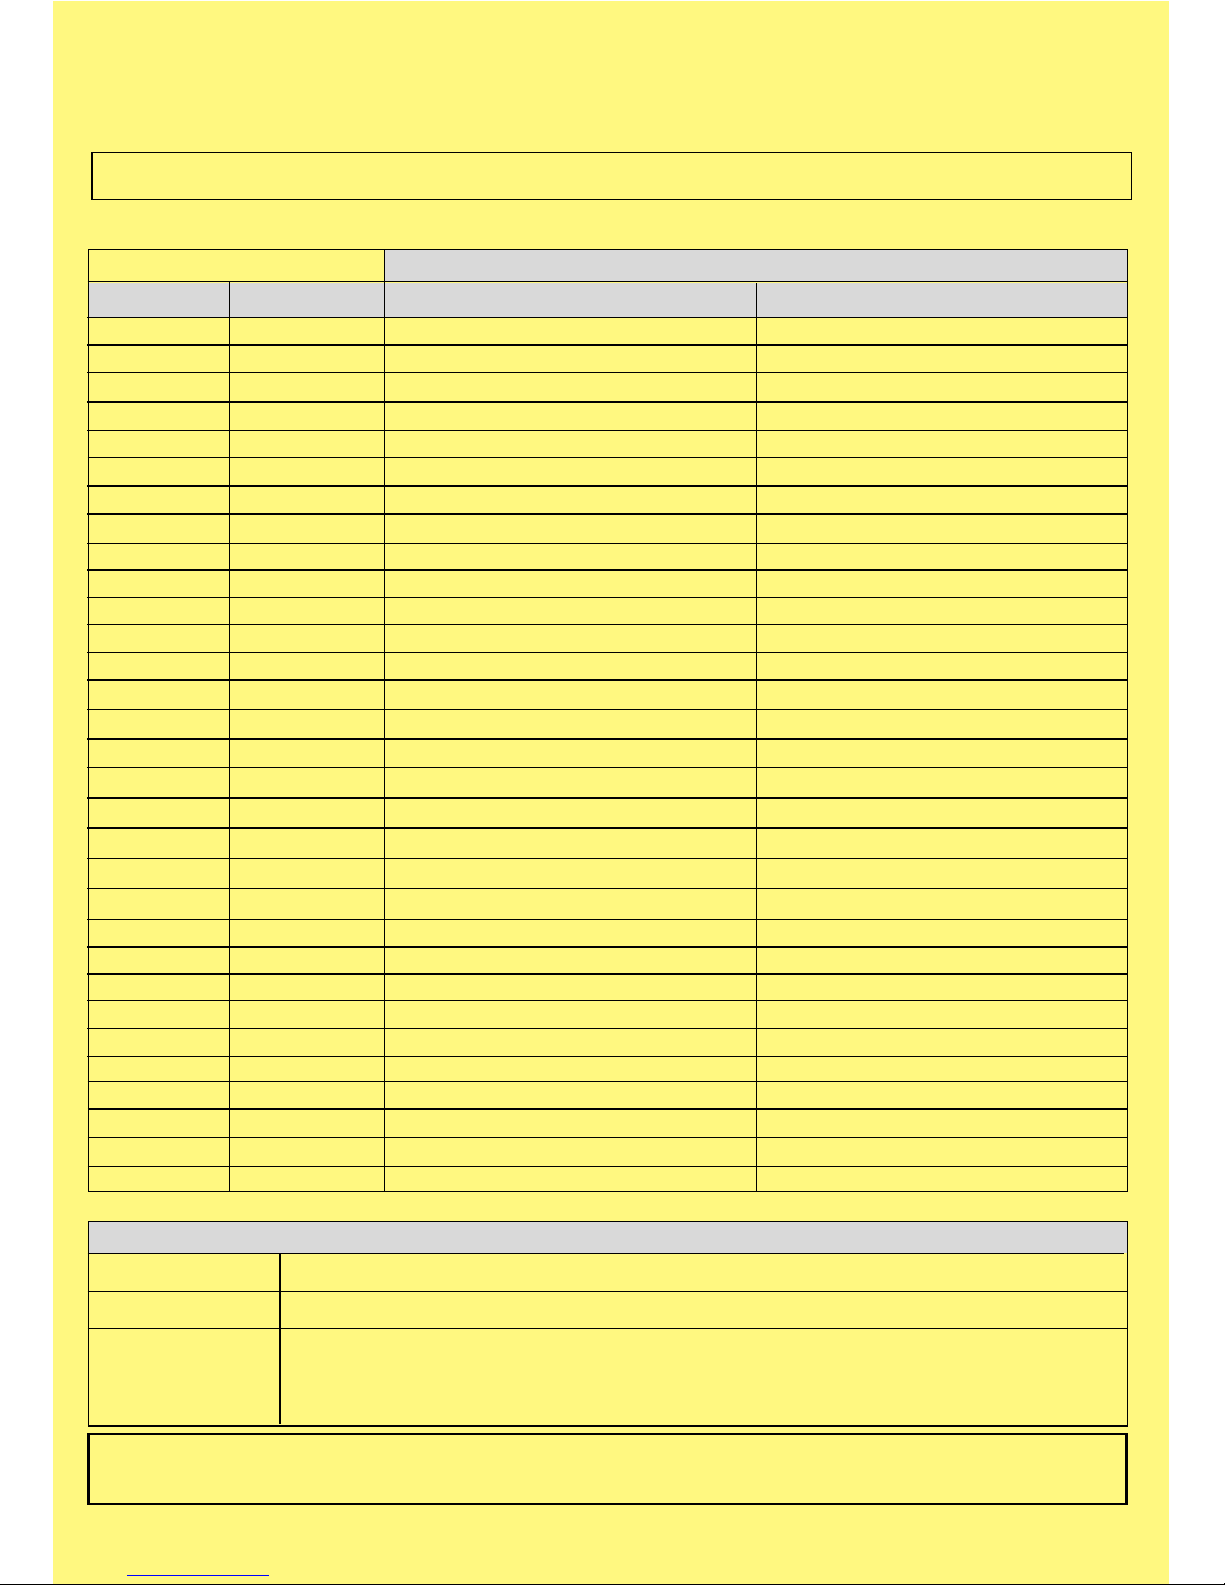
Cleaning Record Card
Declaration: This machine has been cleaned in compliance with the cleaning instructions.
Signature
Date Time Regular cleaning Weeky cleaning
Monthly management check
Date
Signature
Comment
KEEP THIS CARD WITH THE IN 7600 MACHINE
(and file when completed)
12
 Loading...