

Page 1
Quick start guide
Page 2

Firmware 1.1
Page 3
3
ENGLISH
WELCOME
Thank you for choosing bq.
This manual will help you use your new 3D printer correctly.
Welcome to the world of Witbox!
How do I use this manual?
To make sure you use your Witbox correctly, read this manual carefully before
using the printer for the rst time.
These instructions are based on the factory settings for the device.
The illustrations and images shown in this manual may not exactly match those
of the nal product.
bq shall not be held responsible for any performance-related problems or
incompatibility issues arising from modication of the device parameters on the
part of the user.
Icon key
Note: Recommendations and notications regarding use of your 3D
printer
>
Next: Indicates the sequence of the steps to follow in order to perform
an action.
Tool needed: This task requires the use of a tool.
Trademarks
Witbox and bq are registered trademarks and logos owned by Mundo Reader,
S.L.
Page 4
4
ENGLISH
CONTENTS
6 What is a 3D printer?
6 Online resources for the Witbox
7 Getting started
7 Box contents
10 Basic glossary
12 Unpacking your Witbox
13 Attaching the side panels
14 Attaching the top panel
14 Attaching the print base
15 Attaching the spool and support
15 Connecting the power cable
16 Setting up
16 Control panel
16 Levelling the print base
19 Loading the lament
20 Printing a test object
21 Printing an object using Cura
21 What is Cura?
21 Online resources for Cura
21 Downloading and installation
21 Cura setup wizard for the Witbox
23 Appearance and main controls
23 Loading a 3D object
24 Generating and saving a le on the SD card
24 Printing a 3D object using the Witbox
Page 5
5
ENGLISH
25 Using and maintaining your Witbox
25 Why is it important to use and maintain the printer
correctly?
25 Online resources: use and maintenance
25 Cleaning the nozzle
25 Updating the rmware
26 Safety precautions
27 Troubleshooting
27 FAQs
28 Technical support
29 Technicalspecications
31 Correct disposal of the product
32 Declaration of conformity
Page 6
6
ENGLISH
What is a 3D printer?
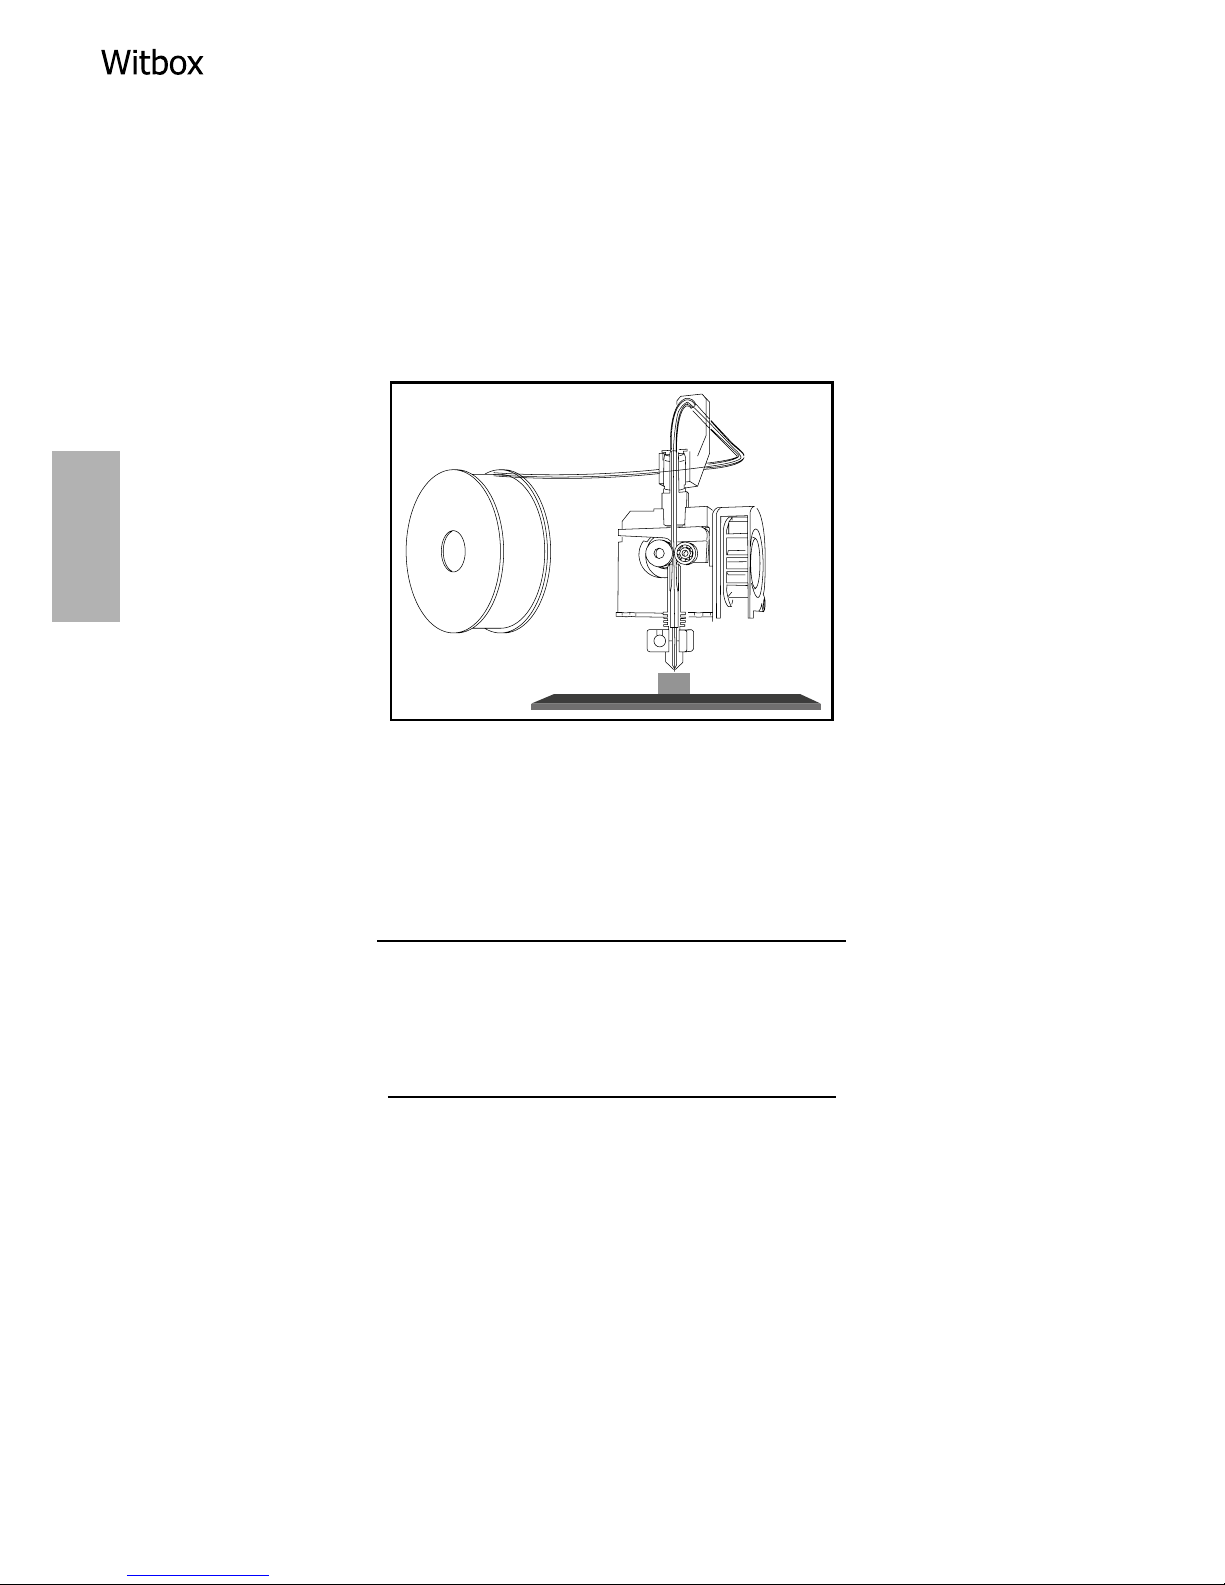
A 3D printer is a device that is capable of creating solid, three-dimensional
objects using a design produced on a computer. Currently, there are various
technologies that make this possible. The Witbox uses the method known as
Fused Filament Fabrication (FFF), which builds objects by adding one layer of
melted polymer lament on top of another until the item has been completed.
Online resources for the Witbox
You can nd the most up-to-date version of this manual in electronic format on
our website:
www.bq.com/gb/downloads-witbox.html
We have also provided a series of instructional videos that will help you get the
most out of your Witbox desktop printer:
www.bq.com/gb/products/witbox.html
Page 7
7
ENGLISH
GETTING STARTED
Box contents
Before using your Witbox printer for the rst time, please check the contents of
the box. If any of the items listed below are missing, contact the retailer where
you purchased the device.
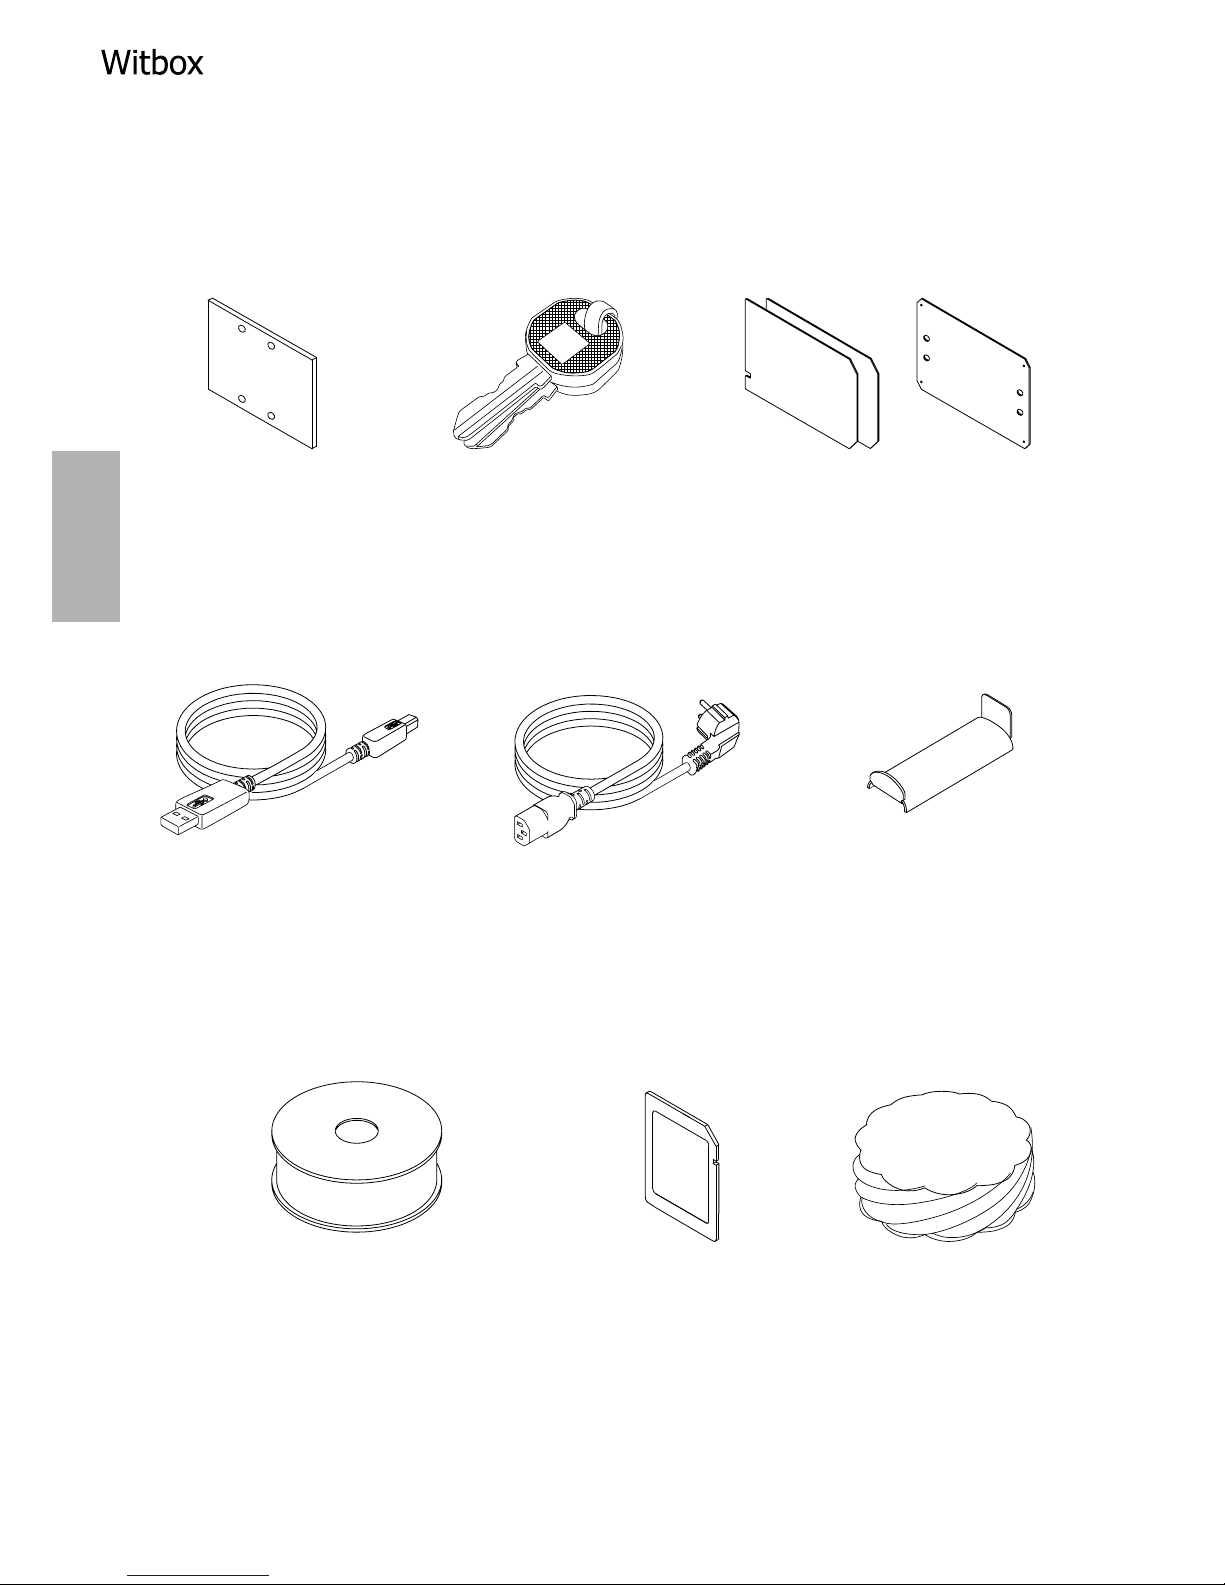
Witbox 3D printer
Print base
Set of two keys
Two side panels and one top panel
USB cable
Power cable
Spool of PLA lament (1.75 mm)
Metal spool-holder
SD card (pre-loaded with sample 3D models)
Sample printed object
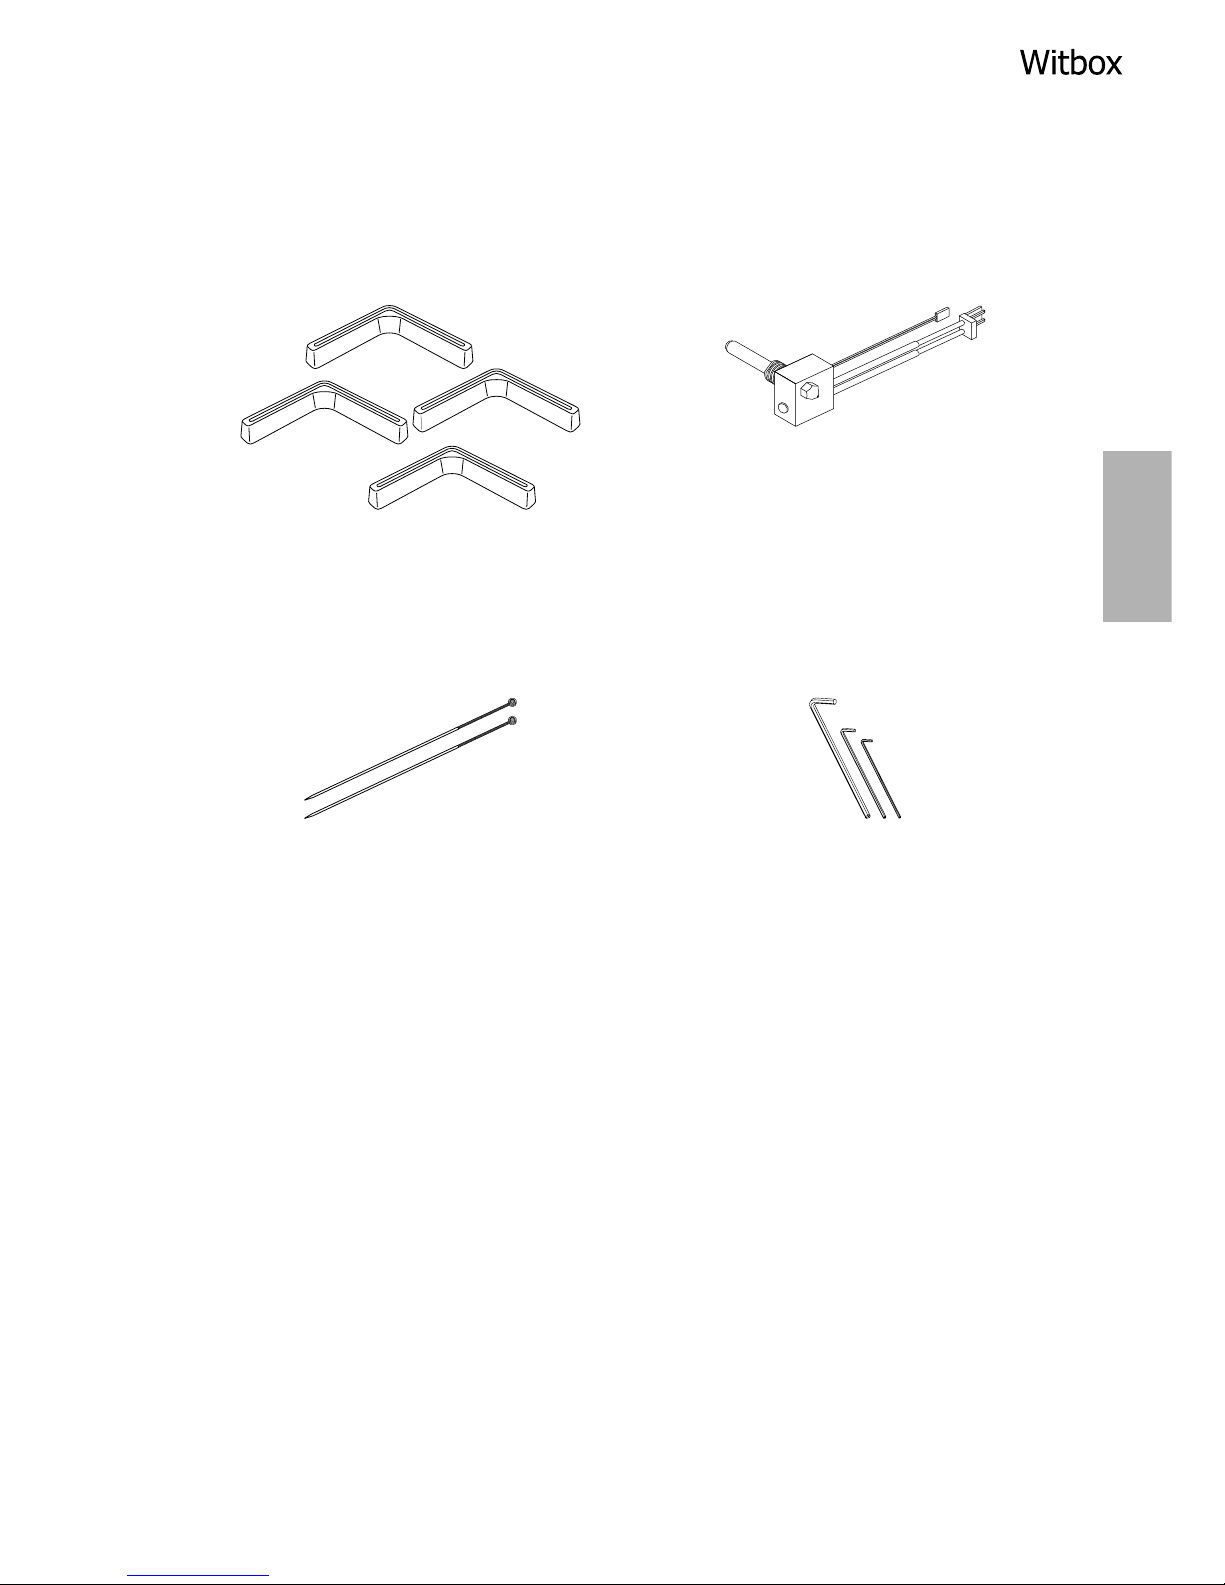
Four feet/underside supports
Maintenance kit, comprising:
One replacement Hot-End
Two cleaning needles
Three Allen keys (1.5, 2.5 and 4 mm)
Page 8
8
ENGLISH
Print base Set of two keys 2 side panels and 1 top panel
USB cable Power cable Metal spool holder
Spool of PLA lament (1.75 mm)
SD card
Sample printed object
Page 9
9
ENGLISH
1 replacement Hot-End
2 cleaning needles 3 Allen keys (1.5, 2.5 and 4 mm)
4 feet/underside supports
Page 10
10
ENGLISH
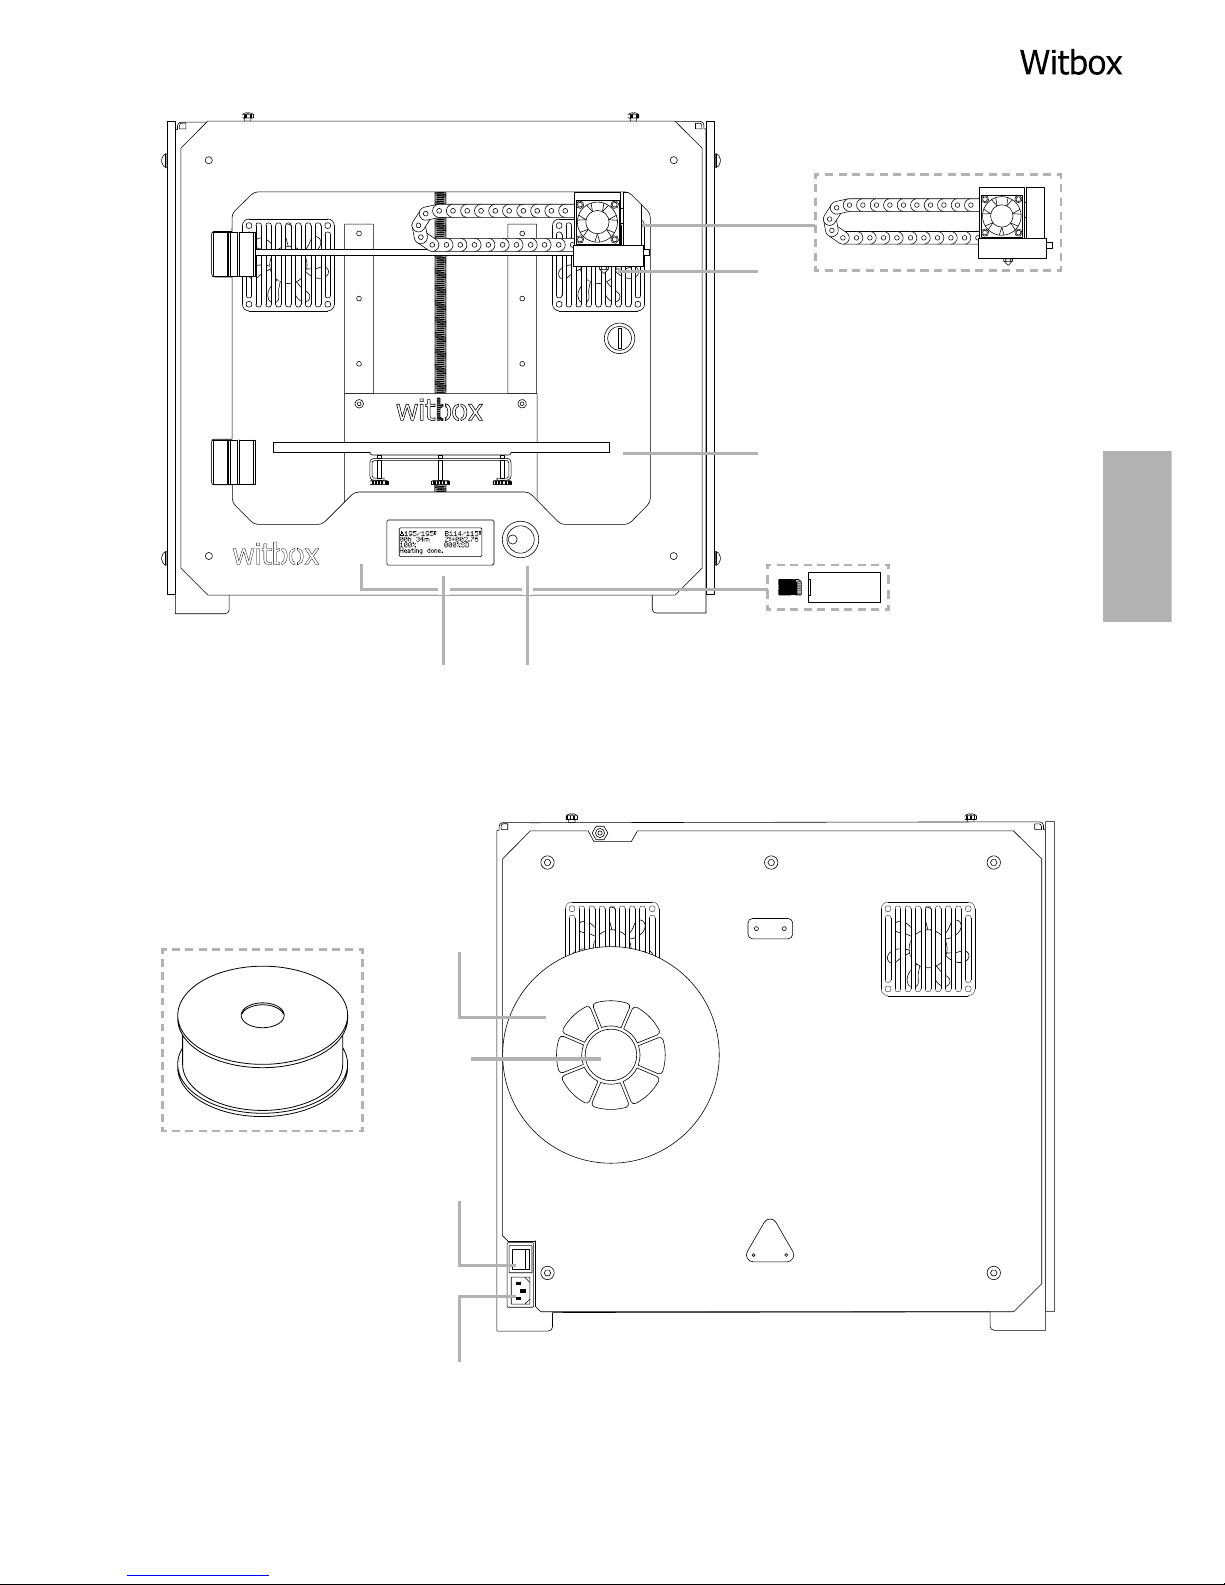
Basic glossary
1
LCD screen: Backlit blue screen that displays information regarding the
status of the device.
2
Control wheel: Metal wheel used for scrolling through the menus.
3
SD card slot: Slot located inside the printer, at the rear of the control
panel, where the SD card is inserted.
4
Print base: Rectangle of thick glass onto which the object is printed.
5
Hot-End: Metal part through which the melted plastic comes out; so-
called because it reaches high temperatures during operation.
6
Extruder: Device comprising the hot end, the lament-feeder motor and
a fan.
7
Filament spool: Spool of thermoplastic material with a thickness of 1.75
mm.
8
PLA: Material that the lament is made of.
9
Spool holder: Metal part located at the rear of the printer, which
supports the lament spool.
10
Fibonacci guide tube: Plastic tube that guides the lament towards the
extruder. Its shape allows it to adapt to the movement of the printer and
protects the lament.
11
Power socket: Located at the back of the printer, towards the bottom.
12
On/Off switch: Dual-position switch to turn the Witbox on and off.
13
USB port: Connector for the USB cable; located on the right side of the
printer.
Page 11
11
ENGLISH
5
6
4
1
7
9
12
11
2
3
7
Page 12
12
ENGLISH
Unpacking your Witbox
Your Witbox printer has been carefully packaged using durable materials that
incorporate safety features to protect it during transportation.
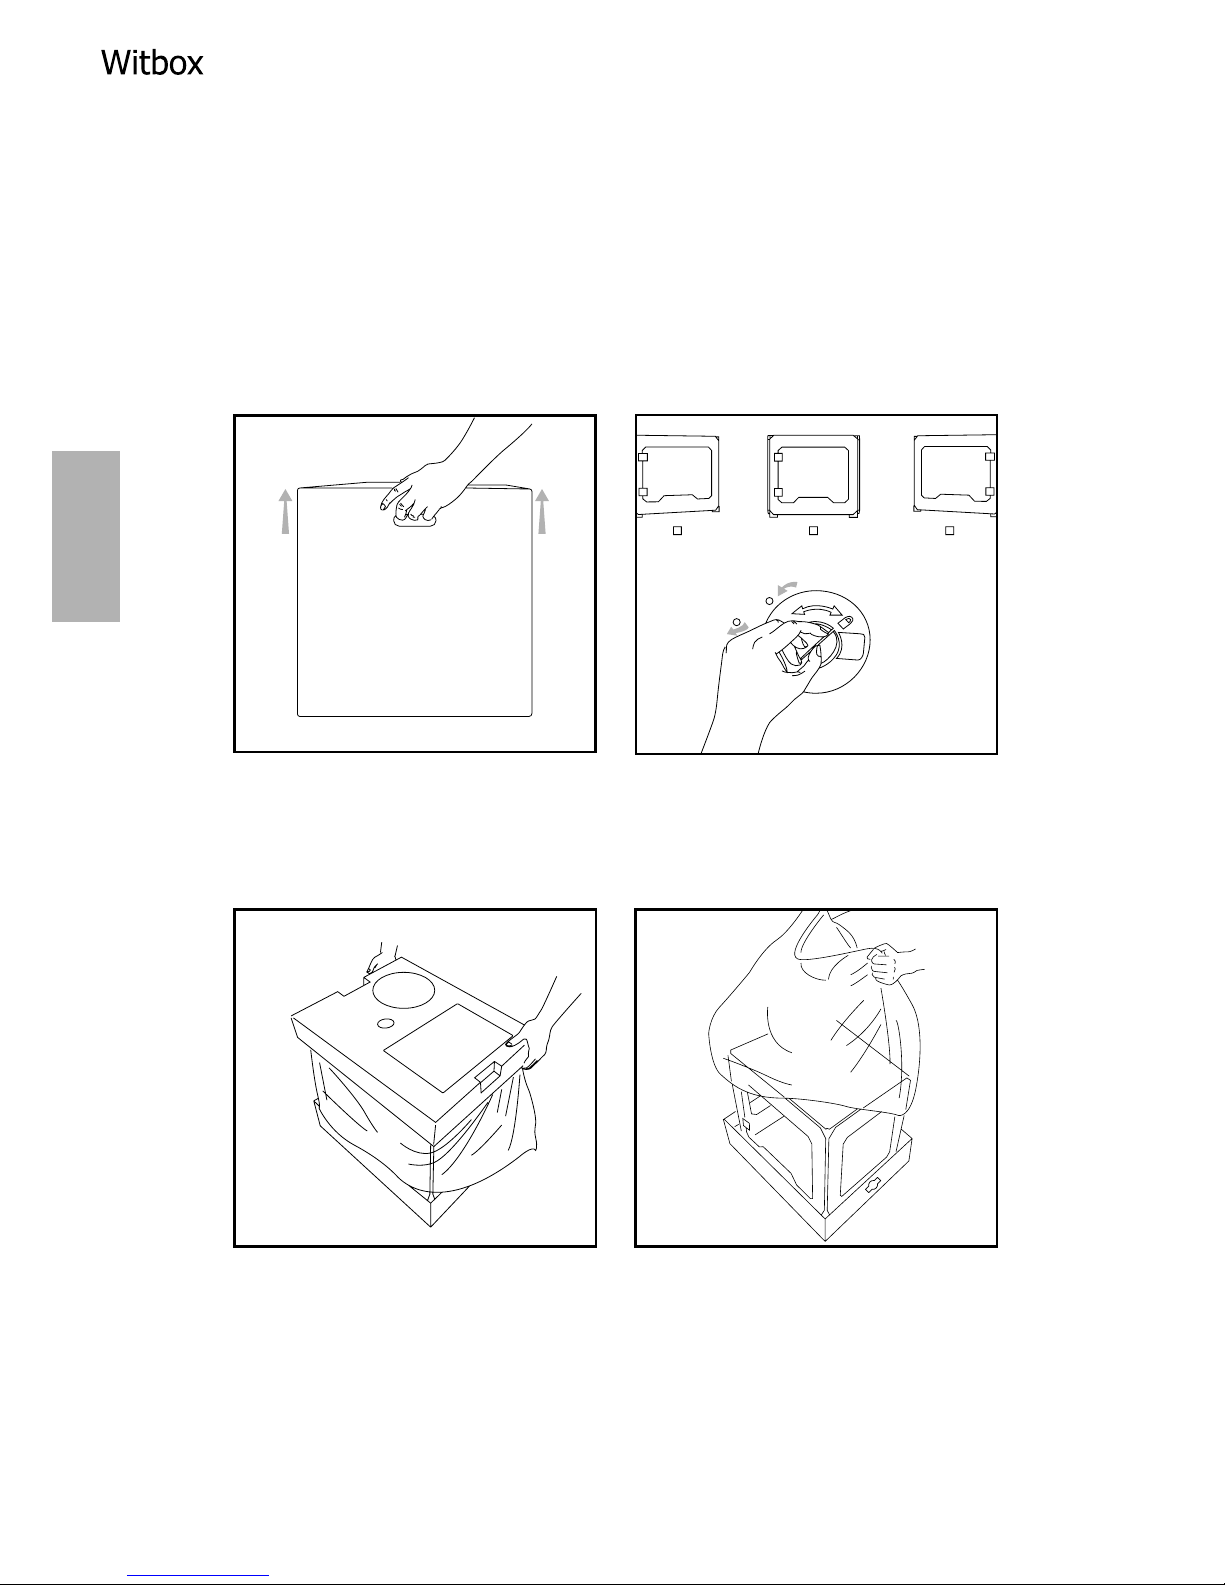
1. The box is made from two pieces of cardboard: a tray-shaped piece on the
bottom and a printed piece on top. To remove the top piece, rst remove the
two circular plastic tabs connecting it to the bottom piece. Then lift it using
the handles on the upper section; it should lift off easily.
2. Inside, the box has two further packages: a box of accessories, at the top, and
the printer (in its own packaging) underneath.
1
2
Page 13
13
ENGLISH
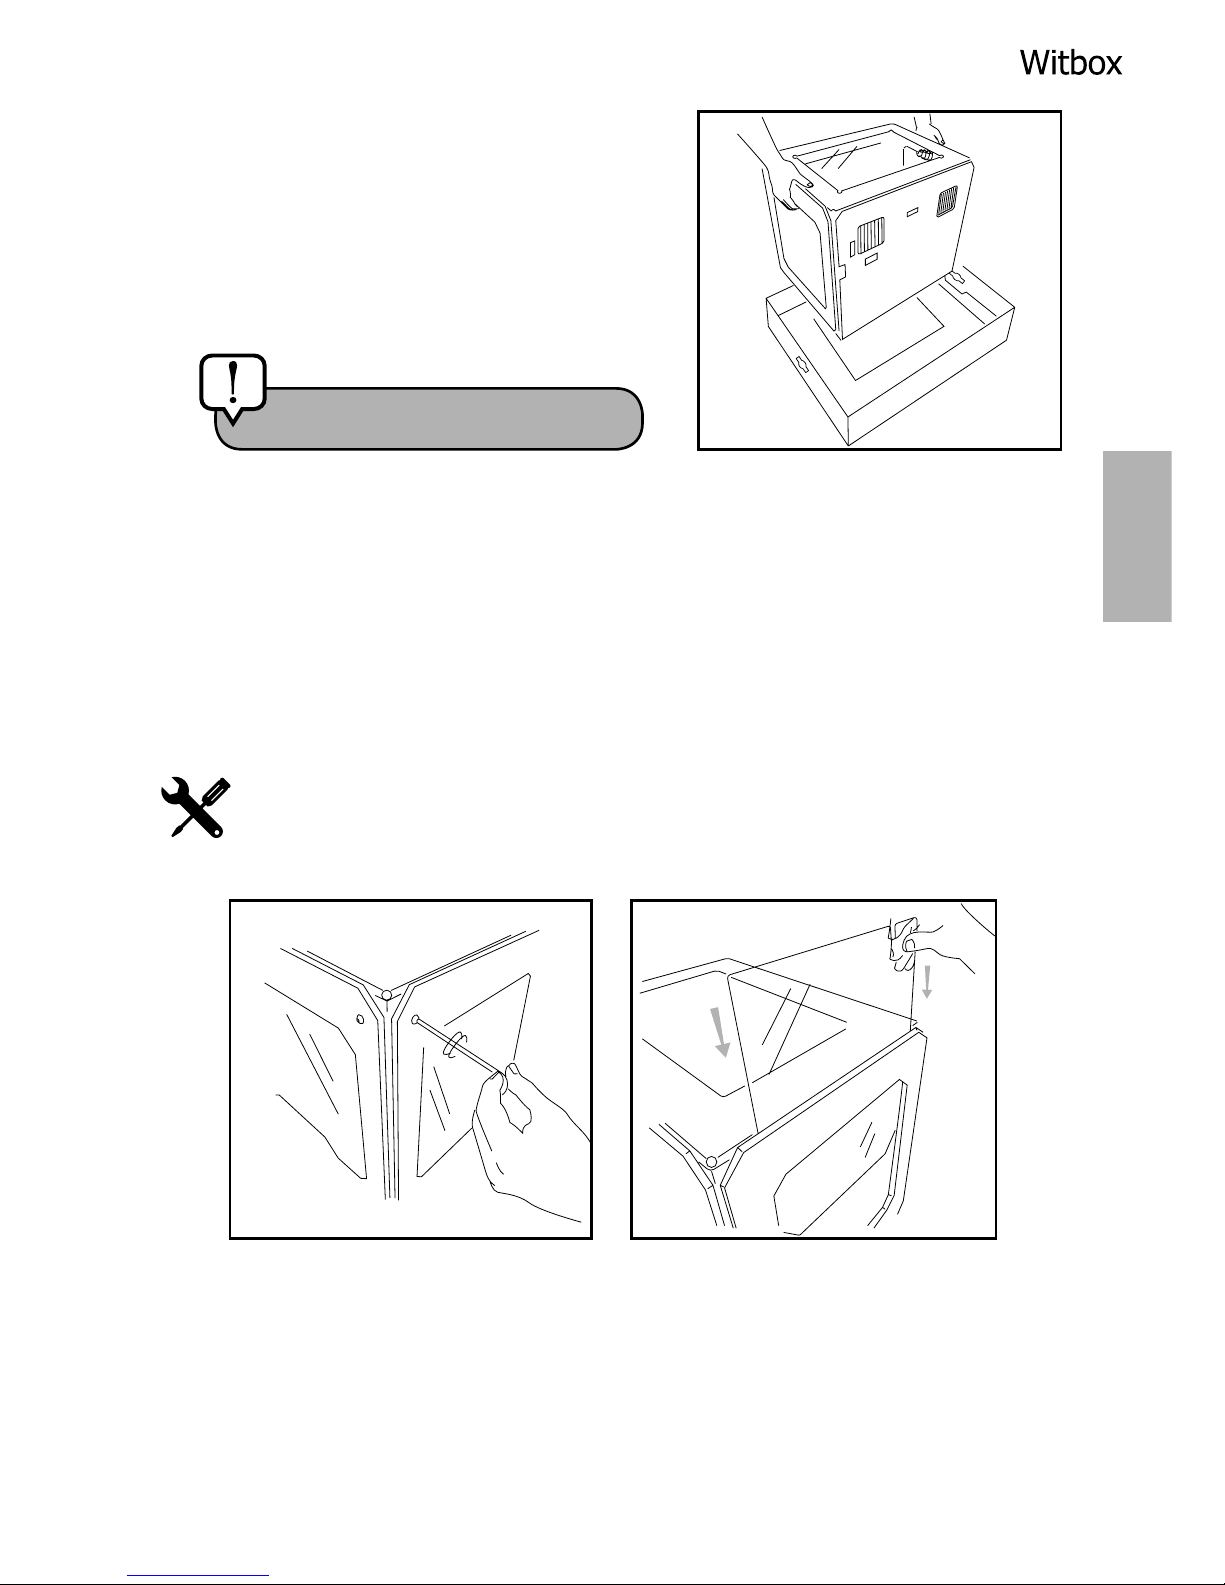
3. After taking the printer out of the
protective bag, grasp it rmly by the sides
and lift it onto a table.
4. The Witbox is supported on four metal “feet” that are designed to allow one
printer to be stacked on top of another. These are packaged along with the
Witbox and can be attached immediately in order to protect it. To avoid
scratching the table, take care when moving the printer and try not to drag it.
Attaching the side panels
Remove the plastic lm protectors from both sides of the side panels.
Gently loosen the eight screws (four on each side) located on either side
of the printer, using the Allen key included in the maintenance kit. Then
slide the panels in fully, and tighten the screws.
Caution! heavy object.
Page 14
14
ENGLISH
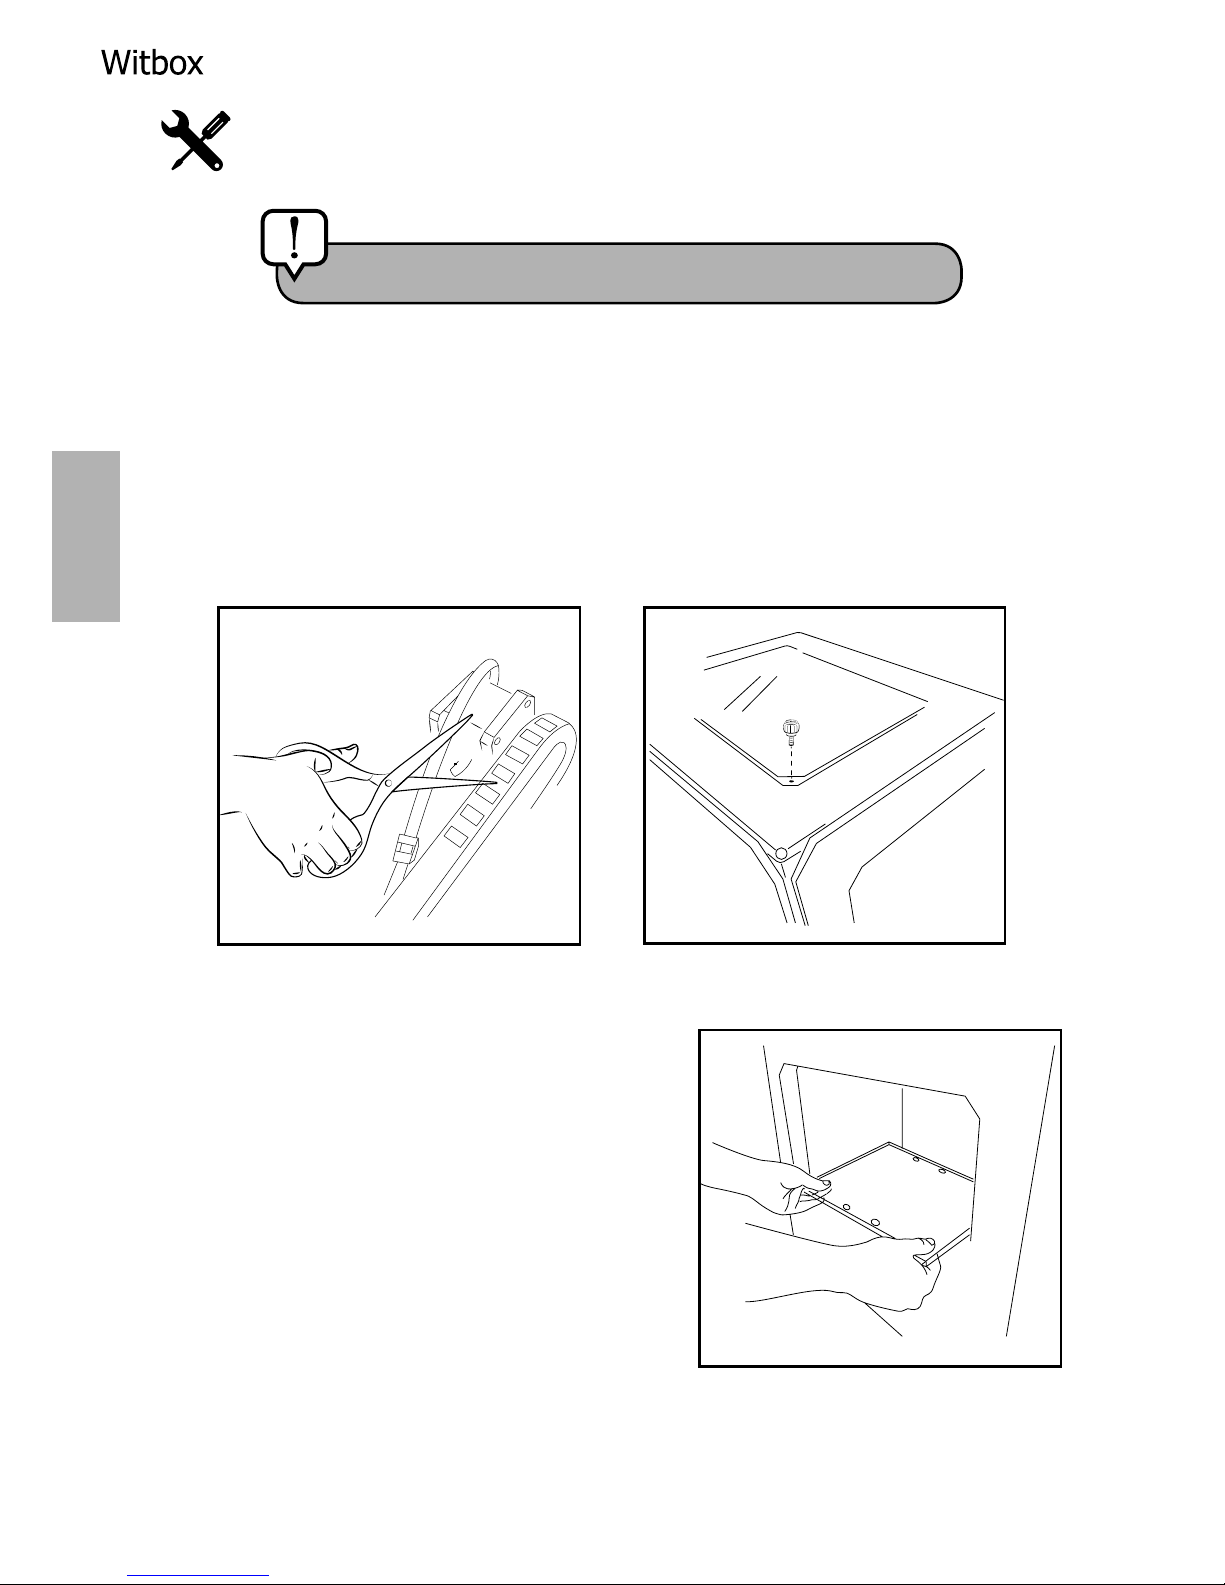
Open the front door using the keys you will nd in the box of accessories.
Cut the two ties that are attached to the extruder carriage.
Attaching the top panel
Remove the plastic lm protectors from both sides of the top panel.
Position the panel on top of the printer. In the box of accessories you’ll
nd four screws: place them in the holes in the corners of the panel and
turn them on them with your ngers.
Attaching the print base
In the box of accessories you’ll also nd the
print base, which is made of glass and has
four magnets attached to one side. Place it
gently on the support inside the printer, with
the magnets facing downwards as shown in
the illustration.
Caution! Use scissors or wire cutters.
Page 15
15
ENGLISH
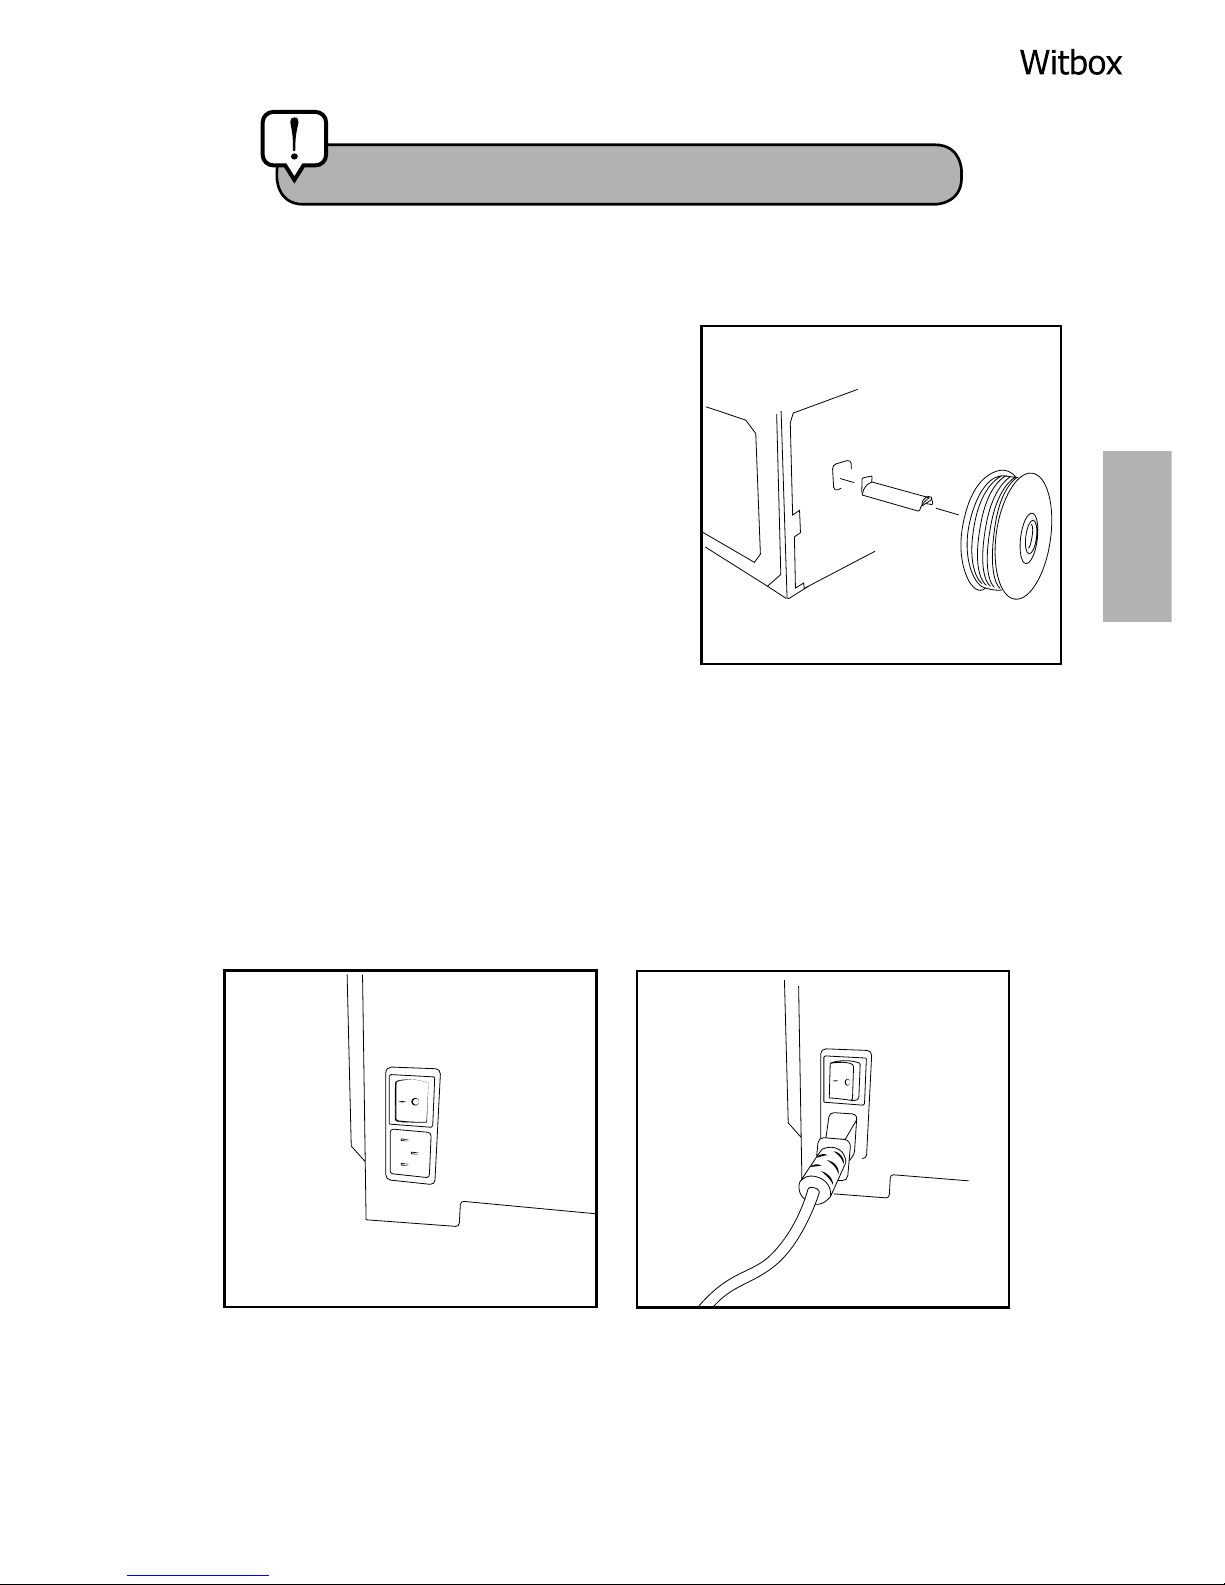
Attaching the spool and support
The spools of lament need to be placed on
a spool-holder. First, attach the metal
support to the rear of the printer by inserting
the short end into the corresponding slot.
Then remove the plastic protector from the
spool and place it onto the spool-holder. The
lament will be loaded at a later stage.
Connecting the power cable
Before connecting the power cable, make sure the switch is in the “0” position.
Then connect the power cable to the printer and plug the other end into the
power socket.
Caution! Handle with care
Page 16
16
ENGLISH
SETTING UP
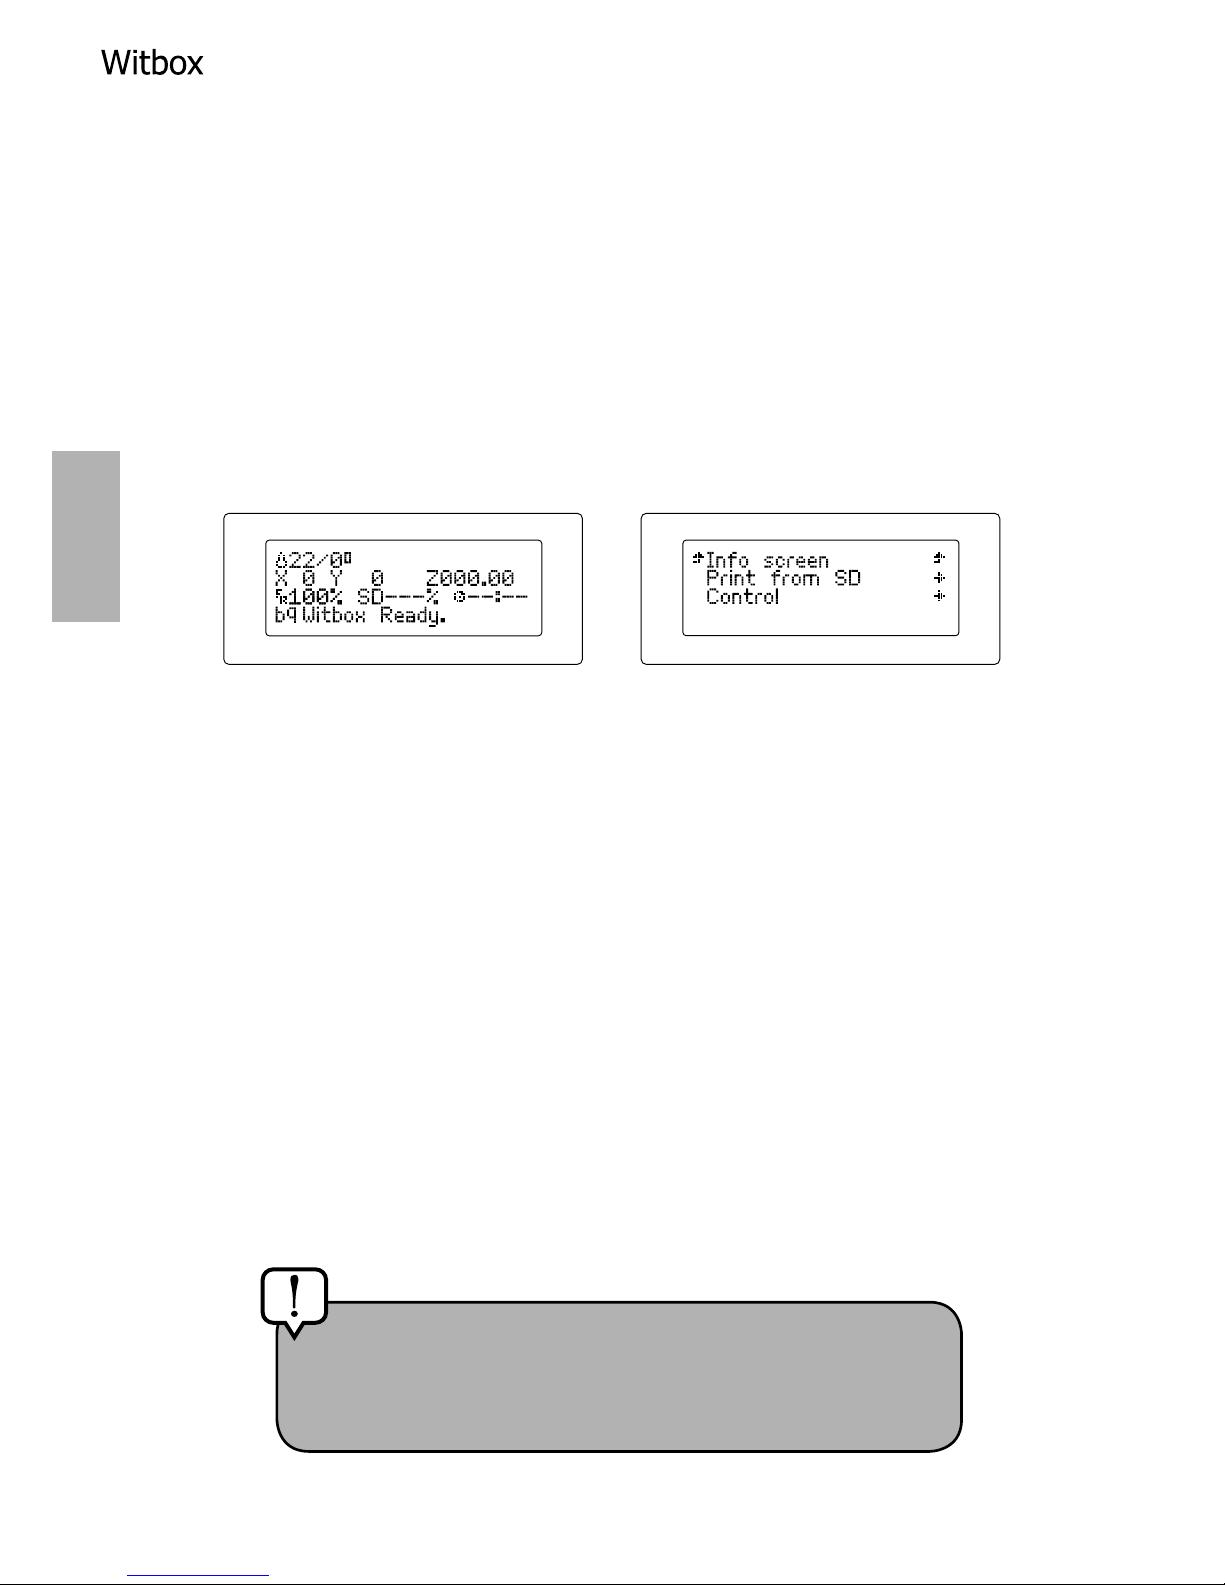
Once you have plugged the Witbox in, it’s ready to be switched on. The LCD
screen will light up and display the name of the current rmware version.
Control panel
When you switch the Witbox on, the LCD screen will display information
regarding the status of the device, such as its temperature, name, etc. Next to
the LCD screen is a control wheel that you can press in order to display the print
menu. Press and turn the wheel to the left or right to scroll through the various
options.
Levelling the print base
One of the most important factors in achieving objects of high quality is having
a correctly levelled print base. The levelling process adjusts the print base so
that the distance from the base to the extruder is the same at every point.
Why is it so important?
•
If the extruder nozzle is too far away from the base, or if one part of the base
is closer than the other, the objects you print will probably not adhere
correctly.
•
If the nozzle is too close to the base, this may prevent the lament from being
extruded and could also scratch the base.
•
Levelling the print base regularly helps improve the quality of the objects you
print.
Before you start the levelling process, make sure there
is no plastic residue on any of the parts. Clean them if
necessary (we explain how in the section on Cleaning
and maintaining your Witbox).
Page 17
17
ENGLISH
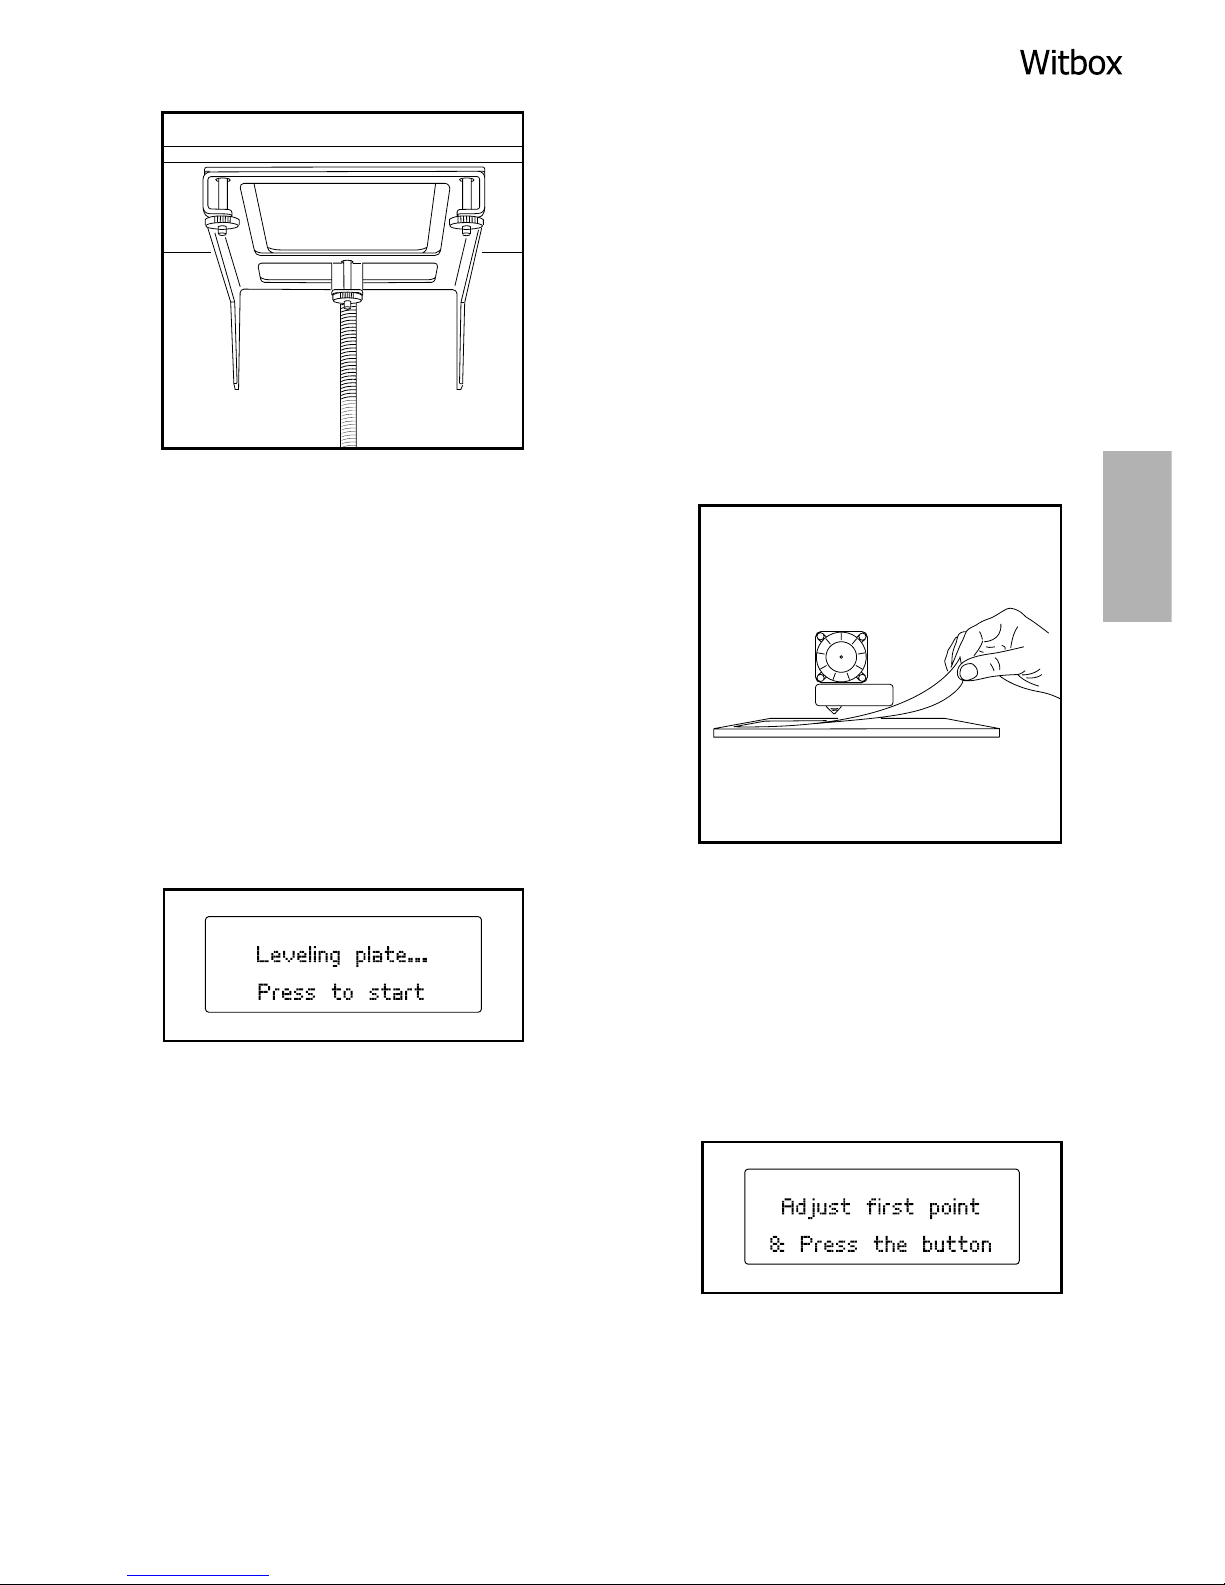
To help you with this process, step-by-step
instructions will be given via the LCD screen.
To level the print base you need to adjust the
three screws located underneath the base
support.
1. Place the sheet of calibration paper
(supplied) onto the print base. Press the
control wheel and go to Control > Level
Plate.
Press the wheel to begin levelling.
2. The extruder will position itself at the
reference point (the rear right-hand
corner), then move over to the first
levelling point. Check the space between
the base and the extruder using the
calibration sheet, and (if necessary) adjust
it by turning the screws located underneath the print base. Turn them to the
right to move the base away from the extruder, and to the left to move it
closer. The calibration sheet should just about be able to pass between the
base and the extruder nozzle.
Page 18
18
ENGLISH
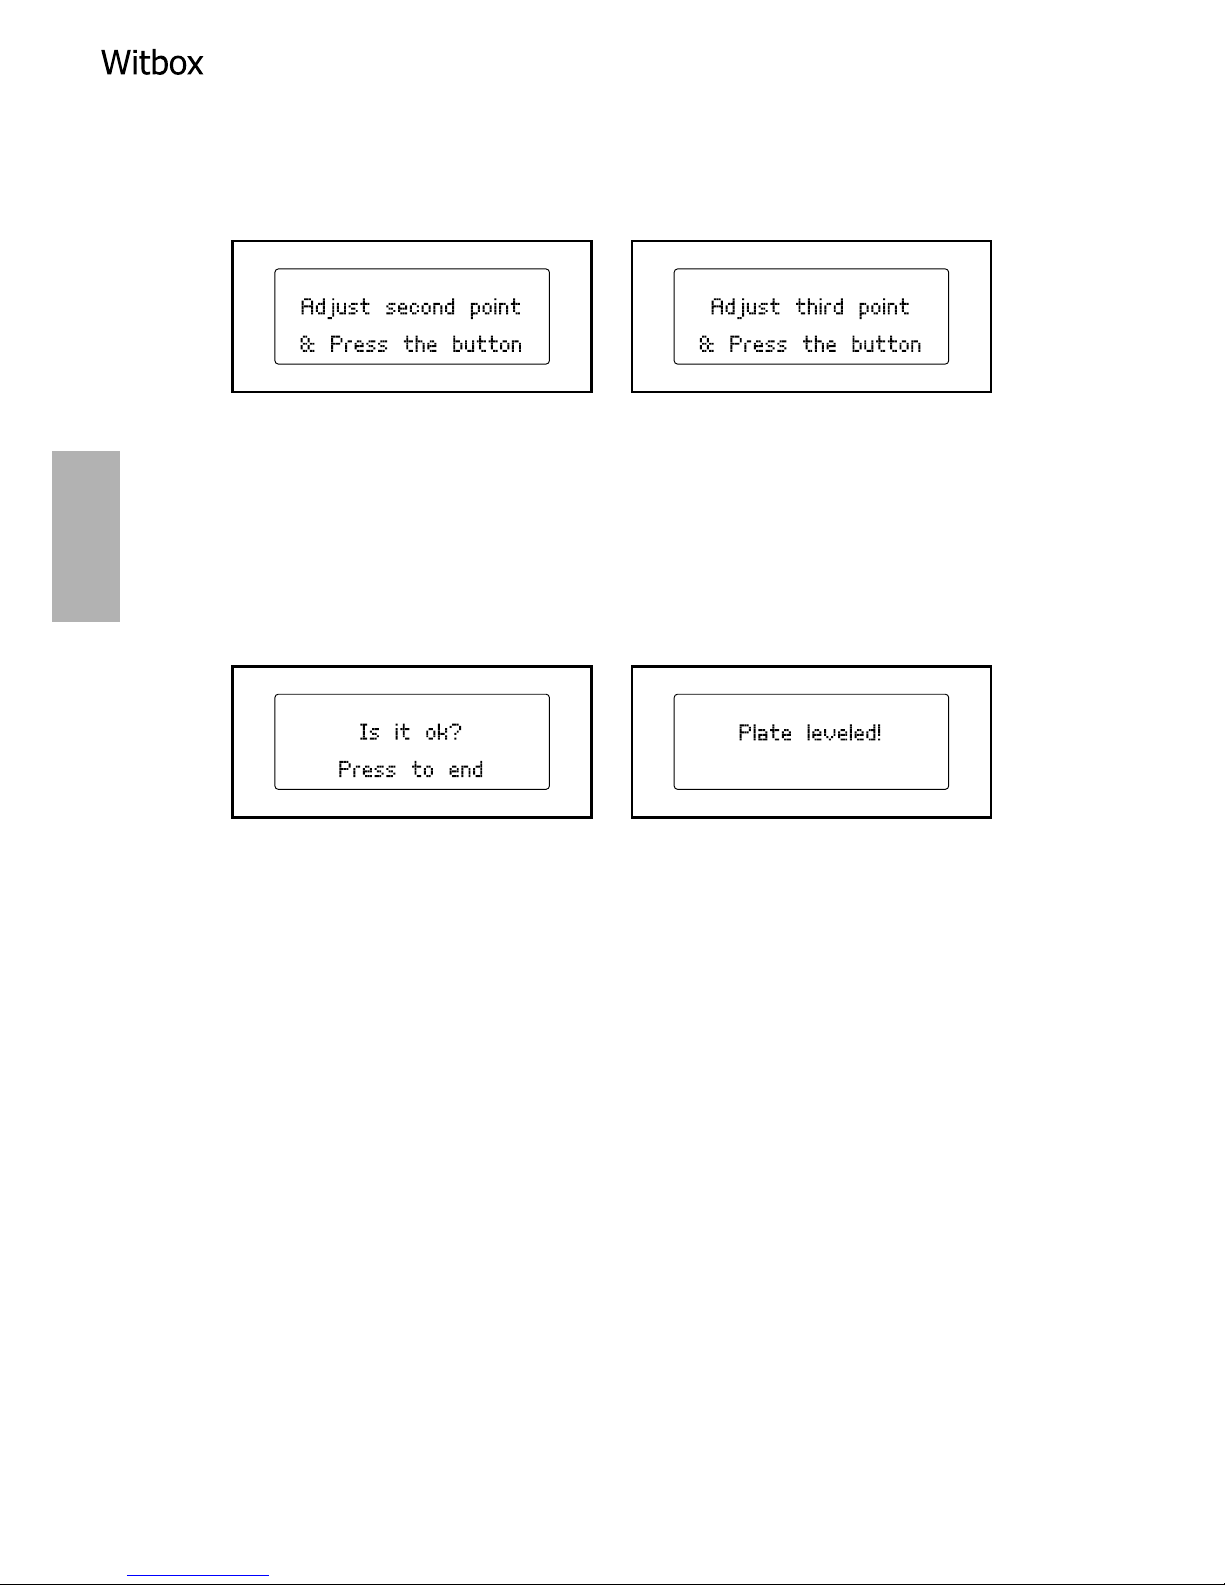
3. Press the control wheel again, and the extruder will move onto the second
calibration point. Repeat the previous process, then do the same again for the
third calibration point.
4. Finally, the extruder will move across to the centre of the base, and you will
be asked to verify the distance between the nozzle and the print base once
again. Once you have done so, press the wheel to exit the levelling program.
It is recommended that you repeat the levelling process as many times as
necessary, in order to make sure the base is correctly levelled.
Page 19
19
ENGLISH
Loadingthelament
Now you’re ready to load the lament into the Witbox and print a test object.
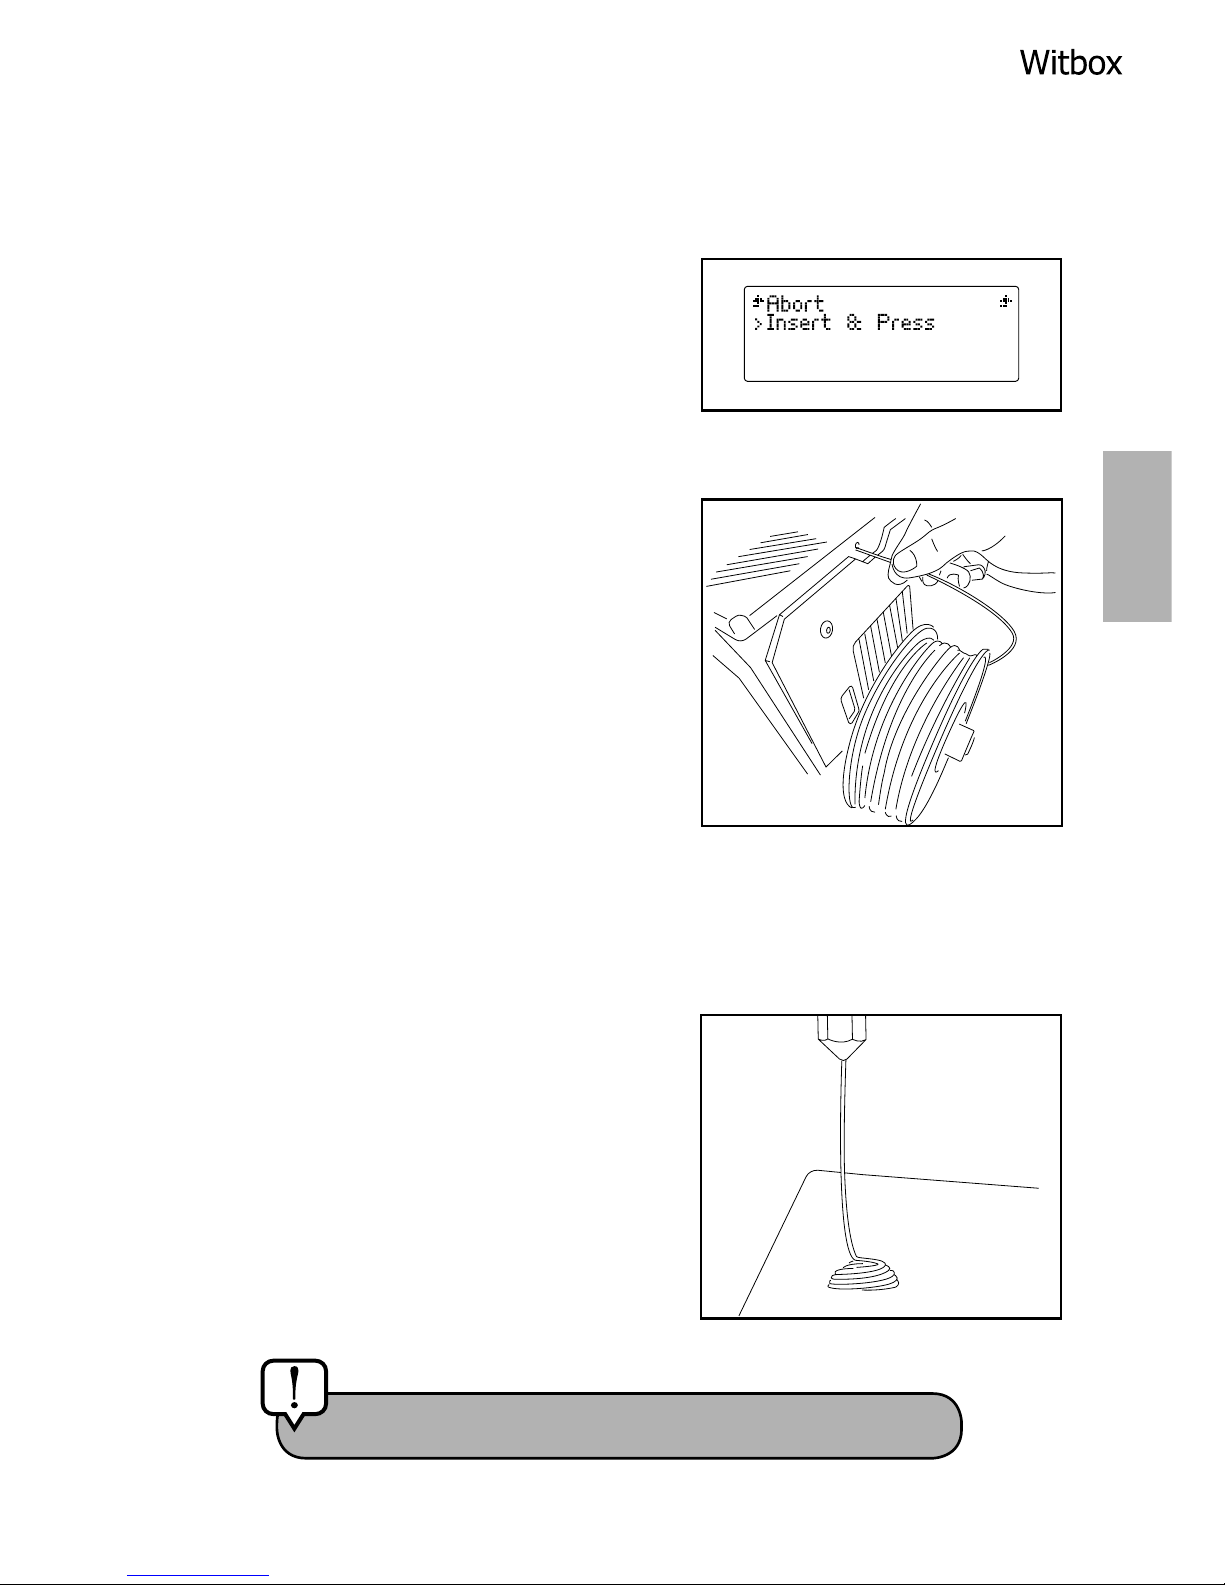
1. Go to Control > Filament > Load. The
extruder will heat itself to a temperature
of 220°C. You can monitor the
temperature increases on the LCD
screen. Once the correct temperature has
been reached, the message Insert &
Press.
2. The lament is loaded at the rear of the
Witbox via the bulkhead connector,
which is attached to the Fibonacci guide
tube. It is very important that you position
the spool with the loose end of the
lament on the right-hand side. Trim the
end of the lament diagonally across with
a pair of scissors, to make it easier to
guide into the tube.
3. Feed the lament through the tube until you feel it bump against the extruder.
Push it in rmly to make sure it has reached the end of the tube.
4. Press the control wheel. After a few
seconds, a small stream of melted plastic
will appear in the extruder nozzle. Each
time you press the wheel, plastic will be
extruded for a few seconds.
Caution! High temperature.
Page 20
20
ENGLISH
5. Allow the extruded plastic to cool for a few moments before opening the
printer door.
Printing a test object
The SD card that came with your Witbox has been pre-loaded at the factory with
a number of les for printing test objects.
All our printers are tested before they leave our factories, and in the box of
accessories you will nd a plastic object (of medium quality) that was printed
using your printer before it left the factory, in order to make sure the printer was
working correctly.
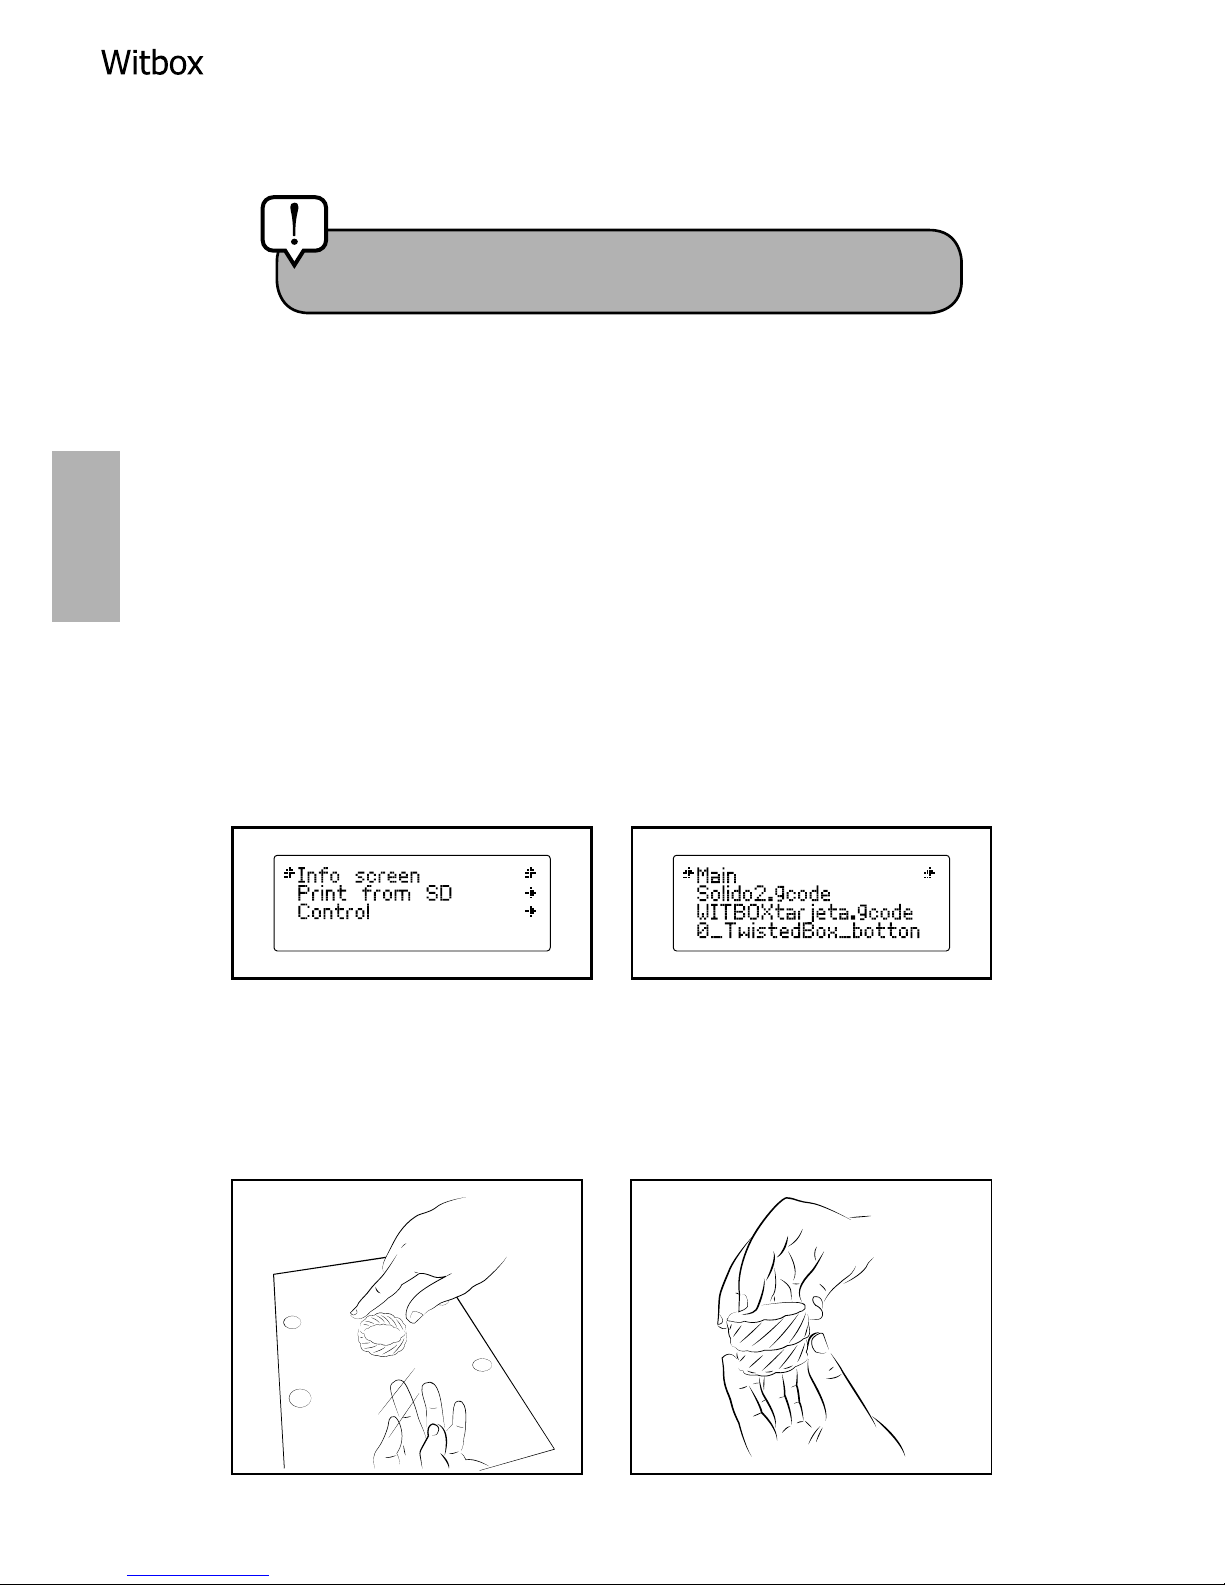
Go to the main menu and select the option Print from SD. The names of the
various objects you can print will be displayed on the screen: select the one
called Twisted BOX. After you have selected an object, the printer will initiate
the printing process automatically. On the LCD screen you can monitor the
progress of the printing and check the extrusion temperature.
When the printing process has been completed, open the door and take out the
print base. Rest the base on a table and pull firmly on the printed object to
remove it. You can check that it matches and connects to the test object that
came with the printer.
Caution! Do not touch the end of the extruder, as it will
still be hot.
Page 21
21
ENGLISH
PRINTING AN OBJECT USING CURA
What is Cura?
Cura is a computer program that prepares and converts 3D computer-generated
models into commands that can be understood by your Witbox printer.
Online resources for Cura
Cura is a free, multi-platform program that can be used with Windows, Mac OS
and Linux. On our website you can nd a version that has been precongured
for your Witbox:
www.bq.com/gb/products/witbox.html
Downloading and installation
Once you have downloaded the correct Cura installer for your operating system,
execute the le and follow the instructions shown on your computer screen.
Cura setup wizard for the Witbox
When you open the program for the rst time, a wizard will help you nd the
right settings for your printer model.
When you reach step 2 of the setup process, select the third option; i.e. Other(Ex:
RepRap, MakerBot, Witbox). You do not have to select anything else on this
screen.
You will then be asked to choose a predened machine prole. Select Witbox
again and move onto the nal screen, where you will be informed that the setup
process has been successfully completed. The software is now ready to use.
Page 22
22
ENGLISH
Page 23
23
ENGLISH
Appearance and main controls
The graphical interface is simple and intuitive. The control screen comprises a
series of options on the left-hand side and a three-dimensional work area on the
right-hand side, with the same size print area as the Witbox. This screen allows
you to examine the 3D models we have loaded, as well as move, rotate and resize
them and add new objects to the work area. You can find more detailed
information about the Cura program in the manuals available from the
downloads section of our website:
www.bq.com/gb/products/witbox.html
Loading a 3D object
Go to File > Load model le or open the le icon in the work area, and select the
3D object you wish to print.
Page 24
24
ENGLISH
GeneratingandsavingaleontheSDcard
Remove the SD card from the printer and insert it into your computer. An SD
card icon will appear in the top left-hand corner of the work. Underneath it you’ll
nd information on the length of lament and the amount of plastic (in grams)
required to print the object.
Printing a 3D object using the Witbox
Now you can remove the SD card from your computer and insert it back into
your Witbox.
To print the object, switch on the printer, go to the main menu, select the > Print
from SD > option and select your recently created le.
Page 25
25
ENGLISH
USING AND MAINTAINING YOUR WITBOX
Why is it important to use and maintain the printer correctly?
Using it correctly will prevent problems in the future. The printer comes with a
basic maintenance kit comprising three Allen keys, two cleaning needles and a
replacement hot end.
Online resources: use and maintenance
Before carrying out any maintenance we recommend that you visit the following
website, where you will find additional material and information on how to
perform maintenance operations successfully:
www.bq.com/gb/products/witbox.html
Cleaning the nozzle
If you use the device frequently, plastic residue can build up around the nozzle.
It is important that you remove this residue in order to prevent the extruded
plastic from sticking to the nozzle instead of the print base. You can remove it
using a brush with metal bristles, or a pair of slim-nosed pliers.
Updatingthermware
Our team of professionals is constantly striving to improve the capabilities of
your Witbox printer. To guarantee optimum print quality and technical
assistance, make sure your printer always uses the most up-to-date version of
the rmware.
www.bq.com/gb/products/witbox.html
Page 26
26
ENGLISH
Safety precautions
When using your Witbox, please observe the following safety precautions:
•
Do not use power cables, connectors or plugs that are damaged or contain
loose wiring. Do not bend or damage the power cable, touch it with wet hands,
or pull on it in order to unplug the cable from the power socket.
•
The Witbox operates at high temperatures and contains moving parts that
could cause injury if touched during operation. Do not access the interior of
the printer or touch the extruder while in operation.
•
If you need to access the interior of the printer:
·
Make sure it is fully switched off; i.e. the switch is in the
position
and the power cable is unplugged from the power socket.
·
Allow the device to cool if it has been used recently.
·
Make sure the front door of the printer remains closed while the
device is in operation and when it is not being used.
•
Do not knock the printer or cause it to fall. Do not use cables that have not
been approved by the manufacturer.
•
Handle and dispose of consumables with caution.
•
Switch the printer off in potentially explosive environments or in the vicinity
of ammable chemicals. Always observe the site regulations, instructions and
safety signs.
•
Make sure that small printed objects, or any other objects that could be
hazardous for young children, are kept out of their reach.
•
Do not store or transport ammable liquids or gases or explosive materials in
the vicinity of the device or any of its parts or accessories.
•
Supervise the printing process while the Witbox is in operation.
Page 27
27
ENGLISH
TROUBLESHOOTING
FAQs
I can’t load the lament into the extruder
Trim the end of the lament again. Throw away any damaged, bent or excessively
curved sections. Make sure there is no lament residue in the guide tube.
The LCD screen is showing strange letters/symbols. What should I do?
Remove the SD card from the printer and then put it back in again. If the problem
persists, switch the device off and then switch it on again.
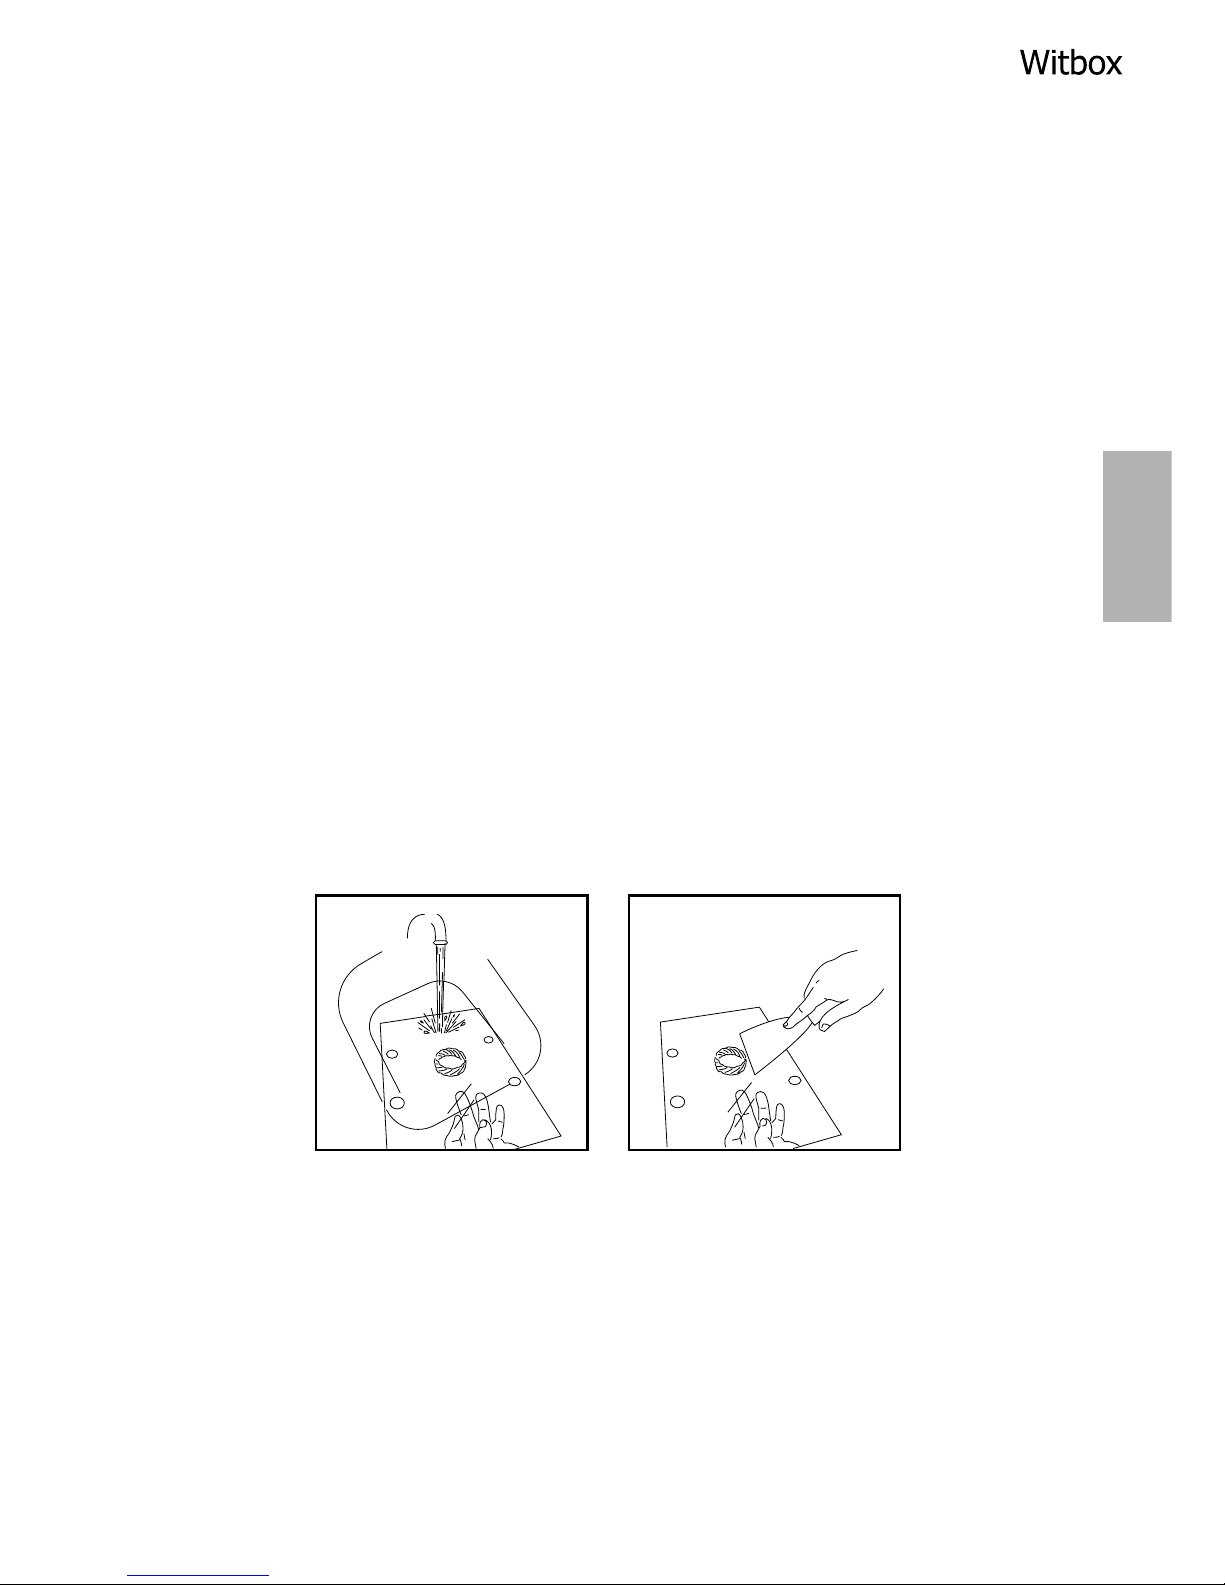
I can’t remove the completed objects after printing
This is because the extruder is positioned too close to the print base, meaning
the rst layer of plastic has adhered too rmly to it.
To remove the object, immerse the print base in hot water. If you still can’t
remove the object, carefully use a spatula or similar utensil to loosen it at the
edges.
After you have removed the object you need to level the print base in order to
create more space between the base and the extruder.
Objects won’t adhere to the print base
This is because the extruder is positioned too far away from the print base or
the print base has become dirty (ngerprints, etc.). Level the base in order to
reduce the distance between the base and the extruder.
Page 28
28
ENGLISH
Objects are printed OK, but the edges start to come unstuck
This is because the base has not been levelled correctly. If the distance between
the extruder nozzle and the print base is too great, the plastic at the edges of the
object will not adhere correctly and will become unstuck. Additionally, you can
improve adherence by applying a small amount of lacquer onto the base before
printing.
Can I pause the Witbox while it is printing?
Yes, you can pause an ongoing printing operation by pressing the control wheel
and selecting the option Pause Print. When you want to resume printing, go back
to the same menu and select the option Resume Print.
Can I stop the Witbox while it is printing?
Yes, you can stop an ongoing printing operation by pressing the control wheel
and selecting the option STOP Print.
The lament has broken inside the Fibonacci guide tube
If this happens, you must remove the broken lament manually. Disconnect the
guide tube from the extruder by pressing downwards on the oval bulkhead
connector while pulling the guide tube upwards. This will give you access to the
tube and allow you to remove the broken lament.
Technical support
Visit the website below for details of the e-mail address for our technical support
team. Contact us if you need help or if you have any queries regarding your
Witbox.
www.bq.com/gb/technical-support.html
Page 29
29
ENGLISH
TECHNICAL SPECIFICATIONS
Dimensions
Printer: (x)505 x (y)388 x (z)450 mm
Print area: (x)297 x (y)210 x (z)200 mm
Box: (x)622 x (y)524 x (z)624 mm
Mechanics (general)
Powder-coated steel chassis
Toughened chrome bars for the X, Y and Z carriages
Igus bushing for X, Y and Z
Igus E-chains
Igus screw drive for the Z axis with exible motor coupling
Powder-coated steel supports and moving parts
3-point cushioned levelling system for the print base
Quick-change print base system with neodymium magnets
Layer resolution
Very high: 50 microns
High: 100 microns
Medium: 200 microns
Low: 300 microns
Mechanics (extruder)
Own-design extruder
0.4 mm nozzle
Refrigeration nozzle for cooling parts
Print speed
Recommended speed: 50 mm/s
Maximum recommended speed: 80 mm/s
Page 30
30
ENGLISH
Electronics
Ramps 1.4
Mega 2560
LCD screen with rotary encoder and push-button navigation
Glass cold base, A4-size (29.7 x 21.0 cm)
348 W input power
100k thermistors in the extruder
40 W, 12 V heater cartridge
Software
Marlin-derived rmware
Recommended software environment: Cura Software
Permitted les: .stl, .gcode
Compatible OS: Windows XP and later
Mac OS X and later
Linux
Connections
Standard SD card reader
4 GB SD card included
Type B USB port
Materials
PLA lament, 1.75 mm
Other features
Stackable
Door with safety lock
Rear-loading system inspired by the Fibonacci spiral
Page 31
31
ENGLISH
CORRECT DISPOSAL OF THE PRODUCT
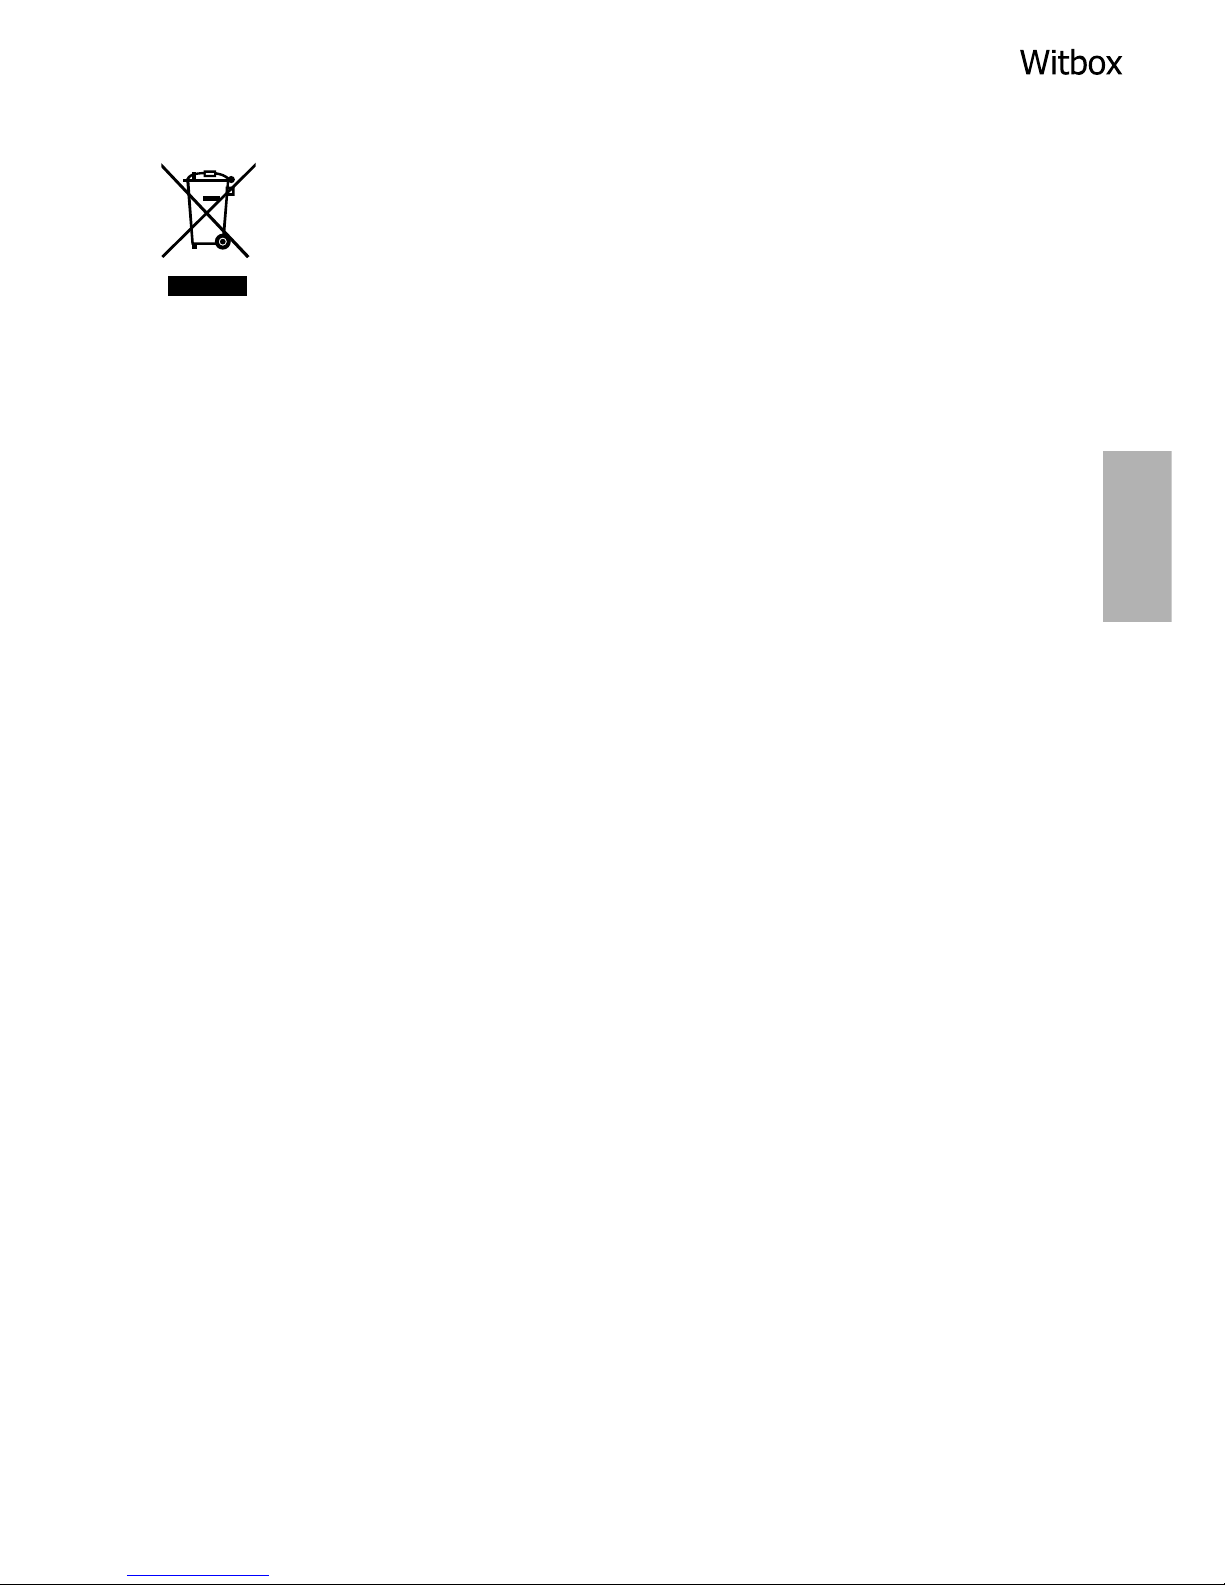
(Waste electrical and electronic equipment. Applies within the
European Union and in European countries with selective sorting
processes for waste materials).
The inclusion of this symbol on the product and/or its accessories (extruder,
cables, etc.) and documentation indicates that they cannot be processed as
household waste at the end of their useful life.
To prevent possible damage to the environment or human health, separate these
products from other types of waste and recycle them correctly. This will help
promote the sustainable use of material resources.
Household users should contact the retailer where they purchased the product
or the relevant local authorities in order to nd out how and where they can
recycle this product safely and without harming the environment.
Business users should contact their supplier and consult the terms and
conditions of the purchase contract. This product and its electronic accessories
should not be disposed of along with other commercial waste.
Page 32
32
ENGLISH
DECLARATION OF CONFORMITY
Mundo Reader, S.L.
Pol. Ind. Európolis.
Calle Sofía, 10.
28232 - Las Rozas (Madrid).
CIF: B85991941
Made in Spain
Declares that the:
Witbox
complies with the provisions of Directive 2006/42/EC and the following
harmonised standards:
UNE EN ISO 12100-1 and 2
EN ISO 14121-1:2007
EN 60204-1:2007
UNE EN 13849-1:2007.
Madrid, December 2013.
Alberto Méndez Peydró
CEO
Page 33

 Loading...