

WisyCom MTP40S-US, MTP40S-USX User Manual

MTP40S-US/USX User Manual
Wideband Wireless
Professional Pocket
Transmitter
SN: ________________
Rev.01 (ref. FW 1.22.0A)
Date: 09 April 2014
MTP40
E-series
MTP40S-US/USX User Manual
Rev.01
2
INTRODUCTION
“MTP40S is an extremely small and light pocket transmitter especially designed for
professional wireless microphone applications”
Very easy and quick to use thanks to OLED display, dedicated buttons and a joggle selector.
MTP40S benefits also of the latest Wisycom RF technology along with an enhanced
robustness against noise and inter-modulation.
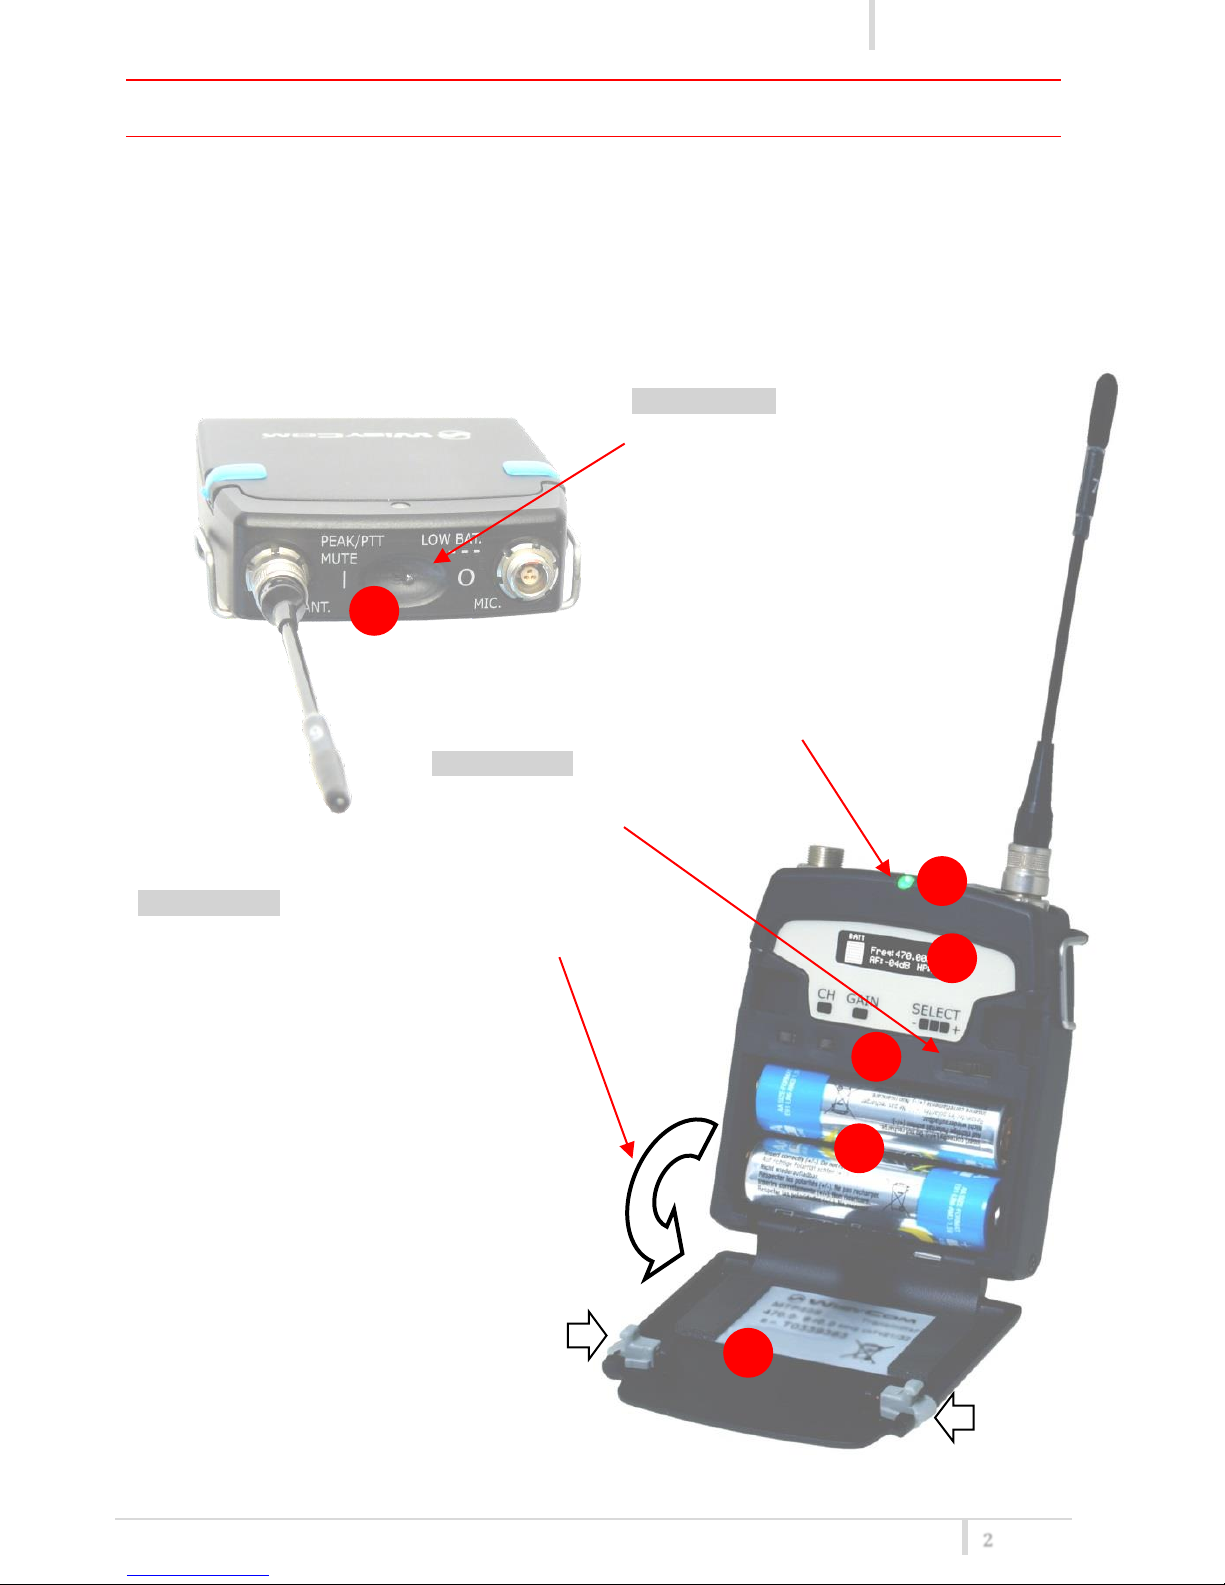
Fig. 1
❶
Switch to enable wireless transmission, it
also indicates the battery status and
peak/mute operation (with PTT)
❷
In order to allow front visibility same colour
information on (1) is replicated with this LED
❸
Oled display for transmitter setup
❹
<ch>, <gain> and 3 positions <selector>
❺
Battery holder
❻
Cover (to open push side buttons)
1.
6
5
4
3
2
Turn on wireless:
Move the Wireless power switch in
“I” position.
1
Open MIC Body:
Push the side buttons and flip down the cover, to access
internal setup controls and batteries.
Turn on display:
Push <select switch> and hold it.
Front LED RGB.
Fig. 2

MTP40S-US/USX User Manual
Rev.01
3
SAFETY INSTRUCTION
Read this safety instruction and the manual first
Follow all instructions and information.
Do not lose this manual.
Do not use this apparatus under the rain or near the water.
Do not install the apparatus near heaters or in hot environments, do not use outside the
operating temperature range.
Do not open the apparatus, only qualified service technician are enabled to operate on it.
The apparatus needs servicing when it is not properly working or is damaged by liquids,
moisture or other objects are fallen in the apparatus.
Use only accessories or replacement parts authorized or specified by the manufacturer.
Clean the apparatus only with dry cloths, do not use liquids.
Report the serial number and the purchasing date in front of the manual. It is needed to have
proper replacement parts or accessories from the manufacturer.
When replacement parts are needed, use only replacement parts authorized from the
manufacturer. Substitution with not authorized parts could result in electric shock, hazards
or fire.
Keep attention on all the labels with warnings or hazards on the apparatus.
LED INDICATIONS
Led indication with LED RGB (red, green, blue) in front led (2):
- Wireless transmission status: Green when RF transmission power is on,
Red when RF transmission power is off.
Blue when the input signal is above the peak threshold
- Battery status: green steady, slowly blinking (< 25%), quickly blinking (<12%).
- Modulation peek (if activated and the limiter is disabled): red.
- Ptt status: red if active (push to talk “pushed”).
BATTERIES
MTP40S is working with 2 AA alkaline or NiMH batteries (select correct type on setup controls).
Battery status can be checked on internal OLED display or looking to LED status on power switch
(see 1.1).
BATTERY SUBSTITUTION
Open transmitter cover and insert batteries following polarity indicated.
Attention: always replace both the batteries
MTP40S-US/USX User Manual
Rev.01
4
POWERING UP
Move the wireless power switch (see Fig. 1) in “I” position to activate wireless transmission: a
green LED lights up (blinking when battery is low!)
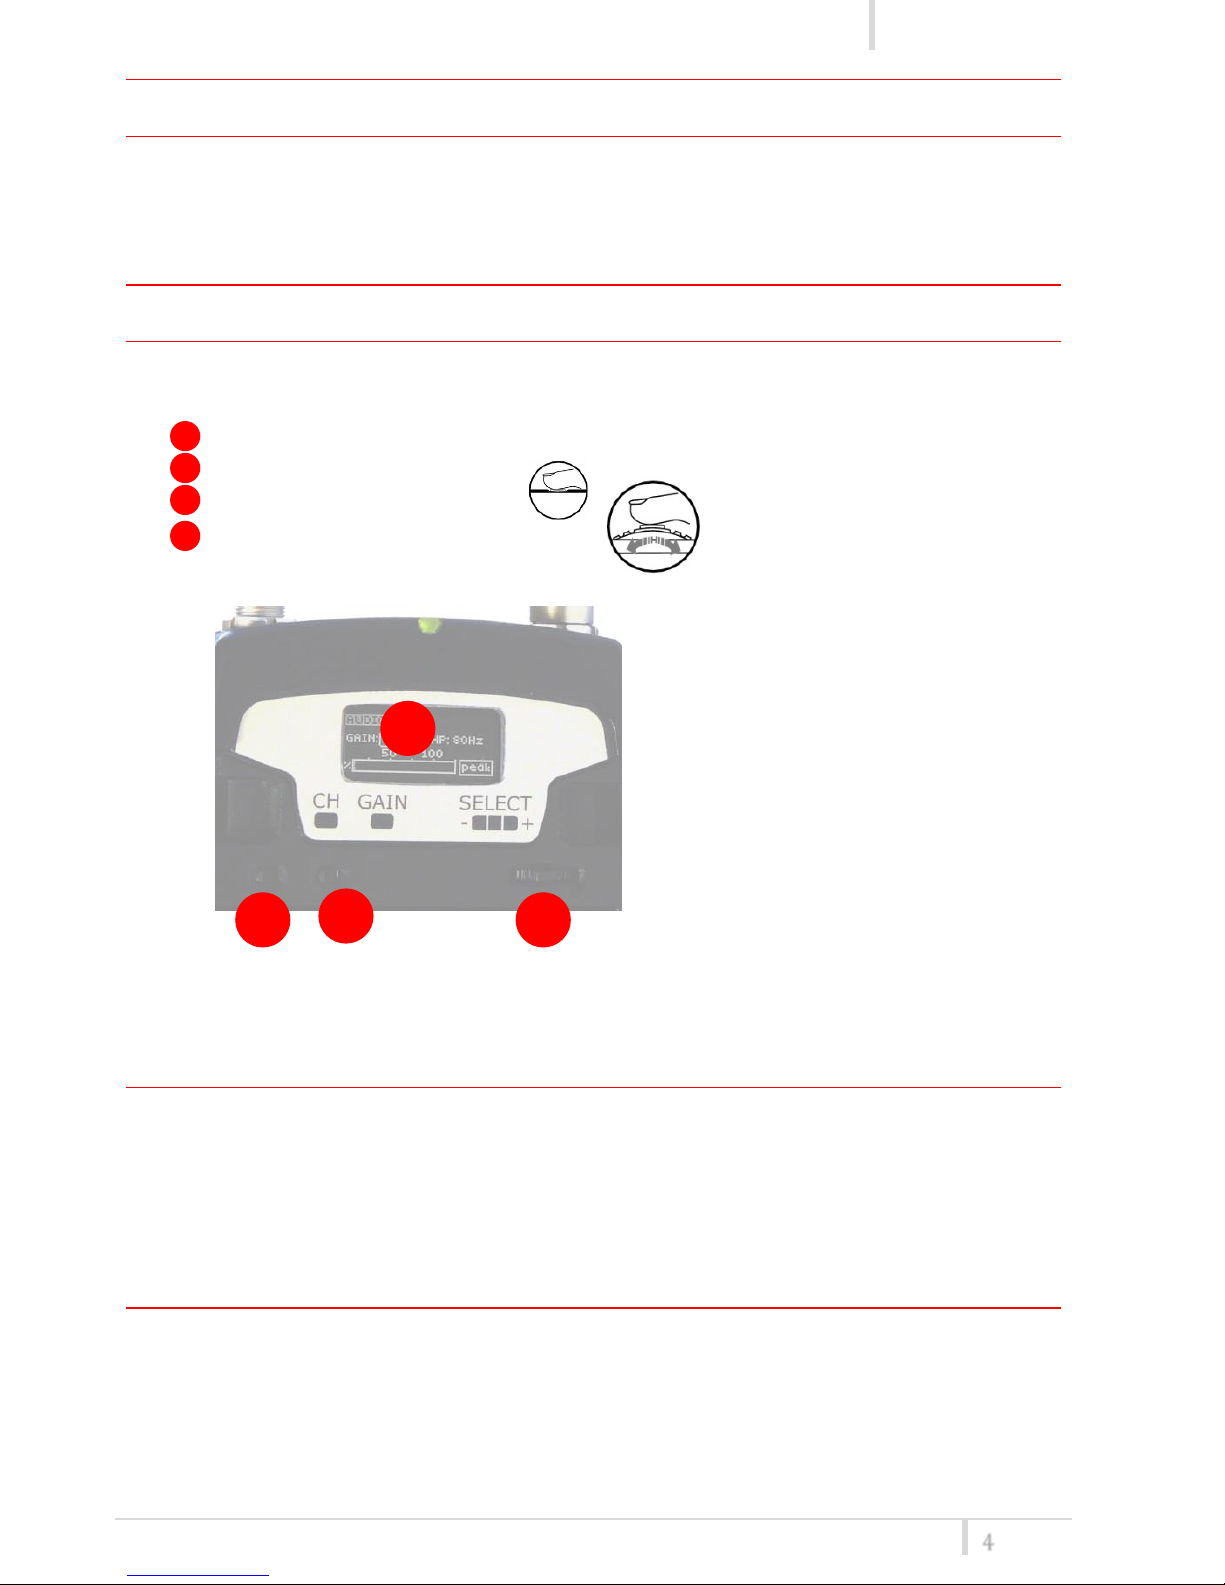
SETUP CONTROL
Open transmitter Body to access the “display and controls” area (Fig. 3):
A. Graphics Display (OLED)
B. Channel selection buttons (ch)
C. MIC gain setup buttons (gain)
D. 3 position selector (up / down / click)
Fig. 3
OLED POWER UP (OLED IS IN OFF CONDITION)
Pushing down selector (click), oled turns on. A first menu with serial NO and brand logo is
displayed, then <status> menu enters automatically.
Pushing and holding selector, serial NO menu is displayed.
OLED POWER DOWN (OLED IS IN ON CONDITION)
Display turns off automatically after 15 sec, unless in <IRDA> menu or in <AUDIO> menu (with
audio level < 5% from nominal).
+
-
CLICK
A
B C D

MTP40S-US/USX User Manual
Rev.01
5
DISPLAY MENU
Setup menu are accessed in sequence:
MENU
STATUS
PRESET
Current
Load
FACTORY/USER/PRESET1/2/3/4/5/6/7/8
Save
USER
TUNING
CH 00-59
GR 00-39
Freq
1: 470.000÷640.000
2: 566.000÷798.000
3: 510.000÷698.000
AUDIO
AF In Gain
-60÷40 dsB (1dB step)
Phase 0/180
HPass Filter Flat/60/80/120/170/250/400Hz
Noise R.
ENR-Wisy/ENC-Wisy
Limiter On/Off
MIC
Mode
2 wires/2wires+bias/3 wires/
2wire&pha/2w+bias&pha
PTT
Disable/Normal/Muting/No Data
RF/Battery
RF Power
10/50/100 mW
Battery Alkaline/NiMH
LED
Led Light 0÷16
Led Mode
None/ModPeak/PTT
IRDA
Lock
Preset parameters

MTP40S-US/USX User Manual
Rev.01
6
+
-
CLICK
Using <+/-> selector all menus can be accessed in sequence, push <click> to enter edit mode
(in the left side of the display appear the word EDIT and the parameter start blinking):
<+/-> to setup field
<click> again to confirm changes and exit.
exit without confirmation if no button is pressed after a few seconds time out.
<START UP> menu
These menus are displayed during power up for few seconds.
First one gives information of antenna to be used. The number
displayed is the center-band of the antenna to be used.
The second menu gives indication on product:
product id (MTP40S), a letter which identify the working band
1
470-640
2
566-798
3
510-698
a number which identify the hardware version, the firmware release
(120.0B), the band in extended format and the serial number.
Keep selector pushed to hold this menu!
<STATUS> menu
This is the first menu displayed after power up.
Major info are displayed:
- Current channel/group (i.e. CH:00 GR:39)
- Current frequency (i.e. 566.000 MHz)
- Mic gain (i.e. AF: +00 dB) and high pass filter (i.e. HP:60 Hz)
- “RF 100” or RF 50” or “RF 10” on top right if RF transmission is
on at 100mW or 50mW or 10mW of power respectively
- On bottom battery bar is displayed
<PRESET> menu
This menu can be entered by scrolling selector, or pushing at the same time both quick channel setup
buttons (<ch> & <gain>).
MTP40S can recall configuration presets. “FACTORY” recalls the
Wisycom factory configuration. “USER” recalls the user
configuration (the transmitter configuration is copied into the
USER using the “save to” submenu). All “USER” menus are not
locked by default, thus this is quick way to unlock features!
The other 8 configuration presets are user programmable thru the infrared and the PC
interface (using the programmer UPK 300 or the receiver MRK950/MRK960).
All parameters can be “left unchanged”, “changed” or “changed and lock”, allowing a very
flexible way to pre-program MTP40S configuration.
 Loading...