


MPR30 Manager
Products:
MPR30-IEM, MPR30-ENG

MPR30 Manager
Pag. 1
HOW TO USE MPR30 RX MANAGER
Wisycom MPR30 RX Manager can be used to load or save the channels memory and upgrade
the firmware.
Instruction to connect MPR30 using UPK300 / UPK300E:
1. Connect to the PC the infrared programming interface (UPK300 or UPK300E) using a
USB cable (NOTE: it is not possible to use IR interface of MRK950 or MRK960)
2. Check if the version of ENG RX Manager installed in your PC is the latest version. If
not, uninstall the ENG RX Manager actives in your PC and install the new version as
indicated in the section How to update ENG RX Manager .
3. Run ENG RX Manager
4. Power up the receiver MPR30 and enable the IRDA interface:
a. push button,
b. push button until that Infrared submenu appears on the display
(Headphones>Edit RX>Display>Infrared)
c. push again button and check the display shows ‘IR IF active’
5. Put in contact MPR30 and UPK300/UPK300E
6. Push Disconnected button. On the Device connection windows select UPK port and
verify that upk300 is
selected on the
Silabs USB devices
panel. If upk300
device is not
showed, push
Refresh button
and/or try to
disconnect and
reconnect the USB
cable connected to

MPR30 Manager
Pag. 2
the UPK300. Then click OK.
7. If the connection is ended well, the Connected icon is showed on the top of the
panel and “Connected on USB by UPK” is displayed on the information panel
MPR30 Manager
Pag. 3
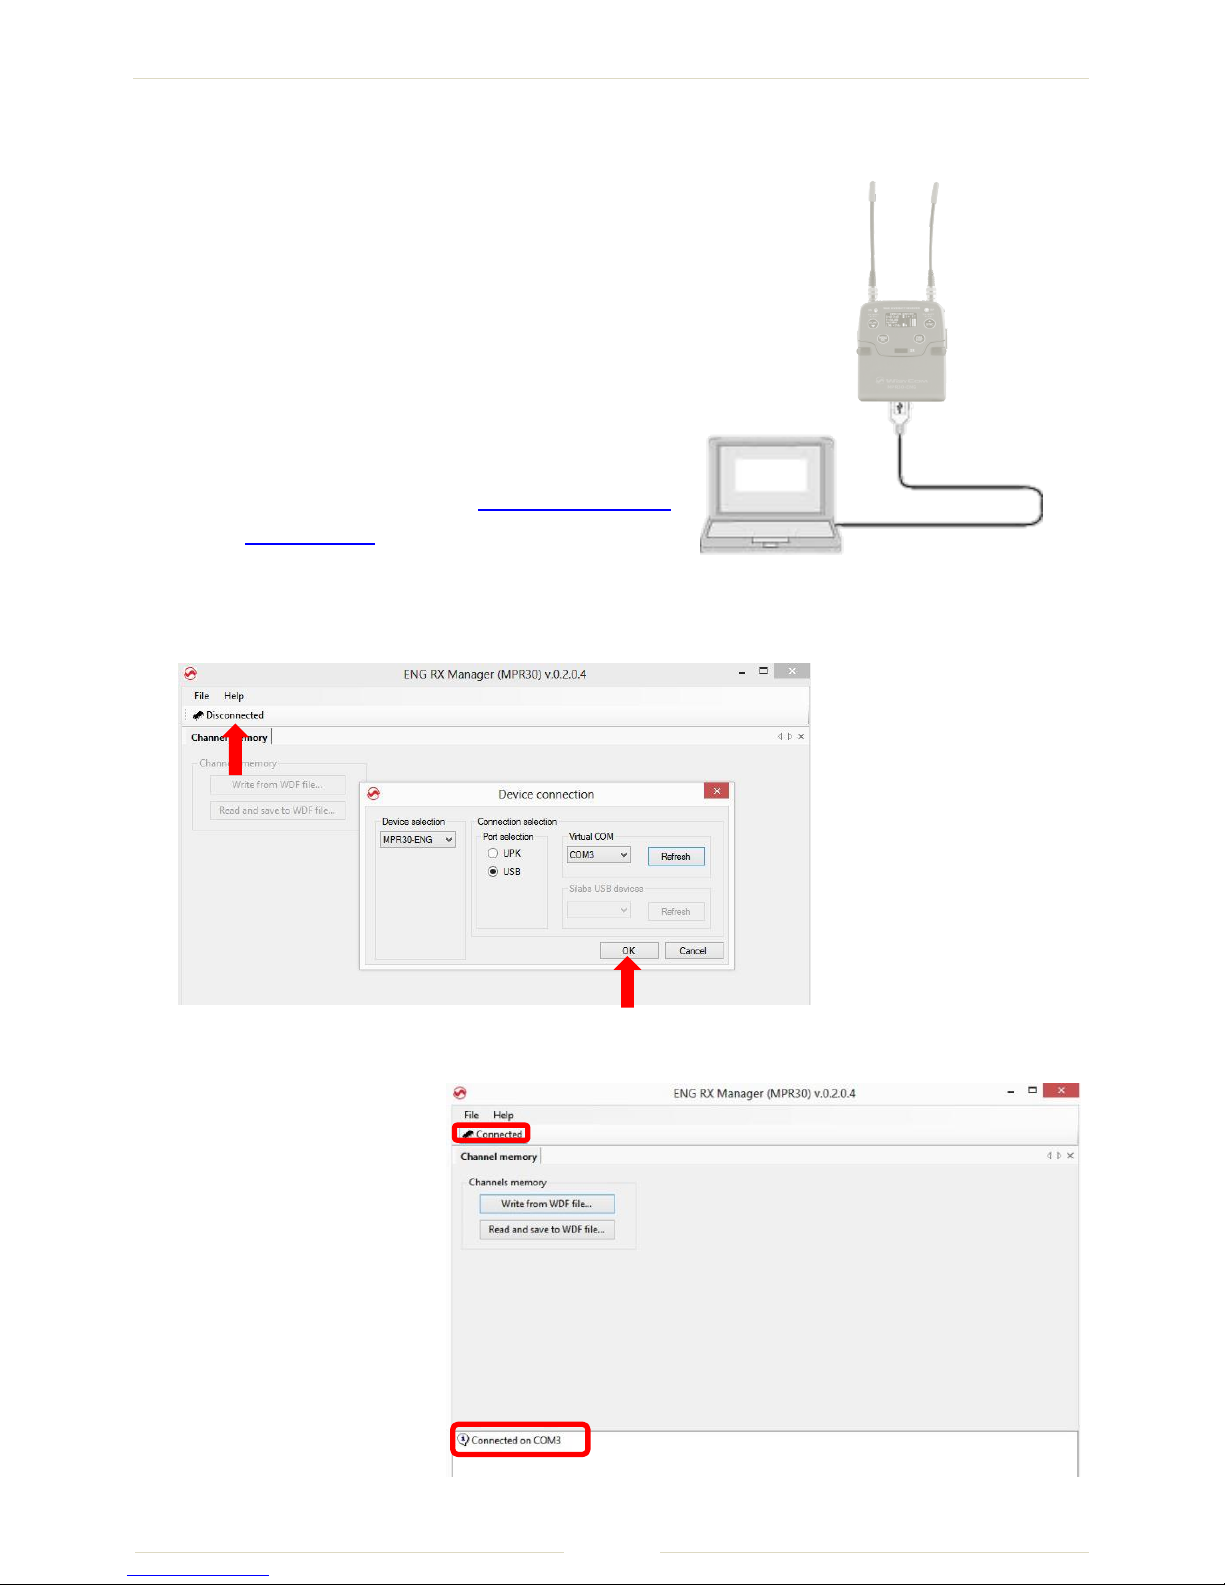
Instruction to connect MPR30 using USB cable:
In order to use the microUSB port to configure the
MPR30, it is necessary to install the MPR30 USB
driver (see How to install MPR30 USB driver)
1. Connect the MPR30 to the PC thru the
micro USB interface using the USB cable
2. Check if the version of ENG RX Manager
installed in your PC is the latest version. If
not, uninstall the ENG RX Manager actives
in your PC and install the new version as
indicated in the section How to update ENG
RX Manager .
3. Run ENG RX Manager
4. Power up the receiver MPR30
5. Push Disconnected button. On the Device connection windows select USB port and
verify that a COMx is
selected on the Virtual
COM panel. If COMx is
not showed, push
Refresh button and/or
try to disconnect and
reconnect the USB cable
connected to the
MPR30. Then click OK.
6. If the connection
is ended well, the
Connected icon is
showed on the
top of the panel
and “Connected
on COMx” is
displayed on the
information panel

MPR30 Manager
Pag. 4
How to load/save channels memory
Write:
Push the button Write from WDF file… and select the wdf file to load on the MPR30.
Read and save:
Push the button Read and save to WDF file… , insert the .wdf file name and the path where to
save the wdf file.
During the process of writing/reading & saving, a green bar below the panel shows the
progress of the process and on the information panel it is possible to verify what the
application is doing.
To Modify the wdf file, it is possible to use the spreadsheet FREQUENCY 2010 v15 beta.xls
available on the website:
- open the file and enable changes and macro
- load the wdf file clicking on READ WDF button
- execute the desiderate changes
- save the wdf file clicking on SAVE WDF button
The WDF thus modified can be used to write on the MPR30’s channels memory.

MPR30 Manager
Pag. 5
How to upgrade the firmware
Select FW upgrade panel
1. Push the Browse button and select the upk file
2. Put the receiver in bootloader mode: power on the MPR30 keep pushing both the
arrow bottons). When the receiver is in bootloader mode, all the led in the front
panel are turn on.
3. Click on Start button and check the progress of the upgrade process in the green bar

MPR30 Manager
Pag. 6
RX MANAGER MPR30 - INSTALLATION
How to install RX Manager
Run the executable file (i.e. RX Manager (MPR30) Setup vx.x.x.exe) and follow the installation
instructions. WARNING: If it is the first installation and Wisycom USB driver is not already
installed in the PC, please see Wisycom Driver section.
How to update RX Manager
Uninstall the RX Manager program active in your computer and afterwards install the newest
version of RX Manager.
Wisycom RX Manager - Version history
The following table reports the released versions of ENG RX Manager and for each one there
are listed:
added features add
fixed bugs fix
improvement/modified features mod
Version
Date
Added or modified features/Bugs Fixed
0.2.0.8
25/06/2013
-add: MPR30-IEM manager and firmware upgrade
0.2.0.7
22/05/2013
-fix: bug load channels with Windows7
0.2.0.4
21/12/2012
First version

MPR30 Manager
Pag. 7
WISYCOM DRIVERS
How to check if the Wisycom USB driver of UPK300 is installed on the PC
connect the device using USB cable (UPK300E)
open Windows Control Panel
select Hardware and Sound
select Device Manager
verify that the hidden devices are showed
check item Controller USB device: if Wisycom Device is present, then
the USB Wisycom Driver of UPK300 is installed. Otherwise it is necessary to install the driver.
How to install the driver for USB interface of UPK300
Download Drivers.zip from the web site
Unzip the folder
Run DriverInstaller.exe
For Windows 8 platform, if you have problem during the installation (ex. the INF file is not
correct,….) please see section “How to install Wisycom Driver on Windows 8”.

MPR30 Manager
Pag. 8
How to check if the Wisycom USB driver of MPR30 is installed on the PC
connect the device using USB cable from the microUSB of MRP30 and the USB of PC
open Windows Control Panel
select Hardware and Sound
select Device Manager
verify that the hidden devices are showed
check item COM and LPT ports: if MSP-MPR30ENG – CDC or MSP-MPR30ENG – CDC
is present, then
the USB Wisycom Driver of MPR30 is installed. Otherwise it is necessary to install the driver.
How to install the driver for USB interface of MPR30
connect the microUSB of MRP30 to the USB interface of the PC
open Windows Control Panel
select Hardware and Sound
select Device Manager
click MPR30 device

MPR30 Manager
Pag. 9
with the right button of the mouse, select Update the Driver: the following windows
appears
Select Search for the driver on the computer, and select the Wisycom folder where
the MRP30 manager is installed
Es: C:\Program Files (x86)\Wisycom\ENG RX Manager (MPR30) SERVICE\Driver\MPR30

MPR30 Manager
Pag.
10
Confirm pushing Next button
For Windows 8 platform, if you have problem during the installation (ex. the INF file is not
correct,….) please see section “How to install Wisycom Driver on Windows 8”.
Platforms Supported
Microsoft Windows XP SP3 (32-bit and 64-bit )
Microsoft Windows 7 (32-bit and 64-bit)
Microsoft Windows 8 (32-bit and 64-bit)

MPR30 Manager
Pag.
11
How to install Wisycom Driver on Windows 8
1. Access to the main Charm Bar moving the cursor to the bottom right corner and
press Setting Charm or press win + I The Settings charm menu will appear.
2. Click Change PC Settings at the bottom.
3. Go to General, and scroll to the bottom of the page, click Restart Now button under
Advanced Startup section. Remember to save all your work first before clicking it.
4. The computer reboots to a
startup menu, in which click
Troubleshoot.
5. Click Advanced Options at next screen.
6. Choose Startup Settings
next

MPR30 Manager
Pag.
12
7. Click Restart button.
8. The computer reboots and
prompts another menu to choose.
One of the items is to Disable driver
signature enforcement. Press
number 7 or F7 to continue booting
to Windows 8 with digital sign
enforcement disabled.
9. Install Wisycom Driver as
indicate in the Wisycom
driver section. When the
Windows security alert
appears (see next window),
choose “Install this driver
software anyway”
For more information or support, please visit our www.wisycom.com or email us at
support@wisycom.com
 Loading...