

Page 1

S
tarmate
Satellite Radio Plug & Play Receiver
User Guide
Page 2

Page 3

Congratulations on the Purchase of your new SIRIUS Starmate 3
Plug-n-Play Receiver
Your new SIRIUS Starmate 3 Plug-n-Play Receiver lets y ou enjoy SIRIUS® Satellite Radio’s
digital entertainment anywhere you’ve installed the SU PH1 SIRIUS Universal Plug and Play
Home Kit, SUPV1 SIRIUS Universal Plug and Play Vehicle Kit, or the SUBX1 SIRIUS Plug and
Play Universal Boombox (each sold separately). Use thi s manual to familiarize yourself with all
of SIRIUS Starmate 3 features and capabilities. For th e latest information about this and other
SIRIUS Starmate products and accessories, visit http:/ /www.sirius.com.
Page 4

Table of Contents
TABLE OF CONTENTS . . . . . . . . . . . . . . . . . . . . . . . . . . . . . . 2
WARNING AND SAFETY INFORMATION . . . . . . . . . . . . . . . . . . . . . . 4
FCC Caution . . . . . . . . . . . . . . . . . . . . . . . . . . . . . . . . . . 4
Canadian Compliance . . . . . . . . . . . . . . . . . . . . . . . . . . . . . . 4
General Precautions . . . . . . . . . . . . . . . . . . . . . . . . . . . . . . .4
COPYRIGHTS & TRADEMARKS . . . . . . . . . . . . . . . . . . . . . . . . . 7
PACKAGE CONTENTS . . . . . . . . . . . . . . . . . . . . . . . . . . . . . . 8
GETTING STARTED . . . . . . . . . . . . . . . . . . . . . . . . . . . . . . 10
Maximizing Audio Quality From Your SIRIUS Receiver . . . . . . . . . . . . . . . 10
Wireless Connection . . . . . . . . . . . . . . . . . . . . . . . . . . . . 10
Direct Connections . . . . . . . . . . . . . . . . . . . . . . . . . . . . . 11
Subscribing to the SIRIUS Service . . . . . . . . . . . . . . . . . . . . . . . . 14
CONTROLS . . . . . . . . . . . . . . . . . . . . . . . . . . . . . . . . . 16
SIRIUS Starmate 3 Reference Guide . . . . . . . . . . . . . . . . . . . . . . . 16
Remote Control Reference Guide . . . . . . . . . . . . . . . . . . . . . . . . . 18
OPERATION . . . . . . . . . . . . . . . . . . . . . . . . . . . . . . . . . 20
Display Screen Information . . . . . . . . . . . . . . . . . . . . . . . . . . . 20
Changing Channels and Categories . . . . . . . . . . . . . . . . . . . . . . . . 21
Display Button (DISP) . . . . . . . . . . . . . . . . . . . . . . . . . . . . . 22
Selecting Channels Directly . . . . . . . . . . . . . . . . . . . . . . . . . . . 24
Channel Presets (BAND) . . . . . . . . . . . . . . . . . . . . . . . . . . . . 24
Memory (MEMO) and Song Seek (S-Seek) Functions . . . . . . . . . . . . . . . . . 27
Jump Button . . . . . . . . . . . . . . . . . . . . . . . . . . . . . . . . . 35
Game Alert . . . . . . . . . . . . . . . . . . . . . . . . . . . . . . . . . . 37
FM Preset Button . . . . . . . . . . . . . . . . . . . . . . . . . . . . . . . 38
MENU OPTIONS . . . . . . . . . . . . . . . . . . . . . . . . . . . . . . . 39
Sirius ID . . . . . . . . . . . . . . . . . . . . . . . . . . . . . . . . . . . 39
FM Transmitter . . . . . . . . . . . . . . . . . . . . . . . . . . . . . . . . 40
Game Alert . . . . . . . . . . . . . . . . . . . . . . . . . . . . . . . . . . 42
Settings . . . . . . . . . . . . . . . . . . . . . . . . . . . . . . . . . . . 44
[ Table of Contents ]
2
Page 5

Jump Settings . . . . . . . . . . . . . . . . . . . . . . . . . . . . . . . 44
Display Options . . . . . . . . . . . . . . . . . . . . . . . . . . . . . . 46
Memory Options . . . . . . . . . . . . . . . . . . . . . . . . . . . . . . 47
Audio Level . . . . . . . . . . . . . . . . . . . . . . . . . . . . . . . . . 48
Confirmation Tone . . . . . . . . . . . . . . . . . . . . . . . . . . . . . . . 49
Parental Control . . . . . . . . . . . . . . . . . . . . . . . . . . . . . . . . 49
Time Based Features . . . . . . . . . . . . . . . . . . . . . . . . . . . . . . 54
Signal Indicator . . . . . . . . . . . . . . . . . . . . . . . . . . . . . . . . 62
Factory Default . . . . . . . . . . . . . . . . . . . . . . . . . . . . . . . . 63
TROUBLESHOOTING . . . . . . . . . . . . . . . . . . . . . . . . . . . . . 65
OPTIONAL ACCESSORIES . . . . . . . . . . . . . . . . . . . . . . . . . . . 66
SPECIFICATIONS . . . . . . . . . . . . . . . . . . . . . . . . . . . . . . . 68
WARRANTY . . . . . . . . . . . . . . . . . . . . . . . . . . . . . . . . . 69
SIRIUS ID . . . . . . . . . . . . . . . . . . . . . . . . . . . . . . . . . . 70
[ Table of Contents ]
3
Page 6
This device complies with Part 15 of the FCC Rules. Operation is subject to the following
two conditions: (1) This device may not cause harmful interference, and (2) this device
must accept any interference received, including interference that may cause undesired
operation.
FCC Caution: Any changes or modifications not expressly approved by the party
responsible for compliance could void the user's authority to operate this equipment.
Federal Communication Commission Interference Statement
This equipment has been tested and found to comply with the limits for a Class B digital
device, pursuant to Part 15 of the FCC Rules. These limits are designed to provide
reasonable protection against harmful interference in a residential installation.This
equipment generates, uses and can radiate radio frequency energy and, if not installed
and used in accordance with the instructions, may cause harmful interference to radio
communications. However, there is no guarantee that interference will not occur in a
particular installation. If this equipment does cause harmful interference to radio or
television reception, which can be determined by turning the equipment off and on, the
user is encouraged to try to correct the interference by one of the following measures:
.Reorient or relocate the receiving antenna.
.Increase the separation between the equipment and receiver.
.Connect the equipment into an outlet on a circuit different from that to which the
receiver is connected.
.Consult the dealer or an experienced radio/TV technician for help.
IMPORTANT NOTE:
FCC Radiation Exposure Statement:
This equipment complies with FCC radiation exposure limits set forth for an uncontrolled
environment. This equipment should be installed and operated with minimum distance 20
cm between the radiator & your body.
This transmitter must not be co-located or operating in conjunction with any other antenna
or transmitter.
Page 7

Warning and Safety Information
FCC Caution
Any changes or modifications not expressly approved by the party responsible for compliance
could void the user’s authority to operate this equipm ent.
This device complies with part 15 of the FCC Rules.
Operation is subject to the following two conditions:
This device may not cause harmful interference, and
1.
This device must not accept any interference received, including interference that may
2.
cause undesired operation.
This transmitter must not be co-located or operating i n conjunction with any other antenna or
transmitter.
Canadian Compliance
This Class B digital apparatus complies with Canadian ICES-003.
Cet appareil numérique de la classe B est conforme à l a norme NMB-003 du Canada.
General Precautions
Liqu id Crys tal Precautions
If the LCD screen on the receiver is damaged, do not t o touch the liquid crystal fluid. If any of
the following situations happen, take the action indic ated:
[ Warning and Safety Information ]
4
Page 8

If the liquid crystal fluid comes in contact with your skin, wipe the skin area with a cloth
1.
and then wash the skin thoroughly with soap and runnin g water.
If the liquid crystal fluid gets into your eye, flush the eye with clean water for at least 15
2.
minutes. Seek medical care.
If the liquid crystal fluid is ingested, flush your mo uth thoroughly with water. Drink large
3.
quantities of water and induce vomiting. Seek medical care.
Safe ty Prec autions
Be sure to observe the following warnings. Failure to follow these safety instructions and
warnings may result in a serious accident.
Do not operate the receiver in a way that might divert your attention from driving safely.
•
As a driver, you alone are responsible for safely oper ating your vehicle in accordance with
traffic safety laws at all times.
Do not install the receiver where it may obstruct your view through the windshield, or of
•
your vehicle’s indicator displays.
Do not install the receiver where it may hinder the fu nction of safety devices such as an
•
airbag. Doing so may prevent the airbag from functioni ng properly in the event of an accident.
Be sure the receiver and accessories are installed as described in the installation instruc-
•
tions which accompany each accessory kit. SIRIUS Satel lite Radio is not responsible for
issues arising from installations which were not insta lled according to the instructions.
To avoid short circuits, do not open the receiver or a ccessories, and never put or leave any
•
metallic objects (coins, tools, etc.) inside the recei ver.
If the receiver or accessories emits smoke or unusual odors, turn the power off immedi-
•
ately, and disconnect the receiver from any power sour ce.
Do not drop the receiver or subject it to strong shock s.
•
If the receiver doesn’t seem to be working properly, t urn the receiver off, wait 10 seconds,
•
replace the battery and then turn it on again.
The installation and use suggestions contained in this manual are subject to any restric-
•
tions or limitations that may be imposed by applicable law. The purchaser should check
applicable law for any restrictions or limitations bef ore installing and/or operating this unit.
[ Warning and Safety Information ]
5
Page 9

Oper ating T emperature
The receiver is designed to operate between -20° to +8 5° C (-4° to +185° F). Avoid leaving
the receiver in a vehicle or elsewhere where the tempe rature may fall outside this range. Extreme temperatures or extreme temperature fluctuations can degrade the performance of the
LCD display screen, and possibly damage it.
Clea ning an d Maintenance
If the receiver or accessories become dirty, turn the power off and wipe it clean with a soft
cloth. Do not use hard cloths, strong cleaning fluids, paint thinner, alcohol, or other volatile
solvents to clean. These may cause damage to the recei ver.
[ Warning and Safety Information ]
6
Page 10

Copyrights & Trademarks
© 2006 SIRIUS Satellite Radio Inc. All Rights Reserved .
® “SIRIUS”, the SIRIUS dog logo, channel names and log os are trademarks of SIRIUS
Satellite Radio Inc. “NFL” and the NFL Shield logo, an d the NFL Sunday Drive name and logo
are registered trademarks of the National Football Lea gue. “NHL” and the NHL Shield are
registered trademarks of the National Hockey League. “ NBA” and the NBA silhouette logo are
registered trademarks of NBA Properties Inc. All other trademarks, service marks, sports team
names, album art, and logos are the property of their respective owners. All Rights Reserved.
“Starmate” is a trademark of SIRIUS Satellite Radio.
™
Portions of the software on this receiver are licensed under the eCos License. Distribution of
eCos requires that the eCos source code be made availa ble to Sirius Satellite Radio customers. The eCos License and eCos source code are availab le to the public at http://www.sirius.
com/ecoslicense.
Sirius Satellite Radio reserves all rights to all rece iver software not covered under the eCos
license. This includes all portions of receiver softwa re that were not distributed to Sirius as
part of the eCos operating system.
Hardware, subscription and activation fee required. Fo r full Terms & Conditions, visit
http://sirius.com. Prices and programming are subject to change. Not available in HI and AK.
Equipment and subscription sold separately. Installati on required with some equipment.
[ Copyrights & Trademarks ]
7
Page 11
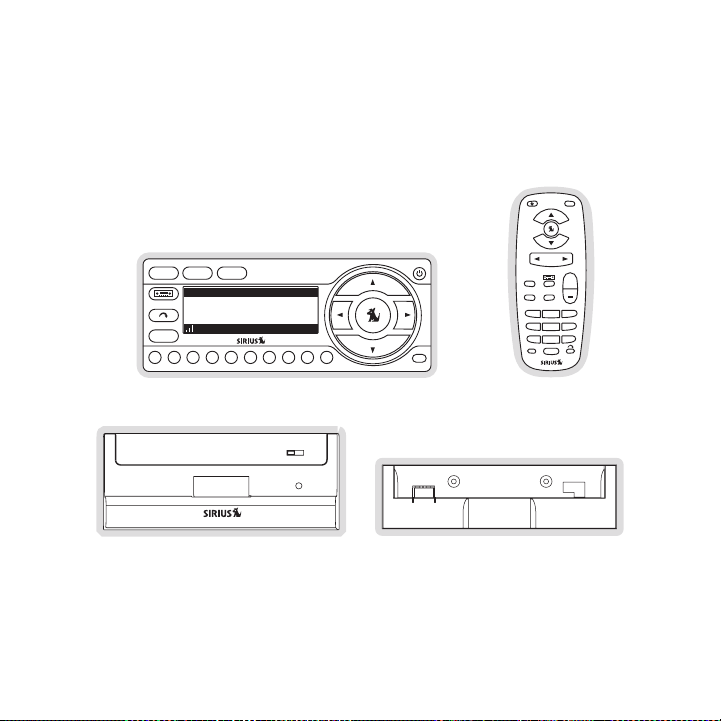
Package Contents
MUTE
CATEGORY
MENU
BAND MEMO
+
1 2 3
4 5 6
7 809
DISP
1
MENU
2 3 4 5 6 7 8 9 0
147147 RoadDog TruckingRoadDog Trucking
Charlie DanielsCharlie Daniels
Road DogsRoad Dogs
Entrtain
12:00P
Entrtain
12:00P
A2A2
DISP MEMO
BAND
The following items are included with your purchase of the SIRIUS Starmate 3 receiver:
Vehic le Docking StationVehic le Docking Station
8
[ Package Contents ]
Starm ate 3 Rece iverStarm ate 3 Rece iver
Remot e
Remot e
Contr ol
Contr ol
Docki ng Station AdapterDocki ng Station Adapter
Page 12
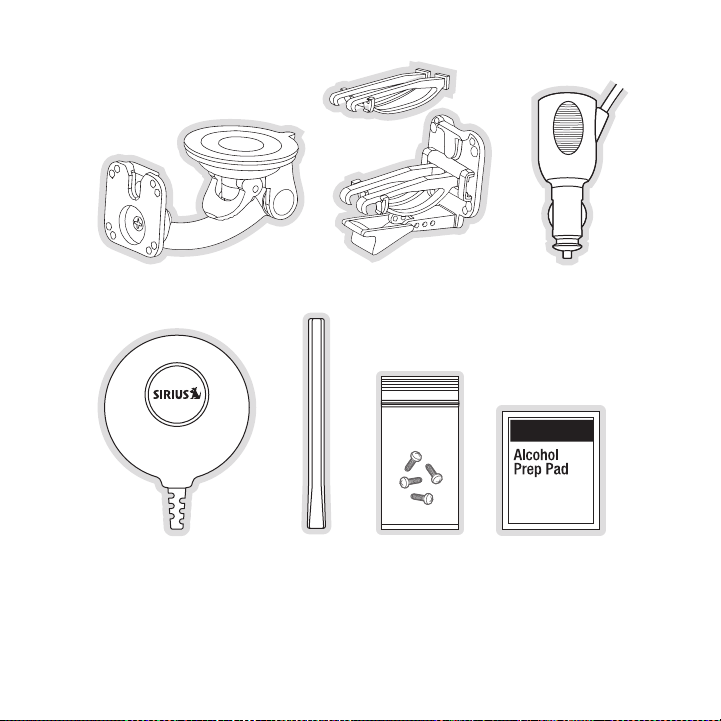
Sucti on Cup Mou ntSucti on Cup Mou nt
Magne tic Antenn aMagne tic Antenn a
Anten na
Anten na
Cover /Tail
Cover /Tail
Vent Mount &
Vent Mount &
Exten ded Vent Hooks
Exten ded Vent Hooks
Mount ing ScrewsMount ing Screws Alcoh ol SwabAlcoh ol Swab
Cigar ette Light er
Cigar ette Light er
Adapt er
Adapt er
Unpack your SIRIUS Starmate 3 receiver carefully and m ake sure that everything shown is
present. If anything is missing or damaged, or if your SIRIUS Starmate 3 receiver fails to operate, notify your dealer immediately. It is recommended that you retain the original carton and
packing materials in case you need to ship your receiv er in the future.
[ Package Contents ]
9
Page 13

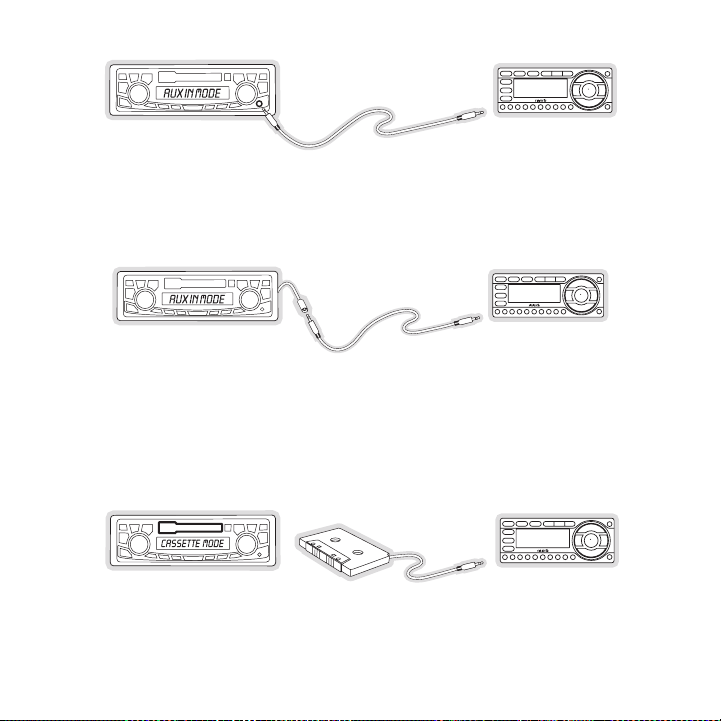
90.1
Figur e 1Figur e 1
Getting Started
SIRIUS suggests professional installation of this prod uct in your vehicle. Professional installation provides an experienced technician to install t his product in your vehicle, advice for
selecting a suitable mounting location, installation o f the antenna, and routing all the necessary wires and cables. An installer will have the nece ssary audio connection accessories to
provide optimal audio output of the SIRIUS receiver di rectly to your vehicle’s audio system.
Ask your SIRIUS retailer if they provide professional installation services, or can recommend a
professional installation service.
Maximizing Audio Quality From Your SIRIUS Receiver
There are two primary ways to connect your SIRIUS sate llite radio. The following procedures
will help you obtain the best performance.
Wir eles s Co nneC tion
Your SIRIUS radio contains an FM transmitter. The FM t ransmitter sends the audio from your
SIRIUS radio to your vehicle radio. (Figure 1)
To tune your transmitter:
Turn off your SIRIUS radio and tune through the FM cha nnels on your vehicle radio to
1.
locate an FM channel that is not broadcasting in your area. If you use an FM channel
[ Getting Started ]
10
Page 14

that is being used by a local broadcaster, it will int erfere with the performance of your
SIRIUS radio. Once you have located an FM channel that is not broadcasting in your
area, save it as a preset on your vehicle radio. This will become your SIRIUS preset.
Turn on your SIRIUS radio. Press and hold the FM Prese t button, which is identified by
2.
the radio icon, to access the five FM preset lists. Select FM1 and tune to the channel that matches the SIRIUS preset on your vehicle rad io. Refer to the Menu Options/
FM T ransmitter section of this manual for more detaile d instructions on how to do this.
Note : The FM transmitter in your SIRIUS radio is autom atically set to FM channel 88.1. This
may not be the best channel in your area.
Tip: If you regularly travel between cities with diffe rent active FM channels, you may need
to find channels that are not broadcasting in each cit y. Several SIRIUS receiver models can
store multiple FM transmit channels, so you can easily switch to the best FM channel for
each city. You will also want to set the FM channels t hat are not broadcasting in each city as
presets on your vehicle radio.
If you’re not sure which FM channels are not broadcast ing in your home or travel cities, you
can also go to http://SIRIUS.com/fmchannel and search for a suggested FM channel based
on your zip code.
Dir eCt Conn eCti ons
Direct connection provides better audio performance th an a wireless connection and removes
the possibility of interference from local FM broadcas ters.
Dire ct Wire d Audio Connection
If your vehicle radio offers an “AUX IN” or “LINE IN” connection, it is the best audio connection available. If the “AUX IN” or “LINE IN” connector is located on the front of your vehicle
radio, this is also the easiest connection. (Figure 2)
Purchase an audio cable that matches the connection ty pe of your vehicle radio and your
1.
SIRIUS radio at your local electronics retailer. Your SIRIUS radio requires a 1/8” stereo
male connector. Your local electronics retailer can he lp you determine the proper connection for your car radio.
Plug one end of the cable into the “AUDIO OUT” or “LIN E OUT” jack on your SIRIUS
2.
radio. Plug the other end into your “AUX IN” or “LINE IN” jack on your vehicle radio.
[ Getting Started ]
11
Page 15
FM OFF
FM OFF
FM OFF
Figur e 2Figur e 2
Figur e 3Figur e 3
Figur e 4Figur e 4
NOTE : Refer to your vehicle radio manufacturer’s guide lines for correct installation.
NOTE : If the “AUX IN” or “LINE IN” connection is on th e back of your vehicle radio, you may
want to consider professional installation. (Figure 3)
Cass ette Ad apter
If your vehicle radio has a cassette player:
Purchase a Cassette Adapter at your local electronics retailer.
1.
Connect the adapter between the “AUDIO OUT” or “LINE O UT” on your SIRIUS radio
2.
and the vehicle radio’s cassette slot. (Figure 4)
[ Getting Started ]
12
Page 16

NOTE : Refer to the cassette adapter manufacturer’s gui delines for correct use.
90.1
FM
DIRECT
ADAPTER
Figur e 5Figur e 5
SIRI US FM D irect Adapter
If your vehicle radio does not have an “AUX IN” or “LI NE IN” jack, the SIRIUS FM Direct Adaptor provides a wired connection between your SIRIUS ra dio and your vehicle radio, eliminating
the outside static and interference you sometimes expe rience when using a wireless FM
connection. (Figure 5)
Professional installation may be required. See your lo cal SIRIUS retailer.
For the latest information refer to http://www.SIRIUS. com/vehicleinstallation.
(The SIRIUS FM Direct Adaptor is available at your loc al SIRIUS retailer or at
http://shop.SIRIUS.com).
[ Getting Started ]
13
Page 17

X% Completed
Updating Channels
184
News 12:00P A
To Activate CallTo Activate Call
1-888-539-SIRIUS1-888-539-SIRIUS
Preview
Figur e 6Figur e 6
Figur e 7Figur e 7
Subscribing to the SIRIUS Service
Before you can listen to the SIRIUS service, you need to subscribe to the SIRIUS Satellite
Radio service. To subscribe, do the following:
Be sure that the SIRIUS Starmate 3 is correctly instal led, is in the vehicle or home dock,
1.
and that the antenna is oriented to receive the SIRIUS signal.
Turn on the SIRIUS Starmate 3. After the startup seque nce, it will update the SIRIUS
2.
channel line-up. Wait until the channel updates have c ompleted before pressing any
buttons. (Figure 6)
Once the channels have been updated, the display will change to
3.
To A ctivate Call 1-888-539-SI RIUS and will tune to cha nnel 184. (Figure 7) You will not
be able to listen to other channels until you activate your SIRIUS subscription.
Use the channel up and down buttons to tune the receiv er to channel 000 to display
4.
the receiver’s unique 12-digit SIRIUS ID Number (SID). (Figure 8) You can also tune
directly to channel 000 by pressing the Select button, then the 0 (zero) button, and then
the Select button again. You may do this from either t he receiver or the remote control.
The SID number is also available on the SIRIUS Starmat e 3 packaging, and may also be
[ Getting Started ]
14
Page 18

accessed by pressing the MENU button and selecting Sir ius ID . Write the SID number
000
SIDSID
012345678912012345678912
12:00P
SIRIUS ID
A
001
Category 12:00P A
Artist NameArtist Name
Song TitleSong Title
Any Key to Continue
Subscription Updated
Channel Name
Figur e 8Figur e 8
Figur e 9Figur e 9
down in the space provided near the end of this guide.
Have your credit card handy and contact SIRIUS on the Internet at:
5.
https://activate .siriusradio.com/
and follow the prompts to activate your subscription. You can also call SIRIUS toll-free
at: 1-888-539-SIRIUS (1-888-539-7474).
When you have successfully subscribed to the SIRIUS se rvice, and the SIRIUS Starmate
6.
3 has been updated with your subscription information, an alert will be displayed. (Figure
9) To continue, press any key on the receiver
You are now ready to begin enjoying SIRIUS Satellite R adio’s digital entertainment, and can
tune to other channels!
[ Getting Started ]
15
Page 19
Controls
1
MENU
2 3 4 5 6 7 8 9 0
147 RoadDog Trucking147 RoadDog Trucking
Charlie DanielsCharlie Daniels
Road DogsRoad Dogs
Entrtain 12:00PEntrtain 12:00P A2A2
DISP MEMO
BAND
11
32
4
1
7
5
6
8
10
9
Figur e 1Figur e 1
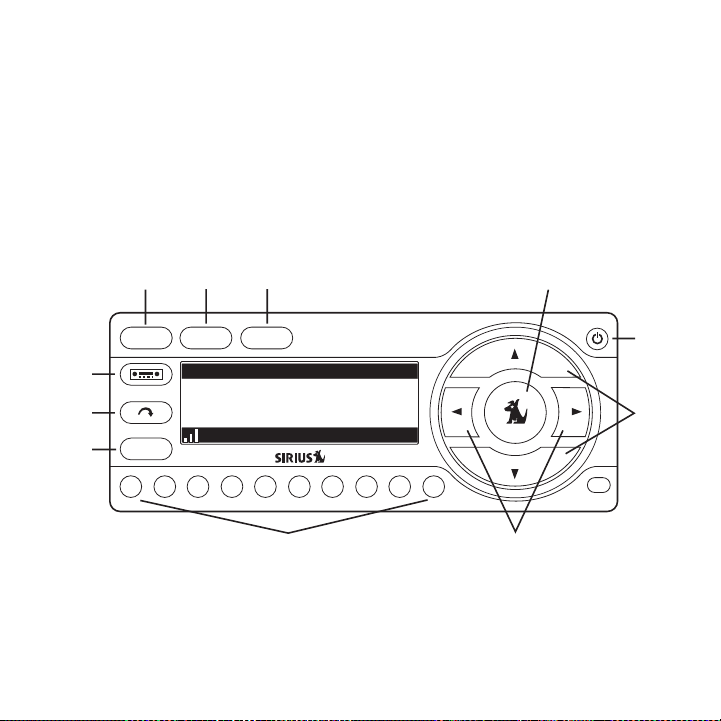
SIRIUS Starmate 3 Reference Guide
Figure 1 and the section following identify and descri be the buttons and controls of the
SIRIUS Starmate 3.
MENU Button: Used to access menu options to make setup and feature changes.
1.
DISP (Display) Button: Toggles display between the def ault display screen and large
2.
screen display mode. Pressing and holding switches the display to the channel list
[ Controls ]
16
Page 20

mode.
MEMO (Memory) Button (S-Seek Function): Saves and reca lls artist names, song
3.
titles, and sports teams. Pressing and holding enters the S-Seek mode.
Sele ct Button: Selects items highlighted on the displa y screen. When at the default
4.
display screen, a press and release will display a pro mpt to enter a channel number.
Pressing and holding will return to the last channel p layed.
POWE R Button: Turns the receiver On or Off.
5.
Chan nel Up/Down Buttons: Navigates through channels an d display screens, and
6.
highlights items on the display.
Cate gory Previous/Next Button s: Navigates through the category list screen which
7.
displays SIRIUS channel categories.
Pres et Number Buttons (0-9): Sets and selects preset c hannels. Also used to directly
8.
tune channels by entering the channel number.
BAND Button: Pressing and releasing switches between t he five preset banks (A, B, C),
9.
which hold ten presets each. Pressing and holding enab les “Preset Tune Mode”, which
allows for viewing and listening of stored presets wit h the channel up/down buttons.
Jump Button: Used to quickly switch between the curren t channel and a favorite chan-
10.
nel.
FM P reset Button: Selects between preset FM frequencie s used for the built-in wireless
11.
transmitter.
[ Controls ]
17
Page 21
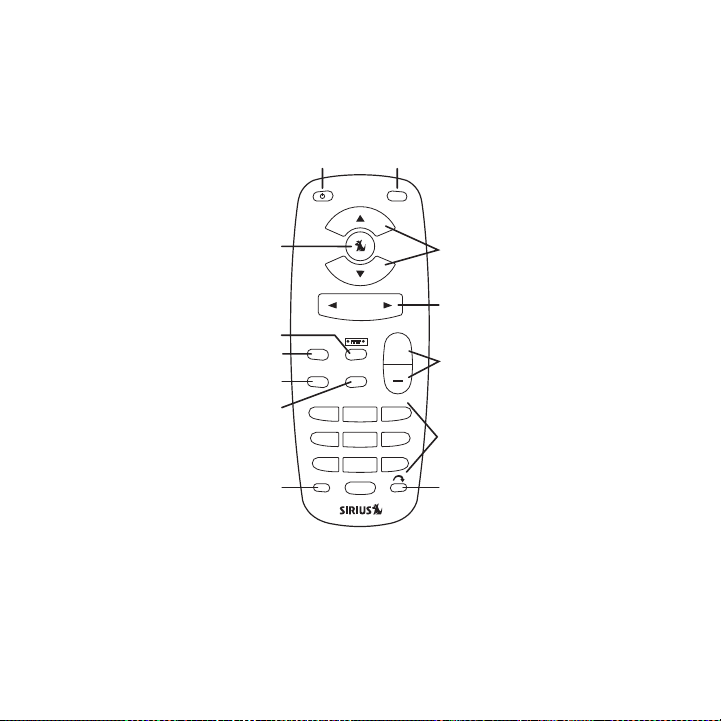
Remote Control Reference Guide
1
12
11
10
9
2
3
4
5
6
7
8
13
MUTE
CATEGORY
MENU
BAND MEMO
+
1 2 3
4 5 6
7 809
DISP
Figur e 2Figur e 2
Figure 2 and the section following identify the button s of the remote control.
Powe r Button: Turns the receiver On or Off.
1.
MUTE Button: Mutes the audio.
2.
Chan nel Up/Down Buttons: Navigates through channels an d display screens, and
3.
highlights items on the display.
[ Controls ]
18
Page 22

Cat egory Previous/Next Butto ns: Navigates through the category list screen which
4.
displays SIRIUS channel categories.
+/- Volume Buttons: Adjusts the audio volume up & down .
5.
Numb er Buttons (0-9): Used for directly selecting chan nels and for presets.
6.
Jump Button: Used to quickly switch between the curren t channel and a favorite chan-
7.
nel.
DISP (Display) Button: Toggles display between the def ault display screen and large
8.
screen display mode. Pressing and holding switches the display to the channel list
mode.
MEMO (Memory) Button (S-Seek Function): Saves and reca lls artist names, song
9.
titles, and sports teams. Pressing and holding enters the S-Seek mode.
BAND Button: Pressing and releasing switches between t he five preset banks (A, B, C),
10.
which hold ten presets each. Pressing and holding enab les “Preset Tune Mode”, which
allows for viewing and listening of stored presets wit h the channel up/down buttons.
MENU Button: Used to access menu options to make setup and feature changes.
11.
FM P reset Button: Selects between preset FM frequencie s used for the built-in wireless
12.
transmitter.
Sele ct Button: Selects items highlighted on the displa y screen. When at the default
13.
display screen, a press and release will display a pro mpt to enter a channel number.
Pressing and holding will return to the last channel p layed.
Remo te Cont rol Battery Installa tion
To install the remote control battery, turn the remote control over and locate the battery cover
near the bottom edge. Open the battery compartment and place the battery in the compartment with the + side of the battery facing up. Replace the battery cover on the remote control.
[ Controls ]
19
Page 23

Operation
3-Digit Channel Number
Channel Name
Band/Preset Bank Number
8-Character
Category Name
Clock
A
uto Sizing/Scrolling Artist Name
Auto Sizing/Scrolling Song Title
SIRIUS Signal Strength Meter
001
Artist Name
Song Title
Category 12:00P A
Channel Name
Figur e 1Figur e 1
Display Screen Information
The display screen of the SIRIUS Starmate 3 provides i nformation about the operation of the
receiver, such as the currently tuned channel, song or show being played, artist name, time
and other information. This screen is referred to as t he Def ault display screen in this manual.
Figure 1 identifies the information displayed when lis tening to a typical broadcast.
When the receiver is powered On, the previously select ed channel will automatically begin
playing, and the artist name and song title of the cur rently playing song will be displayed.
20
[ Operation ]
Page 24

Changing Channels and Categories
Category
001 Channel Name001 Channel Name
002 Channel Name
003 Channel Name003 Channel Name
004 Channel Name004 Channel Name
Category
001 Channel Name001 Channel Name
002 Channel Name
003 Channel Name003 Channel Name
004 Channel Name004 Channel Name
Category
001 Artist Name001 Artist Name
002 Artist Name
003 Artist Name003 Artist Name
004 Artist Name004 Artist Name
Category
001 Song Title001 Song Title
002 Song Title
003 Song Title003 Song Title
004 Song Title004 Song Title
Figur e 2Figur e 2
Figur e 3Figur e 3
Pressing the channel up or down button will cause the receiver to immediately tune to the next
or previous channel.
Pressing the category previous or next button will cau se the receiver to display a list of the
channels in the current category, highlighting the cha nnel to which you are currently tuned.
(Figure 2)
Repeated momentary pressing of the DISP button while i n the category list mode will cause
the receiver to sequence the display between listings of artist names, song titles, and back to
channel names. (Figure 3)
Pressing the category previous or next button again wi ll cause the receiver to display a listing
of the previous or next channel category.
Use the channel up/down buttons to highlight a channel within a category and press the
Select button to tune to the highlighted channel. When a new channel is selected, the display
[ Operation ]
21
Page 25

will revert to the default display screen for the new channel.
001
Category 12:00P A
Artist N
Channel Name
001
Artist Name
Song Title
Category 12:00P A
Channel Name
Figur e 4Figur e 4
To exit the channel list mode without changing to a di fferent channel, press and hold the DISP
button for 1½ seconds, until the default screen is dis played.
Display Button (DISP)
Momentarily pressing and releasing the DISP (Display) button while the default screen is
displayed changes the artist name and song title to a scrolling, single line, large format display
for easier viewing from a distance. (Figure 4)
Pressing and holding the DISP button for 1½ seconds wi ll cause the receiver enter the channel list mode. The channel list mode makes it easy to quickly search for and locate music by
channel, by category, by artist, and by song title.
Once the receiver has entered the channel list mode, a listing of the channel numbers and
names is displayed. (Figure 5) Repeated momentary pres sing and releasing of the DISP
button will sequence the display between listings of a rtist names, song titles, and back to
channel names.
22
[ Operation ]
Page 26

001 Channel Name001 Channel Name
003 Channel Name
005 Channel Name005 Channel Name
004 Channel Name004 Channel Name
002 Channel Name002 Channel Name
001 Artist Name001 Artist Name
003 Artist Name
005 Artist Name005 Artist Name
004 Artist Name004 Artist Name
002 Artist Name002 Artist Name
001 Song Title001 Song Title
003 Song Title
005 Song Title005 Song Title
004 Song Title004 Song Title
002 Song Title002 Song Title
Figur e 5Figur e 5
Note: If you are viewing a sports category channel lis t (NFL®, NBA®, NHL®, or College),
pressing the DISP button will instead toggle between t he team names and the current score
of any live play-by-play game.
Use the category previous and next buttons to scroll t hrough the music and entertainment
categories, and the channel up and down buttons to scr oll through the available channels in
each category to find the channel to which you want to listen.
When you have found the channel you wish to listen to, highlight the channel using the channel up and down buttons and press the Select button to tune to the channel. The new channel
will begin playing and the display will revert to the default display screen for the new channel.
To exit the channel list mode without changing to a di fferent channel, press and hold the DISP
button for 1½ seconds, until the default screen is dis played.
[ Operation ]
23
Page 27

001
Category 12:00P A
Artist NArtist N
# ___
Enter Channel
Channel Name
Figur e 6Figur e 6
Selecting Channels Directly
A channel may be directly selected by entering the cha nnel number using the 0 - 9 buttons on
the receiver. To enter a channel number, momentarily p ress and release the Select button. At
the display prompt (Figure 6) enter the three digit ch annel number.
Channel Presets (BAND)
You can store up to 30 of your favorite channels as pr esets for quick recall access. The
preset channels are stored in 3 bands, A, B, and C, ea ch containing 10 channel presets, and
are numbered 0 to 9. The 10 channel presets in each ba nd are accessed by pressing the appropriate number (0 to 9) on the receiver. A momentary press and release of the BAND button
cycles through the 3 preset bands (A, B, and C).
Stor ing Cha nnel Presets
To store a favorite channel as a preset, do the follow ing:
Momentarily press and release the BAND button until th e desired preset band, A, B, or
1.
C, is displayed in the lower right corner of the defau lt display screen.
Tune the receiver to the channel you wish to store as a preset. (Refer to the section
2.
Chan ging Channels for specific instructions for tuning to a channel.)
Press and hold the numbered preset button in which you wish to store your favorite
3.
channel for 1½ seconds until you hear a beep. The band and preset number will then be
displayed in the lower right corner of the display scr een to confirm that the channel has
been stored. (Figure 7)
24
[ Operation ]
Page 28

001
Category 12:00P A1
Artist NameArtist Name
Song TitleSong Title
Channel Name
Preset Stored
001
Category 12:00P A3
Artist NameArtist Name
Song TitleSong Title
Channel Name
Figur e 7Figur e 7
Figur e 8Figur e 8
Note: If the preset button already has a channel store d in it, the preset will be replaced by the
newly stored channel.
Usin g Chann el Presets
The active band of presets is displayed in the lower r ight corner of the default display screen,
A, B or C. To change the active band, momentarily pres s and release the BAND button to
cycle between the preset bands.
The 10 preset channels in the active band can then be selected by momentarily pressing and
releasing the 0 through 9 buttons.
When you have chosen a preset channel, the band and pr eset number will be displayed in the
lower right corner of the default display screen. (Fig ure 8)
Sear ching f or a Channel Preset (P.TUNE Mode)
To quickly search through all of your presets in the P .TUNE mode, do the following:
Press and hold the BAND button for approximately 1 sec ond to enter the P.TUNE mode.
1.
Pres et Tuning Mode will momentarily be displayed and t he top left and lower right
corners of the display will invert to indicate the rec eiver is in the Preset Tune Mode.
(Figure 9)
[ Operation ]
25
Page 29

001
Category 12:00P A1
Artist Name
Song Title
Channel Name
001
Artist NameArtist Name
Song TitleSong Title
Category 12:00P A
Preset Tune Mode
Channel Name
A-1 Channel NameA-1 Channel Name
A-3 Channel Name
A-5 Channel NameA-5 Channel Name
A-4 Channel NameA-4 Channel Name
A-2 Channel NameA-2 Channel Name
A-1 Artist NameA-1 Artist Name
A-3 Artist Name
A-5 Artist NameA-5 Artist Name
A-4 Artist NameA-4 Artist Name
A-2 Artist NameA-2 Artist Name
A-1 Song TitleA-1 Song Title
A-3 Song Title
A-5 Song TitleA-5 Song Title
A-4 Song TitleA-4 Song Title
A-2 Song TitleA-2 Song Title
Figur e 9Figur e 9
Figur e 10F igure 10
Use the channel up and down buttons to move up or down through your channel presets
2.
and immediately tune to each channel. Channel presets are grouped and displayed by
bank and preset number, i.e., A-1, A-2...B-1, B-2, et c. Empty presets are not displayed.
To view the channel presets in the channel list mode, where you can view 4 presets at
3.
once, momentarily press and hold the DISP button for a pproximately one second until
the channel list mode is displayed. Repeated momentary pressing and releasing of the
DISP button will sequence the display between listings of artist names, song titles, and
back to channel names. (Figure 10)
Note: If you are viewing a sports category channel lis t (NFL®, NBA®, NHL®, or COLLEGE), pressing the DISP button will instead toggle be tween the team names and the
current score of any live play-by-play game.
To exit the channel list mode, press and hold the DISP button for approximately one
4.
second, until the display reverts to the P.TUNE mode.
To exit the P.TUNE mode, press and hold the BAND butto n for approximately 1 second,
5.
until the default display screen is displayed.
[ Operation ]
26
Page 30

Memory (MEMO) and Song Seek (S-Seek) Functions
001
Artist NameArtist Name
Song TitleSong Title
Category 12:00P A
S-Seek Alert
Channel Name
001
Artist NameArtist Name
Song TitleSong Title
Category 12:00P A
Game Alert
Channel Name
Figur e 11F igure 11
Figur e 12F igure 12
This feature allows you to capture and store informati on in the receiver’s memory about the
currently tuned programming– artist, song, or sports t eam. The receiver then continuously
searches all incoming SIRIUS channels and alerts the u ser when a program saved in memory
matches a selection currently being played. (Figure 11 )
A total of 30 artists, songs, and sports teams may be stored in memory.
If you have saved a sports team (or teams) in memory, at the time receiver is initially powered
on, you will be alerted if your sports teams are playi ng in a game being broadcast. Also, while
listening to your SIRIUS receiver, should one of your teams begin to play a game, you will be
alerted.
Stor ing Art ist Names, Song Titl es, and Sports Teams to Mem ory
If you are listening to a song or other entertainment channel, or a sports team, and wish to
save the artist, song, or sports team selection to mem ory for future S-Seek alerts, do the following:
For Artist Names or Song Titl es: If the currently tune d channel is a music or entertain-
1.
ment channel, momentarily press and release the MEMO b utton. The receiver will display
a menu to choose to store the artist name or the song title. (Figure 13)
[ Operation ]
27
Page 31

100
Category 12:00P A
Artist NameArtist Name
Song TitleSong Title
Store Song?
Store Artist?Store Artist?
Channel Name
If either the artist name or song title is not availab le to save, the choice will be displayed
100
Category 12:00P A
Artist NameArtist Name
Song TitleSong Title
Song Unavailable
Store Artist?Store Artist?
Channel Name
100
Category 12:00P A
Artist NameArtist Name
Song TitleSong Title
Artist Unavailable
Store Song?Store Song?
Channel Name
100
Category 12:00P A
Artist NameArtist Name
Song TitleSong Title
Song Stored
Store Artist?Store Artist?
Channel Name
100
Category 12:00P A
Artist NameArtist Name
Song TitleSong Title
Artist Stored
Store Song?Store Song?
Channel Name
Figur e 13F igure 13
Figur e 14F igure 14
Figur e 15F igure 15
as unavailable. (Figure 14)
Using the channel up and down buttons, choose Store Ar tist or Store Song (when available) and press the Select button to save the current selection to memory.
If both the artist and song are available to save, you will be prompted again to save
whichever one you haven’t yet saved, song title or art ist name. (Figure 15) If you do not
wish to save, press the MEMO button to exit.
For Sports Games: If the current tuned channel is an N FL, NBA, NHL, or College play-
2.
by-play sports broadcast, momentarily press and releas e the MEMO button. The receiver
will display a menu to choose which sports team should be saved to memory. (Figure
16)
28
[ Operation ]
Page 32

100
Category 12:00P A
Artist NameArtist Name
Song TitleSong Title
Store DAL?
Store NYG?Store NYG?
Channel Name
100
Category 12:00P A
Artist NameArtist Name
Song TitleSong Title
Team2 Unavailable
Store NYG?Store NYG?
Channel Name
Alert Type
Initial Game Alert
All Score UpdatesAll Score Updates
Figur e 16F igure 16
Figur e 17F igure 17
Figur e 18F igure 18
If either of the teams is not available to save, that team will be displayed as unavailable.
(Figure 17)
Using the channel up and down buttons, choose the desi red sports team (when available) and press the Select button to save the current selection to memory.
The next screen will ask which kind of alert you wish to have. (Figure 18)
Init ial Game Alert will provide an alert when the team you have chosen is playing a
game. All Score Updates will provide an alert when the team you have chosen is playing
a game, and also when the scores are updated for the t eam.
Using the channel up and down buttons, choose the desi red alert and press the Select
button to save the selection to memory.
If both teams are available to save, you will be promp ted again to save the other team.
If you wish to save the team, follow the same procedur e as when saving the first team.
(Figure 19) If you do not wish to save, press the MEMO button to exit.
[ Operation ]
29
Page 33

100
Category 12:00P A
Artist NameArtist Name
Song TitleSong Title
NYG Stored
Store DAL?Store DAL?
Channel Name
100
Category 12:00P A
Artist NameArtist Name
Song TitleSong Title
DAL Stored
Store NYG?Store NYG?
Channel Name
001
Category 12:00P
Artist NArtist N
Unable to Store
A
Channel Name
001
Artist NameArtist Name
Song TitleSong Title
Category 12:00P A
X Used/Y Empty
Channel Name
001
Artist NameArtist Name
Song TitleSong Title
Category 12:00P A
Artist Stored
Channel Name
Figur e 19F igure 19
Figur e 20F igure 20
Figur e 21F igure 21
To ensure that no duplicate entries are stored in memo ry, the receiver will check the
3.
stored memory list to ensure that the alert about to b e stored is not already stored in
memory. If a duplicate entry is found, an Unable to St ore screen will be displayed for 1
second. (Figure 20) The receiver will then revert to t he last active display mode.
If the new alert was successfully stored in memory, a Artist /Song/Game Stored pop-up
4.
screen followed by an X Used/ Y Empty screen will be di splayed for 1 and 2 seconds
respectively. X is the total number of listings stored in memory, and Y is the total number
of memory listings still available for storage. (Figur e 21)
If the MEMO button is pressed and all of the memory sp aces are full, an “S-Seek Full”
5.
screen will be displayed for 1 second. (Figure 21)
30
[ Operation ]
Page 34

001
Artist NameArtist Name
Song TitleSong Title
Category 12:00P A
Memory Full
Channel Name
001
Category 12:00P A
Artist NArtist N
Cancel
ReplaceReplace
Channel Name
Replace
Artist Name/ Song TitArtist Name/ Song Tit
Artist Name
Sports TeamSports Team
Artist Name/ Song TitArtist Name/ Song Tit
X/Y
Figur e 21F igure 21
Figur e 22F igure 22
Figur e 23F igure 23
A Re place - Cancel screen will then be displayed which will allow you to choose
whether to replace an existing alert stored in memory, or to cancel storing the alert to
memory. (Figure 22)
Using the channel up and down buttons, choose whether to replace an existing alert or
cancel saving the alert to memory. If you choose to ca ncel saving the alert, the receiver
will revert to the last active display mode.
If you have chosen to replace an existing alert, a lis ting of all the alerts stored in memory
will be displayed. (Figure 23)
Using the channel up and down buttons, highlight the a lert that you would like to
overwrite and press the Select button to store the new alert. If the new alert was successfully saved in memory, a Artist/Song/Game Stored p op-up screen followed by an
X Us ed/Y Empty screen will be displayed for 1 and 2 se conds respectively. (Figure 24)
X is the total number of listings stored in memory, an d Y is the total number of memory
listings still available for storage.
[ Operation ]
31
Page 35

001
Artist NameArtist Name
Song TitleSong Title
Category 12:00P A
X Used/Y Empty
Channel Name
001
Artist NameArtist Name
Song TitleSong Title
Category 12:00P A
Artist Stored
Channel Name
Memory
Artist NameArtist Name
Song TitleSong Title
1/30
Figur e 24F igure 24
Figur e 25F igure 25
The receiver will revert to the last active display mo de.
View ing Sto red Alerts Stored in Memory
To view the alerts which have been saved to memory, pr ess and hold the MEMO button for
1½ seconds to enter S-Seek mode. The alerts stored in memory will be displayed one-at-atime in page format. (Figure 25) Use the channel up an d down buttons to scroll through the
listings. This function allows you to review previousl y stored program information.
To exit this function, press and release the MEMO butt on.
Dele ting an Alert Stored into M emory
To delete an alert stored in memory, do the following:
Press and hold the MEMO button for 1½ seconds to enter S-Seek mode. The alerts
1.
stored in memory will be displayed one-at-a-time in pa ge format.
Use the channel up and down buttons to find the alert which you wish to delete and
2.
press the Select button.
A screen displaying Delete, S eek On, and Seek Off will be displayed. (Figure 26)
3.
32
[ Operation ]
Page 36

Memory Recall
Delete
Seek OffSeek Off
Seek OnSeek On
Use the channel up and down buttons to highlight the Delete option, and press the
Delete
Yes
NoNo
Memory
Artist NameArtist Name
Song TitleSong Title
08/29
29 Used/1 Empty
Memory
Artist NameArtist Name
Song TitleSong Title
08/29
Deleted
Figur e 26F igure 26
Figur e 27F igure 27
Figur e 28F igure 28
4.
Select button. A delete confirmation screen will appea r. (Figure 27)
To permanently delete the alert from the memory list, highlight Yes using the channel up
and down buttons and press the Select button to confir m.
A De leted pop-up screen followed by an X Used/Y Empty screen will be displayed for
5.
1 and 2 seconds respectively. (Figure 28) X is the tot al number of listings saved in
memory, and Y is the total number of memory listings s till available for storage.
The receiver will revert to the last active display mo de.
[ Operation ]
33
Page 37

Acti vating the S-Seek Alert
Memory Recall
S-Seek On
S-Seek OffS-Seek Off
DeleteDelete
001
Artist NameArtist Name
Song TitleSong Title
Category 12:00P A
S-Seek Alert
Channel Name
001
Artist NameArtist Name
Song TitleSong Title
Category 12:00P A
Game Alert
Channel Name
Figur e 29F igure 29
Figur e 30F igure 30
To activate the S-Seek alert function to begin receivi ng alerts, do the following:
Press and hold the MEMO button for 1½ seconds to enter the S-Seek mode.
1.
Press and release the Select button. A screen displayi ng S-S eek On, S-Seek Off, and
2.
Dele te will be displayed. (Figure 29)
To enable S-Seek alerts, use the channel up and down b uttons to highlight the S-Seek
3.
On option and press the Select button. The S-Seek func tion is now enabled.
When the S-Seek option is enabled, whenever the receiv er is turned on, it automatically
searches the incoming channels to determine if a match exists with the program information
stored in the S-Seek memory. If one or more matches ar e found, a pop-up screen momentarily
appears for 2 seconds and displays S-Seek Alert or Gam e Aler t, depending upon which type
of a match was found. (Figure 30) An audible beep tone will also be heard indicating that a
match was found.
The receiver then displays the SIRIUS SEEK LIST or MY GAME Z ONE screen, which displays a list of the current matches. (Figure 31) No al ert is provided for the currently selected
channel.
34
[ Operation ]
Page 38

SIRIUS SEEK LIST
121 Artist Name/ Song121 Artist Name/ Song
156 Artist Name
MY GAME ZONE
100 Giants @ Cowboys100 Giants @ Cowboys
123 Bulls @ Cavaliers
MY GAME ZONE
100 NFL NYG 7 DAL 3100 NFL NYG 7 DAL 3
123 NBA BUL 77 CLE 73
Figur e 31F igure 31
You can now select the artist, song, or sports game th at you wish to tune to by using the
channel up and down buttons to highlight your selectio n from the list, and then pressing the
Select button. If no selection is made within 10 secon ds, the receiver will revert to the last
active display mode. Note that play of the current sel ection will continue until a new selection
is chosen from the S-Seek or My Game Zone list.
Jump Button
The receiver has a special preset button called the Ju mp button, which is identified by the
icon. The Jump button is used to quickly tune to a cha nnel that is accessed frequently and
temporarily such as a traffic channel, a weather chann el, a news channel, a sports channel, or
any channel at all. Pressing the Jump button allows yo u to quickly tune to the specific channel you have programmed into the Jump button, and then tune back to the original channel
by pressing the Jump button again. (Refer to the Menu Option s section of this manual for
instructions for configuring the Jump button.)
If the Jump button has been preset to the traffic opti on, which will cause the receiver to access a specific city traffic report, pressing the Jump button will immediately begin a search for
the city’s traffic report. The Jump icon will be displ ayed in the lower right corner of the display
screen to indicate that a Jump search is active. The s earch process may take up to 4 minutes
until the city’s traffic report found. The receiver wi ll automatically tune to the traffic report
[ Operation ]
35
Page 39

001
Artist NameArtist Name
Song TitleSong Title
Category 12:00P
NYC Pending
Channel Name
001
Artist NameArtist Name
Song TitleSong Title
Category 12:00P
A
Jump Canceled
Channel Name
Category 12:00P
150
NYC WeatherNYC Weather
NYC WeatherNYC Weather
Channel Name
Figur e 32F igure 32
Figur e 33F igure 33
Figur e 34F igure 34
channel when the traffic report is found. (Figure 32)
Pressing the Jump button again while the receiver is a ctively searching will cancel the search.
(Figure 33)
Pressing the Jump button after the receiver has tuned to the traffic report channel will return
you to the previous channel.
If the Jump button has been preset to the JumpSet opti on, pressing the Jump button will
immediately tune to the channel preset into the JumpSe t. (Figure 34) The Jump icon will be
displayed in the lower right corner of the display scr een to indicate that the Jump preset channel is currently tuned.
Pressing the Jump button again will return to the prev ious channel.
Note: The channel preset for the Jump button remains t he same regardless of which preset
memory bank is currently selected.
36
[ Operation ]
Page 40

Game Alert
MY GAME ZONE
100 Giants @ Cowboys100 Giants @ Cowboys
123 Bulls @ Cavaliers
001
Artist NameArtist Name
Song TitleSong Title
Category 12:00P A
Game Alert
Channel Name
Figur e 35F igure 35
The receiver has a feature called Game Alert which can automatically alert you when your favorite sports team is playing a game. When a sports ga me involving one of your favorite sports
teams is found, a Game Alert screen is displayed, foll owed by a screen displaying tuning information for the sports games. (Figure 35)
You can then use the channel up and down buttons to hi ghlight your favorite sports team
in the list, and then press the Select button to tune to the channel where the game is being
broadcast.
Refer to the Gam e Aler t section in the Menu Options se ction of this manual for instructions
on programming your favorite sports teams into the rec eiver. You can also use the S-Seek feature to add Game Alerts for sports teams. Refer to the section, Storing Artist Names, Song
Titl es, and Sports Teams to M emory for more informatio n.
[ Operation ]
37
Page 41

FM Preset Button
FM Presets
FM1 88.1 MHz
FM2 <EMPTY>FM2 <EMPTY>
FM3 <EMPTY>FM3 <EMPTY>
FM4 <EMPTY>FM4 <EMPTY>
Figur e 36F igure 36
The receiver has a special button called the FM Preset button, which is identified by the
icon.
When the FM Preset button is pressed, the receiver tur ns on the built-in FM transmitter and
begins transmitting on the next frequency from the FM frequency preset list. A screen will be
displayed for 3 seconds showing the currently selected FM frequency. When the FM transmitter is turned on, an FM radio tuned to the same FM fre quency will receive the currently tuned
SIRIUS broadcast. Each subsequent press of the FM Pres et button advances to the next
frequency in the FM frequency preset list. Using the F M Preset button, a quiet FM frequency
may be quickly tuned.
If no FM frequencies have been preset when the FM Pres et button is pressed, the receiver will
default to a frequency of 88.1 MHz.
Pressing and holding the FM Preset button will cause a list of the FM presets to be displayed.
(Figure 36)
You can use the channel up and down buttons to scroll through the FM preset list and highlight the preset you wish to change, and press the Sel ect button to choose the preset. Use
the channel up and down buttons to highlight the frequ ency you wish to select for the preset
and press the Select button. The FM frequency will the n be stored in the preset. To select the
preset and exit, press the MENU button.
You may also change the FM presets by using the FM Pre sets menu option of the receiver.
(Refer to the FM Transmitter section in the Menu Optio ns section of this manual for instructions on programming the FM frequency preset list.)
38
[ Operation ]
Page 42

Menu Options
Menu Options
Sirius ID
FM Transmitter
Game Alert
Settings
Figur e 1Figur e 1
To enter the Menu Options page of the receiver, press the MENU button. The Menu Options
list will be displayed. (Figure 1)
To select a menu option, use the channel up and down b uttons to highlight the option you
wish to adjust, and press the Select button. If a sele ction is not made within 10 seconds, the
receiver will exit the menu options screen, and revert to the last active display mode.
To exit the Menu Options screen, or any of the other m enu option screens, repeatedly press
and release the MENU button until you are returned to the default display screen.
The following sections explain each of the menu option s in the order in which they are displayed on the Menu Options screen.
Sirius ID
This menu option displays your 12 digit SIRIUS ID (SID ) number. (Figure 2) The SID is unique
to each SIRIUS receiver, and is required to activate y our service. It is recommended that you
write this number in the space provided near the end o f this user guide. No adjustments are
allowed in this mode. To exit, press the MENU button.
[ Menu Options ]
39
Page 43

Sirius ID
ESN 000492229812
FM Transmitter
FM On/OffFM On/Off
FM Presets
Figur e 2Figur e 2
Figur e 3Figur e 3
FM Transmitter
The FM Transmitter feature allows you to create a pres et list of 5 suitable FM frequencies
which can then be accessed by using the FM Preset butt on. This option also allows you to
turn the FM transmitter On and Off. (Figure 3)
FM P resets
To create or add to a list of FM Preset frequencies , do the following:
Using the channel up and down buttons, highlight the “ FM Presets” menu item and press
1.
the Select button. A list of the FM presets will be di splayed. (Figure 4) (You may also
enter this list by pressing and holding the FM Preset button.)
[ Menu Options ]
40
Page 44

FM Presets
FM1 88.1 MHz
FM2 <EMPTY>FM2 <EMPTY>
FM3 <EMPTY>FM3 <EMPTY>
FM4 <EMPTY>FM4 <EMPTY>
<EMPTY><EMPTY>
88.3 MHz
88.7 MHz88.7 MHz
88.5 MHz88.5 MHz
88.1 MHz88.1 MHz
Figur e 4Figur e 4
Figur e 5Figur e 5
Using the channel up and down buttons, highlight the F M preset you wish to set (or
2.
change) and press the Select button. A list of FM freq uencies will be displayed, beginning with the currently selected FM frequency for the preset. (Figure 5)
Use your FM radio to locate quiet FM frequencies where there is no interference from
3.
adjacent FM stations. These are the frequencies which should be added to the FM
Presets list.
Using the channel up and down buttons, highlight the f requency you wish to select for
4.
the preset and press the Select button. The FM frequen cy will then be stored in the
preset. If you do not want a frequency for the preset, choose EMPTY from the menu and
press the Select button.
You may then continue to select FM frequencies for oth er presets using the same steps.
5.
To exit the FM Presets menu, press the MENU button.
FM O n/Off
To turn the receiver’s FM transmitter On or Off, use t he channel up and down buttons to
highlight the FM On/Off menu item and press the Select button.
Use the channel up and down buttons to highlight FM On or FM Off and press the Select
button. (Figure 6)
[ Menu Options ]
41
Page 45

FM On/Off
FM On
FM OffFM Off
To exit the FM On/Off menu, press the MENU button.
Figur e 6Figur e 6
Game Alert
The Game Alert feature allows you to store your favori te sports teams in memory. The receiver
will constantly scan the SIRIUS channels and will soun d an alert when a sports team you had
stored in memory is playing, or when there is a score update for a team, depending on which
option you have chosen for the sports team.
Sports teams which you have selected and which are cur rently playing will be displayed in a
category called My Game Zone.
You may select one sports team from each sports league and the college category using
the Game Alert option, however, more teams may be chos en by using the Memory (MEMO)
function. (See the section Me mory ( MEMO) and Song Seek (S-Se ek) Functions for more
information about adding additional teams.)
To choose sports teams to add for game alerts, do the following:
Use the channel up and down buttons to highlight Game Alert and press the Select
1.
button.
Use the channel up and down buttons to highlight the s ports league or college category
2.
of the sports team you wish to add, and press the Sele ct button. (Figure 7)
[ Menu Options ]
42
Page 46

Game Alert
NFL
NBANBA
NHLNHL
COLLEGECOLLEGE
NFL
None
Arizona CardinalsArizona Cardinals
Atlanta FalconsAtlanta Falcons
Baltimore RavensBaltimore Ravens
COLLEGE
None
AlabamaAlabama
AuburnAuburn
ColoradoColorado
Alert Type
Initial Game Alert
All Score UpdatesAll Score Updates
Figur e 7Figur e 7
Figur e 8Figur e 8
Figur e 9Figur e 9
Use the channel up and down buttons to highlight the league team name or college team
3.
name you wish to add, and press the Select button. (Fi gure 8)
Note that for college teams, you will rece ive an alert for al l teams playing for that college.
Use the channel up and down buttons to highlight which type of an alert you want, and
4.
press the Select button. (Figure 9)
When the receiver is powered on, and while it is playi ng, In itial Game Alert will sound
an alert when the team you have chosen is playing a ga me. Al l Score Updates does the
same but also sounds an alert when the scores are upda ted for the chosen team.
To exit the Game Alert menu, press the MENU button.
[ Menu Options ]
43
Page 47

Settings
Jump Setting
Display OptionsDisplay Options
Memory OptionsMemory Options
Auto SelectAuto Select
Jump Setting
Traffic: ATL
Jump Set
Jump Setting
Choose one of theChoose one of the
following options
for button
following options
for button
Figur e 10F igure 10
Figur e 11F igure 11
Settings
The following sections explain each of settings menu o ptions in the order in which they are
displayed. (Figure 10)
To select a menu option, use the channel up and down b uttons to highlight the option you
wish to adjust, and press the Select button.
Jum p se ttin gs
The Jump setting controls the actions of the Jump butt on. The Jump setting menu may also be
accessed by pressing and holding the Jump button. (Fig ure 11)
Two options are available for the Jump setting, Traffi c and Jump Set. The currently selected
option is indicated by the Jump icon.
The Traffic option sets the function of the Jump butto n to provide a traffic report for a selected
city, while the JumpSet option assigns any channel to the Jump button.
Traf fic
To set the Jump button to provide a traffic report whe n pressed, do the following:
Use the channel up and down buttons to highlight the T raffic option, and press the 1.
[ Menu Options ]
44
Page 48

Select button.
Traffic Market
Atlanta
BaltimoreBaltimore
BostonBoston
ChicagoChicago
Traffic Market
Atlanta
BaltimoreBaltimore
BostonBoston
Updating City List
Figur e 12F igure 12
Figur e 13F igure 13
A screen showing a list of cities will be displayed. ( Figure 12)
2.
Use the channel up and down buttons to highlight the c ity for which you wish to have a
traffic report and press the Select button.
If the city list has not yet been updated, a message w ill be displayed indicating that the
3.
city list is updating. (Figure 13) Wait 10 minutes and then try again.
To exit the Jump Settings menu, press the MENU button.
Jump Set
To set the Jump button to a specific channel (other th an a traffic channel) when pressed, do
the following:
Use the channel up and down buttons to highlight the “ JumpSet” option, and press the
1.
Select button.
Figure 14 will be displayed.
2.
[ Menu Options ]
45
Page 49

Jump Setting
Tune to desired Ch.Tune to desired Ch.
press & hold
the button
press & hold
the button
Use the channel up and down buttons to tune to the cha nnel you want assigned to the
Jump Setting
Traffic: NONE
JumpSetJumpSet
Display Options
Brightness
ContrastContrast
Figur e 14F igure 14
Figur e 15F igure 15
Figur e 16F igure 16
3.
Jump button. When the channel is tuned, press and hold the Jump button for 2 seconds
until Figure 15 is displayed.
The channel selected is now assigned to the Jump butto n.
To exit the Jump Settings menu, press the MENU button.
At any time while listening to a channel (other than a traffic channel), the channel may be as-
signed to the Jump button by simply pressing and holdi ng the Jump button for 2 seconds.
Dis play o ptio ns
The receiver’s display screen can be adjusted for brig htness and contrast using the D isplay
Opti ons. (Figure 16)
Use the channel up and down buttons to highlight the B rightn ess or Contrast option, and
[ Menu Options ]
46
Page 50

- +- +
Brightness
- +- +
Contrast
Memory Options
Auto Memory Search
Clear All MemoryClear All Memory
Figur e 17F igure 17
Figur e 18F igure 18
press the Select button.
Brightness adjusts the overall intensity of the LCD di splay to help with viewing in different
lighting conditions. Contrast adjusts the relationship between the background and the text on
the LCD display. Use the channel up and down buttons, to adjust the brightness/contrast. The
bar graph will move to indicate the change. (Figure 17 )
To exit the Brightness/Contra st screen, press the MENU button.
mem ory o ptio ns
The Memory Options feature allows you to set whether t he automatic S-Seek feature is On
or Off, and also provides the a way to clear (erase) a ll the stored S-Seek alerts from memory.
(Figure 18)
Auto matic M emory Search
To turn the automatic memory search On or Off, do the following:
1. Use the channel up and down buttons to highlight Au to Mem ory Search, and press the
Select button.
2. Use the channel up and down buttons to highlight ei ther O n or Off, and press the Select
button. (Figure 19)
[ Menu Options ]
47
Page 51

Auto Memory Search
On
OffOff
Clear All Memory?
YesYes
No
Figur e 19F igure 19
Figur e 20F igure 20
To exit the Memory Options menu, press the MENU button .
Clea r All M emory
To clear all the S-Seek alerts stored in memory, do th e following:
Use the channel up and down buttons to highlight Clear All M emory, and press the
1.
Select button.
At the confirmation screen, use the channel up and dow n buttons to highlight Yes and
2.
press the Select button. (Figure 20)
The S-Seek memory is now erased.
To exit the Memory Options menu, press the MENU button .
Audio Level
The Audio Level setting adjusts the level of the audio output of the receiver.
To adjust the audio level, use the channel up and down buttons to change the audio level. The
bar graph will move to indicate the change. (Figure 21 )
[ Menu Options ]
48
Page 52

-
+-
+
Audio Level
Confirm. Tone
On
OffOff
Figur e 21F igure 21
Figur e 22F igure 22
To exit the Audio Level menu, press the MENU button.
Confirmation Tone
The receiver will sound an audio tone alert when it is powered On or Off, as well as when an
S-Seek alert is activated and other alerts. The defaul t setting is On. To change the Confirmation Tone setting to On or Off, use the channel up or down buttons to highlight On or Off, and
press the Select button. (Figure 22)
To exit the Confirmation Tone menu, press the MENU but ton.
Parental Control
The receiver has the ability to lock out with password protection any channels you do not
want others to access without your permission. (Figure 23) A locked channel will not appear
in the channel list.
[ Menu Options ]
49
Page 53

Parental Control
Lock/Unlock
Edit CodeEdit Code
Enter Code
# ____# ____
Enter Code
Wrong Code
Figur e 23F igure 23
Figur e 24F igure 24
Figur e 25F igure 25
When access to a locked channel is attempted using the direct channel entry method, the
Ente r Code screen is displayed and the channel cannot be accessed until the correct code is
entered. (Figure 24)
If the wrong code is entered, a message will be displa yed indicating that the wrong code has
been entered. (Figure 25)
Lock /Unlock
To lock or unlock a channel, do the following:
Use the channel up and down buttons to highlight “Lock /Unlock, and press the Select
1.
button.
If this is the first time that Parental Control is bei ng used, you will be prompted to cre-
2.
ate and enter a four digit numerical code. (Figure 26) This code can be any four digit
number from 0000 to 9999.
[ Menu Options ]
50
Page 54

Enter Code
# ____# ____
Enter Code
# ____# ____
001 Channel Name001 Channel Name
002 Channel Name
003 Channel Name Lock003 Channel Name Lock
004 Channel Name004 Channel Name
Lock/Unlock
Figur e 26F igure 26
Figur e 27F igure 27
Figur e 28F igure 28
If you should exit this prompt without entering a code , you will be prompted to set a
code next time you enter the Lock/Unlock option.
If a code has been previously set, a Enter Code prompt will be displayed. (Figure 27)
3.
Enter your four digit code and press the Select button to continue.
When the correct code has been entered, a listing of c hannels will be displayed. (Figure
4.
28) Use the channel up and down buttons to navigate to the channel you wish to lock
or unlock, and press the Select button. A previously l ocked channel will have the word
Lock displayed to the right of the channel name.
To lock or unlock a channels, use the channel up and d own buttons to highlight a chan-
5.
nel, and press the Select button.
If you are locking a channel, the Lock will be display ed to the right of the channel name.
If you are unlocking a channel, the Lock will be remov ed from the right of the channel
name.
[ Menu Options ]
51
Page 55

To exit the Parental Control menu, press the MENU butt on.
Enter Code
# ____# ____
Enter Code
# ____# ____
Figur e 29F igure 29
Figur e 30F igure 30
Edit Code
This setting allows you to change a previously selecte d Parental Control code.
The first time the Edit Code setting is accessed you w ill be prompted to enter a four digit
code. (Figure 29) This code can be any four digit numb er from 0000 to 9999.
If you should exit this prompt without entering a code , you will be prompted to set a code the
next time you enter the Edit Code option.
To change the Parental Control code, do the following:
Use the channel up and down buttons to highlight Edit Code, and press the Select
1.
button.
At the prompt, enter the four digit Parental Control c ode. (Figure 30)
2.
If you did not enter the correct code, a message will be displayed alerting you that the
3.
wrong code was entered, and you will be prompted again to enter the code. (Figure 31)
[ Menu Options ]
52
Page 56

Enter Code
Wrong Code
New Code
# ____# ____
Confirm Code
# ____# ____
Figur e 31F igure 31
Figur e 32F igure 32
Figur e 33F igure 33
If the correct code was entered, the “New Code” prompt will appear. Enter the new
4.
Parental Control code. (Figure 32)
You will then be prompted to confirm the new code by e ntering it again. (Figure 33)
5.
If you confirmed the correct code, the lock code is no w changed and a confirmation
6.
screen is displayed. If you entered the wrong code at the confirmation prompt, a screen
will be displayed to alert you that you have entered t he wrong code, and you will have to
repeat the process again. (Figure 34)
[ Menu Options ]
53
Page 57

Confirm Code
Wrong Code
Confirm Code
Code Saved
Time Features
Clock
AlarmAlarm
Program AlertProgram Alert
Auto ShutdownAuto Shutdown
Figur e 34F igure 34
Figur e 35F igure 35
To exit the Parental Control menu, press the MENU butt on.
If you have forgotten your Parental Control code, call SIRIUS Customer Service for help.
Time Based Features
Time based settings (Figure 35) allow for adjustment o f the following features of the receiver:
Cloc k - Sets the clock format, time zone, and daylight savings time function.
Alar m - Sets an alarm for a specific time.
Prog ram Alert - Sets the receiver to tune to a specifi c channel at a specified time.
Auto Shutdown - Sets the receiver to turn off at a spe cified time.
Slee p Mode - Sets the receiver to turn off after a des ignated period of time.
To select a menu option, use the channel up and down b uttons to highlight the option you
wish to adjust, and press the Select button.
Cloc k
The time data for the receiver’s clock is provided via the SIRIUS signal, and will update based
[ Menu Options ]
54
Page 58

Clock
Format
Time ZoneTime Zone
Daylight Savings TimeDaylight Savings Time
Format
12 Hour12 Hour
24 Hour
Figur e 36F igure 36
Figur e 37F igure 37
on the data received from the signal.
You can configure the clock format for 12-hour or 24-h our display format, set the time zone
for the clock for your location, and turn On or Off th e automatic adjustment for Daylight Savings Time (DST) (Figure 36).
Form at
To change the clock display format of the receiver to 12 hour or 24 hour format, do the following:
Use the channel up and down buttons to highlight Clock and press the Select button.
1.
Use the channel up and down buttons to highlight eithe r 12 h our or 24 Hour, and press
2.
the Select button. (Figure 37)
To exit the Clock menu, press the MENU button.
Time Zone
To change the time zone of the receiver, do the follow ing:
Use the channel up and down buttons to highlight Time Zone, and press the Select
1.
button.
Use the channel up and down buttons to highlight the p roper time zone for your location,
2.
and press the Select button. (Figure 38)
[ Menu Options ]
55
Page 59

Time Zone
(GMT -6:00) Central(GMT -6:00) Central
(GMT -5:00) Eastern
(GMT -4:30) Atlantic (GMT -4:30) Atlantic
(GMT -3:30) Newfndlnd(GMT -3:30) Newfndlnd
Daylight Savings Time
DST Observed
DST Not ObservedDST Not Observed
Figur e 38F igure 38
Figur e 39F igure 39
To exit the Time Zone menu, press the MENU button.
Dayl ight Sa vings Time
To turn the Daylight Savings Time feature On or Off, d o the following:
Use the channel up and down buttons to highlight Dayli ght Sa vings Time, and press the
1.
Select button.
2. Use the channel up and down buttons to highlight DST O bserve d or DST Not
2.
Obse rved, and press the Select button. (Figure 39)
To exit the Daylight Savings Time menu, press the MENU button.
[ Menu Options ]
56
Page 60

Alar m
Alarm
Set Alarm
Alarm TimeAlarm Time
Set Alarm
OnOn
Off
Figur e 40F igure 40
Figur e 41F igure 41
This feature allows you to set an alarm to sound at a specific time each day, and to turn the
alarm feature On or Off. (Figure 40)
Set Alarm
To turn the alarm On or Off, do the following:
Use the channel up and down buttons to highlight Set A larm, and press the Select but-
1.
ton.
Use the channel up and down buttons to highlight Alarm On or Alarm Off, and press the
2.
Select button. (Figure 41)
To exit the Set Alarm menu, press the MENU button.
Alar m Time
To set the time of the alarm, do the following:
Use the channel up and down buttons to highlight Alarm Time, and press the Select
1.
button.
Use the channel up and down buttons to change the minu tes, and the category previous
2.
and next buttons to change the hours, to select the de sired alarm time. (Figure 42)
[ Menu Options ]
57
Page 61

Alarm Time
12:00 PM12:00 PM
Program Alert
Program Time/Day
ChannelChannel
Program Alert On/OffProgram Alert On/Off
Figur e 42F igure 42
Figur e 43F igure 43
When you have selected the desired alarm time, press t he Select button to set the alarm
3.
time and exit.
To exit the Alarm Time menu, press the MENU button.
Prog ram Ale rt
The Program Alert feature allows you to program the re ceiver to automatically tune to a
specific channel at a specific time. The receiver must be powered on in order for this feature
to function. (Figure 43)
Prog ram Tim e/Day
To program the time and day when the receiver will tun e to the specified channel, do the
following:
Use the channel up and down buttons to highlight Progr am Tim e/Day, and press the
1.
Select button.
At the Program Time/Day screen, use the channel up and down buttons to highlight
2.
Time , and press the Select button. (Figure 44)
[ Menu Options ]
58
Page 62

Program Time/Day
Time
DayDay
Program Time
12:00 PM12:00 PM
Program Day
MondayMonday
Figur e 44F igure 44
Figur e 45F igure 45
Figur e 46F igure 46
Use the channel up and down buttons to change the minu tes, and the category previous
3.
and next buttons to change the hours, to select the ti me you wish to tune to the specified channel. (Figure 45)
When you have selected the desired time, press the Sel ect button to set the time and
4.
exit.
At the Program Time/Day screen, use the channel up and down buttons to highlight Day,
5.
and press the Select button.
Using the channel up and down buttons, select the day of the week you wish to tune to
6.
the selected channel, i.e., Monday, Tuesday, etc., and press the Select button. (Figure
46)
To exit the Program Time/Day menu, press the MENU butt on.
[ Menu Options ]
59
Page 63

Chan nel
A
001
Artist NameArtist Name
Song TitleSong Title
Category 12:00P
Channel Name
A
Program Alert On/Off
On
OffOff
Figur e 47F igure 47
Figur e 48F igure 48
To set the channel to which the receiver will tune whe n the Program Alert feature is On, do
the following:
Use the channel up and down buttons to highlight Chann el, and press the Select button.
1.
When the default display screen is displayed, use the channel up and down buttons to
2.
navigate to the channel which you wish to select for t he Program Alert feature. Use the
category previous and next buttons to navigate between categories. When the channel
is displayed, press the Select button.
To exit the Channel menu, press the MENU button.
Prog ram Ale rt On/Off
To turn the Program Alert feature is On or Off, do the following:
Use the channel up and down buttons to highlight Progr am Ale rt On/Off, and press the
1.
Select button.
Use the channel up and down buttons to highlight Progr am Ale rt On or Program Alert
2.
Off, and press the Select button. (Figure 48)
To exit the Program Alert On/ Off menu, press the MENU button.
[ Menu Options ]
60
Page 64

001
Artist NameArtist Name
Song TitleSong Title
Category 12:00P
A
Cancel Auto Shutdown
Channel Name
Auto Shutdown
EnabledEnabled
Disabled
Figur e 49F igure 49
Figur e 50F igure 50
Auto Shutdo wn
You can set the receiver to automatically power off af ter a 1 hour period of inactivity, that is,
no buttons have been pressed for 1 hour.
When the Auto Shutdown feature is enabled, after 59 mi nutes of inactivity, a beep tone will
sound and a display prompt will appear on the screen, Cancel Auto Shutdown. (Figure 49)
At this point the auto shutdown can be reset to 1 hour of inactivity by pressing the Select button. If the Auto Shutdown is not reset, the receiver w ill automatically power off.
To enable or disable the Auto Shutdown feature, do the following:
Use the channel up and down buttons to highlight Auto Shutdo wn, and press the Select
1.
button.
Use the channel up and down buttons to highlight Enabl ed or Disabled, and press the
2.
Select button. (Figure 50)
To exit the Auto Shutdown menu, press the MENU button.
Slee p Mode
The receiver can be set to turn off automatically afte r a selected period of time, 15, 30, 45, or
60 minutes.
To activate or deactivate the Sleep Mode feature, do t he following:
Use the channel up and down buttons to highlight Sleep Mode, and press the Select
1.
[ Menu Options ]
61
Page 65

button.
Sleep Mode
Off
15 min15 min
30 min30 min
45 min45 min
Signal Indicator
SAT - +SAT - +
TER - +TER - +
Figur e 51F igure 51
Figur e 52F igure 52
Use the channel up and down buttons to select the desi red time, 15, 30, 45, or 60
2.
minutes to activate the Sleep Mode feature, or choose Off to cancel the sleep feature,
and press the Select button. (Figure 51)
To exit the Sleep Mode menu, press the MENU button.
Signal Indicator
The Signal Indicator display screen provides a visual display of the strength of the SIRIUS
signal from the satellite antenna and also from terres trial (ground) transmitters.
To display the Signal Indicator screen, do the followi ng:
Use channel up and down buttons to highlight Signal In dicato r, and press the Select
1.
button.
Two 10 segment horizontal bar graphs will be displayed with a “-“ sign to the left and a
2.
“+” sign to the right. SAT indicates the satellite sig nal strength while TER indicates the
terrestrial signal strength, if a terrestrial signal i s available. (Figure 52)
To exit the Signal Indicator menu, press the MENU butt on.
[ Menu Options ]
62
Page 66

Factory Default
The Factory Default option will restore most every fea ture of the receiver to the original factory
settings. The following is a list of all features affe cted by the Factory Default option:
Note that the Parental Control feature is not affected by the Factory Default option. If a code
has been set for the Parental Control feature, the cod e will not be reset by the Factory Default
feature, preventing someone from circumventing the Par ental Control feature. Channels which
have been locked will remain locked.
To activate the Factory Default feature, and restore t he features of the receiver to the factory
defaults, do the following:
All Presets are cleared
•
All Game Al erts are cleared
•
Receiver se t to Normal Tuning Mode
•
Display bri ghtness set to 50%
•
Display Con trast set to 50%
•
FM Transmit ter set to On
•
FM Frequenc y set to 88.1 MHz
•
All S-Seek memory cleared
•
Clock set t o 12-Hour Format
•
Time Zone s et to Eastern Standard Time
•
Daylight Sa vings Time set to Observed
•
Auto Shutdo wn set to Off
•
Sleep Mode set to Off
•
Auto Select set to Off
•
Program Ale rt cleared
•
Use the channel up and down buttons to highlight Facto ry Def ault, and press the Select
1.
button.
Use the channel up and down buttons to select Yes to r estore all settings to the settings
2.
from the factory, or select N o to leave them as-is and return to the Menu Options menu.
(Figure 53)
[ Menu Options ]
63
Page 67

Restore Settings?
YesYes
No
Are You Sure?
Yes
NoNo
Are You Sure?
Yes
NoNo
Restoring
Factory Defaults
Figur e 53F igure 53
Figur e 54F igure 54
Figur e 55F igure 55
If Y es is chosen, a confirmation is displayed. Use the channel up and down buttons to
3.
select Yes to restore all settings to the settings fro m the factory, or select No to leave
them as-is and return to the Menu Options menu. (Figur e 54)
If Y es is chosen, the receiver will revert to the orig inal factory settings. (Figure 55)
4.
When the Factory Default is complete, the receiver wil l place you in Channel 184 the
5.
SIRIUS preview channel and display, Call 1-888-539-SIR IUS to Subscribe. The receiver
is still subscribed to the SIRIUS service.
[ Menu Options ]
64
Page 68

Troubleshooting
Symp tom Solu tion
Receiver does not
power on
Receiver displays: An-
tenn a Not Detected
Receiver displays:
Acqu iring Signal
Audio static or loss of
clarity
No sound The audio cables are not connected, or the FM radio is set to the
Blown fuse, or the power cable is not properly connect ed.
Check for a bad fuse and check power cable connection
The satellite antenna is not connected to the receiver dock.
Check the satellite antenna connection to the dock.
No satellite signal is being received.
Check for obstacles over or around the satellite anten na.
Change the vehicle location to eliminate nearby obstac les
(bridges, overpasses, tress, buildings, etc.).
The FM frequency contains static.
Locate a quiet FM frequency on your vehicle radio and set the FM
transmitter frequency of the SIRIUS Starmate 3 to matc h.
If using the AUX audio connector, check the cable conn ections.
wrong frequency. Check the audio cables at the receive r dock
and the radio. Tune the FM radio to the same FM freque ncy the
receiver is tuned.
[ Troubleshooting ]
65
Page 69

Optional Accessories
The following optional accessories are available for p urchase from your SIRIUS retailer to
maximize your SIRIUS experience:
SUBX 1 SIRIU S Plug and Play Univ ersal B oombox
The SUBX1 SIRIUS Plug and Play Universal Boombox is a portable docking station and audio
system for use with the SIRIUS Sportster receiver. Wit h the built-in amplifier and speakers,
the boombox delivers rich powerful sound indoors or ou tdoors, and features an auxiliary input
for other audio devices,
Included with the boombox is an adjustable indoor/outd oor windowsill antenna with 20’ of
cable and an AC adapter.
SUPH 1 SIRIU S Universal Plug and Play H ome Kit
The SUPH1 SIRIUS Universal Plug and Play Home Kit is a compact docking cradle that positions the receiver for easy viewing and operation. Designed for quick and easy self-installation,
it includes all necessary cabling to connect your SIRI US receiver to your home audio system.
The kit includes a compact tabletop/desktop docking cr adle with FM output for wireless
connectivity, an audio cable for connection to any ste reo bookshelf system, an adjustable
indoor/outdoor windowsill antenna with 20’ of cable, a nd an AC Adapter.
SUPV 1 SIRIU S Universal Plug and Play V ehicle Kit
The SUPV1 SIRIUS Universal Plug and Play Vehicle Kit i s a compact docking cradle that positions the receiver for easy wiring, viewing, and opera tion in a vehicle. Designed for quick and
easy self-installation, it provides several mounting o ptions and includes all necessary cabling
to connect your SIRIUS receiver to your car audio syst em.
The SUPV1 SIRIUS Universal Plug and Play Vehicle Kit w ill work with the Sportster 4 and
most new SIRIUS plug and play receivers.
The kit includes a mobile docking cradle, a suction cu p vehicle mount, a vent mount, a cigarette lighter adapter, and a magnetic antenna with 21’ of cable.
[ Optional Accessories ]
66
Page 70

FM D irect A dapter
The FM Direct Adapter accessory redirects your vehicle ’s FM antenna signal when listening to
your SIRIUS receiver using your vehicle’s AM/FM radio. When the SIRIUS receiver is powered
on the FM Direct Adapter automatically redirects the v ehicle’s FM antenna signal away from
the vehicle’s AM/FM radio, reducing any interference w hich might be present from FM radio
station broadcasts. Whe n the SIRIUS receiver is turned off, the FM antenna signal is a utomatically redirected back to the vehicle’s AM/FM radio. (P roduct number 14100.)
[ Optional Accessories ]
67
Page 71

Specifications
Satellite Frequencies . . . . . . . . . . . . . . . . . . . . . . . . . . . . . . . . . . . . . .2322.293/2330.207 MHz
Terrestrial Frequencies . . . . . . . . . . . . . . . . . . . . . . . . . . . . . . . . . . . . . . . . . . . . . 2326.250MHz
Power Requirements . . . . . . . . . . . . . . . . . . . . . . . . . . . . . . . . . . .5 Volts, Negative Ground, DC
Audio Output . . . . . . . . . . . . . . . . . . . . . . . . . . . . . . . . . 2V (normal) 2.8V (max.) (Peak-to-Pe ak)
Total Harmonic Distortion (THD) . . . . . . . . . . . . . . . . . . . . . . . . . . . . . . . . . . . . . . . . . . . . <0.2%
Signal-to-noise (S/N) . . . . . . . . . . . . . . . . . . . . . . . . . . . . . . . . . . . . . . . . . . . Greater than 73dB
Fuse Requirement . . . . . . . . . . . . . . . . . . . . . . . . . . . . . . . . . . . . . . . . . . . . . . . . . . . . . . 2A ATC
Receiver Dimensions (Length x Height x Depth) . . . . . . . . . . . . . . . 124.2mm x 48.5mm x 16mm
(4.9” x 1.9” x .0.6”)
Receiver Weight. . . . . . . . . . . . . . . . . . . . . . . . . . . . . . . . . . . . . . . . . . . . . . . . . . . . 91g (3.2 oz.)
Antenna Type . . . . . . . . . . . . . . . . . . . . . . . . . . . . . . . . . . . . . . . . . . . . . . . Low Profile Magnetic
Antenna Cable Length . . . . . . . . . . . . . . . . . . . . . . . . . . . . . . . . . . . . . . .21’ (single micro-cable)
Connector Type . . . . . . . . . . . . . . . . . . . . . . . . . . . . . . . . . . . . . . . . . . . . . . . . SMB (right-angle)
Remote Control Dimensions (Width x Length x Height) . . . . . . . . . . . . 41mm x 104mm x 15mm
(1.61” x 4.09” x .59”)
Remote Control Battery Requirements . . . . . . . . . . . . . . . . . . . . . . . . . . . . . . . . . . . . . .CR2025
[ Specifications ]
68
Page 72

Warranty
12 M onth Wa rranty
SIRIUS Sate llite Radio Inc. (the “Comp any”) warrants to th e origi nal retail purchaser of this product
that should this product or any part t hereof, under normal use an d conditions, be pro ven defective in
material or workmanship within 12 mont hs from the date of origina l purchase, such def ect(s) will be
repaired or replaced with new or recon ditioned product (at the Co mpany’s option) with out charge for
parts and r epair labor. To obtain repa ir or replacement wi thin th e terms of this Warr anty, the product
is to be de livered with proof of warra nty coverage (e.g. d ated bi ll of sale), specifi cation of defect(s),
transportat ion prepaid, to the locatio n shown below under WARRANT Y RETURN.
This Warran ty does not extend to the e limination of extern ally ge nerated static or no ise, to correction
of antenna problems, to costs incurred for installation, r emoval or reinstallation of the product, or to
damage to t apes, compact discs, speake rs, accessories, or vehicle electrical systems.
This Warran ty does not apply to any pr oduct or part thereo f which , in the opinion of the Company,
has suffere d or been damaged through a lteration, improper install ation, mishandling, misuse, neglect,
accident, o r by removal or defacement of the factory seria l numbe r/bar code label(s). THE EXTENT
OF THE COMP ANY’S LIABILITY UNDER THIS WARRANTY IS LIMITED TO THE REPAIR OR
REPLACEMENT PROVIDED ABOVE AND, IN NO EVENT, SHALL THE COM PANY’S LIABILITY
EXCEED THE PURCHASE PRICE PAID BY PURC HASER FOR THE PRODUC T.
This Warran ty is in lieu of all other express warranties o r liabi lities. ANY IMPLIED WARRANTIES, INCLUDING ANY IMPLIED WARRANTY OF MERCHA NTABILITY, SHALL BE LIMITED TO THE DURATION OF THI S WRITTEN WARRANTY. ANY ACT ION FOR BREACH OF AN Y WARRA NTY HEREUNDER INCLU DING ANY IMPLIED WARRANTY O F MERCHANTABILITY MU ST BE B ROUGHT
WITHIN A PE RIOD OF 48 MONTHS FROM DATE OF ORIGINAL PURCHAS E. IN N O CASE SHALL
THE COMPANY BE LIABLE FOR ANY CONSEQUE NTIAL OR INCIDENTAL DAMAGES FOR
BREACH OF T HIS OR ANY OTHER WARRANTY, EXPRESS OR IMPLIED, WHATSOE VER. No
person or r epresentative is authorized to assume for the C ompany any liability other than expressed
herein in c onnection with the sale of this product. Some s tates d o not allow limitati ons on how long
an implied warranty lasts or the exclu sion or limitation o f incid ental or consequenti al damage so the
above limit ations or exclusions may no t apply to you. This Warran ty gives you specifi c legal rights and
you may als o have other rights which v ary from state to st ate.
WARRANTY RE TURN: To obtain repair or r eplacement within th e terms of this Warranty, p lease return produc t to an authorized retailer or call Customer Se rvice a t 1-800-869-5590; pr oof of purchase
and descrip tion of defect are required . Products to be ret urned t o an approved warran ty station must
be shipped freight prepaid.
[ Warranty ]
69
Page 73

SIRIUS ID
Write down the SIRIUS ID (SID) of your SIRIUS Starmate 3 i n the s pace provided below.
SID: _______________________________________
70
[ SIRIUS ID ]
Page 74

Page 75

Page 76

SIRI US Customer Service: 1-888-539-7474
customercare@sirius-radio.com
SIRI US Satellite Radio Inc.
1221 Avenue of the Americas
New York, NY 10020
1-888-539-7474
http://www.sirius.com
Page 77

SI RIUS Satel lite Radio In c.
1221 Avenue of the Americas
New York, NY 10020
(800) 869-5590
http://sirius.com
SIRIUS Starmate ST3 (080 106a)
49.UPAS3.002
 Loading...