

Page 1

IEEE 802.11b/g VoIP Phone
User’s Manual
Nov. 2006
Page 2

Chapter 1 Getting Started
1.1 Reading this Manual
Thank you for purchasing this VoIP phone. To operate accordingly your new phone, carefully
read this user’s manual first. Screen displays and illustrations in this user ’s manual are designed
to help you to operate all the steps directly and precisely.
Note! For information about your internet phone service, ref er to the materials provided by your
Internet ph one service provide r.
1.2 Package Contents
One 802.11b/g VoWLAN handset
One Li-ion battery
One Setup CD-ROM with user’s manual. (optional)
One power adapter or mini-USB cable. (optional)
One Charging Cradle. (optional)
1.3 Care and Maintenance
Keep your phone and accessories away from dusty, wet or dirty areas.
Don’t put your phone or accessories in extremely hot or cold areas.
Don’t use harsh chemicals, cleaning solvents, or strong deter gents to clean your
phone or accessories.
Page 3
Chapter 2 Phone Features
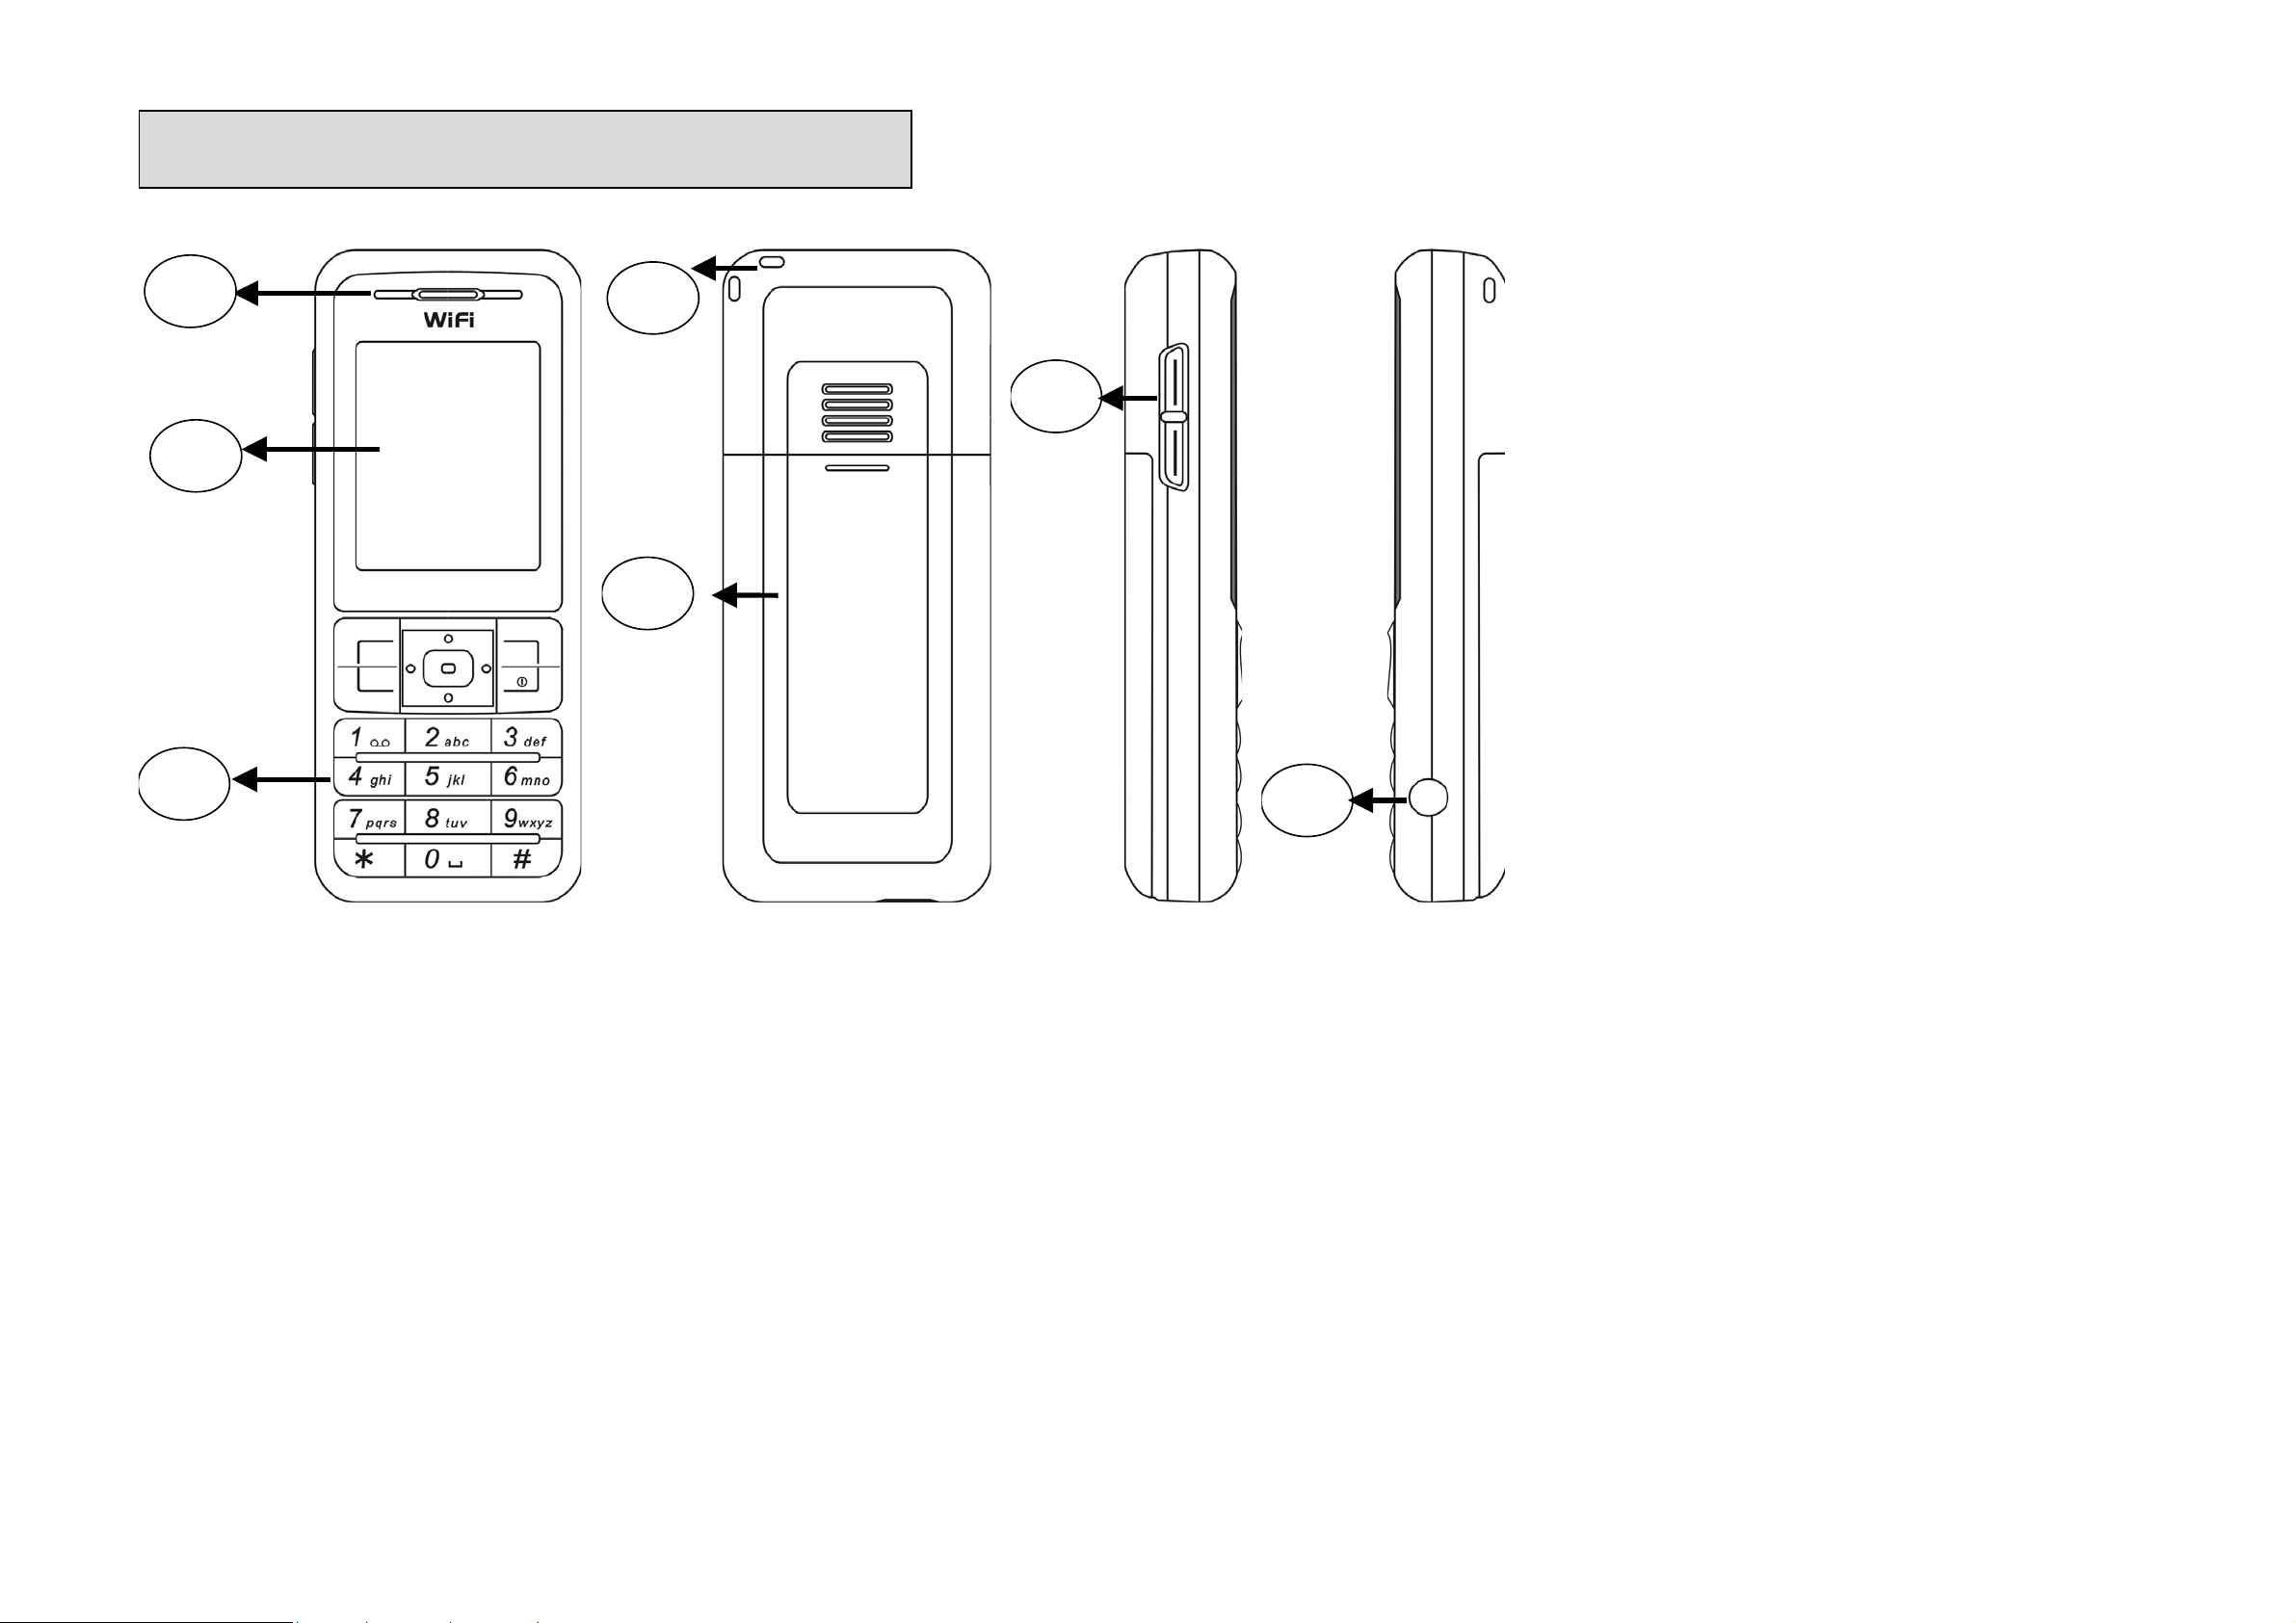
2.1 Overall Appearance
1
2
4
5
6
3
7
Page 4

8
1. Earphone 5. Battery
2. Screen 6. Volume adjustment keys
3. Keypads 7. Earphone slot
4. Strap eyelet 8. Data cab le slot
2.2 Overall Features
• Slim candybar type
•
•
•
•
•
•
•
•
•
IEEE 802.11b/g WLAN and Em b edded 2.4GHz Antenna
G.711a , G.711u, G.729a CODEC support
SIP v2 signaling protocol, RFC-3261
1.8” 128 x 160 (65k-colour) TFT LCD
Keypad with backlight
Side key for volume control
Li-ion, 900 mAh Nominal
Phone Book & Speed Dial
Polyphonic Ring Tone
Page 5

•
New Call Screen --- Mute, Hold, Second call, Conference, Swap, Transfer, Handsfree
•
•
•
•
•
•
and Recording.
RF and battery level indication
Web-based user management console
WLAN Site Survey to ease AP search
Supports detail Call Log
Supports Speed-Dial setup
Supports WEP(64/128-bit), WPA and WPA2 security for WLAN
2.3 Product Specification
Item Description
CPU BRCM1161
Flash Memory 32MB NAND Flash
SRAM Memory
32MB
Data/power Recharge Port USB 1.1
Wireless LAN Standard Compliance IEEE802.11b/g 2.4GHz
Wireless Frequency Range
Output Power(Average Power)
Data T r ansmi ssion Rate 1, 2, 5.5, 11Mbps up to 54Mbps
WLAN Network Architecture Type Infrastructure
LCD
Max. 18.62dBm @802.11g
Approx. 2.400~2.484GHz
Max. 16.71dBm @802.11b
1.8” Colorful LCD, 128x160 pixel, 65k
Page 6
Item Description
colors
Antenna Type Embedded antenna
Battery Li-ion 900 mAh
Power Supply
Dimension
Weight Approx. 100g
External power adapter or mini-USB
cable
17mm (T) x 44mm (W) x 106mm (H)
2.4 WLAN Application
Place a Call via “SIP Proxy Server”
Use your new Wi-Fi phone to make and receive VoIP telephone calls when you are within
range of a wireless Internet Telephony Service Provid er (ITSP). You do not need to know if
the recipient’s connection type is an IP, cellular or landline based service. Your Wi-Fi phone
can call any landline or mobile telephone that a traditional PSTN telephone can connect to
as well as the IP telephone network. Calls received from IP telephones works exactly as
you would expect from the traditional telephone service.
Your Wi-Fi phone registers with a SIP proxy server in the following circumstances:
(1) Your connection uses an IP Telephony Service.
(2) Your connection is based in a corporate VoIP environment.
Page 7

Chapter 3 Installing and Using the VoIP Phone
3.1 Charging Your VoIP Phone’s Battery
New battery is shipped pa r tially char ged. B efor e you can use your phone , you need to in st all a nd
charge the battery.
Note! For the first time usage, it is recommended to charge the battery for at least 8 hours.
1. Make sure the battery is installed properly.
2. Ways to charge the battery:
Plug the power adapter between the data cable slot on the bottom of the phone and
the socket.
Locate your VoIP phone on the cradle an d plug the other end into a standard electrical
outlet.
3. You see a charging indicator on the LCD screen.
4. When the battery chargin g indicator r emains solid blue, the battery is fully char ged and r eady
for use.
Use mini-USB cable to charge through your notebook or related device.
3.2 Setting Up Your VoIP Phone
Before you begin, make sure you have an active internet connection and the account information
provided by your internet phone service provider.
Page 8

1. Press
2. It is necessary to enter your password when your phone is set as “Phon e P ro t ection”. Use
the keypad to enter the password. Default password is user.
Entering English mode
When inputting the text in English, press the key labeled with the character you prefer:
-Once for the first character;
-Twice for the second character and so on…
This method is so-called Multi-tap typing.
For example, you have to press the 5 key twice display the character “K”, the 3 key five times
to display the character “e” and the 6 key five times again to disp lay “n”.
to power on the phone.
You can insert a space between words/letter s by pressing the 0 key.
Refer to the chart below for detailed information about the characters available:
0
1
2
3
The cursor mov es to the rig ht when you press a different key. When entering the
same letter twice or a different letter on the same key, just wait for a few seconds
for the cursor to move to the right automatically, and then select the next letter.
→
space
→
" ' [ ] < > ( ) { }
→
ABCabc
→
DEFdef
Page 9
→
4
5
6
7
8
9
*
#
3. When you are finished entering the password, press
GHIghi
→
JKLjkl
→
MNOmno
→
PQRSpqrs
→
TUVtuv
→
WXYZwxyz
→
* . + - / , : ; = ? !
→
# @ $ % & \ ^ _ ` | ~
to save it.
4. If you do not need to enter a password, then press
5. Scroll to Profile, then press
6. Scroll to SIP Account, then press
7. Press 》Option, then press
8. From the Edit menu, highlight each setting your service provider requires you to change,
then press
》
Select to change the setting. When you are finished changing a setting, press
》
Profile.
》
Select to enter the SIP Account menu.
》
Select to edit the default SIP account.
》
Menu.
to save the changes.
9. If you need to change a setting that does not appear on the Edit screen scroll to Advance,
then press
10. Highlight each setting your service provider requires you to change, then press
》
Select to enter the Advanced menu.
》
Select to
Page 10

change the setting. When you are finished changing the setting, press
changes.
to save your
11. When you are finished making cha nges in the advanced settings menu, press
you return to the Profile menu.
12. Highlight Network Profile, then press
13. Highlight the network profile that matches the type of security you’re using for your wireless
network and press
enabled on your wireless network, hig hlight OPEN.
14. Press 》Select to edit the network profile.
15. Highlight Wireless Settings, then press
16. Highlight ESSID, then press
17. Highlight Site Survey, then press 》Select to scan for your wireless network. You see a list of
wireless networks in range of the phone. Highlight your wireless network’s ESSID name in
the list, then press
18. If you don’t see your wireless network’s ESSID name in the list, your wireless network may
not be set to broadcast its ESSID name. To enter the ESSID name manually , press 》Back to
》
Option to enter the Profile Options menu. If you d o not have security
》
Select to enter the ESSID menu.
to select it.
》
Select to enter the Network Profile menu.
》
Select to enter the Wireless Settings menu.
》
Back until
return to the ESSID menu, highlight New ESSID, then press
19. Press 》Back until you return to the Wireless Settings menu.
20. Highlight Security, then press
to enter the Security menu.
to edit the ESSI D name.
Page 11

21. Highlight the type of security you have enabled on your wireless network, press
select it. Then change the settings to m atch your wireless network. If you don’t have security
enabled on your wireless network, select OPEN.
22. When you are finished selecting wireless secur ity settings, pr ess 》Back to return to the Edit
menu.
to
23. Highlight Account Choice and press
24. Press
25. Highlight On, then press
26. Press 》Back until you return to standby mode.
to assign the default SIP account to the current network profile.
to activate the SIP account.
》
Select to enter the Acc ount Choice menu.
Page 12

Chapter 4 Configuring the VoIP Phone
y
4.1 Standby Mode
A variety of information is displayed on standby mode. Refer to the table below for a list of icons
that indicate on the home scree n and their definitions:
Icon Description
Signal Strength
/
/
/ / /
Indicates the received signal strength. The greater the number of
bars, the better the signal
Message
When you have received new messages.
In Call / Call Forward
When you are on the phone or forward the call.
Network Encryption
When you have set for network encryption.
SIP Registered/ Not Registered
When you have (not) registered to SIP server.
Ring Mode (Silent/Ring/Vibrate/Ring+Vibrate)
Alarm
Pops up when you set an alarm to ring at a specified time.
Battery Level
Indicates th e leve l of the ba tter
. The more bars you see, the more
Page 13
power you have remaining.
Note! You can also view a summary of the phone’s current status by pressing
》
Status.
4.2 Main Menu
Press
information on the options available in the main menu.
Phonebook
The phonebook can store and display up to 100 entries. To view details of an entry,
A list of options available in the Phonebook:
Option Description
Search Search for an entry by name.
Edit Edit the currently selected entry.
》
Menu in standby mode to enter the main menu. Refer to the sections below for
highlight the entry and press.
. To call the contact, press
》
》
Call.
Delete Delete the currently selected entry.
New Add a new entry.
Call Log
Your VoIP phone keeps a record of the calls you’ve recent ly missed, dialed, and received.
Option Description
A list of options available in the Call Log:
Page 14

Missed Calls Displays a list of calls you’ve recently missed.
Dialed Calls Displays a list of calls you’ve recently dialed.
Received Calls Displays a list of calls you’ve recently received.
Delete All Remove all call records.
To get more information about a call in your call log, highlight the call, then press to display
date and time information for the call.
Options available in the Missed Calls, Dialed Calls and Receive Calls menus:
Option Description
Save Add additional information about a caller and save the contact
information to your Phonebook.
Del Record Remove the current caller from the call log.
Del All
Missed/Dialed/Received
Remove all of the calls in the call list you’re viewing.
E-mail
Your VoIP phone’s built-in e-mail client enables you to send and receive messages using your
POP3 e-mail account.
Configuring Your E-mail Account
1. In standby mode, press
2. Enter the information provided by your e-mail service.
3. When you have finished configuring your e-mail account information, press 》Back》Option.
》
Menu》E-mail》New. (if the e-mail account is not configured.)
Page 15

4. Press.
ply
5. Press 》Back to see E-mail menu.
Using the E-mail Client
Options available in the E-mail menu:
Option Description
Wri te New
.》OK to activate the e-mail account.
Compose a new e-mail message, press
Recipients, and Content of the message. When you finish editing,
select Send Mail or Save to Draft to store the message to the dra ft
folder.
. Enter a Subject, the
While editing, press
0-9).
Receive Receive new e-mail messages.
A pop-up message “Receive Mails?” indicates on the screen,
press
Inbox Access e-mail messages you’ve received. To read a message,
highlight the message you want to read , then press
While viewing the message, press
options:
Reply: enables you to quickly reply to e-mail messages.
Re
OK then you can receiv e ne w ma ils.
with Log: enables you to quickly reply to e-mail
to switch the input method (ABC or
to read it.
》
Option to select the following
Page 16

messages with a history of the original E-mail.
y
Forward: enables you to quickly edit and send e-mail to other
contacts or save it as a draft.
Delete: enables you to remove the current message from
your Inbox.
Clear Inbox: enables you to remove all of the e-mail
messages in your Inbox.
Outbox Access e-mail messages you’ve sent. To read a message, highlight
the message you want to read, then press
viewing the message, press
》
Option to select the following
to read it. While
options:
Edit: enables you to edit a sent message and send it to other
contacts or save it as a draft.
Delete: enables you to remove the current message from
your Outbox.
Clear Outbox: enables you to remove all of the e-mail
messages in your Outbox.
Draft Access e-mail messages you’ve stored as drafts. To view a draft,
highlight the message you want to read, then press
While viewing the message, press
》
Option to select the following
to view it.
options:
Edit: enables
ou to edit a sent message and send it to other
Page 17

contacts or save it as a draft.
Delete: enables you to remove the current message from
your Draft folder.
Account Settings Enables you to activate, edit and delete your e-mail account
settings. (Account Name/ Y our Name / Mail Address / Reply
Address / POP3 Address / POP3 Port / POP3 User ID / SMTP
Address / SMTP Port / SMTP User ID / Signature / Reserve Mail)
Clear Outbox: enables you to remove all of the e-mail
messages in your Draft folder.
Speed Dial
The speed dial menu enables you to assign up to nine phone numbers you frequently call to the
number keys on the phone. Follow the steps below to assign a contact to your Speed Dial list.
1. Press 》Menu》Speed Di al
2. Highlight the number you would like to assign a cont act’s phone number to.
3. Press 》Option to view the contacts in your Phonebook.
》
.
4. Highlight the contact you want to assign to the speed dial location, then press
5. Press 》Back until you re turn to the m a in Speed Dial menu.
.
Profile
The Profile menu enables you to make changes to your SIP accounts, network profiles, roaming
options, profile password, or configure your VoIP phone using Secure Setup.
Page 18

Network Profile
p
The Network Profile menu enables you to assign up to six wireless access points for your VoIP
phone to link to. To check the details of a profile, press
network profile you would like to edit, then press
》
Option.
. To edit a profile, highlight the
Available options are as below:
Option Description
Edit Edit the current network profile.
Rename Change the current network profile’s name.
Delete Delete the current network profile.
Auto Detect Activate or deactivate the current network profile.
Move Move the current network profile up or down in the network profile
list. The VoIP phone will try to connect to all of the access points, in
the order they appear in the network profile list, until it is able to
make a connection.
Editing a Network Profile
The Edit menu enables you to edit the currently selected network profile.
Options available in the Edit menu:
Option Description
Preview View a summary of the current network profile.
Wireless Settings
Edit wireless network settings. Press
》
Select:
ESSID: enables you to enter your wireless network’s ESSID
name or
erform a site survey to view wireless networks in
Page 19

range of your VoIP phone.
Data Rate: enables you to specify the da ta rate of your
wireless network. If you don’t know the da ta rate, select Auto.
Security: enables you to select wireless security se ttings to
match your network.
IP Setting s Select from the following IP modes:
Fixed IP: enables you to manually enter IP settings for your
network.
DHCP: enables you to use DHCP to acquire IP settings for
your network.
PPPoE: enables you to use PPPoE to acquire IP settings for
your network.
Account Choice Assign a SIP account to a network profile.
NAT Settings
Set STUN server options: Press
》
Select:
NAT Solution: enables you to activate or deactivate STUN
services.
STUN Address: enables you to enter the address of the
STUN server you want the phone to use.
STUN Port: enables you to enter the network port of the
STUN.
SIP Account
The SIP Account menu enables you to assign up to six SIP account s to your VoIP phone. To view
Page 20

the details of an ac coun t, pr ess . To edit a SIP ac cou nt, hi ghlight th e a ccou nt you woul d li ke
to edit, press
》
Option, then press
》
Select to edit the account.
Options available in the Edit menu:
Option Description
Preview View a summary of the current SIP account.
Phone Number Enter your Internet phone number.
Auth. ID Enter your Internet phone service a ccount’s authorization id.
Auth. Password Enter your Internet phone service account’s authorization
password.
SIP Domain Enter the address of your Internet phone service provider’s SIP
domain.
Proxy Address Enter the address of your Internet phone service provider’s proxy
server.
Advanced
Make advanced changes to the SIP Account. Press
》
Select:
Proxy Port: The port number of SIP server.
Outbound Address: Outbound proxy address.
Outbound Port: Outbound proxy port.
Local Port: Local port number.
Reg. Timer(sec): Registration refreshing interval.
Codec: Compressed audio format.
Pkt Time(ms): Audio transmitting interval.
OutofBand DTMF: The working of out-of-band dual-tone
multifrequency.
Page 21

Roaming
The Roaming menu enables you to set specific parameters for roaming from wireless access
point to another.
Options available in the Roaming menu:
Option Description
Roam Metric Specify an RSSI (Received Signal St rength Indication) value to
begin a roaming scan.
Roam Delta Specify the RSS I threshold for target access points to join.
Nprobes Specify the number of pro bes per channel to send when scanning.
Active Time Specify the amount of time spent on each channel when scanning.
Home Time Specify the amount of time spent on the home channel between
scans.
Secure Setup
The Secure Set up me n u ena bl es you to configure your VoIP Phone’s wireless ne twork settings
with the push of a button.
When you see “Run Secure Easy Setup?” message appear on the screen, press
OK.
Settings
Use the Settings menu to make changes to select regional settings, set the date and time, and
personalize your phone.
Options available in the Settings menu:
Page 22

Language
The Language menu enables you to set your VoIP phone’s display language. To change the
language, highlight the language you would like the phone to use, then press
setting.
Clock
The Clock menu enables you to set your VoIP phone’s time and date settings.
Options available in the Clock menu:
Option Description
Time Set the time displayed on your VoIP ‘s standby mode.
Date Set the date displayed on your VoIP ‘s standby mode.
Time Format Set the time’s display format to 12-Hour or 24-Hour format.
Date Format Set the date’s display format to ‘YY/MM/DD or MM/DD/’YY format.
Timezone Set your local timezone.
Daylight Savings Activate or deactivate automatic Daylight Savings time adjust ment.
Network Time Activate or deactivate the phone from updating the time from an
NTP server.
to store your
Alarm Clock
The Alarm Clock enables you to se t an alar m on at a specified tim e . The alar m cl ock can also be
set Once, Daily or Weekly.
Options available in the Alarm Clock menu:
Option Description
Alarm Time Set the time you want the alarm to activate.
Page 23

Mode Set the alarm to activate Once, Daily, or Weekly.
Melody Set what tun e th e a l a rm wil l make.
Call Settings
The Call Settings menu enables you to change all call related setting on your VoIP phone.
Options available in the Call Settings menu:
Option Description
Call Waiti ng Activate or deactivate call waiting.
Call Forward
Make changes to call forward settings. Press
Forward Number: enables you to enter a number to forward
》
Select
calls to.
Forward All: enables you to forward all calls.
No Answer: enables you to forward missed calls.
Busy: enables you to forward calls when your phone is busy.
Cancel All: enables you to cancel all forwarding options.
Block Caller ID Activate or deactivate caller ID blocking.
Refuse Private Block incoming calls from callers with a private caller ID.
Beep Notification Activate or deactivate the beep awareness at the 50 seconds for
every minute interval.
Hold Tr ansfer This feature allows you to transfer your call via SIP server or DTMF
Flash.
Regional Tone This feature enables you to set specific call progressing tone, either
Japan or North America.
Page 24

Speed Dial
The Speed Dial menu enables you to change the way your VoIP phone’s speed dial function
works. You can select Disable to disable speed dial, Ask to see a confirmation screen before the
phone dials a contact, or Dial immediately dial a contact.
Sound Settings
The Sound Settings enables you to adjust your VoIP phone’s speaker volume, ringer settings,
warning and power on/off tones.
Options available in the Sound Settings menu:
Option Description
Speaker Volume Set your VoIP phone’s speaker volume.
Ring Tone
Set your VoIP phone’s ring tone and volume. Press
》
Select
Melody: enables you to set the VoIP phone’s ri ng tone.
Ring Volume: enables you to adjust your VoIP phone’s ringer
volume.
Ring Mode Set your VoIP phone’s ring mode to Silent, Ring, Vibrate, or
Ring+Vibrator.
Warning Tone Activate or deactivate your VoIP phone’s warning tones.
On/Off Tone Activate or deactivate your VoIP phone’s powering on/off tones.
Display Settings
The Display Settings menu enables you to customize your VoIP phone’s display.
Options available in the Display Settings menu:
Option Description
Page 25

Wallpaper Change the picture displayed on the standby mode.
Greeting Change the message displayed on the standby mode.
LCD Off Time Change the amount of time it takes for your VoIP phone to turn off
its LCD when then phone is not use.
LCD Brightness Change the brightness of the LCD screen.
Config. Tip Activate or deactivate confi guration tips.
Keypad
The Keypad menu enables yo u to customize your VoIP phone’s keypad settings.
Options available in the Keypad menu:
Option Description
Key Lock
Key Tone Activate or deactivate your VoIP phone’ s key tones.
Key Tone Volume Change the volume of the key to ne.
Key Backlight Activate or deactivate your VoIP phone’s key backlight.
User Data
The User Data enables you to customize your VoIP phone’s files.
Options available in the User Data menu:
Option Description
Wallpaper Wallpaper can be uploaded to your VoIP phone.
Melody Melodies can be uploaded to your VoIP phone.
Voice Recorder Calls can be saved as voice memo for your VoIP phone.
Lock your VoIP phone’s keypad. Press
》
OK.
Page 26

Passwd. Settings
The User Data enabl es you to customize your VoIP phone’s files.
Options available in the Passwd. Settings menu:
Option Description
Passwd. Protect Protect the usage of your VoIP phone.
Passwd. Change Change the password of your VoIP phone.
Tools
Use the Tools menu to view information about your VoIP phone and network status.
Options available in the Tools menu:
Option Description
Signal Quality View signal status information for the wireless access point you’re
connected to.
Site Survey Perform a site survey of all the wireless access points in range of
Statistics
your VoIP p hone.
View your VoIP phone’s network and codec statistics. Press
Select:
RTP/RTCP: enables you to check Real-Time Transport
Encoding: enables you to check encoding statistics.
Decoding: enables you to check decoding statistics.
IP S tatistics: enables you to check network p acket s stati stics.
Protocol (RTP) and Real Time Control Protocol.
》
Page 27

Battery Check your VoIP phone’s battery level.
Ping Ping an IP address or domain.
Version Your VoIP phone’s software version.
Back to Default Reset all of your VoIP phone’s setti ngs back to their factory
defaults.
Restart Soft reset your VoIP phone.
Page 28

Chapter 5 Using the Web-Based Utility
The web-based utility on your PC enables you to view, change, or edit the most commonly
used features of your VoIP phone.
5.1 Accessing the Web-Based Utility
1. To start, it is necessary to have your VoIP phone’s IP addres s . In standby, press》Status
Phone Status》IP Addres s. If you use a Static IP, the address will stay the same. If you use
a DHCP, the IP address may change every time you turn on the phone.
2. On your PC that is linked t o the same network as the phone, launch Internet Explorer. In the
Address field, enter
address that you obtained in step 1. Press
3. The VoIP phone login screen is displayed. Enter
You will log in to the Wireless Network Status screen and can select any of the tabs to add
or change phone settings’ information.
Note! The default User Name is admin and the Password is admin, but may change if you
have an ITSP.
》
http:// IP Address where the IP address is the VoIP phone’s IP
》
Enter.
》
User Name and Password
》
Submit.
》
Current Status
By selecting Current Status, you will view your VoIP phone’s linkage status: ESSID, BSSID, IP
address and MAC address are indicated.
Page 29

Phone Book
Note! The Phone Book stores and displays up to 100 contacts.
Phone Book List
Access a list of all contacts and numbers. To edit a contact, press the contact’s Name. To add a
new entry, press New. Press Clear All to remove all entrie s from the phone.
Page 30

Phone Book Edit
In the Phone Book Edit screen, the following optional information are listed:
Option Description
Name The contact’s name.
E-mail The e-mail address for the contact.
Ring Tone Stores a specific ring tone for the contact.
Number 1-5 Stores up to five different phone numbers for the contact.
Speed Dial 1-5 Sets speed dial numbers for each number. The phone holds 9
speed dial numbers.
Type Choice 1-5 Set the type either Generic, Mobile, Office, Home or Fax for each
number.
Wireless Network Settings
Click Configure, the Wireless Network Settings options are listed. Enter the Network Profile
Name, ESSID, Data Rate of the router, Security, IP Setting and NAT Setting.
Page 31

Data Rate
Options include: Auto, 1Mb/s, 2Mb/s, 5.5Mb/s, 6Mb/s, 9Mb/s, 11Mb/s, 12Mb/s, 18Mb/s, 24Mb/s,
36Mb/s, 48Mb/s or 54Mb/s.
Security
You can select the type of Security settings you want to use, including OPEN, or one of several
WEP or WPA/WPA2 options.
IP Setting
Options include: DHCP, Fixed IP or PPPoE.
NAT Setting
For the NAT Setting you can Disable the NAT Solution or select STUN server options.
Certification
Enter the Certification setting, including CA Cert., User Cert. and Private Key. The
correspondent information can be uploaded.
SIP Account Choice
SIP Account Choice can be selected on this screen. Click Commit Changes to configure the
accounts. The following items are listed:
Option Description
SIP Account Name Enter the corresponden t name.
Phone Number Enter the correspondent numbers.
Page 32

Authentication ID Enter th e correspondent identification.
Authentication Password Enter the cor respondent password.
SIP Domain Enter the SIP domain address..
Local Port Enter the local port number.
Proxy Address Enter the proxy address.
Outbound Address The outbound p roxy address.
Register T im er(sec) Refers to Registration refreshing interval.
Codec Compressed audio format. You can set either Auto,G.711u or
G.711a.
Pkt Time(ms) The Audio transmitting interval. You can set either Default,
20,30,40,50,60,70 or 80
OutofBand DTMF The working of out-of-band dual-tone multifrequency. You can
either set Off or On.
SIP Settings
Six SIP account s can be set for your VoIP phone. The SIP Account List option displays first.
When you Configure, the SIP Setting screen displays. You can add, change or edit the SIP
Account Name, Phone Number, Authentication ID, Authentication Password, SIP Domain,
Proxy Address, Outbound Address, Local Port and Register Timer(sec). You can also select
Codec options, Pkt Time(ms) (in milliseconds)and OutBand DTMF (On/Off).
Page 33

Phone Settings
Adjust the phone’s Clock, Call, Sound and Displa y Settings. Also set the Phone Protection.
Page 34

Clock
Option Description
Time Zone Set your local time zone.
Daylight Savings Check to enable or uncheck to disable automatic Daylight Savings
time adjustment.
Network Time Set On or Off the phone from updating the time from an NTP
server.
Call Settings
Option Description
Call Waiting Check to activate Call Waiting, uncheck to deactivate.
Forward Number Enter a phone number or IP address to forward your calls to.
Forward All Check to send all incoming calls to the Forward Number.
No Answer Check to send calls to Forward Number when there is no answer
on the VoIP phone.
Busy Check to forward calls when your phone is busy.
Block Caller ID Select On to block caller id’s that you previously set up in the VoIP
phone menu.
Refuse Private Select On to refuse calls that display Private Call as the user ID.
Beep Notification Activate or deactivate the beep notification feature.
Regional Tone Set the regional tone setting to North America or Jap an.
Hold Transfer Select SIP or DTMF Flash as the way used to transfer calls.
Page 35

Sound Settings
Option Description
Speaker Volume Set the VoIP phone’s speaker volume.
Ring Volume Set the VoIP phone’s ring volume.
Start Tone Check to activate the VoIP phone’s power on tone.
Alarm Melody Set the VoIP phone’s alarm melody.
Warning Tone Check to activate the VoIP phone’s warning tone, such as low
battery.
Ring Mode Set the VoIP phone’s ring mode to Silent, Ring, Vibrate, or Ring +
Vibrate.
Shutdown Tone Check to activate the VoIP phone’s power off tone.
Melody Select one of the preset ring tone melodies.
Display Settings
Option Description
LCD Off Time Change th e amount of time it takes for the VoIP phone to turn off its
LCD when the phone is not in use.
Wallpaper Change the picture displayed in standby.
Phone Protection
Check the Protect Phone Admin Access box to deactivate the phone from being used by other
SIP providers.
Page 36

E-mail Settings
Your VoIP phone built-in e-mail client enables you to send and receive messages using your
POP3 account.
This screen enables you to adjust your e-mail account list. Five different e-mail account s can be
created. From the list, click Configure to set up a new account. You can also remove or activate
an existing e-mail account.
Option Details
Account Setting
POP3 Setting
(To find out these settings
check the specific e-mail
program’s instructions)
SMTP Setting
(The outgoing server)
Additional Settings
Account Name
Your Name
Mail Address
POP3 Address
POP3 User ID
POP3 Password
POP3 Port (default: 110)
SMTP Address
SMTP User ID
SMTP Password
SMTP Port (default: 25)
Reply Address
Reserve Mail
(to keep a copy of t he ma i l o n the remove POP3 server)
Signature
Page 37

Click Save to add this entry to your e-mail account list. Click Reset to cancel the settings. Click
E-mail tab to return to the main E-mail screen.
Upload
This screen enables you to Upload and Preview (either Play or Show) the Melody and
Wallpaper.
Click Delete (one by one) or Delete All to remove the melody and the wallpaper.
Upgrade
Software information
Option Description
Active View the Active software application.
Inactive View the Inactive software application.
New Image Select a New software Image by typing the address, or click
Browse and locate the image.
Debug Statistics
This screen enabl es yo u to v iew Wirel ess Ne twork Status, WL Information, RTP Stats, PVE
Stats and PVE State.
Reboot Phone
After upgrading software it is necessary to re-power on the phone to activate all new settings.
Page 38

Password
This screen enables you to change the password information of your VoIP phone. Enter the new
Username and/or Password for the VoIP phone. Click Submit to immediately change the
password, or click Reset to cancel the setting.
Page 39

Page 40

Chapter 6 Troubleshooting
1. What is Wi Fi?
Wi-Fi® is a registered certification mark of the Wi-Fi Alliance. Wi Fi stands for Wireless Fidelity. It
is a way to get Internet access and is used to define any of the wireless technology in the
IEEE802.11 specification, such as 802.11a, 802.11b and 802.11g. The Wi-Fi Alliance is the body
responsible for promoting the term and its association with various wireless technology
standards.
2. What do I need to access Wi Fi?
You need a Wi Fi device (a computer, PDA or this mobile phone) that has Wi Fi connectivity
already working. You need to oper ate this device in any location which 802.11 wireless service is
available, such as a Wi Fi hotspot. You may need to contact the wireless service provider for
details of the Wi Fi settings, such as the network name, IP address or security codes.
3. How do I find a Wi Fi hotspot?
Check the website at http://www.wi-fihotspotlist.com/ to find hotspots in more than 50 countries.
4. What if unable to register with the SIP server?
Make sure the Internet and the SIP proxy server are reachable.
Make sure the SIP acc o unt and the password are correct.
Page 41

5. Which Codec Should I Choose?
As which codec ch oice is depending on what codec is supported on both end of the VoI P h ost.
Generally a codec with low bandwidth consumption and high voice quality is a good codec
.
6. How do I know that the call quality is good?
Technology advances in IP telephony transportation have made Internet calling as good as or
better than normal PSTN connections. This is mostly effective for high speed Broadband
connections, whereas dial up services h ave some way to go before delivering the quality of
PSTN calling.
Page 42

Federal Communication Commission Interference Statement
This equipment has been tested and found to comply with the limits for a Class B digital device,
pursuant to Part 15 of the FCC Rules. These limits are designed to provide reasonable
protection against harmful interference in a residential installation. This equipment generates,
uses and can radiate radio frequency energy and, if not installed and used in accordance with
the instructions, may cause harmful interference to radio communications. However, there is no
guarantee that interference will not occur in a p ar ticu lar installation. If this equipment does cause
harmful interference to radio or television reception, which can be determined by turning the
equipment off and on, the user is encouraged to try to correct the interference by one of the
following measures:
●
Reorient or relocate the receiving antenna.
●
Increase the separation between the equipment and receiver.
●
Connect the equipment into an outlet on a circuit different from that to which the receiver is
connected.
●
Consult the dealer or an experienced radio/TV technician for help.
FCC Caution: Any changes or modifications not expressly approved by the party responsible for
compliance could void the user's authority to operate this equipment.
This device complies with Part 15 of the FCC Rules. Operation is subject to the following two
conditions: (1) This device may not cause harmful interference, and (2) this device must accept
any interference received, including interference that may cause undesired operation.
Page 43

This device and its antenna(s) must not be co-located or operating in conjunction with any other
antenna or transmitter.
IMPORTANT NOTE:
Federal Communication Commission (FCC) Radiation Exposure Statement
This EUT is compliance with SAR for general population/uncontrolled exposure limits in
ANSI/IEEE C95.1-1999 and had been tested in accordance with the measurement methods and
procedures specified in OET Bulletin 65 Supplement C.
For product available in the USA/Canada market , only channel 1~11 c an be operated. Select ion
of other channels is not possible.
 Loading...