

Page 1

User Guide
Verizon 5G
Home Router
Page 2

Safety Warnings
Adapter
Do not use any other power adapter except the one that accompanies this unit or a
power adapter identified in the list below.
Use of another adapter could result in damage to the unit.
The following power adapter is qualified for use with this Verizon 5G Home Router.
This unit must be powered by FSP, model FSP-120-AWAN3-W or equivalent UL
listed power source rated @ output 54Vdc, Minimum 2.0A.
Battery
Do not use any other battery. Risk of explosion if battery is replaced by an incorrect
type. To prevent electrical shock, please do not open the cover.
The following battery is qualified for use with this Verizon 5G Home Router.
WNC, model BTY-LRV5000 (3.6Vdc, 2280mAh, 8.208Wh)
i
Page 3

Table of Contents
CHAPTER 1 INTRODUCTION ............................................................................................................... 1
1.1 PACKAGE CONTENTS ..................................................................................................................... 1
1.2 SYSTEM REQUIREMENTS ................................................................................................................ 1
1.3 FEATURES ................................................................................................................................... 1
1.4 GETTING TO KNOW THE ROUTER ..................................................................................................... 2
CHAPTER 2 CONNECTING THE ROUTER .............................................................................................. 4
2.1 SETTING UP THE ROUTER ............................................................................................................... 4
2.2 CONFIGURING THE ROUTER ............................................................................................................ 4
2.3 CONNECTING OTHER DEVICES ........................................................................................................ 5
2.4 HOME PAGE/MAIN SECTION .......................................................................................................... 6
CHAPTER 3 SETTING UP A WIRELESS NETWORK ................................................................................. 9
3.1 WIRELESS STATUS......................................................................................................................... 9
3.2 5 GHZ WI-FI ............................................................................................................................ 10
3.3 2.4 GHZ WI-FI ......................................................................................................................... 12
3.4 GUEST WI-FI ............................................................................................................................ 14
CHAPTER 4 CONNECTED DEVICES ..................................................................................................... 16
4.1 DEVICES CONNECTED TO YOUR ROUTER........................................................................................... 16
4.2 RESTRICTIONS ........................................................................................................................... 17
CHAPTER 5 CONFIGURING SYSTEM SETTINGS .................................................................................. 18
5.1 GENERAL INFORMATION .............................................................................................................. 18
5.2 HISTORY LOG ............................................................................................................................ 20
5.3 PHONE SETTINGS ....................................................................................................................... 21
5.4 BACKUP & RESTORE ................................................................................................................... 22
5.5 LAN SETTINGS .......................................................................................................................... 23
5.6 APN SETTINGS .......................................................................................................................... 25
5.7 PORT FORWARDING .................................................................................................................... 26
CHAPTER 6 USING PARENTAL CONTROLS ......................................................................................... 28
CHAPTER 7 HELP .............................................................................................................................. 30
CHAPTER 8 TROUBLESHOOTING ....................................................................................................... 31
APPENDIX: SPECIFICATIONS .......................................................................................................... 33
ii
Page 4

Chapter 1
Introduction
This chapter includes a list of items included with the Router, the minimum system
requirements for using the Verizon 5G Home Router, and an overview of the Router’s
features.
1.1 Package Contents
The product package should contain the following items:
Verizon 5G Home Router
AC adapter
Power cord
Ethernet cable
Rechargeable battery
1.2 System Requirements
The Verizon 5G Home Router requires the following systems and software:
Computers with Ethernet capability
TCP/IP network protocol installed on each computer
1.3 Features
Twenty four hours standby time for the battery
Remote Device Management/FOTA/OMADM
Administration website
REST API
WAN port with PSE 60W support on CPE
1
Page 5
1.4 Getting to Know the Router
This section contains a short description of LED indicators on the Router’s front
panel, and the ports and buttons on its rear panel.
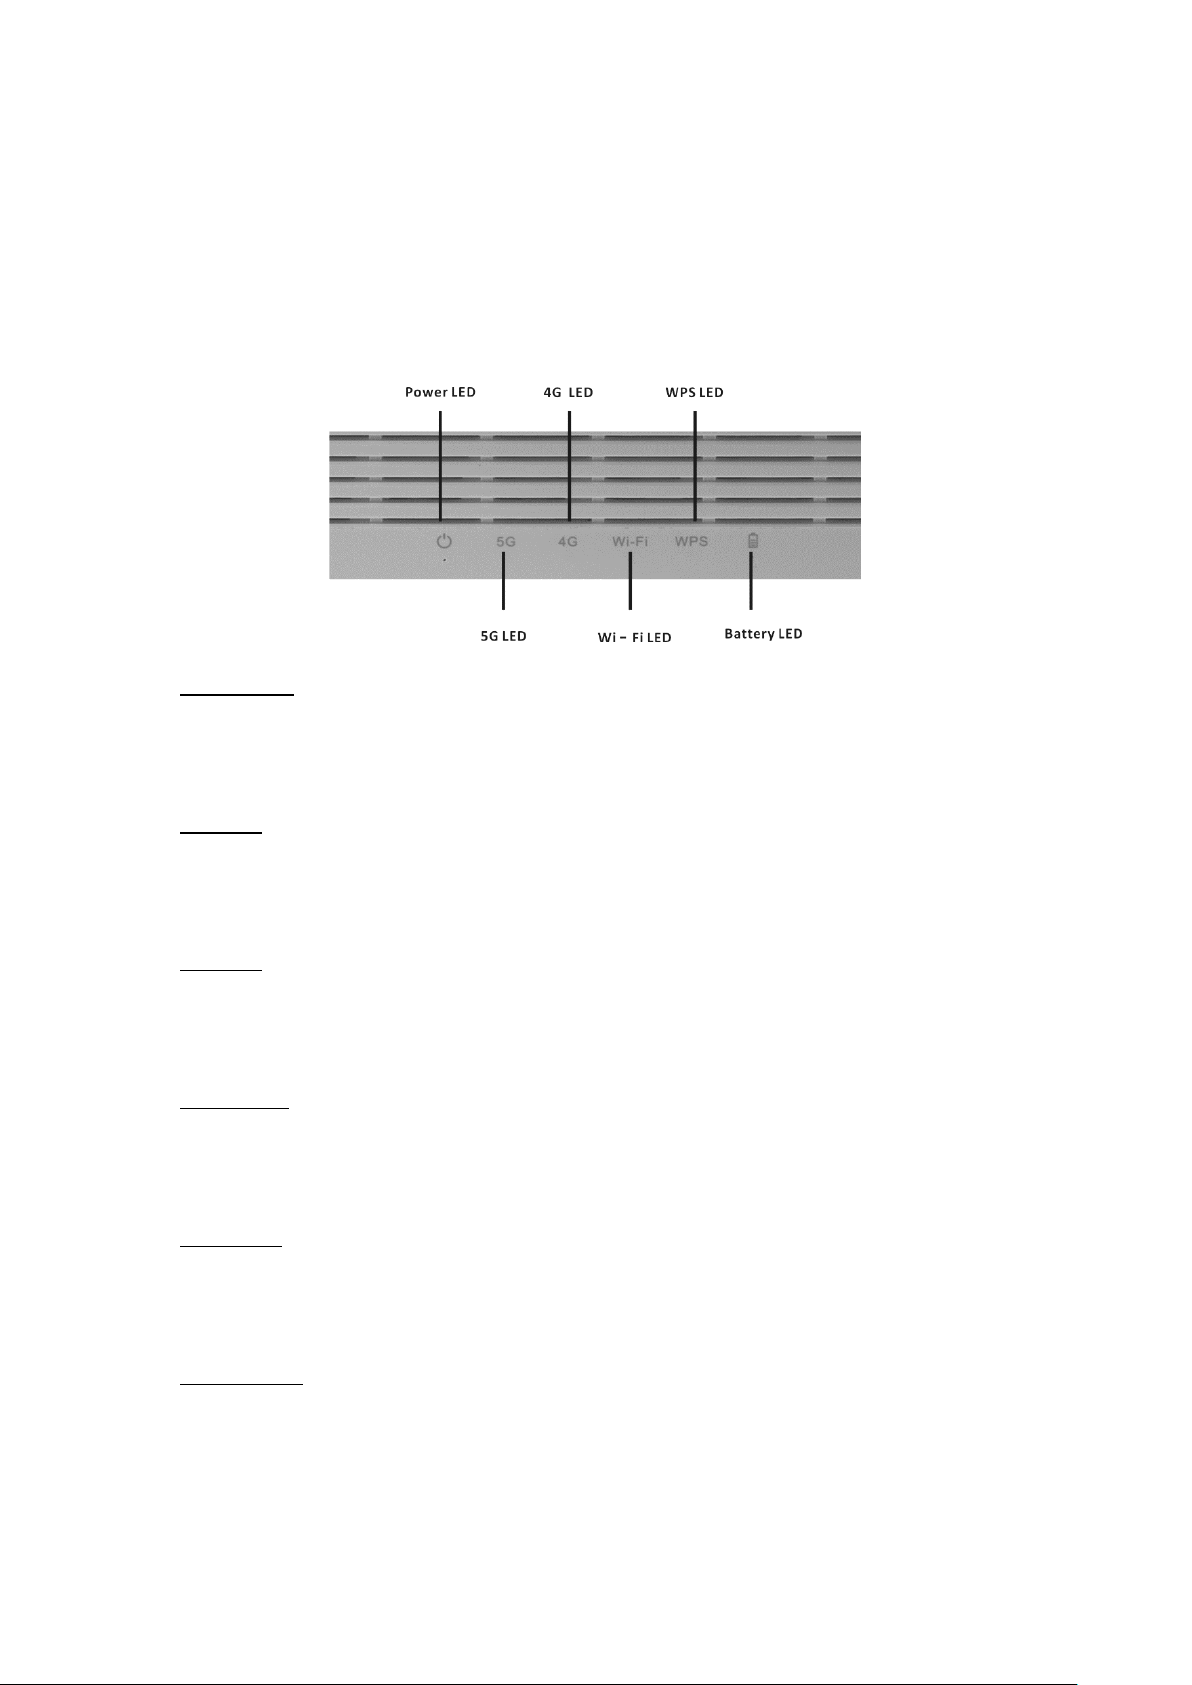
Front Panel/LED lights
The front panel of the Router features six LEDs.
Power LED
The Power LED indicates the Router’s status. If the Power LED glows green, the
Router is on. If the Power LED is amber, there is a malfunction, hardware failure, or a
boot error.
5G LED
If the 5G LED glows green, the Router can communciate to servers via 5G. If the 5G
Connectivity LED is amber, there is no 5G connectivity and the Router will switch to
4G fallback mode if 4G is available.
4G LED
When the 4G LED glows green, the Router can communicate to servers via 4G. When
the LED is amber, there is no 4G signal. When it blinks amber, a SIM card is missing
or invalid.
Wi-Fi LED
The Wi-Fi LED glows green when the Router is transmitting a Wi-Fi signal. The LED
glows amber to indicate Wi-Fi radio error. When the LED is off, the Router is not
transmitting a Wi-Fi signal.
WPS LED
The WPS LED blinks green to indicate that the WPS button has been pressed and
pairing is active. When pairing is successful, the LED will glow green. When the LED
glows amber, there is a pairing error. The LED is off when WPS is not in use.
Battery LED
When the Battery LED glows green, the Router is plugged in and charging on AC
power. The LED glows amber when the Router is on battery power, and battery life is
between 25% and 100%. The LED blinks amber when battery life is below 25%. The
LED turns off when the battery is depleted or removed.
2
Page 6
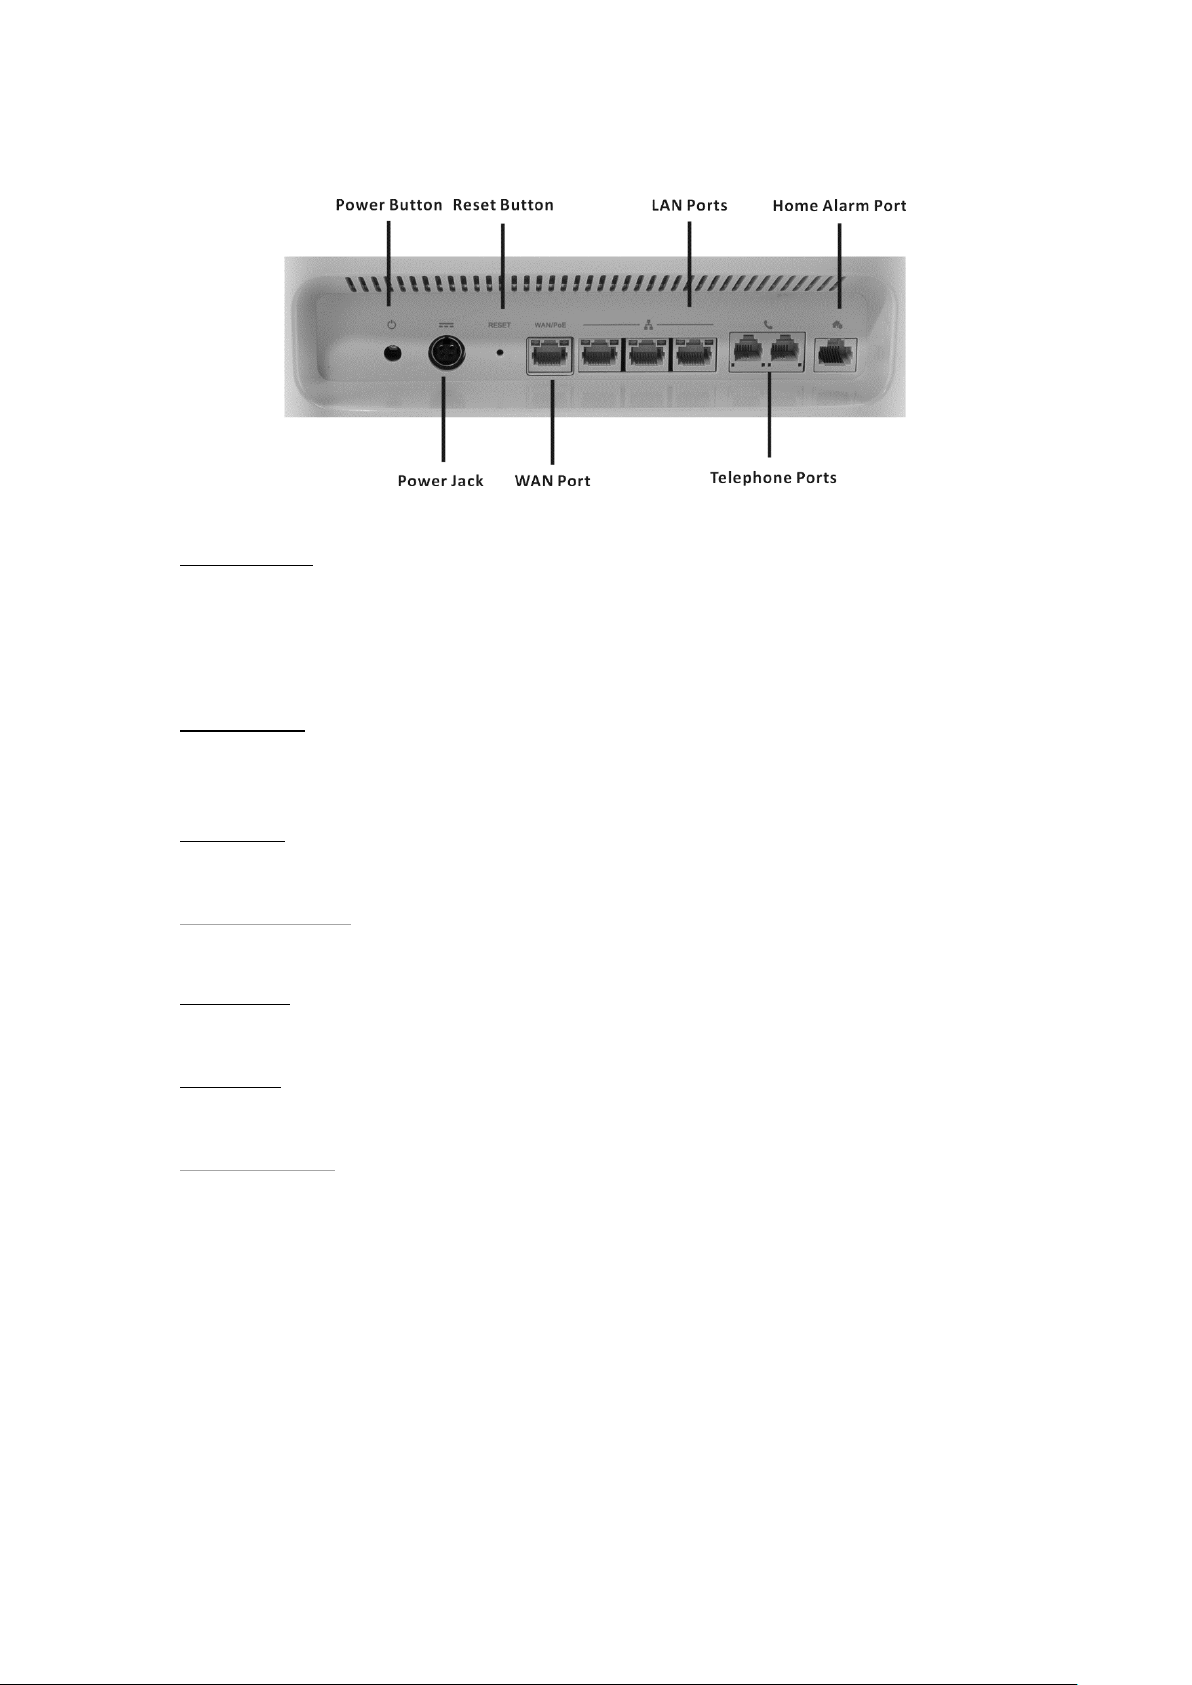
Rear Panel
Power Button
Press this button to turn the Router on or off.
Note: If you turn off the Router by pressing the power button, be sure to wait for
approximately five seconds before turning on the device again. Failing to do so could
disrupt the power supply to the 5G CPE.
Reset Button
To reset the Router, press and hold this button for approximately 1–10 seconds. To
perform a factory reset, press and hold this button for over 10 seconds.
LAN Ports
The three LAN Ports enable you to connect devices to the Router via Ethernet cables.
Home Alarm Port
This feature will be available soon.
Power Jack
The Power Jack connects the Router to an electrical outlet via the power cord.
WAN Port
The WAN Port connects the Router to an ICL 5G Modem using an Ethernet cable.
Telephone Ports
This feature will be available soon.
3
Page 7
Chapter 2
Connecting the Router
This section describes Router set up and configuration.
2.1 Setting up the Router
1 Unbox the Router, AC adaptor, and power cord.
2 Connect the AC adapter to the power cord.
3 Plug the power cord into an electrical outlet, then connect the adapter to the
power jack on the back of the Router.
4 Press the power button to turn on the Router.
5 During initialization, the Power LED on the front of the Router will glow amber
for approximately 35 seconds before it turns green. Wait for one minute until the
initialization finishes before proceeding to Step 6.
6 Plug an Ethernet cable into one of the LAN ports on the back of the Router.
7 Power up a computer, then plug the other end of the Ethernet cable into an
Ethernet port on the computer.
2.2 Configuring the Router
1 Open a web browser on the computer that is connected to the Router. In the
address text box, type 192.168.0.1 or http://my.router in the address bar, then
press Enter on the computer’s keyboard.
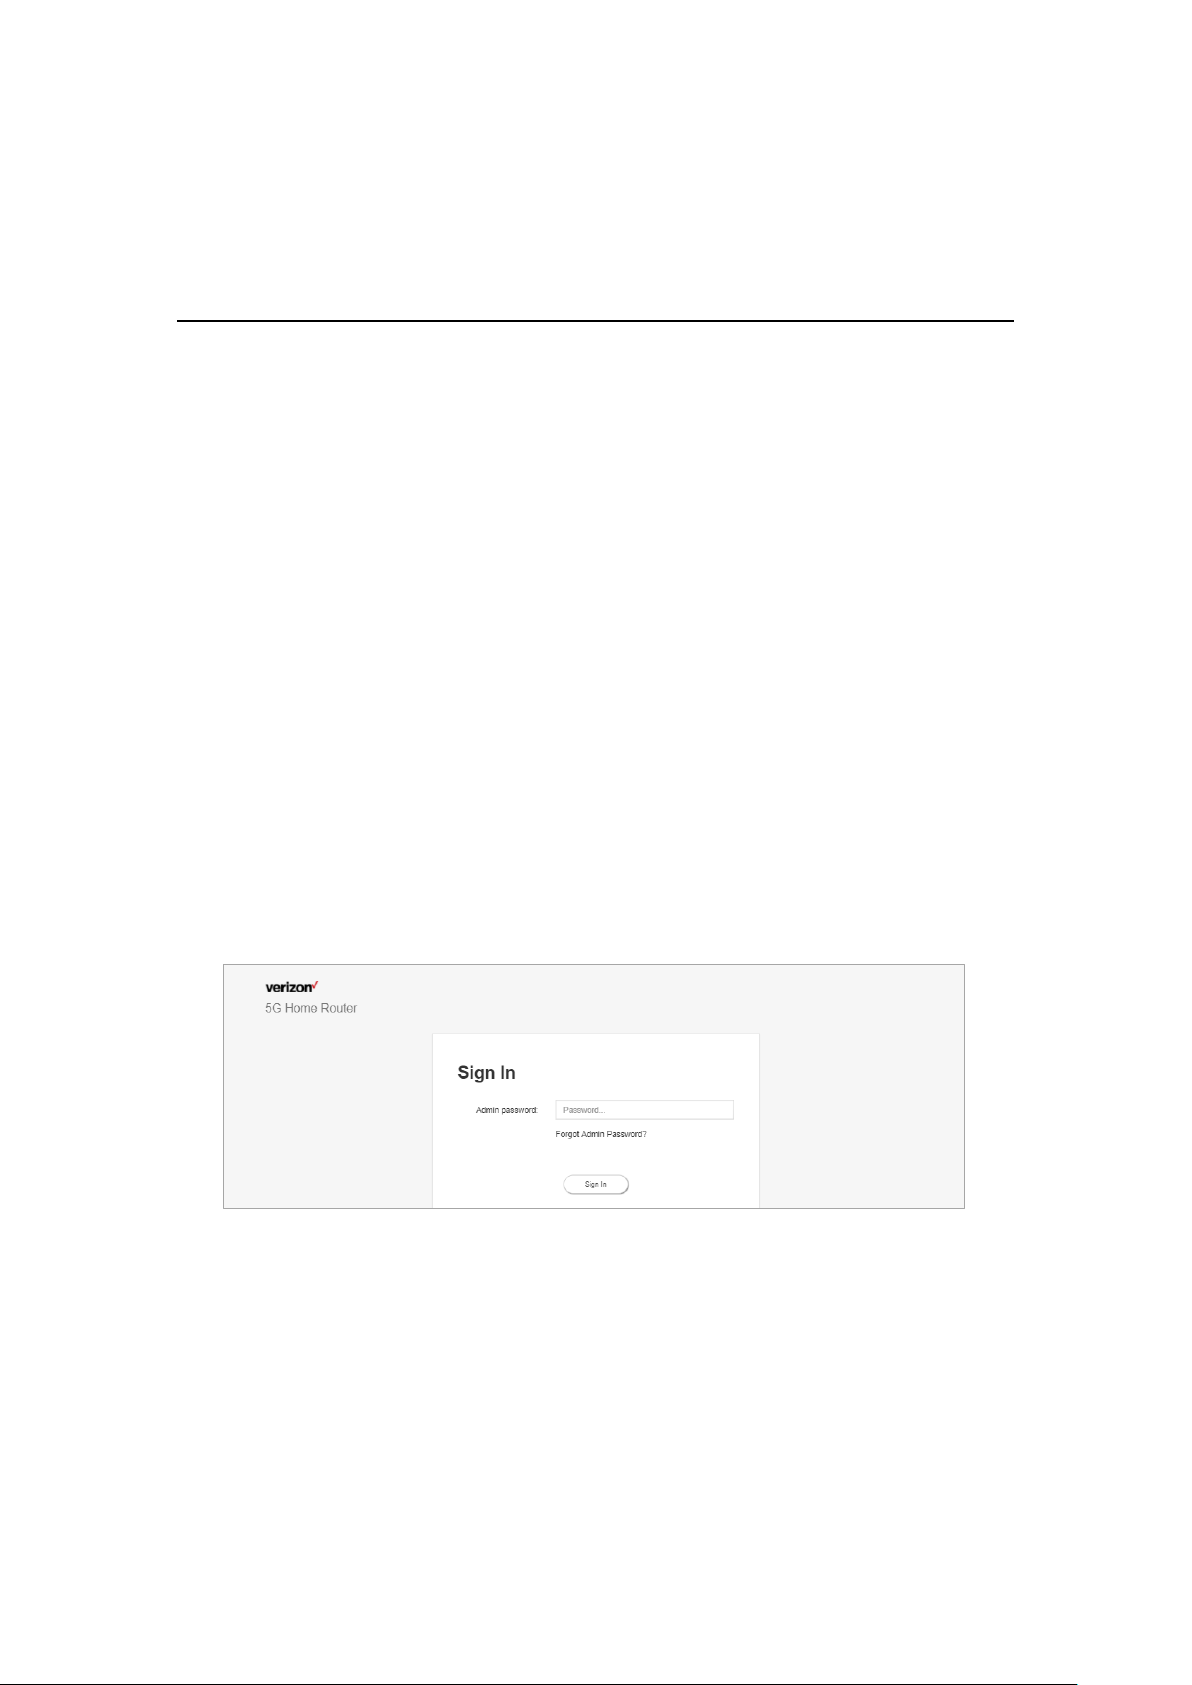
2 The following Login screen will appear.
1
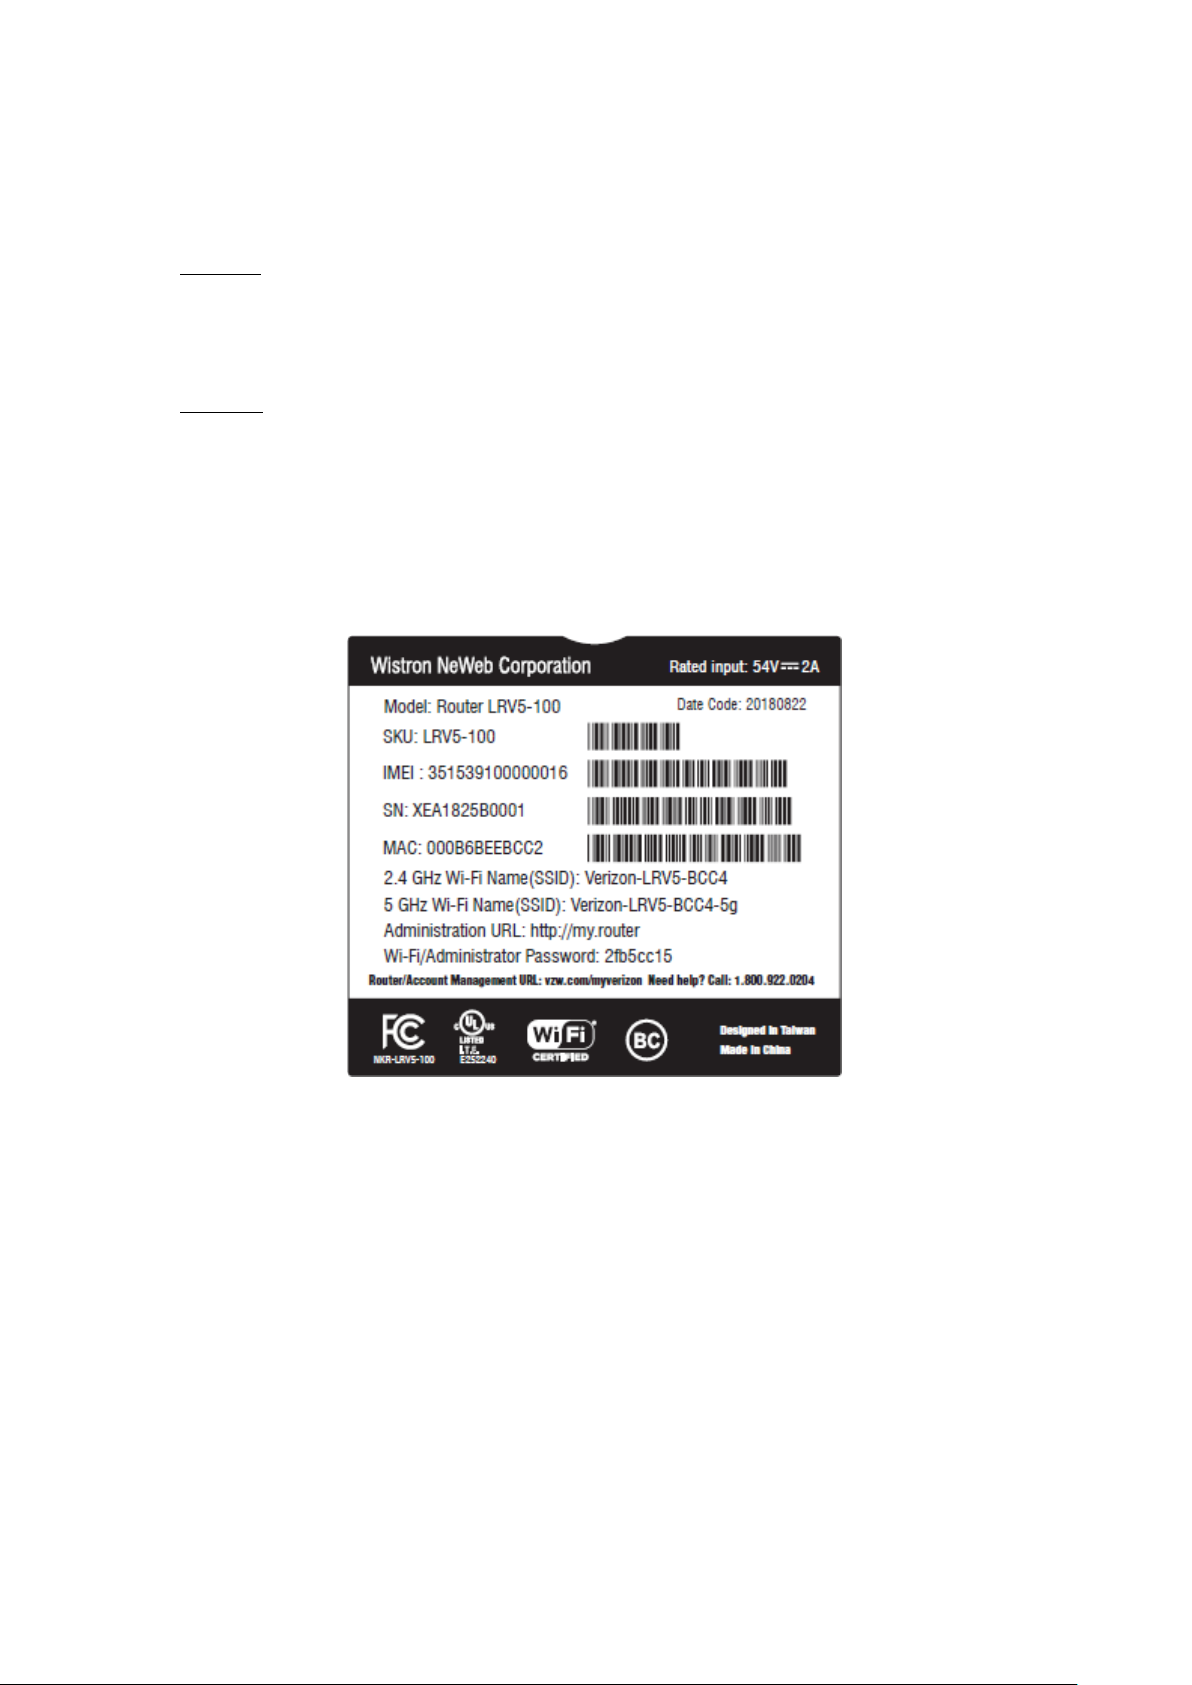
3. Type in the admin password written on the label of the Router. Then click Sign In.
The Router is now configured.
Note: We recommend that you change the password for greater system security.
Please access the administration website and click Admin Settings on the dropdown menu on the top right of the administration website’s Home page.
4
Page 8
2.3 Connecting Other Devices
The Router can connect to other devices via Ethernet and via wireless connection.
Ethernet
1. Take an Ethernet cable and plug one end into one of the Ethernet ports on the back
of the Router.
2. Plug the other end of the Ethernet cable into an Ethernet port on the device.
3. Repeat these steps to connect other devices to the Router via Ethernet.
Wireless
1. Ensure that the devices to be connected wirelessly to the Router have Wi-Fi
capability.
2. Make sure the devices use the same SSID and password as the Router by
launching the devices’ wireless application.
3. Make sure the Wi-Fi LED on the front of the Router glows green.
4. Enter the SSID and password displayed on the label on the bottom of the Router
in the devices’ wireless settings and click Save.
5. Make sure the changes are successfully applied by surfing the Internet using the
connected devices.
5
Page 9
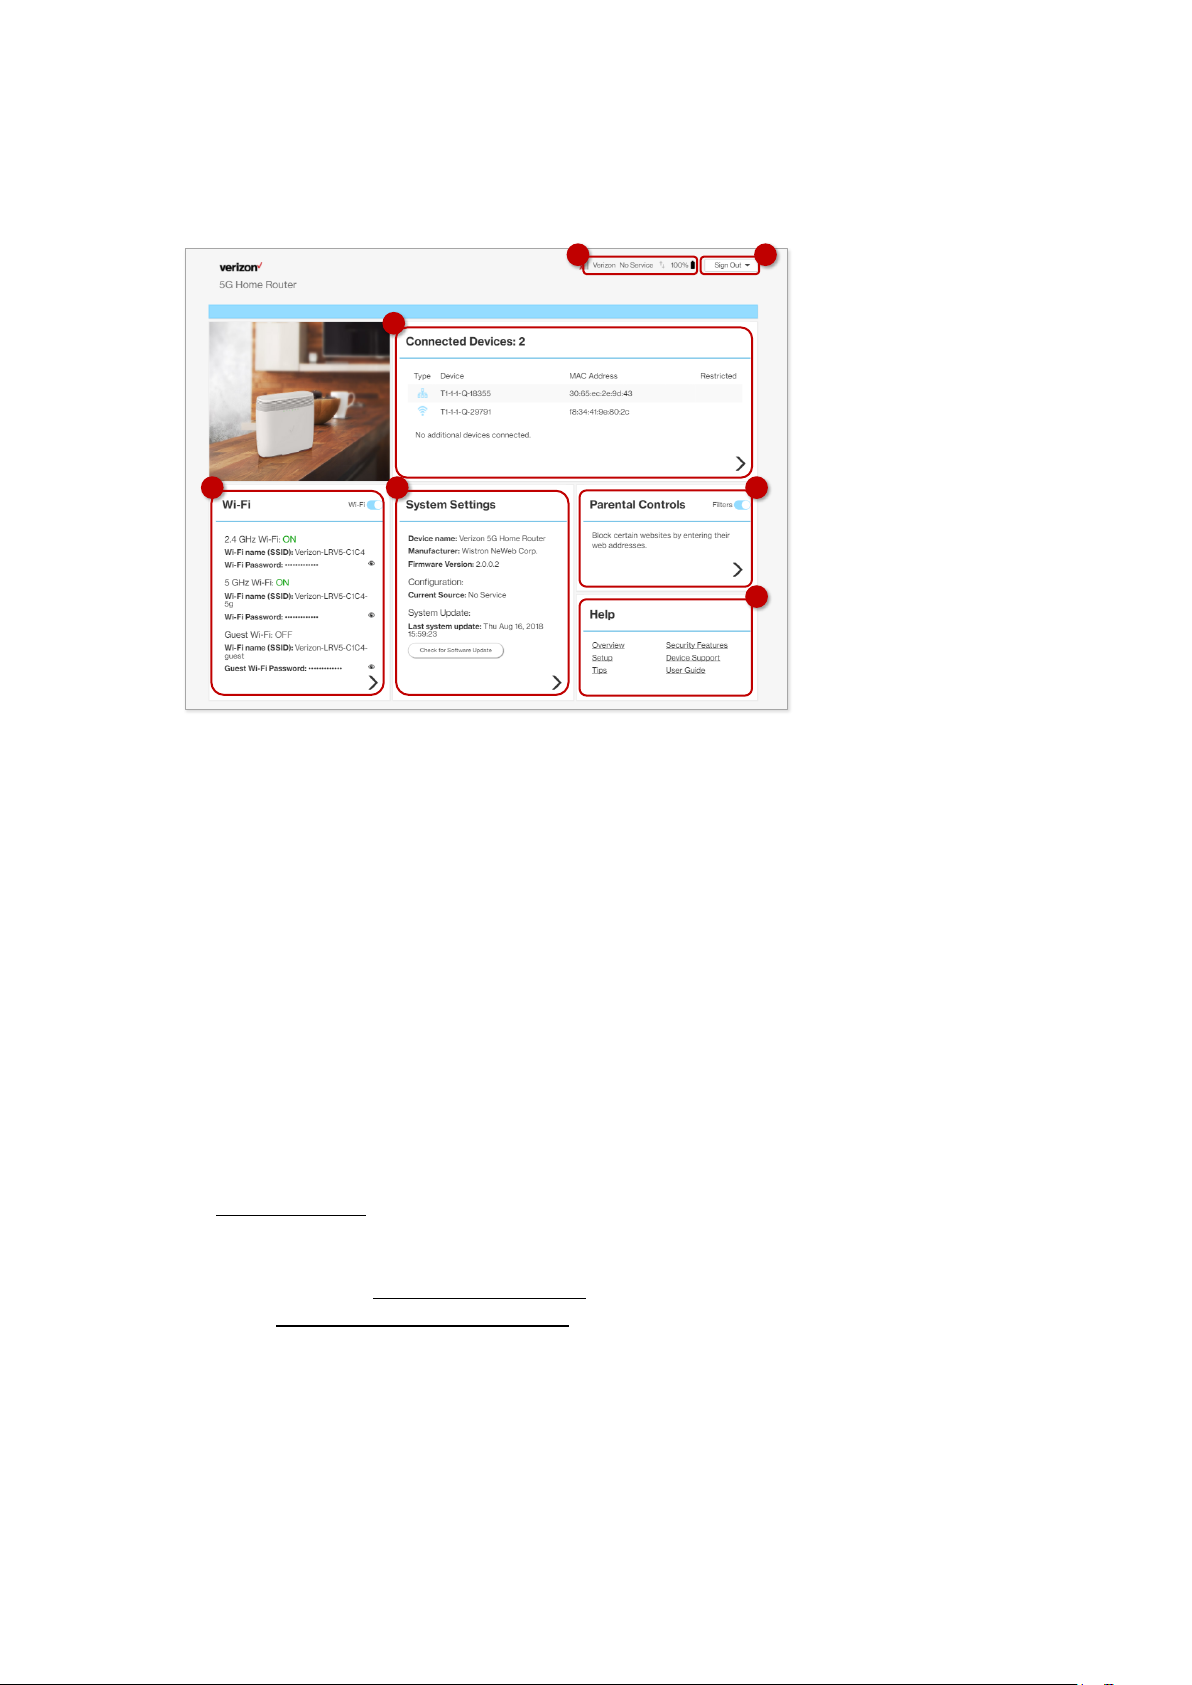
2.4 Home Page/Main Section
1
2
3 4 5
6
7
After logging in, the Router Home screen appears.
In the upper right panel of the screen, Connected Devices presents a list of devices
that are currently connected to the Router. Below that, the screen is divided into three
columns: Wi-Fi on the left, System Settings in the middle, and Parental controls
and Help on the right.
1. General information icons
This section displays four icons to indicate (from left to right) 4G signal strength,
carrier information, data transfer direction, and battery life.
2. Drop-down menu
The drop-down menu includes selections such as Admin Settings, My Verizon,
Restart 5G Home Router, and Sign Out.
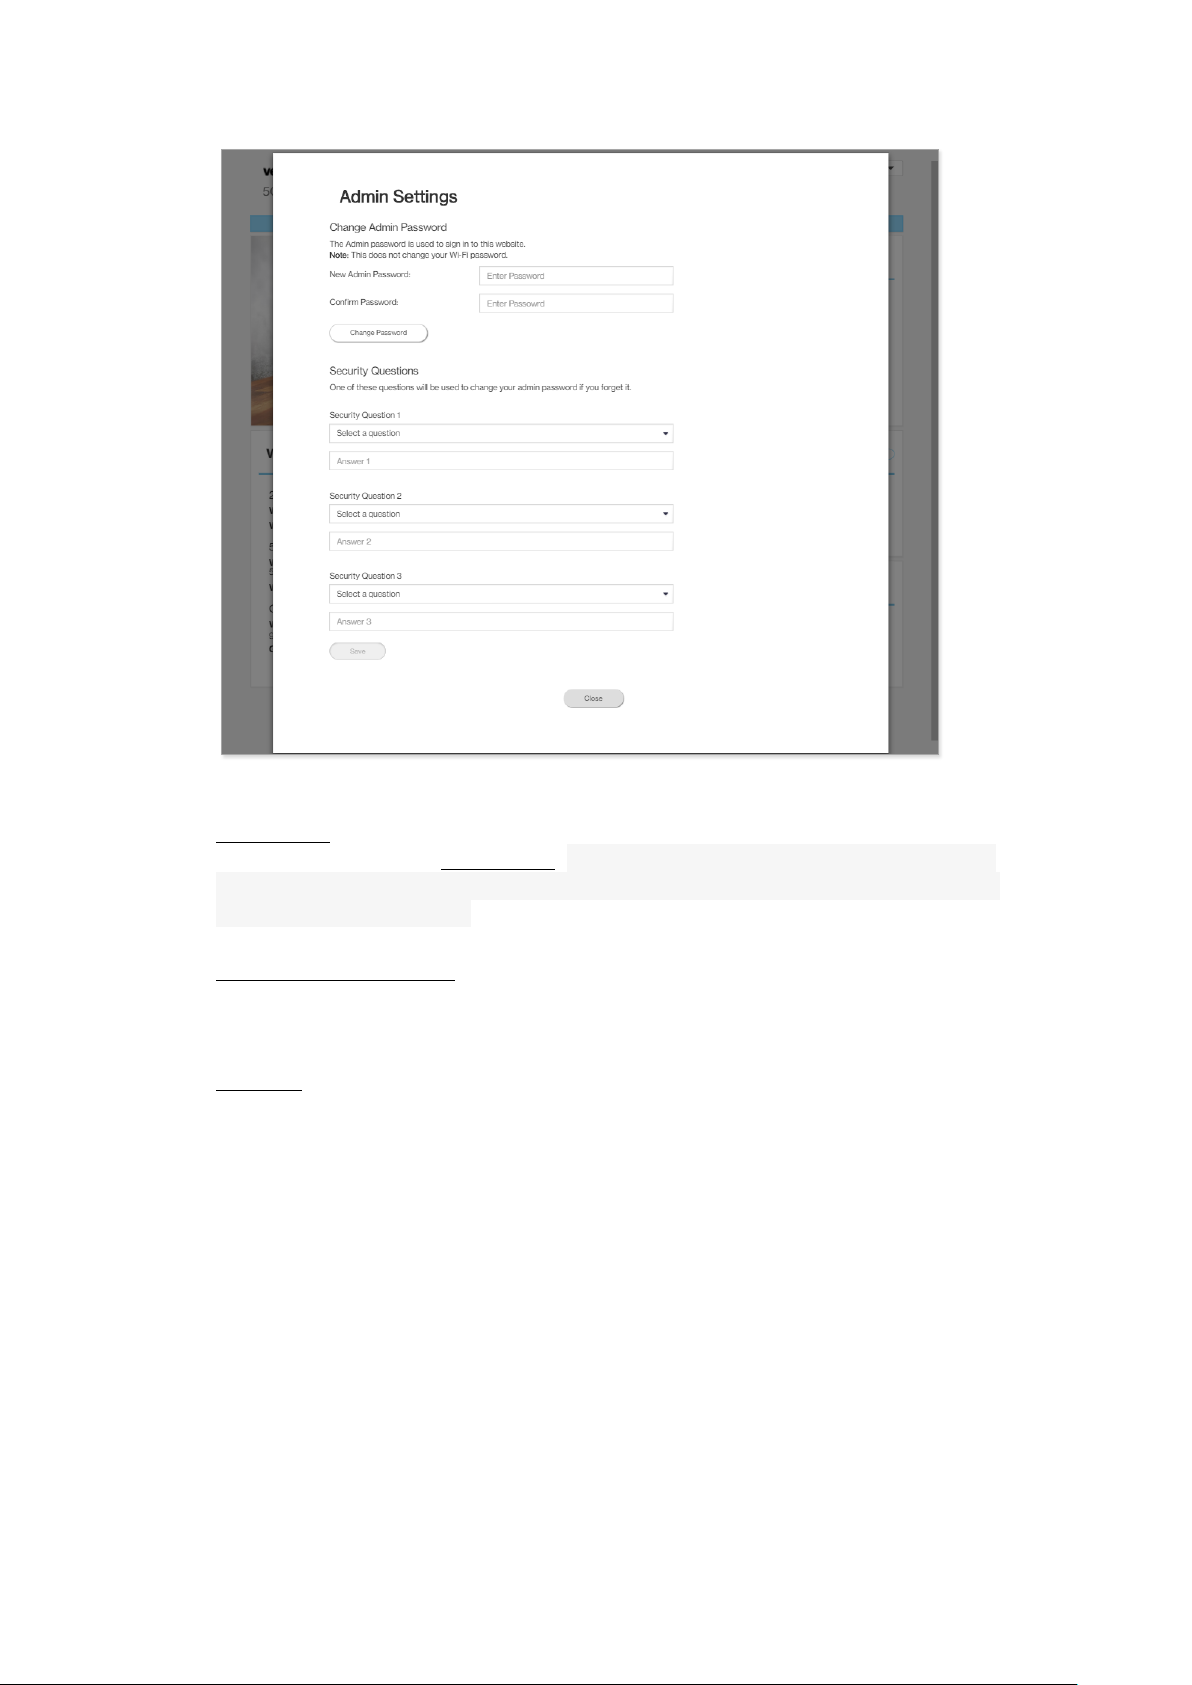
Admin Settings
The Change Admin Password section enables you to change the Admin password
that is used to sign in to the Router’s administration website. Type the admin
password in the New Admin password field, then type the admin password again
in the Admin password confirmation field. Click Change Password to apply the
settings.
In the Security Questions section, you can choose three security questions then
enter the answer for each question. If a user forgets his/her admin password, one
of the questions will be used to change the admin password. Click Save to save
your changes. Click Close to close the Admin Settings window.
6
Page 10
My Verizon
You will be directed to My Verizon, where you can manage your account online.
With My Verizon, you can also pay your bill, check your usage, swap SIM cards,
and view your order status.
Restart 5G Home Router
To restart the Router, click the drop-down arrow and select Restart 5G Home
Router. A window will appear on the screen. Click Restart to restart the Router.
Sign Out
Click Sign Out to sign out from the Router.
3. Connected Devices
This section displays information of connected devices, including the connection
type, device name, MAC address, and whether the device is restricted from
connecting to the Router.
4. Wi-Fi
This section displays the current network status, the Wi-Fi name (SSID), and the
Wi-Fi password of different network connections, including 2.4 GHz Wi-Fi, 5
GHz Wi-Fi, and the Guest Wi-Fi.
5. System Settings
This section displays the name, manufacturer, and the firmware version of the
device. You can also check here for software updates.
7
Page 11

6. Parental Controls
Parental Controls enable you to block certain websites by entering their web
addresses.
7. Help
Click on the link provided here to access the Verizon Wireless website, where you
can find the support and the resources you need.
8
Page 12
Chapter 3
Setting up a Wireless Network
Click the arrow “>” on the bottom right side of the Wi-Fi column to enable or disable
the 5 GHz Wi-Fi, 2.4 GHz Wi-Fi, or Guest Network.
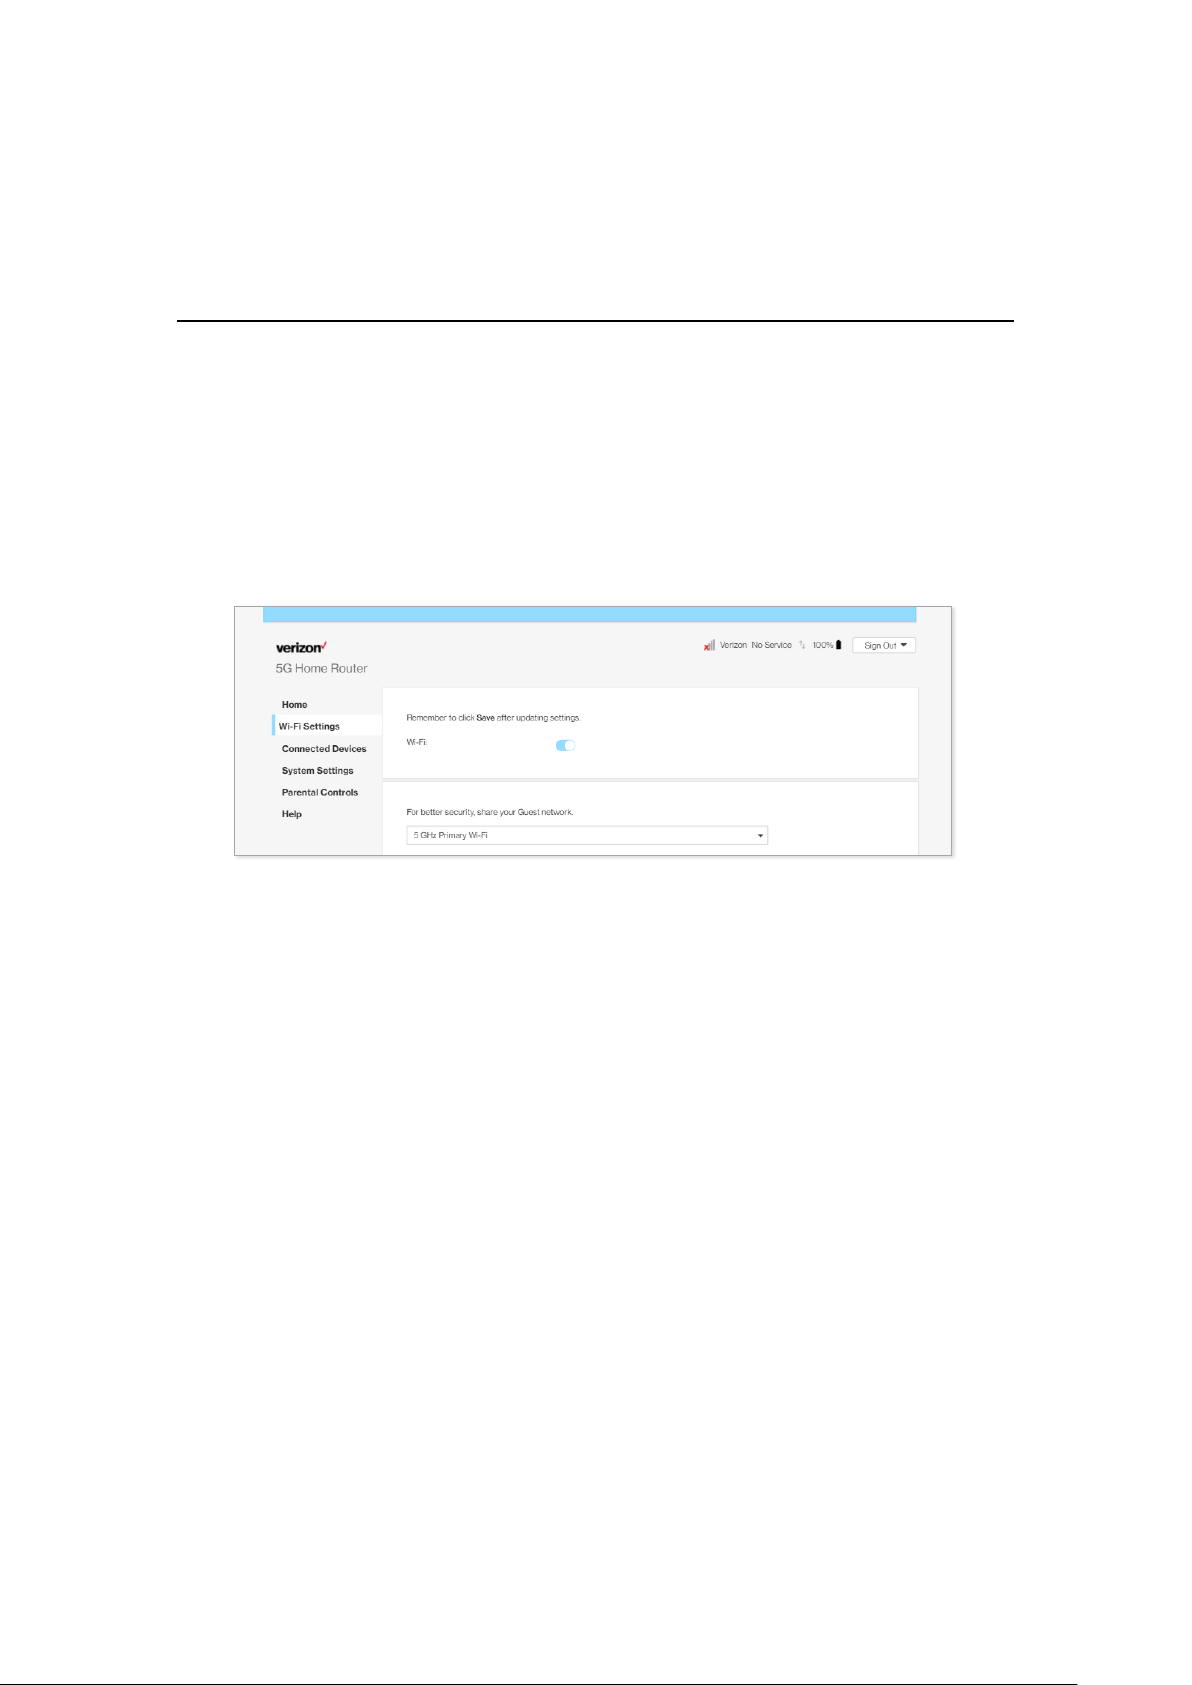
3.1 Wireless Status
There are two ways to change Wi-Fi status. The first is to slide the Wi-Fi switch in
the Wi-Fi column to the right. The switch will turn blue when Wi-Fi is on. The second
is to click the arrow “>” on the bottom right side of the Wi-Fi column. The Wi-Fi
page will appear. Slide the Wi-Fi switch to the right. You will know that Wi-Fi is
turned on when the switch turns blue. To turn off Wi-Fi, slide the switch to the left.
Grey indicates that Wi-Fi is now disabled.
The drop-down menu in the middle of the screen enables you to select the 5 GHz WiFi or 2.4 GHz Wi-Fi to view and change related settings.
9
Page 13

3.2 5 GHz Wi-Fi
Slide the Enable 5 GHz Wi-Fi switch to the right. The switch turns blue to indicate
that the selected Wi-Fi is turned on. To turn off the Wi-Fi, slide the switch to the left.
If 5 GHz Wi-Fi is not turned on, the Guest Wi-Fi on 5 GHz will not work.
Wi-Fi name (SSID)
The Wi-Fi name (SSID) is the name of the wireless network broadcasting from this
system. In order for devices to connect to the local network over a wireless link, they
must select this network name from the list of detected wireless networks in the area.
Password
Specify a password for your wireless network. Click the icon to display the
selected password for the SSID.
New Password
Enter a new password here for the SSID.
Confirm Password
Type the new password here.
Note: Passwords must be 8–28 characters long and are case sensitive. (If the
encryption type is WEP-64, the password must be exactly 10 hex digits ([0–9], [a–f],
or [A–F]). Changing your Wi-Fi password may cause your devices to lose their
connection to your Wi-Fi. Leave empty if you don’t want to make a change.
Broadcast Wi-Fi Name (SSID)
Check the box if you want to broadcast the SSID. The SSID will be displayed when
you search for available networks.
Wi-Fi network encryption
10
Page 14

Select one security method from the drop-down menu.
Max Wi-Fi devices 5 GHz
The maximum number of Wi-Fi clients allowed on the Router using 5 GHz Wi-Fi.
The highest value for this field is 128.
Channel
This specifies the frequency the radio uses to transmit wireless frames. Select a
channel from the list of channels or choose Auto to allow the system to determine the
best channel to use.
Bandwidth
Specify the bandwidth for each channel. Select Auto to allow the system to determine
the optimal bandwidth.
5 GHz Primary Wi-Fi Protected Setup (WPS)
WPS allows rapid wireless connection between the Router and other WPS-compatible
devices. Click on the WPS button to turn on the WPS function.
11
Page 15

3.3 2.4 GHz Wi-Fi
Slide the switch to the right. The switch turns blue to indicate that the selected Wi-Fi
is turned on. To turn off the Wi-Fi, slide the switch to the left. If the 2.4 GHz Wi-Fi is
not turned on, the Guest Wi-Fi on 2.4 GHz will not work.
Wi-Fi name (SSID)
The Wi-Fi name (SSID) is the name of the wireless network broadcasting from this
system. In order for devices to connect to the local network over a wireless link, they
must select this network name from the list of detected wireless networks in the area.
Password
Specify a password for your wireless network. Click the icon to display the
selected password for the SSID.
New Password
Enter a new password here for the SSID.
Confirm Password
Type the new password here.
Note: Passwords must be 8–28 characters long and are case sensitive. (If the
encryption type is WEP-64, the password must be exactly 10 hex digits ([0–9], [a–f],
or [A–F]). Changing your Wi-Fi password may cause your devices to lose their
connection to your Wi-Fi. Leave empty if you don’t want to make a change.
Broadcast Wi-Fi Name (SSID)
Check the box if you want to broadcast the SSID. The SSID will be displayed when
you search for available networks.
Wi-Fi network encryption
Select one security method from the drop-down menu.
12
Page 16

Max Wi-Fi devices 2.4 GHz
The maximum number of Wi-Fi clients allowed on the Router using 2.4 GHz Wi-Fi.
The highest value for this field is 128.
Channel
This specifies the frequency the radio uses to transmit wireless frames. Select a
channel from the list of channels or choose Auto to allow the system to determine the
best channel to use.
Bandwidth
Specify the bandwidth for each channel. Select Auto to allow the system to determine
the optimal bandwidth.
2.4 GHz Primary Wi-Fi Protected Setup (WPS)
WPS allows rapid wireless connection between the Router and other WPS-compatible
devices. Click on the WPS button to turn on the WPS function.
13
Page 17

3.4 Guest Wi-Fi
Slide the Enable Guest Wi-Fi switch to the right. The switch will be blue when the
guest network is enabled.
Wi-Fi name (SSID)
The Wi-Fi name (SSID) is the name of the wireless network broadcasting from this
system. In order for devices to connect to the local network over a wireless link, they
must select this network name from the list of detected wireless networks in the area.
Password
Specify a password for your wireless network. Click the icon to display the
selected password for the SSID.
New Password
Enter a new password here for the SSID.
Confirm Password
Type the new password here.
Note: Passwords must be 8–28 characters long and are case sensitive. (If the
encryption type is WEP-64, the password must be exactly 10 hex digits ([0–9], [a–f],
or [A–F]). Changing your Wi-Fi password may cause your devices to lose their
connection to your Wi-Fi. Leave empty if you don’t want to make a change.
Broadcast Wi-Fi Name (SSID)
Check the box if you want to broadcast the SSID. The SSID will be displayed when
you search for available networks.
Wi-Fi network encryption
Select one security method from the drop-down menu.
Band
14
Page 18

Select the band to be used.
Max Wi-Fi devices 2.4 GHz
The maximum number of Wi-Fi clients allowed on the Router using 2.4 GHz Guest
Wi-Fi. The highest value for this field is 128.
Max Wi-Fi devices 5 GHz
The maximum number of Wi-Fi clients allowed on the Router using 5 GHz Guest WiFi. The highest value for this field is 128.
Guest Wi-Fi Protected Setup (WPS)
WPS allows rapid wireless connection between the Router and other WPS-compatible
devices. Click on the WPS button to turn on the WPS function.
Note: WPS will become inaccessible if the Broadcast Wi-Fi Name (SSID) feature is
not activated.
Click Save to save your changes, or click Cancel to discard any changes you made.
Note: The 2.4 GHz Guest Wi-Fi only works when the matching 2.4 GHz Wi-Fi is
activated. The 5GHz Guest Wi-Fi only works when the matching 5 GHz Wi-Fi is
activated.
15
Page 19

Chapter 4
Connected Devices
This section displays information of LAN connected devices, including the
connection type, IP address, host name, MAC address, and whether the connected
devices are restricted or not.
4.1 Devices connected to your router
The function presents a list of devices that are currently connected to your router as
well as the information of these devices, including the names, MAC addresses,
connection types, and whether the devices are restricted or not.
Device
The name of each device that is connected to the Router is displayed here.
MAC Address
The MAC Address of each device that is connected to the Router is displayed here.
Type
This section shows the type of connection each device uses to connect to the Router.
Restricted
This section displays devices which are blocked from connecting to the Router as well
as the settings of the restriction. The icon indicates that the selected device is
blocked permanently. The icon indicates that the device is only restricted during
the specified periods of time.
The Disconnect Device feature enables you to select and remove devices which have
connected to the Router. Once removed, the computer/device will not be displayed on
this page.
The Block Device switch allows you to block or allow computers or devices from
establishing a connection to the Router. To block a device, first click on its name, then
slide the Block Device switch to the right. The switch will be blue when the feature is
16
Page 20

enabled.
4.2 Restrictions
You can specify a period of time during which the selected device will be blocked
from connecting to the Router. To add rules, click Add Schedule.
Schedule Name
Type the name for the schedule in this field.
Time Restrictions
Specify the date and time period when you wish the selected devices to be blocked.
Slide the All Day switch to the right if you want to block a selected device for a
whole day. Click Save to apply the changes you made.
17
Page 21

Chapter 5
Configuring System Settings
You can select different settings for the system here.
5.1 General Information
The General Information page in System Settings provides device information on
the Router, including the device name, IMEI, model, and more.
To access the General Information page, click System Settings on the front page of
the administration website.
Manual Software Update
This option enables you to update the software on your Router. Click Manual
Software Update to update the Router’s software.
Check for Software Update
Click Check for Software Update to see if there are software updates available.
18
Page 22

Check for FTP FOTA
FOTA (Firmware over the Air) is a method that enables firmware update online. Click Check
for FTP FOTA to check if the firmware is the latest version.
At the bottom of the General Information page are six panels: History Log, Phone
Settings, Backup & Restore, LAN Settings, APN Settings, and Port Forwarding.
19
Page 23

5.2 History Log
The History Log page provides various activity records of your Router. To access this
page, click History Log on the General Information page.
History Logging
Use this switch to turn the History Logging function on or off.
Category
Use the drop-down menu to select the type of log you wish to export, then click the
Export Log button to export the log. Select Export All Log to export all types of
logs. To erase all log history, click Clear Log. Click Close to close the window.
Date & Time
Click on Date & Time to sort the history log in chronological order.
Activity
Click on Activity to sort the history log by Activity.
20
Page 24

5.3 Phone Settings
The Phone Settings page covers settings for a landline phone connected to your
Router. To access this page, click Phone Settings on the General Information page.
TTY
When the TTY (teletypewriter) setting is enabled, you can use your phone with a TTY
device to assist with hearing impairments.
Start dial timeout
Period that the dial tone is available after the phone is lifted off the hook.
Inter-digit timeout
Maximum interval between digits when dialing.
Remote party hang up timeout
Period of silence following remote hang-up.
Click Save to save your preferred phone settings, or click Cancel to discard any
changes you made.
21
Page 25

5.4 Backup & Restore
The Backup & Restore page covers functions for backing up/restoring the settings on
your Router and resetting it to factory settings. To access this page, click Backup &
Restore on the General Information page.
Backup Settings
Click the Backup button to backup your current Router settings to your computer.
Restore from Backup
Click Browse and select the file on your computer which contains the backup settings
you wish to restore, then click Restore to restore the settings.
Restore to Factory Settings
Click Restore Factory Defaults and wait for the progress bar to complete in order to
reset your Router to factory settings.
Click Close to close this window.
22
Page 26

5.5 LAN Settings
The LAN Settings page includes settings to configure advanced LAN settings (e.g.,
IP address, Subnet mask, DHCP, etc.) for your Router. To access this page, click LAN
Settings on the General Information page.
LAN Configuration
In this section, enter the desired info in the following fields:
Router IP address
Specify a range of IP addresses the Router may assign to devices. The default LAN IP
configuration is 192.168.0.1.
Subnet Mask
The subnet mask along with the previously configured IP address defines the network.
The default value for subnet mask is 255.255.255.0.
DNS Server
Use this function to toggle whether the DNS server is set automatically or manually.
IP addresses for multiple DNS servers
Enter the IP addresses for multiple DNS servers in this field (separate each IP address
with a comma.)
DHCP
DHCP assigns LAN IP addresses for connected devices. You can specify the range of
IP addresses the Router may assign to devices. Click the DHCP switch to turn the
DHCP function on or off. You can also enter the desired information in the following
fields:
23
Page 27

DHCP Start Address
Specify the address that starts the range for the pool of IP addresses in the same
subnet as the router.
DHCP End Address
Specify the address that ends the range for the pool of IP addresses in the same subnet
as the router.
Lease Time
You can specify a period of time after which an assigned IP address will be retrieved
from devices.
Click Save to save your preferred LAN settings, or click Cancel to discard any
changes you made.
24
Page 28

5.6 APN Settings
The APN Settings page enables you to configure the Access Point Name (APN) for
your Router. To access this page, click APN Settings on the General Information
page.
Verizon APN
Type the desired APN name into this field, then click Save to save your settings, or
click Cancel to discard any changes you made.
Restrict Background Data
This feature will be automatically enabled if the current data usage exceeds the
threshold defined by the user. Once enabled, data transfer in the background will be
stopped.
25
Page 29

5.7 Port Forwarding
Port Forwarding can be used to open certain ports of a device to communicate with an
Internet service. To turn on the Port Forwarding, slide the Port Forwarding switch on
the bottom right of the General Information page to the right. The switch turns blue
to indicate that the function is turned on. To turn off this function, slide the switch to
the left. To access this page, click Port Forwarding on the General Information
page.
From the Port Forwarding page, enter the appropriate forwarding options listed on
the page, then click Add to save your changes, or click Cancel to discard any changes
you made. Click Close to close this page. The options include:
Add Rules
Rule Name
The name of the service for which the port forwarding rule has been created.
From Port
Type the value of the start port.
Protocol
Choose the protocol to be used for port forwarding.
IP Address
The local server’s IP address.
To Port
Type the value of the end port.
Configured Ports
This table displays the ports that have been configured.
26
Page 30

Application
The created rule name will be displayed here.
Port From
This shows the value of the start port.
Protocol
This shows the protocol selected for the corresponding port forwarding rule.
IP Address
This shows the local server’s IP address.
Port To
This shows the value of the end port.
Enabled
The icon indicates that the corresponding port forwarding rule has been enabled.
Remove
Click on the x icon to delete a port forwarding rule.
27
Page 31

Chapter 6
Using Parental Controls
By creating Internet access policies, Parental Controls allow you to control and
monitor Internet access.
Parental Controls can be activated on the Home page by sliding the Filters switch in
the Parental Controls column.
You can also enable or disable the function after you enter the Parental Controls
page. Slide the Parental controls switch to the right. When the switch is blue,
parental control of websites and devices is enabled. To turn off this function, slide the
switch to the left.
Websites
This function can be used to block computers or devices from accessing certain
websites through the Router. The websites that have been blocked are displayed on
the screen. To add a website to the block list, click Add Website and enter the website
in the input field. Click Add to save your changes, or click on the icon to remove
the selected website from the block list.
Devices
To add a device to the block list, click Add Device. A drop-down list will display the
28
Page 32

devices that are currently connected to the Router and their MAC address. Select the
device that you want to block, then click Include. The devices that appear on this list
will be not be able to access ALL the websites listed in the Websites section.
29
Page 33

Chapter 7
Help
Click on the link provided in this chapter to access the Verizon Wireless website,
where you can find the support and the resources you need.
Verizon Wireless: Support
https://www.verizonwireless.com/support/5g/home/
30
Page 34

Chapter 8
Step 1:
Press down on the battery cover.
Step 2:
Slide the cover in the direction of the red arrows and pull the
cover out.
Step 3:
Install the battery.
Step 4:
Place the battery cover back on top of the battery compartment
as indicated in the image.
Step 5:
Slide the battery cover back in the direction as indicated by the
arrows.
Troubleshooting
This chapter contains a list of issues frequently encountered by users. Possible
solutions and techniques to address the issues are also provided.
How do I remove the battery cover and put the cover back on after I replace
the battery?
31
Page 35

How do I restore the Router’s defaults settings?
There are two ways to restore the Router’s default settings:
A) Use the tip of a ballpoint pen or a straightened paperclip to depress the “Reset”
button on the back of the Router for at least ten seconds.
B) Go to the System Settings column on the Home screen and access the Backup &
Restore section. Click Restore Factory Defaults and wait for the progress bar to
complete in order to reset your Router to factory settings.
How do I change the password on the Router’s administration website?
From the Router’s Home screen, access the Admin Settings on the drop-down menu
on the top right of the administration website’s Home page.
Can I use an 802.11b wireless card to connect to the Router?
Yes, the Router can interface with 802.11b cards or 802.11g cards. The 802.11g
standard is backward compatible with the 802.11b standard. The Router can be
setup to handle just “g” wireless cards, just “b” wireless cards, or both.
I cannot access the Router’s administration website. What should I do?
Make sure the computer that is connected to the Router is set up to dynamically
obtain an IP address.
32
Page 36

Specifications
Product specifications
Wi-Fi
2.4G 802.11b/g/n MIMO 2 × 2
5G 802.11 a/n/ac MIMO 4 × 4
5G 802.11 ac MIMO 4 × 4 (backhaul)
2.4G/5G DBDC, WPS
LTE
CAT 6 (Rel.10), Band 2/4/5/13, FDD
Supports downlink inter and intra 2-Carrier Aggregation
Memory
DDR3: 256 MB × 4
NAND: eMMC 512 MB
Embedded Antenna
2.4G/5G, GPS, LTE
Mechanical Specifications
LEDs
LEDs × 6 (amber and green)
Ports/Interface
LAN (Gigabit Ethernet RJ-45 ports with LED) × 3
WAN (Gigabit Ethernet RJ-45 port with LED) × 1
RJ11 phone ports × 2 (Related features will be available soon)
RJ31X alarm port × 1 (Related features will be available soon)
Reset button × 1
DC Jack × 1
Power button × 1
WPS button × 1
SIM Socket x1
Environmental
Power
Router: 54V/40W & PSE: 54V/60W
Operating Ambient Temperature
10°C to 40°C
Appendix:
33
Page 37

Relative Humidity
8% to 95% non-condensing
Shipping and Storage Temperature
–20°C to 85°C
Shipping and Storage Relative Humidity
5% to 100%
34
Page 38

Federal Communication Commission Interference Statement
This device complies with Part 15 of the FCC Rules. Operation is subject to
the following two conditions: (1) This device may not cause harmful
interference, and (2) this device must accept any interference received,
including interference that may cause undesired operation.
This equipment has been tested and found to comply with the limits for a
Class B digital device, pursuant to Part 15 of the FCC Rules. These limits
are designed to provide reasonable protection against harmful interference in a
residential installation. This equipment generates, uses and can radiate radio
frequency energy and, if not installed and used in accordance with the
instructions, may cause harmful interference to radio communications.
However, there is no guarantee that interference will not occur in a particular
installation. If this equipment does cause harmful interference to radio or
television reception, which can be determined by turning the equipment off
and on, the user is encouraged to try to correct the interference by one of the
following measures:
- Reorient or relocate the receiving antenna.
- Increase the separation between the equipment and receiver.
- Connect the equipment into an outlet on a circuit different from that
to which the receiver is connected.
- Consult the dealer or an experienced radio/TV technician for help.
FCC Caution: Any changes or modifications not expressly approved by the
party responsible for compliance could void the user's authority to operate this
equipment.
This transmitter must not be co-located or operating in conjunction with any
other antenna or transmitter.
Operations in the 5.15-5.25GHz band are restricted to indoor usage only.
Page 39

Radiation Exposure Statement:
This equipment complies with FCC radiation exposure limits set forth for an
uncontrolled environment. This equipment should be installed and operated
with minimum distance 29cm between the radiator & your body.
 Loading...