

Page 1
DOCUMENT TRACKING – REMOVE THIS SECTION BEFORE FINAL PRODUCTION
Date By Notes
3/18/2011 Kevin Lewis Updates following changes in screen flow and new requirements for
U.S. Changes since last posting are highlighted yellow. Information
I need help with is highlighted red.
3/22/2011 Kevin Lewis Updates following feedback from Dalei.
3/29/2011 Kevin Lewis Add versioning and new message content.
Page 2

In-Home Display
DE220-1
DE220-1-A
Page 3
Table of Contents
Introduction 1
Display Overview 2
Installation 5
Monitoring Your Energy 11
Smart Controls 16
Messages 17
Common Z-Wave Tasks 19
Network Inclusion Process 19
Network Exclusion Process 20
Making Changes to Your Configuration 22
Safety Information 27
About GreenWave 31
Page 4

Introduction
The GreenWave Reality platform helps create a smart, energy-efficient home through the monitoring and
controlling of your appliances and electronics (referred to as “devices”). You can conserve energy with minimal
impact to your lifestyle by using our products to easily manage your devices. Simply connect our Gateway to
your GreenWave Reality energy management system, plug your devices into our PowerNodes, and then monitor
and control the devices’ power usage through a Web browser, smartphone application, or In-Home Display.
1
Page 5
Display Overview
The GreenWave Reality In-Home Display connects to your energy management system to show you information
about your energy consumption and billing and allows you to forecast future usage and costs. If you have
GreenWave Reality PowerNodes connected to you network, you can also use the Display to activate your
system’s default Smart Controls.
Your Display is designed to work either as part of a GreenWave Reality
energy management system (with a Gateway and PowerNodes) or
through a Gateway that connects directly with your utility meter. If you
are using your Display through the Gateway and meter, be sure to read
any additional documentation that your utility provider may have
provided.
Page 6
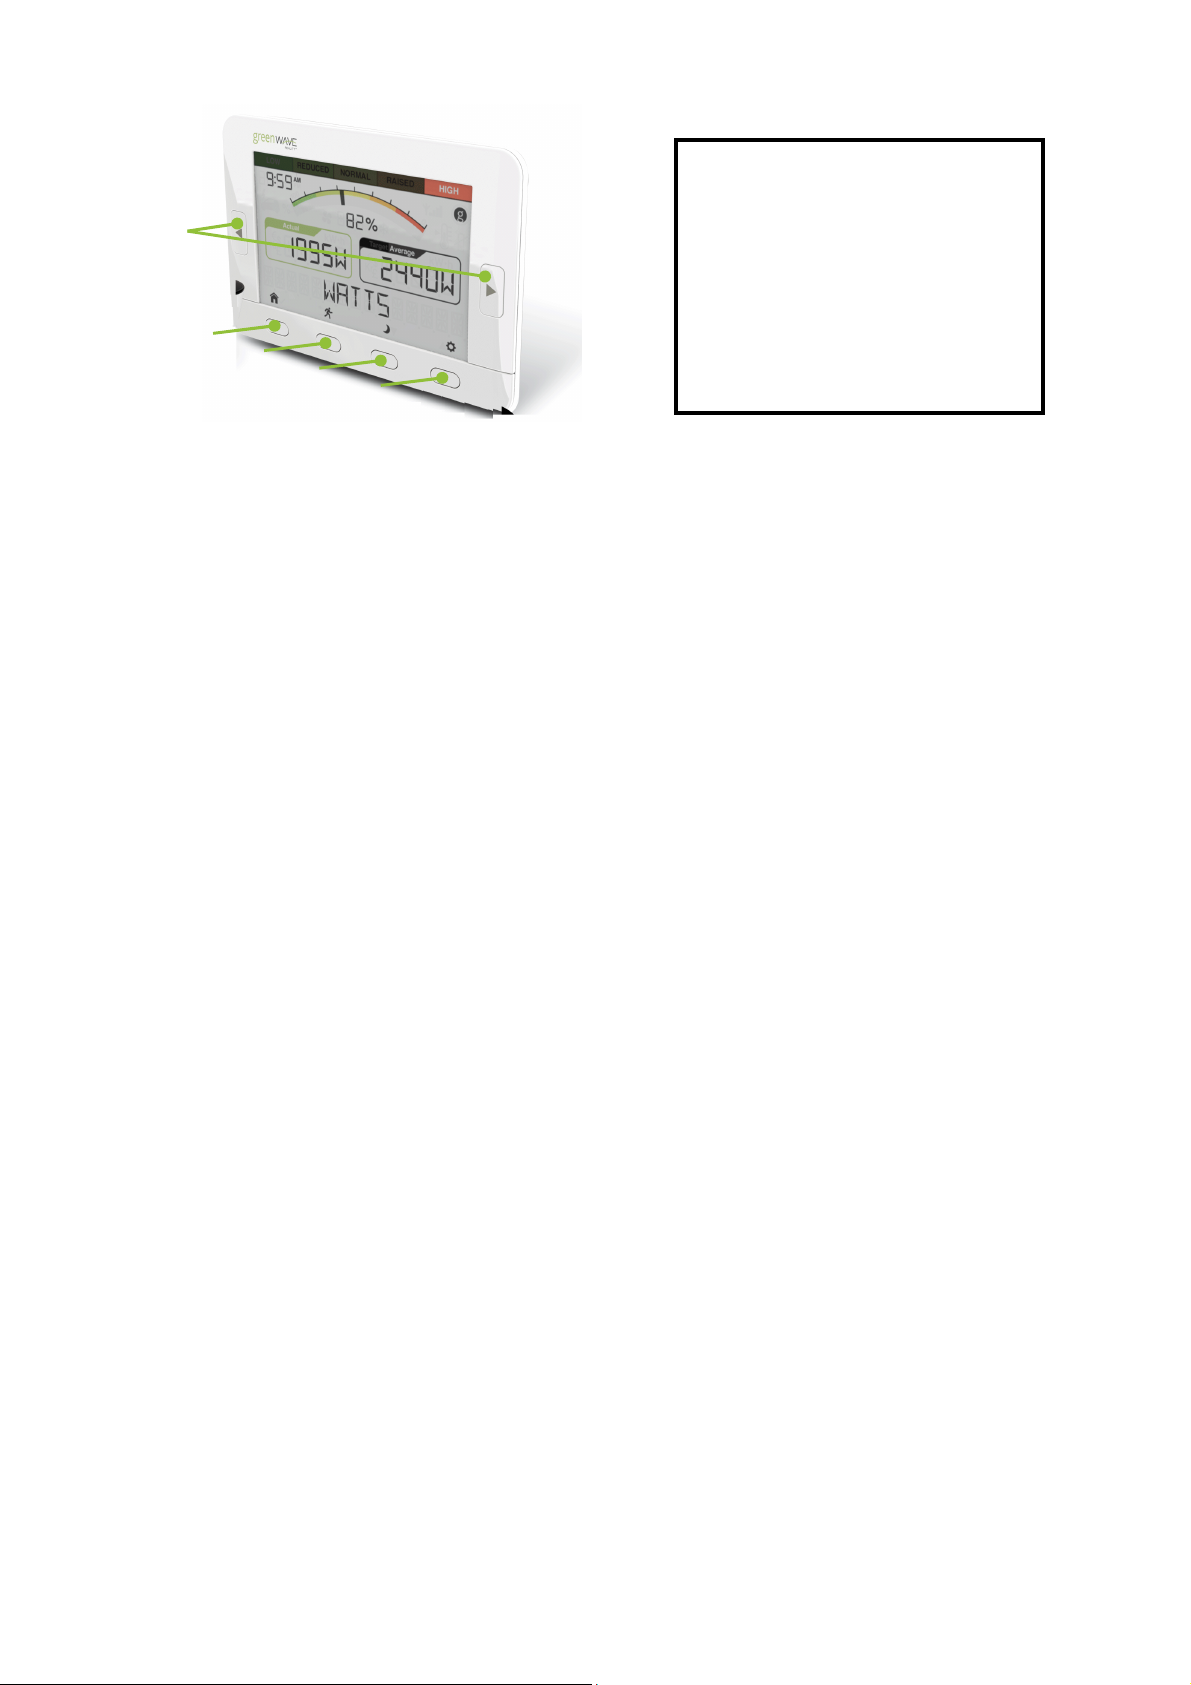
IMAGE: Back of Display
with Numbered Callouts
1
2
3
4
1. Left and right buttons: Press to move backward (left button) and forward (right button) through the screens.
2. Home Smart Control / menu select button: Press to activate the Home Smart Control. If the Display is in setup mode,
press to save the selected option or to start the selected process on the screen.
3. Away Smart Control / menu exit button: Press to activate the Away Smart Control. If the Display is in setup mode, press to
exit back to the previous menu or to presentation mode (if the Display is already showing the top menu).
4. Night Smart Control / down button: Press to activate the Night Smart Control. If the Display is in setup mode, press to
scroll down through the options for the selected setting. If the Display is in presentation mode, press to navigate down to
the next information screen.
5. Menu activation / up button: Press to activate the setup menu. If the Display is in setup mode, press to scroll up through
the options for the selected setting. If the Display is in presentation mode, press to navigate up to the previous information
screen.
6. Wall-mounting holes: If you are mounting the Display on a wall, slide these holes over the wall screws.
7. Kickstand: If you are placing the Display on a shelf or other surface, extend the kickstand to sit the Display upright.
8. Battery compartment: If you are powering the Display with batteries, slide the cover off and insert four (4) AA alkaline
(LR6) batteries.
9. AC adapter port: If you are powering the Display with the AC adapter (included with some models), plug the adapter into
5
3
Page 7
Page 8

Installation
You must follow several installation steps before you can begin using your Display.
1. Set up and Configure Your Gateway
Make sure your GreenWave Reality Gateway is set up and configured so that the Display can communicate with
it. Refer to the GreenWave Reality Gateway User Guide for instructions on adding the Gateway to your energy
management system and configuring any PowerNodes or other power management devices that you may have
received.
If your solution includes electricity meter monitoring, then refer to any documentation and instructions you may
have received from your utility provider for connecting the meter.
5
Page 9
IMAGE
2. Mount the In-Home Display
There are two options for mounting your Display:
• Kickstand, for setting the Display on a shelf or other flat surface
• Wall mount, for hanging the Display on a wall
Whichever mounting option you choose, be sure to select a location where your Display will maintain clear radio
signals with your Gateway. Refer to the installation tips later in this chapter for more information on maintaining
clear radio signals.
Using the In-Home Display Kickstand
The kickstand is attached to the back of the Display. Simply locate a
flat surface where you want to sit the Display, and extend the
kickstand so that the Display sits upright.
: Insert illustration here that
shows and angle view of the Display
with the kickstand extended. Uses
arrows by the kickstand the indicate the
direction to open the kickstand.
Mounting the In-Home Display on a Wall
To mount the Display on a wall, you will need two {???screw type and size???} screws. Screw the screws into
the wall, level with a distance of {???} between the center point of the two screw heads.
Page 10
IMAGE: Insert illustration here that
well.
shows Display mounting on wall via
screws, include distance of screws
based on holes on back of Display.
Insert new illustration on the left as
Note: If you are powering the Display with batteries, you should install the batteries before mounting the unit to
the wall. Powering the unit is discussed in the next step.
Hang the Display by sliding the holes on the back of the unit over the screws and then gently pressing the
Display downward until it is secure.
3. Power the In-Home Display
There are two options for powering your Display:
• Four (4) AA alkaline (LR6) batteries
• AC adapter (included with some models)
Note: You cannot use both options at the same time. Do not plug in the AC adapter if there are batteries in the
Display.
7
Page 11
IMAGE:
The Display automatically turns on as soon as you install batteries or plug in the AC adapter.
Installing and Replacing Batteries
To power the Display by batteries, use four (4) AA alkaline (LR6) batteries (included with your Display). Slide the
cover off the back of the unit, insert the batteries as shown in the illustration, and then replace the cover.
IMAGE: Insert sequence of illustrations here that show back cover
coming off and the insertion of batteries (including number and size)
with arrows showing + and - direction of batteries.
CAUTION
RISK OF EXPLOSION IF BATTERY IS REPLACED BY AN INCORRECT TYPE.
DISPOSE OF USED BATTERIES ACCORDING TO THE INSTRUCTIONS.
Using the AC Adapter
You can power the Display from an electrical outlet using the AC
adapter (included with some models). Be sure to remove any
batteries that may be in the Display before using the AC adapter.
Insert illustration here that
shows plugging AC adapter into
Display and an outlet.
Page 12
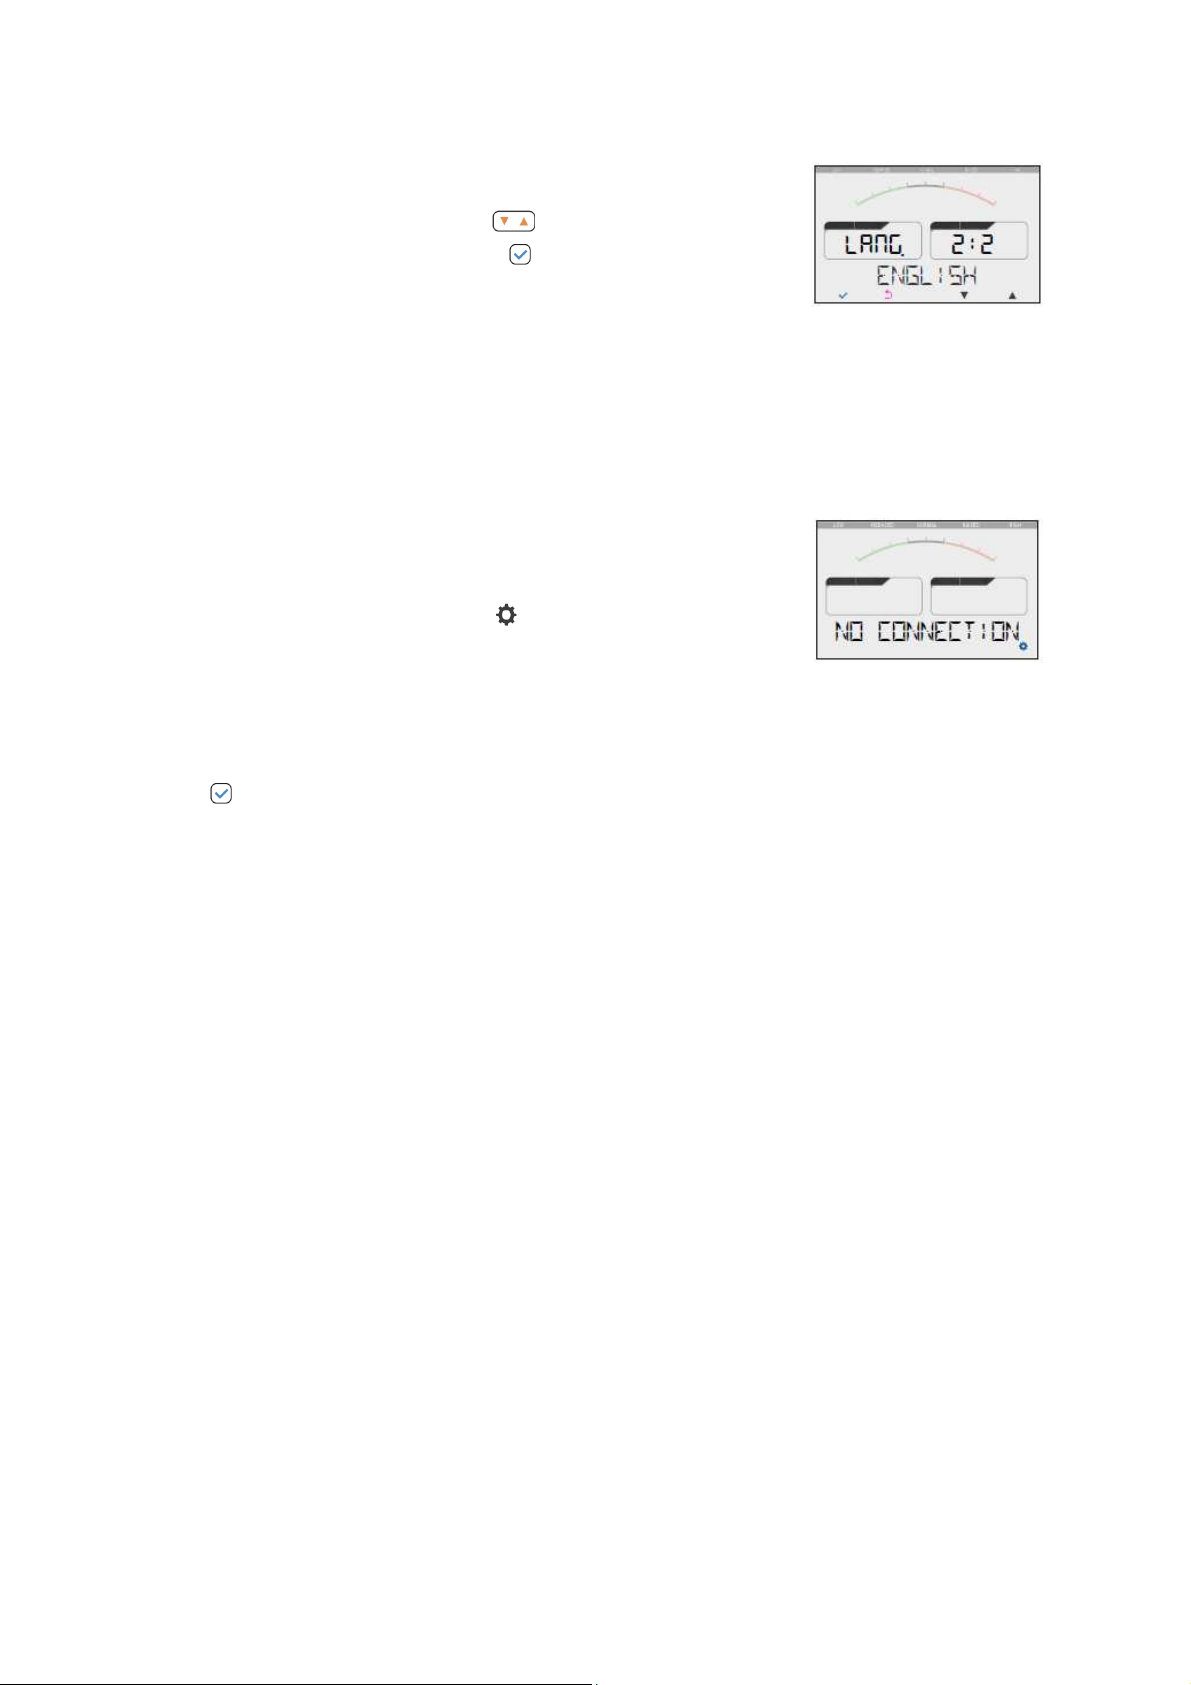
4. Select the Display Language
When your Display powers on for the first time, it prompts you to select a
language. Press the up and down buttons ( ) to scroll through the available
languages, and then press the select button ( ) when the screen shows your
preferred language.
5. Connect to the Gateway
Note: If your Display came as part of a package that includes a Gateway, then you can skip this step since the
Display was already connected to the Gateway at the factory.
If your Display does not already have an established network connection with
your Gateway, then NO CONNECTION appears on the screen. To connect the
Display to your Gateway, you must place your Gateway in network inclusion
mode and then press the activation button ( ) on the Display. For specific
instructions, refer to the Common Z-Wave Tasks chapter and follow the network
inclusion process.
When the Display connects successfully, the screen shows the message CONNECTED. If the connection
process should fail, the screen shows the message UNSUCCESSFUL. If this happens, you can press the select
button ( ) to try connecting again.
9
Page 13

Installation Tips
Review the safety information. Be sure to review the information contained in the “Safety Information” chapter
for important safety information you should follow.
Keep radio signals clear. Your Gateway and Display have antennas built-in for radio communication with
Internet services and other devices on your energy management system. Just as you might experience reception
problems on your mobile phone inside a building, your Display can have trouble communicating with the
Gateway if their radio signals are blocked by obstacles such as large metal panels or walls containing wire mesh.
When placing these devices in your home, imagine invisible lines connecting between them. Try to keep these
lines clear from obstruction as much as possible.
Page 14

Monitoring Your Energy
When the Display is in standard presentation mode, it cycles through each of the presentation screens to show
you the following information:
• Your current energy cost (if available) and usage
• Your projected energy cost and usage for the day
• The cost of your energy per kilowatt hour (KWh)
You can drill down into any of these screens to view more information by pressing the left and right buttons on
the Display. Continue pressing these buttons until you are on the screen for which you want more information.
When you press a left or right button, the Display exits presentation mode, allowing you to drill down into the
current information screen.
11
Page 15

When you drill down into the information screens, the bottom button icons change from presentation mode icons
to the following:
Exit button: Press to exit the information screen and return to presentation
mode.
Up and down buttons: Press to scroll through more information screens for
the current selection.
No Service
If the Display is connected to your Gateway, but it cannot find your utility service,
then NO SERVICE appears on the screen. You can press the activation button
( ) to refresh the Display and try to obtain your service information again. If
you continue to experience no service, try the following:
• Make sure the Display has a connection with the Gateway
(discussed in the Making Changes to Your Configuration chapter).
• If there is no Gateway connection, perform the exclusion process followed by the inclusion process
(discussed in the Common Z-Wave Tasks chapter).
Page 16

• If you still encounter problems, you can try resetting the Display (discussed in the Making Changes
2
to Your Configuration chapter).
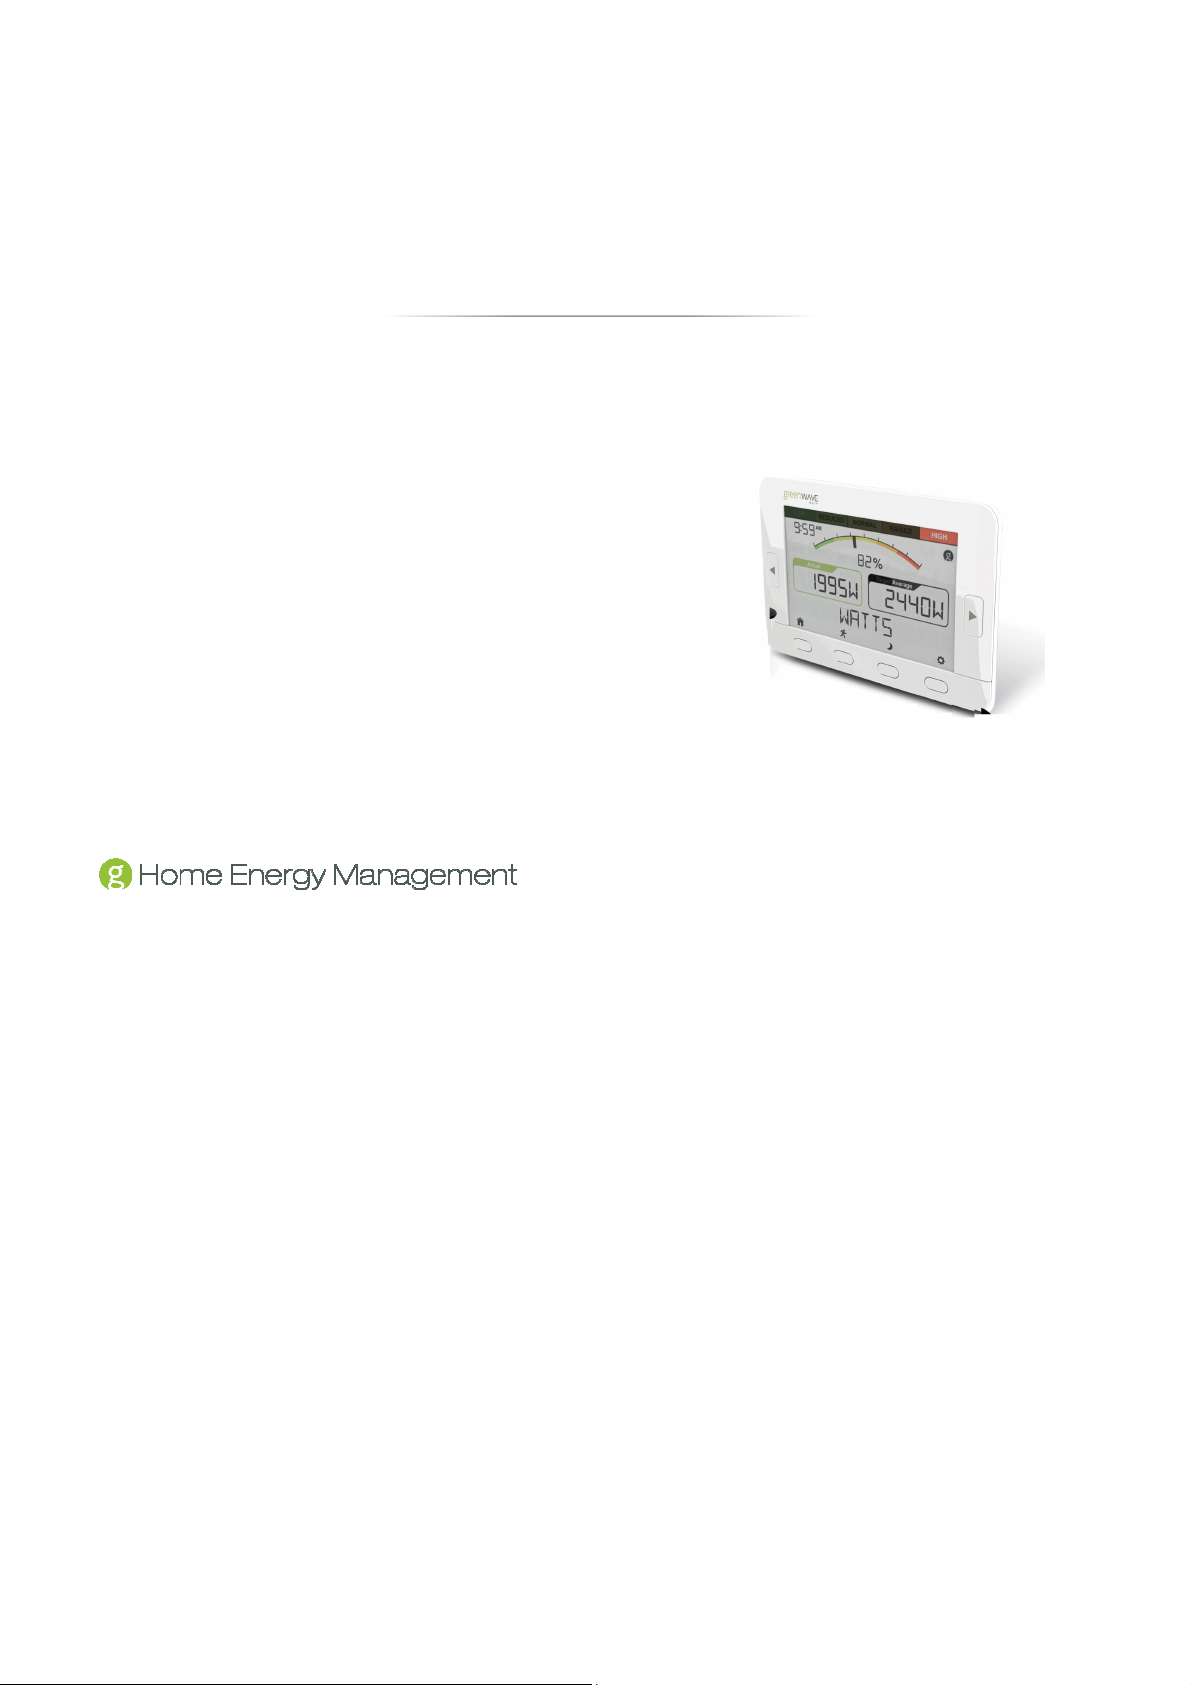
Current Cost and Usage
To view your current energy cost (if available) and usage, press the left or right Display buttons until the
CURRENT screen appears. In addition to this current information, you can view cost and usage information for
the entire day, previous week, and previous month by pressing the up and down buttons while on the CURRENT
screen.
1
4
5
3
1. Gauge shows how your usage for the selected timeframe compares with your average usage. The closer the
indicator is to the left side of the gauge, the lower your current usage is, as compared to your average. The
closer the indicator is to the right side, the higher your current usage is, as compared to your average.
2. KWh shows how much energy you are using in kilowatt hours for the selected timeframe.
3. Timeframe shows the duration over which the information is based. Available timeframes include the entire
day, previous week, and previous month. Press the up and down buttons to access these other timeframes.
4. Icon shows network status. A broken circle means the Display is not connected to the Gateway. A full circle
means the Display is connected but no service is available. A full circle with G means the Display is
connected and service is available.
5. Cost shows your total cost for energy used during the selected timeframe.
13
Page 17

Projected Cost and Usage
To view your projected energy cost and usage for the day, press the left or right Display buttons until the
PROJECTED screen appears. In addition to the projected information for the day, you can view projected energy
cost and usage information for the week and month by pressing the up and down buttons while on the
PROJECTED screen.
3
1
4
2
1. KWh shows how much energy you are projected to use in kilowatt hours for the selected timeframe.
2. Timeframe shows the duration over which the projected information is based. Available timeframes
include day, week, and month. Press the up and down buttons to access these other timeframes.
3. Icon shows network status. A broken circle means the Display is not connected to the Gateway. A full
circle means the Display is connected but no service is available. A full circle with G means the
Display is connected and service is available.
4. Cost shows your projected total cost for energy used over the selected timeframe.
Page 18

Price per KWh
To view the price of your energy per kilowatt hour, press the left or right Display buttons until the $ PER KWH
screen appears.
15
Page 19

Smart Controls
If you have GreenWave Reality PowerNodes connected to your home network, you can use your Display to
activate the Home, Away, and Night default Smart Controls. The following buttons activate each of the Smart
Controls:
Home: By default, the Home Smart Control powers on all of the devices that are
plugged into your PowerNodes.
Away: By default, the Away Smart Control powers off the devices that are
plugged into your PowerNodes that are not considered special devices (devices
that you typically would not want to power off, such as a clock or DVR).
Night: The Night Smart Control is similar to the Away Smart Control in that it
Note: These buttons are available when the Display is in standard presentation mode. If the Display is in setup
mode you can return to presentation mode by pressing the exit button ( ).
powers off the devices that are plugged into your PowerNodes that are not
considered special devices.
Page 20

Messages
If your utility provider has sent you a message, the Display alerts you in
presentation mode by intermittently displaying a new message alert between
presentation screens. To view the message press any button on the Display. If
there are multiple messages, you can scroll through them by pressing the up and
down buttons ( ).
With a message showing on the Display, you can press the select button ( ) to view options related to the
message. Possible options for the message might include:
• SHOW AGAIN allows you to view the message again.
• DELETE, when available, allows you to permanently remove the
message from the Display.
• YES and NO allow you to answer a question your utility provider has
asked in the message.
• Similar to YES and NO, there may be custom answers for you to answer a question.
IMAGE: Display containing
one of the options, such as
DELETE.
17
Page 21

To view the options for an active message, press the up and down buttons ( ). When the option you want
to select (or the answer you want to send back to your utility provider) is visible on the Display, press the select
button ( ).
When you have finished viewing your messages, you can return to standard presentation mode by pressing the
exit button ( ).
Page 22

Common Z-Wave Tasks
The Display communicates wirelessly with your Gateway by use of Z-Wave mesh networking, which is a robust
connection technology designed for home automation with security and privacy in mind. The more Z-Wave
compatible devices installed in your home, the better coverage your private home network will have.
Network Inclusion Process
The process for adding a Display to your home network is called “inclusion.” It must only be performed once and
only if your Display is not already connected to the Gateway (for example, through the installation process). You
must have your Gateway plugged in and working first. Also make sure the Display is powered, as explained in
the Installation chapter. To complete the inclusion process you must perform the following steps:
1. On your Gateway, press and hold the sync button for two seconds until the two
rotating green bars appear on the Gateway activity indicator. When this is completed,
the Gateway is ready for you to perform the inclusion on the Display. The remaining
19
Page 23

steps are performed on the Display.
2. Make sure you are on the JOIN NETWORK screen, as explained in either the Installation chapter or the
Making Changes to Your Configuration chapter.
3. Press the select button ( ) to have the Display start the connection process.
4. When the Display connects successfully, the screen shows the message CONNECTED.
If the screen shows the message UNSUCCESSFUL, then the inclusion process has failed, and you
must start over.
Network Exclusion Process
Note: If your Display is new and has never been used before, then you should not need to perform the exclusion
process.
The process for removing a Display from your home network is called “exclusion.” You would perform a network
exclusion for such situations as:
• You are permanently removing your Display from your energy management system.
• Your Display was previously used on a different Z-Wave network, and you must remove its
association (homeID) with the other network before you can connect it to your energy management
system.
• You need to send your Display in for servicing.
Page 24

Make sure the Display is powered, as explained in the Installation chapter. To complete the exclusion process
you must perform the following steps:
1. On your Gateway, press and hold the sync button for five seconds until the rotating
green single bar appears on the Gateway activity Indicator. When this is completed,
the Gateway is ready for you to perform the exclusion on the Display. The remaining
steps are performed on the Display.
2. Make sure you are on the LEAVE NETWORK screen, as explained in the Making Changes to Your
Configuration chapter.
3. Press the select button ( ) to have the Display start the exclusion process.
4. When you are prompted to confirm, press the select button ( ) again.
5. When the Display disconnects successfully, the screen shows the message COMPLETED.
If the screen shows the message UNSUCCESSFUL, then the exclusion process has failed, and you
must start over.
21
Page 25

Making Changes to Your Configuration
If you want to make changes to your Display’s configuration, you can access the menu by pressing the menu
activation button ( ). After the Menu screen appears momentarily, the Display enters setup mode. Once you
are in setup mode you can press the left and right buttons to move back and forth through the menu screens.
The bottom button icons change from presentation mode to setup mode icons as follows:
Menu activation button: Press to activate setup mode from presentation mode. Once in
setup mode, press when on any setting to view information or select an option for that
setting. The up and down buttons then become available so that you can navigate through
the setting’s options.
Select button: Press to save the selected option or to start the selected process on the
screen. This button is not available on screens that are for information only.
Page 26

Exit button: Press to exit setup mode and return to presentation mode. Any changes that
you saved will be kept.
Up and down buttons: Press to scroll through the options available for the selected setting.
As you press the left and right buttons on the Display, you advance through the following settings. The initial
value you see for each setting is the current value for that setting.
Presentation Speed (Slide Delay)
The Presentation Speed (Slide Delay) setting allows you to change the duration
for which each screen appears when the Display is in presentation mode
(showing information screens on your energy cost and consumption). Press the
up or down button to increase or decrease (or stop) the number of seconds that
each screen appears in presentation mode. When the screen shows your
preferred speed, press the select button.
23
Page 27

Device Information
The Device Information setting is for information only and shows the Display’s battery information, software
version, serial number, and Z-Wave HomeID. Press the up and down buttons to scroll through each information
screen.
Battery information shows the approximate percentage of remaining battery life,
both numerically in the left box and visually in the top gauge. If the battery life
drops below 10%, then LOW appears in the right box and a battery icon flashes
on the screen. If you are using the AC adapter instead of batteries, the screen
simply confirms that external power is being used.
Language
The Language setting allows you to select the language in which you want
screen text to appear. Press the up and down buttons to scroll through the
available languages. When the screen shows your preferred language, press
the select button.
Page 28

Connection to Gateway
The Network setting allows you to view the Display’s network connection status
with your Gateway and to make any needed changes to the Display’s
connection status. If your Display has an active network connection with your
Gateway, then OK appears on the initial Network setting screen. If your Display
does not have an active connection, then you can press the menu activation
button to access the join network option. When you do so, JOIN NETWORK
appears on the screen. To connect the Display to your Gateway, you must place your Gateway in network
inclusion mode and then press the select button on the Display. For specific instructions, refer to the Common Z-
Wave Tasks chapter and follow the network inclusion process.
When the Display connects successfully, the screen shows the message CONNECTED. If the connection
process should fail, the screen shows the message UNSUCCESSFUL. If this happens, you can press the select
button to try connecting again.
If your Display has an active network connection, then REFRESH appears as you navigate up and down the
connection setting. On this screen you can press the select button to perform a service query with your Gateway
and refresh the screen data if there is an update. Also if your Display has an active network connection, then
LEAVE NETWORK appears as you navigate up and down the connection setting. This screen allows you to
disconnect from your Gateway. If you need to disconnect from the Gateway, refer to the Common Z-Wave Tasks
chapter and follow the network exclusion process.
25
Page 29

The ALL RESET screen allows you to reset your settings to the factory defaults. This action is helpful if you are
not able to perform a successful exclusion from the Gateway or if you simply want to revert back to the factory
settings for such items as slide delay or language. If you select this option, the Display prompts you to confirm
the reset process. Press the select button to continue, or press the exit button to escape without resting the
Display.
Exit Setup
After the final setup screen, the Display shows the Exit Menu screen. Press the
select button to exit setup mode and return to standard presentation mode.
Note: You can also press the exit button at any time to return to presentation
mode.
Page 30

Safety Information
Powering Your Display
POWER ONLY WITH EITHER AC ADPATOR OR BATTERIES. NOT BOTH AT THE SAME TIME.
Remove the batteries when the Display is powered with the AC adapter. A deeply discharged battery can cause
damage to the device.
Batteries
Use only alkaline LR6 AA batteries.
WARNING: Batteries can explode, or leak, and can cause injury or fire. To reduce this risk:
• Carefully follow all instructions and warnings on the battery label and package.
• Always insert batteries correctly with regard to polarity (+ and -) marked on the battery and the
equipment.
• Do not short battery terminals.
27
Page 31

• Do not mix old and new batteries. Replace all of them at the same time with new batteries of the
same brand and type.
• Remove dead batteries immediately and follow local regulations for safe disposal.
• Do not dispose of batteries in fire.
• Keep batteries out of reach of children.
• Transporting batteries can possibly cause fires if the battery terminals inadvertently come in contact
with conductive materials such as keys, coins, hand tools, etc. The US Department of
Transportation Hazardous Material Regulations (HMR) actually prohibits transporting batteries in
commerce or on airplanes (i.e. packed in suitcases and carryon luggage) UNLESS they are
properly protected from short circuits. So when transporting individual batteries, make sure that the
battery terminals are protected and well insulated from materials that could contact them and cause
a short circuit.
Liquid Crystal Display (First Aid Measures)
The viewing screen in your Display is of a liquid crystal display type. It is protected inside a glass enclosure
which may break if dropped or subjected to extreme mechanical force. In such an event, use the following first
aid measures:
• If liquid crystal comes in contact with your skin: Wash area completely with plenty of water.
Remove contaminated clothing.
Page 32

• If liquid crystal gets into your eye: Flush the affected eye with clean water, and then seek
medical attention.
• If liquid crystal is swallowed: Flush your mouth thoroughly with water. Drink large quantities of
water and induce vomiting. Then seek medical attention.
Indoor Use Only
Your Display should be used only in dry, indoor locations. Do not use your Display in high-humidity locations
such as greenhouses, saunas, washrooms, or patios. Do not use your Display in locations where it can get wet
such as near aquariums or running water. Keep your Display dry, and keep it away from radiators and other heat
sources.
Do Not Disassemble
Your Display has no user-serviceable parts inside. In case of persisting malfunction, please contact Customer
Service to arrange for repair at a certified service location. Do not attempt to disassemble the Display for any
reason.
29
Page 33

Arrange for Service if Needed
Should you encounter any problems with your Display, turn the device off by unplugging it from the electrical
outlet and/or removing any batteries. Contact Customer Service to arrange for repair at a certified service
location under the following conditions:
• When the power cable or plug is damaged or frayed
• If the product has been exposed to rain or water
• If the product casing has been damaged
Disposing of Your Used Product
This product complies with the WEEE Directive (2002/96/EC) marking
requirements. The affixed label indicates that you must not discard this electrical /
electronic product in domestic household waste.
WEEE Product Category. With reference to the equipment types in the WEEE
Directive Annex 1, this product is classed as category 3 “IT and Telecommunications
Equipment.”
DO NOT DISPOSE IN DOMESTIC HOUSEHOLD WASTE. To return unwanted products, contact your local
GreenWave Reality office for more information (see contact information in the back of manual).
Page 34

About GreenWave
NORTH AMERICA
EUROPE
ASIA-PACIFIC
GreenWave Reality is a global innovator in the emerging Home Energy Management market. GreenWave
Reality provides an affordable, easy-to-use, standards-based platform that allows utilities enhance their
relationship with consumers and better balance energy on the grid while consumers can conserve energy with a
minimal impact to their lifestyle by easily monitoring and controlling their appliances and adding intelligent LED
lighting. GreenWave Reality is led by a diverse team of proven leaders with global experience.
39 Parker, Suite 100
Irvine, CA 92618
USA
Tel. +1 714 805 WAVE (9283)
na@greenwavereality.com
41 Science Park Road
#01-01 The Gemini (Science Park II)
SINGAPORE 117610
Tel. +65 3157 1700
apac@greenwavereality.com
GreenWave Reality ApS.
Dr. Neergaardsvej 3
2970 Hørsholm
DENMARK
Tel. +45 6913 2333
eu@greenwavereality.com
31
Page 35

Document Version
1.01
Model
DE220-1
DE220-1-A
Wireless Network Features
Z-Wave Radio Frequency:
Z-Wave Maximum Inter-Node Range: Up to 30m
Z-Wave Command Classes Certified
Binary Switch
Multichannel
Firmware Metadata
EU: 868.42MHz
US: 908.42MHz,
AUS/NZ: 921.42MHz
Page 36

Federal Communication Commission Interference Statement
This equipment has been tested and found to comply with the limits for a Class B digital device, pursuant to Part 15 of the FCC
Rules. These limits are designed to provide reasonable protection against harmful interference in a residential installation. This
equipment generates, uses and can radiate radio frequency energy and, if not installed and used in accordance with the
instructions, may cause harmful interference to radio communications. However, there is no guarantee that interference will not
occur in a particular installation. If this equipment does cause harmful interference to radio or television reception, which can be
determined by turning the equipment off and on, the user is encouraged to try to correct the interference by one of the following
measures:
• Reorient or relocate the receiving antenna.
• Increase the separation between the equipment and receiver.
• Connect the equipment into an outlet on a circuit different from that to which the receiver is connected.
• Consult the dealer or an experienced radio/TV technician for help.
FCC Caution: Any changes or modifications not expressly approved by the party responsible for compliance could void the
user's authority to operate this equipment.
This device complies with Part 15 of the FCC Rules. Operation is subject to the following two conditions: (1) This device may
not cause harmful interference, and (2) this device must accept any interference received, including interference that may
cause undesired operation.
IMPORTANT NOTE:
FCC Radiation Exposure Statement:
This equipment complies with FCC RF radiation exposure limits set forth for an uncontrolled environment. To maintain
compliance with FCC RF exposure compliance requirements, please follow operation instruction as documented in this manual.
This transmitter must not be co-located or operating in conjunction with any other antenna or transmitter.
33
Page 37

Declaration(s) of Conformity
These CE Marked GreenWave Reality products incorporating Radio and Telecoms Terminal Equipment functionality are in
compliance with the essential requirements and other relevant provisions of Directive 1999/5/EC.
A copy of the original CE Declaration of Conformity is on file and available upon request for all CE Marked GreenWave Reality
products. Please visit www.greenwavereality.com to obtain a copy of the Declaration.
Page 38

The use of such device might not be harmonized throughout EU and EFTA Member States. The Final Integrator of the product
shall check that the use of such devices for power node are allowed for placing on the market in any particular Member State.
35
Page 39

www.greenwavereality.com
 Loading...