


table of contents
DIRECTV CINEMA™ Connection Kit Product Information .......................................................................................................................................2
Important Safety Instructions .................................................................................................................................................................................3
Product Overview .....................................................................................................................................................................................................5
Package Contents ....................................................................................................................................................................................................6
Connection ................................................................................................................................................................................................................7
Determine Your Connection Type ..........................................................................................................................................................................10
Direct Ethernet Connection ...................................................................................................................................................................................13
®
DIRECTV
DIRECTV
Completing Wireless Protected Setup.................................................................................................................................................................. 21
Manual Wireless Setup ..........................................................................................................................................................................................23
Troubleshooting .....................................................................................................................................................................................................29
Warranty .................................................................................................................................................................................................................35
Federal Communication Commission Interference Statement ..........................................................................................................................39
Terms and Conditions ............................................................................................................................................................................................ 41
Whole-Home DVR Service Compatible Connection ........................................................................................................................... 15
®
Whole-Home DVR Service Compatible with Connected Home Adapter Connection .......................................................................18
1

Product information
Keep your receipt as proof of acquisition to obtain warranty parts and service. Attach it here and record the serial number and model number
in case you need them. These numbers are typically on the rear panel of your device.
Model No.
Serial No.
Dealer/Address/Phone
The DIRECTV CINEMA™ Connection Kit is compatible with receiver models R22, HR20, HR21, HR22, HR23, HR24. Additional models
may be added in the future. Please visit directv.com/getconnected for up-to-date listings.
2

imPortant safety instructions
®
Your DIRECTV
for safe and optimal use of the equipment.
Meaning of symbols printed on the rear panel of the product:
Important Safety Instructions
1) Read these instructions.
2) Keep these instructions.
3) Heed all warnings.
4) Follow all instructions.
5) Do not use this device near water.
6) Clean only with dry cloth.
7) Do not block any ventilation openings. Install in accordance with the manufacturer’s instructions.
8) Do not install near any heat sources such as radiators, heat registers, stoves, or other apparatus (including amplifiers) that produce heat.
9) Do not defeat the safety purpose of the polarized or grounding-type plug. A polarized plug has two blades with one wider than the other. A grounding-type plug has two blades
and a third grounding prong. The wide blade or the third prong is provided for your safety. If the provided plug does not fit into your outlet, consult an electrician for replacement
of the obsolete outlet.
10) Protect the power cord from being walked on or pinched, particularly at plugs, convenience receptacles, and the point where they exit from the device.
11) Only use attachments/accessories specified by the manufacturer.
12) Unplug this device during lightning storms or when unused for long periods of time.
13) Refer all servicing to qualified service personnel. Servicing is required when the device has been damaged in any way, such as power supply cord or plug is damaged,
liquid has been spilled or objects have fallen into the device, the device has been exposed to rain or moisture, does not operate normally, or has been dropped.
device has been designed and manufactured to stringent quality and safety standards. You should, however, be aware of the following important precautions
This symbol indicates that dangerous voltage consisting of a risk of electric shock is present within this unit.
This symbol indicates that there are important operating and maintenance instructions in the literature accompanying this unit.
3

imPortant safety instructions
WARNING: To reduce the risk
of fire or electric shock, do not
expose this product to rain or
moisture. The device must not be
exposed to dripping or splashing
and objects filled with liquids,
such as vases, must not be placed
on the device.
CAUTION
RISK OF
ELECTRIC SHOCK
DO NOT OPEN!
CAUTION: To reduce the risk of
electric shock, do not remove cover
(or back). No user-serviceable
parts inside. Refer servicing to
qualified service personnel.
IMPORTANT: Do not place your
®
device near anything
DIRECTV
WET or HOT!
TIP: We highly recommend
plugging the DIRECTV
into a surge protector to prevent
damage from fluctuations in
your power supply.
4
®
device
• Ensure proper ventilation — the DIRECTV® device must be left uncovered to allow proper airflow to the unit. Blocking the airflow to the unit
could impair performance or damage your device and other components.
• Do not stack electronic components or other objects on top of the DIRECTV device. Also, do not stack the device on top of a “hot component”
such as an audio power amplifier.
• Protect your components from power surges by connecting all the components before plugging any power cords into the wall outlet.
Use of a surge protector is also recommended.
• Don’t overload power outlets or extension cords, which can result in the risk of fire or shock. It’s also important to use only the type of power source
indicated on the marking label or in this manual.
• Never insert objects of any kind into any openings in the DIRECTV device.
• It is preferable to place the device on a flat, hard surface.
• Always unplug your DIRECTV device before moving it.
• Always unplug the DIRECTV device, TV and other equipment before you connect or disconnect any cables.
• The only way to disconnect the DIRECTV device from the power supply is to remove the power cord. The DIRECTV device must therefore
be installed next to the power source which must be easily accessible.
• CAUTION: Electric Shock — never attempt to disassemble the DIRECTV device yourself; always take it to a qualified service person when repair
is required. Opening or removing covers may expose dangerous voltage or other risks, and incorrect reassembly can cause shock when the device
is subsequently used. Attempted self-repair may also void your warranty. Changes or modifications not expressly approved by the party responsible
for compliance (by the warranty or by the manufacturer) could void the user’s authority to operate the equipment.
• Do not drop your DIRECTV device and always move it with care.
• Have your DIRECTV device professionally serviced (do not attempt to service it yourself).
• Any changes or modifications in construction of this device which are not expressly approved by the party responsible for compliance could void
the user’s authority to operate the equipment.
• If you move your DIRECTV device between locations at different temperatures, allow it to reach room temperature before you apply power to it.
• Do not pick up or otherwise move your DIRECTV device while it is connected to the AC power supply. If you want to move your device,
first disconnect it, then wait at least 30 seconds before continuing.
• For your information: The identification sticker can be located on the rear of your device.
• The telecommunication network voltage used is the category number 3.
Note to Satellite Dish Installer: This reminder is provided to call your attention to articles 810 and 820 of the 2005 National Electrical Code.
Refer to article 810, in particular 810-1 and 810-15, for required grounding of the metal structure of the dish antenna. Refer also to the 810-2
which, by reference to article 820, requires that the satellite dish coaxial cable shield be connected to the grounding system of the building as
close to the point of cable entry as practical.

Product overview
The DIRECTV CINEMA™ Connection Kit (DCCK) creates a wireless connection between your wireless router and your DIRECTV® Receiver
or DIRECTV
has been customized to work with the DCCK device to enable the DIRECTV CINEMAplus
®
Whole-Home DVR service compatible network, so your DIRECTV Receiver can access the Internet. Your DIRECTV Receiver
™
service and other DIRECTV broadband services.
This User’s Manual will take you through the setup process to connect the DCCK device to your DIRECTV Receiver.
Diagram of a Typical Installation
OFFICE LIVING ROOM
Internet
Modem Router
DCCK
Device
NOTE 1: Due to potential user interface improvements, the screens you see on your TV may differ slightly
from the ones included in this User’s Manual.
DIRECTV
Receiver
5

Package contents
DIRECTV CINEMA
Connection Kit Device
6
™
Power Adapter Ethernet Cable Coaxial Cable

™
Before you begin the installation of the DIRECTV CINEMA
and TV are powered on. Also, make sure you can connect to the Internet through your wireless router and computer.
Connection Kit (DCCK), make sure your DIRECTV® Receiver
Prepare Your DCCK Device for Connection
connection
A. Plug the power adapter
Power port of the
DCCK device.
Connect Power Adapter
to DCCK Device
NOTE 2: If your Wi-Fi router features Wireless Protected Setup (WPS)*, continue to Step C. One of the images below
Otherwise continue to the “Determine Your Connection Type” section on page 10.
*WPS allows for easy and secure wireless network setup. WPS can automatically set up network names and wireless
security for wireless routers, access points, computers, adapters, Wi-Fi phones, and other consumer electronics devices.
into the
should appear on your router if it is WPS capable:
B. Plug the other end of the power adapter
into a surge protector (recommended)
or an electrical outlet.
or
Connect Power Adapter
to Electrical Outlet
7

connection
NOTE 3: During WPS configuration, the DCCK device should be powered on, but not connected to the DIRECTV® Receiver.
C. On your router, press the WPS button and wait until
the WPS LED begins to flash. The WPS button may look
like one of the icons to the right.
Within two minutes of activating WPS on your router,
press and hold the WPS button on the DCCK device
until the WLAN LED on the DCCK flashes green
(approximately 2 seconds).
or
Press WPS Button on Router
Press WPS Button on DCCK Device
8

D. When the connection is complete, the WLAN LED displays solid green.
You have successfully completed the WPS connection between the DCCK
and your Wi-Fi router. You should now proceed to the next section
to connect the DCCK device to your receiver.
If the WLAN LED does not light up, then repeat Steps C and D. If the
WLAN LED still does not light up, then proceed to the next section
and you will have the option to manually configure the wireless connection
when you reach the “Manual Wireless Setup” section on page 23.
IMPORTANT: There are three different options for connecting your DCCK device to your receiver, depending
on the DIRECTV installation in your home. To properly install your DCCK device, carefully follow
the steps in the “Determine Your Connection Type” section (see page 10).
connection
LED is solid green
9

determine your connection tyPe
This section will guide you through a simplified process to determine which DCCK connection type will work with your DIRECTV installation.
A. To determine your DIRECTV installation type, turn on the
that you will be connecting. Next, press the DASH key
DIRECTV
10
®
Remote Control and note the information displayed on your TV.
DIRECT V Remote Control Dash Key
HD DVR Receiver
(lower left key) on your

determine your connection tyPe
DASH KEY DISPLAYS ON TV CHECK BACK OF RECEIVER CONNECTION
No check needed Proceed to the “Direct Ethernet Connection”
section on page 13.
Connected Home Adapter attached to receiver
No Connected Home Adapter attached to receiver
Proceed to the “DIRECTV
®
Whole-Home
DVR Service Compatible with Connected
Home Adapter Connection” section
on page 18.
Receiver Models H24 or HR24 only – Proceed
to the “DIRECTV
®
Whole-Home DVR Service
Compatible Connection” section on page 15.
All other Receiver Models – Proceed to the
“Direct Ethernet Connection” section on page 13.
11

determine your connection tyPe
B. To determine your receiver model, you may use the on-screen display or find the model number
behind the access card door of the receiver.
Determine your DIRECTV® Receiver model.
Go to System Setup to find your model type.
To do this, using your DIRECTV Remote Control, press “MENU”,
select “Parental, Fav’s & Setup”, then “System Setup”.
Note the name next to the text “Receiver:” on the right side
of the screen. “HR20/700” is the model name in the example
screen on the right.
System Information Screen
The model name is also located on a sticker behind
the access card door (or underneath the receiver).
Sticker Behind Access Card Door on Receiver
12
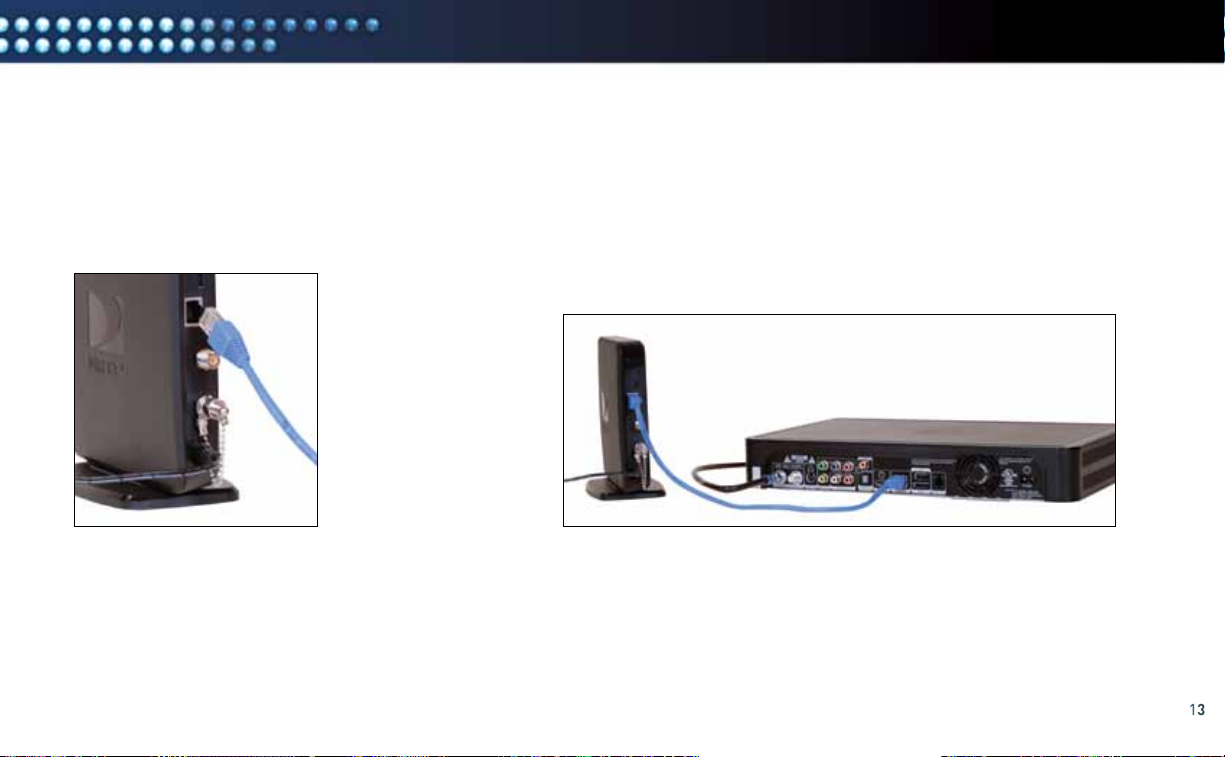
direct ethernet connection
This section describes how to attach your DCCK device if your installation requires the use of an Ethernet connection. In this installation,
you will use the enclosed Ethernet cable. The coaxial cable included with your DCCK will not be used in this configuration.
A. Connect one end of the enclosed
Ethernet cable to the Ethernet port
of the DCCK device.
Connect Ethernet to DCCK Device
B. Connect the other end of the Ethernet cable to the Ethernet
port on the back of your DIRECTV
®
Receiver. (If your DIRECTV
Receiver has two Ethernet ports, connect the cable to the upper
port labeled “ETHERNET 1”.)
Connect Ethernet Cable to DIRECTV Receiver
13

direct ethernet connection
C. The POWER and Activity LEDs on the DCCK device should
light up. Wait for the POWER LED to stop flashing.
POWER and Activity
LEDs Light Up
D. If you used WPS to automatically set up your wireless connection,
go to the “Completing Wireless Protected Setup” section on page 21.
Otherwise, if you cannot use WPS or are unsure if you have WPS,
go to the “Manual Wireless Setup” section on page 23 to manually
establish your wireless connection.
14
 Loading...