

Page 1

ThinkPadHelixUserGuide
20CGand20CH
Page 2

Note:Beforeusingthisinformationandtheproductitsupports,besuretoreadandunderstandthefollowing:
•Safety,Warranty,andSetupGuide
•RegulatoryNotice
•“Importantsafetyandhandlinginformation”onpageiii
•AppendixD“Notices”onpage109
ThelatestSafety,Warranty,andSetupGuideandtheRegulatoryNoticeareavailableontheLenovoSupport
Websiteathttp://www.lenovo.com/UserManuals.
FirstEdition(November2014)
©CopyrightLenovo2014.
LIMITEDANDRESTRICTEDRIGHTSNOTICE:IfdataorsoftwareisdeliveredpursuantaGeneralServicesAdministration
“GSA”contract,use,reproduction,ordisclosureissubjecttorestrictionssetforthinContractNo.GS-35F-05925.
Page 3

Contents
Readthisfirst.............iii
Importantsafetyandhandlinginformation.....iii
Chapter1.Productoverview......1
Tabletlayout................1
Frontviewandsideview..........1
Rearview................3
Accessories.................4
Features..................5
Specifications................6
Operatingenvironment............7
Lenovoprograms..............7
Chapter2.Usingyourtablet......9
Initialsetupinstructions............9
Usingthemulti-touchscreen.........10
Powermanagement............11
Chargingthebattery..........12
Extendingthebatterylifebetweencharges..13
Checkingthebatterystatus........13
UsingtheT abletDigitizerPen.........14
UsingtheOn-ScreenKeyboardorthetouch
keyboardandhandwritingpanel........14
Changingthestartupbehaviortoopeneitherthe
desktoportheStartscreen..........15
Downloadinggamesandapplications.....15
Usingthefingerprintreader..........15
UsingtheThinkPadHelixQuickshotCover...18
Usingthecameras.............20
Usingthemicro-SD-cardreader........20
Usingasmartcard.............22
UsingHDMIdevices............24
Usingsynchronizationsolutions........25
UsingtheGPSsatellitereceiver........25
Turningoffthetablet............25
Chapter3.Wirelessnetworksand
devices................27
InstallingandremovingthemicroSIMcard...27
Determiningwhichmobilenetworkyouareusing.29
ConnectingtoaWi-Finetwork........29
Connectingtoamobilenetwork........30
SharingyourInternetconnection.......31
UsingBluetoothdevices...........31
UsingtheNFCconnection..........32
Chapter4.Youandyourtablet....37
Comfortandaccessibility..........37
Usingyourtabletmorecomfortably....37
Accessibilityinformation.........37
Gettingupdates..............40
Travelingwithyourtablet...........40
Traveltips...............40
Travelaccessories...........40
Careandmaintenance...........41
Chapter5.ThinkPadHelixoptions..43
ThinkPadHelixUltrabookKeyboard......43
OverviewofThinkPadHelixUltrabook
Keyboard...............43
UsingtheThinkPadHelixUltrabook
Keyboard...............44
ThinkPadHelixUltrabookProKeyboard.....48
OverviewofThinkPadHelixUltrabookPro
Keyboard...............48
UsingtheThinkPadHelixUltrabookPro
Keyboard...............50
ThinkPadTabletDock............59
OverviewofThinkPadTabletDock.....59
UsingtheThinkPadTabletDock......61
Chapter6.Security..........63
Usingpasswords..............63
Typingpasswords...........63
Passwordsandsleepmode........63
Power-onpassword...........63
Supervisorpassword..........64
Harddiskpasswords..........65
Harddisksecurity...........67
Usingthesecuritychip...........68
Usingfirewalls...............68
Protectingdataagainstviruses........69
Chapter7.Advancedconfiguration..71
Installingdevicedrivers...........71
ThinkPadTabletSetup...........71
Mainmenu..............72
Configmenu..............73
Securitymenu.............77
Startupmenu.............82
Restartmenu.............83
UpdatingyoursystemUEFIBIOS.....84
Usingsystemmanagement..........84
Systemmanagement..........84
©CopyrightLenovo2014
i
Page 4

Chapter8.Troubleshooting
problems...............85
Diagnosingproblems............85
Troubleshooting..............85
Recoveringfromaseveresoftwareproblem...87
Errormessages..............87
Chapter9.Recoveryinformation...89
Refreshingyourtablet............89
Resettingyourtablettothefactorydefault
settings.................89
Usingtheadvancedstartupoptions......90
RecoveringyouroperatingsystemifWindows8.1
failstostart................90
Creatingandusingrecoverymedia......90
Chapter10.Gettingsupport.....93
Locatingimportantproductinformation.....93
Lenovotechnicalsupport..........94
Lenovouserforums.............95
FindingThinkPadoptions..........95
Purchasingadditionalservices........95
AppendixA.Regulatory
information..............97
Wirelessrelatedinformation.........97
LocatingtheUltraConnect™wireless
antennas...............98
Locatingwirelessregulatorynotices....99
Exportclassificationnotice..........99
Electronicemissionnotices..........99
FederalCommunicationsCommission
DeclarationofConformity........99
IndustryCanadaClassBemissioncompliance
statement...............99
EuropeanUnion-Compliancetothe
ElectromagneticCompatibilityDirective...100
GermanClassBcompliancestatement...100
KoreaClassBcompliancestatement....101
JapaneseVCCIClassBstatement.....101
Japancompliancestatementforproducts
whichconnecttothepowermainswith
ratedcurrentlessthanorequalto20Aper
phase................101
Lenovoproductserviceinformationfor
Taiwan................101
Eurasiancompliancemark..........101
Brazilregulatorynotice...........101
Mexicoregulatorynotice...........101
AppendixB.WEEEandrecycling
information.............103
ImportantWEEEinformation.........103
RecyclinginformationforChina........103
RecyclinginformationforJapan........103
RecyclinginformationforBrazil........104
BatteryrecyclinginformationforTaiwan.....105
BatteryrecyclinginformationfortheUnitedStates
andCanada................105
BatteryrecyclinginformationfortheEuropean
Union..................105
ChinarecyclinginformationforWasteElectrical
andElectronicEquipment(WEEE).......106
AppendixC.RestrictionofHazardous
SubstancesDirective(RoHS)....107
EuropeanUnionRoHS...........107
ChinaRoHS................107
TurkishRoHS...............107
UkraineRoHS...............108
IndiaRoHS................108
AppendixD.Notices.........109
Trademarks................110
iiThinkPadHelixUserGuide
Page 5
Readthisfirst
Besuretofollowtheimportanttipsgivenheretogetthemostuseandenjoymentoutofthetablet.Failureto
dosomightleadtodiscomfortorinjury,orcausethetablettofail.
Importantsafetyandhandlinginformation
Toavoidpersonalinjury,propertydamage,oraccidentaldamagetoyourThinkPad
calledthetablet),readalloftheinformationinthissectionbeforeusingit.
Fordetailedoperatinginstructions,refertotheThinkPadHelixUserGuide(thispublication).Y oucan
accesstheThinkPadHelixUserGuidebyusingoneofthefollowingmethods:
•Gotohttp://www.lenovo.com/UserManualsandfollowtheinstructionsonthescreen.
•OpenWindows
Foradditionaltipstohelpyouoperatethetabletsafely,goto:
http://www.lenovo.com/safety
®
HelpandSupport.ThentapLenovoUserGuide.
Handleyourtabletwithcare:
Donotdrop,bend,puncture,insertforeignobjects,orplaceheavyobjectsonyourtablet.Sensitive
componentsinsidemightbecomedamaged.
Yourtabletscreenismadeofglass.Theglassmightbreakifthetabletisdroppedonahardsurface,is
thesubjectofahighimpact,oriscrushedbyaheavyobject.Iftheglasschipsorcracks,donottouch
thebrokenglassorattempttoremoveitfromthetablet.Stopusingthetabletimmediatelyandcontact
Lenovo
®
technicalsupportforrepair,replacement,ordisposalinformation.
®
Helix(hereafter
Donotdisassembleormodifyyourtablet:
Yourtabletisasealedunit.Therearenoend-userserviceablepartsinside.Allinternalrepairsmustbedone
byaLenovo-authorizedrepairfacilityoraLenovo-authorizedtechnician.Attemptingtoopenormodifyyour
tabletwillvoidthewarranty.
Generalbatterynotice
DANGER
BatteriessuppliedbyLenovoforusewithyourproducthavebeentestedforcompatibilityand
shouldonlybereplacedwithapprovedparts.AbatteryotherthantheonespecifiedbyLenovo,ora
disassembledormodifiedbatteryisnotcoveredbythewarranty.
Batteryabuseormishandlingcancauseoverheat,liquidleakage,oranexplosion.T oavoidpossible
injury,dothefollowing:
•Donotopen,dissemble,orserviceanybattery.
•Donotcrushorpuncturethebattery.
•Donotshort-circuitthebattery,orexposeittowaterorotherliquids.
•Keepthebatteryawayfromchildren
•Keepthebatteryawayfromfire.
©CopyrightLenovo2014
iii
Page 6
Stopusingthebatteryifitisdamaged,orifyounoticeanydischargeorthebuildupofforeign
materialsonthebatteryleads.
Storetherechargeablebatteriesorproductscontainingtherechargeablebatteriesatroom
temperature,chargedtoapproximately30to50%ofcapacity.Werecommendthatthebatteriesbe
chargedaboutonceperyeartopreventoverdischarge.
Donotputthebatteryintrashthatisdisposedofinlandfills.Whendisposingofthebattery,comply
withlocalordinancesorregulations.
Noticeforbuilt-inrechargeablebattery
DANGER
Donotattempttoreplacethebuilt-inrechargeablebattery.Replacementofthebatterymustbe
donebyaLenovo-authorizedrepairfacilityortechnician.
Onlyrechargethebatterystrictlyaccordingtoinstructionsincludedintheproductdocumentation.
TheLenovo-authorizedrepairfacilitiesortechniciansrecycleLenovobatteriesaccordingtolocal
lawsandregulations.
Noticefornon-rechargeablecoin-cellbattery
DANGER
Ifthecoin-cellbatteryisincorrectlyreplaced,thereisdangerofanexplosion.Thebatterycontains
asmallamountofharmfulsubstance.
Donotheattomorethan100°C(212°F).
ThefollowingstatementappliestousersinthestateofCalifornia,U.S.A.
CaliforniaPerchlorateInformation:
Productscontainingmanganesedioxidelithiumcoin-cellbatteriesmaycontainperchlorate.
PerchlorateMaterial-specialhandlingmayapply,See
www.dtsc.ca.gov/hazardouswaste/perchlorate
Preventyourtabletandadapterfromgettingwet:
Donotimmerseyourtabletinwaterorleaveitinalocationwhereitcangetsaturatedwithwaterorother
liquids.
Usesupportedchargingmethodsonly:
Youcanuseanyofthefollowingchargingmethodstorechargetheinternalbatteryofyourtabletsafely:
Attention:UseonlyLenovo-approvedacpoweradapters.Unauthorizedacpoweradapterscouldseverely
damagethetablet.
•acpoweradaptershippedwithyourtablet
•ThinkPadUltrabookProKeyboardandtheacpoweradaptershippedwiththekeyboard,ifavailable
ivThinkPadHelixUserGuide
Page 7

•ThinkPadT abletDockandtheacpoweradaptershippedwiththedock
Note:TheThinkPadT abletDockisanoptionaldevicethatLenovodesignedspecificallyforyourtablet.
TopurchasetheoptionfromLenovo,goto:
http://www.lenovo.com/essentials
Chargingdevicesmightbecomewarmduringnormaluse.Ensurethatyouhaveadequateventilationaround
thechargingdevice.Unplugthechargingdeviceifanyofthefollowingoccurs:
•Thechargingdevicehasbeenexposedtorain,liquid,orexcessivemoisture.
•Thechargingdeviceshowssignsofphysicaldamage.
•Y ouwanttocleanthechargingdevice.
Lenovoisnotresponsiblefortheperformanceorsafetyofproductsnotmanufacturedorapprovedby
Lenovo.
Preventhearingdamage:
Yourtablethasacomboaudioconnectorthatyoucanuseforheadphones(alsocalledaheadset)or
earphones.
CAUTION:
Excessivesoundpressurefromearphonesandheadphonescancausehearingloss.Adjustmentof
theequalizertomaximumincreasestheearphoneandheadphoneoutputvoltageandthesound
pressurelevel.Therefore,toprotectyourhearing,adjusttheequalizertoanappropriatelevel.
Excessiveuseofheadphonesorearphonesforalongperiodoftimeathighvolumecanbedangerousif
theoutputoftheheadphoneorearphoneconnectorsdonotcomplywithspecificationsofEN50332-2.
TheheadphoneoutputconnectorofyourtabletcomplieswithEN50332-2Subclause7.Thisspecification
limitsthetablet'smaximumwidebandtrueRMSoutputvoltageto150mV.Tohelpprotectagainsthearing
loss,ensurethattheheadphonesorearphonesyouusealsocomplywithEN50332-2(Clause7limits)fora
widebandcharacteristicvoltageof75mV.UsingheadphonesthatdonotcomplywithEN50332-2canbe
dangerousduetoexcessivesoundpressurelevels.
Ifyourtabletcamewithheadphonesorearphonesinthepackage,asaset,thecombinationofthe
headphonesorearphonesandthetabletalreadycomplieswiththespecificationsofEN50332-1.Ifdifferent
headphonesorearphonesareused,ensurethattheycomplywithEN50332-1(Clause6.5Limitation
Values).UsingheadphonesthatdonotcomplywithEN50332-1canbedangerousduetoexcessive
soundpressurelevels.
Takecarewhenusingyourtabletinamotorvehicleoronabicycle:
Alwaysprioritizeyoursafetyandthesafetyofothers.Followthelaw.Locallawsandregulationsmight
governhowyoucanusemobileelectronicdevices,suchasyourtablet,whileyoudriveamotorvehicle
orrideabicycle.
Disposeaccordingtolocallawsandregulations:
Whenyourtabletreachestheendofitsusefullife,donotcrush,incinerate,immerseinwater,ordisposeof
yourtabletinanymannercontrarytolocallawsandregulations.Someinternalpartscontainsubstances
thatcanexplode,leak,orhaveanadverseenvironmentalaffectifdisposedofincorrectly.
SeeAppendixB“WEEEandrecyclinginformation”onpage103
©CopyrightLenovo2014
foradditionalinformation.
v
Page 8

Keepyourtabletandaccessoriesawayfromsmallchildren:
Yourtabletcontainssmallpartsthatcanbeachokinghazardtosmallchildren.Additionally,theglassscreen
canbreakorcrackifdroppedonorthrownagainstahardsurface.
Protectyourdataandsoftware:
Donotdeleteunknownfilesorchangethenameoffilesordirectoriesthatwerenotcreatedbyyou;
otherwise,yourtabletsoftwaremightfailtowork.
Beawarethataccessingnetworkresourcescanleaveyourtabletvulnerabletoviruses,hackers,spyware,
andothermaliciousactivitiesthatmightdamageyourtablet,software,ordata.Itisyourresponsibilityto
ensurethatyouhaveadequateprotectionintheformoffirewalls,antivirussoftware,andanti-spyware
softwareandkeepthissoftwareuptodate.
Keepelectricalappliancessuchasanelectricfan,radio,high-poweredspeakers,airconditioner,and
microwaveovenawayfromyourtabletbecausethestrongmagneticfieldsgeneratedbytheseappliances
candamagethescreenandthedataonthetablet.
Beawareofheatgeneratedbyyourtablet:
Whenyourtabletisturnedonorthebatteryischarging,somepartsmightbecomehot.Thetemperature
thattheyreachdependsontheamountofsystemactivityandthelevelofchargeinthebattery.Extended
contactwithyourbody,eventhroughclothing,couldcausediscomfortorevenaskinburn.Avoidkeeping
yourhands,yourlap,oranyotherpartofyourbodyincontactwithahotsectionofthetabletforany
extendedtime.
Plasticbagnotice
DANGER
Plasticbagscanbedangerous.Keepplasticbagsawayfrombabiesandchildrentoavoiddanger
ofsuffocation.
PolyvinylChloride(PVC)cableandcordnotice
Manypersonalcomputerproductsandaccessoriescontaincords,cablesorwires,suchaspowercordsor
cordstoconnecttheaccessorytoapersonalcomputer.Ifthisproducthassuchacord,cableorwire,then
thefollowingwarningapplies:
WARNING:Handlingthecordonthisproductorcordsassociatedwithaccessoriessoldwiththisproduct
willexposeyoutolead,achemicalknowntotheStateofCaliforniatocausecancer,andbirthdefectsor
otherreproductiveharm.Washhandsafterhandling.
viThinkPadHelixUserGuide
Page 9
Chapter1.Productoverview
Thischapterprovidesanoverviewofthetablet,includingthelocationsofconnectorsandcontrols,tablet
features,accessories,specifications,operatingenvironment,andpreinstalledLenovoprograms.
Tabletlayout
Thistopicintroducesthetablethardwarefeaturestogiveyouthebasicinformationyouneedtostart
usingthetablet.
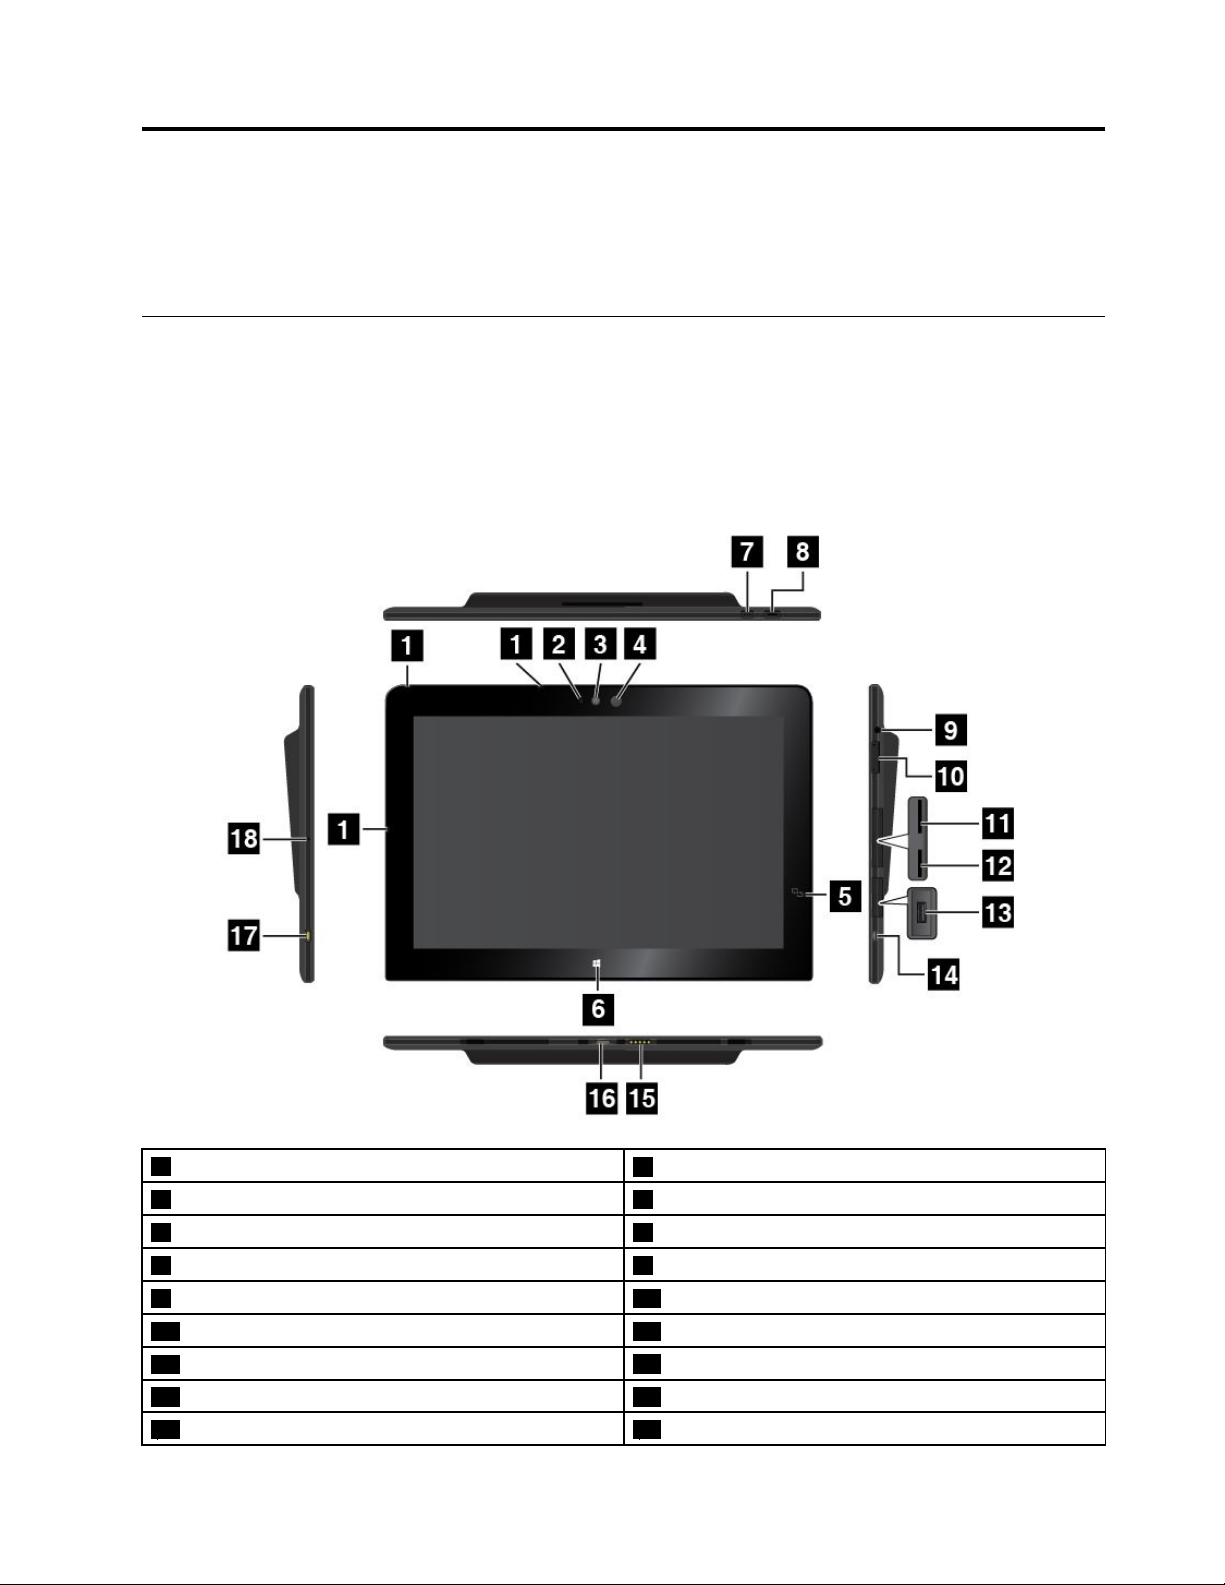
Frontviewandsideview
Note:Yourtabletmightlookslightlydifferentfromthefollowingillustration.
1Microphones
3Front-facingcamera
5NFCtouchpoint(onsomemodels)6WindowsStartscreencontrol
7Screen-rotation-lockbutton
9Audioconnector10Volume-controlbuttons
11Micro-SIM-cardslot(onsomemodels)12Micro-SD-cardslot
13USB3.0connector
15Keyboardconnector16Dockconnector
17Powerconnector18Emergency-resthole
©CopyrightLenovo2014
2Camera-statusindicator
4Ambientlightsensor
8Powerbutton
14MicroHDMI™connector
1
Page 10

1Microphones
Thebuilt-inmicrophonescapturesoundandvoicewhentheyareusedwithanapplicationcapableof
handlingaudio.
2Camera-in-useindicator
Whenyoustarteitherthefrontfacingcameraortherear-facingcamera,thecamera-in-useindicatorturns
onautomatically.
3Front-facingcamera
Yourtablethasa2-megapixelfront-facingcamera.Youcanusethecameratotakepictures,createvideos,
ormakevideocallsincollaborationwithWebapplications.Whenthecameraisstarted,thecamera-in-use
indicatorturnson.Formoreinformation,see“Usingthecameras”onpage20.
4Ambientlightsensor
Theambientlightsensordetectsthebrightnessoftheenvironment.Thescreenbrightnessautomatically
adjustsdependingontheambientlightconditionsdetectedbytheambientlightsensor.
5NFCtouchpoint(onsomemodels)
Ifyoufindanearfieldcommunication(NFC)touchpointontherightsideofthedisplay,itindicatesthat
yourtabletsupportstheNFCfeature.FormoreinformationabouttheNFCfeature,see“UsingtheNFC
connection”onpage32.
6WindowsStartscreencontrol
TaptheWindowsStartscreencontroltogototheStartscreen.
7Screen-rotation-lockbutton
Pressthebuttontoenableordisablethescreenauto-rotationfunction.
8Powerbutton
Pressthepowerbuttontoturnonthetablet.
Toturnoffthetablet,swipeinfromtherightedgeofthescreentodisplaythecharms.ThentapSettings➙
Power➙Shutdown.
Ifthetabletstopsrespondingandyoucannotturnitoff,pressandholdthepowerbuttonforfoursecondsor
more.
Youalsocanprogramthepowerbuttonsothatbypressingthepowerbuttonyoucanshutdownthetablet
orputitintosleeporhibernationmode.Toachievethis,changeyourpowerplansettings.T oaccess
powerplansettings,dothefollowing:
1.Fromthedesktop,tapthebattery-statusiconintheWindowsnotificationarea.
2.TapMorepoweroptions.
3.Inthenavigationpanel,tapChoosewhatthepowerbuttondoes.
4.Followtheinstructionsonthescreentochangethesettingsaccordingtoyourpreference.
9Audioconnector
Connectheadphonesoraheadsettolistentostereosoundfromthetablet.Youalsocanconnectaheadset
torecordaudioormakecalls.
Note:Theaudioconnectordoesnotsupportaconventionalmicrophone.
2ThinkPadHelixUserGuide
Page 11

10Volume-controlbuttons
Pressthevolume-uporvolume-downbuttontoadjustthetabletvolume.
11Micro-SIM-cardslot(onsomemodels)
OpentheprotectivecovertoaccessthemicroSubscriberIdentificationModule(SIM)cardslot.Inserta
microSIMcardtoestablishawirelesswideareanetwork(WAN)connection.Forinstructionsonhowto
installamicroSIMcard,see“InstallingandremovingthemicroSIMcard”onpage27.
12Micro-SD-cardslot
Opentheprotectivecovertoaccessthemicrosecuredigital(SD)cardreader.InsertamicroSDcardinto
themicro-SD-cardslotfordataaccessorstorage.Formoreinformation,see“Usingthemicro-SD-card
reader”onpage20.
13USB3.0connector
TheUSB3.0connectorisusedforconnectingUSB-compatibledevices,suchasaUSBprinter,USBmouse,
USBkeyboard,USBmemorykey,oradigitalcamera.
Attention:WhenyouattachaUSBcabletothisUSBconnector,ensurethattheUSBmarkisfacingupward.
Otherwisetheconnectormightbedamaged.
14MicroHDMI
TM
connector
YourtablethasamicroHigh-DefinitionMultimediaInterface(HDMI)connector,whichisadigitalaudioand
videointerfacethatcanconnectacompatibledigitalaudiodeviceorvideodisplaysuchasahigh-definition
television(HDTV).Formoreinformation,see“UsingHDMIdevices”onpage24.
15Keyboardconnector
UsethisconnectortoconnectaThinkPadHelixUltrabookKeyboardoraThinkPadHelixUltrabookPro
Keyboard.Formoreinformation,see“ThinkPadHelixUltrabookKeyboard”onpage43and“ThinkPadHelix
UltrabookProKeyboard”onpage48.
16Dockconnector
UsethisconnectortoconnectaThinkPadTabletDock.TheThinkPadTabletDockisavailableasanoption
fromLenovoathttp://www.lenovo.com/essentials.Formoreinformation,see“ThinkPadTabletDock”
onpage59.
17Powerconnector
Usethisconnectorwiththesuppliedpowercordandtheacpoweradaptertochargethetabletwhen
thebatterypowerislow.
Formoreinformation,see“Chargingthebattery”onpage12.
18Emergency-resethole
Ifthetabletstopsrespondingandyoucannotturnitoffbypressingthepowerbutton,removetheacpower
adapterandinsertastraightenedpaperclipintotheemergency-resetholetoresetthetablet.
Rearview
Note:Yourtabletmightlookslightlydifferentfromthefollowingillustration.
Chapter1.Productoverview3
Page 12
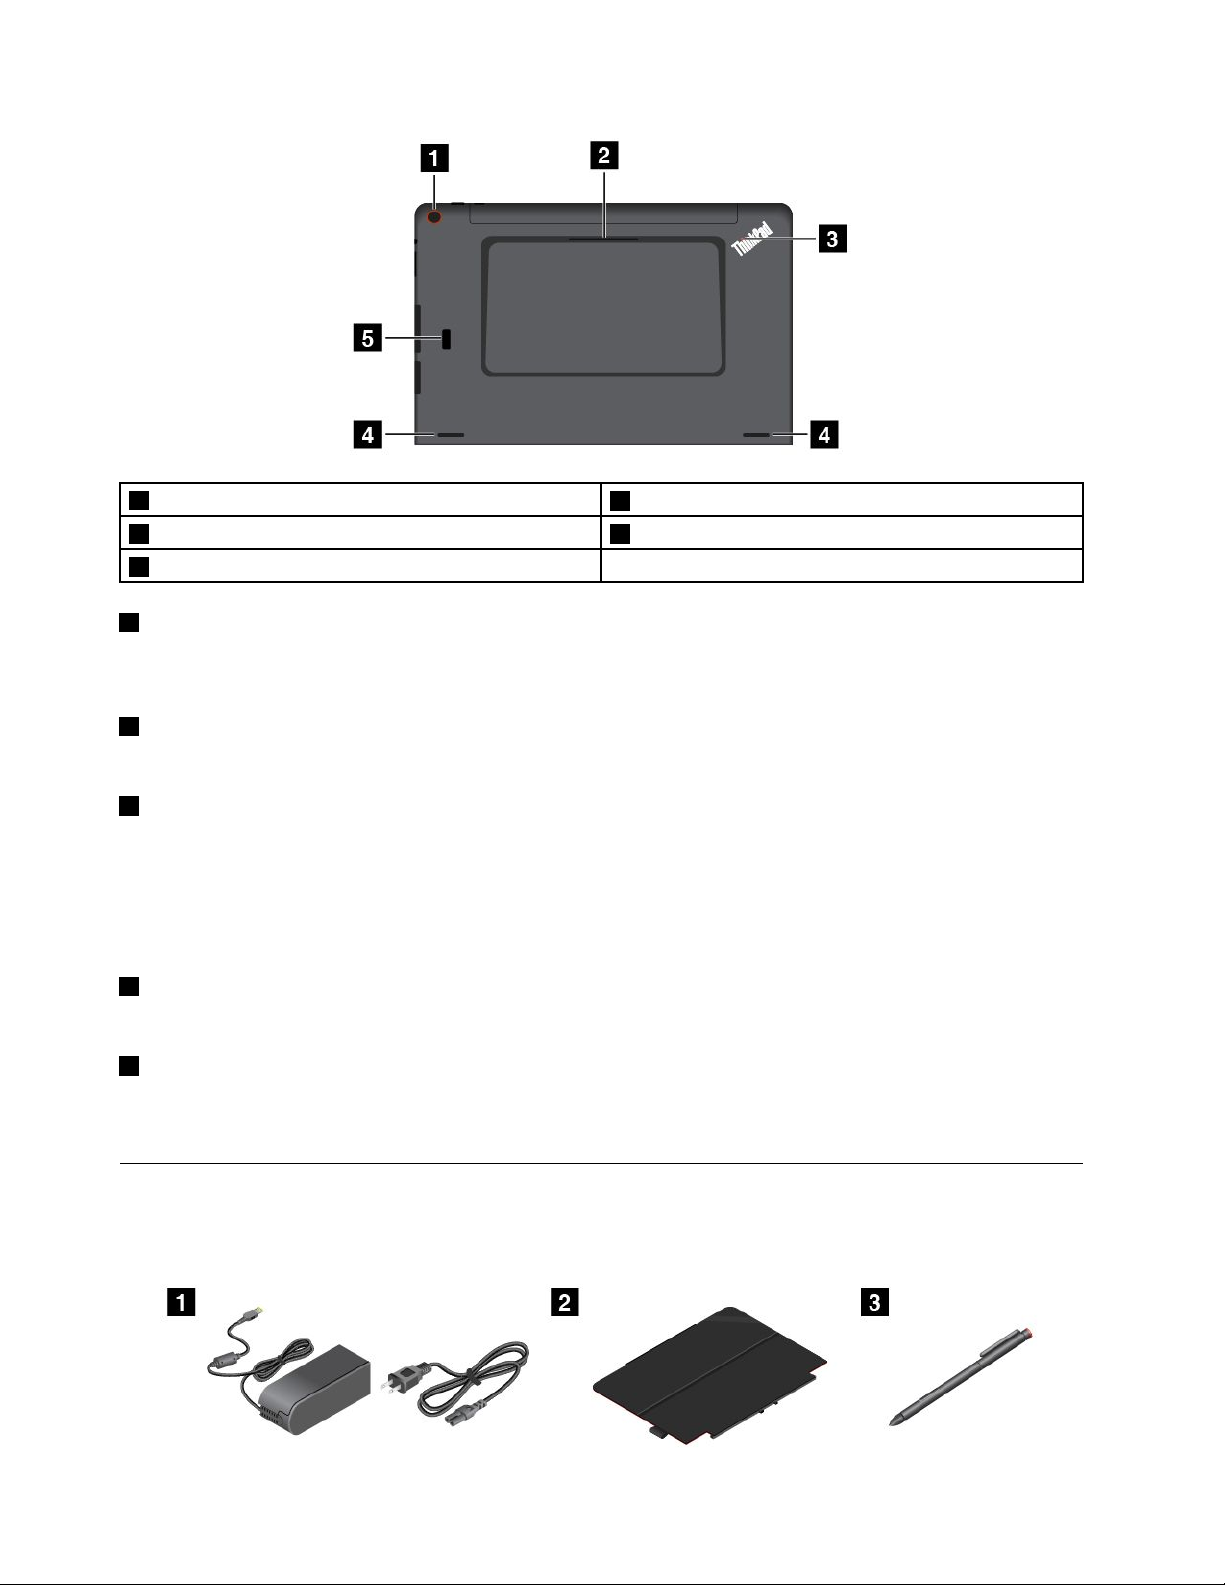
1Rear-facingcamera
3System-statusindicator4Speakers
5Fingerprintreader(onsomemodels)
1Rear-facingcamera
2Smartcardslot(onsomemodels)
Yourtablethasan5-megapixelrear-facingcamera.Youcanusethecameratotakepicturesandcreate
videos.Formoreinformation,see“Usingthecameras”onpage20.
2Smartcardslot(onsomemodels)
Yourtabletmighthaveasmartcardslot.Formoreinformation,see“Usingasmartcard”onpage22.
3System-statusindicator
TheilluminateddotintheThinkPadlogoonthebacksideofthetabletworksasasystem-statusindicator.
•Blinksthreetimes:Thetabletisconnectedtoapowersource.
•On:Thetabletisonandinuse.
•Off:Thetabletisoff,insleepmode,orinhibernationmode.
4Speakers
Theintegratedspeakersprovideaudiooutputforvideoandmusicplayback.
5Fingerprintreader(onsomemodels)
Fingerprintauthenticationtechnologyprovidessimpleandsecureuseraccessbyassociatingyourfingerprint
withapassword.Formoreinformation,see“Usingthefingerprintreader”onpage15.
Accessories
Thefollowingaresomeexamplesofaccessoriesavailableforyourtablet.Youcanpurchasethese
accessoriesfromtheLenovoWebsiteathttp://www.lenovo.com/essentialsorfromaLenovoreseller.
4ThinkPadHelixUserGuide
Page 13

1Powercordandacpoweradapter:Usethepowercordtogetherwiththeacpoweradaptertoprovide
acpowertoyourtabletandchargethebattery.
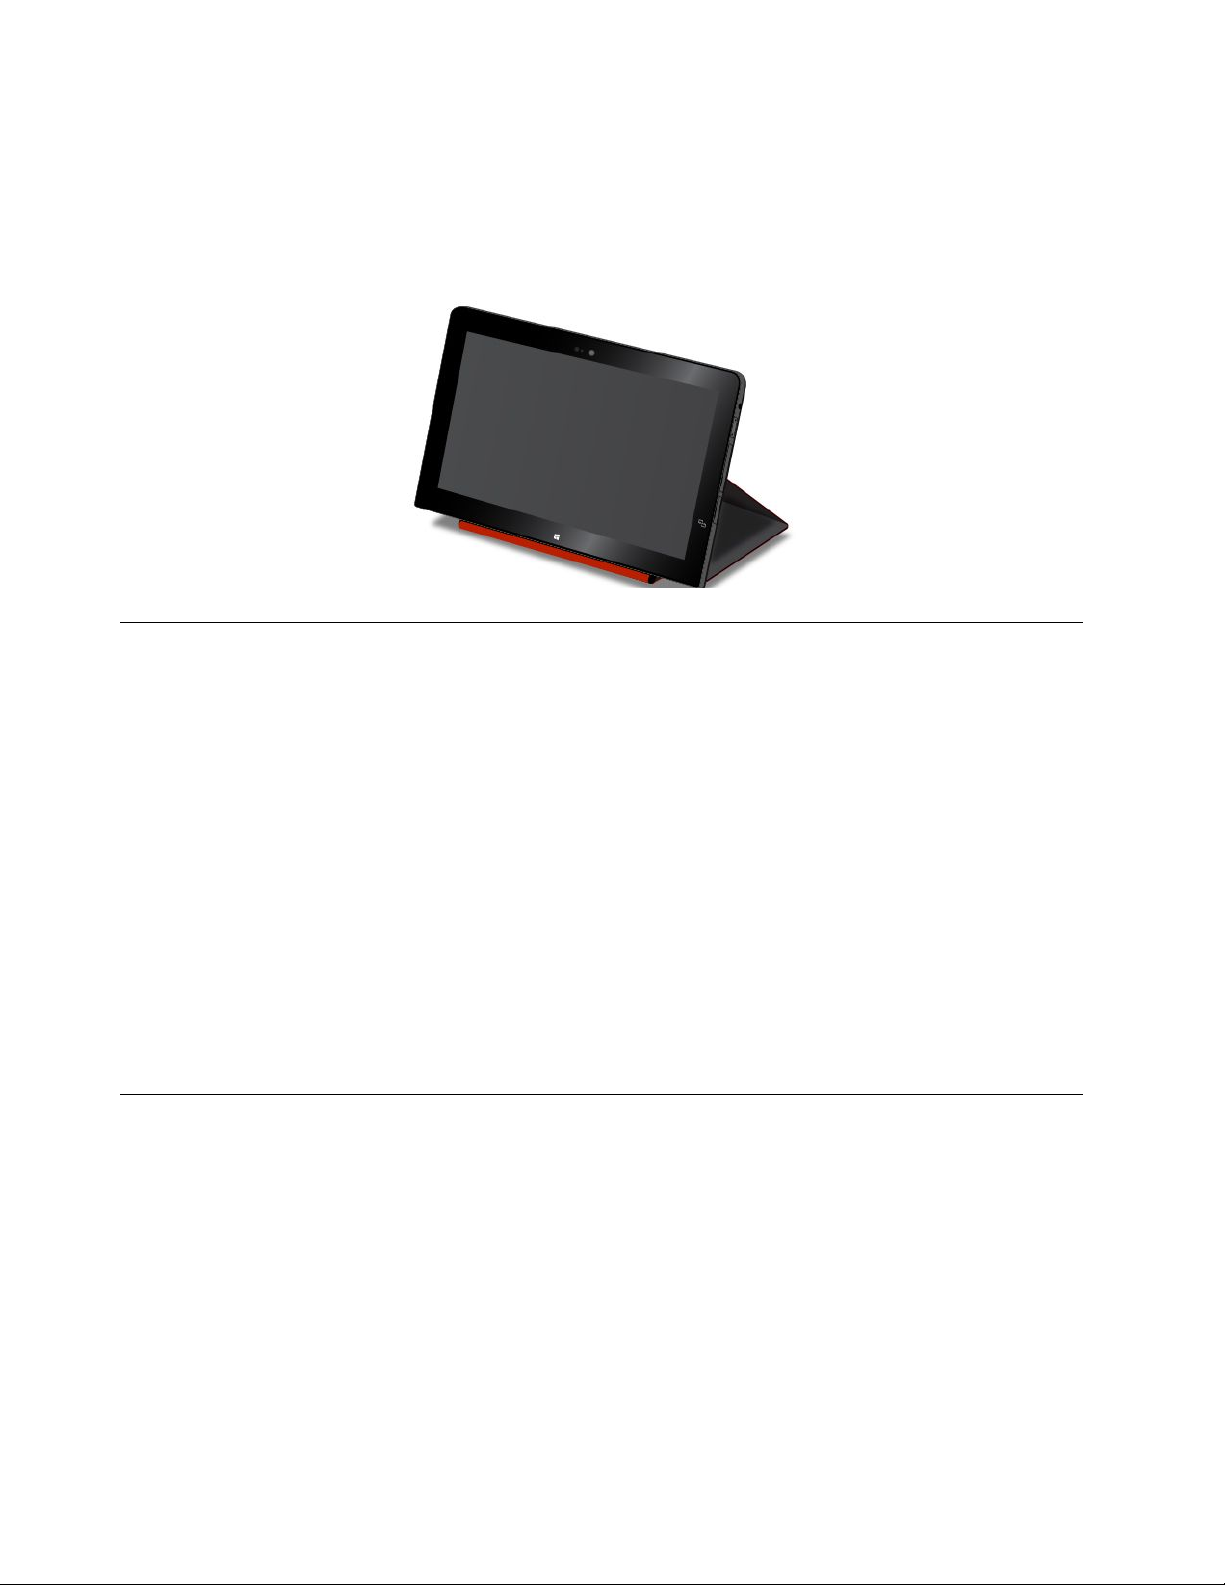
2ThinkPadHelixQuickshotCover(onsomemodels):TheThinkPadHelixQuickshotCoverattachesto
thetabletmagnetically.Usethecovertodothefollowing:
•Protectthetabletscreen.
•Wakeupthetabletorputthetabletintosleepmodeconveniently.
•Launchthecamera.
•Serveasastandforthetablet.
Formoreinformation,see“UsingtheThinkPadHelixQuickshotCover”onpage18.
3TabletDigitizerPen(onsomemodels):SometabletsareequippedwithaTabletDigitizerPen.Usethe
TabletDigitizerPentoinputtextordrawgraphicsinanaturalmannerandperformotheroperationswithout
tappingthescreenwithyourfinger.Formoreinformation,see“UsingtheT abletDigitizerPen”onpage14.
Formoreinformationaboutotheroptionsavailableforyourtablet,seeChapter5“ThinkPadHelixoptions”
onpage43.
Features
Processor
•Intel
®
Core™processor
Operatingsystem
•Microsoft
®
Windows8.1
Memory
•4GBor8GB
Internalstorage
•M.2solid-statedrive
Display
•Anti-reflective,GorillaGlass
•Size:294.5mm(11.6inches)
•Screenresolution:1920x1080pixels
•Automaticbrightnesscontrol(ambientlightsensor)
•In-planeswitchingtechnologyforfastresponsetime,wideviewingangle,andhigh-qualitycolor
reproduction
•Light-emittingdiode(LED)backlighttechnology
•Multi-touchtechnology
Integratedcameras
•Front-facingcamera,twomegapixels
•Rear-facingcamera,fivemegapixels,auto-focus
Chapter1.Productoverview5
Page 14

Connectors
•Oneaudioconnector
•Onepowerconnector
•Onekeyboardconnector
•Onedockconnector
•OnemicroHDMIconnector
•OneUSB3.0connector
•OneAlwaysOnUSB3.0connectors(ontheThinkPadHelixUltrabookProKeyboard)
•OneMiniDisplayPortconnector(ontheThinkPadHelixUltrabookProKeyboard)
•OneUSB2.0connector(ontheThinkPadHelixUltrabookKeyboard)
Cardslotorcardreader
•Onemicro-SIM-cardslot(onsomemodels)
•Onemicro-SD-cardslot
•Onesmartcardslot(onsomemodels)
Wirelessfeatures
•Bluetooth4.0
•WirelessLAN
•WirelessWAN(onsomemodels)
•NFC(onsomemodels)
•GlobalPositioningSystem(GPS)satellitereceiver(onsomemodels)
Securityfeatures
Fingerprintreader(onsomemodels)
Specifications
Tabletsize
•Width:301.1mm(11.85inches)
•Depth:192.5mm(7.58inches)
•Height:
–Formodelswithoutasmartcardslot:9.6mm(0.38inch)
–Formodelswithasmartcardslot:19.35mm(0.76inch)
ThinkPadHelixUltrabookKeyboardsize
•Width:301.1mm(11.85inches)
•Depth:215.7mm(8.49inches)
•Height:7.3mm(0.29inches)to25.4mm(1.0inches)
ThinkPadHelixUltrabookProKeyboardsize
•Width:301.1mm(11.85inches)
•Depth:213.3mm(8.4inches)
6ThinkPadHelixUserGuide
Page 15

•Height:20.2mm(0.8inches)
Battery
•35WhLi-Polymerbattery
Powersource(acpoweradapter)
•Sine-waveinputat50Hzto60Hz
•Inputratingoftheacpoweradapter:100Vacto240Vac
Operatingenvironment
•Maximumaltitudewithoutpressurization:5000m(16404ft)
•T emperature:
–Ataltitudesupto2438m(8000ft)
Operating:5.0°Cto35.0°C(41°Fto95°F)
Storage:5.0°Cto43.0°C(41°Fto109°F)
–Ataltitudesabove2438m(8000ft)
Maximumtemperaturewhenoperatingunderunpressurizedconditions:31.3°C(88°F)
•Relativehumidity:
–Operating:8%to95%
–Storage:5%to95%
Ifpossible,placeyourtabletinadry,well-ventilatedareawithoutdirectexposuretosunshine.Donotuseor
storeyourtabletindusty,dirtyareas,orextremelyhotorcoldareas.
Lenovoprograms
YourtabletcomeswithLenovoprogramstohelpyouworkmoreeasilyandsecurely.
ToaccessLenovoprograms,swipeinfromtherightedgeofthescreentodisplaythecharms.Thentapthe
Searchcharmtosearchforthedesiredprogram.
ThefollowingtableprovidesabriefintroductiontosomeLenovoprogramsthatmightbepreinstalledon
yourtablet.
Note:PreinstalledLenovoprogramsvarybygeographiclocationsandaresubjecttochange.
LenovoProgramDescription
LenovoCompanionGetinformationaboutaccessoriesforyourtablet,viewblogsandarticlesaboutyourtablet,
andcheckforrecommendedprograms.
Lenovo
QuickControl
LenovoReachEnhanceyourcloudexperience.LenovoReachkeepsyouconnectedatalltimesandenables
LenovoSettings
Enableyoutocontrolyourtabletremotelythroughyoursmartphone,suchascontrollingthe
pointer,changingprojectionsettings,andmanagingforegroundapplicationsandwindows.
youtoaccessallyourfavoriteitemsfrompersonaltablets,smartphones,ortablets.With
LenovoReach,youcanaddyourfavoriteWebservicestoyourclouddesktop;stayloggedin
toWebsiteswiththecloudpasswordmanager;andaccess,edit,andshareyourfilesfrom
anywhere.
Enhanceyourcomputingexperiencebyconfiguringcameraandmicrophonesettings,
optimizingyourpowersettings,andcreatingandmanagingmultiplenetworkprofiles.
Chapter1.Productoverview7
Page 16

LenovoProgramDescription
LenovoSHAREit
LenovoSolution
Center
LenovoSupport
SystemUpdate
Enableyoutosharefileseasilyandrapidlyacrossdevicessuchascomputersand
smartphones,evenwithoutanyInternetconnection.Y oucanconnecttoyourfriendsandsend
photos,folders,andotherfilesthroughLenovoSHAREit.Everysharingisquickandsimple.
Troubleshootandresolvetabletproblems.Itcombinesdiagnostictests,systeminformation
collection,securitystatus,andsupportinformation,alongwithhintsandtipsformaximum
systemperformance.
RegisteryourtabletwithLenovo,viewusermanualsforyourtablet,getthewarrantyinformation
foryourtablet,andexplorehelpandsupportinformation.
Keepthesoftwareonyourtabletup-to-datebydownloadingandinstallingsoftwarepackages,
includingLenovoprograms,devicedrivers,UnifiedExtensibleFirmwareInterface(UEFI)basic
input/outputsystem(BIOS)updates,andotherthird-partyprograms.
8ThinkPadHelixUserGuide
Page 17
Chapter2.Usingyourtablet
Thischapterprovidesinstructionsonhowtousesomebasicapplicationsandtabletfeatures.
Initialsetupinstructions
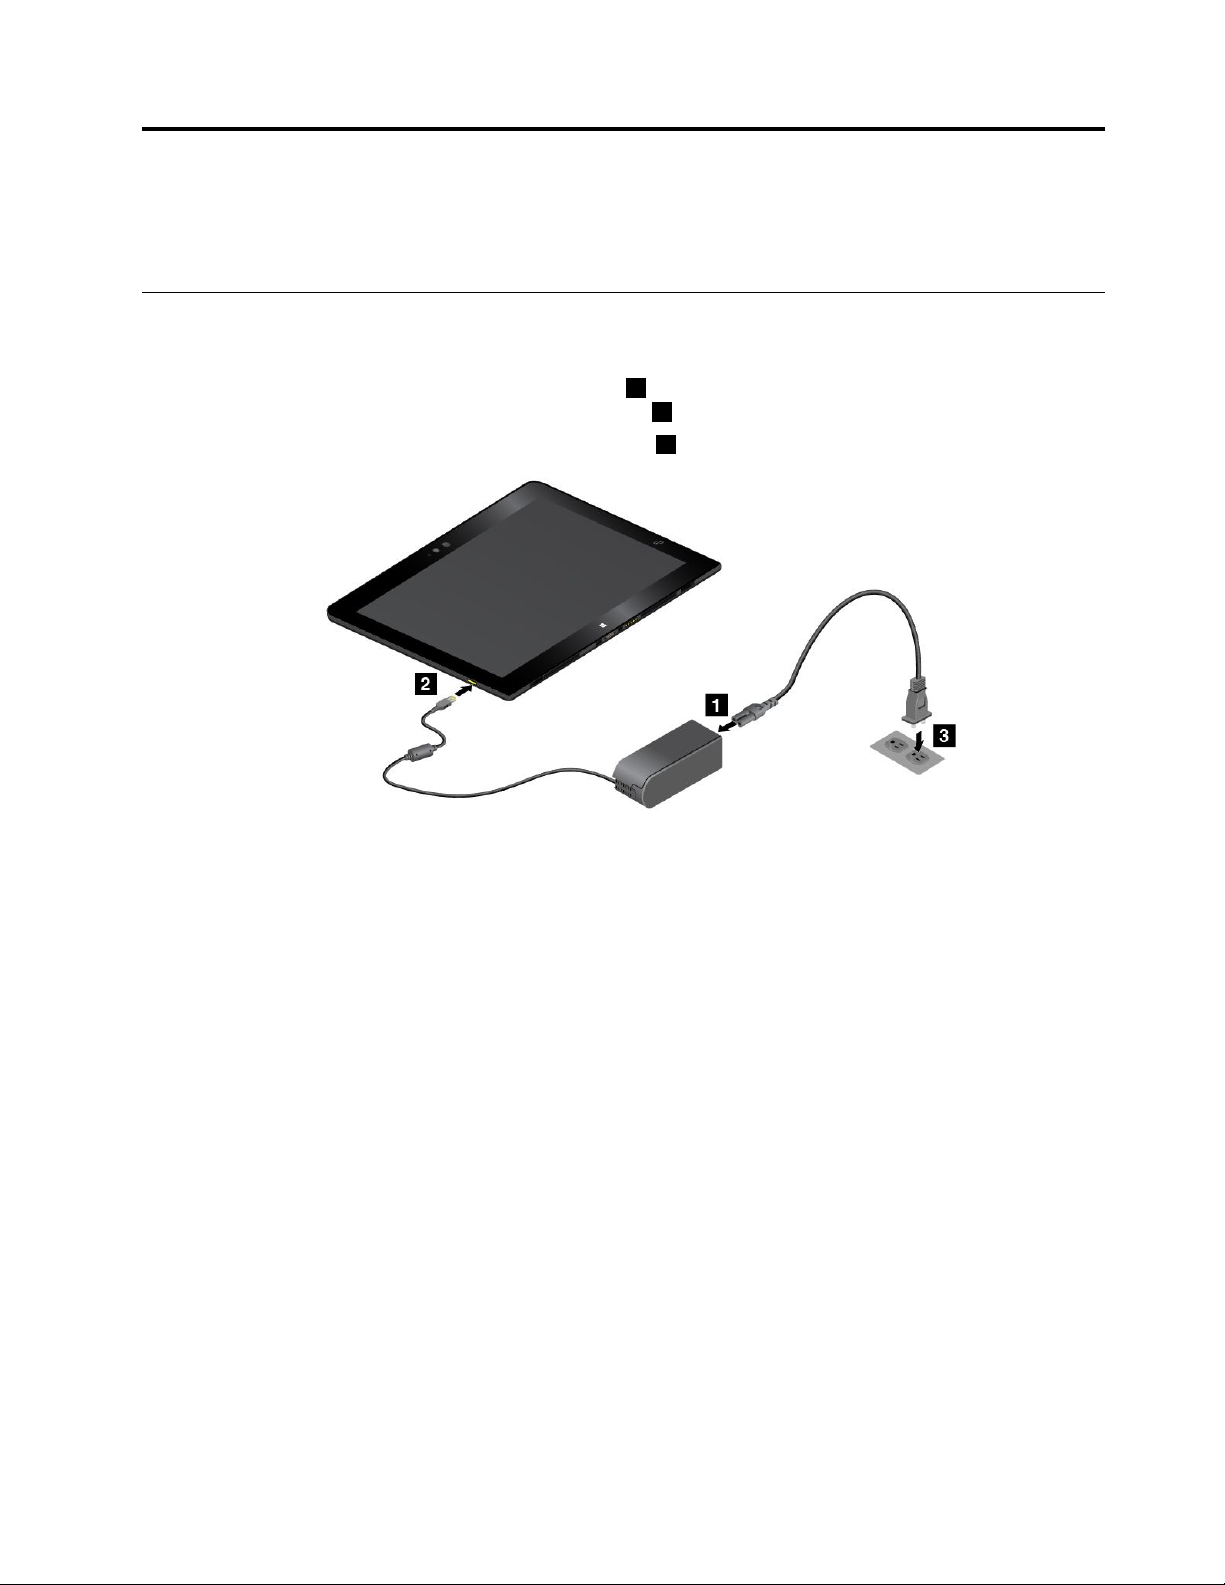
Tousethetabletthefirsttimeafteryoutakeitoutofthebox,ensurethatyoufollowtheinstructionsbelow:
1.Connectthepowercordtotheacpoweradapter1.Then,connectthepowerconnectoroftheac
poweradaptertothepowerconnectoronthetablet2.
2.Plugthepowercordintoastandardacpoweroutlet3.
3.Pressandreleasethepowerbuttontoturnonthetablet.
4.Followtheinstructionsonthescreentocompletetheinitialsetup.
IfyoutabletcomeswithaThinkPadUltrabookProKeyboard,youalsocansetupyourtabletbydoing
thefollowing:
1.InstallthetabletintotheThinkPadUltrabookProKeyboard.See“Installingorremovingthetablet”
onpage50
.
©CopyrightLenovo2014
9
Page 18
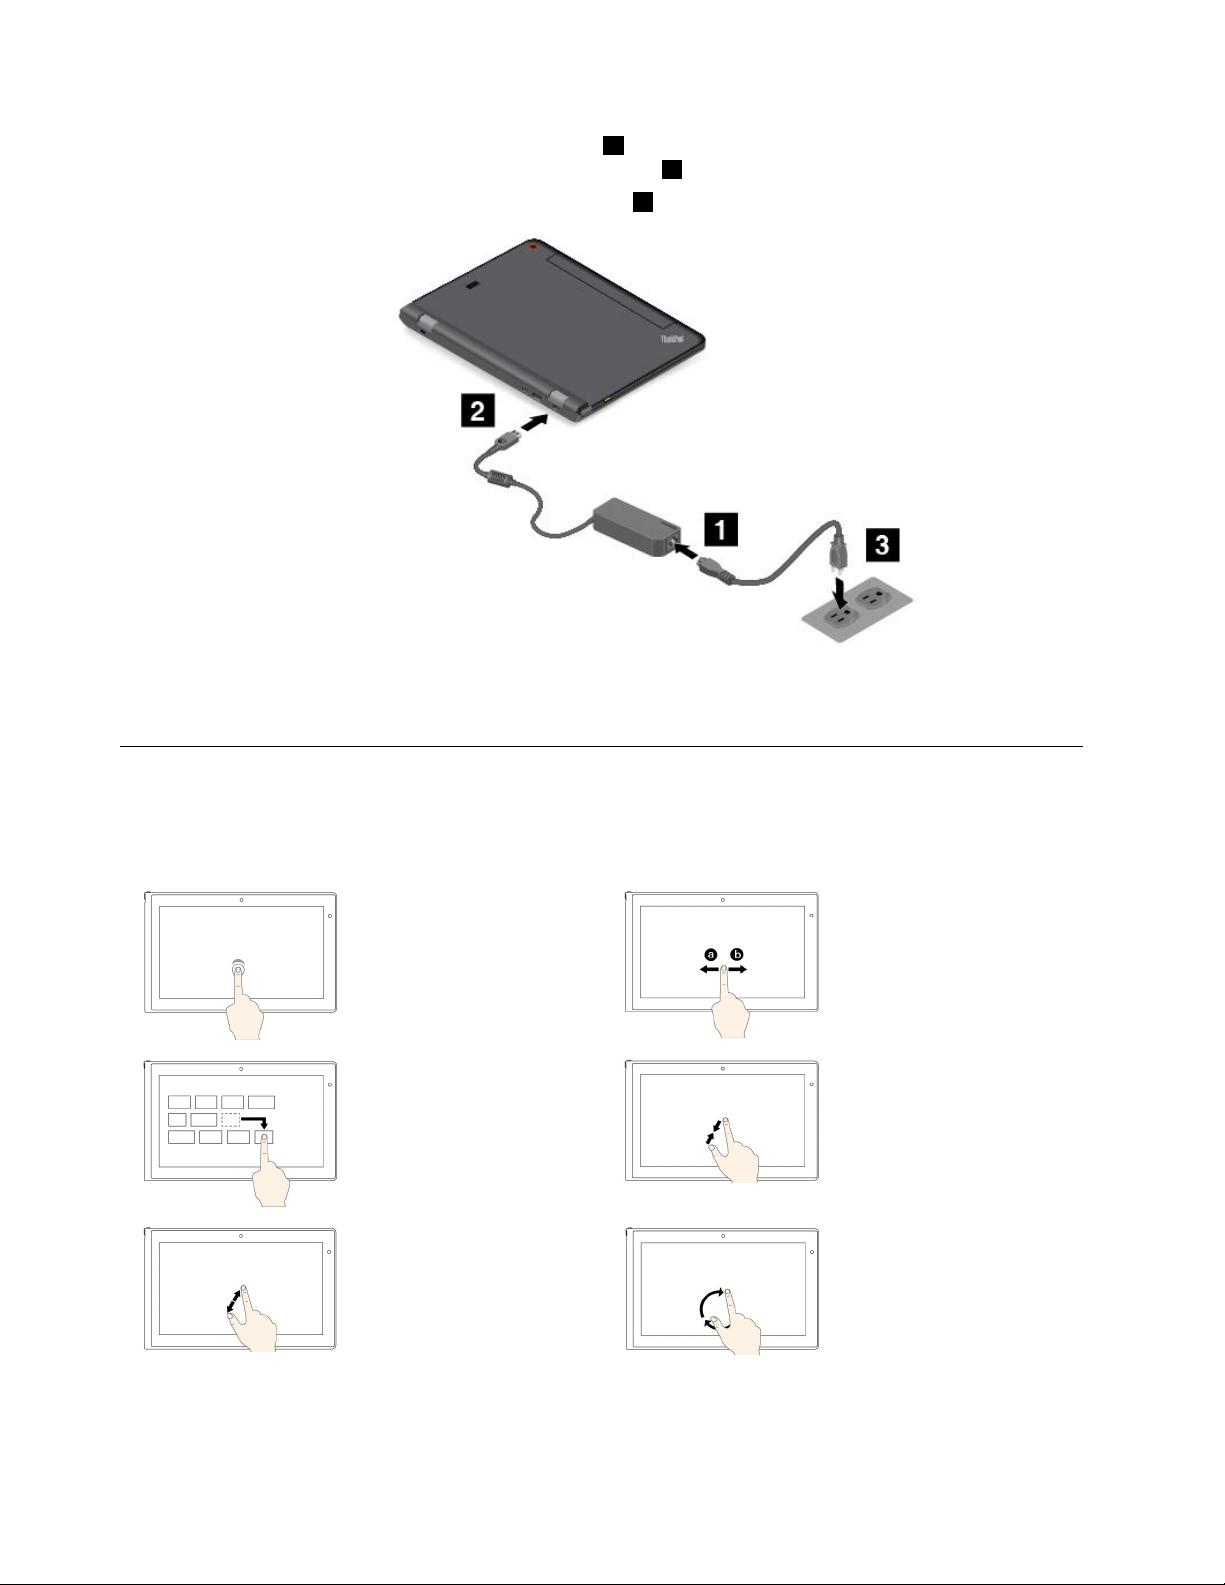
2.Connectthepowercordtotheacpoweradapter1.Then,connectthepowerconnectoroftheac
poweradaptertothepowerconnectoronthekeyboard
2.
3.Plugthepowercordintoastandardacpoweroutlet3.
4.Pressandreleasethepowerbuttontoturnonthetablet.
5.Followtheinstructionsonthescreentocompletetheinitialsetup.
Usingthemulti-touchscreen
Thistopicprovidesinstructionsonhowtousethemulti-touchscreen.
Note:Yourtabletscreenmightlookdifferentfromthefollowingillustrations.
Tap
Taponthescreentoopen
anapporperformanaction
onanopenapp,suchas
Copy,Save,andDelete,
dependingontheapp.
Drag
Draganitemtothedesired
locationtomoveanobject.
Zoomin
Puttwofingersonthe
screenandmovethem
fartheraparttozoomin.
Slide
Slideleftwardorrightward
onthescreentoscroll
throughitems,suchaslists,
pages,andphotos.
Zoomout
Puttwofingersonthe
screenandmovethem
closertogethertozoom
out.
Rotate
Puttwoormorefingerson
anitem,andthenrotate
yourfingersclockwiseor
counterclockwise(supported
onlyonsomeapps).
10ThinkPadHelixUserGuide
Page 19
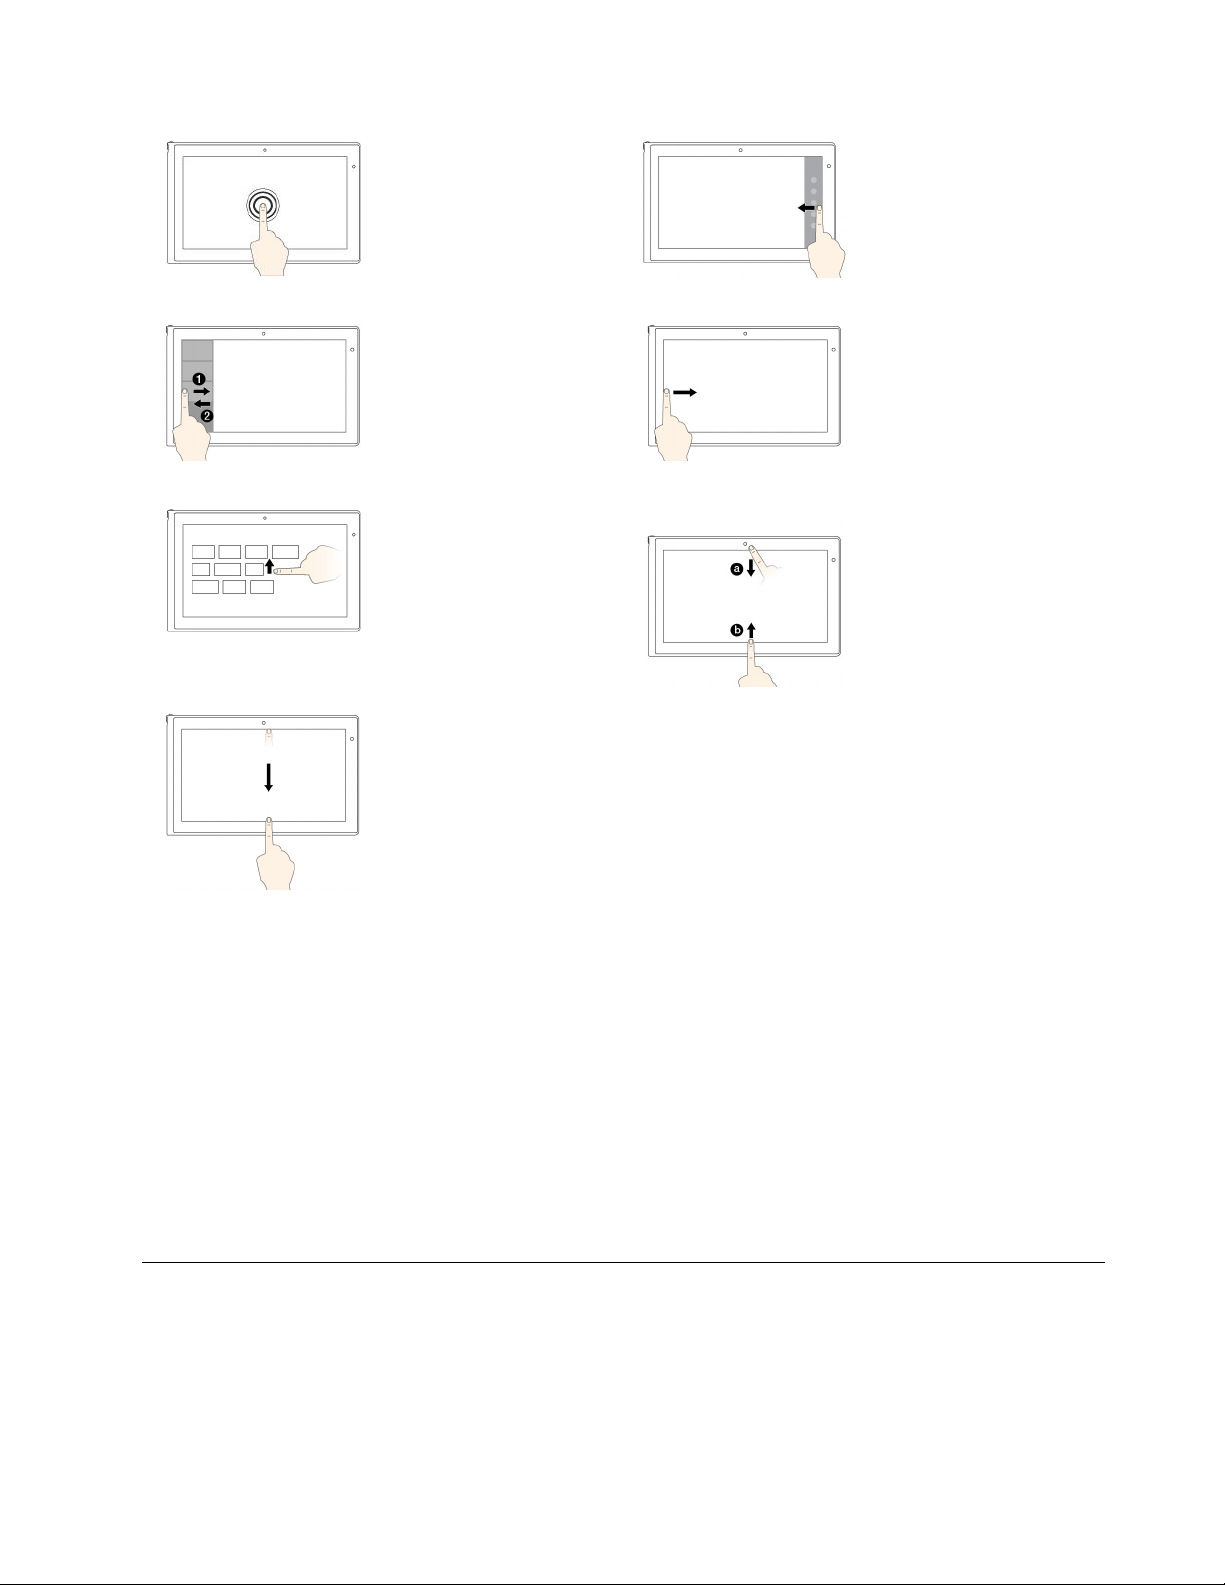
Tapandhold
Swipefromtherightedge
Tapandholdonthescreen
toopenamenuwith
multipleoptions.
Swipeinandoutonthe
leftedge
Swipeinandoutontheleft
edgeofthescreentoview
therecentlyusedappsor
selectanactiveappfrom
thelist.
Swipeuptothetopedge
Swipeuptothetopedgeof
thescreentoviewallapps
ontheStartscreen.
Swipeinfromthetop
edgetothebottom
Swipeinfromtherightedge
ofthescreentodisplaythe
charmsthatcontainsystem
commands,suchasStart,
Settings,Search,Share,
andDevices.
Swipefromtheleftedge
Swipeinfromtheleftedge
ofthescreentocycle
throughandswitchtoopen
apps.
Swipefromthetopor
bottomedge
Swipeinfromthetopor
bottomedgeofthescreen
toviewtheappcommands,
suchasCopy,Save,and
Delete,dependingonthe
app.
Swipeinfromthetopedge
toofthescreenthebottom
toclosethecurrentapp.
Tipsonusingthemulti-touchscreen
•Themulti-touchscreenisaglasspanelcoveredwithaplasticfilm.Donotapplypressureorplaceany
metallicobjectonthescreenthatmightdamagethetouchpanelorcauseittomalfunction.
•Donotusefingernails,glovedfingers,orinanimateobjectsotherthananapprovedTabletDigitizer
Penforinputonthescreen.
Tipsoncleaningthemulti-touchscreen
•T urnoffthetabletbeforecleaningthemulti-touchscreen.
•Useadry,soft,andlint-freeclothorapieceofabsorbentcottontoremovefingerprintsordustfromthe
multi-touchscreen.Donotapplysolventstothecloth.
•Gentlywipethescreenusingatop-downmotion.Donotapplyanypressureonthescreen.
Powermanagement
Thissectionprovidesinstructionsonhowtochargethebattery,extendthebatterylifebetweencharges,
andcheckthebatterystatus.
Chapter2.Usingyourtablet11
Page 20
Chargingthebattery
Thetabletisshippedwithanacpoweradapterandapowercordtochargethetabletfromanystandard
acpoweroutlet.
Note:Thebatteryisnotfullychargedwhenshipped.
Attention:UseonlyLenovo-approvedacpoweradapters.Unauthorizedacpoweradapterscouldseverely
damagethetablet.
Tochargethetabletbattery,dooneofthefollowing:
•Usetheacpoweradaptershippedwiththetablettochargethetabletbatteryasshown.
•IfyourtabletcomeswithaThinkPadHelixUltrabookProKeyboard,usetheThinkPadHelixUltrabook
ProKeyboardandtheacpoweradaptershippedwiththekeyboardtochargethetabletbatteryand
keyboardbatteryasshown.
•UsetheThinkPadTabletDockandtheacpoweradaptershippedwiththedocktochargetheinternal
batteryofyourtablet.See“UsingtheThinkPadTabletDock”onpage61.
TheThinkPadTabletDockisanoptionaldevice.T opurchasetheoptionfromLenovo,goto:
http://www.lenovo.com/essentials
12ThinkPadHelixUserGuide
Page 21

Extendingthebatterylifebetweencharges
Whenyouaretravelingwithyourtabletandacpowerisnotavailable,youcanextendthebatterylife
bydoingthefollowing:
•T urnoffWi-Fi,mobilenetwork,andBluetoothwhennotinuse.
ToturnoffWi-Fi,mobilenetwork,andBluetooth,dothefollowing:
1.Swipeinfromtherightedgeofthescreentodisplaythecharms.
2.TapSettings➙ChangePCsettings.
3.Inthenavigationpanel,tapNetwork➙Airplanemode.
4.IntheAirplanemodesection,slidethecontroltotherighttoturnonAirplanemodetodisable
allwirelessdevices.
•T urnoffautomaticsynchronizationifyoudonotneedit.
Toturnofftheautomaticsynchronizationfunction,dothefollowing:
1.Swipeinfromtherightedgeofthescreentodisplaythecharms.
2.TapSettings➙ChangePCsettings.
3.Inthenavigationpanel,tapOneDrive➙Syncsettings.
4.SwitchoffSyncsettingswithOneDrive.
•Lowerthebrightnesslevelofthescreen.
Tolowerthebrightnesslevelofthescreen,dothefollowing:
1.Swipeinfromtherightedgeofthescreentodisplaythecharms.
2.TapSettings➙Brightness.
3.Slidethecontroldowntolowerthebrightness.
•Entersleepmodewhenthetabletistemporarilynotinuse.
Toentersleepmode,dooneofthefollowing:
–ClosetheThinkPadHelixQuickshotCover.
–T oentersleepmodefromtheoperatingsystem,dothefollowing:
1.Swipeinfromtherightedgeofthescreentodisplaythecharms.
2.TapSettings➙Power➙Sleep.
•T urnoffyourtabletifyouarenotgoingtouseitforawhile.
Toturnoffyourtablet,dothefollowing:
1.Swipeinfromtherightedgeofthescreentodisplaythecharms.
2.TapSettings➙Power➙Shutdown.
Checkingthebatterystatus
Gettheapproximatestatusofyourbatteryatanytimebycheckingthedesktopbattery-statusiconin
theWindowsnotificationarea.
Tocheckfortheaccuratestatusandadjustyourtabletpowersettingstoachievethebestbalancebetween
performanceandpowersaving,dothefollowing:
1.FromtheStartscreen,tapLenovoSettings➙Power.
2.Checkyourbatterystatusandconfiguresettings.
Chapter2.Usingyourtablet13
Page 22
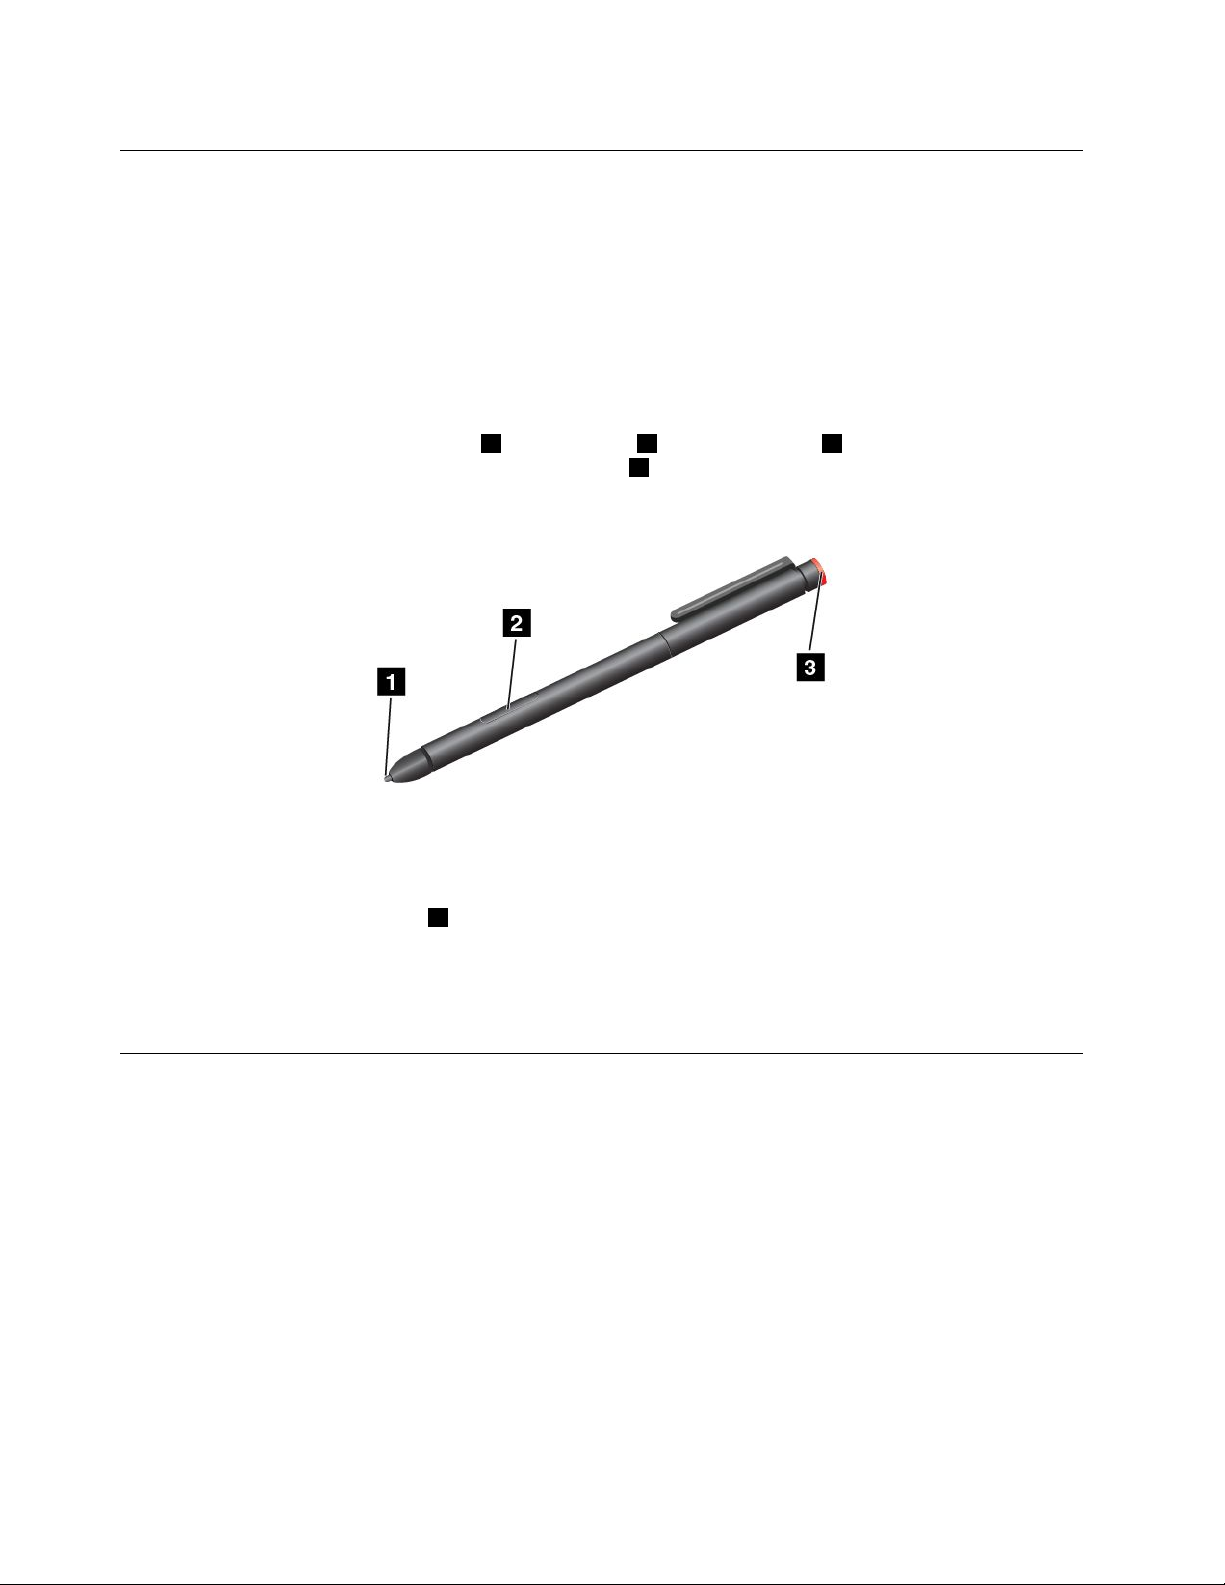
UsingtheT abletDigitizerPen
SomemodelsareequippedwithaTabletDigitizerPenasastandardfeature.TheTabletDigitizerPenenables
youtoinputtextinanaturalmanner,takenotes,annotatePortableDocumentFormat(PDF)files,anddraw
graphicstogetherwithapplicationscapableofeditingandsketching.
Notes:
•Thispenisnotwaterproof.Takecarenottosoakitordipitinwater.
•Thepencontainspressuresensors.Donotpushthetipofthepenforanextendedperiodoftime.Donot
subjectthepentoshockorvibration.
TheT abletDigitizerPenconsistsofatip1,aclickbutton2,andanerasertip3.Holdthepenandpoint
thetipatthedisplaytomovethepointer.Theerasertip3functionslikeaneraserinprogramsthat
supportthisfunction.
Tomakeaselection(singleclick),tapthedisplayoncewiththepen.Todouble-click,tapthedisplaytwice
withthepenwithoutpausingbetweentaps.T oright-click,dooneofthefollowing:
•T apandholdthetipofthepenonthedisplayforonesecondandthenliftthepenfromthedisplay.
•Pressandholdtheclickbutton
FormoreinstructionsaboutusingthepenwithThinkPadHelixUltrabookKeyboardorThinkPadHelix
UltrabookProKeyboard,see“UsingtheThinkPadHelixUltrabookKeyboard”onpage44or“Usingthe
ThinkPadHelixUltrabookProKeyboard”onpage50.
2andtapthetiponthedisplay.
UsingtheOn-ScreenKeyboardorthetouchkeyboardandhandwriting panel
UsetheOn-ScreenKeyboardorthetouchkeyboardandhandwritingpaneltotypetext,numbers,symbols,
andothercharacters.Y oualsocanusethetouchkeyboardandhandwritingpaneltoperformhandwriting.
Whenyourotatethetablet,theOn-ScreenKeyboardorthetouchkeyboardandhandwritingpanel
automaticallyrotatestothecorrespondingportraitorlandscapeview.
ToopentheOn-ScreenKeyboard,dothefollowing:
1.Swipeinfromtherightedgeofthescreentodisplaythecharms.
2.TaptheSearchcharmtosearchforOn-ScreenKeyboard.
3.TapOn-ScreenKeyboard.
Toopenthetouchkeyboardandhandwritingpanel,dooneofthefollowing:
•Onthedesktop,tapthekeyboardiconintheWindowsnotificationarea.
14ThinkPadHelixUserGuide
Page 23

•OntheStartscreen,thetouchkeyboardandhandwritingpanelisdisplayedautomaticallyanytimeyou
type.
•OntheDesktoportheStartscreen,dothefollowing:
1.Swipeinfromtherightedgeofthescreentodisplaythecharms.
2.TaptheSettingscharm.
3.TapKeyboard➙Touchkeyboardandhandwritingpanel.
Toconfiguretheinputlanguage,dothefollowing:
1.Fromthedesktop,swipeinfromtherightedgeofthescreentodisplaythecharms.
2.TapSettings➙ControlPanel.
3.TapClock,Language,andRegion➙Changeinputmethods.
4.Followtheinstructionsonthescreentoconfiguretheinputlanguage.
ChangingthestartupbehaviortoopeneitherthedesktoportheStart screen
YoucansetthetablettoopeneitherthedesktoportheStartscreenbydefault.Tosetthedefaultstartup
screen,dothefollowing:
1.Onthedesktop,tapandholdonthetaskbar.Amenuisdisplayed.
2.TapProperties.TheTaskbarandNavigationpropertieswindowisdisplayed.
3.OntheNavigationtab,locatetheStartscreensection,andthendooneofthefollowing:
•T osetthedesktopasyourdefaultstartupscreen,selectWhenIsigninorcloseallappsona
screen,gotothedesktopinsteadofStartsoacheckisvisible.
•T osettheStartscreenasyourdefaultstartupscreen,removethecheckfromtheWhenIsigninor
closeallappsonascreen,gotothedesktopinsteadofStartcheckbox.
4.TapOKtosavethenewsetting.
Downloadinggamesandapplications
Toextendthefunctionalityofyourtablet,downloadandinstalladditionalapplicationsfromtheWindows
Store.TheWindowsStoreprovidesaneasyandquickwayforyoutoshopforgamesandmobile
applications.
TodownloadorbuyanapplicationoragamefromWindowsStore,tapStorefromtheStartscreen,andthen
followtheinstructionsonthescreen.
Usingthefingerprintreader
Dependingonthemodel,yourtabletmighthaveafingerprintreader.Fingerprintauthenticationcanreplace
yourWindowspassword.Inthisway,youcanlogontoyourtabletsimplyandsecurely.Toenablefingerprint
authentication,enrollyourfingerprintsfirst.
Enrollingyourfingerprints
Toenrollyourfingerprints,dothefollowing:
1.Swipeinfromtherightedgeofthescreentodisplaythecharms.
2.TapSettings➙ChangePCsettings.
3.Inthenavigationpanel,tapAccounts➙Sign-inoptions.
Chapter2.Usingyourtablet15
Page 24
4.IntheFingerprintsection,tapAdd.The“Addafingerprinttothisaccount”windowisdisplayed.
5.EntertheWindowspasswordasrequired.Thenfollowtheinstructionsonthescreentoenrollyour
fingerprint.
Note:Itisrecommendedthatyouenrollmorethanonefingerprintincaseofanyinjuriestoyourfingers.
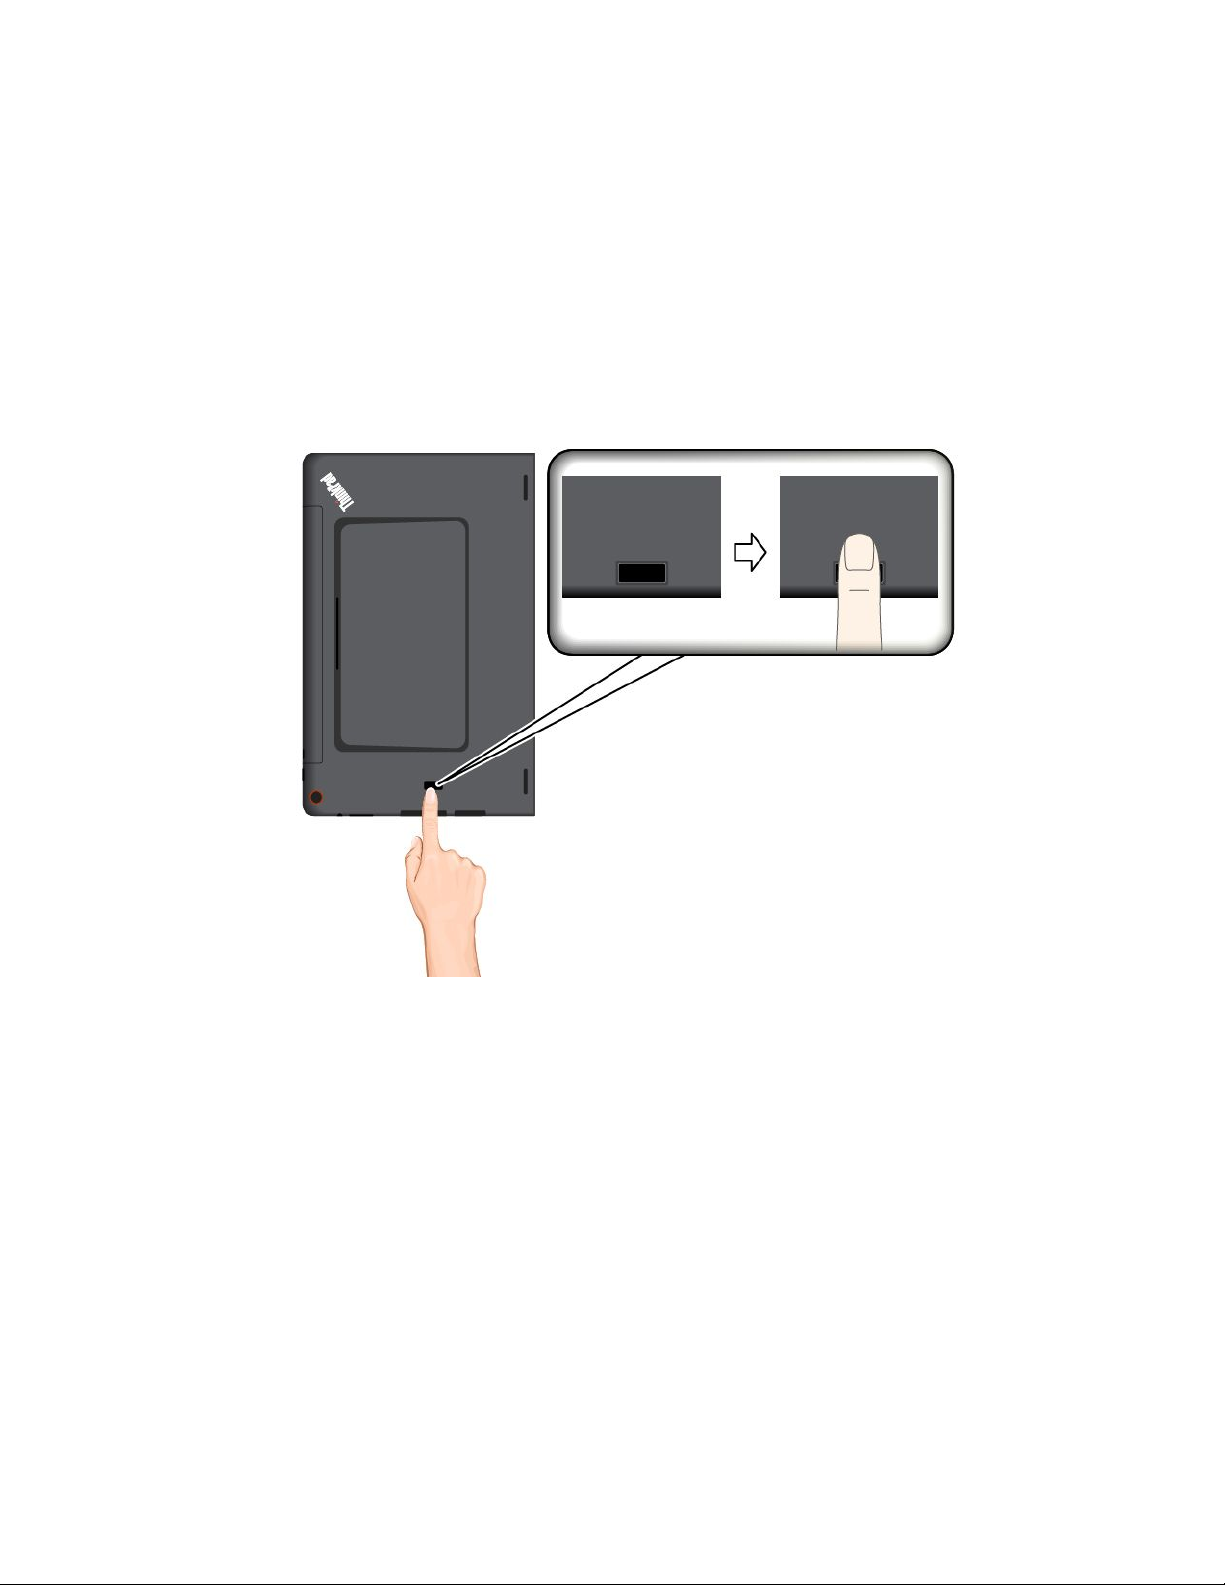
Swipingyourfingeroverthefingerprintreader
Toswipeyourfingeroverthefingerprintreader,dothefollowing:
Note:Yourtabletmightlookslightlydifferentfromtheillustrationsinthistopic.
1.Placethetopjointofyourfingeronthesensor.
16ThinkPadHelixUserGuide
Page 25

2.Applylightpressureandswipeyourfingertowardyouacrossthereaderinonesmoothmotion.Donot
liftyourfingerwhenyouareswipingit.
Maintainingthefingerprintreader
Thefollowingactionscoulddamagethefingerprintreaderorcauseitnottoworkproperly:
•Scratchingthesurfaceofthereaderwithahard,pointedobject.
•Scrapingthesurfaceofthereaderwithyourfingernailoranythinghard.
•Usingortouchingthereaderwithadirtyfinger.
Ifyounoticeanyofthefollowingconditions,gentlycleanthesurfaceofthereaderwithadry,soft,lint-free
cloth:
•Thesurfaceofthereaderisdirtyorstained.
•Thesurfaceofthereaderiswet.
•Thereaderoftenfailstoenrollorauthenticateyourfingerprint.
Ifyourfingerhasanyofthefollowingconditions,youmightnotbeabletoregisterorauthenticateit:
•Y ourfingeriswrinkled.
•Y ourfingerisrough,dry,orinjured.
•Y ourfingerisstainedwithdirt,mud,oroil.
•Thesurfaceofyourfingerisdifferentfromwhenyouenrolledyourfingerprint.
•Y ourfingeriswet.
•Afingerisusedthathasnotbeenenrolled.
Toimprovethesituation,trythefollowing:
•Cleanorwipeyourhandstoremoveanyexcessdirtormoisturefromthefingers.
Chapter2.Usingyourtablet17
Page 26
•Enrollanduseadifferentfingerforauthentication.
•Ifyourhandsaredry,applylotiontothem.
UsingtheThinkPadHelixQuickshotCover
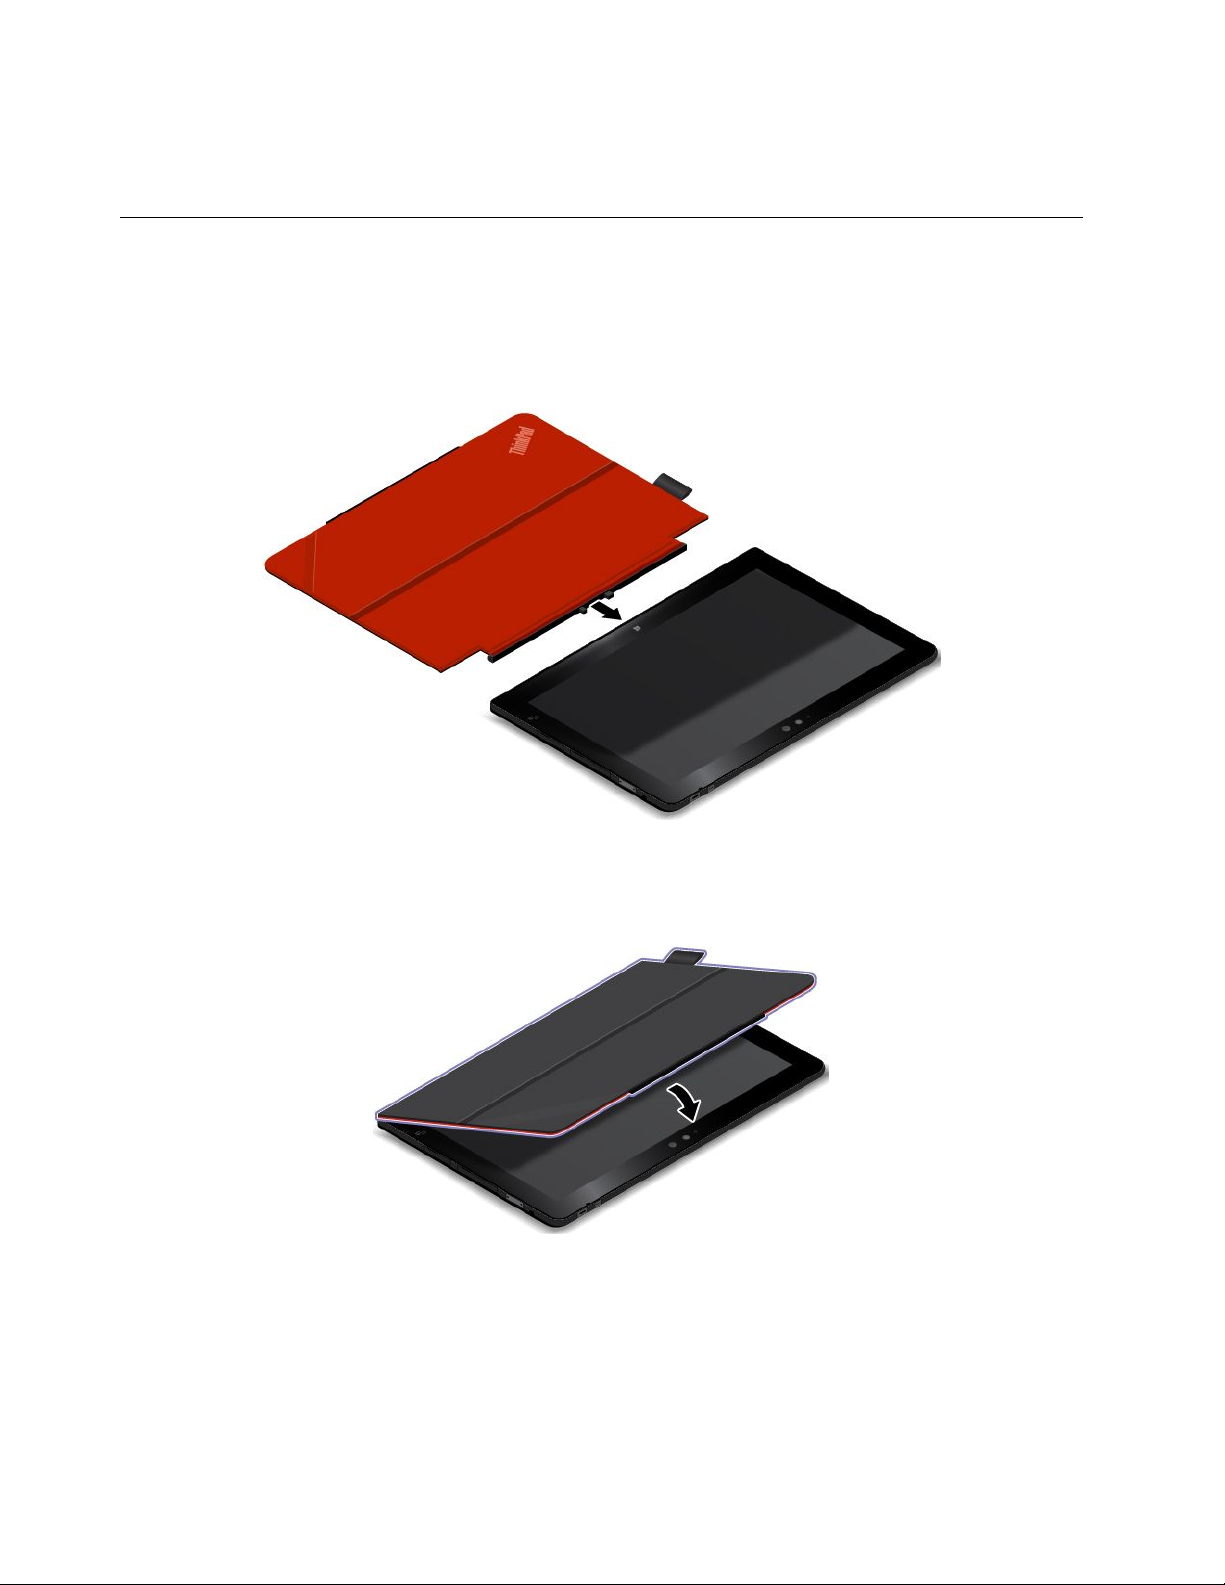
Dependingonthemodel,yourtabletmightcomewithaThinkPadHelixQuickshotCover(hereaftercalled
thecover).Thistopicprovidesinstructionsonhowtousethecover.
Tousethecover,attachthecovertothetabletfirstasshown.Thecoverwillbeattachedtothetablet
magnetically.
Putthetabletintosleepmodeorwakeupthetablet
Ifthecoverisopenandthetabletison,thetablet,bydefault,enterssleepmodeautomaticallyafteryou
closethecover.
18ThinkPadHelixUserGuide
Page 27
Ifthecoverisclosedandthetabletisinsleepmode,thetablet,bydefault,resumesnormaloperation
whenyouopenthecover.
Youalsocanchangethesettingssothatbyclosingthecoveryoucanshutdownthetablet,putthetabletinto
hibernationmode,ordonothing.T oachievethis,youmustchangeyourlidsettingsbydoingthefollowing:
1.Fromthedesktop,swipeinfromtherightedgeofthescreentodisplaythecharms.
2.TapSettings➙ControlPanel➙HardwareandSound➙PowerOptions.
3.Inthenavigationpanel,tapChoosewhatclosingtheliddoes.
4.Followtheinstructionsonthescreentochooseanoptionaccordingtoyourpreference.
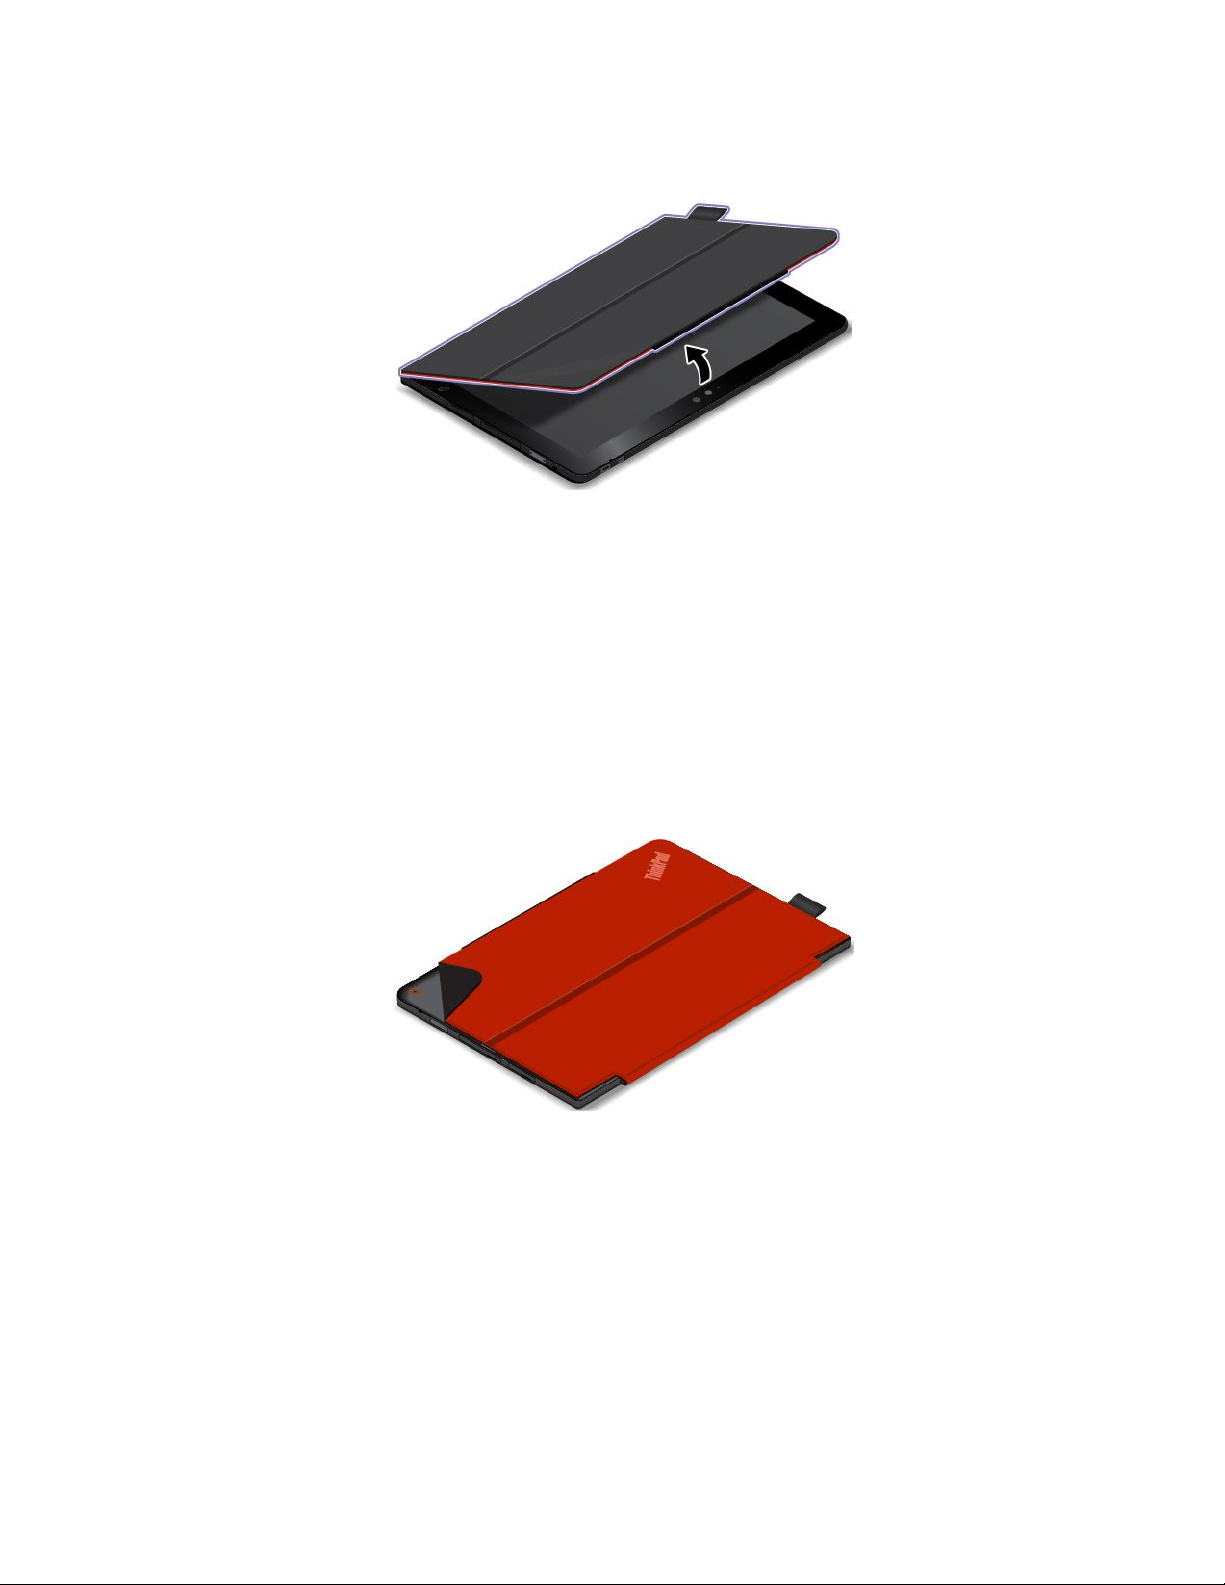
Launchthecamera
Whenyouusethetabletwiththecoveropentoanangleof360degrees,youcanflipoverthemagnetictab
ofthecoverasshowntolaunchthecameraautomatically.Thisfunctionisenabledbydefault.
Ifyouwanttodisablethisfunction,dothefollowing:
1.FromtheStartscreen,tapLenovoSettings➙Camera.
2.IntheQuickshotsection,slidethecontroltothelefttodisablethefunction.
Chapter2.Usingyourtablet19
Page 28
Serveasastandforthetablet
Thecovercanserveasastandforthetabletasshown.Inthisway,youcanusethetablettowatchmovies,
viewphotos,ormakeapresentationconveniently.
Note:Ifyourtabletisequippedwithasmartcardslotontherearside,thecovermightnotworkwellas
astandforthetablet.
Usingthecameras
Yourtablethastwocameras,afront-facingcameraandarear-facingcamera.Therear-facingcameraan
auto-focusfeaturethatenablesyoutocapturehigh-qualitypicturesandvideos.
Tolaunchacameraandconfigurethecamerasettings,dothefollowing:
1.FromtheStartscreen,tapLenovoSettings➙Camera.
2.Followtheinstructionsonthescreentoconfiguresettingsandusethecamera.
Toswitchbetweenthefront-facingcameraandtherear-facingcamera,dothefollowing:
1.FromtheStartscreen,tapLenovoSettings➙Camera.
2.IntheViewsection,selectFront-facingcameraorRear-facingcamerafromtheSelectacamera
drop-downlistboxtoswitchthecameras.
Youalsocanusethecamerawithotherapplicationsthatprovidefeaturessuchasphotographing,video
capturing,andvideoconferencing.Todownloadotherapplications,tapWindowsStorefromtheStart
screen.Thenfollowtheinstructionsonthescreen.
Usingthemicro-SD-cardreader
Yourtablethasamicro-SD-cardreaderthatprovidesamicro-SD-cardslotforyoutoinstallamicroSDcard.
Themicro-SD-cardslotsupportsthefollowingtypesofcards:
•SecureDigitaleXtended-Capacity(SDXC)card
•SecureDigital(SD)card
•SecureDigitalHigh-Capacity(SDHC)card
Installingamicro-SD-card
Attention:BeforehandlingamicroSDcard,touchametaltableoragroundedmetalobject.Thisaction
reducesanystaticelectricityfromyourbody.Staticelectricitycandamagethecard.
ToinstallamicroSDcardintothemicro-SD-cardslot,dothefollowing:
20ThinkPadHelixUserGuide
Page 29
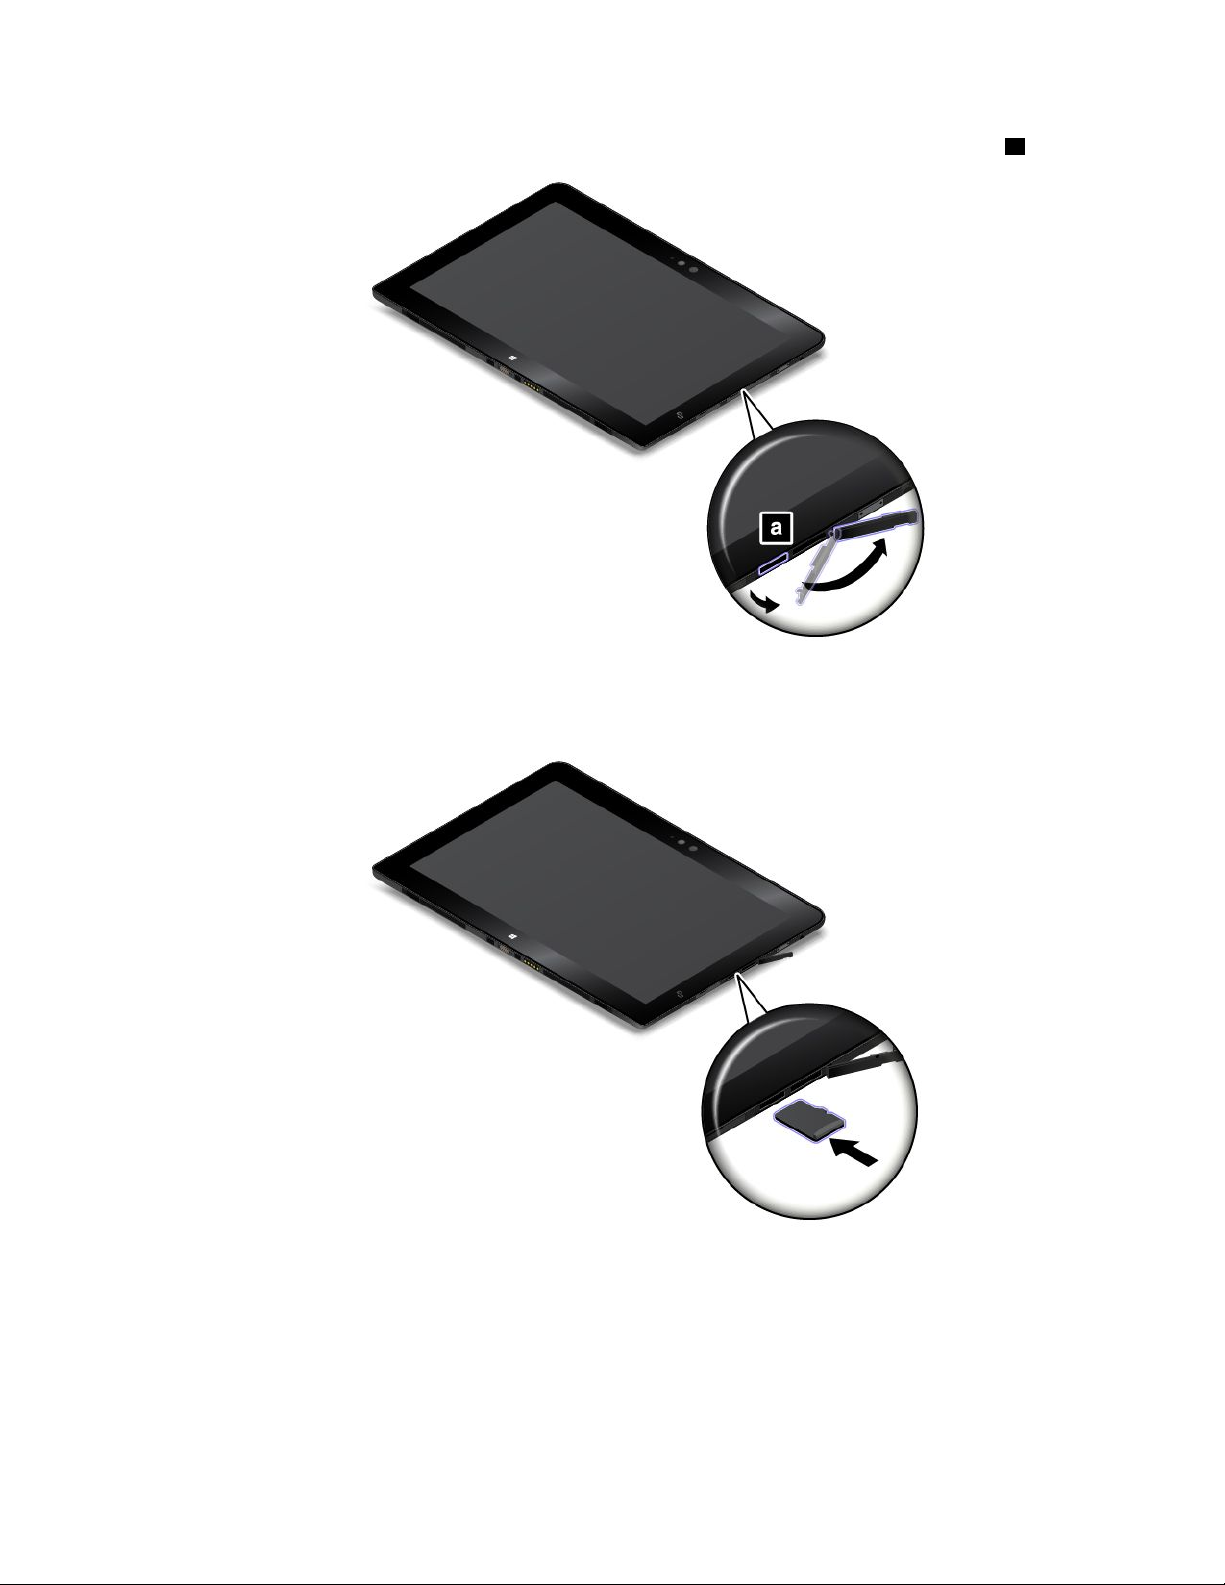
1.Opentheprotectivecoverontheleftsideofyourtablet.Thenlocatethemicro-SD-cardslota.
2.Ensurethatthemetalcontactsofthecardarefacingdownandpointingtowardthetablet.
3.Insertthecardintothemicro-SD-cardslot.Thecardmightstopbeforeitiscompletelyinstalledintothe
cardreader.Ensurethatyouinsertthecardfirmlyuntilyouhearaclick.
RemovingamicroSDcard
ToremoveamicroSDcard,dothefollowing:
1.Opentheprotectivecoverontheleftsideofyourtablet.
Chapter2.Usingyourtablet21
Page 30
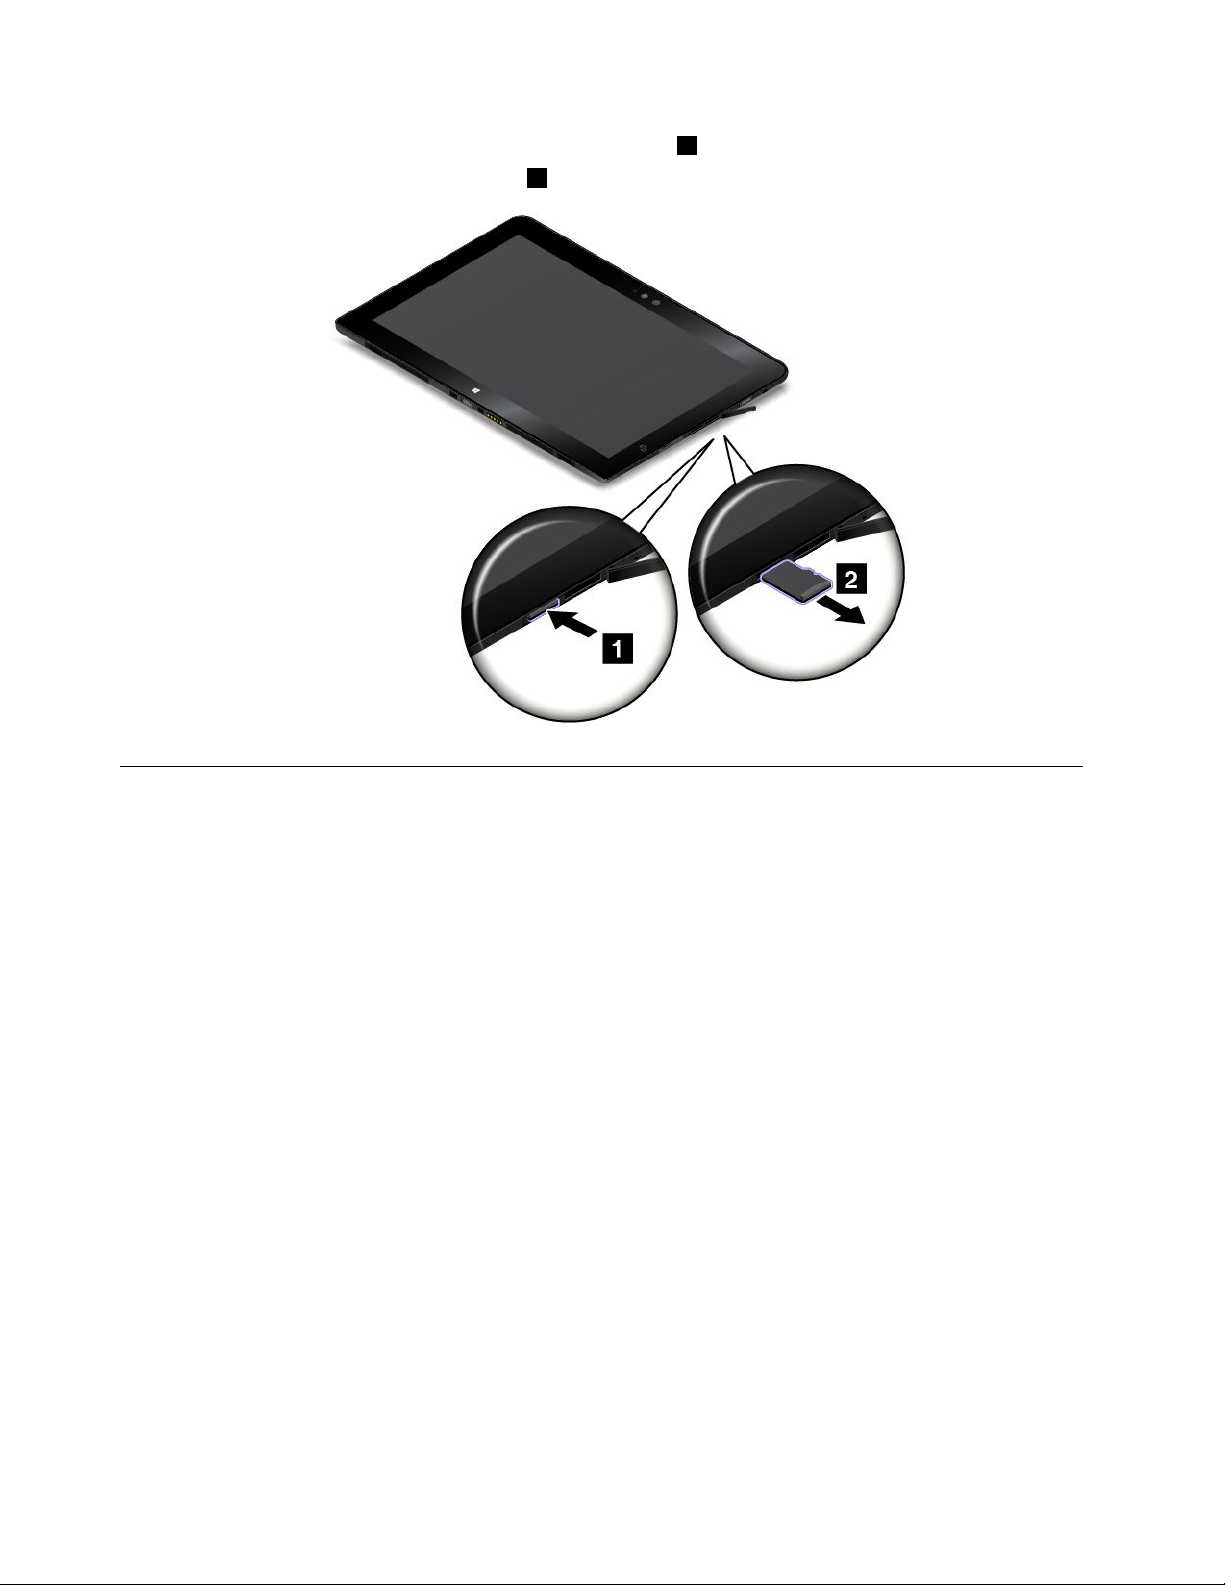
2.PushthemicroSDcardinwardalittleuntilyouhearaclick1.Then,releaseit.ThemicroSDcardejects.
3.Gentlyslidethecardoutofthecardslot2.
Usingasmartcard
Somemodelscomewithasmartcardslot.Thistopicprovidesinformationonhowtousethesmartcard.
Generally,smartcardscanprovideauthentication,datastorage,andapplicationprocessing.Smartcards
alsomightprovidestrongsecurityauthenticationforsinglesign-on(SSO)withinlargeorganizations.
Yourtabletsupportssmartcardswiththefollowingspecifications:
•Width:85.60mm(3.37inches)
•Depth:53.98mm(2.13inches)
•Height:0.76mm(0.03inch)
22ThinkPadHelixUserGuide
Page 31

Thefollowingillustrationsshowbothsidesofasmartcard.Inillustration1,themetalcontactsaofthecard
arefacingupward.Inillustration
2,themetalcontactsaofthecardarefacingdownward.
Note:Yoursmartcardmightlookslightlydifferentfromthefollowingillustrations.
Installingasmartcard
Attention:
•Beforeinstallingasmartcard,touchametaltableoragroundedmetalobject.Thisactionreducesany
staticelectricityfromyourbody.Staticelectricitycoulddamagethecard.
•Whiletransferringdatatoorfromasmartcard,donotputyourtabletintosleeporhibernationmode
beforethedatatransferfinishes;otherwise,yourdatacouldbecomedamaged.
Toinstallasmartcard,dothefollowing:
1.Positionyourtabletasshownandensurethatthemetalcontactsaofthecardarefacingdownward
andpointingtowardthecardslot.
2.Insertthecardintotheslotasshown.
Iftheplug-and-playfeatureisnotenabledfortheinstalledsmartcard,dothefollowingtoenablethefeature:
1.GotoControlPanel.
2.TapHardwareandSound.
3.TapDeviceManager.Ifyouarepromptedforanadministratorpasswordorconfirmation,typethe
passwordorprovideconfirmation.
4.FromtheActionmenu,tapAddlegacyhardware.TheAddHardwareWizardstarts.
5.Followtheinstructionsonthescreen.
Chapter2.Usingyourtablet23
Page 32

Removingasmartcard
Attention:
•Beforeremovingasmartcard,stopthecardfirst.Otherwise,dataonthecardmightbedamagedorlost.
•Donotremovethesmartcardwhilethetabletisinsleepmodeorhibernationmode.Otherwise,the
systemmightnotrespondwhenyoutrytoresumeoperation.
Toremoveasmartcard,dothefollowing:
1.Tapthetriangularicononthetaskbartoshowhiddenicons.Then,tapandholdtheSafelyRemove
HardwareandEjectMediaicon.
2.Taptheitemyouwanttoremovetostopthecard.
3.Pullthecardoutwardalittle,andgentlyslidethecardoutoftheslot.
Note:IfyoudonotremovethesmartcardfromyourtabletafteryouejectthecardfromtheWindows
operatingsystem,thecardcannolongerbeaccessed.Toaccessthecard,youmustremoveitfirst,
theninsertitagain.
UsingHDMIdevices
YourtablethasamicroHDMIconnectorthatyoucanusetoconnectanexternaldisplayforvideooutput.
TolocatethemicroHDMIconnector,see“Tabletlayout”onpage1.
Connecting an external monitor
When you connect an external monitor, a video interface cable with a ferrite core is required.
You might need a micro HDMI to VGA adapter. You can purchase the micro HDMI to VGA adapter as
option at http://www.lenovo.com/essentials.
To connect an external monitor, do the following:
Connect a supported external display to the micro HDMI connector on your tablet.
1.
2.Connecttheexternalmonitortoanelectricoutlet.
3.Turnontheexternaldisplay.
Ifyourtabletcannotdetecttheexternaldisplay,right-clickanywhereonthedesktop,thenclickScreen➙
Resolution➙Detect.
Configuringthesettings
Toconfigurescreensettingsfortheexternaldisplay,dothefollowing:
24ThinkPadHelixUserGuide
Page 33

1.Swipeinfromtherightedgeofthescreentodisplaycharms.
2.TaptheDevicescharm.
3.TapProject➙Secondscreen.
4.Taptoselectapresentationscheme.
Usingsynchronizationsolutions
Byusingsynchronizationsolutions,youcaneasilysynchronizesettingsbetweenyourtabletandother
personalcomputer.
YoucansynchronizingthesettingsbyusingtheWindowssynchronizationsolution.
ToaccessWindowssynchronizationsolution,dothefollowing:
1.Swipeinfromtherightedgeofthescreentodisplaythecharms.
2.TapSettings➙ChangePCsettings.
3.Inthenavigationpanel,tapOneDrive➙Syncsettings.
4.Configuresettingsasdesired.
UsingtheGPSsatellitereceiver
YourtabletmighthaveaGPSsatellitereceiverthatenablesyoutopinpointyourlocationdowntothestreet
level.Uselocation-basedapplicationstofindyourcurrentlocation,getdirectionstoyourdestination,and
findotherlocation-basedinformation.
Note:Bydefault,theGPSsatellitereceiverisenabled.Foralongerbatterylife,disabletheGPSsatellite
receiverwhennotinuse.
TodisabletheGPSsatellitereceiver,dothefollowing:
1.Swipeinfromtherightedgeofthescreentodisplaythecharms.
2.TapSettings➙ChangePCsettings.
3.Inthenavigationpanel,tapNetwork➙Airplanemode.
4.IntheGNSSsection,slidethecontroltothelefttodisabletheGPSsatellitereceiver.
Turningoffthetablet
Toturnofthetablet,dooneofthefollowing:
•GototheStartscreenbypressingtheWindowskey,clickthepowericoninthetop-rightcornerofthe
screen,thenclickShutdown.
•Moveyourpointertothetop-rightorbottom-rightcornerofthescreentodisplaythecharms.Then
clickSettings➙Power➙Shutdown.
Note:Ifyourtabletisattachedtoasupportedkeyboard,youalsocanopentheSettingscharmbypressing
thesettingskey.
Chapter2.Usingyourtablet25
Page 34

26ThinkPadHelixUserGuide
Page 35

Chapter3.Wirelessnetworksanddevices
Yourtabletcanconnecttoavarietyofnetworksanddevices,includingmobilenetworks(3Gor4G),Wi-Fi
datanetworks,andBluetoothdevices.
Note:Sometabletmodelscanconnecttobothmobilenetworks(3Gor4G)andWi-Finetworks,whileothers
canconnecttoWi-Finetworksonly.IfyourtabletsupportsWi-Ficonnectiononly,theinformationrelated
tomobilenetworksdoesnotapplytoyourtablet.
InstallingandremovingthemicroSIMcard
Ifthetabletsupportsmobilenetworkconnection,itmightrequireamicroSIMcardtoconnecttoamobile
network.ThemicroSIMcardisshippedwithsometabletmodelsonlyandyoucanpurchaseonewhen
necessary.
Attention:WheninstallingorremovingthemicroSIMcard,donottouchthemicroSIMcardmetal
connectors.AlwaysholdthetabletinyourhandbeforeyouinstallorremovethemicroSIMcardtoavoid
electrostaticdischarges.
ToinstallthemicroSIMcard,dothefollowing:
1.Turnoffthetablet.
2.Opentheprotectivecoverontheleftsideofyourtablet.Thenlocatethemicro-SIM-cardslota.
©CopyrightLenovo2014
27
Page 36

3.HoldthemicroSIMcardwiththemetalcontactsfacingdown,andtheninsertitfirmlyintothe
micro-SIM-cardslotasshownuntilyouhearaclick.
4.Closetheprotectivecoverandturnonyourtablet.
ToremovethemicroSIMcard,dothefollowing:
1.Turnoffthetablet.
2.Opentheprotectivecoverontheleftsideofyourtablet.
28ThinkPadHelixUserGuide
Page 37

3.PushthemicroSIMcardinwarduntilyouhearaclick1.ThemicroSIMcardejects.Gentlyslide
themicroSIMcardoutoftheslot
2.
4.Closetheprotectivecover.
Determiningwhichmobilenetworkyouareusing
Ifyouhaveconnectedtoanetwork,youcancheckthenetworknametoseewhichmobilenetworkyou
areusing.
Tocheckthenetworkname,dooneofthefollowing:
•Swipeinfromtherightedgeofthescreentodisplaythecharms.ThentaptheSettingscharm.The
networknameisdisplayedunderthenetworkicon.
•Onthedesktop,movethepointertothenetworkiconintheWindowsnotificationarea.Thenetwork
nameisdisplayed.
ConnectingtoaWi-Finetwork
Wi-Fiisawirelessnetworkingtechnologythatprovidesnetworkaccessatdistancesofupto100meters
(328feet)dependingontheWi-Firouterandyoursurroundings.
AWi-FiconnectionrequiresaccesstoafunctioningWirelessAccessPoint(WAP),alsocalledahotspot.
Somehotspotsareopentothepublic,butsomeothersimplementsecurityfeaturestolimitaccessto
specificgroupsorindividuals.
Note:TherangeandqualityoftheWi-Fisignalareaffectedbythenumberofconnecteddevices,the
infrastructure,andtheobjectsthroughwhichthesignalistransmitted.
ConnectingtoaWi-Finetwork
ToestablishaWi-Finetworkconnection,dothefollowing:
1.Swipeinfromtherightedgeofthescreentodisplaythecharms.
Chapter3.Wirelessnetworksanddevices29
Page 38

2.TaptheSettingscharm.
3.Tapthenetworkicon.AlistofavailableWi-Finetworksisdisplayed.
4.TaptheIDofthenetworkyouwanttoconnect.
5.FollowtheinstructionsonthescreentoconnecttotheWi-Finetwork.
Toviewsecurity,address,andotherinformationabouttheWi-Finetworkyouareconnected,dothefollowing:
1.Swipeinfromtherightedgeofthescreentodisplaythecharms.
2.TapSettings➙ChangePCsettings.
3.Inthenavigationpanel,tapNetwork➙Connections.
4.IntheWi-Fisection,tapthenetworknametoviewtheinformation.
ThetabletsupportstheproxyfeatureforWi-Ficonnection.Theproxyfeatureenablesyoutoaccessmore
Web-basedsourceandbrowseInternetmoresecurely.Ifyouwanttoconfiguretheproxysettingswhenyou
areconnectingtoaWi-Finetwork,dothefollowing:
1.Swipeinfromtherightedgeofthescreentodisplaythecharms.
2.TapSettings➙ChangePCsettings.
3.Inthenavigationpanel,tapNetwork➙Proxy.
4.Followtheinstructionsonthescreentoconfiguretheproxysettings.
AddingaWi-Finetwork
IfyouwanttoaccessaWi-Finetworkthatdoesnotbroadcastitsnetworkname(alsocalledaserviceset
identifierorSSID),youmustaddthatWi-Finetworkbeforeyoucanconnecttoit.
ToaddaWi-Finetwork,dothefollowing:
1.Swipeinfromtherightedgeofthescreentodisplaythecharms.
2.TaptheSettingscharm.
3.Tapthenetworkicon.AlistofavailableWi-Finetworksisdisplayed.
4.TapHiddennetwork.
5.FollowtheinstructionsonthescreentoaddaWi-Finetwork.
Addinganetworkprofile
EachlocationprofilestoresallthenetworkandInternetconfigurationsettingsneededforconnectingtoa
networkinfrastructurefromaspecificlocationsuchasahomeoranoffice.Byswitchingbetweenlocation
profilesasyoumoveyourtabletfromplacetoplace,youcanquicklyandeasilyconnecttoanetworkwith
noneedtoreconfigureyoursettingsmanuallyandrestartthetableteachtime.
Toaddanetworkprofile,dothefollowing:
1.FromtheStartmenu,tapLenovoSettings.
2.TapLocationAwareness.
3.Followtheinstructionsonthescreentoaddanetworkprofile.
Connectingtoamobilenetwork
AmicroSIMcardisrequiredtoconnecttoamobilenetwork.Referto“InstallingandremovingthemicroSIM
card”onpage27forinstructionsonhowtoinstallamicroSIMcard.
Note:SometabletssupportaccesstoWi-Finetworksonly.See“ConnectingtoaWi-Finetwork”onpage
29forinstructionsonconnectingtoaWi-Finetwork.
30ThinkPadHelixUserGuide
Page 39

Toconnecttothemobilenetwork,dothefollowing:
1.Swipeinfromtherightedgeofthescreentodisplaythecharms.
2.TaptheSettingscharm.
3.Tapthenetworkicon.Alistofavailablenetworksisdisplayed.
4.IntheMobilebroadbandsection,slidethecontroltotherighttoturniton.
5.Tapthenetworkname.Amenuisdisplayed.
6.TapConnect.
Whenyouareconnectedtothemobilenetwork,settheactivemobilenetworkasmeteredconnectionto
reducetheamountofdatayousendandreceive.
Tosettheactivemobilenetworkasmeteredconnection,dothefollowing:
1.Swipeinfromtherightedgeofthescreentodisplaythecharms.
2.TapSettings➙ChangePCsettings.
3.Inthenavigationpanel,tapNetwork➙Connections.
4.IntheMobilebroadbandsection,tapthenetworkname.Amenuisdisplayed.
5.IntheSetasameteredconnectionsection,slidethecontroltotherighttoturniton.
Afteryousetyourmobilenetworkasameteredconnection,youcandisabletheDownloadovermetered
connectionsfeaturetopreventextracharges.
TodisabletheDownloadovermeteredconnectionsfeature,dothefollowing:
1.Swipeinfromtherightedgeofthescreentodisplaythecharms.
2.TapSettings➙ChangePCsettings.
3.Inthenavigationpanel,tapPCanddevices➙Devices.
4.IntheDownloadovermeteredconnectionssection,slidethecontroltothelefttoturnitoff.
SharingyourInternetconnection
YoucanshareyourmobilebroadbandInternetconnectionwithmultipledevices.
ToshareyourInternetconnection,dothefollowing:
1.Swipeinfromtherightedgeofthescreentodisplaythecharms.
2.TapSettings➙ChangePCsettings.
3.Inthenavigationpanel,tapNetwork➙Connections.
4.IntheMobilebroadbandsection,tapthenetworkname.Amenuisdisplayed.
5.IntheSharethisconnectionsection,slidethecontroltotherighttoturniton.
UsingBluetoothdevices
Bluetoothisashort-rangewirelesscommunicationstechnology.UseBluetoothtoestablishawireless
connectionwithanotherBluetooth-enableddeviceoveradistanceofabout10m(32.8ft).
PairingwithaBluetoothdevice
ToconnectandexchangedatawithanotherBluetoothdevice,pairyourtabletwiththeBluetoothdevice
bydoingthefollowing:
1.Swipeinfromtherightedgeofthescreentodisplaythecharms.
Chapter3.Wirelessnetworksanddevices31
Page 40

2.TapSettings➙ChangePCsettings.
3.Inthenavigationpanel,tapPCanddevices➙Bluetooth.
4.Slidethecontroltotherighttoturniton.ThetabletwillsearchforBluetoothdevices.
5.WhentheBluetoothdeviceyouwanttopairisfound,taptheIDoftheBluetoothdevice.
6.TapPair.
UnpairingaBluetoothdevice
TounpairaBluetoothdevice,dothefollowing:
1.Swipeinfromtherightedgeofthescreentodisplaythecharms.
2.TapSettings➙ChangePCsettings.
3.Inthenavigationpanel,tapPCanddevices➙Bluetooth.
4.TaptheIDoftheBluetoothdeviceyouwanttounpair.
5.TapRemovedevice.Anotificationpromptisdisplayed.
6.TapY es.
UsingtheNFCconnection
Nearfieldcommunication(NFC)isahigh-frequencyandshort-rangewirelesscommunicationstechnology.
Dependingonthemodel,yourtabletmightcomewiththeNFCfeature.ByusingtheNFCfeature,youcan
establishradiocommunicationsbetweenyourtabletandanotherNFC-enableddeviceoveradistanceno
morethanafewcentimeters.
IfyourtabletisequippedwiththeNFCfeature,youcanfindtheNFCicon
Bydefault,theNFCfeatureisenabled.IftheNFCfeatureofyourtabletisdisabled,dothefollowingto
enabletheNFCfeature:
1.Swipeinfromtherightedgeofthescreentodisplaythecharms.
2.TapSettings➙ChangePCsettings➙Network➙Radiodevices.
3.SlidetheNFCcontroltotherighttoenabletheNFCfeature.
IfyoustillcannotenabletheNFCfeature,checktheNFCsettingintheThinkPadT abletSetupprogram
bydoingthefollowing:
1.StarttheThinkPadTabletSetupprogram.See“ThinkPadTabletSetup”onpage71.
2.TapSecurity➙I/OPortAccess.
3.SettheNFCoptiontoOn.
YoucanusetheNFCfeaturewithNFC-supportedprograms,suchastheLenovoQuickControlprogram.
Insomescenarios,youmightwanttouseanNFCcardoranNFC-enabledsmartphonewithyourtabletto
transferdata.ThefollowingsectionsprovideinstructionsonhowtoadjustthepositionofanNFCcardand
anNFC-enabledsmartphoneforNFCcommunication.
PositioninganNFCcard
Attention:
onthetablet.
•BeforepositioninganNFCcard,touchametaltableoragroundedmetalobject.Thisactionreducesany
staticelectricityfromyourbody.Staticelectricitycoulddamagethecard.
32ThinkPadHelixUserGuide
Page 41

•WhiletransferringdatatoorfromanNFCcard,donotputyourtabletintosleeporhibernationmode
beforethedatatransferfinishes;otherwise,yourdatacouldbecomedamaged.
Notes:
•BeforepositioninganNFCcard,ensurethatthetabletisonandtheNFCfeatureofthetabletisenabled.
•BeforepositioninganNFCcard,ensurethatthecardisinNFCDataExchangeFormat(NDEF),otherwise
thecardwillnotbesuccessfullydetectedbythetablet.
•Y ourtabletscreenandNFCcardmightlookdifferentfromtheillustrationsinthistopic.
TopositionanNFCcard,dothefollowing:
1.Positionyourtabletasshownandensurethatthefrontsideofthecardisfacingupward.Alignthe
left-sideedgeofthecardwiththeNFClogoonthetablet.
2.Movethecardleftandrightwithin5mm(0.20inch)asshown.Then,holdthecardforaboutone
seconduntilyouarepromptedthatthecardhasbeensuccessfullydetectedbythetablet.Then,you
cantransferdatatoorfromthecardthroughNFC.
FormoreinformationabouttransferringdatathroughNFC,refertothedocumentationthatcamewiththe
card.
PositioninganNFC-enabledsmartphone
Attention:WhiletransferringdatatoorfromanNFC-enabledsmartphone,donotputyourtabletintosleep
orhibernationmodebeforethedatatransferfinishes;otherwise,yourdatacouldbecomedamaged.
Chapter3.Wirelessnetworksanddevices33
Page 42

Notes:
•BeforepositioninganNFC-enabledsmartphone,ensurethatboththetabletandthesmartphoneareon
andtheNFCfeatureisenabledonboththetabletandsmartphone.
•ThescreenofyourtabletandNFC-enabledsmartphonemightlookdifferentfromtheillustrationsin
thistopic.
TopositionanNFC-enabledsmartphone,dooneofthefollowingdependingonthepositionofyour
smartphone:
•Whenthesmartphoneisinaportraitposition:
1.Positionyourtabletasshownandensurethatthescreenofthesmartphoneisfacingupward.Align
theleft-sideedgeofthesmartphonewiththeNFClogoonthetablet.
2.Movethesmartphoneleftandrightwithin5mm(0.20inch)asshown.Then,holdthesmartphonefor
aboutoneseconduntilyouarepromptedthatthesmartphonehasbeensuccessfullydetectedbythe
tablet.Then,youcantransferdatatoorfromthesmartphonethroughNFC.
FormoreinformationabouttransferringdatathroughNFC,refertothedocumentationthatcamewith
thesmartphone.
•Whenthesmartphoneisinalandscapeposition:
34ThinkPadHelixUserGuide
Page 43

1.Positionyourtabletasshownandensurethatthescreenofthesmartphoneisfacingupward.Align
theleft-sideedgeofthesmartphonewiththeNFClogoonthetablet.
2.Movethesmartphoneleftandrightwithin5mm(0.20inch)asshown.Then,holdthesmartphonefor
aboutoneseconduntilyouarepromptedthatthesmartphonehasbeensuccessfullydetectedbythe
tablet.Then,youcantransferdatatoorfromthesmartphonethroughNFC.
FormoreinformationabouttransferringdatathroughNFC,refertothedocumentationthatcamewith
thesmartphone.
Chapter3.Wirelessnetworksanddevices35
Page 44

36ThinkPadHelixUserGuide
Page 45

Chapter4.Youandyourtablet
Thischapterprovidestheaccessibilityinformationaboutyourtablet,andinstructionsontravelingwith
thetabletandmaintainingthetablet.
Comfortandaccessibility
Readthistopictolearnhowtouseyourtabletmorecomfortablyandhowtousetheaccessibilityfeatures.
Usingyourtabletmorecomfortably
Withthehelpofalltheconveniencesandpowerfulfeaturesofyourtablet,youcancarryyourtabletallday
longforworkorentertainmentatmanyplaces.Thereforeitisimportantthatyouremainattentivetogood
posture,goodlighting,andproperseatingtoachievegreatercomfortwithyourtablet.
Activesittingandrestbreaks:Thelongeryousitandworkwithyourtabletthemoreimportantitisto
observeyourworkingposture.Makeminorvoluntaryposturalchangesandtakefrequent,shortbreakswhen
youusethetabletforalongtime.Yourtabletisalightandmobilesystem;rememberthatitcaneasilybe
repositionedtoaccommodatemanyposturemodificationsyoumightwishtomake.
Workareasetupoptions:Familiarizeyourselfwithallofyourofficefurnituresothatyouknowhowtoadjust
yourworksurface,seat,andotherworktoolstoaccommodateyourpreferencesforcomfort.Ifyourwork
areaisnotinanofficesetting,besuretotakespecialnoteofemployingactivesittingandutilizingwork
breaks.NotethattherearemanyThinkPadproductsolutionsavailabletohelpyoumodifyandexpand
yourtablettobestsuityourneeds.AccesstheWebsitehttp://www.lenovo.com/essentialstoviewsome
oftheseoptions.Exploreyouroptionsfordockingsolutionsandexternalproductsthatcanprovidethe
adjustabilityandfeaturesthatyouwant.
Accessibilityinformation
Lenovoiscommittedtoprovidingpeoplewithdisabilitiesgreateraccesstoinformationandtechnology.
Sometechnologiesarealreadyprovidedinyouroperatingsystem.Otherscanbepurchasedthrough
vendors.
UsersalsocanusetheEaseofAccessCenterprovidedintheWindowsoperatingsystemtoconfiguretheir
tablettosuittheirphysicalandcognitiveneeds.TheEaseofAccessCenterisacentrallocationthatyoucan
usetoconfiguretheaccessibilitysettingsandprogramsavailableintheMicrosoftWindowsoperatingsystem.
TousetheEaseofAccessCenter,openControlPanelandtapEaseofAccess➙EaseofAccessCenter.
Thefollowinginformationprovideswaystohelpuserswhohavehearing,vision,andmobilitylimitationsget
themostoutoftheircomputerexperience.
On-screennotification
On-screennotificationhelpshearing-impairedpeoplebeawareofthestatusoftheirtablet.On-screen
notificationreplacessoundswithvisualcuesortextcaptionstoindicatethatactivityishappeningon
thetablet.Asaresult,systemalertsarenoticeableevenwhentheyarenotheard.Forexample,when
youselectoneobject,theobjectishighlighted.
Touseon-screennotification,openControlPanel,tapEaseofAccess➙EaseofAccessCenter,and
thentapUsetextorvisualalternativeforsounds.
©CopyrightLenovo2014
37
Page 46

Audionotification
Audionotificationhelpsvisuallyimpairedpeopleorpeoplewithweaksightbeawareofthestatusoftheir
tablet.
Touseaudionotification,openControlPanel,tapEaseofAccess➙EaseofAccessCenter➙Usethe
computerwithoutadisplay,andthenselectTurnonAudioDescription.
Narrator
Narratorisascreenreaderthatreadstextsonthescreenaloudanddescribeseventslikeerrormessages.
ToopenNarrator,dothefollowing:
1.SwipeinfromtherightedgeofthescreentodisplaythecharmsandtapSearch.
2.Inthesearchfiled,enterNarrator,andthen,inthelistofresults,tapNarrator.
FormoreinformationabouthowtouseandconfigureNarrator,seetheWindowsHelpandSupport
informationsystem.
Screen-readertechnologies
Screen-readertechnologiesareprimarilyfocusedonsoftwareprograminterfaces,helpinformationsystems,
andavarietyofonlinedocuments.Foradditionalinformationaboutscreenreaders,seethefollowing:
•UsingPDFswithscreenreaders:
http://www.adobe.com/accessibility.html?promoid=DJGVE
•UsingtheJAWSscreenreader:
http://www.freedomscientific.com/jaws-hq.asp
•UsingtheNVDAscreenreader:
http://www.nvaccess.org/
SpeechRecognition
SpeechRecognitionenablesyoutocontrolyourtabletbyvoice.
Usingonlyyourvoice,youcanstartprograms,openmenus,tapbuttonsandotherobjectsonthescreen,
dictatetextintodocuments,andwriteandsende-mails.
ToopenSpeechRecognition,dothefollowing:
1.SwipeinfromtherightedgeofthescreentodisplaythecharmsandtapSearch.
2.Inthesearchfiled,enterSpeechRecognition,andthen,inthelistofresults,tapSpeechRecognition.
FormoreinformationabouthowtouseandconfigureSpeechRecognition,seetheWindowsHelpand
Supportinformationsystem.
Customizabletextsize
Dependingonyourpreference,youcanchangeonlythetextsizeinsteadofchangingthesizeofeverything
onthedesktop.Tochangethetextsize,openControlPanelandtapAppearancesandPersonalization➙
Display.Then,gotoChangeonlythetextsizeandsetatextsizethatmeetsyourneeds.
Magnifier
YourtabletisequippedwiththeMicrosoftMagnifiertohelpvisuallyimpairedpeopleusethecomputermore
comfortably.Magnifierisausefulutilitythatenlargespartorallofyourscreensothatyoucanseethewords
andimagesbetter.MagnifierispartoftheEaseofAccessCenter.
38ThinkPadHelixUserGuide
Page 47

ToopenMagnifier,dothefollowing:
1.SwipeinfromtherightedgeofthescreentodisplaythecharmsandtapSearch.
2.Inthesearchfiled,enterMagnier,andthen,inthelistofresults,tapMagnifier.
FormoreinformationabouthowtouseandconfigureMagnifier,seetheWindowsHelpandSupport
informationsystem.
Zoom
Youcanusethezoomfeaturetoenlargeorreducethesizeoftext,pictures,maps,orotherobjects.
•Zoomin:Movetwofingersfartherapartonthetouchscreentoenlargethesizeoftext,pictures,maps,
orotherobjects.
•Zoomout:Movetwofingersclosertogetheronthetouchscreentoreducethesizeoftext,pictures,
maps,orotherobjects.
Screenresolution
Youcanmakeyourdocumentseasiertoreadbyadjustingthescreenresolutionofyourtablet.Toadjust
thescreenresolution,tapandholdanywhereonthedesktop,tapScreenresolution,andthenadjustthe
settingsasyouprefer.
Note:Settingtoolowofaresolutionmightpreventsomeitemsfromfittingonthescreen.
Foralternativesonincreasingthesizeoftextandotherobjects,seethefollowing:
•“Customizabletextsize”onpage38
•“Magnifier”onpage38
•“Zoom”onpage39
On-ScreenKeyboard
On-ScreenKeyboarddisplaysavisualkeyboardwithallthestandardkeys.
ToopenOn-ScreenKeyboard,dothefollowing:
1.SwipeinfromtherightedgeofthescreentodisplaythecharmsandtapSearch.
2.Inthesearchfiled,enterOn-ScreenKeyboard,andthen,inthelistofresults,tapOn-ScreenKeyboard.
FormoreinformationabouthowtouseandconfigureOn-ScreenKeyboard,see“UsingtheOn-Screen
Keyboardorthetouchkeyboardandhandwritingpanel”onpage14ortheWindowsHelpandSupport
informationsystem.
Industry-standardconnectors
Yourtabletprovidesindustry-standardconnectorsthatenableyoutoconnectassistivedevices,ifneeded.
Formoreinformationonthelocationandfunctionofeachconnector,see“Tabletlayout”onpage1.
Documentationinaccessibleformats
Lenovoprovideselectronicdocumentationinaccessibleformats,suchasproperlytaggedPDFfilesor
HyperTextMarkupLanguage(HTML)files.Lenovoelectronicdocumentationisdevelopedtoensure
thatvisuallyimpaireduserscanreadthedocumentationthroughascreenreader.Eachimageinthe
documentationalsoincludesadequatealternativetexttoexplaintheimagesothatvisuallyimpairedusers
canunderstandtheimagewhentheyuseascreenreader.
Chapter4.Youandyourtablet39
Page 48

Gettingupdates
YourtabletenablesyoutoupdatetheWindowsoperatingsystemandLenovoapplications.
GettingupdatesfromLenovo
YourtabletispreinstalledwithSystemUpdate.ThisprogramenablesyoutokeeptheLenovosoftwareon
yourtabletup-to-datebydownloadingandinstallingsoftwareupdates.
TostartSystemUpdate,dothefollowing:
1.Swipeinfromtherightedgeofthescreentodisplaythecharms.
2.TaptheSearchcharmtosearchforSystemUpdate.
3.TapSystemUpdate.
4.Followtheinstructionsonthescreen.
GettingupdatesfromMicrosoft
TocheckandkeepyourWindows,programs,ordevicedriversup-to-date,seetheWindowsHelpand
Supportformoreinformation.
Travelingwithyourtablet
Thistopicprovidesinformationtohelpyouworkwithandtransportyourtabletwhileyoutraveling.
Traveltips
Usethefollowingtraveltipstotravelmoreconfidentlyandefficientlywithyourtablet:
•Whileitissafetoallowyourtablettogothroughthexraymachinesatairportsecuritystations,itis
importanttokeepyoureyesonthetabletatalltimestopreventtheft.
•Putyourtabletinaprotectivecasewhennotinusetopreventdamageorscratching.
Traveltipsonairplanes
Ifyoucarryyourtabletintoanairplane,checkthefollowingtraveltips:
•Ifyouaregoingtousethewirelessservice,checkwiththeairlineforanyrestrictionsbeforeboarding
theairplane.
•Iftherearerestrictionsontheuseoftabletswiththewirelessfeatureonanairplane,enabletheAirplane
mode.Toenableit,dothefollowing:
1.Swipeinfromtherightedgeofthescreentodisplaythecharms.
2.TapSettings➙ChangePCsettings.
3.Inthenavigationpanel,tapNetwork➙Airplanemode.
4.SlidethecontroltotherighttoturnonAirplanemodetodisableallwirelessdevices.
•Becarefulabouttheseatinfrontofyouontheairplane.Placeyourtabletinasafepositionsothatitdoes
notgetcaughtwhenthepersoninfrontofyouleansback.
Travelaccessories
Thefollowingisachecklistofthingstoconsiderpackingwhenyouaregoingtobeawayfromyourofficeor
home:
40ThinkPadHelixUserGuide
Page 49

Travelessentials:
•Theacpoweradapterthatcomeswithyourtablet
•Thepowercordthatcomeswithyourtablet
•Aqualitycarryingcasethatprovidesadequatecushionandprotection
Otheritemsyoumightwanttoconsider:
•ThinkPadheadphones
•Additionalstoragedevicesorsmartcards
•T abletDigitizerPen
•ThinkPadTabletDock
•ThinkPadHelixQuickshotCover
•ThinkPadHelixUltrabookKeyboard
•ThinkPadHelixUltrabookProKeyboard
Ifyouaretravelingtoanothercountryorregion,youmightwanttoconsiderthefollowingitems:
•AThinkPadacpoweradapterforthecountryorregiontowhichyouaretraveling
•AmicroSIMcardforthelocalmobileservicesinthatcountryorregion
Careandmaintenance
Handleyourtabletwithcaresothatyoucanenjoythisproductforalongtime.
Cleaningyourtablet
Tocleanyourtablet,unplugallcablesandturnoffthetabletbypressingandholdingthepowerbuttonfora
fewseconds.Thenwipethetabletscreenwithasoft,lint-free,dryclothtoclearstainsandsmudges.
Note:Donotusescreencleaners,householdcleaners,aerosolsprays,solvents,alcohol,ammonia,or
abrasivestocleanyourtablet.
Protectingthescreenwithareplaceablefilm
Youcanpurchaseareplaceablefilmtoprotectthescreenfromscratchingandextendthelifeofyourtablet.
Touseareplaceablefilm,cleanthescreenfirstandthenapplythereplaceablefilmonthescreen.
Storingthetabletforextendedperiods
Ifyouarenotgoingtouseyourtabletforanextendedperiodoftime,removethemicroSIMcardfromyour
tablet,andthenpackyourtabletwithaprotectivecaseandstoreitinawell-ventilatedanddryareawithout
directexposuretosunshine.
Chapter4.Youandyourtablet41
Page 50

42ThinkPadHelixUserGuide
Page 51

Chapter5.ThinkPadHelixoptions
ThefollowingoptionaldevicesaredesignedspeciallyforyourThinkPadHelixtablet.
•ThinkPadHelixUltrabookKeyboard
•ThinkPadHelixUltrabookProKeyboard
•ThinkPadTabletDock
Theseoptionsprovideconvenienceandmakeyourtableteasiertouseforwork,study,andentertainment.
Fortabletsthatdonotcomewiththeseoptionaldevices,youcanpurchasethemfromLenovoat
http://www.lenovo.com/essentials.
ThinkPadHelixUltrabookKeyboard
ThistopicprovidesanoverviewoftheThinkPadHelixUltrabookKeyboardandinstructionsonhowtouseit.
OverviewofThinkPadHelixUltrabookKeyboard
ThetopicintroducestheThinkPadHelixUltrabookKeyboardhardwarefeaturestogiveyouthebasic
informationyouneedtostartusingit.
12TabletDigitizerPenslotcoverandTabletDigitizerPenslot
SomemodelscomewithaTabletDigitizerPenslotcover1.T ostoretheTabletDigitizerPenintheTablet
DigitizerPenslot,removetheTabletDigitizerPenslotcoverfromtheslotfirst.
Note:EnsurethatyoukeeptheTabletDigitizerPenslotcover.ReattachittotheTabletDigitizerPenslot
whenyouarenotstoringthepenintheslot.
3Two-buttonclickpad
Thetwo-buttonclickpadisapointer-positioningdevicethatenablesyoutopoint,select,drag,andscroll,
likeyoudowhenusingamouse.Youalsocanuseittoperformsomebasictouchgestures.
Formoreinformation,see“Usingthetwo-buttonclickpad”onpage46
©CopyrightLenovo2014
.
43
Page 52

4Specialkeys
Thespecialkeysenableyoutocontrolmanyfeaturesofyourtabletbypressingasinglekey.Formore
information,see“Usingthespecialkeys”onpage45
5USB2.0connector
TheUSB2.0connectorisusedforconnectingUSB-compatibledevices,suchasaUSBprinter,USBmouse,
USBkeyboard,USBmemorykey,oradigitalcamera.
Attention:WhenyouattachaUSBcabletothisUSBconnector,ensurethattheUSBmarkisfacingupward.
Otherwisetheconnectormightbedamaged.
.
UsingtheThinkPadHelixUltrabookKeyboard
TousetheThinkPadHelixUltrabookKeyboard,installyourtabletintothekeyboardfirst,asshowninthe
followingillustration.Ensurethatthetabletissecuredinplace.
Note:DonotdetachthetabletfromtheThinkPadHelixUltrabookKeyboardwhileusingthekeyboard,
otherwisetheThinkPadHelixUltrabookKeyboardwillbedisabled.
44ThinkPadHelixUserGuide
Page 53

StoringandremovingtheTabletDigitizerPen
SomemodelsareequippedwithaTabletDigitizerPenasastandardfeature.Youcanstorethepeninthe
slotontherightsideoftheThinkPadHelixUltrabookKeyboard.RemovetheTabletDigitizerPenslotcover
1,thenpushthepengentlyintotheslotuntilyouhearaclick2.
first
Note:TheT abletDigitizerPenslotcoverisavailableonsomemodels.
Toremovethepenfromtheslot,pressthepengentlyintotheslot1toreleaseit;thenpullthepenout2.
Note:Thepencontainspressuresensors.Donotpushthetipofthepenforanextendedperiodoftime.Do
notsubjectthepentoshockorvibration.
Formoreinformationaboutusingthepen,see“UsingtheTabletDigitizerPen”onpage14.
Usingthespecialkeys
TheThinkPadHelixUltrabookKeyboardhasseveralspecialkeys.Pressaspecialkeytoquicklycontrol
theassociatedfunction.
Volumeandmutecontrol
•Mutethespeakers.
Chapter5.ThinkPadHelixoptions45
Page 54

•Turndownthespeakervolume.
•Turnupthespeakervolume.
•Mutethemicrophone.
Screencontrol
•
•
Turndownthebrightness.
Turnupthebrightness.
Applicationcontrol
•
OpentheSettingscharm.
•OpentheSearchcharm.
•Viewallapplicationsthatyouhaveopened.
•Viewallapplications.
•Navigatetothetopwhenyouareviewinginformation,suchasadocumentoraWebpage.
•
Navigatetothebottomwhenyouareviewinginformation,suchasadocumentoraWebpage.
Fnkeycontrol
+:PressFn+EsctoenableordisabletheFnLockfunction.
•WhentheFnLockfunctionisdisabled:TheFnLockindicatorisoff.T oinitiatethespecialfunction
ofeachkey,pressthefunctionkeydirectly.ToinputF1–F12,presstheFnkeyandthecorresponding
functionkey.
•WhentheFnLockfunctionisenabled:TheFnLockindicatorturnson.ToinputF1–F12,pressthe
correspondingfunctionkeydirectly.T oinitiatethespecialfunctionofeachkey,presstheFnkeyandthe
correspondingfunctionkey.
Functionkeycombinations
•Fn+4:Putsthecomputerintosleepmode.Toreturntonormaloperation,presstheFnkeyorpower
button.
•Fn+End:HasthesamefunctionastheInsertkeyonaconventionalkeyboard.
•Fn+B:HasthesamefunctionastheBreakkeyonaconventionalkeyboard.
•Fn+K:HasthesamefunctionastheScrLKkeyontheconventionalkeyboard.
•Fn+P:HasthesamefunctionasthePausekeyontheconventionalkeyboard.
•Fn+S:HasthesamefunctionastheSysRqkeyontheconventionalkeyboard.
Usingthetwo-buttonclickpad
Youcanenableordisablethetwo-buttonclickpadbypressingFn+8.
46ThinkPadHelixUserGuide
Page 55

Theright-clickareaaonthetwo-buttonclickpadworksastheright-clickbuttononaconventionalmouse.
Therestareaonthetwo-buttonclickpadworksastheleft-clickbuttononaconventionalmouse.
Youalsocanusethetwo-buttonclickpadtoperformthefollowingtouchgestures.
Tap
Tapanywhereontheclickpad
withonefingertoselectoropen
anitem.
Two-fingerscroll
Puttwofingersontheclickpad
andmovethemintheverticalor
horizontaldirection.Thisaction
enablesyoutoscrollthroughthe
document,Website,orapps.
Two-fingertap
Tapanywhereontheclickpadwith
twofingerstodisplayashortcut
menu.
CarryingorstoringthetablettogetherwiththeThinkPadHelixUltrabookKeyboard
SometimesyoudonotneedtousethekeysontheThinkPadHelixUltrabookKeyboard,butyouwouldlike
tocarryorstorethetablettogetherwiththekeyboard.Inthissituation,youmightconsiderthefollowing
methodsdependingonthemodelofyourtablet.
•Formodelsthatarenotequippedwithasmartcardslot,youcaninstallthetabletintotheThinkPadHelix
UltrabookKeyboardwiththetabletscreenfacingupward.Toachievethis,dothefollowing:
1.Positionthetabletwiththetabletscreenfacingupward.
2.Gentlyslideyourtabletasshown.ThetabletisattachedtotheThinkPadHelixUltrabookKeyboard.
TheThinkPadHelixUltrabookKeyboardisdisabledinthissituation.
Chapter5.ThinkPadHelixoptions47
Page 56

•Forallmodels,youcaninstallthetabletintotheThinkPadHelixUltrabookKeyboardwiththetabletscreen
facingdownward.Toachievethis,dothefollowing:
Note:Yourtabletmightlookslightlydifferentfromthefollowingillustrations.
1.Positionthetabletwiththetabletscreenfacingdownward.
2.Gentlyslideyourtabletasshown.ThetabletisattachedtotheThinkPadHelixUltrabookKeyboard.
TheThinkPadHelixUltrabookKeyboardisdisabledinthissituation.
Formoreinformation,refertothedocumentationthatcamewiththeThinkPadHelixUltrabookKeyboard.
ThinkPadHelixUltrabookProKeyboard
ThistopicprovidesanoverviewoftheThinkPadHelixUltrabookProKeyboardandinstructionsonhowto
useit.
OverviewofThinkPadHelixUltrabookProKeyboard
ThetopicintroducestheThinkPadHelixUltrabookProKeyboardhardwarefeaturestogiveyouthebasic
informationyouneedtostartusingtheit.
1TrackPointbuttons
TheTrackPointbuttonscontainthefollowingparts:
48ThinkPadHelixUserGuide
Page 57

•Left-clickbutton:Presstheleft-clickzonetoselectoropenanitem.
•Scrollbar:Pressandholdthedottedscrollingbarwhileapplyingpressuretothepointingstickinthe
verticalorhorizontaldirection.Thenyoucanscrollthroughthedocument,Website,orapps.
•Right-clickbutton:Presstheright-clickzonetodisplayashortcutmenu.
2Touchpad
Thetouchpadisapointer-positioningdevicethatenablesyoutopoint,select,drag,andscroll,likeyoudo
whenusingamouse.Youalsocanuseittoperformsometouchgestures.
Formoreinformation,see“Usingthetouchpad”onpage56.
3Specialkeys
Thespecialkeysenableyoutocontrolmanyfeaturesofyourtabletbypressingasinglekey.Formore
information,see“Usingthespecialkeys”onpage55.
4TrackPointpointingstick
TousetheTrackPointpointingstick,applypressuretothenonslipcaponthepointingstickinanydirection
paralleltothekeyboard.Thenyoucanmovethepointer.Butthepointingstickitselfdoesnotmove.The
speedatwhichthepointermovesdependsonthepressureyouapplytothepointingstick.Thecapon
theendofthepointingstickisremovable.Formoreinformation,see“Replacingthecapofthepointing
stick”onpage57
5Dockconnector
.
UsethisconnectortoconnectthetablettotheThinkPadHelixUltrabookProKeyboard.
6Security-lockslot
ToprotectyourThinkPadHelixUltrabookProKeyboardfromtheft,youcanpurchaseasecuritycablelock
thatfitsthesecurity-lockslottolockthekeyboardtoastationaryobject.See“Attachingamechanical
lock”onpage53
7MiniDisplayPortconnector
.
UsetheminiDisplayPortconnectortoconnectyourcomputertoacompatibleprojector,externalmonitor,
orhigh-definitiontelevision.TheminiDisplayPortconnectorofyourcomputersupportsaudioaswellas
videostreaming.Thiscompactconnectorenablesaplug-and-playsetupandsupportsadaptersthatcan
plugintoDVI,VGA,orHDMIconnectors.
Chapter5.ThinkPadHelixoptions49
Page 58

8AlwaysOnUSB3.0connector
Bydefault,theAlwaysOnUSBconnectorenablesyoutochargesomemobiledigitaldevicesand
smartphonesinthefollowingsituations:
•Whenyourtabletisonorinsleepmode
•Whenyourtabletisinhibernationmodeoristurnedoff,butconnectedtoacpower
Ifyouwanttochargethesedeviceswhenthetabletisinhibernationmodeoristurnedoff,andthetablet
isnotconnectedtoacpower,tapWindowsStartscreencontroltogototheStartscreen.ClickLenovo
Settings➙Power.ThenmovetheswitchtotheOnpositionintheEnableAlwaysOnUSBareaandselect
theEnableevenwhenthecomputerisoffcheckbox,andclickOKorApply.
9Powerconnector
UsethisconnectorwiththesuppliedpowercordandtheacpoweradaptertochargetheThinkPadHelix
UltrabookProKeyboardandthetabletwhenthebatterypowerislow.
Formoreinformation,see“Chargingthebattery”onpage12.
10Ejectionbutton
PresstheejectionbuttontoreleaseyourtabletfromtheThinkPadHelixUltrabookProKeyboard.
11Penholder(onsomemodels)
SomemodelsareequippedwithaTabletDigitizerPen.Youcanstorethepeninthepenholder.See“Storing
andremovingtheTabletDigitizerPen”onpage53.
UsingtheThinkPadHelixUltrabookProKeyboard
ThistopicprovidesinstructionsonhowtousetheThinkPadHelixUltrabookProKeyboard.
Installingorremovingthetablet
TousetheThinkPadHelixUltrabookProKeyboard,installyourtabletintothekeyboardfirst.Toinstallthe
tabletforthefirsttime,dothefollowing:
1.Alignthehookholeonthebottomofthetabletwiththekeyboardhook,then,gentlyslideyourtabletas
shown.ThetabletisattachedtotheThinkPadHelixUltrabookProKeyboard.
50ThinkPadHelixUserGuide
Page 59

2.Pivotupthetablet.
Toremovethetabletfromthekeyboard,dothefollowing:
1.Presstheejectbuttonontherightsideofthekeyboard.
Chapter5.ThinkPadHelixoptions51
Page 60

2.Removethetabletfromthekeyboard.
Note:DonotremovethetabletfromtheThinkPadHelixUltrabookProKeyboardwhileusingthe
keyboard,otherwisetheThinkPadHelixUltrabookProKeyboardwillbedisabled.
Thenexttimeyouwanttoreinstallthetablet,alignthehookholeonthebottomofthetabletwiththe
keyboardhook,Then,insertthetabletintothekeyboardasshown.
Note:DonottouchthekeyboardconnectorontheThinkPadUltrabookProKeyboard.
52ThinkPadHelixUserGuide
Page 61
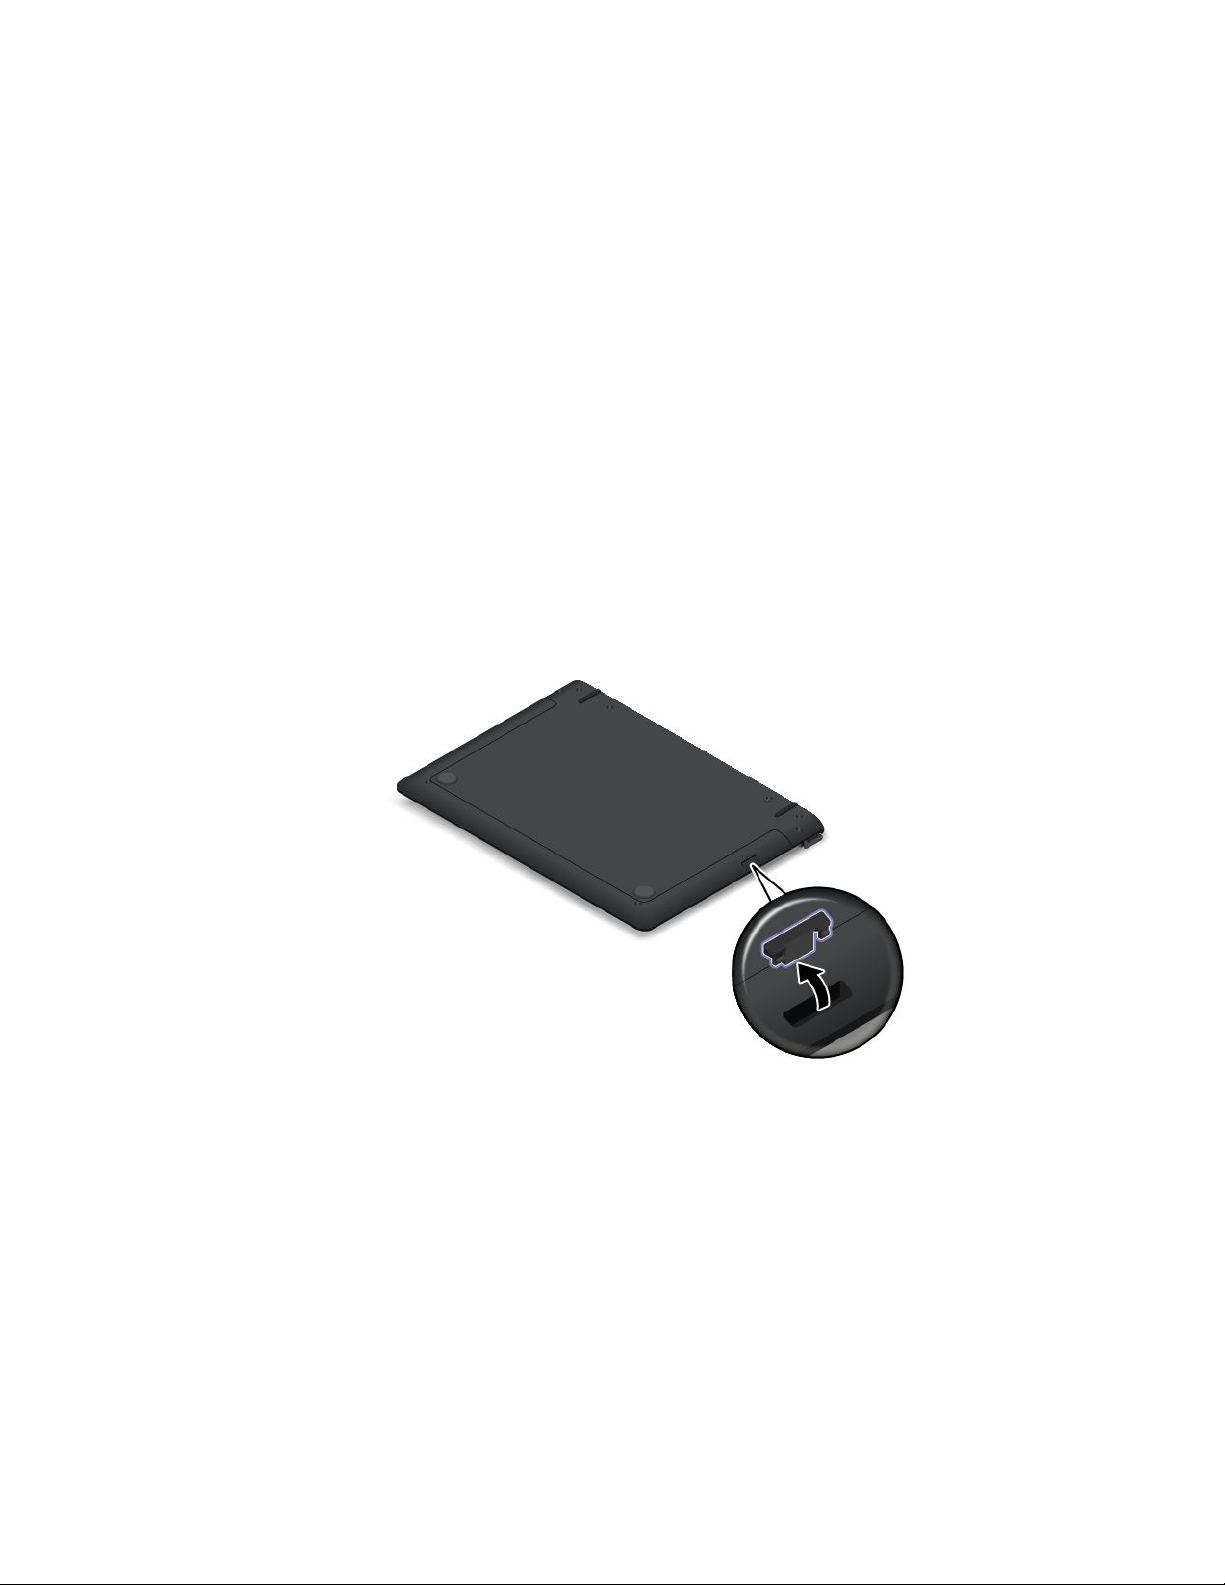
Attachingamechanicallock
YoucanattachasecuritycablelocktotheThinkPadHelixUltrabookProKeyboardtopreventthekeyboard
fromtheft.
Note:Youareresponsibleforevaluating,selecting,andimplementingthelockingdeviceandsecurity
feature.Lenovomakesnocomments,judgments,orwarrantiesaboutthefunction,quality,orperformance
ofthelockingdeviceandsecurityfeature.
Toattachasecuritycablelocktothekeyboard,dothefollowing:
1.Securethechainonthelocktoastationaryobject.Refertotheinstructionsshippedwiththe
mechanicallock.
2.Insertthesecuritycablelockintothesecurity-lockslot.Thenturnaroundthelockkeytothelocked
position.
StoringandremovingtheTabletDigitizerPen
SomemodelsareequippedwithaTabletDigitizerPenasastandardfeature.Youcanstorethepeninthe
penholderontherightsideoftheThinkPadHelixUltrabookProKeyboard.
Tostorethepen,dothefollowing:
1.Takeoutthedummyrubberfromthepen-holderslot.
Chapter5.ThinkPadHelixoptions53
Page 62

2.Insertthepenholderintothepen-holderslot.
3.Insertthepenintothepenholderinthedirectionasshownbythearrow.
Toremovethepenfromtheslot,dothefollowing:
54ThinkPadHelixUserGuide
Page 63
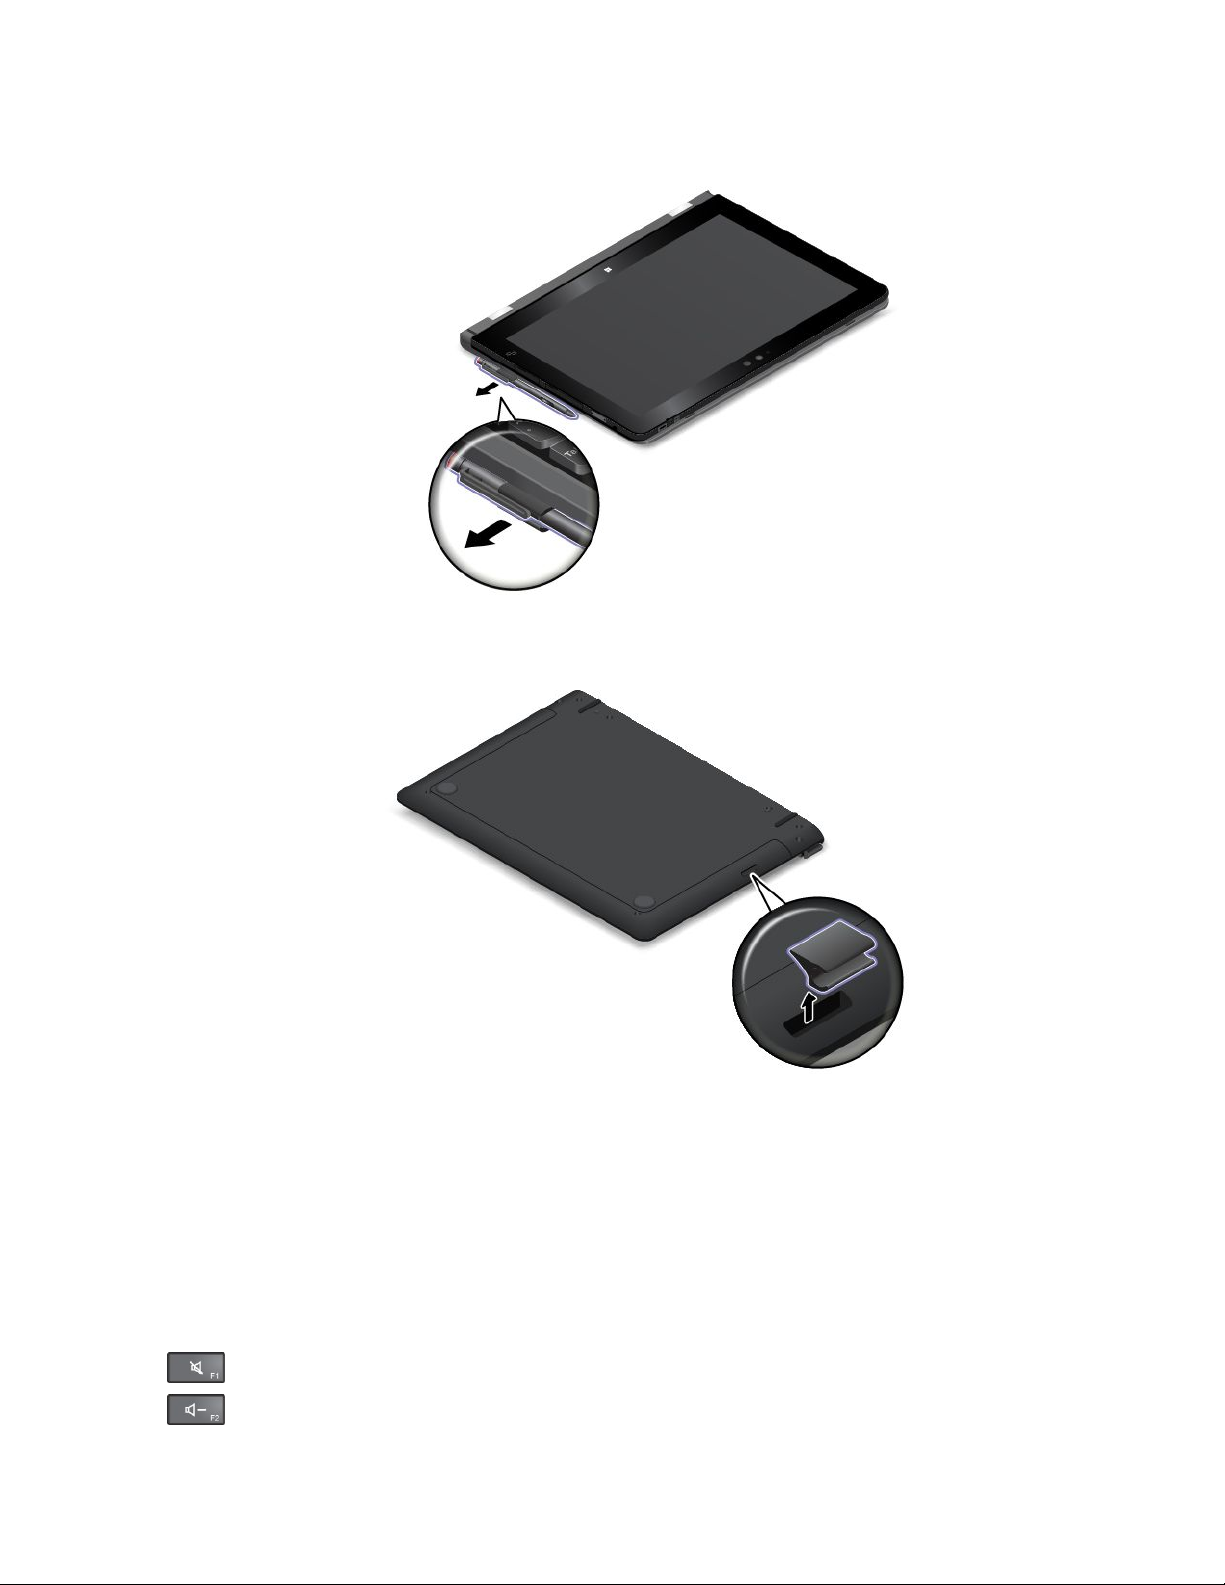
1.Pullthepenoutofthepenholderinthedirectionasshownbythearrow.
2.Takethepenholderoutfromthepen-holderslot,ifnecessary.Then,insertthedummyrubberback
intothepen-holderslot.
Note:Thepencontainspressuresensors.Donotpushthetipofthepenforanextendedperiodoftime.Do
notsubjectthepentoshockorvibration.
Formoreinformationaboutusingthepen,see“UsingtheTabletDigitizerPen”onpage14.
Usingthespecialkeys
TheThinkPadHelixUltrabookKeyboardhasseveralspecialkeys.Pressaspecialkeytoquicklycontrol
theassociatedfunction.
Volumeandmutecontrol
•
•
Mutethespeakers.
Turndownthespeakervolume.
Chapter5.ThinkPadHelixoptions55
Page 64

•Turnupthespeakervolume.
•Mutethemicrophone.
Screencontrol
•Turndownthebrightness.
•Turnupthebrightness.
Applicationcontrol
•
OpentheSettingscharm.
•OpentheSearchcharm.
•Viewallapplicationsthatyouhaveopened.
•
Viewallapplications.
•Navigatetothetopwhenyouareviewinginformation,suchasadocumentoraWebpage.
•Navigatetothebottomwhenyouareviewinginformation,suchasadocumentoraWebpage.
Fnkeycontrol
+:PressFn+EsctoenableordisabletheFnLockfunction.
•WhentheFnLockfunctionisdisabled:TheFnLockindicatorisoff.T oinitiatethespecialfunction
ofeachkey,pressthefunctionkeydirectly.ToinputF1–F12,presstheFnkeyandthecorresponding
functionkey.
•WhentheFnLockfunctionisenabled:TheFnLockindicatorturnson.ToinputF1–F12,pressthe
correspondingfunctionkeydirectly.T oinitiatethespecialfunctionofeachkey,presstheFnkeyandthe
correspondingfunctionkey.
Functionkeycombinations
•Fn+Spacebar:Controlsthekeyboardbacklight.
Therearethreemodesforthekeyboardbacklight:Off,Low,andHigh.PressFn+Spacebartochange
themodesofthekeyboardbacklight.
•Fn+4:Putsthecomputerintosleepmode.Toreturntonormaloperation,presstheFnkeyorpower
button.
•Fn+End:HasthesamefunctionastheInsertkeyonaconventionalkeyboard.
•Fn+B:HasthesamefunctionastheBreakkeyonaconventionalkeyboard.
•Fn+K:HasthesamefunctionastheScrLKkeyontheconventionalkeyboard.
•Fn+P:HasthesamefunctionasthePausekeyontheconventionalkeyboard.
•Fn+S:HasthesamefunctionastheSysRqkeyontheconventionalkeyboard.
Usingthetouchpad
Youcanusethetouchpadtoperformavarietyoftouchgestures.Thefollowingtableintroducessome
frequentlyusedtouchgestures.
56ThinkPadHelixUserGuide
Page 65

Tap
Tapanywhereonthetouchpad
withonefingertoselectoropen
anitem.
Two-fingertap
Tapanywhereonthetouchpadwith
twofingerstodisplayashortcut
menu.
Two-fingerscroll
Puttwofingersonthetouchpad
andmovethemintheverticalor
horizontaldirection.Thisaction
enablesyoutoscrollthroughthe
document,Website,orapps.
Two-fingerzoomout
Puttwofingersonthetouchpad
andmovethemclosertogether
tozoomout.
Three-fingerswipe
Putthreefingersonthetouch
padandmovethemlefttoshow
thenextitem.Movethemrightto
showthepreviousitem.
Four-fingerswipe
Putfourfingersonthetouchpad
andmovethemdownwardto
showthedesktop.
Two-fingerrotate
Puttwofingersonthetouchpad
androtatethemclockwiseor
counterclockwisetorotateanitem.
Two-fingerzoomin
Puttwofingersonthetouchpad
andmovethemfartherapartto
zoomin.
Four-fingerswipe
Putfourfingersonthetouchpad
andmovethemupwardtoviewand
choosefromopenedapps.
Swipefromthetopedge
FromtheStartscreenorthecurrent
app,swipeinfromthetopedgeof
thetouchpadwithonefingerto
displaythecommandmenu.
Swipefromthetoptothe
bottomedge
Swipefromthetoptothebottom
edgeofthetouchpadwithone
fingertoclosethecurrentapp.
Performingthisgestureonthe
desktopclosesthedesktopand
displaystheStartscreen.
Swipeinandout
Swipeinandoutfromtheright
edgeofthetouchpadwithone
fingertohidethecharms.
Swipefromtherightedge
Swipeinfromtherightedgeofthe
touchpadwithonefingertodisplay
thecharms.
Swipefromtheleftedge
Swipeinfromtheleftedgeofthe
touchpadwithonefingertoshow
thepreviouslyusedapp.
Replacingthecapofthepointingstick
Thecap1ontheendofthepointingstickisremovable.Afteryouusethecapforaperiodoftime,you
mightconsiderreplacingthecapwithanewone.
Note:Ensurethatyouuseacapwithgrooves
aasshowninthefollowingillustration.
Chapter5.ThinkPadHelixoptions57
Page 66

CarryingorstoringthetablettogetherwiththeThinkPadHelixUltrabookProKeyboard
SometimesyoudonotneedtousethekeysontheThinkPadHelixUltrabookProKeyboard,butyouwould
liketocarryorstorethetablettogetherwiththekeyboard.Inthissituation,youmightconsiderthefollowing
methodsdependingonthemodelofyourtablet.
•Formodelsthatarenotequippedwithasmartcardslot,youcaninstallthetabletintotheThinkPadHelix
UltrabookProKeyboardwiththetabletscreenfacingupward.T oachievethis,dothefollowing:
1.Positionthetabletwiththetabletscreenfacingupward.
2.Alignthehookholeonthebottomofthetabletwiththekeyboardhook,then,gentlyslideyourtablet
asshown.ThetabletisattachedtotheThinkPadHelixUltrabookProKeyboard.Thekeyboard
isdisabledinthissituation.
•Forallmodels,youcaninstallthetabletintotheThinkPadHelixUltrabookProKeyboardwiththetablet
screenfacingdownward.T oachievethis,dothefollowing:
Note:Yourtabletmightlookslightlydifferentfromthefollowingillustrations.
58ThinkPadHelixUserGuide
Page 67

1.Positionthetabletwiththetabletscreenfacingdownward.
2.Alignthehookholeonthebottomofthetabletwiththekeyboardhook,then,gentlyslideyourtablet
asshown.ThetabletisattachedtotheThinkPadHelixUltrabookProKeyboard.Thekeyboard
isdisabledinthissituation.
Formoreinformation,refertothedocumentationthatcamewiththeThinkPadHelixUltrabookProKeyboard.
ThinkPadTabletDock
TheThinkPadTabletDock(hereaftercalledthedock)holdsyourtabletinanuprightpositionandfreesyour
handstodoothertasks.ThedockalsoprovidesyouwitheasyaccesstoconnectorsforUSBdevices,file
transfers,charging,audioinput,audiooutput,andvideooutput.
ThistopicprovidesanoverviewofThinkPadT abletDockandinstructionsonhowtouseit.
OverviewofThinkPadTabletDock
ThetopicintroducestheThinkPadTabletDockhardwarefeaturestogiveyouthebasicinformationyou
needtostartusingtheit.
Frontviewandleft-sideviewofthedock
1Dockconnector
Usedtoestablishtheconnectionbetweenthedockandtabletwhenyourtabletisseatedinthedock.
Chapter5.ThinkPadHelixoptions59
Page 68

2Always-onUSBconnector(USB3.0connector)
Usedtochargesomemobiledigitaldevicesandsmartphonesbydefault,nomatterwhenyourtabletis
off,insleepmode,orinhibernationmode.Formoreinformation,refertothedocumentationthatcame
withthedock.
Note:ThisconnectoriscompatiblewiththeUSB2.0standard.
3Comboaudioconnector
Usedtoconnectheadphonesoraheadsettolistentostereosoundfromthetablet.Y oualsocanconnecta
headsettorecordaudioormakecalls.
Rearviewofthedock
1USB3.0connectors
UsedtoconnectdevicesthatarecompatiblewithUSB3.0andUSB2.0.
2HDMIconnector
Usedtoconnectacompatibledigitalaudiodeviceorvideodisplay.
3Ethernetconnector
UsedtoconnectthedocktoanEthernetLAN.
4Powerconnector
Usedtoconnecttheacpoweradaptershippedwiththedocktoprovidepowertothetabletandcharge
thebattery.
60ThinkPadHelixUserGuide
Page 69

UsingtheThinkPadTabletDock
Beforeusingthedock,ensurethatyouconnectthetablettothedockandthenconnectthedocktoan
electricaloutletbydoingthefollowing:
1.Positionyourtabletwiththedockconnectorsidefacingdownward.
2.Alignthedockconnectoronthetabletwiththeoneonthedock.
3.Gentlyslideyourtabletintothedockuntilitisseatedinplace.
4.Usetheacpoweradapterandpowercordshippedwiththedocktoconnectthedocktoanelectrical
outlet.
Chapter5.ThinkPadHelixoptions61
Page 70

Afterthetabletisconnectedtothedock,youcan:
•Useyourtabletinanuprightpositionwithouthavingtoholdthetablet.
•UsethedocktoholdyourtabletuprightwhenusinganexternalUSBkeyboard.
•ConnectthedocktoyourpersonalUSBstoragedevicewiththesuppliedUSBcabletotransferfiles.
•Connectthedocktoastereosystemorspeakersusingastereoaudiocabletoplaymusic.
•Connectthedocktoanelectricaloutletusingtheacpoweradaptershippedwiththedocktocharge
thetabletbattery.
62ThinkPadHelixUserGuide
Page 71

Chapter6.Security
Thischapterprovidesinformationabouthowtoprotecttheinformationstoredonyourtablet.
Usingpasswords
Youcanhelppreventyourtabletfromunauthorizedusebyusingpasswords.Onceyousetapassword,a
promptisdisplayedonthescreeneachtimeyouturnonthetablet.Enteryourpasswordattheprompt.Y ou
cannotusethetabletunlessyoutypethecorrectpassword.
Ifyouhavesetapower-onpassword,asupervisorpassword,oraharddiskpassword,itunlocks
automaticallywhenthetabletresumesfromsleepmode.
Note:IfaWindowspasswordhasbeenset,youwillbepromptedtoenterit.
Typingpasswords
Whenthisiconisdisplayed,typeapower-onpasswordorasupervisorpassword.
Whenthisiconisdisplayed,typeauserharddiskpassword.T otypeamasterharddiskpassword,
pressF1.Whentheiconchangesto,typethemasterharddiskpassword
Note:Toreturntotheicon,pressF1again.
Passwordsandsleepmode
IfyouhavesetaWindowspasswordandyouputyourtabletintosleepmode,youwillbepromptedtoenter
thepasswordwhenresumingoperation.
IfyouuseyouremailaddressasauseraccounttosignintoWindows,enteryouremailpasswordwhen
resumingoperation.
Power-onpassword
Youcansetapower-onpasswordtohelpprotectyourtabletagainstaccessbyunauthorizedusers.
Ifyousetapower-onpassword,thepasswordpromptisdisplayedonthescreenwheneveryouturnonthe
tablet.Youmustenterthecorrectpasswordtostartusingthetablet.
Setting,changing,orremovingapower-onpassword
Toset,change,orremoveapower-onpassword,dothefollowing:
1.Printtheseinstructions.
2.Saveallopenfiles,andexitallapplications.
3.Restartthetabletbypressingthepowerbuttonandthevolume-upbuttonatthesametime.The
ThinkPadT abletSetupprogrammenuopens.
4.TapSecurity➙Password➙Power-onPassword.
5.Dependingonyourneed,dooneofthefollowing:
©CopyrightLenovo2014
63
Page 72

•T osetapassword,dothefollowing:
a.T apEnter.Awindowopens.IntheEnterNewPasswordfield,enteradesiredpassword.
b.IntheConfirmNewPasswordfield,reenterthepasswordandtapOK.
c.IntheChangeshavebeensavedwindow,tapOK.
•T ochangeapassword,dothefollowing:
a.T apEnter.Awindowopens.IntheEnterCurrentPasswordfield,enterthecurrentpower-on
password.
b.IntheEnterNewPasswordfield,enteranewpower-onpassword.
c.IntheConfirmNewPasswordfield,reenterthenewpower-onpasswordandtapOK.
d.IntheChangeshavebeensavedwindow,tapOK.
•T oremoveapassword,dothefollowing:
a.T apEnter.Awindowopens.IntheEnterCurrentPasswordfield,enterthecurrentpower-on
password.
b.LeavetheEnterNewPasswordandConfirmNewPasswordfieldsblank.T apOK.
c.IntheChangeshavebeensavedwindow,tapOK.
Attention:Itisrecommendedthatyourecordyourpasswordandstoreitinasafeplace.Ifyouforget
yoursupervisorpassword,Lenovocannotresetyourpassword.Y oumusttakeyourtablettoaLenovo
reselleroraLenovomarketingrepresentativetohavethesystemboardreplaced.Proofofpurchaseis
required,andafeewillbechargedforpartsandservice.
6.Saveconfigurationchangesandexit.
Supervisorpassword
IfyouhavesetasupervisorpasswordintheThinkPadT abletSetupprogram,youwillbepromptedtoentera
supervisorpasswordwhenyoustarttheThinkPadT abletSetupprogram.
ThesupervisorpasswordprotectsthesysteminformationstoredinThinkPadTabletSetup.Withoutit,
noonecanchangetheconfigurationofthetablet.
Note:Thesystemadministratorcansetthesamesupervisorpasswordonmanytabletstomake
administrationeasier.
Setting,changing,orremovingasupervisorpassword
Onlyasystemadministratorcanset,change,orremoveasupervisorpassword.
Toset,change,orremoveasupervisorpassword,dothefollowing:
1.Printtheseinstructions.
2.Saveallopenfiles,andexitallapplications.
3.Restartthetabletbypressingthepowerbuttonandthevolume-upbuttonatthesametime.The
ThinkPadT abletSetupprogrammenuopens.
4.TapSecurity➙Password➙SupervisorPassword.
5.Dependingonyourneeds,dooneofthefollowing:
•T osetapassword,dothefollowing:
a.T apEnter.Awindowopens.IntheEnterNewPasswordfield,enteradesiredpassword.
b.IntheConfirmNewPasswordfield,reenterthepasswordandtapOK.
c.IntheChangeshavebeensavedwindow,tapOK.
64ThinkPadHelixUserGuide
Page 73

•T ochangeapassword,dothefollowing:
a.T apEnter.Awindowopens.IntheEnterCurrentPasswordfield,enterthecurrentsupervisor
password.
b.IntheEnterNewPasswordfield,enteranewsupervisorpassword.
c.IntheConfirmNewPasswordfield,reenterthenewsupervisorpasswordandtapOK.
d.IntheChangeshavebeensavedwindow,tapOK.
•T oremoveapassword,dothefollowing:
a.T apEnter.Awindowopens.IntheEnterCurrentPasswordfield,enterthecurrentsupervisor
password.
b.LeavetheEnterNewPasswordandConfirmNewPasswordfieldsblank.T apOK.
c.IntheChangeshavebeensavedwindow,tapOK.
Attention:Itisrecommendedthatyourecordyourpasswordandstoreitinasafeplace.Ifyouforget
yoursupervisorpassword,Lenovocannotresetyourpassword.Y oumusttakeyourtablettoaLenovo
reselleroraLenovomarketingrepresentativetohavethesystemboardreplaced.Proofofpurchaseis
required,andafeewillbechargedforpartsandservice.
6.Saveconfigurationchangesandexit.
ThenexttimeyouopentheThinkPadTabletSetupprogram,youwillbepromptedtoenteryourpassword
toproceed.
Harddiskpasswords
Thefollowingtwotypesofharddiskpasswordscanhelpprotecttheinformationstoredontheharddiskdrive:
•Userharddiskpassword
Ifauserharddiskpasswordhasbeenset,butnomasterharddiskpasswordhasbeen,theusermust
entertheuserharddiskpasswordtoaccessfilesandapplicationsontheharddiskdrive.
•Masterharddiskpassword
Themasterharddiskpasswordalsorequiresauserharddiskpassword.Themasterharddiskpassword
isusuallysetandusedbyasystemadministrator.Itenablestheadministratortoaccessanyharddisk
driveinasystemlikeamasterkey.Theadministratorsetsthemasterpassword;thenassignsauser
passwordforeachtabletinthenetwork.Theusercanthenchangetheuserpasswordasdesired,but
theadministratorstillcangetaccessbyusingthemasterpassword.
Whenamasterharddiskpasswordisset,onlytheadministratorcanremovetheuserharddiskpassword.
Settingaharddiskpassword
Tosetaharddiskpassword,dothefollowing:
1.Printtheseinstructions.
2.Saveallopenfiles,andexitallapplications.
3.Restartthetabletbypressingthepowerbuttonandthevolume-upbuttonatthesametime.The
ThinkPadT abletSetupprogrammenuopens.
4.TapSecurity➙Password➙HarddiskPassword.
5.Apasswordwindowisdisplayed.YouarepromptedtoselectUserorUser+Master.SelectUserif
youwanttosetonlyoneharddiskpassword.SelectUser+Masterifyouwanttosetauserharddisk
passwordandamasterharddiskpassword,forexampleifyouareanadministratororasupervisor.
•IfyouselectUser,dothefollowing:
a.T apEnter.Awindowopens.IntheEnterNewPasswordfield,enteradesiredpassword.
Chapter6.Security65
Page 74

b.IntheConfirmNewPasswordfield,reenterthepasswordandtapOK.
c.IntheChangeshavebeensavedwindow,tapOK.
•IfyouselectUser+Master,dothefollowing:
a.First,setauserharddiskpassword.Whenamessagewindowpromptsyoutosettheuserhard
diskpassword,pressEntertocontinue.TypeyournewuserharddiskpasswordintheEnter
NewPasswordfieldandpressEnter.RetypethepasswordintheConfirmNewPassword
fieldandpressEnter.
b.Then,setamasterharddiskpassword.Whenamessagewindowpromptsyoutosetthemaster
harddiskpassword.PressEntertocontinue.Typeyournewmasterharddiskpasswordinthe
EnterNewPasswordfieldandpressEnter.RetypethepasswordintheConfirmNewPassword
fieldandpressEnter.
6.Saveconfigurationchangesandexit.
Thenexttimeyouturnonyourtablet,typetheuserormasterharddiskpasswordtostartyourtabletand
accesstheoperatingsystem.
Changingorremovingaharddiskpassword
Tochangeorremovetheharddiskpassword,dothefollowing:
•IfyouareinUser+Masterharddiskmode,youcanselecteitherUserHDPorMasterHDPtochange
thepassword,dependingonyourneeds.
–IfyouselectUserHDPmode,followthefollowingstepstochangetheuserharddiskpassword:
1.TypethecurrentuserharddiskpasswordintheEnterCurrentPasswordfieldandpressEnter.
2.TypethenewpasswordintheEnterNewPasswordfieldandpressEnter;thenretypethe
passwordintheConfirmNewPasswordfieldandpressEnter.
3.ASetupNoticewindowisdisplayed.PressEnteragaintocontinue.Theuserharddiskpassword
ischanged.
Note:TheharddiskpasswordcannotberemovedinUserHDPmode.
–IfyouselectMasterHDPmode,followthefollowingstepstochangethemasterharddiskpassword:
1.TypethecurrentmasterharddiskpasswordintheEnterCurrentPasswordfieldandpressEnter.
2.TypethenewmasterharddiskpasswordintheEnterNewPasswordfieldandpressEnter;then
retypethenewpasswordyoujustenteredintheConfirmNewPasswordfieldandpressEnter.
3.ASetupNoticewindowisdisplayed.PressEntertocontinue.Themasterharddiskpasswordis
changed.
Note:IfyouleavetheEnterNewPasswordandConfirmNewPasswordfieldsblankandpressEnter
twice,boththeuserandmasterharddiskpasswordsareremoved.
•IfyouareinUserharddiskmode,followthefollowingstepstochangetheuserharddiskpassword:
1.Followsteps1through7in“Settingaharddiskpassword”onpage65,typingyourpasswordtostart
theThinkPadTabletSetupprogram.
2.TypethecurrentuserharddiskpasswordintheEnterCurrentPasswordfieldandpressEnter.
3.TypethenewpasswordintheEnterNewPasswordfieldandpressEnter;thenretypethenew
passwordintheConfirmNewPasswordfieldandpressEnter.
4.ASetupNoticewindowisdisplayed.PressEnteragaintocontinue.Theuserharddiskpasswordis
changed.
Note:IfyouleavetheEnterNewPasswordandConfirmNewPasswordfieldsblankandpressEnter
twice,theuserharddiskpasswordisremoved.
66ThinkPadHelixUserGuide
Page 75

Tipsonusingtheharddiskpasswords
•Y oucansettheminimumlengthofaharddiskpasswordthroughtheSecuritymenu.
•Ifyousetaharddiskpasswordofoversevencharacters,theharddiskdrivecanbeusedonlywitha
tabletthatcanrecognizeaharddiskpasswordofoversevencharacters.Ifyoutheninstalltheharddisk
driveinatabletthatcannotrecognizeaharddiskpasswordthatcontainsmorethansevencharacters,
youcannotaccessthedrive.
•Recordyourpasswordandstoreitinasafeplace.Ifyouforgettheuserharddiskpassword,orbothuser
andmasterharddiskpasswords,Lenovocannotresetyourpasswordsorrecoverdatafromtheharddisk
drive.YoumusttakeyourtablettoaLenovoreselleroramarketingrepresentativetohavetheharddisk
drivereplaced.Proofofpurchaseisrequired,andafeewillbechargedforpartsandservice.
Notes:TheeDrivestoragedrivesorTrustedComputingGroup(TCG)Opal-compliantstoragedrivesprovide
self-encryptioncapabilitiestosecureyourdata.
•IfaTCGOpal-compliantstoragedriveandaTCGOpalmanagementsoftwareprogramareinstalled,and
theTCGOpalmanagementsoftwareprogramisactivated,theharddiskpasswordisnotavailable.
•IfaneDrivestoragedriveisinstalledinyourtablet,andyourtabletispreinstalledwiththeWindows8.1
operatingsystem,theharddiskpasswordisnotavailable.
Harddisksecurity
Toprotectpasswordsfromunauthorizedsecurityattacks,refertothefollowingtipstomaximizesecurity:
•Setapower-onpasswordaswellasaharddiskpasswordforyourinternalsolid-statedrive.Refertothe
proceduresin“Power-onpassword”onpage63and“Harddiskpasswords”onpage65.Forsecurity,
alongerpasswordisrecommended.
•T oprovidereliablesecurityfortheUEFIBIOS,usethesecuritychipandasecurityapplicationwitha
TrustedPlatformModulemanagementfeature.Referto“Usingthesecuritychip”onpage68.
•IfanEncryptionsolid-statedriveisinstalledinyourtablet,besuretoprotectthecontentsofyourtablet
memoryfromunauthorizedaccessbyuseofdriveencryptionsoftware,suchasMicrosoftWindows
BitLocker
Windows8.1operatingsystem.Referto“UsingWindowsBitLockerDriveEncryption”onpage67
•Beforeyoudisposeof,sell,orhandoveryourtablet,deletethedatastoredonit.
®
DriveEncryption,whichissupportedintheProfessionalandEnterpriseeditionsofthe
.
UsingWindowsBitLockerDriveEncryption
Tohelpprotectyourtabletagainstunauthorizedaccess,usethedriveencryptionsoftware,suchas
WindowsBitLockerDriveEncryption.
WindowsBitLockerDriveEncryptionisanintegralsecurityfeatureofWindows8.1operatingsystem.Itis
supportedintheProfessionalandEnterpriseeditionsoftheWindows8.1operatingsystem.Itcanhelpyou
protecttheoperatingsystemanddatastoredonyourtablet,evenifyourtabletislostorstolen.BitLocker
worksbyencryptingalluserandsystemfiles,includingtheswapandhibernationfiles.
BitLockerusesaTrustedPlatformModuletoprovideenhancedprotectionforyourdataandtoensureearly
bootcomponentintegrity.AcompatibleTPMisdefinedasaV1.2TPM.
TochecktheBitLockerstatus,gotoControlPanel,andclickSystemandSecurity➙BitLockerDrive
Encryption.
FormoreinformationaboutWindowsBitLockerDriveEncryption,seethehelpinformationsystemofthe
Windowsoperatingsystem,orsearchfor“MicrosoftWindowsBitLockerDriveEncryptionStep-by-Step
Guide”ontheMicrosoftWebsite.
Chapter6.Security67
Page 76

Encryptionsolid-statedrive
SomemodelscontaintheEncryptionsolid-statedrive.Thisfeaturehelpstoprotectyourtabletagainst
securityattacksonmedia,NANDflash,ordevicecontrollersbyuseofahardwareencryptionchip.Forthe
efficientuseoftheencryptionfeature,setaharddiskpasswordfortheinternalstoragedevice.
Usingthesecuritychip
Strictsecurityrequirementsareimposedonnetworkclientcomputersthattransferconfidentialinformation
electronically.Y oucansetthesecuritychipinyourtablettoenhancecomputingsecurity.Somemodels
areequippedwithonesecuritychipcalledthefirmwareTPM(displayedas“T rustedPlatformModule
2.0”inDeviceManager).SomemodelsareequippedwithtwosecuritychipscalledthediscreteTPM
(displayedas“TrustedPlatformModule1.2”inDeviceManager)andthefirmwareTPM.Formodelswithtwo
securitychips,youcanselectwhichoneyouwanttouseintheThinkPadTabletSetupprogrambyusing
theinstructionsinthistopic.
Note:EnsurethatthesupervisorpasswordhasbeensetintheThinkPadTabletSetupprogram;otherwise
anyonecanchangethesettingsforthesecuritychip.
AbouttheSecurityChipmenu
TheSecurityChipmenuprovidesthefollowingitemsforyoutoconfiguretheembeddedsecuritychip.You
canfindtheSecurityChipmenufromtheSecuritymenuoftheThinkPadT abletSetupprogram.
•SecurityChipSelection:Selectthesecuritychipyouwanttouse.Thisitemisdisplayedonlyonsome
tabletmodels.
•SecurityChip:Enableordisablethesecuritychip.
•ClearSecurityChip:Cleartheencryptionkey.Thisoptionisnotdisplayedwhenthesecuritychipis
inactiveordisabled.Toclearthesecuritychip,ensurethatyouactivateorenablethesecuritychipfirst
sothatthisoptioncanbedisplayed.
Settingthesecuritychip
TosetthesecuritychipthroughtheSecurityChipmenu,dothefollowing:
1.Printtheseinstructions.
2.Saveallopenfilesandexitallapplications.Then,turnoffyourtablet.
3.Pressthepowerbuttonandthevolume-upbuttonatthesametimewhenyouturnonthetablet.The
ThinkPadT abletSetupprogrammenuopens.
4.TapSecurity.
5.TapSecurityChip.
6.Settheitems.
7.Saveconfigurationchangesandexit.
Usingfirewalls
Yourtabletispreinstalledwithafirewallprogramaspartofantiviruspackage.Thisprogramprotectsagainst
Internetsecuritythreats,unauthorizedaccess,intrusions,andInternetattacks.Italsoprotectsyourprivacy.
Formoreinformationabouthowtousethefirewallprogram,refertotheonlinehelpthatcomeswiththe
program.
68ThinkPadHelixUserGuide
Page 77

Protectingdataagainstviruses
Yourtabletispreinstalledwithanantivirusprogramsoyoucandetectandeliminateviruses.Theantivirus
programisdesignedtohelpyoudetectandeliminateviruses.
Lenovoprovidesafullversionofantivirussoftwareonyourtabletwithafree30-daysubscription.After30
days,youmustrenewthelicensetocontinuereceivingtheantivirussoftwareupdates.
Formoreinformationabouthowtouseyourantivirussoftware,refertothehelpsystemofyourantivirus
software.
Chapter6.Security69
Page 78

70ThinkPadHelixUserGuide
Page 79

Chapter7.Advancedconfiguration
IfyouneedtoupdateyoursystemUEFIBIOS,installnewdevicedrivers,thisinformationwillhelpyouhandle
yourtabletwithpropercareandkeepitintopworkingshape.
•“Installingdevicedrivers”onpage71
•“ThinkPadT abletSetup”onpage71
•“Usingsystemmanagement”onpage84
Installingdevicedrivers
Thedevicedriversareavailableathttp://www.lenovo.com/ThinkPadDrivers.Chooseyourtabletproduct
nametoviewallthedevicedriversforyourtablet.
Attention:Alwaysgotohttp://www.lenovo.com/ThinkPadDriversforthelatestdevicedrivers.Donot
downloadthemfromtheWindowsUpdateWebsite.
ThinkPadTabletSetup
YourtabletcomeswiththeThinkPadTabletSetupprogramthatenablesyoutoviewandconfigurevarious
setupparameters.
TostarttheThinkPadT abletSetupprogram,dooneofthefollowing:
Note:Ifyouarerequiredtoenterthesupervisorpassword,enterthecorrectpassword.Y oualsocanskip
thepasswordpromptandstarttheThinkPadT abletSetupprogram.Ifyoudonotenterthepassword,you
cannotchangetheconfigurationsthatareprotectedbythesupervisorpassword.Formoreinformation,
referto“Usingpasswords”onpage63
•Ifyoutabletisattachedtoasupportedkeyboard,restartthetablet.WhentheThinkPadlogoisdisplayed,
pressF1.TheThinkPadTabletSetupprogrammainmenuopens.
•Pressthepowerbuttonandthevolume-upbuttonatthesametimewhenyouturnonthetablet.The
ThinkPadT abletSetupprogrammainmenuopens.
•T ostarttheThinkPadT abletSetupprogramfromtheoperatingsystem,dothefollowing:
1.Swipeinfromtherightedgeofthescreentodisplaythecharms.
2.TapSettings➙ChangePCsettings.
3.Inthenavigationpanel,tapUpdateandrecovery➙Recovery.
4.IntheAdvancedstartupsection,tapRestartnow.
5.Thetabletrestartsandamenuisdisplayed.TapTroubleshoot➙Advancedoptions➙
UEFIFirmwareSettings➙Restart.
6.ThetabletrestartsandenterstheThinkPadT abletSetupprogram.
Note:Ifyouhavesetasupervisorpassword,theThinkPadT abletSetupprogrammenuwillbedisplayed
afteryouenterthepassword.
TheThinkPadT abletSetupprogramincludesthefollowingmenus:
.
•Mainmenu:Viewthesysteminformationandsetthedateandtimeforyourtablet.
•Configmenu:Viewandchangetheconfigurationsofyourtablet.
•Securitymenu:Setthesupervisorpasswordandconfigureothersecurityfeaturesofyourtablet.
©CopyrightLenovo2014
71
Page 80

•Startupmenu:Changethetabletstartupsettings.
•Restartmenu:ChooseanoptionforclosingtheThinkPadTabletSetupprogramandrestartingthe
system.
Oneachmenu,tapthedefaultvaluetoshowselectableoptionsandtapadesiredoptiontoselectit.You
canfollowtheinstructionsonthescreentoconfiguresettings.Afteryouchangethesettings,tapRestart,
andthentapyourdesiredoptiontorestartthetablet.
Notes:
•Someitemsaredisplayedonthemenuonlyifthetabletsupportsthecorrespondingfeatures.
•Thedefaultconfigurationsarealreadyoptimizedforyou.Incorrectchangeoftheconfigurationsmight
causeunexpectedresults.
Mainmenu
TheMainmenuisthefirstinterfaceyouseeafteryouentertheThinkPadTabletSetupprogram.Itdisplays
thefollowingconfigurationofyourtablet:
•SystemInformation
–UEFIBIOSVersion
–UEFIBIOSDate(Year-Month-Day)
–EmbeddedControllerVersion
–MPUFirmwareVersion
–TXEFirmwareVersion
–MachineTypeModel
–System-unitserialnumber
–UUID
–Systemboardserialnumber
–AssetTag
–ProcessorType
–ProcessorSpeed
–T otalMemory
–Preinstalledoperatingsystemlicense
–UEFISecureBoot
•SystemDate
•SystemTime
Setthesystemdateandsystemtime
Ifyouneedtosetthecurrentdateandtimeofyourtablet,tapSystemDateorSystemTimefromthe
ThinkPadTabletSetupmenu.Oneofthefollowingsubmenusisdisplayed:
•SystemDate
•SystemTime
Tochangethedateandtime,dothefollowing:
1.Taptoselecttheitemtochangethedateortime.
2.Taptoselectafield.
72ThinkPadHelixUserGuide
Page 81

3.Inputthedateortimebyusingtheonscreenkeyboard.
Configmenu
Ifyouneedtochangetheconfigurationofyourtablet,tapConfigfromtheThinkPadT abletSetupprogram
mainmenu.
ThefollowingtableliststheConfigmenuitems.
Notes:
•Defaultvaluesareinboldface.
•Oneachsubmenu,tapthedefaultvaluetoshowselectableoptionsandtapadesiredoption.
•Someitemsaredisplayedonthemenuonlyifthetabletsupportsthecorrespondingfeatures.
Table1.Configmenuitems
Menuitem
Network
USB
SubmenuitemSelectionComments
UEFIIPv4NetworkStack•Off
•On
UEFIIPv6NetworkStack•Off
•On
UEFIPXEBootPriority•IPv6First
•IPv4First
USBUEFIBIOSSupport
AlwaysOnUSB
–ChargeinBatteryMode
USB3.0Mode
•Disabled
•Enabled
•Disabled
•Enabled
•Disabled
•Enabled
•Disabled
•Enabled
•Auto
EnableordisableNetwork
StackforPXEBoot.
EnableordisableNetwork
StackforPXEBoot.
EnableordisableNetwork
StackforPXEBoot.
Enableordisableboot
supportforUSBstorage
devices.
IfyouselectEnabled,the
externalUSBdevicescan
bechargedthroughUSB
connectorsevenwhen
thetabletisinlow-power
mode(sleep,hibernate,or
power-off).
Note:IfyouselectEnabled,
USBwakeupfunctionis
notsupportedonAlways
OnUSBconnector.
IfyouselectEnabled,the
externalUSBdevicescan
bechargedthroughUSB
connectorsevenwhen
systemisinhibernation
orpower-offmodeandin
batterymode.
SettheUSB3.0controller
modefortheportsshared
betweenUSB2.0and
USB3.0controllers.If
youselectAuto,itenables
youtoconnectandroute
appropriateUSB3.0or
USB2.0connectors.Ifyou
selectEnabled,itenables
Chapter7.Advancedconfiguration73
Page 82

Table1.Configmenuitems(continued)
Menuitem
Keyboard/Mouse
DisplayBootDisplayDevice
SubmenuitemSelectionComments
TrackPoint•Disabled
Trackpad•Disabled
FnandCtrlKeyswap
•Enabled
•Enabled
•Disabled
•Enabled
•ThinkPadLCD
•Analog(VGA)
•DigitalonThinkPad
•Displayondock
USB3.0modeandallows
USB3.0tobesupported
intheoperatingsystem.
IfyouselectDisabled,it
disablesandhidestheUSB
3.0controller,andUSB3.0
connectorswillworkas
USB2.0connectors.
Enableordisablethe
built-inTrackPointpointing
device.
Enableordisablethe
built-intrackpad.
IfyouselectEnabled,the
FnkeyworksastheCtrl
key,andtheCtrlkeyworks
astheFnkey.
Selectthedisplaydevice
thatistobeactivatedat
boottime.Thisselection
iseffectiveforboottime,
passwordprompt,and
ThinkPadTabletSetup.
DigitalonThinkPadisthe
MiniDisplayPortconnector
onyourtablet.
Displayondockisdisplay
connectorsonadock.
Power
Intel(R)SpeedStep
technology
AdaptiveThermal
Management
•Disabled
•Enabled
ModeforAC
•MaximumPerformance
•BatteryOptimized
ModeforBattery
•MaximumPerformance
•BatteryOptimized
SchemeforAC
•MaximizePerformance
•Balanced
SchemeforBattery
•MaximizePerformance
•Balanced
SelectthemodeofIntel
SpeedSteptechnologyat
runtime.
MaximumPerformance:
Alwayshighestspeed.
BatteryOptimized:Always
lowestspeed.
Disabled:Noruntime
support,highestspeed.
Selectathermal
managementscheme
touse.
MaximizePerformance:
Reducemicroprocessor
throttling.
Balanced:Balance
sound,temperature,and
performance.
74ThinkPadHelixUserGuide
Page 83

Table1.Configmenuitems(continued)
Menuitem
SubmenuitemSelectionComments
CPUPowerManagement
•Disabled
•Enabled
PowerOnwithACAttach
•Disabled
•Enabled
Note:Eachschemeaffects
fansound,temperature,
andperformance.
Enableordisablethe
power-savingfeaturethat
stopsthemicroprocessor
clockautomaticallywhen
therearenosystem
activities.Normally,it
isnotnecessarytochange
thesetting.
Enableordisableafeature
thatpowersonthesystem
whentheacpoweradapter
isattached.
IfyouselectEnabled,the
systemispoweredonwhen
theacpoweradapteris
attached.Whenthesystem
isinhibernatestate,the
systemresumes.
IntelRapidStartTechnology
DisableBuilt-inBattery•Y es
•Disabled
•Enabled
Enterafter:
•Immediately
•1minute
•2minutes
•5minutes
•10minutes
•15minutes
•30minutes
•1hour
•2hours
•3hours
•No
IfyouselectDisabled,the
systemisnotpoweredon
norresumedwhentheac
poweradapterisattached.
Tousethisfeature,aspecial
partitiononthesolid-state
driveisrequired.
Whenenabled,thetablet
entersalowerpowerstate
afterthespecifiedtimein
sleepstate.Andittakes
onlysecondstoresume
normaloperation.
Temporarilydisablethe
internalbuilt-inbatteryfor
servicingthesystem.After
selectingthisitem,the
systemwillbeautomatically
poweredoff.Thesystemis
thenreadytobeserviced.
Note:Thebatterywillbe
automaticallyre-enabled
whentheacpoweradapter
isreconnectedtothe
system.
Chapter7.Advancedconfiguration75
Page 84

Table1.Configmenuitems(continued)
Menuitem
BeepandAlarm
Startupoption
IntelAMT
SubmenuitemSelectionComments
PasswordBeep•Disabled
•Enabled
KeyboardBeep•Enabled
•Disabled
BootDeviceListF12Option•On
•Off
BootOrderLock•On
•Off
IntelAMTControl
•Disabled
•Enabled
•PermanentlyDisabled
Enablethisoptiontohave
abeepsoundwhenthe
systemiswaitingfora
power-on,harddisk,or
supervisorpassword.
Differentbeepswillsound
whentheenteredpassword
matchesordoesnotmatch
theconfiguredpassword.
Enableordisablekeyboard
beepwhenunmanageable
keycombinationsare
pressed.
Enableordisableboot
devicemenu.
Enableordisableboot
orderlock.
IfyouselectEnabled,Intel
AMT(ActiveManagement
Technology)isconfigured
andadditionalsetupitems
areprovidedinMEBx
(ManagementEngineBIOS
Extension)Setup.
IfyouselectPermanently
Disabled,youwillneverbe
abletoenableitagain.Be
cautiouswhenyouwantto
usethisoption.
Note:Youcanenterthe
MEBxSetupmenuby
pressingtheCtrl+Pkey
combinationintheStartup
InterruptMenuwindow.To
displaytheStartupInterrupt
Menuwindow,pressthe
blackbuttonorEnter
keyduringthepower-on
self-test(POST).
CIRATimeout
0-255
Note:Thedefaultvalueis
60seconds.
Setthetimeoutoptionfor
CIRAconnectiontobe
established.Selectable
secondvaluesarefrom1to
254.
Ifyouselect0,use60
secondsasthedefault
timeoutvalue.
Ifyouselect255,the
waitingtimeforestablishing
aconnectionisunlimited.
76ThinkPadHelixUserGuide
Page 85

Table1.Configmenuitems(continued)
Menuitem
DebugPortDebugPort•Disabled
SubmenuitemSelectionComments
ConsoleT ype•PCANSI
•VT100+
•PC-ANSI
•VT -UTF8
•Enabled
Selecttheconsoletypefor
AMT.
Note:Thisconsoletype
shouldmatchtheIntelAMT
remoteconsole.
Disabled:Donotallow
userstousedebugport.
Enabled:Allowusersto
usedebugport.
Securitymenu
Ifyouneedtosetthesecurityfeaturesofyourtablet,tapSecurityfromtheThinkPadTabletSetupmenu.
ThefollowingtableliststheSecuritymenuitems.
Notes:
•Defaultvaluesareinboldface.Thedefaultsettingsarealreadyoptimizedforyou.Ifyouconsider
changingthetabletconfiguration,proceedwithextremecaution.Settingtheconfigurationincorrectly
mightcauseunexpectedresults.
•Ineachsubmenu,tapthedefaultvaluetoshowselectableoptionsandtapadesiredoption.
•Someitemsaredisplayedonthemenuonlyifthetabletsupportsthecorrespondingfeatures.
Table2.Securitymenuitems
Menuitem
Password
Submenuitem
SupervisorPassword
LockUEFIBIOSSettings
PasswordatUnattendedBoot•Disabled
Value
•Disabled
•Enabled
•Disabled
•Enabled
•Enabled
Comments
See“Supervisor
password”onpage64.
Enableordisablethe
functionthatprotects
itemsinThinkPadTablet
Setupfrombeingchanged
byauserwhodoes
nothavethesupervisor
password.Bydefault,
thisissettoDisabled.
Ifyousetthesupervisor
passwordandenablethis
function,noonebutyou
canchangeanyitemsin
ThinkPadTabletSetup.
Ifyouselectandenable
Passwordatunattended
boot,apasswordprompt
isdisplayedwhenthe
tabletisturnedon,from
eitherapower-offstateor
hibernationstate,byan
unattendedeventsuchas
aWakeonLANattempt.
IfyouselectDisabled,
Chapter7.Advancedconfiguration77
Page 86

Table2.Securitymenuitems(continued)
Menuitem
Submenuitem
PasswordatRestart•Disabled
PasswordatBootDeviceList•Disabled
Value
•Enabled
•Enabled
Comments
nopasswordprompt
isdisplayed;thetablet
goesaheadandloads
theoperatingsystem.
Topreventunauthorized
access,settheuser
authenticationonthe
operatingsystem.
Ifyouselectandenable
Passwordatrestart,
apasswordpromptis
displayedwhenyourestart
thetablet.Ifyouselect
Disabled,nopassword
promptisdisplayed;
thetabletgoesahead
andloadstheoperating
system.T oprevent
unauthorizedaccess,set
theuserauthenticationon
theoperatingsystem.
IftheSecuritypassword
isset,thisoptionisused
tospecifywhetherthe
Securitypasswordmust
beenteredtodisplaythe
F12bootdevicelist.
PasswordCountExceededError
SetMinimumLength
Power-OnPassword
HardDisk1Password•Disabled
•Disabled
•Enabled
•Disabled
•xcharacters(4≤x≤12)
•Disabled
•Enabled
•Enabled
SelectEnabledtoprompt
fortheSecuritypassword.
SelectDisabledto
proceedwithoutany
useractionrequired.
SelectEnabledtoshow
thePOST0199error
andpromptforthe
Securitypassword.Select
DisabledtohidethePOST
0199errorandproceed
withoutanyuseraction
needed.
Specifyaminimumlength
forpower-onpasswords
andharddiskpasswords.
Ifyousetthesupervisor
passwordandspecify
aminimumlengthfor
passwords,noonebut
youcanchangethelength.
See“Power-onpassword”
onpage63.
See“Harddisk
passwords”onpage
65
.
78ThinkPadHelixUserGuide
Page 87

Table2.Securitymenuitems(continued)
Menuitem
SecureBoot
UEFIBIOSUpdate
Option
Submenuitem
SecureBoot•On
PlatformMode
SecureBootMode•StandardMode
ResettoSetupMode
Value
Comments
EnableordisableUEFI
•Off
•UserMode
•SetupMode
SecureBootfeature.
Specifythesystem
operatingmode.
IndicatesSecureBoot
•CustomMode
modeisstandardmodeor
custommode.
•EnterThisoptionisusedto
clearthecurrentplatform
keyandputthesystem
intosetupmode.Youcan
installyourownplatform
keyandcustomizethe
SecureBootsignature
databasesinsetupmode.
SecureBootmodewillbe
settocustommode.
RestoreFactoryKeys•EnterThisoptionisusedto
restoreallkeysand
certificatesinSecure
Bootdatabasestofactory
defaults.Anycustomized
SecureBootsettings
willbeerased,andthe
defaultplatformkeywill
bere-establishedalong
withtheoriginalsignature
databasesincluding
certificateforWindows8.1
operatingsystem.
FlashBIOSUpdatingby
End-Users
•Disabled
•Enabled
IfyouselectEnabled,
alluserscanupdatethe
UEFIBIOS.Ifyouselect
Disabled,onlytheperson
whoknowsthesupervisor
passwordcanupdatethe
UEFIBIOS.
SecureRollBackPrevention•On
•Off
IfyouselectOff,you
canflashtotheprevious
versionofUEFIBIOS.If
youselectOn,youcan
notflashtotheprevious
versionofUEFIBIOS.
Chapter7.Advancedconfiguration79
Page 88

Table2.Securitymenuitems(continued)
Menuitem
MemoryProtectionExecutionPrevention•Disabled
Virtualization
I/OPortAccess
Submenuitem
IntelVirtualizationT echnology•Disabled
IntelVT-dFeature•Disabled
WirelessLAN
WirelessWAN
Bluetooth
GPS•On
USBPort•On
MemoryCardSlot•On
SmartCardSlot•On
IntegratedCamera•On
NFC•On
FingerprintReader
Value
•Enabled
•Enabled
•Enabled
•On
•Off
•On
•Off
•On
•Off
•Off
•Off
•Off
•Off
•Off
•Off
•On
•Off
Comments
Somecomputerviruses
andwormscausememory
bufferstooverflow.By
selectingEnabledyou
canprotectyourtablet
againstattacksbysuch
virusesandworms.Ifafter
choosingEnabledyou
findthataprogramdoes
notruncorrectly,select
Disabledandresetthe
setting.
IfyouselectEnabled,a
VirtualMachineMonitor
(VMM)canutilizethe
additionalhardware
capabilitiesprovided
byIntelVirtualization
Technology.
IntelVT-dstandsforIntel
VirtualizationT echnology
forDirectedI/O.When
enabled,aVMMcanutilize
theplatforminfrastructure
forI/Ovirtualization.
IfyouselectOn,you
canusethewirelessLAN
device.
IfyouselectOn,youcan
usethewirelessWAN
device.
IfyouselectOn,youcan
useBluetoothdevices.
IfyouselectOn,youcan
useGPSdevices.
IfyouselectOn,youcan
useUSBconnectors.
IfyouselectOn,youcan
usethememorycardslots.
IfyouselectOn,youcan
usethesmartcardslot.
IfyouselectOn,youcan
usetheintegratedcamera.
IfyouselectOn,youcan
usetheNFCconnection.
IfyouselectOn,youcan
usethefingerprintreader.
80ThinkPadHelixUserGuide
Page 89

Table2.Securitymenuitems(continued)
Menuitem
SecurityChip
Submenuitem
Microphone
UltrabookKeyboard
ThinkPadTabletDock
Audio
ThinkPadTabletDock
EthernetLAN
USBPortonThinkPadT ablet
Dock
IntelTXTFeature
SecurityChipSelection
SecurityChip•On
ClearSecurityChip
Value
•On
•Off
•On
•Off
•On
•Off
•On
•Off
•On
•Off
•On
•Off
•FirmwareTPM
•DiscreteTPM
•Off
•Enter
Comments
IfyouselectOn,you
canusethemicrophones
(internal,external,or
line-in).
IfyouselectOn,youcan
usetheThinkPadHelix
UltrabookKeyboard.
IfyouselectOn,youcan
usetheaudioconnector
onThinkPadTabletDock.
IfyouselectOn,youcan
usetheEthernetLAN
deviceonThinkPadTablet
Dock.
IfyouselectOn,youcan
useUSBconnectorson
ThinkPadTabletDock.
EnableordisableIntel
TrustedExecution
Technology.
Notes:
•Thisitemisdisplayed
onlyifyouhave
selectedActiveor
Enabledforthe
SecurityChipoption.
•Thisissettodisabled
whenIntelPTTis
enabled.
Configurethesecurity
chip.Thisoptionis
availableonlyonmodels
thathaveboththe
firmwareTPMandthe
discreteTPM.
Enableordisablesecurity
chipfeature.
Cleartheencryptionkey.
PhysicalPresencefor
Provisioning
Note:Thisitemis
displayedonlyifyou
haveselectedOnforthe
SecurityChipoption.
•Off
•On
Thisoptionenablesor
disablestheconfirmation
messagewhenyou
changethesettingsofthe
securitychip.
Chapter7.Advancedconfiguration81
Page 90

Table2.Securitymenuitems(continued)
Menuitem
Anti-Theft
Submenuitem
PhysicalPresenceforClear•On
IntelATModuleActivation•Disabled
IntelATSuspend
ComputraceModuleActivationCurrentSetting:
Value
•Off
•Enabled
•PermanentlyDisabled
•EnterThisoptionisdisplayed
•On
•Off
CurrentState:
•Notactivated
•Activated
PermanentlyDisabled:
•Enter
Comments
Thisoptionenablesor
disablestheconfirmation
messagewhenyouclear
thesecuritychip.
EnableordisabletheUEFI
BIOSinterfacetoactivate
theIntelA Tmodule,which
isanoptionalanti-theft
servicefromIntel.
Note:IfyousettheIntel
ATmoduleactivationto
PermanentlyDisabled,
youwillbeunableto
enablethissettingagain.
onlywhentheanti-theft
functionisactivated.The
Intelanti-theftsuspend
screenwillbedisplayed
atnextboottoenterthe
suspendmode.
EnableordisabletheUEFI
BIOSinterfacetoactivate
thecomputracemodule.
Computraceisanoptional
monitoringservicefrom
AbsoluteSoftware.
Note:Ifyousetthe
computracemodule
activationtoPermanently
Disabled,youwillbe
unabletoenablethis
settingagain.
Startupmenu
Youmightneedtochangethetabletstartupsettings.Todoso,tapStartupfromtheThinkPadTablet
Setupmenu.
Attention:
•Afteryouchangeyourstartupsequence,youmustbeextremelycarefulnottospecifyawrongdevice
duringacopy,asave,oraformatoperation.Ifyouspecifyawrongdevice,yourdataandprograms
mightbeerasedoroverwritten.
•IfyouareusingtheBitLocker
driveencryptiondetectsthechangeofstartupsequenceandlocksthetabletfrombooting.
Changingthestartupsequence
Tochangethestartupsequence,dothefollowing:
1.TapBoot.Thedefaultbootlistisdisplayed,showingtheorderinwhichdeviceswillbestartedup.Even
devicesthatarenotattachedtoorinstalledonyourtabletarelisted.
82ThinkPadHelixUserGuide
®
driveencryption,youshouldnotchangethestartupsequence.BitLocker
Page 91

2.FromtheBootsubmenu,tapthemenuitemtospecifythestartupsequencethatrunswhenyouturnon
thepower.
3.Savethechangesandrestartthesystem.
ThefollowingtableliststheStartupmenuitems.
Notes:
•Defaultvaluesareinboldface.
•Fromeachsubmenu,tapthedefaultvaluetoshowselectableoptionsandselectadesiredoption.
•Someitemsaredisplayedonthemenuonlyifthetabletsupportsthecorrespondingfeatures.
Table3.Startupmenuitems
MenuitemValue
Boot
InternalStorage•On
USBHDD•On
USBCD/DVD•On
USBFDD•On
SDCard0•On
NetworkAdapter
•Off
•Off
•Off
•Off
•Off
•On
•Off
Comments
See“Changingthestartupsequence”
onpage82
ChangetheBootorderbydragging
anddroppingtheicon.
ChangetheBootorderbydragging
anddroppingtheicon.
ChangetheBootorderbydragging
anddroppingtheicon.
ChangetheBootorderbydragging
anddroppingtheicon.
ChangetheBootorderbydragging
anddroppingtheicon.
ChangetheBootorderbydragging
anddroppingtheicon.
.
Restartmenu
IfyouwanttoclosetheThinkPadTabletSetupprogramandrestartthesystem,tapRestartfromthe
ThinkPadTabletSetupmainmenu.Thefollowingitemsaredisplayed:
•ExitSavingChanges:Exitsystemsetupandsavethechanges.
•ExitDiscardingChanges:Exitsystemsetupwithoutsavingthechanges.
•LoadSetupDefaults:Restoretothefactorydefaultsettings.
•DiscardChanges:Discardthechanges.
•SaveChanges:Savethechanges.
Note:Changesonthefollowingitemsaresavedautomaticallyduringyourconfiguration:
•AnyitemsincludedintheSecuritymenu
•Systemdateandtime
Thesechangescannotbediscardedevenyouselectanoptiontodiscardthechangesorrestoreto
thefactorydefaultsettingswhenexitingtheThinkPadTabletSetupprogram.Todiscardthechangesor
makenewchanges,youmustentertheThinkPadT abletSetupprogramagainandresetthecorresponding
itemsaccordingtoyourneeds.
Chapter7.Advancedconfiguration83
Page 92

UpdatingyoursystemUEFIBIOS
TheUnifiedExtensibleFirmwareInterface(UEFI)BIOSisapartofthesystemprogramsthatmakeup
thebasiclayerofsoftwarebuiltintoyourtablet.TheUEFIBIOStranslatestheinstructionsfromother
softwarelayers.
YoucanupdatetheUEFIBIOSandtheThinkPadT abletSetupprogrambystartingyourtabletwithaflash
updateapplicationrunningintheWindowsenvironment.
Insomeinstanceswhenyouaddsoftware,hardware,oradevicedriver,youmightbeinformedthatyou
needtoupdateyourUEFIBIOSinorderforthenewadditiontoworkproperly.
ToupdateyourUEFIBIOS,gotothefollowingWebsiteandfollowtheinstructionsonthescreen:
http://www.lenovo.com/ThinkPadDrivers
Usingsystemmanagement
Thissectionisintendedprimarilyfornetworkadministrators.
Yourtabletisdesignedformanageability,sothatyoucanredirectmoreofyourresourcestobettermeet
yourbusinessobjectives.
Thismanageability,or“TotalCostofOwnership”(TCO),enablesyoutoremotelyoperateclienttabletsin
thesamewayasyouoperateyourowntablet,suchasturningonaclienttablet,formattingharddisk
drive,andinstallingsoftware.
Oncethetabletisconfiguredandoperational,youcanmanageitbyuseofsoftwareandmanageability
featuresalreadyintegratedintotheclientsystemandthenetwork.
Systemmanagement
Readthistopictolearnmoreaboutfeaturesofsystemmanagement.
DesktopManagementInterface
ThesystemUEFIBIOSofyourtabletsupportsaninterfacecalledSystemManagementBIOSReference
Specification(SMBIOS)V2.6.1SMBIOSprovidesinformationaboutthehardwarecomponentsofyour
system.ItistheresponsibilityoftheBIOStosupplythisdatabasewithinformationaboutitselfandthe
devicesonthesystemboard.ThisspecificationdocumentsthestandardsforgettingaccesstothisBIOS
information.
AssetIDEEPROM
TheAssetIDEEPROMcontainsinformationaboutthesystem,includingitsconfigurationandtheserial
numbersofkeycomponents.Italsoincludesanumberofblankfieldsinwhichyoucanrecordinformation
abouttheendusersinyournetwork.
PrebooteXecutionEnvironment
ThePrebooteXecutionEnvironment(PXE)technologymakesthetabletmoremanageablebyenabling
thetablettostartfromaserver.Forexample,withtheappropriateLANcard,yourtabletcanbestarted
fromthePXEserver.
Note:TheRemoteInitialProgramLoad(RIPLorRPL)functioncannotbeusedwithyourtablet.
84ThinkPadHelixUserGuide
Page 93

Chapter8.Troubleshootingproblems
Thischapterdescribesonwhattodoifyouexperienceaproblemwithyourtablet.
Diagnosingproblems
Ifyouexperienceproblemswithyourtablet,usetheLenovoSolutionCenterprogramasastartingpoint
forsolvingthem.
TheLenovoSolutionCenterprogramenablesyoutotroubleshootandresolvetabletproblems.Itcombines
diagnostictests,systeminformationcollection,securitystatus,andsupportinformation,alongwithhints
andtipsformaximumsystemperformance.
Note:TheLenovoSolutionCenterprogramcanbedownloadedfromhttp://www.lenovo.com/diags.
ToruntheLenovoSolutionCenterprogram,dothefollowing:
1.Swipeinfromtherightedgeofthescreentodisplaythecharms.
2.TaptheSearchcharmtosearchforLenovoSolutionCenter.
3.TapLenovoSolutionCenter.
Foradditionalinformation,refertotheLenovoSolutionCenterhelpsystem.
Note:Ifyouareunabletoisolateandrepairtheproblemyourselfafterrunningtheprogram,saveandprint
thelogfiles.YouwillneedthelogfileswhenyouspeaktoaLenovotechnicalsupportrepresentative.
Troubleshooting
Theproblemsandsolutionsdescribedinthissectionaremeantonlyasaguide.Theyarenotdefinitive
problemsolvingtechniques.Forsomeproblems,youmightneedhelpfromLenovo,yourreseller,oryour
serviceprovider.
Whenyouobserveaproblem,stopoperationimmediately,becausetakingfurtheractionmightresultindata
lossordamage.Takeanoteofwhatthesystemisdoingandwhatactionsyouperformedbeforetheproblem
occurred.ProvidedetailedinformationtoLenovooryourserviceproviderforquickerproblemresolution.
Internetproblem
•Problem:Unabletoconnecttothewirelessnetwork.
Suggestedsolution:Ensurethat:
–ThemicroSIMcardisvalidandworkableifyouareusingamobilenetwork(3Gor4G).
–Y ouarewithinthenetwork’sservicerangeandthesignalstrengthisgood.
–Y ourtabletisnotinAirplanemode.
Iftheproblempersists,contactLenovofortechnicalsupport.
Screenproblems
•Problem:Themulti-touchscreenrespondsslowlyorimproperly.
Suggestedsolution:Dothefollowing:
1.Ensurethatyourhandsarecleananddrywhentouchingthescreen.
2.Restartyourtablettotryagain.
©CopyrightLenovo2014
85
Page 94

Iftheproblempersists,contactLenovofortechnicalsupport.
•Problem:MyscreenkeepsblankingwhenIdonotwantitto.
Solution:Youcandisableanysystemtimers,suchastheLCDturn-offtimerortheblanktimerby
doingthefollowing:
1.Gothedesktopandtapthebattery-statusiconintheWindowsnotificationarea.
2.TapMorepoweroptions➙Balanced.
•Problem:WhenIturnonthetablet,nothingisdisplayedonthescreenandthetabletdoesnotbeep
whilestartingup.
Note:Ifyouarenotsurewhetheryouheardanybeeps,turnoffthetabletbypressingandholdingthe
powerbuttonforfoursecondsormore.Turnitonandlistenagain.
Solution:Ensurethat:
–ThetabletisconnectedtotheacpoweradapterbythesuppliedUSBcableandtheacpoweradapter
ispluggedintoaworkingelectricaloutlet.
Thetabletisturnedon.(Turnthepowerbuttononagainforconfirmation.)
Iftheseitemsarecorrectlyset,andthescreenremainsblank,havethetabletserviced.
•Problem:WhenIturnonthetablet,onlyawhitepointerisdisplayedonablankscreen.
Solution:Dothefollowing:
1.Turnoffthetablet,andthenturnitonagain.
2.Ifyoustillseeonlythepointeronthescreen,usetherecoverysolutionstorestorethesystemto
thefactorystate.
Iftheproblempersists,havethetabletserviced.
•Problem:Myscreengoesblankwhilethetabletison.
Solution:Y ourscreensaverorpowermanagementmighthavebeenenabled.Doeitherofthefollowing:
–T apthetabletscreentoexitthescreensaver.
–Pressthepowerbuttontoresumefromsleeporhibernationmode.
Batteryproblem
•Problem:Thebatterydoesnotchargecorrectly.
Suggestedsolution:Checkiftheacpoweradapterisconnectedcorrectly.Iftheconnectionisgoodbut
thebatterystilldoesnotcharge,contactLenovotoreplacewithanewbattery.
Systemproblem
•Problem:Unabletoturnthetableton.
Suggestedsolution:Connectyourtablettoanacpoweroutlettoseeiftheproblemiscaused
byadrainedbattery.Iftheproblempersists,insertaneedleorastraightenedpaperclipintothe
emergency-resethole.T olocatetheemergency-resethole,see“Frontviewandsideview”onpage1
Iftheproblemstillpersists,contactLenovofortechnicalsupport.
Mediaproblems
•Problem:Theaudioqualityispoororthereisnosoundoutput.
Suggestedsolution:Checkandensurethat:
–Thespeakerisnotcovered.
.
86ThinkPadHelixUserGuide
Page 95

–Thespeakermutefunctionisdisabled.
–Ifyouareusingaheadset,unplugit,thenplugitinagain.
–Thevolumeisnotturnedtothelowestlevel.
Iftheproblempersists,contactLenovofortechnicalsupport.
•Problem:Asong,video,orothermediafilecannotbeplayed.
Suggestedsolution:Checkandensurethatthemediafileisnotcorrupted.
Externaldeviceconnectionproblems
•Problem:Aconnectionisnotestablishedwhenyouconnectthetablettoacomputer.
Suggestedsolution:EnsurethatthetabletUSBcableyouareusingistheonethatisshippedwith
yourtablet.
•Problem:Bluetoothdevicescannotbelocated.
Suggestedsolution:Ensurethat:
–Y ourtabletBluetoothisswitchedon.
–TheBluetoothfeatureisactivatedonthedevicetowhichyouwanttoconnect.
–Y ourtabletandtheBluetoothdevicearewithinthemaximumBluetoothrange(10m).
Iftheproblempersists,contactLenovofortechnicalsupport.
Recoveringfromaseveresoftwareproblem
Ifyourtabletstopsrespondingandyoucannotturnoffthetabletbypressingandholdingthepowerbutton,
insertaneedleorastraightenedpaperclipintotheemergency-resetholetoresetthetablet.Thenrestart
yourtablet.Tolocatetheemergency-resethole,see“Frontviewandsideview”onpage1.
Ifyoustillencounterthesameproblemafteryourestartyourtablet,resetyourtabletandrestartitagain,
youcanperformafactorydataresetoperation.Formoreinformation,referto“Resettingyourtabletto
thefactorydefaultsettings”onpage89.
Errormessages
•Message:0177:BadSVPdata,stopPOSTtask.
Solution:ChecksumofthesupervisorpasswordintheEEPROMisnotcorrect.Thesystemboardshould
bereplaced.Havethetabletserviced.
•Message:0183:BadCRCofSecuritySettingsinEFIVariable.EnterThinkPadT abletSetup.
Solution:ChecksumoftheSecuritysettingsintheEFIVariableisnotcorrect.EnterThinkPadTabletSetup
tochecksecuritysettings,andrestartthesystem.Ifyoustillhaveaproblem,havethetabletserviced.
•Message:0187:EAIAdataaccesserror.
Solution:TheaccesstoEEPROMisfailed.Havethetabletserviced.
•Message:0188:InvalidRFIDSerializationInformationArea.
Solution:TheEEPROMchecksumisnotcorrect(block#0and1).Thesystemboardshouldbereplaced,
andtheboxserialnumberneedstobereinstalled.Havethetabletserviced.
•Message:0189:InvalidRFIDconfigurationinformationarea
Solution:TheEEPROMchecksumisnotcorrect(block#4and5).Thesystemboardshouldbereplaced,
andtheuniversallyuniqueidentifier(UUID)needstobereinstalled.Havethetabletserviced.
•Message:0190:Criticallow-batteryerror
Chapter8.Troubleshootingproblems87
Page 96

Solution:Thetabletturnedoff,becausethebatterypowerislow.Connecttheacpoweradaptertothe
tabletandchargethebatteries.
•Message:0191:SystemSecurity-Invalidremotechangerequested
Solution:Thesystemconfigurationchangehasfailed.Confirmtheoperationandtryagain.Toclear
theerror,enterThinkPadTabletSetup.
•Message:0199:SystemSecurity-Securitypasswordretrycountexceeded.
Solution:Thismessageisdisplayedifyouenterawrongsupervisorpasswordmorethanthreetimes.
Confirmthesupervisorpasswordandtryagain.Tocleartheerror,enterThinkPadTabletSetup.
•Message:1802:Unauthorizednetworkcardispluggedin-Poweroffandremovethenetworkcard.
Solution:Thewirelessnetworkcardisnotsupportedonthistablet.Removeit.
•Message:1820:Morethanoneexternalfingerprintreadersareattached.
Solution:Poweroffandremoveallbutthereaderthatyousetupwithinyourmainoperatingsystem.
•Message:2101:DetectionerroronSSD1(M.2)
Solution:TheM.2SSDdeviceisnotworking.HavetheM.2SSDdeviceserviced.
•Message:2102:DetectionerroronSSD2(M.2)
Solution:TheM.2SSDdeviceisnotworking.HavetheM.2SSDdeviceserviced.
•Message:2111:ReaderroronSSD1(M.2)
Solution:TheM.2SSDdeviceisnotworking.HavetheM.2SSDdeviceserviced.
•Message:2112:ReaderroronSSD2(M.2)
Solution:TheM.2SSDdeviceisnotworking.HavetheM.2SSDdeviceserviced.
•Message:2200:MachineTypeandSerialNumberareinvalid.
Solution:MachineTypeandSerialNumberareinvalid.Havethetabletserviced.
•Message:2201:MachineUUIDisinvalid.
Solution:MachineUUIDisinvalid.Havethetabletserviced.
•Message:Fanerror
Solution:Coolingfanhasfailed.Shutdownthetabletimmediatelyandhavethetabletserviced.
•Message:Thermalsensingerror
Solution:Thethermalsensorhasproblem.Shutdownthetabletimmediatelyandhavethetablet
serviced.
•Message:Error:TheSystemUEFIVariableStorageisnearlyfull.
Note:Thiserrorindicatesthattheoperatingsystemorapplicationscannotcreate,modify,ordeletedata
inthenon-volatilesystemUEFIvariablestorageduetoinsufficientstoragespaceafterPOST.
Thenon-volatilesystemUEFIvariablestorageisusedbytheUEFIBIOSandbytheoperatingsystemor
applications.Thiserroroccurswhentheoperatingsystemorapplicationsstorelargeamountsofdata
inthevariablestorage.AlldataneededforPOST,suchasBIOSsetupsettings,chipsetorplatform
configurationdata,arestoredinaseparateUEFIvariablestorage.
Solution:EnterThinkPadTabletSetupaftertheerrormessageisdisplayed.Adialogaskstheuserfor
confirmationtocleanupthestorage.Iftheuserselects“Yes”,alldatathatwerecreatedbytheoperating
systemorapplicationsaredeletedexceptglobalvariablesdefinedbytheUnifiedExtensibleFirmware
InterfaceSpecification.Iftheuserselects“No”,alldataiskept,buttheoperatingsystemorapplications
willnotbeabletocreate,modify,ordeletedatainthestorage.
Ifthiserrorhappensataservicecenter,Lenovoauthorizedservicepersonnelwillcleanupthenon-volatile
systemUEFIvariablestorageusingtheabovesolution.
88ThinkPadHelixUserGuide
Page 97

Chapter9.Recoveryinformation
Thissectionprovidesinformationabouttherecoverysolutions.
AWindowsrecoveryimageispreinstalledintherecoverypartitiononyourtablet.TheWindowsrecovery
imageenablesyoutorefreshyourtablet,orresetyourtablettothefactorydefaultsettings.
YoucancreaterecoverymediaasbackupsorreplacementfortheWindowsrecoveryimage.Withthe
recoverymedia,youcantroubleshootandfixtheproblemsonyourtabletevenifyoucannotstartthe
operatingsystem.Itisrecommendedthatyoucreaterecoverymediaasearlyaspossible.Formore
information,see“Creatingandusingrecoverymedia”onpage90.
Refreshingyourtablet
Ifyourtabletdoesnotperformwellandtheproblemmightbecausedbyarecentlyinstalledprogram,you
canrefreshyourtabletwithoutlosingyourpersonalfilesorchangingyoursettings.
Attention:Ifyourefreshyourtablet,theprogramsthatcamewithyourtabletandtheprogramsthatyou
installedfromWindowsStorewillbereinstalled,butallotherprogramswillberemoved.
Torefreshyourtablet,dothefollowing:
1.Swipeinfromtherightedgeofthescreentodisplaythecharms.
2.TapSettings➙ChangePCsettings.
3.Inthenavigationpanel,tapUpdateandrecovery➙Recovery.
4.IntheRefreshyourPCwithoutaffectingyourfilessection,tapGetstarted.
5.Followtheinstructionsonthescreentorefreshyourtablet.
Resettingyourtablettothefactorydefaultsettings
Ifyouwanttorecycleyourtabletorjuststartover,youcanresetyourtablettothefactorydefaultsettings.
Resettingthetabletwillreinstalltheoperatingsystem,reinstallalltheprogramsthatcamewithyourtablet,
andresetallthesettingstothefactorydefaultsettings.
Attention:Ifyouresetthetablettothefactorydefaultsettings,allyourpersonalfilesandsettingswillbe
deleted.Toavoiddataloss,makeabackupcopyofallthedatathatyouwanttokeep.
Toresetyourtablettothefactorydefaultsettings,dothefollowing:
1.Swipeinfromtherightedgeofthescreentodisplaythecharms.
2.TapSettings➙ChangePCsettings.
3.Inthenavigationpanel,tapUpdateandrecovery➙Recovery.
4.IntheRemoveeverythingandreinstallWindowssection,tapGetstarted.ThentapNexttoconfirm
theoperation.
5.Dependingonyourneeds,dooneofthefollowing:
•T operformaquickformat,tapJustremovemyfilestostarttheprocess.Theprocesswilltake
severalminutes.
•T operformacompleteformat,tapFullycleanthedrivetostarttheprocess.Theprocesswill
takeseveralhours.
6.Followtheinstructionsonthescreentoresetyourtablettothefactorydefaultsettings.
©CopyrightLenovo2014
89
Page 98

Usingtheadvancedstartupoptions
Withtheadvancedstartupoptions,youcanchangethefirmwaresettingsofthetablet,changethestartup
settingsoftheWindowsoperatingsystem,startthetabletfromanexternaldevice,orrestoretheWindows
operatingsystemfromasystemimage.
Tousetheadvancedstartupoptions,dothefollowing:
1.Swipeinfromtherightedgeofthescreentodisplaythecharms.
2.TapSettings➙ChangePCsettings.
3.Inthenavigationpanel,tapUpdateandrecovery➙Recovery.
4.IntheAdvancedstartupsection,tapRestartnow➙T roubleshoot➙Advancedoptions.
5.Selectadesiredstartupoption,thenfollowtheinstructionsonthescreen.
RecoveringyouroperatingsystemifWindows8.1failstostart
TheWindowsrecoveryenvironmentonyourtabletiscapableofoperatingindependentlyfromtheWindows
8.1operatingsystem.ThisenablesyoutorecoverorrepairtheoperatingsystemeveniftheWindows8.1
operatingsystemfailstostart.
Aftertwoconsecutivefailedbootattempts,theWindowsrecoveryenvironmentstartsautomatically.Then
youcanchooserepairandrecoveryoptionsbyfollowingtheinstructionsonthescreen.
Note:Ensurethatyourtabletisconnectedtoacpowerduringtherecoveryprocess.
Creatingandusingrecoverymedia
YoucancreaterecoverymediaasbackupsfortheWindowsrecoveryenvironmentandtheWindows
recoveryimage.Ifyoucannotstartthetablet,youcanuserecoverymediatotroubleshootandfixthe
problemsonyourtablet.
Itisrecommendedthatyoucreaterecoverymediaasearlyaspossible.Onceyoucreaterecoverymedia,
keeptheminasafeplaceanddonotusethemtostoreotherdata.
Creatingrecoverymedia
Tocreaterecoverymedia,youneedaUSBdrivewithatleast16GBofstorage.TherequiredUSBcapacity
dependsonthesizeoftherecoveryimage.
Attention:CreatingrecoverymediawilldeleteanythingstoredontheUSBdrive.T oavoiddataloss,makea
backupcopyofallthedatathatyouwanttokeep.
Tocreaterecoverymedia,dothefollowing:
Note:Ensurethatyourtabletisconnectedtoacpower.
1.Swipeinfromtherightedgeofthescreentodisplaythecharms.
2.TaptheSearchcharm.
3.TyperecoveryintheSearchfield.ThentapCreatearecoverydrive.
4.TapYesintheUserAccountControlwindowtoallowtheRecoveryMediaCreatorprogramtostart.
5.EnsurethatyouselecttheCopytherecoverypartitionfromthePCtotherecoverydrive.option.
ThentapNext.
90ThinkPadHelixUserGuide
Page 99

Important:IfyoucleartheCopytherecoverypartitionfromthePCtotherecoverydrive.option,
youwillcreaterecoverymediawithouttherecoverypartitioncontent.Y oustillcanstartthetablet
fromtherecoverymedia,butyoumightbeunabletorecoveryourtabletiftherecoverypartitionon
yourtabletisdamaged.
6.ConnectaproperUSBdrive,thentapNext.
7.TapCreateintheRecoveryDrivewindow.Thecreationoftherecoverymediastarts.
8.Whenthecreationoftherecoverymediafinishes,dooneofthefollowing:
•T okeeptherecoverypartitiononyourtablet,tapFinish.
•T odeletetherecoverypartitiononyourtablet,tapDeletetherecoverypartition.
Attention:Ifyoudeletetherecoverypartitiononyourtablet,dokeeptherecoverymediainasafe
place.TheWindowsrecoveryimagewillnotbestoredinyourtabletanymore,andyouwillneedthe
recoverymediatorefreshorresetyourtablet.
9.RemovetheUSBdrive.Therecoverymediaarecreatedsuccessfully.
Usingrecoverymedia
Ifyoucannotstartyourtablet,orifyoucannotstarttheWindowsrecoveryimageonyourtablet,use
recoverymediatorecoveryourtablet.
Touserecoverymedia,dothefollowing:
Note:Ensurethatyourtabletisconnectedtoacpower.
1.Pressthepowerbuttonandthevolume-upbuttonatthesametimewhenyouturnonthetablet.The
ThinkPadT abletSetupprogrammenuopens.
2.TapStartup.
3.IntheBootsubmenu,dragtherecoverydrivetothefirstplacetoselectitasthebootdevice.
4.Saveconfigurationchangesandrestartthetablet.
5.Followingtheinstructionsonthescreentorecoverthetablet.
FormoreinformationabouttherecoverysolutionsprovidedbytheWindows8.1operatingsystem,goto:
http://go.microsoft.com/fwlink/?LinkID=263800
Chapter9.Recoveryinformation91
Page 100

92ThinkPadHelixUserGuide
 Loading...