

Page 1
VB002R VIDEO RECORDING BORESCOPE
z
z
A
y
y
(9)
(2)
(7)
(1)
A
ㅔԧЁ᭛/㐕储Ё᭛/䞲ῃ㦮
g
z
z
A
y
g
yg(
)
(
)
(
)
(
)
(
)
r
A
ㅔԧЁ᭛
㐕储Ё᭛
䞲ῃ㦮
Inspection Camera with RecordingLCD Monitor
Features:
Ƶ10mm camera head
VGA CMOS Sensor
Ƶ
Ƶ2.4ʾTFT LCD Panel
ƵMax.tube length:100mm
Adjustable with white LED light
Ƶ
ƵBattery alkaline “AA” 1.5Vh4
Technical specifications
6.1cm TFT resolution 320 x 234 Pixels
Lens sensor resolution 320 x 240 Pixels
Sensitivity 0.7V/(Lux.sec)
Color Mosaic RGB Bayer patt--- ern
White comparison Automatic
Exposure to light Automatic
Video format NTSC & PAL composite video
Camera illumination 4 LEDs, white
Handler end AVI port NTSC/PAL signal out
Power by 4x1.5V AA
Power Consumption 350 mA
Ambient/operation temperature
TV Cable length Approx 1.5 M
Total length of device 124+-2.0 cm
Metal tube length 99.5 +- 2.0 cm
Minmum bending radius 4.5 cm
Diameter of camera head 10.0 mm
Lens coverage
Short distance focus 3~6 cm
Weight without accessories
Photo capture 640x480 (D1) resolution by JPEG format
Movie recording
AVI Playback
SD slot Support Micro SD up to 32GB
Zoom Maximum to 10 Times
USB Port USB2.0
Batteies Life 7 Hours Continuous Usage
0to45ć
54 ć
30fps@720x480 (D1) and
30fps@320x240 (CIF)
MJPG format
30fps@720x480 (D1) and
30fps@320x240 (CIF)
MJPG format
Please read this information carefully before you use the
video borescope.
Environmental conditions
z Do not drop or shake the unitˈit might be damaged.
z Do not press the LCD-display with high pressureˈit might be damaged.
Do not leave the unit where the temperature is highe r than 45ćˈe.g.in cars with closed
z
windows in the summertimeˈnear heaters or any other type of heat source.
z Do not use the unit under high humidity e.g. bathroomsˊParts of the apparatusˈtube and mini
cam-era are water proofed. See technical specifications for details.
z Do not use the unit at dusty places.
z In case any foreign material or liquid gets into the productˈplease power it off to avoid the
damage.
Packaging material
z Please do not keep any packaging material within reach of small childre n to avoid the
unexpected dangerous accidents.
Maintenance
z Please remove the battery in case you don’t use the product for a longer period of timeˊ
Leaking batteries can damage the productˊStore the product at a clean and dry place.
z For cleaning use dry and soft cloth.
Interference by radio
The apparatus operates on a frequency, which is also used by other devices ˈthat transmit
video by radio. In some cases, this may cause interferences.
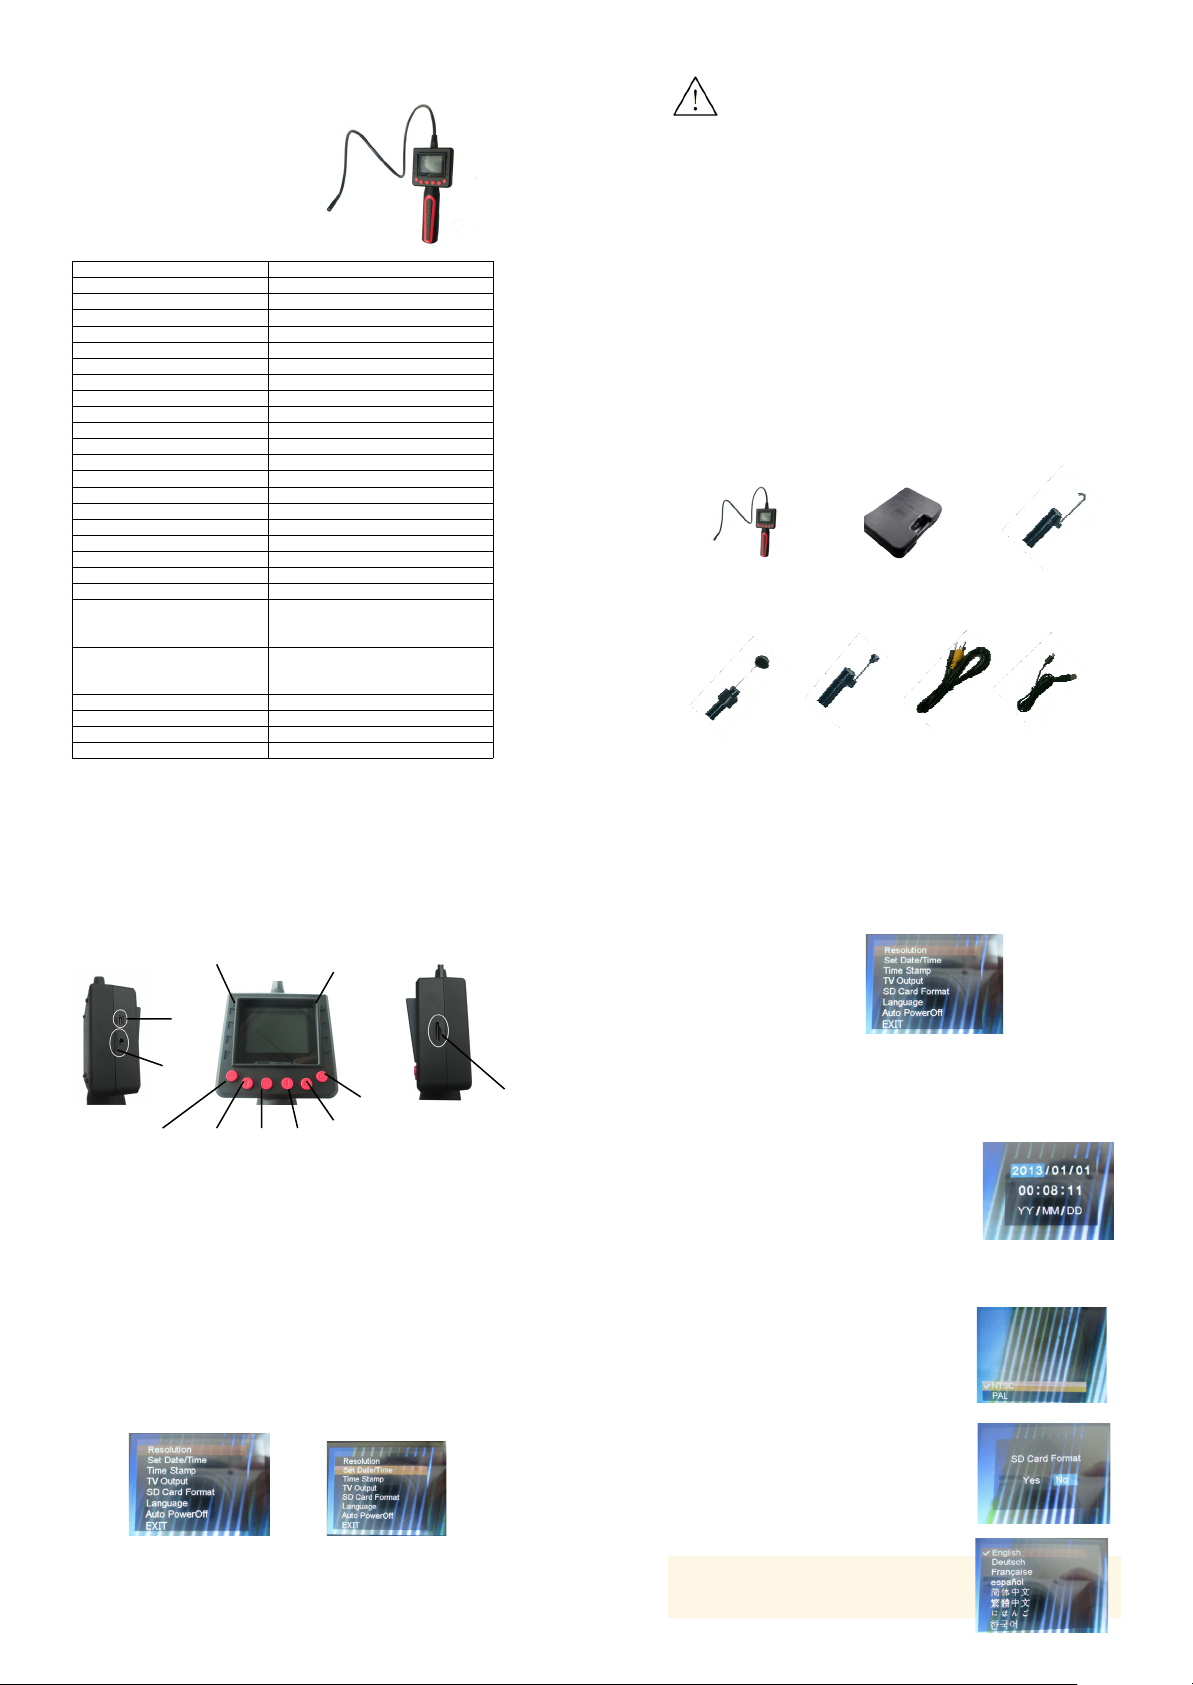
Delivery Content
Video Borescope PE Carry Case Hook
Mirror Magnet TV Cable USB Cable
1
Appliance Description
(10)
(4)
(3)
(1) USB PORT (7) PHOTO/VIDEO
(2) Video out (8) POWER ON/OFF
(3) MENU (9)SD-SLOT
(4)UP/REPLAY (10)BATTERY INDICATOR
(5)OK (11)BATTERYINDICATOR
(6) DOWN/ZOOM
Operation
z Turn on the power button (8) at the right side of the video borescopeˊ
z The power indicator (10) lights on as green color ,it means the unit is power onˊ
Press power button (8) to increase or to decrease the light of the twin LEDs at the
imager head.
Battery Low Warning
While battery indicator (11) blinks as red colorˈit means the batteries power lowˊ
Please replace the new batteries.
(5) (6)
Press MENU button
llow user select˖ or
Pressingbutton UP or DOWN to select the wanted function.
b
pressingOK button(5)to enter the next level of function.
b
(11)
(8)
2
In Case Enterto Menu
llow user set up:
Resolution
Set Date/Time
TV Output
SD Card Format
Language
Auto poweroff
t
Exi
Under Resolution
Allow user set up: Standard /High Resolution
Set Date/Time
Under
Allow user set up:Year/Month/Day
Alow user set up:Hour/Minute/Second
Like the right screen
by pressing UP button (4) to adjust the number
by pressing BUTTON (6) down to select the item.
TV Output
Under
Allow user set up˖NTSC/PAL
Under SD Card Format
Allow user set up˖Yes/No
Under Language
Allow user set up
English/Deutsch/ Française
/
˖
3
4
Page 2
Under Auto poweroff
웛
˖
Installing
theA
y
g
USBcabl
PC
for
datastoring
웛
˖
Itlli
g
th
A
y
g
g
g
USB
bl
t
t
PC
frdttigii
g
Allow user set up˖On/off
Select Exit , press OK Button (5) , back to the preview state.
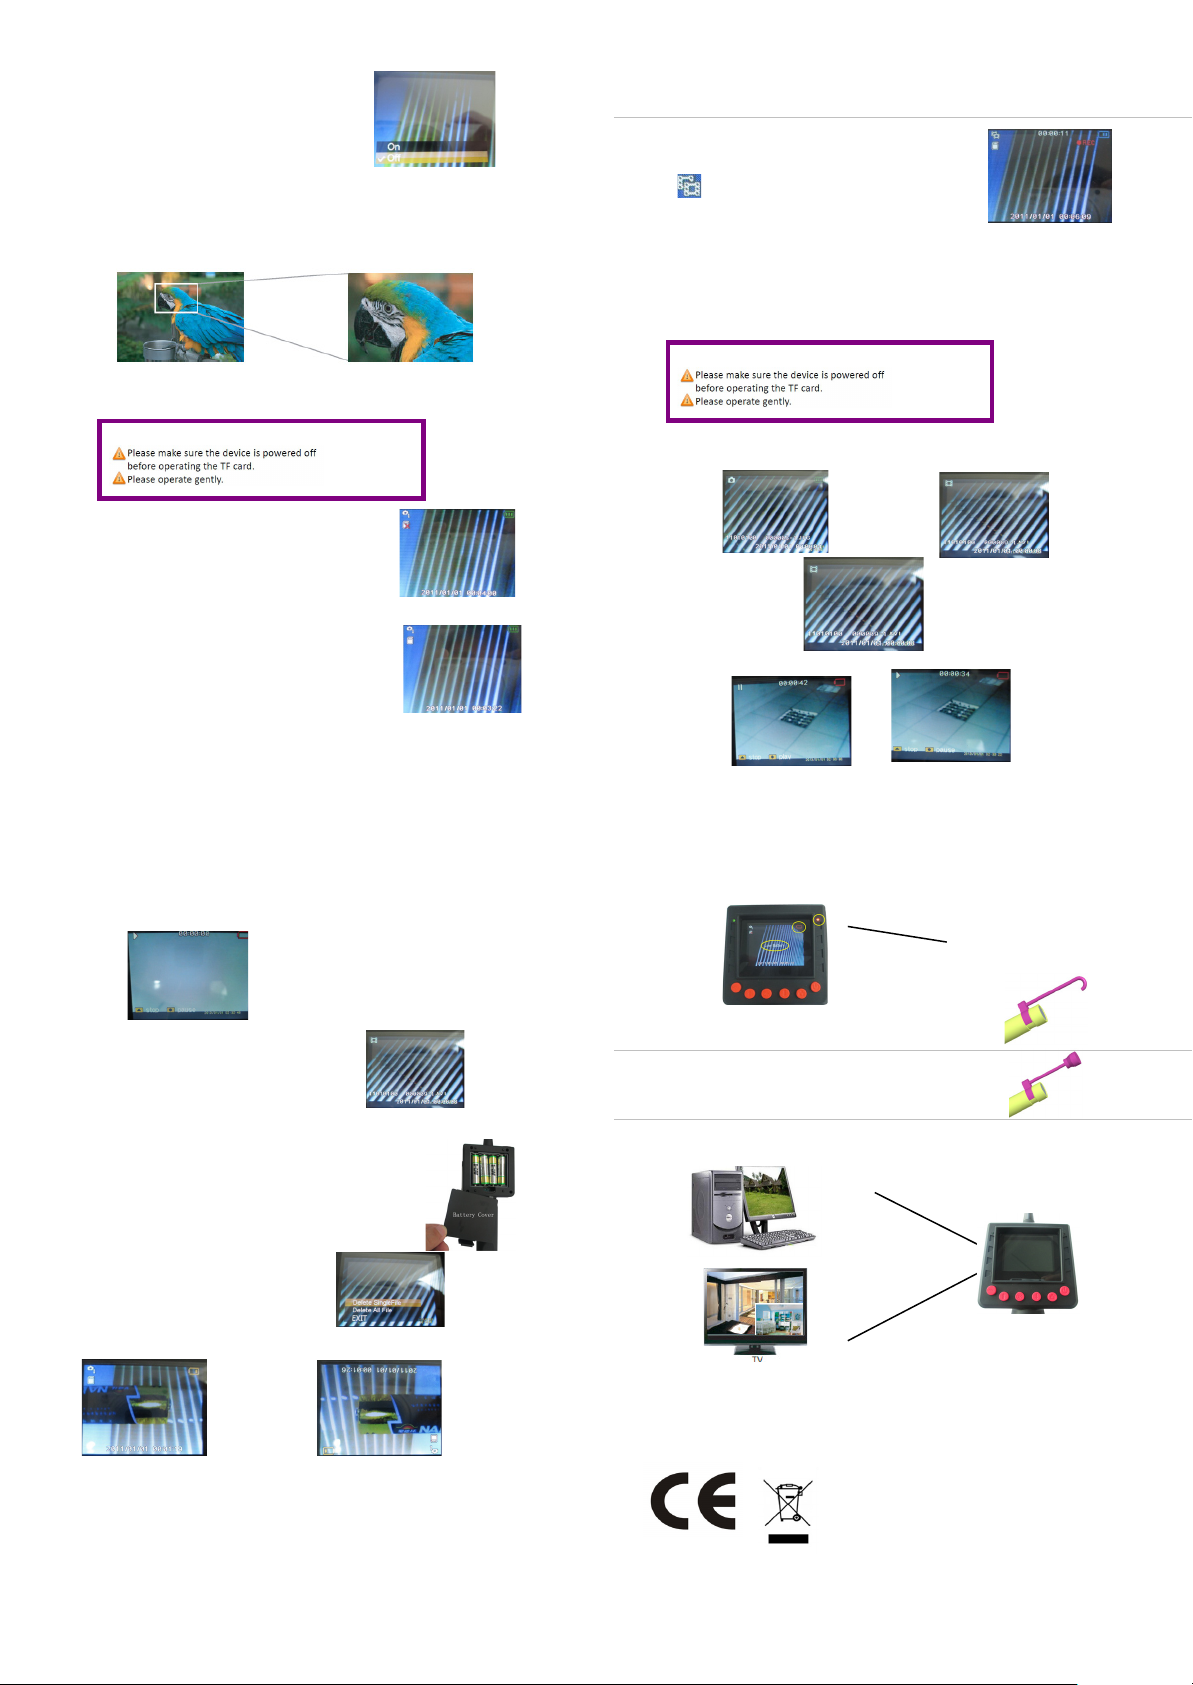
Zoom Function
Under preview state:
Press OK Button (5) to enlarge from 1 to 5 times
Video Record Function
Press SNAP button (7) for 3 Seconds till
symbol shows on the top right
corner of the screen.
While video recording start, you will see
00:00:01 and ƽREC symbol shows on the top of the
Screen
To exit Video Recordˈplease press SNAP Button (7) one time.
Photo/Video Review Function:
Insert card: Power off the device first, an d then insert the TF card
Insert card: Power off the device first, an d then insert the TF card
In Case No SD Card Inserted
Preview started
Screen shows no SD symbol
on the top left corner
Note: now Cannot replay and record the videos and photo
In Case SD card inserted
Screen shows SD symbol on the top left corner
Please note Camera & Video Record function are
executed only while SD card inserted.
Camera Function
While SD card inserted,
Press SNAP button (7) to take the photos
5
and stop
Make sure SD card insertedˈpress UP Button (4) one time to enter data
folder, Press UP or DOWN to select the wanted Photo
Video
Watching a video
Press OK button (5) to play
6
(8)BATTERY INDICATOR
.
then Press Down button back to data folder
Then press SNAP Button (7) one time, back to preview state.
Photo/Video Files Delete
Make sure SD card insertedˈpress UP Button
(4) one time to enter data folder, Press UP or
(5) DOWN to select the wanted picture and video.
Press menu button (3) ,
Allow user set up
Delete Single File /Delete All File /EXIT
Mirror Function:
Under preview state, press Down Button (6) to rotate.
Insert Batteries
Pull or push from here for easer
open or close the battery door.
Powered by 4 x 1.5V AA batteries (excluded)
Battery Low Warning
While RED battery indicator on the right of the screen turn on and Letter “ low
Battery” shows on the screenˈit means the batteries power lowˊPlease turn off the
machine and replace the new batteries immidiately.
Or the machine will shut off automatically, the photo or video files may be missing.
Hook is for receivingparts.
netic is for receivingmetallic parts
Ma
like screws.
e connectsto
ccessor
or reviewing.
PC
AV cable connects to TV
for bigger screen watching
At the end of its serviceable life, this product should not
be treated as household or general waste. It should be
handed over to the applicable collection point for the
recycling of electrical and electronic equipment, or
returned to the supplier for disposal.
,
7
8
 Loading...