

Page 1
WIFI38
User Manual (IOS version)
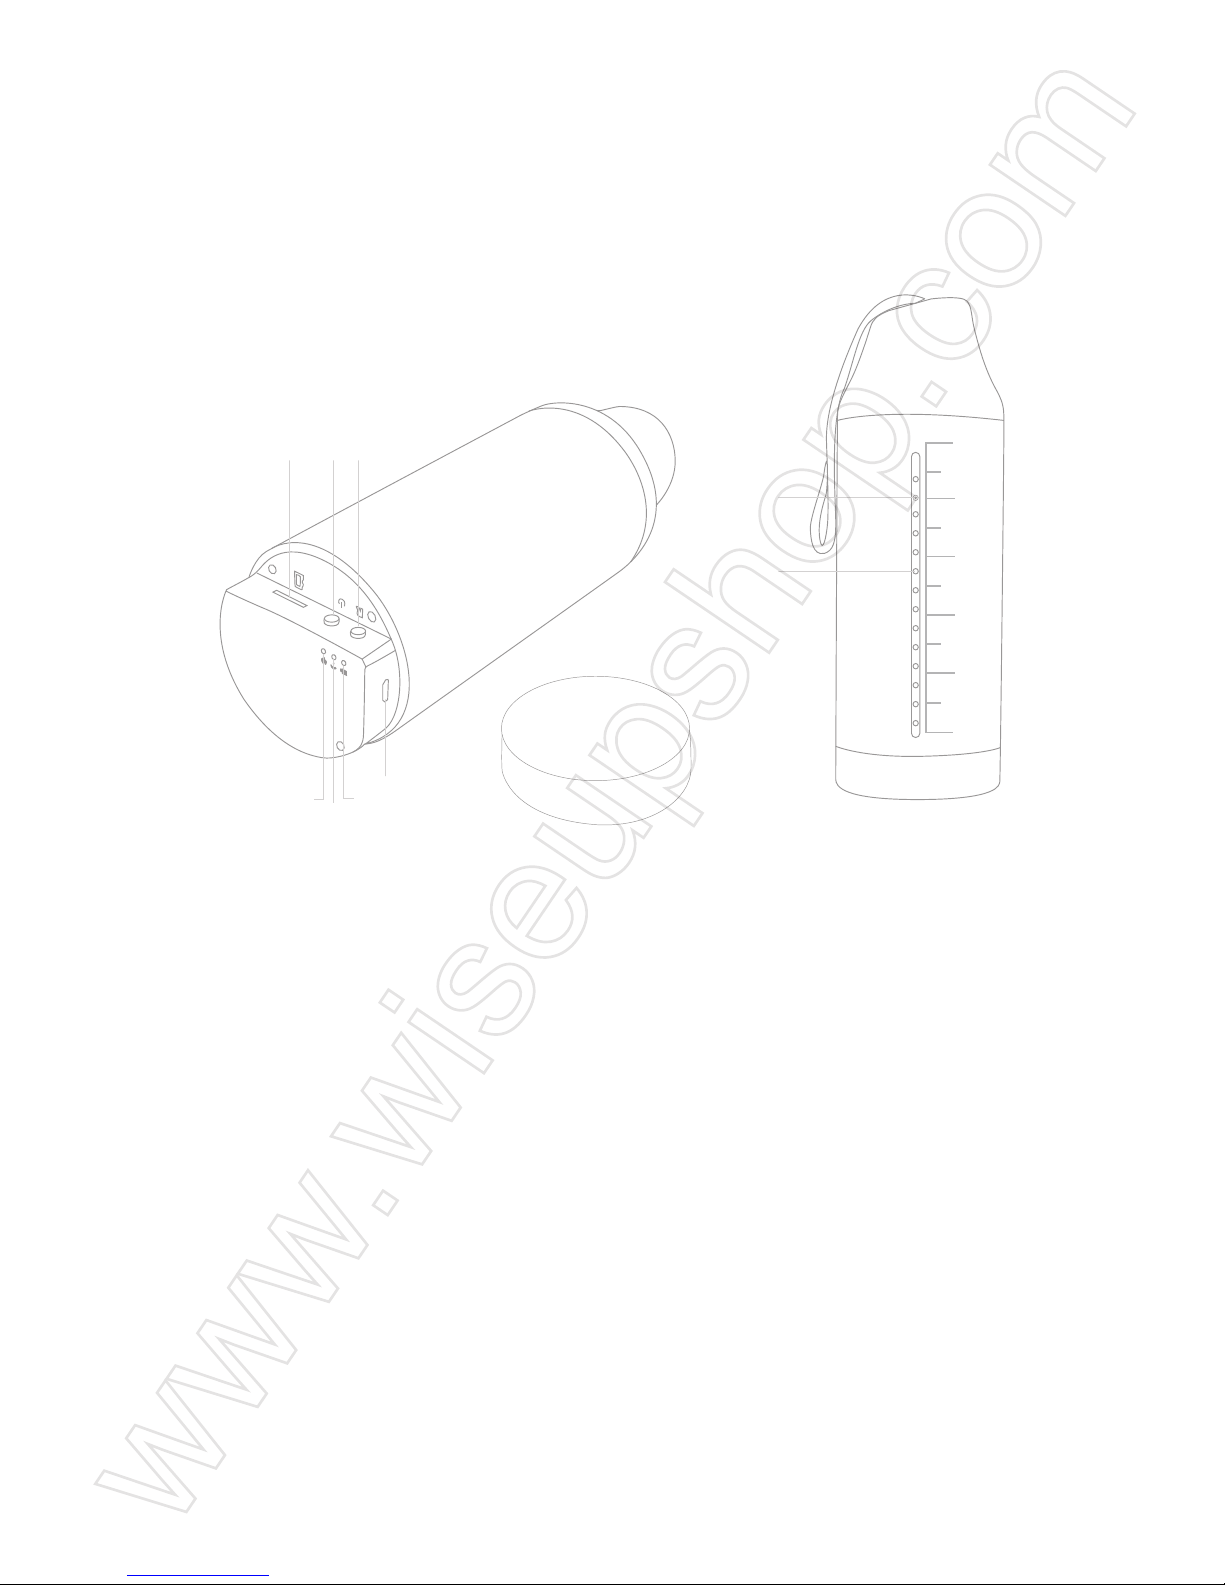
I. Product Overview
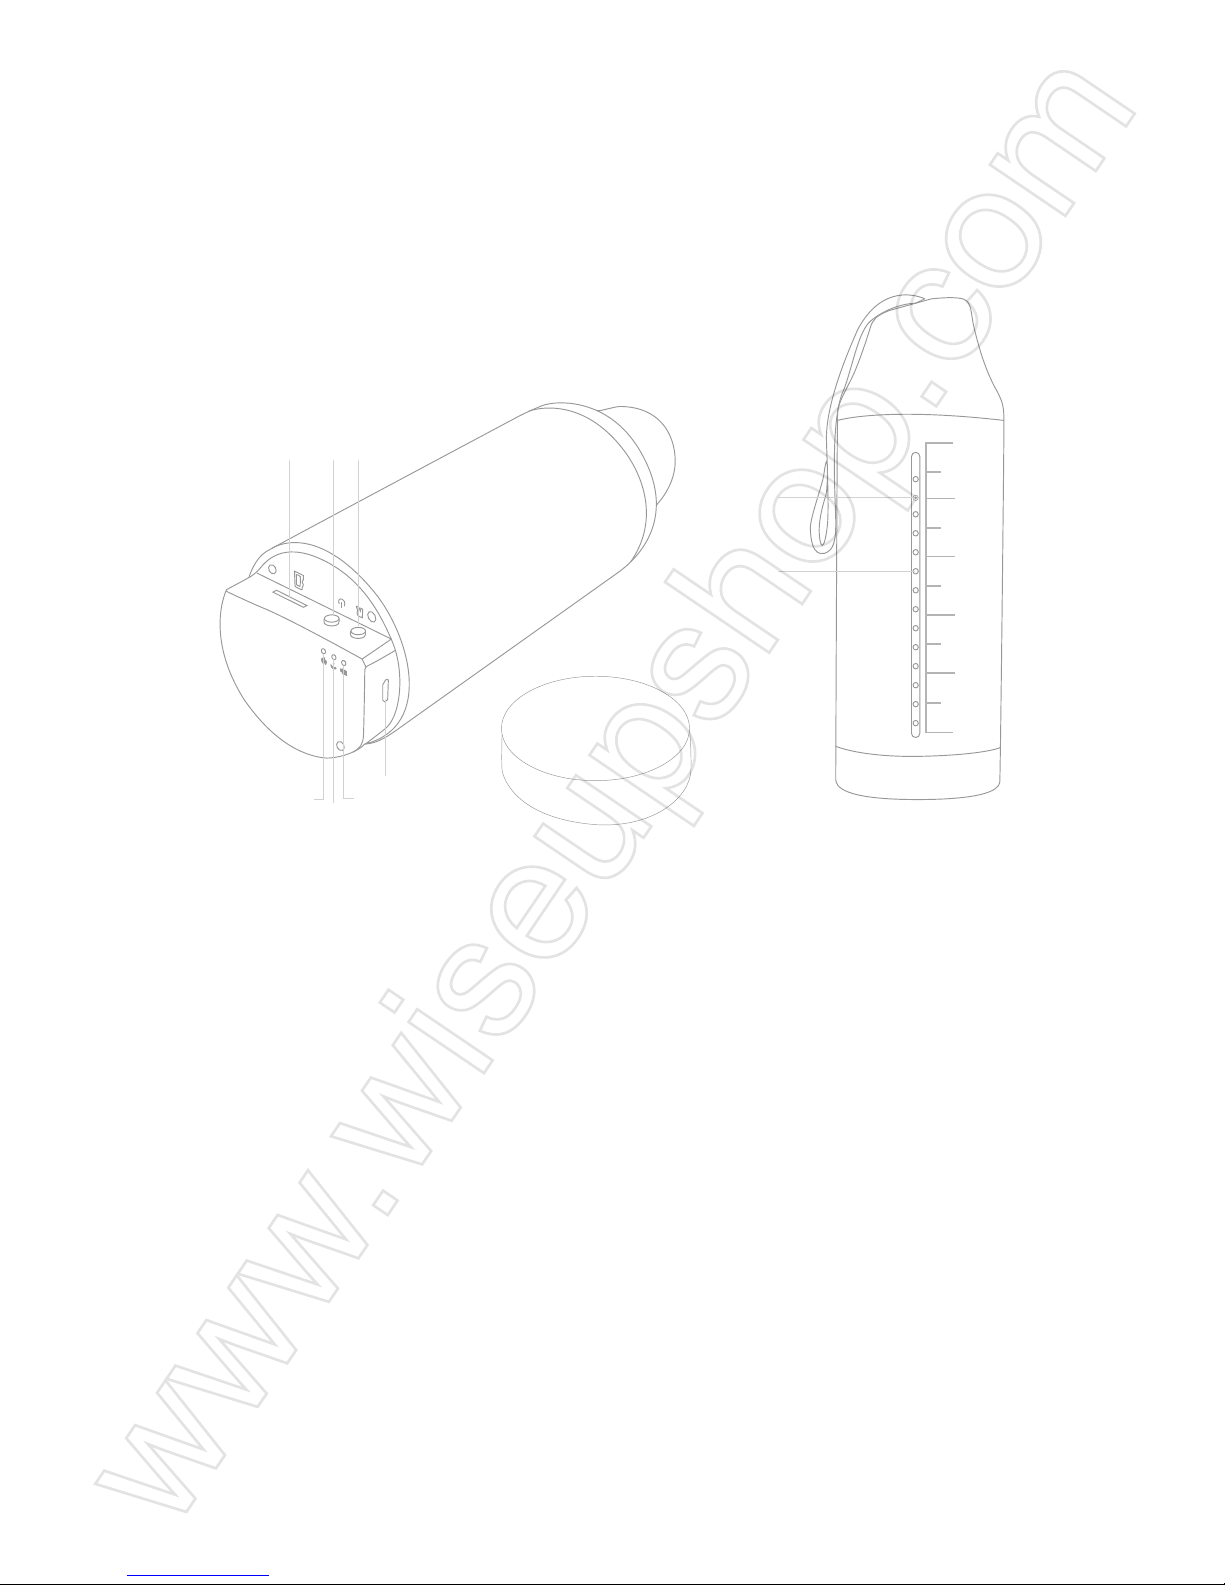
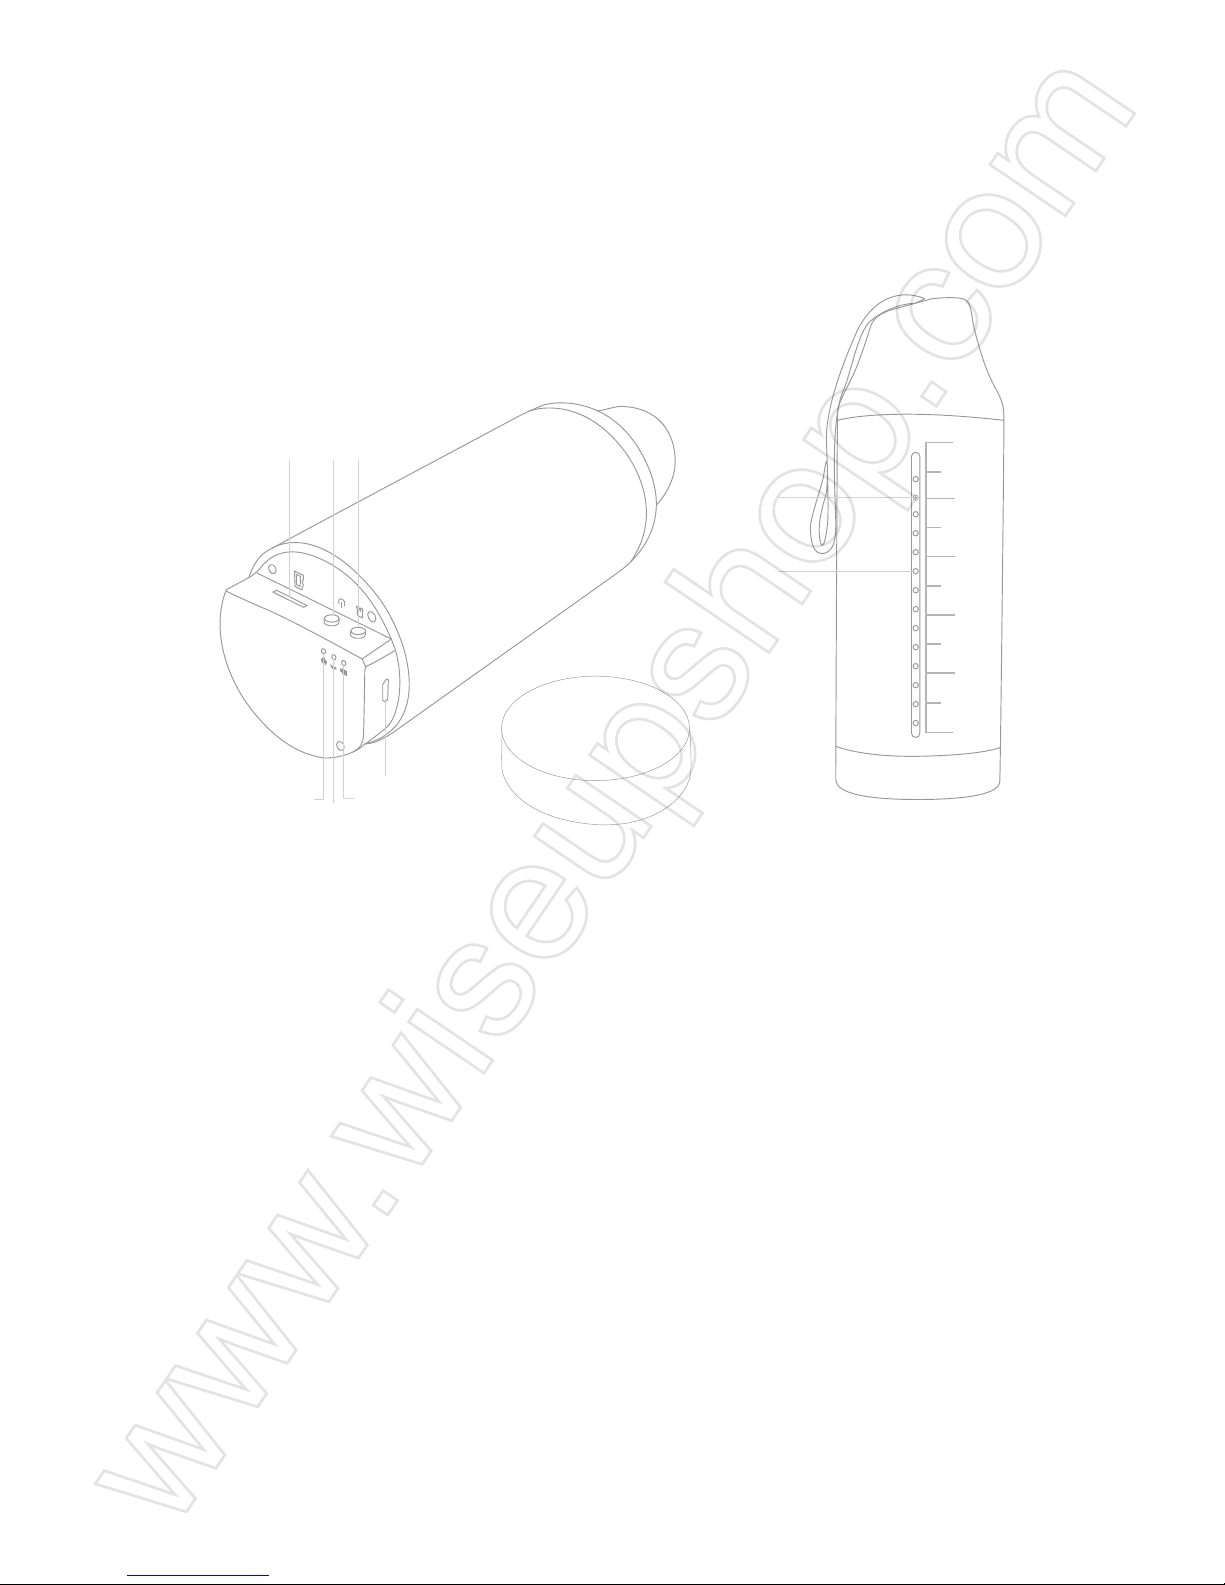
1. Reset Button
2. Power Button
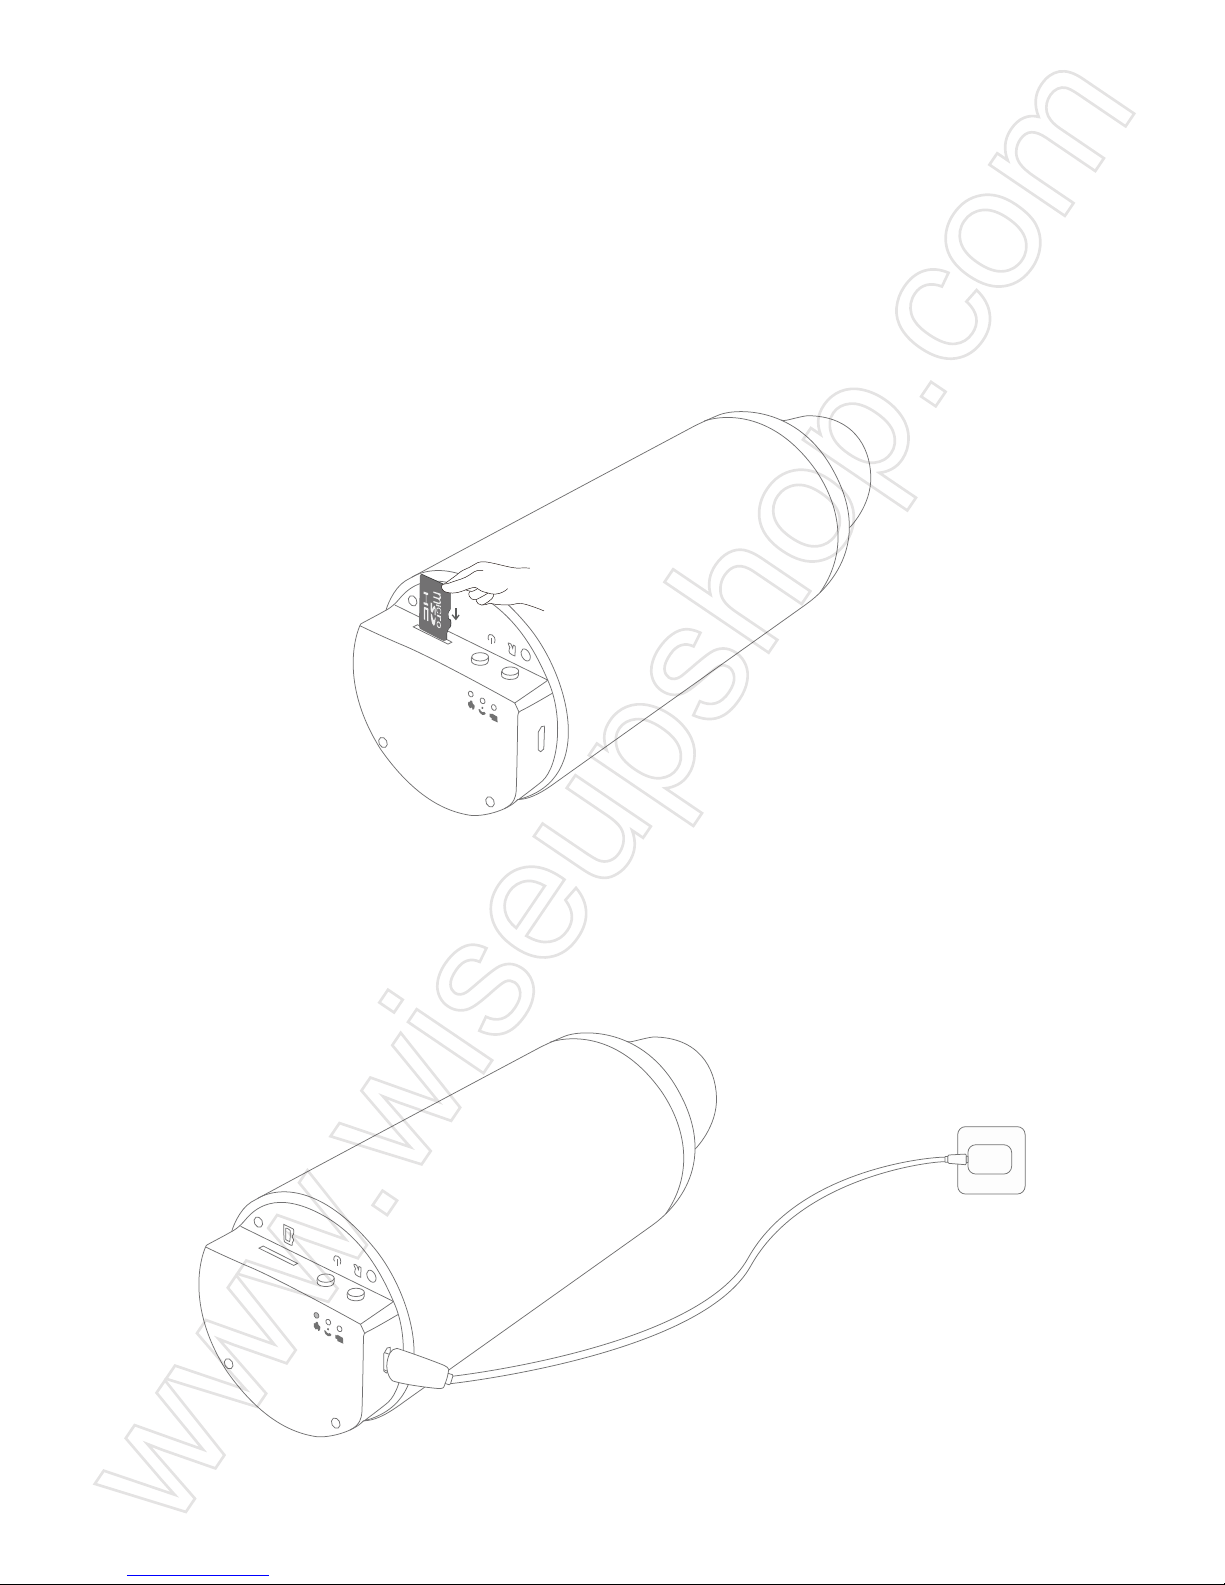
3. Micro SD Card Slot
4. USB Port
5. Battery Charging Indicator Light
6. WIFI Indicator Light
7. Power Indicator Light
8. Camera Lens
9. Infrared Leds
II. What's in the Package?
-1× Travelling Mug Camera
-1× USB Cable
-1× AC110-240V to DC 5V Power Adapter
-1× 16GB Micro SDHC Class 10 Card (already inserted into the Micro SD card slot)
600ml
500ml
400ml
300ml
200ml
100ml
1
4
8
9
5
6
7
2
3
Page 2
III. Preparation of Camera
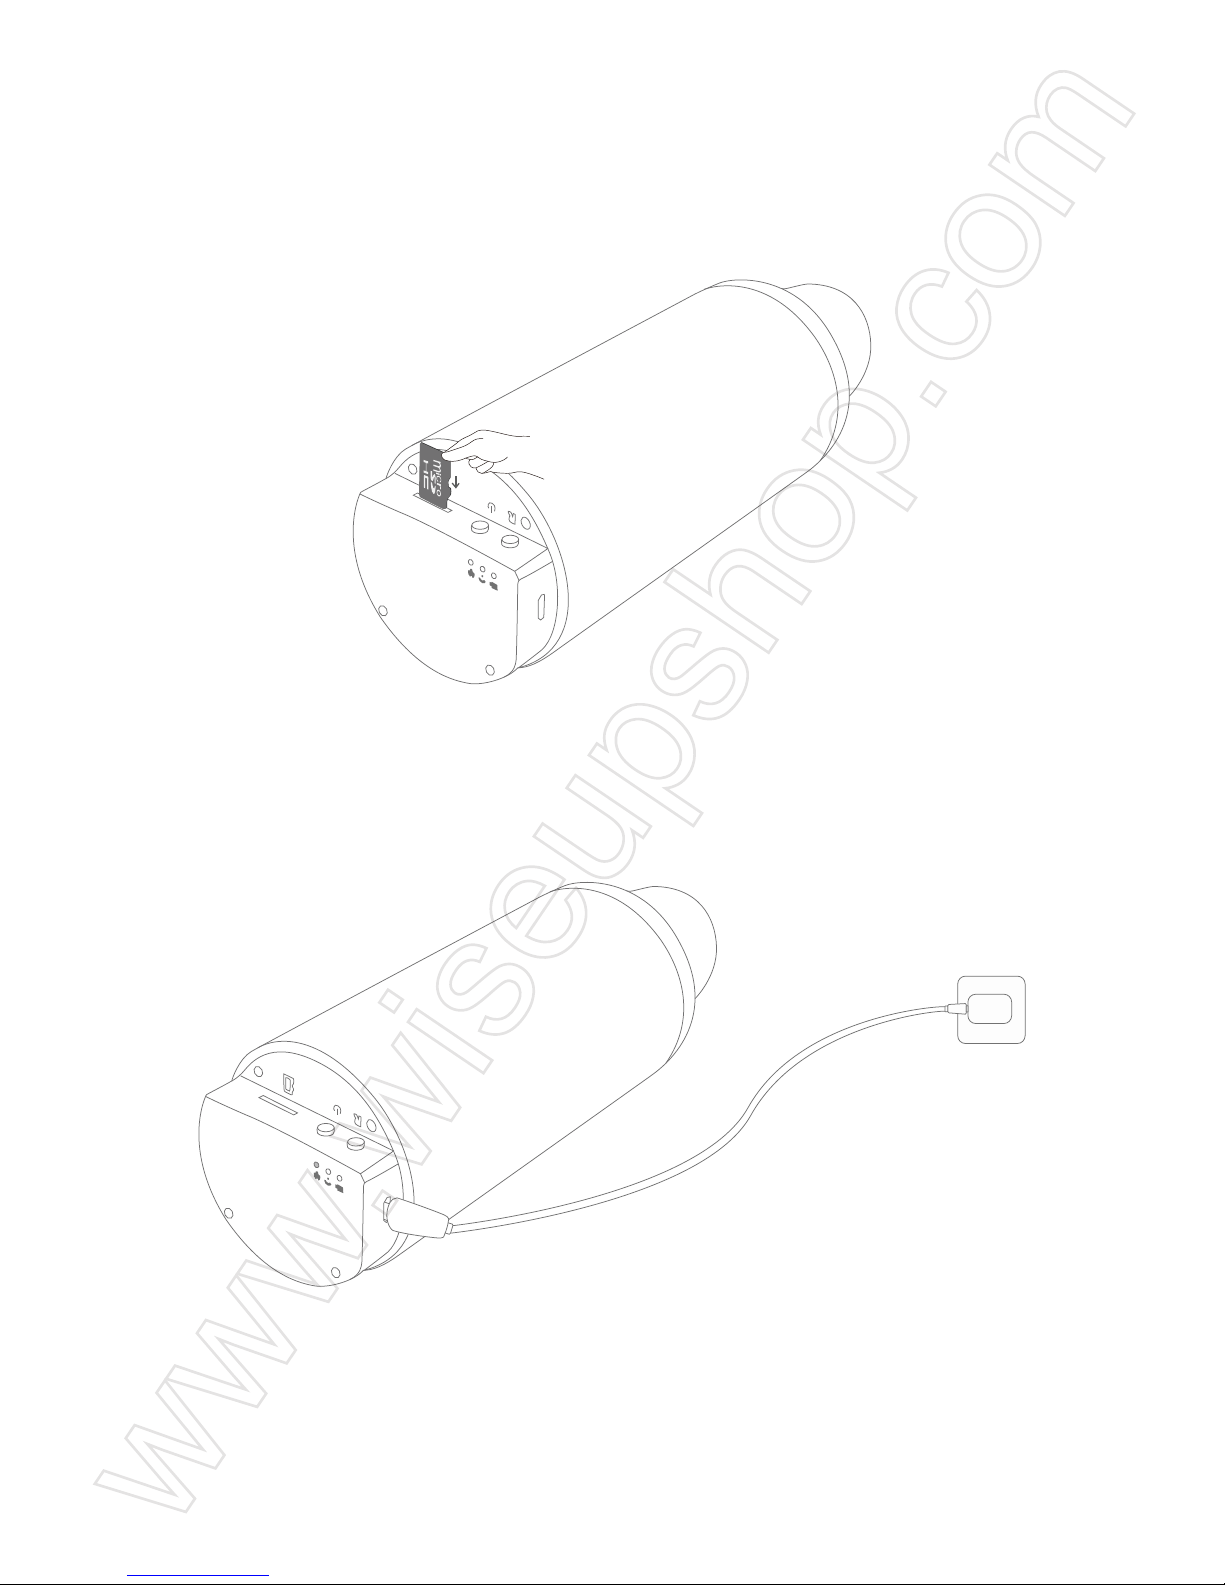
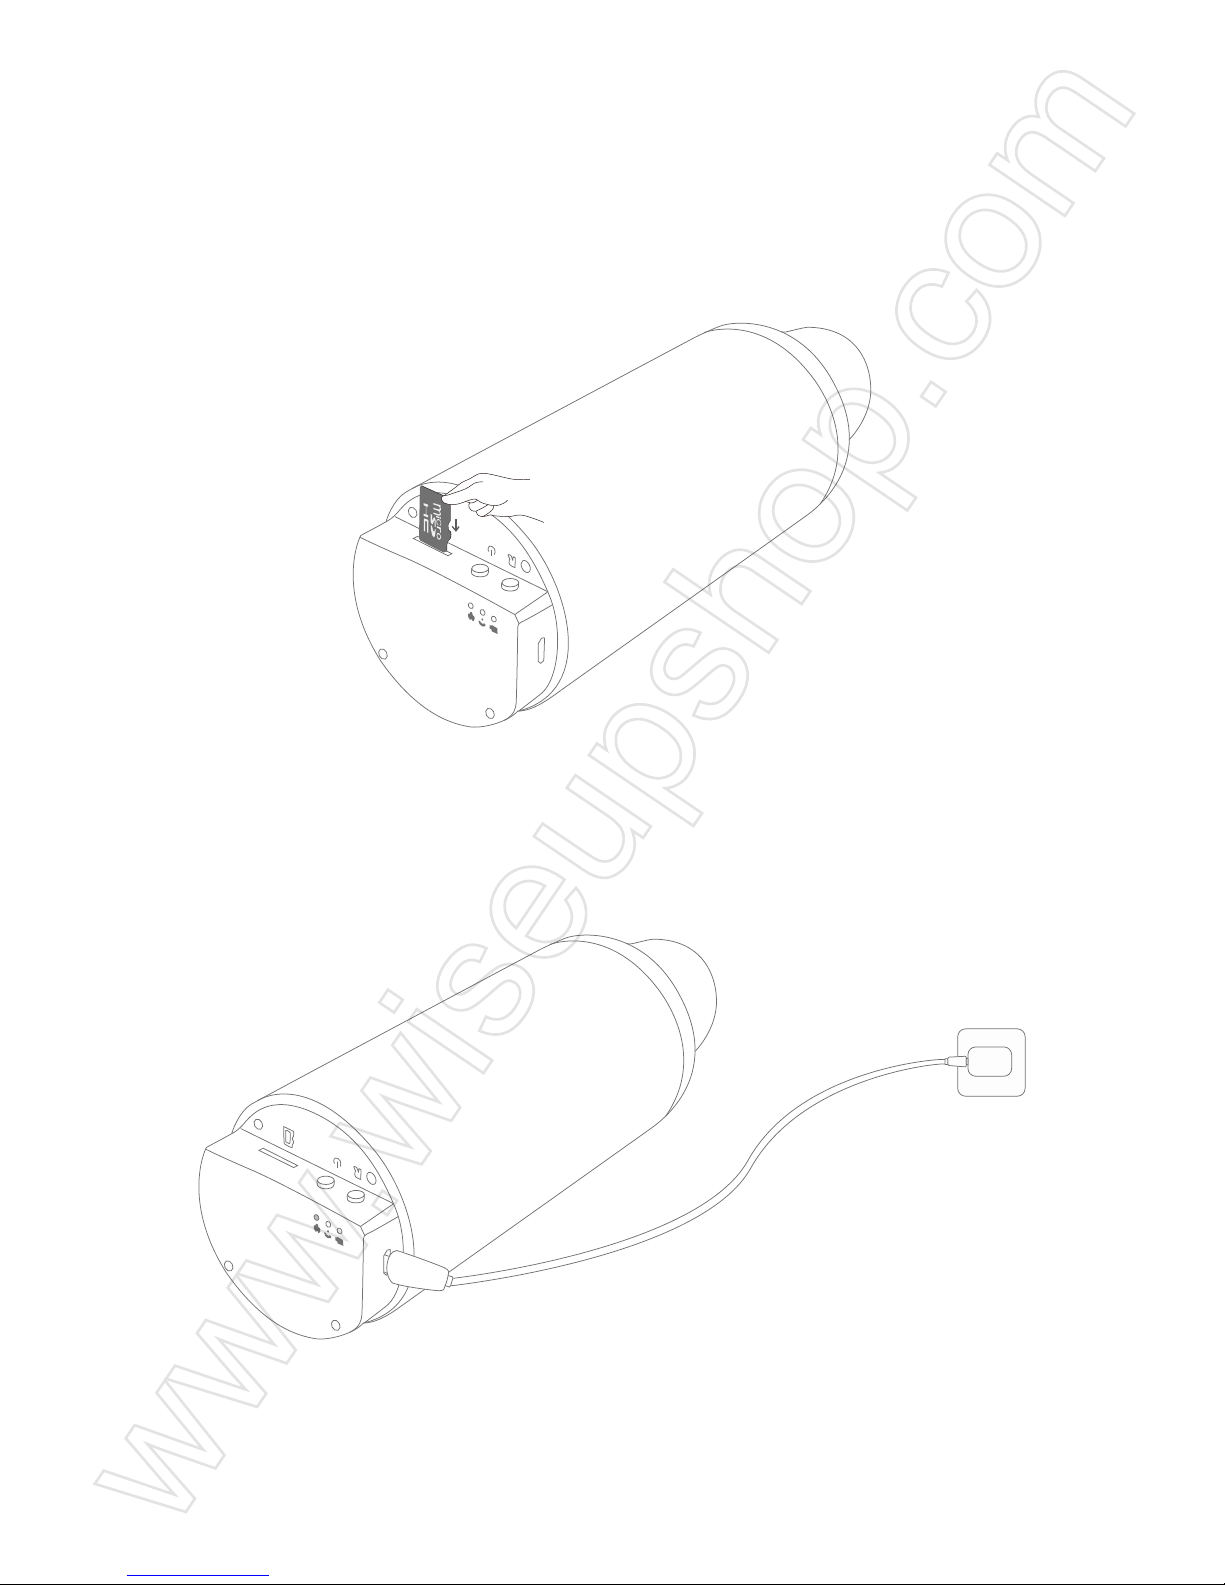
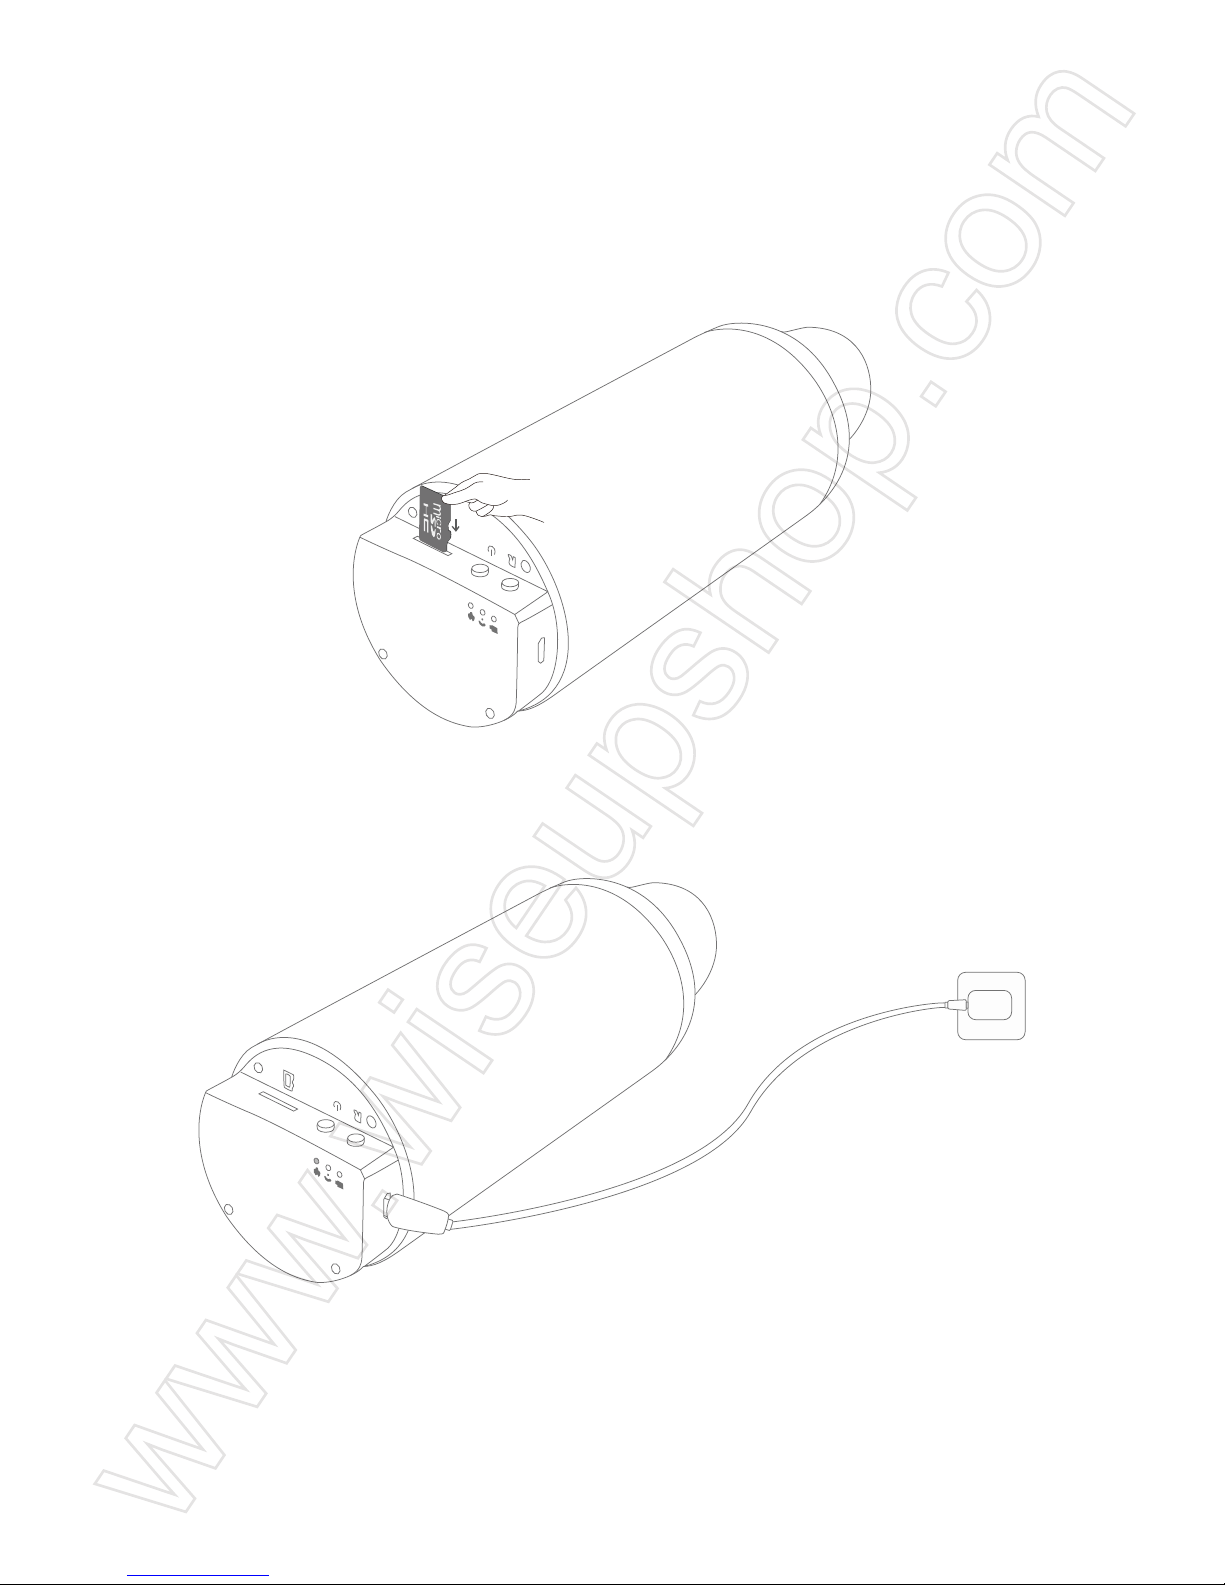
3.1. Make sure that a micro SD card which has been formatted in advance has been
inserted into the SD card slot of the camera. The internal memory of this SD card cannot
exceed 64GB and we suggest you use the Micro SDHC Class 10 card only.
3.2 Connect the camera to an external power source, the power indicator light and the
charging indicator light will be solid on and the camera will be turned on automatically.
IV. P2P Network Configuration (LAN Mode)
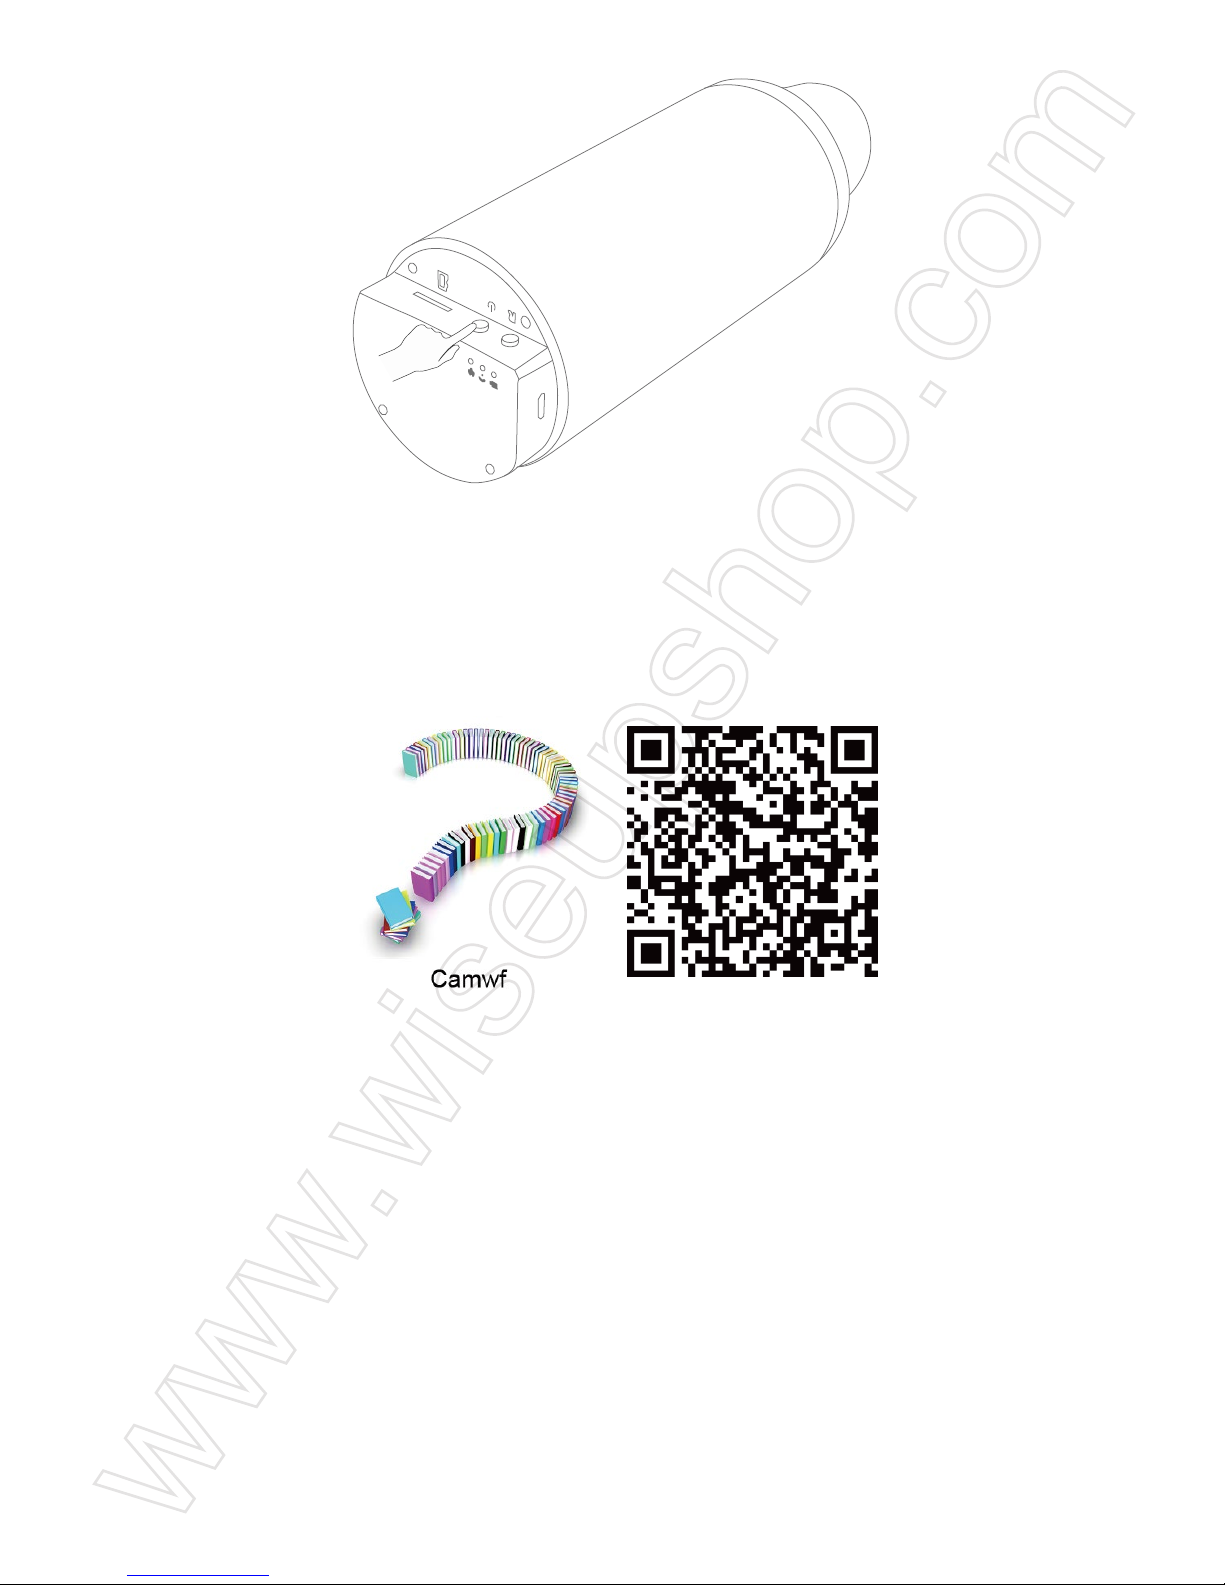
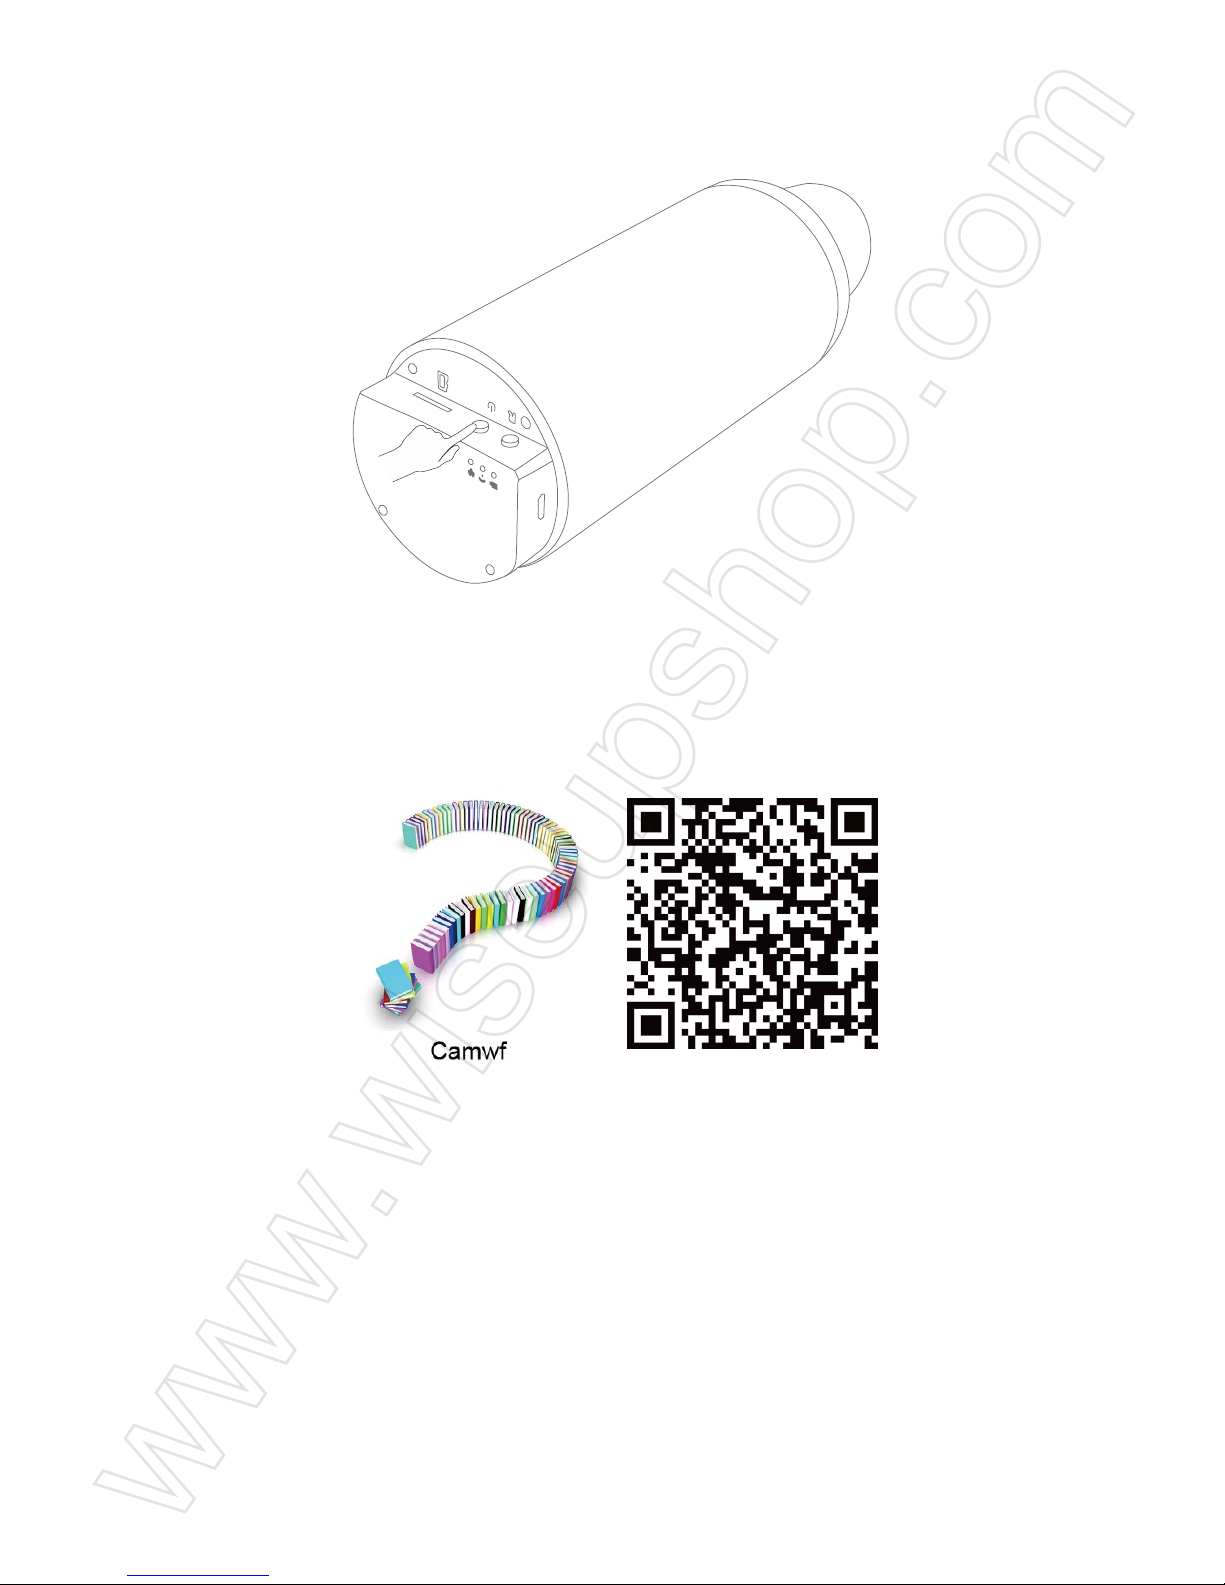
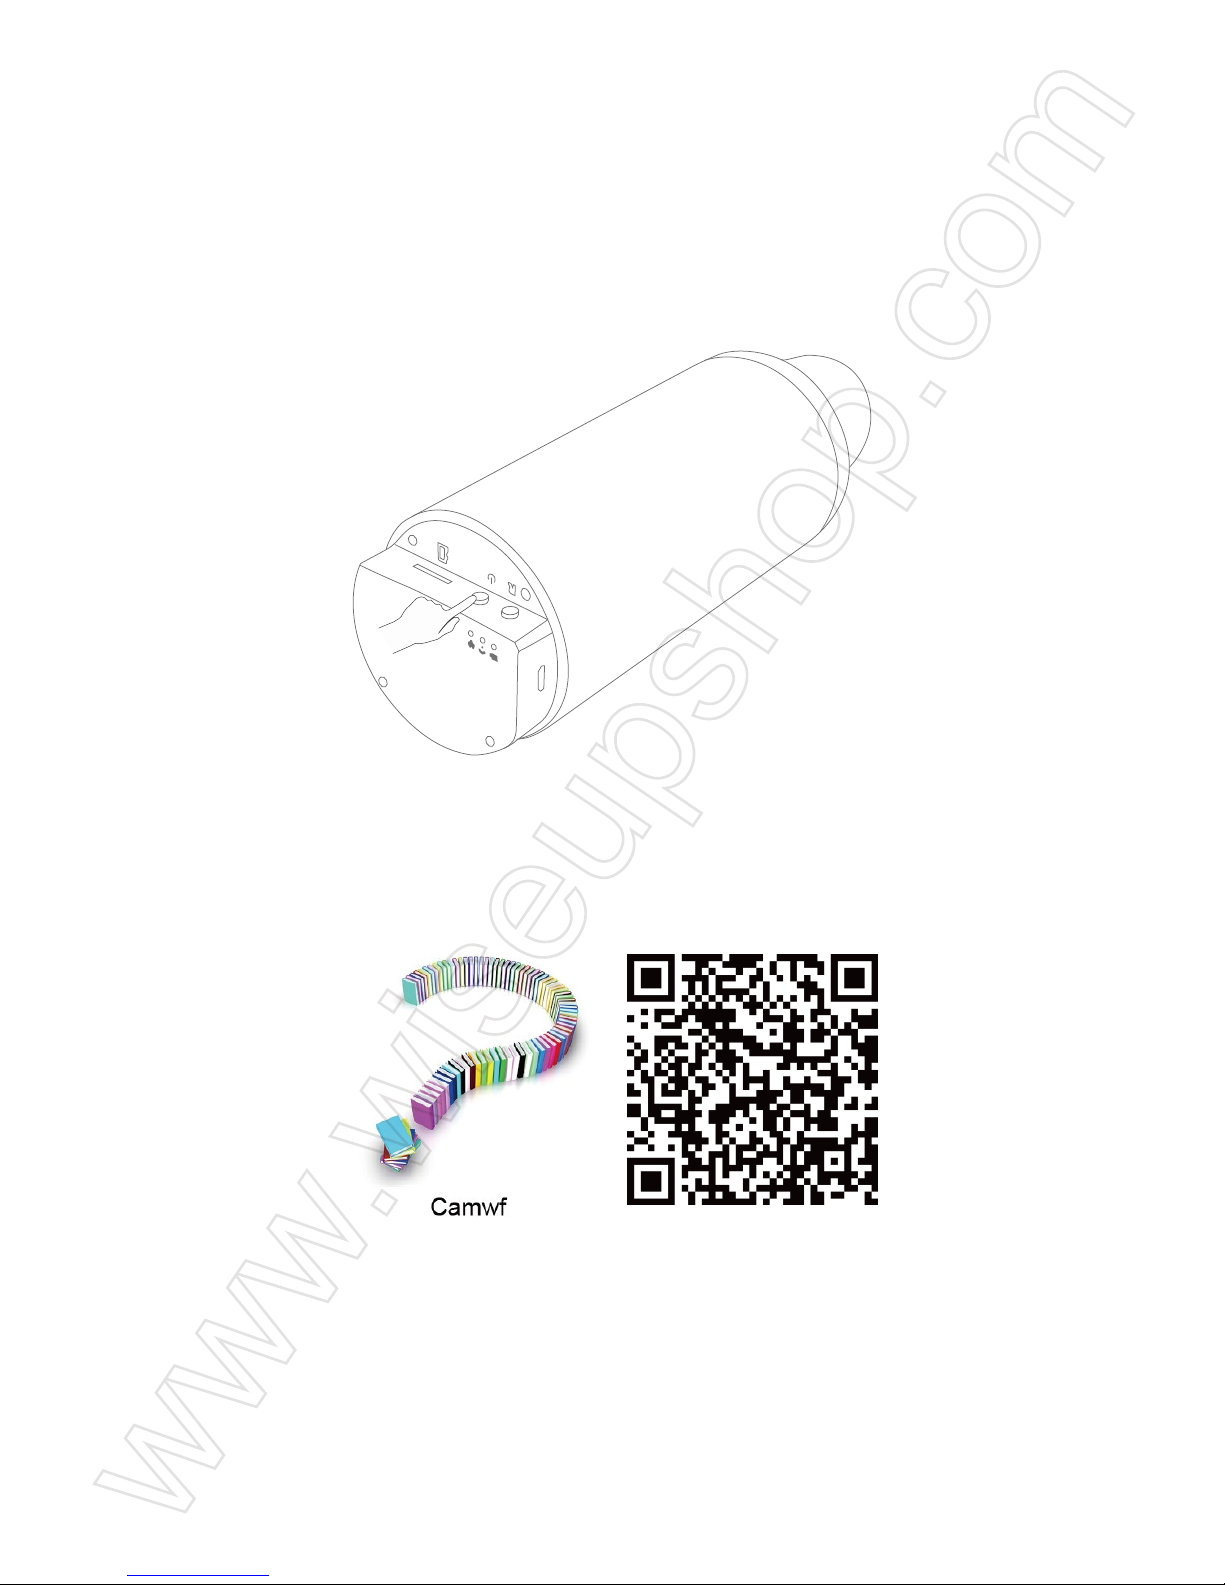
4.1 Connect your camera to an external power source, or press and hold the power button
for 3 seconds to switch on the camera. When the WIFI indicator light flashes slowly,
indicating that the WIFI hotspot of camera has been on and ready.
Page 3
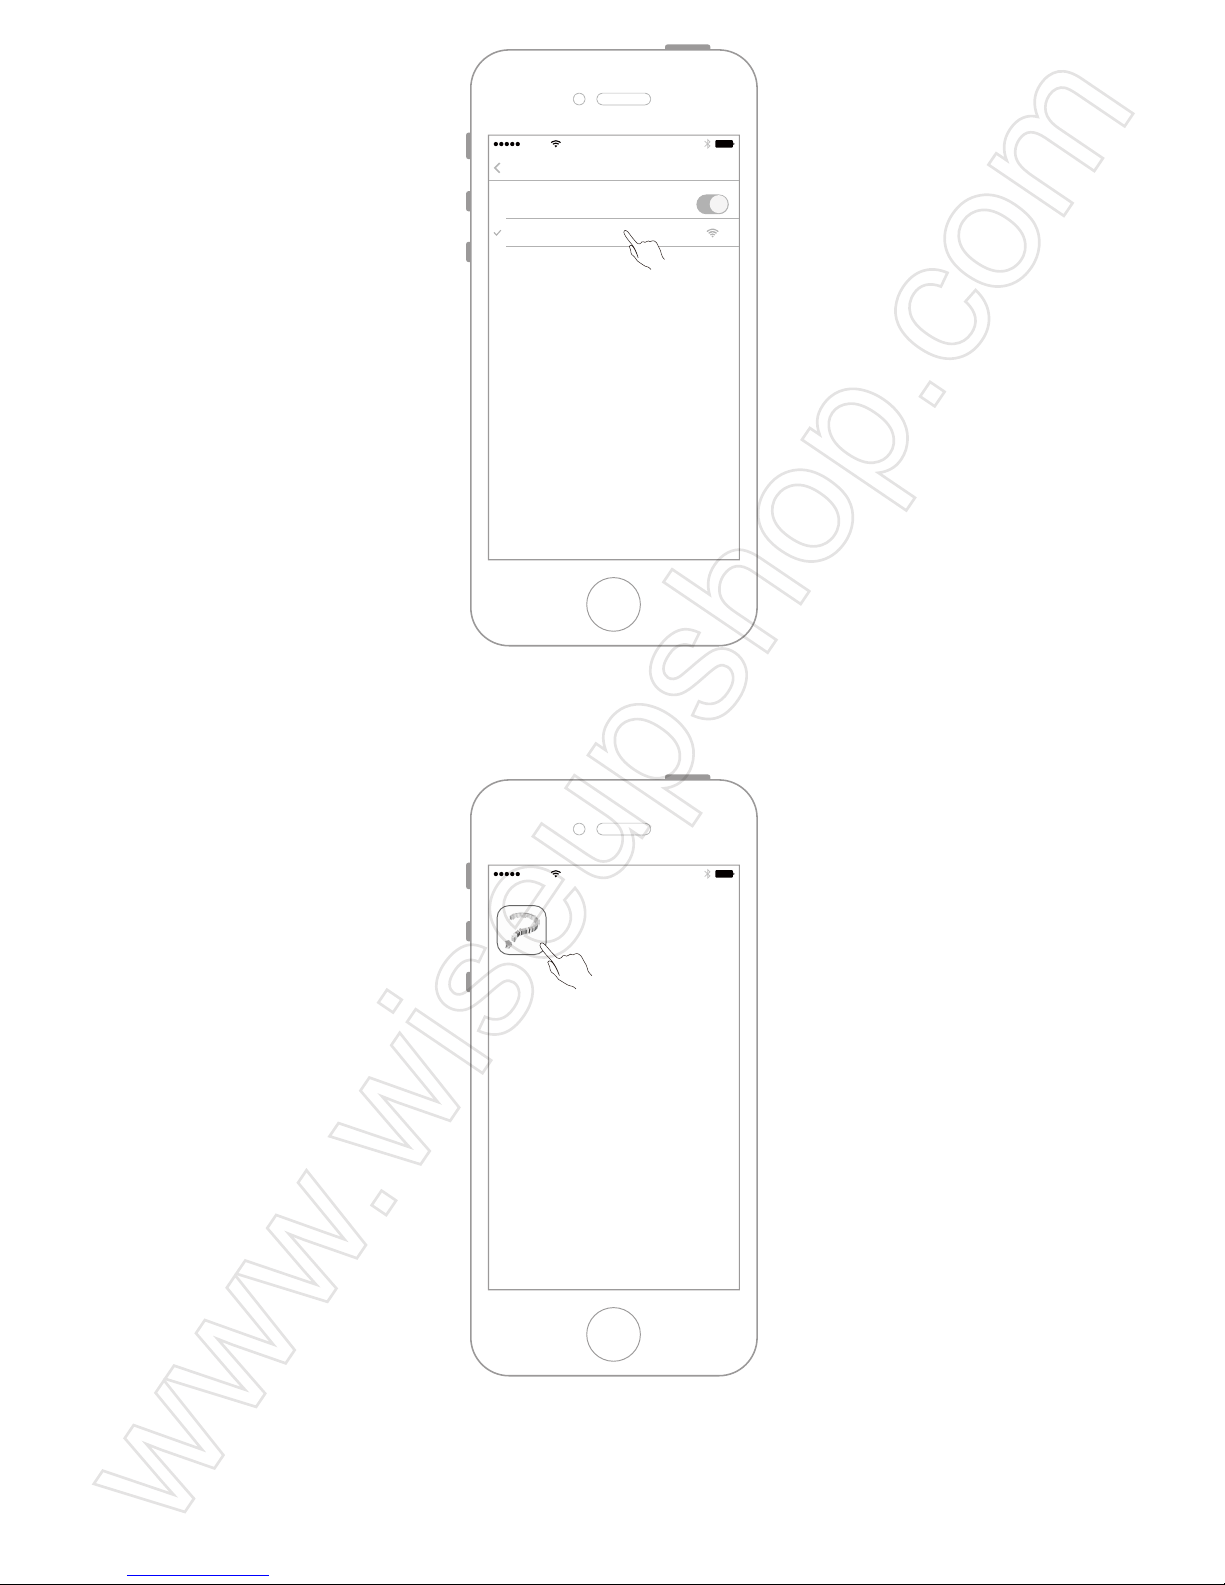
4.2 Use IOS mobile device to scan the two-dimension code below, or directly search
"Camwf " in the App Store to install the APP.
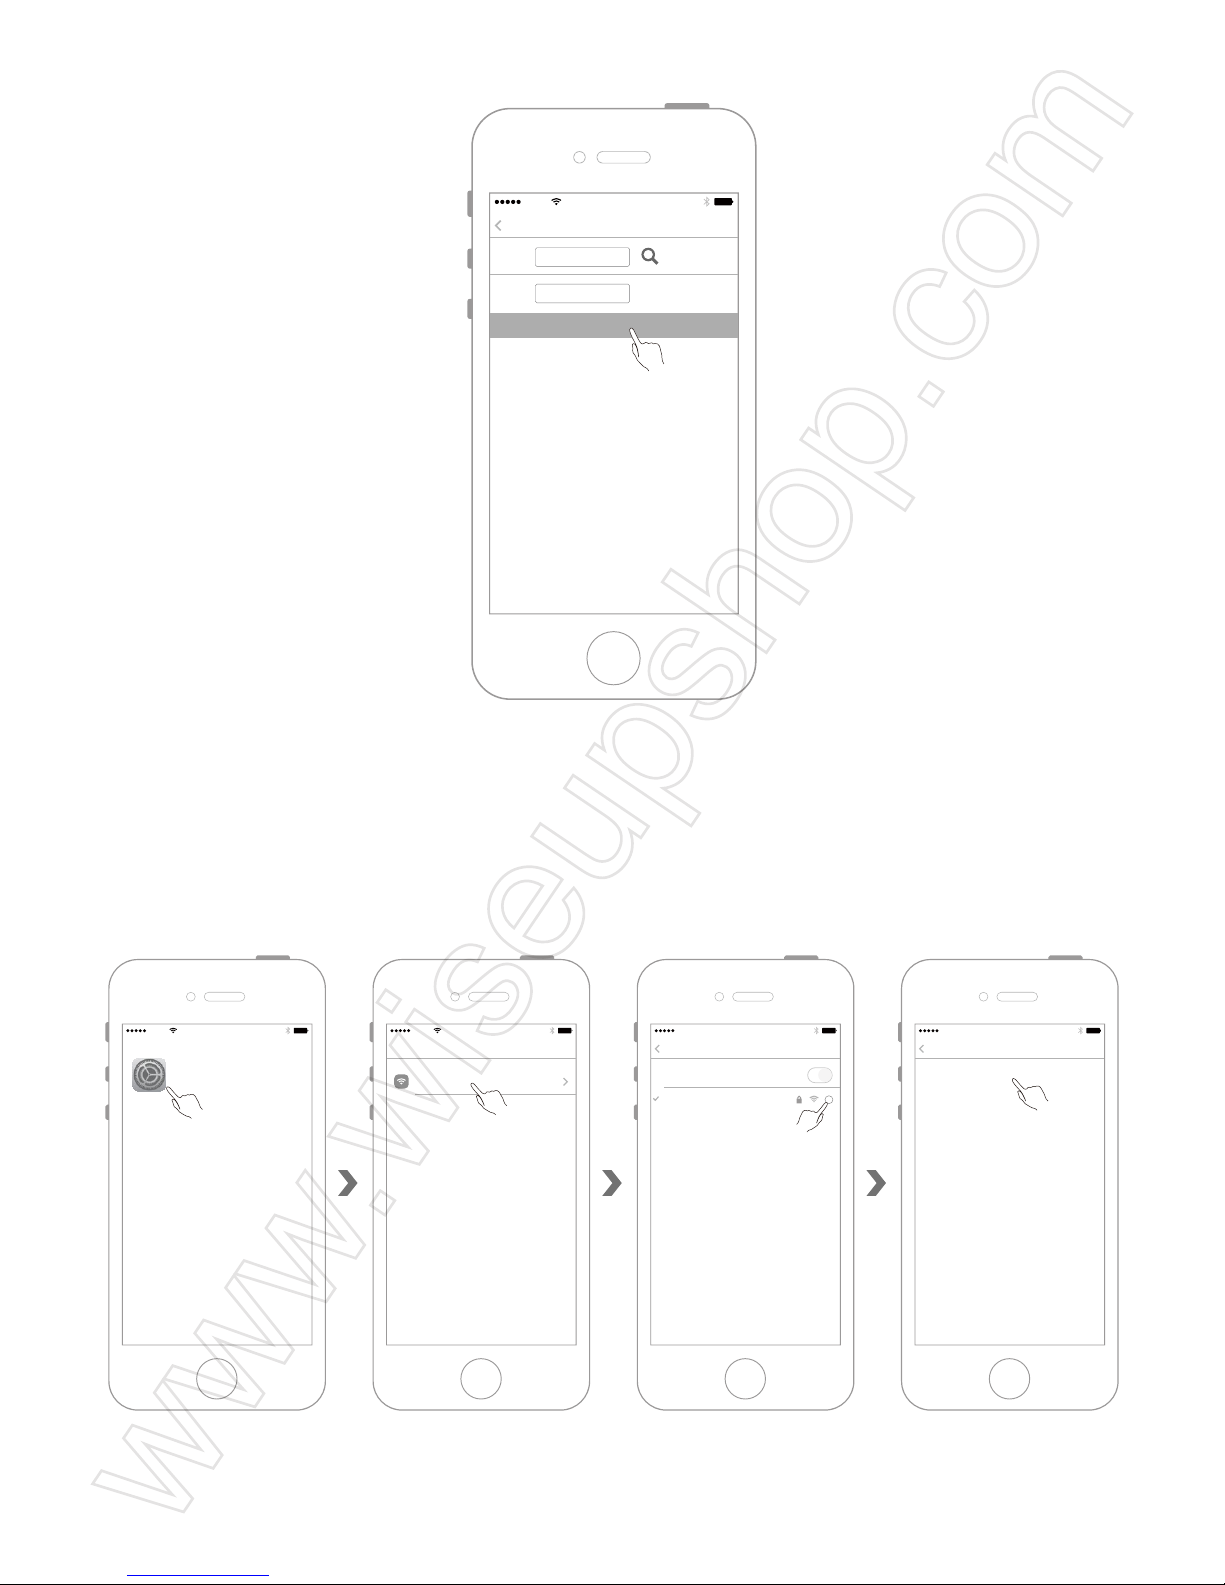
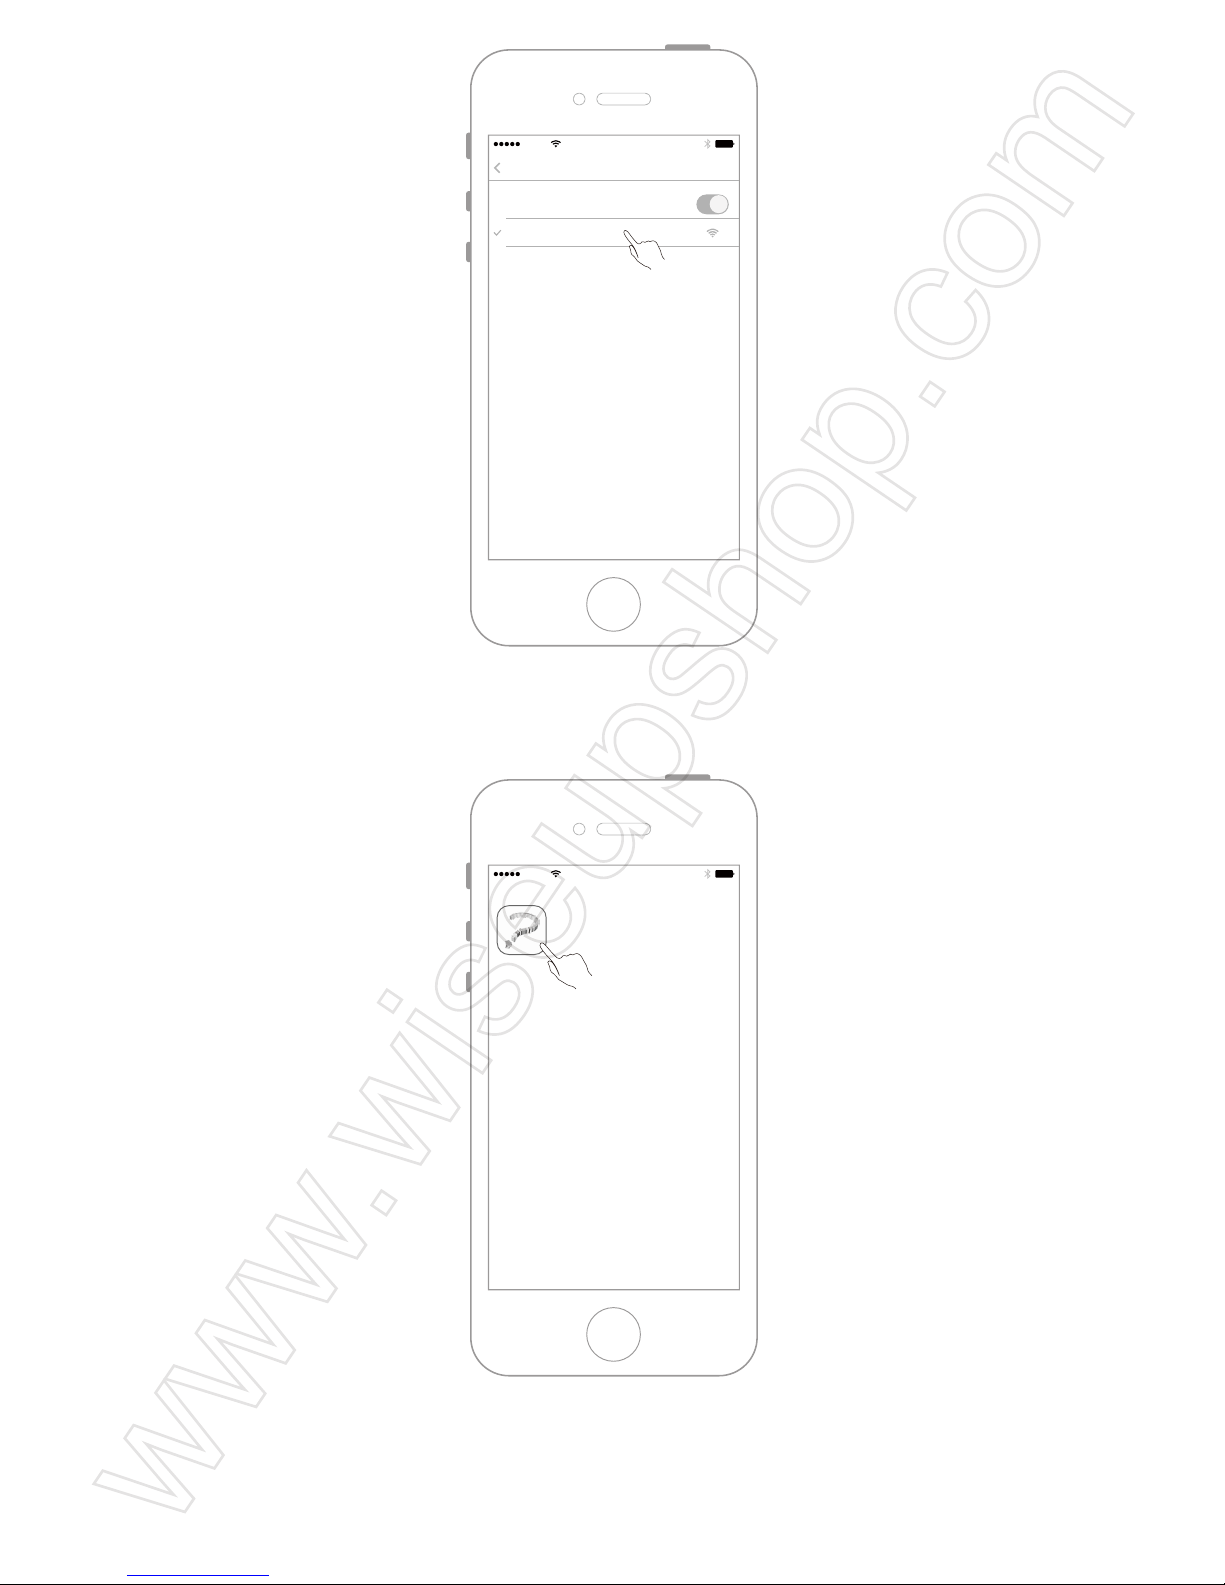
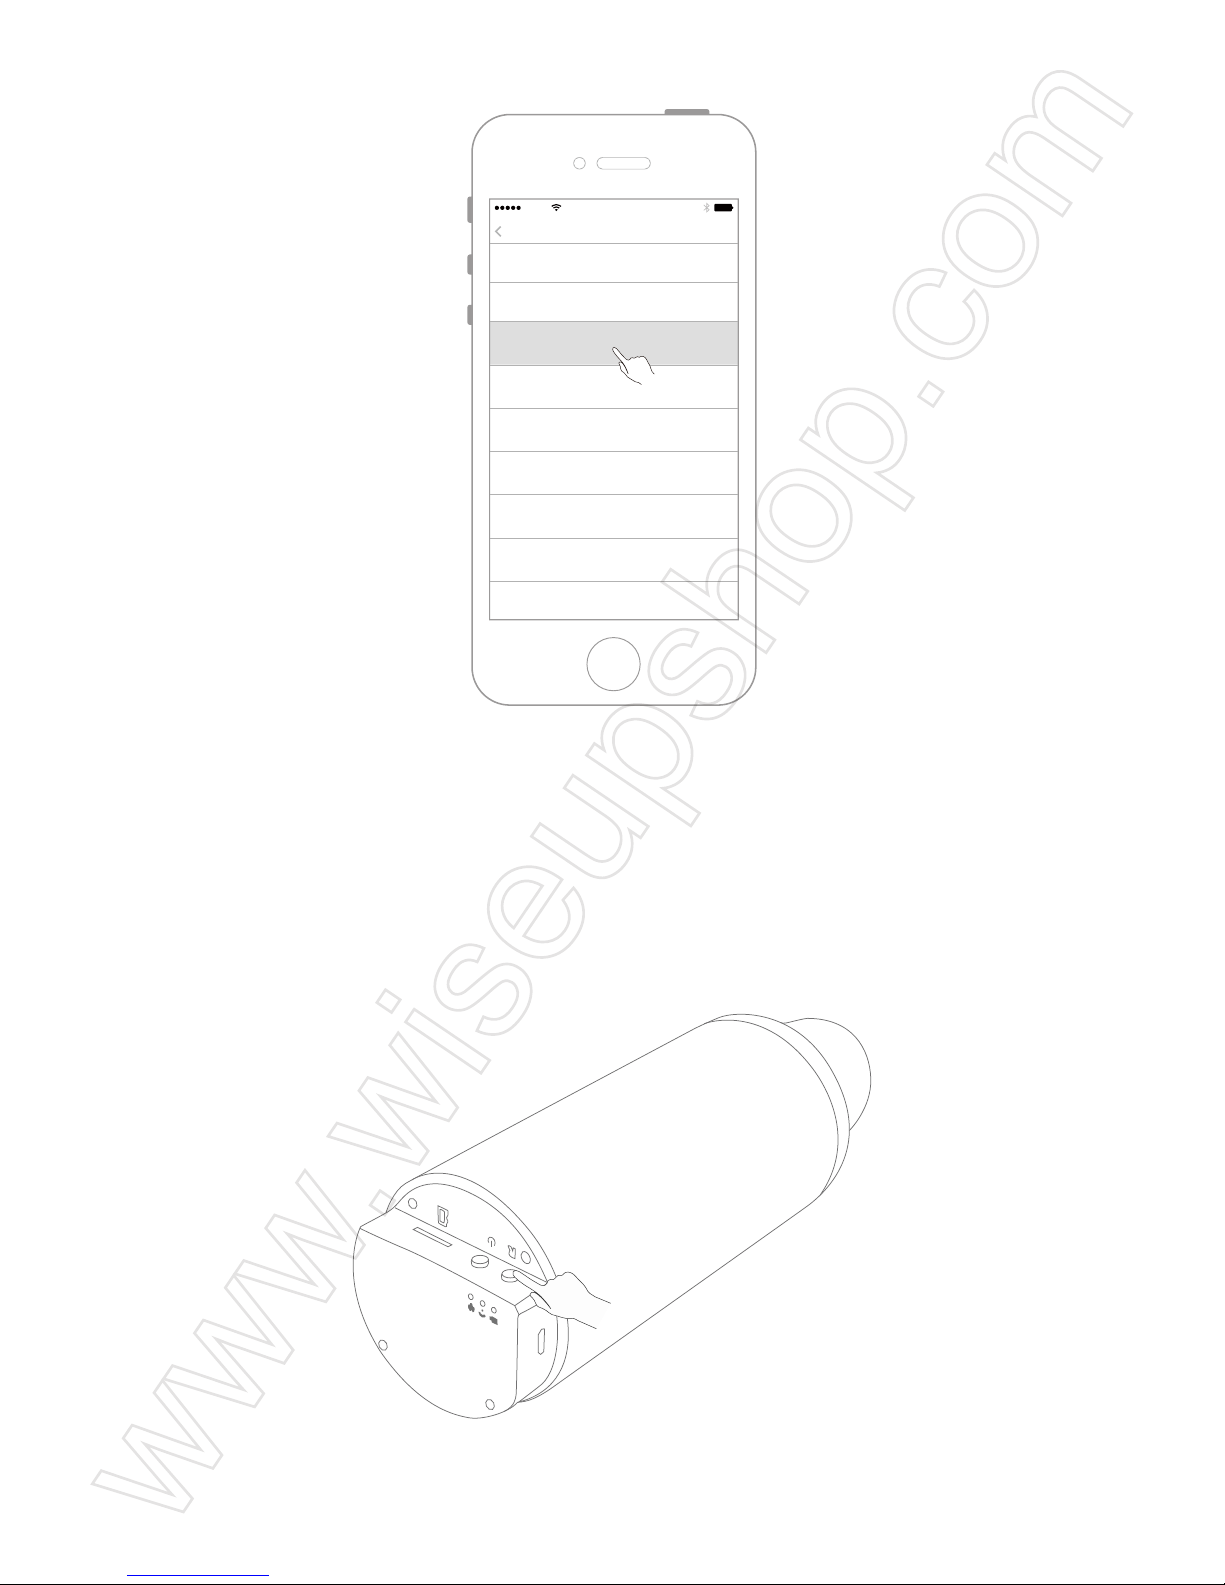
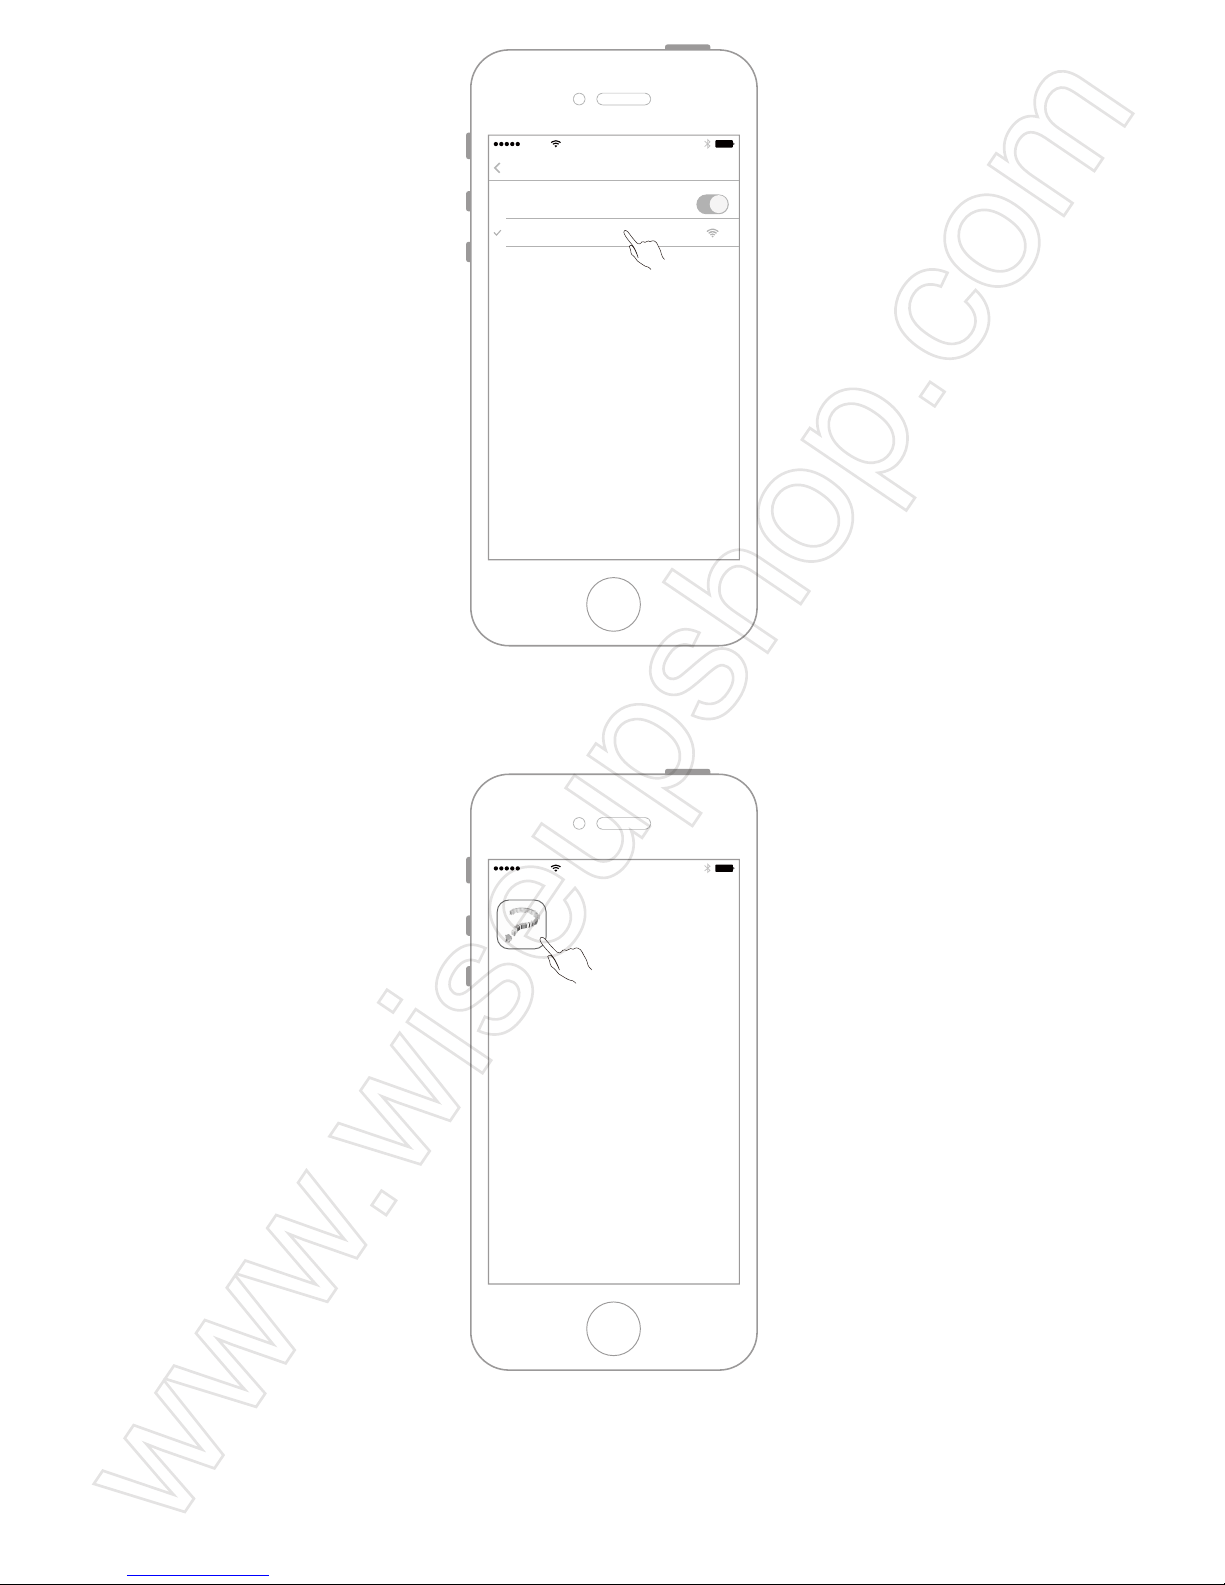
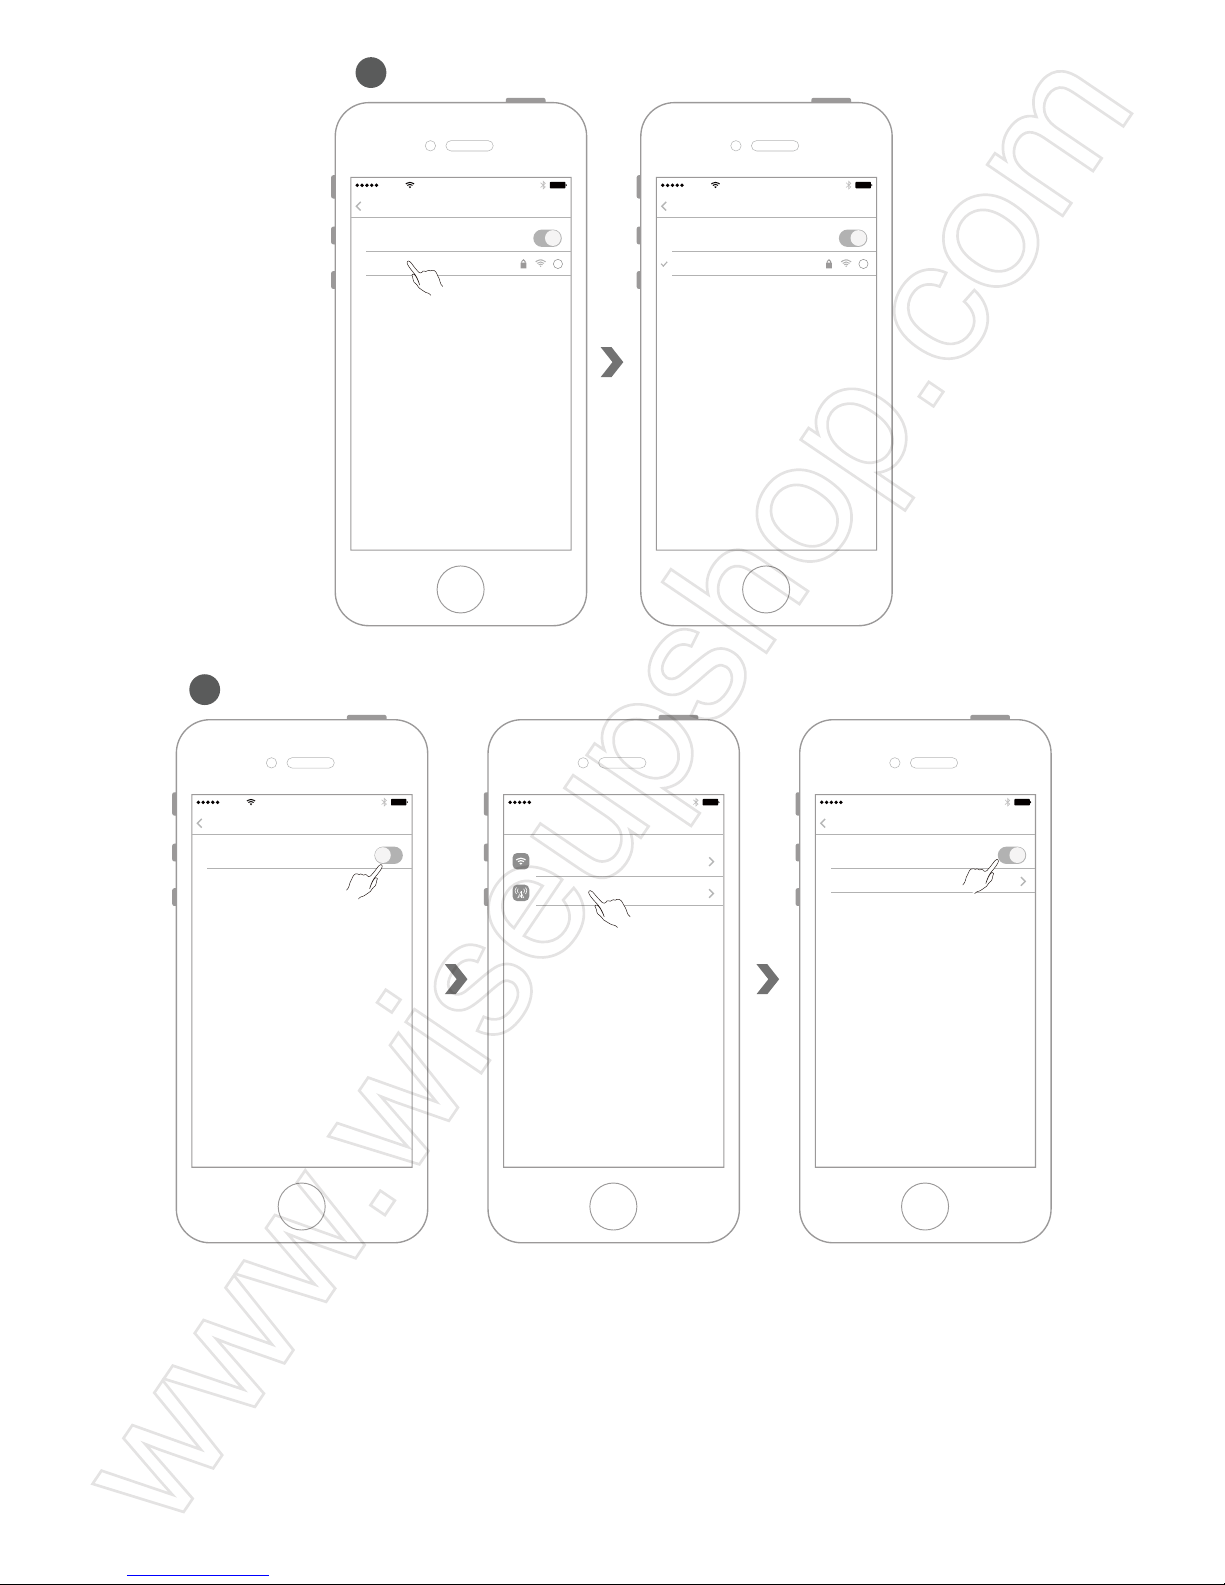
4.3 Open the WLAN settings page of the IOS mobile device and connect the IOS mobile
device to the WIFI hotspot of camera.
Page 4
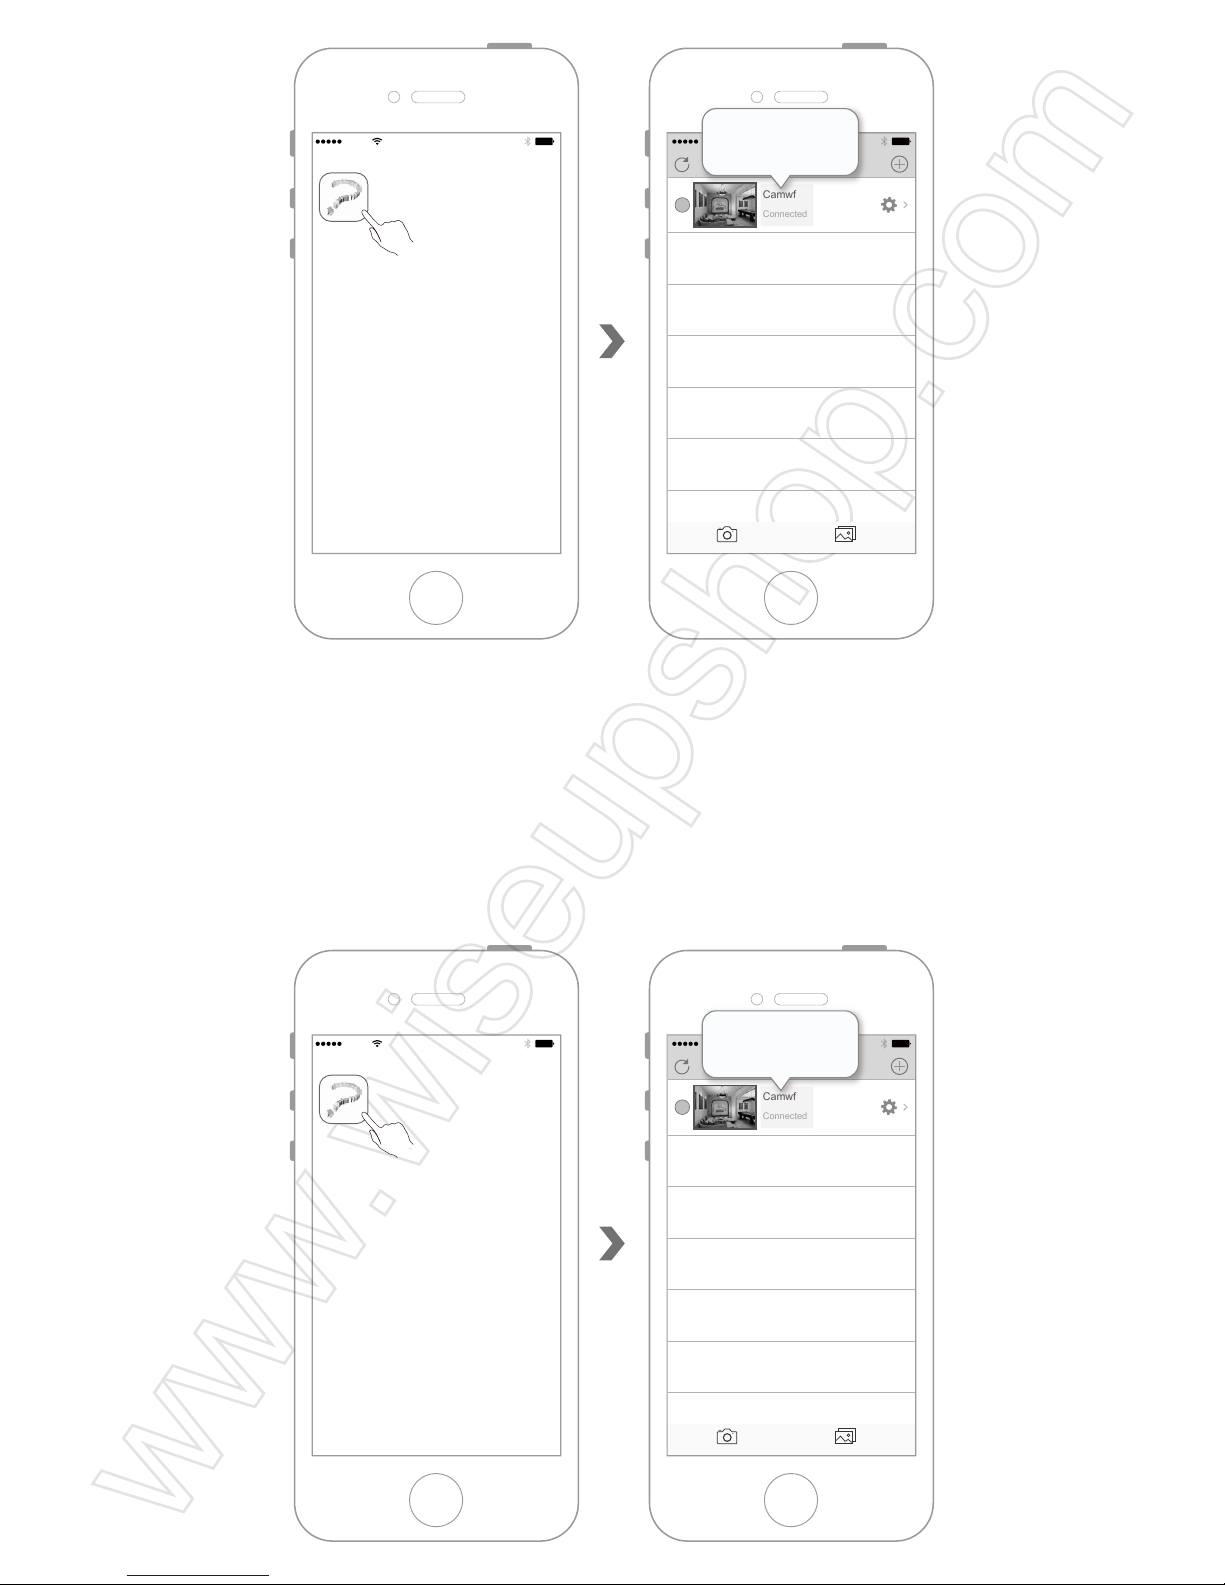
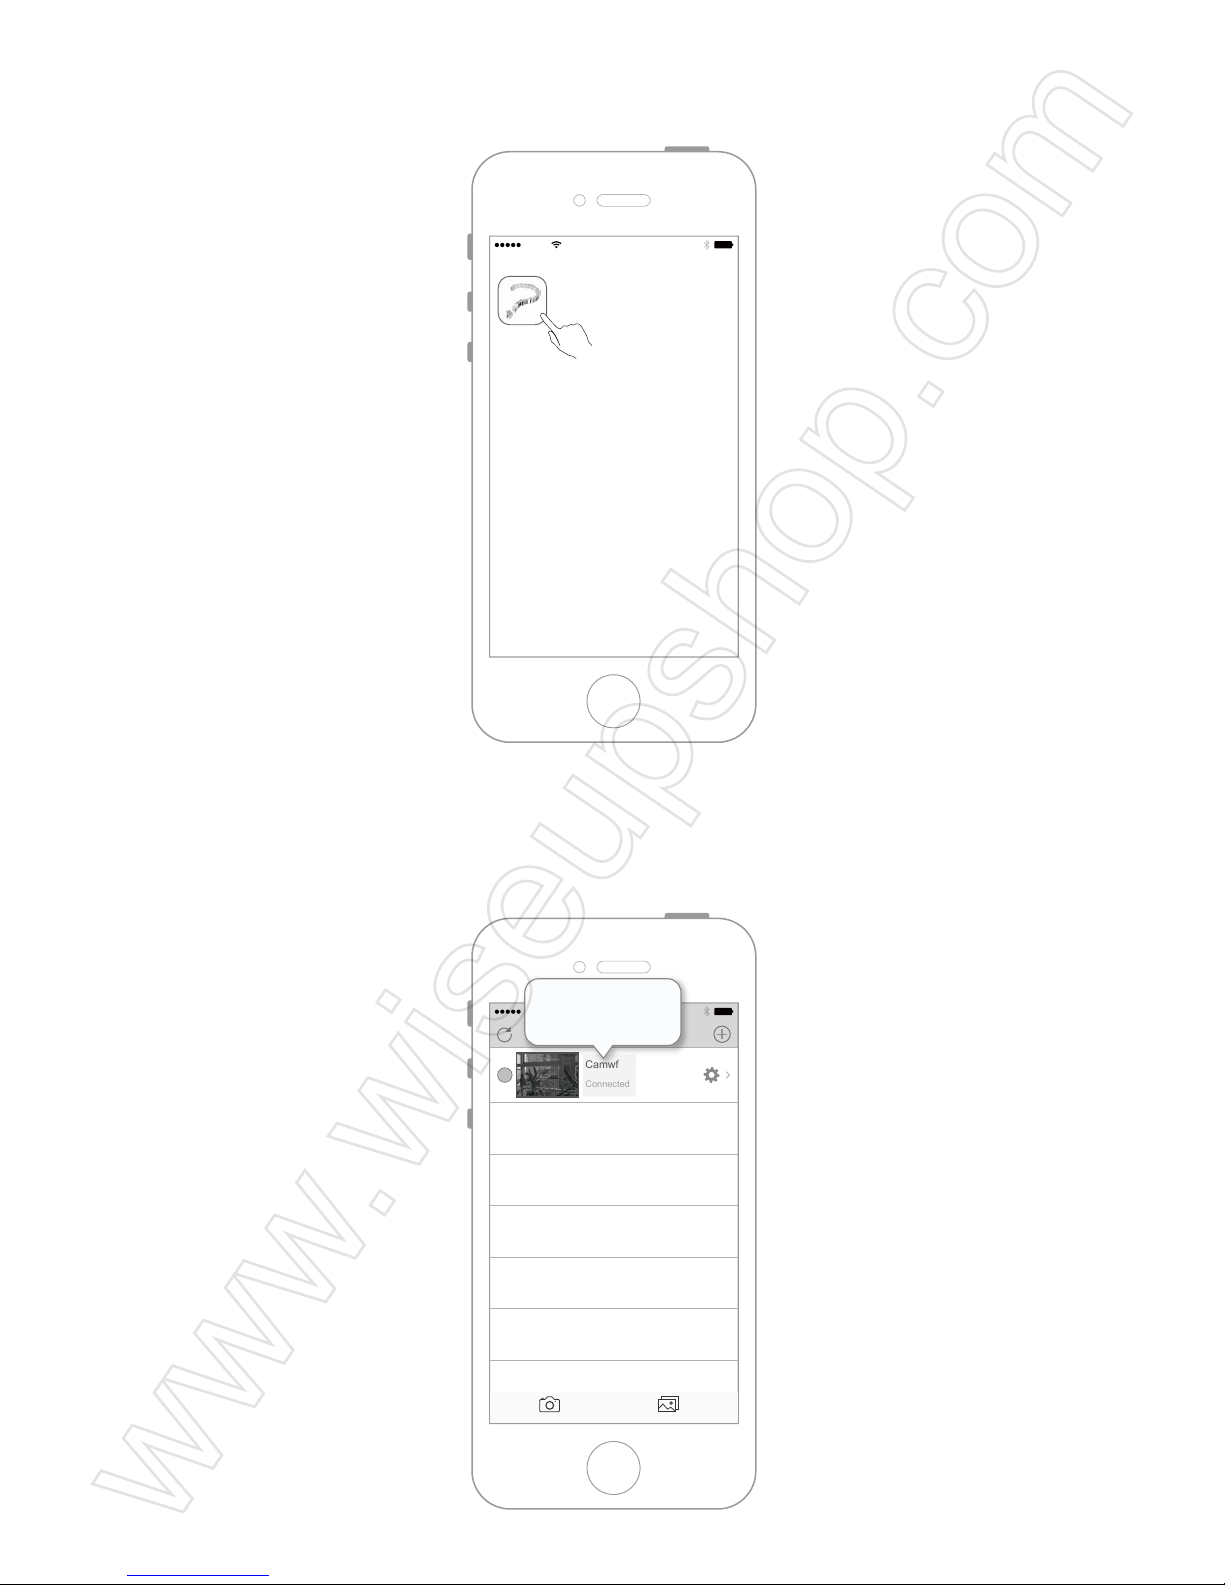
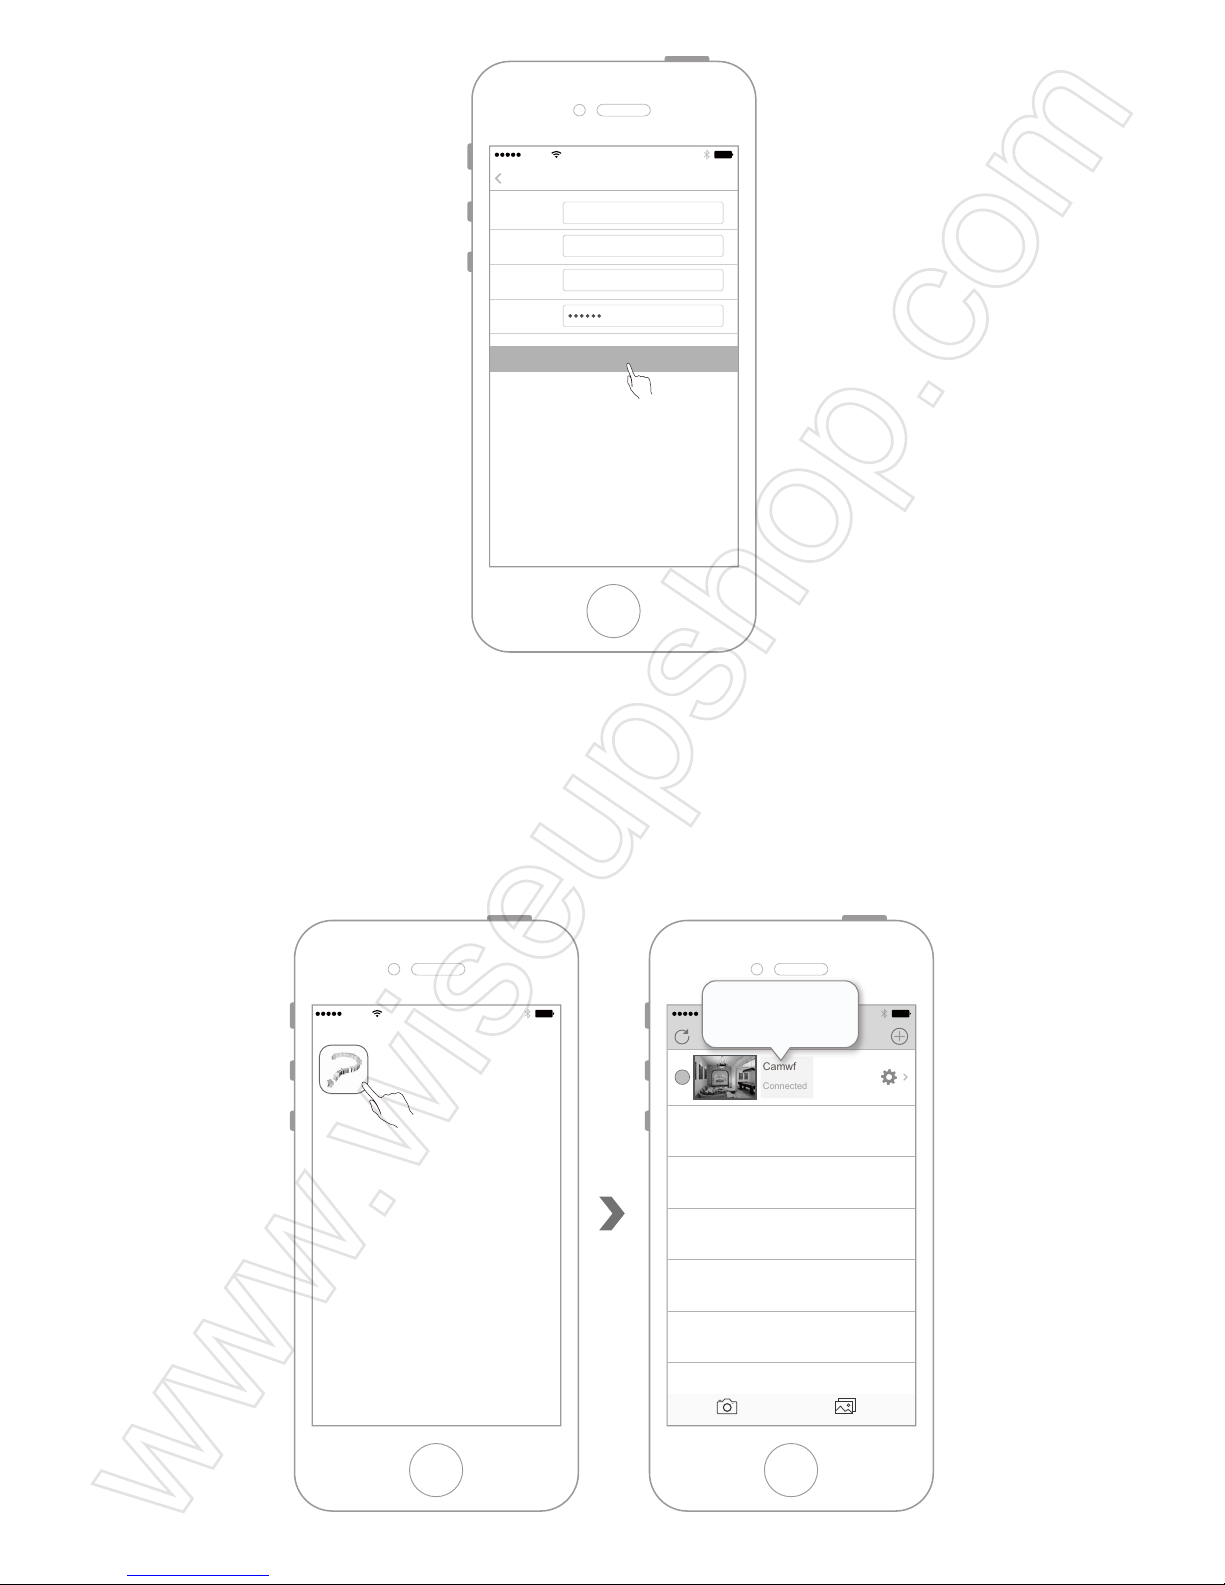
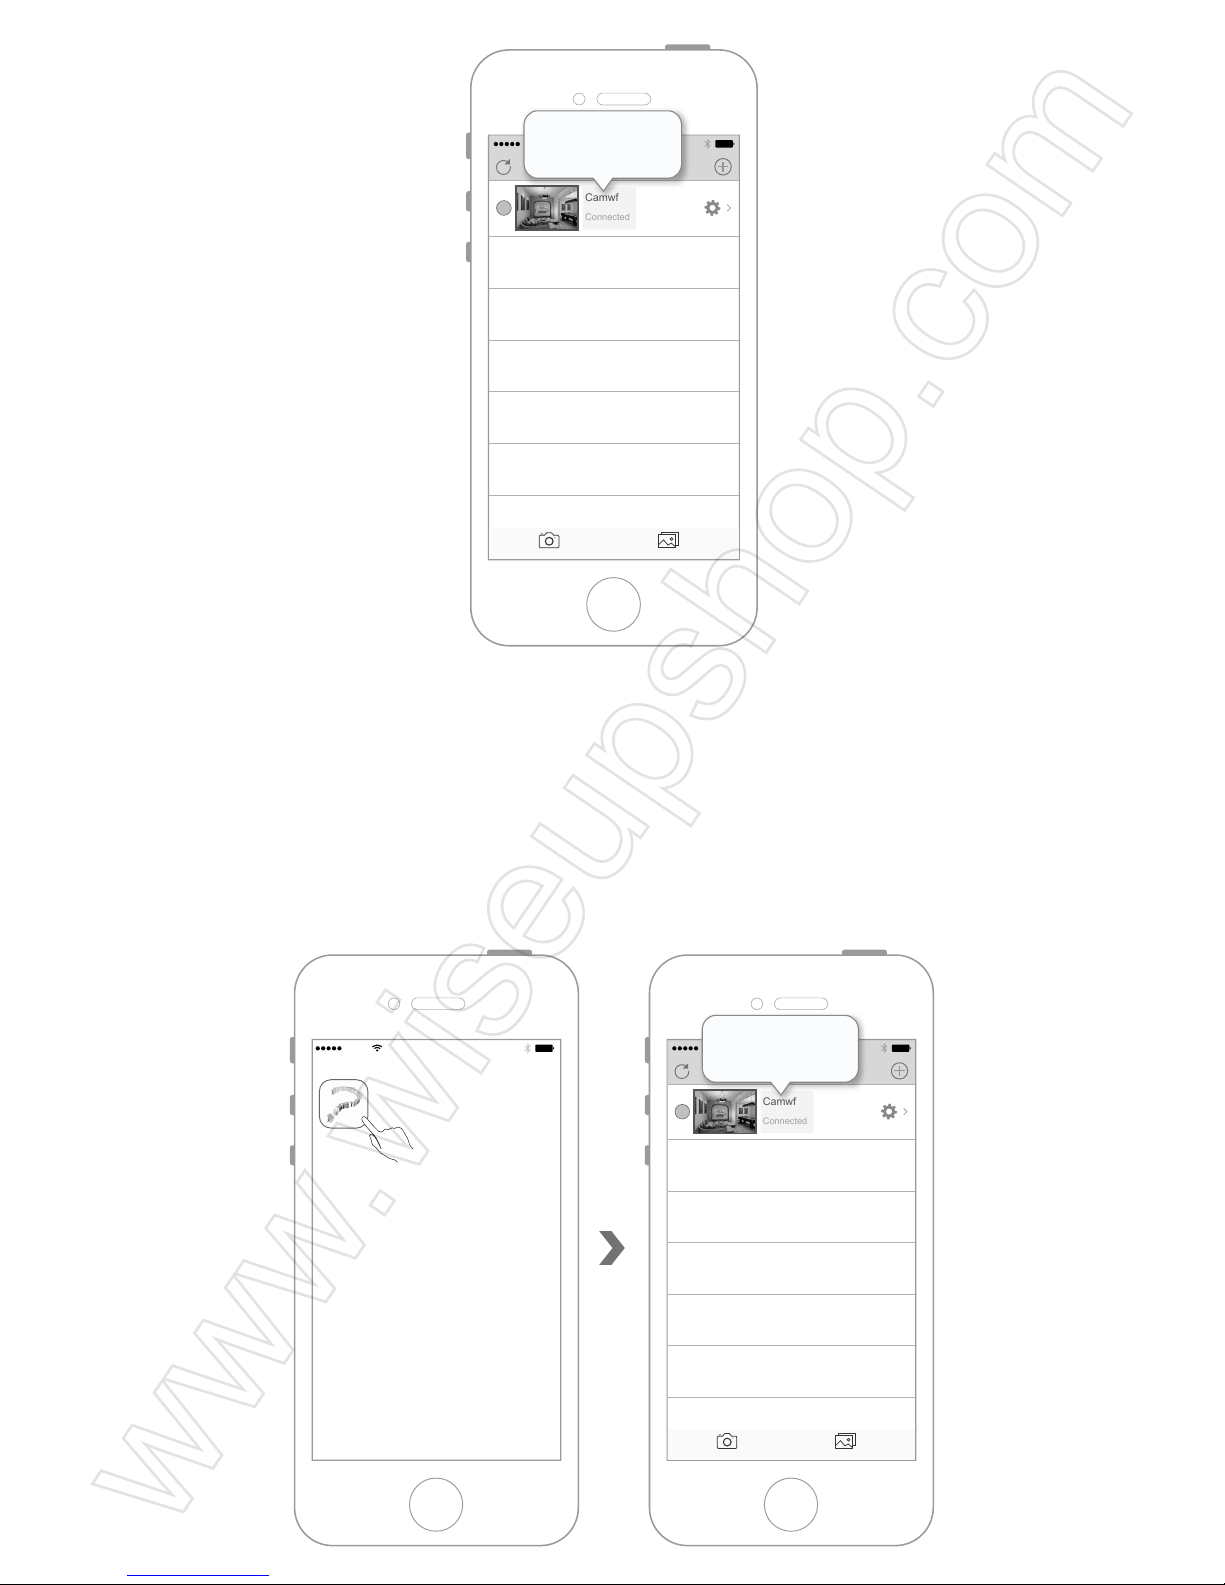
4.4 Open the "Camwf " APP.
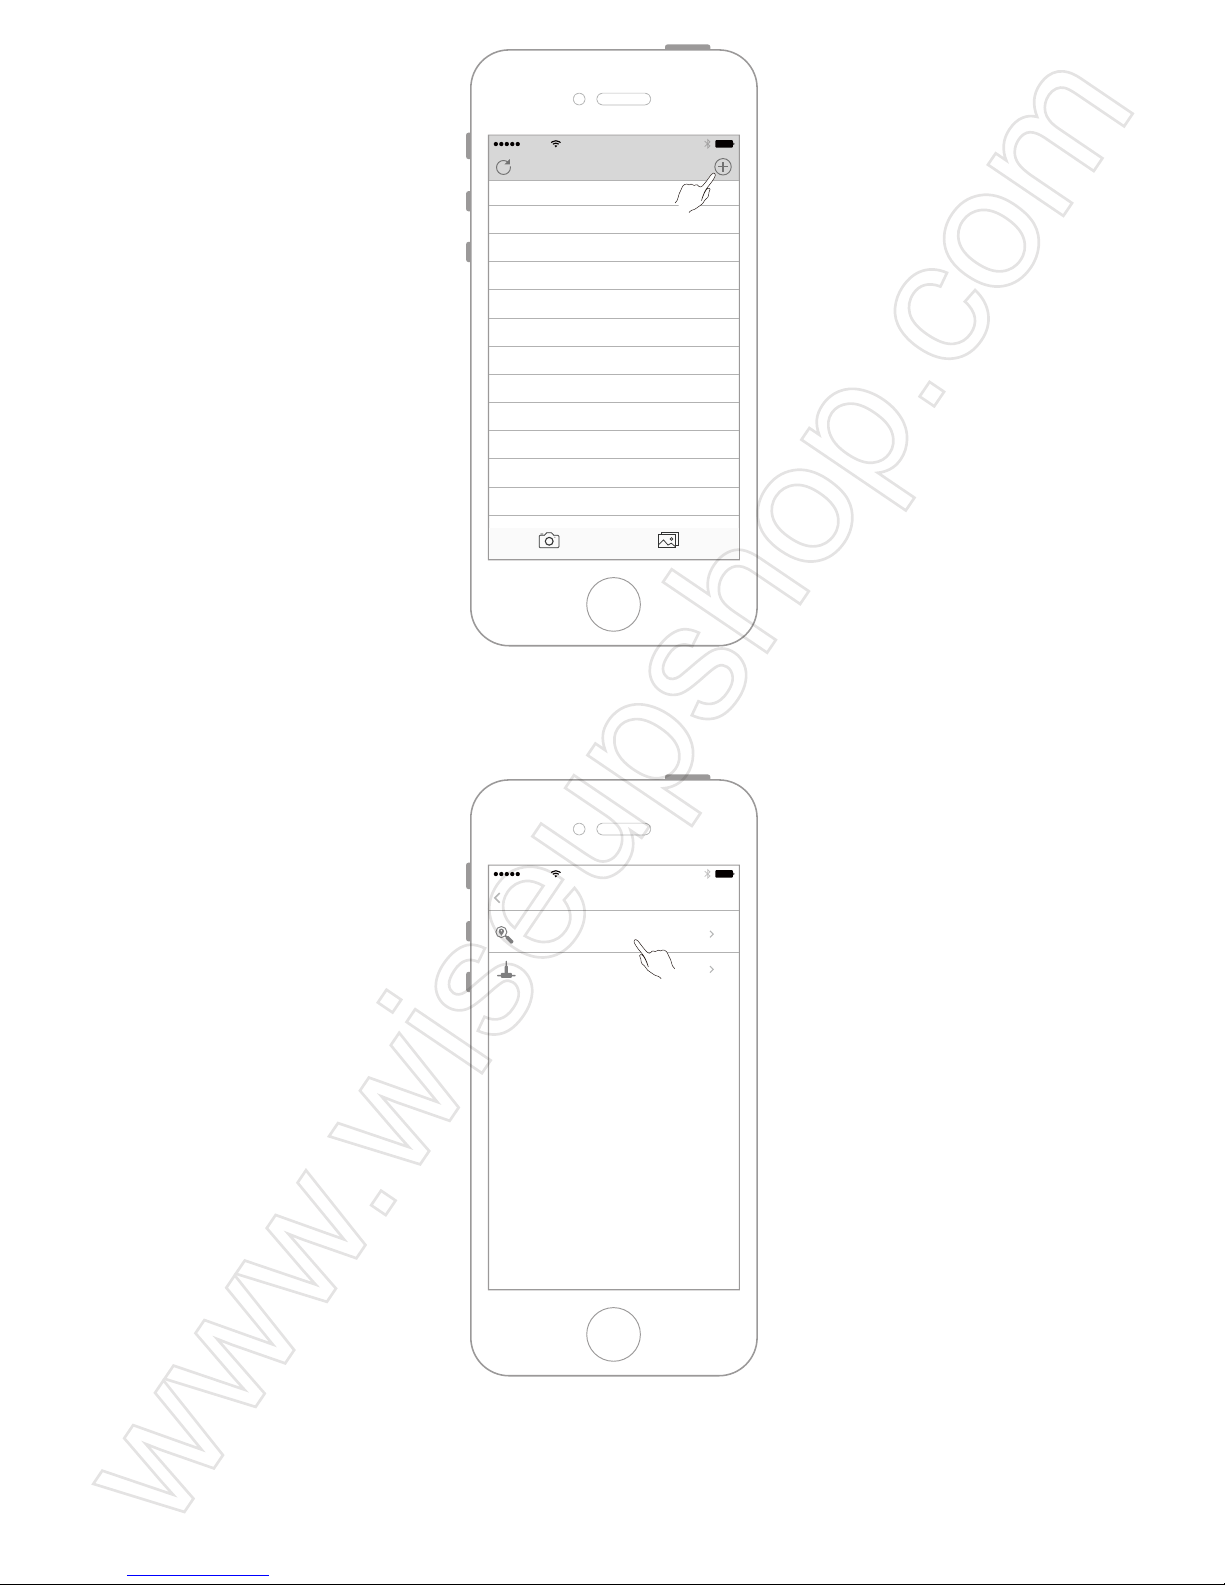
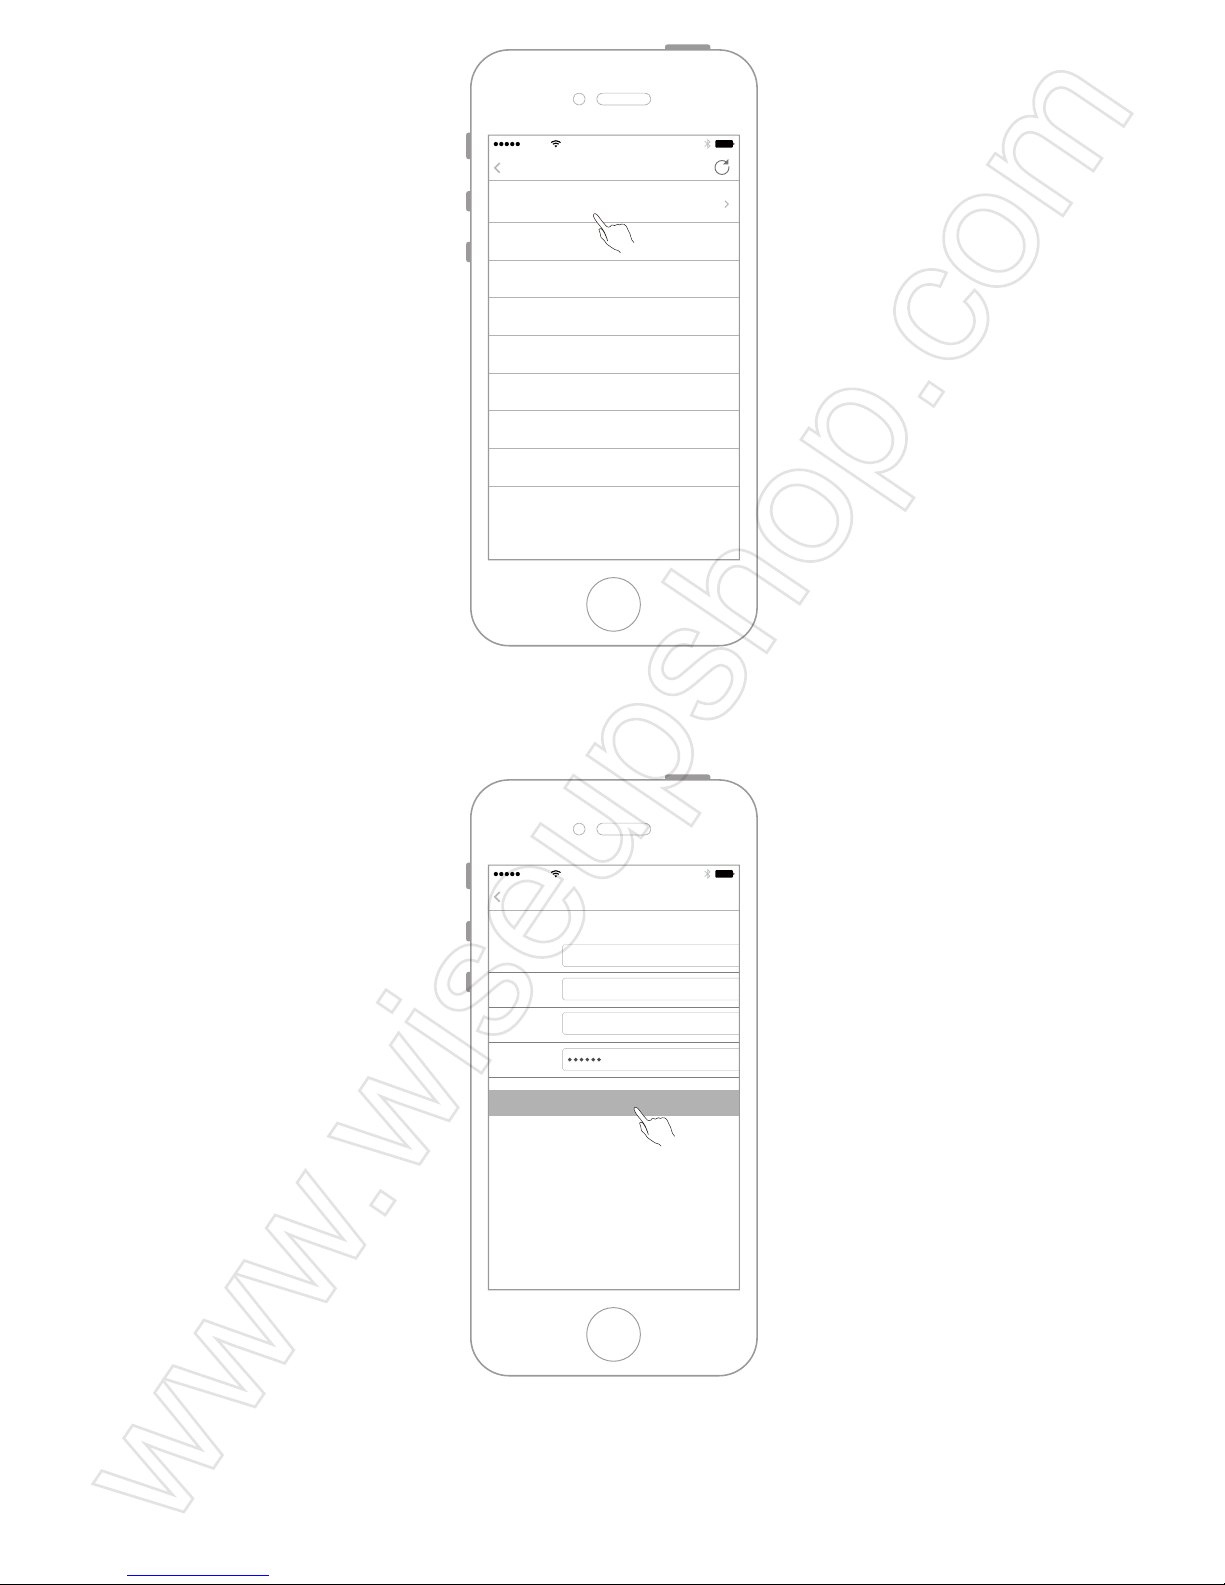
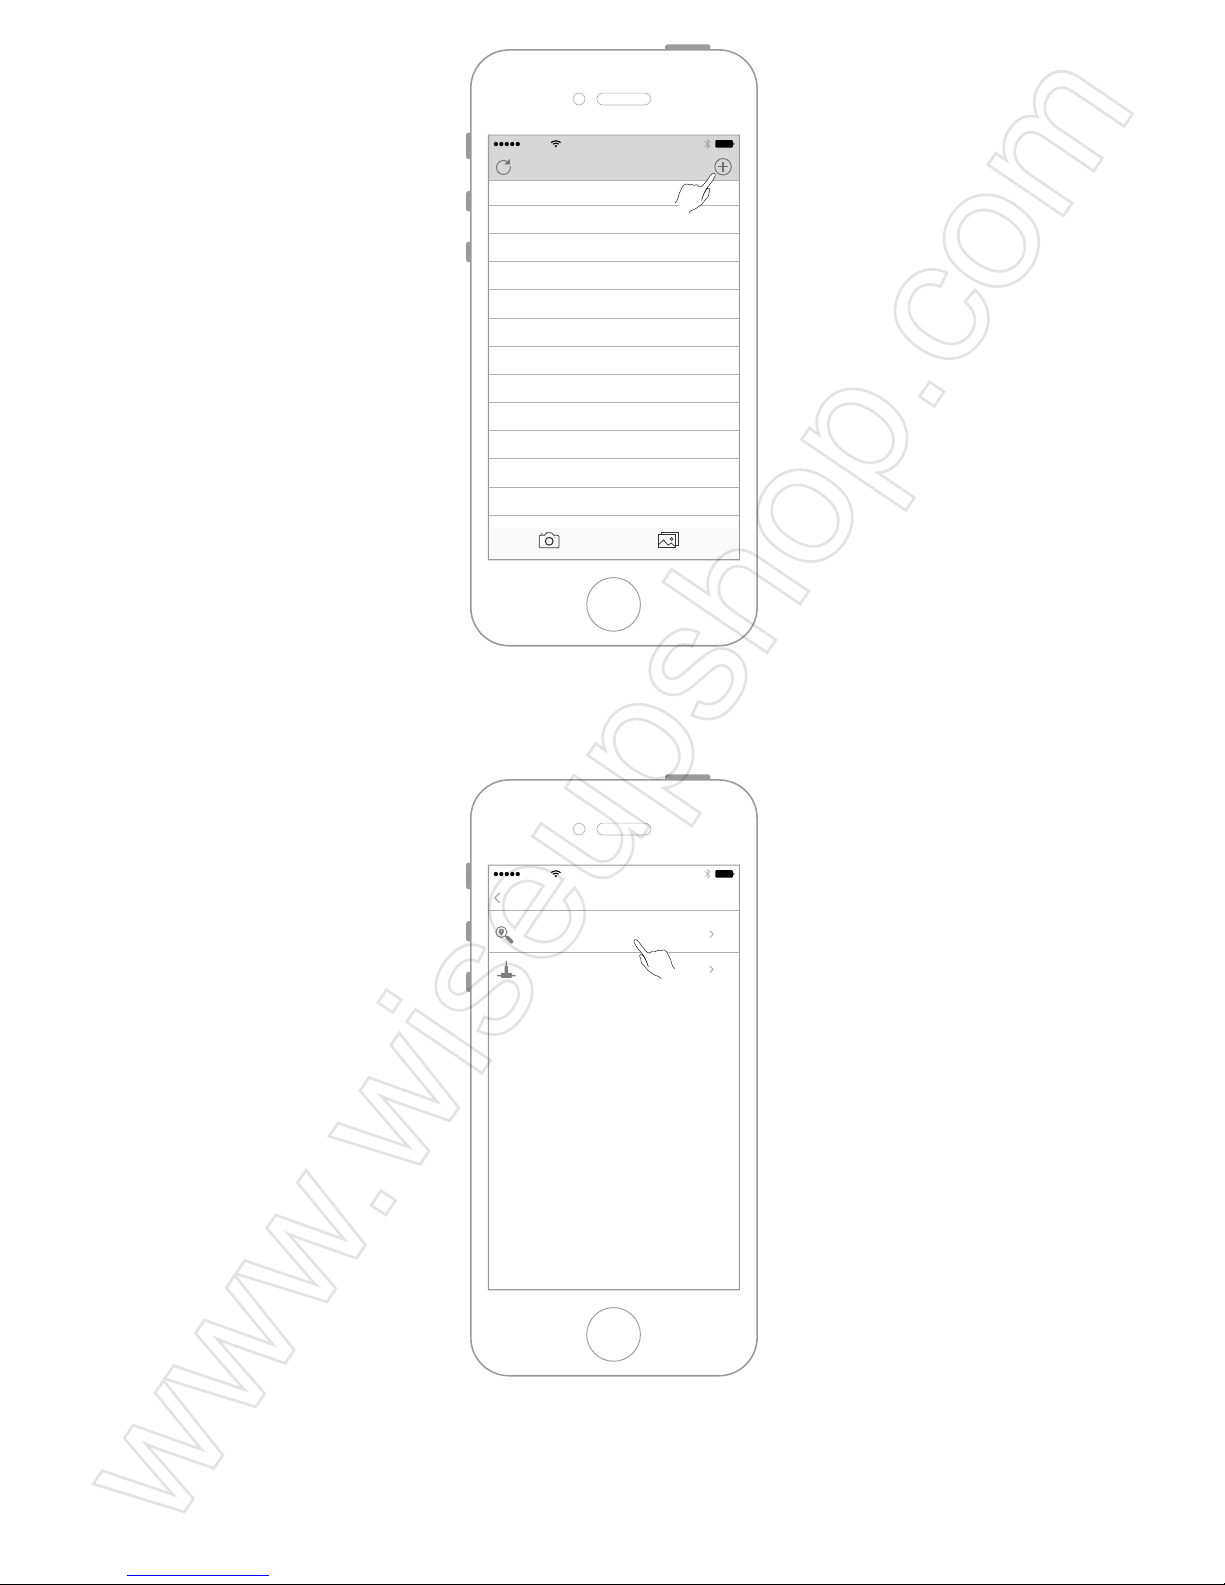
4.5 Add the camera to the "Camwf " APP.
Step 1.
AT&T
11:57 AM
WLAN
Settings
Wi-Fi
RT-FHC22NUK111A
AT&T
11:57 AM
Camwf
Page 5
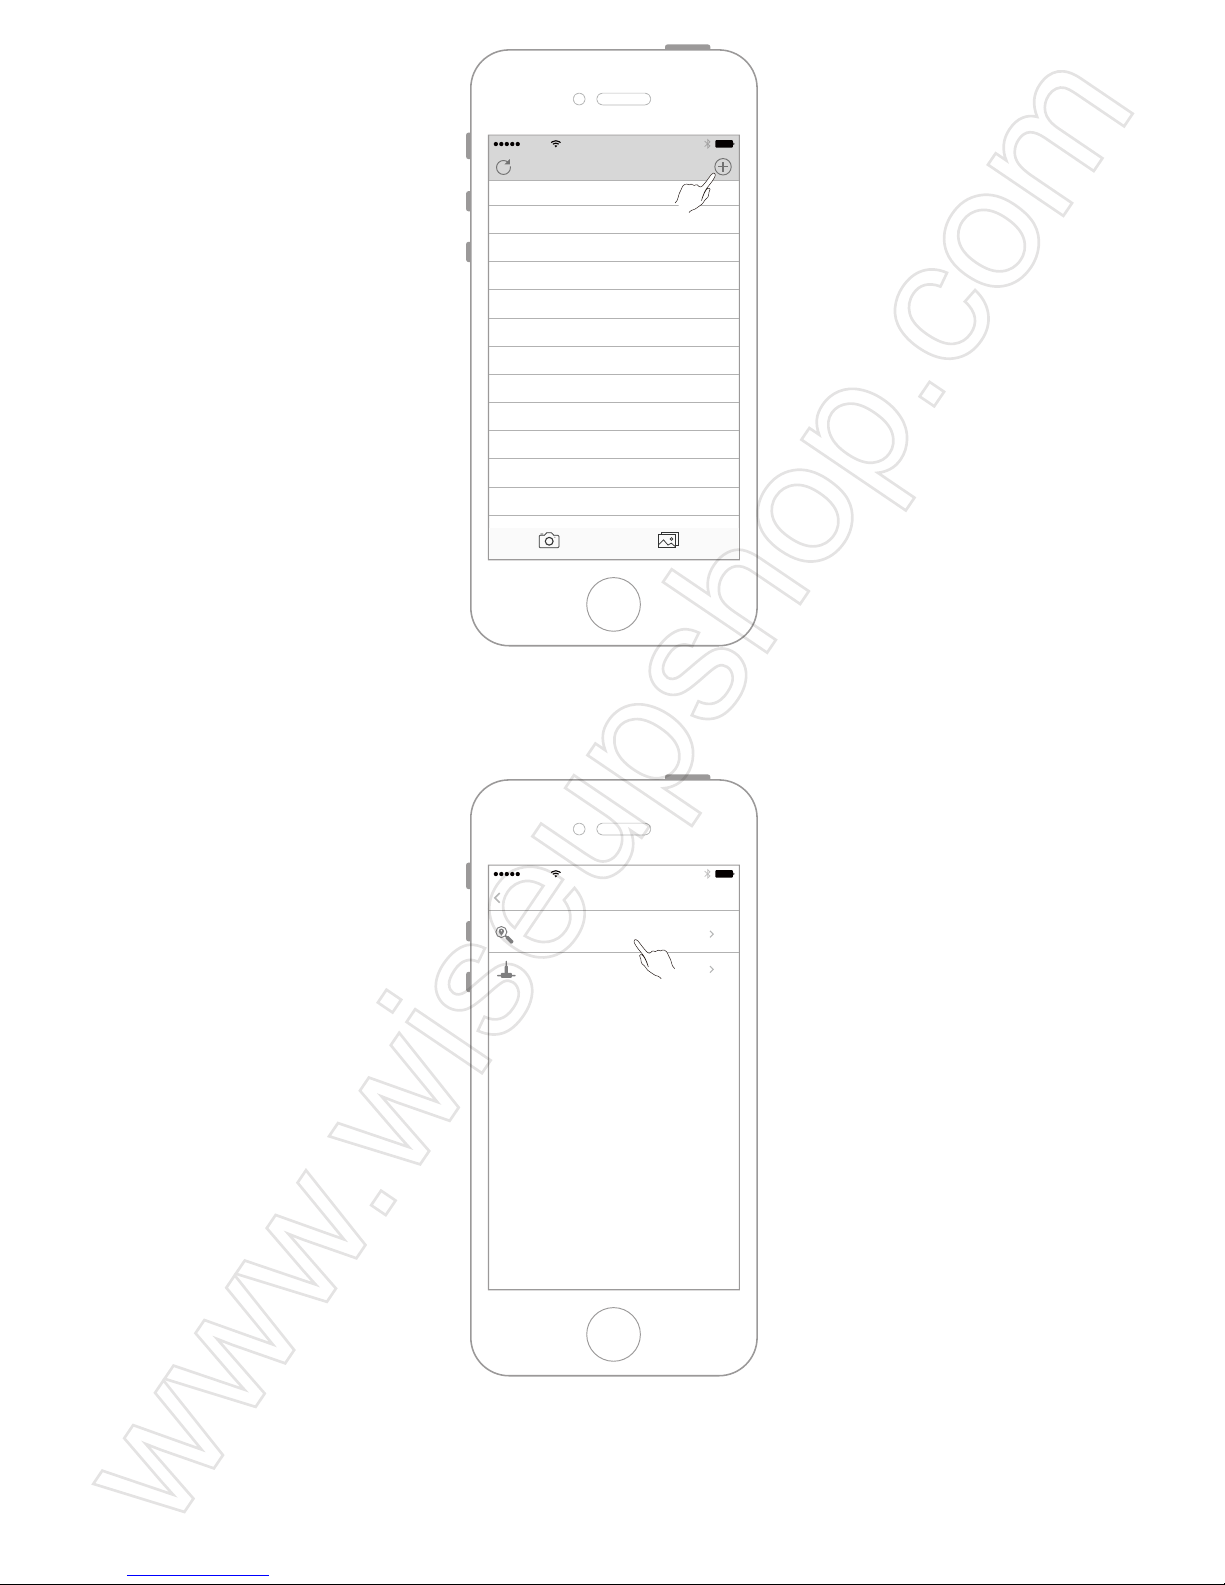
Step 2.
Step 3.
AT&T
11:57 AM
Devices
Devices Media
AT&T
11:57 AM
Add DeviceBack
LAN Search Devices
Add Device By ID
Page 6
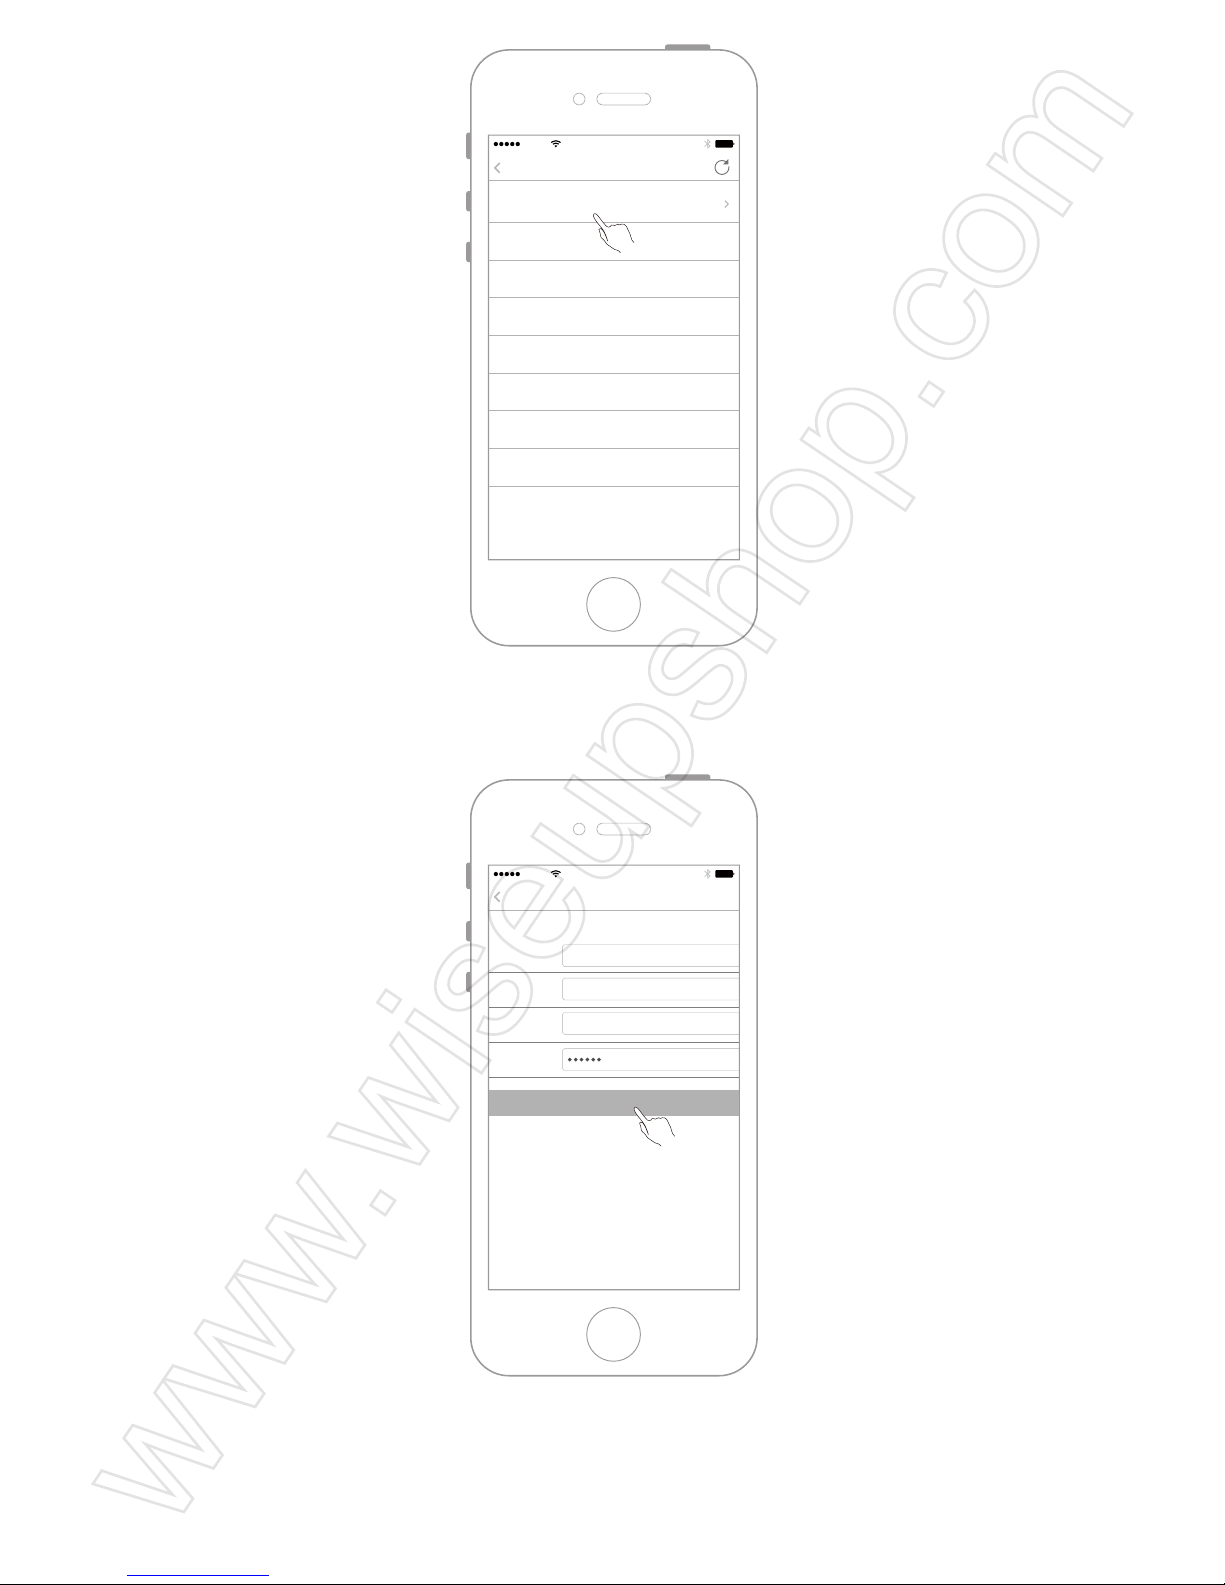
Step 4.
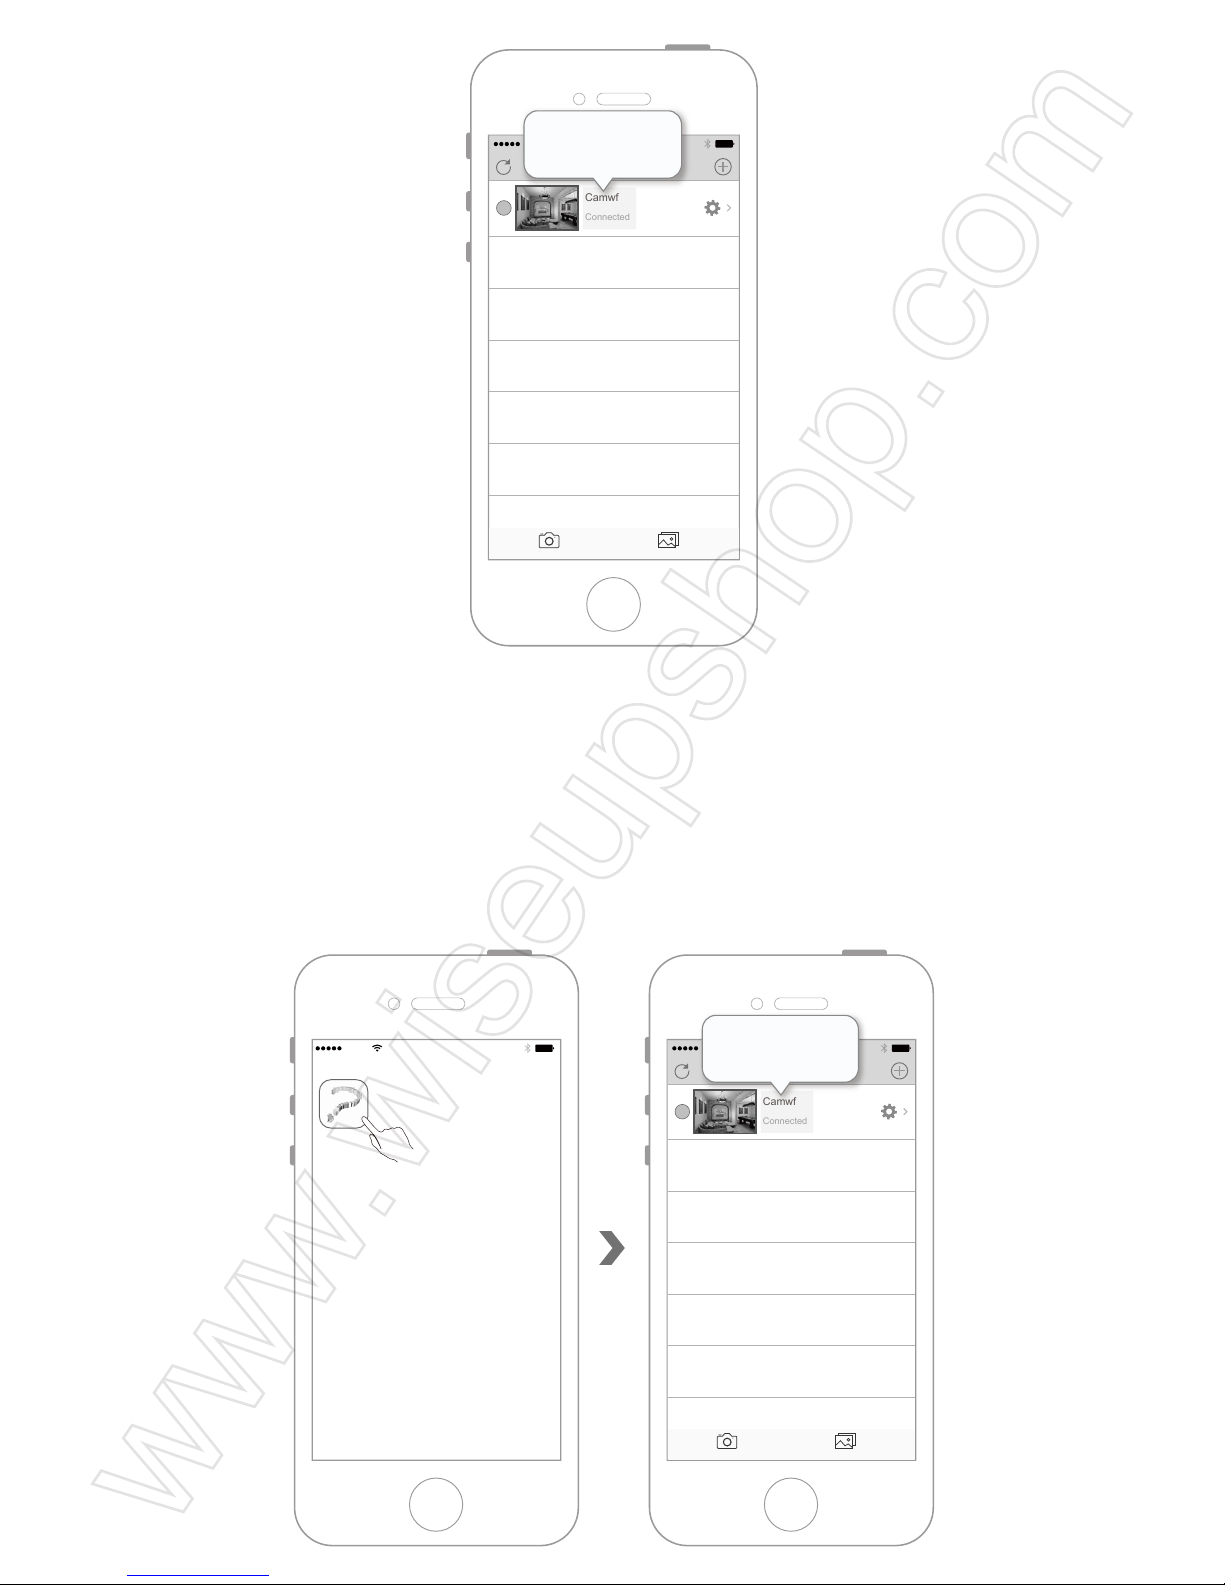
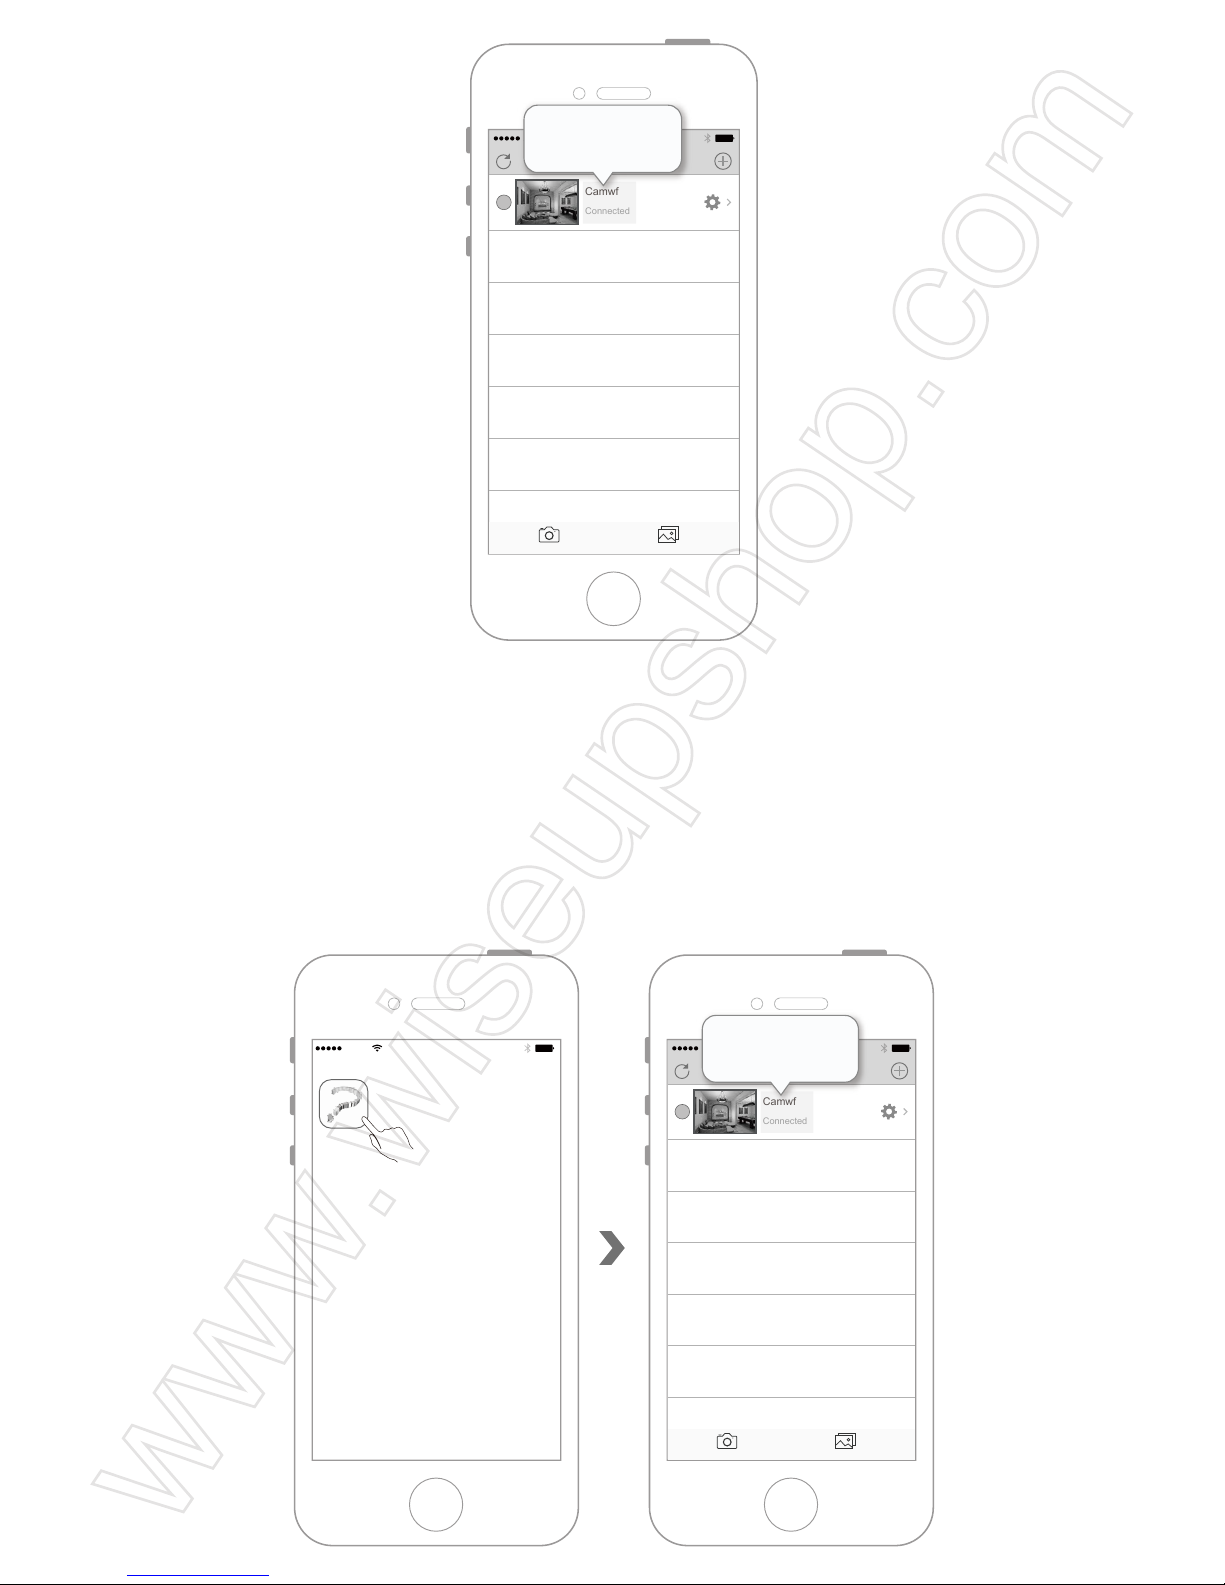
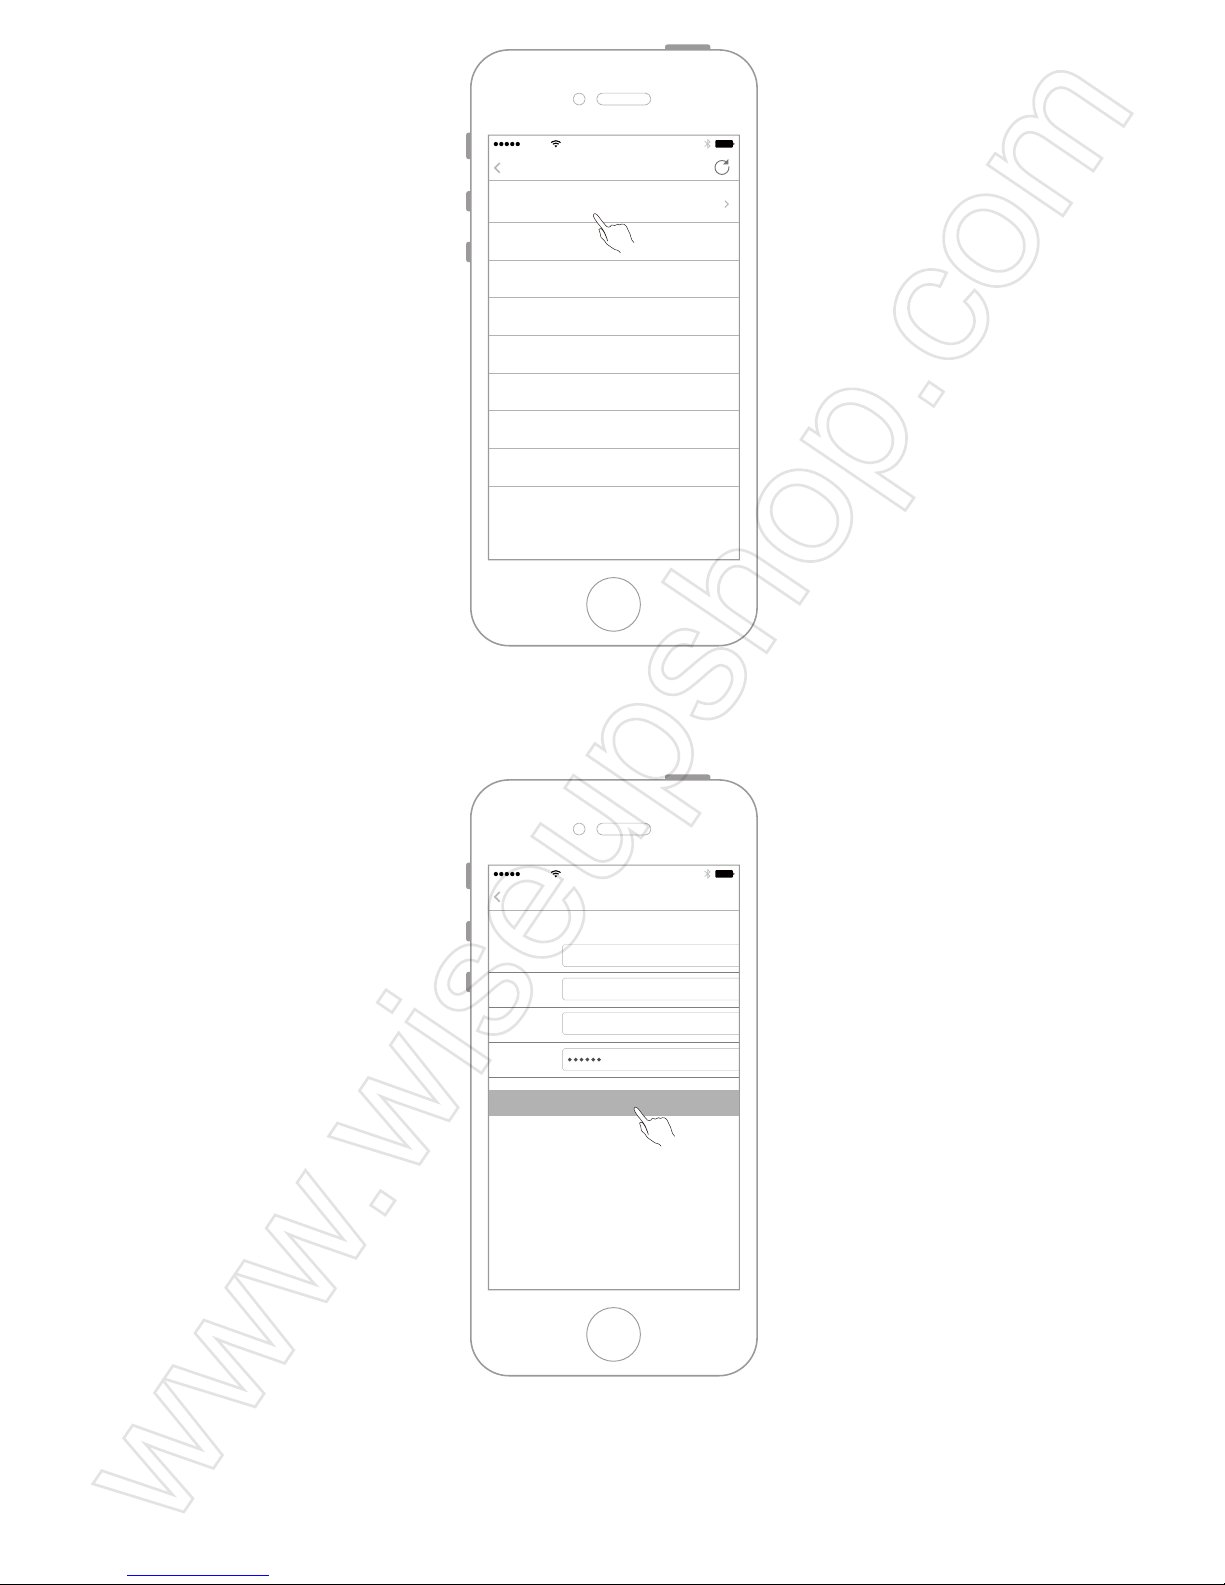
4.6 If the status of the camera is "Connected", indicating that the P2P network mode(LAN
mode) of the camera is configured successfully.
AT&T
11:57 AM
LAN search devices
JP5DLXEVZGES11FZ111A
AT&T
11:57 AM
Add Device
Back
Device Name IP Cam
Device UID
User Name
Password
JP5DLXEVZGES11FZ111A
admin
OK
Page 7
<Note>: The effective connection distance between the camera WIFI hotspot and the IOS mobile
device is approximately 15 meters (49 feet).
V. Remote Network Configuration (WAN Mode)
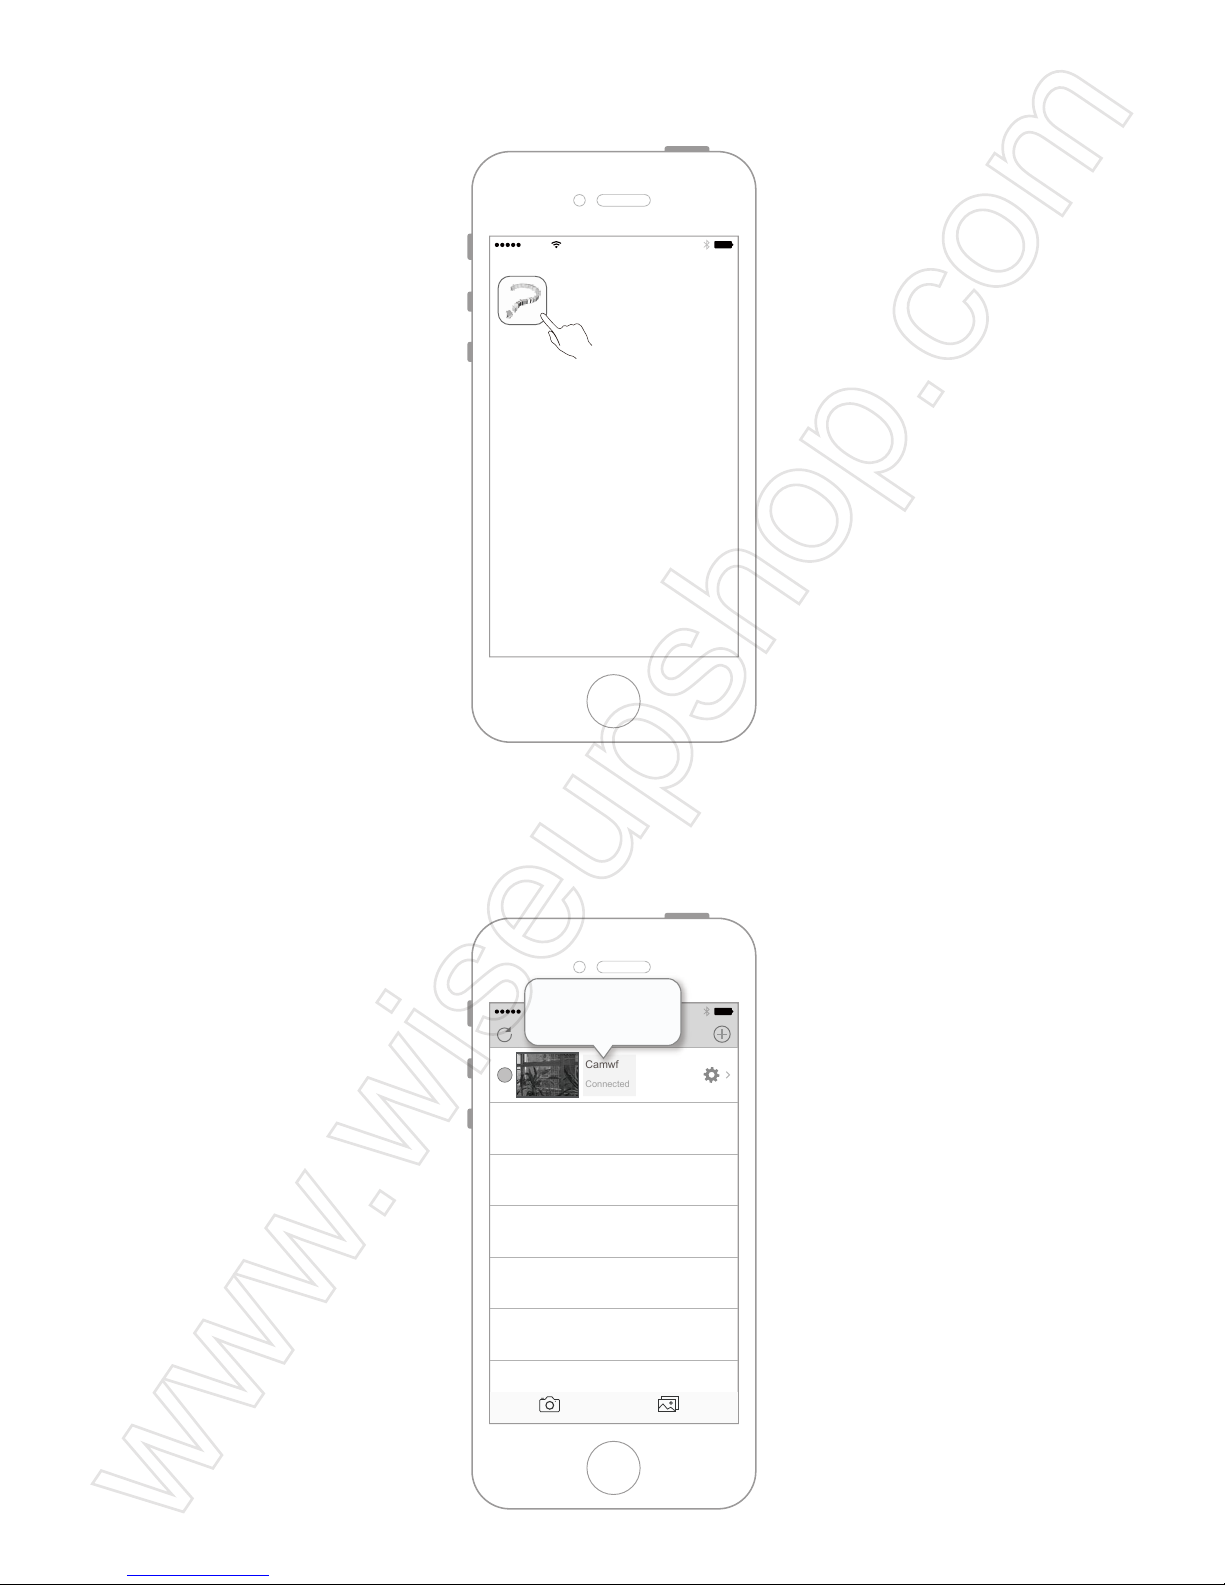
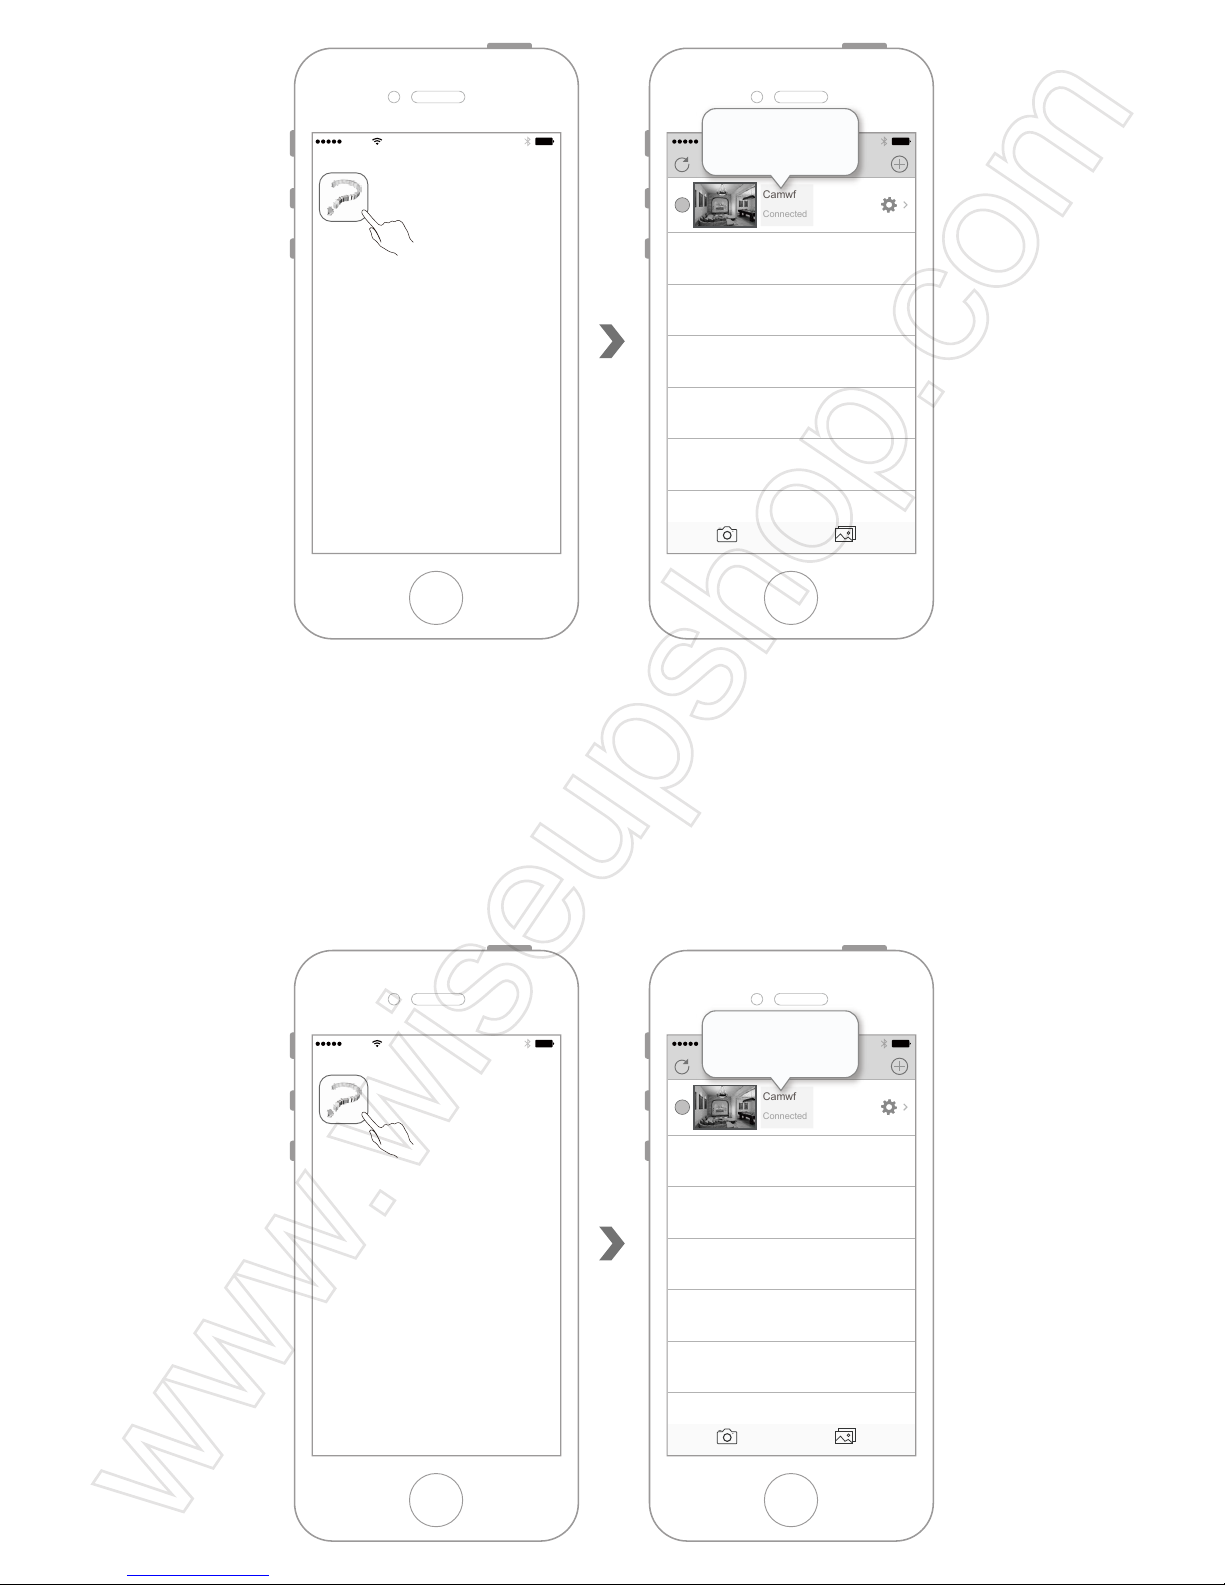
5.1 Open the "Camwf " app and make sure that the camera has been successfully added
to the app and is in the online condition.
AT&T
11:57 AM
Devices
Devices Media
Camwf
Connected
Camwf
Connected
AT&T
11:57 AM
Camwf
AT&T
11:57 AM
Devices
Devices Media
Camwf
Connected
Camwf
Connected
Page 8
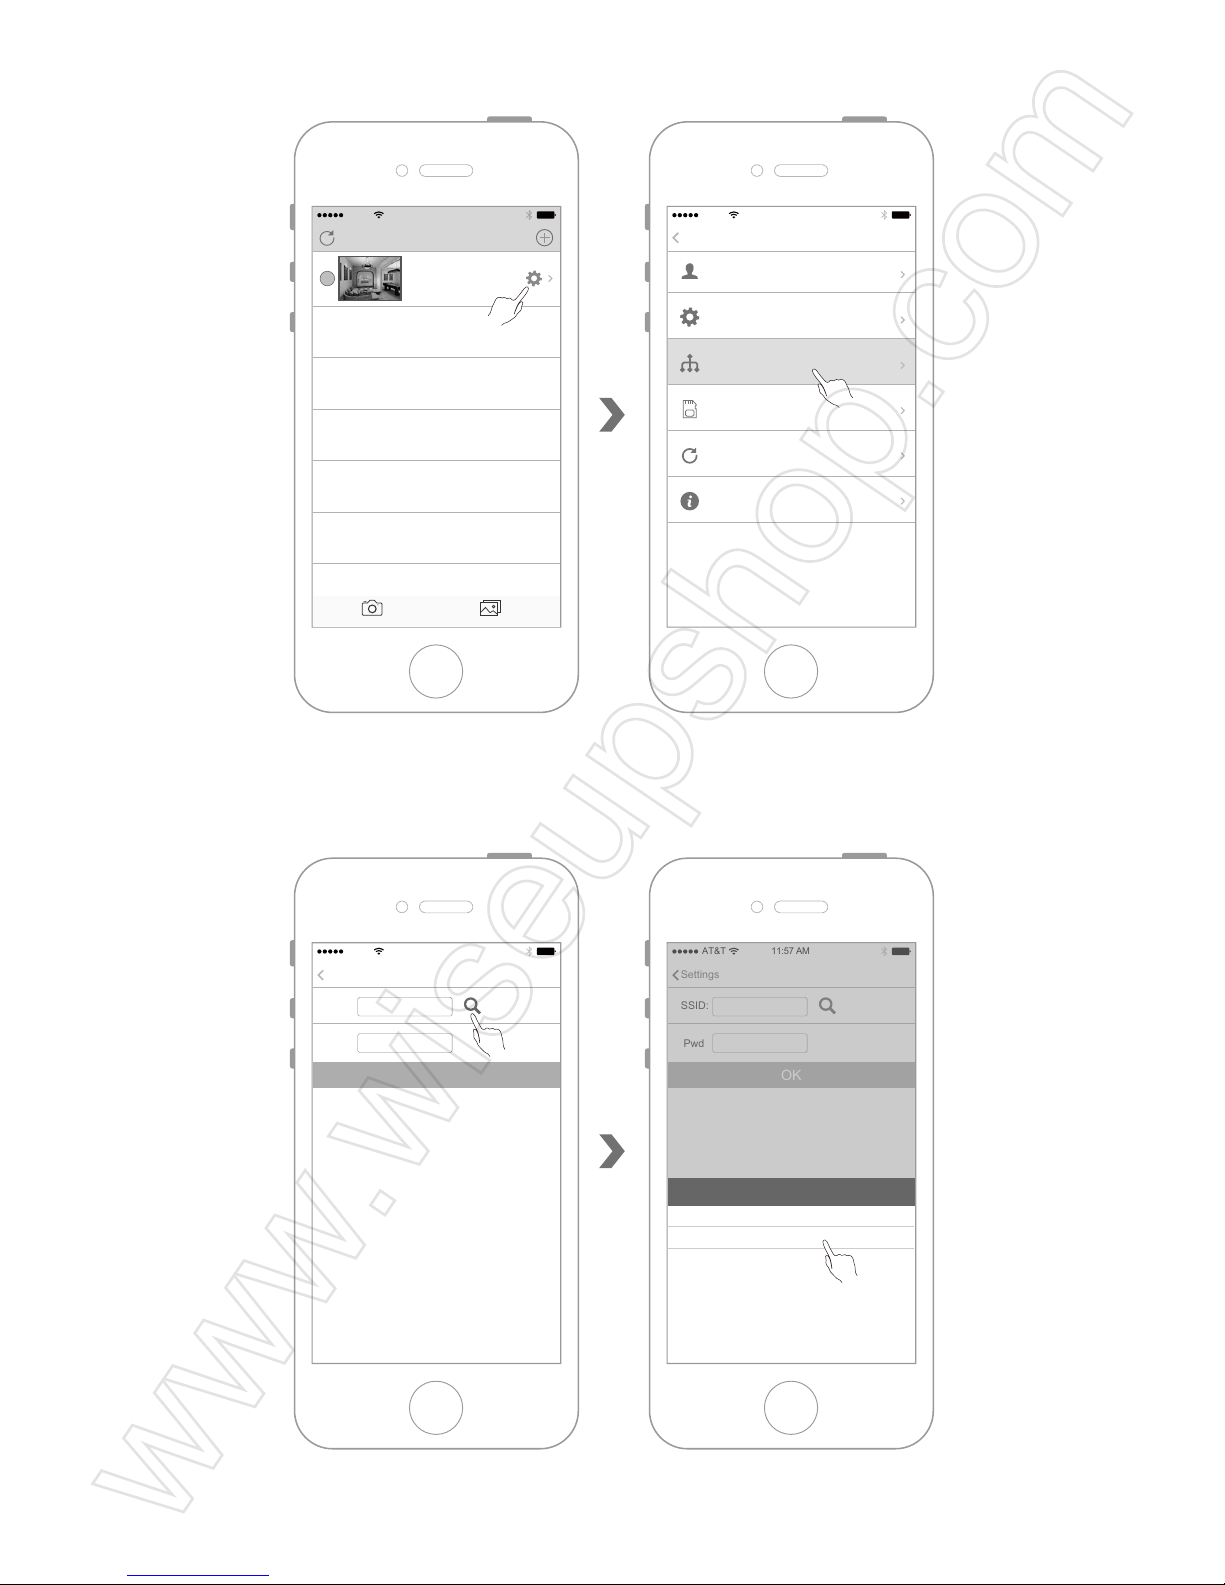
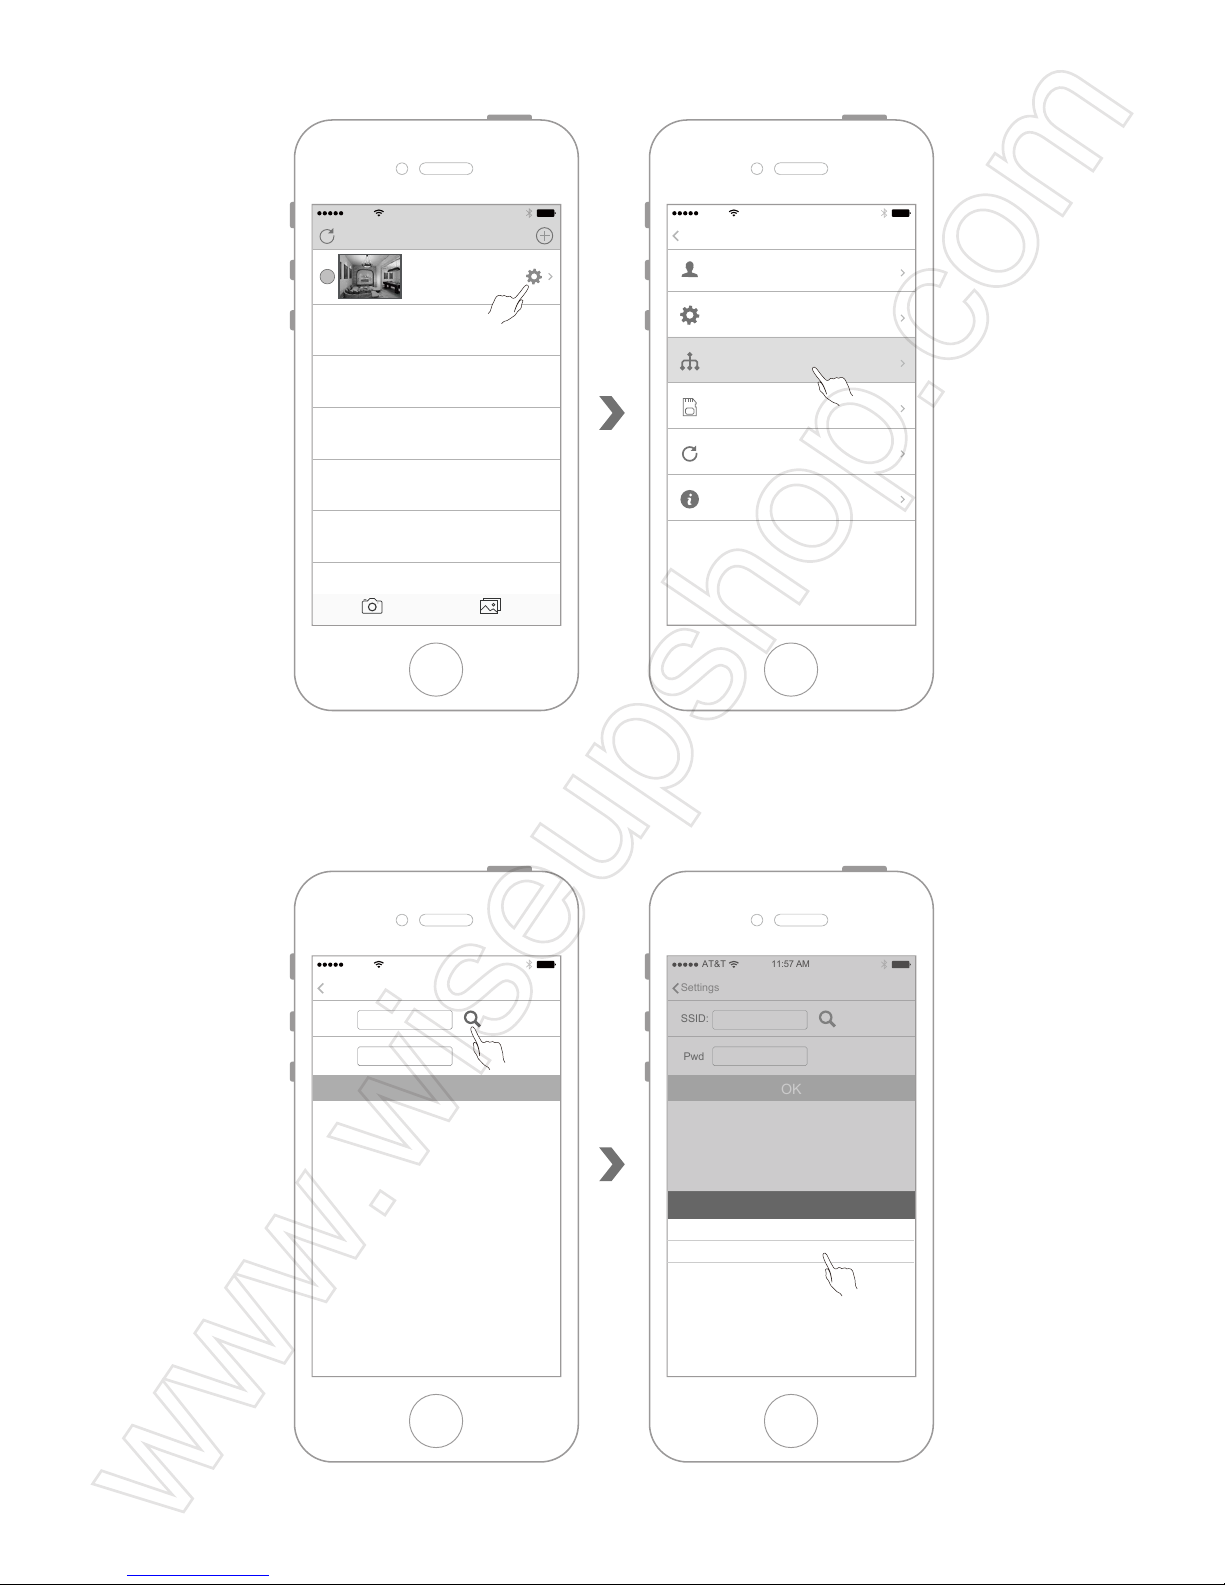
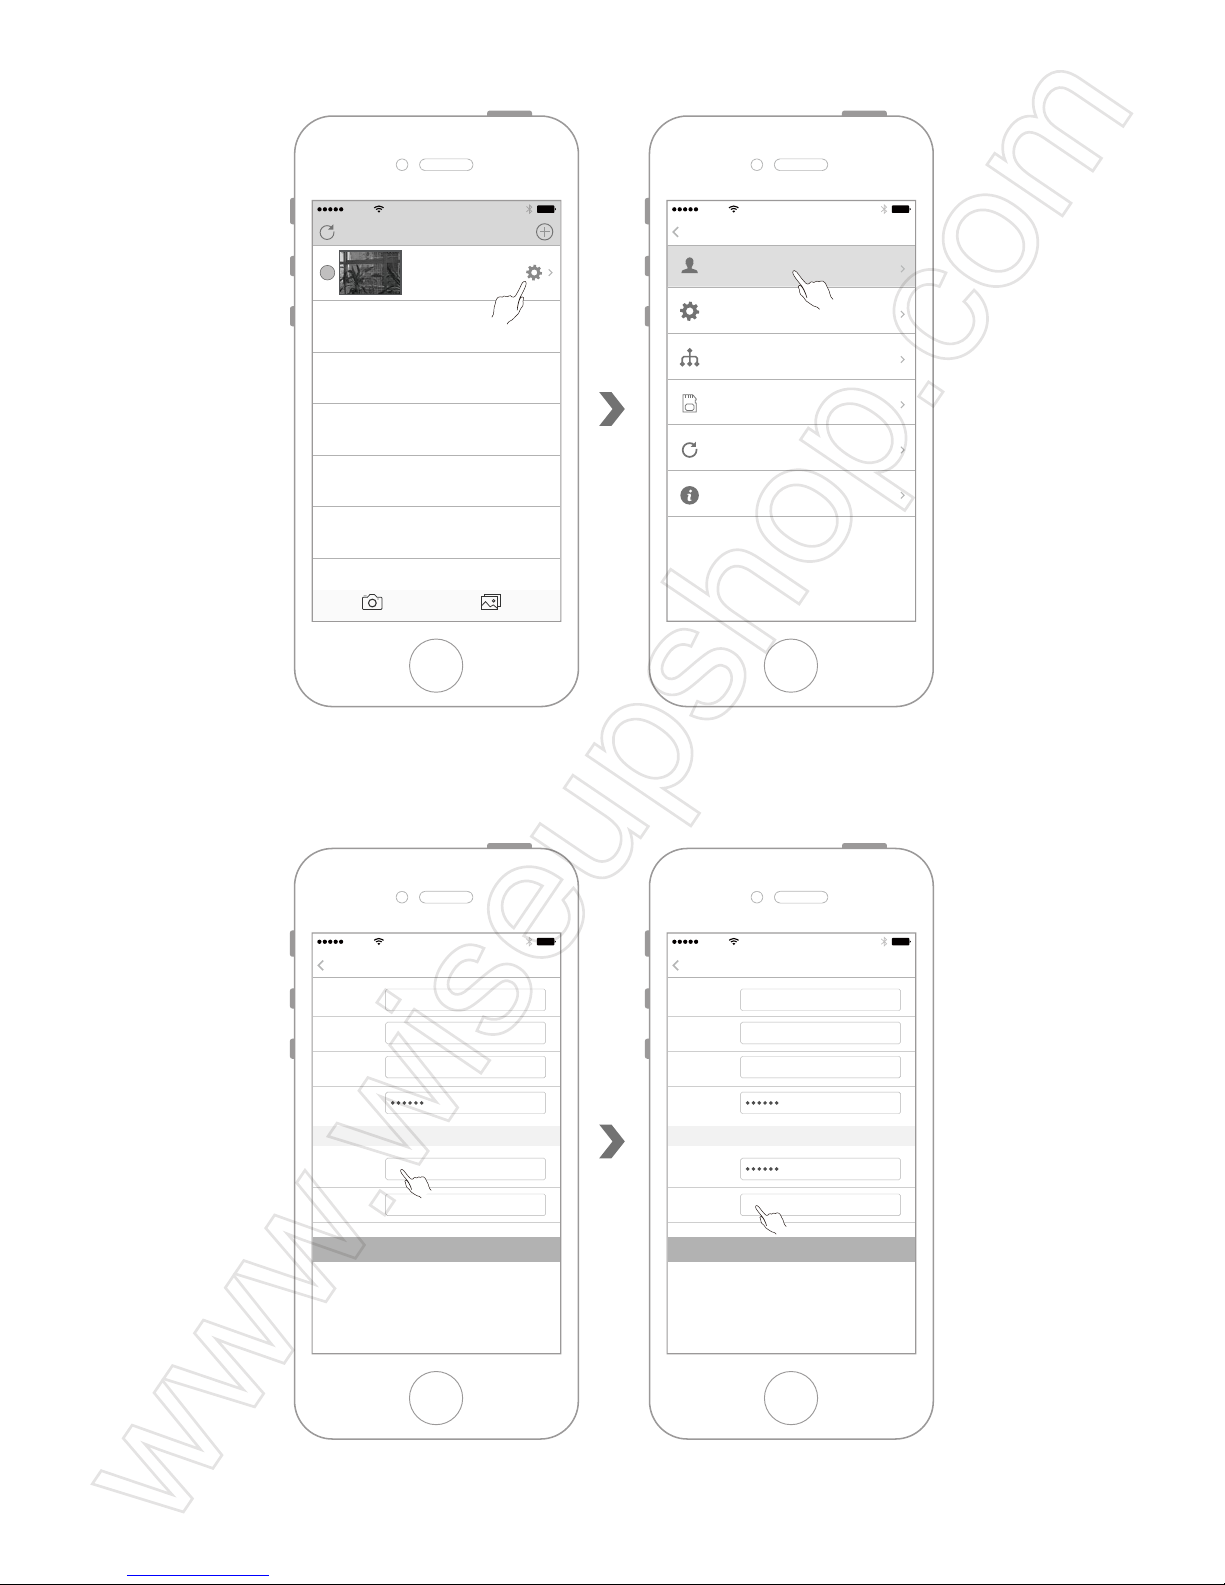
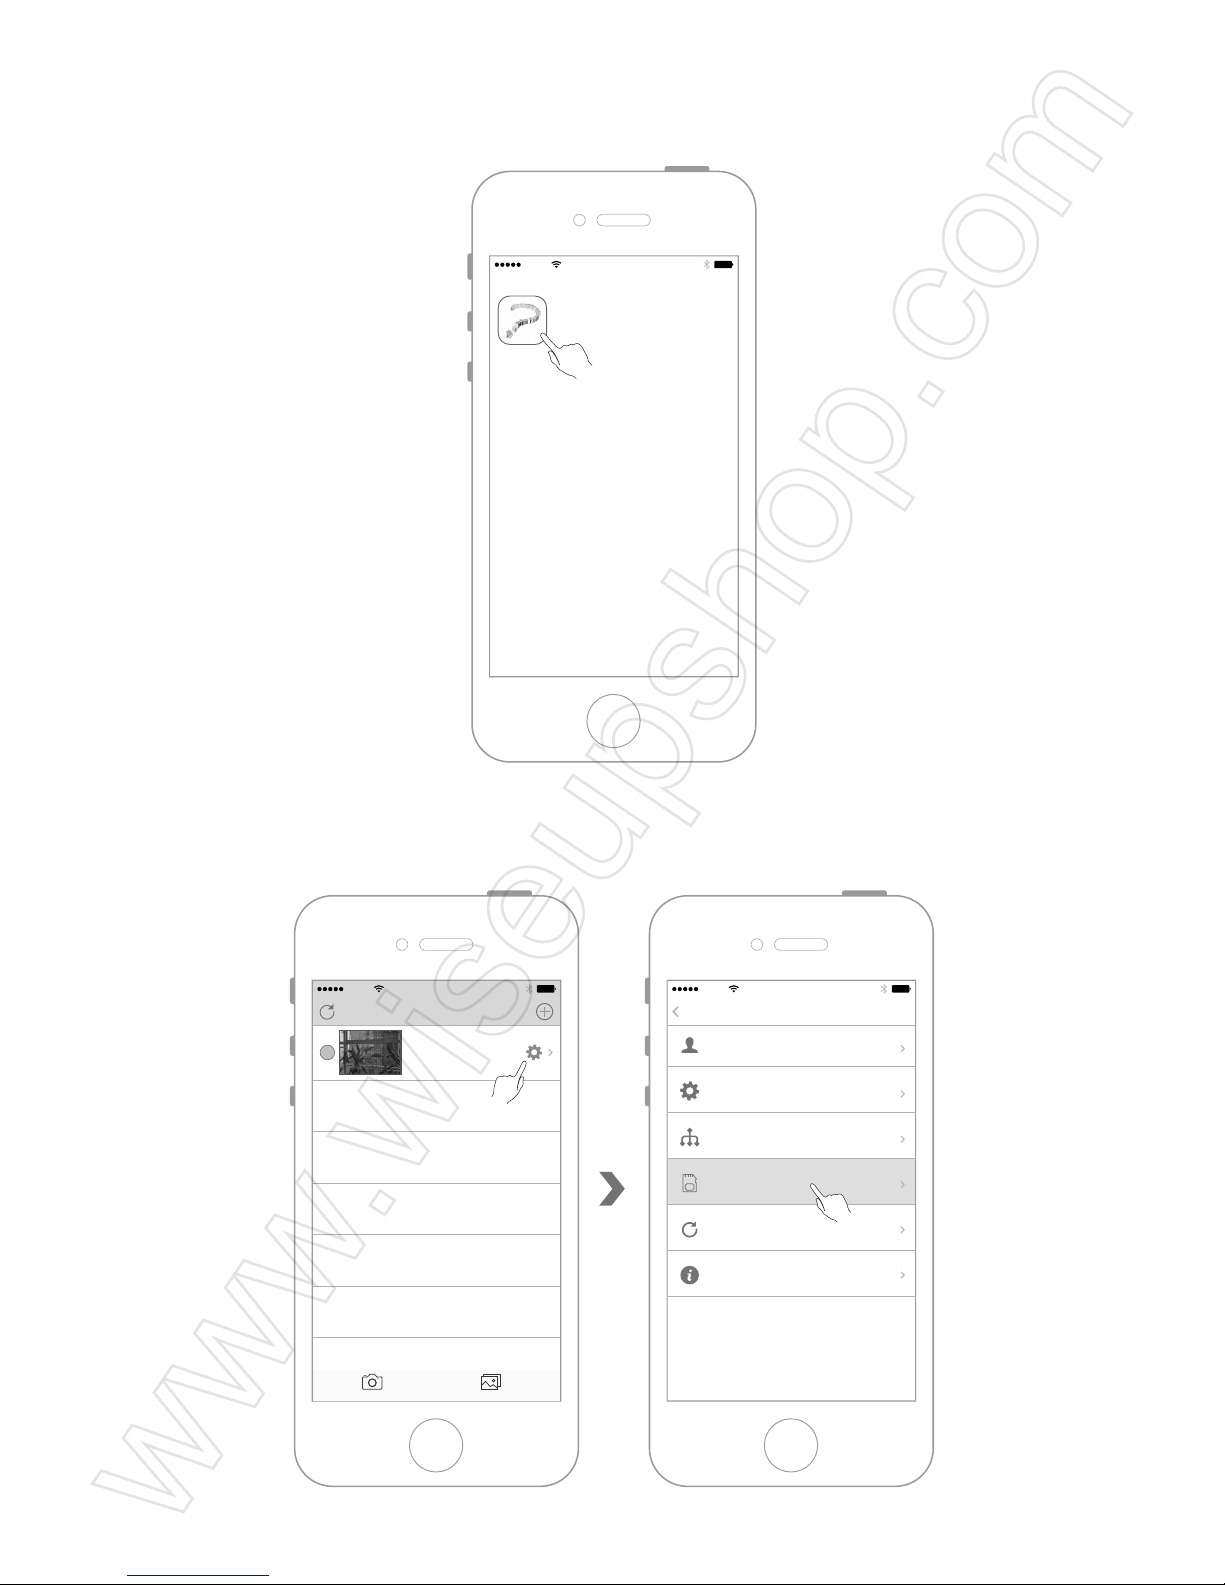
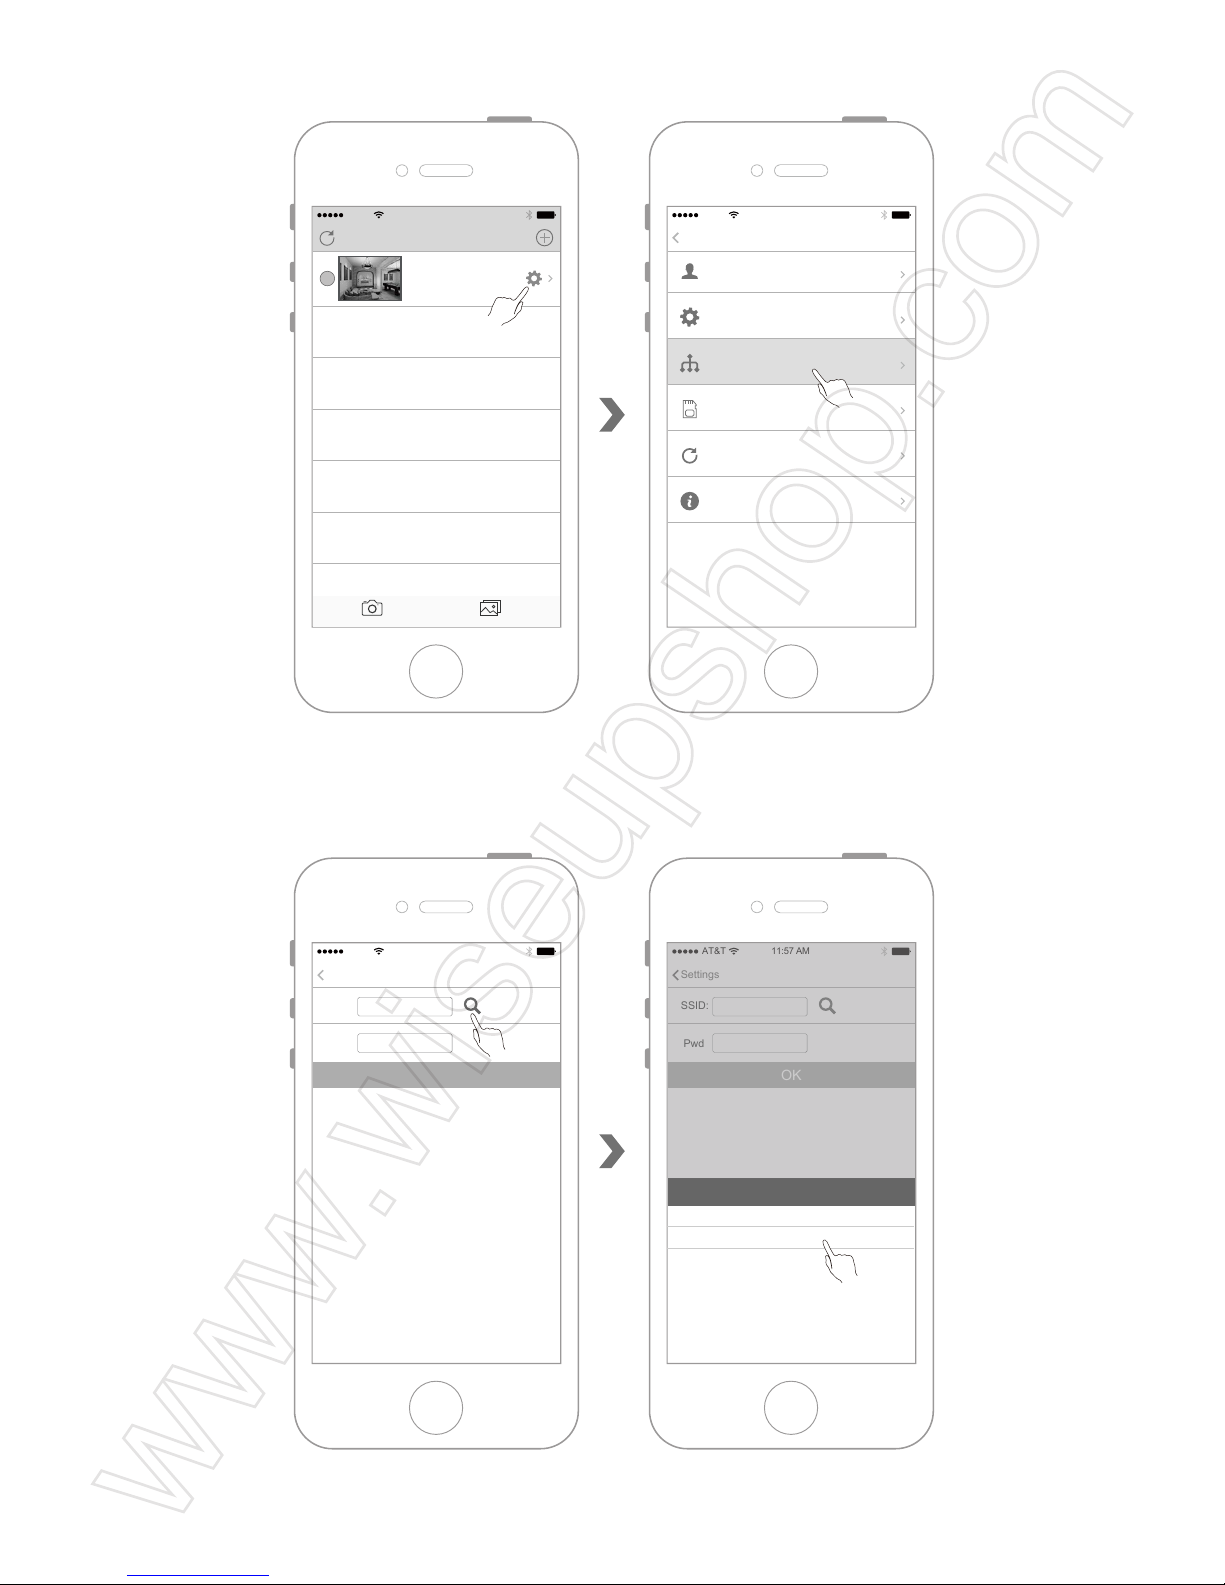
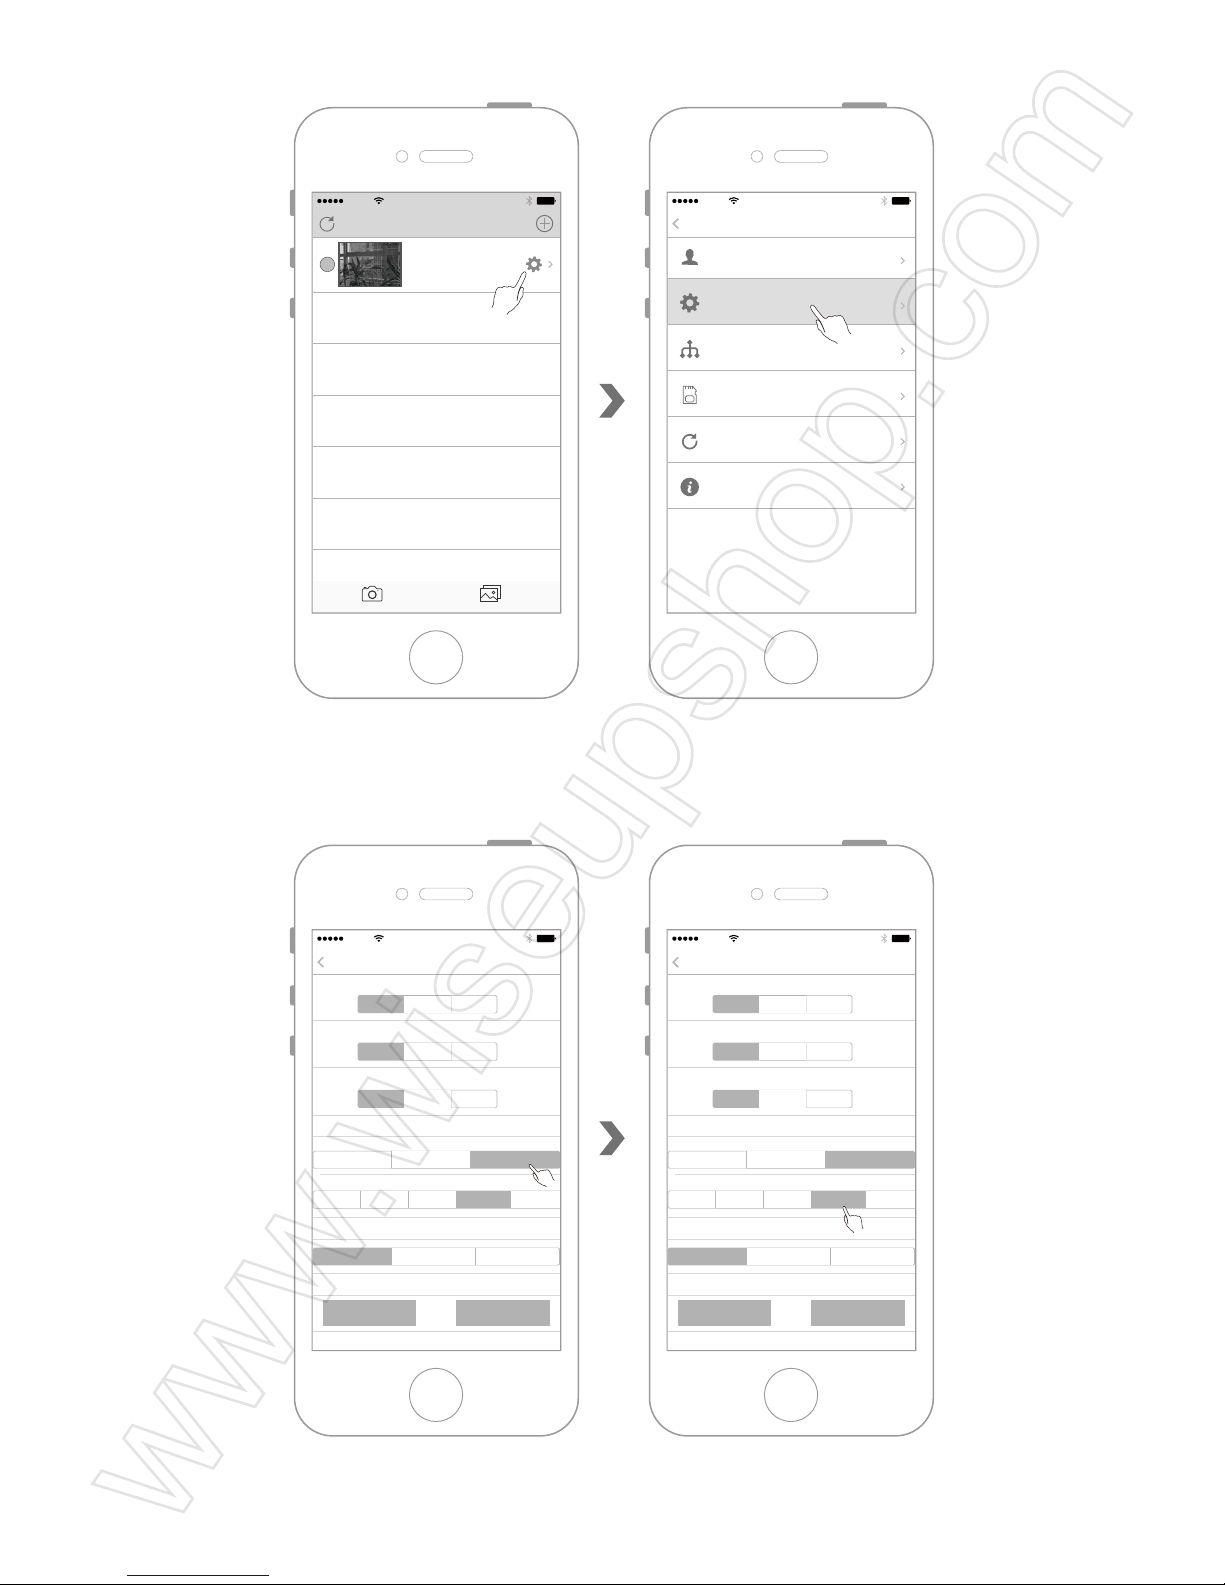
5.2 Enter the camera menu and then select "Network Settings".
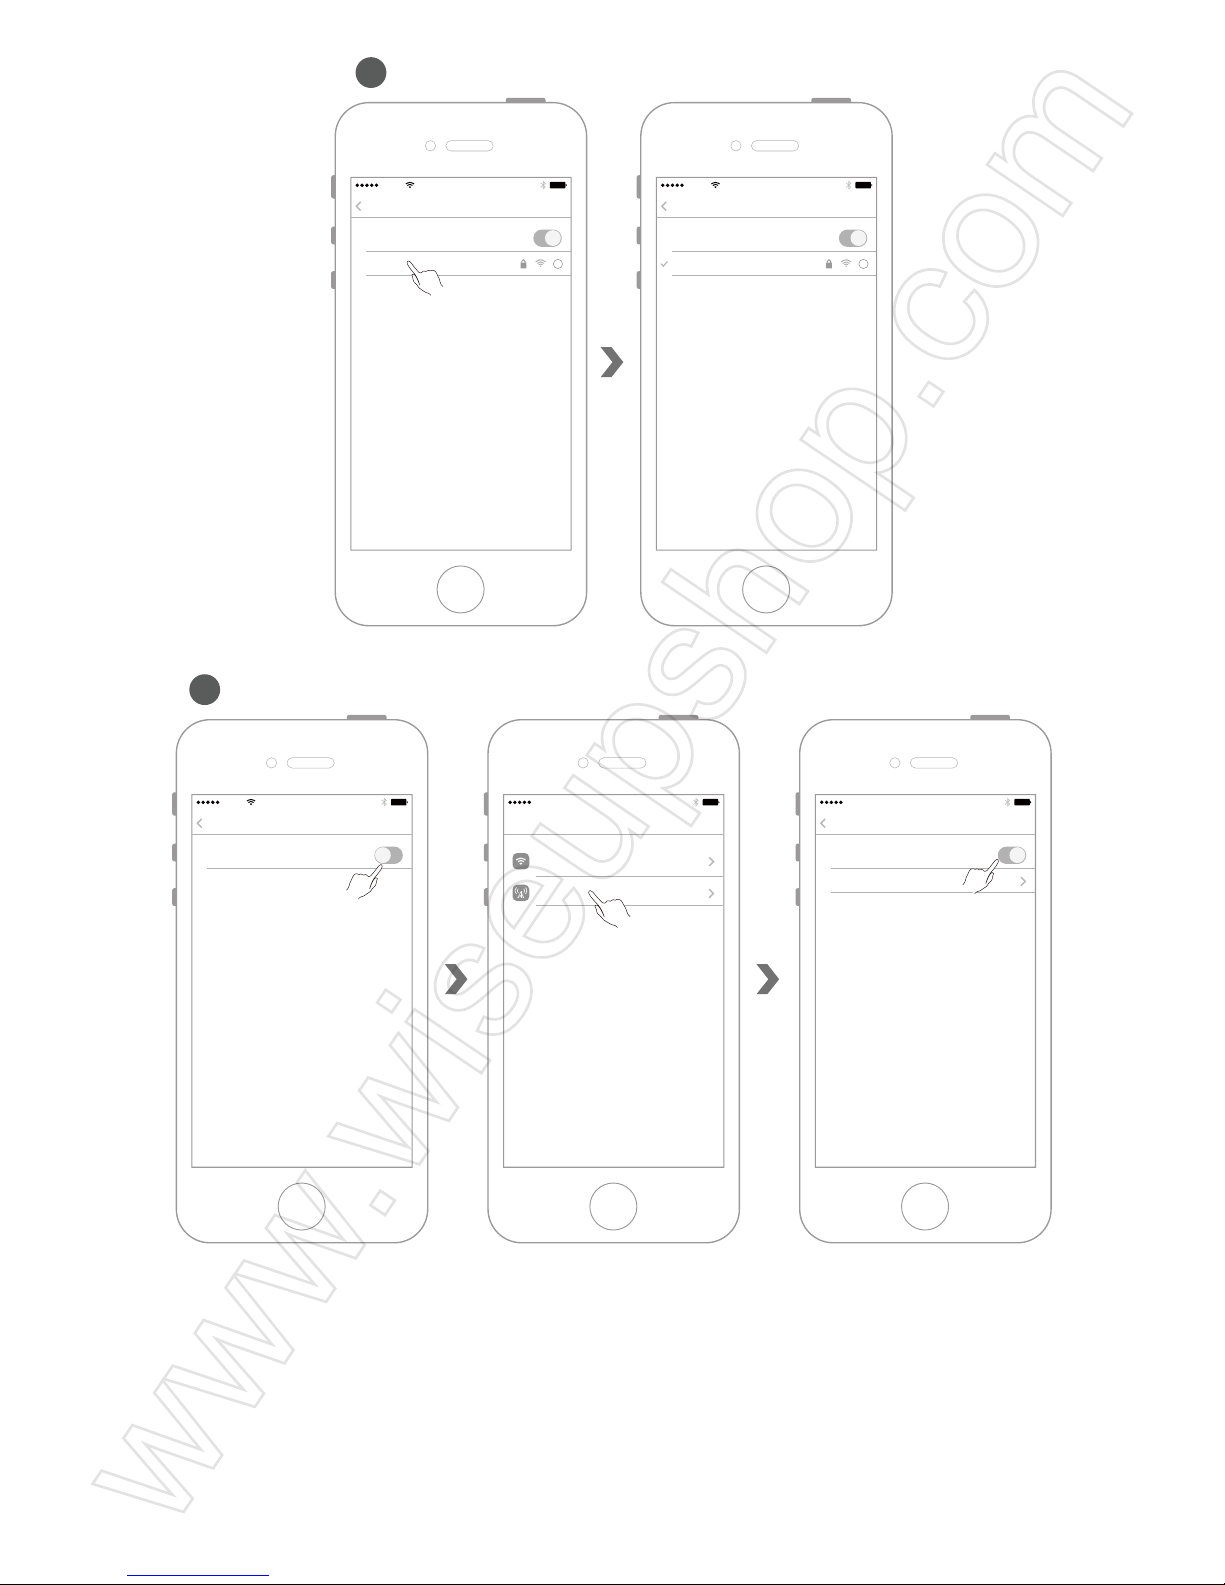
5.3 Enter "Network Settings" to search for the available WIFI hotspots, select the WIFI
hotspot you want to connect.
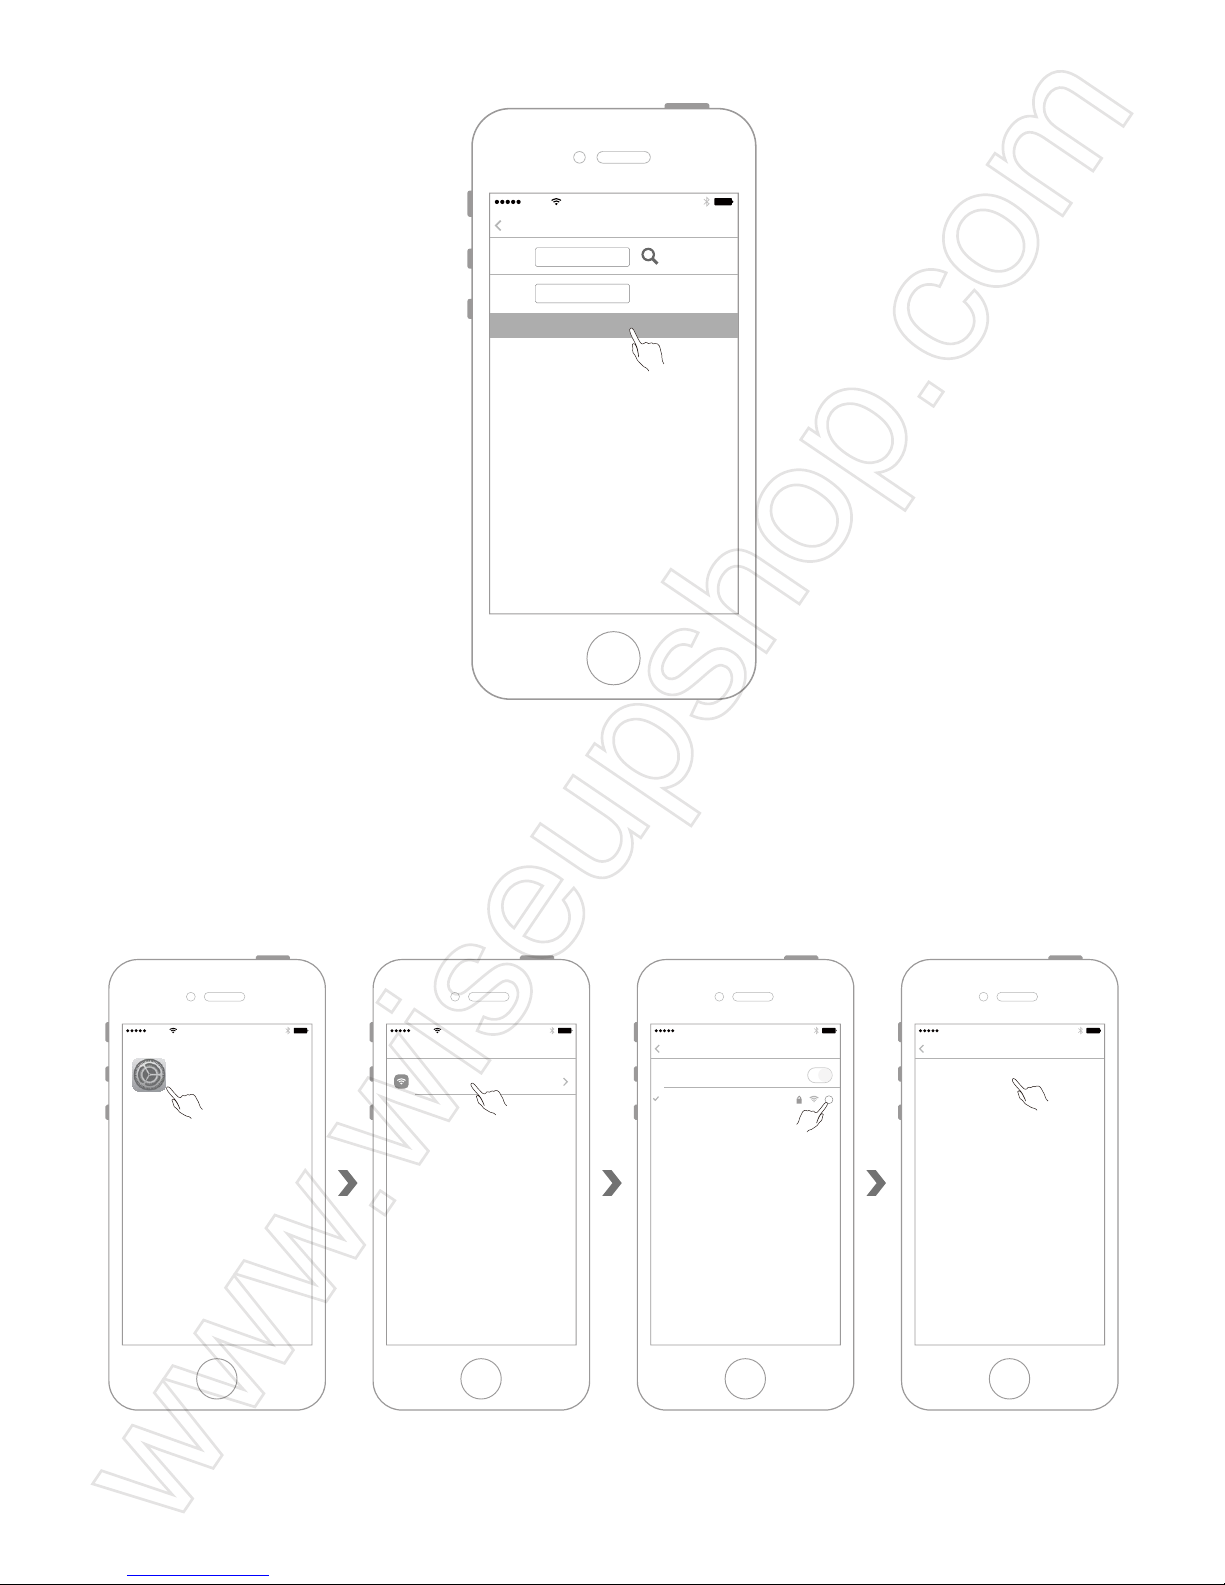
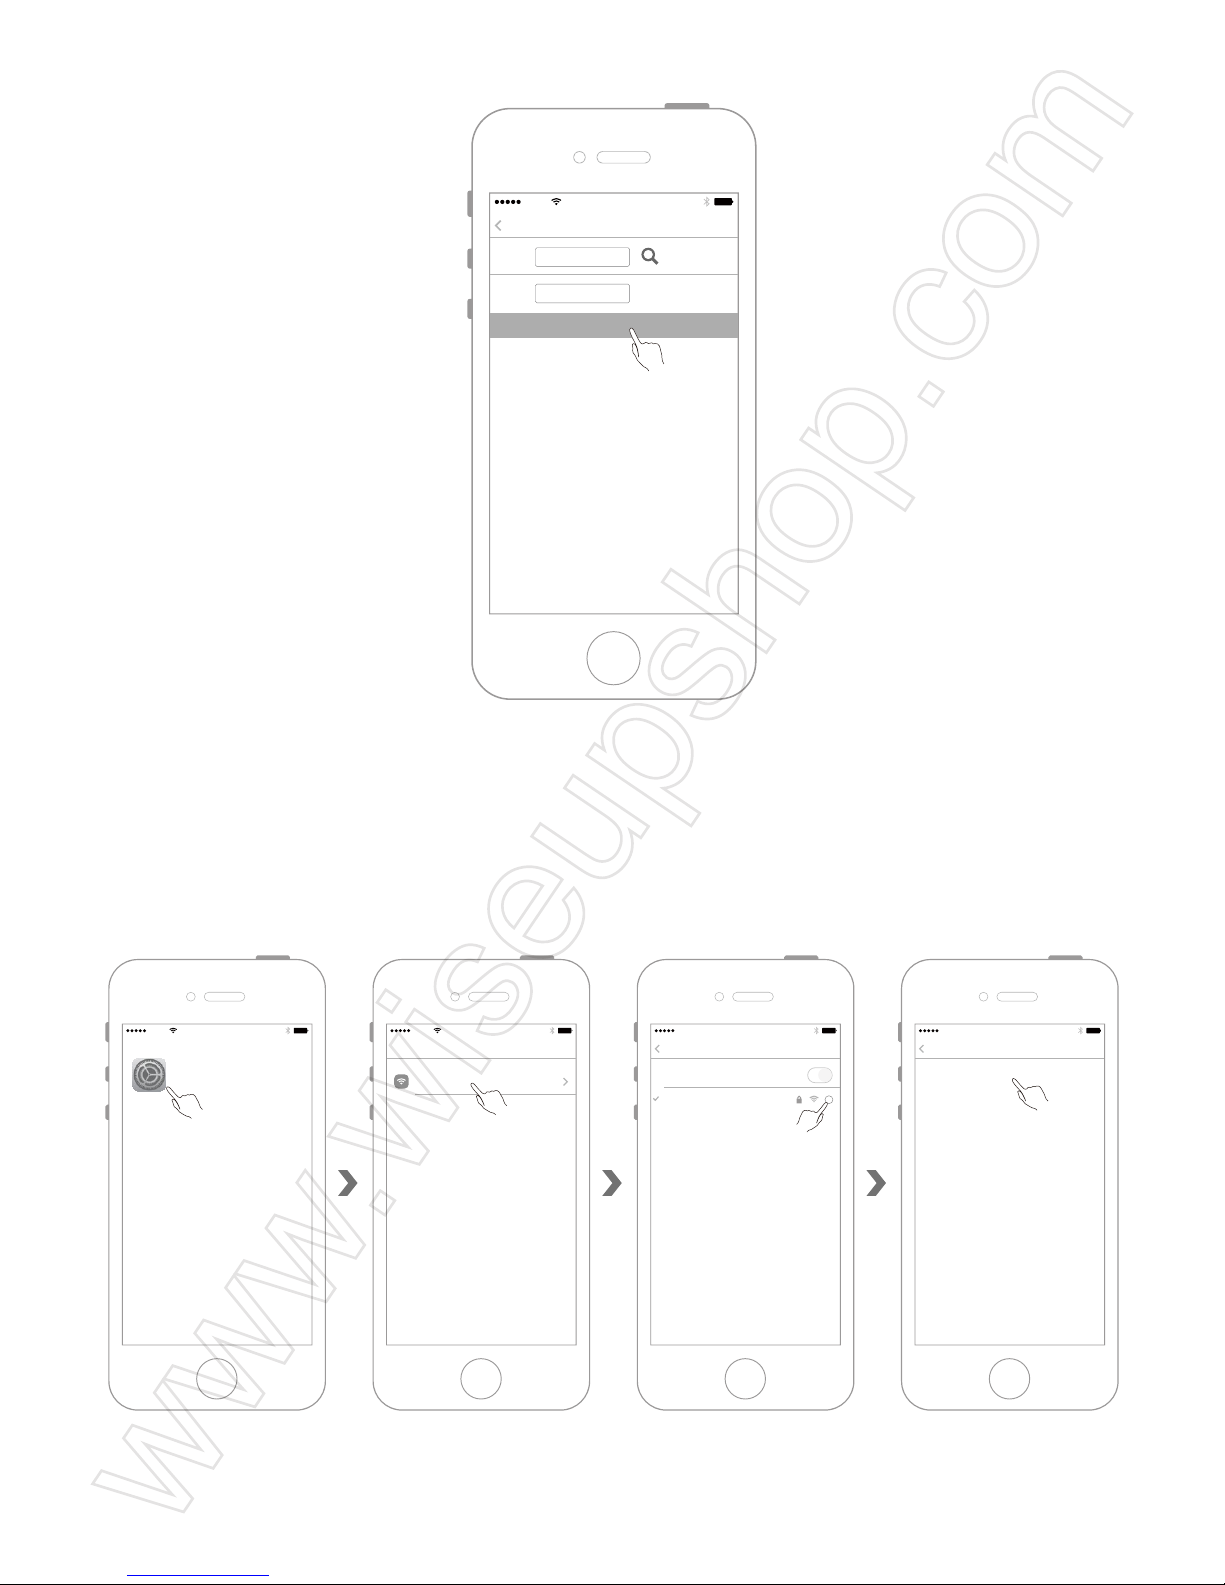
5.4 Input the password and tap "OK" to enroll the camera in, the camera will restart
AT&T
11:57 AM
Settings
Back
User Settings
Device Settings
Network Settings
SDCard Record
Refresh push
About
AT&T
11:57 AM
Devices
Devices Media
Camwf
Connected
AT&T
11:57 AM
Network Settings
Settings
SSID:
Pwd
OK
AT&T
11:57 AM
Settings
SSID:
Pwd
OK
SSIDCancel
SSID-3
SSID-2
SSID-4
SSID-5
SSID-1
OK
Network Settings
Page 9
automatically.
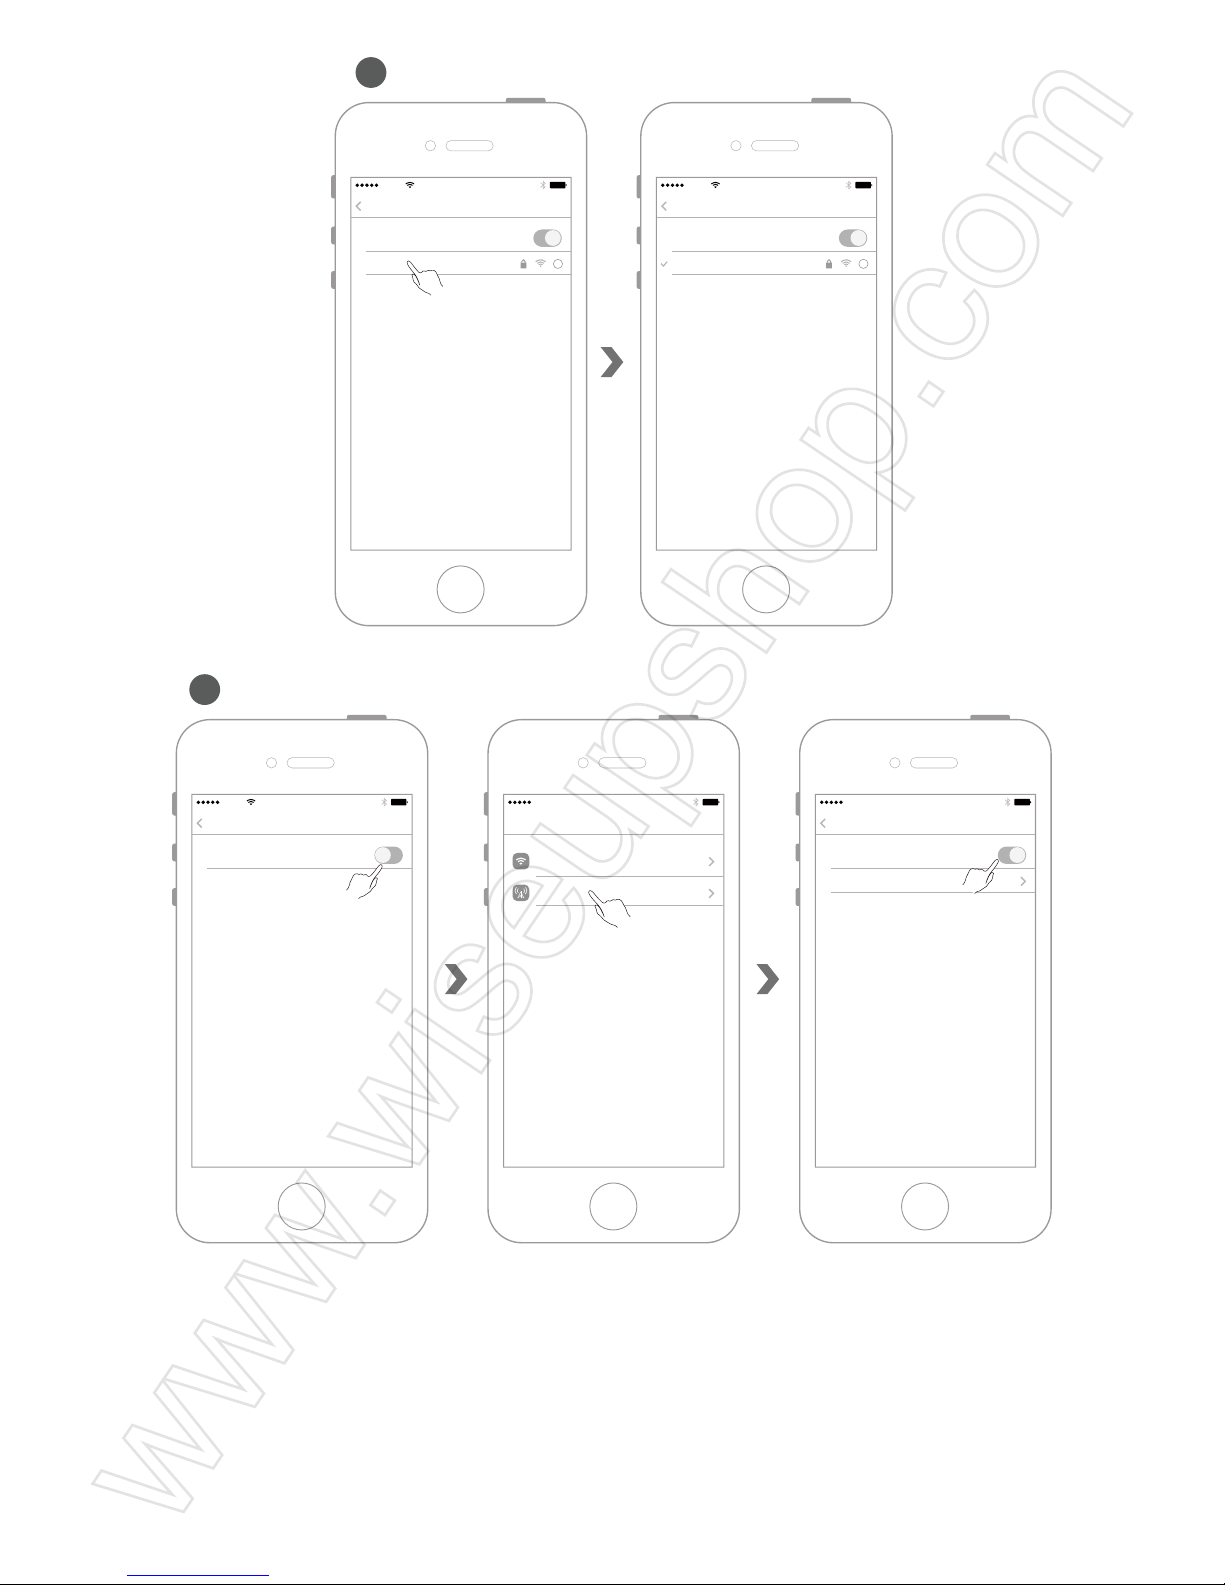
5.5 Exit the "Camwf " APP.
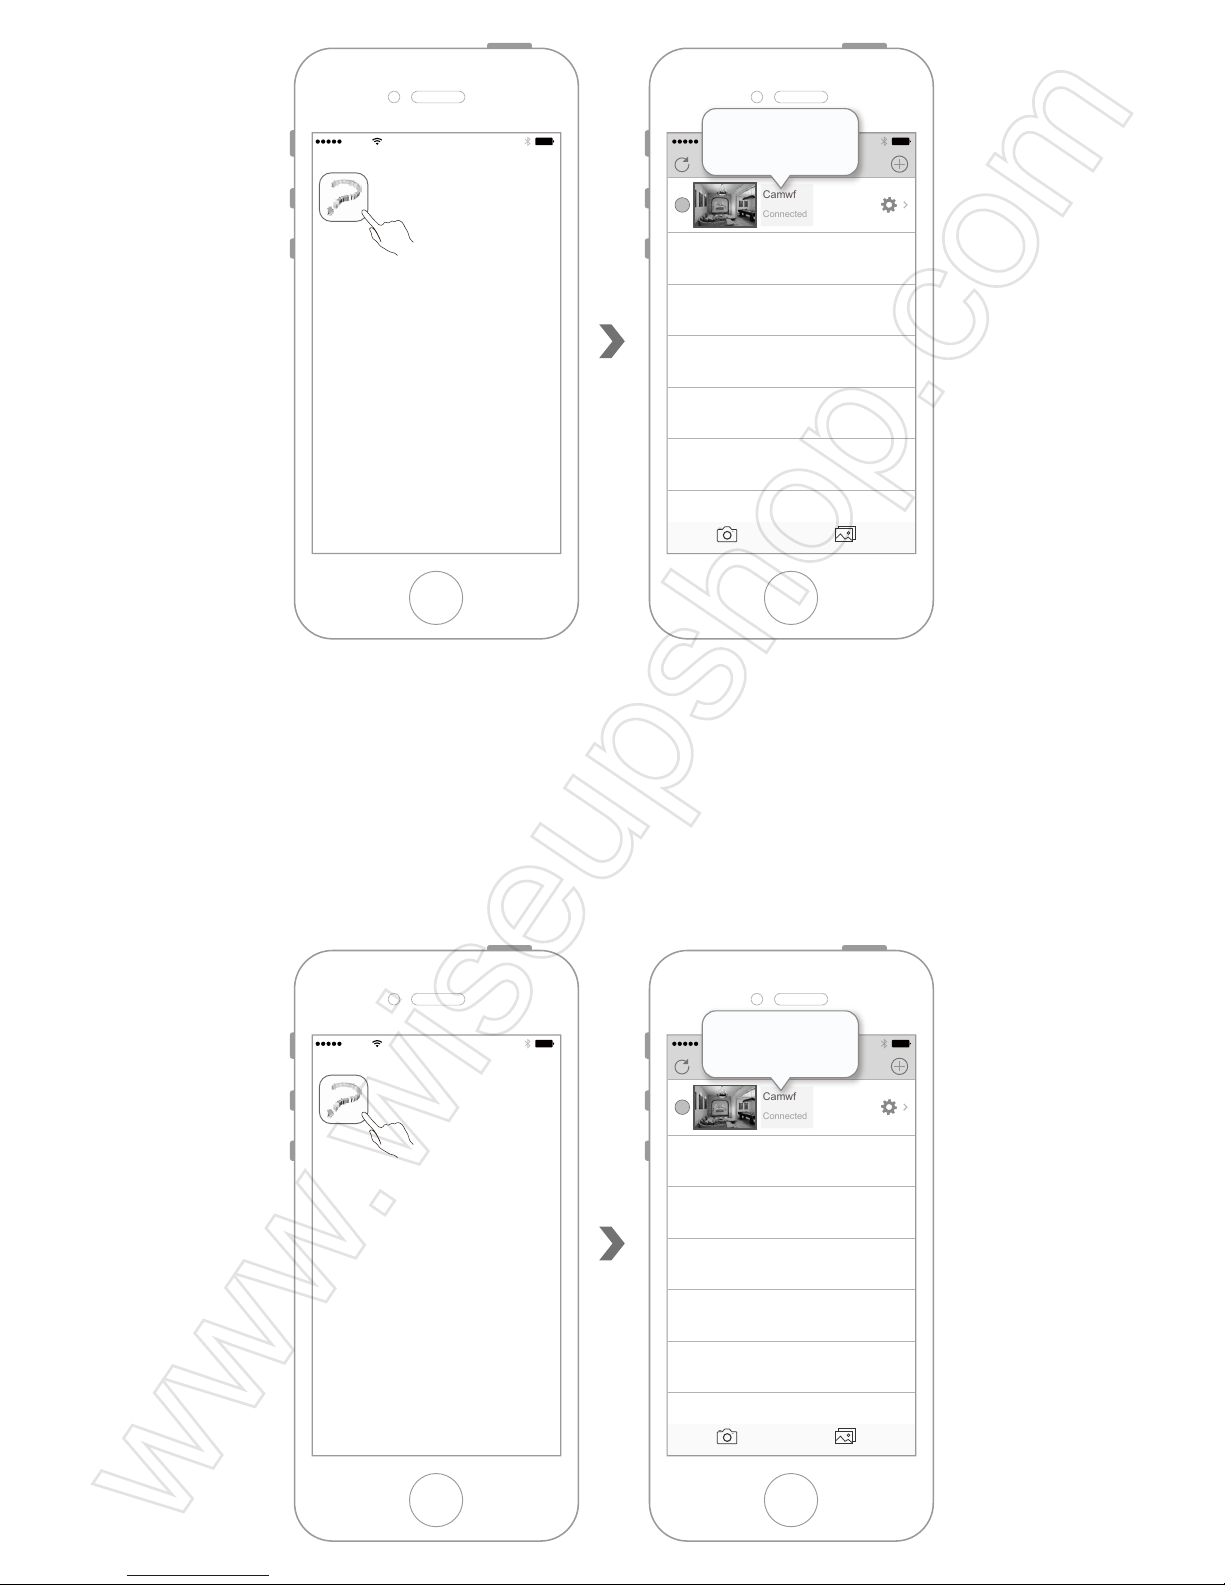
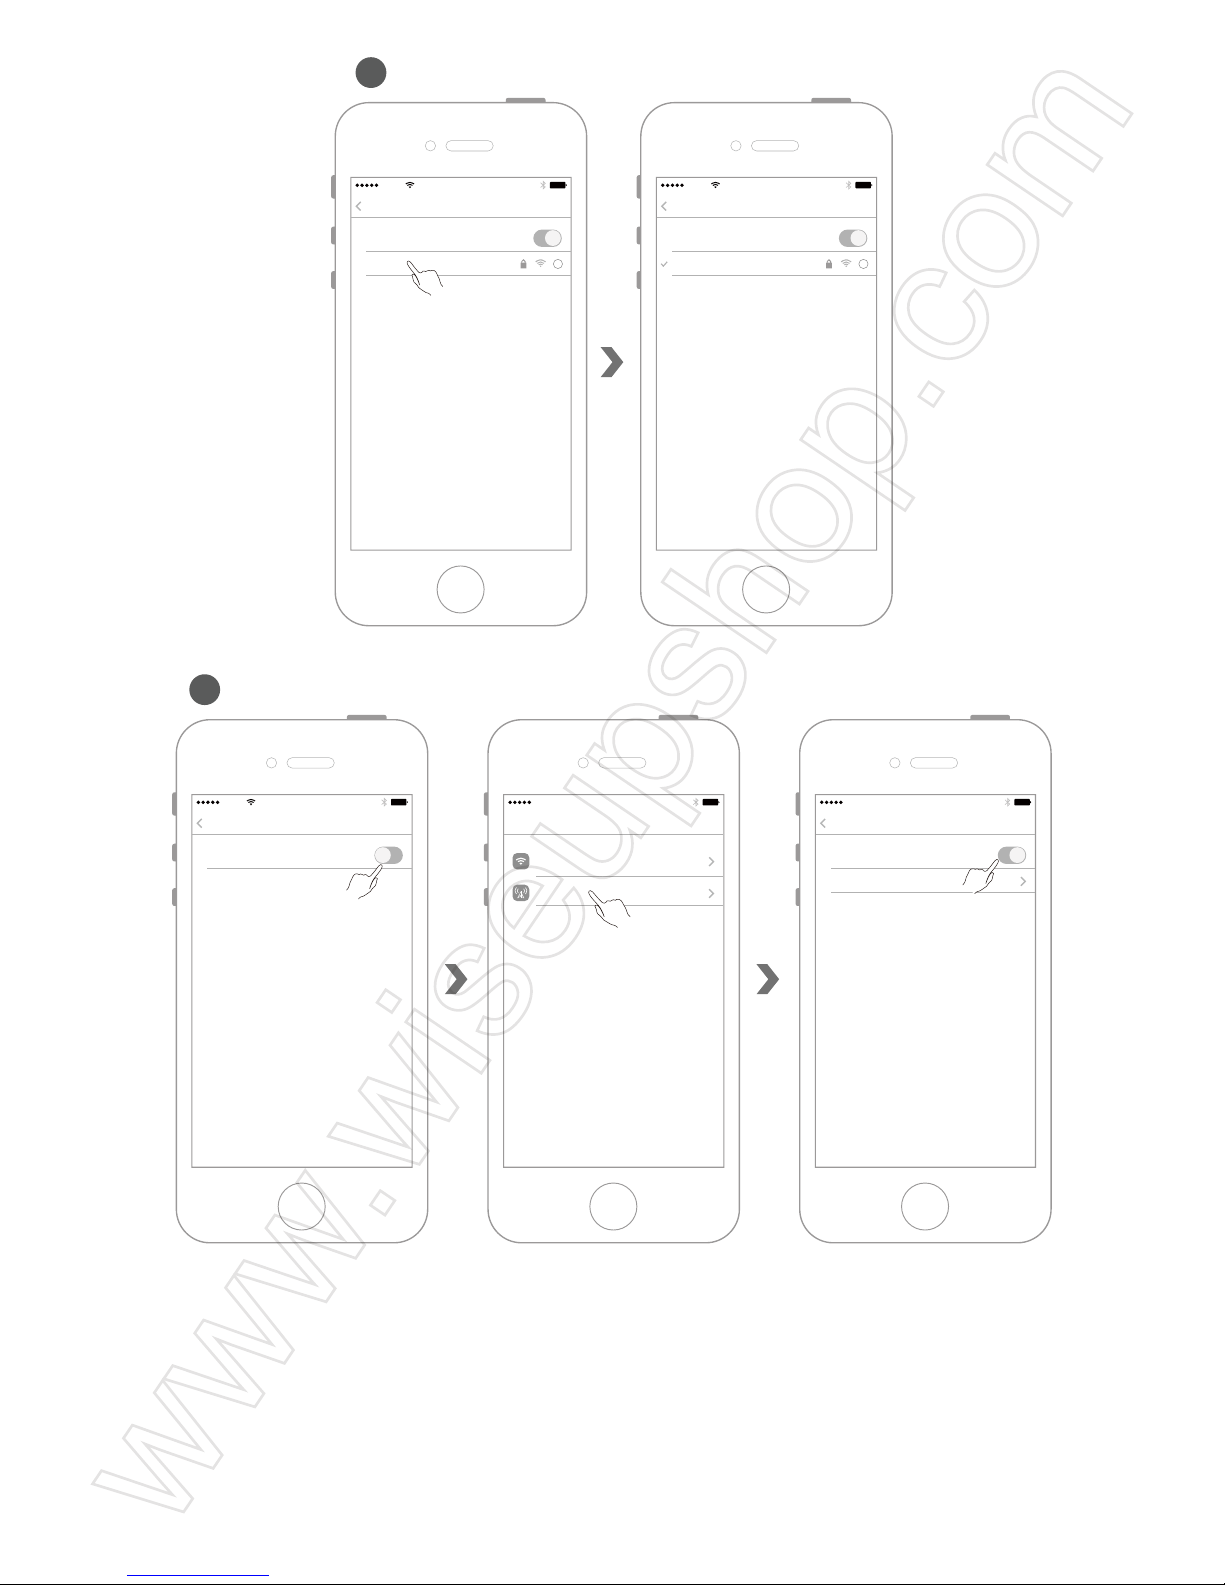
5.6 Return to the WLAN settings page of the IOS mobile device and disconnect the camera
from the current WIFI hotspot.
5.7 Enroll the IOS mobile device in another WIFI hotspot, or enable the data network
connection of IOS mobile device itself.
AT&T
11:57 AM
Network Settings
Settings
SSID: SSID-1
xxxxxxxx
Pwd
OK
AT&T
11:57 AM
Settings
AT&T
11:57 AM
Settings
WLAN
SSID-1
WLAN
AT&T
11:57 AM
Fukeside
Forget This Network
AT&T
11:57 AM
WLAN
Settings
WLAN
i
SSID-1
Page 10
5.8 After make sure that your IOS mobile device has Internet access, open the "Camwf "
APP again. If the status of the camera is "Connected", indicating that the remote network
mode (WAN mode) of the camera is configured successfully.
AT&T
11:57 AM
Settings
SSID-2
WLAN
WLAN
i
1
AT&T
11:57 AM
Settings
SSID-2
WLAN
WLAN
i
AT&T
11:57 AM
Cellular
Settings
Cellular Data
Cellular Data Options
AT&T
11:57 AM
Settings
WLAN
Cellular
Off
Off
2
AT&T
11:57 AM
Settings
WLAN
WLAN
Page 11
<Note>: If the status of the camera is "Connect Fail", indicating that the remote network configuration
failed, please re-configure the remote network.
VI. Settings of Motion Detection Video Recording Mode
6.1 Open the "Camwf " app and make sure that the camera has been successfully added
to the app and is in the online condition.
AT&T
11:57 AM
Camwf
AT&T
11:57 AM
Devices
Devices Media
Camwf
Connected
Camwf
Connected
AT&T
11:57 AM
Camwf
AT&T
11:57 AM
Devices
Devices Media
Camwf
Connected
Camwf
Connected
Page 12
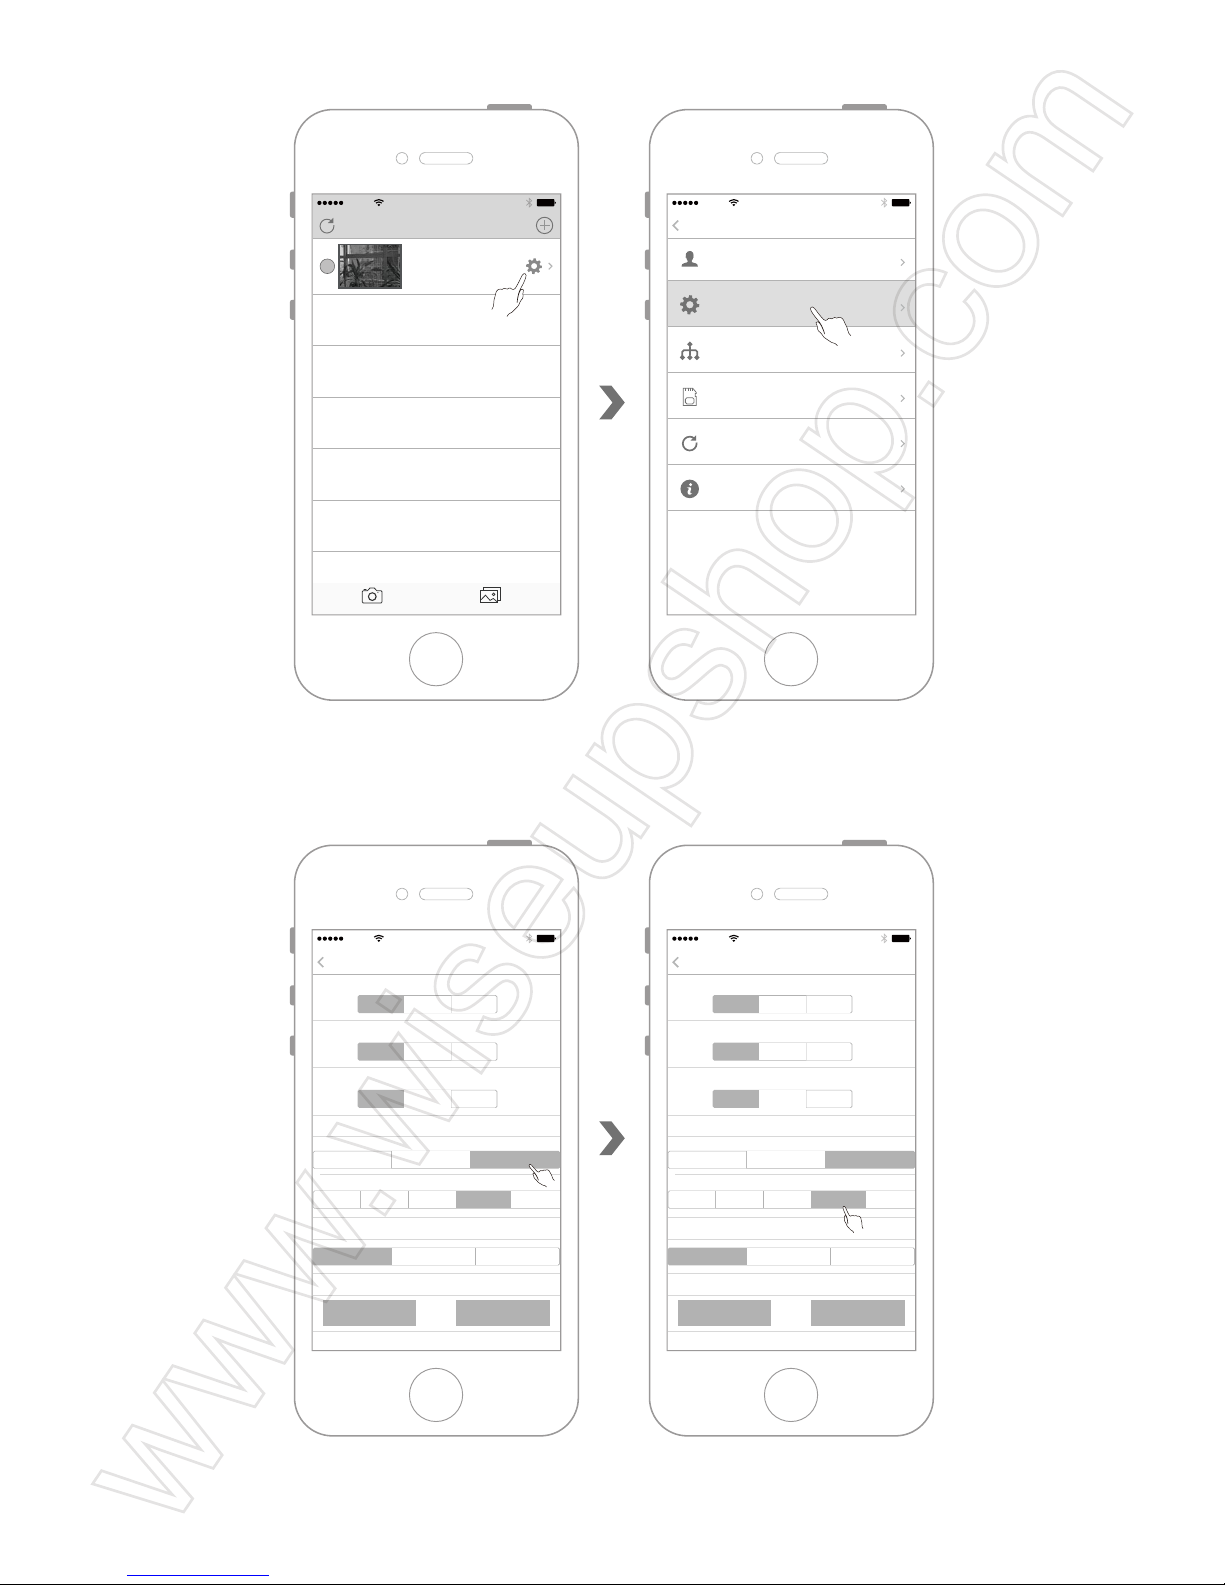
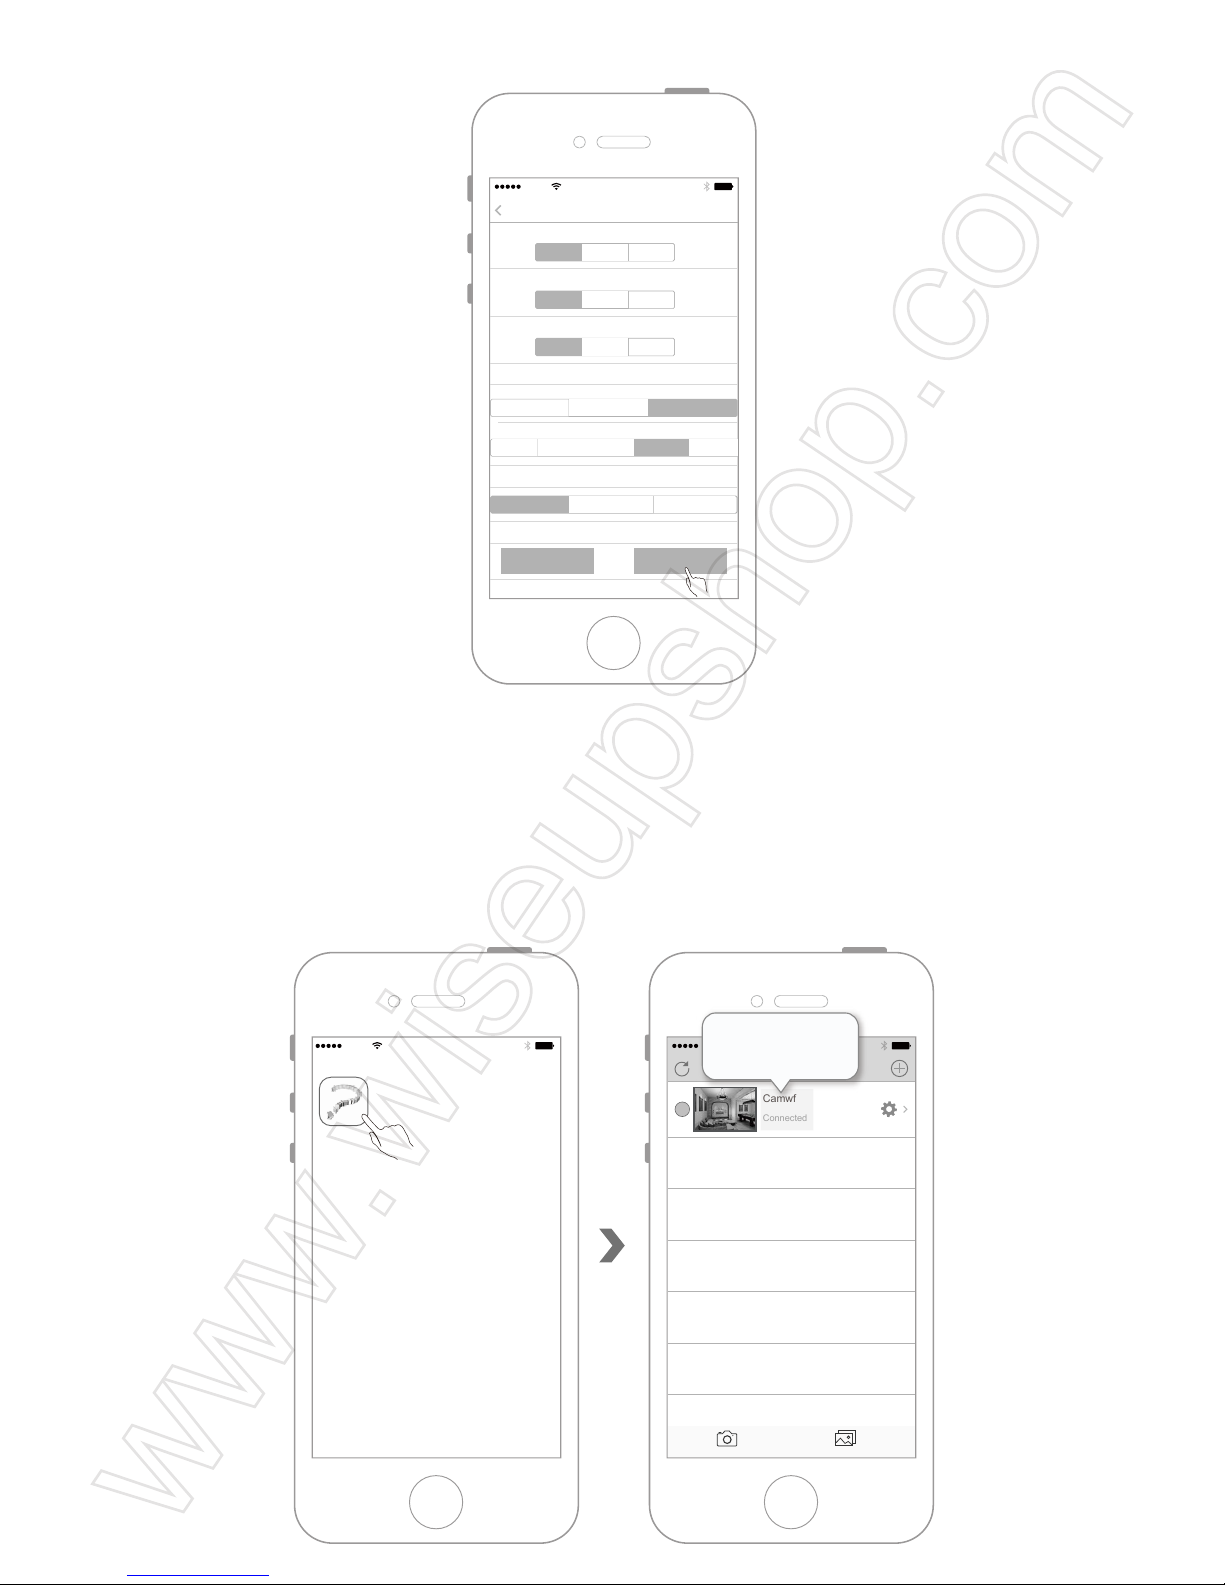
6.2 Enter the camera menu and select "Device Settings".
6.3 Select "Alarm Record" and then select the desired motion detection sensitivity under
"Motion Detection".
6.4 Tap "Confirm" to complete the motion detection video recording settings. The video files
will be automatically saved in the micro SD card of the camera.
AT&T
11:57 AM
Devices
Devices Media
Camwf
Connected
AT&T
11:57 AM
Settings
Back
User Settings
Device Settings
Network Settings
SDCard Record
Refresh push
About
AT&T
11:57 AM
Settings
Settings
Start Time: End Time:
End Time:
End Time:
Status:
Start Time:
Status:
Start Time:
SD record
Motion detection
Status:
Close Record Capture
Close Record Capture
Close Record Capture
Close 24h Video Alarm Record
HD(1920*1080) HD(1280*720)
Close Low Middle High Highest
VGA(640*480)
Restart Confirm
AT&T
11:57 AM
Settings
Settings
Start Time: End Time:
End Time:
End Time:
Status:
Start Time:
Status:
Start Time:
SD record
Motion detection
Status:
Close Record Capture
Close Record Capture
Close Record Capture
Close 24h Video Alarm Record
HD(1920*1080) HD(1280*720)
Close Low Middle High Highest
VGA(640*480)
Restart Confirm
Page 13
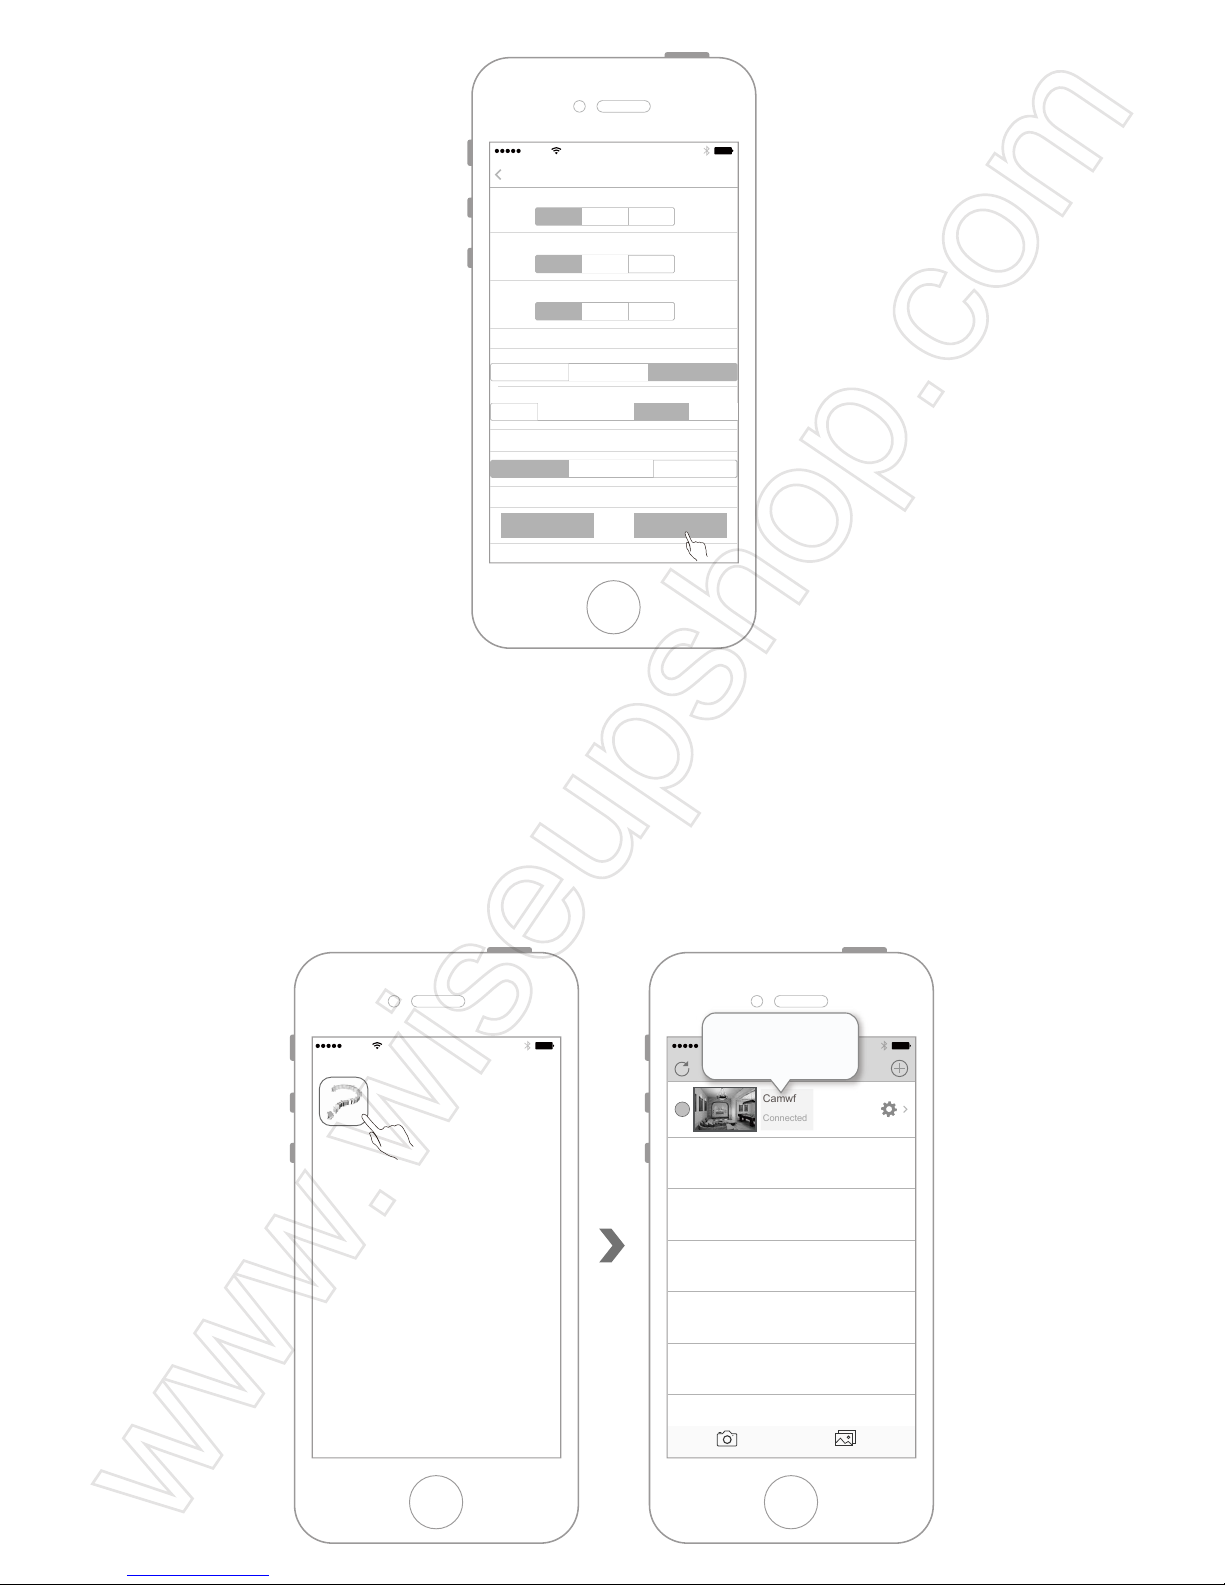
<Note>: The motion detection video resolution is 1280x720P and the video format is AVI.
VII. Settings of Local Uninterrupted Video Recording Mode
7.1 Open the "Camwf " app and make sure that the camera has been successfully added
to the app and is in the online condition.
Restart Confirm
AT&T
11:57 AM
Settings
Settings
Start Time: End Time:
End Time:
End Time:
Status:
Start Time:
Status:
Start Time:
SD record
Motion detection
Status:
Close Record Capture
Close Record Capture
Close Record Capture
Close 24h Video Alarm Record
HD(1920*1080) HD(1280*720)
Close Low Middle High Highest
VGA(640*480)
AT&T
11:57 AM
Camwf
AT&T
11:57 AM
Devices
Devices Media
Camwf
Connected
Camwf
Connected
Page 14
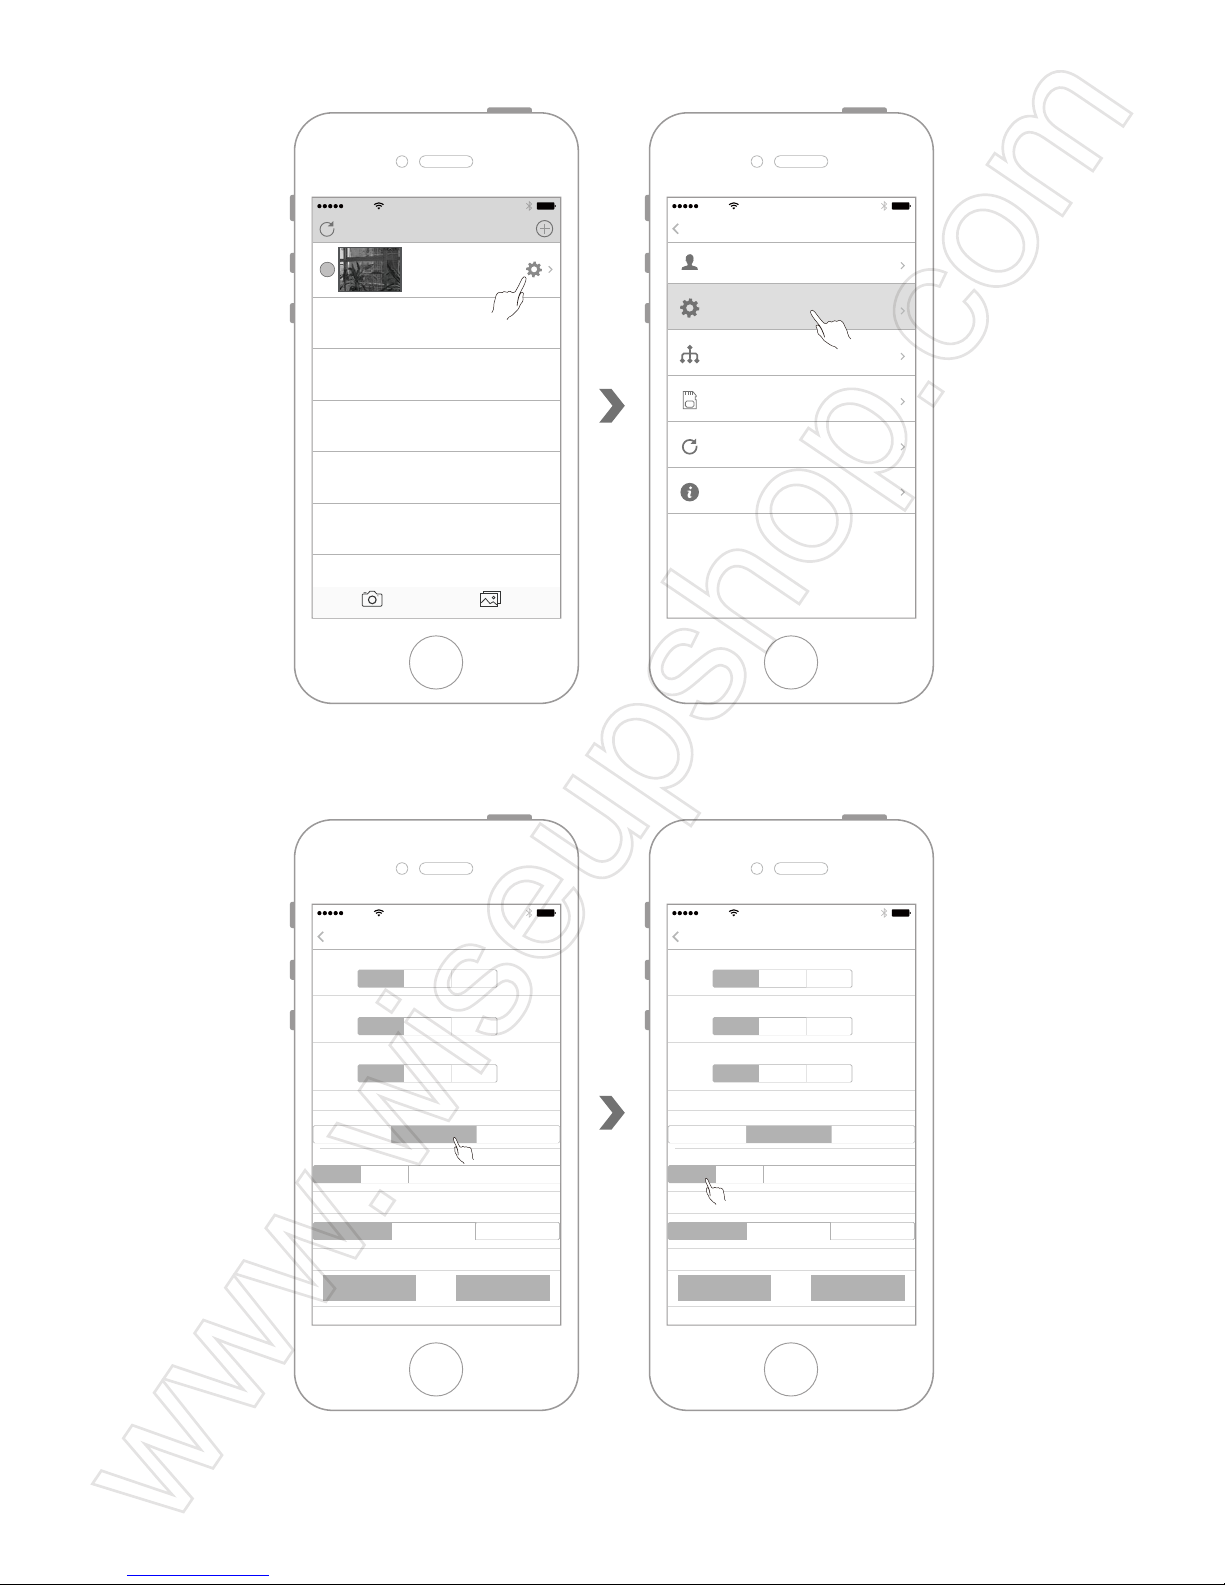
7.2 Enter the camera menu and select "Device Settings".
7.3 Select "24h Video" and turn off the "Motion Detection" function.
7.4 Tap "Confirm" to complete the settings. The camera will automatically start the 24-hours
uninterrupted video recording.
AT&T
11:57 AM
Devices
Devices Media
Camwf
Connected
AT&T
11:57 AM
Settings
Back
User Settings
Device Settings
Network Settings
SDCard Record
Refresh push
About
AT&T
11:57 AM
Settings
Settings
Start Time: End Time:
End Time:
End Time:
Status:
Start Time:
Status:
Start Time:
SD record
Motion detection
Status:
Close Record Capture
Close Record Capture
Close Record Capture
Close 24h Video
HD(1920*1080) HD(1280*720)
Close Low Middle High Highest
VGA(640*480)
Restart Confirm
Alarm Record
AT&T
11:57 AM
Settings
Settings
Start Time: End Time:
End Time:
End Time:
Status:
Start Time:
Status:
Start Time:
SD record
Motion detection
Status:
Close Record Capture
Close Record Capture
Close Record Capture
Close 24h Video
HD(1920*1080) HD(1280*720)
Close Low Middle High Highest
VGA(640*480)
Restart Confirm
Alarm Record
Page 15
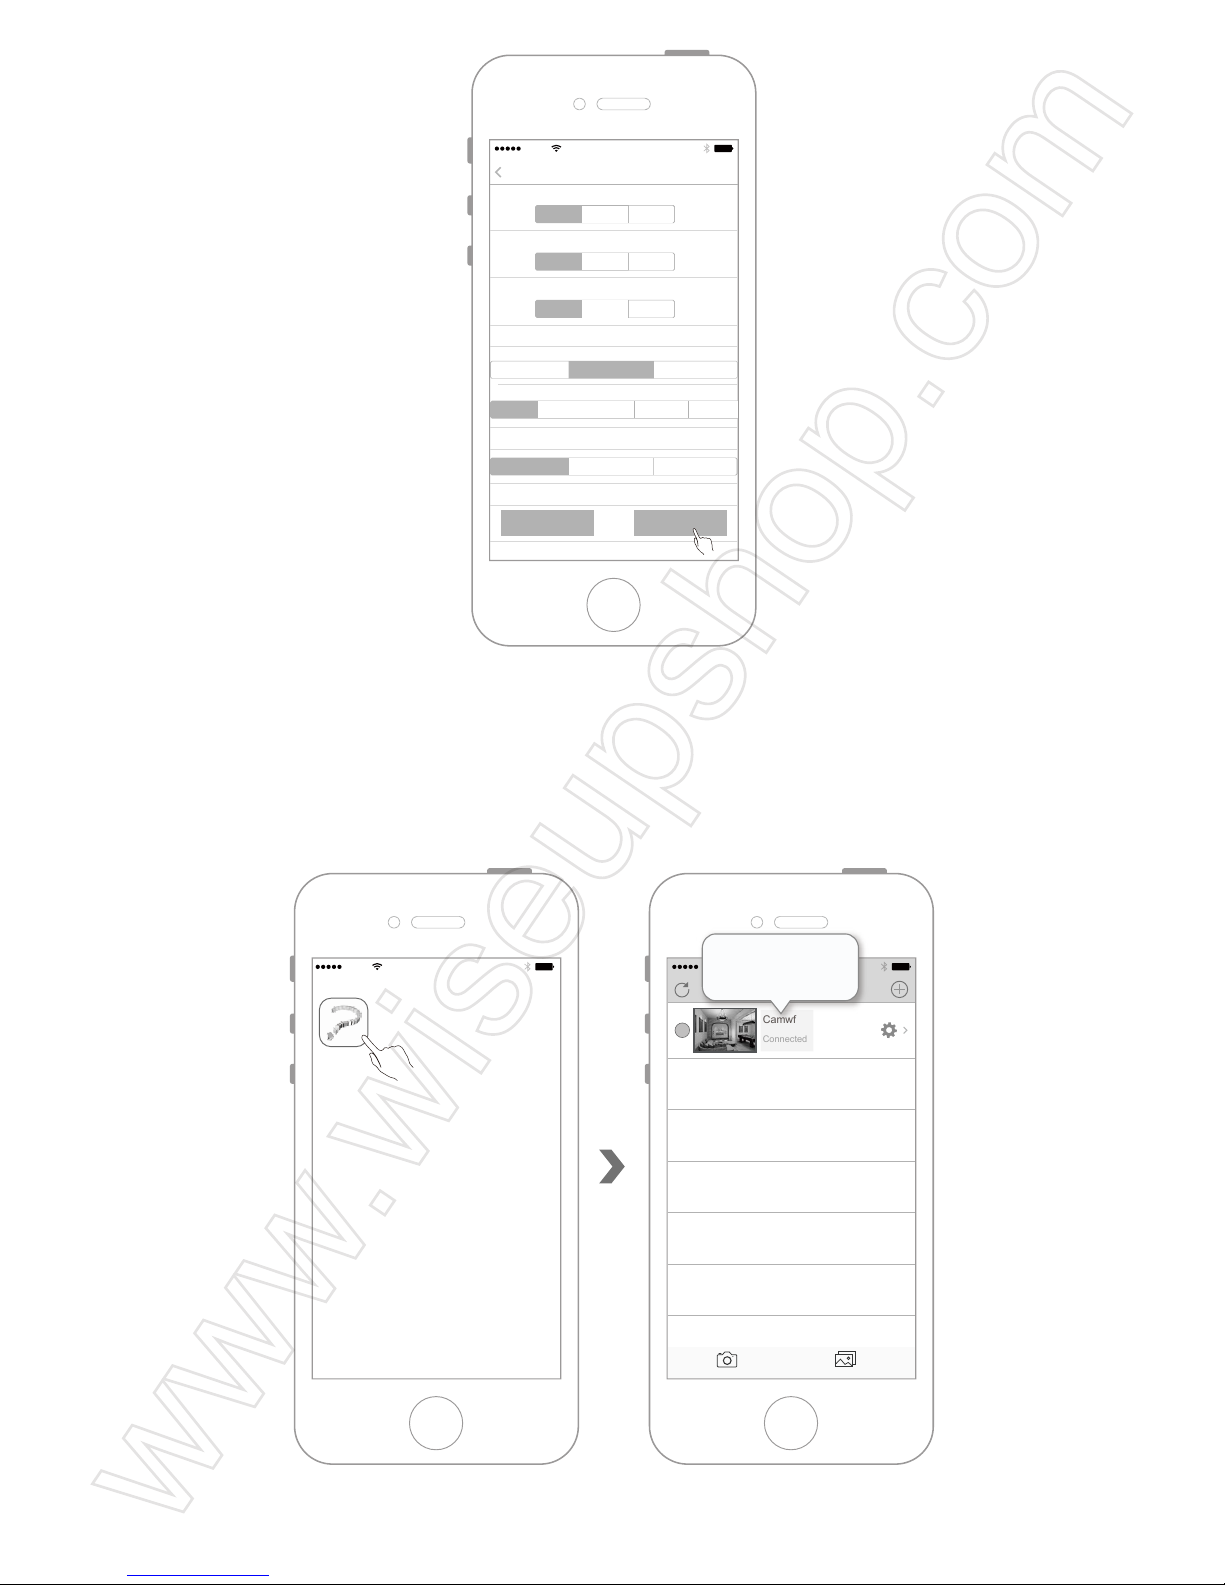
VIII. Manual Remote Video Recording by Using IOS Mobile Device
8.1 Open the "Camwf " app and make sure that the camera has been successfully added
to the app and is in the online condition.
8.2 Tap the camera.
AT&T
11:57 AM
Camwf
AT&T
11:57 AM
Devices
Devices Media
Camwf
Connected
Camwf
Connected
Restart Confirm
AT&T
11:57 AM
Settings
Settings
Start Time: End Time:
End Time:
End Time:
Status:
Start Time:
Status:
Start Time:
SD record
Motion detection
Status:
Close Record Capture
Close Record Capture
Close Record Capture
Close 24h Video
HD(1920*1080) HD(1280*720)
Close Low Middle High Highest
VGA(640*480)
Alarm Record
Page 16
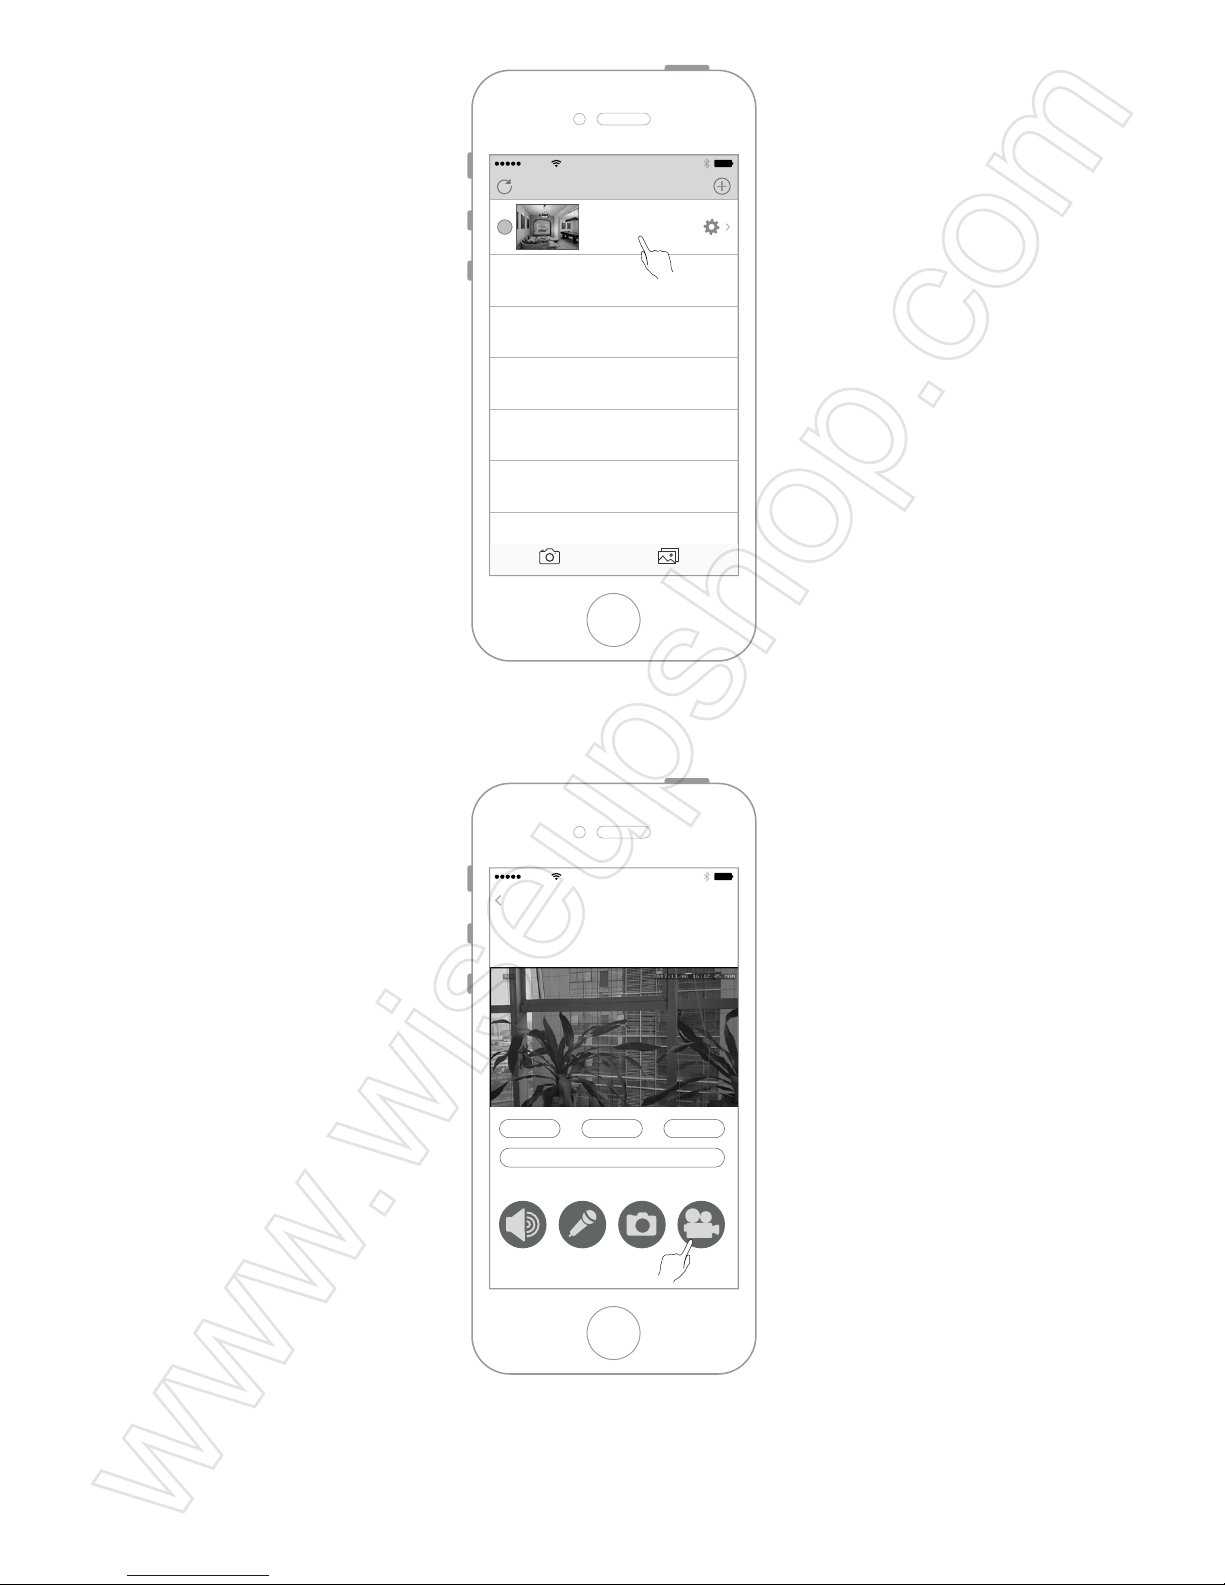
8.3 Tap the video recording button to start video recording.
8.4 Tap the sound recording button to turn on/off the sound recording function.
AT&T
11:57 AM
Devices
Devices Media
Camwf
Connected
AT&T
11:57 AM
Camwf
Network:184 k/s
00:12
Full Flip
Video Reset
Horizontal Flip Vertical Flip
Page 17
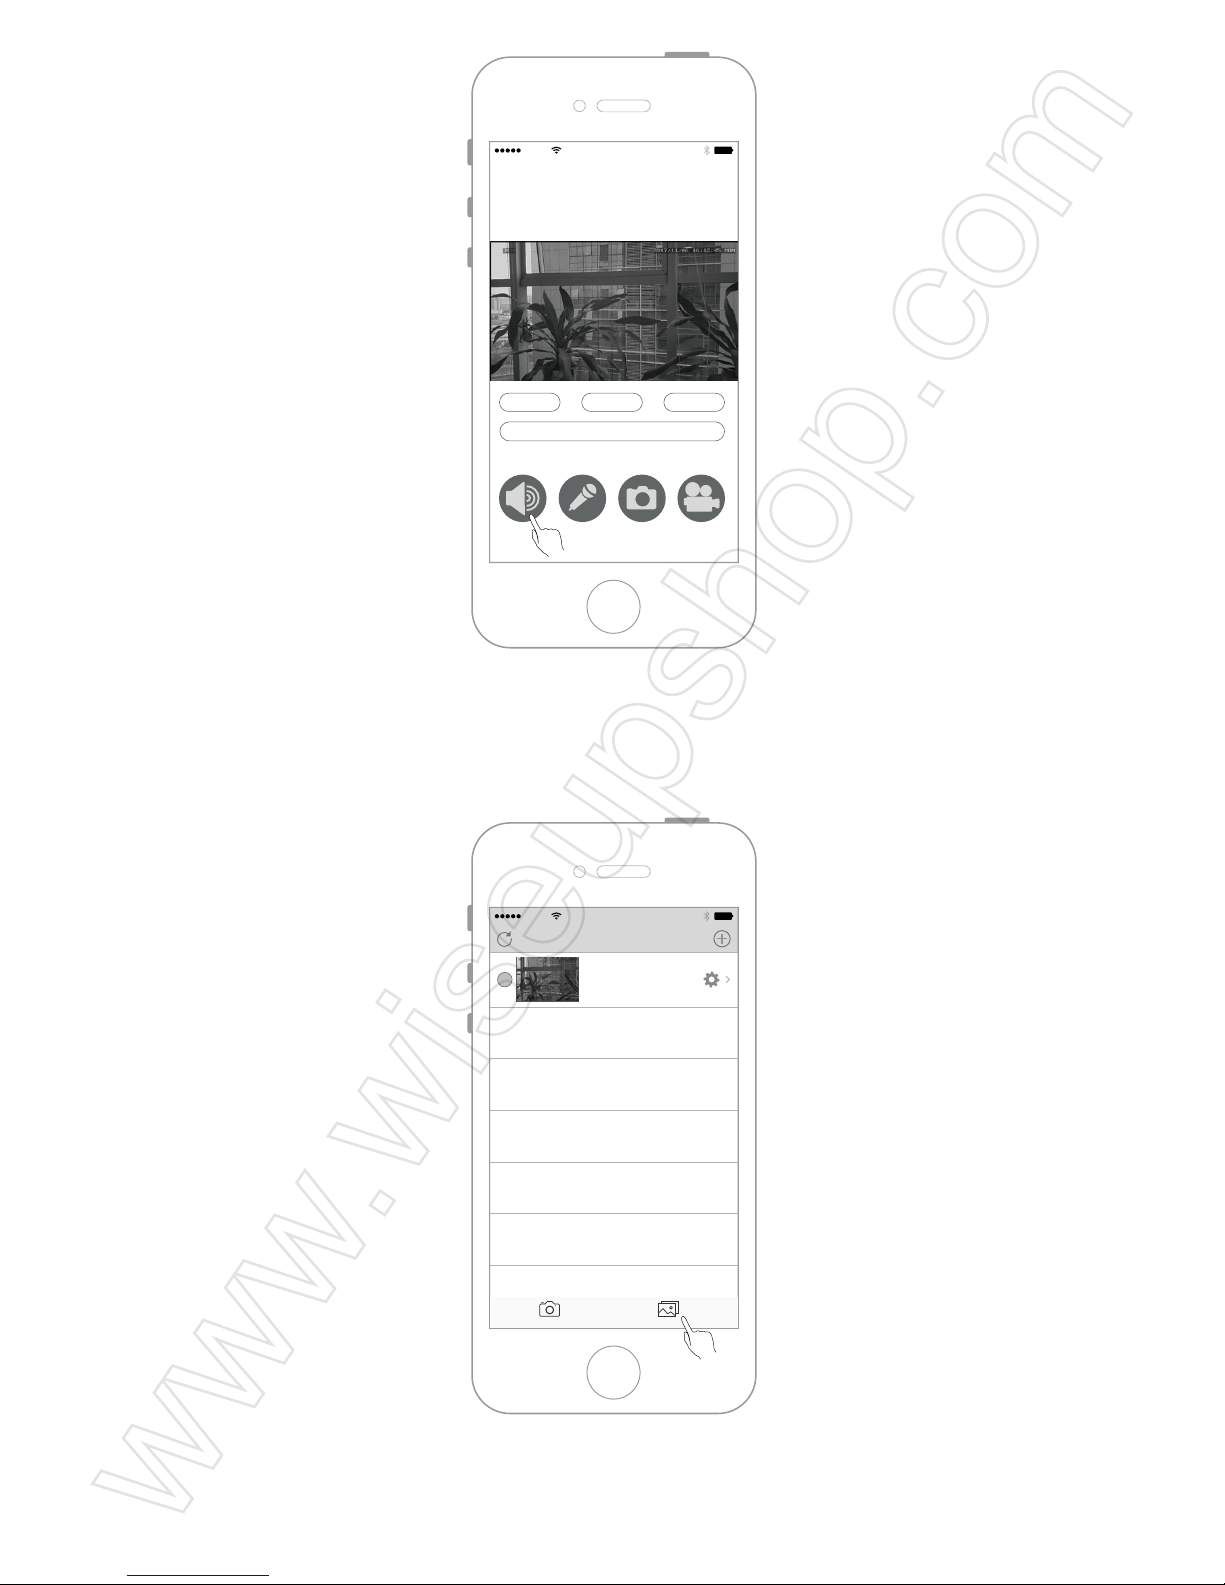
8.5 Play the video files saved on the IOS mobile device.
Step 1
Step 2
AT&T
11:57 AM
Devices
Devices Media
Camwf
Connected
AT&T
11:57 AM
Camwf
Network:184 k/s
00:12
Full Flip
Video Reset
Horizontal Flip Vertical Flip
Page 18
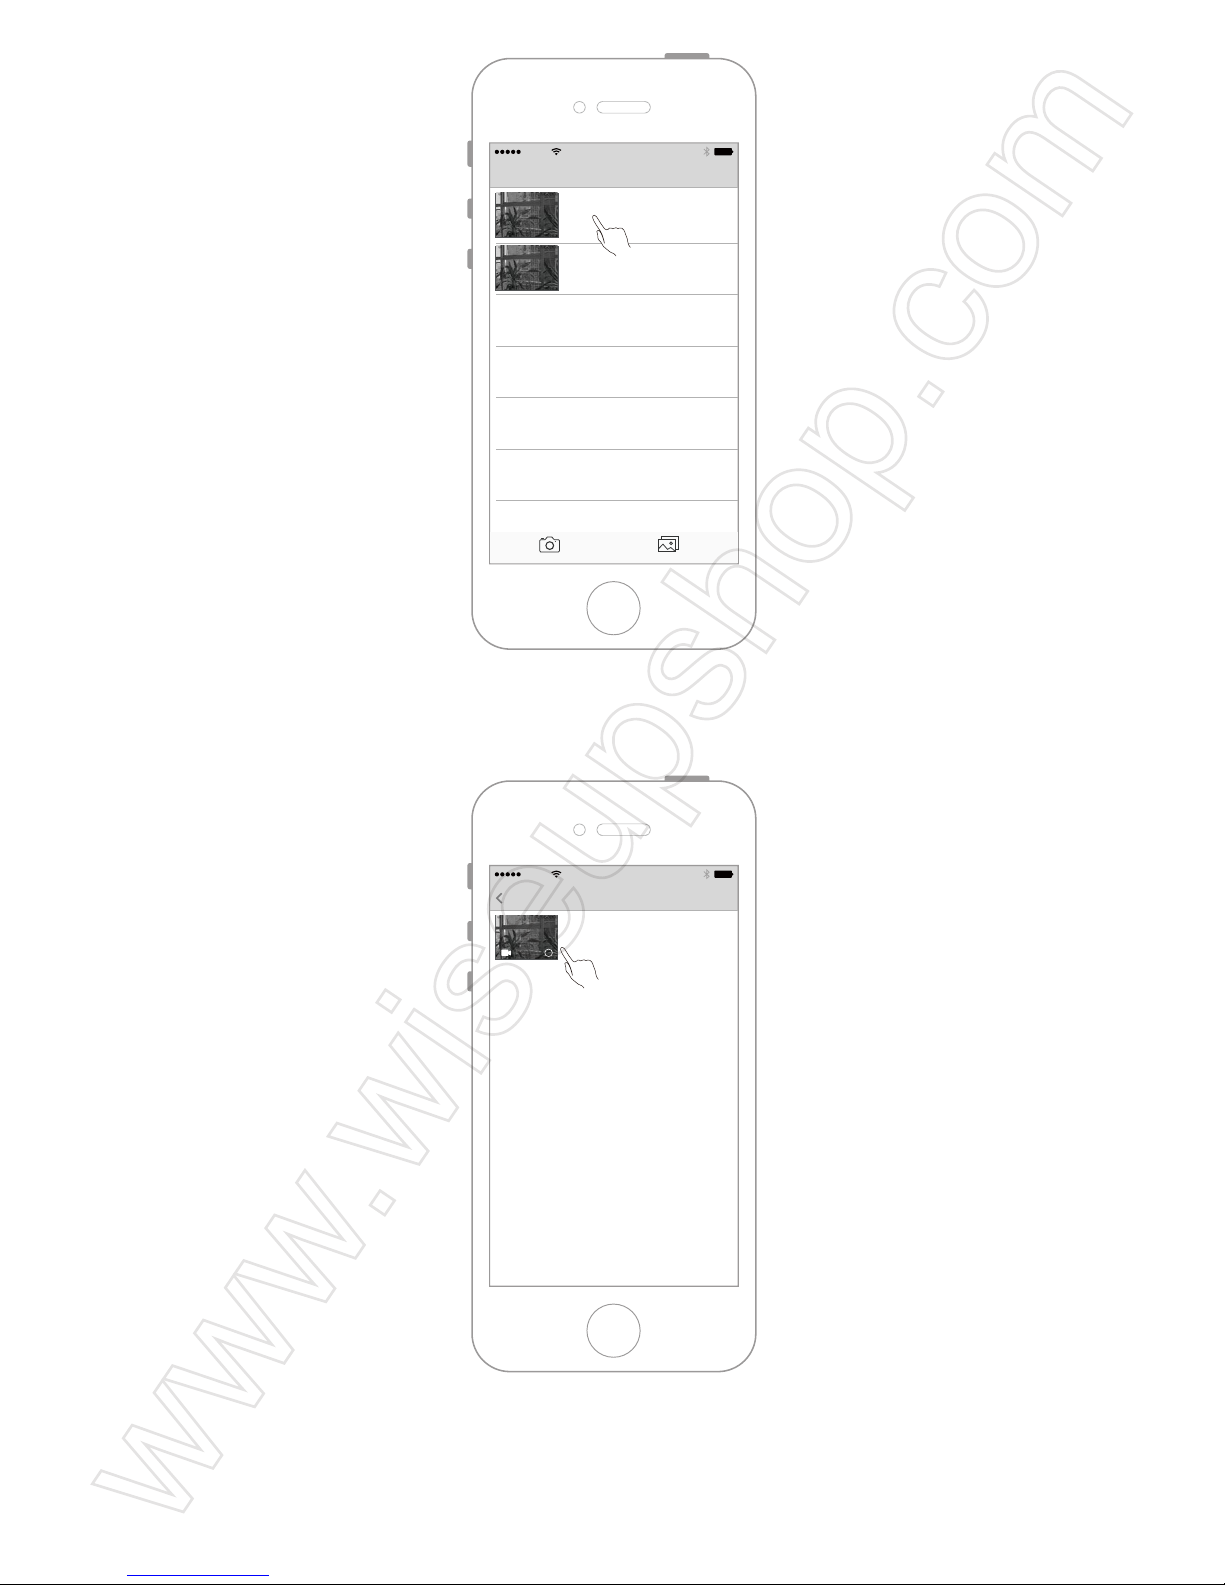
Step 3
<Note>: The video resolution is 1280x720P and the video format is MP4.
AT&T
11:57 AM
Photos
Devices Media
Camwf
1
Camwf
2
AT&T
11:57 AM
Camwf Edit
Page 19
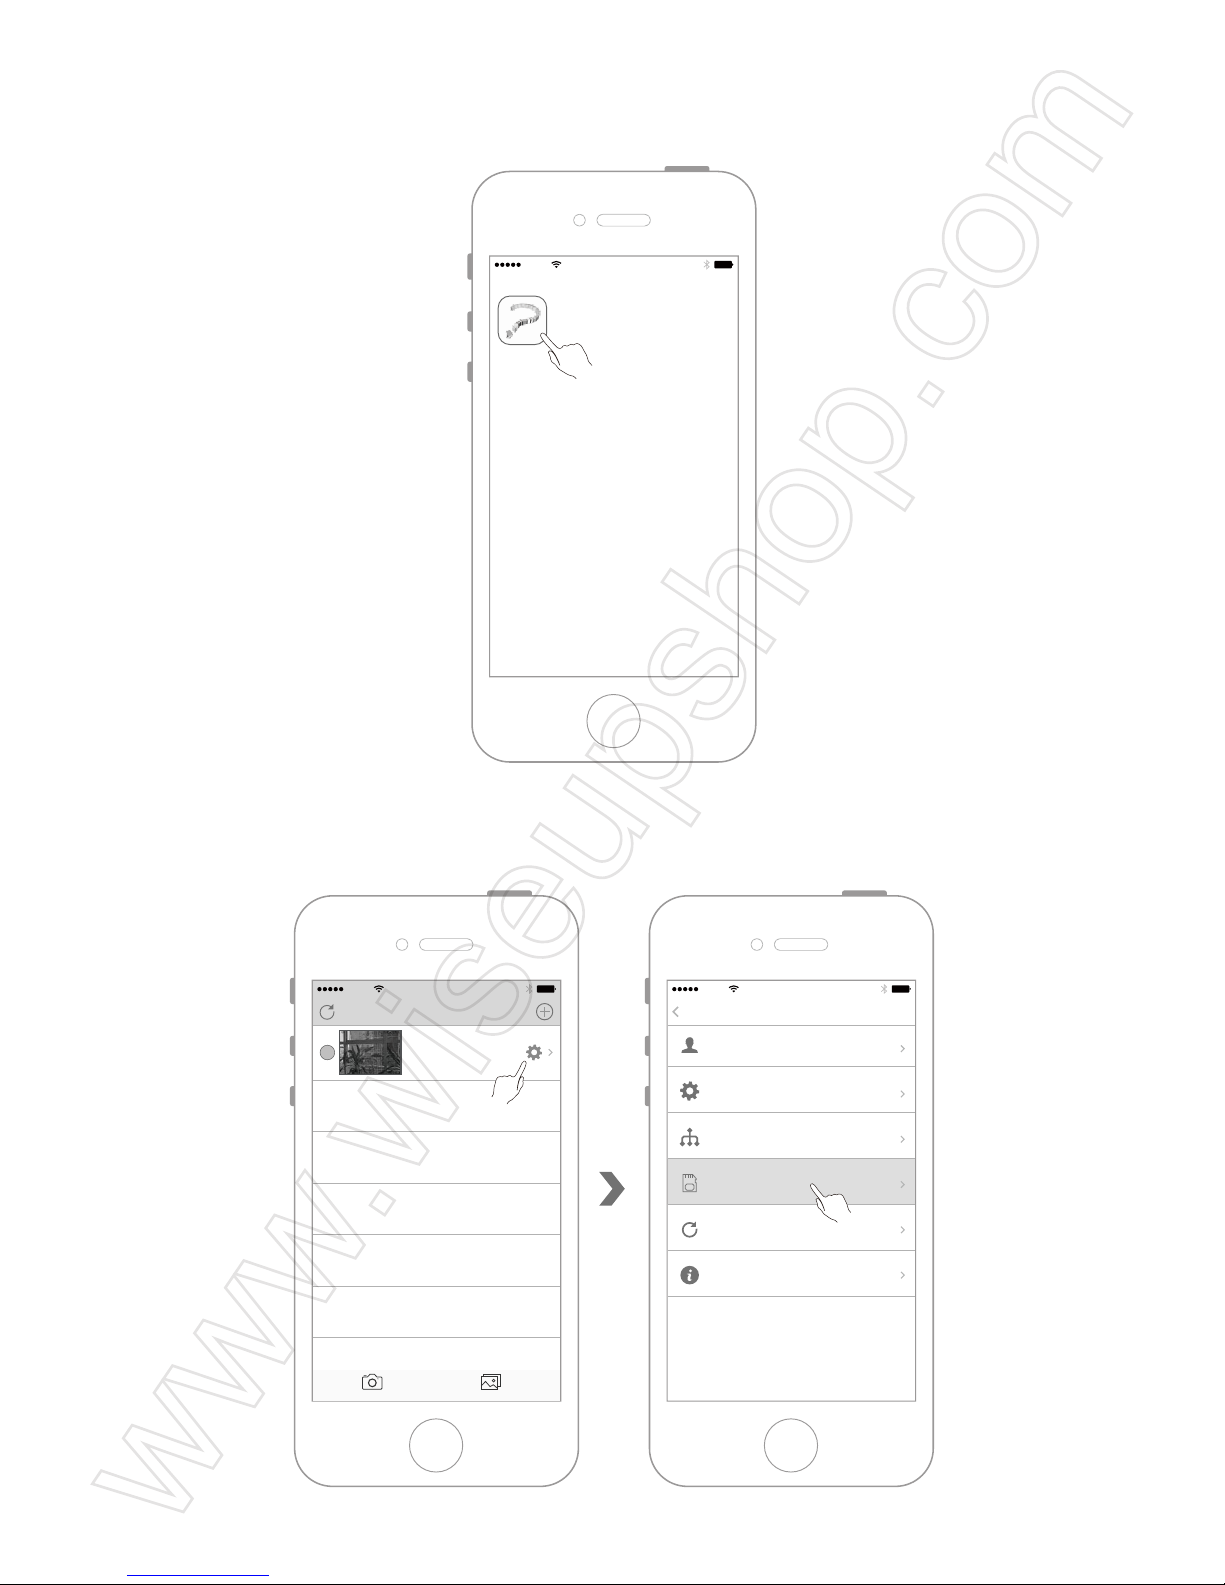
IX. Play the Camera SD Card Video Files on the IOS Mobile Device
9.1 Open the "Camwf " APP.
9.2 Enter the camera menu and select "SDCard Record".
AT&T
11:57 AM
Camwf
AT&T
11:57 AM
Devices
Devices Media
Camwf
Connected
AT&T
11:57 AM
Settings
Back
User Settings
Device Settings
Network Settings
SDCard Record
Refresh push
About
Page 20
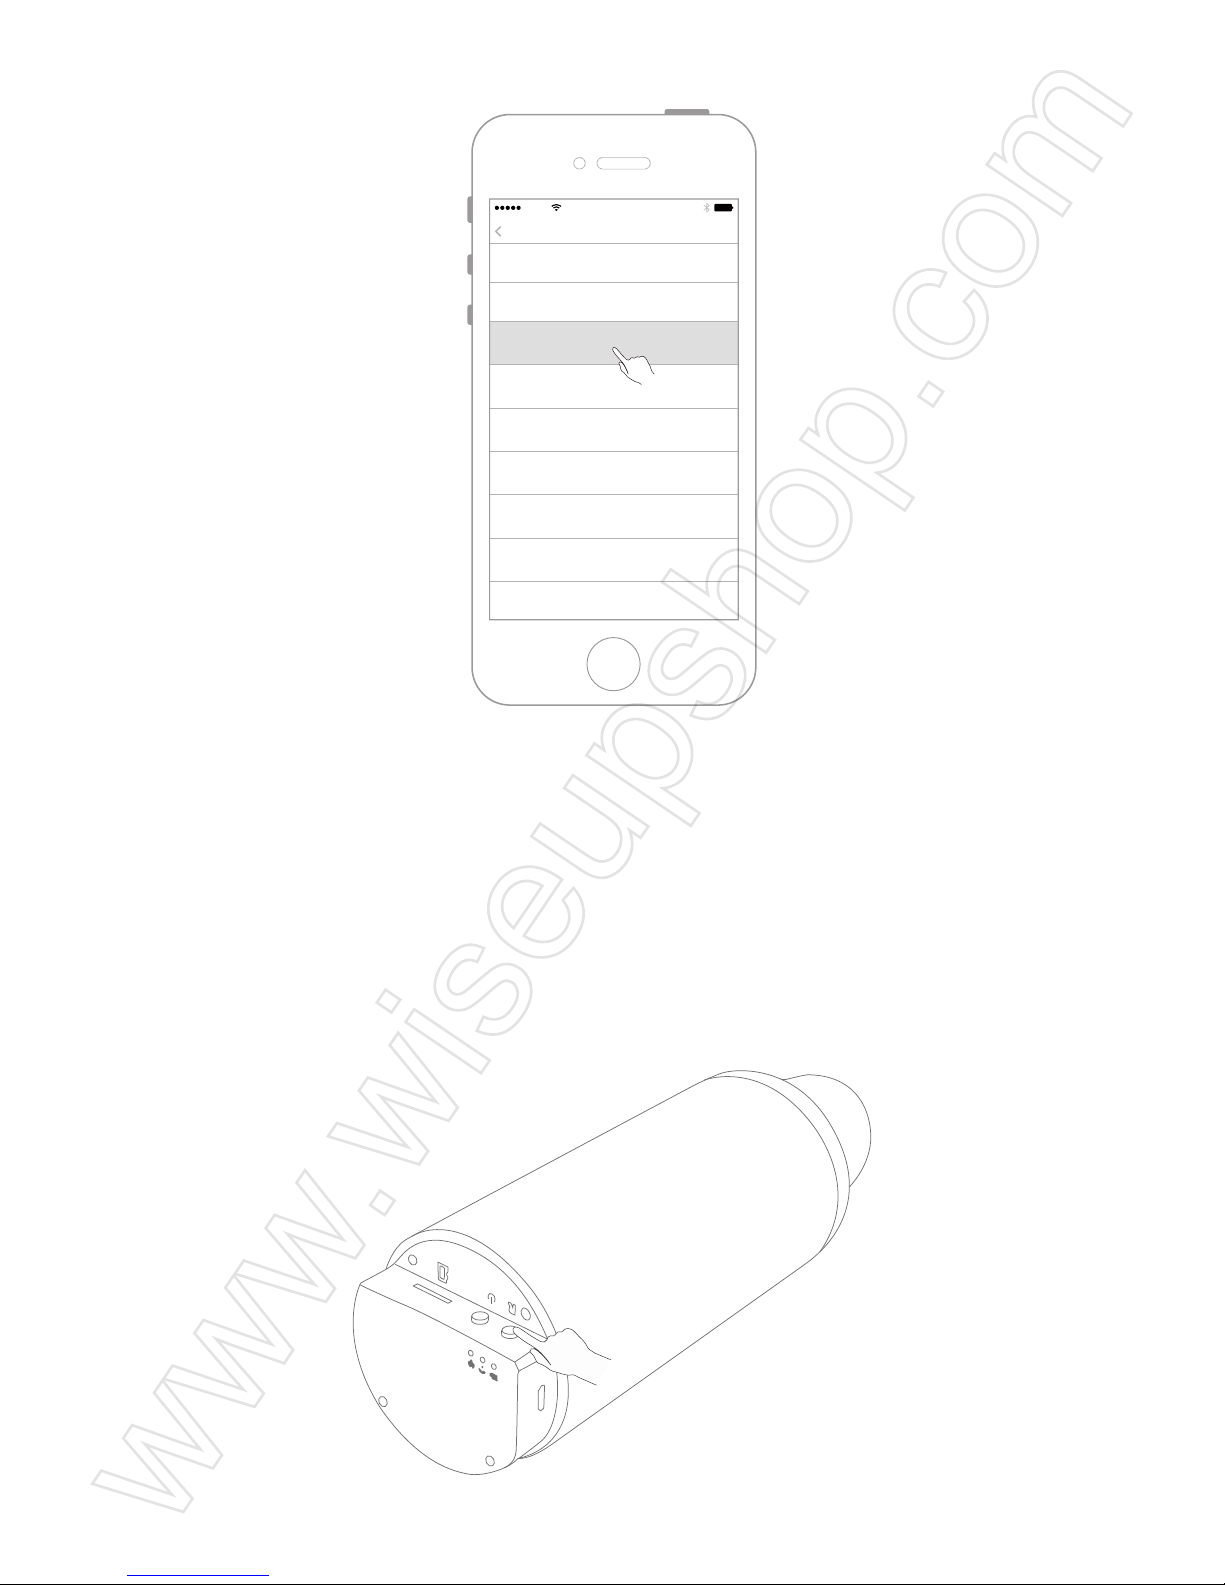
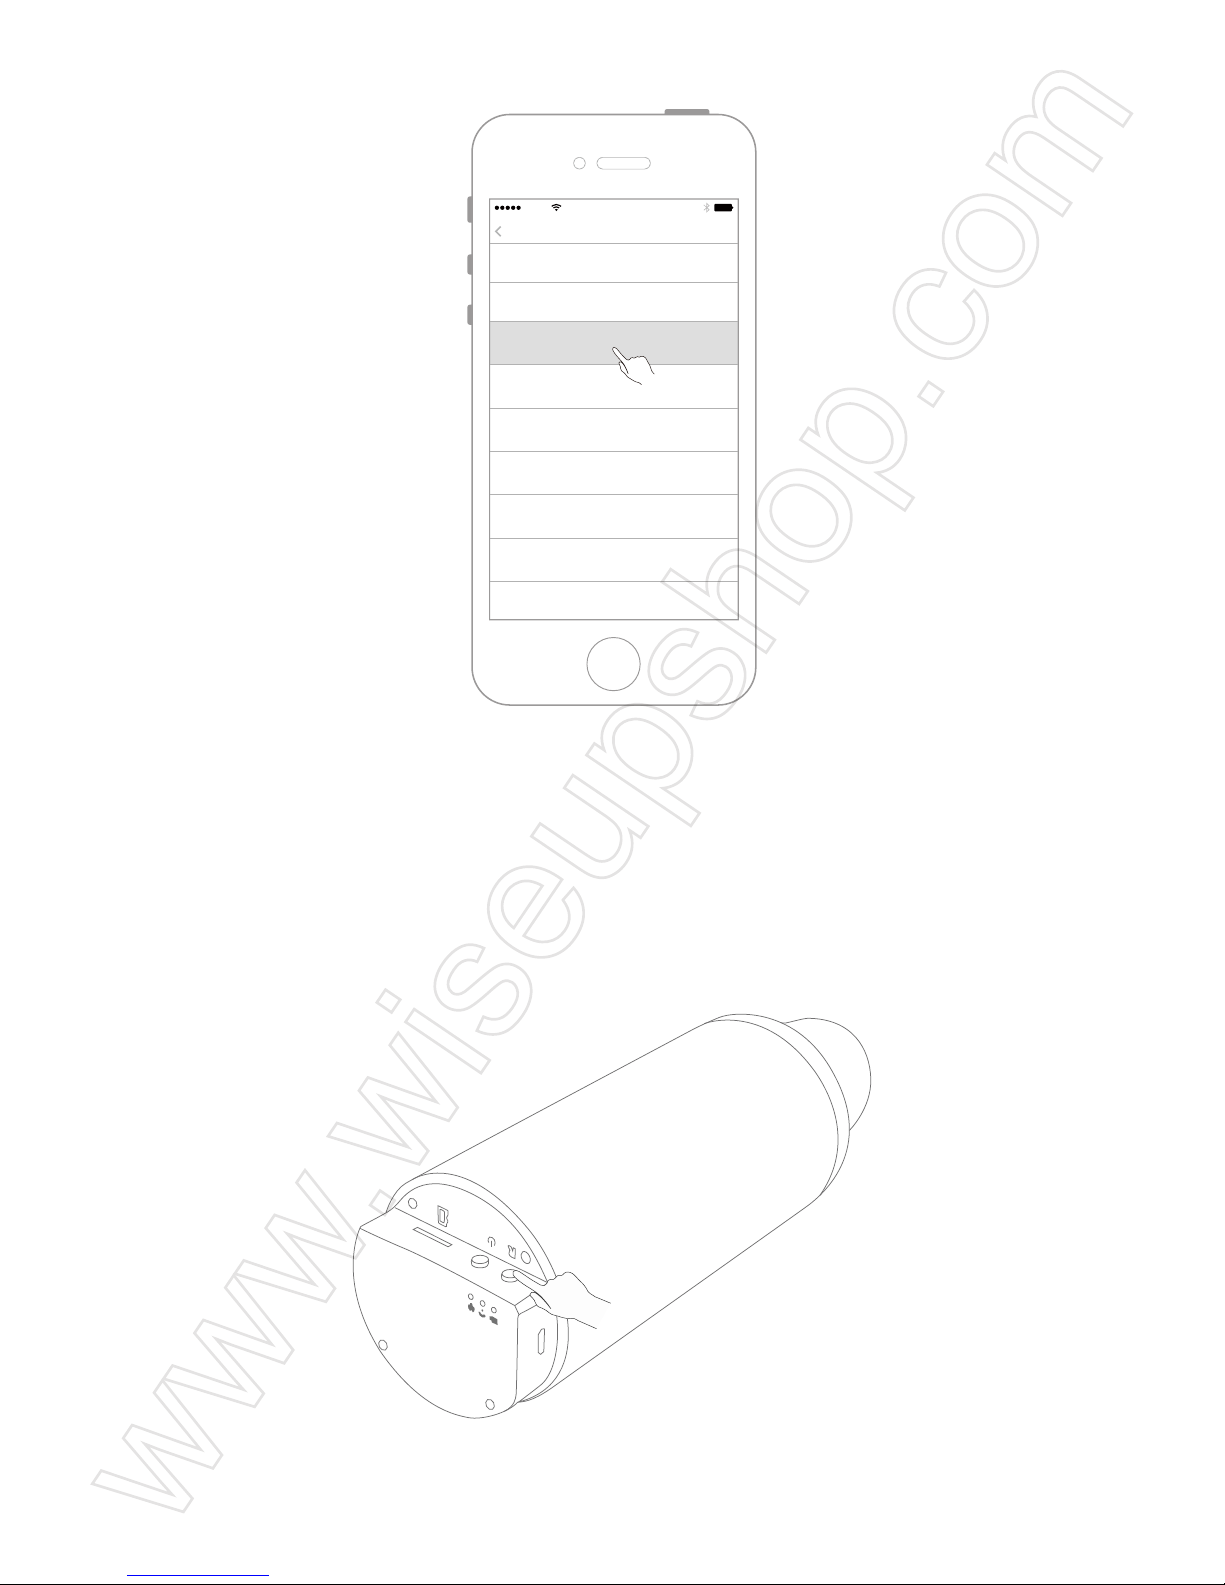
9.3 Select one of the video files to play.
X. Reset
Operation: When the camera is powered on, press and hold the reset button for 10 seconds
to restore the factory settings.
AT&T
11:57 AM
SDCard
Full time recording
6 Now 2017 at 4:20 PM
Full time recording
6 Now 2017 at 4:15 PM
Full time recording
6 Now 2017 at 4:08 PM
Full time recording
6 Now 2017 at 4:02 PM
Full time recording
6 Now 2017 at 3:57 PM
Full time recording
6 Now 2017 at 3:40 PM
Full time recording
6 Now 2017 at 3:33 PM
Full time recording
6 Now 2017 at 3:15 PM
Page 21
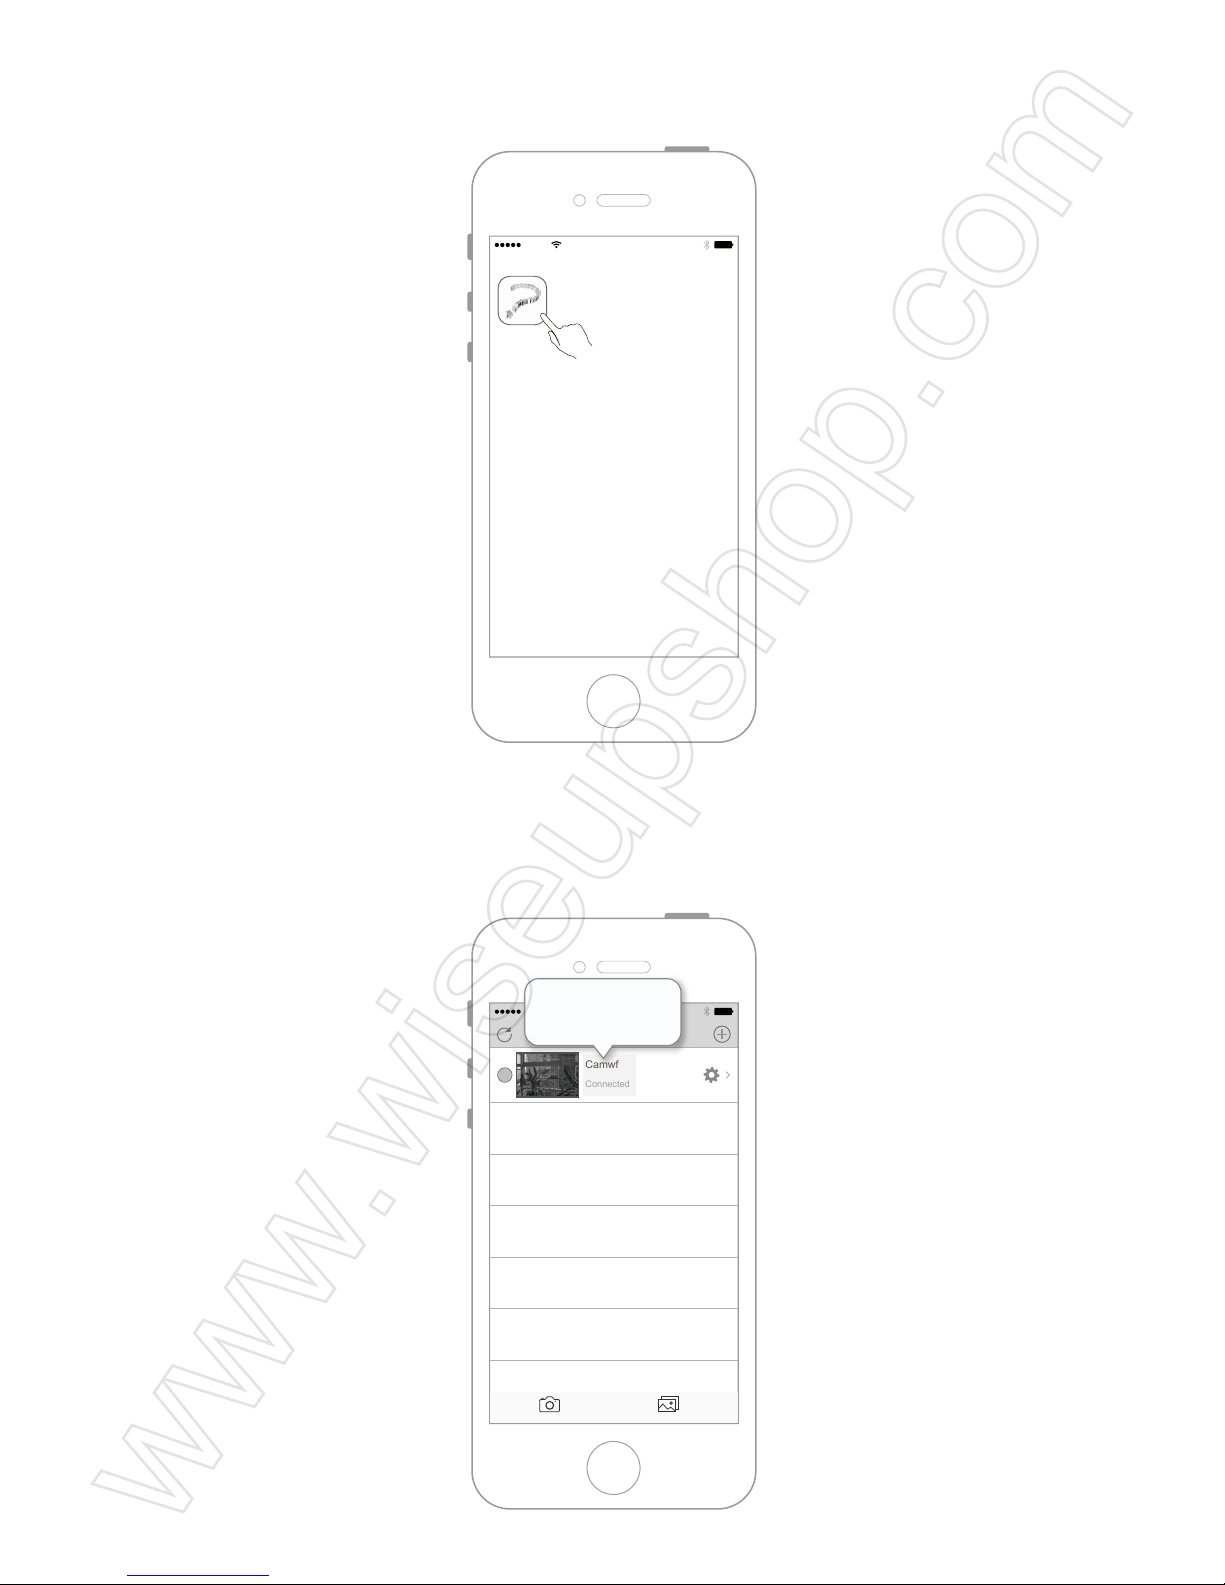
XI. Change the Camera Name
11.1 Open the "Camwf " APP.
11.2 Make sure that the camera has been successfully added to the app and is in the online
condition.
AT&T
11:57 AM
Camwf
AT&T
11:57 AM
Devices
Devices Media
Camwf
Connected
Camwf
Connected
Page 22
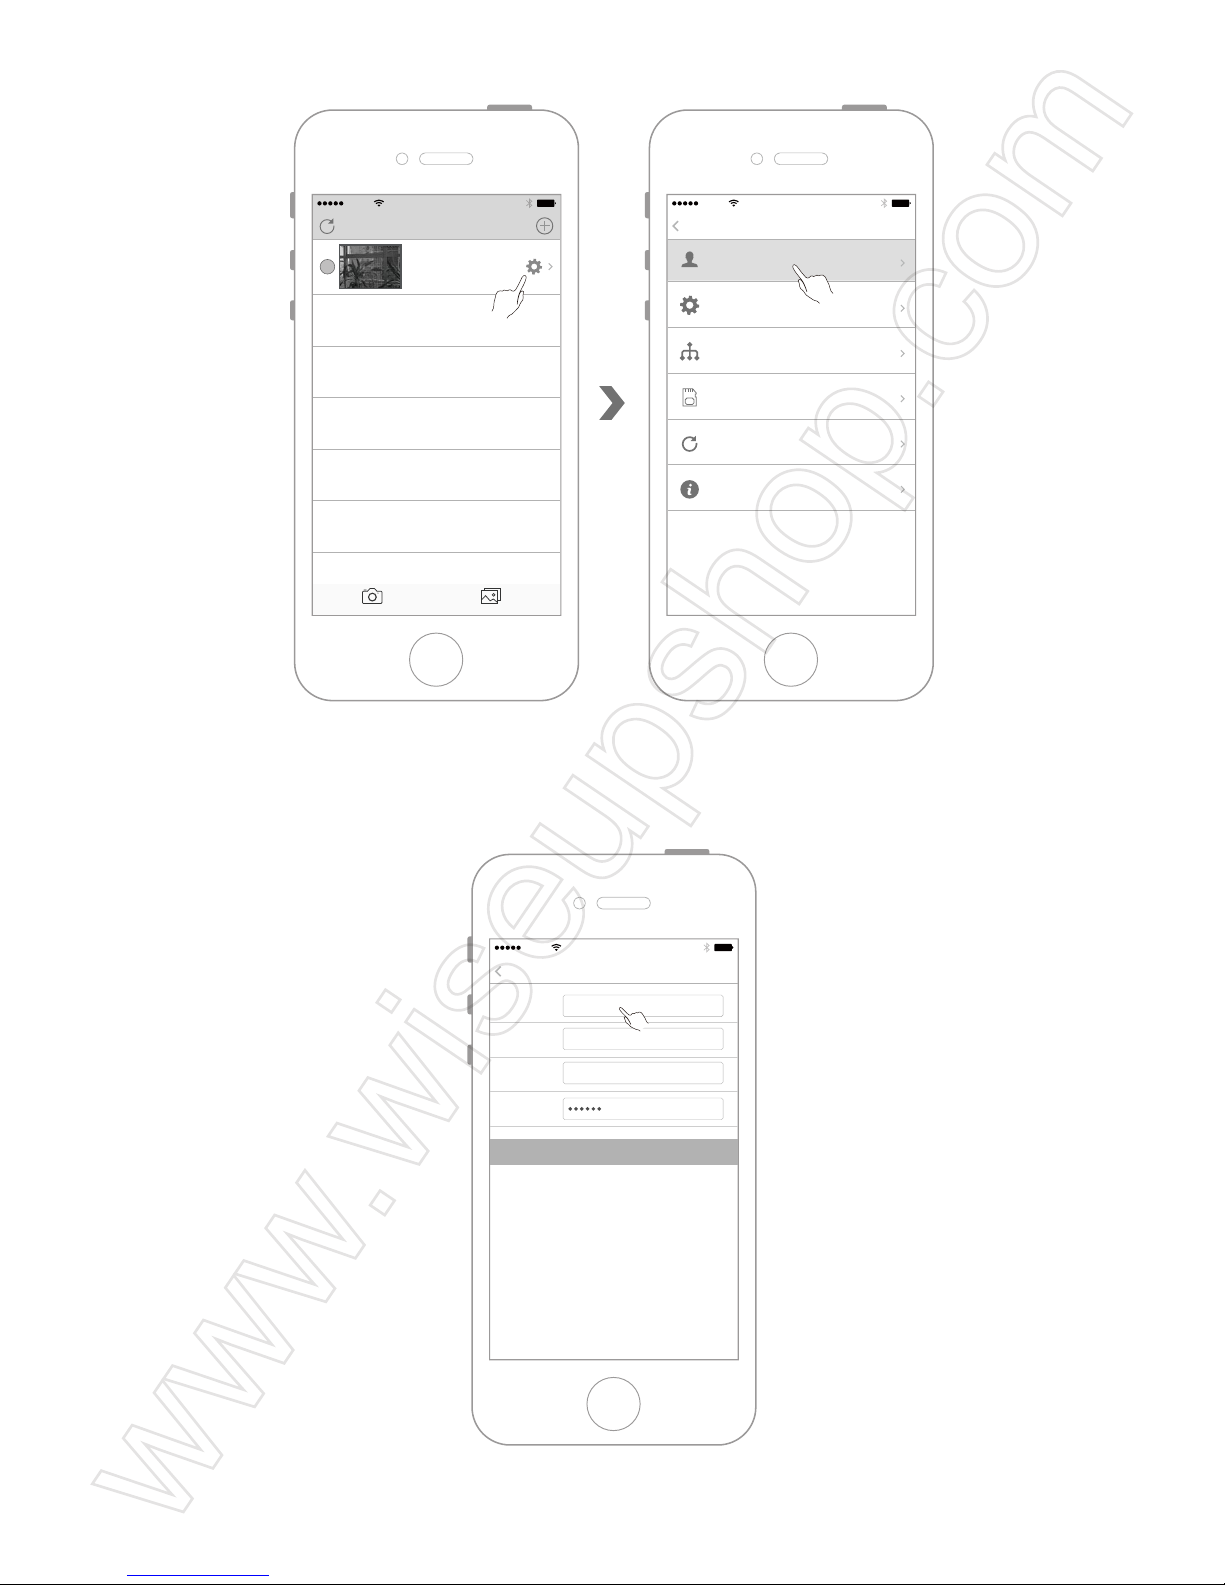
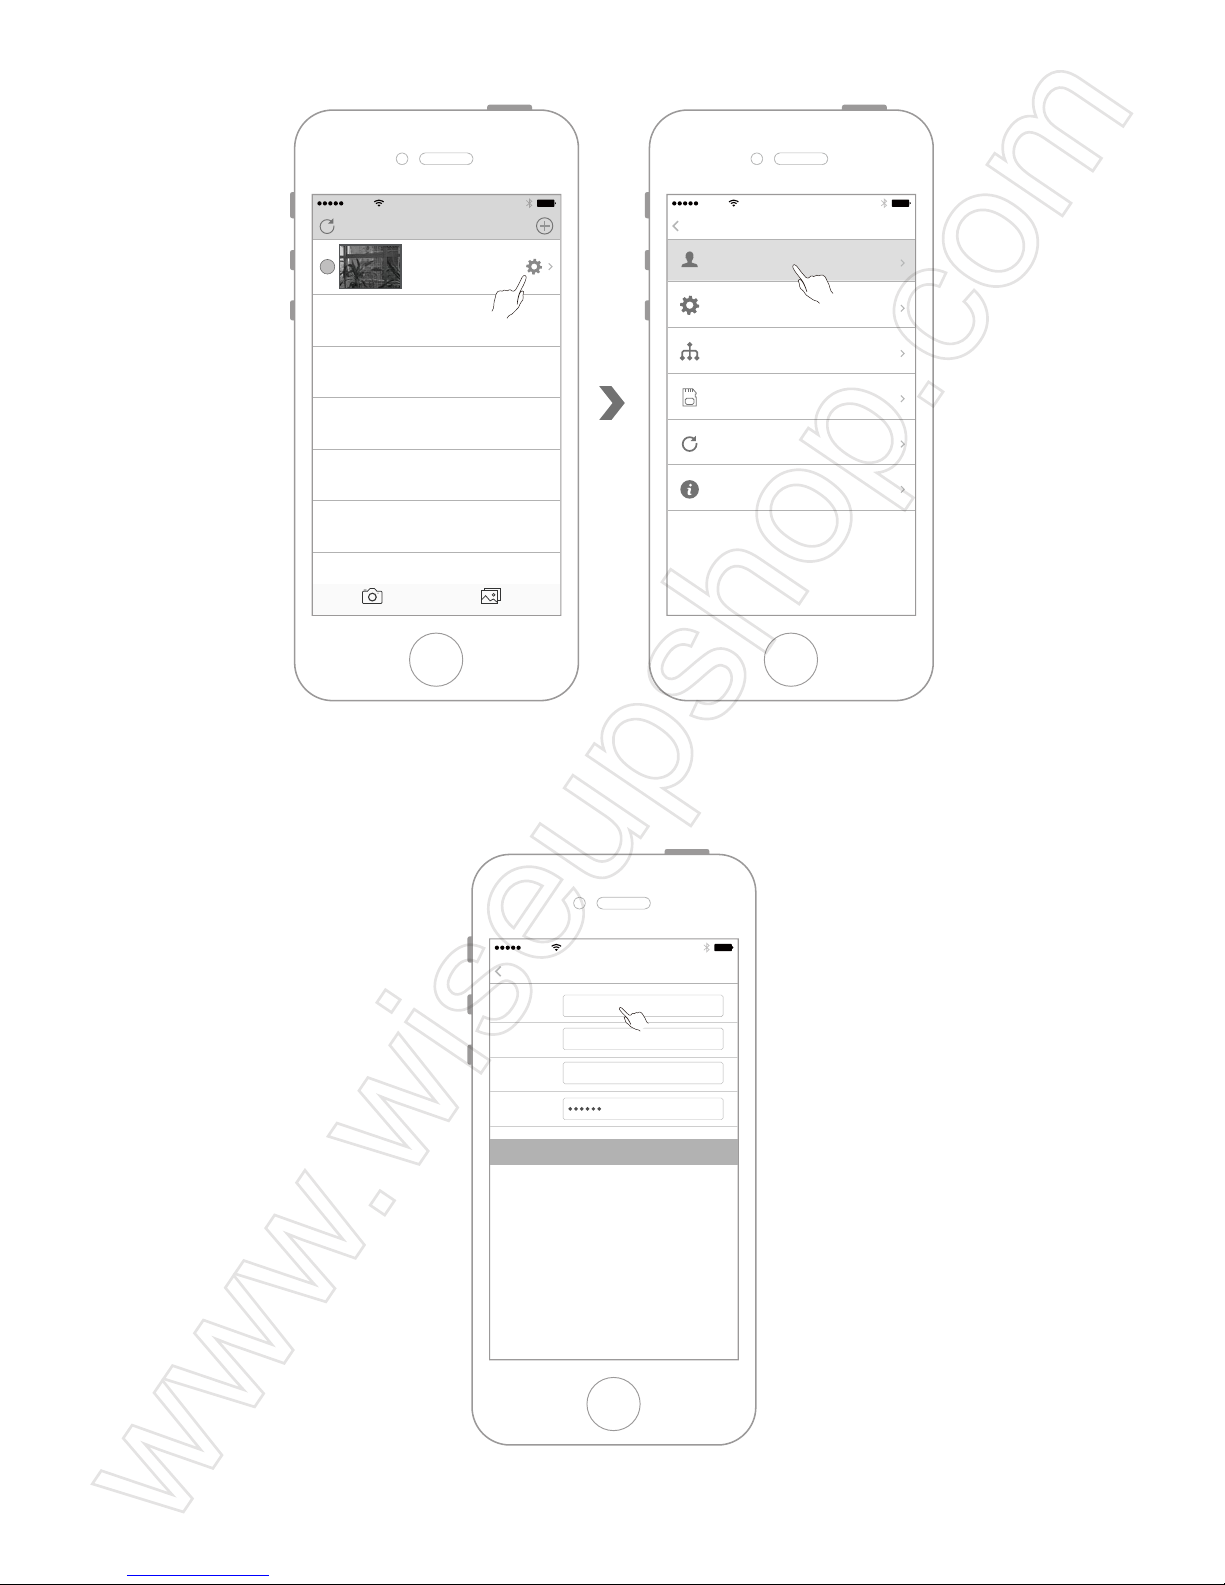
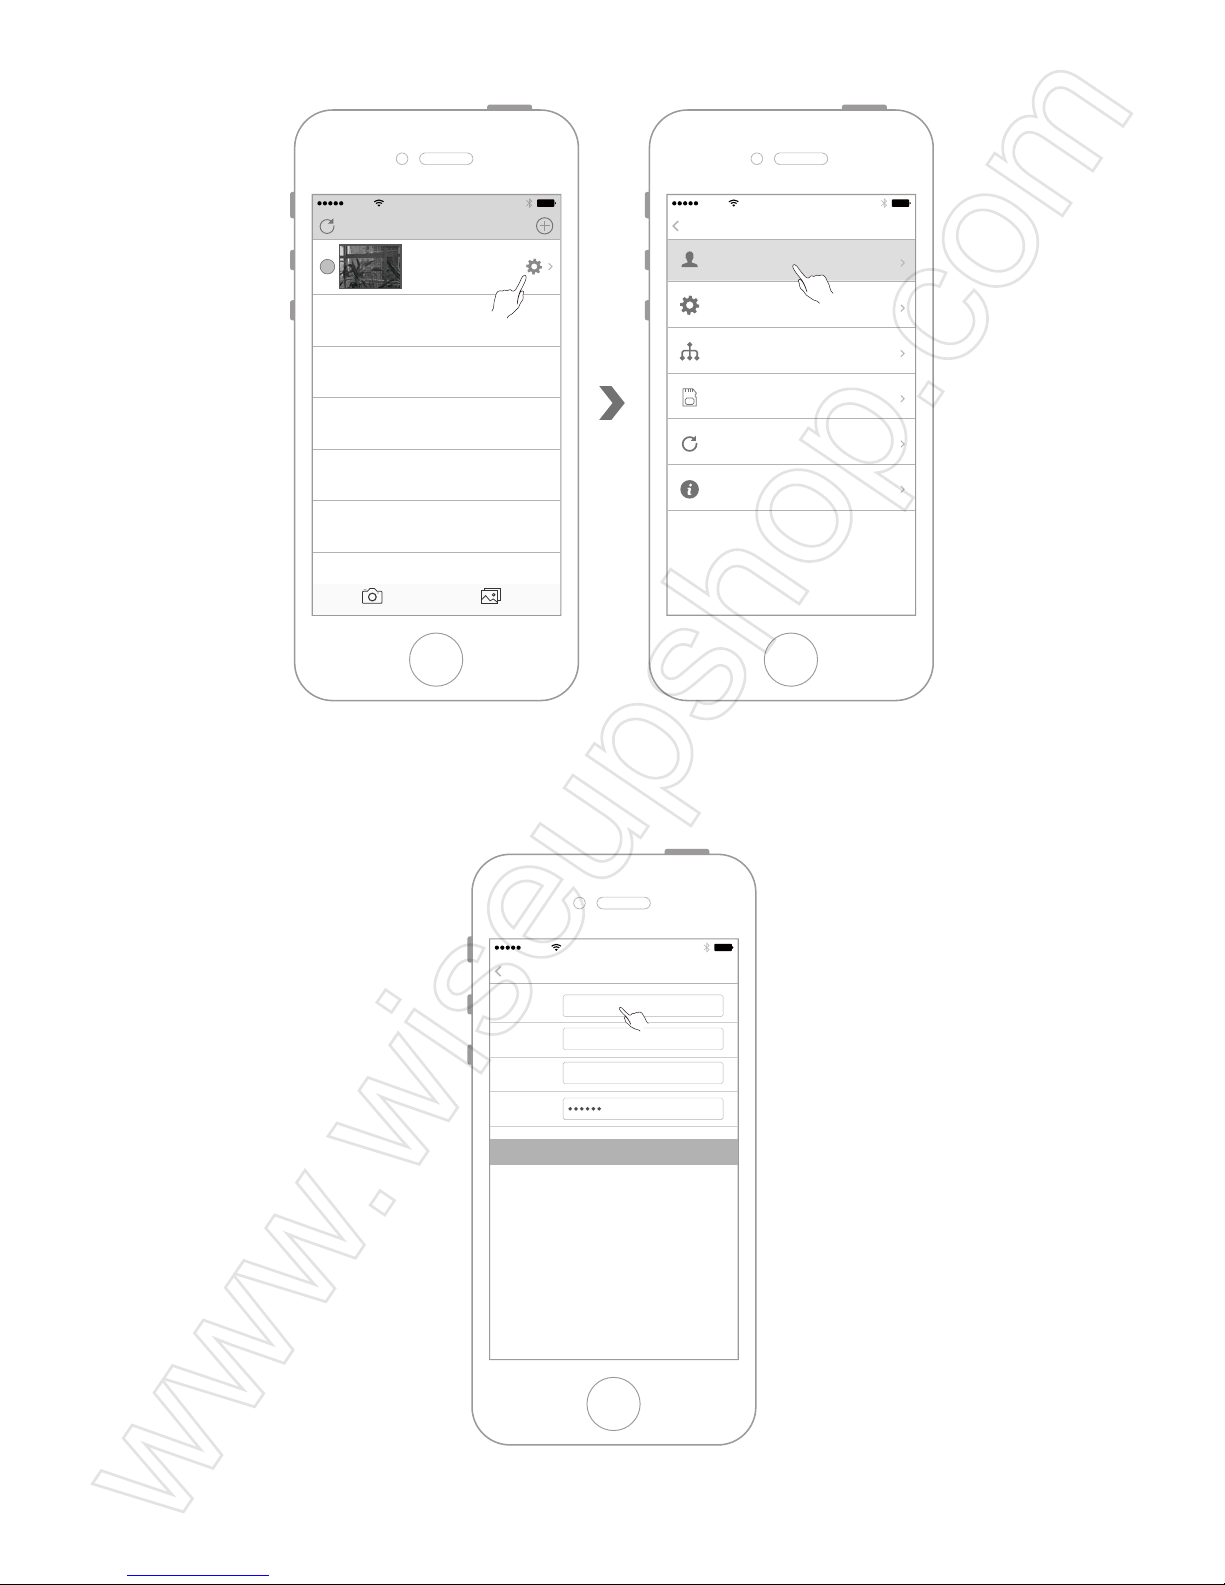
11.3 Enter the camera menu and select "User Settings".
11.4. Input the new camera name.
11.5 Tap "OK" to confirm the modification.
AT&T
11:57 AM
Devices
Devices Media
Camwf
Connected
AT&T
11:57 AM
Settings
Back
User Settings
Device Settings
Network Settings
SDCard Record
Refresh push
About
AT&T
11:57 AM
User Settings
Settings
Device Name New name
Device UID
User Name
Password
JP5DLXEVZGES11FZ111A
admin
OK
Page 23
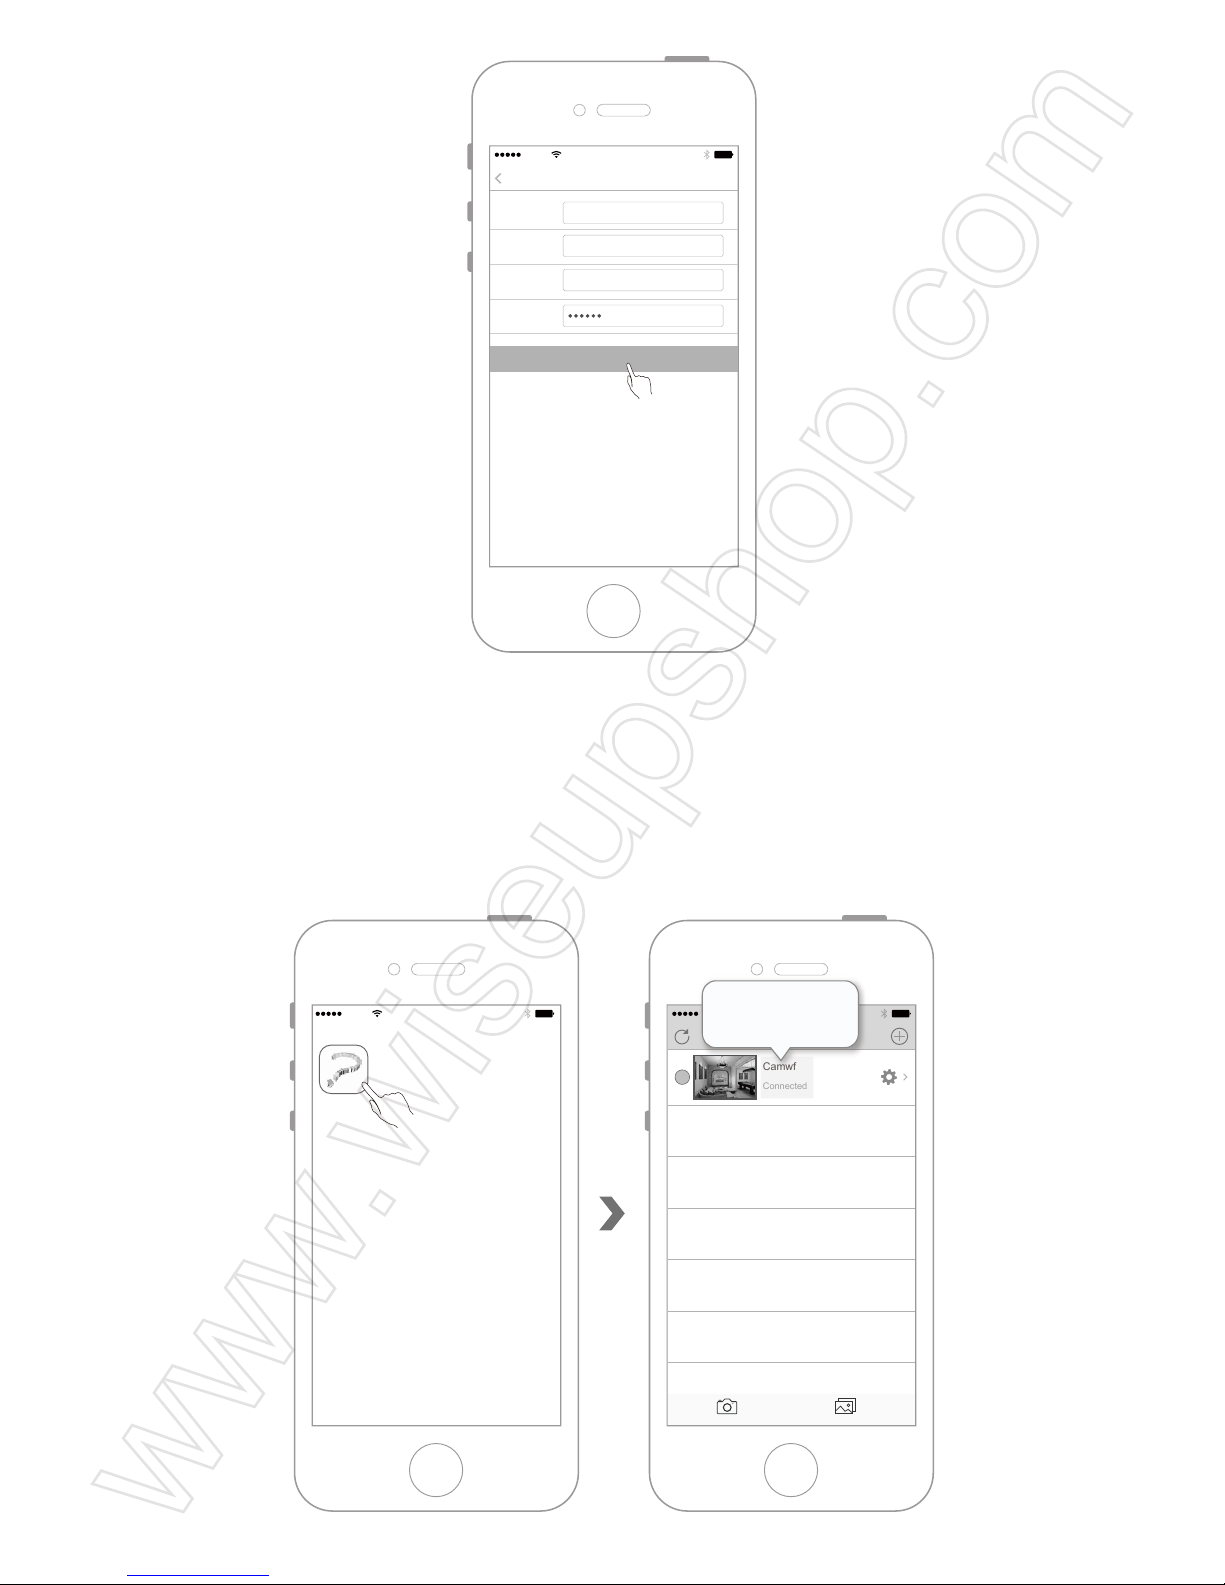
XII. Change the Camera's Login Password
12.1 Open the "Camwf " app and make sure that the camera has been successfully added
to the app and is in the online condition.
AT&T
11:57 AM
Camwf
AT&T
11:57 AM
Devices
Devices Media
Camwf
Connected
Camwf
Connected
AT&T
11:57 AM
User Settings
Settings
Device Name New name
Device UID
User Name
Password
JP5DLXEVZGES11FZ111A
admin
OK
Page 24
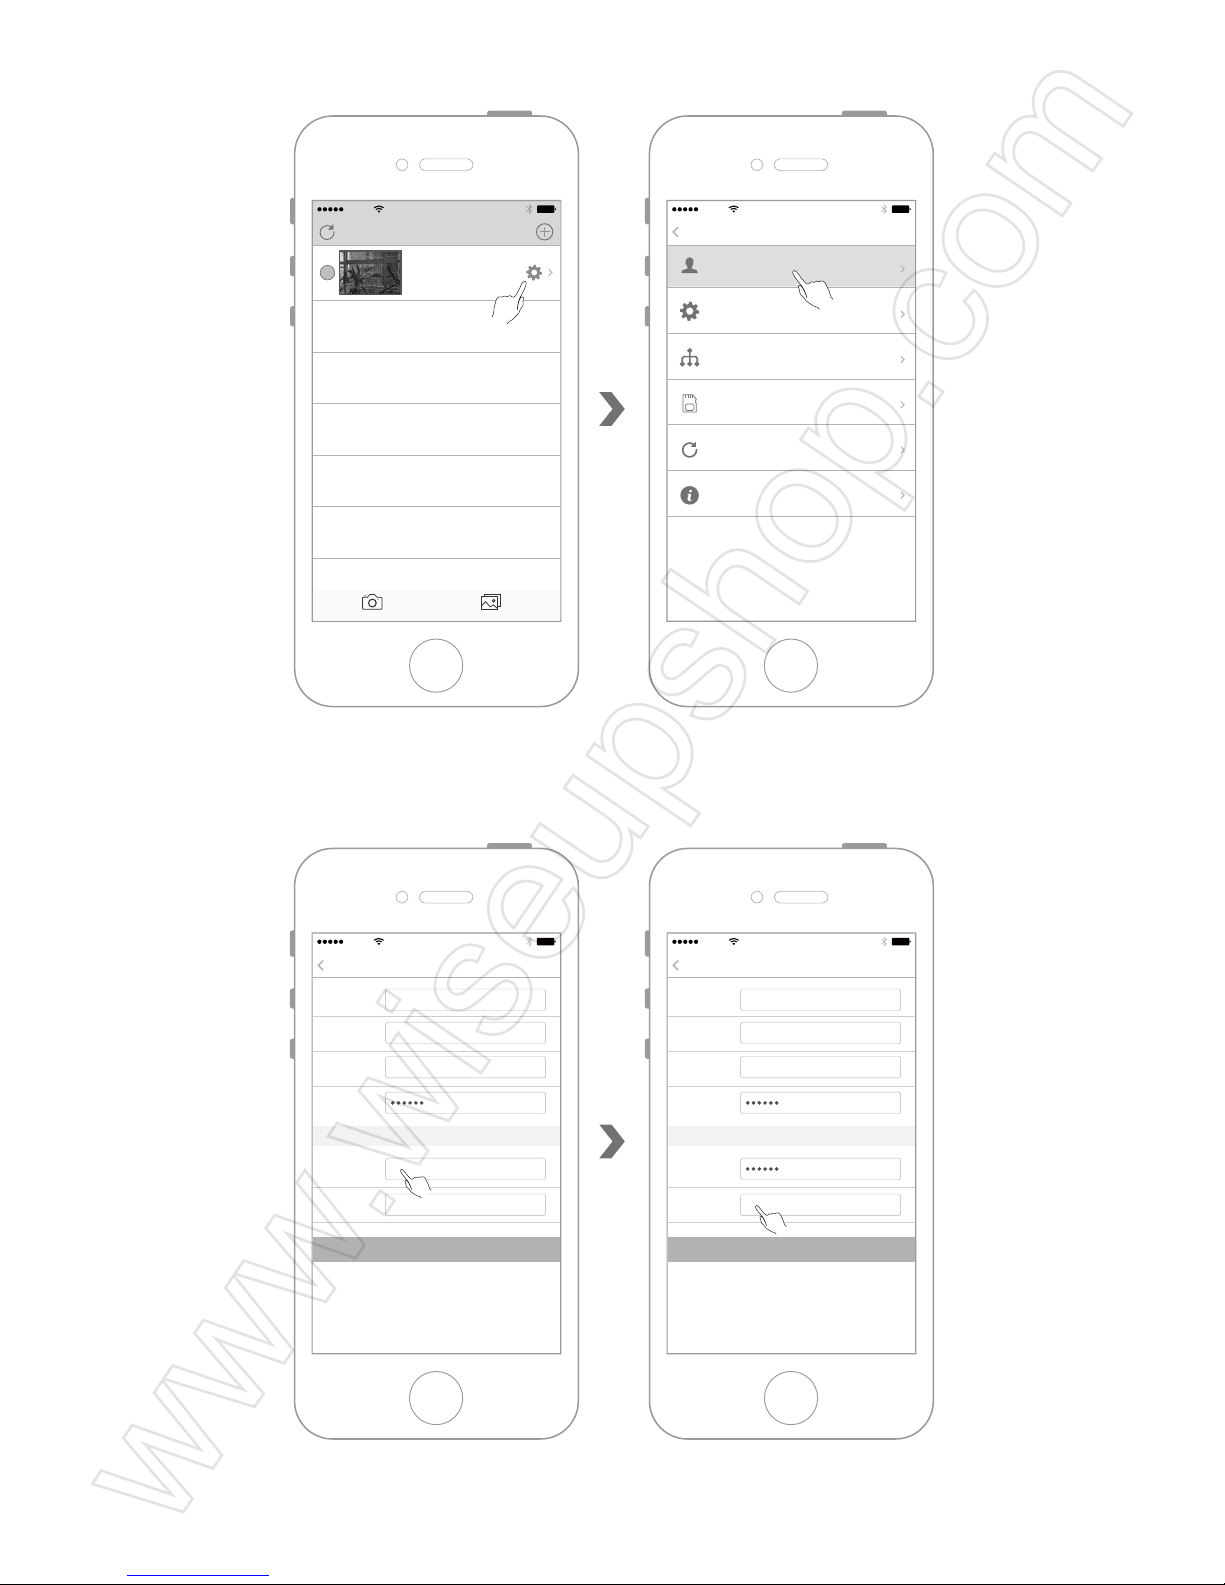
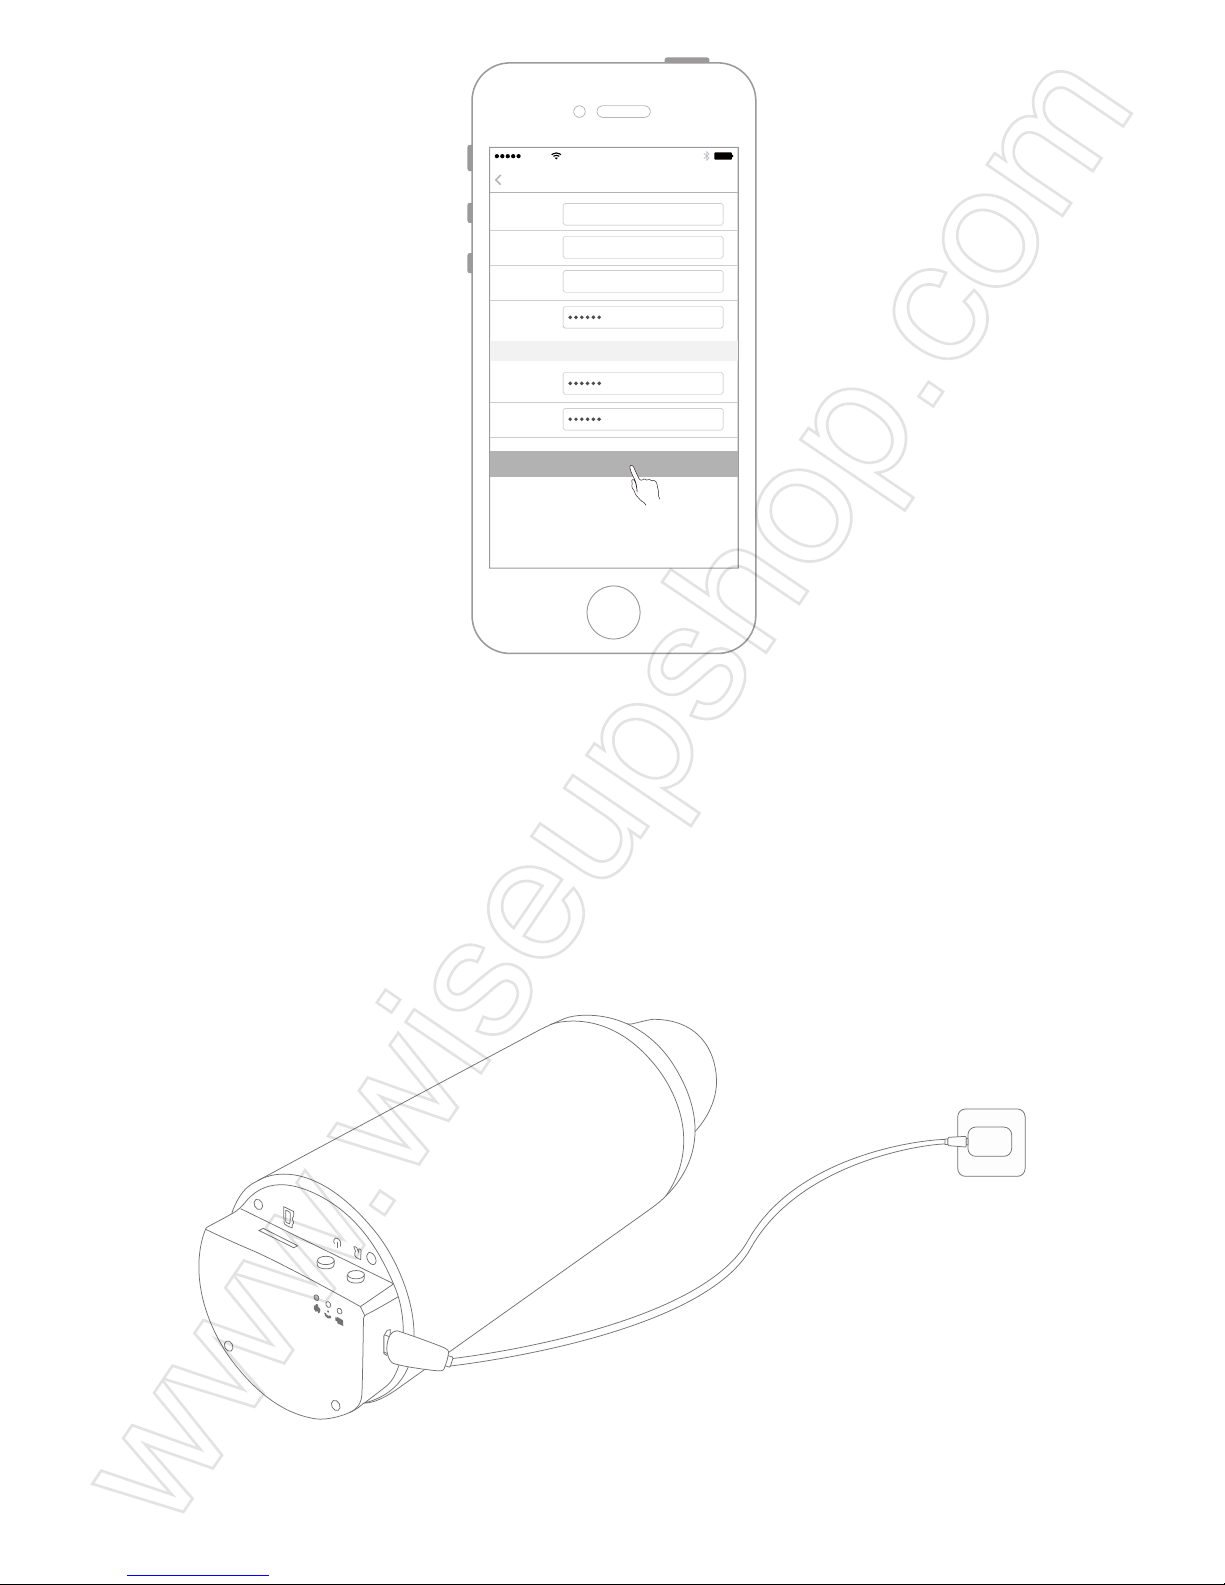
12.2 Enter the camera menu and select "User Settings".
12.3 Input the new password.
12.4 Tap "OK" to save the modification.
AT&T
11:57 AM
Devices
Devices Media
Camwf
Connected
AT&T
11:57 AM
Settings
Back
User Settings
Device Settings
Network Settings
SDCard Record
Refresh push
About
AT&T
11:57 AM
User Settings
Settings
Device Name Camwf
Device UID
User Name
Password
JP5DLXEVZGES11FZ111A
admin
OK
Psaaword1
Password2
NEW PASSWORD
AT&T
11:57 AM
User Settings
Settings
Device Name Camwf
Device UID
User Name
Password
JP5DLXEVZGES11FZ111A
admin
OK
Psaaword1
Password2
NEW PASSWORD
Page 25
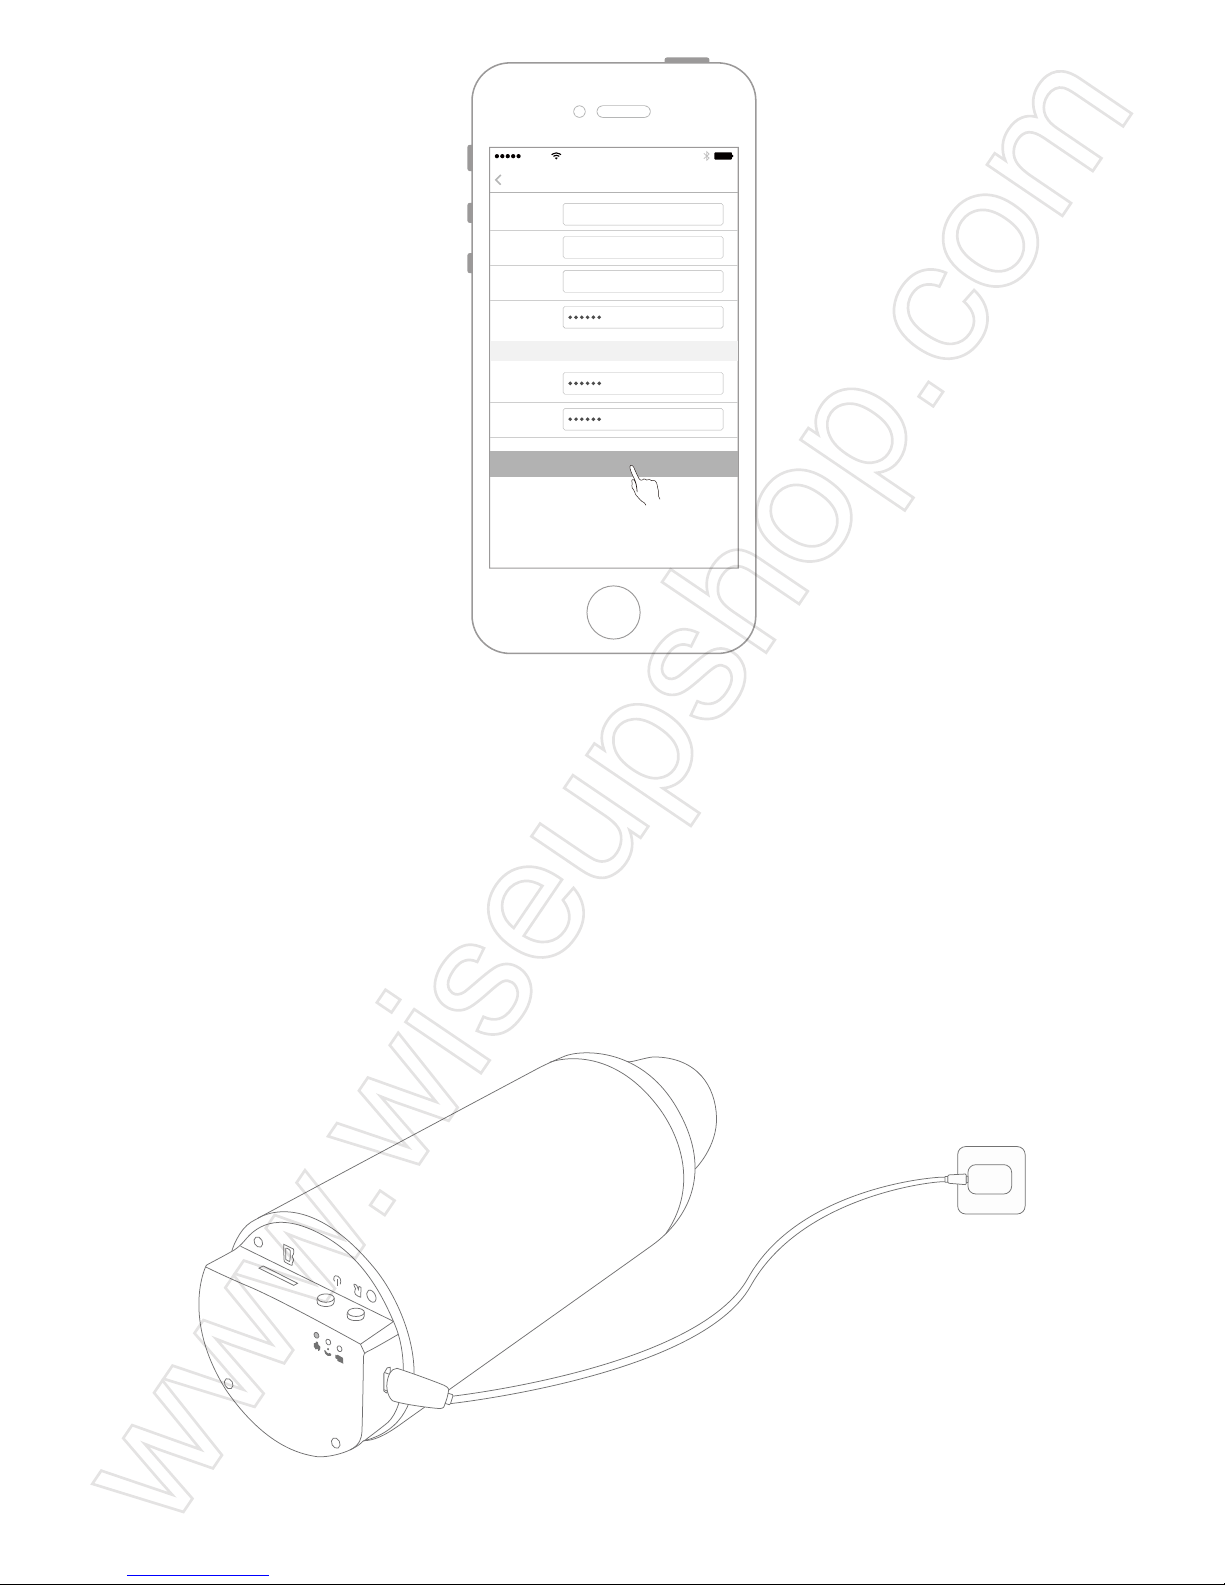
XIII. Back-up Battery Charging
Connect your camera to an external power source to charge the battery, the power indicator
light and the charging indicator light will be solid on at the same time during the charging
process. When the charging time is over 6 hours, please disconnect the camera from the outlet
power source.
AT&T
11:57 AM
User Settings
Settings
Device Name Camwf
Device UID
User Name
Password
JP5DLXEVZGES11FZ111A
admin
OK
Psaaword1
Password2
NEW PASSWORD
Page 26

Frequently Asked Questions:
Q: Why I cannot find the camera’s WIFI hotspot on my IOS mobile device?
A: Please try one of the following methods to solve the problem:
1. Connect the camera to an external power source with the power adapter.
2. Reset the camera.
3. Check the distance between the IOS mobile device and the camera, make sure that the
IOS mobile device is within the effective connection range of the camera's WIFI hotspot.
Refresh the WIFI setting page on your mobile device 2 minutes later.
4. Disable the WIFI connection function of your IOS mobile device, enable it later and
check.
Q: Why there is no video signal on the APP screen, the live video screen is black or the
video is always in loading status?
A: Exit the APP and log in again, make sure that the camera is online.
Q: Why the camera often shows offline?
A: Check if the camera is connected to an outlet power source. Or check the distance
between the camera and your IOS mobile device.
Q: How to add the camera to more IOS mobile devices?
A: Install and launch the APP "Camwf " on other IOS mobile devices, tap "+" to scan the QR
code on the camera, or input the camera UID and password to add the camera.
Q: What can I do if I forget the login password?
A: Reset the camera to factory default settings.
Q: How many IOS mobile devices can be connected to the camera at the same time?
A: Theoretically there is no limit, but we suggest 4 devices in max.
Q: How many cameras can be added to the APP?
A: No limit.
Page 27

Q: Can I connect the camera to my Windows PC?
A: Yes, you can, but you need to use an IOS mobile device to add the camera on the APP
in the first place, then add the camera on the PC client software. The PC client software
download address is: http://www.mymitech.com/download.html
Page 28
WIFI38
Bedienungsanleitung (IOS)
I.Produktbeschreibung
1. Reset-Taste
2. Netzschalter-Taste
3. Micro SD-Kartensteckplatz
4. USB-Anschluss
5. Ladeanzeige
6. WIFI-Indikator
7. Stromanzeige
8. Kameralinse
9. Infrarotlicht
II.Was istim Packet enthalten
-1× Reisebecher-Kamera
-1× USB-Kabel
-1× AC110-240VzuDC 5VNetzteil-Adaptor
-1× 16GB Micro SDHC Class 10 micro SD-Karte(im Micro SD-Kartensteckplatz installiert)
600ml
500ml
400ml
300ml
200ml
100ml
1
4
8
9
5
6
7
2
3
Page 29
III. Kameravorbereiten
3.1 Versichern Sie bitte, dass eine Mini-SD-Karte in den SD-Kartensteckplatz der Kamera
eingesetzt wird und dass die Karte zuvor formatiert wurde. Die maximale Speicherung der
eingelegten SD-Kartedarf nicht 64 GBüberschreiten. Wir empfehlen Sie daher, nur Micro
SDHC Class 10 Micro SD-Karten zu verwenden.
3.2 Schließen Sie die Kamera an eine externe Stromquelle an. Die Stromanzeige und die
Ladeanzeige leuchten auf und die Kamera schaltet sich automatisch ein.
IV. Peer-to-Peer-Netzwerkmoduskonfiguration (LAN-Modus)
4.1 Schließen Sie die Kamera an externe Stromquelle an oderdrücken Sie Netzschalter-Taste
Page 30
für 3 Sekunden lang, um die Kamera einzuschalten. Wenn die WIFI-Anzeige langsam blinkt,
bedeutet dies, dass der WIFI-Hotspot der Kamera eingeschaltet und funktionsbereit ist.
4.2 Verwenden Sie IOS-Mobilgeräte, um den QR-Code unten zu scannen, oder suchen Sie
im App Store nach "Camwf ", um APP zu installieren.
4.3 Öffnen Sie die WLAN-Einstellungsseite des IOS-Mobilgeräts und verbinden Sie das
IOS-Mobilgerät mit dem WIFI-Hotspot der Kamera.
Page 31
4.4 Öffnen Sie das APP "Camwf ".
4.5 Fügen Sie Ihre Kamera zum "Camwf " hinzu.
1.Schritt
AT&T
11:57 AM
WLAN
Settings
Wi-Fi
RT-FHC22NUK111A
AT&T
11:57 AM
Camwf
Page 32
2. Schritt
3.Schritt
AT&T
11:57 AM
Devices
Devices Media
AT&T
11:57 AM
Add DeviceBack
LAN Search Devices
Add Device By ID
Page 33
4.Schritt
4.6 Wenn der Status der Kamera als "Connected" angezeigt wird, ist der
Peer-to-Peer-Netzwerkmodus (LAN-Modus) der Kamera erfolgreich konfiguriert.
AT&T
11:57 AM
LAN search devices
JP5DLXEVZGES11FZ111A
AT&T
11:57 AM
Add Device
Back
Device Name IP Cam
Device UID
User Name
Password
JP5DLXEVZGES11FZ111A
admin
OK
Page 34
<Hinweis>: Die effektive Verbindungsdistanz des WIFI-Hotspots der Kamera beträgt etwa 15
Meter (49 Fuß).
V. Entfernt-Netzwerkmodus-Konfiguration (WAN-Modus)
5.1 Öffnen Sie das App "Camwf " und versichern Sie bitte, dass die Kamera erfolgreich zum
App hinzugefügt wurde und online ist.
AT&T
11:57 AM
Devices
Devices Media
Camwf
Connected
Camwf
Connected
AT&T
11:57 AM
Camwf
AT&T
11:57 AM
Devices
Devices Media
Camwf
Connected
Camwf
Connected
Page 35
5.2 Rufen Sie das Kameramenü auf und wählen Sie "Network Settings".
5.3 Bitte geben Sie "Netzwerkeinstellungen" ein und suchen Sie nach verfügbaren
WIFI-Hotspots. Wählen Sie den WIFI-Hotspot aus, den Sie verbinden möchten.
5.4 Geben Sie das Passwort ein, klicken Sie auf "OK" um sich zu registrieren, die Kamera
AT&T
11:57 AM
Settings
Back
User Settings
Device Settings
Network Settings
SDCard Record
Refresh push
About
AT&T
11:57 AM
Devices
Devices Media
Camwf
Connected
AT&T
11:57 AM
Network Settings
Settings
SSID:
Pwd
OK
AT&T
11:57 AM
Settings
SSID:
Pwd
OK
SSIDCancel
SSID-3
SSID-2
SSID-4
SSID-5
SSID-1
OK
Network Settings
Page 36
wird dann automatisch neu gestartet.
5.5 Fahren Sie das App "Camwf " herunter.
5.6 Kehren Sie zur WIFI-Einstellungsseite auf IOS-Mobilgeräts zurück und trennen Sie die
Verbindung zum aktuellen WIFI-Hotspot.
5.7 Verbinden Sie Ihr IOS-Mobilgeräts mit einem anderen WIFI-Hotspot oderverwenden
Sie das eigene Datennetzwerk Ihres IOS-Mobilgeräts.
AT&T
11:57 AM
Network Settings
Settings
SSID: SSID-1
xxxxxxxx
Pwd
OK
AT&T
11:57 AM
Settings
AT&T
11:57 AM
Settings
WLAN
SSID-1
WLAN
AT&T
11:57 AM
Fukeside
Forget This Network
AT&T
11:57 AM
WLAN
Settings
WLAN
i
SSID-1
Page 37
5.8 Nachdem Sie sichergestellt haben, dass Ihr IOS-Mobilgeräts über einen Internetzugang
verfügt, öffnen Sie das App "Camwf " erneut. Wenn Sie sehen, dass der Kamerastatus
"Connected" ist, bedeutet dies, dass der Entfernt-Netzwerkmodus der Kamera (WAN-Modus)
erfolgreich konfiguriert wird.
AT&T
11:57 AM
Settings
SSID-2
WLAN
WLAN
i
1
AT&T
11:57 AM
Settings
SSID-2
WLAN
WLAN
i
AT&T
11:57 AM
Cellular
Settings
Cellular Data
Cellular Data Options
AT&T
11:57 AM
Settings
WLAN
Cellular
Off
Off
2
AT&T
11:57 AM
Settings
WLAN
WLAN
Page 38
<Hinweis>: Wenn der Status der Kamera "Connect Fail" anzeigt, schlägt die Konfiguration des
Entfernt-Netzwerkmodus fehl. Konfigurieren Sie das Entfernt-Netzwerk erneut.
VI. Einstellung des Aufnahmemodus für Bewegungserkennung
6.1 Öffnen Sie das App "Camwf " und versichern Sie, dass die Kamera erfolgreich zum App
hinzugefügt wird und onlineist.
AT&T
11:57 AM
Camwf
AT&T
11:57 AM
Devices
Devices Media
Camwf
Connected
Camwf
Connected
AT&T
11:57 AM
Camwf
AT&T
11:57 AM
Devices
Devices Media
Camwf
Connected
Camwf
Connected
Page 39
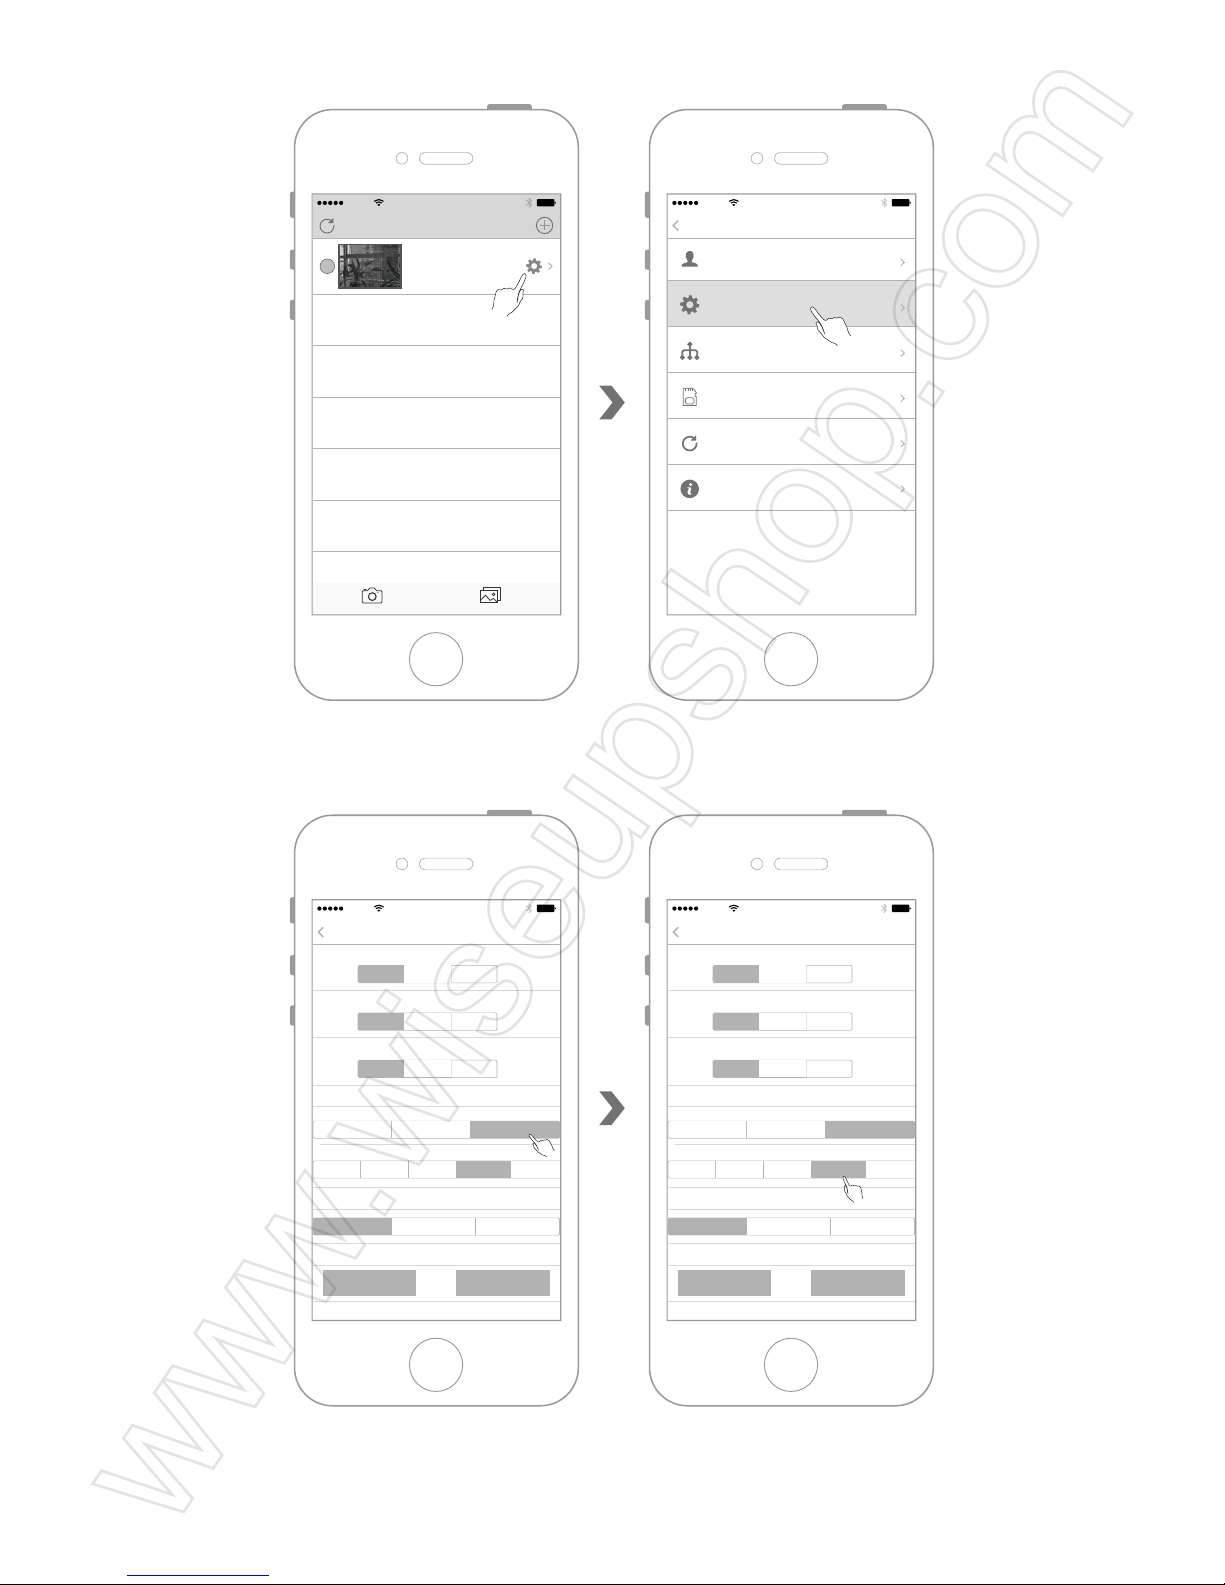
6.2 Rufen Sie das Kameramenü auf und wählen Sie "Device Settings".
6.3 Wählen Sie "Alarm Record" und wählen Sie die gewünschte
Bewegungserkennungsempfindlichkeit in "Motion Detection".
6.4 Klicken Sie auf "Confirm", um die Einstellungen für den
Bewegungserkennungs-Aufnahmemodus abzuschließen. Ihr Bewegungserkennungsvideo
wird automatisch auf der Mini-SD-Karte der Kamera gespeichert.
AT&T
11:57 AM
Devices
Devices Media
Camwf
Connected
AT&T
11:57 AM
Settings
Back
User Settings
Device Settings
Network Settings
SDCard Record
Refresh push
About
AT&T
11:57 AM
Settings
Settings
Start Time: End Time:
End Time:
End Time:
Status:
Start Time:
Status:
Start Time:
SD record
Motion detection
Status:
Close Record Capture
Close Record Capture
Close Record Capture
Close 24h Video Alarm Record
HD(1920*1080) HD(1280*720)
Close Low Middle High Highest
VGA(640*480)
Restart Confirm
AT&T
11:57 AM
Settings
Settings
Start Time: End Time:
End Time:
End Time:
Status:
Start Time:
Status:
Start Time:
SD record
Motion detection
Status:
Close Record Capture
Close Record Capture
Close Record Capture
Close 24h Video Alarm Record
HD(1920*1080) HD(1280*720)
Close Low Middle High Highest
VGA(640*480)
Restart Confirm
Page 40
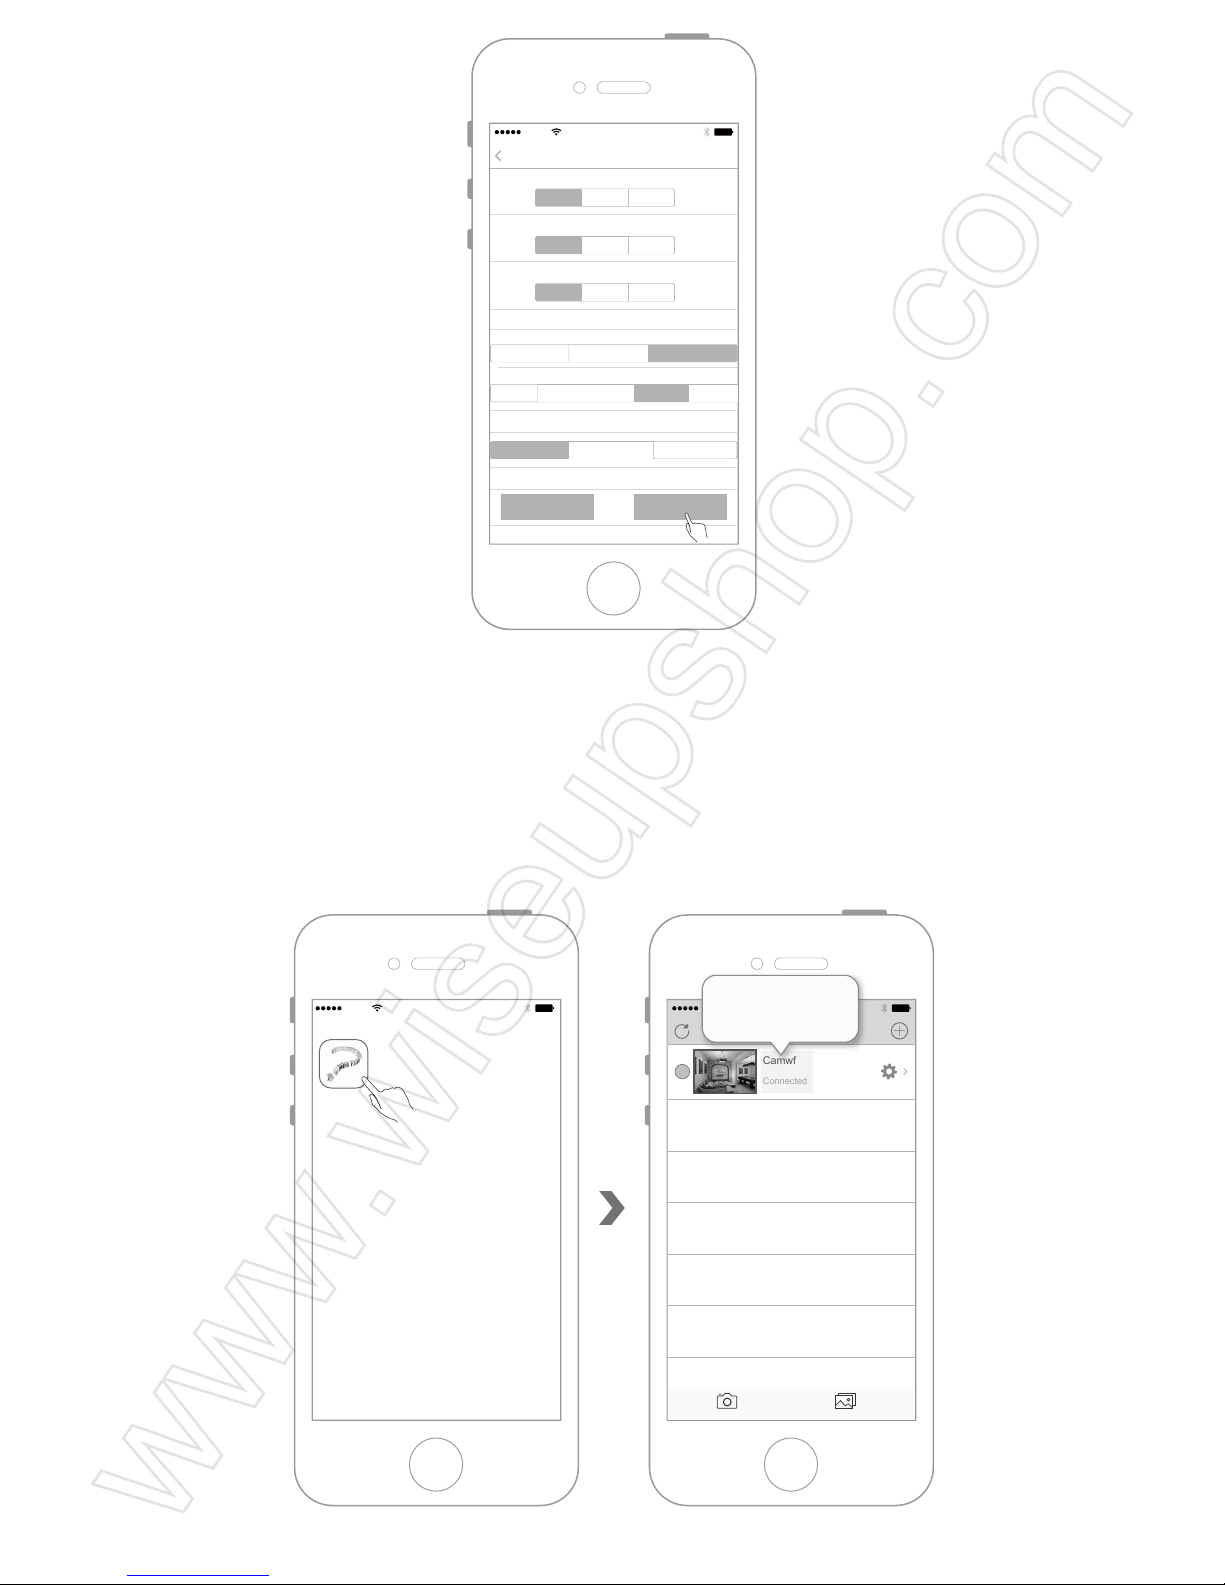
<Hinweis>: Die Video-Auflösung von Bewegungserkennung ist 1280x720P, das Video-Format ist AVI.
VII. Einstellung für den lokalen Nonstop-Aufnahmemodus
7.1 Öffnen Sie das App "Camwf " und versichern Sie, dass die Kamera erfolgreich zum App
hinzugefügt wird und onlineist.
Restart Confirm
AT&T
11:57 AM
Settings
Settings
Start Time: End Time:
End Time:
End Time:
Status:
Start Time:
Status:
Start Time:
SD record
Motion detection
Status:
Close Record Capture
Close Record Capture
Close Record Capture
Close 24h Video Alarm Record
HD(1920*1080) HD(1280*720)
Close Low Middle High Highest
VGA(640*480)
AT&T
11:57 AM
Camwf
AT&T
11:57 AM
Devices
Devices Media
Camwf
Connected
Camwf
Connected
Page 41
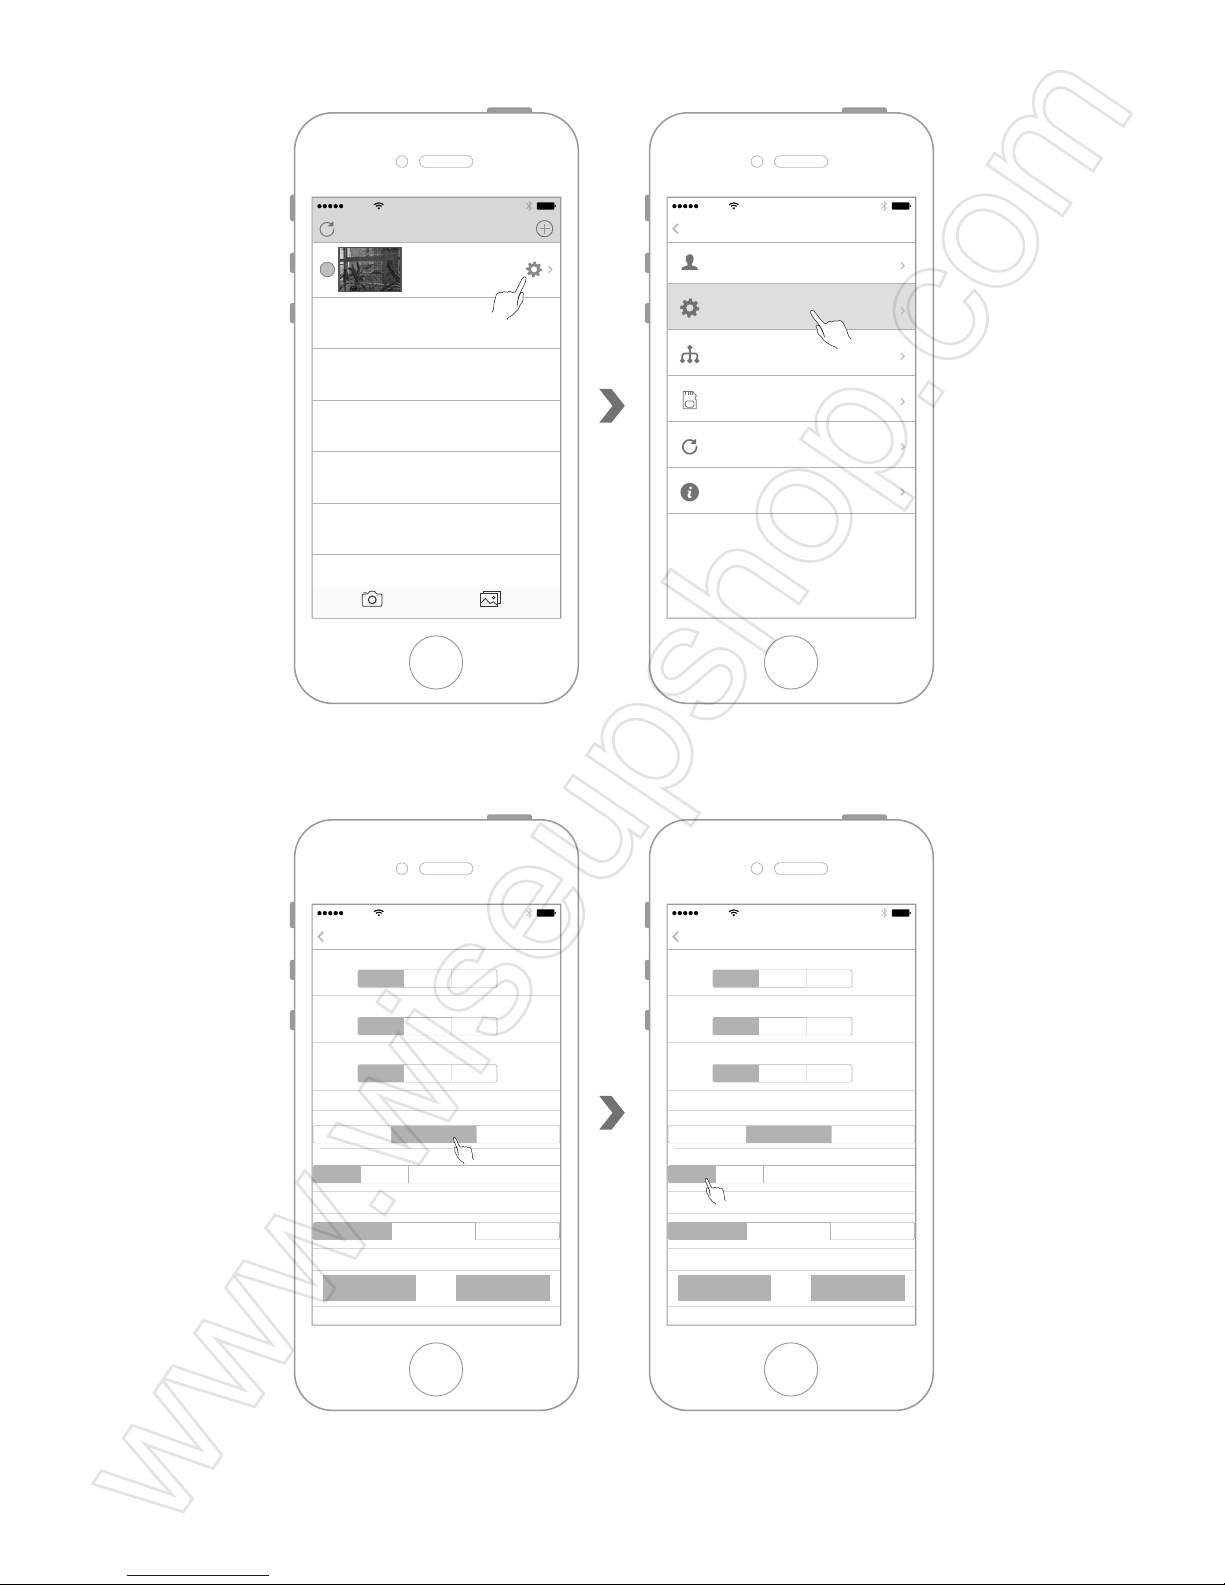
7.2 Rufen Sie das Kameramenü auf und wählen Sie "Device Settings".
7.3 Wählen Sie "24h Video" und deaktivieren Sie die Funktion "Motion Detection".
7.4 Klicken Sie auf "Confirm". Die Kamera startet automatisch die Aufnahme 24 Stunden
ununterbrochen.
AT&T
11:57 AM
Devices
Devices Media
Camwf
Connected
AT&T
11:57 AM
Settings
Back
User Settings
Device Settings
Network Settings
SDCard Record
Refresh push
About
AT&T
11:57 AM
Settings
Settings
Start Time: End Time:
End Time:
End Time:
Status:
Start Time:
Status:
Start Time:
SD record
Motion detection
Status:
Close Record Capture
Close Record Capture
Close Record Capture
Close 24h Video
HD(1920*1080) HD(1280*720)
Close Low Middle High Highest
VGA(640*480)
Restart Confirm
Alarm Record
AT&T
11:57 AM
Settings
Settings
Start Time: End Time:
End Time:
End Time:
Status:
Start Time:
Status:
Start Time:
SD record
Motion detection
Status:
Close Record Capture
Close Record Capture
Close Record Capture
Close 24h Video
HD(1920*1080) HD(1280*720)
Close Low Middle High Highest
VGA(640*480)
Restart Confirm
Alarm Record
Page 42
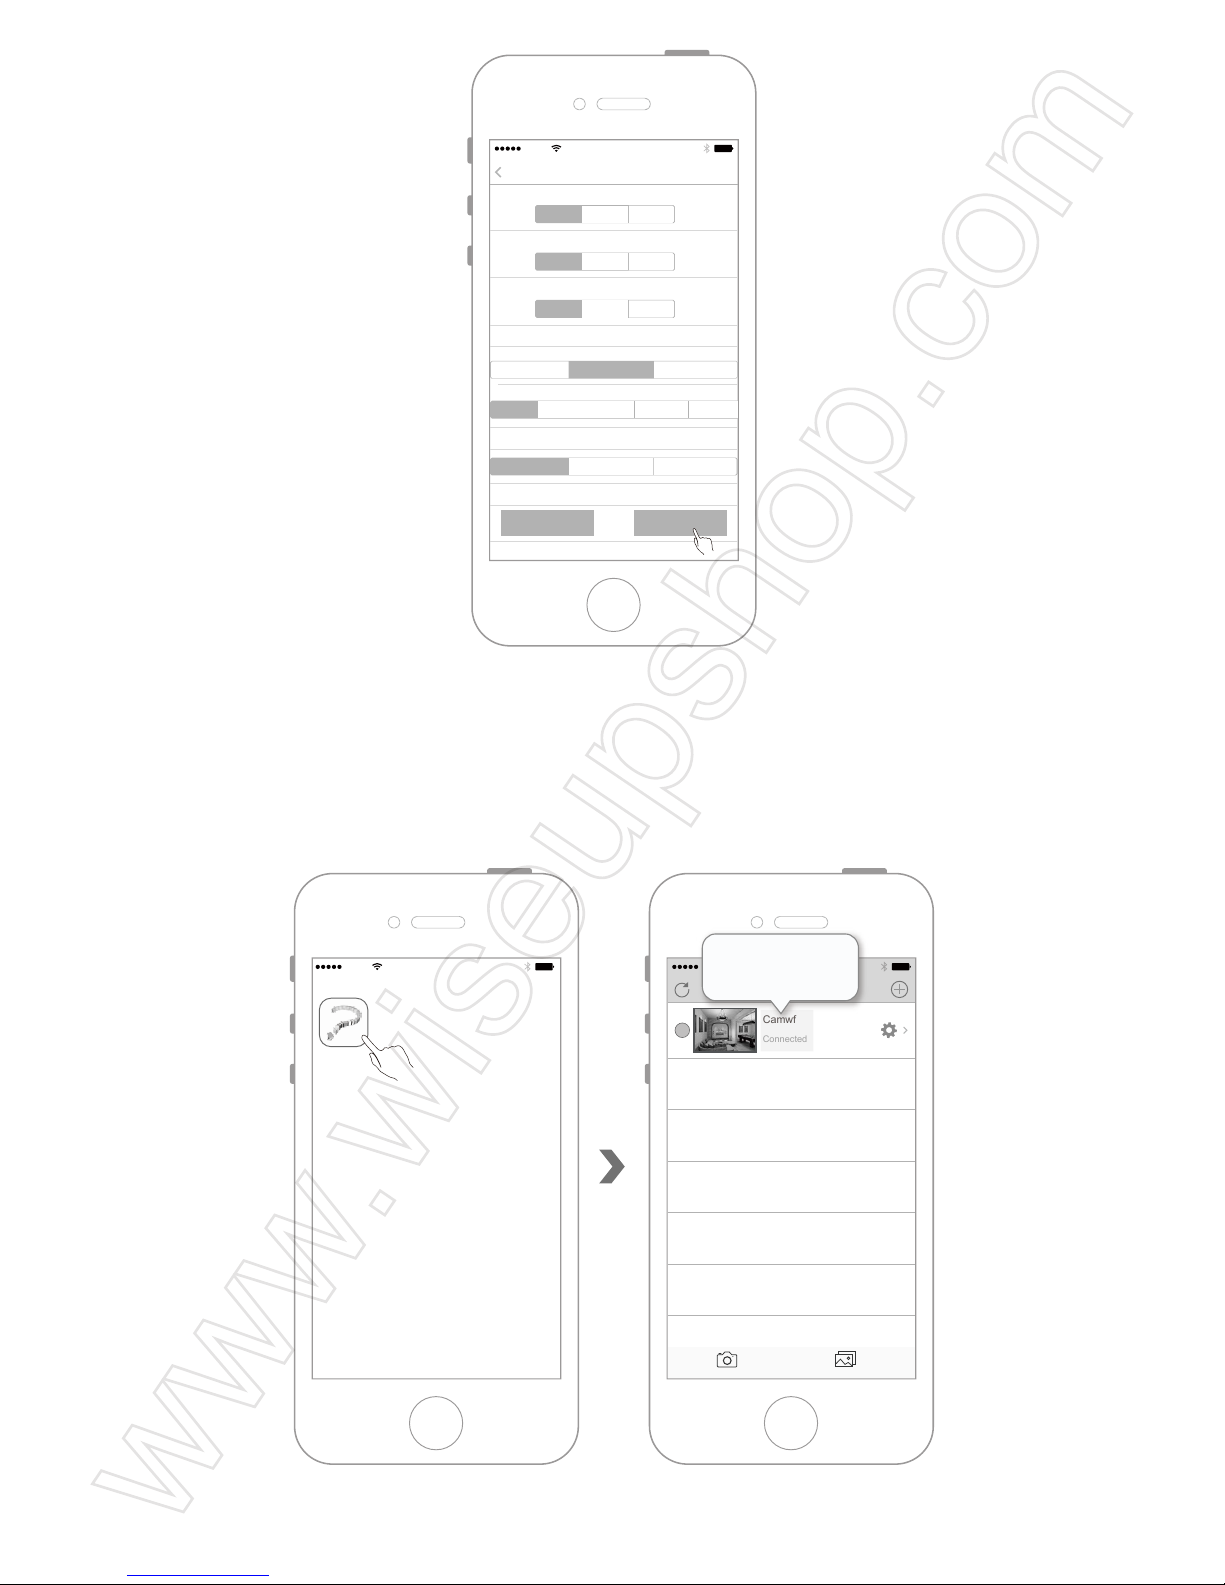
VIII. Manuelle Entfernt-Aufnahme mit einem IOS-Mobilgerät
8.1 Öffnen Sie das App "Camwf " und versichern Sie, dass die Kamera erfolgreich zum App
hinzugefügt wird und onlineist.
8.2 Klicken Sie auf die Kamera.
AT&T
11:57 AM
Camwf
AT&T
11:57 AM
Devices
Devices Media
Camwf
Connected
Camwf
Connected
Restart Confirm
AT&T
11:57 AM
Settings
Settings
Start Time: End Time:
End Time:
End Time:
Status:
Start Time:
Status:
Start Time:
SD record
Motion detection
Status:
Close Record Capture
Close Record Capture
Close Record Capture
Close 24h Video
HD(1920*1080) HD(1280*720)
Close Low Middle High Highest
VGA(640*480)
Alarm Record
Page 43
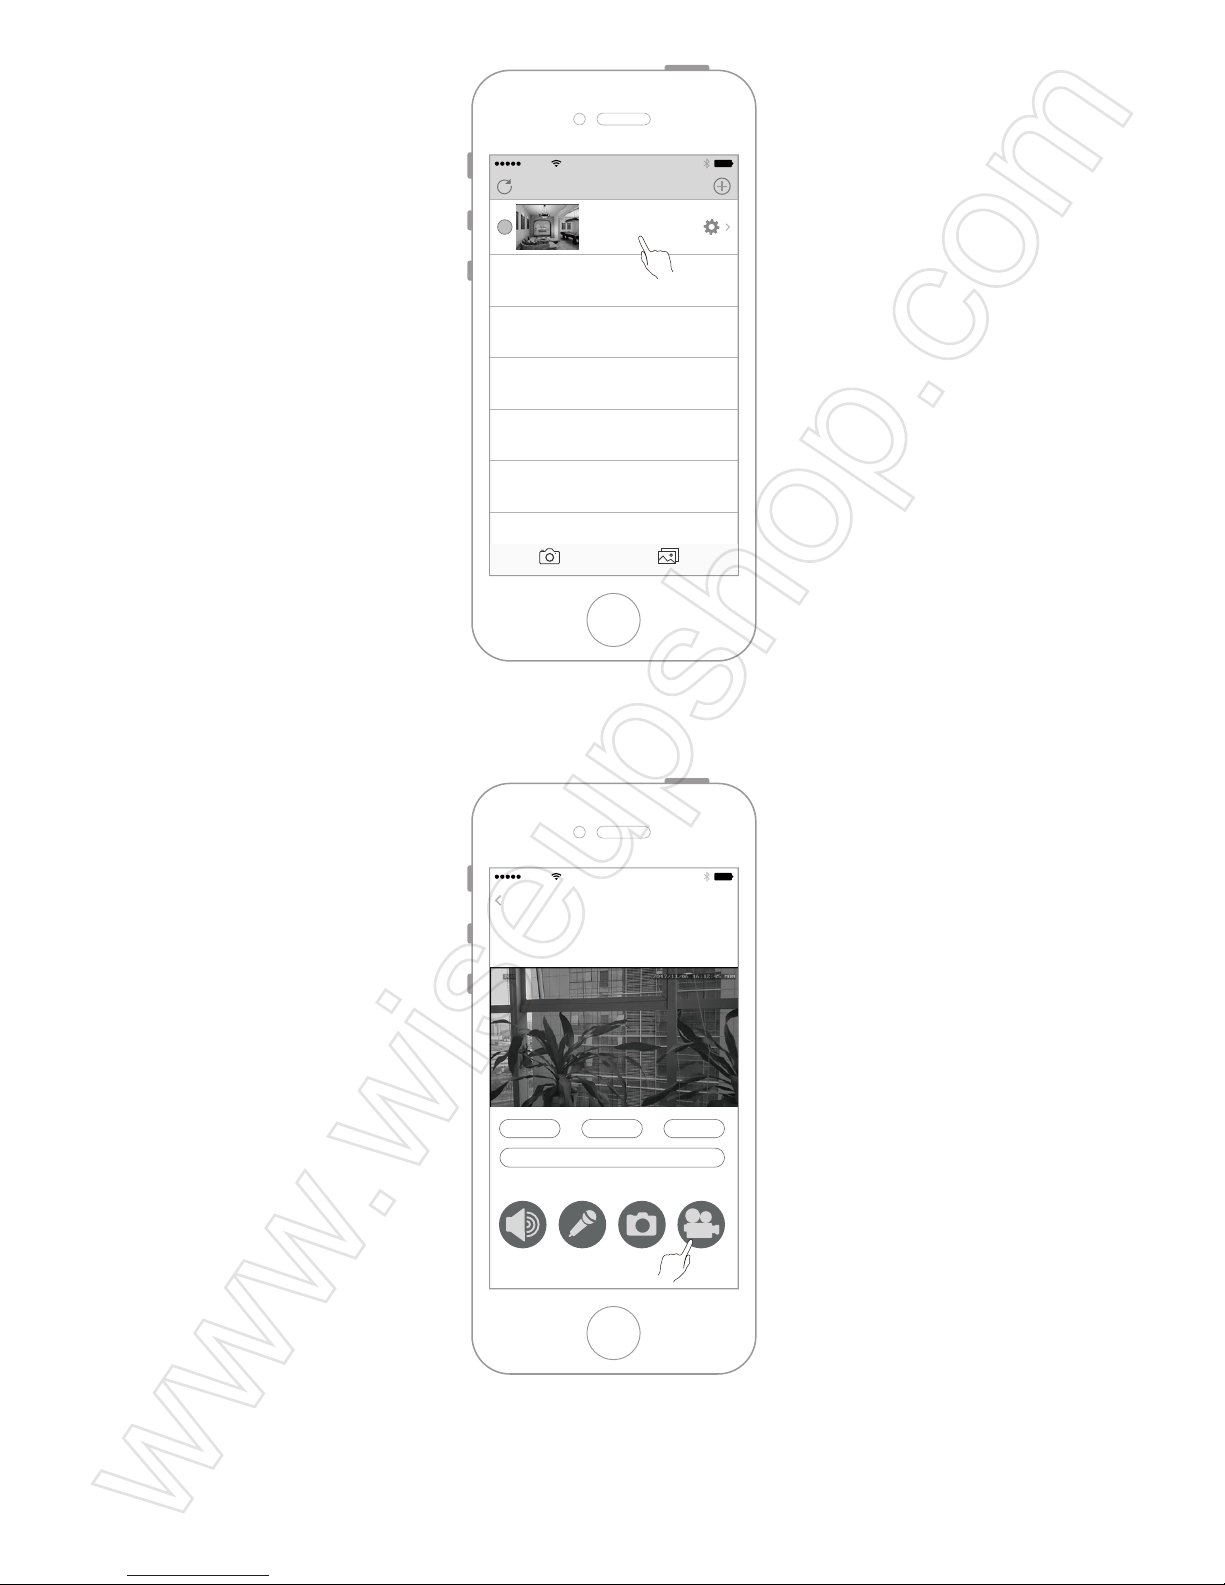
8.3 Klicken Sie auf die Aufnahmetaste, um die Aufnahme zu starten.
8.4 Klicken Sie auf die Aufnahmetaste, um die Aufnahmefunktion ein- oder auszuschalten.
AT&T
11:57 AM
Devices
Devices Media
Camwf
Connected
AT&T
11:57 AM
Camwf
Network:184 k/s
00:12
Full Flip
Video Reset
Horizontal Flip Vertical Flip
Page 44
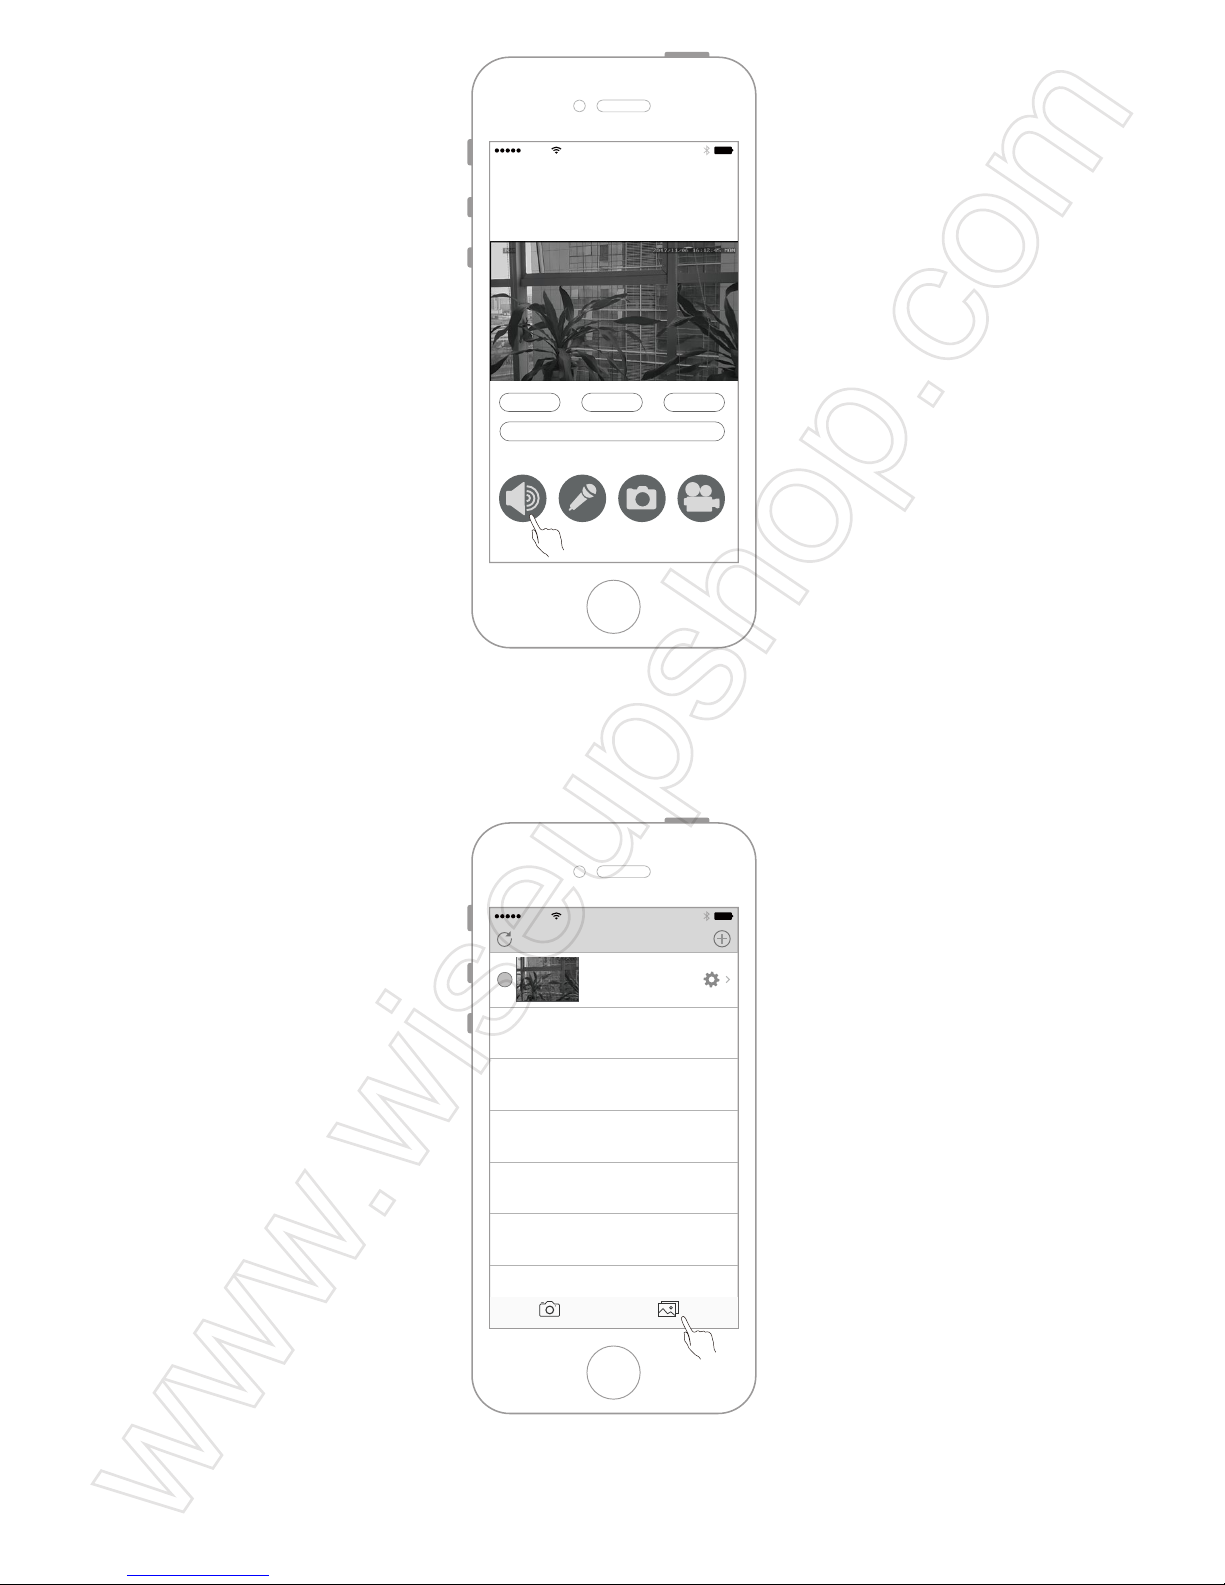
8.5 Sie können Videodateien wiedergeben, die auf IOS-Mobilgeräten gespeichert sind.
1.Schritt
2.Schritt
AT&T
11:57 AM
Devices
Devices Media
Camwf
Connected
AT&T
11:57 AM
Camwf
Network:184 k/s
00:12
Full Flip
Video Reset
Horizontal Flip Vertical Flip
Page 45
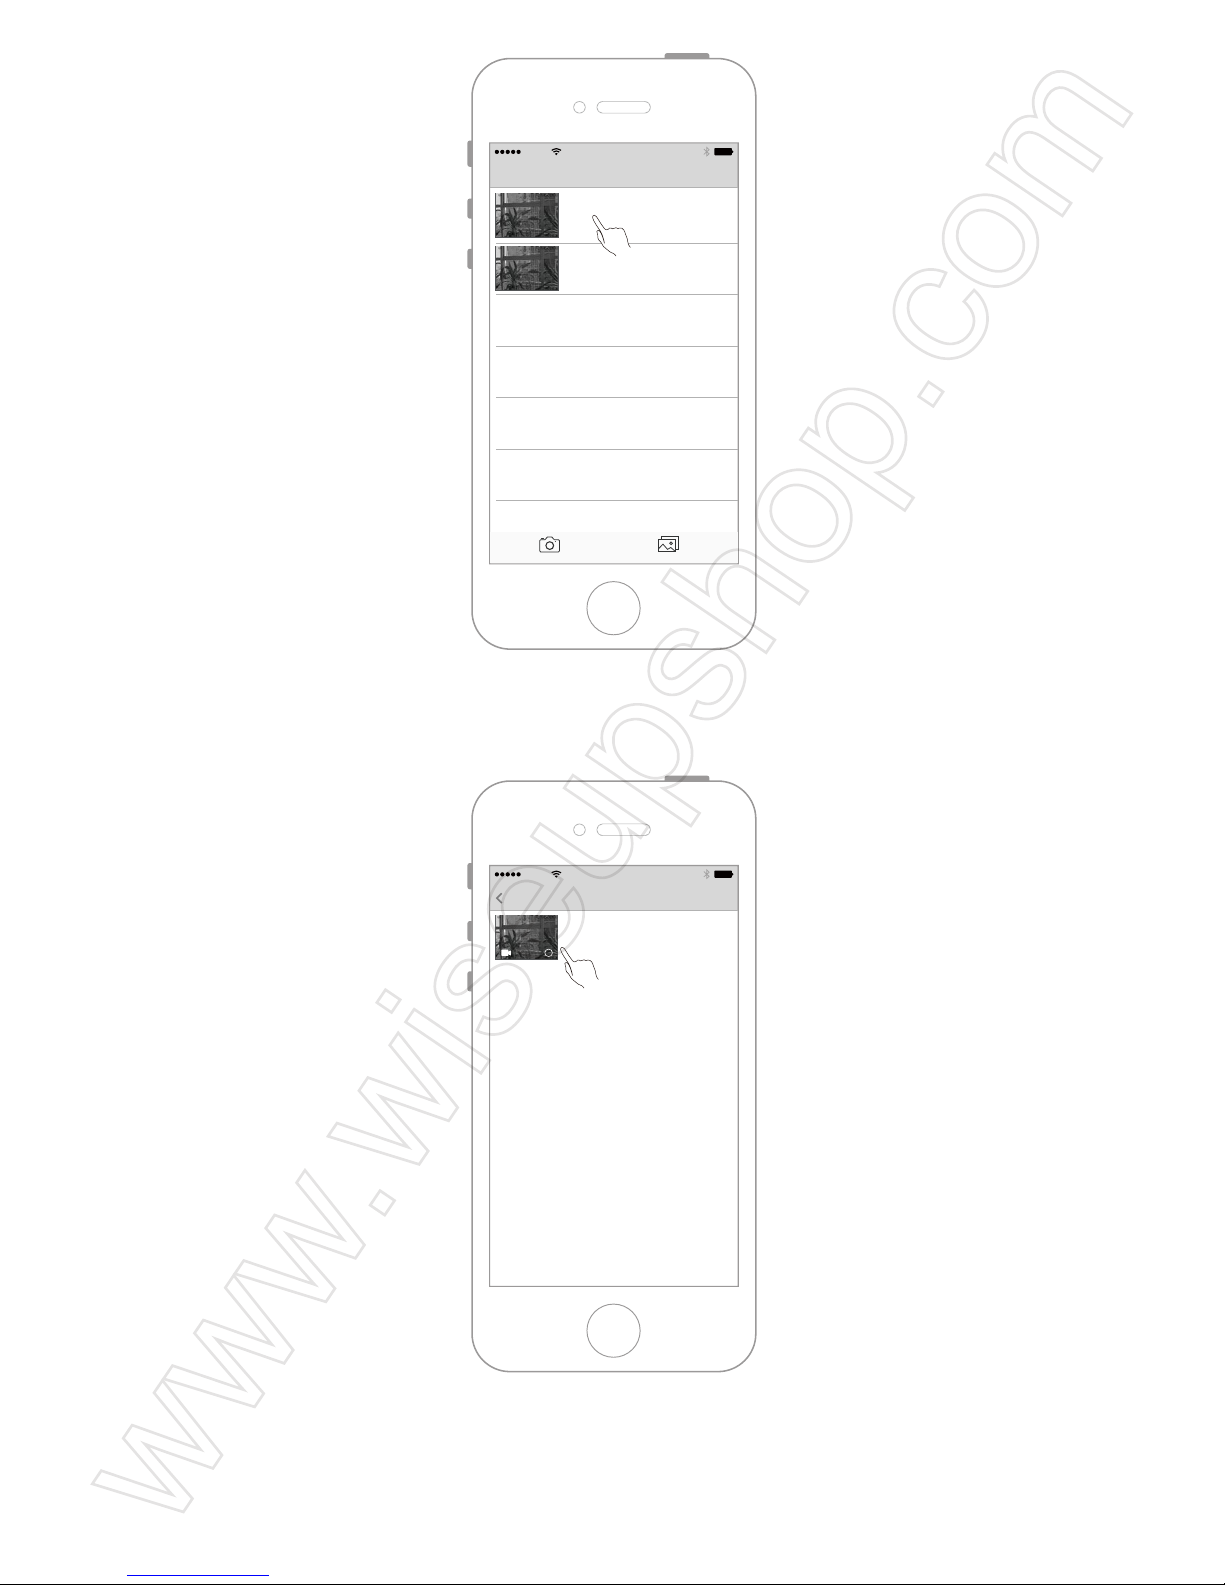
3.Schritt
<Hinweis>: Die Video-Auflösung von ist 1280x720P, das Video-Format ist MP4.
AT&T
11:57 AM
Photos
Devices Media
Camwf
1
Camwf
2
AT&T
11:57 AM
Camwf Edit
Page 46
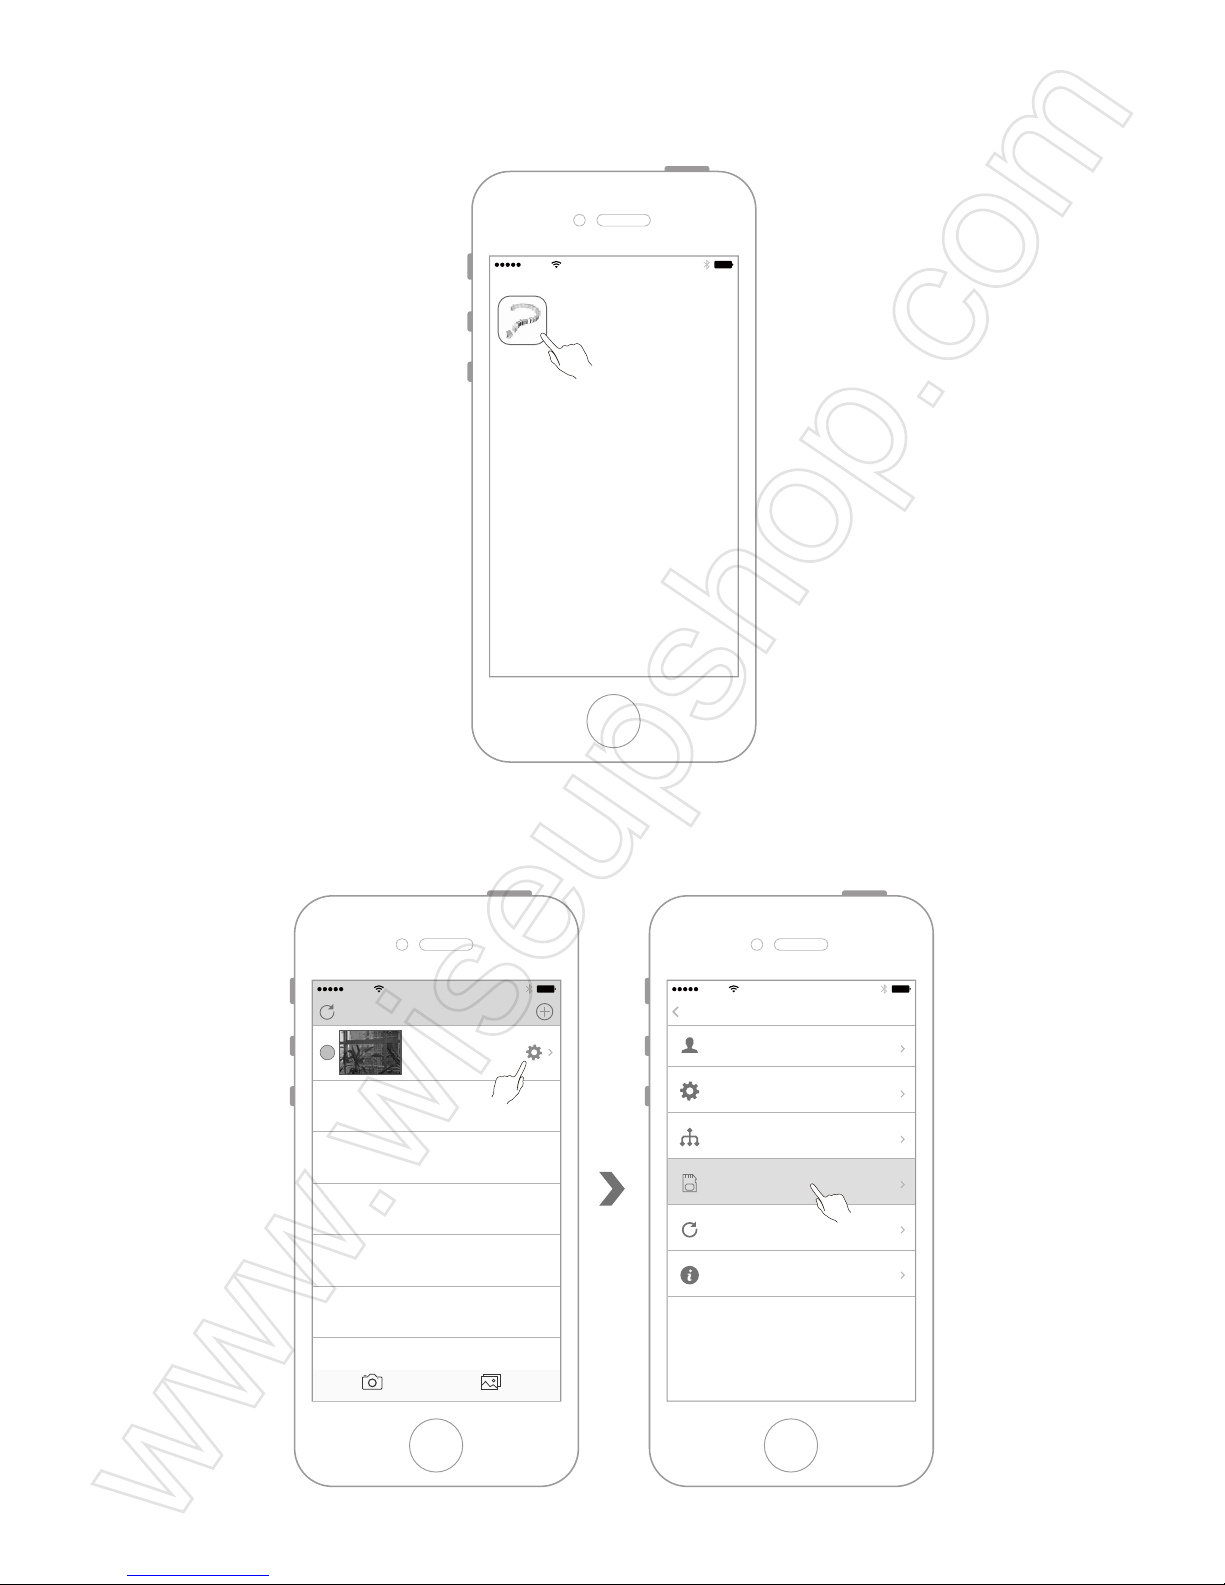
IX. Wiedergabe lokaler Videos auf einem IOS-Mobilgerät
9.1 Öffnen Sie das App "Camwf ".
9.2 Rufen Sie das Kameramenü auf und wählen Sie "SDCard Record".
AT&T
11:57 AM
Camwf
AT&T
11:57 AM
Devices
Devices Media
Camwf
Connected
AT&T
11:57 AM
Settings
Back
User Settings
Device Settings
Network Settings
SDCard Record
Refresh push
About
Page 47
9.3 Wählen Sie eine der Videodateien aus,um wiederzugeben.
X. Reset
Bedienung: Halten Sie bei eingeschalteter Kamera die Reset-Taste 10 Sekunden lang
gedrückt, um die Werkseinstellungen wiederherzustellen.
AT&T
11:57 AM
SDCard
Full time recording
6 Now 2017 at 4:20 PM
Full time recording
6 Now 2017 at 4:15 PM
Full time recording
6 Now 2017 at 4:08 PM
Full time recording
6 Now 2017 at 4:02 PM
Full time recording
6 Now 2017 at 3:57 PM
Full time recording
6 Now 2017 at 3:40 PM
Full time recording
6 Now 2017 at 3:33 PM
Full time recording
6 Now 2017 at 3:15 PM
Page 48
XI. Ändern Sie den Kameranamen
11.1 Öffnen Sie das App "Camwf ".
11.2 Versichern Sie, dass die Kamera erfolgreich zum App hinzugefügt wird und onlineist.
AT&T
11:57 AM
Camwf
AT&T
11:57 AM
Devices
Devices Media
Camwf
Connected
Camwf
Connected
Page 49
11.3 Rufen Sie das Kameramenü auf und wählen Sie "User Settings".
11.4 Geben Sie einen neuen Kameranamen ein.
11.5 Klicken Sie auf "OK", um die Änderung zu bestätigen.
AT&T
11:57 AM
Devices
Devices Media
Camwf
Connected
AT&T
11:57 AM
Settings
Back
User Settings
Device Settings
Network Settings
SDCard Record
Refresh push
About
AT&T
11:57 AM
User Settings
Settings
Device Name New name
Device UID
User Name
Password
JP5DLXEVZGES11FZ111A
admin
OK
Page 50
XII Änderung des Login-Passwortes der Kamera
12.1 Öffnen Sie das App "Camwf ". Versichern Sie, dass die Kamera erfolgreich zum App
hinzugefügt wird und online ist.
AT&T
11:57 AM
Camwf
AT&T
11:57 AM
Devices
Devices Media
Camwf
Connected
Camwf
Connected
AT&T
11:57 AM
User Settings
Settings
Device Name New name
Device UID
User Name
Password
JP5DLXEVZGES11FZ111A
admin
OK
Page 51
12.2 Rufen Sie das Kameramenü auf und wählen Sie "User Settings".
12.3 Geben Sie das neue Passwort ein.
12.4 Klicken Sie auf "OK", um die Änderungen zu speichern.
AT&T
11:57 AM
Devices
Devices Media
Camwf
Connected
AT&T
11:57 AM
Settings
Back
User Settings
Device Settings
Network Settings
SDCard Record
Refresh push
About
AT&T
11:57 AM
User Settings
Settings
Device Name Camwf
Device UID
User Name
Password
JP5DLXEVZGES11FZ111A
admin
OK
Psaaword1
Password2
NEW PASSWORD
AT&T
11:57 AM
User Settings
Settings
Device Name Camwf
Device UID
User Name
Password
JP5DLXEVZGES11FZ111A
admin
OK
Psaaword1
Password2
NEW PASSWORD
Page 52
XIII. Aufladen der Ersatzakku
Schließen Sie die Kamera an eine externe Stromquelle an. Während des Ladevorgangs
sind die Strom- und Ladelanzeigen immer eingeschaltet. Wenn die Ladezeit 6 Stunden
erreicht, schalten Sie bitte die Kamera aus.
AT&T
11:57 AM
User Settings
Settings
Device Name Camwf
Device UID
User Name
Password
JP5DLXEVZGES11FZ111A
admin
OK
Psaaword1
Password2
NEW PASSWORD
Page 53

Häufig gestellte Fragen:
F: Der WIFI-Hotspot der Kamera kann nicht auf der WIFI-Einstellungsseite des
IOS-Mobilgeräts gefunden werden.
A: Bitte versuchen Sie die folgenden Lösungen.
1. Schließen Sie die Kamera an eine externe Stromquelle an.
2. Reset.
3.Überprüfen Sie die Entfernung zwischen dem IOS-Mobilgerät und der Kamera und
warten Sie 2 Minuten lang, bis die WIFI-Einstellungsseite des IOS-Mobilgeräts innerhalb
der effektiven WIFI-Verbindungsdistanz der Kamera aktualisiert ist.
4. Deaktivieren Sie die WIFI-Funktionen von IOS-Mobilgeräte und warten Sie ein bisschen.
F: Es gibt kein Videosignal auf APP, der Bildschirm ist leer oder es bleibt immer beim
Suchen.
A: Beenden Sie das APP, melden Sie sich erneut an und stellen Sie fest, dass die Kamera
online ist.
F: Die Kamera hat oft verlorene Verbindung.
A: Schließen Sie die Kamera an eine externe Stromquelle an. Stellen Sie die Entfernung
zwischen der Camera und dem WIFI-Hotspot ein.
F: Wie füge ich eine Kamera zu mehr IOS-Mobilgeräten hinzu?
A: Installieren und öffnen Sie das App "Camwf ", klicken Sie auf "+", scannen Sie den
QR-Code an der Unterseite der Kamera oder geben Sie die UID und das Passwort der
Kamera ein, um sie hinzuzufügen.
F: Was tun Sie, wenn Sie Ihr Passwort vergessen haben?
A: Die Kamera reset.
F: Wie viele IOS-Mobilgeräte können gleichzeitig mit der Kamera verbunden werden?
A: Theoretisch gibt es keine Grenze, aber wir empfehlen, die Verbindung mit nicht mehr als
4 IOS-Mobilgeräten herzustellen.
Page 54

F: Wie viele Kameras kann ich meinem App hinzufügen?
A: EsgibtkeineBeschränkung.
F: Kann ich meine Kamera an einen Windows-PC anschließen?
A: Ja, aber Sie müssen im Voraus eine Kamera zu Ihrem mobilen Gerät hinzufügen und
dann die kostenlose PC-Software auf Ihrem Computer installieren, um eine Kamera
hinzuzufügen. PC-Client-Software-Downloadlink: http://www.mymitech.com/download.html
Page 55
WIFI38
Manueld’emploi (IOS version)
I.A Propos du Produit
1. Bouton de réinitialisation
2. Boutond' interrupteurd' alimentation
3. Fente pour carte Micro SD
4. USB port
5. Indicateur de charge
6. Indicateur de WIFI
7. Indicateur de puissance
8. Objectif de caméra
9. Lumière infrarouge
II.Qu'y a-t-il dans le Paquet?
-1× Coupe de voyage, caméra
-1× Câble USB
-1× AC110-240V à DC 5VAdaptateur d'alimentation
-1× 16 Go Micro SDHC Classe 10 Carte SD(Installé dans la fente pour carte de Micro SD)
600ml
500ml
400ml
300ml
200ml
100ml
1
4
8
9
5
6
7
2
3
Page 56
III. Préparez-vous pour la Caméra
3.1 Assurez-vous qu'il y a une mini carte SD insérée dans la fente pour carte SD de la caméra
et que la carte a été préalablement formatée. La quantité maximale de mémoire insérée dans
la carte SD ne peut pas dépasser 64 Go, et il est recommandé d'utiliser uniquement une carte
Micro SDHC Class 10 SD.
3.2 Lors de la connexion du caméscope à une source d'alimentation externe, l'indicateur
d'alimentation et l'indicateur de charge s'allument et la caméra s'allume automatiquement.
IV. Configuration du Mode Réseau Point-à-Point (LAN mode)
4.1 Connectez la caméra à l'alimentation externe ou maintenez le bouton d'alimentation
pendant 3 secondes pour allumer la caméra. Lorsque l'indicateur WIFI clignote lentement,
cela signifie que le point d’accès WIFI de la caméra est allumé et prêt.
Page 57
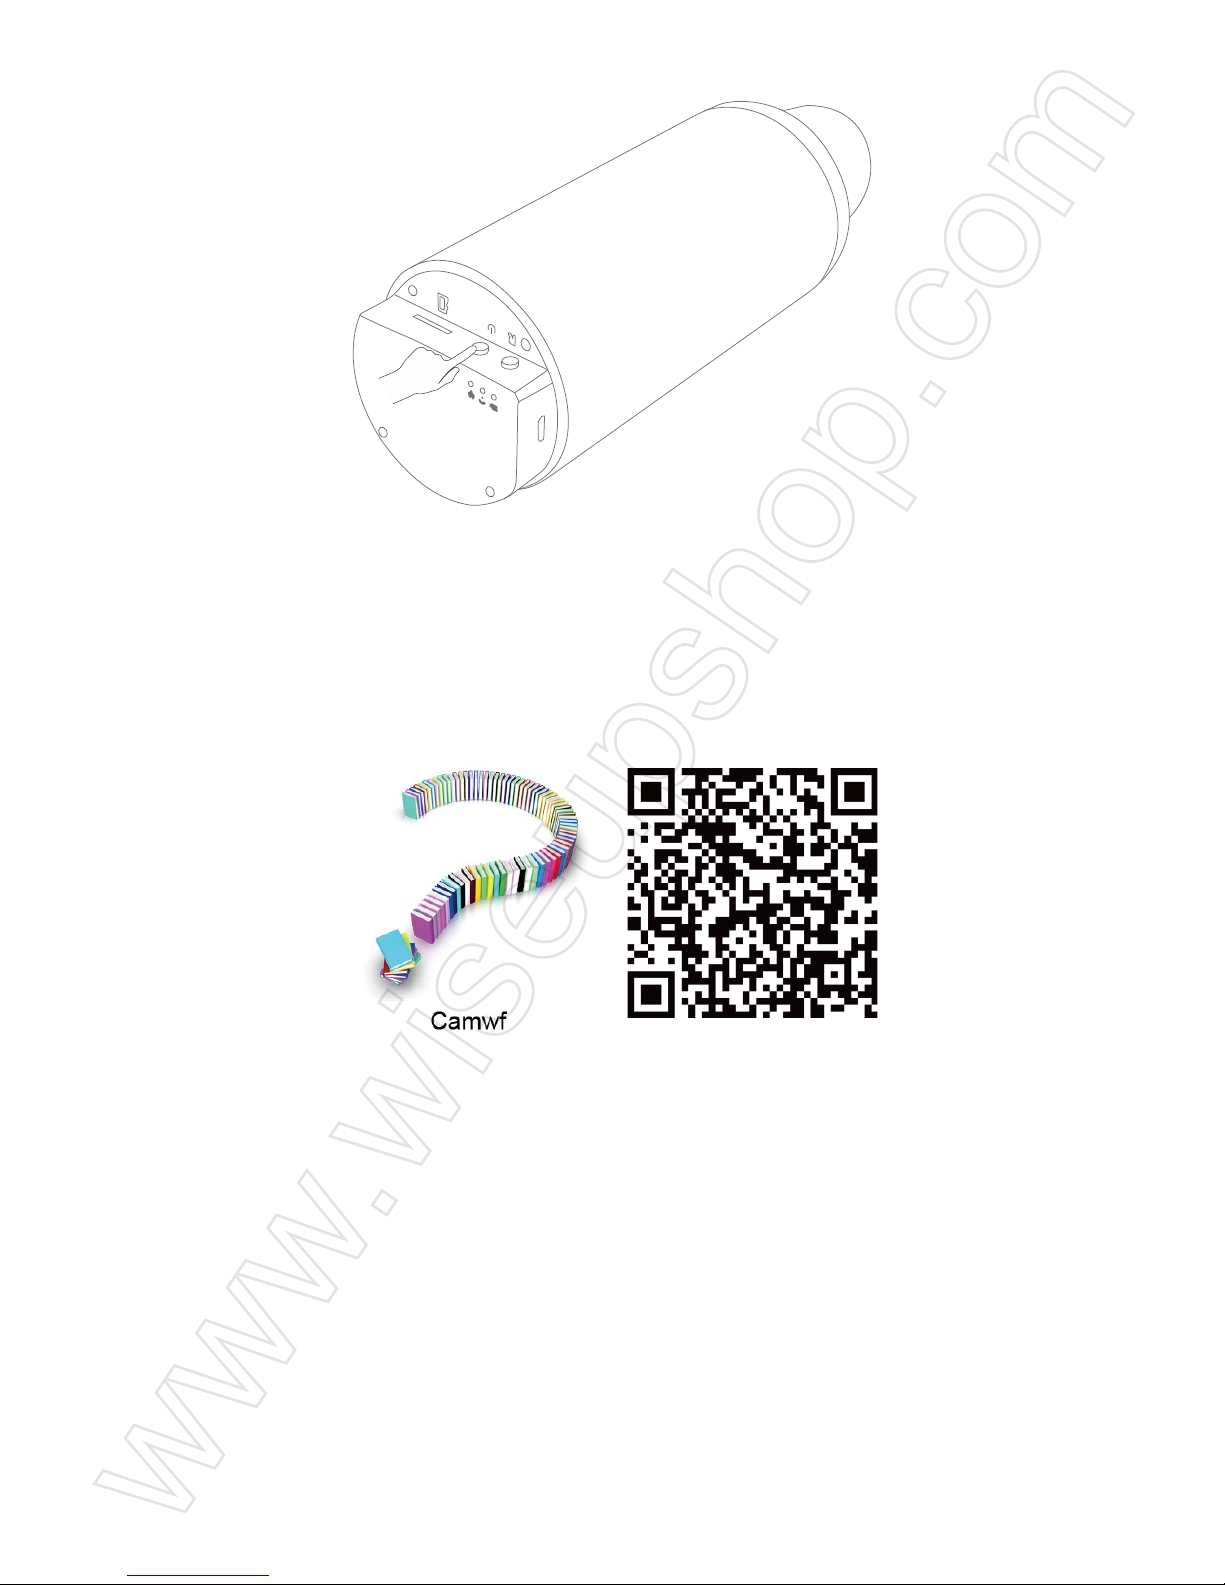
4.2 Scannez le code QR ci-dessous avec l'appareil mobile IOS, ou recherchez "Camwf "
directement dans App Store, pour installer APP.
4.3 Ouvrez la page des paramètres WLANsur l’appareil mobile IOS, pour connecter l’appareil
mobile IOS au point d'accès WIFI de la caméra.
Page 58
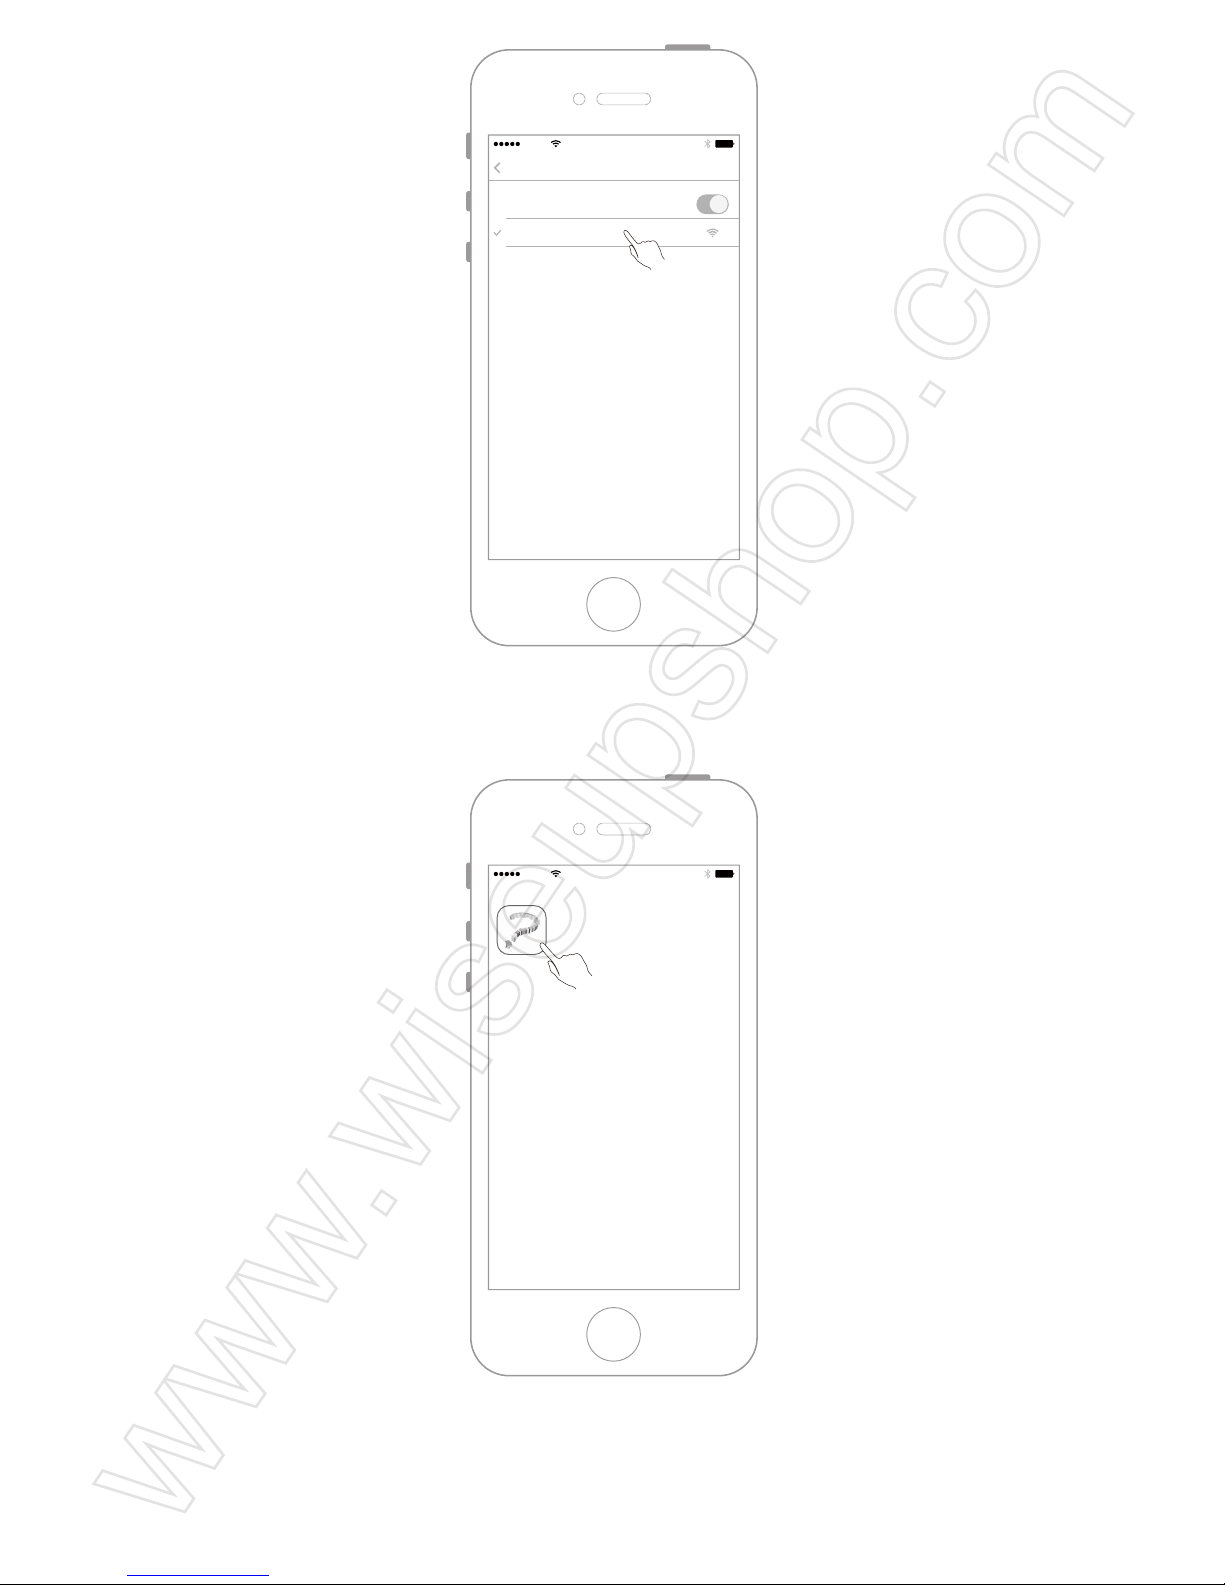
4.4 Activez l'APP "Camwf ".
4.5 Ajoutez votre Caméravidéo à l'APP "Camwf ".
Étape 1
AT&T
11:57 AM
WLAN
Settings
Wi-Fi
RT-FHC22NUK111A
AT&T
11:57 AM
Camwf
Page 59
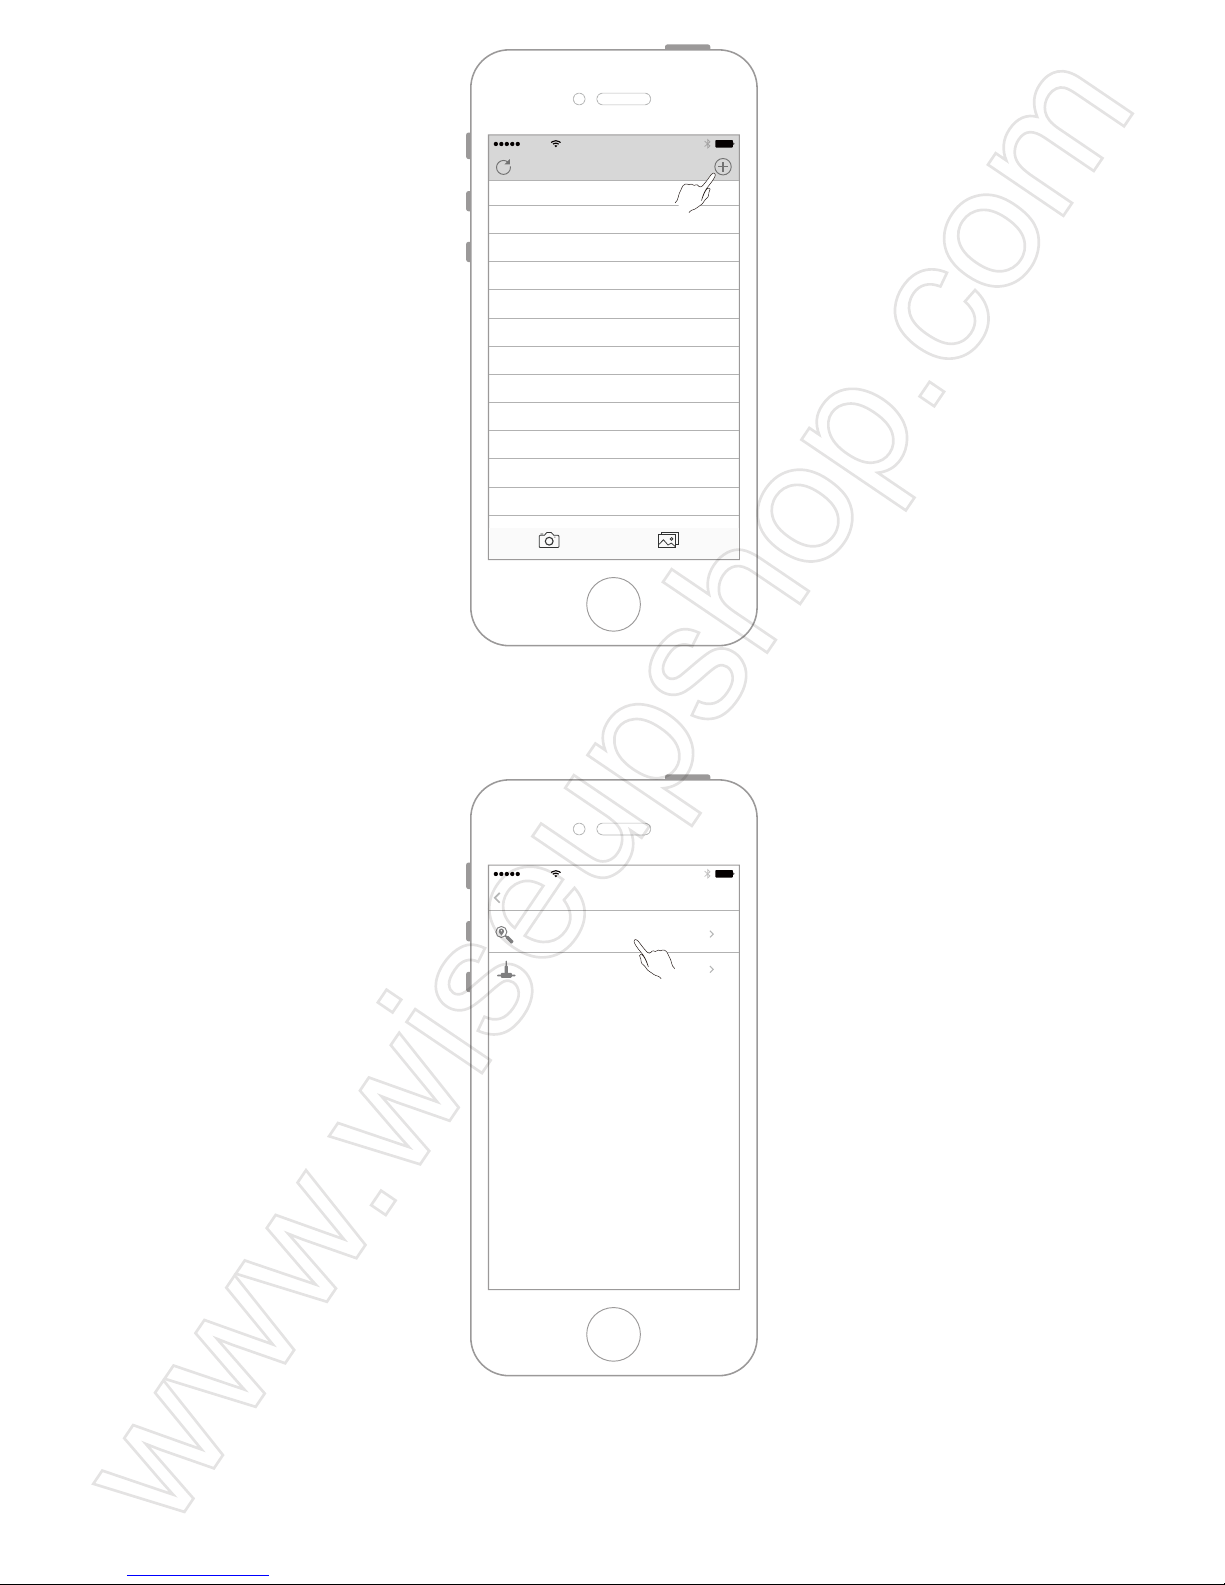
Étape 2
Étape 3
AT&T
11:57 AM
Devices
Devices Media
AT&T
11:57 AM
Add DeviceBack
LAN Search Devices
Add Device By ID
Page 60
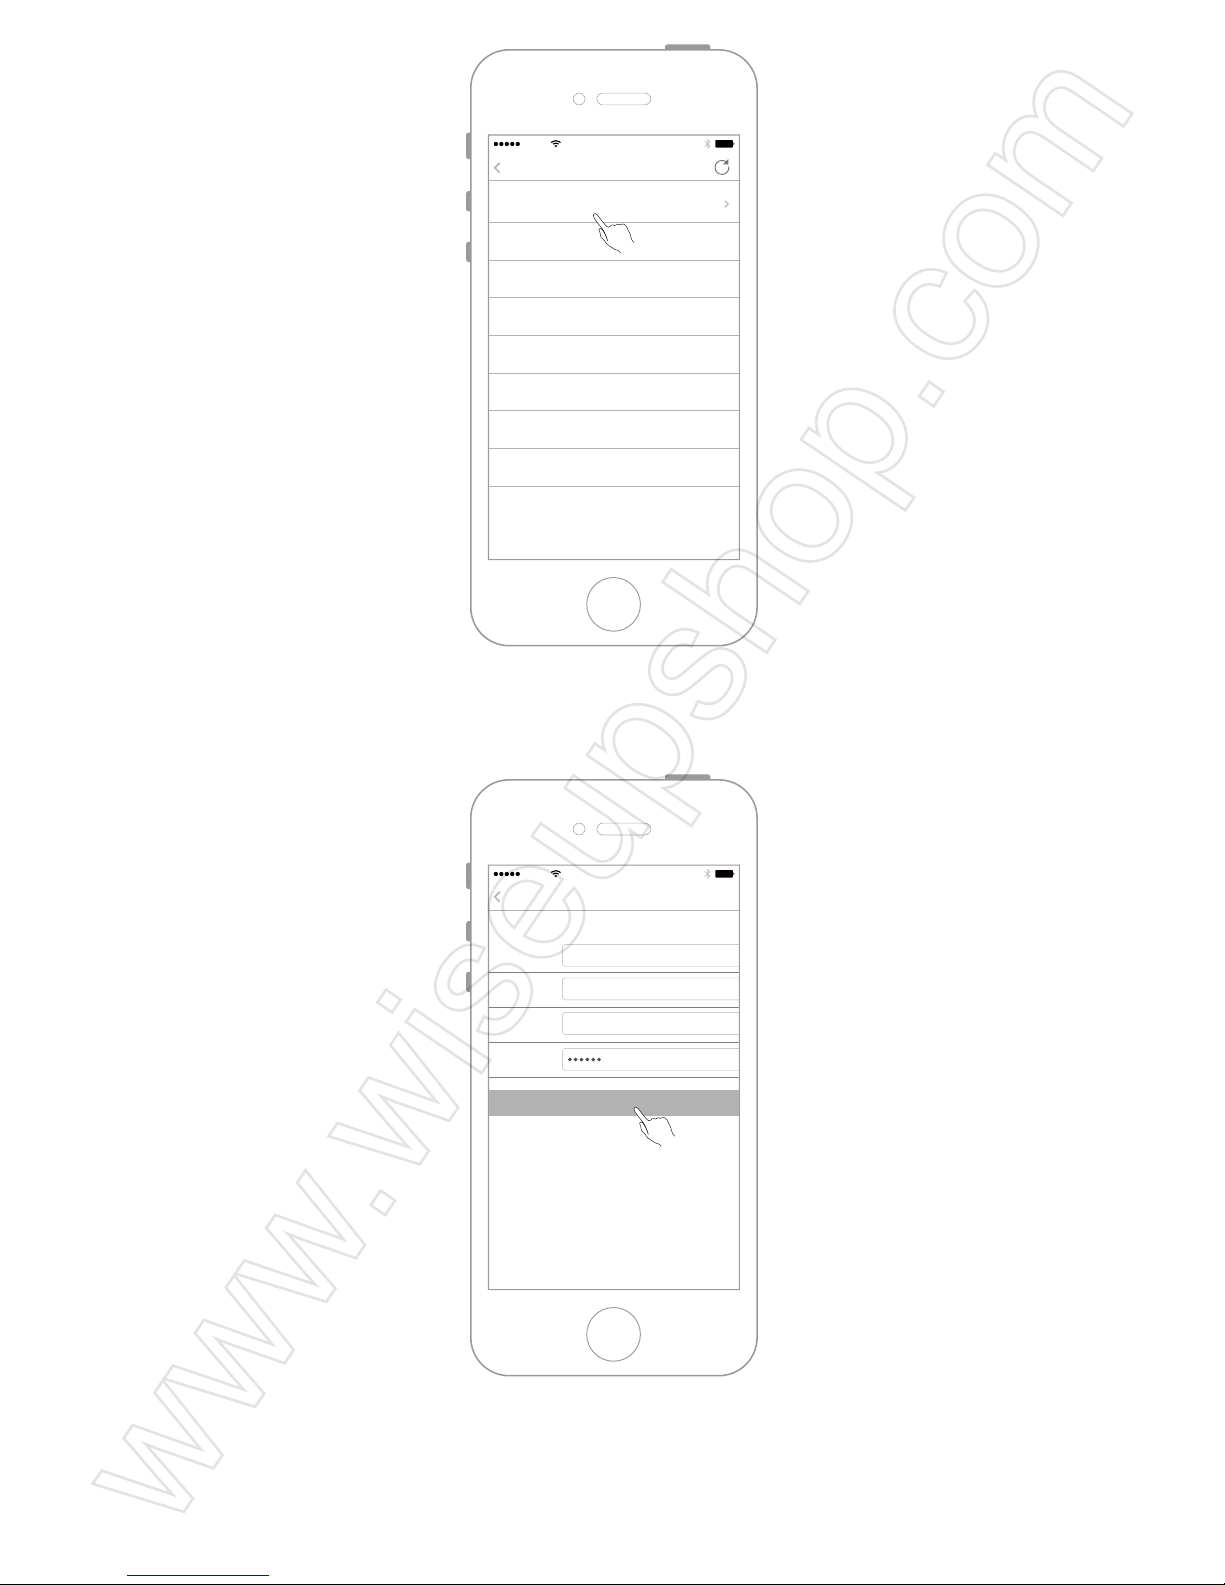
Étape 4
4.6 Si la caméra est en état d’ "Connected", il indique que le mode réseau point à point de
la caméra est configuré avec succès (mode LAN).
AT&T
11:57 AM
LAN search devices
JP5DLXEVZGES11FZ111A
AT&T
11:57 AM
Add Device
Back
Device Name IP Cam
Device UID
User Name
Password
JP5DLXEVZGES11FZ111A
admin
OK
Page 61
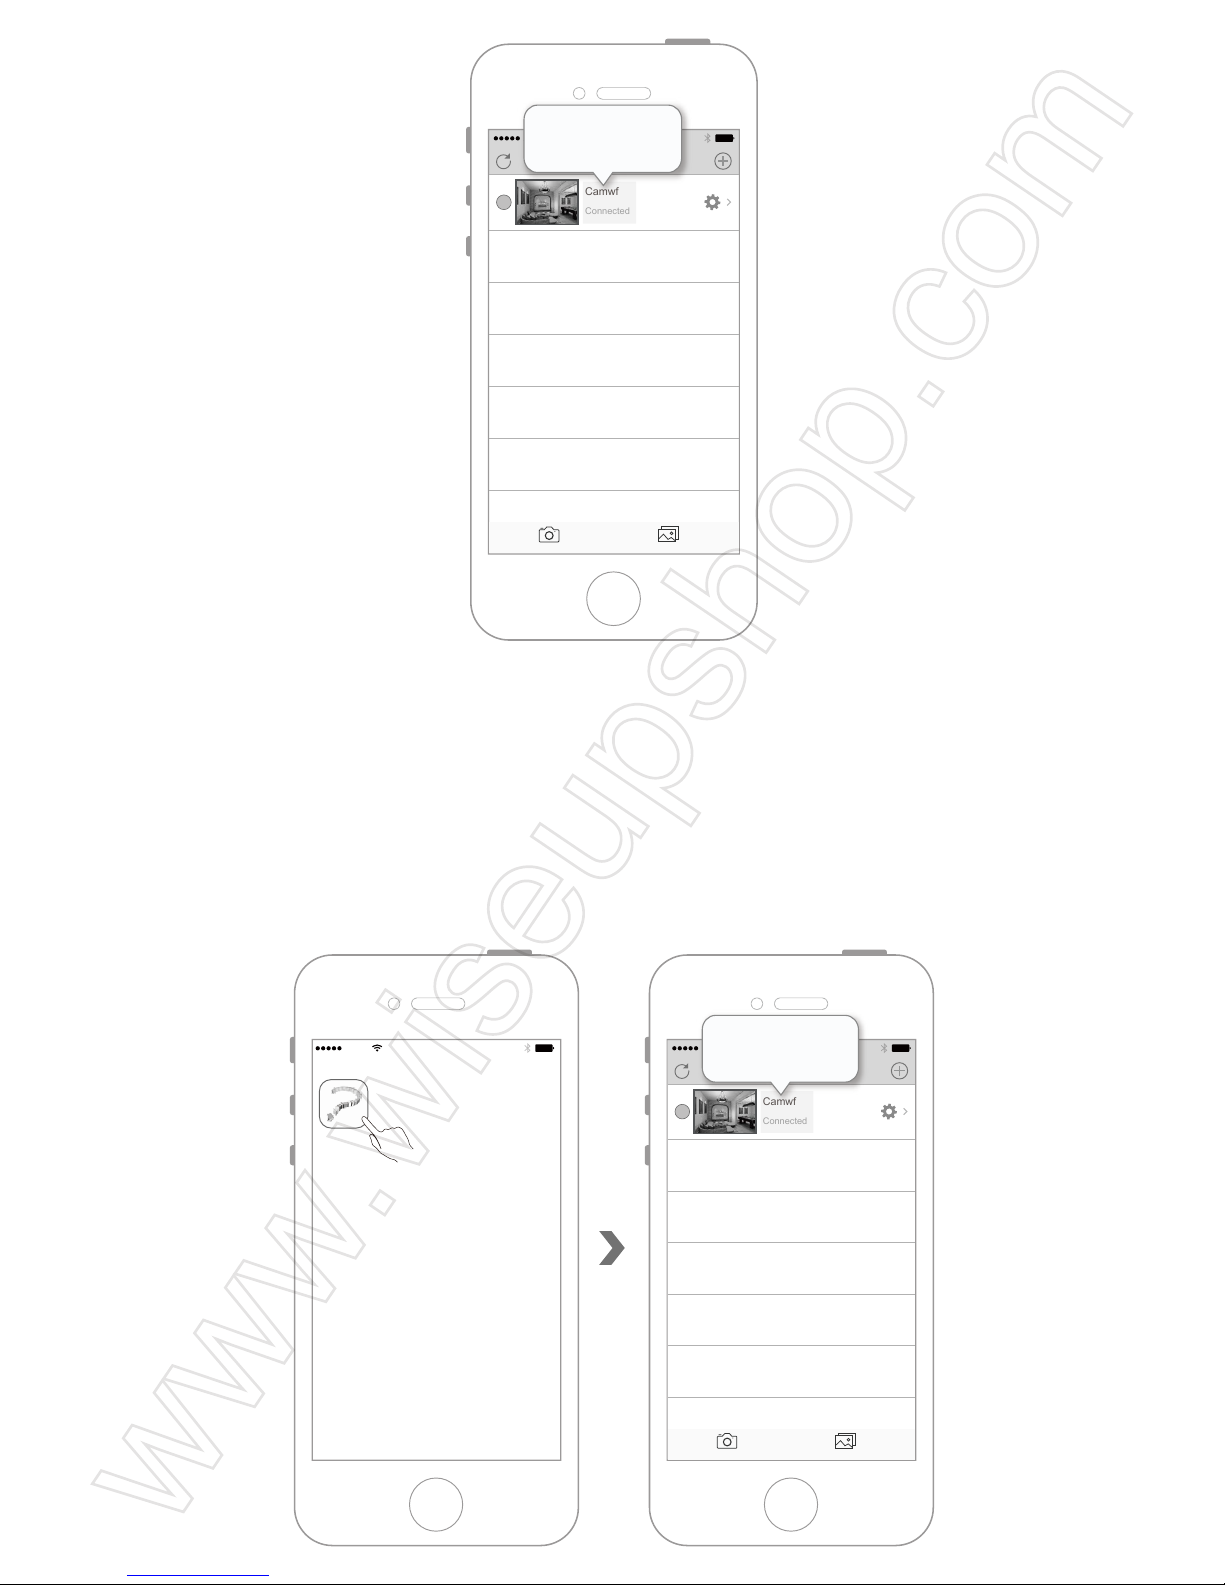
<Remarque>: La distance effective de connexion du point d’accès Wi-Fi de la caméra et les
appareils mobiles IOS est d'environ 15 mètres (49 pieds).
V. Configuration du Mode Réseau à Distance (WAN mode)
5.1 Activez l'APP "Camwf " et assurez-vous que la caméra a bien été ajoutée à l’APP et
qu'elle est Online.
AT&T
11:57 AM
Devices
Devices Media
Camwf
Connected
Camwf
Connected
AT&T
11:57 AM
Camwf
AT&T
11:57 AM
Devices
Devices Media
Camwf
Connected
Camwf
Connected
Page 62
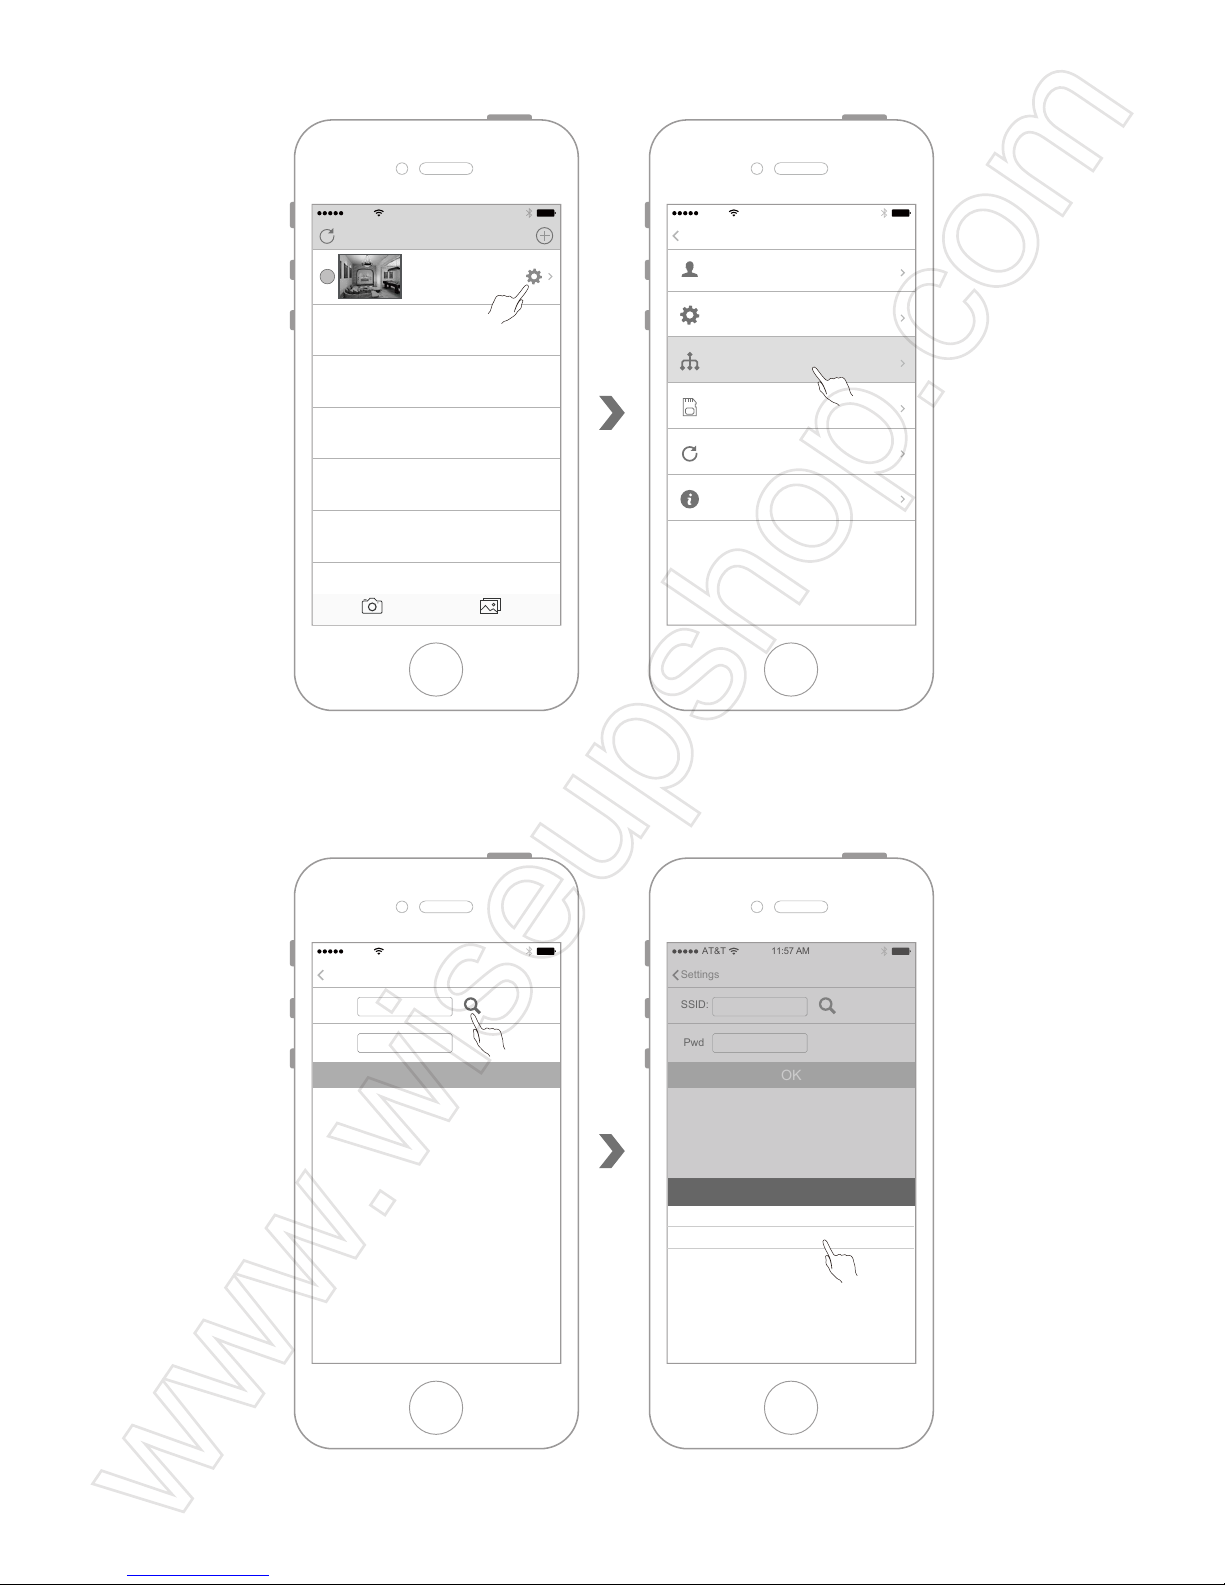
5.2 Entrez dans le menu de la caméra et sélectionnez "Network Settings".
5.3 Entrez dans "Network Settings" pour chercher les points d'accès Wi-Fi disponibles et
sélectionnez le point d'accès WIFI souhaité.
5.4 Entrez le mot de passe, et cliquez sur "OK" pour enregistrer, la caméra redémarrera
AT&T
11:57 AM
Settings
Back
User Settings
Device Settings
Network Settings
SDCard Record
Refresh push
About
AT&T
11:57 AM
Devices
Devices Media
Camwf
Connected
AT&T
11:57 AM
Network Settings
Settings
SSID:
Pwd
OK
AT&T
11:57 AM
Settings
SSID:
Pwd
OK
SSIDCancel
SSID-3
SSID-2
SSID-4
SSID-5
SSID-1
OK
Network Settings
Page 63
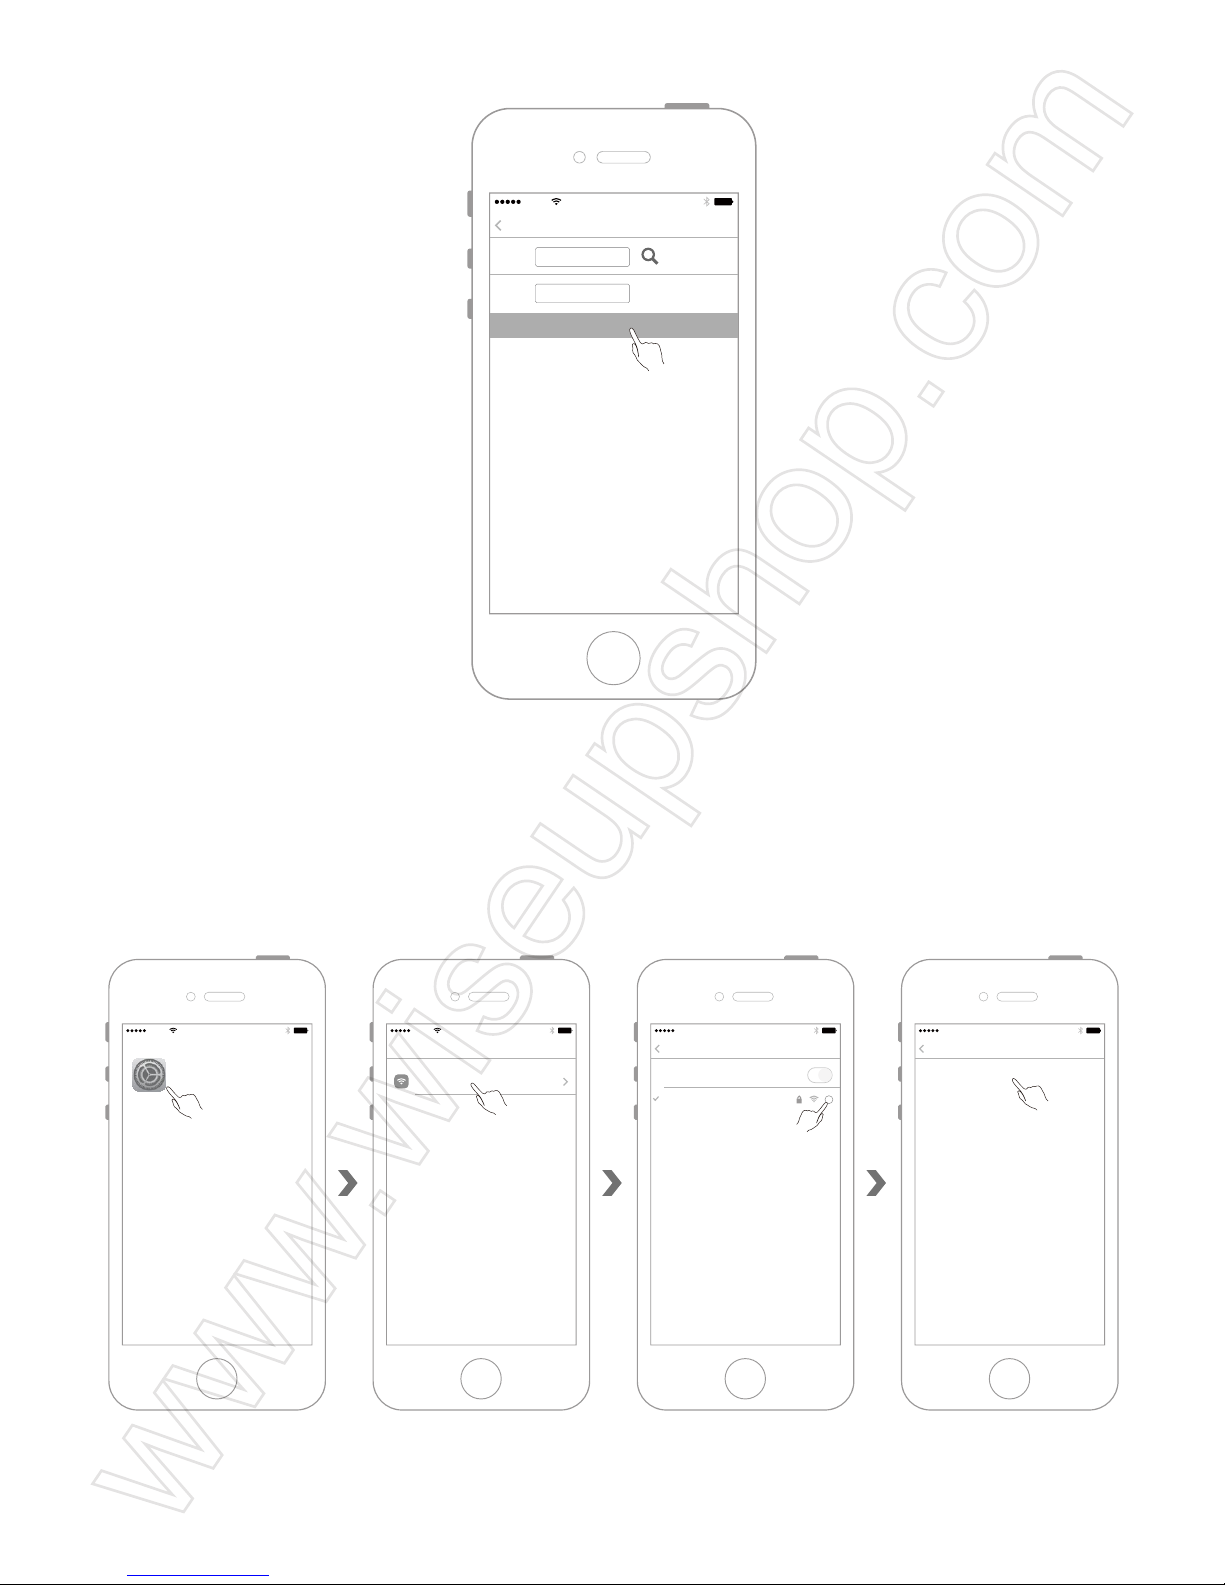
automatiquement.
5.5 Quittez l’APP "Camwf ".
5.6 Retournez à la page des paramètres WIFI sur l’appareil mobile IOS et déconnectez-vous
du point d’accès WIFI actuel.
5.7 Connectez l’appareil mobile IOS à un autre point d’accès WIFI ou utilisez le propre
réseau de données de votre l’appareil mobile IOS.
AT&T
11:57 AM
Network Settings
Settings
SSID: SSID-1
xxxxxxxx
Pwd
OK
AT&T
11:57 AM
Settings
AT&T
11:57 AM
Settings
WLAN
SSID-1
WLAN
AT&T
11:57 AM
Fukeside
Forget This Network
AT&T
11:57 AM
WLAN
Settings
WLAN
i
SSID-1
Page 64
5.8 Assurez-vous que votre l’appareil mobile IOS a un accès Internet, ensuite, activez à
nouveau "Camwf " APP. Lorsque vous voyez que la caméra est en état d’ "Connected",
cela indique que le mode réseau distant de la caméra (WAN mode) a été configuré avec
succès.
AT&T
11:57 AM
Settings
SSID-2
WLAN
WLAN
i
1
AT&T
11:57 AM
Settings
SSID-2
WLAN
WLAN
i
AT&T
11:57 AM
Cellular
Settings
Cellular Data
Cellular Data Options
AT&T
11:57 AM
Settings
WLAN
Cellular
Off
Off
2
AT&T
11:57 AM
Settings
WLAN
WLAN
Page 65
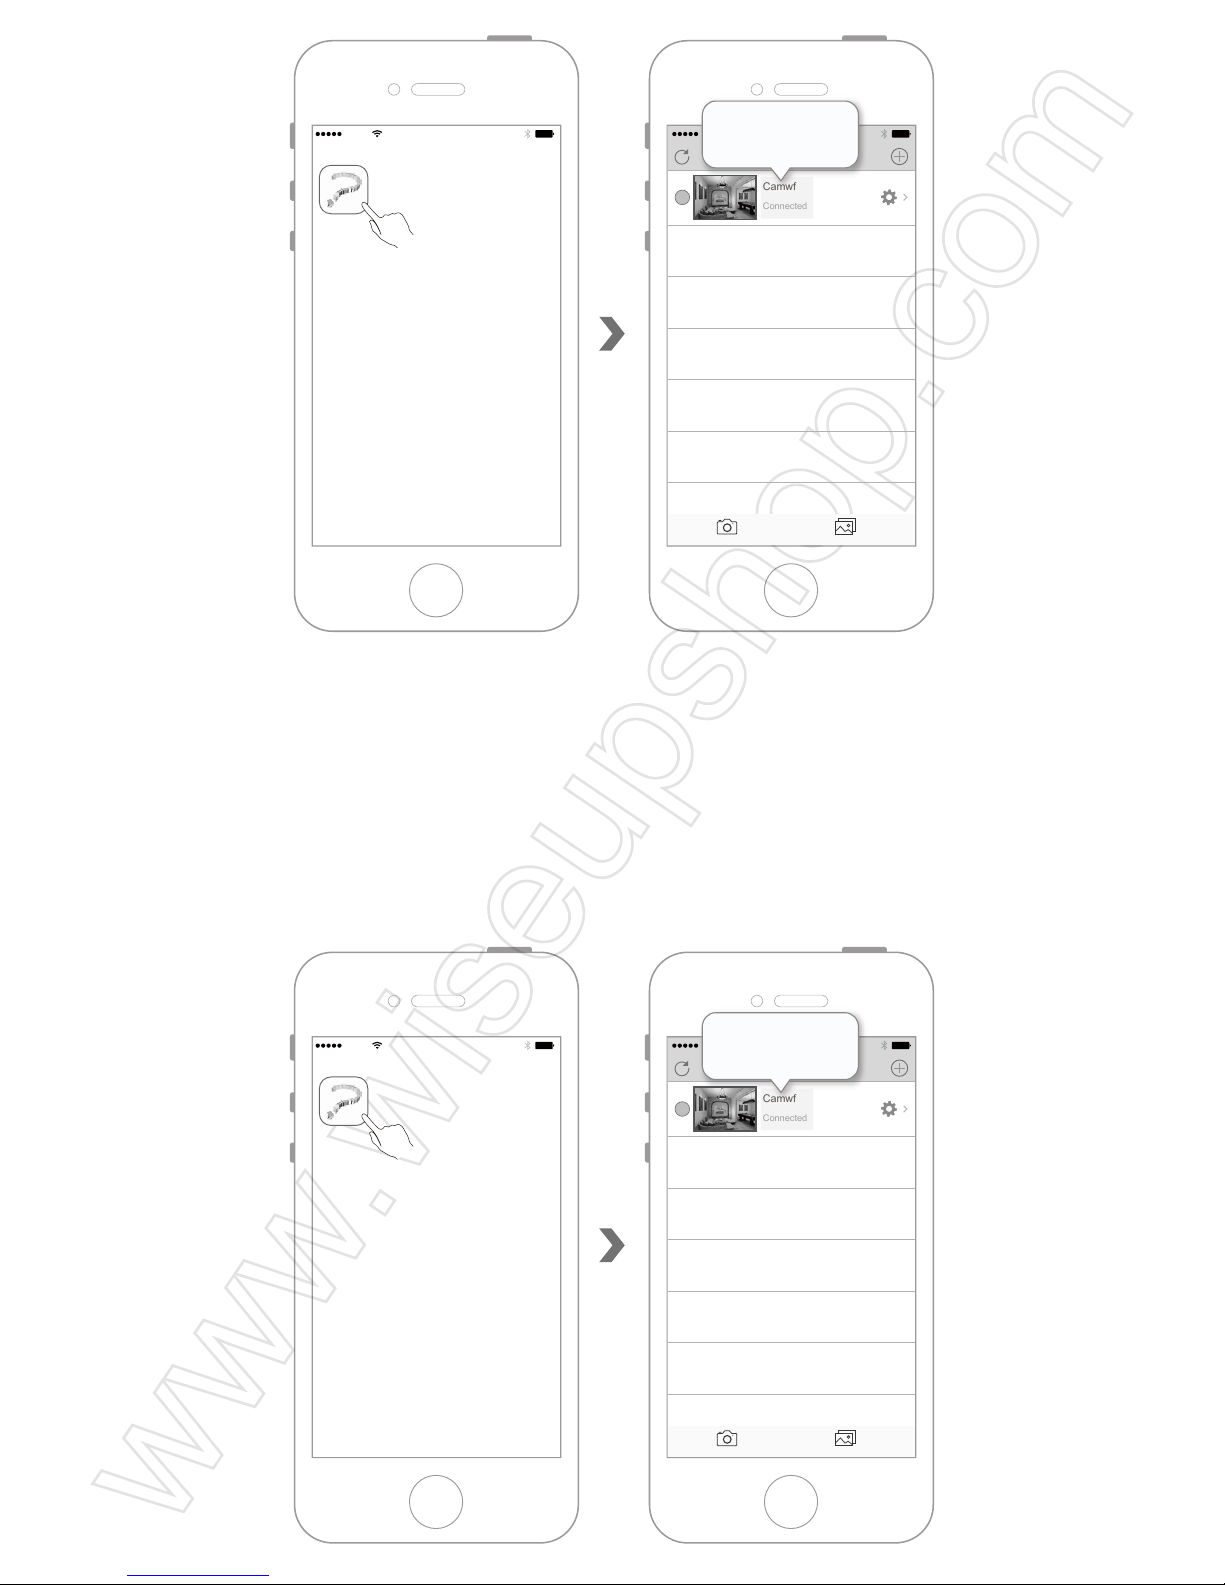
<Remarque>: Si la caméra est en état de "Connect Fail", cela signifie que la configuration du mode
réseau distant a échoué. Veuillez reconfigurer le réseau distant.
VI. Définir le Mode d'Enregistrement de Détection de Mouvement
6.1 Activez "Camwf " APP pour vous assurer que la caméra a bien été ajouté à l’APP et
qu'il est Online.
AT&T
11:57 AM
Camwf
AT&T
11:57 AM
Devices
Devices Media
Camwf
Connected
Camwf
Connected
AT&T
11:57 AM
Camwf
AT&T
11:57 AM
Devices
Devices Media
Camwf
Connected
Camwf
Connected
Page 66
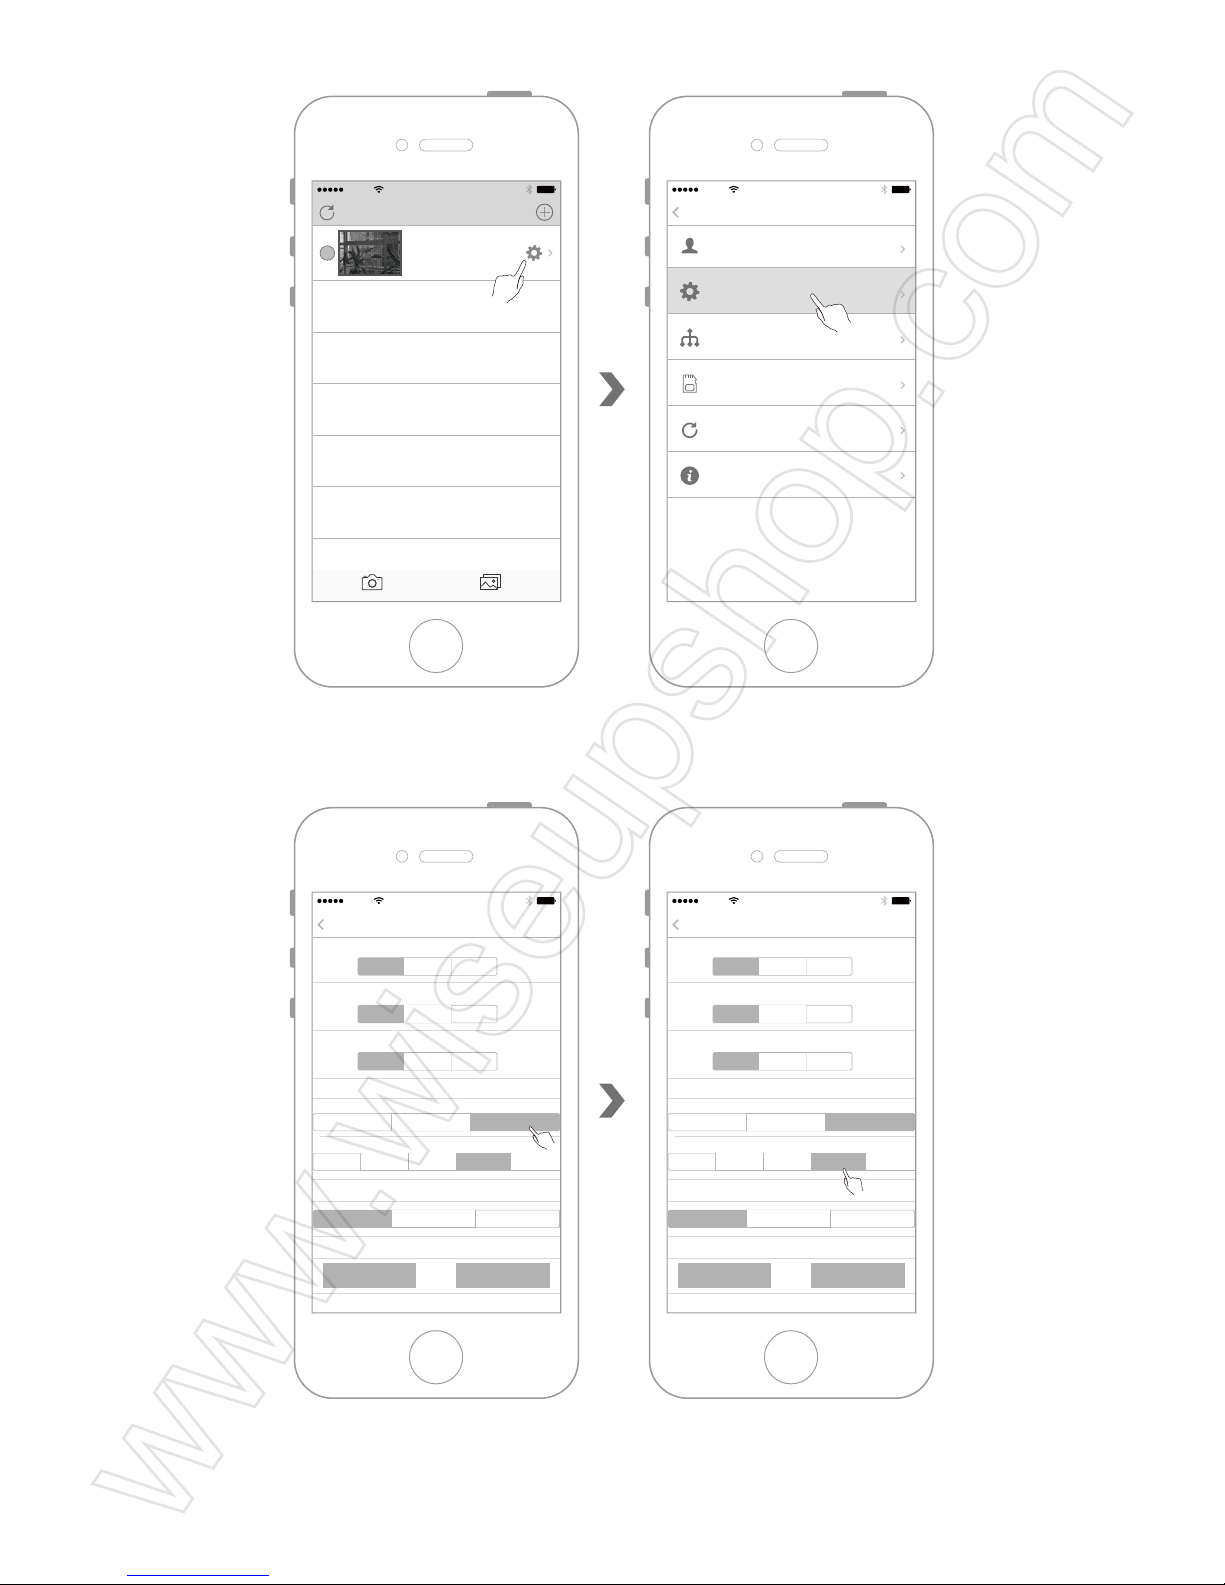
6.2 Entrez dans le menu de la caméra pour sélectionner "Device Settings".
6.3 Sélectionnez "Alarm Record", puis sélectionnez la sensibilité de détection de mouvement
souhaitée dans "Motion Detection".
6.4 Touchez "Confirm" pour terminer le réglage du mode d'enregistrement de détection de
mouvement. La vidéo de détection de mouvement sera automatiquement enregistrée sur
la mini carte SD de la caméra.
AT&T
11:57 AM
Devices
Devices Media
Camwf
Connected
AT&T
11:57 AM
Settings
Back
User Settings
Device Settings
Network Settings
SDCard Record
Refresh push
About
AT&T
11:57 AM
Settings
Settings
Start Time: End Time:
End Time:
End Time:
Status:
Start Time:
Status:
Start Time:
SD record
Motion detection
Status:
Close Record Capture
Close Record Capture
Close Record Capture
Close 24h Video Alarm Record
HD(1920*1080) HD(1280*720)
Close Low Middle High Highest
VGA(640*480)
Restart Confirm
AT&T
11:57 AM
Settings
Settings
Start Time: End Time:
End Time:
End Time:
Status:
Start Time:
Status:
Start Time:
SD record
Motion detection
Status:
Close Record Capture
Close Record Capture
Close Record Capture
Close 24h Video Alarm Record
HD(1920*1080) HD(1280*720)
Close Low Middle High Highest
VGA(640*480)
Restart Confirm
Page 67
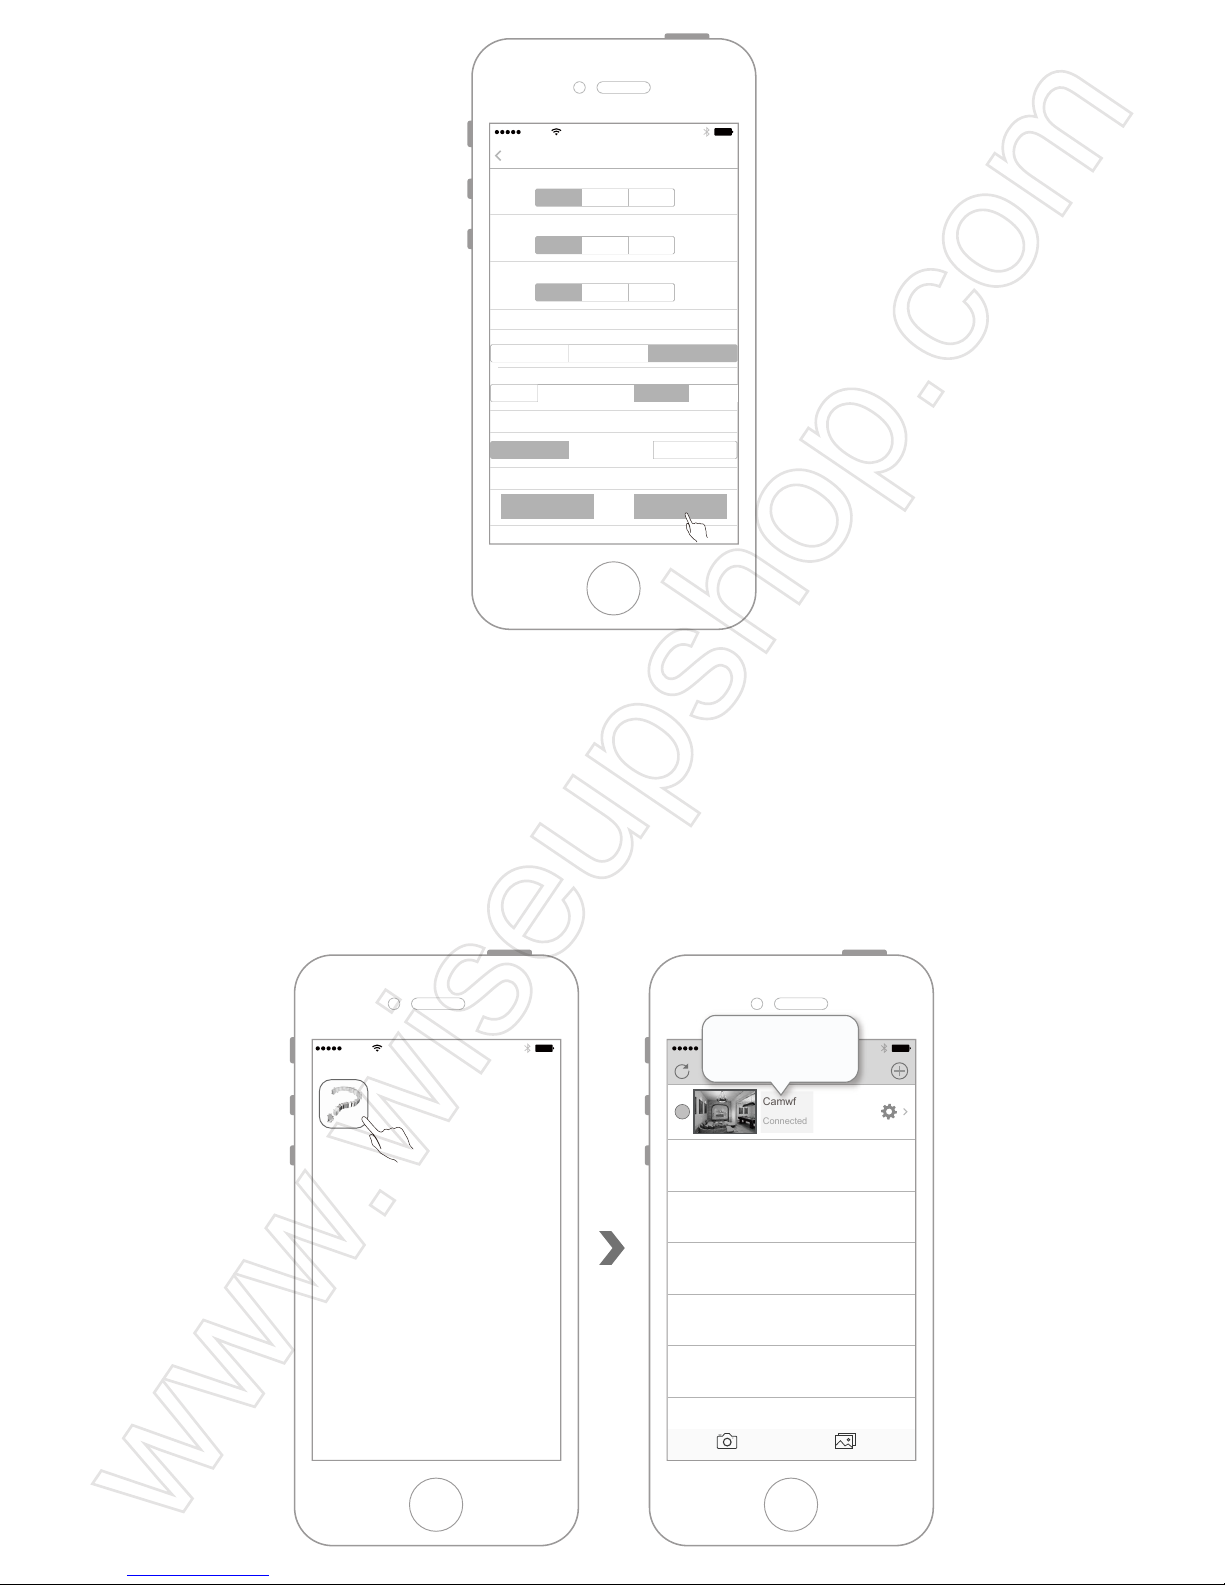
<Remarque>: La résolution d’enregistrement de détection de mouvement est 1280x720P, et le
format d’enregistrement est AVI
VII. Paramètres du Mode d'Enregistrement Local Non-stop
7.1 Activez "Camwf " APP et assurez-vous que la caméra a bien été ajouté à l’APP et qu'il
est Online.
Restart Confirm
AT&T
11:57 AM
Settings
Settings
Start Time: End Time:
End Time:
End Time:
Status:
Start Time:
Status:
Start Time:
SD record
Motion detection
Status:
Close Record Capture
Close Record Capture
Close Record Capture
Close 24h Video Alarm Record
HD(1920*1080) HD(1280*720)
Close Low Middle High Highest
VGA(640*480)
AT&T
11:57 AM
Camwf
AT&T
11:57 AM
Devices
Devices Media
Camwf
Connected
Camwf
Connected
Page 68
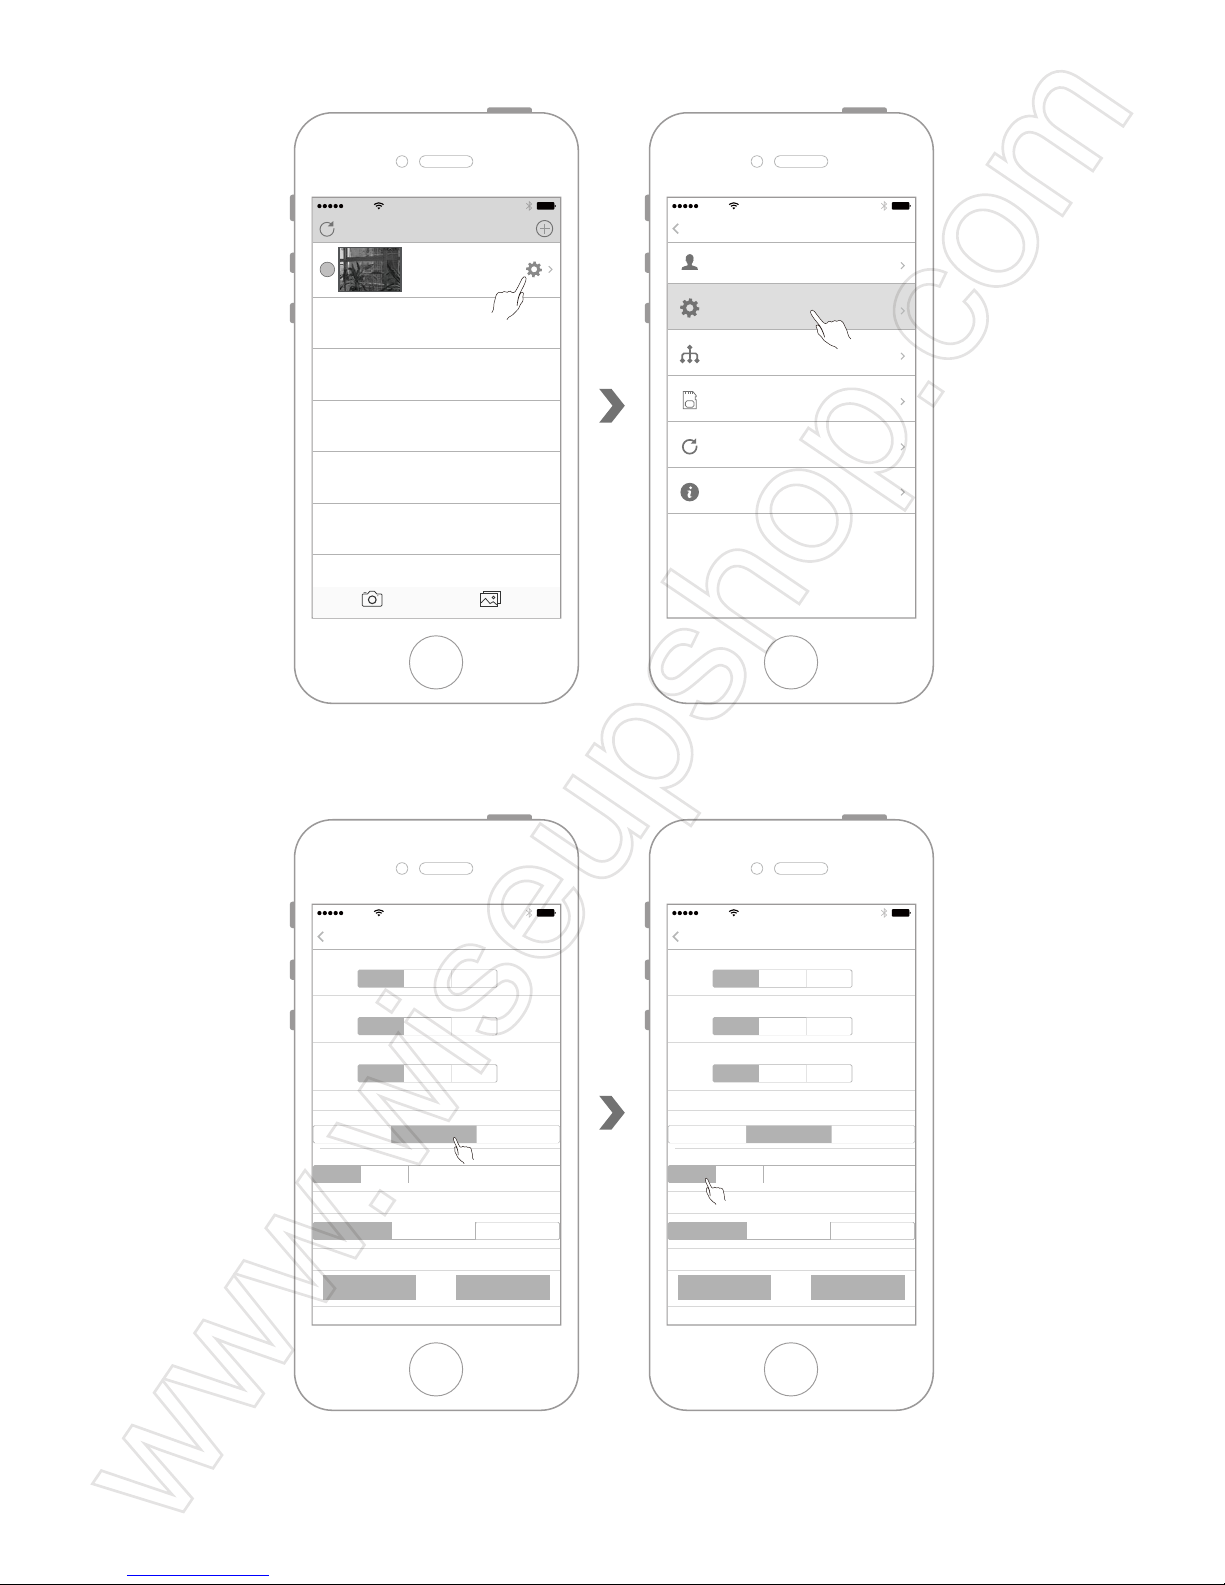
7.2 Entrez dans le menu de la caméra, et sélectionnez "Device Settings".
7.3 Sélectionnez “24h Video”et désactivez la fonction de "Motion Detection".
7.4 Touchez "Confirm" pour terminer la configuration. La caméraenregistrera
automatiquement 24 heures par jour, tous les fichiers vidéo seront stockés sur la carte SD.
AT&T
11:57 AM
Devices
Devices Media
Camwf
Connected
AT&T
11:57 AM
Settings
Back
User Settings
Device Settings
Network Settings
SDCard Record
Refresh push
About
AT&T
11:57 AM
Settings
Settings
Start Time: End Time:
End Time:
End Time:
Status:
Start Time:
Status:
Start Time:
SD record
Motion detection
Status:
Close Record Capture
Close Record Capture
Close Record Capture
Close 24h Video
HD(1920*1080) HD(1280*720)
Close Low Middle High Highest
VGA(640*480)
Restart Confirm
Alarm Record
AT&T
11:57 AM
Settings
Settings
Start Time: End Time:
End Time:
End Time:
Status:
Start Time:
Status:
Start Time:
SD record
Motion detection
Status:
Close Record Capture
Close Record Capture
Close Record Capture
Close 24h Video
HD(1920*1080) HD(1280*720)
Close Low Middle High Highest
VGA(640*480)
Restart Confirm
Alarm Record
Page 69
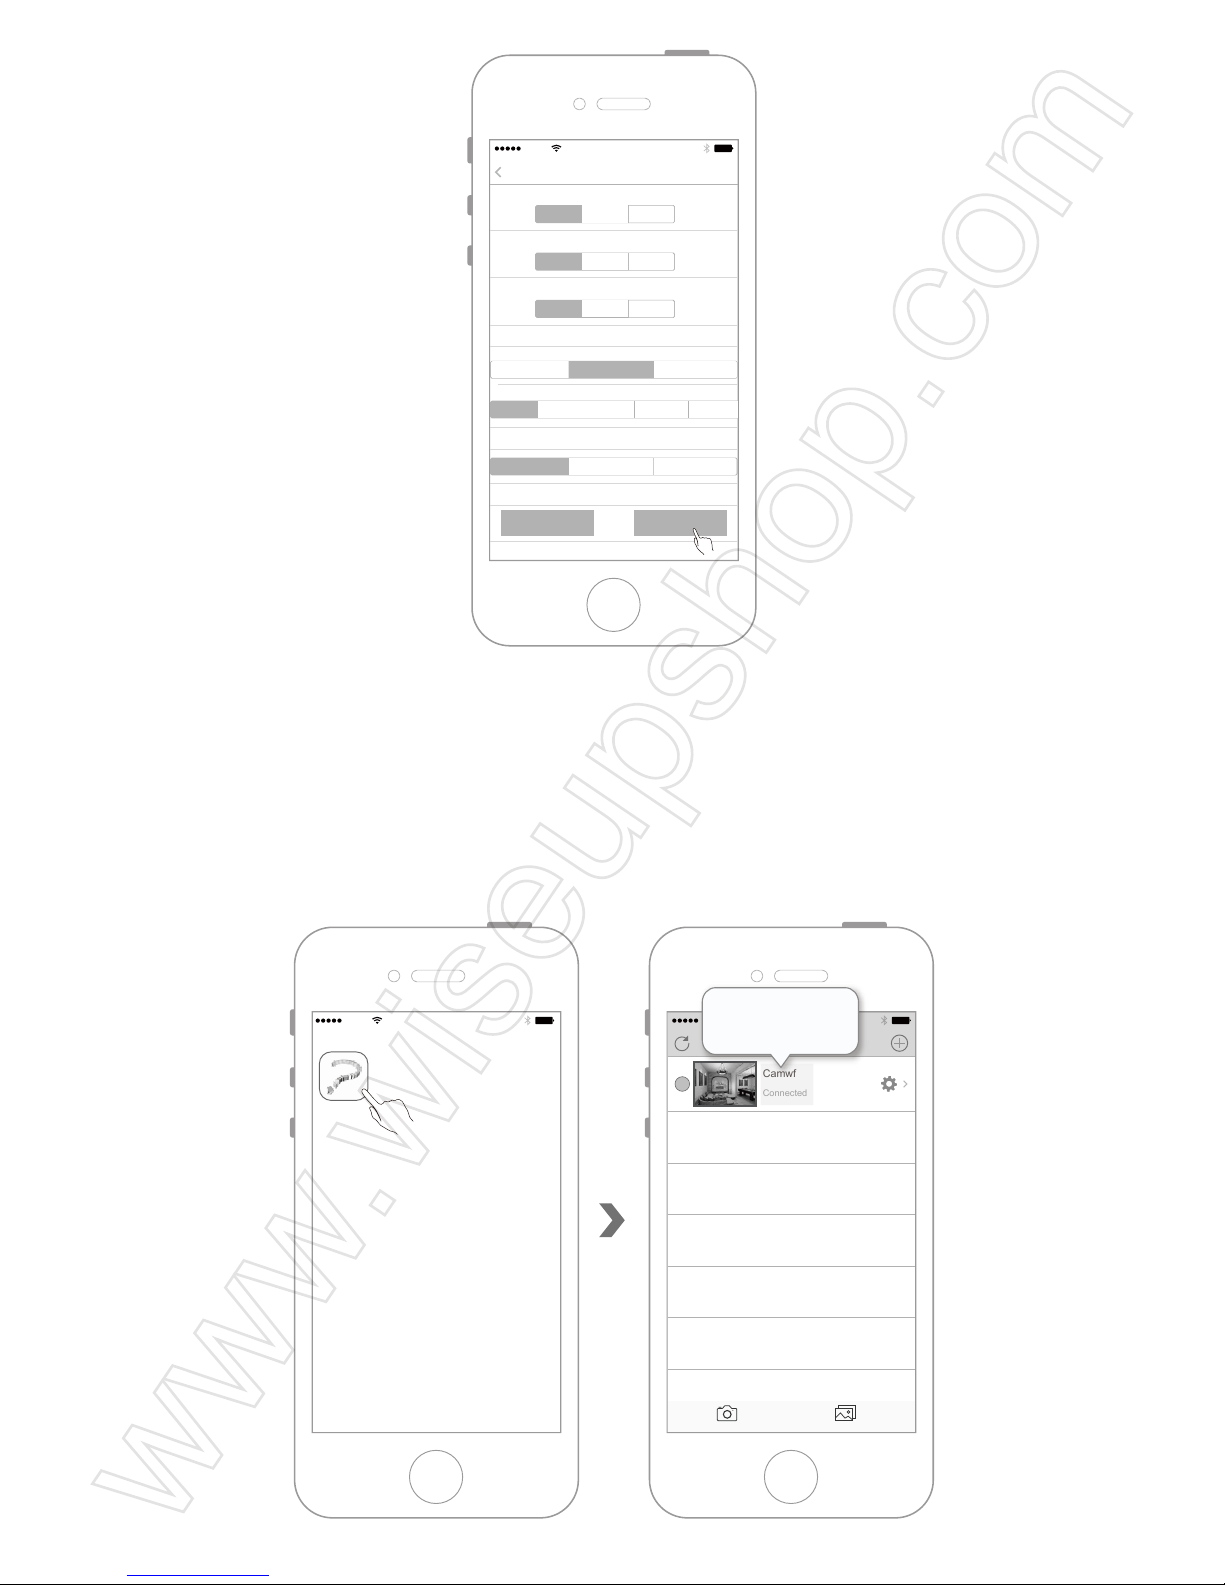
VIII. Faire l'Enregistrement à Distance Manuel avec un Appareil Mobile
IOS
8.1 Activez "Camwf " APP pour vous assurer que la caméra a bien été ajouté à l’APP et
qu'elle est Online.
AT&T
11:57 AM
Camwf
AT&T
11:57 AM
Devices
Devices Media
Camwf
Connected
Camwf
Connected
Restart Confirm
AT&T
11:57 AM
Settings
Settings
Start Time: End Time:
End Time:
End Time:
Status:
Start Time:
Status:
Start Time:
SD record
Motion detection
Status:
Close Record Capture
Close Record Capture
Close Record Capture
Close 24h Video
HD(1920*1080) HD(1280*720)
Close Low Middle High Highest
VGA(640*480)
Alarm Record
Page 70
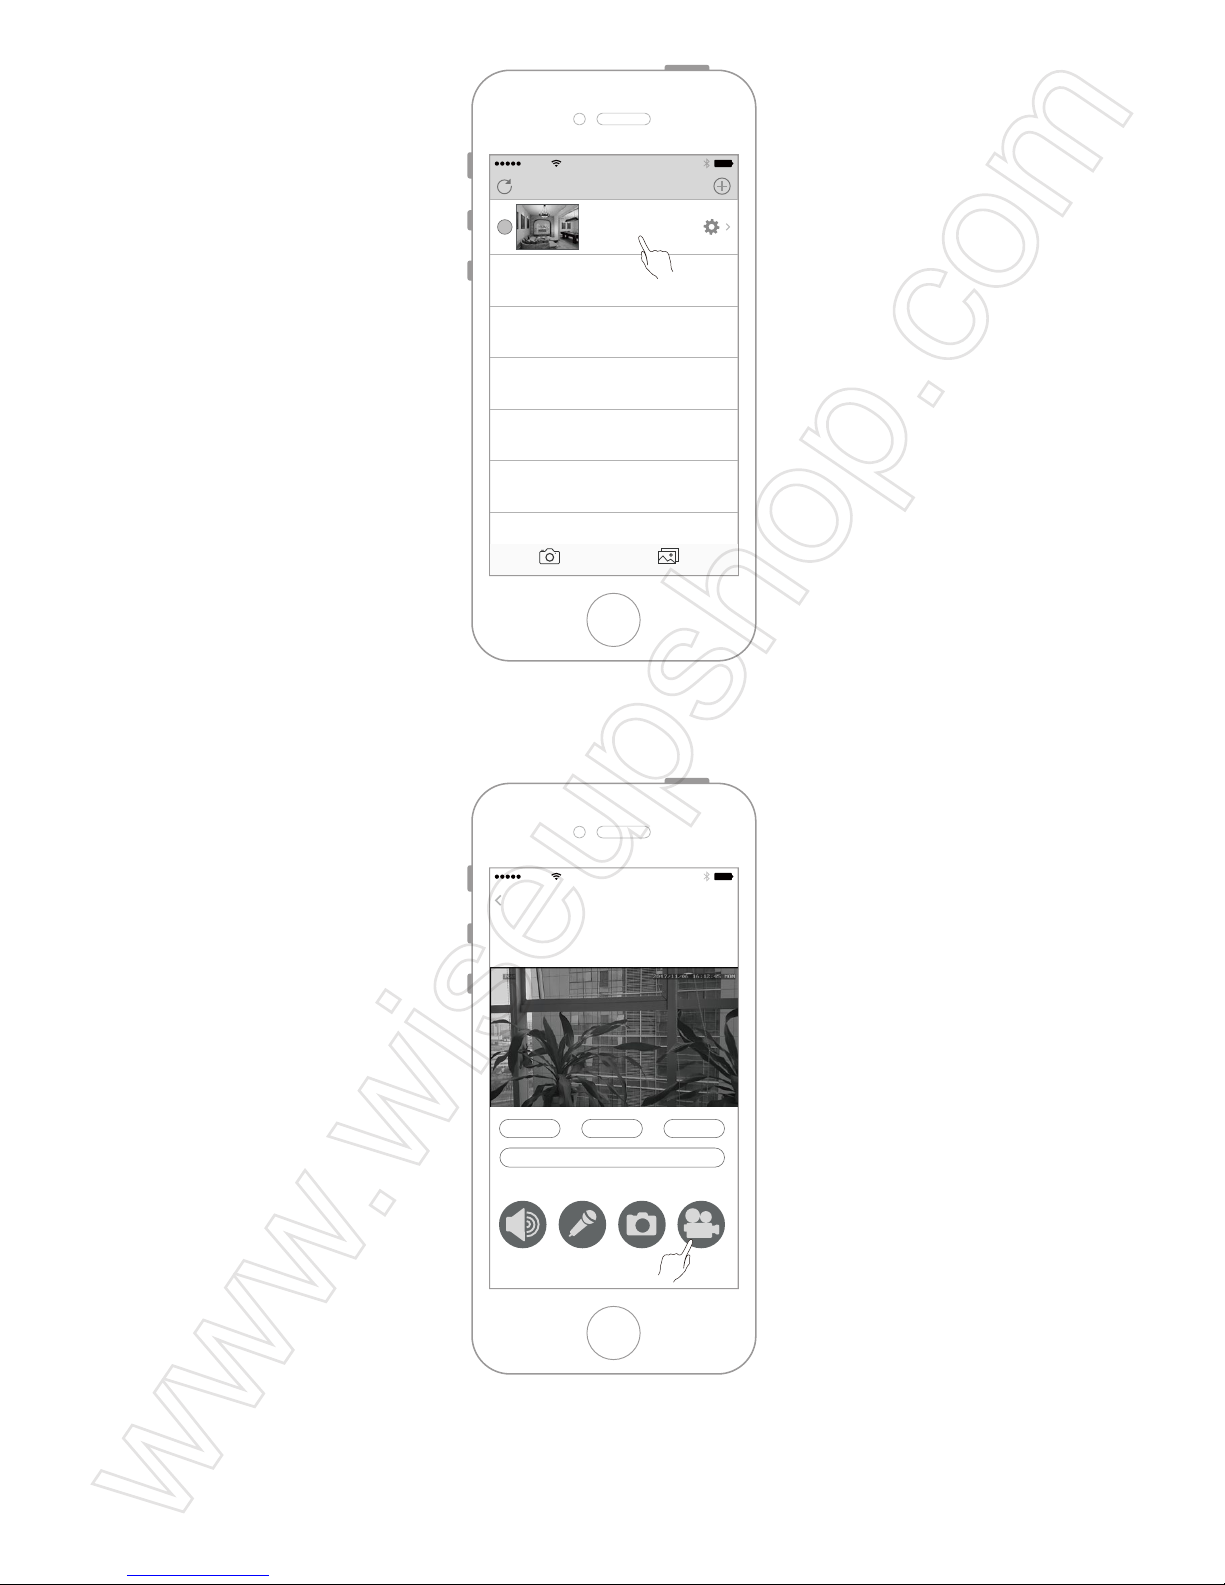
8.2 Touchez la caméra.
8.3 Touchez le bouton d'enregistrement pour enregistrer.
8.4 Touchez sur le bouton d'enregistrement, vous pouvez activer ou désactiver.
AT&T
11:57 AM
Devices
Devices Media
Camwf
Connected
AT&T
11:57 AM
Camwf
Network:184 k/s
00:12
Full Flip
Video Reset
Horizontal Flip Vertical Flip
Page 71
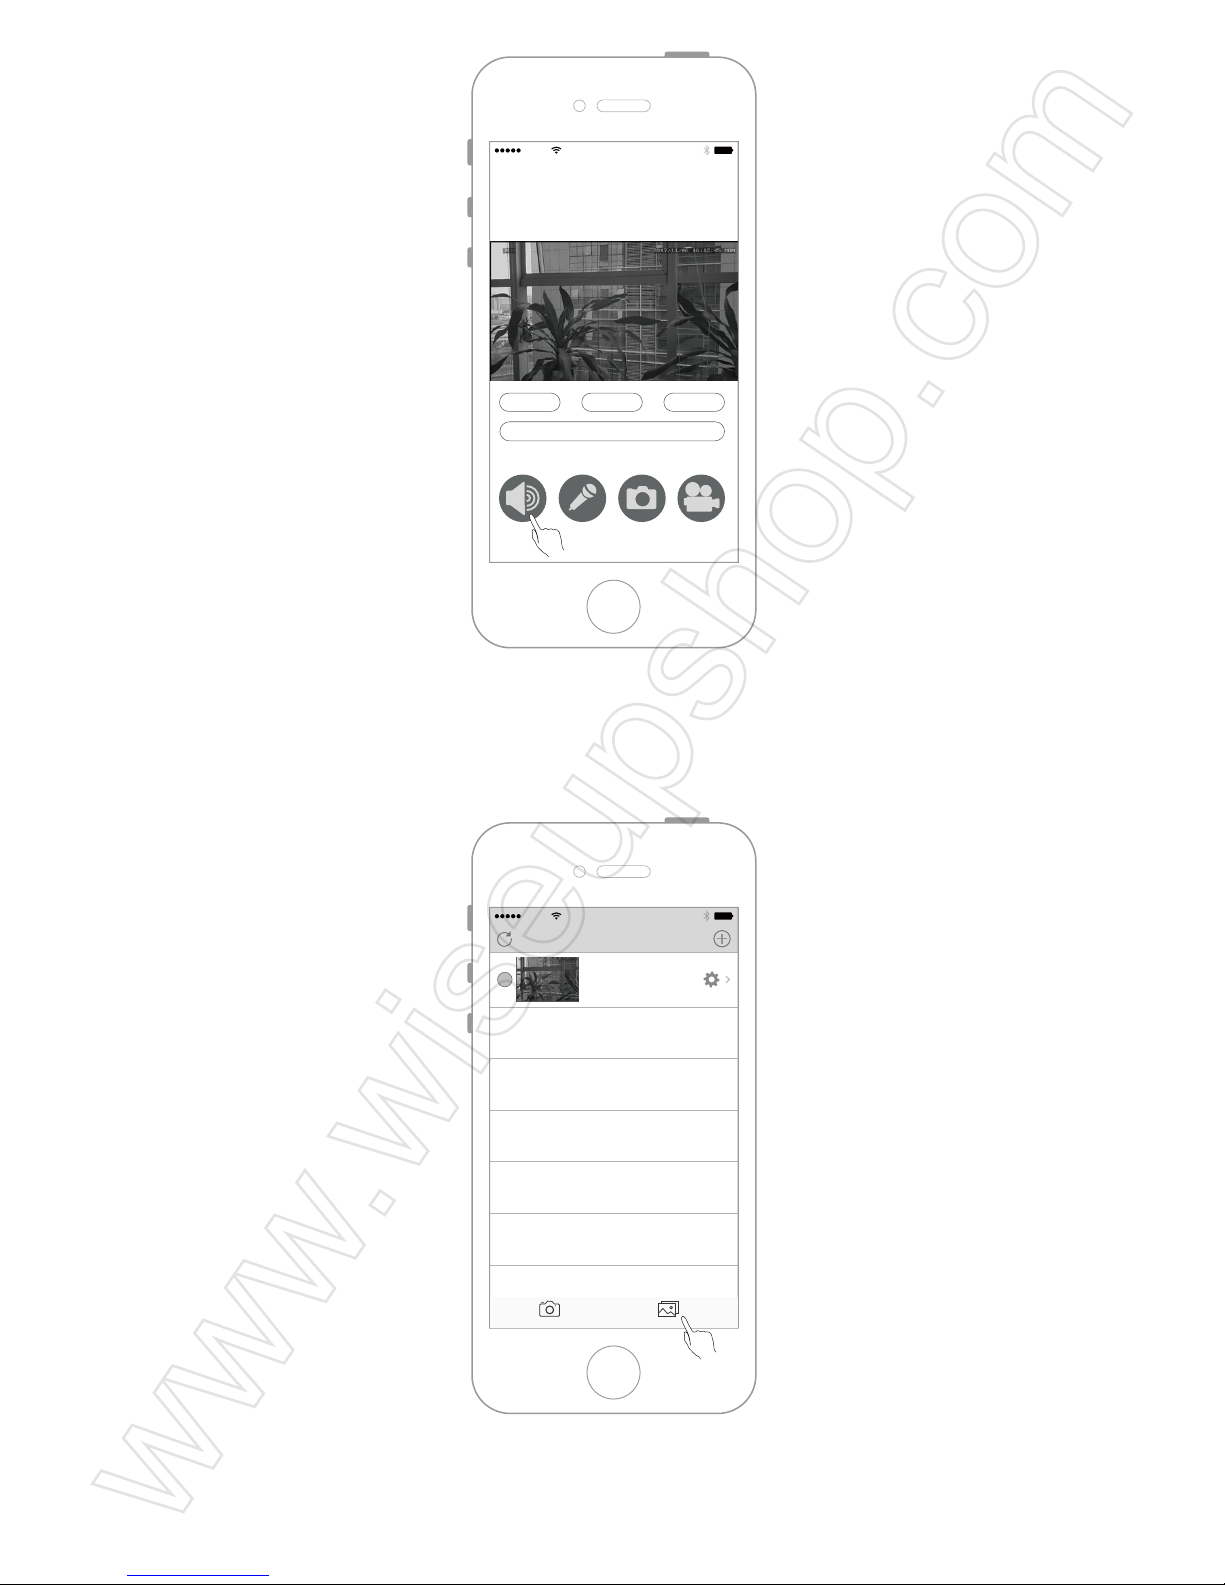
8.5 Jouer les fichiersvidéo stockésur l’appareil mobile IOS.
Étape1
Étape2
AT&T
11:57 AM
Devices
Devices Media
Camwf
Connected
AT&T
11:57 AM
Camwf
Network:184 k/s
00:12
Full Flip
Video Reset
Horizontal Flip Vertical Flip
Page 72
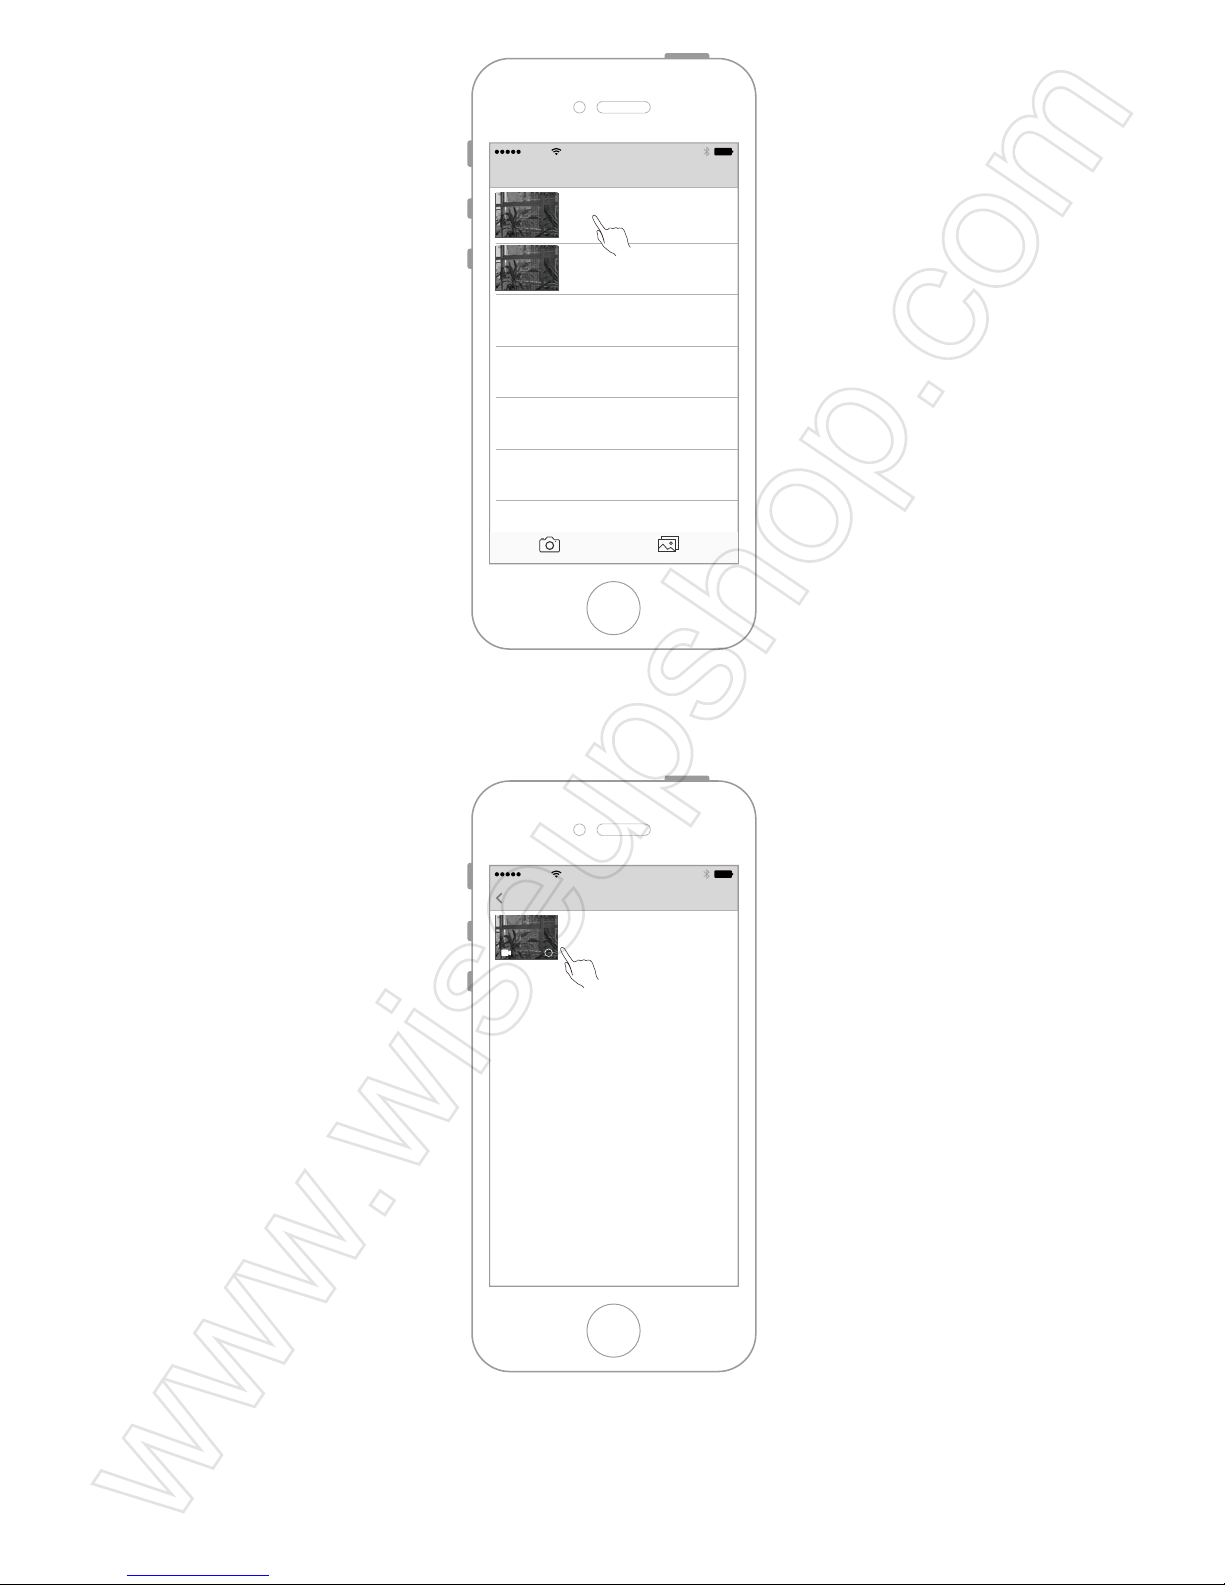
Étape3
<Remarque>: la résolution vidéo de 1280x720P, et le format vidéo est MP4.
AT&T
11:57 AM
Photos
Devices Media
Camwf
1
Camwf
2
AT&T
11:57 AM
Camwf Edit
Page 73
IX. Jouez les Fichiers Vidéo Locaux sur l’Appareil Mobile Android
9.1 Activez l’APP.
9.2 Entrez dans le menu de la caméra et sélectionnez "SDCard Record".
AT&T
11:57 AM
Camwf
AT&T
11:57 AM
Devices
Devices Media
Camwf
Connected
AT&T
11:57 AM
Settings
Back
User Settings
Device Settings
Network Settings
SDCard Record
Refresh push
About
Page 74
9.3 Choisissez l'un des fichiers vidéo à jouer.
X. Réinitialiser
Fonctionnement: Lorsque la caméra est allumée, appuyez sur le bouton de réinitialisation
pendant 10 secondes pour restaurer les paramètres par défaut.
AT&T
11:57 AM
SDCard
Full time recording
6 Now 2017 at 4:20 PM
Full time recording
6 Now 2017 at 4:15 PM
Full time recording
6 Now 2017 at 4:08 PM
Full time recording
6 Now 2017 at 4:02 PM
Full time recording
6 Now 2017 at 3:57 PM
Full time recording
6 Now 2017 at 3:40 PM
Full time recording
6 Now 2017 at 3:33 PM
Full time recording
6 Now 2017 at 3:15 PM
Page 75
XI. Changer le Nom de la Caméra
11.1 Activez l’APP "Camwf ".
11.2 Assurez-vous que la caméra a bien été ajoutée à l’APP et qu'elle est Online.
AT&T
11:57 AM
Camwf
AT&T
11:57 AM
Devices
Devices Media
Camwf
Connected
Camwf
Connected
Page 76
11.3 Entrez dans le menu de la caméra et sélectionnez "User Settings".
11.4 Entrez un nouveau nom de caméra.
11.5 Touchez "OK" pour confirmer la modification.
AT&T
11:57 AM
Devices
Devices Media
Camwf
Connected
AT&T
11:57 AM
Settings
Back
User Settings
Device Settings
Network Settings
SDCard Record
Refresh push
About
AT&T
11:57 AM
User Settings
Settings
Device Name New name
Device UID
User Name
Password
JP5DLXEVZGES11FZ111A
admin
OK
Page 77
XII. Modifier le mot de Passe de Connexion de la Caméra
12.1 Activez l’APP "Camwf " pour vous assurer que la caméra a bien été ajoutée à l’APP
et qu'elle est Online.
AT&T
11:57 AM
Camwf
AT&T
11:57 AM
Devices
Devices Media
Camwf
Connected
Camwf
Connected
AT&T
11:57 AM
User Settings
Settings
Device Name New name
Device UID
User Name
Password
JP5DLXEVZGES11FZ111A
admin
OK
Page 78
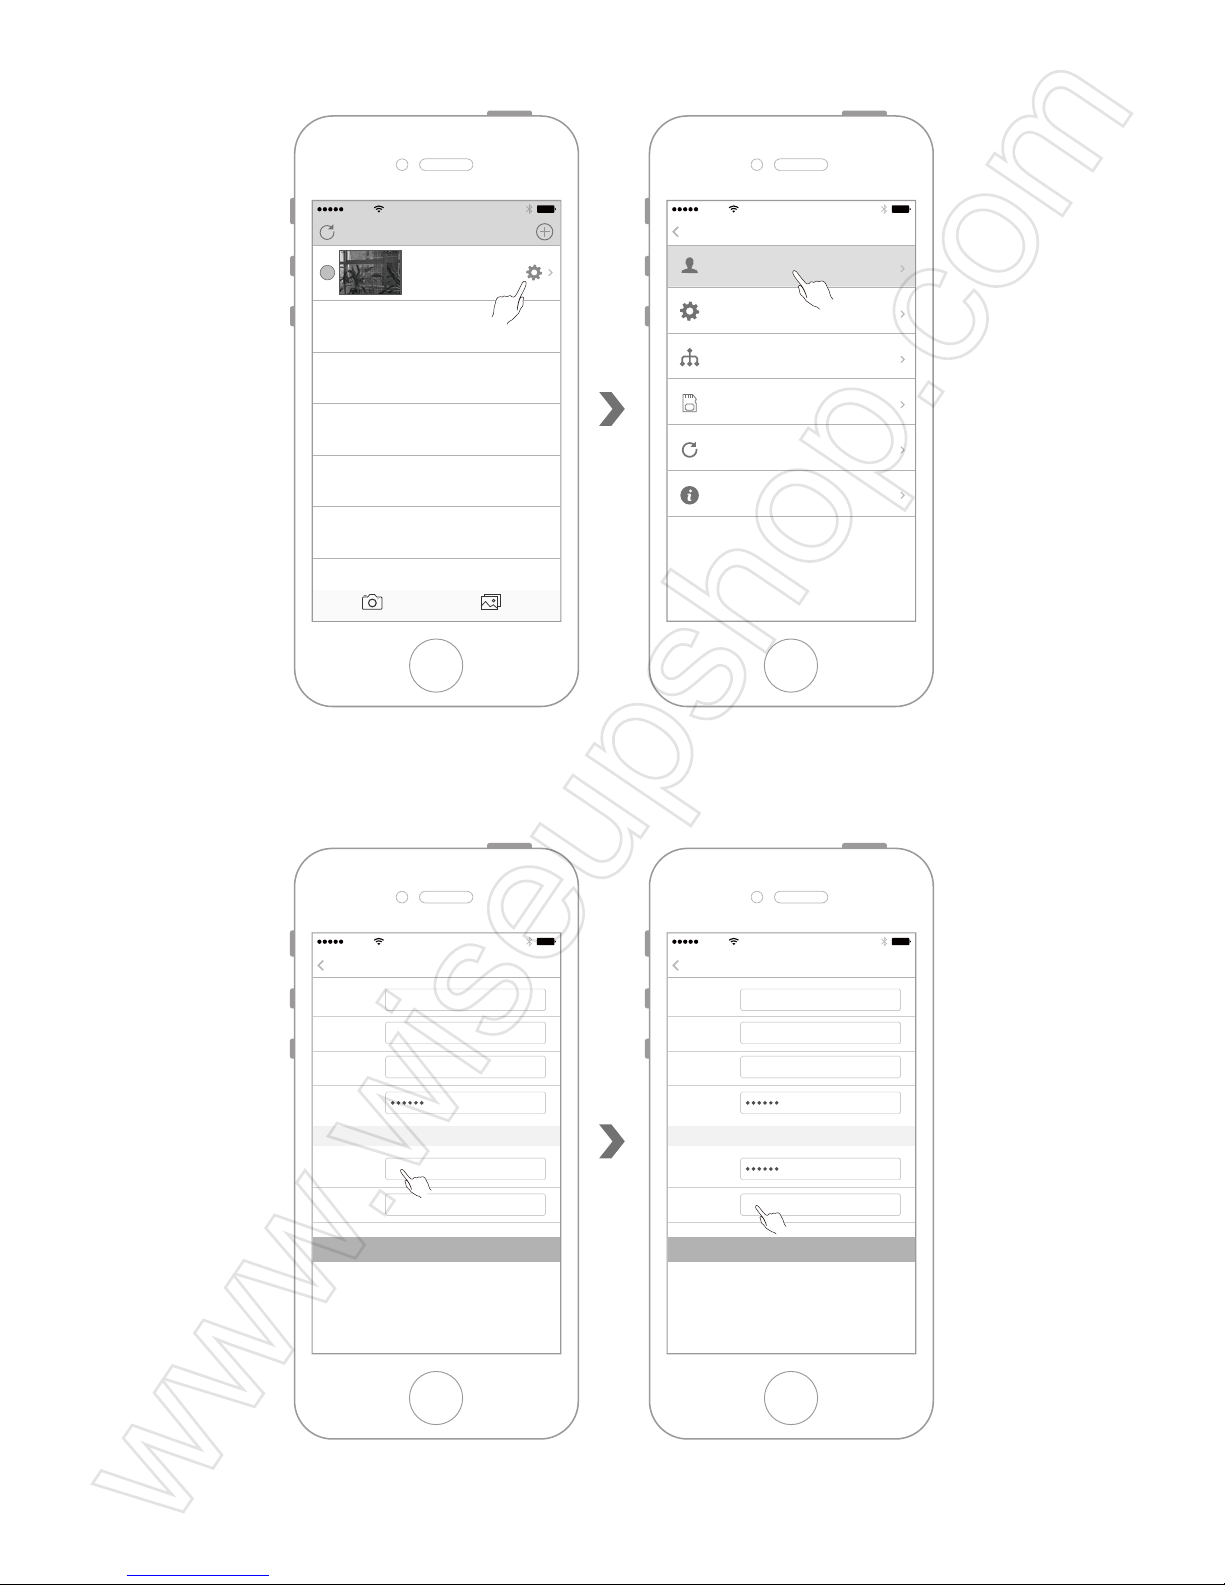
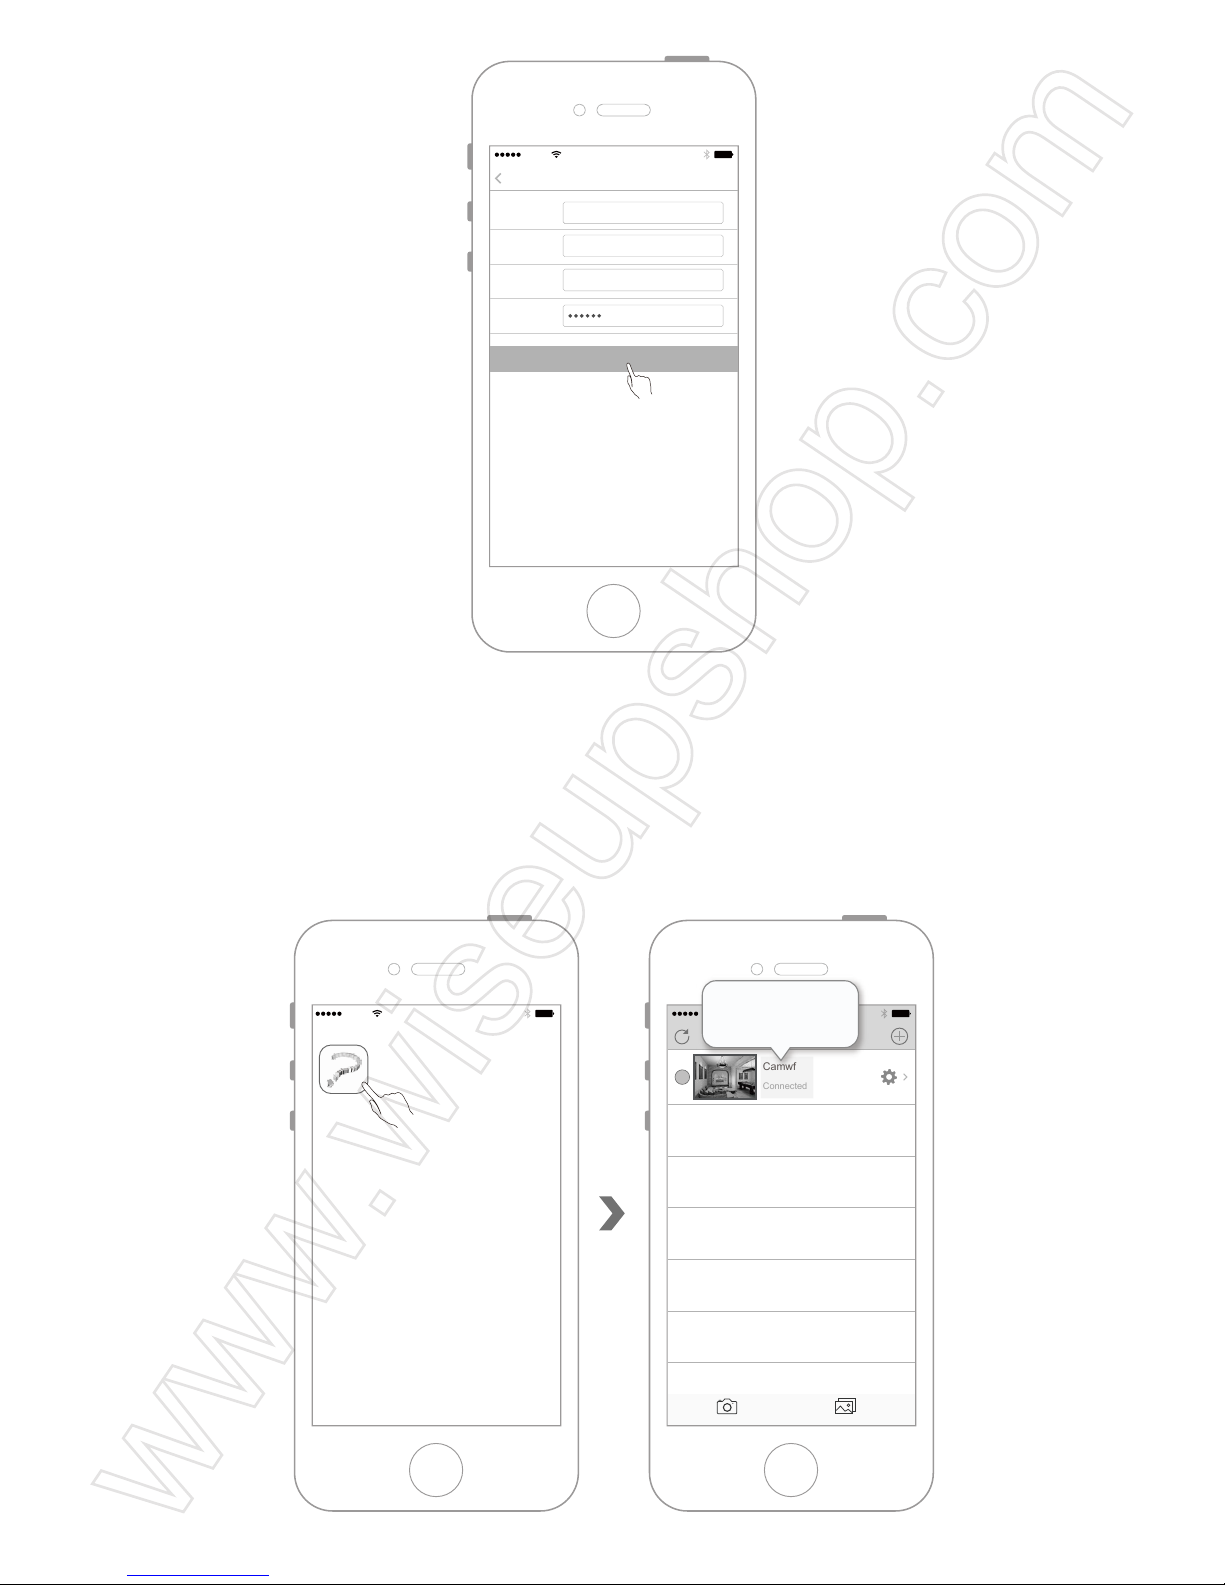
12.2 Entrez dans le menu de la caméra, et sélectionnez "User Settings".
12.3 Entrez un nouveau mot de passe.
12.4 Touchez "OK" pour enregistrer les modifications.
AT&T
11:57 AM
Devices
Devices Media
Camwf
Connected
AT&T
11:57 AM
Settings
Back
User Settings
Device Settings
Network Settings
SDCard Record
Refresh push
About
AT&T
11:57 AM
User Settings
Settings
Device Name Camwf
Device UID
User Name
Password
JP5DLXEVZGES11FZ111A
admin
OK
Psaaword1
Password2
NEW PASSWORD
AT&T
11:57 AM
User Settings
Settings
Device Name Camwf
Device UID
User Name
Password
JP5DLXEVZGES11FZ111A
admin
OK
Psaaword1
Password2
NEW PASSWORD
Page 79
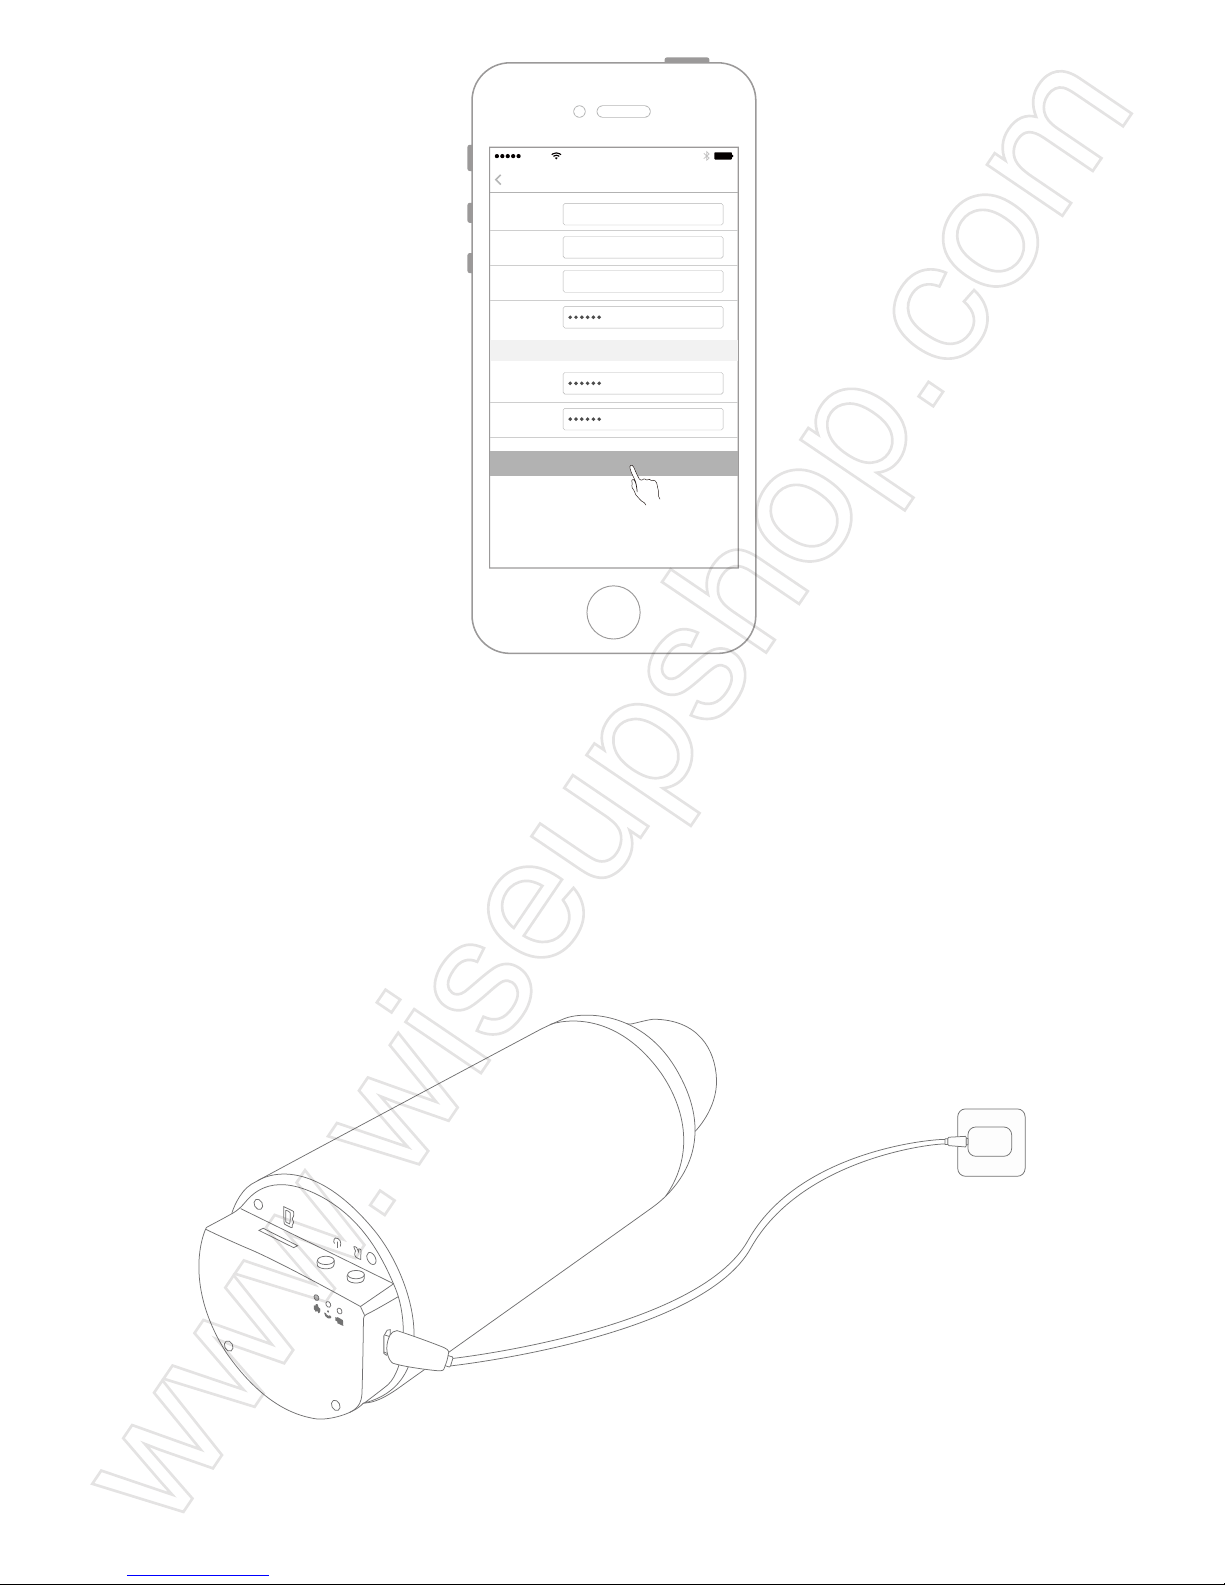
XIII. Charger la Batterie de Réserve
Connectez la caméra à une source d'alimentation externe. Lors du chargement, les voyants
d'alimentation et de charge seront allumés en permanence. Lorsque la durée de charge atteint
6 heures, il faut éteindre la caméra.
AT&T
11:57 AM
User Settings
Settings
Device Name Camwf
Device UID
User Name
Password
JP5DLXEVZGES11FZ111A
admin
OK
Psaaword1
Password2
NEW PASSWORD
Page 80

Problèmescommuns:
Q: Il est impossible de trouver le point d’accès WIFI de la caméra sur la page des
paramètres WIFI de l’appareil mobile IOS.
A:
1. Veuillez utiliser une alimentation externe pour alimenter la caméra.
2. Veuillez réinitialiserla caméra.
3. Vérifiez la distance entre l’appareil mobile IOS. et la caméra pour vous assurer que l’appareil
mobile IOS est dans la distance de connexion efficace de points d'accès WIFI de la caméra,
patientez 2 minutes, pour actualiser la page des paramètres WIFI pour l'appareil mobile IOS.
4. Désactivez les fonctionnalités WIFI de l’appareil mobile IOS et patientez un moment
avant de rédémarrer.
Q: Comment faire s'il n'y a pas de signal vidéo sur l'APP, l'écran est vide ou l'écran
recherche toujours.
A: Quittez l’APP, reconnectez-vous, et assurez-vous que la caméra est Online.
Q: La caméra a souvent chuté.
A: Utilisez une alimentation externe pour alimenter la caméra et réglez la distance entre la
caméra et le point d'accès WIFI.
Q: Comment ajouter une caméra à plusieurs appareils mobiles IOS?
A: Installez et ouvrez l’APP "Camwf ", touchez "+", scannez le code QR au bas de la caméra,
ou entrez l'UID et le mot de passe de la caméra pour l'ajouter.
Q: Comment faire si l’on a oublié le mot de passe?
A: Réinitialiser la caméra.
Q: Combien d'appareils mobiles IOS peut-on connecter à la caméra en même temps?
A: En théorie, ce n'est pas limité, mais il est recommandé d'utiliser 4 appareils mobiles IOS
au max pour se connecter à la caméra.
Q:Combien de caméras peut-on ajouter à l’APP?
Page 81

A: Pas de limite
Q: Puis-je connecter ma caméra à un PC Windows?
A: Oui, cependant, il faut d'abord ajouter une caméra sur l'appareil mobile, et puis ajouter
un caméra gratuit sur votre PC pour installer le logiciel gratuit à partir du côté PC. Lien de
téléchargement du logiciel client PC: http://www.mymitech.com/download.html.
Page 82
WIFI38
Istruzione (Versione IOS)
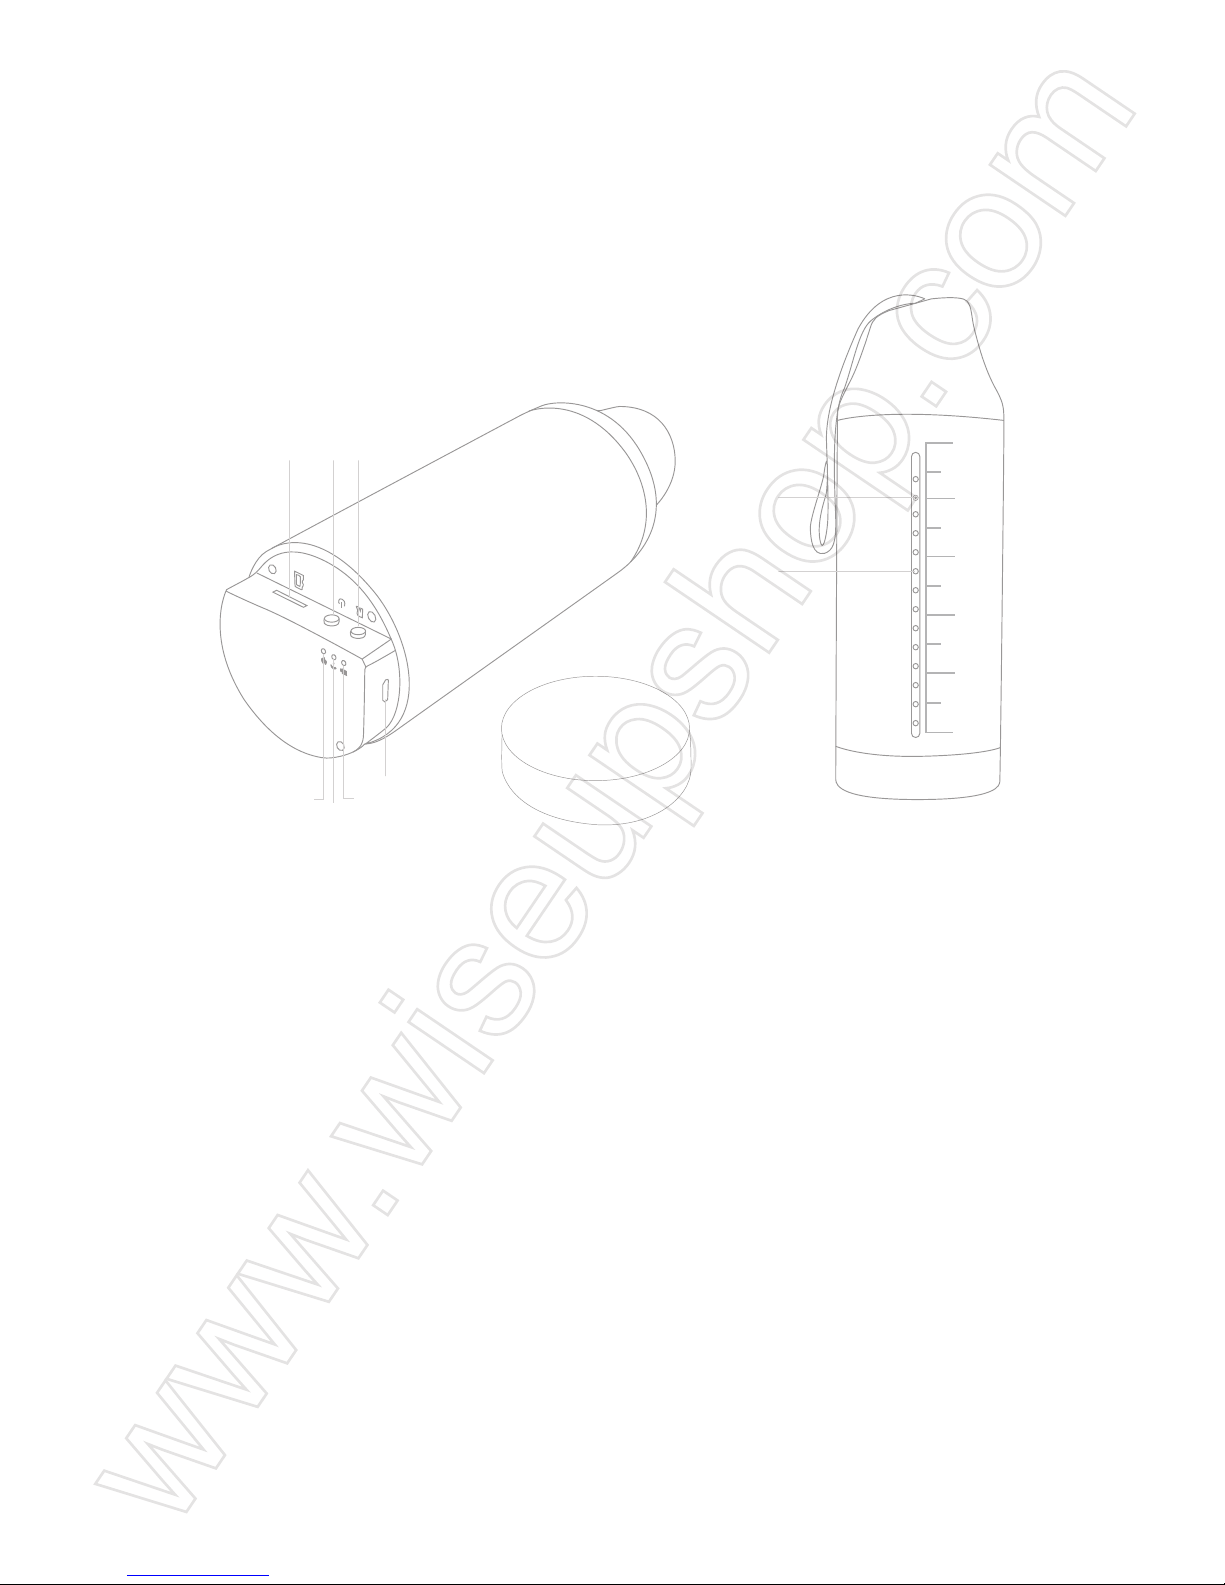
I. Panoramica del Prodotto
1. Tasto di reset
2. Tasto di accensione
3. Slot per scheda Micro SD
4. Porta USB
5. Indicatore di carica
6. Indicatore di WIFI
7. Indicatore di alimentazione
8. Lenti della videocamera
9. Lampada a raggi infrarossi
II. Cosa c'è nel pacchetto?
-1× Videocamera tazza da viaggio
-1× Linea dati USB
-1× Adattatore di corrente da AC110-240V a DC 5V
-1× Scheda micro SD Micro SDHC Classe 10 da 16 GB(È stato installato nello slot per
600ml
500ml
400ml
300ml
200ml
100ml
1
4
8
9
5
6
7
2
3
Page 83
scheda Micro SD)
III. Prepara la Videocamera
3.1 Si prega di assicurarsi che una scheda mini SD sia stata inserita nello slot della scheda
SD della videocamera e questa scheda sia stata formattata in anticipo. La scheda SD
massima non deve superare i 64 GB, e ti consigliamo di usare solo la scheda Micro SDHC
Classe 10 Micro SD.
3.2 Quando la videocamera è collegata all'alimentatore esterno, l'indicatore di alimentazione
e l'indicatore di carica si accendono e la videocamera si accende automaticamente.
Page 84
IV. Configurazione della Modalità di Rete Punto a Punto (Modalità di
LAN)
4.1 Collegare la videocamera a un alimentatore esterno o premere a lungo il tasto di
accensione per 3s per accendere la videocamera. Quando vedi l'indicatore WIFI che
cambia a lampeggiare lento, significa che l'hotspot WIFI della videocamera è stata accesa
e pronta.
4.2 Per gli utenti che utilizzano dispositivi mobili IOS, si prega di scansionare il codice
bidimensionale qui sotto,o cercare "Camwf " direttamente nell'App Store e poi installare
l'APP.
4.3 Accendere la pagina delle impostazioni WLAN per il dispositivo mobile IOS,e poi
collegare il dispositivo mobile IOS all'hotspot Wi-Fi della videocamera.
Page 85
4.4 Accende APP "Camwf ".
4.5 Aggiungi la videocamera all'APP "Camwf ".
Fase 1.
AT&T
11:57 AM
WLAN
Settings
Wi-Fi
RT-FHC22NUK111A
AT&T
11:57 AM
Camwf
Page 86
Fase 2.
Fase 3.
AT&T
11:57 AM
Devices
Devices Media
AT&T
11:57 AM
Add DeviceBack
LAN Search Devices
Add Device By ID
Page 87
Fase 4.
4.6 Se lo stato della telecamera viene visualizzato come "Connected", la modalità di rete
punto a punto della videocamera (modalità di LAN) viene configurata correttamente.
AT&T
11:57 AM
LAN search devices
JP5DLXEVZGES11FZ111A
AT&T
11:57 AM
Add Device
Back
Device Name IP Cam
Device UID
User Name
Password
JP5DLXEVZGES11FZ111A
admin
OK
Page 88
<Nota>: La distanza effettiva di collegamento tra l'hotspot Wi-Fi della videocamera e i dispositivi
mobili IOS è di circa 15 metri (49 piedi).
V. Configurazione della Modalità di Rete Remota ( Modalità di WAN)
5.1 Accende APP "Camwf ", assicurarsi che la videocamera sia stata aggiunta con successo
ad APP e in linea.
AT&T
11:57 AM
Devices
Devices Media
Camwf
Connected
Camwf
Connected
AT&T
11:57 AM
Camwf
AT&T
11:57 AM
Devices
Devices Media
Camwf
Connected
Camwf
Connected
Page 89
5.2 Entrare al menu della videocamera, e poi selezionare "Network Settings".
5.3 Entrare "Network Settings" per cercare gli hotspot WIFI disponibili, e poi selezionare
l'hotspot Wi-Fi a cui vuoi connetterti.
5.4 Inserire la parola d’ordine, premere il tasto "OK" per registrare, la videocamera si
AT&T
11:57 AM
Settings
Back
User Settings
Device Settings
Network Settings
SDCard Record
Refresh push
About
AT&T
11:57 AM
Devices
Devices Media
Camwf
Connected
AT&T
11:57 AM
Network Settings
Settings
SSID:
Pwd
OK
AT&T
11:57 AM
Settings
SSID:
Pwd
OK
SSIDCancel
SSID-3
SSID-2
SSID-4
SSID-5
SSID-1
OK
Network Settings
Page 90
riavvierà automaticamente.
5.5 Uscire da APP "Camwf ".
5.6 Torna alla pagina delle impostazioni WIFI sui dispositivi mobili IOS e poi disconnettiti
dall'attuale hotspot WIFI.
5.7 Collega il dispositivo mobile IOS a un altro hotspot WIFI,o usa la rete dati stessa del
dispositivo mobile IOS.
AT&T
11:57 AM
Network Settings
Settings
SSID: SSID-1
xxxxxxxx
Pwd
OK
AT&T
11:57 AM
Settings
AT&T
11:57 AM
Settings
WLAN
SSID-1
WLAN
AT&T
11:57 AM
Fukeside
Forget This Network
AT&T
11:57 AM
WLAN
Settings
WLAN
i
SSID-1
Page 91
5.8 Assicurati che il tuo dispositivo mobile IOS possa accedere a Internet, e poi accende
nuovamente APP "Camwf ". Quando la videocamera è nello stato di "Connected", la modalità
di rete remota (modalità di WAN) che rappresenta la videocamera è stata configurata
correttamente.
AT&T
11:57 AM
Settings
SSID-2
WLAN
WLAN
i
1
AT&T
11:57 AM
Settings
SSID-2
WLAN
WLAN
i
AT&T
11:57 AM
Cellular
Settings
Cellular Data
Cellular Data Options
AT&T
11:57 AM
Settings
WLAN
Cellular
Off
Off
2
AT&T
11:57 AM
Settings
WLAN
WLAN
Page 92
<Nota>: Se lo stato della videocamera mostra "Connect Fail", la configurazione della modalità di
rete remota ha esito negativo. Si prega di riconfigurare la configurazione di rete remota.
VI. Imposta la Modalità Video per il Rilevamento del Movimento
6.1 Accende APP "Camwf ", assicurarsi che la videocamera sia stata aggiunta con successo
ad APP e in linea.
AT&T
11:57 AM
Camwf
AT&T
11:57 AM
Devices
Devices Media
Camwf
Connected
Camwf
Connected
AT&T
11:57 AM
Camwf
AT&T
11:57 AM
Devices
Devices Media
Camwf
Connected
Camwf
Connected
Page 93
6.2 Entrare al menu della videocamera, e poi selezionare "Device Settings".
6.3 Selezionare "Alarm Record", e poi selezionare la sensibilità di rilevamento del movimento
desiderata in "Motion Detection".
6.4 Toccare "OK" per completare la impostazione della modalità video di rilevamento del
movimento. I videi di rilevamento del movimento verrà automaticamente archiviato nella
AT&T
11:57 AM
Devices
Devices Media
Camwf
Connected
AT&T
11:57 AM
Settings
Back
User Settings
Device Settings
Network Settings
SDCard Record
Refresh push
About
AT&T
11:57 AM
Settings
Settings
Start Time: End Time:
End Time:
End Time:
Status:
Start Time:
Status:
Start Time:
SD record
Motion detection
Status:
Close Record Capture
Close Record Capture
Close Record Capture
Close 24h Video Alarm Record
HD(1920*1080) HD(1280*720)
Close Low Middle High Highest
VGA(640*480)
Restart Confirm
AT&T
11:57 AM
Settings
Settings
Start Time: End Time:
End Time:
End Time:
Status:
Start Time:
Status:
Start Time:
SD record
Motion detection
Status:
Close Record Capture
Close Record Capture
Close Record Capture
Close 24h Video Alarm Record
HD(1920*1080) HD(1280*720)
Close Low Middle High Highest
VGA(640*480)
Restart Confirm
Page 94
scheda Mini SD della viedeocamera.
<Nota> : La risoluzione video del rilevamento del movimento è 1280x720P e il formato video è AVI.
VII. Impostazioni della Modalità Video Ininterrotta Locale
7.1 Accende APP "Camwf ", assicurarsi che la videocamera sia stata aggiunta con successo
ad APP e in linea.
Restart Confirm
AT&T
11:57 AM
Settings
Settings
Start Time: End Time:
End Time:
End Time:
Status:
Start Time:
Status:
Start Time:
SD record
Motion detection
Status:
Close Record Capture
Close Record Capture
Close Record Capture
Close 24h Video Alarm Record
HD(1920*1080) HD(1280*720)
Close Low Middle High Highest
VGA(640*480)
AT&T
11:57 AM
Camwf
AT&T
11:57 AM
Devices
Devices Media
Camwf
Connected
Camwf
Connected
Page 95
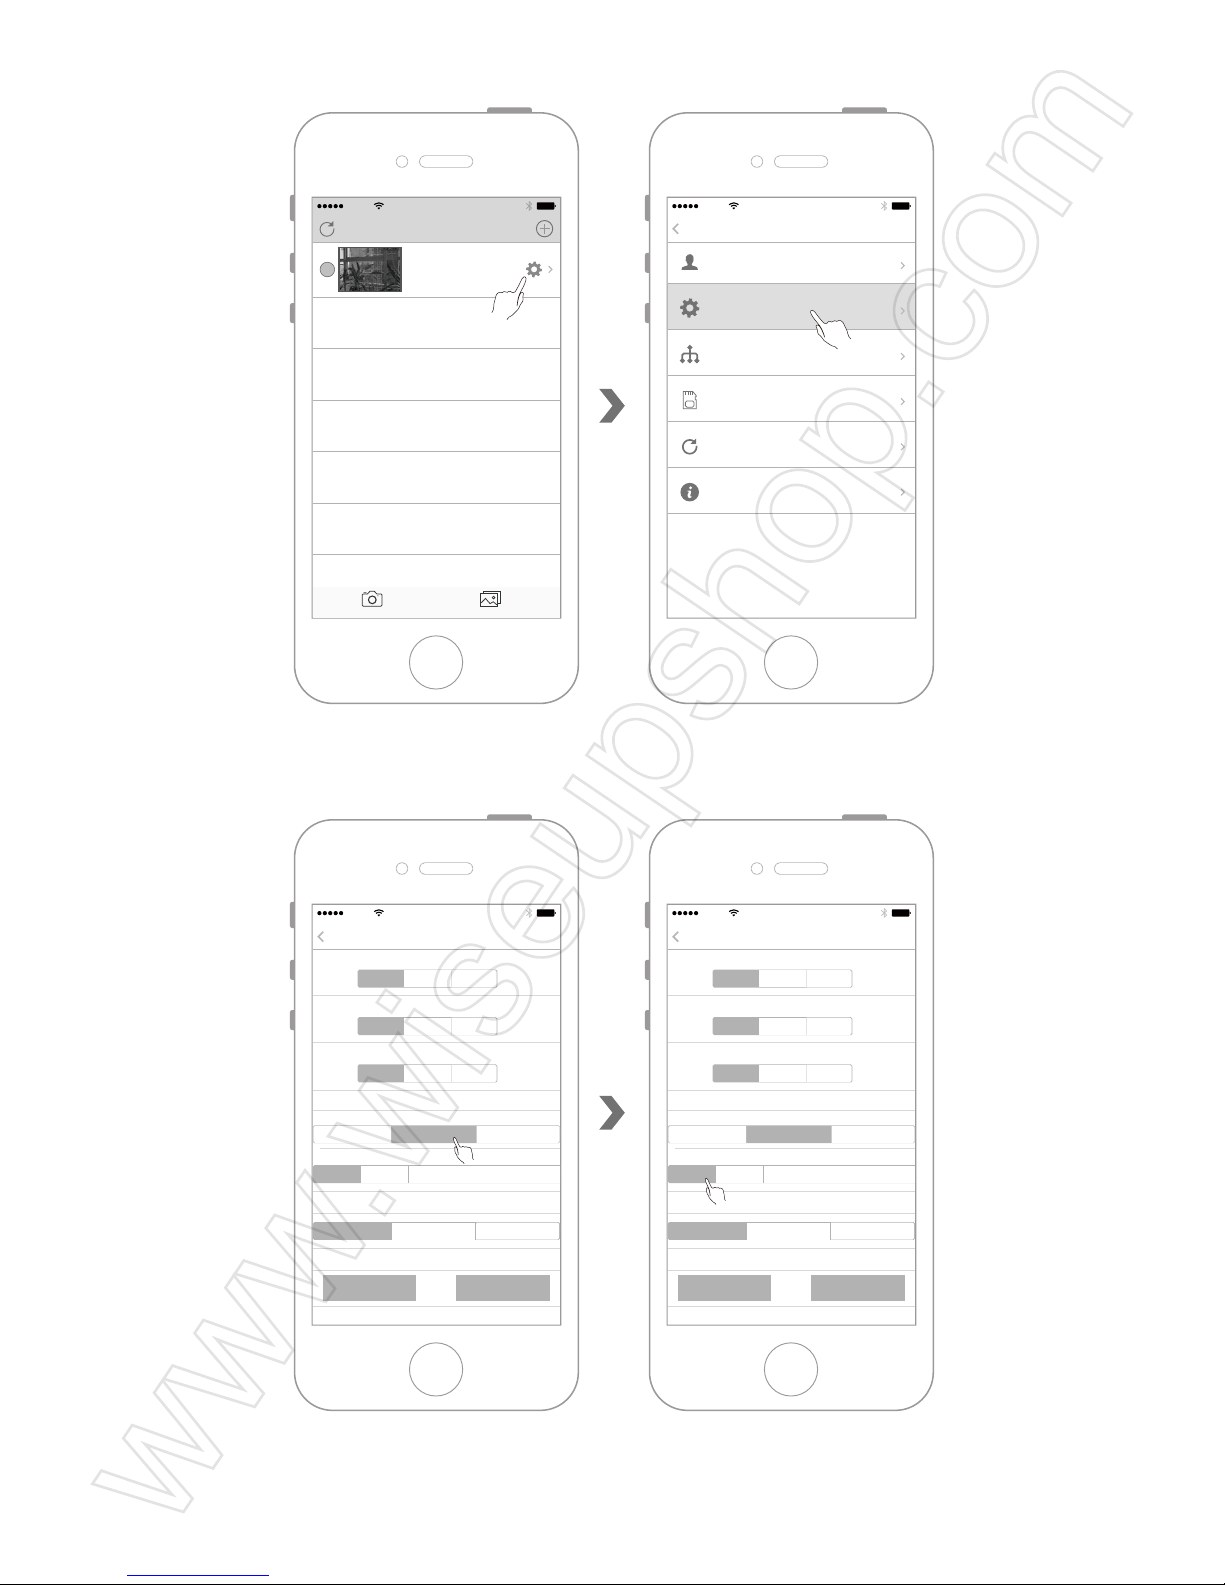
7.2 Entrare al menu della videocamera, e poi selezionare "Device Settings".
7.3 Selezionare "24h Video", e poi spegnere la funzione "Motion Detection".
7.4 Toccare "OK" per completare la impostazione. La videocamera avvierà automaticamente
24 ore di registrazione video ininterrotta.
AT&T
11:57 AM
Devices
Devices Media
Camwf
Connected
AT&T
11:57 AM
Settings
Back
User Settings
Device Settings
Network Settings
SDCard Record
Refresh push
About
AT&T
11:57 AM
Settings
Settings
Start Time: End Time:
End Time:
End Time:
Status:
Start Time:
Status:
Start Time:
SD record
Motion detection
Status:
Close Record Capture
Close Record Capture
Close Record Capture
Close 24h Video
HD(1920*1080) HD(1280*720)
Close Low Middle High Highest
VGA(640*480)
Restart Confirm
Alarm Record
AT&T
11:57 AM
Settings
Settings
Start Time: End Time:
End Time:
End Time:
Status:
Start Time:
Status:
Start Time:
SD record
Motion detection
Status:
Close Record Capture
Close Record Capture
Close Record Capture
Close 24h Video
HD(1920*1080) HD(1280*720)
Close Low Middle High Highest
VGA(640*480)
Restart Confirm
Alarm Record
Page 96
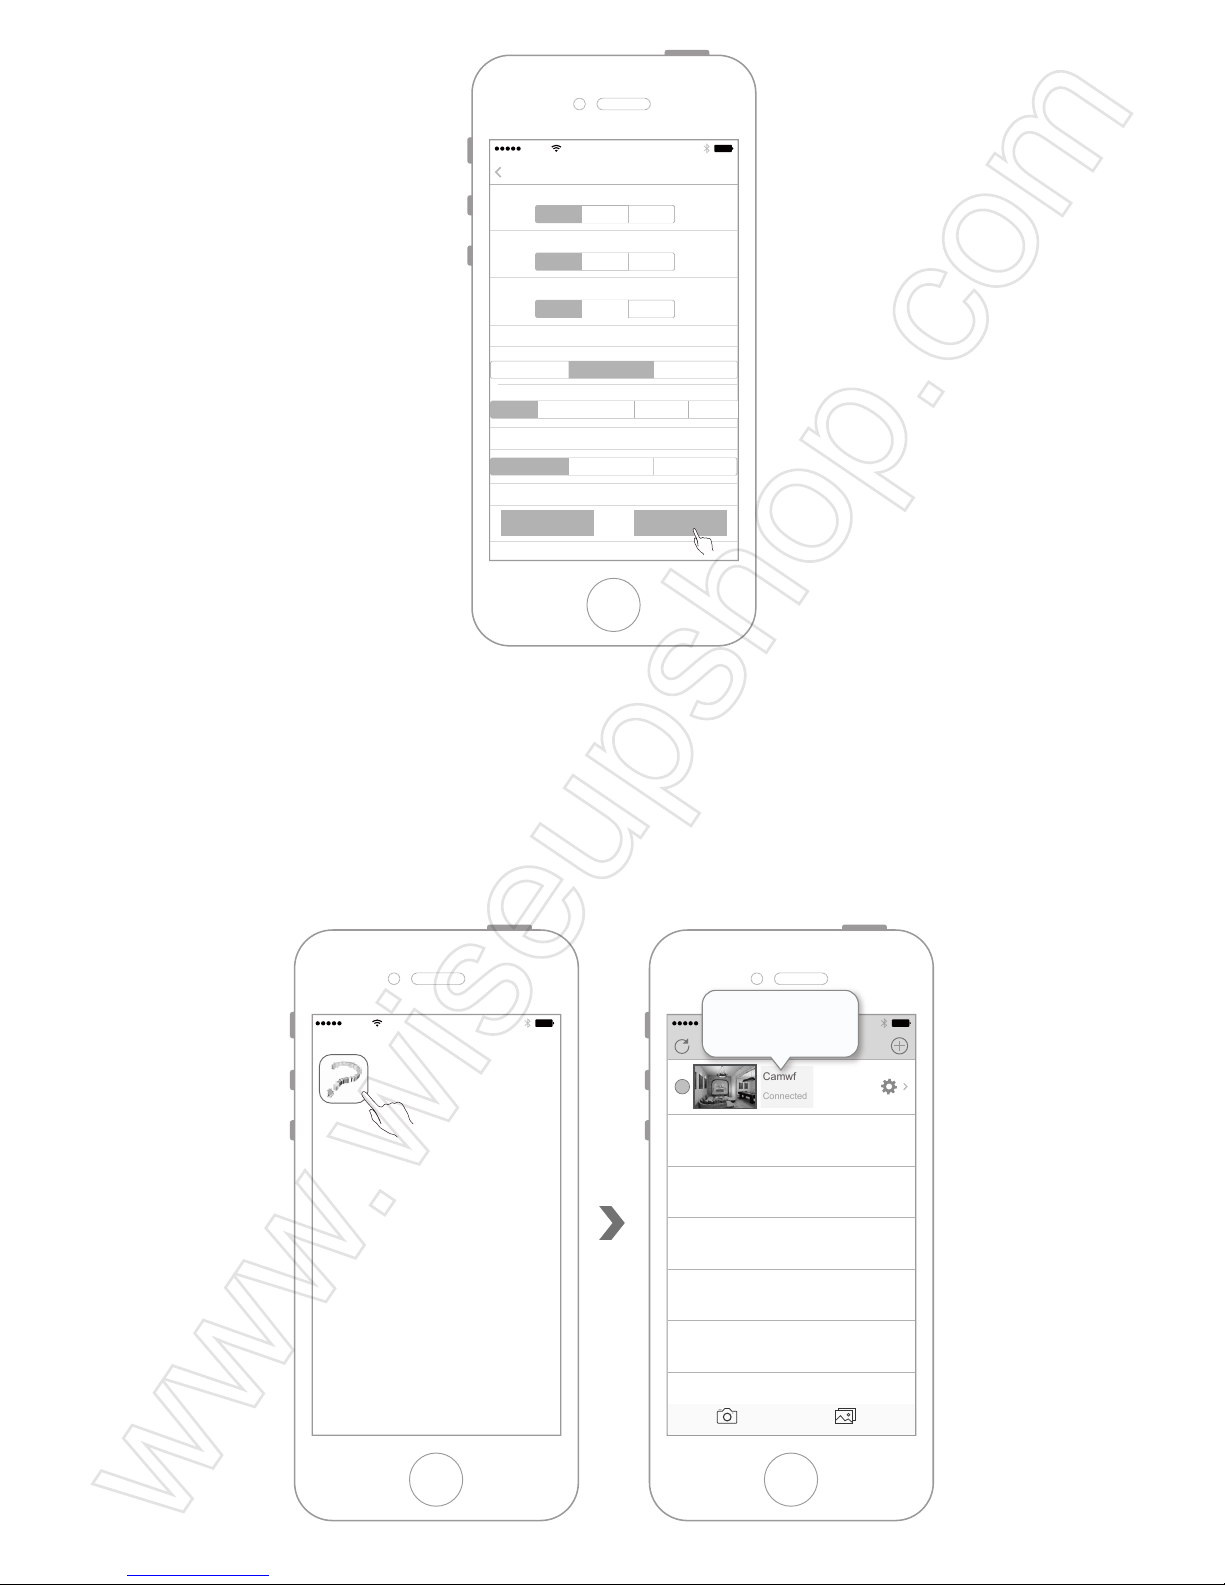
VIII. Usando i Dispositivi Mobili IOS per la Registrazione Video Remota
Manuale
8.1 Accende APP "Camwf ", assicurarsi che la videocamera sia stata aggiunta con successo
ad APP e in linea.
AT&T
11:57 AM
Camwf
AT&T
11:57 AM
Devices
Devices Media
Camwf
Connected
Camwf
Connected
Restart Confirm
AT&T
11:57 AM
Settings
Settings
Start Time: End Time:
End Time:
End Time:
Status:
Start Time:
Status:
Start Time:
SD record
Motion detection
Status:
Close Record Capture
Close Record Capture
Close Record Capture
Close 24h Video
HD(1920*1080) HD(1280*720)
Close Low Middle High Highest
VGA(640*480)
Alarm Record
Page 97
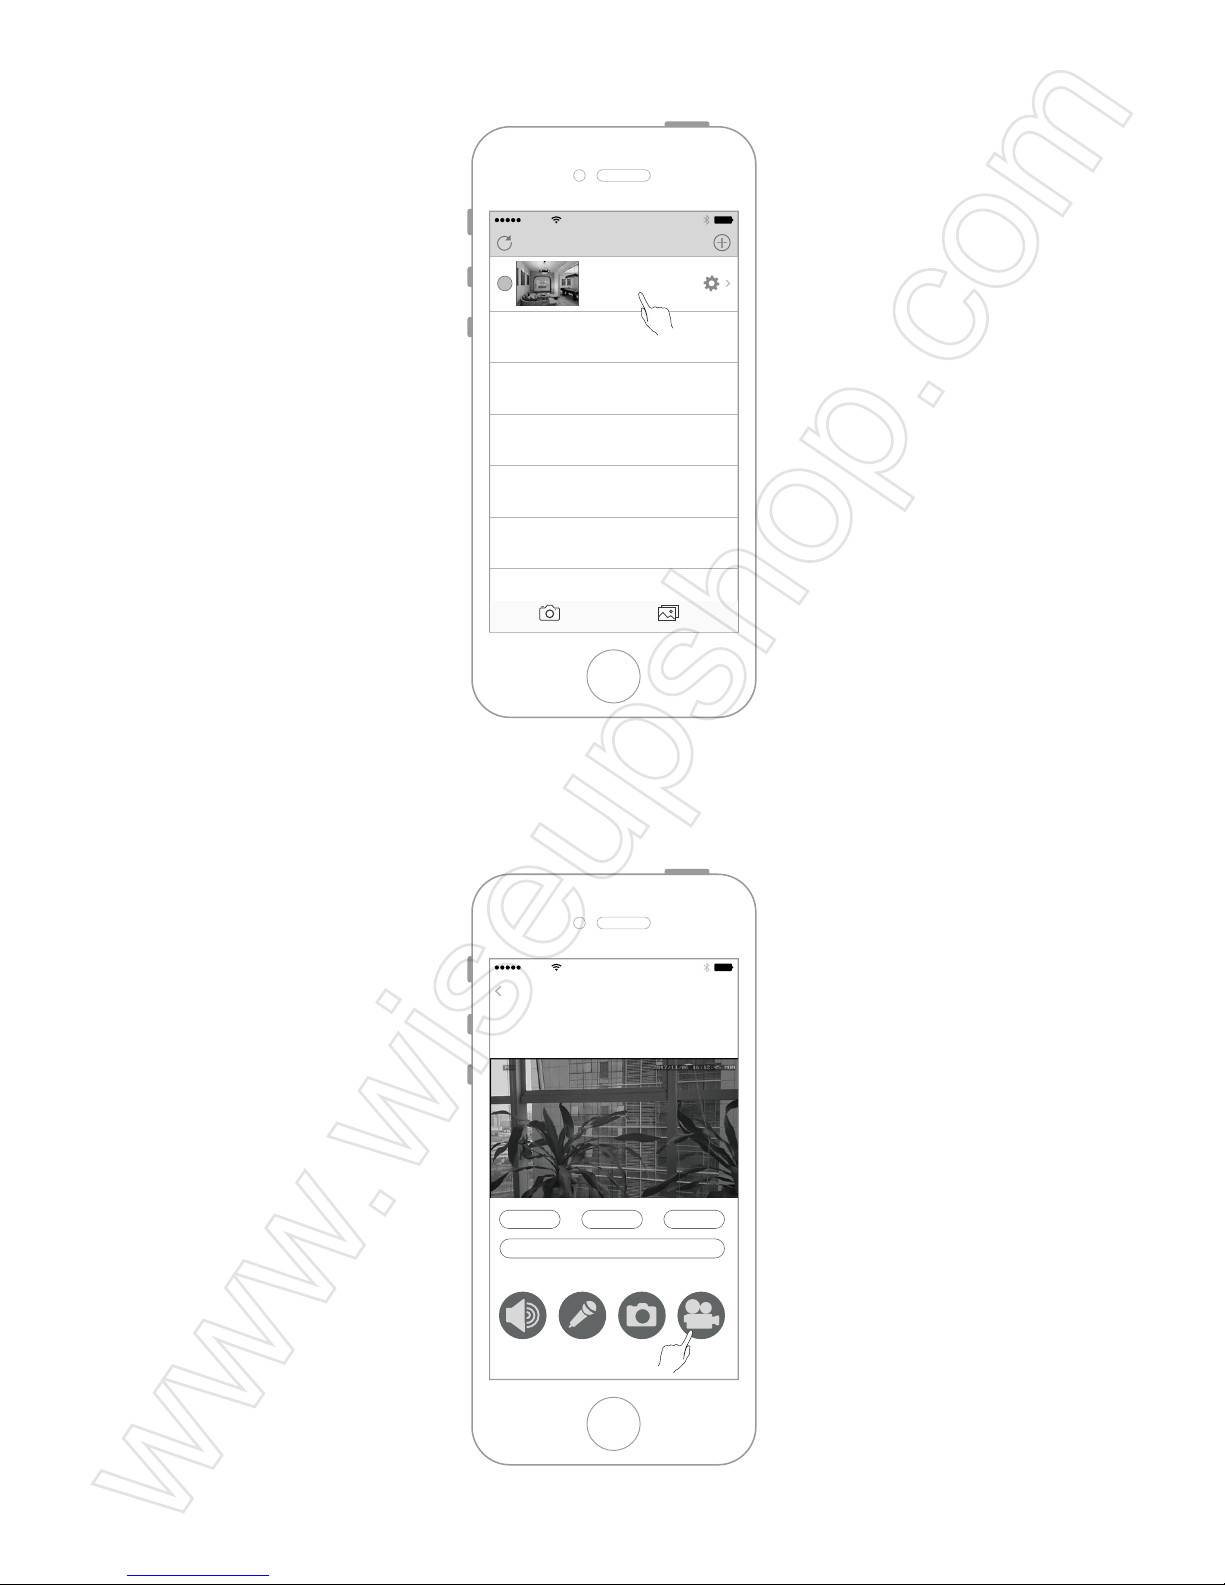
8.2 Toccare la videocamera.
8.3 Toccare il tasto di video per avviare il video.
AT&T
11:57 AM
Devices
Devices Media
Camwf
Connected
AT&T
11:57 AM
Camwf
Network:184 k/s
00:12
Full Flip
Video Reset
Horizontal Flip Vertical Flip
Page 98
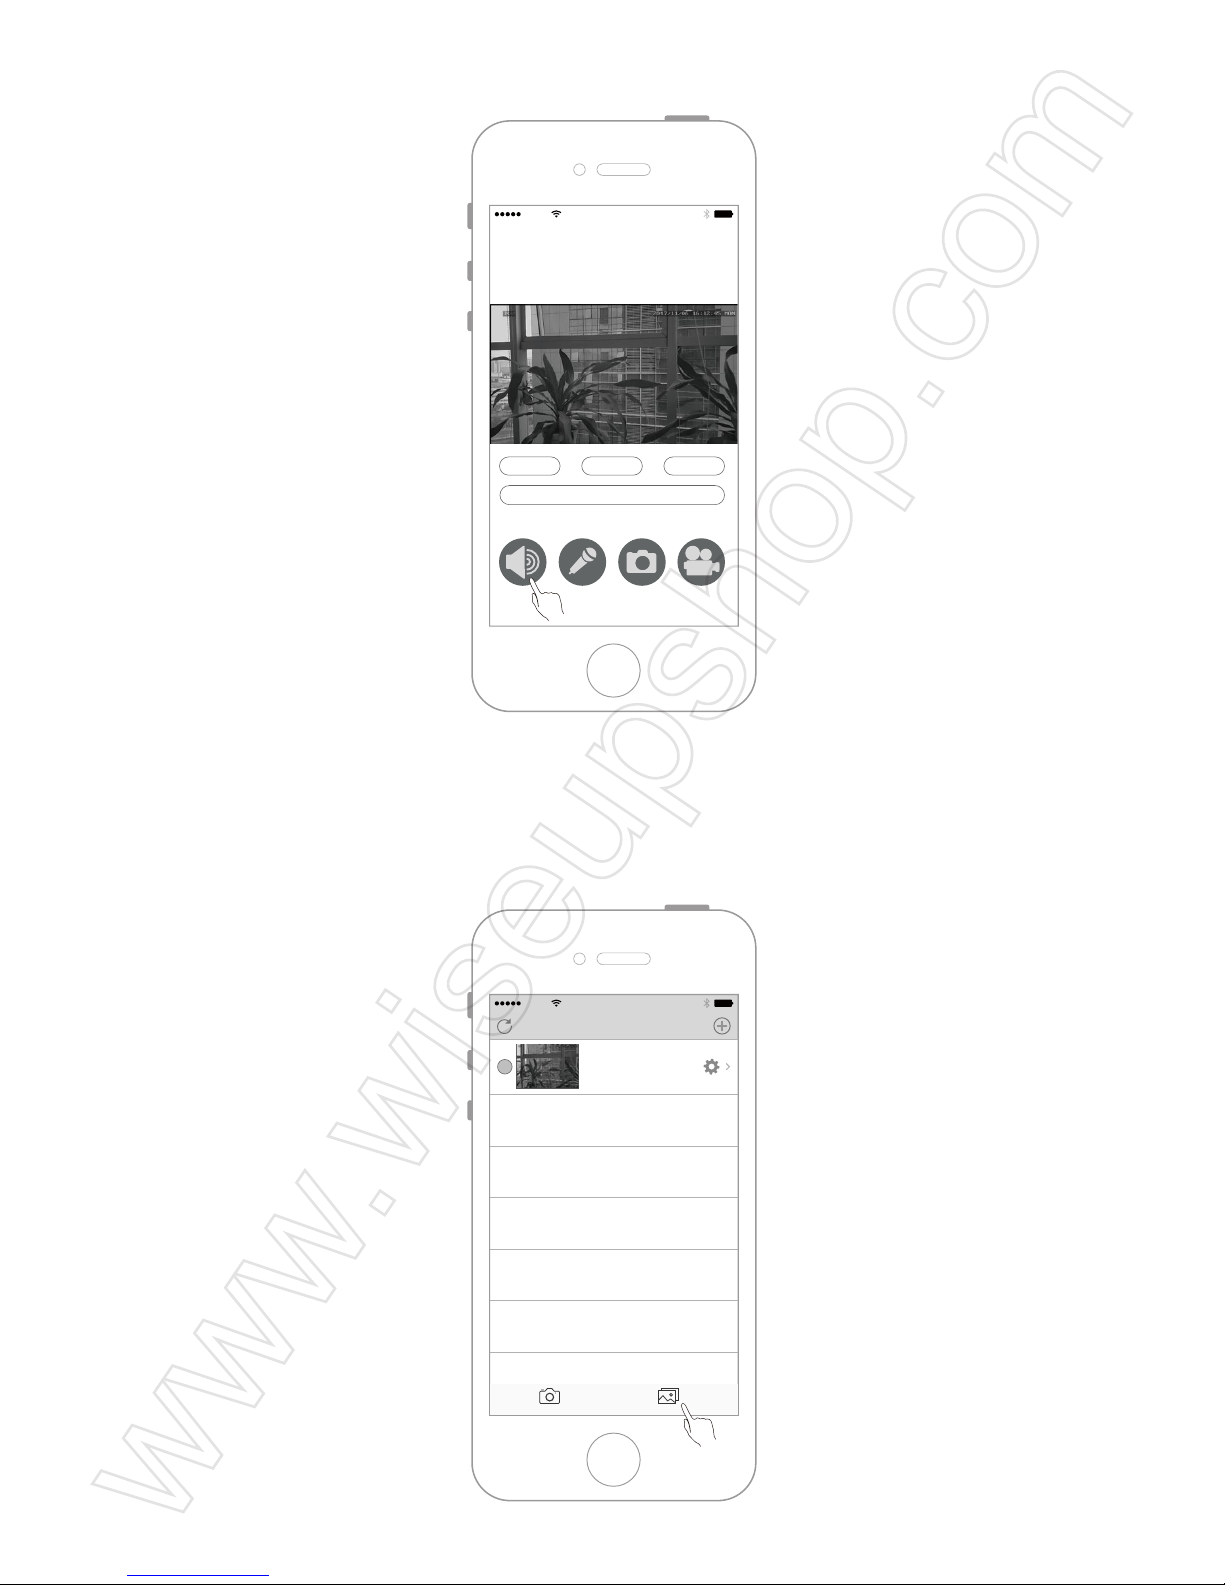
8.4 Premere il tasto di registrazione per accendere o spegnere la funzione di registrazione.
8.5 Riproduce file video archiviati sul dispositivo mobile IOS.
Fase1
AT&T
11:57 AM
Devices
Devices Media
Camwf
Connected
AT&T
11:57 AM
Camwf
Network:184 k/s
00:12
Full Flip
Video Reset
Horizontal Flip Vertical Flip
Page 99
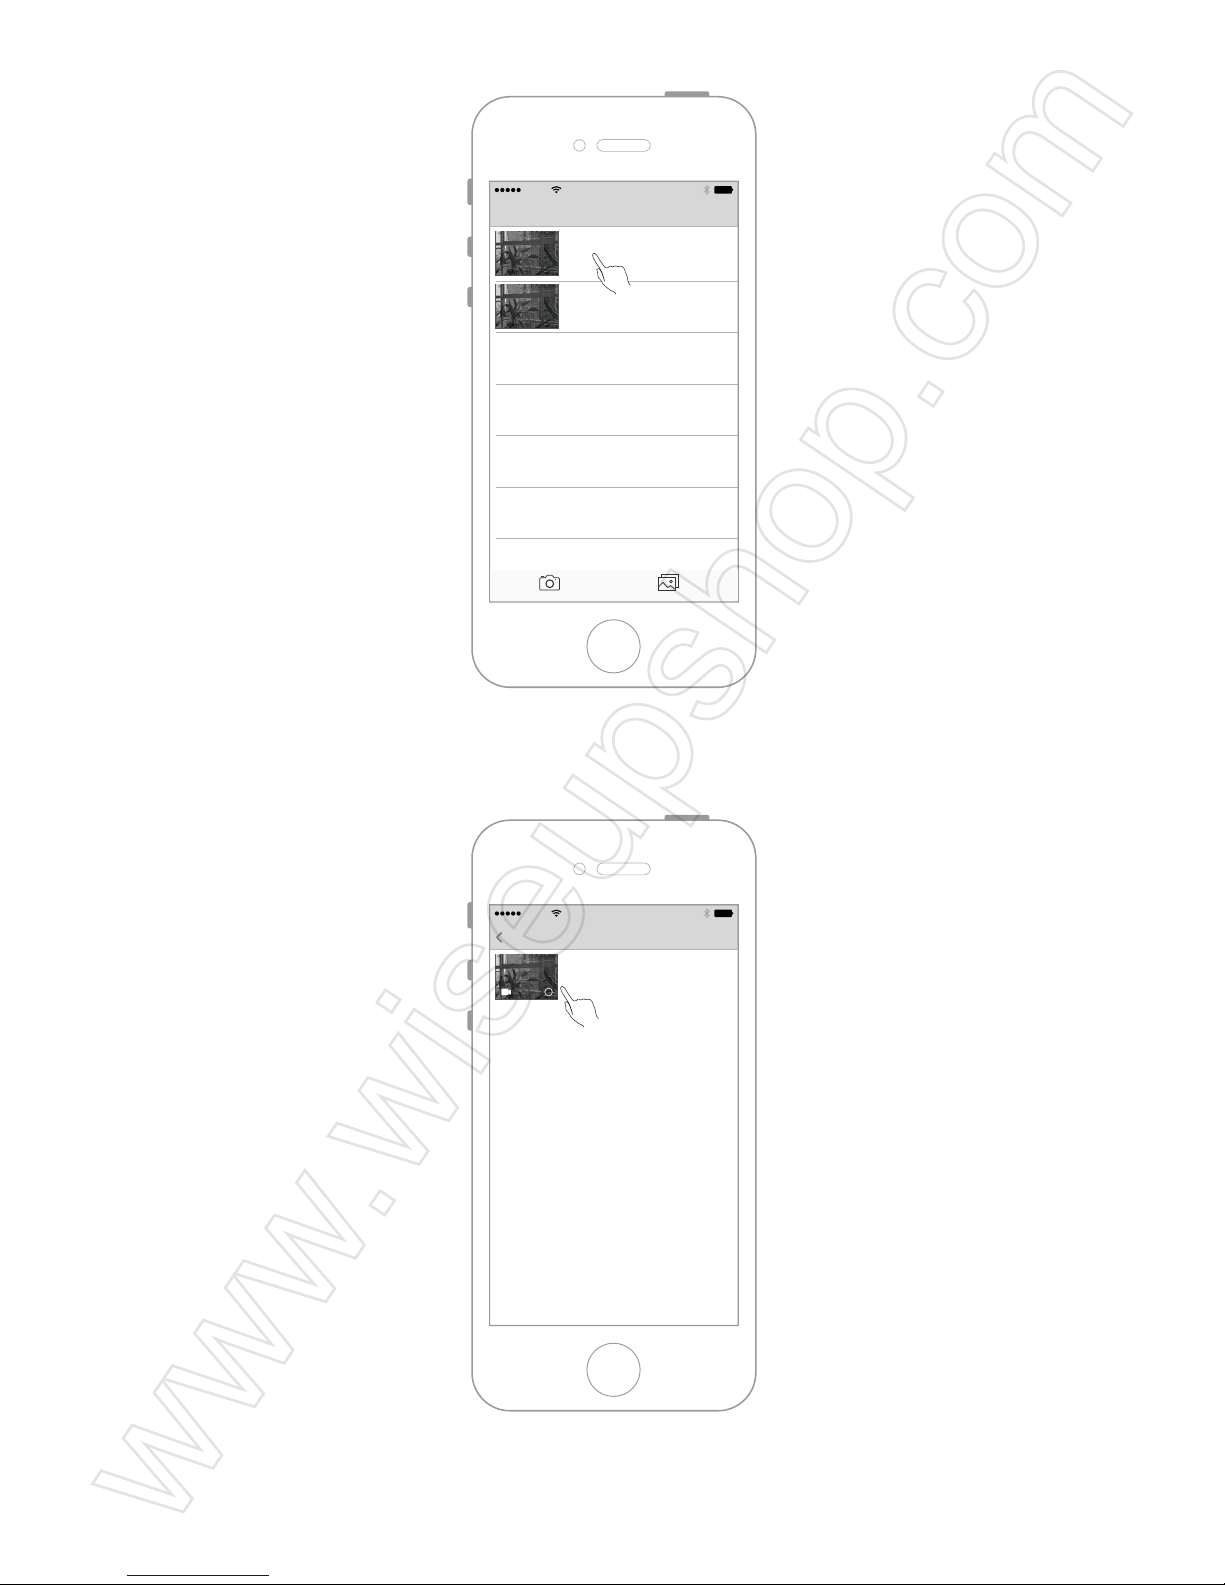
Fase2
Fase3
<Nota>: La risoluzione video del dispositivo mobile IOS 1280x720P, e il formato video è MP4.
AT&T
11:57 AM
Photos
Devices Media
Camwf
1
Camwf
2
AT&T
11:57 AM
Camwf Edit
Page 100
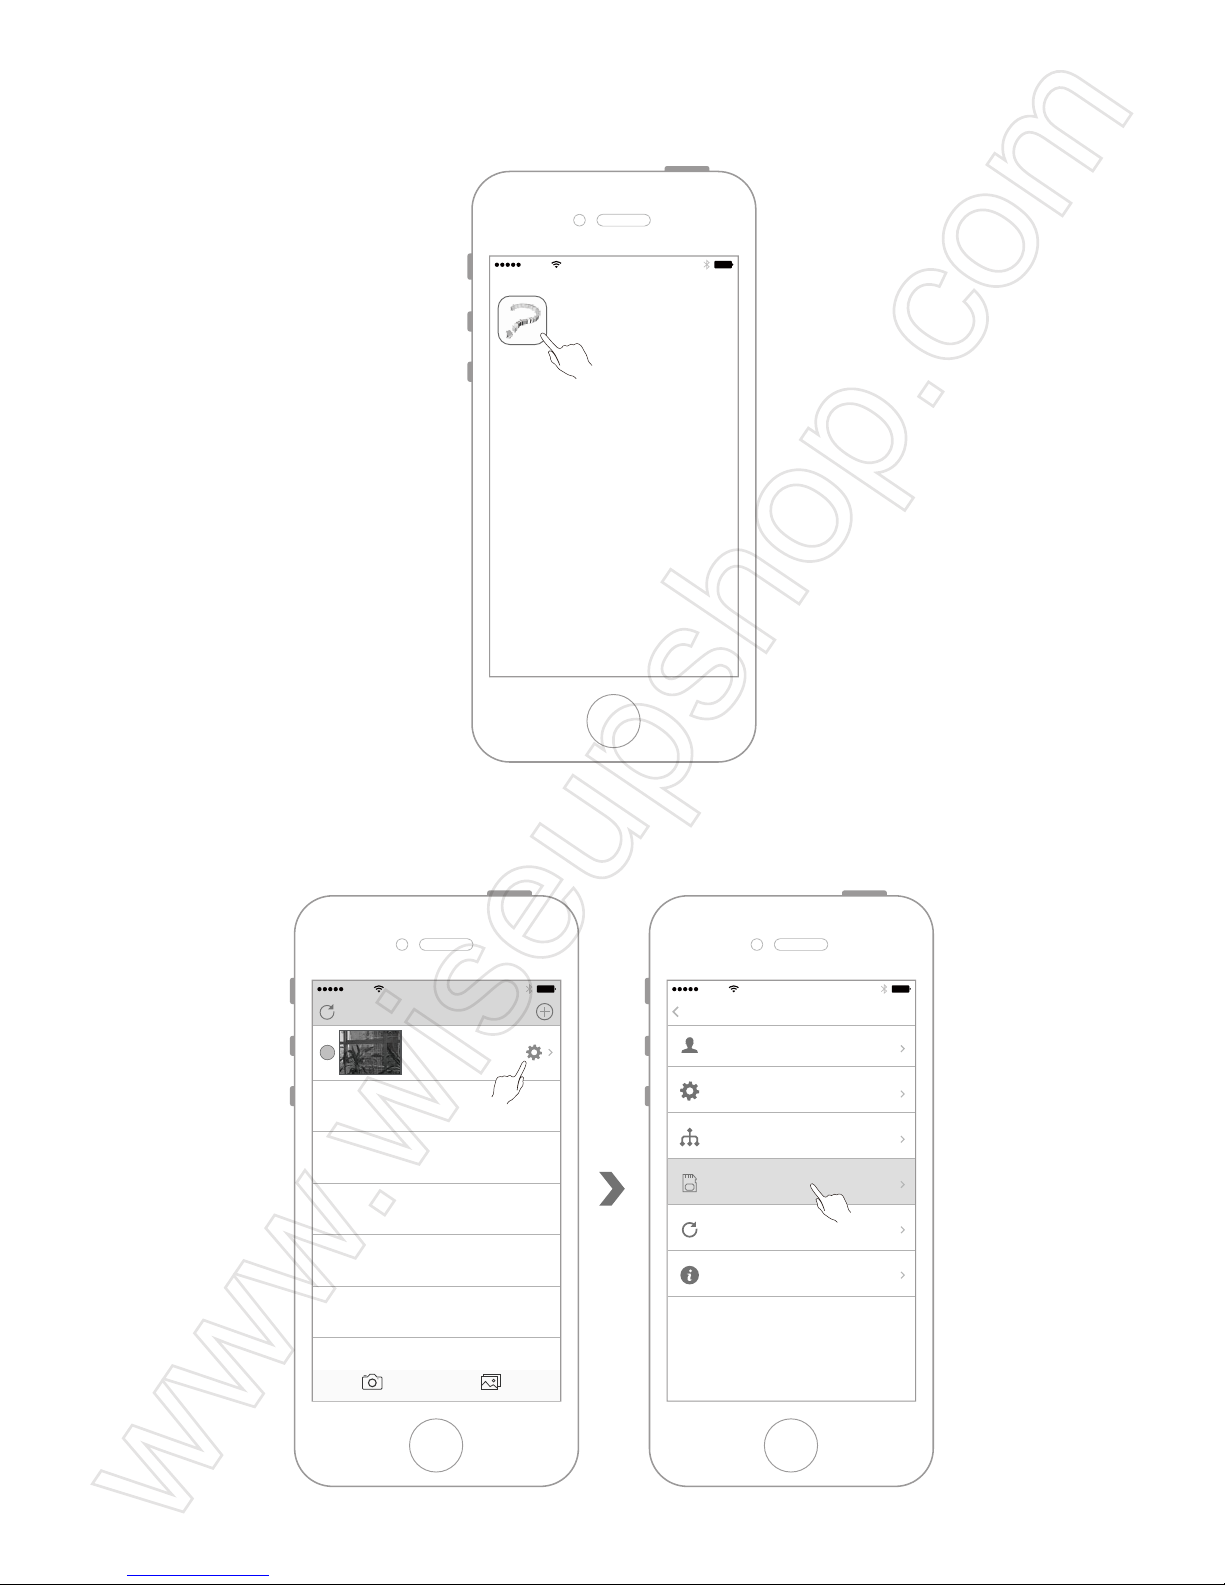
IX. Riproduci File Video Locali sul Dispositivo Mobile Android
9.1 Accende APP "Camwf ".
9.2 Entrare al menu della videocamera, e poi selezionare "SDCard Record".
AT&T
11:57 AM
Camwf
AT&T
11:57 AM
Devices
Devices Media
Camwf
Connected
AT&T
11:57 AM
Settings
Back
User Settings
Device Settings
Network Settings
SDCard Record
Refresh push
About
 Loading...