

Page 1
WIFI23
User Guide
I
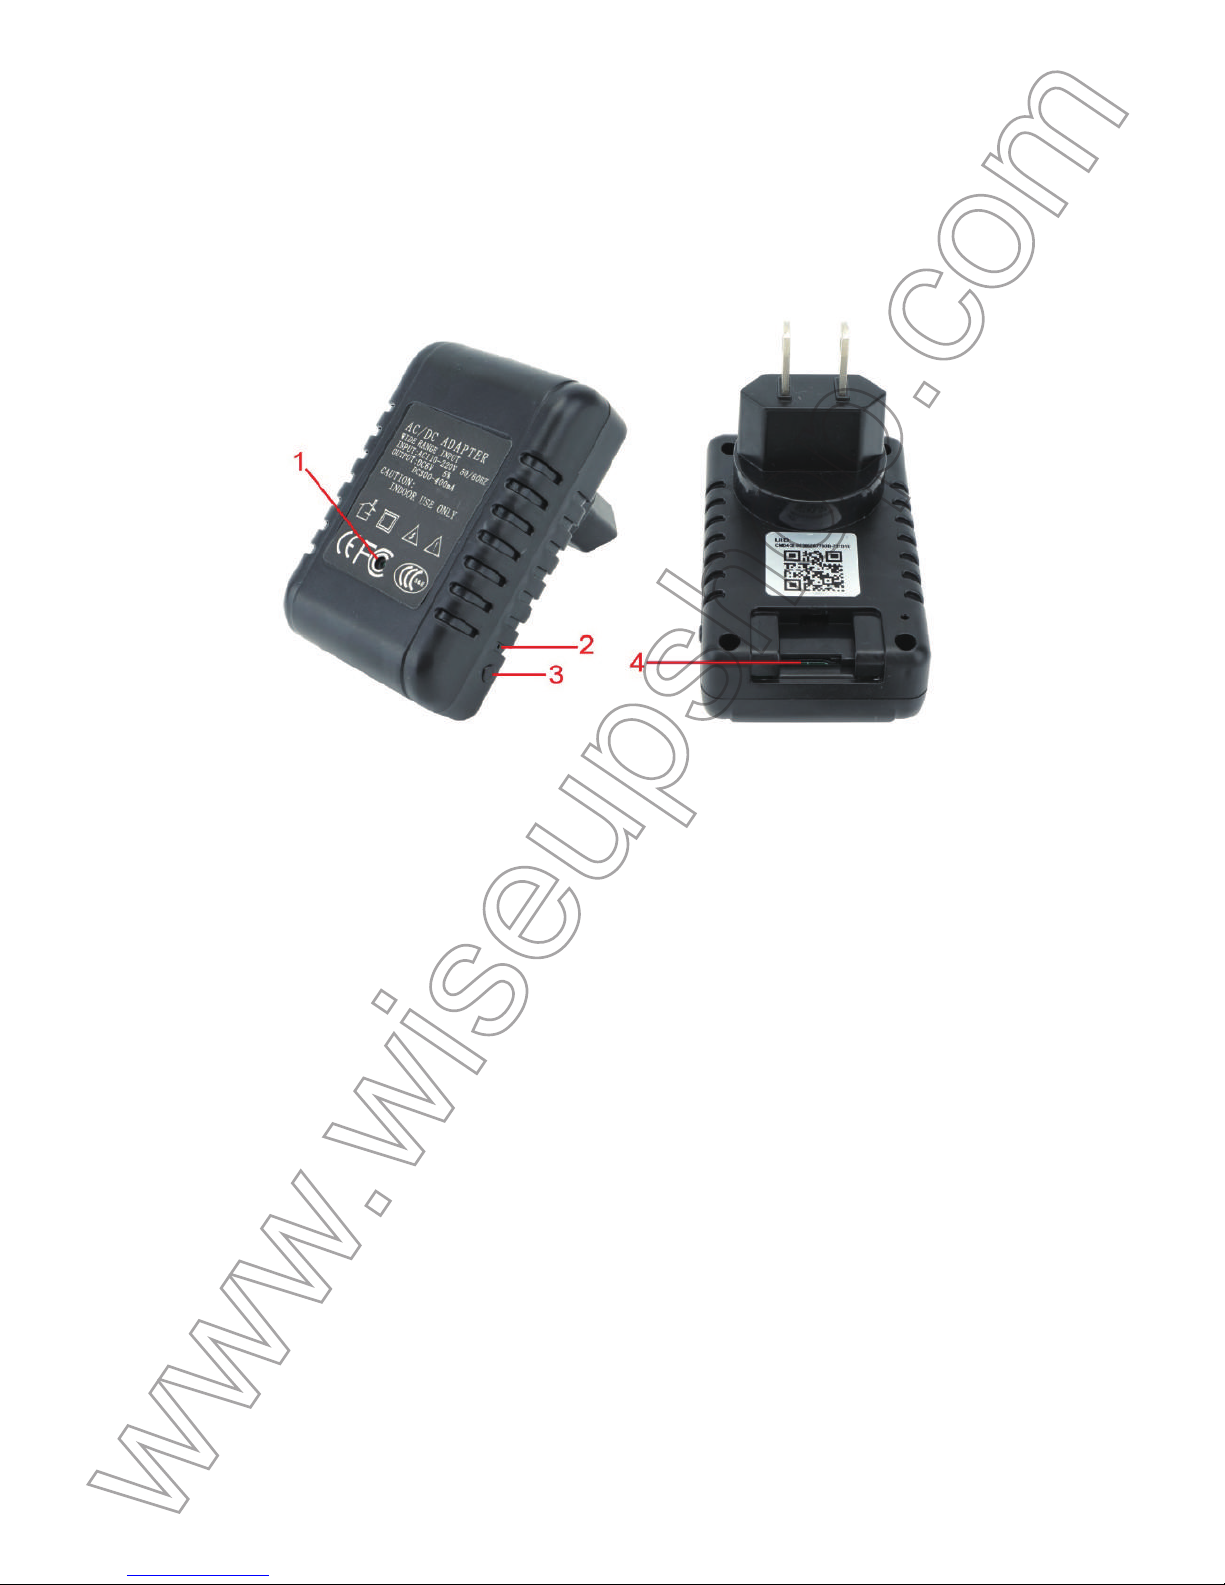
. Product Overview
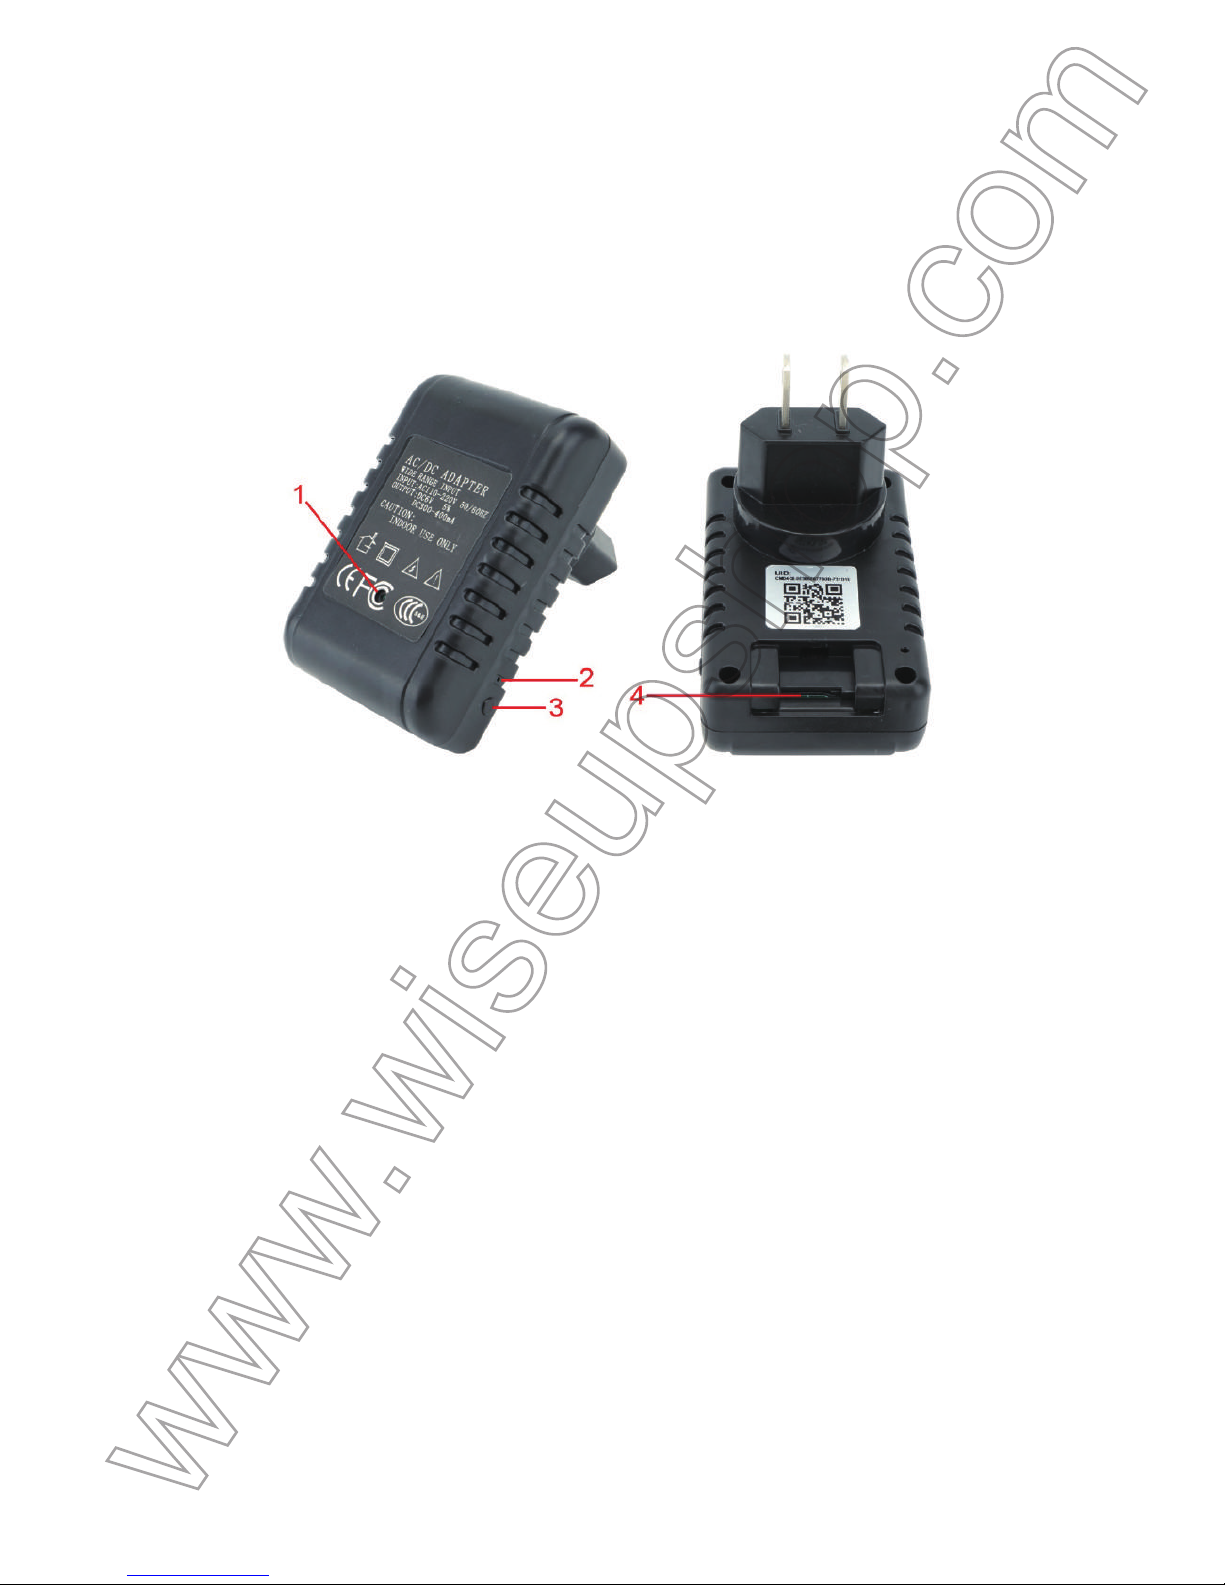
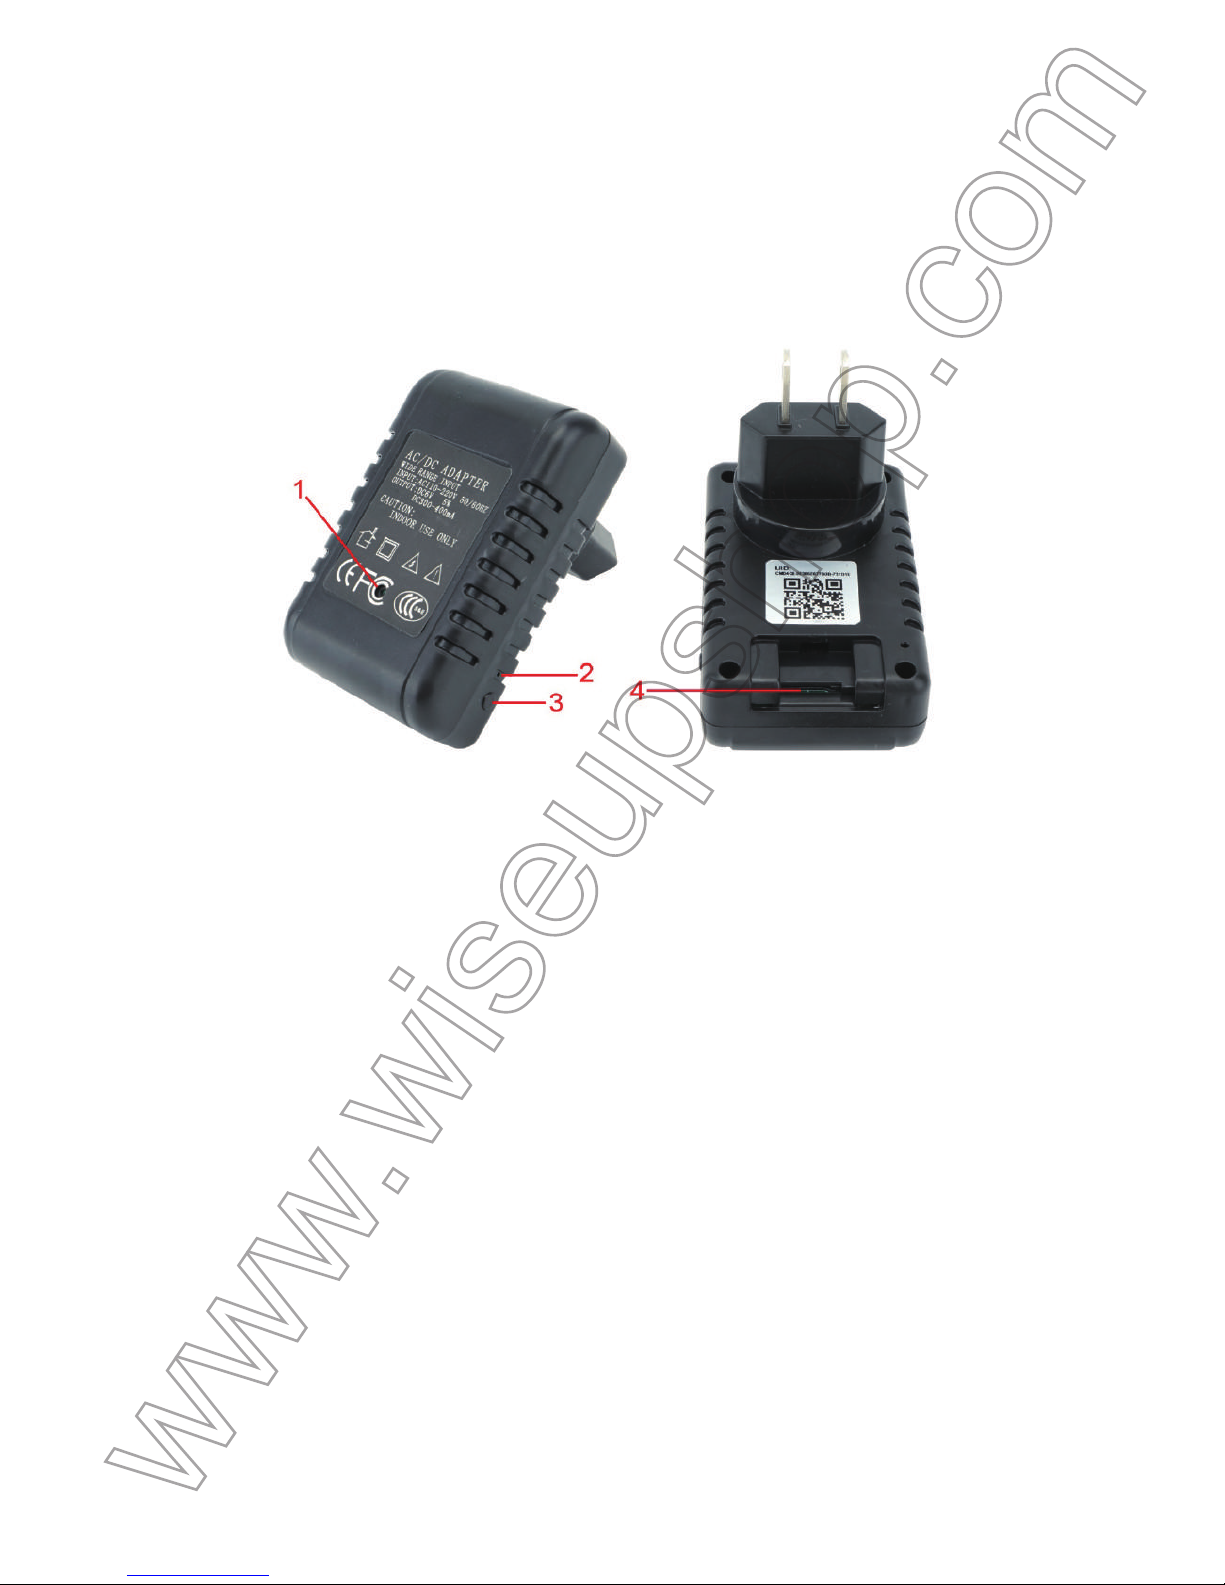
1
. Camera Lens
2
. Indicator Light
3
. Reset Button
4
. Micro SD Card Slot
II. What’s In the Box
-Mini CD Disc
-Card Reader
-WIFI AC Adapter Camera
III. Network Setup
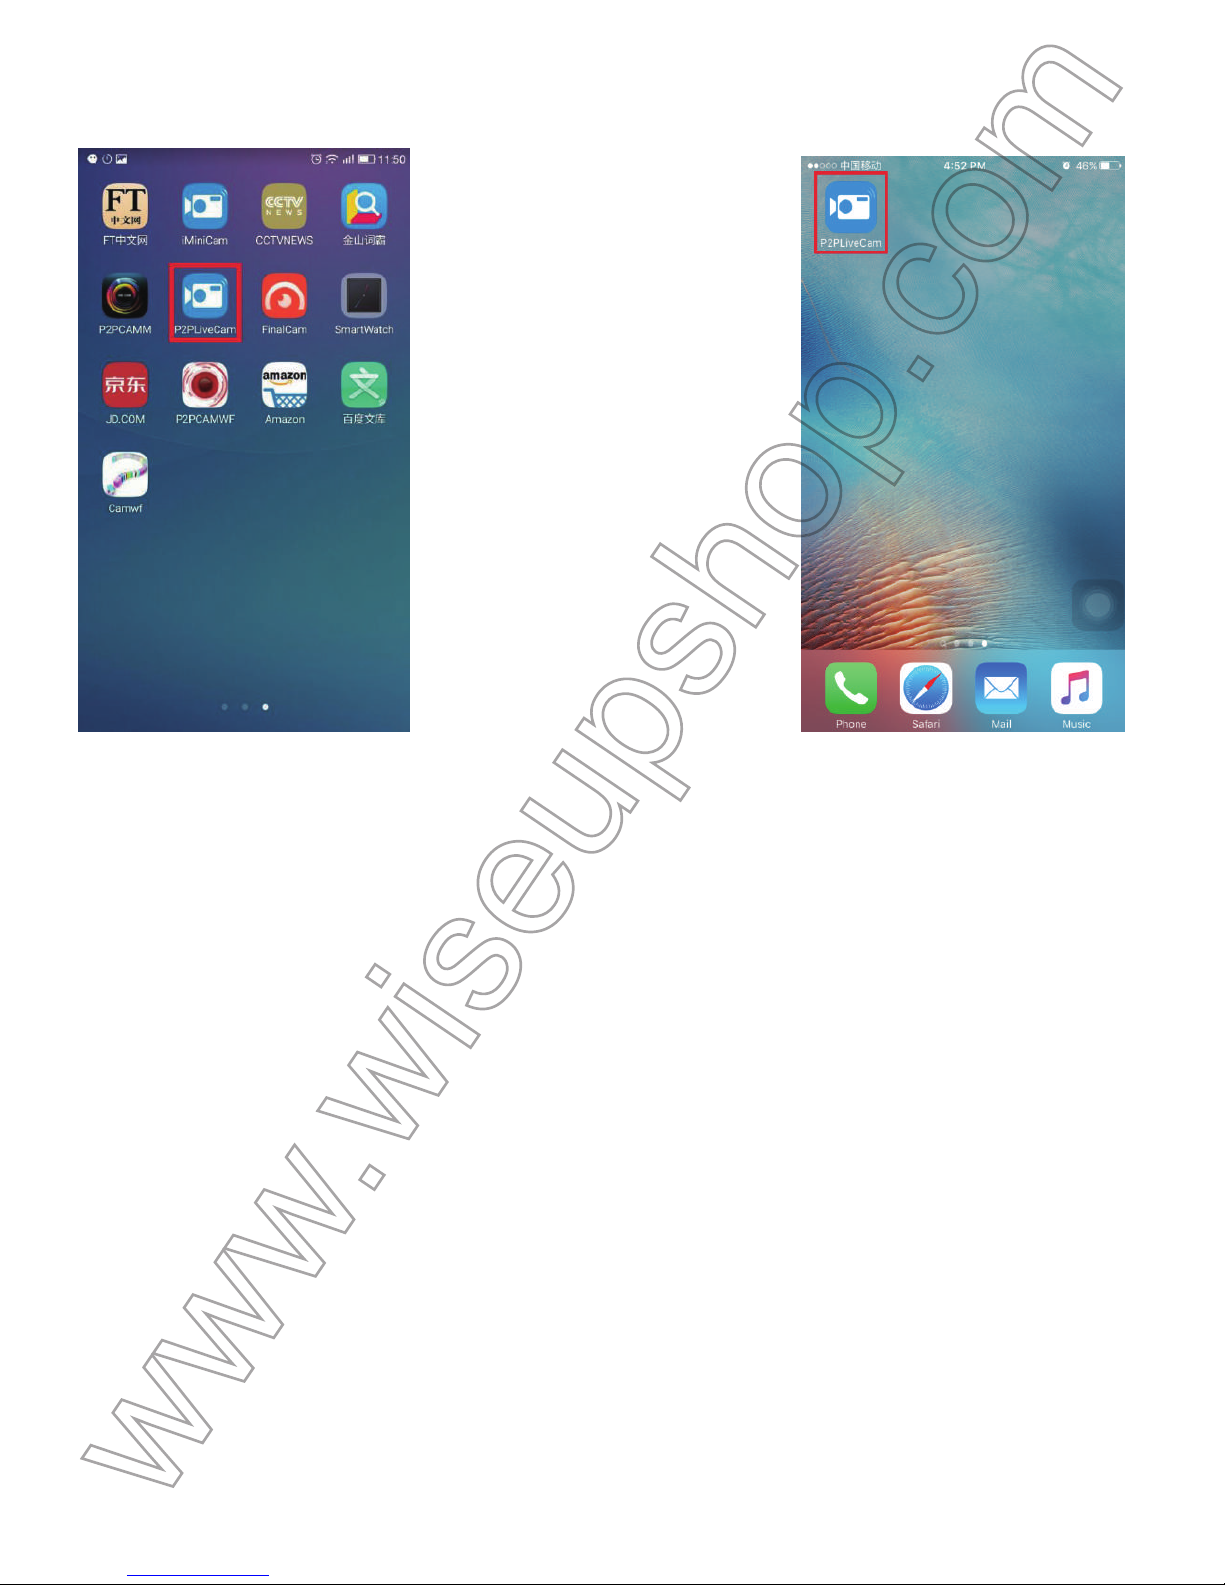
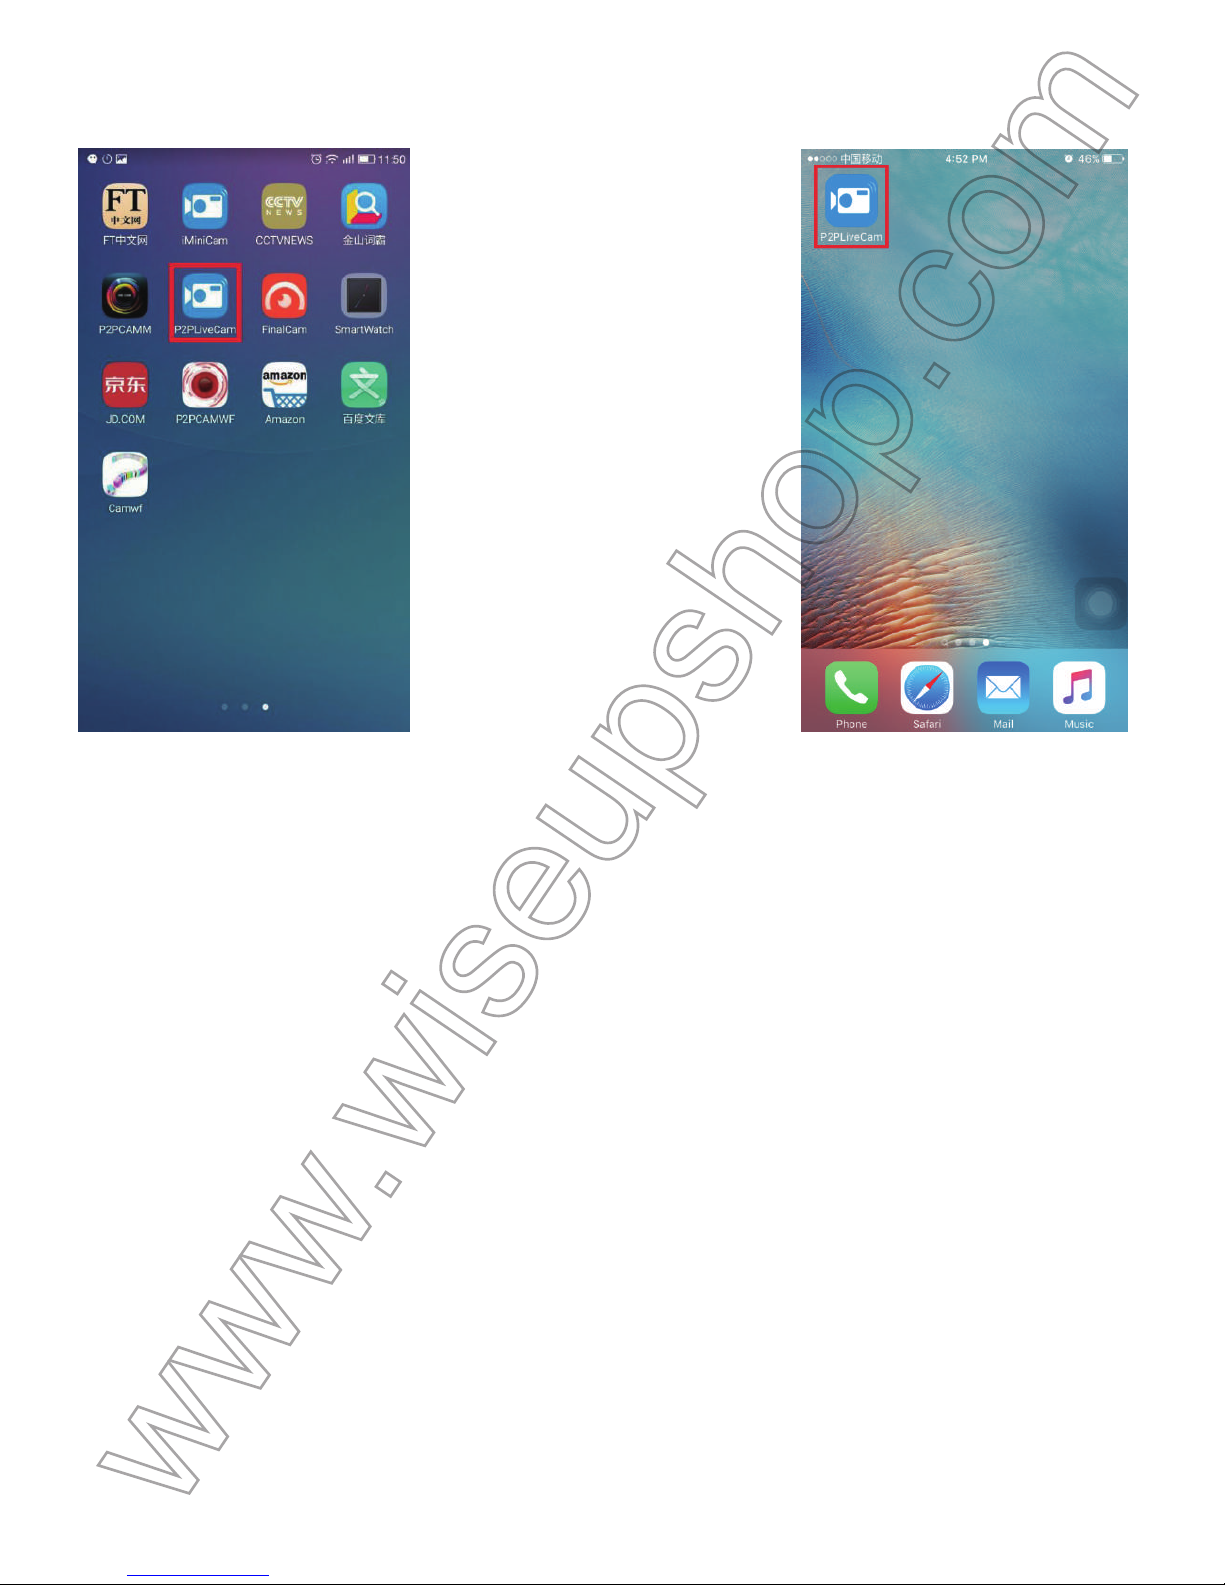
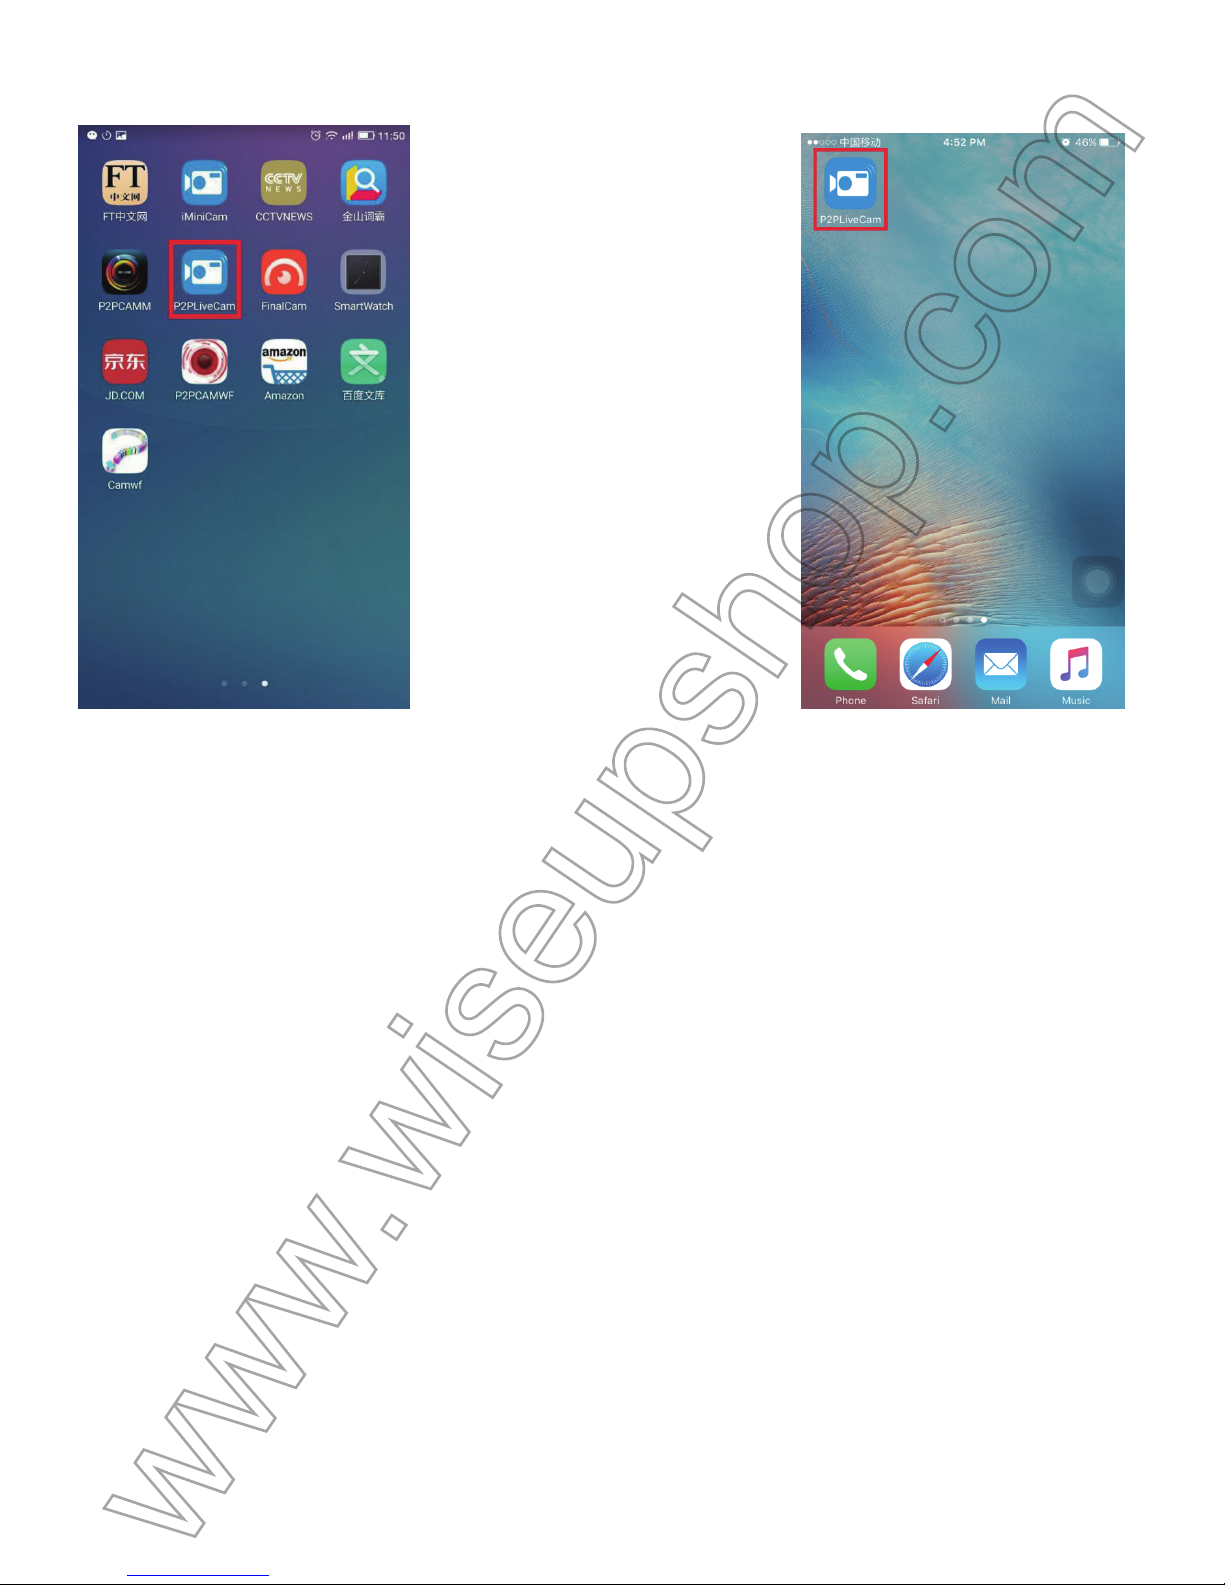
3.1. Install the P2PLiveCam APP
Search for the P2PLiveCam APP in Google Play Store or Apple Store and install it on your
smartphone or tablet PC.
Page 2
(Android) (IOS)
3
.2. P2P or LAN Mode Setup
3
.2.1. Power on the camera by plugging it into an outlet power socket.
[
Note]:
1
). The indicator light will illuminate blue for 5 seconds and go out. 30 seconds later, it will blink red and blue slowly
,
i
ndicating the camera has entered into the P2P (LAN) mode.
2
). Unplug the camera to power it off.
3
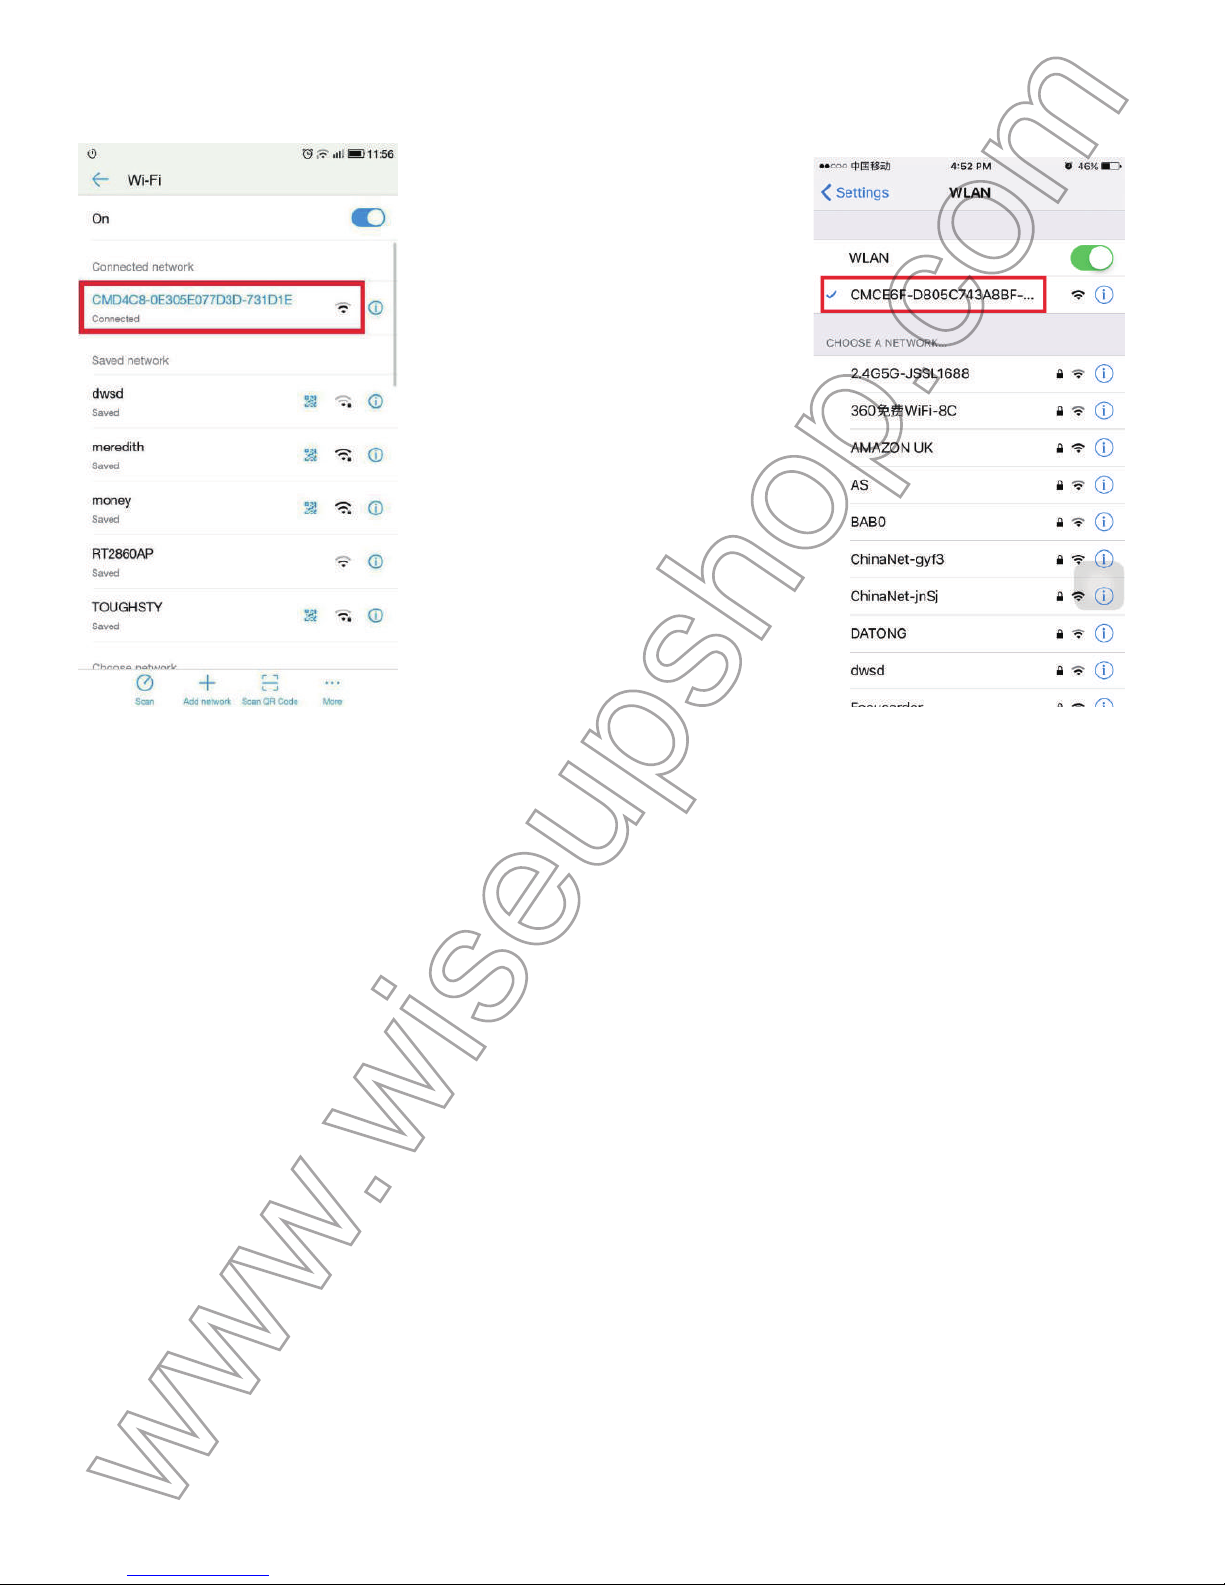
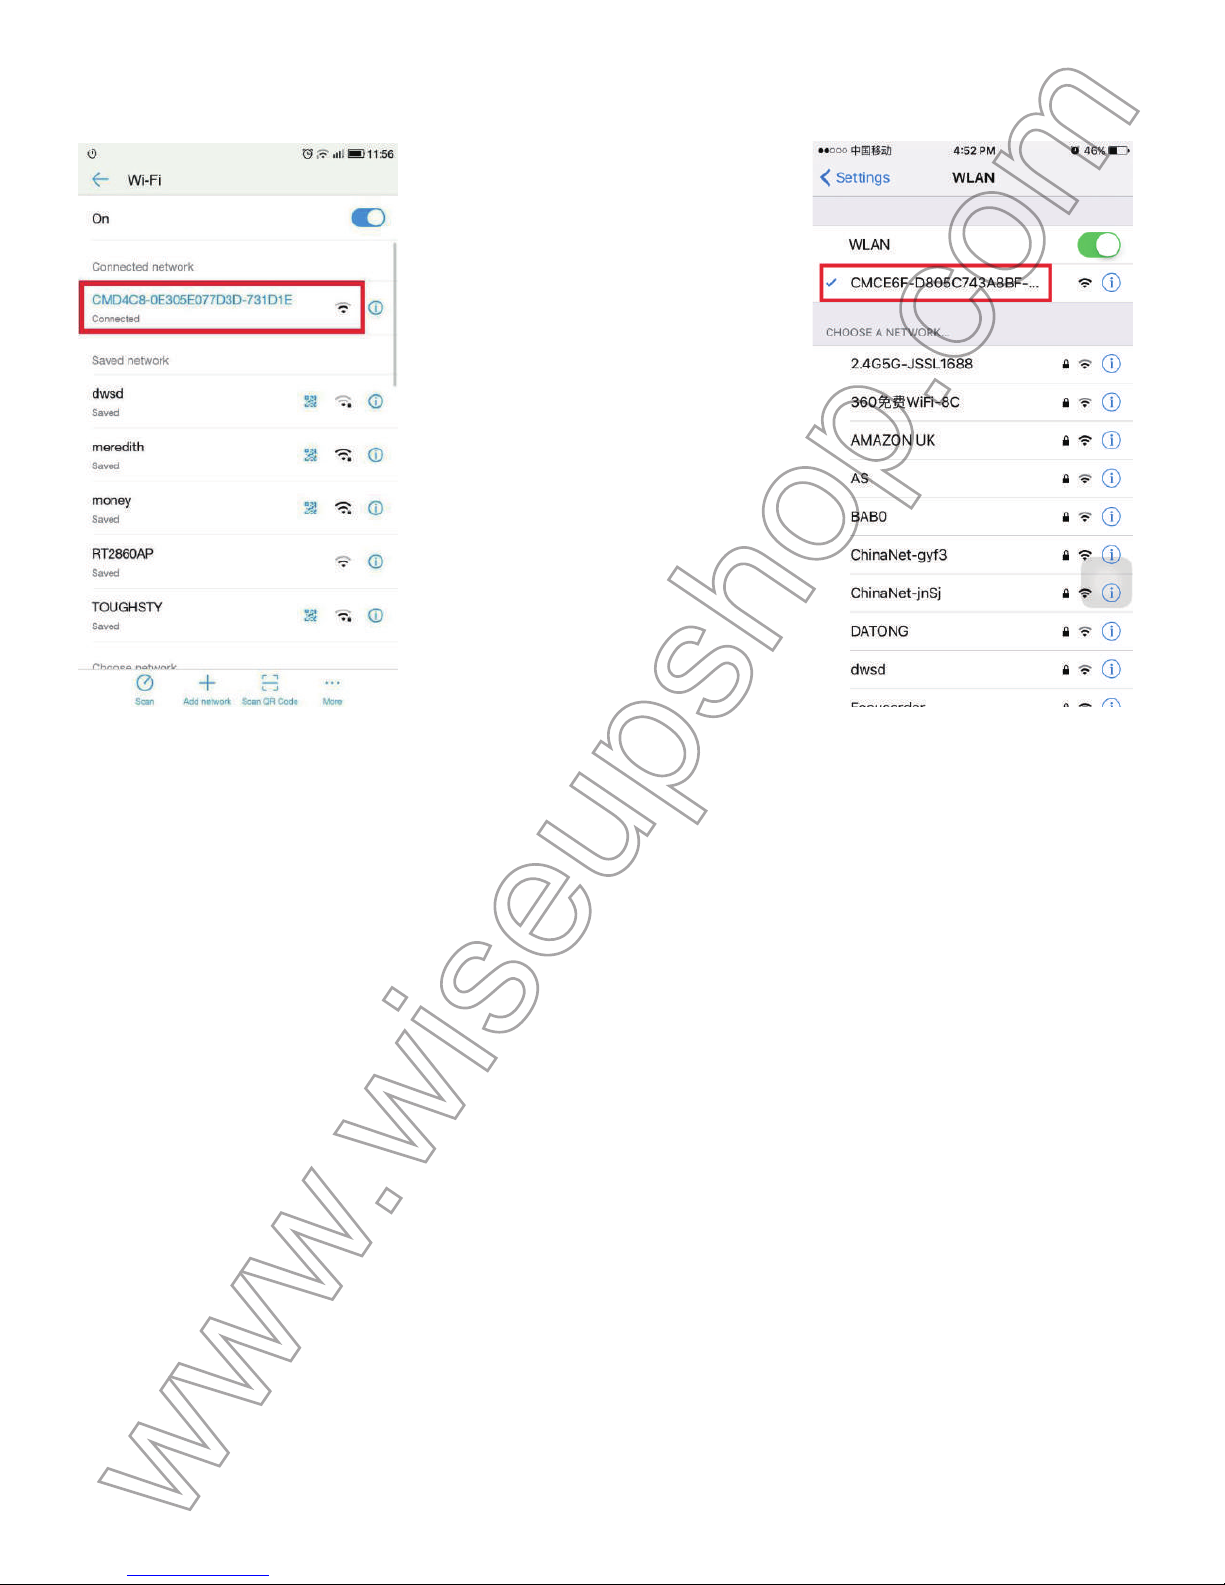
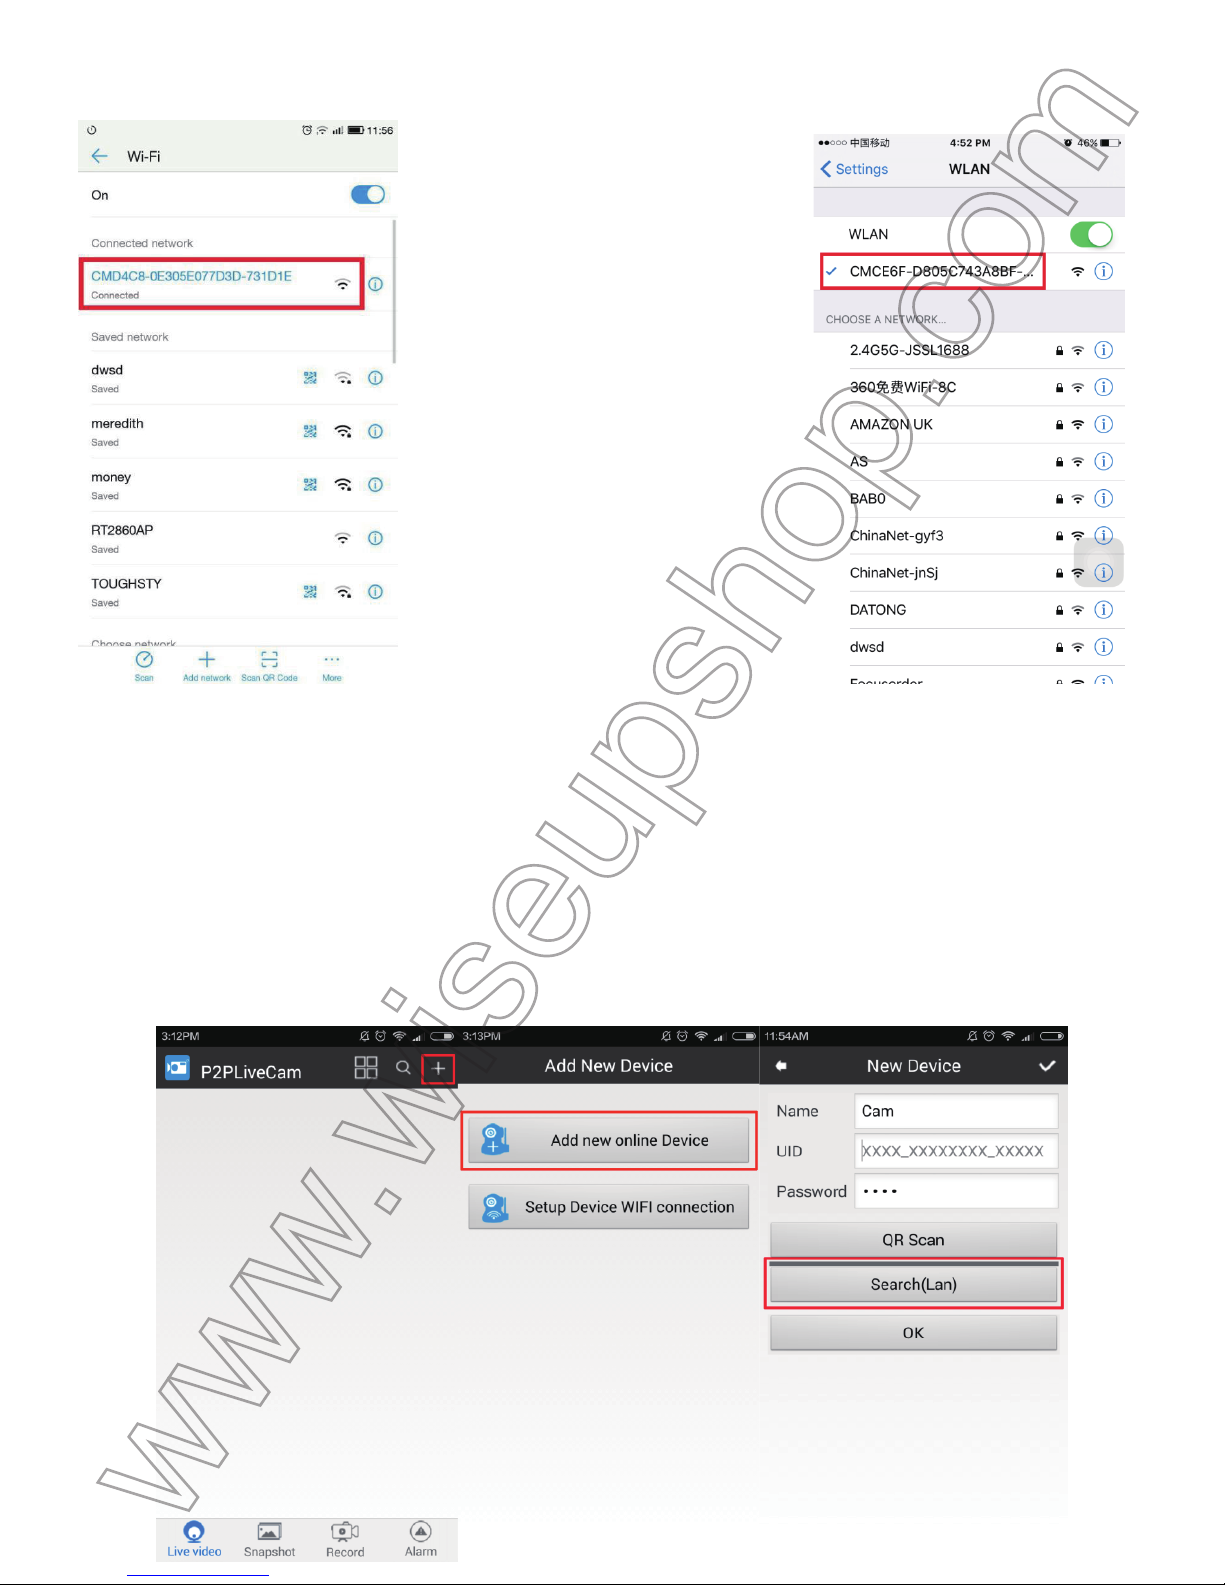
.2.2. Go to the WIFI or WLAN Settings page on your smartphone or tablet PC, connect your device t
o
t
he camera’s WIFI signal. The camera’s WIFI network SSID starts with CM******** and it will appear o
n
y
our WIFI or WLAN Settings page as below:
Page 3
(Android) (IOS)
[
Note]:
1
). It will take 1-3 minutes before the camera’s WIFI signal is found by your smartphone or tablet PC.
2
). If the camera’s WIFI signal cannot be found on your smartphone or tablet PC, please reset the camera (See VII)
a
nd then try it again.
3
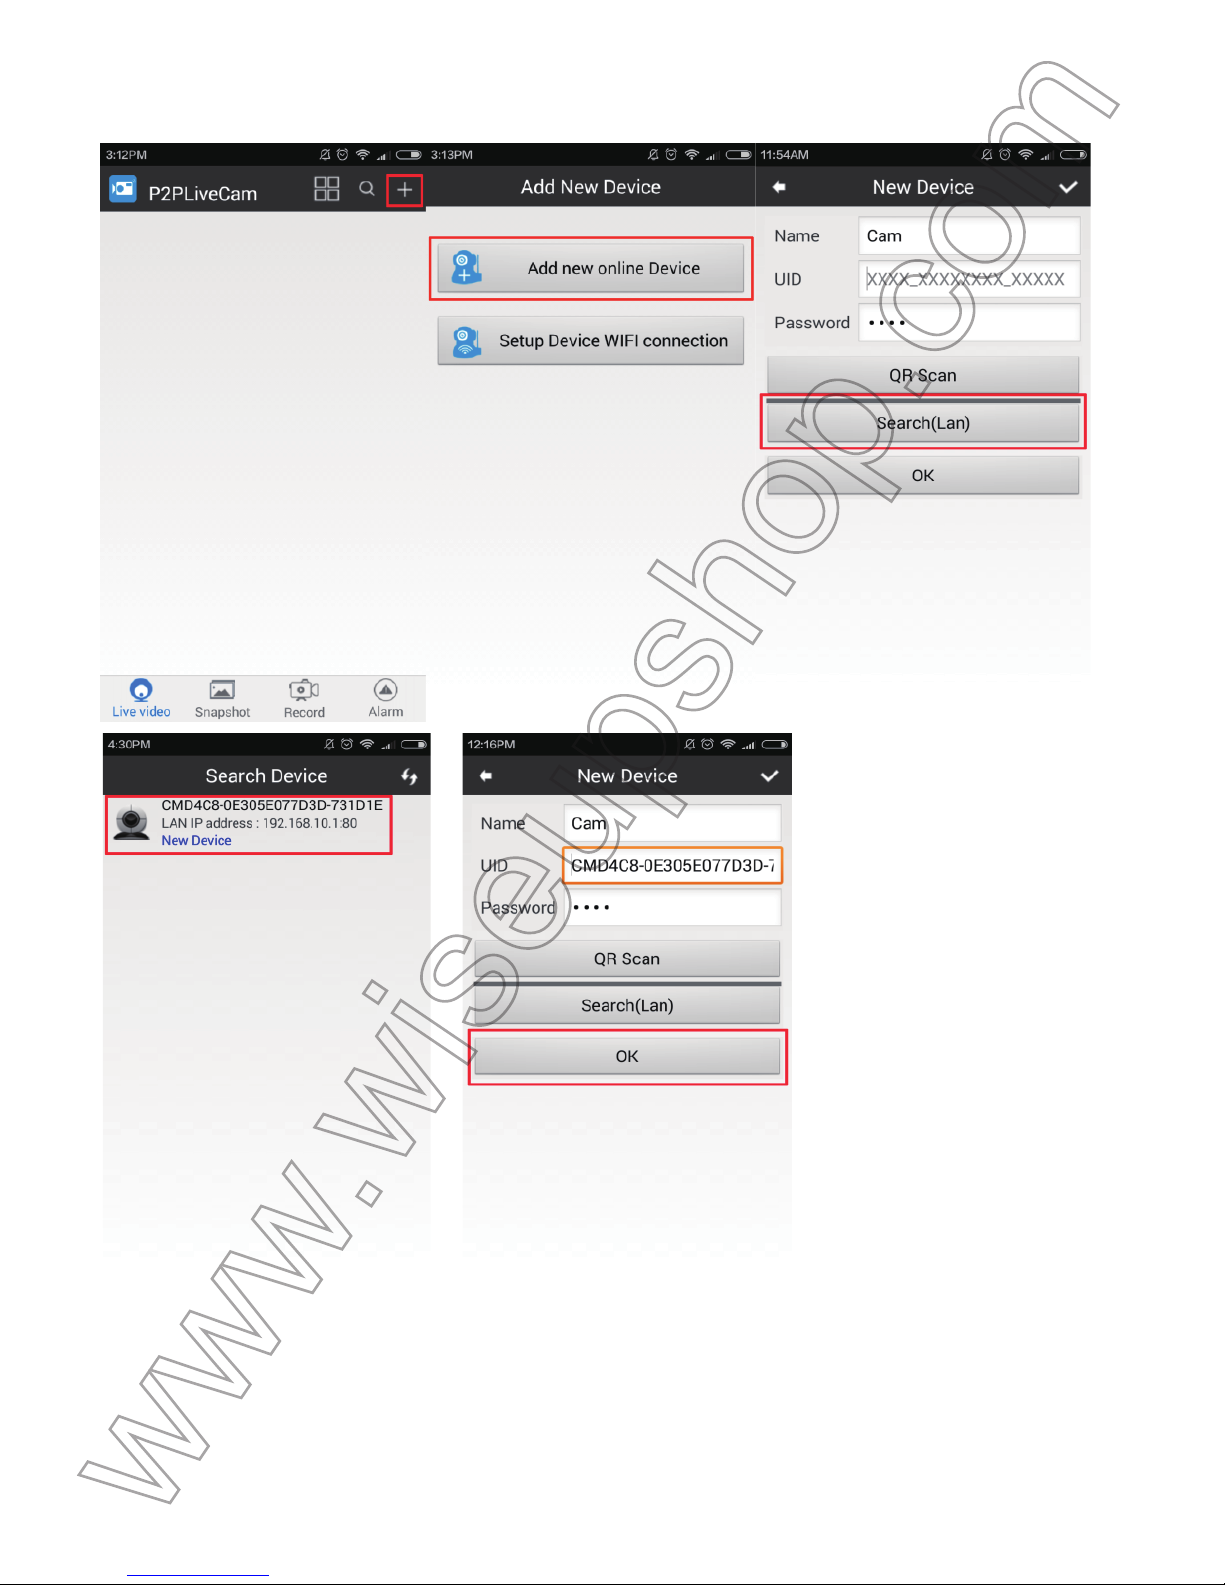
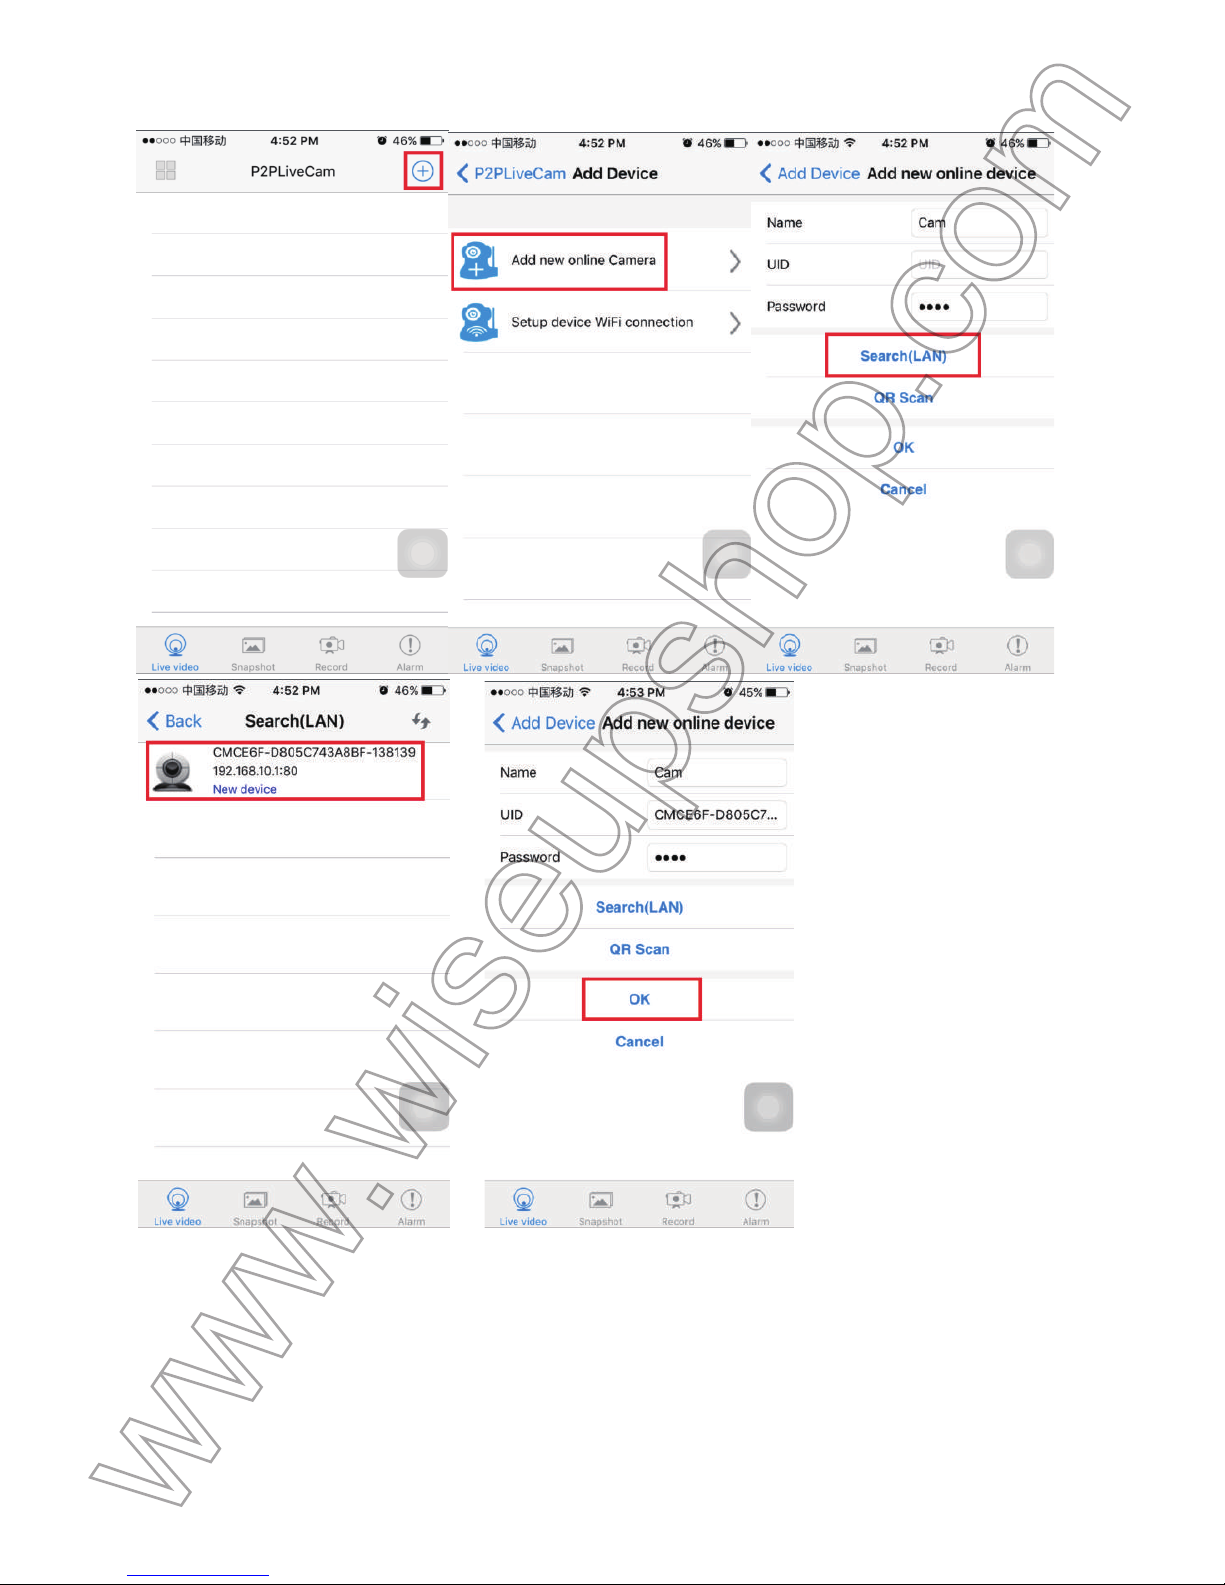
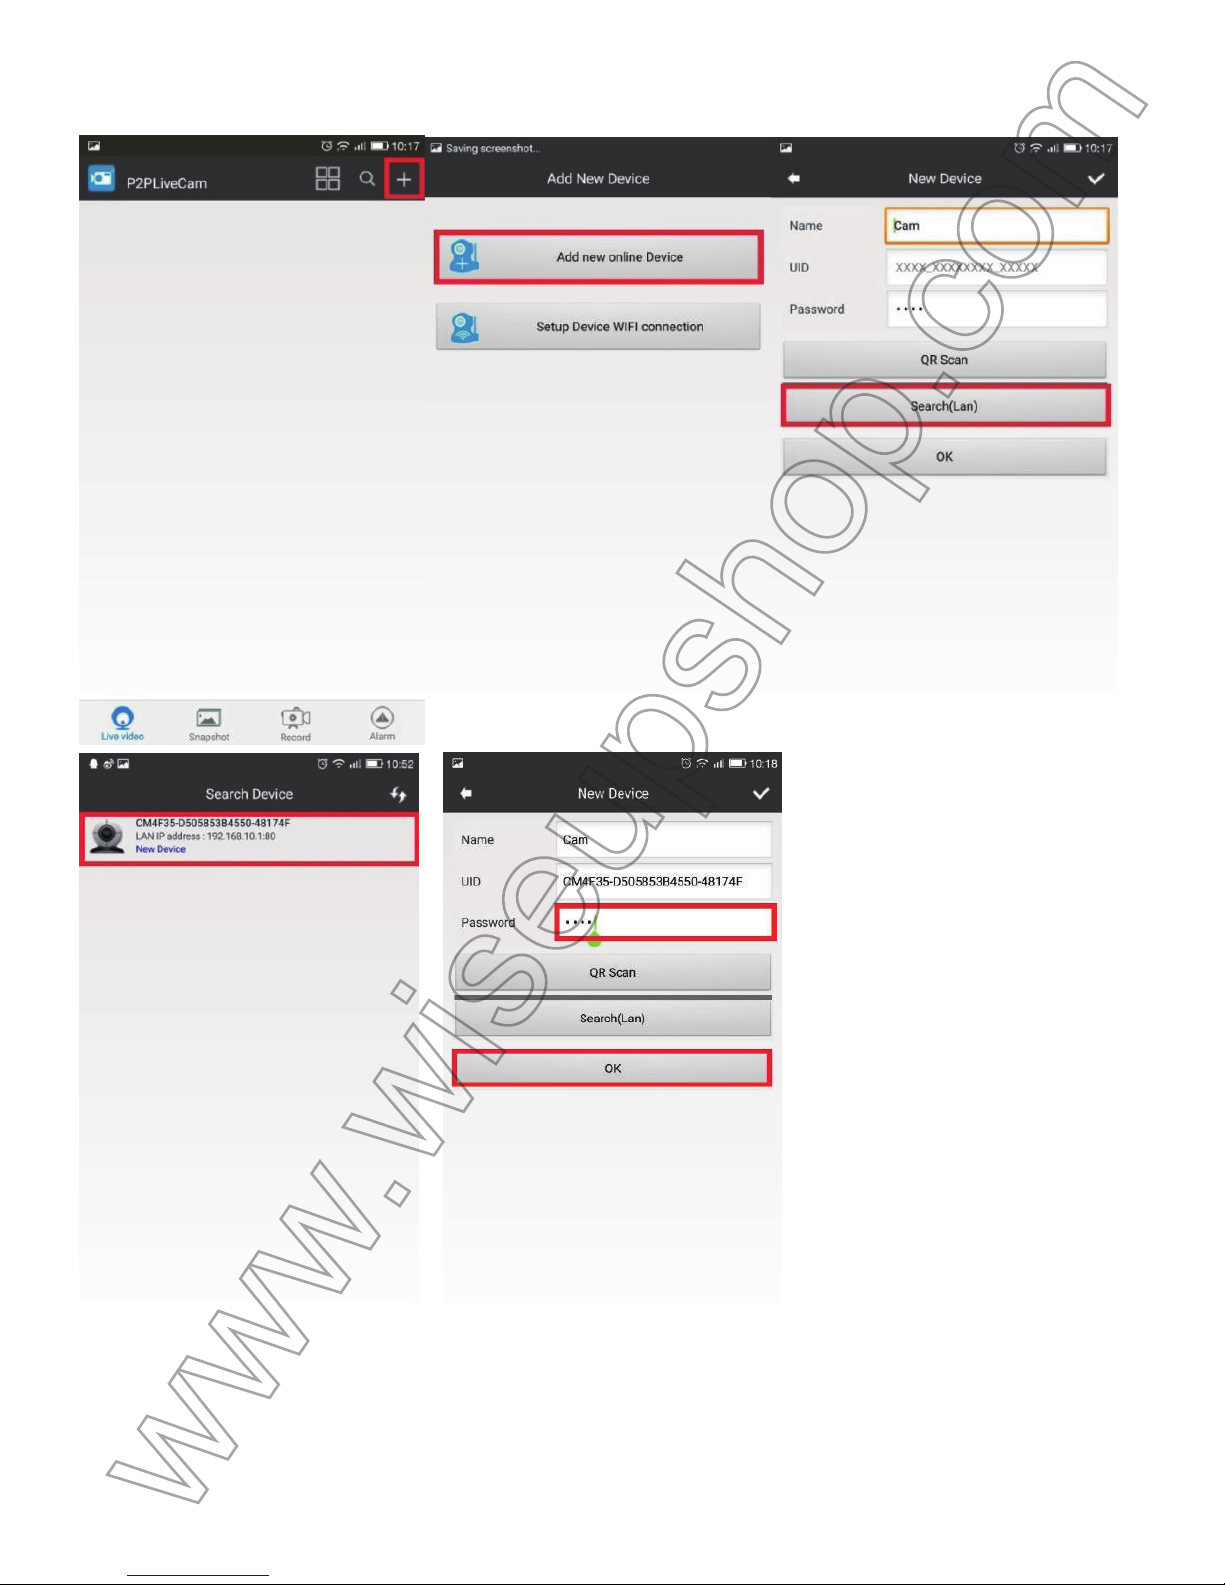
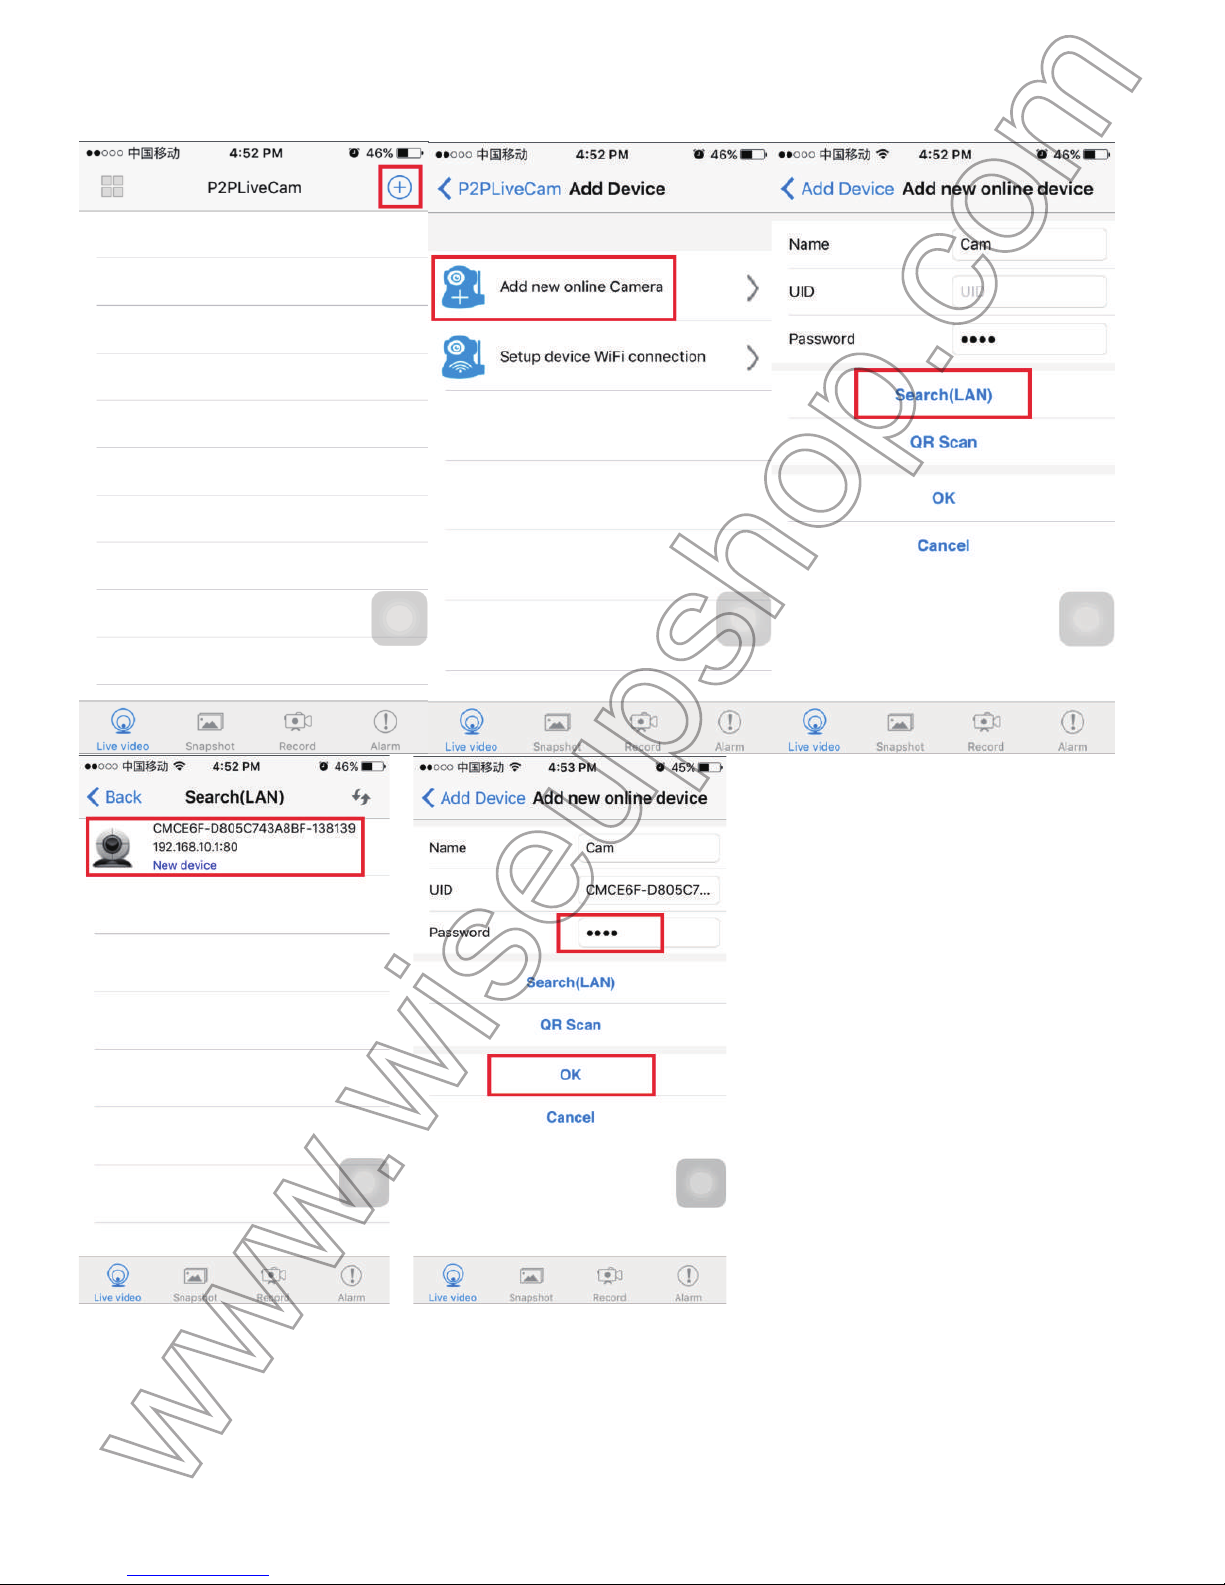
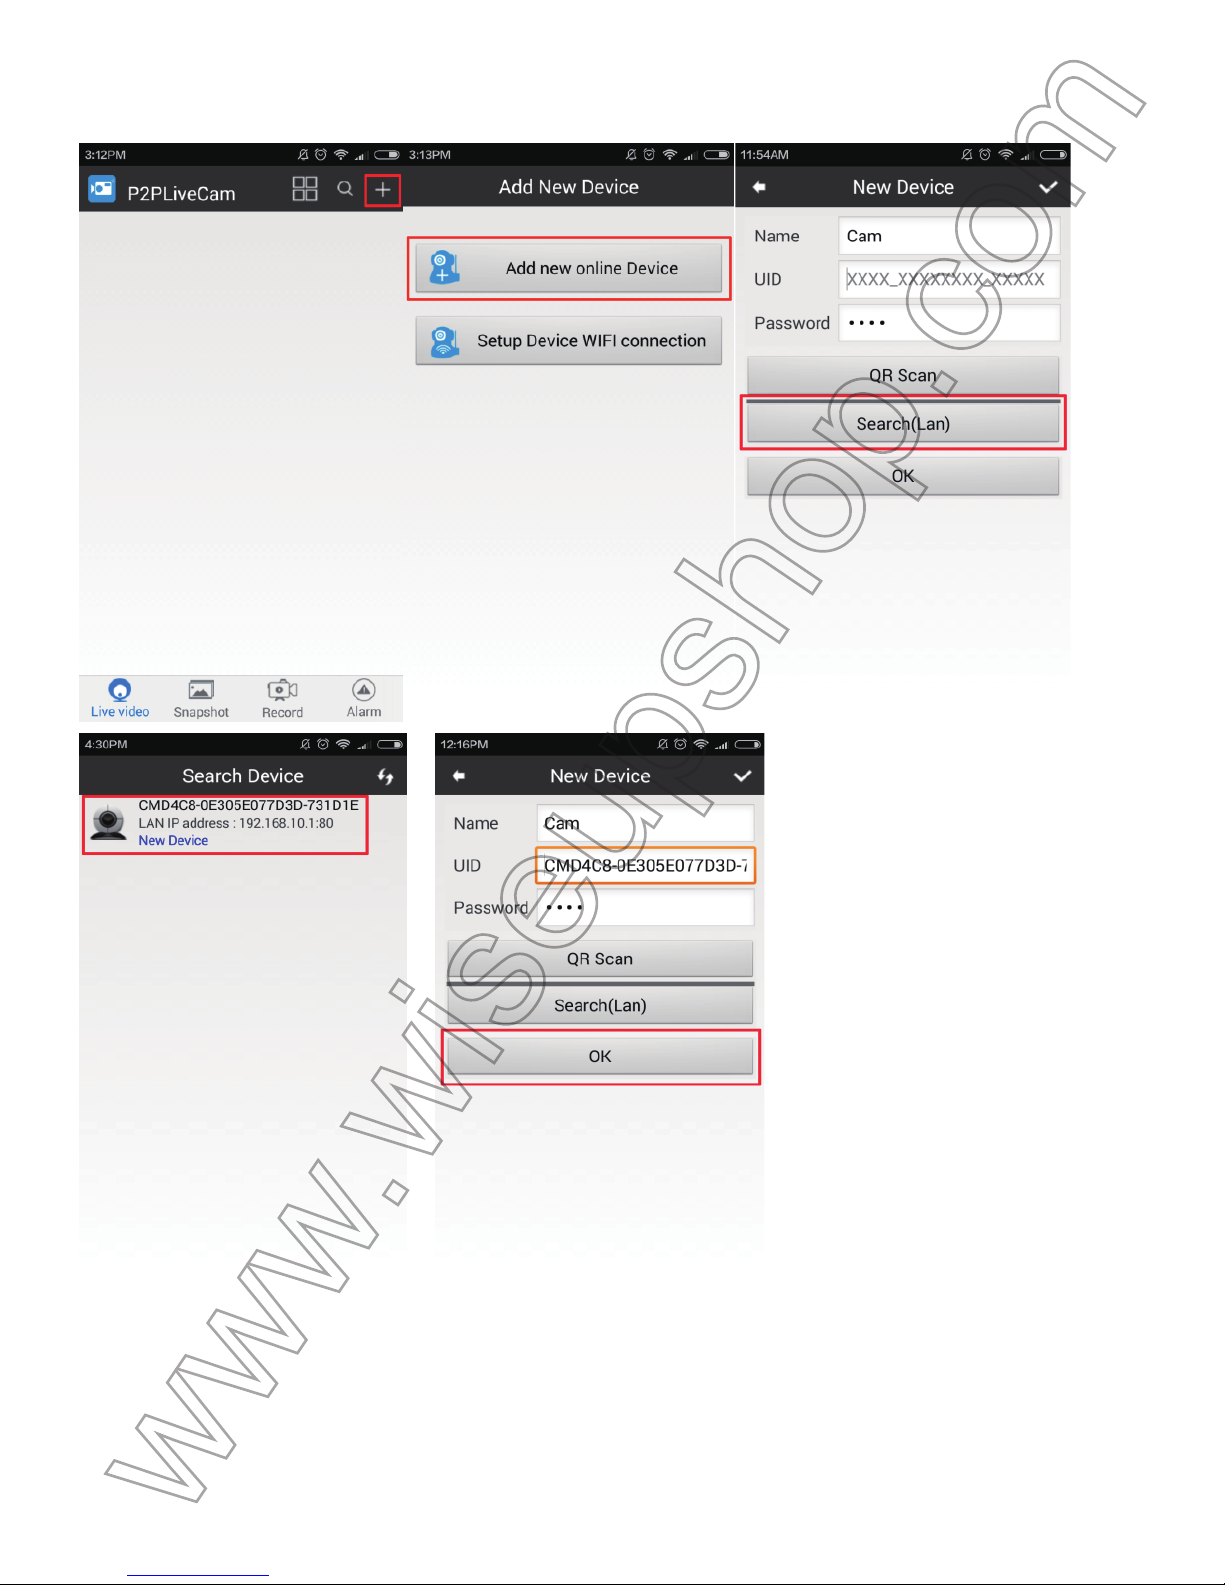
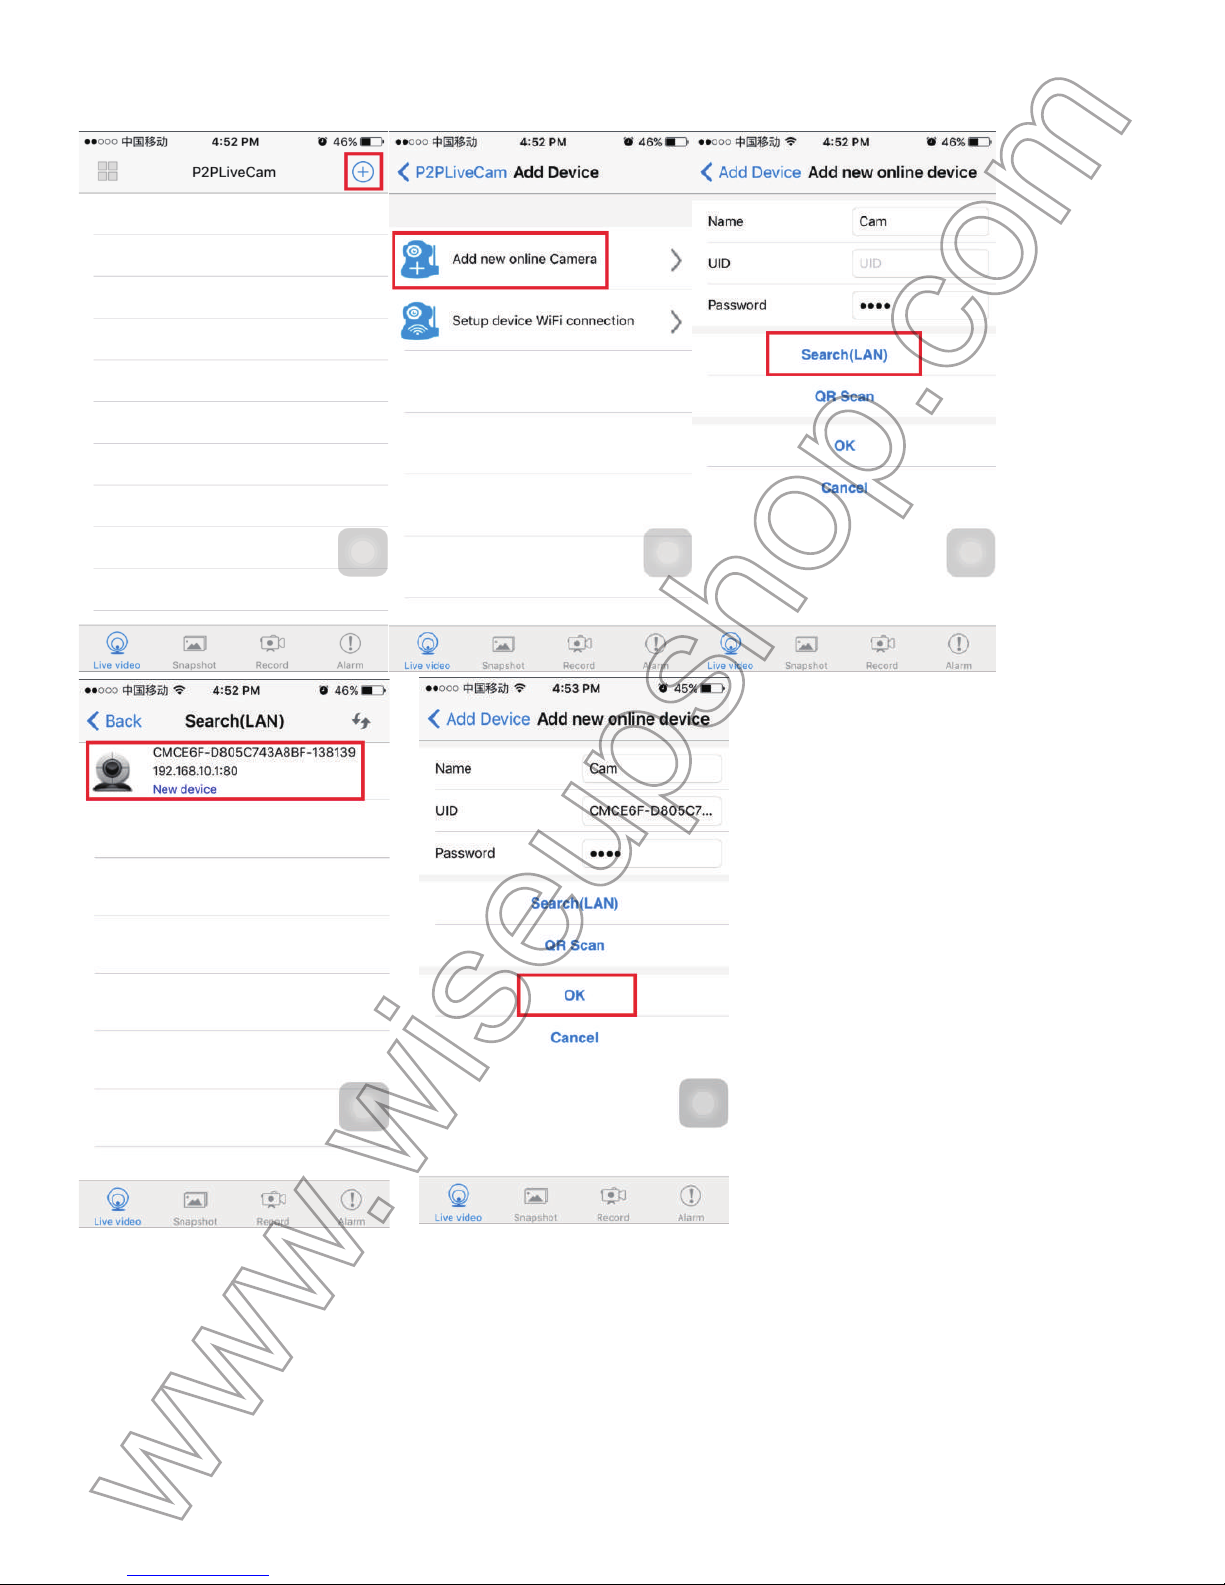
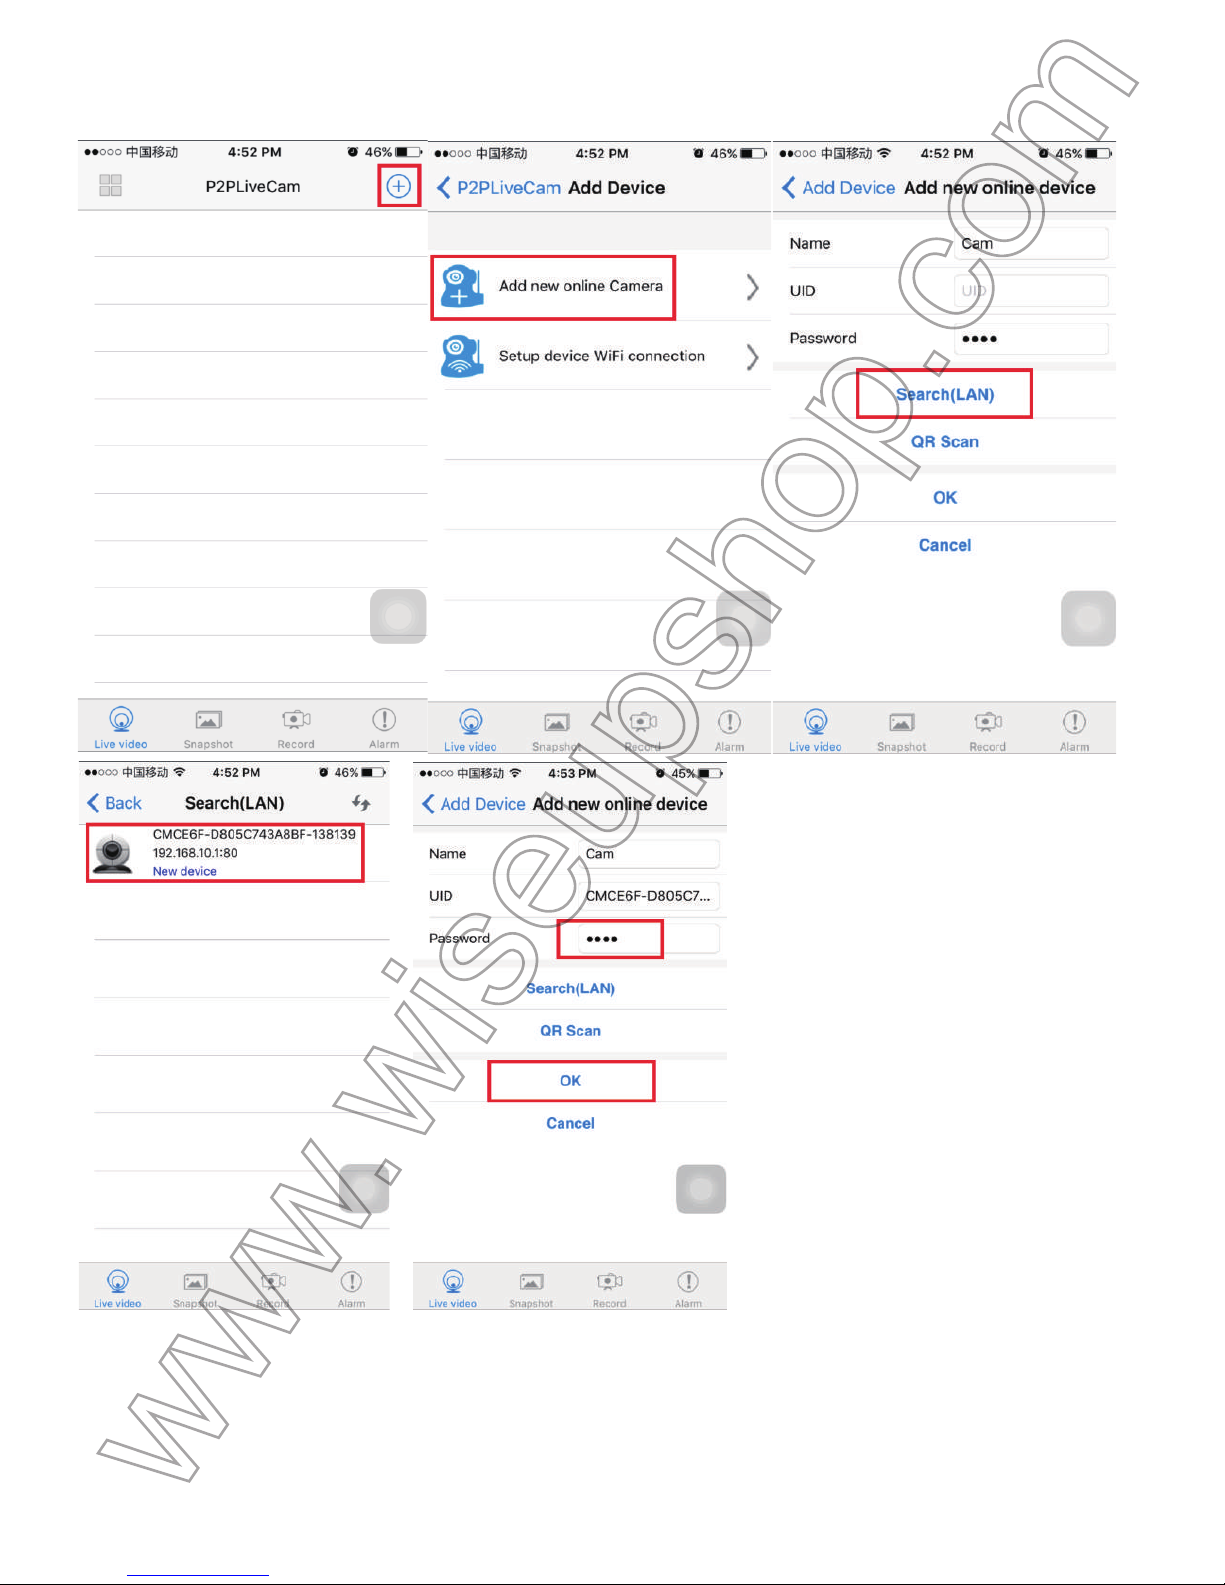
.2.3. Launch the P2PLiveCam APP. Tap the + > Add new online Device (Camera) > Search (LAN
)
>
the camera icon > OK.
Page 4
(Android)
Page 5
(IOS)
3
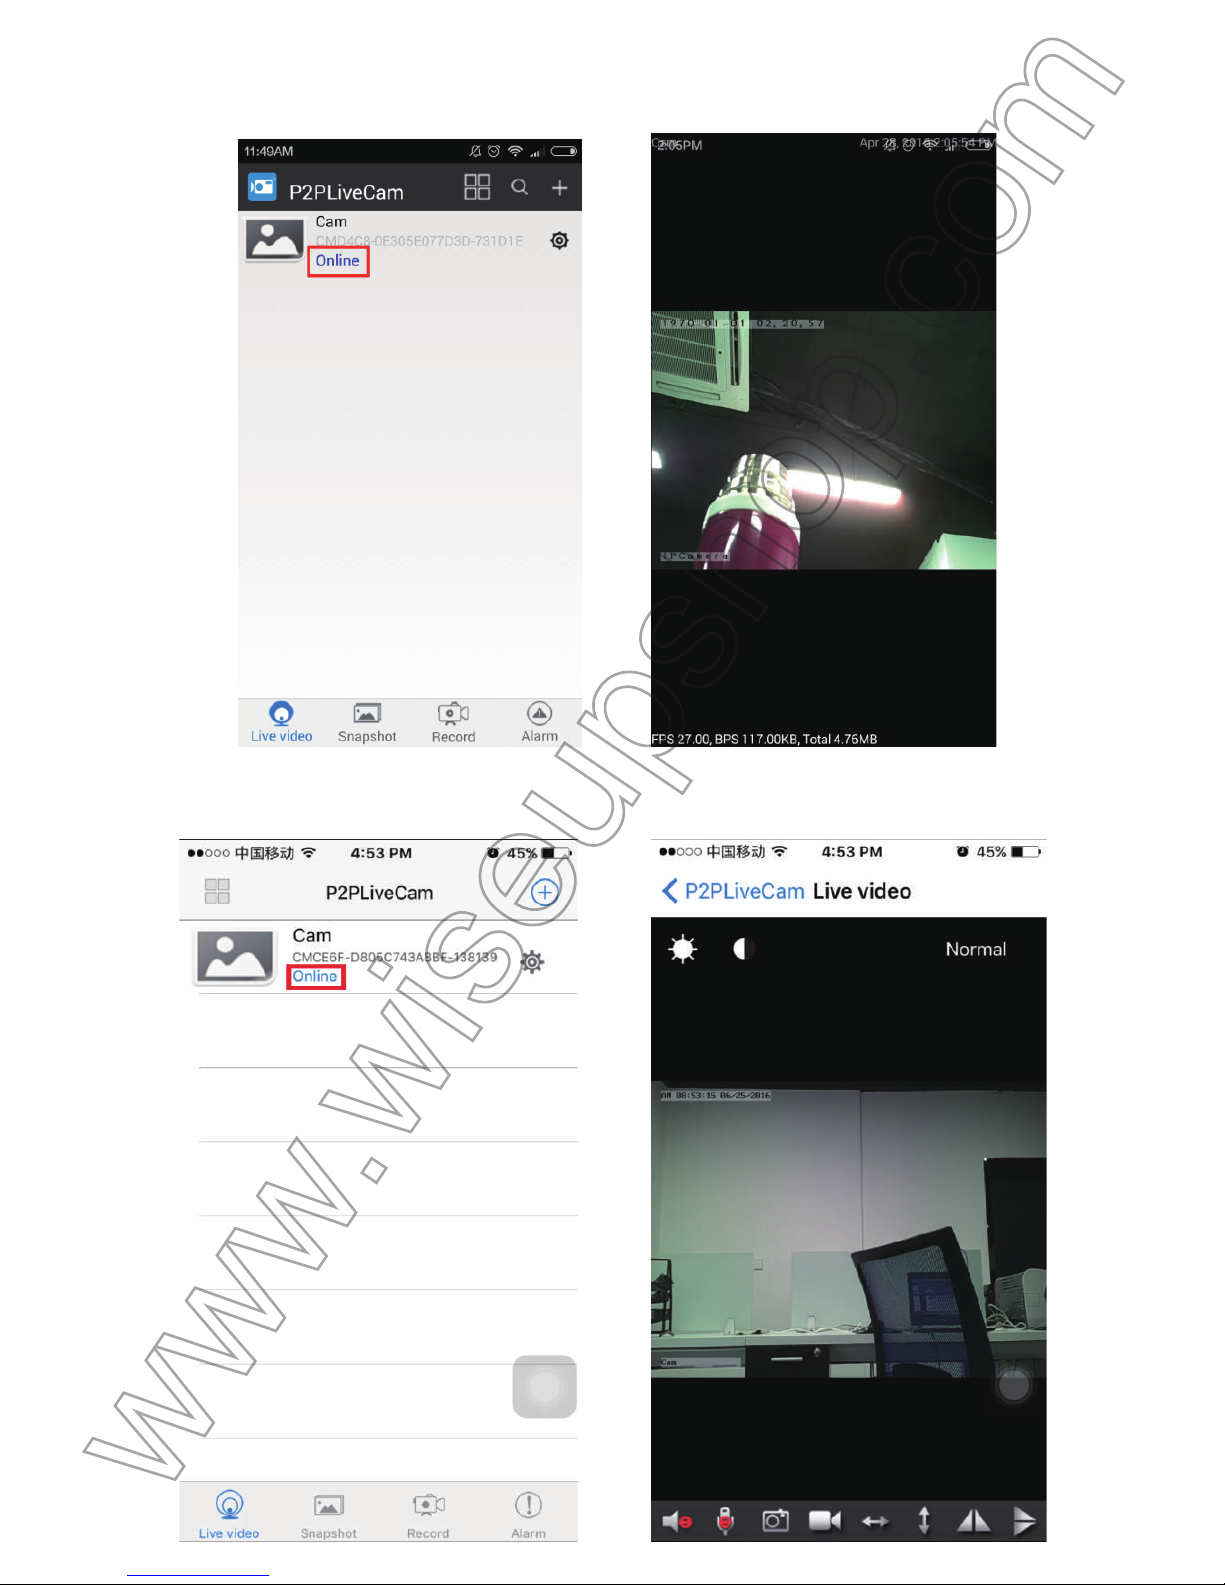
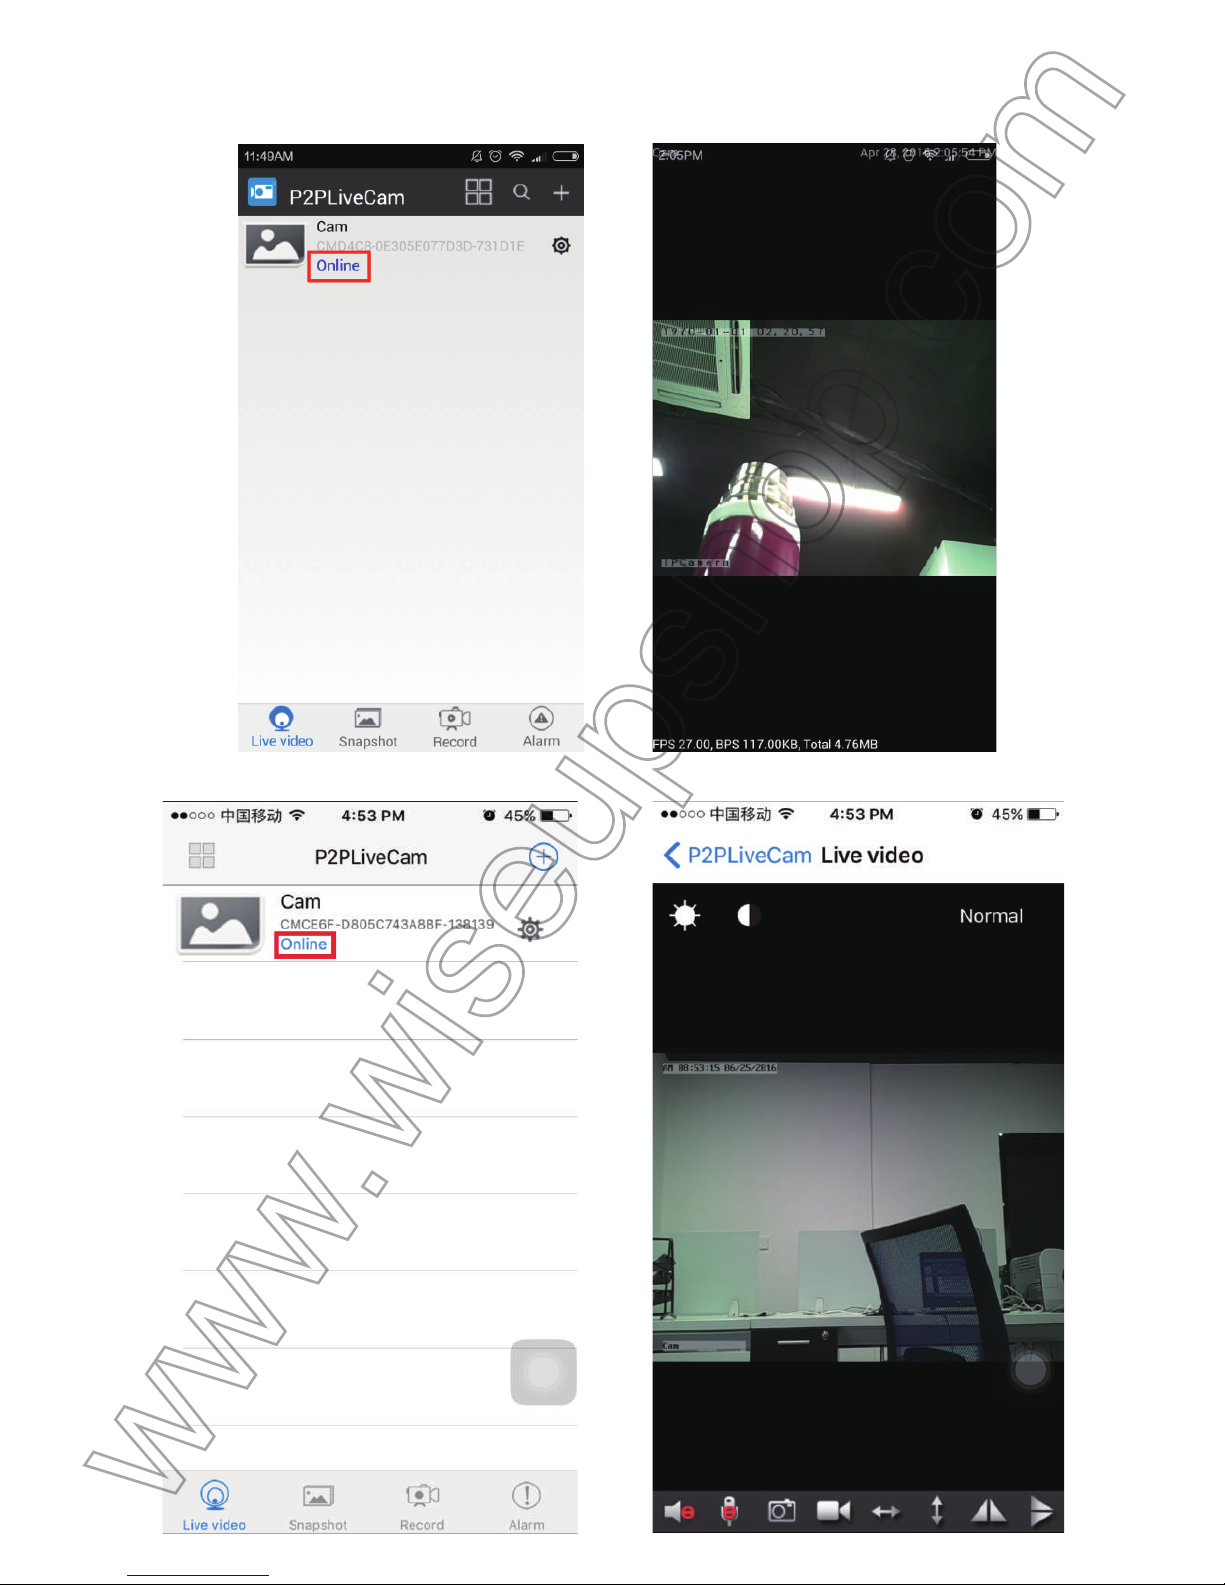
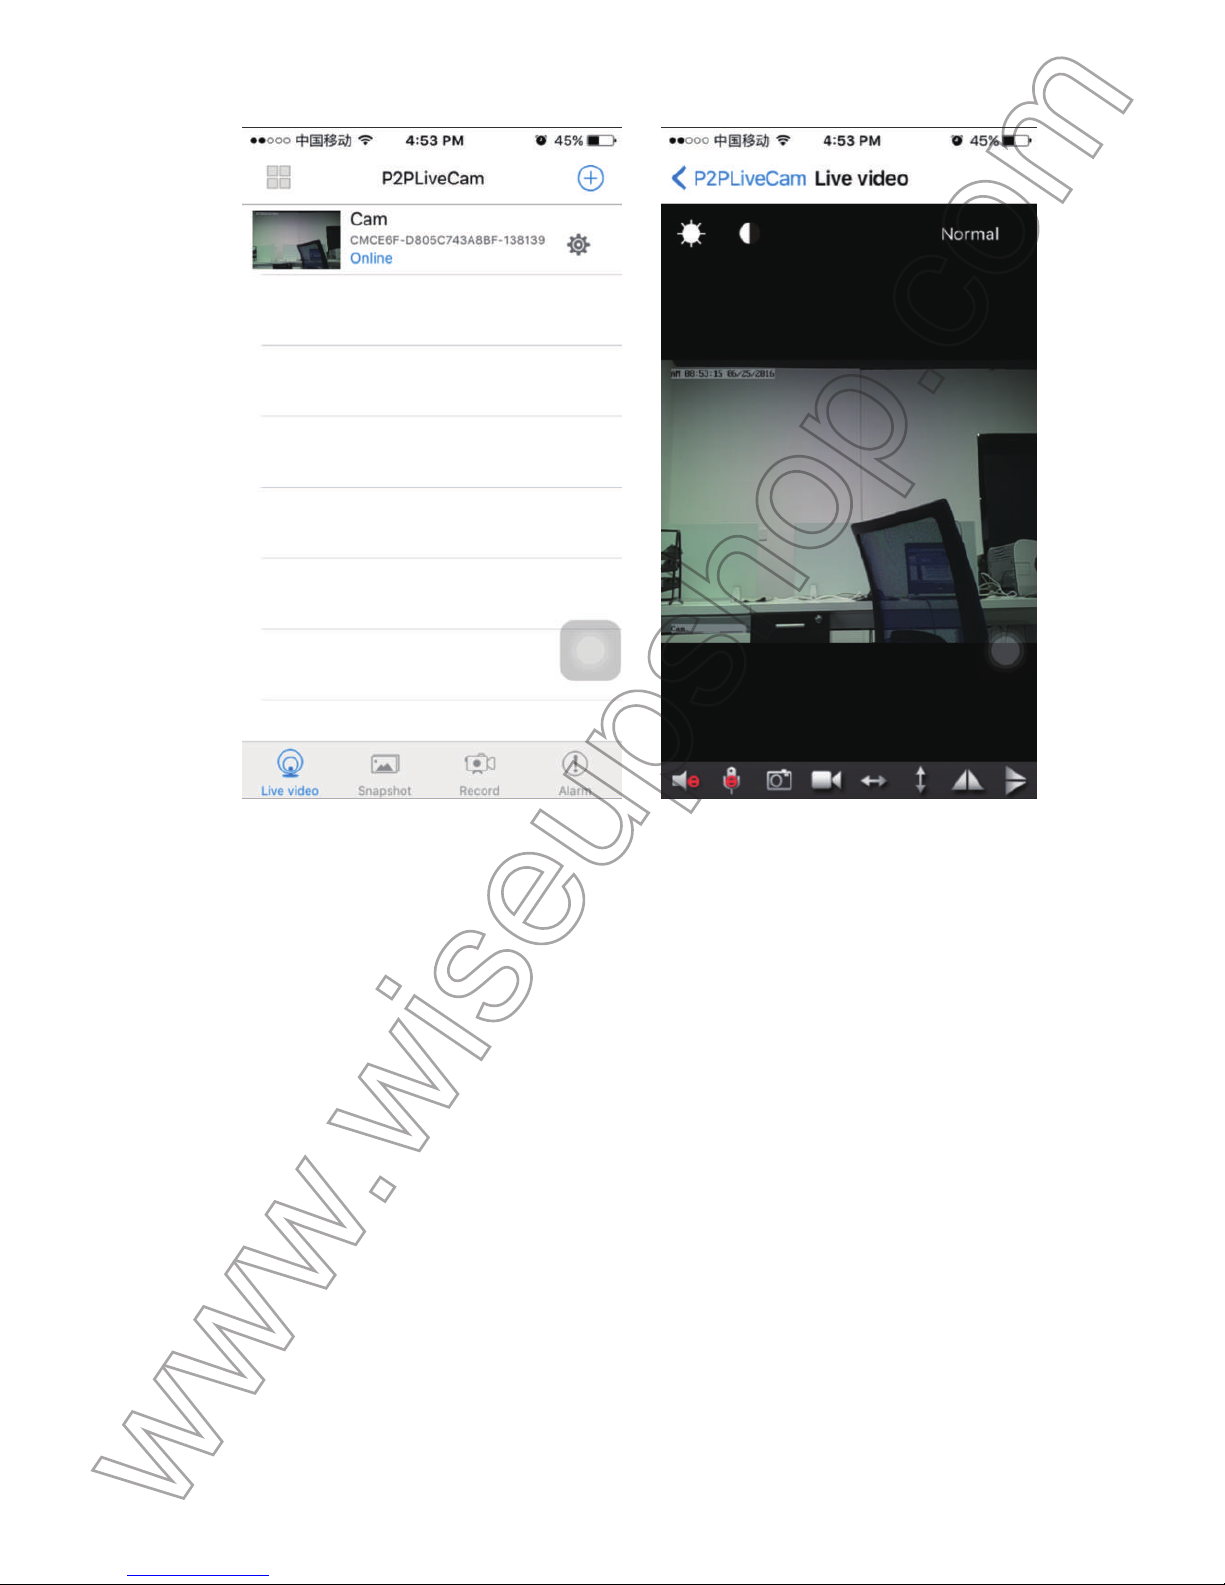
.2.4. The camera is added successfully if you see it is Online. Tap the camera icon to watch liv
e
v
ideo in the P2P (LAN) mode.
Page 6
(Android)
(IOS)
Page 7
[Note]:
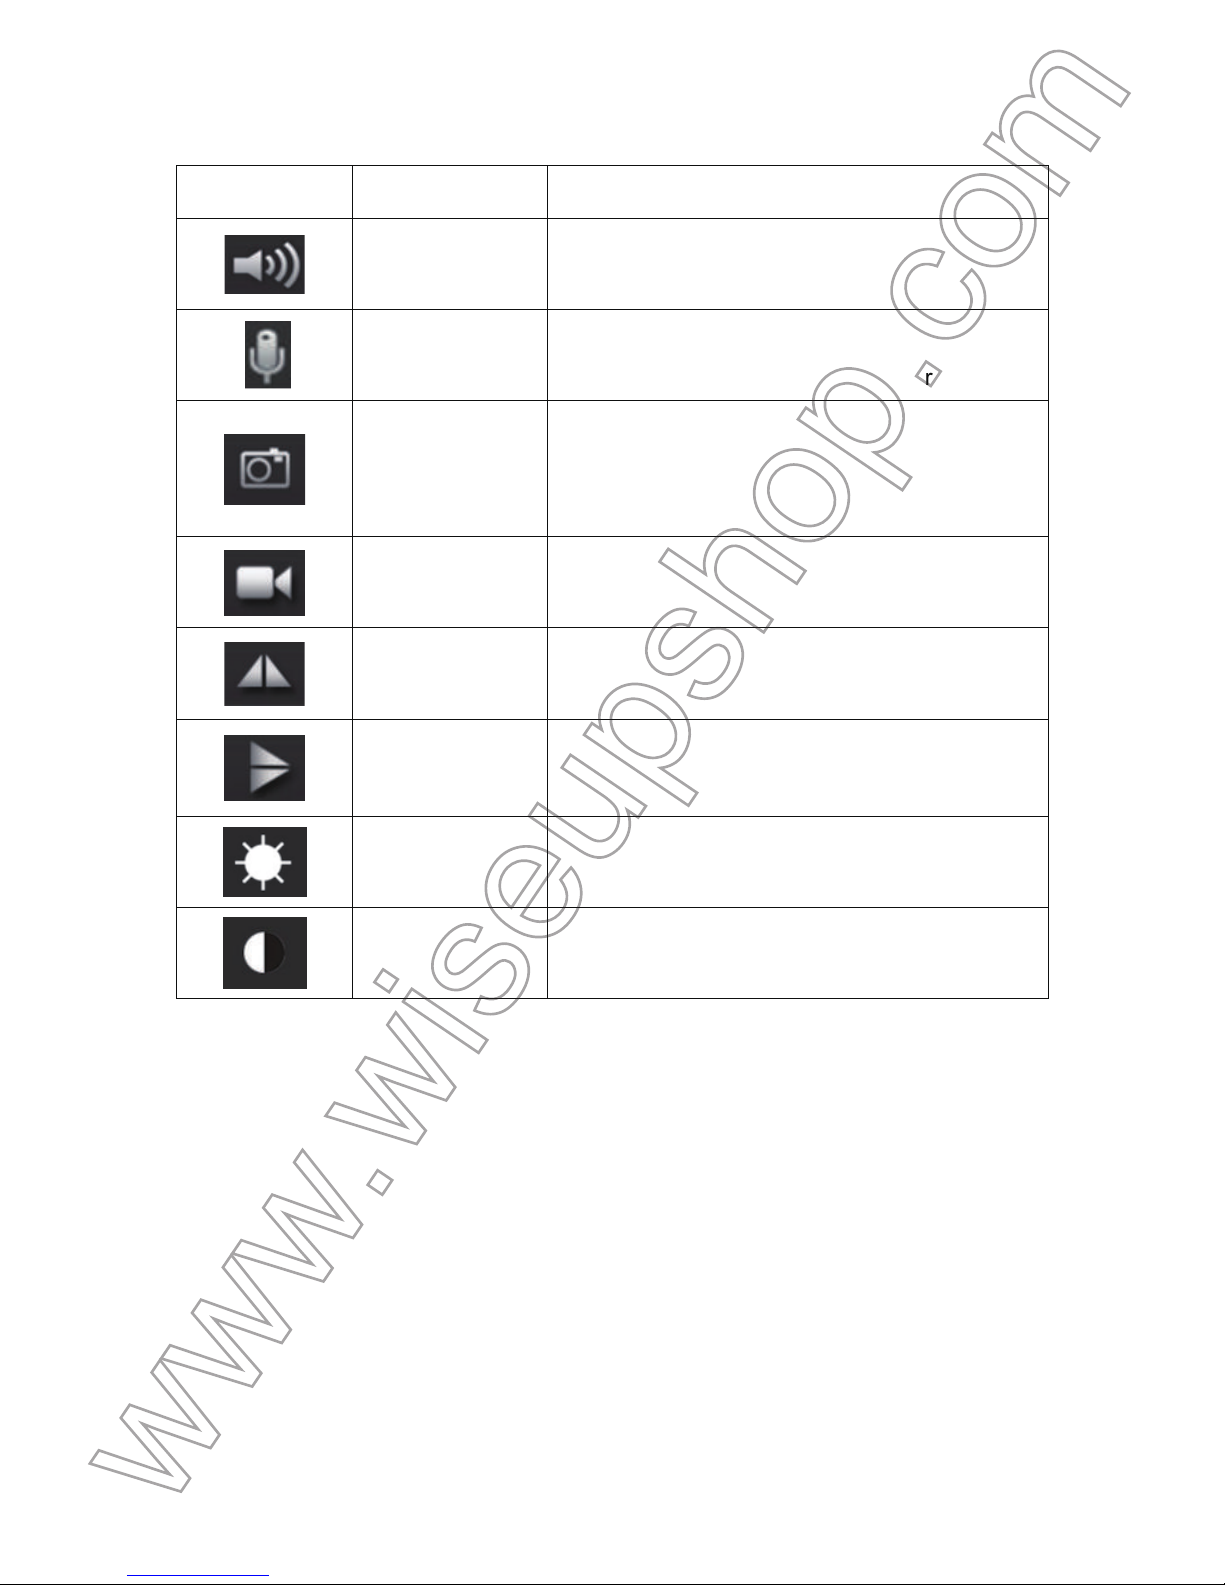
See the table below for an explanation of the different functions available:
Button Function Name Function Description
Audio
Tap this button to enable or disable the live
audio output.
Microphone
Tap Audio and Microphone to record audio
during the remote video recording process.
Snapshot
Tap this button to take a screenshot of the live
video. The pictures will be saved in your
smartphone or tablet PC.
Remote video
recording
Tap this button to start or stop remote video
recording.
Horizontal Mirror
Tap this button to flip the live video’s picture
horizontally.
Vertical Mirror
Tap this button to flip the live video’s picture
vertically.
Brightness
Tap this button to adjust the live video
brightness.
Contrast
Tap this button to adjust the live video contrast
ratio.
3.3. WAN Mode or Remote View Setup
>> Before the WAN configuration, please confirm that the camera is added successfully to
smartphone or tablet PC, and that the P2P (LAN) connection between the camera and smartphone or
tablet PC works well.
3.3.1. Launch the P2PLiveCam APP.
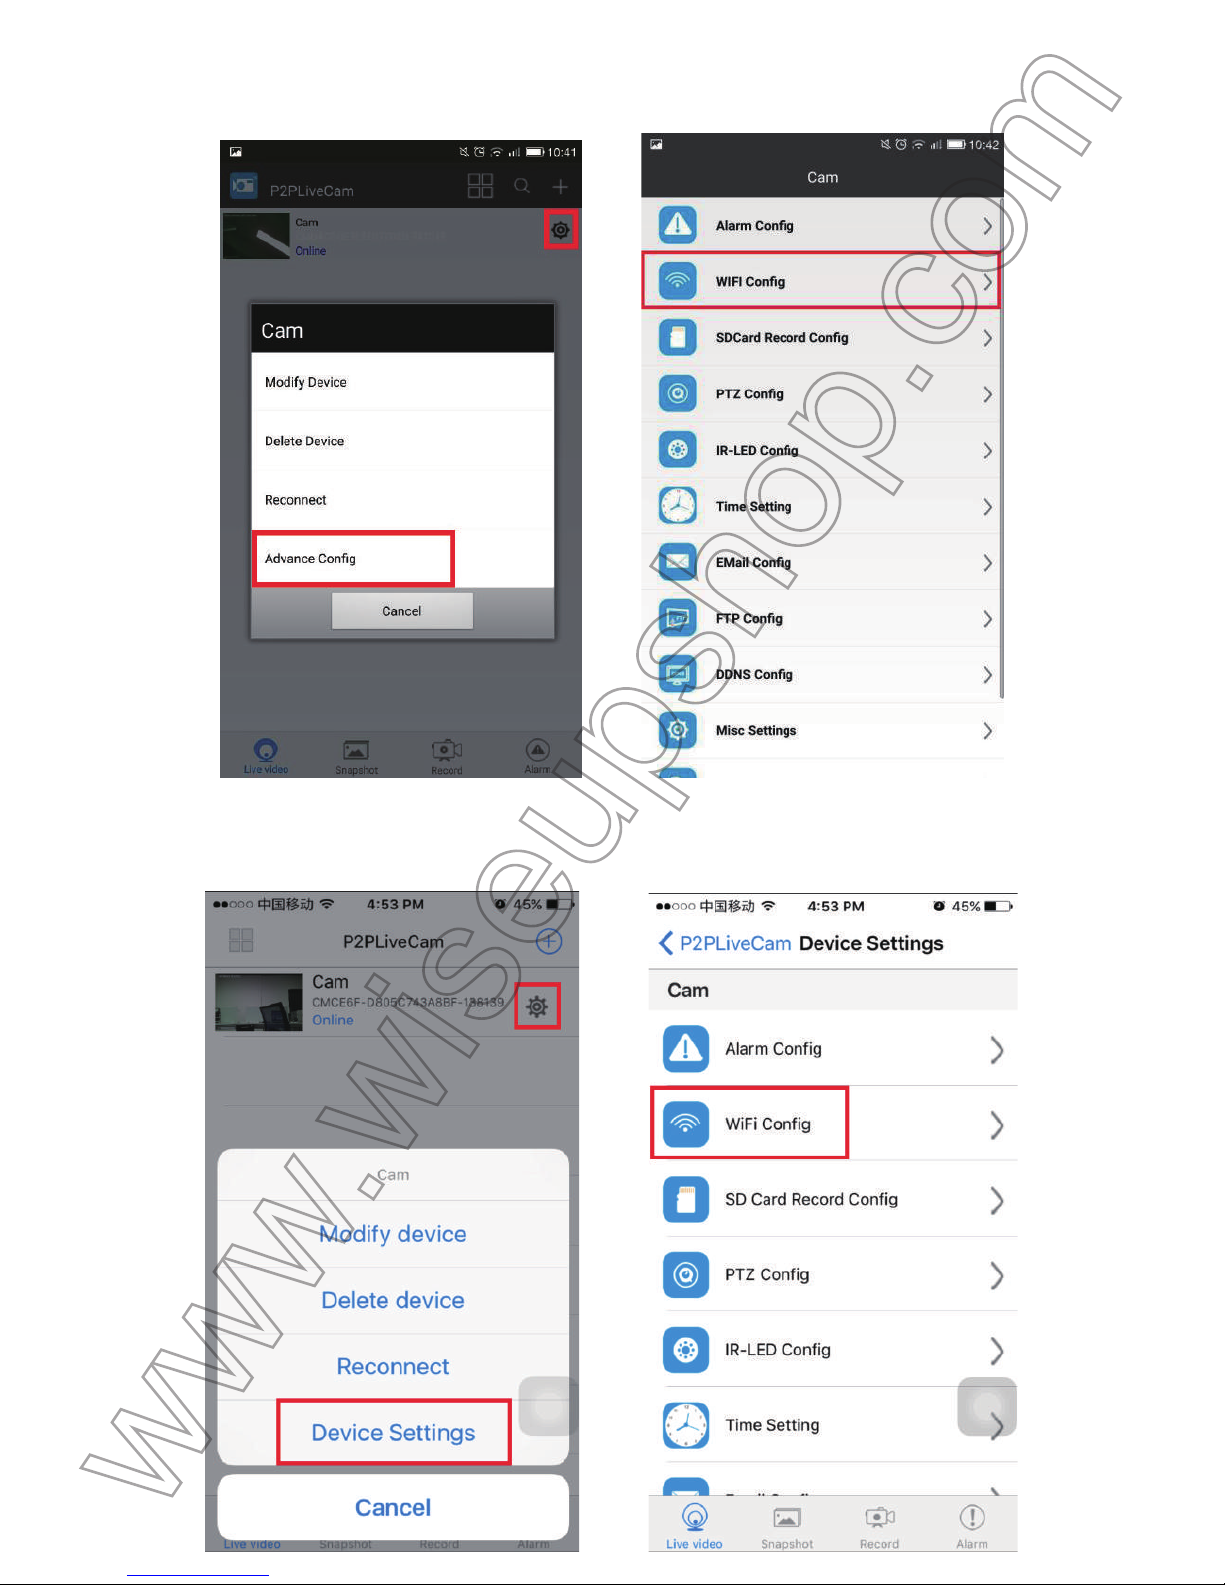
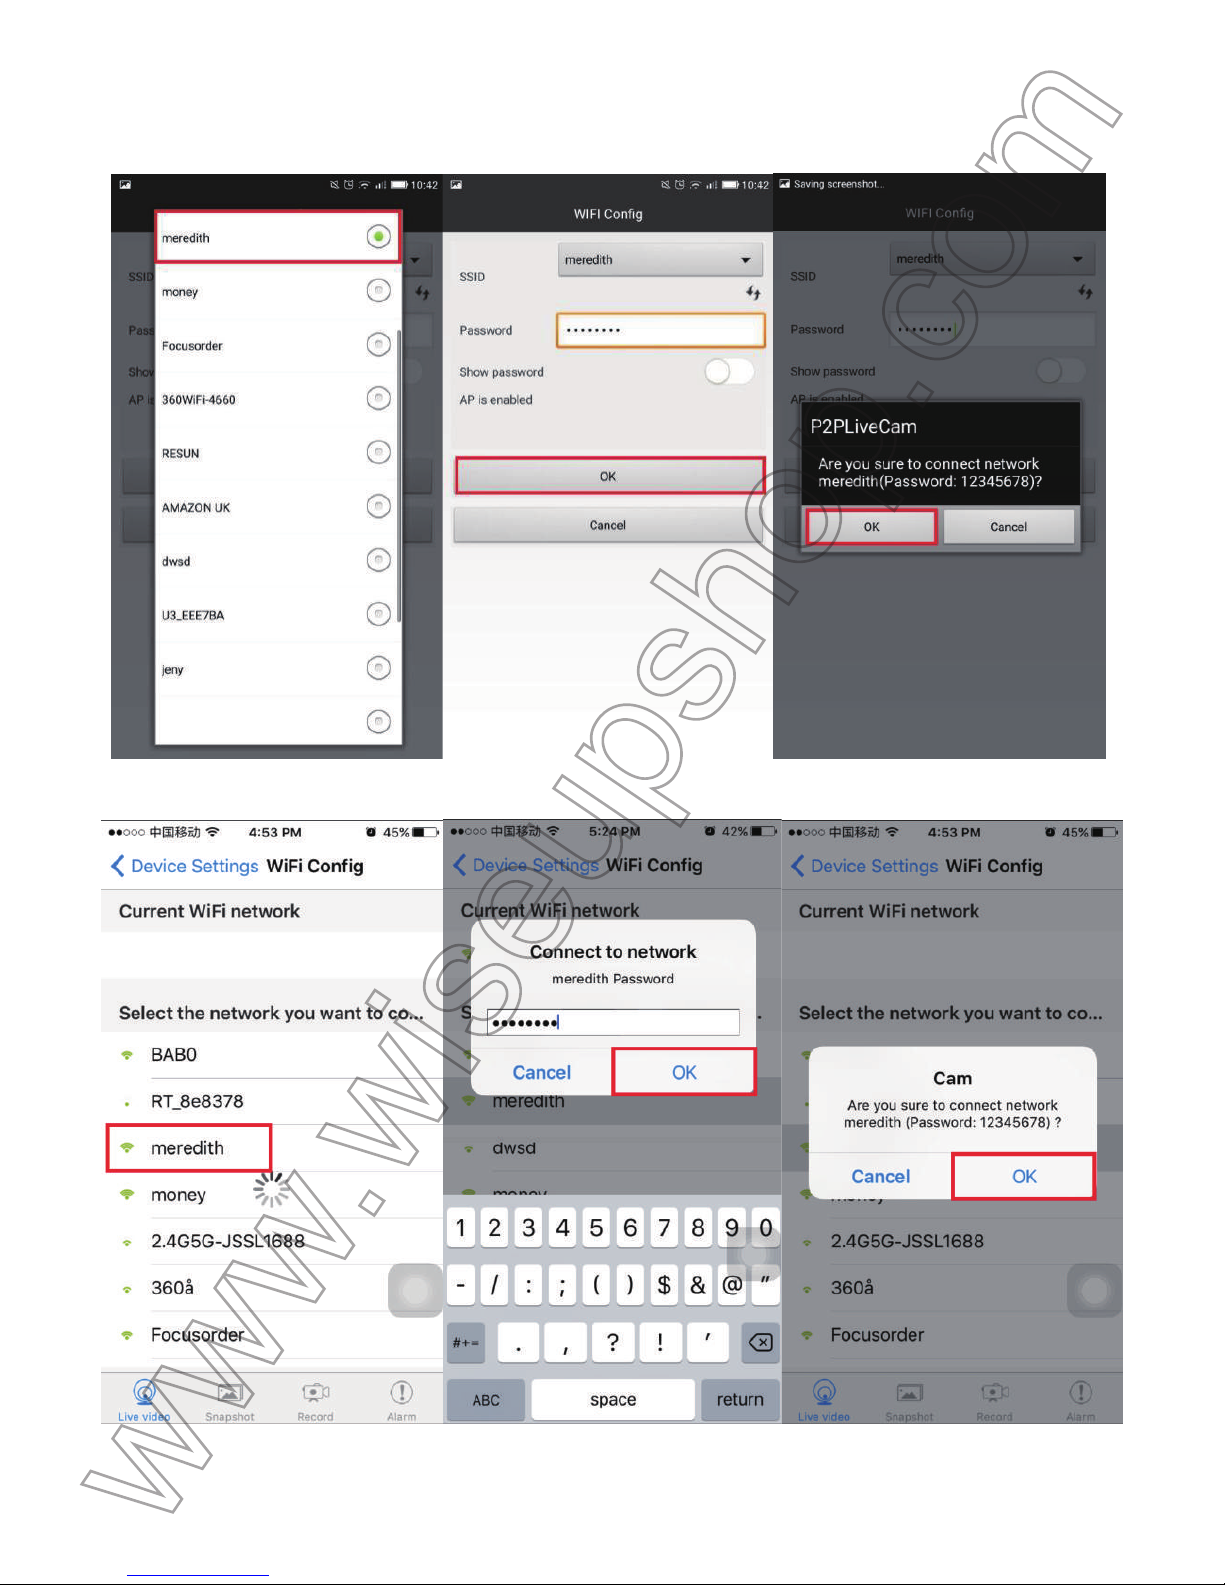
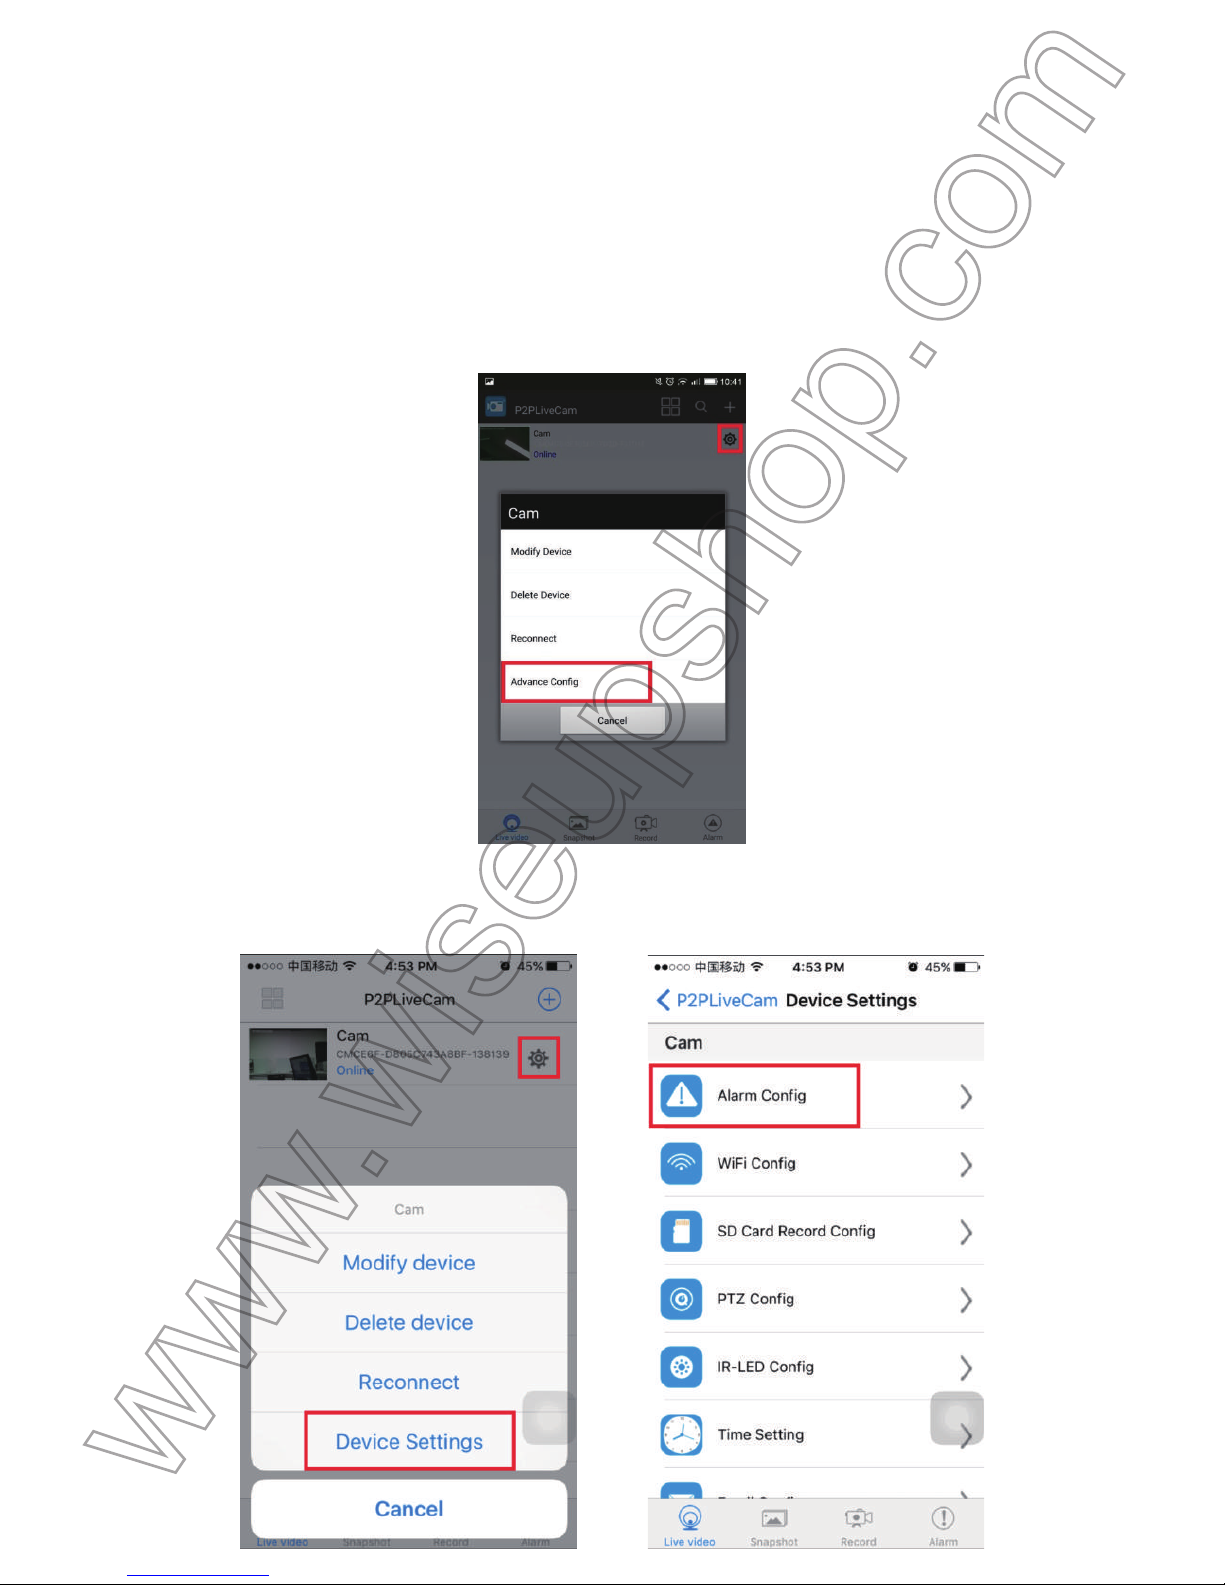
3.3.2. In the P2P (LAN) mode, tap the setting icon > Advance Config or Device Settings > WIFI
Config.
Page 8
(Android)
(IOS)
Page 9
3
.3.3. Enroll the camera in a desired WIFI network and then tap OK to confirm the configuration.
(Android)
(IOS)
Page 10
C
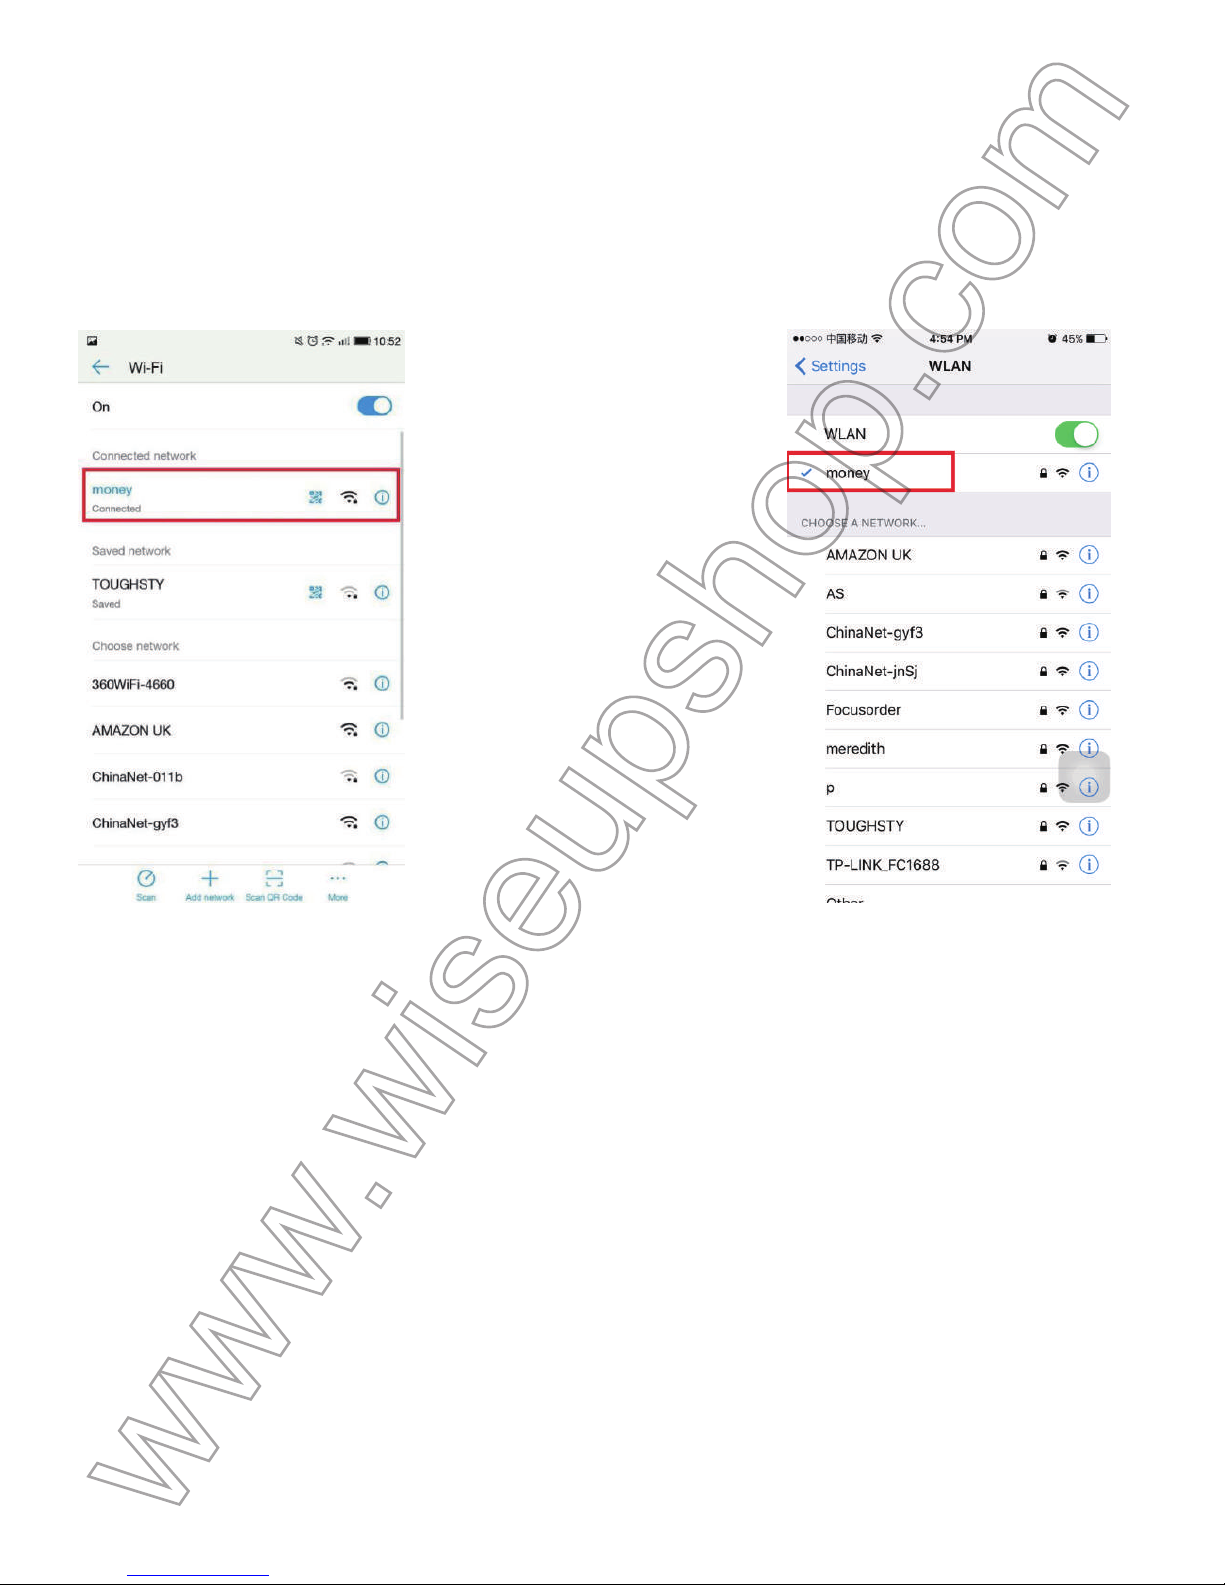
heck if the WAN mode or remote view setup works!
1
. Exit the P2PLiveCam APP.
2
. Go to the WIFI or WLAN Settings Page on you smartphone or tablet PC, join to another WIFI signa
l
w
hich must be different from the current one or you can use your mobile network.
(Android) (IOS)
3
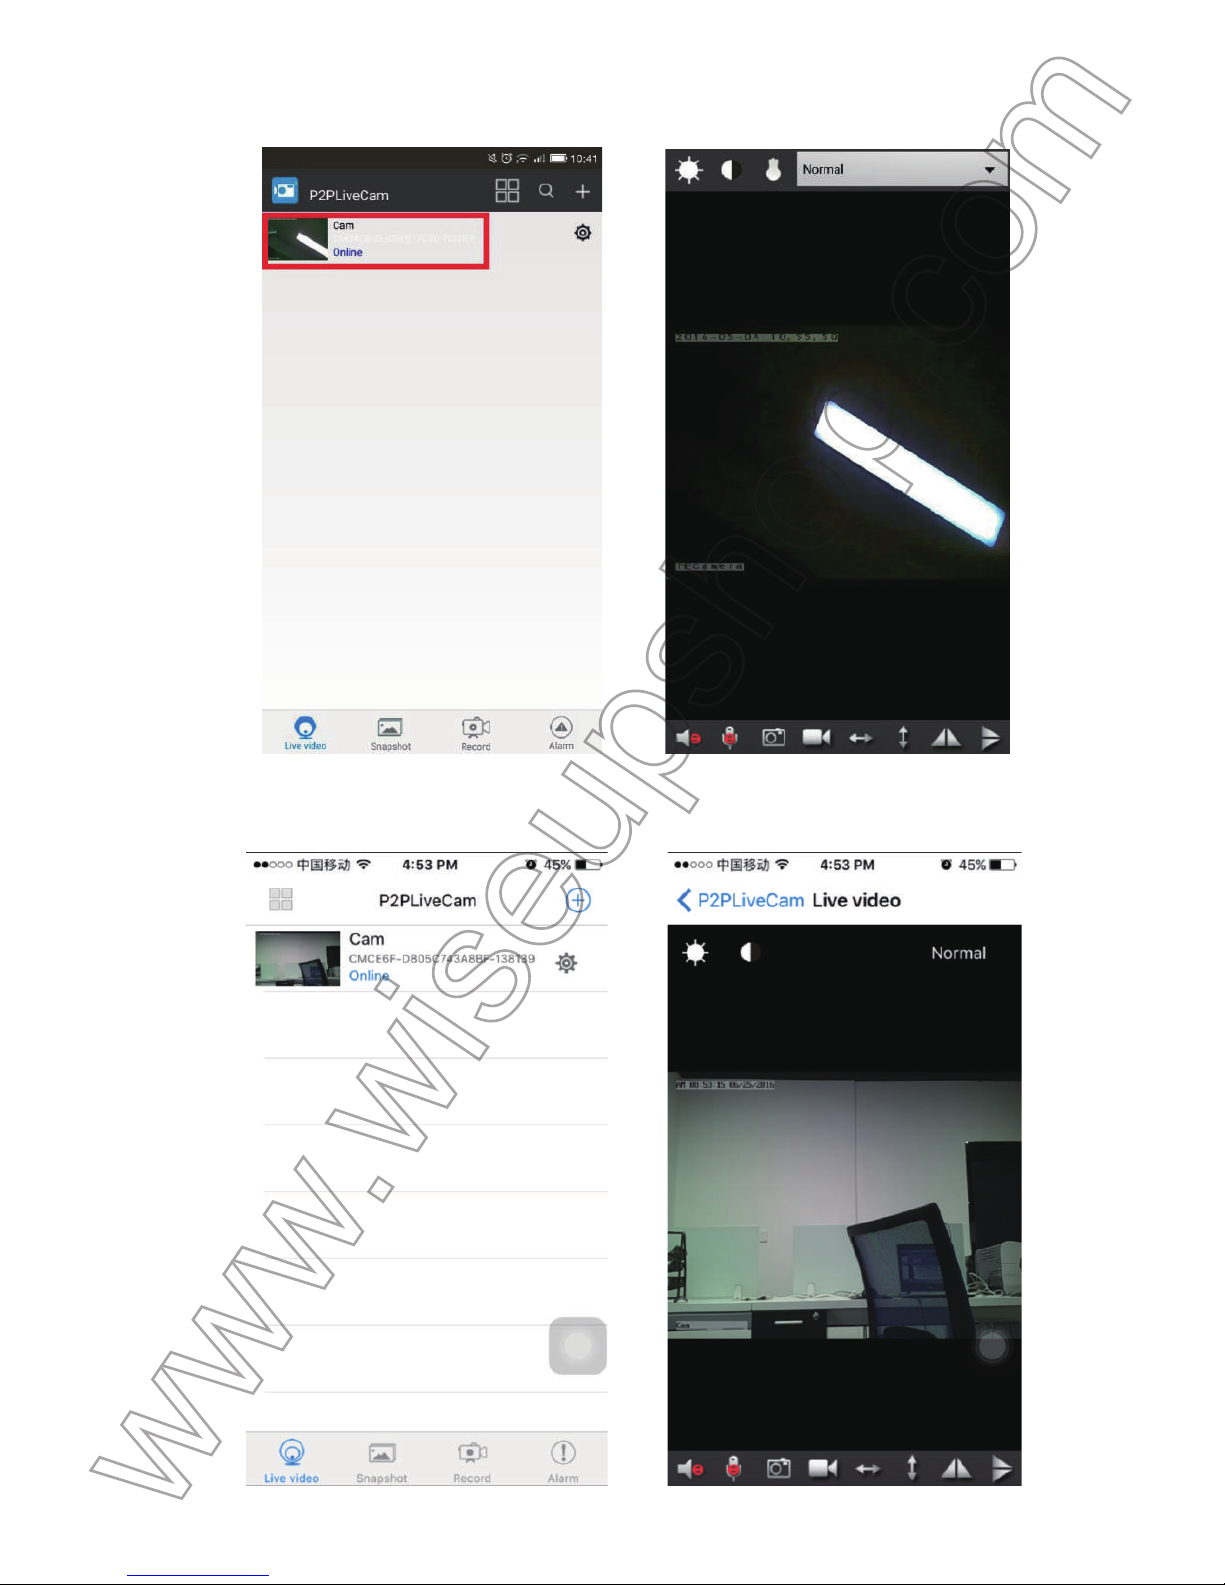
. Launch the P2PLiveCam APP again. If you see the camera is Online, it means that the remot
e
v
iew (WAN) setting is successful.
Page 11
(Android)
(IOS)
Page 12
I
V. Motion Detection Setup
>
> Please make sure a Micro SD card is securely fitted into the SD card slot on your camera. A SDH
C
C
lass 10 Micro SD card is recommended.
4
.1. In the WAN or LAN mode, launch the P2PLiveCam APP.
4
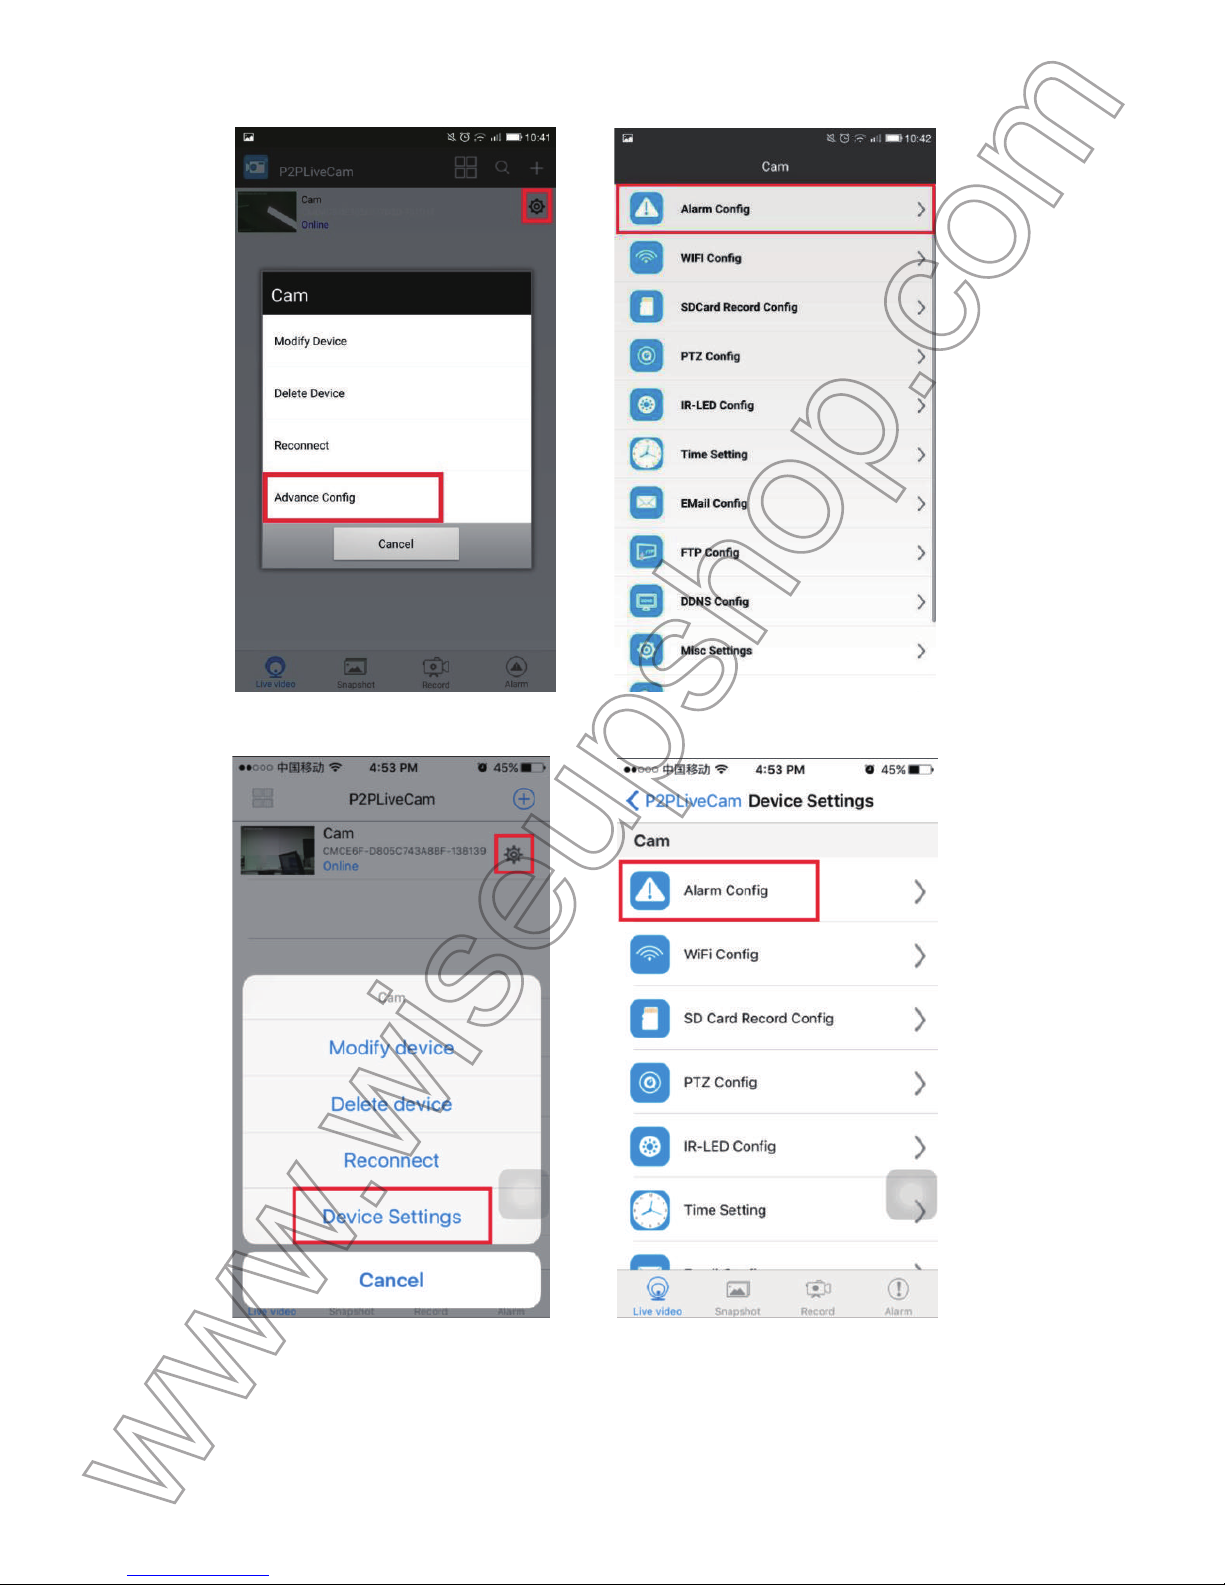
.2. Tap the setting icon > Advance Config or Device Settings > Alarm Config.
(Android)
(IOS)
Page 13
4
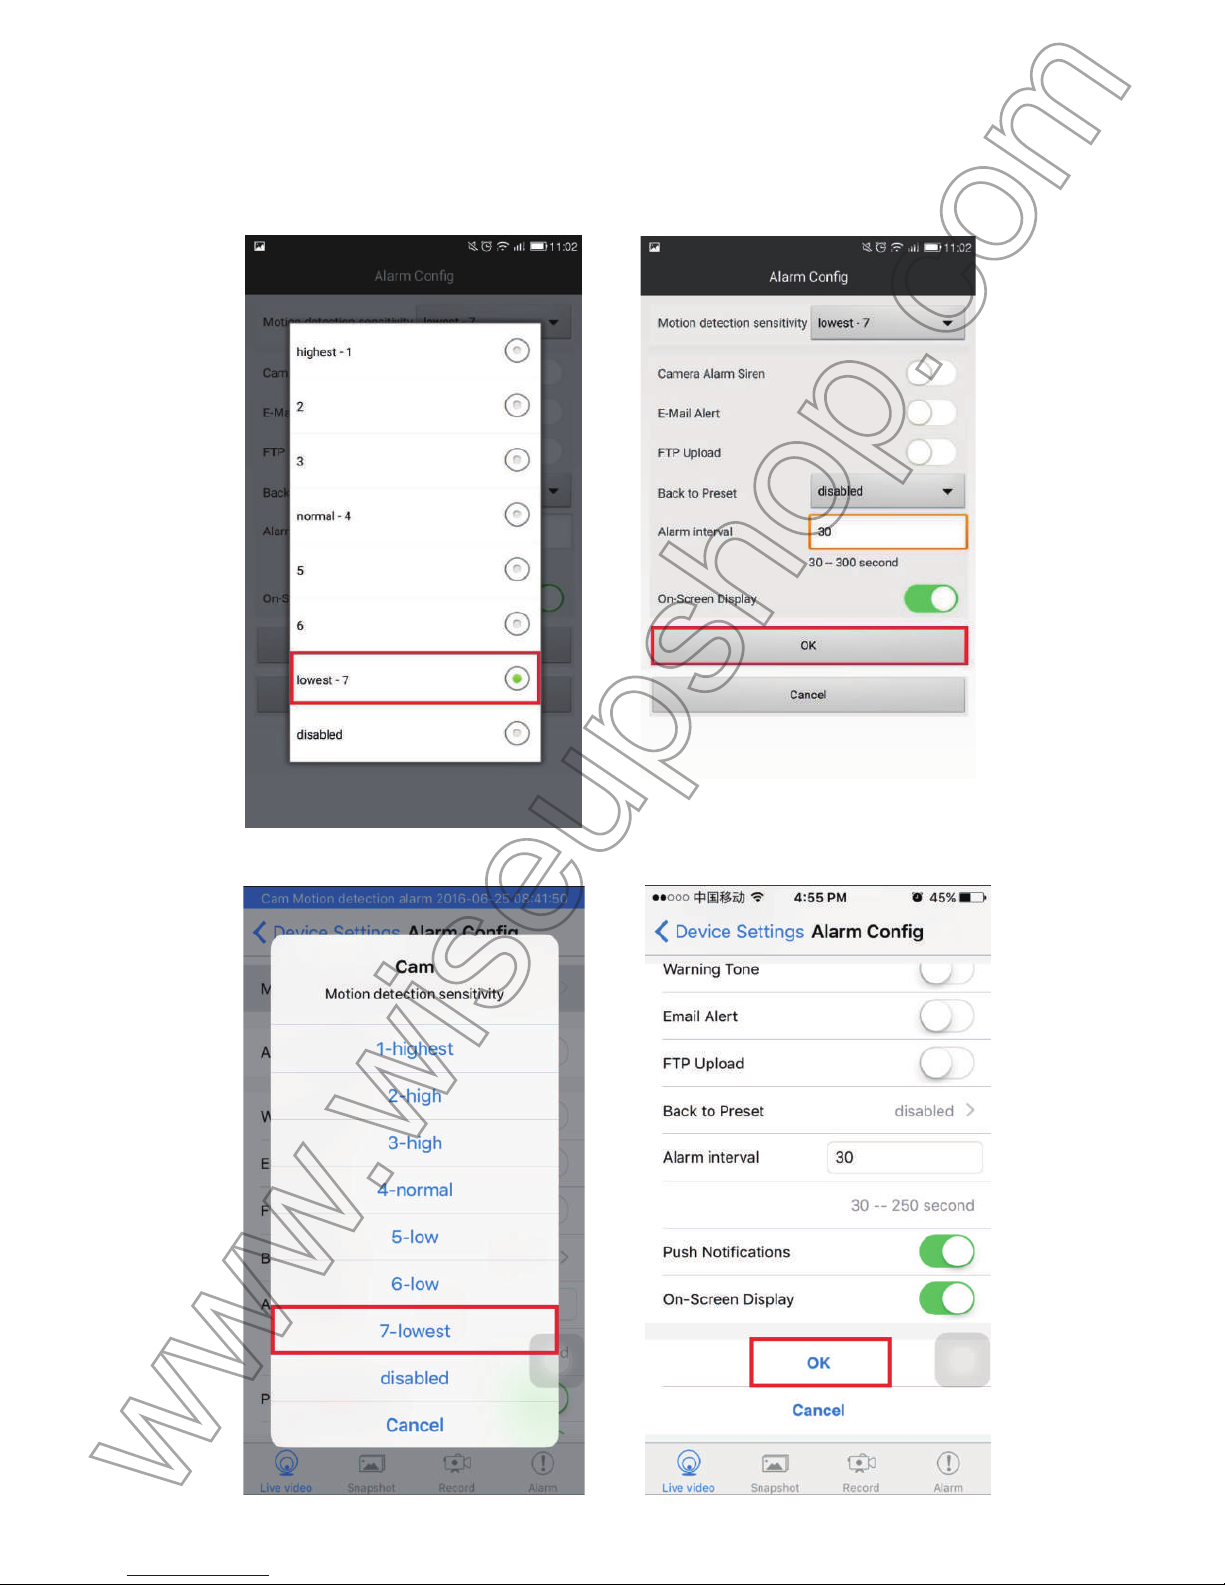
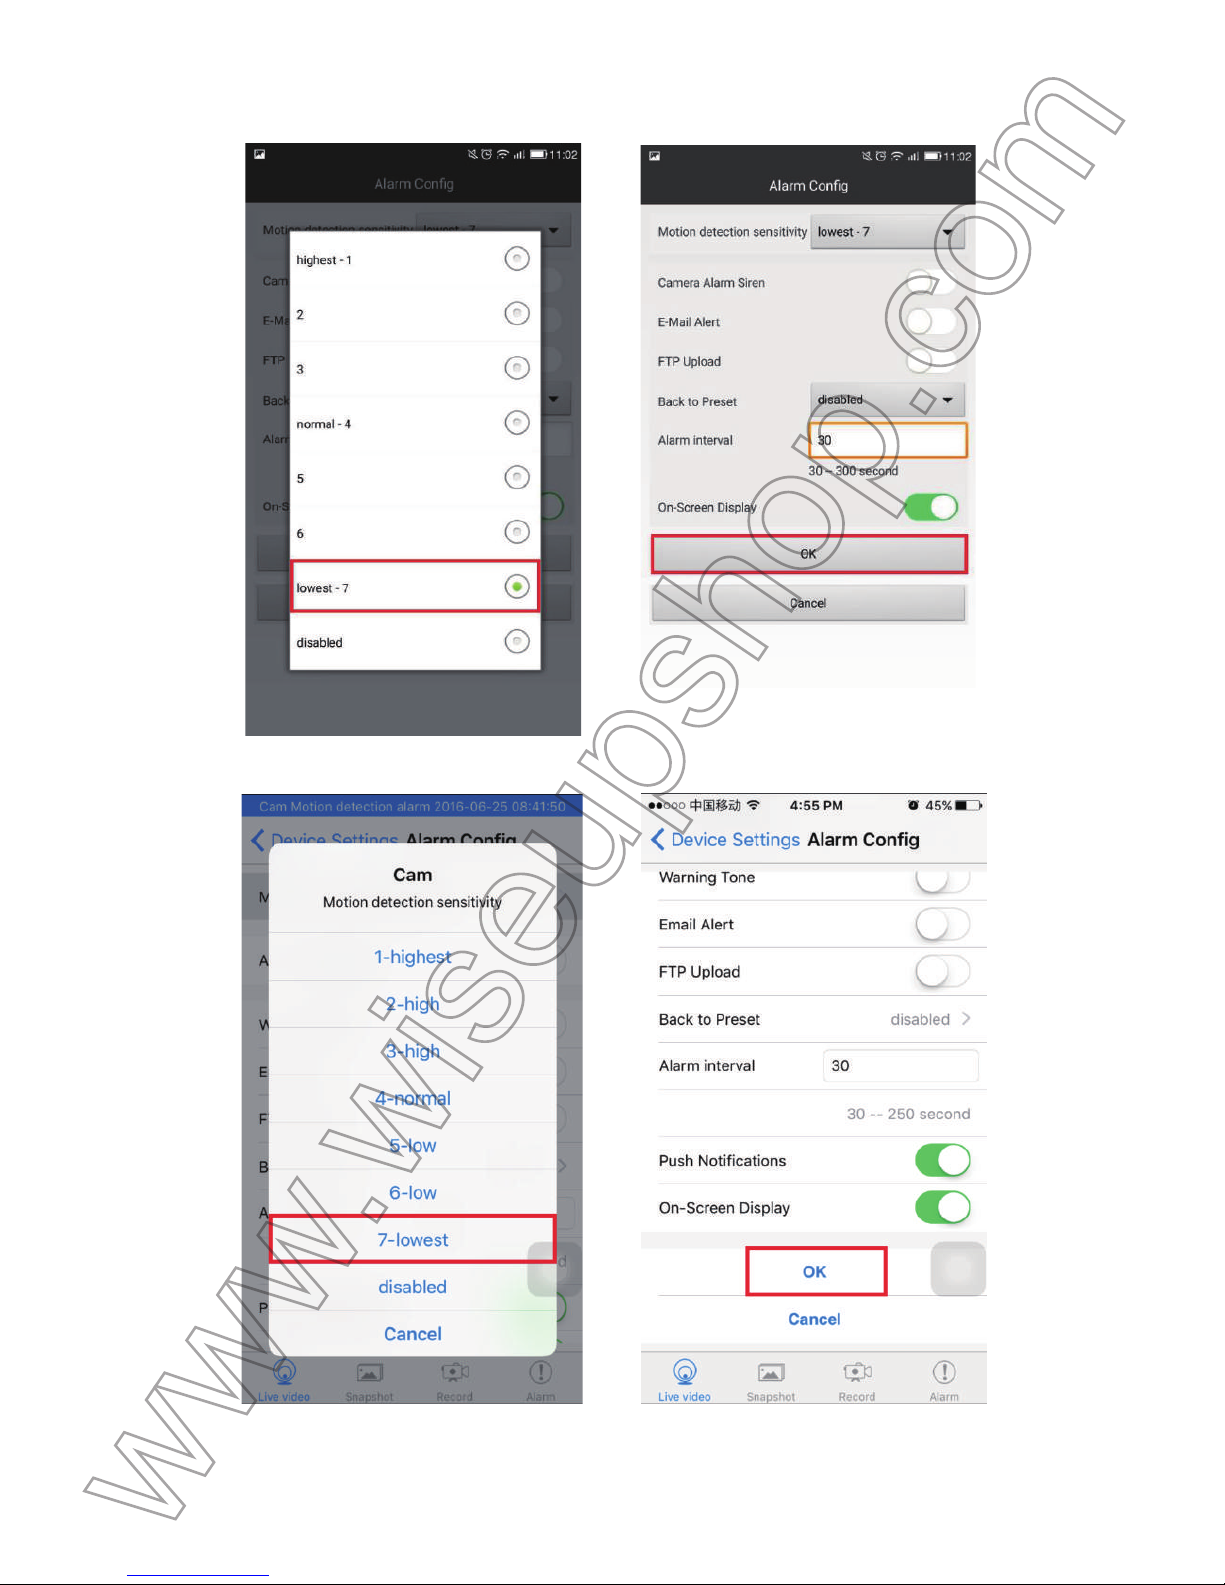
.3. Enable the motion detection function and then tap OK to confirm the setting. The camera will tak
e
a
picture automatically when a movement is detected.
(Android)
(IOS)
Page 14
4
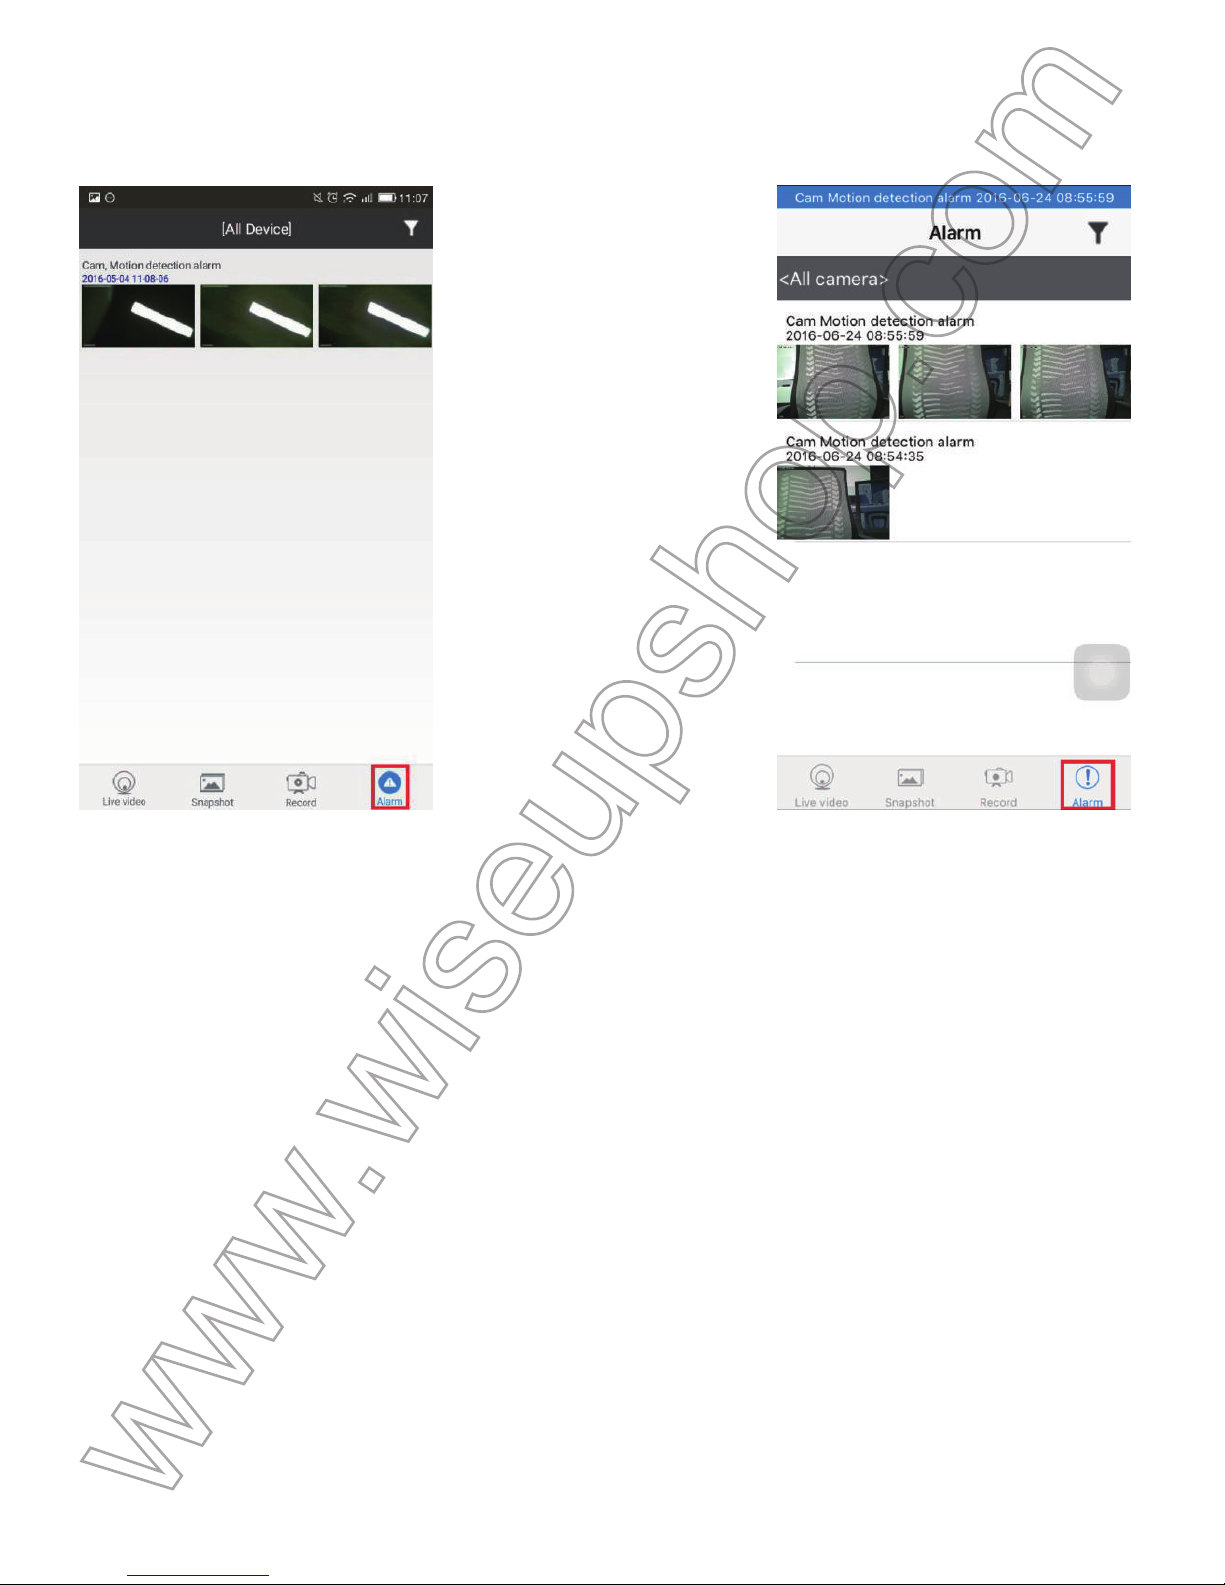
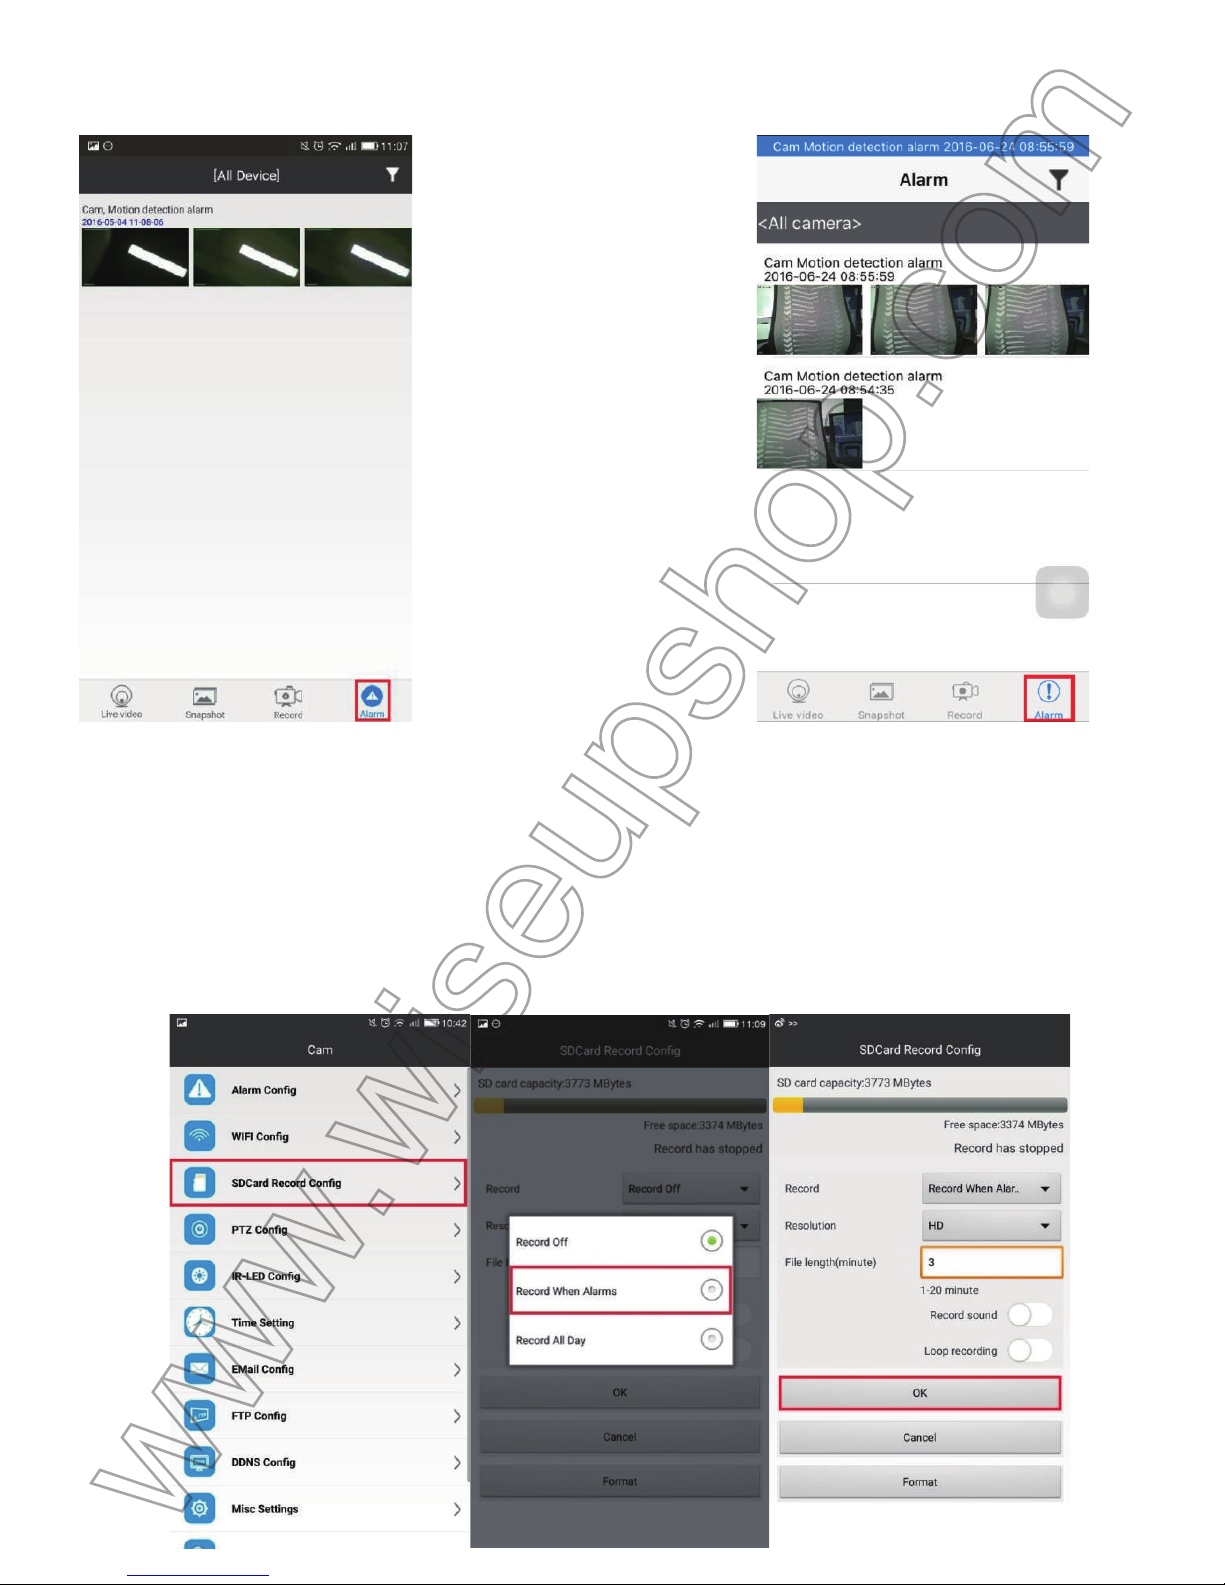
.4. Go back to the camera list page, tap Alarm at the bottom of the screen to check the photos.
(Android) (IOS)
4
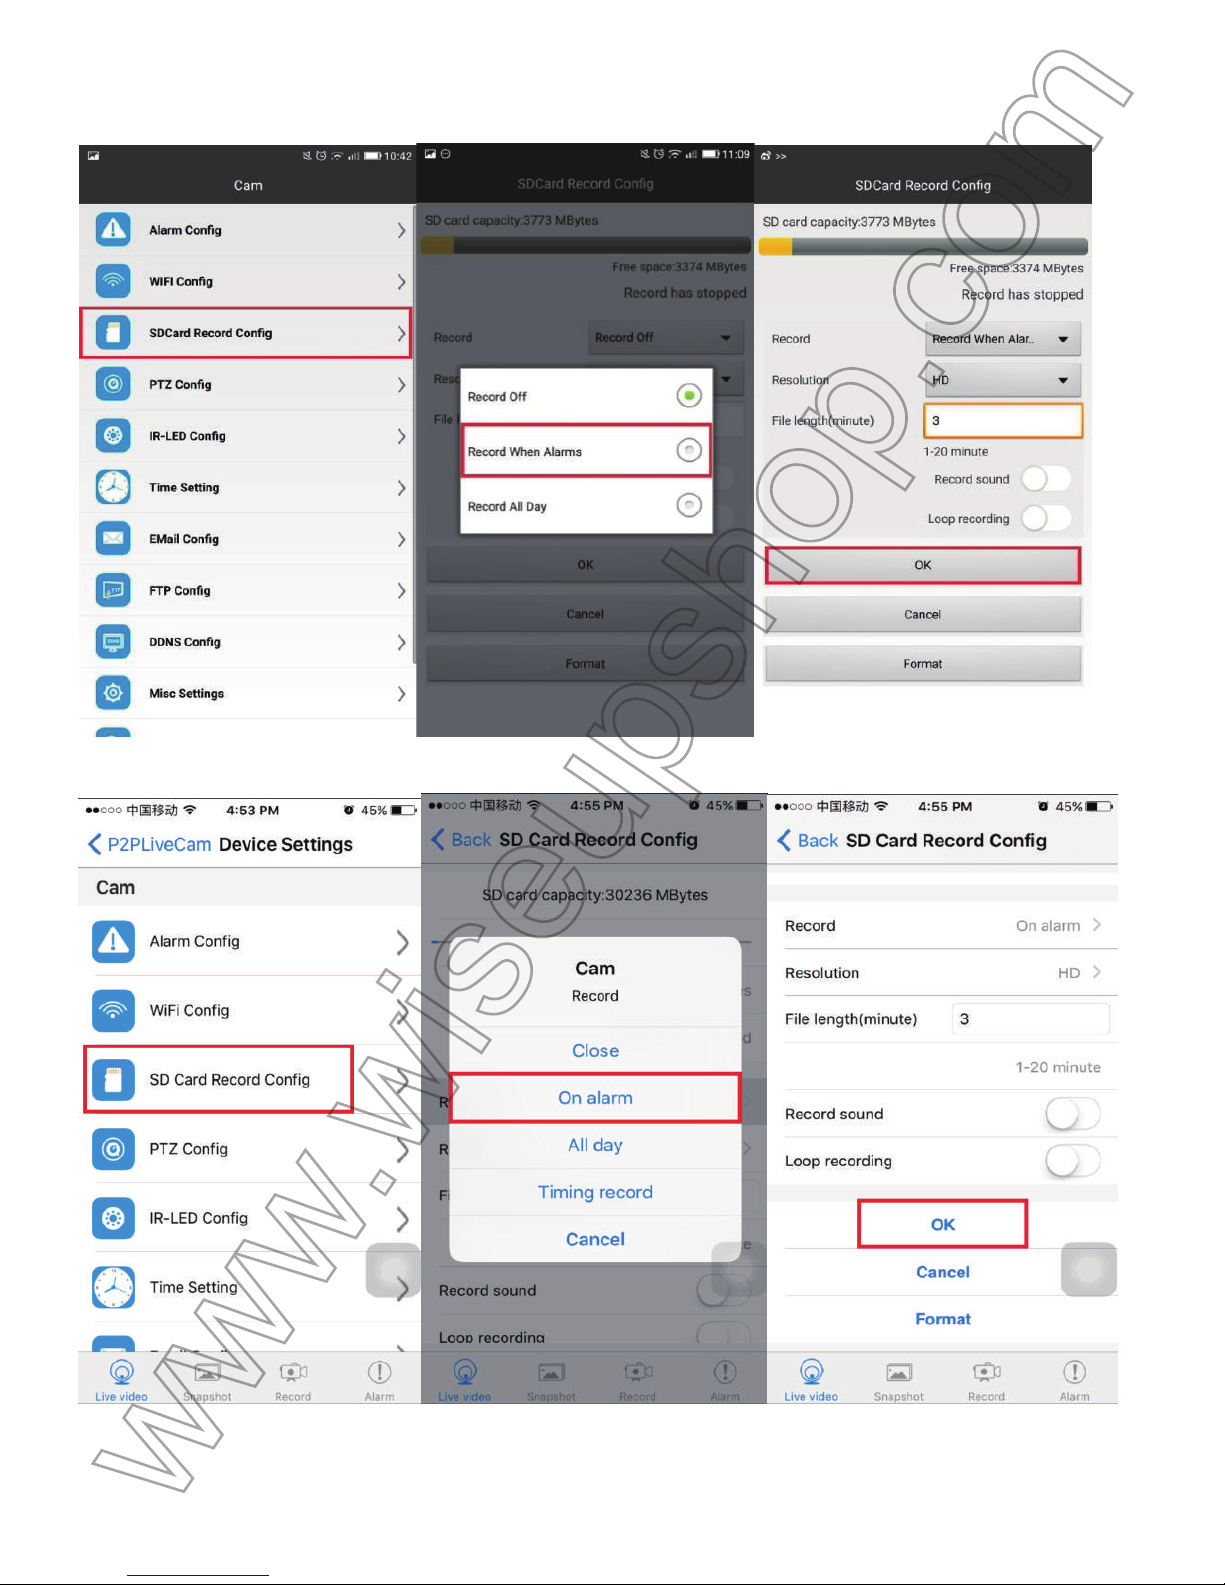
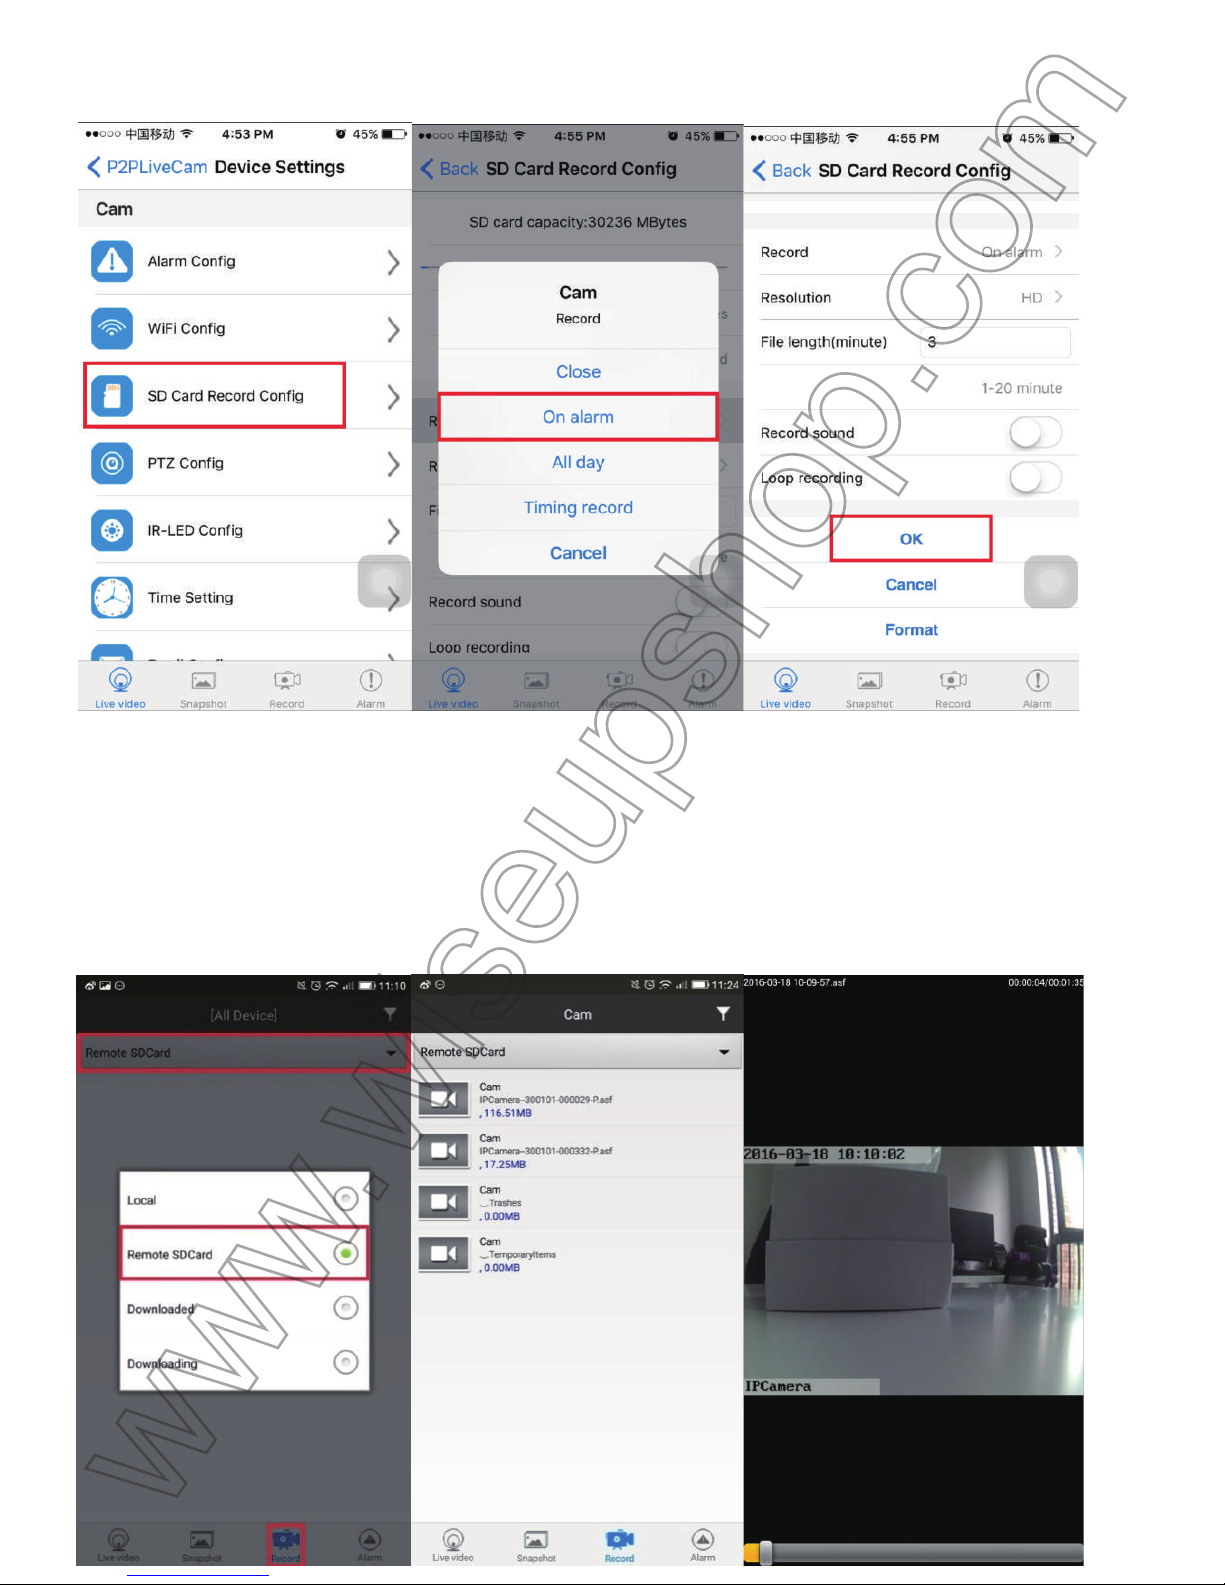
.5. Go to the Advance Config or Device Settings page and select SDCard Record Config. Choos
e
R
ecord When Alarms or On alarm and set other desired parameters. Then tap OK to confirm th
e
s
etting. The camera will start recording video automatically when a movement is detected.
Page 15
(Android)
(IOS)
4
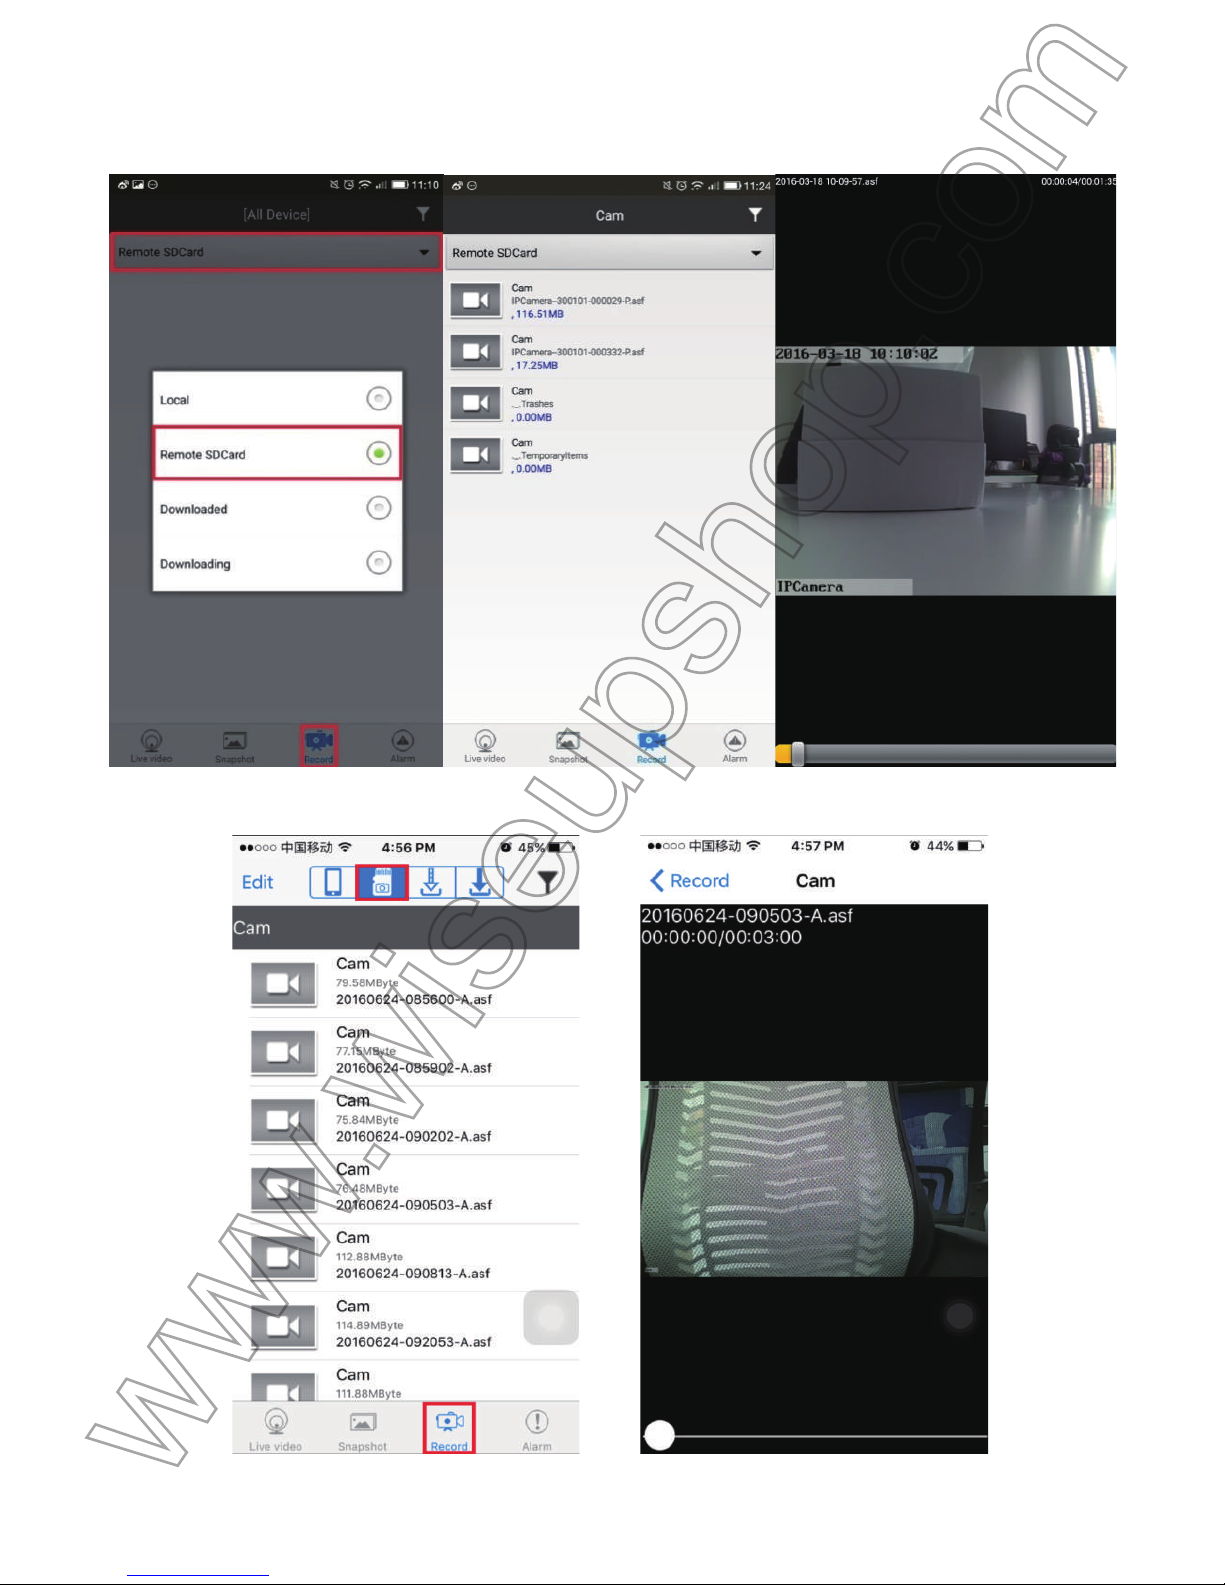
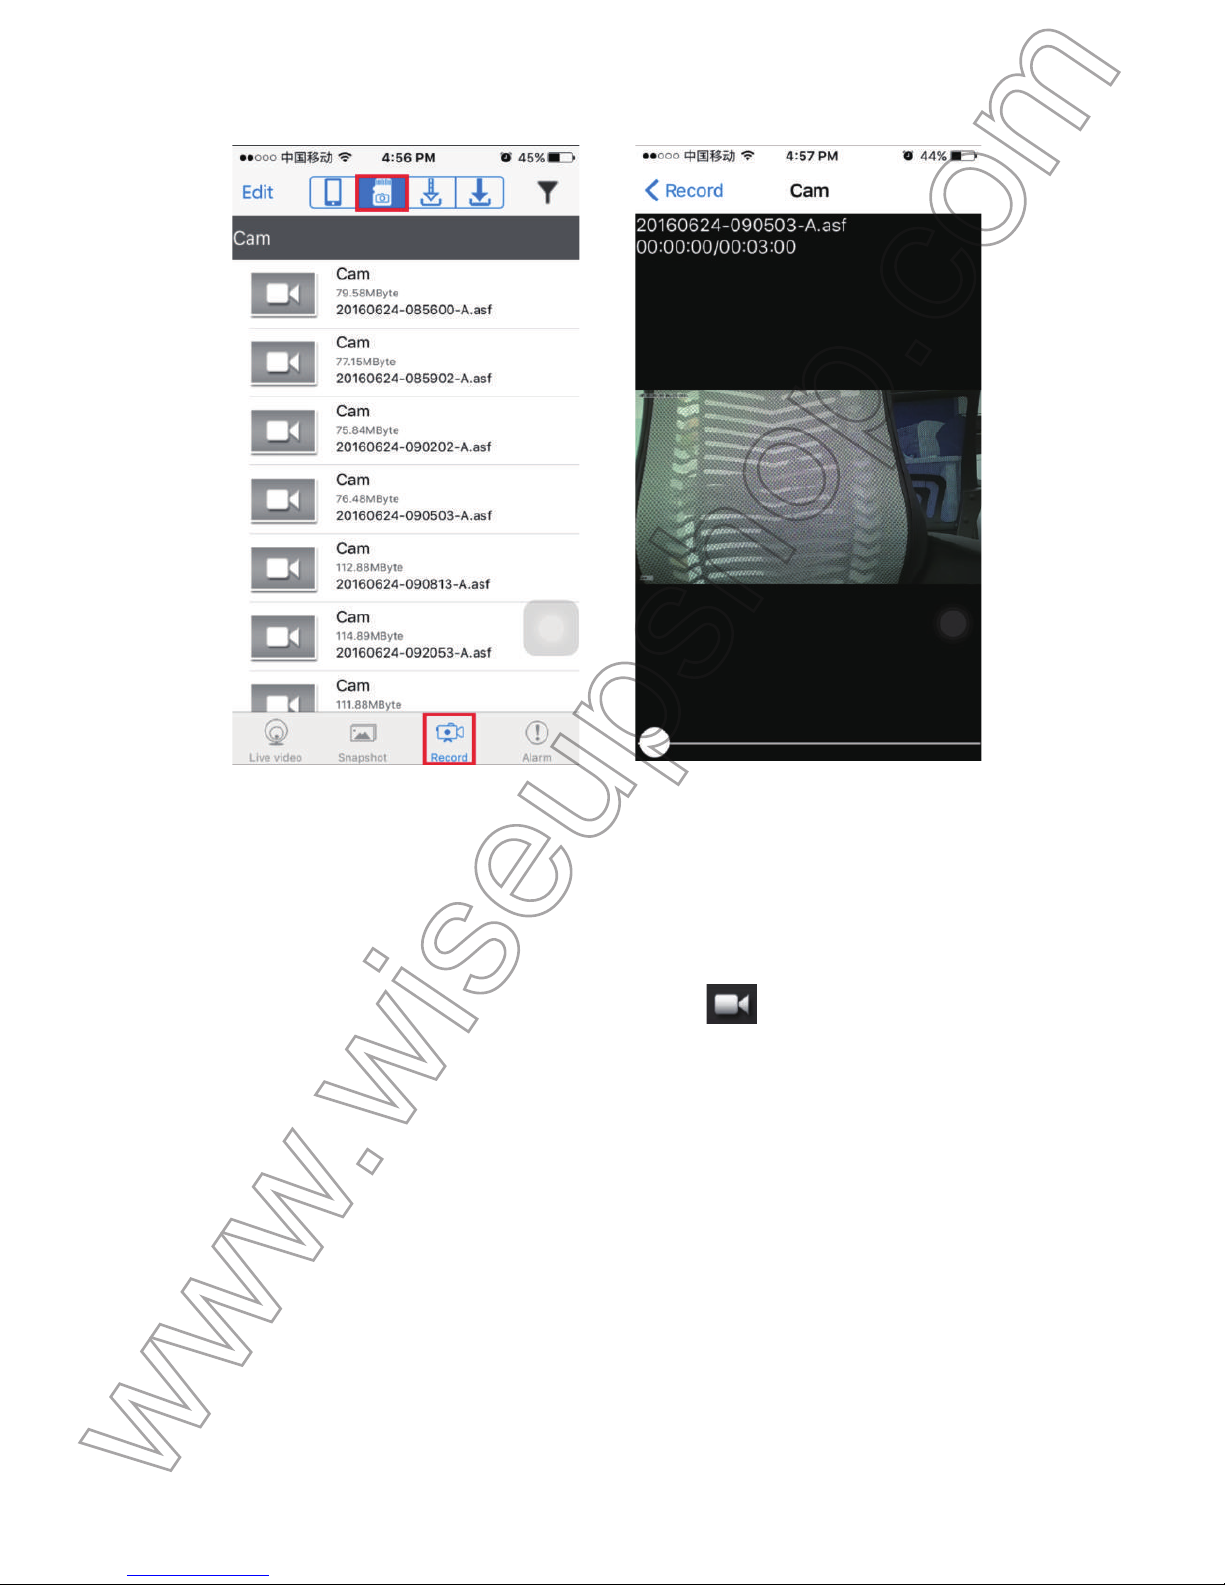
.6. Go back to the camera list page, tap Record at the bottom of the screen and choose Remote S
D
C
ard to check motion detection video files.
Page 16
[
Note]:
All the video files will be saved in the micro SD card on your camera.
(Android)
(IOS)
Page 17
V
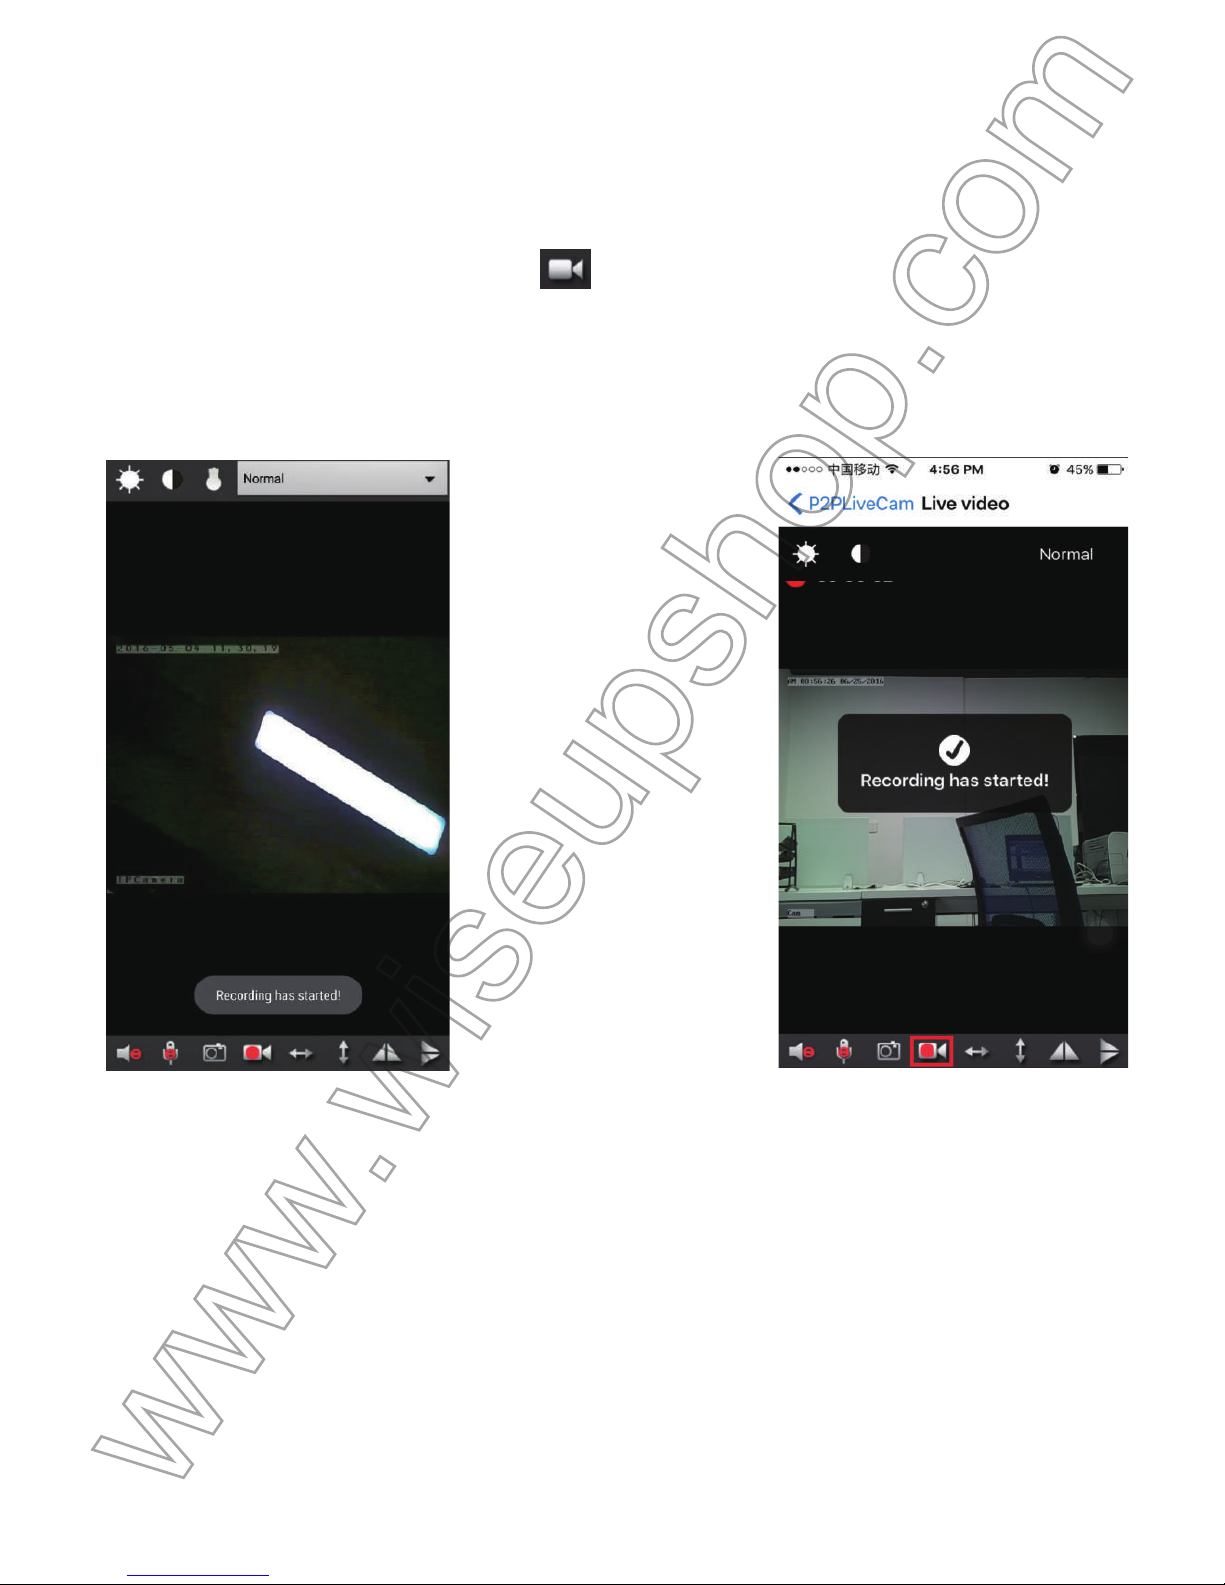
. Record Video to Your Smartphone or Tablet PC
5
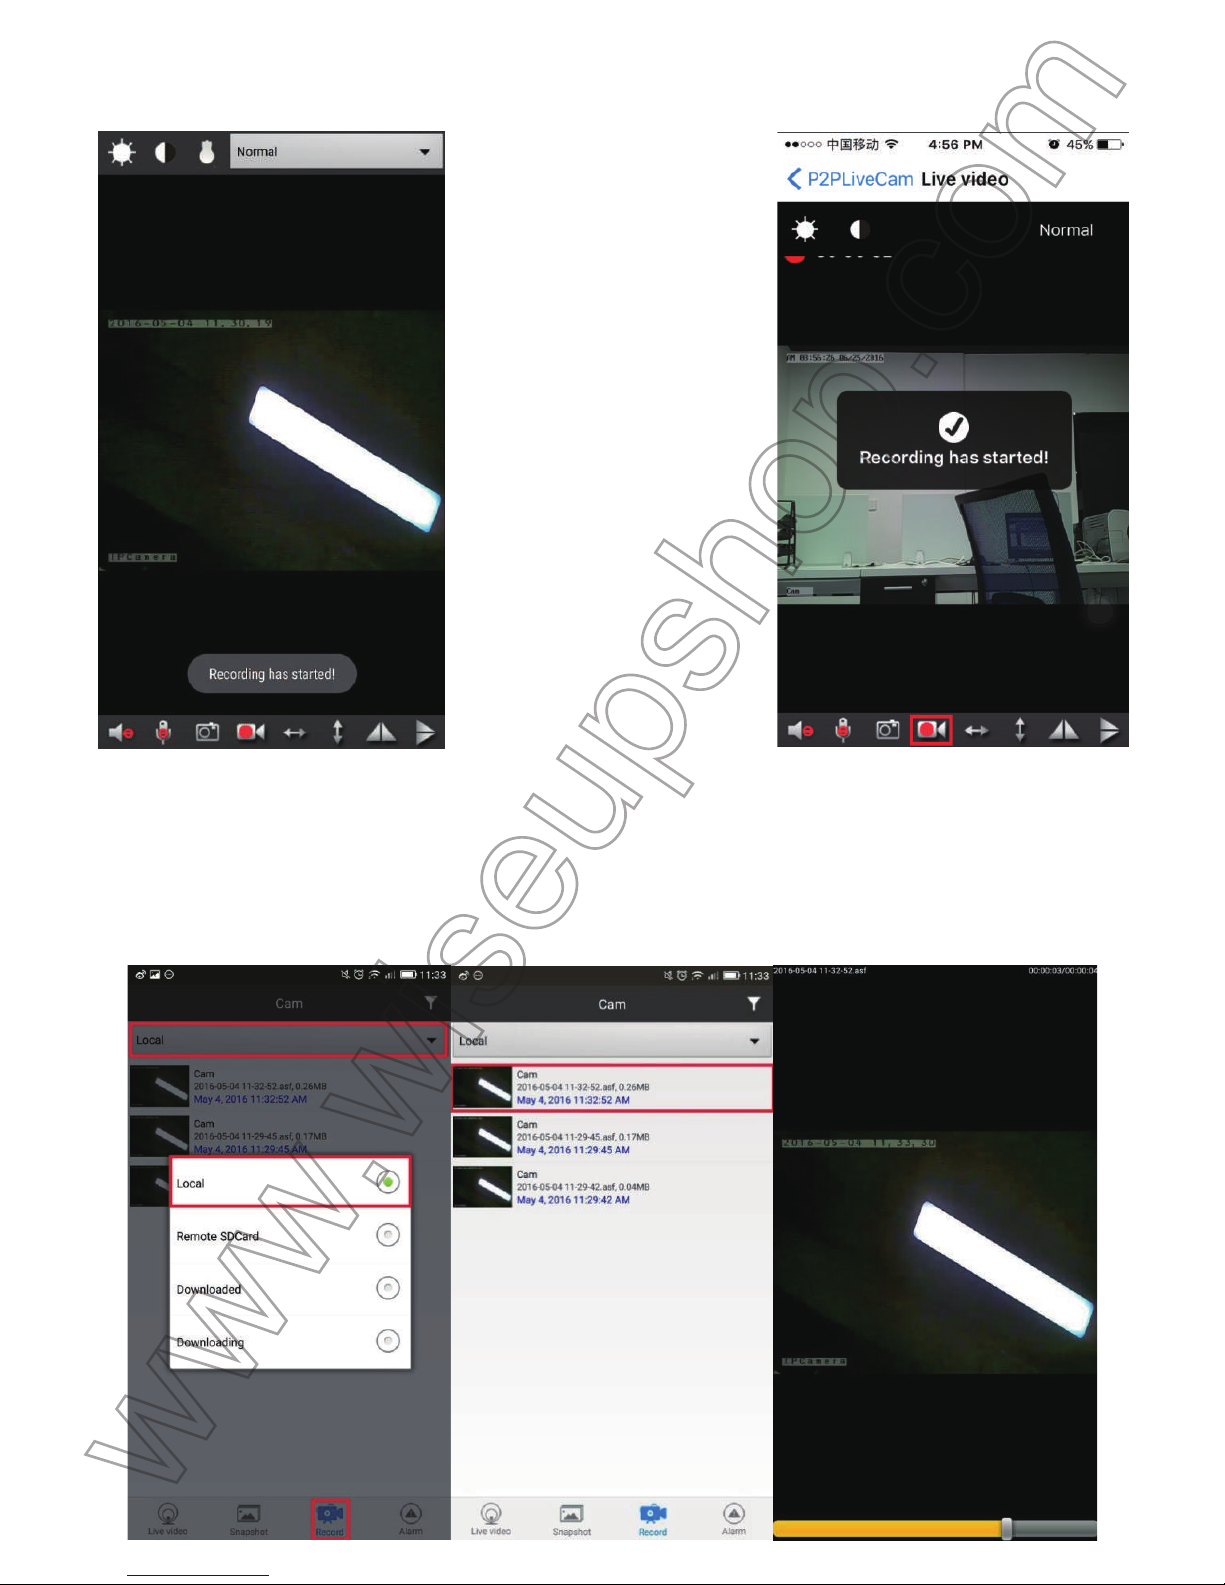
.1. In the LAN or WAN mode, launch the P2PLiveCam APP. Tap the camera icon to the live vide
o
s
creen.
5
.2. Tap the remote video recording button to start or stop recording video.
[
Note]:
All the video files will be saved in the flash memory or extended Micro SD card of your smartphone or table
t
P
C.
(Android) (IOS)
5
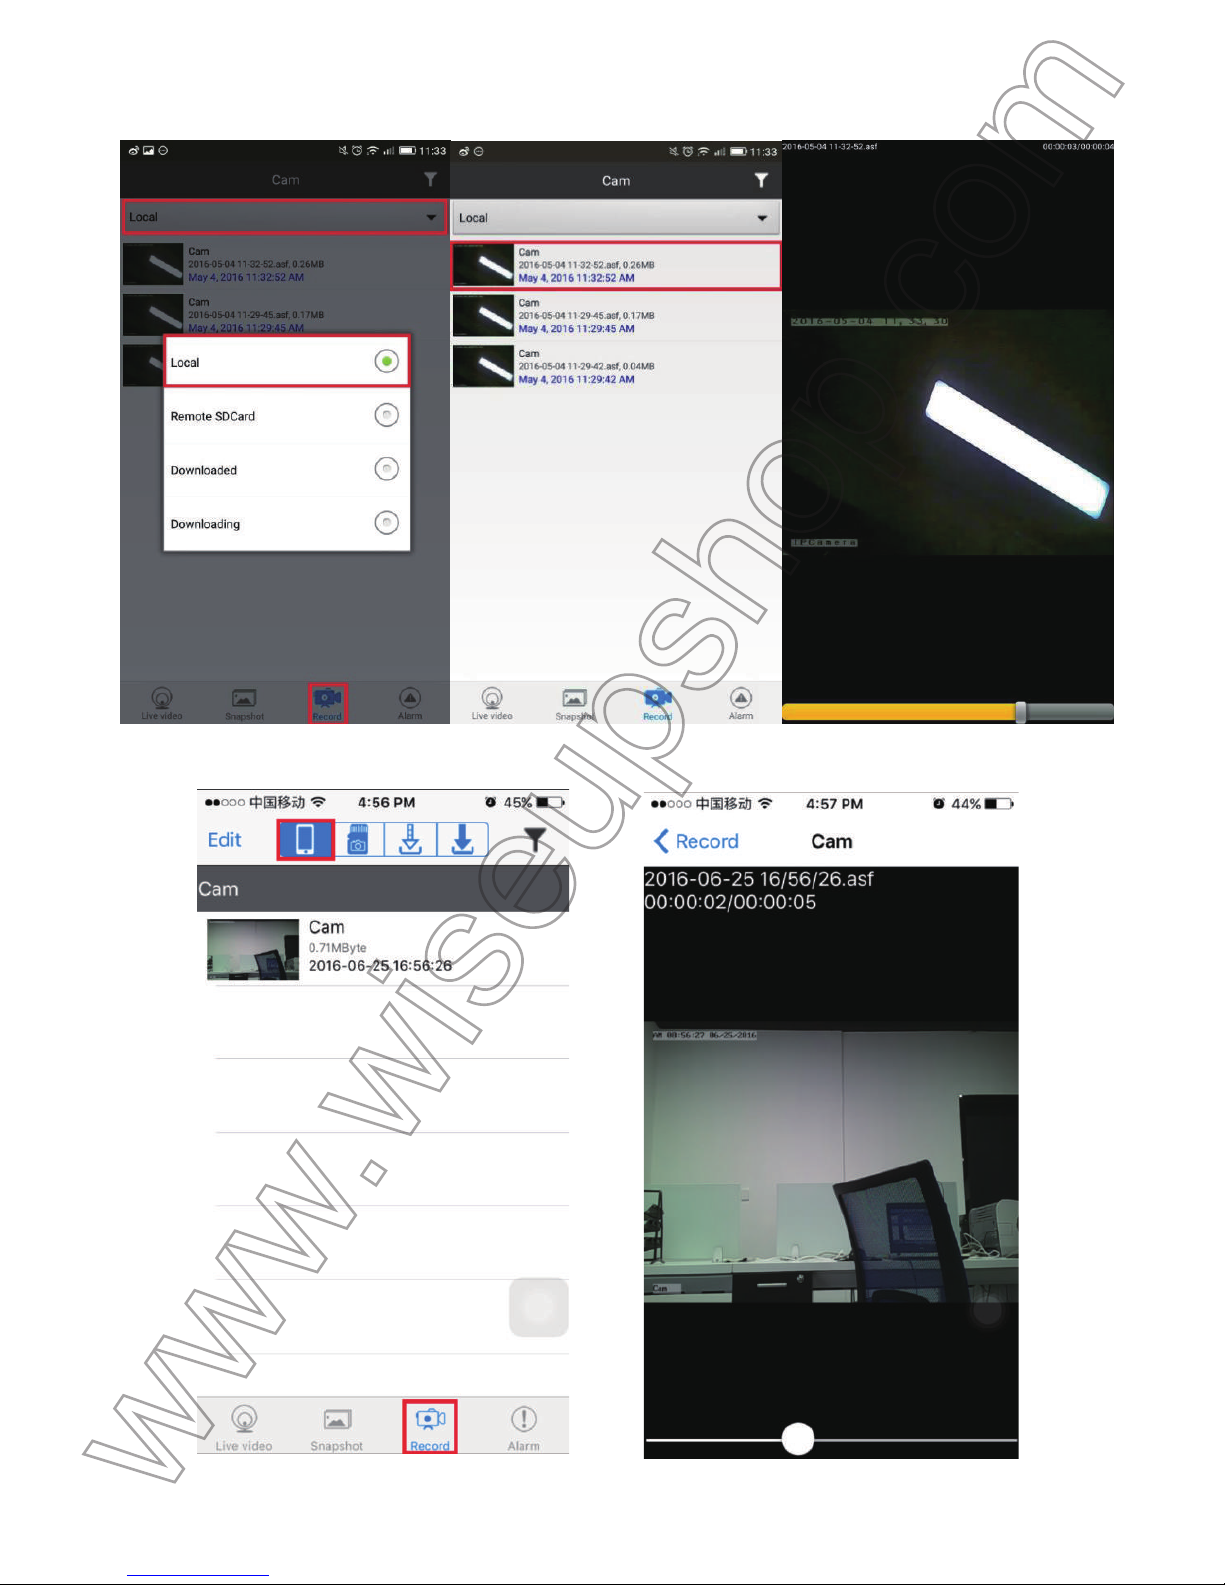
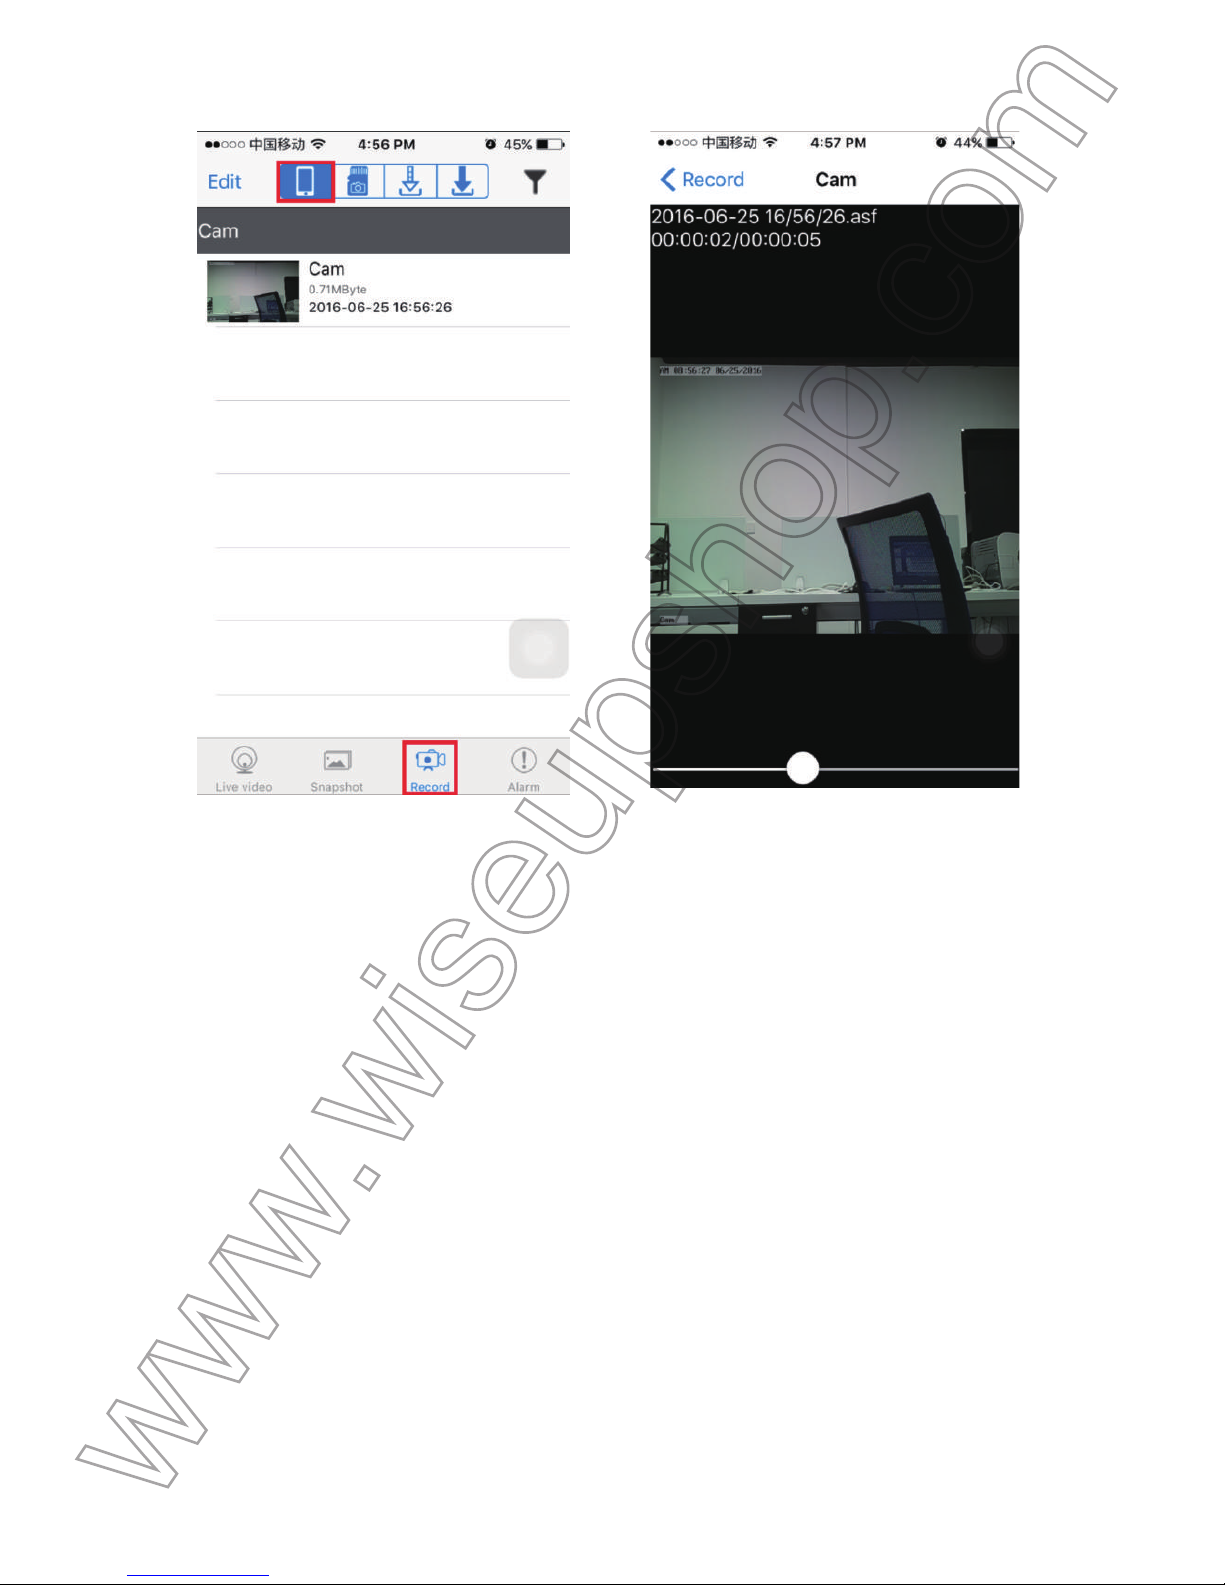
.3. Go back to the camera list, tap Record at the bottom of the screen and choose Local to access
t
he videos files.
Page 18
(Android)
(IOS)
Page 19
[
Note]:
1
). Before recording, make sure that there is enough memory in the smartphone or tablet PC to save the video files.
2
). Video Resolutions: 640P, 720P, 1080P Optional Video Format: ASF
V
I. Record Video to a Remote Micro SD Card
>
> Please make sure the Micro SD card is securely fitted into the SD card slot on your camera.
A
S
DHC Class10 Micro SD card is recommended.
6
.1. Launch the P2PLiveCam APP.
6
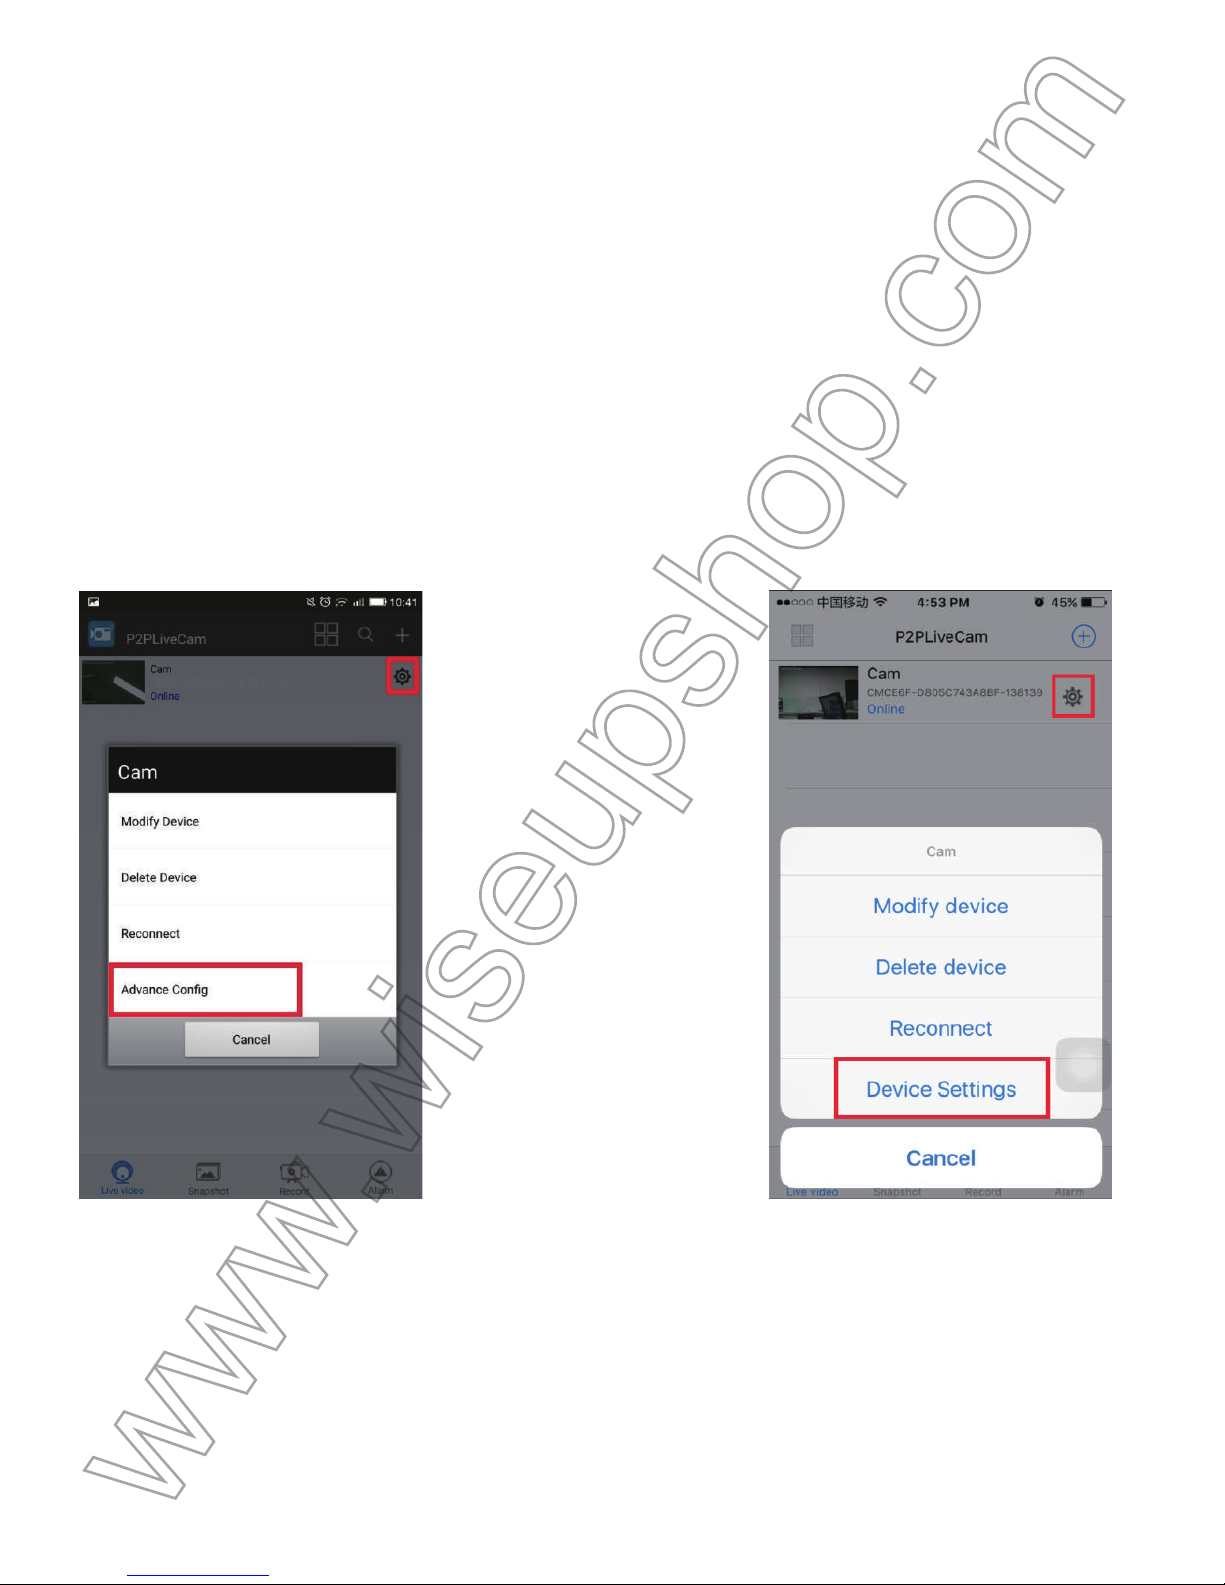
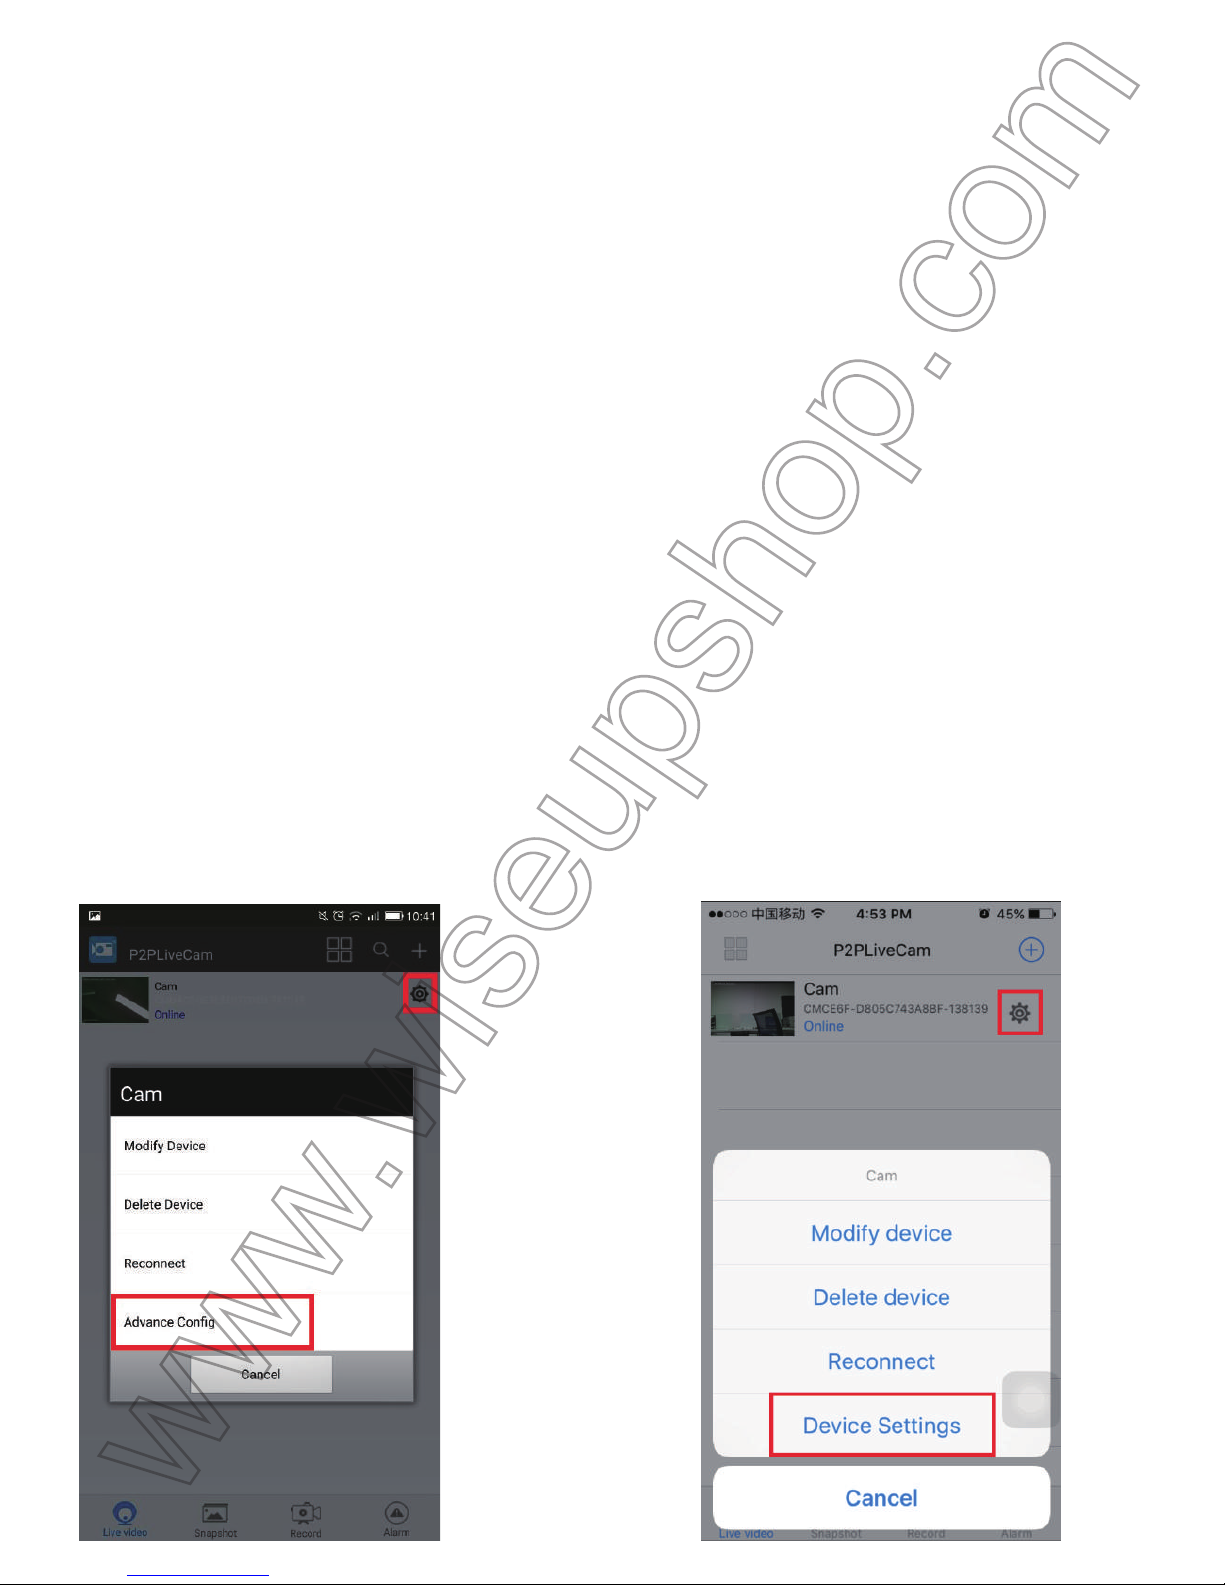
.2. Tap the setting icon > Advance Config or Device Settings.
(Android) (IOS)
6
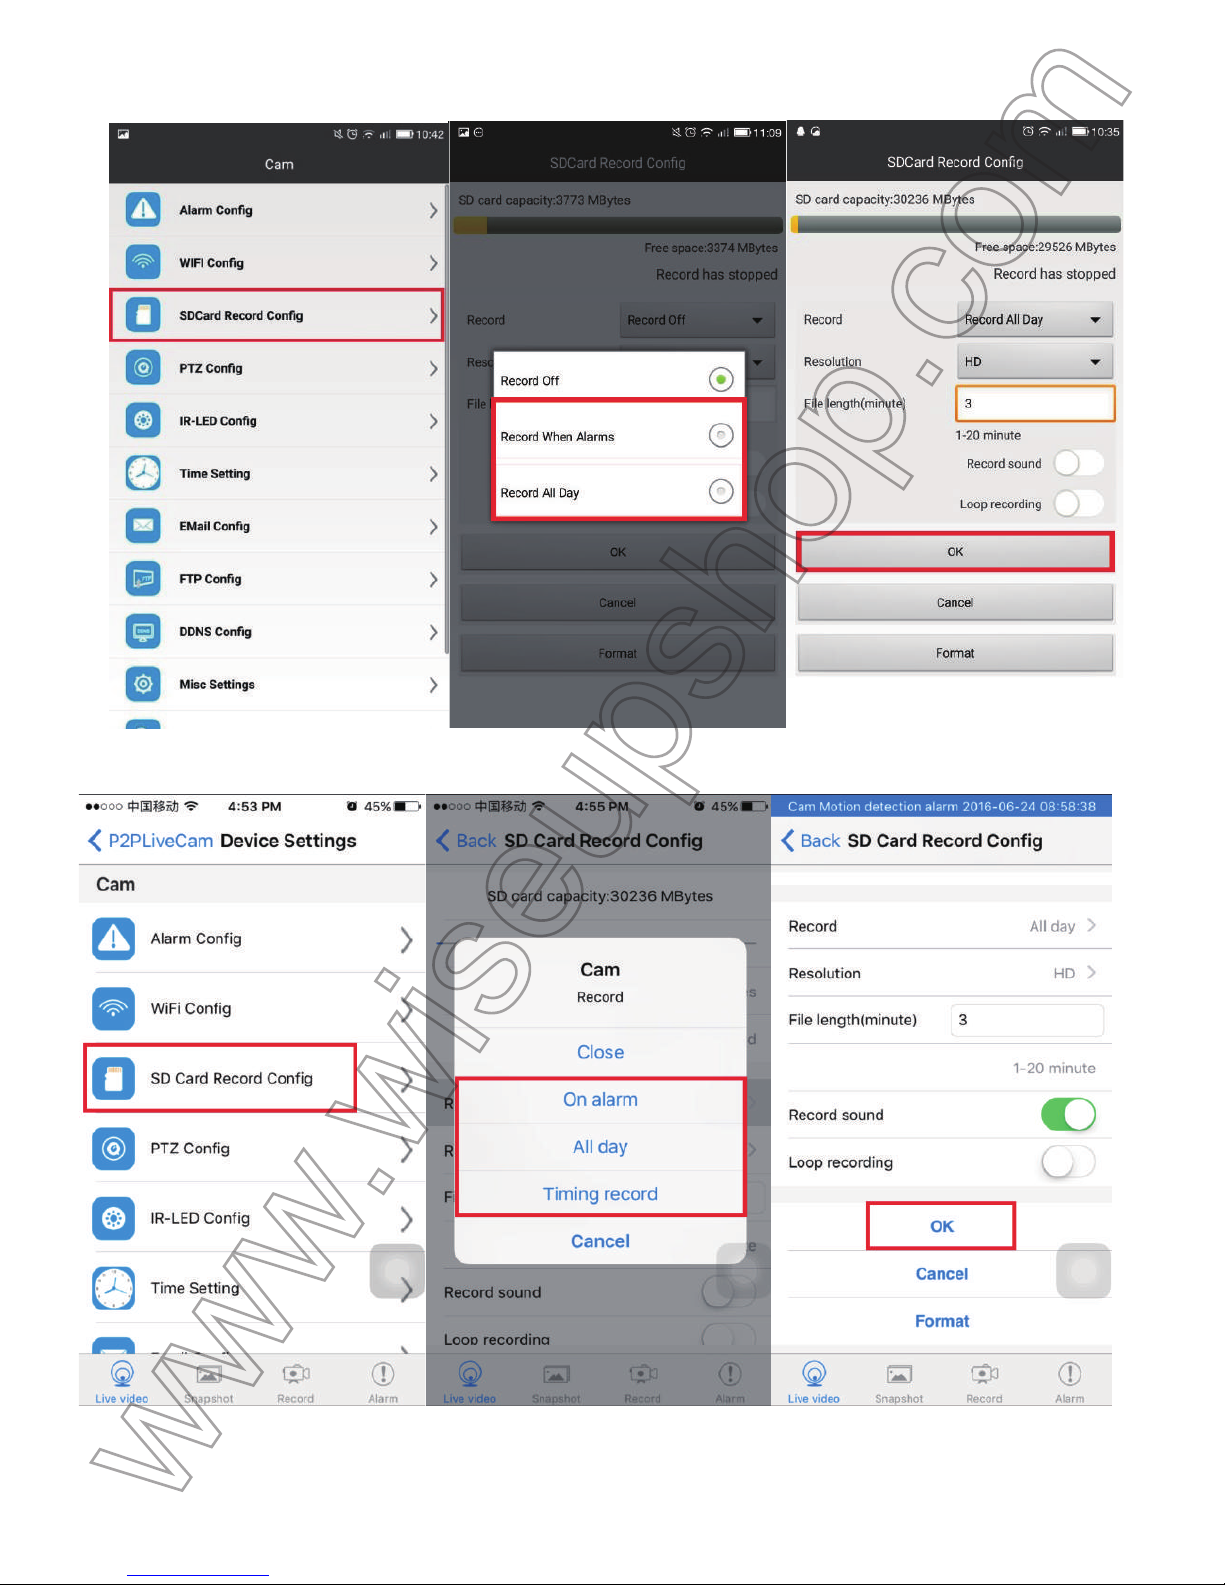
.3. Tap SDCard Record Config, choose a recording mode and set other desired parameters, then
t
ap OK to confirm the setting.
Page 20
(Android)
(IOS)
6
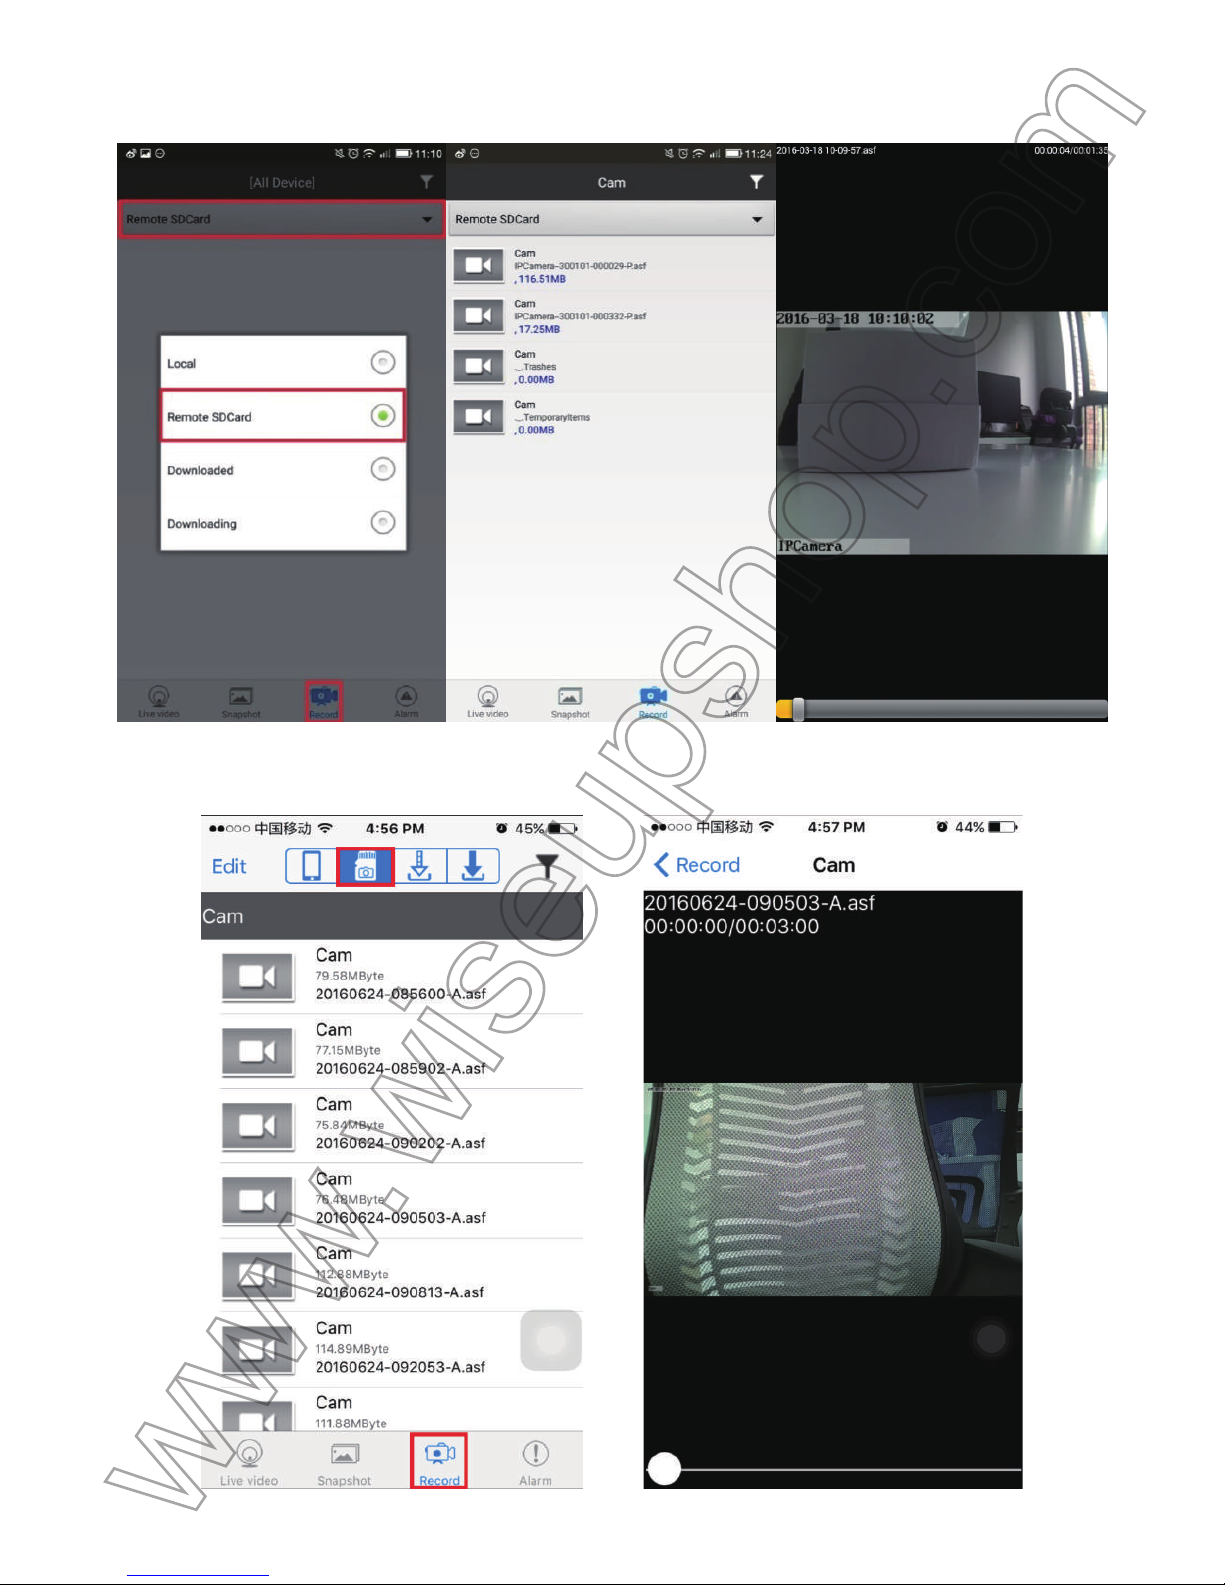
.4. Go back to the camera list page, tap Record at the bottom of the screen and choose Remote S
D
C
ard to check the video files.
Page 21
(Android)
(IOS)
Page 22
[
Note]:
1
). All the video files will be saved in the micro SD card on your camera.
2
). Please format the Micro SD card or make sure there is enough space in the Micro SD card to store the vide
o
f
ootage before video recording.
V
II. Reset
I
f for any reason the camera stops responding or isn’t working properly, a quick reset will restore it
b
ack to normal operation.
O
peration: press the Reset Button for 5 seconds to reset the camera. The indicator lights will go out
.
T
he camera will restart automatically in 15 seconds or so.
V
III. Change the Camera’s Password
>
> Please confirm that the camera is successfully added to your smartphone or tablet PC in the P2P
(
LAN) mode, and that the P2P (LAN) connection works well.
8
.1. In the P2P (LAN) mode, tap the settings icon and select Advance Config or Device Settings.
(Android) (IOS)
Page 23
8
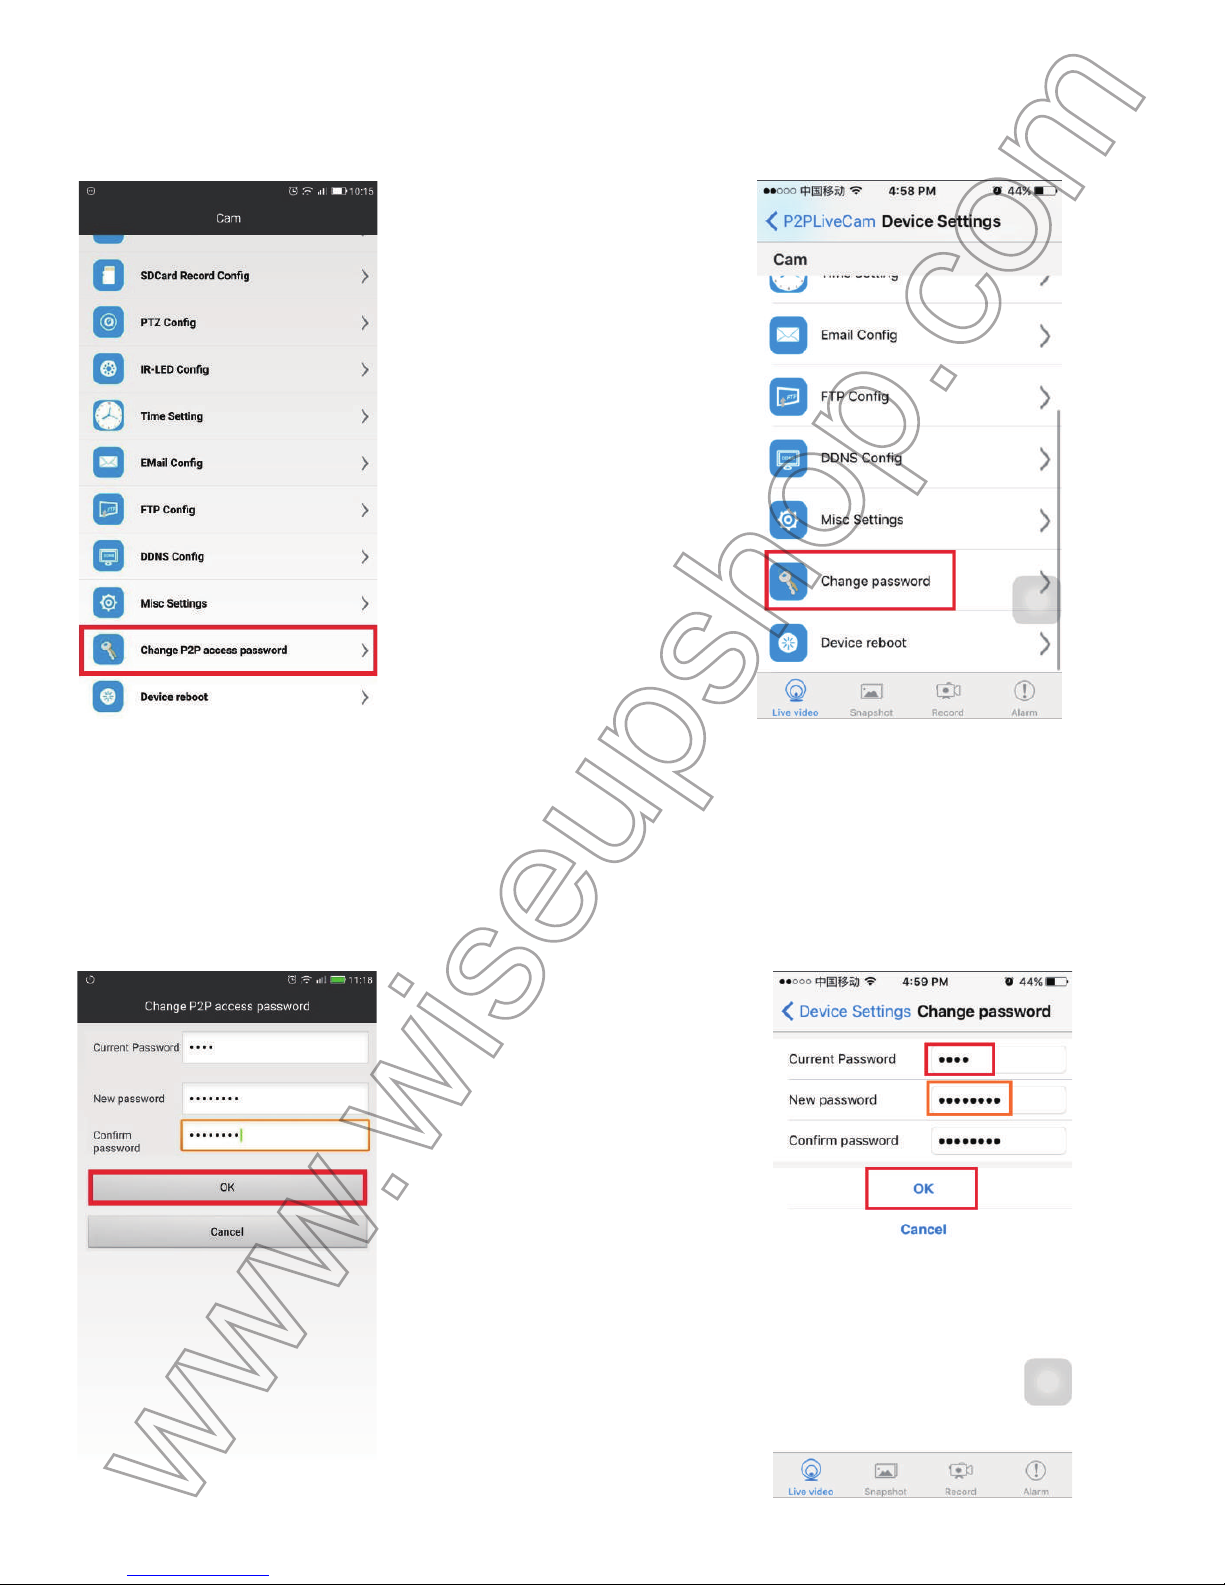
.2. Tap Change P2P access password or Change password.
(Android) (IOS)
8
.3. The user default password is 8888. Input a new password and confirm it. Then tap OK to save th
e
c
hange.
(Android) (IOS)
Page 24
C
heck if the new password works!
1
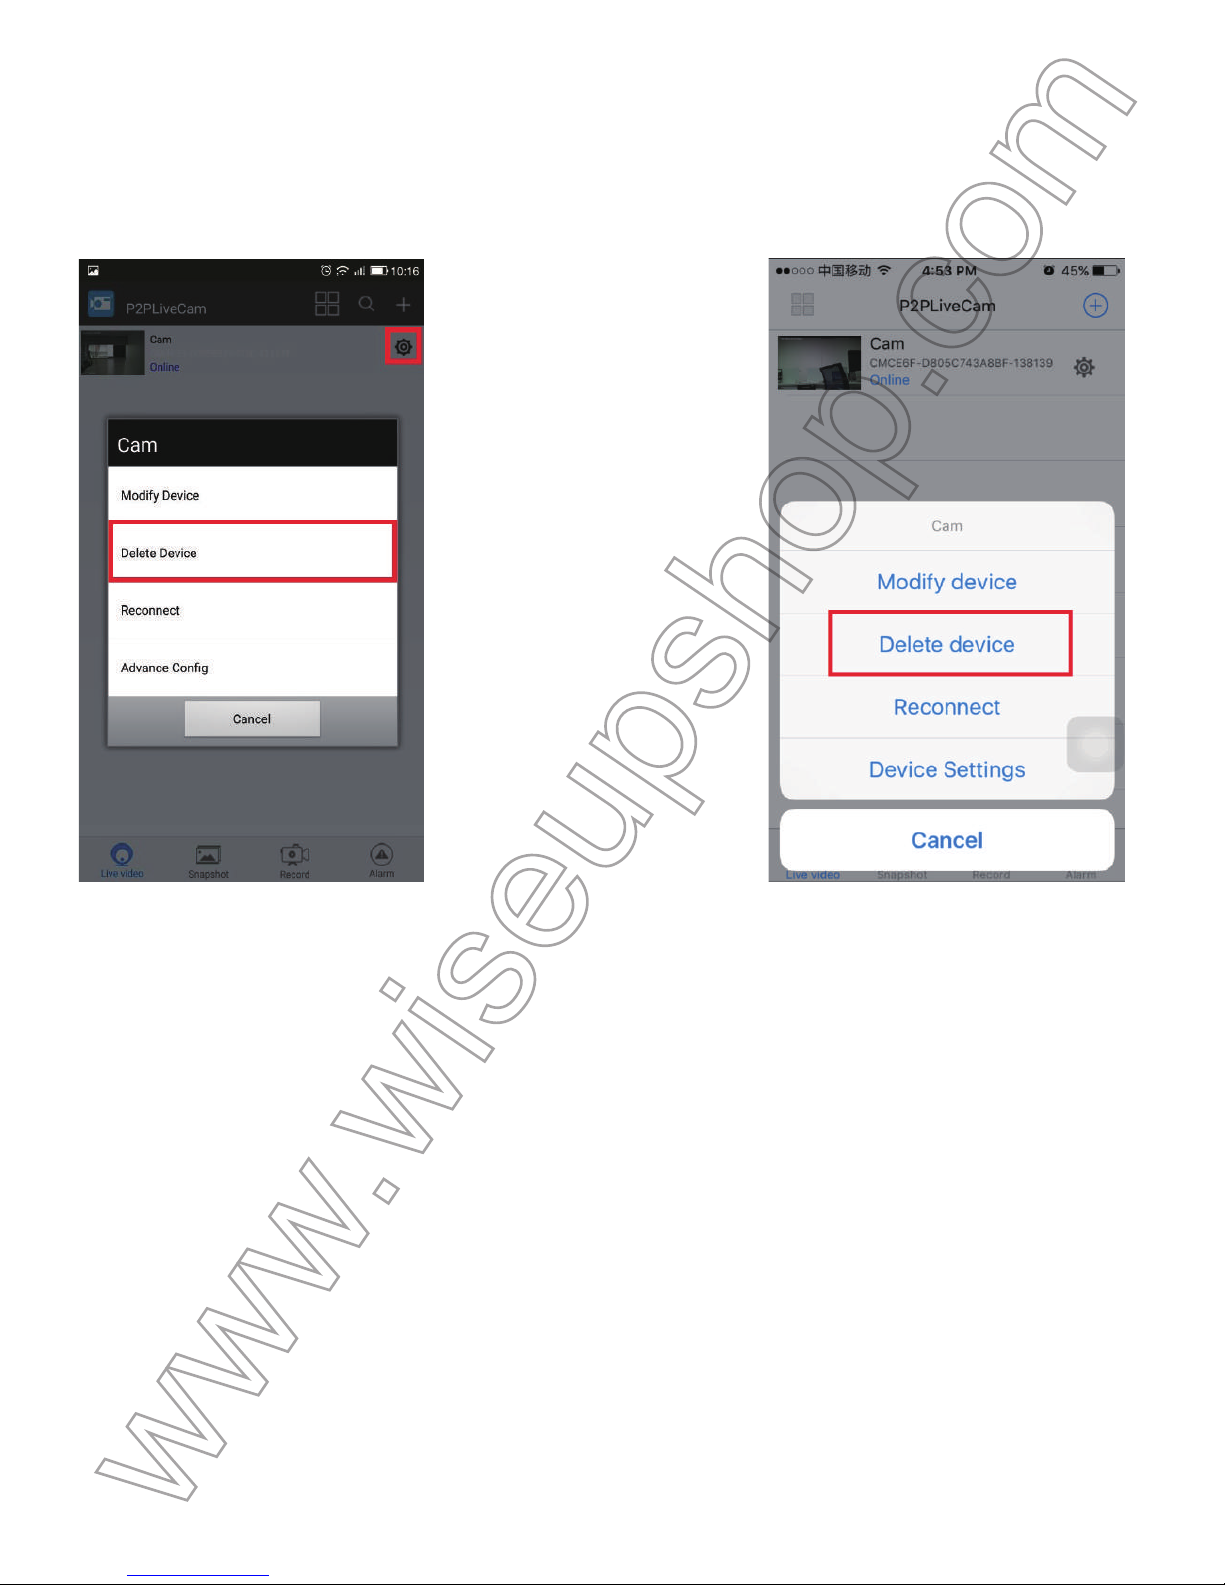
. Go back to the camera list page, tap the setting icon and delete the current camera.
(Android) (IOS)
2
. Exit the APP.
3
. Launch the APP again. Follow 3.2.3 to add the camera. Don’t forget to type the new passwor
d
b
efore tapping OK to add the camera.
Page 25
(Android)
Page 26
(IOS)
6
. If the camera is shown Online, it means the camera is added successfully. If it is shown Wron
g
p
assword, it means you input a wrong password.
Page 27

F
requently Asked Questions
Q
: What kind of memory card can I use in this camera?
A
: You are recommended to use a SDHC Class 10 Micro SD card (4GB-64GB). If a memory card doe
s
n
ot work, remove and format it on a PC computer before trying it in the camera again.
Q
: Why can’t I find the camera’s WIFI signal on my phone or tablet PC?
A
: It may take 1-3 minutes before the camera’s WIFI signal is found on your smartphone or tablet PC
.
I
f the WIFI signal still cannot be found, please refer to VII to reset the camera.
Q
: Why can’t I play back video files or the video files are corrupted?
A
: It is mainly because the camera is powered off inappropriately.
Q
: Why am I having trouble viewing live video remotely?
A
: A minimum bandwidth speed of 1.5Mbps is required to watch HD live video (1280*720P,
1
920*1080P).
Q
: What media player software should I use to play back the video files?
A
: Install the VLC Media player from the CD Disc to play back video files on your PC computer.
Q
: How do I reset my camera back to the way I got it?
A
: Hold down the Reset Button for 5 seconds to reset the camera. (See VII)
Q
: How can I stop strangers from accessing my camera?
A
: Change your camera’s password. (See VIII)
Page 28
WIFI23
Benutzerhandbuch
I
. Produktübersicht
1
. Kamera-Objektiv
2
. Anzeigeleuchte
3
. Reset-Taste
4
. MicroSD-Kartenslot
I
I. Was ist in der Box
-
Mini-CD Disc
-
Kartenleser
-
WIFI AC Adapter Kamera
I
II. Netzwerkeinrichtung
3
.1. Installieren Sie die P2PLiveCam APP
S
uchen Sie nach der P2PLiveCam APP im Google Play Store oder Apple Store und installieren es au
f
I
hrem Smartphone oder Tablet-PC.
Page 29
(Android) (IOS)
3
.2. P2P oder LAN-Modus Setup
3
.2.1. Schalten Sie die Kamera, indem sie in eine Steckdose Steckdose anschließen.
[
Hinweis]:
1
). Die Anzeigelampe für 5 Sekunden leuchtet blau auf und erlöschen. 30 Sekunden später blinkt die LED rot un
d
b
lau langsam, was auf die Kamera in das P2P (LAN) Modus eingegeben hat.
2
). Ziehen Sie die Kamera, um diese auszuschalten.
3
.2.2. Gehen Sie auf die WiFi oder WLAN-Einstellungen Seite auf Ihrem Smartphone oder Tablet-PC
,
s
chließen Sie das Gerät mit dem WiFi-Signal der Kamera. Die Wi-Fi-Netzwerk-Kamera SSID beginn
t
m
it CM ******** und es wird, wie unten auf dem WIFI oder WLAN-Einstellungen Seite erscheinen:
Page 30
(Android) (IOS)
[
Hinweis]:
1
). Es dauert 1-3 Minuten vor dem WiFi-Signal der Kamera von Ihrem Smartphone oder Tablet-PC zu finden ist.
2
). Wenn die WiFi-Signal der Kamera kann nicht auf Ihrem Smartphone oder Tablet-PC zu finden, stellen Sie bitte
d
ie Kamera (siehe VII) und es dann erneut versuchen.
3
.2.3. Starten Sie die P2PLiveCam APP. Tippen Sie auf die + > Hinzufügen Online-Gerät (Kamera)>
S
uchen (PAN)> das Kamerasymbol > OK.
Page 31
(Android)
Page 32
(IOS)
3
.2.4. Die Kamera ist erfolgreich hinzugefügt, wenn Sie es sehen Online ist. Tippen Sie auf da
s
K
amera-Symbol, um Live-Videos im P2P (LAN) Modus zu sehen.
Page 33
(Android)
(IOS)
Page 34
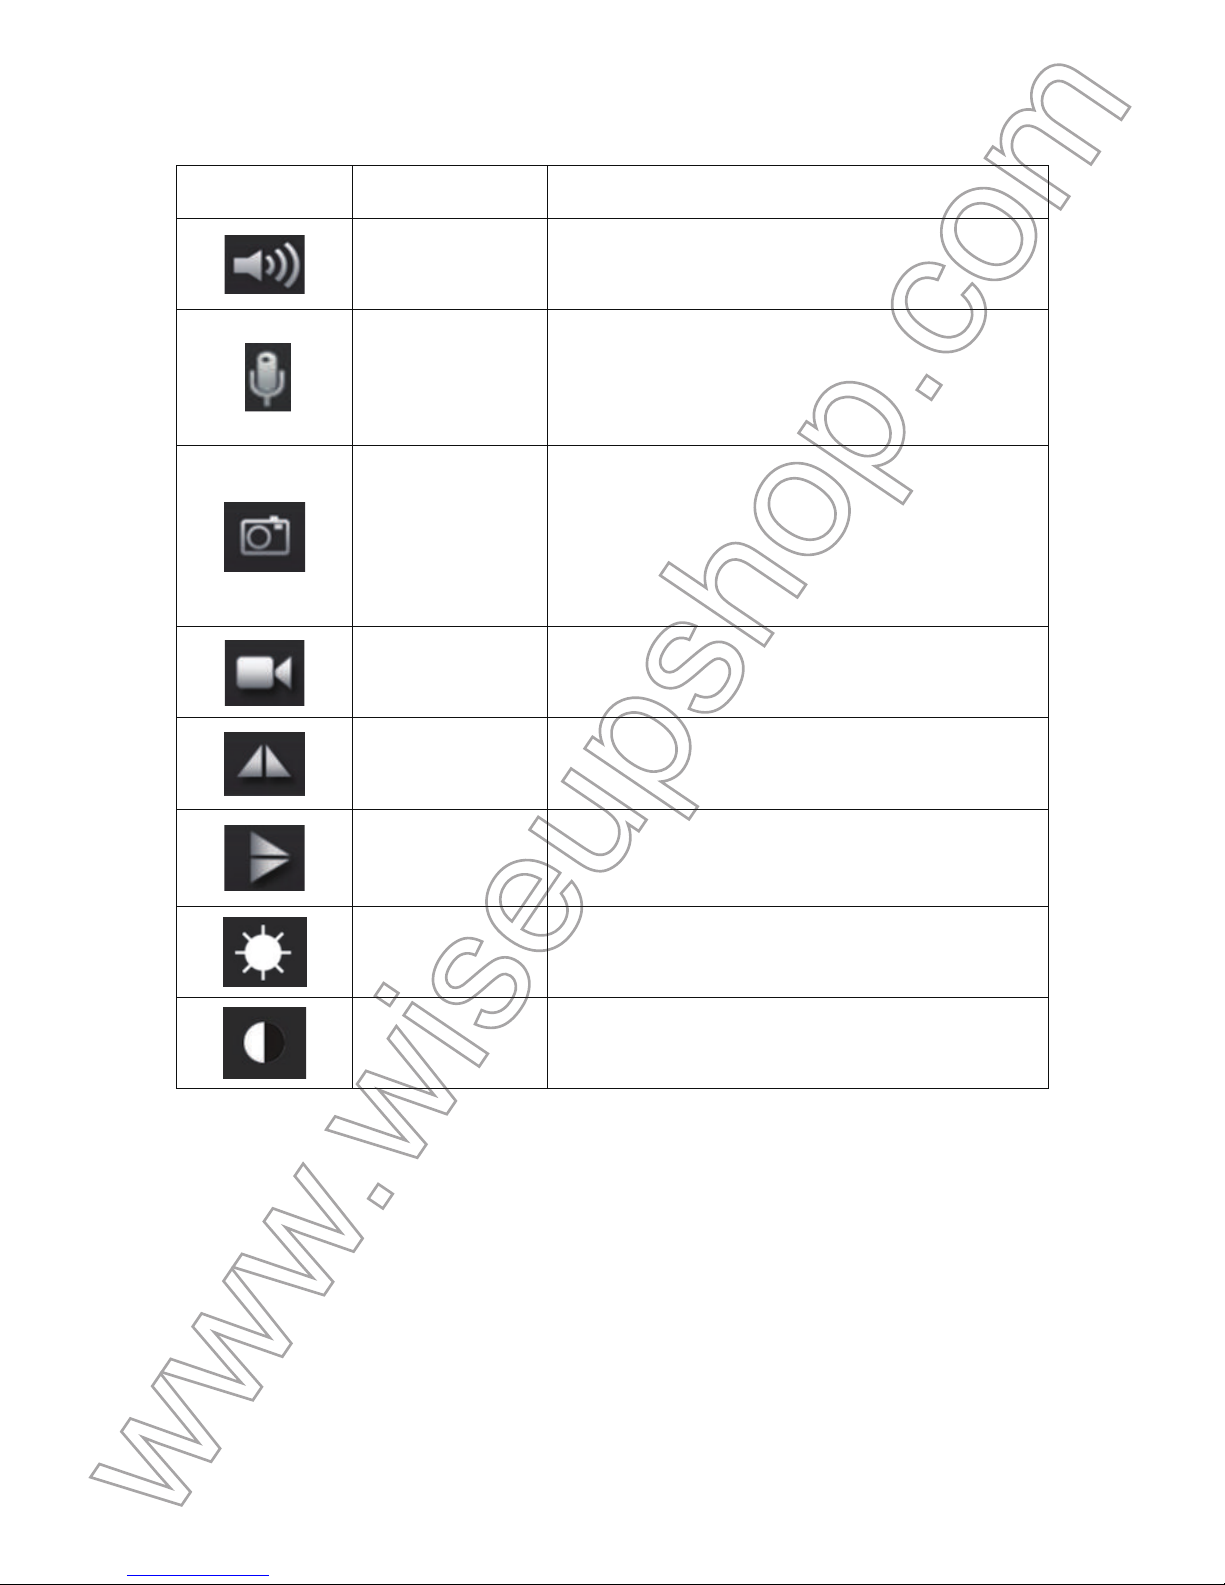
[Hinweis]:
Siehe Tabelle unten für eine Erklärung der verschiedenen Funktionen zur Verfügung:
Taste Funktionsname Bedienungsanleitung
Audio
Tippen Sie auf diese Schaltfläche zu aktivieren
oder die Live-Audio-Ausgang deaktivieren.
Mikrofon
Tippen Sie Audio und Mikrofon zur
Aufzeichnung des Tons während der
Remote-Video-Aufnahme-Prozess.
Schnappschuss
Tippen Sie auf diese Schaltfläche, um einen
Screenshot des Live-Videos zu nehmen. Die
Bilder werden in Ihrem Smartphone oder
Tablet-PC gespeichert werden.
Remote-Videoa
ufzeichnung
Tippen Sie auf diese Taste zum Starten oder
Remote-Video-Aufnahme zu stoppen.
Horizontal
Spiegel
Tippen Sie auf diese Schaltfläche, um Flip
Live-Videos Bild horizontal.
Vertikal Spiegel
Tippen Sie auf diese Taste, um die
Live-Videos vertikal Bild zu kippen.
Helligkeit
Tippen Sie auf diese Schaltfläche, um die
Live-Video-Helligkeit einzustellen.
Kontrast
Tippen Sie auf diese Taste, um das
Live-Video-Kontrastverhältnis einzustellen.
3.3. WAN-Modus oder im Remote View-Setup
>> Vor der WAN-Konfiguration, bestätigen Sie bitte, dass die Kamera erfolgreich auf dem Smartphone
oder Tablet-PC hinzugefügt wird, und dass das P2P (LAN) Verbindung zwischen der Kamera und dem
Smartphone oder Tablet-PC funktioniert gut.
3.3.1. Starten Sie die P2PLiveCam APP.
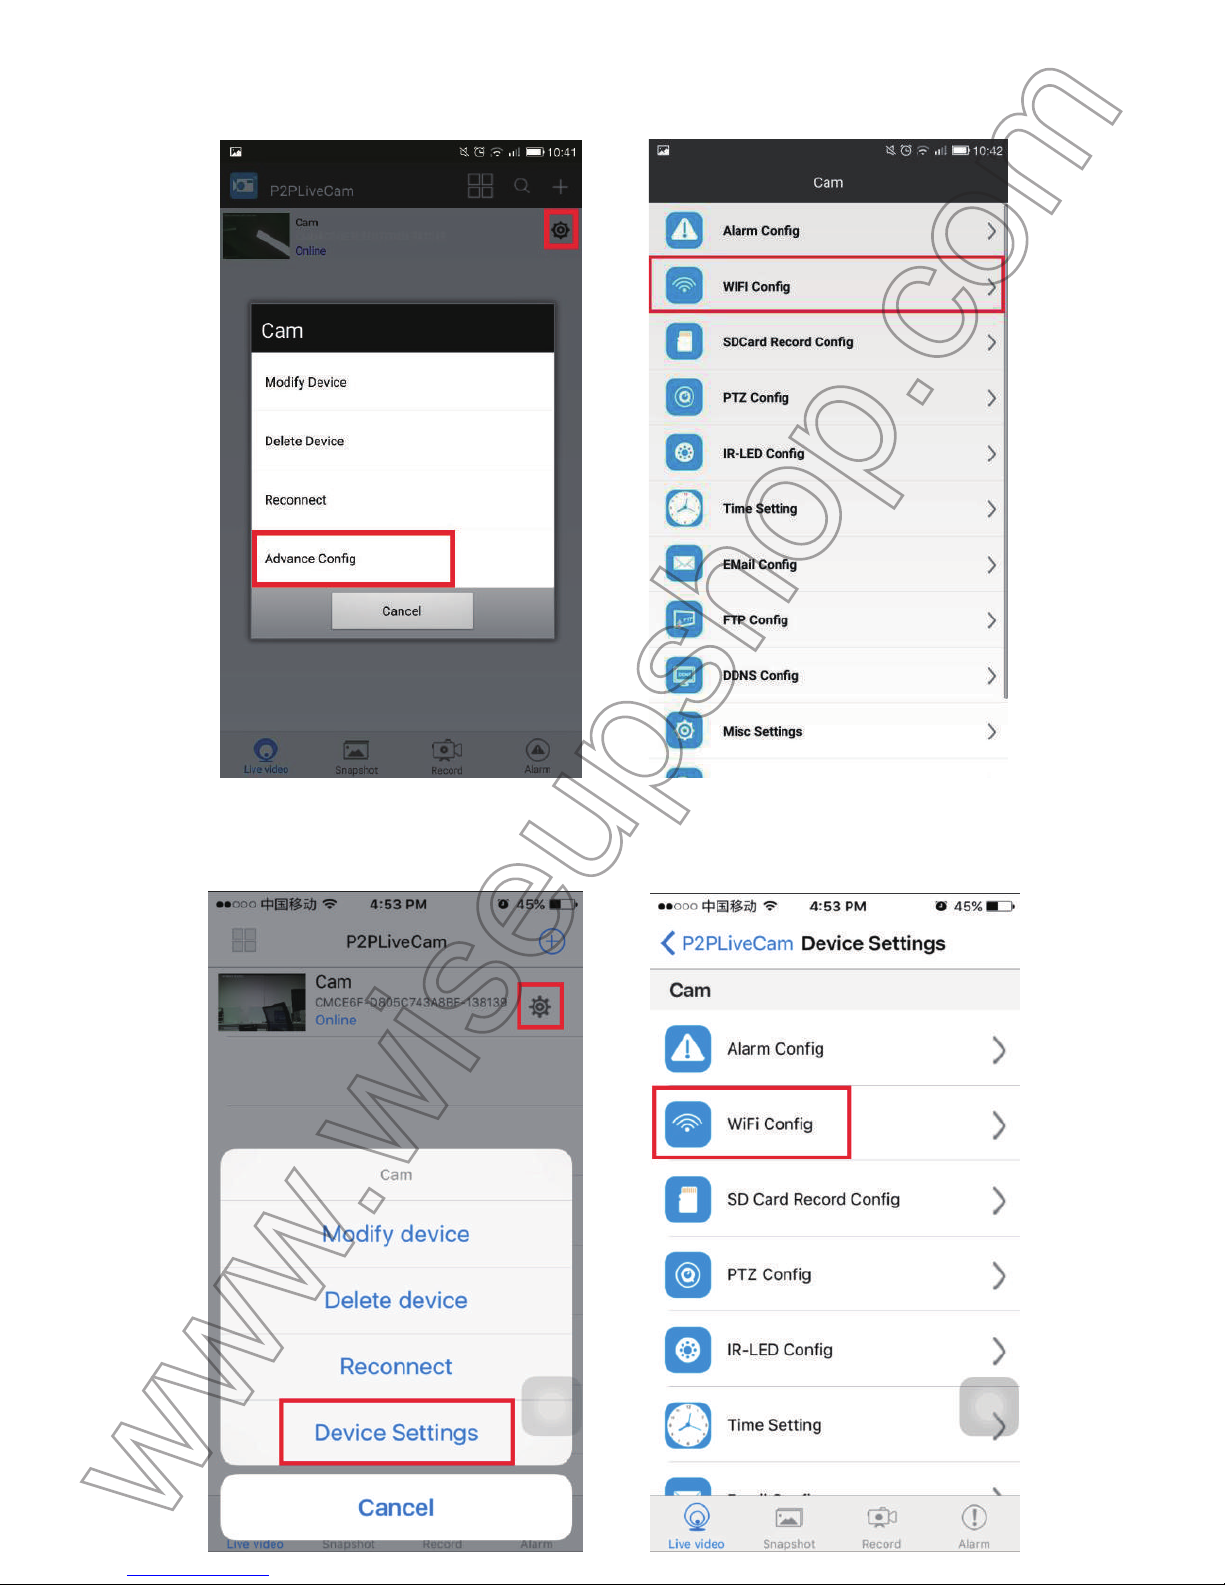
3.3.2. Im P2P (LAN) Modus, tippen Sie auf das Symbol Einstellung > Erweiterte Konfig oder
Geräteeinstellungen > WIFI Config.
Page 35
(Android)
(IOS)
Page 36
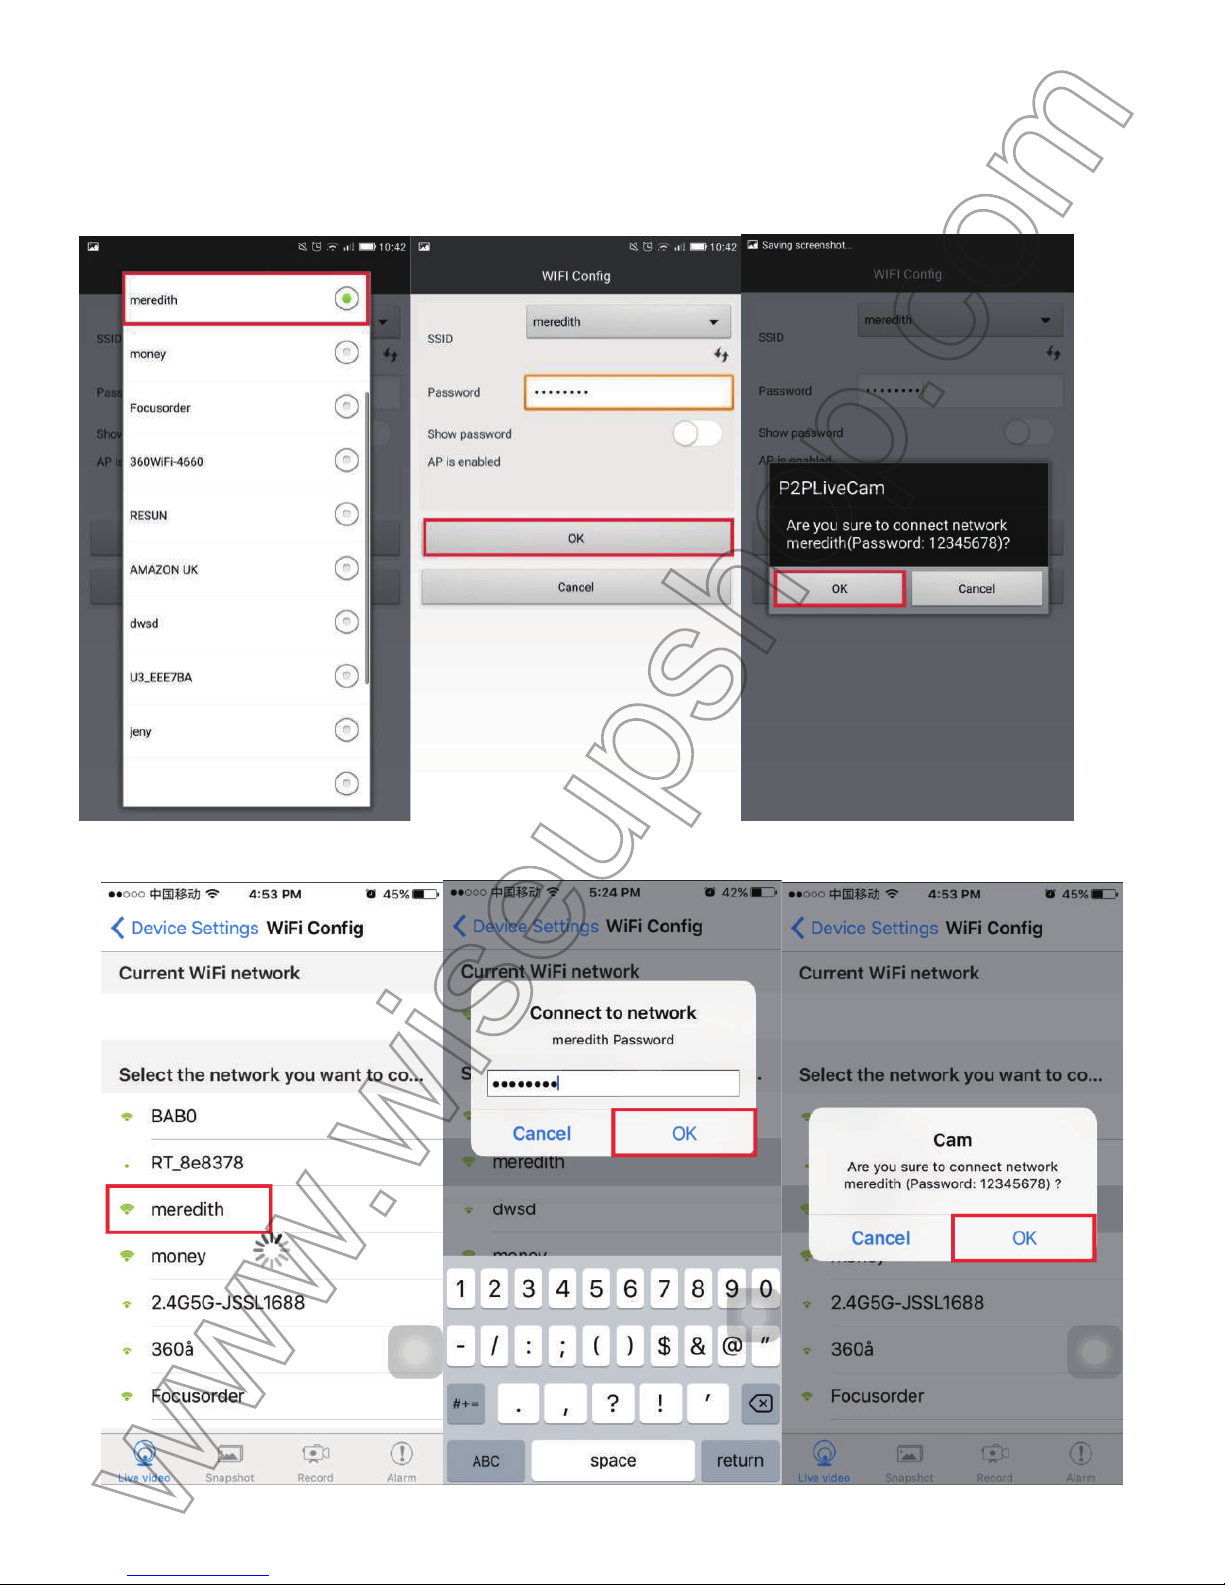
3
.3.3. Melden Sie die Kamera in einem WiFi-Netzwerk gewünscht und tippen Sie auf OK um di
e
K
onfiguration zu bestätigen.
(Android)
(IOS)
P
rüfen Sie, ob der WAN-Modus oder Fernansicht Setup-Arbeiten!
Page 37
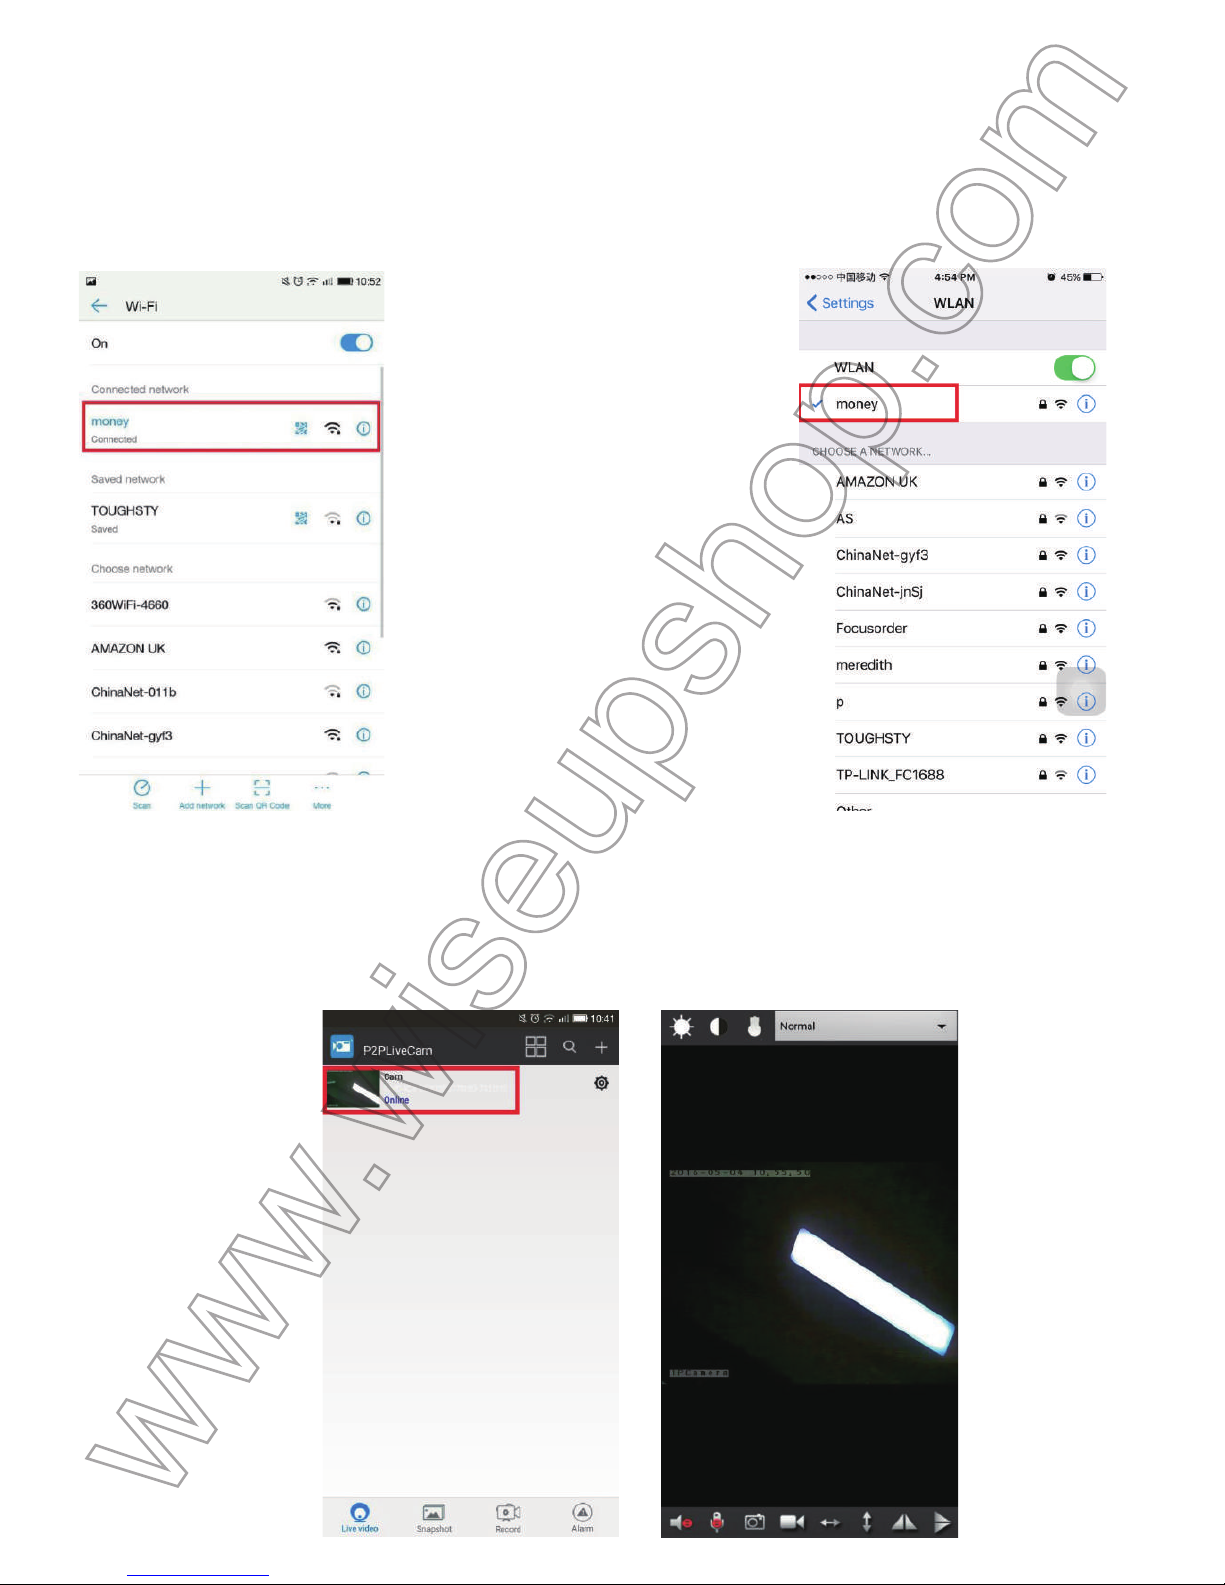
2
. Gehen Sie auf die WiFi oder WLAN-Einstellungen Seite auf Ihrem Smartphone oder Tablet-PC
,
v
erbinden sie zu einem anderen WLAN-Signal, das von der aktuellen verschieden sein müssen, ode
r
S
ie können Ihr Mobilnetz nutzen.
(Android) (IOS)
3
. Starten Sie erneut die P2PLiveCam APP. Wenn Sie die Kamera Online zu sehen, bedeutet dies
,
d
ass die Remote-Ansicht (WAN) Einstellung erfolgreich ist.
(Android)
Page 38
(IOS)
I
V. Motion Detection-Setup
>
> Bitte stellen Sie sicher, eine Micro-SD-Karte sicher in den SD-Kartensteckplatz an der Kamer
a
a
ngebracht ist. Eine SDHC Class 10 Micro-SD-Karte wird empfohlen.
4
.1. Im WAN oder LAN-Modus, starten Sie die P2PLiveCam APP.
4
.2. Tippen Sie auf die Einstellung Symbol > Erweitert Config oder Geräteeinstellungen > Alarm
C
onfig.
Page 39
(Android)
(IOS)
4
.3. Aktivieren Sie die Bewegungserkennung und dann auf OK, um die Einstellung zu bestätigen. Die
K
amera nimmt ein Bild automatisch, wenn eine Bewegung erkannt wird.
Page 40
(Android)
(IOS)
4
.4. Gehen Sie zurück in die Kameraliste Seite, tippen Alarm am unteren Rand des Bildschirms, u
m
d
ie Fotos zu überprüfen.
Page 41
(Android) (IOS)
4
.5. Gehen Sie auf die Advance-Config oder Geräteeinstellungen Seite und wählen Sie SD-Kart
e
N
ehmen Sie Config. Wählen Sie Nehmen Wenn Alarme oder auf Alarm und stellen Sie andere
n
g
ewünschten Parameter. Dann tippen Sie auf OK um die Einstellung zu bestätigen. Die Kamera wird
d
ie Aufnahme von Video automatisch gestartet, wenn eine Bewegung erkannt wird.
(Android)
Page 42
(IOS)
4
.6. Gehen Sie zurück in die Kameraliste Seite, tippen Sie auf am unteren Rand des Bildschirms un
d
w
ählen Sie Karte Fern SD Bewegungserkennung Video-Dateien zu überprüfen.
[
Hinweis]:
Alle Videodateien werden in der Mikro-SD-Karte auf der Kamera gespeichert werden.
(Android)
Page 43
(IOS)
V
. Nimm ein Video auf Ihrem Smartphone oder Tablet-PC
5
.1. Im LAN oder WAN-Modus, starten Sie die P2PLiveCam APP. Tippen Sie auf das Kamera-Symbo
l,
u
m das Live-Videobild.
5
.2. Tippen Sie auf die Remote-Video-Aufnahmetaste zum Starten oder Stoppen der
V
ideoaufnahme.
[
Hinweis]:
Alle Videodateien werden im Flash-Speicher oder erweitert Micro-SD-Karte von Ihrem Smartphone
o
der Tablet-PC gespeichert warden.
Page 44
(Android) (IOS)
5
.3. Gehen Sie zurück in die Kameraliste , tippen Sie auf am unteren Rand des Bildschirms und
w
ählen Sie Lokale, die Videos auf Dateien zuzugreifen.
(Android)
Page 45
(IOS)
[
Hinweis]:
1
). Vor der Aufnahme, stellen Sie sicher, dass es auf dem Smartphone oder Tablet-PC genügend Speicher ist die
V
ideo-Dateien zu speichern.
2
). Videoauflösungen: 640P, 720P, 1080P Optional Video Format: ASF
V
I. Nimm ein Video zu einem Remote-Micro-SD-Karte
>
> Bitte stellen Sie sicher, dass die Micro-SD-Karte sicher in den SD-Kartensteckplatz an der Kamer
a
a
ngebracht ist. Eine SDHC Class 10 Micro-SD-Karte wird empfohlen.
6
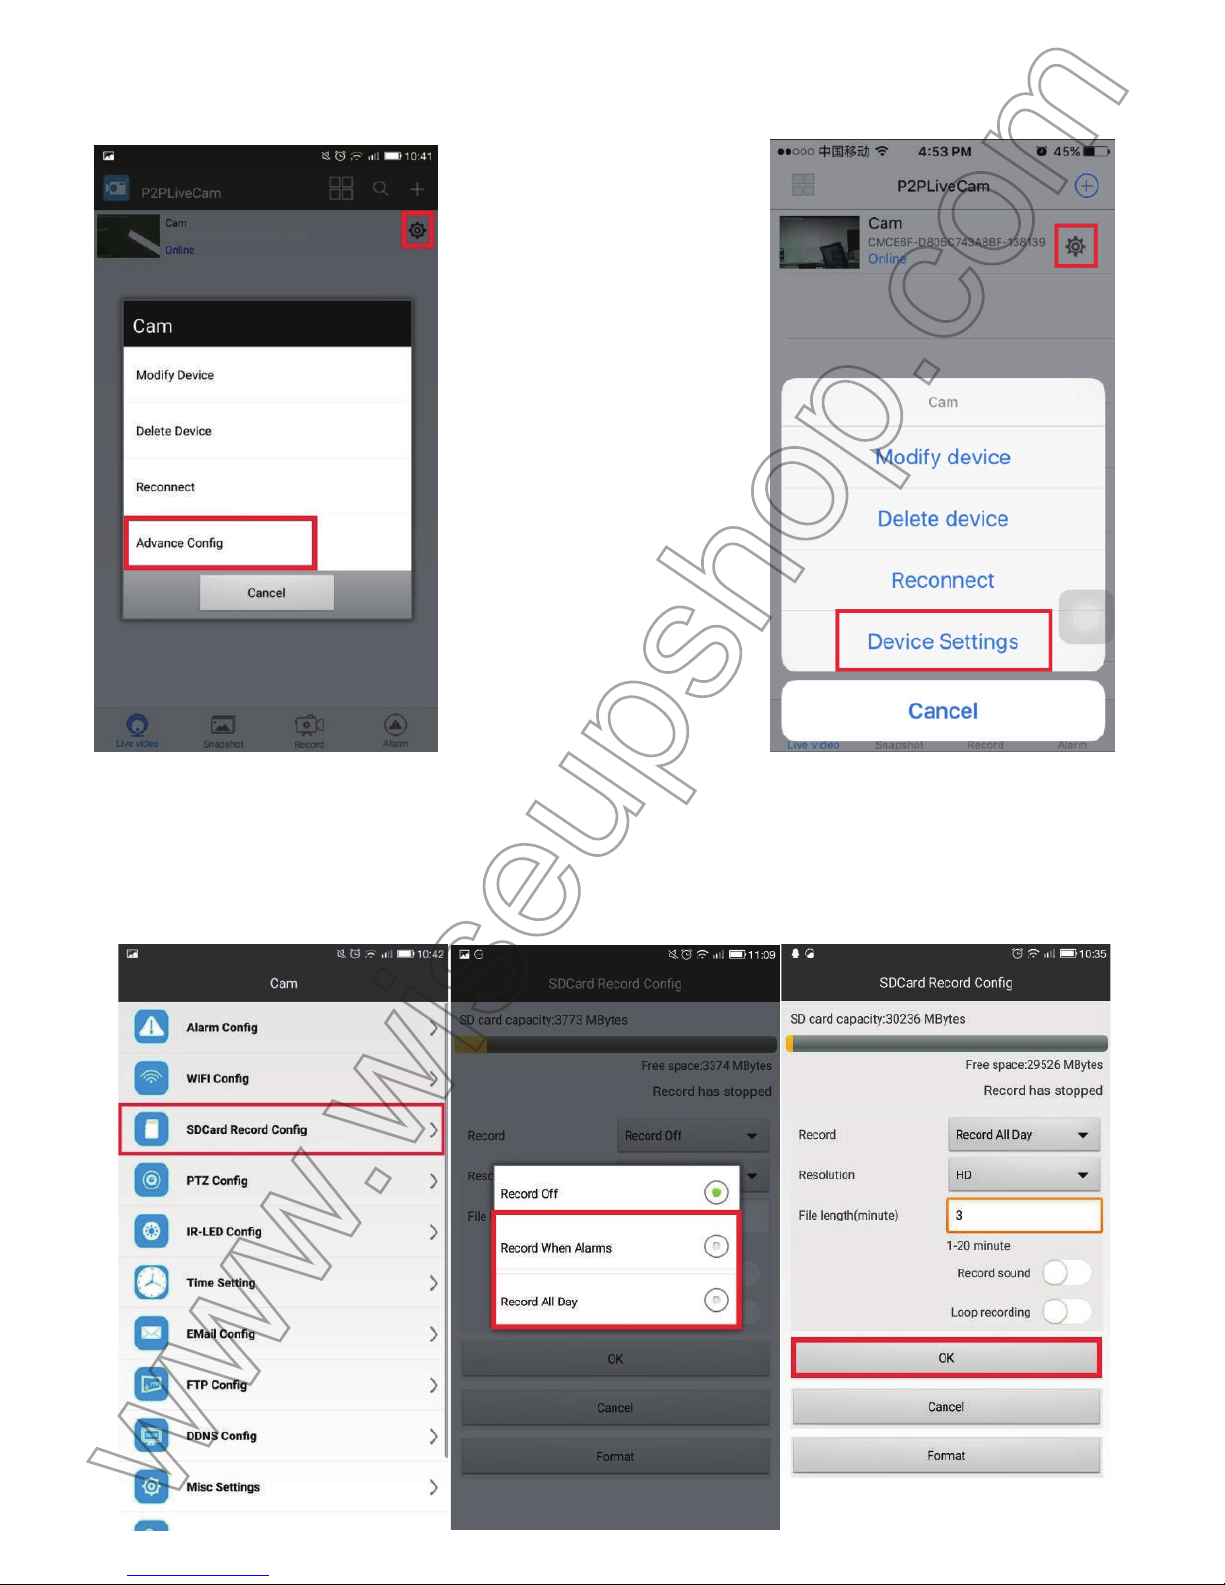
.1. Starten Sie die P2PLiveCam APP.
6
.2. Tippen Sie auf die Einstellung Symbol > Erweiterte Konfig oder Geräteeinstellungen.
Page 46
(Android) (IOS)
6
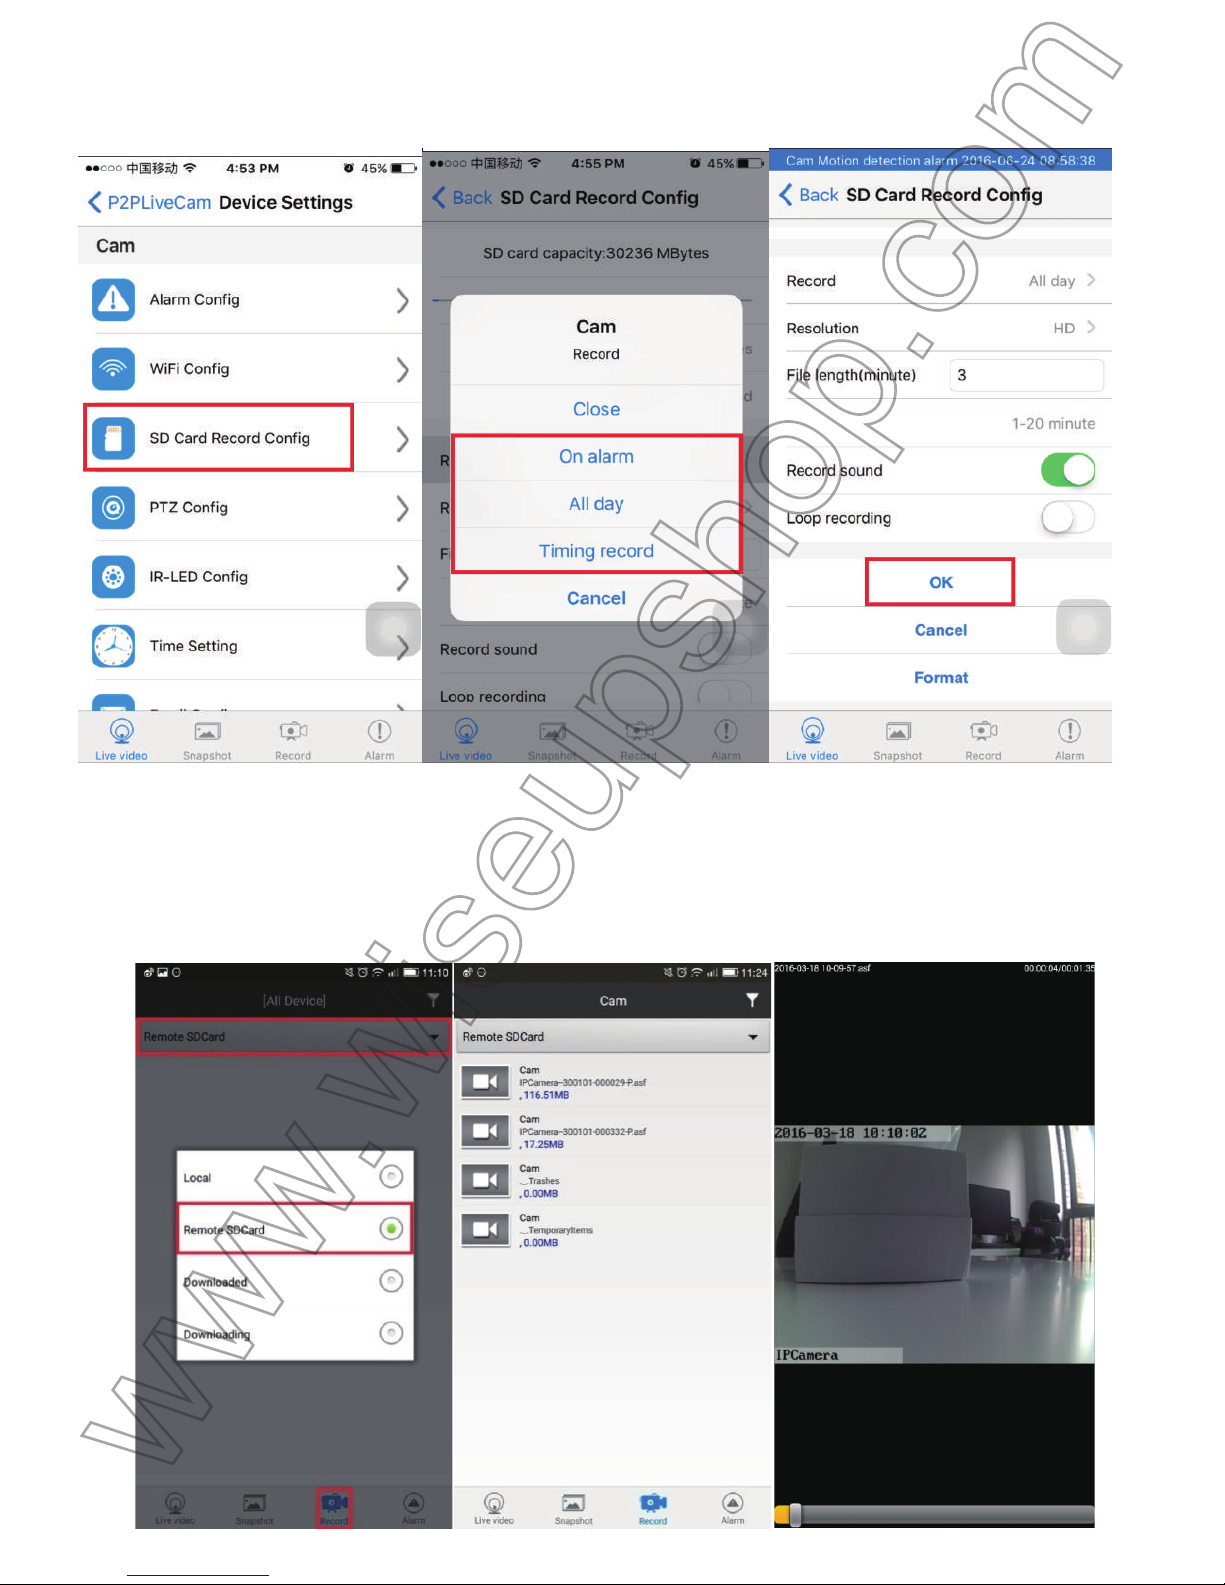
.3. Tippen Sie SD-Karte aufnehmen Config, wählen Sie einen Aufnahmemodus und stellen Si
e
a
nderen gewünschten Parameter, und tippen Sie auf OK, um die Einstellung zu bestätigen.
(Android)
Page 47
(IOS)
6
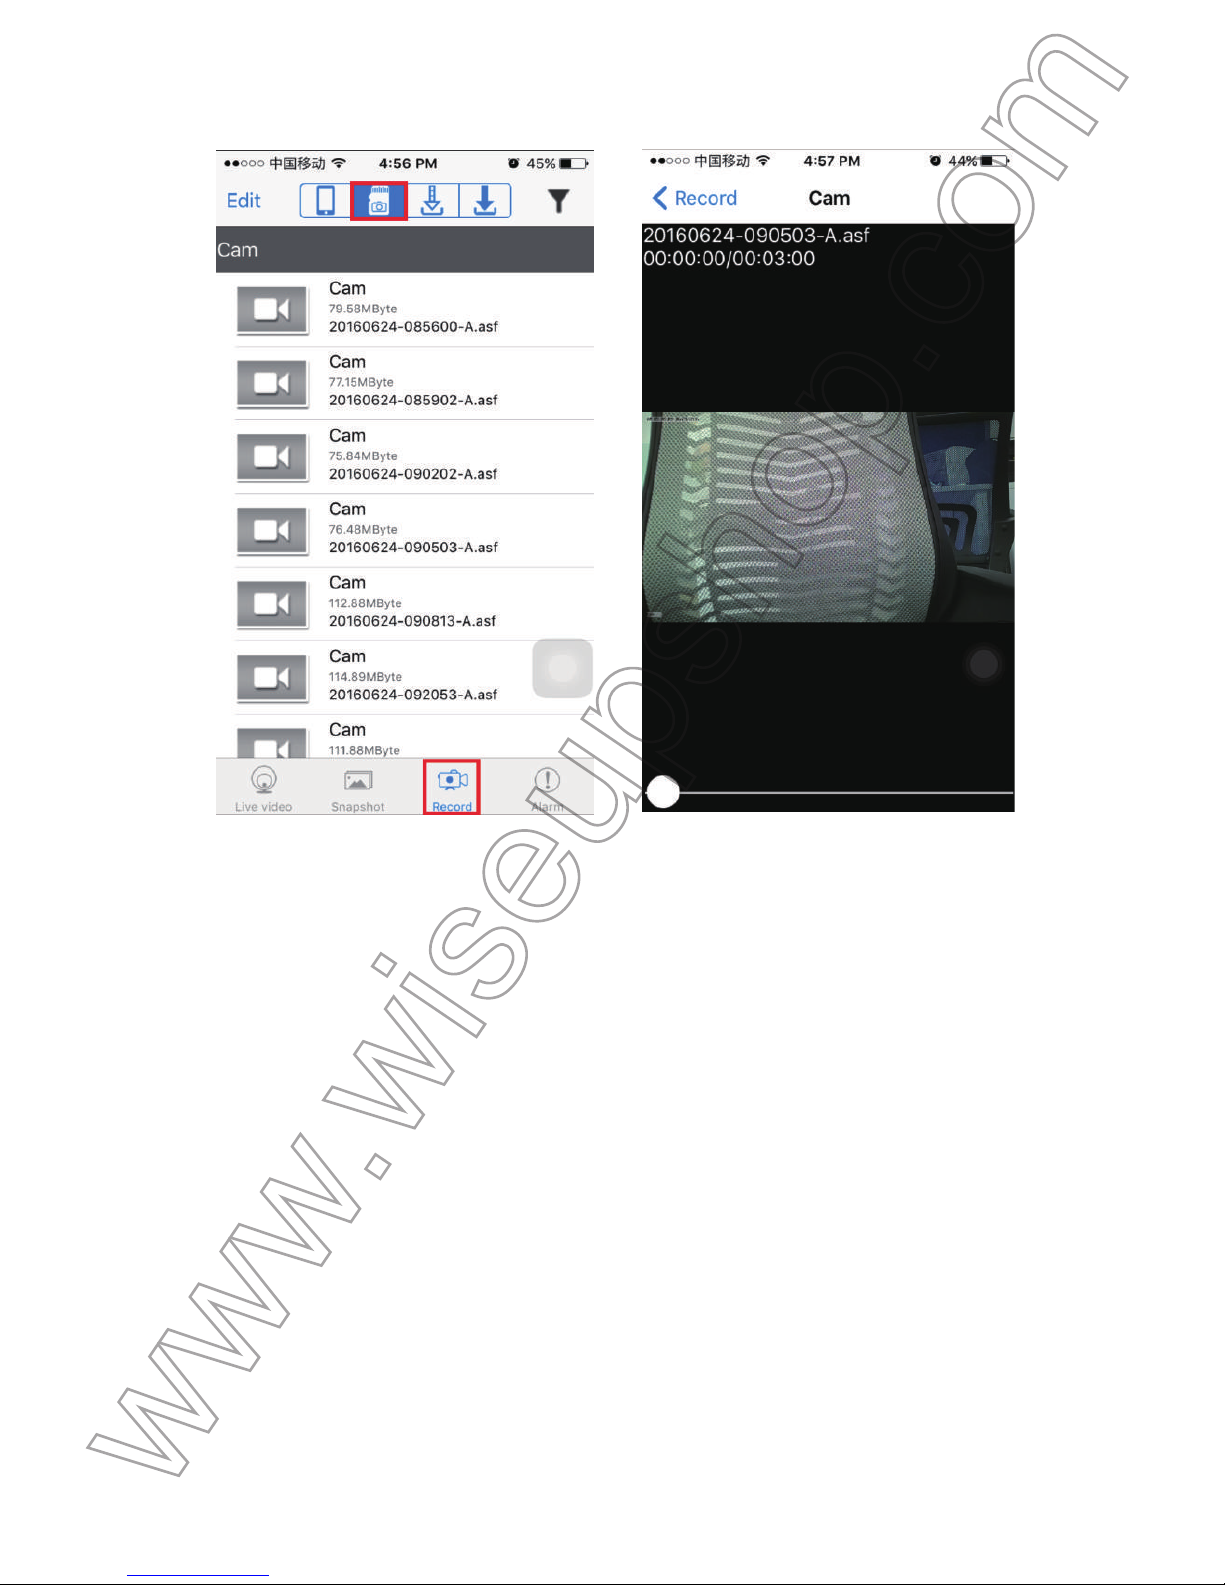
.4. Gehen Sie zurück in die Kameraliste Seite, tippen Sie auf am unteren Rand des Bildschirms un
d
w
ählen Sie Remote-SD-Karte, um die Video-Dateien zu überprüfen.
(Android)
Page 48
(IOS)
[
Hinweis]:
1
). Alle Videodateien werden in der Mikro-SD-Karte auf der Kamera gespeichert werden.
2
). Formatieren Sie die Micro SD-Karte oder stellen Sie sicher, es in der Micro-SD-Karte genügend Platz ist da
s
V
ideomaterial vor Video-Aufzeichnung zu speichern.
V
II. Zurückstellen
W
enn aus irgendeinem Grund reagiert die Kamera hält oder nicht richtig funktioniert, ein einfache
s
Z
urücksetzen wird es in den Normalbetrieb wiederherzustellen zurück.
O
peration: Drücken Sie die Reset-Taste für 5 Sekunden, um die Kamera zu setzen. Die Anzeig
e
l
euchtet, erlischt. Die Kamera wird automatisch neu gestartet, in 15 Sekunden oder so.
V
III. Ändern Sie das Kennwort des Kamera
>
> Bitte bestätigen Sie, dass die Kamera erfolgreich auf Ihr Smartphone oder Tablet-PC im P2P (LA
N)
M
odus hinzugefügt wird, und dass die P2P-Verbindung (LAN) funktioniert gut.
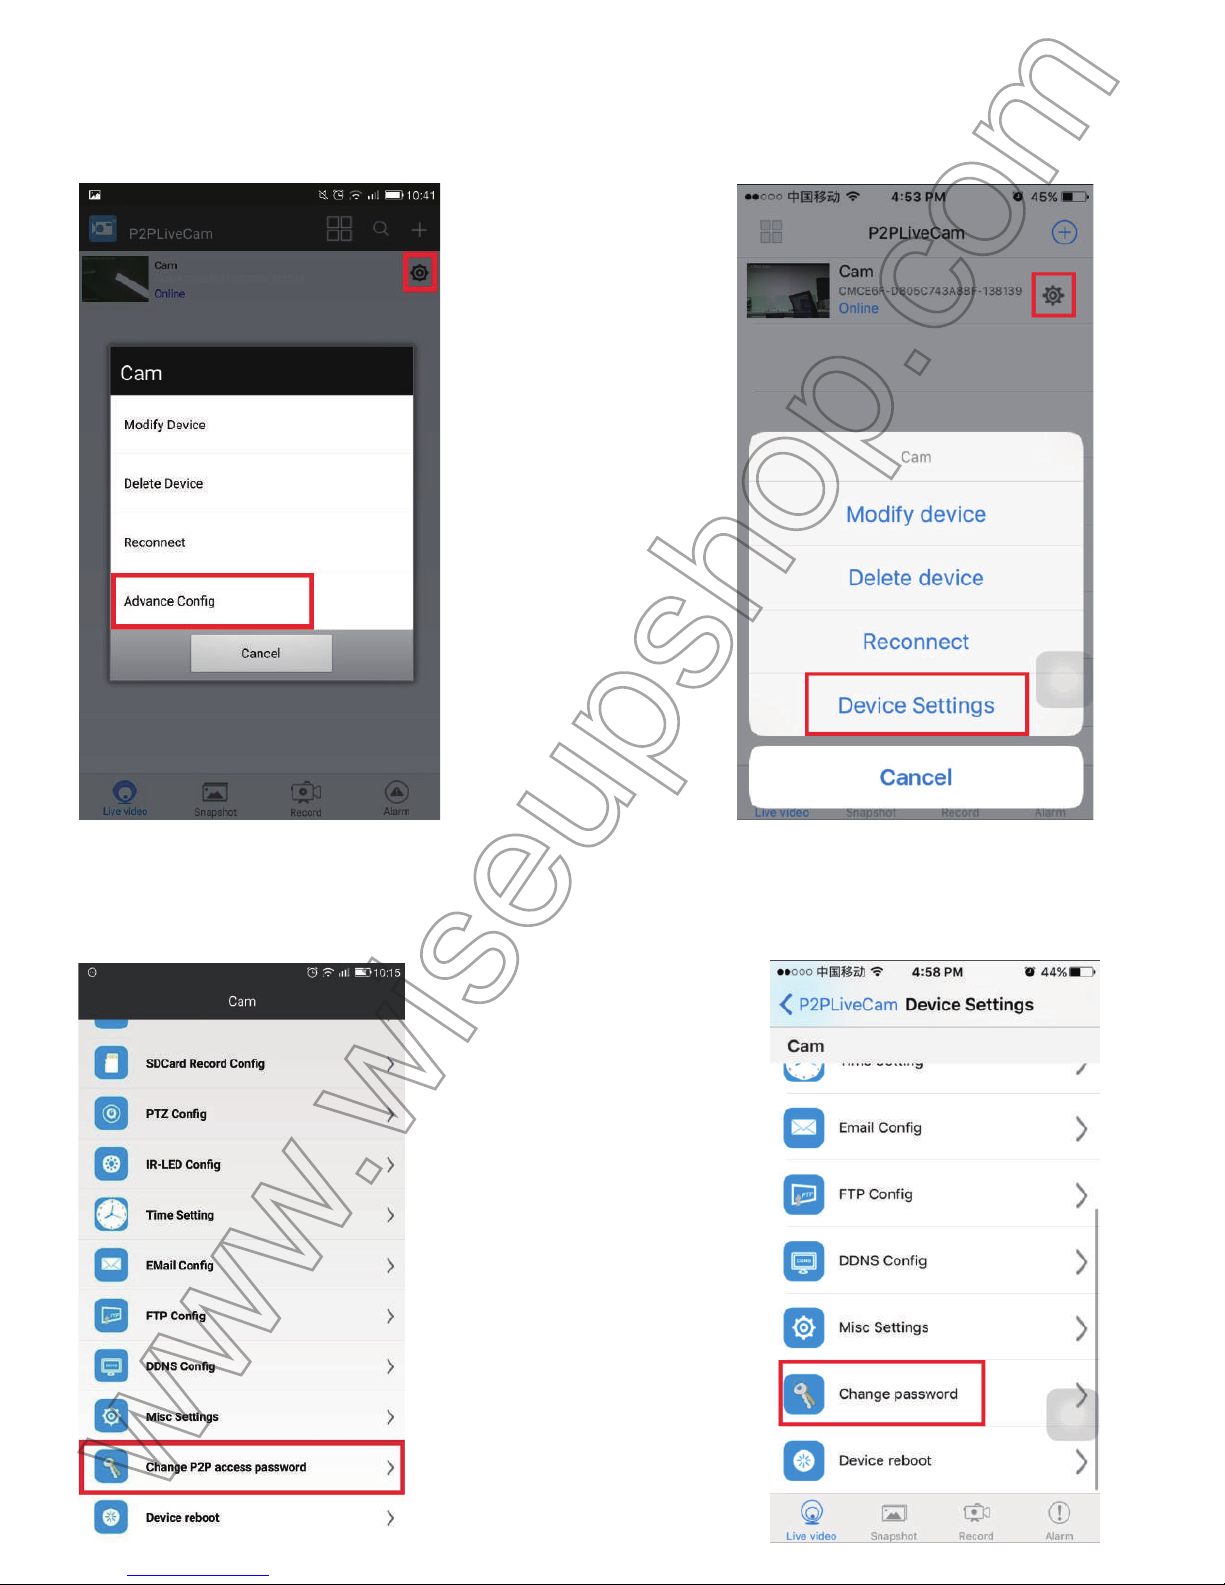
8
.1. Im P2P (LAN) Modus, tippen Sie auf das Symbol Einstellungen und wählen Sie Advanced
Page 49
C
onfig oder Geräteeinstellungen.
(Android) (IOS)
8
.2. Tippen Sie ändern P2P Zugang Passwort oder Passwort ändern.
(Android) (IOS)
Page 50
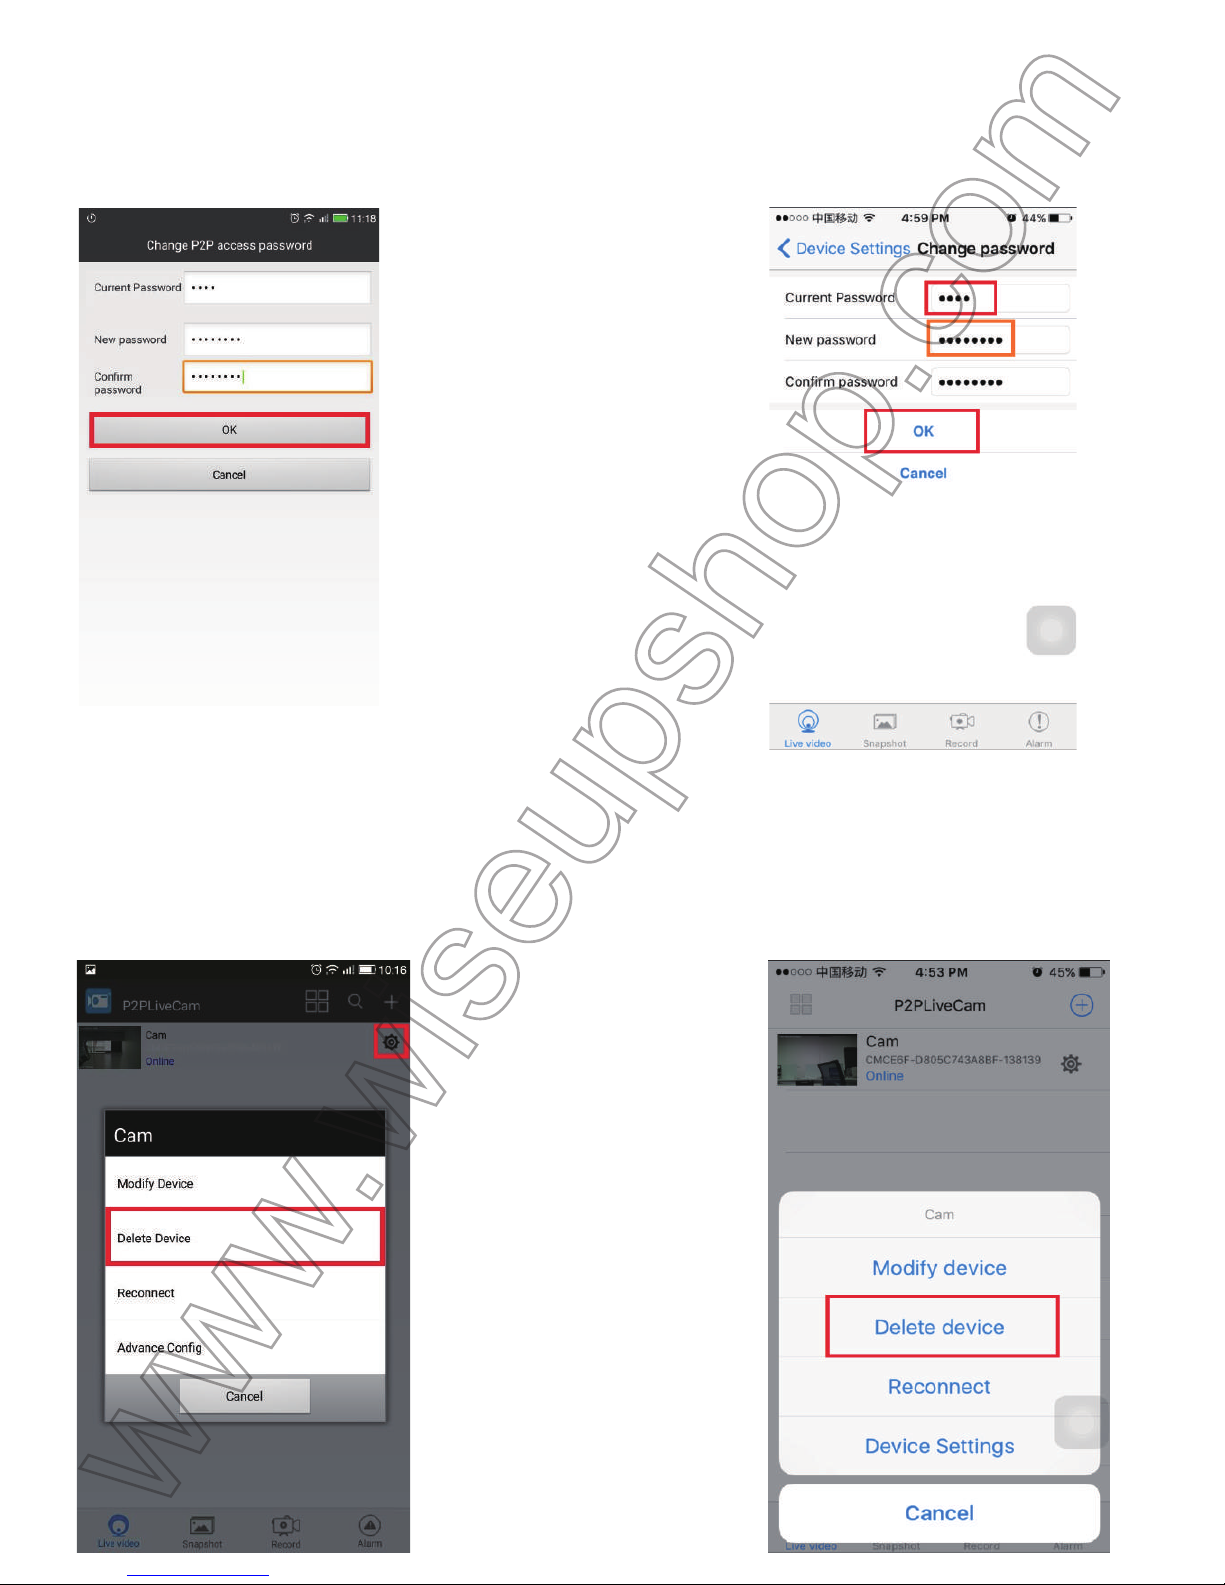
8
.3. Der Benutzer Standardkennwort lautet 8888. Geben Sie ein neues Passwort ein und bestätige
n
S
ie es. Dann tippen Sie auf OK um die Änderung zu speichern.
(Android) (IOS)
Ü
berprüfen Sie, ob das neue Passwort Werke!
1
. Gehen Sie zurück in die Kameraliste Seite, tippen Sie auf die Einstellung Symbol und löschen Si
e
d
ie aktuelle Kamera.
(Android) (IOS)
Page 51
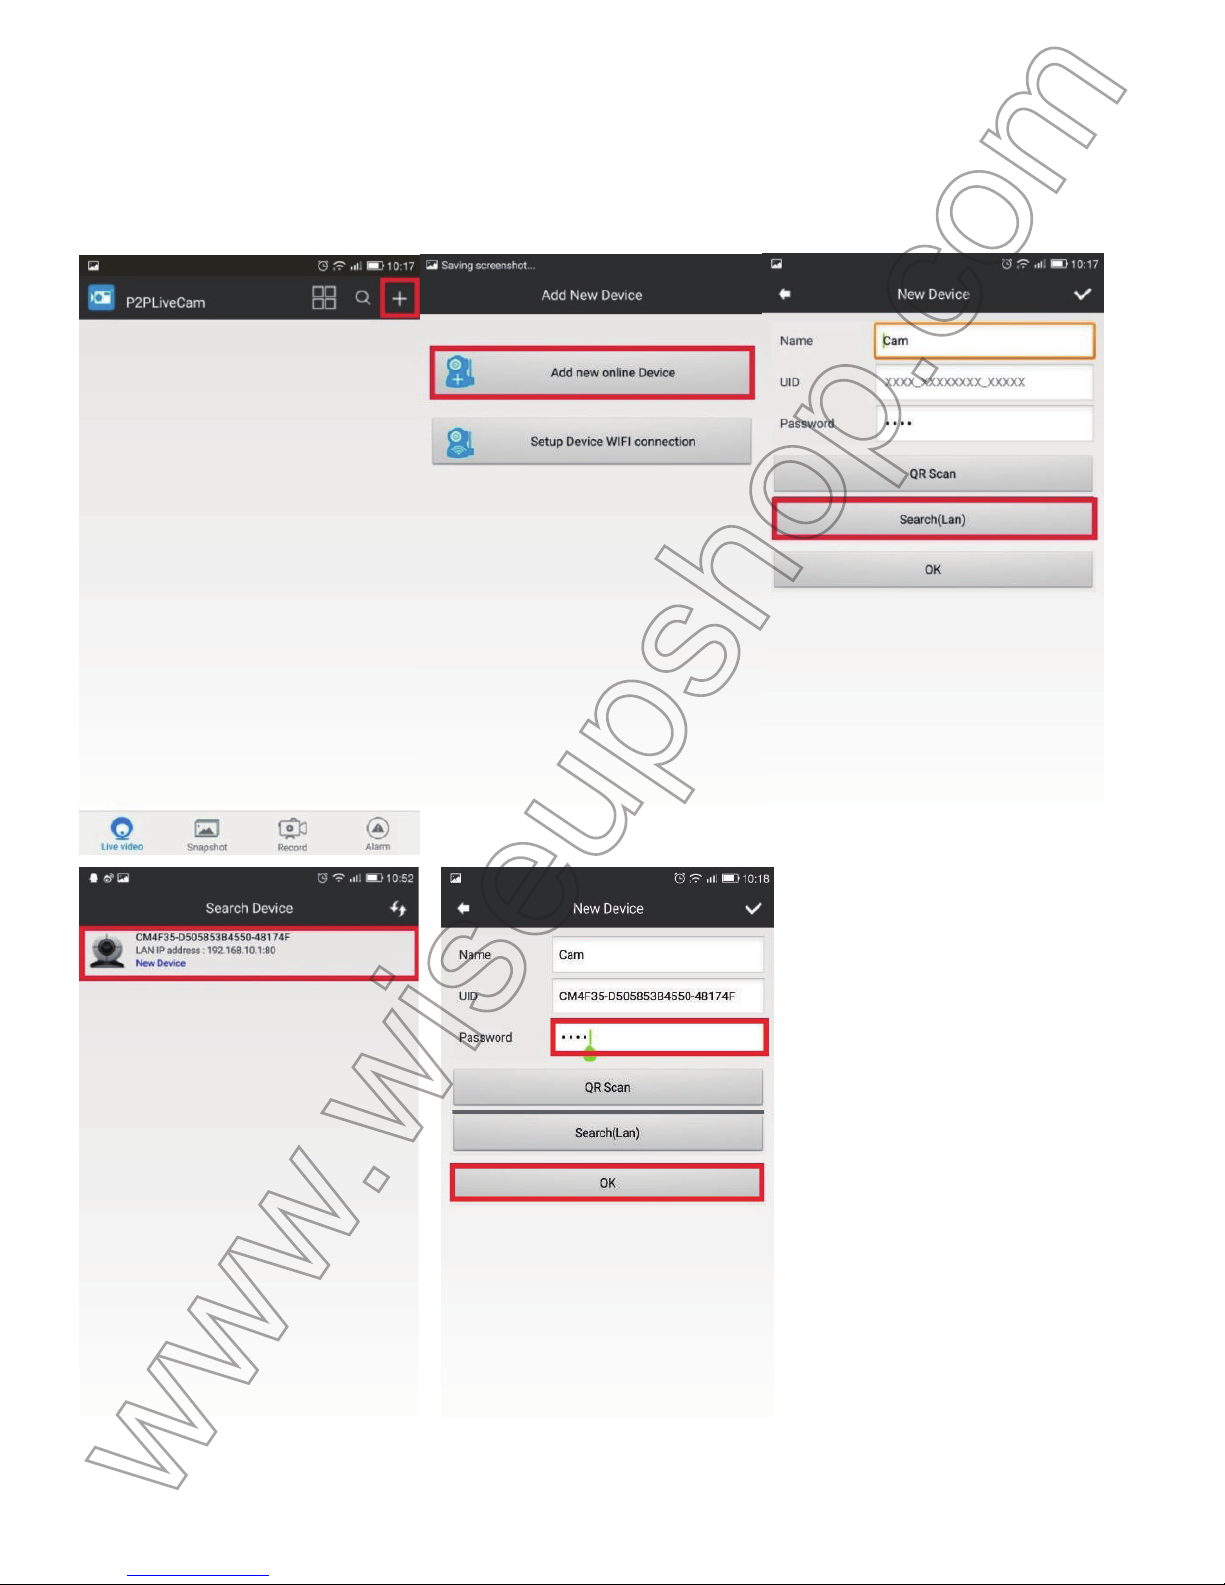
2
. Verlassen Sie die APP.
3
. Starten Sie erneut die APP. Folgen Sie 3.2.3, um die Kamera hinzuzufügen. Vergessen Sie nicht
,
d
as neue Passwort eingeben, bevor OK tippen Sie die Kamera hinzuzufügen.
(Android)
Page 52
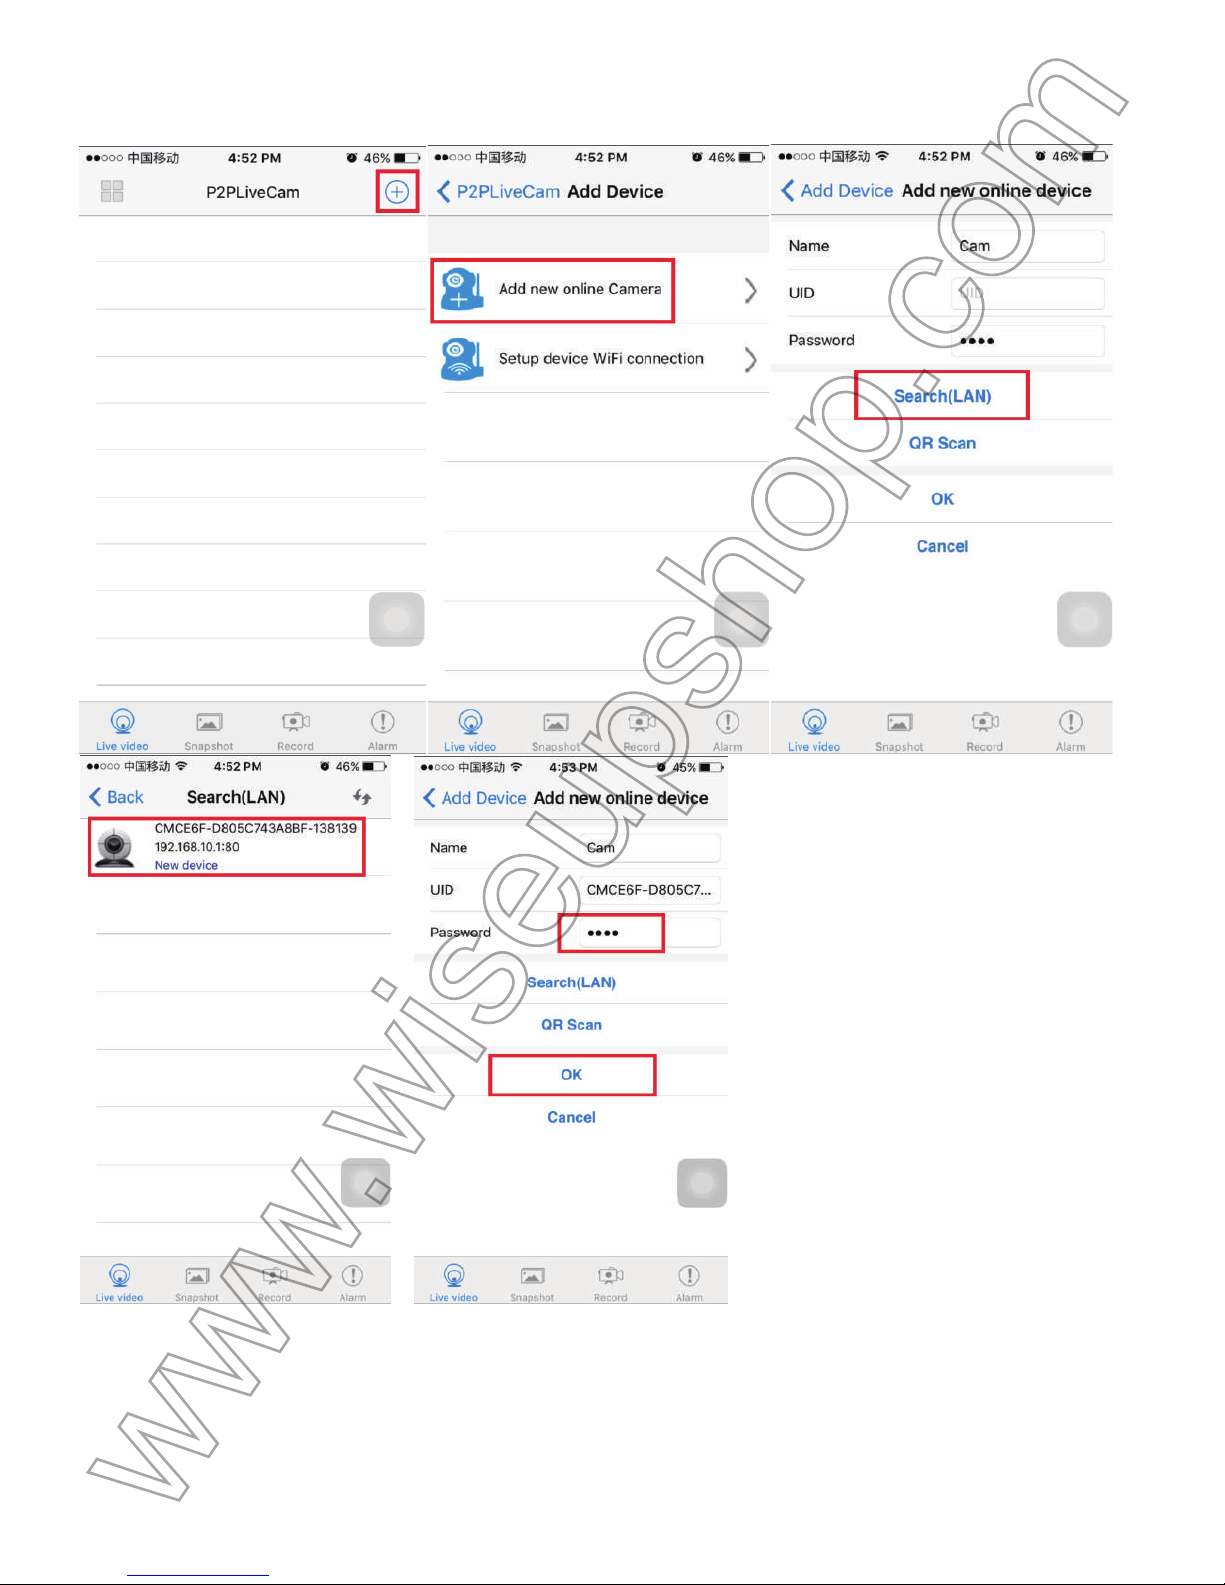
(IOS)
6
. Wenn die Kamera Online angezeigt wird, bedeutet, dass die Kamera erfolgreich hinzugefügt wurde
.
W
enn es falsch Passwort angezeigt wird, bedeutet dies, Sie Eingabe ein falsches Passwort.
Page 53

H
äufig gestellte Fragen
Q
: Welche Art von Speicherkarte kann ich in dieser Kamera verwenden?
A
: Es wird empfohlen, eine SDHC Class 10 Micro SD-Karte (4GB-64GB) zu verwenden. Wenn ein
e
S
peicherkarte nicht funktioniert, entfernen und Format auf einem PC-Computer, bevor es wieder in de
r
K
amera versuchen.
Q
: Warum kann ich auf meinem Handy oder Tablet-PC nicht die WiFi-Signal der Kamer
a
f
inden?
A
: Es kann 1-3 Minuten dauern, bevor die WiFi-Signal der Kamera auf Ihrem Smartphone oder
T
ablet-PC zu finden ist. Wenn das WIFI Signal noch nicht gefunden werden kann, entnehmen Sie bitt
e
V
II die Kamera zu setzen.
Q
: Warum kann die Wiedergabe nicht ich Videodateien oder die Video-Dateien beschädig
t
s
ind?
A
: Es ist vor allem, weil die Kamera unangemessen ausgeschaltet ist.
Q
: Warum habe ich Probleme beim Remote Live-Video-Anzeige?
A
: Eine minimale Bandbreite Geschwindigkeit von 1,5 Mbps erforderlich HD-Live-Video (1280 * 720P
,
1
920 * 1080P) zu beobachten.
Q
: Welche Media-Player-Software sollte ich verwenden, um die Video-Dateien wiedergegebe
n
w
erden?
A
: Installieren Sie den VLC Media Player von der CD Disc-Video-Dateien auf Ihrem PC Compute
r
a
bzuspielen.
Q
: Wie setze ich meine Kamera zurück auf die Art, wie ich es bekam?
A
: Halten Sie die Reset-Taste für 5 Sekunden die Kamera zurückgesetzt werden. (Siehe VII)
Q
: Wie kann ich Fremden den Zugriff auf meine Kamera zu stoppen?
A
: Ändern Sie Ihre Kamera Passwort. (Siehe VIII)
Page 54
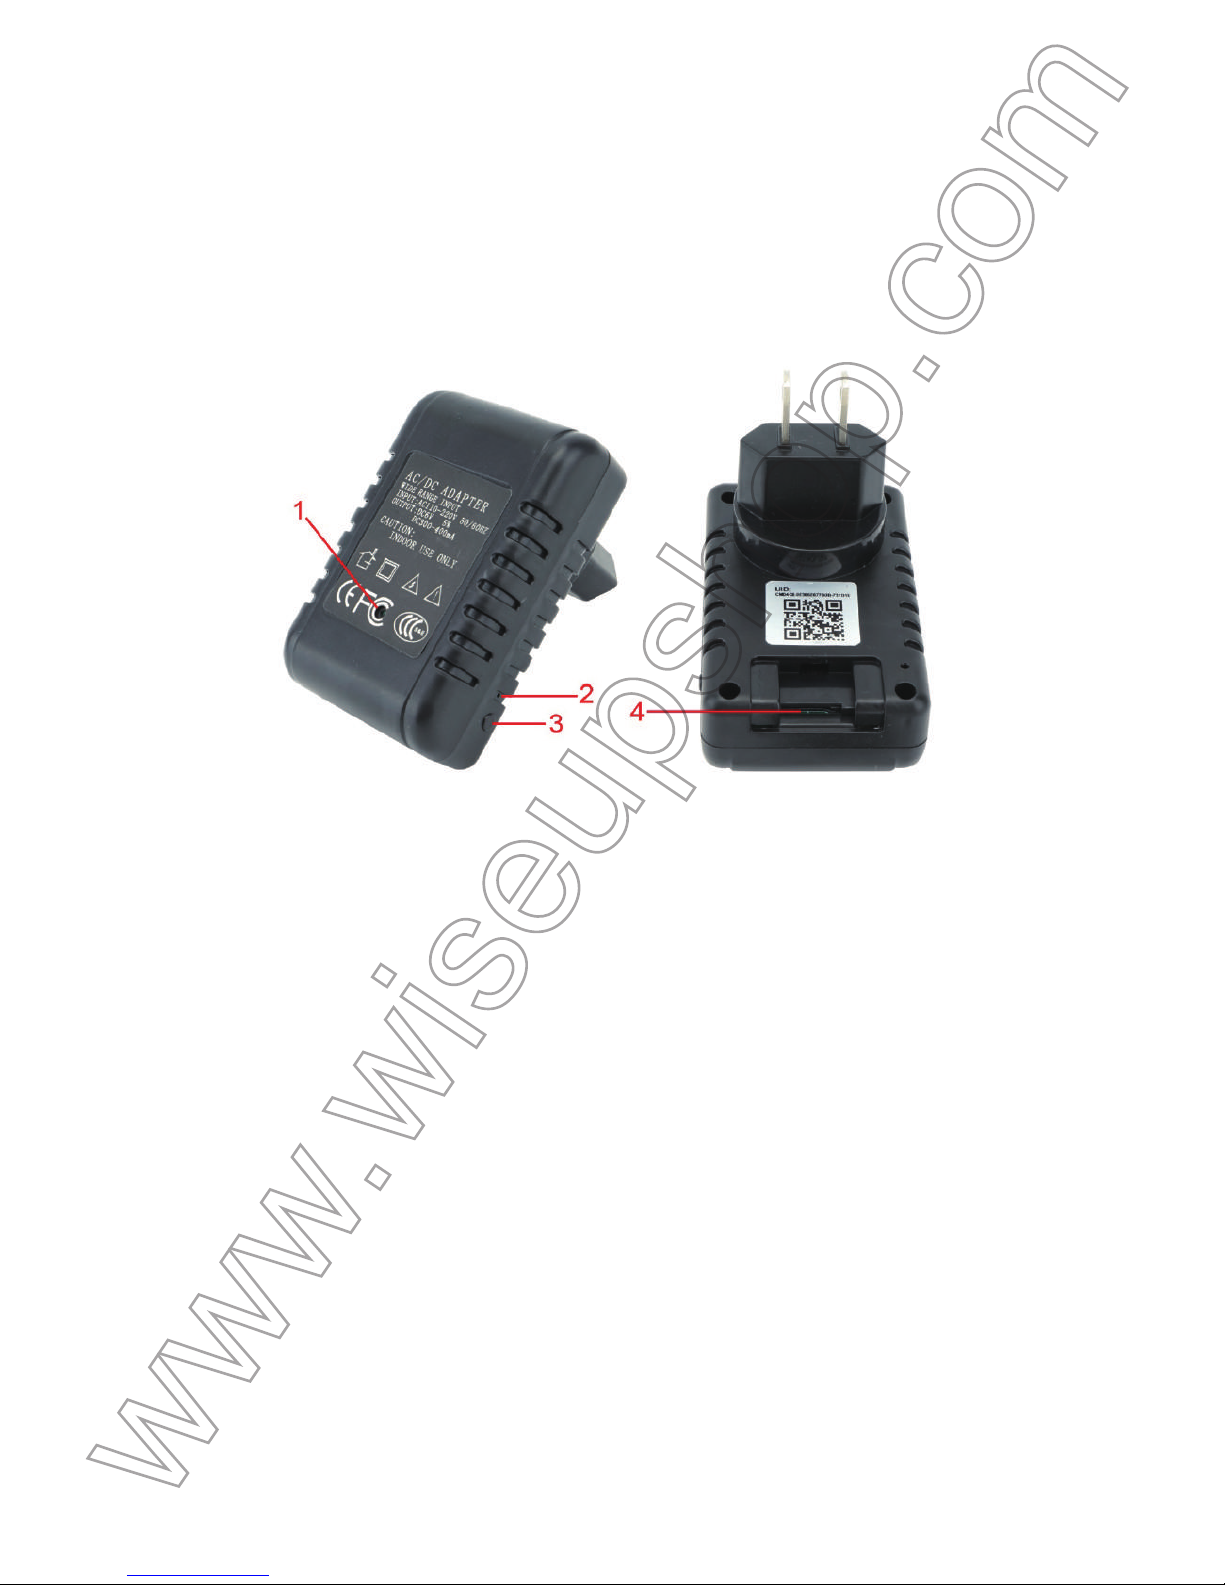
WIFI23
Mode d'emploi
I
. Présentation du produit
1
. Caméra Lens
2
. Voyant Lumineux
3
. Bouton de Réinitialisation
4
. Micro SD Carte Slot
I
I. Qu'y a-t-il dans la boite
-
Mini CD Disc
-
Lecteur de carte
-
WIFI Caméra Adaptateur AC
I
II. Configuration du réseau
3
.1. Installez le P2PLiveCam APP
R
echerchez le P2PLiveCam APP dans Google Play Store ou Apple Store et l'installer sur votre
s
martphone ou tablette PC.
Page 55
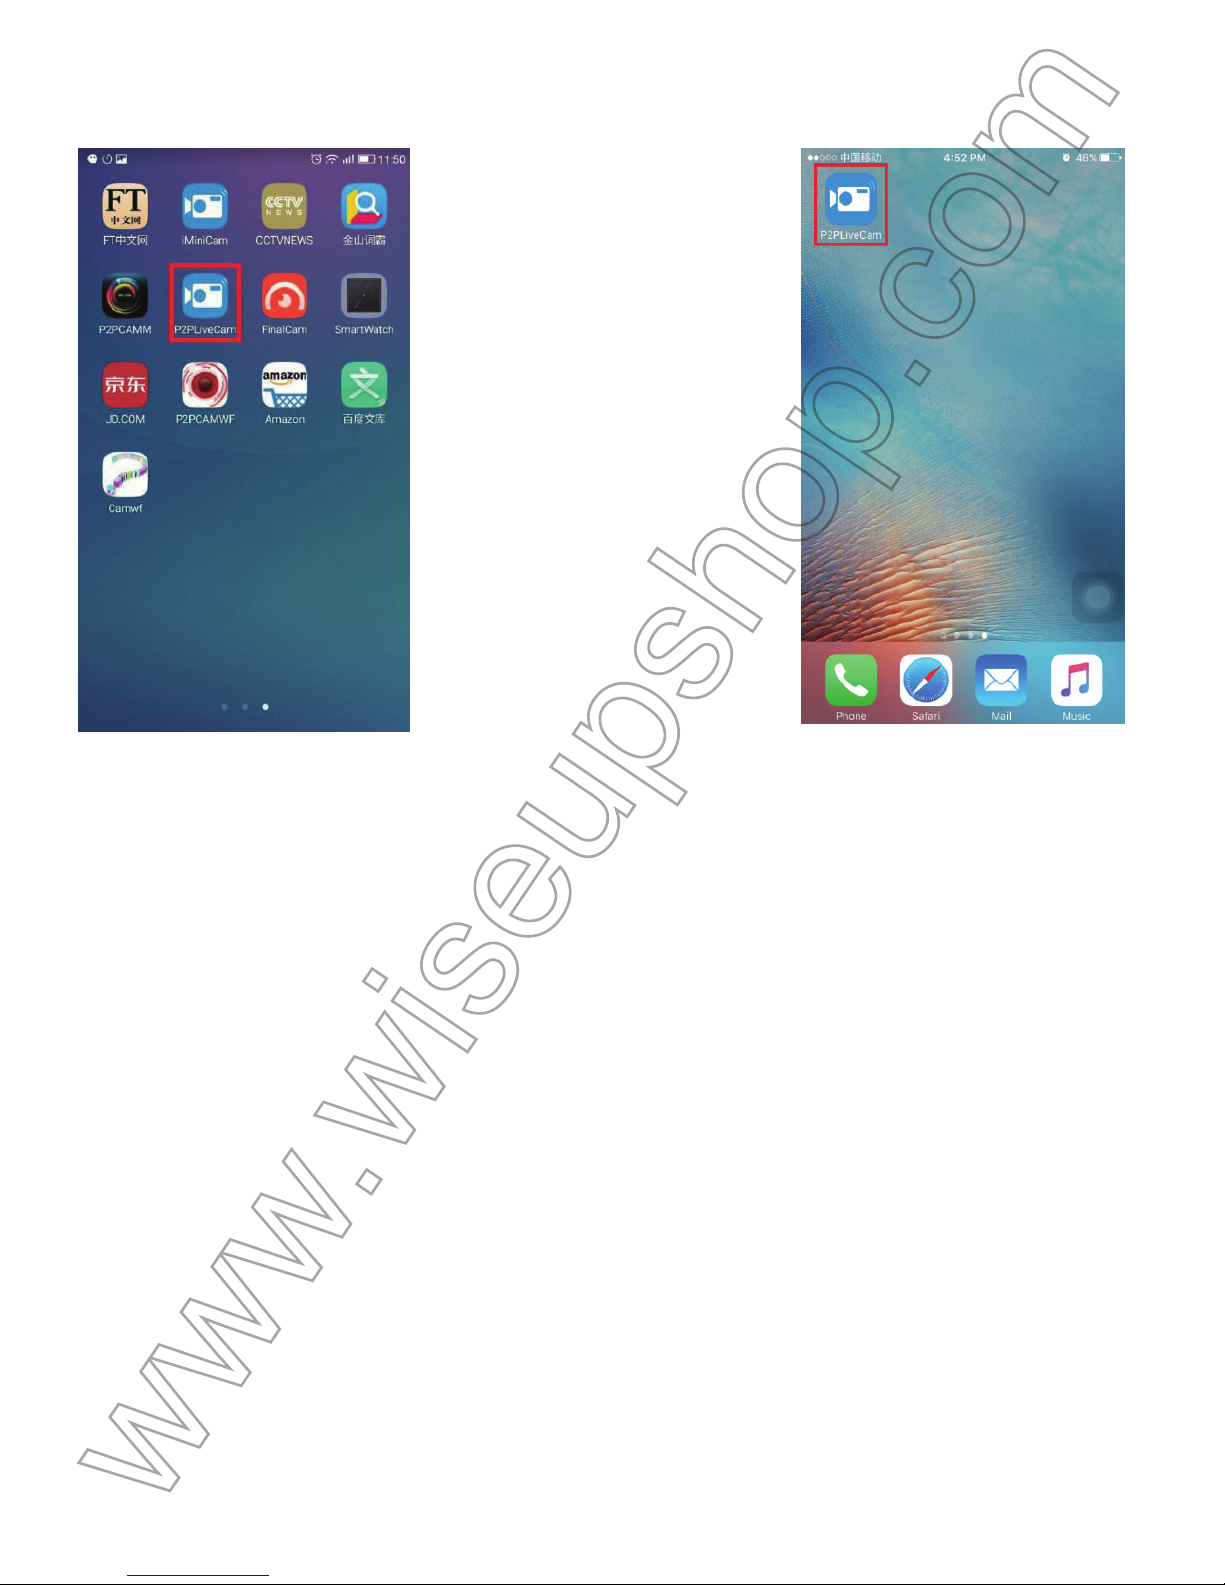
(Android) (IOS)
3
.2. Configuration du mode P2P ou LAN
3
.2.1. Allumez l'appareil en le branchant sur une prise de courant de sortie.
[
Remarque]:
1
). Le voyant s'allume en bleu pendant 5 secondes et sortir. 30 secondes plus tard, il clignote en rouge et ble
u
l
entement, indiquant que l'appareil est entré en mode P2P (LAN).
2
). Débranchez l'appareil photo pour le mettre hors tension.
3
.2.2. Allez à la WIFI ou la page Paramètres WLAN sur votre smartphone ou tablette PC, connecte
z
v
otre appareil à signal WIFI de l'appareil photo. Le réseau WIFI de l'appareil photo SSID commenc
e
p
ar CM ******** et il apparaîtra sur votre WIFI ou page Paramètres WLAN comme ci-dessous:
Page 56
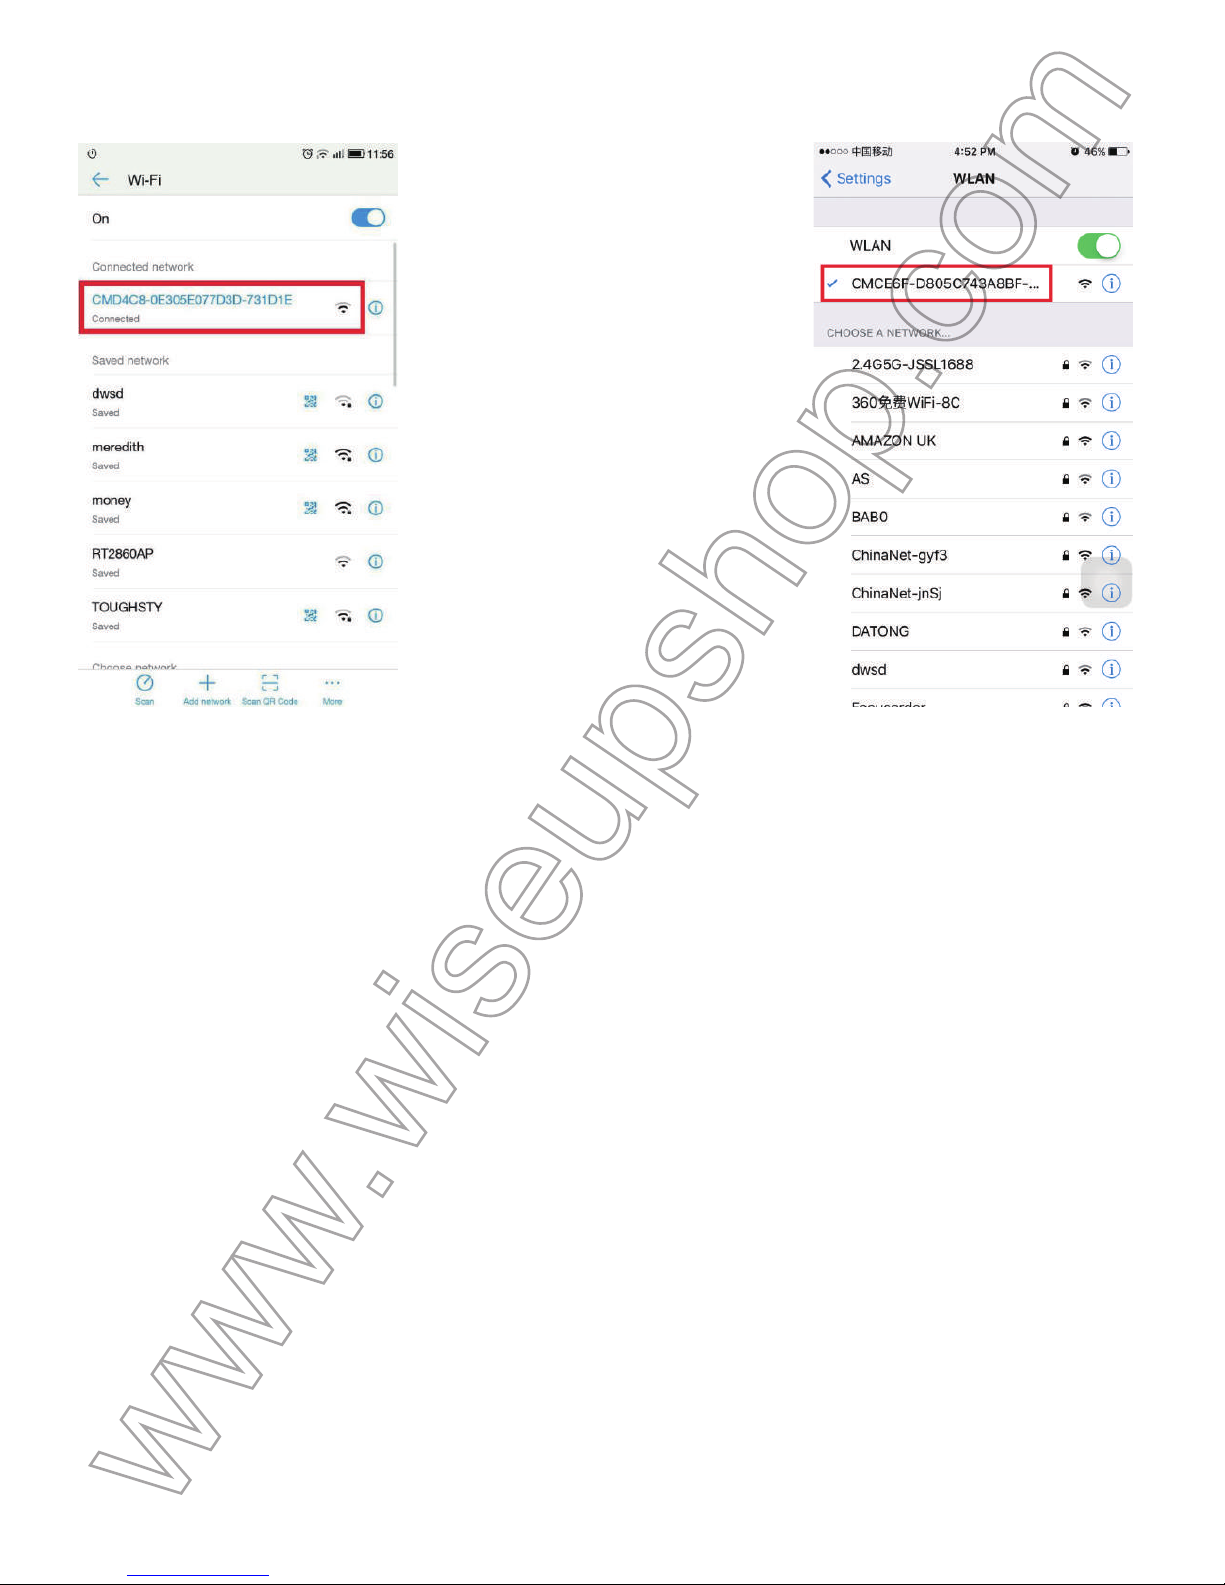
(Android) (IOS)
[
Remarque]:
1
). Il faudra 1-3 minutes avant le signal WIFI de l'appareil photo est trouvé par votre smartphone ou tablette PC.
2
). Si le signal WIFI de l'appareil photo ne peut pas être trouvé sur votre smartphone ou tablette PC, s'il vous plaît
r
éinitialiser la caméra (voir VII), puis essayer de nouveau.
3
.2.3. Lancez le P2PLiveCam APP. Appuyez sur le + > Ajouter un nouveau périphérique en lign
e
(
Caméra)> Rechercher (PAN)> l'icône de la camera > OK.
Page 57
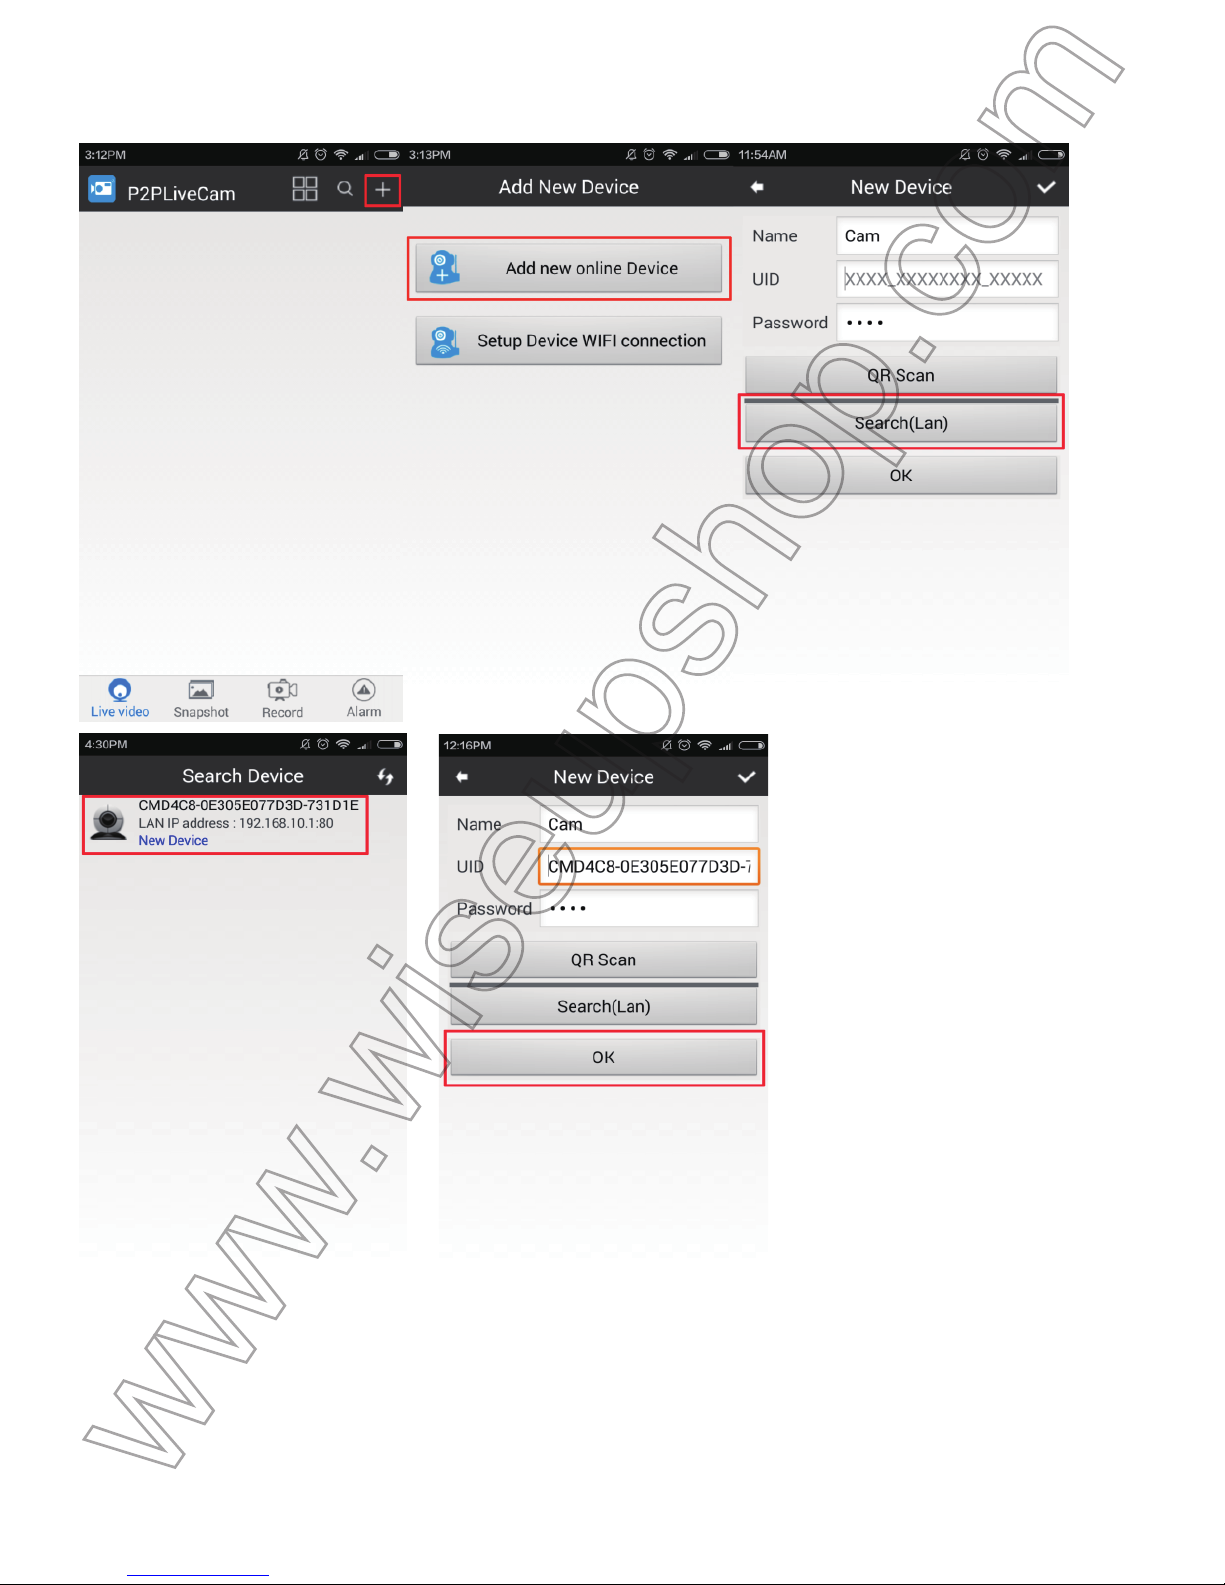
(Android)
Page 58
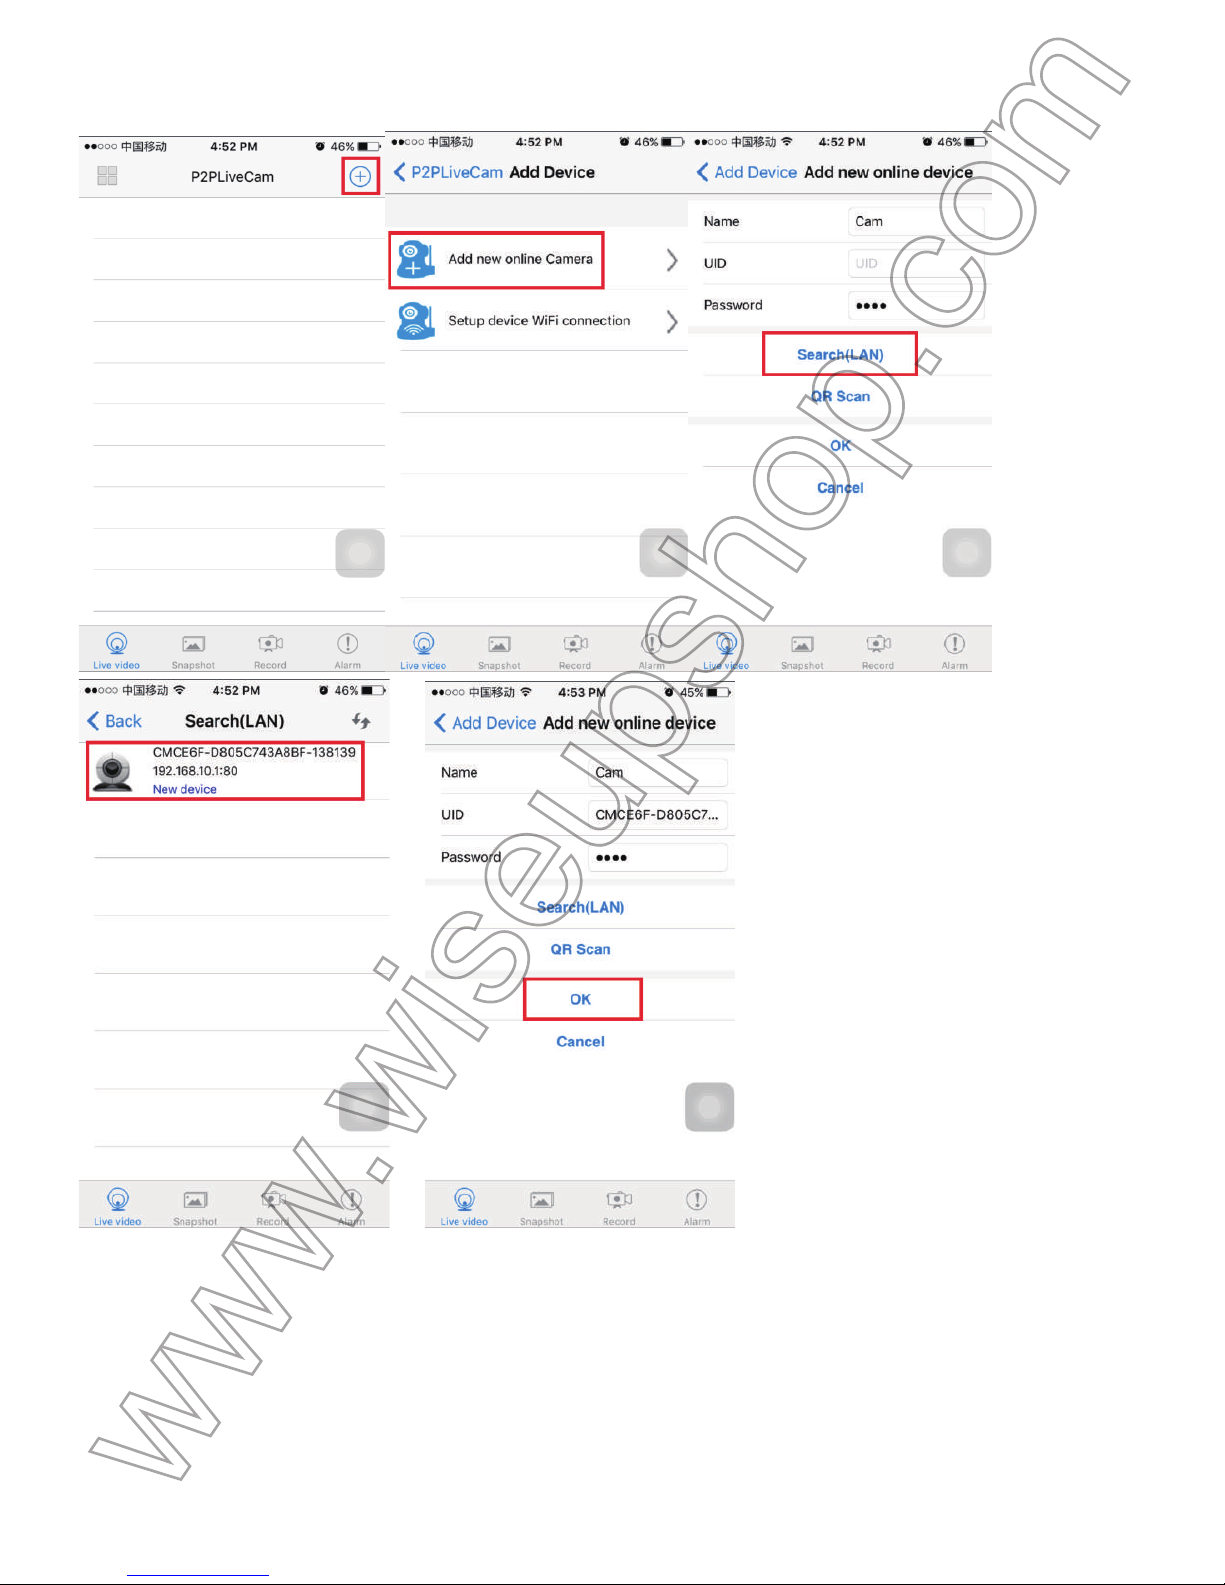
(IOS)
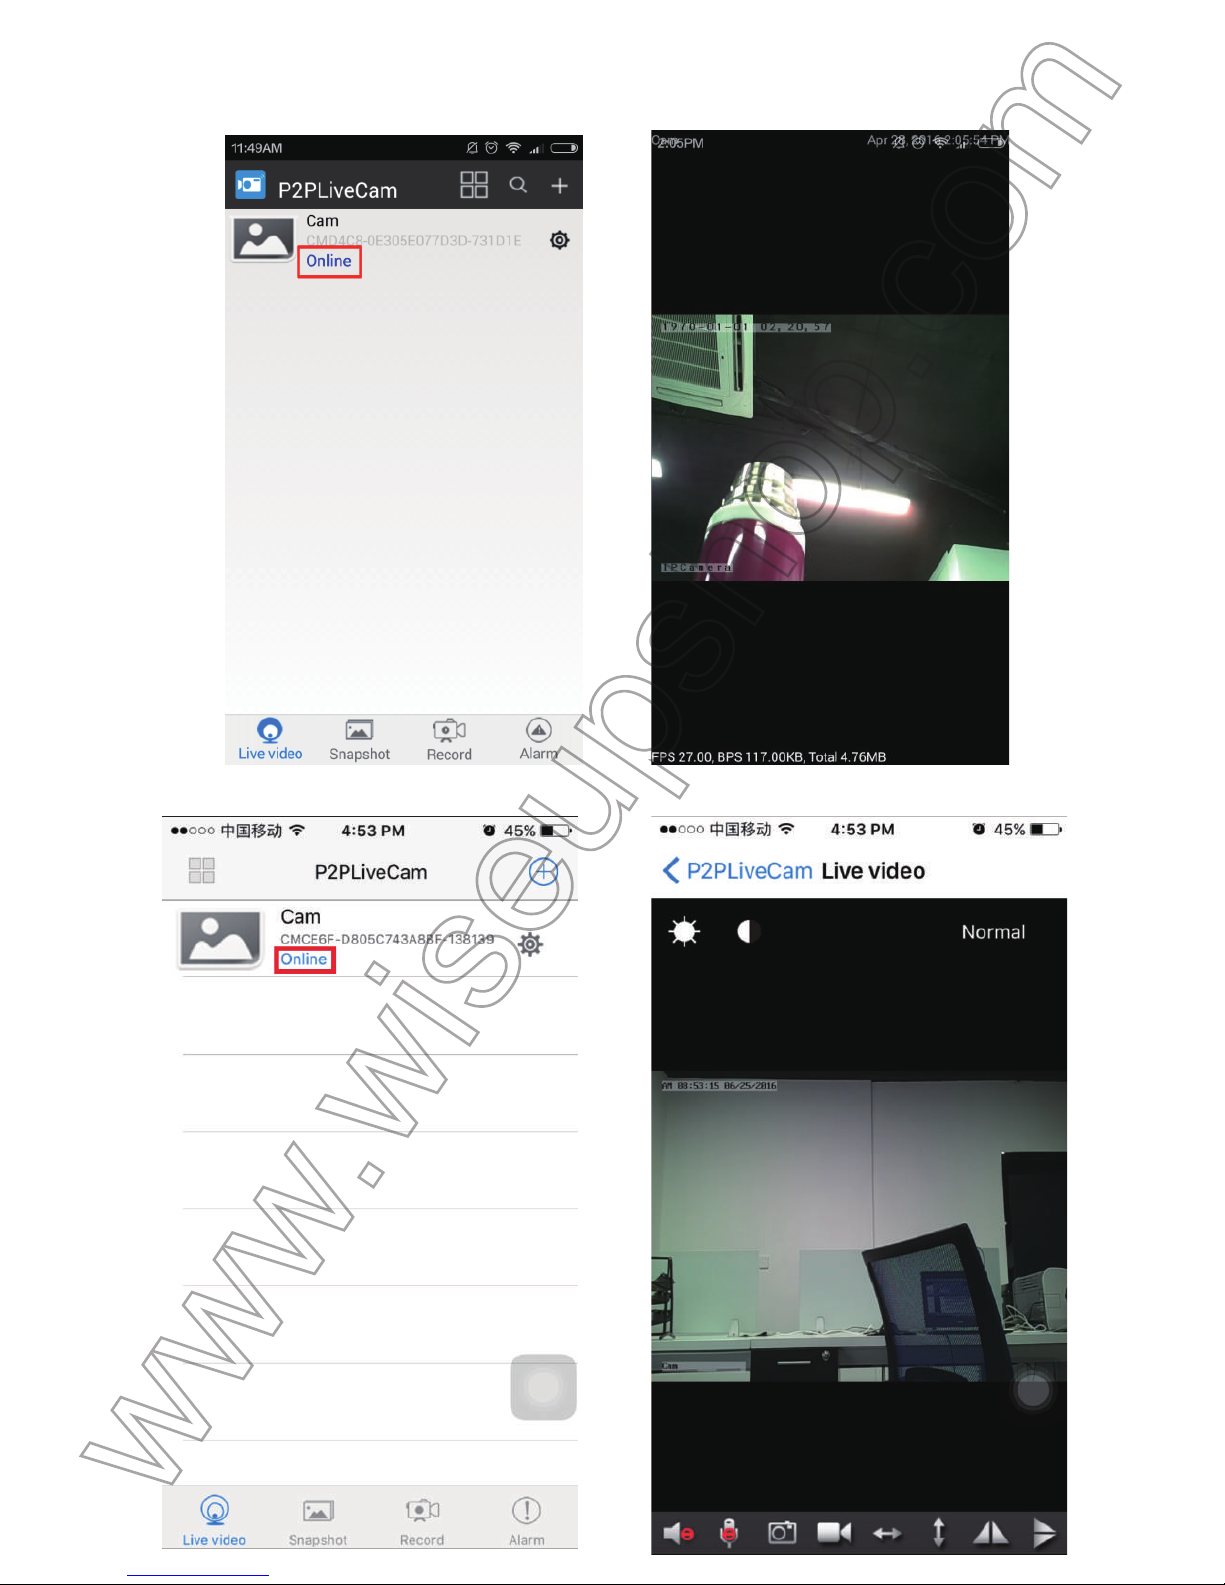
3
.2.4. L'appareil photo est ajouté avec succès si vous voyez qu'il est en ligne. Appuyez sur l'icône d
e
l
'appareil photo pour regarder la vidéo en direct en mode P2P (LAN).
Page 59
(Android)
(IOS)
Page 60
[Remarque]:
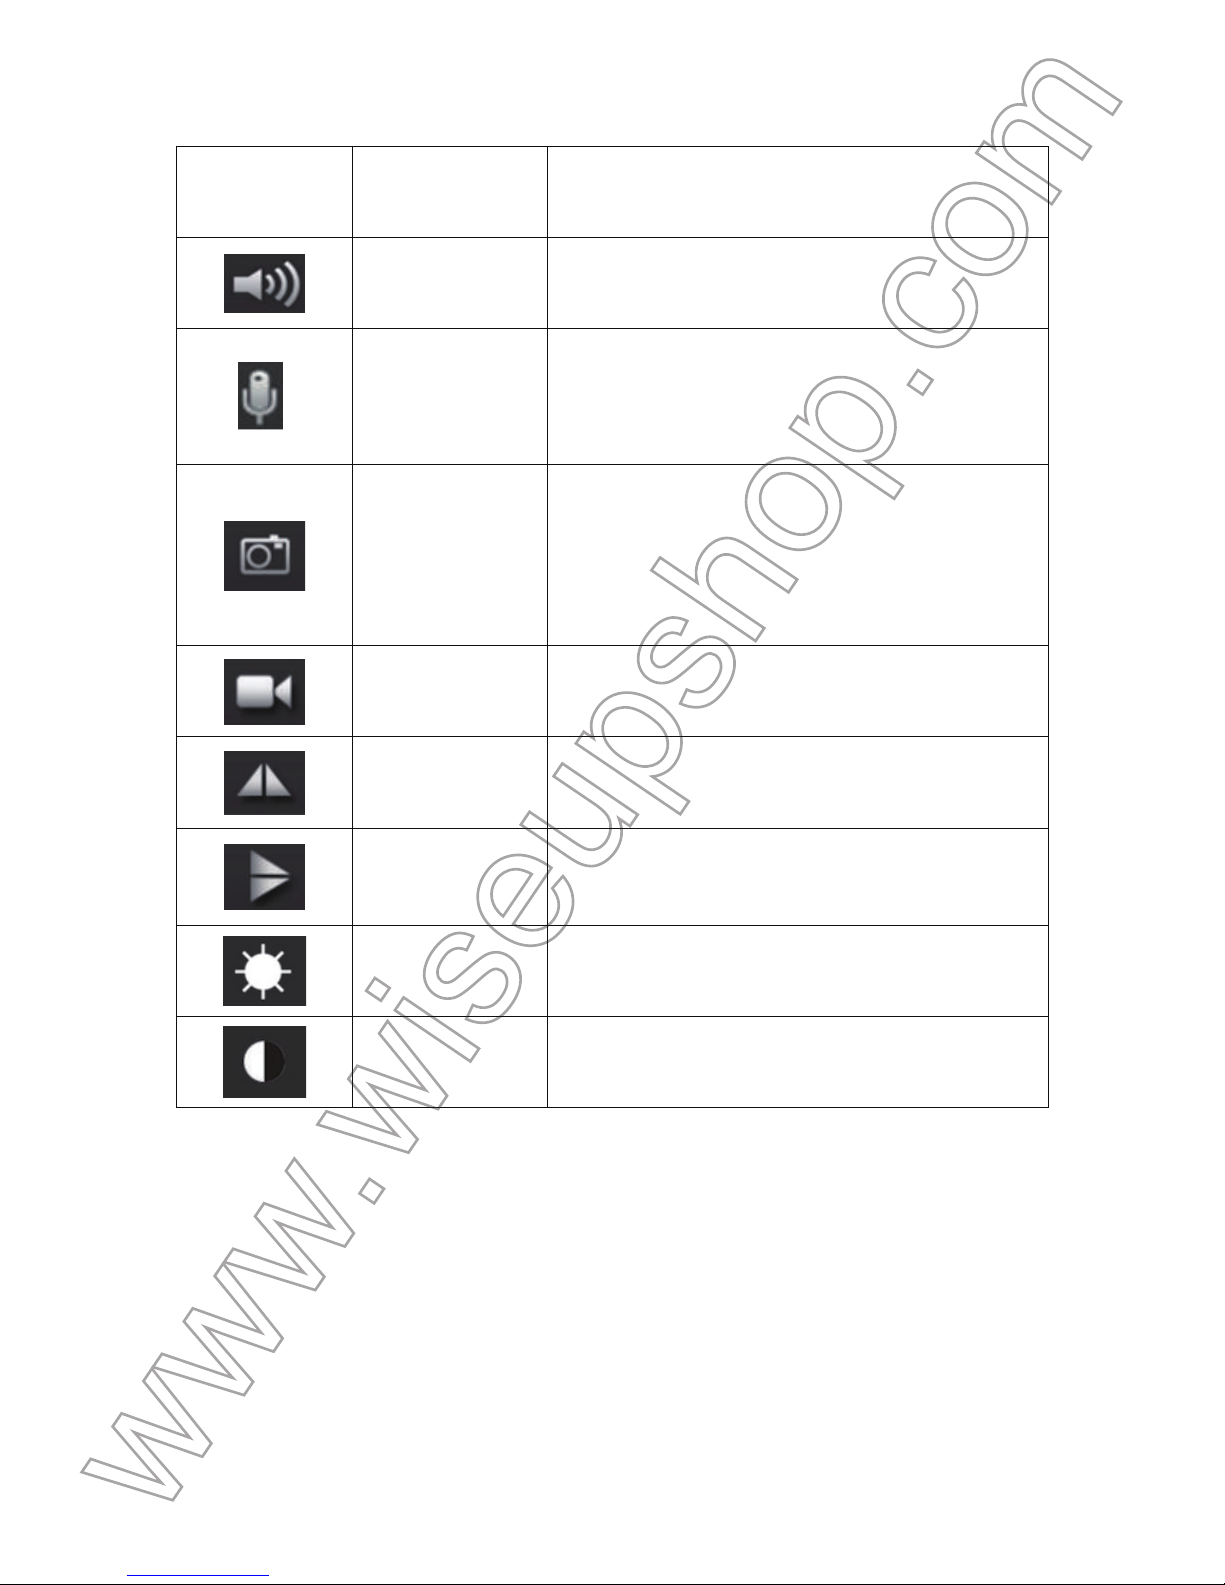
Voir le tableau ci-dessous pour une explication des différentes fonctions disponibles:
Bouton
Nom de la
fonction
Description de la fonction
Audio
Appuyez sur ce bouton pour activer ou
désactiver la sortie audio en direct.
Microphone
Tap audio et microphone pour enregistrer
audio pendant le processus d'enregistrement
vidéo à distance.
Instantané
Appuyez sur ce bouton pour prendre une
capture d'écran de la vidéo en direct. Les
images seront enregistrées dans votre
smartphone ou tablette PC.
Enregistrement
vidéo à distance
Appuyez sur ce bouton pour démarrer ou
arrêter l'enregistrement vidéo à distance.
Miroir Horizontal
Appuyez sur ce bouton pour faire basculer les
vidéos en direct image horizontalement.
Miroir Vertical
Appuyez sur ce bouton pour faire basculer les
vidéos en direct image verticalement.
Luminosité
Appuyez sur ce bouton pour régler la
luminosité de la vidéo en direct.
Contraste
Appuyez sur ce bouton pour régler le rapport
de contraste en direct vidéo.
3.3. Mode WAN ou Vue à Diatance Configuration
>> Avant la configuration WAN, s'il vous plaît confirmer que l'appareil photo est ajouté avec succès
pour smartphone ou tablette PC, et que la connexion P2P (LAN) entre l'appareil photo et smartphone
ou tablette PC fonctionne bien.
3.3.1. Lancez le P2PLiveCam APP.
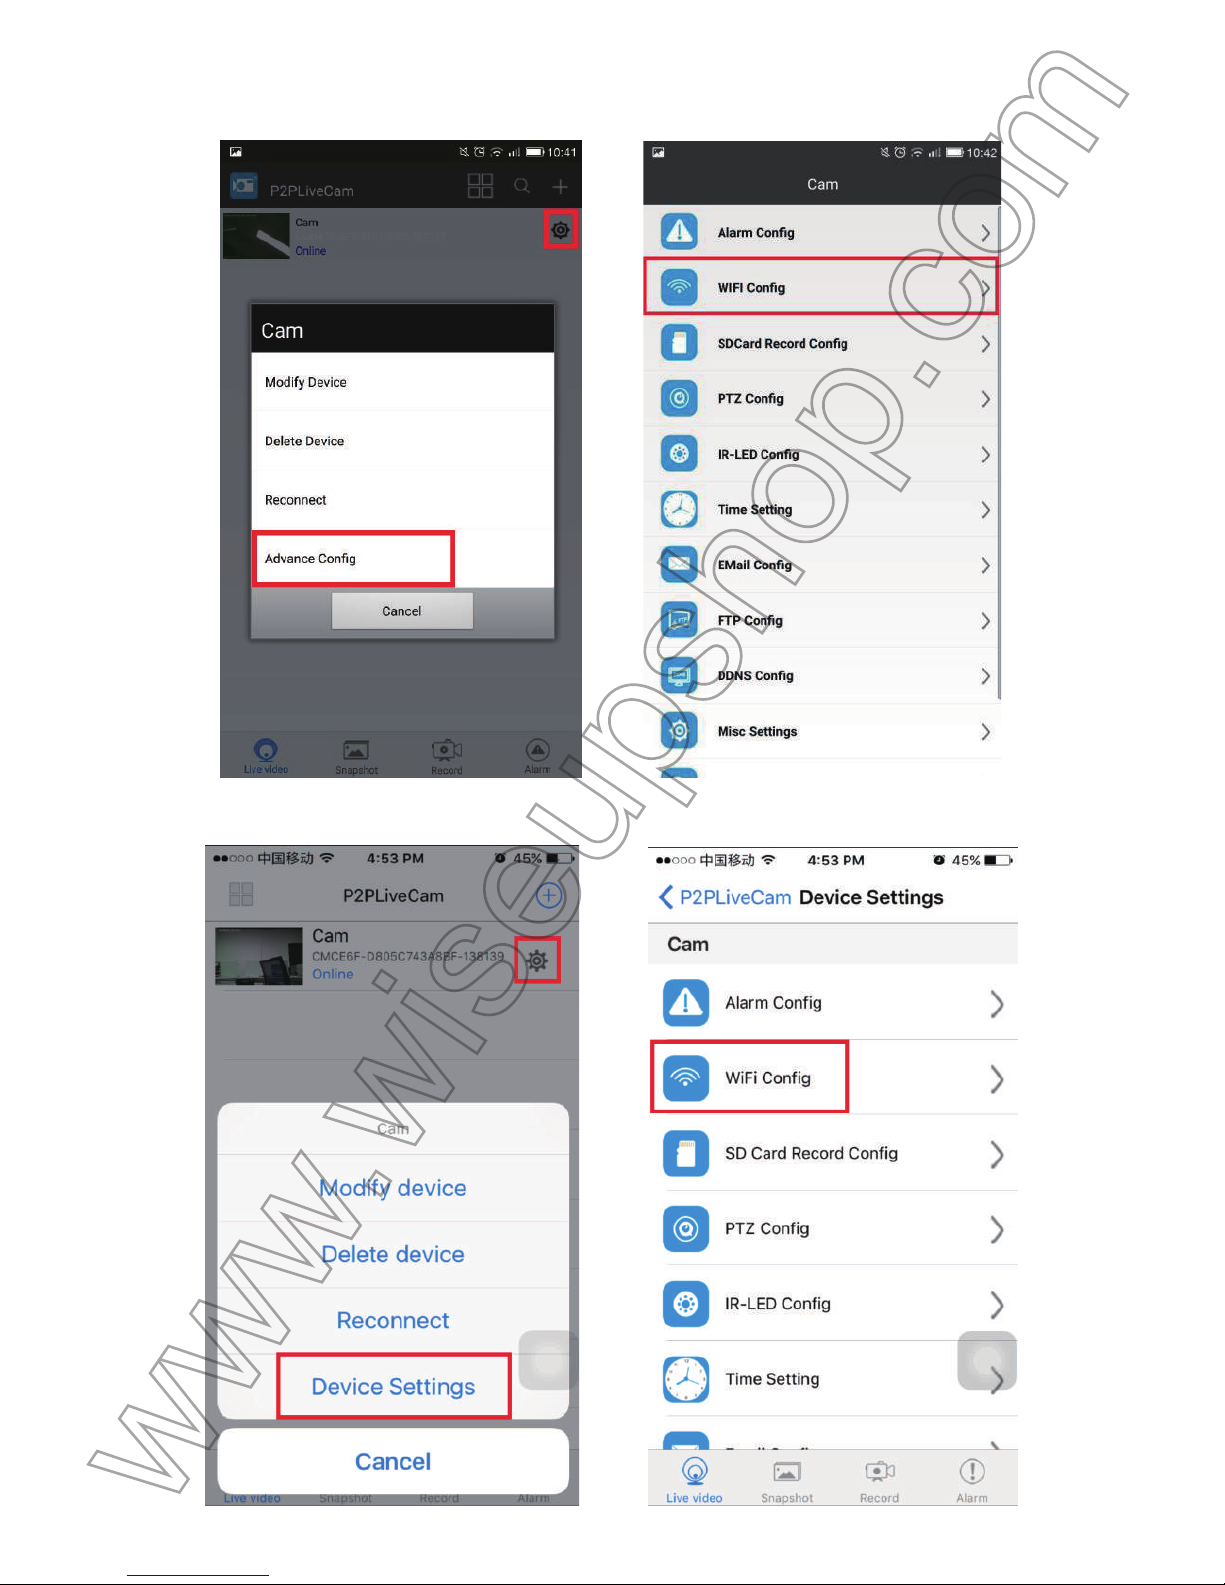
3.3.2. Dans le mode P2P (LAN), appuyez sur l'icône de réglage > Avancé Config ou Paramètres du
périphérique > WIFI Config.
Page 61
(Android)
(IOS)
Page 62
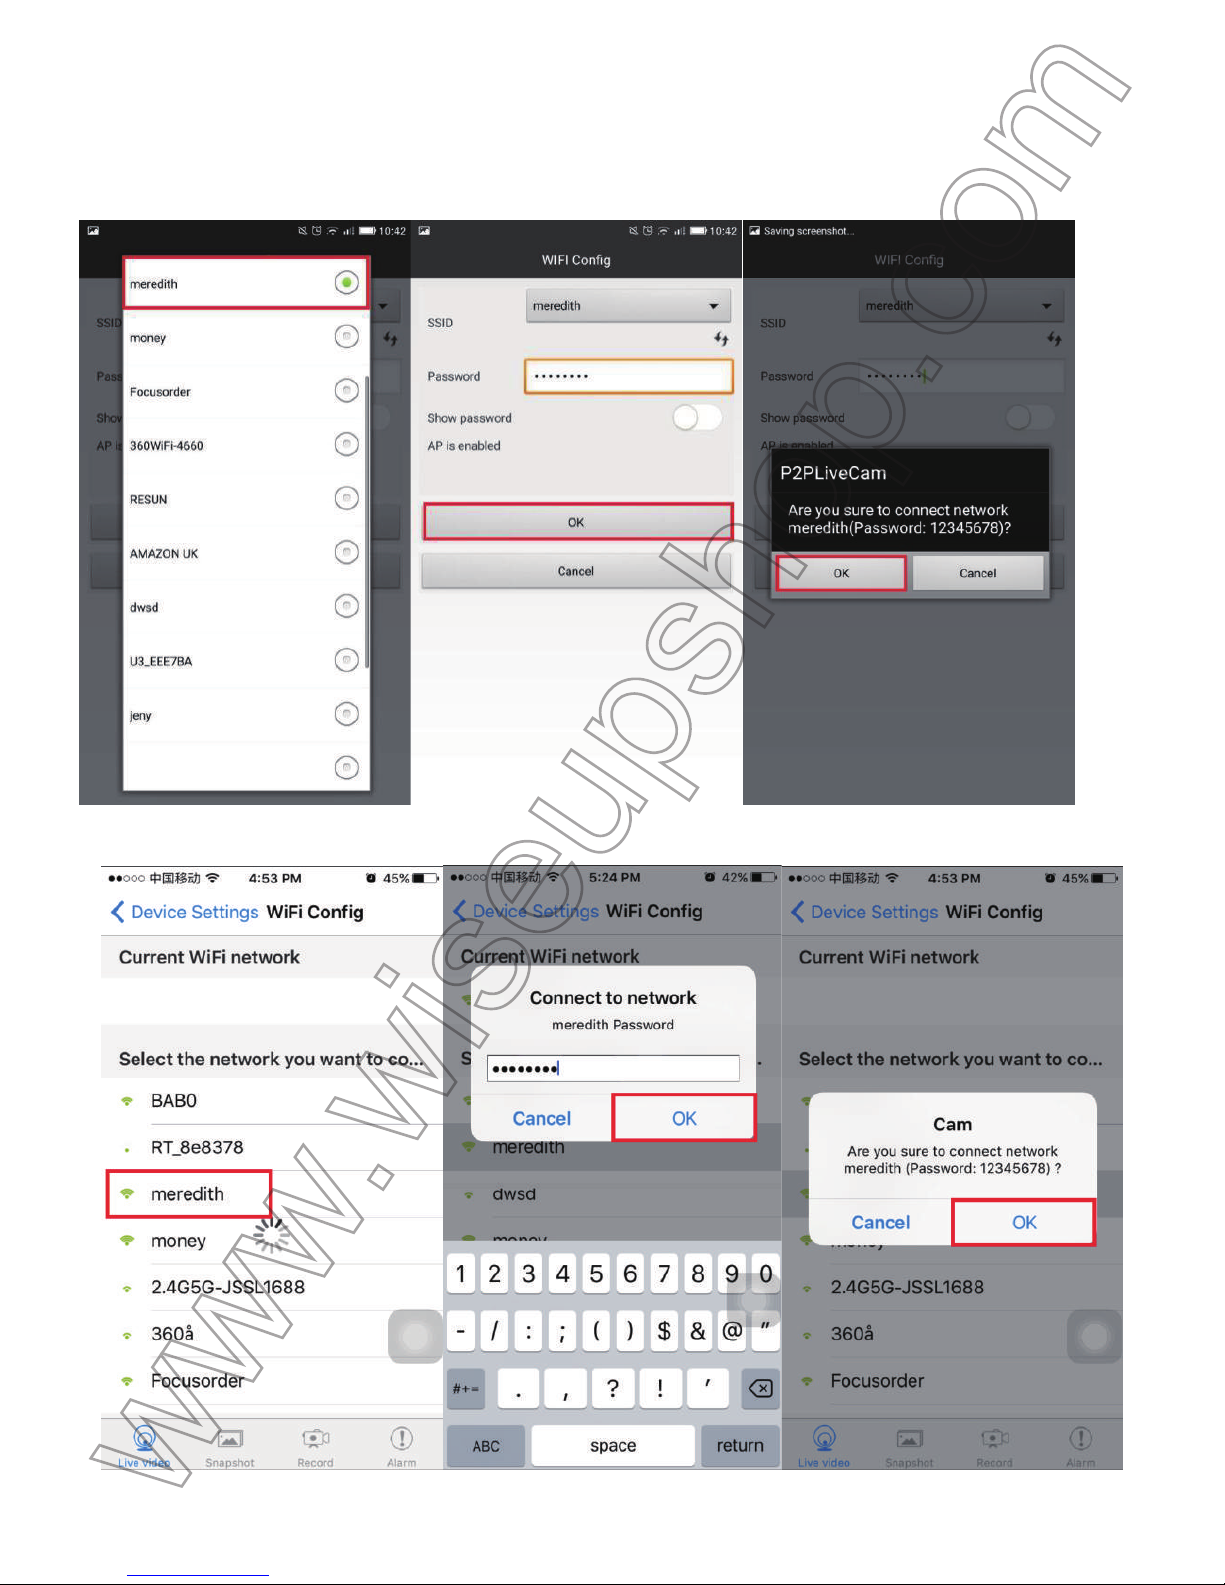
3
.3.3. Inscrivez-vous la caméra dans un réseau WIFI souhaité, puis appuyez sur OK pour confirmer l
a
c
onfiguration.
(Android)
(IOS)
Page 63
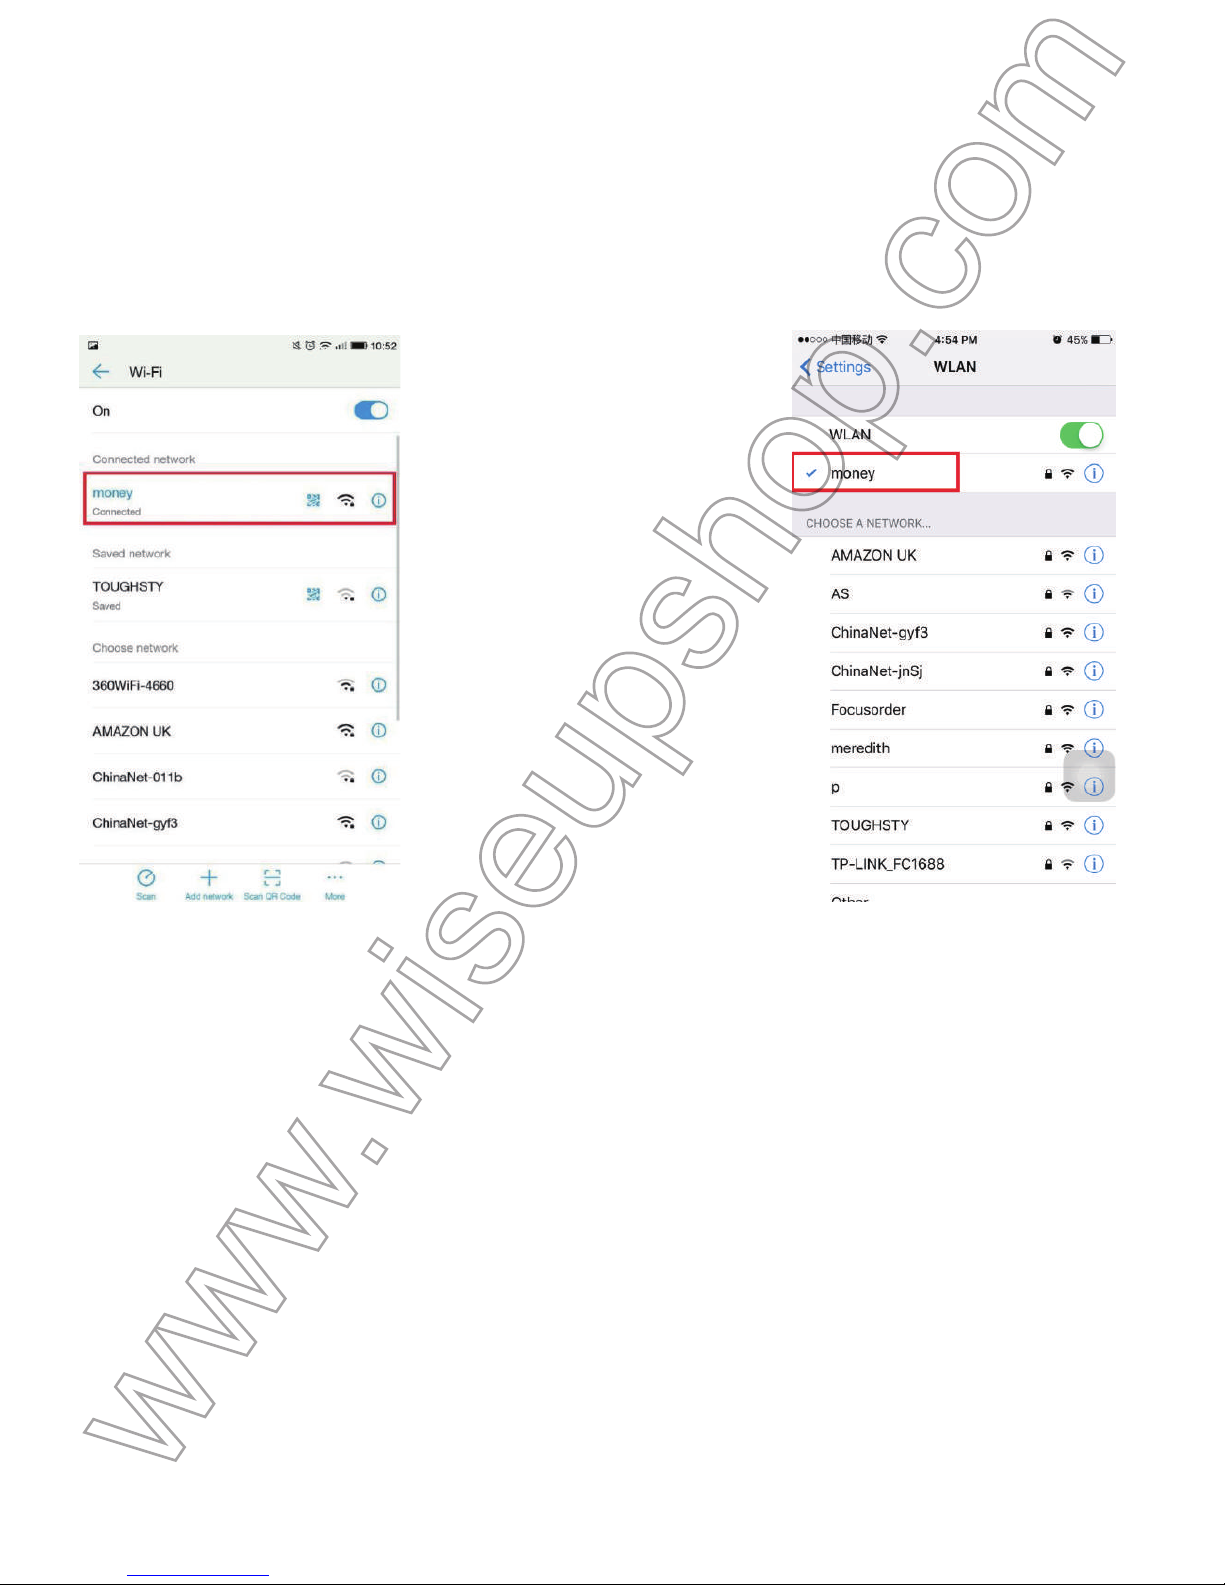
V
érifiez si le mode WAN ou des œuvres vue de configuration à distance!
1
. Quittez le P2PLiveCam APP.
2
. Allez dans le WIFI ou WLAN Page Paramètres sur votre smartphone ou tablette PC, joindre à u
n
a
utre signal WIFI qui doit être différent de celui en cours ou vous pouvez utiliser votre réseau mobile.
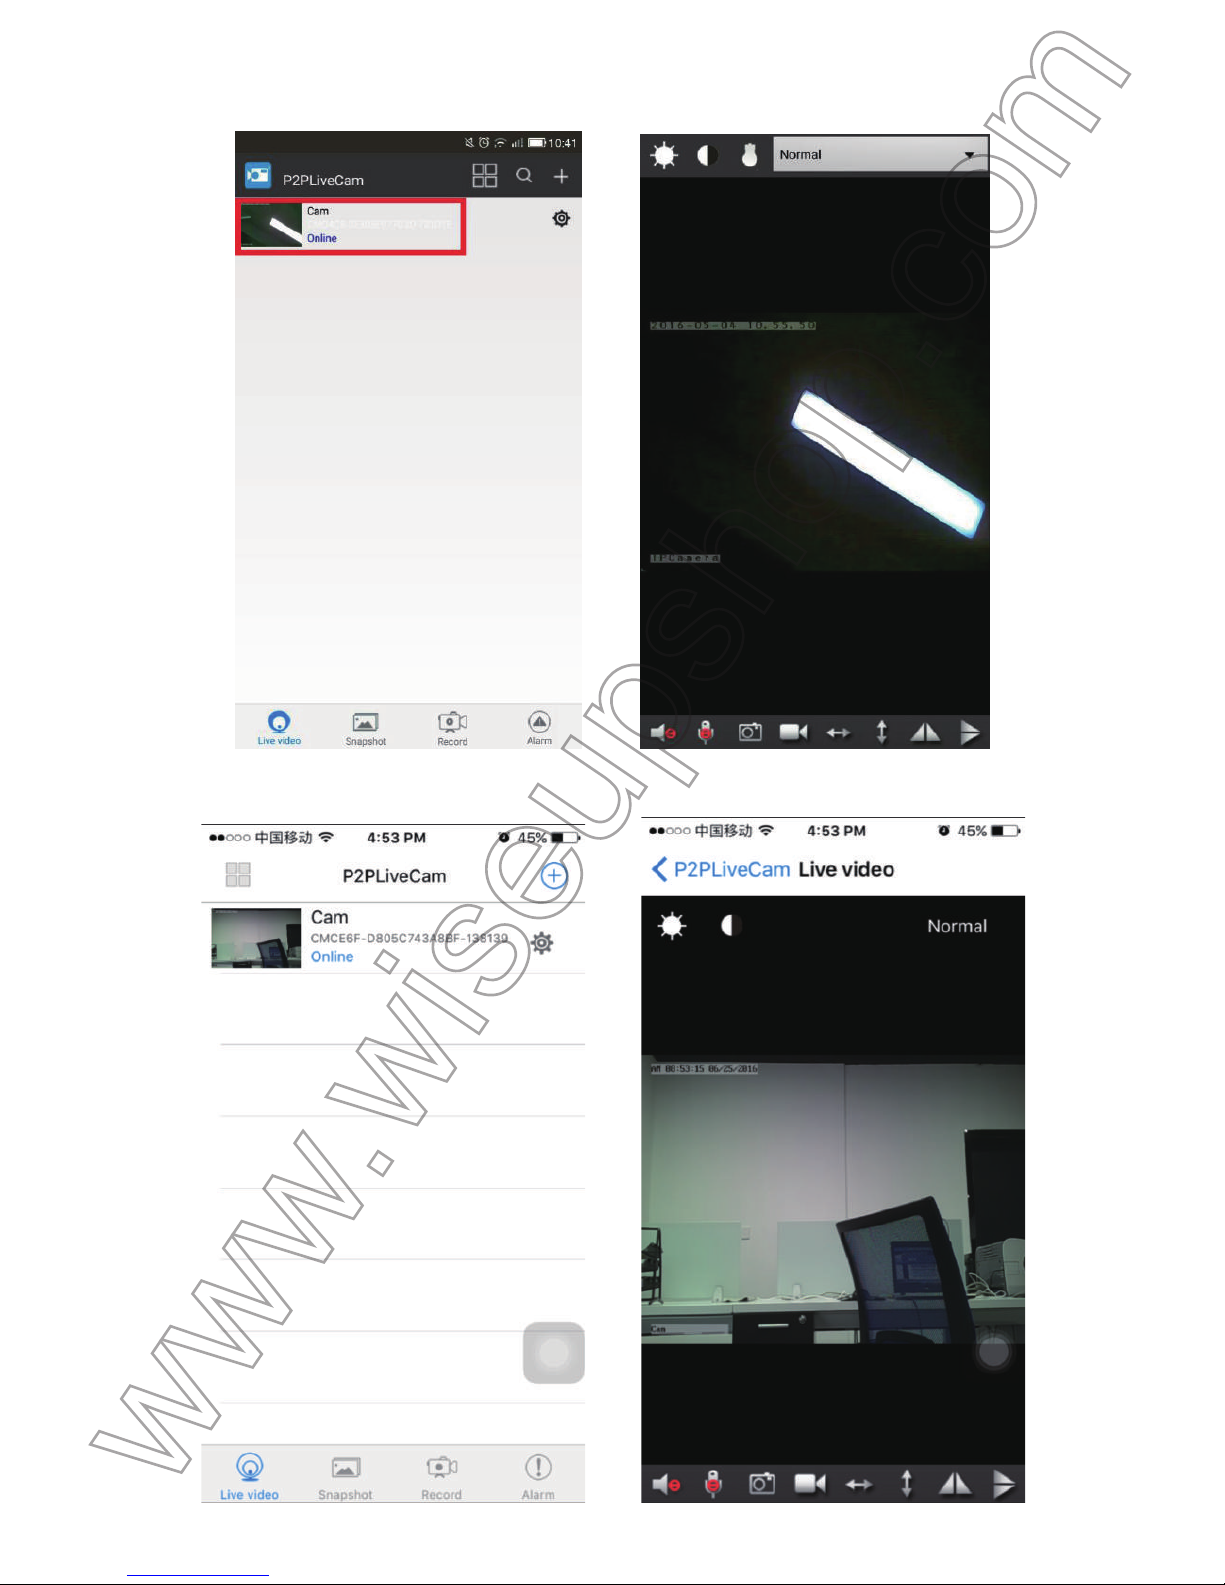
(Android) (IOS)
3
. Lancez à nouveau le P2PLiveCam APP. Si vous voyez l'appareil photo est en ligne, cela signifi
e
q
ue le réglage vue à distance (WAN) est réussie.
Page 64
(Android)
(IOS)
Page 65
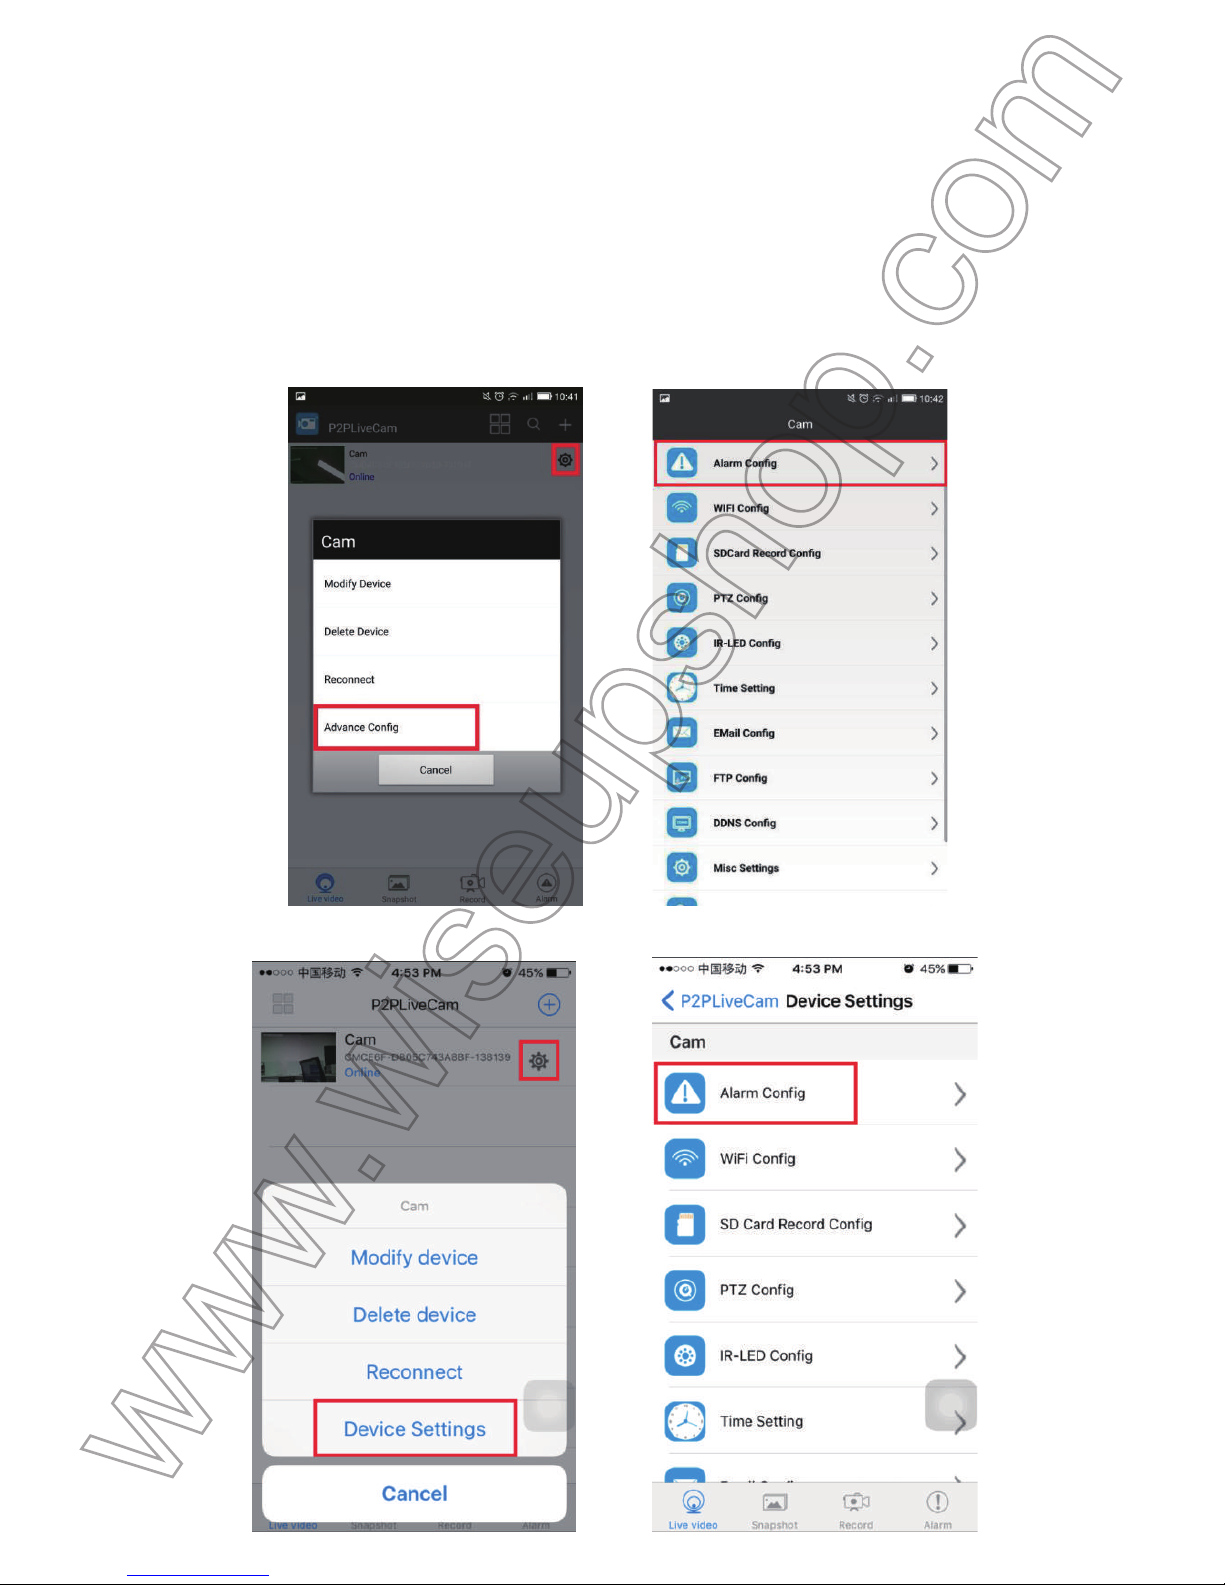
I
V. Configuration de détection de mouvement
>
> S'il vous plaît assurez-vous que une carte Micro SD est bien insérée dans la fente de la carte S
D
d
e votre appareil photo. Une SDHC Classe 10 carte Micro SD est recommandée.
4
.1. Dans le mode WAN ou LAN, lancez le P2PLiveCam APP.
4
.2. Appuyez sur l'icône de réglage > Paramètres Advance Config ou périphérique> Alarm Config.
(Android)
(IOS)
Page 66
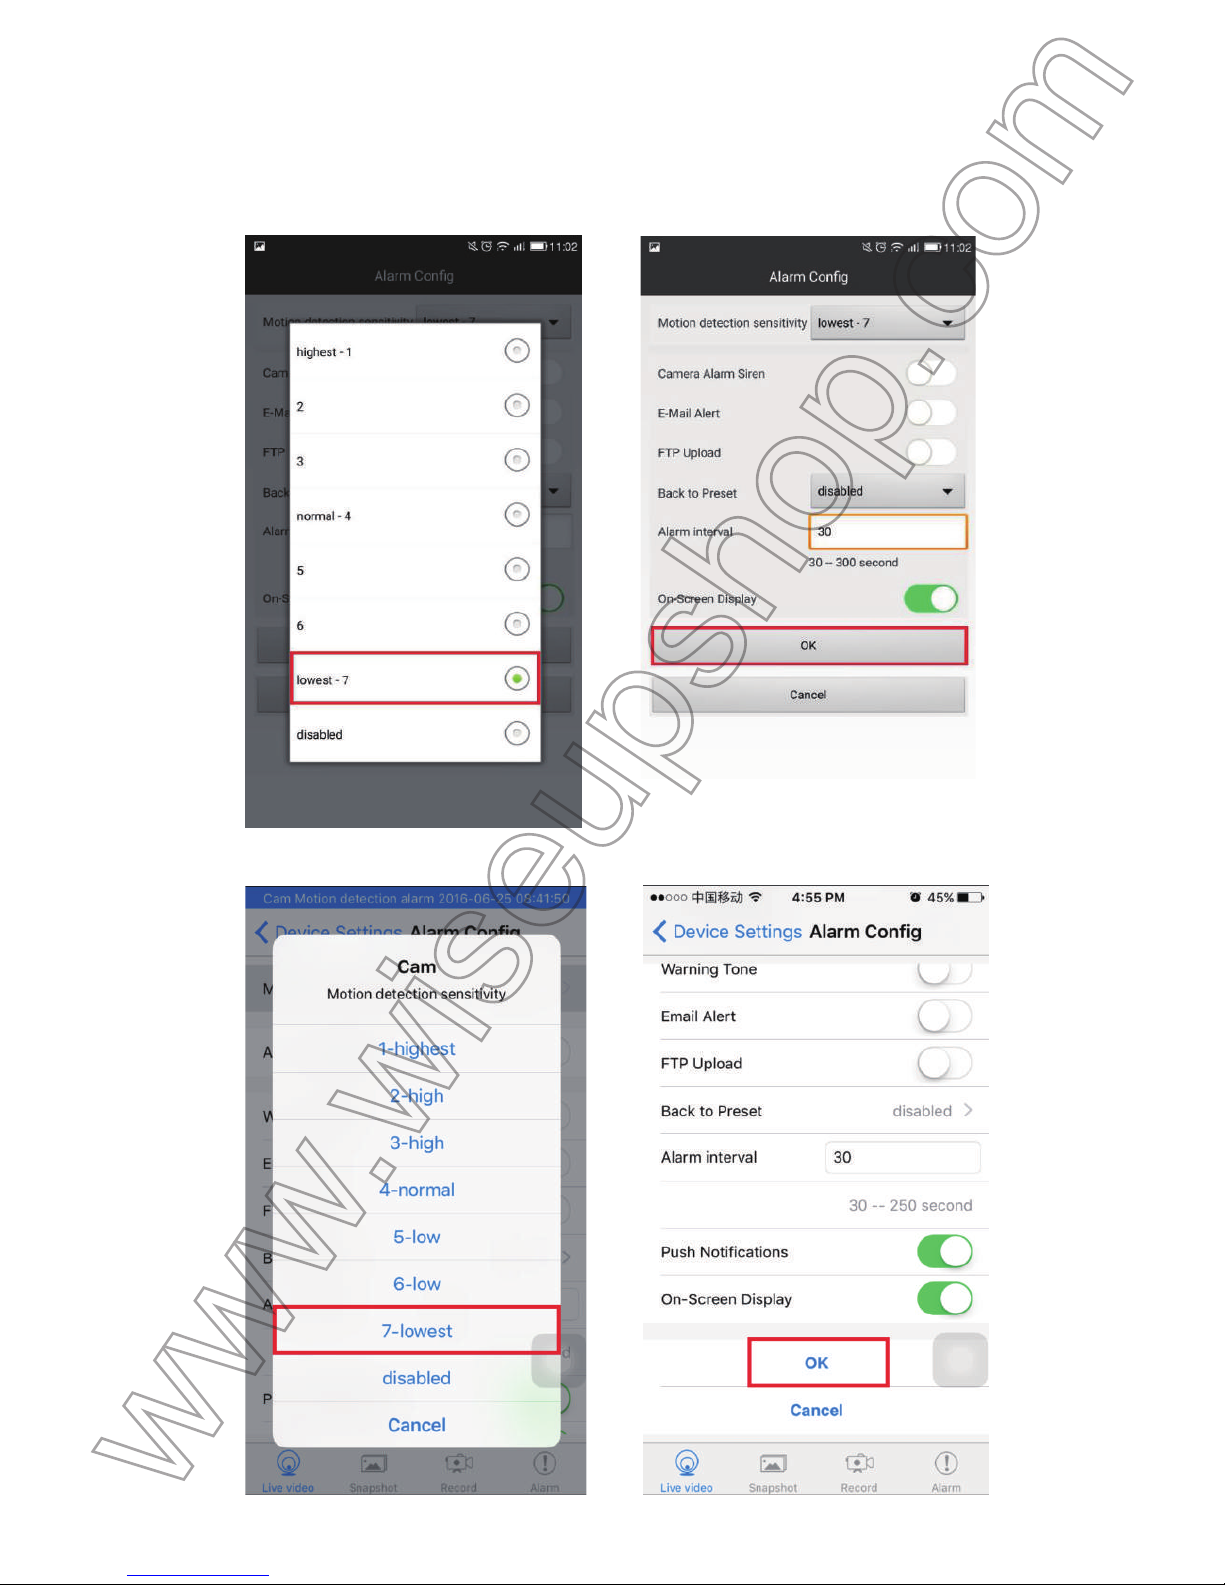
4
.3. Activer la fonction de détection de mouvement, puis appuyez sur OK pour confirmer le réglage.
L
a caméra prend une photo automatiquement quand un mouvement est détecté.
(Android)
(IOS)
Page 67
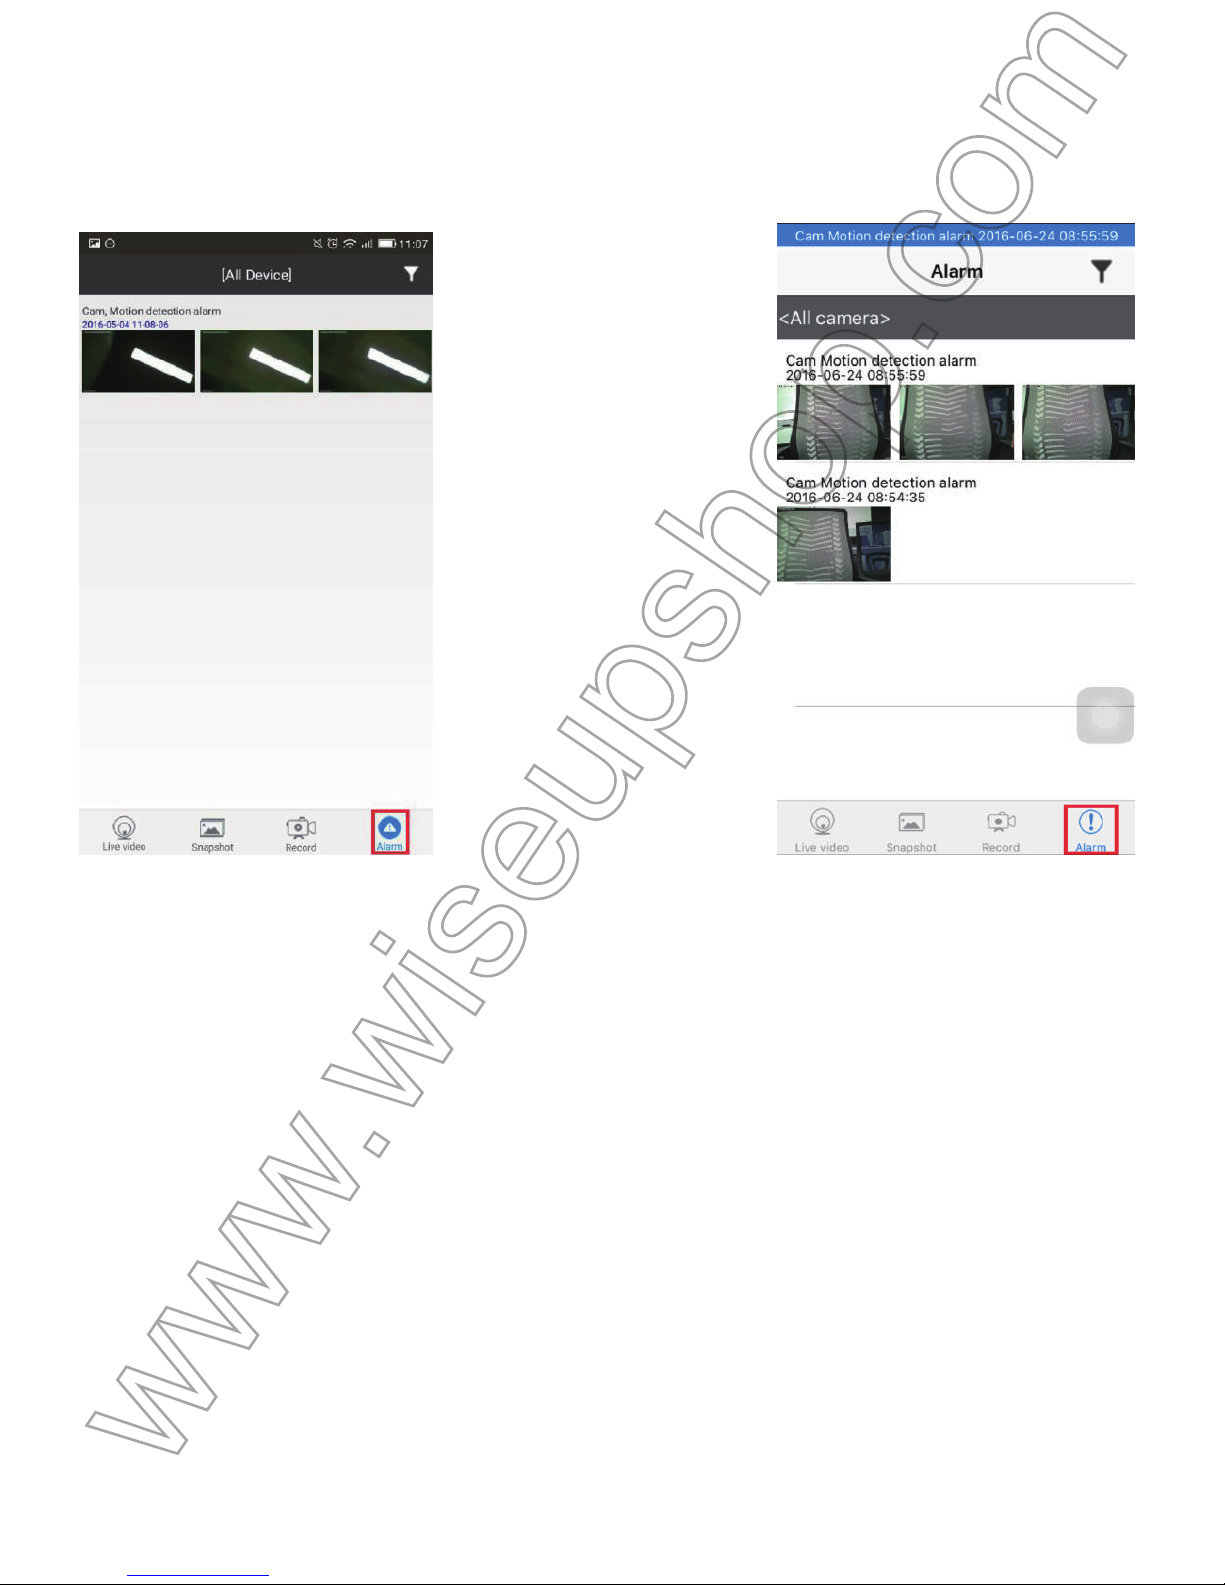
4
.4. Retour à la page de la liste de l'appareil photo, appuyez sur alarme au bas de l'écran pour vérifier
p
hotos.
(Android) (IOS)
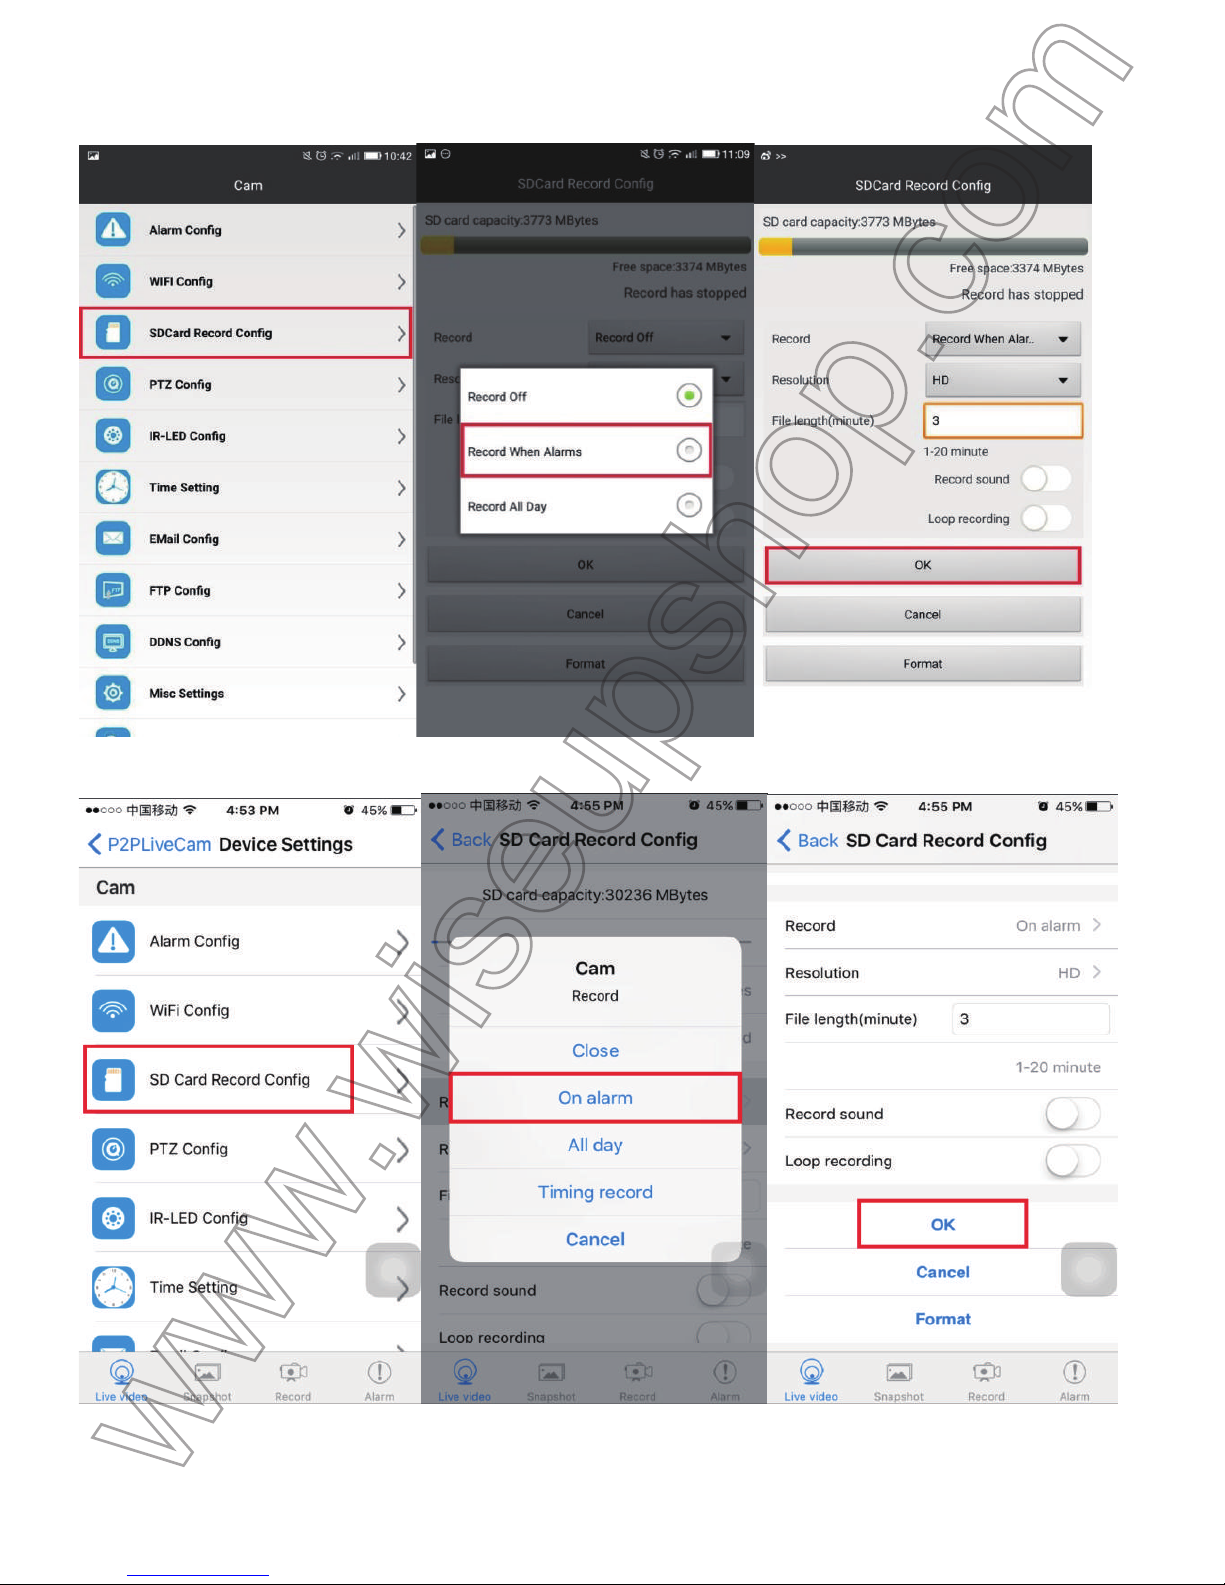
4
.5. Aller à l'avance Config ou la page Paramètres du périphérique et sélectionnez SDCar
d
E
nregistrer Config. Choisissez enregistrement Lorsque alarmes ou sur alarme et définir d'autre
s
p
aramètres souhaités. Ensuite, appuyez sur OK pour confirmer le réglage. La caméra va commencer
l
'enregistrement vidéo automatiquement lorsqu'un mouvement est détecté.
Page 68
(Android)
(IOS)
4
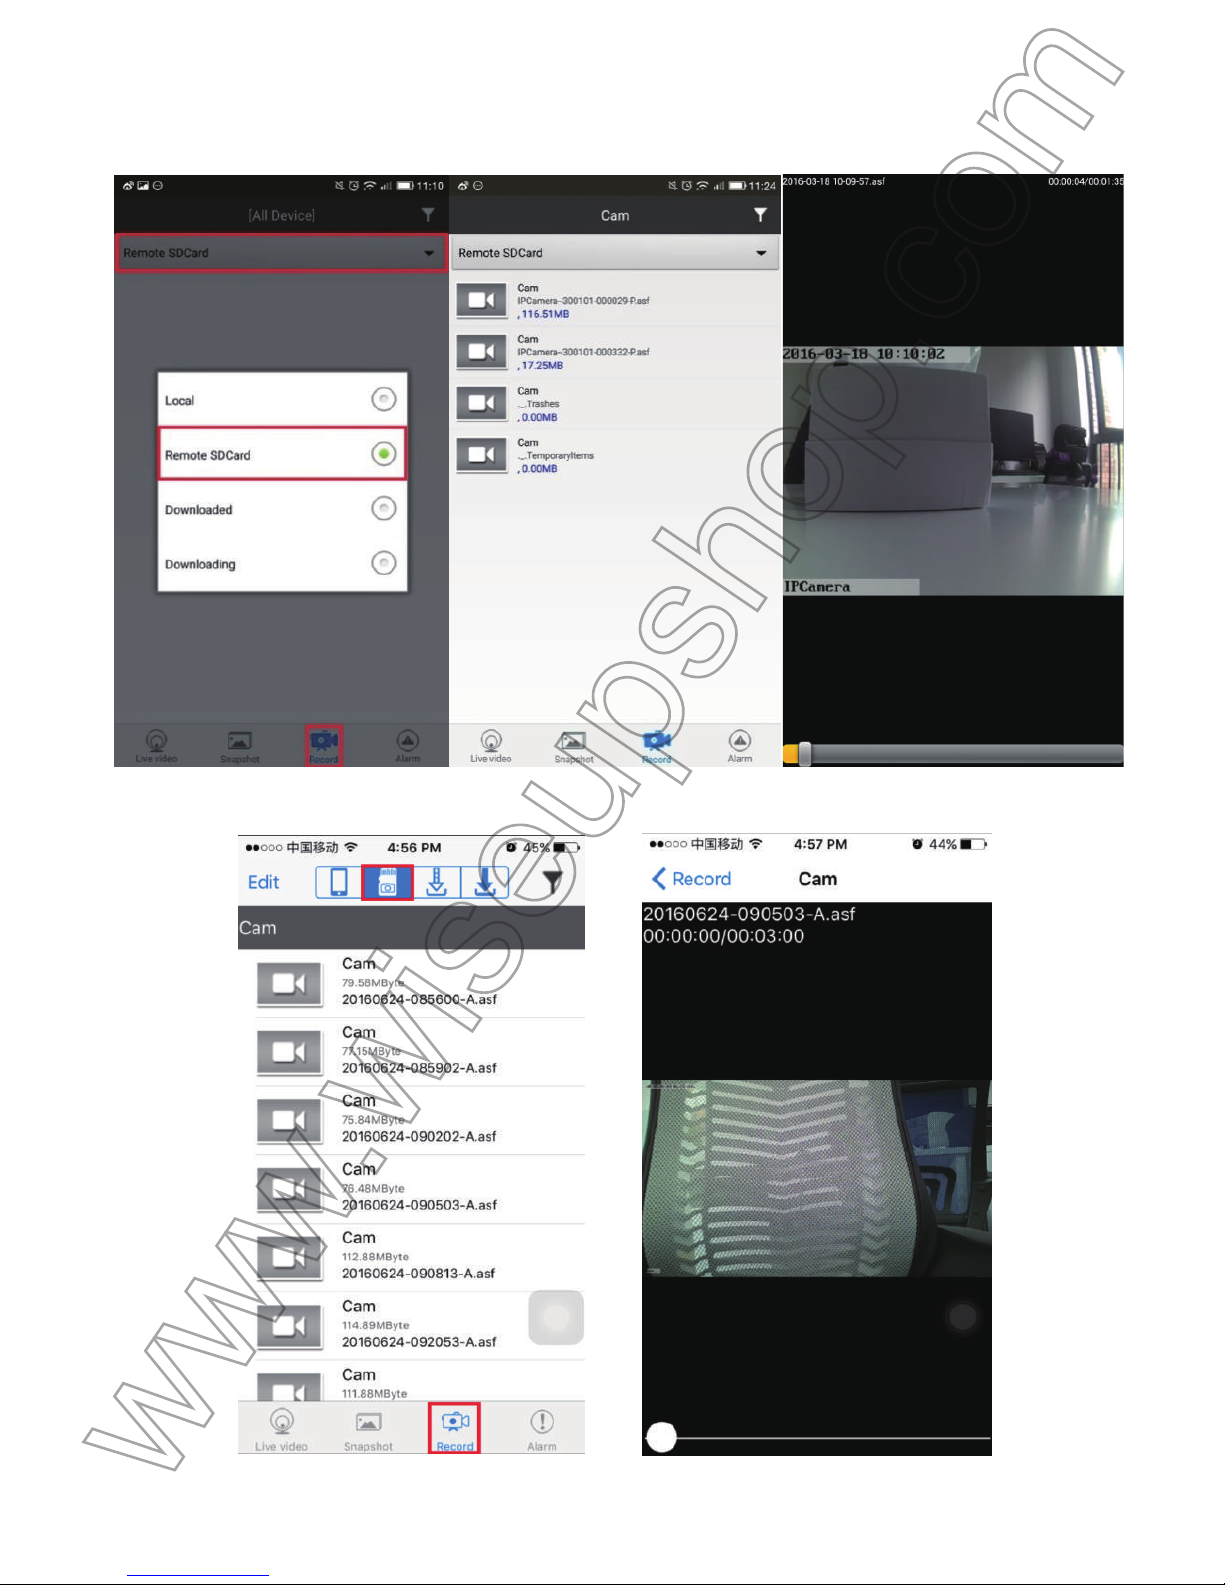
.6. Retour à la page de la liste de la caméra, appuyez sur Enregistrer au bas de l'écran et choisisse
z
à
distance carte SD pour vérifier les fichiers vidéo de détection de mouvement.
Page 69
[
Remarque]:
Tous les fichiers vidéo seront enregistrées dans la carte micro SD de votre appareil photo.
(Android)
(IOS)
Page 70
V
. Enregistrement vidéo à votre Smartphone ou Tablet PC
5
.1. Dans le mode LAN ou WAN, lancer le P2PLiveCam APP. Appuyez sur l'icône de l'appareil phot
o
à
l'écran vidéo en direct.
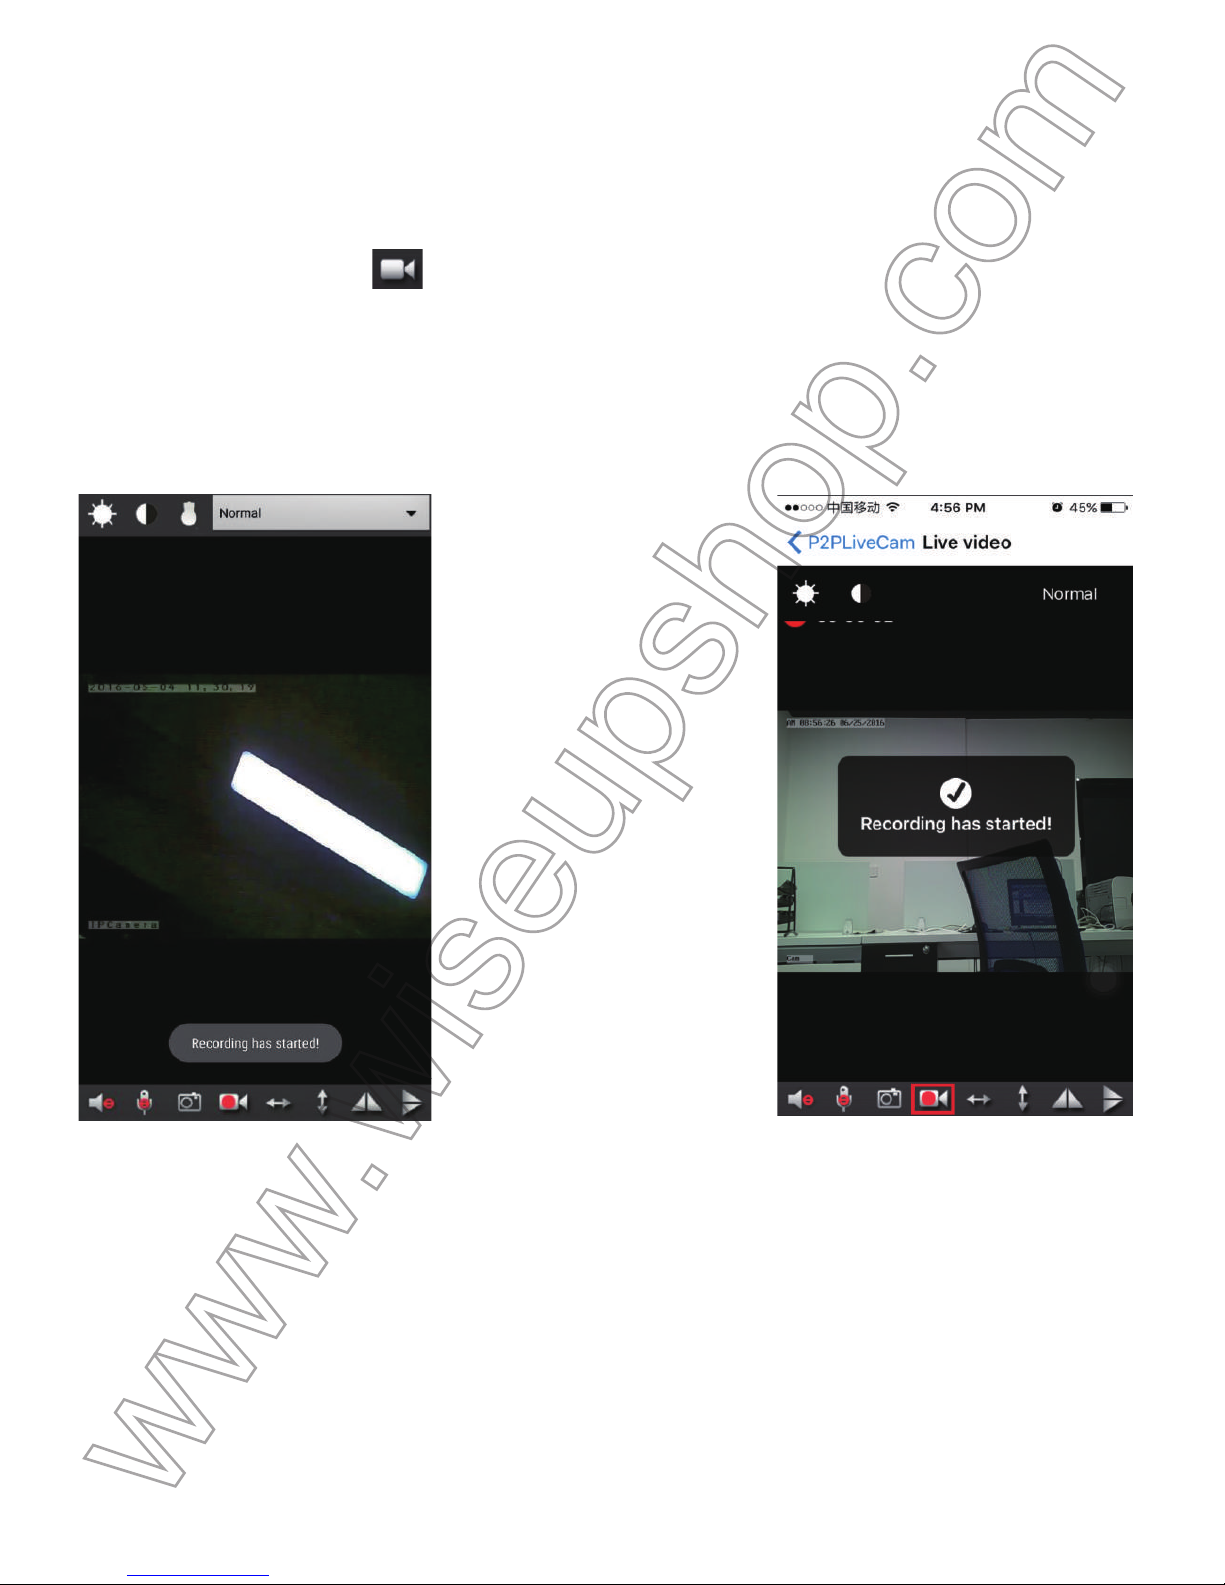
5
.2. Appuyez sur le bouton d'enregistrement vidéo à distance pour démarrer ou arrêter
l
'enregistrement vidéo.
[
Remarque]:
Tous les fichiers vidéo seront enregistrés dans la mémoire flash ou d'extension de carte Micro SD d
e
v
otre smartphone ou tablette PC.
(Android) (IOS)
5
.3. Retour à la liste des caméras, appuyez sur Enregistrer au bas de l'écran et choisissez Local pour
a
ccéder aux fichiers vidéos.
Page 71
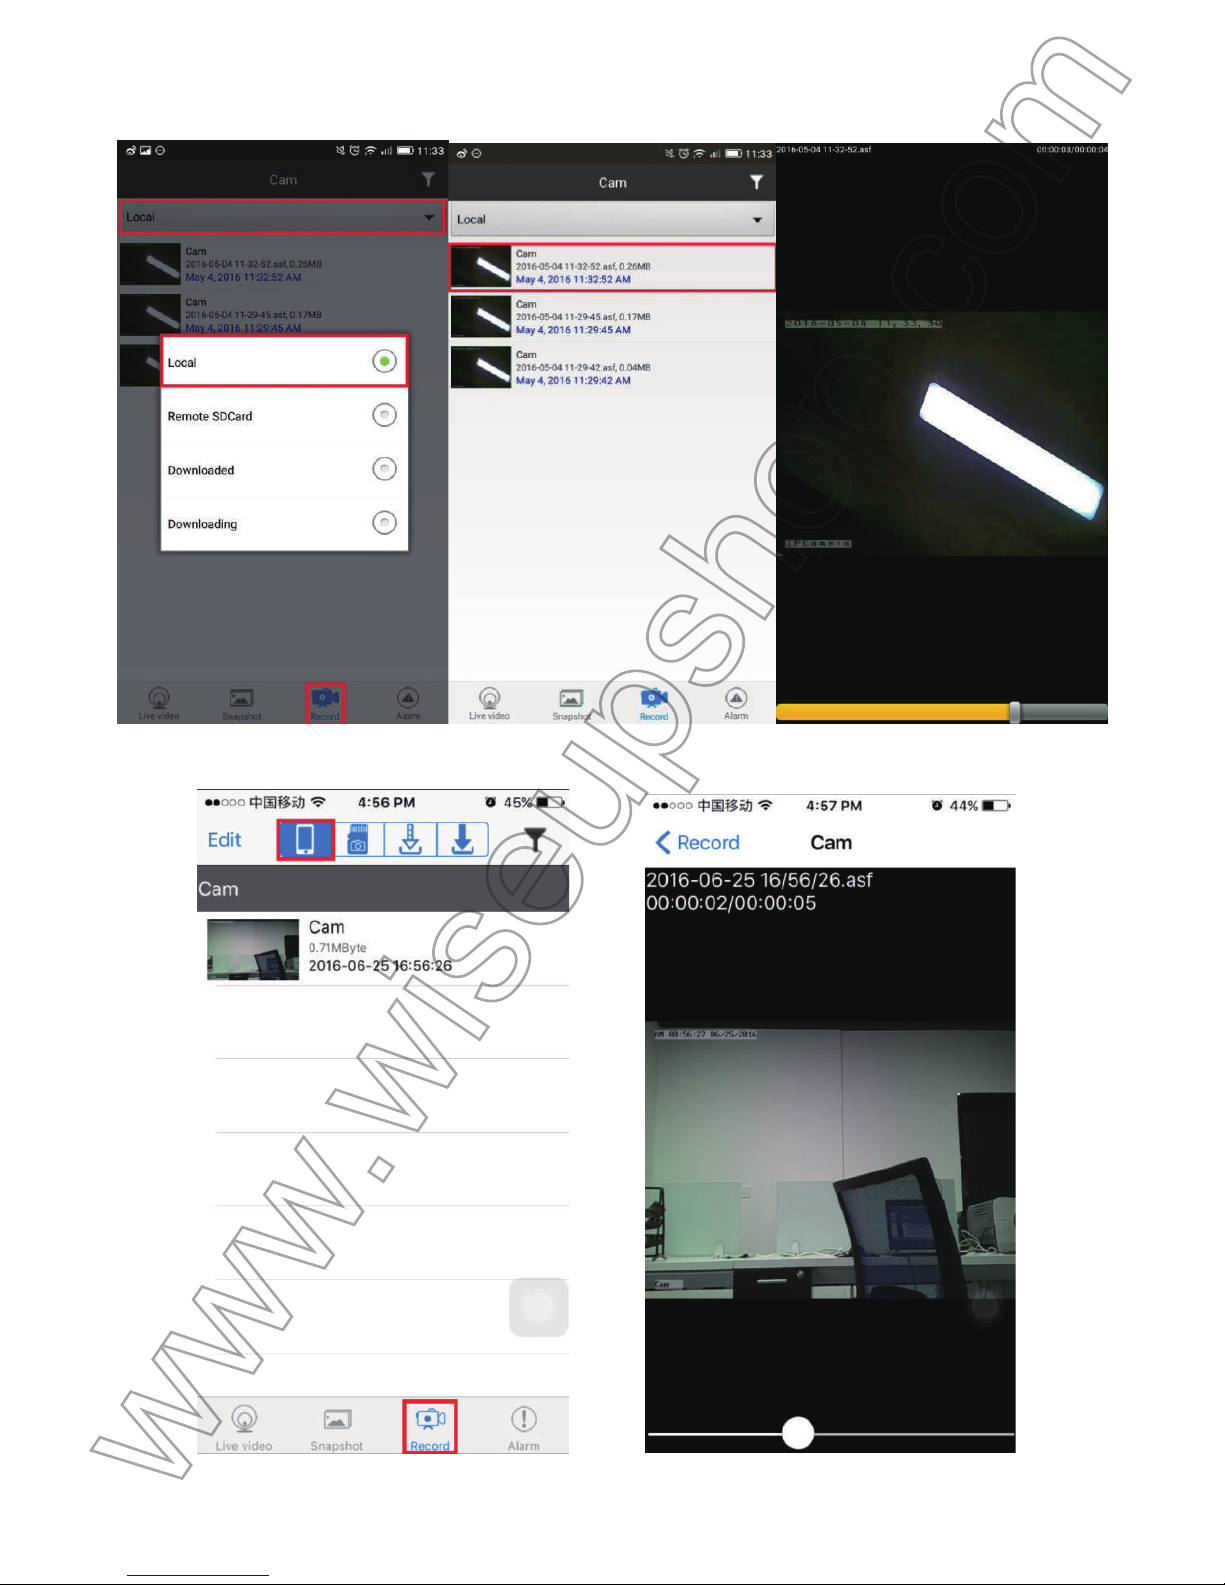
(Android)
(IOS)
Page 72
[
Remarque]:
1
). Avant l'enregistrement, assurez-vous qu'il y a assez de mémoire dans le smartphone ou tablette PC pour
e
nregistrer les fichiers vidéo.
2
). Résolutions Video: 640P, 720P, 1080P Optional Format Vidéo: ASF
V
I. Enregistrement vidéo à une carte Micro SD à distance
>
> S'il vous plaît assurez-vous que la carte Micro SD est bien insérée dans la fente de la carte SD d
e
v
otre appareil photo. Une carte SD SDHC Class10 Micro est recommandé.
6
.1. Lancez le P2PLiveCam APP.
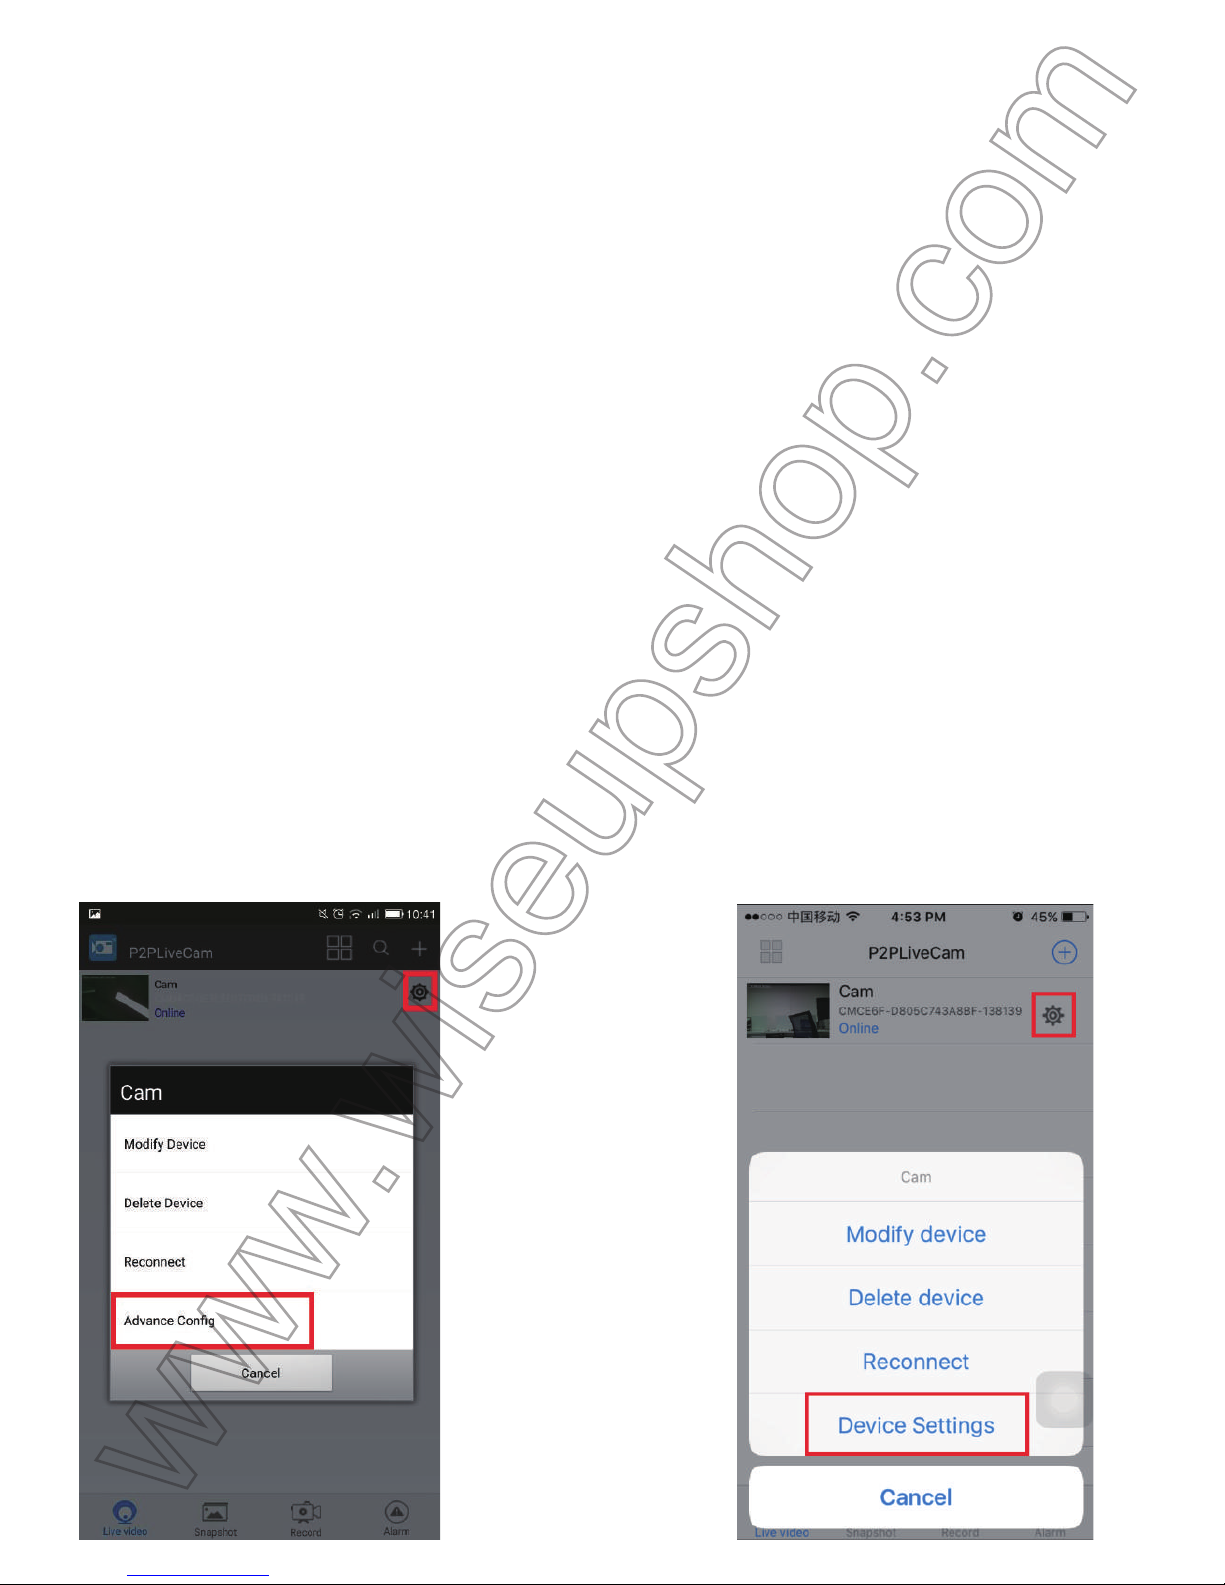
6
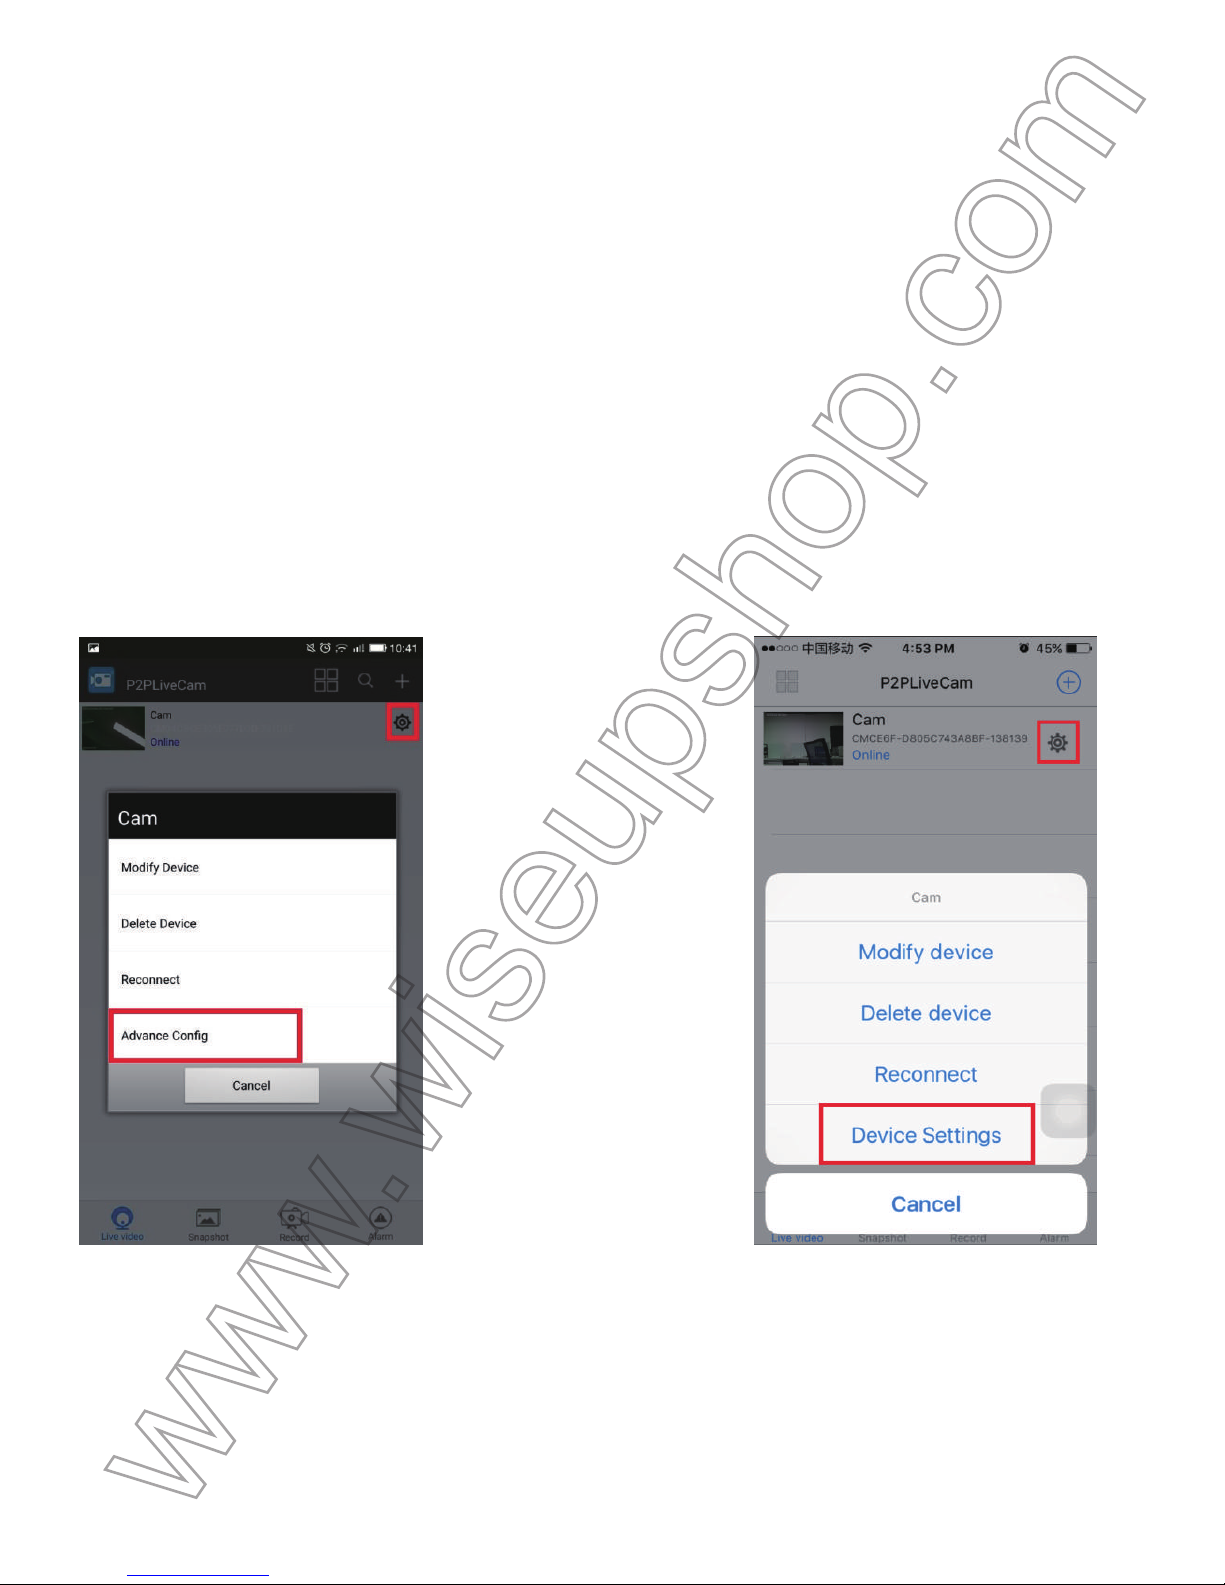
.2. Appuyez sur l'icône de réglage > Advance Config ou Paramètres du périphérique.
(Android) (IOS)
6
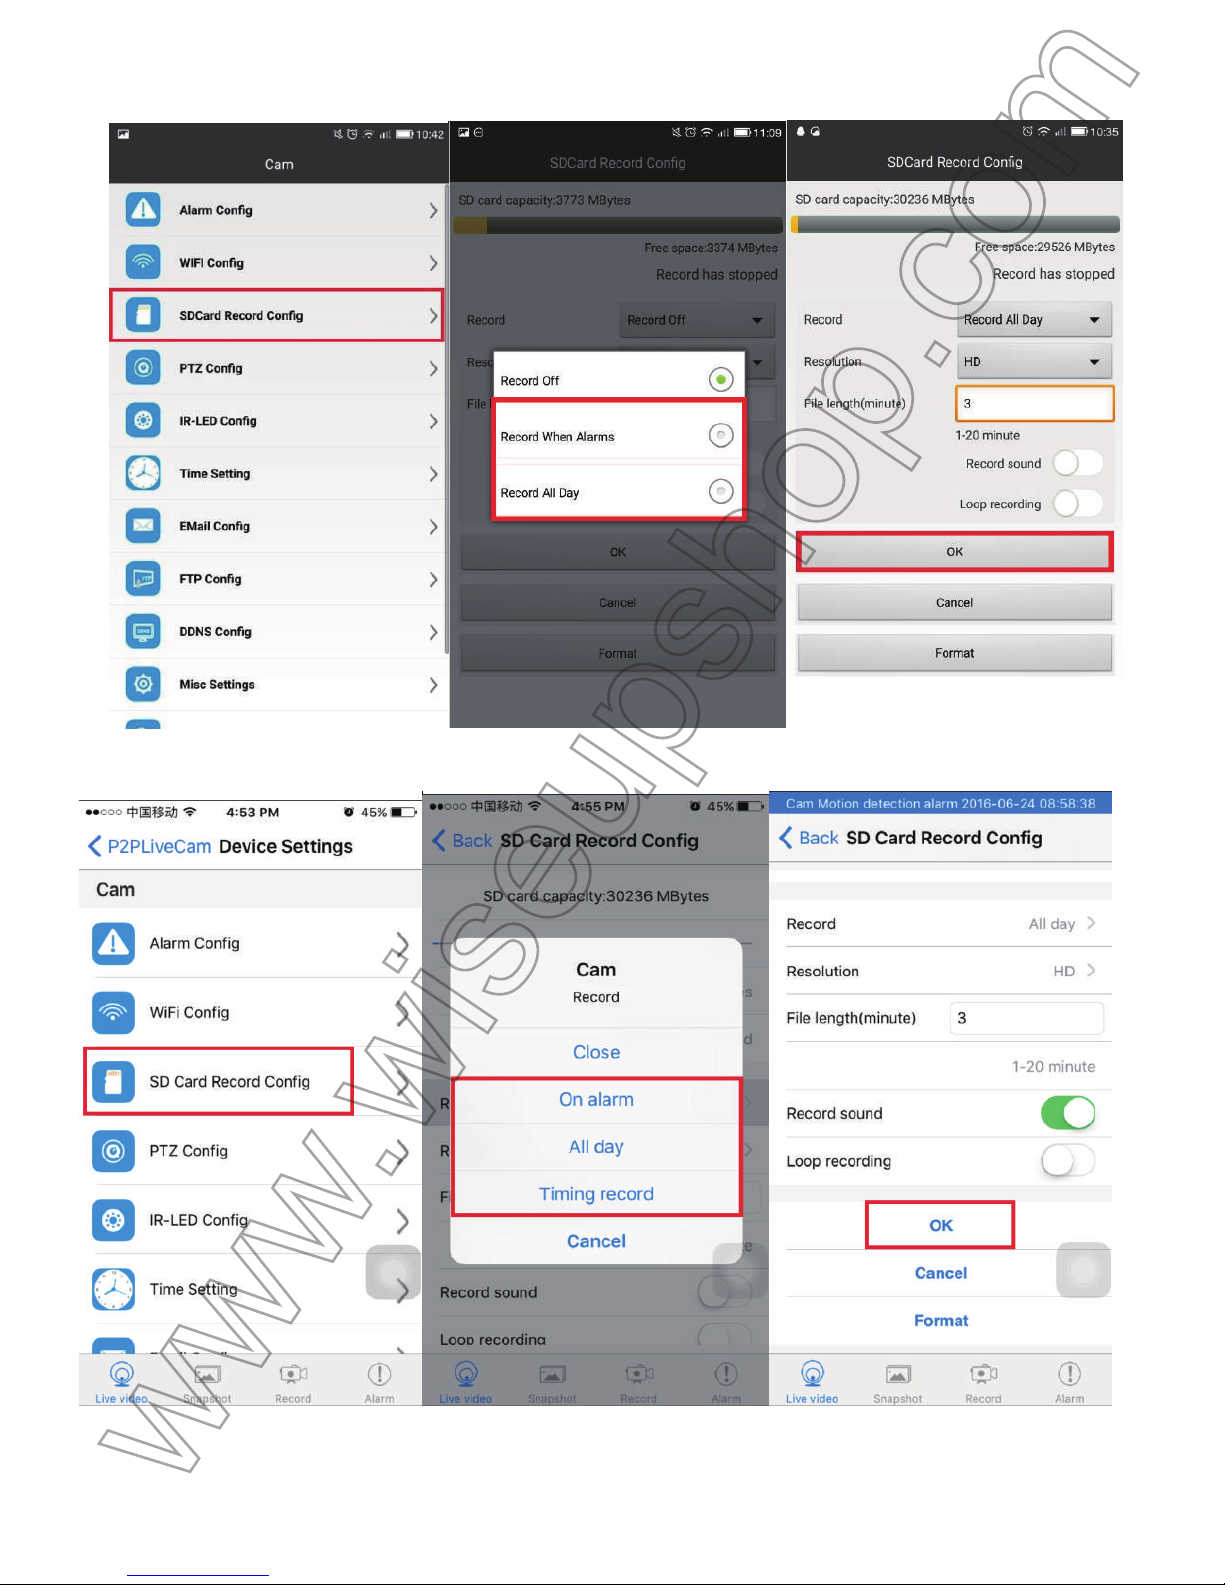
.3. Appuyez sur la carte SD enregistrement Config, choisissez un mode d'enregistrement et définir
d
'autres paramètres souhaités, puis appuyez sur OK pour confirmer le réglage.
Page 73
(Android)
(IOS)
6
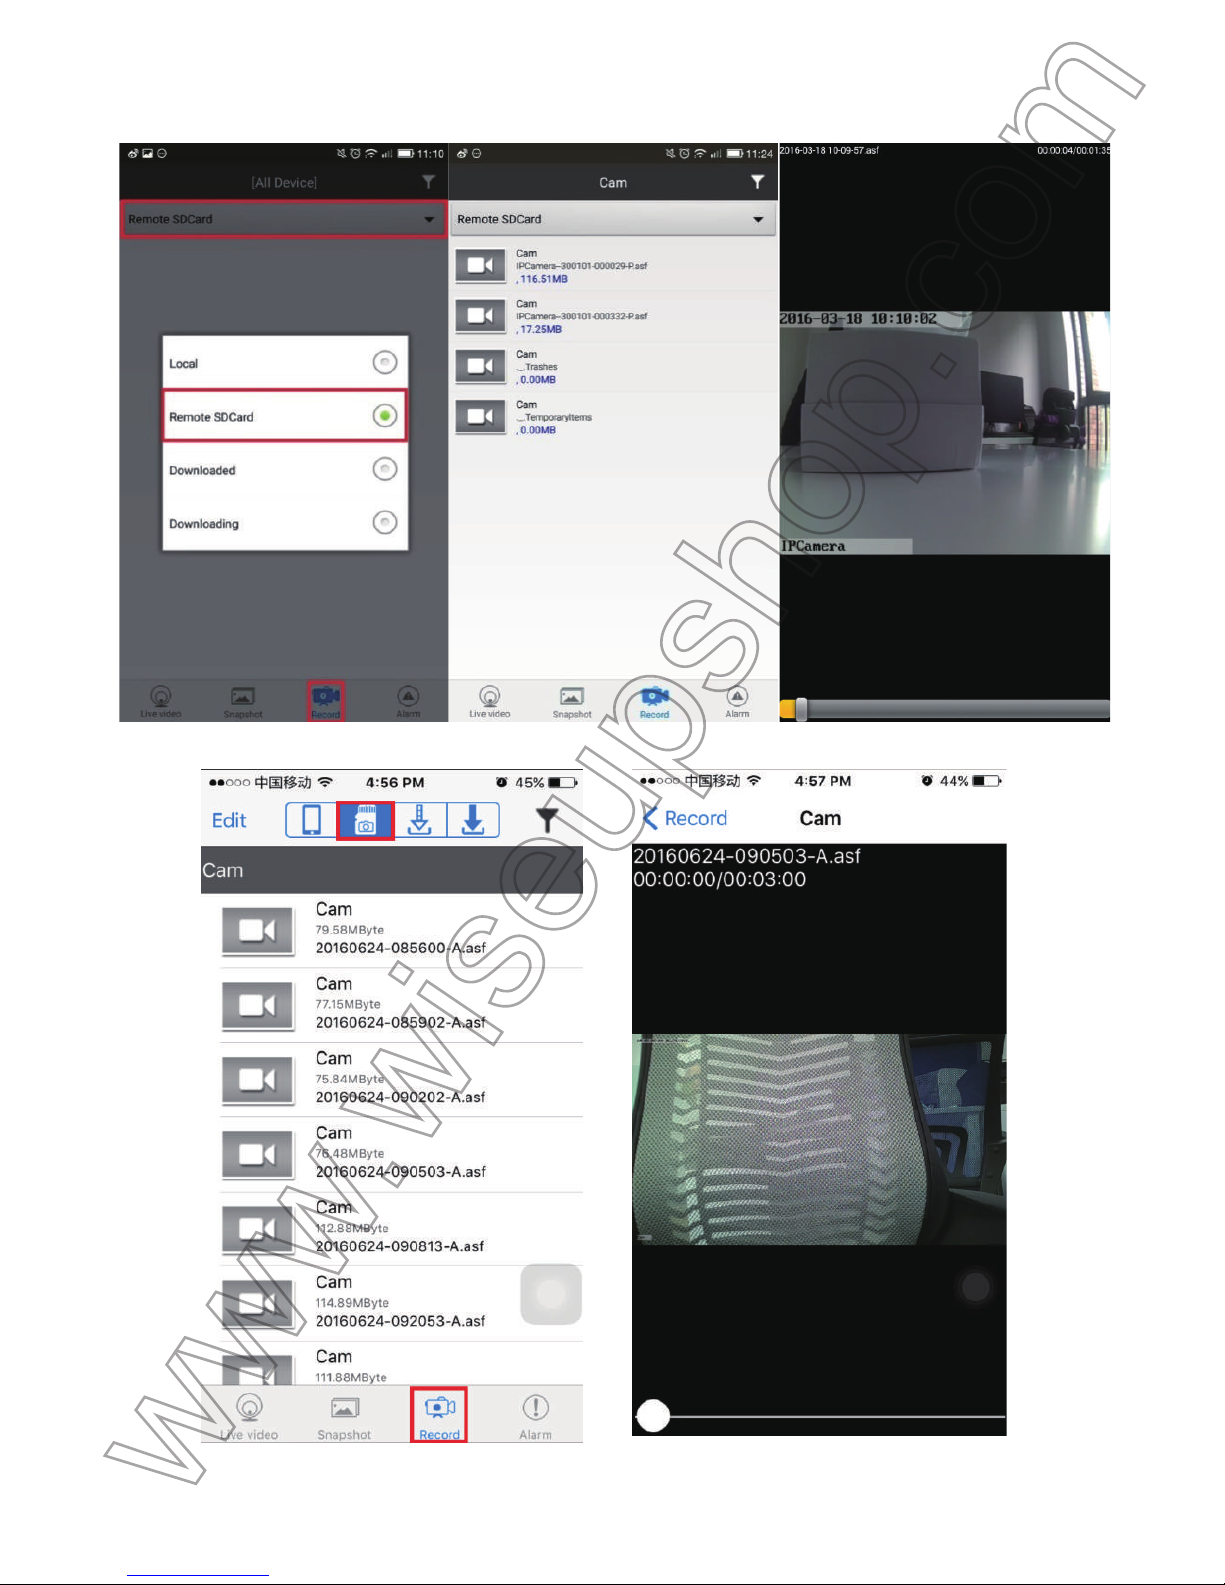
.4. Retour à la page de la liste de la caméra, appuyez sur Enregistrer au bas de l'écran et choisisse
z
l
a carte SD à distance pour vérifier les fichiers vidéo.
Page 74
(Android)
(IOS)
Page 75
[
Remarque]:
1
). Tous les fichiers vidéo seront enregistrées dans la carte micro SD de votre appareil photo.
2
). S'il vous plaît formater la Micro SD carte ou assurez-vous qu'il y a assez d'espace dans la Micro SD carte pou
r
s
tocker les séquences vidéo avant l'enregistrement vidéo.
V
II. Réinitialiser
S
i pour une raison quelconque la caméra cesse de répondre ou ne fonctionne pas correctement, un
e
r
éinitialisation rapide sera le restaurer à un fonctionnement normal.
O
pération: appuyer sur le bouton de réinitialisation pendant 5 secondes pour réinitialiser l'appareil
p
hoto. Les voyants se sortir. La caméra redémarre automatiquement en 15 secondes ou plus.
V
III. Changer le mot de passe de l'appareil photo
>
> S'il vous plaît confirmer que l'appareil photo est ajouté avec succès à votre smartphone ou tablett
e
P
C en mode P2P (LAN), et que le (LAN) P2P fonctionne bien.
8
.1. Dans le mode P2P (LAN), appuyez sur l'icône des paramètres et sélectionnez Avancé Config o
u
P
aramètres du périphérique.
(Android) (IOS)
Page 76
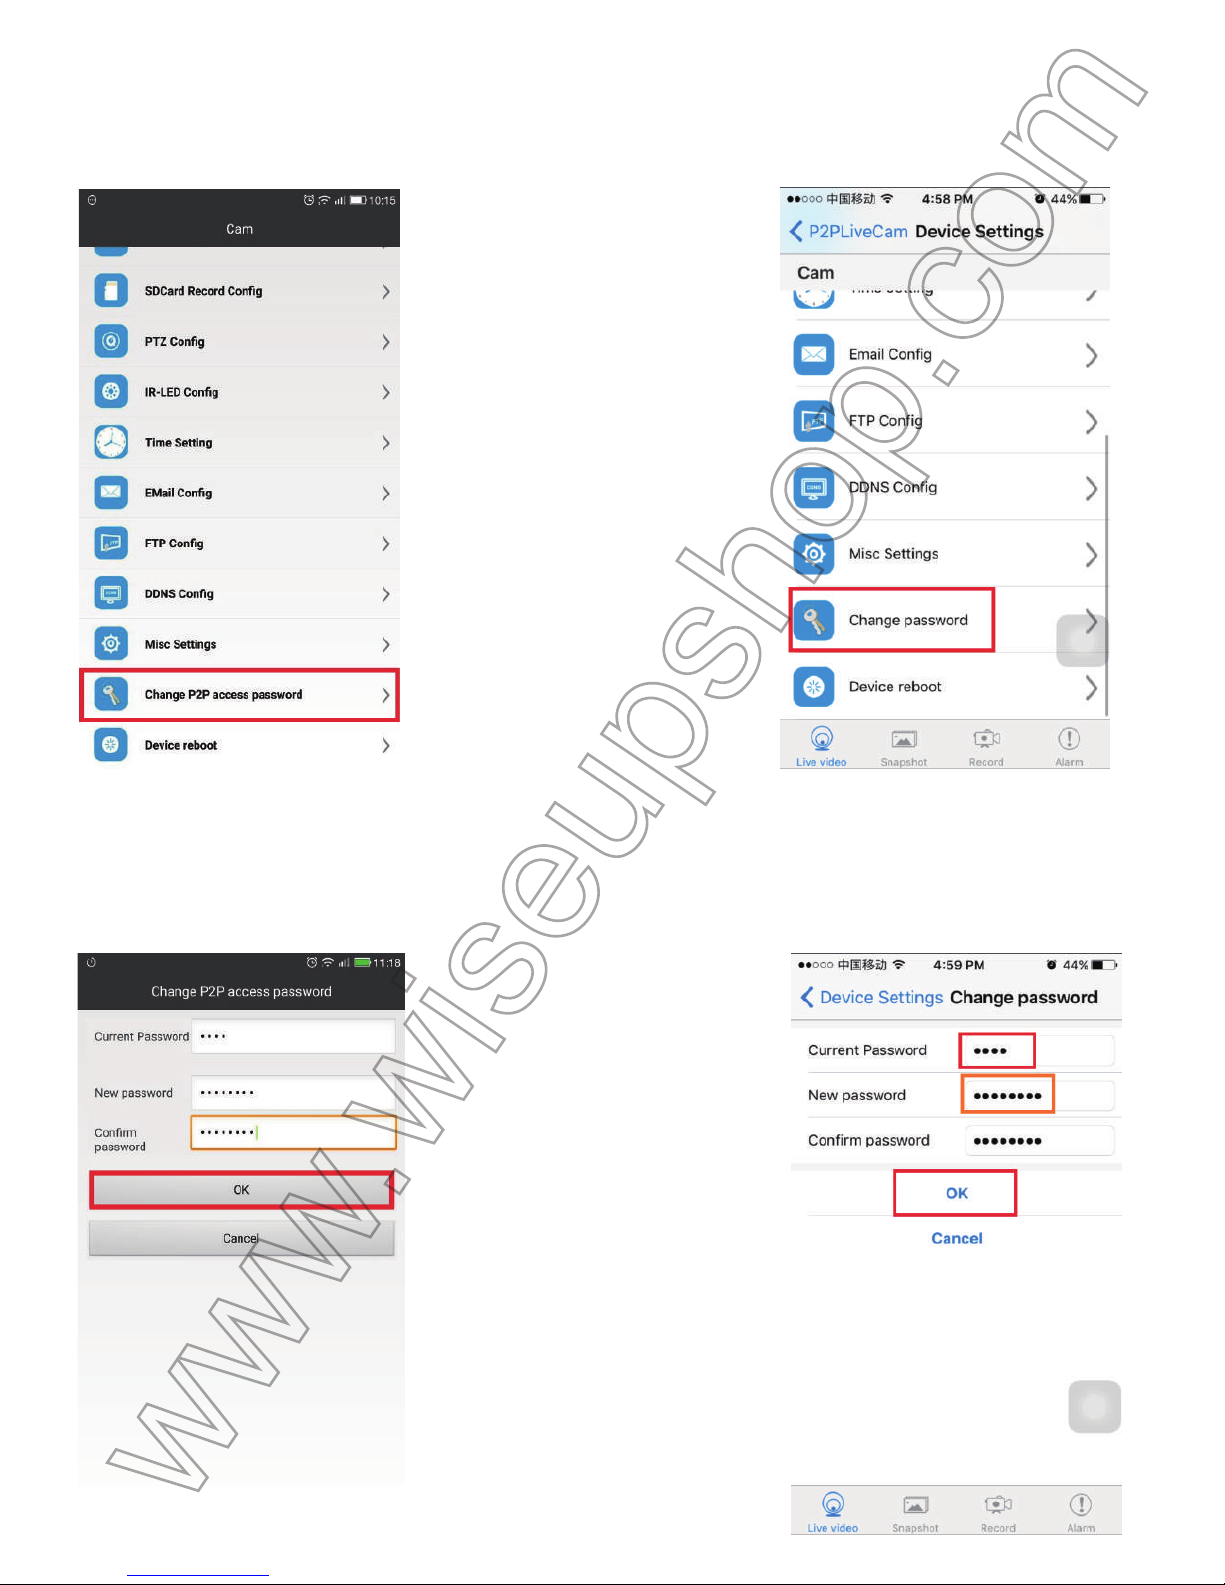
8
.2. Appuyez sur Modifier le mot de passe d'accès P2P ou modifier le mot de passe.
(Android) (IOS)
8
.3. Le mot de passe utilisateur par défaut est 8888. Entrez un nouveau mot de passe et le confirmer
.
E
nsuite, appuyez sur OK pour enregistrer la modification.
(Android) (IOS)
Page 77
V
érifiez si les nouvelles œuvres de mot de passe!
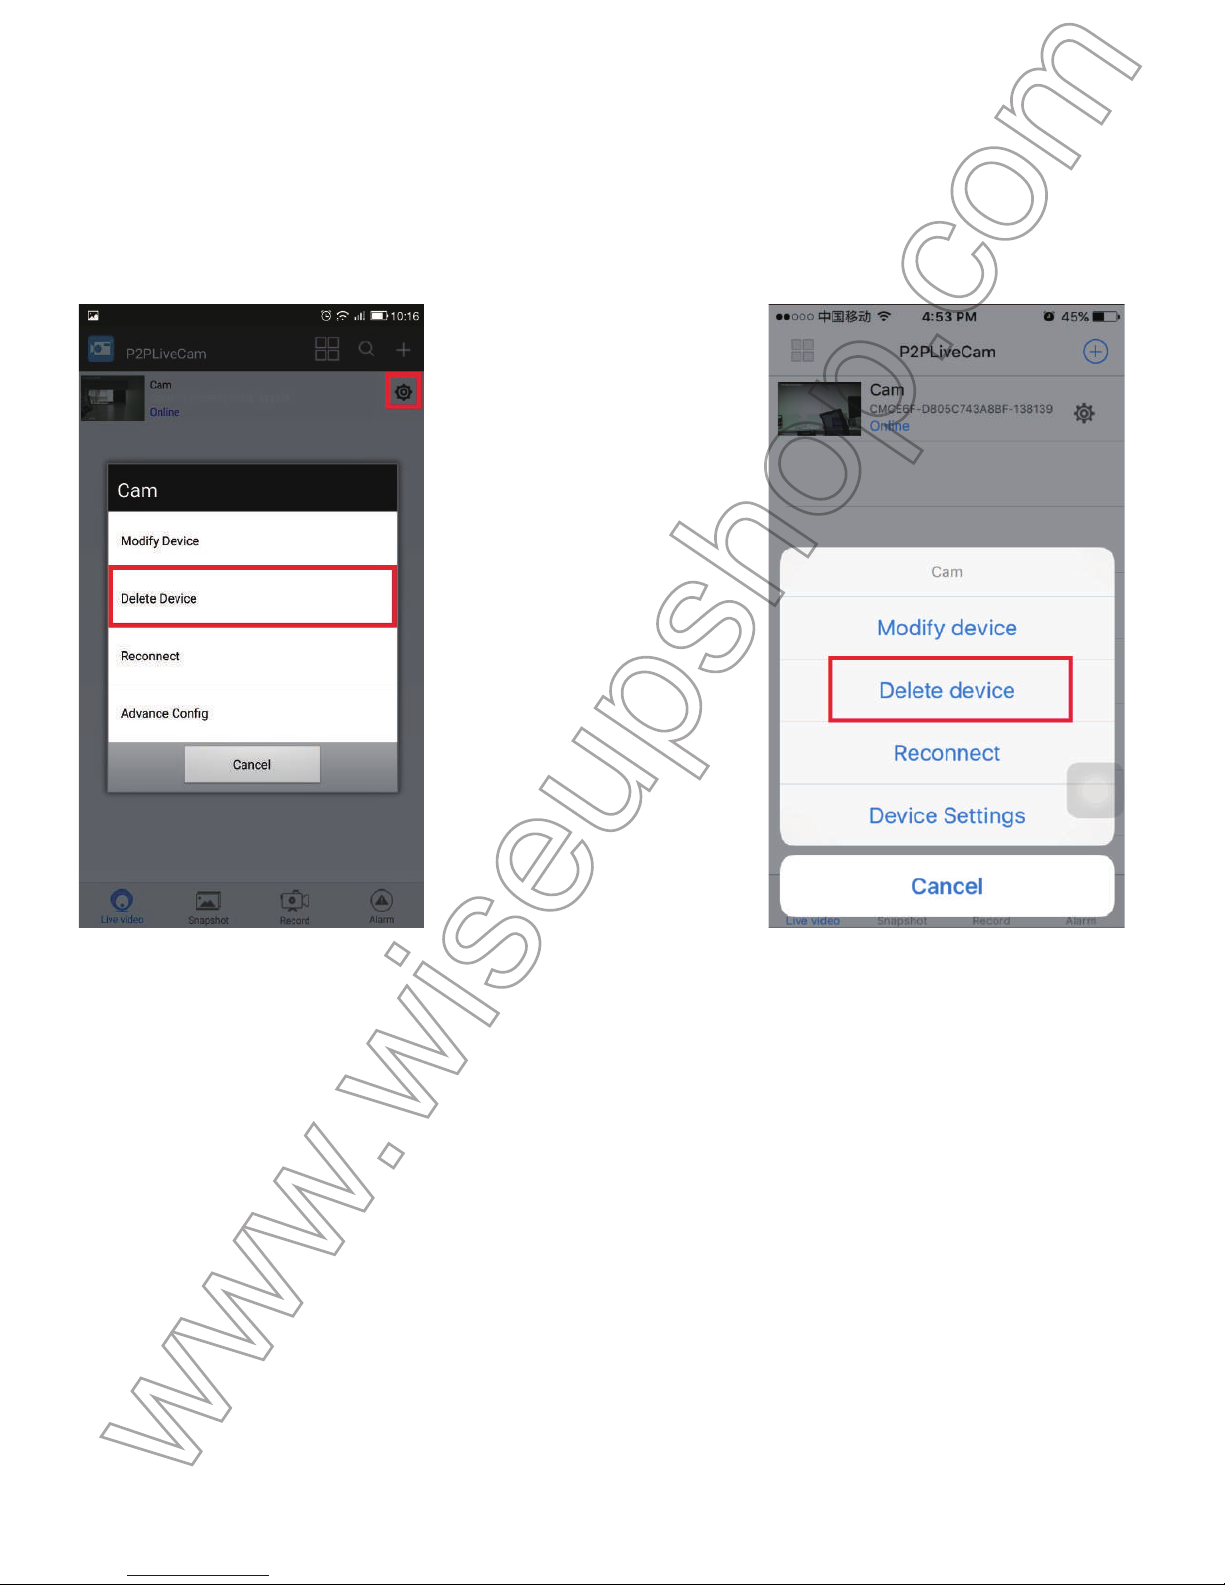
1
. Retour à la page de la liste de l'appareil photo, appuyez sur l'icône de réglage et de supprimer l
a
caméra en cours.
(Android) (IOS)
2
. Quittez l'APP.
3
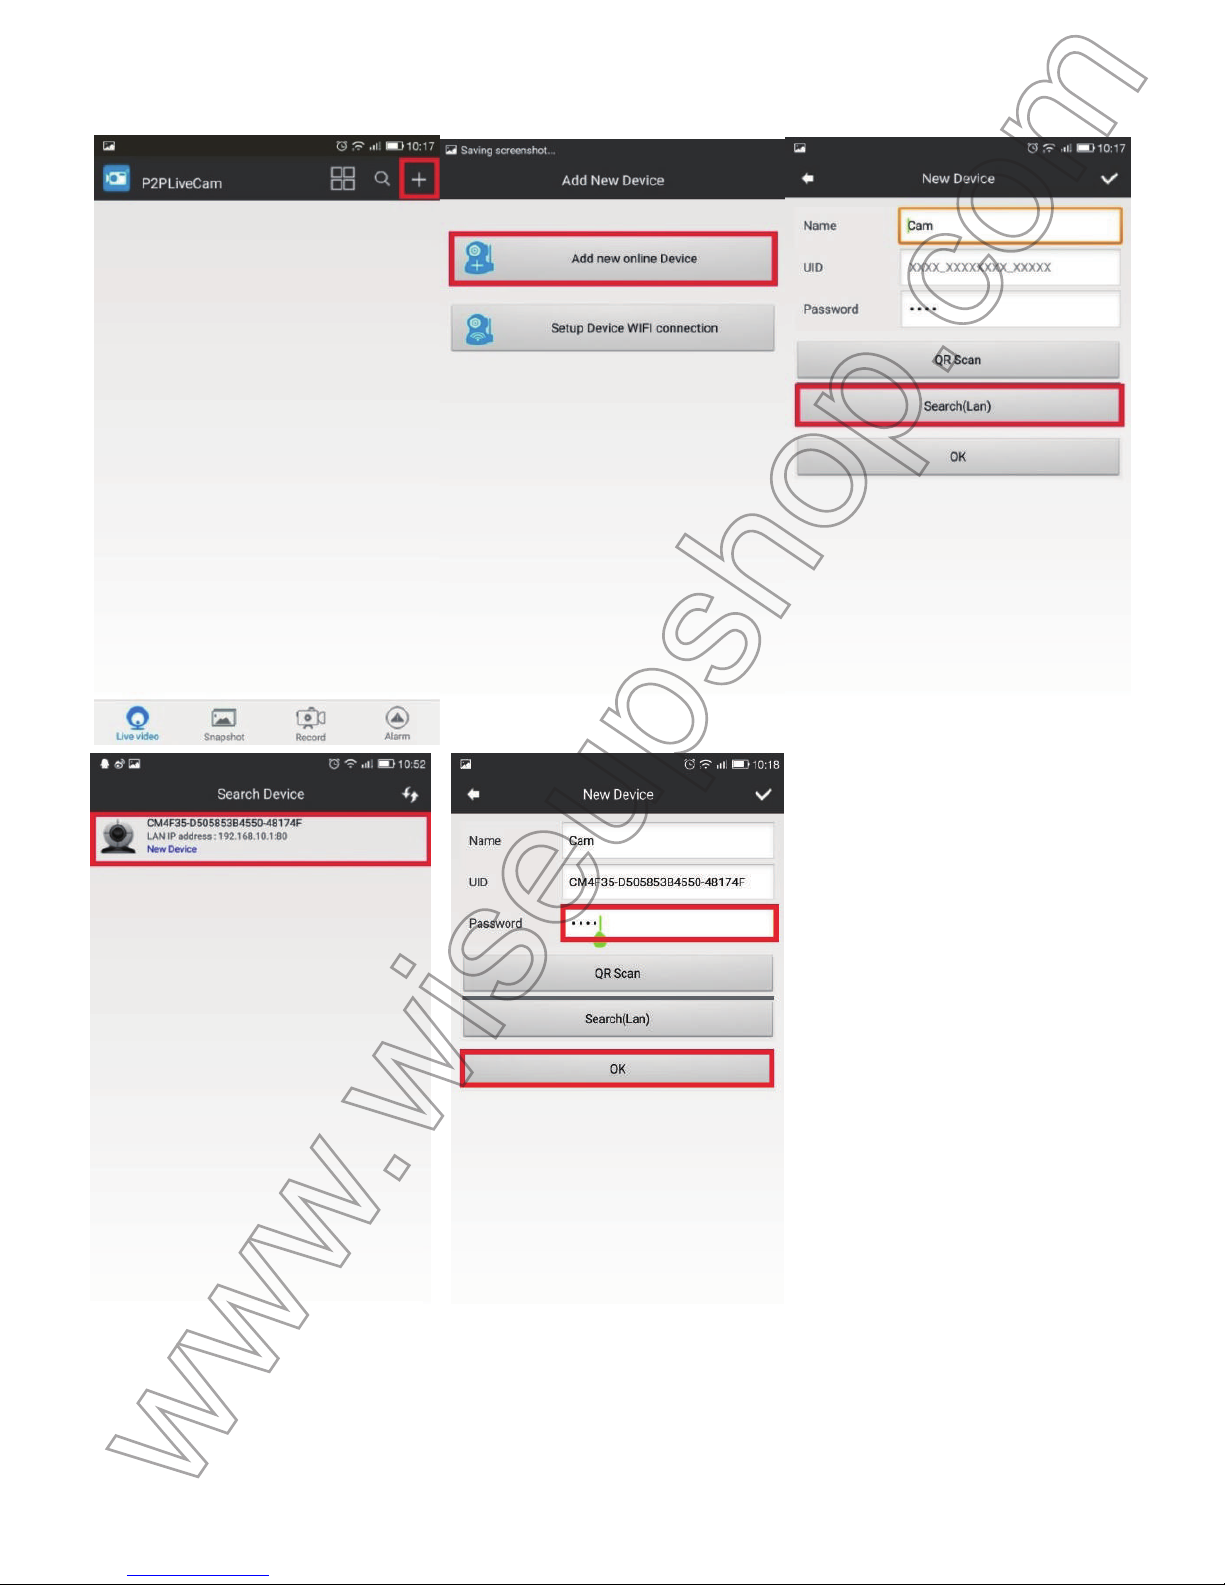
. Lancez à nouveau l'APP. Suivez 3.2.3 pour ajouter la caméra. Ne oublier pas de taper le nouvea
u
m
ot de passe avant de taper OK pour ajouter la caméra.
Page 78
(Android)
Page 79
(IOS)
6
. Si l'appareil photo est affichée en ligne, cela signifie que l'appareil photo est correctement ajoutée.
S
'il est démontré mot de passe incorrect, cela signifie que vous entrez un mot de passe erroné.
Page 80

Q
uestions fréquemment posées
Q
: Quel type de carte mémoire puis-je utiliser cet appareil photo?
A
: Il est recommandé d'utiliser une classe 10 de carte Micro SD SDHC (4 Go-64GB). Si une cart
e
m
émoire ne fonctionne pas, enlever et formater sur un ordinateur PC avant de l'essayer dan
s
l
'appareil photo à nouveau.
Q
: Pourquoi ne puis-je pas trouver le signal WIFI de l'appareil photo sur mon téléphone o
u
t
ablette PC?
A
: Il peut prendre 1-3 minutes avant le signal WIFI de l'appareil photo se trouve sur votre smartphon
e
o
u tablette PC. Si le signal WIFI encore ne peut être trouvé, s'il vous plaît se référer à VII pour
r
éinitialiser l'appareil.
Q
: Pourquoi ne puis-je lire des fichiers vidéo ou les fichiers vidéo sont corrompus?
A
: Il est principalement parce que l'appareil est mis hors tension de façon inappropriée.
Q
: Pourquoi ai-je des difficultés à visualiser la vidéo en direct à distance?
A
: Une vitesse de bande passante minimum de 1.5Mbps est nécessaire pour lire la vidéo HD en direc
t
(
1280 * 720p, 1920 * 1080P).
Q
: Quel logiciel lecteur multimédia dois-je utiliser pour lire les fichiers vidéo?
A
: Installez le lecteur VLC Media à partir du CD Disc pour lire des fichiers vidéo sur votre ordinateur
P
C.
Q
: Comment puis-je réinitialiser mon appareil photo à la façon dont je l'ai eu?
A
: Maintenez enfoncé le bouton de réinitialisation pendant 5 secondes pour réinitialiser l'apparei
l
p
hoto. (Voir VII)
Q
: Comment puis-je arrêter des étrangers d'accéder à mon appareil photo?
A
: Changer le mot de passe de votre appareil photo. (Voir VIII)
Page 81
WIFI23
Guida utente
I
. Panoramica del Prodotto
1
. Camera Lens
2
. Spia
3
. Pulsante di ripristino
4
. Slot per scheda micro SD
I
I. Cosa c'è nella scatola
-
Disco Mini CD
-
Lettore di schede
-
Macchina fotografica WIFI AC Adapter
I
II. Configurazione di rete
3
.1. Installare il P2PLiveCam APP
C
erca il P2PLiveCam APP nel Google Play Store o Apple Store e installarlo sul vostro smartphone
o
t
ablet PC.
Page 82
(Android) (IOS)
3
.2. Impostazione P2P o LAN modalità
3
.2.1. Accendere la fotocamera collegandolo ad una presa di corrente di uscita.
[
Nota]:
1
). La spia si illumina blu per 5 secondi e uscire. 30 secondi più tardi, lampeggia in rosso e blu lentamente, indicand
o
l
a telecamera è entrato in modalità P2P (LAN).
2
). Scollegare la fotocamera per spegnerla.
3
.2.2. Vai alla Wi-Fi o la pagina delle impostazioni WLAN sul proprio smartphone o tablet PC
,
c
ollegare il dispositivo al segnale Wi-Fi della fotocamera. La telecamera di rete WIFI SSID inizia co
n
C
M ******** e apparirà sul tuo WIFI o pagina Impostazioni WLAN come di seguito:
Page 83
(Android) (IOS)
[
Nota]:
1
). Ci vorranno 1-3 minuti prima che il segnale Wi-Fi della fotocamera viene trovato dal tuo smartphone o tablet PC.
2
). Se il segnale Wi-Fi della fotocamera non può essere trovato sul vostro smartphone o tablet PC, ripristinare la
f
otocamera (vedere VII) e poi provare di nuovo.
3
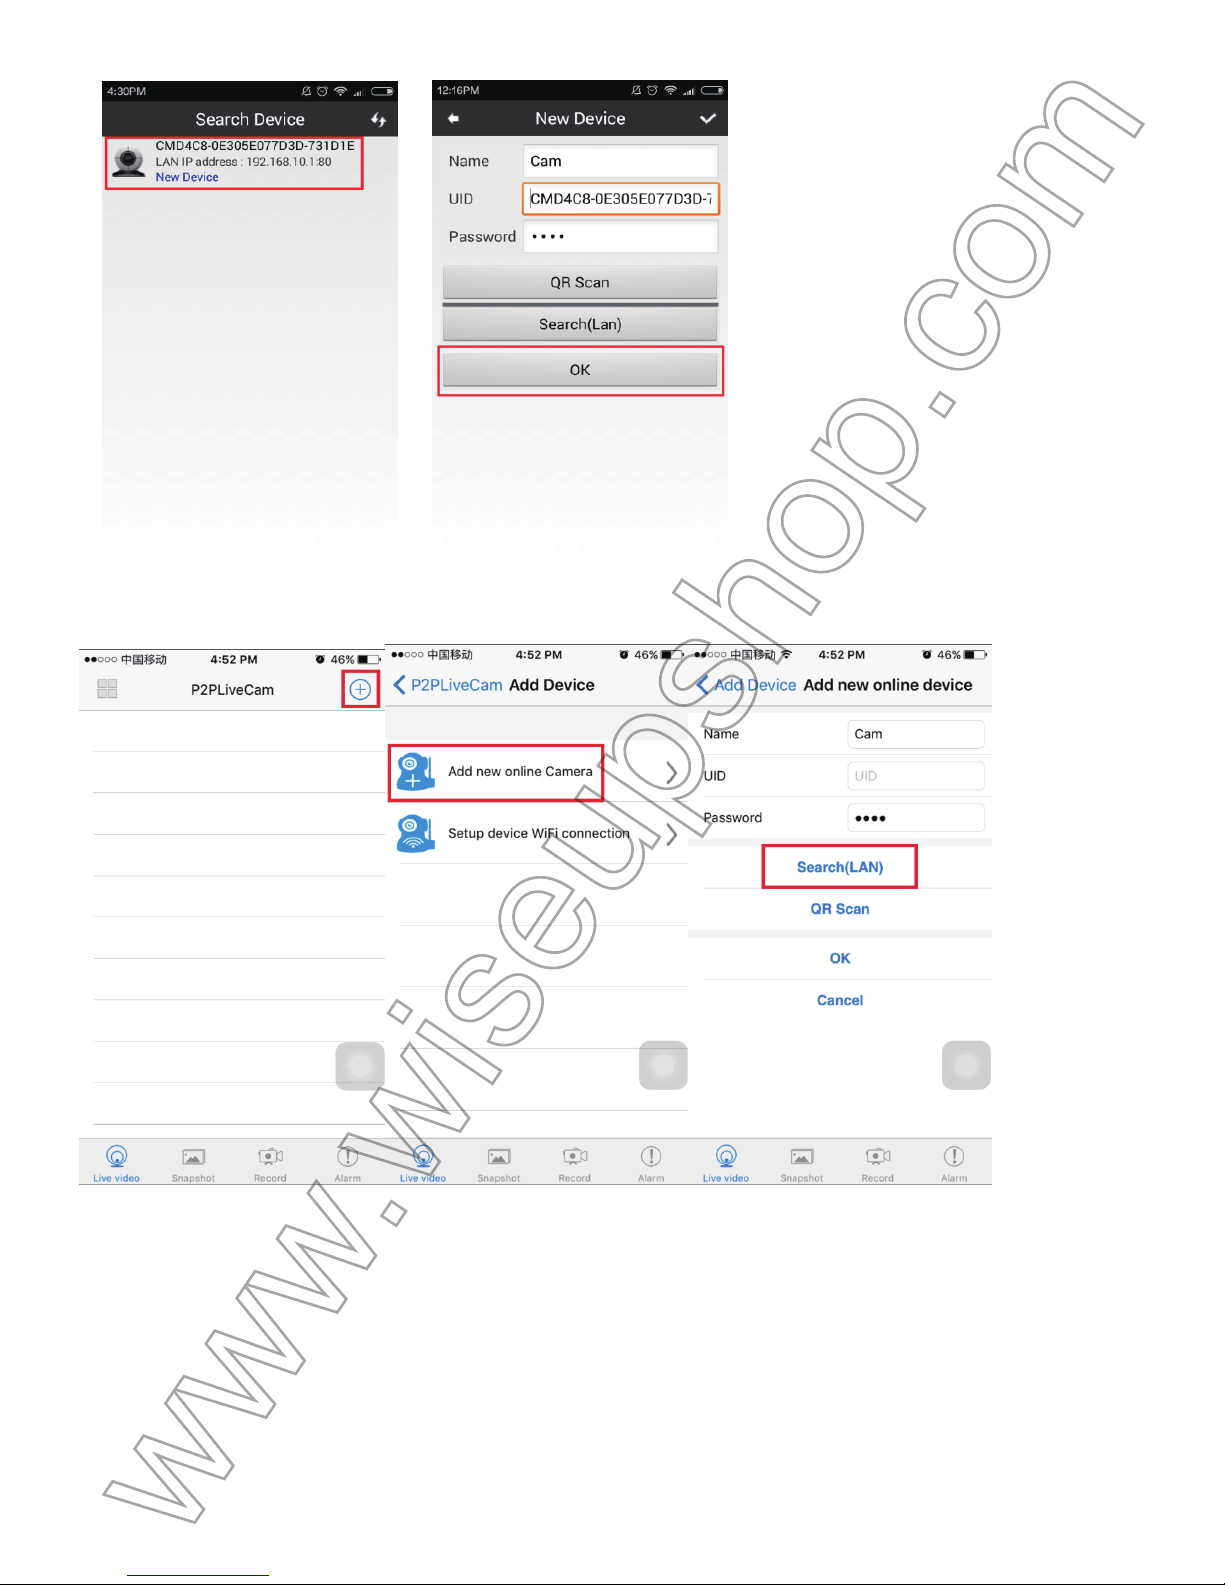
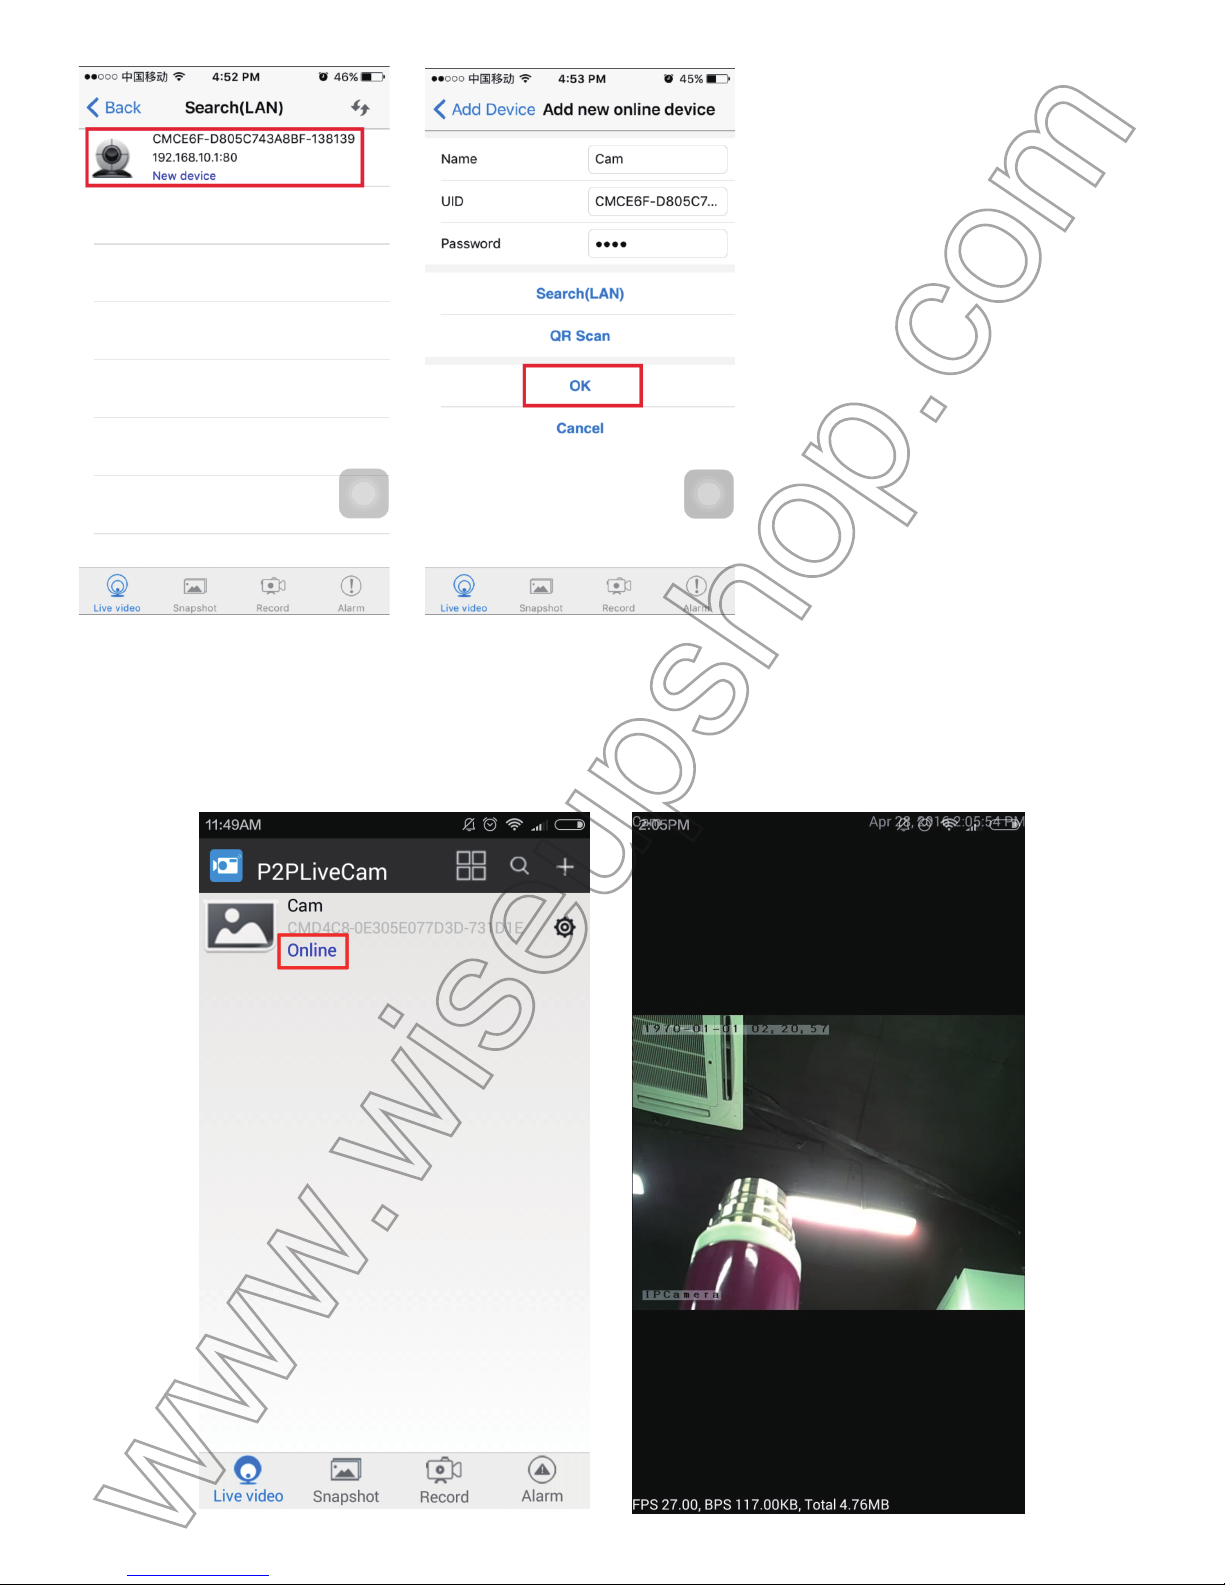
.2.3. Avviare il P2PLiveCam APP. Toccare la Aggiungi nuovo dispositivo online (Camera)
>
R
icerca (PAN) > l'icona +> telecamera> OK.
(Android)
Page 84
(IOS)
Page 85
3
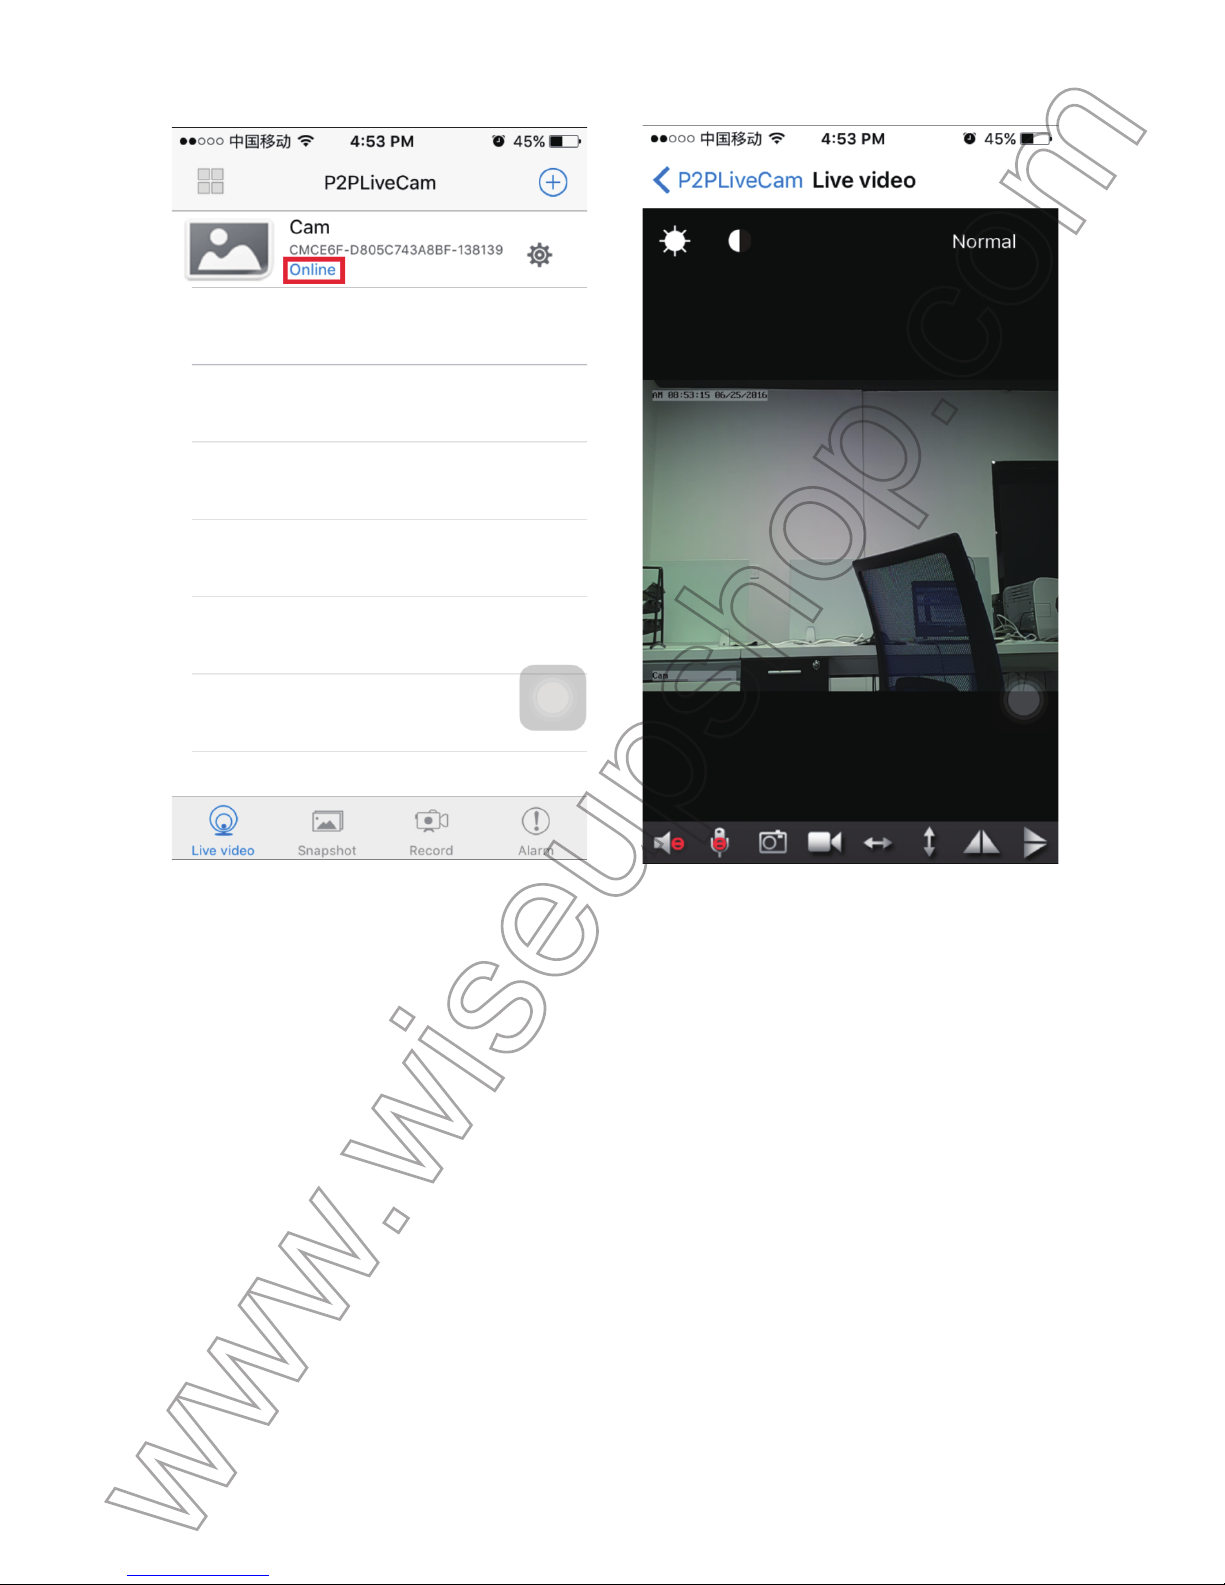
.2.4. La fotocamera è inserita correttamente se si vede che è in linea. Toccare l'icona dell
a
f
otocamera per guardare video in diretta in modalità P2P (LAN).
(Android)
Page 86
(IOS)
Page 87
[Nota]:
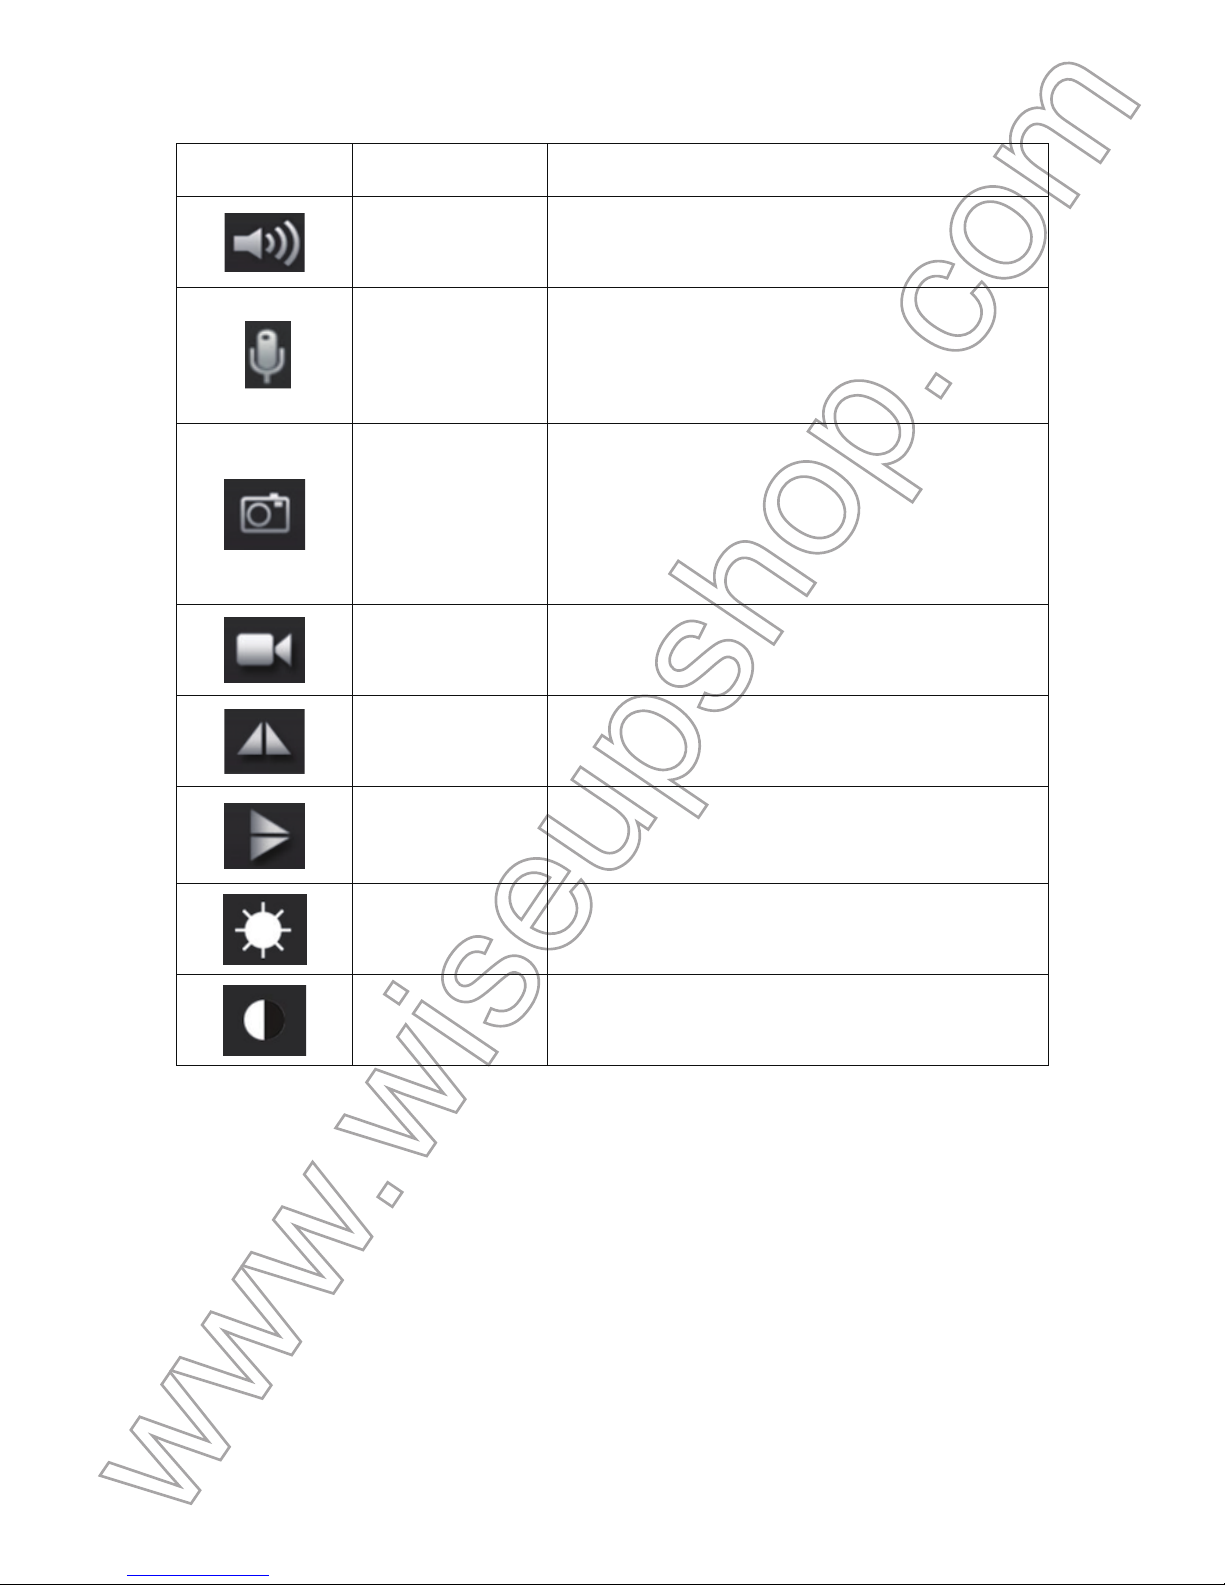
Vedere la tabella qui sotto per una spiegazione delle diverse funzioni disponibili:
Pulsante Nome funzione Descrizione della funzione
Audio
Toccare questo pulsante per attivare o
disattivare l'uscita audio dal vivo.
Microfono
Toccare Audio e microfono per registrare
l'audio durante la registrazione video a
distanza.
Istantanea
Toccare questo pulsante per prendere uno
screenshot del video in diretta. Le immagini
vengono salvate nel vostro smartphone o
tablet PC.
registrazione
video a distanza
Toccare questo pulsante per avviare o
interrompere la registrazione video a distanza.
Specchio
orizzontale
Toccare questo pulsante per capovolgere i
video live immagine in orizzontale.
Specchio
verticale
Toccare questo pulsante per capovolgere i
video live immagine in verticale.
Luminosità
Toccare questo pulsante per regolare la
luminosità video dal vivo.
Contrasto
Toccare questo pulsante per regolare il
rapporto di contrasto del video in diretta.
3.3. Modalità WAN o View Impostazione remota
>> Prima della configurazione WAN, si prega di confermare che la fotocamera viene aggiunta con
successo per smartphone o tablet PC, e che la connessione P2P (LAN) tra la fotocamera e
smartphone o tablet PC funziona bene.
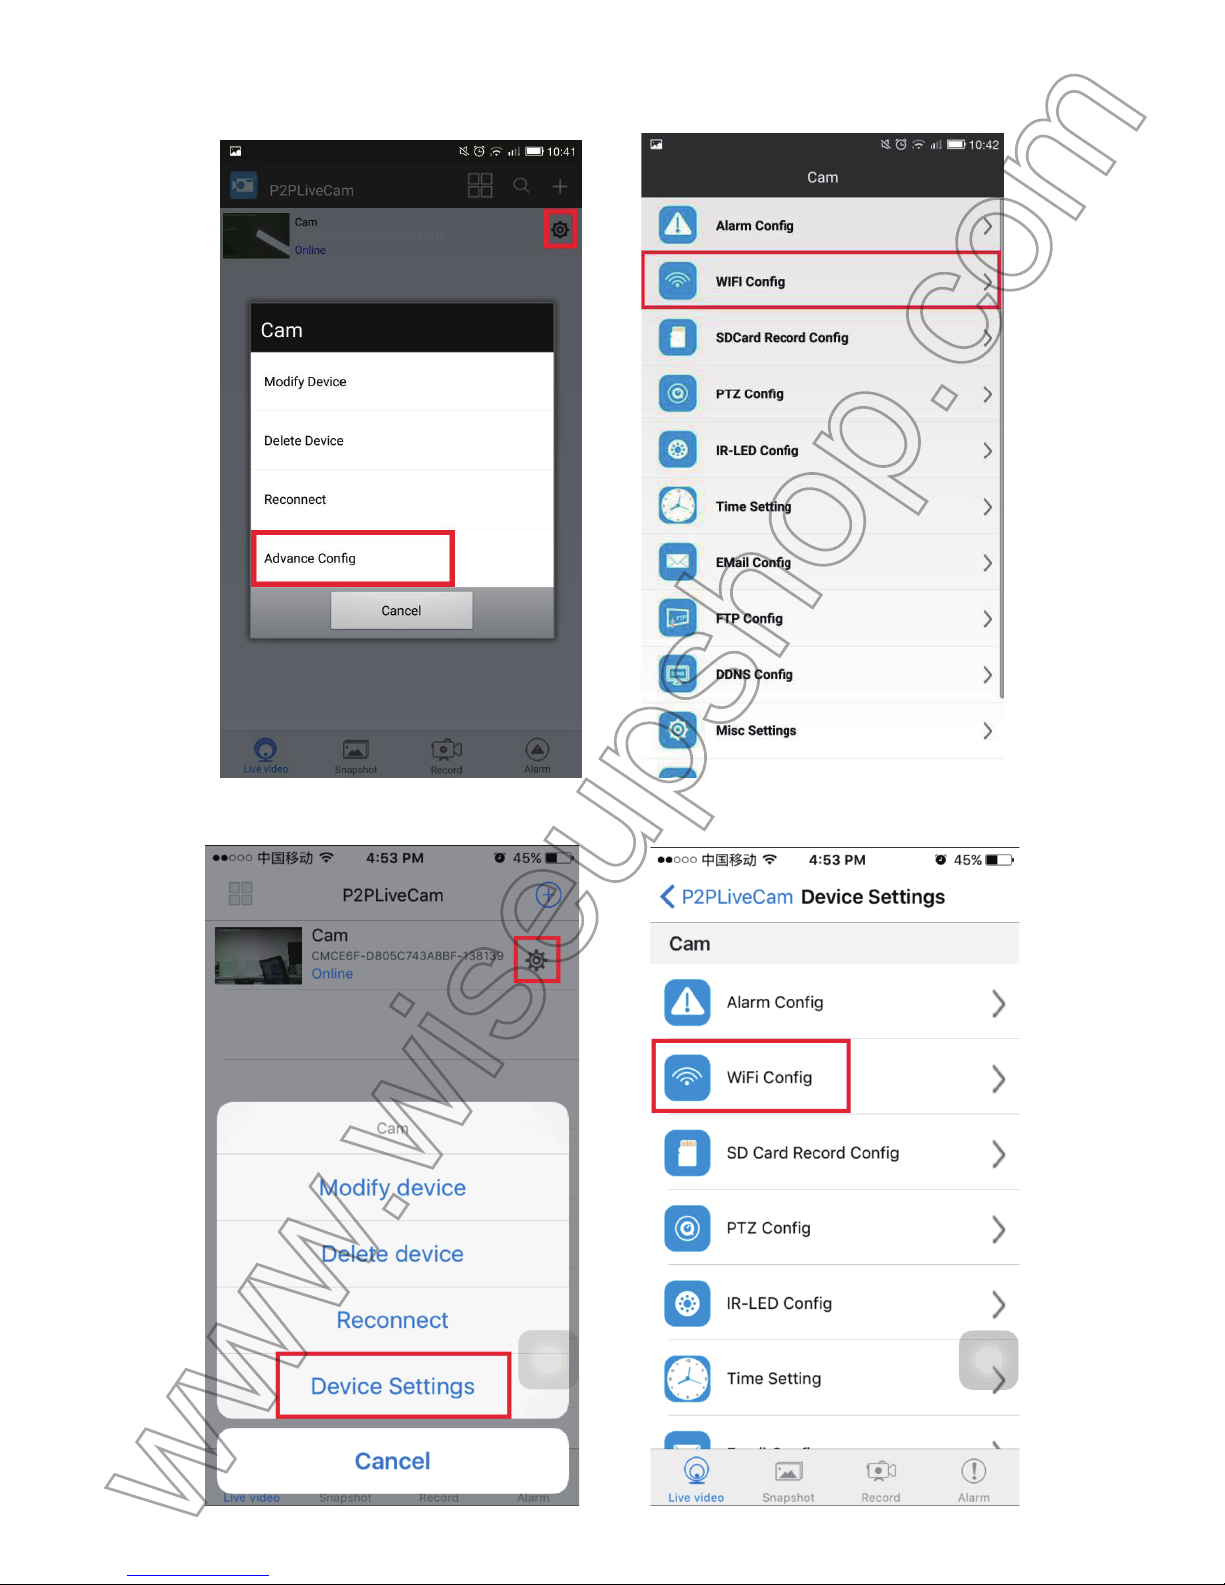
3.3.1. Avviare il P2PLiveCam APP.
3.3.2. Nella modalità P2P (LAN), toccare l'icona Impostazioni > Configurazione avanzata o
Impostazi
oni dispositivo > WIFI Config.
Page 88
(Android)
(IOS)
Page 89
3
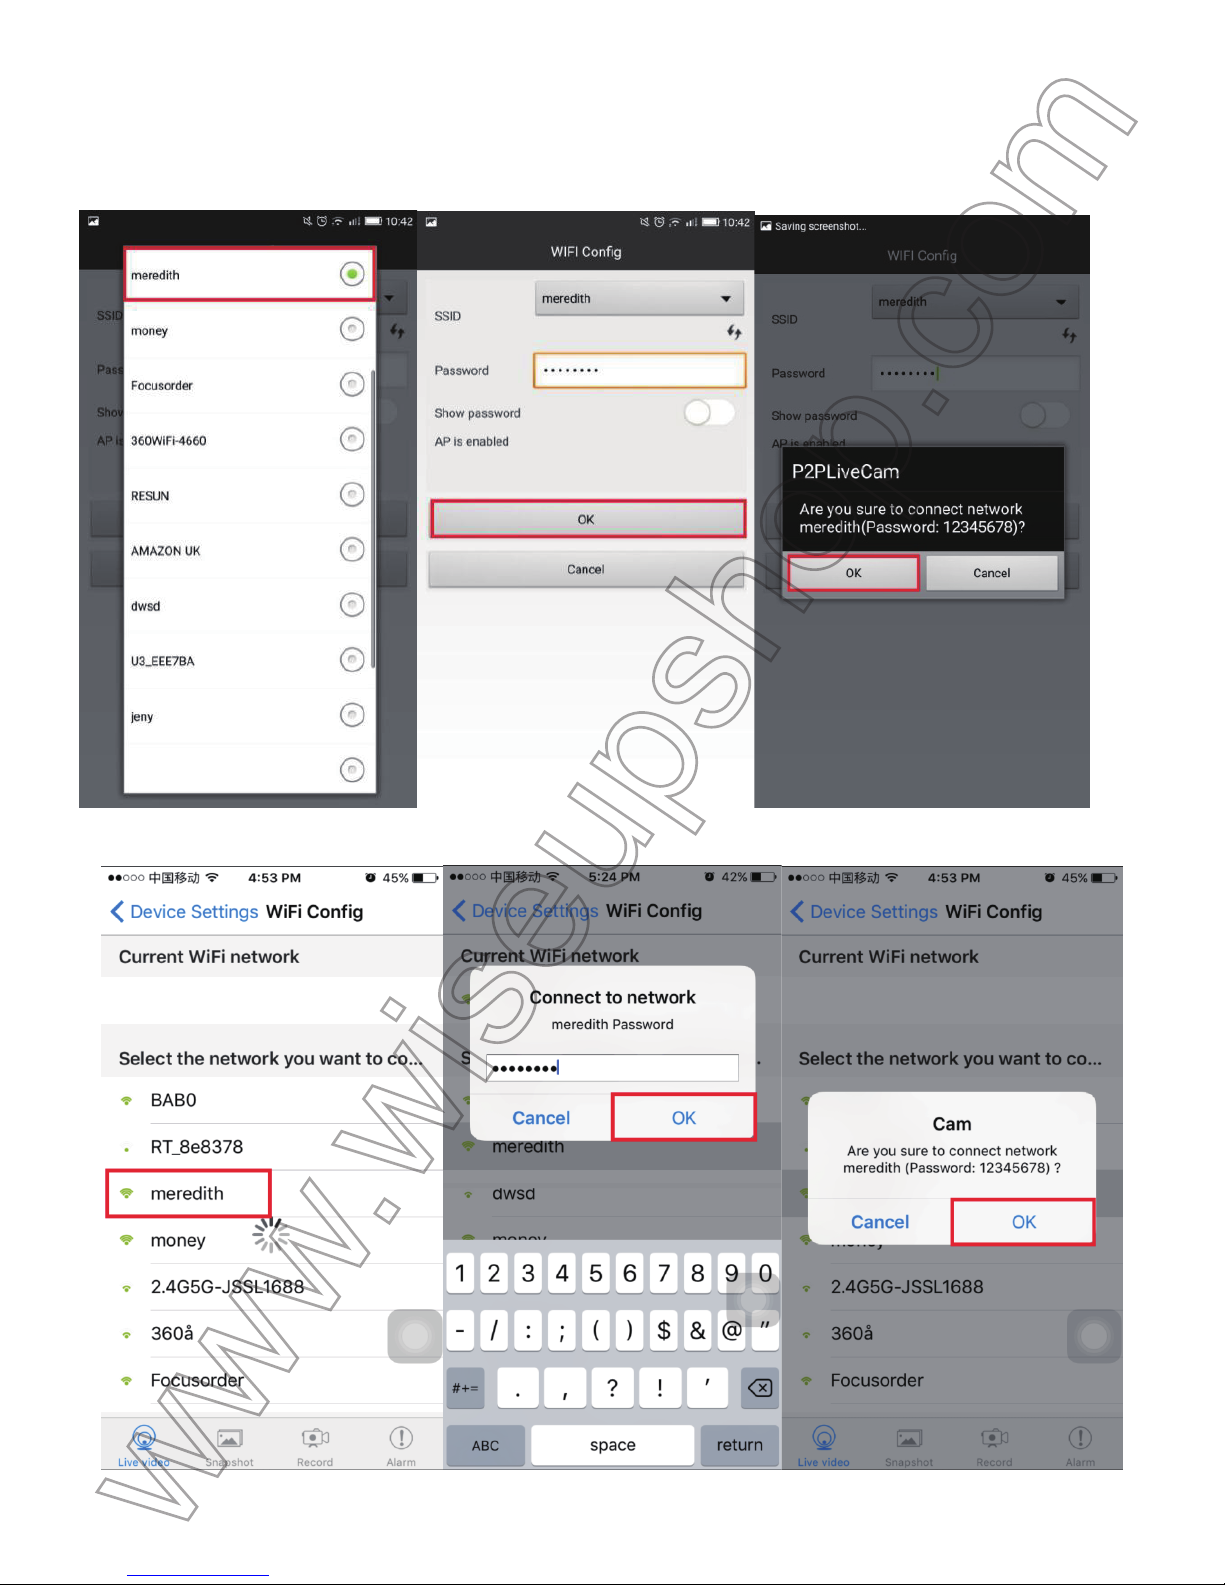
.3.3. Iscriversi alla telecamera in una rete Wi-Fi desiderata, quindi toccare OK per confermare l
a
c
onfigurazione.
(Android)
(IOS)
Page 90
C
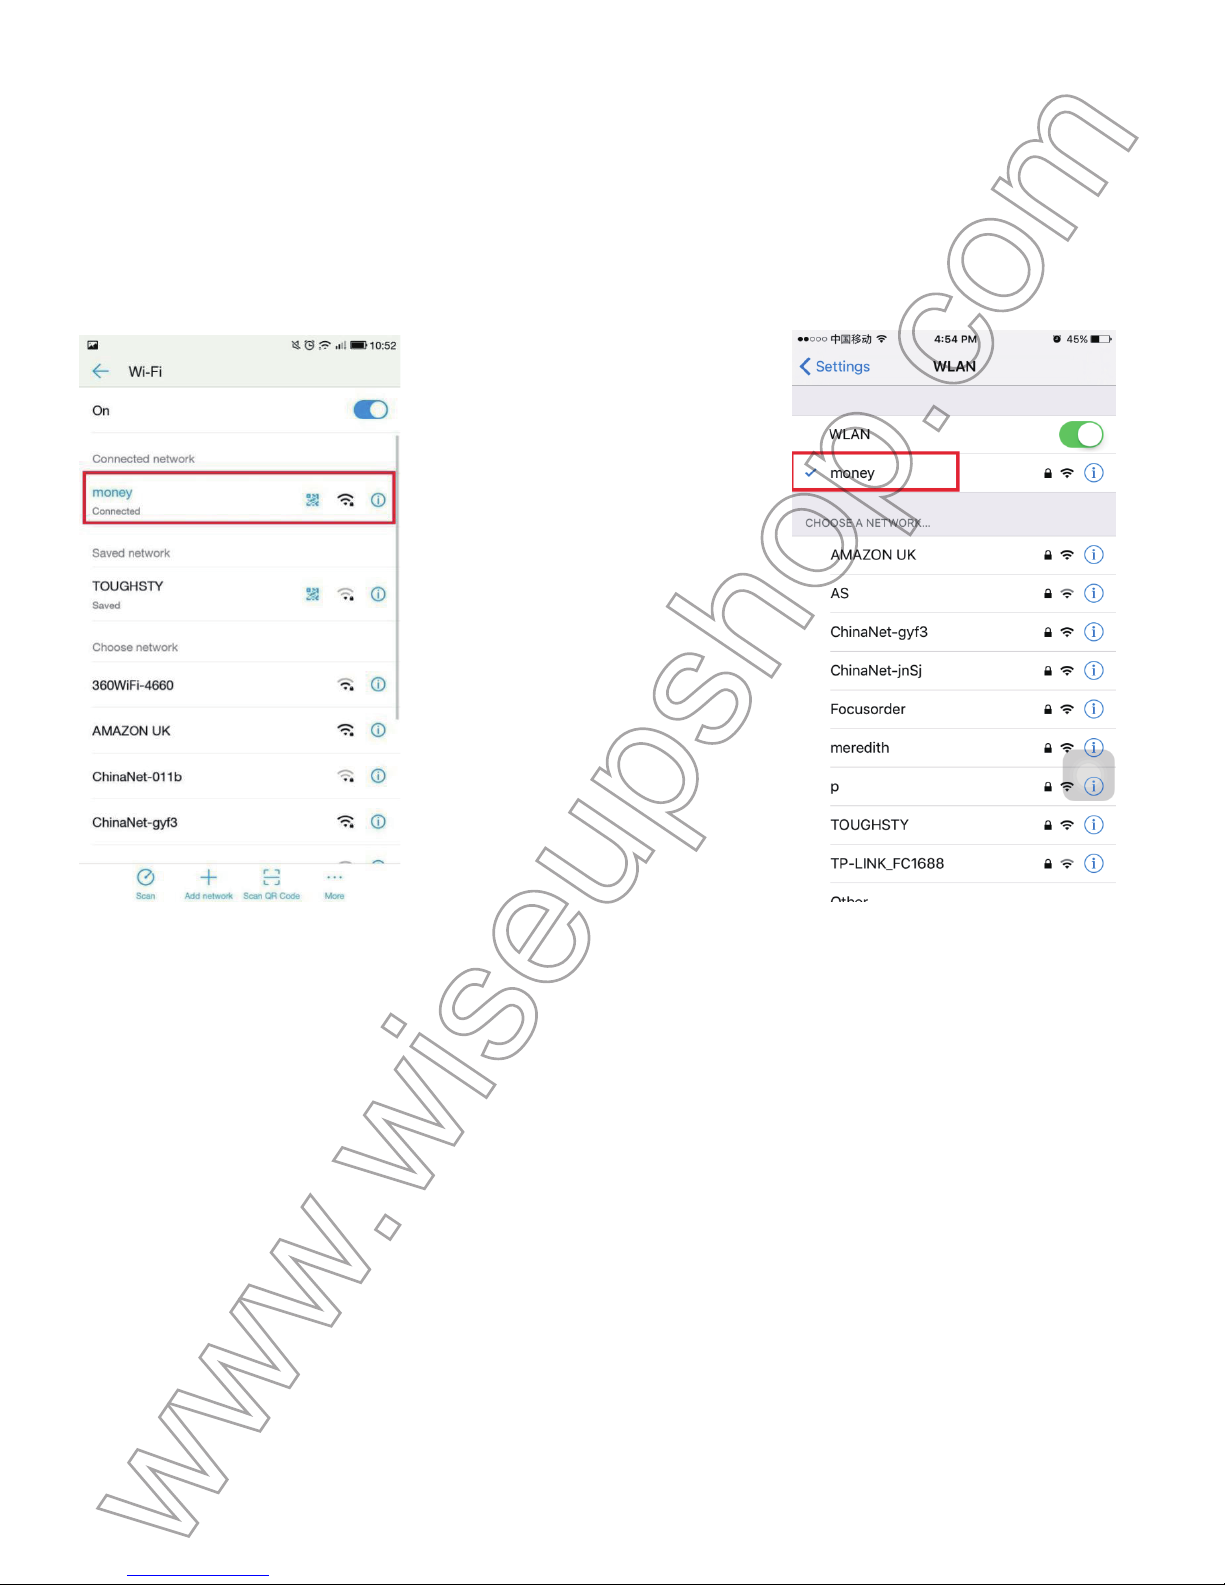
ontrollare se la modalità WAN o configurazione vista a distanza funziona!
1
. Uscire dalla P2PLiveCam APP.
2
. Vai WIFI o delle impostazioni WLAN pagina sul vostro smartphone o tablet PC, unirsi ad un altr
o
s
egnale Wi-Fi, che deve essere diverso da quello attuale oppure è possibile utilizzare la rete mobile.
(Android) (IOS)
1
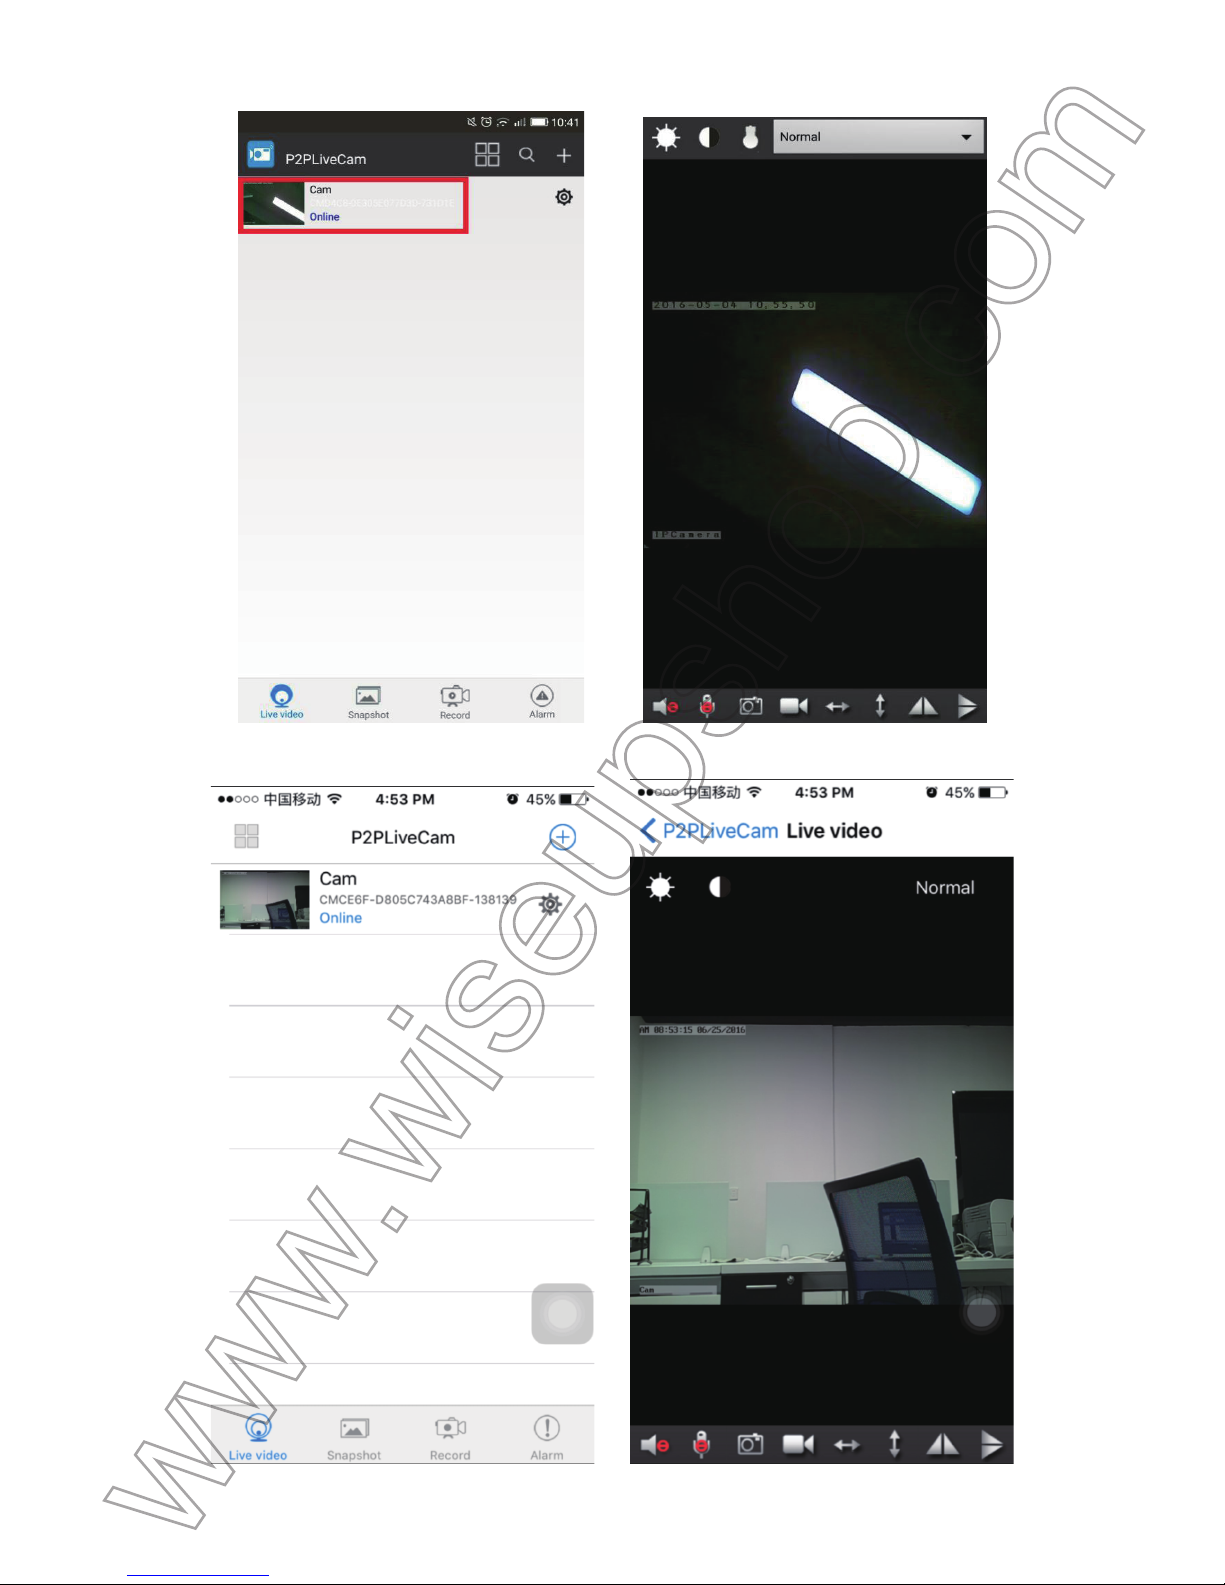
. Avviare di nuovo il P2PLiveCam APP. Se si vede la fotocamera è in linea, significa che l
a
visualizzazione remota (WAN) impostazione è successo.
Page 91
(Android)
(IOS)
Page 92
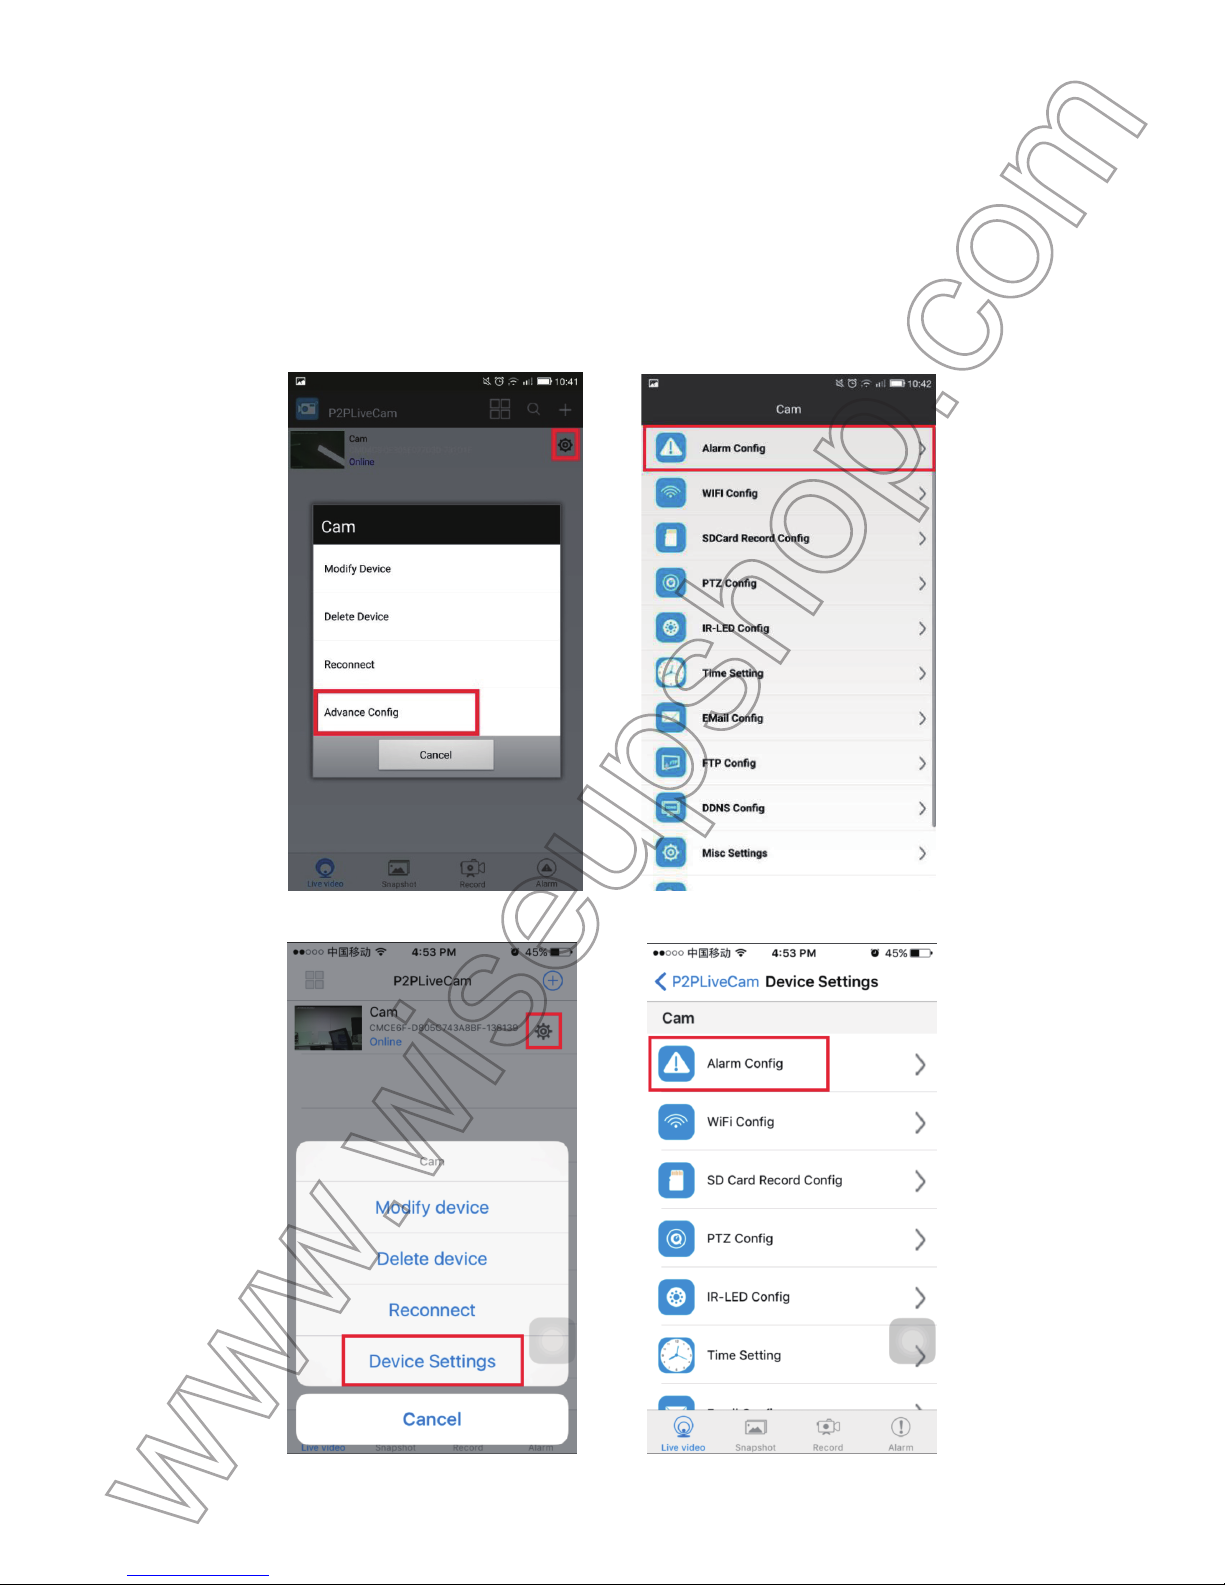
I
V. Motion Detection Setup
>
> Assicurarsi che una scheda Micro SD sia saldamente nello slot per schede SD della fotocamera. S
i
r
accomanda un SDHC Classe 10 scheda Micro SD.
4
.1. Nella modalità WAN o LAN, lanciare il P2PLiveCam APP.
4
.2. Toccare l'icona Impostazioni > Configurazione avanzata o Impostazioni dispositivo > allarme
C
onfig. (Android)
(IOS)
Page 93
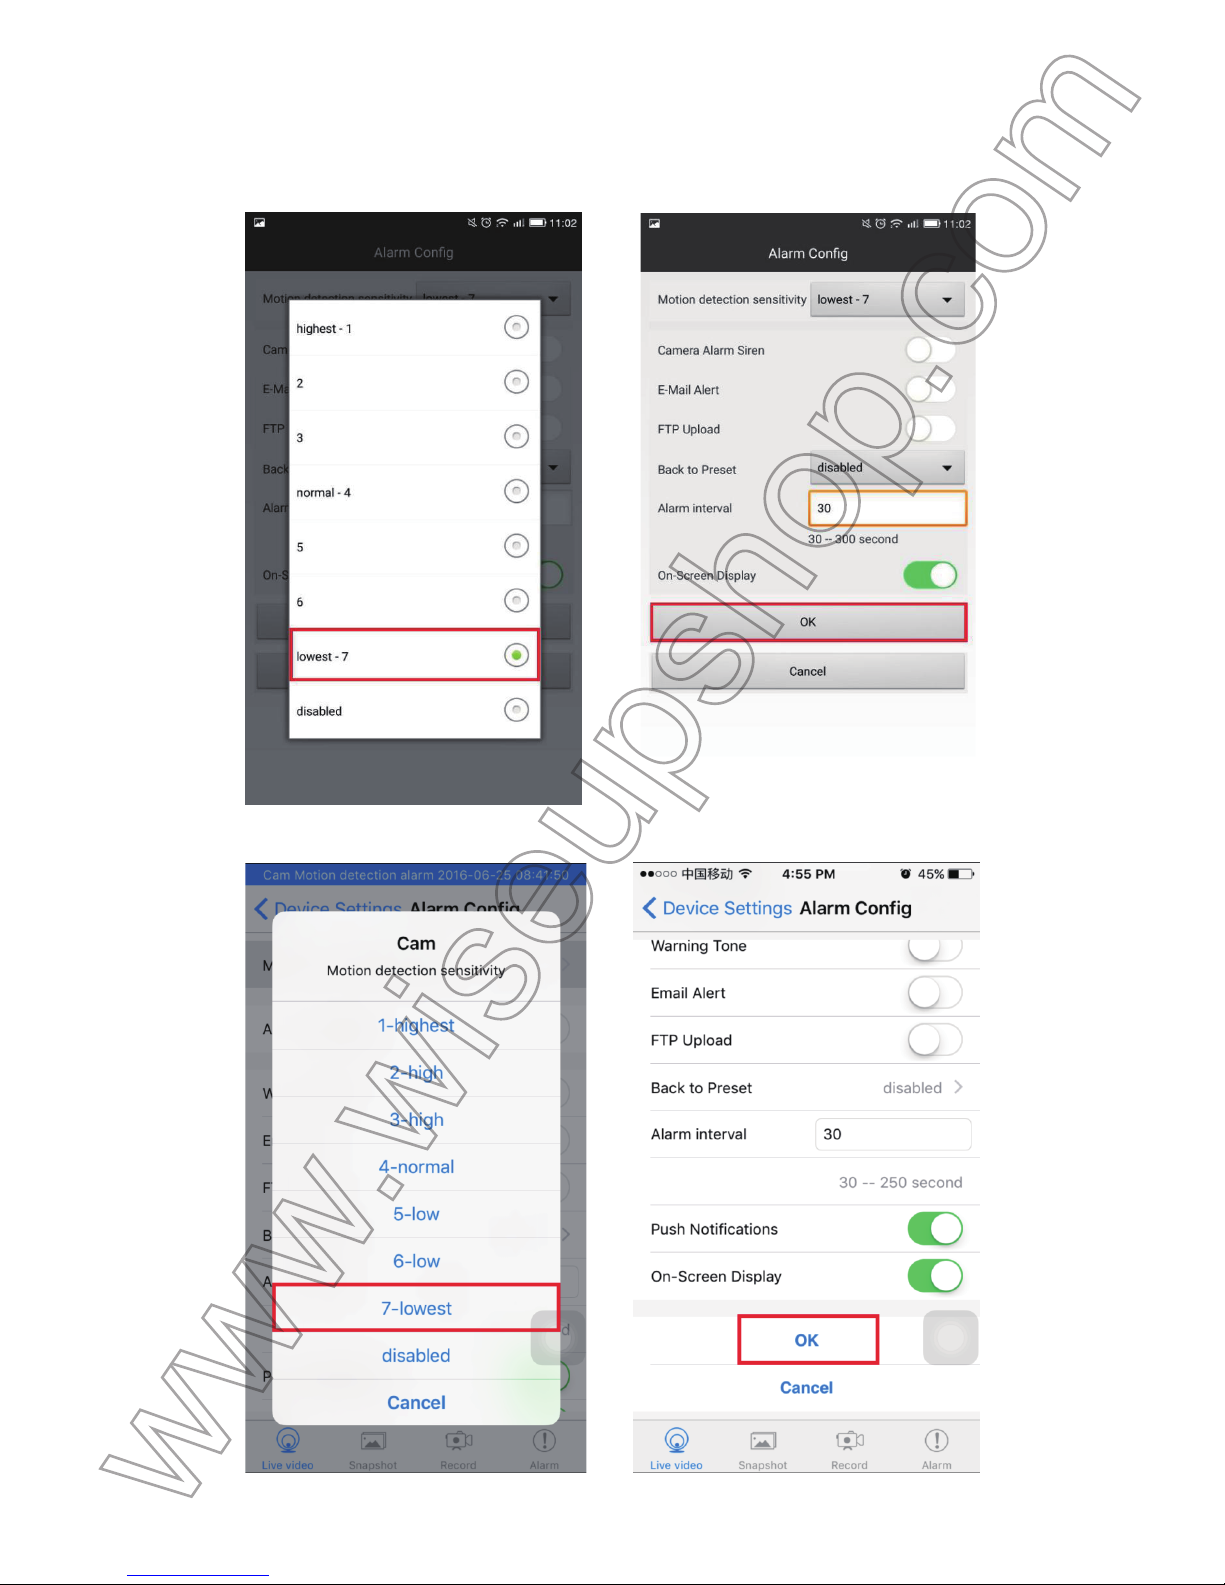
4
.3. Attivare la funzione di rilevamento del movimento e quindi toccare OK per confermare
l
'impostazione. La fotocamera scatta una foto automaticamente quando viene rilevato un movimento.
(Android)
(IOS)
Page 94
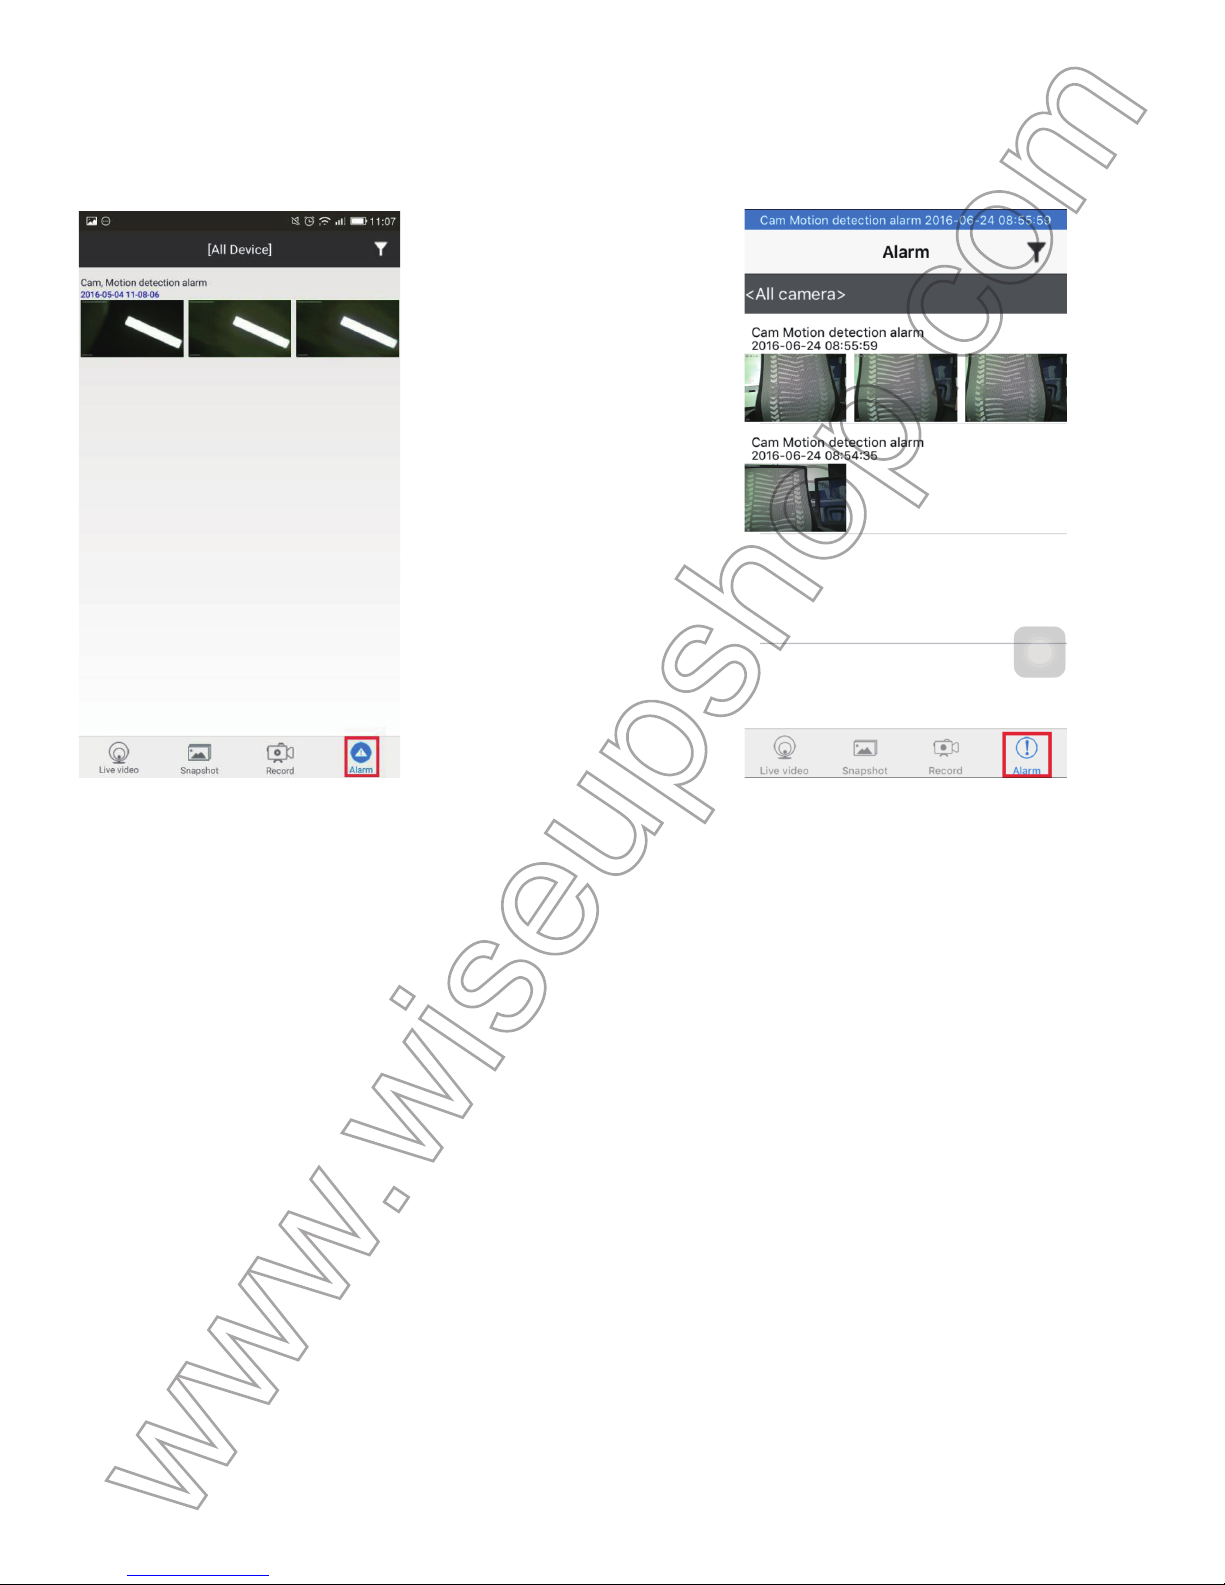
4
.4. Torna alla pagina di elenco delle telecamere, toccare Allarme nella parte inferiore dello scherm
o
p
er controllare le foto.
(Android) (IOS)
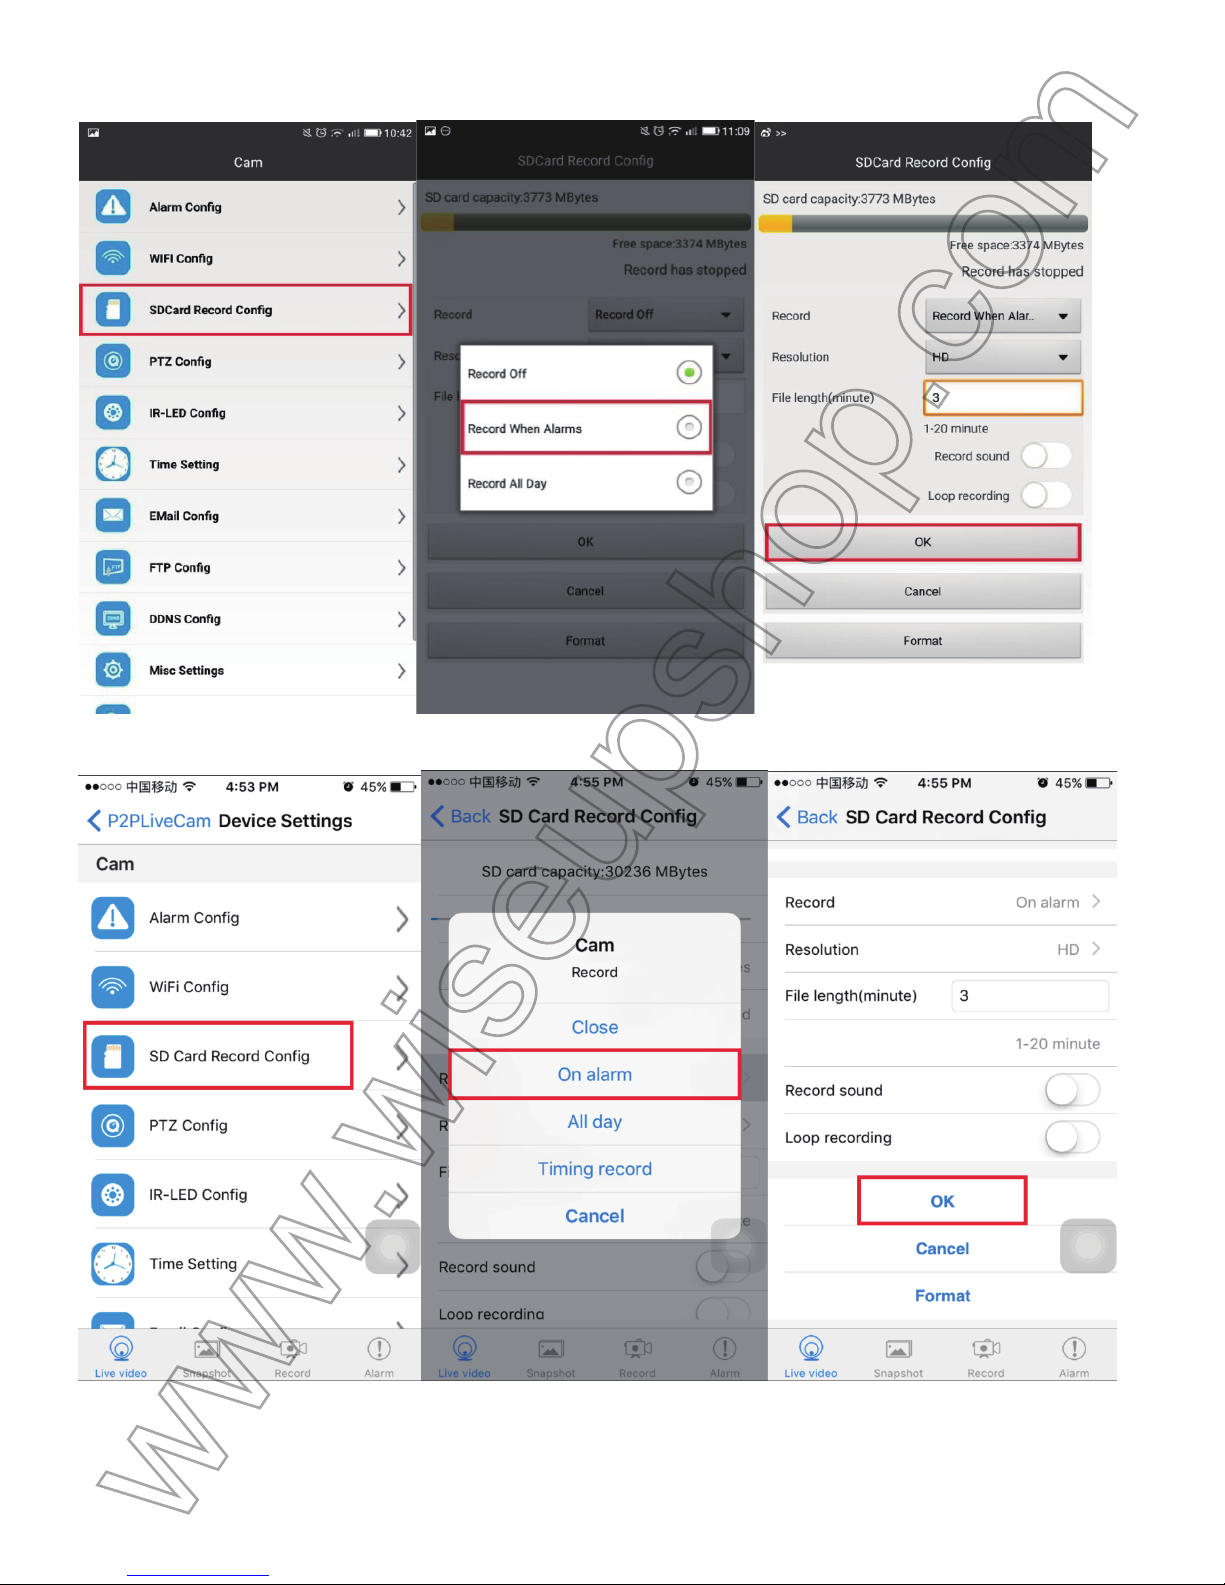
4
.5. Vai a Config Advance o pagina Impostazioni periferiche e selezionare SDCard Record Config
.
S
cegli record quando allarmi o allarmi On e impostare altri parametri desiderati. Quindi toccare O
K
p
er confermare l'impostazione. La fotocamera inizierà a registrare il video automaticamente quando
v
iene rilevato un movimento.
Page 95
(Android)
(IOS)
4
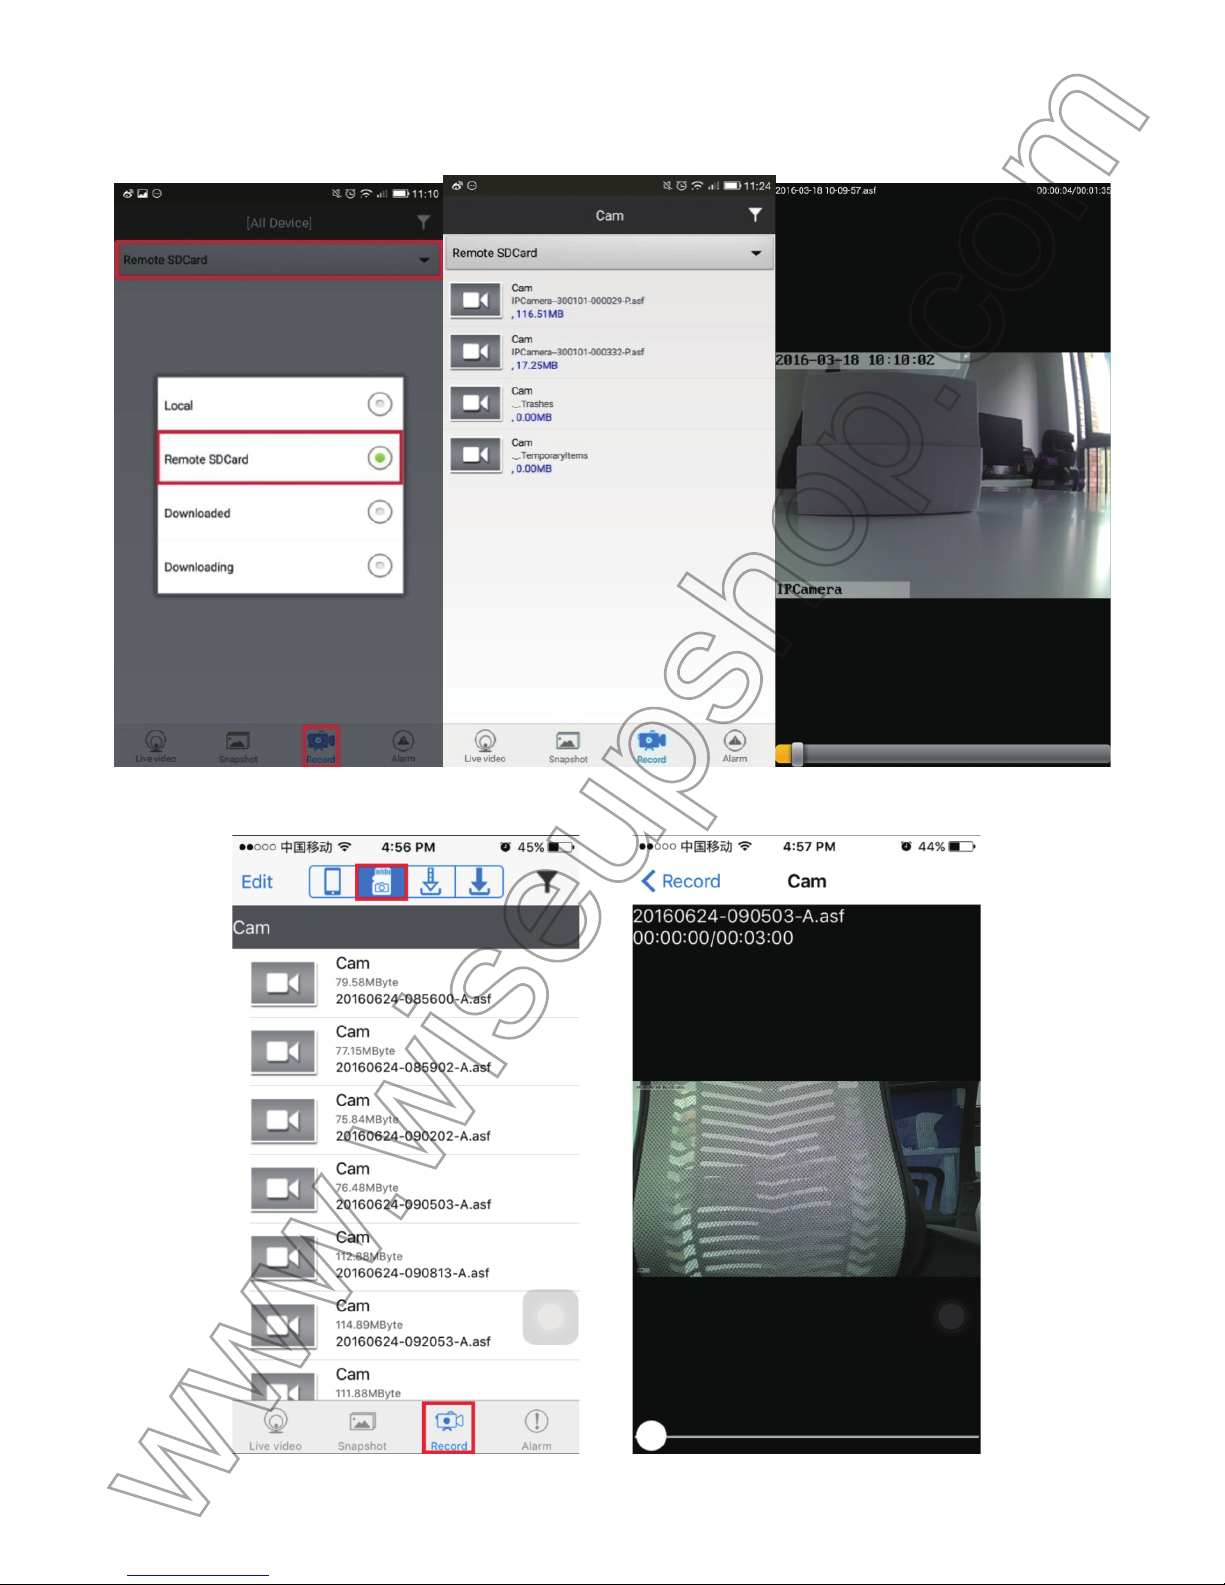
.6. Torna alla pagina di elenco delle telecamere, toccare Record nella parte inferiore dello schermo
e
s
cegliere scheda SD Remote per controllare i file video di rilevamento del movimento.
Page 96
[
Nota]:
Tutti i file video verranno salvati nella scheda micro SD della fotocamera.
(Android)
(IOS)
Page 97
V
. Record Video to Your Smartphone or Tablet PC
5
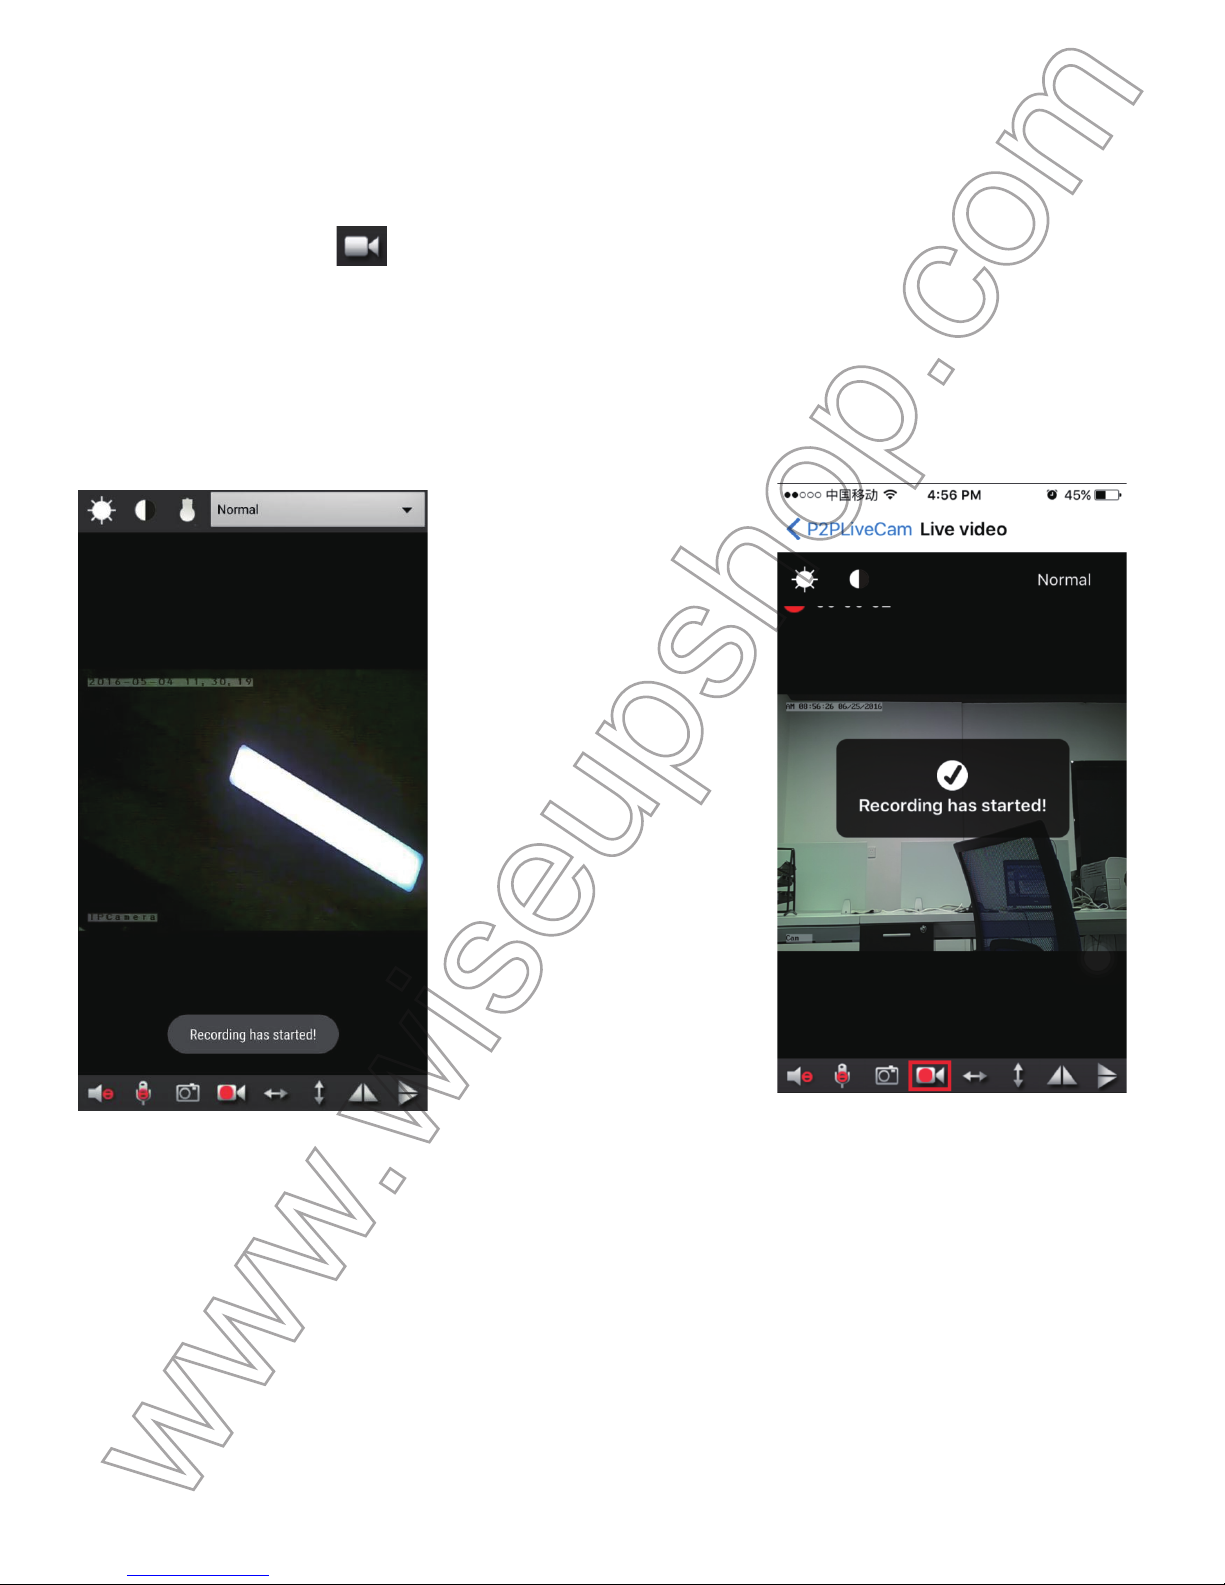
.1. Nella modalità LAN o WAN, lanciare il P2PLiveCam APP. Toccare l'icona della fotocamera per l
o
s
chermo video in diretta.
5
.2. Toccare il pulsante di registrazione video a distanza per avviare o interrompere la
r
egistrazione di video.
[
Note]:
All the video files will be saved in the flash memory or extended Micro SD card of your smartphone or table
t
P
C.
(Android) (IOS)
5
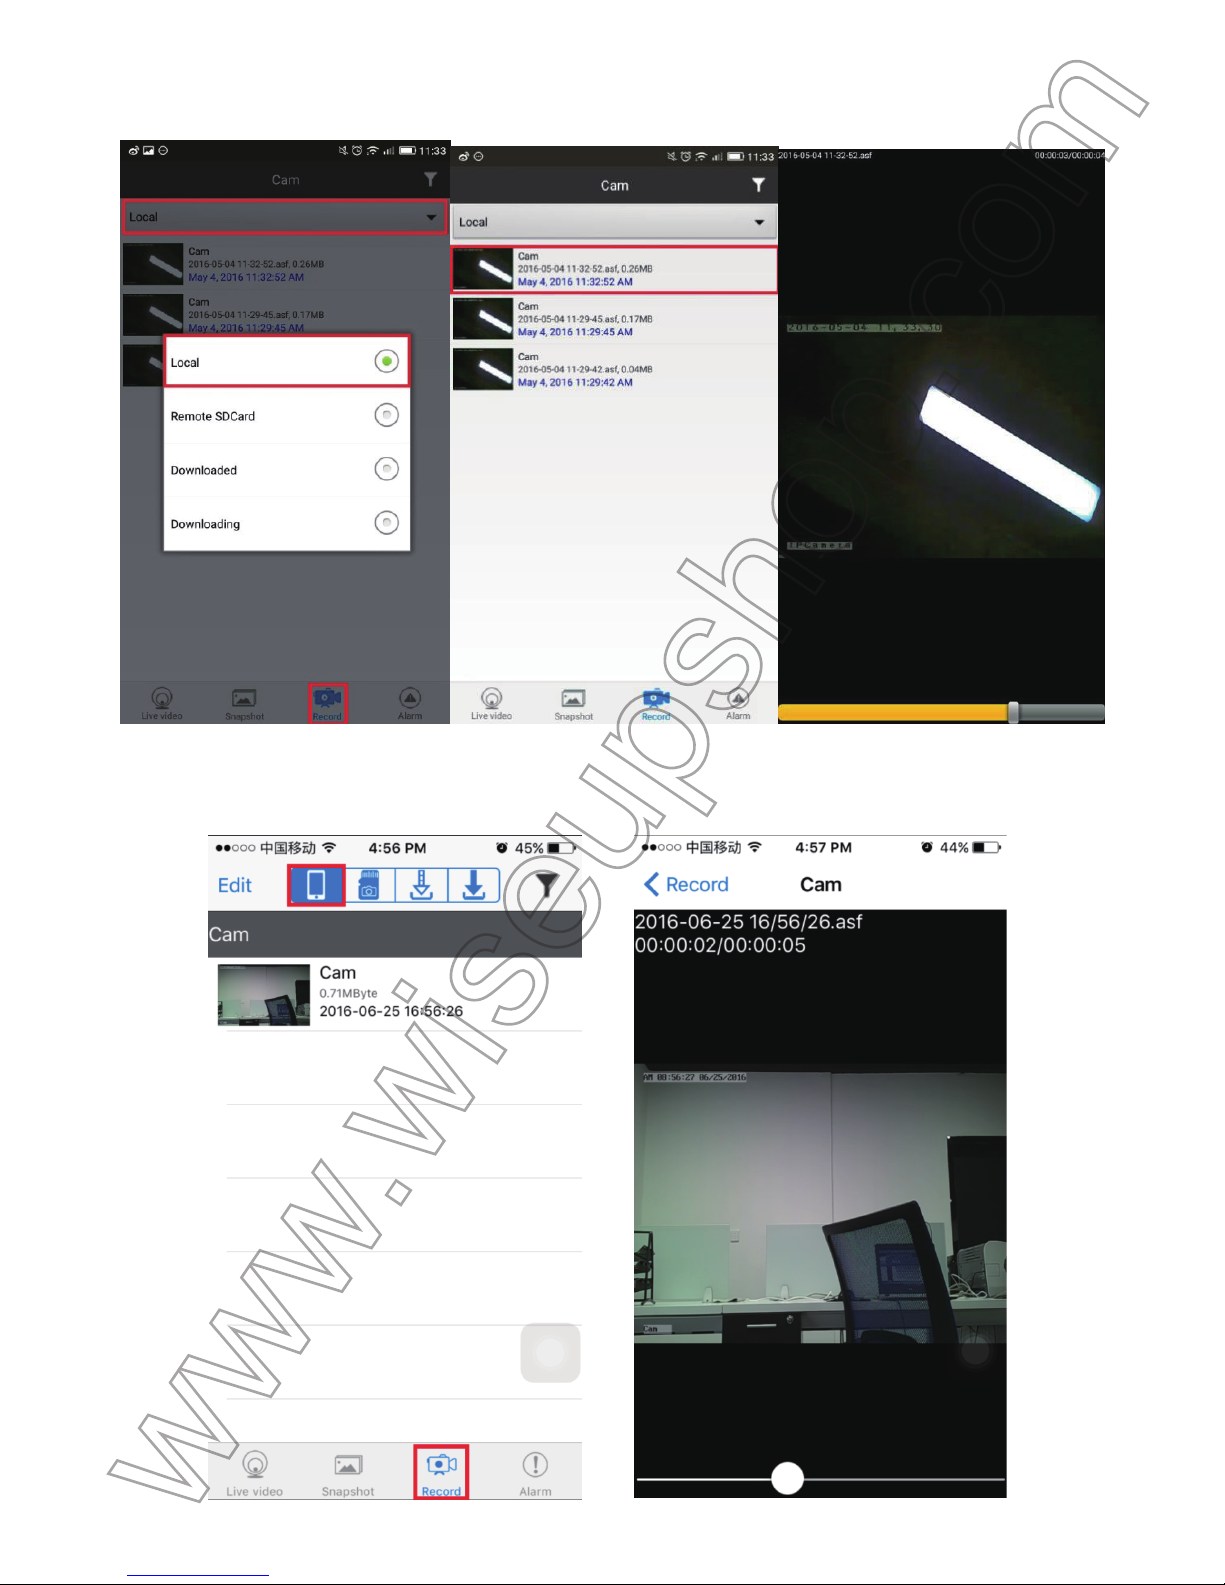
.3. Torna alla lista fotocamera, toccare Record nella parte inferiore dello schermo e scegliere locale
p
er accedere ai file video.
Page 98
(Android)
(IOS)
Page 99
[
Nota]:
1
). Prima della registrazione, assicurarsi che ci sia abbastanza memoria nel smartphone o tablet PC per salvare i fil
e
v
ideo.
2
). Risoluzioni Video: 640P, 720P, 1080P Optional Formato video: ASF
V
I. Registra video su una scheda Micro SD Remote
>
> Si prega di accertarsi che la scheda Micro SD sia saldamente nello slot per schede SD dell
a
f
otocamera. Si raccomanda un SDHC Classe 10 scheda Micro SD.
6
.1. Avviare il P2PLiveCam APP.
6
.2. Toccare l'icona Impostazioni > Configurazione avanzata o Impostazioni periferica.
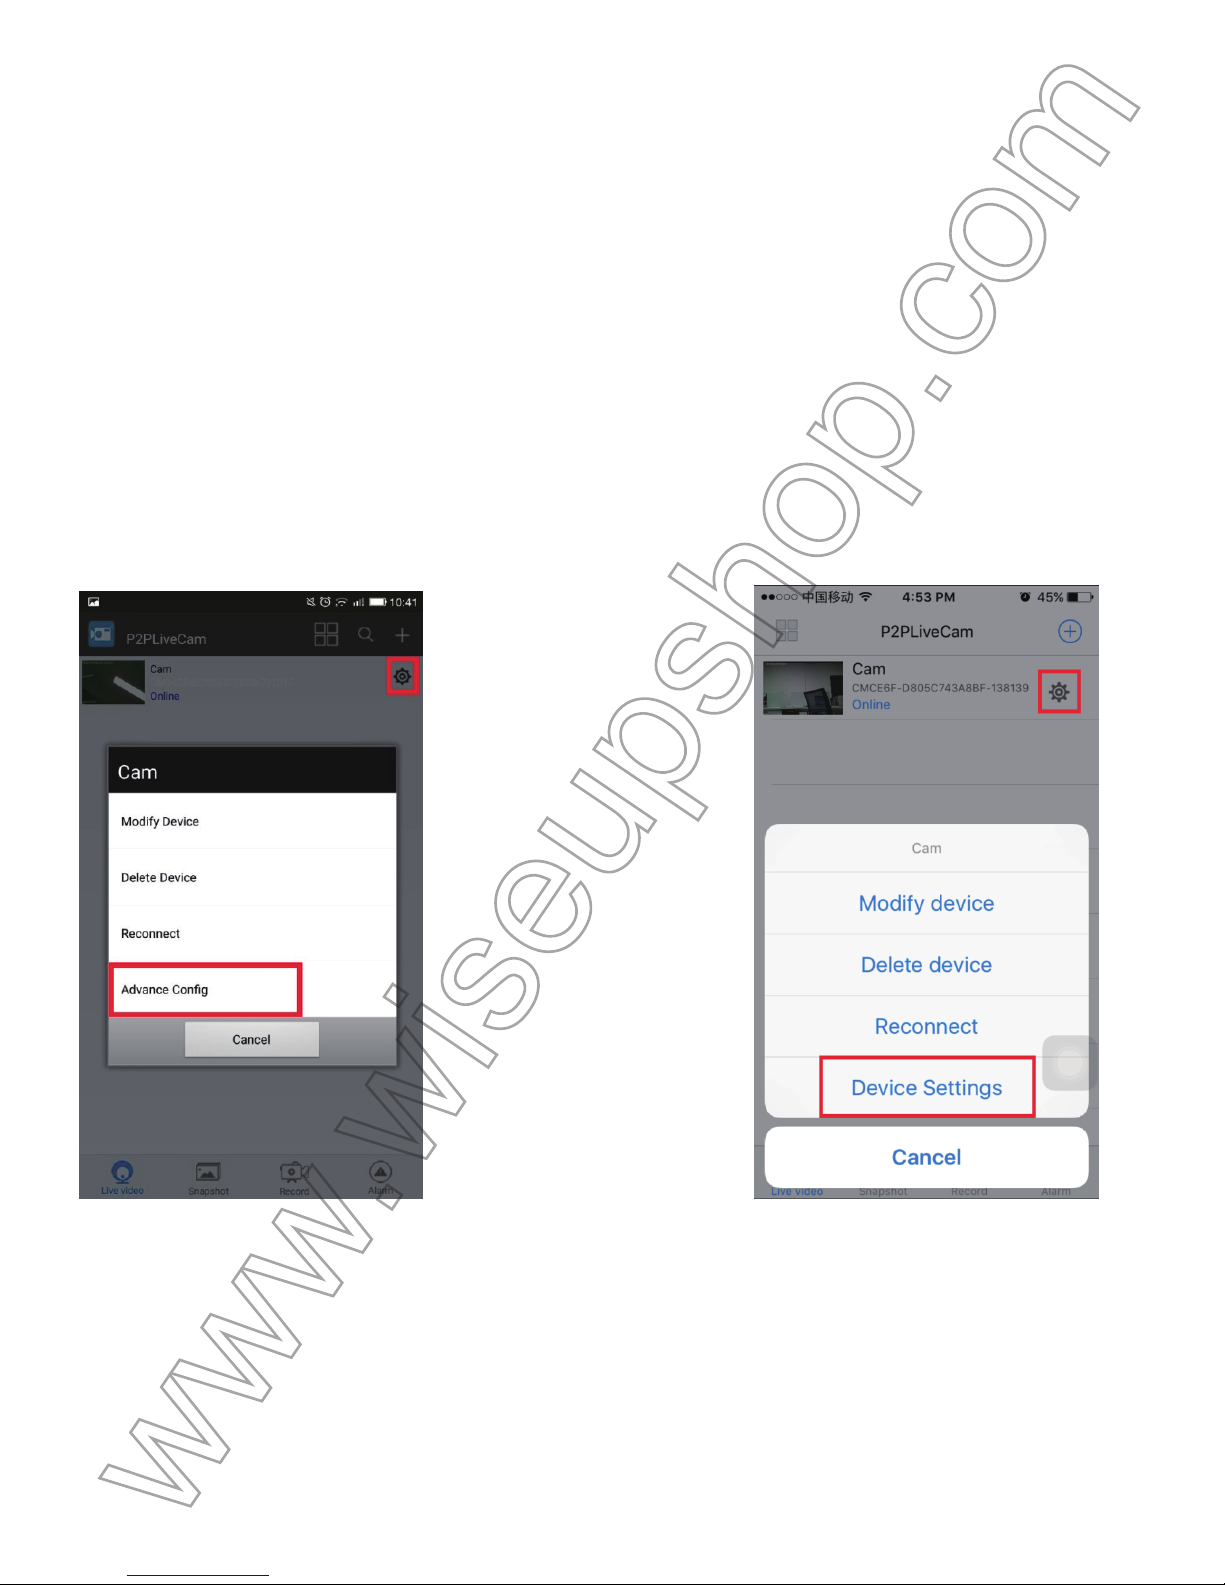
(Android) (IOS)
6
.3. Toccare SD Record Config, scegliere una modalità di registrazione e impostare altri parametri
d
esiderati, quindi toccare OK per confermare l'impostazione.
Page 100
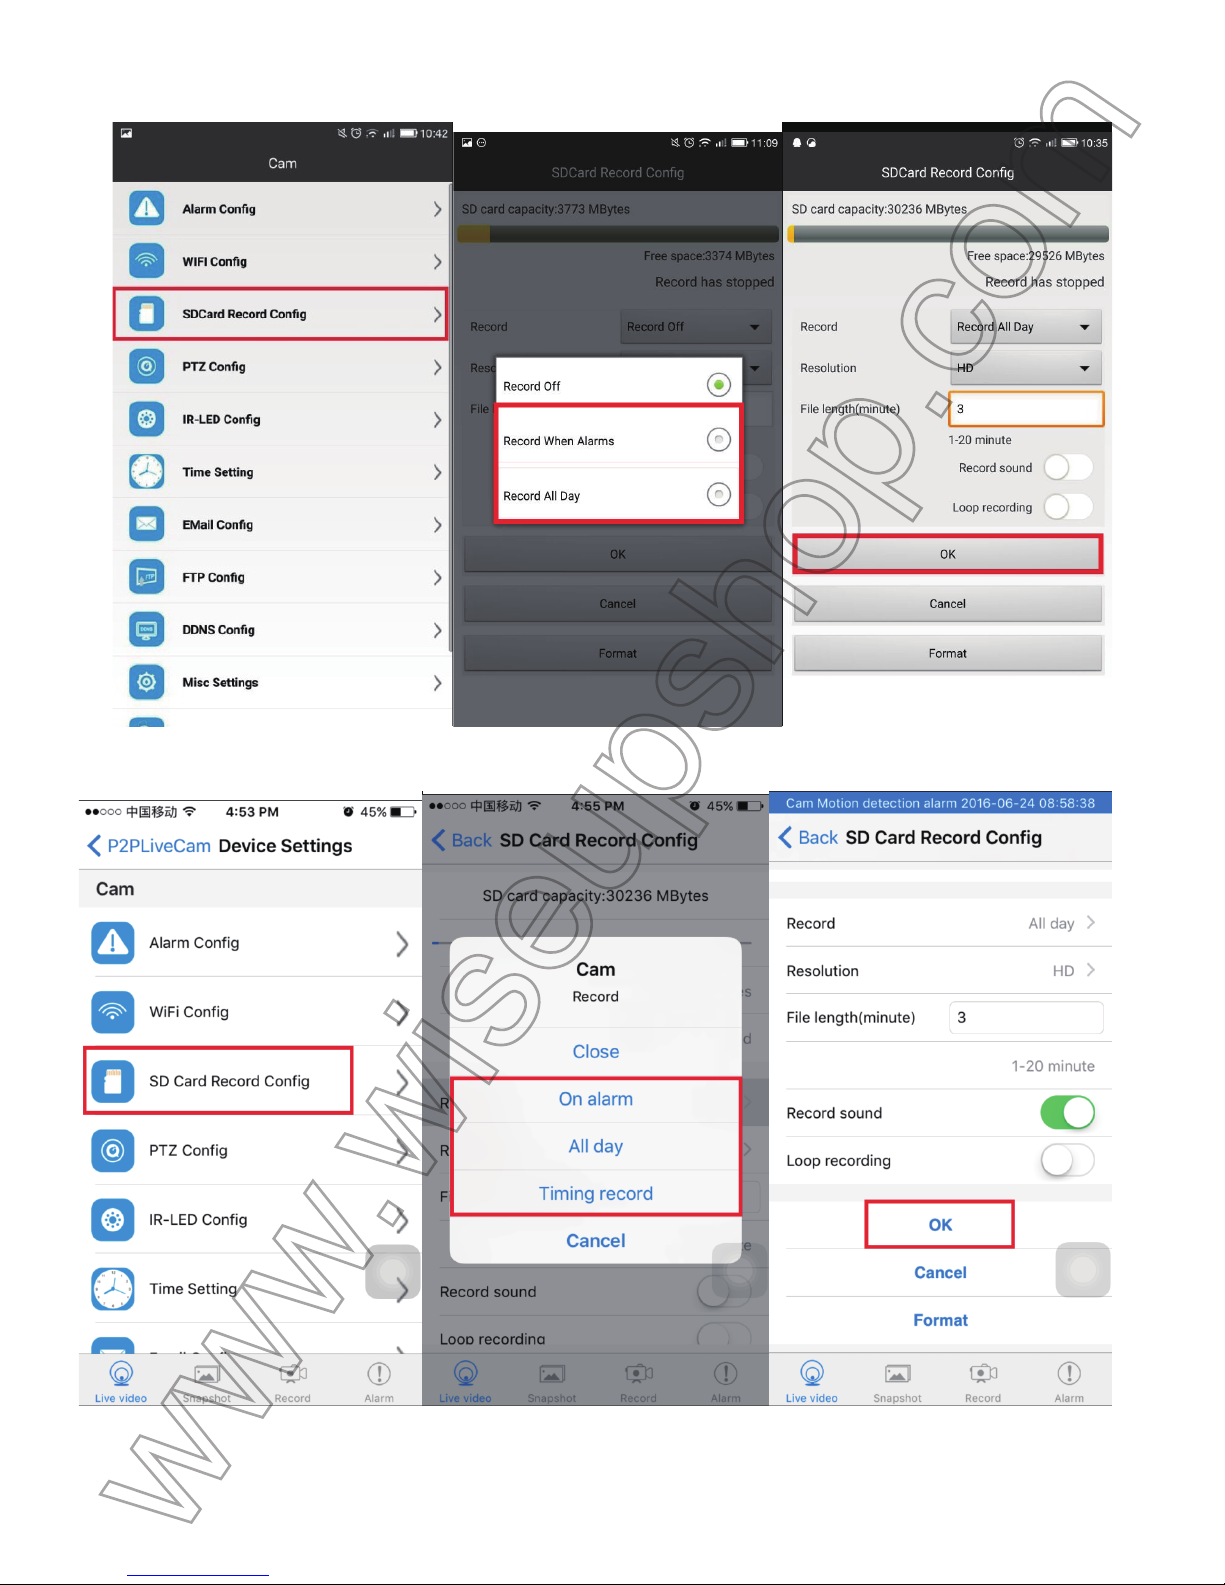
(Android)
(IOS)
6
.4. Torna alla pagina di elenco delle telecamere, toccare Record nella parte inferiore dello schermo
e
s
cegliere la scheda SD Remote per controllare i file video.
 Loading...