

Page 1
W8500
User Guide
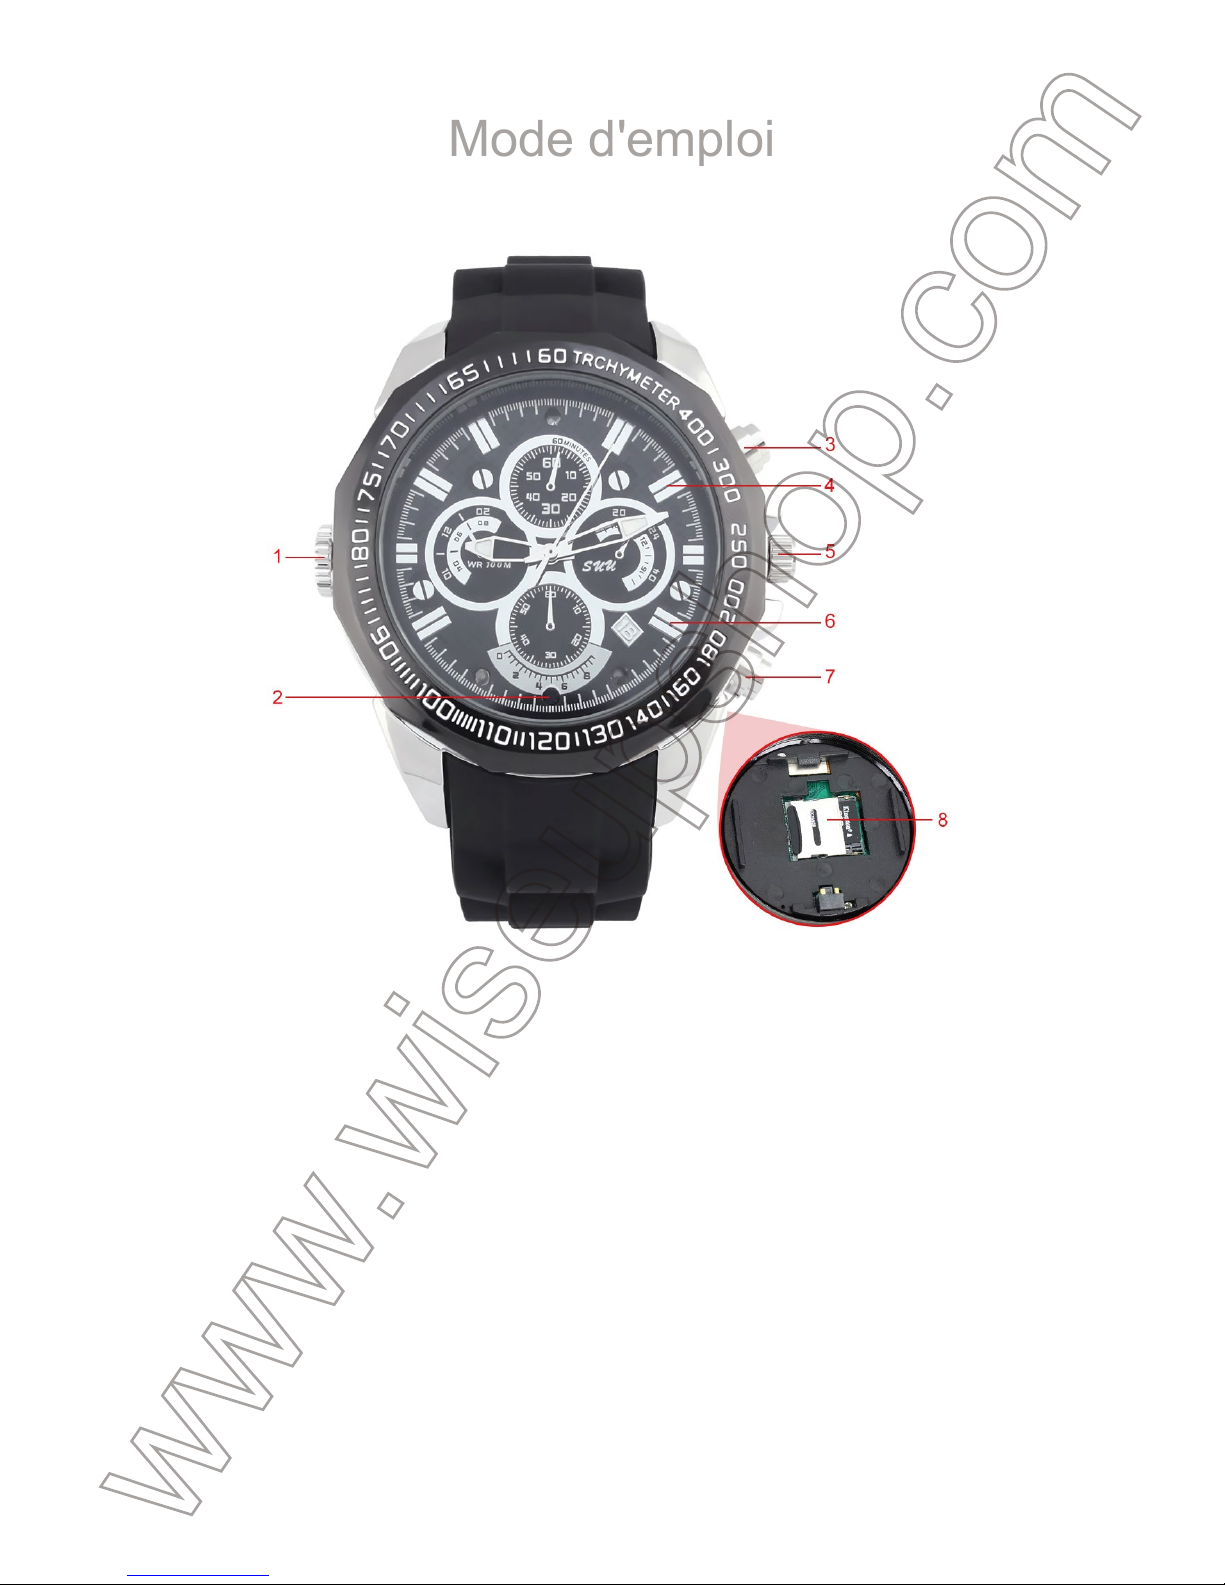
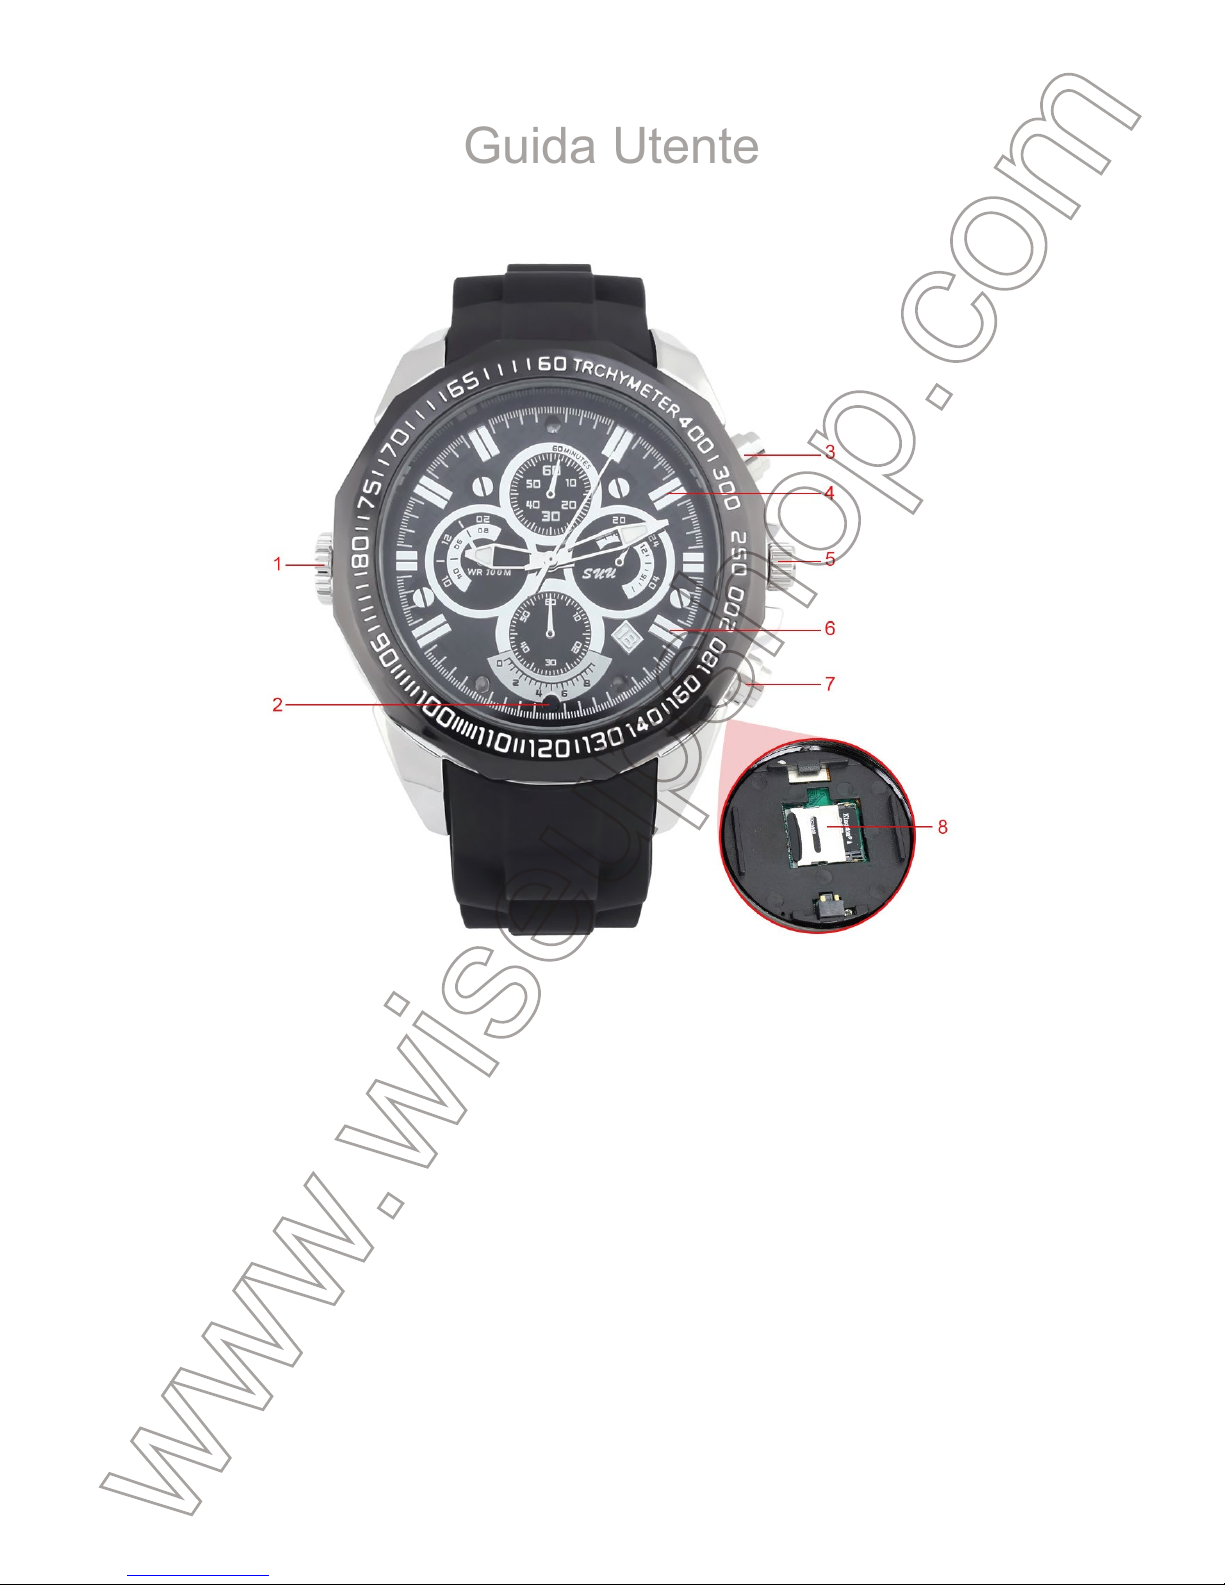
I. Product Overview
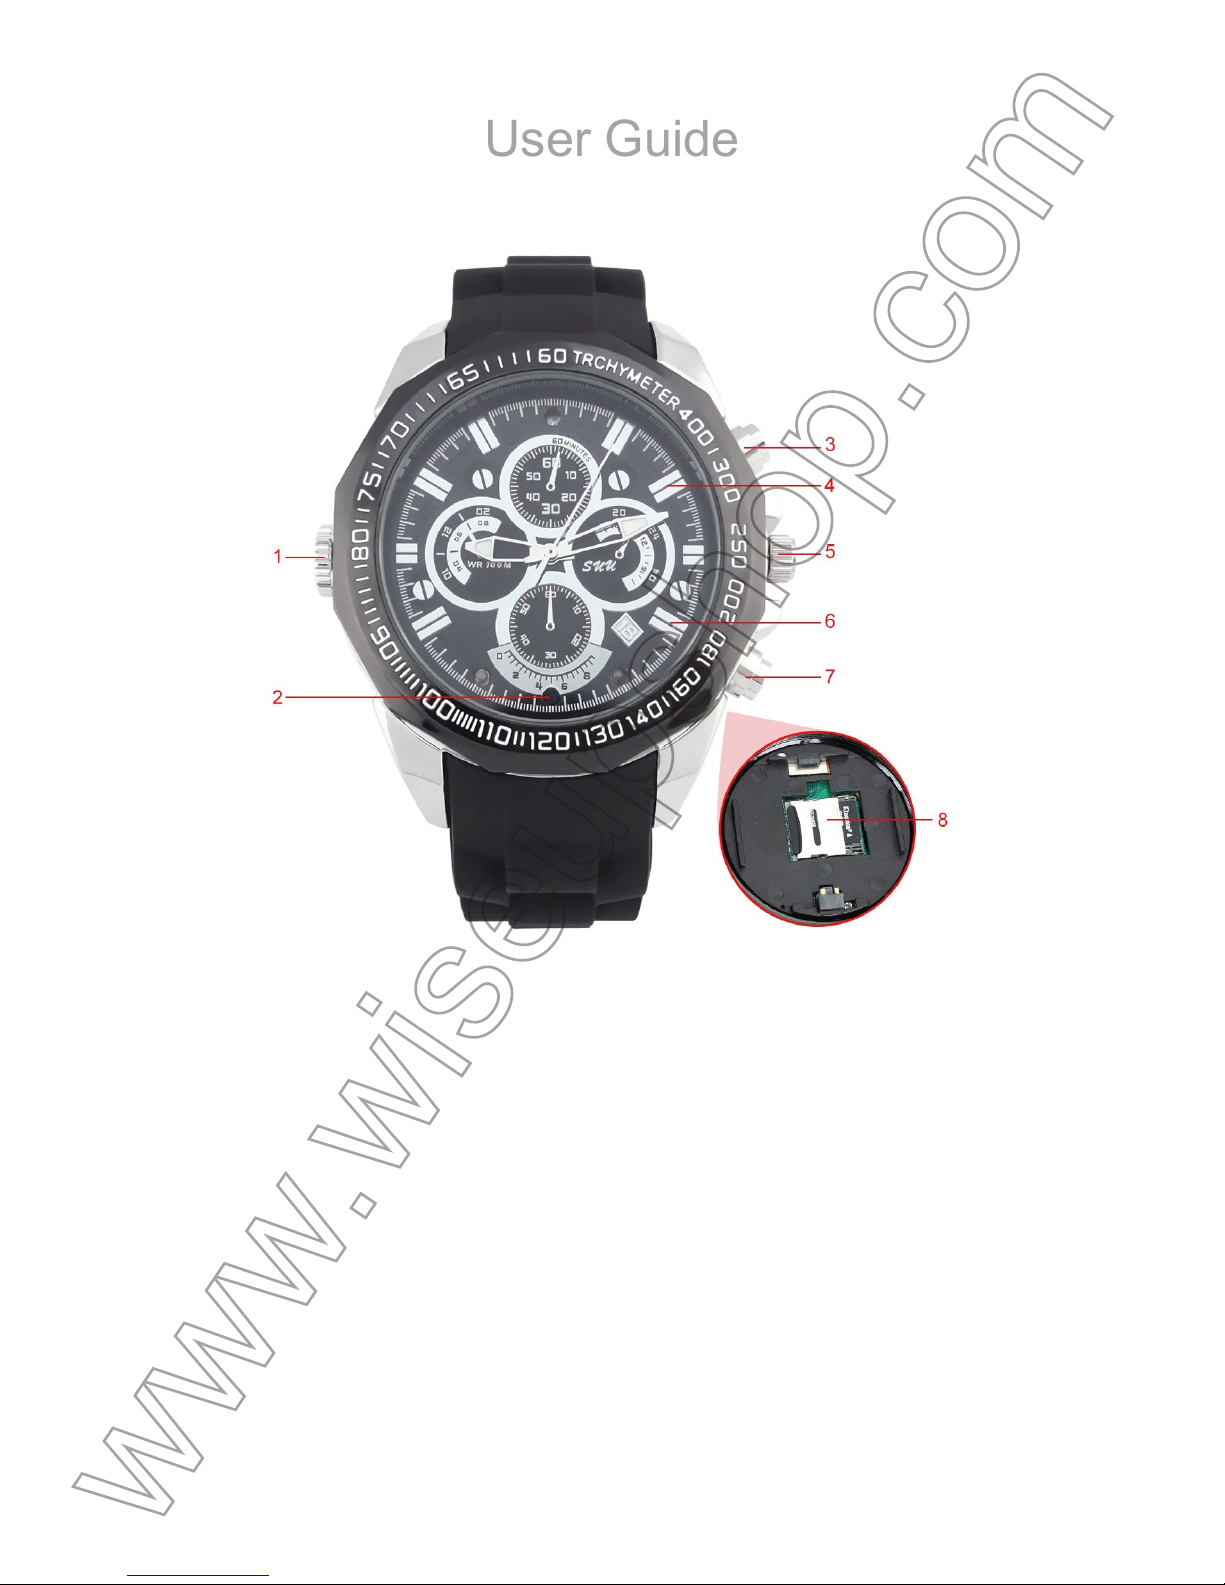
1. Knob Cover for Mini USB Port
2. Camera Lens
3. Power Button
4. Green/Red Indicator Light
5. Time Adjustment Knob
6. Blue Indicator Light
7. Mode Button
8. Micro SD Card Slot
II. What’s in the Box
-1 × Watch Camera
-1 × USB Cable
-1 × AC110-230V to DC 5V Power Adapter
-1 × 8GB Micro SD Card (fitted into the Micro SD card slot already)
III. Operation
>> Please make sure the camera is fully charged and the Micro SD card has been formatted
already and is securely fitted into the camera’s SD card slot, or it will not work. You are recom-
mended to use a SDHC Class 10 Micro SD card.
[Note]:
nated for 3 seconds, then the green one will turn off while the blue one will keep flashing for 3 seconds
and turn off, next, the green one will flash 3 times and turn off. The camera will shut down automatically.
3.1. POWER ON/OFF
3.1.1. Power on the camera by pressing the Power Button for 2 seconds. Both blue and green
indicator lights will be illuminated for 2 seconds and then the green one will turn off while the
blue one will stay illuminated, indicating the camera has entered into standby mode automati-
cally.
3.1.2. Power off the camera by pressing the Power Button for 2 seconds again in standby
mode. The green indicator light will flash 3 times and turn off with the blue one.
[Note]:
1). The camera will shut down automatically if it is in standby mode without any operation more than 3
minutes.
2). If the camera is running low on batteries, the green indicator light will keep flashing for 30 seconds
and turn off. The camera will shut down automatically.
3.2. VIDEO RECORDING
3.2.1. Power on the camera by pressing the Power Button for 2 seconds. Both blue and green
indicator lights will be illuminated for 2 seconds and then the green one will turn off while the
blue one will stay illuminated, indicating the camera has entered into standby mode automati-
cally.
3.2.2. Press the Power Button once to start video recording. The blue indicator light will flash 3
times and turn off.
3.2.3. Press the Power Button once again to stop video recording. The blue indicator light will
come on and stay illuminated, indicating the camera is back to standby mode.
[Note]:
1). A video clip will be generated and saved every 5 minutes automatically.
2). The camera can record video for 65 minutes continuously on a full charge.
3). Video Resolution: 1920x1080P, 1280x720P, 640x480 Optional Video Format: AVI
4). Loop recording is supported.
5). Each video clip takes up about 700MB at 1920x1080P, 300MB at 1280x720P, 120MB at 640x480.
Page 2
III. Operation
>> Please make sure the camera is fully charged and the Micro SD card has been formatted
already and is securely fitted into the camera’s SD card slot, or it will not work. You are recommended to use a SDHC Class 10 Micro SD card.
[Note]:
If no Micro SD card is fitted into the camera, both blue and green indicator lights will stay illumi-
nated for 3 seconds, then the green one will turn off while the blue one will keep flashing for 3 seconds
and turn off, next, the green one will flash 3 times and turn off. The camera will shut down automatically.
3.1. POWER ON/OFF
3.1.1. Power on the camera by pressing the Power Button for 2 seconds. Both blue and green
indicator lights will be illuminated for 2 seconds and then the green one will turn off while the
blue one will stay illuminated, indicating the camera has entered into standby mode automatically.
3.1.2. Power off the camera by pressing the Power Button for 2 seconds again in standby
mode. The green indicator light will flash 3 times and turn off with the blue one.
[Note]:
1). The camera will shut down automatically if it is in standby mode without any operation more than 3
minutes.
2). If the camera is running low on batteries, the green indicator light will keep flashing for 30 seconds
and turn off. The camera will shut down automatically.
3.2. VIDEO RECORDING
3.2.1. Power on the camera by pressing the Power Button for 2 seconds. Both blue and green
indicator lights will be illuminated for 2 seconds and then the green one will turn off while the
blue one will stay illuminated, indicating the camera has entered into standby mode automatically.
3.2.2. Press the Power Button once to start video recording. The blue indicator light will flash 3
times and turn off.
3.2.3. Press the Power Button once again to stop video recording. The blue indicator light will
come on and stay illuminated, indicating the camera is back to standby mode.
[Note]:
1). A video clip will be generated and saved every 5 minutes automatically.
2). The camera can record video for 65 minutes continuously on a full charge.
3). Video Resolution: 1920x1080P, 1280x720P, 640x480 Optional Video Format: AVI
4). Loop recording is supported.
5). Each video clip takes up about 700MB at 1920x1080P, 300MB at 1280x720P, 120MB at 640x480.
3.3. CAMERA/STILL PHOTOGRAPHY
3.3.1. Power on the camera by pressing the Power Button for 2 seconds. Both blue and green
indicator lights will be illuminated for 2 seconds and then the green one will turn off while the
blue one will stay illuminated, indicating the camera has entered into standby mode automati-
cally.
3.3.2. Press the Mode Button twice to enter into still photograph mode. Both green and blue
indicator lights will stay illuminated.
3.3.3. Press the Power Button once to take a photo. Every time you take a photo, both green
and blue indicator lights will flash once.
3.4. AUDIO RECORDING
3.4.1. Power on the camera by pressing the Power Button for 2 seconds. Both blue and green
indicator lights will be illuminated for 2 seconds and then the green one will turn off while the
blue one will stay illuminated, indicating the camera has entered into standby mode automati-
cally.
3.4.2. Press the Mode Button once to enter into audio recording mode. The blue indicator light
will turn off while the green indicator light will come on and remain solid.
3.4.3. Press the Power Button once to record audio only. The green indicator light will flash 3
times and turn off.
3.4.4. Press the Power Button once again to stop audio recording. The green indicator light will
come on and remain solid.
[Note]:
1). An audio clip will be generated and saved every 30 minutes automatically.
2). The camera can record audio for 60 minutes continuously on a full charge.
3). Audio Format: WAV
IV. Video/Image File Uploads
4.1. Power off the camera, remove the Micro SD card and insert it into a card reader.
4.2. Insert the card reader into a proper PC computer USB port.
4.3. The camera will be recognized as a removable disk drive.
4.4. All the files can be accessed in the drive.
V. Setting Time/Date Stamp
5.1. Power off the camera, remove the Micro SD card and insert it into a card reader.
5.2. Insert the card reader into a proper PC computer USB port.
5.3. The camera will be recognized as a removable disk drive.
Page 3

3.3. CAMERA/STILL PHOTOGRAPHY
3.3.1. Power on the camera by pressing the Power Button for 2 seconds. Both blue and green
indicator lights will be illuminated for 2 seconds and then the green one will turn off while the
blue one will stay illuminated, indicating the camera has entered into standby mode automatically.
3.3.2. Press the Mode Button twice to enter into still photograph mode. Both green and blue
indicator lights will stay illuminated.
3.3.3. Press the Power Button once to take a photo. Every time you take a photo, both green
and blue indicator lights will flash once.
3.4. AUDIO RECORDING
3.4.1. Power on the camera by pressing the Power Button for 2 seconds. Both blue and green
indicator lights will be illuminated for 2 seconds and then the green one will turn off while the
blue one will stay illuminated, indicating the camera has entered into standby mode automatically.
3.4.2. Press the Mode Button once to enter into audio recording mode. The blue indicator light
will turn off while the green indicator light will come on and remain solid.
3.4.3. Press the Power Button once to record audio only. The green indicator light will flash 3
times and turn off.
3.4.4. Press the Power Button once again to stop audio recording. The green indicator light will
come on and remain solid.
[Note]:
1). An audio clip will be generated and saved every 30 minutes automatically.
2). The camera can record audio for 60 minutes continuously on a full charge.
3). Audio Format: WAV
IV. Video/Image File Uploads
4.1. Power off the camera, remove the Micro SD card and insert it into a card reader.
4.2. Insert the card reader into a proper PC computer USB port.
4.3. The camera will be recognized as a removable disk drive.
4.4. All the files can be accessed in the drive.
V. Setting Time/Date Stamp
5.1. Power off the camera, remove the Micro SD card and insert it into a card reader.
5.2. Insert the card reader into a proper PC computer USB port.
5.3. The camera will be recognized as a removable disk drive.
5.4. Click on the drive in the root directory and inside the root directory, open the file named
“TIME.TXT”.
5.5. Write the current date and time in the “TIME.TXT” file with the correct format:
[date]
YYYY.MM.DD HH:MM:SS Y 1
For example:
[date]
2017.04.12 14:24:32 Y 1
Save this file.
5.6. If you need the camera to record video at a lower resolution, you can change 1 into 2 or 3
in the “TIME.TXT” file. 1 stands for 1920x1080P, 2 for 1280x720P and 3 for 640x480.
5.7. If you don’t need the time stamp on the video footage, change “Y” into “N” in the
“TIME.TXT” file.
For example:
[date]
2017.04.12 14:24:32 N 2
5.8. Restart the camera and the system will upgrade the program automatically.
VI. Charging
6.1. Power off the camera and connect it to an outlet AC power supply using the DC5V power
adapter and the USB cable provided.
6.2. Both blue and red indicator lights will stay illuminated during the charging process.
6.3. It will take 1 hour to obtain a full charge.
6.4. The red indicator light will turn off and the blue one will stay illuminated when the camera
is fully charged.
VII. Resetting
If for any reason, the camera stops responding or isn’t working properly, a quick reset will
restore it back to normal operation.
Operation: When the camera is powered on, press the Power Button and Mode Button simul-
taneously once; the camera will shut down automatically. Then you can restart the camera with
factory default settings.
VIII. Time Setting
8.1. Pull the Time Adjustment Knob until you hear a click. Both hour and minute hands will be
Page 4

5.4. Click on the drive in the root directory and inside the root directory, open the file named
“TIME.TXT”.
5.5. Write the current date and time in the “TIME.TXT” file with the correct format:
[date]
YYYY.MM.DD HH:MM:SS Y 1
For example:
[date]
2017.04.12 14:24:32 Y 1
Save this file.
5.6. If you need the camera to record video at a lower resolution, you can change 1 into 2 or 3
in the “TIME.TXT” file. 1 stands for 1920x1080P, 2 for 1280x720P and 3 for 640x480.
5.7. If you don’t need the time stamp on the video footage, change “Y” into “N” in the
“TIME.TXT” file.
For example:
[date]
2017.04.12 14:24:32 N 2
5.8. Restart the camera and the system will upgrade the program automatically.
VI. Charging
6.1. Power off the camera and connect it to an outlet AC power supply using the DC5V power
adapter and the USB cable provided.
6.2. Both blue and red indicator lights will stay illuminated during the charging process.
6.3. It will take 1 hour to obtain a full charge.
6.4. The red indicator light will turn off and the blue one will stay illuminated when the camera
is fully charged.
VII. Resetting
If for any reason, the camera stops responding or isn’t working properly, a quick reset will
restore it back to normal operation.
Operation: When the camera is powered on, press the Power Button and Mode Button simultaneously once; the camera will shut down automatically. Then you can restart the camera with
factory default settings.
VIII. Time Setting
8.1. Pull the Time Adjustment Knob until you hear a click. Both hour and minute hands will be
stopped.
8.2. Rotate the Time Adjustment Knob to set time.
8.3. Push the Time Adjustment Knob back after the time set is completed.
Page 5
stopped.
8.2. Rotate the Time Adjustment Knob to set time.
8.3. Push the Time Adjustment Knob back after the time set is completed.
Page 6
W8500
Benutzerhandbuch
I. Produktübersicht
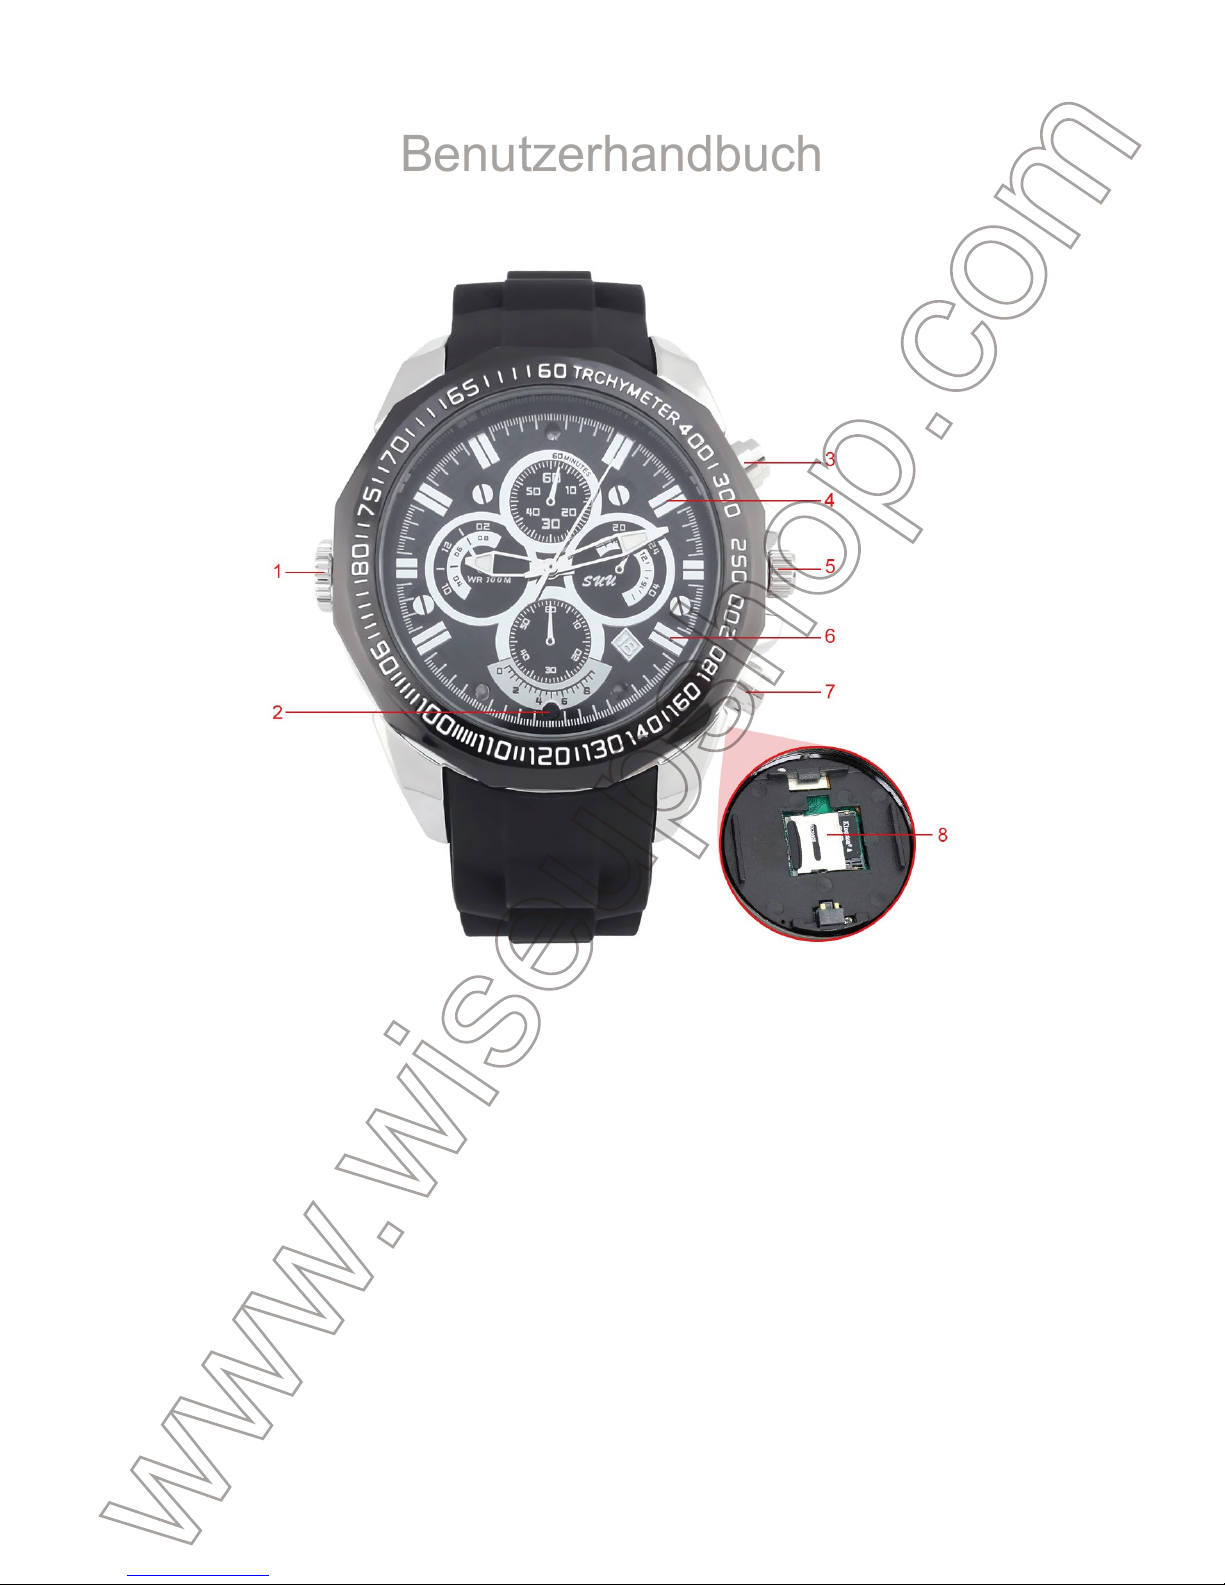
1. Knopfabdeckung für Mini-USB-Port
2. Kameraobjektiv
3. Netzschalter
4. Grüne / rote Kontrollleuchte
5. Zeiteinstellknopf
6. Blaues Indikatorlicht
7. Modus-Taste
8. Mikro-Sd-Einbauschlitz
II. Was ist in der Box
-1 × Uhr Kamera anschauen
-1 × USB-Kabel
-1 × AC110-230V bis DC 5V Netzteil
-1 × 8GB Micro SD Card (bereits in den Micro SD Kartensteckplatz eingebaut)
III. Betrieb
>> Bitte stellen Sie sicher, dass die Kamera voll aufgeladen ist und die Micro SD-Karte bereits
formatiert ist und sicher in den SD-Kartensteckplatz der Kamera eingepasst ist, oder es funk-
tioniert nicht. Es wird empfohlen, eine SDHC Class 10 Micro SD Karte zu verwenden.
[Hinweis]:
Kontrollleuchten für 3 Sekunden leuchtend, dann wird die grüne ausgeschaltet, während die blaue LED
für 3 Sekunden blinkt und als nächstes ausschaltet , Das grüne blitzt 3 mal und schaltet aus. Die
Kamera schaltet sich automatisch ab.
3.1. EINSCHALTEN / AUSSCHALTEN
3.1.1. Schalten Sie die Kamera ein, indem Sie den Netzschalter 2 Sekunden lang drücken. Die
blauen und grünen Kontrollleuchten werden für 2 Sekunden beleuchtet und dann wird die
grüne ausgeschaltet, während die blaue beleuchtet bleibt, was anzeigt, dass die Kamera
automatisch in den Standby-Modus geschaltet ist.
3.1.2. Schalten Sie die Kamera aus, indem Sie den Netzschalter für 2 Sekunden im Stand-
by-Modus drücken. Die grüne Kontrollleuchte blinkt 3 mal und schaltet sich mit dem blauen
aus.
[Hinweis]:
1). Die Kamera schaltet sich automatisch ab, wenn sie sich im Standby-Modus befindet, ohne jeglichen
Betrieb mehr als 3 Minuten.
2). Wenn die Kamera mit Batterien leer ist, blinkt die grüne Kontrollleuchte für 30 Sekunden und
schaltet sich aus. Die Kamera schaltet sich automatisch ab.
3.2. VIDEOAUFNAHME
3.2.1. Schalten Sie die Kamera ein, indem Sie den Netzschalter 2 Sekunden lang drücken. Die
blauen und grünen Kontrollleuchten werden für 2 Sekunden beleuchtet und dann wird die
grüne ausgeschaltet, während die blaue beleuchtet bleibt, was anzeigt, dass die Kamera
automatisch in den Standby-Modus geschaltet ist.
3.2.2 Drücken Sie einmal die Ein- / Aus-Taste, um die Videoaufnahme zu starten. Die blaue
Kontrollleuchte blinkt 3 mal und schaltet sich aus.
3.2.3. Drücken Sie die Power-Taste erneut, um die Videoaufnahme zu stoppen. Die blaue Kon-
trollleuchte leuchtet auf und leuchtet auf und zeigt an, dass die Kamera wieder in den Stand-
by-Modus versetzt wird.
[Hinweis]:
1). Ein Videoclip wird alle 5 Minuten automatisch generiert und gespeichert.
2). Die Kamera kann Video für 65 Minuten kontinuierlich auf eine volle Ladung aufnehmen.
Page 7

III. Betrieb
>> Bitte stellen Sie sicher, dass die Kamera voll aufgeladen ist und die Micro SD-Karte bereits
formatiert ist und sicher in den SD-Kartensteckplatz der Kamera eingepasst ist, oder es funktioniert nicht. Es wird empfohlen, eine SDHC Class 10 Micro SD Karte zu verwenden.
[Hinweis]:
Wenn keine Micro SD-Karte in die Kamera eingebaut wird, bleiben die blauen und grünen
Kontrollleuchten für 3 Sekunden leuchtend, dann wird die grüne ausgeschaltet, während die blaue LED
für 3 Sekunden blinkt und als nächstes ausschaltet , Das grüne blitzt 3 mal und schaltet aus. Die
Kamera schaltet sich automatisch ab.
3.1. EINSCHALTEN / AUSSCHALTEN
3.1.1. Schalten Sie die Kamera ein, indem Sie den Netzschalter 2 Sekunden lang drücken. Die
blauen und grünen Kontrollleuchten werden für 2 Sekunden beleuchtet und dann wird die
grüne ausgeschaltet, während die blaue beleuchtet bleibt, was anzeigt, dass die Kamera
automatisch in den Standby-Modus geschaltet ist.
3.1.2. Schalten Sie die Kamera aus, indem Sie den Netzschalter für 2 Sekunden im Standby-Modus drücken. Die grüne Kontrollleuchte blinkt 3 mal und schaltet sich mit dem blauen
aus.
[Hinweis]:
1). Die Kamera schaltet sich automatisch ab, wenn sie sich im Standby-Modus befindet, ohne jeglichen
Betrieb mehr als 3 Minuten.
2). Wenn die Kamera mit Batterien leer ist, blinkt die grüne Kontrollleuchte für 30 Sekunden und
schaltet sich aus. Die Kamera schaltet sich automatisch ab.
3.2. VIDEOAUFNAHME
3.2.1. Schalten Sie die Kamera ein, indem Sie den Netzschalter 2 Sekunden lang drücken. Die
blauen und grünen Kontrollleuchten werden für 2 Sekunden beleuchtet und dann wird die
grüne ausgeschaltet, während die blaue beleuchtet bleibt, was anzeigt, dass die Kamera
automatisch in den Standby-Modus geschaltet ist.
3.2.2 Drücken Sie einmal die Ein- / Aus-Taste, um die Videoaufnahme zu starten. Die blaue
Kontrollleuchte blinkt 3 mal und schaltet sich aus.
3.2.3. Drücken Sie die Power-Taste erneut, um die Videoaufnahme zu stoppen. Die blaue Kontrollleuchte leuchtet auf und leuchtet auf und zeigt an, dass die Kamera wieder in den Standby-Modus versetzt wird.
[Hinweis]:
1). Ein Videoclip wird alle 5 Minuten automatisch generiert und gespeichert.
2). Die Kamera kann Video für 65 Minuten kontinuierlich auf eine volle Ladung aufnehmen.
3). Video Auflösung: 1920x1080P, 1280x720P, 640x480 Optionales Videoformat: AVI
4). Die Loop-Aufnahme wird unterstützt.
5). Jeder Videoclip nimmt etwa 700MB bei 1920x1080P, 300MB bei 1280x720P, 120MB bei 640x480
auf.
3.3. KAMERA / NOCH FOTOGRAFIE
3.3.1. Schalten Sie die Kamera ein, indem Sie den Netzschalter 2 Sekunden lang drücken. Die
blauen und grünen Kontrollleuchten werden für 2 Sekunden beleuchtet und dann wird die
grüne ausgeschaltet, während die blaue beleuchtet bleibt, was anzeigt, dass die Kamera
automatisch in den Standby-Modus geschaltet ist.
3.3.2. Drücken Sie zweimal die Mode-Taste, um in den Standbildmodus zu gelangen. Beide
grüne und blaue Kontrollleuchten bleiben erhalten.
3.3.3. Drücken Sie einmal die Power-Taste, um ein Foto aufzunehmen. Jedes Mal, wenn Sie
ein Foto machen, blinkt die grüne und blaue Kontrollleuchte einmal.
3.4. AUDIO AUFNAHME
3.4.1. Schalten Sie die Kamera ein, indem Sie den Netzschalter 2 Sekunden lang drücken. Die
blauen und grünen Kontrollleuchten werden für 2 Sekunden beleuchtet und dann wird die
grüne ausgeschaltet, während die blaue beleuchtet bleibt, was anzeigt, dass die Kamera
automatisch in den Standby-Modus geschaltet ist.
3.4.2. Drücken Sie einmal die Mode-Taste, um in den Audio-Aufnahmemodus zu gelangen. Die
blaue Kontrollleuchte schaltet sich aus, während die grüne Kontrollleuchte aufleuchtet und
solide bleibt.
3.4.3. Drücken Sie die Power-Taste einmal, um nur Audio aufzunehmen. Die grüne Kontroll-
leuchte blinkt 3 mal und schaltet sich aus.
3.4.4 Drücken Sie erneut die Power-Taste, um die Audioaufnahme zu beenden. Die grüne Kon-
trollleuchte leuchtet auf und bleibt solide.
[Hinweis]:
1). Ein Audioclip wird alle 30 Minuten automatisch generiert und gespeichert.
2). Die Kamera kann Audio für 60 Minuten kontinuierlich auf eine volle Ladung aufnehmen.
3). Audioformat: WAV
IV. Video- / Bilddatei-Uploads
4.1. Schalten Sie die Kamera aus, entfernen Sie die Micro SD-Karte und legen Sie sie in einen
Kartenleser ein.
4.2. Legen Sie den Kartenleser in einen geeigneten PC-Computer ein.
Page 8
3). Video Auflösung: 1920x1080P, 1280x720P, 640x480 Optionales Videoformat: AVI
4). Die Loop-Aufnahme wird unterstützt.
5). Jeder Videoclip nimmt etwa 700MB bei 1920x1080P, 300MB bei 1280x720P, 120MB bei 640x480
auf.
3.3. KAMERA / NOCH FOTOGRAFIE
3.3.1. Schalten Sie die Kamera ein, indem Sie den Netzschalter 2 Sekunden lang drücken. Die
blauen und grünen Kontrollleuchten werden für 2 Sekunden beleuchtet und dann wird die
grüne ausgeschaltet, während die blaue beleuchtet bleibt, was anzeigt, dass die Kamera
automatisch in den Standby-Modus geschaltet ist.
3.3.2. Drücken Sie zweimal die Mode-Taste, um in den Standbildmodus zu gelangen. Beide
grüne und blaue Kontrollleuchten bleiben erhalten.
3.3.3. Drücken Sie einmal die Power-Taste, um ein Foto aufzunehmen. Jedes Mal, wenn Sie
ein Foto machen, blinkt die grüne und blaue Kontrollleuchte einmal.
3.4. AUDIO AUFNAHME
3.4.1. Schalten Sie die Kamera ein, indem Sie den Netzschalter 2 Sekunden lang drücken. Die
blauen und grünen Kontrollleuchten werden für 2 Sekunden beleuchtet und dann wird die
grüne ausgeschaltet, während die blaue beleuchtet bleibt, was anzeigt, dass die Kamera
automatisch in den Standby-Modus geschaltet ist.
3.4.2. Drücken Sie einmal die Mode-Taste, um in den Audio-Aufnahmemodus zu gelangen. Die
blaue Kontrollleuchte schaltet sich aus, während die grüne Kontrollleuchte aufleuchtet und
solide bleibt.
3.4.3. Drücken Sie die Power-Taste einmal, um nur Audio aufzunehmen. Die grüne Kontrollleuchte blinkt 3 mal und schaltet sich aus.
3.4.4 Drücken Sie erneut die Power-Taste, um die Audioaufnahme zu beenden. Die grüne Kontrollleuchte leuchtet auf und bleibt solide.
[Hinweis]:
1). Ein Audioclip wird alle 30 Minuten automatisch generiert und gespeichert.
2). Die Kamera kann Audio für 60 Minuten kontinuierlich auf eine volle Ladung aufnehmen.
3). Audioformat: WAV
IV. Video- / Bilddatei-Uploads
4.1. Schalten Sie die Kamera aus, entfernen Sie die Micro SD-Karte und legen Sie sie in einen
Kartenleser ein.
4.2. Legen Sie den Kartenleser in einen geeigneten PC-Computer ein.
4.3. Die Kamera wird als Wechseldatenträger erkannt.
4.4. Auf alle Dateien kann im Laufwerk zugegriffen werden.
V. Einstellzeit / Datumsstempel
5.1. Schalten Sie die Kamera aus, entfernen Sie die Micro SD-Karte und legen Sie sie in einen
Kartenleser ein.
5.2. Legen Sie den Kartenleser in einen geeigneten PC-Computer ein.
5.3. Die Kamera wird als Wechseldatenträger erkannt.
5.4 Klicken Sie auf das Laufwerk im Stammverzeichnis und im Stammverzeichnis, öffnen Sie
die Datei mit dem Namen "TIME.TXT".
5.5 Schreiben Sie das aktuelle Datum und die Uhrzeit in der Datei "TIME.TXT" mit dem richti-
gen Format:
[Datum]
YYYY.MM.DD HH: MM: SS Y 1
Beispielsweise:
[Datum]
2017.04.12 14:24:32 Y 1
Diese Datei speichern
5.6. Wenn Sie die Kamera benötigen, um Video mit einer niedrigeren Auflösung aufzunehmen,
können Sie 1 in 2 oder 3 in der Datei "TIME.TXT" ändern. 1 steht für 1920x1080P, 2 für
1280x720P und 3 für 640x480.
5.7. Wenn Sie den Zeitstempel auf dem Videomaterial nicht benötigen, ändern Sie "Y" in "N" in
der Datei "TIME.TXT".
Beispielsweise:
[Datum]
2017.04.12 14:24:32 N 2
5.8. Starten Sie die Kamera neu und das System wird das Programm automatisch aktualisie-
ren.
VI. Aufladen
6.1. Schalten Sie die Kamera aus und schließen Sie sie an eine Steckdose an. Stromver-
sorgung mit dem DC5V Netzteil und dem mitgelieferten USB-Kabel.
6.2. Sowohl die blaue als auch die rote Kontrollleuchte bleiben während des Ladevorgangs
beleuchtet.
6.3. Es dauert 1 Stunde, um eine volle Ladung zu erhalten.
Page 9

4.3. Die Kamera wird als Wechseldatenträger erkannt.
4.4. Auf alle Dateien kann im Laufwerk zugegriffen werden.
V. Einstellzeit / Datumsstempel
5.1. Schalten Sie die Kamera aus, entfernen Sie die Micro SD-Karte und legen Sie sie in einen
Kartenleser ein.
5.2. Legen Sie den Kartenleser in einen geeigneten PC-Computer ein.
5.3. Die Kamera wird als Wechseldatenträger erkannt.
5.4 Klicken Sie auf das Laufwerk im Stammverzeichnis und im Stammverzeichnis, öffnen Sie
die Datei mit dem Namen "TIME.TXT".
5.5 Schreiben Sie das aktuelle Datum und die Uhrzeit in der Datei "TIME.TXT" mit dem richtigen Format:
[Datum]
YYYY.MM.DD HH: MM: SS Y 1
Beispielsweise:
[Datum]
2017.04.12 14:24:32 Y 1
Diese Datei speichern
5.6. Wenn Sie die Kamera benötigen, um Video mit einer niedrigeren Auflösung aufzunehmen,
können Sie 1 in 2 oder 3 in der Datei "TIME.TXT" ändern. 1 steht für 1920x1080P, 2 für
1280x720P und 3 für 640x480.
5.7. Wenn Sie den Zeitstempel auf dem Videomaterial nicht benötigen, ändern Sie "Y" in "N" in
der Datei "TIME.TXT".
Beispielsweise:
[Datum]
2017.04.12 14:24:32 N 2
5.8. Starten Sie die Kamera neu und das System wird das Programm automatisch aktualisieren.
VI. Aufladen
6.1. Schalten Sie die Kamera aus und schließen Sie sie an eine Steckdose an. Stromversorgung mit dem DC5V Netzteil und dem mitgelieferten USB-Kabel.
6.2. Sowohl die blaue als auch die rote Kontrollleuchte bleiben während des Ladevorgangs
beleuchtet.
6.3. Es dauert 1 Stunde, um eine volle Ladung zu erhalten.
6.4. Die rote Kontrollleuchte schaltet sich aus und die blaue leuchtet auf, wenn die Kamera voll
aufgeladen ist.
VII. Zurücksetzen
Wenn aus irgendeinem Grund die Kamera nicht mehr reagiert oder nicht ordnungsgemäß funk-
tioniert, wird ein schneller Reset wieder in den normalen Betrieb zurückversetzt.
Bedienung: Wenn die Kamera eingeschaltet ist, drücken Sie gleichzeitig einmal den Ein- /
Ausschalter und die Modus-Taste. Die Kamera schaltet sich automatisch ab. Dann können Sie
die Kamera mit den Werkseinstellungen neu starten.
VIII. Zeiteinstellung
8.1. Ziehen Sie den Zeitregler, bis Sie einen Klick hören. Beide Stunden- und Minutenzeiger
werden gestoppt.
8.2. Drehen Sie den Zeiteinstellknopf, um die Zeit einzustellen.
8.3. Drücken Sie den Zeiteinstellknopf zurück, nachdem die eingestellte Zeit abgeschlossen
ist.
Page 10

6.4. Die rote Kontrollleuchte schaltet sich aus und die blaue leuchtet auf, wenn die Kamera voll
aufgeladen ist.
VII. Zurücksetzen
Wenn aus irgendeinem Grund die Kamera nicht mehr reagiert oder nicht ordnungsgemäß funktioniert, wird ein schneller Reset wieder in den normalen Betrieb zurückversetzt.
Bedienung: Wenn die Kamera eingeschaltet ist, drücken Sie gleichzeitig einmal den Ein- /
Ausschalter und die Modus-Taste. Die Kamera schaltet sich automatisch ab. Dann können Sie
die Kamera mit den Werkseinstellungen neu starten.
VIII. Zeiteinstellung
8.1. Ziehen Sie den Zeitregler, bis Sie einen Klick hören. Beide Stunden- und Minutenzeiger
werden gestoppt.
8.2. Drehen Sie den Zeiteinstellknopf, um die Zeit einzustellen.
8.3. Drücken Sie den Zeiteinstellknopf zurück, nachdem die eingestellte Zeit abgeschlossen
ist.
Page 11
W8500
Mode d'emploi
I. Aperçu du produit
1. Couvercle de bouton pour mini port USB
2. Lentille de caméra
3. Bouton d’Alimentation
4. Voyant vert / rouge
5. Bouton de Réglage du Temps
6. Voyant lumineux bleu
7. Bouton Mode
8. Emplacement pour carte micro SD
II. Qu'y a-t-il dans la boite
-1 × Caméra Montre
-1 × Câble USB
-1 × AC110-230V à DC 5V Power Adapter
-1 × 8 GB de carte Micro SD (monté sur l'emplacement de la carte Micro SD déjà)
III. Opération
>> Assurez-vous que la caméra est complètement chargé et que la carte Micro SD a déjà été
formatée et qu'elle est correctement installée dans le logement de la carte SD de la caméra ou
qu'elle ne fonctionnera pas. Vous êtes recommandé d'utiliser une carte SD SDHC de classe 10
Micro.
[Note]:
allumés pendant 3 secondes, puis le vert s'éteint lorsque le bleu continuera à clignoter pendant 3 sec-
ondes et s'éteint, ensuite , Le vert clignote 3 fois et éteint. La caméra s'arrête automatiquement.
3.1. MARCHE / ARRÊT
3.1.1. Allumez la caméra en appuyant sur le Bouton d’Alimentation pendant 2 secondes. Les
voyants bleu et vert s'allument pendant 2 secondes, puis le vert s'éteint lorsque le bleu reste
allumé, indiquant que la caméra est entré en mode veille automatiquement.
3.1.2. Mettez l'appareil hors tension en appuyant de nouveau sur le Bouton d’Alimentation pen-
dant 2 secondes en mode veille. Le voyant vert clignote 3 fois et éteint le bleu.
[Note]:
1). La caméra s'éteint automatiquement si elle est en mode veille sans aucune opération pendant plus
de 3 minutes.
2). Si la caméra est faible sur les piles, le voyant vert continuera à clignoter pendant 30 secondes et
s'éteint. La caméra s'arrête automatiquement.
3.2. ENREGISTREMENT VIDEO
3.2.1. Allumez la caméra en appuyant sur le Bouton d’Alimentation pendant 2 secondes. Les
voyants bleu et vert s'allument pendant 2 secondes, puis le vert s'éteint lorsque le bleu reste
allumé, indiquant que la caméra est entré en mode veille automatiquement.
3.2.2. Appuyez une fois sur le Bouton d’Alimentation pour commencer l'enregistrement vidéo.
Le voyant bleu clignote 3 fois et éteint.
3.2.3. Appuyez à nouveau sur le Bouton d’Alimentation pour arrêter l'enregistrement vidéo. Le
voyant bleu s'allume et reste allumé, indiquant que la caméra est en mode veille.
[Note]:
1). Un clip vidéo sera généré et enregistré toutes les 5 minutes automatiquement.
2). La caméra peut enregistrer une vidéo pendant 65 minutes en continu sur une charge complète.
3). Résolution vidéo: 1920x1080P, 1280x720P, 640x480 Format vidéo optionnel: AVI
4). L'enregistrement en boucle est pris en charge.
5). Chaque vidéo prend environ 700 Mo à 1920x1080P, 300 Mo à 1280x720P, 120 Mo à 640x480.
Page 12
III. Opération
>> Assurez-vous que la caméra est complètement chargé et que la carte Micro SD a déjà été
formatée et qu'elle est correctement installée dans le logement de la carte SD de la caméra ou
qu'elle ne fonctionnera pas. Vous êtes recommandé d'utiliser une carte SD SDHC de classe 10
Micro.
[Note]:
Si aucune carte Micro SD n'est installée dans la caméra, les voyants bleu et vert restent
allumés pendant 3 secondes, puis le vert s'éteint lorsque le bleu continuera à clignoter pendant 3 sec-
ondes et s'éteint, ensuite , Le vert clignote 3 fois et éteint. La caméra s'arrête automatiquement.
3.1. MARCHE / ARRÊT
3.1.1. Allumez la caméra en appuyant sur le Bouton d’Alimentation pendant 2 secondes. Les
voyants bleu et vert s'allument pendant 2 secondes, puis le vert s'éteint lorsque le bleu reste
allumé, indiquant que la caméra est entré en mode veille automatiquement.
3.1.2. Mettez l'appareil hors tension en appuyant de nouveau sur le Bouton d’Alimentation pendant 2 secondes en mode veille. Le voyant vert clignote 3 fois et éteint le bleu.
[Note]:
1). La caméra s'éteint automatiquement si elle est en mode veille sans aucune opération pendant plus
de 3 minutes.
2). Si la caméra est faible sur les piles, le voyant vert continuera à clignoter pendant 30 secondes et
s'éteint. La caméra s'arrête automatiquement.
3.2. ENREGISTREMENT VIDEO
3.2.1. Allumez la caméra en appuyant sur le Bouton d’Alimentation pendant 2 secondes. Les
voyants bleu et vert s'allument pendant 2 secondes, puis le vert s'éteint lorsque le bleu reste
allumé, indiquant que la caméra est entré en mode veille automatiquement.
3.2.2. Appuyez une fois sur le Bouton d’Alimentation pour commencer l'enregistrement vidéo.
Le voyant bleu clignote 3 fois et éteint.
3.2.3. Appuyez à nouveau sur le Bouton d’Alimentation pour arrêter l'enregistrement vidéo. Le
voyant bleu s'allume et reste allumé, indiquant que la caméra est en mode veille.
[Note]:
1). Un clip vidéo sera généré et enregistré toutes les 5 minutes automatiquement.
2). La caméra peut enregistrer une vidéo pendant 65 minutes en continu sur une charge complète.
3). Résolution vidéo: 1920x1080P, 1280x720P, 640x480 Format vidéo optionnel: AVI
4). L'enregistrement en boucle est pris en charge.
5). Chaque vidéo prend environ 700 Mo à 1920x1080P, 300 Mo à 1280x720P, 120 Mo à 640x480.
3.3. CAMERA / TOUCHE PHOTOGRAPHIE
3.3.1. Allumez la caméra en appuyant sur le Bouton d’Alimentation pendant 2 secondes. Les
voyants bleu et vert s'allument pendant 2 secondes, puis le vert s'éteint lorsque le bleu reste
allumé, indiquant que la caméra est entré en mode veille automatiquement.
3.3.2. Appuyez deux fois sur le bouton Mode pour entrer en mode photographie fixe. Les voy-
ants lumineux vert et bleu resteront allumés.
3.3.3. Appuyez une fois sur le Bouton d’Alimentation pour prendre une photo. Chaque fois que
vous prenez une photo, les voyants lumineux vert et bleu clignotent une fois.
3.4. ENREGISTREMENT AUDIO
3.4.1. Allumez la caméra en appuyant sur le Bouton d’Alimentation pendant 2 secondes. Les
voyants bleu et vert s'allument pendant 2 secondes, puis le vert s'éteint lorsque le bleu reste
allumé, indiquant que la caméra est entré en mode veille automatiquement.
3.4.2. Appuyez une fois sur le bouton Mode pour entrer en mode d'enregistrement audio. Le
témoin lumineux bleu s'éteint lorsque le voyant vert s'allume et reste solide.
3.4.3. Appuyez une fois sur le Bouton d’Alimentation pour enregistrer uniquement l'audio. Le
voyant vert clignote 3 fois et éteint.
3.4.4. Appuyez à nouveau sur le Bouton d’Alimentation pour arrêter l'enregistrement audio. Le
voyant vert s'allume et reste solide.
[Note]:
1). Un clip audio sera généré et sauvegardé toutes les 30 minutes automatiquement.
2). La caméra peut enregistrer l'audio pendant 60 minutes en continu sur une charge complète.
3). Format audio: WAV
IV. Téléchargement de fichiers vidéo / image
4.1. Éteignez la caméra, retirez la carte Micro SD et insérez-la dans un lecteur de carte.
4.2. Insérez le lecteur de carte dans un port USB approprié pour PC.
4.3. La caméra sera reconnu comme un lecteur de disque amovible.
4.4. Tous les fichiers peuvent être consultés dans le lecteur.
V. Réglage de l'heure / Date Stamp
5.1. Éteignez la caméra, retirez la carte Micro SD et insérez-la dans un lecteur de carte.
5.2. Insérez le lecteur de carte dans un port USB approprié pour PC.
5.3. La caméra sera reconnu comme un lecteur de disque amovible.
5.4. Cliquez sur le lecteur dans le répertoire racine et dans le répertoire racine, ouvrez le fichier
nommé "TIME.TXT".
Page 13
3.3. CAMERA / TOUCHE PHOTOGRAPHIE
3.3.1. Allumez la caméra en appuyant sur le Bouton d’Alimentation pendant 2 secondes. Les
voyants bleu et vert s'allument pendant 2 secondes, puis le vert s'éteint lorsque le bleu reste
allumé, indiquant que la caméra est entré en mode veille automatiquement.
3.3.2. Appuyez deux fois sur le bouton Mode pour entrer en mode photographie fixe. Les voyants lumineux vert et bleu resteront allumés.
3.3.3. Appuyez une fois sur le Bouton d’Alimentation pour prendre une photo. Chaque fois que
vous prenez une photo, les voyants lumineux vert et bleu clignotent une fois.
3.4. ENREGISTREMENT AUDIO
3.4.1. Allumez la caméra en appuyant sur le Bouton d’Alimentation pendant 2 secondes. Les
voyants bleu et vert s'allument pendant 2 secondes, puis le vert s'éteint lorsque le bleu reste
allumé, indiquant que la caméra est entré en mode veille automatiquement.
3.4.2. Appuyez une fois sur le bouton Mode pour entrer en mode d'enregistrement audio. Le
témoin lumineux bleu s'éteint lorsque le voyant vert s'allume et reste solide.
3.4.3. Appuyez une fois sur le Bouton d’Alimentation pour enregistrer uniquement l'audio. Le
voyant vert clignote 3 fois et éteint.
3.4.4. Appuyez à nouveau sur le Bouton d’Alimentation pour arrêter l'enregistrement audio. Le
voyant vert s'allume et reste solide.
[Note]:
1). Un clip audio sera généré et sauvegardé toutes les 30 minutes automatiquement.
2). La caméra peut enregistrer l'audio pendant 60 minutes en continu sur une charge complète.
3). Format audio: WAV
IV. Téléchargement de fichiers vidéo / image
4.1. Éteignez la caméra, retirez la carte Micro SD et insérez-la dans un lecteur de carte.
4.2. Insérez le lecteur de carte dans un port USB approprié pour PC.
4.3. La caméra sera reconnu comme un lecteur de disque amovible.
4.4. Tous les fichiers peuvent être consultés dans le lecteur.
V. Réglage de l'heure / Date Stamp
5.1. Éteignez la caméra, retirez la carte Micro SD et insérez-la dans un lecteur de carte.
5.2. Insérez le lecteur de carte dans un port USB approprié pour PC.
5.3. La caméra sera reconnu comme un lecteur de disque amovible.
5.4. Cliquez sur le lecteur dans le répertoire racine et dans le répertoire racine, ouvrez le fichier
nommé "TIME.TXT".
5.5. Écrivez la date et l'heure actuelles dans le fichier "TIME.TXT" avec le format correct:
[rendez-vous amoureux]
AAAA.MM.DD HH: MM: SS Y 1
Par exemple:
[date]
2017.04.12 14:24:32 Y 1
Enregistrez ce fichier.
5.6. Si vous avez besoin de la caméra pour enregistrer une vidéo à une résolution inférieure,
vous pouvez changer 1 en 2 ou 3 dans le fichier "TIME.TXT". 1 représente 1920x1080P, 2 pour
1280x720P et 3 pour 640x480.
5.7. Si vous n'avez pas besoin de l'horodatage sur la vidéo, modifiez "Y" dans "N" dans le fichi-
er "TIME.TXT".
Par exemple:
[date]
2017.04.12 14:24:32 N 2
5.8. Redémarrez la caméra et le système met à jour automatiquement le programme.
VI. Charger
6.1. Mettez l'appareil hors tension et connectez-le à une alimentation secteur en utilisant l'ad-
aptateur secteur DC5V et le câble USB fourni.
6.2. Les voyants bleu et rouge s'allument pendant le processus de charge.
6.3. Il faudra 1 heure pour obtenir une charge complète.
6.4. Le voyant rouge s'éteint et le bleu reste allumé lorsque la caméra est complètement
chargé.
VII. Réinitialisation
Si, pour quelque raison que ce soit, l'appareil cesse de répondre ou ne fonctionne pas correcte-
ment, une réinitialisation rapide le rétablira à son fonctionnement normal.
Fonctionnement: Lorsque la caméra est sous tension, appuyer simultanément sur le Bouton
d’Alimentation et le Bouton de Mode; La caméra s'éteindra automatiquement. Ensuite, vous
pouvez redémarrer la caméra avec les paramètres par défaut.
VIII. Réglage de l'heure
8.1. Tirez le Bouton de Réglage du Temps jusqu'à ce que vous entendiez un clic. Des mains
d'une heure et d'une minute seront arrêtées.
Page 14

5.5. Écrivez la date et l'heure actuelles dans le fichier "TIME.TXT" avec le format correct:
[rendez-vous amoureux]
AAAA.MM.DD HH: MM: SS Y 1
Par exemple:
[date]
2017.04.12 14:24:32 Y 1
Enregistrez ce fichier.
5.6. Si vous avez besoin de la caméra pour enregistrer une vidéo à une résolution inférieure,
vous pouvez changer 1 en 2 ou 3 dans le fichier "TIME.TXT". 1 représente 1920x1080P, 2 pour
1280x720P et 3 pour 640x480.
5.7. Si vous n'avez pas besoin de l'horodatage sur la vidéo, modifiez "Y" dans "N" dans le fichier "TIME.TXT".
Par exemple:
[date]
2017.04.12 14:24:32 N 2
5.8. Redémarrez la caméra et le système met à jour automatiquement le programme.
VI. Charger
6.1. Mettez l'appareil hors tension et connectez-le à une alimentation secteur en utilisant l'adaptateur secteur DC5V et le câble USB fourni.
6.2. Les voyants bleu et rouge s'allument pendant le processus de charge.
6.3. Il faudra 1 heure pour obtenir une charge complète.
6.4. Le voyant rouge s'éteint et le bleu reste allumé lorsque la caméra est complètement
chargé.
VII. Réinitialisation
Si, pour quelque raison que ce soit, l'appareil cesse de répondre ou ne fonctionne pas correctement, une réinitialisation rapide le rétablira à son fonctionnement normal.
Fonctionnement: Lorsque la caméra est sous tension, appuyer simultanément sur le Bouton
d’Alimentation et le Bouton de Mode; La caméra s'éteindra automatiquement. Ensuite, vous
pouvez redémarrer la caméra avec les paramètres par défaut.
VIII. Réglage de l'heure
8.1. Tirez le Bouton de Réglage du Temps jusqu'à ce que vous entendiez un clic. Des mains
d'une heure et d'une minute seront arrêtées.
8.2. Tournez le Bouton de Réglage du Temps pour régler l'heure.
8.3. Appuyez sur le bouton Réglage du temps après que l'heure est terminée.
Page 15
8.2. Tournez le Bouton de Réglage du Temps pour régler l'heure.
8.3. Appuyez sur le bouton Réglage du temps après que l'heure est terminée.
Page 16
W8500
Guida Utente
I. Panoramica del Prodotto
1. Coperchio della manopola per la porta mini USB
2. Obiettivo della fotocamera
3. Pulsante di alimentazione
4. Luce indicatore verde / rosso
5. Manopola di regolazione del tempo
6. Luce indicatore blu
7. Tasto modalità
8. Slot Micro SD Card
II. Cosa c'è nella scatola
-1 × Macchina fotografica
-1 × cavo USB
-1 × AC110-230V ad adattatore di alimentazione DC 5V
-1 × 8GB Micro SD Card (inserito nello slot Micro SD card già)
III. Operazione
>> Assicurarsi che la fotocamera sia completamente carica e che la scheda Micro SD sia già
stata formattata e sia correttamente inserita nello slot SD della fotocamera, oppure non funzio-
na. Si consiglia di utilizzare una scheda Micro SD SDHC Class 10.
[Nota]:
ranno illuminate per 3 secondi, mentre quella verde si spegne mentre il blu lampeggerà per 3 secondi
e spegnerà , Il verde lampeggerà 3 volte e spegnerà. La fotocamera si spegne automaticamente.
3.1. POTENZA ON / OFF
3.1.1. Accendere la fotocamera premendo il pulsante di alimentazione per 2 secondi. Entrambe
le luci blu e verde verranno illuminate per 2 secondi e poi la spia verde si spegne mentre quella
blu resta illuminata, indicando che la fotocamera è entrata automaticamente in modalità stand-
by.
3.1.2. Spegnere la fotocamera premendo nuovamente il pulsante di alimentazione per 2 sec-
ondi in modalità standby. La spia verde lampeggerà 3 volte e spegnerà con quella blu.
[Nota]:
1). La fotocamera si spegne automaticamente se è in modalità di standby senza operazione di più di 3
minuti.
2). Se la batteria non funziona correttamente, la spia verde lampeggerà per 30 secondi e spegnerà. La
fotocamera si spegne automaticamente.
3.2. REGISTRAZIONE VIDEO
3.2.1. Accendere la fotocamera premendo il pulsante di alimentazione per 2 secondi. Entrambe
le luci blu e verde verranno illuminate per 2 secondi e poi la spia verde si spegne mentre quella
blu resta illuminata, indicando che la fotocamera è entrata automaticamente in modalità stand-
by.
3.2.2. Premere una volta il pulsante di alimentazione per avviare la registrazione video. La spia
blu lampeggerà tre volte e spegnerà.
3.2.3. Premere nuovamente il pulsante di alimentazione per interrompere la registrazione
video. La spia blu si accende e rimane illuminata indicando che la fotocamera torna in modalità
standby.
[Nota]:
1). Un clip video verrà generato e salvato automaticamente ogni 5 minuti.
2). La fotocamera può registrare video per 65 minuti in continuo con una carica completa.
3). Risoluzione video: 1920x1080P, 1280x720P, 640x480 Formato video opzionale: AVI
4). La registrazione Loop è supportata.
Page 17
III. Operazione
>> Assicurarsi che la fotocamera sia completamente carica e che la scheda Micro SD sia già
stata formattata e sia correttamente inserita nello slot SD della fotocamera, oppure non funziona. Si consiglia di utilizzare una scheda Micro SD SDHC Class 10.
[Nota]:
Se nella fotocamera non è inserita una scheda Micro SD, le spie luminose blu e verde rimar-
ranno illuminate per 3 secondi, mentre quella verde si spegne mentre il blu lampeggerà per 3 secondi
e spegnerà , Il verde lampeggerà 3 volte e spegnerà. La fotocamera si spegne automaticamente.
3.1. POTENZA ON / OFF
3.1.1. Accendere la fotocamera premendo il pulsante di alimentazione per 2 secondi. Entrambe
le luci blu e verde verranno illuminate per 2 secondi e poi la spia verde si spegne mentre quella
blu resta illuminata, indicando che la fotocamera è entrata automaticamente in modalità standby.
3.1.2. Spegnere la fotocamera premendo nuovamente il pulsante di alimentazione per 2 secondi in modalità standby. La spia verde lampeggerà 3 volte e spegnerà con quella blu.
[Nota]:
1). La fotocamera si spegne automaticamente se è in modalità di standby senza operazione di più di 3
minuti.
2). Se la batteria non funziona correttamente, la spia verde lampeggerà per 30 secondi e spegnerà. La
fotocamera si spegne automaticamente.
3.2. REGISTRAZIONE VIDEO
3.2.1. Accendere la fotocamera premendo il pulsante di alimentazione per 2 secondi. Entrambe
le luci blu e verde verranno illuminate per 2 secondi e poi la spia verde si spegne mentre quella
blu resta illuminata, indicando che la fotocamera è entrata automaticamente in modalità standby.
3.2.2. Premere una volta il pulsante di alimentazione per avviare la registrazione video. La spia
blu lampeggerà tre volte e spegnerà.
3.2.3. Premere nuovamente il pulsante di alimentazione per interrompere la registrazione
video. La spia blu si accende e rimane illuminata indicando che la fotocamera torna in modalità
standby.
[Nota]:
1). Un clip video verrà generato e salvato automaticamente ogni 5 minuti.
2). La fotocamera può registrare video per 65 minuti in continuo con una carica completa.
3). Risoluzione video: 1920x1080P, 1280x720P, 640x480 Formato video opzionale: AVI
4). La registrazione Loop è supportata.
5). Ogni video richiede circa 700MB a 1920x1080P, 300MB a 1280x720P, 120MB a 640x480.
3.3. FOTOGRAFIA CAMERA / STILL
3.3.1. Accendere la fotocamera premendo il pulsante di alimentazione per 2 secondi. Entrambe
le luci blu e verde verranno illuminate per 2 secondi e poi la spia verde si spegne mentre quella
blu resta illuminata, indicando che la fotocamera è entrata automaticamente in modalità stand-
by.
3.3.2. Premere due volte il tasto modalità per entrare in modalità fotografica. Le luci di indica-
tore verde e blu rimarranno illuminate.
3.3.3. Premere una volta il pulsante di alimentazione per scattare una foto. Ogni volta che si
scatta una foto, le luci di indicatore verde e blu lampeggiano una volta.
3.4. REGISTRAZIONE AUDIO
3.4.1. Accendere la fotocamera premendo il pulsante di alimentazione per 2 secondi. Entrambe
le luci blu e verde verranno illuminate per 2 secondi e poi la spia verde si spegne mentre quella
blu resta illuminata, indicando che la fotocamera è entrata automaticamente in modalità stand-
by.
3.4.2. Premere una volta il pulsante Mode per entrare in modalità di registrazione audio. La
spia blu si spegne mentre la spia verde si accende e rimane solida.
3.4.3. Premere una volta il pulsante di alimentazione per registrare solo audio. La spia verde
lampeggerà 3 volte e spegnerà.
3.4.4. Premere nuovamente il pulsante di alimentazione per interrompere la registrazione
audio. La spia verde si accende e rimane solida.
[Nota]:
1). Una clip audio verrà generata e salvata automaticamente ogni 30 minuti.
2). La telecamera può registrare audio per 60 minuti in continuo con una carica completa.
3). Formato audio: WAV
IV. Upload di file video / immagini
4.1. Spegnere la fotocamera, rimuovere la scheda Micro SD e inserirla in un lettore di schede.
4.2. Inserire il lettore di schede in una porta USB corretta del computer.
4.3. La fotocamera verrà riconosciuta come un'unità disco rimovibile.
4.4. È possibile accedere a tutti i file nell'unità.
V. Impostazione del timbro di data e ora
5.1. Spegnere la fotocamera, rimuovere la scheda Micro SD e inserirla in un lettore di schede.
Page 18
5). Ogni video richiede circa 700MB a 1920x1080P, 300MB a 1280x720P, 120MB a 640x480.
3.3. FOTOGRAFIA CAMERA / STILL
3.3.1. Accendere la fotocamera premendo il pulsante di alimentazione per 2 secondi. Entrambe
le luci blu e verde verranno illuminate per 2 secondi e poi la spia verde si spegne mentre quella
blu resta illuminata, indicando che la fotocamera è entrata automaticamente in modalità standby.
3.3.2. Premere due volte il tasto modalità per entrare in modalità fotografica. Le luci di indicatore verde e blu rimarranno illuminate.
3.3.3. Premere una volta il pulsante di alimentazione per scattare una foto. Ogni volta che si
scatta una foto, le luci di indicatore verde e blu lampeggiano una volta.
3.4. REGISTRAZIONE AUDIO
3.4.1. Accendere la fotocamera premendo il pulsante di alimentazione per 2 secondi. Entrambe
le luci blu e verde verranno illuminate per 2 secondi e poi la spia verde si spegne mentre quella
blu resta illuminata, indicando che la fotocamera è entrata automaticamente in modalità standby.
3.4.2. Premere una volta il pulsante Mode per entrare in modalità di registrazione audio. La
spia blu si spegne mentre la spia verde si accende e rimane solida.
3.4.3. Premere una volta il pulsante di alimentazione per registrare solo audio. La spia verde
lampeggerà 3 volte e spegnerà.
3.4.4. Premere nuovamente il pulsante di alimentazione per interrompere la registrazione
audio. La spia verde si accende e rimane solida.
[Nota]:
1). Una clip audio verrà generata e salvata automaticamente ogni 30 minuti.
2). La telecamera può registrare audio per 60 minuti in continuo con una carica completa.
3). Formato audio: WAV
IV. Upload di file video / immagini
4.1. Spegnere la fotocamera, rimuovere la scheda Micro SD e inserirla in un lettore di schede.
4.2. Inserire il lettore di schede in una porta USB corretta del computer.
4.3. La fotocamera verrà riconosciuta come un'unità disco rimovibile.
4.4. È possibile accedere a tutti i file nell'unità.
V. Impostazione del timbro di data e ora
5.1. Spegnere la fotocamera, rimuovere la scheda Micro SD e inserirla in un lettore di schede.
5.2. Inserire il lettore di schede in una porta USB corretta del computer.
5.3. La fotocamera verrà riconosciuta come un'unità disco rimovibile.
5.4. Fare clic sull'unità nella directory principale e all'interno della directory principale, aprire il
file denominato "TIME.TXT".
5.5. Scrivere la data e l'ora correnti nel file "TIME.TXT" con il formato corretto:
[Data]
YYYY.MM.DD HH: MM: SS Y 1
Per esempio:
[Data]
2017.04.12 14:24:32 Y 1
Salva questo file.
5.6. Se hai bisogno della fotocamera per registrare video a una risoluzione inferiore, puoi cam-
biare 1 su 2 o 3 nel file "TIME.TXT". 1 sta per 1920x1080P, 2 per 1280x720P e 3 per 640x480.
5.7. Se non è necessario il timbro sul video, cambiare "Y" in "N" nel file "TIME.TXT".
Per esempio:
[Data]
2017.04.12 14:24:32 N 2
5.8. Riavviare la fotocamera e il sistema aggiorna automaticamente il programma.
VI. Ricarica
6.1. Spegnere la fotocamera e collegarla ad una presa di rete AC utilizzando l'adattatore di
alimentazione DC5V e il cavo USB fornito.
6.2. Le luci blu e rosse rimangono illuminate durante il processo di ricarica.
6.3. Ci vorrà 1 ora per ottenere una carica completa.
6.4. La spia rossa si spegne e l'azzurro rimane illuminato quando la fotocamera è completa-
mente carica.
VII. Ripristino
Se per qualsiasi ragione la fotocamera smette di rispondere o non funziona correttamente, un
reset rapido lo ripristinerà al normale funzionamento.
Funzionamento: Quando la fotocamera è accesa, premere contemporaneamente il pulsante
di accensione e il pulsante modalità; La fotocamera si spegne automaticamente. Quindi è pos-
sibile riavviare la fotocamera con impostazioni predefinite di fabbrica.
VIII. Impostazioni orario
Page 19

5.2. Inserire il lettore di schede in una porta USB corretta del computer.
5.3. La fotocamera verrà riconosciuta come un'unità disco rimovibile.
5.4. Fare clic sull'unità nella directory principale e all'interno della directory principale, aprire il
file denominato "TIME.TXT".
5.5. Scrivere la data e l'ora correnti nel file "TIME.TXT" con il formato corretto:
[Data]
YYYY.MM.DD HH: MM: SS Y 1
Per esempio:
[Data]
2017.04.12 14:24:32 Y 1
Salva questo file.
5.6. Se hai bisogno della fotocamera per registrare video a una risoluzione inferiore, puoi cambiare 1 su 2 o 3 nel file "TIME.TXT". 1 sta per 1920x1080P, 2 per 1280x720P e 3 per 640x480.
5.7. Se non è necessario il timbro sul video, cambiare "Y" in "N" nel file "TIME.TXT".
Per esempio:
[Data]
2017.04.12 14:24:32 N 2
5.8. Riavviare la fotocamera e il sistema aggiorna automaticamente il programma.
VI. Ricarica
6.1. Spegnere la fotocamera e collegarla ad una presa di rete AC utilizzando l'adattatore di
alimentazione DC5V e il cavo USB fornito.
6.2. Le luci blu e rosse rimangono illuminate durante il processo di ricarica.
6.3. Ci vorrà 1 ora per ottenere una carica completa.
6.4. La spia rossa si spegne e l'azzurro rimane illuminato quando la fotocamera è completamente carica.
VII. Ripristino
Se per qualsiasi ragione la fotocamera smette di rispondere o non funziona correttamente, un
reset rapido lo ripristinerà al normale funzionamento.
Funzionamento: Quando la fotocamera è accesa, premere contemporaneamente il pulsante
di accensione e il pulsante modalità; La fotocamera si spegne automaticamente. Quindi è possibile riavviare la fotocamera con impostazioni predefinite di fabbrica.
VIII. Impostazioni orario
8.1. Tirare la manopola di regolazione del tempo fino a quando non si sente un clic. Le mani di
ore e minuti saranno fermate.
8.2. Ruotare la manopola di regolazione del tempo per impostare l'ora.
8.3. Spingere di nuovo la manopola di regolazione del tempo dopo che il set di tempo è termi-
nato.
Page 20
8.1. Tirare la manopola di regolazione del tempo fino a quando non si sente un clic. Le mani di
ore e minuti saranno fermate.
8.2. Ruotare la manopola di regolazione del tempo per impostare l'ora.
8.3. Spingere di nuovo la manopola di regolazione del tempo dopo che il set di tempo è terminato.
Page 21
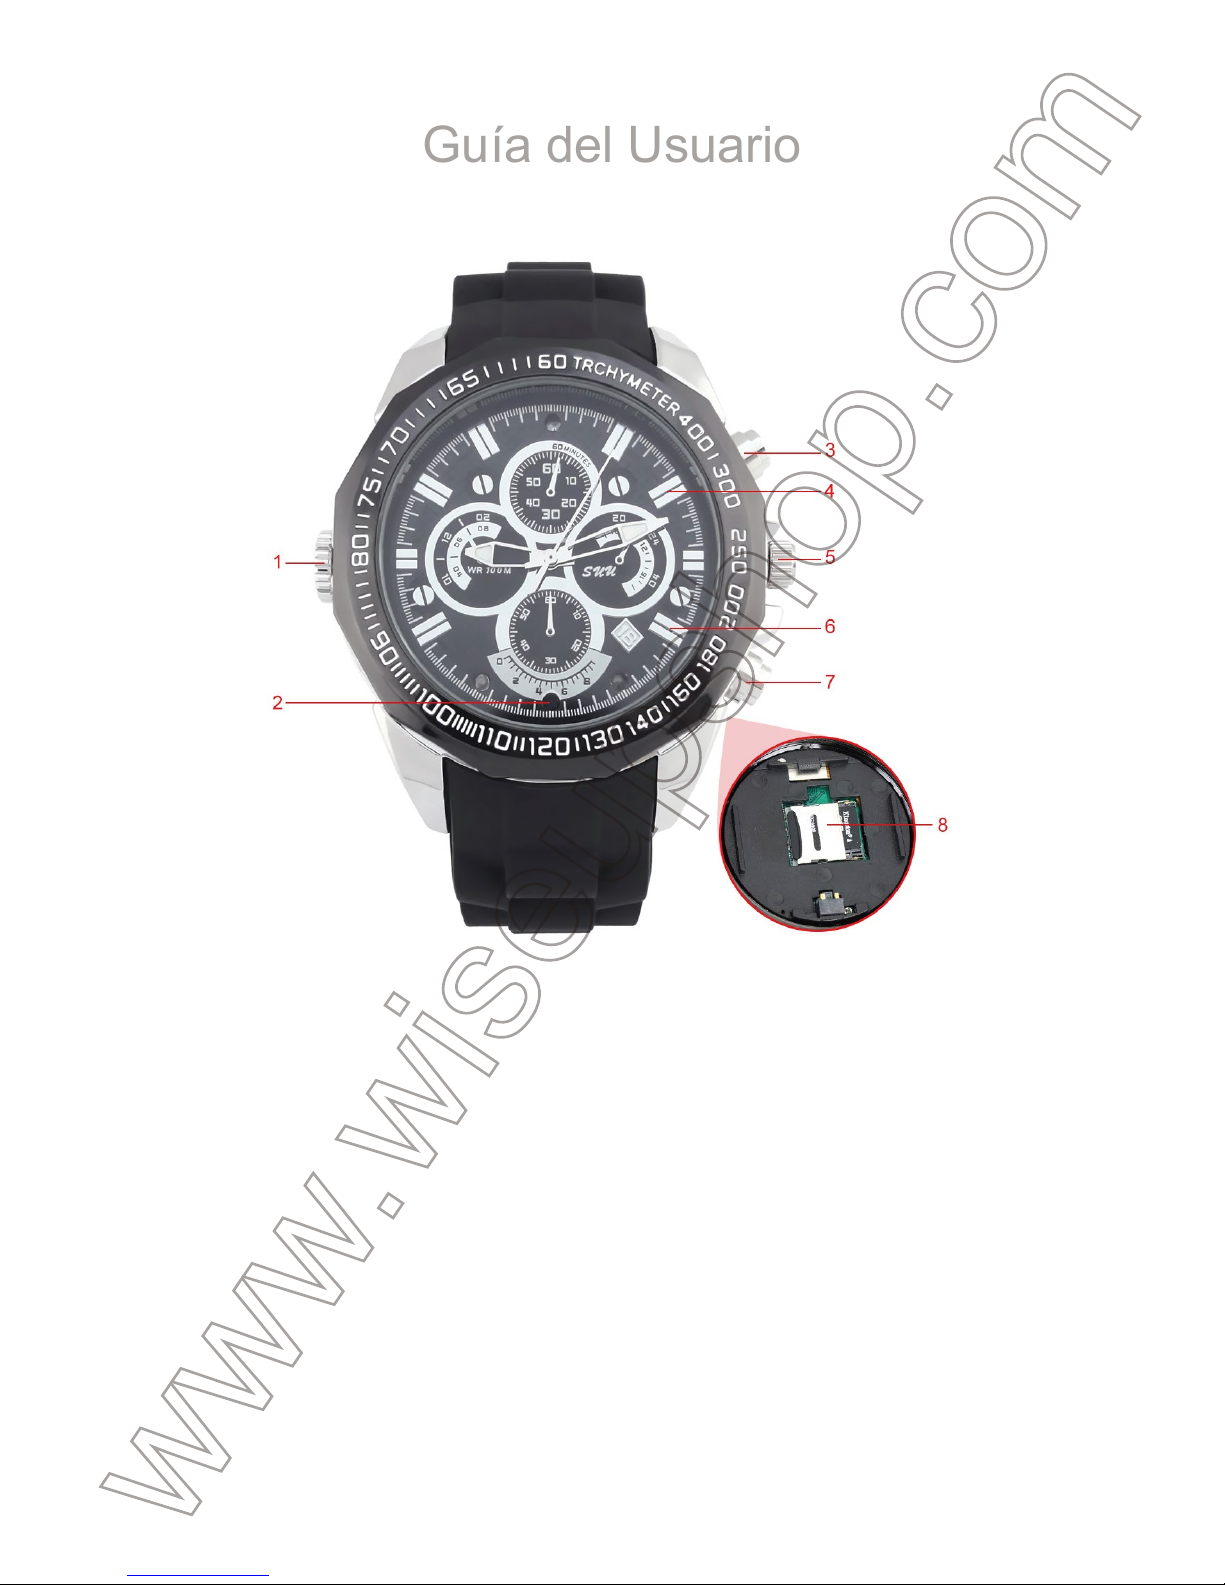
W8500
Guía del Usuario
I. Descripción del Producto
1. Cubierta del Botón para el Mini Puerto del USB
2. Lente de la Cámara
3. Botón de Encendido
4. Indicadora Verde / Rojo
5. Perilla de Ajuste de la Hora
6. Indicadora Azul
7. Botón de Modo
8. Ranura para Tarjetas Micro SD
II. Qué hay en la caja
-1 × Cámara de reloj
-1 × Cable USB
-1 × AC110-230V al Adaptador de la Corriente Continua 5V
-1 × 8GB Micro SD Tarjeta (ya montada en la ranura para tarjetas Micro SD)
III. Operación
>> Por favor, asegúrese de que la cámara esté completamente cargada y que la tarjeta Micro
SD haya sido formateada y esté bien instalada en la ranura para tarjetas SD de la cámara, o
no funcionará. Se recomienda utilizar una tarjeta SDHC de clase 10 Micro SD.
[Nota]:
ecerán iluminadas durante 3 segundos, luego la verde se apagará mientras que la azul permanecerá
parpadeando durante 3 segundos y se apagará, a continuación , la verde parpadeará 3 veces y se
apagará. La cámara se apagará automáticamente.
3.1. ENCENDIDO / APAGADO
3.1.1. Encienda la cámara presionando el botón de encendido durante 2 segundos. Las luces
indicadoras azul y verde se iluminarán durante 2 segundos y luego la verde se apagará, mien-
tras que la azul permanecerá iluminada, indicando que la cámara ha entrado en modo de
espera automáticamente.
3.1.2. Apague la cámara presionando el botón de encendido durante 2 segundos nuevamente
en modo de espera. La luz indicadora verde parpadeará 3 veces y se apagará con la azul.
[Nota]:
1). La cámara se apagará automáticamente si está en modo de espera sin ninguna operación durante
más de 3 minutos.
2). Si la cámara está agotando las pilas, la luz indicadora verde permanecerá parpadeando durante 30
segundos y se apagará. La cámara se apagará automáticamente.
3.2. GRABACIÓN DE VÍDEO
3.2.1. Encienda la cámara presionando el botón de encendido durante 2 segundos. Las luces
indicadoras azul y verde se iluminarán durante 2 segundos y luego la verde se apagará, mien-
tras que la azul permanecerá iluminada, indicando que la cámara ha entrado en modo de
espera automáticamente.
3.2.2. Pulse el botón de encendido una vez para iniciar la grabación de vídeo. La luz indicadora
azul parpadeará 3 veces y se apagará.
3.2.3. Presione el botón de encendido una vez más para detener la grabación de vídeo. La
indicadora luminosa azul se encenderá y permanecerá iluminada, indicando que la cámara
vuelve al modo de espera.
[Nota]:
1). Se generará un video clip y se guardará cada 5 minutos automáticamente.
2). La cámara puede grabar vídeo durante 65 minutos continuamente con una carga completa.
3). Resolución de vídeo: 1920x1080P, 1280x720P, 640x480 Formato de vídeo opcional: AVI
Page 22
III. Operación
>> Por favor, asegúrese de que la cámara esté completamente cargada y que la tarjeta Micro
SD haya sido formateada y esté bien instalada en la ranura para tarjetas SD de la cámara, o
no funcionará. Se recomienda utilizar una tarjeta SDHC de clase 10 Micro SD.
[Nota]:
Si no hay ninguna tarjeta Micro SD en la cámara, las luces indicadoras azul y verde perman-
ecerán iluminadas durante 3 segundos, luego la verde se apagará mientras que la azul permanecerá
parpadeando durante 3 segundos y se apagará, a continuación , la verde parpadeará 3 veces y se
apagará. La cámara se apagará automáticamente.
3.1. ENCENDIDO / APAGADO
3.1.1. Encienda la cámara presionando el botón de encendido durante 2 segundos. Las luces
indicadoras azul y verde se iluminarán durante 2 segundos y luego la verde se apagará, mientras que la azul permanecerá iluminada, indicando que la cámara ha entrado en modo de
espera automáticamente.
3.1.2. Apague la cámara presionando el botón de encendido durante 2 segundos nuevamente
en modo de espera. La luz indicadora verde parpadeará 3 veces y se apagará con la azul.
[Nota]:
1). La cámara se apagará automáticamente si está en modo de espera sin ninguna operación durante
más de 3 minutos.
2). Si la cámara está agotando las pilas, la luz indicadora verde permanecerá parpadeando durante 30
segundos y se apagará. La cámara se apagará automáticamente.
3.2. GRABACIÓN DE VÍDEO
3.2.1. Encienda la cámara presionando el botón de encendido durante 2 segundos. Las luces
indicadoras azul y verde se iluminarán durante 2 segundos y luego la verde se apagará, mientras que la azul permanecerá iluminada, indicando que la cámara ha entrado en modo de
espera automáticamente.
3.2.2. Pulse el botón de encendido una vez para iniciar la grabación de vídeo. La luz indicadora
azul parpadeará 3 veces y se apagará.
3.2.3. Presione el botón de encendido una vez más para detener la grabación de vídeo. La
indicadora luminosa azul se encenderá y permanecerá iluminada, indicando que la cámara
vuelve al modo de espera.
[Nota]:
1). Se generará un video clip y se guardará cada 5 minutos automáticamente.
2). La cámara puede grabar vídeo durante 65 minutos continuamente con una carga completa.
3). Resolución de vídeo: 1920x1080P, 1280x720P, 640x480 Formato de vídeo opcional: AVI
4). Se admite la grabación cíclica.
5). Cada clip de vídeo ocupa unos 700MB a 1920x1080P, 300MB a 1280x720P, 120MB a 640x480.
3.3. FOTOGRAFÍA DE CÁMARA / STILL
3.3.1. Encienda la cámara presionando el botón de encendido durante 2 segundos. Las luces
indicadoras azul y verde se iluminarán durante 2 segundos y luego la verde se apagará, mien-
tras que la azul permanecerá iluminada, indicando que la cámara ha entrado en modo de
espera automáticamente.
3.3.2. Presione el botón de modo dos veces para entrar en el modo de fotografía fija. Las luces
indicadoras verde y azul permanecerán iluminadas.
3.3.3. Presione el botón de encendido una vez para tomar una foto. Cada vez que tome una
foto, las luces indicadoras verde y azul parpadearán una vez.
3.4. GRABACIÓN DE AUDIO
3.4.1. Encienda la cámara presionando el botón de encendido durante 2 segundos. Las luces
indicadoras azul y verde se iluminarán durante 2 segundos y luego la verde se apagará, mien-
tras que la azul permanecerá iluminada, indicando que la cámara ha entrado en modo de
espera automáticamente.
3.4.2. Pulse el botón de modo una vez para entrar en el modo de grabación de audio. La luz
indicadora azul se apagará mientras la indicadora verde se enciende y permanece sólida.
3.4.3. Pulse el botón de encendido una vez para grabar sólo audio. La luz indicadora verde
parpadeará 3 veces y se apagará.
3.4.4. Presione el botón de encendido una vez más para detener la grabación de audio. La luz
indicadora verde se encenderá y permanecerá sólida.
[Nota]:
1). Se generará un clip de audio y se guardará cada 30 minutos automáticamente.
2). La cámara puede grabar audio durante 60 minutos continuamente con una carga completa.
3). Formato de audio: WAV
IV. Subida de archivos de video / imagen
4.1. Apague la cámara, retire la tarjeta Micro SD e insértela en un lector de tarjetas.
4.2. Inserte el lector de tarjetas en un puerto USB adecuado de la computadora de la PC.
4.3. La cámara se reconocerá como una unidad de disco extraíble.
4.4. Se puede acceder a todos los archivos en la unidad.
V. Establecimiento del sello de fecha y hora
Page 23
4). Se admite la grabación cíclica.
5). Cada clip de vídeo ocupa unos 700MB a 1920x1080P, 300MB a 1280x720P, 120MB a 640x480.
3.3. FOTOGRAFÍA DE CÁMARA / STILL
3.3.1. Encienda la cámara presionando el botón de encendido durante 2 segundos. Las luces
indicadoras azul y verde se iluminarán durante 2 segundos y luego la verde se apagará, mientras que la azul permanecerá iluminada, indicando que la cámara ha entrado en modo de
espera automáticamente.
3.3.2. Presione el botón de modo dos veces para entrar en el modo de fotografía fija. Las luces
indicadoras verde y azul permanecerán iluminadas.
3.3.3. Presione el botón de encendido una vez para tomar una foto. Cada vez que tome una
foto, las luces indicadoras verde y azul parpadearán una vez.
3.4. GRABACIÓN DE AUDIO
3.4.1. Encienda la cámara presionando el botón de encendido durante 2 segundos. Las luces
indicadoras azul y verde se iluminarán durante 2 segundos y luego la verde se apagará, mientras que la azul permanecerá iluminada, indicando que la cámara ha entrado en modo de
espera automáticamente.
3.4.2. Pulse el botón de modo una vez para entrar en el modo de grabación de audio. La luz
indicadora azul se apagará mientras la indicadora verde se enciende y permanece sólida.
3.4.3. Pulse el botón de encendido una vez para grabar sólo audio. La luz indicadora verde
parpadeará 3 veces y se apagará.
3.4.4. Presione el botón de encendido una vez más para detener la grabación de audio. La luz
indicadora verde se encenderá y permanecerá sólida.
[Nota]:
1). Se generará un clip de audio y se guardará cada 30 minutos automáticamente.
2). La cámara puede grabar audio durante 60 minutos continuamente con una carga completa.
3). Formato de audio: WAV
IV. Subida de archivos de video / imagen
4.1. Apague la cámara, retire la tarjeta Micro SD e insértela en un lector de tarjetas.
4.2. Inserte el lector de tarjetas en un puerto USB adecuado de la computadora de la PC.
4.3. La cámara se reconocerá como una unidad de disco extraíble.
4.4. Se puede acceder a todos los archivos en la unidad.
V. Establecimiento del sello de fecha y hora
5.1. Apague la cámara, retire la tarjeta Micro SD e insértela en un lector de tarjetas.
5.2. Inserte el lector de tarjetas en un puerto USB adecuado de la computadora de la PC.
5.3. La cámara se reconocerá como una unidad de disco extraíble.
5.4. Haga clic en la unidad en el directorio raíz y dentro del directorio raíz, abra el archivo
denominado "TIME.TXT".
5.5. Escriba la fecha y la hora actuales en el archivo "TIME.TXT" con el formato correcto:
[fecha]
YYYY.MM.DD HH: MM: SS Y 1
Por ejemplo:
[fecha]
2017.04.12 14:24:32 Y 1
Guarde este archivo.
5.6. Si necesita que la cámara grabe vídeo con una resolución más baja, puede cambiar 1 en
2 o 3 en el archivo "TIME.TXT". 1 representa 1920x1080P, 2 para 1280x720P y 3 para
640x480.
5.7. Si no necesita la marca de tiempo en el video, cambie "Y" en "N" en el archivo "TIME.TXT".
Por ejemplo:
[fecha]
2017.04.12 14:24:32 N 2
5.8. Reinicie la cámara y el sistema actualizará el programa automáticamente.
VI. Cargando
6.1. Apague la cámara y conéctela a una toma de corriente de CA con el adaptador de corrien-
te DC5V y el cable USB suministrado.
6.2. Las luces indicadoras azul y roja permanecerán iluminadas durante el proceso de carga.
6.3. Se necesitará una hora para obtener una carga completa.
6.4. La luz indicadora roja se apagará y la azul permanecerá iluminada cuando la cámara esté
completamente cargada.
VII. Restablecimiento
Si por alguna razón, la cámara deja de responder o no funciona correctamente, un restablec-
imiento rápido volverá a su funcionamiento normal.
Funcionamiento: Cuando la cámara esté encendida, presione simultáneamente los botones
de encendido y el botón de modo; La cámara se apagará automáticamente. A continuación,
puede reiniciar la cámara con la configuración predeterminada de fábrica.
Page 24

5.1. Apague la cámara, retire la tarjeta Micro SD e insértela en un lector de tarjetas.
5.2. Inserte el lector de tarjetas en un puerto USB adecuado de la computadora de la PC.
5.3. La cámara se reconocerá como una unidad de disco extraíble.
5.4. Haga clic en la unidad en el directorio raíz y dentro del directorio raíz, abra el archivo
denominado "TIME.TXT".
5.5. Escriba la fecha y la hora actuales en el archivo "TIME.TXT" con el formato correcto:
[fecha]
YYYY.MM.DD HH: MM: SS Y 1
Por ejemplo:
[fecha]
2017.04.12 14:24:32 Y 1
Guarde este archivo.
5.6. Si necesita que la cámara grabe vídeo con una resolución más baja, puede cambiar 1 en
2 o 3 en el archivo "TIME.TXT". 1 representa 1920x1080P, 2 para 1280x720P y 3 para
640x480.
5.7. Si no necesita la marca de tiempo en el video, cambie "Y" en "N" en el archivo "TIME.TXT".
Por ejemplo:
[fecha]
2017.04.12 14:24:32 N 2
5.8. Reinicie la cámara y el sistema actualizará el programa automáticamente.
VI. Cargando
6.1. Apague la cámara y conéctela a una toma de corriente de CA con el adaptador de corriente DC5V y el cable USB suministrado.
6.2. Las luces indicadoras azul y roja permanecerán iluminadas durante el proceso de carga.
6.3. Se necesitará una hora para obtener una carga completa.
6.4. La luz indicadora roja se apagará y la azul permanecerá iluminada cuando la cámara esté
completamente cargada.
VII. Restablecimiento
Si por alguna razón, la cámara deja de responder o no funciona correctamente, un restablecimiento rápido volverá a su funcionamiento normal.
Funcionamiento: Cuando la cámara esté encendida, presione simultáneamente los botones
de encendido y el botón de modo; La cámara se apagará automáticamente. A continuación,
puede reiniciar la cámara con la configuración predeterminada de fábrica.
VIII. Configuracion de hora
8.1. Tire de la Perilla de Ajuste de Tiempo hasta oír un clic. Se detendrán las manecillas de las
horas y los minutos.
8.2. Gire la perilla de ajuste de la hora para ajustar la hora.
8.3. Vuelva a pulsar el mando de ajuste de la hora una vez finalizado el ajuste de tiempo.
Page 25
VIII. Configuracion de hora
8.1. Tire de la Perilla de Ajuste de Tiempo hasta oír un clic. Se detendrán las manecillas de las
horas y los minutos.
8.2. Gire la perilla de ajuste de la hora para ajustar la hora.
8.3. Vuelva a pulsar el mando de ajuste de la hora una vez finalizado el ajuste de tiempo.
Page 26
W8500
ユーザーガイド
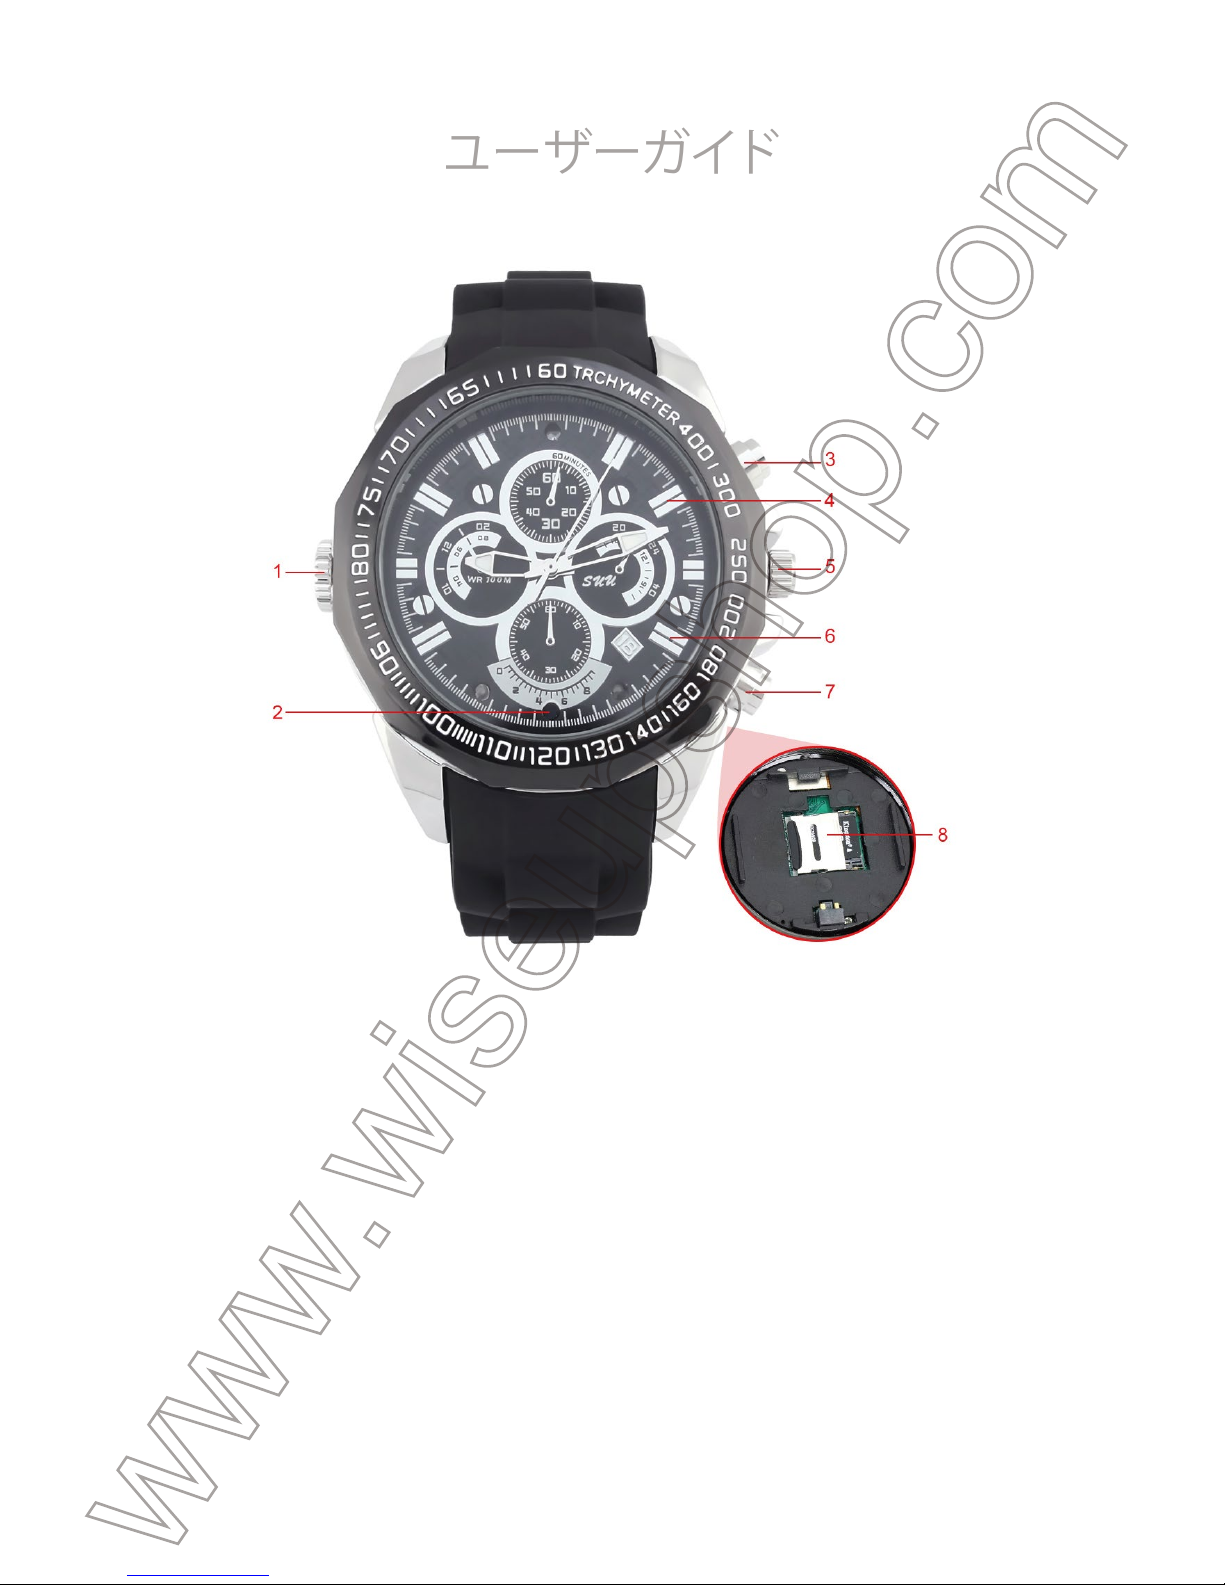
I.製品の概要
1.ミニUSBポート用ノブカバー
2.カメラのレンズ
3.電源ボタン
4.緑色/赤色インジケータライト
5.時間調整つまみ
6.ブルーインジケータライト
7.モードボタン
8.マイクロSDカードスロット
II.ボックスの内容
-1×時計カメラ
-1×USBケーブル
-1×AC110-230V〜DC5V電源アダプタ
-1×8GBのマイクロSDカード(すでにMicroSDカードスロットに装着済み)
III.操作
>>カメラが完全に充電され、MicroSDカードがすでにフォーマットされており、カメラのSDカード
スロットにしっかりと固定されていることを確認してください。SDHCClass10MicroSDカードを使
用することをお勧めします。
[注意]:
秒間点灯した後、緑色のインジケータライトは消灯し、青色のインジケータライトは消灯し、青色のインジ
ケータライトは3秒間点滅し続けて消灯します。緑色のものが3回点滅して消灯します。カメラは自動的に
シャットダウンします。
3.1.電源ON/OFF
3.1.1.電源ボタンを2秒間押してカメラの電源を入れます。青と緑の両方のインジケータランプが2
秒間点灯し、緑色のインジケータランプが消灯し、青色のランプが点灯したままになり、カメラが
自動的にスタンバイモードに入ったことを示します。
3.1.2.スタンバイモードでもう一度電源ボタンを2秒間押してカメラの電源を切ってください。緑色
のインジケータランプが3回点滅し、青色のインジケータランプが消灯します。
[注意]:
1).3分以上何も操作せずにスタンバイ状態になると、カメラは自動的にシャットダウンします。
2). カメラの電池残量が少なくなると、緑のインジケータランプが30秒間点滅し続けて消灯します。カメラ
は自動的にシャットダウンします。
3.2.ビデオ録画
3.2.1.電源ボタンを2秒間押してカメラの電源を入れます。青と緑の両方のインジケータランプが2
秒間点灯し、緑色のインジケータランプが消灯し、青色のランプが点灯したままになり、カメラが
自動的にスタンバイモードに入ったことを示します。
3.2.2. ビデオ録画を開始するには、電源ボタンを1回押します。青のインジケータランプが3回点滅
して消灯します。
3.2.3. 電源ボタンをもう一度押すと、録画を停止します。青色のインジケータランプが点灯して点
灯し、カメラがスタンバイモードに戻ったことを示します。
[注意]:
1).ビデオクリップが生成され、5分ごとに自動的に保存されます。
2).カメラはフル充電で連続して65分間ビデオを録画できます。
3).ビデオ解像度:1920x1080P、1280x720P、640x480オプションのビデオフォーマット:AVI
4).ループ録音がサポートされています。
5).各ビデオクリップは、1920x1080Pで約700MB、1280x720Pで300MB、640x480で120MBを占めます。
3.3.カメラ/静止画撮影
Page 27

III.操作
>>カメラが完全に充電され、MicroSDカードがすでにフォーマットされており、カメラのSDカード
スロットにしっかりと固定されていることを確認してください。SDHCClass10MicroSDカードを使
用することをお勧めします。
[注意]:
カメラにMicroSDカードが装着されていない場合は、青色と緑色の両方のインジケータライトが3
秒間点灯した後、緑色のインジケータライトは消灯し、青色のインジケータライトは消灯し、青色のインジ
ケータライトは3秒間点滅し続けて消灯します。緑色のものが3回点滅して消灯します。カメラは自動的に
シャットダウンします。
3.1.電源ON/OFF
3.1.1.電源ボタンを2秒間押してカメラの電源を入れます。青と緑の両方のインジケータランプが2
秒間点灯し、緑色のインジケータランプが消灯し、青色のランプが点灯したままになり、カメラが
自動的にスタンバイモードに入ったことを示します。
3.1.2.スタンバイモードでもう一度電源ボタンを2秒間押してカメラの電源を切ってください。緑色
のインジケータランプが3回点滅し、青色のインジケータランプが消灯します。
[注意]:
1).3分以上何も操作せずにスタンバイ状態になると、カメラは自動的にシャットダウンします。
2). カメラの電池残量が少なくなると、緑のインジケータランプが30秒間点滅し続けて消灯します。カメラ
は自動的にシャットダウンします。
3.2.ビデオ録画
3.2.1.電源ボタンを2秒間押してカメラの電源を入れます。青と緑の両方のインジケータランプが2
秒間点灯し、緑色のインジケータランプが消灯し、青色のランプが点灯したままになり、カメラが
自動的にスタンバイモードに入ったことを示します。
3.2.2. ビデオ録画を開始するには、電源ボタンを1回押します。青のインジケータランプが3回点滅
して消灯します。
3.2.3. 電源ボタンをもう一度押すと、録画を停止します。青色のインジケータランプが点灯して点
灯し、カメラがスタンバイモードに戻ったことを示します。
[注意]:
1).ビデオクリップが生成され、5分ごとに自動的に保存されます。
2).カメラはフル充電で連続して65分間ビデオを録画できます。
3).ビデオ解像度:1920x1080P、1280x720P、640x480オプションのビデオフォーマット:AVI
4).ループ録音がサポートされています。
5).各ビデオクリップは、1920x1080Pで約700MB、1280x720Pで300MB、640x480で120MBを占めます。
3.3.カメラ/静止画撮影
3.3.1.電源ボタンを2秒間押してカメラの電源を入れます。青と緑の両方のインジケータランプが2
秒間点灯し、緑色のインジケータランプは消灯し、青色のランプは点灯したままになり、カメラが
自動的にスタンバイモードに入ったことを示します。
3.3.2.モードボタンを2回押して静止画モードにします。緑と青の両方のインジケータライトは点灯
したままです。
3.3.3. 電源ボタンを1回押して写真を撮影します。写真を撮るたびに、緑色と青色の両方のインジ
ケータライトが一度点滅します。
3.4.オーディオ録音
3.4.1.電源ボタンを2秒間押してカメラの電源を入れます。青と緑の両方のインジケータランプが2
秒間点灯し、緑色のインジケータランプが消灯し、青色のランプが点灯したままになり、カメラが
自動的にスタンバイモードに入ったことを示します。
3.4.2. モードボタンを1回押して音声録音モードにします。青のインジケータランプが消灯し、緑色
のインジケータランプが 点 灯して点灯します。
3.4.3. オーディオのみを録音するには、電源ボタンを1回押します。緑色のインジケータランプが3
回点滅して消灯します。
3.4.4. 電源ボタンをもう一度押すと、録音を停止します。緑色のインジケータランプが点灯し、点灯
します。
[注意]:
1).オーディオクリップが生成され、30分ごとに自動的に保存されます。
2).カメラはフル充電で60分間連続して音声を録音できます。
3).オーディオ形式:WAV
IV.ビデオ/画像ファイルのアップロード
4.1.カメラの電源を切り、MicroSDカードを取り出してカードリーダーに挿入します。
4.2.カードリーダーを適切なPCコンピュータのUSBポートに挿入します。
4.3.カメラはリムーバブルディスクドライブとして認識されます。
4.4.ドライブ内のすべてのファイルにアクセスできます。
V.設定時間/日付スタンプ
5.1.カメラの電源を切り、MicroSDカードを取り出してカードリーダーに挿入します。
5.2.カードリーダーを適切なPCコンピュータのUSBポートに挿入します。
5.3.カメラはリムーバブルディスクドライブとして認識されます。
5.4.ルートディレクトリ内のドライブをクリックし、ルートディレクトリ内で"TIME.TXT"という名前の
ファイルを開きます。
5.5.現在の日付と時刻を「TIME.TXT」ファイルに正しい形式で書き込みます。
Page 28

3.3.1.電源ボタンを2秒間押してカメラの電源を入れます。青と緑の両方のインジケータランプが2
秒間点灯し、緑色のインジケータランプは消灯し、青色のランプは点灯したままになり、カメラが
自動的にスタンバイモードに入ったことを示します。
3.3.2.モードボタンを2回押して静止画モードにします。緑と青の両方のインジケータライトは点灯
したままです。
3.3.3. 電源ボタンを1回押して写真を撮影します。写真を撮るたびに、緑色と青色の両方のインジ
ケータライトが一度点滅します。
3.4.オーディオ録音
3.4.1.電源ボタンを2秒間押してカメラの電源を入れます。青と緑の両方のインジケータランプが2
秒間点灯し、緑色のインジケータランプが消灯し、青色のランプが点灯したままになり、カメラが
自動的にスタンバイモードに入ったことを示します。
3.4.2. モードボタンを1回押して音声録音モードにします。青のインジケータランプが消灯し、緑色
のインジケータランプが 点 灯して点灯します。
3.4.3. オーディオのみを録音するには、電源ボタンを1回押します。緑色のインジケータランプが3
回点滅して消灯します。
3.4.4. 電源ボタンをもう一度押すと、録音を停止します。緑色のインジケータランプが点灯し、点灯
します。
[注意]:
1).オーディオクリップが生成され、30分ごとに自動的に保存されます。
2).カメラはフル充電で60分間連続して音声を録音できます。
3).オーディオ形式:WAV
IV.ビデオ/画像ファイルのアップロード
4.1.カメラの電源を切り、MicroSDカードを取り出してカードリーダーに挿入します。
4.2.カードリーダーを適切なPCコンピュータのUSBポートに挿入します。
4.3.カメラはリムーバブルディスクドライブとして認識されます。
4.4.ドライブ内のすべてのファイルにアクセスできます。
V.設定時間/日付スタンプ
5.1.カメラの電源を切り、MicroSDカードを取り出してカードリーダーに挿入します。
5.2.カードリーダーを適切なPCコンピュータのUSBポートに挿入します。
5.3.カメラはリムーバブルディスクドライブとして認識されます。
5.4.ルートディレクトリ内のドライブをクリックし、ルートディレクトリ内で"TIME.TXT"という名前の
ファイルを開きます。
5.5.現在の日付と時刻を「TIME.TXT」ファイルに正しい形式で書き込みます。
[日付]
YYYY.MM.DDHH:MM:SSY1
例 え ば:
[日付]
2017.04.1214:24:32Y1
このファイルを保 存します。
5.6. 低解像度でビデオを録画する必要がある場合は、「TIME.TXT」ファイルで1を2または3に変更
することができます。1は1920x1080Pを表し、2は1280x720Pを表し、3は640x480を表します。
5.7. ビデオ映像にタイムスタンプが必要ない場合は、「TIME.TXT」ファイルで「Y」を「N」に変更しま
す。
例 え ば:
[日付]
2017.04.1214:24:32N2
5.8.カメラを再起動すると、システムが自動的にプログラムをアップグレードします。
VI.充電
6.1.付属のDC5V電源アダプタとUSBケーブルを使用して、カメラの電源を切り、コンセントのAC電
源に接続します。
6.2.青色と赤色の両方のインジケータランプは充電中に点灯したままです。
6.3.フル充電をするには1時間かかります。
6.4.赤色のインジケータランプが消灯し、カメラが完全に充電されると青色のランプが点灯したま
まになります。
VII.リセット
何らかの理由でカメラが応答しなくなった場合、または正常に動作していない場合、クイックリセ
ットを実行すると通常の動作に戻ります。
操 作:カメラの電源が入ったら、電源ボタンとモードボタンを同時に1回押します。カメラは自動的
にシャットダウンします。その後、工場出荷時の設定でカメラを再起動できます。
VIII.時間設定
8.1.クリック音が聞こえるまで時間調整ノブを引きます。時針と分針の両方が停止します。
8.2.時間調整ノブを回して時間を設定します。
8.3.時間の設定が完了したら、時間調整つまみを押してください。
Page 29

[日付]
YYYY.MM.DDHH:MM:SSY1
例 え ば:
[日付]
2017.04.1214:24:32Y1
このファイルを保 存します。
5.6. 低解像度でビデオを録画する必要がある場合は、「TIME.TXT」ファイルで1を2または3に変更
することができます。1は1920x1080Pを表し、2は1280x720Pを表し、3は640x480を表します。
5.7. ビデオ映像にタイムスタンプが必要ない場合は、「TIME.TXT」ファイルで「Y」を「N」に変更しま
す。
例 え ば:
[日付]
2017.04.1214:24:32N2
5.8.カメラを再起動すると、システムが自動的にプログラムをアップグレードします。
VI.充電
6.1.付属のDC5V電源アダプタとUSBケーブルを使用して、カメラの電源を切り、コンセントのAC電
源に接続します。
6.2.青色と赤色の両方のインジケータランプは充電中に点灯したままです。
6.3.フル充電をするには1時間かかります。
6.4.赤色のインジケータランプが消灯し、カメラが完全に充電されると青色のランプが点灯したま
まになります。
VII.リセット
何らかの理由でカメラが応答しなくなった場合、または正常に動作していない場合、クイックリセ
ットを実行すると通常の動作に戻ります。
操 作:
カメラの電源が入ったら、電源ボタンとモードボタンを同時に1回押します。カメラは自動的
にシャットダウンします。その後、工場出荷時の設定でカメラを再起動できます。
VIII.時間設定
8.1.クリック音が聞こえるまで時間調整ノブを引きます。時針と分針の両方が停止します。
8.2.時間調整ノブを回して時間を設定します。
8.3.時間の設定が完了したら、時間調整つまみを押してください。
 Loading...