

Page 1
PBC300
User Guide
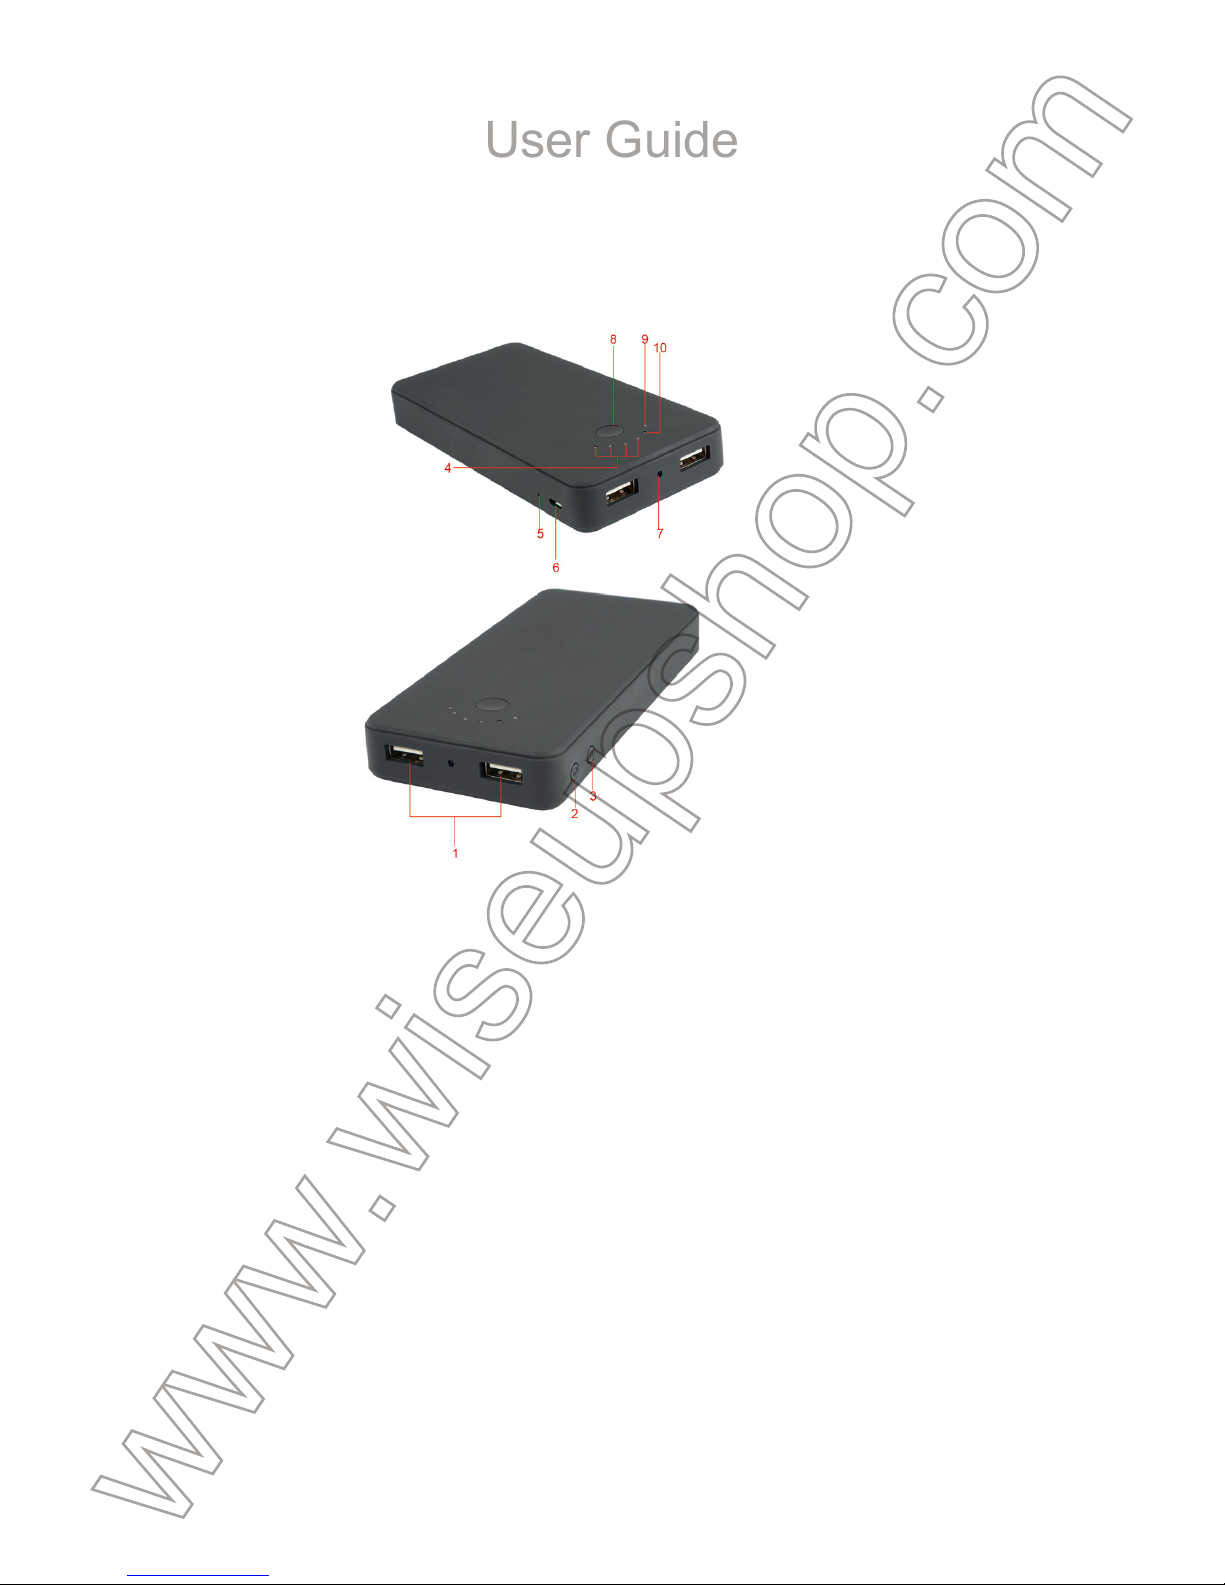
I. Product Overview
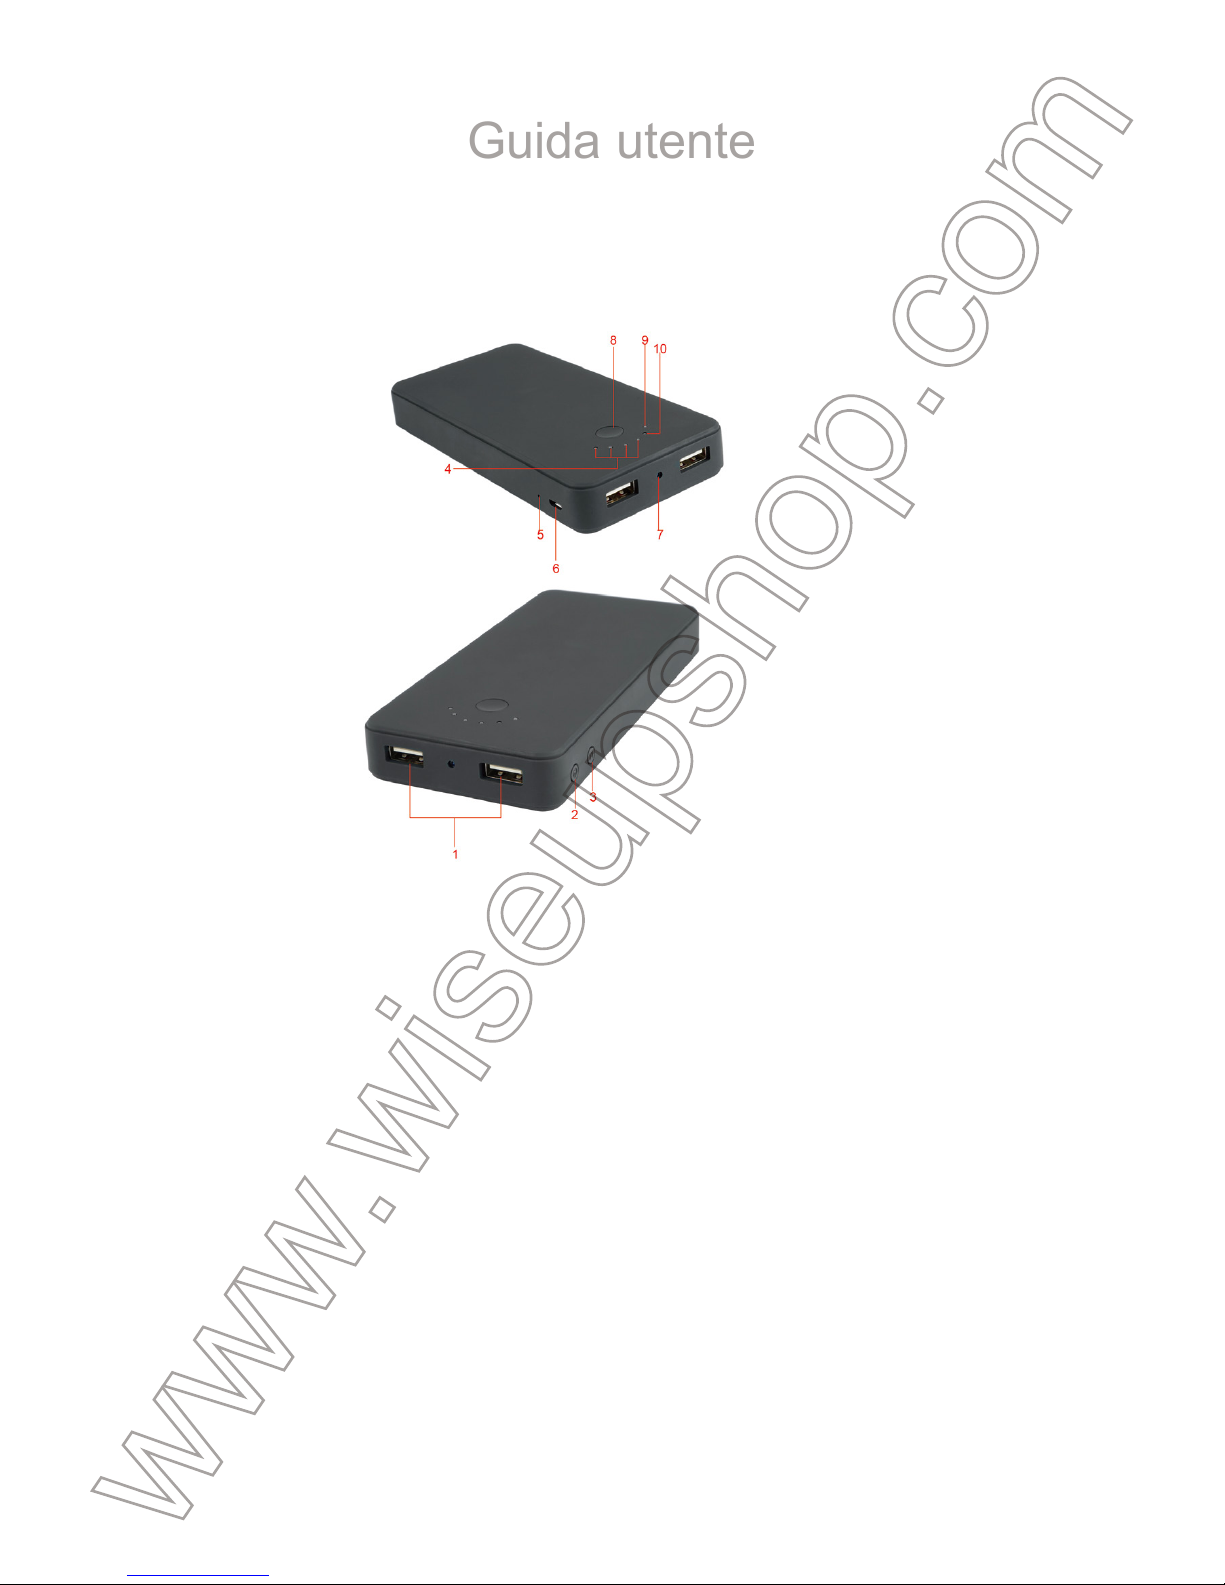
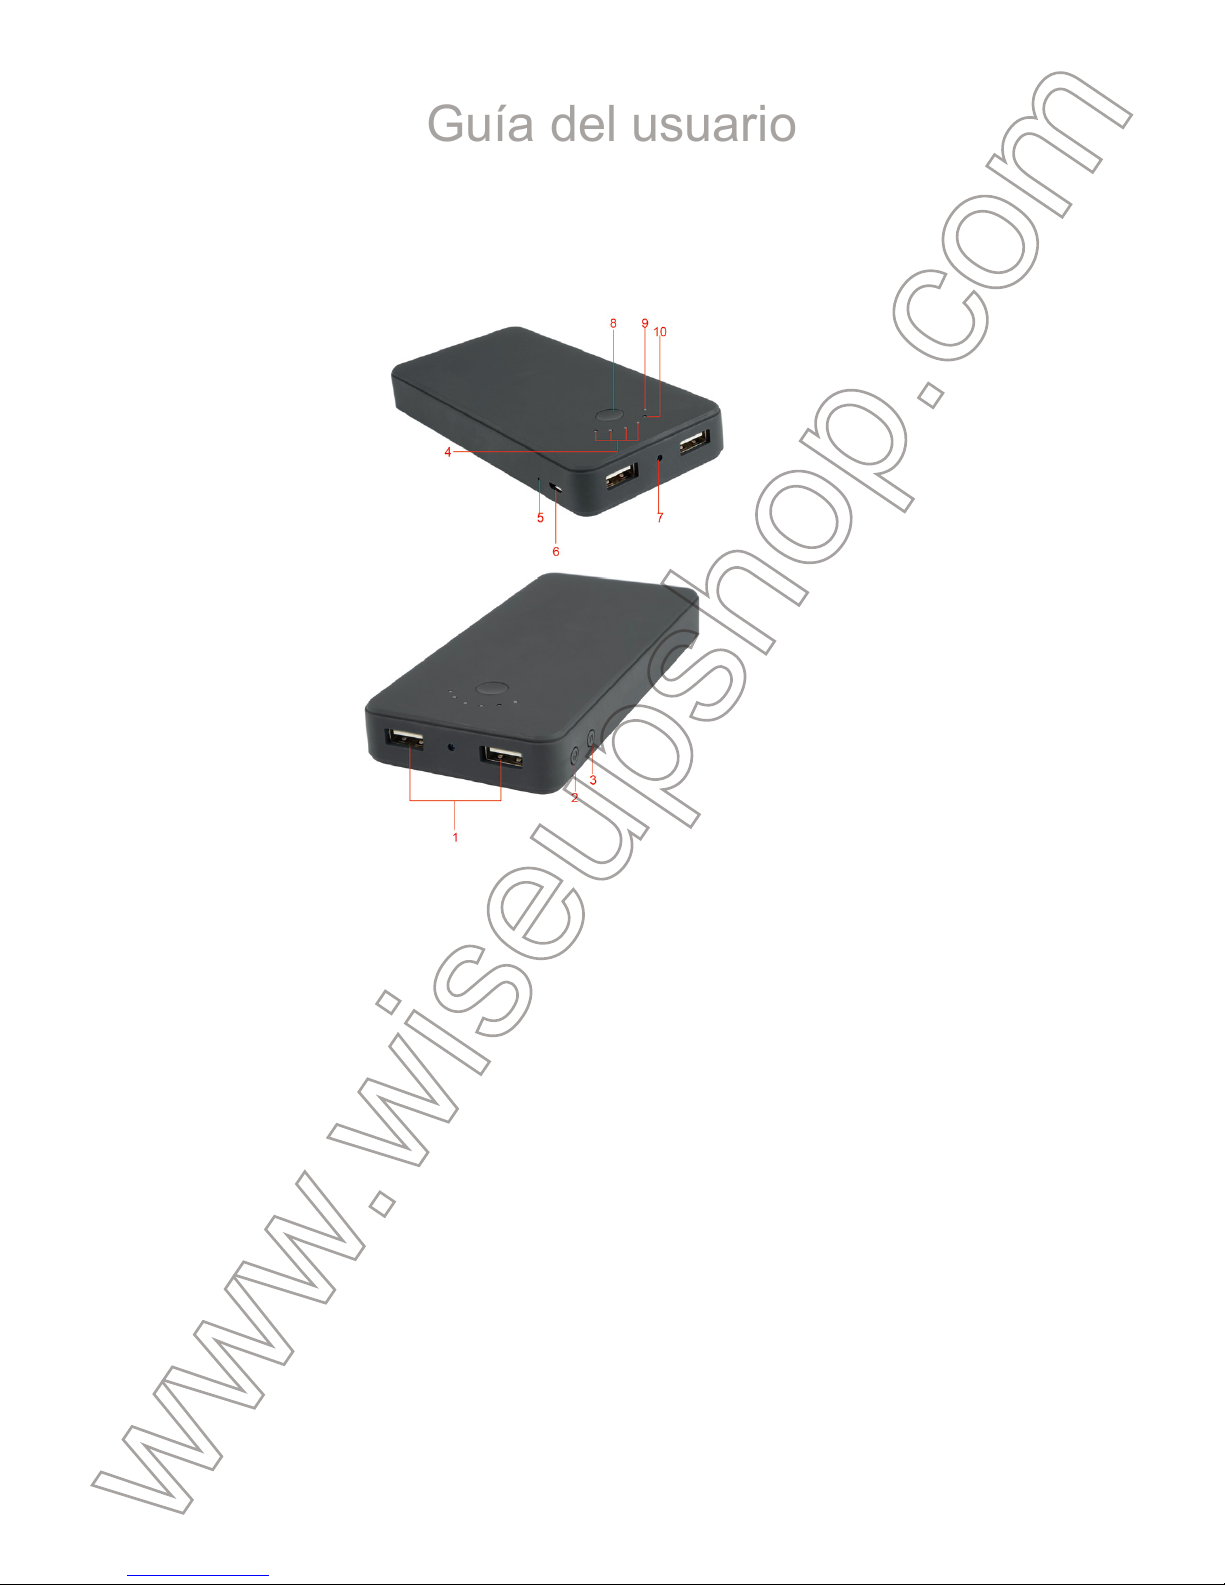
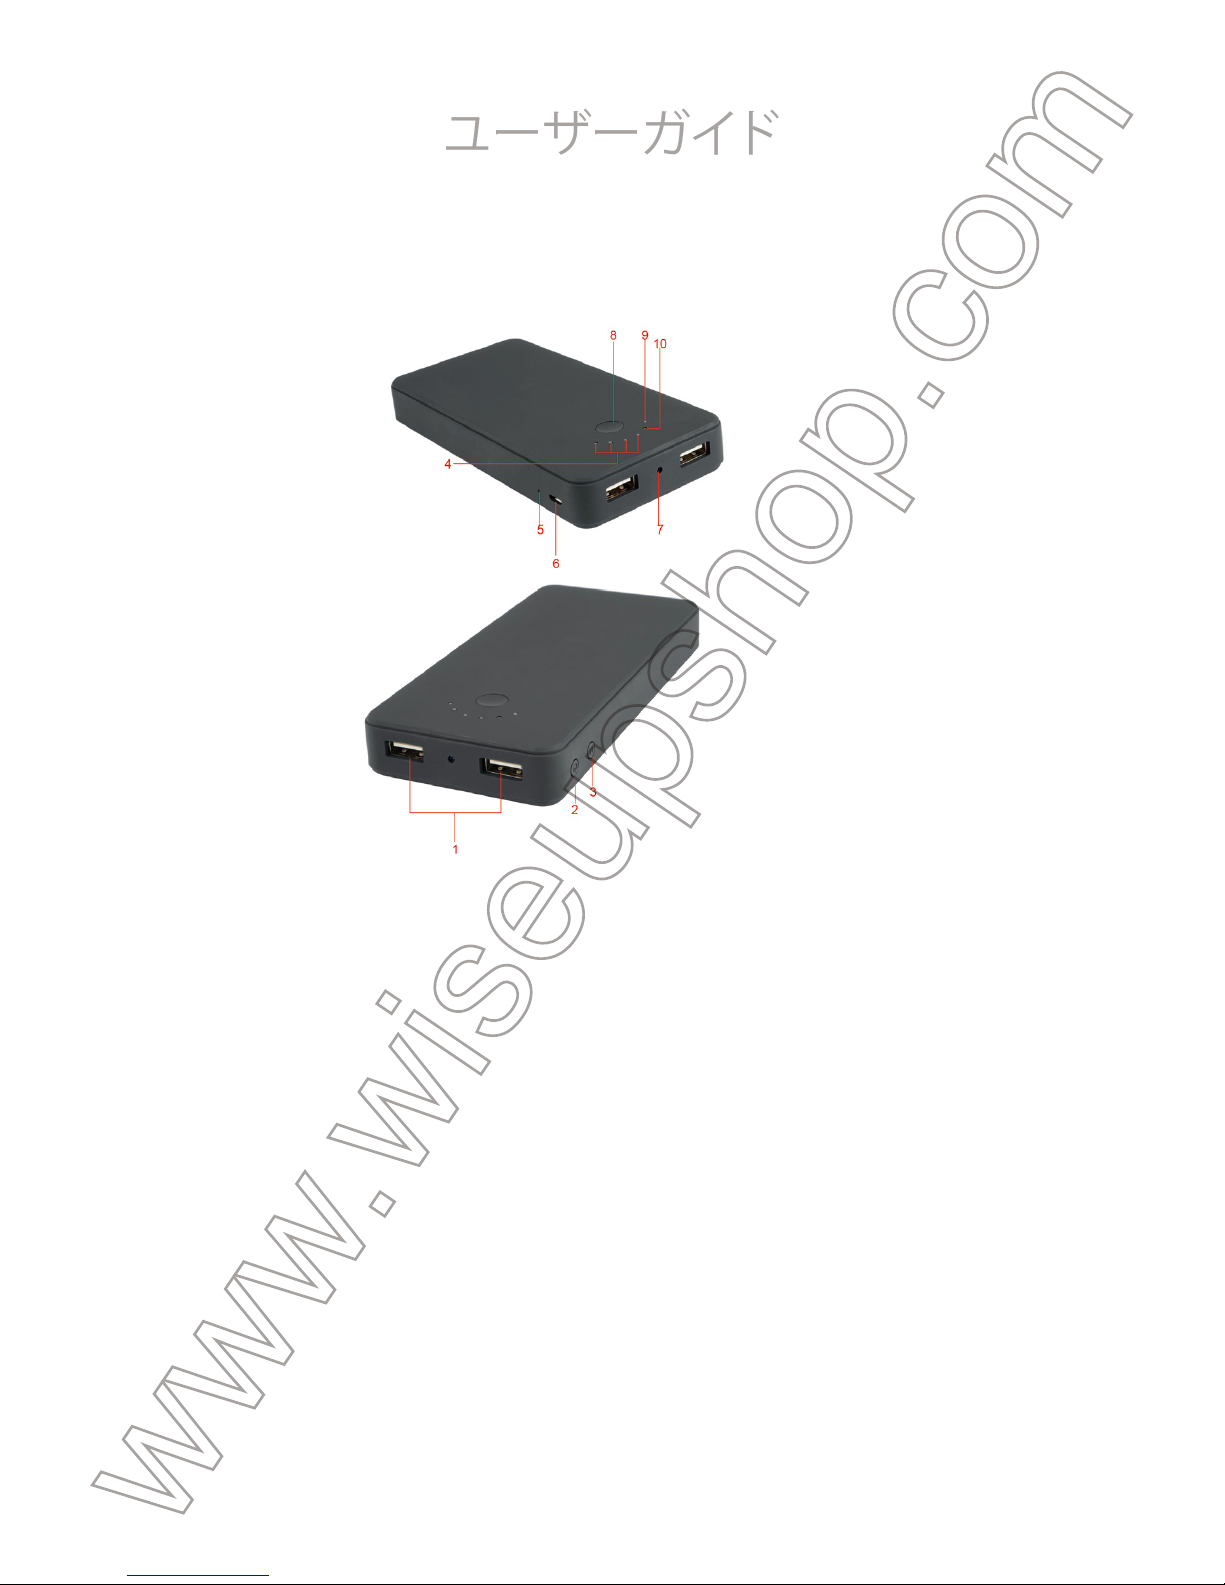
1. DC 5V 2.5A USB Power Output
2. Power Button
3. Camera Button
4. Battery Indicator Lights
5. Reset Button
II. What’s in the Box
-1× Power Bank Camera
-1× USB Cable
-1× AC110-230V to DC 5V Power Adapter
-1× 8GB Micro SD Card (fitted into the Micro SD card slot already)
III. Operation
>> Before using, make sure that the power bank is fully recharged.
>> Before using, make sure the Micro SD card (4GB-64GB) has been formatted
already and is securely fitted into the camera’s SD card slot, or it will not work. A
SDHC Class 10 Micro SD card is recommended. If no Micro SD card is fitted into the
camera, the red and blue indicator lights will flash 10 times and turn off. The camera
will shut down automatically. If the Micro SD card cannot be read, the camera will not
respond to your operation.
3.1. POWER ON/OFF
3.1.1. Power on the camera by pressing the Power Button for 2 seconds. The red
indicator light will stay illuminated, indicating the camera has entered into standby
mode automatically.
3.1.2. Power off the camera by pressing the Power Button for 3 seconds. The red
indicator light will turn off.
[Note]:
than 1 minute.
3.2. VIDEO RECORDING
3.2.1. Power on the camera by pressing the Power Button for 2 seconds. The red
indicator light will stay illuminated, indicating the camera has entered into standby
mode automatically.
3.2.2. Press the Power Button once to record video. The red indicator light will flash
3 times and then turn off.
3.2.3. Press the Power Button once again to stop recording video. The red indicator
light will stay illuminated, indicating the camera is back to standby mode.
[Notes]:
1). A video file will be generated and saved every 5 minutes automatically.
2). The camera can record video for 17 hours continuously on a full charge.
3). Video Resolution: 1920×1080P Video Format: MOV
3.3. CAMERA/STILL PHOTOGRAPHY
3.3.1. Power on the camera by pressing the Power Button for 2 seconds. The red
indicator light will stay illuminated, indicating the camera has entered into standby
mode automatically.
3.3.2. Press the Camera Button once to take a photo. The blue indicator light will
flash once and turn off.
3.4. MICRO SD CARD FORMATTING
3.4.1. Power on the camera by pressing the Power Button for 2 seconds. The red
6. USB Power Input
7. Camera Lens
8. Battery Status Button
9. Red Indicator Light
10. Blue Indicator Light
Page 2

SDHC Class 10 Micro SD card is recommended. If no Micro SD card is fitted into the
camera, the red and blue indicator lights will flash 10 times and turn off. The camera
will shut down automatically. If the Micro SD card cannot be read, the camera will not
respond to your operation.
3.1. POWER ON/OFF
3.1.1. Power on the camera by pressing the Power Button for 2 seconds. The red
indicator light will stay illuminated, indicating the camera has entered into standby
mode automatically.
3.1.2. Power off the camera by pressing the Power Button for 3 seconds. The red
indicator light will turn off.
[Note]:
The camera will shut down automatically if it is in standby mode without any operation more
than 1 minute.
3.2. VIDEO RECORDING
3.2.1. Power on the camera by pressing the Power Button for 2 seconds. The red
indicator light will stay illuminated, indicating the camera has entered into standby
mode automatically.
3.2.2. Press the Power Button once to record video. The red indicator light will flash
3 times and then turn off.
3.2.3. Press the Power Button once again to stop recording video. The red indicator
light will stay illuminated, indicating the camera is back to standby mode.
[Notes]:
1). A video file will be generated and saved every 5 minutes automatically.
2). The camera can record video for 17 hours continuously on a full charge.
3). Video Resolution: 1920×1080P Video Format: MOV
3.3. CAMERA/STILL PHOTOGRAPHY
3.3.1. Power on the camera by pressing the Power Button for 2 seconds. The red
indicator light will stay illuminated, indicating the camera has entered into standby
mode automatically.
3.3.2. Press the Camera Button once to take a photo. The blue indicator light will
flash once and turn off.
3.4. MICRO SD CARD FORMATTING
3.4.1. Power on the camera by pressing the Power Button for 2 seconds. The red
indicator light will stay illuminated, indicating the camera has entered into standby
mode.
3.4.2. Press the Camera Button for 2 seconds. The red and blue indicator lights will
flash 5 times and turn off, indicating the SD card formatting has been completed; the
red one will stay illuminated, indicating the camera is back to standby mode.
3.5. RESETTING
If, for any reason, the camera stops working or isn’t working properly, a reset will
restore it back to normal operation.
Operation: Use a pin to press the Reset Button once to reset all settings to factory
default. The camera will shut down automatically. Restart the camera with the de-
fault settings.
IV. Video/Image Files Uploads
4.1. Power off the camera, remove the Micro SD card and insert it into a card reader.
4.2. Insert the card reader into a PC computer.
4.3. The Micro SD card will be recognized as a removable disk drive.
4.4. All the files can be accessed in the “DCIM” folder.
V. Setting Time/Date Stamp
5.1. Power off the camera, remove the Micro SD card and insert it into a card reader.
5.2. Insert the card reader into a PC computer.
5.3. Removable disk drive folder appears.
5.4. Click on the drive in the root directory and inside the root directory, create a file
named “TIMERSET.TXT”.
5.5. Write the current date and time in the “TIMERSET.TXT” file with the correct
format:
YYYYMMDDHHMMSS Y. (For example: 20160412142432 Y). Save this file. If you
don’t need stamp on your video or image files, change “Y” into “N” in the “TIM-
ERSET.TXT” file.
5.6. Restart the camera and the system will upgrade the program automatically.
VI. Charging
6.1. Connect the camera to an outlet AC power socket by using the USB cable and
DC 5V charging adapter provided.
6.2. It will take 12 hours to obtain a full charge.
Page 3

indicator light will stay illuminated, indicating the camera has entered into standby
mode.
3.4.2. Press the Camera Button for 2 seconds. The red and blue indicator lights will
flash 5 times and turn off, indicating the SD card formatting has been completed; the
red one will stay illuminated, indicating the camera is back to standby mode.
3.5. RESETTING
If, for any reason, the camera stops working or isn’t working properly, a reset will
restore it back to normal operation.
Operation: Use a pin to press the Reset Button once to reset all settings to factory
default. The camera will shut down automatically. Restart the camera with the default settings.
IV. Video/Image Files Uploads
4.1. Power off the camera, remove the Micro SD card and insert it into a card reader.
4.2. Insert the card reader into a PC computer.
4.3. The Micro SD card will be recognized as a removable disk drive.
4.4. All the files can be accessed in the “DCIM” folder.
V. Setting Time/Date Stamp
5.1. Power off the camera, remove the Micro SD card and insert it into a card reader.
5.2. Insert the card reader into a PC computer.
5.3. Removable disk drive folder appears.
5.4. Click on the drive in the root directory and inside the root directory, create a file
named “TIMERSET.TXT”.
5.5. Write the current date and time in the “TIMERSET.TXT” file with the correct
format:
YYYYMMDDHHMMSS Y. (For example: 20160412142432 Y). Save this file. If you
don’t need stamp on your video or image files, change “Y” into “N” in the “TIMERSET.TXT” file.
5.6. Restart the camera and the system will upgrade the program automatically.
VI. Charging
6.1. Connect the camera to an outlet AC power socket by using the USB cable and
DC 5V charging adapter provided.
6.2. It will take 12 hours to obtain a full charge.
6.3. All 4 battery indicator lights will be on when the power bank is fully recharged.
Page 4

6.3. All 4 battery indicator lights will be on when the power bank is fully recharged.
Page 5
PBC300
Benutzerhandbuch
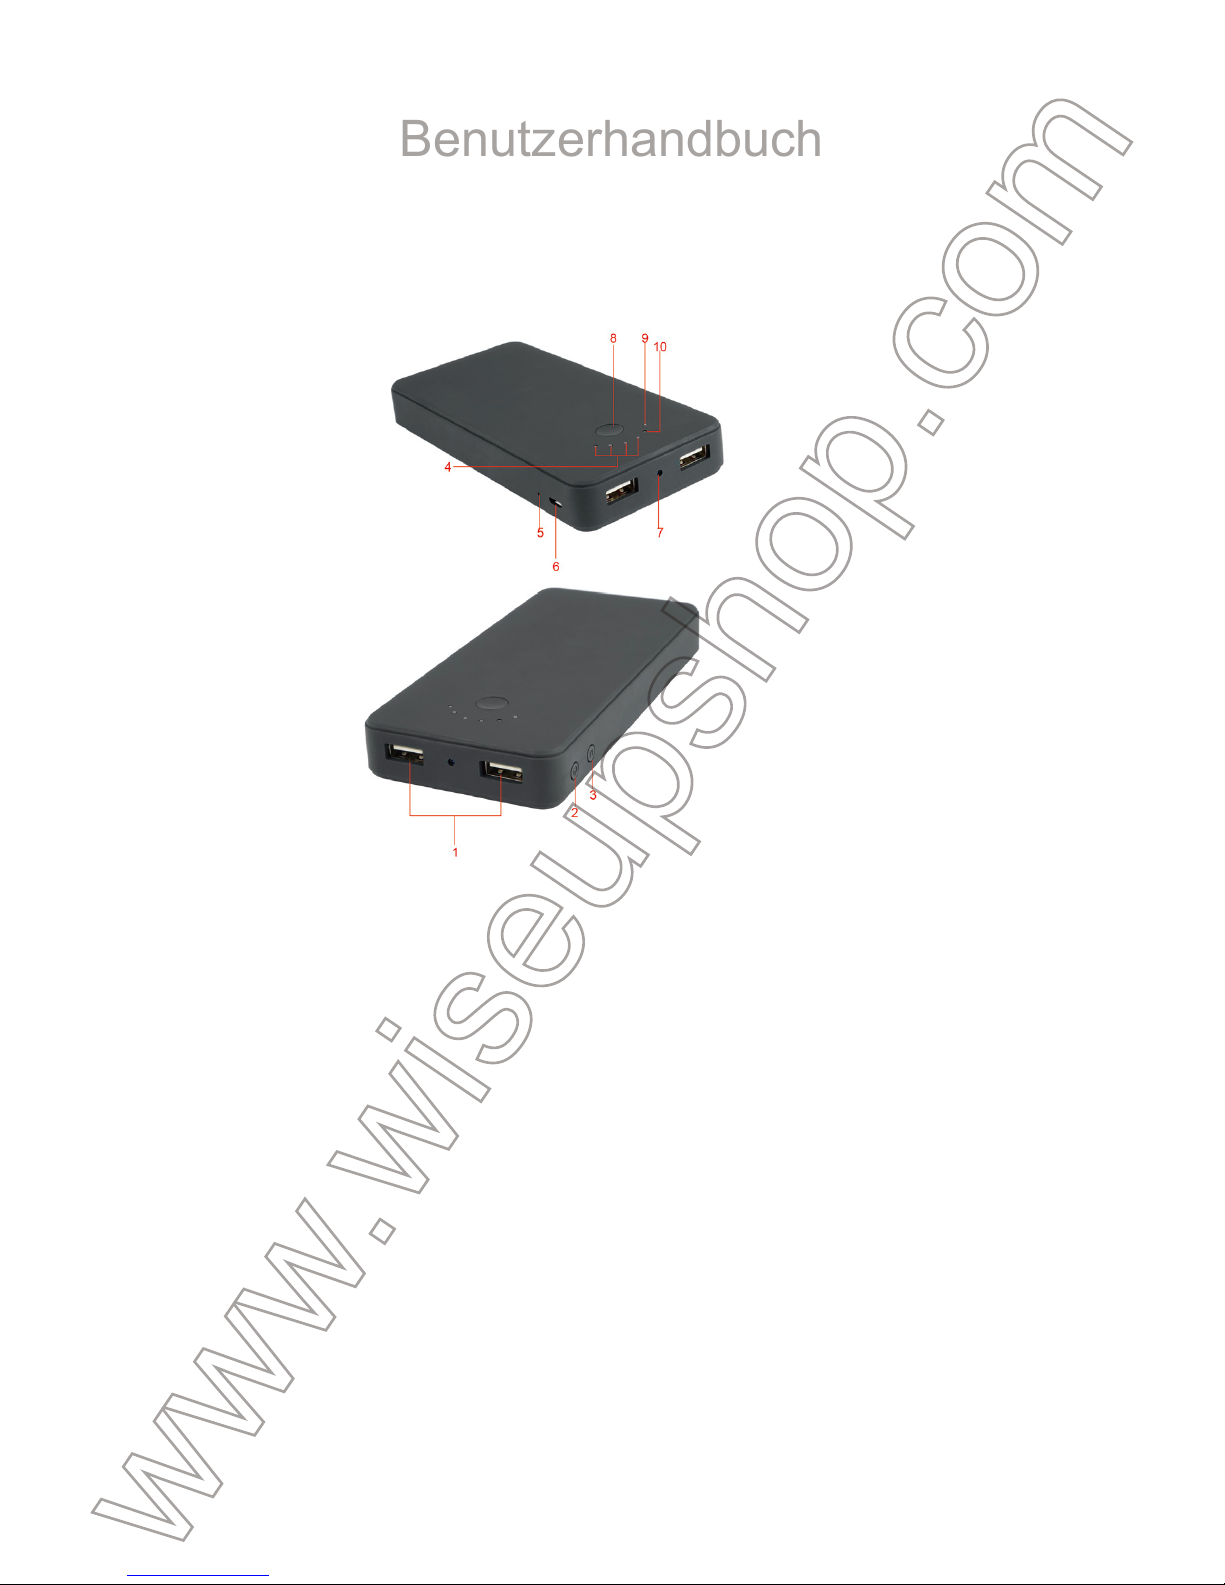
I. Produktübersicht
1. DC 5V 2.5A USB Power Output
2. Power-Taste
3. Kamera-Taste
4. Batterieanzeigeleuchten
5. Reset-Taste
II. Was ist in der Box
-1 × Energien-Bank-Kamera
-1 × USB-Kabel
-1 × AC110-230V DC 5V Netzteil
-1 × 8 GB Micro SD-Karte (in den Steckplatz Micro SD-Karte ausgestattet bereits)
III. Betrieb
>> Vor der Verwendung, stellen Sie sicher, dass die Strom Bank vollständig aufgeladen ist.
>> Vor der Verwendung sicherstellen, dass die Micro SD-Karte (4GB-64GB) bereits
formatiert wurde und sicher in die Kamera SD-Kartensteckplatz ausgestattet ist,
oder es wird nicht funktionieren. Eine SDHC Class 10 Micro-SD-Karte wird emp-
fohlen. Wenn keine Micro-SD-Karte in die Kamera eingebaut ist, werden die roten
und blauen Anzeigeleuchten 10 mal blinken und auszuschalten. Die Kamera
schaltet sich automatisch aus. Wenn die Micro SD-Karte kann nicht gelesen
werden, wird die Kamera nicht mit dem Betrieb reagieren.
3.1. EINSCHALTEN / AUSSCHALTEN
3.1.1. Schalten Sie die Kamera mit der Power-Taste 2 Sekunden lang drücken. Die
rote Anzeigelampe bleibt beleuchtet, was die Kamera hat sich automatisch in den
Standby-Modus.
3.1.2. Schalten Sie die Kamera mit der Power-Taste 3 Sekunden lang drücken. Die
rote Anzeigelampe erlischt.
[Hinweis]:
deinen Betrieb mehr als 1 Minute ist.
3.2. VIDEOAUFNAHME
3.2.1. Schalten Sie die Kamera mit der Power-Taste 2 Sekunden lang drücken. Die
rote Anzeigelampe bleibt beleuchtet, was die Kamera hat sich automatisch in den
Standby-Modus.
3.2.2. Drücken Sie die Power-Taste einmal, um Video aufnehmen. Die rote Kontroll-
leuchte 3-mal blinken und dann auszuschalten.
3.2.3. Drücken Sie die Power-Taste erneut zu stoppen Videoaufzeichnung . Die rote
Anzeigelampe bleibt beleuchtet, was die Kamera in den Standby-Modus ist zurück.
[Hinweis]:
1). Eine Videodatei wird erzeugt und automatisch gespeichert, alle 5 Minuten werden.
2). Die Kamera kann Video 17 Stunden lang ununterbrochen auf einer vollen Ladung aufzunehmen.
3). Video-Auflösung: 1920 × 1080p-Video-Format: MOV
3.3. CAMERA / FOTOGRAFIE
3.3.1. Schalten Sie die Kamera mit der Power-Taste 2 Sekunden lang drücken. Die
rote Anzeigelampe bleibt beleuchtet, was die Kamera hat sich automatisch in den
Standby-Modus.
3.3.2. Drücken Sie einmal auf die Schaltfläche Kamera ein Foto zu machen. Die
blaue Anzeigelampe blinkt einmal und ausschalten.
6. USB-Energien-Eingang
7. Kamera-Objektiv
8. Batteriestatustaste
9. Red Indicator Light
10. Blau-Anzeigelampe
Page 6

formatiert wurde und sicher in die Kamera SD-Kartensteckplatz ausgestattet ist,
oder es wird nicht funktionieren. Eine SDHC Class 10 Micro-SD-Karte wird empfohlen. Wenn keine Micro-SD-Karte in die Kamera eingebaut ist, werden die roten
und blauen Anzeigeleuchten 10 mal blinken und auszuschalten. Die Kamera
schaltet sich automatisch aus. Wenn die Micro SD-Karte kann nicht gelesen
werden, wird die Kamera nicht mit dem Betrieb reagieren.
3.1. EINSCHALTEN / AUSSCHALTEN
3.1.1. Schalten Sie die Kamera mit der Power-Taste 2 Sekunden lang drücken. Die
rote Anzeigelampe bleibt beleuchtet, was die Kamera hat sich automatisch in den
Standby-Modus.
3.1.2. Schalten Sie die Kamera mit der Power-Taste 3 Sekunden lang drücken. Die
rote Anzeigelampe erlischt.
[Hinweis]:
Die Kamera wird automatisch abgeschaltet, wenn er sich im Standby-Modus ohne irgen-
deinen Betrieb mehr als 1 Minute ist.
3.2. VIDEOAUFNAHME
3.2.1. Schalten Sie die Kamera mit der Power-Taste 2 Sekunden lang drücken. Die
rote Anzeigelampe bleibt beleuchtet, was die Kamera hat sich automatisch in den
Standby-Modus.
3.2.2. Drücken Sie die Power-Taste einmal, um Video aufnehmen. Die rote Kontrollleuchte 3-mal blinken und dann auszuschalten.
3.2.3. Drücken Sie die Power-Taste erneut zu stoppen Videoaufzeichnung . Die rote
Anzeigelampe bleibt beleuchtet, was die Kamera in den Standby-Modus ist zurück.
[Hinweis]:
1). Eine Videodatei wird erzeugt und automatisch gespeichert, alle 5 Minuten werden.
2). Die Kamera kann Video 17 Stunden lang ununterbrochen auf einer vollen Ladung aufzunehmen.
3). Video-Auflösung: 1920 × 1080p-Video-Format: MOV
3.3. CAMERA / FOTOGRAFIE
3.3.1. Schalten Sie die Kamera mit der Power-Taste 2 Sekunden lang drücken. Die
rote Anzeigelampe bleibt beleuchtet, was die Kamera hat sich automatisch in den
Standby-Modus.
3.3.2. Drücken Sie einmal auf die Schaltfläche Kamera ein Foto zu machen. Die
blaue Anzeigelampe blinkt einmal und ausschalten.
3.4. MICRO SD-KARTE FORMATIERUNG
3.4.1. Schalten Sie die Kamera mit der Power-Taste 2 Sekunden lang drücken. Die
rote Anzeigelampe bleibt beleuchtet, was die Kamera hat sich in den Standby-Mo-
dus.
3.4.2. Drücken Sie die Kamera-Taste für 2 Sekunden. Die roten und blauen Anzei-
geleuchten 5 mal blinken und ausschalten, was anzeigt, die SD-Karte Formatierung
abgeschlossen ist; die rote bleiben beleuchtet, die Kamera anzeigt, in den Stand-
by-Modus ist zurück.
3.5. RÜCKSTELLUNG
Wenn aus irgendeinem Grund, stoppt die Kamera funktioniert oder nicht richtig funk-
tioniert, wird ein Reset wiederherstellen, den normalen Betrieb zurück.
Betrieb: Verwenden Sie einen Stift in die Reset-Taste zu drücken, wenn alle Einstel-
lungen auf die Werkseinstellungen zurückgesetzt werden. Die Kamera schaltet sich
automatisch aus. Starten Sie die Kamera mit den Standardeinstellungen.
IV. Video / Bilddateien Uploads
4.1. Schalten Sie die Kamera aus, entfernen Sie die Micro SD-Karte und in einen
Kartenleser ein.
4.2. Setzen Sie den Kartenleser in einen PC-Computer.
4.3. Die SD-Micro-Karte wird als Wechsellaufwerk erkannt werden.
4.4. Alle Dateien können im Ordner "DCIM" zugegriffen werden.
V. Einstellung von Uhrzeit / Datum-Stempel
5.1. Schalten Sie die Kamera aus, entfernen Sie die Micro SD-Karte und in einen
Kartenleser ein.
5.2. Setzen Sie den Kartenleser in einen PC-Computer.
5.3. Wechselplattenlaufwerk Ordner angezeigt wird.
5.4. Klicken Sie auf das Laufwerk im Stammverzeichnis und im Inneren des
Root-Verzeichnis eine Datei mit dem Namen "TIMERSET.TXT".
5.5. Schreiben Sie das aktuelle Datum und die Uhrzeit in der "TIMERSET.TXT"
Datei mit dem richtigen Format:
YYYYMMDDHHMMSS Y. (Zum Beispiel: 20160412142432 Y). Speichern Sie diese
Datei. Wenn Sie nicht Stempel auf Ihrem Video- oder Bilddateien benötigen, ändern
Sie "Y" in "N" in der "TIMERSET.TXT" Datei.
5.6. Starten Sie die Kamera und das System-Upgrade, das Programm automatisch.
Page 7

3.4. MICRO SD-KARTE FORMATIERUNG
3.4.1. Schalten Sie die Kamera mit der Power-Taste 2 Sekunden lang drücken. Die
rote Anzeigelampe bleibt beleuchtet, was die Kamera hat sich in den Standby-Modus.
3.4.2. Drücken Sie die Kamera-Taste für 2 Sekunden. Die roten und blauen Anzeigeleuchten 5 mal blinken und ausschalten, was anzeigt, die SD-Karte Formatierung
abgeschlossen ist; die rote bleiben beleuchtet, die Kamera anzeigt, in den Standby-Modus ist zurück.
3.5. RÜCKSTELLUNG
Wenn aus irgendeinem Grund, stoppt die Kamera funktioniert oder nicht richtig funktioniert, wird ein Reset wiederherstellen, den normalen Betrieb zurück.
Betrieb: Verwenden Sie einen Stift in die Reset-Taste zu drücken, wenn alle Einstellungen auf die Werkseinstellungen zurückgesetzt werden. Die Kamera schaltet sich
automatisch aus. Starten Sie die Kamera mit den Standardeinstellungen.
IV. Video / Bilddateien Uploads
4.1. Schalten Sie die Kamera aus, entfernen Sie die Micro SD-Karte und in einen
Kartenleser ein.
4.2. Setzen Sie den Kartenleser in einen PC-Computer.
4.3. Die SD-Micro-Karte wird als Wechsellaufwerk erkannt werden.
4.4. Alle Dateien können im Ordner "DCIM" zugegriffen werden.
V. Einstellung von Uhrzeit / Datum-Stempel
5.1. Schalten Sie die Kamera aus, entfernen Sie die Micro SD-Karte und in einen
Kartenleser ein.
5.2. Setzen Sie den Kartenleser in einen PC-Computer.
5.3. Wechselplattenlaufwerk Ordner angezeigt wird.
5.4. Klicken Sie auf das Laufwerk im Stammverzeichnis und im Inneren des
Root-Verzeichnis eine Datei mit dem Namen "TIMERSET.TXT".
5.5. Schreiben Sie das aktuelle Datum und die Uhrzeit in der "TIMERSET.TXT"
Datei mit dem richtigen Format:
YYYYMMDDHHMMSS Y. (Zum Beispiel: 20160412142432 Y). Speichern Sie diese
Datei. Wenn Sie nicht Stempel auf Ihrem Video- oder Bilddateien benötigen, ändern
Sie "Y" in "N" in der "TIMERSET.TXT" Datei.
5.6. Starten Sie die Kamera und das System-Upgrade, das Programm automatisch.
VI. Lade
6.1. Schließen Sie die Kamera an eine Steckdose an Steckdose mit dem USB-Ka-
bel und DC 5V Ladeadapter zur Verfügung gestellt.
6.2. Es wird 12 Stunden dauern, eine volle Ladung zu erhalten.
6.3. Alle 4 Batterie-Anzeige leuchtet auf, wenn die Power Bank vollständig aufgelad-
en ist.
Page 8
VI. Lade
6.1. Schließen Sie die Kamera an eine Steckdose an Steckdose mit dem USB-Kabel und DC 5V Ladeadapter zur Verfügung gestellt.
6.2. Es wird 12 Stunden dauern, eine volle Ladung zu erhalten.
6.3. Alle 4 Batterie-Anzeige leuchtet auf, wenn die Power Bank vollständig aufgeladen ist.
Page 9
PBC300
Mode d'emploi
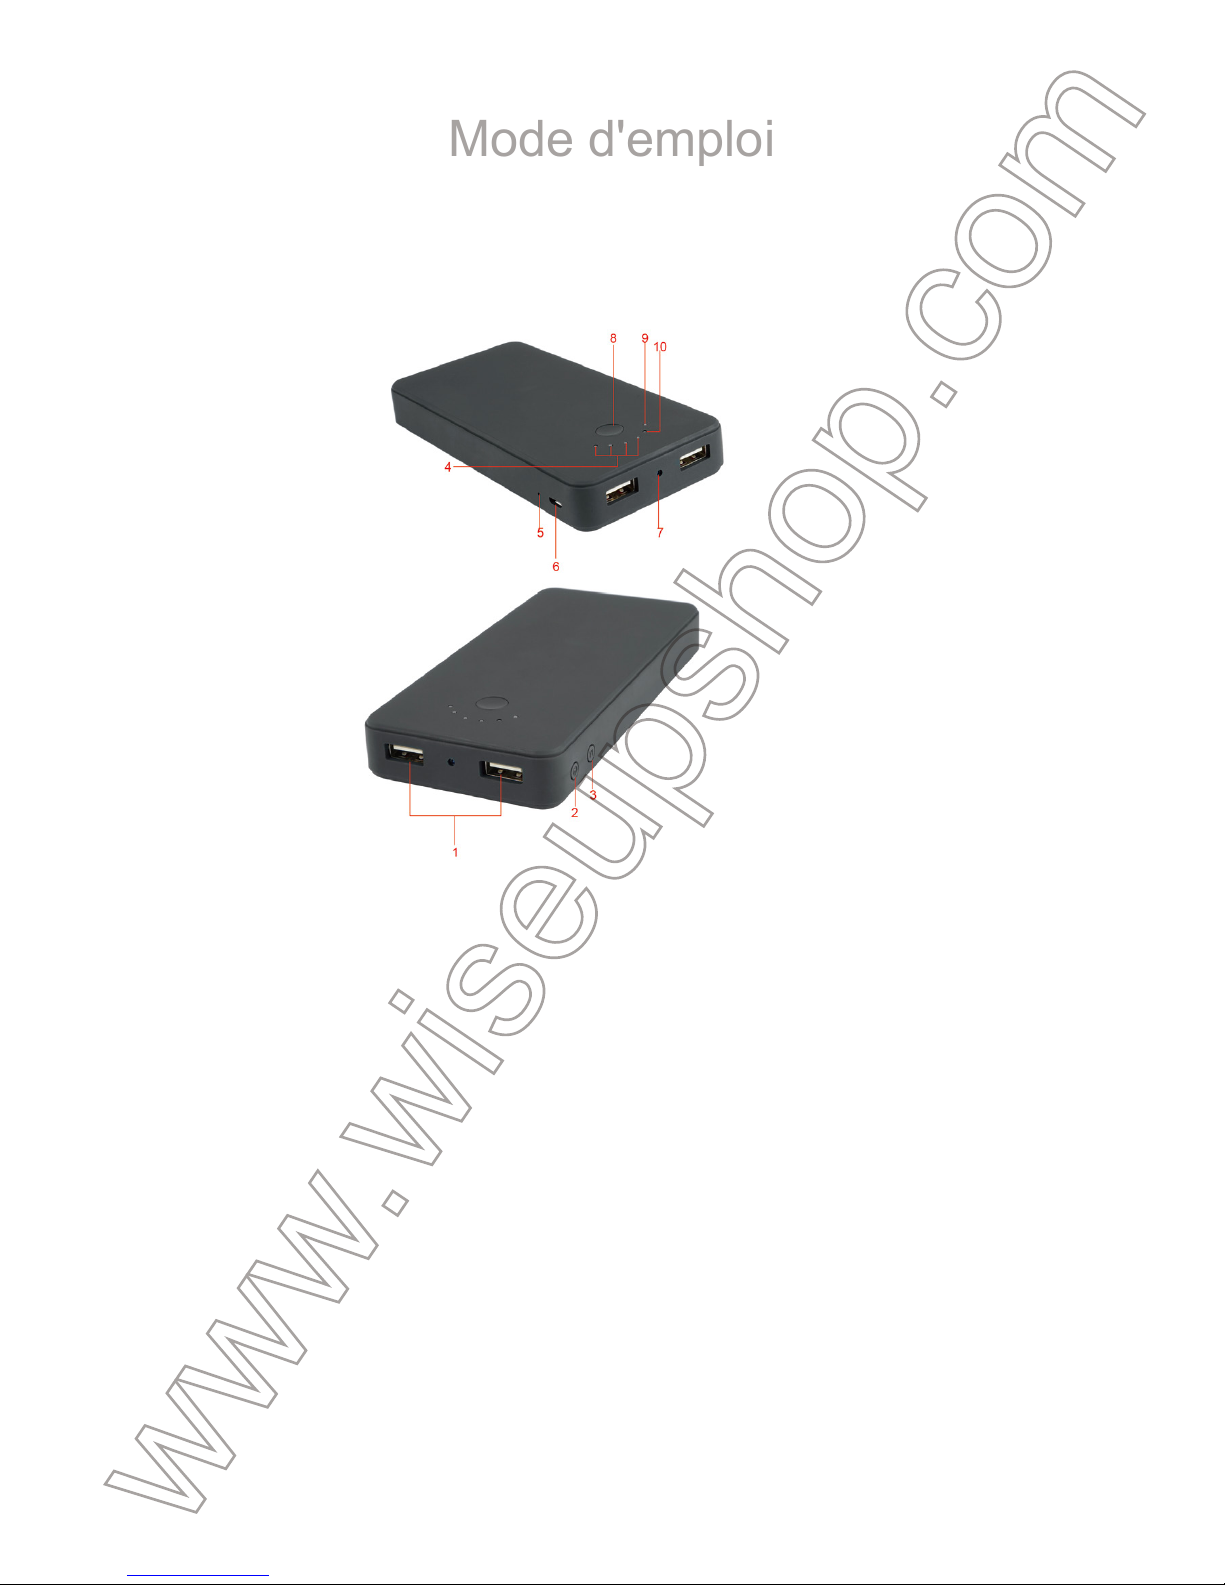
I. Aperçu du produit
1. DC 5V 2.5A USB Puissance de sortie
2. Bouton d'alimentation
3. Bouton de l'appareil photo
4. Voyant de la batterie
5. Bouton de réinitialisation
II. Qu'y a-t-il dans la boite
-1 × Caméra Chargeur Mobile
-1 × Câble USB
-1 × AC110-230V à DC Power Adapter 5V
-1 × 8 GB Carte SD Mémoire (insérée dans la fente pour Carte SD Mémoire déjà)
III. Opération
>> Avant d'utiliser, assurez-vous que la banque d'alimentation est complètement
rechargée.
>> Avant d'utiliser, assurez-vous que la Carte SD Mémoire (4 GB-64GB) a déjà été
formaté et est solidement monté dans la fente de la carte SD de l'appareil photo, ou
il ne fonctionnera pas. Une SDHC Classe 10 Carte SD Mémoire est recommandée.
Si aucune Carte SD Mémoire est insérée dans l'appareil photo, les voyants rouge et
bleu clignotent 10 fois et éteignez. L'appareil photo est éteint automatiquement. Si
la Carte SD Mémoire ne peut pas être lu, l'appareil ne répond pas à votre exploita-
tion.
3.1. MARCHE / ARRÊT
3.1.1. Allumez l'appareil photo en appuyant sur le bouton d'alimentation pendant 2
secondes. Le voyant rouge reste allumé, indiquant que l'appareil est entré en mode
veille automatiquement.
3.1.2. Mise hors tension de l'appareil photo en appuyant sur le bouton d'alimentation
pendant 3 secondes. Le voyant rouge s'éteint.
[Remarque]:
opération de plus de 1 minute.
3.2. ENREGISTREMENT VIDEO
3.2.1. Allumez l'appareil photo en appuyant sur le bouton d'alimentation pendant 2
secondes. Le voyant rouge reste allumé, indiquant que l'appareil est entré en mode
veille automatiquement.
3.2.2. Appuyez sur le bouton d'alimentation une fois pour enregistrer de la vidéo. Le
voyant rouge clignote 3 fois puis éteignez.
3.2.3. Appuyez sur le bouton d'alimentation une fois de plus pour arrêter l'enregis-
trement vidéo. Le voyant rouge reste allumé, indiquant que l'appareil est en mode
veille.
[Remarque]:
1). Les fichiers vidéos seront générés et enregistrés tous les 5 minutes automatiquement.
2). La caméra peut enregistrer des vidéos en continu pendant 17 heures sur une charge complète.
3). Résolution vidéo: 1920×1080P Video Format: MOV
3.3. CAMÉRA / PHOTOGRAPHIE
3.3.1. Allumez l'appareil photo en appuyant sur le bouton d'alimentation pendant 2
secondes. Le voyant rouge reste allumé, indiquant que l'appareil est entré en mode
veille automatiquement.
3.3.2. Appuyez sur le bouton de l'appareil photo une fois pour prendre une photo. Le
voyant lumineux bleu clignote une fois et éteignez.
6. Alimentation Entrée USB
7. Objetif de Caméra
8. Batterie Bouton d'état
9. Témoin lumineux rouge
10. Voyant bleu
Page 10

formaté et est solidement monté dans la fente de la carte SD de l'appareil photo, ou
il ne fonctionnera pas. Une SDHC Classe 10 Carte SD Mémoire est recommandée.
Si aucune Carte SD Mémoire est insérée dans l'appareil photo, les voyants rouge et
bleu clignotent 10 fois et éteignez. L'appareil photo est éteint automatiquement. Si
la Carte SD Mémoire ne peut pas être lu, l'appareil ne répond pas à votre exploitation.
3.1. MARCHE / ARRÊT
3.1.1. Allumez l'appareil photo en appuyant sur le bouton d'alimentation pendant 2
secondes. Le voyant rouge reste allumé, indiquant que l'appareil est entré en mode
veille automatiquement.
3.1.2. Mise hors tension de l'appareil photo en appuyant sur le bouton d'alimentation
pendant 3 secondes. Le voyant rouge s'éteint.
[Remarque]:
L'appareil photo arrête automatiquement si elle est en mode veille sans aucune
opération de plus de 1 minute.
3.2. ENREGISTREMENT VIDEO
3.2.1. Allumez l'appareil photo en appuyant sur le bouton d'alimentation pendant 2
secondes. Le voyant rouge reste allumé, indiquant que l'appareil est entré en mode
veille automatiquement.
3.2.2. Appuyez sur le bouton d'alimentation une fois pour enregistrer de la vidéo. Le
voyant rouge clignote 3 fois puis éteignez.
3.2.3. Appuyez sur le bouton d'alimentation une fois de plus pour arrêter l'enregistrement vidéo. Le voyant rouge reste allumé, indiquant que l'appareil est en mode
veille.
[Remarque]:
1). Les fichiers vidéos seront générés et enregistrés tous les 5 minutes automatiquement.
2). La caméra peut enregistrer des vidéos en continu pendant 17 heures sur une charge complète.
3). Résolution vidéo: 1920×1080P Video Format: MOV
3.3. CAMÉRA / PHOTOGRAPHIE
3.3.1. Allumez l'appareil photo en appuyant sur le bouton d'alimentation pendant 2
secondes. Le voyant rouge reste allumé, indiquant que l'appareil est entré en mode
veille automatiquement.
3.3.2. Appuyez sur le bouton de l'appareil photo une fois pour prendre une photo. Le
voyant lumineux bleu clignote une fois et éteignez.
3.4. CARTE SD MÉMOIRE FORMATAGE
3.4.1. Allumez l'appareil photo en appuyant sur le bouton d'alimentation pendant 2
secondes. Le voyant rouge reste allumé, indiquant que l'appareil est entré en mode
veille.
3.4.2. Appuyez sur le bouton de l'appareil photo pendant 2 secondes. Les voyants
lumineux rouge et bleu clignotent 5 fois et désactiver, en indiquant le formatage de
la carte SD a été achevée; le rouge restera allumé, indiquant que l'appareil est en
mode veille.
3.5. RÉINITIALISATION
Si l'appareil cesse de fonctionner ou ne fonctionne pas correctement, une remise
sera le restaurer à un fonctionnement normal.
Opération: Utilisez une épingle pour appuyer sur le bouton de réinitialisation une
fois pour réinitialiser tous les réglages d'usine par défaut. L'appareil photo est éteint
automatiquement. Redémarrez l'appareil photo avec les paramètres par défaut.
IV. Vidéo / Image Fichiers Envois
4.1. Mise hors tension de l'appareil photo, retirez la Carte SD Mémoire et l'insérer
dans un lecteur de carte.
4.2. Insérez le lecteur de carte dans l'ordinateur.
4.3. La Carte SD Mémoire sera reconnu comme un lecteur de disque amovible.
4.4. Tous les fichiers peuvent être consultés dans le dossier "DCIM".
V. Réglage de l'heure / Date Stamp
Mise hors tension de l'appareil photo, retirez la Carte SD Mémoire et l'insérer dans
un lecteur de carte.
5.2. Insérez le lecteur de carte dans l'ordinateur.
5.3. Apparence de disue amocible.
5.4. Cliquez sur le lecteur dans le répertoire racine et à l'intérieur du répertoire
racine, créez un fichier nommé "TIMERSET.TXT".
5.5. Écrivez la date et l'heure actuelle dans le "TIMERSET.TXT" fichier avec le
format correct:
YYYYMMDDHHMMSS Y. (Par exemple: 20160412142432 Y). Enregistrez ce fichi-
er. Si vous n'avez pas besoin timbre sur vos fichiers vidéo ou image, changer "Y" en
"N" dans le fichier "TIMERSET.TXT".
5.6. Redémarrez l'appareil photo et le système de mise à niveau du programme au-
Page 11

3.4. CARTE SD MÉMOIRE FORMATAGE
3.4.1. Allumez l'appareil photo en appuyant sur le bouton d'alimentation pendant 2
secondes. Le voyant rouge reste allumé, indiquant que l'appareil est entré en mode
veille.
3.4.2. Appuyez sur le bouton de l'appareil photo pendant 2 secondes. Les voyants
lumineux rouge et bleu clignotent 5 fois et désactiver, en indiquant le formatage de
la carte SD a été achevée; le rouge restera allumé, indiquant que l'appareil est en
mode veille.
3.5. RÉINITIALISATION
Si l'appareil cesse de fonctionner ou ne fonctionne pas correctement, une remise
sera le restaurer à un fonctionnement normal.
Opération: Utilisez une épingle pour appuyer sur le bouton de réinitialisation une
fois pour réinitialiser tous les réglages d'usine par défaut. L'appareil photo est éteint
automatiquement. Redémarrez l'appareil photo avec les paramètres par défaut.
IV. Vidéo / Image Fichiers Envois
4.1. Mise hors tension de l'appareil photo, retirez la Carte SD Mémoire et l'insérer
dans un lecteur de carte.
4.2. Insérez le lecteur de carte dans l'ordinateur.
4.3. La Carte SD Mémoire sera reconnu comme un lecteur de disque amovible.
4.4. Tous les fichiers peuvent être consultés dans le dossier "DCIM".
V. Réglage de l'heure / Date Stamp
Mise hors tension de l'appareil photo, retirez la Carte SD Mémoire et l'insérer dans
un lecteur de carte.
5.2. Insérez le lecteur de carte dans l'ordinateur.
5.3. Apparence de disue amocible.
5.4. Cliquez sur le lecteur dans le répertoire racine et à l'intérieur du répertoire
racine, créez un fichier nommé "TIMERSET.TXT".
5.5. Écrivez la date et l'heure actuelle dans le "TIMERSET.TXT" fichier avec le
format correct:
YYYYMMDDHHMMSS Y. (Par exemple: 20160412142432 Y). Enregistrez ce fichier. Si vous n'avez pas besoin timbre sur vos fichiers vidéo ou image, changer "Y" en
"N" dans le fichier "TIMERSET.TXT".
5.6. Redémarrez l'appareil photo et le système de mise à niveau du programme au-
tomatiquement
VI. Se charge
6.1. Branchez l'appareil photo à une prise de courant alternatif de sortie en utilisant
le câble USB et DC 5V adaptateur de charge fourni.
6.2. Il faudra 12 heures pour obtenir une charge complète.
6.3. Tous les voyants 4 de la batterie sera lorsque la banque d'alimentation est com-
plètement rechargée.
Page 12

tomatiquement
VI. Se charge
6.1. Branchez l'appareil photo à une prise de courant alternatif de sortie en utilisant
le câble USB et DC 5V adaptateur de charge fourni.
6.2. Il faudra 12 heures pour obtenir une charge complète.
6.3. Tous les voyants 4 de la batterie sera lorsque la banque d'alimentation est complètement rechargée.
Page 13
PBC300
Guida utente
I. Panoramica del Prodotto
1. DC 5V 2.5A USB Potenza di uscita
2. Pulsante di alimentazione
3. Pulsante Camera
4. indicatori luminosi della batteria
5. Pulsante di ripristino
II. Cosa c'è nella scatola
-1× Camera Banca di potere
-1 × Cavo USB
-1 × AC110-230V a CC adattatore di alimentazione 5V
-1 × 8 GB Micro SD Card (montato nello slot per schede Micro SD già)
III. Operazione
>> Prima di utilizzare, assicurarsi che la banca di potere è completamente carica.
>> Prima di utilizzare, assicurarsi che la scheda Micro SD (4GB-64GB) è stato formattato già ed è dotato saldamente nella slot per scheda SD della fotocamera, o
non funzionerà. Si raccomanda un SDHC Classe 10 scheda Micro SD. Se nessuna
scheda micro SD è montato nella fotocamera, le spie rossa e blu lampeggiano per
10 volte e spegnere. La fotocamera si spegne automaticamente. Se la scheda Micro
SD non può essere letto, la fotocamera non risponderà alla vostra operazione.
3.1. ACCENSIONE / SPEGNIMENTO
3.1.1. Accendere la fotocamera premendo il pulsante di accensione per 2 secondi.
La spia rossa rimarrà illuminato, indicando la telecamera è entrato in modalità
standby automaticamente.
3.1.2. Spegnere la fotocamera premendo il tasto Power per 3 secondi. La spia rossa
si spegne.
[Nota]:
one più di 1 minuto.
3.2. REGISTRAZIONE VIDEO
3.2.1. Accendere la fotocamera premendo il pulsante di accensione per 2 secondi.
La spia rossa rimarrà illuminato, indicando la telecamera è entrato in modalità
standby automaticamente.
3.2.2. Premere il pulsante di accensione una volta per registrare video. La spia
rossa lampeggia 3 volte e poi si spegne.
3.2.3. Premere il pulsante di accensione, ancora una volta per interrompere la regis-
trazione del video. La spia rossa rimarrà illuminato, indicando la fotocamera è in mo-
dalità standby.
[Nota]:
1). Un file video viene generato e salvato automaticamente ogni 5 minuti.
2). La fotocamera può registrare video per 17 ore consecutive su una carica completa.
3). Risoluzione video: 1920×1080P Video Format: MOV
3.3. CAMERA / LA FOTOGRAFIA
3.3.1. Accendere la fotocamera premendo il pulsante di accensione per 2 secondi.
La spia rossa rimarrà illuminato, indicando la telecamera è entrato in modalità
standby automaticamente.
3.3.2. Premere il pulsante della fotocamera, una volta per scattare una foto. La spia
blu lampeggia una volta e si spegne.
3.4. MICRO SD CARD FORMATTING
6. Ingresso alimentazione USB
7. Camera Lens
8. Pulsante di stato della batteria
9. spia rossa
10. Indicatore luminoso blu
Page 14

non funzionerà. Si raccomanda un SDHC Classe 10 scheda Micro SD. Se nessuna
scheda micro SD è montato nella fotocamera, le spie rossa e blu lampeggiano per
10 volte e spegnere. La fotocamera si spegne automaticamente. Se la scheda Micro
SD non può essere letto, la fotocamera non risponderà alla vostra operazione.
3.1. ACCENSIONE / SPEGNIMENTO
3.1.1. Accendere la fotocamera premendo il pulsante di accensione per 2 secondi.
La spia rossa rimarrà illuminato, indicando la telecamera è entrato in modalità
standby automaticamente.
3.1.2. Spegnere la fotocamera premendo il tasto Power per 3 secondi. La spia rossa
si spegne.
[Nota]:
La fotocamera si spegne automaticamente se è in modalità standby, senza alcuna operazi-
one più di 1 minuto.
3.2. REGISTRAZIONE VIDEO
3.2.1. Accendere la fotocamera premendo il pulsante di accensione per 2 secondi.
La spia rossa rimarrà illuminato, indicando la telecamera è entrato in modalità
standby automaticamente.
3.2.2. Premere il pulsante di accensione una volta per registrare video. La spia
rossa lampeggia 3 volte e poi si spegne.
3.2.3. Premere il pulsante di accensione, ancora una volta per interrompere la registrazione del video. La spia rossa rimarrà illuminato, indicando la fotocamera è in modalità standby.
[Nota]:
1). Un file video viene generato e salvato automaticamente ogni 5 minuti.
2). La fotocamera può registrare video per 17 ore consecutive su una carica completa.
3). Risoluzione video: 1920×1080P Video Format: MOV
3.3. CAMERA / LA FOTOGRAFIA
3.3.1. Accendere la fotocamera premendo il pulsante di accensione per 2 secondi.
La spia rossa rimarrà illuminato, indicando la telecamera è entrato in modalità
standby automaticamente.
3.3.2. Premere il pulsante della fotocamera, una volta per scattare una foto. La spia
blu lampeggia una volta e si spegne.
3.4. MICRO SD CARD FORMATTING
3.4.1. Accendere la fotocamera premendo il pulsante di accensione per 2 secondi.
La spia rossa rimarrà illuminato, indicando la telecamera è entrato in modalità
standby.
3.4.2. Premere il pulsante della fotocamera per 2 secondi. L'indicatore luci rosse e
blu lampeggerà 5 volte e spegnere, indicando la formattazione della scheda SD è
stata completata; quello rosso rimarrà illuminato, indicando la fotocamera è in mo-
dalità standby.
3.5. AZZERAMENTO
Se, per qualsiasi motivo, la fotocamera smette di funzionare o non funziona corretta-
mente, un reset riportarlo al funzionamento normale.
Operazione: utilizzare uno spillo per premere il tasto Reset una volta per ripristinare
tutte le impostazioni di fabbrica. La fotocamera si spegne automaticamente. Riavvi-
are la macchina fotografica con le impostazioni predefinite.
IV. Video / Immagine carica i file
4.1. Spegnere la fotocamera, rimuovere la scheda Micro SD e inserirla in un lettore
di schede.
4.2. Inserire il lettore di schede in un computer PC.
4.3. La scheda Micro SD verrà riconosciuta come unità disco rimovibile.
4.4. Tutti i file sono accessibili nella cartella "DCIM".
V. Impostazione Ora / Data
5.1. Spegnere la fotocamera, rimuovere la scheda Micro SD e inserirla in un lettore
di schede.
5.2. Inserire il lettore di schede in un computer PC.
5.3. appare cartella sul disco rimovibile.
5.4. Fare clic sul disco nella directory principale e all'interno della directory princi-
pale, creare un file denominato "TIMERSET.TXT".
5.5. Scrivere la data e l'ora correnti nel file "TIMERSET.TXT" con il formato corretto:
AAAAMMGGHHMMSS Y. (per esempio: 20160412142432 Y). Salvare il file. Se non
avete bisogno di bollo sui tuoi file video o immagini, cambiare "Y" in "N" nel file "TIM-
ERSET.TXT".
5.6. Riavviare la telecamera e il sistema aggiornerà automaticamente il programma.
VI. Ricarica
Page 15

3.4.1. Accendere la fotocamera premendo il pulsante di accensione per 2 secondi.
La spia rossa rimarrà illuminato, indicando la telecamera è entrato in modalità
standby.
3.4.2. Premere il pulsante della fotocamera per 2 secondi. L'indicatore luci rosse e
blu lampeggerà 5 volte e spegnere, indicando la formattazione della scheda SD è
stata completata; quello rosso rimarrà illuminato, indicando la fotocamera è in modalità standby.
3.5. AZZERAMENTO
Se, per qualsiasi motivo, la fotocamera smette di funzionare o non funziona correttamente, un reset riportarlo al funzionamento normale.
Operazione: utilizzare uno spillo per premere il tasto Reset una volta per ripristinare
tutte le impostazioni di fabbrica. La fotocamera si spegne automaticamente. Riavviare la macchina fotografica con le impostazioni predefinite.
IV. Video / Immagine carica i file
4.1. Spegnere la fotocamera, rimuovere la scheda Micro SD e inserirla in un lettore
di schede.
4.2. Inserire il lettore di schede in un computer PC.
4.3. La scheda Micro SD verrà riconosciuta come unità disco rimovibile.
4.4. Tutti i file sono accessibili nella cartella "DCIM".
V. Impostazione Ora / Data
5.1. Spegnere la fotocamera, rimuovere la scheda Micro SD e inserirla in un lettore
di schede.
5.2. Inserire il lettore di schede in un computer PC.
5.3. appare cartella sul disco rimovibile.
5.4. Fare clic sul disco nella directory principale e all'interno della directory principale, creare un file denominato "TIMERSET.TXT".
5.5. Scrivere la data e l'ora correnti nel file "TIMERSET.TXT" con il formato corretto:
AAAAMMGGHHMMSS Y. (per esempio: 20160412142432 Y). Salvare il file. Se non
avete bisogno di bollo sui tuoi file video o immagini, cambiare "Y" in "N" nel file "TIMERSET.TXT".
5.6. Riavviare la telecamera e il sistema aggiornerà automaticamente il programma.
VI. Ricarica
6.1. Collegare la fotocamera ad una presa di corrente alternata presa utilizzando il
cavo USB e ricarica DC 5V adattatore in dotazione.
6.2. Ci vorranno 12 ore per ottenere una carica completa.
6.3. Tutti gli indicatori luminosi della batteria 4 sarà su quando la banca di potere è
completamente carica..
Page 16

6.1. Collegare la fotocamera ad una presa di corrente alternata presa utilizzando il
cavo USB e ricarica DC 5V adattatore in dotazione.
6.2. Ci vorranno 12 ore per ottenere una carica completa.
6.3. Tutti gli indicatori luminosi della batteria 4 sarà su quando la banca di potere è
completamente carica..
Page 17
PBC300
Guía del usuario
I. Descripción del producto
1. DC 5V 2.5A USB salida de Potencia
2. Botón de fuente de alimentación
3. Botón de cámara
4. Los indicadores luminosos de batería
5. Botón de reinicio
II. Qué hay en la caja
-1×Cámara de banco de la energía
-1 ×USB Cable
-1 × AC110-230V a DC 5V adaptador de alimentación
-1 × 8GB tarjeta micro SD (encajado en la ranura de tarjetas Micro SD ya)
III. Operación
>> Antes de usar, asegúrese de que el banco de energía está completamente recargada.
>> Antes de usar, asegúrese de que la tarjeta Micro SD (4GB-64GB) se ha for-
mateado y ya está instalado de forma segura en la ranura de la tarjeta SD de la
cámara, o no va a funcionar. Se recomienda una tarjeta SD Micro SDHC Clase 10.
Si no hay ninguna tarjeta Micro SD está montado en la cámara, el indicador rojo y
azul parpadea 10 veces y se apagará. La cámara se apagará automáticamente. Si
la tarjeta Micro SD no se puede leer, la cámara no responderá a su operación.
3.1. ENCENDIDO / APAGADO
3.1.1. Encienda la cámara por pulsar el Botón de fuente de alimentación durante 2
segundos. El indicador de luz roja permanecerá iluminado, lo que indica que la
cámara ha entrado en modo de espera automáticamente.
3.1.2. Apague la cámara por pulsar el Botón de fuente de alimentación durante 3
segundos.El indicador de luz roja se apagará.
[Nota]:
operación de más de 1 minuto.
3.2. GRABACIÓN DE VÍDEO
3.2.1. Encienda la cámara por pulsar el Botón de fuente de alimentación durante 2
segundos. El indicador de luz roja permanecerá iluminado, lo que indica que la
cámara ha entrado en modo de espera automáticamente.
3.2.2. Pulse el Botón de fuente de alimentación una vez para grabar vídeo. El indi-
cador de luz roja parpadea 3 veces y luego se apagará.
3.2.3. Pulse el Botón de fuente de alimentación una vez para detener la grabación
de vídeo. El indicador de luz roja permanece encendida, lo que indica que la cámara
está de vuelta al modo de espera.
[Nota]:
1). Un archivo de vídeo se genera y se guarda automáticamente cada 5 minutos.
2). La cámara puede grabar vídeo de forma continua durante 17 horas con una carga completa.
3). Resolución de video: 1920×1080P Formato de video: MOV
3.3. CÁMARA / FOTO FIJA
3.3.1. Encienda la cámara por pulsar el Botón de fuente de alimentación durante 2
segundos. El indicador de luz roja permanecerá iluminado, lo que indica que la
cámara ha entrado en modo de espera automáticamente.
3.3.2. Pulse el Botón de cámara una vez para tomar una foto. El indicador de luz
azul parpadea una vez y se apagá
6. USB Entrada de alimentación
7. Lente de la cámara
8. Botón de estado de la batería
9. Indicador de luz roja
10. Indicador de luz azul
Page 18

mateado y ya está instalado de forma segura en la ranura de la tarjeta SD de la
cámara, o no va a funcionar. Se recomienda una tarjeta SD Micro SDHC Clase 10.
Si no hay ninguna tarjeta Micro SD está montado en la cámara, el indicador rojo y
azul parpadea 10 veces y se apagará. La cámara se apagará automáticamente. Si
la tarjeta Micro SD no se puede leer, la cámara no responderá a su operación.
3.1. ENCENDIDO / APAGADO
3.1.1. Encienda la cámara por pulsar el Botón de fuente de alimentación durante 2
segundos. El indicador de luz roja permanecerá iluminado, lo que indica que la
cámara ha entrado en modo de espera automáticamente.
3.1.2. Apague la cámara por pulsar el Botón de fuente de alimentación durante 3
segundos.El indicador de luz roja se apagará.
[Nota]:
La cámara se apagará automáticamente si está en el modo de espera sin ningún tipo de
operación de más de 1 minuto.
3.2. GRABACIÓN DE VÍDEO
3.2.1. Encienda la cámara por pulsar el Botón de fuente de alimentación durante 2
segundos. El indicador de luz roja permanecerá iluminado, lo que indica que la
cámara ha entrado en modo de espera automáticamente.
3.2.2. Pulse el Botón de fuente de alimentación una vez para grabar vídeo. El indicador de luz roja parpadea 3 veces y luego se apagará.
3.2.3. Pulse el Botón de fuente de alimentación una vez para detener la grabación
de vídeo. El indicador de luz roja permanece encendida, lo que indica que la cámara
está de vuelta al modo de espera.
[Nota]:
1). Un archivo de vídeo se genera y se guarda automáticamente cada 5 minutos.
2). La cámara puede grabar vídeo de forma continua durante 17 horas con una carga completa.
3). Resolución de video: 1920×1080P Formato de video: MOV
3.3. CÁMARA / FOTO FIJA
3.3.1. Encienda la cámara por pulsar el Botón de fuente de alimentación durante 2
segundos. El indicador de luz roja permanecerá iluminado, lo que indica que la
cámara ha entrado en modo de espera automáticamente.
3.3.2. Pulse el Botón de cámara una vez para tomar una foto. El indicador de luz
azul parpadea una vez y se apagá
3.4. FORMATEO DE MICRO SD
3.4.1. Encienda la cámara por pulsar el Botón de fuente de alimentación durante 2
segundos. El indicador de luz roja permanecerá iluminado, lo que indica que la
cámara ha entrado en modo de espera automáticamente.
3.4.2. Pulse el Botón de cámara durante 2 segundos. El indicador se ilumina de
color rojo y azul parpadeará 5 veces y se apagará, lo que indica el formato de tarjeta
SD se ha completado; el indicador rojo permanece encendida, lo que indica que la
cámara está de vuelta al modo de espera.
3.5. RESTABLECIMIENTO
Si, por alguna razón, la cámara deja de funcionar o no funciona correctamente, un
restablecimiento restablecerá de nuevo a la operación normal.
Operación: Utilice un bolígrafo para presionar el Botón de reinicio una vez para
ajustar los ajustes por defecto de fábrica. La cámara se apagará automáticamente.
Reiniciar la cámara con la configuración predeterminada.
IV. Subidas de Archivos de Vídeo/Imagen
4.1. Apague la cámara, retire la tarjeta Micro SD e insertarla en un lector de tarjetas.
4.2. Inserte el lector de tarjetas en un ordenador PC.
4.3. La tarjeta Micro SD será reconocida como un controlador de disco extraíble.
4.4. Todos los archivos se puede acceder en la carpeta "DCIM".
V. Ajuste de la marca de la hora / fecha
5.1. Apague la cámara, retire la tarjeta Micro SD e insertarla en un lector de tarjetas.
5.2. Inserte el lector de tarjetas en un ordenador PC.
5.3. Aparece carpeta del controlador de disco extraíble.
5.4. Haga clic en el directorio raíz y dentro del directorio raíz, cree un archivo llama-
do "TIMERSET.TXT".
5.5. Escribe la fecha y la hora actual en el archivo "TIMERSET.TXT" con el formato
correcto:
AAAAMMDDHHMMSS Y. (Por ejemplo: 20160412142432 Y). Guarde este archivo.
Si usted no necesita esta marca en sus archivos de vídeo o imagen, cambiar de "Y"
en "N" en el archivo "TIMERSET.TXT".
5.6. Reiniciar la cámara y el sistema actualizará el programa automáticamente.
VI. Carga
Page 19

3.4. FORMATEO DE MICRO SD
3.4.1. Encienda la cámara por pulsar el Botón de fuente de alimentación durante 2
segundos. El indicador de luz roja permanecerá iluminado, lo que indica que la
cámara ha entrado en modo de espera automáticamente.
3.4.2. Pulse el Botón de cámara durante 2 segundos. El indicador se ilumina de
color rojo y azul parpadeará 5 veces y se apagará, lo que indica el formato de tarjeta
SD se ha completado; el indicador rojo permanece encendida, lo que indica que la
cámara está de vuelta al modo de espera.
3.5. RESTABLECIMIENTO
Si, por alguna razón, la cámara deja de funcionar o no funciona correctamente, un
restablecimiento restablecerá de nuevo a la operación normal.
Operación: Utilice un bolígrafo para presionar el Botón de reinicio una vez para
ajustar los ajustes por defecto de fábrica. La cámara se apagará automáticamente.
Reiniciar la cámara con la configuración predeterminada.
IV. Subidas de Archivos de Vídeo/Imagen
4.1. Apague la cámara, retire la tarjeta Micro SD e insertarla en un lector de tarjetas.
4.2. Inserte el lector de tarjetas en un ordenador PC.
4.3. La tarjeta Micro SD será reconocida como un controlador de disco extraíble.
4.4. Todos los archivos se puede acceder en la carpeta "DCIM".
V. Ajuste de la marca de la hora / fecha
5.1. Apague la cámara, retire la tarjeta Micro SD e insertarla en un lector de tarjetas.
5.2. Inserte el lector de tarjetas en un ordenador PC.
5.3. Aparece carpeta del controlador de disco extraíble.
5.4. Haga clic en el directorio raíz y dentro del directorio raíz, cree un archivo llamado "TIMERSET.TXT".
5.5. Escribe la fecha y la hora actual en el archivo "TIMERSET.TXT" con el formato
correcto:
AAAAMMDDHHMMSS Y. (Por ejemplo: 20160412142432 Y). Guarde este archivo.
Si usted no necesita esta marca en sus archivos de vídeo o imagen, cambiar de "Y"
en "N" en el archivo "TIMERSET.TXT".
5.6. Reiniciar la cámara y el sistema actualizará el programa automáticamente.
VI. Carga
6.1. Conectar la cámara a un enchufe de alimentación de AC de salida mediante el
cable USB y el adaptador de carga DC 5V proporcionada.
6.2. Se llevará a 12 horas para obtener una carga completa.
6.3. Todas los 4 indicadores de luz de la batería estarán encendidos cuando el
banco de energía está completamente cargada.
Page 20

6.1. Conectar la cámara a un enchufe de alimentación de AC de salida mediante el
cable USB y el adaptador de carga DC 5V proporcionada.
6.2. Se llevará a 12 horas para obtener una carga completa.
6.3. Todas los 4 indicadores de luz de la batería estarán encendidos cuando el
banco de energía está completamente cargada.
Page 21
PBC300
ユーザーガイド
I.製品の概要
1.DC5V2.5AUSB電源出力
2.電源ボタン
3.カメラボタン
4.バッテリーインジケーター
5. リセットボタン
II.ボックスの中身に
-1×モバイルバッテリ型カメラ
-1×USBケーブル
-1×DC5V電源アダプタにAC110-230V
-1×18GBのマイクロSDカード(すでにマイクロSDカードスロットに装着されますれま
す)
III.操作
>>使用する前に、パワーバンクが完全に再充電されていることを確認してください。
>>使用する前に、マイクロSDカード(最大4GB-64GB)は既にフォーマットされていて、
しっかりとカメラのSDカードスロットに装着されていることを確認してくたさい、また
はそれが動作しません。SDHCクラス10マイクロSDカードをお勧めします。何のマイク
ロSDカードがカメラに装着されていない場合は、赤と青のインジケータライトが10回
点滅し、オフになります。カメラが自動的にシャットダウンします。マイクロSDカードを
読み取ることができない場合は、カメラがあなたの操作に応答しません.
3.1.電源のオン/オフ
3.1.1.2秒間電源ボタンを押してカメラの電源をオンにします。赤のインジケータライト
着いたままになり、カメラが自動的にスタンバイモードに入ります。
3.1.2。3秒間電源ボタンを押してカメラの電源をオフにします。赤のインジケータライ
トが オフに なります。
[注意]:
ダウンしま す。
3.2.録画
3.2.1.2秒間電源ボタンを押してカメラの電源をオンにします。赤のインジケータライト
着いたままになり、カメラが自動的にスタンバイモードに入ります。
3.2.2. 記録映像に電源ボタンを1回押します。赤のインジケータランプが3回点滅し、そ
の後消灯します。
3.2.3. ビデオの録画を停止するには、もう一回電源ボタンを押します。赤のインジケー
タライト着いたままになり、カメラが自動的にスタンバイモードに入ります.
[注意]:
1).ビデオファイルが生成され、自動的に5分ごとに保存されます。
2).カメラは、フル充電で連続17時間のビデオを記録することができます。
3).ビデオ解像度:1920×1080P映像フォーマット:MOV
3.3.カメラ/静止画撮影
3.3.1.2秒間電源ボタンを押してカメラの電源をオンにします。赤のインジケータライト
着いたままになり、カメラが自動的にスタンバイモードに入ります。
3.3.2. 写真を撮るために、一回カメラのボタンを押してください。青色のインジケータ
ランプが一回点滅と消灯します。
3.4.マイクロSDカードのフォーマット
3.4.1.2秒間電源ボタンを押してカメラの電源をオンにします。赤のインジケータライト
がスタンバイモードに入ったカメラを示し、照らされたままになります。
3.4.2.2秒間カメラボタンを押します。5回点滅し、SDカードのフォーマットが完了したこ
6. USB電源入力
7. カメラレンズ
8. バッテリステータスボタン
9. レッドインジケータライト
10. ブル ーインジケータライト
Page 22
しっかりとカメラのSDカードスロットに装着されていることを確認してくたさい、また
はそれが動作しません。SDHCクラス10マイクロSDカードをお勧めします。何のマイク
ロSDカードがカメラに装着されていない場合は、赤と青のインジケータライトが10回
点滅し、オフになります。カメラが自動的にシャットダウンします。マイクロSDカードを
読み取ることができない場合は、カメラがあなたの操作に応答しません.
3.1.電源のオン/オフ
3.1.1.2秒間電源ボタンを押してカメラの電源をオンにします。赤のインジケータライト
着いたままになり、カメラが自動的にスタンバイモードに入ります。
3.1.2。3秒間電源ボタンを押してカメラの電源をオフにします。赤のインジケータライ
トが オフに なります。
[注意]:
それは1分以上何も操作せずにスタンバイモードになっている場合はカメラが自動的にシャット
ダウンしま す。
3.2.録画
3.2.1.2秒間電源ボタンを押してカメラの電源をオンにします。赤のインジケータライト
着いたままになり、カメラが自動的にスタンバイモードに入ります。
3.2.2. 記録映像に電源ボタンを1回押します。赤のインジケータランプが3回点滅し、そ
の後消灯します。
3.2.3. ビデオの録画を停止するには、もう一回電源ボタンを押します。赤のインジケー
タライト着いたままになり、カメラが自動的にスタンバイモードに入ります.
[注意]:
1).ビデオファイルが生成され、自動的に5分ごとに保存されます。
2).カメラは、フル充電で連続17時間のビデオを記録することができます。
3).ビデオ解像度:1920×1080P映像フォーマット:MOV
3.3.カメラ/静止画撮影
3.3.1.2秒間電源ボタンを押してカメラの電源をオンにします。赤のインジケータライト
着いたままになり、カメラが自動的にスタンバイモードに入ります。
3.3.2. 写真を撮るために、一回カメラのボタンを押してください。青色のインジケータ
ランプが一回点滅と消灯します。
3.4.マイクロSDカードのフォーマット
3.4.1.2秒間電源ボタンを押してカメラの電源をオンにします。赤のインジケータライト
がスタンバイモードに入ったカメラを示し、照らされたままになります。
3.4.2.2秒間カメラボタンを押します。5回点滅し、SDカードのフォーマットが完了したこ
とを示す、オフになります赤と青のインジケーターが点灯。赤のインジケータライト着
いたままになり、カメラが自動的にスタンバイモードに入ります。
3.5.リセット
何らかの理由で、カメラが動作しなくなったり正常に動作していない場合、リセットは
通常の動作に戻ってそれを復元します。
操 作:工場出荷時にすべての設定をリセットするには、一回リセットボタンを押して、ピ
ンを使用します。カメラが自動的にシャットダウンします。デフォルトの設定でカメラを
再起動します。
IV.ビデオ/画像ファイルのアップロード
4.1. カメラの電源をオフにし、マイクロSDカードを取り外し、カードリーダーに挿入し
てくたさい。
4.2.パソコンにカードリーダーを挿入してくたさい。
4.3.マイクロSDカードは、取り外し可能なディスクドライブとして認識されます。
4.4.すべてのファイルは、「DCIM」フォルダにアクセスすることができます。
V.設定時刻/日付スタンプ
5.1. カメラの電源をオフにし、マイクロSDカードを取り外し、カードリーダーに挿入し
てくたさい。
5.2.パソコンにカードリーダーを挿入してくたさい。
5.3.リムーバブルディスクドライブのフォルダが表示されます。
5.4. ルートディレクトリのドライブをクリックして、ルートディレクトリの中に、「TIM-
ERSET.TXT"という名前のファイルを作成します。
5.5.正しい形式で「TIMERSET.TXT」ファイル内の現在の日付と時刻を書きます:
(例:20160412142432Y)YYYYMMDDHHMMSS Y.。このファイルを保存してくたさい。
あなたがビデオや画像ファイルのタイムスタンプを必要としない場合は、「TIM-
ERSET.TXT」ファイルに「N」に「Y」に変更します。
5.6.カメラを再起動し、システムが自動的にプログラムをアップグレードします。
VI.充電
6.1. USBケーブルを使用し、DC 5Vのアダプタが提供充電することによって、コンセント
のAC電源ソケットにカメラを接続します。
6.2.これは、フル充電を取得するために12時間かかります。
6.3. すべての4バッテリーインジケータライトは、電源バンクがフル充電されたときに
オンになります。
Page 23

とを示す、オフになります赤と青のインジケーターが点灯。赤のインジケータライト着
いたままになり、カメラが自動的にスタンバイモードに入ります。
3.5.リセット
何らかの理由で、カメラが動作しなくなったり正常に動作していない場合、リセットは
通常の動作に戻ってそれを復元します。
操 作:
工場出荷時にすべての設定をリセットするには、一回リセットボタンを押して、ピ
ンを使用します。カメラが自動的にシャットダウンします。デフォルトの設定でカメラを
再起動します。
IV.ビデオ/画像ファイルのアップロード
4.1. カメラの電源をオフにし、マイクロSDカードを取り外し、カードリーダーに挿入し
てくたさい。
4.2.パソコンにカードリーダーを挿入してくたさい。
4.3.マイクロSDカードは、取り外し可能なディスクドライブとして認識されます。
4.4.すべてのファイルは、「DCIM」フォルダにアクセスすることができます。
V.設定時刻/日付スタンプ
5.1. カメラの電源をオフにし、マイクロSDカードを取り外し、カードリーダーに挿入し
てくたさい。
5.2.パソコンにカードリーダーを挿入してくたさい。
5.3.リムーバブルディスクドライブのフォルダが表示されます。
5.4. ルートディレクトリのドライブをクリックして、ルートディレクトリの中に、「TIMERSET.TXT"という名前のファイルを作成します。
5.5.正しい形式で「TIMERSET.TXT」ファイル内の現在の日付と時刻を書きます:
(例:20160412142432Y)YYYYMMDDHHMMSS Y.。このファイルを保存してくたさい。
あなたがビデオや画像ファイルのタイムスタンプを必要としない場合は、「TIM
-
ERSET.TXT」ファイルに「N」に「Y」に変更します。
5.6.カメラを再起動し、システムが自動的にプログラムをアップグレードします。
VI.充電
6.1. USBケーブルを使用し、DC 5Vのアダプタが提供充電することによって、コンセント
のAC電源ソケットにカメラを接続します。
6.2.これは、フル充電を取得するために12時間かかります。
6.3. すべての4バッテリーインジケータライトは、電源バンクがフル充電されたときに
オンになります。
 Loading...