

Page 1
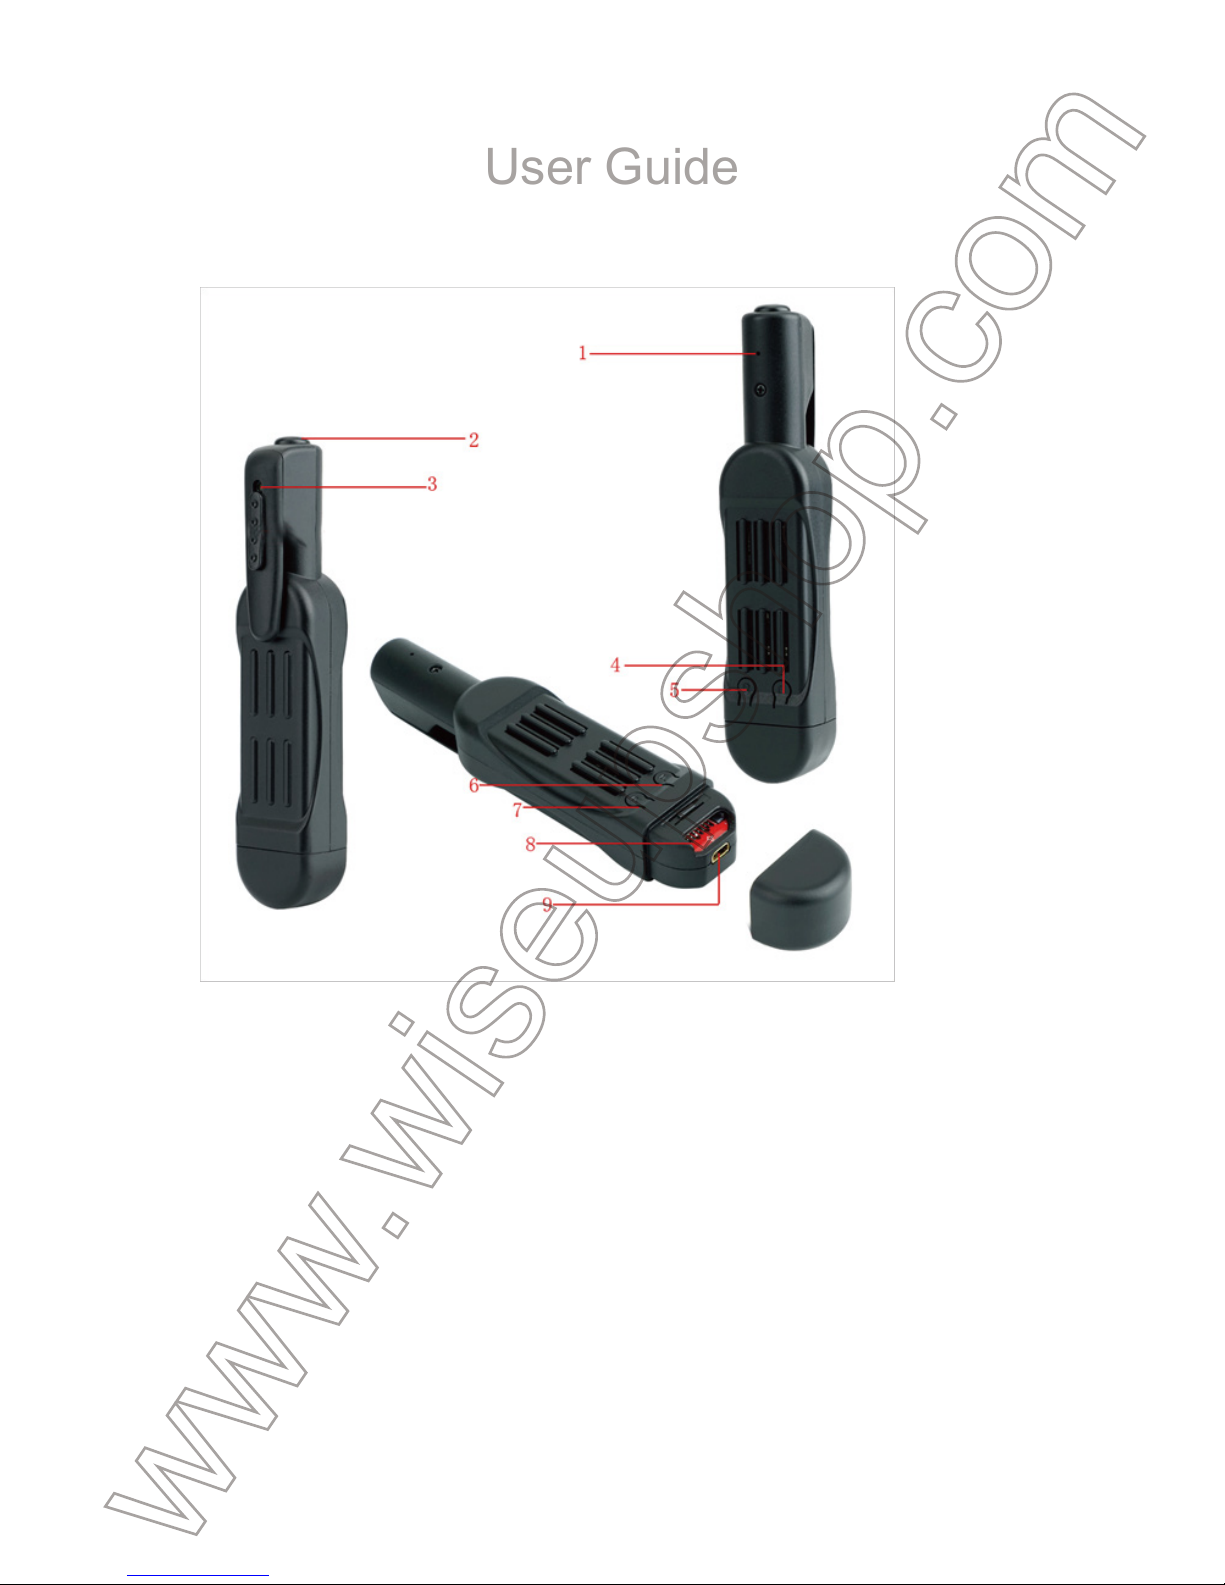
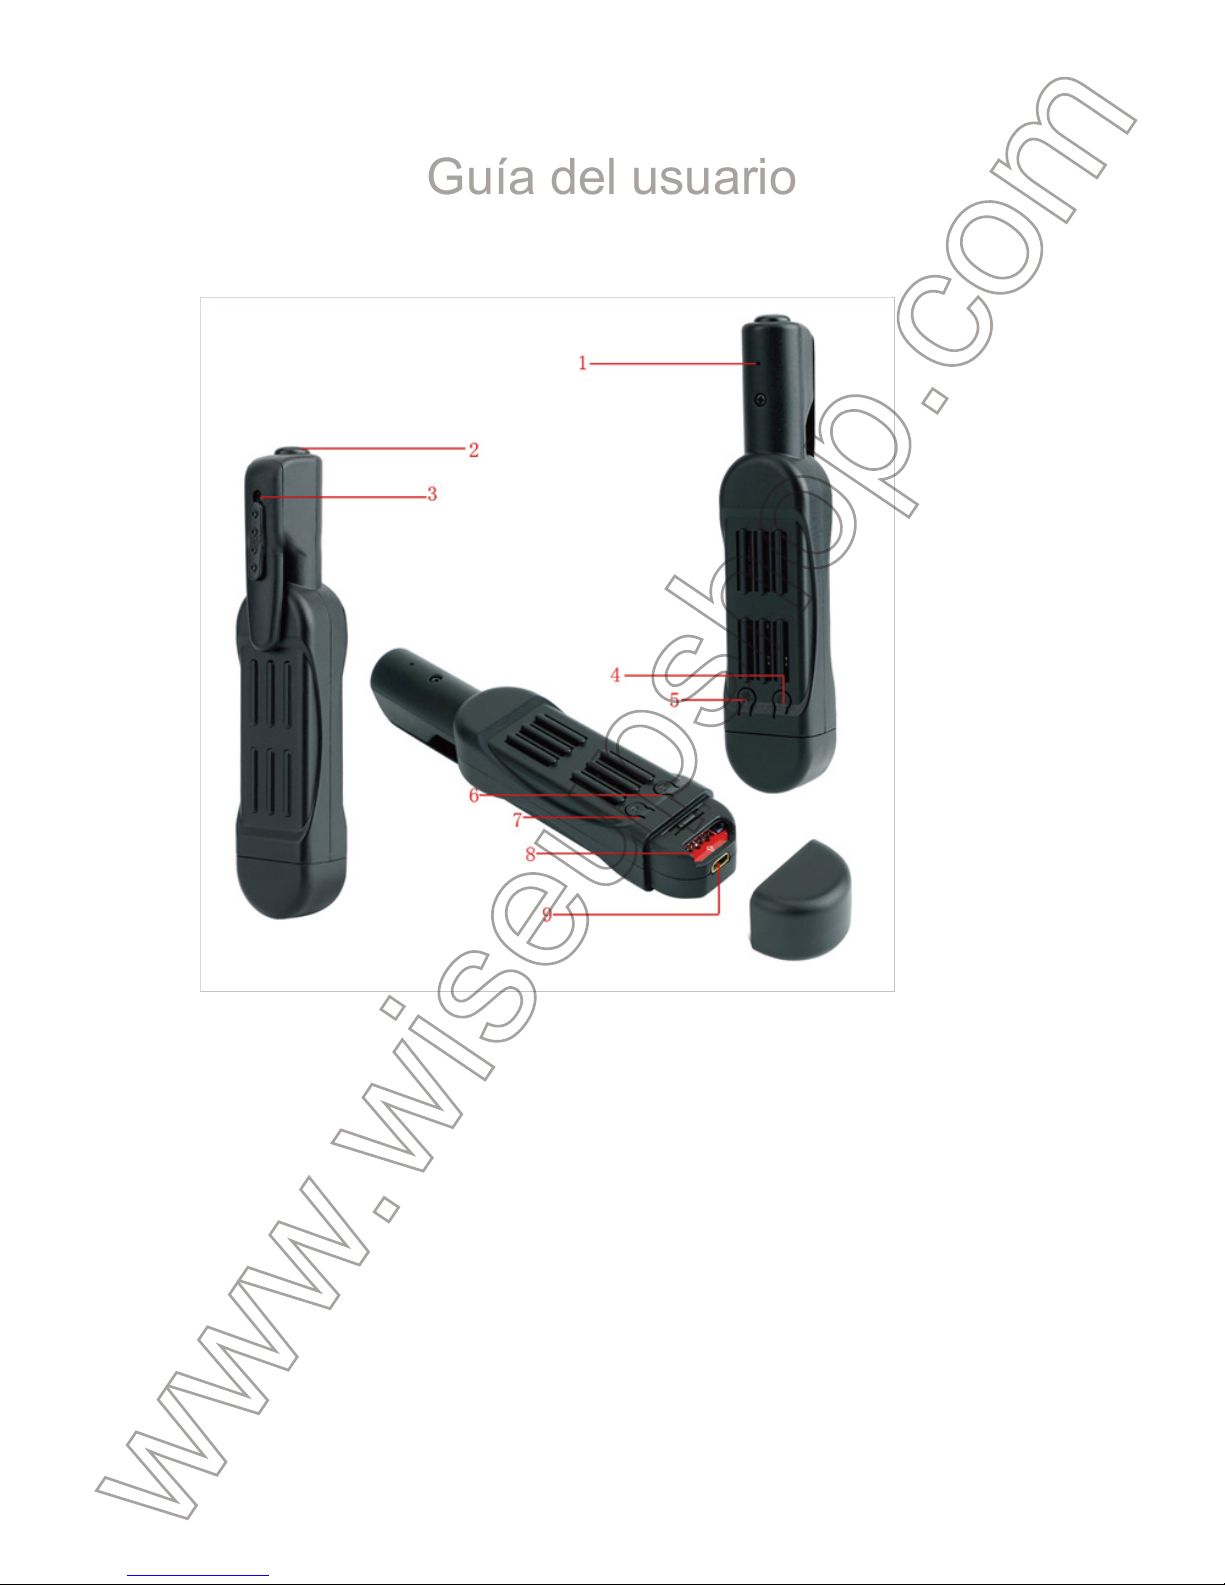
6. Yellow Indicator Light
7. Blue Indicator Light
8. Micro SD Card Slot
9. Mini USB Port
securely fitted into the camera’s SD card slot, or the camera will not work. A SDHC
Class 10 Micro SD card is recommended.
[Note]:
yellow indicator lights will flash four times and then turn off. The camera will shut down automatically.
3.1. POWER ON/OFF
3.1.1. Power on the camera by pressing Power Button for two seconds. The blue
and yellow indicator lights will be illuminated for five seconds. Then the yellow one
will turn off, while the blue one will stay illuminated, indicating the camera has
entered into standby mode automatically.
3.1.2. Power off the camera by pressing Power Button for seven seconds when the
camera is recording or is in standby mode.
[Note]:
than one minute.
3.2. 720P VIDEO RECORDING
3.2.1. Power on the camera by pressing Power Button for two seconds. The blue
and yellow indicator lights will be illuminated for five seconds. Then the yellow one
will turn off, while the blue one will stay illuminated, indicating the camera has
entered into standby mode automatically.
3.1.2. Press Power Button once to record video with 1280×720P video resolution.
The blue indicator light will flash three times and then turn off.
3.1.3. Press Power Button once again to stop recording video. The blue indicator
light will stay illuminated, indicating the camera is back to standby mode.
[Notes]:
1). A video file will be generated and saved every 5 minutes automatically.
2). The camera can record video continuously for 5.5 hours on a full charge.
3). Video Resolution: 1920×1080P Video Format: AVI
3.3. 1080P VIDEO RECORDING
3.3.1. Power on the camera by pressing Power Button for two seconds. The blue
and yellow indicator lights will be illuminated for five seconds. Then the yellow one
will turn off, while the blue one will stay illuminated, indicating the camera has
entered into standby mode automatically.
3.3.2. Hold down Power Button for three seconds to record video with 1920×1080P
video resolution. The yellow indicator light will flash three times and turn off.
P9000
User Guide
I. Product Overview
1. Microphone
2. Power Button
3. Camera Lens
4. Camera Button
5. Reset Button
II. What’s In the Box
-1× Meeting Recorder Camera
-1× USB/AV Cable
III. Operation
>> Before using, make sure that the camera is fully recharged.
>> Please make sure the Micro SD card (4GB-32GB, format it for the first usage) is
Page 2

securely fitted into the camera’s SD card slot, or the camera will not work. A SDHC
Class 10 Micro SD card is recommended.
[Note]:
If no Micro SD card is fitted into the camera or the SD card cannot be read, the blue and
yellow indicator lights will flash four times and then turn off. The camera will shut down automatically.
3.1. POWER ON/OFF
3.1.1. Power on the camera by pressing Power Button for two seconds. The blue
and yellow indicator lights will be illuminated for five seconds. Then the yellow one
will turn off, while the blue one will stay illuminated, indicating the camera has
entered into standby mode automatically.
3.1.2. Power off the camera by pressing Power Button for seven seconds when the
camera is recording or is in standby mode.
[Note]:
The camera will shut down automatically if it is in standby mode without any operation more
than one minute.
3.2. 720P VIDEO RECORDING
3.2.1. Power on the camera by pressing Power Button for two seconds. The blue
and yellow indicator lights will be illuminated for five seconds. Then the yellow one
will turn off, while the blue one will stay illuminated, indicating the camera has
entered into standby mode automatically.
3.1.2. Press Power Button once to record video with 1280×720P video resolution.
The blue indicator light will flash three times and then turn off.
3.1.3. Press Power Button once again to stop recording video. The blue indicator
light will stay illuminated, indicating the camera is back to standby mode.
[Notes]:
1). A video file will be generated and saved every 5 minutes automatically.
2). The camera can record video continuously for 5.5 hours on a full charge.
3). Video Resolution: 1920×1080P Video Format: AVI
3.3. 1080P VIDEO RECORDING
3.3.1. Power on the camera by pressing Power Button for two seconds. The blue
and yellow indicator lights will be illuminated for five seconds. Then the yellow one
will turn off, while the blue one will stay illuminated, indicating the camera has
entered into standby mode automatically.
3.3.2. Hold down Power Button for three seconds to record video with 1920×1080P
video resolution. The yellow indicator light will flash three times and turn off.
3.3.3. Press Power Button once to stop recording video. The blue indicator light will
stay illuminated, indicating the camera is back to standby mode.
3.4. CAMERA/STILL PHOTOGRAPHY
3.4.1. Power on the camera by pressing Power Button for two seconds. The blue
and yellow indicator lights will be illuminated for five seconds. Then the yellow one
will turn off, while the blue one will stay illuminated, indicating the camera has
entered into standby mode automatically.
3.4.2. Press Camera Button once to take a photo. The yellow indicator light will flash
once and then turn off. The blue indicator light will stay illuminated, indicating the
camera is back to standby mode.
3.5. MICRO SD CARD FORMATTING
3.5.1. Power on the camera by pressing Power Button for two seconds. The blue
and yellow indicator lights will be illuminated for five seconds. Then the yellow one
will turn off, while the blue one will stay illuminated, indicating the camera has
entered into standby mode automatically.
3.5.2. Hold down Camera Button for three seconds. The blue and yellow indicator
lights will flash four times first, then they will be illuminated for five seconds and the
yellow indicator light will turn off, indicating the SD card formatting has been
completed.
3.5.3. The blue indicator light will stay illuminated, indicating the camera is back to
standby mode.
IV. Video/Image File Uploads
4.1. When the camera is powered off, remove the Micro SD card and insert it into a
card reader.
4.2. Insert the card reader into a PC computer.
4.3. The Micro SD card will be recognized as a removable disk drive.
4.4. All the files can be accessed in the “DCIM” folder.
V. Setting Time/Date Stamp
5.1. Connect the camera to a PC computer when it is powered off,
5.2. Removable disk drive folder appears.
5.3. Click on the drive in the root directory and inside the root directory, create a file
named “TIMERSET.TXT”.
Page 3

3.3.3. Press Power Button once to stop recording video. The blue indicator light will
stay illuminated, indicating the camera is back to standby mode.
3.4. CAMERA/STILL PHOTOGRAPHY
3.4.1. Power on the camera by pressing Power Button for two seconds. The blue
and yellow indicator lights will be illuminated for five seconds. Then the yellow one
will turn off, while the blue one will stay illuminated, indicating the camera has
entered into standby mode automatically.
3.4.2. Press Camera Button once to take a photo. The yellow indicator light will flash
once and then turn off. The blue indicator light will stay illuminated, indicating the
camera is back to standby mode.
3.5. MICRO SD CARD FORMATTING
3.5.1. Power on the camera by pressing Power Button for two seconds. The blue
and yellow indicator lights will be illuminated for five seconds. Then the yellow one
will turn off, while the blue one will stay illuminated, indicating the camera has
entered into standby mode automatically.
3.5.2. Hold down Camera Button for three seconds. The blue and yellow indicator
lights will flash four times first, then they will be illuminated for five seconds and the
yellow indicator light will turn off, indicating the SD card formatting has been
completed.
3.5.3. The blue indicator light will stay illuminated, indicating the camera is back to
standby mode.
IV. Video/Image File Uploads
4.1. When the camera is powered off, remove the Micro SD card and insert it into a
card reader.
4.2. Insert the card reader into a PC computer.
4.3. The Micro SD card will be recognized as a removable disk drive.
4.4. All the files can be accessed in the “DCIM” folder.
V. Setting Time/Date Stamp
5.1. Connect the camera to a PC computer when it is powered off,
5.2. Removable disk drive folder appears.
5.3. Click on the drive in the root directory and inside the root directory, create a file
named “TIMERSET.TXT”.
5.4. Write the current date and time in the “TIMERSET.TXT” file with the correct
format:
YearMonthDayHourMinuteSecond Y. (For example: 20160412142432 Y). Save this
file. If you don’t need the stamp on the video files, change “Y” into “N” in the file.
5.5. Restart the camera and the system will upgrade the program automatically.
VI. Charging Only
6.1. Remove the Micro SD card from the camera.
6.2. Connect the camera to a PC computer by using the USB cable provided.
6.3. It will take 3 hours to obtain a full charge.
6.4. The blue indicator light will stay illuminated during the charging process.
6.5. When the camera is fully charged, the blue and yellow indicator lights will stay
illuminated.
VII. Charging and Recording Simultaneously
7.1. Insert a Micro SD card into the camera.
7.2. Connect the camera to a PC computer by using the USB cable provided.
7.3. The blue indicator light will flash three times and then turn off, indicating the
camera is recording video with 1280x720P video resolution.
7.4. Press Power Button once to stop recording video. The blue indicator light will
stay illuminated, indicating the camera is back to standby mode.
[Note]:
VIII. Resetting
If for any reason the camera stops responding or isn’t working properly, a quick reset
will restore it back to normal operation.
Operation: Press the Reset Button once to reset the camera. The blue and yellow
indicator lights will turn off and the camera will shut down automatically.
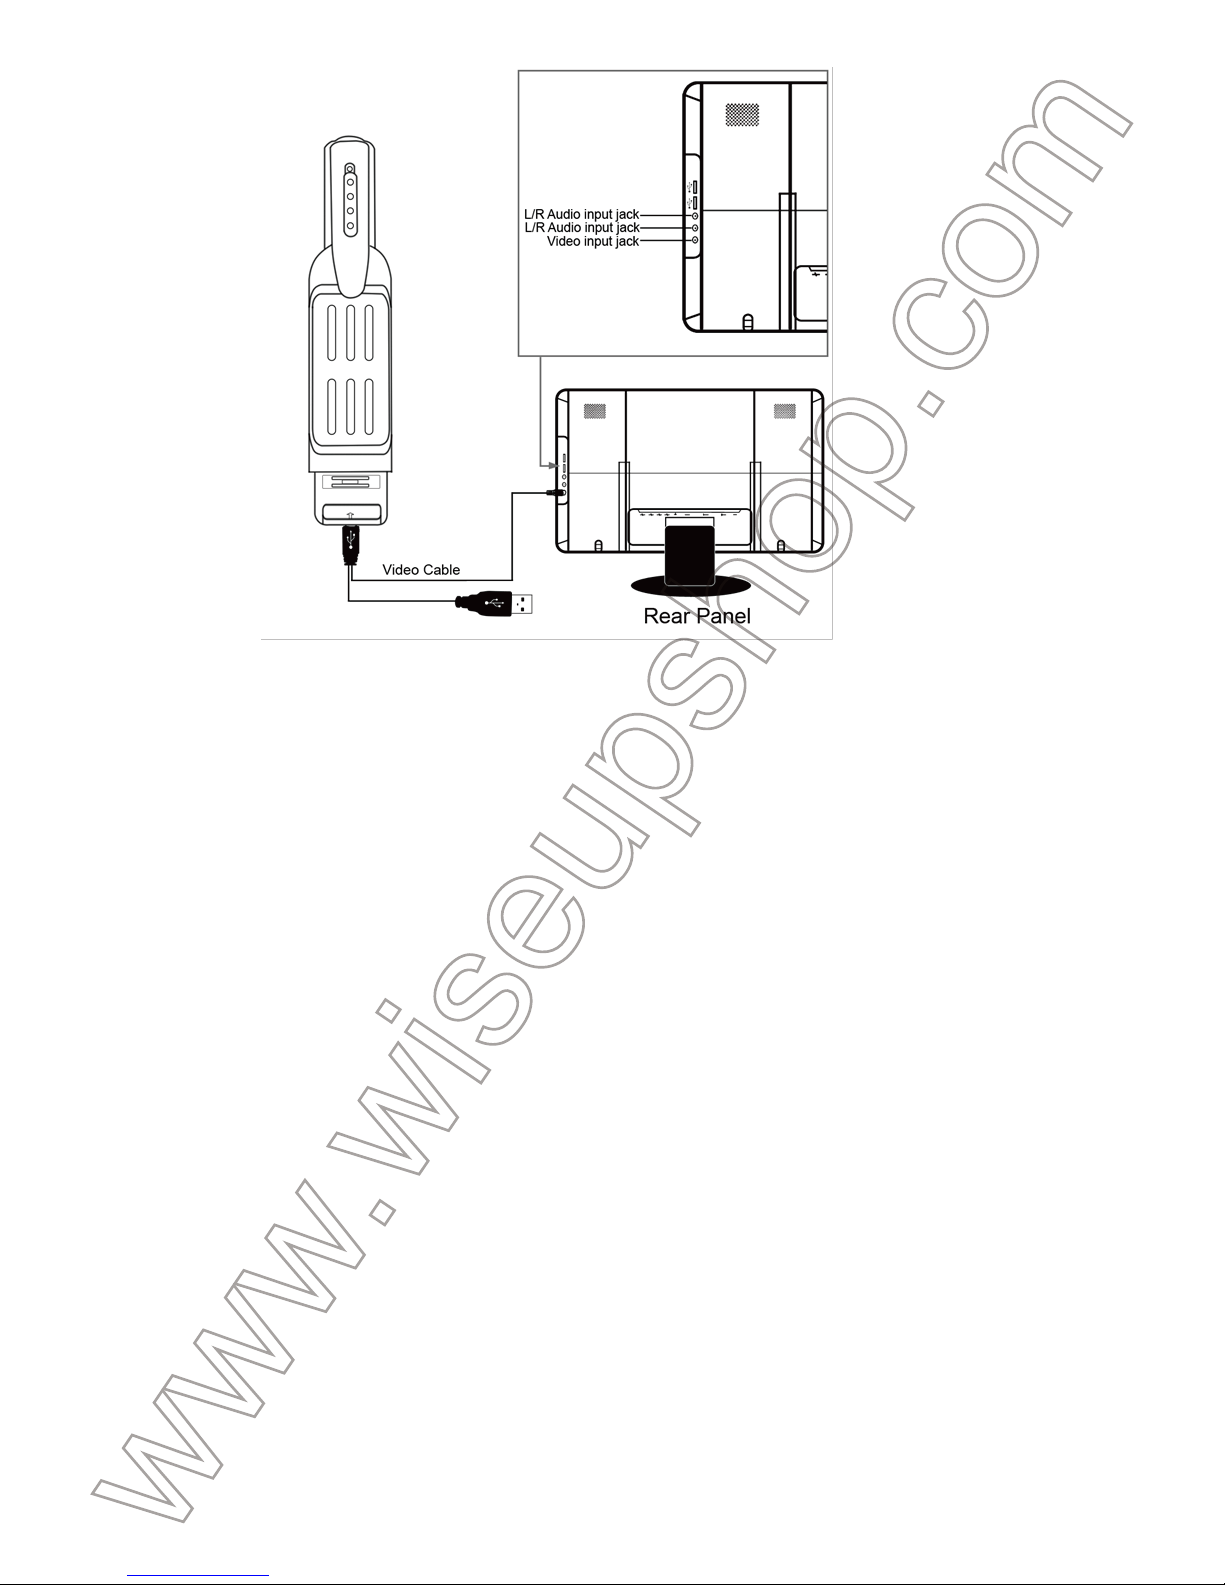
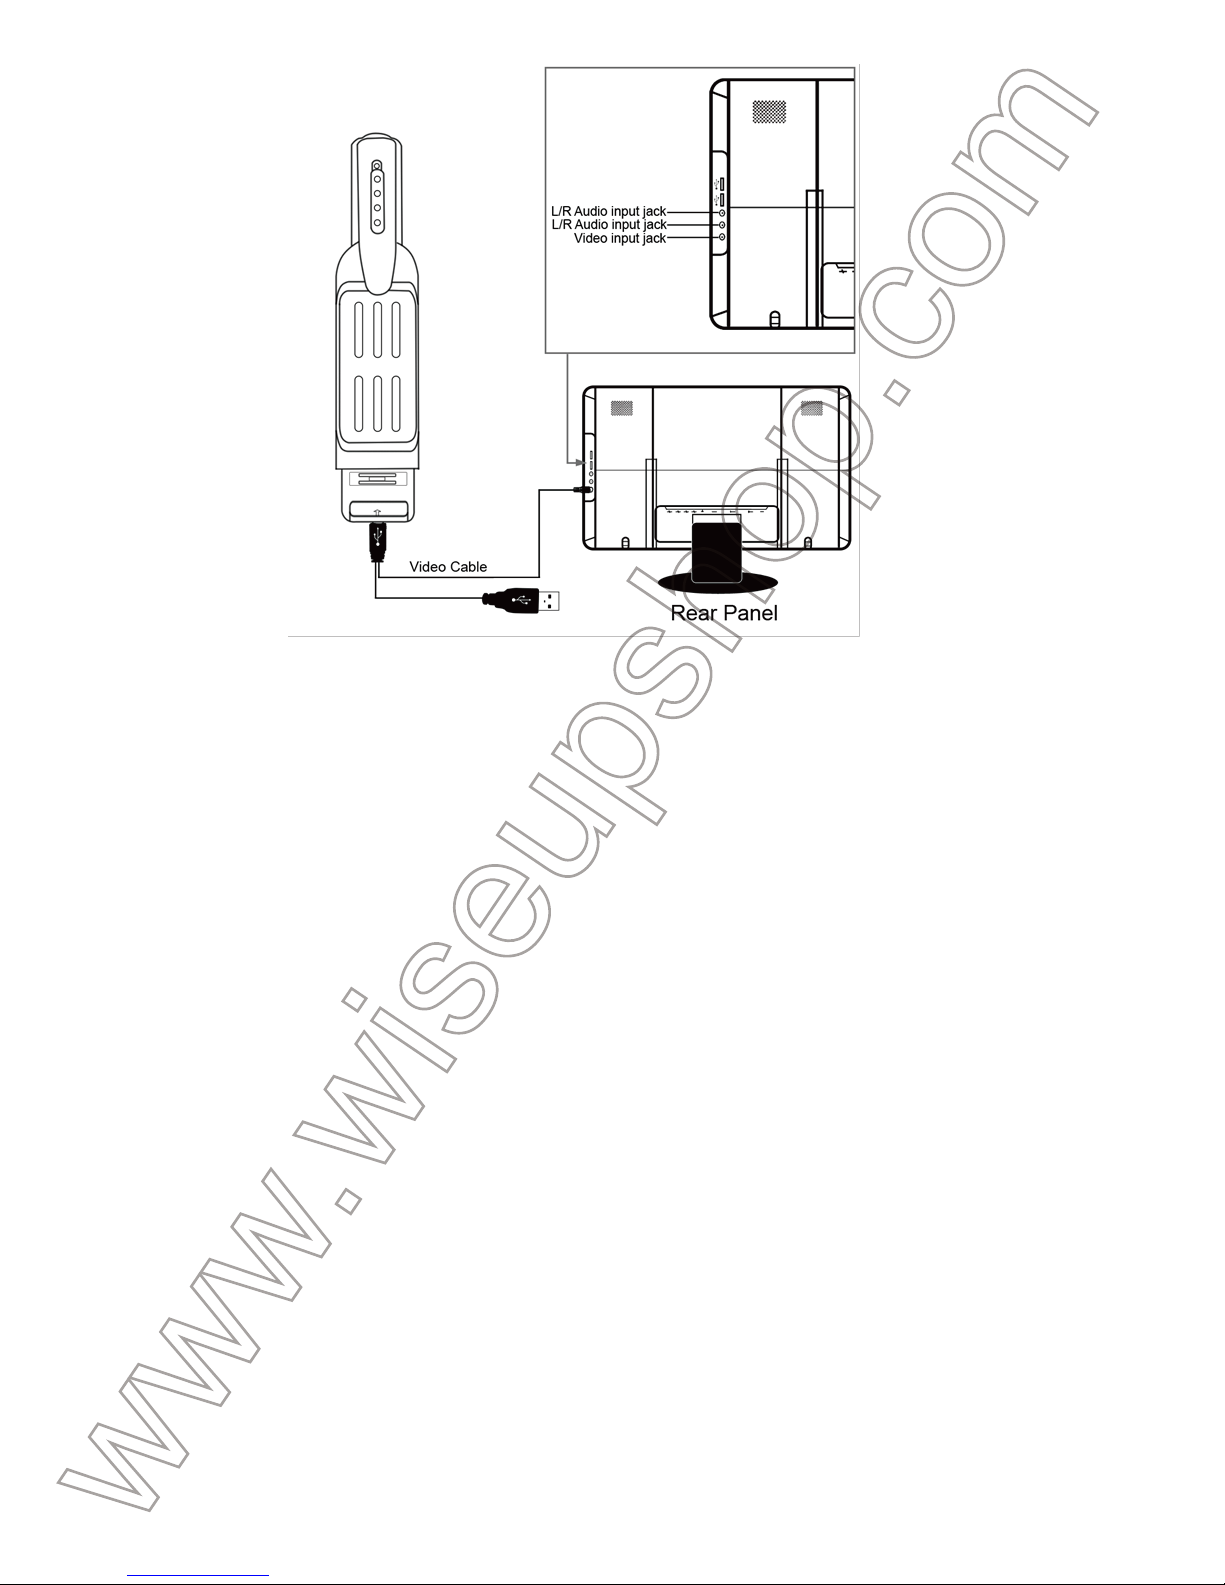
IX. Live Video Output
9.1. Connect the camera to a TV or monitor by using the AV cable provided as
below:
Page 4

5.4. Write the current date and time in the “TIMERSET.TXT” file with the correct
format:
YearMonthDayHourMinuteSecond Y. (For example: 20160412142432 Y). Save this
file. If you don’t need the stamp on the video files, change “Y” into “N” in the file.
5.5. Restart the camera and the system will upgrade the program automatically.
VI. Charging Only
6.1. Remove the Micro SD card from the camera.
6.2. Connect the camera to a PC computer by using the USB cable provided.
6.3. It will take 3 hours to obtain a full charge.
6.4. The blue indicator light will stay illuminated during the charging process.
6.5. When the camera is fully charged, the blue and yellow indicator lights will stay
illuminated.
VII. Charging and Recording Simultaneously
7.1. Insert a Micro SD card into the camera.
7.2. Connect the camera to a PC computer by using the USB cable provided.
7.3. The blue indicator light will flash three times and then turn off, indicating the
camera is recording video with 1280x720P video resolution.
7.4. Press Power Button once to stop recording video. The blue indicator light will
stay illuminated, indicating the camera is back to standby mode.
[Note]:
You could experience other functions of the camera in the charging process.
VIII. Resetting
If for any reason the camera stops responding or isn’t working properly, a quick reset
will restore it back to normal operation.
Operation: Press the Reset Button once to reset the camera. The blue and yellow
indicator lights will turn off and the camera will shut down automatically.
IX. Live Video Output
9.1. Connect the camera to a TV or monitor by using the AV cable provided as
below:
9.2. Select the camera video signal source on the TV or monitor.
9.3. Power on the camera and start recording video (See 3.2 or 3.3), then you can
watch the camera’s live video on the TV or monitor during the video recording
process.
9.4. You could experience other functions of this camera in the live view mode.
Page 5
9.2. Select the camera video signal source on the TV or monitor.
9.3. Power on the camera and start recording video (See 3.2 or 3.3), then you can
watch the camera’s live video on the TV or monitor during the video recording
process.
9.4. You could experience other functions of this camera in the live view mode.
Page 6
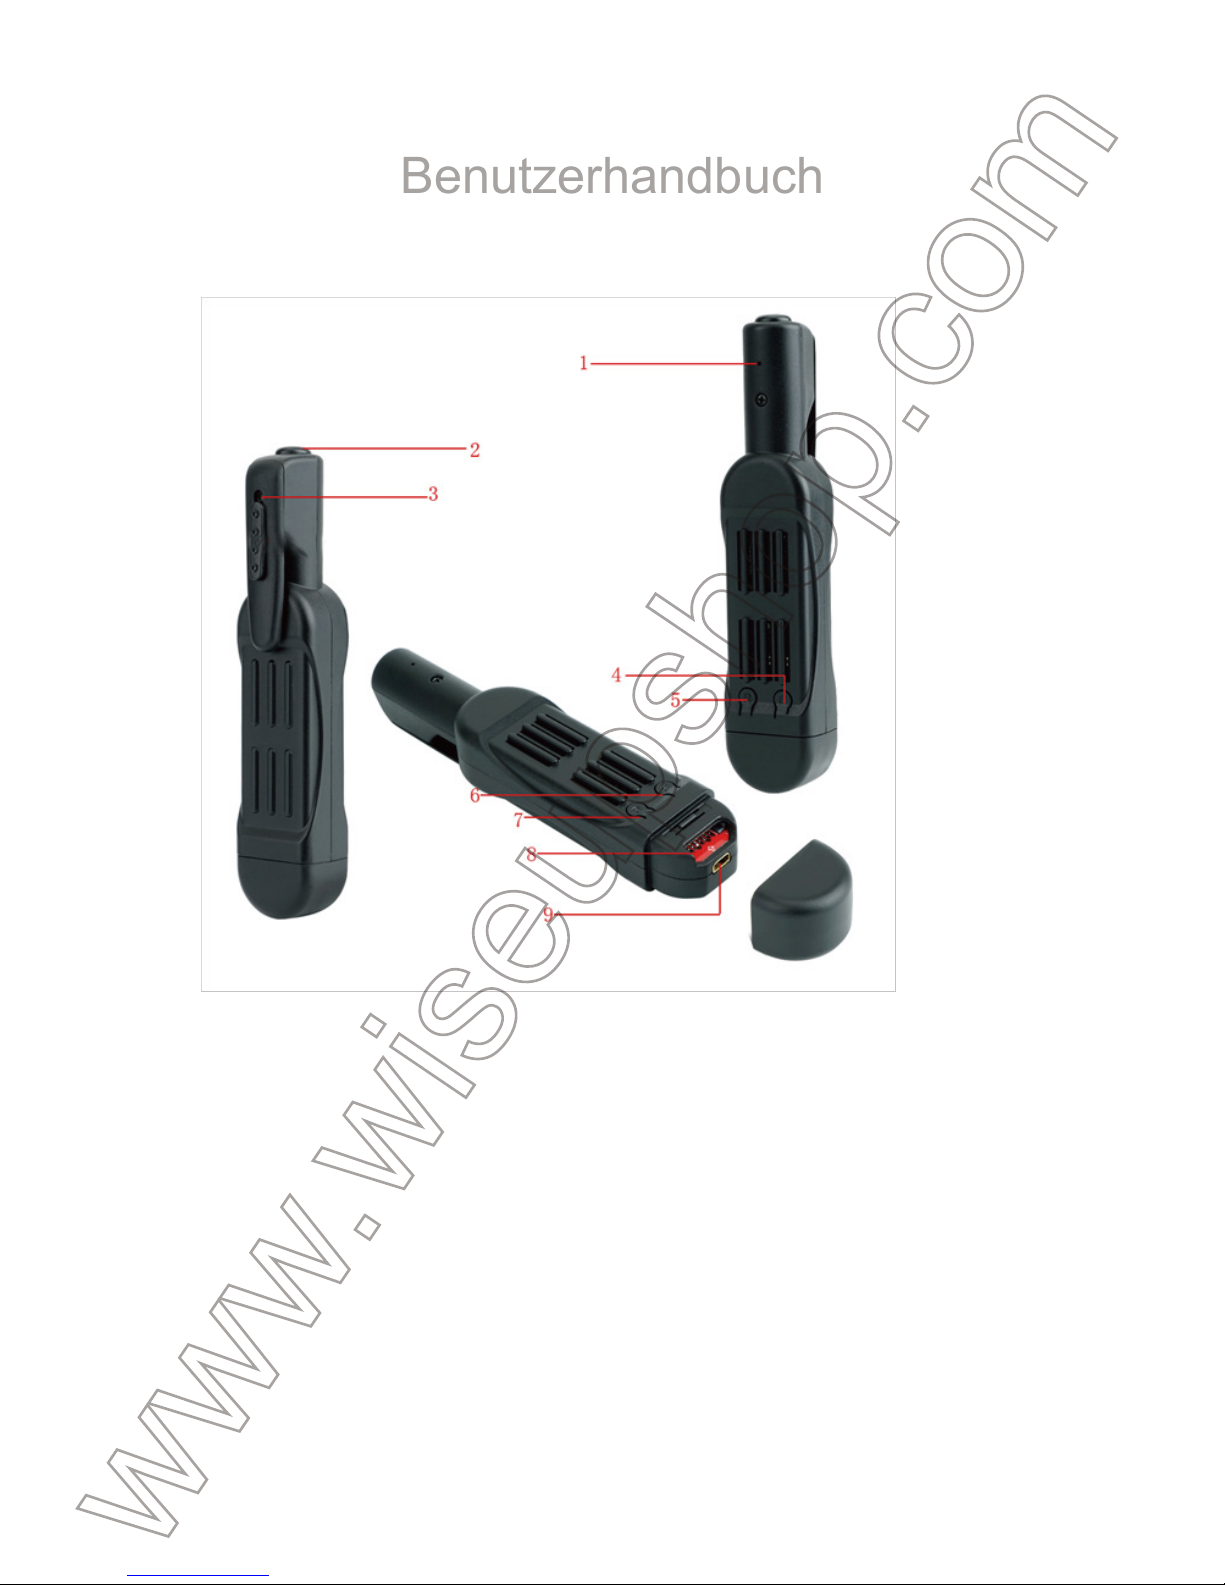
6. Yellow Indicator Light
7. blaue Anzeigelampe
8. Micro SD-Karten-Slot
9. Mini-USB-Anschluss
>> Bitte stellen Sie sicher, dass die Micro SD-Karte (4GB-32GB, formatieren Sie es
für die erste Nutzung) sicher in den SD-Kartensteckplatz der Kamera angebracht
sind, oder die Kamera wird nicht funktionieren. Eine SDHC Class 10 Micro-SD-Karte
wird empfohlen.
[Hinweis]:
gelesen werden, die blaue und die gelbe Anzeige leuchtet, wird viermal aufleuchten und dann wieder
ab. Die Kamera schaltet sich automatisch aus.
3.1. EINSCHALTEN / AUSSCHALTEN
3.1.1. Schalten Sie die Kamera durch Power-Knopf für zwei Sekunden lang
drücken. Die blaue und gelbe Anzeige leuchtet, wird fünf Sekunden lang beleuchtet
werden. Dann wird das gelbe ausschalten, während die blaue beleuchtet wird
bleiben, was auf die Kamera hat sich automatisch in den Standby-Modus.
3.1.2. Schalten Sie die Kamera durch Power-Taste sieben Sekunden lang gedrückt,
wenn die Kamera aufzeichnet oder im Standby-Modus.
[Hinweis]:
irgendeinen Betrieb mehr als eine Minute ist.
3.2. 720P-VIDEOAUFNAHME
3.2.1. Schalten Sie die Kamera durch Power-Knopf für zwei Sekunden lang
drücken. Die blaue und gelbe Anzeige leuchtet, wird fünf Sekunden lang beleuchtet
werden. Dann wird das gelbe ausschalten, während die blaue beleuchtet wird
bleiben, was auf die Kamera hat sich automatisch in den Standby-Modus.
3.1.2. Drücken Sie die Power-Taste einmal, um Video mit 1280 × 720p
Video-Auflösung aufzeichnen. Die blaue Anzeigelampe blinkt dreimal und dann
auszuschalten.
3.1.3. Drücken Sie die Power-Taste erneut zu stoppen Videoaufzeichnung. Die
blaue Anzeigelampe bleibt beleuchtet, was die Kamera in den Standby-Modus ist
zurück.
[Notizen]:
1). Eine Videodatei wird erzeugt und automatisch gespeichert, alle 5 Minuten werden.
2). Die Kamera kann Video kontinuierlich für 5,5 Stunden bei voller Ladung aufzunehmen.
3). Video Auflösung: 1920×1080P Videoformat: AVI
3.3. 1080P VIDEOAUFNAHME
3.3.1. Schalten Sie die Kamera durch Power-Knopf für zwei Sekunden lang
P9000
Benutzerhandbuch
I. Produktübersicht
1. Mikrofon
2. Power-Taste
3. Kamera-Objektiv
4. Kamera-Taste
5. Reset-Taste
II. Was ist in der Box
-1×Meeting-Recorder-Kamera
-1× USB/AV Kabel
III. Betrieb
>> Vor der Verwendung, stellen Sie sicher, dass die Kamera vollständig aufgeladen
ist.
Page 7
>> Bitte stellen Sie sicher, dass die Micro SD-Karte (4GB-32GB, formatieren Sie es
für die erste Nutzung) sicher in den SD-Kartensteckplatz der Kamera angebracht
sind, oder die Kamera wird nicht funktionieren. Eine SDHC Class 10 Micro-SD-Karte
wird empfohlen.
[Hinweis]:
Wenn keine Micro-SD-Karte in die Kamera oder die SD-Karte ausgestattet ist, kann nicht
gelesen werden, die blaue und die gelbe Anzeige leuchtet, wird viermal aufleuchten und dann wieder
ab. Die Kamera schaltet sich automatisch aus.
3.1. EINSCHALTEN / AUSSCHALTEN
3.1.1. Schalten Sie die Kamera durch Power-Knopf für zwei Sekunden lang
drücken. Die blaue und gelbe Anzeige leuchtet, wird fünf Sekunden lang beleuchtet
werden. Dann wird das gelbe ausschalten, während die blaue beleuchtet wird
bleiben, was auf die Kamera hat sich automatisch in den Standby-Modus.
3.1.2. Schalten Sie die Kamera durch Power-Taste sieben Sekunden lang gedrückt,
wenn die Kamera aufzeichnet oder im Standby-Modus.
[Hinweis]:
Die Kamera wird automatisch abgeschaltet, wenn er sich im Standby-Modus ohne
irgendeinen Betrieb mehr als eine Minute ist.
3.2. 720P-VIDEOAUFNAHME
3.2.1. Schalten Sie die Kamera durch Power-Knopf für zwei Sekunden lang
drücken. Die blaue und gelbe Anzeige leuchtet, wird fünf Sekunden lang beleuchtet
werden. Dann wird das gelbe ausschalten, während die blaue beleuchtet wird
bleiben, was auf die Kamera hat sich automatisch in den Standby-Modus.
3.1.2. Drücken Sie die Power-Taste einmal, um Video mit 1280 × 720p
Video-Auflösung aufzeichnen. Die blaue Anzeigelampe blinkt dreimal und dann
auszuschalten.
3.1.3. Drücken Sie die Power-Taste erneut zu stoppen Videoaufzeichnung. Die
blaue Anzeigelampe bleibt beleuchtet, was die Kamera in den Standby-Modus ist
zurück.
[Notizen]:
1). Eine Videodatei wird erzeugt und automatisch gespeichert, alle 5 Minuten werden.
2). Die Kamera kann Video kontinuierlich für 5,5 Stunden bei voller Ladung aufzunehmen.
3). Video Auflösung: 1920×1080P Videoformat: AVI
3.3. 1080P VIDEOAUFNAHME
3.3.1. Schalten Sie die Kamera durch Power-Knopf für zwei Sekunden lang
drücken. Die blaue und gelbe Anzeige leuchtet, wird fünf Sekunden lang beleuchtet
werden. Dann wird das gelbe ausschalten, während die blaue beleuchtet wird
bleiben, was auf die Kamera hat sich automatisch in den Standby-Modus.
3.3.2. Halten Sie die Power-Taste für drei Sekunden Video mit 1920 × 1080p
Videoauflösung aufzeichnen. Die gelbe Kontrollleuchte blinkt dreimal und
auszuschalten.
3.3.3. Drücken Sie die Power-Taste einmal zu stoppen Videoaufzeichnung . Die
blaue Anzeigelampe bleibt beleuchtet, was die Kamera in den Standby-Modus ist
wieder da.
3.4. CAMERA / FOTOGRAFIE
3.4.1. Schalten Sie die Kamera durch Power-Knopf für zwei Sekunden lang
drücken. Die blaue und gelbe Anzeige leuchtet, wird fünf Sekunden lang beleuchtet
werden. Dann wird das gelbe ausschalten, während die blaue beleuchtet wird
bleiben, was auf die Kamera hat sich automatisch in den Standby-Modus.
3.4.2. Drücken Sie die Kamera-Taste einmal um ein Foto aufzunehmen. Die gelbe
Kontrollleuchte blinkt einmal und dann auszuschalten. Die blaue Anzeigelampe
bleibt beleuchtet, was die Kamera in den Standby-Modus ist zurück.
3.5. MICRO SD-KARTE FORMATIERUNG
3.5.1. Schalten Sie die Kamera durch Power-Knopf für zwei Sekunden lang
drücken. Die blaue und gelbe Anzeige leuchtet, wird fünf Sekunden lang beleuchtet
werden. Dann wird das gelbe ausschalten, während die blaue beleuchtet wird
bleiben, was auf die Kamera hat sich automatisch in den Standby-Modus.
3.5.2. Halten Sie die Kamera-Taste für drei Sekunden. Die blaue und gelbe Anzeige
leuchtet viermal blinken zuerst, dann werden sie fünf Sekunden lang beleuchtet
werden und die gelbe Kontrollleuchte erlischt und zeigt die SD-Karte Formatierung
abgeschlossen ist.
3.5.3. Die blaue Anzeigelampe bleibt beleuchtet, was die Kamera in den
Standby-Modus ist wieder da.
IV. Video- / Bilddateiuploads
4.1. Wenn die Kamera ausgeschaltet ist, entfernen Sie die Micro SD-Karte und in
einen Kartenleser ein.
4.2. Setzen Sie den Kartenleser in einen PC-Computer.
4.3. Die SD-Micro-Karte wird als Wechsellaufwerk erkannt werden.
Page 8

drücken. Die blaue und gelbe Anzeige leuchtet, wird fünf Sekunden lang beleuchtet
werden. Dann wird das gelbe ausschalten, während die blaue beleuchtet wird
bleiben, was auf die Kamera hat sich automatisch in den Standby-Modus.
3.3.2. Halten Sie die Power-Taste für drei Sekunden Video mit 1920 × 1080p
Videoauflösung aufzeichnen. Die gelbe Kontrollleuchte blinkt dreimal und
auszuschalten.
3.3.3. Drücken Sie die Power-Taste einmal zu stoppen Videoaufzeichnung . Die
blaue Anzeigelampe bleibt beleuchtet, was die Kamera in den Standby-Modus ist
wieder da.
3.4. CAMERA / FOTOGRAFIE
3.4.1. Schalten Sie die Kamera durch Power-Knopf für zwei Sekunden lang
drücken. Die blaue und gelbe Anzeige leuchtet, wird fünf Sekunden lang beleuchtet
werden. Dann wird das gelbe ausschalten, während die blaue beleuchtet wird
bleiben, was auf die Kamera hat sich automatisch in den Standby-Modus.
3.4.2. Drücken Sie die Kamera-Taste einmal um ein Foto aufzunehmen. Die gelbe
Kontrollleuchte blinkt einmal und dann auszuschalten. Die blaue Anzeigelampe
bleibt beleuchtet, was die Kamera in den Standby-Modus ist zurück.
3.5. MICRO SD-KARTE FORMATIERUNG
3.5.1. Schalten Sie die Kamera durch Power-Knopf für zwei Sekunden lang
drücken. Die blaue und gelbe Anzeige leuchtet, wird fünf Sekunden lang beleuchtet
werden. Dann wird das gelbe ausschalten, während die blaue beleuchtet wird
bleiben, was auf die Kamera hat sich automatisch in den Standby-Modus.
3.5.2. Halten Sie die Kamera-Taste für drei Sekunden. Die blaue und gelbe Anzeige
leuchtet viermal blinken zuerst, dann werden sie fünf Sekunden lang beleuchtet
werden und die gelbe Kontrollleuchte erlischt und zeigt die SD-Karte Formatierung
abgeschlossen ist.
3.5.3. Die blaue Anzeigelampe bleibt beleuchtet, was die Kamera in den
Standby-Modus ist wieder da.
IV. Video- / Bilddateiuploads
4.1. Wenn die Kamera ausgeschaltet ist, entfernen Sie die Micro SD-Karte und in
einen Kartenleser ein.
4.2. Setzen Sie den Kartenleser in einen PC-Computer.
4.3. Die SD-Micro-Karte wird als Wechsellaufwerk erkannt werden.
4.4. Alle Dateien können im Ordner "DCIM" zugegriffen werden.
V. EINSTELLUNG VON UHRZEIT / DATUM-STEMPEL
5.1. Schließen Sie die Kamera an einen PC-Computer, wenn es ausgeschaltet ist,
5.2. Wechselplattenlaufwerk Ordner angezeigt wird.
5.3. Klicken Sie auf das Laufwerk im Stammverzeichnis und im Inneren des
Root-Verzeichnis eine Datei mit dem Namen "TIMERSET.TXT".
5.4. Schreiben Sie das aktuelle Datum und die Uhrzeit in der "TIMERSET.TXT"
Datei mit dem richtigen Format:
JahrMonatTagStundeMinuteSekunde Y. (Zum Beispiel: 20160412142432 Y).
Speichern Sie diese Datei. Wenn Sie den Stempel auf den Video-Dateien nicht
benötigen, ändern "Y" in "N" in der Datei.
5.5. Starten Sie die Kamera und das System-Upgrade, das Programm automatisch.
VI. Aufladen Nur
6.1. Entfernen Sie die Micro-SD-Karte aus der Kamera.
6.2. Schließen Sie die Kamera über das mitgelieferte USB-Kabel an einen PC an.
6.3. Es wird 3 Stunden eine volle Ladung zu erhalten.
6.4. Die blaue Anzeige leuchtet während des Ladevorgangs beleuchtetem bleiben.
6.5. Wenn die Kamera vollständig aufgeladen ist, bleiben die blauen und gelben
Anzeigelampen beleuchtet.
VII. Lade- und Aufnahme Gleichzeitig
7.1. Legen Sie eine SD-Micro-Karte in die Kamera ein.
7.2. Schließen Sie die Kamera über das mitgelieferte USB-Kabel an einen PC an.
7.3. Die blaue Anzeigelampe blinkt dreimal und dann wieder aus, was auf die
Kamera die Aufnahme von Video mit 1280x720P Videoauflösung.
7.4. Drücken Sie die Power-Taste einmal zu stoppen Videoaufzeichnung . Die blaue
Anzeigelampe bleibt beleuchtet, was die Kamera in den Standby-Modus ist wieder
da.
[Hinweis]:
VIII. Neueinstellung
Wenn aus irgendeinem Grund reagiert die Kamera hält oder nicht richtig
funktioniert, ein einfaches Zurücksetzen wird es in den Normalbetrieb
wiederherzustellen zurück.
Page 9

4.4. Alle Dateien können im Ordner "DCIM" zugegriffen werden.
V. EINSTELLUNG VON UHRZEIT / DATUM-STEMPEL
5.1. Schließen Sie die Kamera an einen PC-Computer, wenn es ausgeschaltet ist,
5.2. Wechselplattenlaufwerk Ordner angezeigt wird.
5.3. Klicken Sie auf das Laufwerk im Stammverzeichnis und im Inneren des
Root-Verzeichnis eine Datei mit dem Namen "TIMERSET.TXT".
5.4. Schreiben Sie das aktuelle Datum und die Uhrzeit in der "TIMERSET.TXT"
Datei mit dem richtigen Format:
JahrMonatTagStundeMinuteSekunde Y. (Zum Beispiel: 20160412142432 Y).
Speichern Sie diese Datei. Wenn Sie den Stempel auf den Video-Dateien nicht
benötigen, ändern "Y" in "N" in der Datei.
5.5. Starten Sie die Kamera und das System-Upgrade, das Programm automatisch.
VI. Aufladen Nur
6.1. Entfernen Sie die Micro-SD-Karte aus der Kamera.
6.2. Schließen Sie die Kamera über das mitgelieferte USB-Kabel an einen PC an.
6.3. Es wird 3 Stunden eine volle Ladung zu erhalten.
6.4. Die blaue Anzeige leuchtet während des Ladevorgangs beleuchtetem bleiben.
6.5. Wenn die Kamera vollständig aufgeladen ist, bleiben die blauen und gelben
Anzeigelampen beleuchtet.
VII. Lade- und Aufnahme Gleichzeitig
7.1. Legen Sie eine SD-Micro-Karte in die Kamera ein.
7.2. Schließen Sie die Kamera über das mitgelieferte USB-Kabel an einen PC an.
7.3. Die blaue Anzeigelampe blinkt dreimal und dann wieder aus, was auf die
Kamera die Aufnahme von Video mit 1280x720P Videoauflösung.
7.4. Drücken Sie die Power-Taste einmal zu stoppen Videoaufzeichnung . Die blaue
Anzeigelampe bleibt beleuchtet, was die Kamera in den Standby-Modus ist wieder
da.
[Hinweis]:
Sie könnten auch andere Funktionen der Kamera in den Ladevorgang erfahren.
VIII. Neueinstellung
Wenn aus irgendeinem Grund reagiert die Kamera hält oder nicht richtig
funktioniert, ein einfaches Zurücksetzen wird es in den Normalbetrieb
wiederherzustellen zurück.
Bedienung: Drücken Sie die Reset-Taste einmal, um die Kamera zu setzen. Die
blaue und gelbe Anzeige leuchtet, schaltet sich die Kamera automatisch
abgeschaltet.
IX. Live-Video-Ausgang
9.1. Schließen Sie die Kamera an einen Fernseher oder Monitor mit dem AV-Kabel
wie unten angegeben:
9.2. Wählen Sie die Kamera Videosignalquelle auf dem Fernseher oder Monitor.
9.3. Schalten Sie die Kamera und starten Sie die Aufnahme von Video (siehe 3.2
oder 3.3), dann können Sie die Kamera-Live-Videos auf dem TV oder während der
Videoaufzeichnung Prozess überwachen.
9.4. Sie könnten auch andere Funktionen dieser Kamera im Live-View-Modus
erleben.
Page 10
Bedienung: Drücken Sie die Reset-Taste einmal, um die Kamera zu setzen. Die
blaue und gelbe Anzeige leuchtet, schaltet sich die Kamera automatisch
abgeschaltet.
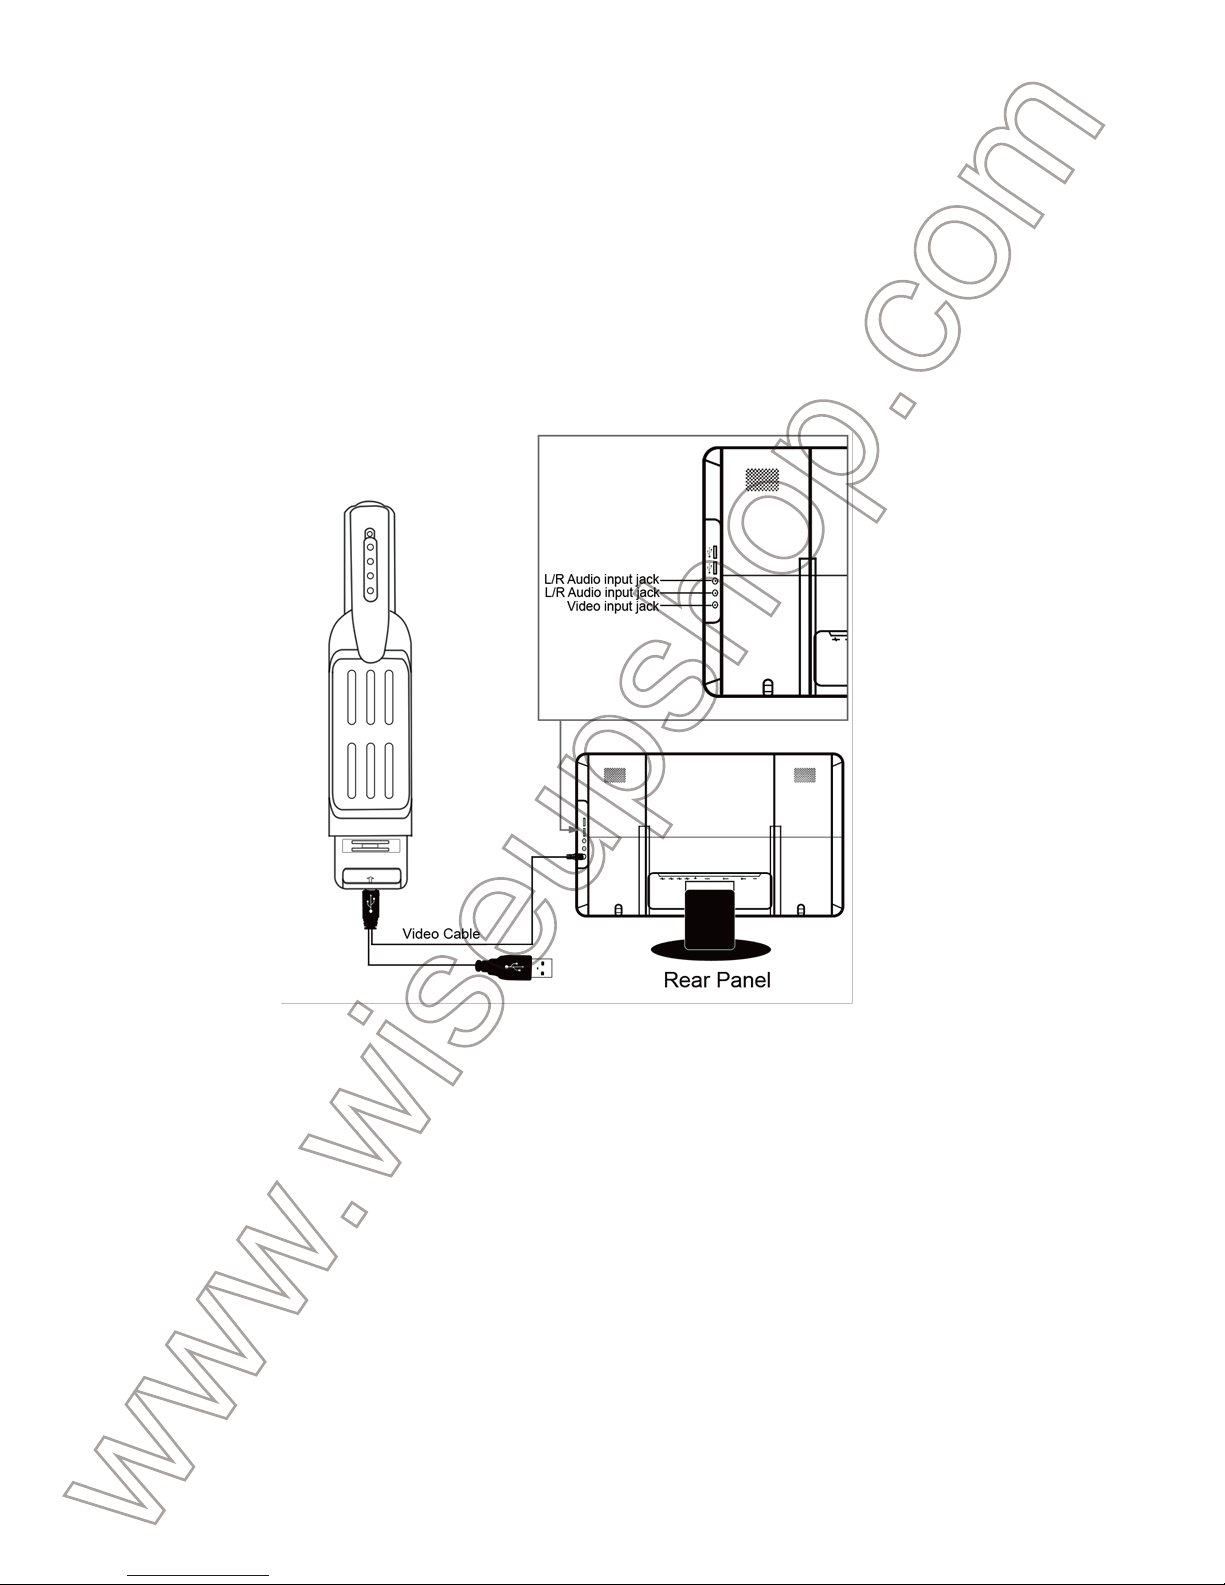
IX. Live-Video-Ausgang
9.1. Schließen Sie die Kamera an einen Fernseher oder Monitor mit dem AV-Kabel
wie unten angegeben:
9.2. Wählen Sie die Kamera Videosignalquelle auf dem Fernseher oder Monitor.
9.3. Schalten Sie die Kamera und starten Sie die Aufnahme von Video (siehe 3.2
oder 3.3), dann können Sie die Kamera-Live-Videos auf dem TV oder während der
Videoaufzeichnung Prozess überwachen.
9.4. Sie könnten auch andere Funktionen dieser Kamera im Live-View-Modus
erleben.
Page 11
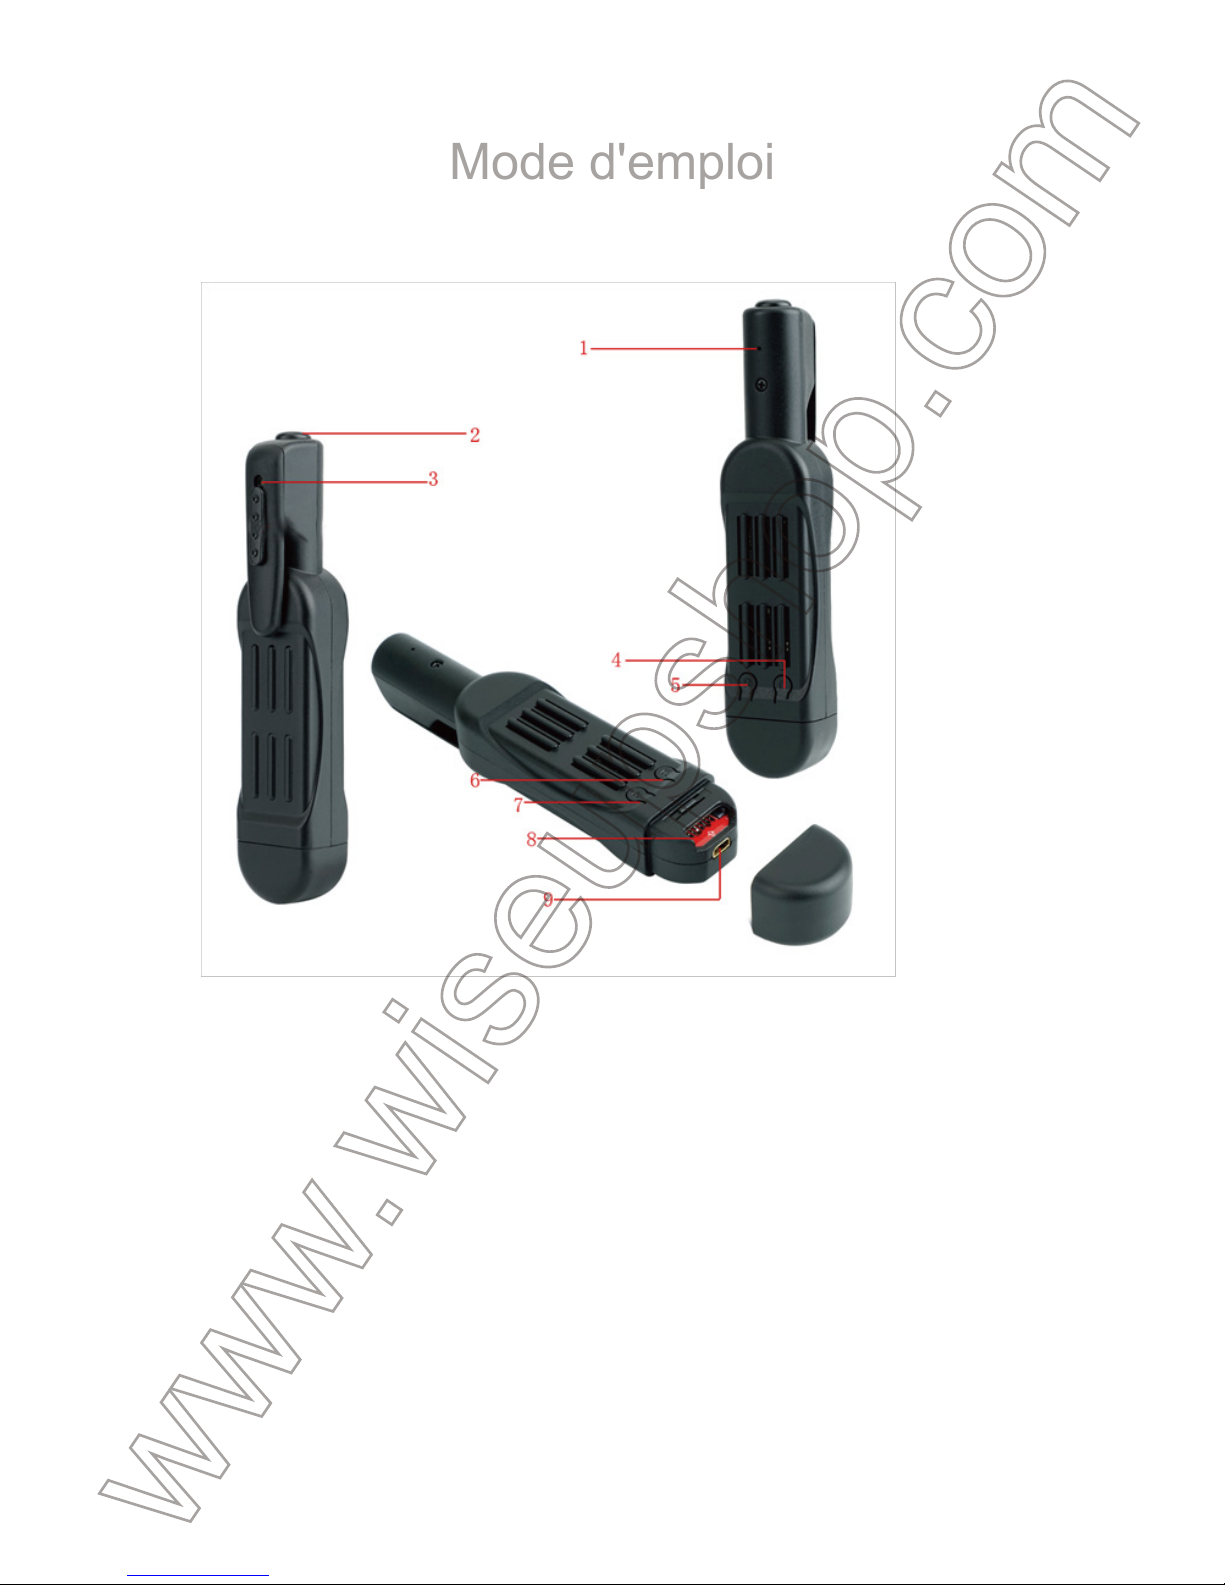
6. Lampe témoin jaune
7. Lampe témoin bleu
8. Micro SD Card slot
9. Port USB Mini
utilisation) est solidement fixé dans la fente de la carte SD de l'appareil photo ou la
caméra ne fonctionnera pas. Une SDHC carte Micro SD de Classe 10 est
recommandée s’il vous plaît.
[Remarque]:
pas être lu, les voyants bleu et jaune sera étientes après clignoter quatre fois puis. L'appareil photo est
éteint automatiquement.
3.1. MARCHE / ARRÊT
3.1.1. Allumez l'appareil photo en appuyant sur le bouton d'alimentation pendant
deux secondes. Les voyants bleu et jaune seront allumés pendant cinq secondes.
Ensuite, le jaune s'éteint, tandis que le bleu reste allumé, indiquant que l'appareil est
entré en mode veille automatiquement.
3.1.2. Mise hors tension de l'appareil photo en appuyant sur le bouton d'alimentation
pendant sept secondes lorsque l'appareil enregistre ou est en mode veille.
[Remarque]:
opération plus d'une minute.
3.2. 720P ENREGISTREMENT VIDEO
3.2.1. Allumez l'appareil photo en appuyant sur le bouton d'alimentation pendant
deux secondes. Les voyants bleu et jaune seront allumés pendant cinq secondes.
Ensuite, le jaune s'éteint, tandis que le bleu reste allumé, indiquant que l'appareil est
entré en mode veille automatiquement.
3.1.2. Appuyez sur le bouton d'alimentation une fois pour enregistrer des vidéos
avec une résolution de 1280 × vidéo 720P. Le voyant lumineux bleu clignote trois
fois puis éteignez.
3.1.3. Appuyez sur le bouton d'alimentation une fois de plus pour arrêter
l'enregistrement vidéo. Le voyant lumineux bleu restera allumé, indiquant que
l'appareil est en mode veille.
[Remarques]:
1). Un fichier vidéo sera généré et enregistré toutes les 5 minutes automatiquement.
2). La caméra peut enregistrer de la vidéo en continu pendant 5,5 heures sur une charge complète.
3). Résolution vidéo: 1920×1080P Format vidéo: AVI
3.3. 1080P ENREGISTREMENT VIDEO
3.3.1. Allumez l'appareil photo en appuyant sur le bouton d'alimentation pendant
deux secondes. Les voyants bleu et jaune seront allumés pendant cinq secondes.
P9000
Mode d'emploi
I. Présentation du produit
1. Microphone
2. Bouton d'alimentation
3. Caméra Lens
4. Bouton de l'appareil photo
5. Bouton de réinitialisation
II. Qu'y a-t-il dans la boite
-1×Caméra Enregistreur de Réunion
-1× USB/AV Câble
III. Opération
>> Avant d'utiliser, assurez-vous que la caméra est complètement rechargée.
>> Assurez-vous que la carte Micro SD (4 Go-32GB, formater pour la première
Page 12

utilisation) est solidement fixé dans la fente de la carte SD de l'appareil photo ou la
caméra ne fonctionnera pas. Une SDHC carte Micro SD de Classe 10 est
recommandée s’il vous plaît.
[Remarque]:
Si aucune carte Mémoire Sd est insérée dans l'appareil photo ou la carte SD ne peut
pas être lu, les voyants bleu et jaune sera étientes après clignoter quatre fois puis. L'appareil photo est
éteint automatiquement.
3.1. MARCHE / ARRÊT
3.1.1. Allumez l'appareil photo en appuyant sur le bouton d'alimentation pendant
deux secondes. Les voyants bleu et jaune seront allumés pendant cinq secondes.
Ensuite, le jaune s'éteint, tandis que le bleu reste allumé, indiquant que l'appareil est
entré en mode veille automatiquement.
3.1.2. Mise hors tension de l'appareil photo en appuyant sur le bouton d'alimentation
pendant sept secondes lorsque l'appareil enregistre ou est en mode veille.
[Remarque]:
L'appareil photo arrête automatiquement si elle est en mode veille sans aucune
opération plus d'une minute.
3.2. 720P ENREGISTREMENT VIDEO
3.2.1. Allumez l'appareil photo en appuyant sur le bouton d'alimentation pendant
deux secondes. Les voyants bleu et jaune seront allumés pendant cinq secondes.
Ensuite, le jaune s'éteint, tandis que le bleu reste allumé, indiquant que l'appareil est
entré en mode veille automatiquement.
3.1.2. Appuyez sur le bouton d'alimentation une fois pour enregistrer des vidéos
avec une résolution de 1280 × vidéo 720P. Le voyant lumineux bleu clignote trois
fois puis éteignez.
3.1.3. Appuyez sur le bouton d'alimentation une fois de plus pour arrêter
l'enregistrement vidéo. Le voyant lumineux bleu restera allumé, indiquant que
l'appareil est en mode veille.
[Remarques]:
1). Un fichier vidéo sera généré et enregistré toutes les 5 minutes automatiquement.
2). La caméra peut enregistrer de la vidéo en continu pendant 5,5 heures sur une charge complète.
3). Résolution vidéo: 1920×1080P Format vidéo: AVI
3.3. 1080P ENREGISTREMENT VIDEO
3.3.1. Allumez l'appareil photo en appuyant sur le bouton d'alimentation pendant
deux secondes. Les voyants bleu et jaune seront allumés pendant cinq secondes.
Ensuite, le jaune s'éteint, tandis que le bleu reste allumé, indiquant que l'appareil est
entré en mode veille automatiquement.
3.3.2. Maintenez le bouton d'alimentation pendant trois secondes pour enregistrer
de la vidéo avec résolution de 1920 × vidéo 1080P. Le voyant jaune clignote trois
fois et éteignez.
3.3.3. Appuyez sur le bouton d'alimentation une fois pour arrêter l'enregistrement
vidéo. Le voyant lumineux bleu restera allumé, indiquant que l'appareil est en mode
veille.
3.4. CAMERA / PHOTOGRAPHIE
3.4.1. Allumez l'appareil photo en appuyant sur le bouton d'alimentation pendant
deux secondes. Les voyants bleu et jaune seront allumés pendant cinq secondes.
Ensuite, le jaune s'éteint, tandis que le bleu reste allumé, indiquant que l'appareil est
entré en mode veille automatiquement.
3.4.2. Appuyez sur le bouton de l'appareil photo une fois pour prendre une photo. Le
voyant jaune clignote une fois, puis éteindre. Le voyant lumineux bleu restera
allumé, indiquant que l'appareil est en mode veille.
3.5. MICRO SD CARD FORMATAGE
3.5.1. Allumez l'appareil photo en appuyant sur le bouton d'alimentation pendant
deux secondes. Les voyants bleu et jaune seront allumés pendant cinq secondes.
Ensuite, le jaune s'éteint, tandis que le bleu reste allumé, indiquant que l'appareil est
entré en mode veille automatiquement.
3.5.2. Maintenez enfoncé le bouton de l'appareil photo pendant trois secondes. Les
voyants bleu et jaune clignote quatre fois, puis ils seront illuminés pendant cinq
secondes et le témoin lumineux jaune s'éteint, indiquant le formatage de la carte SD
a été achevée.
3.5.3. Le voyant lumineux bleu restera allumé, indiquant que l'appareil est en mode
veille.
IV. Uploads Vidéo De Fichiers / D'image
4.1. Lorsque l'appareil est mis hors tension, retirez la carte Micro SD et l'insérer
dans un lecteur de carte.
4.2. Insérez le lecteur de carte dans un ordinateur PC.
4.3. La carte Micro SD sera reconnu comme un lecteur de disque amovible.
4.4. Tous les fichiers peuvent être consultés dans le dossier "DCIM".
Page 13

Ensuite, le jaune s'éteint, tandis que le bleu reste allumé, indiquant que l'appareil est
entré en mode veille automatiquement.
3.3.2. Maintenez le bouton d'alimentation pendant trois secondes pour enregistrer
de la vidéo avec résolution de 1920 × vidéo 1080P. Le voyant jaune clignote trois
fois et éteignez.
3.3.3. Appuyez sur le bouton d'alimentation une fois pour arrêter l'enregistrement
vidéo. Le voyant lumineux bleu restera allumé, indiquant que l'appareil est en mode
veille.
3.4. CAMERA / PHOTOGRAPHIE
3.4.1. Allumez l'appareil photo en appuyant sur le bouton d'alimentation pendant
deux secondes. Les voyants bleu et jaune seront allumés pendant cinq secondes.
Ensuite, le jaune s'éteint, tandis que le bleu reste allumé, indiquant que l'appareil est
entré en mode veille automatiquement.
3.4.2. Appuyez sur le bouton de l'appareil photo une fois pour prendre une photo. Le
voyant jaune clignote une fois, puis éteindre. Le voyant lumineux bleu restera
allumé, indiquant que l'appareil est en mode veille.
3.5. MICRO SD CARD FORMATAGE
3.5.1. Allumez l'appareil photo en appuyant sur le bouton d'alimentation pendant
deux secondes. Les voyants bleu et jaune seront allumés pendant cinq secondes.
Ensuite, le jaune s'éteint, tandis que le bleu reste allumé, indiquant que l'appareil est
entré en mode veille automatiquement.
3.5.2. Maintenez enfoncé le bouton de l'appareil photo pendant trois secondes. Les
voyants bleu et jaune clignote quatre fois, puis ils seront illuminés pendant cinq
secondes et le témoin lumineux jaune s'éteint, indiquant le formatage de la carte SD
a été achevée.
3.5.3. Le voyant lumineux bleu restera allumé, indiquant que l'appareil est en mode
veille.
IV. Uploads Vidéo De Fichiers / D'image
4.1. Lorsque l'appareil est mis hors tension, retirez la carte Micro SD et l'insérer
dans un lecteur de carte.
4.2. Insérez le lecteur de carte dans un ordinateur PC.
4.3. La carte Micro SD sera reconnu comme un lecteur de disque amovible.
4.4. Tous les fichiers peuvent être consultés dans le dossier "DCIM".
V. Réglage de l'heure / Date Stamp
5.1. Branchez l'appareil photo à un ordinateur PC quand il est éteint,
5.2. dossier de disque amovible apparaît.
5.3. Cliquez sur le lecteur dans le répertoire racine et à l'intérieur du répertoire
racine, créez un fichier nommé "TIMERSET.TXT".
5.4. Écrivez la date et l'heure actuelle dans le "TIMERSET.TXT" fichier avec le
format correct:
annéemoisjourheureminuteseconde Y. (Par exemple: 20160412142432 Y).
Enregistrez ce fichier. Si vous n'avez pas besoin du timbre sur les fichiers vidéo,
changer "Y" en "N" dans le fichier.
5.5. Redémarrez l'appareil photo et le système de mise à niveau du programme
automatiquement.
VI. Charge Seulement
6.1. Retirez la carte Micro SD de l'appareil photo.
6.2. Connectez la camméra à un ordinateur à l'aide du câble USB fourni.
6.3. Il faudra 3 heures pour obtenir une charge complète.
6.4. Le voyant lumineux bleu restera éclairé pendant le processus de charge.
6.5. Lorsque l'appareil est complètement chargé, le voyant bleu et jaune reste
allumée.
VII. Chargement et enregistrement simultané
7.1. Insérez une carte Micro SD dans l'appareil photo.
7.2. Connectez la camméra à un ordinateur à l'aide du câble USB fourni.
7.3. Le voyant lumineux bleu clignote trois fois, puis éteint, indiquant que l'appareil
enregistre la vidéo avec une résolution vidéo 1280x720p.
7.4. Appuyez sur le bouton d'alimentation une fois pour arrêter l'enregistrement
vidéo. Le voyant lumineux bleu restera allumé, indiquant que l'appareil est en mode
veille.
[Remarque]:
VIII. Réinitialisation
Si pour une raison quelconque la caméra cesse de répondre ou ne fonctionne pas
correctement, une réinitialisation rapide sera le restaurer à un fonctionnement
normal.
Page 14

V. Réglage de l'heure / Date Stamp
5.1. Branchez l'appareil photo à un ordinateur PC quand il est éteint,
5.2. dossier de disque amovible apparaît.
5.3. Cliquez sur le lecteur dans le répertoire racine et à l'intérieur du répertoire
racine, créez un fichier nommé "TIMERSET.TXT".
5.4. Écrivez la date et l'heure actuelle dans le "TIMERSET.TXT" fichier avec le
format correct:
annéemoisjourheureminuteseconde Y. (Par exemple: 20160412142432 Y).
Enregistrez ce fichier. Si vous n'avez pas besoin du timbre sur les fichiers vidéo,
changer "Y" en "N" dans le fichier.
5.5. Redémarrez l'appareil photo et le système de mise à niveau du programme
automatiquement.
VI. Charge Seulement
6.1. Retirez la carte Micro SD de l'appareil photo.
6.2. Connectez la camméra à un ordinateur à l'aide du câble USB fourni.
6.3. Il faudra 3 heures pour obtenir une charge complète.
6.4. Le voyant lumineux bleu restera éclairé pendant le processus de charge.
6.5. Lorsque l'appareil est complètement chargé, le voyant bleu et jaune reste
allumée.
VII. Chargement et enregistrement simultané
7.1. Insérez une carte Micro SD dans l'appareil photo.
7.2. Connectez la camméra à un ordinateur à l'aide du câble USB fourni.
7.3. Le voyant lumineux bleu clignote trois fois, puis éteint, indiquant que l'appareil
enregistre la vidéo avec une résolution vidéo 1280x720p.
7.4. Appuyez sur le bouton d'alimentation une fois pour arrêter l'enregistrement
vidéo. Le voyant lumineux bleu restera allumé, indiquant que l'appareil est en mode
veille.
[Remarque]:
Vous pourriez éprouver d'autres fonctions de la caméra dans le processus de charge.
VIII. Réinitialisation
Si pour une raison quelconque la caméra cesse de répondre ou ne fonctionne pas
correctement, une réinitialisation rapide sera le restaurer à un fonctionnement
normal.
Opération: Appuyez sur le bouton de réinitialisation une fois pour réinitialiser la
caméra. Les voyants bleu et jaune s'éteint et l'appareil photo arrête
automatiquement.
IX. En direct Sortie vidéo
9.1. Branchez l'appareil photo à un téléviseur ou un moniteur en utilisant le câble AV
fourni comme ci-dessous:
9.2. Sélectionnez la source de signal caméra vidéo sur le téléviseur ou moniteur.
9.3. Allumez l'appareil photo et commencer l'enregistrement vidéo (voir 3.2 ou 3.3),
alors vous pouvez regarder la vidéo en direct de la caméra sur le téléviseur ou le
moniteur pendant le processus d'enregistrement vidéo.
9.4. Vous pourriez éprouver d'autres fonctions de cet appareil dans le mode
d'affichage en direct.
Page 15
Opération: Appuyez sur le bouton de réinitialisation une fois pour réinitialiser la
caméra. Les voyants bleu et jaune s'éteint et l'appareil photo arrête
automatiquement.
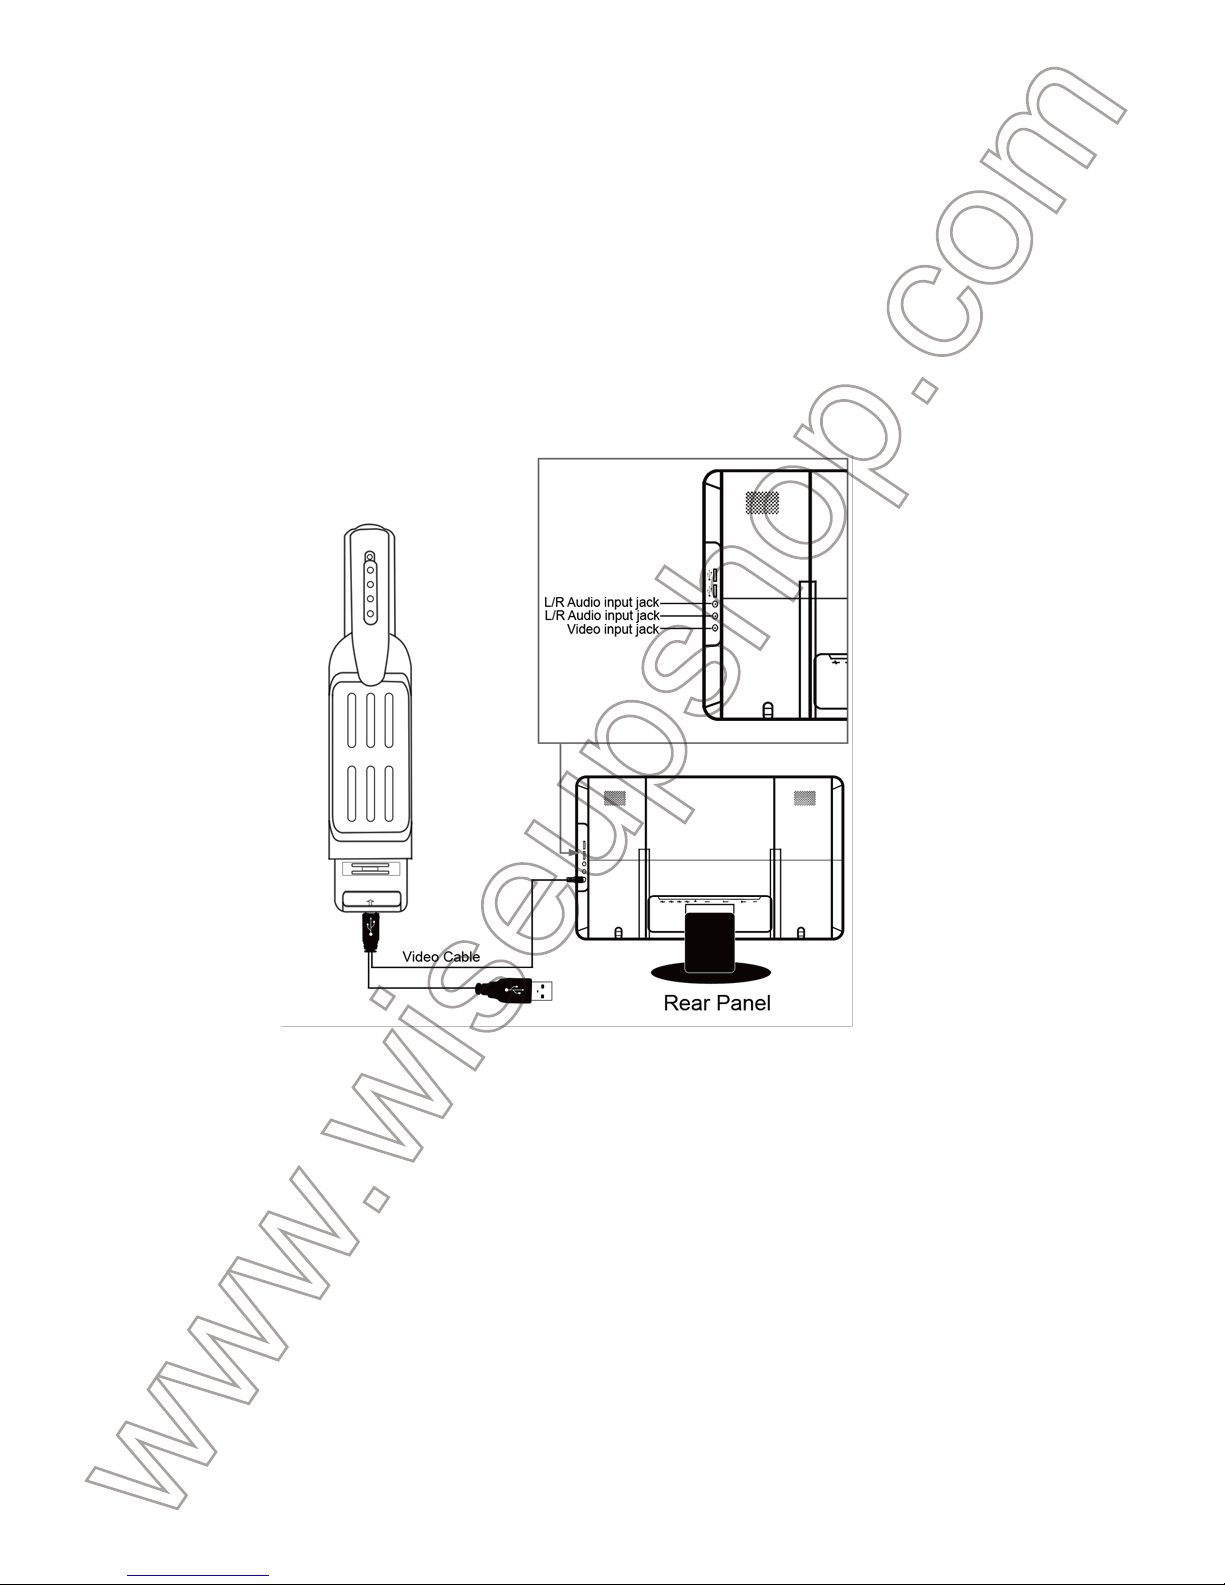
IX. En direct Sortie vidéo
9.1. Branchez l'appareil photo à un téléviseur ou un moniteur en utilisant le câble AV
fourni comme ci-dessous:
9.2. Sélectionnez la source de signal caméra vidéo sur le téléviseur ou moniteur.
9.3. Allumez l'appareil photo et commencer l'enregistrement vidéo (voir 3.2 ou 3.3),
alors vous pouvez regarder la vidéo en direct de la caméra sur le téléviseur ou le
moniteur pendant le processus d'enregistrement vidéo.
9.4. Vous pourriez éprouver d'autres fonctions de cet appareil dans le mode
d'affichage en direct.
Page 16
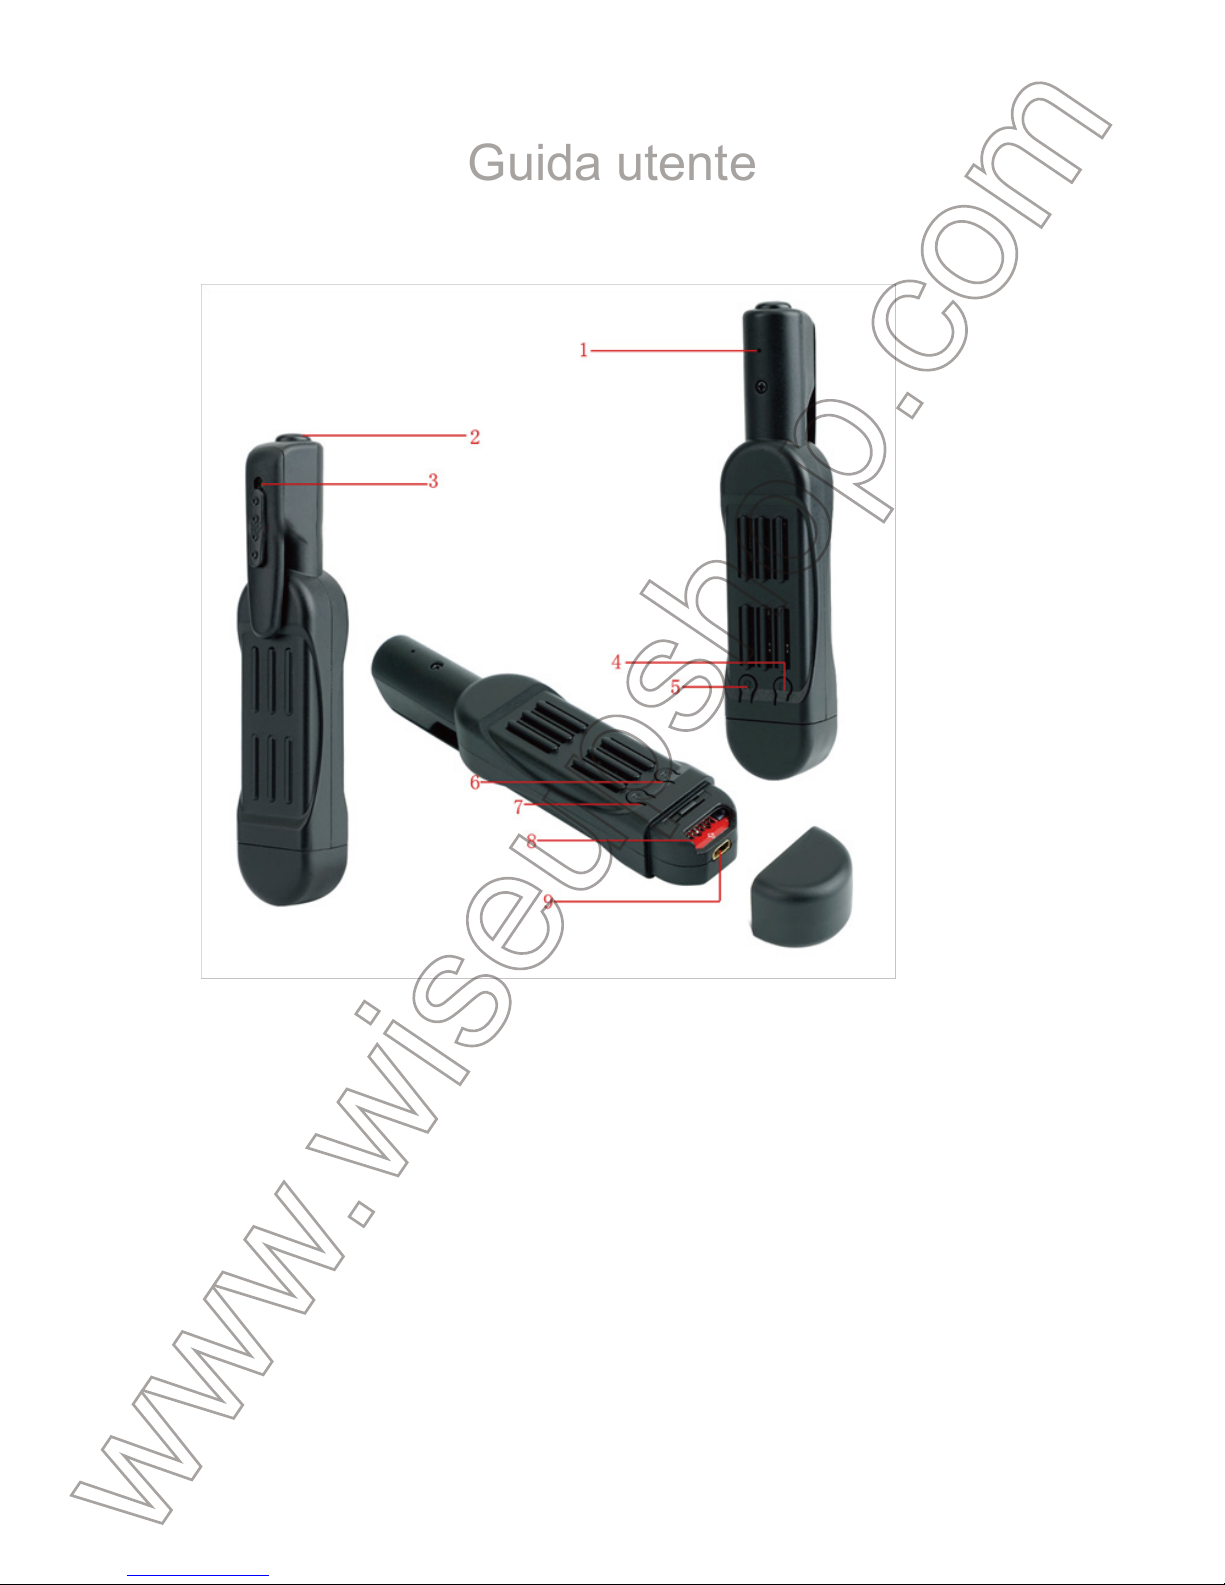
6. spia gialla
7. indicatore luminoso blu
8. Slot Micro SD Card
9. porta mini USB
prima fornitura) è montato saldamente nella slot per scheda SD della fotocamera,
oppure la fotocamera non funziona. Si raccomanda un SDHC Classe 10 SD card
Micro.
[Nota]:
letto, le spie blu e giallo lampeggiano quattro volte e poi si spegne. La fotocamera si spegne
automaticamente.
3.1. ACCENSIONE / SPEGNIMENTO
3.1.1. Accendere la fotocamera premendo il tasto Power per due secondi.
L'indicatore blu e giallo saranno illuminati per cinque secondi. Poi quello giallo si
spegne, mentre quello blu resterà illuminato, indicando la telecamera è entrato in
modalità standby automaticamente.
3.1.2. Spegnere la fotocamera premendo il pulsante di alimentazione per sette
secondi quando la fotocamera sta registrando o è in modalità standby.
[Nota]:
operazione più di un minuto.
3.2. 720P REGISTRAZIONE VIDEO
3.2.1. Accendere la fotocamera premendo il tasto Power per due secondi.
L'indicatore blu e giallo saranno illuminati per cinque secondi. Poi quello giallo si
spegne, mentre quello blu resterà illuminato, indicando la telecamera è entrato in
modalità standby automaticamente.
3.1.2. Premere il pulsante di accensione una volta per registrare video con
risoluzione 1280 × 720p il video. La spia blu lampeggia tre volte e poi si spegne.
3.1.3. Premere il pulsante di accensione una volta per interrompere la registrazione
video. La spia blu rimarrà illuminato, indicando la fotocamera è in modalità standby.
[Notas]:
1). Un file video viene generato e salvato automaticamente ogni 5 minuti.
2). La fotocamera può registrare video in continuo per 5,5 ore con una carica completa.
3). Risoluzione video: 1920×1080P Formato video: AVI
3.3. 1080P REGISTRAZIONE VIDEO
3.3.1. Accendere la fotocamera premendo il tasto Power per due secondi.
L'indicatore blu e giallo saranno illuminati per cinque secondi. Poi quello giallo si
spegne, mentre quello blu resterà illuminato, indicando la telecamera è entrato in
modalità standby automaticamente.
P9000
Guida utente
I. Panoramica del Prodotto
1. Microfono
2. Pulsante di alimentazione
3. Camera Lens
4. Pulsante Camera
5. Pulsante di ripristino
II. Cosa c'è nella scatola
-1×Fotocamera Meeting Recorder
-1× USB/AV Cavo
III. Operazione
>> Prima di utilizzare, assicurarsi che la fotocamera è completamente carica.
>> Si prega di verificare che la scheda Micro SD (4GB-32GB, formattarlo per la
Page 17

prima fornitura) è montato saldamente nella slot per scheda SD della fotocamera,
oppure la fotocamera non funziona. Si raccomanda un SDHC Classe 10 SD card
Micro.
[Nota]:
Se nessuna scheda micro SD è montato nella fotocamera o la scheda SD non può essere
letto, le spie blu e giallo lampeggiano quattro volte e poi si spegne. La fotocamera si spegne
automaticamente.
3.1. ACCENSIONE / SPEGNIMENTO
3.1.1. Accendere la fotocamera premendo il tasto Power per due secondi.
L'indicatore blu e giallo saranno illuminati per cinque secondi. Poi quello giallo si
spegne, mentre quello blu resterà illuminato, indicando la telecamera è entrato in
modalità standby automaticamente.
3.1.2. Spegnere la fotocamera premendo il pulsante di alimentazione per sette
secondi quando la fotocamera sta registrando o è in modalità standby.
[Nota]:
La fotocamera si spegne automaticamente se è in modalità standby, senza alcuna
operazione più di un minuto.
3.2. 720P REGISTRAZIONE VIDEO
3.2.1. Accendere la fotocamera premendo il tasto Power per due secondi.
L'indicatore blu e giallo saranno illuminati per cinque secondi. Poi quello giallo si
spegne, mentre quello blu resterà illuminato, indicando la telecamera è entrato in
modalità standby automaticamente.
3.1.2. Premere il pulsante di accensione una volta per registrare video con
risoluzione 1280 × 720p il video. La spia blu lampeggia tre volte e poi si spegne.
3.1.3. Premere il pulsante di accensione una volta per interrompere la registrazione
video. La spia blu rimarrà illuminato, indicando la fotocamera è in modalità standby.
[Notas]:
1). Un file video viene generato e salvato automaticamente ogni 5 minuti.
2). La fotocamera può registrare video in continuo per 5,5 ore con una carica completa.
3). Risoluzione video: 1920×1080P Formato video: AVI
3.3. 1080P REGISTRAZIONE VIDEO
3.3.1. Accendere la fotocamera premendo il tasto Power per due secondi.
L'indicatore blu e giallo saranno illuminati per cinque secondi. Poi quello giallo si
spegne, mentre quello blu resterà illuminato, indicando la telecamera è entrato in
modalità standby automaticamente.
3.3.2. Tenere premuto il pulsante di alimentazione per tre secondi per registrare
video con risoluzione video 1920 × 1080p. La spia gialla lampeggia tre volte e
spegnere.
3.3.3. Premere il pulsante di accensione una volta per interrompere la registrazione
video. La spia blu rimarrà illuminato, indicando la fotocamera è in modalità standby.
3.4. CAMERA/LA FOTOGRAFIA
3.4.1. Accendere la fotocamera premendo il tasto Power per due secondi.
L'indicatore blu e giallo saranno illuminati per cinque secondi. Poi quello giallo si
spegne, mentre quello blu resterà illuminato, indicando la telecamera è entrato in
modalità standby automaticamente.
3.4.2. Premere il pulsante della fotocamera una volta per scattare una foto. La spia
gialla lampeggia una volta e poi si spegne. La spia blu rimarrà illuminato, indicando
la fotocamera è in modalità standby.
3.5. FORMATTAZIONE DELLA SCHEDA MICRO SD
3.5.1. Accendere la fotocamera premendo il tasto Power per due secondi.
L'indicatore blu e giallo saranno illuminati per cinque secondi. Poi quello giallo si
spegne, mentre quello blu resterà illuminato, indicando la telecamera è entrato in
modalità standby automaticamente.
3.5.2. Tenere premuto il tasto Fotocamera per tre secondi. L'indicatore blu e giallo
lampeggiano quattro volte prima, poi si illumina per cinque secondi e la spia gialla si
spegne, indicando la formattazione della scheda SD è stata completata.
3.5.3. La spia blu rimarrà illuminato, indicando la fotocamera è in modalità standby.
IV. UPLOAD DI FILE VIDEO / IMMAGINI
4.1. Quando la fotocamera è spenta, rimuovere la scheda Micro SD e inserirla in un
lettore di schede.
4.2. Inserire il lettore di schede in un computer PC.
4.3. La scheda Micro SD verrà riconosciuta come unità disco rimovibile.
4.4. Tutti i file sono accessibili nella cartella "DCIM".
V. IMPOSTAZIONE ORA / DATA
5.1. Collegare la fotocamera ad un computer PC quando è spento,
5.2. appare cartella sul disco rimovibile.
5.3. Fare clic sul disco nella directory principale e all'interno della directory
Page 18

3.3.2. Tenere premuto il pulsante di alimentazione per tre secondi per registrare
video con risoluzione video 1920 × 1080p. La spia gialla lampeggia tre volte e
spegnere.
3.3.3. Premere il pulsante di accensione una volta per interrompere la registrazione
video. La spia blu rimarrà illuminato, indicando la fotocamera è in modalità standby.
3.4. CAMERA/LA FOTOGRAFIA
3.4.1. Accendere la fotocamera premendo il tasto Power per due secondi.
L'indicatore blu e giallo saranno illuminati per cinque secondi. Poi quello giallo si
spegne, mentre quello blu resterà illuminato, indicando la telecamera è entrato in
modalità standby automaticamente.
3.4.2. Premere il pulsante della fotocamera una volta per scattare una foto. La spia
gialla lampeggia una volta e poi si spegne. La spia blu rimarrà illuminato, indicando
la fotocamera è in modalità standby.
3.5. FORMATTAZIONE DELLA SCHEDA MICRO SD
3.5.1. Accendere la fotocamera premendo il tasto Power per due secondi.
L'indicatore blu e giallo saranno illuminati per cinque secondi. Poi quello giallo si
spegne, mentre quello blu resterà illuminato, indicando la telecamera è entrato in
modalità standby automaticamente.
3.5.2. Tenere premuto il tasto Fotocamera per tre secondi. L'indicatore blu e giallo
lampeggiano quattro volte prima, poi si illumina per cinque secondi e la spia gialla si
spegne, indicando la formattazione della scheda SD è stata completata.
3.5.3. La spia blu rimarrà illuminato, indicando la fotocamera è in modalità standby.
IV. UPLOAD DI FILE VIDEO / IMMAGINI
4.1. Quando la fotocamera è spenta, rimuovere la scheda Micro SD e inserirla in un
lettore di schede.
4.2. Inserire il lettore di schede in un computer PC.
4.3. La scheda Micro SD verrà riconosciuta come unità disco rimovibile.
4.4. Tutti i file sono accessibili nella cartella "DCIM".
V. IMPOSTAZIONE ORA / DATA
5.1. Collegare la fotocamera ad un computer PC quando è spento,
5.2. appare cartella sul disco rimovibile.
5.3. Fare clic sul disco nella directory principale e all'interno della directory
principale, creare un file denominato "TIMERSET.TXT".
5.4. Scrivere la data e l'ora correnti nel file "TIMERSET.TXT" con il formato corretto:
giornomeseannooreminutisecondi Y. (per esempio: 20160412142432 Y). Salvare il
file. Se non è necessario il timbro sui file video, cambiare "Y" in "N" nel file.
5.5. Riavviare la telecamera e il sistema aggiornerà automaticamente il programma.
VI. Solo ricarica
6.1. Rimuovere la scheda Micro SD dalla fotocamera.
6.2. Collegare la fotocamera ad un computer PC utilizzando il cavo USB in
dotazione.
6.3. Ci vorranno 3 ore per ottenere una carica completa.
6.4. La spia blu rimane illuminato durante il processo di carica.
6.5. Quando la fotocamera è completamente carica, l'indicatore blu e giallo
rimarranno illuminati.
VII. Caricamento e registrare simultaneamente
7.1. Inserire una scheda Micro SD nella fotocamera.
7.2. Collegare la fotocamera ad un computer PC utilizzando il cavo USB in
dotazione.
7.3. La spia blu lampeggia tre volte e poi si spegne, indicando la fotocamera sta
registrando un video con risoluzione video 1280x720P.
7.4. Premere il pulsante di accensione una volta per interrompere la registrazione
video. La spia blu rimarrà illuminato, indicando la fotocamera è in modalità standby.
[Nota]:
VIII. Ripristino
Se per qualsiasi motivo la fotocamera smette di rispondere o non funziona
correttamente, eseguire un ripristino rapido ripristinerà di nuovo al normale
funzionamento.
Funzionamento: premere il tasto RESET una volta per ripristinare la fotocamera.
L'indicatore blu e giallo le luci si spegneranno e la fotocamera si spegne
automaticamente.
IX. Uscita video dal vivo
9.1. Collegare la fotocamera a un televisore o monitor utilizzando il cavo AV in
dotazione, come di seguito:
Page 19

principale, creare un file denominato "TIMERSET.TXT".
5.4. Scrivere la data e l'ora correnti nel file "TIMERSET.TXT" con il formato corretto:
giornomeseannooreminutisecondi Y. (per esempio: 20160412142432 Y). Salvare il
file. Se non è necessario il timbro sui file video, cambiare "Y" in "N" nel file.
5.5. Riavviare la telecamera e il sistema aggiornerà automaticamente il programma.
VI. Solo ricarica
6.1. Rimuovere la scheda Micro SD dalla fotocamera.
6.2. Collegare la fotocamera ad un computer PC utilizzando il cavo USB in
dotazione.
6.3. Ci vorranno 3 ore per ottenere una carica completa.
6.4. La spia blu rimane illuminato durante il processo di carica.
6.5. Quando la fotocamera è completamente carica, l'indicatore blu e giallo
rimarranno illuminati.
VII. Caricamento e registrare simultaneamente
7.1. Inserire una scheda Micro SD nella fotocamera.
7.2. Collegare la fotocamera ad un computer PC utilizzando il cavo USB in
dotazione.
7.3. La spia blu lampeggia tre volte e poi si spegne, indicando la fotocamera sta
registrando un video con risoluzione video 1280x720P.
7.4. Premere il pulsante di accensione una volta per interrompere la registrazione
video. La spia blu rimarrà illuminato, indicando la fotocamera è in modalità standby.
[Nota]:
Si potrebbe sperimentare altre funzioni della fotocamera nel processo di ricarica.
VIII. Ripristino
Se per qualsiasi motivo la fotocamera smette di rispondere o non funziona
correttamente, eseguire un ripristino rapido ripristinerà di nuovo al normale
funzionamento.
Funzionamento: premere il tasto RESET una volta per ripristinare la fotocamera.
L'indicatore blu e giallo le luci si spegneranno e la fotocamera si spegne
automaticamente.
IX. Uscita video dal vivo
9.1. Collegare la fotocamera a un televisore o monitor utilizzando il cavo AV in
dotazione, come di seguito:
9.2. Selezionare la sorgente del segnale video della telecamera sul televisore o
monitor.
9.3. Accendere la fotocamera e avviare la registrazione video (vedere 3.2 o 3.3),
quindi è possibile guardare video in diretta della telecamera sul televisore o monitor
durante il processo di registrazione video.
9.4. Si potrebbe provare altre funzioni di questa fotocamera in modalità live view.
Page 20
9.2. Selezionare la sorgente del segnale video della telecamera sul televisore o
monitor.
9.3. Accendere la fotocamera e avviare la registrazione video (vedere 3.2 o 3.3),
quindi è possibile guardare video in diretta della telecamera sul televisore o monitor
durante il processo di registrazione video.
9.4. Si potrebbe provare altre funzioni di questa fotocamera in modalità live view.
Page 21
6. Indicador de luz amarilla
7. Indicador de luz azul
8. Ranura tarjeta de Micro SD
9.Mini USB puerto
el uso ) está montado de forma segura en la ranura de la tarjeta SD de la cámara,
en caso contrario, la cámara no funcionará. Se recomienda una tarjeta Micro SD de
SDHC Clase 10.
[Nota]:
leer, el indicador azul y amarillo parpadean cuatro veces y luego se apagará. La cámara se apagará
automáticamente.
3.1. ENCENDIDO / APAGADO
3.1.1. Encienda la cámara por pulsar el botón de fuente de alimentación durante
dos segundos. El indicador de luz azul y amarilla se iluminarán durante cinco
segundos. Despúes, el amarillo se apagará, mientras que el azul permanece
encendida, lo que indica que la cámara ha entrado en el modo de espera
automáticamente.
3.1.2. Apagar la cámara por pulsar el botón de fuente de alimentación durante siete
segundos cuando la cámara está grabando o está en el modo de espera.
[Nota]:
operación de más de un minuto.
3.2. GRABACIÓN DE VÍDEO 720P
3.2.1. Encienda la cámara por pulsar el botón de fuente de alimentación durante
dos segundos. El indicador de luz azul y amarillo se iluminarán durante cinco
segundos. Despúes, el amarillo se apagará, mientras que el azul permanece
encendida, indica que la cámara ha entrado en el modo de espera
automáticamente.
3.1.2. Pulse el botón de fuente de alimentación una vez para grabar vídeo con
resolución de 1280 × 720p.El indicador de luz de color azul parpadea tres veces y
luego se apagará.
3.1.3. Pulse el botón de encendido una vez para detener la grabación de vídeo. El
indicador de luz azul permanece encendida, lo que indica que la cámara está de
vuelta al modo de espera.
[Notes]:
1). Un archivo de vídeo se genera y se guarda automáticamente cada 5 minutos.
2). La cámara puede grabar vídeo continuamente durante 5,5 horas con una carga completa.
3). Resolución de video: 1920×1080P Formato de video: AVI
3.3. GRABACIÓN DE VÍDEO 1080P
P9000
Guía del usuario
I. Descripción del producto
1. Micrófono
2. Botón de fuente de alimentación
3. Lente de la cámara
4. Botón de la cámara
5. Botón de reinicio
II. Qué hay en la caja
-1×Cámara de grabación de conferencia
-1×Cable USB / AV
III. Operación
>> Antes de usar, asegúrese de que la cámara esté completamente recargada.
>> Por favor asegúrese de que la tarjeta Micro SD (4GB-32GB, es de perioridad en
Page 22

el uso ) está montado de forma segura en la ranura de la tarjeta SD de la cámara,
en caso contrario, la cámara no funcionará. Se recomienda una tarjeta Micro SD de
SDHC Clase 10.
[Nota]:
Si no hay ninguna tarjeta Micro SD está montado en la cámara o la tarjeta SD no se puede
leer, el indicador azul y amarillo parpadean cuatro veces y luego se apagará. La cámara se apagará
automáticamente.
3.1. ENCENDIDO / APAGADO
3.1.1. Encienda la cámara por pulsar el botón de fuente de alimentación durante
dos segundos. El indicador de luz azul y amarilla se iluminarán durante cinco
segundos. Despúes, el amarillo se apagará, mientras que el azul permanece
encendida, lo que indica que la cámara ha entrado en el modo de espera
automáticamente.
3.1.2. Apagar la cámara por pulsar el botón de fuente de alimentación durante siete
segundos cuando la cámara está grabando o está en el modo de espera.
[Nota]:
La cámara se apagará automáticamente si está en el modo de espera sin ningún tipo de
operación de más de un minuto.
3.2. GRABACIÓN DE VÍDEO 720P
3.2.1. Encienda la cámara por pulsar el botón de fuente de alimentación durante
dos segundos. El indicador de luz azul y amarillo se iluminarán durante cinco
segundos. Despúes, el amarillo se apagará, mientras que el azul permanece
encendida, indica que la cámara ha entrado en el modo de espera
automáticamente.
3.1.2. Pulse el botón de fuente de alimentación una vez para grabar vídeo con
resolución de 1280 × 720p.El indicador de luz de color azul parpadea tres veces y
luego se apagará.
3.1.3. Pulse el botón de encendido una vez para detener la grabación de vídeo. El
indicador de luz azul permanece encendida, lo que indica que la cámara está de
vuelta al modo de espera.
[Notes]:
1). Un archivo de vídeo se genera y se guarda automáticamente cada 5 minutos.
2). La cámara puede grabar vídeo continuamente durante 5,5 horas con una carga completa.
3). Resolución de video: 1920×1080P Formato de video: AVI
3.3. GRABACIÓN DE VÍDEO 1080P
3.3.1. Encienda la cámara por pulsar el botón de fuente de alimentación durante
dos segundos. El indicador de luz azul y amarillo se iluminarán durante cinco
segundos.Despúes, el amarillo se apagará, mientras que el azul permanece
encendida, indica que la cámara ha entrado en el modo de espera
automáticamente.
3.3.2. Mantenga pulsado el botón de fuente de alimentación durante tres segundos
para grabar vídeo con resolución de 1920 x 1080p. El indicador de luz amarilla
parpadea tres veces y se apagará.
3.3.3. Pulse el botón de fuente de alimentación una vez para detener la grabación
de vídeo. El indicador de luz azul permanece encendida, lo que indica que la
cámara está de vuelta al modo de espera.
3.4. CÁMARA / FOTO FIJA
3.4.1. Encienda la cámara por pulsar el botón de fuente de alimentación durante
dos segundos. El indicador de luz azul y amarilla se iluminarán durante cinco
segundos. Despúes, el amarillo se apagará, mientras que el azul permanece
encendida, lo que indica que la cámara ha entrado en el modo de espera
automáticamente.
3.4.2. Pulse el botón de la cámara una vez para tomar una foto. El indicador de luz
amarilla parpadea una vez y luego se apagará. El indicador de luz azul permanece
encendida, lo que indica que la cámara está de vuelta al modo de espera.
3.5. FORMATEO DE LA TARJETA MICRO SD
3.5.1. Encienda la cámara por pulsar el botón de fuente de alimemntación durante
dos segundos. El indicador de luz azul y amarilla se iluminarán durante cinco
segundos. A continuación, el amarillo se apagará, mientras que el azul permanece
encendida, lo que indica que la cámara ha entrado en el modo de espera
automáticamente.
3.5.2. Mantenga pulsado el botón de la cámara durante tres segundos. El indicador
de luz azul y amarilla parpadean cuatro veces en primer lugar, a continuación, y
despúes se iluminarán durante cinco segundos, al final, el indicador de luz amarilla
se apagará, lo que indica que el formato de tarjeta SD se ha completado.
3.5.3. El indicador de luz azul permanece encendida, indica que la cámara está de
vuelta al modo de espera.
IV. Subida de archivos de vídeo / imagen
Page 23

3.3.1. Encienda la cámara por pulsar el botón de fuente de alimentación durante
dos segundos. El indicador de luz azul y amarillo se iluminarán durante cinco
segundos.Despúes, el amarillo se apagará, mientras que el azul permanece
encendida, indica que la cámara ha entrado en el modo de espera
automáticamente.
3.3.2. Mantenga pulsado el botón de fuente de alimentación durante tres segundos
para grabar vídeo con resolución de 1920 x 1080p. El indicador de luz amarilla
parpadea tres veces y se apagará.
3.3.3. Pulse el botón de fuente de alimentación una vez para detener la grabación
de vídeo. El indicador de luz azul permanece encendida, lo que indica que la
cámara está de vuelta al modo de espera.
3.4. CÁMARA / FOTO FIJA
3.4.1. Encienda la cámara por pulsar el botón de fuente de alimentación durante
dos segundos. El indicador de luz azul y amarilla se iluminarán durante cinco
segundos. Despúes, el amarillo se apagará, mientras que el azul permanece
encendida, lo que indica que la cámara ha entrado en el modo de espera
automáticamente.
3.4.2. Pulse el botón de la cámara una vez para tomar una foto. El indicador de luz
amarilla parpadea una vez y luego se apagará. El indicador de luz azul permanece
encendida, lo que indica que la cámara está de vuelta al modo de espera.
3.5. FORMATEO DE LA TARJETA MICRO SD
3.5.1. Encienda la cámara por pulsar el botón de fuente de alimemntación durante
dos segundos. El indicador de luz azul y amarilla se iluminarán durante cinco
segundos. A continuación, el amarillo se apagará, mientras que el azul permanece
encendida, lo que indica que la cámara ha entrado en el modo de espera
automáticamente.
3.5.2. Mantenga pulsado el botón de la cámara durante tres segundos. El indicador
de luz azul y amarilla parpadean cuatro veces en primer lugar, a continuación, y
despúes se iluminarán durante cinco segundos, al final, el indicador de luz amarilla
se apagará, lo que indica que el formato de tarjeta SD se ha completado.
3.5.3. El indicador de luz azul permanece encendida, indica que la cámara está de
vuelta al modo de espera.
IV. Subida de archivos de vídeo / imagen
4.1. Cuando la cámara está apagada, retire la tarjeta Micro SD y la inserta en un
lector de tarjetas.
4.2. Inserte el lector de tarjetas en un ordenador PC.
4.3. La tarjeta Micro SD será reconocida como un controlador de disco extraíble.
4.4. Todos los archivos se puede acceder en la carpeta "DCIM".
V. Ajuste de la marca de hora / fecha
5.1. Conectar la cámara a un ordenador PC cuando está apagado,
5.2. Aparece una carpeta del controlador de disco extraíble.
5.3. Haga clic en el directorio raíz y dentro del directorio raíz, cree un archivo
llamado "TIMERSET.TXT".
5.4. Escribe la fecha y la hora actual en el archivo "TIMERSET.TXT" con el formato
correcto:
añomesdíahoraminutosegundo Y. (Por ejemplo: 20160412142432 Y). Guarde este
archivo. Si no necesita la marca en los archivos de vídeo, cambiar de "Y"a "N" en el
archivo.
5.5. Reiniciar la cámara y el sistema actualizará el programa automáticamente.
VI. Carga Solamente
6.1. Retire la tarjeta Micro SD de la cámara.
6.2. Conecta la cámara a un ordenador de PC por utilizar el cable USB
proporcionado.
6.3. Se llevará a 3 horas para obtener una carga completa.
6.4. El indicador de luz azul permanece encendida durante el proceso de carga.
6.5. Cuando la cámara está completamente cargada, el indicador de luz azul y
amarilla permanece encendida.
VII. Carga y grabación simultánea
7.1. Inserte una tarjeta Micro SD en la cámara.
7.2. Conecta la cámara a un ordenador de PC por utilizar el cable USB
proporcionado.
7.3. El indicador de luz azul parpadea tres veces y luego se apagará, lo que indica
que la cámara está grabando vídeo con resolución de 1280x720P.
7.4. Pulse el botón de encendido una vez para detener la grabación de vídeo. El
indicador de luz azul permanece encendido, indica que la cámara está de vuelta al
modo de espera.
Page 24

4.1. Cuando la cámara está apagada, retire la tarjeta Micro SD y la inserta en un
lector de tarjetas.
4.2. Inserte el lector de tarjetas en un ordenador PC.
4.3. La tarjeta Micro SD será reconocida como un controlador de disco extraíble.
4.4. Todos los archivos se puede acceder en la carpeta "DCIM".
V. Ajuste de la marca de hora / fecha
5.1. Conectar la cámara a un ordenador PC cuando está apagado,
5.2. Aparece una carpeta del controlador de disco extraíble.
5.3. Haga clic en el directorio raíz y dentro del directorio raíz, cree un archivo
llamado "TIMERSET.TXT".
5.4. Escribe la fecha y la hora actual en el archivo "TIMERSET.TXT" con el formato
correcto:
añomesdíahoraminutosegundo Y. (Por ejemplo: 20160412142432 Y). Guarde este
archivo. Si no necesita la marca en los archivos de vídeo, cambiar de "Y"a "N" en el
archivo.
5.5. Reiniciar la cámara y el sistema actualizará el programa automáticamente.
VI. Carga Solamente
6.1. Retire la tarjeta Micro SD de la cámara.
6.2. Conecta la cámara a un ordenador de PC por utilizar el cable USB
proporcionado.
6.3. Se llevará a 3 horas para obtener una carga completa.
6.4. El indicador de luz azul permanece encendida durante el proceso de carga.
6.5. Cuando la cámara está completamente cargada, el indicador de luz azul y
amarilla permanece encendida.
VII. Carga y grabación simultánea
7.1. Inserte una tarjeta Micro SD en la cámara.
7.2. Conecta la cámara a un ordenador de PC por utilizar el cable USB
proporcionado.
7.3. El indicador de luz azul parpadea tres veces y luego se apagará, lo que indica
que la cámara está grabando vídeo con resolución de 1280x720P.
7.4. Pulse el botón de encendido una vez para detener la grabación de vídeo. El
indicador de luz azul permanece encendido, indica que la cámara está de vuelta al
modo de espera.
[Nota]: Usted podría experimentar otras funciones de la cámara en el proceso de carga.
VIII. Restablecimiento
Si por alguna razón la cámara deja de responder o no está funcionando
correctamente, un reinicio rápido va a restaurar de nuevo a la operación normal.
Operación: Pulse el botón de reinicio una vez para restablecer la cámara. Los
indicadores de luz azul y amarilla se apagarán y la cámara se apagará
automáticamente.
IX. Salida de vídeo en vivo
9.1. Conectar la cámara a un televisor o monitor mediante el cable AV que se
proporciona la siguiente:
9.2. Seleccione la fuente de señal de vídeo de la cámara en el televisor o monitor.
9.3. Encienda la cámara y empezar la grabación de vídeo (Ver 3.2 o 3.3), entonces
usted puede ver el video en vivo de la cámara en el televisor o monitor durante el
proceso de grabación de vídeo.
9.4. Usted podría experimentar otras funciones de esta cámara en el modo de
visualización en vivo.
Page 25
[Nota]: Usted podría experimentar otras funciones de la cámara en el proceso de carga.
VIII. Restablecimiento
Si por alguna razón la cámara deja de responder o no está funcionando
correctamente, un reinicio rápido va a restaurar de nuevo a la operación normal.
Operación: Pulse el botón de reinicio una vez para restablecer la cámara. Los
indicadores de luz azul y amarilla se apagarán y la cámara se apagará
automáticamente.
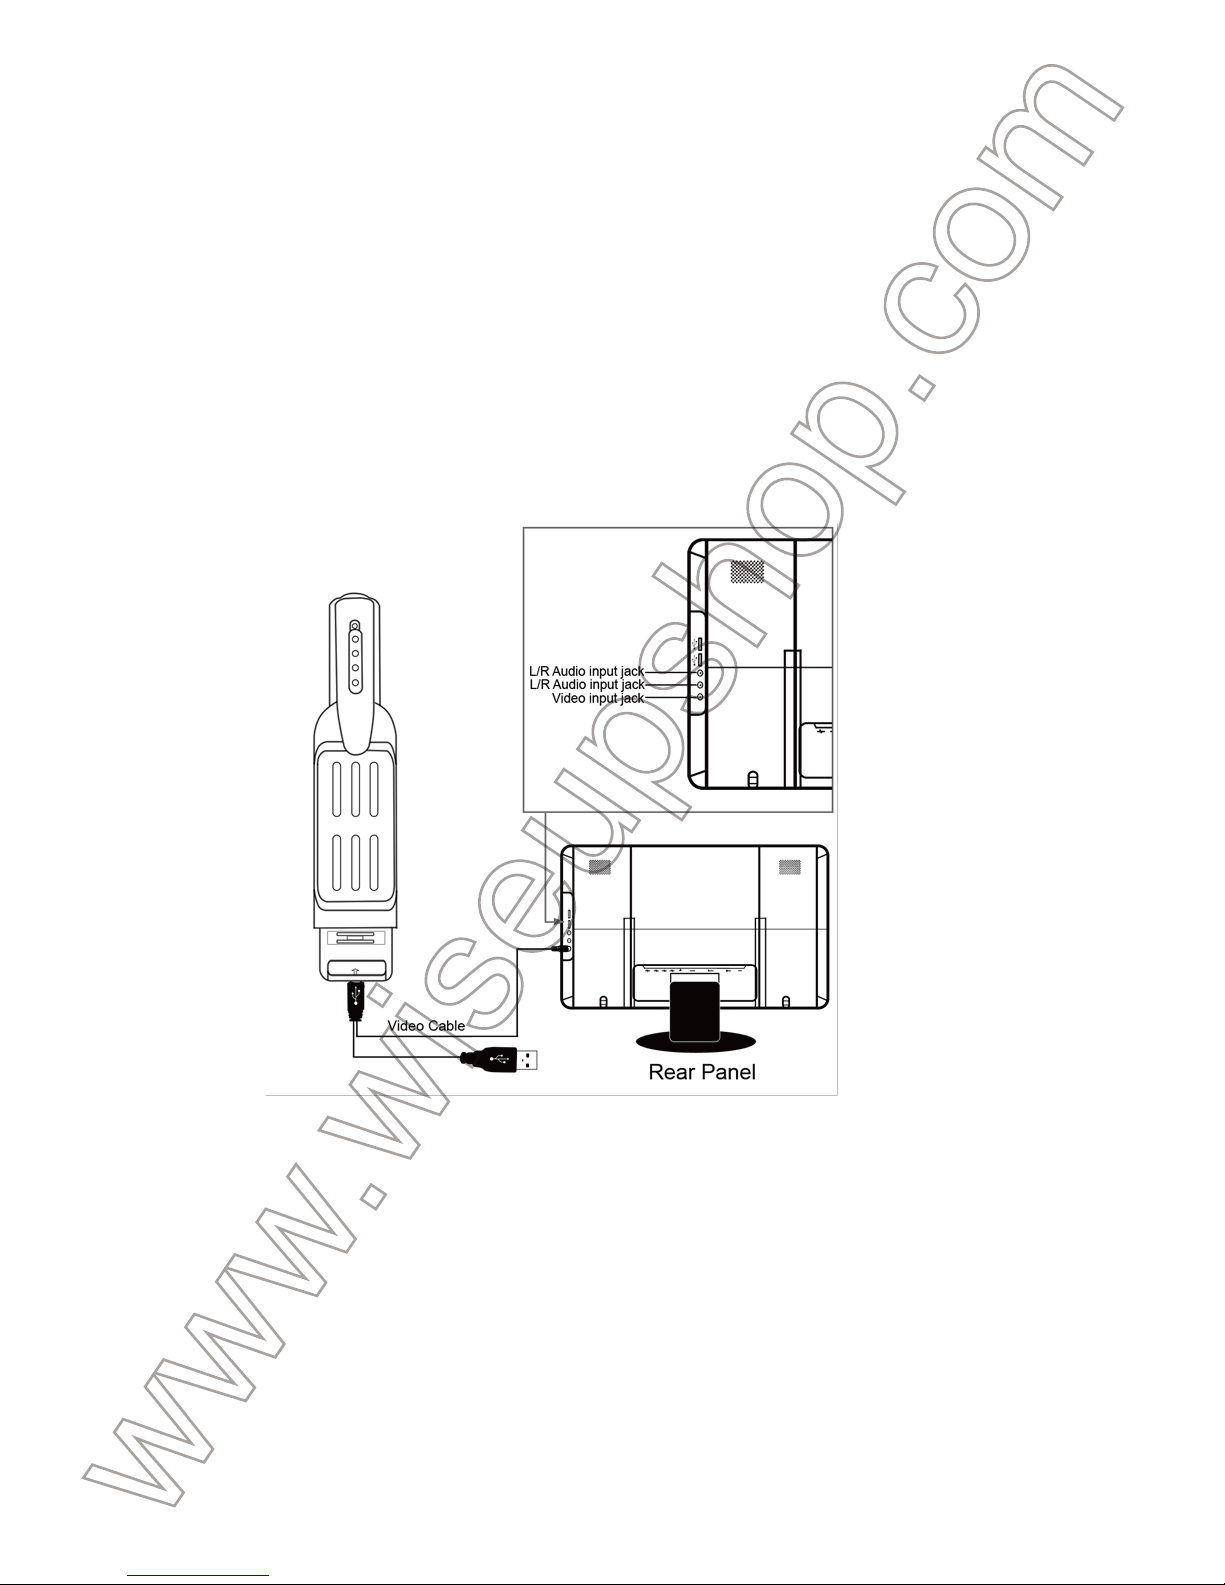
IX. Salida de vídeo en vivo
9.1. Conectar la cámara a un televisor o monitor mediante el cable AV que se
proporciona la siguiente:
9.2. Seleccione la fuente de señal de vídeo de la cámara en el televisor o monitor.
9.3. Encienda la cámara y empezar la grabación de vídeo (Ver 3.2 o 3.3), entonces
usted puede ver el video en vivo de la cámara en el televisor o monitor durante el
proceso de grabación de vídeo.
9.4. Usted podría experimentar otras funciones de esta cámara en el modo de
visualización en vivo.
Page 26
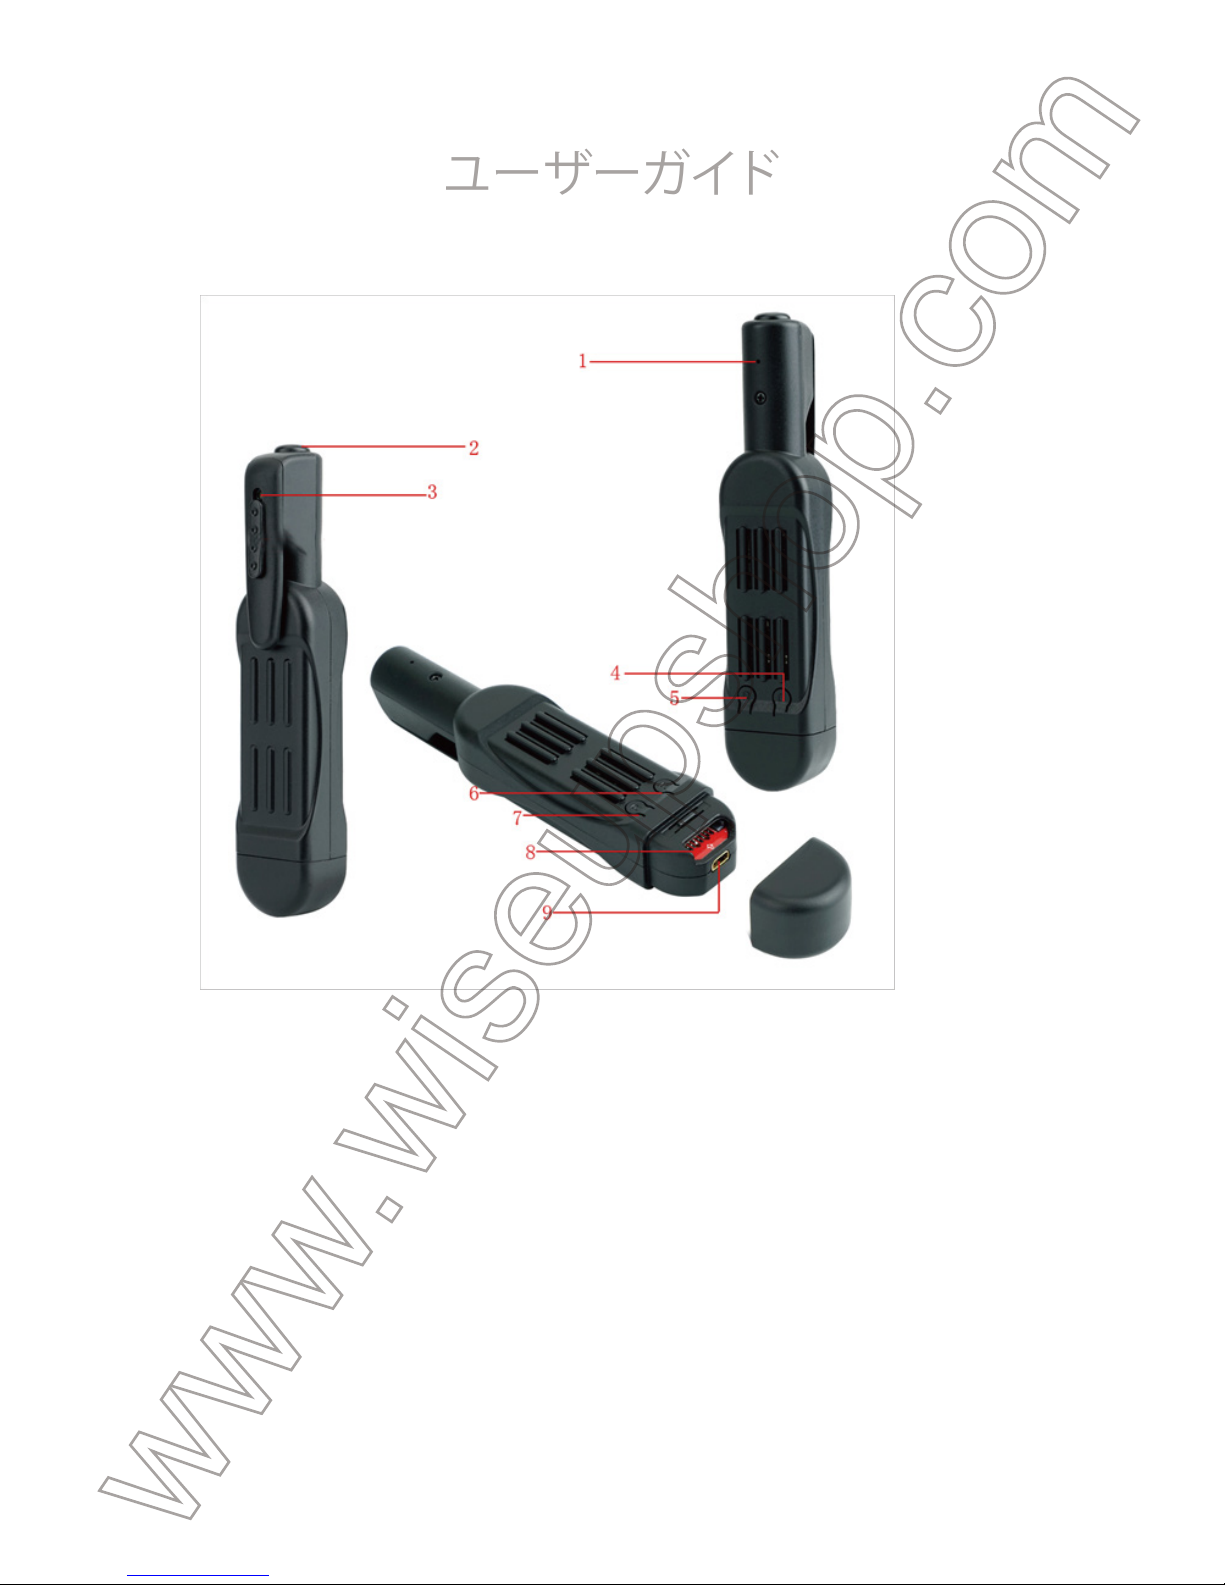
6.黄色のインジケータライト
7.青色のインジケータライト
8.マイクロSDカードスロット
9.ミニUSBポート
ット)を確認してくださいしっかりとカメラのSDカードスロットに装着されている、また
はカメラが動作しません。SDHCクラス10マイクロSDカードをお勧めします。
[注意]:
合は、青と黄色のインジケータライトが4回点滅してから消灯します。カメラが自動的にシャットダウンしま
す。
3.1.電源のオン/オフ
3.1.1. 2秒間電源ボタンを押してカメラの電源をオンにします。青と黄色のインジケー
タランプが5秒間点灯します。青1が点灯したままになりながら、黄色の1は、自動的にス
タンバイモードに入ったカメラを示す、オフになります。
3.1.2. カメラが記録中またはスタンバイモードになっているときに7秒間電源ボタンを
押してカメラの電源をオフにします。
[注意]:
ダウンしま す。
3.2.720P録画
3.2.1. 2秒間電源ボタンを押してカメラの電源をオンにして。青と黄色のインジケータ
ランプが5秒間点灯します。青のインジケータライトが点灯したままになりながら、黄色
のインジケータライトが消えます、自動的にスタンバイモードに入ります。
3.1.2.POWERボタンを押すと、一度1280×720Pのビデオ解像度でビデオを記録します
。青色のインジケータランプが3回点滅し、その後消灯します。
3.1.3. POWERボタンを押すと、再びビデオの録画を停止します。青色のインジケータラ
イトがカメラを示すが戻ってスタンバイモードにある、照らされたままになります.
[注意]:
1).ビデオファイルが生成され、自動的に5分ごとに保存されます。
2).カメラは完全充電で5.5時間連続した映像を記録することができます。
3).ビデオ解像度:1920×1080P映像フォーマット:AVI
3.3.1080P録画
3.3.1. 2秒間電源ボタンを押してカメラの電源をオンにして。青と黄色のインジケータ
ランプが5秒間点灯します。青のインジケータライトが点灯したままになりながら、黄色
のインジケータライトが消えます、自動的にスタンバイモードに入ります。
3.3.2.3秒は1920×1080のビデオ解像度でビデオを録画するための電源ボタンを押し
たままにします。黄色のインジケータランプが3回点滅し、オフになります。
P9000
ユーザーガイド
I.製品の概要
1.マイクロフォン
2.電源ボタン
3.カメラレンズ
4.カメラボタン
5. リセットボタン
II.ボックスについて
-1×ミーティングレコーダーカメラ
-1×USB/AVケーブル
III.操作
>>使用する前に、カメラが完全に再充電されていることを確認してください。
>> マイクロSDカード(最大4GB-32ギガバイトは、第1の使用のためにそれをフォーマ
Page 27

ット)を確認してくださいしっかりとカメラのSDカードスロットに装着されている、また
はカメラが動作しません。SDHCクラス10マイクロSDカードをお勧めします。
[注意]:
何のマイクロSDカードがカメラに装着されていないか、SDカードを読み取ることができない場
合は、青と黄色のインジケータライトが4回点滅してから消灯します。カメラが自動的にシャットダウンしま
す。
3.1.電源のオン/オフ
3.1.1. 2秒間電源ボタンを押してカメラの電源をオンにします。青と黄色のインジケー
タランプが5秒間点灯します。青1が点灯したままになりながら、黄色の1は、自動的にス
タンバイモードに入ったカメラを示す、オフになります。
3.1.2. カメラが記録中またはスタンバイモードになっているときに7秒間電源ボタンを
押してカメラの電 源をオフにします。
[注意]:
それは1分以上何も操作せずにスタンバイモードになっている場合はカメラが自動的にシャット
ダウンしま す。
3.2.720P録画
3.2.1. 2秒間電源ボタンを押してカメラの電源をオンにして。青と黄色のインジケータ
ランプが5秒間点灯します。青のインジケータライトが点灯したままになりながら、黄色
のインジケータライトが消えます、自動的にスタンバイモードに入ります。
3.1.2.POWERボタンを押すと、一度1280×720Pのビデオ解像度でビデオを記録します
。青色のインジケータランプが3回点滅し、その後消灯します。
3.1.3. POWERボタンを押すと、再びビデオの録画を停止します。青色のインジケータラ
イトがカメラを示すが戻ってスタンバイモードにある、照らされたままになります.
[注意]:
1).ビデオファイルが生成され、自動的に5分ごとに保存されます。
2).カメラは完全充電で5.5時間連続した映像を記録することができます。
3).ビデオ解像度:1920×1080P映像フォーマット:AVI
3.3.1080P録画
3.3.1. 2秒間電源ボタンを押してカメラの電源をオンにして。青と黄色のインジケータ
ランプが5秒間点灯します。青のインジケータライトが点灯したままになりながら、黄色
のインジケータライトが消えます、自動的にスタンバイモードに入ります。
3.3.2.3秒は1920×1080のビデオ解像度でビデオを録画するための電源ボタンを押し
たままにします。黄色のインジケータランプが3回点滅し、オフになります。
3.3.3. POWERボタンを押すと、一度ビデオの録画を停止します。青色のインジケータラ
イトがカメラを示すが戻ってスタンバイモードにある、照らされたままになります。
3.4.カメラ/静止画撮影
3.4.1. 2秒間電源ボタンを押してカメラの電源をオンにして。青と黄色のインジケータ
ランプが5秒間点灯します。青のインジケータライトが点灯したままになりながら、黄色
のインジケータライトが消えます、自動的にスタンバイモードに入ります。
3.4.2. [カメラ]ボタンを押して、写真を取ることができます。黄色のインジケータランプ
が一度点滅した後、オフになります。青色のインジケータライトがカメラを示すが戻っ
てスタンバイモードにある、照らされたままになります。
3.5.マイクロSDカードのフォーマット
3.5.1. 2秒間電源ボタンを押してカメラの電源をオンにします。青と黄色のインジケー
タランプが5秒間点灯します。青1が点灯したままになりながら、黄色の1は、自動的にス
タンバイモードに入ったカメラを示す、オフになります。
3.5.2. 3秒間カメラボタンを押したままにします。青と黄色のインジケータライトは、最
初に、その後、彼らは5秒間点灯します4回点滅し、黄色のインジケータライトは、SDカ
ードのフォーマットが 完了したことを示 す、オフに なります。
3.5.3. 青色のインジケータライトがカメラを示すが戻ってスタンバイモードにある、照
らされたままになります。
IV.ビデオ/画像ファイルのアップロード
4.1. カメラの電源がオフのときは、マイクロSDカードを取り外し、カードリーダーに挿
入します。
4.2.PCのコンピュータにカードリーダーを挿入します。
4.3.マイクロSDカードは、取り外し可能なディスクドライブとして認識されます。
4.4.すべてのファイルは、「DCIM」フォルダにアクセスすることができます。
V.設定時刻/日付スタンプ
5.1.それがパワーオフされたときにPCコンピュータにカメラを接続し、
5.2.リムーバブルディスクドライブのフォルダが表示されます。
5.3. ルートディレクトリのドライブをクリックして、ルートディレクトリの中に、「
TIMERSET.TXT"という名前のファイルを作成します。
5.4.正しい形式で「TIMERSET.TXT」ファイル内の現在の日付と時刻を書いてください:
Page 28

3.3.3. POWERボタンを押すと、一度ビデオの録画を停止します。青色のインジケータラ
イトがカメラを示すが戻ってスタンバイモードにある、照らされたままになります。
3.4.カメラ/静止画撮影
3.4.1. 2秒間電源ボタンを押してカメラの電源をオンにして。青と黄色のインジケータ
ランプが5秒間点灯します。青のインジケータライトが点灯したままになりながら、黄色
のインジケータライトが消えます、自動的にスタンバイモードに入ります。
3.4.2. [カメラ]ボタンを押して、写真を取ることができます。黄色のインジケータランプ
が一度点滅した後、オフになります。青色のインジケータライトがカメラを示すが戻っ
てスタンバイモードにある、照らされたままになります。
3.5.マイクロSDカードのフォーマット
3.5.1. 2秒間電源ボタンを押してカメラの電源をオンにします。青と黄色のインジケー
タランプが5秒間点灯します。青1が点灯したままになりながら、黄色の1は、自動的にス
タンバイモードに入ったカメラを示す、オフになります。
3.5.2. 3秒間カメラボタンを押したままにします。青と黄色のインジケータライトは、最
初に、その後、彼らは5秒間点灯します4回点滅し、黄色のインジケータライトは、SDカ
ードのフォーマットが 完了したことを示 す、オフに なります。
3.5.3. 青色のインジケータライトがカメラを示すが戻ってスタンバイモードにある、照
らされたままになります。
IV.ビデオ/画像ファイルのアップロード
4.1. カメラの電源がオフのときは、マイクロSDカードを取り外し、カードリーダーに挿
入します。
4.2.PCのコンピュータにカードリーダーを挿入します。
4.3.マイクロSDカードは、取り外し可能なディスクドライブとして認識されます。
4.4.すべてのファイルは、「DCIM」フォルダにアクセスすることができます。
V.設定時刻/日付スタンプ
5.1.それがパワーオフされたときにPCコンピュータにカメラを接続し、
5.2.リムーバブルディスクドライブのフォルダが表示されます。
5.3. ルートディレクトリのドライブをクリックして、ルートディレクトリの中に、「
TIMERSET.TXT"という名前のファイルを作成します。
5.4.正しい形式で「TIMERSET.TXT」ファイル内の現在の日付と時刻を書いてください:
年月日時分秒Y(例:20160412142432 Y)。このファイルを保存してください。あなたが
ビデオファイルにスタンプを必要としない場合は、ファイル内の「N」に「Y」に変更しま
す。
5.5.カメラを再起動し、システムが自動的にプログラムをアップグレードします。
VI.充電のみ
6.1.カメラからのマイクロSDカードを取り外します。
6.2.付属のUSBケーブルを使用して、カメラをパソコンに接続してくたさい。
6.3.完全充電になるために3時間かかります。
6.4.青色のインジケータライトは、充電中に着いたたままになります。
6.5.カメラが完全に充電されると、青と黄色のインジケータランプが点灯したままにな
ります .
VII.充電と同時に録音
7.1.カメラにマイクロSDカードを挿入します。
7.2.付属のUSBケーブルを使用して、カメラをパソコンに接続してくたさい。
7.3. 青色のインジケータランプが3回点滅した後、カメラは1280x720P解像度でビデオ
を録 画している示 す、オフに なります。
7.4. POWERボタンを押すと、ビデオの録画を停止します。青色のインジケータライトが
カメラを示すが戻ってスタンバイモードにある、照らされたままになります。
[注意]:充電過程中でカメラの他の機能を使用することができます。
VIII.再設定
何らかの理由で、カメラが応答を停止または正常に動作していない場合、クイックリセ
ットは通常の動作に復元します。
操 作:カメラをリセットするには、一度リセットボタンを押します。青と黄色のインジケ
ータライトがオフに なり、カメラが自動 的 にシャットダウンします。
IX.ライブビデオ出力
9.1. 以下のように付属のAVケーブルを使用してテレビやモニターにカメラを接続しま
す:
Page 29

年月日時分秒Y(例:20160412142432 Y)。このファイルを保存してください。あなたが
ビデオファイルにスタンプを必要としない場合は、ファイル内の「N」に「Y」に変更しま
す。
5.5.カメラを再起動し、システムが自動的にプログラムをアップグレードします。
VI.充電のみ
6.1.カメラからのマイクロSDカードを取り外します。
6.2.付属のUSBケーブルを使用して、カメラをパソコンに接続してくたさい。
6.3.完全充電になるために3時間かかります。
6.4.青色のインジケータライトは、充電中に着いたたままになります。
6.5.カメラが完全に充電されると、青と黄色のインジケータランプが点灯したままにな
ります .
VII.充電と同時に録音
7.1.カメラにマイクロSDカードを挿入します。
7.2.付属のUSBケーブルを使用して、カメラをパソコンに接続してくたさい。
7.3. 青色のインジケータランプが3回点滅した後、カメラは1280x720P解像度でビデオ
を録 画している示 す、オフに なります。
7.4. POWERボタンを押すと、ビデオの録画を停止します。青色のインジケータライトが
カメラを示すが戻ってスタンバイモードにある、照らされたままになります。
[注意]:充電過程中でカメラの他の機能を使用することができます。
VIII.再設定
何らかの理由で、カメラが応答を停止または正常に動作していない場合、クイックリセ
ットは通常の動作に復元します。
操 作:カメラをリセットするには、一度リセットボタンを押します。青と黄色のインジケ
ータライトがオフに なり、カメラが自動 的 にシャットダウンします。
IX.ライブビデオ出力
9.1. 以下のように付属のAVケーブルを使用してテレビやモニターにカメラを接続しま
す:
9.2.テレビやモニターにカメラ映像信号源を選択してください。
9.3.カメラの電源をオンにして、録音を開始したビデオ(3.2または3.3を参照)、その後、
テレビでカメラのライブ映像を見ることができるか、録画処理中に監視します。
9.4.ライブビューモードの途中で、他の機能を使用することができます。
Page 30
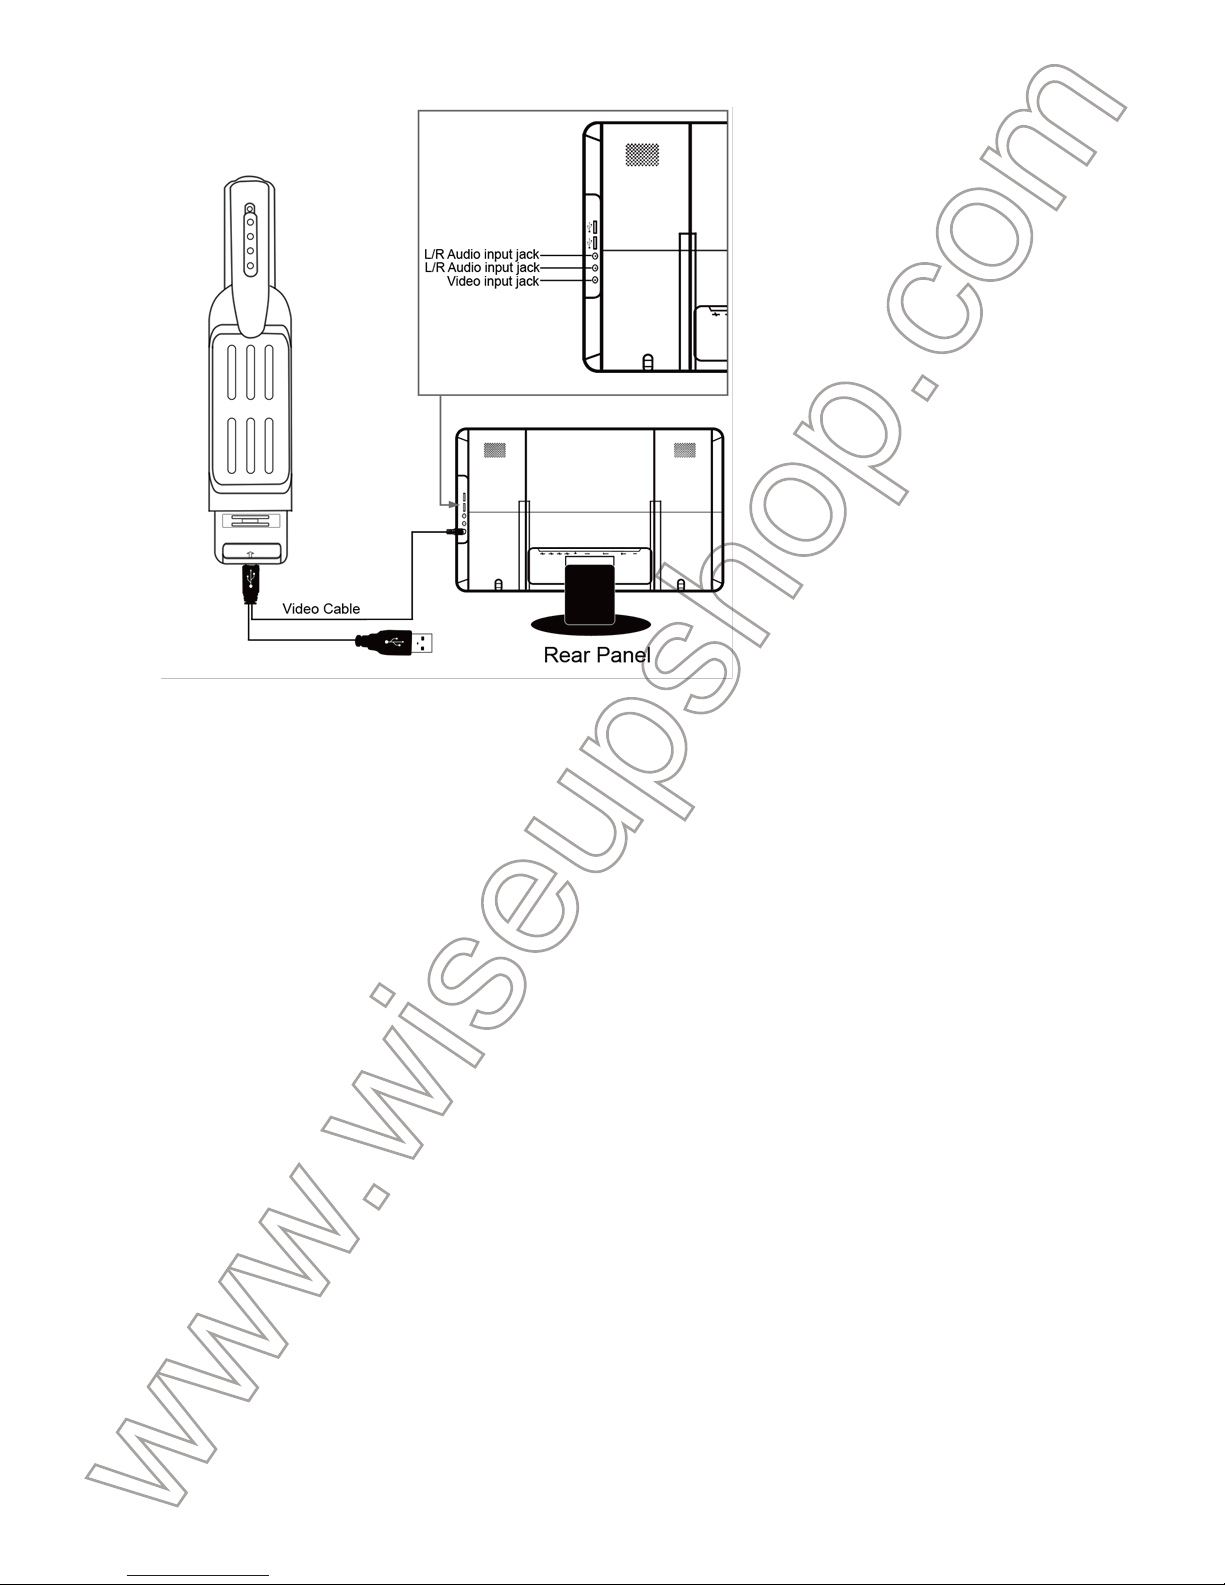
9.2.テレビやモニターにカメラ映像信号源を選択してください。
9.3.カメラの電源をオンにして、録音を開始したビデオ(3.2または3.3を参照)、その後、
テレビでカメラのライブ映像を見ることができるか、録画処理中に監視します。
9.4.ライブビューモードの途中で、他の機能を使用することができます。
 Loading...