

Page 1
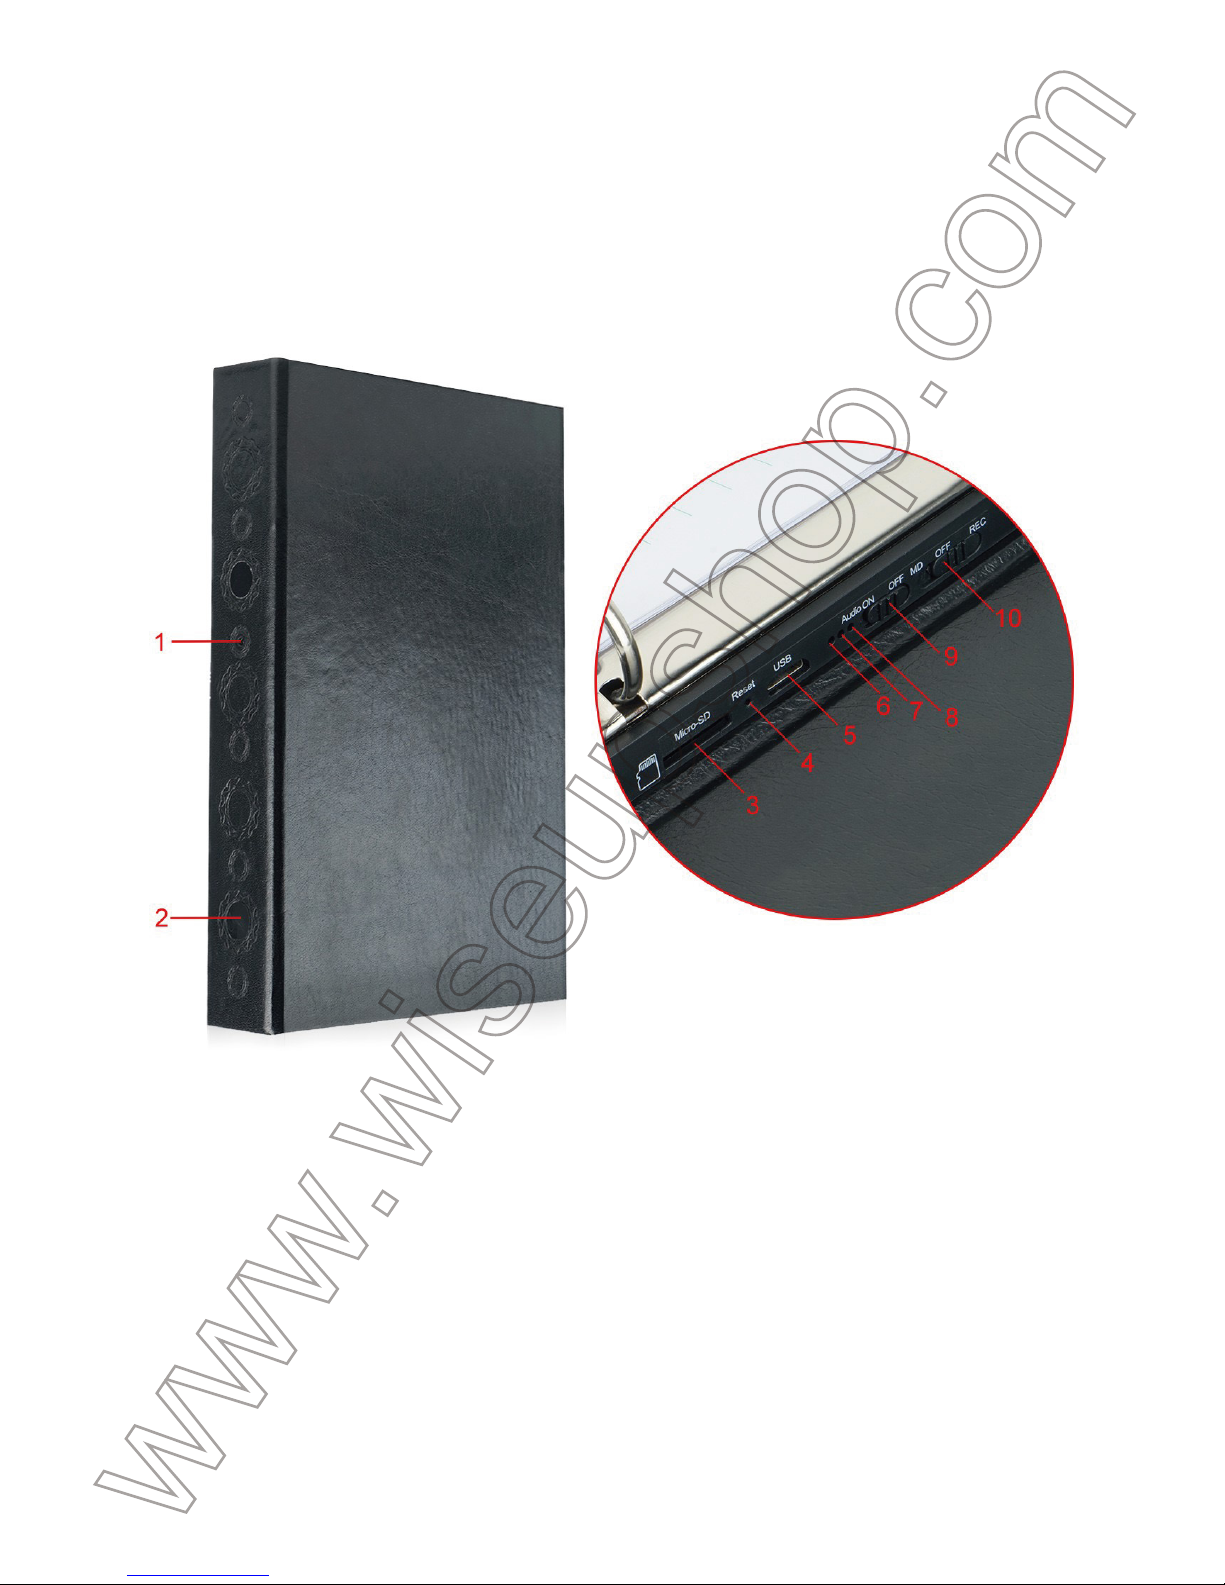
BOOK100
User Guide
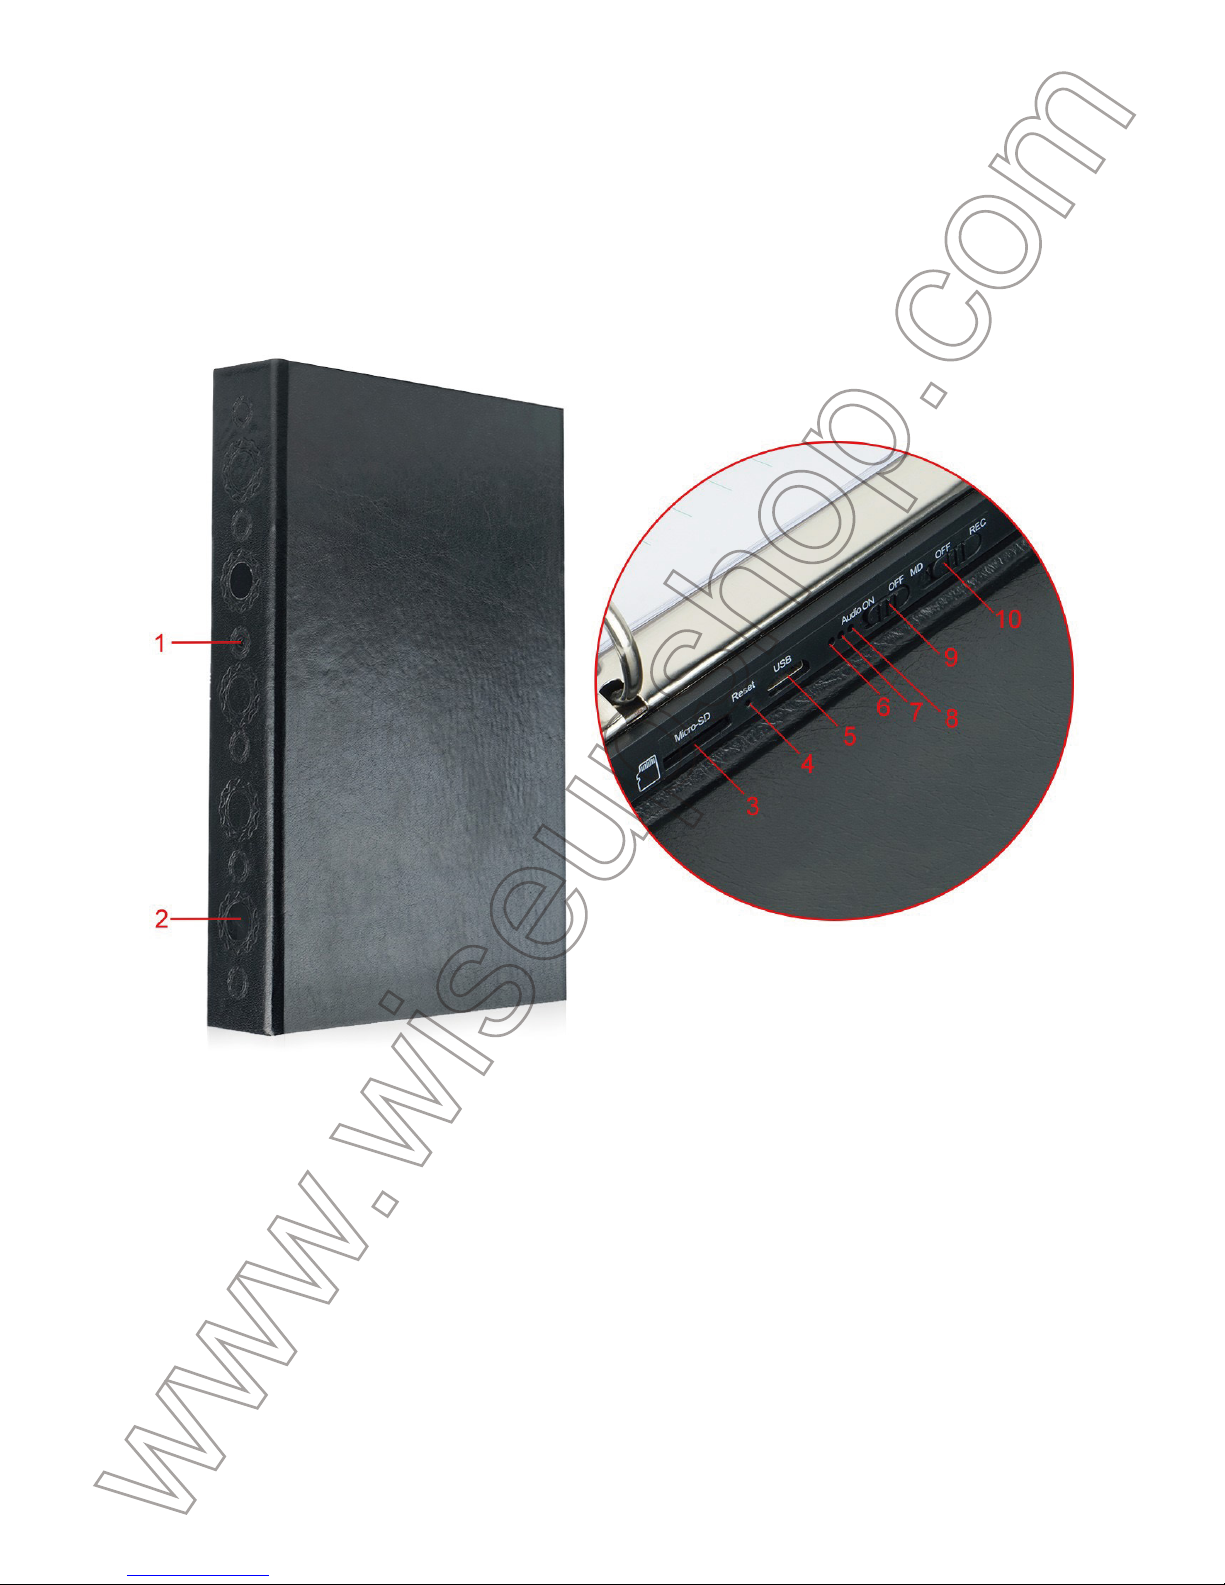
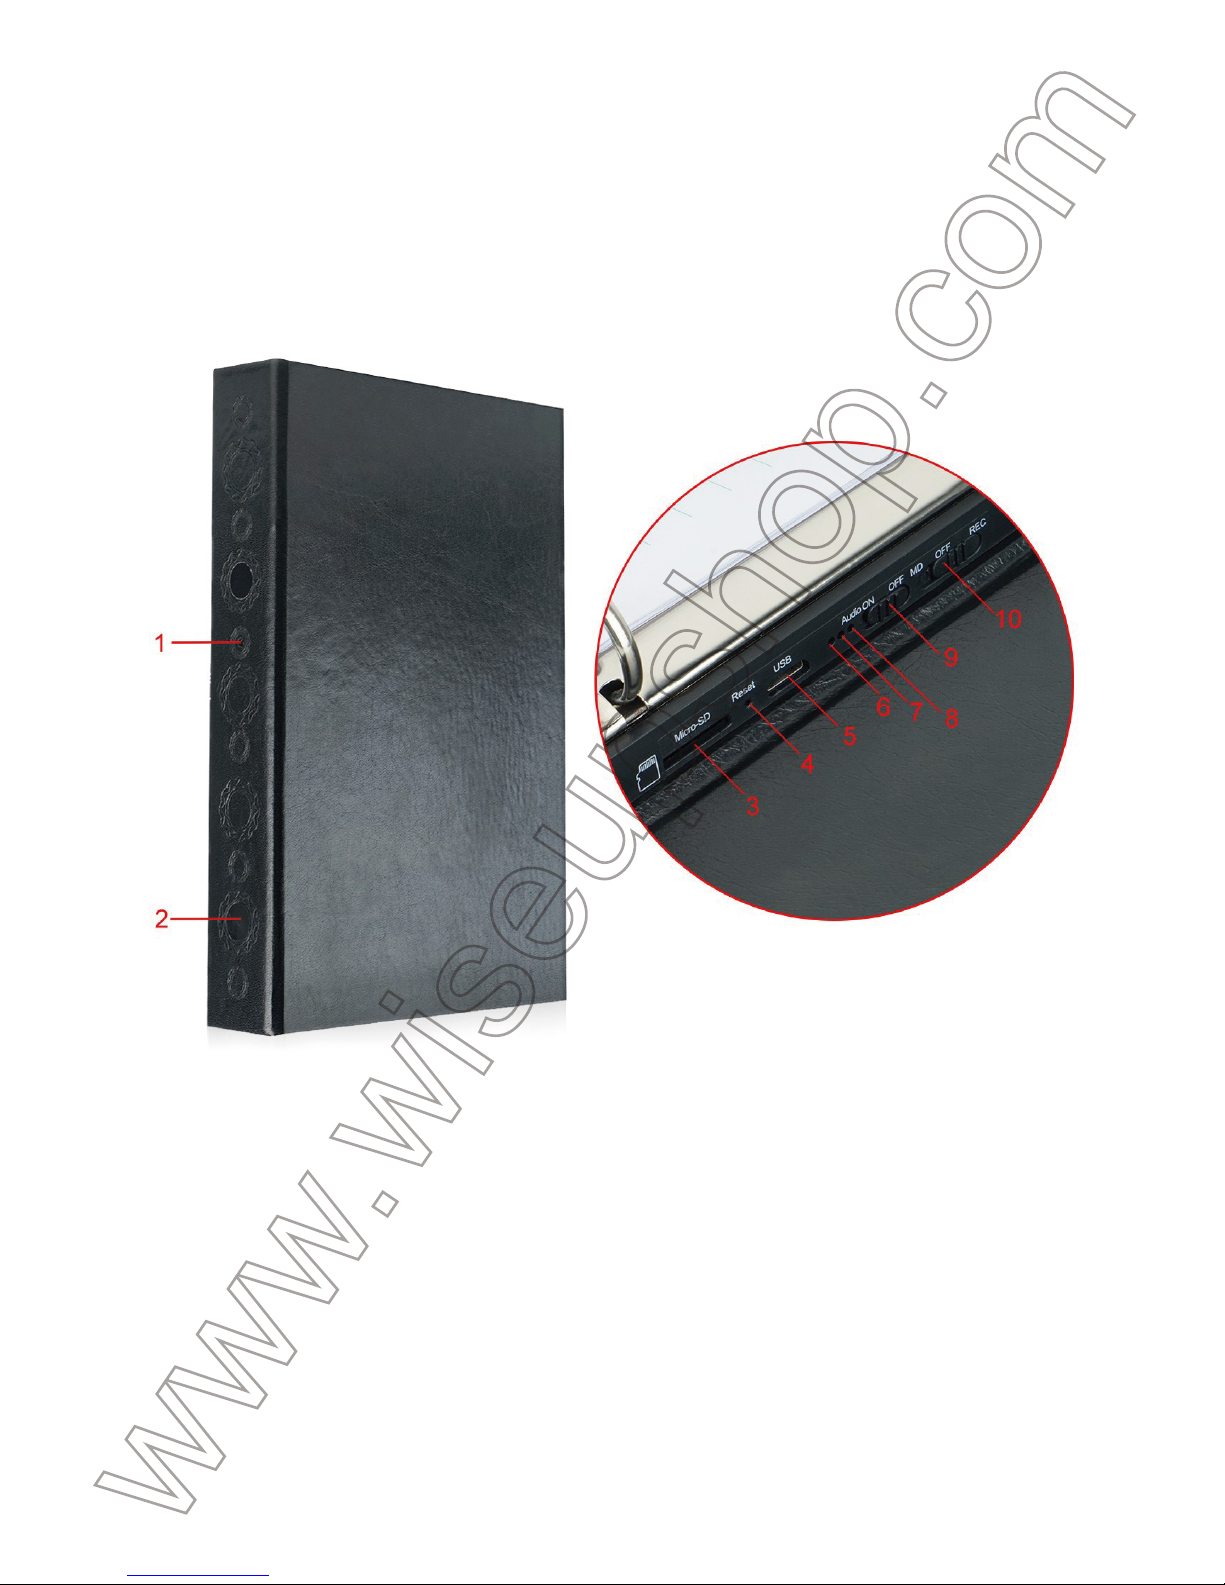
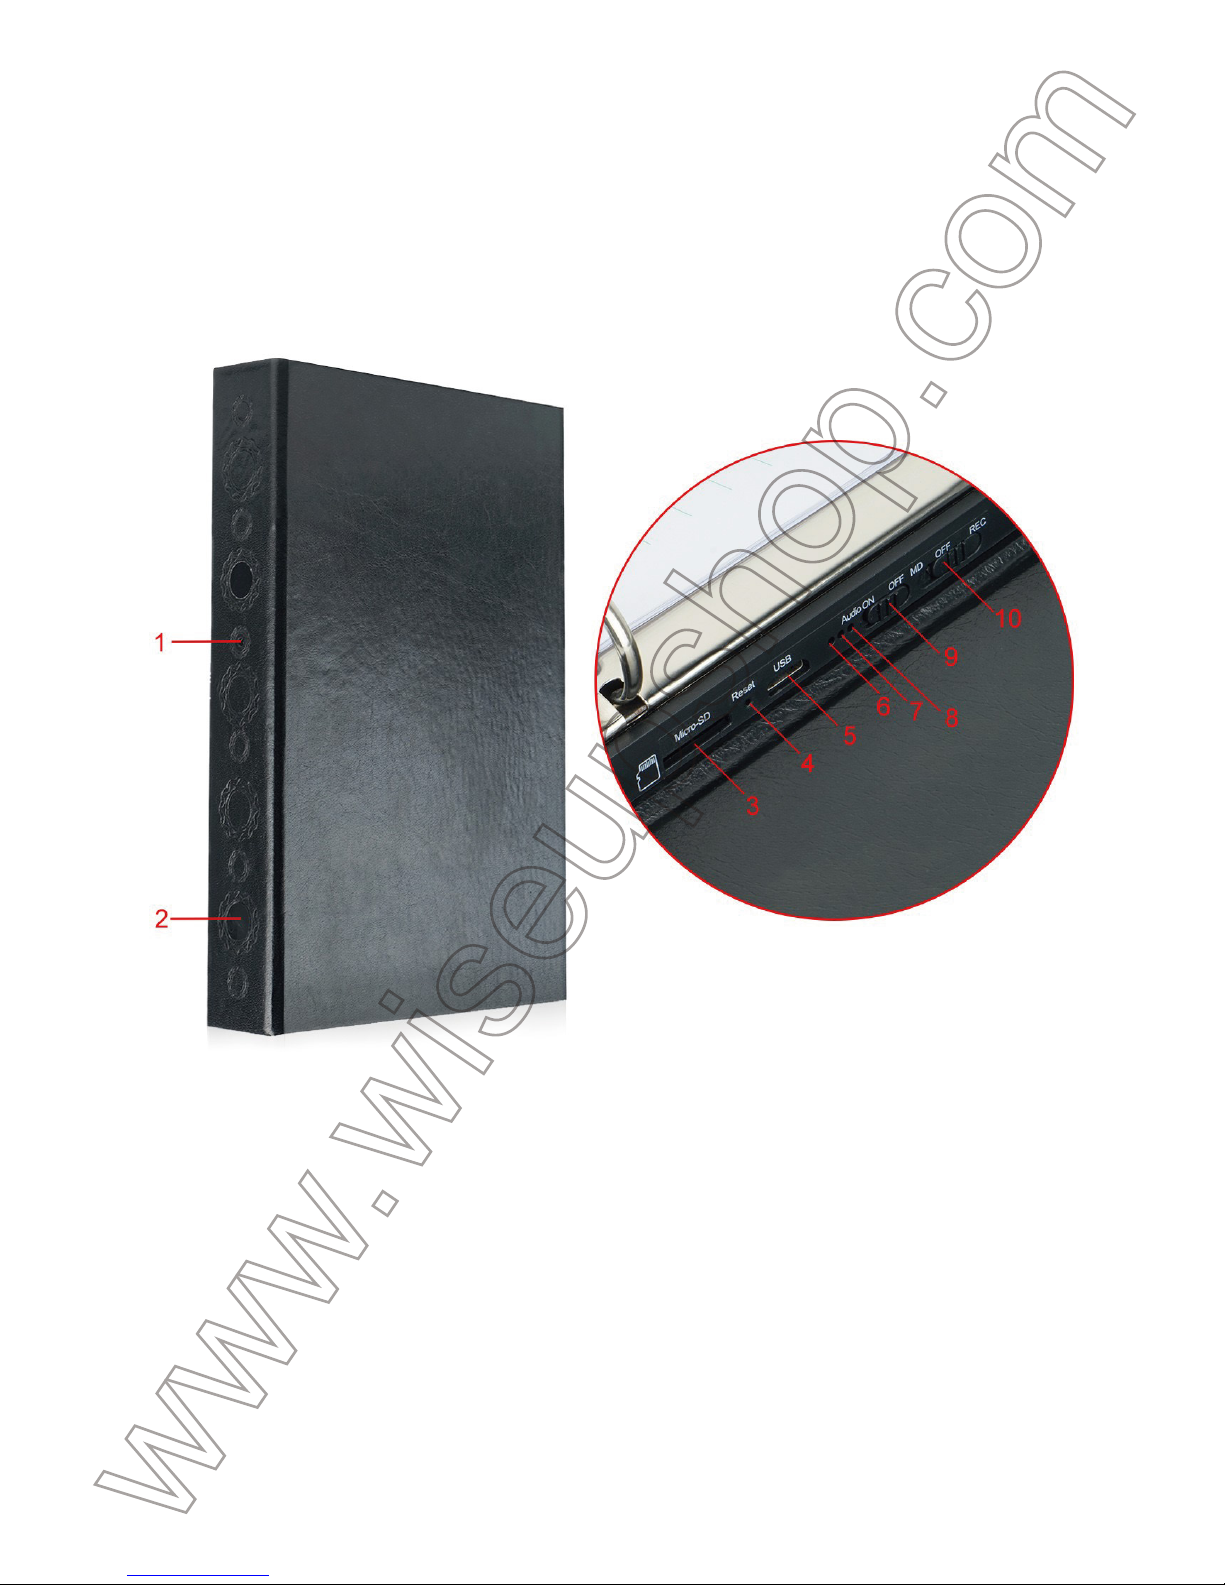
I. Product Overview
1. Camera Lens
2. PIR Sensor
3. Micro SD Card Slot
4. Reset Button
5. USB Port
6. Blue Indicator Light
7. Red Indicator Light
8. Yellow Indicator Light
9. Audio Switch
10. Mode Switch
Page 2

II. What’s in the Box
-1 x Book Camera
-1 x USB Cable
-1 x Card Reader
-1× AC110-240V to DC5V Charging Adapter
-1× 8GB Micro SD Card (fitted into the Micro SD card slot already)
III. Operation
>> Please make sure your book camera is fully recharged before using.
>> Please make sure the Micro SD card has been formatted already and is
securely fitted into the camera’s SD card slot, or it will not work. We recommend
you to use a SDHC Class 10 Micro SD card.
>> Slide the Audio Switch to the ON position; otherwise the video files will have no
audio.
[Note]: If no Micro SD card is fitted into the camera, the camera will shut down
automatically.The blue indicator light will flash 10 seconds and turn off if the Mode Switch
is in the REC position; the red indicator light will flash 10 seconds and turn off if the Mode
Switch is in the MD position.
3.1. POWER ON/OFF & VIDEO RECORDING
3.1.1. Slide the Mode Switch to the REC position to power on the camera. The blue
indicator light will come on and flash 3 times, then turn off. The camera will start
video recording automatically.
3.1.2. Slide the Mode Switch to the OFF position to power off the camera. The blue
indicator light will flash once and then turn off. The camera will stop video recording
and the video files will be saved automatically.
[Note]:
1). A video clip will be generated and saved every 2 minutes automatically.
2). The book camera can record video for 19.5 hours continuously on a full charge.
3). Video Resolution: 1920x1080P Video Format: AVI
4). Night Vision Range: 5m
5). If the camera is in low battery, the camera will save all video files and then shut down
Page 3

automatically. Both blue and red indicator lights will flash for 5 seconds and then turn off.
3.2. MOTION DETECTION VIDEO RECORDING
3.2.1. You can directly slide the Mode Switch to the MD position to make the
camera enter into motion detection recording mode. The blue indicator light will
come on and turn off, then the red one will flash 4 times and turn off. The camera
will capture a video automatically when a movement is detected.
3.2.2. Slide the Mode Switch to the OFF position to exit motion detection recording
mode. The blue indicator light will flash once and then turn off.
IV. Video/Image Files Uploads
4.1. Power off the camera, remove the Micro SD card and insert it into a card reader.
4.2. Insert the card reader into a proper PC computer USB port.
4.3. The Micro SD card will be recognized as a removable disk drive.
4.4. All the files can be accessed in the drive.
V. Setting Time/Date Stamp
5.1. Power off the camera, remove the Micro SD card and insert it into a card reader.
5.2. Insert the card reader into a proper PC computer USB port.
5.3. Removable disk drive folder appears.
5.4. Click on the drive in the root directory and inside the root directory, open the txt
file named "YM-TIME.TXT”.
5.5. Write the current date and time in the file "YM-TIME.TXT” with the correct
format:
YYYY/MM/DD HH:MM:SS (For example: 2016/03/08 14:24:32). Save this file.
5.6. Restart the camera and the system will upgrade the program automatically.
[Note]: There is a "yes" in the file named "YM-TIME.TXT”, and you can’t change it into
"no", otherwise the video files cannot be saved in the Micro SD card. If you have done the
above action, all you need do is to change the "no" into "yes", and reset the camera (See
VII).
Page 4

VI. Charging
6.1. Power off the camera, connect the camera to an outlet AC power supply by
using the USB cable and DV 5V charging adapter provided.
6.2. The yellow indicator light will remain solid during the charging process.
6.3. It will take 20.5 hours to obtain a full charge.
6.4. The yellow indicator light will turn off when the camera is fully recharged.
VII. Resetting
If for any reason the camera stops responding or isn’t working properly, a quick
reset will restore it back to normal operation.
Operation: When the camera is powered on, use a pin to press the Reset Button
once to restore all settings to factory settings. The camera will restart automatically
to default settings in 5 seconds.
Page 5
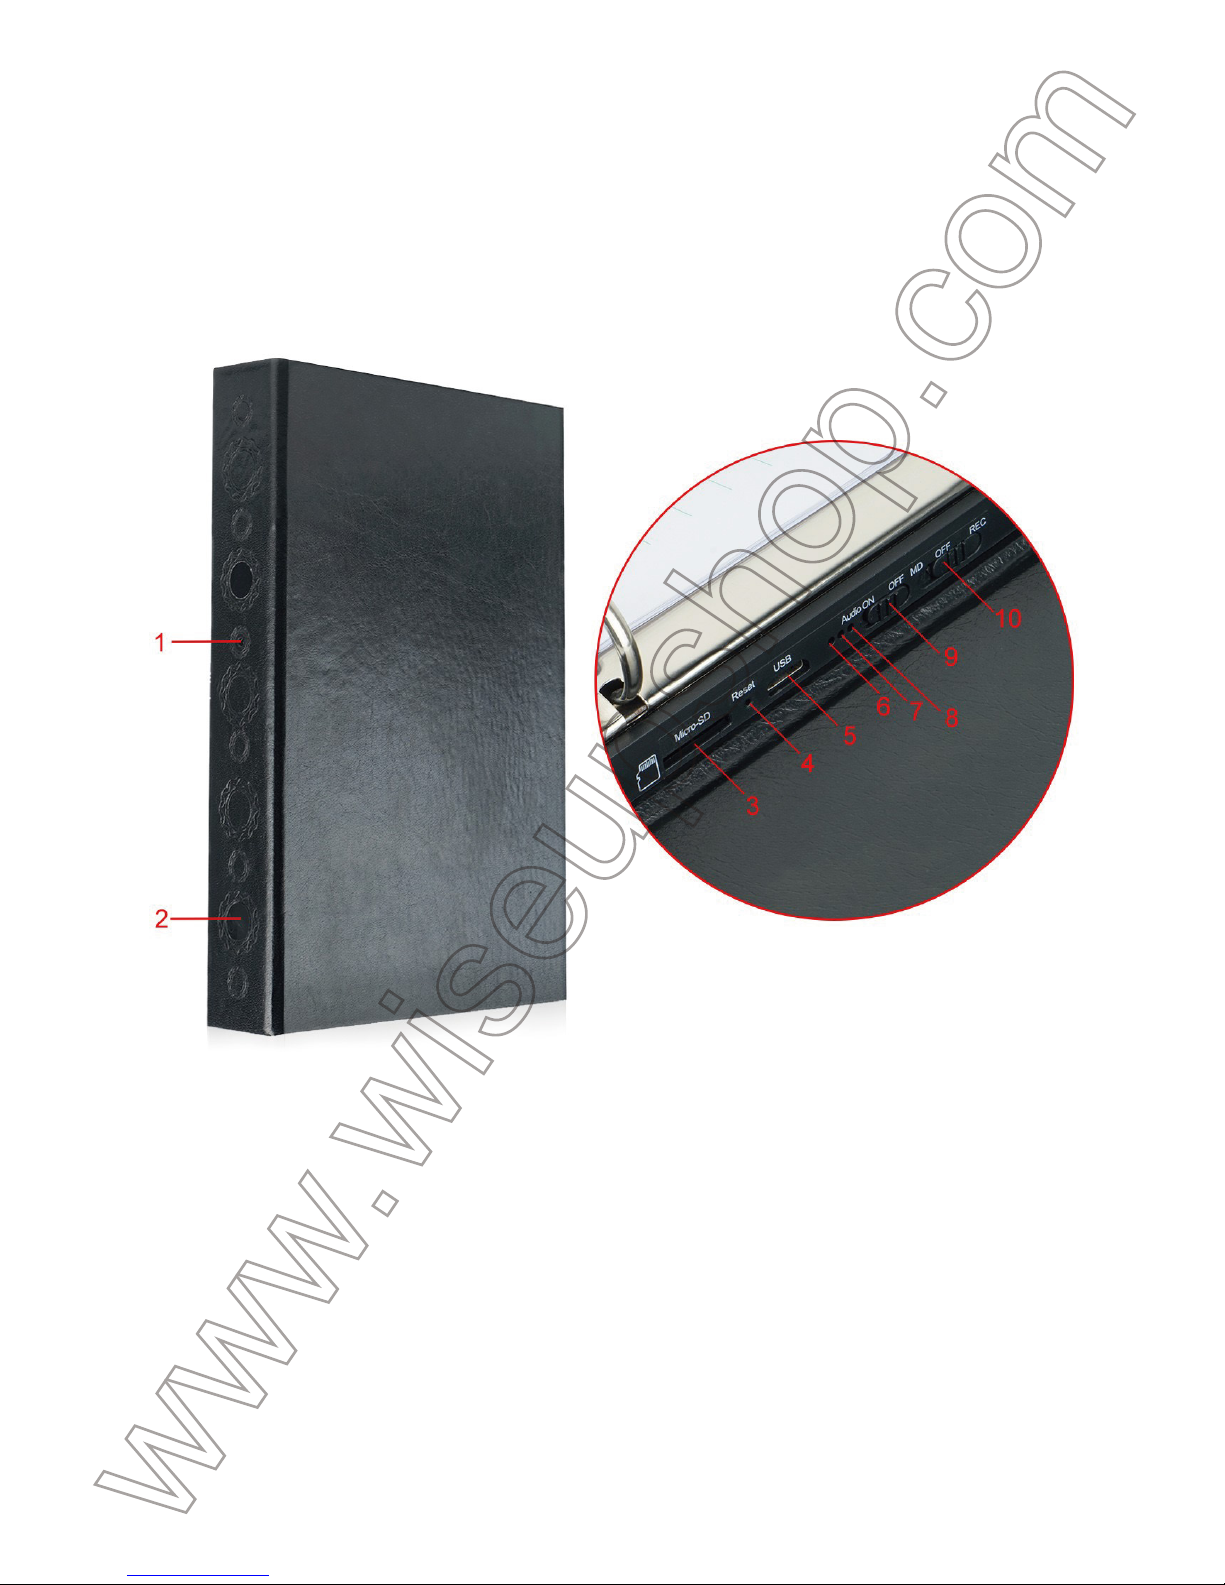
BOOK100
Benutzerhandbuch
I. Produktübersicht
1. Kameraobjektiv
2. PIR-Sensor
3. Mikro-Sd-Einbauschlitz
4. Reset-Taste
5. USB-Anschluss
6. Blaue Anzeigeleuchte
7. Rote Anzeigelampe
8. Gelbe Anzeigelampe
9. Audio-Schalter
10. Modusschalter
Page 6

II. Was ist in der Box
-1 x Buch-Kamera
-1 x USB-Kabel
-1 x Kartenleser
-1 × AC110-240V zum DC5V aufladenadapter
-1 × 8GB Micro SD-Karte (in den Micro SD-Kartensteckplatz bereits eingebaut)
III. Betrieb
>> Stellen Sie bitte sicher, dass Ihre Buchkamera vollständig vor Gebrauch
aufgeladen wird.
>> Vergewissern Sie sich, dass die Micro SD-Karte bereits formatiert wurde und
sicher in den SD-Kartensteckplatz der Kamera eingesetzt ist, oder es funktioniert
nicht. Wir empfehlen Ihnen, eine SDHC Klasse 10 Micro SD-Karte zu verwenden.
>> Schieben Sie den Audio-Schalter auf ON; Sonst haben die Videodateien keinen
Ton.
[Hinweis]:Wenn keine Micro SD-Karte in die Kamera eingelegt ist, wird die Kamera
automatisch heruntergefahren. Die blaue Kontrollleuchte blinkt 10 Sekunden und
schaltet sich aus, wenn sich der Modusschalter in der REC-Position befindet; Blinkt die
rote Kontrollleuchte 10 Sekunden und schaltet sich aus, wenn sich der Modusschalter in
der Position MD befindet.
3.1. POWER ON / OFF & VIDEOAUFNAHME
3.1.1. Schieben Sie den Modusschalter in die REC-Position, um die Kamera
einzuschalten. Die blaue Kontrolllampe leuchtet auf und blinkt dreimal, dann
ausschalten. Die Kamera startet die Videoaufnahme automatisch.
3.1.2. Schieben Sie den Modusschalter auf OFF, um die Kamera auszuschalten.
Die blaue Kontrollleuchte blinkt einmal und schaltet sich dann aus. Die Kamera
stoppt die Videoaufnahme und die Videodateien werden automatisch gespeichert.
[Hinweis]:
1). Alle 2 Minuten wird automatisch ein Videoclip erzeugt und gespeichert.
2). Die Buchkamera kann Video für 19,5 Stunden ununterbrochen auf einer vollen
Gebühr aufzeichnen.
Page 7

3). Video-Auflösung: 1920x1080P Video-Format: AVI
4). Nachtsicht-Strecke: 5m
5). Wenn die Kamera eine niedrige Batterie hat, speichert die Kamera alle Videodateien
und schaltet sich dann automatisch ab. Die blaue und rote Kontrollleuchte blinkt 5
Sekunden lang und schaltet sich dann aus.
3.2. MOTION DETECTION VIDEOAUFNAHME
3.2.1. Sie können den Modus-Schalter direkt auf die MD-Position schieben, um die
Kamera in den Bewegungserkennungs-Aufnahmemodus zu versetzen. Die blaue
Kontrolllampe leuchtet auf und schaltet sich aus, dann blinkt die rote 4 mal und
schaltet aus. Die Kamera erfasst automatisch ein Video, wenn eine Bewegung
erkannt wird.
3.2.2. Schieben Sie den Modusschalter auf die Position OFF, um den Modus für die
Bewegungserkennung zu beenden. Die blaue Kontrollleuchte blinkt einmal und
schaltet sich dann aus.
IV. Video / Bilddateien Uploads
4.1. Schalten Sie die Kamera aus, entfernen Sie die Micro SD-Karte und stecken
Sie sie in einen Kartenleser ein.
4.2. Stecken Sie den Kartenleser in einen geeigneten USB-Anschluss des
PC-Computers.
4.3. Die Micro SD-Karte wird als Wechseldatenträger erkannt.
4.4. Auf alle Dateien kann im Laufwerk zugegriffen werden.
V. Einstellzeit / Datumsstempel
5.1. Schalten Sie die Kamera aus, entfernen Sie die Micro SD-Karte und stecken
Sie sie in einen Kartenleser ein.
5.2.Stecken Sie den Kartenleser in einen ordnungsgemäßen
PC-Computer-USB-Anschluss.
5.3. Wechseldatenträgerordner wird angezeigt.
5.4. Klicken Sie auf das Laufwerk im Stammverzeichnis und im Stammverzeichnis,
öffnen Sie die txt-Datei mit dem Namen "YM-TIME.TXT".
Page 8
5.5. Schreiben Sie das aktuelle Datum und die Uhrzeit in die Datei "YM-TIME.TXT"
mit dem richtigen Format:
JJJJ / MM / TT HH: MM: SS (Beispiel: 2016/03/08 14:24:32). Speichern Sie diese
Datei.
5.6. Starten Sie die Kamera neu und das System aktualisiert das Programm
automatisch.
[Anmerkung]:In der Datei "YM-TIME.TXT" befindet sich ein "Ja", und Sie können es
nicht in "Nein" ändern, sonst können die Videodateien nicht auf der Micro SD-Karte
gespeichert werden Die oben beschriebene Aktion ausführen, brauchen Sie nur "no" in
"yes" zu setzen und die Kamera zurückzusetzen (siehe VII).
VI. Aufladen
6.1. Schalten Sie die Kamera aus, und schließen Sie die Kamera an eine
Netzsteckdose an, indem Sie das mitgelieferte USB-Kabel und den mitgelieferten
DV 5V-Ladeadapter verwenden.
6.2. Die gelbe Kontrollleuchte bleibt während des Ladevorgangs stabil.
6.3. Es dauert 20,5 Stunden, um eine volle Ladung zu erhalten.
6.4. Die gelbe Kontrolllampe erlischt, wenn die Kamera vollständig aufgeladen ist.
VII. Rücksetzen
Wenn die Kamera aus irgendeinem Grund nicht mehr reagiert oder nicht
ordnungsgemäß funktioniert, wird sie durch einen schnellen Reset wieder in den
Normalbetrieb zurückversetzt.
Bedienung: Wenn die Kamera eingeschaltet ist, drücken Sie die Reset-Taste
einmal, um alle Einstellungen auf die Werkseinstellungen zurückzusetzen. Die
Kamera startet nach 5 Sekunden automatisch auf die Standardeinstellungen.
Page 9
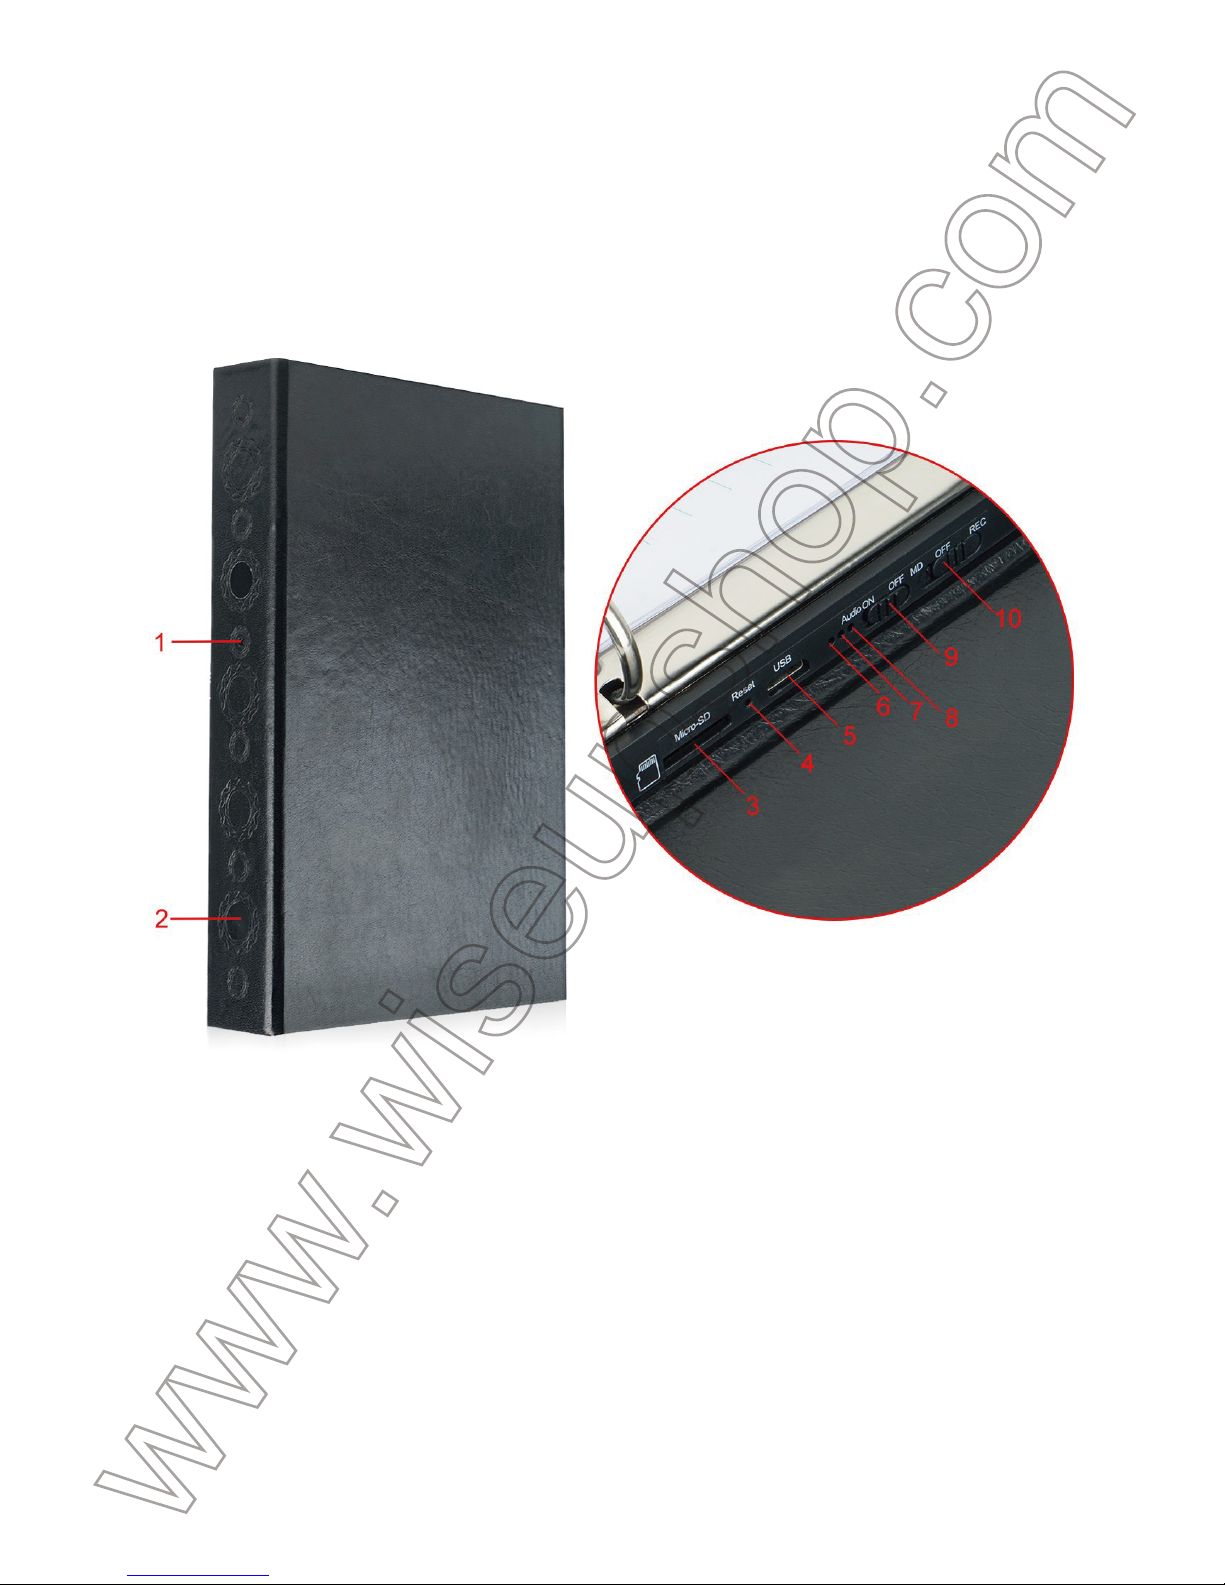
BOOK100
Mode d'emploi
I. Aperçu du produit
1. Objectif de la caméra
2. Capteur PIR
3. Emplacement pour carte micro SD
4. Bouton Réinitialiser
5. Port USB
6. Voyant bleu
7. Voyant rouge
8. Voyantjaune
9. Commutateur audio
10. Commutateur de mode
Page 10

II. Qu'y a-t-il dans la boite
-1 x Caméra de livre
-1 x câble USB
-1 x lecteur de carte
-1 × AC110-240V à DC5V Adaptateur de charge
-1 × 8 GB Carte Micro SD (déjà installée dans la fente Micro SD)
III. Opération
>> Assurez-vous que votre caméra est complètement rechargé avant de l'utiliser.
>> Veuillez vous assurer que la carte Micro SD a déjà été formatée et qu'elle est
correctement insérée dans l'emplacement pour carte SD de la caméra, sinon elle
ne fonctionnera pas. Nous vous recommandons d'utiliser une carte SDHC Class
10 Micro SD.
>> Faites glisser le commutateur audio sur la position ON; Sinon les fichiers vidéo
n'auront pas d'audio.
[Remarque]:Si aucune carte Micro SD n'est installée dans l'appareil, la caméra s'arrête
automatiquement. Le Voyant bleu clignote pendant 10 secondes et s'éteint si le
Commutateur de Mode est en position REC; Le voyant rouge clignote pendant 10
secondes et s'éteint si le Commutateur de Mode est en position MD.
3.1. MARCHE / ARRÊT ET ENREGISTREMENT VIDÉO
3.1.1. Faites glisser le Commutateur de Mode sur la position REC pour allumer la
caméra. Le voyant bleu s'allume et clignote 3 fois, puis s'éteint. la caméra démarre
automatiquement l'enregistrement vidéo.
3.1.2. Faites glisser le Commutateur de Mode sur la position OFF pour éteindre la
caméra. Le voyant bleu clignote une fois, puis s'éteint. la caméra arrêtera
l'enregistrement vidéo et les fichiers vidéo seront automatiquement enregistrés.
[Remarque]:
1). Un clip vidéo sera généré et enregistré toutes les 2 minutes automatiquement.
2). La caméra du livre peut enregistrer la vidéo pendant 19,5 heures en continu sur une
pleine charge.
3). Résolution vidéo: 1920x1080P Format vidéo: AVI
Page 11

4). Gamme de vision nocturne: 5m
5). Si la caméra est en batterie faible, l'appareil enregistre tous les fichiers vidéo, puis
s'éteint automatiquement. Les témoins bleus et rouges clignotent pendant 5 secondes
puis s'éteignent.
3.2. DETECTION DE MOUVEMENT ENREGISTREMENT VIDÉO
3.2.1. Vous pouvez faire glisser le Commutateur de Mode vers la position MD pour
faire entrer la caméra dans le mode d'enregistrement de détection de mouvement.
Le voyant bleu s'allume et s'éteint, puis le rouge clignote 4 fois et s'éteint.
L'appareil capture automatiquement une vidéo lorsqu'un mouvement est détecté.
3.2.2. Faites glisser le Commutateur de Mode en position OFF pour quitter le mode
d'enregistrement de détection de mouvement. Le voyant bleu clignote une fois,
puis s'éteint.
IV. Téléchargement de fichiers vidéo / image
4.1. Mettez l'appareil hors tension, retirez la carte Micro SD et insérez-la dans un
lecteur de carte.
4.2. Insérez le lecteur de carte dans un port USB de l'ordinateur approprié.
4.3. La carte Micro SD sera reconnue comme un lecteur de disque amovible.
4.4. Tous les fichiers sont accessibles dans le lecteur.
V. Réglage de l'heure / date
5.1. Mettez l'appareil hors tension, retirez la carte Micro SD et insérez-la dans un
lecteur de carte.
5.2. Insérez le lecteur de carte dans un port USB de l'ordinateur approprié.
5.3. Le dossier du lecteur de disque amovible s'affiche.
5.4. Cliquez sur le lecteur dans le répertoire racine et à l'intérieur du répertoire
racine, ouvrez le fichier txt nommé "YM-TIME.TXT".
5.5. Ecrivez la date et l'heure actuelles dans le fichier "YM-TIME.TXT" avec le
format correct:
AAAA / MM / JJ HH: MM: SS (Par exemple: 2016/03/08 14:24:32). Enregistrer ce
fichier.
Page 12

5.6. Redémarrez la caméra et le système mettra automatiquement à niveau le
programme.
[Note]:Il y a un "oui" dans le fichier nommé "YM-TIME.TXT", et vous ne pouvez pas le
changer en "non", sinon les fichiers vidéo ne peuvent pas être enregistrés sur la carte
Micro SD. Fait l'action ci-dessus, tout ce que vous devez faire est de changer le "non" en
"oui", et de réinitialiser la caméra (voir VII).
VI. Chargement
6.1. Mettez la caméra hors tension, connectez la caméra à une prise secteur en
utilisant le câble USB et l'adaptateur de charge DV 5V fourni.
6.2. Le voyant jaune reste allumé pendant le processus de charge.
6.3. Il faudra 20,5 heures pour obtenir une charge complète.
6.4. Le Voyant jaune s'éteint lorsque la caméra est entièrement rechargé.
VII. Réinitialisation
Si, pour une raison quelconque, l'appareil cesse de répondre ou ne fonctionne pas
correctement, une réinitialisation rapide le rétablira en mode normal.
Fonctionnement: Lorsque la caméra est sous tension, utilisez une broche pour
appuyer sur le bouton de réinitialisation une fois pour restaurer tous les paramètres
aux réglages d'usine. la caméra redémarre automatiquement aux réglages par
défaut en 5 secondes.
Page 13
BOOK100
Guida utente
I. Descrizione del prodotto
1. Camera Lens
2. Sensore PIR
Slot 3. Micro SD Card
4. Pulsante di ripristino
5. Porta USB
6. indicatore luminoso blu
7. spia rossa
8. spia gialla
9. Switch Audio
Interruttore 10. Modalità
Page 14
II. Cosa c'è nella scatola
-1 X Prenota Camera
-1 X Cavo USB
-1 X lettore di schede
-1 × AC110-240V di DC5V adattatore di ricarica
-1 × 8 GB Micro SD Card (montato nello slot per schede Micro SD già)
III.Operazione
>> Si prega di assicurarsi che la vostra macchina fotografica libro è
completamente ricaricata prima dell'uso.
>> Si prega di verificare che la scheda Micro SD è stata formattata già ed è dotato
saldamente nella slot per scheda SD della fotocamera, o non funzionerà. Si
consiglia di utilizzare un classe 10 SD card SDHC Micro.
>> Far scorrere l'interruttore audio in posizione ON; altrimenti i file video non
avranno audio.
[Nota]: Se nessuna scheda micro SD è montato nella fotocamera, la fotocamera si
spegne automaticamente. La spia blu lampeggia 10 secondi e spegnere se il selettore di
modalità è nella posizione REC; la spia rossa lampeggia 10 secondi e spegnere se il
selettore di modalità è nella posizione di MD.
3.1. POWER ON / OFF & REGISTRAZIONE VIDEO
3.1.1. Far scorrere il selettore di modalità sulla posizione REC per accendere la
fotocamera. La spia blu si accende e lampeggia per 3 volte, poi si spegne. La
fotocamera si avvierà automaticamente la registrazione video.
3.1.2. Far scorrere il selettore di modalità in posizione OFF per spegnere la
fotocamera. La spia blu lampeggia una volta e poi si spegne. La fotocamera
interrompere la registrazione video e file video verrà salvato automaticamente.
[Nota]:
1). Un video clip verrà generato e salvato automaticamente ogni 2 minuti.
2). La fotocamera può registrare video libro per 19,5 ore di continuo su una carica
completa.
3). Risoluzione video: 1920x1080P Formato video: AVI
Page 15
4). Gamma di visione notturna: 5m
5). Se la fotocamera è in basso della batteria, la fotocamera salvare tutti i file video e poi
spegne automaticamente. Sia blu e rosso spie lampeggiano per 5 secondi e poi si
spegne.
3.2. Video Motion Detection REGISTRAZIONE
3.2.1. È possibile far scorrere direttamente l'interruttore di modalità nella posizione
di MD per rendere la fotocamera entra in modalità di registrazione di rilevazione di
movimento. La spia blu si accende e si spegne, poi quello rosso lampeggia 4 volte
e spegnere. La fotocamera cattura video automaticamente quando viene rilevato
un movimento.
3.2.2. Far scorrere il selettore di modalità in posizione OFF per uscire dalla
modalità di registrazione di rilevazione di movimento. La spia blu lampeggia una
volta e poi si spegne.
IV. Video / Immagine carica i file
4.1. Spegnere la fotocamera, rimuovere la scheda Micro SD e inserirla in un lettore
di schede.
4.2. Inserire il lettore di schede in una porta USB del computer corretta PC.
4.3. La scheda Micro SD verrà riconosciuta come unità disco rimovibile.
4.4. Tutti i file sono accessibili nel drive.
V. Impostazione di ora / data timbro
5.1. Spegnere la fotocamera, rimuovere la scheda Micro SD e inserirla in un lettore
di schede.
5.2. Inserire il lettore di schede in una porta USB del computer corretta PC.
5.3. appare cartella sul disco rimovibile.
5.4. Fare clic sul disco nella directory principale e all'interno della directory
principale, aprire il file txt denominato "YM-time.txt".
5.5. Scrivere la data e l'ora correnti nel file "YM-time.txt" con il formato corretto:
AAAA / MM / GG HH: MM: SS (per esempio: 2016/03/08 14:24:32). Salvare il file.
5.6. Riavviare la telecamera e il sistema aggiornerà automaticamente il
Page 16
programma.
[Nota]:Vi è un "sì" nel file denominato "YM-time.txt", e non si può cambiare in "no",
altrimenti i file video non possono essere salvati nella scheda Micro SD Se si dispone.
fatto l'azione di cui sopra, tutto quello che dovete fare è di cambiare il "no" in "sì", e
ripristinare la fotocamera (vedere VII).
VI. ricarica
6.1. Spegnere la fotocamera, collegare la fotocamera a una presa di alimentazione
CA utilizzando il cavo USB e DV 5V ricarica adattatore in dotazione.
6.2. La spia gialla rimane solido durante il processo di carica.
6.3. Ci vorranno 20,5 ore per ottenere una carica completa.
6.4. La spia gialla si spegne quando la fotocamera è completamente carica.
VII. Ripristino
Se per qualsiasi motivo la fotocamera smette di rispondere o non funziona
correttamente, eseguire un ripristino rapido ripristinerà di nuovo al normale
funzionamento.
Funzionamento: Quando la fotocamera è accesa, usare uno spillo per premere il
pulsante Reset una volta per ripristinare tutte le impostazioni alle impostazioni di
fabbrica. La telecamera si riavvierà automaticamente le impostazioni predefinite in
5 secondi.
Page 17
BOOK100
Guía del usuario
I. Descripción del producto
1. Lente de la cámara
2. Sensor PIR
3. Ranura para tarjeta micro SD
4. Botón de reinicio
5. Puerto USB
6. Luz Indicadora Azul
7. Luz Indicadora rojo
8. Luz indicadora amarilla
9. Interruptor de audio
10. Interruptor de modo
Page 18
II. Qué hay en la caja
-1 x Cámara de libro
-1 x Cable USB
-1 x lector de tarjetas
-1 × AC110-240V a DC5V adaptador de carga
-1 × 8GB Micro SD Card (ya montada en la ranura para tarjetas Micro SD)
III. Operación
>> Asegúrese de que su cámara de libro se recarga completamente antes de usar.
>> Asegúrese de que la tarjeta Micro SD ya esté formateada y esté bien instalada
en la ranura de la tarjeta SD de la cámara, o no funcionará. Le recomendamos que
utilice una tarjeta SDHC de clase 10 Micro SD.
>> Deslice el interruptor de audio a la posición ON; De lo contrario los archivos de
vídeo no tendrán audio.
[Nota]:Si no hay ninguna tarjeta Micro SD está instalada en la cámara, la cámara se
apagará automáticamente. La luz indicadora azul parpadeará 10 segundos y se apagará
si el interruptor de modo está en la posición REC; La luz indicadora roja parpadeará 10
segundos y se apagará si el interruptor de modo está en la posición MD.
3.1. ENCENDIDO / APAGADO Y GRABACIÓN DE VIDEO
3.1.1. Deslice el interruptor de modo a la posición REC para encender la cámara.
La luz indicadora azul se encenderá y parpadeará 3 veces, luego se apagará. La
cámara iniciará la grabación de vídeo automáticamente.
3.1.2. Deslice el interruptor de modo a la posición OFF para apagar la cámara. El
indicador luminoso azul parpadeará una vez y luego se apagará. La cámara dejará
de grabar vídeo y los archivos de vídeo se guardarán automáticamente.
[Nota]:
1). Se generará un video clip y se guardará cada 2 minutos automáticamente.
2). La cámara del libro puede grabar vídeo durante 19,5 horas continuamente con una
carga completa.
3). Resolución de vídeo: 1920x1080P Formato de vídeo: AVI
4). Alcance de visión nocturna: 5m
Page 19
5). Si la cámara está en batería baja, la cámara guardará todos los archivos de vídeo y
luego se apagará automáticamente. Las luces indicadoras azul y roja parpadearán juntos
durante 5 segundos y luego se apagarán.
3.2. DETECCIÓN DE MOVIMIENTO GRABACIÓN DE VÍDEO
3.2.1. Puede desplazar directamente el interruptor de modo a la posición MD para
que la cámara entre en el modo de grabación de detección de movimiento. La luz
indicadora azul se encenderá y apagará, luego la roja parpadeará 4 veces y se
apagará. La cámara captura automáticamente un video cuando se detecta un
movimiento.
3.2.2. Deslice el interruptor de modo a la posición OFF para salir del modo de
grabación de detección de movimiento. El indicador luminoso azul parpadeará una
vez y luego se apagará.
IV. Subida de archivos de video / imagen
4.1. Apague la cámara, retire la tarjeta Micro SD e insértela en un lector de tarjetas.
4.2. Inserte el lector de tarjetas en un puerto USB adecuado de la computadora de
la PC.
4.3. La tarjeta Micro SD será reconocida como una unidad de disco extraíble.
4.4. Se puede acceder a todos los archivos en la unidad.
V. Establecimiento del sello de fecha y hora
5.1. Apague la cámara, retire la tarjeta Micro SD e insértela en un lector de tarjetas.
5.2. Inserte el lector de tarjetas en un puerto USB adecuado de la computadora de
la PC.
5.3. Aparece la carpeta de la unidad de disco extraíble.
5.4. Haga clic en la unidad en el directorio raíz y dentro del directorio raíz, abra el
archivo txt llamado "YM-TIME.TXT".
5.5. Escriba la fecha y hora actuales en el archivo "YM-TIME.TXT" con el formato
correcto:
AAAA / MM / DD HH: MM: SS (Por ejemplo: 2016/03/08 14:24:32). Guarde este
archivo.
Page 20
5.6. Reinicie la cámara y el sistema actualizará el programa automáticamente.
[Nota]:Hay un "sí" en el archivo denominado "YM-TIME.TXT", y no se puede cambiar en
"no", de lo contrario los archivos de vídeo no se pueden guardar en la tarjeta Micro SD.
Hecho la acción antedicha, todo lo que usted necesita hacer es cambiar el "no" en "sí", y
reajustar la cámara (véase VII).
VI. Cargando
6.1. Apague la cámara, conecte la cámara a una fuente de alimentación de CA de
salida utilizando el cable USB y el adaptador de carga DV 5V suministrado.
6.2. La luz indicadora amarilla permanecerá sólida durante el proceso de carga.
6.3. Se tardará 20,5 horas para obtener una carga completa.
6.4. La luz indicadora amarilla se apagará cuando la cámara se recargue
completamente.
VII. Restablecimiento
Si por cualquier motivo la cámara deja de responder o no funciona correctamente,
un restablecimiento rápido volverá a su funcionamiento normal.
Funcionamiento: Cuando la cámara esté encendida, utilice un pin para
presionarEl Botón de Reinicio una vez para restaurar todos los ajustes a los
ajustes de fábrica. La cámara se reiniciará automáticamente a la configuración
predeterminada en 5 segundos.
Page 21
BOOK100
ユーザーガイド
I.製品の概要
1.カメラのレンズ
2.PIRセンサ
3.マイクロSDカードスロット
4.リセットボタン
5.USBポート
6. 青いインジケータランプ
7. 赤いインジケータランプ
8. 黄色インジケータランプ
9.オーディオスイッチ
10. モードスイッチ
Page 22

II.ボックスの内容
-1x予約カメラ
-1×USBケーブル
-1×カードリーダー
-1×AC110-240V〜DC5V充電アダプタ
-1×8GBのマイクロSDカード(すでにマイクロSDカードスロットに装着済み)
III.操作
>>使用前に本カメラが完全に充電されていることを確認してください。
>>マイクロSDカードがすでにフォーマットされており、カメラのSDカードスロットに
しっかりと固定されていることを確認してください。SDHCClass10マイクロSDカード
を使用することをお勧めします。
>>オーディオスイッチをONの位置にスライドさせます。それ以外の場合、ビデオファ
イルには音声はありません。
[注意]:カメラにマイクロSDカードが装着されていないと、カメラは自動的にシャットダウン
します。モードスイッチがRECの位置にある場合、青のインジケータランプが10秒間点滅し、
消灯します。赤色のインジケータランプが10秒間点滅し、モードスイッチがMDの位置にあ
ると消 灯します。
3.1.電源オン/オフとビデオ録画
3.1.1.モードスイッチをREC位置にスライドさせて、カメラの電源を入れます。青のイ
ンジケータランプが点灯し、3回点滅してから消灯します。カメラは自動的に録画を開
始します。
3.1.2。カメラの電源を切るには、モードスイッチをOFFの位置にスライドさせます。青
のインジケータランプが一度点滅してから消灯します。カメラはビデオ録画を停止
し、ビデオファイルは自動的に保存されます。
[注意]:
1).ビデオクリップが生成され、2分ごとに自動的に保存されます。
2).ブックカメラはフル充電で連続して19.5時間ビデオを録画できます。
3).ビデオ解像度:1920x1080Pビデオフォーマット:AVI
4 ). ナ イト ビ ジョ ン 距 離:5 m
5).カメラのバッテリー残量が少なくなると、カメラはすべてのビデオファイルを保存して自
Page 23

動的にシャットダウンします。青と赤の両方のインジケータランプが5秒間点滅してから消灯
します。
3.2.動作検知機能
3.2.1.モードスイッチをMDの位置に直接スライドさせると、カメラが動き検出記録
モードに入ることができます。青色のインジケータランプが点灯して消灯し、赤色のラ
ンプが4回点滅して消灯します。動きが検出されると、カメラは自動的にビデオをキャ
プチャします。
3.2.2.動作検知機能モードを終了するには、モードスイッチをOFFの位置にスライドさ
せます。青のインジケータランプが一度点滅してから消灯します。
IV.ビデオ/画像ファイルのアップロード
4.1.カメラの電源を切り、マイクロSDカードを取り出してカードリーダーに挿入しま
す。
4.2.カードリーダーを適切なパソコンのUSBポートに挿入します。
4.3.マイクロSDカードはリムーバブルディスクドライブとして認識されます。
4.4.ドライブ内のすべてのファイルにアクセスできます。
V.設定時間/日付スタンプ
5.1.カメラの電源を切り、マイクロSDカードを取り出してカードリーダーに挿入しま
す。
5.2.カードリーダーを適切なPCコンピュータのUSBポートに挿入します。
5.3.リムーバブルディスクドライブフォルダが表示されます。
5.4.ルートディレクトリ内のドライブをクリックし、ルートディレクトリ内で
"YM-TIME.TXT"という名前のtxtファイルを開きます。
5.5.現在の日付と時刻を"YM-TIME.TXT"ファイルに正しい形式で書き込む:
YYYY/MM/DDHH:MM:SS(たとえば、2016/03/0814:24:32)。このファイルを保存
します。
5.6.カメラを再起動すると、システムが自動的にプログラムをアップグレードします。
[注]:"YM-TIME.TXT"というファイルには "yes"があり、それを "no"に変更することはできま
せん。そうしないと、マイクロSDカードにビデオファイルを保存できません。上記のアクショ
ンを実行して、「いいえ」を「はい」に変更してカメラをリセットします(VIIを参照)。
Page 24

VI.充電
6.1.カメラの電源を切り、USBケーブルと付属のDV 5V充電アダプターを使用して、カ
メラをコンセントのAC電源に接続します。
6.2.充電中に黄色のインジケータランプが点灯します。
6.3.満充電になるまでに20.5時間かかります。
6.4.カメラが完全に充電されると、黄色のインジケータランプが消灯します。
VII.リセット
何らかの理由でカメラが応答しなくなった場合、または正常に動作していない場合、
クイックリセットを実行すると通常の動作に戻ります。
操 作:カメラの電源がオンになったら、ピンを使用してリセットボタンを1回押して、す
べての設定を工場出荷時の設定に戻します。カメラは5秒後に自動的にデフォルト設
定に戻ります。
 Loading...