

Page 1
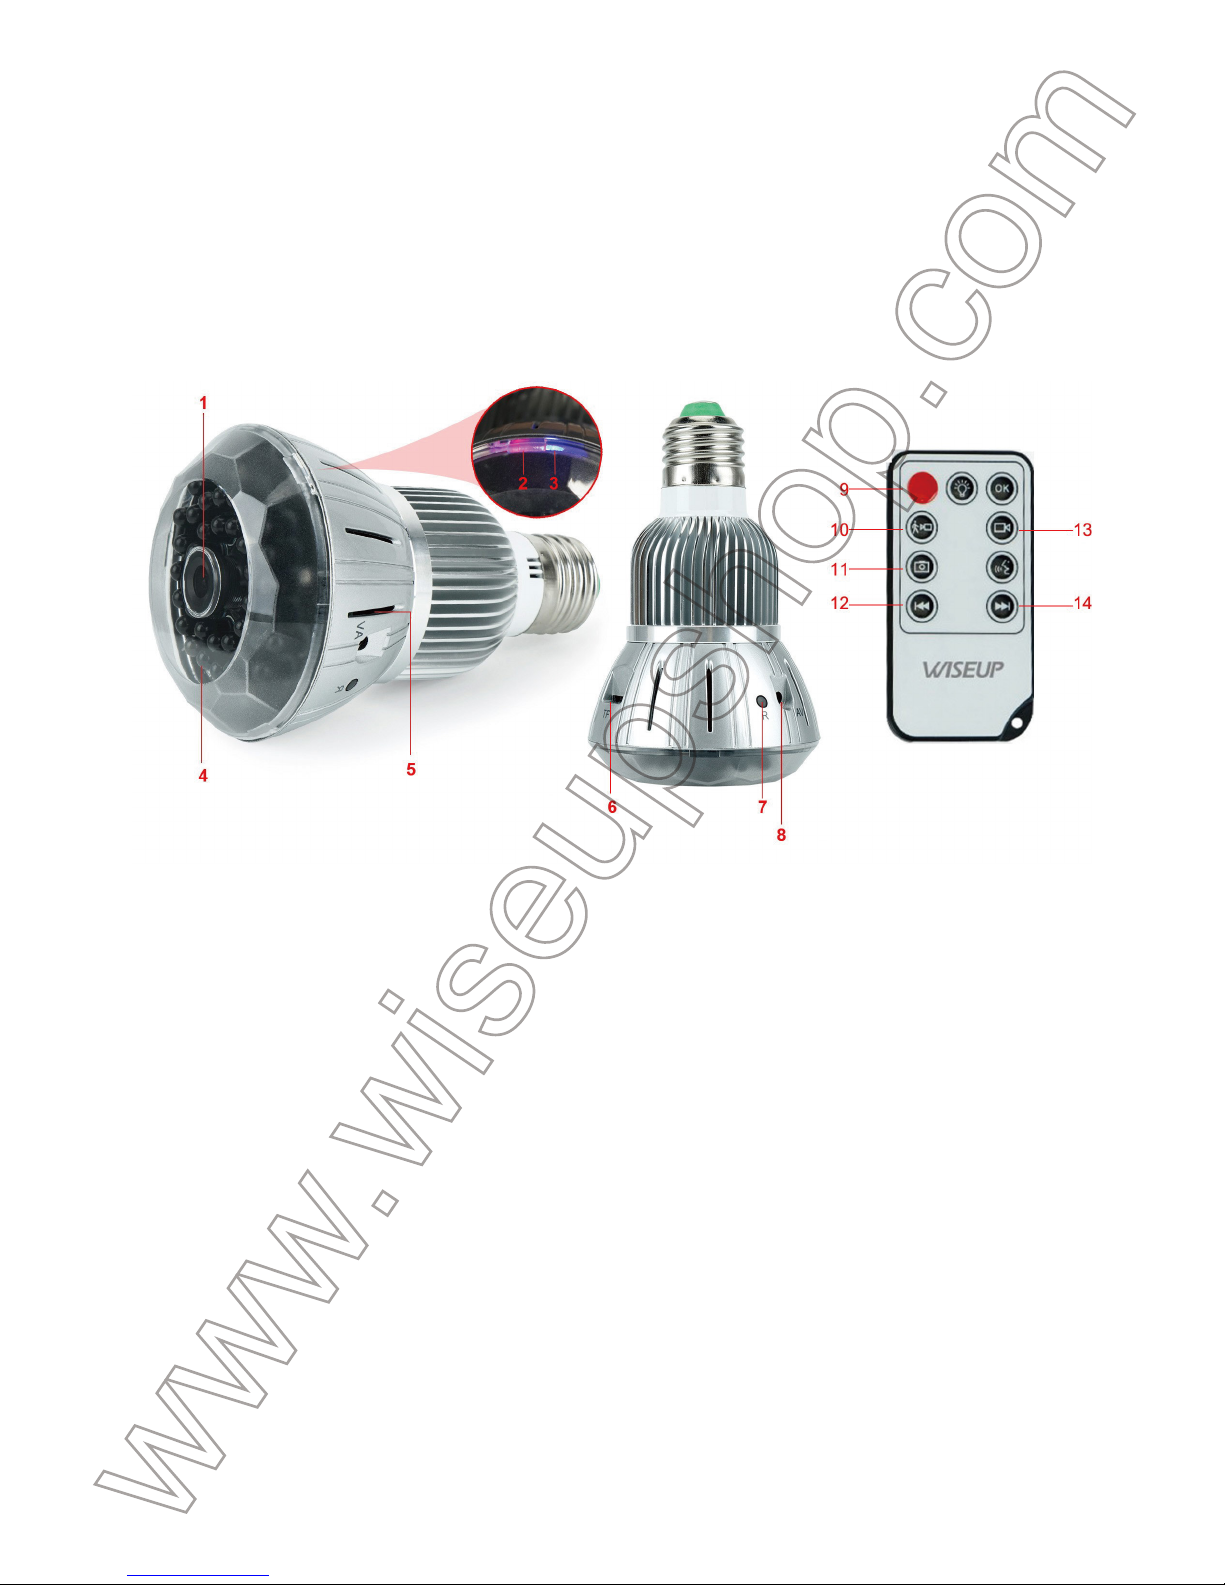
BC303
User Guide
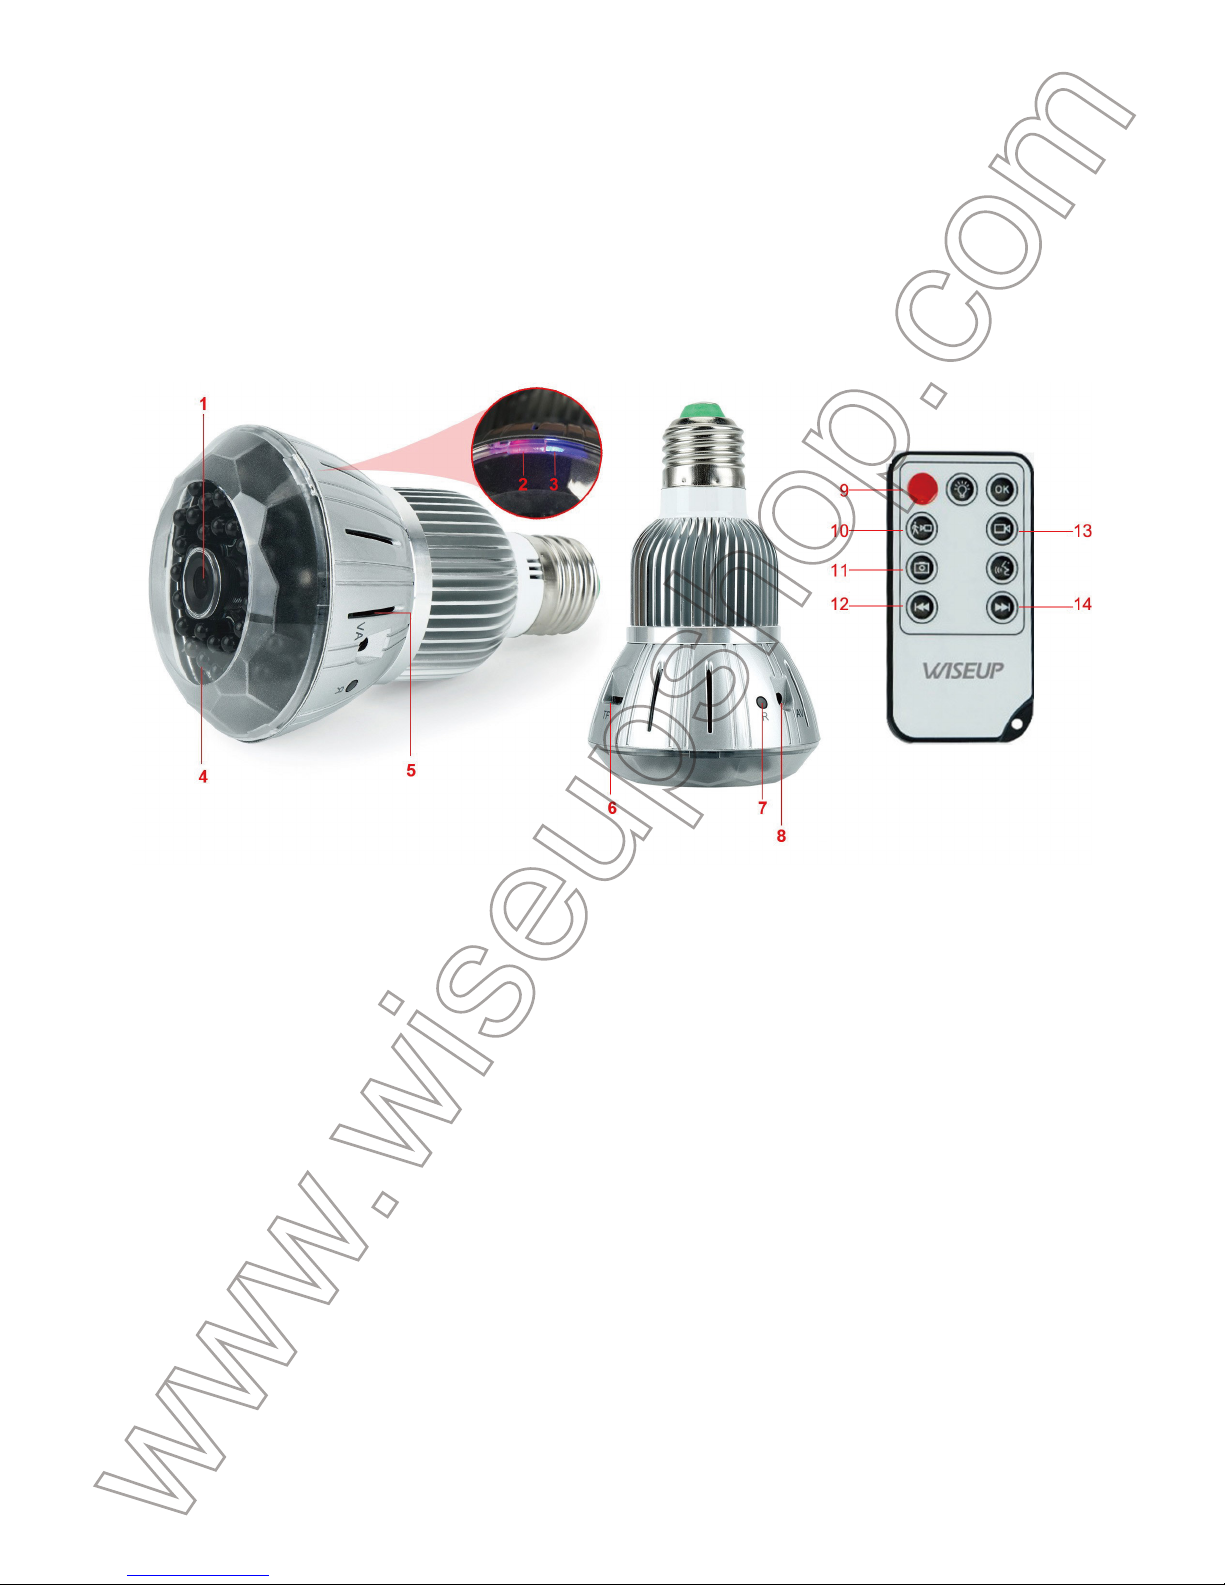
I. Product Overview
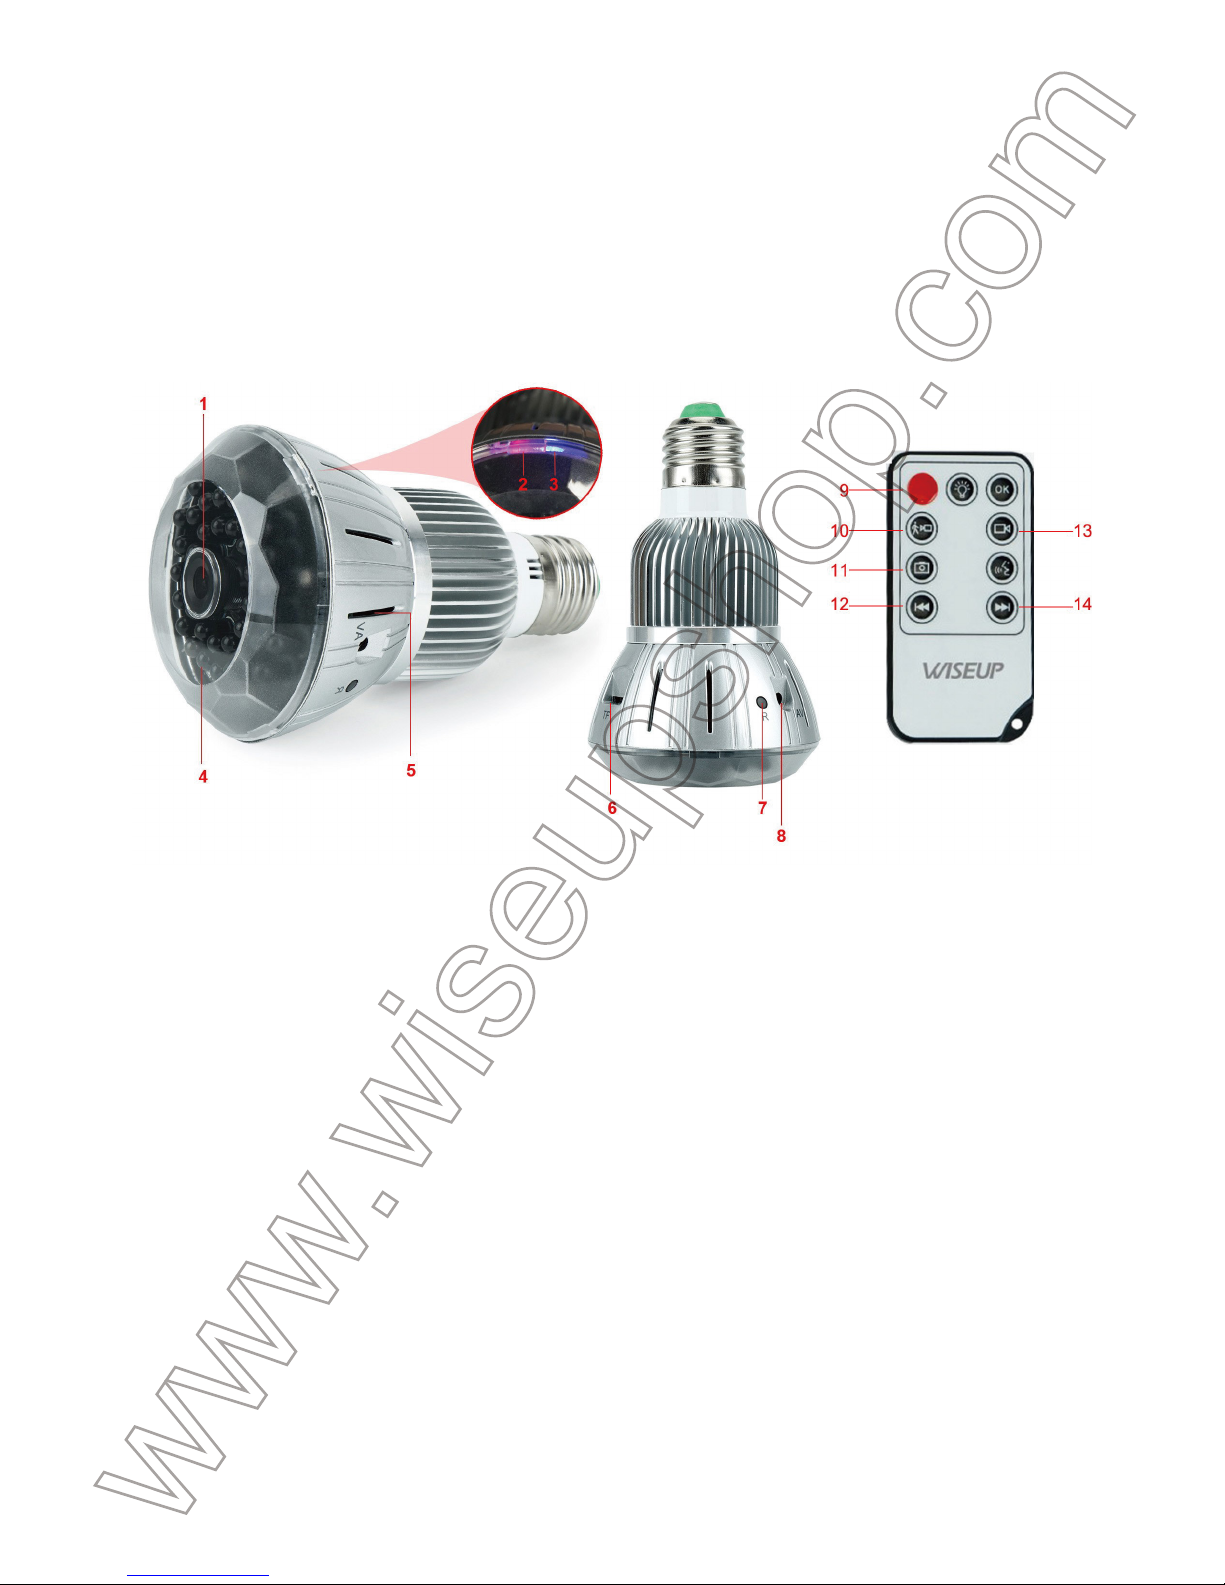
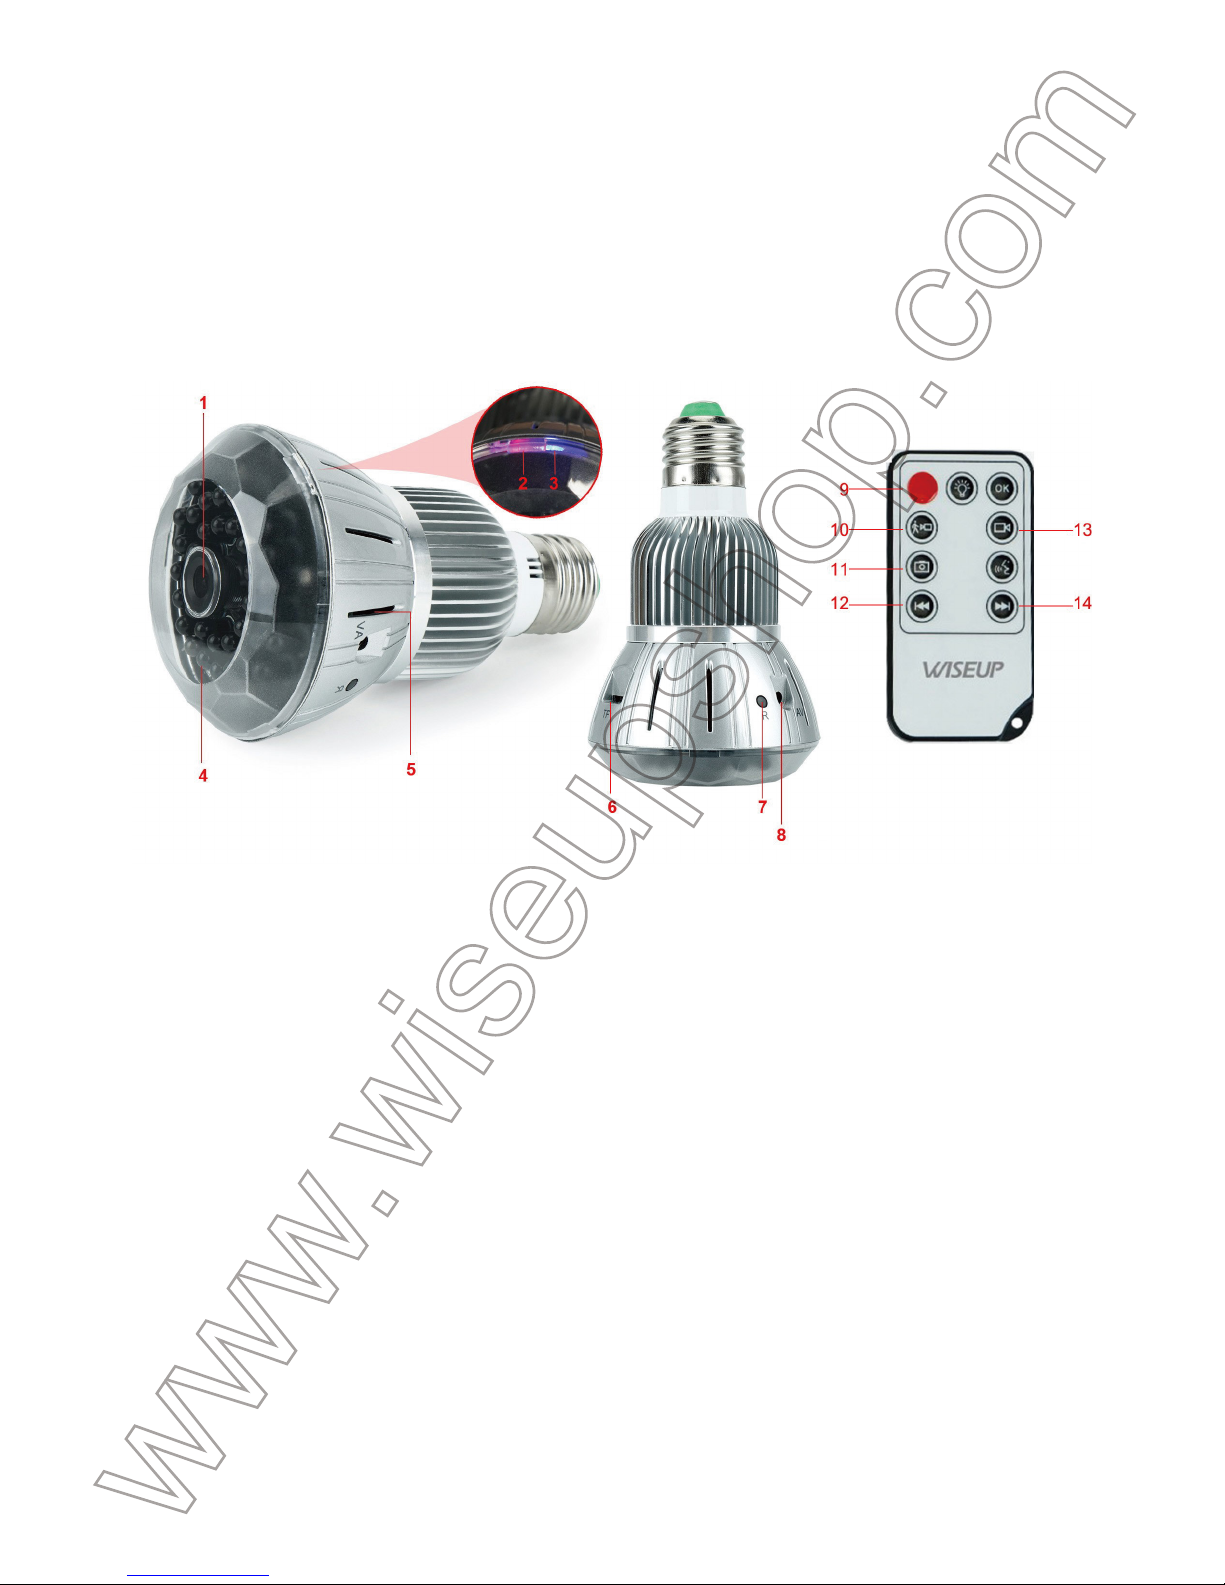
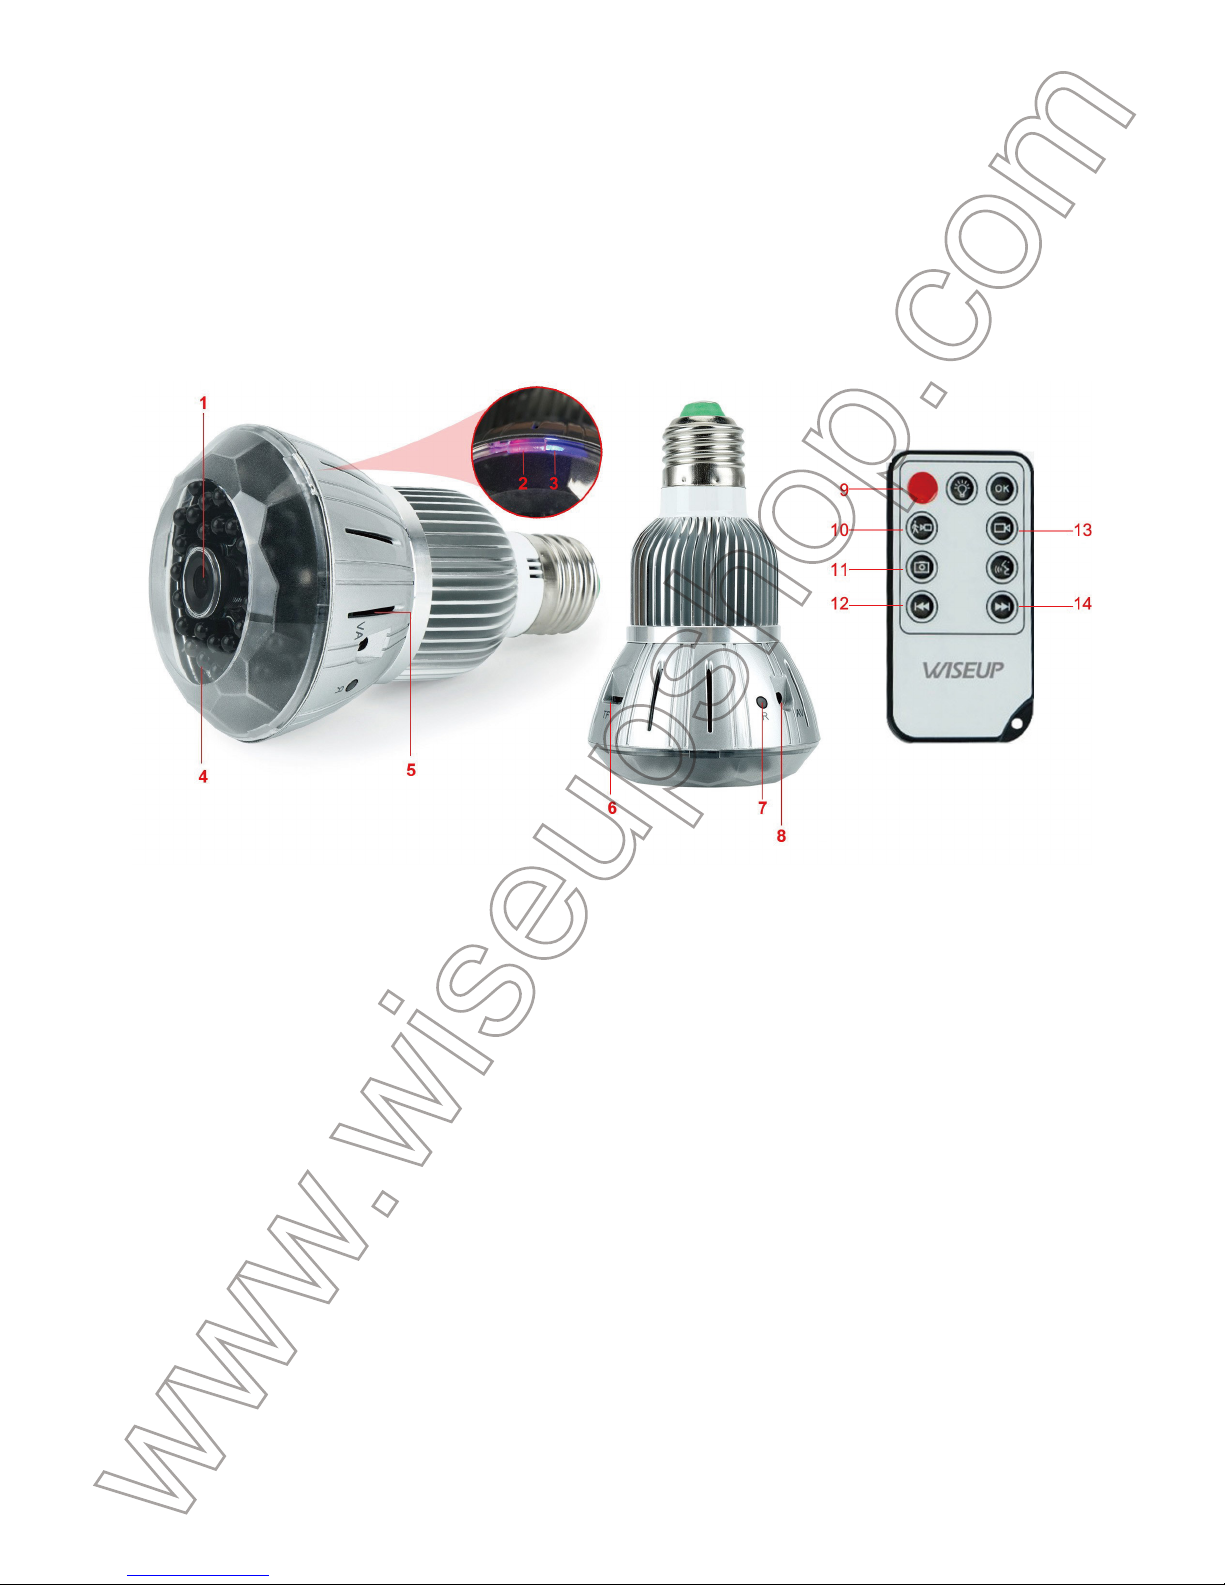
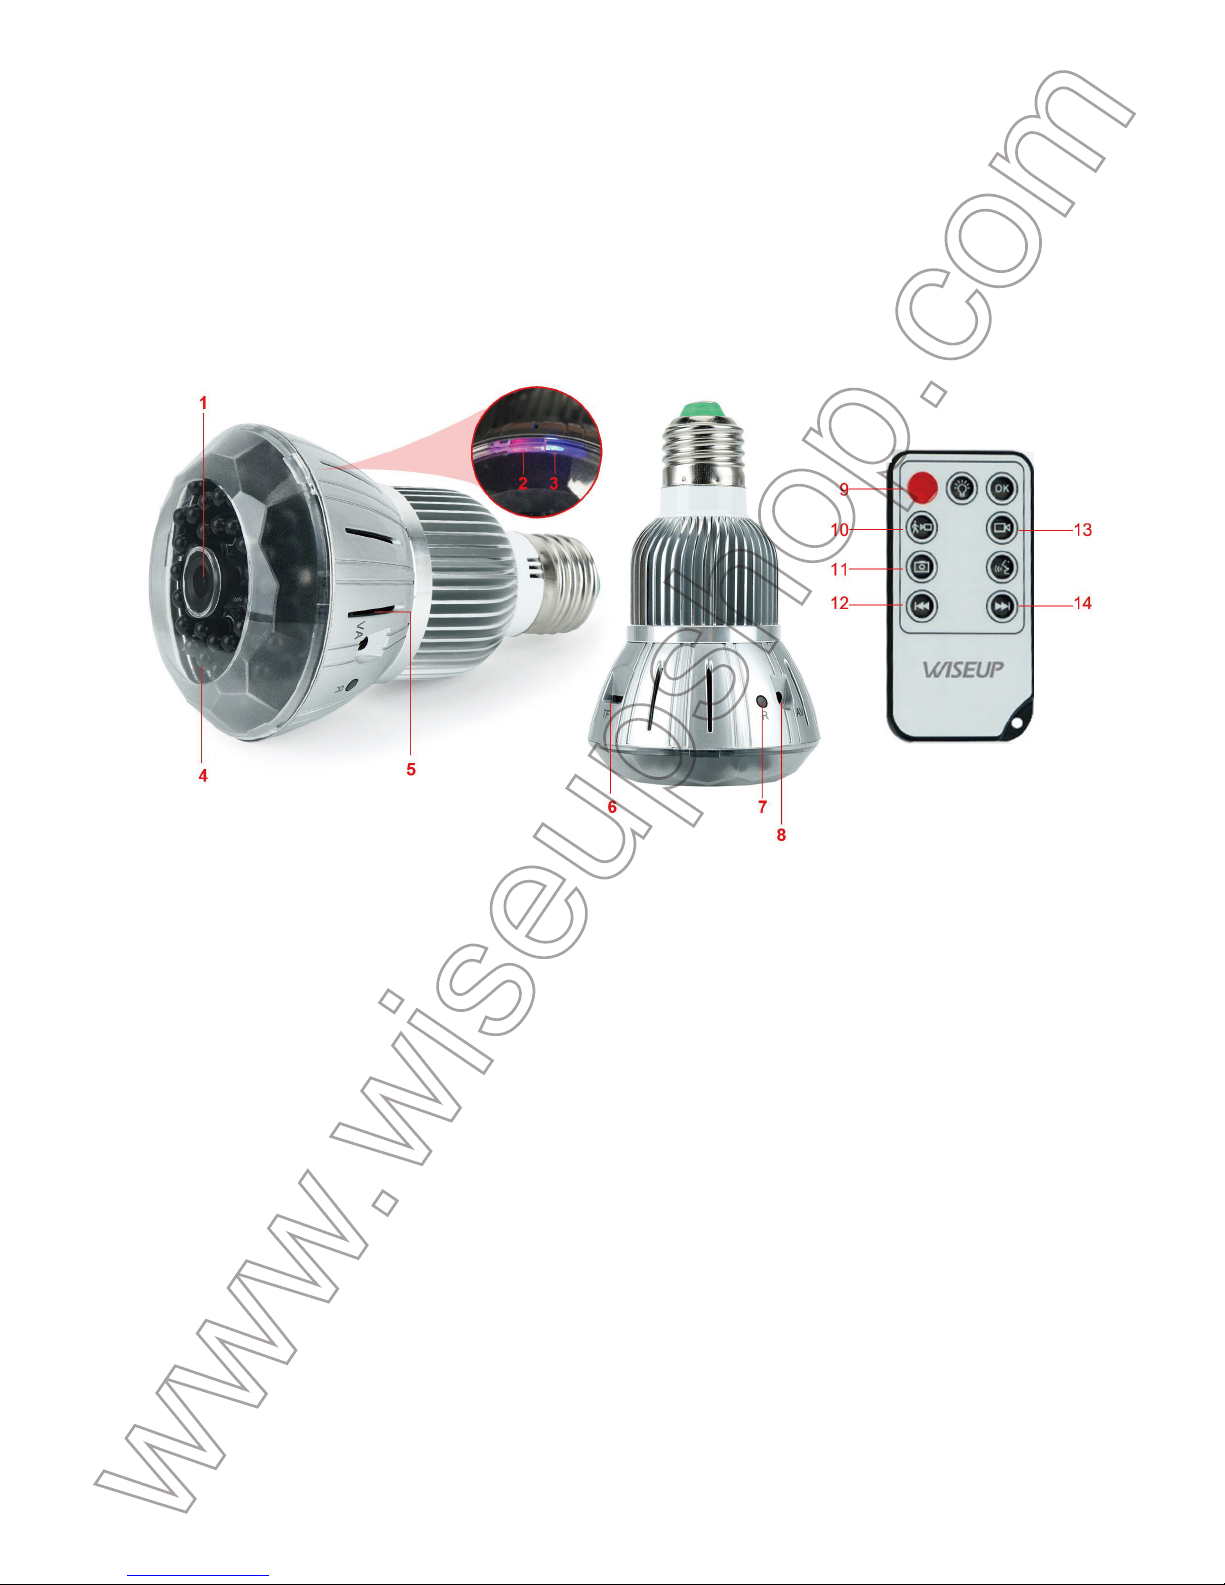
1. Camera Lens
2. Red Indicator Light
3. Blue Indicator Light
4. IR LEDs
5. Power Indicator Light
6. Micro SD Card Slot
7. Reset Button
II. What’s in the Box
-1× Bulb Camera
-1× Remote Controller
-1× Card Reader
-1× 20cm E27 Bulb Extension Adapter
-1× 8GB Micro SD Card (fitted into the SD card slot already)
8. AV Cable Port
9. Power Button
10. Motion Detection Recording Button
11. Camera Button
12. PREV Button
13. Video Recording Button
14. NEXT Button
Page 2
III. Operation
>> Please make sure the Micro SD card (4GB-64GB) has been formatted
already and is securely fitted into the bulb’s SD card slot, or it will not work. A
SDHC Class 10 Micro SD card is recommended. If no Micro SD card is fitted into
the bulb camera, the blue indicator light will keep flashing.
>> Screw the bulb into a standard E27 light socket.
>> Please remove the insulating film from the bottom of the remote controller.
3.1. POWER ON/OFF
3.1.1. The bulb camera will be powered on automatically when connected to an
outlet power supply. The power indicator light will be solid red. Both red and blue
indicator lights will be illuminated for 7 seconds. Then the red indicator light will
turn off, while the blue one will blink twice and turn off. The camera will start
recording video automatically.
3.1.2. Power off the camera by pressing the Power Button once. Both the red
and blue indicator lights will flash twice quickly and turn off.
3.2. VIDEO RECORDING
3.2.1. The bulb camera will be powered on automatically when connected to an
outlet power supply. The power indicator light will be solid red. Both red and blue
indicator lights will be illuminated for 7 seconds. Then the red indicator light will
turn off, while the blue one will blink twice and turn off. The camera will start
recording video automatically.
3.2.2. Press the Video Recording Button once to stop recording video. The blue
indicator light will stay illuminated, indicating the camera has entered into
standby mode.
3.2.3. Press the Video Recording Button once again to resume video recording.
The blue indicator light will blink twice and turn off.
[Note]:
1). A video file will be generated and saved every 5 minutes automatically.
2). If the illumination is under 10 lux, the IR LEDs will be turned on automatically during
the video recording process. The IR distance is 1.5 meters.
Page 3
3). Video Resolution: 1280×720P Video Format: AVI
4). Loop recording is supported.
3.3. MOTION DETECTION RECORDING
3.3.1. The bulb camera will be powered on automatically when connected to an
outlet power supply. The power indicator light will be solid red. Both red and blue
indicator lights will be illuminated for 7 seconds. Then the red indicator light will
turn off, while the blue one will blink twice and turn off. The camera will start
recording video automatically.
3.3.2. Press the Video Recording Button once to stop recording video. The blue
indicator light will stay illuminated, indicating the camera has entered into
standby mode.
3.3.3. Press the Motion Detection Button once to enter into motion detection
recording mode and the blue indicator light will keep flashing slowly. A video file
will be generated and saved every 30 seconds automatically.
3.3.4. Press the Motion Detection Button once again to exit motion detection
recording mode. The blue indicator light will stay illuminated, indicating the
camera is back to standby mode.
3.4. STILL/CAMERA PHOTOGRAPH
3.4.1. The bulb camera will be powered on automatically when connected to an
outlet power supply. The power indicator light will be solid red. Both red and blue
indicator lights will be illuminated for 7 seconds. Then the red indicator light will
turn off, while the blue one will blink twice and turn off. The camera will start
recording video automatically.
3.4.2. Press the Video Recording Button once to stop recording video. The blue
indicator light will stay illuminated, indicating the camera has entered into
standby mode.
3.4.3. Press the Camera Button once to take photos. The camera will take a
photo every 3 seconds automatically and the indicator light will flash red once
every 3 seconds.
3.4.4. Press the Camera Button once again to stop taking photos continuously.
Page 4
The red indicator light will turn off while the blue one will stay illuminated,
indicating the camera is back to standby mode.
IV. Video/Image File Uploads
4.1. Power off the bulb camera, remove the Micro SD card and insert it into a
card reader.
4.2. Insert the card reader into a proper PC computer USB port.
4.3. The Micro SD card will be recognized as a removable disk drive.
4.4. All the files can be accessed in the “DCIM” folder.
V. Setting Time/Date Stamp
5.1. Power off the camera, remove the Micro SD card and insert it into a card reader.
5.2. Insert the card reader into a proper PC computer USB port.
5.3. Removable disk drive folder appears.
5.4. Click on the drive in the root directory and inside the root directory, open the
txt file named “time.txt”. If you can’t find it, then you could create a txt file named
“time.txt”.
5.5. Write the current date and time in the file“time.txt” with the correct format:
YYYY.MM.DD HH:MM:SS (For example: 2016.03.08 14:24:32). Save this file.
5.6. Restart the camera and the system will upgrade the program automatically.
VI. Resetting
If for any reason the bulb camera stops responding or isn’t working properly, a
quick reset will restore it back to normal operation.
Operation: When the camera is powered on, hold down the Reset Button for 3
seconds to restore your camera to factory settings. Both red and blue indicator
lights will go off and the bulb camera will shut down automatically.
Page 5
BC303
Benutzerhandbuch
I. Produktübersicht
1. Kameraobjektiv
2. Rote Anzeigelampe
3. Blaue Anzeigelampe
4. IR-LEDs
5. Energien-Anzeiger-Licht
6. Mikro-Sd-Einbauschlitz
7. Reset-Taste
II. Was ist in der Box
-1 × Birne-Kamera
-1 × Fernsteuerpult
-1 × Kartenleser
-1 × 20cm E27 Birnen-Verlängerungs-Adapter
-1 × 8GB Micro SD-Karte (in den SD-Kartensteckplatz bereits eingebaut)
8. Handels-Kabel-Hafen
9. Netzschalter
10. Motion Detection Aufnahme-Taste
11. Kamerataste
12. PREV-Taste
13. Videoaufnahme-Taste
14. NEXT-Taste
Page 6
III. Betrieb
>> Bitte stellen Sie sicher, dass die Micro SD-Karte (4GB-64GB) bereits
formatiert wurde und sicher in den Birnen-SD-Kartensteckplatz eingesetzt ist,
oder es funktioniert nicht. Eine SDHC Klasse 10 Micro SD-Karte wird
empfohlen. Wenn keine Mikro-Sd-Karte in die Birnenkamera gepasst wird, blinkt
die blaue Anzeigelampe.
>> Schrauben Sie die Lampe in eine Standard-E27-Steckdose.
>> Entfernen Sie bitte die Isolierfolie von der Unterseite der Fernbedienung.
3.1. EINSCHALTEN / AUSSCHALTEN
3.1.1. Die Lampekamera wird automatisch eingeschaltet, wenn sie an eine
Steckdose angeschlossen wird. Die Betriebsanzeige leuchtet rot. Die roten und
blauen Kontrollleuchten leuchten für 7 Sekunden. Dann schaltet sich die rote
Anzeigelampe aus, während die blaue LED zweimal blinkt und ausschaltet. Die
Kamera startet die Videoaufnahme automatisch.
3.1.2. Schalten Sie die Kamera durch einmaliges Drücken der Ein / Aus-Taste
aus. Die rote und blaue Kontrollleuchte blinkt zweimal schnell und schaltet sich
aus.
3.2. VIDEOAUFNAHME
3.2.1. Die Lampekamera wird automatisch eingeschaltet, wenn sie an eine
Steckdose angeschlossen wird. Die Betriebsanzeige leuchtet rot. Die roten und
blauen Kontrollleuchten leuchten für 7 Sekunden. Dann schaltet sich die rote
Anzeigelampe aus, während die blaue LED zweimal blinkt und ausschaltet. Die
Kamera startet die Videoaufnahme automatisch.
3.2.2. Drücken Sie die Video-Aufnahmetaste einmal, um die Aufnahme zu
beenden. Die blaue Kontrolllampe leuchtet auf und zeigt an, dass die Kamera in
den Standby-Modus gegangen ist.
3.2.3. Drücken Sie erneut die Video-Aufnahmetaste, um die Videoaufnahme
wiederaufzunehmen. Die blaue Kontrollleuchte blinkt zweimal und schaltet sich
aus.
[Hinweis]:
Page 7
1). Eine Videodatei wird alle 5 Minuten automatisch generiert und gespeichert.
2). Wenn die Beleuchtung unter 10 Lux liegt, werden die IR-LEDs während des
Videoaufzeichnungsvorgangs automatisch eingeschaltet. Der IR-Abstand beträgt 1,5
Meter.
3). Videoentschließung: 1280 × 720P Video Format: AVI
4). Die Loop-Aufnahme wird unterstützt.
3.3. BEWEGUNGSERKENNUNG
3.3.1. Die Lampekamera wird automatisch eingeschaltet, wenn sie an eine
Steckdose angeschlossen wird. Die Betriebsanzeige leuchtet rot. Die roten und
blauen Kontrollleuchten leuchten für 7 Sekunden. Dann schaltet sich die rote
Anzeigelampe aus, während die blaue LED zweimal blinkt und ausschaltet. Die
Kamera startet die Videoaufnahme automatisch.
3.3.2. Drücken Sie die Video-Aufnahmetaste einmal, um die Aufnahme zu
beenden. Die blaue Kontrolllampe leuchtet auf und zeigt an, dass die Kamera in
den Standby-Modus gegangen ist.
3.3.3. Drücken Sie einmal die Bewegungserkennungstaste, um in den
Bewegungserkennungs-Aufnahmemodus zu gelangen, und die blaue
Kontrollleuchte blinkt langsam. Eine Videodatei wird alle 30 Sekunden automatisch
generiert und gespeichert.
3.3.4. Drücken Sie die Bewegungserkennungstaste erneut, um den
Bewegungserfassungs-Aufnahmemodus zu verlassen. Die blaue Kontrolllampe
leuchtet auf und zeigt an, dass die Kamera wieder in den Standby-Modus
zurückkehrt.
3.4. STILL / KAMERA FOTOGRAFIE
3.4.1. Die Lampekamera wird automatisch eingeschaltet, wenn sie an eine
Steckdose angeschlossen wird. Die Betriebsanzeige leuchtet rot. Die roten und
blauen Kontrollleuchten leuchten für 7 Sekunden. Dann schaltet sich die rote
Anzeigelampe aus, während die blaue LED zweimal blinkt und ausschaltet. Die
Kamera startet die Videoaufnahme automatisch.
3.4.2. Drücken Sie die Video-Aufnahmetaste einmal, um die Aufnahme zu
Page 8
beenden. Die blaue Kontrolllampe leuchtet auf und zeigt an, dass die Kamera in
den Standby-Modus gegangen ist.
3.4.3. Drücken Sie die Kamera-Taste einmal, um Fotos zu machen. Die Kamera
nimmt alle 3 Sekunden automatisch ein Foto auf und die Anzeigeleuchte blinkt
einmal alle 3 Sekunden rot.
3.4.4. Drücken Sie die Kamera-Taste erneut, um die Aufnahme von Fotos
fortzusetzen. Die rote Kontrolllampe erlischt, solange die blaue Lampe leuchtet,
was bedeutet, dass die Kamera wieder in den Standby-Modus zurückkehrt.
IV. Video- / Bilddatei-Uploads
4.1. Schalten Sie die Birnenkamera aus, entfernen Sie die Micro-SD-Karte und
stecken Sie sie in einen Kartenleser ein.
4.2. Stecken Sie den Kartenleser in einen geeigneten USB-Anschluss des
PC-Computers.
4.3. Die Micro SD-Karte wird als Wechseldatenträger erkannt.
4.4. Auf alle Dateien kann im Ordner "DCIM" zugegriffen werden.
V. Einstellung Zeit / Datum Stempel
5.1. Schalten Sie die Kamera aus, entfernen Sie die Micro SD-Karte und
stecken Sie sie in einen Kartenleser ein.
5.2. Stecken Sie den Kartenleser in einen geeigneten USB-Anschluss des
PC-Computers.
5.3. Wechseldatenträgerordner wird angezeigt.
5.4. Klicken Sie auf das Laufwerk im Stammverzeichnis und im
Stammverzeichnis, öffnen Sie die txt-Datei mit dem Namen "time.txt". Wenn Sie
es nicht finden, können Sie eine txt-Datei mit dem Namen "time.txt" erstellen.
5.5. Schreiben Sie das aktuelle Datum und die Uhrzeit in die Datei "time.txt" mit
dem richtigen Format:
YYYY.MM.DD HH: MM: SS (Beispiel: 2016.03.08 14:24:32). Speichern Sie
diese Datei.
5.6. Starten Sie die Kamera neu und das System aktualisiert das Programm
automatisch.
Page 9
VI. Rücksetzen
Wenn die Glühlampe aus irgendeinem Grund nicht mehr reagiert oder nicht
ordnungsgemäß funktioniert, wird sie durch einen schnellen Reset wieder in den
Normalbetrieb zurückversetzt.
Betrieb: Wenn die Kamera eingeschaltet ist, halten Sie die Reset-Taste
für 3 Sekunden gedrückt, um die Kamera auf die Werkseinstellungen
zurückzusetzen. Die rote und die blaue Kontrolllampe erlischt und die
Birnenkamera schaltet sich automatisch aus.
Page 10
BC303
Mode d'emploi
I. Aperçu du produit
1. Objectif de la caméra
2. Voyant rouge
3. Indicateur lumineux bleu
4. Voyants IR
5. Voyant d'alimentation
6. Emplacement pour carte mémoire SD
7. Bouton de réinitialisation
8. Port du câble AV
9. Bouton d'alimentation
10. Bouton d'enregistrement de détection de mouvement
11. Bouton de la caméra
12. Bouton Precedent
13. Bouton d'enregistrement vidéo
14. Bouton Suivant
Page 11
II. Qu'y a-t-il dans la boite
-1 × caméra ampoule
-1 × télécommande
-1 × Lecteur de carte
-1 × 20cm E27 Adaptateur d'extension d'ampoule
-1 × 8 GB carte mémoire SD (déjà installée dans la fente pour carte SD)
III. Opération
>> Assurez-vous que la carte mémoire SD (4GB-64GB) a déjà été formatée et
qu'elle est correctement insérée dans la fente pour carte SD de l'ampoule, sinon
elle ne fonctionnera pas. Une carte mémoire SDHC Class 10 est recommandée.
Si aucune carte mémoire SD n'est installée dans l'ampoule, le témoin lumineux
bleu clignote.
>> Visser l'ampoule dans une prise de courant standard E27.
>> Retirez le film isolant du bas de la télécommande.
3.1. MARCHE / ARRÊT
3.1.1. L'ampoule sera automatiquement mise sous tension lorsqu'elle est
connectée à une prise de courant. Le voyant d'alimentation s'allume en rouge.
Les voyants rouge et bleu s'allument pendant 7 secondes. Ensuite, le voyant
rouge s'éteint tandis que le voyant bleu clignote deux fois et s'éteint. L'appareil
commence automatiquement l'enregistrement vidéo.
3.1.2. Mettez l'appareil hors tension en appuyant une fois sur le bouton
d'alimentation. Les voyants rouge et bleu clignotent deux fois rapidement et
s'éteignent.
3.2. ENREGISTREMENT VIDEO
3.2.1. L'ampoule sera automatiquement mise sous tension lorsqu'elle est
connectée à une prise de courant. Le voyant d'alimentation s'allume en rouge.
Les voyants rouge et bleu s'allument pendant 7 secondes. Ensuite, le voyant
rouge s'éteint tandis que le voyant bleu clignote deux fois et s'éteint. L'appareil
commence automatiquement l'enregistrement vidéo.
Page 12
3.2.2. Appuyez une fois sur le bouton d'enregistrement vidéo pour arrêter
l'enregistrement vidéo. Le témoin lumineux bleu reste allumé, indiquant que la
caméra est entré en mode veille.
3.2.3. Appuyez à nouveau sur le Bouton d'Enregistrement Vidéo pour reprendre
l'enregistrement vidéo. Le voyant bleu clignote deux fois et s'éteint.
[Remarque]:
1). Un fichier vidéo sera généré et enregistré toutes les 5 minutes automatiquement.
2). Si l'éclairage est inférieur à 10 lux, les voyants IR s'allument automatiquement pendant le
processus d'enregistrement vidéo. La distance IR est de 1,5 mètre.
3). Résolution vidéo: 1280 × 720p Format vidéo: AVI
4). L'enregistrement en boucle est pris en charge.
3.3. ENREGISTREMENT DE DÉTECTION DE MOUVEMENT
3.3.1. L'ampoule sera automatiquement mise sous tension lorsqu'elle est
connectée à une prise de courant. Le voyant d'alimentation s'allume en rouge.
Les voyants rouge et bleu s'allument pendant 7 secondes. Ensuite, le voyant
rouge s'éteint tandis que le voyant bleu clignote deux fois et s'éteint. L'appareil
commence automatiquement l'enregistrement vidéo.
3.3.2. Appuyez une fois sur le bouton d'enregistrement vidéo pour arrêter
l'enregistrement vidéo. Le témoin lumineux bleu reste allumé, indiquant que la
caméra est entré en mode veille.
3.3.3. Appuyez une fois sur le Bouton de Détection de Mouvement pour entrer
en mode d'enregistrement de détection de mouvement et le voyant bleu clignote
lentement. Un fichier vidéo sera généré et sauvegardé automatiquement toutes
les 30 secondes.
3.3.4. Appuyez à nouveau sur le Bouton de Détection de Mouvement pour
quitter le mode d'enregistrement de détection de mouvement. Le témoin
lumineux bleu reste allumé, indiquant que l'appareil est de nouveau en mode
veille.
3.4. PHOTO STILL / CAMERA
3.4.1. L'ampoule sera automatiquement mise sous tension lorsqu'elle est
Page 13
connectée à une prise de courant. Le voyant d'alimentation s'allume en rouge.
Les voyants rouge et bleu s'allument pendant 7 secondes. Ensuite, le voyant
rouge s'éteint tandis que le voyant bleu clignote deux fois et s'éteint. L'appareil
commence automatiquement l'enregistrement vidéo.
3.4.2. Appuyez une fois sur le bouton d'enregistrement vidéo pour arrêter
l'enregistrement vidéo. Le témoin lumineux bleu reste allumé, indiquant que la
caméra est entré en mode veille.
3.4.3. Appuyez une fois sur la Bouton de caméra pour prendre une photo.
L'appareil prendra une photo toutes les 3 secondes automatiquement et le
voyant clignotera rouge une fois toutes les 3 secondes.
3.4.4. Appuyez une nouvelle fois sur le bouton Appareil photo pour arrêter de
prendre des photos en continu. Le voyant rouge s'éteint tandis que le voyant
bleu reste allumé, indiquant que l'appareil est de nouveau en mode veille.
IV. Téléchargement de vidéos / images
4,1. Mettez l'appareil hors tension, retirez la carte mémoire SD et insérez-la
dans un lecteur de carte.
4.2. Insérez le lecteur de carte dans le port USB d'un ordinateur approprié.
4.3. La carte mémoire SD sera reconnue comme un lecteur de disque amovible.
4.4. Tous les fichiers sont accessibles dans le dossier "DCIM".
V. Réglage de l'heure / date
5.1. Mettez l'appareil hors tension, retirez la carte mémoire SD et insérez-la
dans un lecteur de carte.
5.2. Insérez le lecteur de carte dans le port USB d'un ordinateur approprié.
5.3. Le dossier du lecteur de disque amovible s'affiche.
5.4. Cliquez sur le lecteur dans le répertoire racine et à l'intérieur du répertoire
racine, ouvrez le fichier txt nommé "time.txt". Si vous ne trouvez pas, vous
pouvez créer un fichier txt nommé "time.txt".
5.5. Écrivez la date et l'heure actuelles dans le fichier "time.txt" avec le format
correct:
YYYY.MM.DD HH: MM: SS (Par exemple: 2016.03.08 14:24:32). Enregistrer ce
Page 14
fichier.
5.6. Redémarrez la caméra et le système mettra automatiquement à niveau le
programme.
VI. Réinitialisation
Si, pour une raison quelconque, la caméra à bulbe cesse de répondre ou ne
fonctionne pas correctement, une réinitialisation rapide le rétablira en mode
normal.
Fonctionnement: Lorsque la caméra est sous tension, maintenez le bouton de
réinitialisation enfoncé pendant 3 secondes pour rétablir les réglages d'usine de
votre appareil photo. Les voyants rouge et bleu s'éteignent et la lampe s'arrête
automatiquement.
Page 15
BC303
Guida Utente
I. Descrizione del prodotto
1. Camera Lens
2. spia rossa
3. Indicatore Light Blue
4. LED IR
5. indicatore luminoso
6. Slot per scheda micro SD
7. Pulsante di ripristino
8. Porto Cavo AV
9.Pulsante di alimentazione
10. Pulsante Registrazione rilevamento movimento
11. Pulsante Camera
12. Tasto PREV
13. Pulsante Registrazione video
14. Tasto AVANTI
Page 16
II. Cosa c'è nella scatola
-1 × lampadina Camera
-1 × Remote Controller
-1 Card Reader ×
-1 Adattatore lampadina estensione × 20 centimetri E27
-1 × 8 GB Micro SD Card (montato nello slot della scheda SD già)
III. Operazione
>> Si prega di verificare che la scheda Micro SD (4GB-64GB) è stato formattato
già ed è dotato saldamente in slot per schede SD del bulbo, o non funzionerà.
Si raccomanda un SDHC Classe 10 scheda Micro SD. Se nessuna scheda
micro SD è montato nella fotocamera lampadina, l'indicatore luminoso blu
continua a lampeggiare.
>> Avvitare il bulbo in una presa di luce standard E27.
>> Rimuovere la pellicola isolante dalla parte inferiore del telecomando.
3.1. ACCENSIONE / SPEGNIMENTO
3.1.1. La fotocamera lampadina sarà alimentato automaticamente quando
collegato ad una presa di corrente elettrica. La spia di alimentazione sarà rosso
fisso. Entrambe le spie rosse e blu saranno illuminati per 7 secondi. Poi la luce
rossa si spegne, mentre quello blu lampeggerà due volte e si spegne. La
fotocamera inizierà a registrare video automaticamente.
3.1.2. Spegnere la fotocamera premendo il pulsante di accensione una volta. La
spia rossa e blu lampeggiano due volte rapidamente e spegnere.
3.2. REGISTRAZIONE VIDEO
3.2.1. La fotocamera lampadina sarà alimentato automaticamente quando
collegato ad una presa di corrente elettrica. La spia di alimentazione sarà rosso
fisso. Entrambe le spie rosse e blu saranno illuminati per 7 secondi. Poi la luce
rossa si spegne, mentre quello blu lampeggerà due volte e si spegne. La
fotocamera inizierà a registrare video automaticamente.
3.2.2. Premere il pulsante di registrazione video una volta per interrompere la
Page 17
registrazione video. La spia blu rimane illuminato, indicando la telecamera è
entrato in modalità standby.
3.2.3. Premere il pulsante di registrazione video ancora una volta per riprendere
la registrazione video. La spia blu lampeggerà due volte e si spegne.
[Nota]:
1). Un file video viene generato e salvato automaticamente ogni 5 minuti.
2). Se l'illuminazione è sotto i 10 lux, i LED IR verranno attivati automaticamente durante
il processo di registrazione video. La distanza IR è di 1,5 metri.
3). Risoluzione video: 1280 × 720p Formato video: AVI
4). registrazione in loop è supportato.
3.3. RILEVAZIONE MOVIMENTO REGISTRAZIONE
3.3.1. La fotocamera lampadina sarà alimentato automaticamente quando
collegato ad una presa di corrente elettrica. La spia di alimentazione sarà rosso
fisso. Entrambe le spie rosse e blu saranno illuminati per 7 secondi. Poi la luce
rossa si spegne, mentre quello blu lampeggerà due volte e si spegne. La
fotocamera inizierà a registrare video automaticamente.
3.3.2. Premere il pulsante di registrazione video una volta per interrompere la
registrazione video. La spia blu rimane illuminato, indicando la telecamera è
entrato in modalità standby.
3.3.3. Premere il pulsante Motion Detection, una volta per entrare in modalità di
registrazione di rilevazione di movimento e l'indicatore luminoso blu non
mancherà di tenere a lampeggiare lentamente. Un file video viene generato e
salvato automaticamente ogni 30 secondi.
3.3.4. Premere il pulsante Motion Detection, ancora una volta per uscire dalla
modalità di registrazione di rilevazione di movimento. La spia blu rimarrà
illuminato, indicando la fotocamera è in modalità standby.
3.4. STILL / CAMERA FOTOGRAFIA
3.4.1. La fotocamera lampadina sarà alimentato automaticamente quando
collegato ad una presa di corrente elettrica. La spia di alimentazione sarà rosso
fisso. Entrambe le spie rosse e blu saranno illuminati per 7 secondi. Poi la luce
Page 18
rossa si spegne, mentre quello blu lampeggerà due volte e si spegne. La
fotocamera inizierà a registrare video automaticamente.
3.4.2. Premere il pulsante di registrazione video una volta per interrompere la
registrazione video. La spia blu rimane illuminato, indicando la telecamera è
entrato in modalità standby.
3.4.3. Premere il pulsante della fotocamera, una volta per scattare foto. La
fotocamera scatta una foto ogni 3 secondi automaticamente e la spia lampeggia
rosso una volta ogni 3 secondi.
3.4.4. Premere il pulsante della fotocamera ancora una volta di smettere di
scattare foto in modo continuo. La spia rossa si spegne, mentre quello blu
resterà illuminato, indicando la fotocamera è in modalità standby.
IV. Upload di video / file di immagine
4.1. Spegnere la fotocamera lampadina, rimuovere la scheda Micro SD e
inserirla in un lettore di schede.
4.2. Inserire il lettore di schede in una porta USB del computer corretta PC.
4.3. La scheda Micro SD verrà riconosciuta come unità disco rimovibile.
4.4. Tutti i file sono accessibili nella cartella "DCIM".
V. Impostazione Ora / Data
5.1. Spegnere la fotocamera, rimuovere la scheda Micro SD e inserirla in un
lettore di schede.
5.2. Inserire il lettore di schede in una porta USB del computer corretta PC.
5.3. appare cartella sul disco rimovibile.
5.4. Fare clic sul disco nella directory principale e all'interno della directory
principale, aprire il file txt denominato "time.txt". Se non si riesce a trovarlo,
allora si potrebbe creare un file txt denominato "time.txt".
5.5. Scrivere la data e l'ora correnti nel file "time.txt" con il formato corretto:
YYYY.MM.DD HH: MM: SS (per esempio: 2016.03.08 14:24:32). Salvare il file.
5.6. Riavviare la telecamera e il sistema aggiornerà automaticamente il
programma.
Page 19
VI. Ripristino
Se per qualsiasi motivo la fotocamera lampadina smette di rispondere o non
funziona correttamente, eseguire un ripristino rapido ripristinerà di nuovo al
normale funzionamento.
Funzionamento: Quando la fotocamera è accesa, tenere premuto il tasto
RESET per 3 secondi per ripristinare la fotocamera alle impostazioni di fabbrica.
Entrambe le spie rosse e blu si spegne e la fotocamera lampadina si spegne
automaticamente.
Page 20
BC303
Guía del Usuario
I. Descripción del producto
1. Lente de la cámara
2. Indicador rojo
3. Luz Indicadora Azul
4. LEDs IR
5. Indicador de encendido
6. Ranura para tarjeta micro SD
7. Botón de reinicio
8. Puerto de cable AV
9. Botón de encendido
10. Botón de grabación de detección de movimiento
11. Botón de la cámara
12. Botón PREV
13. Botón de grabación de vídeo
14. Botón siguiente
Page 21
II. Qué hay en la caja
-1 × Cámara de la bombilla
-1 × Control Remoto
-1 × Lector de tarjetas
-1 × 20cm E27 Bulbo adaptador de extensión
-1 × 8GB Tarjeta Micro SD (ya montada en la ranura de la tarjeta SD)
III. Operación
>> Asegúrese de que la tarjeta Micro SD (4GB-64GB) ya esté formateada y esté
bien instalada en la ranura para tarjeta SD de la bombilla, o no funcionará. Se
recomienda una tarjeta SDHC de clase 10 Micro SD. Si no hay ninguna tarjeta
Micro SD en la cámara de la bombilla, la indicador LED en azul seguirá
parpadeando.
>> Enrosque la bombilla en una toma de corriente estándar E27.
>> Retire la película aislante del control remoto antes usar.
3.1. ENCENDIDO / APAGADO
3.1.1. La cámara de la bombilla se encenderá automáticamente cuando se
conecte a una fuente de alimentación de salida. El indicador LED de
alimentación se encenderá en rojo. Las luces indicadoras roja y azul se
iluminarán durante 7 segundos. A continuación, el indicador LED en rojo se
apagará, mientras que el azul parpadeará dos veces y se apagará. La cámara
empezará a grabar vídeo automáticamente.
3.1.2. Apague la cámara presionando el botón de encendido una vez. Las luces
indicadoras roja y azul parpadearán dos veces rápidamente y se apagarán.
3.2. GRABACIÓN DE VÍDEO
3.2.1. La cámara de la bombilla se encenderá automáticamente cuando se
conecte a una fuente de alimentación de salida. El indicador LED de
alimentación se encenderá en rojo. Las luces indicadoras roja y azul se
iluminarán durante 7 segundos. A continuación, el indicador LED en rojo se
apagará, mientras que el azul parpadeará dos veces y se apagará. La cámara
Page 22
empezará a grabar vídeo automáticamente.
3.2.2. Pulse el botón de grabación de vídeo una vez para detener la grabación
de vídeo. La indicador LED en azul permanecerá iluminada, indicando que la
cámara ha entrado en modo de espera.
3.2.3. Presione el botón de grabación de vídeo una vez más para detener la
grabación de vídeo. El indicador LED en azul parpadeará dos veces y se
apagará.
[Nota]:
1). Se generará un archivo de vídeo y se guardará cada 5 minutos automáticamente.
2). Si la iluminación es inferior a 10 lux, los LED IR se encenderán automáticamente
durante el proceso de grabación de vídeo. La distancia IR es de 1,5 metros.
3). Resolución video: 1280 × 720 Formato video: AVI
4). Se admite la grabación en bucle.
3.3. GRABACIÓN DE DETECCIÓN DE MOVIMIENTO
3.3.1. La cámara de la bombilla se encenderá automáticamente cuando se
conecte a una fuente de alimentación de salida. El indicador LED de
alimentación se encenderá en rojo. Las luces indicadoras roja y azul se
iluminarán durante 7 segundos. A continuación, el indicador LED en rojo se
apagará, mientras que el azul parpadeará dos veces y se apagará. La cámara
empezará a grabar vídeo automáticamente.
3.3.2. Pulse el botón de grabación de vídeo una vez para detener la grabación
de vídeo. La indicador LED en azul permanecerá iluminada, indicando que la
cámara ha entrado en modo de espera.
3.3.3. Pulse el botón de detección de movimiento una vez para entrar en el
modo de grabación de detección de movimiento y la indicador LED en azul
seguirá parpadeando lentamente. Se generará un archivo de vídeo y se
guardará cada 30 segundos automáticamente.
3.3.4. Pulse el botón de detección de movimiento una vez más para salir del
modo de grabación de detección de movimiento. El indicador LED en azul
permanecerá iluminado, indicando que la cámara vuelve al modo de espera.
Page 23
3.4. FOTOGRAFIA EN CASA / CÁMARA
3.4.1. La cámara de la bombilla se encenderá automáticamente cuando se
conecte a una fuente de alimentación de salida. El indicador LED de
alimentación se encenderá en rojo. Las luces indicadoras roja y azul se
iluminarán durante 7 segundos. A continuación, el indicador LED en rojo se
apagará, mientras que el azul parpadeará dos veces y se apagará. La cámara
empezará a grabar vídeo automáticamente.
3.4.2. Pulse el botón de grabación de vídeo una vez para detener la grabación
de vídeo. La indicador LED en azul permanecerá iluminada, indicando que la
cámara ha entrado en modo de espera.
3.4.3. Presione el botón de cámara una vez para tomar fotos. La cámara tomará
una foto cada 3 segundos automáticamente y el indicador LED parpadeará en
rojo una vez cada 3 segundos.
3.4.4. Presione el botón de cámara una vez más para detener la toma de fotos
continuamente. El indicador LED rojo se apagará y el azul permanecerá
iluminado, indicando que la cámara vuelve al modo de espera.
IV. Subida de archivos de video / imagen
4.1. Apague la cámara de la bombilla, extraiga la tarjeta Micro SD e insértela en
un lector de tarjetas.
4.2. Inserte el lector de tarjetas en un puerto USB adecuado de la computadora
de la PC.
4.3. La tarjeta Micro SD será reconocida como una unidad de disco extraíble.
4.4. Todos los archivos se pueden acceder en la carpeta "DCIM".
V. Establecer fecha / hora
5,1. Apague la cámara, retire la tarjeta Micro SD e insértela en un lector de
tarjetas.
5.2. Inserte el lector de tarjetas en un puerto USB adecuado de la computadora
de la PC.
5.3. Aparece la carpeta de unidad de disco extraíble.
5.4. Haga clic en la unidad en el directorio raíz y dentro del directorio raíz, abra
Page 24
el archivo txt llamado "time.txt". Si no lo encuentra, puede crear un archivo txt
llamado "time.txt".
5.5. Escriba la fecha y hora actuales en el archivo "time.txt" con el formato correcto:
YYYY.MM.DD HH: MM: SS (Por ejemplo: 2016.03.08 14:24:32). Guarde este
archivo.
5.6. Reinicie la cámara y el sistema actualizará el programa automáticamente.
VI. Restablecimiento
Si por alguna razón la cámara de la bombilla deja de responder o no está
funcionando correctamente, un restablecimiento rápido le restablecerá el
funcionamiento normal.
Funcionamiento: Cuando la cámara esté encendida, mantenga pulsado el
botón de reinicio durante 3 segundos para restaurar la configuración de fábrica
de la cámara. Las luces indicadoras rojas y azules se apagan y la cámara de la
bombilla se apaga automáticamente.
Page 25
BC303
ユーザーガイド
I.製品の概要
1.カメラのレンズ
2.赤色 インジケータライト
3.ブル ーインジケータライト
4.赤外線LED
5.電源 インジケータライト
6.SDメモリーカードスロット
7.リセットボタン
8.AVケーブ ル ポ ート
9.電源ボタン
10.モーション検知録画ボタン
11.カメラボタン
12.PREVボタン
13.ビデオ録画ボタン
14.NEXTボタン
Page 26
II.ボックス の 内 容
-1×電球型カメラ
-1×リモ ートコ ントロ ー ラ
-1×カードリーダ ー
-1×20センチE27電球延長アダプター
-1×8GBのSDメモリーカード(すでにSDカードスロットに装着済み)
III.操作
>> SDメモリーカード(4GB-64GB)がすでにフォーマットされており、電球のSDカ
ードスロットにしっかりと固定されていることを確認してください。SDHCクラス10
SDメモリーカードを推 奨します。SDメモリーカードが電球型カメラに取り付けられ
ていない場合は、青いインジケータランプが点滅し続けます。
>>バルブを標準のE27ライトソケットにねじ込みます。
>>リモコンの底面から絶縁フィルムをはずしてください。
3.1.電源ON/OFF
3.1.1. 当電球型カメラは、コンセント電源に接続すると自動的に電源が入ります。
電源ランプが赤色に点灯します。赤と青の両方のインジケータランプが7秒間点灯
します。赤色のインジケータランプが消灯し、青色のランプが2回点滅して消灯しま
す。カメラが自動的にビデオの録画を開始します。
3.1.2. 電源ボタンを1回押してカメラの電源を切ります。赤色と青色の両方のイン
ジケータライトが素早く2回点滅して消灯します。
3.2.ビデオレコーディング
3.2.1. 当電球型カメラは、コンセント電源に接続すると自動的に電源が入ります。
電源ランプが赤色に点灯します。赤と青の両方のインジケータランプが7秒間点灯
します。赤色のインジケータランプが消灯し、青色のランプが2回点滅して消灯しま
す。カメラが自動的にビデオの録画を開始します。
3.2.2. ビデオ録画ボタンを1回押すと、録画を停止します。青色のインジケータラン
プが 点灯したままになり、カメラがスタンバイモードに入ったことを示します。
3.2.3.録画ボタンをもう一度押すと録画を再開します。青のインジケータランプが2
回点滅して消灯します。
Page 27
[注意]:
1).ビデオファイルが自動的に生成され、5分ごとに自動的に保存されます。
2). 照明が10ルクス未満の場合、ビデオ録画中にIR LEDが自動的にオンになります。赤外線
距離は1.5メートル で す。
3).ビデオ解像度:1280×720Pビデオフォーマット:AVI
4).ループ録音がサポートされています。
3.3.モーション検知録画
3.3.1. 当電球型カメラは、コンセント電源に接続すると自動的に電源が入ります。
電源ランプが赤色に点灯します。赤と青の両方のインジケータランプが7秒間点灯
します。赤色のインジケータランプが消灯し、青色のランプが2回点滅して消灯しま
す。カメラが自動的にビデオの録画を開始します。
3.3.2. ビデオ録画ボタンを1回押すと、録画を停止します。青色のインジケータラン
プが 点灯したままになり、カメラがスタンバイモードに入ったことを示します。
3.3.3. モーション検知ボタンを1回押すと、モーション検知録画モードに入り、青い
インジケータランプがゆっくりと点滅し続けます。ビデオファイルが生成され、30秒
ごとに自動的に保存されます。
3.3.4.モーション検知ボタンをもう一度押すと、モーション検知録画モードを終了し
ます。青いインジケータランプ が点灯したままになり、カメラがスタンバイモードに
戻ったことを示します。
3.4.静止/カメラ写 真
3.4.1. 当電球型カメラは、コンセント電源に接続すると自動的に電源が入ります。
電源ランプが赤色に点灯します。赤と青の両方のインジケータランプが7秒間点灯
します。赤色のインジケータランプが消灯し、青色のランプが2回点滅して消灯しま
す。カメラが自動的にビデオの録画を開始します。
3.4.2. ビデオ録画ボタンを1回押すと、録画を停止します。青色のインジケータラン
プが 点灯したままになり、カメラがスタンバイモードに入ったことを示します。
3.4.3. カメラボタンを1回押して写真を撮影します。カメラは自動的に3秒ごとに写
真を撮り、インジケータランプは3秒ごとに赤く点滅します。
3.4.4. カメラボタンをもう一度押すと、連続して撮影を停止します。赤色のインジケ
ータランプは消灯し、青色のランプは点灯したままになり、カメラがスタンバイモ
Page 28
ードに戻ります。
IV.ビデオ/画 像 ファイル のアップ ロ ード
4.1. 当電球型カメラの電源を切り、SDメモリーカードを取り出してカードリーダ ー
に挿入してくたさい。
4.2.カードリーダーを適切なパソコンのUSBポートに挿入してくたさい。
4.3.SDメモリーカードはリムーバブルディスクドライブとして認識されます。
4.4.すべてのファイルは"DCIM"フォルダからアクセスできます。
V.時間/日付スタンプ の設 定
5.1. カメラの電源を切り、SDメモリーカードを取り出してカードリーダーに挿入し
てくたさい。
5.2.カードリーダーを適切なパソコンのUSBポートに挿入してくたさい。
5.3.リムーバブルディスクドライブのフォルダが表示されます。
5.4.ルートディレクトリ内のドライブをクリックし、ル ートディレクトリ内で "time.txt"
という名前のテクストファイルを開きます。 見つけられない場合は、 "time.txt"とい
う名前のテクストファイルを作成してくたさい。
5.5.現在の日付と時刻を「time.txt」ファイルに正しい形式で書き込む:
YYYY.MM.DDHH:MM:SS( 例:2016.03.0814:24:32)。このファイルを保 存します。
5.6.カメラを再起動すると、システムが自動的にプログラムをアップグレードします。
VI.リセ ット
何らかの理由でカメラが応答しなくなった場合、または正常に動作していない場
合、クイックリセットを実行すると通常の動作に戻ります。
操 作:カメラの電源が入ったら、リセットボタンを3秒間押し続けると、カメラは工
場出荷時の設定に戻ります。赤と青の両方のインジケータランプが消灯し、電球型
カメラが自動的 にシャットダウンします。
 Loading...