

Page 1
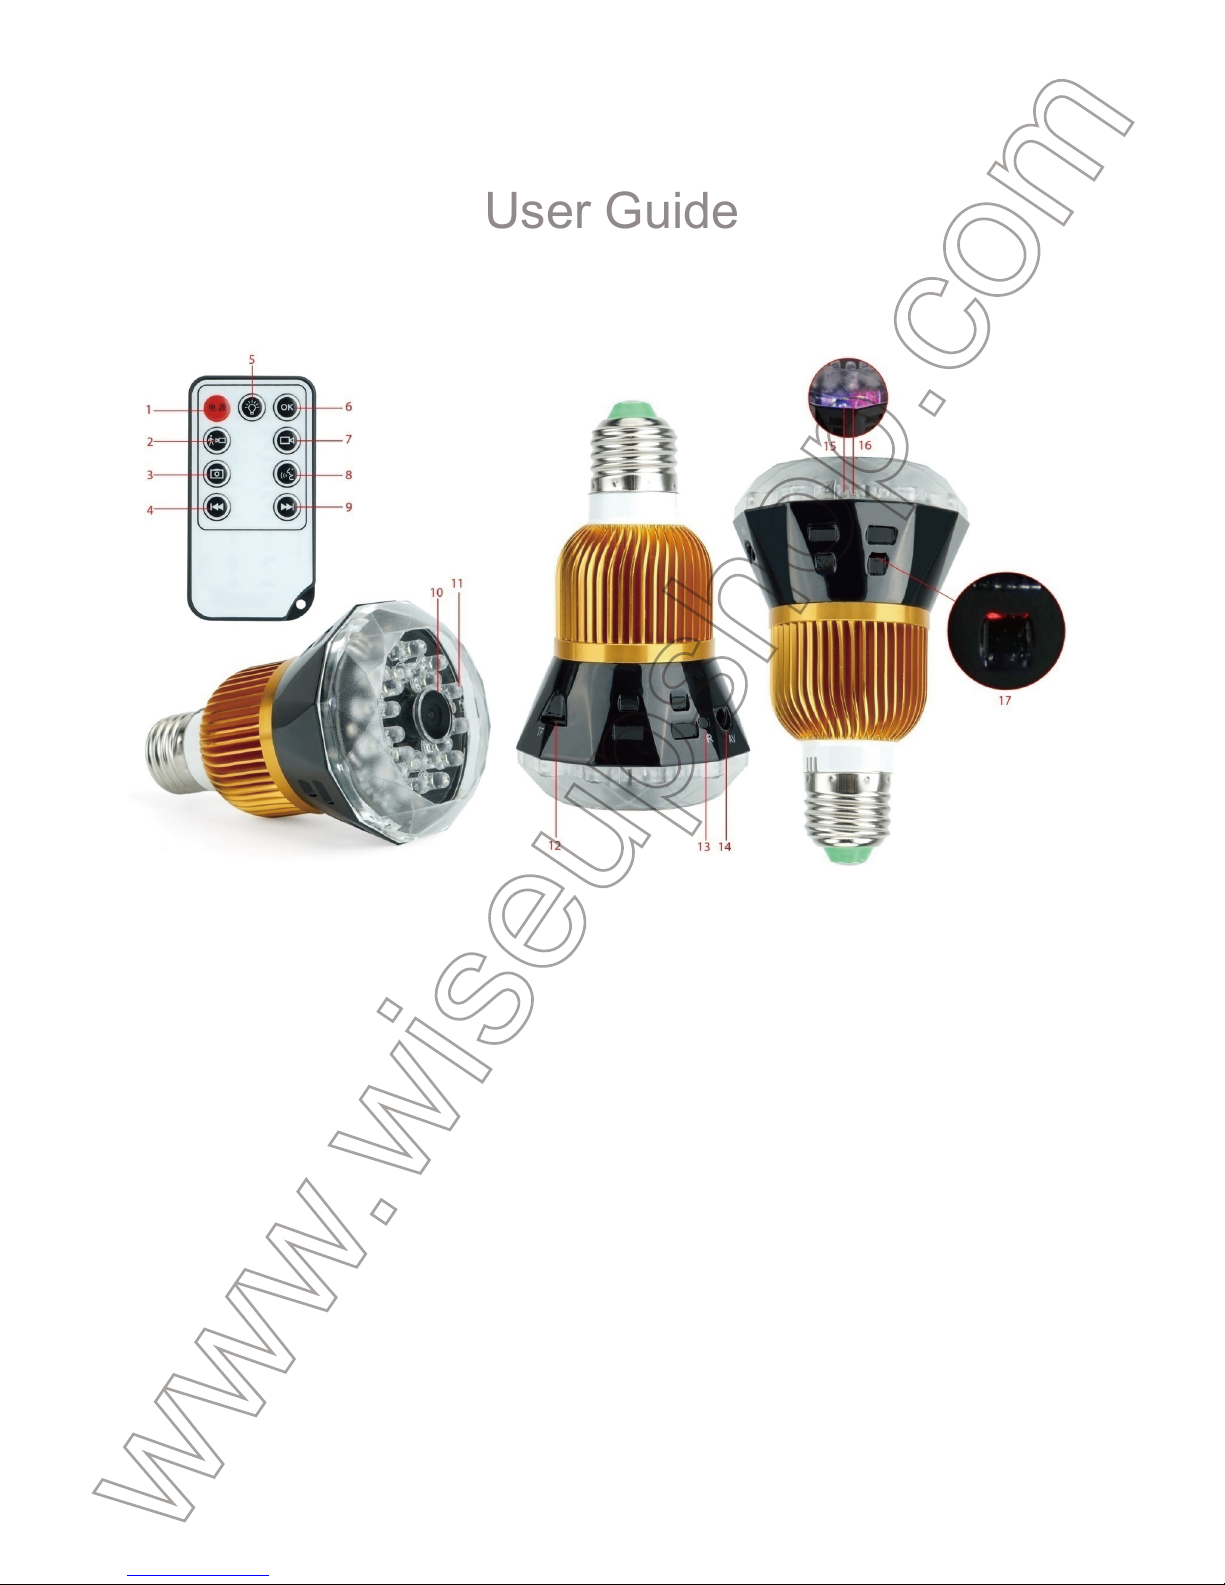
I. Product Overview
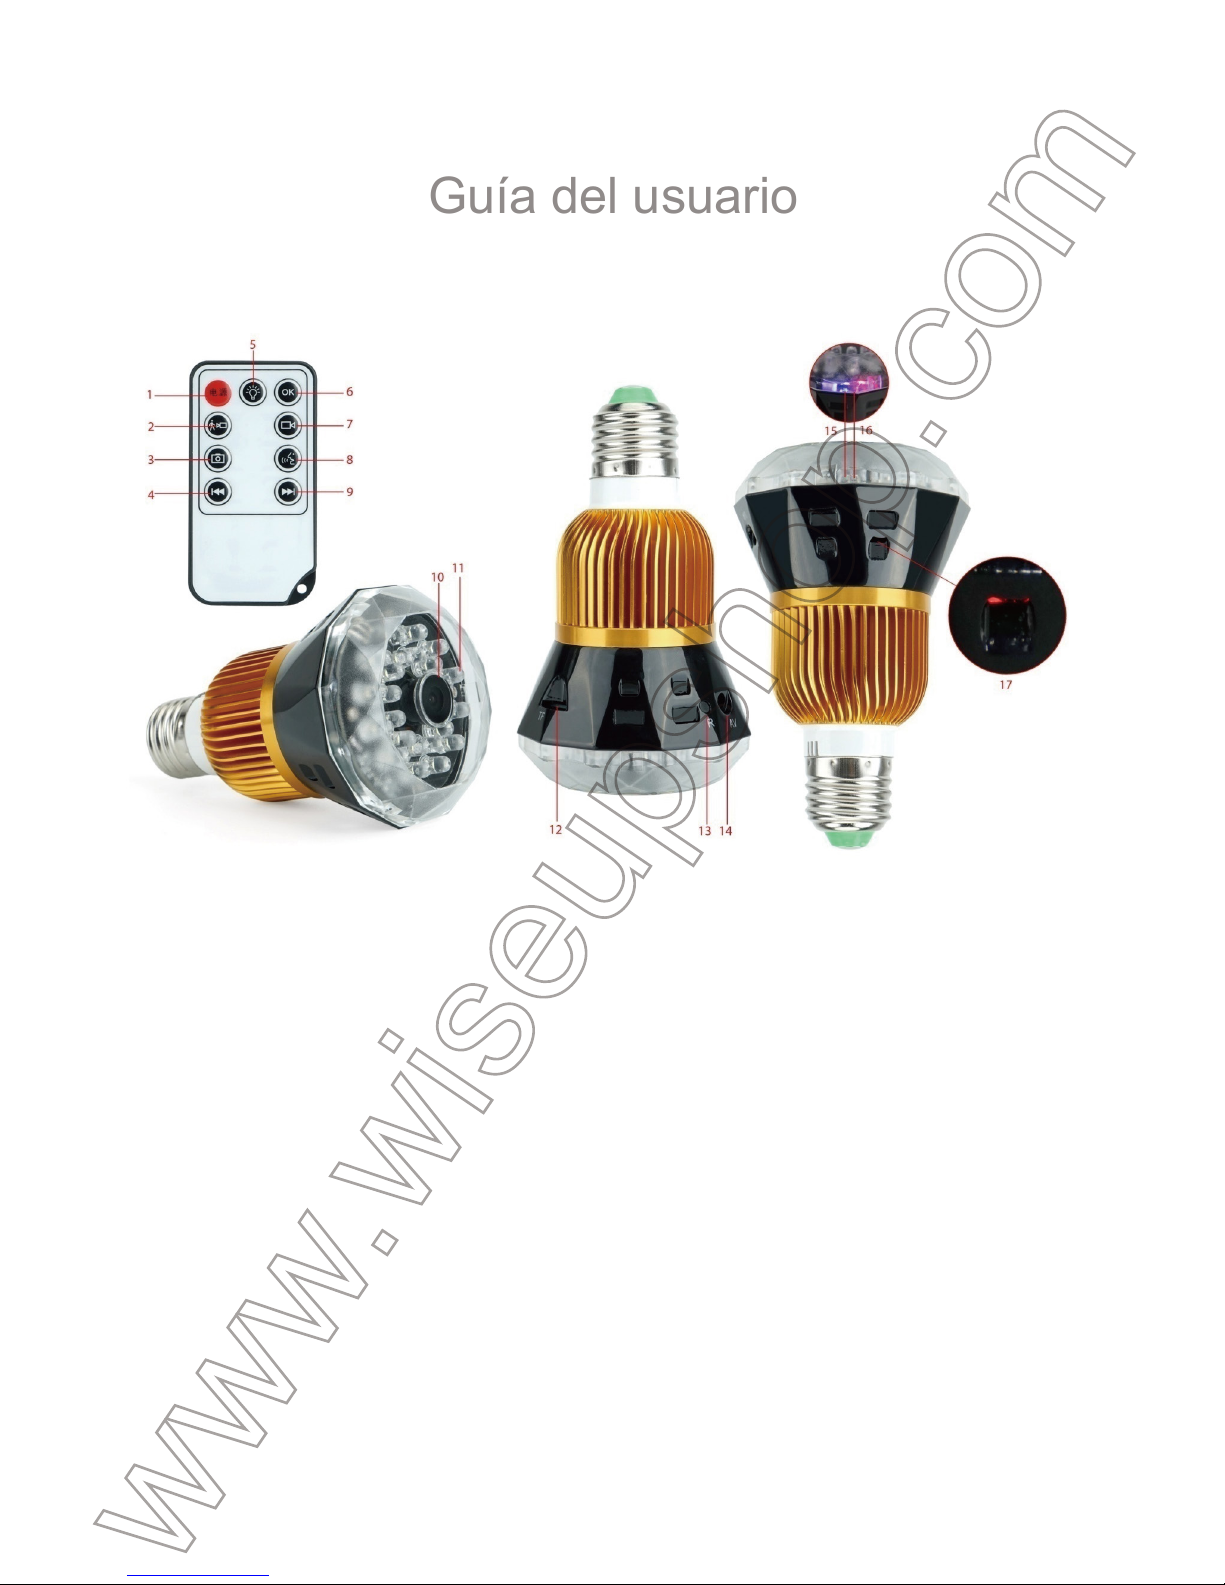
1. Power Button
2. Motion Detection Button
3. Camera Button
4. Previous Button
5. Light On/Off Button
6. Confirmation Button
7. Video Recording Button
8. Voice/Sound Activated Recording Button
9. Next Button
II. What’s In the Box
-1× Bulb Camera
-1× Card Reader
-1× Remote Controller
-1× 20cm E27 Bulb Extension Adapter
BC301
User Guide
10. Camera Lens
11. LED Beads
12. Micro SD Card Slot
13. Reset Button
14. AV Cable Port
15. Blue Indicator Light
16. Red Indicator Light
17. Power Indicator Light
III. Operation
Please check things below before you start:
>> Insert a SDHC Class 10 Micro SD card (4GB-32GB, format it for the first usage)
into the card slot.
>> Screw the bulb into a standard E27 light fixture.
>> Remove the insulating film from the bottom of the remote controller.
[Note]:
3.1. POWER ON/OFF
3.1.1. The bulb will be powered on automatically once connected to outlet power
supply. The red and blue indicator lights will illuminate for 3 seconds first. Then the
red one will turn off, while the blue one will blink twice and turn off. Now the camera
has entered into standby mode.
3.1.2. Power off the camera by pressing Power Button once again. The red and blue
indicator lights will flash fast 3 times and then turn off
3.2. VIDEO RECORDING
3.2.1. The bulb will be powered on automatically once connected to outlet power
supply. The red and blue indicator lights will illuminate for 3 seconds first. Then the
red one will turn off, while the blue one will blink twice and turn off. Now the camera
has entered into standby mode.
3.2.2. Press Video Recording Button once to record video. The blue indicator light will
stay illuminated.
3.2.3. Press Video Recording Button again to stop recording video. The blue indicator
light will turn off and the camera will be back to standby mode.
[Note]:
1). A video file will be generated and saved every 5 minutes automatically.
2). Video Resolution: 1920×1080P Video Format: AVI
3.3. MOTION DETECTION RECORDING
3.3.1. The bulb will be powered on automatically once connected to outlet power
supply. The red and blue indicator lights will illuminate for 3 seconds first. Then the
red one will turn off, while the blue one will blink twice and turn off. Now the camera
has entered into standby mode.
3.3.2. Press Motion Detection Button once to enter into motion detection mode and
the blue indicator light will keep flashing slowly.
Page 2

III. Operation
Please check things below before you start:
>> Insert a SDHC Class 10 Micro SD card (4GB-32GB, format it for the first usage)
into the card slot.
>> Screw the bulb into a standard E27 light fixture.
>> Remove the insulating film from the bottom of the remote controller.
[Note]:
If no Micro SD card is fitted into the bulb, the blue indicator light will keep flashing.
3.1. POWER ON/OFF
3.1.1. The bulb will be powered on automatically once connected to outlet power
supply. The red and blue indicator lights will illuminate for 3 seconds first. Then the
red one will turn off, while the blue one will blink twice and turn off. Now the camera
has entered into standby mode.
3.1.2. Power off the camera by pressing Power Button once again. The red and blue
indicator lights will flash fast 3 times and then turn off
3.2. VIDEO RECORDING
3.2.1. The bulb will be powered on automatically once connected to outlet power
supply. The red and blue indicator lights will illuminate for 3 seconds first. Then the
red one will turn off, while the blue one will blink twice and turn off. Now the camera
has entered into standby mode.
3.2.2. Press Video Recording Button once to record video. The blue indicator light will
stay illuminated.
3.2.3. Press Video Recording Button again to stop recording video. The blue indicator
light will turn off and the camera will be back to standby mode.
[Note]:
1). A video file will be generated and saved every 5 minutes automatically.
2). Video Resolution: 1920×1080P Video Format: AVI
3.3. MOTION DETECTION RECORDING
3.3.1. The bulb will be powered on automatically once connected to outlet power
supply. The red and blue indicator lights will illuminate for 3 seconds first. Then the
red one will turn off, while the blue one will blink twice and turn off. Now the camera
has entered into standby mode.
3.3.2. Press Motion Detection Button once to enter into motion detection mode and
the blue indicator light will keep flashing slowly.
3.3.3. The camera will record video automatically when a movement is detected.
3.3.4. Switch to another mode directly, or press Video Recording Button once to exit
motion detection mode.
[Note]:
3.4. AUDIO ACTIVATED VIDEO RECORDING
3.4.1. The bulb will be powered on automatically once connected to outlet power
supply. The red and blue indicator lights will illuminate for 3 seconds first. Then the
red one will turn off, while the blue one will blink twice and turn off. Now the camera
has entered into standby mode.
3.4.2. Press Voice/Sound Activated Recording Button once to enter into sound acti-
vated video recording mode and the red indicator light will stay illuminated.
3.4.3. The camera will record video automatically when audio is detected.
3.4.4. Switch to another mode directly, or press Video Recording Button once to exit
sound activated video recording mode.
[Note]:
3.5. STILL/CAMERA PHOTOGRAPH
3.5.1. The bulb will be powered on automatically once connected to outlet power
supply. The red and blue indicator lights will illuminate for 3 seconds first. Then the
red one will turn off, while the blue one will blink twice and turn off. Now the camera
has entered into standby mode.
3.5.2. Press Camera Button once to enter into auto photograph mode and the red
indicator light will keep flashing slowly.
3.5.3. A photo will be taken automatically every 3 seconds.
3.5.4. Switch to another mode directly, or press Video Recording Button once to exit
auto photograph mode.
3.6. LIGHT ON/OFF
Press Light On/Off Button once to turn on or off the light.
IV. Video/Image File Uploads
4.1. When the bulb is powered off, remove the Micro SD card and insert it into a card
reader.
4.2. Insert the card reader into a PC computer.
4.3. The Micro SD card will be recognized as a removable disk drive.
Page 3
3.3.3. The camera will record video automatically when a movement is detected.
3.3.4. Switch to another mode directly, or press Video Recording Button once to exit
motion detection mode.
[Note]:
Each video clip lasts 30 seconds.
3.4. AUDIO ACTIVATED VIDEO RECORDING
3.4.1. The bulb will be powered on automatically once connected to outlet power
supply. The red and blue indicator lights will illuminate for 3 seconds first. Then the
red one will turn off, while the blue one will blink twice and turn off. Now the camera
has entered into standby mode.
3.4.2. Press Voice/Sound Activated Recording Button once to enter into sound activated video recording mode and the red indicator light will stay illuminated.
3.4.3. The camera will record video automatically when audio is detected.
3.4.4. Switch to another mode directly, or press Video Recording Button once to exit
sound activated video recording mode.
[Note]:
Each video clip lasts one minute.
3.5. STILL/CAMERA PHOTOGRAPH
3.5.1. The bulb will be powered on automatically once connected to outlet power
supply. The red and blue indicator lights will illuminate for 3 seconds first. Then the
red one will turn off, while the blue one will blink twice and turn off. Now the camera
has entered into standby mode.
3.5.2. Press Camera Button once to enter into auto photograph mode and the red
indicator light will keep flashing slowly.
3.5.3. A photo will be taken automatically every 3 seconds.
3.5.4. Switch to another mode directly, or press Video Recording Button once to exit
auto photograph mode.
3.6. LIGHT ON/OFF
Press Light On/Off Button once to turn on or off the light.
IV. Video/Image File Uploads
4.1. When the bulb is powered off, remove the Micro SD card and insert it into a card
reader.
4.2. Insert the card reader into a PC computer.
4.3. The Micro SD card will be recognized as a removable disk drive.
4.4. All the files can be accessed in the “DCIM” folder.
VII. Setting the Date/Time Stamp
5.1. When the bulb is powered off, remove the Micro SD card and insert it into a card
reader.
5.2. Insert the card reader into a PC computer.
5.3. Removable disk drive folder appears.
5.4. Click on the drive in the root directory and inside the root directory, create a file
named “time.txt”.
5.5. Write the current date and time in the file“time.txt” with the correct format:
Year.Month.Day Hour:Minute:Second. (For example: 2016.03.08 14:24:32). Save
this file.
5.6. Restart the camera and the system will upgrade the program automatically.
VII. Resetting
If for any reason the bulb stops responding or isn’t working properly, a quick reset will
restore it back to normal operation.
Operation: Hold down Reset Button for 3 seconds to reset the bulb. The red and blue
indicator lights will turn off.
Page 4

4.4. All the files can be accessed in the “DCIM” folder.
VII. Setting the Date/Time Stamp
5.1. When the bulb is powered off, remove the Micro SD card and insert it into a card
reader.
5.2. Insert the card reader into a PC computer.
5.3. Removable disk drive folder appears.
5.4. Click on the drive in the root directory and inside the root directory, create a file
named “time.txt”.
5.5. Write the current date and time in the file“time.txt” with the correct format:
Year.Month.Day Hour:Minute:Second. (For example: 2016.03.08 14:24:32). Save
this file.
5.6. Restart the camera and the system will upgrade the program automatically.
VII. Resetting
If for any reason the bulb stops responding or isn’t working properly, a quick reset will
restore it back to normal operation.
Operation: Hold down Reset Button for 3 seconds to reset the bulb. The red and blue
indicator lights will turn off.
Page 5
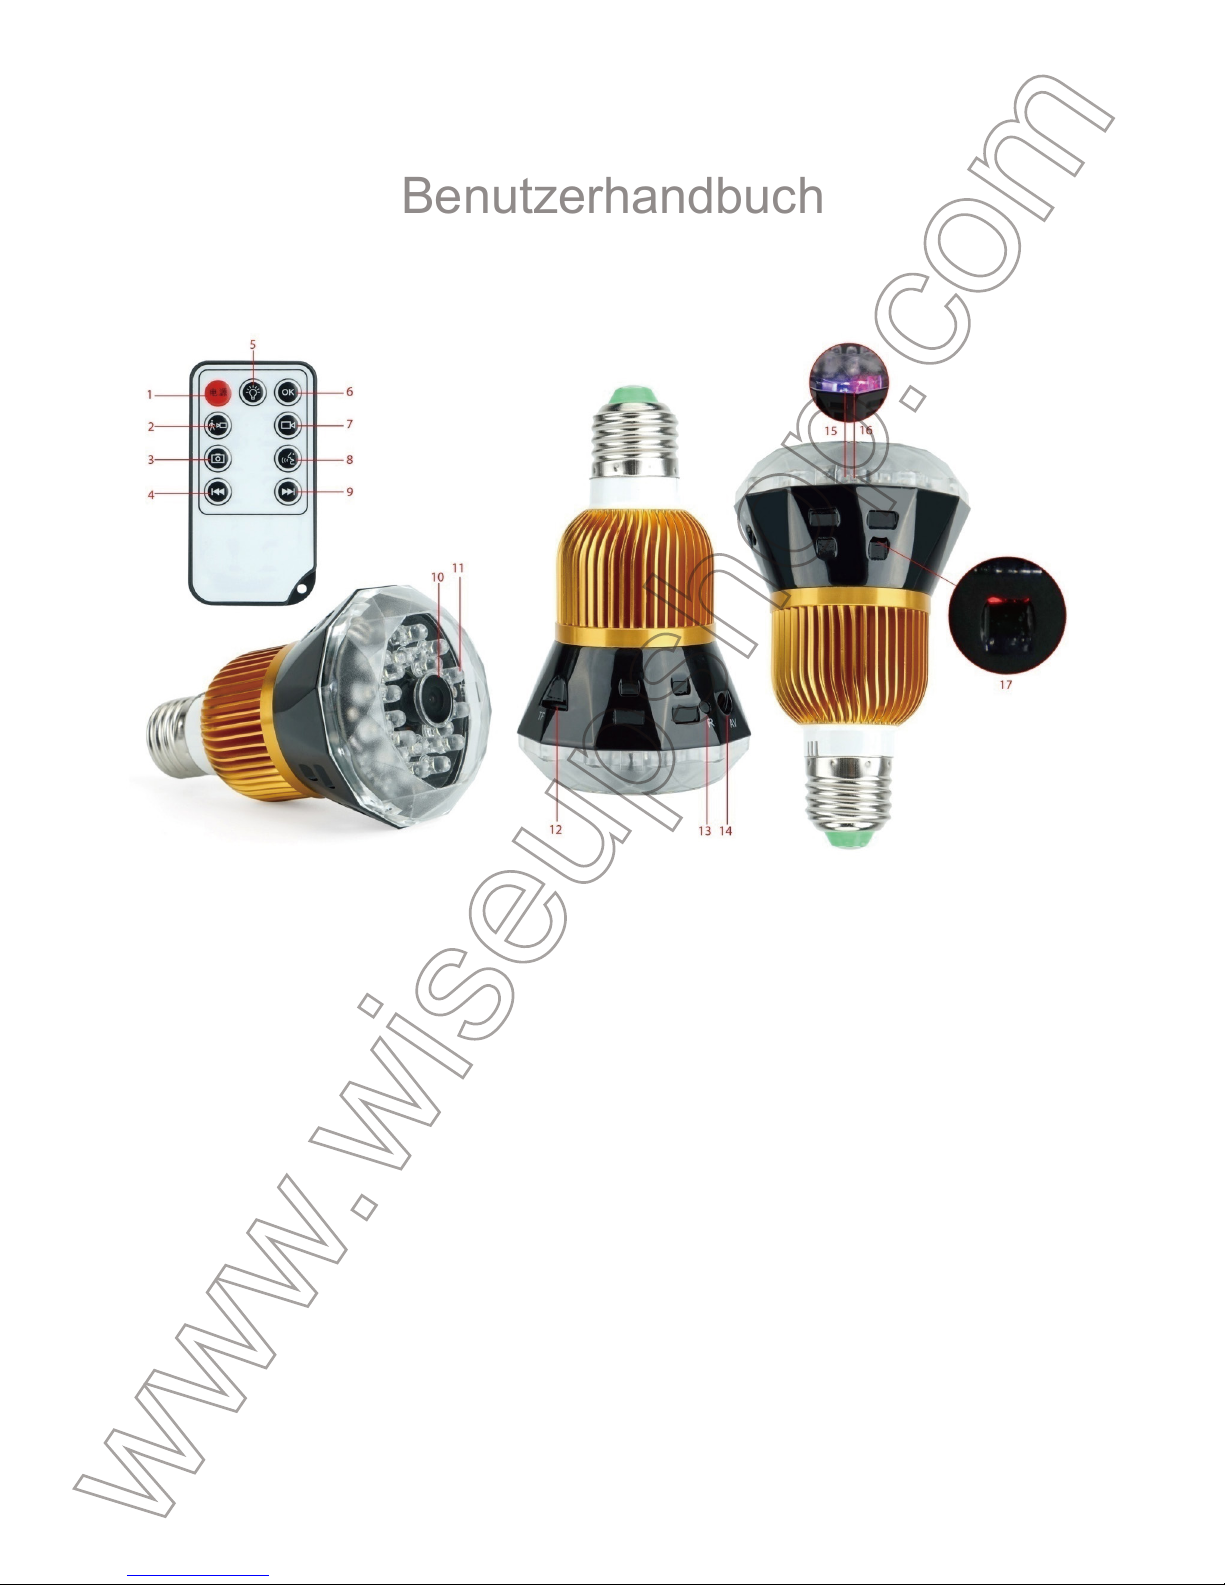
I. Produktübersicht
1. Netzschalter
2. Motion-Detection-Taste
3. Kamera-Taste
4. Zurück-Taste
5. Licht Ein / Aus-Taste
6. Bestätigungstaste
7. Videoaufnahmetaste
8. Voice / Ton aktivierte Aufnahme-Taste
9. Next Button
II. Was ist in der Box
-1×Birnen-Kamera
-1×Kartenleser
-1×Kartenleser
-1×20cm E27 Verlängerung Adapter
BC301
Benutzerhandbuch
10. Kamera-Objektiv
11. LED-Perlen
12. Micro-SD-Kartensteckplatz
13. Reset-Taste
14. AV-Kabel Schnittstelle
15. Blau-Anzeigelampe
16. Rote Anzeigeleuchte
17. Betriebsanzeige Ligh
III. Betrieb
Bitte überprüfen Sie die Dinge unten, bevor Sie beginnen:
>> Um einen SDHC Class 10 Micro SD-Karte ein (4GB-32GB, Format es für die
Erstausstattung) in den Kartenschlitz .
>> Schrauben Sie die Lampe in einem Standard-E27 Leuchte.
>> Entfernen des Isolationsfilms von der Unterseite der Fernbedienung.
[Hinweis]:
blinkt.
3.1. EINSCHALTEN / AUSSCHALTEN
3.1.1. Die Lampe wird automatisch einmal eingeschaltet sein, verbunden Stromver-
sorgung zum Ausgang. Die roten und blauen Anzeigeleuchten ersten 3 Sekunden
lang zu beleuchten. Dann wird die rote ausschalten, während die blaue blinkt zweimal
und auszuschalten. Nun hat sich die Kamera in den Standby-Modus.
3.1.2. Schalten Sie die Kamera durch Power-Knopf einmal drücken wieder. Die roten
und blauen Anzeigeleuchten schnell 3 mal blinken und dann ausschalten.
3.2. VIDEOAUFNAHME
3.2.1. Die Lampe wird automatisch einmal eingeschaltet sein, verbunden Stromver-
sorgung zum Ausgang. Die roten und blauen Anzeigeleuchten ersten 3 Sekunden
lang zu beleuchten. Dann wird die rote ausschalten, während die blaue blinkt zweimal
und auszuschalten. Nun hat sich die Kamera in den Standby-Modus.
3.2.2. Presse Video Aufnahmetaste einmal aufzeichnen Video. Die blaue Anzei-
gelampe leuchtet bleiben.
3.2.3. Presse Video Recording-Taste erneut zu stoppen Videoaufzeichnung . Die
blaue Anzeigelampe erlischt, und die Kamera in den Standby-Modus zurück.
[Hinweis]:
1). Eine Videodatei wird erzeugt und automatisch gespeichert, alle 5 Minuten werden.
2). Video Auflösung: 1920×1080P Video Format: AVI
3.3. ZUR BEWEGUNGSERKENNUNG
3.3.1. Die Lampe wird automatisch einmal eingeschaltet sein, verbunden Stromver-
sorgung zum Ausgang. Die roten und blauen Anzeigeleuchten ersten 3 Sekunden
lang zu beleuchten. Dann wird die rote ausschalten, während die blaue blinkt zweimal
und auszuschalten. Nun hat sich die Kamera in den Standby-Modus.
3.3.2. Drücken Sie Motion-Detection-Taste einmal einzugeben in Bewegungser-
Page 6

III. Betrieb
Bitte überprüfen Sie die Dinge unten, bevor Sie beginnen:
>> Um einen SDHC Class 10 Micro SD-Karte ein (4GB-32GB, Format es für die
Erstausstattung) in den Kartenschlitz .
>> Schrauben Sie die Lampe in einem Standard-E27 Leuchte.
>> Entfernen des Isolationsfilms von der Unterseite der Fernbedienung.
[Hinweis]:
Wenn keine Micro-SD-Karte in den Kolben angebracht ist, hält die blaue Anzeigelampe
blinkt.
3.1. EINSCHALTEN / AUSSCHALTEN
3.1.1. Die Lampe wird automatisch einmal eingeschaltet sein, verbunden Stromversorgung zum Ausgang. Die roten und blauen Anzeigeleuchten ersten 3 Sekunden
lang zu beleuchten. Dann wird die rote ausschalten, während die blaue blinkt zweimal
und auszuschalten. Nun hat sich die Kamera in den Standby-Modus.
3.1.2. Schalten Sie die Kamera durch Power-Knopf einmal drücken wieder. Die roten
und blauen Anzeigeleuchten schnell 3 mal blinken und dann ausschalten.
3.2. VIDEOAUFNAHME
3.2.1. Die Lampe wird automatisch einmal eingeschaltet sein, verbunden Stromversorgung zum Ausgang. Die roten und blauen Anzeigeleuchten ersten 3 Sekunden
lang zu beleuchten. Dann wird die rote ausschalten, während die blaue blinkt zweimal
und auszuschalten. Nun hat sich die Kamera in den Standby-Modus.
3.2.2. Presse Video Aufnahmetaste einmal aufzeichnen Video. Die blaue Anzeigelampe leuchtet bleiben.
3.2.3. Presse Video Recording-Taste erneut zu stoppen Videoaufzeichnung . Die
blaue Anzeigelampe erlischt, und die Kamera in den Standby-Modus zurück.
[Hinweis]:
1). Eine Videodatei wird erzeugt und automatisch gespeichert, alle 5 Minuten werden.
2). Video Auflösung: 1920×1080P Video Format: AVI
3.3. ZUR BEWEGUNGSERKENNUNG
3.3.1. Die Lampe wird automatisch einmal eingeschaltet sein, verbunden Stromversorgung zum Ausgang. Die roten und blauen Anzeigeleuchten ersten 3 Sekunden
lang zu beleuchten. Dann wird die rote ausschalten, während die blaue blinkt zweimal
und auszuschalten. Nun hat sich die Kamera in den Standby-Modus.
3.3.2. Drücken Sie Motion-Detection-Taste einmal einzugeben in Bewegungser-
fassungsmodus und die blaue Anzeigelampe hält langsam zu blinken.
3.3.3. Die Kamera wird Video automatisch aufzeichnen, wenn eine Bewegung erkan-
nt wird.
3.3.4. Wechseln in einen anderen Modus direkt oder drücken Videoaufnahmetaste
einmal, um zu beenden Bewegungsabfragungsmodus.
[Hinweis]:
3.4. AUDIO AKTIV VIDEO-AUFNAHME
3.4.1. Die Lampe wird automatisch einmal eingeschaltet sein, verbunden Stromver-
sorgung zum Ausgang. Die roten und blauen Anzeigeleuchten ersten 3 Sekunden
lang zu beleuchten. Dann wird die rote ausschalten, während die blaue blinkt zweimal
und auszuschalten. Nun hat sich die Kamera in den Standby-Modus.
3.4.2. Drücken Sie Voice / Ton aktivierte Aufnahme-Taste einmal eingeben in Ton
aktivierte Video-Aufnahmemodus und die rote LED beleuchtet wird bleiben.
3.4.3. Die Kamera wird Video automatisch aufzeichnen, wenn der Ton erkannt wird.
3.4.4. Wechseln in einen anderen Modus direkt oder drücken Sie Video-Auf-
nahme-Taste einmal, um zu beenden Sound aktiviert Video-Aufnahmemodus.
[Hinweis]:
3.5. NOCH / KAMERA FOTOGRAFIE
3.5.1. Die Lampe wird automatisch einmal eingeschaltet sein, verbunden Stromver-
sorgung zum Ausgang. Die roten und blauen Anzeigeleuchten ersten 3 Sekunden
lang zu beleuchten. Dann wird die rote ausschalten, während die blaue blinkt zweimal
und auszuschalten. Nun hat sich die Kamera in den Standby-Modus.
3.5.2. Drücken Sie einmal die Kamera-Taste in Auto-Fotografie-Modus und die rote
LED blinkt langsam halten einzugeben.
3.5.3. Ein Foto wird automatisch alle 3 Sekunden aufgenommen werden.
3.5.4. Wechseln in einen anderen Modus direkt oder drücken Videoaufnahmetaste
einmal auf Auto Foto-Modus zu verlassen.
3.6. LICHT AN / AUS
Drücken Sie Licht Ein / Aus-Taste einmal zum Einschalten oder Ausschalten des
Lichts.
IV. Video- / Bilddateiuploads
4.1. Wenn die Lampe ausgeschaltet ist, entfernen Sie die Micro SD-Karte und in
Page 7

fassungsmodus und die blaue Anzeigelampe hält langsam zu blinken.
3.3.3. Die Kamera wird Video automatisch aufzeichnen, wenn eine Bewegung erkannt wird.
3.3.4. Wechseln in einen anderen Modus direkt oder drücken Videoaufnahmetaste
einmal, um zu beenden Bewegungsabfragungsmodus.
[Hinweis]:
Jeder Videoclip dauert 30 Sekunden.
3.4. AUDIO AKTIV VIDEO-AUFNAHME
3.4.1. Die Lampe wird automatisch einmal eingeschaltet sein, verbunden Stromversorgung zum Ausgang. Die roten und blauen Anzeigeleuchten ersten 3 Sekunden
lang zu beleuchten. Dann wird die rote ausschalten, während die blaue blinkt zweimal
und auszuschalten. Nun hat sich die Kamera in den Standby-Modus.
3.4.2. Drücken Sie Voice / Ton aktivierte Aufnahme-Taste einmal eingeben in Ton
aktivierte Video-Aufnahmemodus und die rote LED beleuchtet wird bleiben.
3.4.3. Die Kamera wird Video automatisch aufzeichnen, wenn der Ton erkannt wird.
3.4.4. Wechseln in einen anderen Modus direkt oder drücken Sie Video-Aufnahme-Taste einmal, um zu beenden Sound aktiviert Video-Aufnahmemodus.
[Hinweis]:
Jeder Videoclip dauert eine Minute.
3.5. NOCH / KAMERA FOTOGRAFIE
3.5.1. Die Lampe wird automatisch einmal eingeschaltet sein, verbunden Stromversorgung zum Ausgang. Die roten und blauen Anzeigeleuchten ersten 3 Sekunden
lang zu beleuchten. Dann wird die rote ausschalten, während die blaue blinkt zweimal
und auszuschalten. Nun hat sich die Kamera in den Standby-Modus.
3.5.2. Drücken Sie einmal die Kamera-Taste in Auto-Fotografie-Modus und die rote
LED blinkt langsam halten einzugeben.
3.5.3. Ein Foto wird automatisch alle 3 Sekunden aufgenommen werden.
3.5.4. Wechseln in einen anderen Modus direkt oder drücken Videoaufnahmetaste
einmal auf Auto Foto-Modus zu verlassen.
3.6. LICHT AN / AUS
Drücken Sie Licht Ein / Aus-Taste einmal zum Einschalten oder Ausschalten des
Lichts.
IV. Video- / Bilddateiuploads
4.1. Wenn die Lampe ausgeschaltet ist, entfernen Sie die Micro SD-Karte und in
einen Kartenleser ein.
4.2. Setzen Sie den Kartenleser in einen PC-Computer.
4.3. Die SD-Micro-Karte wird als Wechsellaufwerk erkannt werden.
4.4. Alle Dateien können im Ordner "DCIM" zugegriffen werden.
reader.
VII. Einstellen von Datum / Uhrzeit
5.1. Wenn die Lampe ausgeschaltet ist, entfernen Sie die Micro SD-Karte und in
einen Kartenleser ein.
5.2. Setzen Sie den Kartenleser in einen PC-Computer.
5.3. Wechselplattenlaufwerk Ordner angezeigt wird.
5.4. Klicken Sie auf das Laufwerk im Stammverzeichnis und im Inneren des
Root-Verzeichnis eine Datei mit dem Namen "time.txt".
5.5. Schreiben Sie das aktuelle Datum und die Uhrzeit in der Datei "time.txt" mit dem
richtigen Format:
Year.Month.Day Stunde: Minute: Sekunde. (Zum Beispiel: 2016.03.08 14.24.32).
Speichern Sie diese Datei.
5.6. Starten Sie die Kamera und das System wird das Programm automatisch aktuali-
sieren.
VII. Neueinstellung
Wenn aus irgendeinem Grund reagiert die Glühlampe anhält oder nicht richtig funk-
tioniert, ein einfaches Zurücksetzen wird es in den Normalbetrieb wiederherzustellen
zurück.
Betrieb: Halten Sie die Reset-Taste für 3 Sekunden die Lampe zurücksetzen. Die
roten und blauen Anzeigeleuchten ausschalten.
Page 8

einen Kartenleser ein.
4.2. Setzen Sie den Kartenleser in einen PC-Computer.
4.3. Die SD-Micro-Karte wird als Wechsellaufwerk erkannt werden.
4.4. Alle Dateien können im Ordner "DCIM" zugegriffen werden.
reader.
VII. Einstellen von Datum / Uhrzeit
5.1. Wenn die Lampe ausgeschaltet ist, entfernen Sie die Micro SD-Karte und in
einen Kartenleser ein.
5.2. Setzen Sie den Kartenleser in einen PC-Computer.
5.3. Wechselplattenlaufwerk Ordner angezeigt wird.
5.4. Klicken Sie auf das Laufwerk im Stammverzeichnis und im Inneren des
Root-Verzeichnis eine Datei mit dem Namen "time.txt".
5.5. Schreiben Sie das aktuelle Datum und die Uhrzeit in der Datei "time.txt" mit dem
richtigen Format:
Year.Month.Day Stunde: Minute: Sekunde. (Zum Beispiel: 2016.03.08 14.24.32).
Speichern Sie diese Datei.
5.6. Starten Sie die Kamera und das System wird das Programm automatisch aktualisieren.
VII. Neueinstellung
Wenn aus irgendeinem Grund reagiert die Glühlampe anhält oder nicht richtig funktioniert, ein einfaches Zurücksetzen wird es in den Normalbetrieb wiederherzustellen
zurück.
Betrieb: Halten Sie die Reset-Taste für 3 Sekunden die Lampe zurücksetzen. Die
roten und blauen Anzeigeleuchten ausschalten.
Page 9
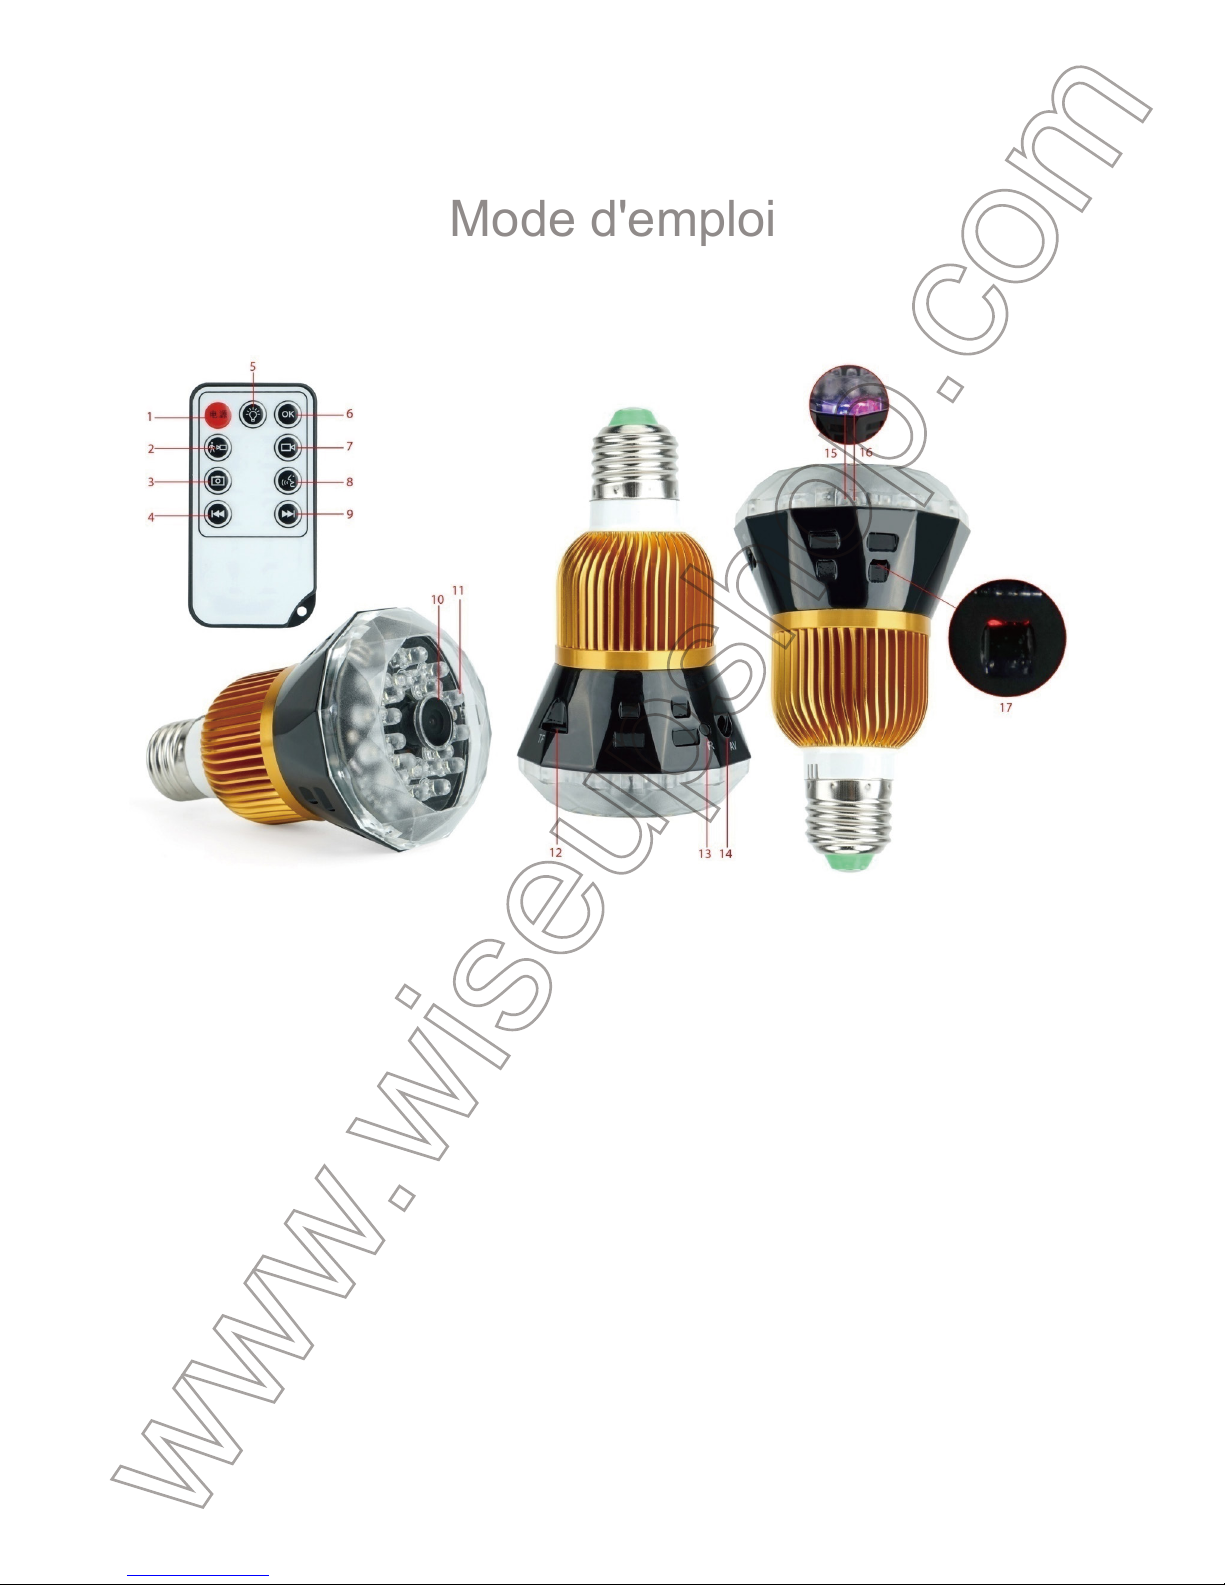
I. Présentation du produit
1. Bouton d'alimentation
2. Bouton de détection de mouvement
3. Bouton de l'appareil photo
4. Bouton Précédent
5. Lumière Bouton Marche / Arrêt
6. Bouton de confirmation
7. Bouton d'enregistrement vidéo
8. Voix / Sound Bouton d'enregistrement Activé
9. Bouton Suivant
II. Qu'y a-t-il dans la boite
-1×ampoule Caméra
-1×Lecteur de carte
-1×Télécommande
-1×20cm E27 Adaptateur Ampoule Extension
BC301
Mode d'emploi
10. Camera Lens
11. Perles LED
12. Micro SD Card Slot
13. Bouton de réinitialisation
14. AV Port Câble
15. Voyant bleu
16. Témoin lumineux rouge
17. Voyant d'alimentation
III. Opération
S'il vous plaît vérifier les choses ci-dessous avant de commencer:
>> Insérez une SDHC Class 10 carte Micro SD (4 Go-32GB, le format pour la
première utilisation) dans la fente de la carte.
>> Visser l'ampoule dans un appareil d'éclairage standard de lumière E27.
>> Enlever le film isolant à partir du bas de la télécommande.
[Remarque]:
ue de clignoter.
3.1. MARCHE / ARRÊT
3.1.1. L'ampoule sera alimenté automatiquement une fois connecté à la sortie d'ali-
mentation. Les lumières rouges et bleues indicateur illumineront pendant 3 secondes
en premier. Ensuite, le rouge sera éteint, tandis que le bleu clignote deux fois et
éteignez. Maintenant, l'appareil est entré en mode veille.
3.1.2. Mise hors tension de l'appareil photo en appuyant sur le bouton d'alimentation
une fois de plus. Les lumières rouges et bleues indicateurs clignotent rapidement 3
fois puis éteignez.
3.2. ENREGISTREMENT VIDEO
3.2.1. L'ampoule sera alimenté automatiquement une fois connecté à la sortie d'ali-
mentation. Les lumières rouges et bleues indicateur illumineront pendant 3 secondes
en premier. Ensuite, le rouge sera éteint, tandis que le bleu clignote deux fois et
éteignez. Maintenant, l'appareil est entré en mode veille.
3.2.2. Appuyez sur les boutons d'enregistrement vidéo une fois pour enregistrer une
vidéo. Le voyant lumineux bleu reste allumé.
3.2.3. nouveau sur le bouton d'enregistrement vidéo Appuyez sur pour arrêter l'en-
registrement vidéo. Le voyant lumineux bleu s'éteint et l'appareil photo sera de retour
en mode veille.
[Remarque]:
1). Un fichier vidéo sera généré et enregistré toutes les 5 minutes automatiquement.
2). Résolution vidéon: 1920×1080P Format vidéo: AVI
3.3. DETECTION DE MOUVEMENT D'ENREGISTREMENT
3.3.1. L'ampoule sera alimenté automatiquement une fois connecté à la sortie d'ali-
mentation. Les lumières rouges et bleues indicateur illumineront pendant 3 secondes
en premier. Ensuite, le rouge sera éteint, tandis que le bleu clignote deux fois et
Page 10
III. Opération
S'il vous plaît vérifier les choses ci-dessous avant de commencer:
>> Insérez une SDHC Class 10 carte Micro SD (4 Go-32GB, le format pour la
première utilisation) dans la fente de la carte.
>> Visser l'ampoule dans un appareil d'éclairage standard de lumière E27.
>> Enlever le film isolant à partir du bas de la télécommande.
[Remarque]:
Si aucune carte Micro SD est insérée dans l'ampoule, le voyant lumineux bleu contin-
ue de clignoter.
3.1. MARCHE / ARRÊT
3.1.1. L'ampoule sera alimenté automatiquement une fois connecté à la sortie d'alimentation. Les lumières rouges et bleues indicateur illumineront pendant 3 secondes
en premier. Ensuite, le rouge sera éteint, tandis que le bleu clignote deux fois et
éteignez. Maintenant, l'appareil est entré en mode veille.
3.1.2. Mise hors tension de l'appareil photo en appuyant sur le bouton d'alimentation
une fois de plus. Les lumières rouges et bleues indicateurs clignotent rapidement 3
fois puis éteignez.
3.2. ENREGISTREMENT VIDEO
3.2.1. L'ampoule sera alimenté automatiquement une fois connecté à la sortie d'alimentation. Les lumières rouges et bleues indicateur illumineront pendant 3 secondes
en premier. Ensuite, le rouge sera éteint, tandis que le bleu clignote deux fois et
éteignez. Maintenant, l'appareil est entré en mode veille.
3.2.2. Appuyez sur les boutons d'enregistrement vidéo une fois pour enregistrer une
vidéo. Le voyant lumineux bleu reste allumé.
3.2.3. nouveau sur le bouton d'enregistrement vidéo Appuyez sur pour arrêter l'enregistrement vidéo. Le voyant lumineux bleu s'éteint et l'appareil photo sera de retour
en mode veille.
[Remarque]:
1). Un fichier vidéo sera généré et enregistré toutes les 5 minutes automatiquement.
2). Résolution vidéon: 1920×1080P Format vidéo: AVI
3.3. DETECTION DE MOUVEMENT D'ENREGISTREMENT
3.3.1. L'ampoule sera alimenté automatiquement une fois connecté à la sortie d'alimentation. Les lumières rouges et bleues indicateur illumineront pendant 3 secondes
en premier. Ensuite, le rouge sera éteint, tandis que le bleu clignote deux fois et
éteignez. Maintenant, l'appareil est entré en mode veille.
3.3.2. Appuyez sur les boutons de détection de mouvement une fois pour entrer en
mode de détection de mouvement et le voyant lumineux bleu continue de clignoter
lentement.
3.3.3. L'appareil photo enregistre la vidéo automatiquement lorsqu'un mouvement est
détecté.
3.3.4. Passer à un autre mode directement, ou bouton d'enregistrement vidéo,
appuyez sur une fois pour quitter le mode de détection de mouvement.
[Remarque]:
3.4. ENREGISTREMENT AUDIO VIDEO ACTIVÉ
3.4.1. L'ampoule sera alimenté automatiquement une fois connecté à la sortie d'ali-
mentation. Les lumières rouges et bleues indicateur illumineront pendant 3 secondes
en premier. Ensuite, le rouge sera éteint, tandis que le bleu clignote deux fois et
éteignez. Maintenant, l'appareil est entré en mode veille.
3.4.2. Appuyez sur la voix / son bouton d'enregistrement Activé une fois pour entrer
en mode d'enregistrement vidéo sonore activé et le voyant rouge reste allumé.
3.4.3. L'appareil photo enregistre automatiquement la vidéo lorsque le son est
détecté.
3.4.4. Passer à un autre mode directement, ou bouton d'enregistrement vidéo,
appuyez sur une fois pour quitter le mode d'enregistrement vidéo sonore activé.
[Remarque]:
3.5. TOUJOURS / APPAREIL PHOTO
3.5.1. L'ampoule sera alimenté automatiquement une fois connecté à la sortie d'ali-
mentation. Les lumières rouges et bleues indicateur illumineront pendant 3 secondes
en premier. Ensuite, le rouge sera éteint, tandis que le bleu clignote deux fois et
éteignez. Maintenant, l'appareil est entré en mode veille.
3.5.2. Appuyez sur le bouton de l'appareil photo une fois pour entrer en mode photo
automatique et le voyant rouge continue à clignoter lentement.
3.5.3. Une photo sera prise automatiquement toutes les 3 secondes.
3.5.4. Passer à un autre mode directement, ou bouton d'enregistrement vidéo,
appuyez sur une fois pour quitter le mode photo automatique.
3.6. ALLUMER / ÉTEINDRE
Press Light On/Off Button once to turn on or off the light.
Page 11
éteignez. Maintenant, l'appareil est entré en mode veille.
3.3.2. Appuyez sur les boutons de détection de mouvement une fois pour entrer en
mode de détection de mouvement et le voyant lumineux bleu continue de clignoter
lentement.
3.3.3. L'appareil photo enregistre la vidéo automatiquement lorsqu'un mouvement est
détecté.
3.3.4. Passer à un autre mode directement, ou bouton d'enregistrement vidéo,
appuyez sur une fois pour quitter le mode de détection de mouvement.
[Remarque]:
Chaque clip vidéo dure 30 secondes.
3.4. ENREGISTREMENT AUDIO VIDEO ACTIVÉ
3.4.1. L'ampoule sera alimenté automatiquement une fois connecté à la sortie d'alimentation. Les lumières rouges et bleues indicateur illumineront pendant 3 secondes
en premier. Ensuite, le rouge sera éteint, tandis que le bleu clignote deux fois et
éteignez. Maintenant, l'appareil est entré en mode veille.
3.4.2. Appuyez sur la voix / son bouton d'enregistrement Activé une fois pour entrer
en mode d'enregistrement vidéo sonore activé et le voyant rouge reste allumé.
3.4.3. L'appareil photo enregistre automatiquement la vidéo lorsque le son est
détecté.
3.4.4. Passer à un autre mode directement, ou bouton d'enregistrement vidéo,
appuyez sur une fois pour quitter le mode d'enregistrement vidéo sonore activé.
[Remarque]:
Chaque clip vidéo dure une minutes.
3.5. TOUJOURS / APPAREIL PHOTO
3.5.1. L'ampoule sera alimenté automatiquement une fois connecté à la sortie d'alimentation. Les lumières rouges et bleues indicateur illumineront pendant 3 secondes
en premier. Ensuite, le rouge sera éteint, tandis que le bleu clignote deux fois et
éteignez. Maintenant, l'appareil est entré en mode veille.
3.5.2. Appuyez sur le bouton de l'appareil photo une fois pour entrer en mode photo
automatique et le voyant rouge continue à clignoter lentement.
3.5.3. Une photo sera prise automatiquement toutes les 3 secondes.
3.5.4. Passer à un autre mode directement, ou bouton d'enregistrement vidéo,
appuyez sur une fois pour quitter le mode photo automatique.
3.6. ALLUMER / ÉTEINDRE
Press Light On/Off Button once to turn on or off the light.
IV. Envois vidéo / des fichiers d'image
4.1. Lorsque l'ampoule est éteinte, retirez la carte Micro SD et l'insérer dans un lec-
teur de carte.
4.2. Insérez le lecteur de carte dans un ordinateur PC.
4.3. La carte Micro SD sera reconnu comme un lecteur de disque amovible.
4.4. Tous les fichiers peuvent être consultés dans le dossier "DCIM".
VII. Réglage de la date / horodatage
5.1. Lorsque l'ampoule est éteinte, retirez la carte Micro SD et l'insérer dans un lec-
teur de carte.
5.2. Insérez le lecteur de carte dans un ordinateur PC.
5.3. dossier de disque amovible apparaît.
5.4. Cliquez sur le lecteur dans le répertoire racine et à l'intérieur du répertoire racine,
créez un fichier nommé "time.txt".
5.5. Écrivez la date et l'heure actuelle dans le fichier "time.txt" avec le format correct:
Year.Month.Day Heure: Minute: Seconde. (Par exemple: 2016.03.08 14:24:32). En-
registrez ce fichier.
5.6. Redémarrez l'appareil photo et le système de mise à niveau du programme
automatiquement.
VII. Réinitialisation
Si pour une raison quelconque l'ampoule cesse de répondre ou ne fonctionne pas
correctement, une réinitialisation rapide sera le restaurer à un fonctionnement
normal.
Opération: Maintenez le bouton Reset pendant 3 secondes pour réinitialiser l'am-
poule. Les lumières rouges et bleues indicateur s'éteignent.
Page 12
IV. Envois vidéo / des fichiers d'image
4.1. Lorsque l'ampoule est éteinte, retirez la carte Micro SD et l'insérer dans un lecteur de carte.
4.2. Insérez le lecteur de carte dans un ordinateur PC.
4.3. La carte Micro SD sera reconnu comme un lecteur de disque amovible.
4.4. Tous les fichiers peuvent être consultés dans le dossier "DCIM".
VII. Réglage de la date / horodatage
5.1. Lorsque l'ampoule est éteinte, retirez la carte Micro SD et l'insérer dans un lecteur de carte.
5.2. Insérez le lecteur de carte dans un ordinateur PC.
5.3. dossier de disque amovible apparaît.
5.4. Cliquez sur le lecteur dans le répertoire racine et à l'intérieur du répertoire racine,
créez un fichier nommé "time.txt".
5.5. Écrivez la date et l'heure actuelle dans le fichier "time.txt" avec le format correct:
Year.Month.Day Heure: Minute: Seconde. (Par exemple: 2016.03.08 14:24:32). Enregistrez ce fichier.
5.6. Redémarrez l'appareil photo et le système de mise à niveau du programme
automatiquement.
VII. Réinitialisation
Si pour une raison quelconque l'ampoule cesse de répondre ou ne fonctionne pas
correctement, une réinitialisation rapide sera le restaurer à un fonctionnement
normal.
Opération: Maintenez le bouton Reset pendant 3 secondes pour réinitialiser l'ampoule. Les lumières rouges et bleues indicateur s'éteignent.
Page 13
I. Panoramica del Prodotto
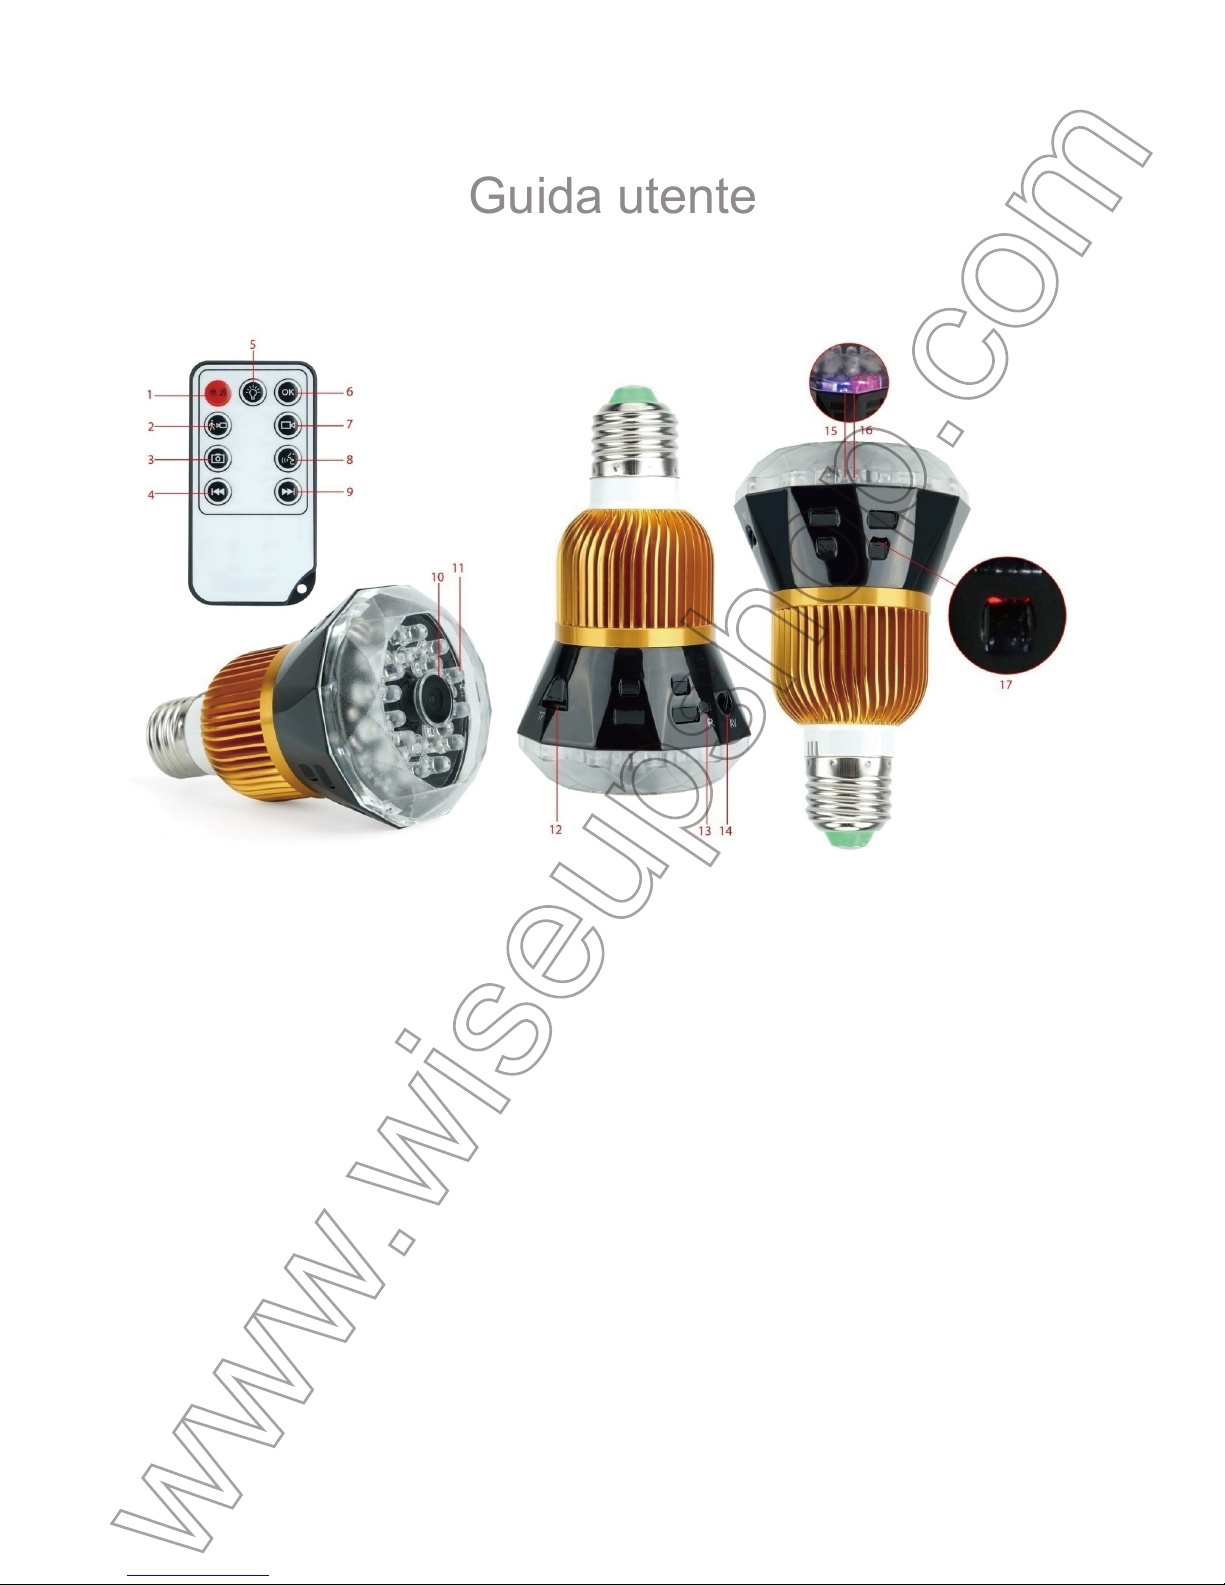
1. Pulsante di accensione
2. Pulsante di rilevamento del movimento
3. pulsante della fotocamera
4. Pulsante Precedente
5. Light On / Off Pulsante
6. Pulsante Conferma
7. Pulsante Registrazione video
8. Voice / suono tasto di Attivato
9. Pulsante Successivo
II. Cosa c'è nella scatola
1×Lampadina Camera
-1×Lettore di schede
-1×Telecomando
-1×Adattatore lampadina Estensione 20 centimetri E27
BC301
Guida utente
10. Camera Lens
11. Beads LED
12. Micro SD Card Slot
13. Pulsante di ripristino
14. AV Cable Port
15. Indicatore luminoso blu
16. Red Spia
17. indicatore luminoso
III. Operazione
Si prega di controllare le cose al di sotto prima di iniziare:
>> Inserire una classe 10 SD card SDHC Micro (4GB-32GB, il formato per la prima
fornitura) nello slot della scheda.
>> Avvitare la lampadina in una lampada E27 standard.
>> Rimuovere la pellicola isolante dalla parte inferiore del telecomando.
[Nota]:
lampeggiare.
3.1. ACCENSIONE / SPEGNIMENTO
3.1.1. Il bulbo viene alimentato automaticamente una volta collegato alla presa di
alimentazione. L'indicatore luci rosse e blu si accendono per 3 secondi prima. Poi il
rosso si spegne, mentre quello blu lampeggerà due volte e si spegne. Ora la fotocam-
era è entrato in modalità standby.
3.1.2. Spegnere la fotocamera premendo nuovamente pulsante di accensione. Le
spie rosse e blu lampeggiano velocemente 3 volte e poi si spegne.
3.2. REGISTRAZIONE VIDEO
3.2.1. Il bulbo viene alimentato automaticamente una volta collegato alla presa di
alimentazione. L'indicatore luci rosse e blu si accendono per 3 secondi prima. Poi il
rosso si spegne, mentre quello blu lampeggerà due volte e si spegne. Ora la fotocam-
era è entrato in modalità standby.
3.2.2. Premere il pulsante di registrazione video una volta per registrare video. La
spia blu rimarrà illuminato.
3.2.3. Premere nuovamente il pulsante di registrazione video per interrompere la reg-
istrazione video. La spia blu si spegne e la fotocamera tornerà alla modalità standby.
[Nota]:
1). Un file video viene generato e salvato automaticamente ogni 5 minuti.
2). Risoluzione video: 1920×1080P Formato video: AVI
3.3. RILEVAZIONE MOVIMENTO REGISTRAZIONE
3.3.1. Il bulbo viene alimentato automaticamente una volta collegato alla presa di
alimentazione. L'indicatore luci rosse e blu si accendono per 3 secondi prima. Poi il
rosso si spegne, mentre quello blu lampeggerà due volte e si spegne. Ora la fotocam-
era è entrato in modalità standby.
Page 14

III. Operazione
Si prega di controllare le cose al di sotto prima di iniziare:
>> Inserire una classe 10 SD card SDHC Micro (4GB-32GB, il formato per la prima
fornitura) nello slot della scheda.
>> Avvitare la lampadina in una lampada E27 standard.
>> Rimuovere la pellicola isolante dalla parte inferiore del telecomando.
[Nota]:
Se nessuna scheda micro SD è montata nel bulbo, l'indicatore luminoso blu continua a
lampeggiare.
3.1. ACCENSIONE / SPEGNIMENTO
3.1.1. Il bulbo viene alimentato automaticamente una volta collegato alla presa di
alimentazione. L'indicatore luci rosse e blu si accendono per 3 secondi prima. Poi il
rosso si spegne, mentre quello blu lampeggerà due volte e si spegne. Ora la fotocamera è entrato in modalità standby.
3.1.2. Spegnere la fotocamera premendo nuovamente pulsante di accensione. Le
spie rosse e blu lampeggiano velocemente 3 volte e poi si spegne.
3.2. REGISTRAZIONE VIDEO
3.2.1. Il bulbo viene alimentato automaticamente una volta collegato alla presa di
alimentazione. L'indicatore luci rosse e blu si accendono per 3 secondi prima. Poi il
rosso si spegne, mentre quello blu lampeggerà due volte e si spegne. Ora la fotocamera è entrato in modalità standby.
3.2.2. Premere il pulsante di registrazione video una volta per registrare video. La
spia blu rimarrà illuminato.
3.2.3. Premere nuovamente il pulsante di registrazione video per interrompere la registrazione video. La spia blu si spegne e la fotocamera tornerà alla modalità standby.
[Nota]:
1). Un file video viene generato e salvato automaticamente ogni 5 minuti.
2). Risoluzione video: 1920×1080P Formato video: AVI
3.3. RILEVAZIONE MOVIMENTO REGISTRAZIONE
3.3.1. Il bulbo viene alimentato automaticamente una volta collegato alla presa di
alimentazione. L'indicatore luci rosse e blu si accendono per 3 secondi prima. Poi il
rosso si spegne, mentre quello blu lampeggerà due volte e si spegne. Ora la fotocamera è entrato in modalità standby.
3.3.2. Premere il pulsante Motion Detection una volta per entrare in modalità di rileva-
mento del movimento e l'indicatore luminoso blu continua a lampeggiare lentamente.
3.3.3. La fotocamera registrare video automaticamente quando viene rilevato un
movimento.
3.3.4. Passare a un'altra modalità direttamente, oppure premere video tasto di una
volta per uscire dalla modalità di rilevamento del movimento.
[Nota]:
3.4. AUDIO ATTIVATO REGISTRAZIONE VIDEO
3.4.1. Il bulbo viene alimentato automaticamente una volta collegato alla presa di
alimentazione. L'indicatore luci rosse e blu si accendono per 3 secondi prima. Poi il
rosso si spegne, mentre quello blu lampeggerà due volte e si spegne. Ora la fotocam-
era è entrato in modalità standby.
3.4.2. Premere Voce / suono pulsante attivato registrazione una volta per entrare in
modalità di registrazione video attivata suono e la spia rossa rimarrà illuminato.
3.4.3. La fotocamera registrare video automaticamente quando viene rilevato l'audio.
3.4.4. Passare a un'altra modalità direttamente, oppure premere video tasto di una
volta per uscire dalla modalità di registrazione video audio attivata.
[Nota]:
3.5. ANCORA / MACCHINA FOTOGRAFICA FOTOGRAFIA
3.5.1. Il bulbo viene alimentato automaticamente una volta collegato alla presa di
alimentazione. L'indicatore luci rosse e blu si accendono per 3 secondi prima. Poi il
rosso si spegne, mentre quello blu lampeggerà due volte e si spegne. Ora la fotocam-
era è entrato in modalità standby.
3.5.2. Premere il pulsante della fotocamera una volta per entrare in modalità automat-
ica fotografia e la spia rossa continua a lampeggiare lentamente.
3.5.3. Una foto verrà scattata automaticamente ogni 3 secondi.
3.5.4. Passare a un'altra modalità direttamente, oppure premere video tasto di una
volta per uscire dalla modalità automatica fotografia.
3.6. LUCE ON / OF
Premere il pulsante Light On / Off una volta per accendere o spegnere la luce.
IV. Upload di video / file di immagine
4.1. Quando la lampadina è spento, rimuovere la scheda Micro SD e inserirla in un
Page 15
3.3.2. Premere il pulsante Motion Detection una volta per entrare in modalità di rilevamento del movimento e l'indicatore luminoso blu continua a lampeggiare lentamente.
3.3.3. La fotocamera registrare video automaticamente quando viene rilevato un
movimento.
3.3.4. Passare a un'altra modalità direttamente, oppure premere video tasto di una
volta per uscire dalla modalità di rilevamento del movimento.
[Nota]:
Ogni clip video dura 30 secondi.
3.4. AUDIO ATTIVATO REGISTRAZIONE VIDEO
3.4.1. Il bulbo viene alimentato automaticamente una volta collegato alla presa di
alimentazione. L'indicatore luci rosse e blu si accendono per 3 secondi prima. Poi il
rosso si spegne, mentre quello blu lampeggerà due volte e si spegne. Ora la fotocamera è entrato in modalità standby.
3.4.2. Premere Voce / suono pulsante attivato registrazione una volta per entrare in
modalità di registrazione video attivata suono e la spia rossa rimarrà illuminato.
3.4.3. La fotocamera registrare video automaticamente quando viene rilevato l'audio.
3.4.4. Passare a un'altra modalità direttamente, oppure premere video tasto di una
volta per uscire dalla modalità di registrazione video audio attivata.
[Nota]:
Ogni video dura un minuto.
3.5. ANCORA / MACCHINA FOTOGRAFICA FOTOGRAFIA
3.5.1. Il bulbo viene alimentato automaticamente una volta collegato alla presa di
alimentazione. L'indicatore luci rosse e blu si accendono per 3 secondi prima. Poi il
rosso si spegne, mentre quello blu lampeggerà due volte e si spegne. Ora la fotocamera è entrato in modalità standby.
3.5.2. Premere il pulsante della fotocamera una volta per entrare in modalità automatica fotografia e la spia rossa continua a lampeggiare lentamente.
3.5.3. Una foto verrà scattata automaticamente ogni 3 secondi.
3.5.4. Passare a un'altra modalità direttamente, oppure premere video tasto di una
volta per uscire dalla modalità automatica fotografia.
3.6. LUCE ON / OF
Premere il pulsante Light On / Off una volta per accendere o spegnere la luce.
IV. Upload di video / file di immagine
4.1. Quando la lampadina è spento, rimuovere la scheda Micro SD e inserirla in un
lettore di schede.
4.2. Inserire il lettore di schede in un computer PC.
4.3. La scheda Micro SD verrà riconosciuta come unità disco rimovibile.
4.4. Tutti i file sono accessibili nella cartella "DCIM".
VII. Impostazione di data / ora
5.1. Quando la lampadina è spento, rimuovere la scheda Micro SD e inserirla in un
lettore di schede.
5.2. Inserire il lettore di schede in un computer PC.
5.3. appare cartella sul disco rimovibile.
5.4. Fare clic sul disco nella directory principale e all'interno della directory principale,
creare un file denominato "time.txt".
5.5. Scrivere la data e l'ora correnti nel file "time.txt" con il formato corretto:
Year.Month.Day Ora: Minuti: Secondi. (Per esempio: 2016.03.08 14:24:32). Salvare
il file.
5.6. Riavviare la telecamera e il sistema aggiornerà automaticamente il programma.
VII. Ripristino
Se per qualsiasi motivo la lampadina smette di rispondere o non funziona corretta-
mente, eseguire un ripristino rapido ripristinerà di nuovo al normale funzionamento.
Funzionamento: tenere premuto il pulsante di reset per 3 secondi per ripristinare la
lampadina. L'indicatore luci rosse e blu si spengono.
Page 16

lettore di schede.
4.2. Inserire il lettore di schede in un computer PC.
4.3. La scheda Micro SD verrà riconosciuta come unità disco rimovibile.
4.4. Tutti i file sono accessibili nella cartella "DCIM".
VII. Impostazione di data / ora
5.1. Quando la lampadina è spento, rimuovere la scheda Micro SD e inserirla in un
lettore di schede.
5.2. Inserire il lettore di schede in un computer PC.
5.3. appare cartella sul disco rimovibile.
5.4. Fare clic sul disco nella directory principale e all'interno della directory principale,
creare un file denominato "time.txt".
5.5. Scrivere la data e l'ora correnti nel file "time.txt" con il formato corretto:
Year.Month.Day Ora: Minuti: Secondi. (Per esempio: 2016.03.08 14:24:32). Salvare
il file.
5.6. Riavviare la telecamera e il sistema aggiornerà automaticamente il programma.
VII. Ripristino
Se per qualsiasi motivo la lampadina smette di rispondere o non funziona correttamente, eseguire un ripristino rapido ripristinerà di nuovo al normale funzionamento.
Funzionamento: tenere premuto il pulsante di reset per 3 secondi per ripristinare la
lampadina. L'indicatore luci rosse e blu si spengono.
Page 17
I. Descripción del producto
1. Botón de alimentación
2. Botón de detección de movimiento
3. Botón de la cámara
4. Botón Anterior
5. Luz de encendido / apagado Botón
6. Botón de Confirmación
7. Botón de grabación de vídeo
8. voz / sonido activado Botón de grabación
9. Botón siguiente
II. Qué hay en la caja
-1× cámara de bulbo
-1×Lector de tarjetas
-1×Control remoto
-1×Adaptador de Extensión 20cm Bombilla E27
BC301
Guía del usuario
10. Lente de la cámara
11. granos del LED
12. Ranura para tarjeta Micro SD
13. Botón de reinicio
14. Puerto Cable AV
15. Indicador de luz azul
16. Red luz indicadora
17. Luz de encendido Indicador
III. Operación
Por favor, compruebe las cosas siguientes antes de empezar:
>> Inserte una tarjeta SD Clase 10 SDHC Micro (4GB-32GB, formato para el primer
uso) en la ranura de tarjeta.
>> Tornillo de la bombilla en una lámpara estándar E27.
>> Retire la película aislante de la parte inferior del controlador remoto.
[Nota]:
rece parpadeando.
3.1. ENCENDIDO / APAGADO
3.1.1. La bombilla se encenderá automáticamente una vez conectado a la salida de
alimentación. El indicador se ilumina en rojo y azul se iluminarán durante 3 segundos
por primera vez. A continuación, el rojo se apagará, mientras que el azul parpadeará
dos veces y se apagará. Ahora la cámara ha entrado en modo de espera.
3.1.2. Apagar la cámara pulsando el botón de encendido una vez más. El indicador
se ilumina en rojo y azul parpadean rápidamente 3 veces y luego se apagará.
3.2. GRABACIÓN DE VÍDEO
3.2.1. La bombilla se encenderá automáticamente una vez conectado a la salida de
alimentación. El indicador se ilumina en rojo y azul se iluminarán durante 3 segundos
por primera vez. A continuación, el rojo se apagará, mientras que el azul parpadeará
dos veces y se apagará. Ahora la cámara ha entrado en modo de espera.
3.2.2. Presione el botón de grabación de vídeo una vez para grabar vídeo. La luz indi-
cadora azul permanece encendida.
3.2.3. Presione el botón de grabación de vídeo de nuevo para detener la grabación
de vídeo. La luz indicadora de color azul se apagará y la cámara volverá al modo de
espera.
[Nota]:
1). Un archivo de vídeo se genera y se guarda automáticamente cada 5 minutos.
2). Resolución de video: 1920×1080P formato de video: AVI
3.3. GRABACION DETECCIÓN DE MOVIMIENTO
3.3.1. La bombilla se encenderá automáticamente una vez conectado a la salida de
alimentación. El indicador se ilumina en rojo y azul se iluminarán durante 3 segundos
por primera vez. A continuación, el rojo se apagará, mientras que el azul parpadeará
dos veces y se apagará. Ahora la cámara ha entrado en modo de espera.
Page 18

III. Operación
Por favor, compruebe las cosas siguientes antes de empezar:
>> Inserte una tarjeta SD Clase 10 SDHC Micro (4GB-32GB, formato para el primer
uso) en la ranura de tarjeta.
>> Tornillo de la bombilla en una lámpara estándar E27.
>> Retire la película aislante de la parte inferior del controlador remoto.
[Nota]:
Si no hay ninguna tarjeta Micro SD se encaja en el bulbo, la luz indicadora de color azul apa-
rece parpadeando.
3.1. ENCENDIDO / APAGADO
3.1.1. La bombilla se encenderá automáticamente una vez conectado a la salida de
alimentación. El indicador se ilumina en rojo y azul se iluminarán durante 3 segundos
por primera vez. A continuación, el rojo se apagará, mientras que el azul parpadeará
dos veces y se apagará. Ahora la cámara ha entrado en modo de espera.
3.1.2. Apagar la cámara pulsando el botón de encendido una vez más. El indicador
se ilumina en rojo y azul parpadean rápidamente 3 veces y luego se apagará.
3.2. GRABACIÓN DE VÍDEO
3.2.1. La bombilla se encenderá automáticamente una vez conectado a la salida de
alimentación. El indicador se ilumina en rojo y azul se iluminarán durante 3 segundos
por primera vez. A continuación, el rojo se apagará, mientras que el azul parpadeará
dos veces y se apagará. Ahora la cámara ha entrado en modo de espera.
3.2.2. Presione el botón de grabación de vídeo una vez para grabar vídeo. La luz indicadora azul permanece encendida.
3.2.3. Presione el botón de grabación de vídeo de nuevo para detener la grabación
de vídeo. La luz indicadora de color azul se apagará y la cámara volverá al modo de
espera.
[Nota]:
1). Un archivo de vídeo se genera y se guarda automáticamente cada 5 minutos.
2). Resolución de video: 1920×1080P formato de video: AVI
3.3. GRABACION DETECCIÓN DE MOVIMIENTO
3.3.1. La bombilla se encenderá automáticamente una vez conectado a la salida de
alimentación. El indicador se ilumina en rojo y azul se iluminarán durante 3 segundos
por primera vez. A continuación, el rojo se apagará, mientras que el azul parpadeará
dos veces y se apagará. Ahora la cámara ha entrado en modo de espera.
3.3.2. Presione el botón de detección de movimiento una vez para entrar en el modo
de detección de movimiento y la luz indicadora de color azul aparece parpadeando
lentamente.
3.3.3. La cámara grabará vídeo de forma automática cuando se detecta un movi-
miento.
3.3.4. Cambiar a otro modo directamente, o pulse vídeo botón de grabación una vez
para salir del modo de detección de movimiento.
[Note]:
3.4. GRABACIÓN DE VÍDEO ACTIVADO
3.4.1. La bombilla se encenderá automáticamente una vez conectado a la salida de
alimentación. El indicador se ilumina en rojo y azul se iluminarán durante 3 segundos
por primera vez. A continuación, el rojo se apagará, mientras que el azul parpadeará
dos veces y se apagará. Ahora la cámara ha entrado en modo de espera.
3.4.2. Prensa de voz / sonido de los botones de grabación activado una vez para
entrar en el modo de grabación de vídeo activada por sonido y la luz indicadora de
color rojo permanecerá iluminado.
3.4.3. La cámara grabará vídeo de forma automática cuando se detecta audio.
3.4.4. Cambiar a otro modo directamente, o pulse vídeo botón de grabación una vez
para salir del modo de grabación de vídeo de sonido activado.
[Nota]:
3.5. TODAVÍA / FOTOGRAFÍA DE LA CÁMARA
3.5.1. La bombilla se encenderá automáticamente una vez conectado a la salida de
alimentación. El indicador se ilumina en rojo y azul se iluminarán durante 3 segundos
por primera vez. A continuación, el rojo se apagará, mientras que el azul parpadeará
dos veces y se apagará. Ahora la cámara ha entrado en modo de espera.
3.5.2. Presione el botón de la cámara una vez para entrar en el modo de fotografía
automática y la luz indicadora de color rojo aparece parpadeando lentamente.
3.5.3. Una fotografía se realizará de forma automática cada 3 segundos.
3.5.4. Cambiar a otro modo directamente, o pulse vídeo botón de grabación una vez
para salir del modo de fotografía automática.
3.6. LA LUZ DE ENCENDIDO / APAGADO
Prensa Luz de encendido / apagado una vez el botón para encender o apagar la luz.
Page 19

3.3.2. Presione el botón de detección de movimiento una vez para entrar en el modo
de detección de movimiento y la luz indicadora de color azul aparece parpadeando
lentamente.
3.3.3. La cámara grabará vídeo de forma automática cuando se detecta un movimiento.
3.3.4. Cambiar a otro modo directamente, o pulse vídeo botón de grabación una vez
para salir del modo de detección de movimiento.
[Note]:
Cada clip de vídeo tiene una duración de 30 segundos.
3.4. GRABACIÓN DE VÍDEO ACTIVADO
3.4.1. La bombilla se encenderá automáticamente una vez conectado a la salida de
alimentación. El indicador se ilumina en rojo y azul se iluminarán durante 3 segundos
por primera vez. A continuación, el rojo se apagará, mientras que el azul parpadeará
dos veces y se apagará. Ahora la cámara ha entrado en modo de espera.
3.4.2. Prensa de voz / sonido de los botones de grabación activado una vez para
entrar en el modo de grabación de vídeo activada por sonido y la luz indicadora de
color rojo permanecerá iluminado.
3.4.3. La cámara grabará vídeo de forma automática cuando se detecta audio.
3.4.4. Cambiar a otro modo directamente, o pulse vídeo botón de grabación una vez
para salir del modo de grabación de vídeo de sonido activado.
[Nota]:
Cada clip de vídeo dura un minutos a.
3.5. TODAVÍA / FOTOGRAFÍA DE LA CÁMARA
3.5.1. La bombilla se encenderá automáticamente una vez conectado a la salida de
alimentación. El indicador se ilumina en rojo y azul se iluminarán durante 3 segundos
por primera vez. A continuación, el rojo se apagará, mientras que el azul parpadeará
dos veces y se apagará. Ahora la cámara ha entrado en modo de espera.
3.5.2. Presione el botón de la cámara una vez para entrar en el modo de fotografía
automática y la luz indicadora de color rojo aparece parpadeando lentamente.
3.5.3. Una fotografía se realizará de forma automática cada 3 segundos.
3.5.4. Cambiar a otro modo directamente, o pulse vídeo botón de grabación una vez
para salir del modo de fotografía automática.
3.6. LA LUZ DE ENCENDIDO / APAGADO
Prensa Luz de encendido / apagado una vez el botón para encender o apagar la luz.
IV. Subida de vídeo / archivos de imagen
4.1. Cuando la lámpara está apagada, retire la tarjeta Micro SD e insertarla en un
lector de tarjetas.
4.2. Inserte el lector de tarjetas en un ordenador PC.
4.3. La tarjeta Micro SD será reconocida como una unidad de disco extraíble.
4.4. Todos los archivos se puede acceder en la carpeta "DCIM".
VII. Ajuste de la fecha / Time Stamp
5.1. Cuando la lámpara está apagada, retire la tarjeta Micro SD e insertarla en un
lector de tarjetas.
5.2. Inserte el lector de tarjetas en un ordenador PC.
5.3. Aparece carpeta de la unidad de disco extraíble.
5.4. Haga clic en la unidad en el directorio raíz y dentro del directorio raíz, cree un
archivo llamado "time.txt".
5.5. Escribe la fecha y la hora actual en el archivo "time.txt" con el formato correcto:
Year.Month.Day Hora: Minuto: Segundo. (Por ejemplo: 2016.03.08 14:24:32).
Guarde este archivo.
5.6. Reiniciar la cámara y el sistema actualizará el programa automáticamente.
VII. Restablecimiento
Si por alguna razón la bombilla deja de responder o no está funcionando correcta-
mente, un reinicio rápido va a restaurar de nuevo a la operación normal.
Operación: mantenga pulsado el botón de reinicio durante 3 segundos para reajus-
tar la bombilla. El indicador se ilumina de color rojo y azul se apagará.
Page 20

IV. Subida de vídeo / archivos de imagen
4.1. Cuando la lámpara está apagada, retire la tarjeta Micro SD e insertarla en un
lector de tarjetas.
4.2. Inserte el lector de tarjetas en un ordenador PC.
4.3. La tarjeta Micro SD será reconocida como una unidad de disco extraíble.
4.4. Todos los archivos se puede acceder en la carpeta "DCIM".
VII. Ajuste de la fecha / Time Stamp
5.1. Cuando la lámpara está apagada, retire la tarjeta Micro SD e insertarla en un
lector de tarjetas.
5.2. Inserte el lector de tarjetas en un ordenador PC.
5.3. Aparece carpeta de la unidad de disco extraíble.
5.4. Haga clic en la unidad en el directorio raíz y dentro del directorio raíz, cree un
archivo llamado "time.txt".
5.5. Escribe la fecha y la hora actual en el archivo "time.txt" con el formato correcto:
Year.Month.Day Hora: Minuto: Segundo. (Por ejemplo: 2016.03.08 14:24:32).
Guarde este archivo.
5.6. Reiniciar la cámara y el sistema actualizará el programa automáticamente.
VII. Restablecimiento
Si por alguna razón la bombilla deja de responder o no está funcionando correctamente, un reinicio rápido va a restaurar de nuevo a la operación normal.
Operación: mantenga pulsado el botón de reinicio durante 3 segundos para reajustar la bombilla. El indicador se ilumina de color rojo y azul se apagará.
Page 21
I. 製品の概要
1.電源ボタン
2.動作検知ボタン
3.カメラボタン
4.前ボタン
5.ラ イトオ ン /オフボタン
6.確認ボタン
7.ビデオ録画ボタン
8.音声/サウンド活性化録画ボタン
9.[次へ]ボタン
II. ボックスには何が
-1×電球カメラ
-1×カード読み取り装置
-1×リモコン
-1×20センチメートルE27電球拡張アダプタ
BC301
ユーザーガイド
10.カメラレンズ
11. LEDビーズ
12.マイクロSDカ ー ド ス ロット
13.リセットボタン
14. AVケ ーブ ル ポ ート
15.ブルーインジケータライト
16.レッドインジケータライト
17.電源インジケータガーゼt
III. 操作
操作する前に以下のことを確認してください:
>> カ ー ド ス ロ ッ ト に( 4GB-32GB 初めて使うなら、フォーマットが必要です)SDHCク
ラス10マイクロSDカードを挿入します。
>> 標準E27の照明器具に電球をねじ込みます。
>> リモコンの底部から絶縁膜を除去します。
[注意]:
します .
3.1. 電源のオン/オフ
3.1.1. バルブは一度パワーオン電源がコンセントに接続されると、自動的にオンにしま
す。赤と青のインジケータライトは、最初に3秒間で点灯します。赤は、オフになります。青
が二回点滅した後、消灯します。今、カメラがスタンバイモードに入りました。
3.1.2. もう一度電源ボタンを押して、カメラの電源をオフにします。赤と青のインジケー
タライトが高速に3回点滅し、その後消灯します。
3.2. 録画
3.2.1. バルブは一度パワーオン電源がコンセントに接続されると、自動的にオンにしま
す。赤と青のインジケータライトは、最初に3秒間で点灯します。赤は、オフになります。青
が二回点滅した後、消灯します。今、カメラがスタンバイモードに入りました。
3.2.2. ビデオ録画ボタンを押して、一度映像を記録します。青色のインジケータランプは
点灯します。
3.2.3. ビデオ録画ボタンを押して再度ビデオの録画を停止します。青色のインジケータ
ライトがオフになり、カメラがスタンバイモードに戻ります。
[注意]:
1). ビデオファイルが自動的に5分ごとに保存されます。
2). ビデオ解像度: 1920×1080P ビデオフォーマット: AVI
3.3. 動作検知録画
3.3.1. バルブは一度パワーオン電源がコンセントに接続されると、自動的にオンにしま
す。赤と青のインジケータライトは、最初に3秒間で点灯します。赤は、オフになります。青
が二回点滅した後、消灯します。今、カメラがスタンバイモードに入りました。。
3.3.2. 動作検知検知ボタンを一回押して、動作検知モードに入ります。青色のインジケ
ータランプが ゆっくり点滅します。
3.3.3. 動きが検出されたときにカメラが自動的に映像を記録します。
3.3.4. 直接他のモードに切り替えて、あるいは録画ボタンを一度押して、動き検出モード
Page 22

III. 操作
操作する前に以下のことを確認してください:
>> カ ー ド ス ロ ッ ト に( 4GB-32GB 初めて使うなら、フォーマットが必要です)SDHCク
ラス10マイクロSDカードを挿入します。
>> 標準E27の照明器具に電球をねじ込みます。
>> リモコンの底部から絶縁膜を除去します。
[注意]:
何のマイクロSDカードが電球に嵌め込まれていない場合は、青色のインジケータランプが点滅
します .
3.1. 電源のオン/オフ
3.1.1. バルブは一度パワーオン電源がコンセントに接続されると、自動的にオンにしま
す。赤と青のインジケータライトは、最初に3秒間で点灯します。赤は、オフになります。青
が二回点滅した後、消灯します。今、カメラがスタンバイモードに入りました。
3.1.2.
もう一度電源ボタンを押して、カメラの電源をオフにします。赤と青のインジケー
タライトが高速に3回点滅し、その後消灯します。
3.2. 録画
3.2.1. バルブは一度パワーオン電源がコンセントに接続されると、自動的にオンにしま
す。赤と青のインジケータライトは、最初に3秒間で点灯します。赤は、オフになります。青
が二回点滅した後、消灯します。今、カメラがスタンバイモードに入りました。
3.2.2.
ビデオ録画ボタンを押して、一度映像を記録します。青色のインジケータランプは
点灯します。
3.2.3. ビデオ録画ボタンを押して再度ビデオの録画を停止します。青色のインジケータ
ライトがオフになり、カメラがスタンバイモードに戻ります。
[注意]:
1). ビデオファイルが自動的に5分ごとに保存されます。
2). ビデオ解像度: 1920×1080P ビデオフォーマット: AVI
3.3. 動作検知録画
3.3.1. バルブは一度パワーオン電源がコンセントに接続されると、自動的にオンにしま
す。赤と青のインジケータライトは、最初に3秒間で点灯します。赤は、オフになります。青
が二回点滅した後、消灯します。今、カメラがスタンバイモードに入りました。。
3.3.2.
動作検知検知ボタンを一回押して、動作検知モードに入ります。青色のインジケ
ータランプが ゆっくり点滅します。
3.3.3. 動きが検出されたときにカメラが自動的に映像を記録します。
3.3.4.
直接他のモードに切り替えて、あるいは録画ボタンを一度押して、動き検出モード
を終了します。.
[注意]:
3.4. 音声コントロール録画
3.4.1. バルブは一度パワーオン電源がコンセントに接続されると、自動的にオンにしま
す。赤と青のインジケータライトは、最初に3秒間で点灯します。赤は、オフになります。青
が二回点滅した後、消灯します。今、カメラがスタンバイモードに入りました。
3.4.2. 音声/サウンドコントロール録画ボタンを一回押して、音声コントロール録画モー
ドに入りますと赤 のインジケータライトが点 灯します。
3.4.3. 音声が検出されたときにカメラが自動的に映像を記録します。
3.4.4. 直接他のモードに切り替えて、あるいは録画ボタンを一度押して音声コントロー
ル録画モードを終了します。
[注意]:
3.5. 写真撮影
3.5.1. バルブは一度パワーオン電源がコンセントに接続されると、自動的にオンにしま
す。赤と青のインジケータライトは、最初に3秒間で点灯します。赤は、オフになります。青
が二回点滅した後、消灯します。今、カメラがスタンバイモードに入りました。
3.5.2. [カメラ]ボタンを押して、オート撮影 モードに入ります。赤 のインジケータライトが
ゆっくり点滅します。
3.5.3. 写真は自動的に3秒ごとに撮影されます。
3.5.4. オート撮影モードを終了するには、他のモードに切り替えて、あるいは、録画ボタ
ンを押します。
3.6. オン/オフ点灯
光をオフとオンにするなら、ライトオン/オフボタンを一度 押します。
IV. ビデオ/画 像ファイル の アップ ロ ード
4.1. 電球の電源がオフのときは、マイクロSDカードを取り外し、カードリーダーに挿 入
します。
4.2. PCのコンピュータにカードリーダーを挿入します。
4.3. マイクロSDカードは、ディスクドライブとして認識されます。
4.4. すべてのファイルは、「DCIM」フォルダにアクセスすることができます.
VII. 日付の設定/タイムスタンプ
5.1. 電球の電源がオフのときは、マイクロSDカードを取り外し、カードリーダーに挿 入
Page 23

を終了します。.
[注意]:
各ビデオが30秒で続きます。
3.4. 音声コントロール録画
3.4.1. バルブは一度パワーオン電源がコンセントに接続されると、自動的にオンにしま
す。赤と青のインジケータライトは、最初に3秒間で点灯します。赤は、オフになります。青
が二回点滅した後、消灯します。今、カメラがスタンバイモードに入りました。
3.4.2. 音声/
サウンドコントロール録画ボタンを一回押して、音声コントロール録画モー
ドに入りますと赤 のインジケータライトが点 灯します。
3.4.3. 音声が検出されたときにカメラが自動的に映像を記録します。
3.4.4.
直接他のモードに切り替えて、あるいは録画ボタンを一度押して音声コントロー
ル録画モードを終了します。
[注意]:
各 ビ デ オクリップ が 1分続きます.
3.5. 写真撮影
3.5.1. バルブは一度パワーオン電源がコンセントに接続されると、自動的にオンにしま
す。赤と青のインジケータライトは、最初に3秒間で点灯します。赤は、オフになります。青
が二回点滅した後、消灯します。今、カメラがスタンバイモードに入りました。
3.5.2. [カメラ]ボタンを押して、オート撮影 モードに入ります。赤 のインジケータライトが
ゆっくり点滅します。
3.5.3. 写真は自動的に3秒ごとに撮影されます。
3.5.4.
オート撮影モードを終了するには、他のモードに切り替えて、あるいは、録画ボタ
ンを押します。
3.6. オン/オフ点灯
光をオフとオンにするなら、ライトオン/オフボタンを一度 押します。
IV. ビデオ/画 像ファイル の アップ ロ ード
4.1. 電球の電源がオフのときは、マイクロSDカードを取り外し、カードリーダーに挿 入
します。
4.2. PCのコンピュータにカードリーダーを挿入します。
4.3. マイクロSDカードは、ディスクドライブとして認識されます。
4.4. すべてのファイルは、「DCIM」フォルダにアクセスすることができます.
VII. 日付の設定/タイムスタンプ
5.1. 電球の電源がオフのときは、マイクロSDカードを取り外し、カードリーダーに挿 入
します。
5.2. PCのコンピュータにカードリーダーを挿入します。
5.3.リムーバブルディスクドライブのフォルダが表示されます。
5.4. ル ートディレクトリのドライブをクリックして、ル ートディレクトリの中に、“time.txt”と
いう名前のファイルを作成します。
5.5. 正しい形式のファイル「time.txt」の現在の日付と時刻を書きます:
Year.Month.Day Hour:Minute:Second.。 ( 例: 2016.03.08 14:24:32)。このファイルを保
存します。
5.6. カメラを再起動し、システムが自動的にプログラムをアップグレードします。
VII. 再設定
何らかの理由で電球が応答を停止または正常に動作していない場合、迅速なリセット
は戻って通常の動作にそれを復元します。
操作: 3秒電 球をリセットするためのリセットボタンを押して、赤と青のインジケータラン
プが消灯します。
Page 24

します。
5.2. PCのコンピュータにカードリーダーを挿入します。
5.3.リムーバブルディスクドライブのフォルダが表示されます。
5.4. ル ートディレクトリのドライブをクリックして、ル ートディレクトリの中に、“time.txt”と
いう名前のファイルを作成します。
5.5. 正しい形式のファイル「time.txt」の現在の日付と時刻を書きます:
Year.Month.Day Hour:Minute:Second.。 ( 例: 2016.03.08 14:24:32)。このファイルを保
存します。
5.6. カメラを再起動し、システムが自動的にプログラムをアップグレードします。
VII. 再設定
何らかの理由で電球が応答を停止または正常に動作していない場合、迅速なリセット
は戻って通常の動作にそれを復元します。
操作: 3秒電 球をリセットするためのリセットボタンを押して、赤と青のインジケータラン
プが消灯します。
 Loading...