

Page 1
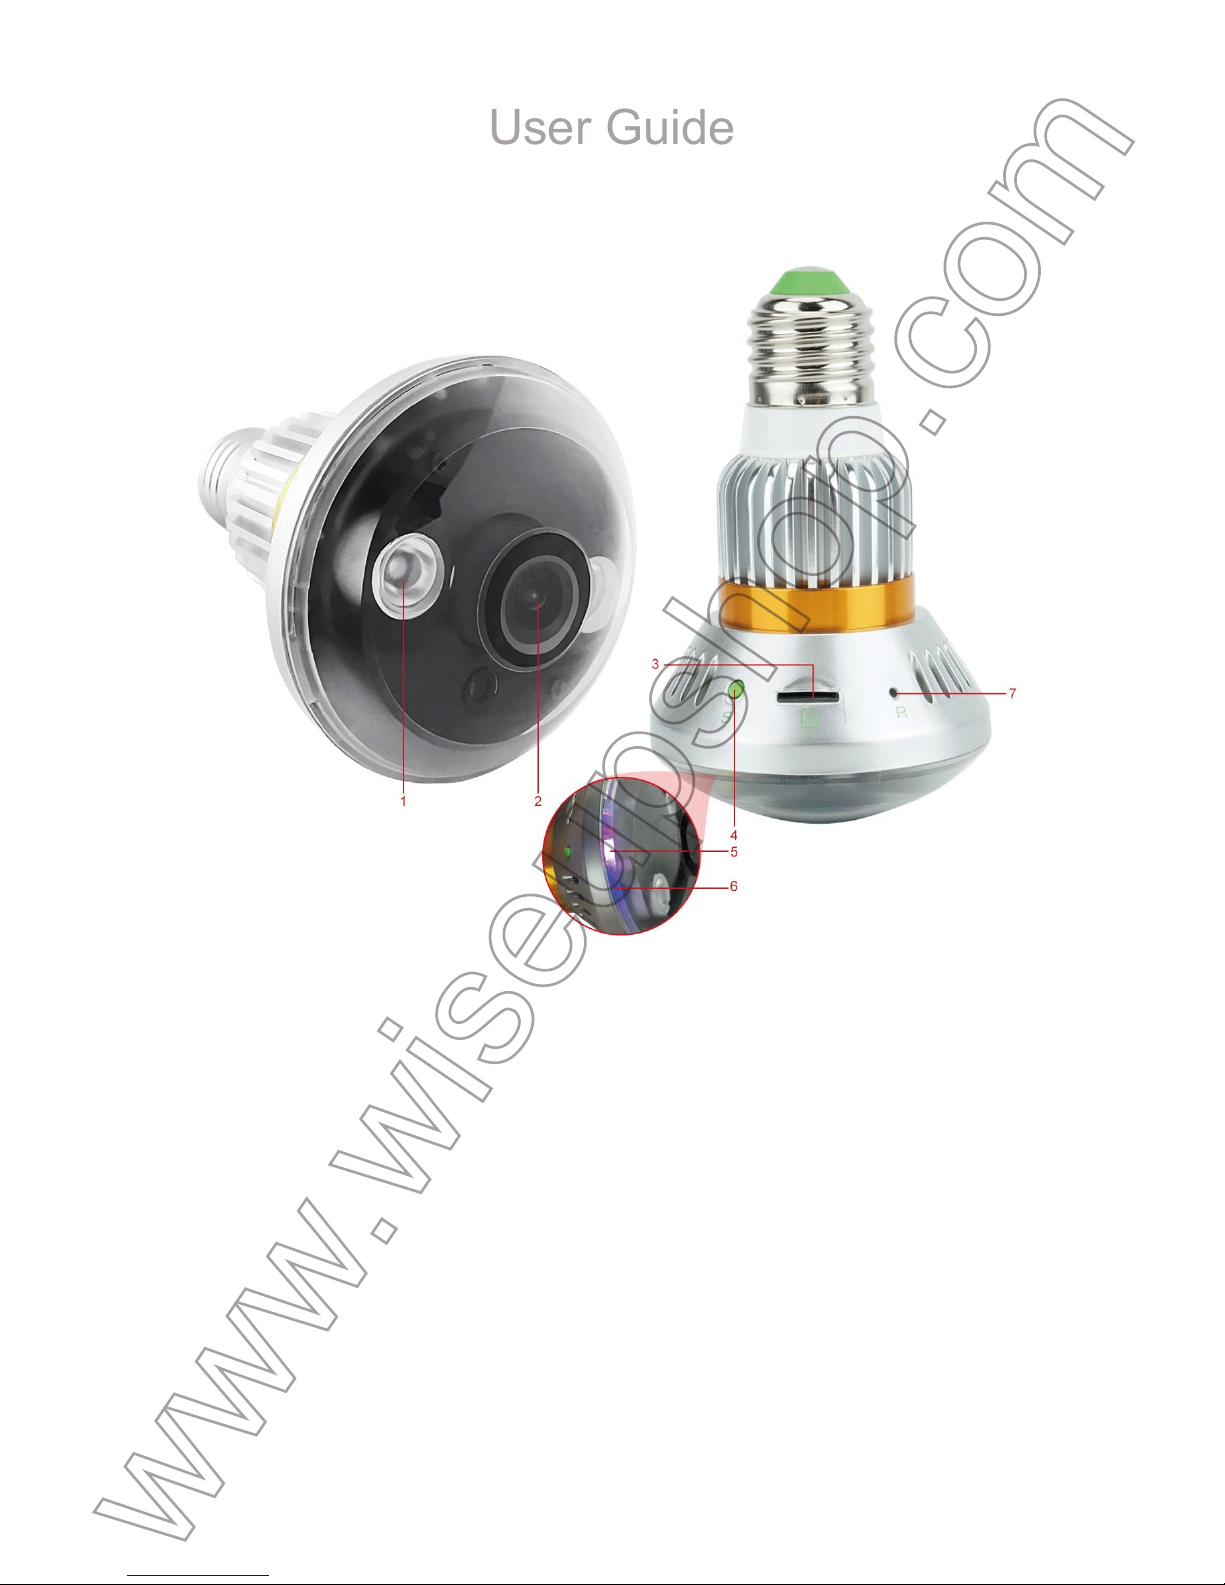
BC186
User Guide
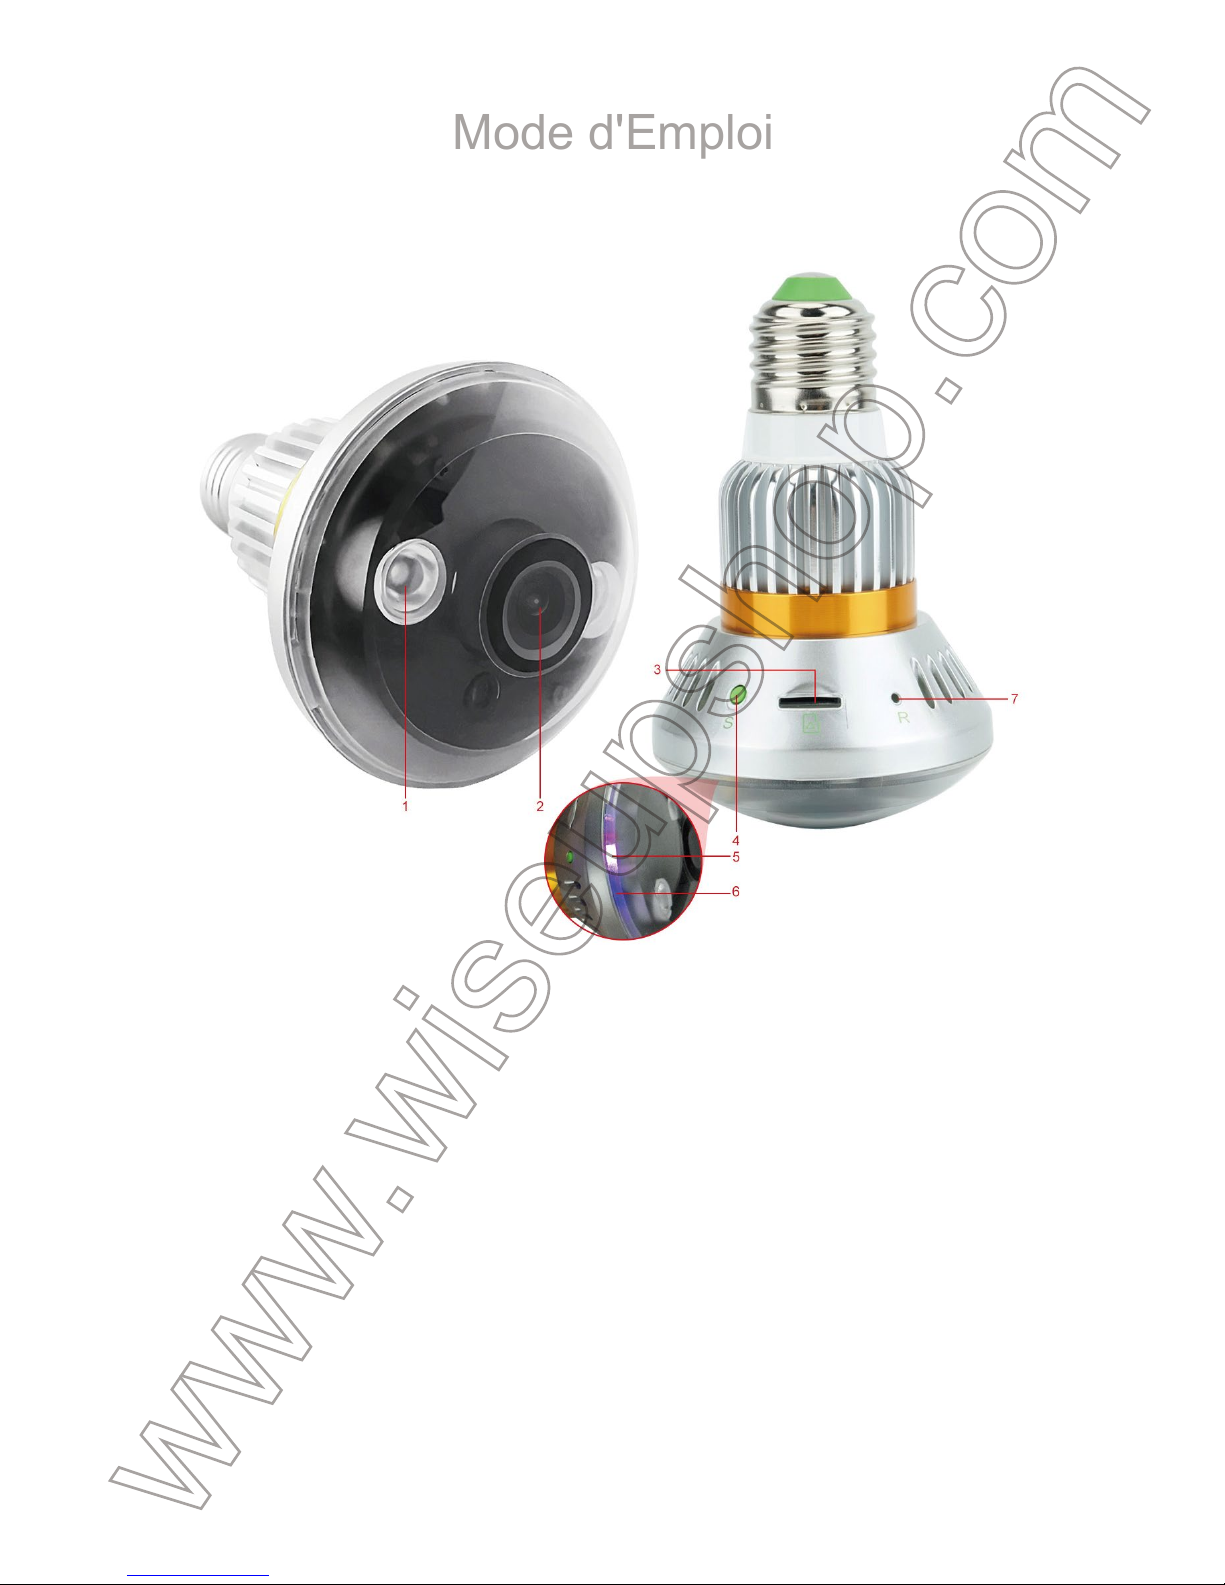
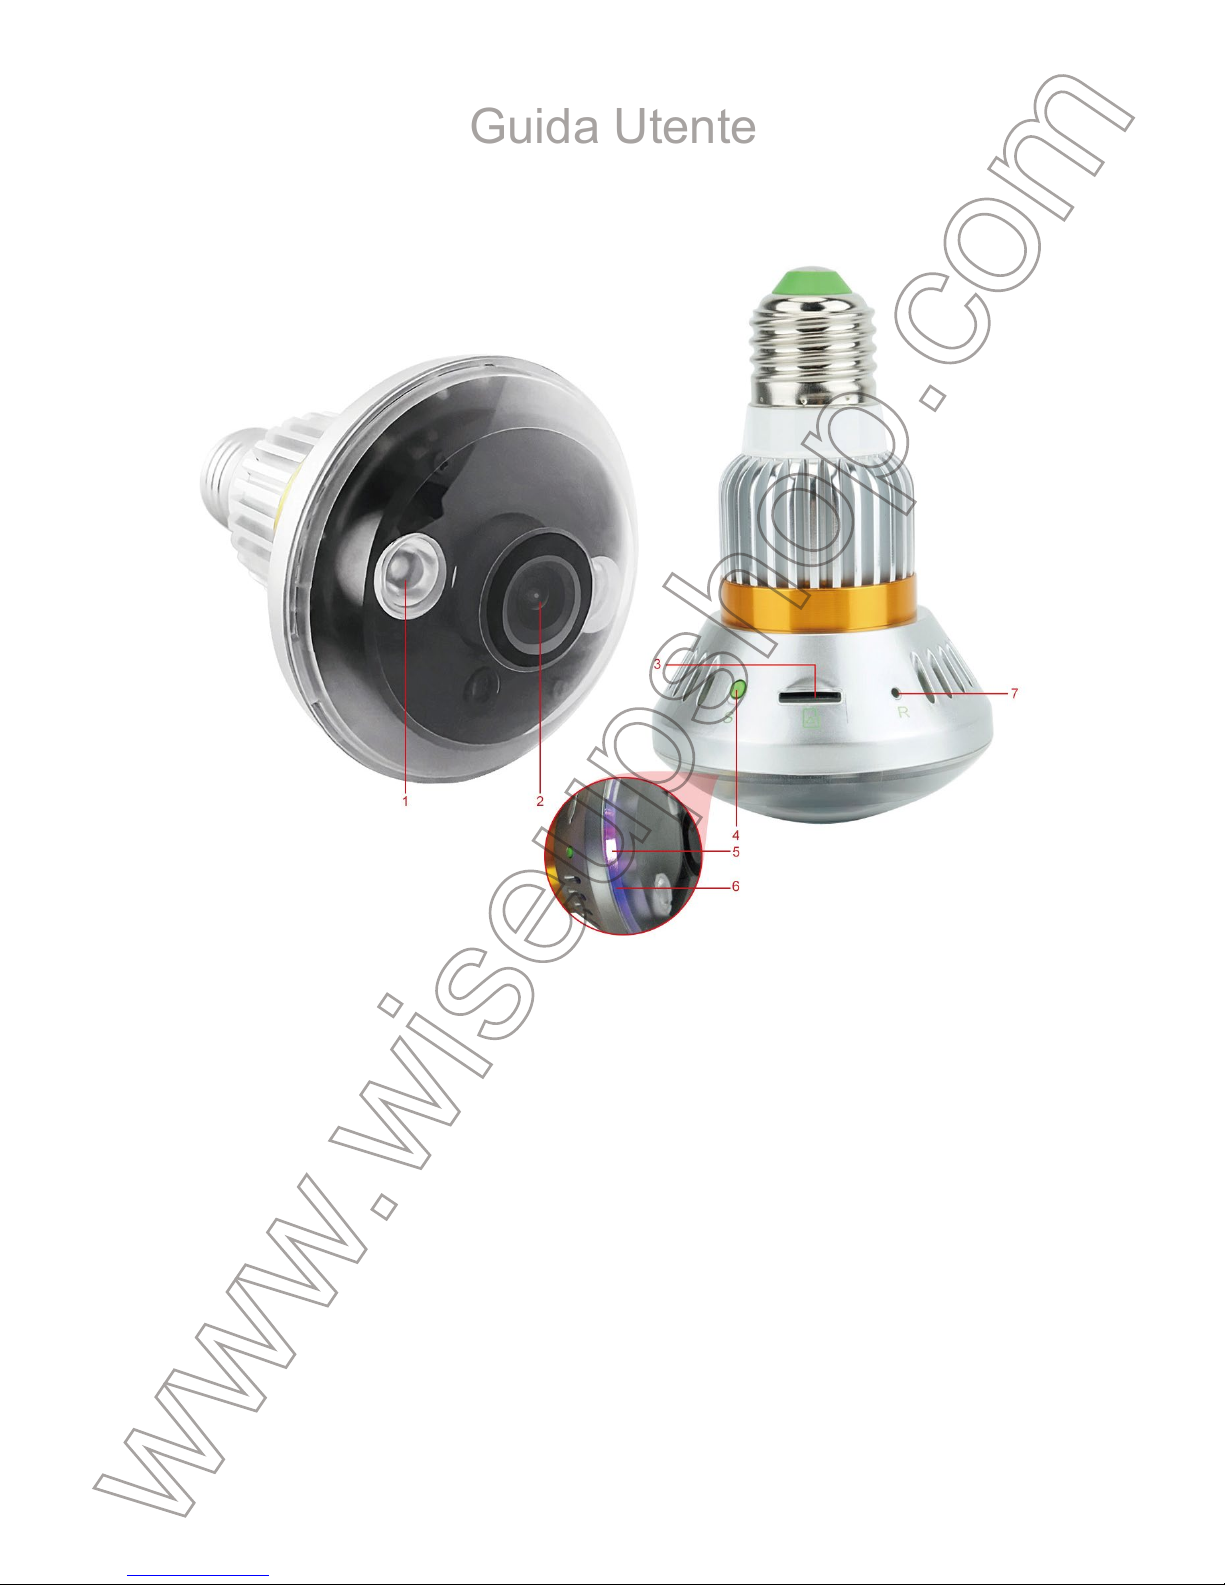
I. Product Overview
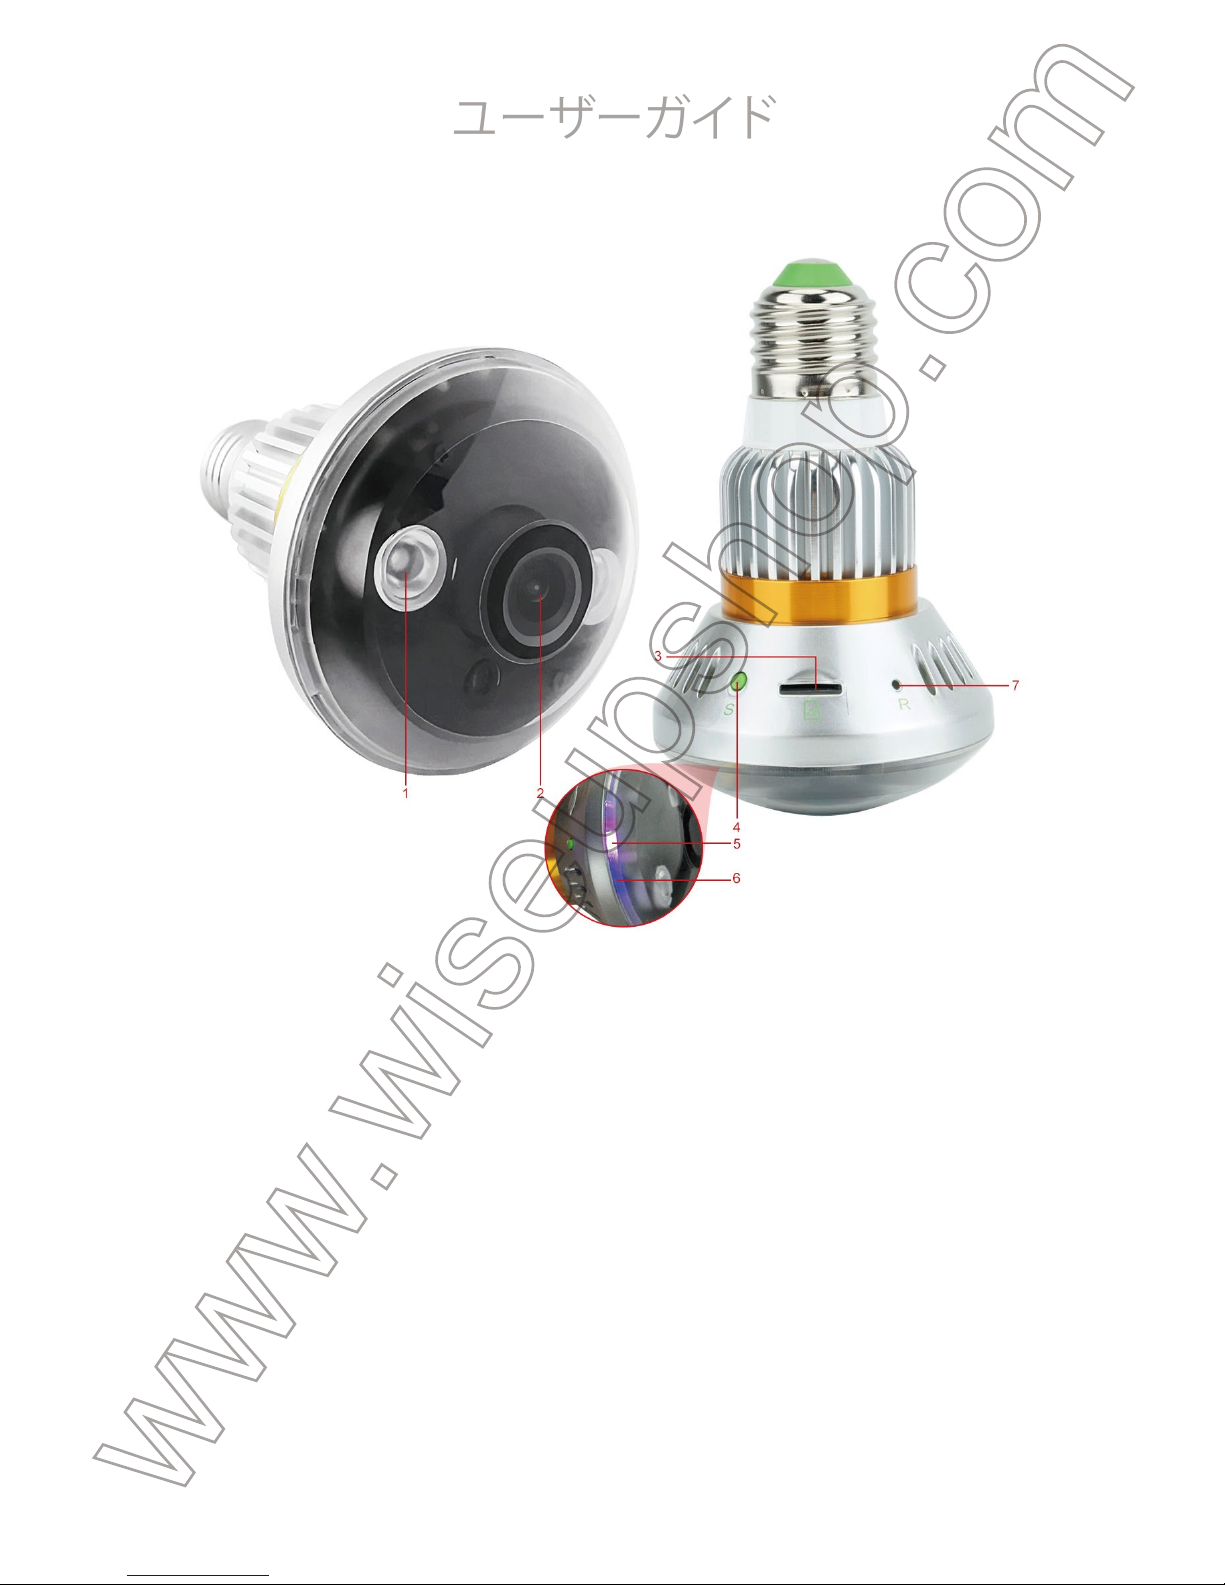
1. IR LEDs
2. Camera Lens
3. Micro SD Card Slot
4. Recording Button
5. Red Indicator Light
6. Blue Indicator Light
7. Restart Button
II. What’s in the Box
-1× Bulb Camera
-1× Card Reader
-1× 8GB Micro SD Card (fitted into the Micro SD card slot already)
-1× 20cm E27 Bulb Extension Adapter
III. Before You Start
3.1. SYETEM SETTING
3.1.1. Click the link and download the file “USERSET TOOL”.
http://www.wiseupshop.com/var/downloadfile/BC186%20USERSET%20TOOL.rar
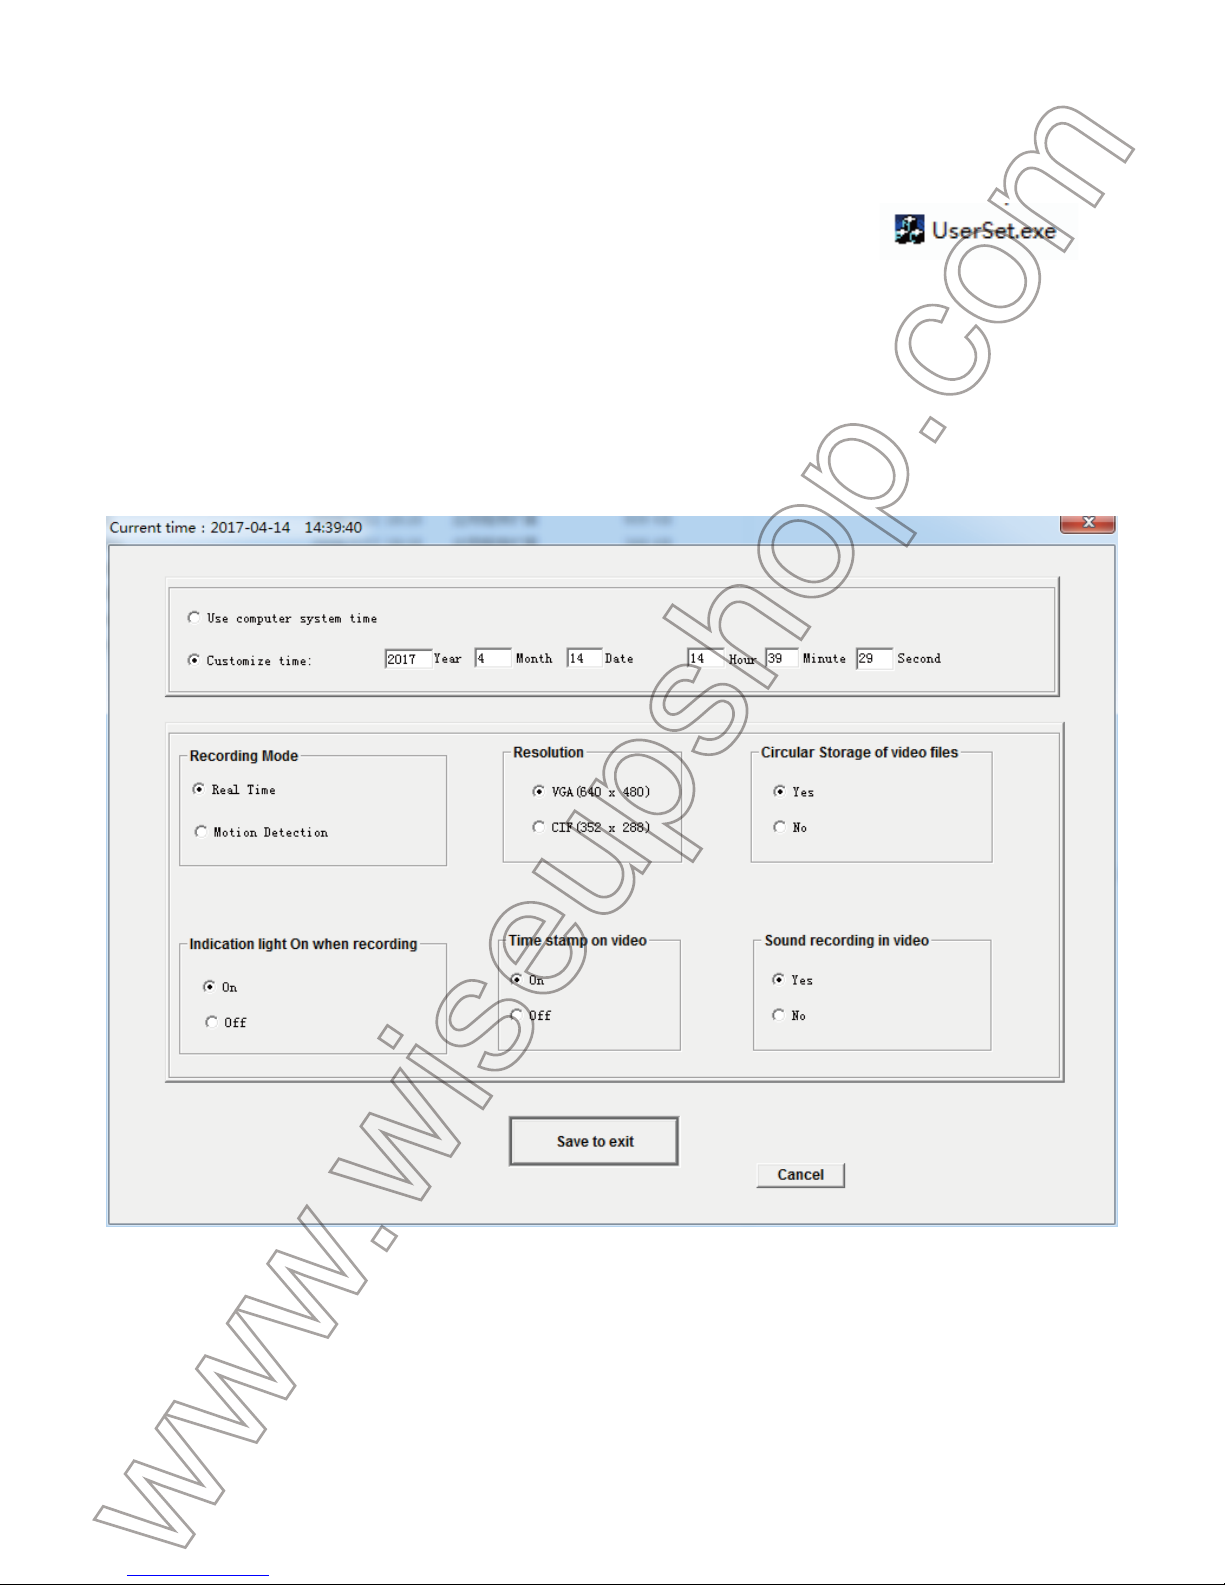
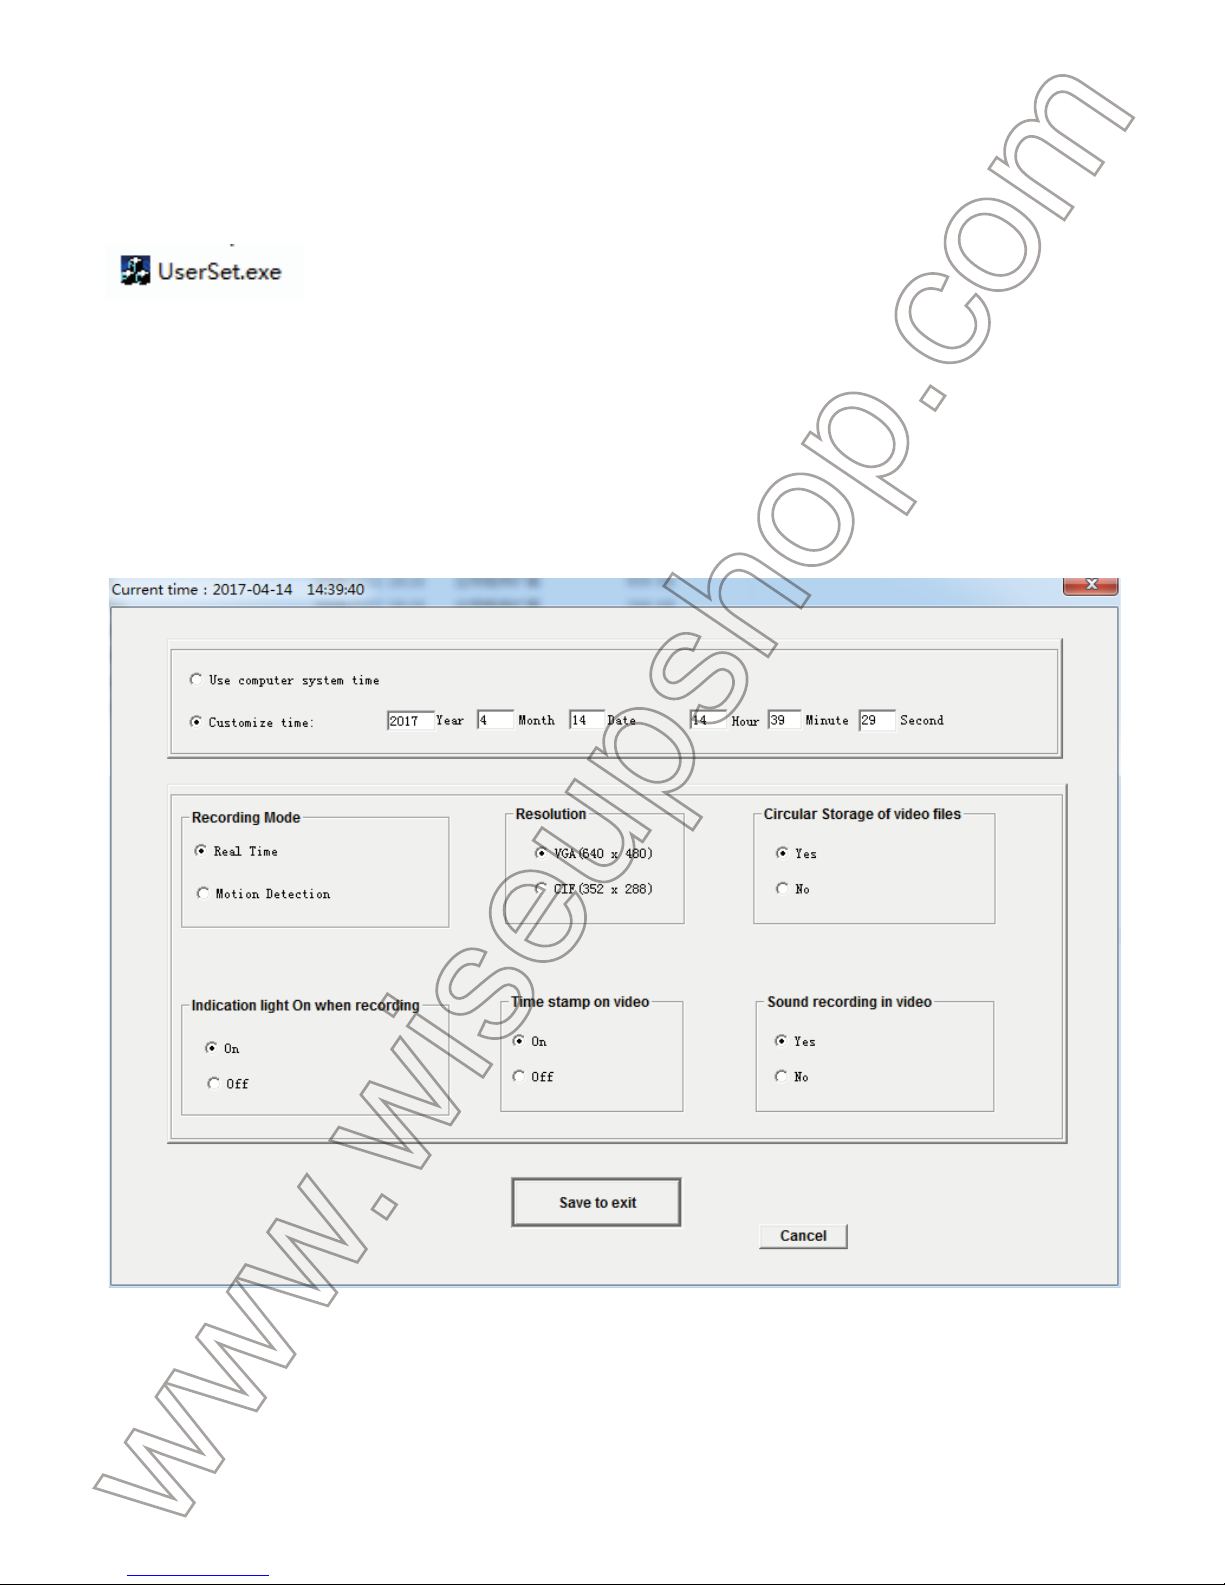
3.1.2. Decompress the zip file you downloaded, then open it and locate .
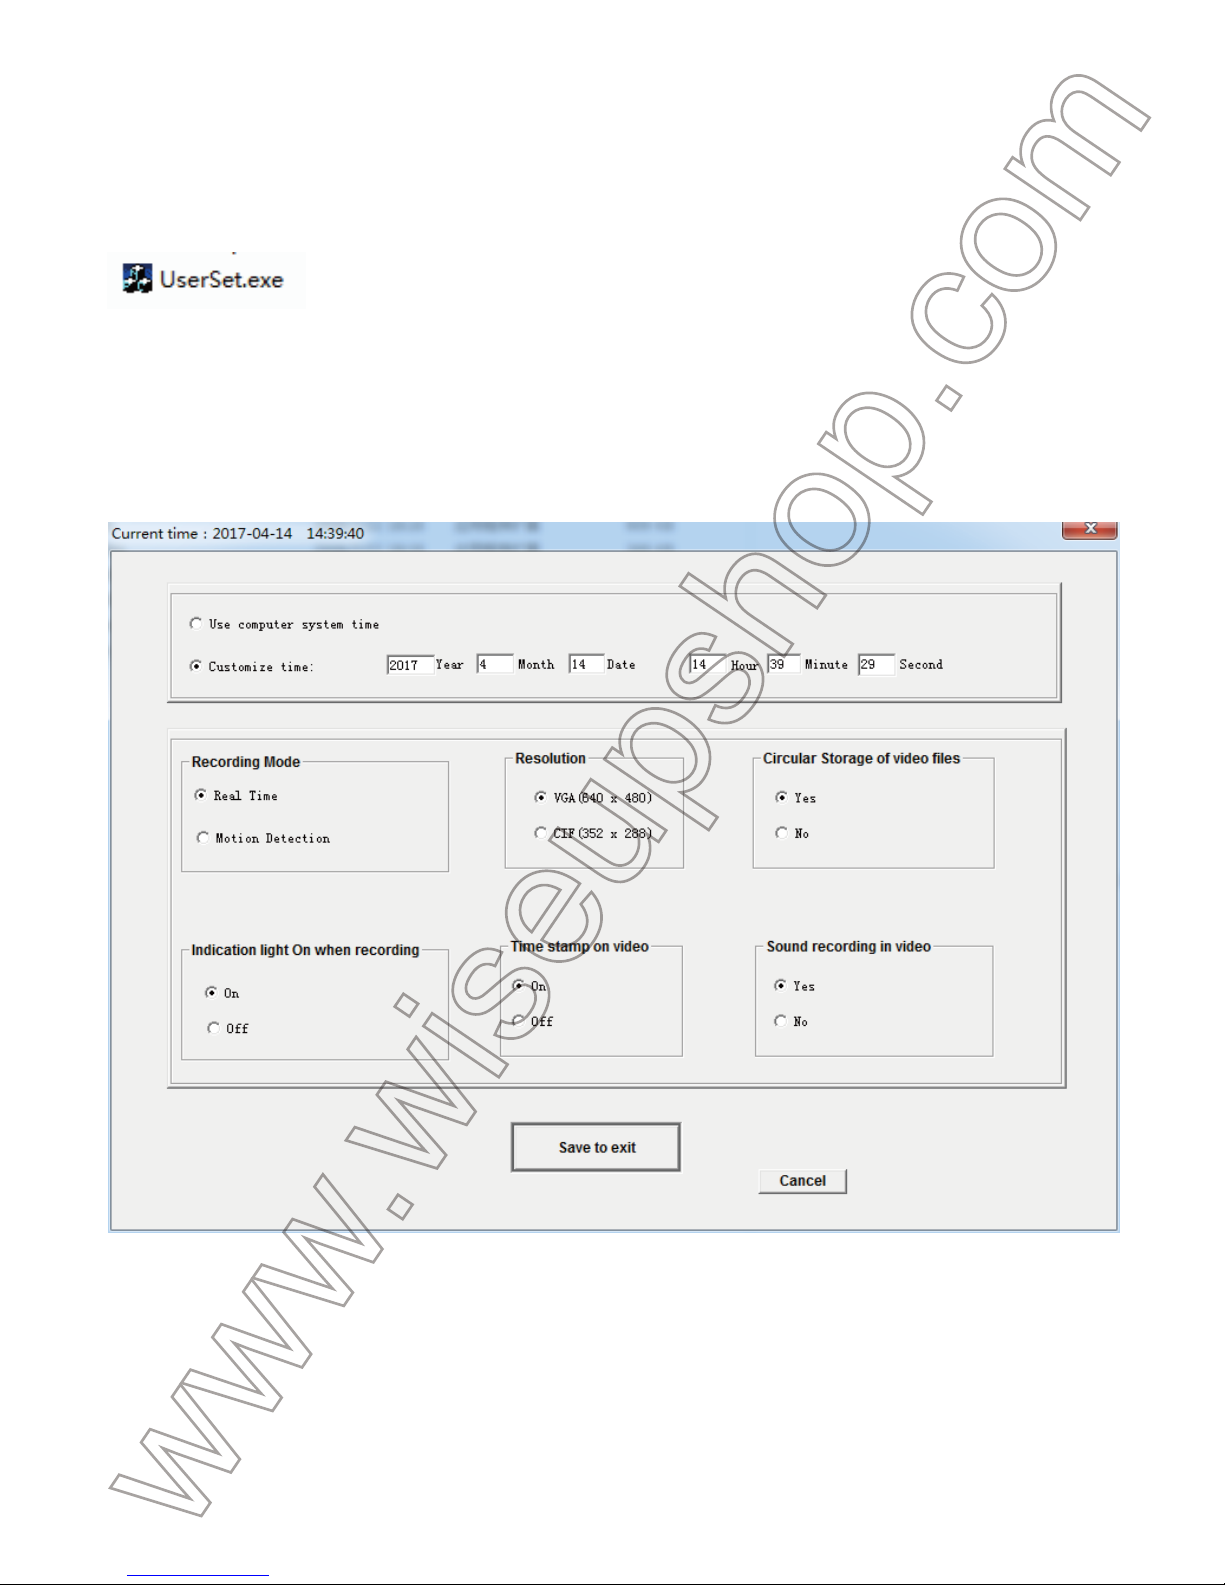
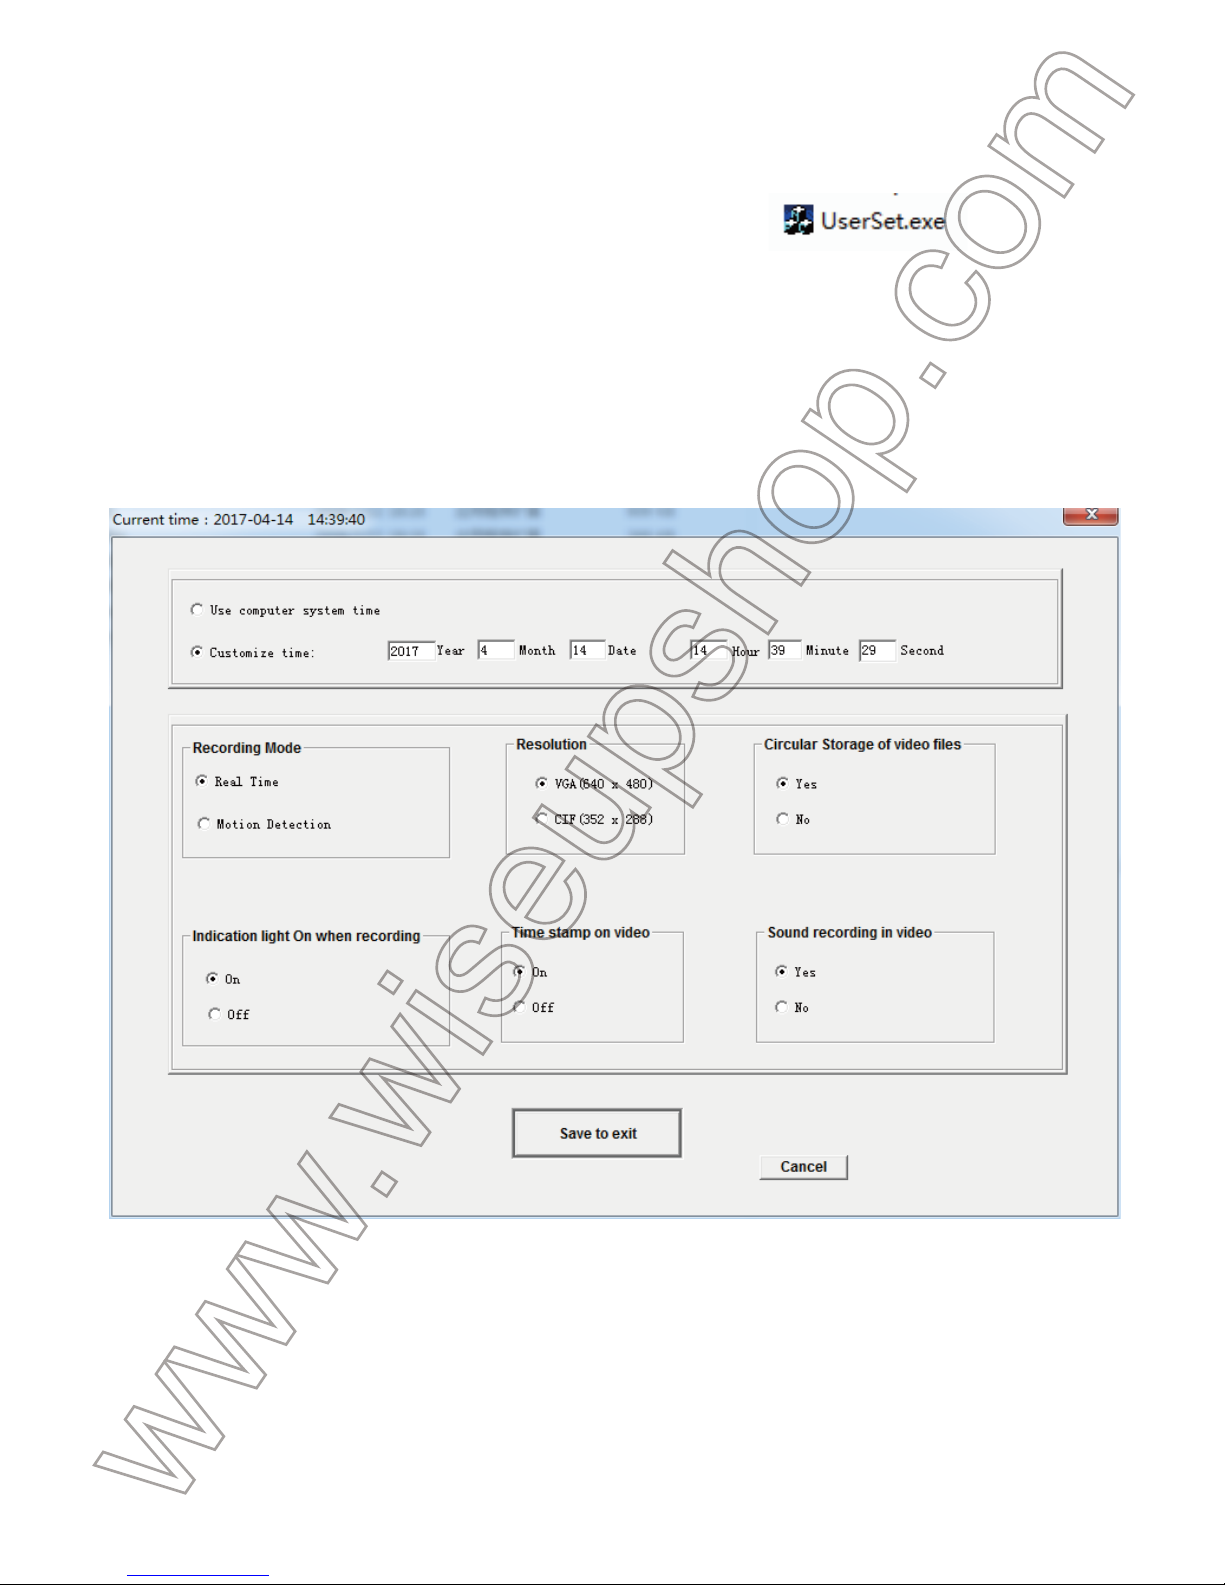
3.1.3. Open the program, then choose your desired recording mode and resolution. You can
also finish other settings to satisfy your need.
3.1.4. Click “Customize time”, then the time and date stamp on the video footage will be sync
with your computer.
3.1.5. Click “Save to exit”.
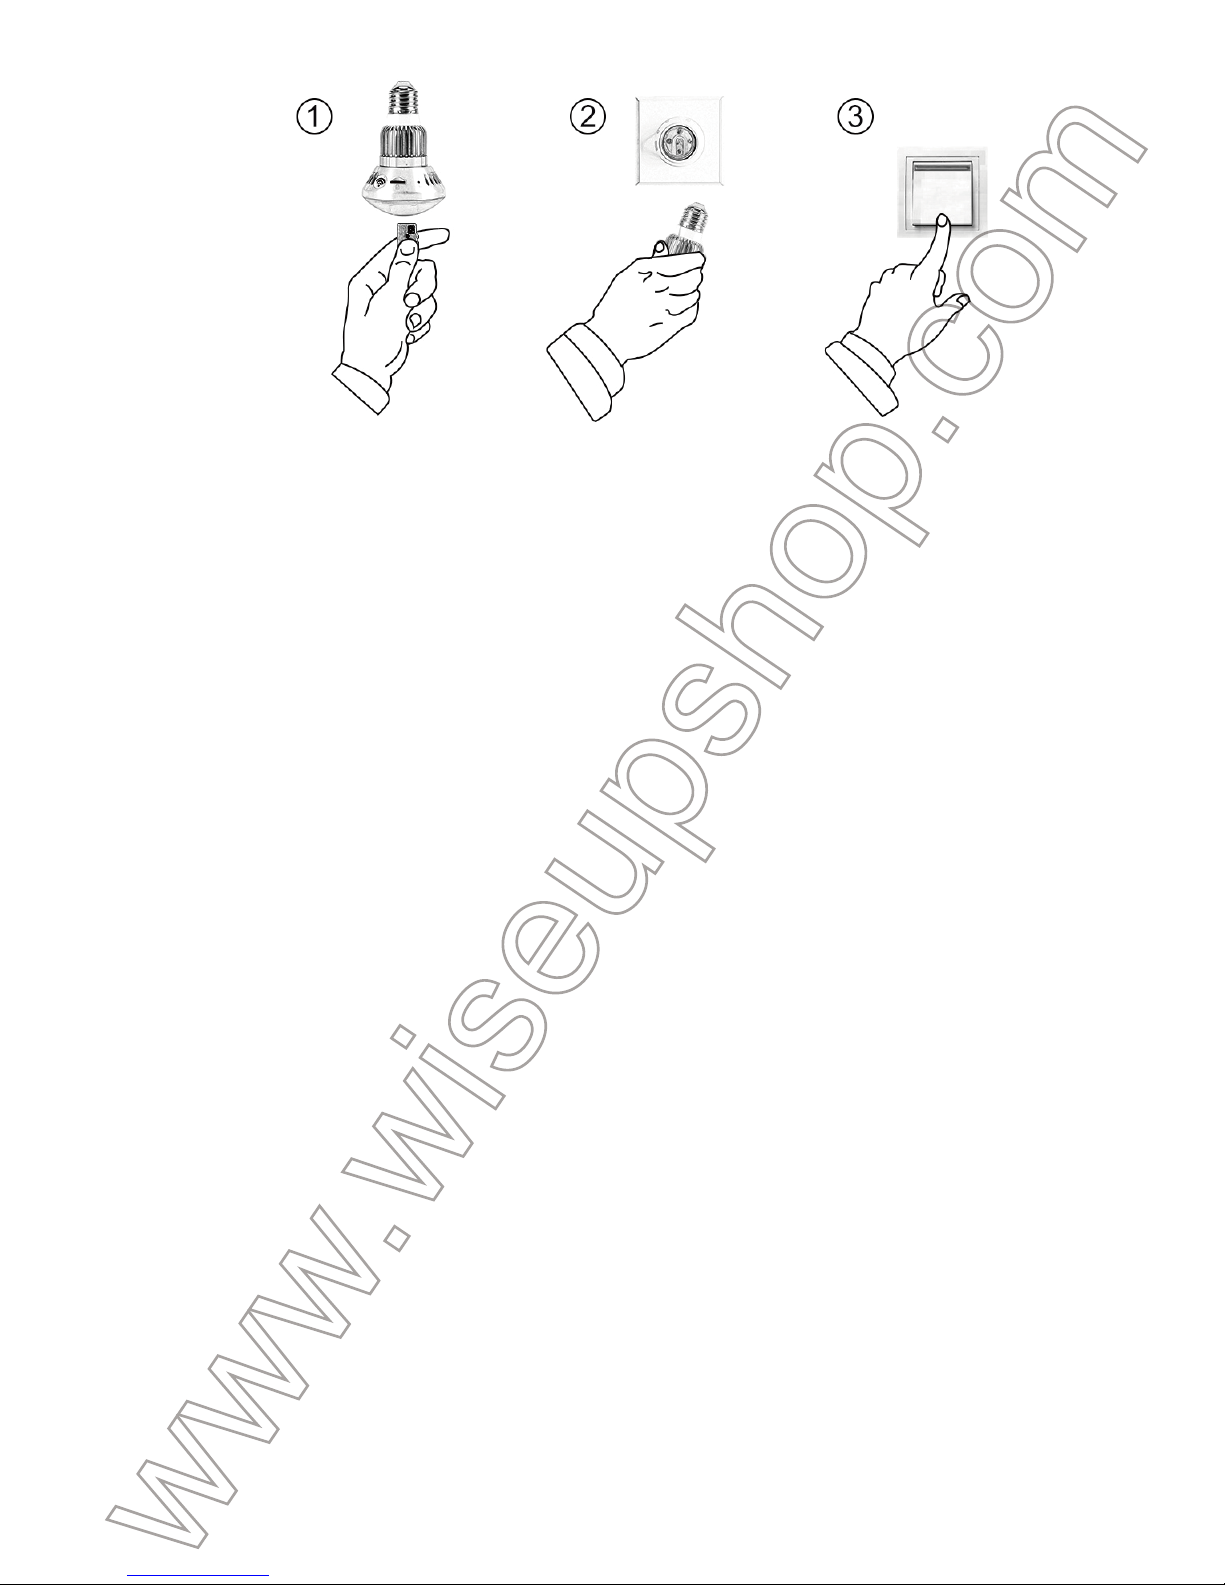
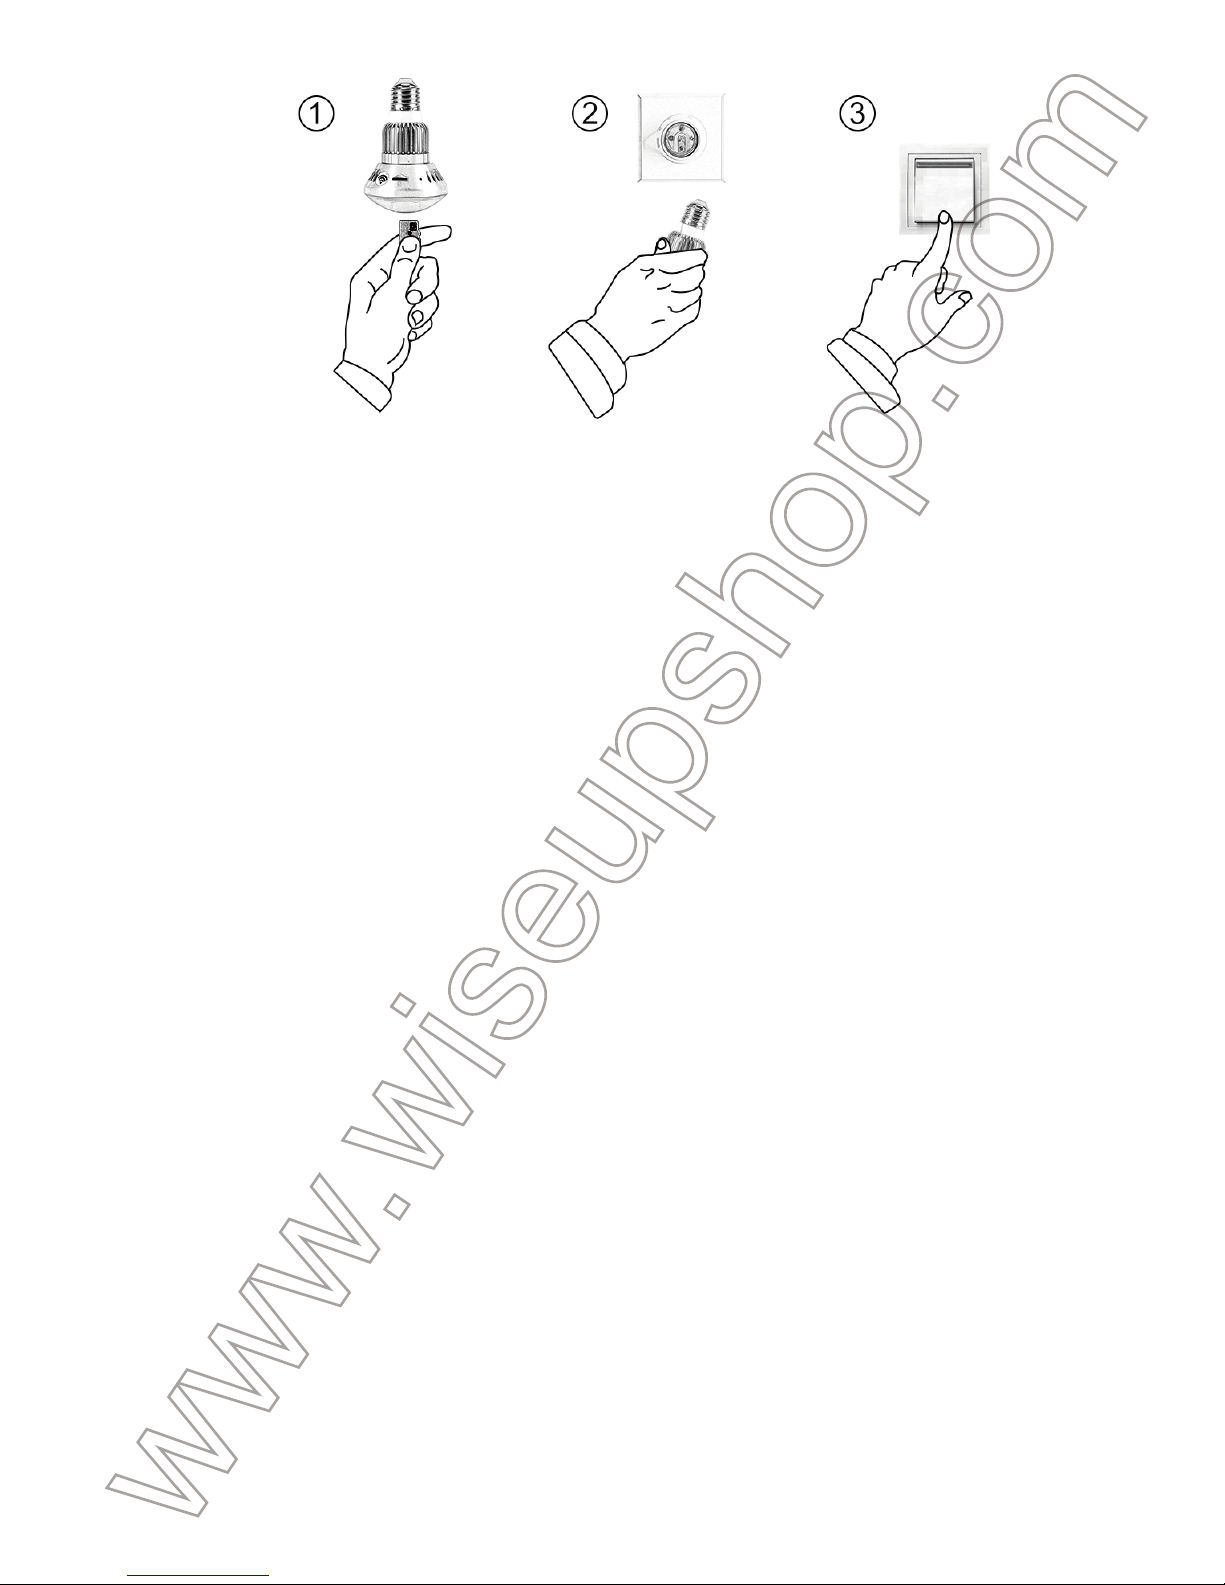
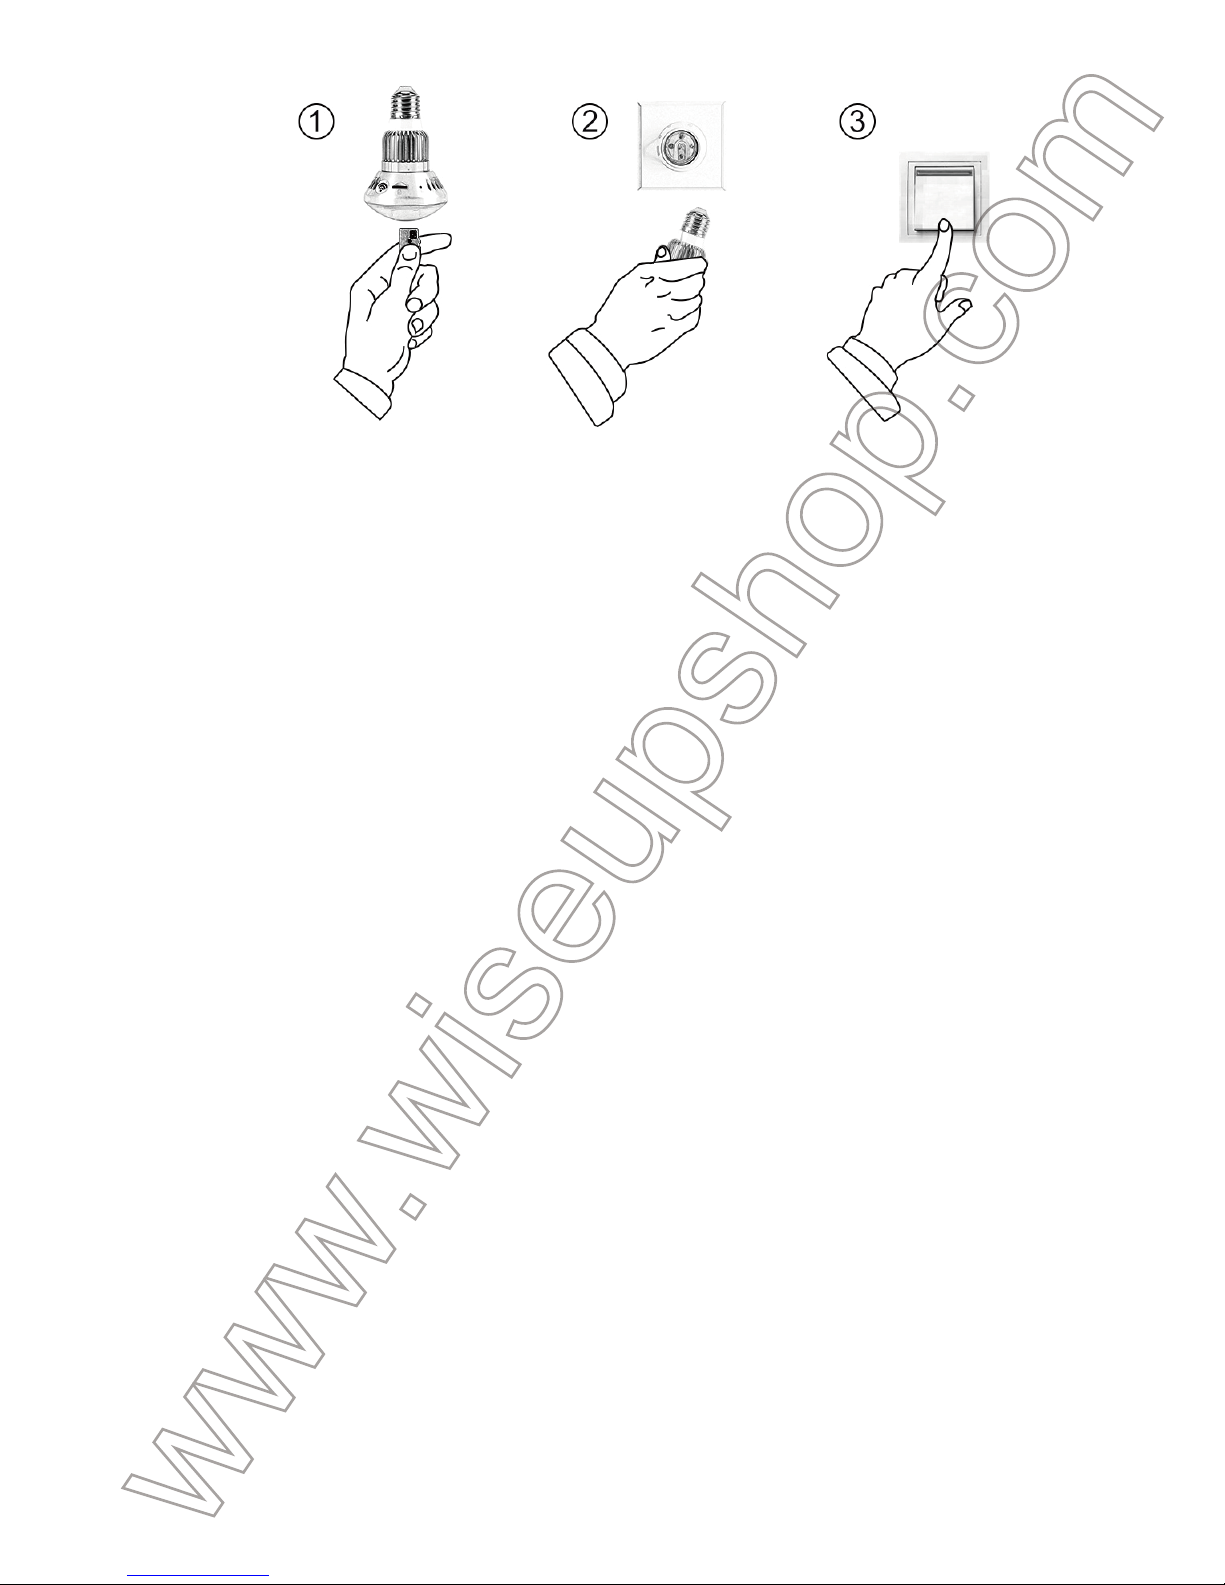
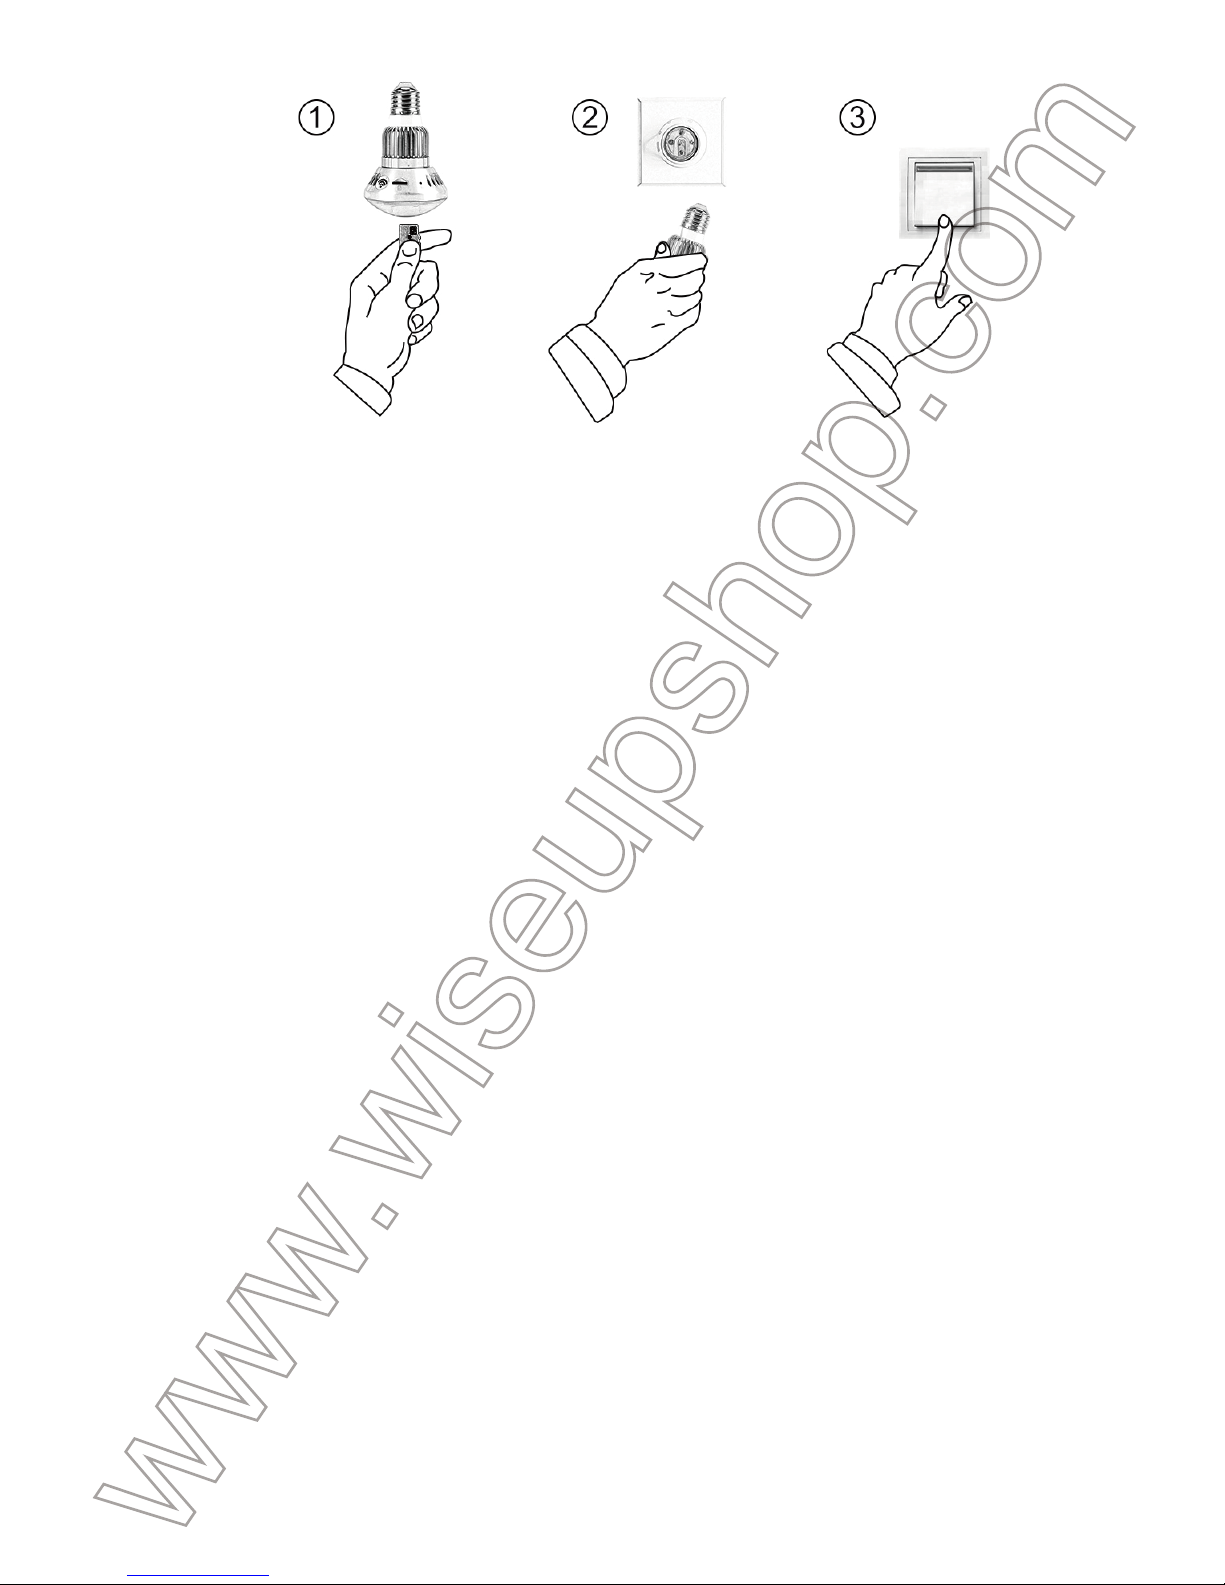
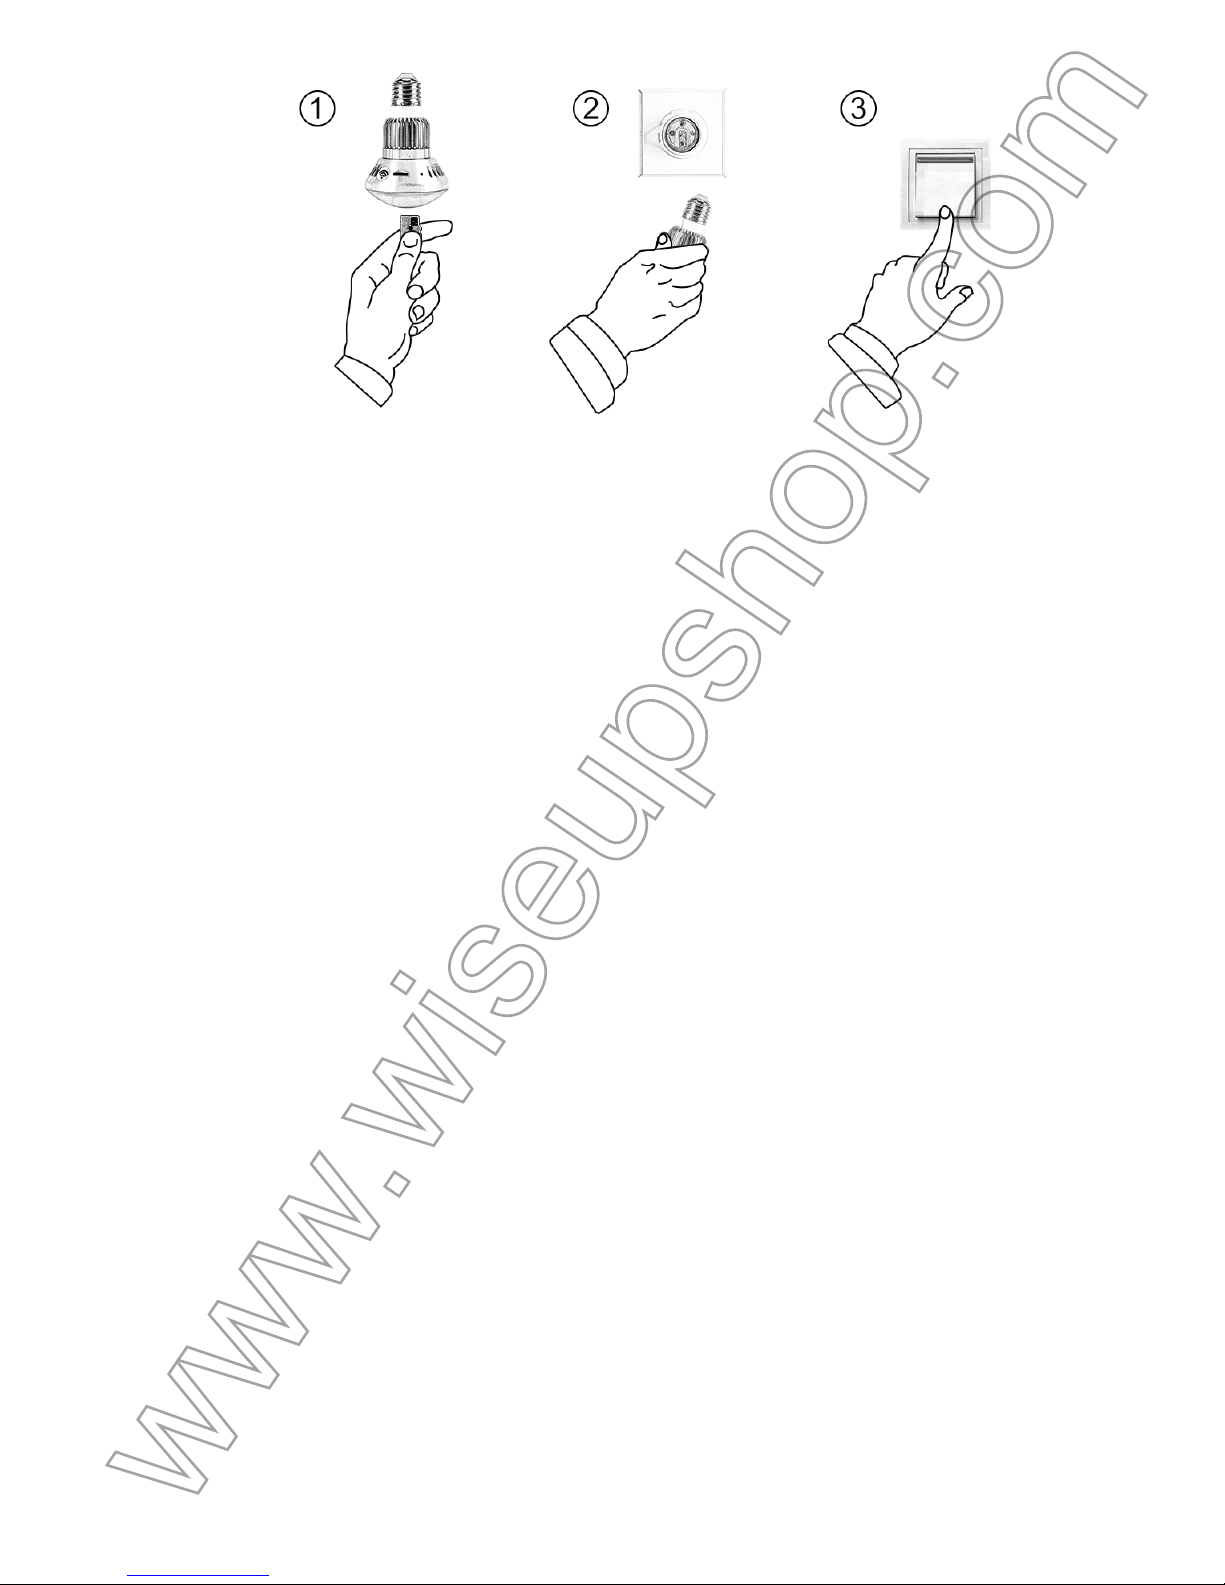
3.2. INSTALL BULB CAMERA
3.2.1. Insert the Micro SD card into the bulb camera.
3.2.2. Turn off power and screw the bulb camera lightly but firmly into the socket.
3.2.3. Once the bulb camera is installed well, switch on the light.
Page 2
III. Before You Start
3.1. SYETEM SETTING
3.1.1. Click the link and download the file “USERSET TOOL”.
http://www.wiseupshop.com/var/downloadfile/BC186%20USERSET%20TOOL.rar
3.1.2. Decompress the zip file you downloaded, then open it and locate .
3.1.3. Open the program, then choose your desired recording mode and resolution. You can
also finish other settings to satisfy your need.
3.1.4. Click “Customize time”, then the time and date stamp on the video footage will be sync
with your computer.
3.1.5. Click “Save to exit”.
3.2. INSTALL BULB CAMERA
3.2.1. Insert the Micro SD card into the bulb camera.
3.2.2. Turn off power and screw the bulb camera lightly but firmly into the socket.
3.2.3. Once the bulb camera is installed well, switch on the light.
IV. Operation
4.1. CONTINUOUS VIDEO RECORDING
4.1.1. Please make sure you have chosen “Real Time” recording mode in 3.1. Once the bulb
camera is switched on, both blue and red indicator lights will come on and stay illuminated for
5 seconds, then the red one will turn off while the blue one will keep flashing. The camera will
start video recording automatically.
4.1.2. Press the Recording Button once to stop video recording. The blue indicator light will stay
illuminated, indicating the camera is back to standby mode.
4.1.3. If the camera is in standby mode without any operation more than 30 seconds, both blue
and red indicator lights will flash once and stay illuminated for 10 seconds, then the red one will
turn off while the blue one will keep flashing. The camera will start video recording again.
[Note]:
1). A video clip will be generated and saved every 30 minutes automatically.
2). Video Resolution: 640×480 Video Format: 3GP
3). Loop recording is supported.
4). Each video clip will take up to about 100MB storage space of the Micro SD card.
5). When the illumination is below 150 lux, the IR LEDs will turn on automatically. IR distance is 6
meters.
6). If no Micro SD card is fitted into the camera, both red and blue indicator lights will come on and stay
illuminated for 2 seconds, then the blue one will turn off while the red one will keep flashing. Every 15
seconds, the camera will check whether there is a Micro SD card is inserted and both red and blue indi-
cator lights will come on again.
7). The bulb camera has a built-in battery, which takes 4 hours to obtain a full charge. The camera will
work for 2 hours on a single charge.
4.2. MOTION DETECTION VIDEO RECORDING
4.2.1. Please make sure you have chosen “Motion Detection” recording mode in 3.1. Once
Page 3
IV. Operation
4.1. CONTINUOUS VIDEO RECORDING
4.1.1. Please make sure you have chosen “Real Time” recording mode in 3.1. Once the bulb
camera is switched on, both blue and red indicator lights will come on and stay illuminated for
5 seconds, then the red one will turn off while the blue one will keep flashing. The camera will
start video recording automatically.
4.1.2. Press the Recording Button once to stop video recording. The blue indicator light will stay
illuminated, indicating the camera is back to standby mode.
4.1.3. If the camera is in standby mode without any operation more than 30 seconds, both blue
and red indicator lights will flash once and stay illuminated for 10 seconds, then the red one will
turn off while the blue one will keep flashing. The camera will start video recording again.
[Note]:
1). A video clip will be generated and saved every 30 minutes automatically.
2). Video Resolution: 640×480 Video Format: 3GP
3). Loop recording is supported.
4). Each video clip will take up to about 100MB storage space of the Micro SD card.
5). When the illumination is below 150 lux, the IR LEDs will turn on automatically. IR distance is 6
meters.
6). If no Micro SD card is fitted into the camera, both red and blue indicator lights will come on and stay
illuminated for 2 seconds, then the blue one will turn off while the red one will keep flashing. Every 15
seconds, the camera will check whether there is a Micro SD card is inserted and both red and blue indi-
cator lights will come on again.
7). The bulb camera has a built-in battery, which takes 4 hours to obtain a full charge. The camera will
work for 2 hours on a single charge.
4.2. MOTION DETECTION VIDEO RECORDING
4.2.1. Please make sure you have chosen “Motion Detection” recording mode in 3.1. Once
the bulb camera is switched on, both blue and red indicator lights will come on and stay illumi-
nated for 5 seconds, then the red one will turn off while the blue one will stay illuminated. The
camera will enter into motion detection recording mode.
4.2.2. The camera will record a 2-minute video automatically when motion is detected. The blue
indicator light will keep flashing.
4.2.3. Press the Recording Button once to exit motion detection recording mode. Both red and
blue indicator lights will stay illuminated, indicating the camera is back to standby mode.
4.2.4. If the camera is in standby mode without any operation more than 30 seconds, both blue
and red indicator lights will flash once and stay illuminated for 10 seconds, then the red one will
turn off while the blue one will keep flashing. The camera has started motion detection record-
ing again.
V. Video File Uploads
5.1. Power off the camera, remove the Micro SD card then insert it into a card reader.
5.2. Insert the card reader into a proper PC computer USB port.
5.3. The Micro SD card will be recognized as a removable disk drive.
5.4. All the files can be accessed in the drive.
VI. Resetting
If for any reason, the camera stops responding or isn’t working properly, a quick reset will
restore it back to normal operation.
Operation: When the camera is powered on, use a pin to press the Reset Button once; the
blue and red indicator lights will be illuminated for 5 seconds, then the red one will turn off while
the blue one will keep flashing. Now you can restart the camera with the factory default set-
tings.
Page 4

the bulb camera is switched on, both blue and red indicator lights will come on and stay illuminated for 5 seconds, then the red one will turn off while the blue one will stay illuminated. The
camera will enter into motion detection recording mode.
4.2.2. The camera will record a 2-minute video automatically when motion is detected. The blue
indicator light will keep flashing.
4.2.3. Press the Recording Button once to exit motion detection recording mode. Both red and
blue indicator lights will stay illuminated, indicating the camera is back to standby mode.
4.2.4. If the camera is in standby mode without any operation more than 30 seconds, both blue
and red indicator lights will flash once and stay illuminated for 10 seconds, then the red one will
turn off while the blue one will keep flashing. The camera has started motion detection recording again.
V. Video File Uploads
5.1. Power off the camera, remove the Micro SD card then insert it into a card reader.
5.2. Insert the card reader into a proper PC computer USB port.
5.3. The Micro SD card will be recognized as a removable disk drive.
5.4. All the files can be accessed in the drive.
VI. Resetting
If for any reason, the camera stops responding or isn’t working properly, a quick reset will
restore it back to normal operation.
Operation: When the camera is powered on, use a pin to press the Reset Button once; the
blue and red indicator lights will be illuminated for 5 seconds, then the red one will turn off while
the blue one will keep flashing. Now you can restart the camera with the factory default settings.
Page 5
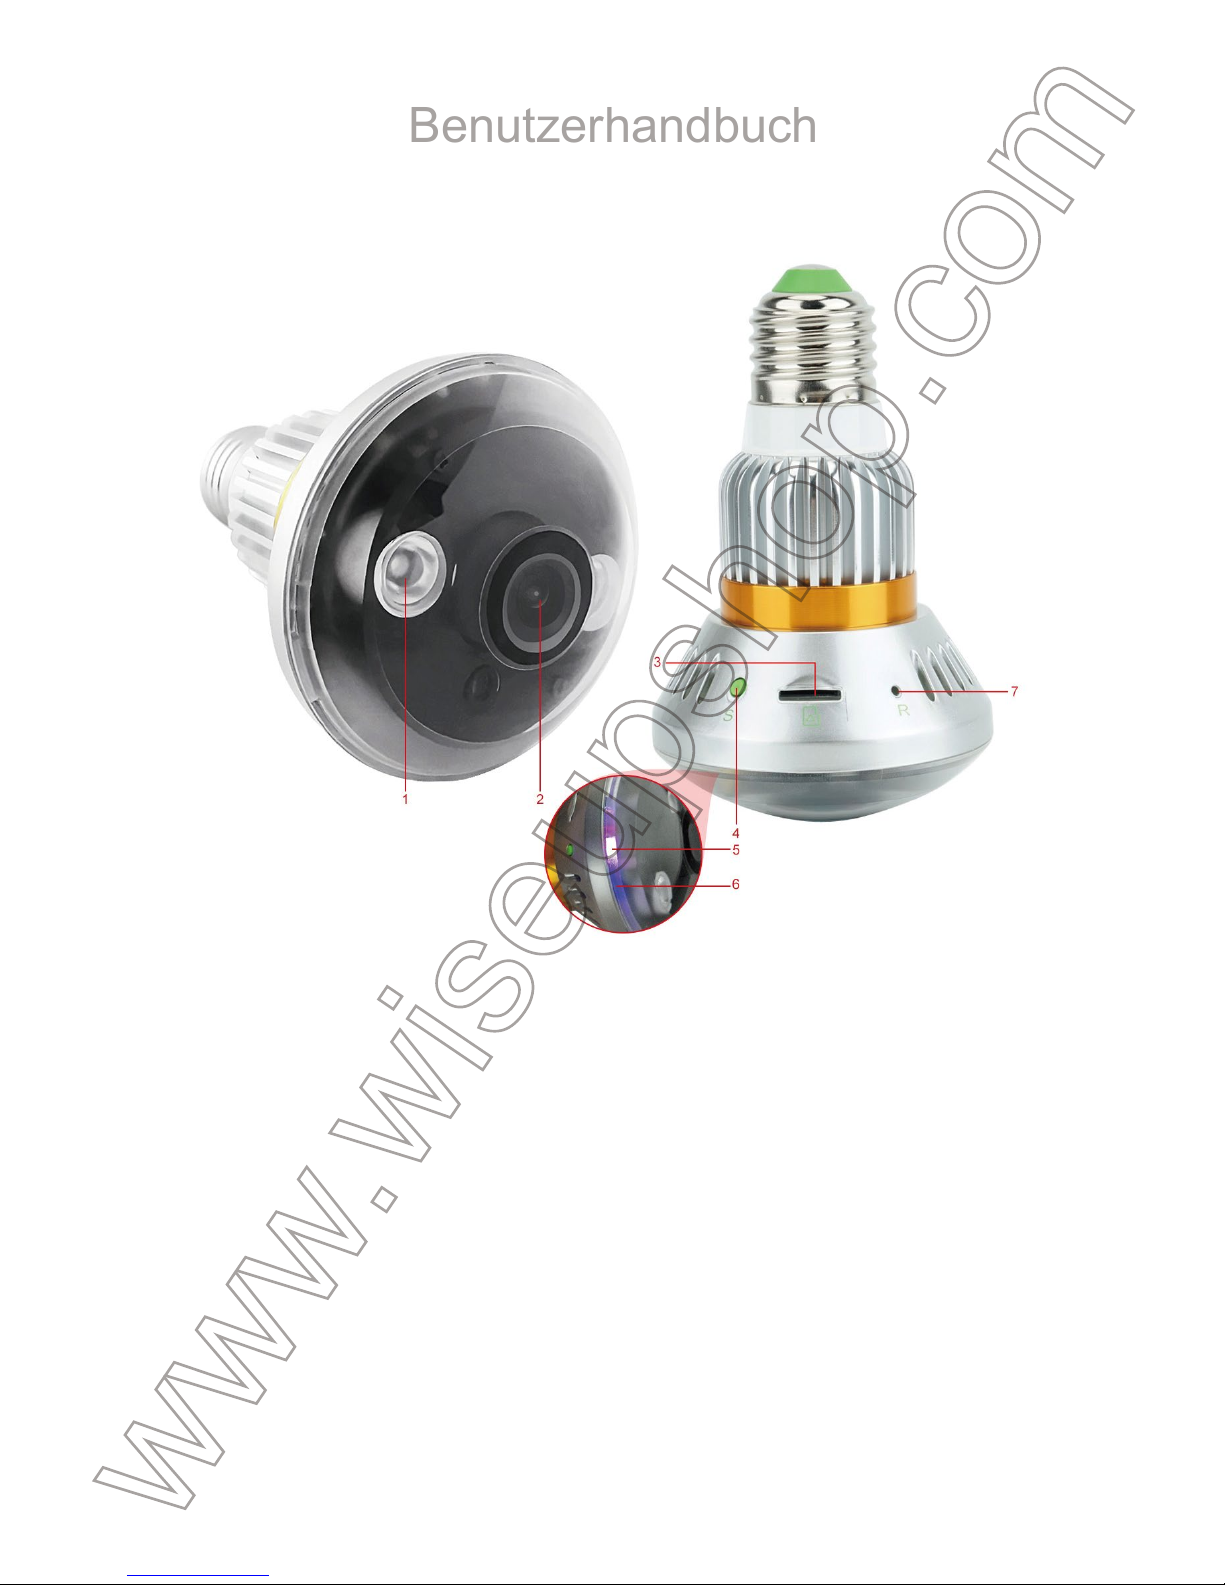
BC186
Benutzerhandbuch
I. Produktübersicht
1. IR LEDs
2. Kameraobjektiv
3. Mikro-Sd-Einbauschlitz
4. Aufnahmetaste
5. Rote Kontrollleuchte
6. Blaues Indikatorlicht
7. Schaltfläche neu starten
II. Was ist in der Box
-1 × Birne Kamera
-1 × Kartenleser
-1 × 8GB Micro SD Card (bereits in den Micro SD Kartensteckplatz eingebaut)
-1 × 20cm E27 Birnenverlängerung Adapter
III. Bevor du anfängst
3.1. SYSTEMEINSTELLUNG
3.1.1. Klicken Sie auf den Link und laden Sie die Datei "USERSET TOOL" herunter.
Http://www.wiseupshop.com/var/downloadfile/BC186%20USERSET%20TOOL.rar
3.1.2. Dekomprimiere die Zip-Datei, die du heruntergeladen hast, dann öffne sie und suche .
3.1.3. Öffnen Sie das Programm und wählen Sie dann den gewünschten Aufnahmemodus und
die gewünschte Auflösung. Sie können auch andere Einstellungen beenden, um Ihren Bedarf
zu erfüllen.
3.1.4. Klicken Sie auf "Anpassen der Zeit", dann wird der Zeit- und Datumsstempel auf dem
Videomaterial mit Ihrem Computer synchronisiert.
3.1.5. Klicken Sie auf "Speichern, um zu beenden".
3.2. INSTALLIEREN DER BIRNKAMERA
3.2.1. Setzen Sie die Micro SD-Karte in die Lampenkamera ein.
3.2.2. Schalten Sie die Stromversorgung aus und schrauben Sie die Lampenkamera leicht,
aber fest in die Steckdose.
3.2.3. Sobald die Lampenkamera gut installiert ist, schalte das Licht ein.
Page 6
III. Bevor du anfängst
3.1. SYSTEMEINSTELLUNG
3.1.1. Klicken Sie auf den Link und laden Sie die Datei "USERSET TOOL" herunter.
Http://www.wiseupshop.com/var/downloadfile/BC186%20USERSET%20TOOL.rar
3.1.2. Dekomprimiere die Zip-Datei, die du heruntergeladen hast, dann öffne sie und suche .
3.1.3. Öffnen Sie das Programm und wählen Sie dann den gewünschten Aufnahmemodus und
die gewünschte Auflösung. Sie können auch andere Einstellungen beenden, um Ihren Bedarf
zu erfüllen.
3.1.4. Klicken Sie auf "Anpassen der Zeit", dann wird der Zeit- und Datumsstempel auf dem
Videomaterial mit Ihrem Computer synchronisiert.
3.1.5. Klicken Sie auf "Speichern, um zu beenden".
3.2. INSTALLIEREN DER BIRNKAMERA
3.2.1. Setzen Sie die Micro SD-Karte in die Lampenkamera ein.
3.2.2. Schalten Sie die Stromversorgung aus und schrauben Sie die Lampenkamera leicht,
aber fest in die Steckdose.
3.2.3. Sobald die Lampenkamera gut installiert ist, schalte das Licht ein.
IV. Betrieb
4.1. KONTINUIERLICHE VIDEOAUFNAHME
4.1.1. Bitte stellen Sie sicher, dass Sie den Aufnahmemodus "Real Time" in 3.1 gewählt
haben. Sobald die Lampenkamera eingeschaltet ist, leuchten die blauen und roten Kontroll-
leuchten auf und bleiben für 5 Sekunden beleuchtet, dann wird die rote ausgeschaltet,
während die blaue blinkt. Die Kamera startet die Videoaufnahme automatisch.
4.1.2. Drücken Sie die Aufnahmetaste einmal, um die Videoaufnahme zu beenden. Die blaue
Kontrollleuchte bleibt leuchtet und zeigt an, dass die Kamera wieder in den Standby-Modus
versetzt wird.
4.1.3. Wenn sich die Kamera im Standby-Modus ohne Betrieb mehr als 30 Sekunden befindet,
blinkt die blaue und rote Kontrollleuchte einmal und leuchtet 10 Sekunden lang auf, dann wird
die rote ausgeschaltet, während die blaue blinkend bleibt. Die Kamera startet die Videoauf-
nahme erneut.
[Hinweis]:
1). Ein Videoclip wird alle 30 Minuten automatisch generiert und gespeichert.
2). Video Auflösung: 640 × 480 Video Format: 3GP
3). Die Loop-Aufnahme wird unterstützt.
4). Jeder Videoclip wird bis zu ca. 100MB Speicherplatz der Micro SD Karte aufnehmen.
5). Wenn die Beleuchtung unter 150 Lux liegt, schalten sich die IR-LEDs automatisch ein. IR Entfer-
nung beträgt 6 Meter.
6). Wenn keine Micro SD-Karte in die Kamera eingepasst ist, leuchten die roten und blauen Kontroll-
leuchten auf und bleiben für 2 Sekunden unbeleuchtet, dann wird die blaue ausgeschaltet, während die
rote LED blinkt. Alle 15 Sekunden prüft die Kamera, ob eine Micro SD-Karte eingesetzt ist und die rote
und blaue Kontrollleuchte wieder eingeschaltet wird.
7). Die Birnenkamera hat eine eingebaute Batterie, die 4 Stunden dauert, um eine volle Ladung zu
erhalten. Die Kamera arbeitet für 2 Stunden mit einer Aufladung.
Page 7
IV. Betrieb
4.1. KONTINUIERLICHE VIDEOAUFNAHME
4.1.1. Bitte stellen Sie sicher, dass Sie den Aufnahmemodus "Real Time" in 3.1 gewählt
haben. Sobald die Lampenkamera eingeschaltet ist, leuchten die blauen und roten Kontrollleuchten auf und bleiben für 5 Sekunden beleuchtet, dann wird die rote ausgeschaltet,
während die blaue blinkt. Die Kamera startet die Videoaufnahme automatisch.
4.1.2. Drücken Sie die Aufnahmetaste einmal, um die Videoaufnahme zu beenden. Die blaue
Kontrollleuchte bleibt leuchtet und zeigt an, dass die Kamera wieder in den Standby-Modus
versetzt wird.
4.1.3. Wenn sich die Kamera im Standby-Modus ohne Betrieb mehr als 30 Sekunden befindet,
blinkt die blaue und rote Kontrollleuchte einmal und leuchtet 10 Sekunden lang auf, dann wird
die rote ausgeschaltet, während die blaue blinkend bleibt. Die Kamera startet die Videoaufnahme erneut.
[Hinweis]:
1). Ein Videoclip wird alle 30 Minuten automatisch generiert und gespeichert.
2). Video Auflösung: 640 × 480 Video Format: 3GP
3). Die Loop-Aufnahme wird unterstützt.
4). Jeder Videoclip wird bis zu ca. 100MB Speicherplatz der Micro SD Karte aufnehmen.
5). Wenn die Beleuchtung unter 150 Lux liegt, schalten sich die IR-LEDs automatisch ein. IR Entfer-
nung beträgt 6 Meter.
6). Wenn keine Micro SD-Karte in die Kamera eingepasst ist, leuchten die roten und blauen Kontroll-
leuchten auf und bleiben für 2 Sekunden unbeleuchtet, dann wird die blaue ausgeschaltet, während die
rote LED blinkt. Alle 15 Sekunden prüft die Kamera, ob eine Micro SD-Karte eingesetzt ist und die rote
und blaue Kontrollleuchte wieder eingeschaltet wird.
7). Die Birnenkamera hat eine eingebaute Batterie, die 4 Stunden dauert, um eine volle Ladung zu
erhalten. Die Kamera arbeitet für 2 Stunden mit einer Aufladung.
4.2. MOTION DETECTION VIDEO AUFNAHME
4.2.1. Bitte stellen Sie sicher, dass Sie den Aufnahmemodus "Bewegungserkennung" in 3.1
gewählt haben. Sobald die Lampenkamera eingeschaltet ist, leuchten die blauen und roten
Kontrollleuchten auf und bleiben für 5 Sekunden aufleuchten, dann wird die rote ausgeschaltet,
während die blaue beleuchtet bleibt. Die Kamera wechselt in den Bewegungserkennungsmo-
dus.
4.2.2. Die Kamera wird automatisch ein 2-Minuten-Video aufnehmen, wenn eine Bewegung
erkannt wird. Die blaue Kontrollleuchte blinkt weiter.
4.2.3. Drücken Sie die Aufnahmetaste einmal, um den Bewegungserkennungs-Aufnahmemo-
dus zu verlassen. Die roten und blauen Kontrollleuchten bleiben aufleuchten und zeigen an,
dass die Kamera wieder in den Standby-Modus versetzt wird.
4.2.4. Wenn sich die Kamera im Standby-Modus ohne Betrieb mehr als 30 Sekunden befindet,
blinkt die blaue und rote Kontrollleuchte einmal und leuchtet 10 Sekunden lang auf, dann wird
die rote ausgeschaltet, während die blaue blinkend bleibt. Die Kamera hat die Bewegung-
serkennung wieder aufgenommen.
V. Video-Datei-Uploads
5.1. Schalten Sie die Kamera aus, entfernen Sie die Micro SD-Karte und stecken Sie sie in
einen Kartenleser ein.
5.2. Legen Sie den Kartenleser in einen geeigneten PC-Computer ein.
5.3. Die Micro SD-Karte wird als Wechseldatenträger erkannt.
5.4 Auf alle Dateien kann im Laufwerk zugegriffen werden.
VI. Zurücksetzen
Wenn aus irgendeinem Grund die Kamera nicht mehr reagiert oder nicht ordnungsgemäß funk-
tioniert, wird ein schneller Reset wieder in den normalen Betrieb zurückversetzt.
Betrieb: Wenn die Kamera eingeschaltet ist, verwenden Sie einen Pin, um die Reset-Taste
einmal zu drücken. Die blauen und roten Kontrollleuchten werden für 5 Sekunden beleuchtet,
dann wird die rote ausgeschaltet, während die blaue blinkt. Jetzt können Sie die Kamera mit
den werkseitigen Standardeinstellungen neu starten.
Page 8
4.2. MOTION DETECTION VIDEO AUFNAHME
4.2.1. Bitte stellen Sie sicher, dass Sie den Aufnahmemodus "Bewegungserkennung" in 3.1
gewählt haben. Sobald die Lampenkamera eingeschaltet ist, leuchten die blauen und roten
Kontrollleuchten auf und bleiben für 5 Sekunden aufleuchten, dann wird die rote ausgeschaltet,
während die blaue beleuchtet bleibt. Die Kamera wechselt in den Bewegungserkennungsmodus.
4.2.2. Die Kamera wird automatisch ein 2-Minuten-Video aufnehmen, wenn eine Bewegung
erkannt wird. Die blaue Kontrollleuchte blinkt weiter.
4.2.3. Drücken Sie die Aufnahmetaste einmal, um den Bewegungserkennungs-Aufnahmemodus zu verlassen. Die roten und blauen Kontrollleuchten bleiben aufleuchten und zeigen an,
dass die Kamera wieder in den Standby-Modus versetzt wird.
4.2.4. Wenn sich die Kamera im Standby-Modus ohne Betrieb mehr als 30 Sekunden befindet,
blinkt die blaue und rote Kontrollleuchte einmal und leuchtet 10 Sekunden lang auf, dann wird
die rote ausgeschaltet, während die blaue blinkend bleibt. Die Kamera hat die Bewegungserkennung wieder aufgenommen.
V. Video-Datei-Uploads
5.1. Schalten Sie die Kamera aus, entfernen Sie die Micro SD-Karte und stecken Sie sie in
einen Kartenleser ein.
5.2. Legen Sie den Kartenleser in einen geeigneten PC-Computer ein.
5.3. Die Micro SD-Karte wird als Wechseldatenträger erkannt.
5.4 Auf alle Dateien kann im Laufwerk zugegriffen werden.
VI. Zurücksetzen
Wenn aus irgendeinem Grund die Kamera nicht mehr reagiert oder nicht ordnungsgemäß funktioniert, wird ein schneller Reset wieder in den normalen Betrieb zurückversetzt.
Betrieb: Wenn die Kamera eingeschaltet ist, verwenden Sie einen Pin, um die Reset-Taste
einmal zu drücken. Die blauen und roten Kontrollleuchten werden für 5 Sekunden beleuchtet,
dann wird die rote ausgeschaltet, während die blaue blinkt. Jetzt können Sie die Kamera mit
den werkseitigen Standardeinstellungen neu starten.
Page 9
BC186
Mode d'Emploi
I. Aperçu du Produit
1. LED IR
2. Lentille de Caméra
3. Emplacement de la Carte Micro SD
4. Bouton d’Enregistrement
5. Voyant Rouge
6. Voyant Bleu
7. Bouton de Redémarrage
II. Qu'y a-t-il dans la boite
-1 × ampoule
-1 × lecteur de carte
-1 × 8 Go de carte Micro SD (monté sur l'emplacement de la carte Micro SD déjà)
-1 × 20cm Adaptateur d'extension d'ampoule E27
III. Avant de commencer
3.1. SYETEM SETTING
3.1.1. Cliquez sur le lien et téléchargez le fichier "USERSET TOOL".
Http://www.wiseupshop.com/var/downloadfile/BC186%20USERSET%20TOOL.rar
3.1.2. Décompressez le fichier zip que vous avez téléchargé, puis ouvrez-le et localisez .
3.1.3. Ouvrez le programme, puis choisissez le mode d'enregistrement et la résolution désirés.
Vous pouvez également terminer d'autres paramètres pour répondre à vos besoins.
3.1.4. Cliquez sur "Personnaliser l'heure", puis l'horodatage sur les images vidéo sera syn-
chronisé avec votre ordinateur.
3.1.5. Cliquez sur "Enregistrer pour sortir".
3.2. INSTALLER LA CAMÉRA D'AMPOULE
3.2.1. Insérez la carte Micro SD dans la caméra bulbe.
3.2.2. Éteignez l'alimentation et ventile légèrement la caméra de l'ampoule mais fermement
dans la prise.
3.2.3. Une fois que la caméra est bien installée, allumez la lumière.
Page 10
III. Avant de commencer
3.1. SYETEM SETTING
3.1.1. Cliquez sur le lien et téléchargez le fichier "USERSET TOOL".
Http://www.wiseupshop.com/var/downloadfile/BC186%20USERSET%20TOOL.rar
3.1.2. Décompressez le fichier zip que vous avez téléchargé, puis ouvrez-le et localisez .
3.1.3. Ouvrez le programme, puis choisissez le mode d'enregistrement et la résolution désirés.
Vous pouvez également terminer d'autres paramètres pour répondre à vos besoins.
3.1.4. Cliquez sur "Personnaliser l'heure", puis l'horodatage sur les images vidéo sera synchronisé avec votre ordinateur.
3.1.5. Cliquez sur "Enregistrer pour sortir".
3.2. INSTALLER LA CAMÉRA D'AMPOULE
3.2.1. Insérez la carte Micro SD dans la caméra bulbe.
3.2.2. Éteignez l'alimentation et ventile légèrement la caméra de l'ampoule mais fermement
dans la prise.
3.2.3. Une fois que la caméra est bien installée, allumez la lumière.
IV. Opération
4.1. ENREGISTREMENT VIDÉO CONTINU
4.1.1. Assurez-vous d'avoir choisi le mode d'enregistrement "En temps réel" en 3.1. Une fois
que la caméra est allumée, les voyants bleu et rouge s'allument et restent allumés pendant 5
secondes, puis le rouge s'éteint alors que le bleu continuera à clignoter. La caméra démarre
automatiquement l'enregistrement vidéo.
4.1.2. Appuyez une fois sur le Bouton d’Enregistrement pour arrêter l'enregistrement vidéo. Le
témoin lumineux bleu reste allumé, indiquant que la caméra est en mode veille.
4.1.3. Si la caméra est en mode veille sans aucune opération de plus de 30 secondes, les voy-
ants bleu et rouge clignotent une fois et restent allumés pendant 10 secondes, puis le rouge
s'éteint alors que le bleu continuera à clignoter. La caméra va recommencer l'enregistrement
vidéo.
[Note]:
1). Une vidéo sera générée et enregistrée toutes les 30 minutes automatiquement.
2). Résolution vidéo: 640 × 480 Format vidéo: 3GP
3). L'enregistrement en boucle est pris en charge.
4). Chaque vidéo prendra jusqu'à environ 100 Mo d'espace de stockage de la carte Micro SD.
5). Lorsque l'éclairage est inférieur à 150 lux, les LED IR s'allument automatiquement. La distance IR
est de 6 mètres.
6). Si aucune carte Micro SD n'est installée dans la caméra, les voyants lumineux rouge et bleu s'allu-
ment et restent allumés pendant 2 secondes, puis le bleu s'éteint lorsque le rouge continuera à clignot-
er. Toutes les 15 secondes, la caméra vérifie si une carte Micro SD est insérée et que les voyants
rouge et bleu s'allument.
7). La caméra bulbe a une batterie intégrée, qui prend 4 heures pour obtenir une charge complète. La
caméra fonctionnera pendant 2 heures sur une seule charge.
4.2. ENREGISTREMENT VIDEO DE DETECTION DE MOUVEMENT
Page 11
IV. Opération
4.1. ENREGISTREMENT VIDÉO CONTINU
4.1.1. Assurez-vous d'avoir choisi le mode d'enregistrement "En temps réel" en 3.1. Une fois
que la caméra est allumée, les voyants bleu et rouge s'allument et restent allumés pendant 5
secondes, puis le rouge s'éteint alors que le bleu continuera à clignoter. La caméra démarre
automatiquement l'enregistrement vidéo.
4.1.2. Appuyez une fois sur le Bouton d’Enregistrement pour arrêter l'enregistrement vidéo. Le
témoin lumineux bleu reste allumé, indiquant que la caméra est en mode veille.
4.1.3. Si la caméra est en mode veille sans aucune opération de plus de 30 secondes, les voyants bleu et rouge clignotent une fois et restent allumés pendant 10 secondes, puis le rouge
s'éteint alors que le bleu continuera à clignoter. La caméra va recommencer l'enregistrement
vidéo.
[Note]:
1). Une vidéo sera générée et enregistrée toutes les 30 minutes automatiquement.
2). Résolution vidéo: 640 × 480 Format vidéo: 3GP
3). L'enregistrement en boucle est pris en charge.
4). Chaque vidéo prendra jusqu'à environ 100 Mo d'espace de stockage de la carte Micro SD.
5). Lorsque l'éclairage est inférieur à 150 lux, les LED IR s'allument automatiquement. La distance IR
est de 6 mètres.
6). Si aucune carte Micro SD n'est installée dans la caméra, les voyants lumineux rouge et bleu s'allu-
ment et restent allumés pendant 2 secondes, puis le bleu s'éteint lorsque le rouge continuera à clignot-
er. Toutes les 15 secondes, la caméra vérifie si une carte Micro SD est insérée et que les voyants
rouge et bleu s'allument.
7). La caméra bulbe a une batterie intégrée, qui prend 4 heures pour obtenir une charge complète. La
caméra fonctionnera pendant 2 heures sur une seule charge.
4.2. ENREGISTREMENT VIDEO DE DETECTION DE MOUVEMENT
4.2.1. Assurez-vous d'avoir choisi le mode d'enregistrement "Détection de mouvement" dans
3.1. Une fois que la caméra est allumé, les voyants lumineux bleu et rouge s'allument et restent
allumés pendant 5 secondes, puis le rouge s'éteint lorsque le bleu reste allumé. La caméra
entrera en mode d'enregistrement de détection de mouvement.
4.2.2. La caméra enregistre une vidéo de 2 minutes automatiquement lorsque le mouvement
est détecté. Le voyant bleu continuera à clignoter.
4.2.3. Appuyez une fois sur le Bouton d’Enregistrement pour quitter le mode d'enregistrement
de détection de mouvement. Les voyants lumineux rouge et bleu restent allumés, ce qui
indique que la caméra est en mode veille.
4.2.4. Si la caméra est en mode veille sans aucune opération de plus de 30 secondes, les voy-
ants bleu et rouge clignotent une fois et restent allumés pendant 10 secondes, puis le rouge
s'éteint alors que le bleu continuera à clignoter. La caméra a recommencé la détection de mou-
vement.
V. Téléchargement de fichiers vidéo
5.1. Mettez l'appareil hors tension, retirez la carte Micro SD puis insérez-la dans un lecteur de
carte.
5.2. Insérez le lecteur de carte dans un port USB approprié pour PC.
5.3. La carte Micro SD sera reconnue comme un lecteur de disque amovible.
5.4. Tous les fichiers peuvent être consultés dans le lecteur.
VI. Réinitialisation
Si, pour quelque raison que ce soit, l'appareil cesse de répondre ou ne fonctionne pas cor-
rectement, une réinitialisation rapide le rétablira à son fonctionnement normal.
Fonctionnement: Lorsque la caméra est sous tension, utilisez une broche pour appuyer une
fois sur le bouton de réinitialisation; Les voyants bleu et rouge s'allument pendant 5 secondes,
puis le rouge s'éteint alors que le bleu continuera à clignoter. Maintenant, vous pouvez
redémarrer la caméra avec les paramètres par défaut.
Page 12
4.2.1. Assurez-vous d'avoir choisi le mode d'enregistrement "Détection de mouvement" dans
3.1. Une fois que la caméra est allumé, les voyants lumineux bleu et rouge s'allument et restent
allumés pendant 5 secondes, puis le rouge s'éteint lorsque le bleu reste allumé. La caméra
entrera en mode d'enregistrement de détection de mouvement.
4.2.2. La caméra enregistre une vidéo de 2 minutes automatiquement lorsque le mouvement
est détecté. Le voyant bleu continuera à clignoter.
4.2.3. Appuyez une fois sur le Bouton d’Enregistrement pour quitter le mode d'enregistrement
de détection de mouvement. Les voyants lumineux rouge et bleu restent allumés, ce qui
indique que la caméra est en mode veille.
4.2.4. Si la caméra est en mode veille sans aucune opération de plus de 30 secondes, les voyants bleu et rouge clignotent une fois et restent allumés pendant 10 secondes, puis le rouge
s'éteint alors que le bleu continuera à clignoter. La caméra a recommencé la détection de mouvement.
V. Téléchargement de fichiers vidéo
5.1. Mettez l'appareil hors tension, retirez la carte Micro SD puis insérez-la dans un lecteur de
carte.
5.2. Insérez le lecteur de carte dans un port USB approprié pour PC.
5.3. La carte Micro SD sera reconnue comme un lecteur de disque amovible.
5.4. Tous les fichiers peuvent être consultés dans le lecteur.
VI. Réinitialisation
Si, pour quelque raison que ce soit, l'appareil cesse de répondre ou ne fonctionne pas correctement, une réinitialisation rapide le rétablira à son fonctionnement normal.
Fonctionnement: Lorsque la caméra est sous tension, utilisez une broche pour appuyer une
fois sur le bouton de réinitialisation; Les voyants bleu et rouge s'allument pendant 5 secondes,
puis le rouge s'éteint alors que le bleu continuera à clignoter. Maintenant, vous pouvez
redémarrer la caméra avec les paramètres par défaut.
Page 13
BC186
Guida Utente
I. Panoramica del Prodotto
1. LED IR
2. Obiettivo della fotocamera
3. Slot Micro SD Card
4. Pulsante di registrazione
5. Luce indicatore rosso
6. Luce indicatore blu
7. Pulsante di riavvio
II. Cosa c'è nella scatola
-1 × Lampadina
-1 × lettore di schede
-1 × 8GB Micro SD Card (inserito nello slot Micro SD card già)
-1 × 20cm E27 Adattatore di estensione della lampadina
III. Prima che inizi
3.1. IMPOSTAZIONE SINEMA
3.1.1. Fare clic sul collegamento e scaricare il file "TOOL UTENTE".
http://www.wiseupshop.com/var/downloadfile/BC186%20USERSET%20TOOL.rar
3.1.2. Decomprimere il file di zip che hai scaricato, quindi aprirlo e individuare .
3.1.3. Aprire il programma, quindi scegliere la modalità di registrazione desiderata e la risoluzi-
one. È inoltre possibile completare altre impostazioni per soddisfare le vostre necessità.
3.1.4. Fai clic su "Personalizza tempo", quindi la data del timbro di data e di data sul video
sarà sincronizzata con il computer.
3.1.5. Fai clic su "Salva per uscire".
3.2. INSTALLA LA CAMERA DELLA BULB
3.2.1. Inserire la scheda Micro SD nella fotocamera a bulbo.
3.2.2. Spegnere l'alimentazione e avvitare la fotocamera a lampadina leggera ma saldamente
nella presa.
3.2.3. Una volta installata la fotocamera a bulbo, accendere la luce.
Page 14
III. Prima che inizi
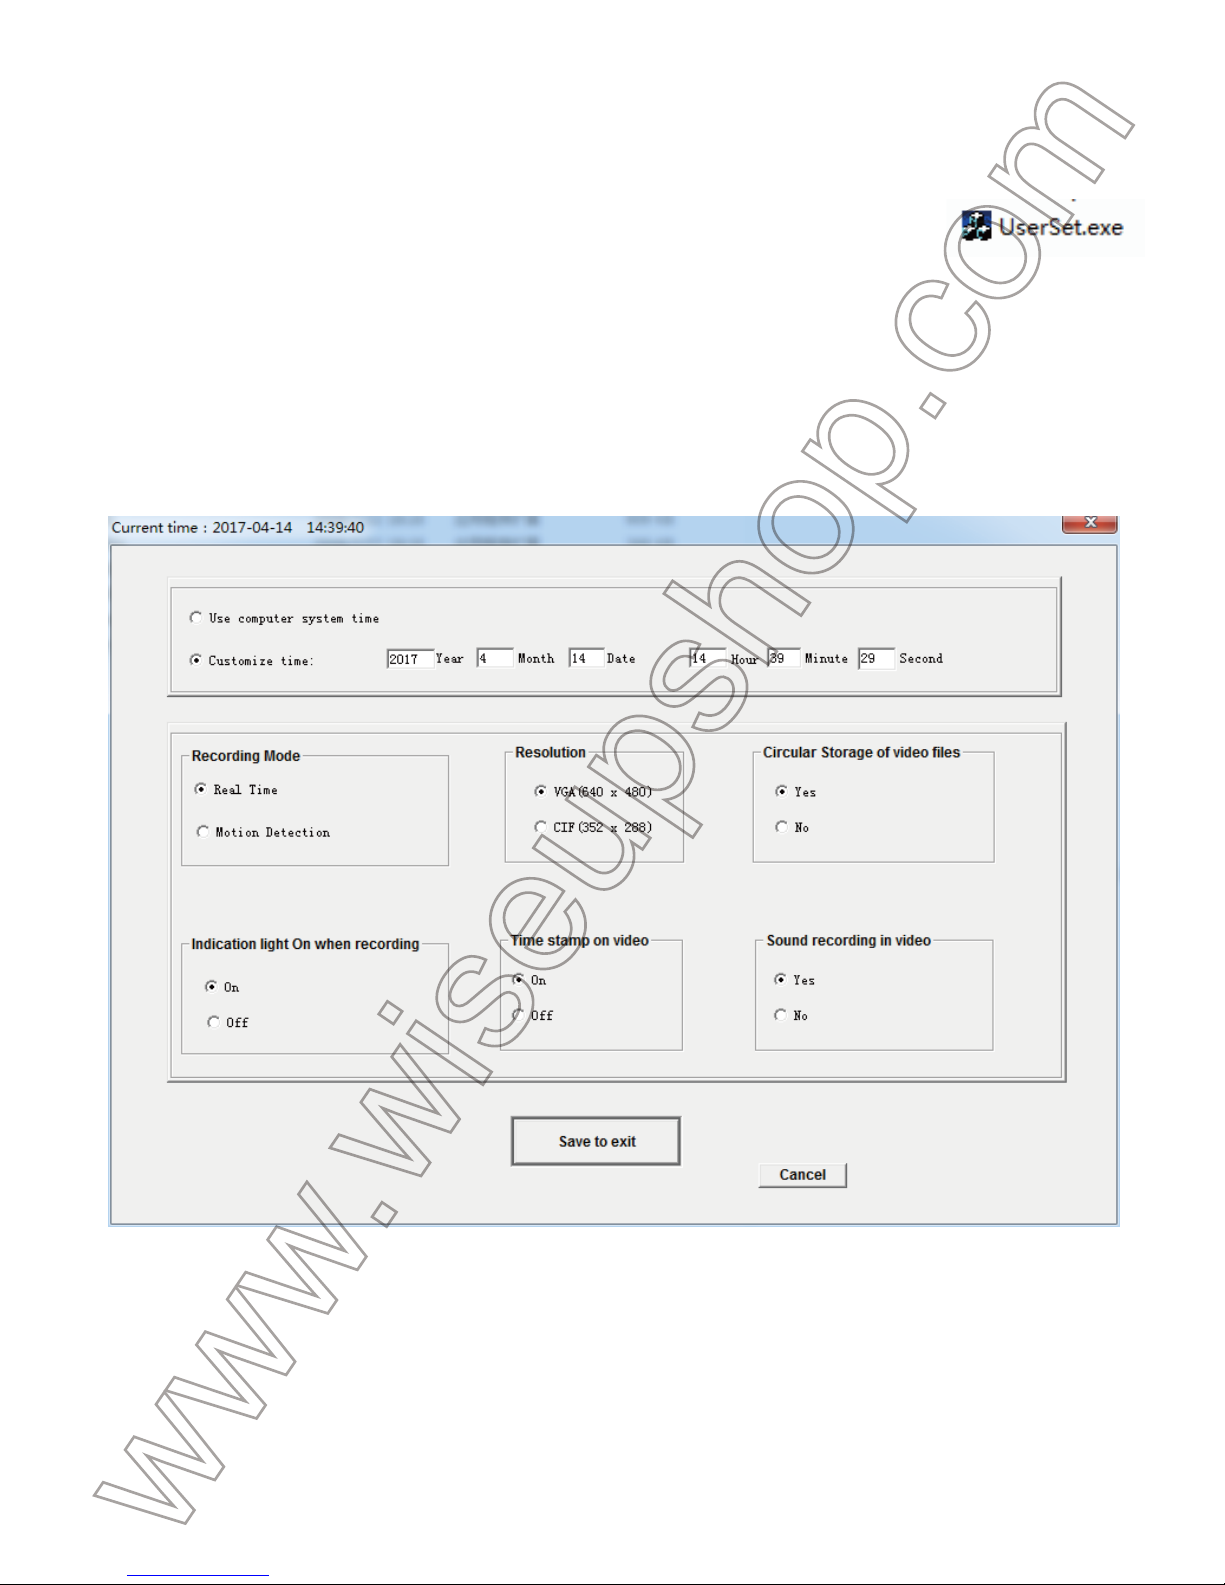
3.1. IMPOSTAZIONE SINEMA
3.1.1. Fare clic sul collegamento e scaricare il file "TOOL UTENTE".
http://www.wiseupshop.com/var/downloadfile/BC186%20USERSET%20TOOL.rar
3.1.2. Decomprimere il file di zip che hai scaricato, quindi aprirlo e individuare .
3.1.3. Aprire il programma, quindi scegliere la modalità di registrazione desiderata e la risoluzione. È inoltre possibile completare altre impostazioni per soddisfare le vostre necessità.
3.1.4. Fai clic su "Personalizza tempo", quindi la data del timbro di data e di data sul video
sarà sincronizzata con il computer.
3.1.5. Fai clic su "Salva per uscire".
3.2. INSTALLA LA CAMERA DELLA BULB
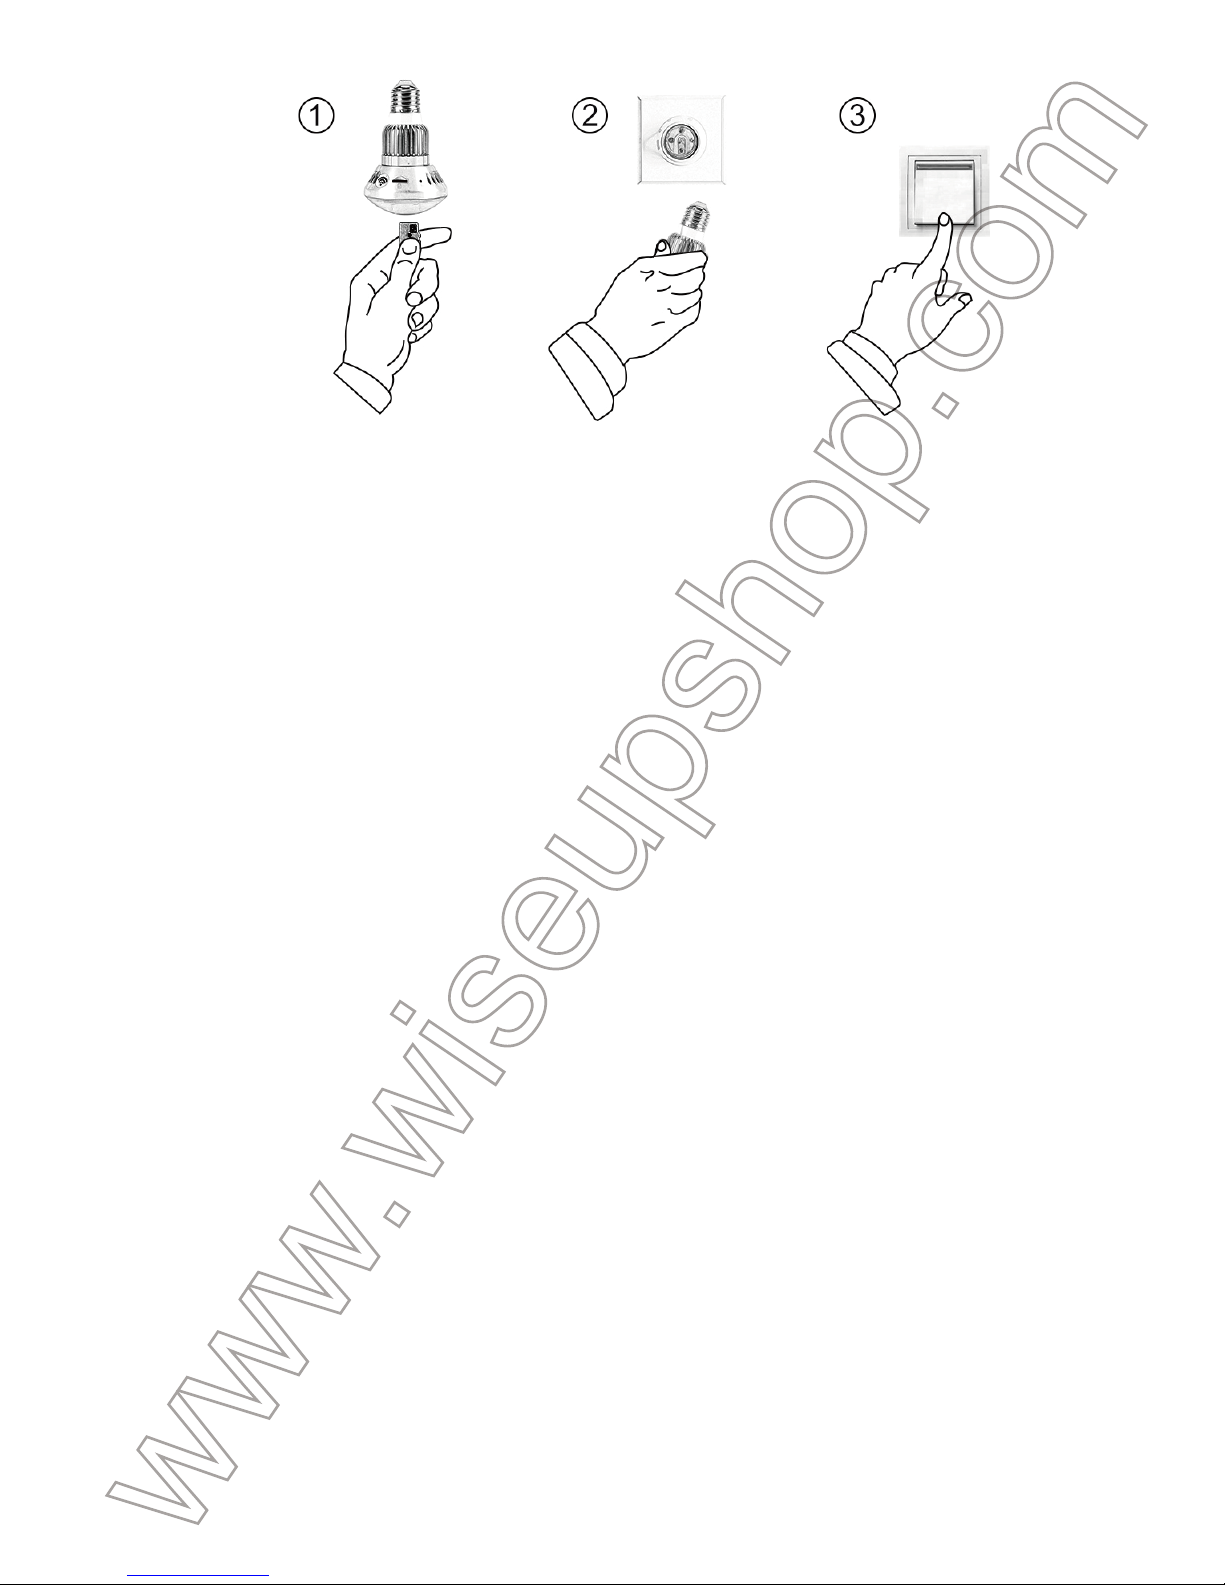
3.2.1. Inserire la scheda Micro SD nella fotocamera a bulbo.
3.2.2. Spegnere l'alimentazione e avvitare la fotocamera a lampadina leggera ma saldamente
nella presa.
3.2.3. Una volta installata la fotocamera a bulbo, accendere la luce.
IV. Operazione
4.1. REGISTRAZIONE VIDEO CONTINUA
4.1.1. Assicurarsi di aver scelto la modalità di registrazione "Real Time" in 3.1. Una volta che
la fotocamera a bulbo è accesa, le spie luminose blu e rosse si accendono e rimangono illumi-
nate per 5 secondi, poi la spia rossa si spegne mentre quella blu continua a lampeggiare. La
videocamera inizia automaticamente la registrazione video.
4.1.2. Premere una volta il pulsante di registrazione per interrompere la registrazione video. La
spia blu rimarrà accesa, indicando che la fotocamera torna in modalità standby.
4.1.3. Se la fotocamera è in modalità di attesa senza alcuna operazione superiore a 30 secon-
di, le spie rosse blu e rosse lampeggiano una volta e rimangono illuminate per 10 secondi,
mentre quella rossa si spegne mentre quella blu continua a lampeggiare. La fotocamera ripren-
derà la registrazione video.
[Nota]:
1). Un video clip verrà generato e salvato ogni 30 minuti automaticamente.
2). Risoluzione video: 640 × 480 Formato video: 3GP
3). La registrazione Loop è supportata.
4). Ogni clip video richiederà fino a circa 100 MB di spazio di archiviazione della scheda Micro SD.
5). Quando l'illuminazione è inferiore a 150 lux, i LED IR si accendono automaticamente. La distanza
IR è di 6 metri.
6). Se nella fotocamera non è inserita una scheda Micro SD, le spie rosse e blu verranno accese e
rimangono illuminate per 2 secondi, poi l'azzurro si spegne mentre il rosso lampeggerà. Ogni 15 secon-
di, la fotocamera verifica se è inserita una scheda Micro SD e le luci di segnalazione rosse e blu si riac-
cendono.
7). La fotocamera a bulbo ha una batteria incorporata, che richiede 4 ore per ottenere una carica com-
pleta. La fotocamera funziona per 2 ore su una sola carica.
4.2. REGISTRAZIONE VIDEO DI RILEVAMENTO MOVIMENTO
Page 15
IV. Operazione
4.1. REGISTRAZIONE VIDEO CONTINUA
4.1.1. Assicurarsi di aver scelto la modalità di registrazione "Real Time" in 3.1. Una volta che
la fotocamera a bulbo è accesa, le spie luminose blu e rosse si accendono e rimangono illuminate per 5 secondi, poi la spia rossa si spegne mentre quella blu continua a lampeggiare. La
videocamera inizia automaticamente la registrazione video.
4.1.2. Premere una volta il pulsante di registrazione per interrompere la registrazione video. La
spia blu rimarrà accesa, indicando che la fotocamera torna in modalità standby.
4.1.3. Se la fotocamera è in modalità di attesa senza alcuna operazione superiore a 30 secondi, le spie rosse blu e rosse lampeggiano una volta e rimangono illuminate per 10 secondi,
mentre quella rossa si spegne mentre quella blu continua a lampeggiare. La fotocamera riprenderà la registrazione video.
[Nota]:
1). Un video clip verrà generato e salvato ogni 30 minuti automaticamente.
2). Risoluzione video: 640 × 480 Formato video: 3GP
3). La registrazione Loop è supportata.
4). Ogni clip video richiederà fino a circa 100 MB di spazio di archiviazione della scheda Micro SD.
5). Quando l'illuminazione è inferiore a 150 lux, i LED IR si accendono automaticamente. La distanza
IR è di 6 metri.
6). Se nella fotocamera non è inserita una scheda Micro SD, le spie rosse e blu verranno accese e
rimangono illuminate per 2 secondi, poi l'azzurro si spegne mentre il rosso lampeggerà. Ogni 15 secon-
di, la fotocamera verifica se è inserita una scheda Micro SD e le luci di segnalazione rosse e blu si riac-
cendono.
7). La fotocamera a bulbo ha una batteria incorporata, che richiede 4 ore per ottenere una carica com-
pleta. La fotocamera funziona per 2 ore su una sola carica.
4.2. REGISTRAZIONE VIDEO DI RILEVAMENTO MOVIMENTO
4.2.1. Assicurarsi di aver scelto la modalità di registrazione "Motion Detection" in 3.1. Una
volta attivata la fotocamera a bulbo, entrambe le luci blu e rosse si accendono e rimangono
illuminate per 5 secondi, poi quella rossa si spegne mentre quella blu rimarrà illuminata. La
fotocamera entrerà in modalità di registrazione rilevata in movimento.
4.2.2. La videocamera registra automaticamente un video di 2 minuti quando viene rilevato il
movimento. La spia luminosa blu continua a lampeggiare.
4.2.3. Premere una volta il pulsante di registrazione per uscire dalla modalità di registrazione
del rilevamento del movimento. Le spie rosse e blu rimarranno illuminate, indicando che la foto-
camera torna in modalità standby.
4.2.4. Se la fotocamera è in modalità di attesa senza alcuna operazione superiore a 30 secon-
di, le spie rosse blu e rosse lampeggiano una volta e rimangono illuminate per 10 secondi,
mentre quella rossa si spegne mentre quella blu continua a lampeggiare. La fotocamera ha
ripreso la registrazione di rilevazione del movimento.
V. Caricamenti dei file video
5.1. Spegnere la fotocamera, rimuovere la scheda Micro SD quindi inserirla in un lettore di
schede.
5.2. Inserire il lettore di schede in una porta USB corretta del computer.
5.3. La scheda Micro SD sarà riconosciuta come un'unità disco rimovibile.
5.4. È possibile accedere a tutti i file nell'unità.
VI. Ripristino
Se per qualsiasi ragione la fotocamera smette di rispondere o non funziona correttamente, un
reset rapido lo ripristinerà al normale funzionamento.
Funzionamento: Quando la fotocamera è accesa, utilizzare un perno per premere una volta il
pulsante di ripristino; Le spie luminose blu e rosse verranno illuminate per 5 secondi, poi quella
rossa si spegne mentre quella blu continua a lampeggiare. Ora è possibile riavviare la fotocam-
era con le impostazioni predefinite di fabbrica.
Page 16

4.2.1. Assicurarsi di aver scelto la modalità di registrazione "Motion Detection" in 3.1. Una
volta attivata la fotocamera a bulbo, entrambe le luci blu e rosse si accendono e rimangono
illuminate per 5 secondi, poi quella rossa si spegne mentre quella blu rimarrà illuminata. La
fotocamera entrerà in modalità di registrazione rilevata in movimento.
4.2.2. La videocamera registra automaticamente un video di 2 minuti quando viene rilevato il
movimento. La spia luminosa blu continua a lampeggiare.
4.2.3. Premere una volta il pulsante di registrazione per uscire dalla modalità di registrazione
del rilevamento del movimento. Le spie rosse e blu rimarranno illuminate, indicando che la fotocamera torna in modalità standby.
4.2.4. Se la fotocamera è in modalità di attesa senza alcuna operazione superiore a 30 secondi, le spie rosse blu e rosse lampeggiano una volta e rimangono illuminate per 10 secondi,
mentre quella rossa si spegne mentre quella blu continua a lampeggiare. La fotocamera ha
ripreso la registrazione di rilevazione del movimento.
V. Caricamenti dei file video
5.1. Spegnere la fotocamera, rimuovere la scheda Micro SD quindi inserirla in un lettore di
schede.
5.2. Inserire il lettore di schede in una porta USB corretta del computer.
5.3. La scheda Micro SD sarà riconosciuta come un'unità disco rimovibile.
5.4. È possibile accedere a tutti i file nell'unità.
VI. Ripristino
Se per qualsiasi ragione la fotocamera smette di rispondere o non funziona correttamente, un
reset rapido lo ripristinerà al normale funzionamento.
Funzionamento: Quando la fotocamera è accesa, utilizzare un perno per premere una volta il
pulsante di ripristino; Le spie luminose blu e rosse verranno illuminate per 5 secondi, poi quella
rossa si spegne mentre quella blu continua a lampeggiare. Ora è possibile riavviare la fotocamera con le impostazioni predefinite di fabbrica.
Page 17
BC186
Guía del Usuario
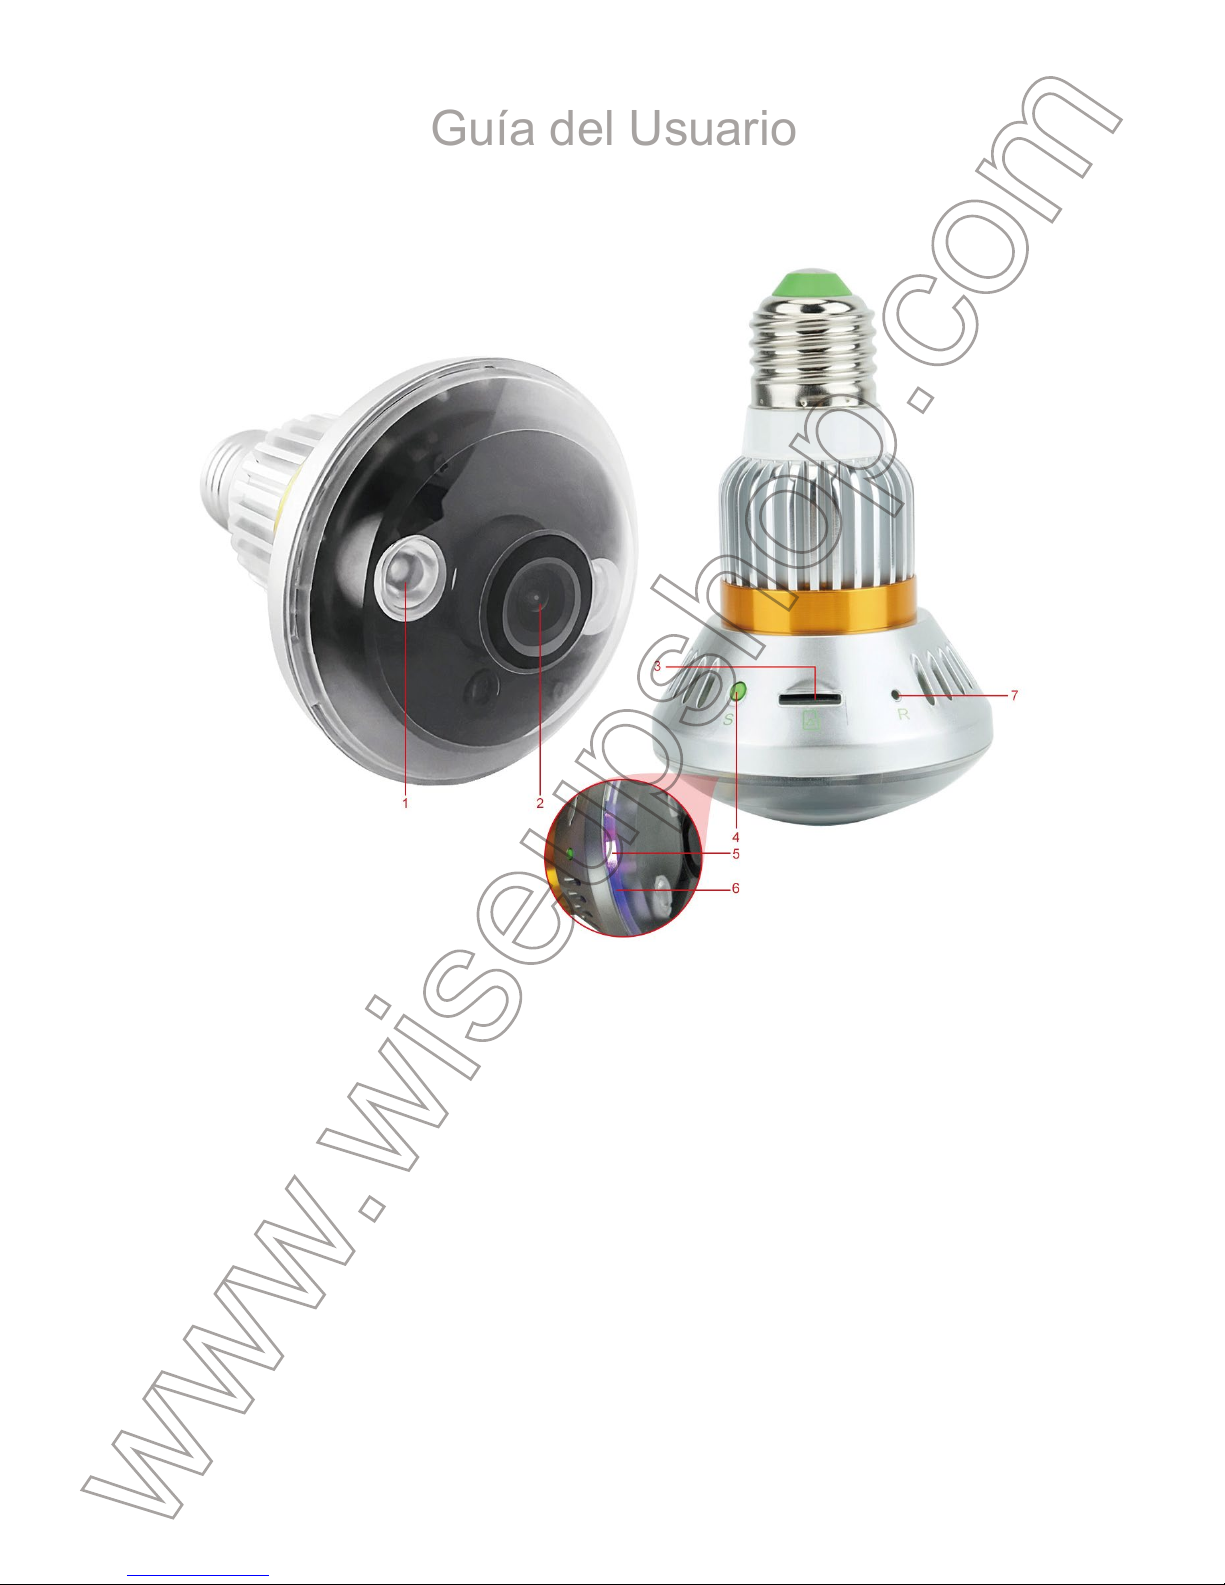
I. Descripción del Producto
1. LEDs IR
2. Lente de la cámara
3. Ranura para Tarjetas micro SD
4. Botón de Grabación de Vídeo
5. Indicadora Rojo
6. Indicadora Azul
7. Botón de Reinicio
II. Qué hay en la caja
-1 × Cámara de la Bombilla
-1 × Lector de Tarjetas
-1 × 8GB Micro SD tarjeta (ya montada en la ranura para tarjetas Micro SD)
-1 × 20cm E27 Bulbo Adaptador de Extensión
III. Antes de Iniciar la Cámara
3.1. AJUSTE DEL SISTEMA
3.1.1. Haga clic en el enlace y descargue el archivo "USERSET TOOL".
Http://www.wiseupshop.com/var/downloadfile/BC186%20USERSET%20TOOL.rar
3.1.2. Descomprima el archivo zip que descargó, luego abra y localice .
3.1.3. Abra el programa y, a continuación, elija el modo de grabación y la resolución deseados.
También puede terminar otros ajustes para satisfacer sus necesidades.
3.1.4. Haga clic en "Personalizar el tiempo", a continuación, la fecha y hora de la secuencia
de vídeo se sincronizará con su computadora.
3.1.5. Haga clic en "Guardar para salir".
3.2. INSTALE LA BOMBILLA
3.2.1. Inserte la tarjeta Micro SD en la cámara de la bombilla.
3.2.2. Apague la alimentación y atornille la cámara de la bombilla ligera pero firmemente en el
zócalo.
3.2.3. Una vez que la cámara del bulbo esté bien instalada, encienda la luz.
Page 18
III. Antes de Iniciar la Cámara
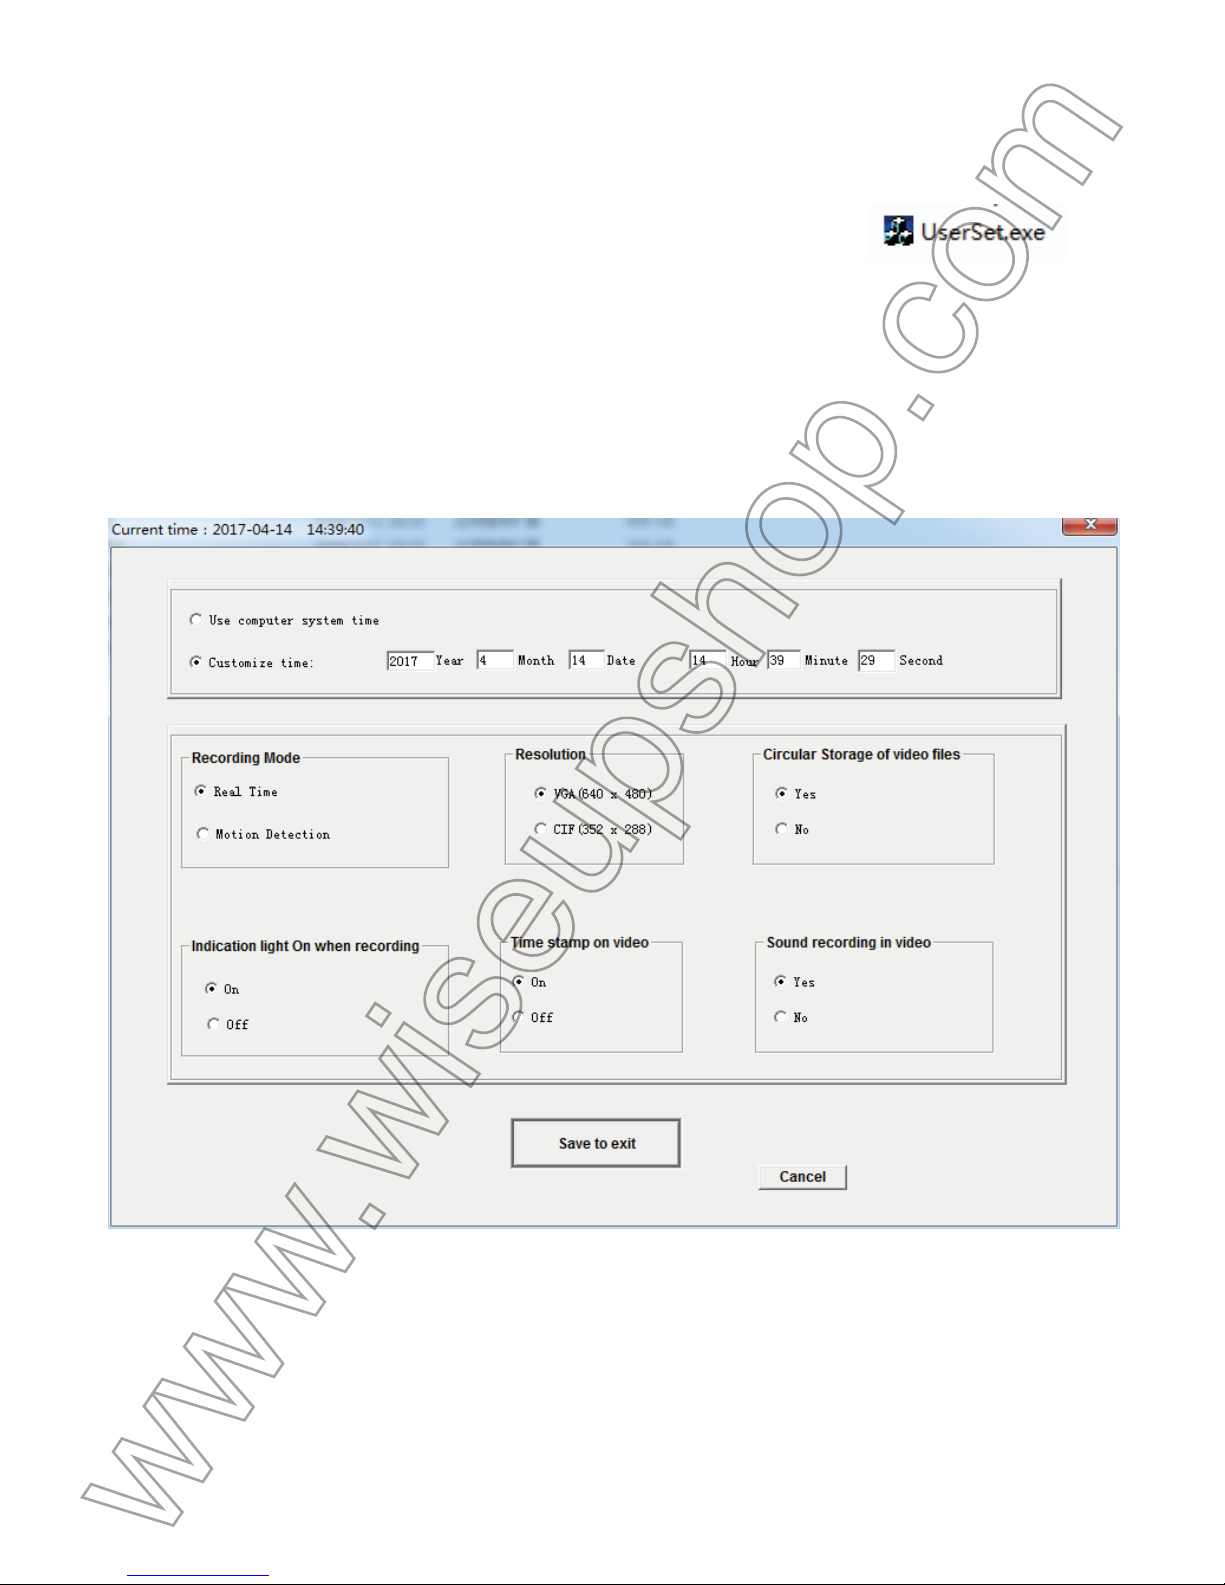
3.1. AJUSTE DEL SISTEMA
3.1.1. Haga clic en el enlace y descargue el archivo "USERSET TOOL".
Http://www.wiseupshop.com/var/downloadfile/BC186%20USERSET%20TOOL.rar
3.1.2. Descomprima el archivo zip que descargó, luego abra y localice .
3.1.3. Abra el programa y, a continuación, elija el modo de grabación y la resolución deseados.
También puede terminar otros ajustes para satisfacer sus necesidades.
3.1.4. Haga clic en "Personalizar el tiempo", a continuación, la fecha y hora de la secuencia
de vídeo se sincronizará con su computadora.
3.1.5. Haga clic en "Guardar para salir".
3.2. INSTALE LA BOMBILLA
3.2.1. Inserte la tarjeta Micro SD en la cámara de la bombilla.
3.2.2. Apague la alimentación y atornille la cámara de la bombilla ligera pero firmemente en el
zócalo.
3.2.3. Una vez que la cámara del bulbo esté bien instalada, encienda la luz.
IV. Operación
4.1. GRABACIÓN DE VIDEO CONTINUO
4.1.1. Asegúrese de haber elegido el modo de grabación "Real Time" en 3.1. Una vez que se
enciende la cámara de la bombilla, las luces indicadoras azul y roja se encienden y perman-
ecen encendidas durante 5 segundos, luego la roja se apagará mientras que la azul seguirá
parpadeando. La cámara iniciará la grabación de vídeo automáticamente.
4.1.3. Pulse el botón de grabación una vez para detener la grabación de vídeo. La luz indicado-
ra azul permanecerá iluminada, indicando que la cámara vuelve al modo de espera.
4.1.3. Si la cámara está en modo de espera sin ninguna operación durante más de 30 segun-
dos, las luces indicadoras azul y roja parpadearán una vez y permanecerán iluminadas duran-
te 10 segundos, luego la roja se apagará mientras que la azul seguirá parpadeando. La
cámara comenzará de nuevo la grabación de vídeo.
[Nota]:
1). Se generará un video clip y se guardará cada 30 minutos automáticamente.
2). Resolución de video: 640 × 480 Formato de video: 3GP
3). Se admite la grabación en bucle.
4). Cada clip de vídeo tendrá un espacio de almacenamiento de hasta 100 MB de la tarjeta Micro SD.
5). Cuando la iluminación es inferior a 150 lux, los LED IR se encenderán automáticamente. La distan-
cia IR es de 6 metros.
6). Si no hay ninguna tarjeta Micro SD en la cámara, las luces indicadoras roja y azul se encenderán
y permanecerán iluminadas durante 2 segundos, luego la azul se apagará mientras que la roja seguirá
parpadeando. Cada 15 segundos, la cámara comprobará si hay una tarjeta Micro SD insertada y las
luces indicadoras roja y azul se encenderán de nuevo.
7). La cámara de la bombilla tiene una batería incorporada, que tarda 4 horas para obtener una carga
completa. La cámara funcionará durante 2 horas con una sola carga.
Page 19
IV. Operación
4.1. GRABACIÓN DE VIDEO CONTINUO
4.1.1. Asegúrese de haber elegido el modo de grabación "Real Time" en 3.1. Una vez que se
enciende la cámara de la bombilla, las luces indicadoras azul y roja se encienden y permanecen encendidas durante 5 segundos, luego la roja se apagará mientras que la azul seguirá
parpadeando. La cámara iniciará la grabación de vídeo automáticamente.
4.1.3. Pulse el botón de grabación una vez para detener la grabación de vídeo. La luz indicadora azul permanecerá iluminada, indicando que la cámara vuelve al modo de espera.
4.1.3. Si la cámara está en modo de espera sin ninguna operación durante más de 30 segundos, las luces indicadoras azul y roja parpadearán una vez y permanecerán iluminadas durante 10 segundos, luego la roja se apagará mientras que la azul seguirá parpadeando. La
cámara comenzará de nuevo la grabación de vídeo.
[Nota]:
1). Se generará un video clip y se guardará cada 30 minutos automáticamente.
2). Resolución de video: 640 × 480 Formato de video: 3GP
3). Se admite la grabación en bucle.
4). Cada clip de vídeo tendrá un espacio de almacenamiento de hasta 100 MB de la tarjeta Micro SD.
5). Cuando la iluminación es inferior a 150 lux, los LED IR se encenderán automáticamente. La distan-
cia IR es de 6 metros.
6). Si no hay ninguna tarjeta Micro SD en la cámara, las luces indicadoras roja y azul se encenderán
y permanecerán iluminadas durante 2 segundos, luego la azul se apagará mientras que la roja seguirá
parpadeando. Cada 15 segundos, la cámara comprobará si hay una tarjeta Micro SD insertada y las
luces indicadoras roja y azul se encenderán de nuevo.
7). La cámara de la bombilla tiene una batería incorporada, que tarda 4 horas para obtener una carga
completa. La cámara funcionará durante 2 horas con una sola carga.
4.2. DETECCIÓN DE MOVIMIENTO GRABACIÓN DE VÍDEO
4.2.1. Asegúrese de haber elegido el modo de grabación "Detección de movimiento" en 3.1.
Una vez que se enciende la cámara de la bombilla, las luces indicadoras azul y roja se encend-
erán y permanecerán iluminadas durante 5 segundos, luego la roja se apagará mientras que
la azul permanecerá iluminada. La cámara entrará en el modo de grabación de detección de
movimiento.
4.2.2. La cámara graba un video de 2 minutos automáticamente cuando se detecta movimien-
to. La luz indicadora azul seguirá parpadeando.
4.2.3. Pulse el botón de grabación de vídeo una vez para salir del modo de grabación de detec-
ción de movimiento. Las luces indicadoras roja y azul permanecerán iluminadas, indicando
que la cámara vuelve al modo de espera.
4.2.4. Si la cámara está en modo de espera sin ninguna operación durante más de 30 segun-
dos, las luces indicadoras azul y roja parpadearán una vez y permanecerán iluminadas duran-
te 10 segundos, luego la roja se apagará mientras que la azul seguirá parpadeando. La
cámara ha comenzado de nuevo la grabación de detección de movimiento.
V. Cargas de archivos de vídeo
5.1. Apague la cámara, retire la tarjeta Micro SD y luego insértela en un lector de tarjetas.
5.2. Inserte el lector de tarjetas en un puerto USB adecuado de la computadora de la PC.
5.3. La tarjeta Micro SD será reconocida como una unidad de disco extraíble.
5.4. Se puede acceder a todos los archivos en la unidad.
VI. Restablecimiento
Si por alguna razón, la cámara deja de responder o no funciona correctamente, un restablec-
imiento rápido le restablecerá el funcionamiento normal.
Funcionamiento: Cuando la cámara está encendida, utilice un pin para presionar el botón de
reinicio una vez; Las luces indicadoras azul y roja se iluminarán durante 5 segundos, luego la
roja se apagará mientras que la azul seguirá parpadeando. Ahora puede reiniciar la cámara
con los ajustes predeterminados de fábrica.
Page 20
4.2. DETECCIÓN DE MOVIMIENTO GRABACIÓN DE VÍDEO
4.2.1. Asegúrese de haber elegido el modo de grabación "Detección de movimiento" en 3.1.
Una vez que se enciende la cámara de la bombilla, las luces indicadoras azul y roja se encenderán y permanecerán iluminadas durante 5 segundos, luego la roja se apagará mientras que
la azul permanecerá iluminada. La cámara entrará en el modo de grabación de detección de
movimiento.
4.2.2. La cámara graba un video de 2 minutos automáticamente cuando se detecta movimiento. La luz indicadora azul seguirá parpadeando.
4.2.3. Pulse el botón de grabación de vídeo una vez para salir del modo de grabación de detección de movimiento. Las luces indicadoras roja y azul permanecerán iluminadas, indicando
que la cámara vuelve al modo de espera.
4.2.4. Si la cámara está en modo de espera sin ninguna operación durante más de 30 segundos, las luces indicadoras azul y roja parpadearán una vez y permanecerán iluminadas durante 10 segundos, luego la roja se apagará mientras que la azul seguirá parpadeando. La
cámara ha comenzado de nuevo la grabación de detección de movimiento.
V. Cargas de archivos de vídeo
5.1. Apague la cámara, retire la tarjeta Micro SD y luego insértela en un lector de tarjetas.
5.2. Inserte el lector de tarjetas en un puerto USB adecuado de la computadora de la PC.
5.3. La tarjeta Micro SD será reconocida como una unidad de disco extraíble.
5.4. Se puede acceder a todos los archivos en la unidad.
VI. Restablecimiento
Si por alguna razón, la cámara deja de responder o no funciona correctamente, un restablecimiento rápido le restablecerá el funcionamiento normal.
Funcionamiento: Cuando la cámara está encendida, utilice un pin para presionar el botón de
reinicio una vez; Las luces indicadoras azul y roja se iluminarán durante 5 segundos, luego la
roja se apagará mientras que la azul seguirá parpadeando. Ahora puede reiniciar la cámara
con los ajustes predeterminados de fábrica.
Page 21
BC186
ユーザーガイド
I.製品の概要
1.暗視LED
2.カメラのレンズ
3.マイクロSDカードスロット
4.録音ボタン
5.赤いインジケータライト
6.ブルーインジケータライト
7.再起動ボタン
II.ボックスの内容
-1×電球型カメラ
-1×カードリーダー
-1×8GBのマイクロSDカード(すでにMicroSDカードスロットに装着済み)
-1×20cmE27電球延長アダプター
III.あなたが始める前に
3.1.システムの設定
3.1.1.リンクをクリックし、「USERSETTOOL」ファイルをダウンロードします。
http://www.wiseupshop.com/var/downloadfile/BC186%20USERSET%20TOOL.rar
3.1.2.ダウンロードしたzipファイルを解凍し、開いて見つけます。
3.1.3.プログラムを開き、目的の録画モードと解像度を選択します。また、必要に応じて他の設定を
完了することもできます。
3.1.4. [カスタマイズ]をクリックすると、ビデオフッテージの時刻と日付がコンピュータと同期され
ます。
3.1.5.[保 存して終了 ] をクリックします。
3.2.カメラをインストールする
3.2.1.MicroSDカードを電球カメラに挿入します。
3.2.2.電源を切り、電球カメラをソケットに軽くてしっかりとねじ込みます。
3.2.3.電球カメラがうまくインストールされたら、ライトのスイッチを入れます。
Page 22
III.あなたが始める前に
3.1.システムの設定
3.1.1.リンクをクリックし、「USERSETTOOL」ファイルをダウンロードします。
http://www.wiseupshop.com/var/downloadfile/BC186%20USERSET%20TOOL.rar
3.1.2.ダウンロードしたzipファイルを解凍し、開いて見つけます。
3.1.3.プログラムを開き、目的の録画モードと解像度を選択します。また、必要に応じて他の設定を
完了することもできます。
3.1.4. [カスタマイズ]をクリックすると、ビデオフッテージの時刻と日付がコンピュータと同期され
ます。
3.1.5.[保 存して終了 ] をクリックします。
3.2.カメラをインストールする
3.2.1.MicroSDカードを電球カメラに挿入します。
3.2.2.電源を切り、電球カメラをソケットに軽くてしっかりとねじ込みます。
3.2.3.電球カメラがうまくインストールされたら、ライトのスイッチを入れます。
IV.操作
4.1.コンティニュアスビデオレコーディング
4.1.1. 3.1の「リアルタイム」レコーディングモードを選択してください。電球カメラの電源を入れる
と、青色と赤色の両方のインジケータライトが点灯し、5秒間点灯したままにしておくと、赤色のラ
ンプは消灯し、赤色のランプは点滅し続けます。カメラは自動的に録画を開始します。
4.1.2. 録画ボタンを1回押して録画を停止します。青いインジケータランプが点灯したままになり、
カメラがスタンバイモードに戻ったことを示します。
4.1.3. 30秒以上何も操作しないでスタンバイ状態にすると、青色と赤色の両方のインジケータラ
イトが一度点滅し、10秒間点灯したままにしておくと、赤色のインジケータライトは消灯し、青色の
インジケータライトは点滅し続けます。カメラが再び録画を開始します。
[注意]:
1).ビデオクリップが自動的に生成され、30分ごとに自動的に保存されます。
2).ビデオ解像度:640×480ビデオフォーマット:3GP
3).ループ録音がサポートされています。
4).各ビデオクリップは、MicroSDカードの最大約100MBの記憶領域を占有します。
5). イルミネーションが150ルクス以下になると、IR LEDが自動的にオンになります。赤外線距離は6メート
ルです。
6). カメラにMicro SDカードが装着されていない場合は、赤と青の両方のインジケータランプが点灯し、2
秒間点灯したままにしておくと、青色のLEDが点滅している間は青色のLEDが消灯します。 15秒ごとに、カ
メラはMicro SDカードが挿入されているかどうかをチェックし、赤と青の両方のインジケータが再び点灯
します。
7). 電球カメラにはバッテリーが内蔵されており、フル充電に4時間かかります。カメラは1回の充電で2時
間働きます。
4.2.動き検出ビデオ記録
Page 23
IV.操作
4.1.コンティニュアスビデオレコーディング
4.1.1. 3.1の「リアルタイム」レコーディングモードを選択してください。電球カメラの電源を入れる
と、青色と赤色の両方のインジケータライトが点灯し、5秒間点灯したままにしておくと、赤色のラ
ンプは消灯し、赤色のランプは点滅し続けます。カメラは自動的に録画を開始します。
4.1.2. 録画ボタンを1回押して録画を停止します。青いインジケータランプが点灯したままになり、
カメラがスタンバイモードに戻ったことを示します。
4.1.3. 30秒以上何も操作しないでスタンバイ状態にすると、青色と赤色の両方のインジケータラ
イトが一度点滅し、10秒間点灯したままにしておくと、赤色のインジケータライトは消灯し、青色の
インジケータライトは点滅し続けます。カメラが再び録画を開始します。
[注意]:
1).ビデオクリップが自動的に生成され、30分ごとに自動的に保存されます。
2).ビデオ解像度:640×480ビデオフォーマット:3GP
3).ループ録音がサポートされています。
4).各ビデオクリップは、MicroSDカードの最大約100MBの記憶領域を占有します。
5). イルミネーションが150ルクス以下になると、IR LEDが自動的にオンになります。赤外線距離は6メート
ルです。
6). カメラにMicro SDカードが装着されていない場合は、赤と青の両方のインジケータランプが点灯し、2
秒間点灯したままにしておくと、青色のLEDが点滅している間は青色のLEDが消灯します。 15秒ごとに、カ
メラはMicro SDカードが挿入されているかどうかをチェックし、赤と青の両方のインジケータが再び点灯
します。
7). 電球カメラにはバッテリーが内蔵されており、フル充電に4時間かかります。カメラは1回の充電で2時
間働きます。
4.2.動き検出ビデオ記録
4.2.1. 3.1の「動き検出」記録モードを選択してください。電球カメラの電源を入れると、青色と赤色
の両方のインジケータランプが点灯し、5秒間点灯したままにしておくと、赤いランプは消灯し、赤
色のランプは消灯します。カメラは動き検出記録モードに入ります。
4.2.2. 動きが検出されると、カメラは自動的に2分のビデオを記録します。青のインジケータランプ
が点滅し続けます。
4.2.3. 録画ボタンを1回押すと、モーション検知録画モードを終了します。赤と青の両方のインジケ
ータランプが点灯したままになり、カメラがスタンバイモードに戻っていることを示します。
4.2.4.30秒以上何も操作しないでスタンバイ状態にすると、青色と赤色の両方のインジケータライ
トが一度点滅し、10秒間点灯したままにしておくと、赤色のインジケータライトは消灯し、青色のイ
ンジケータライトは点滅し続けます。カメラが動き検出録画を再開しました。
V . ビデ オファイル の アップ ロ ード
5.1.カメラの電源を切り、MicroSDカードを取り出してカードリーダーに挿入します。
5.2.カードリーダーを適切なPCコンピュータのUSBポートに挿入します。
5.3.MicroSDカードはリムーバブルディスクドライブとして認識されます。
5.4.ドライブ内のすべてのファイルにアクセスできます。
VI.リセット
何らかの理由でカメラが応答しなくなった場合、または正常に動作していない場合、クイックリセ
ットを実行すると通常の動作に戻ります。
操 作:カメラの電源が入ったら、ピンを使用してリセットボタンを1回押します。青色と赤色のイン
ジケータライトが5秒間点灯し、赤色のインジケータランプが消灯し、青色のインジケータランプ
が点滅し続けます。これで、出荷時のデフォルト設定でカメラを再起動できます。
Page 24

4.2.1. 3.1の「動き検出」記録モードを選択してください。電球カメラの電源を入れると、青色と赤色
の両方のインジケータランプが点灯し、5秒間点灯したままにしておくと、赤いランプは消灯し、赤
色のランプは消灯します。カメラは動き検出記録モードに入ります。
4.2.2. 動きが検出されると、カメラは自動的に2分のビデオを記録します。青のインジケータランプ
が点滅し続けます。
4.2.3. 録画ボタンを1回押すと、モーション検知録画モードを終了します。赤と青の両方のインジケ
ータランプが点灯したままになり、カメラがスタンバイモードに戻っていることを示します。
4.2.4.30秒以上何も操作しないでスタンバイ状態にすると、青色と赤色の両方のインジケータライ
トが一度点滅し、10秒間点灯したままにしておくと、赤色のインジケータライトは消灯し、青色のイ
ンジケータライトは点滅し続けます。カメラが動き検出録画を再開しました。
V . ビデ オファイル の アップ ロ ード
5.1.カメラの電源を切り、MicroSDカードを取り出してカードリーダーに挿入します。
5.2.カードリーダーを適切なPCコンピュータのUSBポートに挿入します。
5.3.MicroSDカードはリムーバブルディスクドライブとして認識されます。
5.4.ドライブ内のすべてのファイルにアクセスできます。
VI.リセット
何らかの理由でカメラが応答しなくなった場合、または正常に動作していない場合、クイックリセ
ットを実行すると通常の動作に戻ります。
操 作:
カメラの電源が入ったら、ピンを使用してリセットボタンを1回押します。青色と赤色のイン
ジケータライトが5秒間点灯し、赤色のインジケータランプが消灯し、青色のインジケータランプ
が点滅し続けます。これで、出荷時のデフォルト設定でカメラを再起動できます。
 Loading...