

Page 1
INSTRUCTION MANUAL
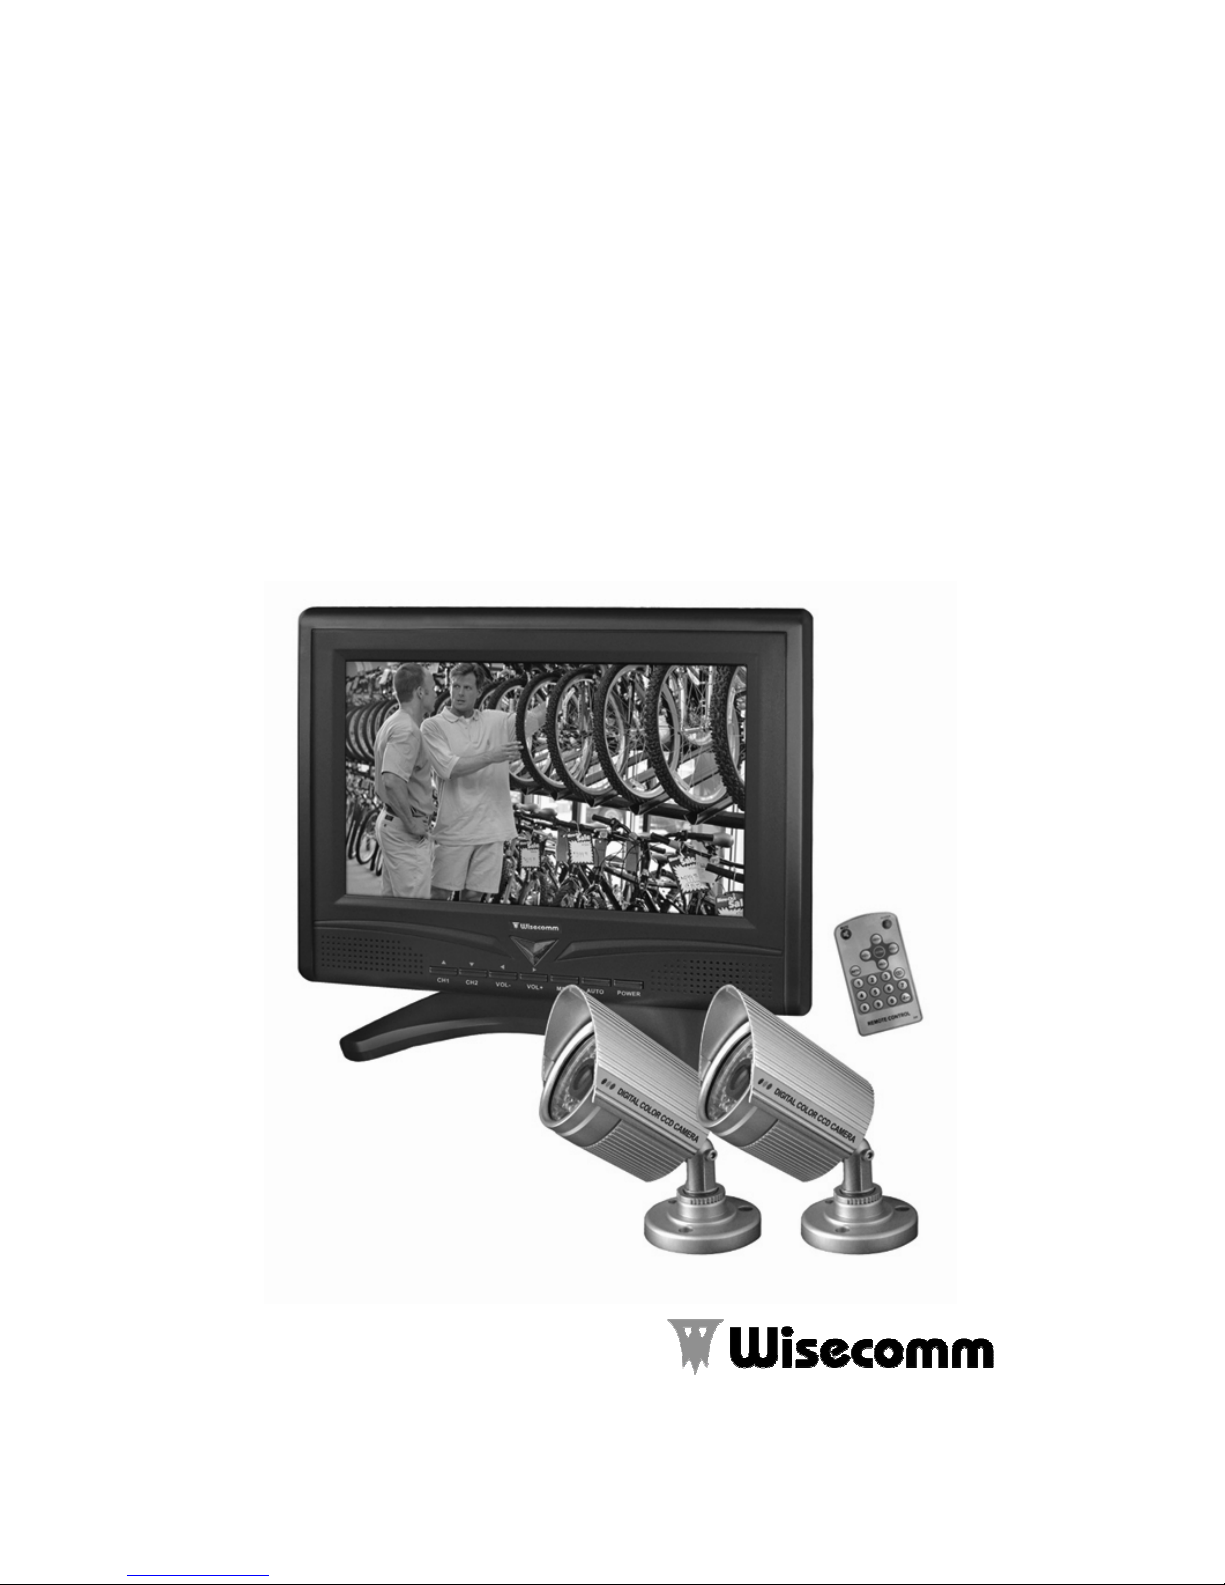
9.2” TFT LCD
COLOR MONITORING SYSTEM
With 2 Indoor/Outdoor Color Cameras
MODEL: LCD0935
Copyright © 2009 Wisecomm. All Rights Reserved.
Page 2

1. IMPORTANT SAFETY PRECAUTIONS
▪ To prevent fire or shock hazard, do not expose the monitor to rain or moisture.
▪ To avoid electrical shock, do not open the case of this product.
▪ Operate this product using only the supplied power supply .
▪ Do not overload electrical outlets or extension cords, this can result in fire or electric
shock.
▪ Keep this product away from strong magnetic fields.
▪ Do not expose this product in direct sunlight or strong reflected rays.
▪ Do not use thinner or other cleanser to clean the unit. Please wipe out the unit with a
soft cloth if it gets dirty.
▪ Refer servicing to qualified personnel only.
▪ Do not change or modify this product, the warranty terms will be voided.
2. FEATURES
▪ Easy installation
▪ 9.2” TFT LCD display
▪ Resolution 640 x 480
▪ 2Ch line locked sequential switcher
▪ 2 (two) 6pin Din video inputs for included cameras, 2 BNC video inputs for other
cameras or video devices and 2 RCA audio inputs.
▪ On screen display
▪ Programmable dwell times up to 60 seconds
3. CONNECTIONS
3.1 TFT LCD MONITOR
Page 3
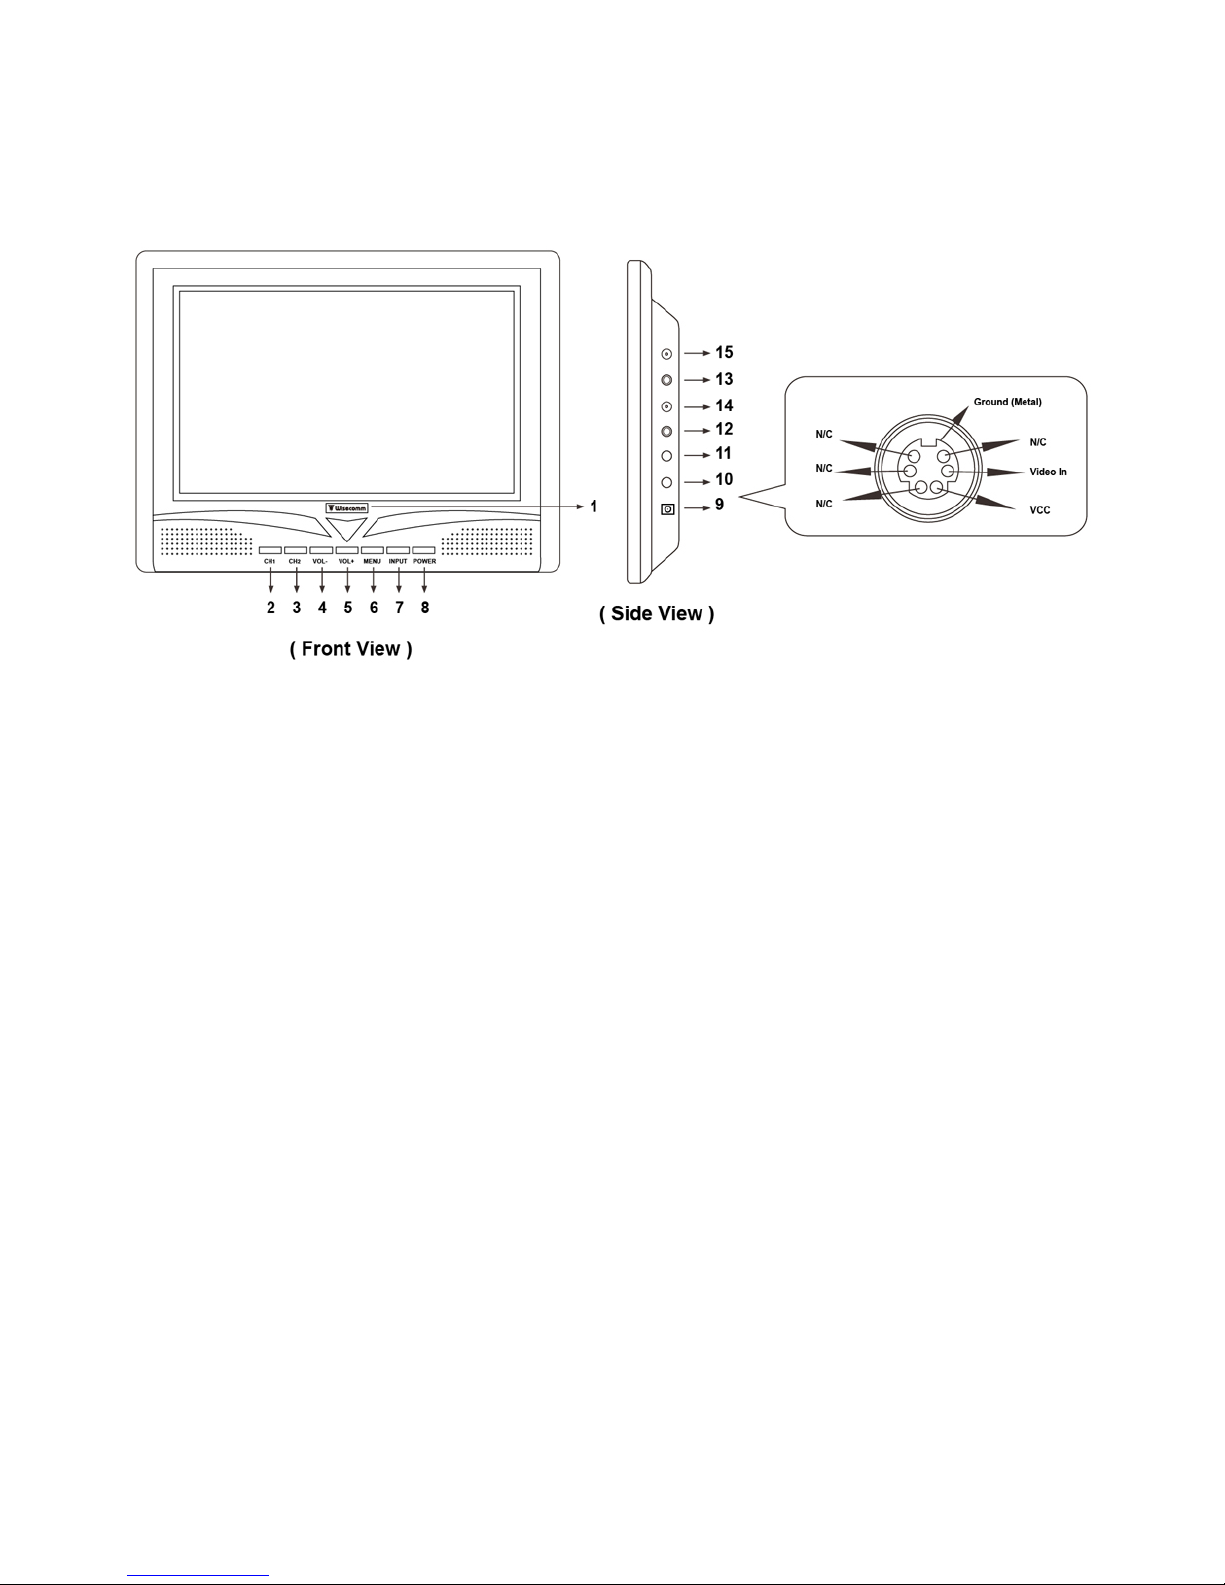
1. This light is lit in blue when the AC power supply is properly plugged to DC jack
(refer to #9).
2 -Select the CH1 camera by pressing this button in the manual mode or automatic
sequential mode.
-Press Down (▼) button to navigate the submenu.
3. -Select the CH2 camera by pressing this button in the manual mode or automatic
sequential mode.
-Press Down (▲) button to navigate the submenu.
4. -If you connect an audio device to the monitor, decrease audio level by pressing this
button. There is no audio function on the included cameras.
-Press Left (◄) button to select values.
5. -If you connect an audio device to the monitor, increase audio level by pressing this
button. There is no audio function on the included cameras.
-Press Left (►) button to select values.
6. Press this button to setup the menus.
7. Press this button to place the system into the automatic sequential mode (See section
6.4).
8. -Press this button to turn the power off.
-Press and hold this button for 3seconds to turn the power on.
9. DC power jack
Plug the provided AC power supply only.
Do not use the unproven AC power supply as this can result in fatal damage to the
system. In case of this, the warranty term should be voided.
10. 11. Video inputs (6pin Din jack)
-Connect a provided camera to the 6pin Din jack.
Page 4
-Make sure that the two arrows on the monitor and on the top of the cable should be
aimed each other.
12. 13. Audio inputs (RCA jack)
Connect an audio device to this jack.
14. 15. Video inputs (BNC)
Connect a BNC camera to BNC input.
Note:
-Do not connect more than two cameras to the monitor for proper working.
-Audio on the provided cameras is not available.
3.2 CAMERA
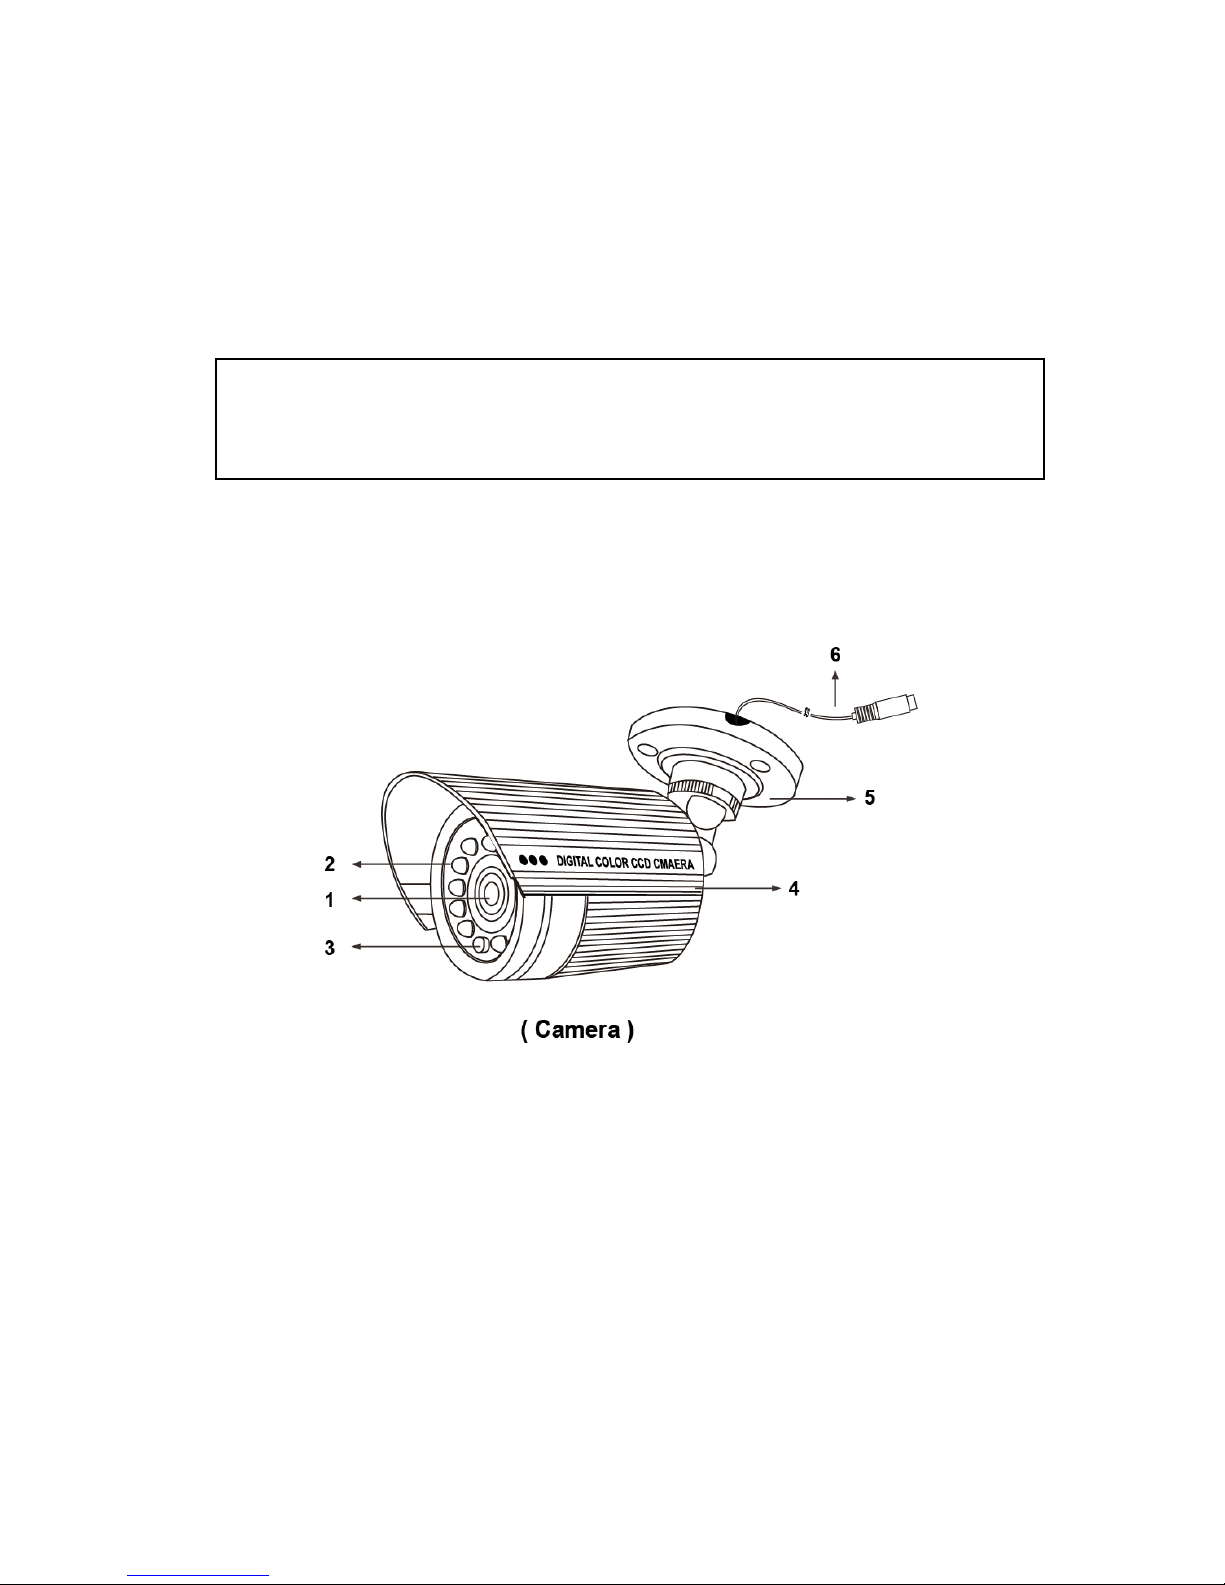
1. Lens
3.6mm fixed Lens.
2. Infrared LEDs
36 Infrared LEDs let you see objects in the darkness.
3. CDS sensor
Automatically turns the Infrared LEDs as needed.
4. Sunshield
5. Mounting bracket
6. 60’ 6pin Din cable.
Page 5
4. INSTALLATION
4.1 Installation of Mounting Bracket for TFT LCD Monitor
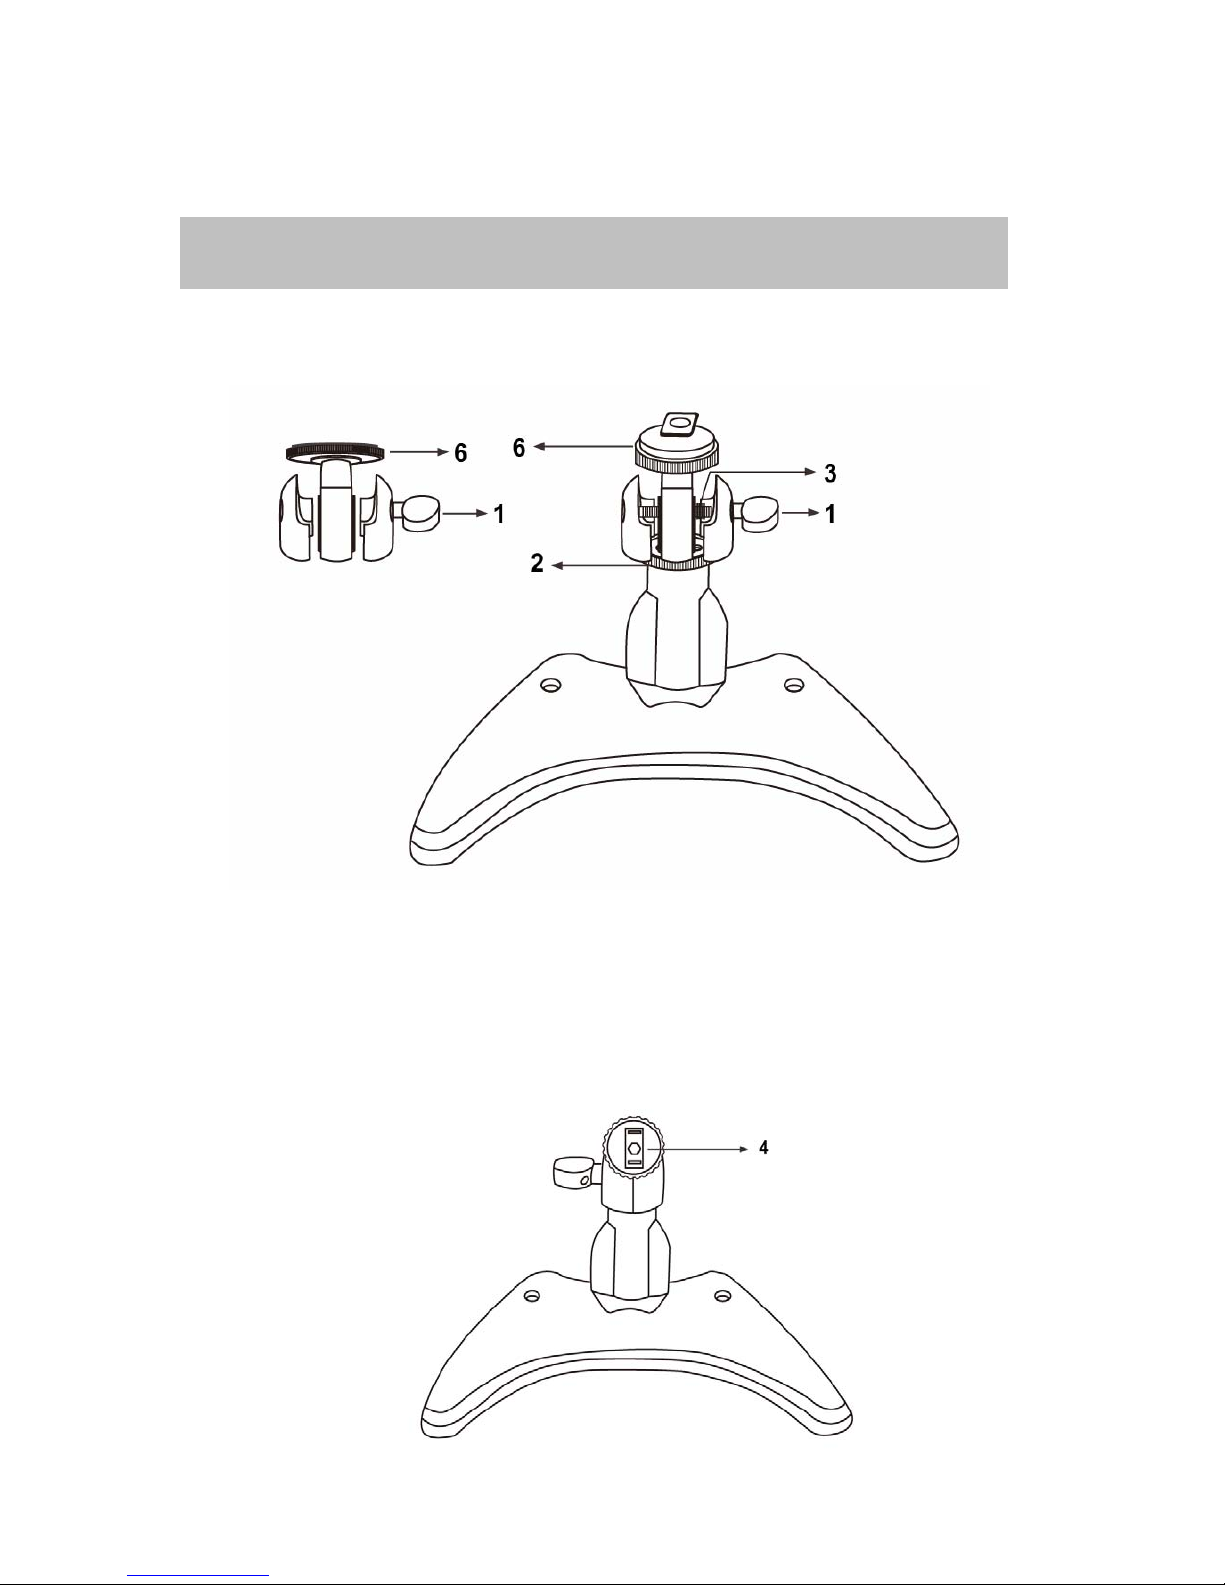
1. Turn the tightening knob① counter-clockwise to disassemble the swivel.
2. Place the fixed ring② into the swivel as shown illustration above and turn the
tightening knob① clockwise to secure the swivel. Pay attention not to miss the
spring③.
Page 6
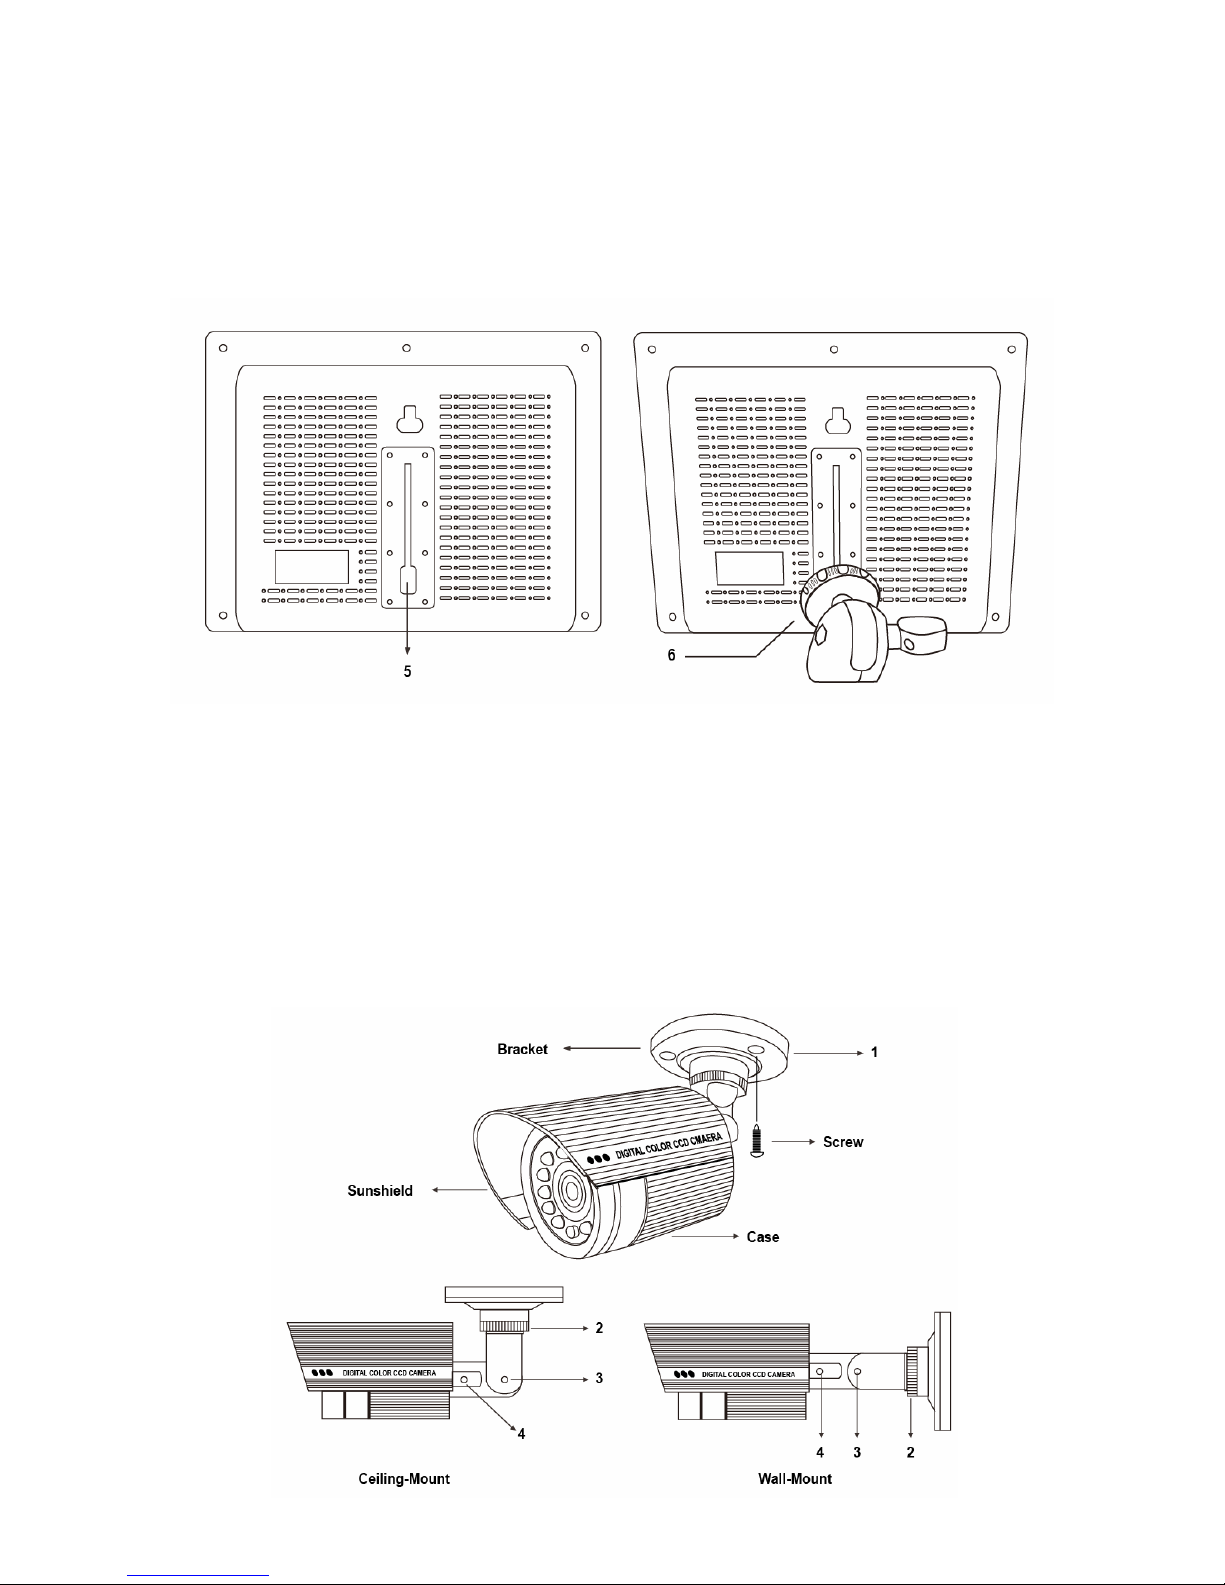
3. Loosen the locking knob and set the proper angle of square metal④ on the top of
the swivel.
4. Place the square metal④ on the top of the mounting bracket into the metal hole
⑤ on the rear of the monitor as shown illustration above, then secure the monitor
using the locking ring ⑥.
5. Turn the tightening knob① clockwise to secure the swivel after setting the desired
angle of monitor to display. It can be used for wall-mount or ceiling-mount
application depending on the setting.
4.2 Installation of Camera
Page 7

1. Attach the mounting bracket base ① to the wall or ceiling, wherever you want to
install the camera. Locate a wall stud or ceiling joist and secure the bracket base
using the supplied screws.
2. Lock the mounting bracket with the locking ring②.
3. Turn the pivot locking screw③ with the provided hex-head wrench counter-
clockwise to set the desired angle of camera toward objects and turn it clockwise
to secure. It can be used for wall-mount or ceiling-mount application depending
on setting this pivot locking screw.
4. Loosen the locking screw④ with the provided hex-head wrench and turn the
camera clockwise or counter-clockwise to upright images on the screen and turn it
clockwise to secure.
5. Connect the one end of 60’ cable to CH1 or CH2. Make sure that the two arrows
on the top of 60’ cable and on the monitor should be aimed at each other.
5. OPERATION
5.1 Automatic Sequential Mode
-Press AUTO button on the front panel, then the monitor will be displayed one
camera after another.
-The dwell time can be adjusted from 1 to 60 seconds in the SETUP menu (See
section 6.4).
5.2 Manual Mode
-Press the desired camera button on the front panel of the monitor to display a full
screen when the system is in the automatic sequential mode or manual mode.
6. SETUP THE MENUS
It is impossible to setup the menus if images are not being displayed on the screen.
-Press the MENU button on the front panel to setup the menus.
-All the menus will automatically disappear if you don’t change values within 10
seconds.
-The remote controller may not control all the functions on the system. In case of this,
please use the buttons on the front panel.
6.1 Video Enhancement (
-Press the MENU button on the front panel to setup the menus.
)
Page 8
-Select the VIDEO INHANCEMENT icon in the MAIN MENU by using the ► and
p
the ◄ buttons.
-Choose an item with the ▲and the ▼buttons and select the values with the ► and
the ◄ buttons.
-To return to the MAIN MENU, select the EXIT with the ▲and the ▼buttons and
then press the MENU button.
6.2 Language (
)
Other languages except English are not available on this model.
6.3 Audio Volume (
)
-Press the MENU button on the front panel to setup the menus.
-Select the AUDIO VOLUME icon in the MAIN MENU by using the ► and the ◄
buttons.
-Choose an item with the ▲and the ▼buttons and select the values with the ► and
the ◄ buttons.
-To return to the MAIN MENU, select the EXIT with the ▲and the ▼buttons and
then press the MENU button.
Note:
The provided cameras don’t have audio function. If necessary, connect an
audio device to the audio input and then adjust audio level in the menu or on
the front
anel.
6.4 System Menu (
)
-Press the MENU button on the front panel to setup the menus.
-Select the SYSTEM MENU icon in the MAIN MENU by using the ► and the ◄
buttons.
-Choose an item with the ▲and the ▼buttons and select the values with the ► and
the ◄ buttons.
-To return to the MAIN MENU, select the EXIT with the ▲and the ▼buttons and
then press the MENU button.
Reset:
-Select the Reset in the SYSTEM MENU to reset to the factory default values.
Blue:
- Select the Blue in the SYSTEM MENU to display in blue when no video signal or
weak signal.
Auto Power Down:
Page 9
-Choose one among 15, 30, 45 and 60 to turn the power off automatically after the
selected time in minute.
Sharp:
-Adjust the sharpness of images.
Panel-LR:
-You can view the mirror images or normal images by selecting.
Panel-UD:
-You can view the reverse images or normal images by selecting.
AUTO-SWITCH
-Select the dwell time for the automatic sequential mode.
6.5 Exit (
-To exit the MAIN MENU, select the EXIT with the ▲and the ▼buttons and then
press the MENU button.
7. SPECIFICATIONS
7.1 TFT LCD Monitor
Display 9.2” TFT LCD active matrix
System NTSC
Pixel pitch 0.108 (H) x 0.376 (V) mm
Luminance 300 cd/m²
Viewing angle L/R/T/B 45/65/65/65 degrees
Power consumption 1,100 mA
Operating temperature -5ºC to 50ºC
Dimensions 260 (W) x 195 (H) x 40 (D) mm
Weight 2.30 Lbs
7.2 Camera
Image pickup device 1/4” Sony Color CCD
TV system NTSC, PAL
No. of pixels NTSC: 510(H) x 492(V)
PAL: 500(H) x 582(V)
Scanning system 2:1 Interlaced
Sync system Internal
Horizontal resolution 420 TV lines
Video output 1.0Vp-p Composite @75 ohms
Minimum illumination 0 Lux (LED on), 0.1 Lux (LED off)
)
Page 10

S/N ratio More than 48db (AGC off)
Gamma characteristics 0.45
Video output 1.0v p-p composite, 75 ohms
Electronic shutter speed NTSC: 1/60 to 1/100,000sec
PAL: 1/50 to 1/100,000sec
Lens 3.6mm fixed lens
Housing material Die cast aluminum alloy
Current consumption 250 mA Max (LED on)
Power supply DC 12V (Regulated: not included)
Operational temperature -10°C to 50°C RH95% Max
Dimensions 55Ø x 95(L) mm
8. Appendix
System Includes
1-9.2” TFT LCD monitor
1-Mounting bracket for monitor
2-Indoor/Outdoor color camera w/60’ cable & mounting bracket
1-AC Power Supply for Monitor, DC12V 3.0A
2-AC Power Supply for camera
1-Remote Controller
1-Hex-head wrench
1-Instruction Manual
Limited 1Year Warranty
This warranty gives the original purchaser specific legal rights and you may also have
other rights, which may vary from state to state. If our products do not function because
of any defect in material or workmanship, we will repair it for free for 1 year on parts and
labor from the date of original purchase. This warranty does not cover modification,
abuse, incidental or consequential damages unless the state of owner’s residence specially
prohibits limitations on incidental or consequential damages.
How to obtain Factory Service
• Original purchaser must fill out the warranty card and mail it to the factory with the
model number, serial number and the date of purchase.
• We will repair or replace, and return the system to the owner under this limited
warranty.
• Please pack the system carefully and securely using the original packing materials,
Page 11

and send it prepaid and insured to: 13073 E. 166th St, Cerritos, CA 90703.
• Please include a check for $20.00 to cover the cost of return postage and handling.
If the system is returned within the warranty period, please include a proof of
purchase. If the system is out of warranty, you will receive an estimate of the repair
cost for your approval before repair work will be started.
 Loading...