

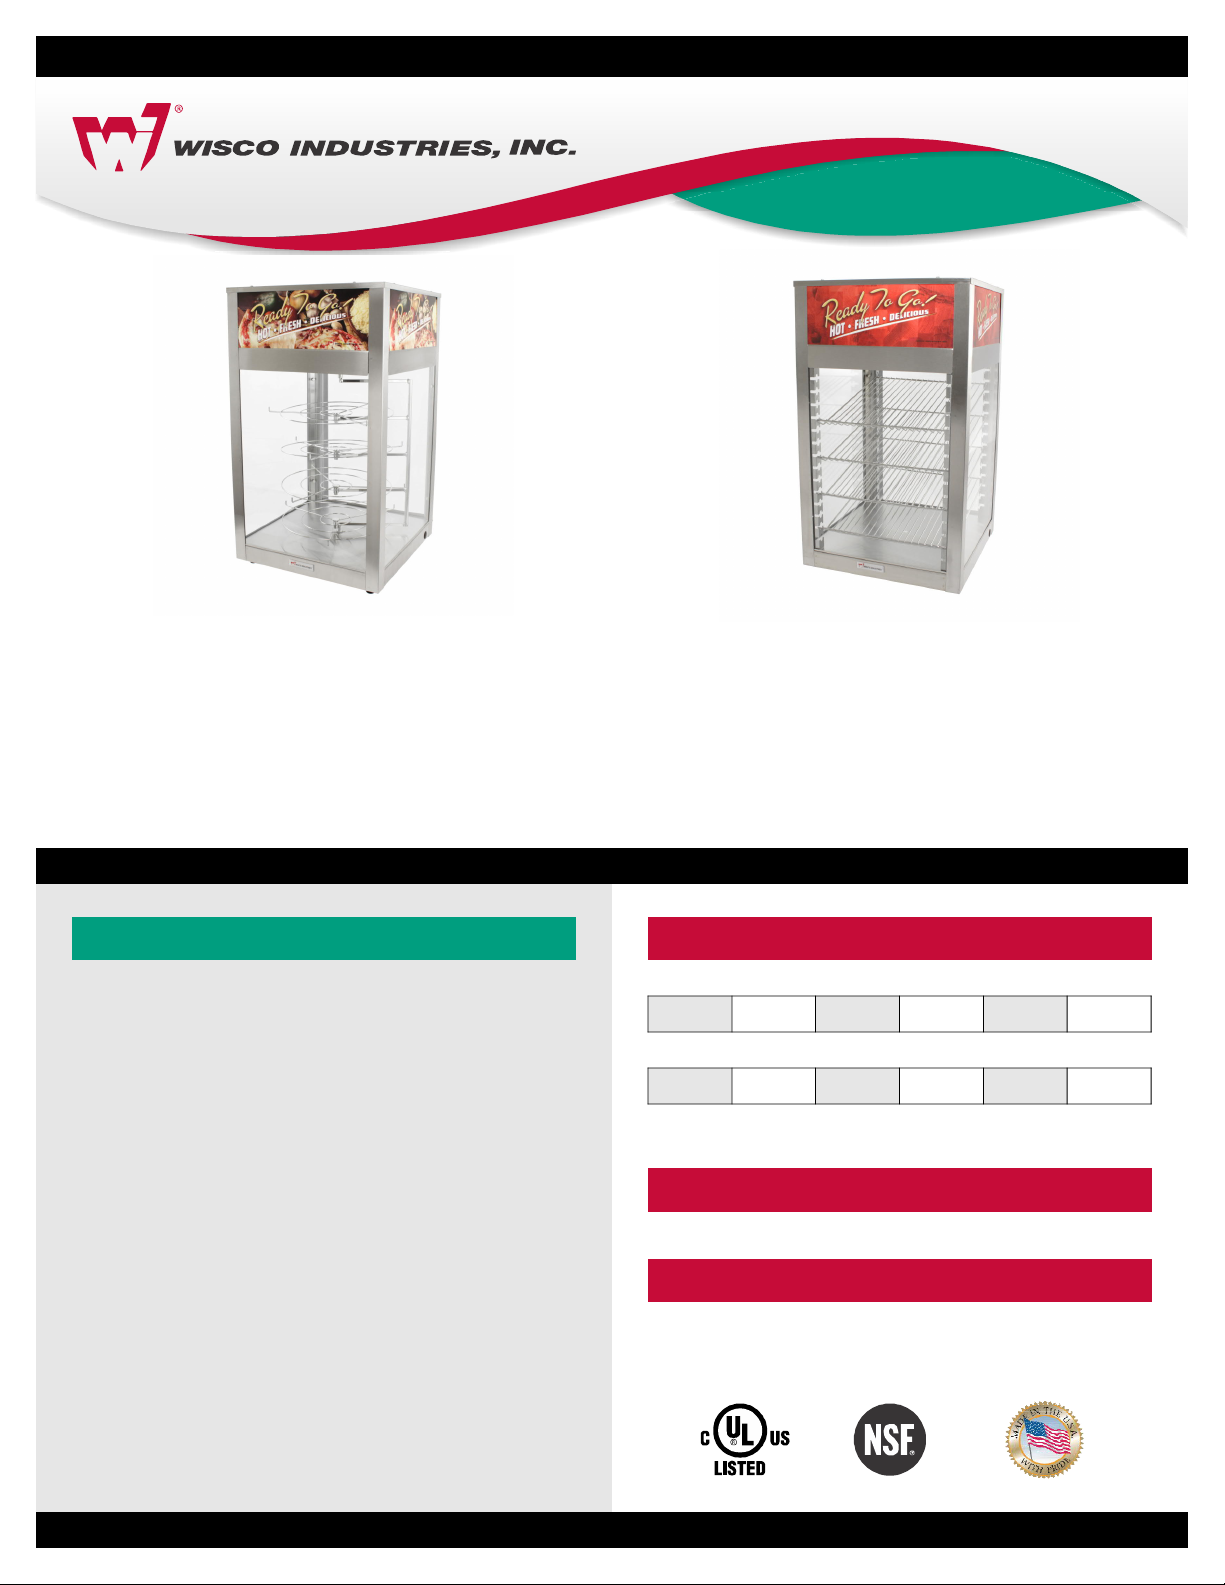
FOOD WARMING/
MERCHANDISING CABINET
MODEL 695D
Single-door Unit Shown
MODEL 695D-S
Single-door Unit Shown
Snack foods have to be hot and moist to be appealing. Cold won’t do... Dry won’t do. Our humidified
model 695 Food Warmers and Displays will keep your snack foods hot and moist with fresh-out-of-theoven flavor and eye appeal. That means longer holding time with less product loss. And that means
more profits for you. Now - isn’t that appealing?
FEATURES:
• “Ready to Go” pizza graphic panels on Model 695D
• “Ready to Go” graphic panels on Model 695D-S
• Indicator lights show w hen water ta nk is
empty/full
• Glass panels and display floor remove for easy
cleaning
• Adjustable thermostat
• Temperatures from 80°F to above 150°F
• 2 Door “self serve” option available
ELECTRICAL DATA:
695D
VOLTS: 120 AMPS: 8.9 WATTS: 1070
695D-S
VOLTS: 120 AMPS: 8.5 WATTS: 1020
• Best when operated on an individual branch circuit
• ’ power cord length6
DIMENSIONS:
MODEL 695D
• Rotating racks accommodate up to a 16” pizza
• 18½”W × 18½”D × 32”H
SHIPPING INFORMATION:
MODEL 695D-S
• Includes (4) shelves
• Total height of adjustable shelf space: 21”
• Adjustable shelves accommodate up to a 14” pizza
• Additional shelves available (#0018630)
P.O. Box 10 • Oregon, WI 53575 • Ph: 608.835.3106 • Fx: 608.835.7399 • wiscoind.com • wiscomade.com
• SHIPPING DIMENSIONS: × 26”W 26”D × 41”H
• SHIPPING WEIGHT: lbs.98
• MUST SHIP VIA FREIGHT TRUCK
FP140039 REV: B
IMPORTANT: Read the following safety and operation instructions to avoid injury and to avoid damage to equipment or property.
Plug unit into a properly grounded electrical outlet of the correct voltage, size, and plug configuration for
this unit. We recommend usage on an individual branch circuit of at least 15 amps for best results. Failure to
do so may result in decreased performance of the warmer.
Exterior surfaces on unit may get hot. Use caution when touching these areas to avoid injury.
Only shatter resistant light bulbs which meet or exceed NSF Standards specifically designed for food holding
units must be used. Breakage of bulbs not specially coated could result in personal injury and/or food
contamination.
Unplug warmer when not in use.
CLEANING INSTRUCTIONS
Unit is not waterproof. Do not submerge in water. Do not operate if unit has been submerged in water.
Unplug unit from power source, and allow to cool completely before performing any maintenance or cleaning.
Do not steam clean or use excessive water on unit to avoid personal injury or electrical shock.
It is recommended that the interior and exterior surfaces be cleaned daily with a mild soap and damp
cloth. Stubborn stains on base of unit and/or shelves may be removed with a non-abrasive cleaner and
a damp cloth. Usage of an abrasive cleanser could scratch or damage the finish of your unit.
EQUIPMENT SETUP
F OR UNIT WITH ROTATING TREE - The Carousel Tree and Racks are securely fastened in place for shipping.
It is necessary that the Carousel Collar (located at the center of the Ceiling Chamber) and the four rotating
Racks be released prior to operation.
OPERATION:
This warmer is designed to maintain food product at or above the optimum temperature. It is not designed
or intended to heat up or cook food to the serving temperature. Product is to be prepared to a temperature
of above 160 F before placing in the warmer.°
OPERATING INSTRUCTIONS
1. Plug unit in, and turn the Power Switch located at the control panel to “ON”.
2. Set the Temperature Selector to the desired temperature.
3. Fill the Water Reservoir. See Water Reservoir
Allow 30 minutes to preheat a full reservoir of water. The elements automatically energize as needed to
maintain the desired setting.
P.O. Box 10 • Oregon, WI 53575 • Ph: 608.835.3106 • Fx: 608.835.8273 • wiscoind.com • wiscomade.com
The reservoir capacity permits uninterrupted operation for approximately 8-12 hours depending upon
settings and how frequently the door is opened.
The green lamp is designed to prevent overfilling of the water reservoir. Its only function is to indicate when
the reservoir is full and to stop adding water. As the water level recedes, the green lamp will deactivate.
When the red indicator light activates, it is signaling that the water level is low, and water should
be added to the unit immediately.
WATER RESERVOIR
On initial start-up, add distilled water to the reservoir until the green indicator light activates signaling that
the reservoir is full. We recommend using distilled water only to preserve the life of the electrical and
mechanical components.
If you do not have distilled water available for the initial operation of the unit, regular tap water may be
substituted. However, continued use of tap water over a period of time will result in diminishing efficiency
and eventual failure of the humidity control components.
The reservoir fill is located on top of the cabinet. Slide the cover open, and fill the reservoir with distilled
water. It is important to reposition the cover after filling the reservoir to maintain a sanitary environment
within.
NOTE: Reservoir capacity on initial fill is 3 quarts 8 ounces maximum. Refill capacity at the time the red indicator
lamp activates is 2 quarts maximum.
DRAINING WATER RESERVOIR: As a safety precaution, it is recommended that the 695 Display Warmer water
reservoir be drained prior to moving the unit. This is to prevent water from spilling into the food compartment or
onto electrical components.
MAINTENANCE:
TO REPLACE DISPLAY LIGHT
Only shatter resistant light bulbs which meet or exceed NSF Standards specifically designed for food holding
units must be used. Breakage of bulbs not specially coated could result in personal injury and/or food
contamination.
Disconnect the power supply cord, and wait until unit has completely cooled. Unscrew light, and replace
with a new specially coated bulb of the same style and wattage.
P.O. Box 10 • Oregon, WI 53575 • Ph: 608.835.3106 • Fx: 608.835.8273 • wiscoind.com • wiscomade.com

REVERSIBLE DOOR:
The Access Door is designed for easy conversion to open right or left. Survey the selected operating area to
determine if conversion is necessary.
T C DO ONVERT OOR:
1. : DO NOT tip unit on its back or sides. Water will escape from the reservoir causing T U OURN NIT FF
electrical short or possible shock.
2. : Slide the front of the Food Warmer toward the edge of the counter or table top until the R DEMOVE OOR
lower Hinge Pin is accessible by screwdriver. While supporting the door, remove upper and lower Hinge Pins
and Nylon Spacers.
3. : Using a 3/32” Allen Wrench, remove the (4) Button Screws located on the right and left R HEVERSE INGES
columns. Move the Hinges to the opposite column, and reassemble.
4. : Rotate the door 180 degrees, insert Spacers and Hinge Pins. NOTE: The Nylon Spacers R DEPLACE OOR
must be reinserted between the door and hinges.
Hinge
Hinge Pin
Button Screws
Nylon Spacer
P.O. Box 10 • Oregon, WI 53575 • Ph: 608.835.3106 • Fx: 608.835.8273 • wiscoind.com • wiscomade.com

TROUBLESHOOTING:
Unplug unit from power source, and allow to cool completely before performing any maintenance or cleaning.
Unit not working:
• Check the power switch position, power cord, and/or electrical circuit.
Display light not working:
• Tighten or replace the bulb.
Loud noise coming from the unit:
Check to see that blower motor is functioning properly•
Unit not heating properly:
• Has food been prepared in advance and placed in warmer at proper serving temperature?
• Check heat settings. Is it at correct setting for your food product?
Turn unit on, open the door, and verify that hot air is being blown into unit. If not, your blower motor •
may not be functioning properly.
• If the air being blown in is not hot, then the thermostat may not be functioning properly.
• If carousel is not turning: Drive motor may not be functioning or door switch may not be functioning
properly
NOTES:
P.O. Box 10 • Oregon, WI 53575 • Ph: 608.835.3106 • Fx: 608.835.8273 • wiscoind.com • wiscomade.com

PARTS LIST:
MODEL 695D
ITEM # PART # DESCRIPTION
1 0016428 10-32 X 3/8 BRASS THUMB SCREW
2 0017201 COVER PLATE
3 0017435-16 WIRE RACK 16” PIZZA
4 0017402 PIZZA TREE WELDMENT
5 0017379 HIGH LIMIT THERMOSTAT
6 I013759 READY TO GO PIZZA SIDE PANEL DECAL
* I013758 READY TO GO SIDE PANEL DECAL
7 00175 NUT
8 0017593 WASHER SPACER
9 0017351SK LIQUID LEVEL SWITCH SERVICE KIT
10 0017350 HUMIDITY TANK
11 0017270 CAROUSEL BUSHING (.40 DEPTH)
12 0018630 WIRE RACK
13 0022309 BLOWER MOTOR (FOR 695 SERIES: SEE REPAIR INSTRUCTIONS TAB BELOW)
14 0018631 BRACKET
15 0018632 END COVER
16 0021012 BLOWER MOTOR W/ METAL SHROUD (SEE REPAIR INSTRUCTIONS TAB BELOW)
17 0016428 10-32 X 3/8 BRASS THUMB SCREW
18 0016418 LIGHT SOCKET ASSY
19 0017265 TUFFSKIN INCANDESCENT LAMP
20 0020943 ADJUSTABLE DOOR CLIP
21 0018656 3/16” CLEAR TEMPERED GLASS
22 00448 POWER CORD – 15A
23 0017436 NYLON GLIDE
24 0021070 BOTTOM PAN WELDMENT
25 0020935 DOOR ASSY
26 0016024 STRAIN RELIEF
27 0020942 MAGNET ASSY
28 0017306 DOOR SWITCH
29 0017596SK GEAR MOTOR SERVICE KIT (Incl. 0017331 fan blade)
30 0017331 FAN BLADE (DRIVE & BLOWER MOTOR)
31 0017271 DOOR HINGE
32 0018629 RACK HOLDER
33 0019577 800W, 115V HEATING ELEMENT
34 0017354 HORIZONTAL DRUM THERMOMETER
35 0017274 THERMOSTAT KNOB
36 009092 RED PILOT LIGHT
37 009093 GREEN PILOT LIGHT
38 0016119 ON/OFF SWITCH
39 I013748 CONTROL PANEL DECAL
40 0017249 AIR THERMOSTAT (95-215 DEG)
* 009126 4” FOOT RETRO FIT KIT
P.O. Box 10 • Oregon, WI 53575 • Ph: 608.835.3106 • Fx: 608.835.8273 • wiscoind.com • wiscomade.com

39
3
!
1
2
31
38
37
32
36
28
34
33
40
30
29
4
7
5
6
8
9
11
10
12
13
14
15
16
18
17
26
25
27
24
19
20
21
23
22
REV: ORIG


 Loading...