

Page 1

IPAD2THRM
IPAD HEADREST MOUNTING BRACKET KIT
ENSEMBLE DE FIXATION APPUIE-TÊTE IPAD
OWNER’S MANUAL
MANUEL DE
L’UTILISATEUR
Page 2

OVERVIEW
Congratulations on your purchase of the Wirez IPAD2THRM iPad Headrest Mounting
kit. This kit was designed to quickly and easily allow you to transform your iPad into a
rear seat entertainment system.
The kit includes:
1 Multi-Adjustable iPad Mounting Bracket
1 6’/1.8M USB to Apple Dock Connector Cable
1 6’/1.8M Auxiliary Input Audio Cable
1 Dual USB Power Adapter Charger
1 Owner’s Manual
INSTALLATION NOTES
• The IPAD2THRM is NOT compatible with the 1st Genertation iPad.
• The IPAD2THRM is not designed to be used with any iPad when installed in a
protective case.
• The IPAD2THRM was designed to attach to the headrest posts found in most
vehicles.
• The bracket will connect to posts with center-line spacing between 2.5 and 8
inches.
• The Dual USB Charging Adapter is designed for use on standard 12V automotive
electrical systems that use a negative ground.
INSTALLATION INSTRUCTIONS
The Apple iPad is a high value tablet computer, and as such, proper installation is
paramount in ensuring it is secure once installed in the IPAD2THRM. Failure to comply
with these instructions may result in damage to your iPad.
1. Remove the 2-piece iPad mounting bracket from the box.
2. Connect the hinged adjustable bracket to the iPad bracket by aligning the four clips
and sliding towards the ‘closed’ position. The four clips should engage with a solid
‘click’. Once assembled, the text on the rear of the bracket should be upright.
NOTE: If the bracket is upside down, the iPad may be easily knocked out
of bracket and fall, causing damage. Damage to the iPad is not, under any
condition, covered by the Wirez Warranty.
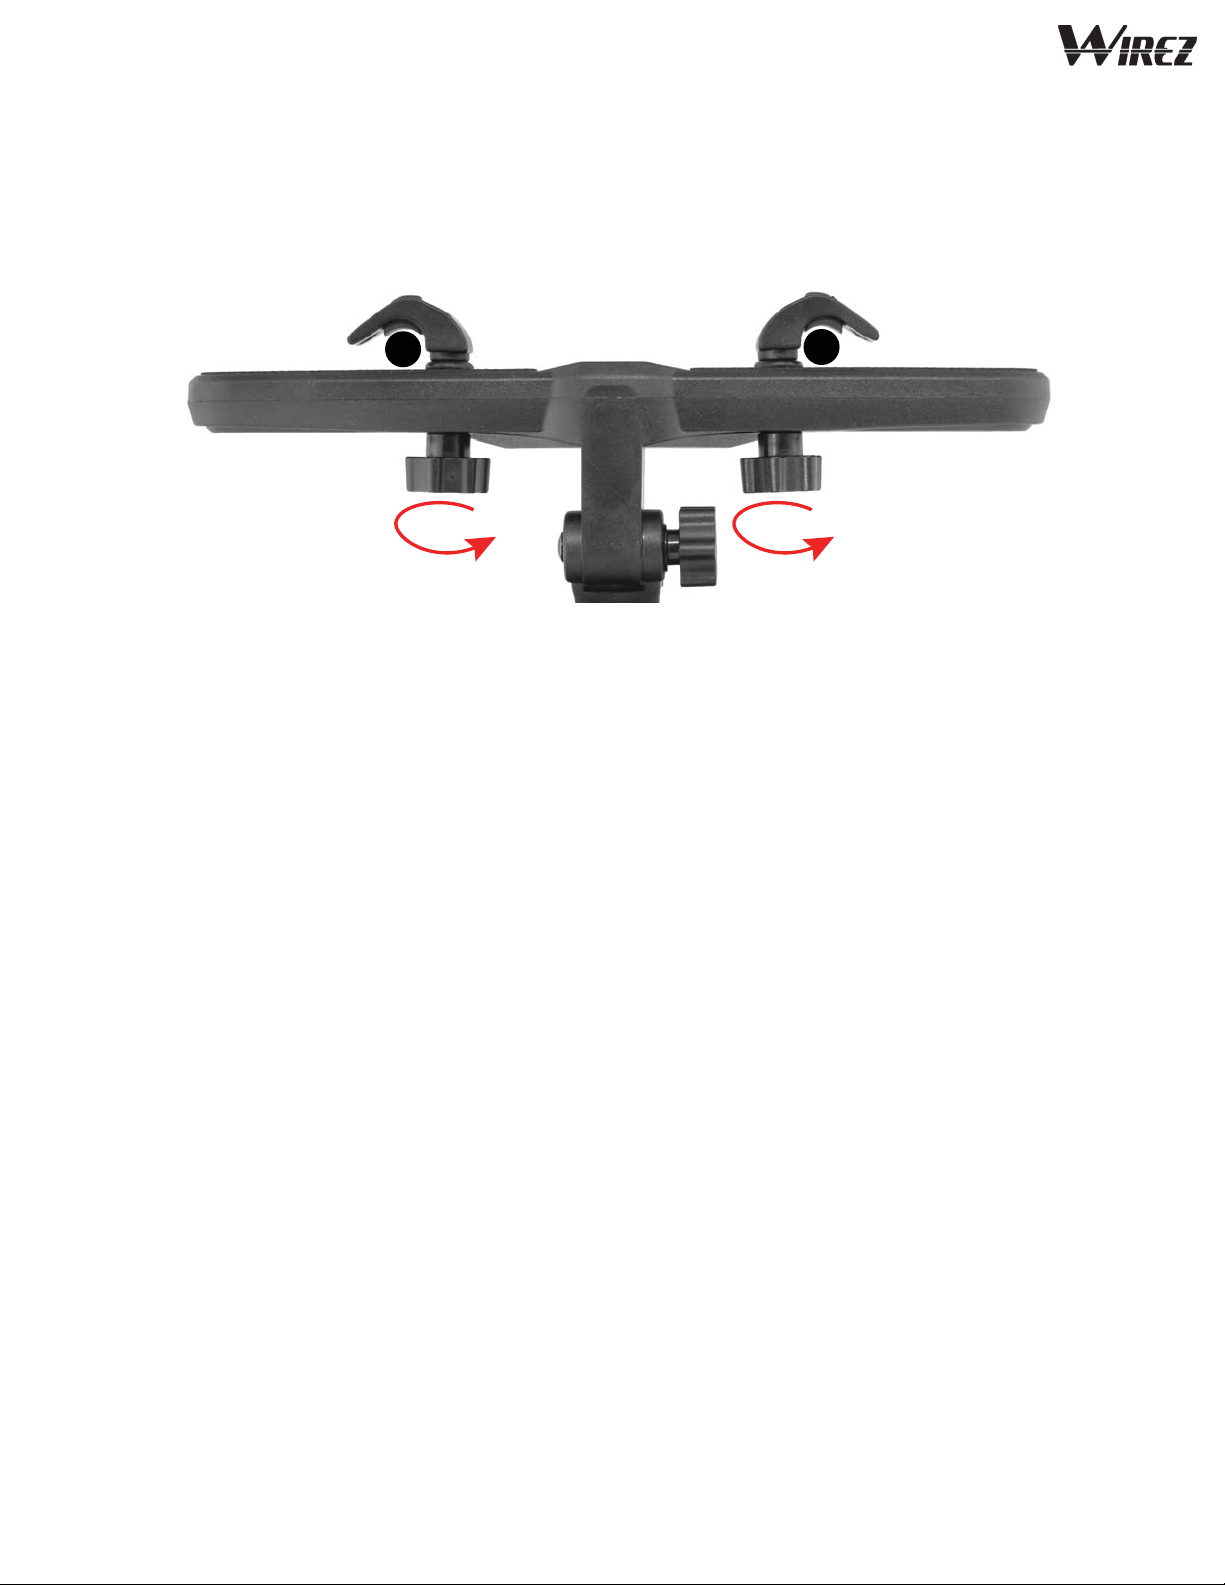
3. Loosen (but do not remove) the two thumb screws on the horizontal portion of the
bracket and position the retaining clips such that they roughly 1 inch wider than the
headrest posts.
4. Place the bracket against the posts and slide the retaining clips over the posts.
Page 3
5. Place the lower edge of the iPad in the two clips at the base of the iPad bracket.
6. Tilt the iPad against the top retaining clips. Pull the clips over the top edge of the
iPad and ensure they are secure.
7. If additional support is required, sliding the headrest down against the mounting
bracket can provide improved stability.
POWER CONNECTION INSTRUCTIONS
The IPAD2THRM includes a Dual USB Charging Adapter and USB to Apple Dock
Connector cable to allow the iPad to be charged when in use.
1. Insert the USB charging adapter into an empty cigarette lighter socket.
2. Plug the 6’/1.8M USB to Apple Charging Adapter cable into one of the USB ports
on the charging adapter.
3. Connect the 30-Pin Dock Connector to the iPad.
4. Locate the USB charging cable such that it does not interfere with the safe
operation of the vehicle and will not be damaged by sliding seat mechanisms, etc.
If you have a vehicle equipped with a USB port, and it has the capability of providing
the 2.1 Amps of current required to charge your iPad, you may use this connection in
place of the Dual USB Charginng Adapter.
AUDIO CONNECTION INSTRUCTIONS
The IPAD2THRM includes a 6’/1.8M Auxiliairy input audio cable. This cable can
connect your iPad to the Auxiliary input on a factory or aftermarket radio.
1. Turn the volume all the way down on your iPad, then connect one end of the Audio
cable to the Auxiliary input jack on radio.
2. Connect the other end of the cable to the headphone jack of the iPad.
3. Select the Auxiliary input as the source on your radio and adjust the volume level of
the iPad until the output of the radio matches that of another sources.
Page 4

WIREZ WARRANTY
Wirez warrants this product to be free from defects in material and workmanship
for a period of ninety (90) days from the original date of purchase provided it was
purchased from an Authorized Wirez dealer.
This warranty is valid only to the original purchaser and is not extended to owners of
the product subsequent to the original purchaser. Any applicable implied warranties
are limited in duration to a period of the express warranty as provided herein
beginning with the date of the original purchase at retail, and no warranties, whether
expressed or implied, shall apply to this product thereafter. Some states do not allow
limitations on implied warranties; therefore these exclusions may not apply to you.This
warranty gives you specifi c legal rights; however you may have other rights that vary
from state to state and province to province.
If your Wirez device needs service, defective merchandise must be returned to your
local Authorized Wirez dealer or shipped to Wirez Inc. at the address on the back of
this manual. Items found to be Non-defective will be returned freight collect. Proof-ofpurchase from an Authorized Wirez dealer must be provided to obtain repairs under
this warranty. Proof of purchase must include the name of the original purchaser, the
name of the authorized Wirez dealer and the purchase date. Warranty expiration on
items returned without proof of purchase will be determined from the manufacturing
date code.
The sole responsibility of Wirez under this Limited Warranty shall be limited to the
repair of the products, or replacement, at the sole discresion of Wirez.
Product must be shipped in its original carton or equivalent carton, fully insured, with
shipping charges prepaid. Wirez assumes no responsibility for any loss or damage
incurred in shipping.
This warranty is valid only if the product is used for the purpose for which it was
designed.
This warranty does not cover:
• The cost of shipping this product to the Wirez Service Department.
• Damage through negligence, misuse, abuse or accident.
• Damage caused by exposure to water and/or excessive heat.
• Items scratched, dented or physically damaged due to abuse.
• Items returned from unauthorized individuals or dealers.
• Items previously repaired by any unauthorized repair facility.
• Items returned without proper proof of purchase.
• Items purchased from a source other than an authorized Wirez dealer.
• Damage to products or devices not made by Wirez.
• Damage to any device to which the Wirez product is installed in, or connected to,
for any reason, including the iPad, iPod or radio.
Due to ongoing product development, features and specifi cations are subject to
change without notice.
Page 5

VUE D’ENSEMBLE
Félicitations pour votre achat de l’Ensemble de Fixation Appuie-Tête iPad. Cet
ensemble a été conçu pour facilement et rapidement, transformer votre iPad en
système de divertissement pour siège arrière.
L’ensemble comprend:
1 Support Appuie-Tête à Ajustements Multiple
1 Câble Prise USB à Prise Connexion Apple de 6’/1,8M
1 Câble Entrée Auxiliaire de 6’/1,8M
1 Adaptateur de Charge USB Double
1 Manuel d’Utilisateur
CONSIGNES D’INSTALLATION
• Le IPAD2THRMn’est pas compatible avec le iPad ière génération.
• Le IPAD2THRM n’est pas conçu pour être utilisé avec n’importe quel iPad si ce
dernier est installé dans un étui protecteur.
• Le IPAD2THRM a été conçu pour être fi xé aux poteaux d’appuie-tête de la majorité
des véhicules.
• Le support se fi xe aux poteaux ayant un espacement de centre à centre entre 2,5
et 8 pouces.
• L’Adaptateur de Courant USB Double est conçu pour fonctionner sur un système
électrique automobile conventionnel de 12 volts utilisant une mise à la masse
négative.
DIRECTIVES POUR L’INSTALLATION
1. Retirer les deux sections du support de fi xation iPad de la boîte.
2. Rattacher le support ajustable avec pentures au support iPad en alignant les quatre
attaches et en glissant vers la position ‘fermée’. Les quatre attaches devraient
s’enclencher avec un ‘clique’ franc et net.
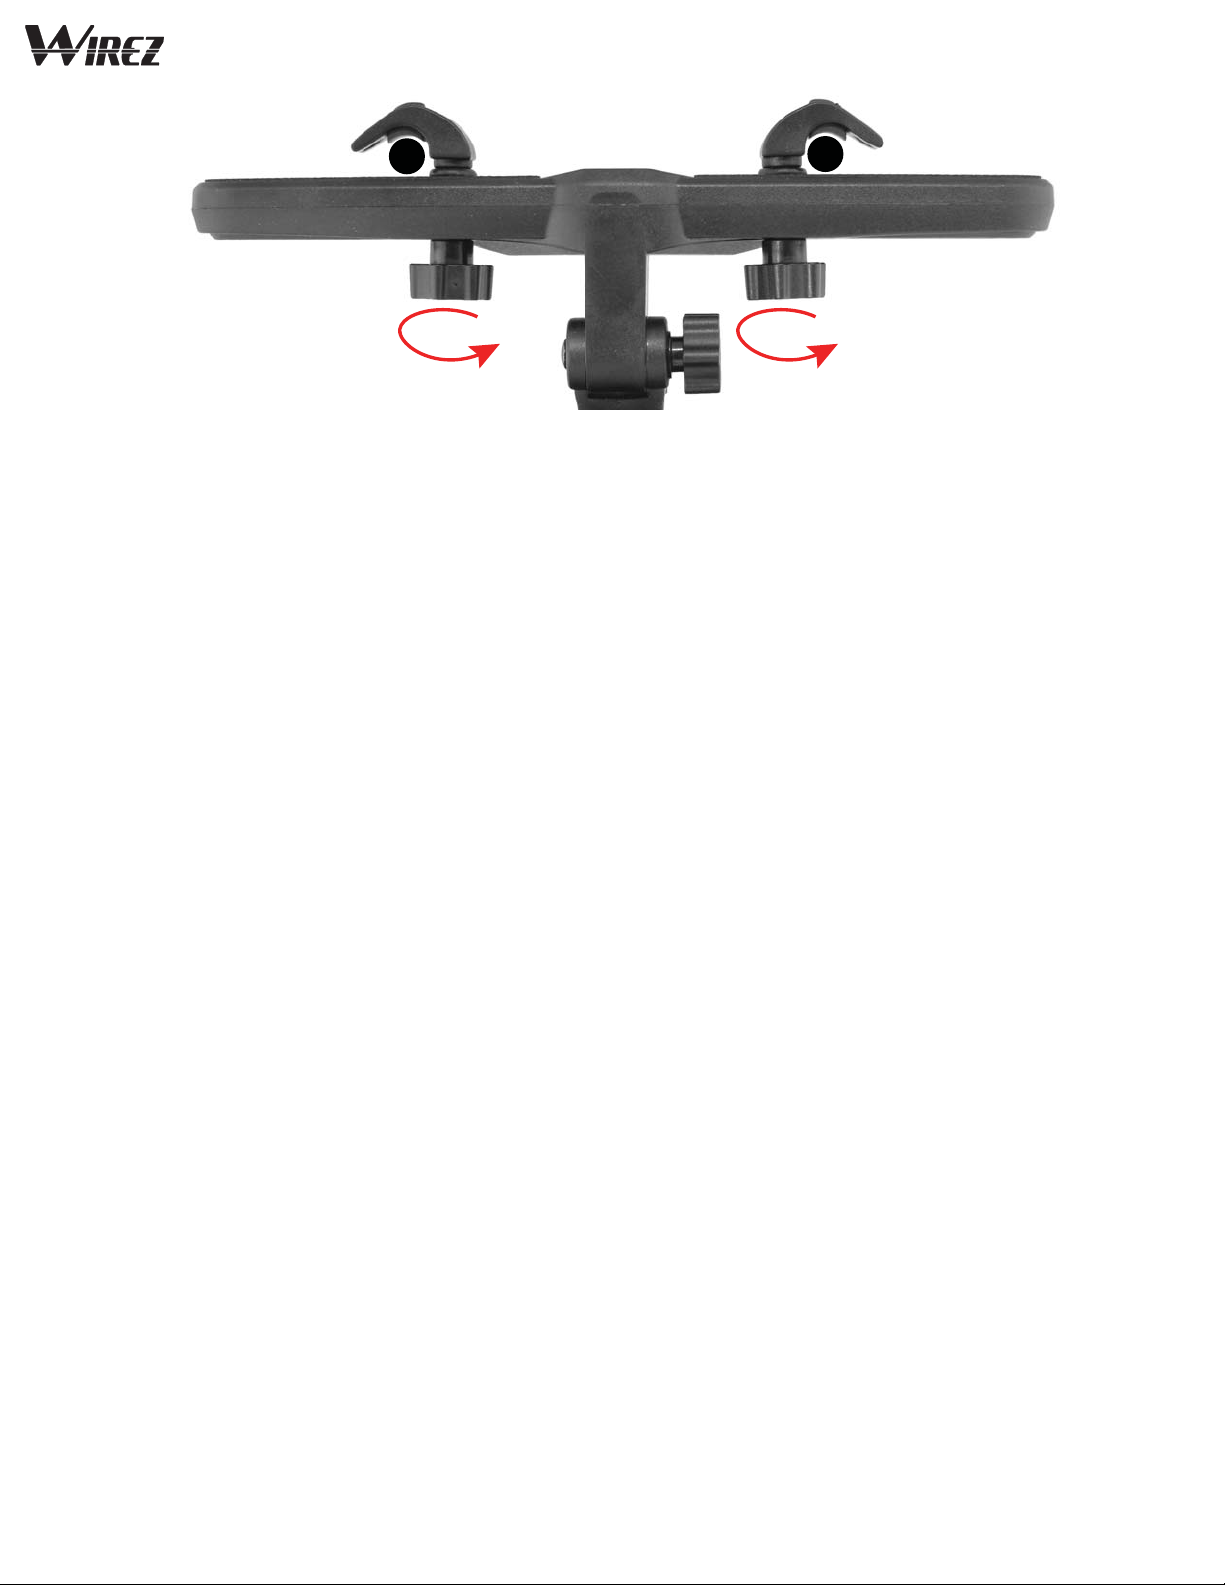
3. Desserrer (mais ne pas retirer) les deux vis sur la portion horizontale du support et
positionner les attaches de retenues de manière à ce qu’elles soient à peu près 1
pouce plus large que les poteaux de l’appuie-tête.
4. Placer le support contre les poteaux et glisser les attaches de retenues par-dessus
les poteaux.
5. Resserrer les vis jusqu’à temps qu’elles soient prises. Ne pas trop serrer, car vous
pourriez endommager certaines pièces.
6. Placer la partie inférieure du iPad dans les deux attaches à la base du support
iPad.
7. Basculer le iPad sur les attaches du haut. Tirer les attaches par-dessus le haut du
iPad et assurez-vous qu’il est bien fi xé.
8. Si un renfort additionnel est requis, abaisser l’appuie-tête contre le support de
fi xation peut fournir une plus grande stabilité.
Page 6
DIRECTIVES POUR RACCORDEMENT DU
COURANT
Le IPAD2THRM comprend un Adaptateur de Charge USB Double et un fi l USB à Prise
Connexion Apple pour vous permettre de recharger votre iPad lors de son utilisation.
1. Insérer l’adaptateur de charge USB dans une prise libre allume-cigarette.
2. Raccorder le fi l USB à Prise Connexion Apple de 6’/1.8M dans l’un des ports USB
du chargeur.
3. Raccorder le connecteur Apple 30-broches au iPad.
4. Placer le fi l USB de charge de manière à ne pas créer déranger la conduite
sécuritaire du véhicule et ne pourra être endommagé par le mécanisme de
mouvement du siège ou autres.
Si vous possédez un véhicule ayant un port USB, et qu’il est capable de fournir les 2,1
ampères nécessaires à la charge du iPad, vous pouvez utiliser cette connexion à la
place de l’adaptateur de charge USB Double.
DIRECTIVES CONNEXIONS AUDIO
Le IPAD2THRM comprend un câble Entrée audio Auxiliaire de 6’/1.8M. Ce câble peut
raccorder votre iPad à une entrée auxiliaire sur une radio d’origine ou de rechange. Le
câble possède un connecteur stéréo 1/8’’ / 3,5mm à chaque extrémité.
1. Baisser la volume au minimum sur votre iPad.
2. Raccorder une extrémité du câble Audio à la borne entrée Auxiliaire de la radio.
3. Raccorder l’autre extrémité du câble à la prise d’écouteurs du iPad.
4. Sélectionner l’entrée auxiliaire comme source de signal sur la radio.
5. Ajuster le volume de la sortie sonore du iPad jusqu’à ce qu’elle soit comparable au
volume des autres sources telles que le CD ou Récepteur AM/FM.
Page 7

GARANTIE WIREZ
Wirez garantit que ce produit est exempt de tout défaut de pièce ou de main-d’œuvre
pour une période de quatre-vingt-dix (90) jours à compter de la date d’achat, tant que
le produit a été acheté chez un revendeur agréé Wirez.
Cette garantie s’applique uniquement au premier acheteur et n’est pas transférable.
Toutes les garanties implicites sont limitées pour la durée de la période de la garantie
expresse, et ce, à compter de la date de l’achat au détail, et aucune garantie,
expresse ou implicite, ne s’appliquera à ce produit par la suite. Certains états/
provinces ne permettent pas de limitation sur la durée des garanties implicites. Par
conséquent, ces exclusions peuvent ne pas s’appliquer pour vous.
Cette garantie vous accorde des droits légaux spécifi ques. Il se peut que vous ayez
d’autres droits pouvant varier d’un état/d’une province à l’autre. Si votre appareil
Wirez nécessite une réparation, la marchandise défectueuse doit être retournée chez
votre revendeur agréé Wirez local pour pouvoir bénéfi cier de la garantie. Les produits
non défectueux reçus seront retournés par fret payable à destination. La garantie ne
couvre pas le retour ou les dommages causés par le transport. Afi n d’obtenir une
réparation du produit sous cette garantie, une preuve d’achat d’un revendeur agréé
Wirez doit être fournie. La preuve d’achat doit comprendre le nom de l’acheteur initial,
le nom du revendeur agréé Wirez et la date d’achat. L’expiration de la garantie, sur les
produits retournés sans preuve d’achat, sera déterminée à partir du code de date de
fabrication. Cette garantie s’applique seulement si le produit est utilisé aux seules fi ns
pour lesquelles il a été conçu.
Cette garantie ne couvre pas :
• Les frais d’expédition pour le transport du produit vers le département de service de
Wirez.
•Les dommages dus à une négligence, une utilisation inappropriée, un usage abusif
ou un accident.
•Les dommages causés par une exposition à l’eau ou une chaleur excessive.
•Les produits égratignés, bosselés ou endommagés par un usage abusif.
•Les produits retournés par un particulier ou un revendeur non autorisé.
•Les produits précédemment réparés par tout service de réparation non autorisé.
•Les produits retournés sans preuve d’achat valide.
•Les produits achetés auprès d’un revendeur non agréé.
• Les dommages aux produits ou appareils qui n’ont pas été fabriqués par Wirez.
En raison du développement de produit en cours, les caractéristiques et
fonctionnalités de l’appareil sont sujettes à un changement sans préavis.
Page 8

Wirez Inc.
2239 Winston Park Drive
Oakville, Ontario
L6H 5R1
www.gotwirez.com
www.facebook.com/gotwirez
 Loading...