

Wire World Of America 1800 User Manual


Notice to Users
©2003 2Wire, Inc. All rights reserved. This manual in whole or in part, may not be reproduced, translated, or reduced to any machine-readable form without prior written
approval.
2WIRE PROVIDES NO WARRANTY WITH REGARD TO THIS MANUAL, THE SOFTWARE, OR OTHER INFORMATION CONTAINED HEREIN AND HEREBY
EXPRESSLY DISCLAIMS ANY IMPLIED WARRANTIES OF MERCHANTABILITY OR FITNESS FOR ANY PARTICULAR PURPOSE WITH REGARD TO THIS
MANUAL, THE SOFTWARE, OR SUCH OTHER INFORMATION, IN NO EVENT SHALL 2WIRE, INC. BE LIABLE FOR ANY INCIDENTAL, CONSEQUENTIAL,
OR SPECIAL DAMAGES, WHETHER BASED ON TORT, CONTRACT, OR OTHERWISE, ARISING OUT OF OR IN CONNECTION WITH THIS MANUAL, THE
SOFTWARE, OR OTHER INFORMATION CONTAINED HEREIN OR THE USE THEREOF.
2Wire, Inc. reserves the right to make any modification to this manual or the information contained herein at any time without notice. The software described herein is
governed by the terms of a separate user license agreement.
Updates and additions to software may require an additional charge. Subscriptions to online service providers may require a fee and credit card information. Financial services
may require prior arrangements with participating financial institutions.
© British Telecommunications Plc 2002. BTopenworld and the BTopenworld orb are registered trademarks of British Telecommunications plc. British Telecommunications
Plc registered office is at 81 Newgate Street, London EC1A 7AJ, registered in England No. 180000.
___________________________________________________________________________________________________________________________
Owner’s Record
The serial number is located on the bottom of your Intelligent Gateway. Record the serial number in the space provided here and refer to
it when you call Customer Care.
Serial Number:__________________________
Safety Information
• Use of an alternative power supply may damage the Intelligent Gateway, and will invalidate the approval that accompanies the
Intelligent Gateway.
• To prevent fire or shock hazard, do not expose your Intelligent Gateway to rain or moisture.
• To avoid electrical shock, do not open the Intelligent Gateway. Refer servicing to qualified personnel only.
• An electrical storm could damage the Intelligent Gateway. To avoid this possibility, disconnect the Intelligent Gateway from the
mains power and telephone line during an electrical storm.
• Never install telephone sockets in wet locations unless the socket is specifically designed for wet locations.
• Never touch uninsulated telephone wire or terminals unless the telephone line has been disconnected at the network interface.
• Use caution when installing or modifying cable or telephone lines.
• Avoid using your modem during an electrical storm.
• Do not use your modem or a telephone to report a gas leak in the vicinity of the leak.
• Install your Intelligent Gateway within 1830mm of a mains socket. Use caution when laying out the cable to avoid hazard to people
walking near or using the equipment.

Contents
To display the Table of Contents in the left-hand pane, click the Window menu and select Bookmarks.
Networking Technology Overview
Ethernet . . . . . . . . . . . . . . . . . . . . . . . . . . . . . . . . . . . . . . . . . . . . . . . . . . . . . . . . . . . . . . . . . . . . . . . . . . . . 1
USB . . . . . . . . . . . . . . . . . . . . . . . . . . . . . . . . . . . . . . . . . . . . . . . . . . . . . . . . . . . . . . . . . . . . . . . . . . . . . . . 1
Home Phoneline Networking (HomePNA) . . . . . . . . . . . . . . . . . . . . . . . . . . . . . . . . . . . . . . . . . . . . . . . . . 2
Wireless . . . . . . . . . . . . . . . . . . . . . . . . . . . . . . . . . . . . . . . . . . . . . . . . . . . . . . . . . . . . . . . . . . . . . . . . . . . . . 2
Intelligent Gateway . . . . . . . . . . . . . . . . . . . . . . . . . . . . . . . . . . . . . . . . . . . . . . . . . . . . . . . . . . . . . . . . . . . 2
Plan your network . . . . . . . . . . . . . . . . . . . . . . . . . . . . . . . . . . . . . . . . . . . . . . . . . . . . . . . . . . . . . . . . . . . . 3
Step 1: Getting Started
First: Remove or disable conflicting applications . . . . . . . . . . . . . . . . . . . . . . . . . . . . . . . . . . . . . . . . . . . . 4
Second: Check your computer’s system and browser requirements . . . . . . . . . . . . . . . . . . . . . . . . . . . . . . 4
System Requirements . . . . . . . . . . . . . . . . . . . . . . . . . . . . . . . . . . . . . . . . . . . . . . . . . . . . . . . . . . . . . 4
Browser Requirements . . . . . . . . . . . . . . . . . . . . . . . . . . . . . . . . . . . . . . . . . . . . . . . . . . . . . . . . . . . . . 5
Third: Install your ADSL Filter . . . . . . . . . . . . . . . . . . . . . . . . . . . . . . . . . . . . . . . . . . . . . . . . . . . . . . . . . . 5
Step 2: Connect Your First Computer to the Intelligent Gateway
Choose a computer and connection type . . . . . . . . . . . . . . . . . . . . . . . . . . . . . . . . . . . . . . . . . . . . . . . . . . . 6
Ethernet Connection . . . . . . . . . . . . . . . . . . . . . . . . . . . . . . . . . . . . . . . . . . . . . . . . . . . . . . . . . . . . . . 7
Check your connections . . . . . . . . . . . . . . . . . . . . . . . . . . . . . . . . . . . . . . . . . . . . . . . . . . . . . . . . 7
USB Connection . . . . . . . . . . . . . . . . . . . . . . . . . . . . . . . . . . . . . . . . . . . . . . . . . . . . . . . . . . . . . . . . . . 8
Install the Intelligent Gateway USB driver — Windows PC. . . . . . . . . . . . . . . . . . . . . . . . . . . . 9
Install the Intelligent Gateway USB driver — Macintosh . . . . . . . . . . . . . . . . . . . . . . . . . . . . 10
Check your connections . . . . . . . . . . . . . . . . . . . . . . . . . . . . . . . . . . . . . . . . . . . . . . . . . . . . . . . 11
Step 3: Install the Intelligent Gateway Software
BT Openworld Pay-As-You-Go Dial Up Connection Option . . . . . . . . . . . . . . . . . . . . . . . . . . . . . . . . . . 12
Installing the Intelligent Gateway Setup Wizard on Windows PCs . . . . . . . . . . . . . . . . . . . . . . . . . . . . . . 13
Starting the Setup Wizard manually on Windows PCs . . . . . . . . . . . . . . . . . . . . . . . . . . . . . . . . . . . 13
Configuring the Intelligent Gateway on Macintosh computers . . . . . . . . . . . . . . . . . . . . . . . . . . . . . . . . . 14
Macintosh 8.6 and 9.x. . . . . . . . . . . . . . . . . . . . . . . . . . . . . . . . . . . . . . . . . . . . . . . . . . . . . . . . . . . . . 14
Macintosh OS X . . . . . . . . . . . . . . . . . . . . . . . . . . . . . . . . . . . . . . . . . . . . . . . . . . . . . . . . . . . . . . . . . 14

Step 4: Add Computers to the Network
Choose a computer and connection type . . . . . . . . . . . . . . . . . . . . . . . . . . . . . . . . . . . . . . . . . . . . . . . . . . 15
Ethernet Connection . . . . . . . . . . . . . . . . . . . . . . . . . . . . . . . . . . . . . . . . . . . . . . . . . . . . . . . . . . . . . 16
USB Connection . . . . . . . . . . . . . . . . . . . . . . . . . . . . . . . . . . . . . . . . . . . . . . . . . . . . . . . . . . . . . . . . . 17
Home Phoneline Networking (HomePNA) Connection . . . . . . . . . . . . . . . . . . . . . . . . . . . . . . . . . . 18
Install the PC Port Driver . . . . . . . . . . . . . . . . . . . . . . . . . . . . . . . . . . . . . . . . . . . . . . . . . . . . . 18
Home Phoneline Networking (HomePNA) Connection . . . . . . . . . . . . . . . . . . . . . . . . . . . . . . . . . . 19
Install the PC Port Driver. . . . . . . . . . . . . . . . . . . . . . . . . . . . . . . . . . . . . . . . . . . . . . . . . . . . . . 19
Wireless Connection . . . . . . . . . . . . . . . . . . . . . . . . . . . . . . . . . . . . . . . . . . . . . . . . . . . . . . . . . . . . . 20
Using the Intelligent Gateway Network
System . . . . . . . . . . . . . . . . . . . . . . . . . . . . . . . . . . . . . . . . . . . . . . . . . . . . . . . . . . . . . . . . . . . . . . . . . . . . 23
Viewing your summary . . . . . . . . . . . . . . . . . . . . . . . . . . . . . . . . . . . . . . . . . . . . . . . . . . . . . . . . . . . 23
Editing your system password . . . . . . . . . . . . . . . . . . . . . . . . . . . . . . . . . . . . . . . . . . . . . . . . . . . . . . 24
Setting a password . . . . . . . . . . . . . . . . . . . . . . . . . . . . . . . . . . . . . . . . . . . . . . . . . . . . . . . . . . . 24
Changing a password . . . . . . . . . . . . . . . . . . . . . . . . . . . . . . . . . . . . . . . . . . . . . . . . . . . . . . . . 24
Editing your date and time settings. . . . . . . . . . . . . . . . . . . . . . . . . . . . . . . . . . . . . . . . . . . . . . . . . . . 25
Viewing your system details. . . . . . . . . . . . . . . . . . . . . . . . . . . . . . . . . . . . . . . . . . . . . . . . . . . . . . . . 25
Broadband Link . . . . . . . . . . . . . . . . . . . . . . . . . . . . . . . . . . . . . . . . . . . . . . . . . . . . . . . . . . . . . . . . . . . . . 26
Viewing your Broadband Link summary . . . . . . . . . . . . . . . . . . . . . . . . . . . . . . . . . . . . . . . . . . . . . 26
Checking your connection details . . . . . . . . . . . . . . . . . . . . . . . . . . . . . . . . . . . . . . . . . . . . . . . . . . . 26
Viewing connection information . . . . . . . . . . . . . . . . . . . . . . . . . . . . . . . . . . . . . . . . . . . . . . . . . . . . 26
Viewing connection details . . . . . . . . . . . . . . . . . . . . . . . . . . . . . . . . . . . . . . . . . . . . . . . . . . . . . . . . 27
DSL connection details . . . . . . . . . . . . . . . . . . . . . . . . . . . . . . . . . . . . . . . . . . . . . . . . . . . . . . . 27
Internet connection details . . . . . . . . . . . . . . . . . . . . . . . . . . . . . . . . . . . . . . . . . . . . . . . . . . . . 28
Checking your connection speed . . . . . . . . . . . . . . . . . . . . . . . . . . . . . . . . . . . . . . . . . . . . . . . . . . . . 29
Monitoring your Internet connection . . . . . . . . . . . . . . . . . . . . . . . . . . . . . . . . . . . . . . . . . . . . . . . . . 30
Using Broadband Link diagnostics. . . . . . . . . . . . . . . . . . . . . . . . . . . . . . . . . . . . . . . . . . . . . . . . . . . 30
Viewing Broadband Link statistics. . . . . . . . . . . . . . . . . . . . . . . . . . . . . . . . . . . . . . . . . . . . . . . . . . . 31
Modifying Broadband Link settings . . . . . . . . . . . . . . . . . . . . . . . . . . . . . . . . . . . . . . . . . . . . . . . . . 32
Local Network . . . . . . . . . . . . . . . . . . . . . . . . . . . . . . . . . . . . . . . . . . . . . . . . . . . . . . . . . . . . . . . . . . . . . . 33
Viewing Local Network summary information . . . . . . . . . . . . . . . . . . . . . . . . . . . . . . . . . . . . . . . . . 33
Editing advanced Local Network settings . . . . . . . . . . . . . . . . . . . . . . . . . . . . . . . . . . . . . . . . . . . . . 34
Changing address allocation . . . . . . . . . . . . . . . . . . . . . . . . . . . . . . . . . . . . . . . . . . . . . . . . . . . . . . . 35
Connecting to a corporate LAN via VPN . . . . . . . . . . . . . . . . . . . . . . . . . . . . . . . . . . . . . . . . . . . . . 36
Maintaining/restoring the VPN connection . . . . . . . . . . . . . . . . . . . . . . . . . . . . . . . . . . . . . . . 38
Firewall . . . . . . . . . . . . . . . . . . . . . . . . . . . . . . . . . . . . . . . . . . . . . . . . . . . . . . . . . . . . . . . . . . . . . . . . . . . . 40
Viewing your firewall summary. . . . . . . . . . . . . . . . . . . . . . . . . . . . . . . . . . . . . . . . . . . . . . . . . . . . . 40
Viewing firewall details . . . . . . . . . . . . . . . . . . . . . . . . . . . . . . . . . . . . . . . . . . . . . . . . . . . . . . . 41
Editing your firewall settings . . . . . . . . . . . . . . . . . . . . . . . . . . . . . . . . . . . . . . . . . . . . . . . . . . . . . . . 43
Updating your Application Profile list . . . . . . . . . . . . . . . . . . . . . . . . . . . . . . . . . . . . . . . . . . . 44
Creating, editing, or deleting your Application Profile . . . . . . . . . . . . . . . . . . . . . . . . . . . . . . . 44
Allowing all applications . . . . . . . . . . . . . . . . . . . . . . . . . . . . . . . . . . . . . . . . . . . . . . . . . . . . . . 45
Monitoring the firewall . . . . . . . . . . . . . . . . . . . . . . . . . . . . . . . . . . . . . . . . . . . . . . . . . . . . . . . . . . . 46
Editing advanced firewall settings . . . . . . . . . . . . . . . . . . . . . . . . . . . . . . . . . . . . . . . . . . . . . . . . . . . 47

Firewall Monitor
Setting up Firewall Monitor attack alerts . . . . . . . . . . . . . . . . . . . . . . . . . . . . . . . . . . . . . . . . . . . . . . . . . . 48
Configuring/editing attack alerts . . . . . . . . . . . . . . . . . . . . . . . . . . . . . . . . . . . . . . . . . . . . . . . . . . . . 49
Enabling attack notification . . . . . . . . . . . . . . . . . . . . . . . . . . . . . . . . . . . . . . . . . . . . . . . . . . . 50
Configuring notification rules . . . . . . . . . . . . . . . . . . . . . . . . . . . . . . . . . . . . . . . . . . . . . . . . . . 50
Enabling email notification . . . . . . . . . . . . . . . . . . . . . . . . . . . . . . . . . . . . . . . . . . . . . . . . . . . . 51
Viewing Firewall Monitor attack alerts . . . . . . . . . . . . . . . . . . . . . . . . . . . . . . . . . . . . . . . . . . . . . . . 52
Viewing top attackers. . . . . . . . . . . . . . . . . . . . . . . . . . . . . . . . . . . . . . . . . . . . . . . . . . . . . . . . . 53
Reporting attacks . . . . . . . . . . . . . . . . . . . . . . . . . . . . . . . . . . . . . . . . . . . . . . . . . . . . . . . . . . . . 53
Understanding the Attacks Blocked area . . . . . . . . . . . . . . . . . . . . . . . . . . . . . . . . . . . . . . . . . 54
Understanding the Firewall Rule Database area . . . . . . . . . . . . . . . . . . . . . . . . . . . . . . . . . . . . 55
Updating your firewall rules. . . . . . . . . . . . . . . . . . . . . . . . . . . . . . . . . . . . . . . . . . . . . . . . . . . . . . . . 56
Access Controls
Internet Access Restriction . . . . . . . . . . . . . . . . . . . . . . . . . . . . . . . . . . . . . . . . . . . . . . . . . . . . . . . . . . . . . 57
Setting up Internet Access Restriction . . . . . . . . . . . . . . . . . . . . . . . . . . . . . . . . . . . . . . . . . . . . . . . . 58
Step 1: Define Internet Access Restriction settings . . . . . . . . . . . . . . . . . . . . . . . . . . . . . . . . . . . . . . 59
Step 2: Enable Internet Access Restriction. . . . . . . . . . . . . . . . . . . . . . . . . . . . . . . . . . . . . . . . . . . . . 60
Step 3: Permit and schedule a specific application category . . . . . . . . . . . . . . . . . . . . . . . . . . . . . . . 60
Internet Access categories . . . . . . . . . . . . . . . . . . . . . . . . . . . . . . . . . . . . . . . . . . . . . . . . . . . . . 60
Permitting use of a specific application . . . . . . . . . . . . . . . . . . . . . . . . . . . . . . . . . . . . . . . . . . 61
Permitting applications only during a specific schedule . . . . . . . . . . . . . . . . . . . . . . . . . . . . . . 61
Viewing a restriction schedule . . . . . . . . . . . . . . . . . . . . . . . . . . . . . . . . . . . . . . . . . . . . . . . . . . . . . . 62
Content Screening . . . . . . . . . . . . . . . . . . . . . . . . . . . . . . . . . . . . . . . . . . . . . . . . . . . . . . . . . . . . . . . . . . . . 63
Setting up Content Screening . . . . . . . . . . . . . . . . . . . . . . . . . . . . . . . . . . . . . . . . . . . . . . . . . . . . . . . 64
Step 1: Block content categories for this screening group . . . . . . . . . . . . . . . . . . . . . . . . . . . . . . . . . 65
Content categories . . . . . . . . . . . . . . . . . . . . . . . . . . . . . . . . . . . . . . . . . . . . . . . . . . . . . . . . . . . 65
Step 2: Block and approve sites for this screening group . . . . . . . . . . . . . . . . . . . . . . . . . . . . . . . . . 66
Adding sites . . . . . . . . . . . . . . . . . . . . . . . . . . . . . . . . . . . . . . . . . . . . . . . . . . . . . . . . . . . . . . . . 67
Removing sites. . . . . . . . . . . . . . . . . . . . . . . . . . . . . . . . . . . . . . . . . . . . . . . . . . . . . . . . . . . . . . 67
Allowing blocked sites. . . . . . . . . . . . . . . . . . . . . . . . . . . . . . . . . . . . . . . . . . . . . . . . . . . . . . . . 67
Blocking approved sites . . . . . . . . . . . . . . . . . . . . . . . . . . . . . . . . . . . . . . . . . . . . . . . . . . . . . . 67
Step 3: Assign computers to screening groups . . . . . . . . . . . . . . . . . . . . . . . . . . . . . . . . . . . . . . . . . 67
Viewing Content Screening settings. . . . . . . . . . . . . . . . . . . . . . . . . . . . . . . . . . . . . . . . . . . . . . . . . . 68
Access Controls log . . . . . . . . . . . . . . . . . . . . . . . . . . . . . . . . . . . . . . . . . . . . . . . . . . . . . . . . . . . . . . . . . . 68
Sharing Files and Printers
PC/network configuration for file sharing . . . . . . . . . . . . . . . . . . . . . . . . . . . . . . . . . . . . . . . . . . . . . . . . . 70
Windows 95, 98, 98 SE operating systems. . . . . . . . . . . . . . . . . . . . . . . . . . . . . . . . . . . . . . . . . . . . . 70
Adding PCs to your network . . . . . . . . . . . . . . . . . . . . . . . . . . . . . . . . . . . . . . . . . . . . . . . . . . . 70
Accessing PCs on your network . . . . . . . . . . . . . . . . . . . . . . . . . . . . . . . . . . . . . . . . . . . . . . . . 74
Sharing your files . . . . . . . . . . . . . . . . . . . . . . . . . . . . . . . . . . . . . . . . . . . . . . . . . . . . . . . . . . . 75
Windows ME operating systems . . . . . . . . . . . . . . . . . . . . . . . . . . . . . . . . . . . . . . . . . . . . . . . . . . . . 76
Adding PCs to your network . . . . . . . . . . . . . . . . . . . . . . . . . . . . . . . . . . . . . . . . . . . . . . . . . . . 76
Accessing PCs on your network . . . . . . . . . . . . . . . . . . . . . . . . . . . . . . . . . . . . . . . . . . . . . . . . 78
Sharing your files . . . . . . . . . . . . . . . . . . . . . . . . . . . . . . . . . . . . . . . . . . . . . . . . . . . . . . . . . . . 79
Windows NT operating systems. . . . . . . . . . . . . . . . . . . . . . . . . . . . . . . . . . . . . . . . . . . . . . . . . . . . . 81
Adding PCs to your network . . . . . . . . . . . . . . . . . . . . . . . . . . . . . . . . . . . . . . . . . . . . . . . . . . . 81
Accessing PCs on your network . . . . . . . . . . . . . . . . . . . . . . . . . . . . . . . . . . . . . . . . . . . . . . . . 81
Sharing your files . . . . . . . . . . . . . . . . . . . . . . . . . . . . . . . . . . . . . . . . . . . . . . . . . . . . . . . . . . . 82
Windows 2000 operating system . . . . . . . . . . . . . . . . . . . . . . . . . . . . . . . . . . . . . . . . . . . . . . . . . . . . 86
Adding PCs to your network . . . . . . . . . . . . . . . . . . . . . . . . . . . . . . . . . . . . . . . . . . . . . . . . . . . 86
Accessing PCs on your network . . . . . . . . . . . . . . . . . . . . . . . . . . . . . . . . . . . . . . . . . . . . . . . . 88
Sharing your files . . . . . . . . . . . . . . . . . . . . . . . . . . . . . . . . . . . . . . . . . . . . . . . . . . . . . . . . . . . . 90

Printer sharing . . . . . . . . . . . . . . . . . . . . . . . . . . . . . . . . . . . . . . . . . . . . . . . . . . . . . . . . . . . . . . . . . . . . . . 94
Sharing your printer (Windows 95, 98, and 98 SE) . . . . . . . . . . . . . . . . . . . . . . . . . . . . . . . . . . . . . . 94
Print sharing as host . . . . . . . . . . . . . . . . . . . . . . . . . . . . . . . . . . . . . . . . . . . . . . . . . . . . . . . . . 94
Print sharing as client. . . . . . . . . . . . . . . . . . . . . . . . . . . . . . . . . . . . . . . . . . . . . . . . . . . . . . . . . 96
Sharing your printer (Windows ME) . . . . . . . . . . . . . . . . . . . . . . . . . . . . . . . . . . . . . . . . . . . . . . . . . 99
Print sharing as host . . . . . . . . . . . . . . . . . . . . . . . . . . . . . . . . . . . . . . . . . . . . . . . . . . . . . . . . . 99
Print sharing as client . . . . . . . . . . . . . . . . . . . . . . . . . . . . . . . . . . . . . . . . . . . . . . . . . . . . . . . 101
Sharing your printer (Windows NT). . . . . . . . . . . . . . . . . . . . . . . . . . . . . . . . . . . . . . . . . . . . . . . . . 105
Print sharing as host . . . . . . . . . . . . . . . . . . . . . . . . . . . . . . . . . . . . . . . . . . . . . . . . . . . . . . . . 105
Print sharing as client. . . . . . . . . . . . . . . . . . . . . . . . . . . . . . . . . . . . . . . . . . . . . . . . . . . . . . . . 106
The Intelligent Gateway Indicator Lights
Intelligent Gateway indicator and status lights . . . . . . . . . . . . . . . . . . . . . . . . . . . . . . . . . . . . . . . . . . . . 109
Diagnosing connection problems . . . . . . . . . . . . . . . . . . . . . . . . . . . . . . . . . . . . . . . . . . . . . . . . . . . . . . . 110
POWER indicator light is not lit . . . . . . . . . . . . . . . . . . . . . . . . . . . . . . . . . . . . . . . . . . . . . . . . . . . 110
BROADBAND LINK indicator light is red . . . . . . . . . . . . . . . . . . . . . . . . . . . . . . . . . . . . . . . . . . . 110
LOCAL NETWORK indicator light is not lit . . . . . . . . . . . . . . . . . . . . . . . . . . . . . . . . . . . . . . . . . 110
Frequently Asked Questions
Installation FAQs . . . . . . . . . . . . . . . . . . . . . . . . . . . . . . . . . . . . . . . . . . . . . . . . . . . . . . . . . . . . . . . . . . . 111
Networking FAQs . . . . . . . . . . . . . . . . . . . . . . . . . . . . . . . . . . . . . . . . . . . . . . . . . . . . . . . . . . . . . . . . . . . 114
Computer Configuration FAQs . . . . . . . . . . . . . . . . . . . . . . . . . . . . . . . . . . . . . . . . . . . . . . . . . . . . . . . . . 115
PC — Internet Explorer 6.0 . . . . . . . . . . . . . . . . . . . . . . . . . . . . . . . . . . . . . . . . . . . . . . . . . . . . . . . 115
PC — Netscape 6.2. . . . . . . . . . . . . . . . . . . . . . . . . . . . . . . . . . . . . . . . . . . . . . . . . . . . . . . . . . . . . . 115
Macintosh — Internet Explorer 5 . . . . . . . . . . . . . . . . . . . . . . . . . . . . . . . . . . . . . . . . . . . . . . . . . . . 115
Macintosh — Netscape 4.7 . . . . . . . . . . . . . . . . . . . . . . . . . . . . . . . . . . . . . . . . . . . . . . . . . . . . . . . 115
Windows — 95, 98, 98SE, ME . . . . . . . . . . . . . . . . . . . . . . . . . . . . . . . . . . . . . . . . . . . . . . . . . . . . 116
Windows — NT, 2000, XP. . . . . . . . . . . . . . . . . . . . . . . . . . . . . . . . . . . . . . . . . . . . . . . . . . . . . . . . 116
Macintosh — 8.6 to 9.x . . . . . . . . . . . . . . . . . . . . . . . . . . . . . . . . . . . . . . . . . . . . . . . . . . . . . . . . . . 116
Macintosh — OS X. . . . . . . . . . . . . . . . . . . . . . . . . . . . . . . . . . . . . . . . . . . . . . . . . . . . . . . . . . . . . . 116
PC — Internet Explorer 6.0 . . . . . . . . . . . . . . . . . . . . . . . . . . . . . . . . . . . . . . . . . . . . . . . . . . . . . . . 123
PC — Netscape 6.2. . . . . . . . . . . . . . . . . . . . . . . . . . . . . . . . . . . . . . . . . . . . . . . . . . . . . . . . . . . . . . 123
Macintosh — Internet Explorer 5 . . . . . . . . . . . . . . . . . . . . . . . . . . . . . . . . . . . . . . . . . . . . . . . . . . . 124
Macintosh — Netscape 4.7 . . . . . . . . . . . . . . . . . . . . . . . . . . . . . . . . . . . . . . . . . . . . . . . . . . . . . . . 124
Configuration and Management FAQs . . . . . . . . . . . . . . . . . . . . . . . . . . . . . . . . . . . . . . . . . . . . . . . . . . . 125
Windows XP FAQs . . . . . . . . . . . . . . . . . . . . . . . . . . . . . . . . . . . . . . . . . . . . . . . . . . . . . . . . . . . . . . . . . . 126
Glossary
Regulatory Information
Declaration of Conformance with European Community Directive 1999/5/EC
Networking Technology Overview
When two or more computers are connected so they can “talk” with each other, a computer network is
established. Individual users can now connect to Web servers worldwide through the Internet, a global
computer network. A local area network (LAN) enables computer users in a business or household to share
files without trading disks, and share peripherals such as printers and external drives.
With the Intelligent Gateway, computers on a LAN can share a connection to the Internet. Several
technologies are available to connect or “network” computers. These technologies include:
•Ethernet
• Universal Serial Bus (USB)
•HomePNA
• Wireless
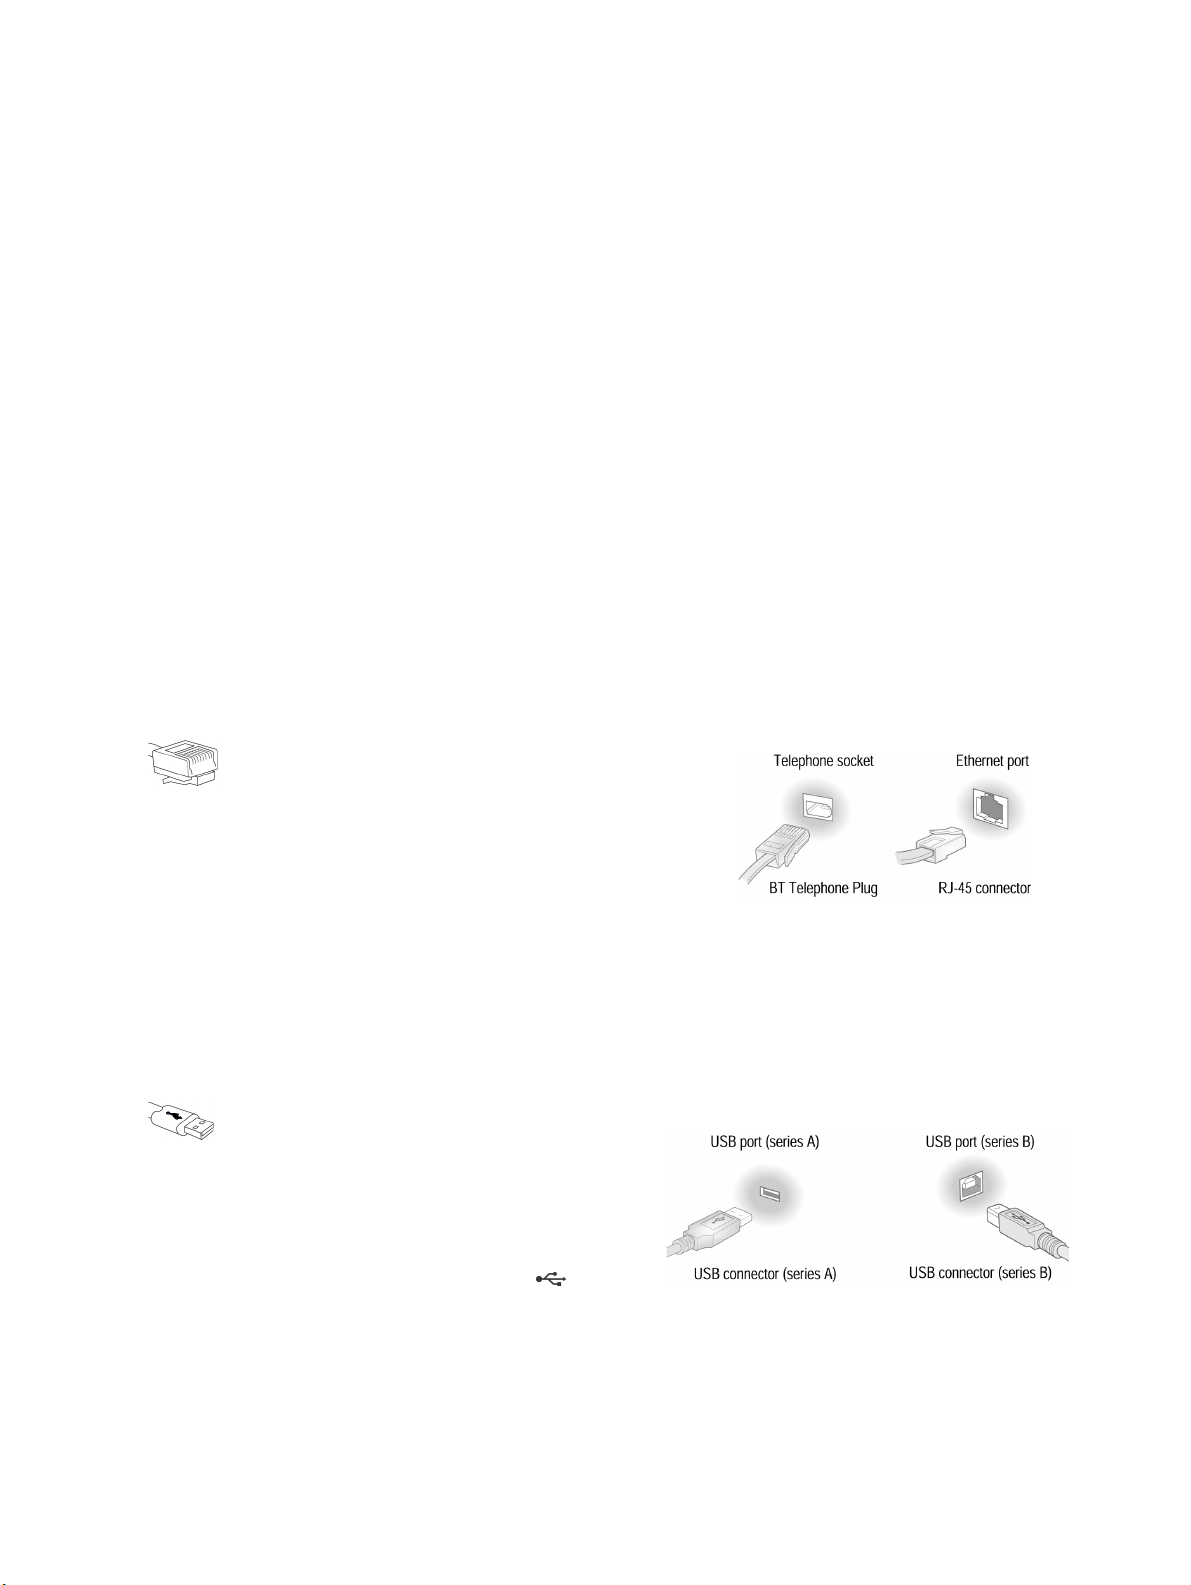
Ethernet
Ethernet is a technology that allows you to create a
network using special wiring (Category 5 cable), such
as the dark gray cable included with the Intelligent
Gateway. Many computers are shipped with a built-in
Ethernet adapter. If you have a computer with an
Ethernet adapter, you can use Ethernet cable to connect the Ethernet connection socket on the
computer to any available local Ethernet port on the Intelligent Gateway. You can identify an
Ethernet connection socket by its rectangular shape and size, which is slightly larger than a
standard telephone socket.
USB
Most computers manufactured in the last few
years come with USB connections. USB ports,
which are small and rectangular, are typically
located on the back of the computer and are
marked with the USB symbol ( ). Use a
USB connection for a computer that is in close
proximity to the Intelligent Gateway.
1

Home Phoneline Networking (HomePNA)
The Intelligent Gateway supports the Home Phoneline
Networking Alliance protocol. HomePNA technology lets you
connect computers in different rooms using your home’s
existing telephone wiring. To create a home phoneline network,
you need an external HomePNA adapter for each additional computer you connect to the
network using HomePNA. These devices make it possible to connect each additional
computer through the phoneline. Use HomePNA for connecting computers to your Intelligent
Gateway if it is used in a home environment.
Wireless
The Intelligent Gateway supports 802.11b wireless networking, which
uses radio waves to connect your computers to your network. Each
computer on your network will need an adapter to work with the
system. Two types of adapter are common: a PC card (commonly used for laptop computers)
and a USB adapter (commonly used for desktop computers). Use wireless technology for
networking computers that are not accessible with physical wiring or require mobility, such as
laptop computers.
Intelligent Gateway
The Intelligent Gateway makes it possible to create a LAN using any or all of the technologies described
above. All Intelligent Gateway network interfaces are completely functional at the same time. This means
that you can have different computers simultaneously connecting with each other using Ethernet, USB,
HPNA, and wireless (optional wireless expansion card required). By enabling you to connect all of the
computers in your small business or home office, the Intelligent Gateway provides you with the benefits of
networking, including the ability to share one Internet connection among all the computers and computer
users at your location.
The Intelligent Gateway offers the following features:
• Delivers rich content from the Internet, distributing it to multiple simultaneous users.
• Provides shared usage of files and printers among users.
• Enables high-speed, continuous Internet access to the computers on your network—while keeping
your confidential files safe from Internet hackers. Intelligent Gateway has a built-in firewall, with
stateful packet inspection, to keep your network safe.
• Allows users to connect to the local network securely through the Internet anywhere in the world.
• Provides a 4-port 10/100 Ethernet switch allowing users to create a larger, faster networking
environment.
2

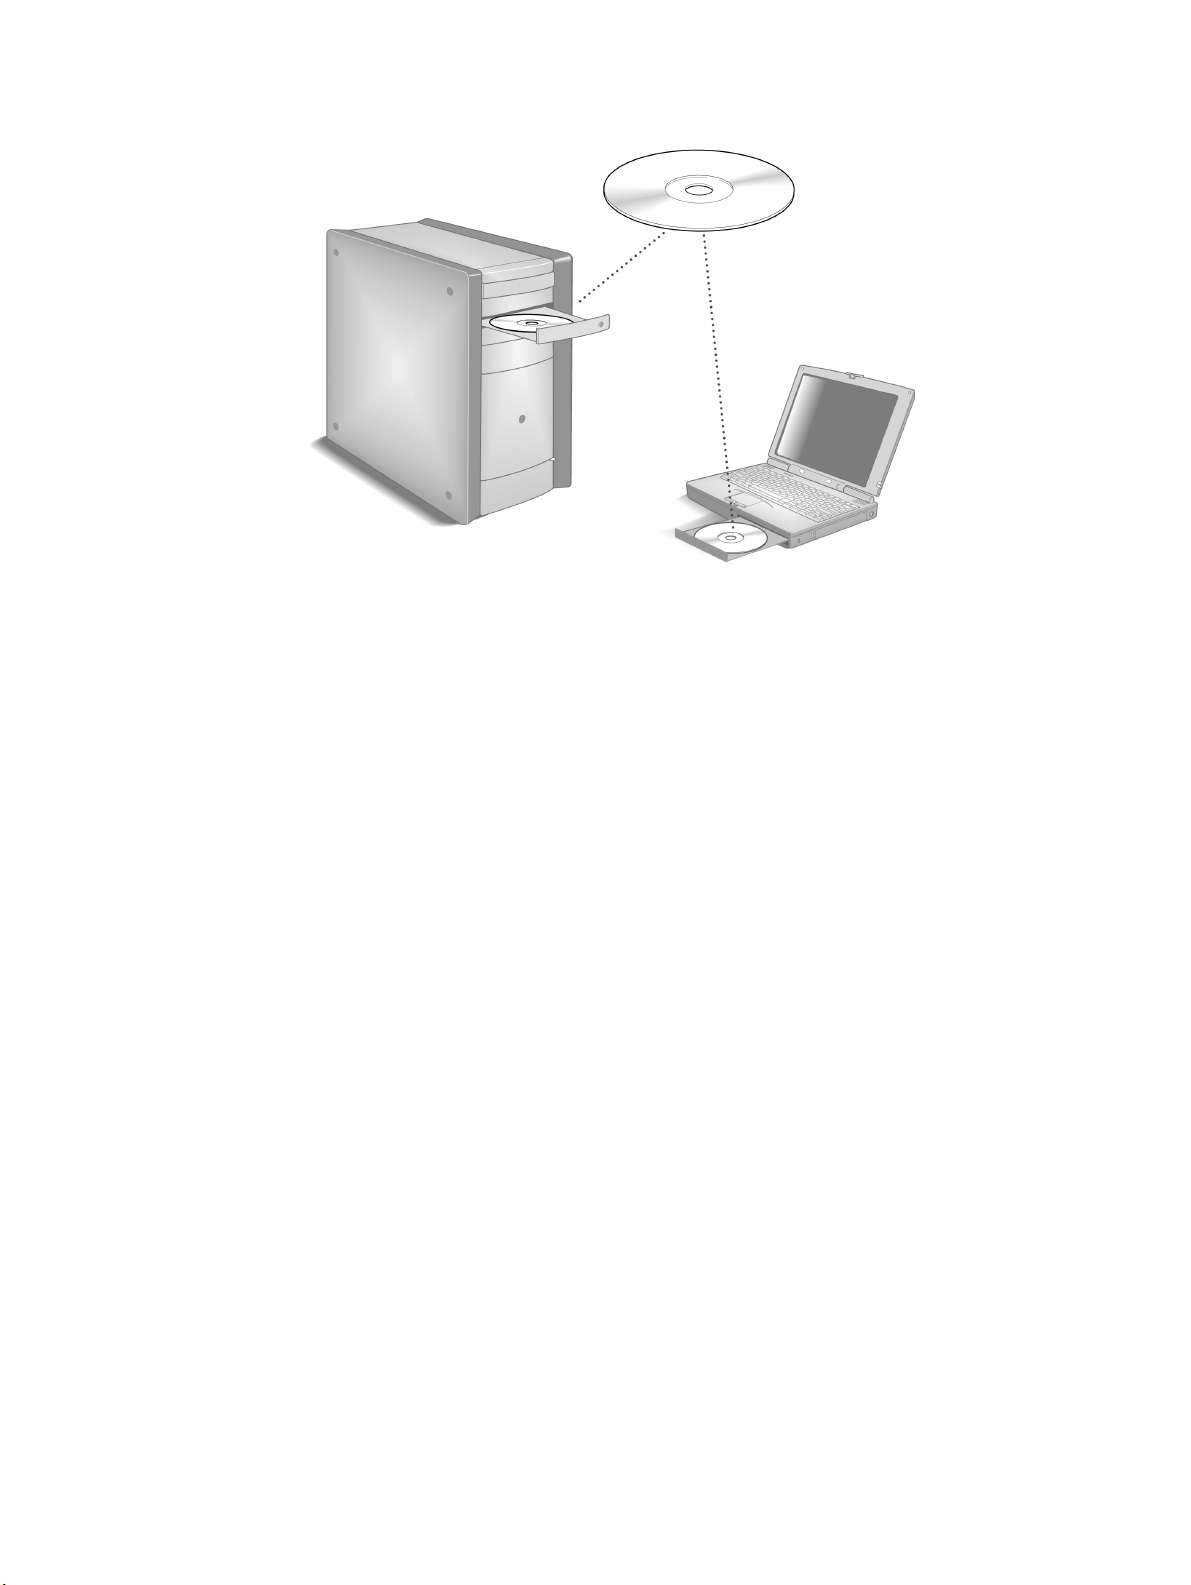
Plan your network
The following diagram shows a recommended location for the Intelligent Gateway and your computers.
Place the Intelligent Gateway in a visible, easily accessible location near the power mains, telephone
socket, and a computer. If your office computer has Windows 98, ME, 2000, or XP, we recommend
connecting it via Ethernet. For two computers, consider using USB and Ethernet. If you have multiple
computers requiring Ethernet, you can use any of the available local Ethernet ports on the Intelligent
Gateway to connect the computers to the Intelligent Gateway.
3

Step
1 Getting Started
First: Remove or disable conflicting applications
Applications that enable a computer to share its Internet connection (often called Internet sharing software)
and PC based firewall applications typically interfere with the Intelligent Gateway and should be removed
or disabled before you install the Intelligent Gateway. The Intelligent Gateway provides all of the same
features as the products listed below so you don’t need to worry about losing Internet sharing and security
capabilities.
If you have any of the following (or similar) applications installed on your computers, remove or disable
them according to the manufacturer’s instructions before proceeding.
Internet sharing applications such as... Proxy software such as... Security software such as...
• 3Com HomeClick
• Microsoft Internet Connection Sharing
• Intel Anypoint ISS
•WinGate
• Sygate
• Norton Internet Security
•McAfee
• Black Ice
• Zone Alarm
Second: Check your computer’s system and browser requirements
Verify that your computers meet the following minimum requirements:
System Requirements
Windows:
• Windows 98, 98SE, Windows ME, Windows NT 4.0 with Service Pack 6, Windows 2000,
or Windows XP
• At least 32 MB of RAM
• At least one computer with CD-ROM
• 5 MB of available hard disk space for Intelligent Gateway software
• Available Ethernet or USB port
Macintosh:
• Mac OS 8.6 or higher (USB connectivity is not supported for Mac OS 10.0 or 10.1)
• At least 32 MB of RAM
• At least one computer with CD-ROM
• 10 MB of available hard disk space for Intelligent Gateway software
• Available Ethernet port
4

Browser Requirements
Windows: Microsoft Internet Explorer 5.0 or higher (Internet Explorer 6.0 is included on the Intelligent
Gateway Setup Wizard CD) or Netscape Navigator 4.7 or higher.
Macintosh: Microsoft Internet Explorer 5.0 or Netscape 4.74 or higher.
Third: Install your ADSL Filter
Because telephony and DSL signals are carried between the exchange and your office over the same cable,
filters are needed to split the signals within your office. By separating the computer data and voice signals,
the ADSL Filter enables you to use your telephone and broadband services simultaneously. Install one
ADSL Filter for each telephony connection, including such devices as answering machines, fax machines,
point of sale terminals, and PSTN dial up modems.
You must install an ADSL Filter for each telephone or telephony device that shares the same line as your
ADSL modem. To do so:
• Disconnect your telephone/other telephony equipment from the wall socket
• Connect the “tail” of the ADSL Filter into the wall socket
• Connect the line cord from your phone or other equipment into the ADSL Filter socket marked
PHONE
• Note that the socket marked ADSL MODEM is unused at this stage
• Repeat this procedure for your other telephones/telephony equipment
• Unused sockets do not need an ADSL Filter installed
5

Step
2
Connect Your First Computer
to the Intelligent Gateway
Choose a computer and connection type
The first computer you connect to your local network is used to configure the Intelligent Gateway for
proper operation, and should be located in the same room as the Intelligent Gateway. Choose one of the
following methods to connect your first computer to the Intelligent Gateway. Save and close all open
programs before you begin connecting your Intelligent Gateway.
Connection Type Go to...
Ethernet
Requires: A computer with an Ethernet port.
Recommended for: Primary computer in the same room as the Intelligent
Gateway.
USB
Requires: A computer with an available USB port. See the USB connection
option for exceptions.
page 7
page 8
Recommended for: Primary computer in the same room as the Intelligent
Gateway.
6
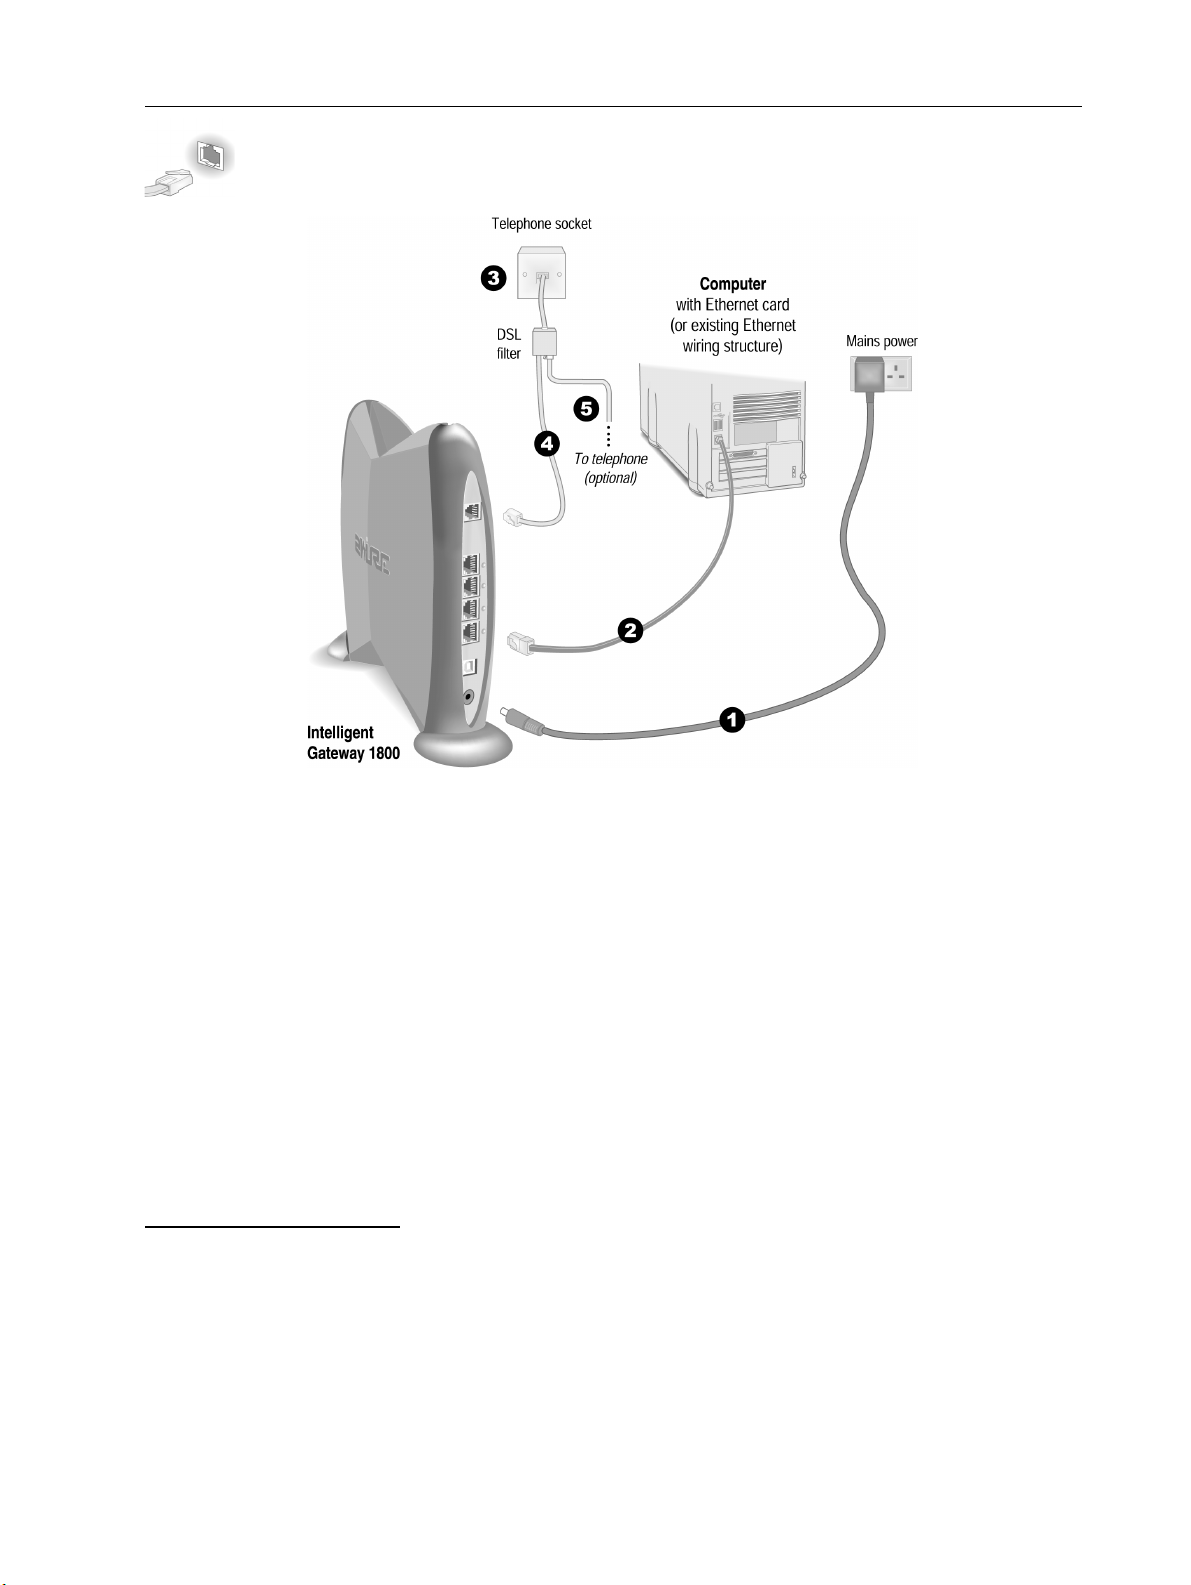
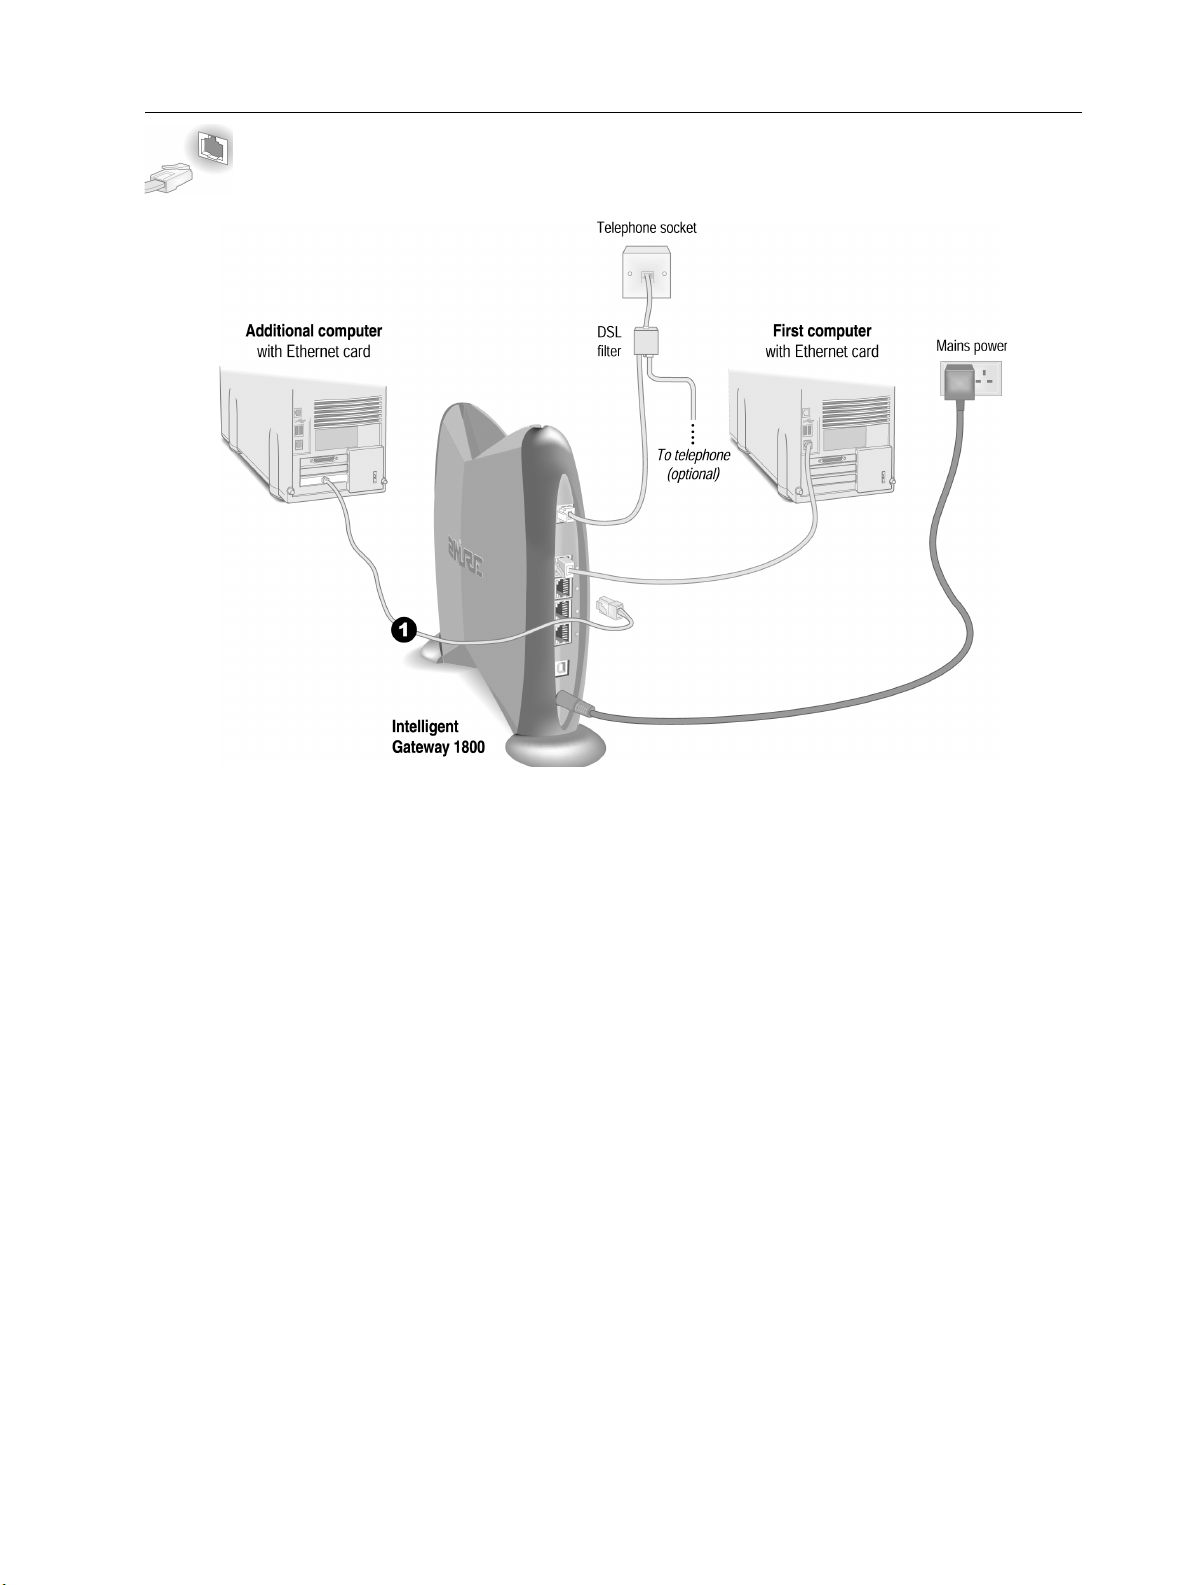
Ethernet Connection
Requires a computer with an Ethernet port
1.
Connect the provided AC power adapter from the Intelligent Gateway’s POWER port to an electrical
outlet. The green
2. Connect the provided Ethernet cable from any available LOCAL ETHENET port on the Intelligent
POWER light on the front of the Intelligent Gateway should light up.
Gateway to your computer’s Ethernet port.
3. Connect the provided ADSL Filter to the telephone socket.
4. Connect the provided telephone cable from the PHONE LINE port on the Intelligent Gateway to the
ADSL MODEM socket on the ADSL Filter.
This connects the internal DSL modem of the Intelligent Gateway to your DSL service provider. If you
have been using an external DSL modem, disconnect it as you will no longer need it.
5. (Optional). If you had a telephone connected to the telephone socket, you can reconnect it to the
PHONE port on the ADSL Filter.
Check your connections
Power-on your computer. When your computer is fully powered-up, verify the POWER and LOCAL
NETWORK indicator lights on the front of the Intelligent Gateway are green. If they are not, see
“Diagnosing connection problems” on page 110. The
BROADBAND LINK indicator light will not turn green
until the Intelligent Gateway software has been installed and an Internet connection has been established.
Continue from here to Step 3 “Install the Intelligent Gateway Software” on page 12.
7
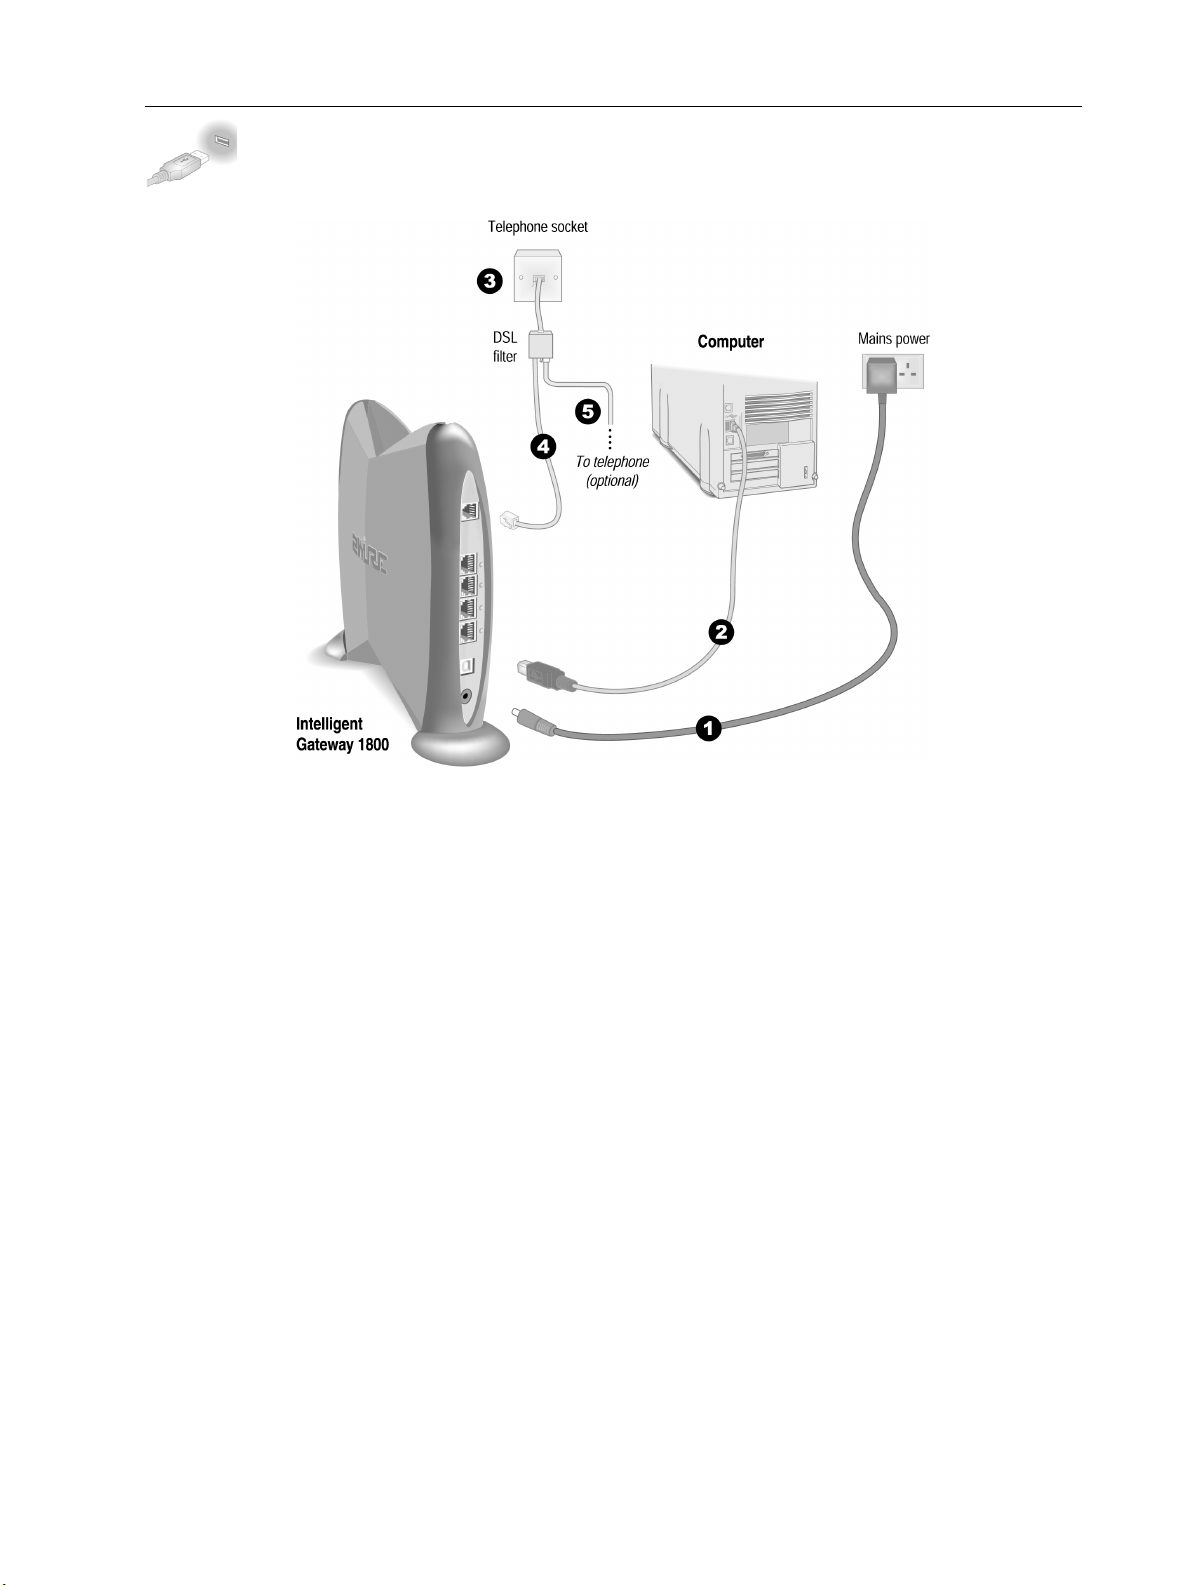
USB Connection
Requires a computer with an available USB port. Refer to the note below for
exceptions.
Note: Only one Windows or Macintosh computer can be directly connected to the Intelligent Gateway
using the USB connection. Intelligent Gateway USB connectivity is NOT available for Macintosh OS
earlier than 8.6, Mac OS 10.0, Mac OS 10.1, Windows 95, Window 95 OSR2, or Windows NT. Additional
computers may be added to the network using connection options such as Ethernet.
1. Connect the provided AC power adapter from the Intelligent Gateway’s POWER port to an electrical
outlet. The green
2. Connect the provided USB cable from the PC port on the Intelligent Gateway to the USB port on your
computer. The gray end fits into the Intelligent Gateway and the beige end goes to your PC.
3. Connect the provided ADSL Filter to the telephone socket.
4. Connect the provided telephone cable from the PHONE LINE port on the Intelligent Gateway to the
ADSL MODEM port on the ADSL Filter.
This connects the internal DSL modem of the Intelligent Gateway to your DSL service provider. If you
have been using an external DSL modem, disconnect it as you will no longer need it.
5. (Optional). If you had a telephone connected to the telephone socket, you can reconnect it to the
PHONE port on the ADSL Filter.
POWER light on the front of the Intelligent Gateway should light up.
8
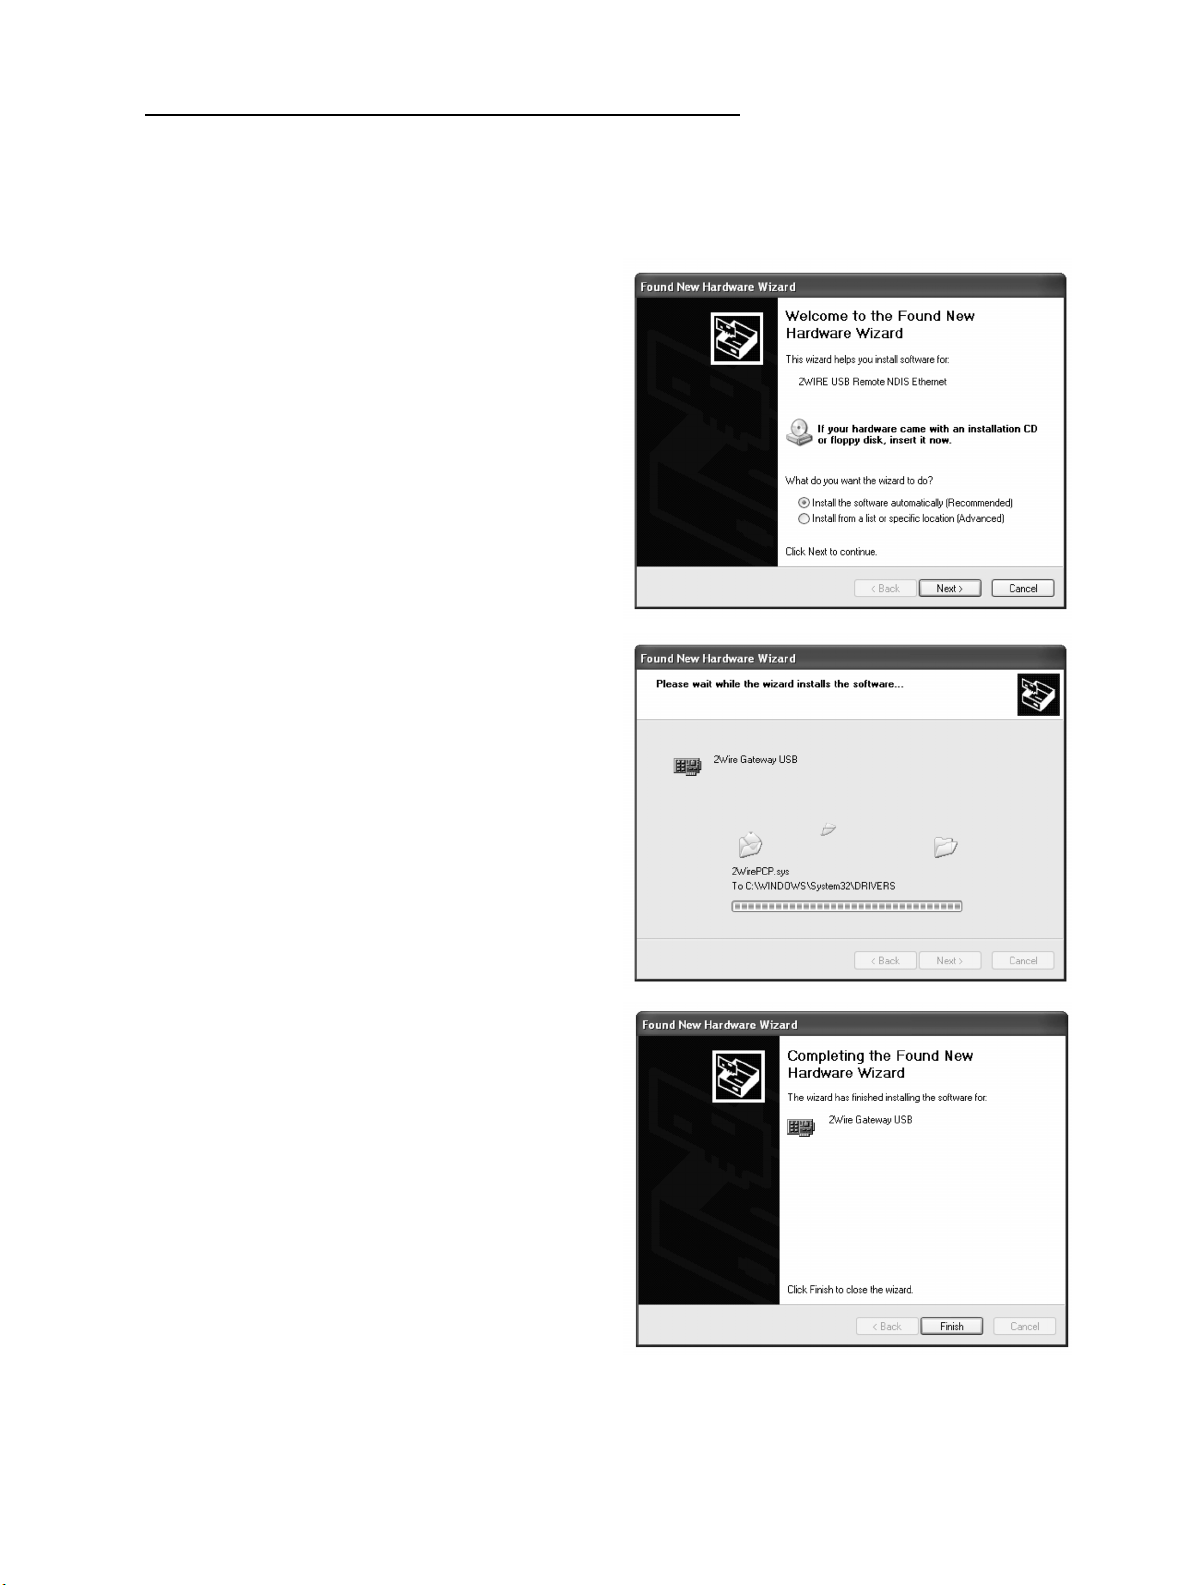
Install the Intelligent Gateway USB driver — Windows PC
Before installing your Intelligent Gateway software, you must install the Intelligent Gateway USB driver
on your computer. The following screens show the installation under Windows XP and may vary
somewhat on Windows 98, Windows ME, and Windows 2000.
1. Power on your computer. When the Found New
Hardware Wizard window opens, make sure
Install the software automatically
that
(Recommended)
is selected and click Next to
continue.
2. The driver installs.
3. Click Finish to complete the installation.
9
Install the Intelligent Gateway USB driver — Macintosh
Before installing your Intelligent Gateway software, you must install the Intelligent Gateway USB driver
on your computer. The following screens show the installation under Macintosh OS 10.2 and may vary
somewhat on Macintosh OS 8.6 to 9.X.
1. Power on your computer.
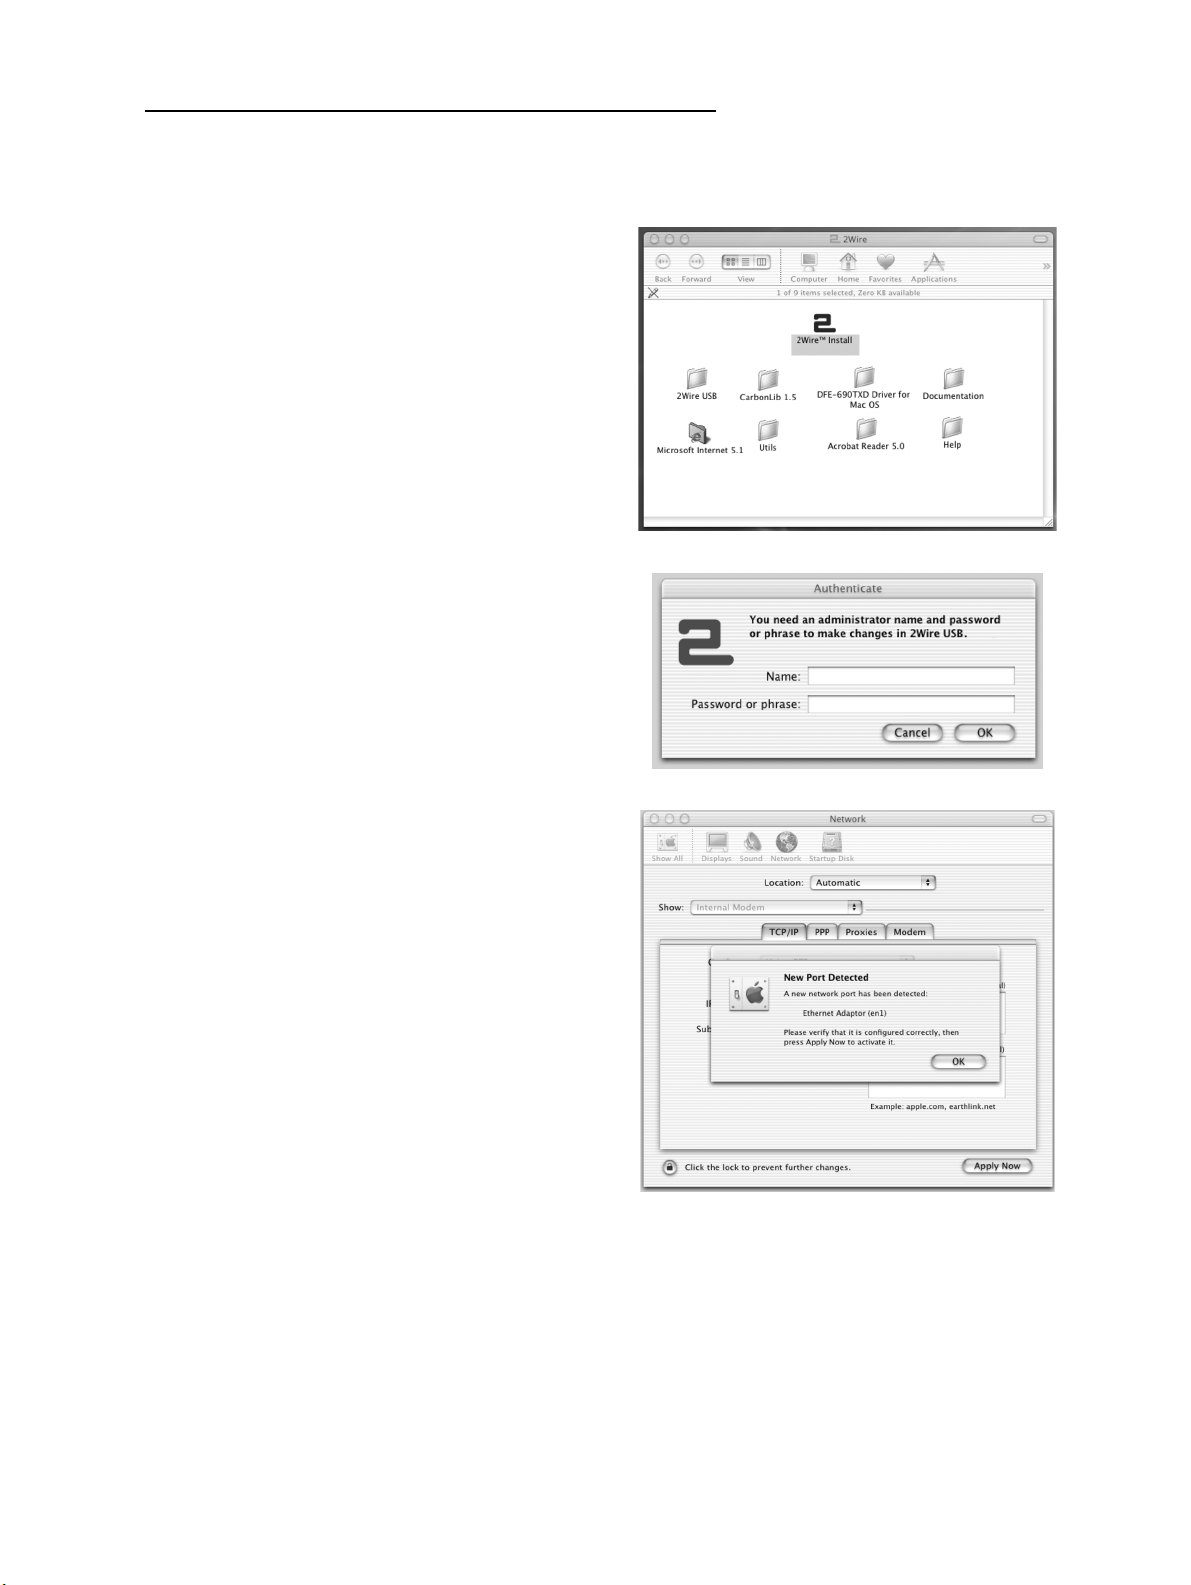
2. Insert the Intelligent Gateway Setup Wizard CD
in your computer’s CD-ROM drive.
3. Double-click the 2Wire USB folder to install
the driver.
4. If you have set up an administrator name and
password, the Authenticate screen opens. Enter
your administrator name and password and
click
OK.
5. Follow the on-screen instructions. When the
driver installation is complete, you will be
prompted to restart your computer.
6. After your computer restarts, connect a USB
cable from your Macintosh computer to the
Intelligent Gateway USB port.
7. Establish your connection. Open the network
Control Panel and select the
Apple icon>System Preferences...>Network.
10
8. Verify that Ethernet Adaptor (en1) is selected
in the Show field. If it is not, select it from the
pull-down menu. When the New Port Detected
message displays, click
9. Click Save to complete your installation.
OK.
Note: Your Macintosh computer automatically assigns the name “(en1)” to the Intelligent Gateway USB
port. If your computer has more than one Ethernet-type network device installed, the USB port may be
named “(en2)” or higher.
Check your connections
Power-on your computer. When your computer is fully powered-up, verify the POWER and LOCAL
NETWORK
“Diagnosing connection problems” on page 110. The
until the Intelligent Gateway software has been installed and an Internet connection has been established.
indicator lights on the front of the Intelligent Gateway are green. If they are not, see
BROADBAND LINK indicator light will not turn green
Continue from here to Step 3 “Install the Intelligent Gateway Software” on page 12.
11

Step
3 Install the Intelligent Gateway
Software
Before installing the Intelligent Gateway software, it is very important that you disable any
conflicting applications such as firewall and file- and printer-sharing applications. See
Step 1, “Getting Started.”
BT Openworld Pay-As-You-Go Dial Up Connection Option
Before installing the Intelligent Gateway software, please make sure that you have your username,
password, and email address that were provided in your Welcome Letter and via email.
When the Setup Wizard CD starts, you will be guided through the BT Openworld Plug & Go installation,
which gives you the option of installing Internet Explorer, Outlook Express, and Windows Media Player
on your computer. You will be prompted for information that enables BT Openworld to automatically
configure your mail account in Outlook Express and set up your default home page in Internet Explorer.
You will also be given the option of installing a Pay-As-You-Go dial-up connection, which will allow you
to connect to the Internet if broadband service is not available. To use the dial-up service, your computer
must be connected to your telephone line via a dial-up modem, and during set up you will be prompted to
select which modem you want to use. You can install the dial-up connection on each PC that has a modem
and that is connected to the network.
IMPORTANT: When you connect a dial-up modem to the same line that is being used for your broadband
service, you MUST use an ADSL Filter.
If you do not want to install the dial-up connection during set up, you can install it at a later time by
navigating to the PAYG folder on the Setup Wizard CD and double-clicking the SetupPAYG.exe file.
To use the dial-up connection, double-click the BT Openworld Connect PAYG desktop icon, enter your
password (if prompted), and connect. Make note of your username and password so that this information is
readily available if you need it. Your username for PAYG is your email address, and your password is
provided in your Welcome Letter and via email. Please note that you will be charged at the usual Pay-As-
You-Go rates when you use this connection.
12
Installing the Intelligent Gateway Setup Wizard on Windows PCs
Note: Close all programs before running the Intelligent Gateway Setup Wizard. The Intelligent Gateway
software must be installed on all computers in your network.
Place the Intelligent Gateway Setup Wizard CD in the CD-ROM drive of your computer and follow the
onscreen instructions. It may take up to one full minute for the Setup Wizard to start.
Starting the Setup Wizard manually on Windows PCs
After one minute, if the Setup Wizard does not run automatically, follow these steps:
1. Double-click the My Computer icon located on the desktop.
2. Double-click the icon that corresponds to your CD-ROM drive, then double-click Setup.exe.
3. Follow the onscreen instructions.
4. After the software installation is complete, your Intelligent Gateway is ready to use ADSL service and
the
POWER, LOCAL NETWORK, and BROADBAND LINK LEDs should be green.
Note: Refer to the “Using the Intelligent Gateway Network” chapter for information about the computers
on your network.
13
Configuring the Intelligent Gateway on Macintosh computers
Refer to the “Welcome Letter” that was included in you Intelligent Gateway package. It provides the key
code you will need to configure the Intelligent Gateway on your Macintosh computer.
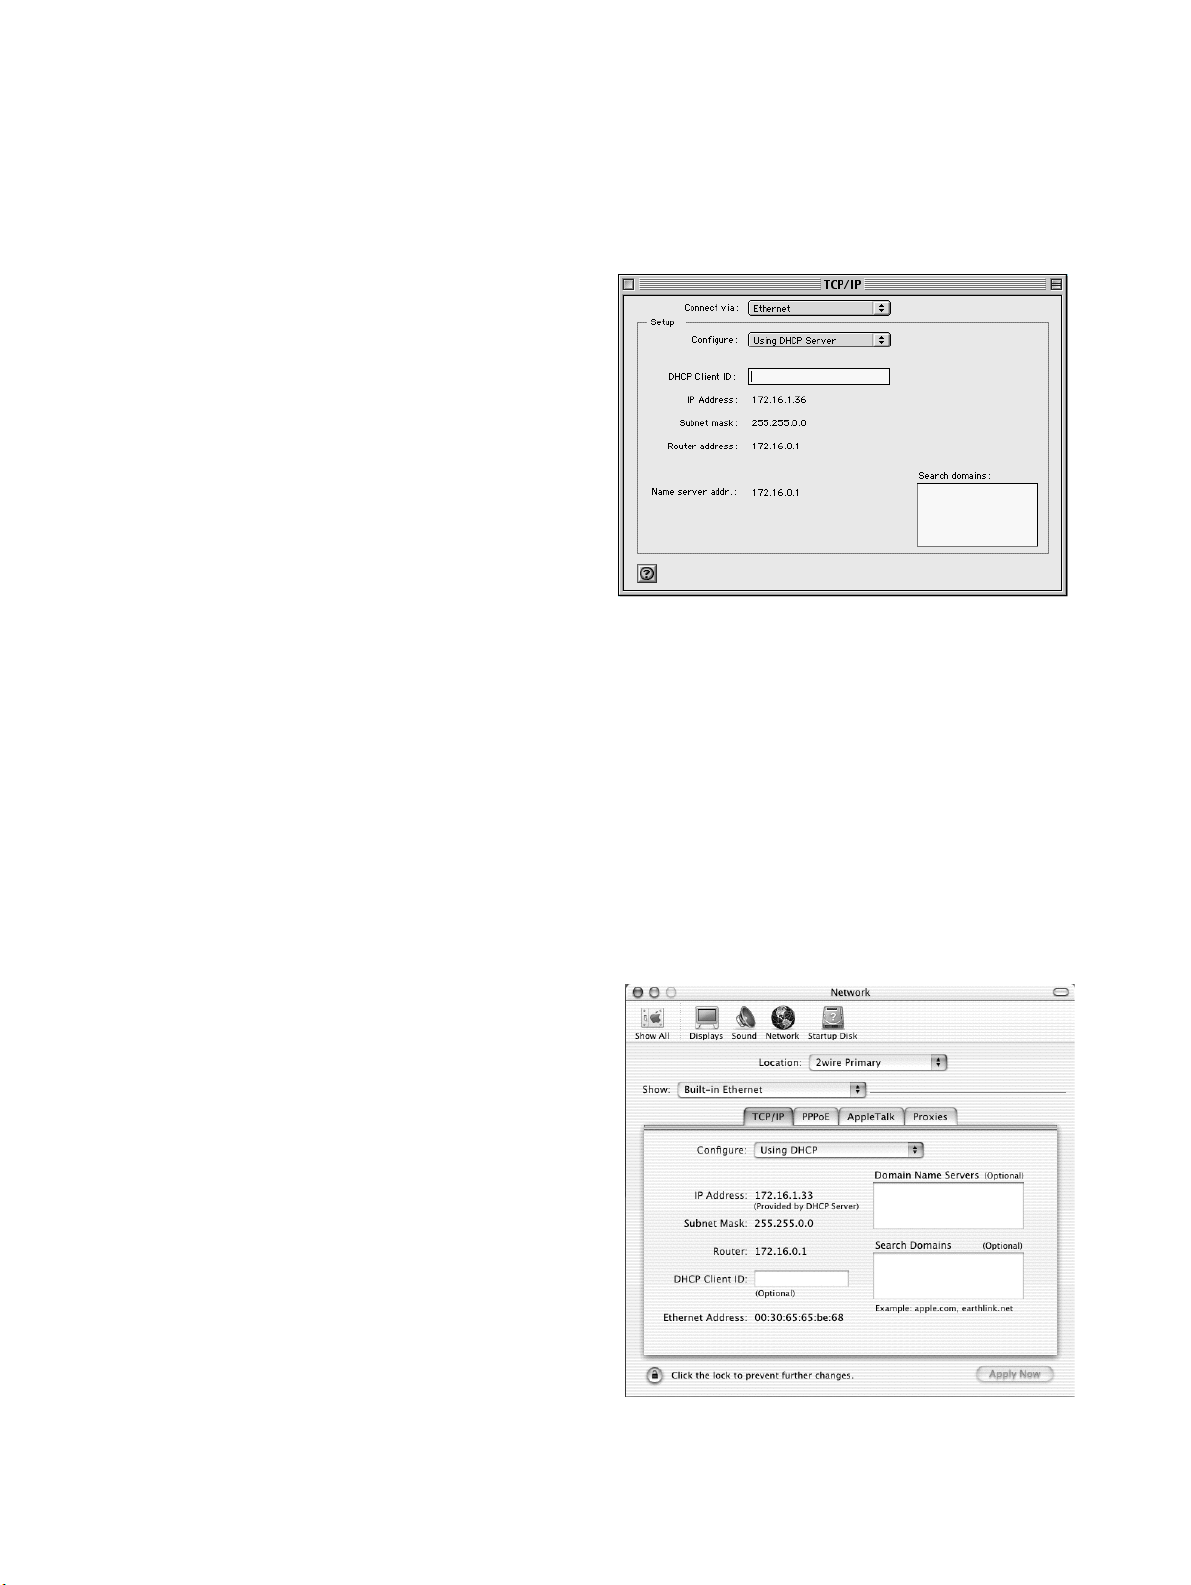
Macintosh 8.6 and 9.x
1. Click the Apple menu and select Control
Panel>TCP/IP
2. From the Connect via dropdown, select the
method by which the Intelligent Gateway will
connect to your computer (Ethernet, PC Port,
or wireless).
3. From the Configure dropdown, select Using
DHCP Server
4. Exit the TCP/IP menu. Click Yes when
prompted to save changes.
5. After the software installation is complete,
your Intelligent Gateway is ready to use ADSL service and the
BROADBAND LINK LEDs should be green.
. The TCP/IP menu opens.
.
POWER, LOCAL NETWORK, and
Note: Refer to the “Using the Intelligent Gateway Network” chapter for information about the computers
on your network.
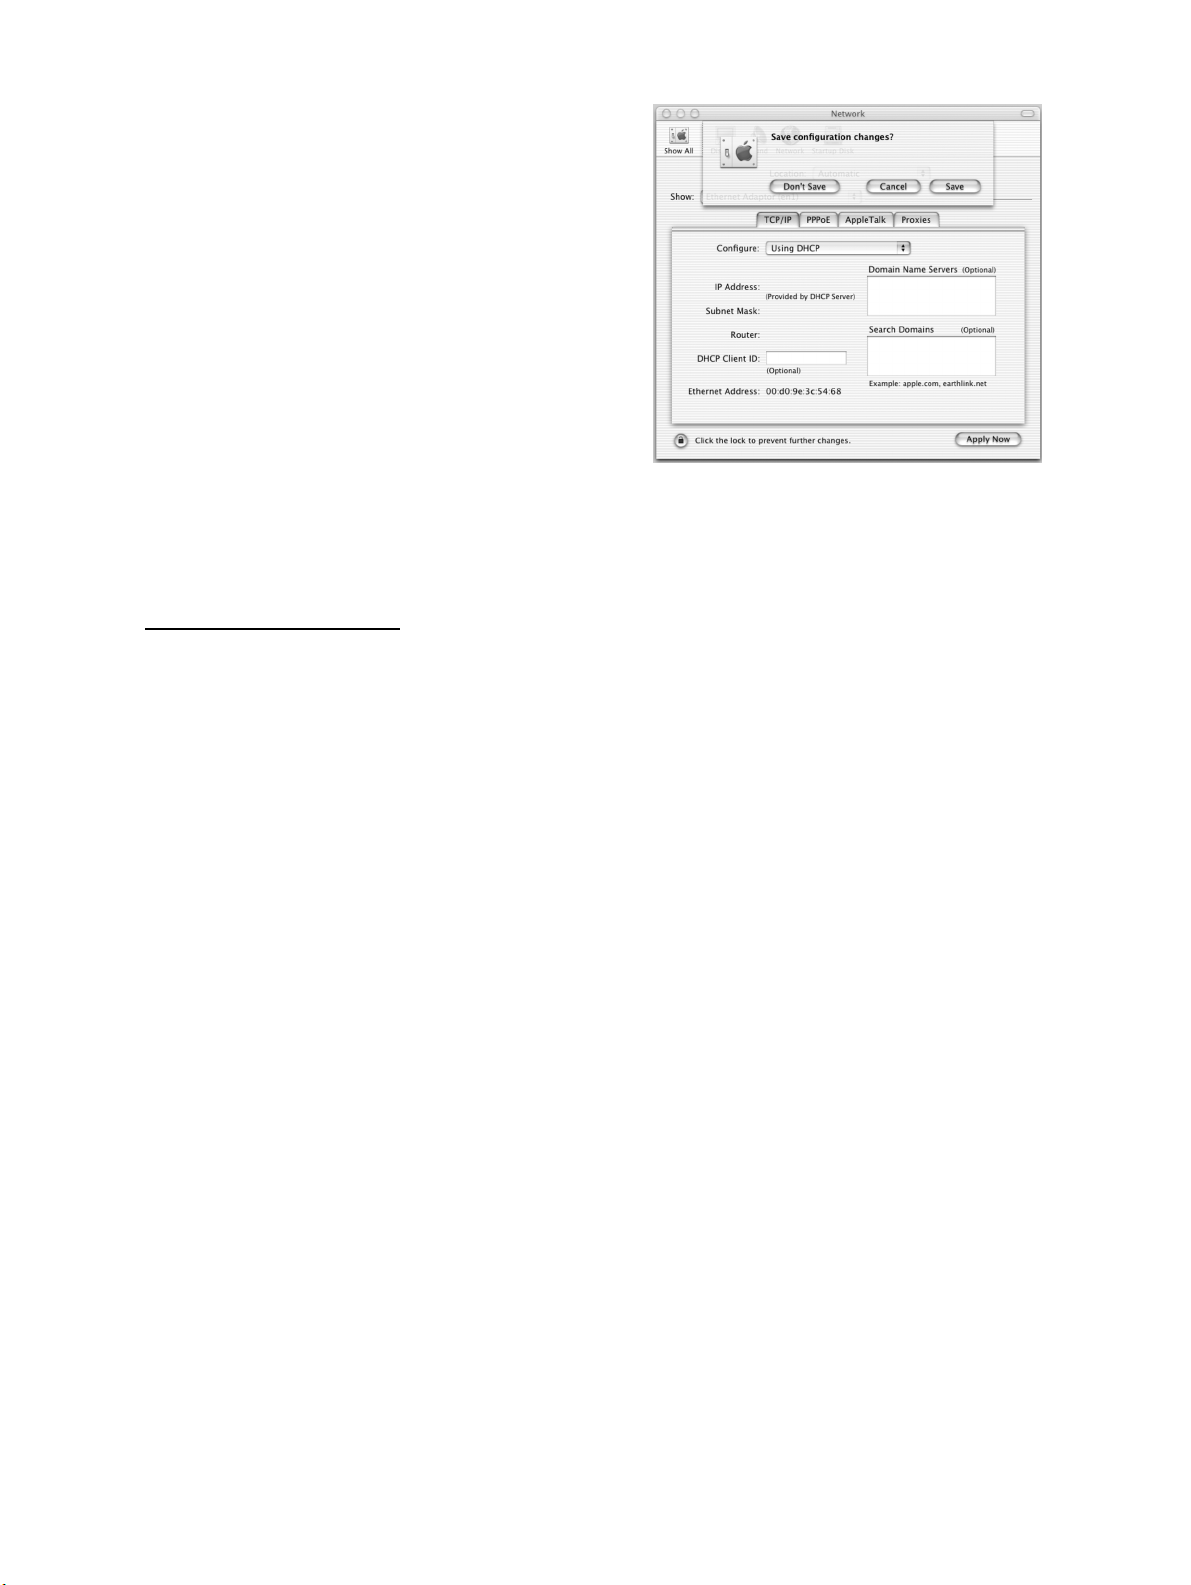
Macintosh OS X
1. Click the Apple menu and select System Preference>Network.
2. From the Show dropdown, select the method by which the Intelligent Gateway will connect to your
computer (Built-in Ethernet, PC Port, or wireless).
3. Click the TCP/IP tab.
4. From the Configure dropdown, select Using
DHCP
.
5. Click Apply Now.
6. After the software installation is complete, your
Intelligent Gateway is ready to use ADSL
service and the
and
BROADBAND LINK LEDs should be
POWER, LOCAL NETWORK,
green.
Note: Refer to the “Using the Intelligent Gateway
Network” chapter for information about the
computers on your network.
14

Step
4 Add Computers to the Network
Choose a computer and connection type
After your first computer is connected to the Intelligent Gateway and your Internet connection has been
established, it is time to connect the other computers to the network.
Use any or all of the following methods to connect additional computers to your network:
Connection Type Go to...
Ethernet
Requires a computer with an Ethernet port.
Recommended for small office environments using Ethernet (Category 5)
wiring.
USB
Requires a computer with an available USB port. See the USB connection
option for exceptions.
Home phoneline networking (HomePNA)
Requires a computer with a HomePNA port or an external HomePNA adapter
such as the PC Port.
Wireless
Requires a computer with a Wi-Fi compliant (802.11b) wireless network adapter
installed and a 2Wire Wireless PC Card* installed in the Intelligent Gateway.
Wireless adapters are purchased separately from the Intelligent Gateway.
Recommended for mobile computers such as laptops.
* You must use a 2Wire Wireless PC Card to convert your Intelligent Gateway into a wireless broadband
router. Other wireless cards are not supported.
page 16
page 17
page 18
page 20
15
Ethernet Connection
Requires a computer with an Ethernet port
Connect an Ethernet cable from any available LOCAL ETHERNET port on the Intelligent Gateway to
1.
your computer’s Ethernet port.
Repeat Step 3 “Install the Intelligent Gateway Software” on page 12.
16

USB Connection
Requires a computer with an available USB port. Refer to the note below for
exceptions.
Note: Only one Windows or Macintosh computer can be directly connected to the Intelligent Gateway
using the USB connection. Intelligent Gateway USB connectivity is NOT available for Macintosh OS
earlier than 8.6, Mac OS 10.0, Mac OS 10.1, Windows 95, Window 95 OSR2, or Windows NT. Additional
computers may be added to the network using connection options such as Ethernet.
1. Connect the USB cable from the PC port on the Intelligent Gateway to the USB port on your computer.
Before installing your Intelligent Gateway software on this computer, you must install a USB driver.
Detailed instructions for installing USB drivers begins on page 8.
Repeat Step 3 “Install the Intelligent Gateway Software” on page 12.
17
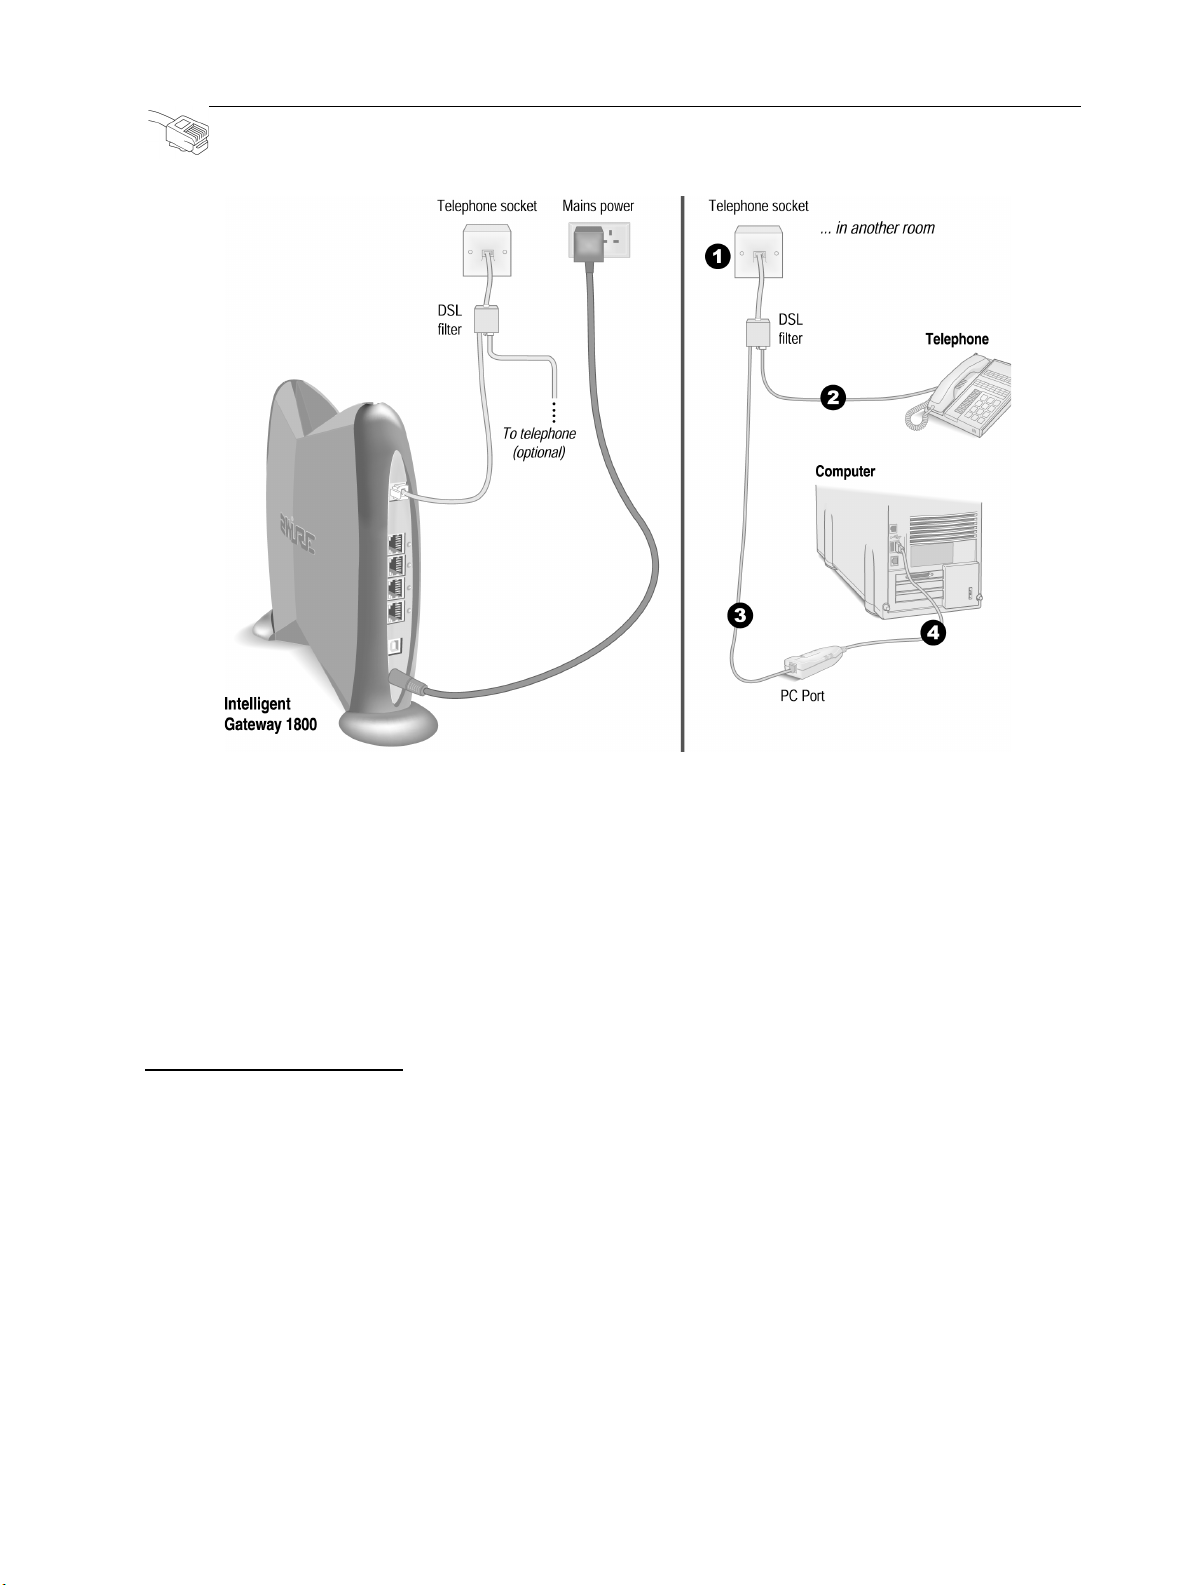
Home Phoneline Networking (HomePNA) Connection
If a telephone is located in the same room in which the PC Port will be installed
Computers connected with HomePNA access the Internet connection on the Intelligent Gateway and other
computers on the network using existing telephone wiring. You will need one PC Port for each computer
that you are connecting through HomePNA.
1. Connect the provided ADSL Filter to the telephone socket.
2. Connect the standard telephone cable from the PHONE port on the ADSL Filter to the telephone.
3. Connect one end of the provided RJ-11/RJ-11 telephone cable (the short adapter cable with the same type
of plug on both ends) to the
4. Insert the PC Port into the USB port on your computer.
ADSL MODEM port on the ADSL Filter, and the other end to the PC Port.
Install the PC Port Driver
• Power on the computer. Windows recognizes the PC Port and automatically launches the Add New
Hardware Wizard.
• Select
• Insert the PC Port CD and wait for the CD to start up. Select
• Windows is now ready to load the network driver. Click
• Click
Specify the location of the driver (Advanced) and click Next to continue.
Removable Media (Floppy, CD-
ROM...)
and click Next to continue.
Next to continue.
Finish. Windows may take several minutes to complete the driver installation as it copies the
files on to your computer.
• Click
Yes to restart the computer. If your System Settings Change window does not appear, restart
your computer: from the Start menu, select
Shut Down > Restart > OK.
After your PC Port and PC Port driver are successfully installed, repeat Step 3 “Install the
Intelligent Gateway Software” on page 12.
18
\
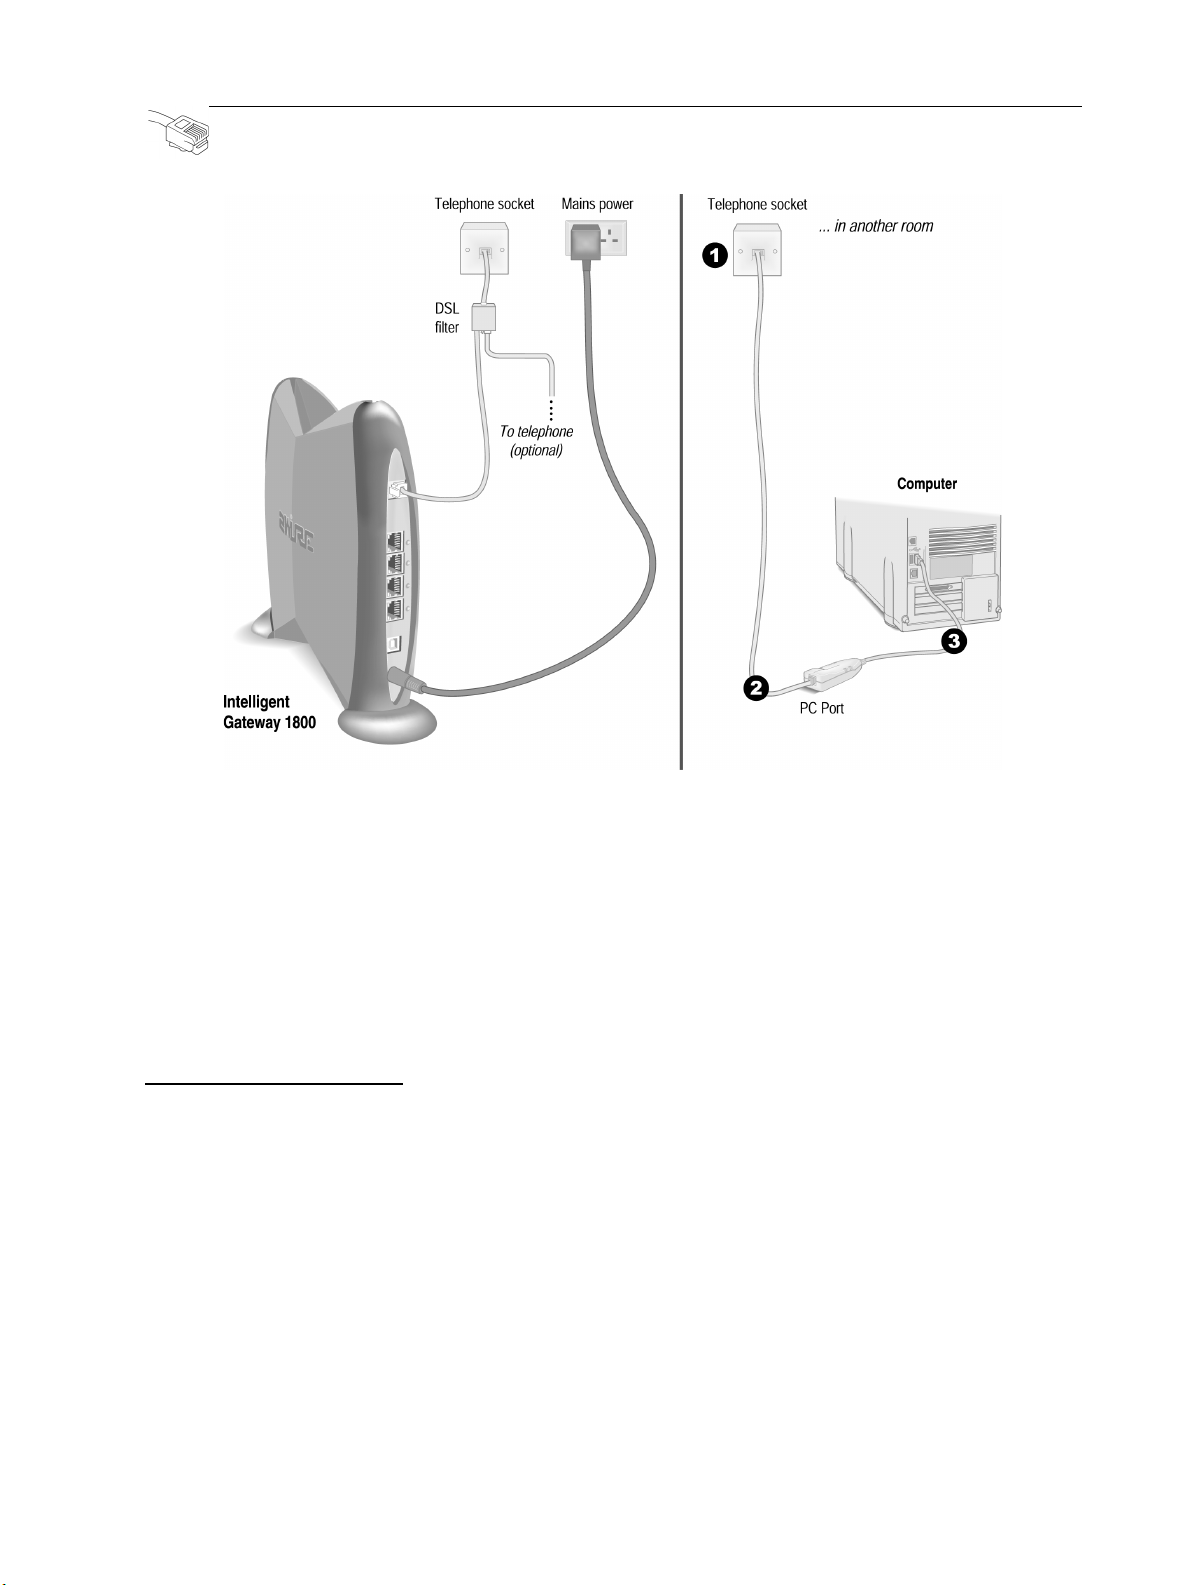
Home Phoneline Networking (HomePNA) Connection
If there is no telephone located in the room in which PC Port will be installed
Computers connected with HomePNA access the Internet connection on the Intelligent Gateway and other
computers on the network using existing telephone wiring. You will need one PC Port for each computer
that you are connecting through HomePNA. If you are connecting a PC to the network and do not need a
telephone to be connected at the same location, use the long telephone cable provided with the PC Port.
1. Connect the end of the telephone cable with the standard telephone plug into the telephone socket.
2. Connect the other end of the telephone cable into the PC Port.
3. Insert the PC Port into the USB port on your computer.
Install the PC Port Driver
• Power on the computer. Windows recognizes the PC Port and automatically launches the Add New
Hardware Wizard.
• Select
• Insert the PC Port CD and wait for the CD to start up. Select
• Windows is now ready to load the network driver. Click
• Click
Specify the location of the driver (Advanced) and click Next to continue.
Removable Media (Floppy, CD-
ROM...)
and click Next to continue.
Next to continue.
Finish. Windows may take several minutes to complete the driver installation as it copies the
files on to your computer.
• Click
Yes to restart the computer. If your System Settings Change window does not appear, restart
your computer: from the Start menu, select
Shut Down > Restart > OK.
After your PC Port and PC Port driver are successfully installed, repeat Step 3 “Install the
Intelligent Gateway Software” on page 12.
19
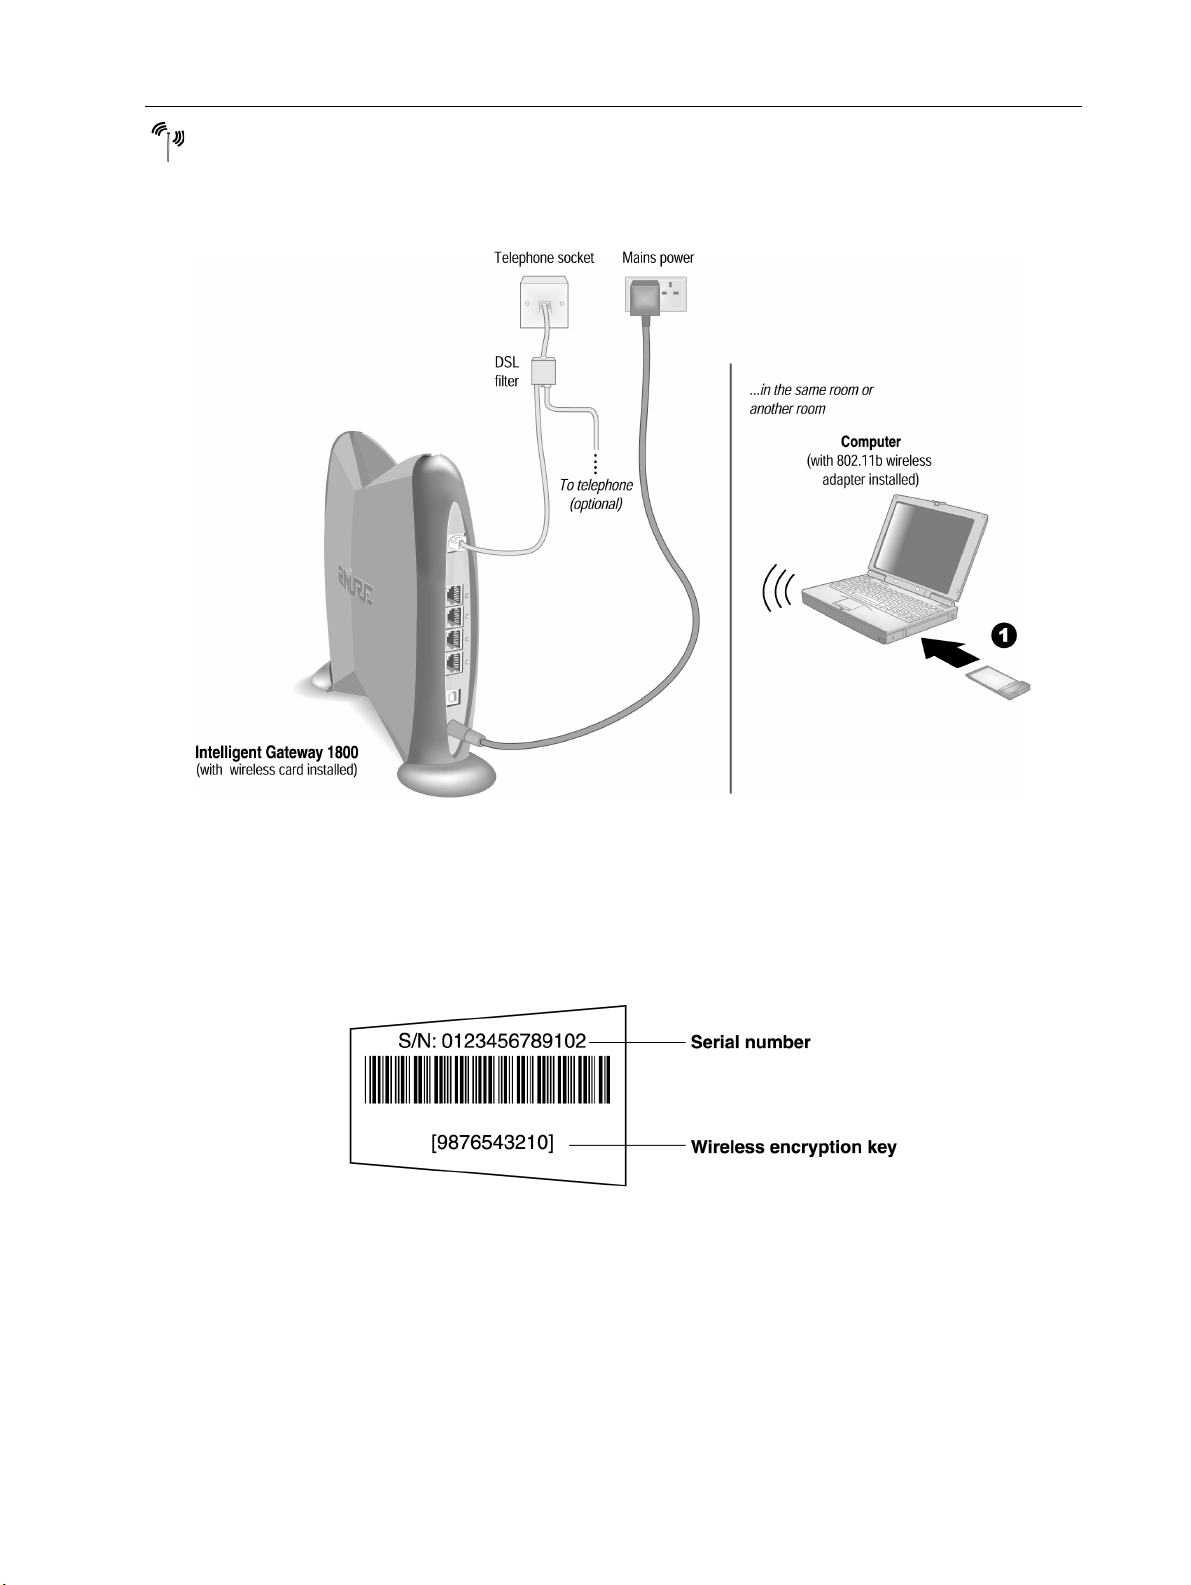
Wireless Connection
Requires a computer with an 802.11b wireless network adapter installed and a 2Wire
Wireless PC Card installed in the Intelligent Gateway. Wireless adapters are
purchased separately from the Intelligent Gateway.
Install your wireless adapter according to the instructions included with your adapter.
1.
2. Configure your wireless adapter. Your Intelligent Gateway is configured with unique security
parameters that must be configured into your wireless adapter. On the bottom of your Intelligent
Gateway you will find two important pieces of information required for configuring your adapter: the
serial number and the wireless encryption key.
3. Set the network type to Infrastructure. Refer to your wireless adapter documentation for instructions on
editing the adapter’s network profile. Your wireless adapter should be configured to operate with an
access point or residential gateway. This mode of operation is typically enabled by setting network
type to Infrastructure.
20

Set the wireless network name (also referred to as SSID). The wireless network name of your
4.
Intelligent Gateway is
2WIRE in all capital letters, followed by the last three digit of the Intelligent
Gateway serial number located on the bottom of your Intelligent Gateway. For example, if the last
three digits of your Intelligent Gateway serial number are 102, your Intelligent Gateway network name
would be 2WIRE102.
The wireless network name is sometimes referred to as the
LAN ID.
5. Enable wireless security. Your Intelligent Gateway automatically configures itself to take advantage of
Network Name, SSID, ESS ID, or Wireless
wireless security. Referring to the instructions provided with your wireless adapter, enable wireless
security.
Wireless security is sometimes referred to as
bit encryption.
6. Enter the encryption key. Once you have enabled security on your wireless adapter, you need to enter
WEP (wired equivalent privacy), 64-bit encryption, or 40-
the unique security key for your Intelligent Gateway. To do this, set the network encryption type to
hexadecimal, and enter your 10-digit wireless encryption key found on the bottom of your Intelligent
Gateway. For Macintosh computers, the encryption key must be prefixed with a “$.”
Note: To maximize your wireless network security, it is recommended that you change the WEP key on a
regular basis and/or enable 128-bit encryption (if your PC card or adapter supports 128-bit encryption).
Doing so will make it harder for hackers to access your wireless network.
Note: For optimal performance, it is recommended that you locate computers in your wireless network no
farther apart than 50 feet. The 50-foot limitation for wireless networks is based on the assumption that
most users are located in a many-walled or multi-story building. If you are using a wireless network in an
outdoor space, your range may be greater.
Repeat Step 3 “Install the Intelligent Gateway Software” on page 12.
21
Using the Intelligent Gateway Network
The Intelligent Gateway user interface allows you to check the status of your network, assign permissions
to other users on the network, and access links to the most commonly used features of your Intelligent
Gateway.
After you have connected your computers to your network and installed the Intelligent Gateway software,
enter http://home in the address bar of your browser. The Intelligent Gateway user interface opens.
22

System
The System pages provide you with general system information and operational status.
• The Summary page is your system home page. You can access this page by clicking the HOME
icon from any system page. The Summary page provides summary information and links to the
most commonly used features of your system.
• The System Password page allows you to password protect local access to your system settings,
preventing users on your local network from changing your system configuration. If a system
password is set, only local users who know the system password can change system settings (for
example, broadband connection parameters and firewall settings).
• The Date and Time Settings page displays your system date and time settings, and allows you to
edit these settings as needed.
• The Details page displays information about your system’s hardware and software configuration,
and provides links to detailed system level access and information.
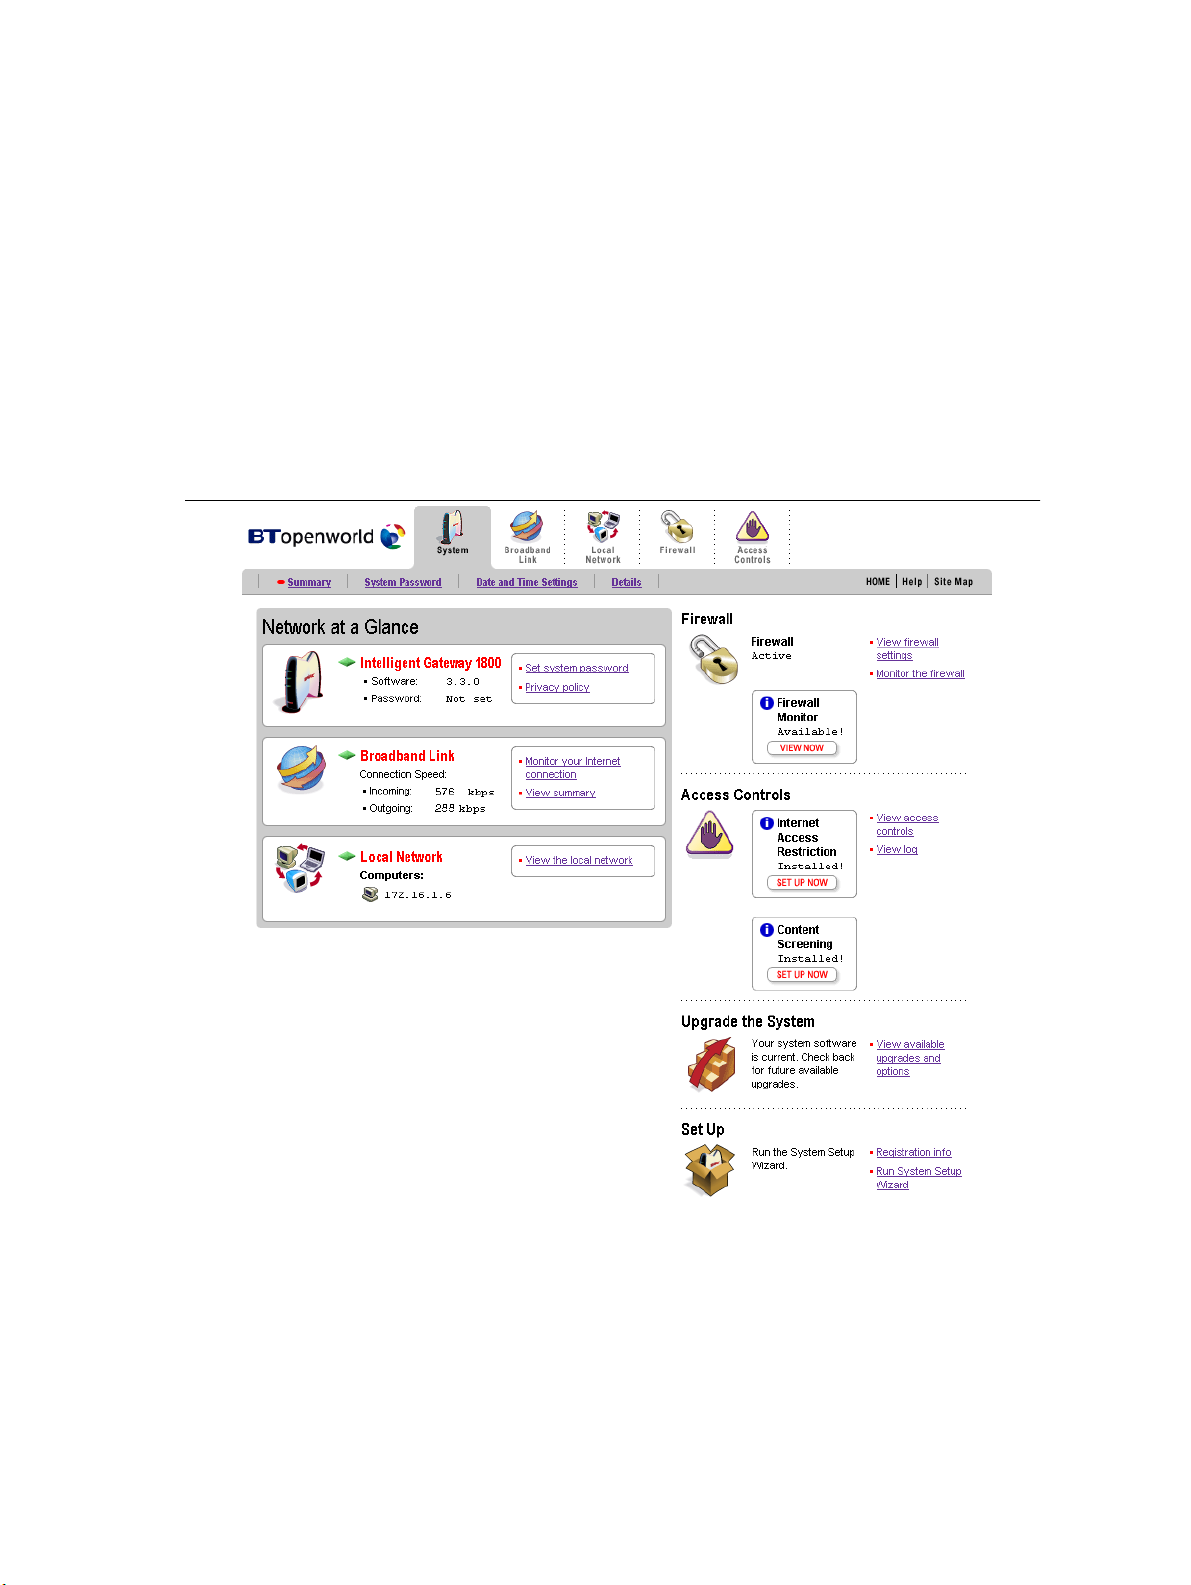
Viewing your summary
The Summary page provides general information and links to your system’s most commonly used features.
This page consists of the Network at a Glance panel to the left, and a list of subsections to the right. These
subsections will vary depending on the options and services installed on your system.
The Network at a Glance panel provides a quick summary of broadband and local network connectivity
information, and the system’s overall status.
• System displays your Intelligent Gateway’s Power light status, the model name, the version of
system software that you are using, and the status of your system password.
• Broadband Link displays a summary of your Broadband Link status.
• Local Network displays your system’s Local Network light status and a list of the devices
currently connected to your local network.
23

Editing your system password
If a system password has been set, the system will prompt you to enter the password when accessing any
page where you can change settings. If a password has not been set, a reminder notice is displayed in some
of the more sensitive topic areas. Setting a system password will ensure that only you are permitted to
make changes to your system settings.
Setting a password
To set your Intelligent Gateway system password:
1. Check the Enable checkbox.
2. In the Enter New Password field, enter your password.
3. In the Confirm New Password field, re-enter your password.
4. (Optional) In the Enter Your Hint field, enter a hint.
5. Click the SAVE button.
To disable password protection, deselect the
Enable checkbox and click SAVE.
Changing a password
To change your Intelligent Gateway system password:
1. In the Enter Current Password field, enter your current system password.
2. In the Enter New Password field, enter your new password.
3. In the Confirm New Password field, re-enter your new password.
4. (Optional) In the Enter Your Hint field, enter a hint.
5. Click the SAVE button.
24
 Loading...