

Page 1
© 2014 Wirepath™ Surveillance Ver. 140718-1740
Support: (866) 838-5052
Package Contents
• (1) WPS-300-BUL-IP Camera
• (1) WPS-ACC-PWR-M Power Adapter
• (1) Female-Female RJ45 Adapter
• (1) 3mm Allen key
• (4) Screws & Wall Anchors
• (1) Quick Start Guide
I. Hardware Setup
(See other side for software and network setup)
WPS-300-BUL-IP
IP Surveillance Cameras
Quick Start Guide
IMPORTANT! BEFORE GOING TO JOB SITE:
Visit the Support Tab on the product page for this
camera at www.SnapAV.com. Download the latest
support les to your PC:
• Installation Manual
• IP Installer utility software
• Latest rmware (if available)
Contact the Tech Support team from the job site for help
with any part of setup:
Call: 866-838-5052
Email: [email protected]
Camera Cabling and Power
Install cabling between the camera and the LAN connection (and power source if not PoE powered)
Needed for this step: Cables and connectors as indicated below, tools and connectors for terminations
Cable recommendations:
Network Connection - The camera must
be connected to a LAN port using cable
that meets TIA/EIA Category 5e standards.
Test the cable after termination if possible.
PoE Power - If the network equipment
supports PoE standard IEEE 802.3af then
power can be provided on the Cat5e/6
connection.
12V DC Power - If PoE is not used, power
must be supplied using the external power
connector. The correct cable size must be
used to prevent voltage drop.
Requirements for Network Cable:
• Type: Cat5e/6+ ONLY
• Terminations: 568B recommended
• Max Length: 100 meters (328 feet)
Requirements for PoE Equipped Port:
• Voltage: 44V DC
• Wattage: 15.4W
• Amperage: 350mA
Requirements for Power Supply:
• Voltage: 12V DC
• Wattage: 12W
• Amperage: 1A
Thank you for purchasing a Wirepath™ IP Surveillance Camera. This
Quick Start Guide page shows the basics of installing the camera and
connecting to it from the local network.
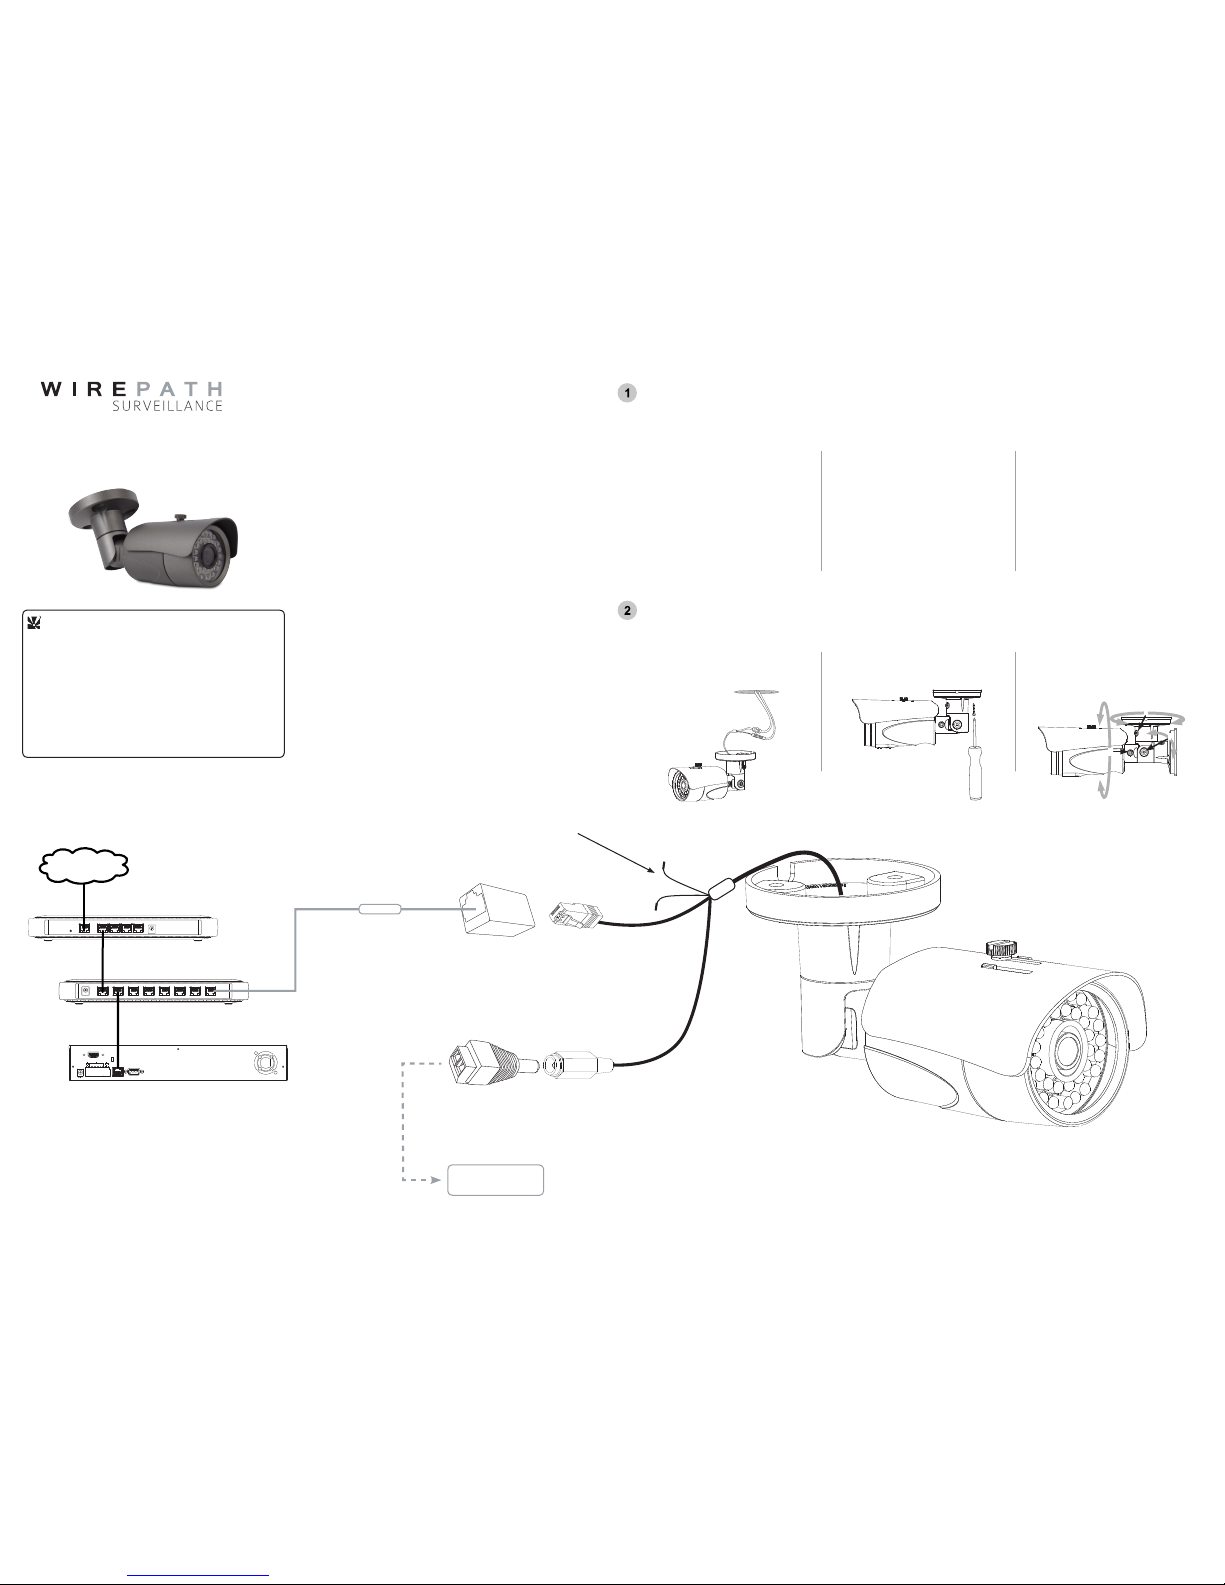
a. Install an accessory mount over the
wiring (if applicable). Then connect
the camera to the wiring as seen in the
diagram below.
Aiming Adjustments
A. Horizontal rotation
B. Swivel left or right
C. Tilt viewing angle
Mounting and Adjustments
A
B
C
Needed for this step: 3mm Allen Wrench, Phillips screwdriver for mounting screws, or tools for accessory mount screws (if used)
Internet
12345678NCNO
COM
RS-485 ALARMIN
HDMIOUTPUT
HDMI
VGA
RELAY
ETHERNETGNDGND VGAOUTPUT
12VDC6A
INPUT
WPS-ACC-PWR-M
Power Adapter
Female-to-Female
RJ45 Adapter
An NVR may be connected to the network for
recording and playback of camera footage
Router
Gigabit Switch
Cat5e/6+
12V DC Power Supply
(if PoE is not used)
b. Mount the camera using 3 of the 4
included screws and anchors, or install
the camera on the accessory mount.
Make adjustments last.
IMPORTANT! The reset wires must remain
separately insulated to avoid accidental resets.
See the manual for camera reset instructions.
Page 2
© 2014 Wirepath™ Surveillance Ver. 140718-1740
Support: (866) 838-5052
First Time Access
The fi rst time the camera is accessed from any PC, a plug-in must be installed for the web browser to enable communication with the
camera. Afterward, the camera may be accessed by that PC at any time by navigating to the camera’s web address and logging in.
a. Connect the PC to the same local network (LAN) the camera is connected to.
b. Open the web browser and enter the IP Address that was assigned to the camera. The address should include the port number
assigned to the camera if one was set. See the example:
• IP Address using default port 80: http://192.168.1.015
• IP Address using port 8015: http://192.168.1.015:8015
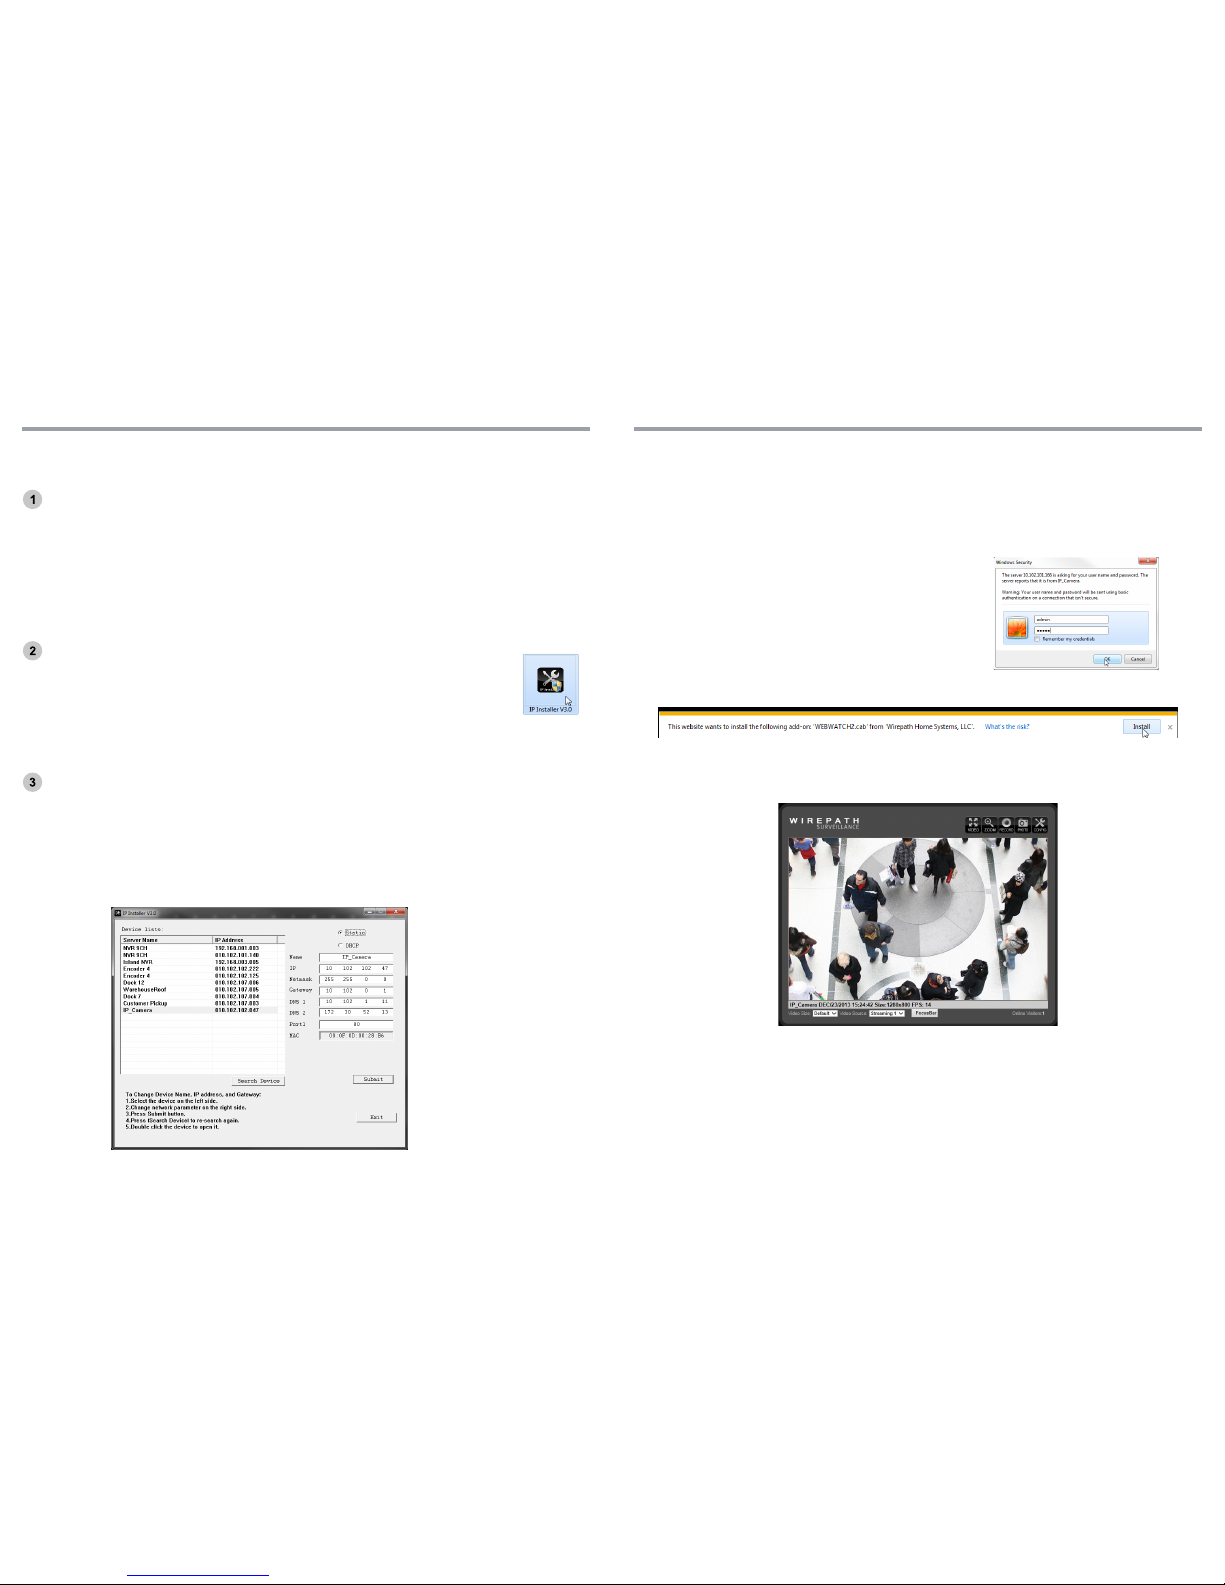
c. A window will open, asking for a user name and password. Default
settings:
• User Name: admin
• Password: admin
d. Install the ActiveX control if prompted:
e. After installing ActiveX, the camera should be visible in the web browser interface. If the web browser interface does not appear,
verify the address using the IP Installer.
Next Steps:
After the camera is accessible, further setup can be completed using the Confi g menus. Visit the Support Tab on the product page for this
camera at www.SnapAV.com to download the manual, IP Installer utility software, and latest fi rmware. Refer to the manual to:
a. Set up User Accounts, including administrator access
b. Set up remote access using wirepathdns.com
c. Set up NVR connections (if using an NVR for network recording)
d. Optimize image and video settings
e. Set up advanced sharing and integration of the camera’s four video streams
f. Set up scheduling and motion detection to optimize recording time
Wirepath™ IP Installer utility software streamlines identifi cation of the cameras on the network and allows basic IP settings to be
established. After the cameras are set up, they can be accessed over the local network by computers and NVRs.
Important! The IP Installer can only be used on a PC with a Windows operating system.
Initial Setup
a. Make sure that all cameras are connected to the network and powered on.
b. Get access to a PC connected to the local network with administrator rights in the operating system (must be a Windows PC to
use the IP Installer)
c. Disable any active VPN connections on the network. These will prevent the IP Installer from working correctly.
d. Download the IP Installer utility from the camera’s support tab at www.SnapAV.com. No installation is required for use. Extract
the software (if compressed in “.zip”) and move it to the Desktop or folder of your choice.
e. Log into the router, set up static IP addresses for each new camera, and record the network settings to be assigned to the
camera(s).
How to Use the IP Installer Utility
a. Double-click the IP Installer icon to run the software. Allow or accept any Windows system warnings. (No
changes will be made to system fi les.) Depending on the computer’s security settings, it may be necessary
to log in using the computer’s administrator account for the IP Installer to run.
b. Click “Search Device” to scan the network for connected Wirepath™ IP Cameras, NVRs, and Encoders.
Wait 30 seconds after powering up a camera to search for it.
c. Click the “Exit” button to close the IP installer when all devices are confi gured.
Important! Windows may display an error stating that the software did not install correctly when it closes, but this should be
disregarded.
How to Con gure a Camera for Access
Cameras are set to DHCP mode by default so that an IP address is automatically assigned for fi rst time access. To ensure
continuous access to the camera, the address must be changed to a static address reserved for the camera (as detailed in step
“1e”, above).
a. Click on an item in the Device List to highlight it blue.
b. Click the “Static” button over the right column information fi elds. Now the settings can be confi gured. (IP Settings fi elds are
greyed out until the mode is set to Static). Enter a value for each of the fi elds in the right column:
II. Network Setup - Identifying Cameras III. Accessing Cameras on the Network
Device List
Displays the Wirepath
IP devices connected
to the network.
Search Device-
Click the button to
refresh the Device
List and see new
devices.
a. Select “Static” to change settings
b. Name for the camera (limited to 31
characters, no spaces)
Examples: FrontDoor1, SideDoor
c. IP address (static) reserved for the
camera (step 1e)
d. Net Mask - usually 255.255.255.0
(set all cameras the same)
e. Gateway address - found in the router.
f. DNS 1 - found in the router
g. DNS 2 - found in the router.
Set DNS 2 to“0.0.0.0” if no DNS 2 is
set in the router.
h. Port - include the last octet of the IP
address in the port:
Examples:
Camera IP Address Port
Patio 192.168.1.050 8050
Front Door 192.168.1.100 8100
i. Click “Submit” to update the camera
settings.
WPS-300-BUL-IP IP Surveillance Cameras
Quick Start Guide
 Loading...