

Page 1
WPS-165-DVR
DVR
4 CHANNEL
INSTALLATION AND USERS MANUAL
Review manual thoroughly before
installation. Retain for future reference.
Page 2

TABLE OF CONTENTS
1. PRODUCT OVERVIEW 5
1.1. INTRODUCTION 5
1.2. PACKING LIST 5
1.3. FEATURES 5
2. FRONT AND REAR PANELS AND REMOTE CONTROL 6
2.1. FRONT PANEL 6
2.2. REAR PANEL 7
2.3. REMOTE CONTROL 8
3. INSTALLATION 9
3.1. POSITIONING THE 165 DVR 9
3.2. CONNECTIONS 10
3.2.1. BASIC CONNECTIONS 10
3.2.2. OPTIONAL CONNECTIONS 10
3.2.3. IP CONTROL CONNECTIONS 11
4. MAIN SCREEN AND BASIC OPERATIONS 12
4.1. TEXT INPUT 13
4.2. LOGIN / LOGOUT 14
4.3. BASIC OPERATIONS USING THE CONTROL BAR 14
4.4. DIGITAL ZOOM 16
5. MAIN MENU 17
5.1. STATUS DISPLAY 17
5.2. VOLUME CONTROL 18
5.3. VIDEO ADJUSTMENT 19
5.4. DISPLAY 20
5.5. BACKUP DEVICE 21
5.6. SOFTWARE UPGRADE 22
5.6.1. UPDATING SOFTWARE VIA DVR LOCAL DISPLAY 22
5.7. SYSTEM SHUTDOWN 23
6. SETUP MENU 24
6.1. PRE-CAMERA SETUP 25
6.2. CAMERA SETUP 26
6.2.1. VIDEO LOSS SETUP 28
6.2.2. MOTION SETUP 30
6.2.2.1. DETECTION SETTINGS 32
6.3. SEQ DISPLAY SETUP 34
6.4. SCHEDULED RECORD SETUP 35
6.5.1. SCHEDULED RECORD – EASY SETUP 38
6.6. HDD SETUP 40
6.6.1. HDD FORMAT/CLEAR 42
6.6.2. ADVANCED HDD SETUP 43
6.7. PASSWORD SETUP 45
6.7.1. ADVANCED USER SETUP 47
6.8. SYSTEM SETUP 49
6.9. NETWORK SETUP 51
6.9.1. E-MAIL SETUP 52
6.9.2. FTP SETUP 54
6.9.3. ADVANCED NETWORK SETUP 55
6.10. FACTORY DEFAULT 56
7. SEARCH/PLAYBACK/ARCHIVE 57
7.1. SEARCH BY TIME 58
7.2. SEARCH BY EVENT / LOG DISPLAY 59
7.3. SMART SEARCH 61
7.4. SEARCH ARCHIVED FILES 63
7.5. PLAYBACK SEARCH RESULTS 64
7.6. ARCHIVE (BACKUP) SEARCH RESULTS 65
8. REMOTE ACCESS 67
8.1. PC REMOTE ACCESS 67
8.2. PC REMOTE DISPLAY AND OPERATIONS 67
8.2.1. SPLIT-WINDOW OPTION MENU 68
8.2.2. CONTROL PANEL 69
Page 3

8.2.3. SPLIT-WINDOW PANEL 70
8.2.4. PLAYBACK PANEL 70
8.2.5. STATUS PANEL 71
8.2.6. SEARCH PANEL AND COPY FEATURE 72
8.2.6.1. SEARCH BY TIME 72
8.2.6.2. SEARCH BY EVENT 73
8.2.6.3. COPY FUNCTION 74
8.2.7. PTZ CONTROL PANEL 75
8.2.8. DEVICE CONFIG 76
8.2.8.1. MODIFY 77
8.2.9. SOFTWARE UPGRADE 78
8.3. PC CONFIGURATION OF DEVICE PROPERTIES 78
8.3.1. SYSTEM 79
8.3.2. PASSWORD 80
8.3.3. NETWORK 83
8.3.4. PRE CAMERA 85
8.3.5. CAMERA 86
8.3.6. MOTION 87
8.3.7. MOTION DETECTION / PRIVACY MASK 89
8.3.7.1. MOTION DETECTION 89
8.3.7.2. PRIVACY MASK 90
8.3.8. VIDEO LOSS 91
8.3.9. SEQ DISPLAY 93
8.3.10. SCHEDULE 94
8.3.11. EASY SCHEDULE 95
8.3.12. E-MAIL (NOTIFICATION) 96
8.3.13. FTP 98
8.3.14. HDD 99
8.3.15. DISPLAY 100
8.4. VIDEO STREAM (DUAL STREAM) 101
8.5. REMOTE VIEWING WITH A SMARTPHONE 103
8.5.1. REMOTE DISPLAY AND OPERATION 104
9. WARRANTY 106
10. APPENDIX A – SPECIFICATIONS 107
11. APPENDIX B – MENU STRUCTURE 109
12. APPENDIX C – HARD DRIVE RECORDING TABLE 110
13. APPENDIX D – H.264 TO AVI CONVERSION UTILITY 111
Page 4

SAFETY INFORMATION
• Handle this device with care. Do not strike or shake this device as this may damage it.
• Do not expose this device to water or moisture. Moisture may damage the device and also cause electric
shock. Do not operate it in wet areas. Take immediate action if the device becomes wet. Turn the power
off and refer servicing to qualied service personnel.
• Do not use this device near any heat sources such as radiators, heat registers, stoves or other apparatus that
produces heat.
• Protect the power cord from being stepped on or pinched particularly at the point where it connects to
the device and at the receptacle.
• Do not operate this device beyond its specied temperature, humidity or power source ratings.
• Use this device in humidity below 85%.
• The performance and lifespan of the hard drive is affected when used in high temperatures. It is
recommended to use this device within 68ºF ~ 86ºF.
• If mounting in a closed space, ventilation should be included. Do not block any ventilation openings.
• Handle the hard drive with care.
- It is possible to damage the hard drive if it is moved while the motor is still spinning. Do not move this
device after turning on the power. Follow the shutdown procedure (see Section 5.6) and wait at
least 30 seconds before moving this device even if it is to simply reposition it on a shelf or in a rack.
- If servicing or exchanging the hard drive, protect it from static electricity. Use a grounded static wrist
guard and matt to properly ground yourself before servicing the hard drive.
- Do not use an electric screw driver to remove or install a hard drive.
• Clean this device with a dry cloth. Do not use strong or abrasive detergents when cleaning the device
chassis. If dirt is hard to remove, use a mild detergent and wipe gently.
• Please make a note of the system settings and save them. This will help when required to change the
system conguration, or when unexpected failure or trouble occurs.
• Do not drop metallic parts through the ventilation slots. This could permanently damage the device.
If something falls inside the device, turn off the power immediately and contact qualied service personnel
for service.
• Distributing, copying, disassembling, reverse compiling, reverse engineering, or exporting the software
provided with this product, is expressly prohibited and in violation of the law.
THIS PUBLICATION COULD INCLUDE TECHNICAL INACCURACIES OR TYPOGRAPHICAL ERRORS. AT ANY TIME
CHANGES COULD BE MADE To THE INFORMATION HEREIN FOR THE IMPROVEMENT OF THIS PUBLICATION
AND/OR THE CORRESPONDING PRODUCT(S).
REGULATORY COMPLIANCE
This product complies with the relevant standards for CE, FCC, and RoHS approval. The Power Adaptor/Supply
has been tested for compliance with UL, CSA, and CE standards.
Page 5

5
WPS-165-DVR-4CH Installation and Users Manual
1. PRODUCT OVERVIEW
1.1. INTRODUCTION
Wirepath™ Surveillance DVRs are state of the art, and offer unsurpassed technology. Features such as
Hexaplex operation with triple streaming via H.264 (low and high res), and MJPEG provides easy-to-use remote
access via Automation Systems, PC, or Smartphone. With H.264 compression, 960H, D1 / Half D1 / CIF video
resolution support and adjustable Frame Per Second record settings the installer can maximize the storage
time of the built-in hard drive. Wirepath™ DVR’s professional grade features make them ideal for high-end
residential and commercial monitoring applications.
1.2. PACKING LIST
(1) DVR
(1) 12V / 3.0A External Power Supply
(1) IEC Power Cord
(1) IR Remote
(2) AAA Batteries
(1) USB 1.1 Mouse
1.3. FEATURES
Connections
·
Up to 4 cameras or composite video sources
· VGA outputs
·
1 audio input, 1 audio output
Video / Audio
· Hexaplex operation - simultaneous record, live playback, backup, control, & simultaneous H.264 and MJPEG
remote access
· Triple Stream H.264 and MJPEG
- High Res H.264 for recording and streaming to IE Interface and Smartphones
- Low Res H.264 for streaming for devices on bandwidth limited networks
- MJPEG for streaming to Automation Systems
· Record capabilities
- Full 30 FPS (frames per second) for all channels across all resolutions
· Playback capabilities
- Full 30 FPS (frames per second) for all channels across all resolutions
· Real-time live display, 30 FPS, for each channel
·
Versatile display formats: full-screen and 4 camera split window
· ADPCM audio compression
Storage
·
One 500GB hard disk drive is already installed
· Video/audio backup to USB thumb drives or PC via web interface
Control / Remote Access
· IR, and IP Controllable
· Ethernet interface
- Stream video/audio to Automation Systems, IE interface, and Smartphones
- Integrated control via Automation Systems such as Control4
- Remote Setup
- Remote software upgrade
- Remote alarm notication via email
- FTP video/audio storage
- DDNS support
Page 6
6
WPS-165-DVR-4CH Installation and Users Manual
2. FRONT AND REAR PANELS AND REMOTE CONTROL
2.1. FRONT PANEL
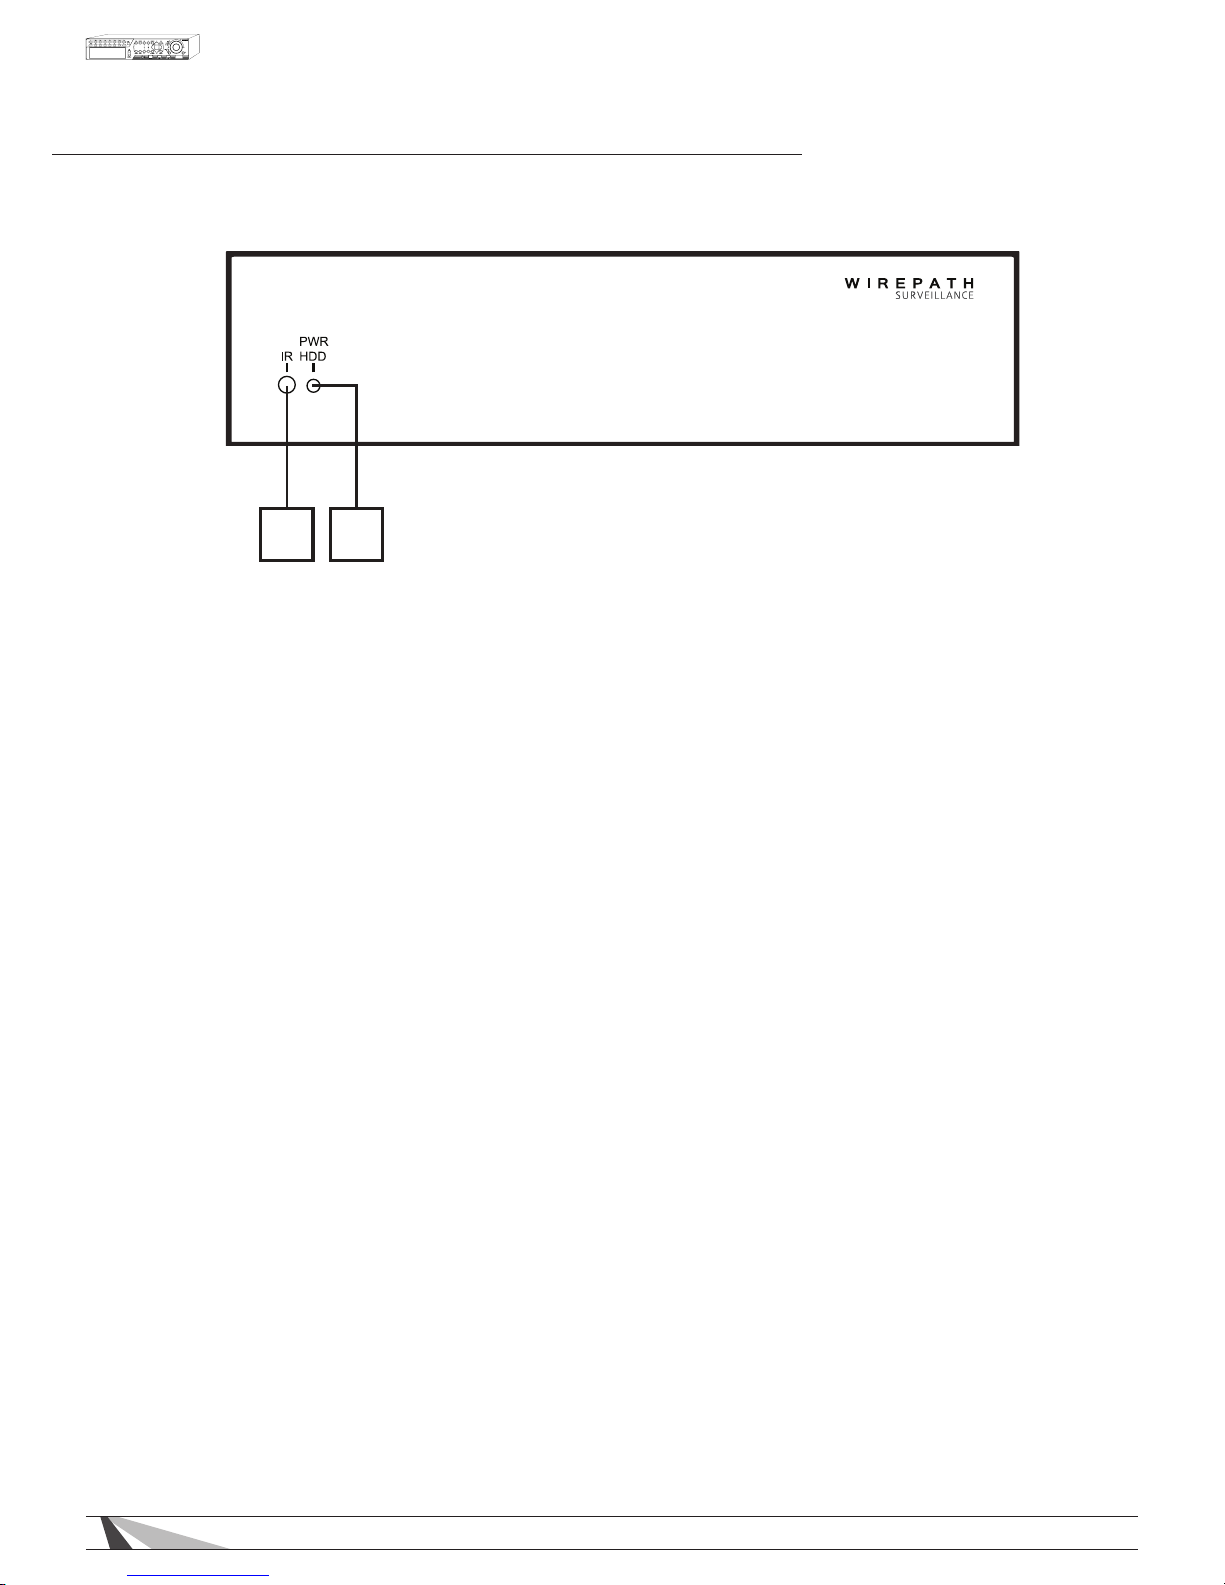
WPS-165-DVR-4CH
1 2
1. Remote IR Sensor
Use to receive signal from IR remote controller.
2. LEDs
Indicators for POWER, HDD(Hard Disk Drive) and Network access.
Page 7
7
WPS-165-DVR-4CH Installation and Users Manual
2.2. REAR PANEL
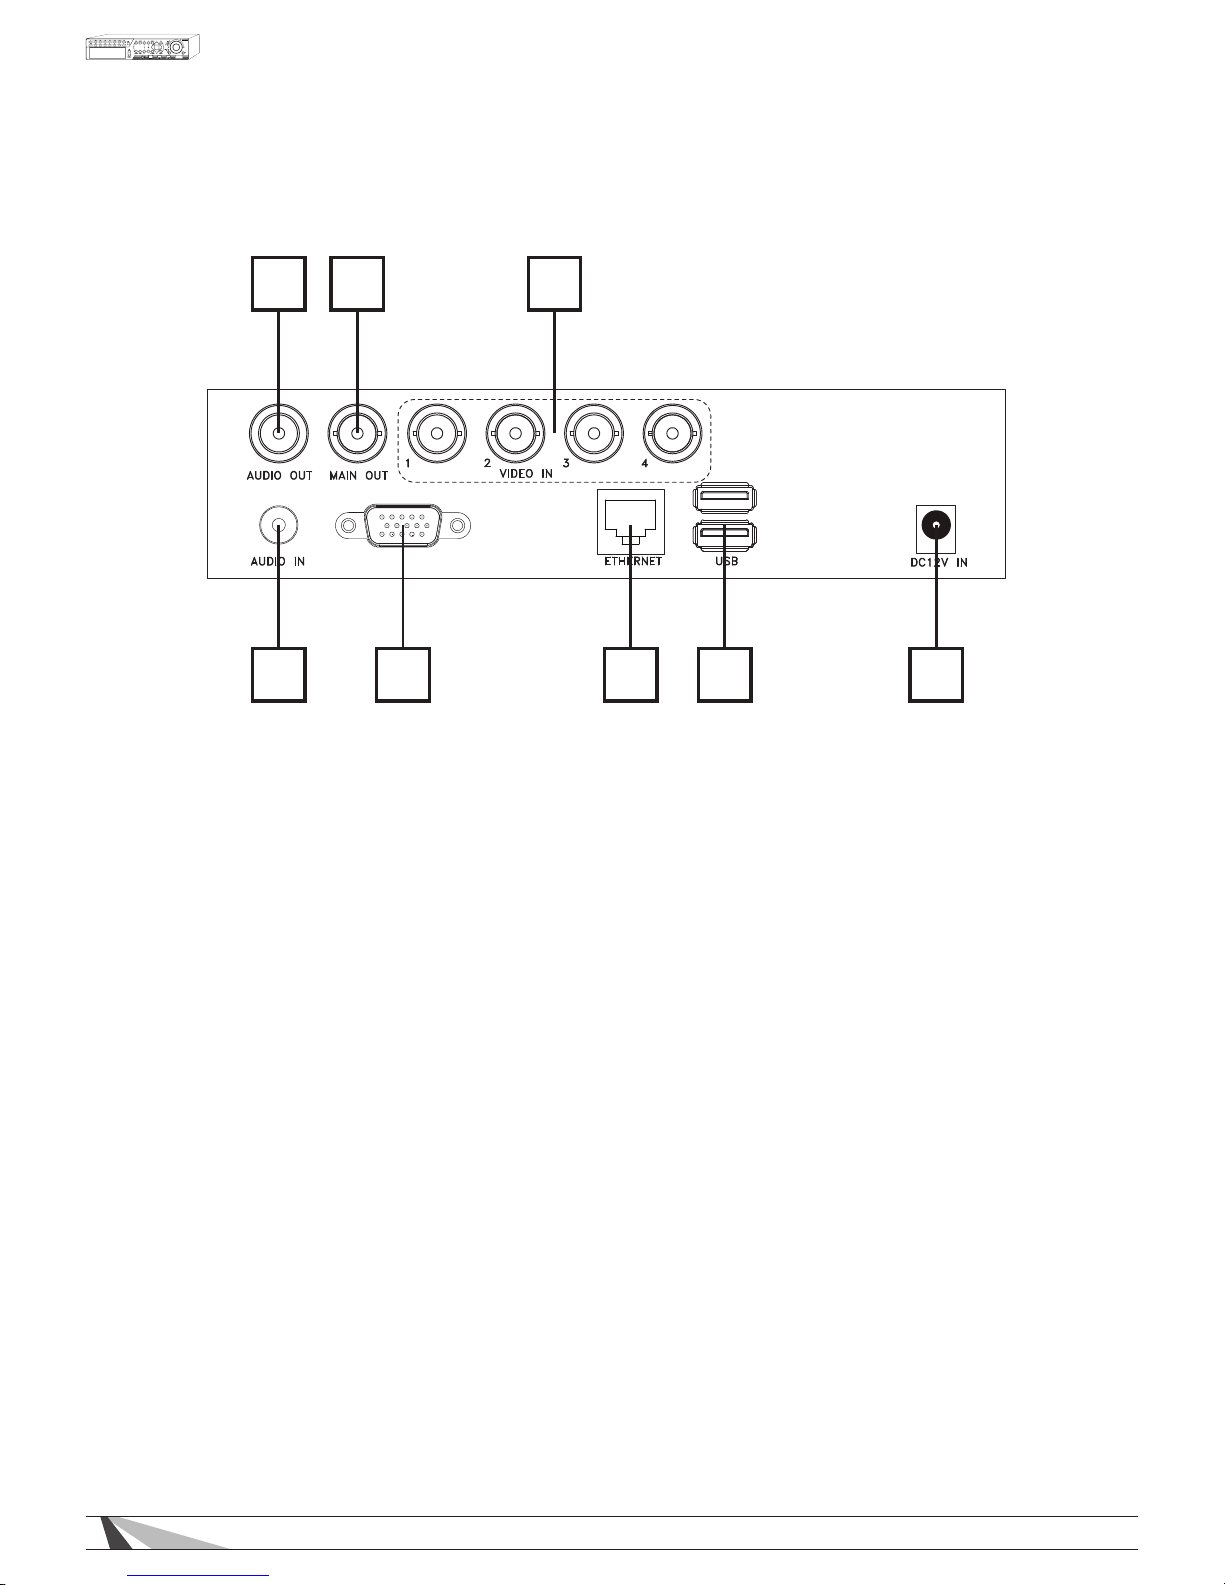
VGA OUT
1 2 3
45678
1. Audio Output Connector
Supplies line-out audio signals to external devices such as ampliers. Recorded audio will be supplied from
AUDIO OUT during playback.
2.
Video Out
Connection to TV monitors via BNC connector for main monitor display.
3.
Video Input Connectors (1-4 on WPS-165-DVR-4CH)
Connect system cameras to these BNC connectors. The corresponding 75 Ω termination must be ON unless
the video output terminal is connected. See item 5 below.
4.
Power Connection (DC IN)
Connect the supplied External Power Supply. Acceptable Range: 12V / 3.0A
DC
5. USB
Connect to USB 2.0 compatible storage device, such as USB 2.0 disk drive, thumb drive, etc.
6. Ethernet Connector
Connect to a 10/100Base-T Ethernet network for remote access and integrated control and video
streaming to Automation Systems.
7. VGA Connector
Main monitor display for connection to VGA monitor for setup, control and monitoring of cameras and
system.
8. Audio Input Connector
RCA connectors for line-in audio signals supplied from external devices such as microphone ampliers.
Page 8
8
WPS-165-DVR-4CH Installation and Users Manual
2.3. REMOTE CONTROL
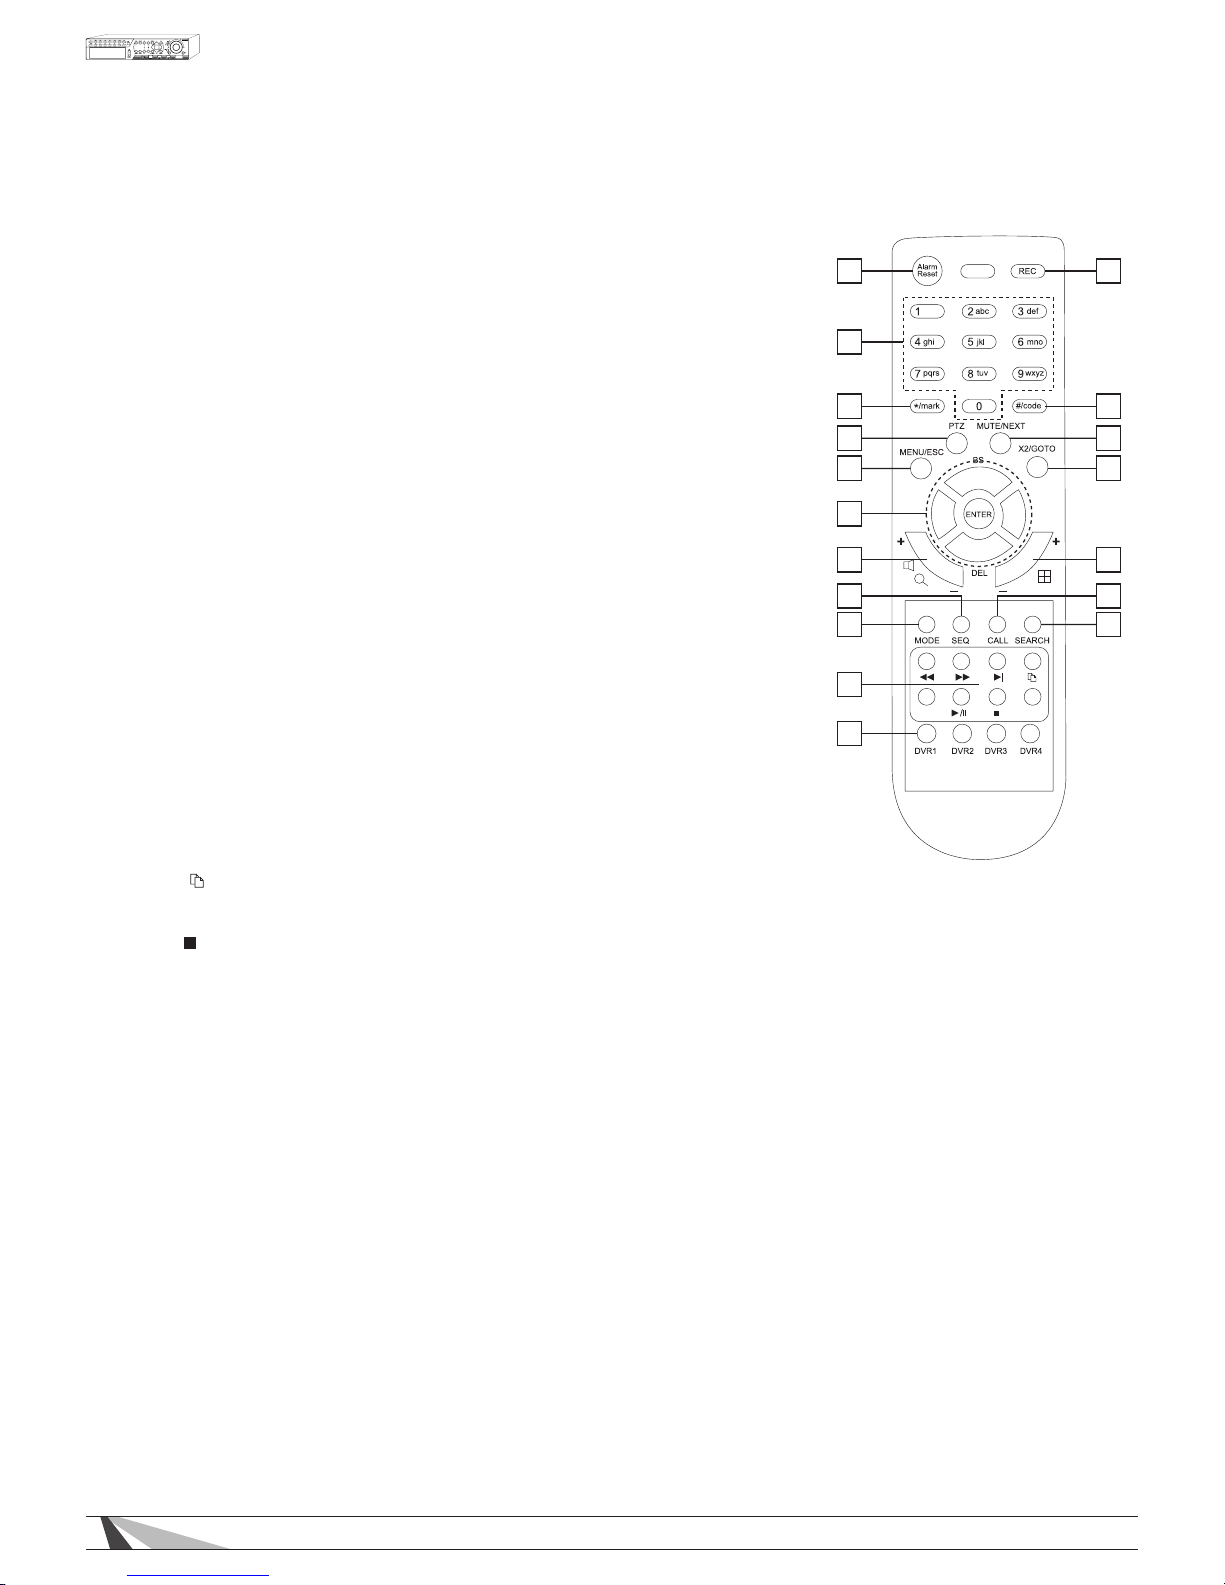
The remote control functions include:
1. Alarm Reset
Press to reset alarm.
2. Number Buttons
Direct selection of channels, display single view of the selected channel
number
3. */mark
This button has no function with this model.
4. PTZ
Opens the PTZ menu to control a connected PTZ camera.
NOTE: The menu will not appear if the selected camera is not a PTZ camera.
5. MENU/ESC
Displays OSD menu or Exits the current menu.
6. Navigation Buttons
Navigates the DVR right side menu, PTZ controls an OSD menus.
7. Volume/Zoom
Adjusts audio level up/down. Digital zoom of currently selected Camera
8. SEQ
Press to sequentially switch through connected cameras.
9. MODE
Press to change DVR modes.
10. Transport Buttons
Press to control DVR playback
◄◄ Rewinds the currently playing recorded content.
►► Fast Forwards the currently playing recorded content.
►| Skips Forwards the currently playing recorded content.
Opens the "Backup" window and allows copying video between select
able Start/End times to an attached USB flash drive or hard drive.
1
2
3
4
5
6
7
9
8
10
11
12
13
14
15
16
17
18
►/ll Plays or Pauses the currently selected content.
Stops the currently playing recorded content.
11. DVR 1-4
DVR ID buttons. In situations with multiple DVRs, use these buttons to select the desired DVR to be controlled, from a
single remote control.
12. REC
Starts and stops recording of the currently displayed image.
13. #/code
This button has no function with this model.
14. MUTE/NEXT
MUTE - Mutes audio from the currently playing recorded content.
NEXT - single camera mode next camera
15. X2/GOTO
X2 - Press once for selected camera digital zoom. Press again for secondary zoom. Press again to exit zoom.
GOTO -In PTZ mode goto calls preset functionality of PTZ camera.
16. GRID
Press to sequentially change the video display grid for 1, 4, 7, 9, 10, 13 or 16 cameras.
17. CALL
In HD mode sets format.
18. SEARCH
Brings up menu system to search time or event for playback.
Page 9

9
WPS-165-DVR-4CH Installation and Users Manual
3. INSTALLATION
3.1. POSITIONING THE 165 DVR
Wirepath Surveillance DVRs are designed to deliver unsurpassed technology with superior performance.
However, where you place the DVR can have a large effect on the performance that you receive, and
the life of the unit. Here are some guidelines to follow when installing the DVR.
• Position it with all feet resting on a solid level surface.
• Be sure that the DVR is in a well-ventilated area that provides adequate cooling.
- Do not block the cooling vents located on the side panel. Proper ventilation is important to the
performance and life span of the power supply and HDD(s).
- Do not place the DVR on carpeting or any similar material.
- Do not install the DVR near a source of heat, or in an extremely humid or wet location.
- If your installation lacks good air ow (such as solid cabinet doors or wall-mounted racks), it may be
necessary to create ventilation to allow outside air into the space.
• Allow a minimum of 2” of depth behind unit to accommodate cables and connectors.
Page 10
10
WPS-165-DVR-4CH Installation and Users Manual
3.2. CONNECTIONS
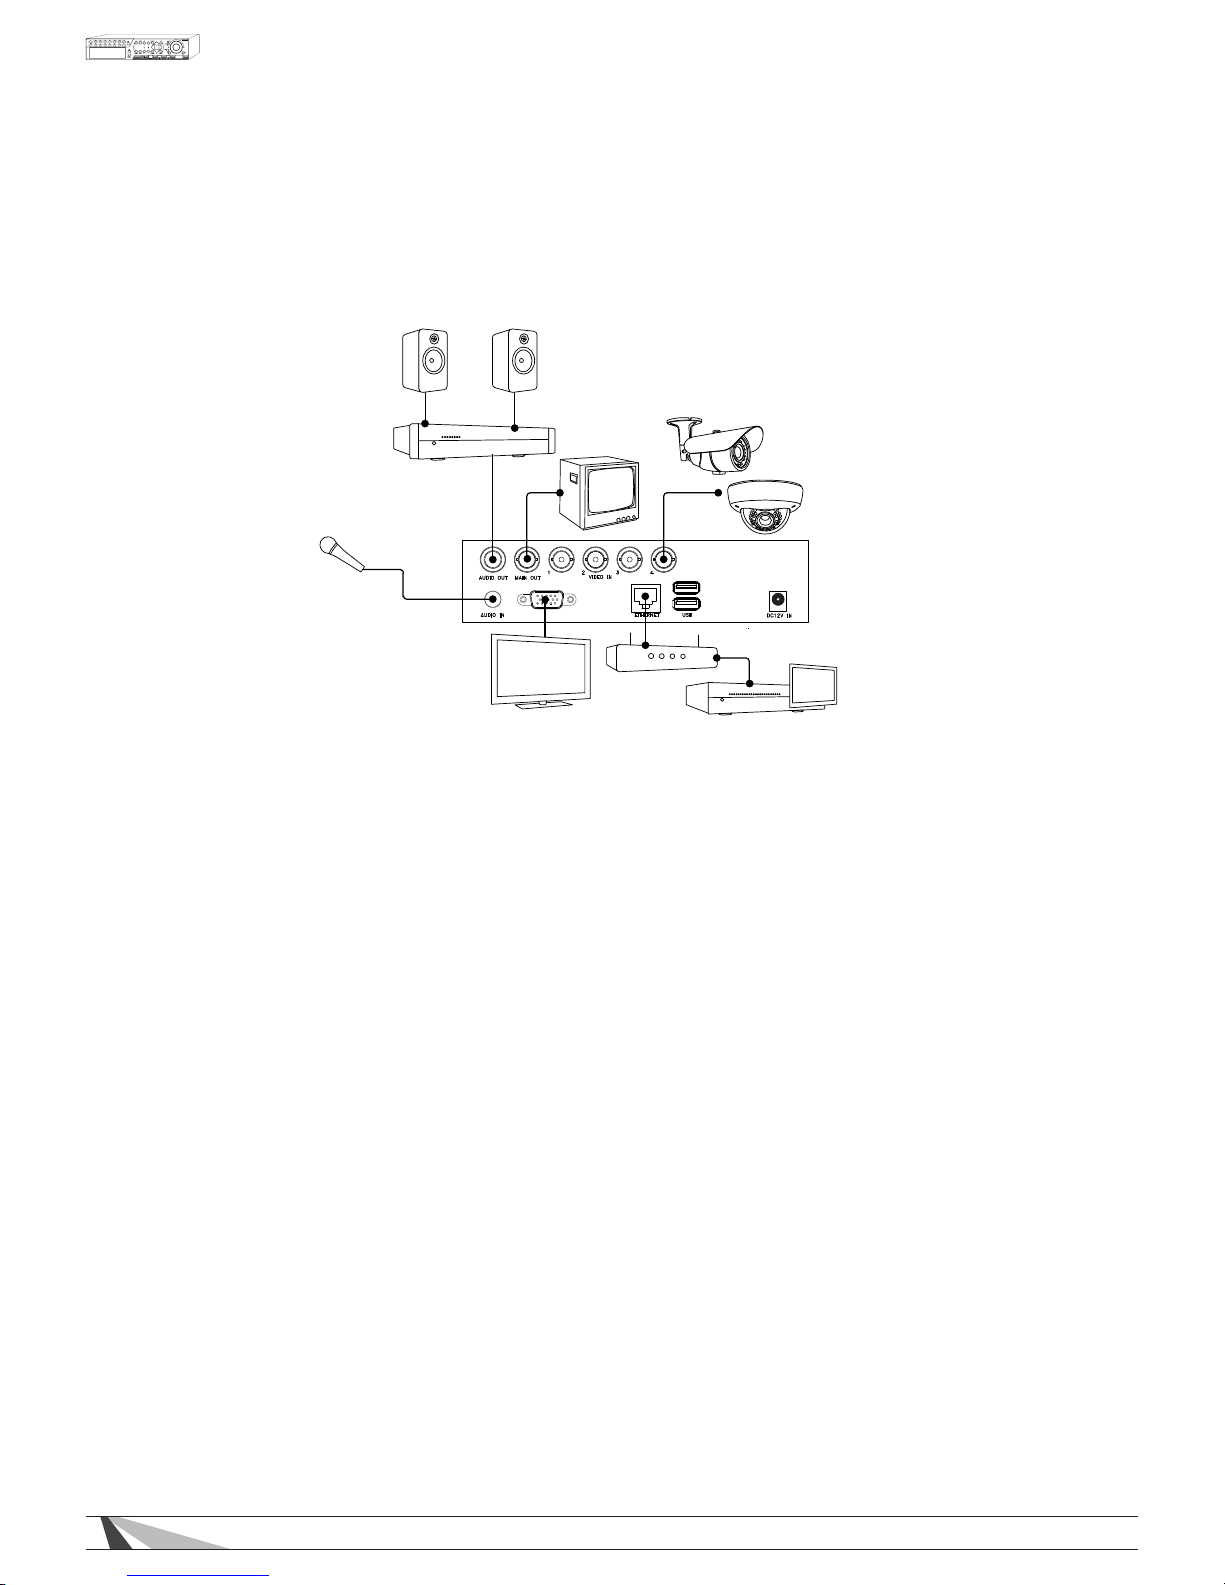
To ensure proper performance and operation of the 165 DVR, it is recommended that all connections
and setup be performed by a qualied system installer.
3.2.1. BASIC CONNECTIONS
Router
Automation System
Camera(s)
Microphone
Amplifier
Speakers
LCD Monitor/Flat Panel TV
WPS-165 4CH DVR
VGA OUT
CRT Monitor
• POWER
Connect the included External Power Supply to surge protection or wall outlet.
• CAMERAS
Connect the video output from cameras or other composite video sources using coaxial cable to the
Video In connectors.
• MAINMONITOR/VGAOUTPUT
Connect the Main Monitor BNC to a surveillance TV monitor
Connect the Main Monitor VGA output to a VGA monitor or Flat Panel TV
3.2.2. OPTIONAL CONNECTIONS
• AUDIOINPUT
Connect the audio input connector to the audio line-out from line level microphones or other audio
sources. Please make sure to associate the audio inputs with a camera in the Camera Setup as described
in Section 6.2 accordingly. An audio input can only be associated with one camera.
• AUDIOOUTPUT
Connect the audio output connector to an amplier and speakers.
• ETHERNET
Connect the Ethernet connector to router via a standard Ethernet cable for control and streaming to an
Automation System, remote access via PC or Smartphone, or event email notications. Please make sure to
setup the related congurations as described in Section 6.11 Network Setup.
Page 11
11
WPS-165-DVR-4CH Installation and Users Manual
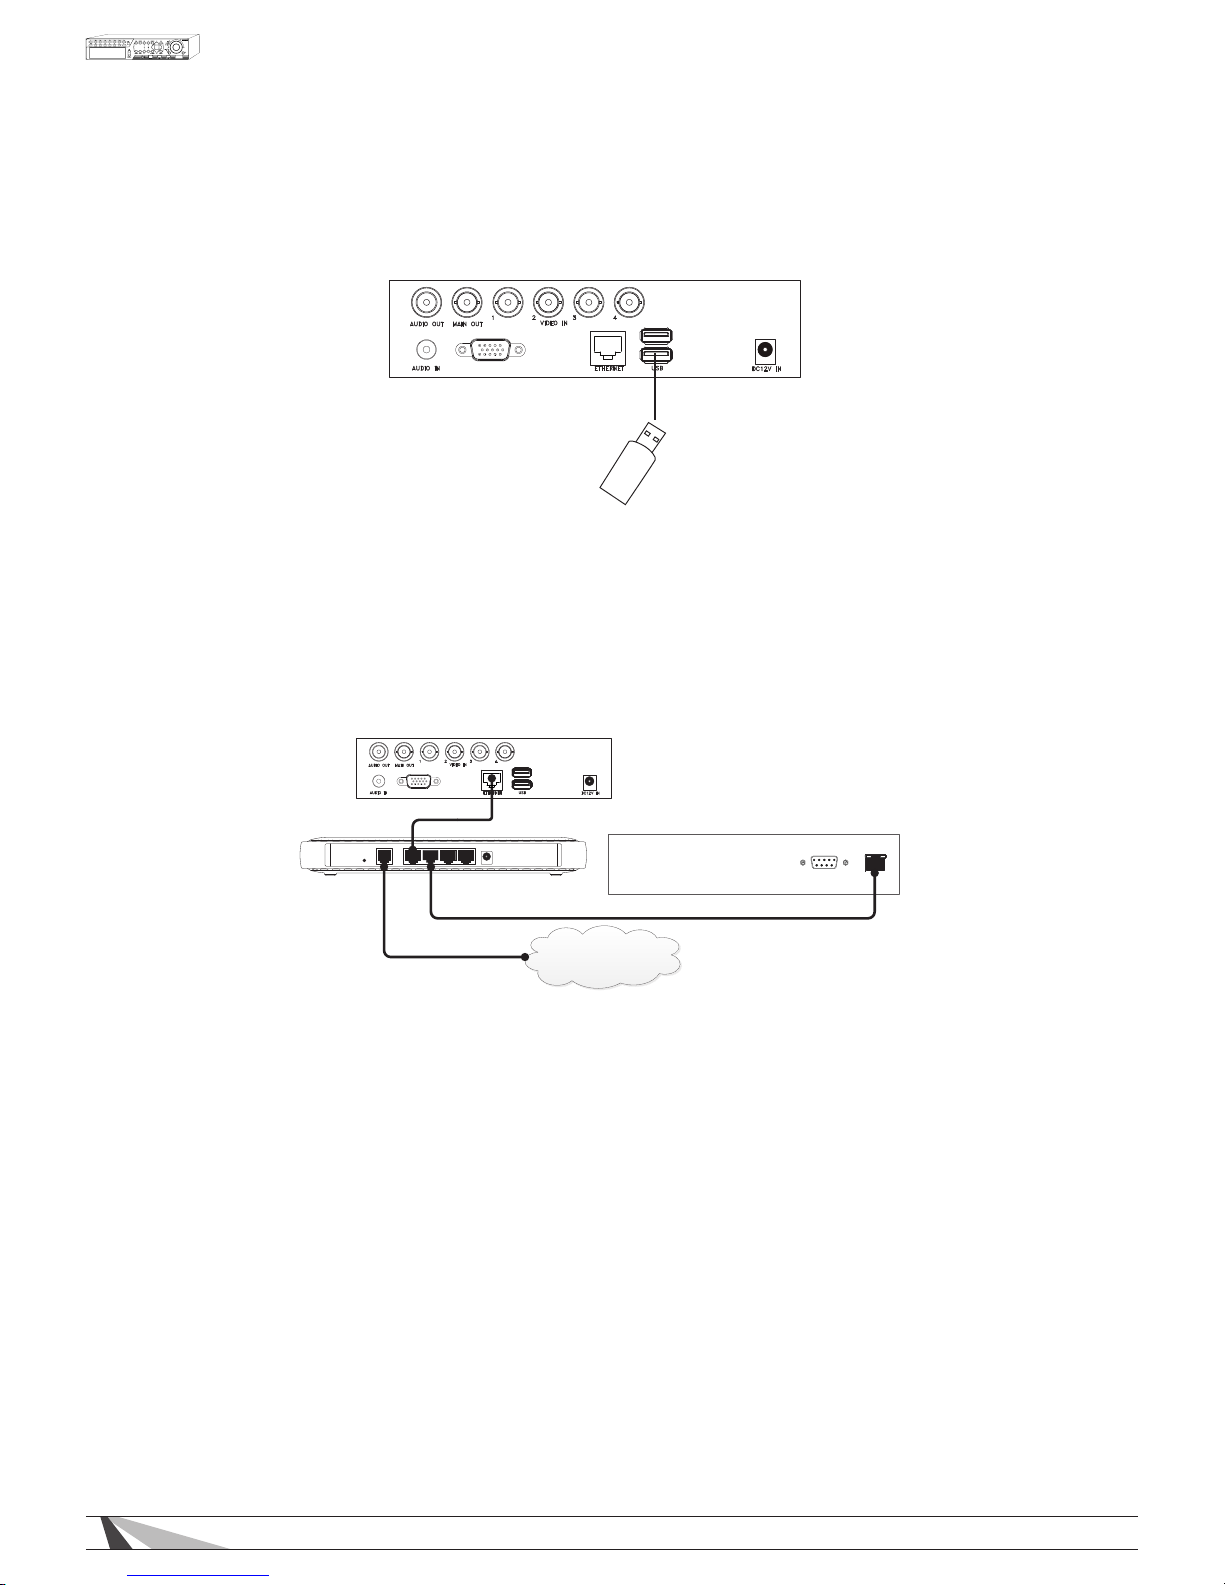
• USB 2.0
External storage devices such as a USB thumb drive can be connected for archiving recorded content.
Content cannot be recorded directly to a USB Drive.
Thumb Drive
VGA OUT
3.2.3. IP CONTROL CONNECTIONS
IP Control Connections
Wirepath™ DVRs provide integration with Automation Systems via Ethernet allowing for control and streaming of video.
Connect the Ethernet port to a home automation network.
RS-232
Network
Control System
Router
Internet
WPS-165 4CH DVR
VGA OUT
Page 12

12
WPS-165-DVR-4CH Installation and Users Manual
4. MAIN SCREEN AND BASIC OPERATIONS
The following sections (Sections 4-6) relate to the display output from the VGA or BNC connection. For
Remote Access operation using Internet Explorer see Section 9.
The split-window screen is the main screen displayed after system startup. There are several types of splitwindow screens including 1 or 4 window grids (as described in Section 4.3). In addition to the split windows,
a System Status Bar is displayed at the bottom of the screen. Time is displayed in the lower-left corner while
system status is displayed in the lower-right corner. Scrolling screen messages are displayed when certain
events occur.
The System Status Bar offers the following information:
• SEQ display – SEQ icon shown for SEQ display ON
• Backup state – Backup icon shown for backup
• Manual record – REC icon shown for ON,
• Zoom states – X2, or X4
• Mute state – Speaker icon visible when not muted; the icon will not be displayed in mute state
• Hard Drive recording percentage
• Video Loss – a message with the corresponding camera number scrolls from right to left
• Motion Detection – a message with the corresponding camera number scrolls from right to left
• Current date and time
In the top left of each camera the following information is displayed:
• Camera Title – name of the camera
• Recording icon – indicates video is being recorded
• Motion icon – indicates motion detected for this camera
• Alarm icon – indicates an alarm that has been associated with corresponding camera has been triggered
In split screen windows, the “focus” camera is indicated by a green or red box around the cameras title.
Green indicates live video, and red indicates recorded video that is being played back.
Page 13
13
WPS-165-DVR-4CH Installation and Users Manual
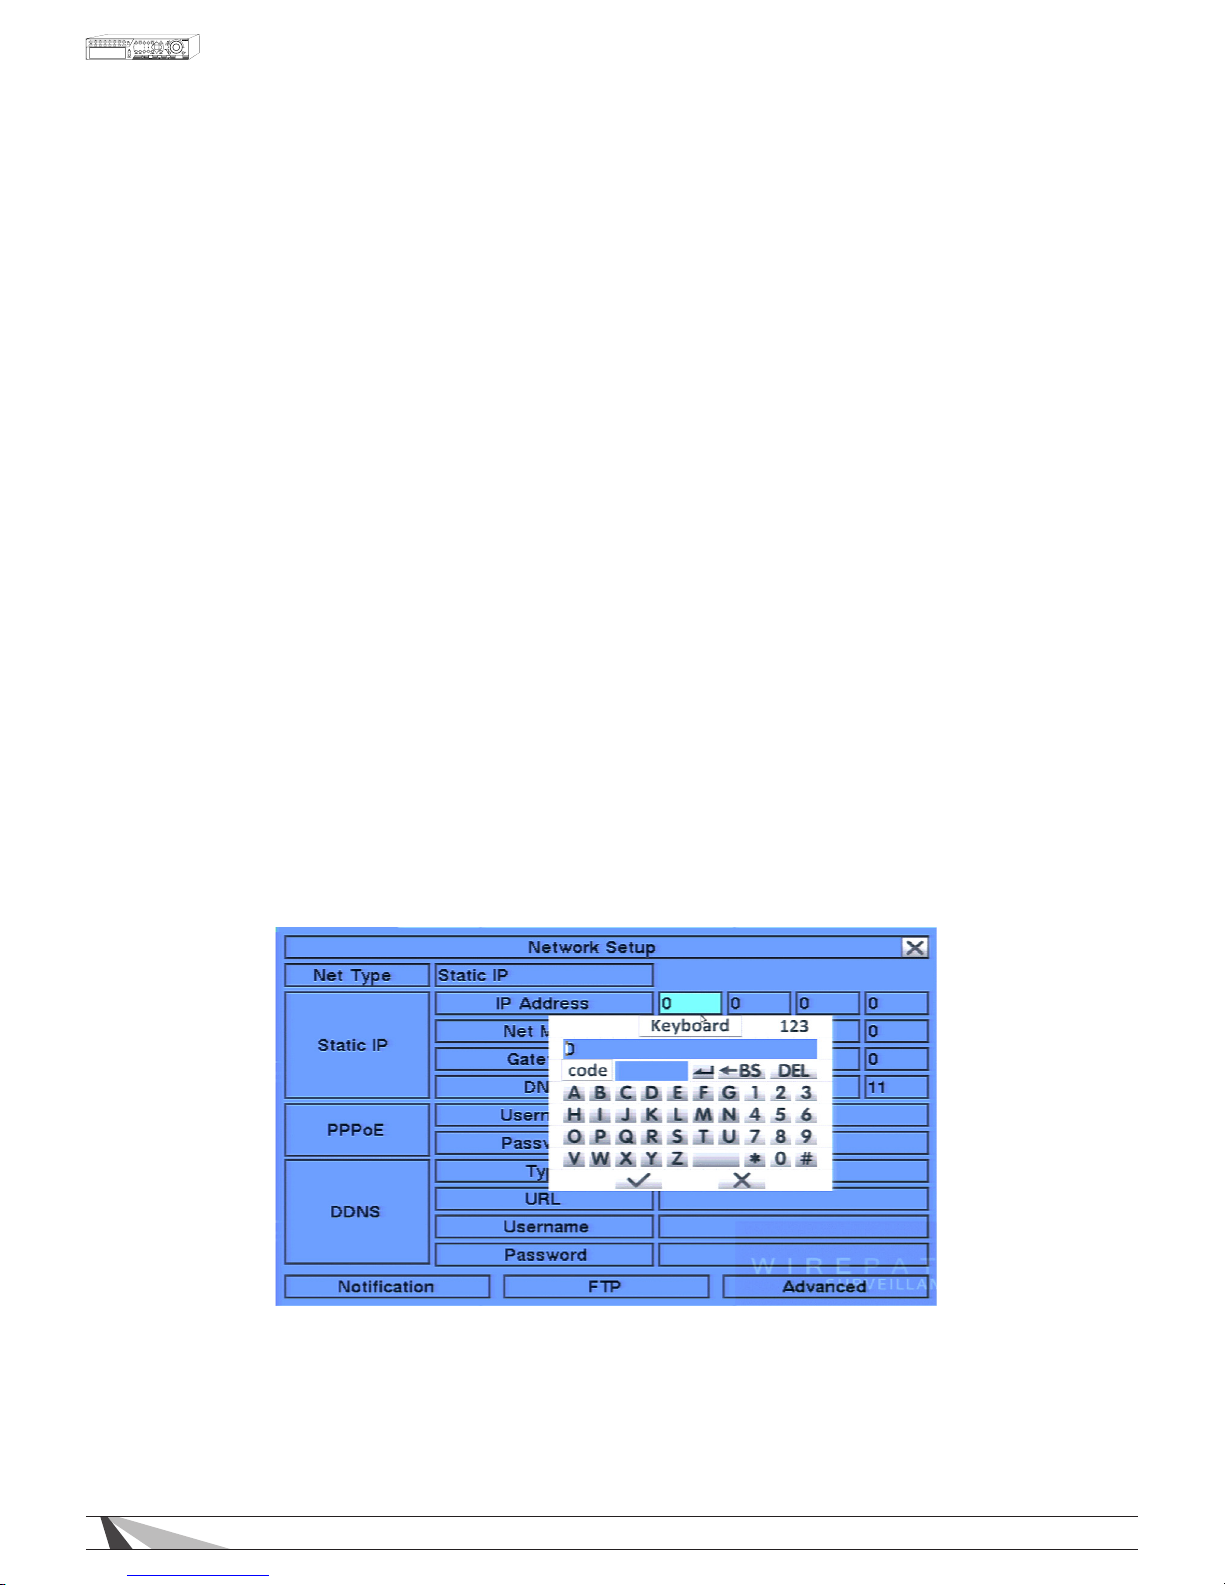
4.1. TEXT INPUT
There are certain system settings that the system requires text to be entered, such as system login, camera title
setup, etc. Follow the steps below using the remote control to enter text when prompted to do so by a text
box:
1. Press ENTER to edit the highlighted option. The ashing cursor will be displayed to indicate the editing point.
2. Press ◄► to move the cursor to the left/right.
3. Press #/code (found on the remote control) in text editing mode to change text case. If the text entry
accepts numbers only, pressing code will have no effect. Toggle through the options to select:
• 123 = Number only
• abc = All lower case letters
• ABC = All capital letters
• CODE = Used for languages that requires characters
4.
Use the remote control to press a number key (1-9, 0) repeatedly until the character you want appears
(1 for 1
or space, 2 for 2, a/A, b/B, or c/C, etc.).
5. Press
*
/mark (found on the remote control) to display a list of punctuation marks and special characters.
The highlighted character in the list indicates the selected character. Press
▲▼◄► to change the
selection.
6. If you make a mistake, using the remote control press BS to remove the character to the left of the cursor, or
press DEL to delete the character at the current cursor position.
7. Press ENTER to exit the highlighted option and save changes, press ESC to exit without making changes.
Alternatively the supplied mouse can be used to enter text. When using the mouse to enter text, click on a
highlighted option window with the left mouse button. A Keyboard Simulator will be shown.
Click on “#” (or “abc”) to change text case. Click on the alpha-numeric characters to enter letters and
numbers. Click on “
*
” for special characters. Click on the check mark to accept the changes or click on the
X to exit without changes.
Page 14
14
WPS-165-DVR-4CH Installation and Users Manual
4.2. LOGIN / LOGOUT
There are three password levels in the system; Administrator (highest), Supervisor, and Operator (lowest). If the
user does not login to the system, the user will be treated as a Guest and can only view live video display.
The system allows up to 18 user accounts. The Administrator can set up the login name and password for each
user (please refer to Section 6.8 for Passw
ord Setup) and has access to all features. The Supervisor can operate
the live video display, video playback and archive. The Operator can only operate the live video display.
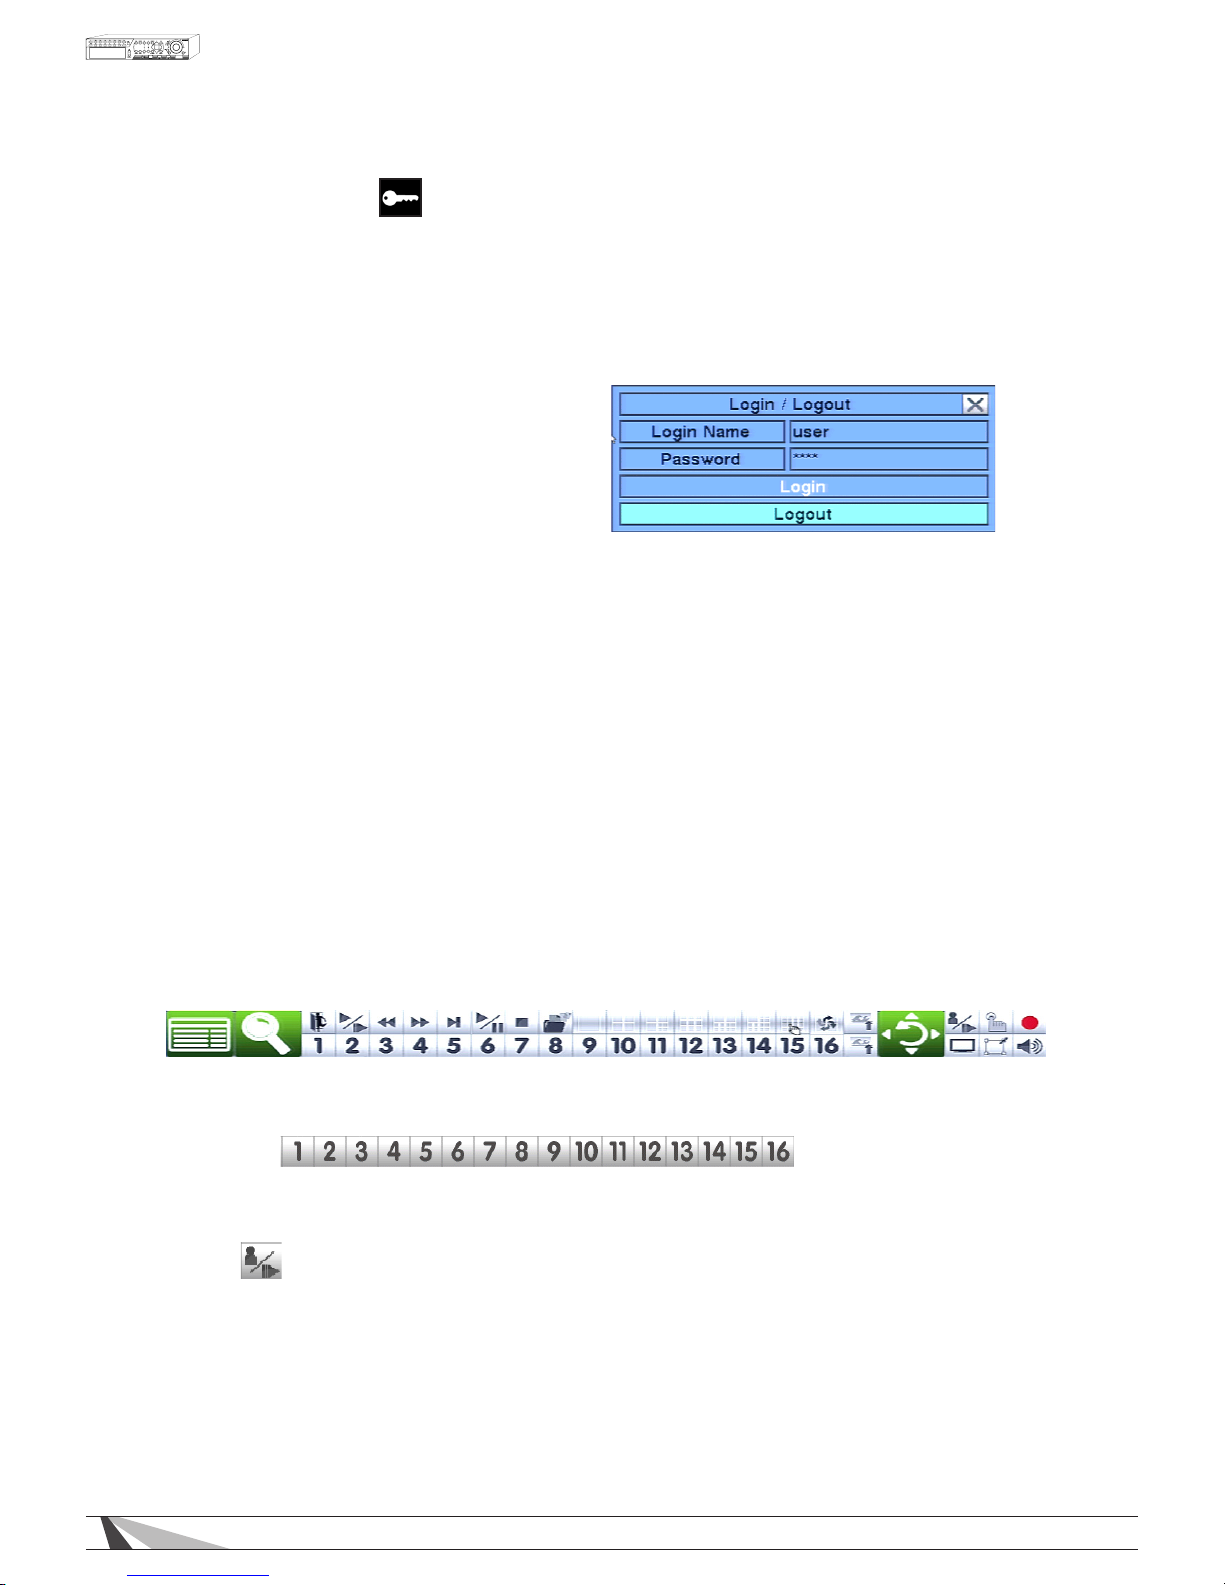
To login or logout of the system, press
the MENU button on the remote control and
then use the arrow buttons to select the
desired option. Once the option is highlighted,
press the ENTER button. Alternatively use the
mouse by first right-clicking the mouse to
display the main MENU and then select the
LOGIN icon.
In Login/Logout menu, follow the text input method described in Section 4.2 to enter the Login name and
Password. Once the name and password are entered, press ◄► to highlight and select the Login option.
Press ENTER to login the system. To logout of the system first display the Login/Logout menu and the press ◄►
to highlight and select Logout option, and then press ENTER. Use the ESC button on the remote control to exit
without making changes. Alternatively use the mouse to select the exit button or simply “right-click.”
FACTORY PRESET ADMINISTRATOR LEVEL LOGIN INFORMATION
• Login Name: user
• Password: 1234
4.3. BASIC OPERATIONS USING THE CONTROL BAR
After logging into the system, use the supplied mouse to operate the DVR. A Control Bar will be displayed at
the bottom of the display by “dragging” the mouse to the bottom screen. It is recommended to operate the
Control Bar using the included mouse. Where applicable, buttons on the remote control are indicated in the
descriptions below. These buttons may have different functions in different menus. The specific functions are
detailed in each of the following sections.
Thefollowingisabriefdescriptionforeachiteminthemenuanditsspecicoperations:
•
NUMERIC
Select any camera from the remote control by using the numeric buttons. Only buttons 1-9 are available
on the 9 channel DVR; all 16 are available on the 16 channel DVR. Alternatively use the mouse to select
any of these icons to switch to the full-window display of a particular camera.
• MODE
Use the button on the remote control to toggle live and playback mode. Playback mode is indicated by a
red box around the camera title of the focus camera (the camera being controlled). If in a split window
display, the focus window will first switch to playback mode. A second press of the button will toggle
additional windows to playback mode. Continue to press the MODE button to return to live mode
(indicated by a green box around the camera title of the focus camera). Alternatively, use the mouse to
select this icon.
MODE is only available to an Administrator or Supervisor.
Page 15

15
WPS-165-DVR-4CH Installation and Users Manual
• SEQ
Press this button on the remote control to switch to or exit from the sequence display mode. Alternatively
use the mouse to select this icon. In sequence mode, each page in the sequence will be shown
sequentially for the preset time, and the SEQ icon will be shown in the System Status Bar in the lower-right
corner of the screen.
•
CALL
Press this button on the remote control to switch to or return from full screen display of the focus camera.
Clicking the mouse in the focus camera window will achieve the same result.
•
SEARCH
Press this button on the remote control to display the search menu. Alternatively use the mouse to select
this icon.
SEARCH is only available to an Administrator or Supervisor.
• REC
Press this button on the remote control to force manual recording. To stop manual recording, press it
again. Alternatively use the mouse to select this icon. All cameras will be recorded and a red REC icon
will be shown on the lower-right corner of the screen when manual recording is active.
•
MENU
Press this button on the remote control (both labeled MENU/ESC) to display the main Menu. Alternatively
use the mouse to select this icon, or, “right-click” the mouse to display the Menu.
• X2
Press this button on the remote control to enter the Digital Zoom mode when in full screen display.
Alternatively use the mouse to select this icon.
• VOLUME
Press these buttons on the remote control to control the gain (volume) of the AUDIO OUT jack. Alternatively
use the mouse to select this icon.
• GRID
Press the Grid buttons (next to the grid symbol) on the remote control to toggle through the available
split-window displays. Only 1 and 4 split-window displays are available on the 4ch. Alternatively use the
mouse to select the split window grid options.
•
PAGE
When in split window view, press the Page button on the remote control to toggle through multi-splitwindow displays. Alternatively use the mouse to consecutively click on this icon.
• OSD
Use the mouse to select the OSD Display icon to enable or disable the following information from appearing
in the System Status Bar on the main display; Title, Time, Messages, Status and Rec%.
Page 16

16
WPS-165-DVR-4CH Installation and Users Manual
•
COPY
Press this button on the remote control to display the Search menu and then copy recorded video to the
storage device connected to the USB port.
•
TRANSPORTCONTROLS
Use the Transport buttons on the remote control during playback to control the video. Alternatively use
the mouse to click on these icons.
• FAST/SLOW
Use the mouse to select this icon to toggle the speed of the forward and backward transport buttons.
•
PLAY/PAUSE
Press this button on the remote control to launch the Instant Playback
menu to playback the last 30
seconds or 1, 2, 3 or 5 minutes of video. Alternatively use the mouse to click on this icon.
• ALARMRESET
Use the button on the remote control to cancel an alarm. Alternatively use the mouse to select this icon.
This will reset the alarm outputs and silence the buzzer.
4.4. DIGITAL ZOOM
The DVR supports X2 and X4 Digital Zoom. Use this function in full window display mode. Press the X2 button
on the remote control to enter Digital Zoom. Alternatively use the mouse to select the icon ( )found in the
Control Bar. A yellow zoom window will be displayed in the video window as shown.
• X2ANDENTER
Use the buttons on the remote control to zoom from X1 to X2. Pressing the X2 button again followed by
ENTER button will zoom to X4. Pressing the X2 button followed by ENTER a third time will return the zoom to
normal X1 view.
• ▲▼◄►
Use these buttons on the remote control to move the zoom window.
• ESC
Use the ESC button on the remote control to escape from Digital Zoom mode and return to the normal full
screen display.
Alternatively use the mouse to select the exit button or simply “right-click.”
Page 17
17
WPS-165-DVR-4CH Installation and Users Manual
5. MAIN MENU
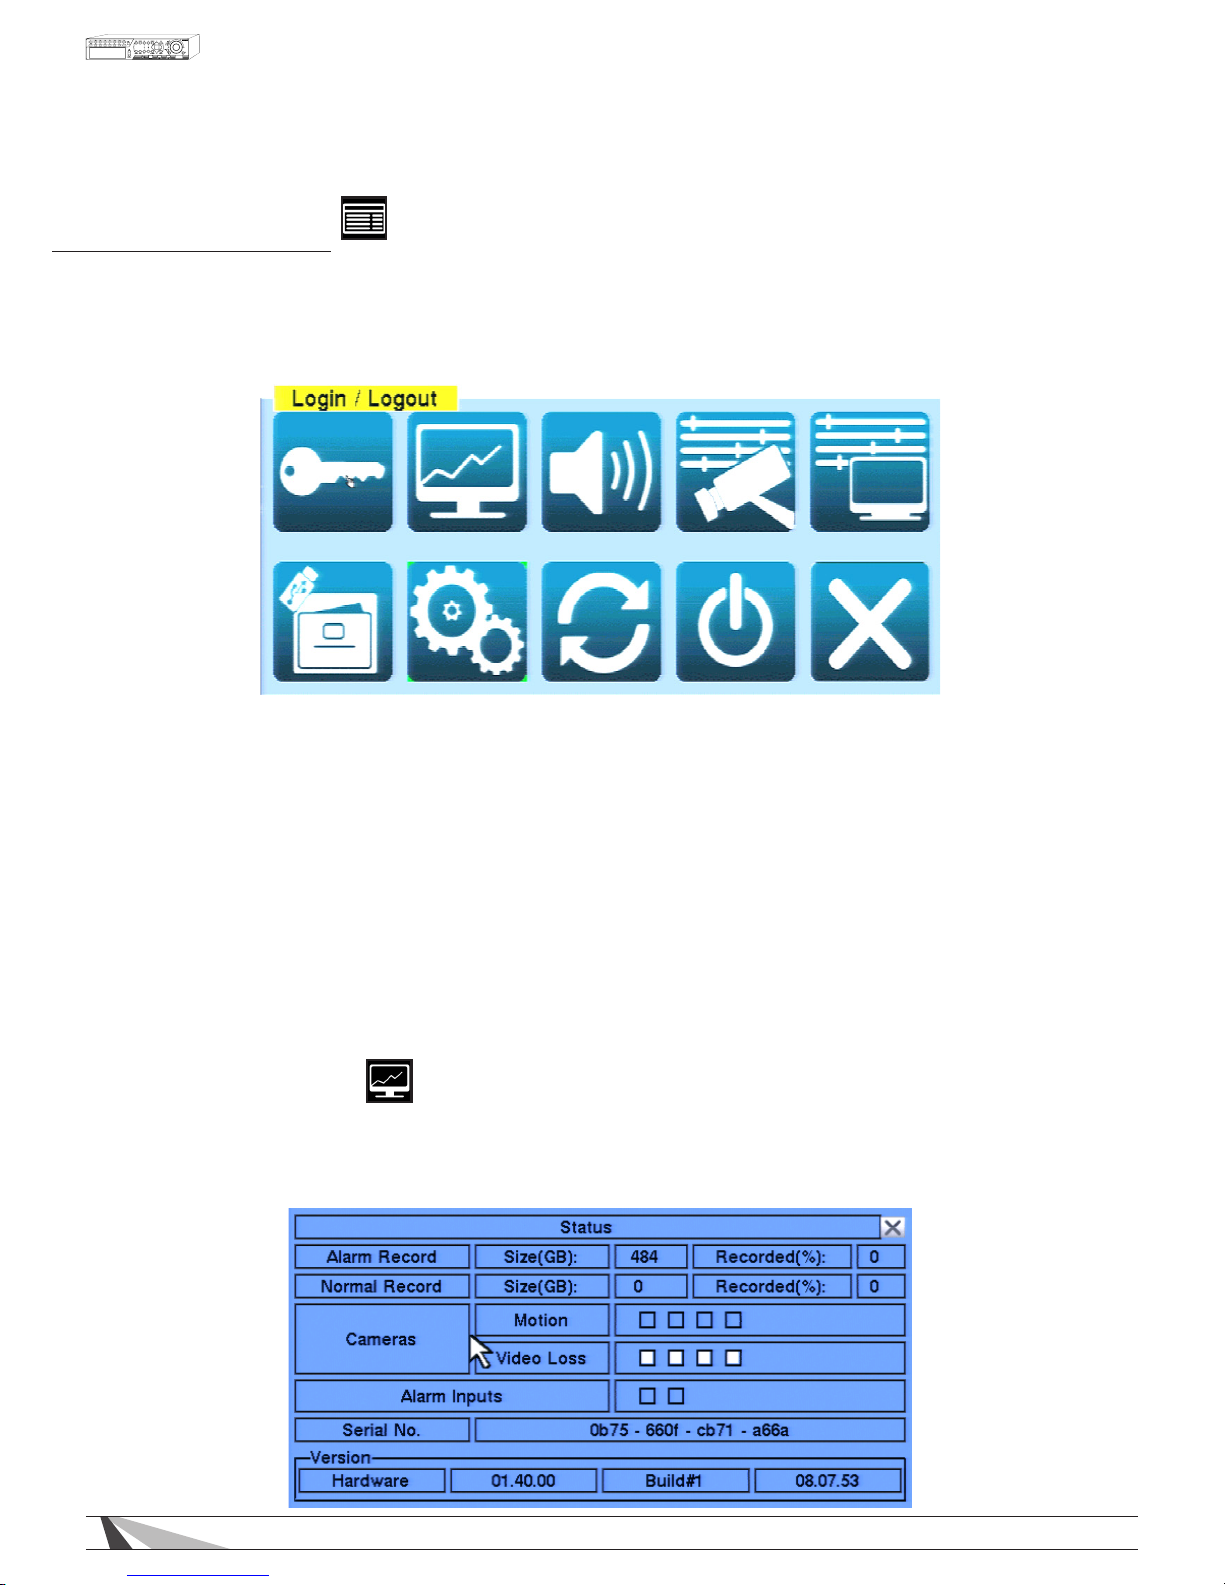
Select the MENU icon from the Control Bar or right click the mouse in the display window to
activate the main Menu display as shown.
In the main Menu display and all subsequent displays, the items enabled are highlighted in Blue, and those
disabled in Gray. Refer to Appendix B for an outline of the structure of Menu Displays, and to Section 4.2 for
Login/Logout display. The names of the icons are displayed when the mouse “hovers” over the icon.
To navigate and operate this menu:
•
▲▼◄►
Press these buttons on the remote control to change the highlighted item. The mouse may also be used
to navigate.
•
ENTER
Press this button on the remote control to enter the detailed display of the highlighted option.
Alternatively use the left mouse button to select an option.
•
ESC
Press this button on the remote control to escape from Menu display, and return to the main video
display. Alternatively use the mouse to select the EXIT icon or simply “right-click” the mouse.
5.1. STATUS DISPLAY
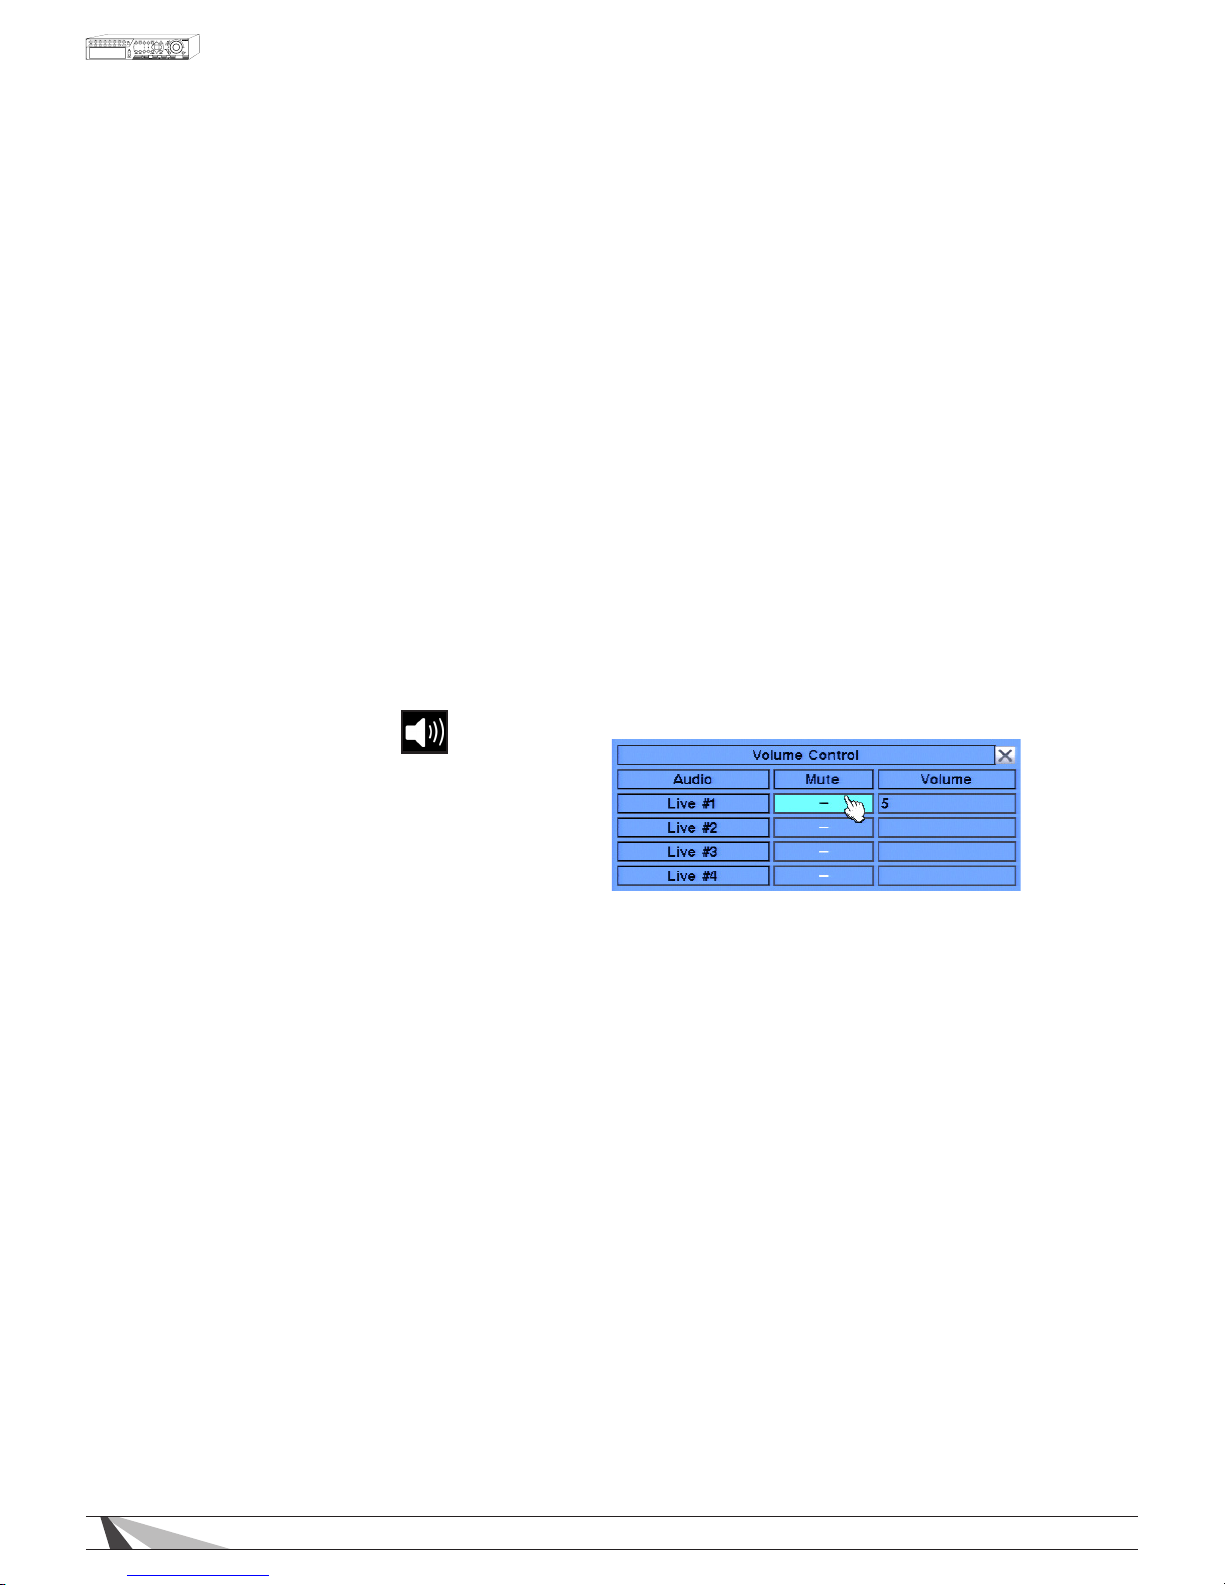
Once in the main Menu display, press ▲▼◄► on the remote control to select Status, and then
press ENTER to display the menu below. Alternatively use the mouse to click on the Status icon.
Page 18
18
WPS-165-DVR-4CH Installation and Users Manual
The Status display includes:
• ALARMRECORDINGSTATUS
Displayed is the portion of the hard drive allocated to recording alarm events and the percentage of that
space that is currently full.
• NORMALRECORDINGSTATUS
Displayed is the portion of the hard drive allocated to regular (normal, non-event) recording and the
percentage of that space that is currently full.
•
CAMERASTATUS
Motion and Video Loss is indicated by a white box for cameras 1-4.
•
ALARMINPUTSTATUS
This feature has no function for this model of DVR.
• SERIALNUMBER
DVR serial number
• VERSIONNUMBER
Hardware and Software version numbers
Press the ESC button on the remote control to escape from this menu and return to the main Menu display.
Alternatively use the mouse to exit the sub menu by clicking on the “X.” Another method to escape is to
use the mouse to “right-click,” and exit the sub menu.
5.2. VOLUME CONTROL
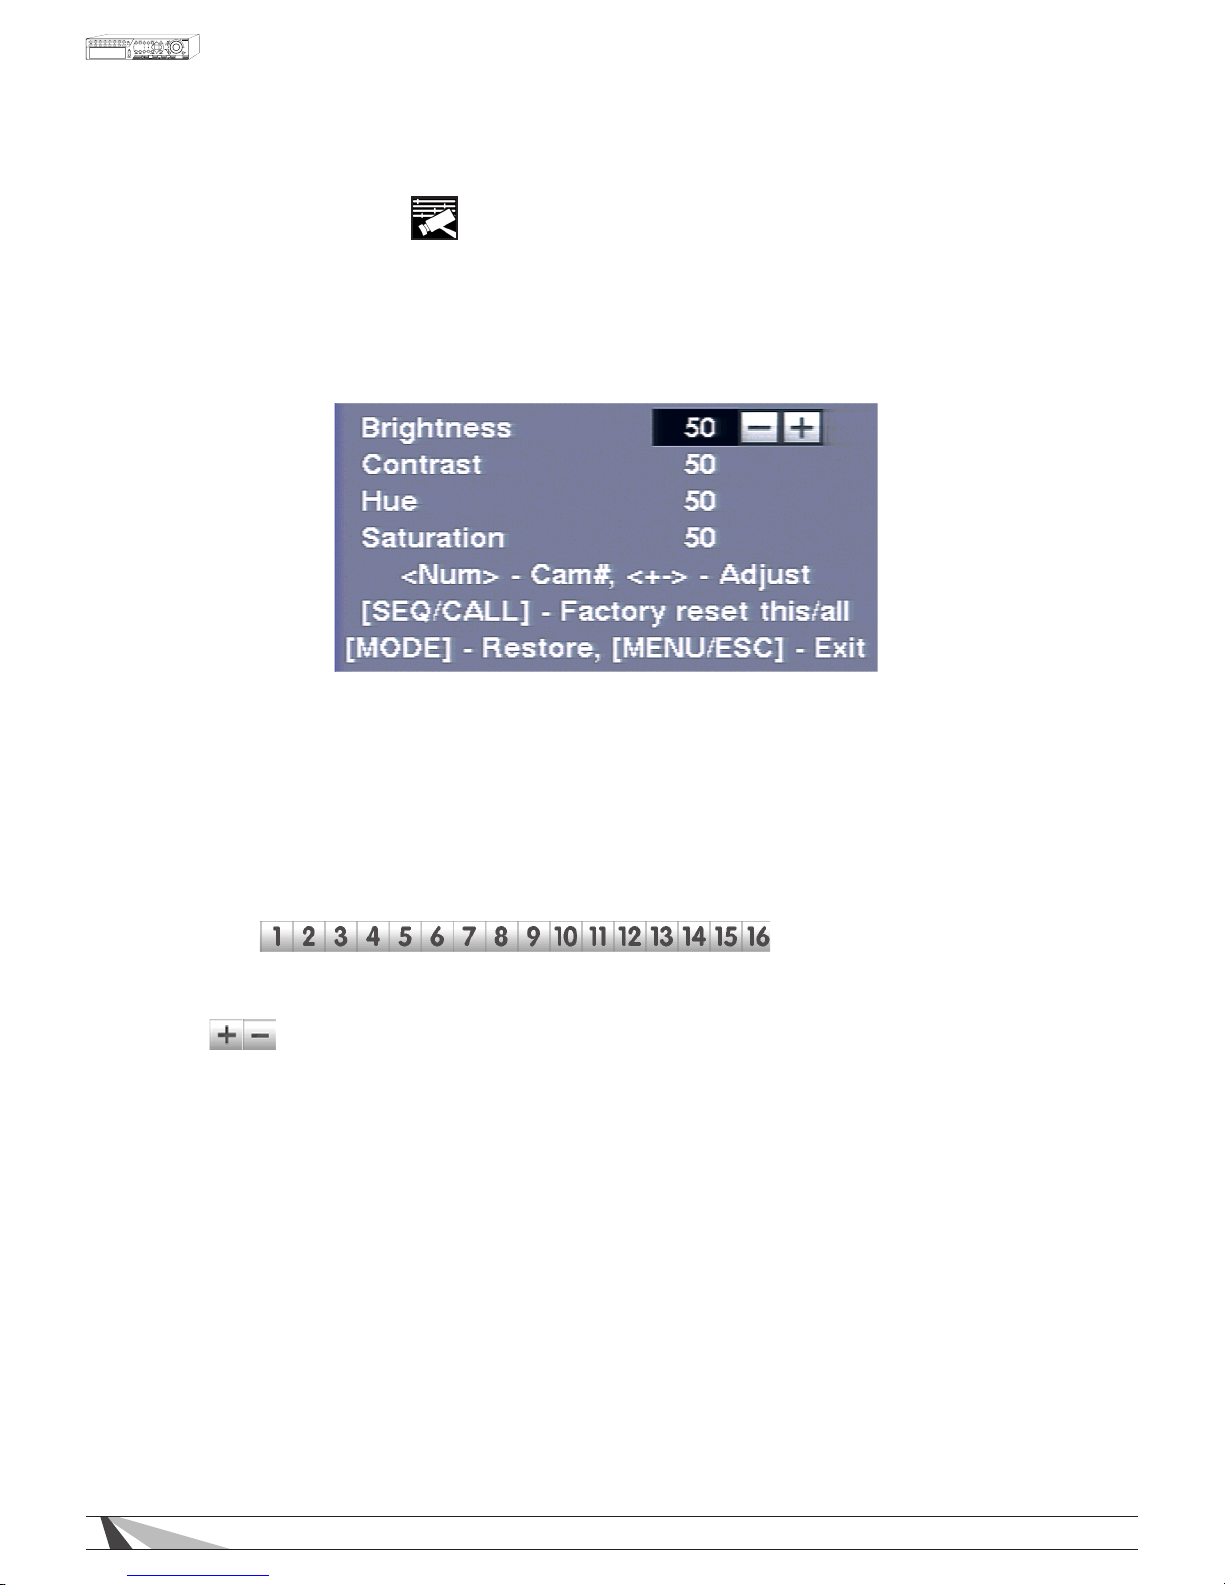
The Volume Control menu allows for the adjustment
of the gain (volume) for the AUDIO IN jacks. The
master audio out volume can be controlled
from the CONTROL BAR.
Once in the main Menu display, press ▲▼◄► on
the remote control to select Volume, and then press
ENTER to display the menu as shown. Alternatively
use the mouse to click on the Volume icon.
Note: This DVR supports one audio input channels.
Therefore options for Audio 2 through 4 will be
displayed in white text and cannot be changed.
Thefollowingisabriefdescriptionforeachiteminthesubmenuanditsspecicoperations:
•
▲▼◄►
Press these buttons on the remote control to select an option. Alternatively use the mouse to select an
option.
•
ESC
Press the ESC button on the remote control to escape from this menu and return to the main Menu display.
Alternatively use the mouse to exit the sub menu by clicking on the “X.” If the contents in this menu have
been modified, a Save dialog box will be displayed requesting the user to save the changes. Press ENTER
on the remote control to exit and save, ESC to exit without saving. Another method to escape is to use the
mouse to “right-click,” and exit the sub menu.
•
MUTE
Mutes the selected audio input channel. Using the remote control, press ENTER (or +/-) to check/
uncheck this item. The default setting is “-” noting that the channel is not muted. Alternatively use the
mouse to enable or disable the mute feature.
•
VOLUME
Adjusts the gain (volume) of the selected audio input channel. Press +/- buttons on the
remote control to
change the value (1-10). Alternatively use the mouse to select the desired volume level.
Page 19
19
WPS-165-DVR-4CH Installation and Users Manual
5.3. VIDEO ADJUSTMENT
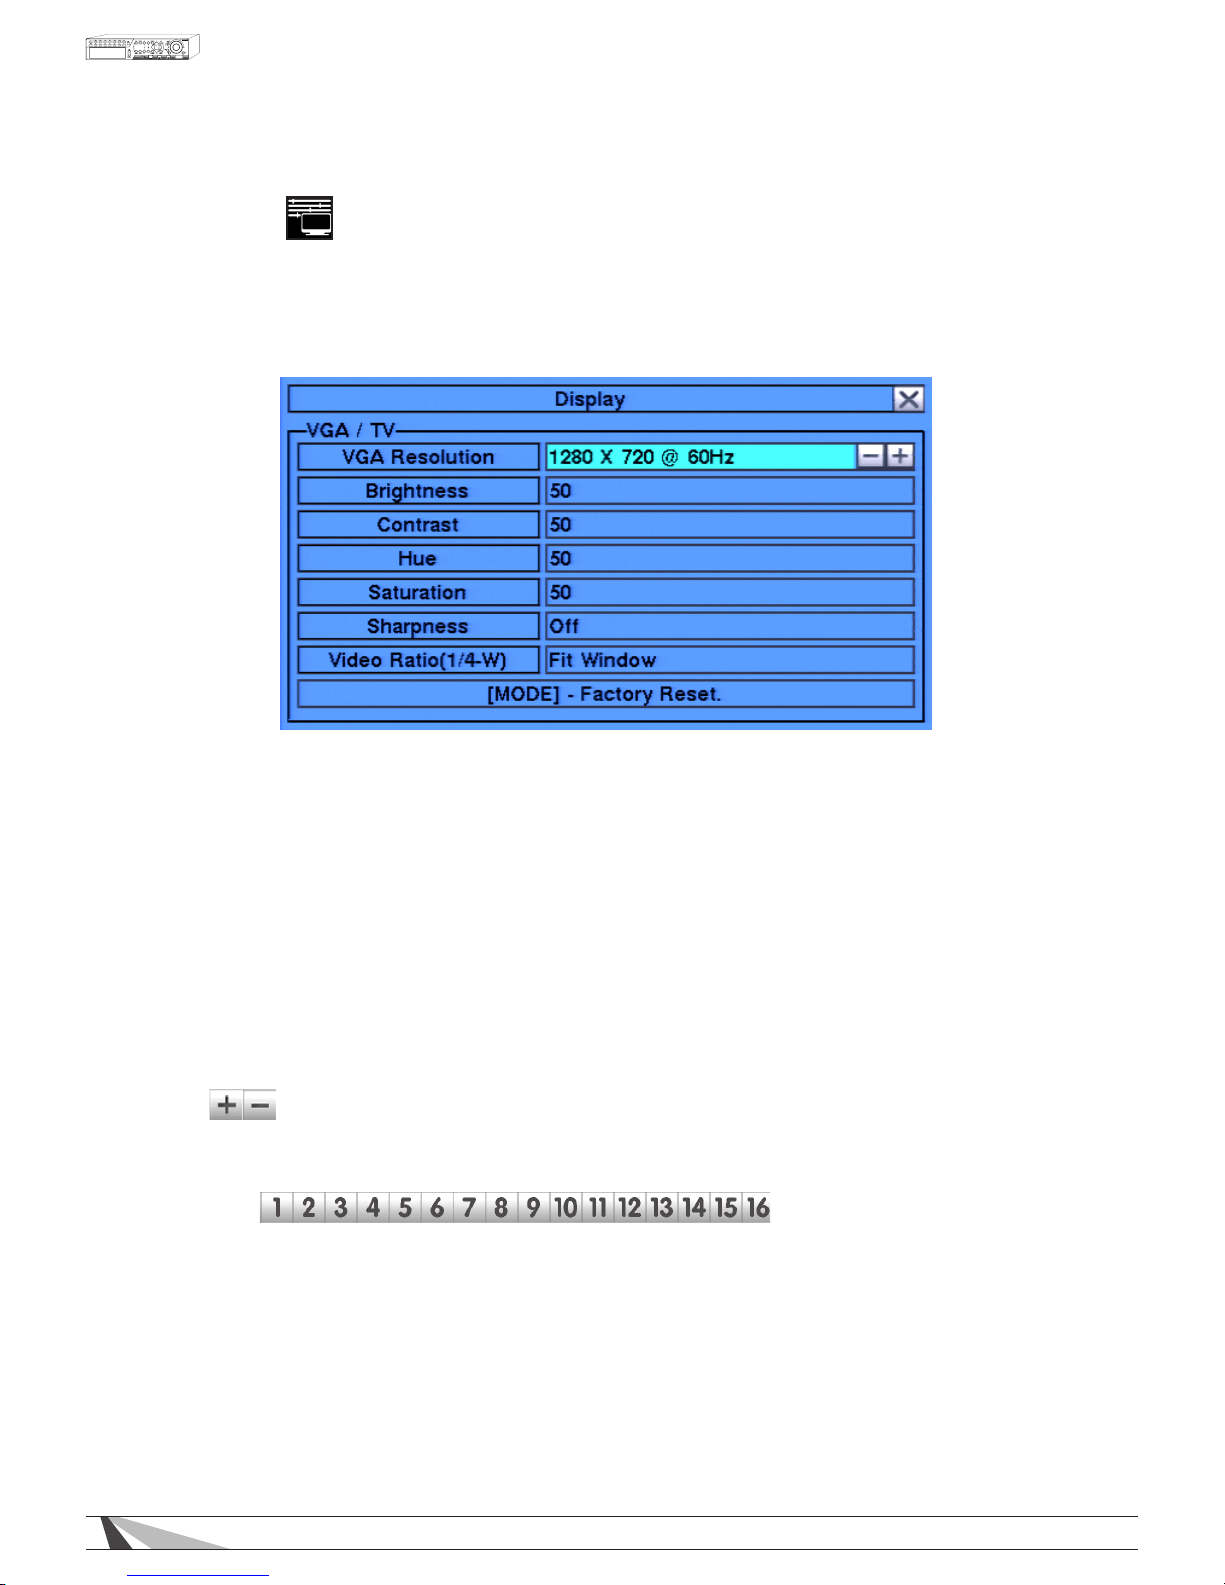
The Video Adjustment menu allows for the adjustment of Brightness, Contrast, Hue, and Saturation for each
video input.
Once in the main Menu display, press ▲▼◄► on the remote control to select Video Adjustment and then
press
ENTER to display the menu as shown. Alternatively use the mouse to click on the Video Adjustment
icon.
Thefollowingisabriefdescriptionforeachiteminthesubmenuanditsspecicoperations:
•
▲▼◄►
Press these buttons on the remote control to select an item. Alternatively use the
mouse to select an item.
• CAMERA SELECTION
Press the appropriate button for the desired adjustment.
•
NUMERIC
Press these buttons on the remote control to change the camera. Alternatively use the mouse to select
the desired camera.
•
+/-
Press these buttons on the remote control to change the settings. Alternatively use the mouse to make
these changes.
•
SEQ
Press this button on the remote control to reset the video settings for the camera being viewed to factory
default values.
•
CALL
Press this button on the remote control to reset the video settings for all cameras to factory default values.
•
MODE
Press this button on the remote control to restore the values.
• ESC
Press the ESC button on the remote control to escape from this menu and return to the main Menu display.
Alternatively use the mouse to exit the sub menu by clicking on the “X.” If the contents in this menu have
been modified, a Save dialog box will be displayed requesting the user to save the changes. Press ENTER
on the remote control to exit and save, ESC to exit without saving. Another method to escape is to use the
mouse to “right-click,” and exit the sub menu.
Page 20
20
WPS-165-DVR-4CH Installation and Users Manual
5.4. DISPLAY
The VGA Display menus allows for adjustment to the VGA output of the DVR.
Once in the Main Menu display, press ▲▼◄► on the remote control to select VGA Display
and then press
ENTER to display the menu as shown. Alternatively use the mouse to click on the VGA Display icon.
Use the operations listed below to adjust Resolution, Brightness, Contrast, Hue, Saturation and Video Ratio.
To set Video Ratio, select between Fit Window and Proportion. Fit Window scales all camera channels to ll the
grids. Proportion allows each camera to be displayed using its output video ratio.
Warning – Be sure the connected VGA monitor can accept the desired resolution before selecting it. If a
resolution is selected that is not supported by the monitor and video is lost at the VGA monitor, continue to
use the +/- buttons on the remote control to select a setting that is supported. Another option would be to
temporarily connect a composite video monitor to the Video Out BNC to
properly set the VGA resolution.
•
▲▼◄►
Press these buttons on the remote control to select an item. Alternatively use the mouse to select
an item.
•
+/-
Press these buttons on the remote control to change the settings. Alternatively use the mouse to make
these changes.
•
NUMERIC
Press these buttons on the remote control to change the camera. Alternatively use the mouse to select
the desired camera.
•
MODE
Press this button on the remote control to restore Brightness, Contrast, Hue and Saturation values.
Alternatively use the mouse to click on the Factory Reset button.
•
ESC
Press the ESC button on the remote control to escape from this menu and return to the main Menu
display. Alternatively use the mouse to exit the sub menu by clicking on the “X.” If the contents in this
menu have been modified, a Save dialog box will be displayed requesting the user to save the changes.
Press
ENTER on the remote control to exit and save, ESC to exit without saving. Another method to escape
is to use the mouse to “right-click,” and exit the sub menu.
Page 21
21
WPS-165-DVR-4CH Installation and Users Manual
5.5. BACKUP DEVICE
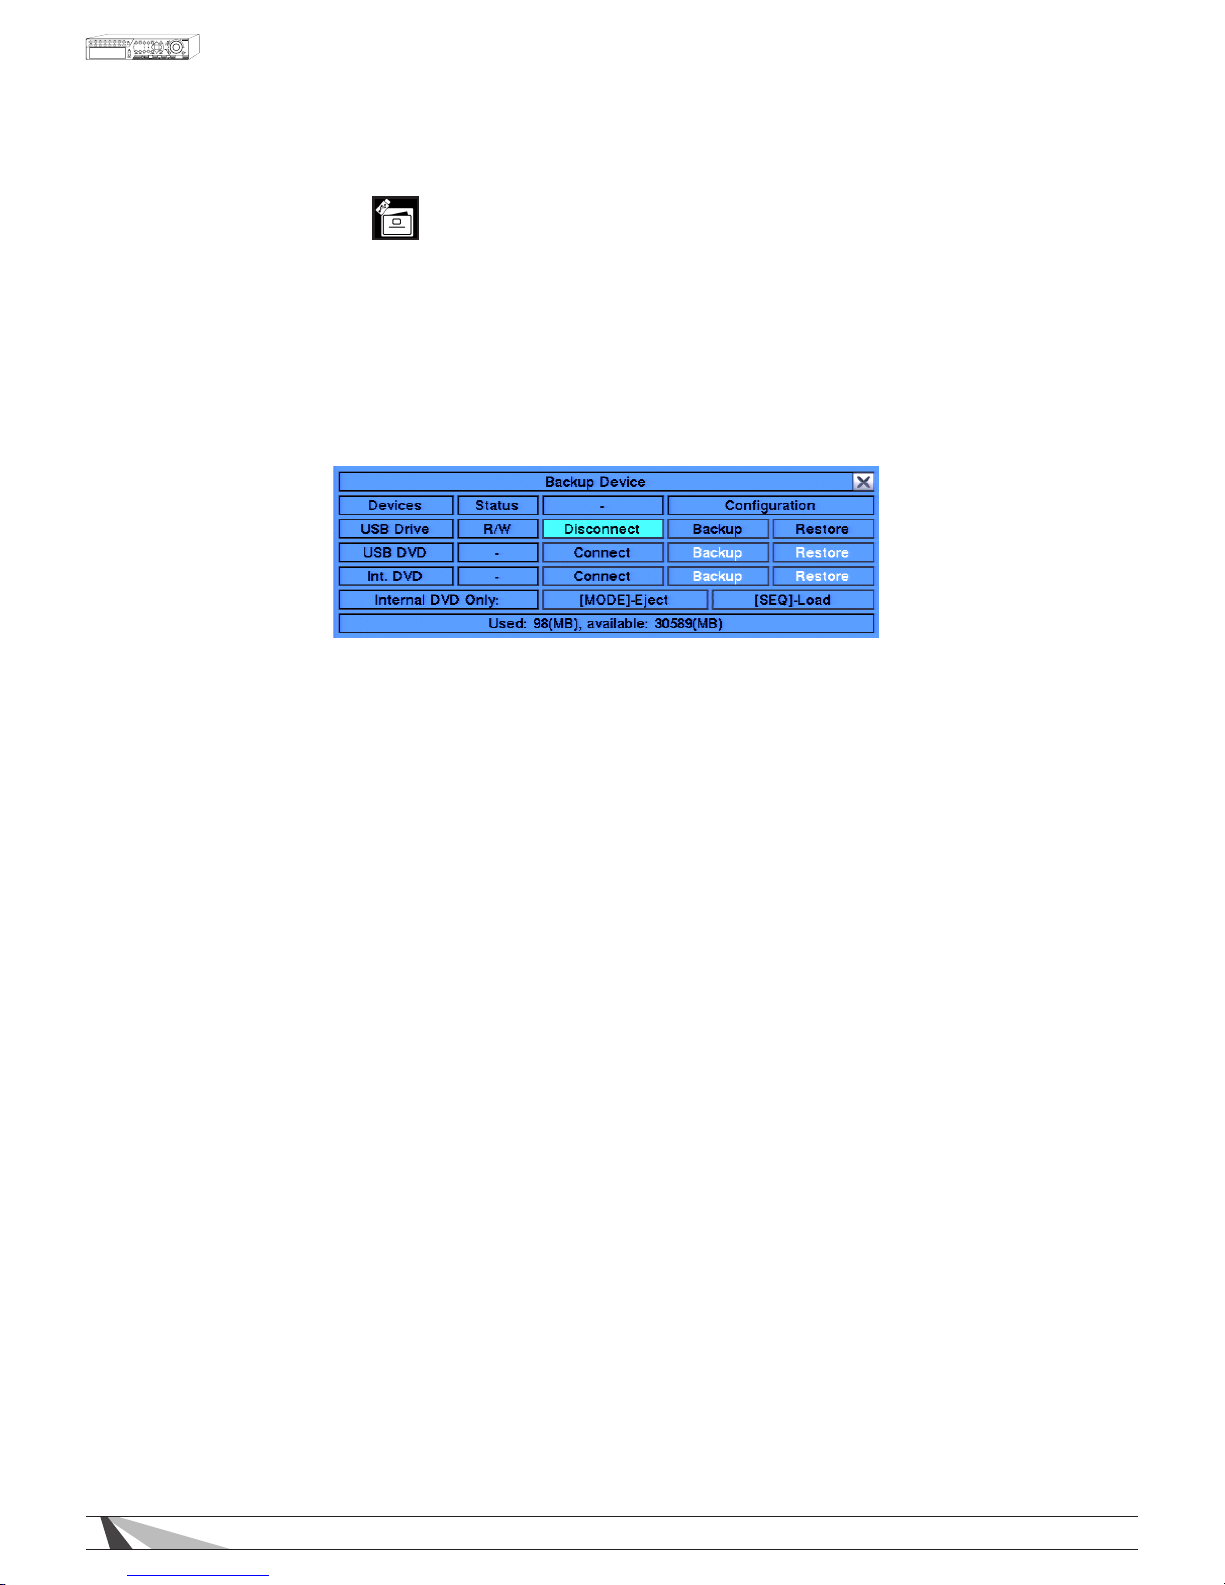
The Backup Device menu allows for backup and recovery of the DVR’s conguration to or from a USB device.
This DVR supports a variety of USB 2.0 storage devices including thumb drives and DVD drives.
Once in the main Menu display, press ▲▼◄► on the remote control to select Backup Device, and
then press ENTER to display the menu as shown. Alternatively use the mouse to click on the Backup
Device icon.
Note: It is highly recommended to make a backup of the conguration once complete. Keep a copy of
this backup in a secure location for future use. When setting up multiple DVRs with similar congurations,
this feature could also be used to create a “template” le to speed the setup process.
To navigate and operate this menu:
•
▲▼◄►
Press these buttons on the remote control to select an item. Alternatively use the mouse to select
an item.
•
ESC
Press the ESC button on the remote control to escape from this menu and return to the main Menu
display. Alternatively use the mouse to exit the sub menu by clicking on the “
X.” If the contents in
this menu have been modified, a Save dialog box will be displayed requesting the user to save the
changes. Press ENTER on the remote control to exit and save, ESC to exit without saving. Another
method to escape is to use the mouse to “right-click,” and exit the sub menu.
•
CONNECT/DISCONNECT
If the backup device is disconnected (as shown in screen capture above), plug the USB device into the
USB 2.0 port and then press ENTER on the remote control. Alternatively use the mouse to click on the
CONNECT button. If the device is already plugged in, press ENTER on the remote control to connect the
device. Alternatively use the mouse to click on CONNECT. It is recommended to select the
DISCONNECT option before unplugging the USB device.
Note 1: Before using a USB drive, please format it to FAT32 le system using Windows.
Note 2: The backup device must be connected by the system software before it can be used to read/
write. If it fails to connect, unplug the device and then plug the device into the USB port again.
Note 3: Some backup devices may have compatibility problems.
•
BACKUP
Once a device is connected, use the ▲▼◄► buttons on the remote control to select BACKUP for the
corresponding USB device and press ENTER. Alternatively use the mouse to select this button. Enter the
directory to backup the configurations to. This button will remain white in color and unavailable until a USB
device is connected.
•
RESTORE
Once a device is connected, use the ▲▼◄► buttons on the remote control to select RESTORE for the
corresponding USB device and press ENTER. Alternatively use the mouse to select this button. Enter the
directory to restore the configurations from. This button will remain white in color and unavailable until a
USB device is connected.
Page 22
22
WPS-165-DVR-4CH Installation and Users Manual
5.6. SOFTWARE UPGRADE
This menu is available to Administrators only.
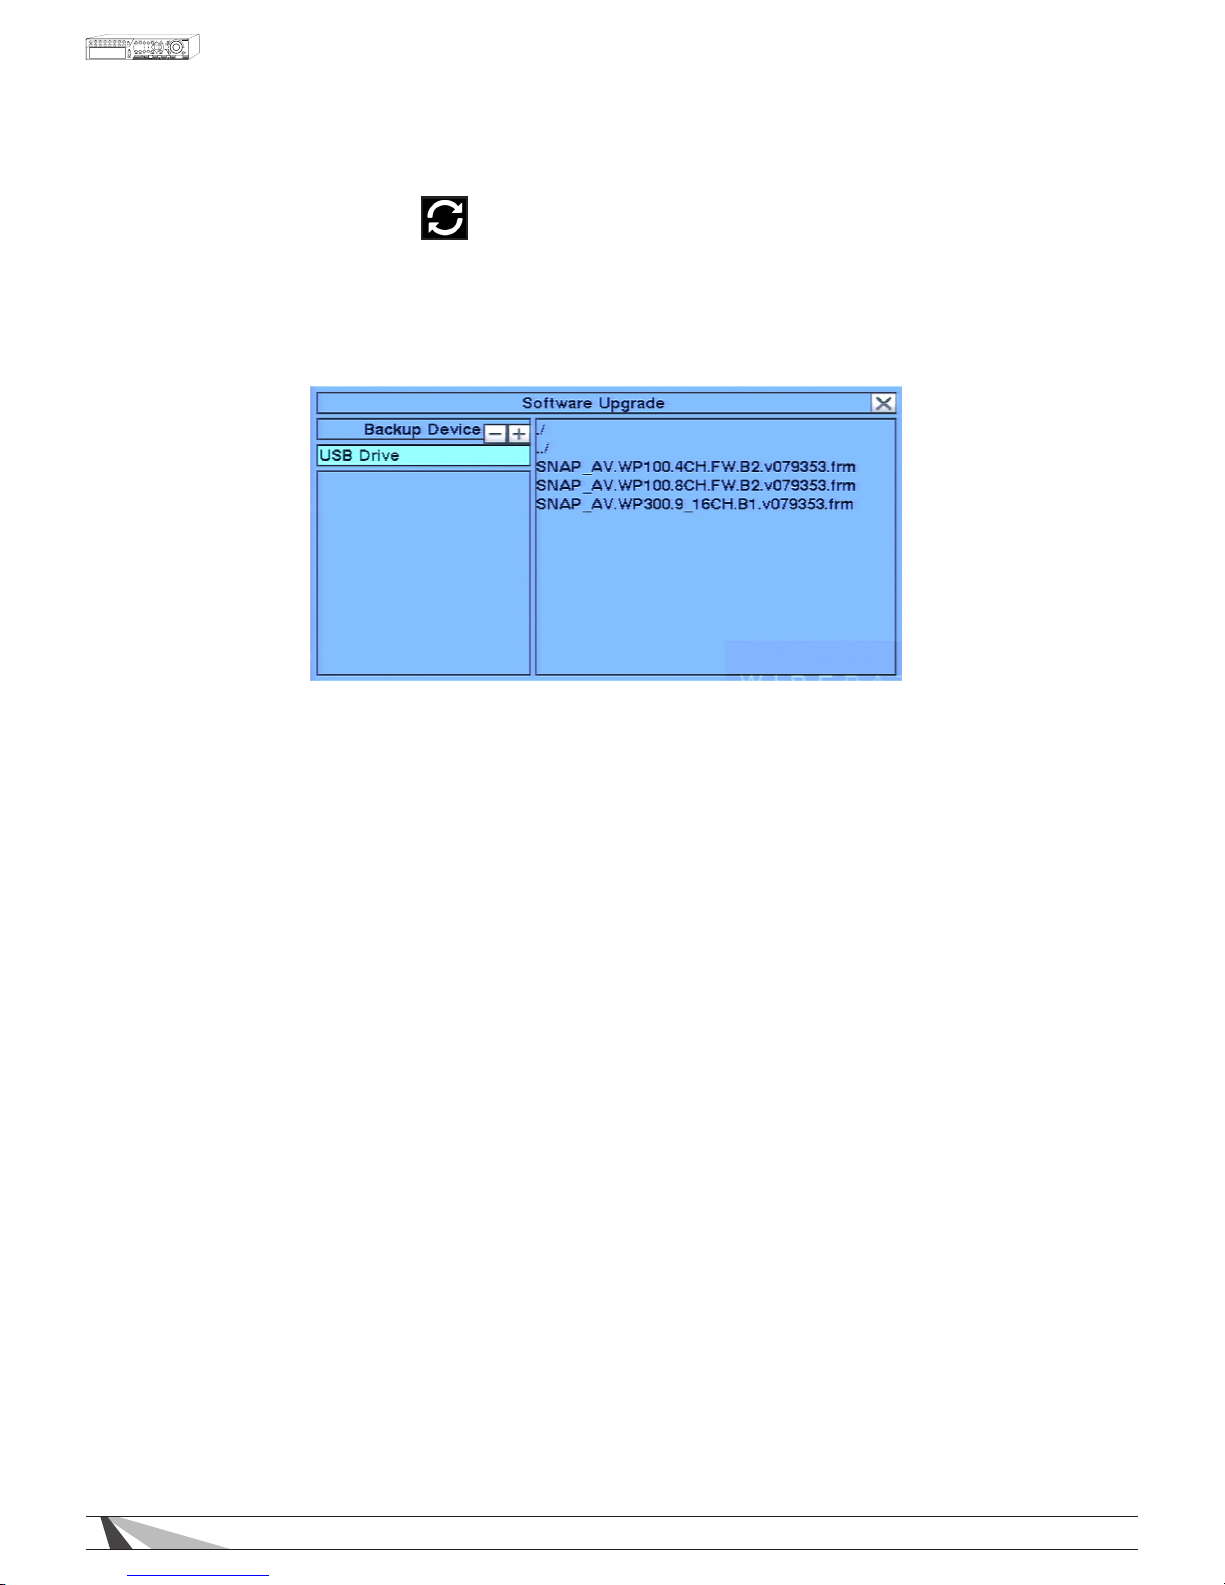
On occasion it may be necessary to update the DVR’s software to take advantage of new features. Using the
commands below, follow the instructions provided with the upgrade file.
In the Menu display, use the buttons on the remote control, and press ▲▼◄► to select the Software
Upgrade icon. Alternatively use the mouse to select this icon from the main Menu.
5.6.1. UPDATING SOFTWARE VIA DVR LOCAL DISPLAY
1. Insert a USB Thumb Drive with the new software into the USB connector on the front of the DVR.
2.
Bring up the menu by pressing MENU/ESC on the remote or by right clicking the mouse.
3.
Select the Software Update
Icon from the Menu using the mouse or the remote control (Menu/ESC+ Up/
Down/Left/Right buttons).
4. USB Thumb Drive contents will show in the right hand window.
5.
Select the appropriate new software file mouse and click the mouse or use enter key on remote.
6.
Use mouse to select the check mark or press enter on remote. Software upgrade is indicated
on the bottom scroll line. During this process the DVR must remain powered ON or the DVR will become
inoperable.
Note: After the software is upgraded, the system will restart immediately. This process may take a few moments,
after the DVR restarts login will be required.
IE Plugin Interface Upgrade
The IE Plugin interface MUST be updated to ensure it can access the latest DVR software features.
1. Update the DVR software following the instructions listed above.
2. Download the Remove_WPS_IE_Plugin le from the SnapAV website. This le is also located in the software
update zip le.
3. Reboot each computer that will be used to access or congure the updated DVR.
4. When the computer restarts, Do Not Open IE. Run the Remove_WPS_IE_Plugin le.
5. Open IE and access the updated Wirepath DVR. Perform Step 2, 3 and 4 for all computers that will be used
to access the DVR.
6. IE may initially block installation of the DVR Plugin. If so, review the prompt and allow the Plugin to be
installed.
7. If prompted, allow installation of the C++ Distributable Package and IEPlugin.cab packages.
8. When Plugin installation is complete, log in to and congure the DVR as usual.
Page 23
23
WPS-165-DVR-4CH Installation and Users Manual
5.7. SYSTEM SHUTDOWN
This menu is available to Administrators only.
Always properly shutdown the DVR before moving it. The hard drive can be damaged if the DVR is moved
before shutdown. The DVR will reboot to whatever state it was in when it was properly shut down (ex: split
window display, etc).
!
WARNING – When powering off the DVR, the following shutdown procedure must
be used. Turning the DVR off or removing power without following this procedure
may cause damage to the hard disk drives.
1.
Access the menu by pressing the MENU/ESC button on the IR remote. Alternatively the mouse can
be used by right clicking to open the menu.
2. Login to the DVR and continue with the following steps.
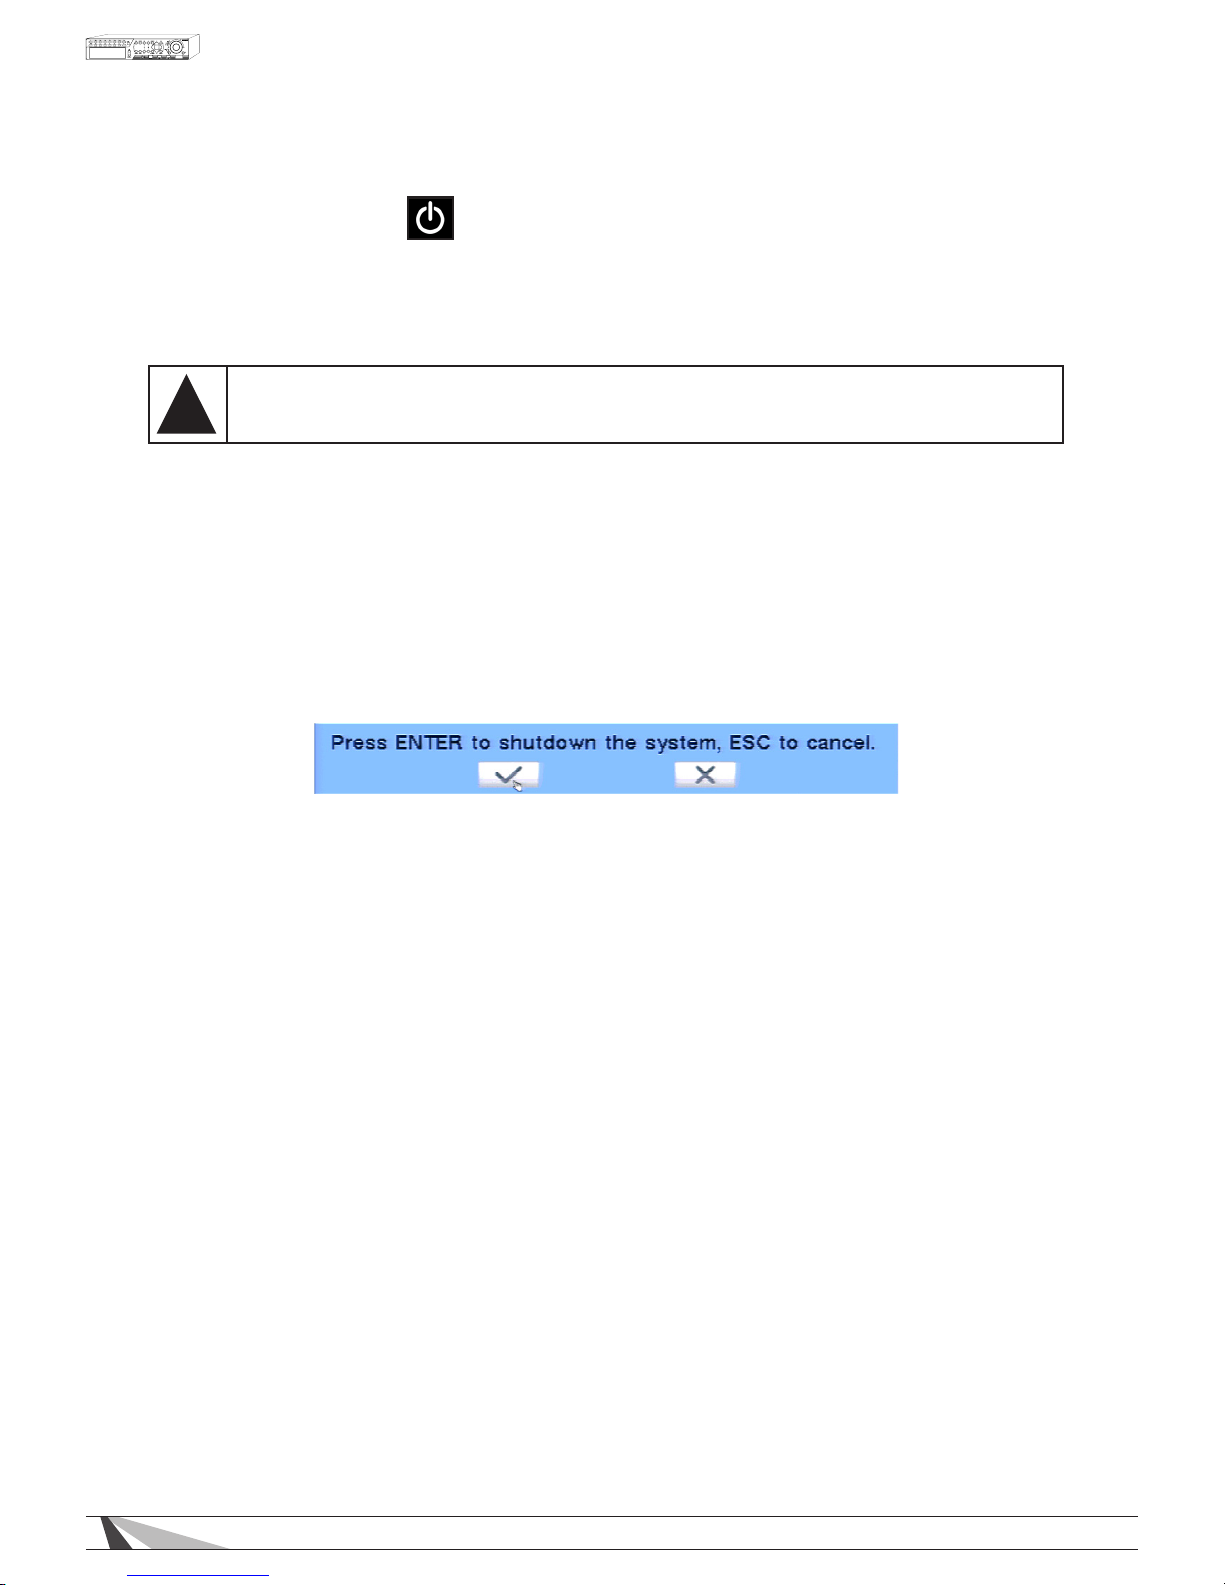
3. Using the ▲▼◄► buttons, navigate to Shutdown . Press ENTER to select. Alternatively the mouse can be
used to select the icon. Once selected a scrolling message will appear at the bottom of screen indicating
that shutdown is in process.
4. Once the message “Shutdown completed. You may turn off the system now.” appears, it is safe to turn the
DVR off using the power switch on the back of the DVR.
5. The DVR is now shutdown and safe to move or service.
Page 24
24
WPS-165-DVR-4CH Installation and Users Manual
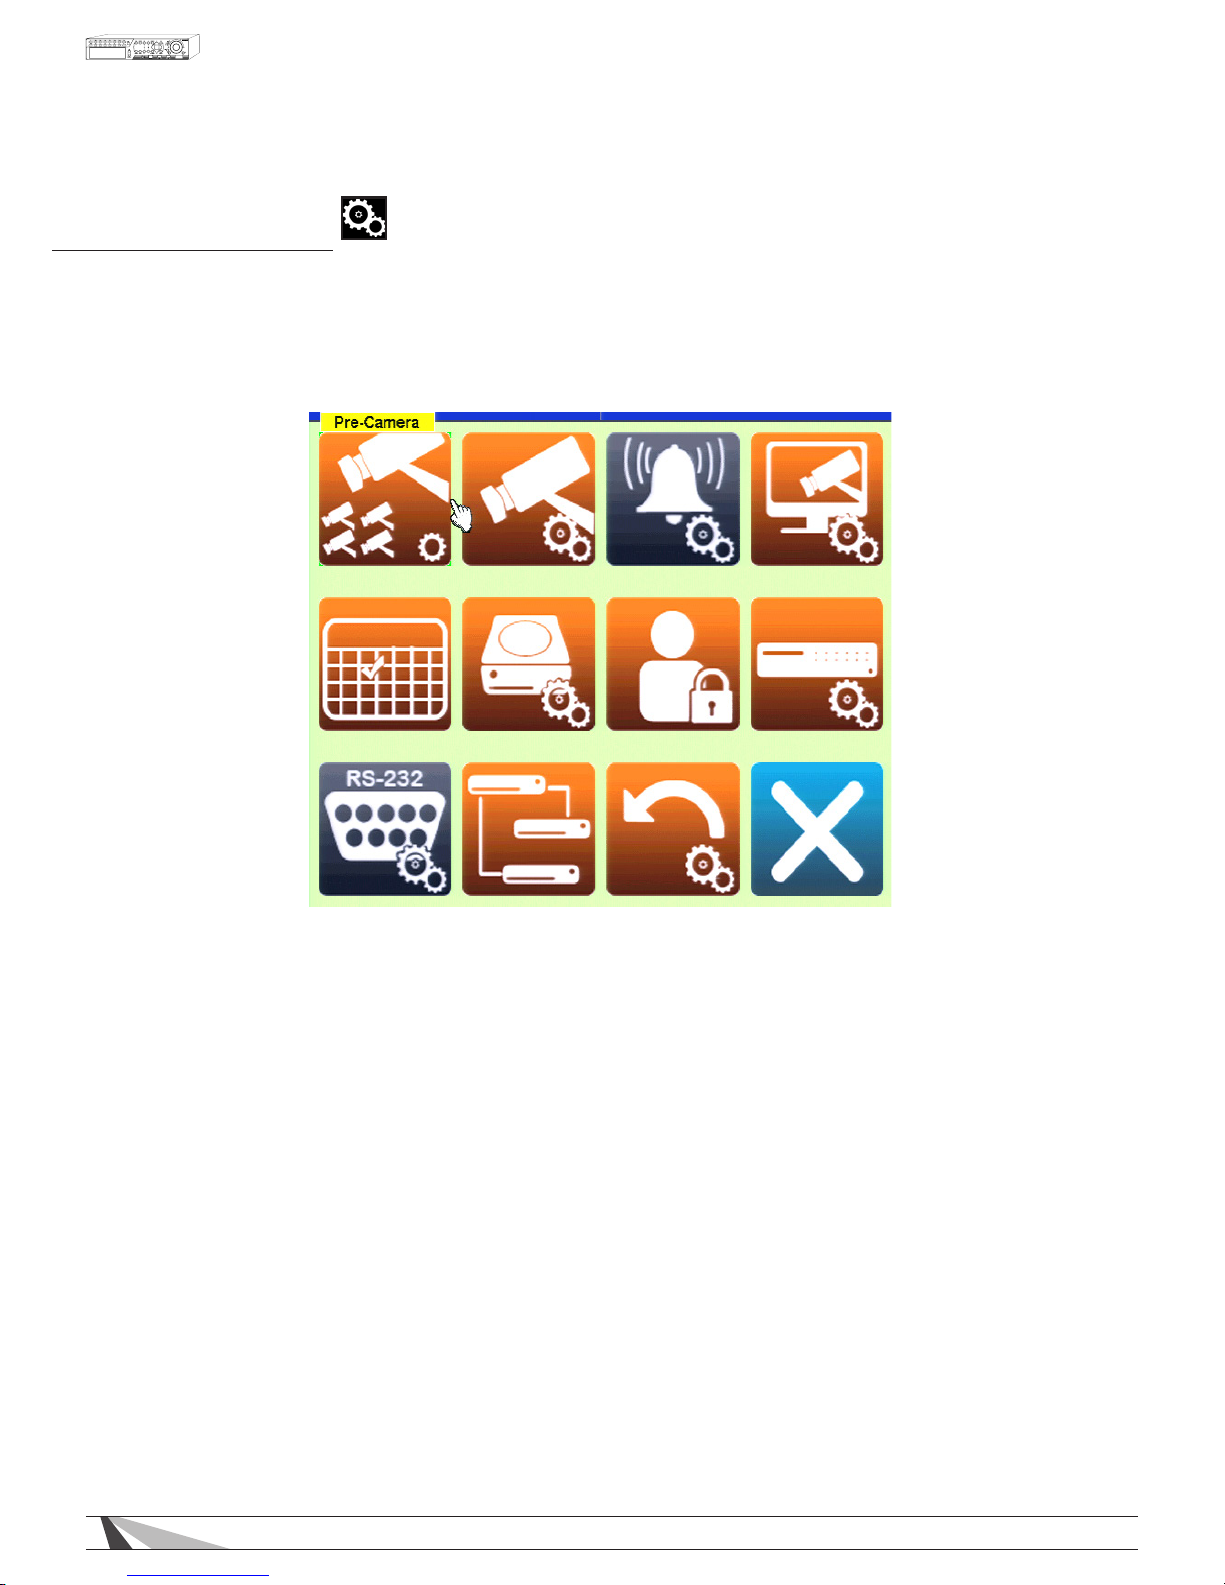
6. SETUP MENU
This menu is available to Administrators only.
In the Menu display, use the buttons on the remote control, and press ▲▼◄►to select Setup, and then
press ENTER.
To navigate and operate this menu:
•
▲▼◄►
Press these buttons on the remote control to change the highlighted item. Alternatively use
the mouse to navigate.
•
ENTER
Press this button on the remote control to enter the detailed display of the highlighted option.
Alternatively use the left mouse button to select an option.
•
ESC
Press the ESC button on the remote control to escape from this menu and return to the main menu.
Alternatively use the mouse to exit the sub menu by clicking on the “X.” Another method to escape
is to use the mouse to “right-click,” and exit the sub menu.
Page 25
25
WPS-165-DVR-4CH Installation and Users Manual
6.1. PRE-CAMERA SETUP
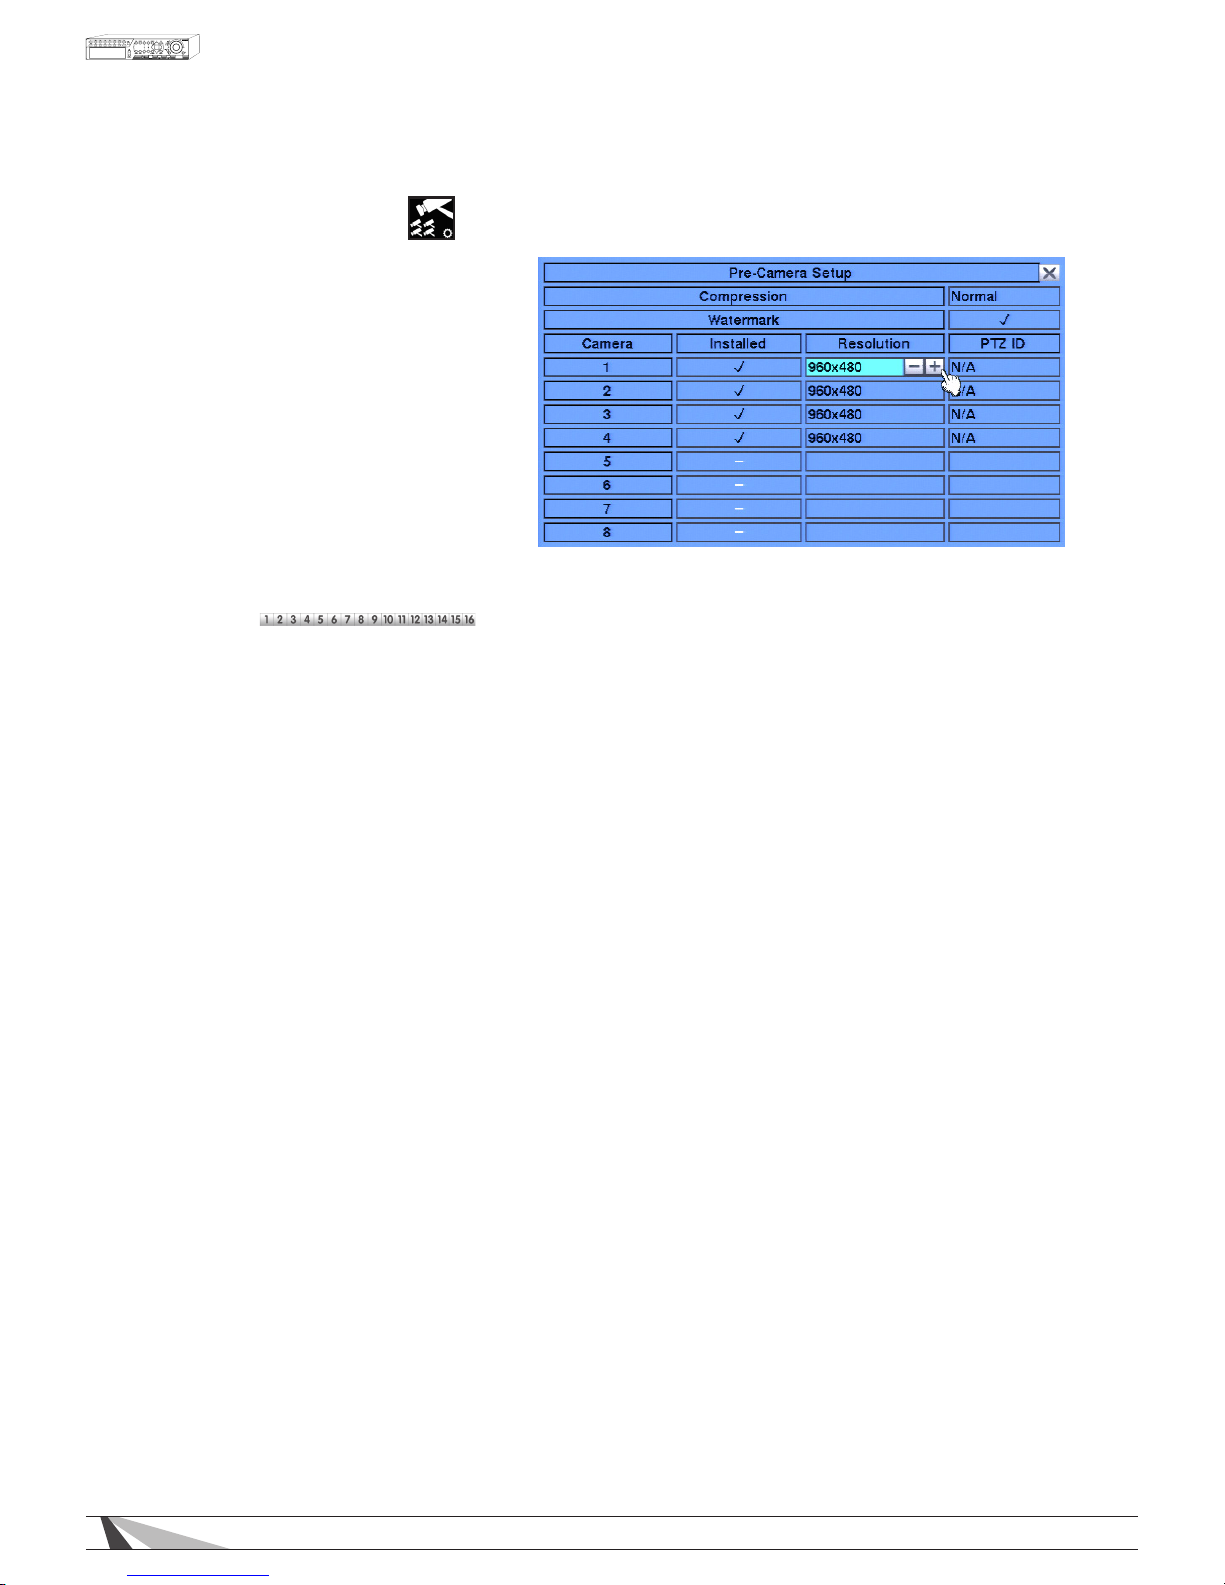
Pre-Camera Setup allows the
administrator to dene fundamental
attributes for connected cameras.
In the Setup menu, press ▲▼◄► on
the remote to change the highlighted
option to Pre-Camera, and then press
ENTER to display Pre-Camera menu.
To navigate and operate this menu:
•
▲▼◄►
Press these buttons▲▼◄► on the
remote control to select an item.
Alternatively
use the mouse to select
an item.
•
NUMERIC
Press these buttons on the remote control to change the camera. Alternatively use the mouse to select
the desired camera.
•
ESC
Press the ESC button on the remote control to escape from this menu and return to the main menu.
Alternatively use the mouse to exit the sub menu by clicking on the “X.” If the contents in this menu
have been modified, a Save dialog box will be displayed requesting the user to save the changes.
Press
ENTER on the remote control to exit and save, ESC to exit without saving. Another method to
escape is to use the mouse to “right-click,” and exit the sub menu.
Thefollowingisabriefdescriptionforeachiteminthesubmenuanditsspecicoperations:
• COMPRESSION
This DVR uses the latest compression format (.h.264) for the most efcient use of storage space and
streaming exibility. The Compression setting allows the administrator to further compress streaming video
to account for slow or bandwidth limited networks. Choose Normal for normal compression or select High
to enable the remote stream of the Video Streaming (See Section 9.4). The High setting will reduce the
resolution of the second stream to one of the four QCIF levels as set in Video Stream setting in the Network
setup (See Section 6.11).
•
WATERMARK
An invisible, digitally-embedded security feature to protect against tampering of recorded content can be
added to the video file. If a downloaded h.264 clip has been altered, the PC based
playback software will
alert the user with a message upon playback. The default setting is enabled.
• INSTALLED
Enable or disable cameras from this menu. The default setting is enabled.
• RESOLUTION
Allows individual camera channels to be set for their appropriate recording resolution. Allows for 960H
(960x480), D1 (720x480), Half 960H (960x240), Half D1 (720x240), 480x240, and CIF (360x240).
• PTZID
This feature has no function for this model of DVR.
Page 26
26
WPS-165-DVR-4CH Installation and Users Manual
6.2. CAMERA SETUP
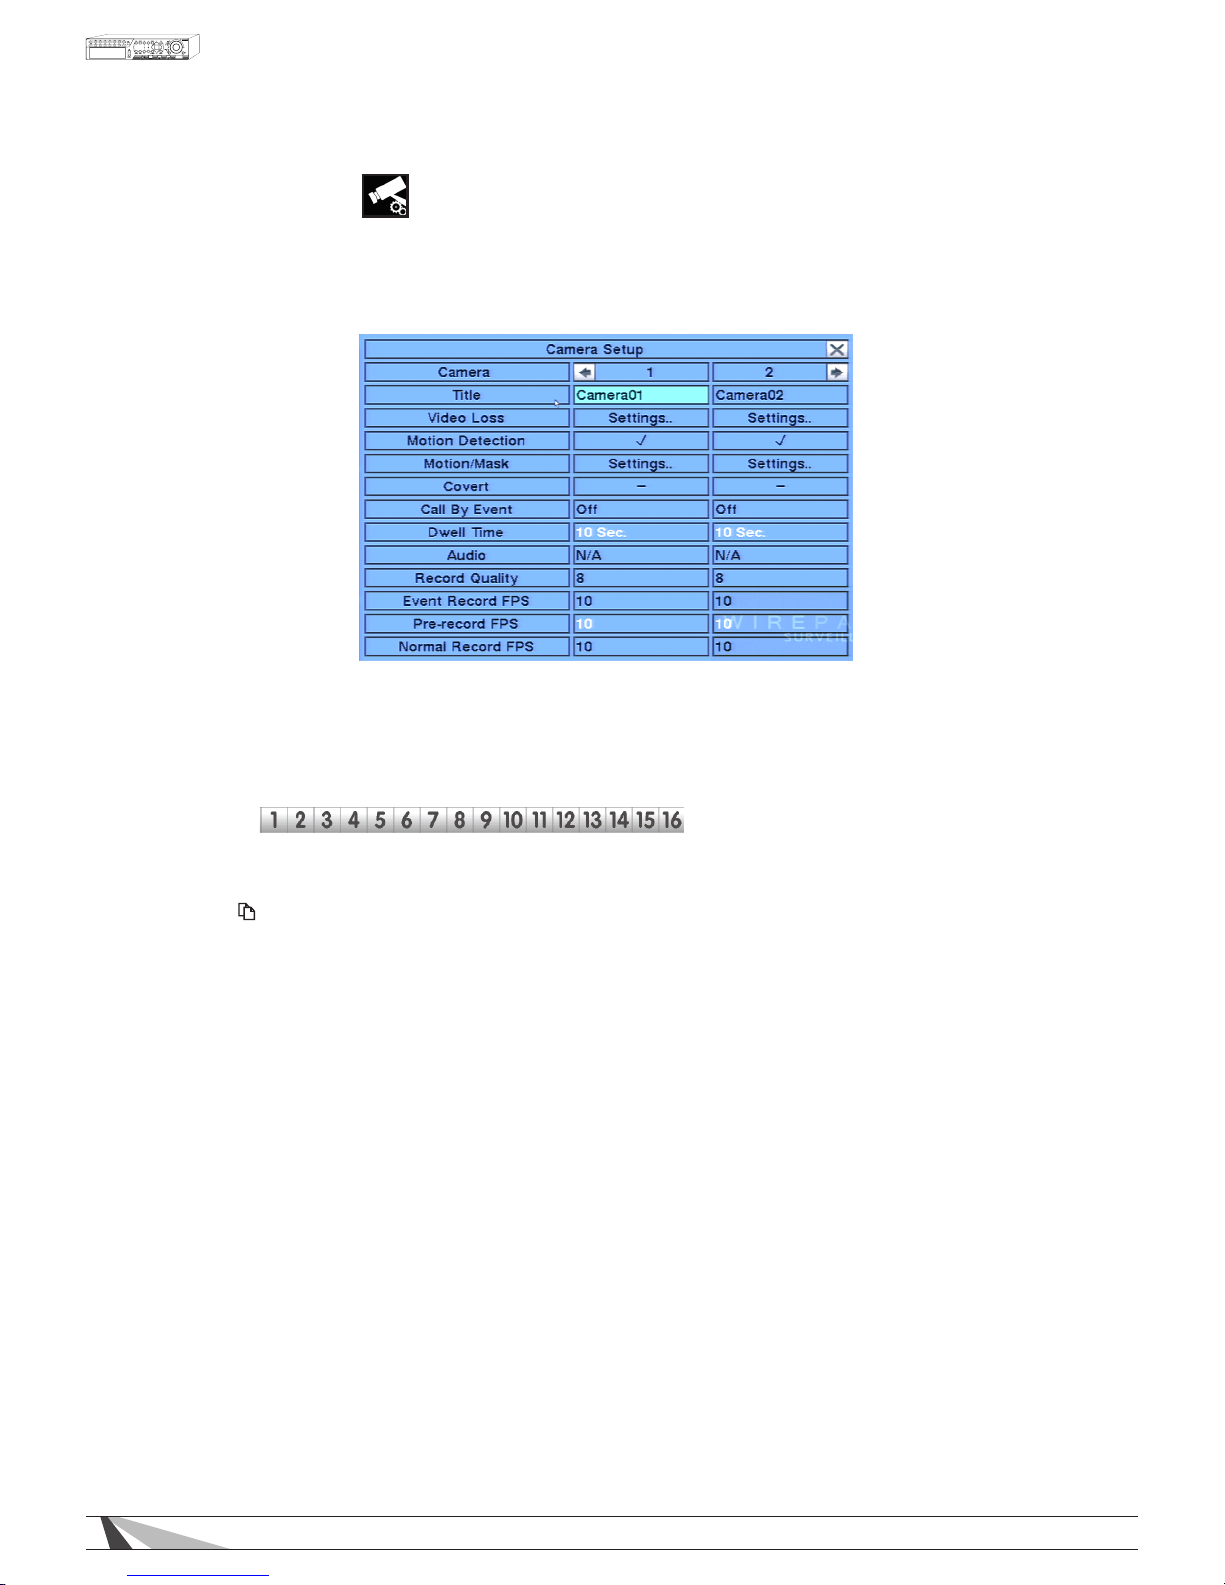
The Camera Setup menu allows the administrator to define additional attributes for each camera.
In the Setup menu, press ▲▼◄► on the remote to change the highlighted option to Camera Setup, and
then press ENTER
to display the Camera Setup menu.
To navigate and operate this menu:
•▲▼◄►
Press these buttons on the remote control to select an item. Alternatively use the mouse to select an
item. The display will scroll left/right if a camera is not shown on the screen.
•
NUMERIC
Press these buttons on the remote control to change the camera. Alternatively use the mouse to select
the desired camera.
•
COPY ( )
Press the COPY button on the remote control to copy all the settings (excluding Title, Video Loss, Motion
Detection and Audio) - of the focus camera to all of the cameras.
•
ESC
Press the ESC button on the remote control to escape from this menu and return to the main menu.
Alternatively use the mouse to exit the sub menu by clicking on the “X.”
If the contents in this menu have been modified, a Save dialog box will be displayed requesting the
user to save the changes. Press ENTER on the remote control to exit and save, ESC to exit without
saving. Another method to escape is to use the mouse to “right-click” and exit the sub menu.
Thefollowingisabriefdescriptionforeachiteminthesubmenuanditsspecicoperations:
• CAMERA
Indicates selected camera.
• TITLE
Name each camera with a unique identifying name up to eight characters maximum. Follow
the Text Input method described in Section 4.1 to modify this item.
• VIDEOLOSSSETTINGS
Used to set specic actions when the DVR losses the video signal for the selected camera. Refer
to Section 6.2.1 for the details.
• MOTIONDETECTION
Enable or disable motion detection for the selected camera. Default setting enables this feature.
Note : This has no effect on the Smart Search function.
Page 27

27
WPS-165-DVR-4CH Installation and Users Manual
•MOTIONSETTINGS
Used to set specic actions for when the DVR detects motion. Please refer to Section 6.2.2 for the details.
•COVERT
If a camera’s covert function is enabled, the video of this camera can only be seen if the user has logged
in an Administrator. The default setting is disabled.
• CALLBYEVENT
If Motion events occur for this camera, the main display will switch to the video of this camera for
a specied period of time (dwell). Options are: Off, Motion, Alarm, Both (Motion & Alarm).
• DWELLTIME
Used in conjunction with Call By Event, dwell time species how long the main display will show the camera
on the screen. The dwell time can be set from 3 to 60 seconds
• AUDIO
Select the corresponding AUDIO IN input for the camera. The audio for the selected AUDIO IN input will be
recorded with the video for this camera. Selections include N/A or AUDIO Inputs 1,2, 3, or 4. The AUDIO
INPUTS can only be assigned to one camera each. The default setting is N/A.
Note: The audio will only be heard when an amplier and speakers are connected to the DVR and the
volume is turned up.
• RECORDQUALITY
Select the record quality for each camera. Values range from 1-9, with 1 the lowest quality and 9 the
highest quality. The higher the quality setting, the larger the resulting le size because there are more pixels
in the image.
• EVENTRECORDFPS
Set the Frames Per Second record rate for each camera when events such as motion or alarm inputs
trigger the camera to record. Settings for Post Record time determines how long the DVR will record after
the event triggers recording. Please refer to Section 6.2.2 and Section 6.3 for Post-record time. Press +/-
buttons to select a value from 0 – 30.
Note: The higher the FPS setting for a camera, the more uid the motion on playback. A slower FPS
setting could result in “choppy” video during playback. As a reference, live video equals 30 FPS.
In surveillance, 15 FPS is recognized as very good quality video, while 7 FPS is typically sufcient
for most cases.
• PRE-RECORDFPS
Pre-Record FPS is the frames per second pre-record rate for each camera when events such as motion,
video loss or alarm inputs trigger the camera to record. For this DVR, the Pre-Record FPS is always the same
as Event Record FPS. Settings for Pre-Record time determine how much time the DVR will record before the
event triggers recording. Please refer to Section 6.2.1, Section 6.2.2 and Section 6.3 for Pre-record time.
• NORMALRECORDFPS
Unless disabled in the schedule (see Section 6.5), the DVR is always recording. If there is no event
triggering the DVR to record (such as motion or alarm inputs), the DVR is still recording and the recording
is referred to as Normal Record. Set the FPS for each camera to be recorded by pressing +/- buttons to
select the value from a minimum of 0 to a maximum equal to the Event Record setting.
Page 28
28
WPS-165-DVR-4CH Installation and Users Manual
6.2.1. VIDEO LOSS SETUP
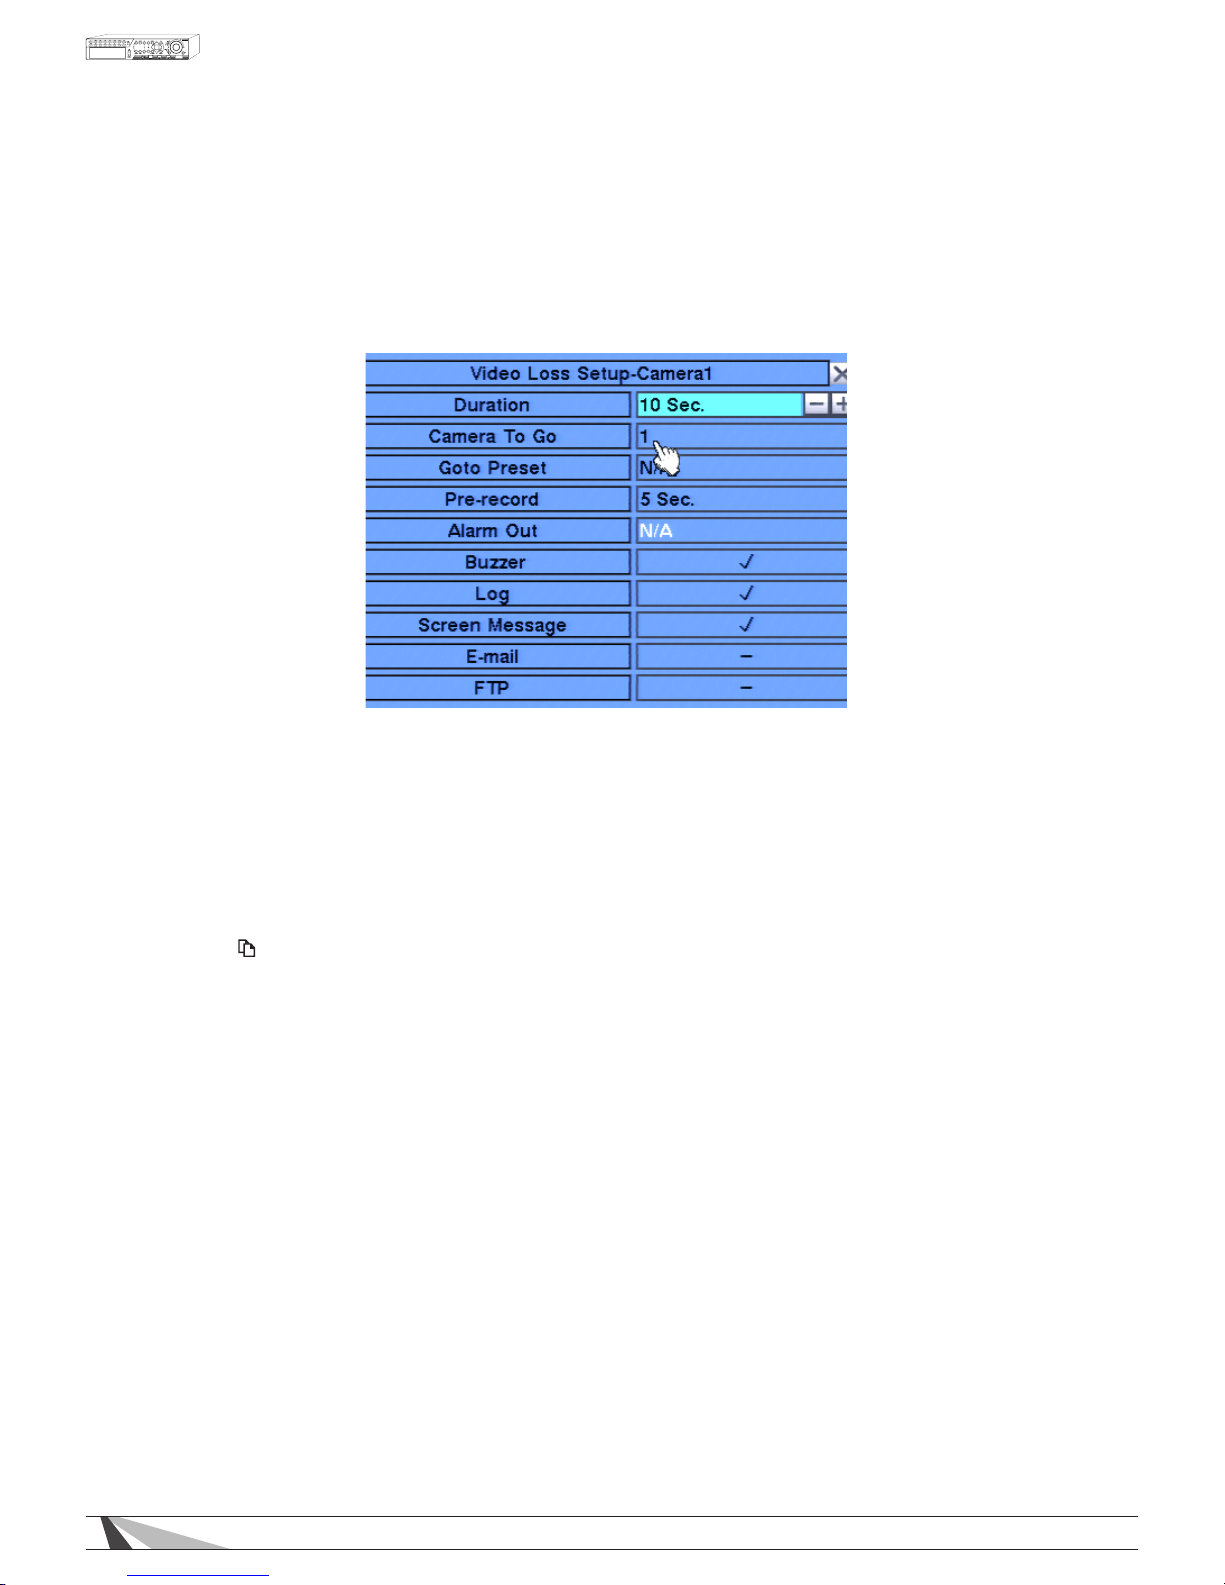
Video Loss Setup allows the administrator to dene how the system responds when video signal is lost for
the camera.
In the Camera Setup
menu, highlight Settings in Video Loss and press the ENTER button on the remote
control to display Video Loss Setup sub menu for the selected camera.
To navigate and operate this menu:
•
▲▼◄►
Press these buttons on the remote control to select an item. Alternatively use the
mouse to select an item.
•
NUMERIC
Press these buttons on the remote control to change the camera. Alternatively use the mouse to select
the desired camera.
•
COPY ( )
Press the COPY button on the remote control to copy the Video Loss settings of the focus camera to
all of the cameras.
•
ESC
Press the ESC button on the remote control to escape from this menu and return to the main menu.
Alternatively use the mouse to exit the sub menu by clicking on the “X.”
If the contents in this menu have been modified, a Save dialog box will be displayed requesting the
user to save the changes. Press ENTER on the remote control to exit and save, ESC to exit without
saving. Another method to escape is to use the mouse to “right-click” and exit the sub menu.
Thefollowingisabriefdescriptionforeachiteminthesubmenuanditsspecicoperations:
•
DURATION
Set the length of time the buzzer will remain triggered once video loss is detected for this camera. The
buzzer will reset immediately once video signal is restored. Press +/- buttons to adjust the value from 3
seconds to 60 minutes or ‘-‘ for indefinite, requiring the Alarm Reset button to be pressed.
•
CAMERATOGO
The Camera To Go setting will specify which camera is pulled up full screen during a video loss event if Call
by Events options are enabled.
Page 29

29
WPS-165-DVR-4CH Installation and Users Manual
•
GOTOPRESET
This feature has no function for this model of DVR.
•
PRE-RECORD
Pre-Record defines how much time the DVR will record before video loss is detected. The Pre Record FPS
set in Section 6.2 determines the frame rate of this recording. Press +/- buttons on the remote control to
adjust the value from 0 to 10 seconds. Alternatively use the mouse to adjust this setting.
Note that the actual pre-record time may be shorter than the value set if the total size of the pre-record
video exceeds the pre-record video buffer.
•
ALARMOUT
This feature has no function for this model of DVR.
• BUZZER
By default, the internal buzzer is enabled to sound when video loss for the camera is detected.
Highlight this setting and press ENTER or +/- to enable or disable this item. Alternatively use the mouse
to left-click on this item.
• LOG
By default, the DVR will log when video loss is detected to the Event Log (see Section 8.2). Highlight
this setting and press ENTER or +/- to enable or disable this item. Alternatively use the mouse to
left-click on this item.
• SCREENMESSAGE
By default, the DVR will display a video loss message in the System Status Bar when video loss is detected
for this camera. Highlight this setting and press ENTER or +/- to enable or disable this item. Alternatively
use the mouse to left-click on this item.
• E-MAIL
This DVR can send an email message to a predened email address in the event video loss is detected
for this camera. Highlight this setting and press ENTER or +/- to enable or disable this item. Alternatively
use the mouse to left-click on this item. The default setting is disabled. See Section 6.11.1 for more
information on e-mail.
• FTP
This DVR can send the recorded video loss event for this camera to a FTP server. Highlight this setting
and press ENTER or +/- to enable or disable this item. Alternatively use the mouse to left-click on this
item. The default setting is disabled.
Page 30
30
WPS-165-DVR-4CH Installation and Users Manual
6.2.2. MOTION SETUP
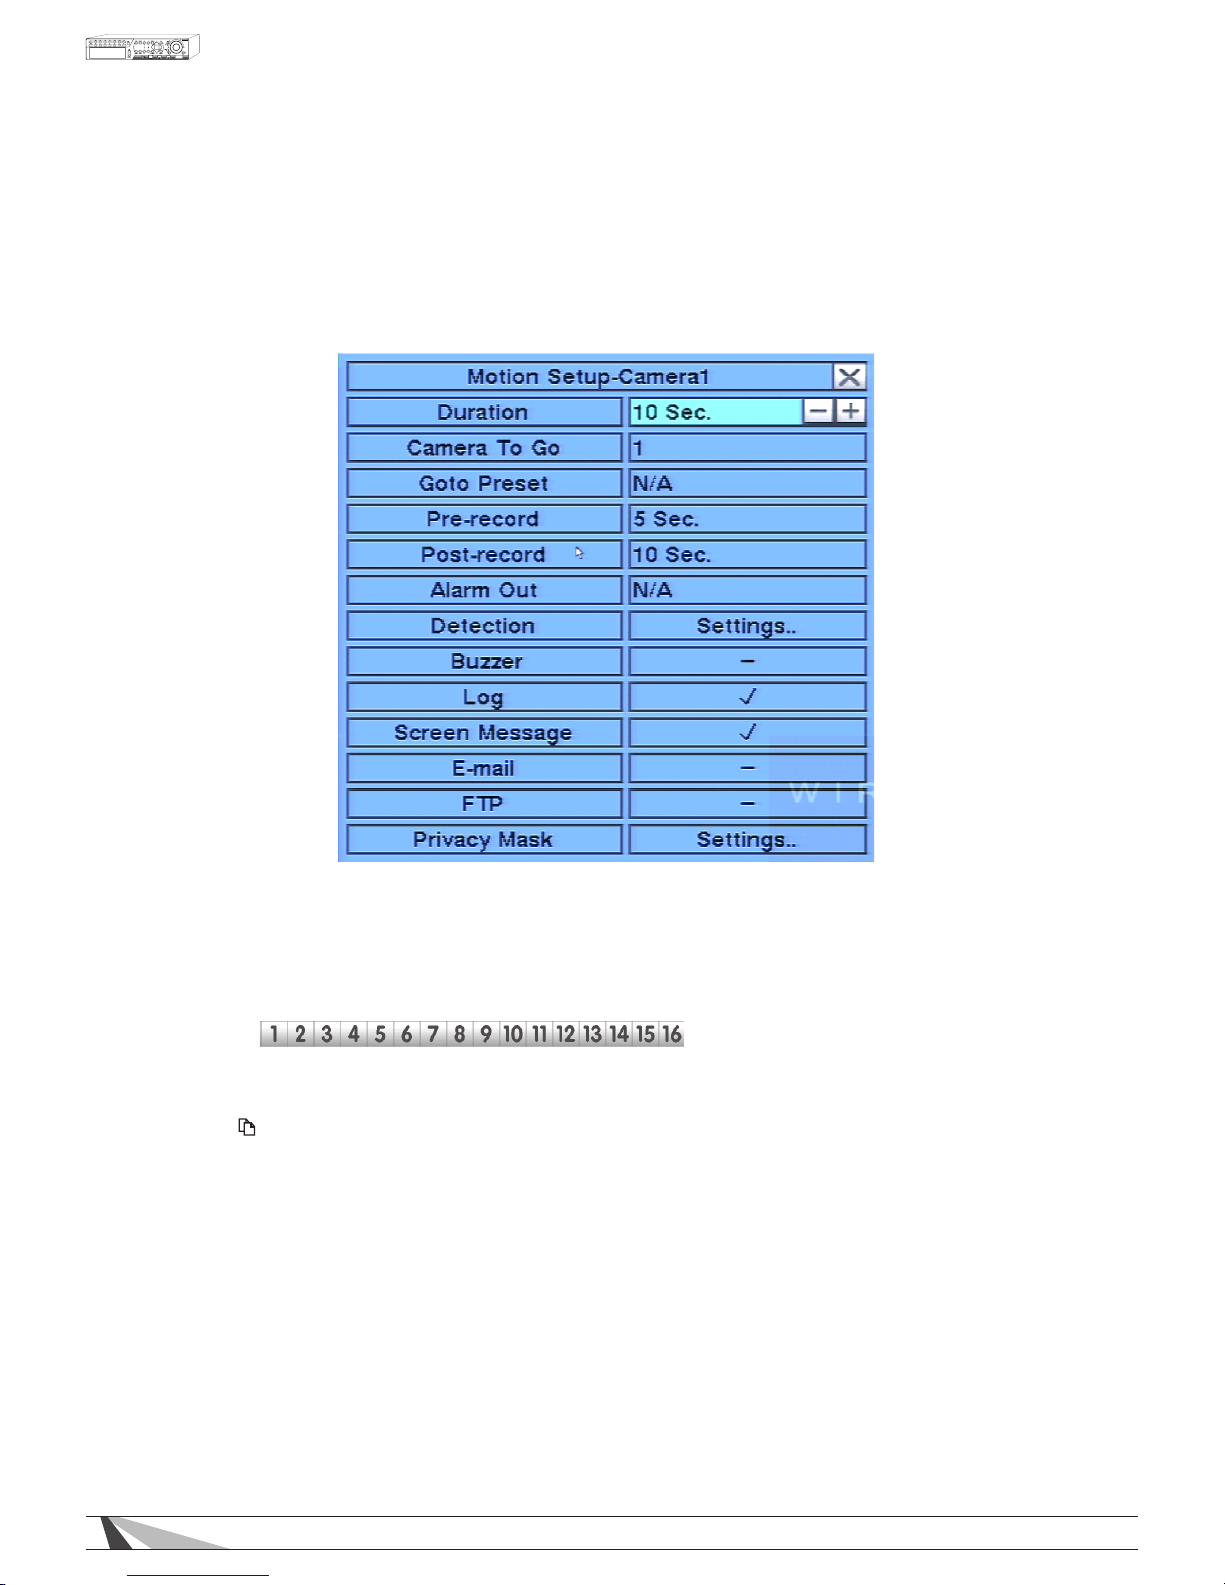
Motion Setup allows the administrator to dene how the system responds when motion is detected for
the camera.
In the Camera Setup menu, highlight Motion Setup
and press the ENTER button on the remote
control to display the Motion Setup sub menu for the selected camera.
To navigate and operate this menu:
•
▲▼◄►
Press these buttons on the remote control to select an item. Alternatively use the
mouse to select an item.
•
NUMERIC
Press these buttons on the remote control to change the camera. Alternatively use the mouse to select
the desired camera.
•
COPY ( )
Press the COPY button on the remote control to copy the Video Loss settings of the focus camera to
all of the cameras.
•
ESC
Press the ESC button on the remote control to escape and return to the main menu. Alternatively you
can use the mouse by right clicking or selecting the “X” in the current dialog window. If the contents in
this menu have been modified, a Save dialog box will be displayed requesting the user to save the
changes. Press ENTER on the remote control to exit and save, ESC to exit without saving. Another
method to escape is to use the mouse to “right-click” and exit the sub menu.
Page 31

31
WPS-165-DVR-4CH Installation and Users Manual
Functions in the Sub-menu:
•
DURATION
Set the length of time the buzzer will remain triggered once video loss is detected for this camera. The
Buzzer will reset immediately once video signal is restored. Press +/- buttons to adjust the value from 3
seconds to 60 minutes or ‘-‘ for indefinite requiring an Alarm Reset.
•
CAMERATOGO
The Camera To Go setting will specify which camera is pulled up full screen during a motion event if Call by
Event options are enabled.
•
GOTOPRESET
This feature has no function for this model of DVR.
•
PRE-RECORD
Pre-Record defines how much time the DVR will record before video loss is detected. The Pre Record FPS
set in Section 6.2 determines the frame rate of this recording. Press +/- buttons on the remote control to
adjust the value from 0 to 10 seconds. Alternatively use the mouse to adjust this setting.
Note that the actual pre-record time may be shorter than the value set if the total size of the pre-record
video exceeds the pre-record video buffer.
•
POST-RECORD
Define how much time the DVR will record after motion is detected. The Post Record FPS set in Section
6.2 determines the frame rate of this recording. Press +/- buttons on the remote control to adjust the
value from 0 to 60 minutes. Alternatively use the mouse to adjust this setting.
•
ALARMOUT
This feature has no function for this model of DVR.
• DETECTION
See 6.2.2.1 Detection Settings for detail on the available settings.
• BUZZER
By default, the internal buzzer is enabled to sound when video loss for the camera is detected.
Highlight this setting and press ENTER or +/- to enable or disable this item. Alternatively use the mouse
to left-click on this item.
• LOG
By default, the DVR will log when video loss is detected to the Event Log (see Section 8.2). Highlight
this setting and press ENTER or +/- to enable or disable this item. Alternatively you can use the mouse
by left clicking in the box next to Buzzer in the current dialog window.
• SCREENMESSAGE
By default, the DVR will display a video loss message in the System Status Bar when video loss is detected
for this camera. Highlight this setting and press ENTER or +/- to enable or disable this item. Alternatively
use the mouse to left-click on this item.
• E-MAIL
This DVR can send an email message to a predened email address in the event video loss is detected
for this camera. Highlight this setting and press ENTER or +/- to enable or disable this item. Alternatively
use the mouse to left-click on this item. The default setting is disabled. See Section 6.11.1 for more
information on e-mail.
• FTP
This DVR can send the recorded video loss event for this camera to a FTP server. Highlight this setting
and press ENTER or +/- to enable or disable this item. Alternatively use the mouse to left-click on this
item. The default setting is disabled.
Page 32
32
WPS-165-DVR-4CH Installation and Users Manual
6.2.2.1. DETECTION SETTINGS
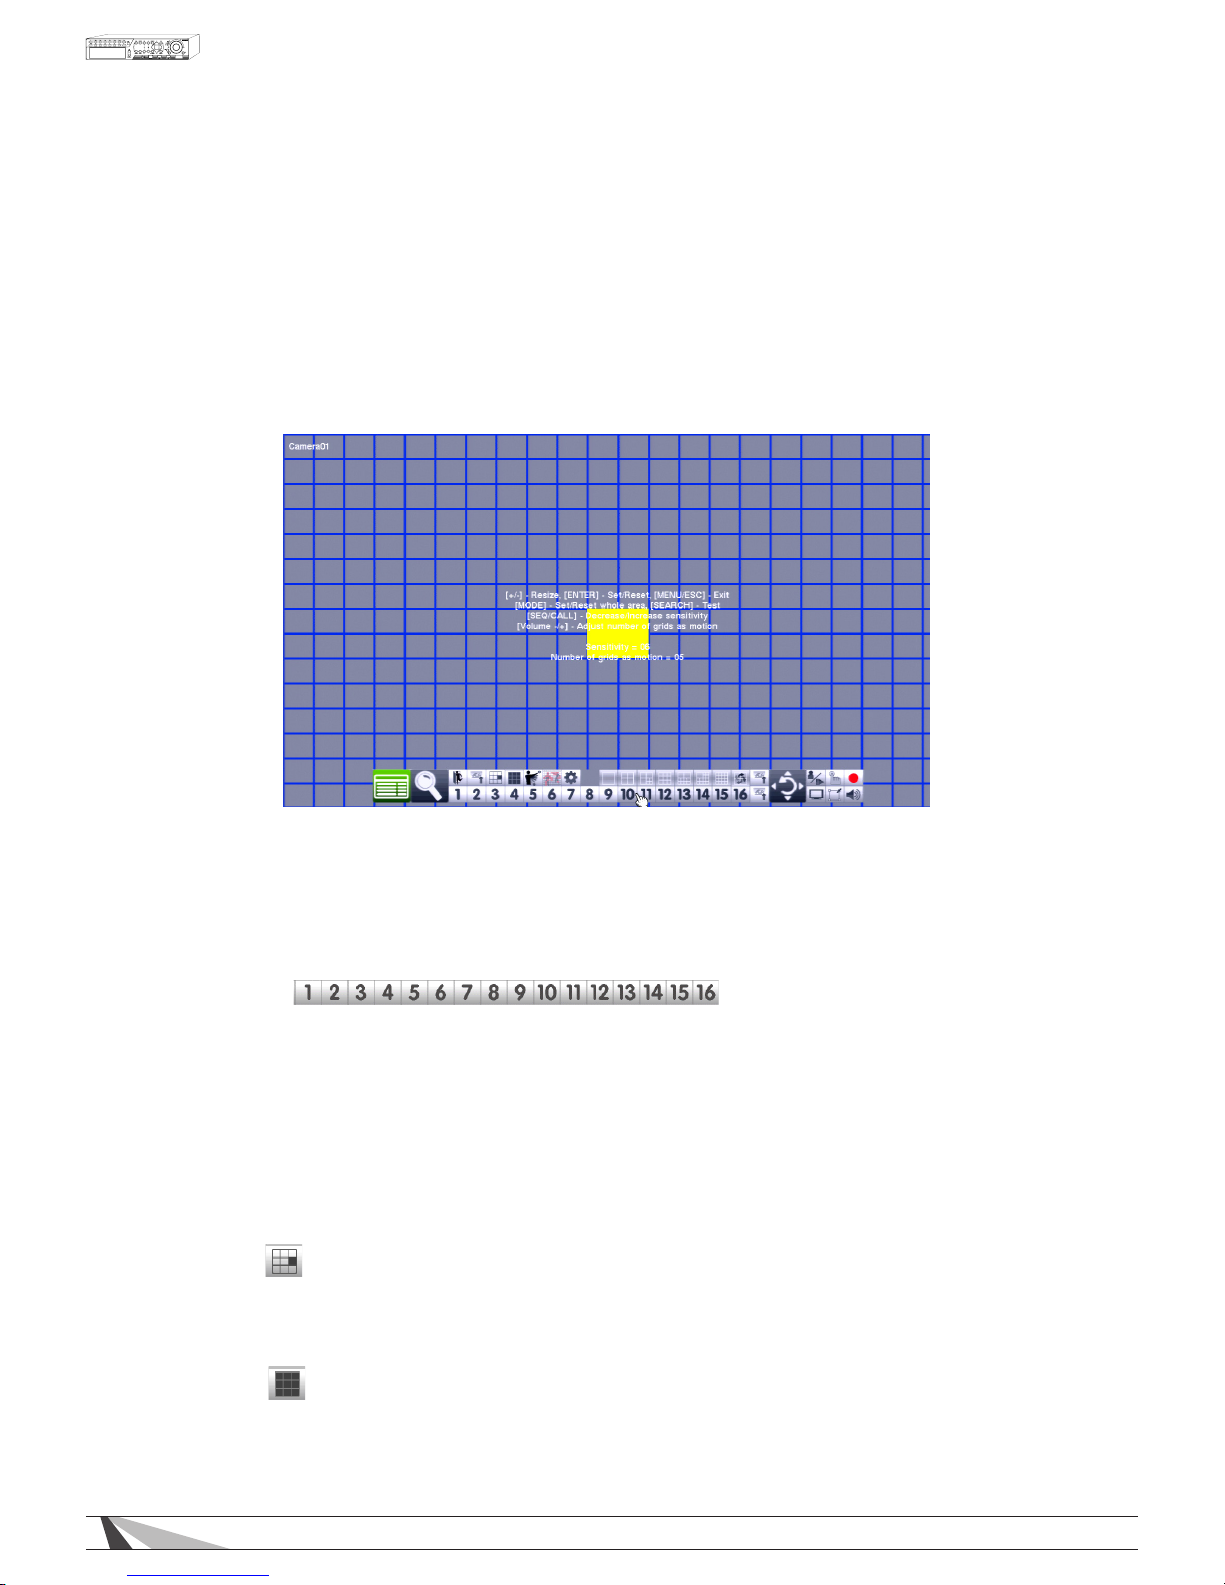
The Detection Setting sub menu is used to customize motion detection settings including the motion
detection area(s) and sensitivity. In the Motion Setup menu, highlight Settings in Detection and
press the ENTER button on the remote control to display the Motion Detection Settings sub menu for
the selected camera. Once in the Motion Detection setting sub menu, a video window is
displayed with the area divided into grids.
• Grids gray in color indicate the area which WILL be used for motion detection.
•Transparent grids indicate the area that will NOT be used for motion detection.
•Yellow grids indicate the currently selected area referred to as the Mask area.
Note: The dened detection area and sensitivity are also used for the Smart Search feature
(Section 8.3). Smart Search will only use information stored “inside” of the detection area.
There will not be any motion information stored by the DVR that is “outside” of the detection
area. Even if motion detection is disabled for a given camera, it is recommended to enable
the entire area if the Smart Search feature may be used.
Thefollowingisabriefdescriptionforeachiteminthesubmenuanditsspecicoperations:
•
NUMERIC
Press these buttons on the remote control to change the camera. Alternatively use the
mouse to select the desired camera.
•
▲▼◄►
Press these buttons on the remote control to move the Mask window (grids yellow in color).
Alternatively use the mouse to select and move the Mask window (grids yellow in color) by “left
clicking” and dragging the mouse over the desired area.
•
+/-
Press these buttons on the remote control to resize the Mask window (grids yellow in color).
Alternatively use the mouse to select and move the Mask window (grids yellow in color) by “left
clicking” and dragging the mouse over the desired area.
•
ENTER
Press this button on the remote control to Set/Reset the area of the Mask window (grids yellow
in color). Additional areas may be selected and added to the detection area. Alternatively
use the mouse to select the Set/Reset icon and adjust the Mask window (grids yellow in color).
•
MODE
Press this button on the remote control to Set/Reset the whole video area. Alternatively use
the mouse to select this icon.
Page 33

33
WPS-165-DVR-4CH Installation and Users Manual
•
SEQ/CALL
Press these buttons on the remote control to decrease (SEQ) or increase (CALL) the Sensitivity of
the motion detection area of this camera from 1 - 10 (1 is least sensitive and 10 is most
sensitive). Alternatively use the mouse to select this icon and adjust the sensitivity. We
recommend that the default setting (3) be used to start and adjusted as needed.
• Volume+/-( +)
Press these buttons on the remote control to increase or decrease the number of grids required
to detect motion before the DVR will trigger motion detection recording and any associated events
Alternatively use the mouse to select this icon and adjust the number of grids.
•
SEARCH
Press this button on the remote control to test the motion detection of this camera. Grids in
green indicate that area that will detect motion. When motion is detected, these grids will
change in color to red. Press this button again to exit testing. Alternatively use the mouse to
select this icon to enter and exit testing mode.
•
ESC
Press the ESC button on the remote control to escape from this menu and return to the main
menu. Alternatively use the mouse to exit the sub menu by clicking on the “X.” If the contents
in this menu have been modified, a Save dialog box will be displayed requesting the user to
save the changes. Press ENTER on the remote control to exit and save, ESC to exit without
saving. Another method to escape is to use the mouse to “right-click,” and exit the sub menu.
Page 34
34
WPS-165-DVR-4CH Installation and Users Manual
6.3. SEQ DISPLAY SETUP
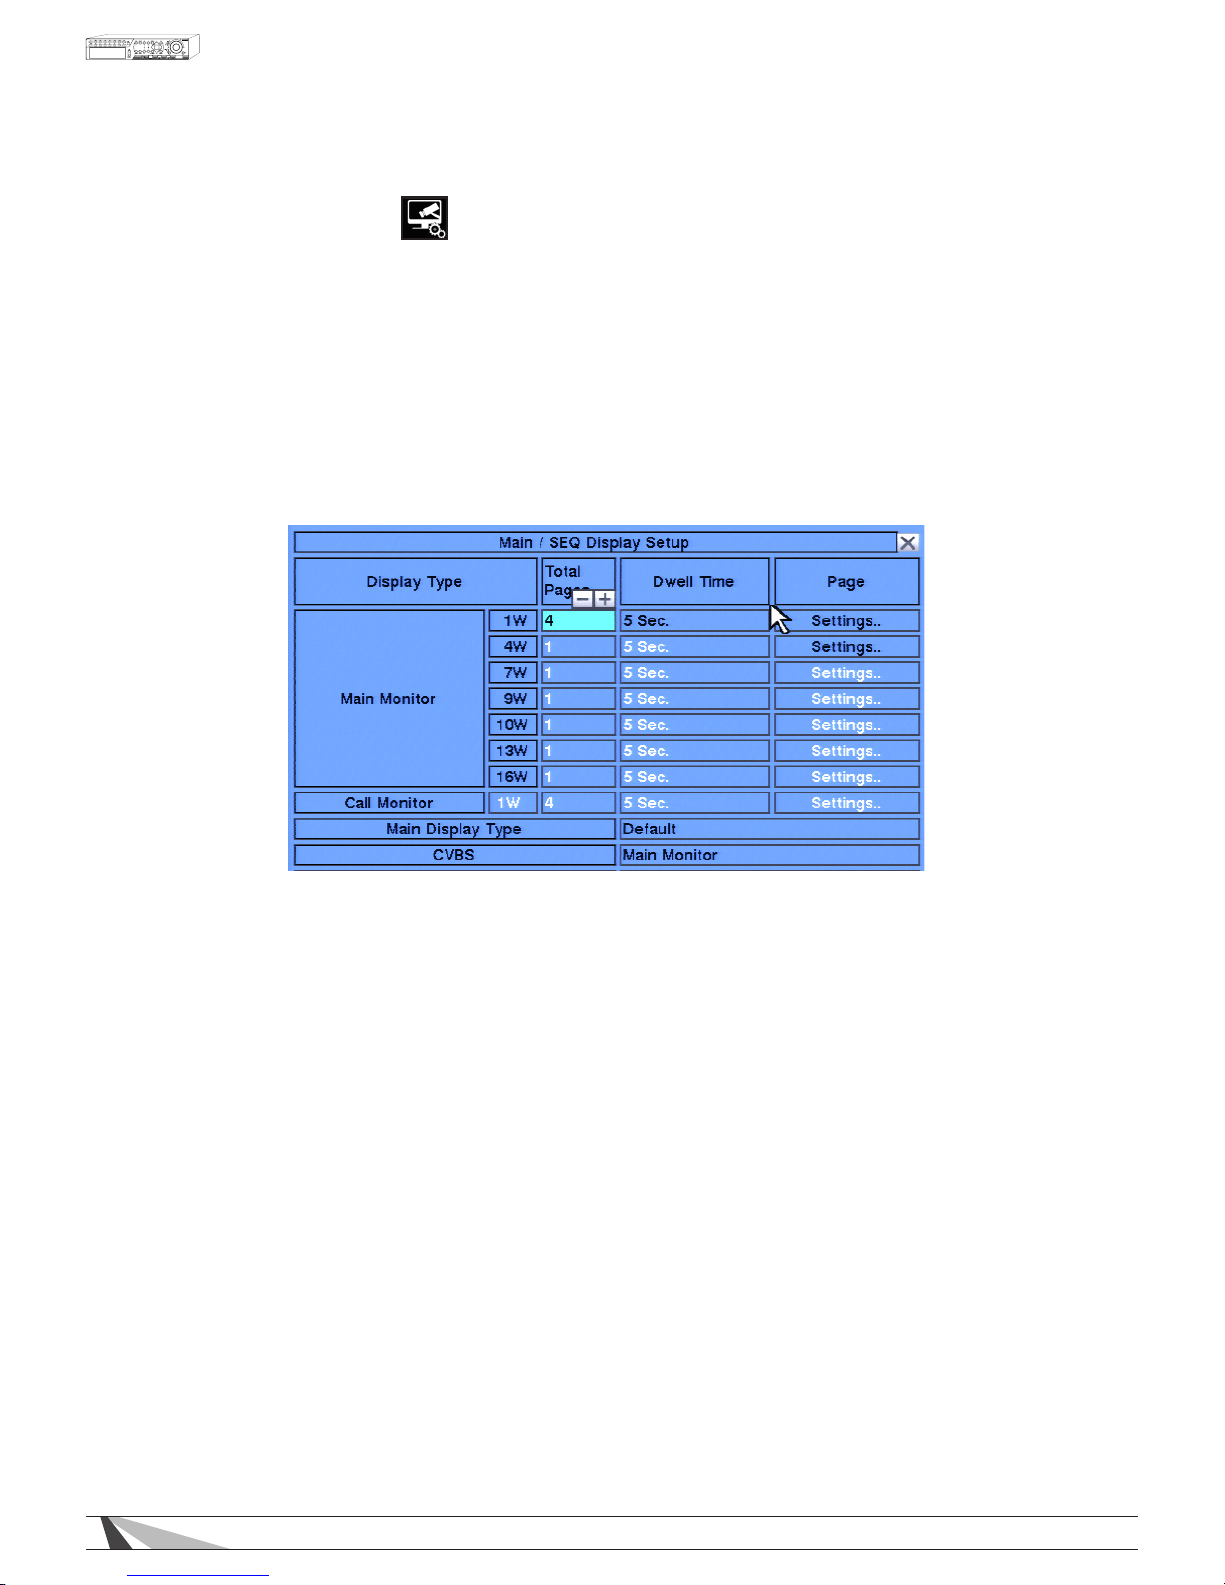
The SEQ Display Setup allows the administrator to dene the displayed pages when in SEQ Display mode.
Display Type Options:
WPS-DVR-165-4CH
• 1-Window
• 4-Window
In the Setup Menu display, press ▲▼◄► on the remote to change the highlighted option to SEQ
Display, and then press ENTER to display SEQ Display Setup as shown.
To navigate and operate this menu:
•
▲▼◄►
Press these buttons on the remote control to select an item. Alternatively use the mouse to select an
item.
•
ESC
Press the ESC button on the remote control to escape from this menu and return to the main menu.
Alternatively use the mouse to exit the sub menu by clicking on the “X.” If the contents in this menu
have been modified, a Save dialog box will be displayed requesting the user to save the changes.
Press ENTER on the remote control to exit and save, ESC to exit without saving. Another method to
escape is to use the mouse to “right-click,” and exit the sub menu.
Thefollowingisabriefdescriptionforeachiteminthesubmenuanditsspecicoperations:
•
TOTALPAGES
Set Total Pages included in this SEQ Display Type. Press +/- buttons on the remote control to select the
desired number from the available list. Alternatively use the mouse to select
the appropriate number.
•
DWELLTIME
Set the Dwell Time (how long this page will be displayed before transitioning to the next page) from 3 to
60 seconds. Press +/-
buttons on the remote control to change this value. Alternatively use the mouse
to select the appropriate time.
•
SETTINGS
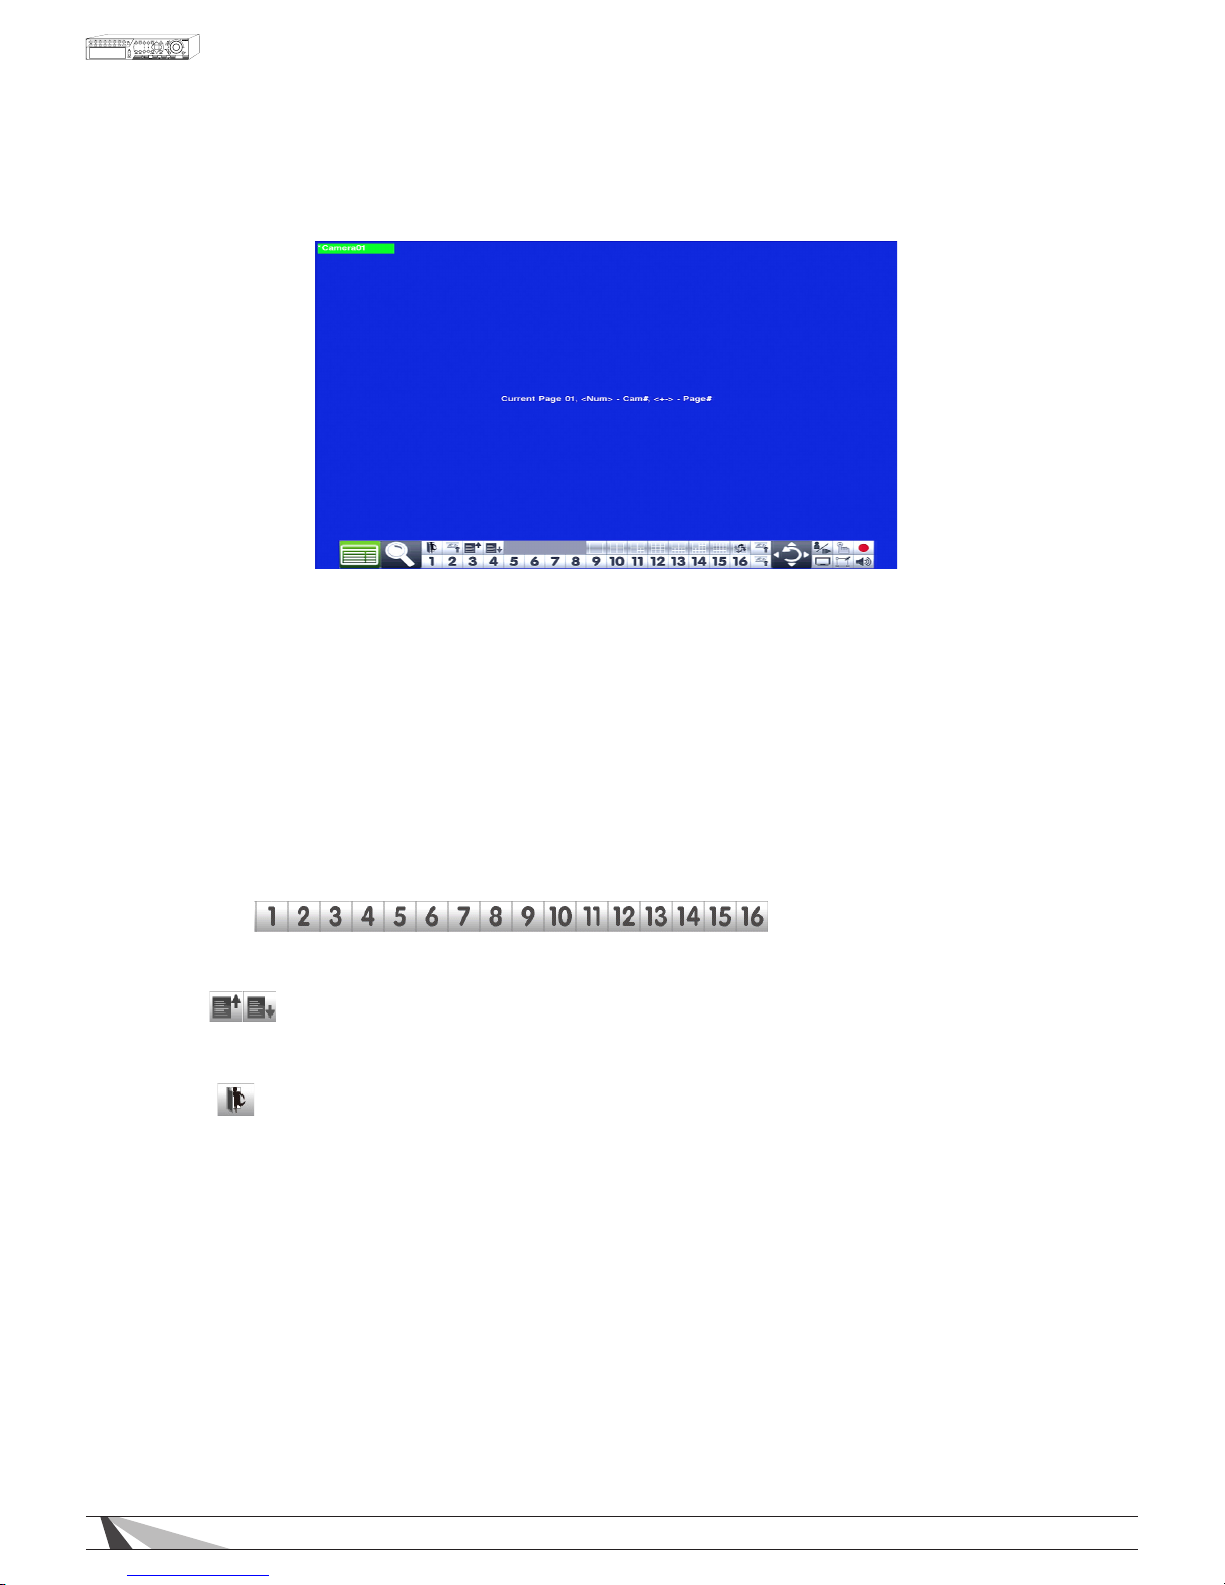
Enter the Settings window to set the camera in each window for each page of this SEQ Display Type.
Press ENTER on the remote control to display settings page as shown.
Page 35
35
WPS-165-DVR-4CH Installation and Users Manual
Alternatively left-click on the Settings button to enter this window.
• MAIN DISPLAY TYPE
Determines the camera channel conguration of the Main Display. In 'Default' the channel conguration
follows a normal standard (i.e. 1w - Page1 = Camera 1, Page2 = Camera 2, etc. 4w - Page1 = 1/2/3/4,
Page2 = Camera 5/6/7/8, etc. 7w - Page1 = Camera 1/2/3/4/5/6/7, etc.) In 'SEQ' the channel conguration
follows the layout of the Sequence menu, where a camera can be placed on any channel number.
• MAIN DISPLAY CALLED BY EVENT
Allows the Main Monitor output to show a single camera full screen view when that channel is triggered by
motion or alarm.
The following is a brief description of the operations in the sub menu:
•
▲▼◄►
Press these buttons on the remote control to change the focus camera. Alternatively
use the mouse to select the focus camera.
•
Numeric
Press these buttons on the remote control to change the camera for this view.
Alternatively use the mouse to select the desired camera.
•
+/-
Press these buttons on the remote control to change the current page for this SEQ Display.
Alternatively use the mouse to change the current page.
•
ESC
Press the ESC button on the remote control to escape from this menu and return to the main
menu. Alternatively use the mouse to exit the sub menu by clicking on the “X.” If the contents
in this menu have been modified, a Save dialog box will be displayed requesting the user to
save the changes. Press ENTER on the remote control to exit and save, ESC to exit without
saving. Another method to escape is to use the mouse to select this icon or “right-click,” and
exit the sub menu.
Page 36
36
WPS-165-DVR-4CH Installation and Users Manual
6.4. SCHEDULED RECORD SETUP
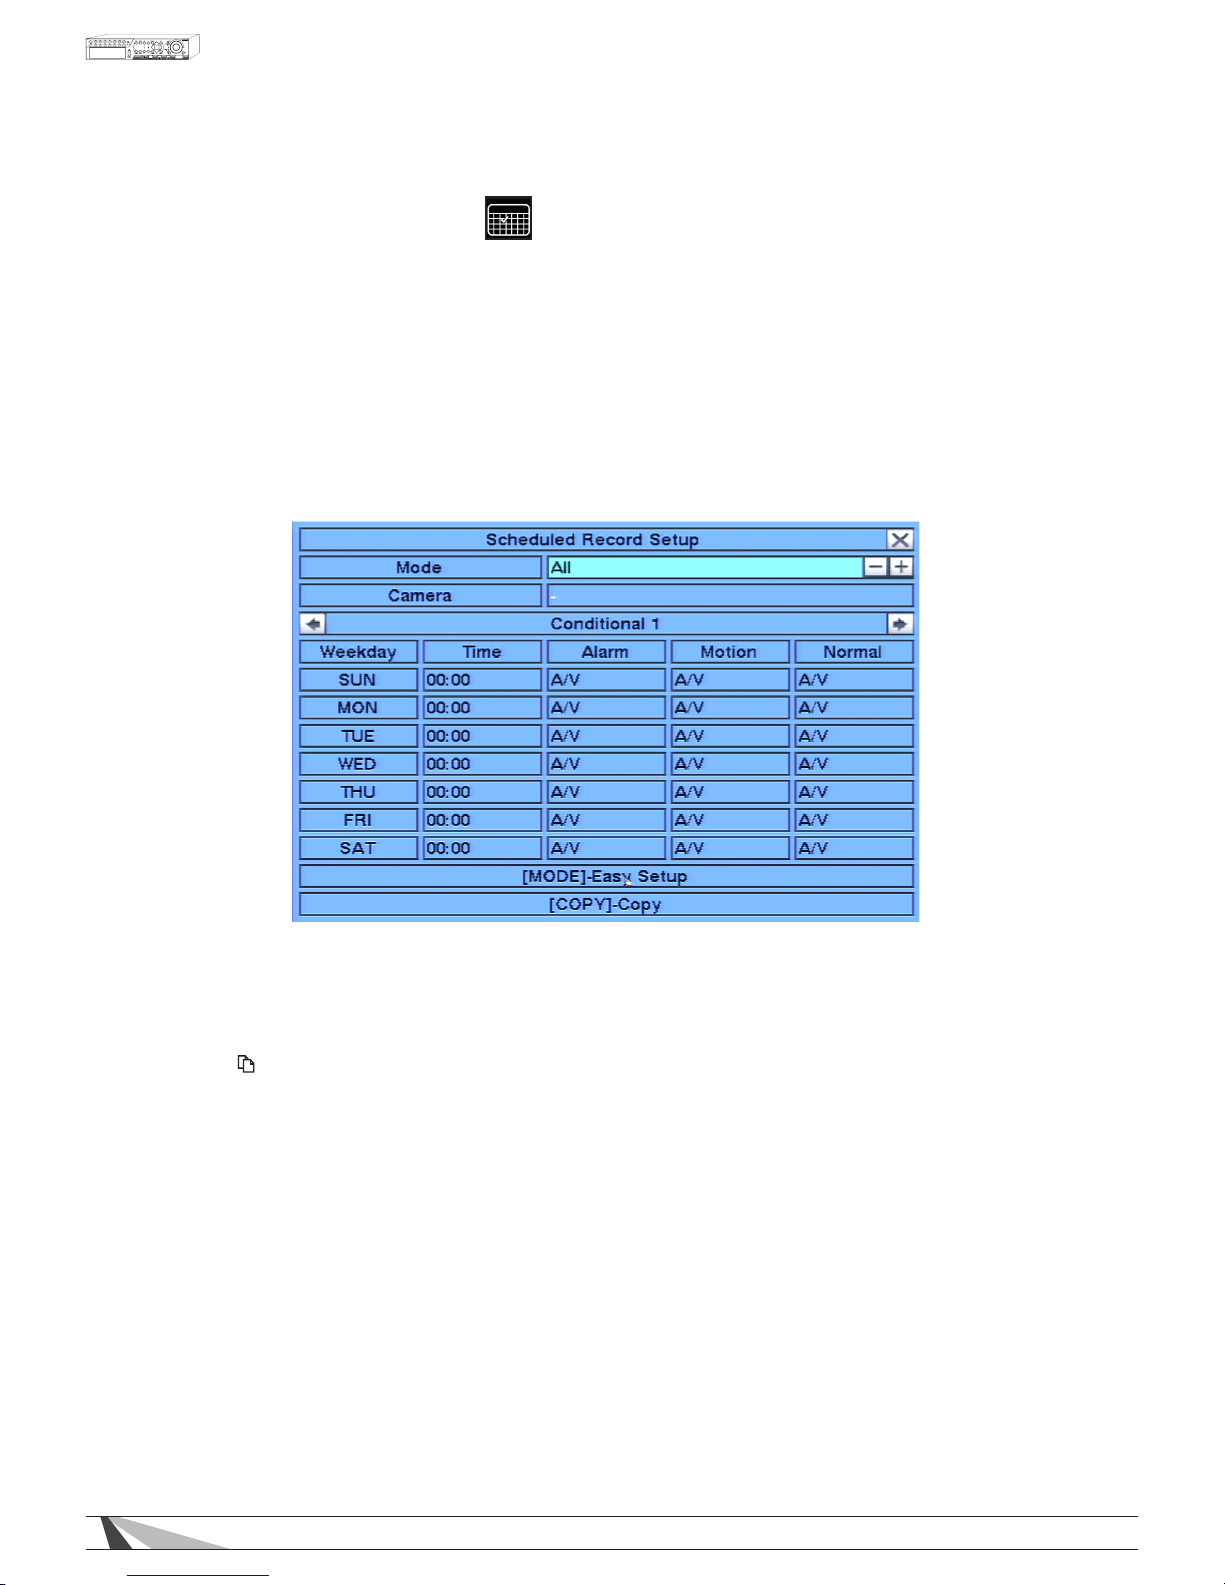
The schedule section affects the when and how the DVR records video and audio. However this does not
affect outgoing email notications or alarm outputs. These will occur 24/7 regardless of schedule
The Scheduled Record Setup allows the administrator to dene when and how video and audio will be
recorded. This feature may be useful to increase hard drive storage space by dening what types of events
are recorded on specic days of the week. For example, if Normal Recording (recall that the DVR is capable
of always recording “normal” video even without event triggers such as motion or alarm) is not necessary, this
feature can be disabled on a daily basis. To further dene when and how the DVR records, up to 16 time
segments (Conditional 1 – Conditional 16) are available for each day of the week.
In the Setup Menu display, press ▲▼◄► on the remote to change the highlighted option to
Scheduled Record, and then press ENTER to display Scheduled Record Setup.
To navigate and operate this menu:
•
▲▼◄►
Press these buttons on the remote control to select an item. Alternatively use the mouse to select
an item.
•
COPY( )
Press the COPY button on the remote control to copy the settings of the focus day to other days of the
week.
•
MODE
Press this button on the remote control to enter Easy Setup for Schedule Record as described in the
following paragraphs. Alternatively use the mouse to select Easy Setup.
•
ESC
Press the ESC button on the remote control to escape from this menu and return to the main menu.
Alternatively use the mouse to exit the sub menu by clicking on the “X.” If the contents in this menu
have been modified, a Save dialog box will be displayed requesting the user to save the changes.
Press
ENTER on the remote control to exit and save, ESC to exit without saving. Another method to
escape is to use the mouse to “right-click,” and exit the sub menu.
Page 37
37
WPS-165-DVR-4CH Installation and Users Manual
Thefollowingisabriefdescriptionforeachiteminthesubmenuanditsspecicoperations:
•
START
Set the start time of this time segment (conditional) in increments of 30 minutes in military time format.
The end time of this conditional is implicitly set as the start time of next conditional. Press the +/- buttons
on
the remote control to select the desired start time. Alternatively use the remote control to set the
desired start time.
Example: If the following start times are set:
• Conditional 1 = MON at 9:00
• Conditional 2 = MON at 18:00
• Conditional 3 - Conditional 16 = MON as N/A (Not Available)
--- then ---
• Conditional 1 = MON 9:00-18:00
• Conditional 2 = MON 0:00-9:00 and 18:00-24:00
•
ALARM
Define if Alarm events are recorded. Options include V for Video only, AV for Audio and Video, NO for
No Recording, and OFF for recording but no event notification. Press +/- buttons on the remote
control to change the value. Alternatively use the mouse to adjust these options.
•
MOTION
Define if Motion events are recorded. Options include V for Video only, AV for Audio and Video, NO for
No Recording, and OFF for recording but no event notification. Press +/- buttons on the remote control
to change the value. Alternatively use the mouse to adjust these options.
•
NORMAL
Dene if normal video and audio (non-event based video and audio) is recorded. Options include V f
or
Video only, AV for Audio and Video, NO for No Recording, and OFF for recording but no event notification.
Press +/- buttons on the remote control to change the value. Alternatively
use the mouse to adjust these options.
Note: If both Alarm and Motion are set to OFF then all video and audio recordings will be considered
“normal recording” unless there is Video Loss for a particular camera.
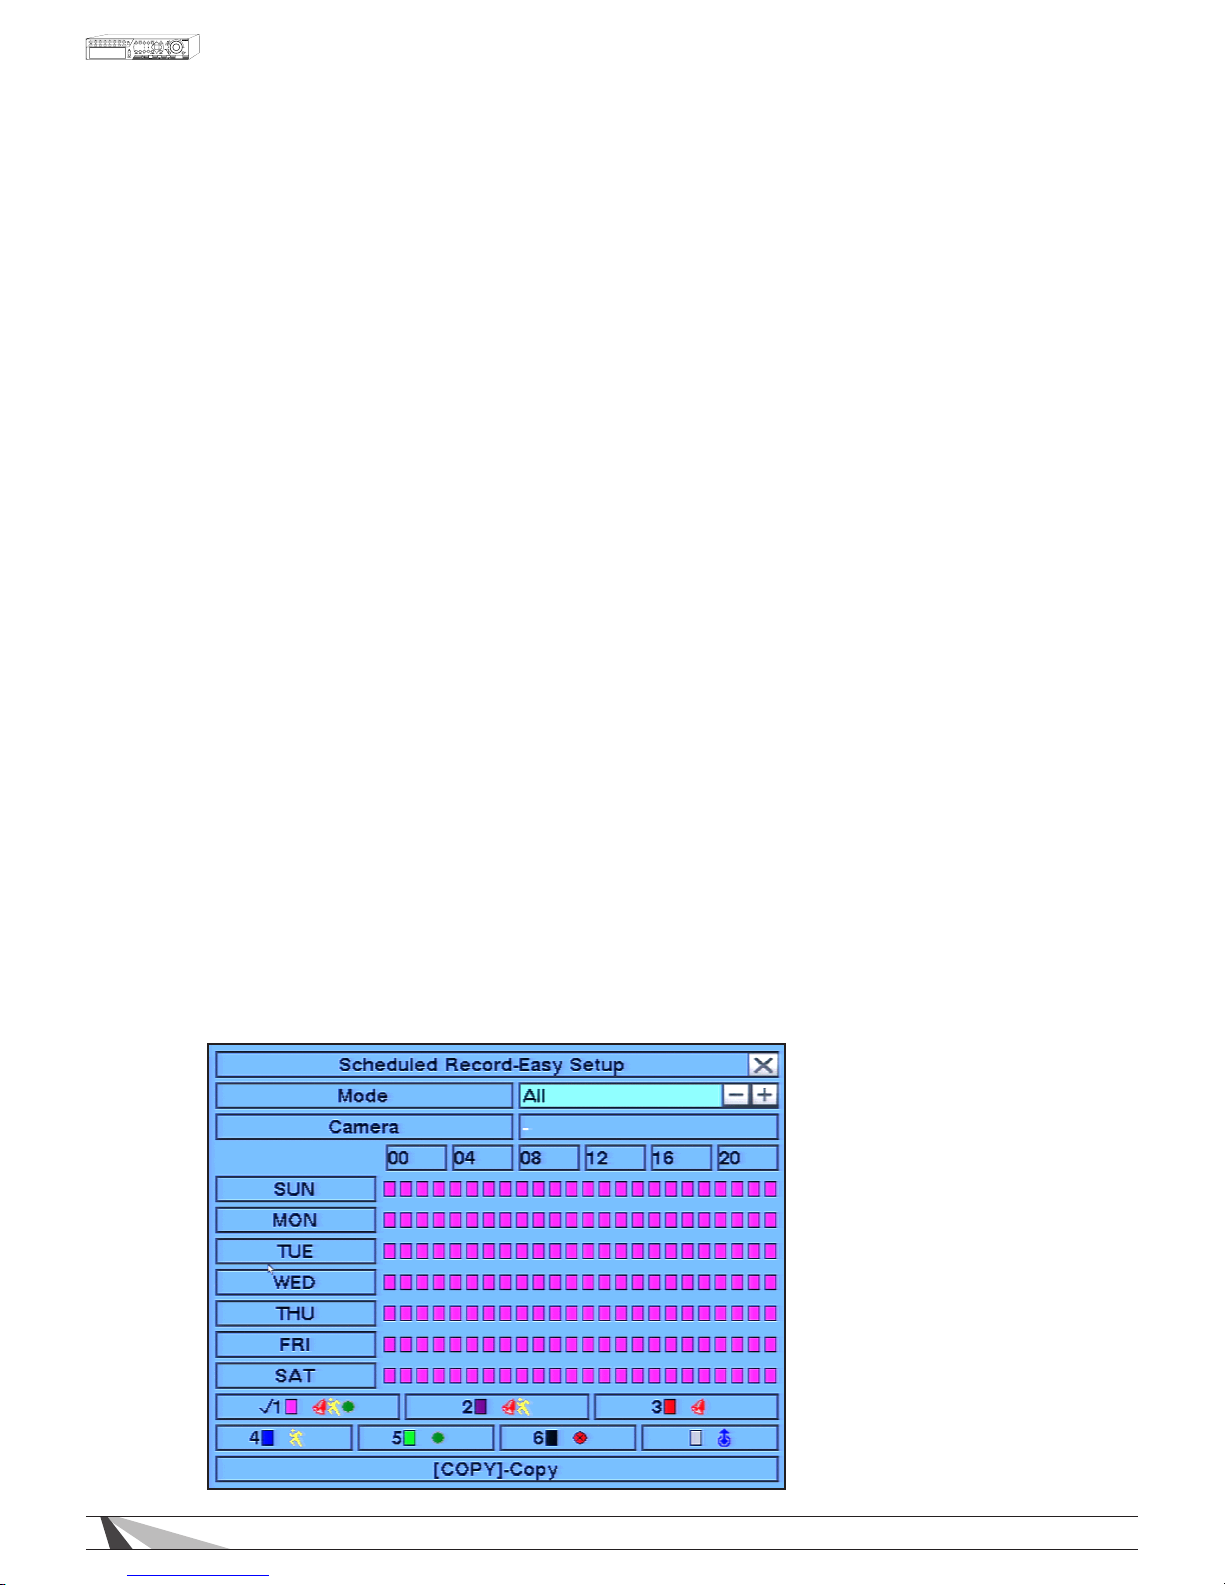
6.4.1. SCHEDULED RECORD – EASY SETUP
Within the Scheduled Record menu, Easy Setup allows the administrator to use a more visual method to setup
the scheduled record of the system.
Press the Mode button on the remote control to select Easy Setup from the Scheduled Record menu.
Alternatively use the mouse to select this sub menu.
Recording options include:
Page 38

38
WPS-165-DVR-4CH Installation and Users Manual
- Pink: Alarm, Motion and Normal Video and Audio Recording (Default setting)
- Purple: Alarm and Motion Video and Audio Recording only
- Red: Alarm Video and Audio Recording only
- Blue: Motion Video and Audio Recording only
- Green: Normal Video and Audio Recording only
- Black: No recording at all
To navigate and operate this menu:
•
▲▼◄►
Press these buttons on the remote control to change the focus recording type. Alternatively use the
mouse to select the focus recording type.
•
Numeric1-6
Press these buttons on the remote control to select one of the Recording Modes
listed above. Or press
the ENTER button on the remote control when the focus is on the appropriate Recording Mode to
activate it. Alternatively use the mouse to select the appropriate Recording Mode.
•
+/-
Press these buttons to set the focus interval in increments of one hour (one grid for each hour) to the active
Recording Mode. Or press the ENTER button on the remote control set the focus interval to the active
Recording Mode. Alternatively use the mouse to left-click and then drag the mouse to select the
appropriate grids.
•
ESC
Press the ESC button on the remote control to escape from this menu and return to the Scheduled Record
Setup display menu. Alternatively use the mouse to exit the sub menu by clicking on the “X.” Once Easy
Setup is complete, the time segments for each conditional in Scheduled Record will be updated
accordingly.
Page 39
39
WPS-165-DVR-4CH Installation and Users Manual
6.5. HDD SETUP
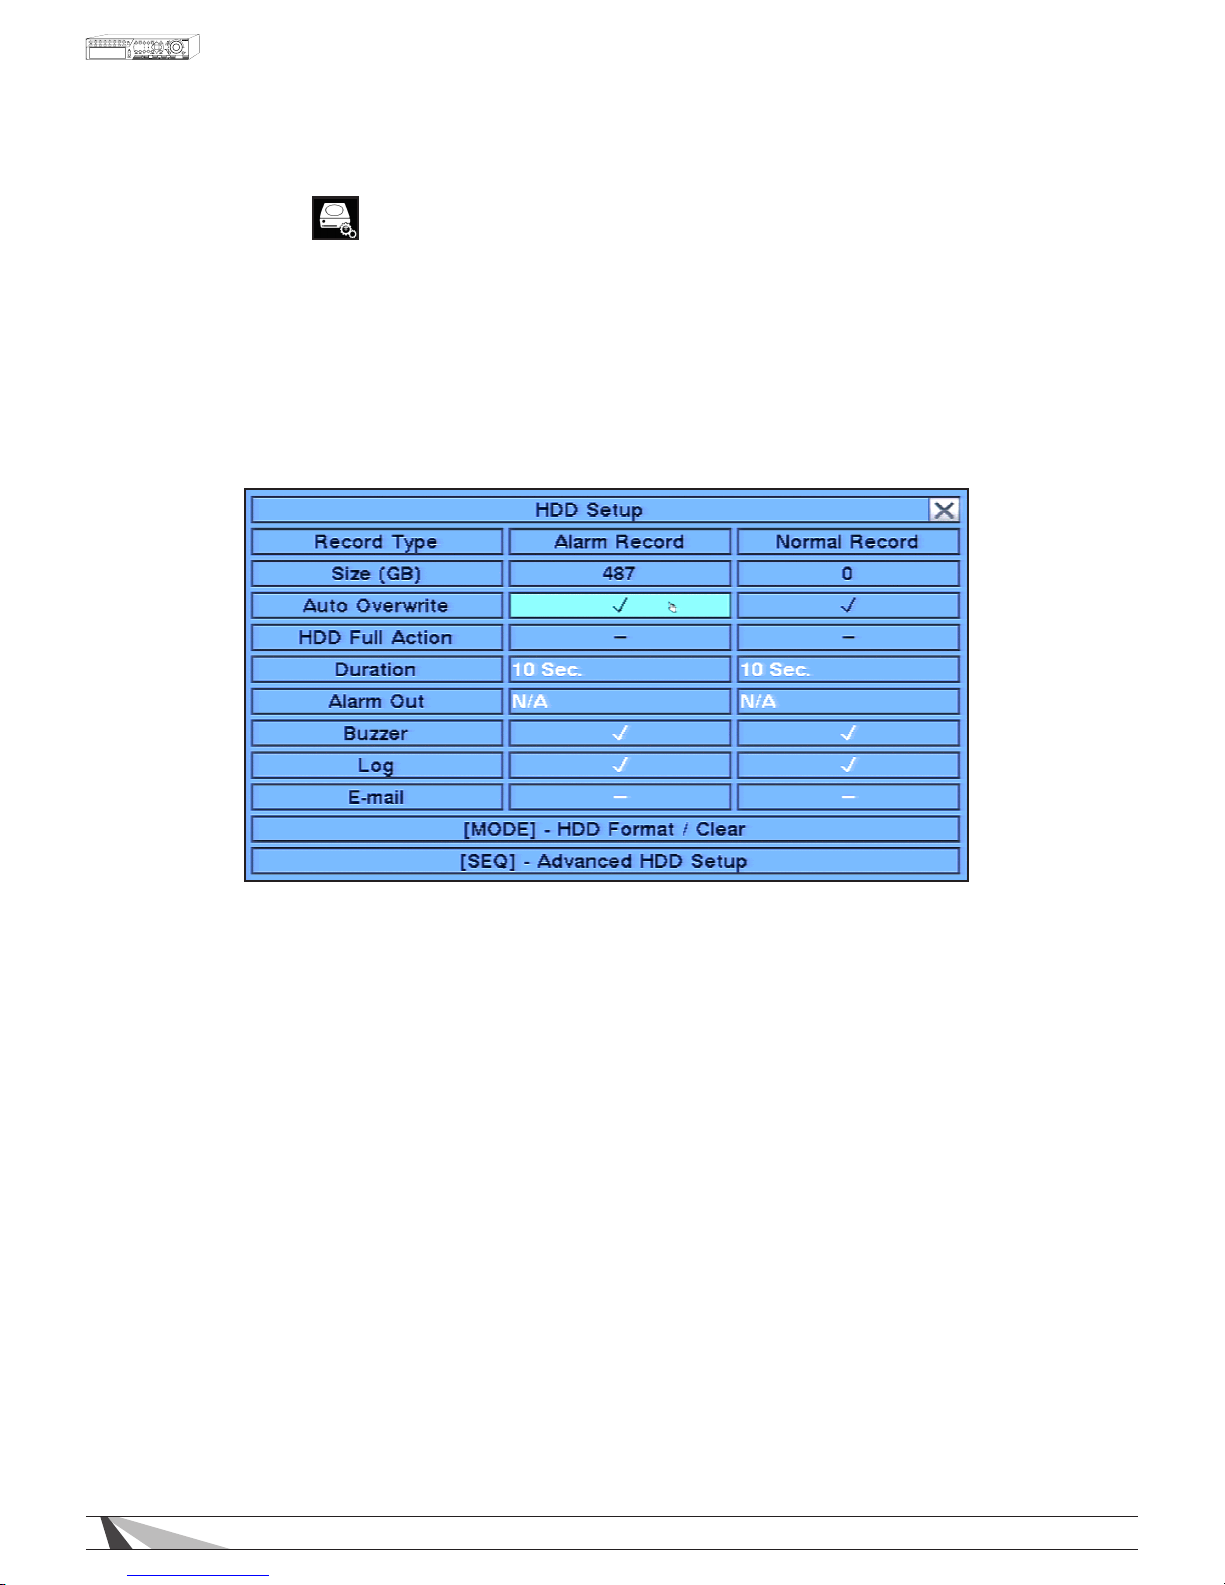
The HDD Setup allows the administrator to format/clear the hard drive, set Alarm Record partition size and
Normal Record partition size, and dene the behavior for Alarm Record and Normal Record partition if the hard
drive becomes full.
T
hefollowingisabriefdescriptionforeachiteminthesubmenuanditsspecicoperations:
In the Setup Menu display, press ▲▼◄► on the remote to change the highlighted option to HDD, and
then press ENTER to display HDD Setup as shown.
To navigate and operate this menu:
•
▲▼◄►
Press these buttons on the remote control to select an item. Alternatively use the
mouse to select an item.
• MODE
Press this button on the remote control to Format/Clear the HDDs as described in Section 6.6.1. Alternatively
use the mouse to select this option.
•
SEQ
Press this button on the remote control to enter Advanced HDD Setup as described in Section 6.7.
Alternatively use the mouse to select this option.
•
ESC
Press the ESC button on the remote control to escape from this menu and return to the main menu.
Alternatively use the mouse to exit the sub menu by clicking on the “X.”
If the contents in this menu have been modified, a Save dialog box will be displayed requesting the
user to save the changes. Press ENTER on the remote control to exit and save, ESC to exit without
saving. Another method to escape is to use the mouse to “right-click,” and exit the sub menu.
Page 40

40
WPS-165-DVR-4CH Installation and Users Manual
Thefollowingisabriefdescriptionforeachiteminthesubmenuanditsspecicoperations:
• Size(GB)
The total hard drive storage capacity in GB (gigabytes).
NOTE: If the total Alarm Record partition size is zero (0) and the total Normal Record Partition is 100, then
Alarm video and audio will NOT be recorded in the Normal Record partition, and only Normal Record video
and audio will be saved.
However, if the total Normal Record partition size is zero(0) and the Alarm Record partition is 100, then
Normal video and audio WILL be recorded in addition to Alarm video and audio, in the Alarm Record
partition.
• AutoOverwrite
By default, the DVR will automatically overwrite recorded video and audio hard drive reaches its capacity.
WARNING - If Auto Overwrite is disabled and the hard drive capacity reaches its maximum, the system will
NOT overwrite recorded video and audio. Therefore the DVR will NOT record Alarm or Normal video or
audio until the user presses the Alarm Reset button.
Press ENTER or +/- on the
remote control to disable this setting. Alternatively use the mouse to make this
change.
•
HDDFullAction
If Auto Overwrite is disabled, the DVR can sound the buzzer, log the event and email an alert when the
hard drives reaches its maximum capacity. Press ENTER or +/- on the
remote control to disable this setting.
Alternatively use the remote control to make this change.
•
Duration
If HDD Full Action is enabled, set the duration that the buzzer will remain triggered when the corresponding
partition is full. Press +/-
buttons on the remote to adjust the time from 3 seconds or 60 minutes or ‘-‘
indefinitely until the Alarm Reset button is pressed.
•
AlarmOut
This feature has no function for this model of DVR.
•
Buzzer
By default, the internal buzzer is enabled to sound when the corresponding hard drive partition
is full. Highlight this setting and press ENTER or +/- on the remote control to enable or disable this item.
Alternatively use the mouse to left-click on this item.
•
Log
By default, the DVR will log when the corresponding hard drive partition is full to the event Log (see Section
8.2
). Highlight this setting and press ENTER or +/- on the remote control to enable or disable this item.
Alternatively use the mouse to left-click on this item.
•
E-mail
Send an email message to a predefined email address when corresponding hard drive partition is full.
Highlight this setting and press ENTER or +/- on the remote control to enable or disable this item.
Alternatively use the mouse to left-click on this item. The default setting is disabled. See Section 6.11.1
for more information on e-mail.
Page 41
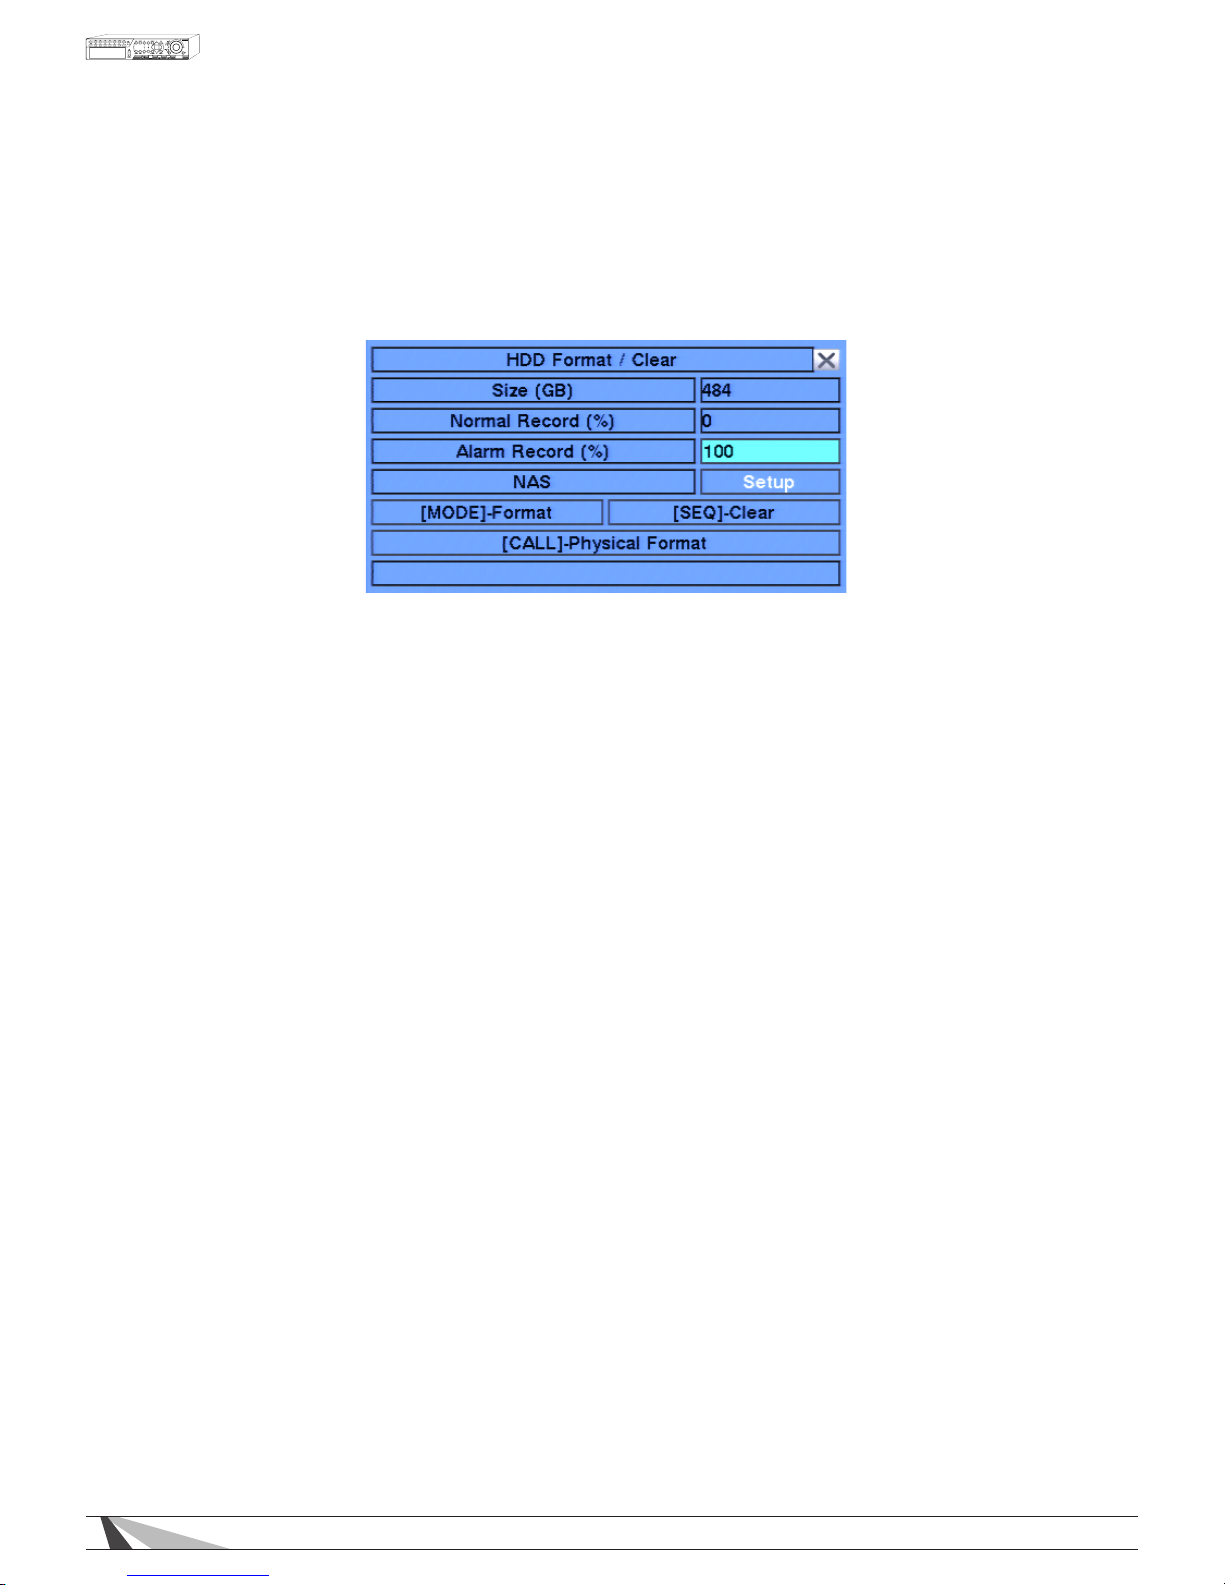
41
WPS-165-DVR-4CH Installation and Users Manual
6.5.1. HDD FORMAT/CLEAR
The HDD Format/Clear menu allows the administrator to format and/or clear the hard drive. The administrator
can also set the size for the Alarm Record partition and the Normal Record partition.
In HDD Setup display, press MODE to display HDD Format/Clear screen as shown.
To navigate and operate this menu:
•
MODE
Press the Mode button on the remote control to Format the hard drive (similar to a Quick Format option
found on a PC). A confirmation dialog box will be displayed on the screen. Using
the remote, press ENTER
to confirm or ESC to cancel. Alternatively
use the mouse to make these selections.
•
SEQ
Press the SEQ button on the remote to Clear (delete all files) the hard drive. A confirmation dialog box will
be displayed on the screen. Using the remote, press ENTER to confirm or ESC to cancel. Alternatively use
the mouse to make these selections.
•
CALL
Press the Call button on the remote control to Physically Format the hard drive (similar to a “full” Format
option found on a PC). A confirmation dialog box will be displayed on the screen. Using the remote,
press ENTER to confirm or ESC to cancel. Alternatively use the mouse to make these selections.
•
ESC
Press the ESC button on the remote control to escape from this menu and return to the main menu.
Alternatively use the mouse to exit the sub menu by clicking on the “X.”
If the contents in this menu have been modified, a Save dialog box will be displayed requesting the
user to save the changes. Press ENTER on the remote control to exit and save, ESC to exit without
saving. Another method to escape is to use the mouse to “right-click” and exit the sub menu.
Thefollowingisabriefdescriptionforeachiteminthismenuanditsspecicoperations:
• SIZE(GB)
The total hard drive storage capacity in GBs (gigabytes) for the Alarm Record partition and Normal
Record partition respectively.
• ALARMRECORD(%)
Set the Alarm Record Size (in percentage) for the hard drive. Please follow the Text Input method
described in Section 4.1 to change the percentage.
Note: If the total Alarm Record partition size is zero, alarm video and audio will be recorded in Normal
Record partition.
• NORMALRECORD(%)
Set the Normal Record Size (in percentage) for the hard drive. Please follow the Text Input method
described in Section 4.1 to change the percentage.
NOTE: If the total Normal Record partition size is zero, normal video and audio will be recorded in
Alarm Record partition.
Page 42
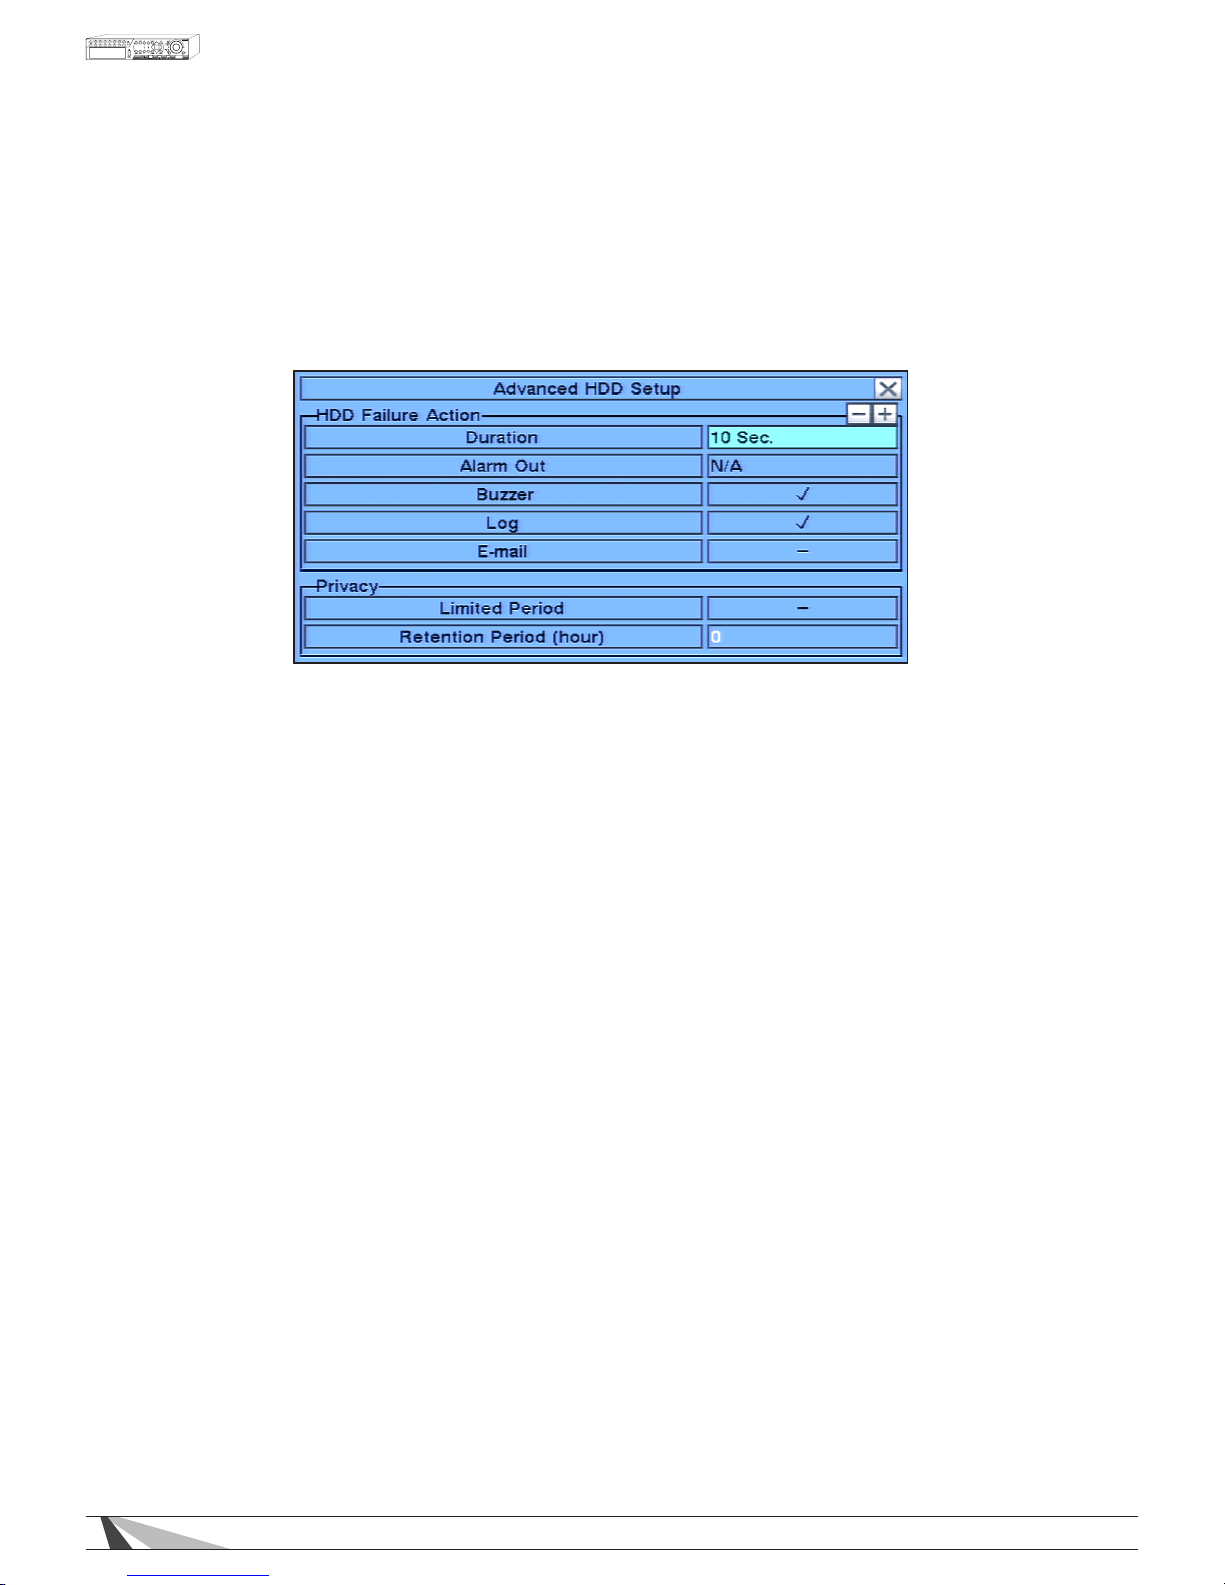
42
WPS-165-DVR-4CH Installation and Users Manual
6.5.2. ADVANCED HDD SETUP
The HDD Failure Action in Advanced HDD Setup allows the administrator to dene how the system responds
to hard drive failure. The HDD Failure Action will be triggered if there’s no available formatted hard drive
detected.
In HDD Setup display, press SEQ on the remote control to display Advanced HDD Setup menu.
To navigate and operate this menu:
•
▲▼◄►
Press these buttons on the remote control to select an item. Alternatively use the mouse to select an item.
•
ESC
Press the ESC button on the remote control to escape from this menu and return to the main menu.
Alternatively use the mouse to exit the sub menu by clicking on the “X.” If the contents in this menu
have been modified, a Save dialog box will be displayed requesting the user to save the changes.
Press ENTER on the remote control to exit and save, ESC to exit without saving. Another method to
escape is to use the mouse to “right-click” and exit the sub menu.
Page 43

43
WPS-165-DVR-4CH Installation and Users Manual
Thefollowingisabriefdescriptionforeachiteminthismenuanditsspecicoperations:
•
DURATION
Set the duration that the buzzer will remain triggered after the hard drive failure is detected. Press +/-
buttons on the remote to adjust the time from 3 seconds or 60 minutes or ‘-‘ indefinitely until the Alarm
Reset button is pressed.
•
ALARMOUT
This feature has no function for this model of DVR.
•
BUZZER
By default the internal buzzer is enabled to sound after the hard drive failure is detected. Highlight this
setting and press ENTER or +/- on the remote control to enable or disable this item. Alternatively use
the mouse to left-click on this item.
•
LOG
By default the DVR will log when the hard drive failure is detected to the Event Log (see Section 8.2).
Highlight this setting and press ENTER or +/- on the remote control to enable or disable this item.
Alternatively use the mouse to left-click on this item.
•
E-MAIL
Send an email message to a predefined email address when the hard drive failure is detected. Highlight
this setting and press ENTER or +/- on the remote control to enable or disable this item. Alternatively use
the mouse to left-click on this item. The default setting is disabled. See Section 6.11.1 for more
information on e-mail.
•
LIMITEDPERIOD
This option will limit the time period in hours for how long recorded video and audio remains on the hard
drive. By default this feature is disabled. Highlight this setting and press ENTER or +/- on the remote
control to enable or disable this item. Alternatively use the mouse to left-click on this item.
• RETENTIONPERIOD(HOUR)
If the Limited Period option is enabled, set the Retention Period of how long the hard drive will store the
recorded video and audio. Please follow the Text Input method described in Section 4.1 to modify this
setting. If set to 0, it will be treated as No Limited Period.
Page 44
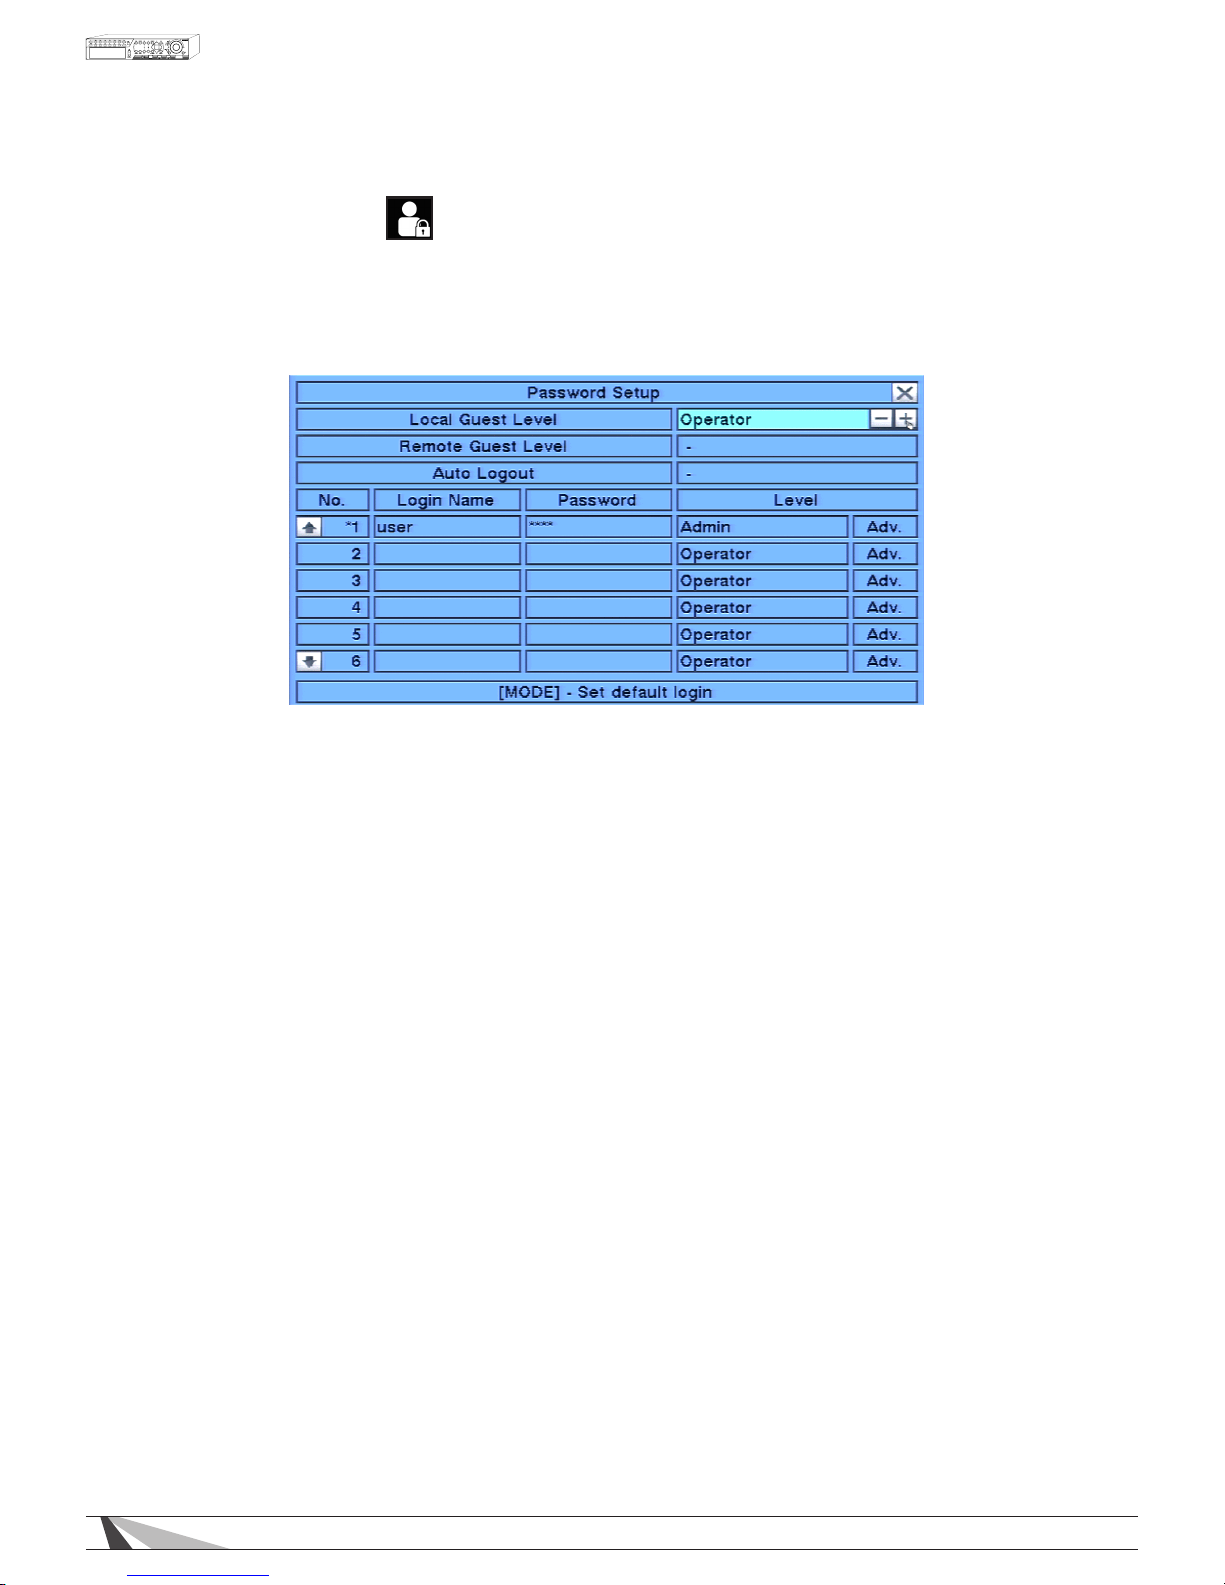
44
WPS-165-DVR-4CH Installation and Users Manual
6.6. PASSWORD SETUP
The Password Setup allows the administrator to add new users, delete existing users, and/or modify the user
login names, password, and levels of access. And allows automation system access
In the Setup Menu display, press ▲▼◄► on the remote to change the highlighted option to Password,
and then press ENTER to display Password Setup as shown.
The DVR allows up to 18 user accounts. There are three default user levels in the system:
• Operator- The lowest level, an Operator can only view live video and audio
• Supervisor- In addition to live video viewing, a Supervisor can review playback video and audio and has
permission to archive les
• Administrator- The highest level is Administrator and has access to all options.
• “ – “- No remote access allowed
• UserName- In addition to the three default levels, an administrator can also set Customized levels of
access for each user as described in the following paragraphs.
The factory preset Administrator level login name is user, the password is 1234. We recommend changing this
to block unwarranted access to the DVR.
To navigate and operate this menu:
• ▲▼◄►
Press these buttons on the remote control to select an item. Alternatively use the mouse to select an item.
•
MODE
Press the Mode button on the remote control to select a user as the default at login. An asterisk (*) will be
shown preceding the number for the default login user. This user’s login name and password will be the
default credentials populated in the Login/Logout dialog box so the user doesn’t have to enter text to login
the system. This feature is enabled by default. Press the Mode button to deselect the user as the default
login user. Alternatively use the mouse to select and deselect default log in users.
WARNING – This feature could allow unwarranted access to the DVR. Caution is strongly advised when
enabling this feature. Setting a default login means that the user login name and password will
automatically populate the Login/Logout box. This could leave the system vulnerable to unauthorized use. It
is recommended to deselect a default login so users are required to provide credentials to access the DVR.
Page 45

45
WPS-165-DVR-4CH Installation and Users Manual
•
ESC
Press the ESC button on the remote control to escape from this menu and return to the main menu.
Alternatively use the mouse to exit the sub menu by clicking on the “X.” If the contents in this menu have
been modified, a Save dialog box will be displayed requesting the user to save the changes. Press ENTER
on the remote control to exit and save, ESC to exit without saving. Another method to escape is to use the
mouse to “right-click,” and exit the sub menu.
Thefollowingisabriefdescriptionforeachiteminthismenuanditsspecicoperations:
WARNING – The following 2 features could allow unwarranted access to the DVR. Caution is strongly advised when
enabling these features.
•
Local Guest Level
Allows or restricts access to the DVR by Guests accessing the DVR through Local interfaces (DVR GUI via
mouse, IR remote control or home automation Ethernet control) without a dedicated Login. The option
selected determines the level of access a Guest will have.
“-“ (Default) - No Guest Access Allowed (Does not prevent access by User with login credentials)
Operator - Provides access to view and control all cameras. No access to Search or settings is provided.
Supervisor - Provides access to view and control all cameras, Search, Archive and modify basic settings.
Administrator - Provides full access to the DVR allowing for viewing of all cameras and modication to all
settings. Use this setting with caution.
UserName - Provides customized access to the features dened in the Advanced Settings for a particular
user. See Adv: below for more information.
Note: A minimum of operator permission level is needed for a third party automation system to control the DVR
• RemoteGuestLevel
Allows or restricts access to the DVR by Guests accessing the DVR from the Internet Explorer plugin interface
without a dedicated Login. The option selected determines the level of access a Remote Guest will have.
“-“ (Default) - No Guest Access Allowed (Does not prevent access by User with login credentials recommended.)
Operator - Provides access to view and control all cameras. No access to Search or settings is provided.
Supervisor- Provides access to view and control all cameras, Search, Archive and modify basic settings.
Administrator - Provides full access to the DVR allowing for viewing of all cameras and modication to all
settings. Use this setting with caution.
UserName - Provides access to the features as dened in the Advanced Settings for a particular user. See
Adv: below for more information.
NOTE: It is recommended that Remote Guest Level be set to the default “-“ to prevent unwarranted access to the
DVR from outside sources.
•
AutoLogout
If there is no user operation in the time selected from 1 minute to 24 hours, the user will automatically be logged
out. Select “-“ to disable this feature (default setting). Press +/- buttons on the remote control to change this
setting. Alternatively use the mouse to set this value.
• LoginName
Enter a unique Name for each user. Follow the Text Input method described in Section 4.1 to enter this
information.
Page 46
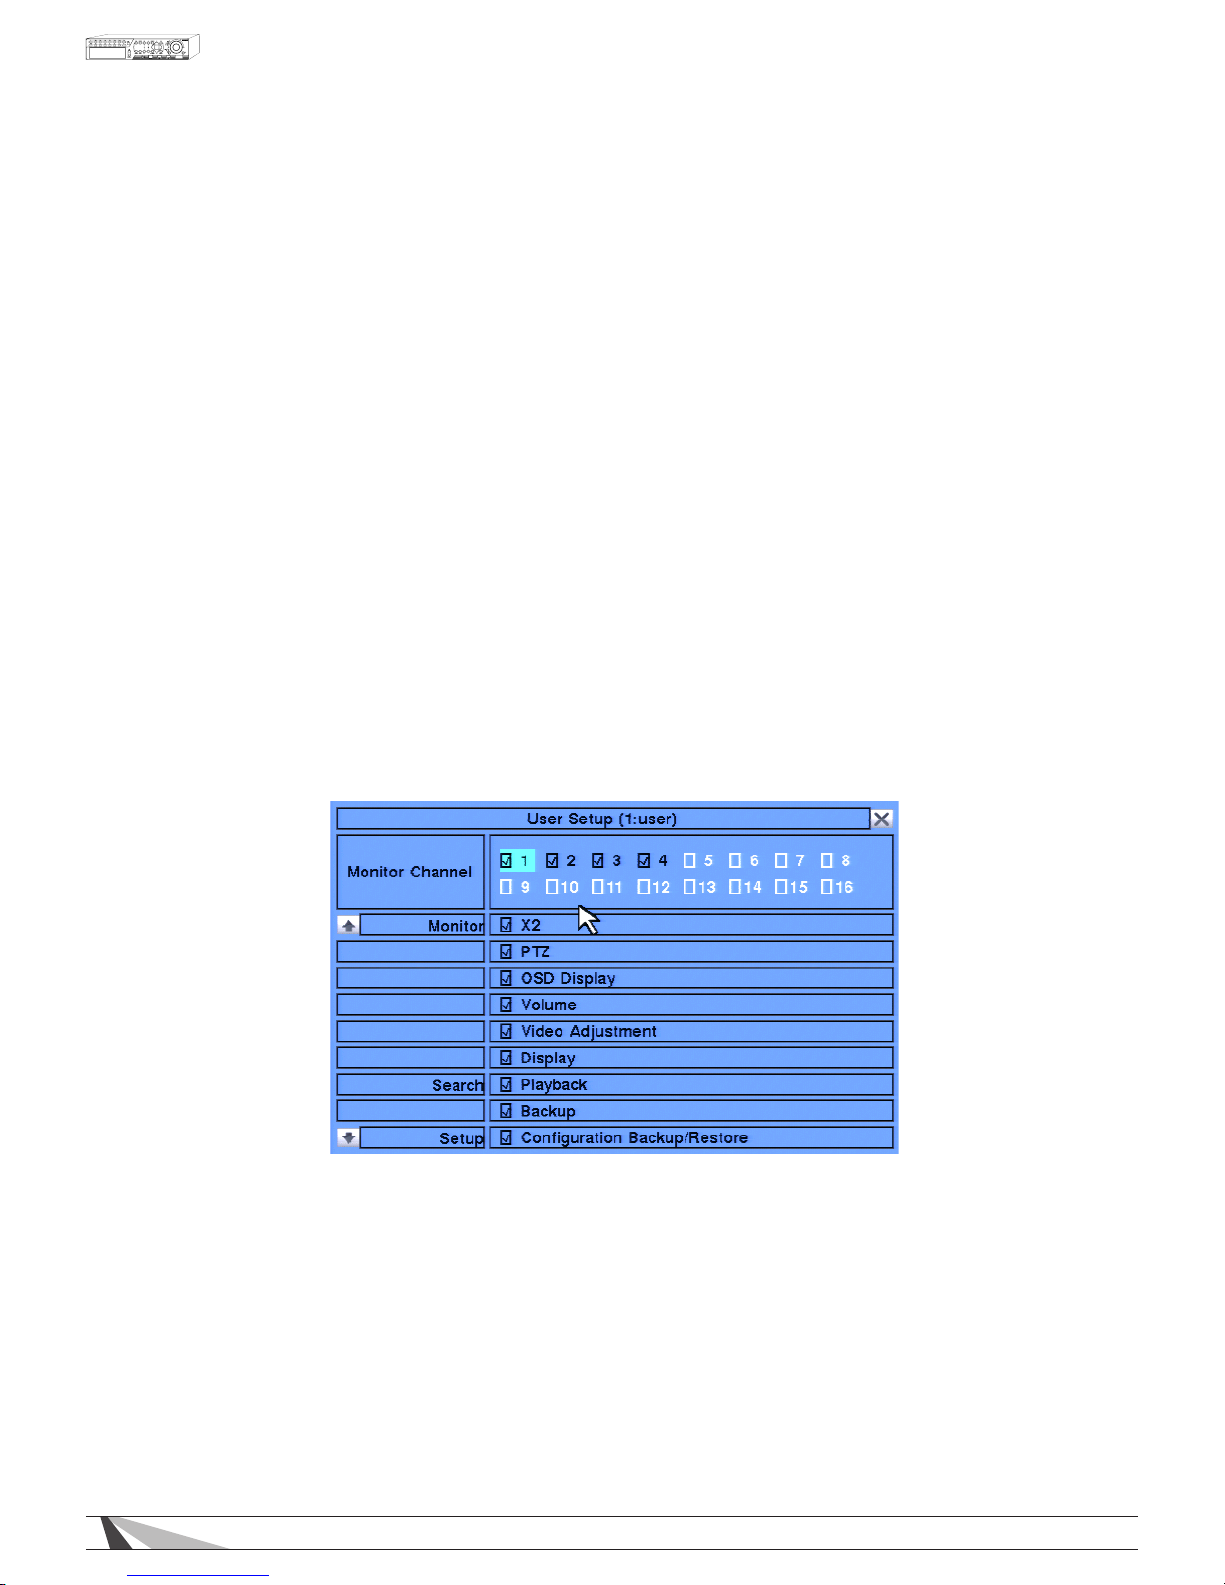
46
WPS-165-DVR-4CH Installation and Users Manual
• Password
Enter a unique Password (numbers only) for each user. Follow the Text Input method described in Section 4.1
to enter this information.
•
Level
Select the appropriate access level (Administrator, Supervisor, Operator, or Customized) for each user. Press
+/- buttons on the remote control to change this level. Alternatively use the mouse to set the level.
“-“ (Default) No Guest Access Allowed
Administrator Provides full access to the DVR allowing for viewing of all cameras and modication to all
settings. Use this setting with caution.
Supervisor Provides access to view all control all cameras, Search, and modication of basic settings.
Operator Provides access to view all control all cameras, No access to Search or settings is provided.
Customized Provides access to the features dened in the Advanced Settings for the user. See Adv: below
for more information.
•
Adv
.
For Customized access per user, press ENTER on the remote control to display
t he Advanced User Setup as shown in Section 6.8.1 below.
6.6.1. ADVANCED USER SETUP
The Advanced User Setup allows the administrator to setup each user’s detailed access rights to the system.
To navigate and operate this menu:
•
▲▼◄►
Press these buttons on the remote control to move the focus box. If the selected item is not
shown on the screen, the screen will scroll up or down by pressing the corresponding button.
Press the ENTER button to enable or disable a feature.
•
ESC
Press the ESC button on the remote control to escape from this screen and return to Password
Setup display. Alternatively right-click the mouse. User Setup
contents will be updated
accordingly.
Page 47

47
WPS-165-DVR-4CH Installation and Users Manual
Thefollowingisabriefdescriptionforeachiteminthismenuanditsspecificoperations:
Press ENTER or +/-
on the remote control to check or uncheck each item. Alternatively use the mouse to
enable or disable each item.
•
MonitorChannel1-4
Select Channels (cameras) the user can monitor.
• X2
Allows the user to zoom live and playback video.
• PTZ
Allows the user to access PTZ features if supported by the camera.
• VOLUME
Allows the user to change volume.
• VIDEOADJUSTMENT
Allows the user to adjust the video
• DISPLAY
Allow the user to change VGA settings.
• PLAYBACK
Allows the user to view playback video and audio.
• BACKUP
Allows the user to backup video and audio.
• CONFIGURATIONBACKUP/RESTORE
Allows the user to backup or restore the DVR conguration.
• SETUPCAMERA
Allows the user access to Camera Setup.
• SETUPALARM
Allows the user access to Alarm Setup.
• SETUPSEQDISPLAY
Allows the user access to Sequence Display setup.
• SETUPSCHEDULEDRECORD
Allows the user access to Scheduled Record setup.
• SETUPHDD
Allows the user access to Hard Drive setup.
• SETUPPASSWORD
Allows the user access to Password Setup.
• SETUPSYSTEM
Allows the user access to System Setup.
• SETUPRS-232/422/485
Allows the user access to RS-485 setup.
• SETUPNETWORK
Allows the user access to Network Setup.
• SETUPFACTORYDEFAULTS
Allows the user to restore factory defaults to all setup related congurations.
• SOFTWAREUPGRADE
Allows the user upgrade the DVR software.
• SHUTDOWN
Allows the user to Shutdown the DVR.
Page 48
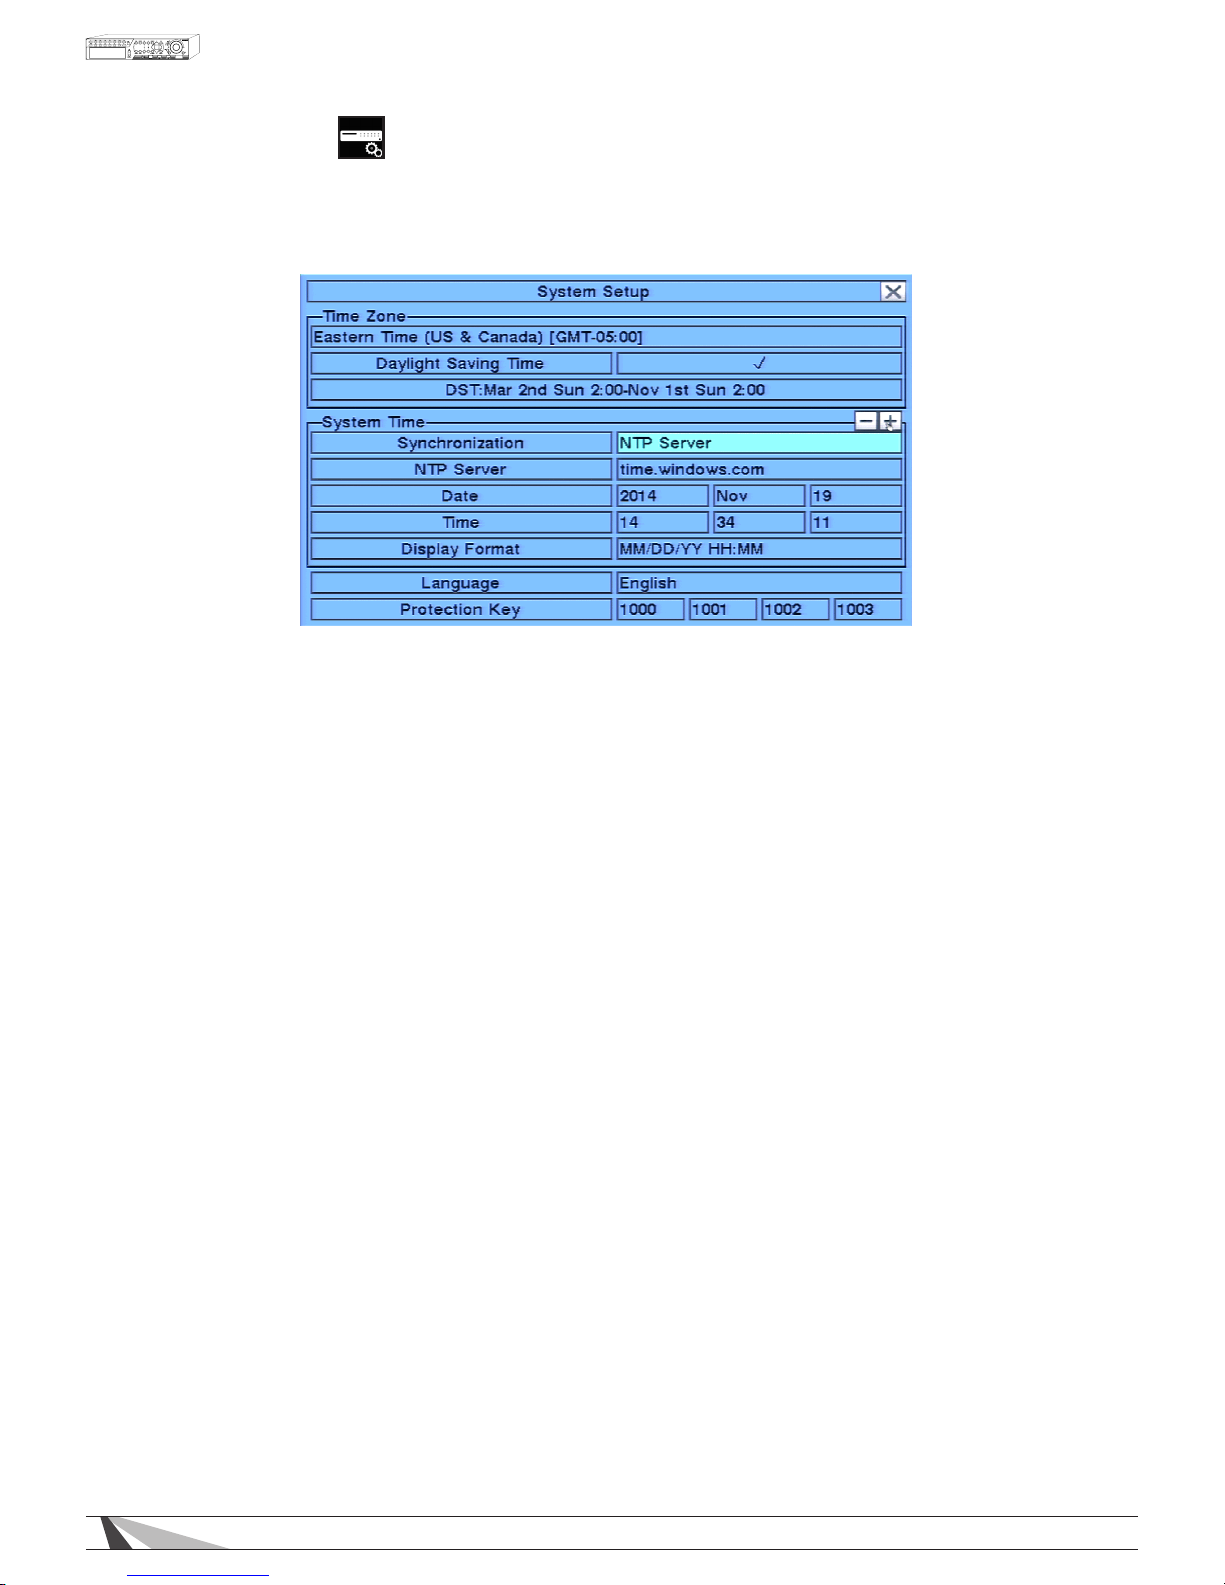
48
WPS-165-DVR-4CH Installation and Users Manual
6.7. SYSTEM SETUP
The System Setup allows the administrator to set the system time, time zone, time synchronization,
language, etc.
In the Setup Menu display, press ▲▼◄►on the remote to change the highlighted option to System,
and then press ENTER to display System Setup as shown.
To navigate and operate this menu:
•
▲▼◄►
Press these buttons on the remote control to select an item. Alternatively use the
mouse to select an item.
•
ESC
Press the ESC button on the remote control to escape from this menu and return to the main menu.
Alternatively use the mouse to exit the sub menu by clicking on the “X.” If the contents in this menu
have been modified, a Save dialog box will be displayed requesting the user to save the changes.
Press
ENTER on the remote control to exit and save, ESC to exit without saving. Another method to
escape is to use the mouse to “right-click” and exit the
sub menu.
Thefollowingisabriefdescriptionforeachiteminthismenuanditsspecicoperations:
•
TIMEZONE
Press the +/- buttons on the remote control to select the appropriate time zone. Alternatively use the
mouse to select the time zone. The default setting is Eastern Standard Time.
•
DAYLIGHTSAVINGTIME
Press ENTER or +/- on the remote control to enable or disable this item. Alternatively use the mouse to
enable or disable this feature.
• SYSTEMTIME
- Synchronization
Press ENTER or +/- buttons on the remote control to enable or disable time synchronized with a TSP
Server. Alternatively use the mouse to enable or disable this feature.
The default setting is enabled.
- TSP Server
If Time Synchronization is enabled, select a TSP (Time Synchronization Protocol) Server. The DVR will
synchronize with the specied TSP server at the system preset interval. Please follow the Text Input
method described in Section 4.1 to modify this setting. Alternatively use the mouse and the pop-up
keyboard to enter the TSP server.
- Date
System Date. Press +/- buttons on the remote control to modify the date. Alternatively use the
mouse to set the date.
- Time
System Time. Press +/- buttons on the
remote control to modify the time. Alternatively use the
mouse to set the date.
Page 49

49
WPS-165-DVR-4CH Installation and Users Manual
- Display Format
Select the format used to display the system time in the System Status Bar. Press +/- buttons on the
remote control to change the format. Alternatively use the mouse to select the format.
•
LANGUAGE
Press +/-
buttons on the remote control to change the language. Alternatively use the mouse to
select the appropriate language.
NOTE: If the selected language is changed, the user will be asked to reboot the system for the newly
selected language to take effect.
• PROTECTIONKEY
The Protection Key is used for secure remote access of the system by various software. Follow the Text
Input method described in Section 4.1 to modify these items. Alternatively use the mouse and the pop-up
keyboard to enter the Protection Key.
NOTE: The Protection Key will be used by some software for authentication when a remote computer
wants to connect with the system through the Ethernet interface, either LAN or internet. The same
protection key must be entered to install the remote software if it is to be used to access the DVR.
Page 50
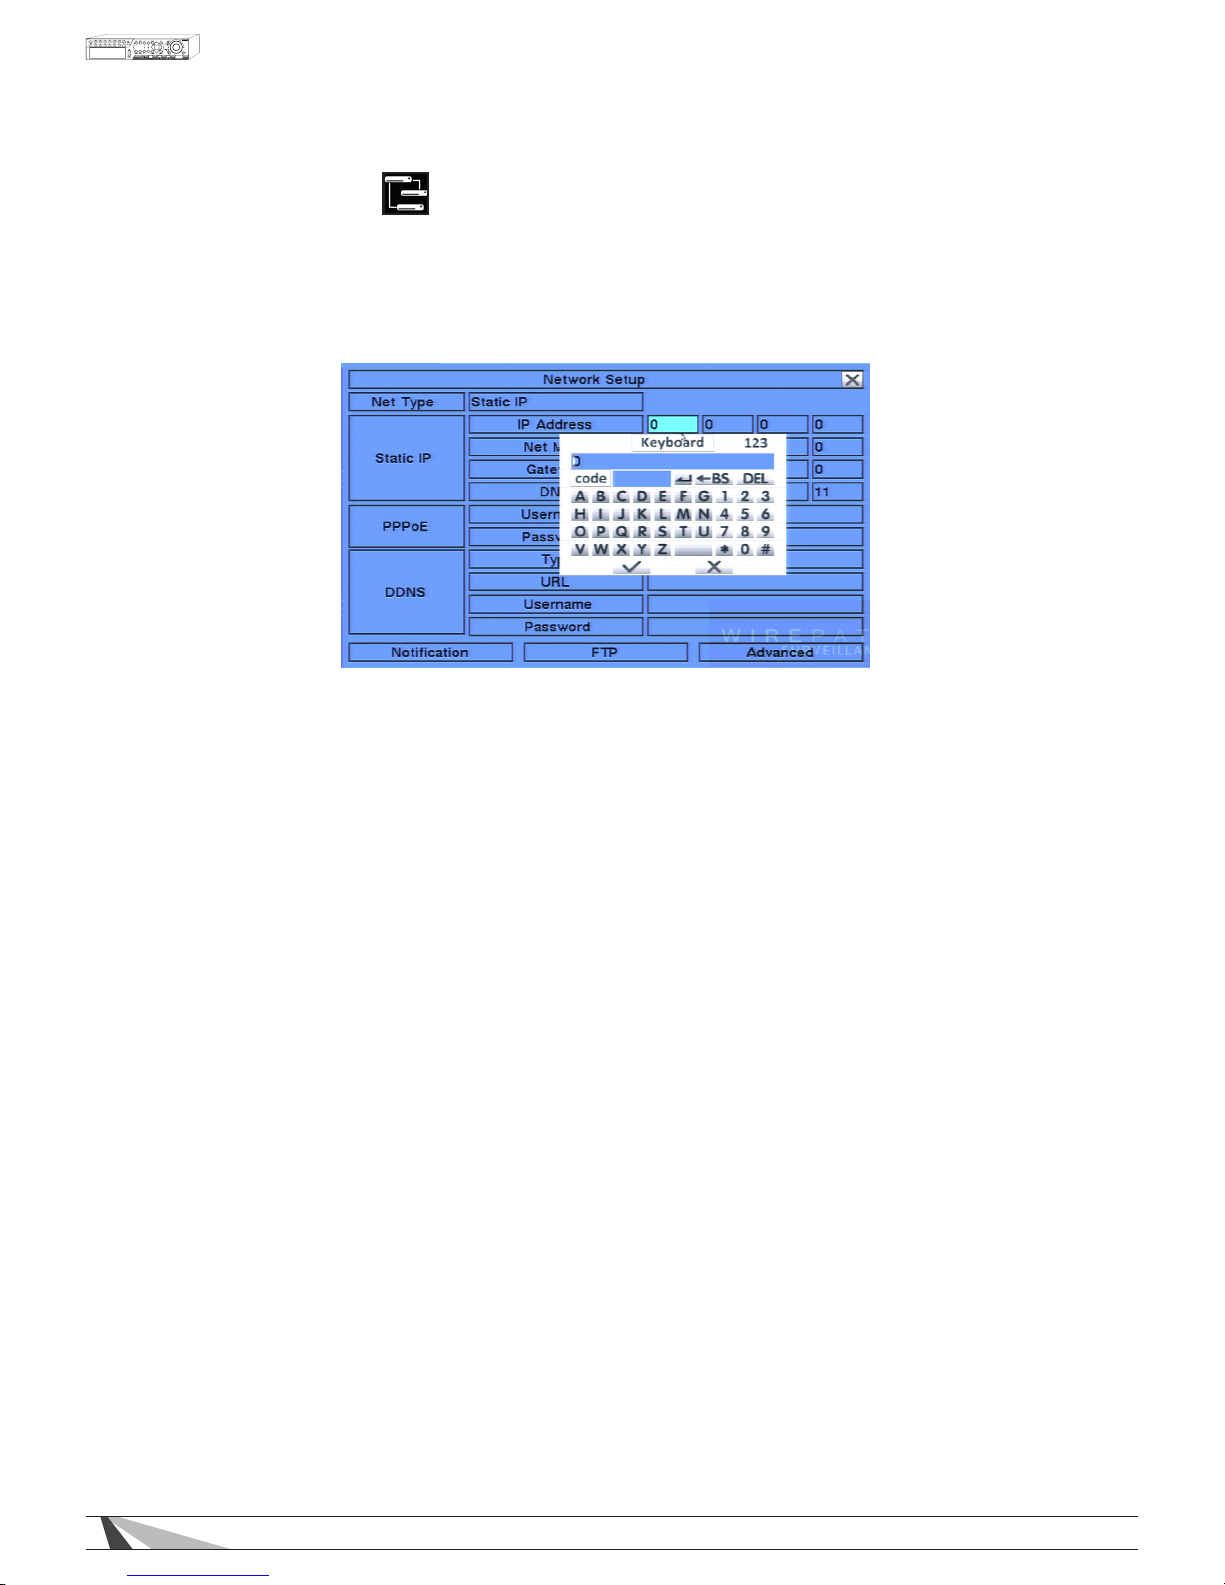
50
WPS-165-DVR-4CH Installation and Users Manual
6.8. NETWORK SETUP
The Network Setup allows the administrator to setup all Ethernet network related parameters. Consultation with
the network administrator may be required to set these parameters correctly.
In the Setup Menu display, press ▲▼◄► on the remote to change the highlighted option to Network,
and then press ENTER to display Network Setup as shown.
To navigate and operate this menu:
• ▲▼◄►
Press these buttons on the remote control to select an item. Alternatively use the
mouse to select an item.
•
ESC
Press the ESC button on the remote control to escape from this menu and return to the main menu.
Alternatively use the mouse to exit the sub menu by clicking on the “X.” If the contents in this menu have
been modified, a Save dialog box will be displayed requesting the user to save the changes. Press ENTER
on the remote control to exit and save, ESC to exit with out saving. Another method to escape is to use
the mouse to “right-click” and exit the sub menu.
Thefollowingisabriefdescriptionforeachiteminthesubmenuanditsspecicoperations.
Please follow the Text Input method described in Section 4.1 to modify these items. Alternatively use the
mouse and the pop-up keyboard to enter these settings. Consultation with the network administrator may
be required for these settings.
•
NetType
Press +/- buttons on the remote control to change the Net Type. Alternatively use the mouse to change
this setting. Options include: Static IP, PPPoE, or DHCP. DHCP can only be used for intranet (LAN) access,
while Static IP and PPPoE can be used for both internet & intranet access. The default setting is DHCP.
• IPAddress
Enter an Ethernet IP Address for the DVR. This address should be static and not conict with any other IP ad
dress on the LAN.
•Net Mask
Enter the Net Mask for the IP address.
• Gateway
Enter the Gateway IP address for the system.
• DNS
If using DNS, enter the Domain Name Server address for the system. (Same address as Default Gateway)
•Username
If PPPoE is used, enter the Username for the system.
Page 51

51
WPS-165-DVR-4CH Installation and Users Manual
• Password
If PPPoE is used, enter the Password for the system.
• DDNSType
Starting with Version 7.75.53 a new selection will appear for WirepathDNS. It is strongly recommended that
this option is used to simplify conguration.
Using the WirepathDNS is easy. Select WirepathDNS from the list and enter the client name or other
unique string in the URL. When exiting the Network menu, conrm the changes. A DDNS service is setup
automatically. See DVR Local Display Menu Setup in Appendix E – WirepathDNS Setup for details on using
Wirepath DNS.
• URL
Enter the DDNS URL if DDNS is used. – Enter Client Name or System Name to identify the DVR.
• DDNSUsername
Enter the DDNS Username if DDNS is used. – Not used unless an existing DDNS other than WirepathDNS
service is congured.
• DDNSPassword
Enter the DDNS Password if DDNS is used. – Not used unless an existing DDNS other than Wirepath DNS
service is congured.
•
E-mail
Press ENTER on the remote to display the E-mail Setup menu. Alternatively use the mouse to enter this
menu. Refer to Section 6.11.1 for details.
•
FTP
Press ENTER on the remote to display the FTP Setup menu. Alternatively use the mouse to enter this menu.
Refer to Section 6.11.2 for details.
•
ADV.
Press ENTER on the remote to display the Advanced Network Setup menu. Alternatively use the mouse to
enter this menu. Refer to Section 6.11.3 for details.
6.8.1. E-MAIL SETUP
The E-mail Setup allows the administrator to set e-mail related parameters. When an event occurs and E-mail is
enabled for the corresponding action, an e-mail will be sent based on the parameters set in this menu.
In Network Setup, press ENTER to display E-mail Setup as shown when the highlighted option is E-mail.
To navigate and operate this menu:
•
▲▼◄►
Press these buttons on the remote control to select an item. Alternatively use the mouse to select an item.
Page 52

52
WPS-165-DVR-4CH Installation and Users Manual
• ESC
Press the ESC button on the remote control to escape from this menu and return to the main menu.
Alternatively use the mouse to exit the sub menu by clicking on the “X.” If the contents in this menu have
been modified, a Save dialog box will be displayed requesting the user to save the changes. Press
ENTER on the remote control to exit and save, ESC to exit without saving. Another method to escape is to
use the mouse to “right-click,” and exit the sub menu.
Thefollowingisabriefdescriptionforeachiteminthesubmenuanditsspecicoperations:
Follow the Text Input method described in Section 4.1 to modify these items. Alternatively use the mouse
and the pop-up keyboard to enter these settings. Consultation with the network administrator or the email
provider may be required for these settings.
• SMTPSERVER
Enter the SMTP mail server name.
• SMTPPORT
Enter the SMTP Port for e-mail transmission. The default value is 25. The DVR uses TLS for email
authentication. Be sure to check with your email host for their specic TLS port number. The DVR uses TLS for
email authentication. Be sure to check with your email host for their specic TLS port number.
• AUTHENTICATION
Press ENTER or +/- on the remote control to enable or disable this item depending on whether the
SMTP mail server requires authentication. Alternatively use the mouse to enable or disable this setting.
• USERNAME
Enter the Username to the email service.
• PASSWORD
Enter the Password to the email service.
• MAILFROM
Enter the e-mail address of the associated email account
NOTE: This setting is specic and must match email client settings used to access an email account or the
email feature will not be operable. Do not enter generic text in this eld.
• MAILTO#1-5
The DVR can send e-mails originated from triggered events to up to ve different email addresses.
Enter the appropriate e-mail addresses in these elds.
•
ATTACHMENT
Press +/- buttons on the remote to attach a picture from the corresponding camera to e-mail
being sent. Optional picture sizes for the attachment can be set to Original to match the
recorded resolution or QCIF (Quarter CIF is 176 x 144 pixels) to reduce the size of the attachment.
Select N/A to disable attachments.
NOTE: If the DVR’s resolution is set to Half D1, picture attachments in the e-mail will appear “squished”
since the DVR reduces the horizontal lines by half (therefore reducing storage space and bandwidth
requirements). This only effects e-mails and not live or recorded .h.264 playback video. FTP Setup
Page 53
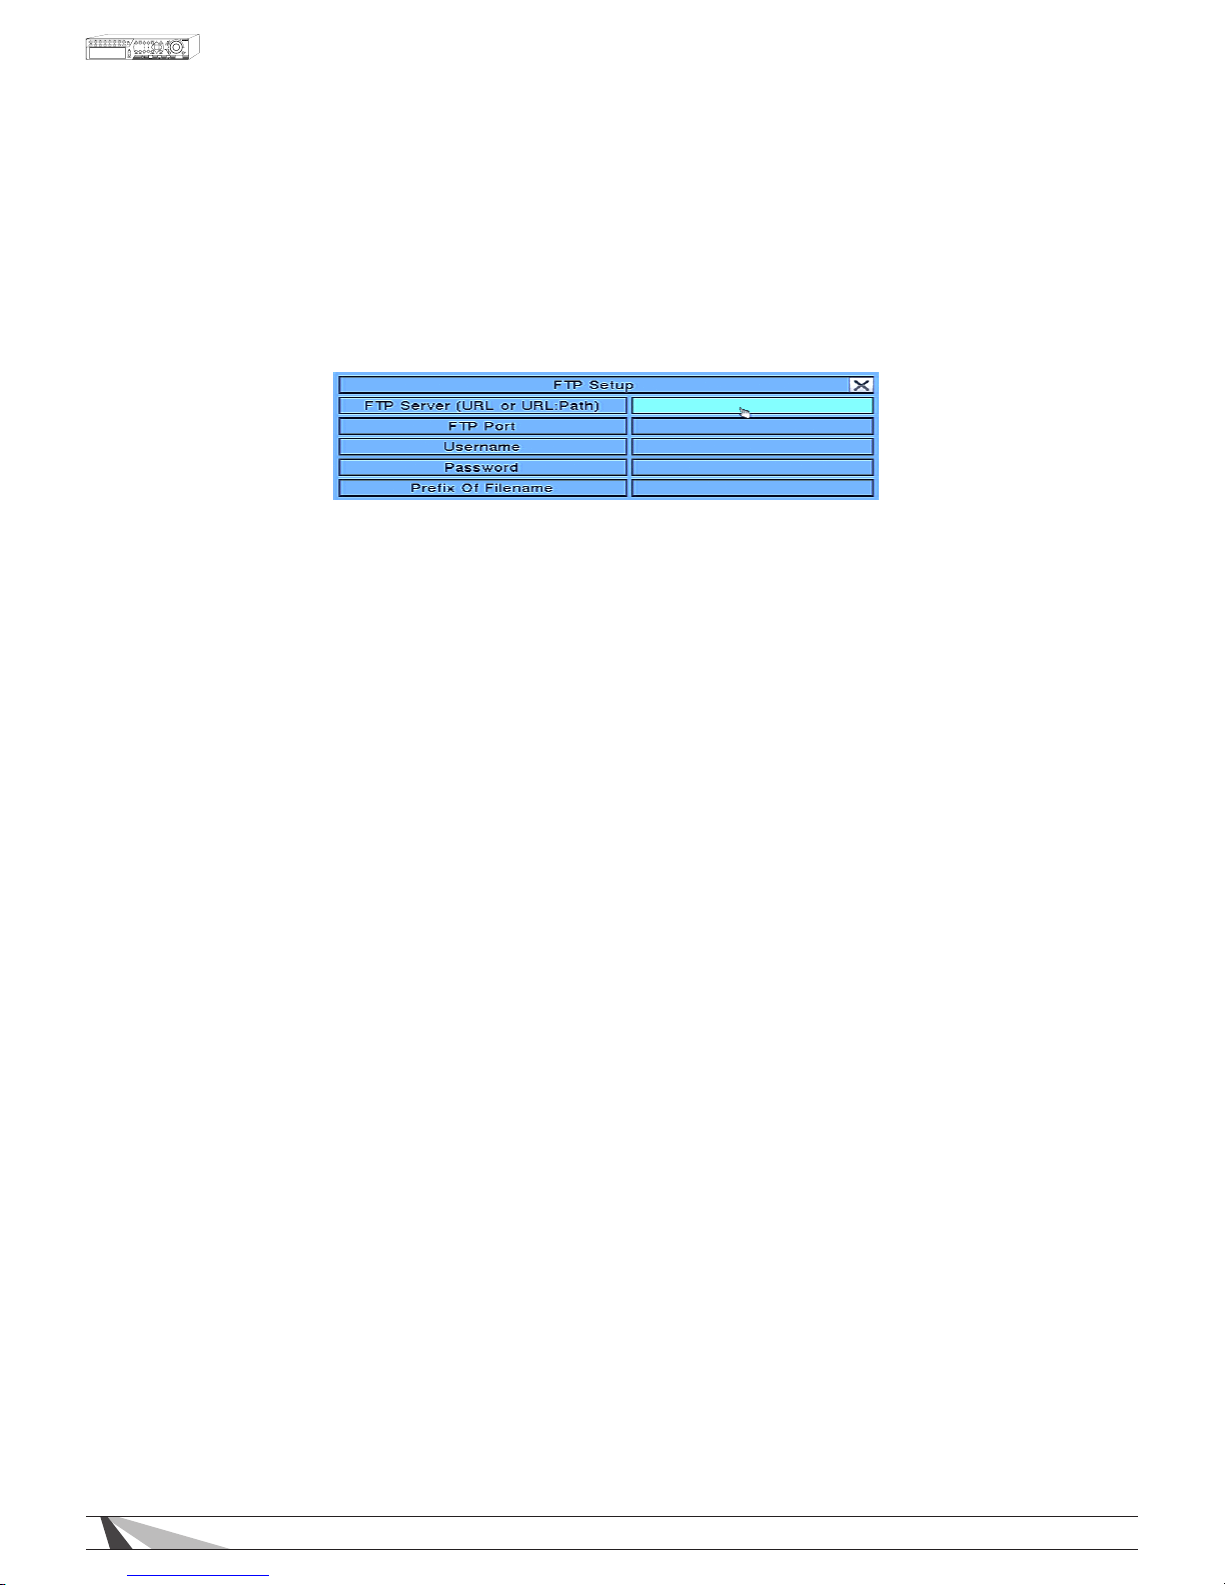
53
WPS-165-DVR-4CH Installation and Users Manual
6.8.2. FTP SETUP
FTP Setup allows the administrator to set FTP related parameters. When an event occurs and FTP is enabled for
the action, the recorded video and audio for that event will be sent to the FTP server based on the parameters
set in this menu.
In Network Setup, press ENTER to display FTP Setup as shown when the highlighted option is FTP.
To navigate and operate this menu:
•
▲▼◄►
Press these buttons on the remote control to select an item. Alternatively use the mouse to select an item.
•
ESC
Press the ESC button on the remote control to escape from this menu and return to the main menu.
Alternatively use the mouse to exit the sub menu by clicking on the “X.” If the contents in this menu
have been modified, a Save dialog box will be displayed requesting the user to save the changes.
Press ENTER on the remote control to exit and save, ESC to exit without saving. Another method to
escape is to use the mouse to “right-click,” and exit the sub menu.
Thefollowingisabriefdescriptionforeachiteminthismenuanditsspecicoperations:
Please follow the Text Input method described in Section 4.1 to modify these items. Alternatively use the mouse
and the pop-up keyboard to enter these settings. Consultation with the network administrator or the FTP server
provider may be required for these settings.
• FTPSERVER
Enter the FTP Server web/IP address.
• FTPPORT
Enter the FTP Port number. The default value is 21.
• USERNAME
Enter the Username for the FTP server.
• PASSWORD
Enter the Password for the FTP server.
• PREFIXOFFILENAME
Enter the PrexoftheFilenames for les sent to the FTP server. If this box is left empty, the lenames will
start with “cam” If a prex such as “Prex” is entered, the lenames will start with “Prex-cam.” For another
example, if the prex is “DVR01”, then the lenames will begin with “DVR01-cam.”
Page 54
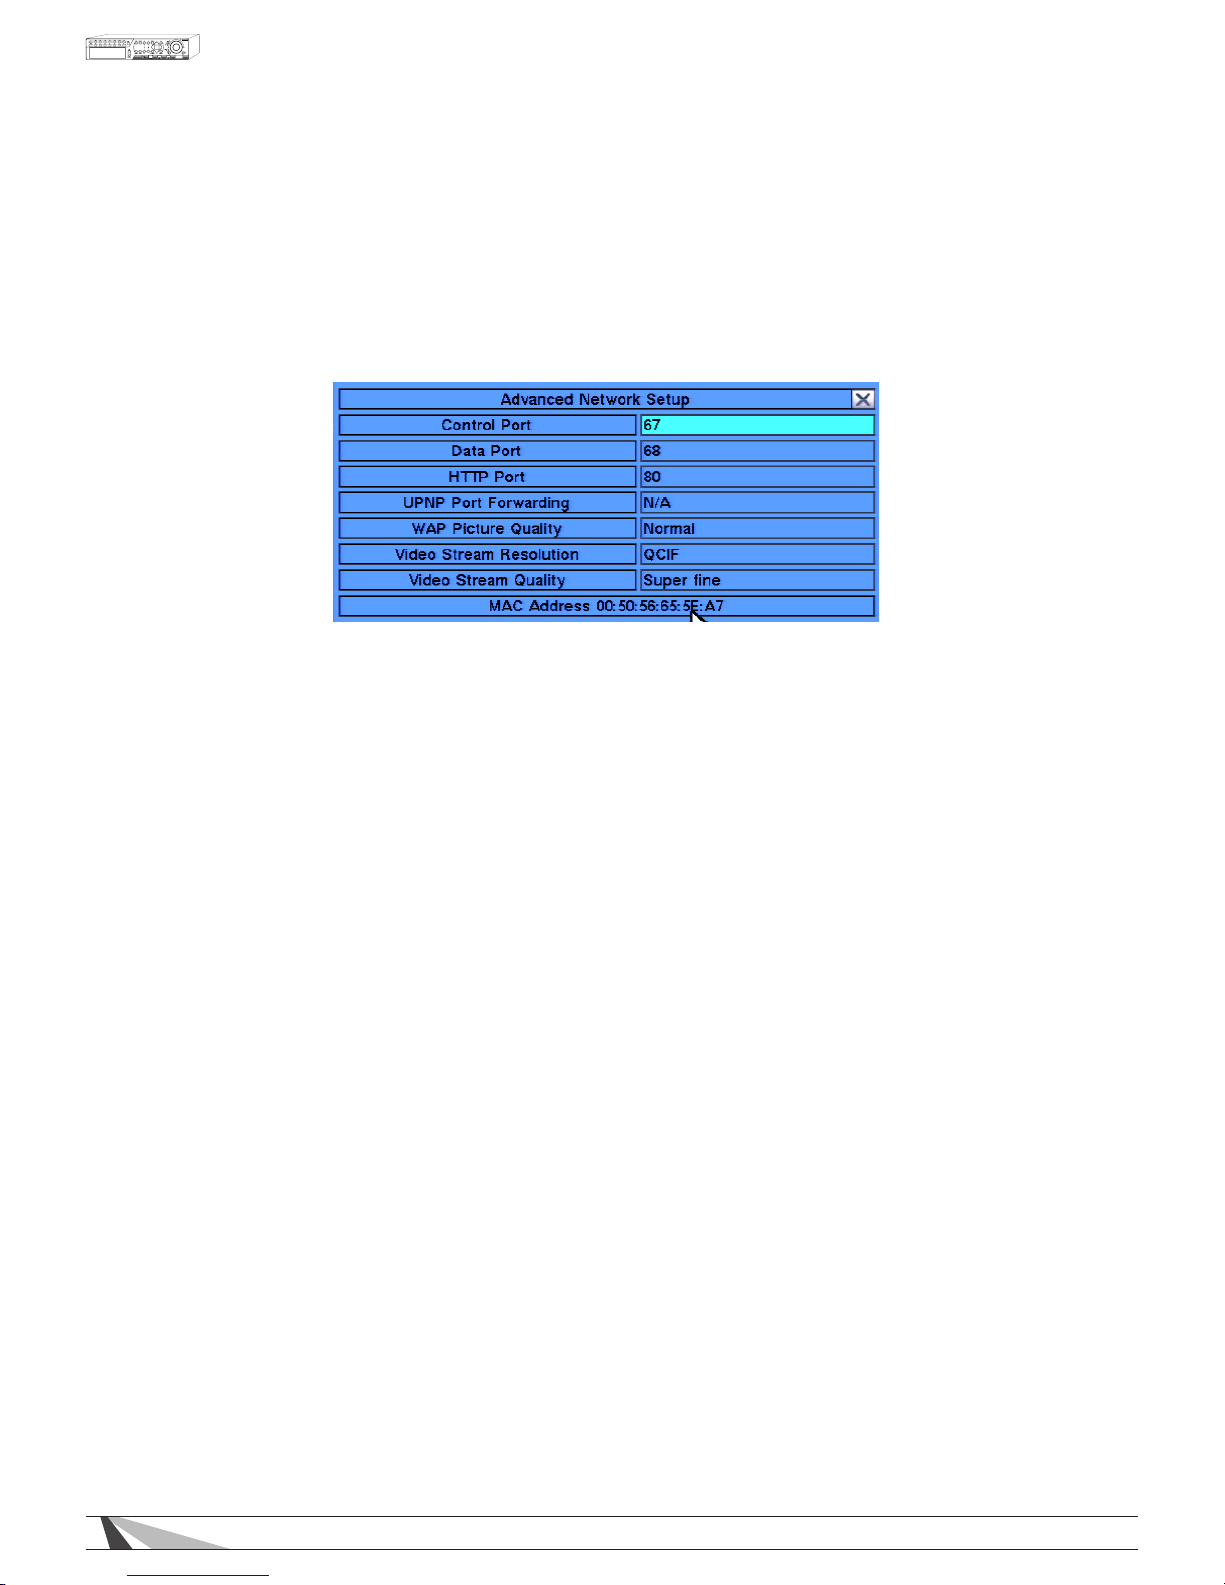
54
WPS-165-DVR-4CH Installation and Users Manual
6.8.3. ADVANCED NETWORK SETUP
The Advanced Network Setup allows the administrator to set advanced network parameters use for
connection from remote devices such as PCs and Smart phones. Consultation with the network
administrator may be required for these settings.
In Network Setup, press ENTER to display Advanced Network Setup as shown when the highlighted
option is Adv.
To navigate and operate this menu:
•
▲▼◄►
Press these buttons on the remote control to select an item. Alternatively use the mouse to select an
item.
•
ESC
Press the ESC button on the remote control to escape from this menu and return to the main menu.
Alternatively use the mouse to exit the sub menu by clicking on the “X.” If the contents in this menu
have been modified, a Save dialog box will be displayed requesting the user to save the changes.
Press ENTER on the remote control to exit and save, ESC to exit without saving. Another method to
escape is to use the mouse to “right-click,” and exit the sub menu.
Thefollowingisabriefdescriptionforeachiteminthismenuanditsspecicoperations:
Please follow the Text Input method described in Section 4.1 to modify these items. Alternatively use the mouse
and the pop-up keyboard to enter these settings. See the Router Setup document located in the support tab
on the product page for more information on Router Setup and how it relates to these settings.
• CONTROLPORT
Enter the Control Port for remote access. The default value is 67.
• DATAPORT
Enter the Data Port for remote access. The default value is 68.
• HTTPPORT
Enter the HTTP (web page) port for remote access. The default value is 80.
• UPNPPORTFORWARDING
If used in conjunction with a UPNP capable router, port forwarding for the DVR within the router will be done
automatically.
•
WAPPICTUREQUALITY
WAP (Wireless Application Protocol) is a simple standard for remote devices (such as Smartphones) to
access the DVR. Press +/- buttons on the
remote control to change the value the WAP picture quality if
WAP access will be required by remote devices.
Page 55

55
WPS-165-DVR-4CH Installation and Users Manual
•
VIDEOSTREAM
Press the +/- buttons on the remote to change the video quality sent to remote devices such as PCs and
Smartphones. Alternatively use the mouse to change this setting. If Record is selected, the DVR will stream
video at the same resolution as the Record setting (See Section 6.1). Video Streaming allows for remote
devices to receive lower resolution at higher speeds to the device
(see
Section 9.4). This is especially helpful for remote devices on slower network. Reducing resolution sent
to these devices will speed up the delivery of the video. To enable Video Streaming, select one of the four
levels of QCIF (Fair is the lowest quality while Superne is the highest quality). If Video Streaming is used, the
total system recording rate will be reduced.
NOTE: To use Video Streaming in Internet Explorer, the user must select the Extra Video Stream option in the
Modify Menu of the Device List (See Section 9.2.8.1).
- QCIF Fair – Lowest QCIF Resolution
- QCIF Normal – Medium QCIF Resolution
- QCIF Fine – High QCIF Resolution
-QCIFSuperne–Best QCIF Resolution
• VIDEOSTREAMQUALITY
Sets the level of data compression when the Video Stream Resolution is set to anything other than Record.
6.9. FACTORY DEFAULT
To reset all the DVR settings to factory default values, press ▲▼◄► on the remote control to change the
highlighted option to Factory Default and then press ENTER. Alternatively use the mouse to select Factory
Default. Once selected, a confirmation dialog will be shown, press ENTER again to make the changes. Or
select ESC, or right-click the mouse to exit without resetting the DVR.
WARNING: All settings will be lost and replaced with factory default settings.
Settings cannot be recovered after a Factory Default.
Page 56
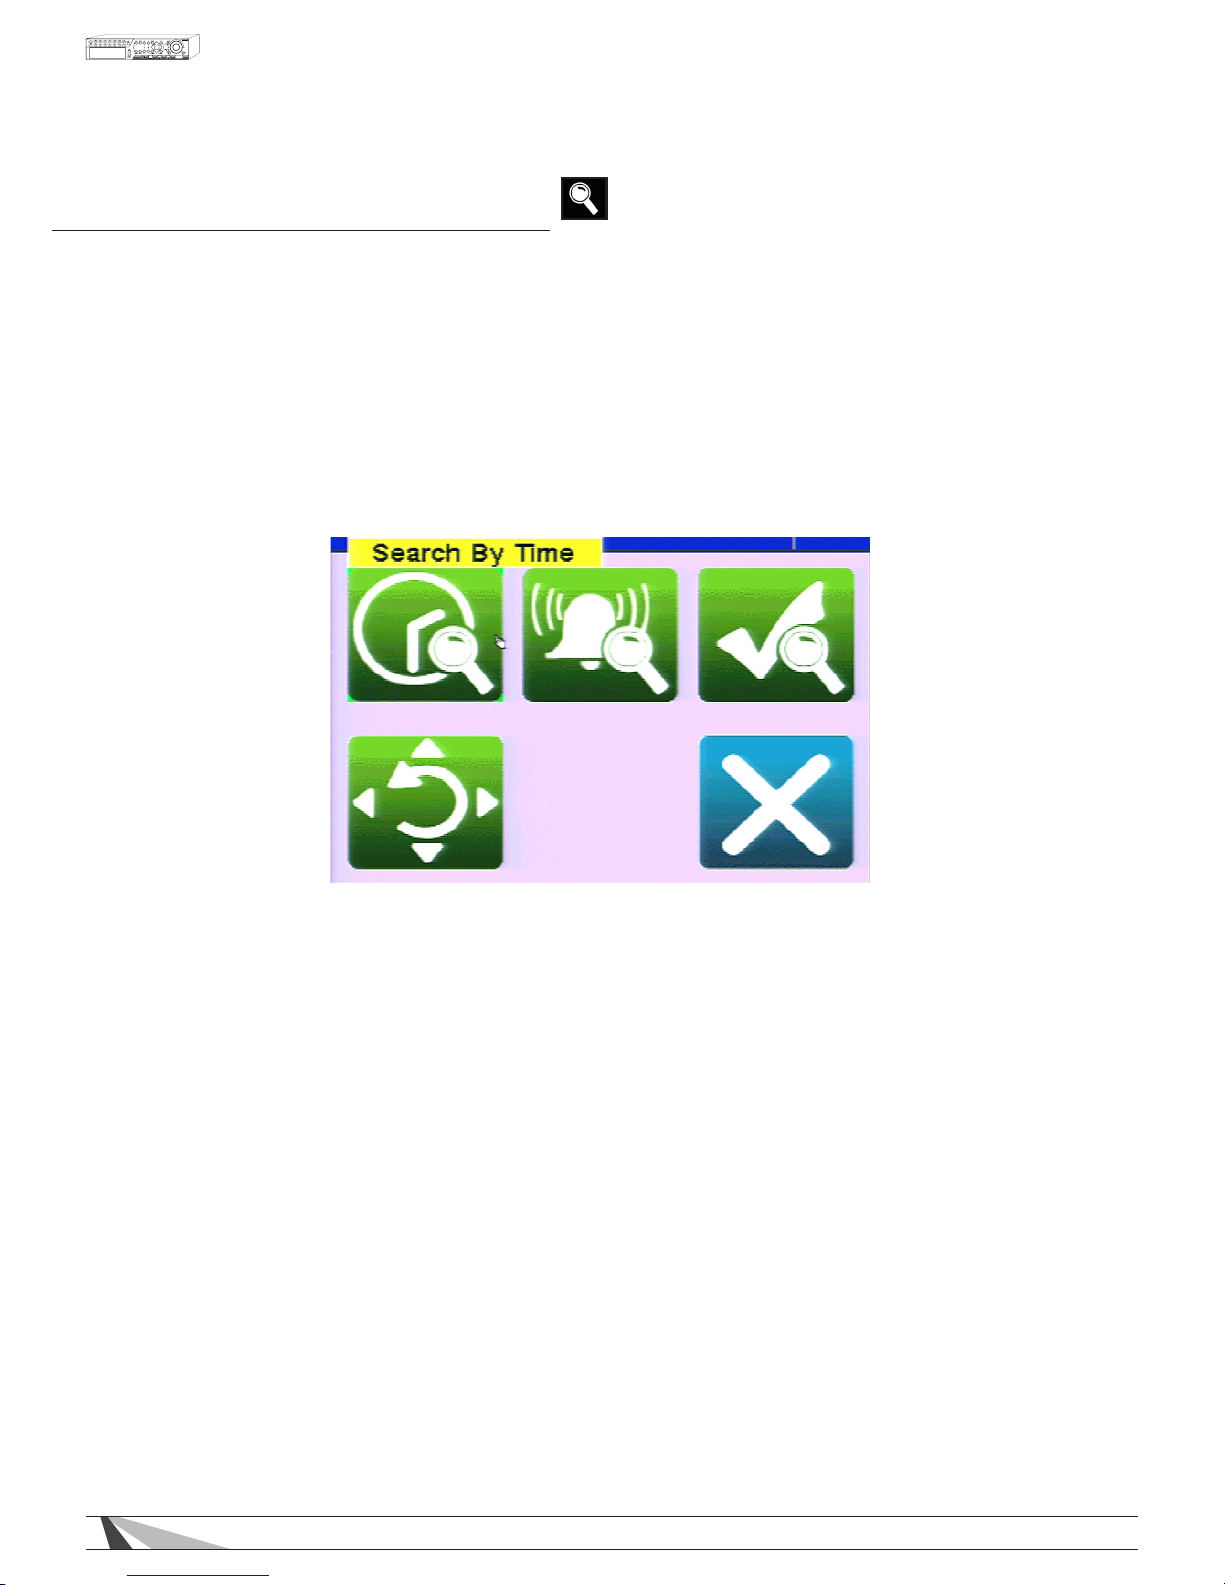
56
WPS-165-DVR-4CH Installation and Users Manual
7. SEARCH/PLAYBACK/ARCHIVE
This menu is available to Administrators and Supervisors only.
There are four ways to search the recorded video and audio for playback:
• Search by time
• Search by event
• Smart Search
• Search archived les
Use the Search button on the remote control to activate the Search Menu. Alternatively use the mouse to
select the Search Icon from the Control Bar.
To navigate and operate this menu:
•
▲▼◄►
Press these buttons on the remote control to select an item. Alternatively use the mouse to select an item.
•
ENTER
Press the ENTER button on the remote control to enter the corresponding Search menu. Alternatively use
the mouse to select the corresponding Search menu icon.
•
ESC
Press the ESC button on the remote control to escape from this menu and return to the video
display. Alternatively use the mouse to exit the sub menu by clicking on the “X.” Another method to
escape is to use the mouse to “right-click,” and exit the menu.
Page 57
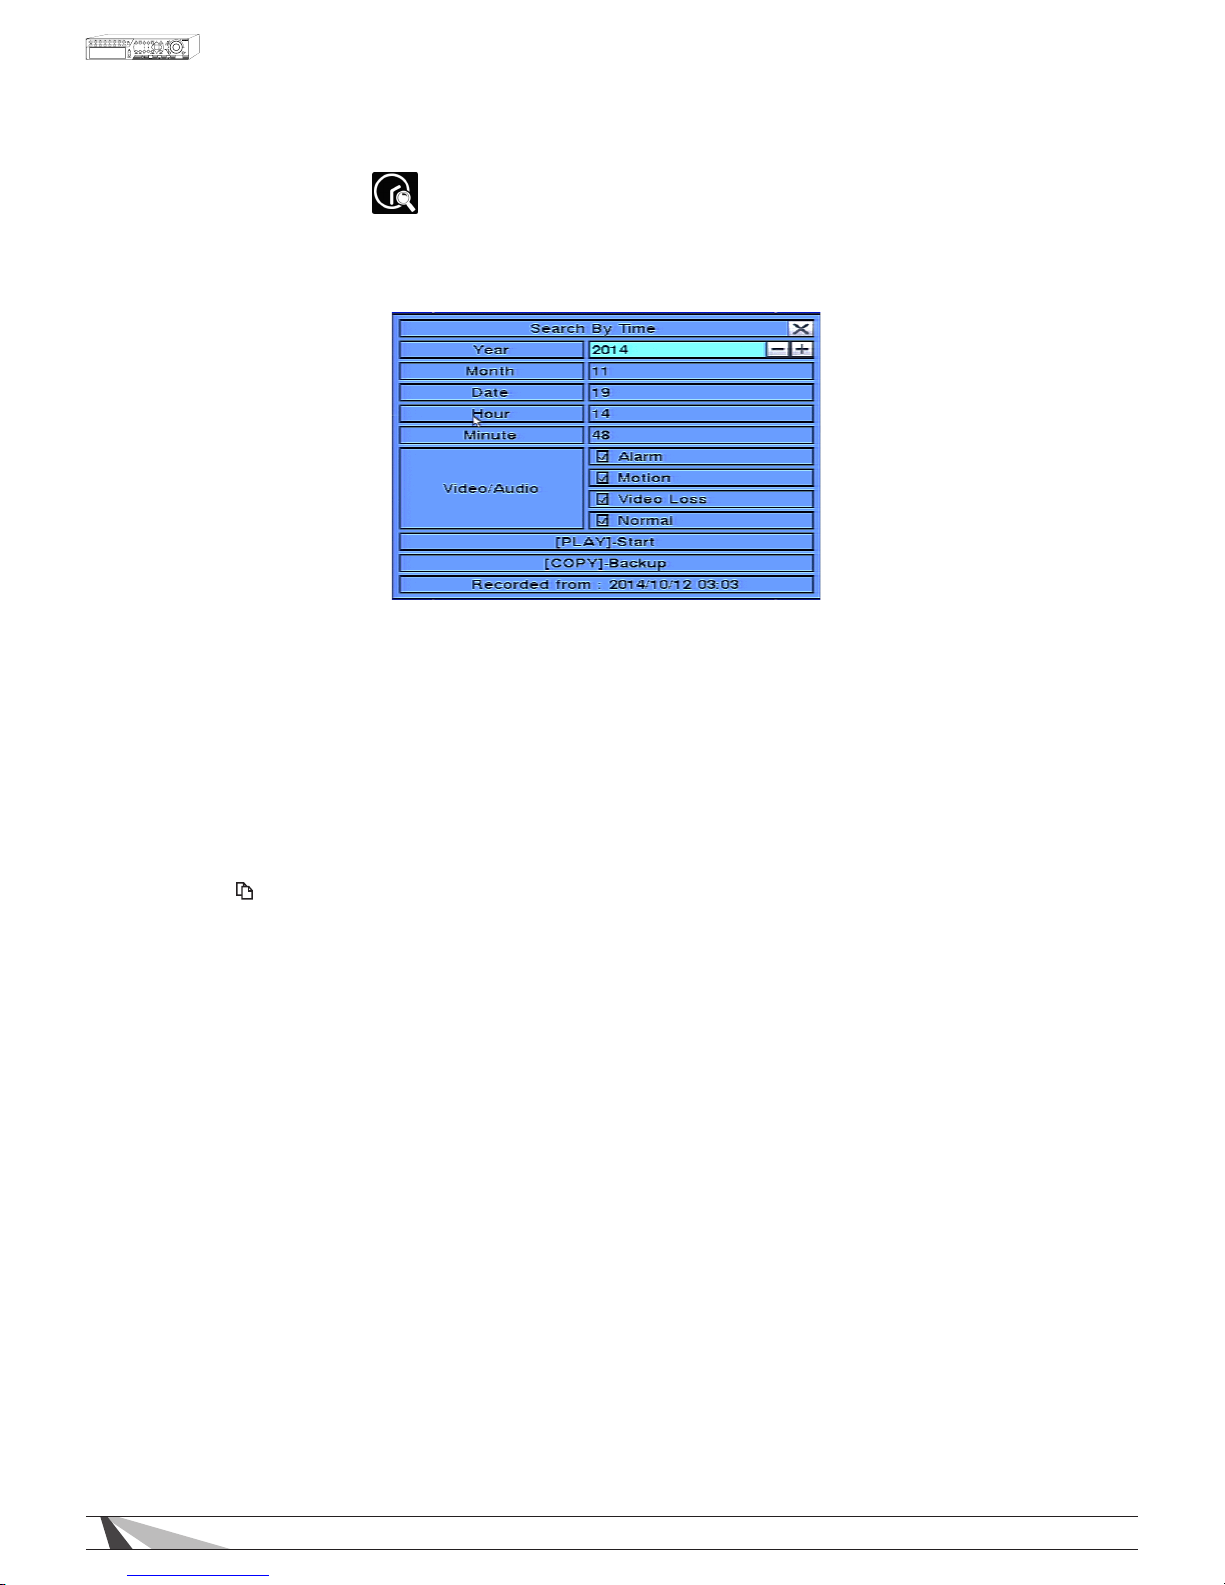
57
WPS-165-DVR-4CH Installation and Users Manual
7.1. SEARCH BY TIME
The Search By Time feature allows the user to search for recorded video and audio based on time.
Tip: When the screen is opened the oldest record time is displayed at the bottom labeled as Recorded From
To navigate and operate this menu:
•
▲▼◄►
Press these buttons on the remote control to select an item. Alternatively use the mouse to select an item.
•
Play(►/II)
Press the PLAY button on the remote control to begin playback of the recorded video and audio using
the defined search time and video type. Alternatively use the mouse to select the PLAY button. If there is
not a camera currently in playback mode then all of the cameras in the current split window will begin
playback. See Section 8.5 for more details.
•
Copy( )
Select the COPY button from the remote control to backup (copy) the selected type of recorded video
(beginning from the Search Time) to the connected backup device. The Backup menu (described in the
Archive portion of Section 8.6) will be displayed. Alternatively use the mouse to select the COPY button.
Thefollowingisabriefdescriptionforeachiteminthesubmenuanditsspecicoperations:
•
SEARCHTIME
Select the Year, Month, Date, Hour, Minute for the recorded video and audio. Playback (or backup) will
begin from the time entered in this menu. Use the +/- buttons on the remote control to modify each
item. Alternatively use the mouse to enter the Search Time.
•
VIDEO/AUDIO
Select the types of recorded video to search: Alarm, Motion, Video Loss, Normal. Press ENTER or +/- buttons
on the remote control to check or
uncheck the corresponding video type. Alternatively use the mouse to
check the appropriate video type(s).
Page 58
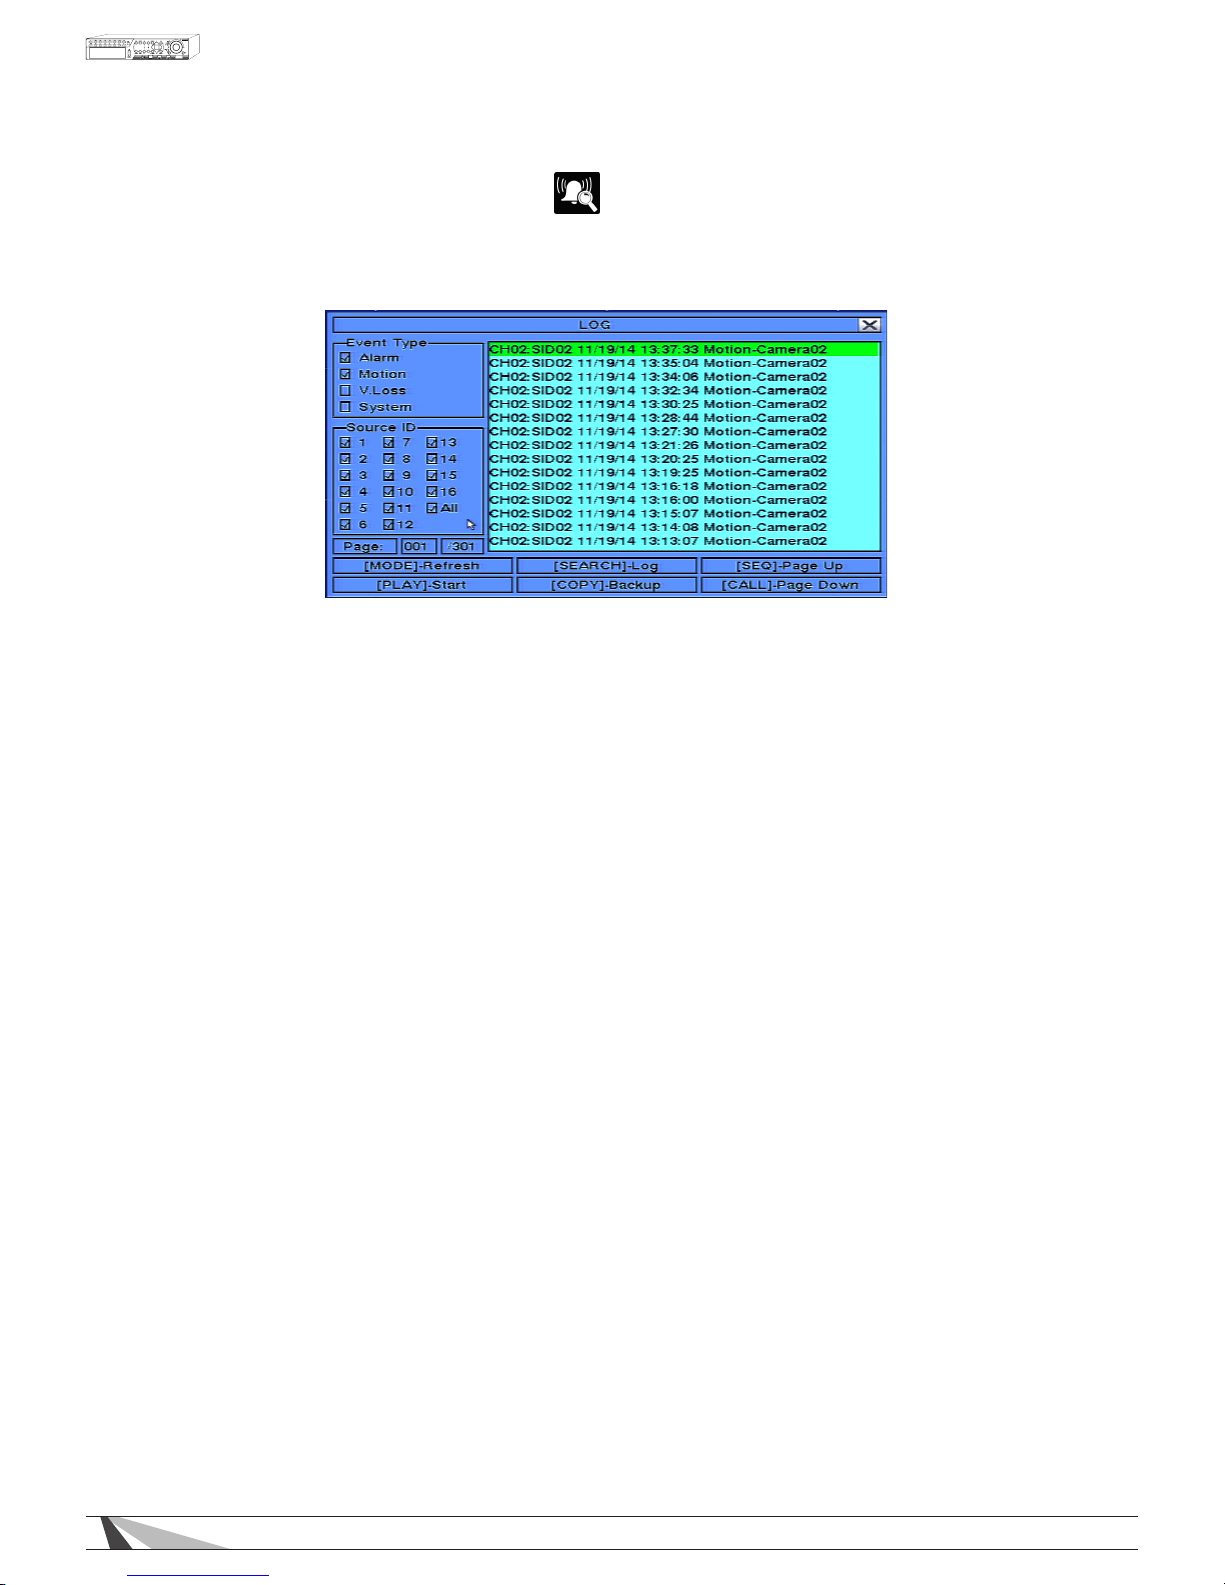
58
WPS-165-DVR-4CH Installation and Users Manual
7.2. SEARCH BY EVENT / LOG DISPLAY
The Search By Event feature allows the user to search for recorded video and audio based on the
type of event recorded by the DVR.
The DVR will store up to 6000 of the most recent event logs. There are four different types of event logs: Alarm,
Motion, Video Loss, and System.
Tip: You can jump to a log page quickly by selecting the page box with the mouse and typing in the desired
page number. This is useful when you need to see the last page of recordings.
To navigate and operate this menu:
•
▲▼◄►
Press these buttons on the remote control to select an item. Alternatively use the mouse to select an item.
•
ENTER
Press the ENTER button on the remote control to select the highlighted log. Alternatively use the mouse to
select the corresponding Search menu icon.
• MODE
Press the Mode button to refresh the log display. If there are new event logs since the screen was displayed,
the log list will be updated accordingly. Alternatively use the mouse to select the Refresh option.
• SEARCH
Press the Search button to Log (export) the event log to a backup device. Alternatively use the mouse to
select the Log option.
•
SEQ
Use the SEQ button on the remote control to scroll the Event Log Page Up. Alternatively use the mouse to
select the Page Up option.
•
CALL
Use the CALL button on the remote control to scroll the Event Log Page Down. Alternatively use the
mouse to select the Page Down option.
•
Numeric
Press the numeric buttons on the remote control followed by the ENTER button to select the display page
of the event logs. Alternatively use the mouse to click the Page Number box.
•
Play(►/II)
Press the PLAY button on the remote control to begin playback of the recorded video and audio using
the defined search time and video type. Alternatively use the mouse to select the PLAY button. If there is
not a camera currently in playback mode then all of the cameras in the current split window will begin
playback. See Section 8.5 for more details.
Page 59
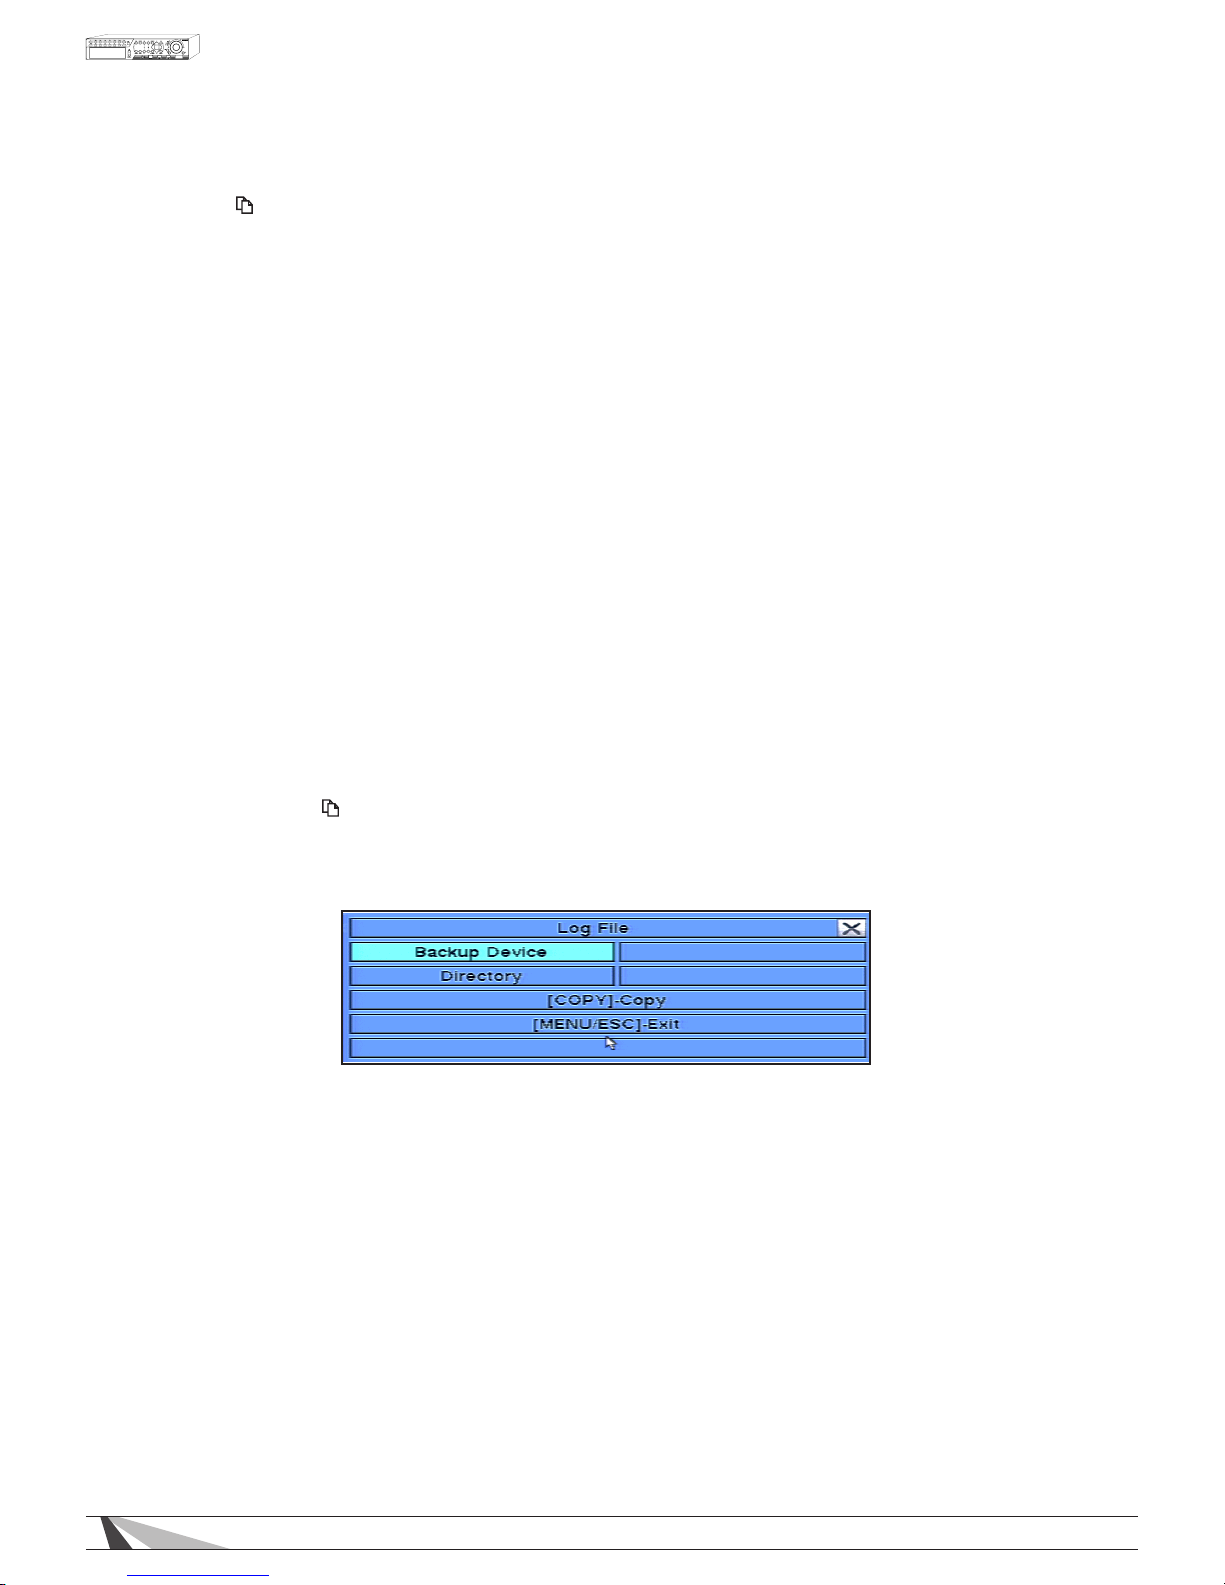
59
WPS-165-DVR-4CH Installation and Users Manual
• Copy( )
Select the COPY button from the remote control to backup (copy) the selected type of recorded video
(beginning from the Search Time) to the connected backup device. The Backup menu (described in the
Archive portion of Section 8.6) will be displayed. Alternatively use the mouse to select the COPY button.
Thefollowingisabriefdescriptionforeachiteminthesubmenuanditsspecicoperations:
• EVENTTYPE
Press ENTER or +/- buttons on the remote control to check or uncheck the event type for the log list. Event
type options include; Alarm, Motion, Video Loss, and System. The event type System includes all systemrelated events that do not trigger recording such as power on/off and Login/Logout. Alternatively use the
mouse to enable or disable the appropriate event types.
• SOURCEID
Press ENTER or +/- buttons on the remote control to check or uncheck the Source ID to be searched.
Check or uncheck ALL for faster operation. Alternatively use the mouse to check or uncheck the Source
ID(s). This feature helps to filter the events shown in the log list. For the Alarm event type, the DVR will
search based on the Alarm Input number. For Motion and Video Loss event types, the DVR will search
based on the camera number.
• LOGLIST
The Log List is the list of events according to the search parameters entered (Event Type and Source ID
selected). Once the list is displayed, the user may:
1. Press the ENTER button on the remote control to select or deselect an event in the log list. Multiple
events can be selected in this manner. Alternatively use the mouse to select or deselect events.
2. Press Play ( ►/II, ►►) button on the remote control to playback all the selected events.
Alternatively use the mouse to select the Play button.
3.
Press Copy ( ) button on the remote control to backup (copy) all of the selected recorded video and
audio events to the connected backup device. Alternatively use the mouse to select the Copy button.
The Backup menu (described in the Archive portion of Section 8.6) will be displayed.
Press the +/- buttons on the remote control to select the backup device and enter the directory
name to store the backup. Press the Copy button on the remote control to copy the recorded
video and audio to the selected backup device. Alternatively use the mouse to select the device
and then the Copy button.
Page 60
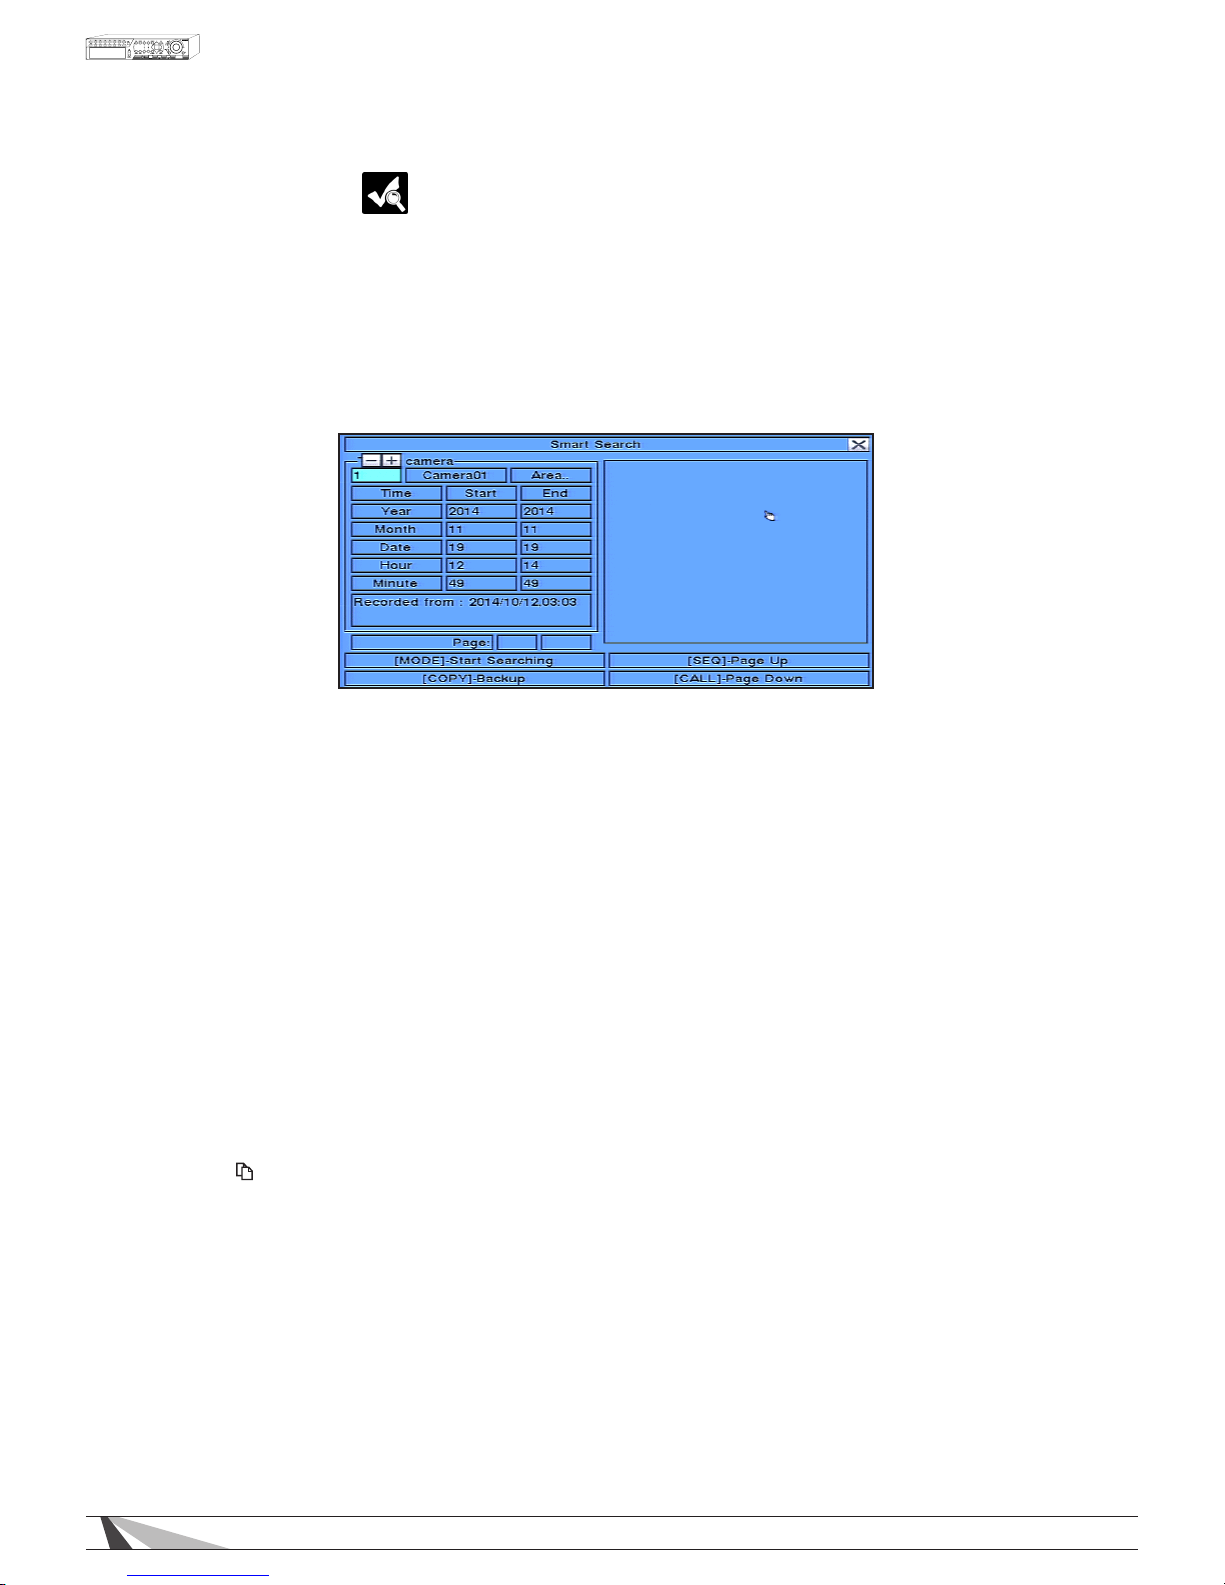
60
WPS-165-DVR-4CH Installation and Users Manual
7.3. SMART SEARCH
The Smart Search feature allows the user to search for motion in a specic area of a video (camera) window.
This is helpful to narrow down the search results if only a portion of the video window contains the event in
question. For example, if a scene in an ofce includes a safe and the manager wants to review who accessed
the safe, the area of the video window that contains the safe could be dened as the only portion of the
recorded videos searched for motion.
Note: the area of a video searched using Smart Search must be part of the dened area for Motion Detection
(see Section 6.2.2).
To navigate and operate this menu:
•
MODE
Press the Mode button on the remote control to begin searching the recorded video and audio based on
the selected search Time, Camera, and Motion Area. Alternatively use the mouse to set the parameters
and begin the search. The search results will be displayed on the right half of the dialog box.
Note: To prevent the Smart Search feature from overloading the system, a maximum of up to 500 matched
les or 200 GB of hard drive storage for each record partition will be searched based on the start time
entered.
•
SEQ
Use the SEQ button on the remote control to scroll the results Page Up. Alternatively use the mouse to
select the Page Up option.
•
CALL
Use the CALL button on the remote control to scroll the results Page Down. Alternatively use the mouse to
select the Page Down option.
•
Numeric
Press the numeric buttons on the remote control followed by the ENTER button to select the display page
of the results. Alternatively use the mouse to click the Page Number box.
•
Copy( )
Select the COPY button from the remote control to backup (copy) the selected type of recorded video
(beginning from the Search Time) to the connected backup device. The Backup menu (described in the
Archive portion of Section 8.6) will be displayed. Alternatively use the mouse to select the COPY button.
Thefollowingisabriefdescriptionforeachiteminthismenuanditsspecicoperations:
•
CAMERAID
Press +/- buttons on the remote control to change the camera ID to be searched for matching files.
Alternatively use the mouse to enter the Camera ID number.
•
Start/EndTime
Press +/-
buttons on the remote control to modify the beginning and end of the search time for the
recorded video and audio. Enter the appropriate Year, Month, Date, Hour, and Minute. Alternatively use
the mouse to enter these parameters.
Page 61
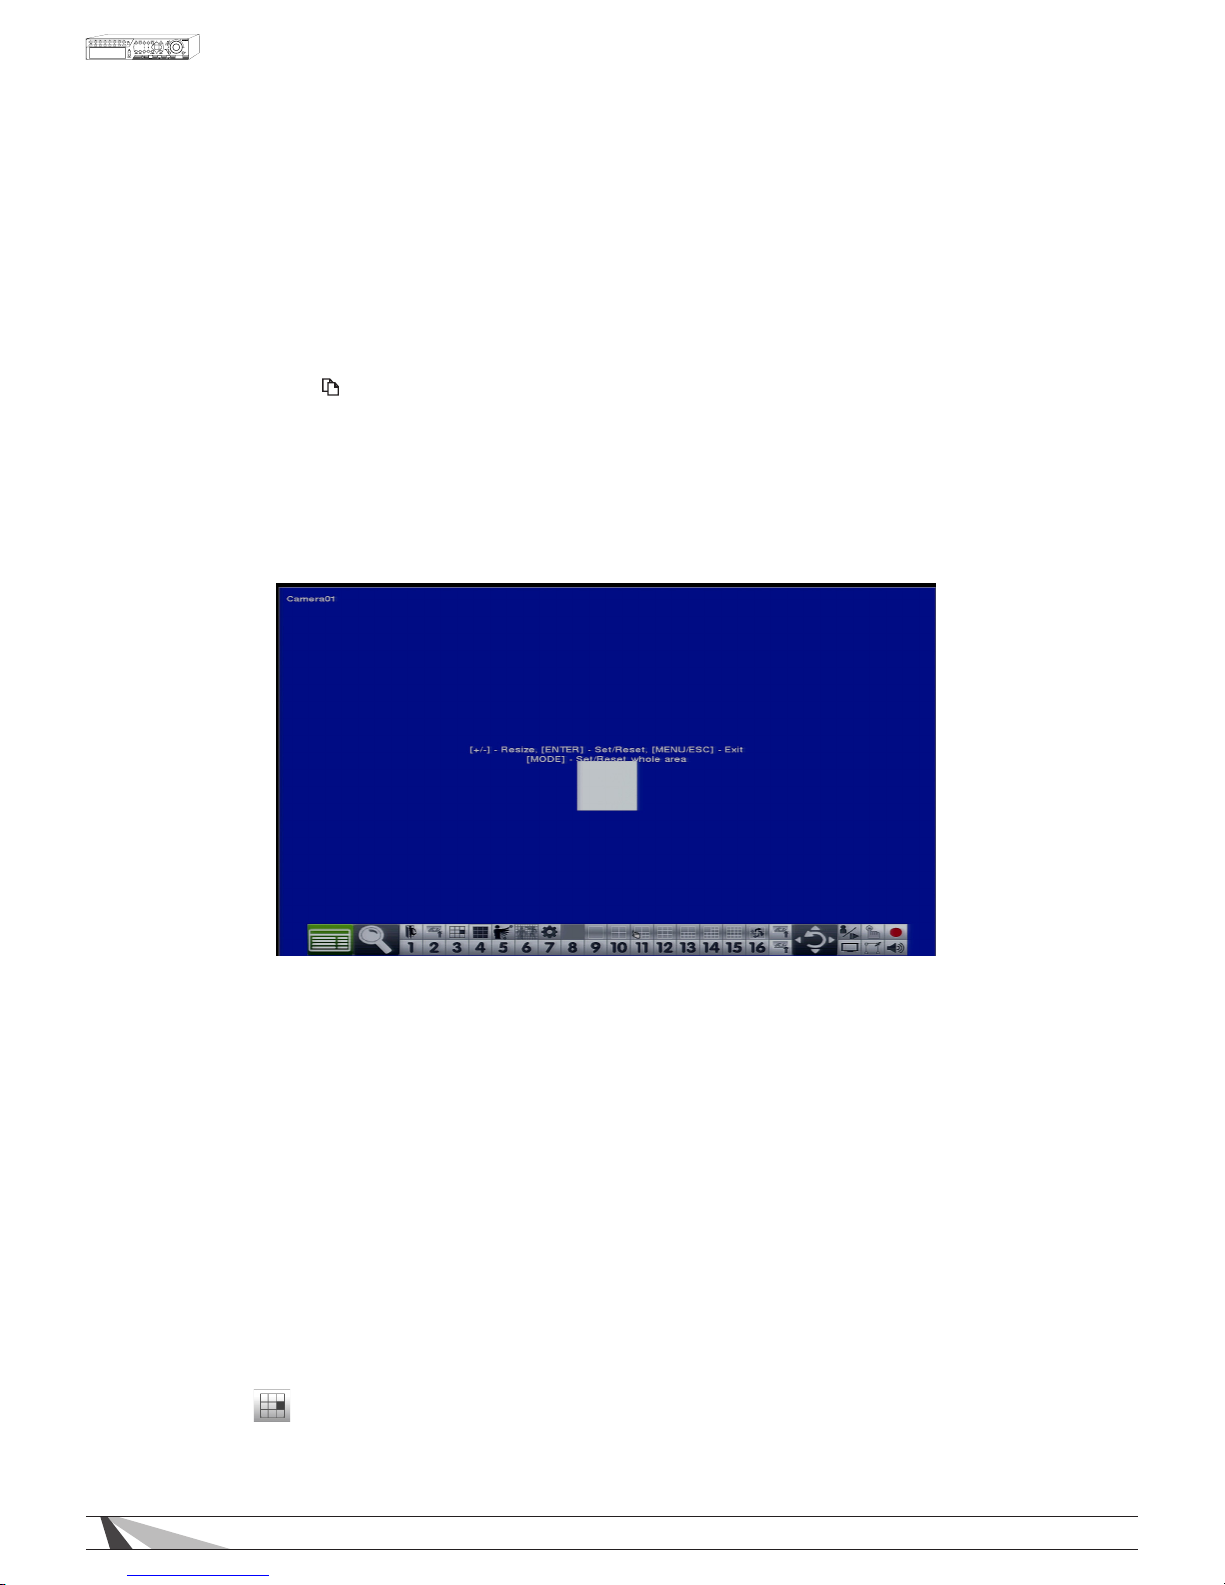
61
WPS-165-DVR-4CH Installation and Users Manual
• MATCHEDFILELIST
The results of the Smart Search will be displayed in the right side of the dialog box. The les are shown from
oldest to newest and a page number is shown on the lower-left corner of the dialog box. The user may:
1.
Press the ENTER button on the remote control to select or deselect a matching event file in the results
list. Multiple events can be selected in this manner. Alternatively use the
mouse to select or deselect
each event.
2.
Press Play (►/II, ►►) button on the
remote control to playback all the selected events. Alternatively
use the mouse to select the Play button.
3.
Press Copy ( ) button on the remote control to backup (copy)
all of the selected recorded video and audio events to the connected backup device. Alternatively
use the mouse to select the Copy button. The Backup menu (described in the Archive portion of Sec-
tion 8.6) will be displayed.
•
Area
Area defined as the motion area for the video to be searched for matching files. Use the buttons on the
remote control to highlight Area and press ENTER to display Motion Area Setting screen as shown below.
In the Motion Area Setting screen use the white mask window to dene the Smart Search area in the same
manner as setting up Motion Detection (see Section 6.2.2).
Note: The area of a video searched using Smart Search must be part of the dened area for Motion
Detection (see Section 6.2.2). Only les with motion covering all of the dened motion area will be
displayed as matching results. Therefore, based on the search algorithm, there will be more matching les
for smaller dened motion areas.
Thefollowingisabriefdescriptionforeachiteminthismenuanditsspecicoperations:
•
▲▼◄►
Press these buttons on the remote control to move the Mask window (grids white in color). Alternatively
use the mouse to select and move the Mask window (grids white in color) by “left clicking” and dragging
the mouse over the desired area.
•
+/-
Press these buttons on the remote control to resize the Mask window (grids white in color). Alternatively
use the mouse to select and move the Mask window (grids white in color) by “left clicking” and dragging
the mouse over the desired area.
•
ENTER
Press this button on the remote control to Set/Reset the area of the Mask window (grids white in color).
Alternatively use the mouse to select the Mask icon and adjust the Mask window
(grids white in color). Once the mask area is set, the mask window will change to yellow.
Page 62
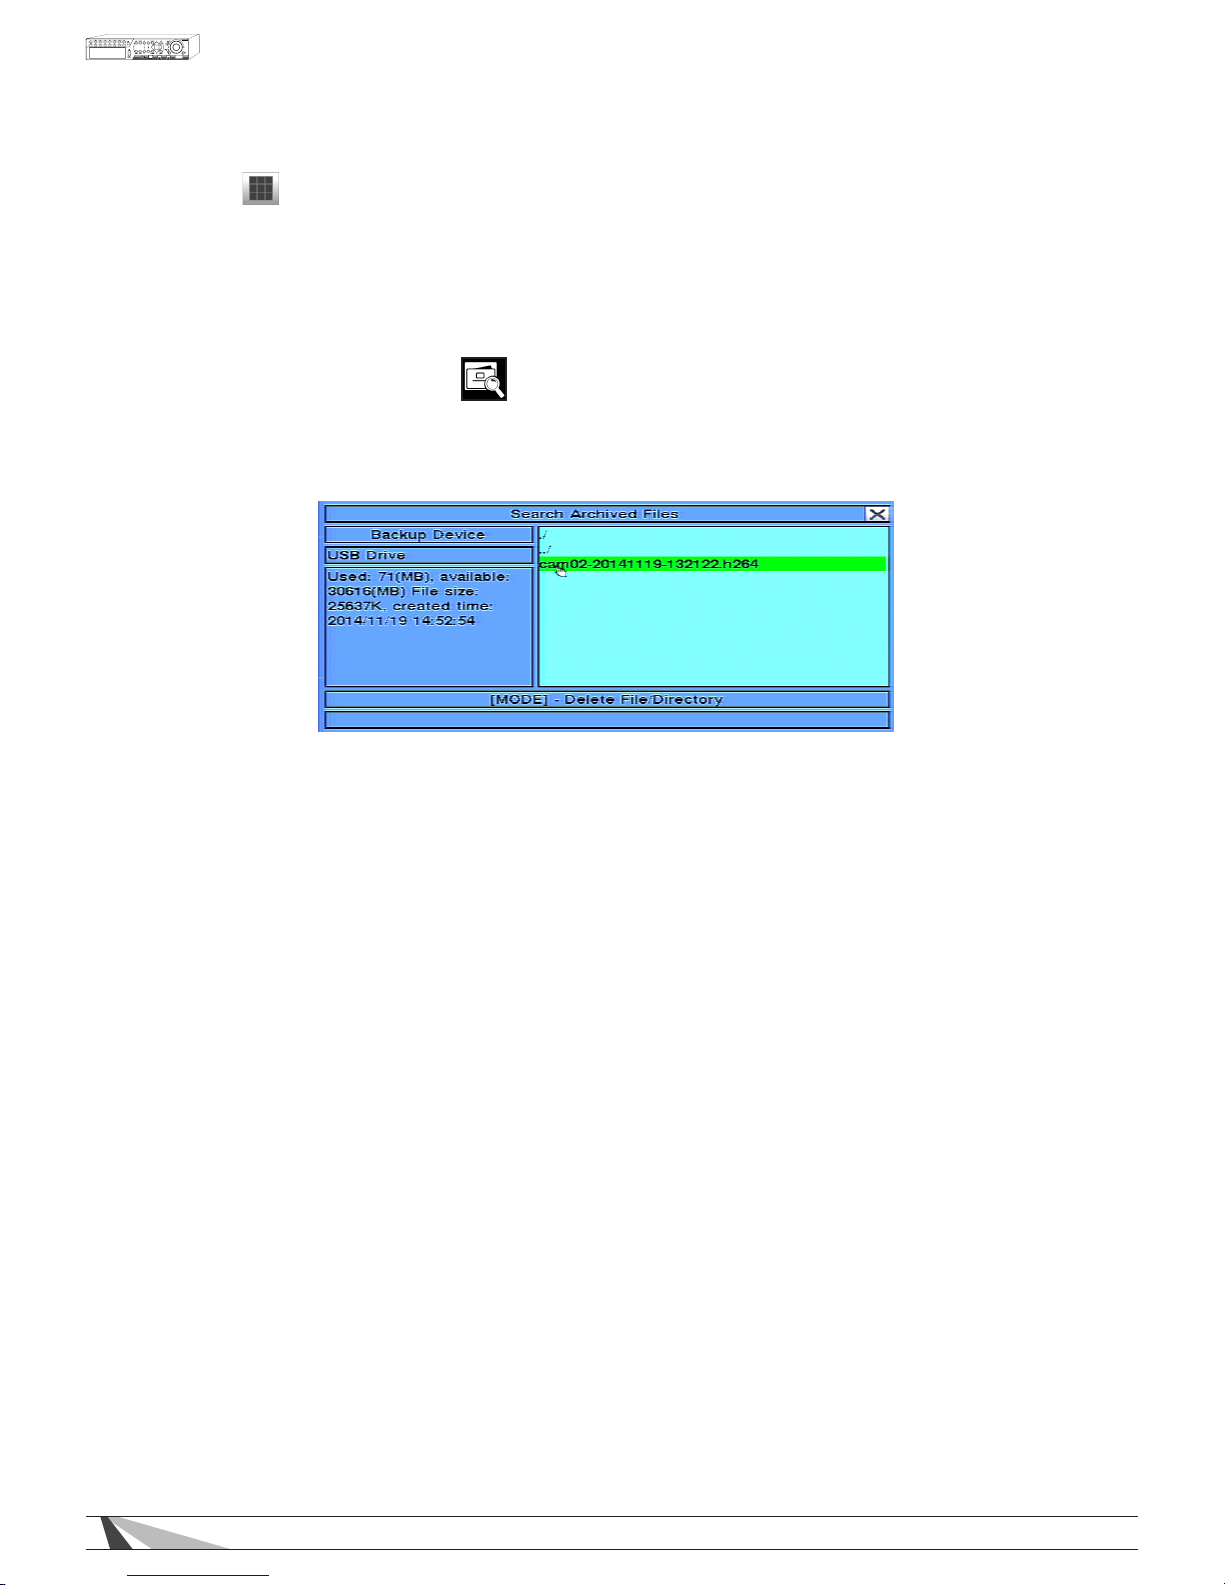
62
WPS-165-DVR-4CH Installation and Users Manual
•
MODE
Press this button on the remote control to Set/Reset the whole video area. Alternatively use the
mouse to select this icon.
•
ESC
Press the ESC button on the remote control to escape from this menu and return to the Smart Search
menu. Alternatively use the mouse to exit the sub menu by clicking on the “X.” Another method to
escape is to use the mouse to “right-click,” and exit the sub menu.
7.4. SEARCH ARCHIVED FILES
The Search Archived Files feature allows the user to search les on a storage devices such as a USB thumb drive.
Thefollowingisabriefdescriptionforeachiteminthesubmenuanditsspecicoperations:
•
BACKUPDEVICE
Press ENTER on the remote control to connect to the backup device and display the files on the device.
Alternatively use the mouse to connect to the backup device and display the files.
•
ARCHIVEDFILELIST
Select the appropriate file from the file list and then press ENTER to begin playback. Pressing the Play button
(►/II) on the remote control, or double-clicking the left mouse button
will also begin playback. Refer to Section 8.5 Playback For Archived Files for the detailed operations. To
delete a file, press the MODE button on the
remote control. Alternatively use the mouse to select files, begin
playback or delete files.
NOTE : File name format for camNN-YYYYMMDD-hhmmss.h.264 is as follows:
• NN = camera number(01-08)
• YYYY = year
• MM = month
• DD = day
• hh = hour
• mm = minute
• ss = second
• .h.264 = le type
Page 63
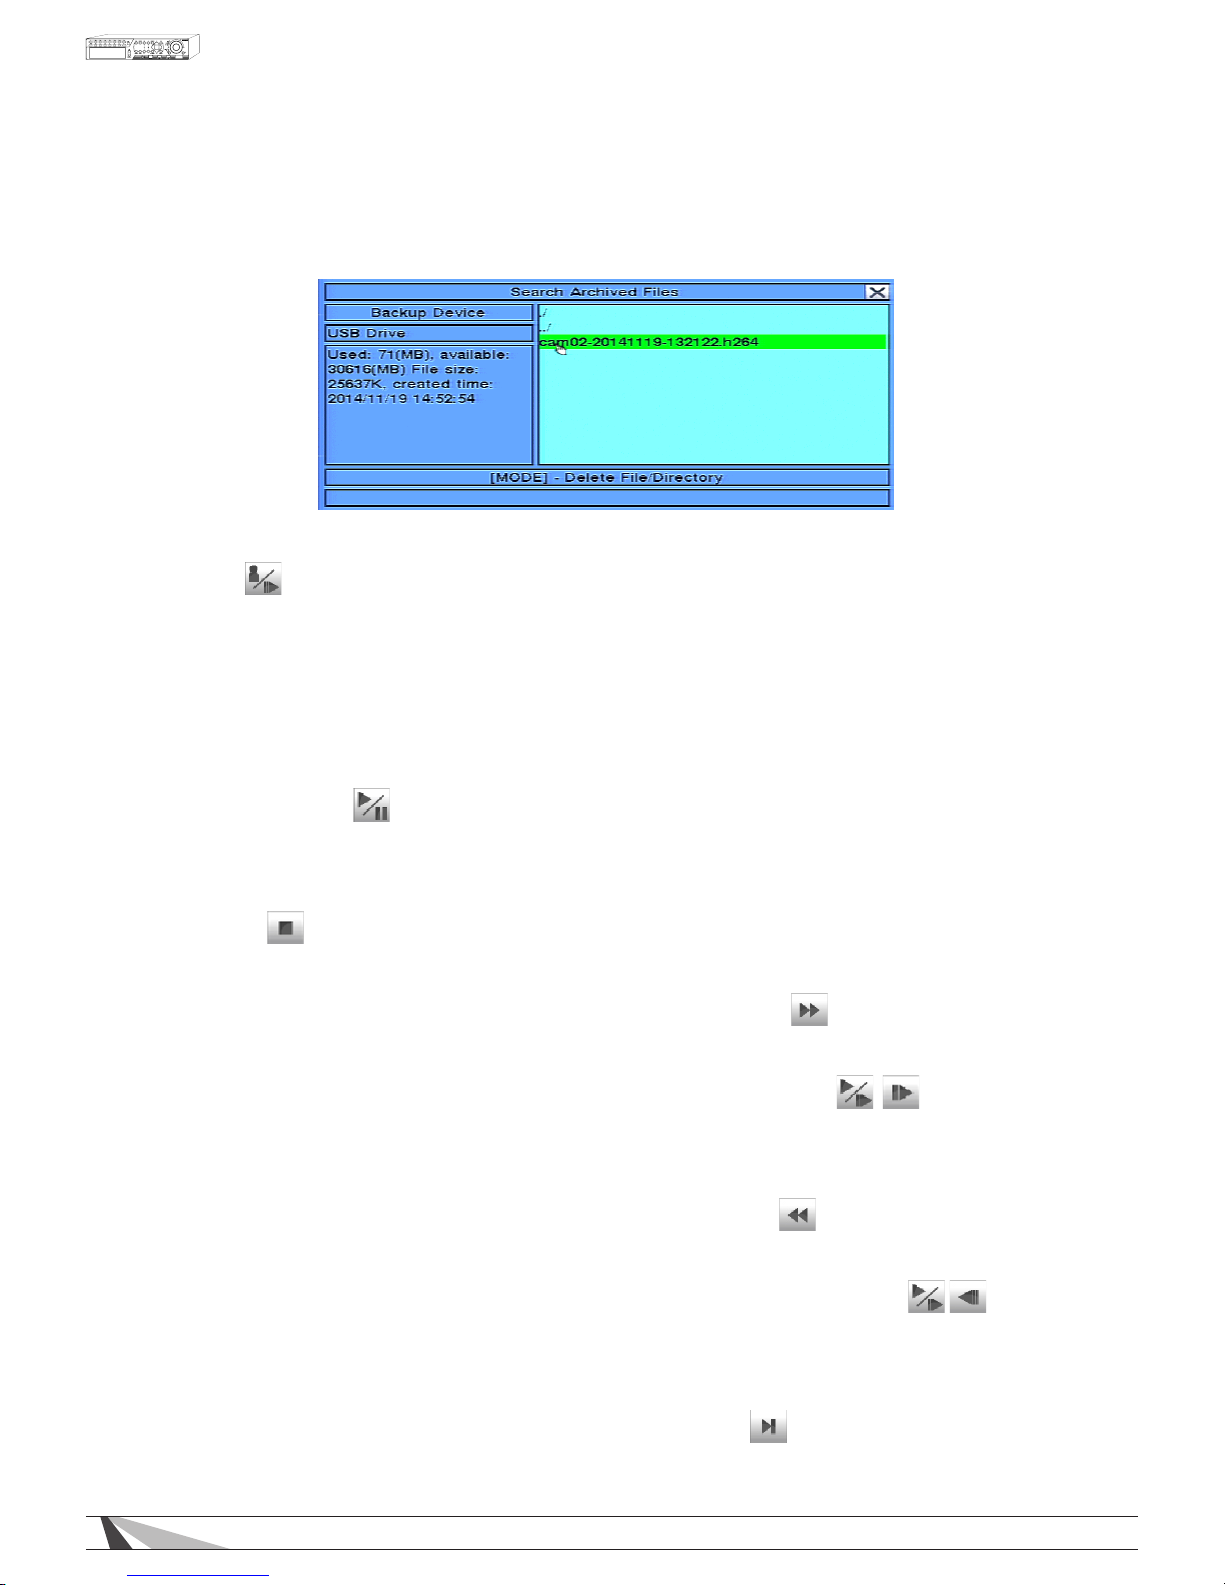
63
WPS-165-DVR-4CH Installation and Users Manual
7.5. PLAYBACK SEARCH RESULTS
Once playing back video, use the following controls to operate and archive the video and audio:
To navigate and operate this menu:
•
MODE
Use the button on the remote control to toggle live and playback mode. Playback mode is indicated by
a red box around the camera title of the focus camera (the camera being controlled). If in a split window
display, the focus window will first switch to playback mode. A second
press of the MODE button will
toggle additional windows to playback mode. Continue to press the MODE button to return to live mode
(indicated by a green box around the camera title of the focus camera).
Alternatively use the mouse to select this icon. Refer to Section 4.3 Basic Operations for instructions on how
to change the camera(s) in the playback window(s). After the cameras are set, use the following buttons
to control the playback:
•
PLAY/PAUSE(►/II)
Press this button on the remote control to play or pause the recorded video and audio at 1X speed. If the
playback is paused, press this button again to resume playback. Alternatively use the mouse to select this
icon. Audio can only be played at forward speed 1X and when the associated cameras is played back in a
full window view.
•
STOP(■)
Press this button on the remote control to stop playback of the recorded video and audio and return to
Live video.
•
FASTFORWARD(► ►/► ON REMOTE CONTROL)
Press this button for fast forward playback. Each time this button is pressed, the forward playback speed
will increase in speed from 2X, 4X, 8X, up to 64X, and then back to 2X.
•
SLOWFORWARDBUTTON(SEQONREMOTECONTROL)
Press this button on the remote control for slow forward playback. Each time this button is pressed,
playback speed will increase in speed from 2X, 4X, 8X, up to 16C, and then back to 2X. Alternatively use
the mouse to select the icon sequence using the Fast/Slow button to toggle the playback speed.
•
FASTREVERSE(◄ ◄/◄ ON REMOTE CONTROL)
Press this button for fast reverse playback. Each time this button is pressed, the reverse playback speed will
increase in speed from 2X, 4X, 8X, up to 64X, and then back to 2X.
•
SLOWBACKWARDBUTTON(MODEONREMOTECONTROL)
Press this button on the remote control for slow backward playback. Each time this button is pressed,
playback speed will increase in speed from 2X, 4X, 8X, up to 16C, and then back to 2X. Alternatively use
the mouse to select the icon sequence using the Fast/Slow button to toggle the playback speed.
•
SINGLESTEP(►I/▼ ON REMOTE CONTROL) Press this button to
play the recorded video frame by frame.
Page 64
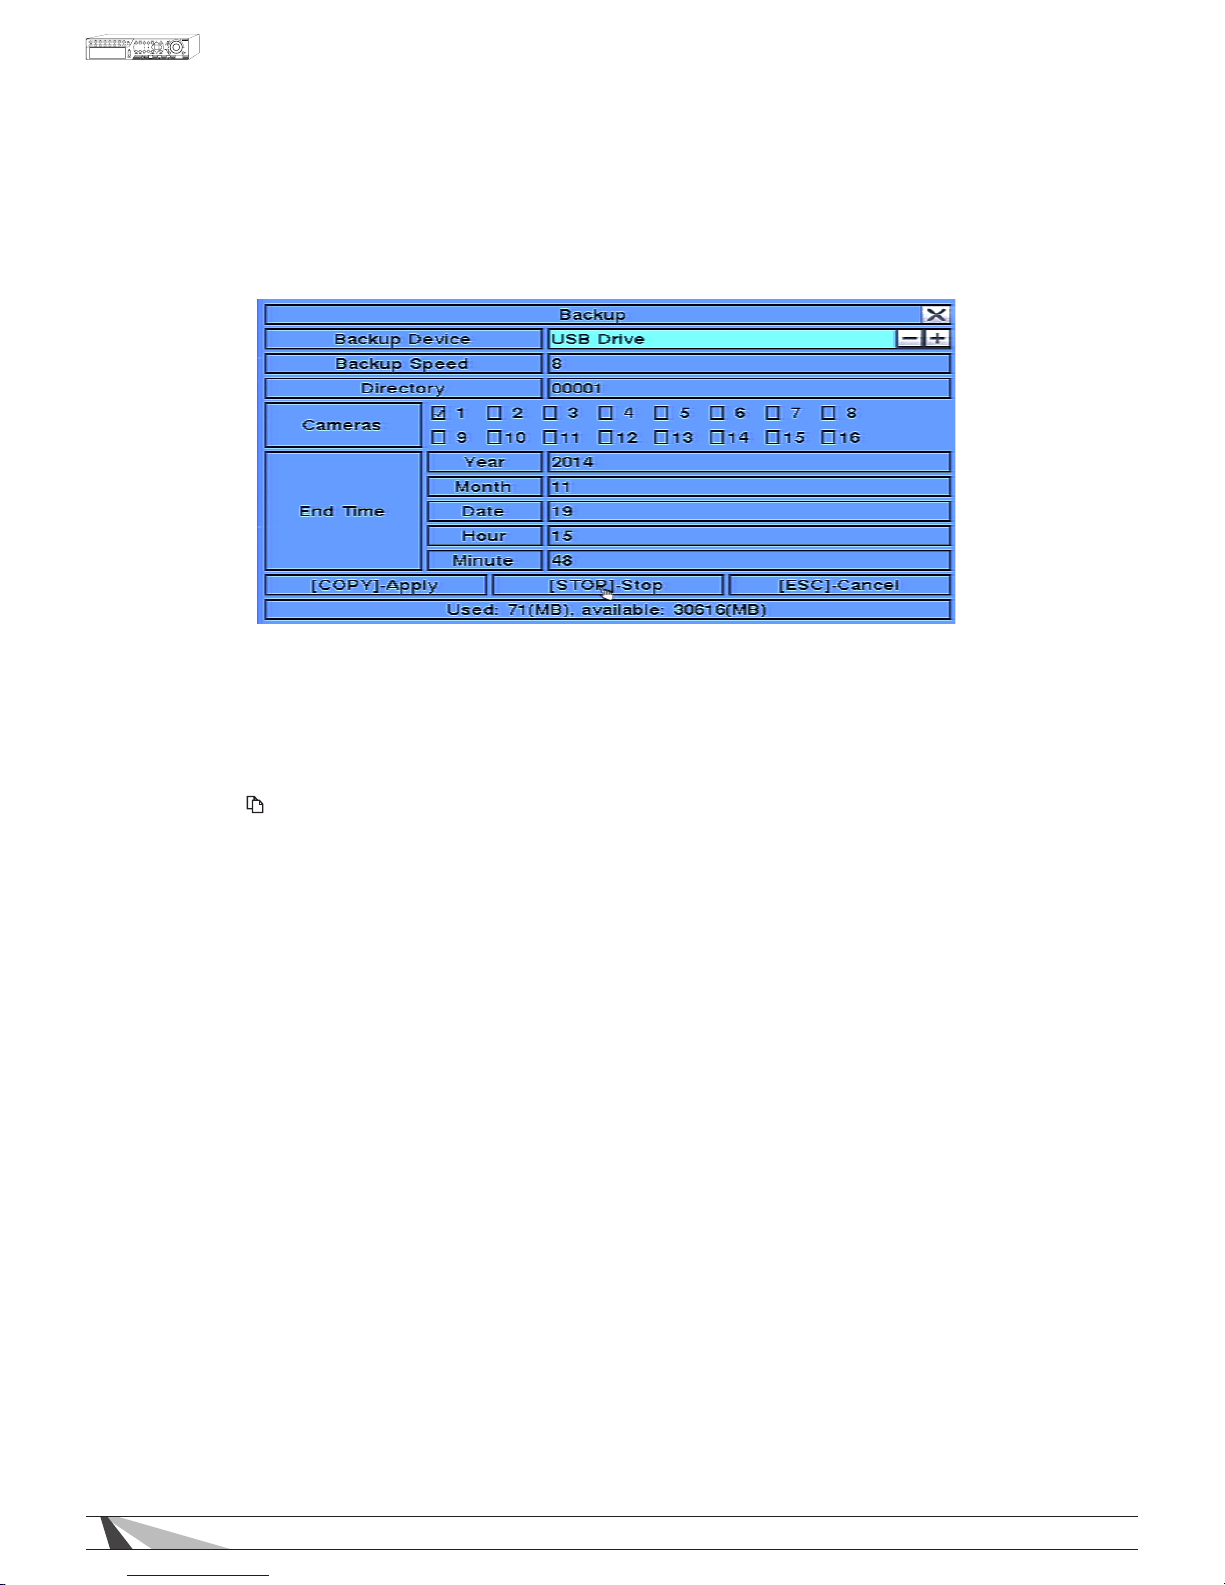
64
WPS-165-DVR-4CH Installation and Users Manual
7.6. ARCHIVE (BACKUP) SEARCH RESULTS
Once playing back video from the Search option, use the following controls to archive (backup)
the video and audio:
The following is a brief description for the operations in the Backup menu:
•
▲▼◄►
Press these buttons on the remote control to select an item. Alternatively use the mouse to select an item.
•
COPY( )
Press this button on the remote control to start the backup (copy) procedure. A Copy icon will be
displayed the lower-right corner of the Status Bar indicating that the selected video and audio is being
copied to the storage device. Alternatively use the mouse to select the Copy function.
•
STOP(■)
Press this button on the remote control to stop copying and return to the
previous display. The Copy icon
will disappear from the Status Bar. Alternatively use the mouse to select
the stop function.
•
ESC
Press the ESC button on the remote control to escape from this menu and return to the Smart Search
menu. Alternatively use the mouse to exit the sub menu by clicking on the “X.” Another method to
escape is to use the mouse to “right-click,” and exit the sub menu.
•
BACKUPDEVICE
Press the +/- buttons on the remote control to select the connected backup device. Alternatively
use the mouse to select the backup device.
NOTE: Follow the steps described in Section 5.5 Backup Device to connect the backup device before
copying.
•
BACKUPSPEED
Press the +/- buttons on the remote control to select a speed from 1-9 with
1 the lowest speed and 9 the
highest speed. Alternatively use the mouse to select the backup speed.
• DIRECTORY
Enter the directory to store the backup les. Please follow the Text Input method described in Section 4.1 to
enter the backup directory. Alternatively use the mouse and the pop-up keyboard to enter the directory.
•
CAMERAS
Press the ENTER or +/- buttons on the remote control to select or deselect each of the cameras to be
archived.
Page 65

65
WPS-165-DVR-4CH Installation and Users Manual
•
ENDTIME
Press the +/-
buttons on the remote control to modify the Year, Month, Date, Hour, and Minute for the
recorded video and audio for the backup without playback of Search by Time. The files will be backedup from the start time to the end time when the user press the COPY button to start copying.
Note : For each camera and each backup, a batch le will be generated as well as the backup .h.264 les.
A directory titled “/SelfPlayer” will also be generated if it’s not already existing on the backup storage device
(thumb drive, local PC, etc).
The user can use the batch le to self-playback the corresponding backup les on a PC. If the PC has not been
installed with the required player components, those components will be installed by running the batch le
In Windows, please run /SelfPlayer/SelfPlayerInstall.exe found on the storage device manually to install the
required player components on the PC (if the PC was NOT used to backup the les)
To copy self-playback les, please copy the batch le and the backup les to the destination directory. Also
copy the entire “/SelfPlayer” directory to the root directory of the destination PC.
Page 66
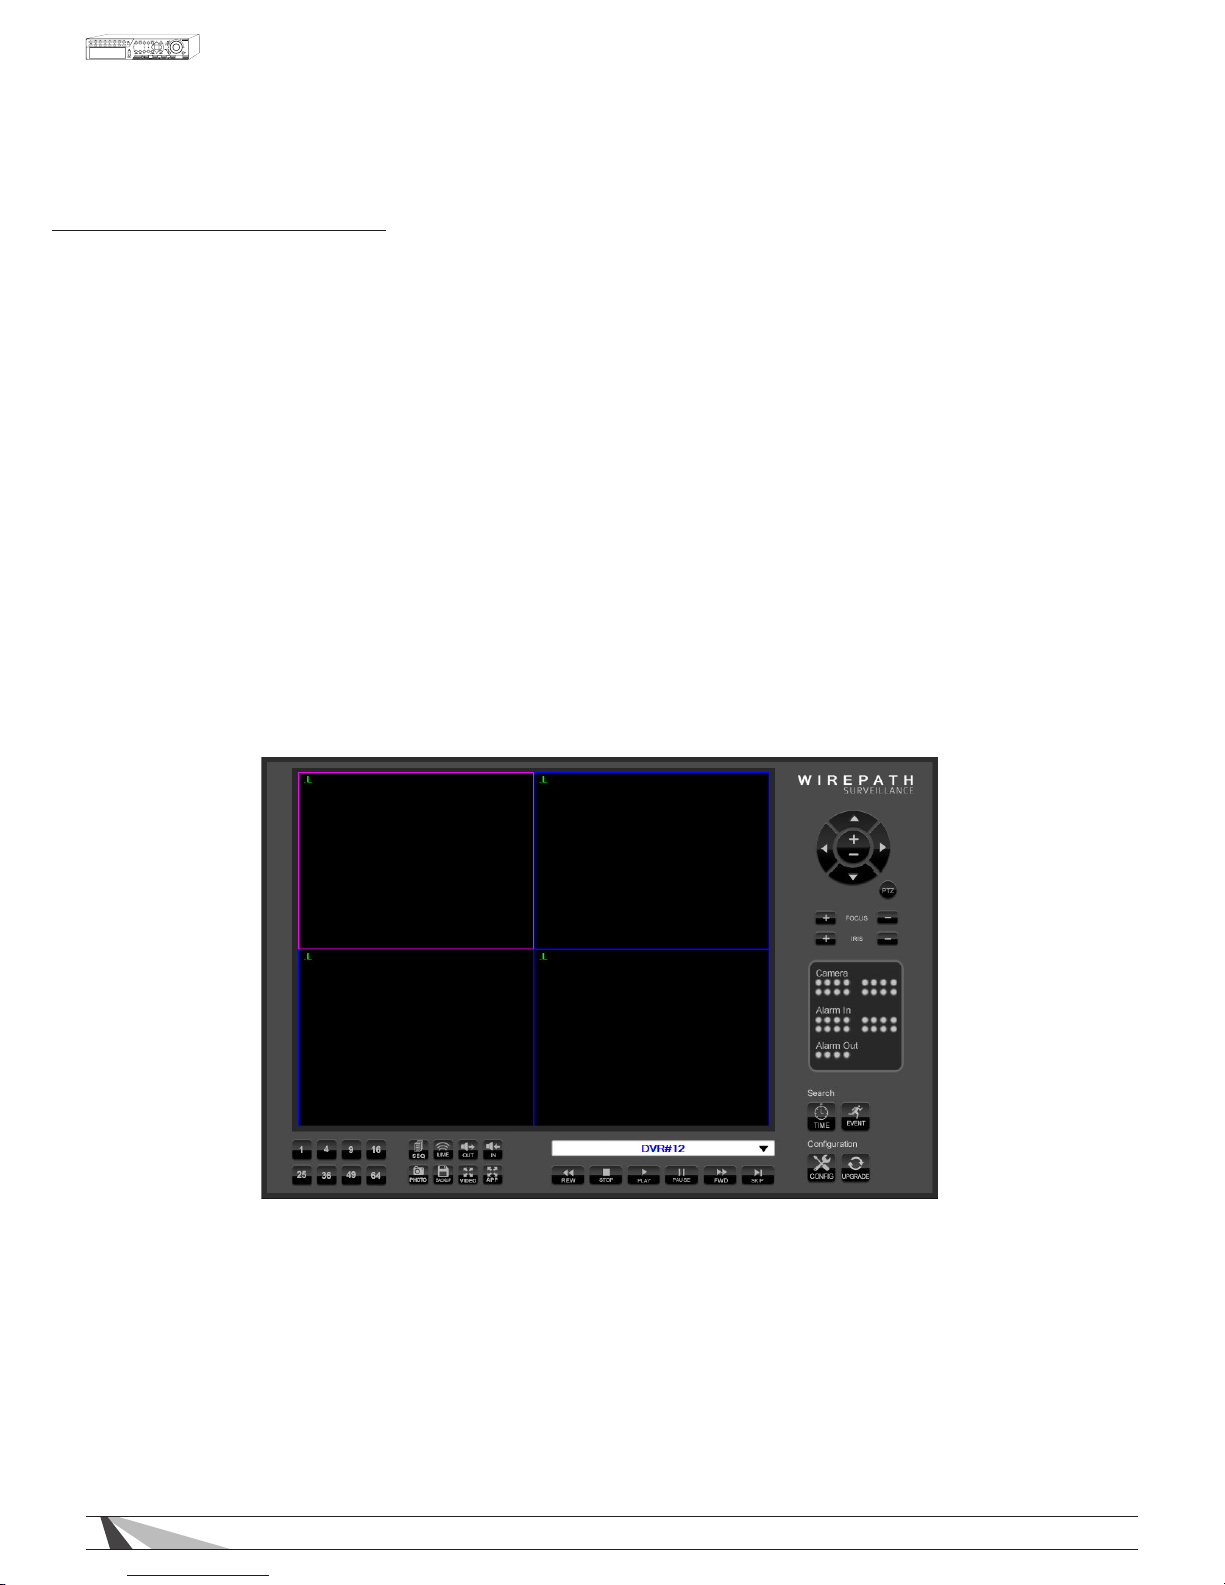
66
WPS-165-DVR-4CH Installation and Users Manual
8. REMOTE ACCESS
The following section discusses DVR remote viewing and control options from PCs and Smart phones.
8.1. PC REMOTE ACCESS
After completing the initial setup, the DVR can be remotely accessed from a PC using a 32bit Internet Explorer
web browser. Refer to Section 6.11 and the appendices (or the Quick Installation Guide included in the box)
for initial network setup instructions.
To log onto the DVR, launch Internet Explorer and enter the IP address of the DVR in the Location/Address eld
of the web browser. The DVR’s address will look similar to this:
http://AAA.AAA.AAA.AAA:BB/ie.htm
• AAA.AAA.AAA.AAA should be replaced with the IP address of the DVR
• If set to a port number other than the default 80, BB should be the HTTP port entered into the DVR
and it must match port forwarding set up in the router
• /ie.htm is the extension for the DVR and must be included at the end of the DVR
Alternatively use the DDNS domain name address if this feature has been enabled and properly setup.
Note: Up to 6 users can log into this DVR simultaneously.
8.2. PC REMOTE DISPLAY AND OPERATIONS
Video images can be displayed in several types of split-window screens including 1/4/9-Window options for a
single DVR and 16/25/36/49/64 options if connected to multiple DVRs.
• The focus window is the window surrounded by a purple frame border.
• The “.L” following the camera title denotes Live video display (text is green).
• The “.P” following the camera title denotes Playback (text is red).
• A white box will appear around the camera title when motion is detected.
• The white text in the top right of each camera window denotes date and time.
Note: The frame rate is limited by the bandwidth of the network and the pre-record FPS of the camera
(Section 9.3.5). The picture quality depends on the recording resolution set in the DVR (Section 9.3.4) and
quality of the camera. See Section 9.4 for Video Streaming options.
Page 67
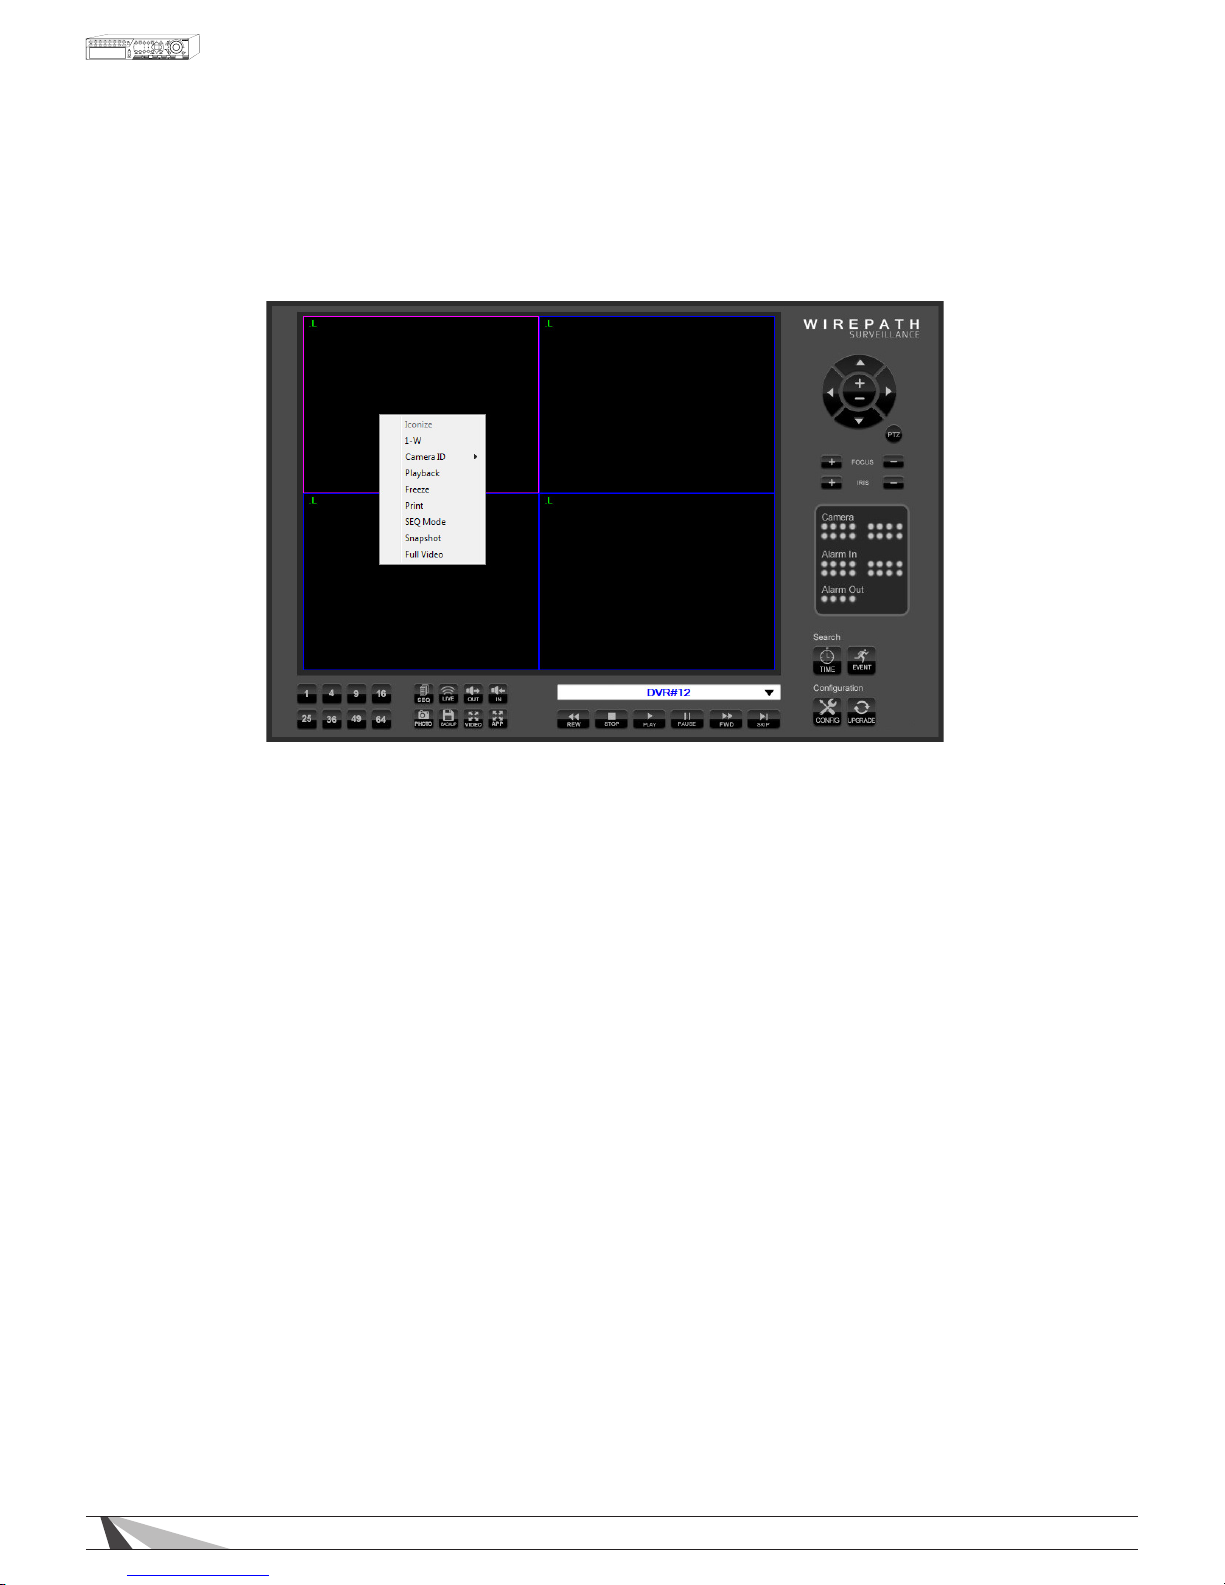
67
WPS-165-DVR-4CH Installation and Users Manual
8.2.1. SPLIT-WINDOW OPTION MENU
Right click on any split-window to display the Split-Window Option Menu.
Thefollowingisabriefdescriptionforeachiteminthismenuanditsspecicoperations:
• 1-W
When in a split-window view, expand the focus window camera to ll the entire video window. When in a
single-window view, uncheck this item to return to the previous split-window view.
• CAMERAID
Change or rearrange the current view by selecting a different camera to appear in each window. If
multiple DVRs are connected, cameras from other DVRs can be displayed simultaneously.
• PLAYBACK
Begin Playback for the current camera window
• FREEZE
Freeze the Video
• PRINT
Print a picture of the current video window
• SEQMODE
Enable Sequence mode
• SNAPSHOT
Take a Snapshot of the video and save it to the local PC
• FULLVIDEO
Expand the current split-window for single window view to ll the entire display and hide all controls
Page 68
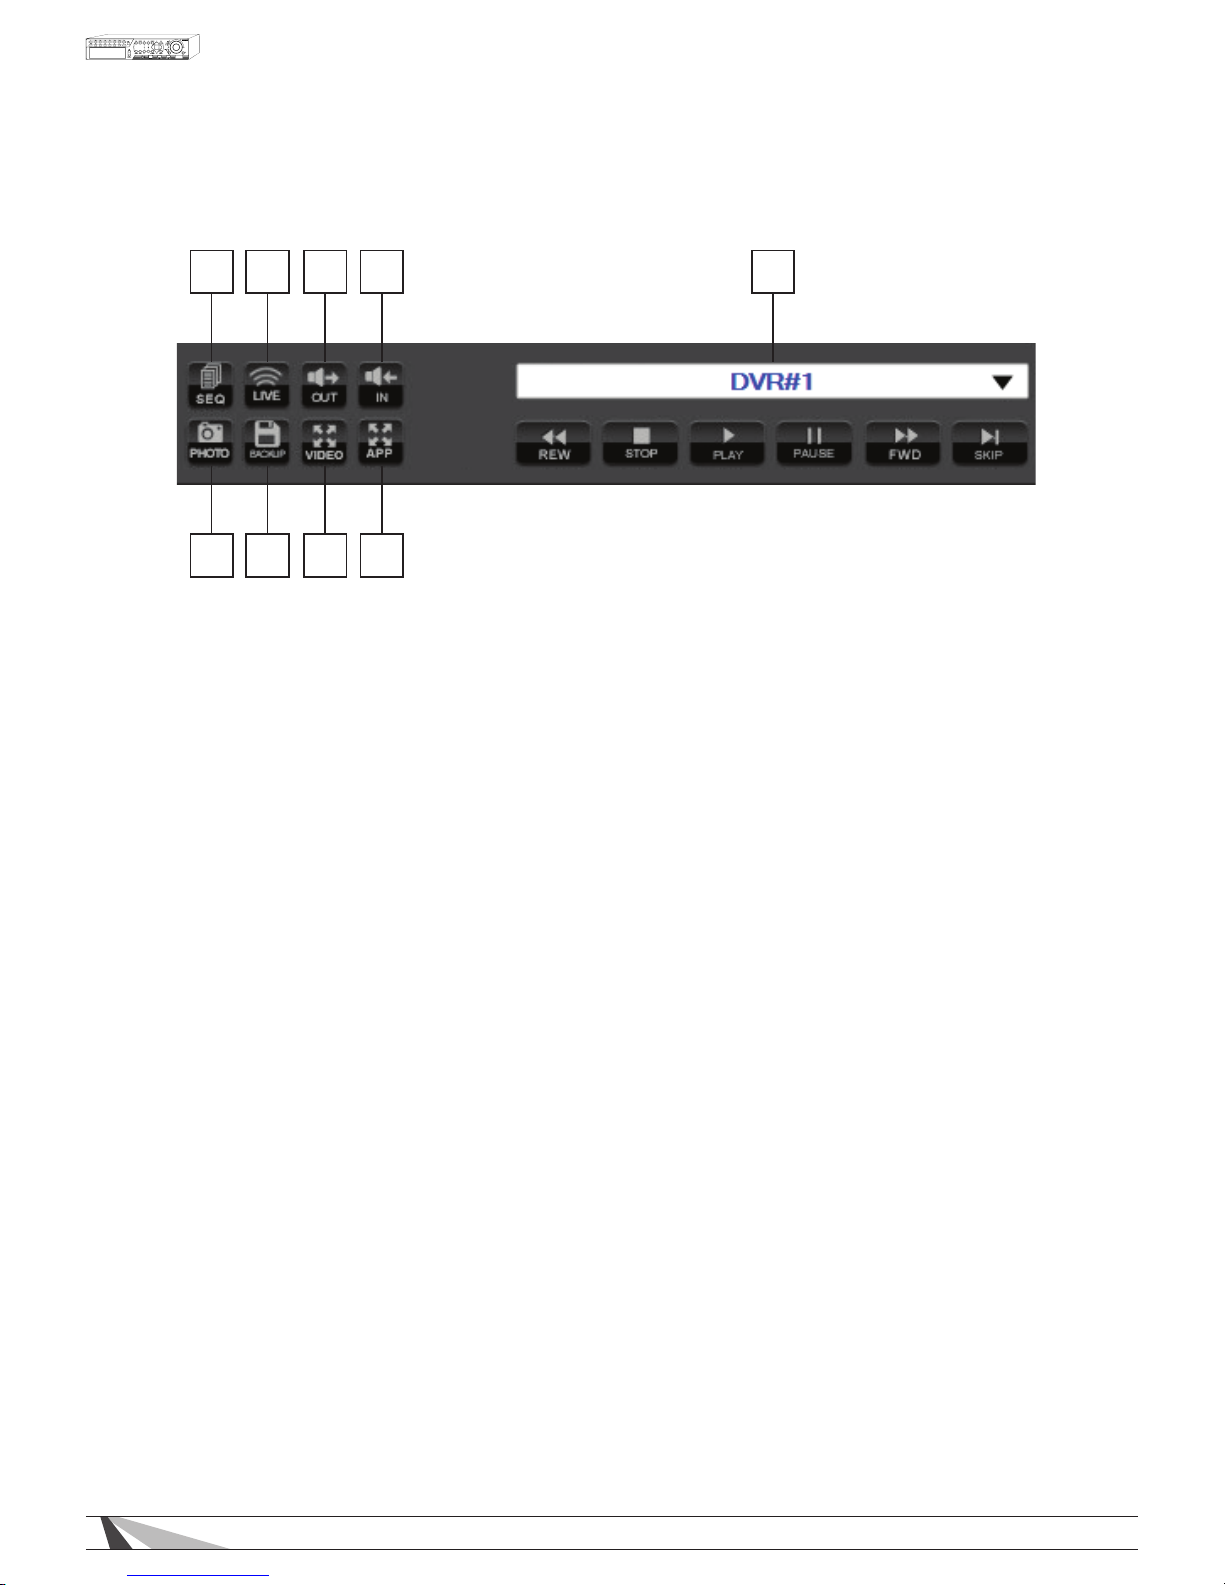
68
WPS-165-DVR-4CH Installation and Users Manual
8.2.2. CONTROL PANEL
1 2 3 4 5
6789
1. SEQ. MODE
Enables the Sequence Mode dened in the setup. This feature will automatically cycle through the cameras
on the display. When SEQ mode enabled recorded playback is unavailable, turn SEQ mode off before
playing recorded video.
NOTE: SEQ button functionality cannot be enabled for camera grid views 9 through 64 on the IE Browser
GUI.
2. LIVE
When in Playback mode, use this icon to exit playback and return to Live Video.
3. AUDIO OUT
When viewing a camera in the single window view, select the Audio Out icon to listen to the associated
audio.
4. AUDIO IN
Use the microphone in the PC to send audio to the DVR. An amplier and speaker must be attached to the
Audio Out connection of the DVR to use this function.
5. NAME OF SELECTED DVR
The name of the connected DVR is displayed in this box. Change the connected DVR or connect to
multiple DVRs simultaneously to mix and match camera views.
6. FULL SCREEN
Expand the user interface to ll the entire display.
7. FULL VIDEO
Expand the video window to ll the entire display.
8. ARCHIVE MENU
Select this icon to save and backup les.
9. SNAPSHOT
Select this icon to take a Snapshot of the screen being viewed. A pop-up window will allow this snapshot to
be saved to the local PC.
3. FREEZE
Freezes live and recorded playback video. Select this icon again to resume Live and Playback modes.
8. AUDIO BROADCAST
Similar to the Audio In function, use this feature to broadcast audio to multiple DVRs simultaneously.
Expand the user interface to ll the entire display.
Page 69
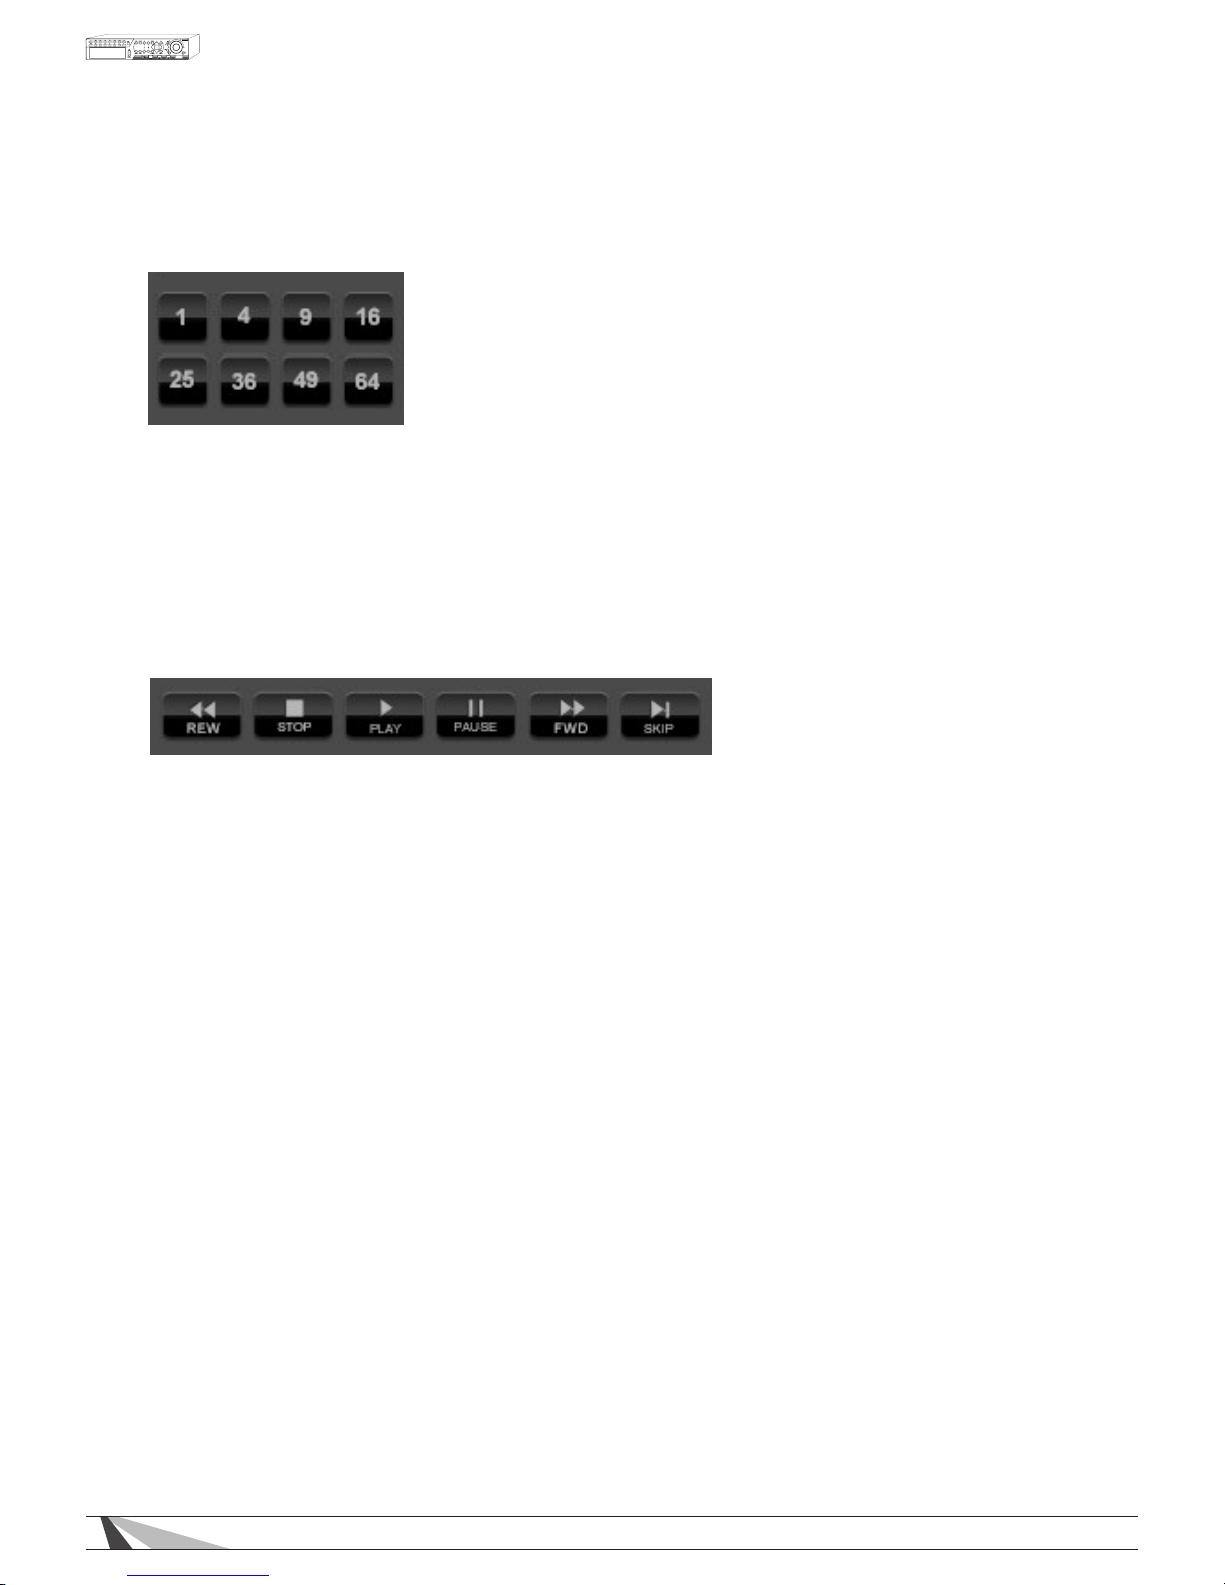
69
WPS-165-DVR-4CH Installation and Users Manual
8.2.3. SPLIT-WINDOW PANEL
Use these icons to select the number of cameras viewed on the display.
• 4AND9SPLITWINDOWICONS
Left-click and hold the mouse over the 4 or 9 split-window icon to toggle to additional pages of cameras.
8.2.4. PLAYBACK PANEL
This panel includes Fast Forward, Fast Reverse, Step Forward, Play, Pause, Stop and Copy.
Fast Forward and Fast Reverse will playback video at 2X, 4X, 8X, 16X, and 32X speeds.
• FORWARDANDREVERSEICONS
Left-click and hold the mouse over the forward or reverse icons to display a pop-up menu to change the
speed. Options include X2, X4, X8, X16, X32 and X64.
Page 70
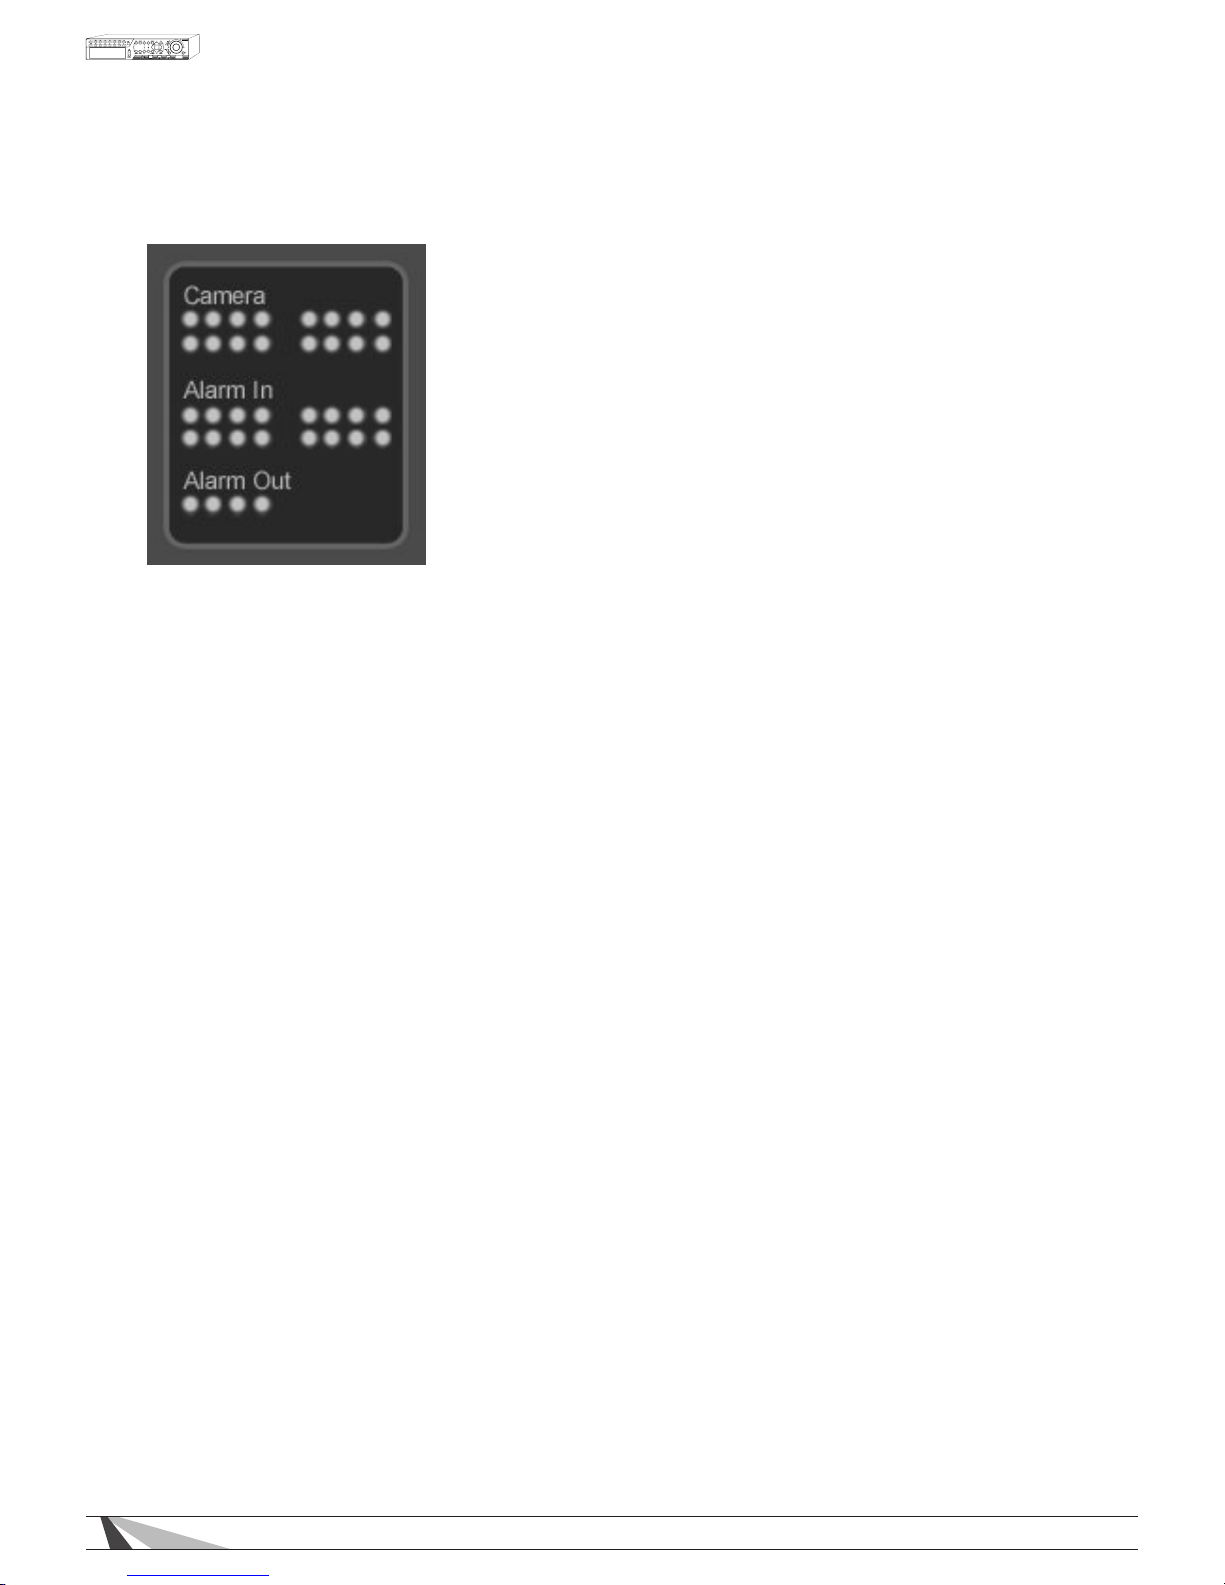
70
WPS-165-DVR-4CH Installation and Users Manual
8.2.5. STATUS PANEL
• CAMERASTATUS
Motion indicators for cameras 1-16 (this DVR supports the rst 8)
- GREEN indicates normal status
- RED indicates motion
Click on any of these icons to select the corresponding camera to be displayed in the focus window
• ALARMINSTATUS
Status indicators for Alarm Inputs 1-16 (this DVR supports the rst 4)
- GREEN indicates normal status
- RED indicates alarm detection
• ALARMOUT
Status indicators for Alarm Outputs 1-8 (this DVR supports the rst 2)
- GREEN indicates normal state
- RED indicates triggered state) for the selected DVR.
As an Administrator, click on any of these icons to control the corresponding Alarm Output.
Page 71
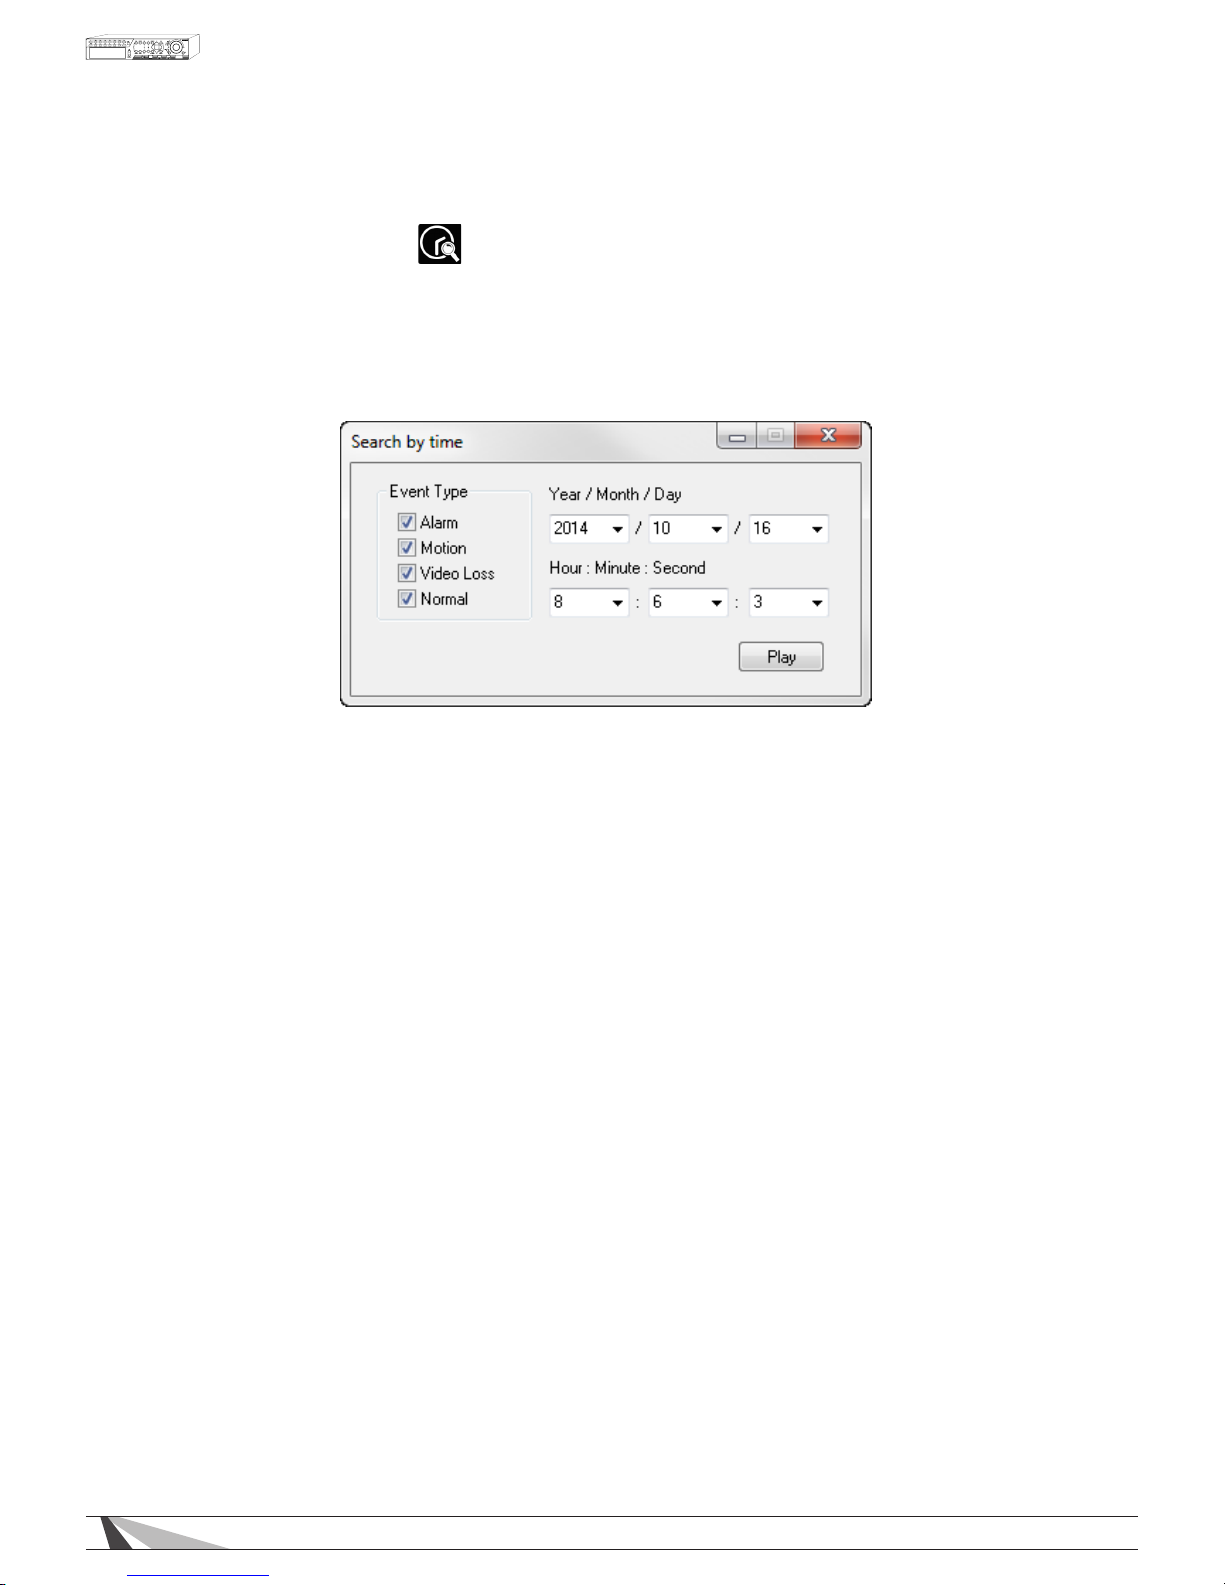
71
WPS-165-DVR-4CH Installation and Users Manual
8.2.6. SEARCH PANEL AND COPY FEATURE
8.2.6.1. SEARCH BY TIME
To playback video starting at a specic time, select the desired time (Year, Month, Date, Hour, Minute and
Second) and recorded event type (Alarm, Motion, Video Loss, and Normal) for playback. Click on the Play
button to begin the playback of all recorded video beginning at that time. Audio will only be played back
if in a single window view of a camera that has an associated audio input. Use the Playback Panel icons to
control the video. To exit playback, select the LIVE icon at the bottom of the screen.
Page 72
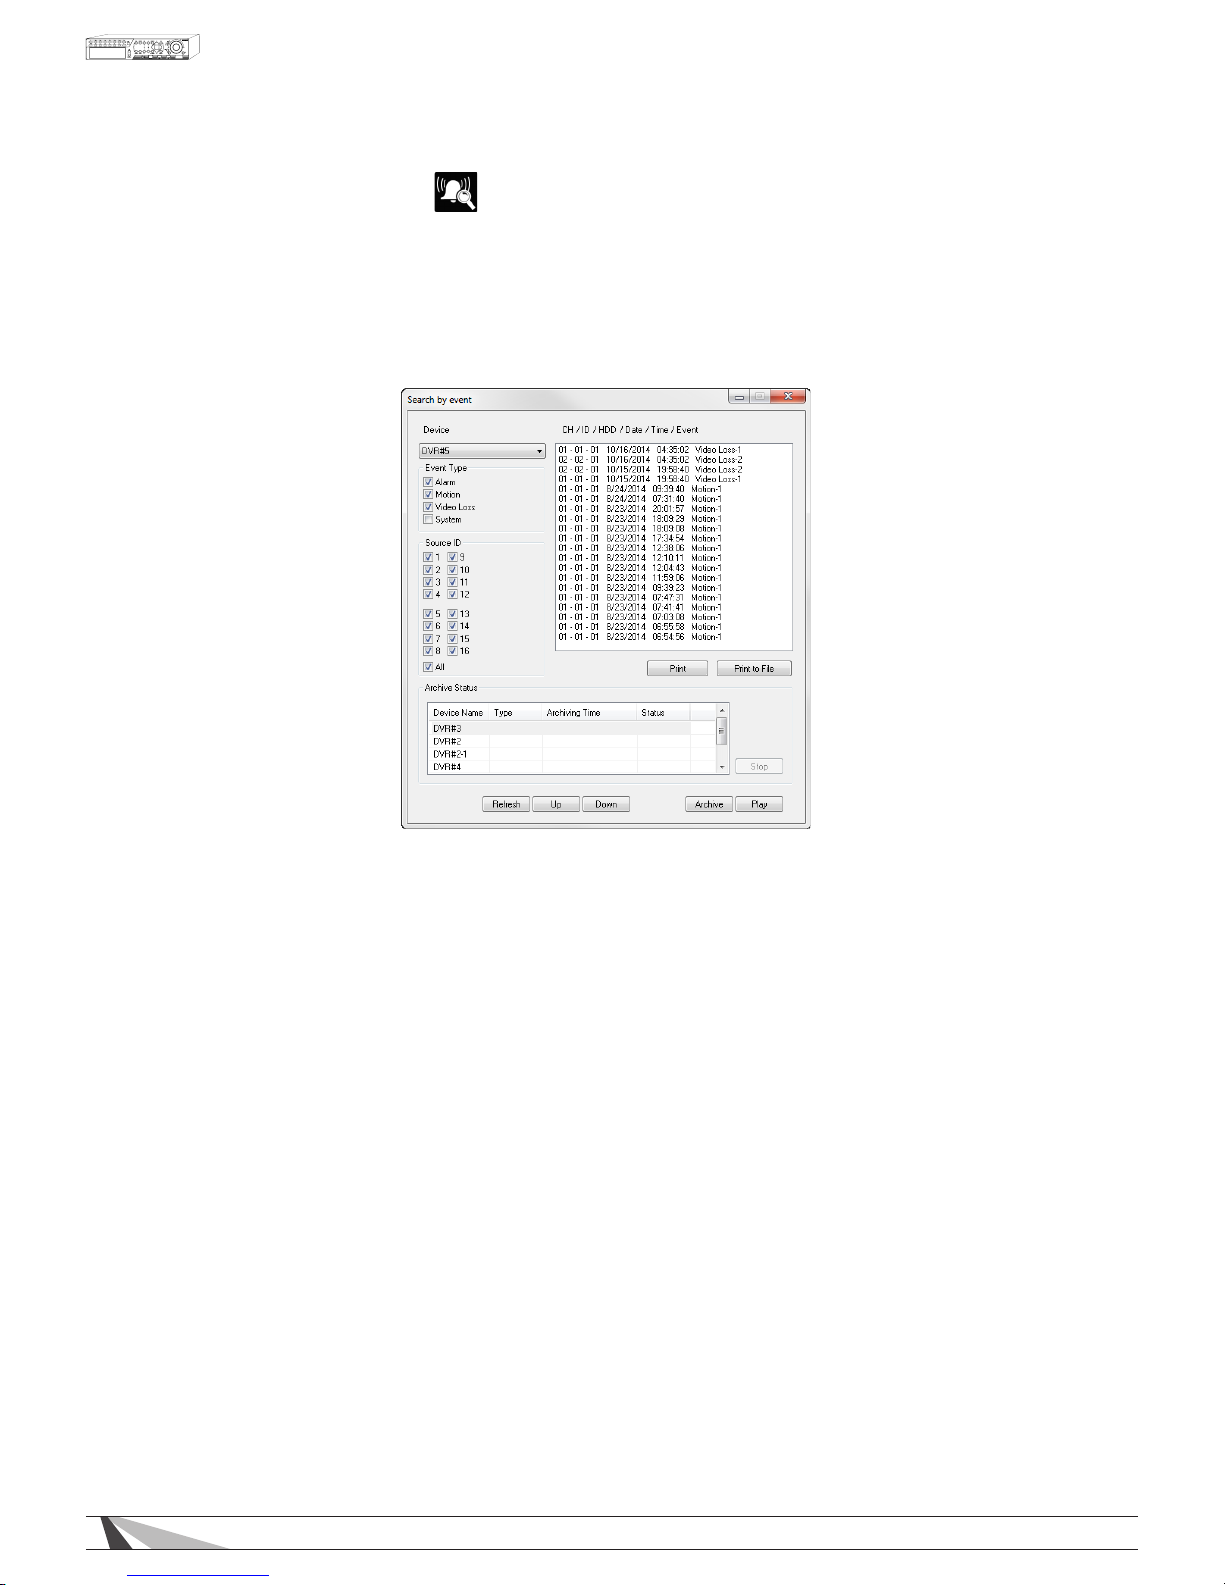
72
WPS-165-DVR-4CH Installation and Users Manual
8.2.6.2. SEARCH BY EVENT
Use the Search by Event feature to search all recorded event types stored on the DVR’s hard drive. Click on
the Search by Event icon to display the Search by Event dialog box and the event log. Select the Device
(DVR) to search. Select the Event Type (Alarm, Motion, Video Loss or System) and Source ID (camera) to
search the event logs. Click on Refresh to update the event log and use the Up and Down buttons to scroll
to additional events. Click on the desired events to highlight and select them for Playback or to Archive
the les to the local PC. Use the Playback Panel icons to control the video. To exit playback, select the
LIVE icon at the bottom of the screen.
Thefollowingisabriefdescriptionforeachiteminthismenuanditsspecicoperations:
• DEVICE
Select the appropriate DVR to search
• EVENTTYPE
Select the event type(s) to search. System events include Login/Logout, e-mail errors, hard drive failures,
etc.
• SOURCEID
Select the camera ID number(s) to search
• PRINT
Print the event log to a printer
• PRINTTOFILE
Export the event log to a “.txt” le
• REFRESH
Refresh the event log after making changes to the search parameters
• UP
Scroll the event log results up
• DOWN
Scroll the event log results down
• ARCHIVE
Archive the selected event(s) to the local PC
• PLAY
Play the selected event(s)
Page 73
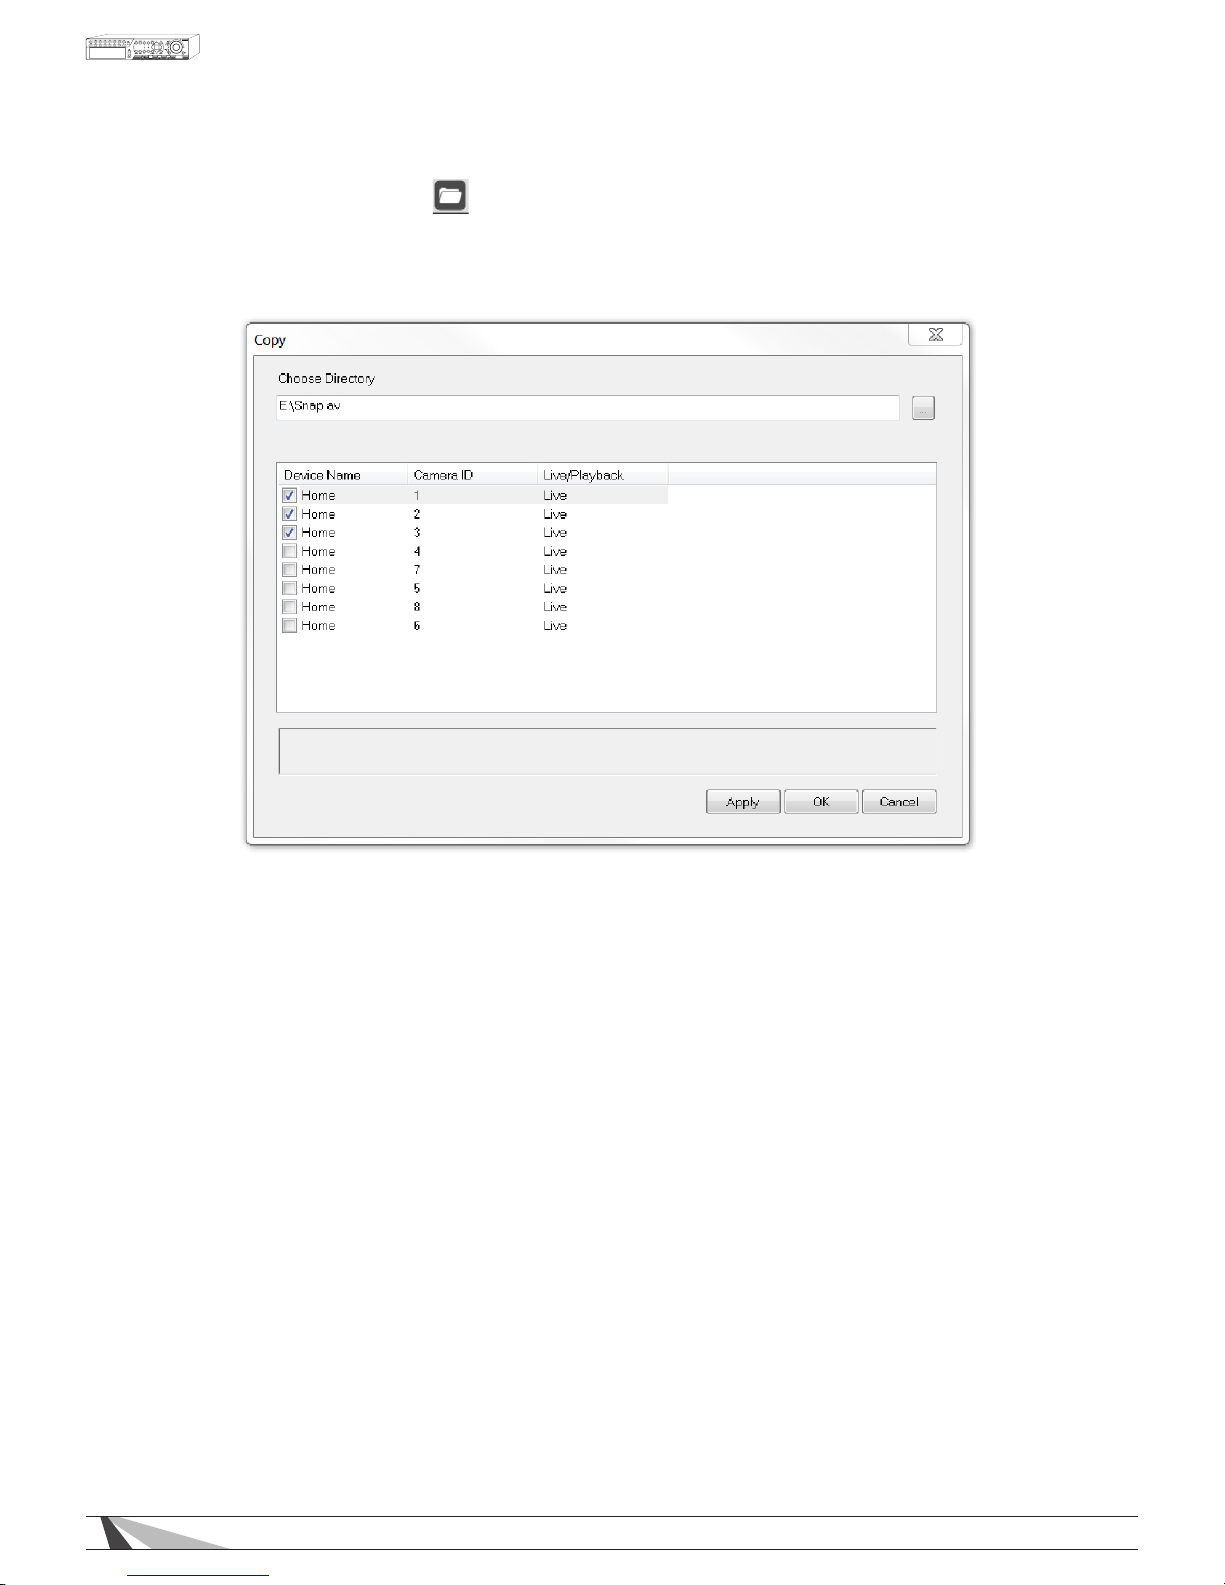
73
WPS-165-DVR-4CH Installation and Users Manual
8.2.6.3. COPY FUNCTION
Use the Copy function to record live video from the DVR onto the local PC. The performance of
this feature is based on bandwidth capacity of the network and the number and size of the les
being copied.
Camera options will populate the Copy menu based on what is being viewed in the split window view.
Therefore if only one camera is being viewed, only that camera will be displayed in the Copy menu as an
option to record.
To enable the Copy feature, rst choose a directory to store the video. Next, depending on the
split-window view, check each camera to be recorded to the local PC and select Apply. Live video
for the selected camera(s) will begin to copy to the chosen directory on the local PC.
To stop the Copy feature, uncheck the appropriate cameras and select the Apply button.
Page 74
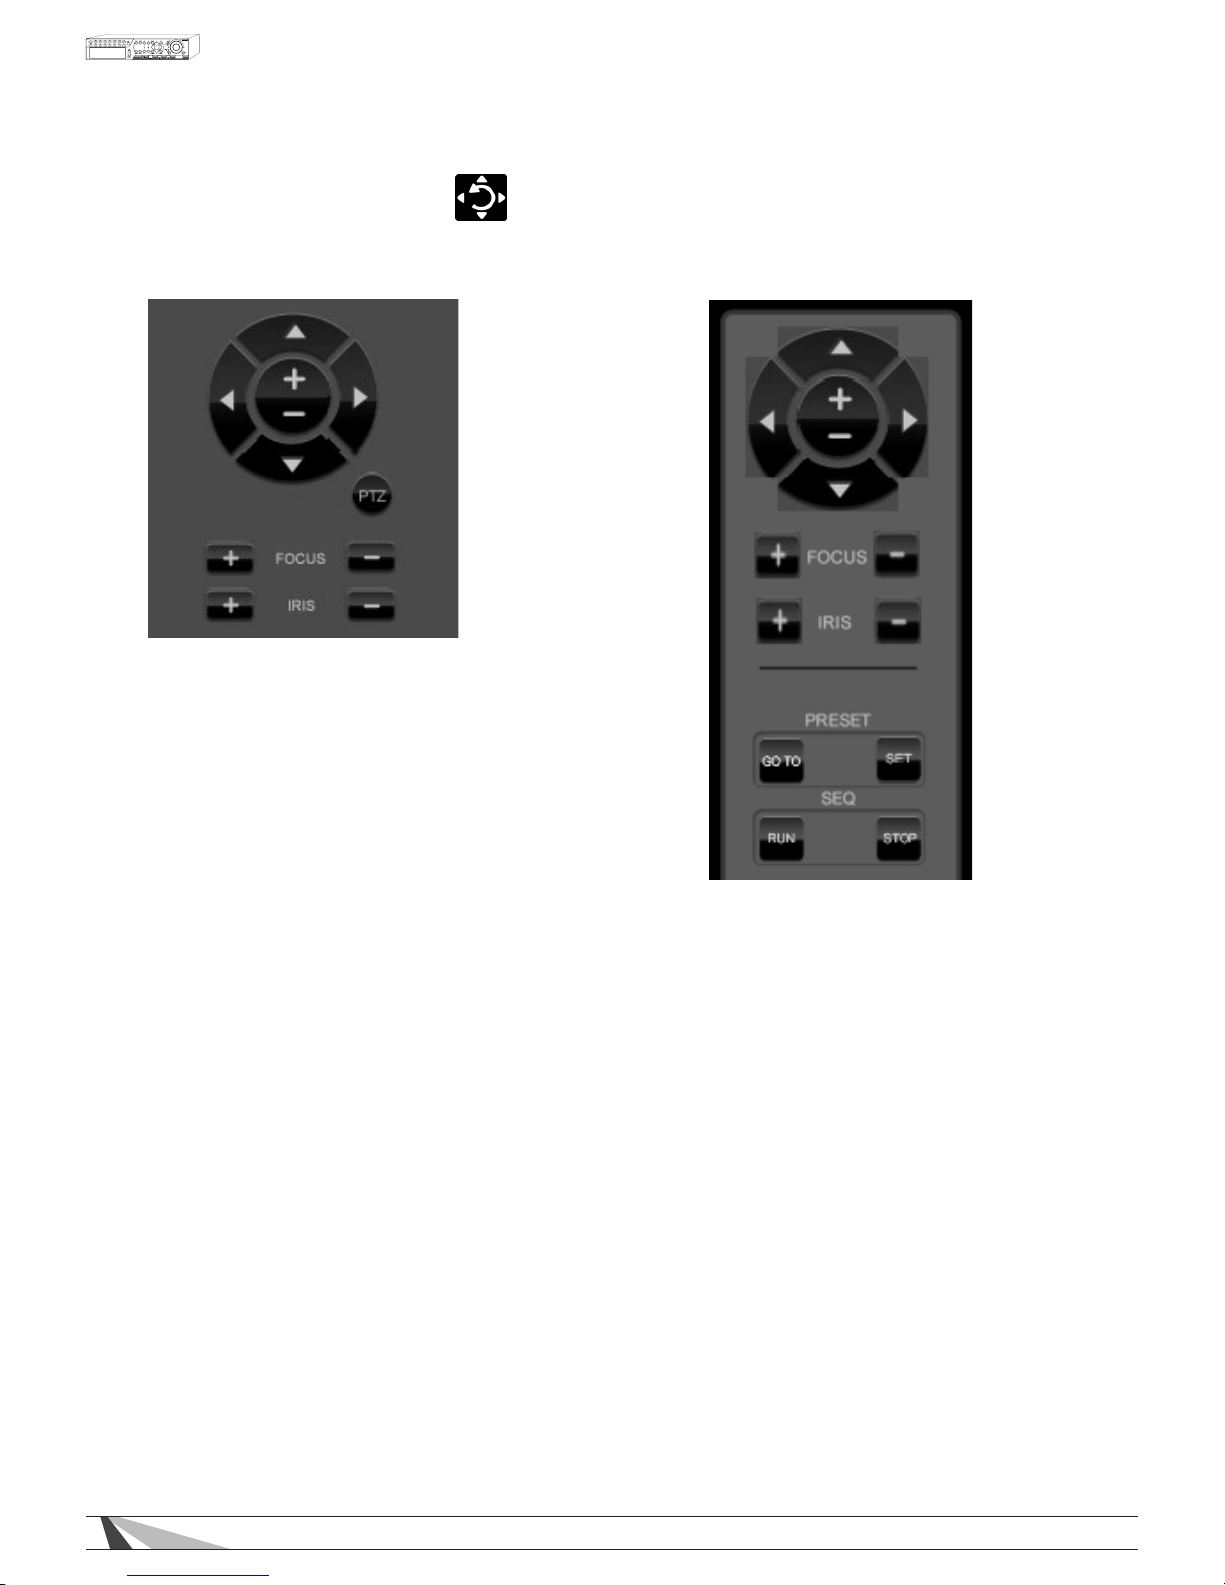
74
WPS-165-DVR-4CH Installation and Users Manual
8.2.7. PTZ CONTROL PANEL
If the camera in the focus window is a Pan/Tilt/Zoom camera, use the buttons on the user interface to operate
basic PTZ features.
For more control, display the PTZ Control
Panel by clicking on the PTZ Panel icon.
Move the panel by clicking and dragging
the panel to the desired location.
To hide the menu, click on the PTZ Panel
icon again.
Page 75
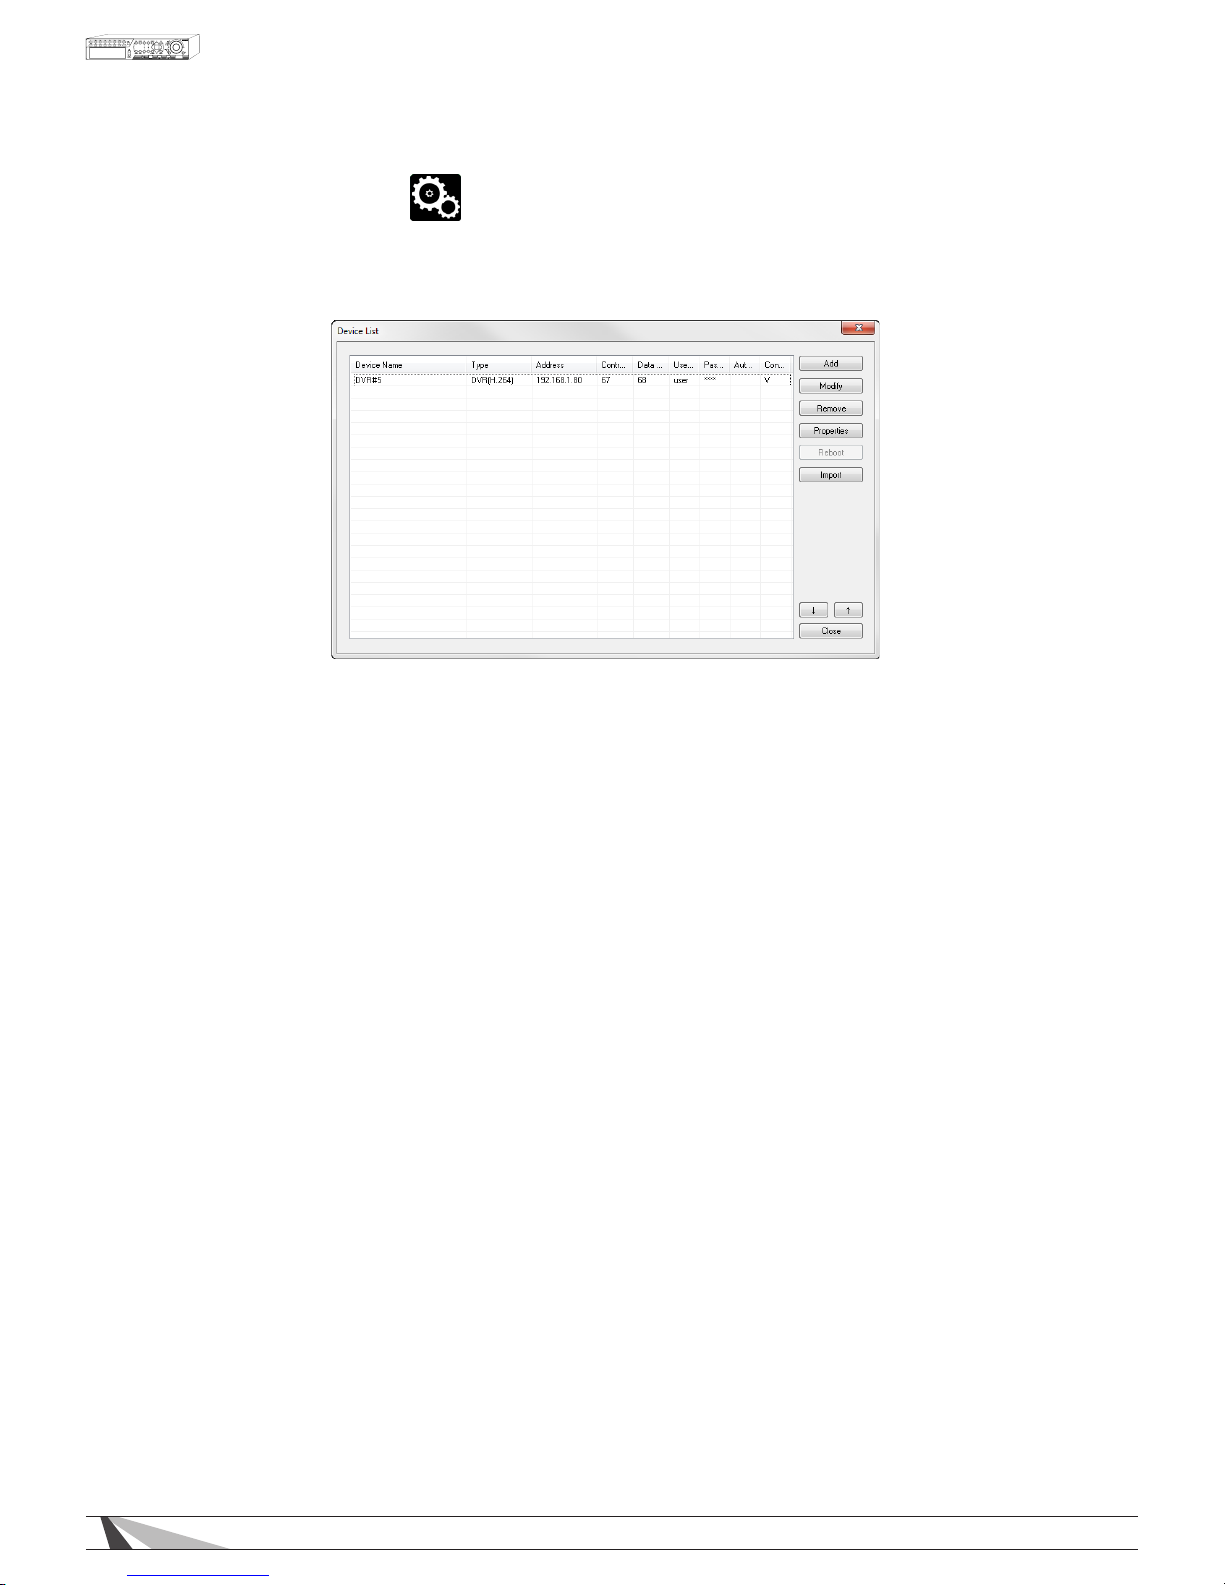
75
WPS-165-DVR-4CH Installation and Users Manual
8.2.8. DEVICE CONFIG
The Internet Explorer user interface has the ability to connect to multiple DVRs. DVRs must rst be added to
the Device List.
Thefollowingisabriefdescriptionforeachiteminthismenuanditsspecicoperations:
• ADD
Add DVRs to the Device List
• MODIFY
Modify the settings of DVRs in the Device List. See Section 9.2.8.1.
• REMOVE
Remove DVRs from the Device List
• PROPERTIES
Adjust the Properties of DVRs in the Device List. See Section 9.3.
• REBOOT
Reboot a DVR in the Device List.
Page 76
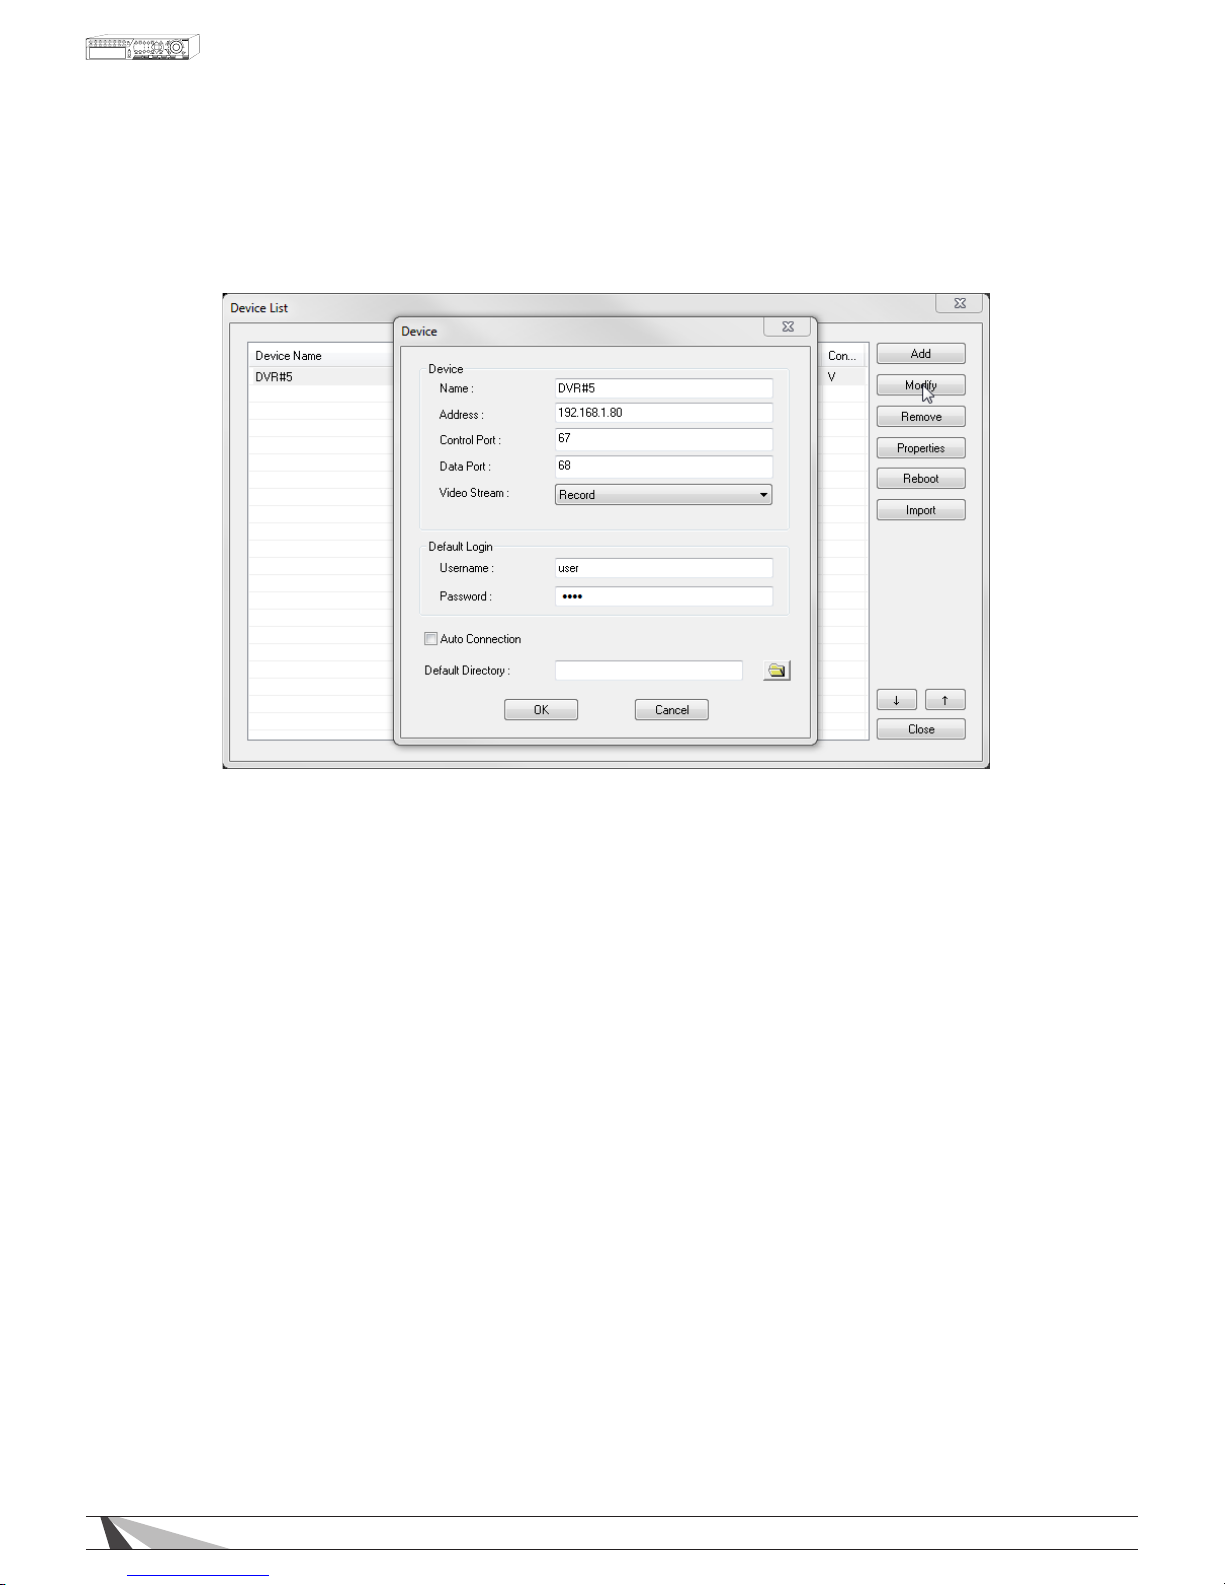
76
WPS-165-DVR-4CH Installation and Users Manual
8.2.8.1. MODIFY
DVRsintheDeviceListmaybemodiedusingthismenu.
Thefollowingisabriefdescriptionforeachiteminthismenuanditsspecicoperations:
• NAME
Enter a meaningful name for the DVR
• ADDRESS
Enter the IP address or URL domain name for the DVR.
• CONTROLPORT
Set the control port for the (DVR) device. The default value is 67 and is auto-populated in menu.
• DATAPORT
Set the data port for the (DVR) device. The default value is 68 and is auto-populated in menu.
• VIDEOSTREAM
Set the Video Stream to Record to view live video at the same rate as the recording (main) stream. Or set
the Video Stream to Extra (for “extra” network stream) for Video Streaming. Video Streaming is helpful
when viewing a remote DVR over a slow network connection. This allows the DVR to continue to record as
the set rate but reduces the resolution to speed the video delivery to remote devices.
NOTE: When Video Streaming is not congured, this Video Stream setting will ALWAYS revert to Record
mode. See Section 9.4 for details.
• USERNAME
Enter the login user name for the DVR. The login name must match a name already set in the DVR.
• PASSWORD
Enter the corresponding password for the login user name. The password must match the password for the
chosen login name already set in the DVR.
• AUTOCONNECTION
If this option is enabled, the Internet Explorer user interface will automatically connect to the corresponding
DVR to display status messages on the PC screen even if the particular DVR is not being viewed.
Page 77
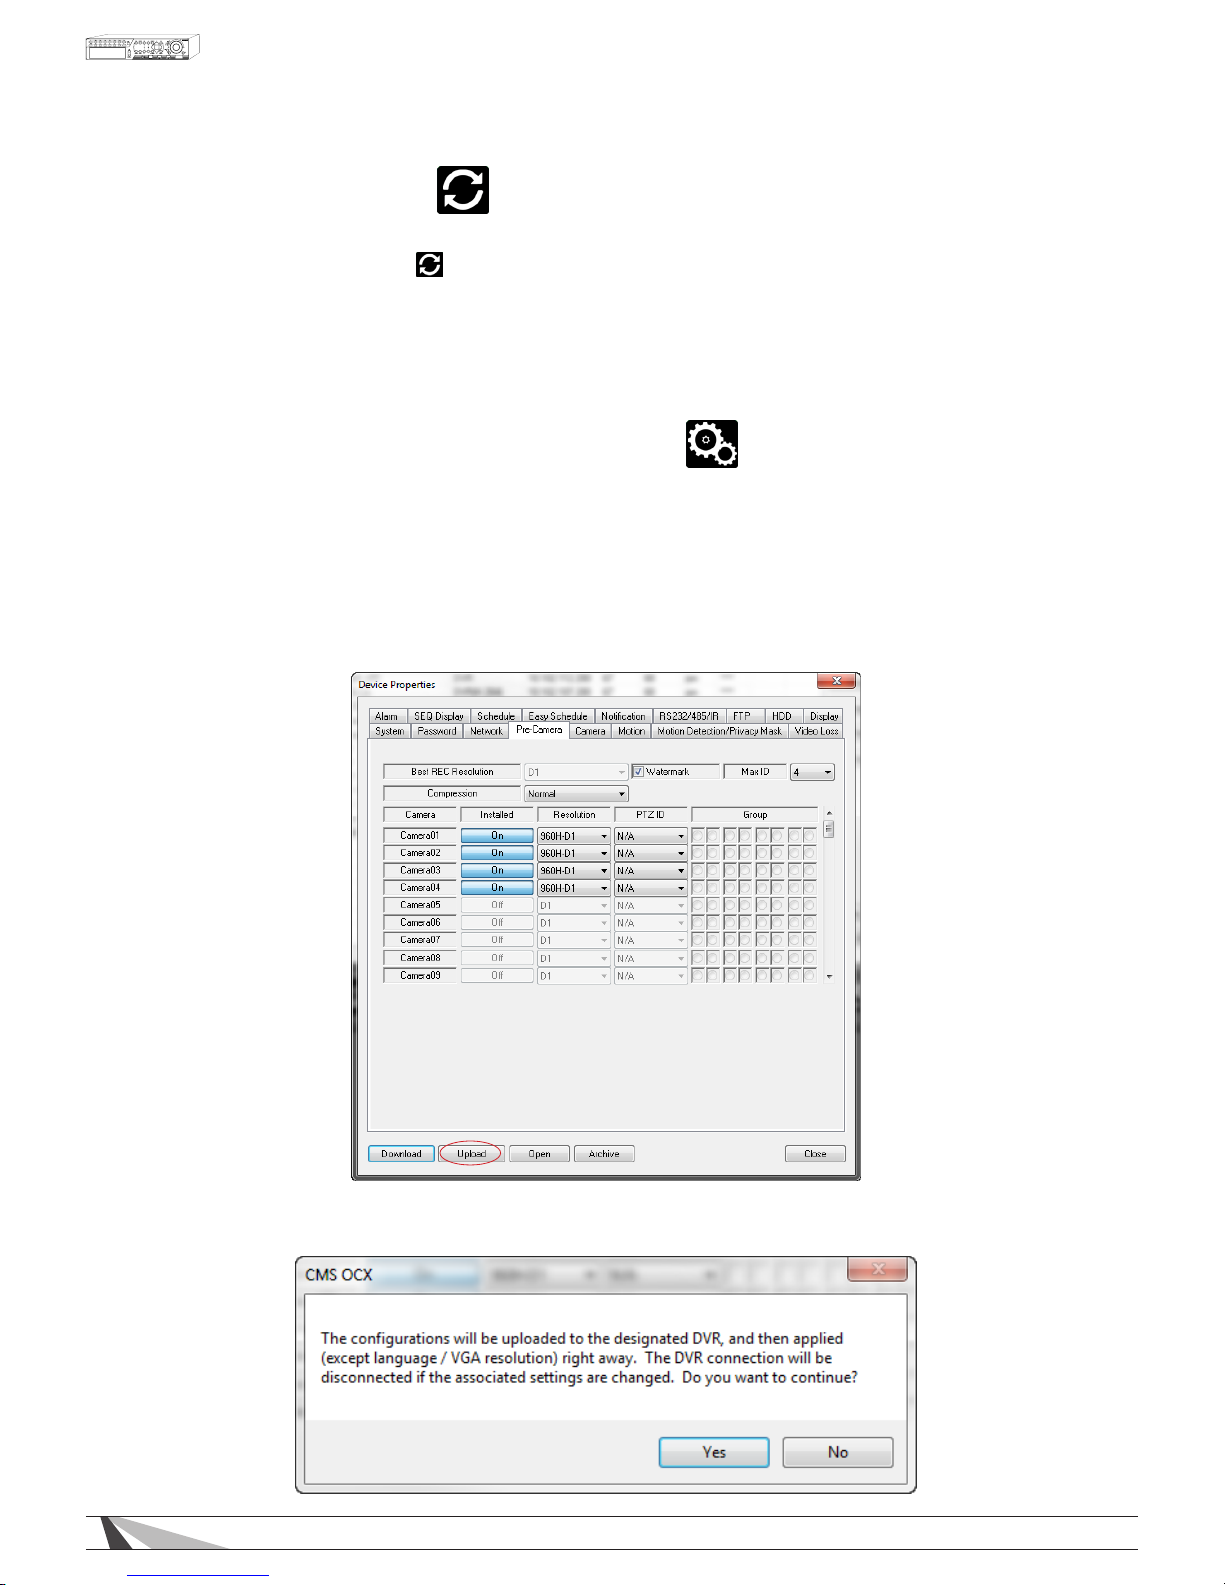
77
WPS-165-DVR-4CH Installation and Users Manual
8.2.9. SOFTWARE UPGRADE
On occasion it may be necessary to update the DVR’s software to take advantage of new features
· Use the Software Upgrade icon to open the Software Upgrade dialog box. The current software version of
the connected DVR(s) will be displayed in the Upgrade Status eld.
· To upgrade a DVR, select the DVR and corresponding upgrade le and then click the Start button to begin the
software upgrade process. The Upgrade status will be updated according to progress.
· The upgrade process may take several minutes and will require the DVR to reboot to complete the process
· The software upgrade can be done over the internet or from a local network connection. The update may
take more than 10 minutes if done over the internet depending on the network speed.
8.3. PC CONFIGURATION OF DEVICE PROPERTIES
Once initially setup, most options of the DVR can be congured remotely. The following sections highlight
the options found in the menus. They have been purposely designed to be similar to the setup menus when
using the OSD menu from the VGA or BNC output of the DVR. Once changes have been made they must
be uploaded to the DVR.
• To save the settings, click on the Upload button.
• Select Yes to conrm the changes when asked to continue
Page 78
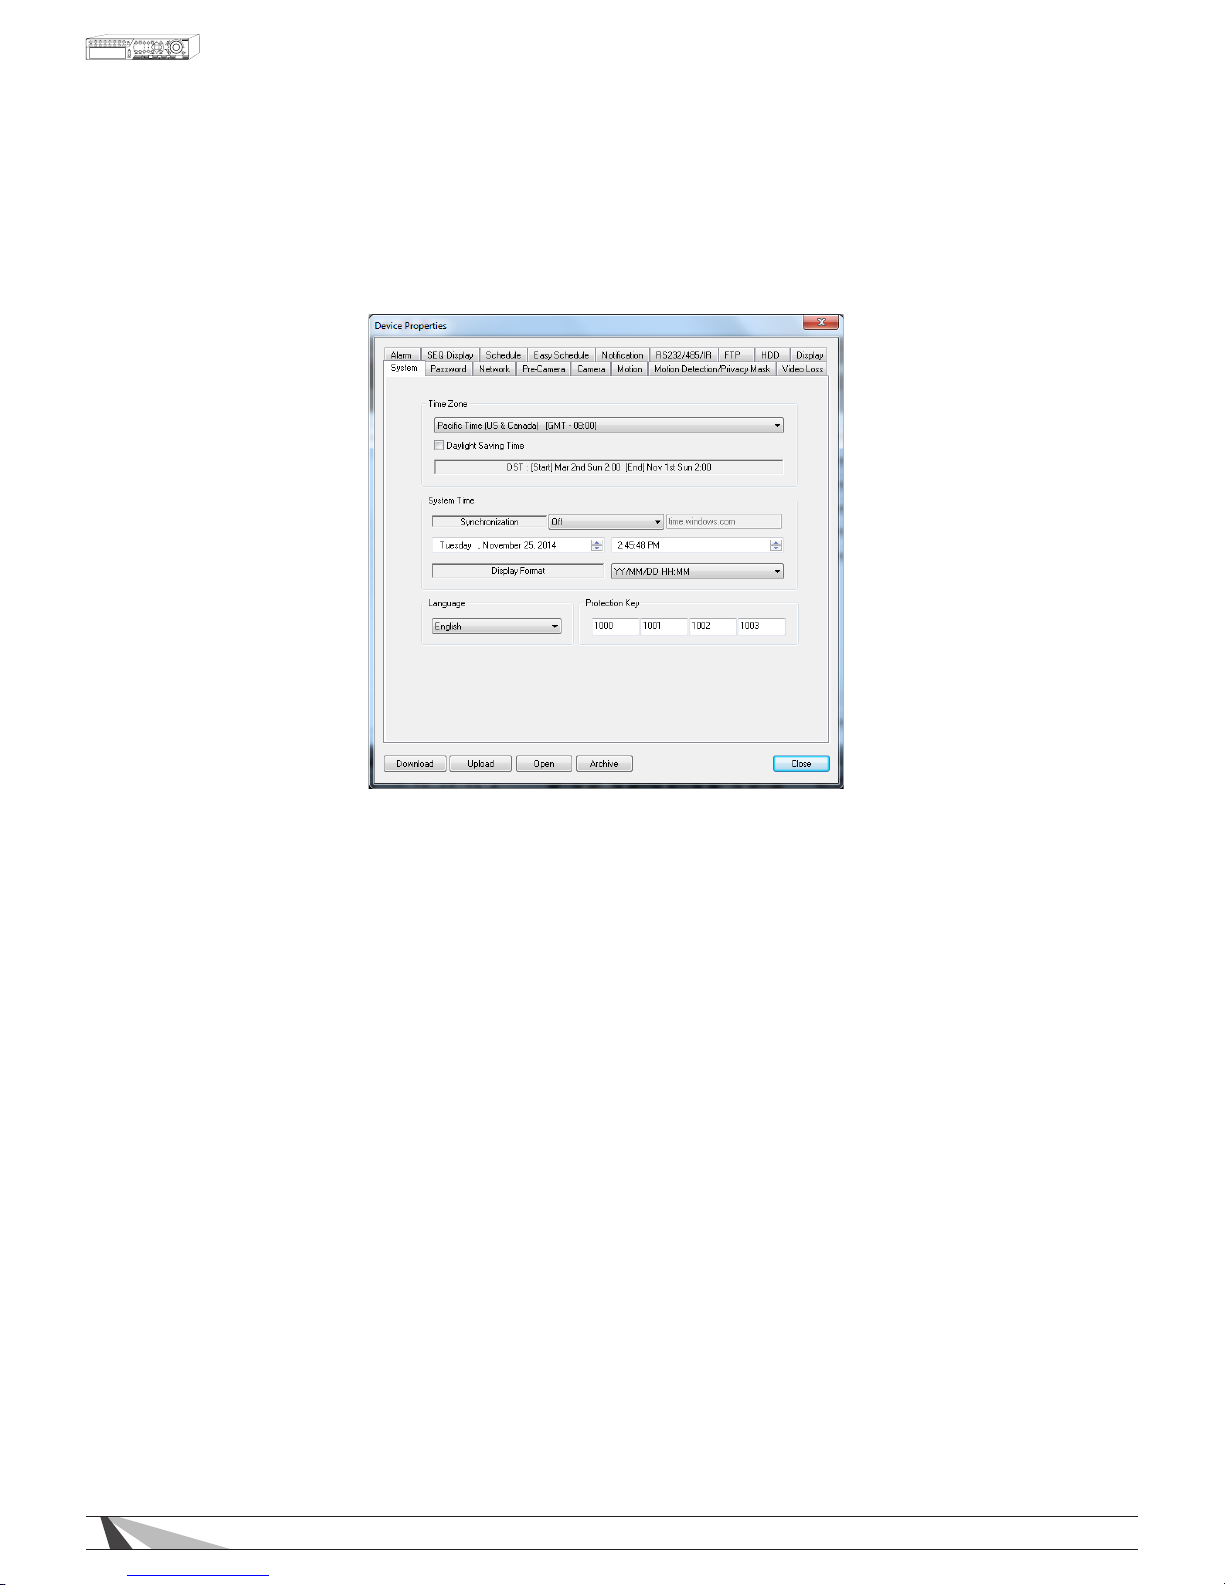
78
WPS-165-DVR-4CH Installation and Users Manual
8.3.1. SYSTEM
The System Setup allows the administrator to set the system time, time zone, time synchronization,
language, etc.
Thefollowingisabriefdescriptionforeachiteminthismenuanditsspecicoperations:
• TIMEZONE
Select the appropriate time zone. The default setting is Eastern Standard Time.
• DAYLIGHTSAVINGTIME
Enable or disable DST by checking this box.
• SYSTEMTIME
- Synchronization
Enable or disable time synchronization with a TSP Server. The default setting is disabled.
- TSP Server
If Time Synchronization is enabled, select a Time Synchronization Protocol (TSP) server. The DVR will
synchronize with the specied TSP server.
- Date
System date
- Time
System time
- Display Format
Select the format used to display the system time in the camera windows
• LANGUAGE
System language
NOTE: If the selected language is changed, reboot the system for the newly selected language to take
effect.
• PROTECTIONKEY
The Protection Key is used for secure remote access of the system.
NOTE: The Protection Key will be used by some software for authentication when a remote computer wants
to connect with the system through the Ethernet interface, either LAN or internet. The same protection key
must be entered to install the remote software if it is to be used to access the DVR.
Page 79
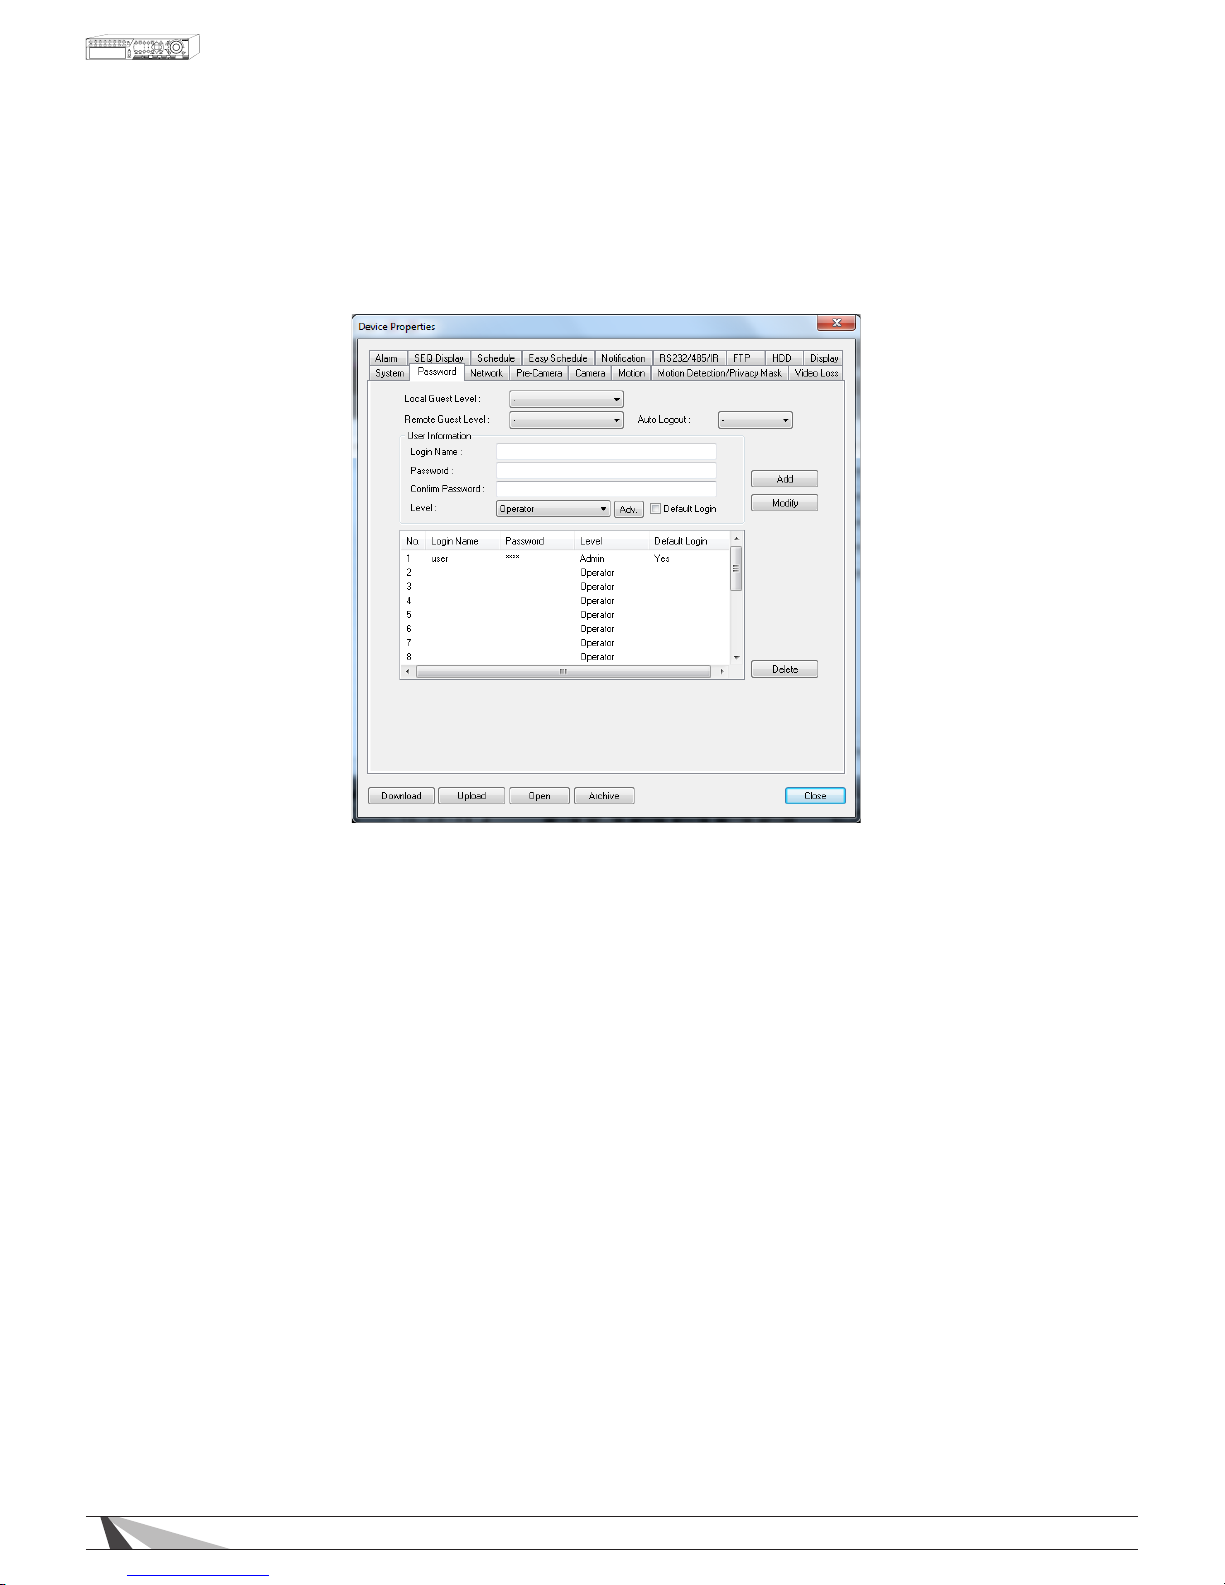
79
WPS-165-DVR-4CH Installation and Users Manual
8.3.2. PASSWORD
The Password Setup allows the administrator to add new users, delete existing users, and/or modify the
user names, password, and levels of access
The DVR allows up to 18 user accounts. There are three default user levels in the system:
• OPERATOR
The lowest level, an Operator can only view live video and audio.
• SUPERVISOR
In addition to live video viewing, a Supervisor can review playback video and audio and has permission
to archive les.
• ADMINISTRATOR
The highest level is Administrator and has access to all options.
• USERNAME
In addition to the three default levels, an administrator can also set Customized levels of access for each
user as described in the following paragraphs.
Thefollowingisabriefdescriptionforeachiteminthismenuanditsspecicoperations:
WARNING – The following 2 features could allow unwarranted access to the DVR. Caution is strongly advised
when enabling these features.
Important Note: The following 2 features were added in software v7.77.53 and were listed as Guest Level in
previous versions. When the DVR is updated, the setting previously set in Guest Level will show as Remote Guest
Level. Verify that it is set to the desired level.
Page 80

80
WPS-165-DVR-4CH Installation and Users Manual
• LocalGuestLevel
Allows or restricts access to the DVR by Guests accessing the DVR through Local interfaces (DVR GUI via
mouse, IR remote control or home automation Ethernet control) without a dedicated Login. The option
selected determines the level of access a Guest will have.
“-“ (Default) - No Guest Access Allowed (Does not prevent access by User with login credentials recommended.)
Operator - Provides access to view and control all cameras. No access to Search or settings is provided.
Supervisor- Provides access to view and control all cameras, Search, Archive and modify basic settings.
Administrator - Provides full access to the DVR allowing for viewing of all cameras and modication to all
settings. Use this setting with caution.
UserName - Provides access to the features as dened in the Advanced Settings for a particular user.
Note: If an RS-232 or IP control system is being used, the Default setting does not allow the system to
control the DVR, and prevents Guest access to DVR features. This setting must be enabled to a minimum
of Operator to allow control from third party automation systems.
• Remote Guest Level
Allows or restricts access to the DVR by Guests accessing the DVR from the Internet Explorer plugin interface
without a dedicated Login. The option selected determines the level of access a Remote Guest will have.
“-“ (Default) - No Guest Access Allowed (Does not prevent access by User with login credentials recommended.)
Operator - Provides access to view and control all cameras. No access to Search or settings is provided.
Supervisor- Provides access to view and control all cameras, Search, Archive and modify basic settings.
Administrator-ProvidesfullaccesstotheDVRallowingforviewingofallcamerasandmodicationtoall
settings. Use this setting with caution.
UserName - Provides access to the features as dened in the Advanced Settings for a particular user. See
Adv: below for more information. Note: It is recommended that Remote Guest Level be set to the default
“-“ to prevent unwarranted access to the DVR from outside sources.
• AUTOLOGOUT
If there is no user operation in the time selected from 1 minute to 24 hours, the user will automatically
be logged out.
• LOGINNAME
Enter a unique name for each user.
• PASSWORDANDCONFIRMPASSWORD
Enter a unique password (numbers only) for each user.
• LEVEL
Select the appropriate access level (Administrator, Supervisor, Operator, or Customized) for each user.
• DEFAULTLOGIN
Check the Default Login box so the corresponding user’s login name and password will be the default
credentials populated in the Login/Logout dialog box so the user doesn’t have to enter text to login
the system. Default Login will be noted with a “V” in the Default Login column.
Page 81

81
WPS-165-DVR-4CH Installation and Users Manual
• ADV.
For Customized access per user setup the Advanced User Setup. Within the menu, options are categorized
into groups (Monitor, Search, Setup and Others):
- Monitor Channel 1-8
Select Channels (cameras) the user has permission to view.
- X2
Allow the user to Zoom live and playback video.
- PTZ
Allow the user to access PTZ features if supported by the camera.
- GPS/POS/OSD Display
This feature has no function for this model of DVR.
- Volume
Allow the user to change volume.
- Video Adjustment
Allow the user to adjust the video
- VGA Display
Allow the user to change VGA settings.
- Playback
Allow the user to view playback video and audio.
- Backup
Allow the user to backup video and audio.
-CongurationBackup/Restore
Allow the user to backup or restore the DVR conguration.
- Setup Camera
Allow the user access to Camera Setup.
- Setup Alarm
Allow the user access to Alarm Setup.
- Setup SEQ Display
Allow the user access to Sequence Display setup.
- Setup Scheduled Record
Allow the user access to Scheduled Record setup.
- Setup HDD
Allow the user access to hard drive setup.
- Setup Password
Allow the user access to Password Setup.
- Setup System
Allow the user access to System Setup.
- Setup RS-232/485/IR
Allow the user access to RS-232, RS-485 and IR setups.
- Setup Network
Allow the user access to Network Setup.
- Setup Factory Defaults
Allow the user to restore factory defaults to all setup related congurations.
- Software Upgrade
Allow the user to upgrade the DVR software.
- Shutdown
Allow the user to shutdown the DVR.
Page 82
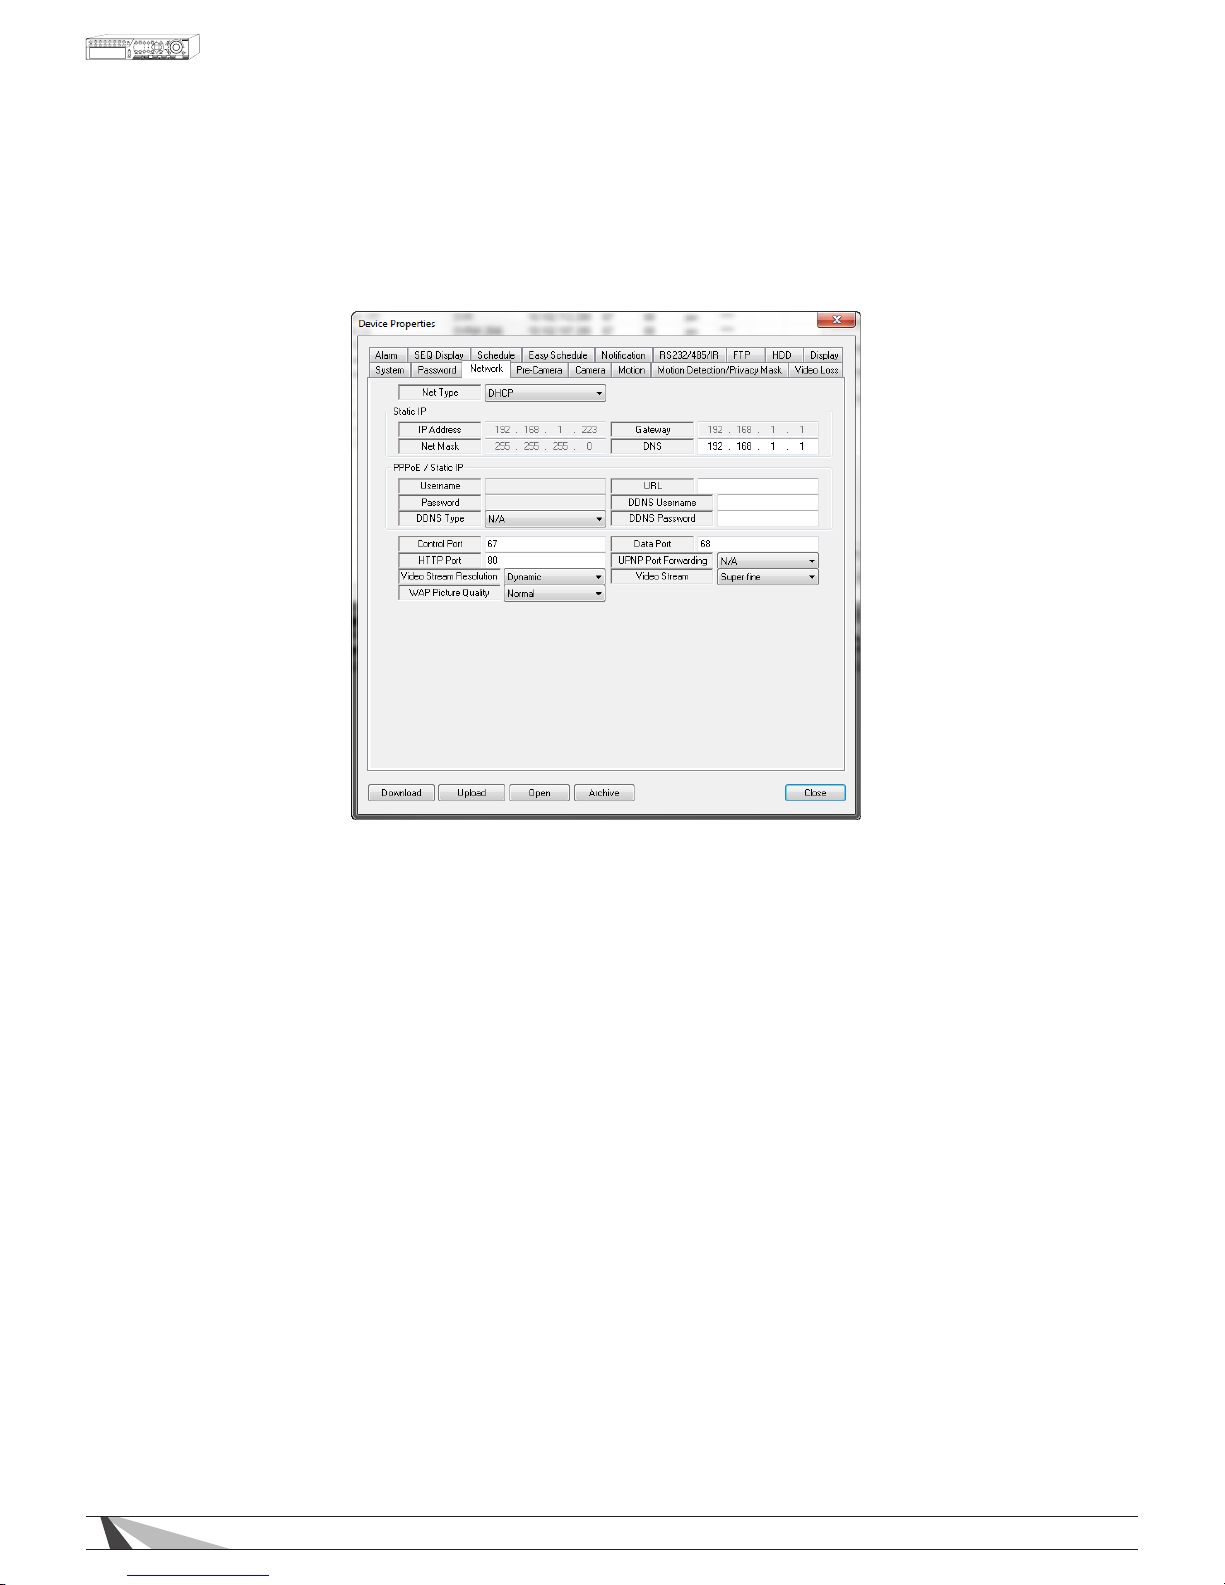
82
WPS-165-DVR-4CH Installation and Users Manual
8.3.3. NETWORK
The Network Setup allows the administrator to setup all Ethernet network related parameters. Consultation with
the network administrator may be required to set these parameters correctly.
Thefollowingisabriefdescriptionforeachiteminthismenuanditsspecicoperations:
NET TYPE
• NetType
Select the type of network connection of the DVR to the network (DHCP, Static IP or PPPoE). DHCP is
enabled by default but a Static IP is recommended.
STATIC IP
• IP Address
Enter an Ethernet IP address for the DVR. This address should be static and not conict with any other IP
address on the LAN.
• Net Mask
Enter the Net Mask for the IP address.
• Gateway
Enter the Gateway IP address for the system.
• DNS
If using DNS, enter the Domain Name Server address for the system. (Same address as Default Gateway)
PPPoE/STATIC IP
•Username
If PPPoE is used, enter the username for the system.
• Password
If PPPoE is used, enter the password for the system.
• DDNS Type
Starting with Version 7.75.53 a new selection will appear for WirepathDNS. It is strongly recommended that
this option is used to simplify conguration.
Page 83

83
WPS-165-DVR-4CH Installation and Users Manual
Using the WirepathDNS is easy. Select WirepathDNS from the list and enter the client name or other unique
string in the URL.
When exiting the Network menu, conrm the changes. A DDNS service is setup automatically. See IE
Interface Setup in Appendix E – WirepathDNS Setup for details on using WirepathDNS.
• URL
Enter the DDNS URL if DDNS is used. – Enter Client Name or System Name to identify the DVR.
• DDNS Username
Enter the DDNS username if DDNS is used. – Not used unless an existing DDNS other than WirepathDNS
service is congured.
• DDNSPassword
Enter the DDNS password if DDNS is used. – Not used unless an existing DDNS other than WirepathDNS
service is congured.
ADVANCED NETWORK SETTINGS
• ControlPort
Default Port is 67
• HTTPPort
Default Port is 80
• DataPort
Default Port is 68.
• UPNPPortForwarding
When enabled in conjunction with a supported UPNP router, port forwarding of the DVR in the router
settings will be done automatically
• WAPPictureQuality
WAP (Wireless Application Protocol) is a simple standard for remote devices (such as Smartphones) to
access the DVR. See Section 6.11.3 for more information on WAP.
• VideoStreamResolution
Allows selection of Video Stream Resolution. If Record is selected, the DVR will stream video at the same
resolution as the Record setting (See Section 6.1). Lower resolutions will allow an increased speed of video
delivery to remote devices
• VideoStream
Video Stream allows the user to choose the compression rate of the video being delivered to a remote
device (see Section 9.4). This is especially helpful for remote devices on slower networks. Increasing
compression of video sent to these devices will speed up the delivery of the video. To enable Video Stream,
select one of the four levels of compression. (Fair is the lowest quality while Superne is the highest quality.)
If the compressed stream is used, the frame rate supplied to each stream will be reduced.
NOTE: To use the compressed stream in Internet Explorer, the user must select Extra Video Stream option in
the Modify menu of the Device List of the remote PC (See Section 9.5).
- QCIF Fair – Lowest QCIF Resolution -
- QCIF Normal – Medium QCIF Resolution
- QCIF Fine – High QCIF Resolution
- QCIF Super Fine – Best QCIF Resolution
Page 84
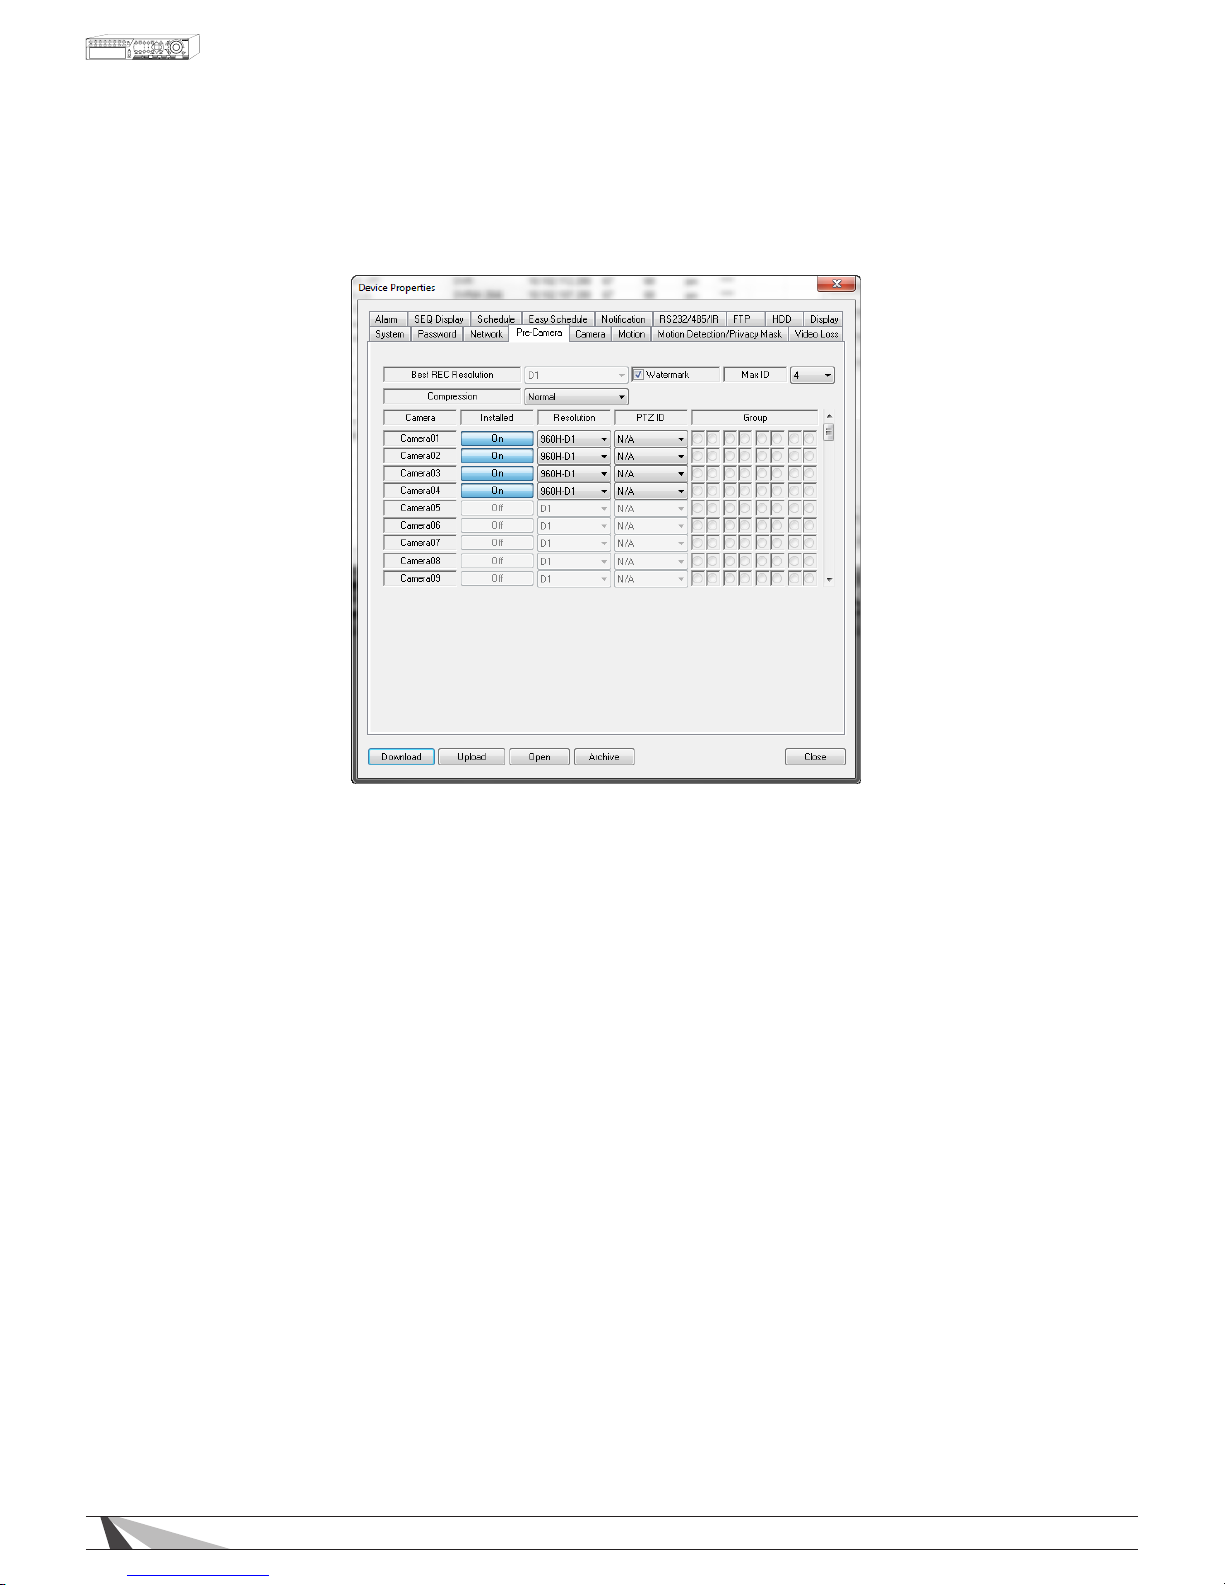
84
WPS-165-DVR-4CH Installation and Users Manual
8.3.4. PRE CAMERA
Pre-Camera setup allows the administrator to dene fundamental attributes for connected cameras.
Thefollowingisabriefdescriptionforeachiteminthismenuanditsspecicoperations:
•
RESOLUTION
Allows individual camera channels to be set for their appropriate recording resolution. Allows for 960H
(960x480), D1 (720x480), Half 960H (960x240), Half D1 (720x240), 480x240, and CIF (360x240).
Note: While higher resolution offers more detail, it does require more hard drive storage space and higher
network bandwidth capacity for streaming.
•
WATERMARK
An invisible, digitally embedded security feature to protect against tampering of recorded content. If
a downloaded h.264 clip has been altered, the PC-based playback software will alert the user with a
message upon playback. The default setting is enabled.
• MAXID
Select the maximum number of cameras connected to the DVR.
• COMPRESSION
This DVR uses the latest compression format (.h.264) for the most efcient use of storage space and
streaming exibility. The Compression setting allows the administrator to further compress streaming
video to account for slow or bandwidth-limited networks. Choose Normal for normal compression or
select High to enable the second stream of the Video Streaming (See Section 9.5). The High setting will
reduce the resolution of the second stream to one of the four QCIF levels as set in the Video Stream setting
in the Network tab (Section 9.3.3).
• INSTALLED
Enable or disable cameras in the system. The default setting is enabled.
•
PTZID
This feature has no function for this model of DVR.
Page 85
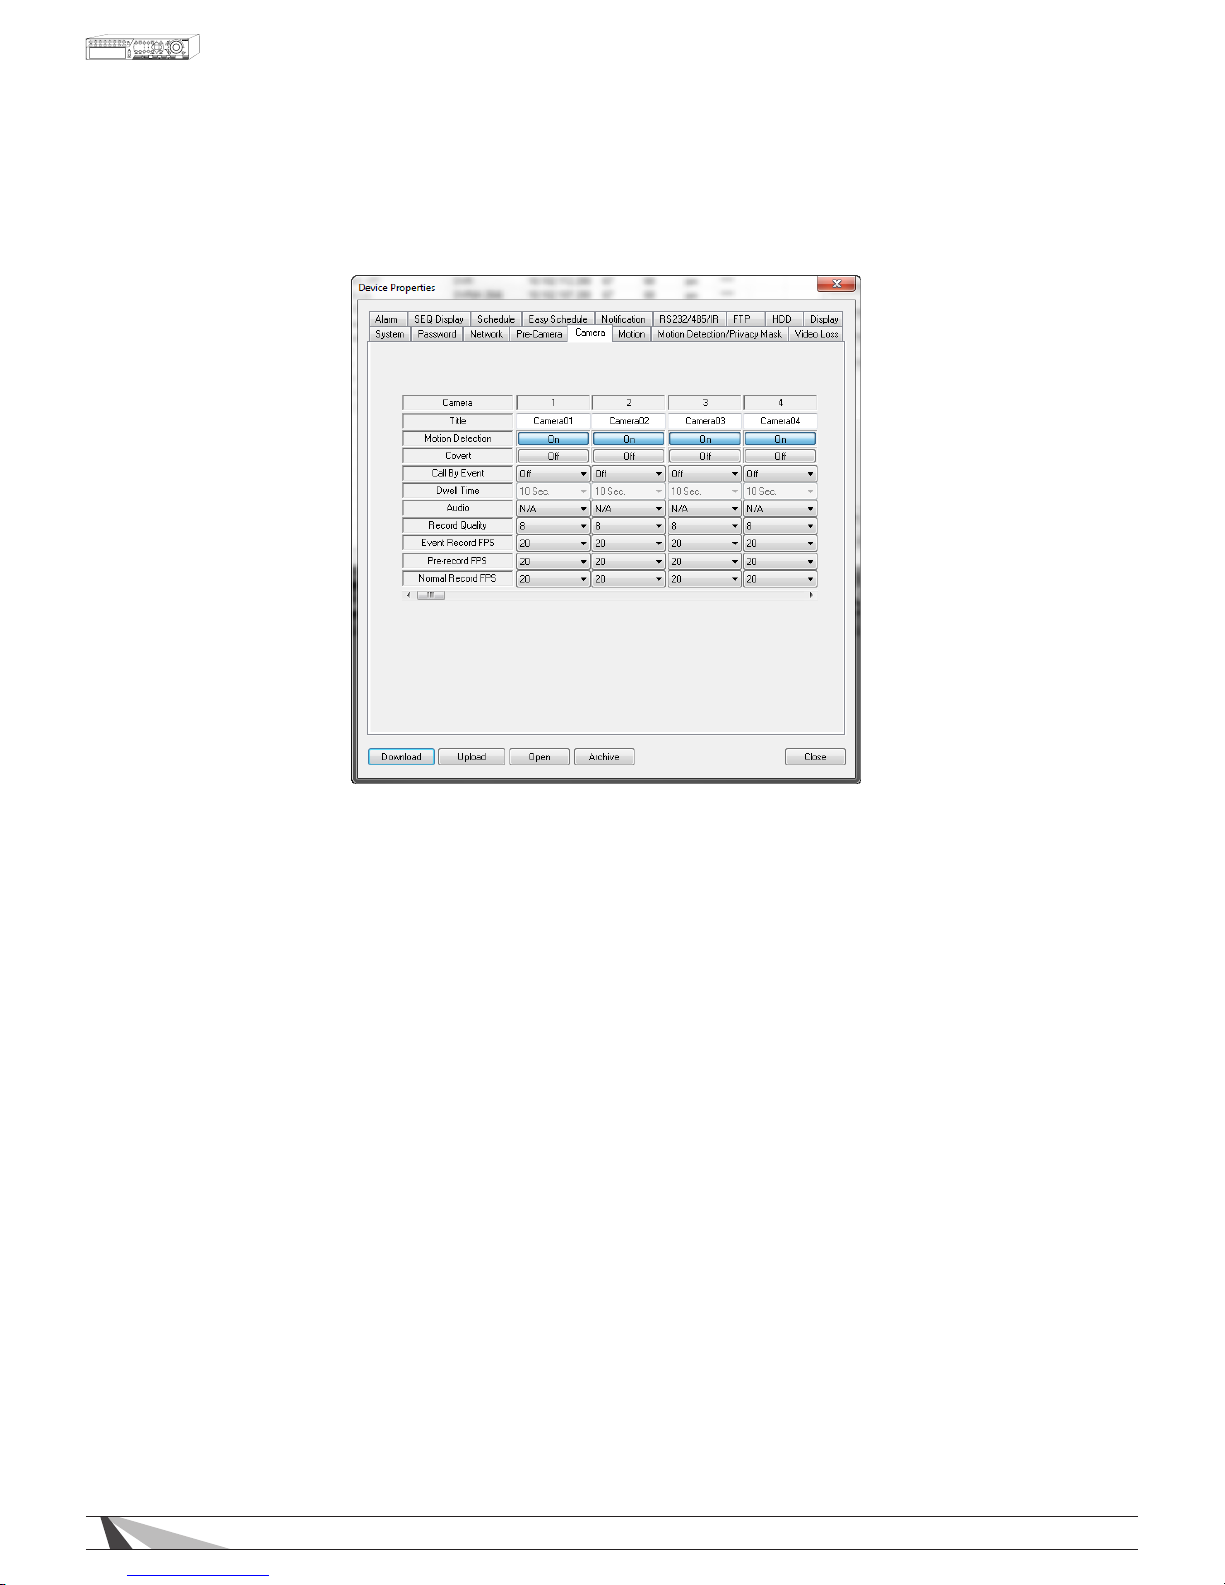
85
WPS-165-DVR-4CH Installation and Users Manual
8.3.5. CAMERA
The Camera setup allows the administrator to dene additional attributes for each camera
Thefollowingisabriefdescriptionforeachiteminthismenuanditsspecicoperations:
• TITLE
Name each camera with a unique identifying name up to eight characters maximum.
• MOTIONDETECTION
Enable or disable motion detection for the selected camera. Default setting enables this feature.
Note: This has no effect on Smart Search functions.
• COVERT
If a camera’s covert function is enabled, the video of this camera can only be seen if the user has logged
in as an Administrator. The default setting is disabled.
• CALLBYEVENT
If the following events occur for this camera, the main display (VGA or BNC) will switch to the video of this
camera for a specied period of time (dwell). Options are: Off, Motion, Alarm, Both (Motion & Alarm).
• DWELLTIME
Used in conjunction with Call By Event, Dwell Time species how long the main display will show the
camera on the screen. The Dwell Time can be set from 3 to 60 seconds
•
AUDIO
Select the corresponding AUDIO IN input for the camera. The audio for the selected AUDIO IN input will
be recorded along with the video for this camera. Selections include N/A or AUDIO Input 1. The AUDIO
INPUT can only be assigned to one camera each. The default setting is “N/A”.
Note: The audio will only be heard when in full window view of the corresponding camera and the
Audio Out button is enabled.
• RECORDQUALITY
Select the Record Quality for each camera. Values range from 1-9, with 1 the lowest quality and 9 the
highest quality.
Page 86
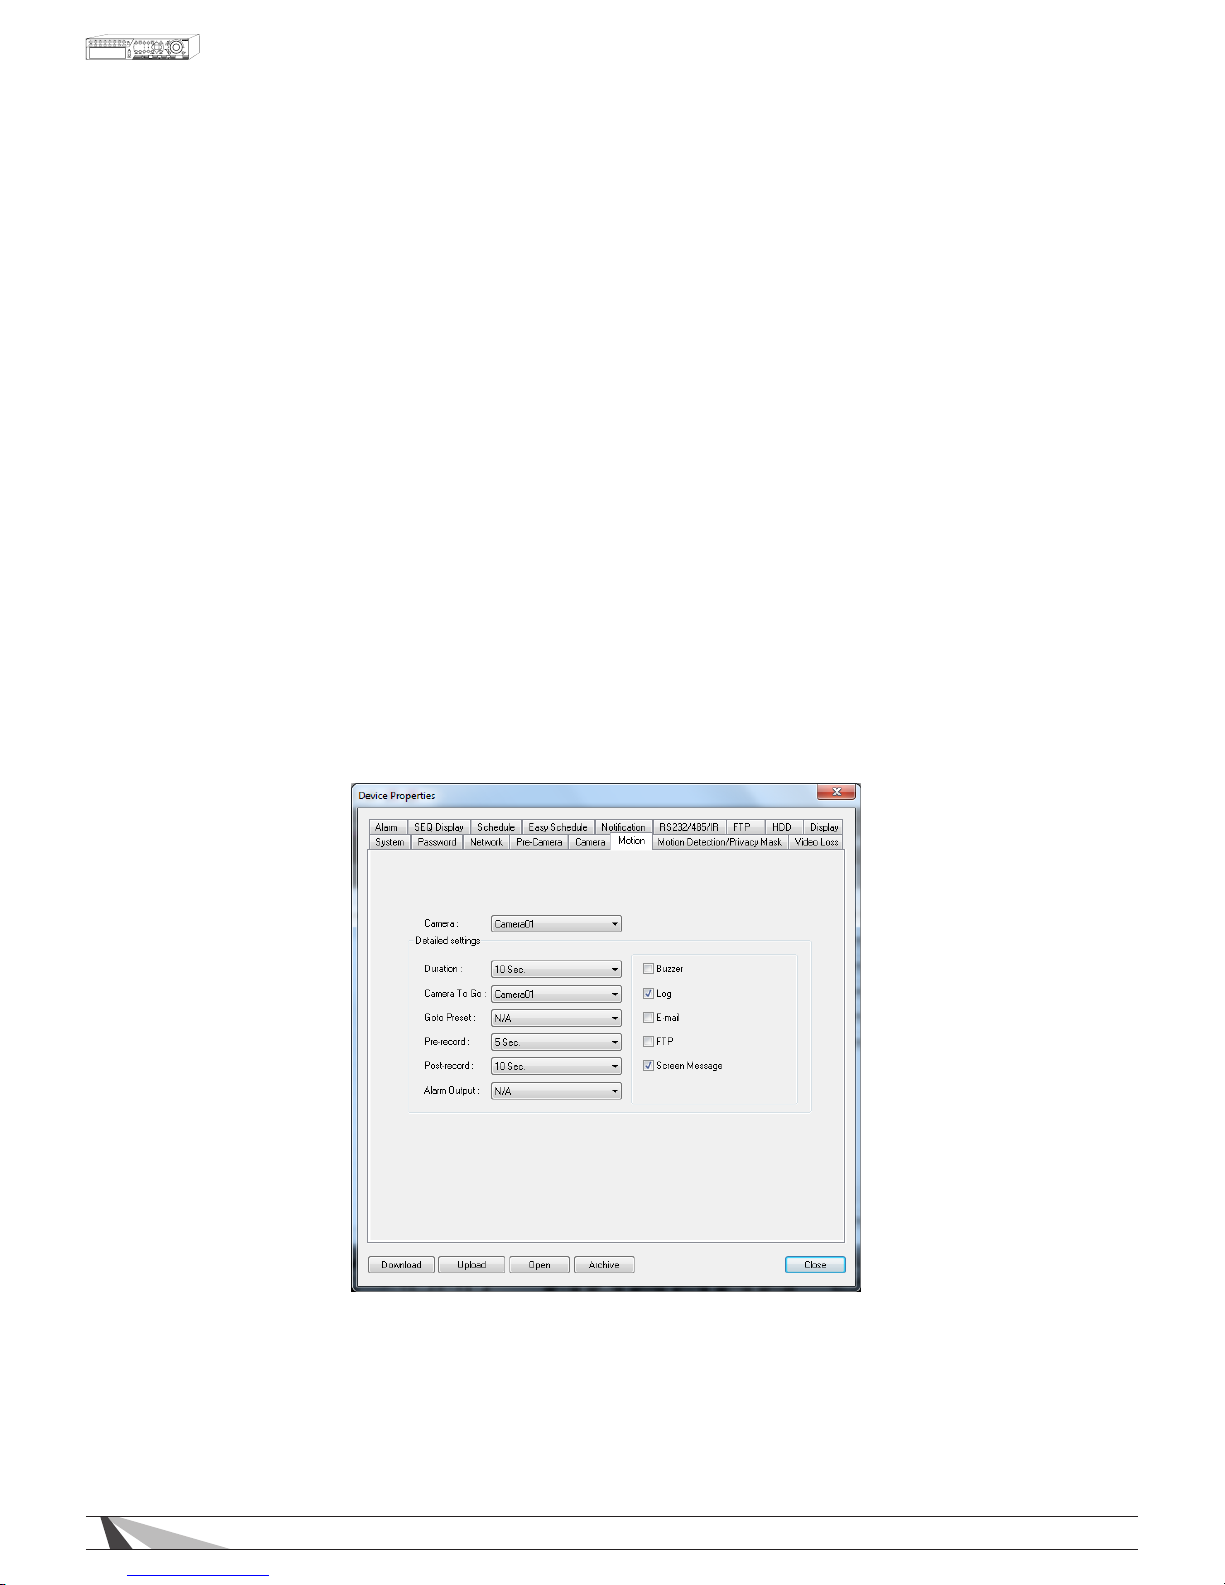
86
WPS-165-DVR-4CH Installation and Users Manual
• EVENTRECORDFPS
Set the Frames Per Second Record rate for each camera when events such as motion or alarm inputs
trigger the camera to record. Settings for Post Record time determines how long the DVR will record
after the event triggers recording. Please refer to Section 9.3.6 and Section 9.3.9 for Post-record time.
Select a value from 0 (off) - 30.
Recommendation: The higher the FPS setting for a camera, the more uid the motion on playback.
A slower FPS setting could result in “choppy” video during playback, As a reference, live video equals
30 FPS. In surveillance, 15 FPS is recognized as very good quality video while 7 FPS is typically sufcient
for most cases.
• PRE-RECORDFPS
The Frames Per Second Pre-Record rate for each camera when events such as motion, video loss or alarm
inputs trigger the camera to record. Settings for Pre-Record determine how much time the DVR will record
before the event triggers recording. Please refer to Section 9.3.6, Section 9.3.8, and Section 9.3.9 for Prerecord time.
• NORMALRECORDFPS
Unless disabled in the schedule (see Section 9.3.11), or this setting is set to 0 the DVR is always recording.
If there is no event triggering the DVR to record (such as motion or alarm inputs), the recording is referred
to as Normal Record. Set the FPS for each camera to be recorded at from a minimum of 0 (off) to a
maximum equal to the Event Record setting.
8.3.6. MOTION
Motion Setup allows the administrator to define how the system responds when motion is detected for
the camera. Use the OSD from the VGA or BNC main monitor outputs to define the motion detection area
(See Section 6.2.2).
Page 87

87
WPS-165-DVR-4CH Installation and Users Manual
Thefollowingisabriefdescriptionforeachiteminthismenuanditsspecicoperations:
• CAMERA
Select the camera to dene motion triggered events.
•
DURATION
Set the length of time the buzzer will remain triggered once motion is detected for this camera. The buzzer
and will reset immediately once motion is no longer detected.
•
CAMERATOGO
The Camera to Go setting will specify which camera is pulled up during a video loss event if Call by Event
options are enabled.
• GOTOPRESET
This feature works in conjunction with the Camera to go setting above and denes the preset position the
Camera to Go PTZ camera will go to when motion is detected for this camera. For more details about
preset positions for PTZ cameras, please refer to Section 7.
• PRE-RECORD
Dene how much time the DVR will record before motion is detected. The Pre Record FPS set in Section
9.3.5 determines the frame rate of this recording.
Note: Actual pre-record time may be shorter than the value set if the total size of the pre-record video
exceeds the pre-record video buffer.
• POST-RECORD
Dene how much time the DVR will record after motion is detected. The Post Record FPS set in Section
9.3.6 determines the frame rate of this recording.
•
ALARMOUT
This feature has no function for this model of DVR.
• BUZZER
By default the internal buzzer is disabled to sound when motion for this camera is detected.
• LOG
By default, the DVR will log to the Event Log when motion is detected.
• E-MAIL
Send an email message to predened email address in the event motion detected for this camera.
See Section 9.3.13 for more information on e-mail.
• FTP
This DVR can send the recorded motion detection event for this camera to an FTP server.
• SCREENMESSAGE
By default, the DVR will display a motion detection message in the System Status Bar (visible from the VGA
or BNC main monitor output only) when motion is detected for this camera.
Page 88
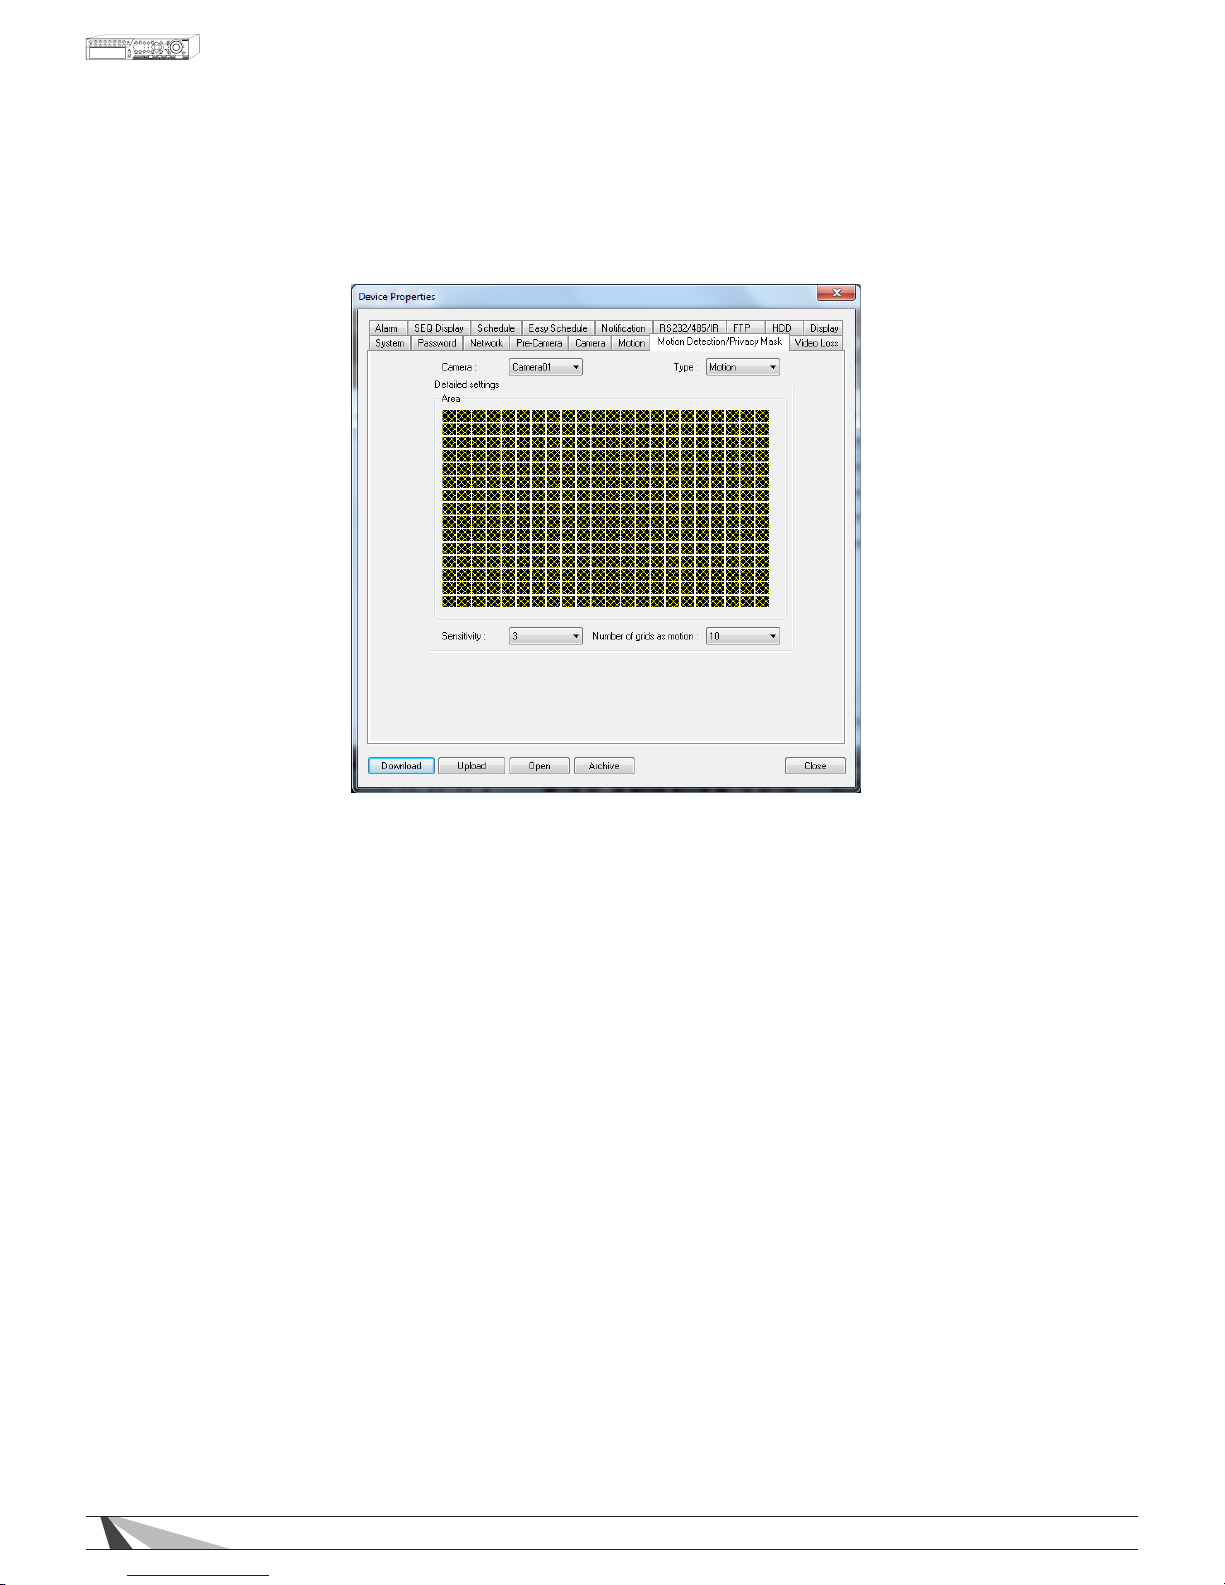
88
WPS-165-DVR-4CH Installation and Users Manual
8.3.7. MOTION DETECTION / PRIVACY MASK
Note: Update the DVR to the latest version available on the SnapAV Website to use this feature.
8.3.7.1. MOTION DETECTION
Motion detection allows administrator level users to dene how the system responds when motion is detected
for the camera.
1. Select the Motion Detection / Privacy Mask tab.
2. Select the desired camera from the Camera drop-down list.
3. Select Motion from the Type drop-down list.
4. When opened, the area will show Yellow patterns over the camera image (Yellow indicates the areas the
DVR will detect for motion). Click and Hold the left mouse button and drag over the area(s) where motion
detection is not desired.
Tip: Select the entire visible area of the camera to remove motion detection from the camera. After doing so,
select the area in which motion detection is desired.
5. Adjust Sensitivity and Number of grids (number of boxes in the picture that must see motion before triggering)
to achieve the desired results. Adjust Sensitivity and Number of grids for all lighting conditions during setup for
the best results.
6. Select Upload to save the settings.
7. Repeat for all cameras connected to the DVR.
Tips for motion detection setup:
DVRs recognize the change in light to detect motion (this is different than the typical PIR security motion
detector that uses multiple beams of infrared light). It is critical to understand possible changes in the
scene to reduce false motion detection. Generally it is easier to control the lighting and the scene in indoor
environments for accurate motion detection.
However, in exterior locations environmental factors such as shadows due to changes in weather or the position
of the sun, leaves blowing in the wind and even animals can falsely trigger motion detection. For highly
sensitive environments it may be better to use a 3rd party PIR motion detector connected to the alarm inputs
on the DVR. We recommend the use of higher quality cameras (that do not induce noise into the picture in low
light conditions that could false trigger the DVR.
Page 89

89
WPS-165-DVR-4CH Installation and Users Manual
8.3.7.2. PRIVACY MASK
Privacy Mask allows administrator level users to dene areas of the camera to not be shown in the camera
image. There areas will be hidden with black boxes/grids
1. Select the Motion Detection / Privacy Mask tab.
2. Select the desired camera from the Camera drop-down list.
3. Select Privacy Mask from the Type drop-down list.
4. When opened, the area will show the camera image. Click and Hold the left mouse button and drag over
the area where privacy is desired. (Yellow indicates the selected Privacy area)
5. Select Upload to save the settings.
6. Repeat for all cameras connected to the DVR.
Page 90
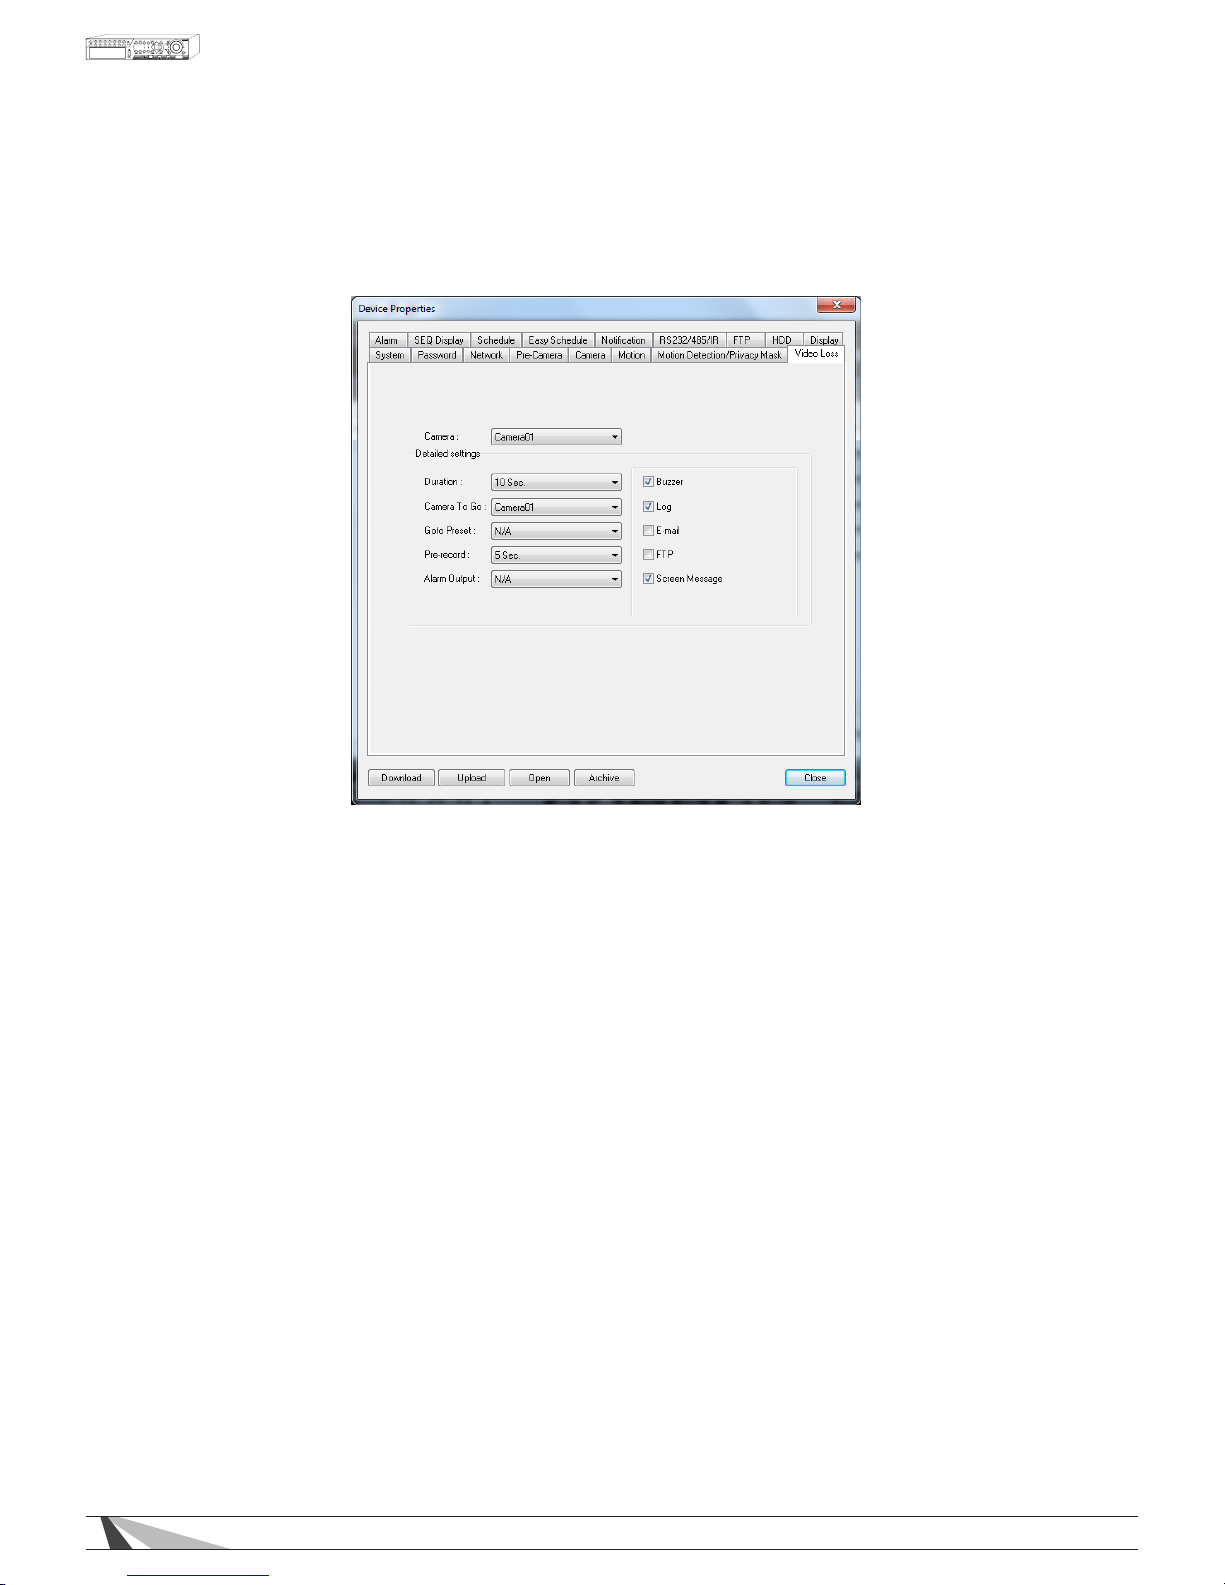
90
WPS-165-DVR-4CH Installation and Users Manual
8.3.8. VIDEO LOSS
Video Loss Setup allows the administrator to dene how the system responds when video signal is lost
for the camera.
Thefollowingisabriefdescriptionforeachiteminthismenuanditsspecicoperations:
• CAMERA
Select the camera to dene video loss triggered events.
•
DURATION
Set the length of time the buzzer will remain triggered once video loss is detected for this camera. The
Buzzer will reset immediately once video signal is restored.
•
CAMERATOGO
The Camera to Go setting will specify which camera is pulled up during a video loss event if Call by Event
options are enabled.
•
GOTOPRESET
This feature has no function for this model of DVR.
• PRE-RECORD
Dene how much time the DVR will record before video loss is detected. The Pre Record FPS set in
Section 9.3.5 determines the frame rate of this recording.
Note: Actual pre-record time may be shorter than the value set if the total size of the pre-record video
exceeds the pre-record video buffer.
•
ALARMOUT
This feature has no function for this model of DVR.
• BUZZER
By default, the internal buzzer is enabled to sound when video loss for the camera is detected.
• LOG
By default, the DVR will log when video loss is detected to the Event Log.
Page 91

91
WPS-165-DVR-4CH Installation and Users Manual
• E-MAIL
This DVR can send an email message to a predened email address in the event video loss is detected for
this camera. The default setting is disabled. See Section 9.3.13 for more information on e-mail.
• FTP
This DVR can send the recorded video loss event for this camera to a FTP server. The default setting
is disabled.
• SCREENMESSAGE
By default, the DVR will display a video loss message in the System Status Bar (visible from the VGA
or BNC main monitor output only) when video loss is detected for this camera.
Page 92
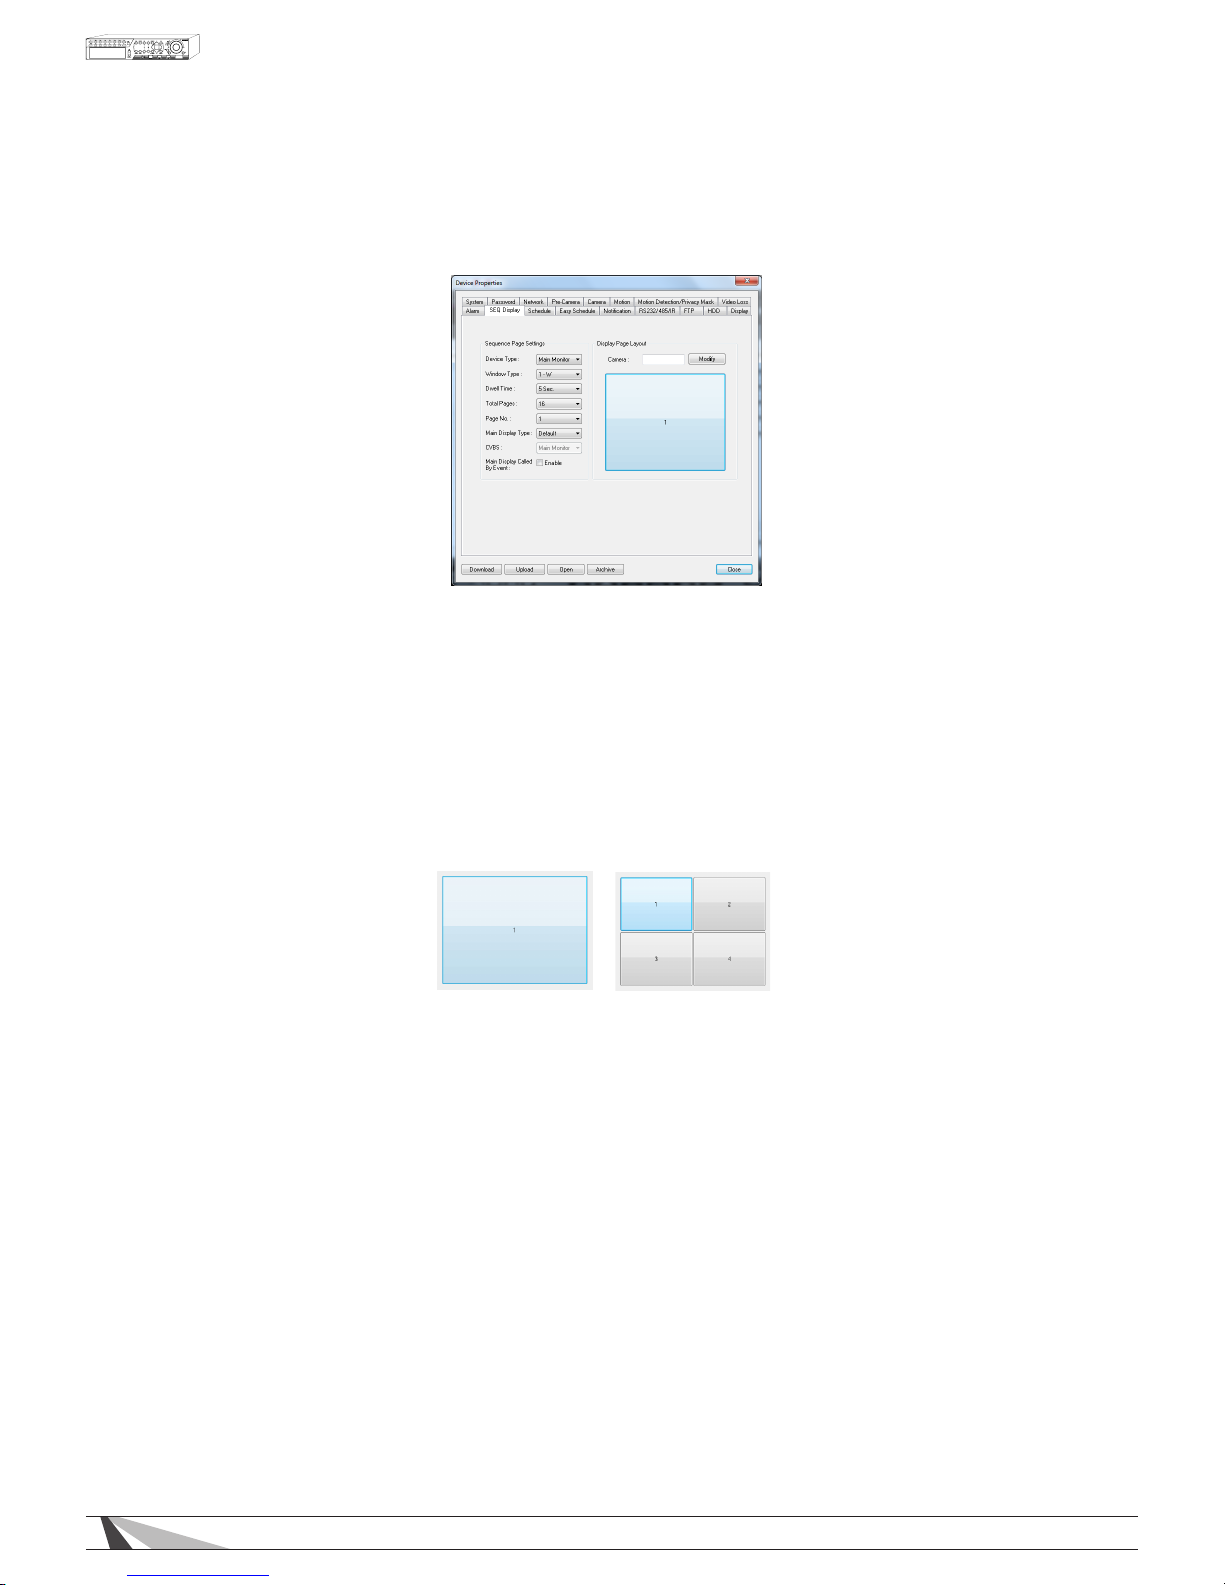
92
WPS-165-DVR-4CH Installation and Users Manual
8.3.9. SEQ DISPLAY
The SEQ Display Setup allows the administrator to dene the displayed pages when in SEQ Display mode.
Thefollowingisabriefdescriptionforeachiteminthismenuanditsspecicoperations:
• DEVICETYPE
This DVR only supports Main Monitor
•
WINDOWTYPE
Select the desired amount of windows to display based on the following options.
WPS-165-DVR-4CH
• 1-Window
• 4-Window
• DWELLTIME
Set the dwell time (how long this page will be displayed before transitioning to the next page) from 3 to 60
seconds.
• TOTALPAGES
Set total pages for this SEQ Display Type.
• PAGENO
Select the page to be modied.
• MAINDISPLAYTYPE
Determines the camera channel conguration of the Main Display. In 'Default' the channel conguration
follows a normal standard (i.e. 1w - Page1 = Camera 1, Page2 = Camera 2, etc; 4w - Page1 = Camera
1/2/3/4, Page2 = Camera 5/6/7/8, etc; 7w - Page1 = 1/2/3/4/5/6/7, etc). In 'SEQ' the channel conguration
follows the layout of the Sequence menu, where a camera can be placed on any channel number.
• CVBS
This feature has no function with this model of DVR.
• CAMERA
Highlight the grid within the displayed page and select the camera number to appear in this grid.
Page 93
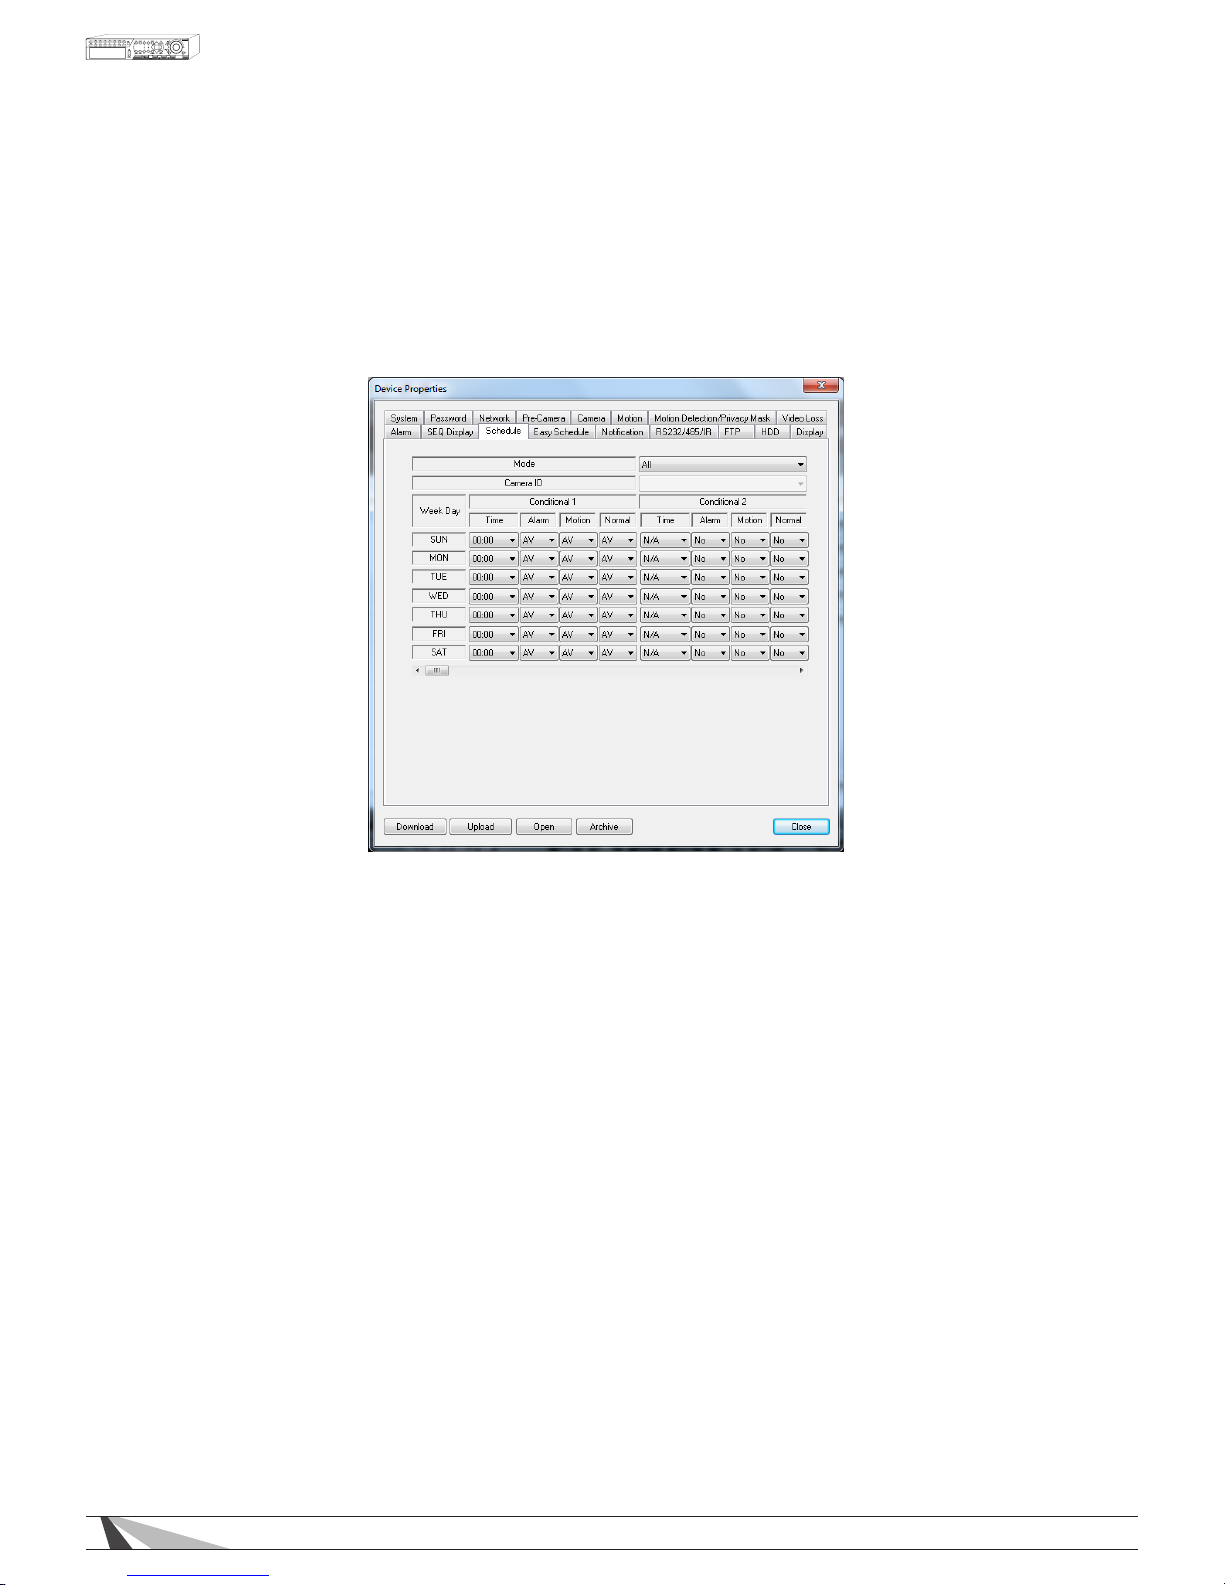
93
WPS-165-DVR-4CH Installation and Users Manual
8.3.10. SCHEDULE
The Scheduled Record Setup allows the administrator to dene when and how video (and audio) will be
recorded. This feature may be useful to increase hard drive storage space by dening what types of events
are recorded on specic days of the week. For example if Normal Recording (recall that the DVR is capable
of always recording video even without event triggers such as motion or alarm) is not necessary, this feature
can be disabled on a daily basis. To further dene when and how the DVR records, up to 16 time segments
(Conditional 1 – Conditional 16) are available for each day of the week.
Thefollowingisabriefdescriptionforeachiteminthismenuanditsspecicoperations:
• MODE
Allows choice of scheduling for all cameras simultaneously, or scheduling by individual camera number.
• CAMERAID
Determine which camera's schedule is being congured when using the Individual mode.
• TIME
Set the start time of this time segment (conditional) in increments of 30 minutes in military time format. The
end time of this conditional is implicitly set as the start time of next conditional.
Example: If the following start times are set:
• Conditional 1 = MON at 9:00
• Conditional 2 = MON at 18:00
• Conditional 3 - Conditional 16 = MON as N/A (Not Available)
--- then ---
• Conditional 1 = MON 9:00-18:00
• Conditional 2 = MON 0:00-9:00 and 18:00-24:00
• ALARM
Dene if Alarm events are recorded. Options include V for Video only, AV for Audio and Video, NO for No
Recording (provides event notications without event recording), and OFF to turn all event notications and
recordings off.
• MOTION
Dene if Motion events are recorded. Options include V for Video only, AV for Audio and Video, NO for No
Recording (provides event notications without event recording), and OFF to turn all event notications and
recordings off.
Page 94
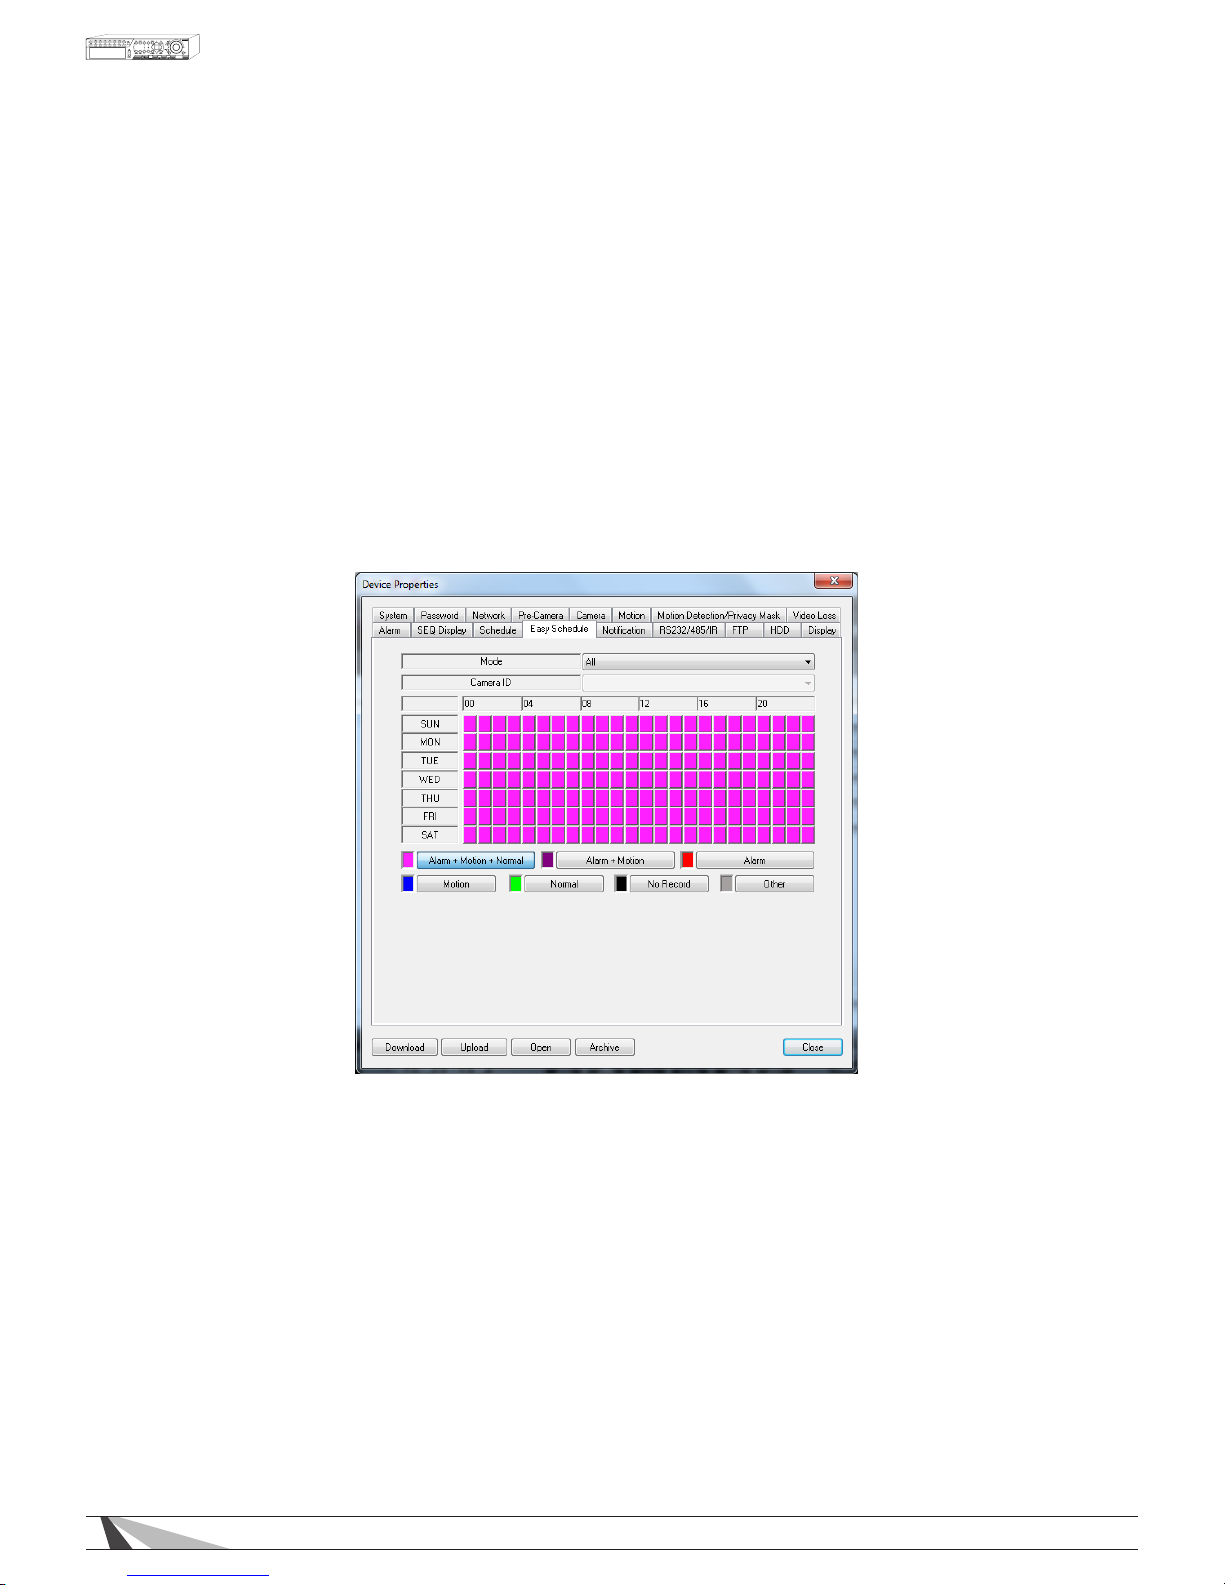
94
WPS-165-DVR-4CH Installation and Users Manual
• NORMAL
Dene if normal video and audio (non-event based video and audio) is recorded. Options include V for
Video only, AV for Audio and Video, NO for No Recording, and OFF for recording but no event notication.
NOTE: If both Alarm and Motion are set to OFF, then all video and audio recordings will be considered
“normal recording” unless there is Video Loss for a particular camera.
• BUZZER
By default, the internal buzzer is enabled to sound when video loss for the camera is detected.
8.3.11. EASY SCHEDULE
The Easy Schedule Record Setup allows the administrator to visually dene when and how video (and audio)
will be recorded. The simple seven day by 24 hour grid, allows push-button scheduling by assigning various
record modes by day/hour/mode.
Simply select a record mode and then assign that mode to the grid by day and hour. (The grid is setup as seven
days by twenty four hours per day in one hour blocks.)
• MODE
Select the cameras to be scheduled from the drop-down menu. OPTIONS: All, Individual.
•
CAMERAID
If 'Individual Mode' was selected, select the camera to be scheduled from the drop-down menu.. OPTIONS:
1-
4.
Select a record mode or combination of record modes for the selected camera(s). Select a record mode and
then click in the grid for the days/hours that mode is to be applied. To change record modes, select a different
mode and click the days/hours on the grid.
• ALARM+MOTION+NORMAL
Select to record 24/7 plus logging and notications of alarm and motion events.
• ALARM+MOTION
Select to disable 24/7 recording while maintaining logging and notications for alarm and motion events.
• ALARM
Select to disable 24/7 recording and motion event logging and notications while maintaining logging and
notications for alarm events only.
• MOTION
Select to disable 24/7 recording and alarm event logging and notications while maintaining logging and
notications for motion events only.
Page 95
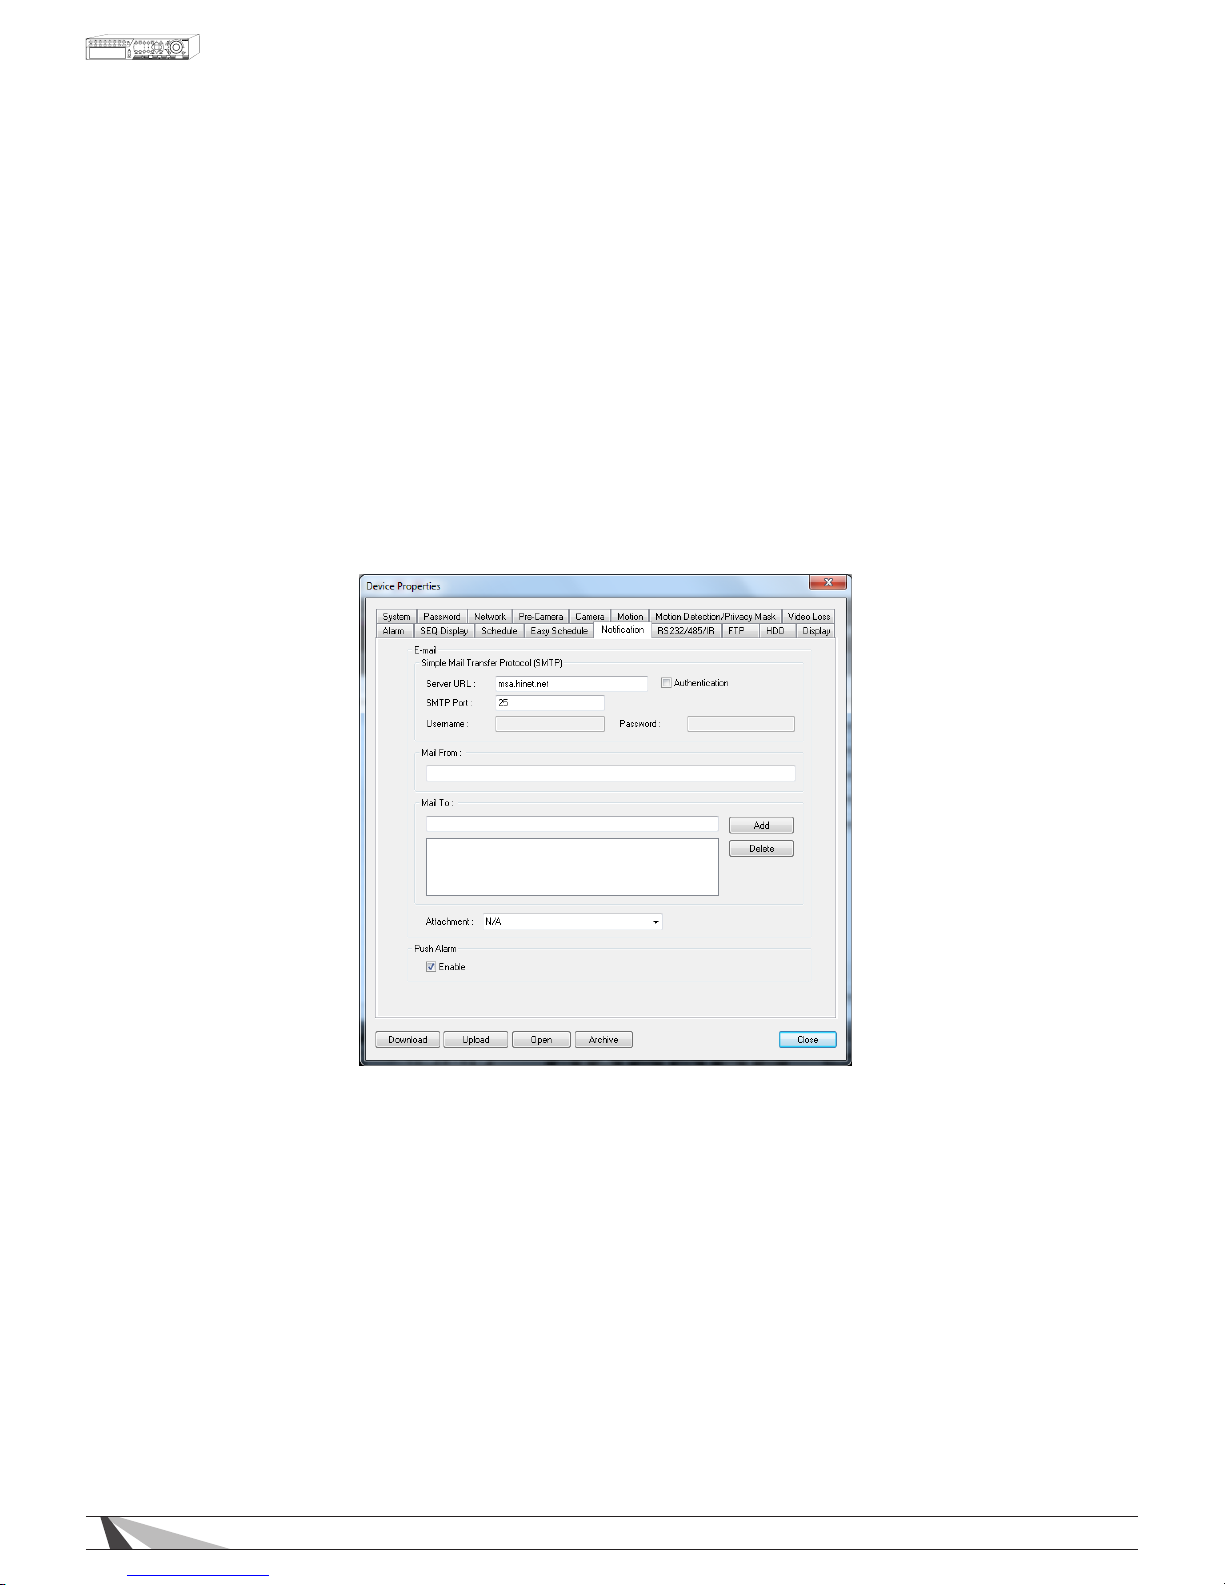
95
WPS-165-DVR-4CH Installation and Users Manual
• NORMAL
Select to record 24/7 video and audio.
• NORECORD
Select to not record any video or audio and disable all logging and notications.
• OTHER
Indicates that a timeframe other than whole hours has been selected in the normal Schedule menu. This
other schedule allows times to be selected in 1/2 hour increments
8.3.12. E-MAIL (NOTIFICATION)
When an event occurs and e-mail is enabled as a corresponding action, an e-mail will be sent based on
the parameters set in this menu. Consultation with the e-mail service provider may be required to set these
parameters correctly.
Note: DVR currently only supports TLS encryption for email.
Thefollowingisabriefdescriptionforeachiteminthismenuanditsspecicoperations:
• SMTPSERVER(SERVERURL)
Enter the SMTP mail server name.
• SMTPPORT
Enter the SMTP port for e-mail transmission. The default value is 25.
• AUTHENTICATION
Check/uncheck this item depending on whether the SMTP mail server requires authentication.
• USERNAME
Enter the username to the e-mail service.
• PASSWORD
Enter the password to the e-mail service.
Page 96

96
WPS-165-DVR-4CH Installation and Users Manual
• MAILFROM
Enter the e-mail address of the associated e-mail account.
Note: This setting is specic and must match e-mail client settings used to access an e-mail account or the
e-mail feature will not be operable. Do not enter generic text in this eld.
• MAILTO#1-5
The DVR can send e-mails originated from triggered events to up to ve different e-mail addresses.
Enter the appropriate e-mail addresses in these elds.
• ATTACHMENT
This feature offers the ability to attach a picture from the corresponding camera to the e-mail being
sent. Optional picture sizes for the attachment can be set to Original to match the recorded resolution
or set to QCIF (Quarter CIF is 176 x 144 pixels) to reduce the size of the attachment. Select N/A to disable
attachments.
NOTE: If the DVR’s resolution is set to Half D1, picture attachments in the e-mail will appear “squished”
since the DVR reduces the horizontal lines of resolution by half (therefore reducing storage space and
bandwidth requirements). This only effects e-mails and not noticeable in .h.264 live or recorded
playback video.
• PUSHALARM
This feature has no function for this model of DVR
Page 97
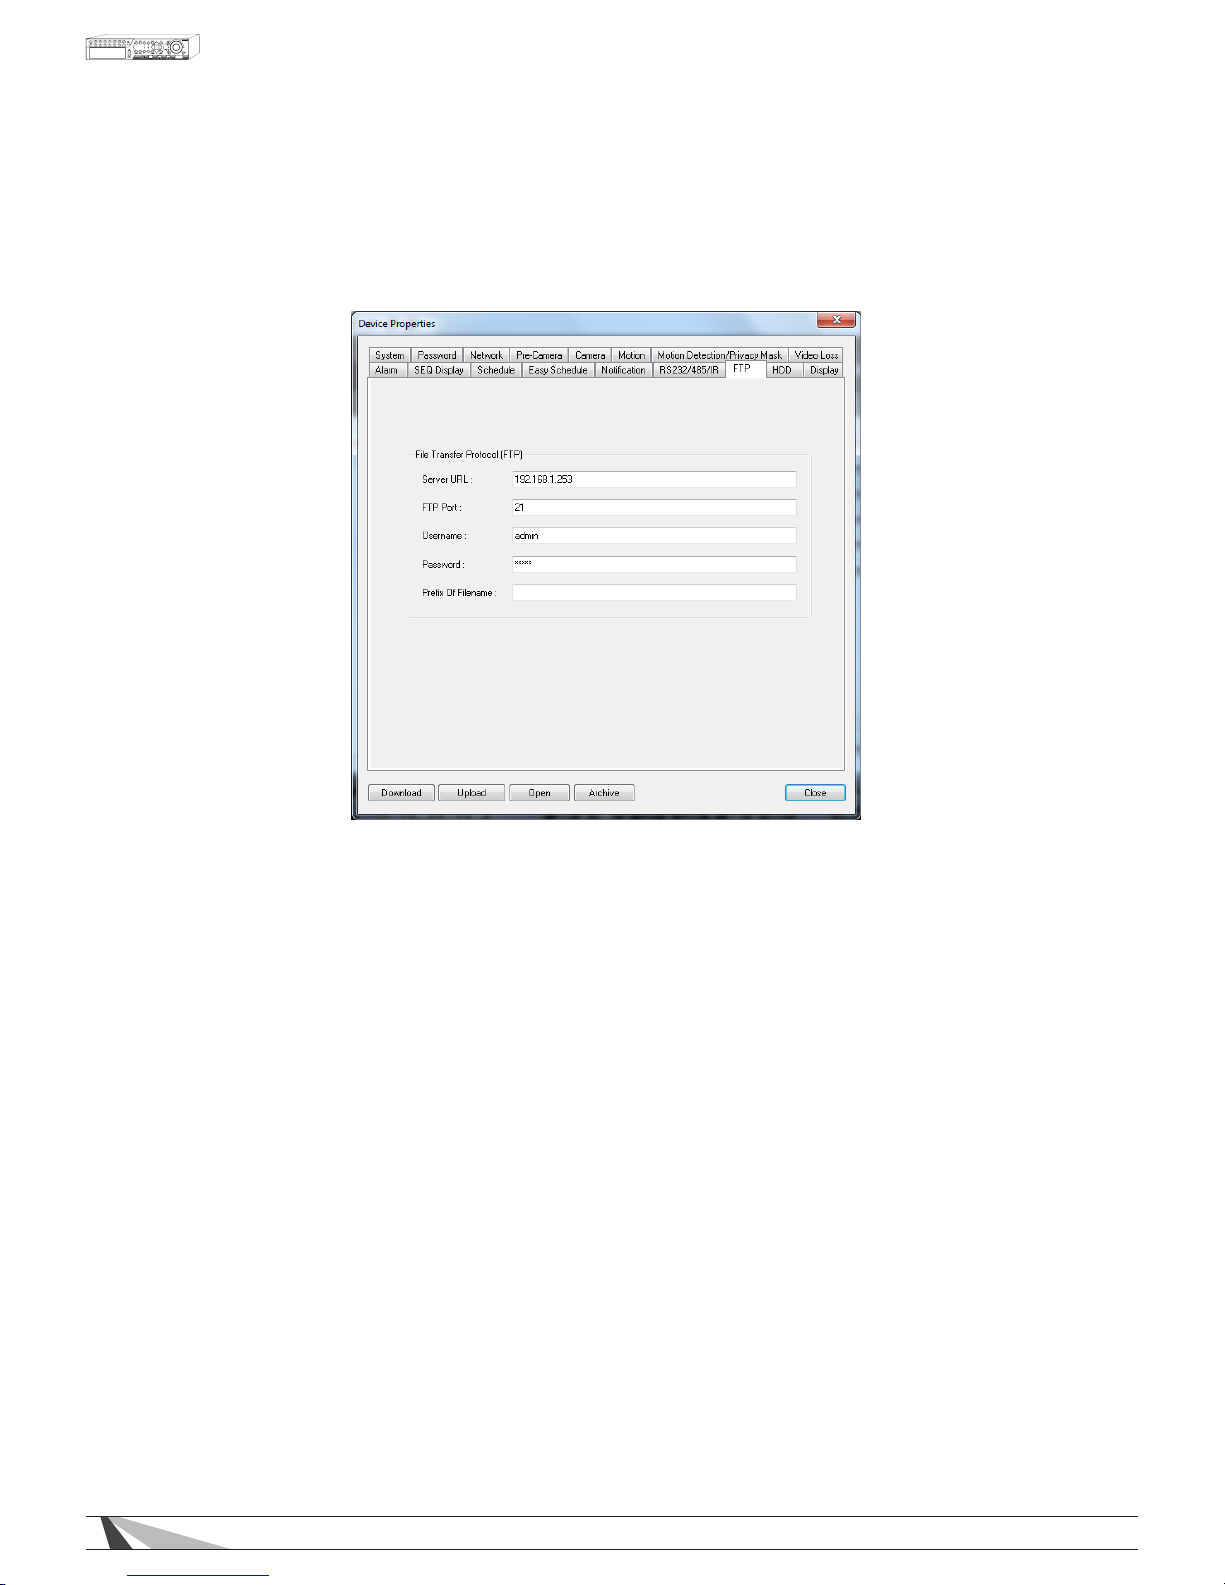
97
WPS-165-DVR-4CH Installation and Users Manual
8.3.13. FTP
FTP Setup allows the administrator to set FTP-related parameters. When an event occurs and FTP is enabled for
the action, the recorded video and audio for that event will be sent to the FTP server based on the parameters
set in this menu.
Thefollowingisabriefdescriptionforeachiteminthismenuanditsspecicoperations:
• SERVERURL
Enter the FTP server web/IP address.
• FTPPORT
Enter the FTP port number. The default value is 21.
• USERNAME
Enter the username for the FTP server.
• PASSWORD
Enter the password for the FTP server.
• PREFIXOFFILENAME
Enter the prex of the lenames for les sent to the FTP server. If this box is left empty, the lenames will
start with “cam” If a prex such as “Prex” is entered, the lenames will be “Prex-cam” For another
example, if the prex is “DVR01”, then the lenames will begin with “DVR01-cam.”
Page 98
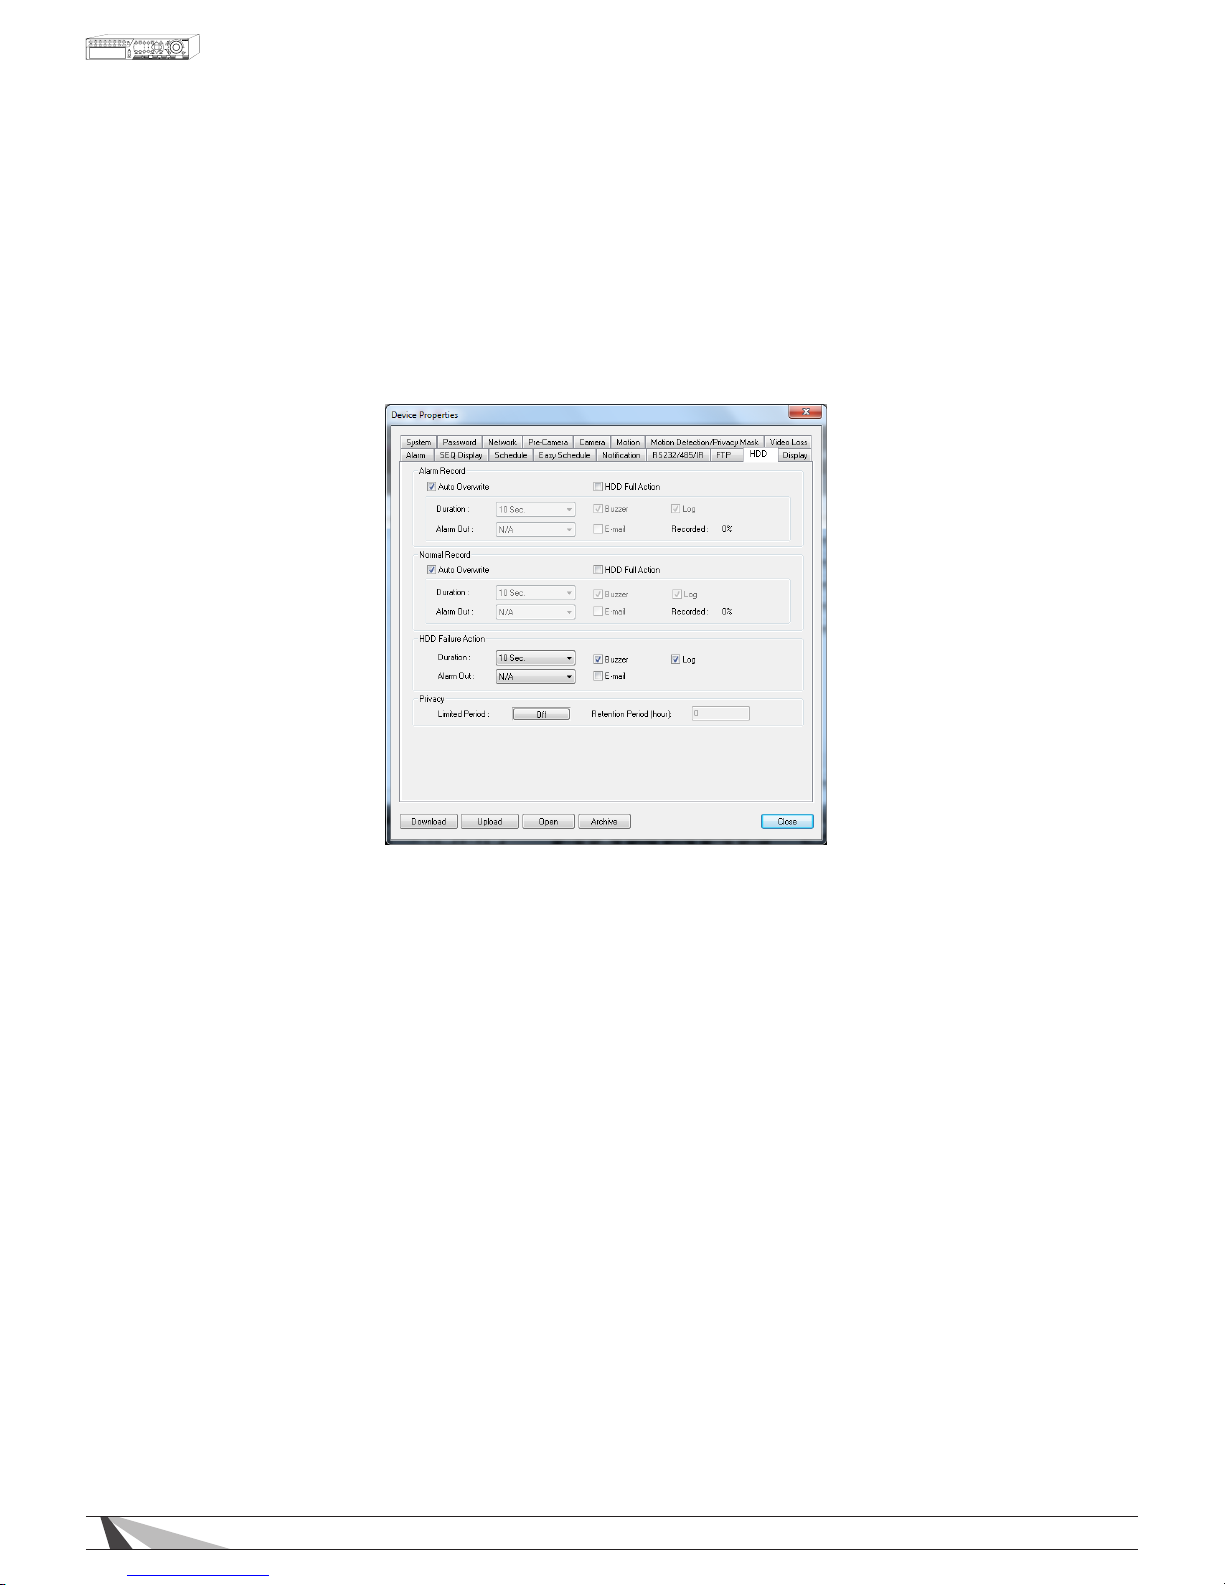
98
WPS-165-DVR-4CH Installation and Users Manual
8.3.14. HDD
Alarm-triggered video and audio is typically more important than non-even normal video and audio recording
in surveillance applications. The DVR is designed to allow the hard drive to be partitioned into an alarm partition
and a normal partition. Partitions can only be set from the VGA or BNC main display (See Section 6.7). Alarm
video and audio will be recorded in alarm partition and normal video and audio will be recorded in the normal
partition.
HDD Setup in Internet Explorer allows the administrator to dene the behavior for Alarm Record and Normal
Record partitions if the hard drive becomes full.
Thefollowingisabriefdescriptionforeachiteminthismenuanditsspecicoperations:
ALARM RECORD/NORMAL RECORD/HDD FAILURE ACTION
• HDDFULLACTION
Based on the hard drive status, the DVR can sound the buzzer, log the event and email an alert when the
hard drives reaches its maximum capacity.
•
DURATION
Set the duration that the buzzer will remain triggered when the corresponding partition is full. Set the time
from 3 seconds to 60 minutes or ‘-‘ indefinitely until the Alarm Reset button on the remote control is pressed.
•
ALARMOUT
This feature has no function for this model of DVR.
• BUZZER
By default, the internal buzzer is enabled to sound when the corresponding hard drive partition is full.
• LOG
By default, the DVR will log when the corresponding hard drive partition is full to the event Log
• E-MAIL
Send an e-mail message to a predened email address when the corresponding hard drive partition is full.
Page 99
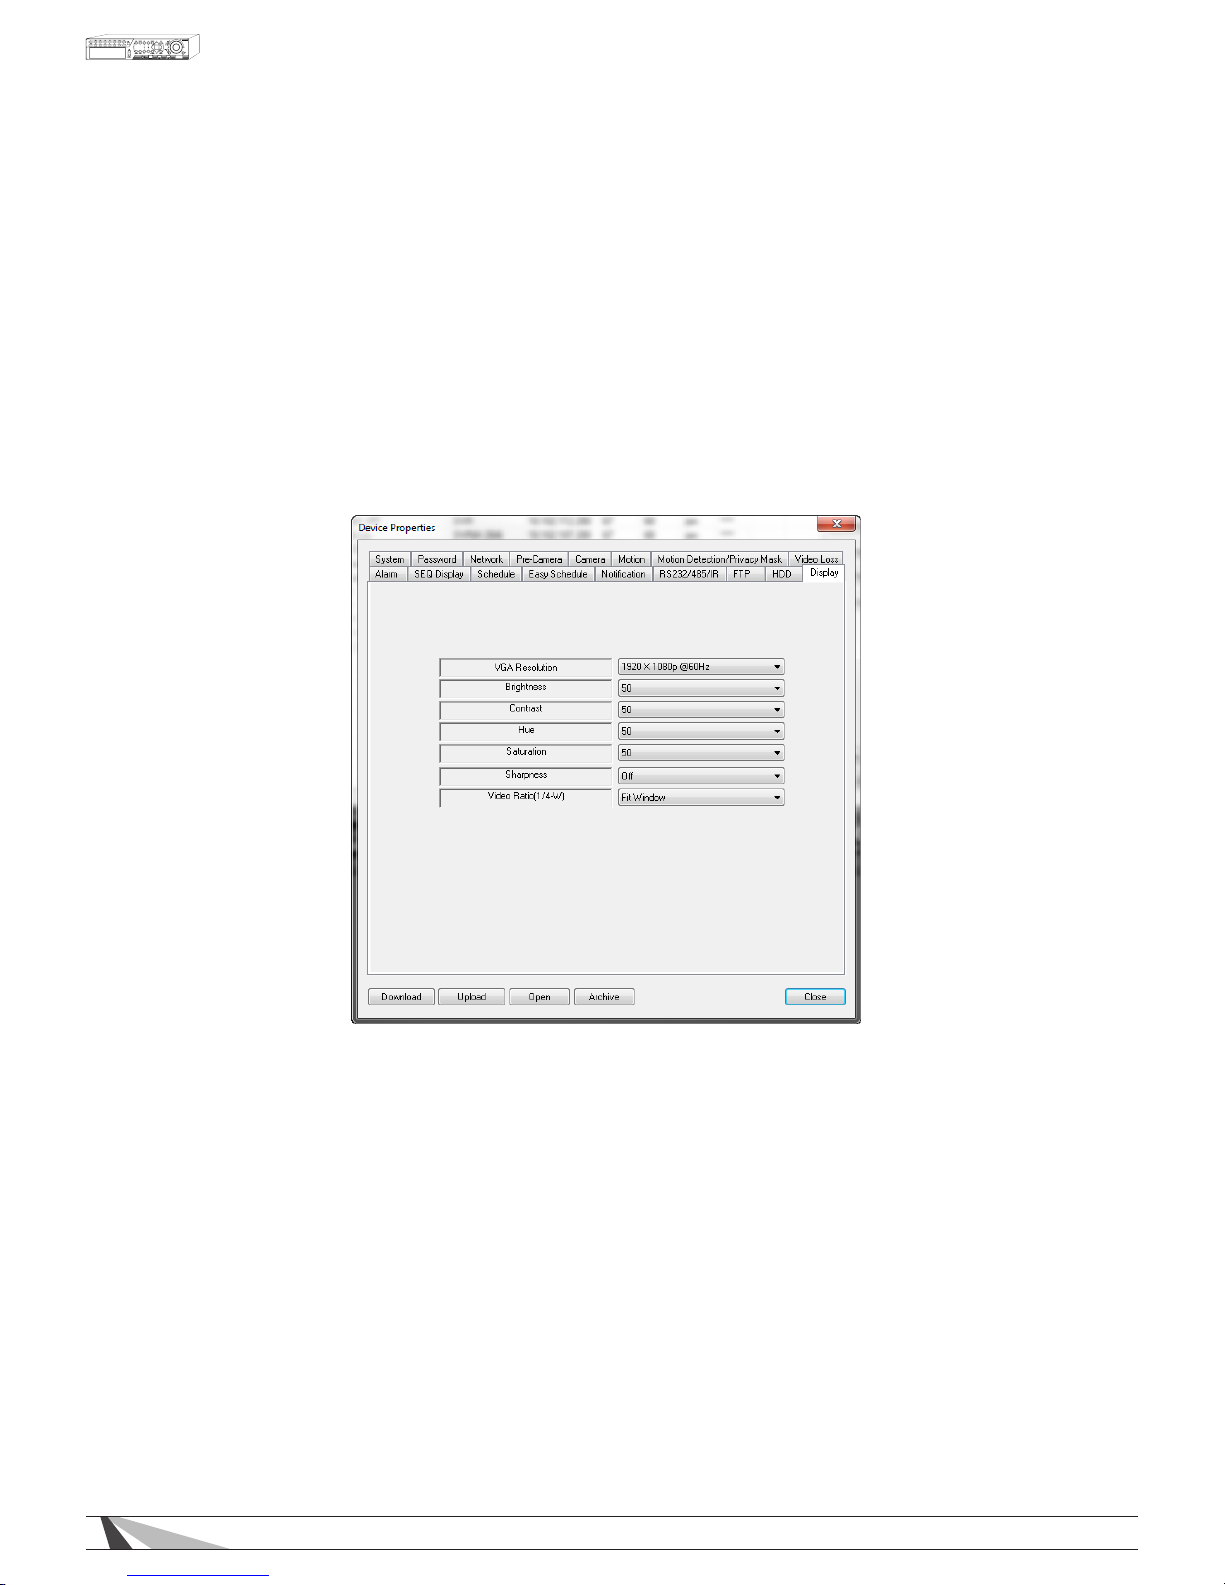
99
WPS-165-DVR-4CH Installation and Users Manual
• RECORDED%
Shows the amount of HDD space that has been overwritten since the beginning of the last overwrite cycle.
PRIVACY
• LIMITEDPERIOD
Turns Privacy option On or Off
• RETENTIONPERIOD
Determines how long the DVR will hold on to previously recorded footage. Example - If this option is set to
30 hours, the DVR will keep a running window containing 30 hours of footage. Anything prior to the 30 hours
will be deleted.
8.3.15. DISPLAY
The Display settings adjust the video output options as viewed through the VGA connections.
•
VGARESOLUTION
Select the desired screen resolution from the drop-down. It is recommended to match the native resolution
of the video display being used. Please refer to the video display documentation for specic information.
OPTIONS: 1024 x 768, 1280 x 1040, 1920 x 1080.
• BRIGHTNESS
Select the desired brightness setting from the drop-down. This setting will determine the black level in the
video output. OPTIONS: 0-100
• CONTRAST
Select the desired contrast setting from the drop-down. This setting will determine the white level in the
video output. OPTIONS: 0-100
• HUE
Select the desired hue setting from the drop-down. This setting will determine the red, green and blue color
level in the video output. OPTIONS: 0-100
• SATURATION
Select the desired saturation setting from the drop-down. This setting will determine the overall color
intensity in the video output. OPTIONS: 0-100
• SHARPNESS
Select the desired sharpness setting from the drop-down. This setting will dene the edge detail in the video
output. OPTIONS: On, Off
Page 100
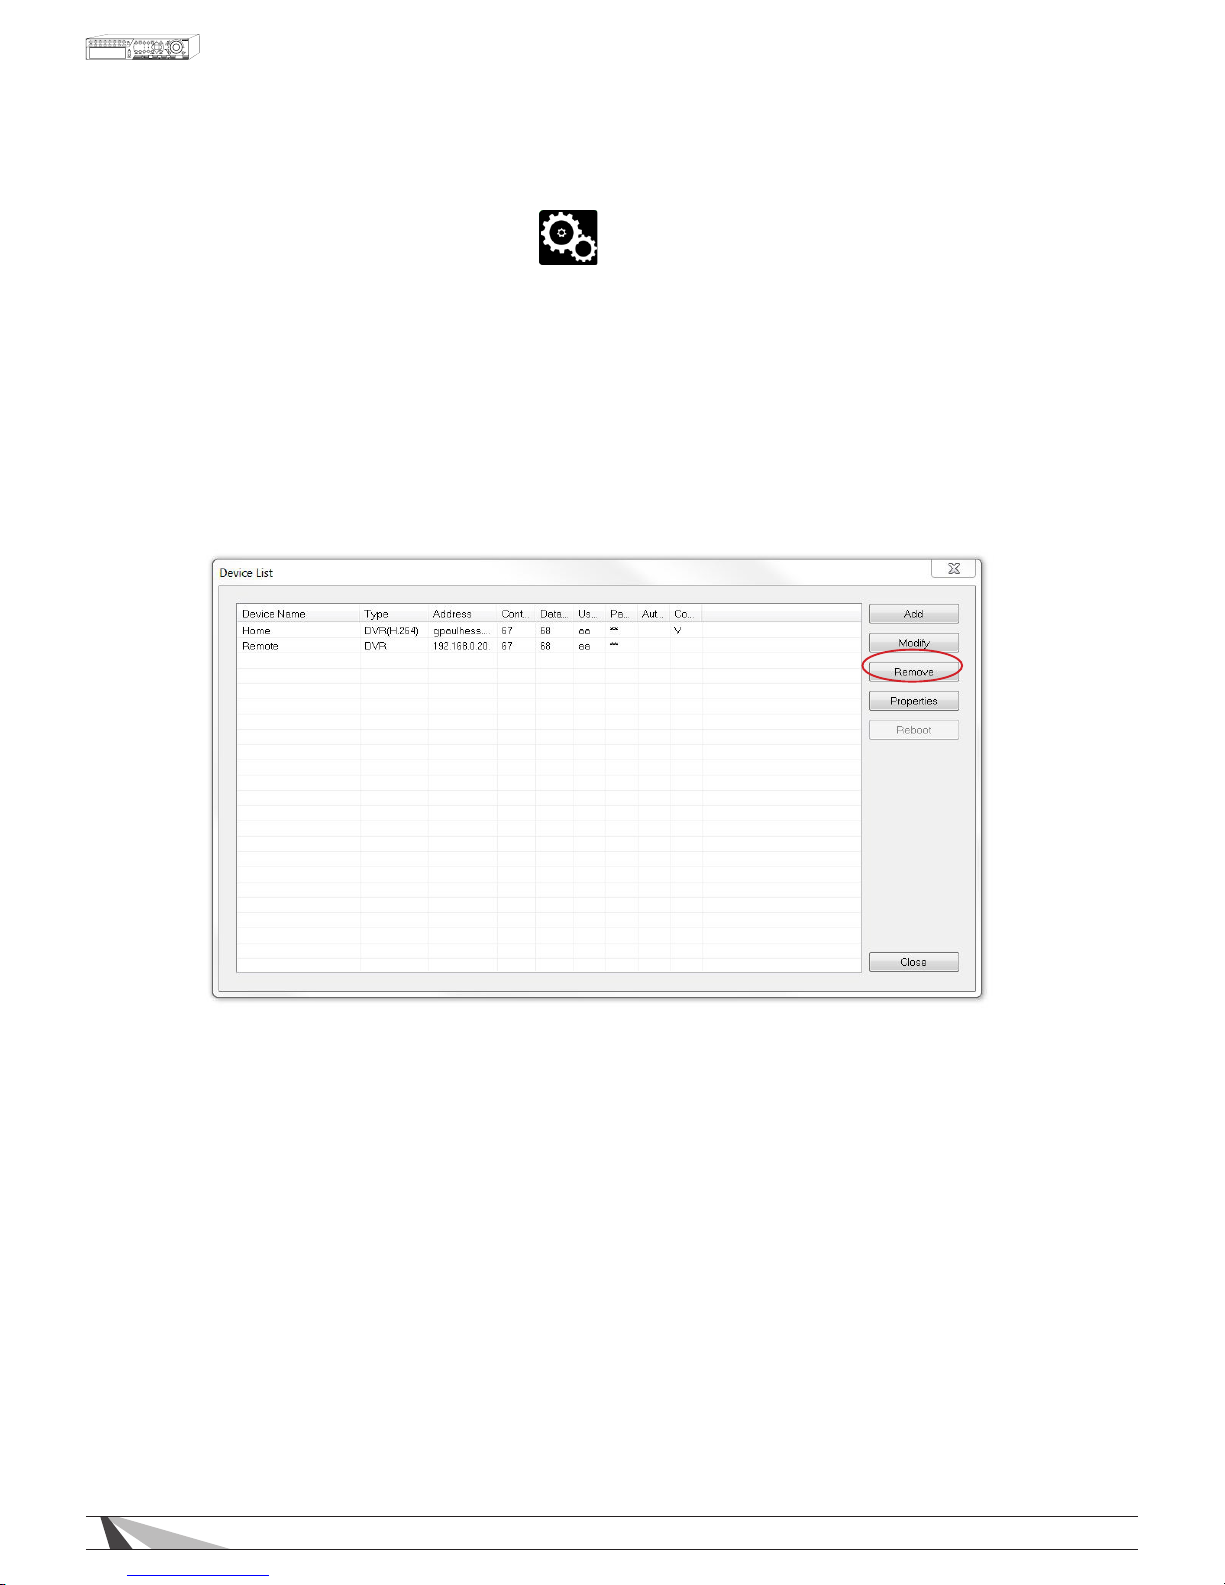
100
WPS-165-DVR-4CH Installation and Users Manual
8.4. VIDEO STREAM (DUAL STREAM)
This DVR offers two simultaneous video (and audio) streams to allow the DVR to record at a higher resolution
while streaming the video to remote devices at a lower resolution.
Internet Explorer allows the user to choose which stream is being viewed, Record or Extra. Use the Modify menu
of
DeviceCong to change the video stream being displayed in Internet Explorer. The setting should be based
on the bandwidth capability of the network.
To access this menu, select
DeviceCongicon from Internet Explorer.
1. Select the DVR to control and click on Modify.
2. Adjust the Video Stream accordingly.
• RECORD
If Record is selected, the PC will match the Best REC Resolution setting found in Pre-Camera tab.
The Record setting (with Compression set to Normal, see Section 9.3.4) delivers the best video performance
but requires the network to offer the necessary bandwidth capacity. See Section 9.3.4 for more information
on the Record setting.
• EXTRA
I f Extra is selected, the PC will use the extra network stream (Video Stream) to reduce bandwidth
consumption and speed video delivery to the remote PC. In the Network tab select one of the four
QCIF options listed in Video Stream. See 9.3.3 for more information on the Video Stream setting.
 Loading...