

Page 1
WireFlow AB, 2013
WireFlow Security Suite
User’s Manual
AC0045-002 rev C
Page 2

WireFlow AB, WireFlow Security Suite
© WireFlow AB, 2014 AC0045-002 rev C 1
Contents
Support information ................................................................................................................... 2
Technical support and Product information ........................................................................... 2
WireFlow headquarters ........................................................................................................... 2
Introduction ................................................................................................................................ 3
How it works .......................................................................................................................... 4
Using asymmetric keys ........................................................................................................... 6
The components ...................................................................................................................... 7
The dongles ......................................................................................................................... 7
The Security Suite Programming application ..................................................................... 7
The LabVIEW drivers ......................................................................................................... 7
The technology behind the Security Suite .................................................................................. 8
SHA-256 ................................................................................................................................. 8
Hash functions ........................................................................................................................ 8
The implementation in the Security Suite .............................................................................. 8
Symmetric keys ................................................................................................................... 8
Asymmetric keys ................................................................................................................ 9
The USB Hardware .................................................................................................................. 10
Dimensions ........................................................................................................................... 10
Electromagnetic Compatibility ............................................................................................. 11
CE Compliance ..................................................................................................................... 11
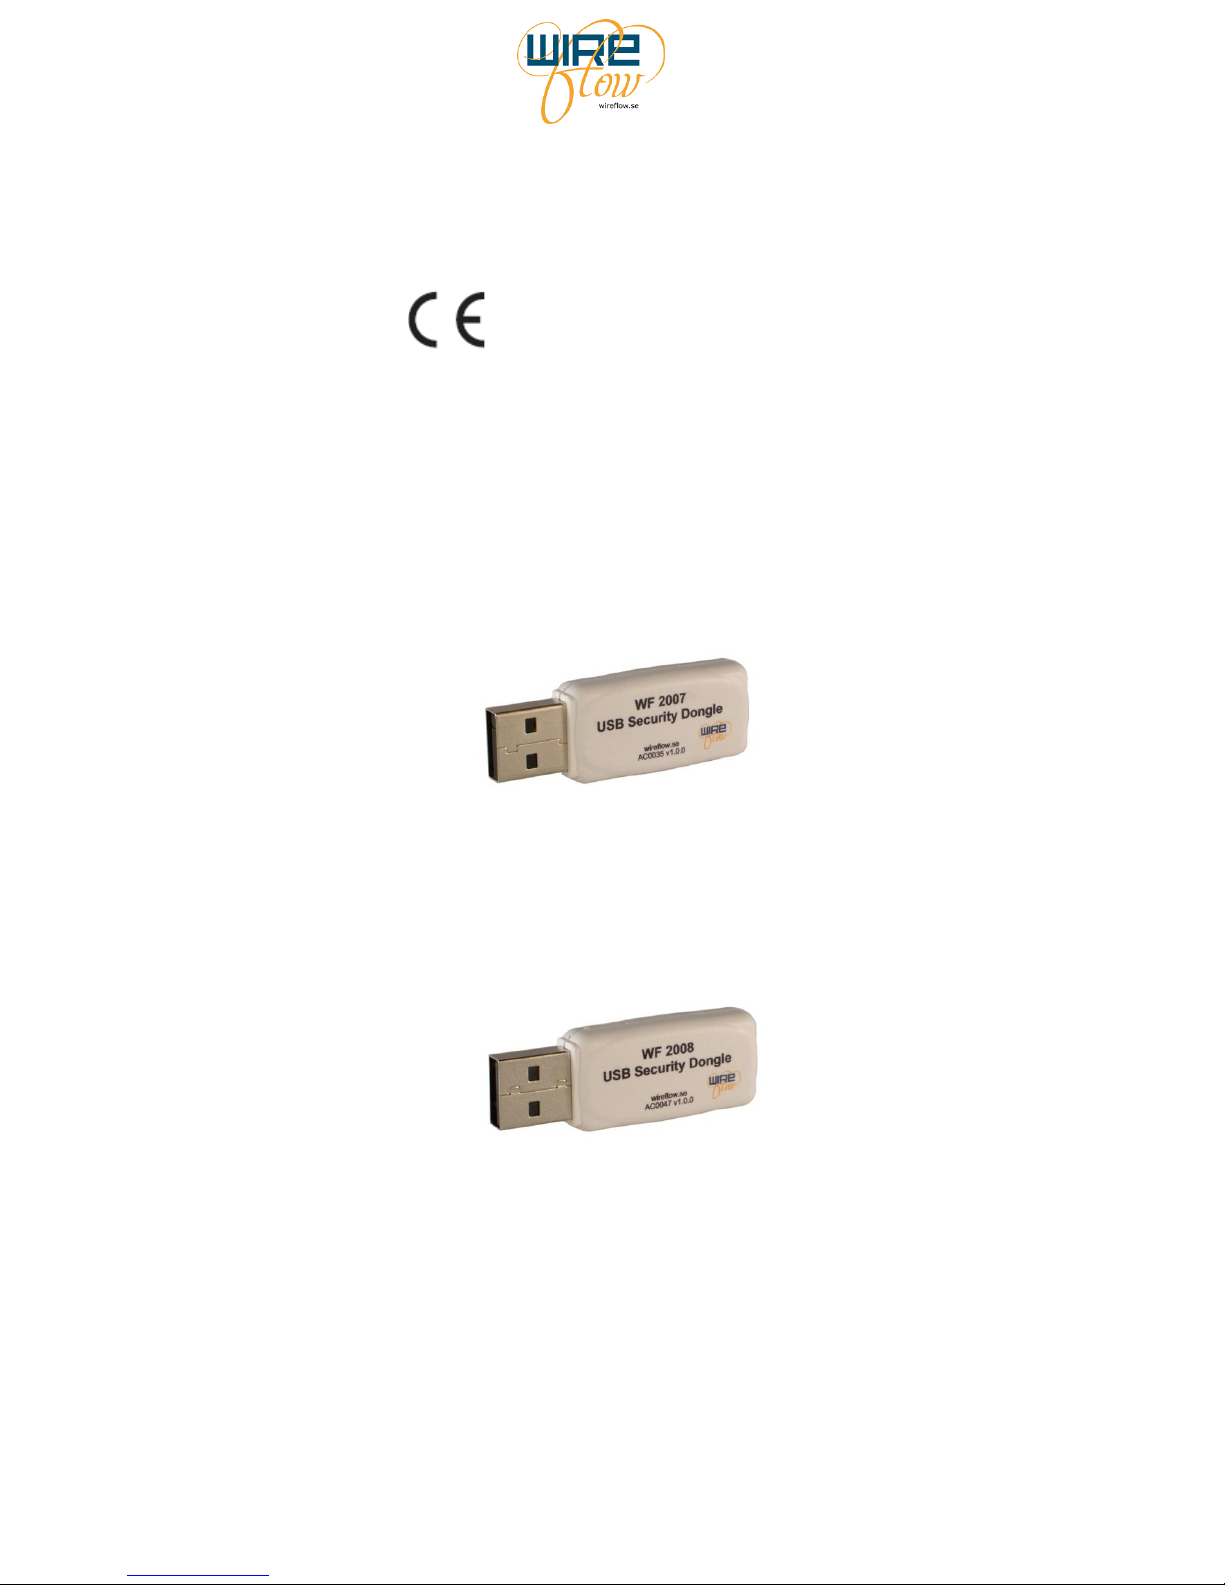
The WF 2007 ........................................................................................................................ 11
The WF 2008 ........................................................................................................................ 11
Security Suite Programming Application ................................................................................ 12
Requirements ........................................................................................................................ 12
Installation and licensing ...................................................................................................... 12
Description of the front panel objects ................................................................................... 13
Using the program ................................................................................................................ 15
Factory setting ................................................................................................................... 15
Managing a dongle ............................................................................................................ 15
Configuration files ............................................................................................................ 16
The WF USB Security dongle driver ....................................................................................... 16
Requirements ........................................................................................................................ 16
Installation ............................................................................................................................ 16
Device driver for Windows ............................................................................................... 17
Installed items ................................................................................................................... 17
The basic VIs ........................................................................................................................ 17
The intermediate VIs ............................................................................................................ 19
The WF Authentication module ............................................................................................... 20
Requirements ........................................................................................................................ 21
Installation ............................................................................................................................ 21
Installed items ................................................................................................................... 21
The VIs ................................................................................................................................. 22
Page 3

WireFlow AB, WireFlow Security Suite
© WireFlow AB, 2014 AC0045-002 rev C 2
Support information
Technical support and Product information
www.wireflow.se
[email protected]
WireFlow headquarters
WireFlow AB
Theres Svenssons gata 10
SE-417 55 Göteborg
Sweden
© WireFlow AB, 2014
Page 4
WireFlow AB, WireFlow Security Suite
© WireFlow AB, 2014 AC0045-002 rev C 3
Introduction
This chapter gives a brief introduction to all parts included in the WireFlow Security Suite. If
you prefer hands-on practice, you may skip this and instead go directly to the Quick guide
document: “AC0045-003 WF Security Suite - Quick Guide”
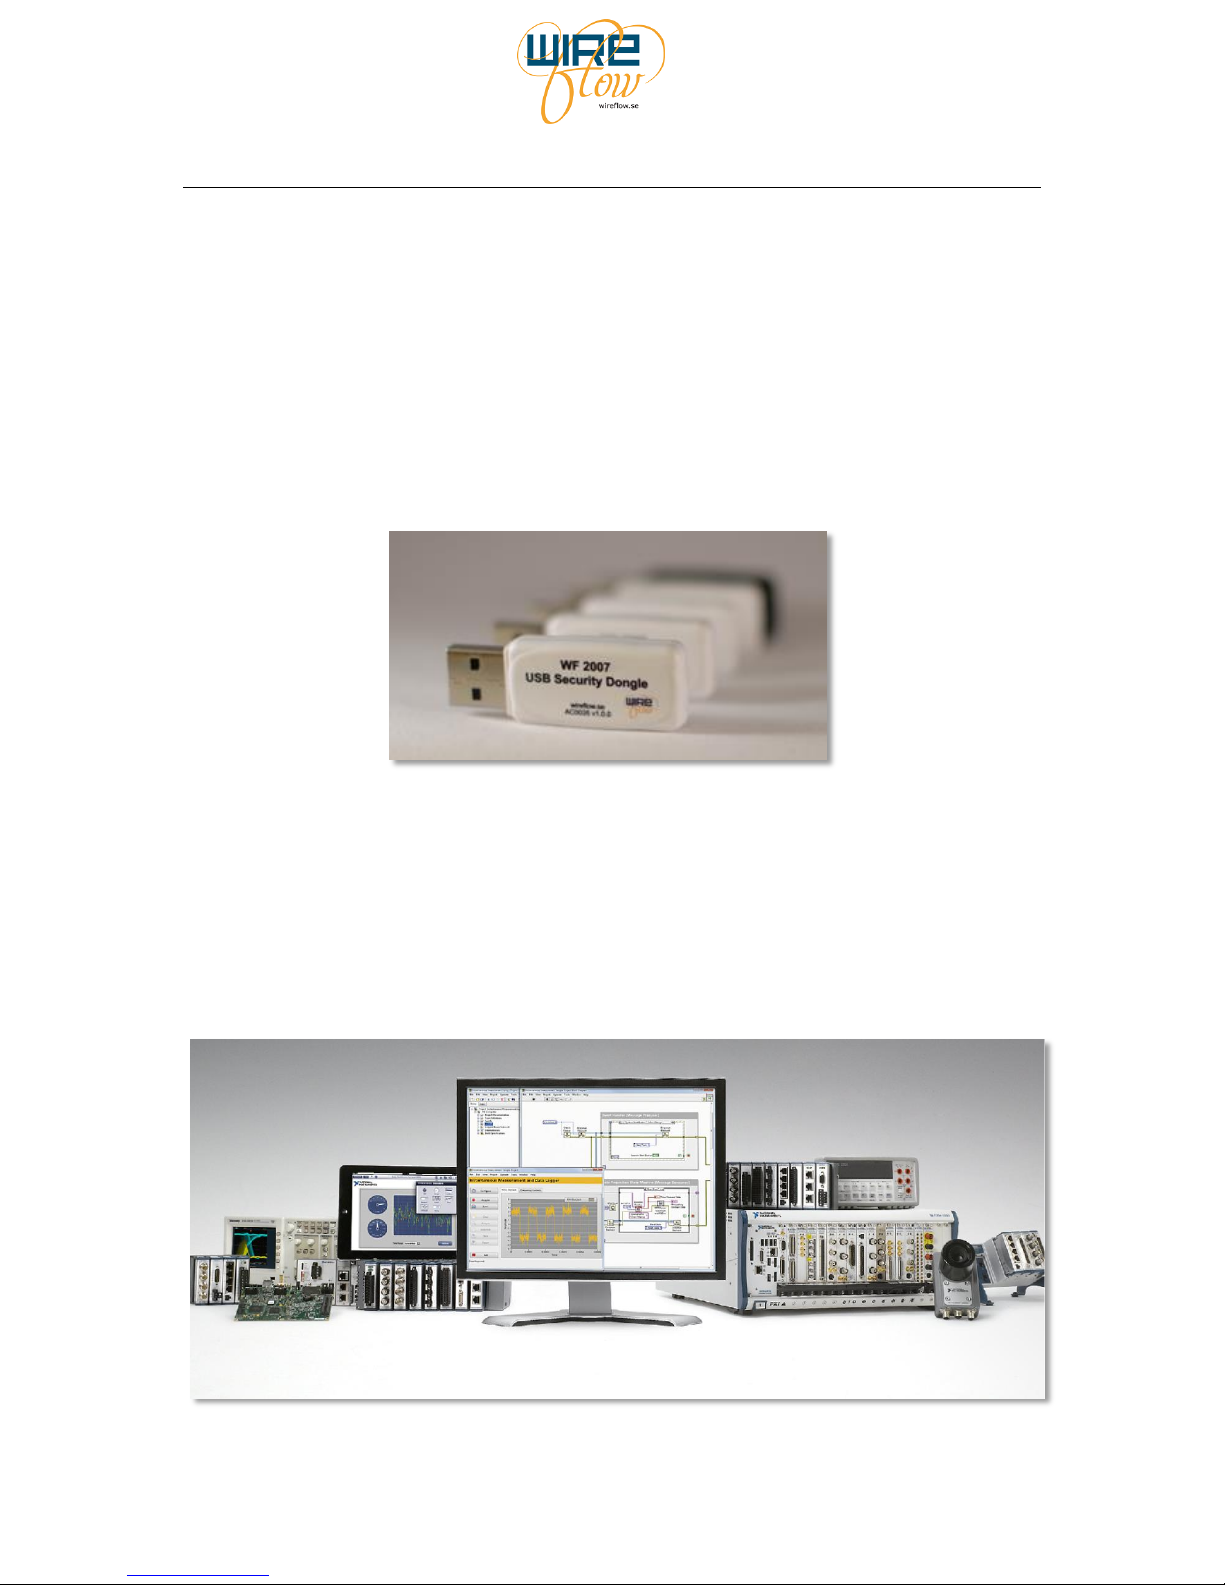
The WireFlow Security Suite is a comprehensive solution that ends IP protection issues
relating to unlawful copying of LabVIEW code. Not only does the Security Suite prohibit
theft of code, the system also enables user identification and system feature control.
The WF Security Suite uses dongles, "hardware keys" to protect the LabVIEW applications.
Software protection dongles have been used since late 1970s, and is a well-proven, intuitive
and robust method to handle software licensing.
The WF Security Suite uses hardware dongles and LabVIEW software drivers based on the
industry standard SHA-256 hash algorithm with 256 bit keys, guaranteeing a rock solid
solution.
The WF Security Suite is fully compatible with all LabVIEW platforms, including LabVIEW
for Windows, LabVIEW for Mac, LabVIEW Real-Time and LabVIEW FPGA.
The WireFlow dongles may thus be used to protect all LabVIEW hardware targets such as
desktop PCs, PXI, Compact RIO and Compact DAQ chassis.
Page 5
WireFlow AB, WireFlow Security Suite
© WireFlow AB, 2014 AC0045-002 rev C 4
It is easy to protect a LabVIEW application by adding security routines to the code using the
WF Security Suite LabVIEW driver. The security functionality can be anything from a simple
license key check at the start-up of the application, to a complex set of functions to handle
user identification and privileges or to handle demo expiration timers.
How it works
The security dongles may be thought of as an ordinary USB flash memory which cannot be
read, written or duplicated by anyone that doesn't know the secret master code of the dongle.
The LabVIEW developer can use this to implement a variety of security functions in the
LabVIEW application. One basic security function is to make sure that the application does
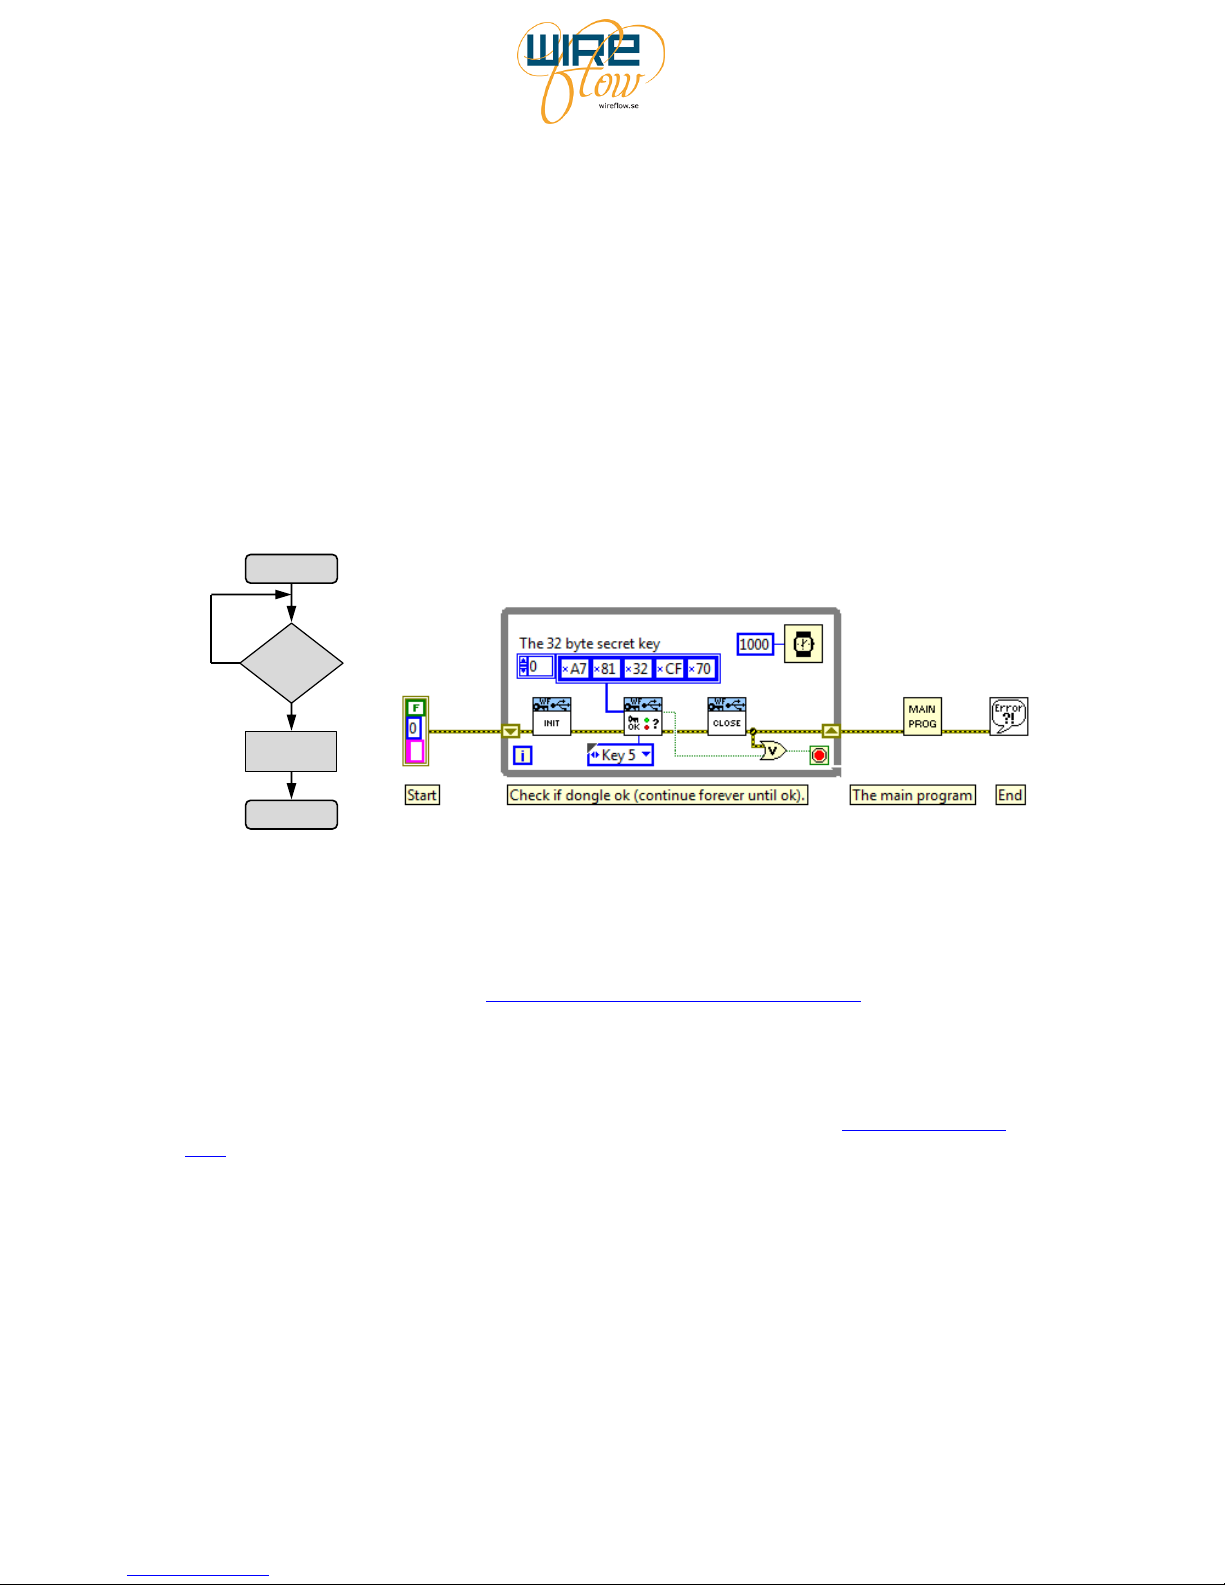
not start in case there is no dongle with the correct key present in the system. The flow chart
and LabVIEW code for such an application would look something like this:
End
Dongle
Key ok?
Main
program
Yes
No
Start
Flow chart LabVIEW implementation
In the example above it is the LabVIEW VI CheckCryptoKey.vi (the one with the key symbol
on the icon) that checks that the Key 5 memory in the dongle has the correct value. The
communication between this LabVIEW VI and the dongle is encrypted to avoid the system
being hacked. Please see chapter The technology behind the Security Suite for more details
regarding this encrypted communication.
Before shipping the LabVIEW application to the end customer, the application must be built
into an .exe file (or .rtexe or .lvbit etc) to make sure that the end user cannot find the secret
key by analysing the source code. (Or use asymmetric keys to prevent end user to find out the
secret key even if he can analyse the source code. Please see the chapter Using asymmetric
keys for more information).
A mentioned before the dongle may be thought of as an ordinary USB flash memory that
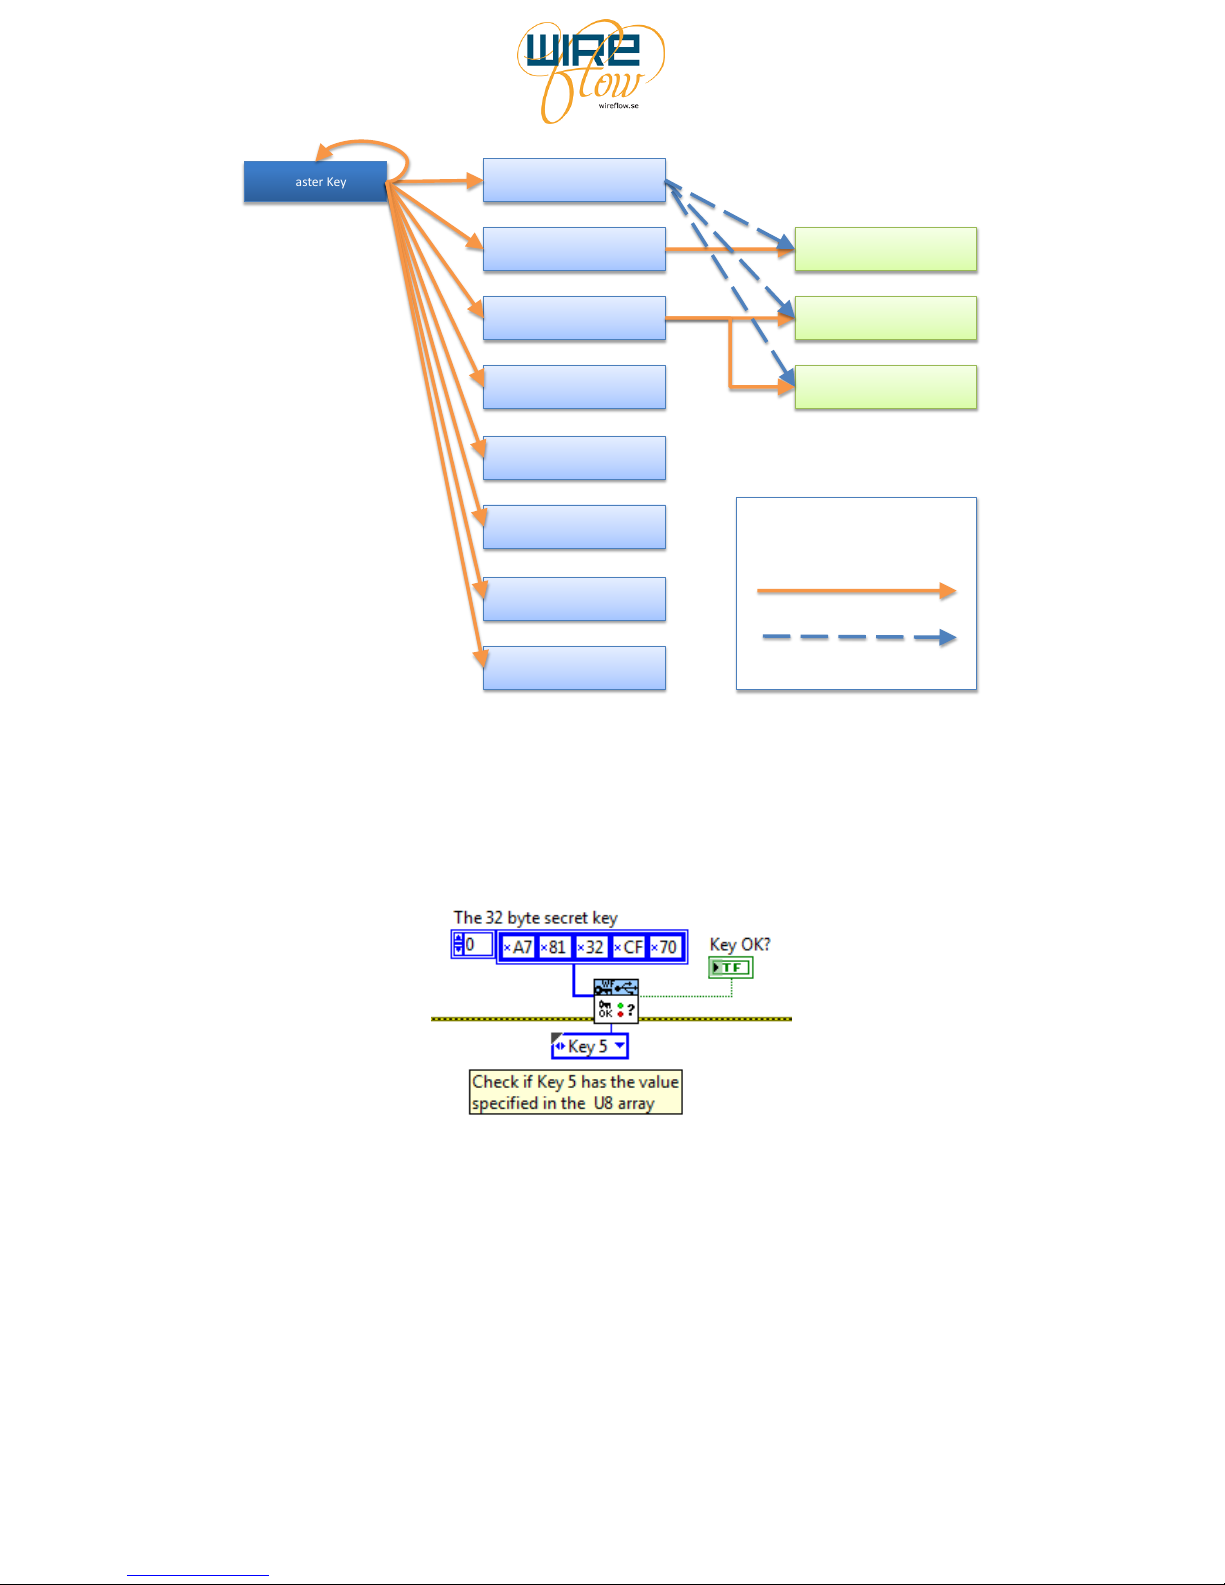
holds secret keys and data. The WireFlow dongles have a memory structured like this:
Page 6
WireFlow AB, WireFlow Security Suite
© WireFlow AB, 2014 AC0045-002 rev C 5
Master Key
Key 1
Key 2
Key 3
Data Field 1
Data Field 2
Data Field 3
Key 4
Key 5
Key 6
Read Key
Write Key
Arrows indicate parent
Key for a specific operation
Key 7
Key 8
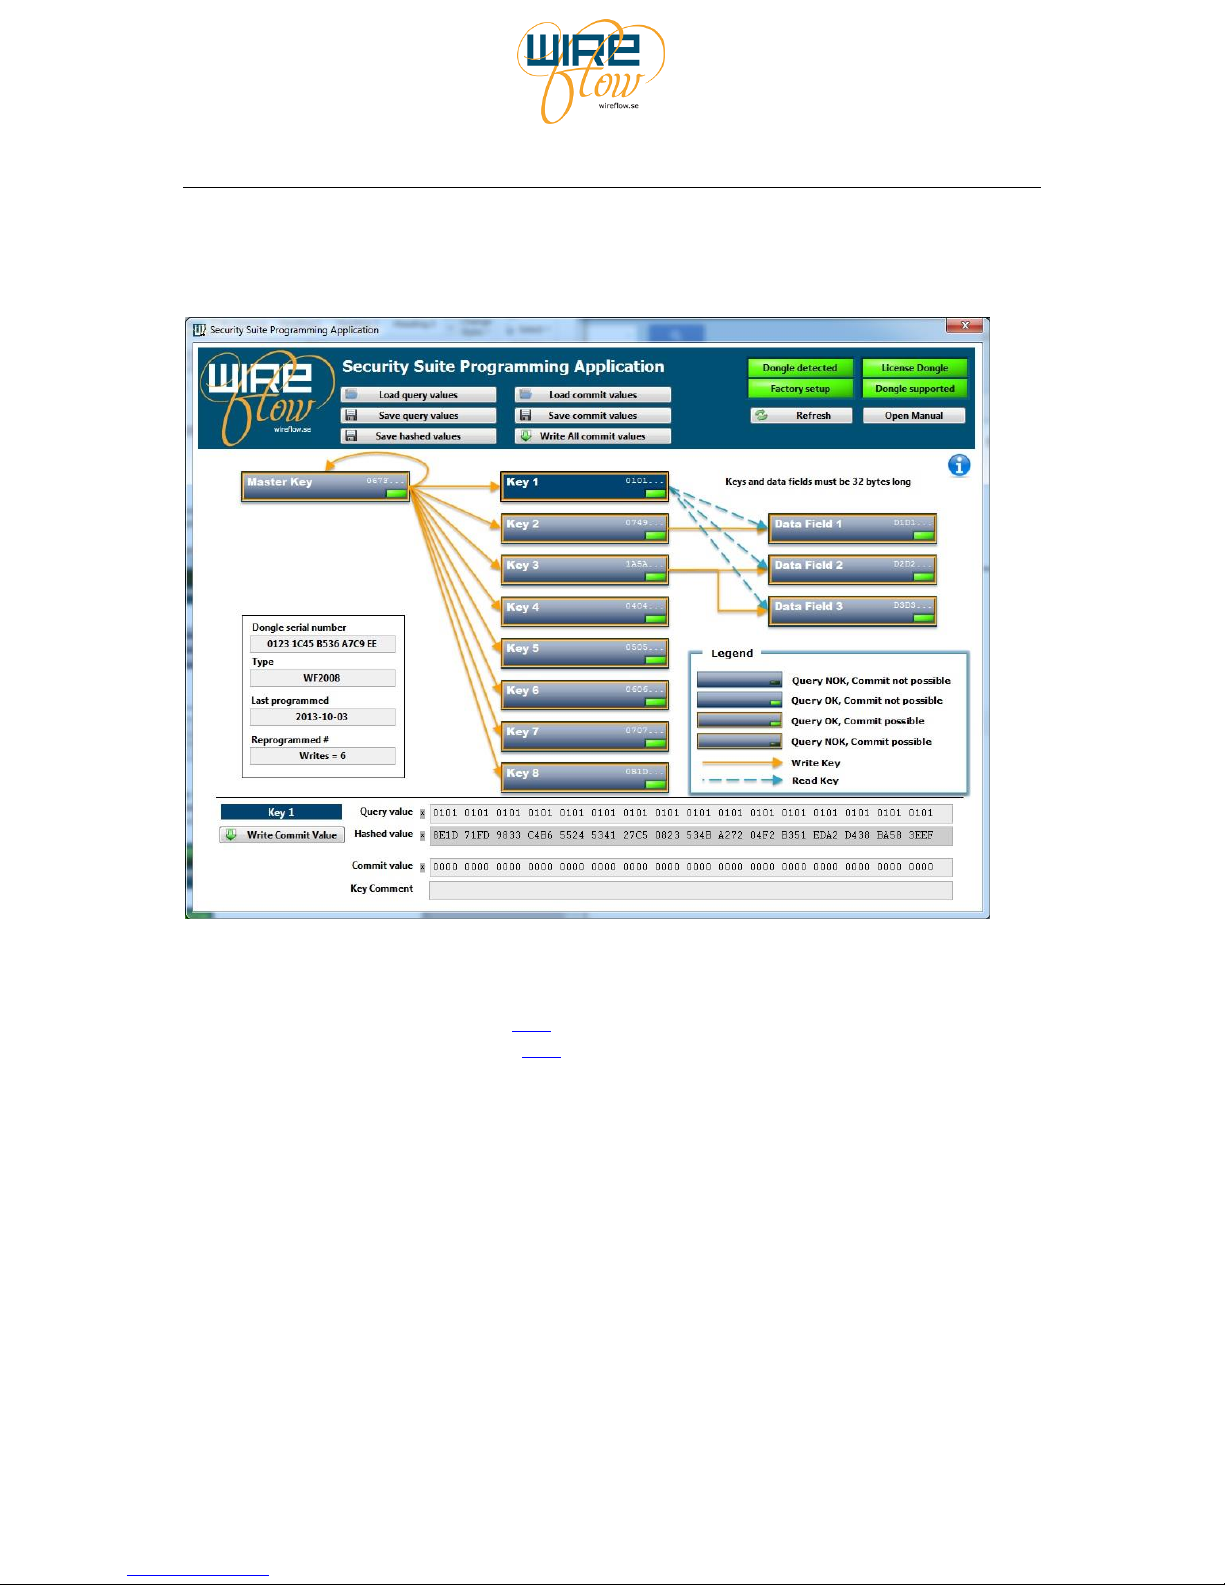
Each rectangle represents a 32 byte (256 bits) memory cell. The 9 keys can be written and
"queried for match" but cannot be read. The data fields can be both written and read.
When doing a "query" it is checked if a key has a specific value. The result of this query is
True or False.
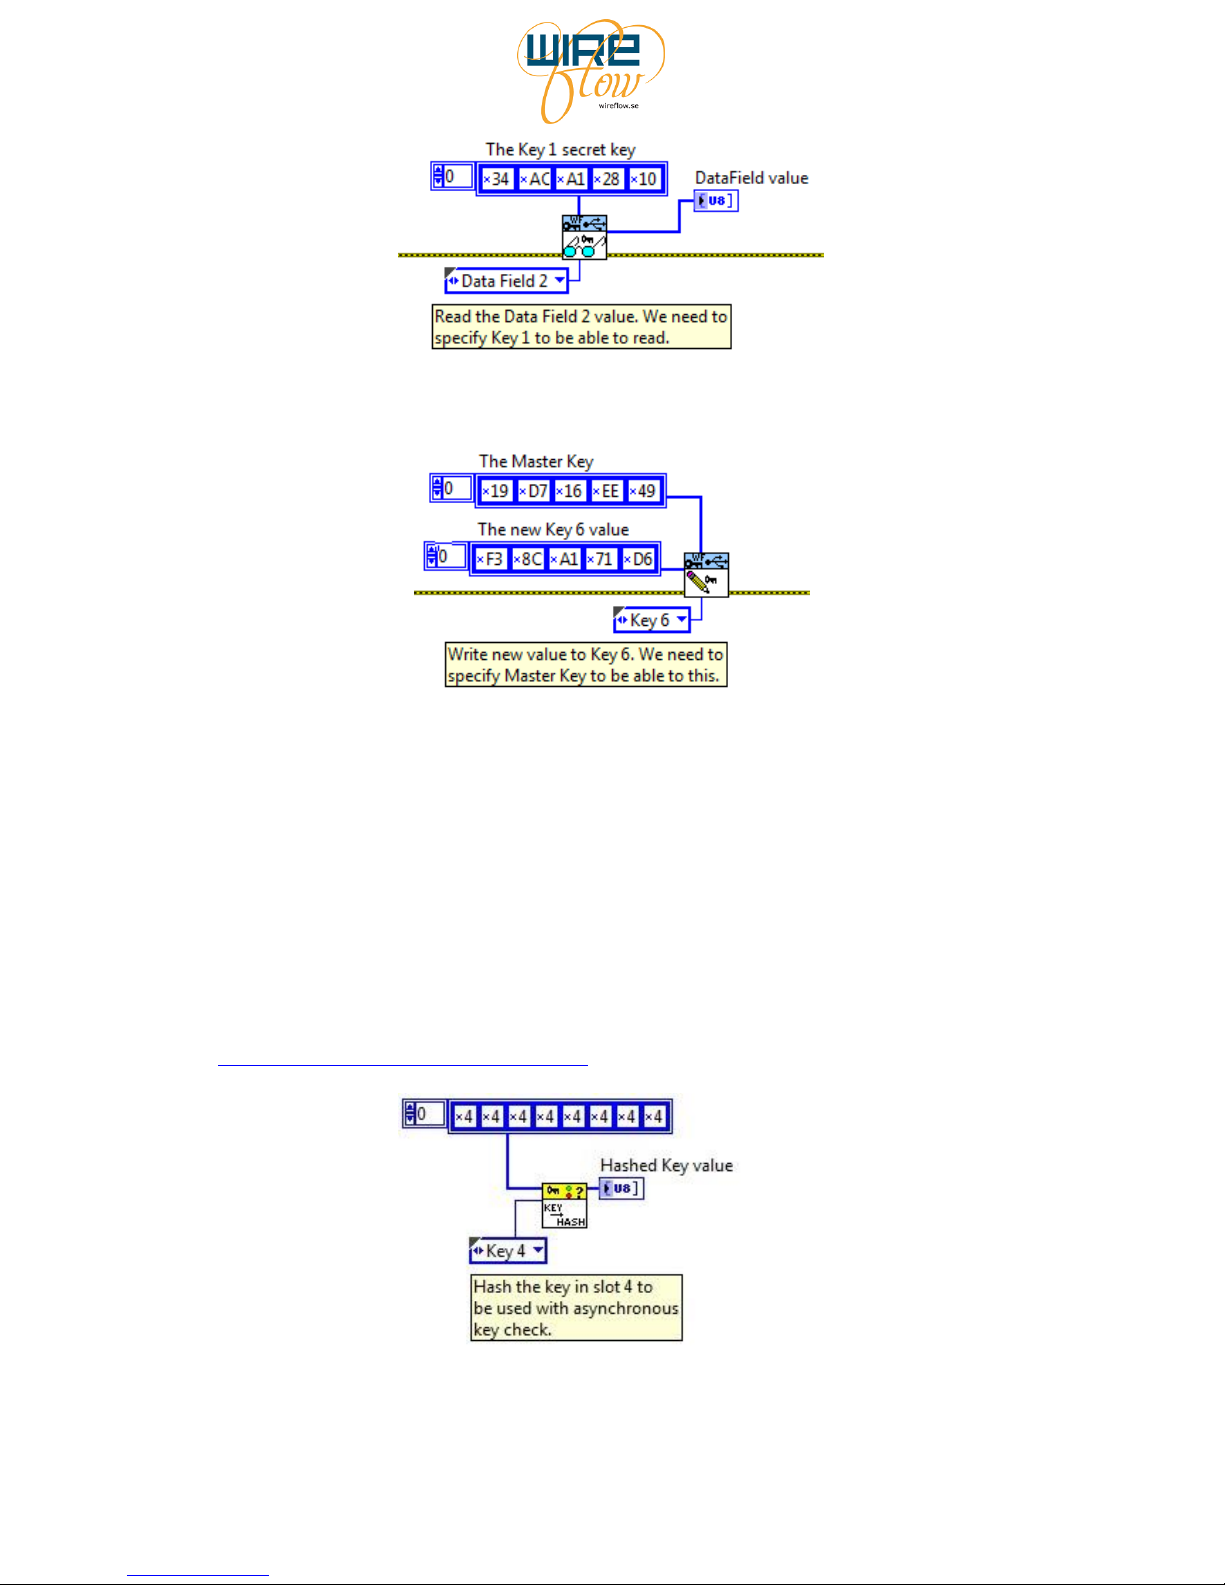
To read a data field, the value of its parent key must be specified.
Page 7
WireFlow AB, WireFlow Security Suite
© WireFlow AB, 2014 AC0045-002 rev C 6
To write a new value to a key or data field, the value of its parent key must be specified.
Using asymmetric keys
There is a more advanced way of protecting the secret key, by using asymmetric keys.
By using asymmetric keys you never have to store the actual key in your application.
This means that even if someone looks in the source code they can’t manufacture their own
dongles using that information.
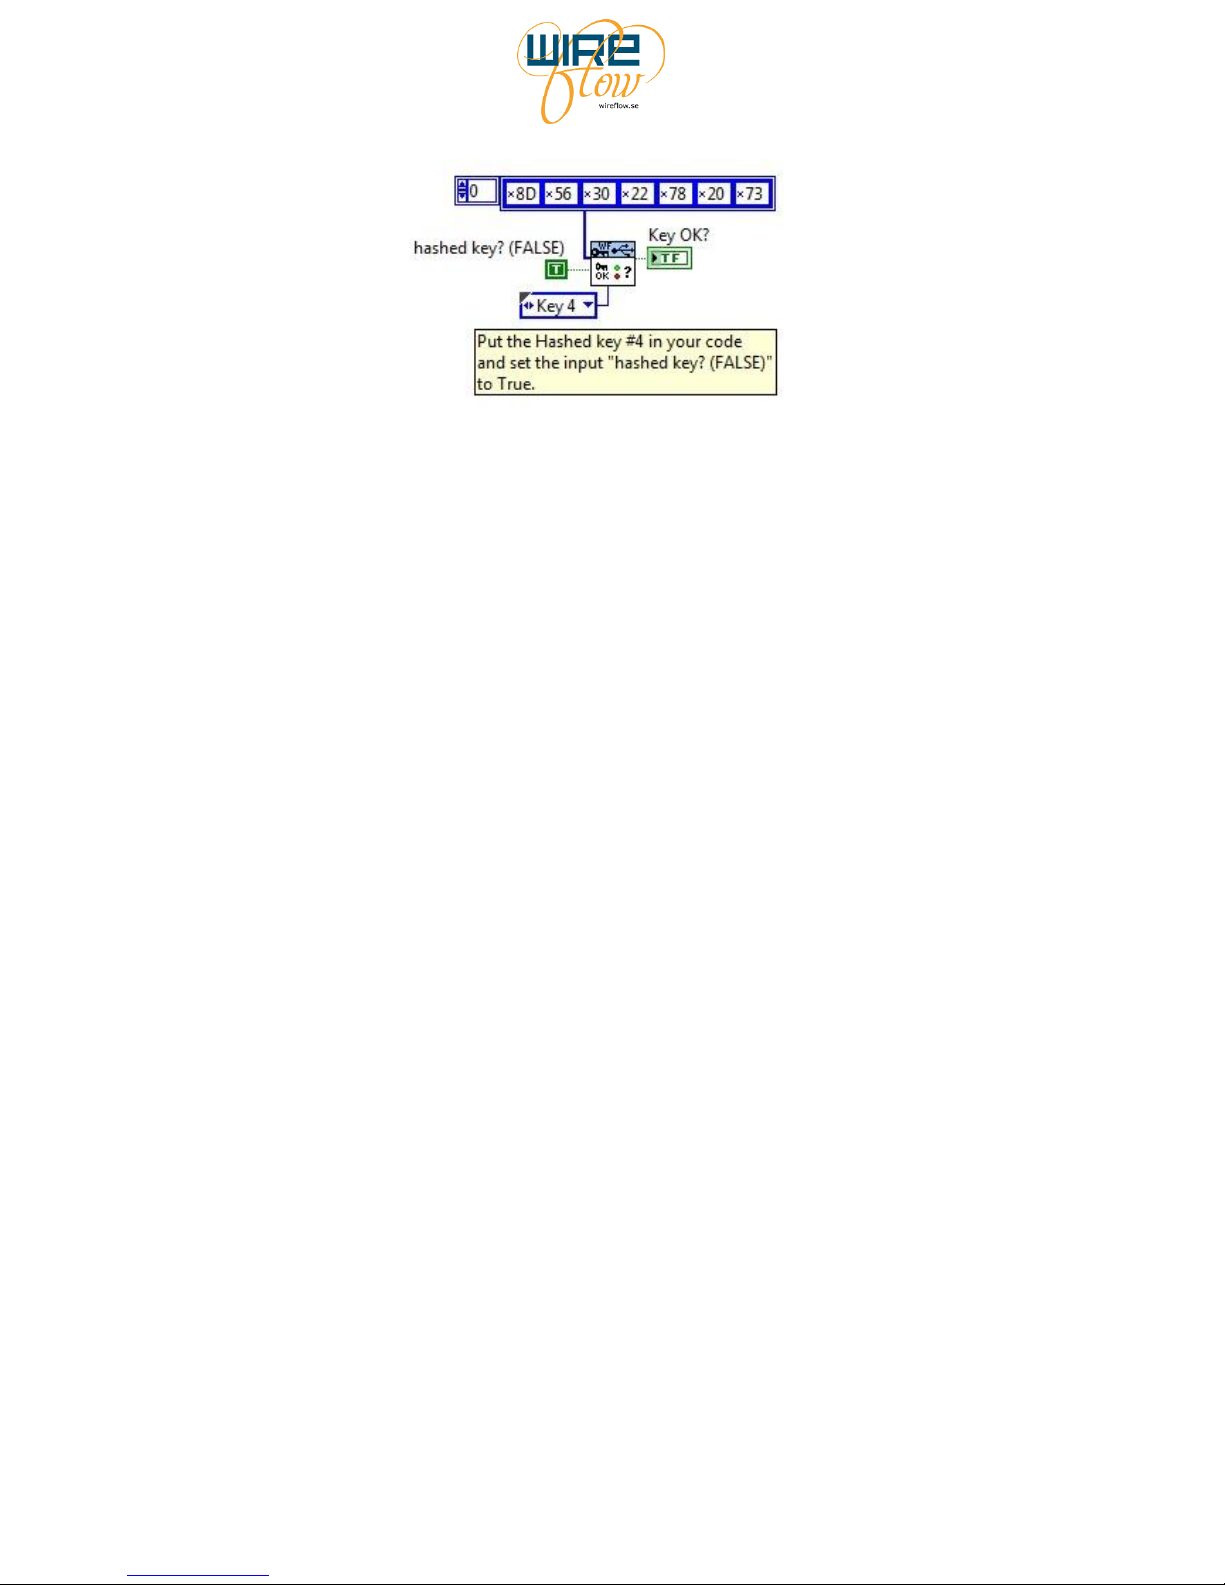
To use this function the secret key must first be run through a hash algorithm. This can be
done using the VI CreateHashFromKey.vi in the Dongle Authentication driver or the hashed
key can be seen in the Security Suite Programming Application (see more in the chapter on
the Security Suite Programming Application).
After a hashed key is created (either in the Security Suite Programming Application or by
using the authentication driver), the check should be implemented by setting the input
“hashed key? (FALSE)” to true and to use the hashed key as key value.
Page 8
WireFlow AB, WireFlow Security Suite
© WireFlow AB, 2014 AC0045-002 rev C 7
By doing this the real key will never be present in your application.
The components
The WireFlow security suite provides a complete set of components used to add software
security to LabVIEW applications.
The dongles
Two types of dongles are currently available:
The WF 2008 is an USB dongle for standard LabVIEW for Windows, Mac and Linux.
The WF 2007 is an USB dongle for LabVIEW RT (Real Time) platforms.
The Security Suite Programming application
The programming application is a Windows application used to program and manage the
dongles. It is with this application you program the secret keys into the dongles.
The LabVIEW drivers
The LabVIEW drivers are used to add software protection into your applications. There are
actually two sets of drivers
The WF USB Security dongle driver is the basic driver to communicate with the USB
dongles and to do key validation etc.
The WF Authentication module contains low level functions used by the WF USB
Security dongle driver. It can be used by itself by advanced users that need advanced
security functions, such as separating the dongle communication from the
authentication control into separate targets etc.
Page 9

WireFlow AB, WireFlow Security Suite
© WireFlow AB, 2014 AC0045-002 rev C 8
The technology behind the Security Suite
This chapter will go through the basic functions of the technology that is used in the Security
suite. After you read this chapter you will have a better understanding of the functions that the
Security Suite offers.
SHA-256
The key functionality in the Security Suite is built around the SHA-256 algorithm. This
algorithm is part of the SHA 2 family which is used throughout many different applications
today.
The SHA-2 hash function is implemented in some widely used security applications and
protocols, including TLS and SSL, PGP, SSH, S/MIME, Bitcoin and IPsec.
Hash functions
The SHA 2 family is based upon the use of hashes.
A hash function is an algorithm that transforms (hashes) an arbitrary set of data elements,
such as a text file, into a single fixed length value (the hash). The computed hash value may
then be used to verify the integrity of copies of the original data without providing any means
to derive said original data.
As the name implies the SHA 256 is built upon hashes with the internal length of 256 bits (32
bytes).
The implementation in the Security Suite
The WireFlow Security Suite uses SHA-256 in conjunction with random numbers to make the
password comparison. Two slightly different sequences are used depending on the type of key
that is used, i.e. symmetric or asymmetric keys. (Note that this is a schematic picture and may
not exactly represent every input and output of every step in the process.)
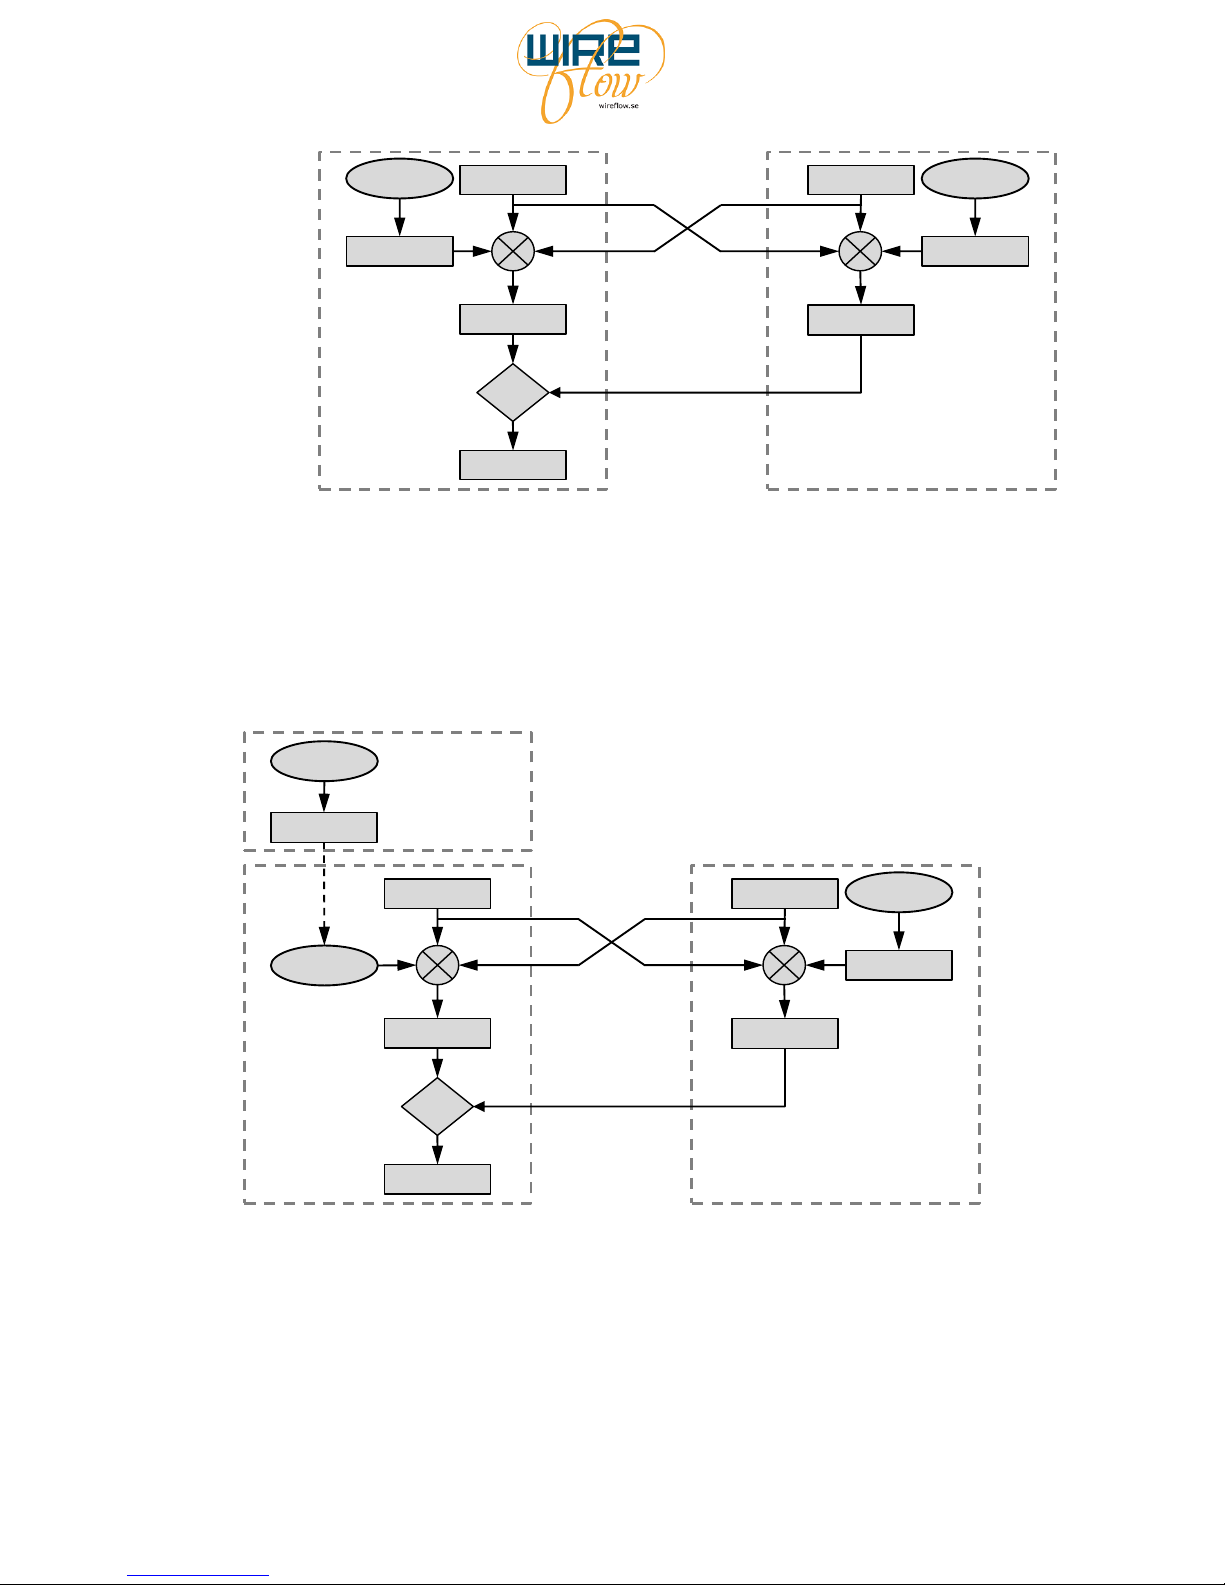
Symmetric keys
1. Both the dongle and the LabVIEW driver generate a random number and these
numbers are sent to each other. The use of random numbers will make the SHA-
256 result different every time it’s run, thus making sniffing on the interface
between the dongle and the LabVIEW code useless as there will be a different
result every time.
2. Both the dongle and the LabVIEW code combine the secret key and the two
random values created in step 1.
3. A SHA-256 calculation is made on the result from step 2.
4. The driver gets the result from the SHA-256 from the dongle and compares this
to its own SHA-256 result. If the secret key has the same value in both dongle
and driver, then the SHA-256 results will match.
Page 10
WireFlow AB, WireFlow Security Suite
© WireFlow AB, 2014 AC0045-002 rev C 9
LabVIEW
software
Random
SHA-256
X=Y?
Pass/Fail
SHA-256
Security
dongle
Random
SHA-256 SHA-256
Secret keySecret key
Asymmetric keys
The difference here compared to the symmetric keys is that the hash of the secret key is done
offline in advance for the LabVIEW part. Since only the hashed key is stored in the LabVIEW
software the secret key cannot be obtained even if studying the LabVIEW source code.
LabVIEW
software
Random
SHA-256
X=Y?
Pass/Fail
SHA-256
Security
dongle
Random
SHA-256
Secret key
SHA-256
Secret key
Hashed key
Offline
preparation
Page 11
WireFlow AB, WireFlow Security Suite
© WireFlow AB, 2014 AC0045-002 rev C 10
The USB Hardware
The USB security dongles used a dedicated crypto chip for secure storage of the secret keys.
An embedded processor handles the interface between the cryptochip and the USB interface.
Inside the crypto chip there are twelve 32 byte (256 bits) memory cells. Nine of these are used
for keys that may be written and "queried for match" but may not be read. Three data fields
may be written and read.
Each memory cell has a guaranteed life of 100.000 write cycles
When dongles are shipped from WireFlow they have a factory setting like this:
Memory cell
Factory setting
Master Key
Encrypted value
Key 1
0x01, 0x01, 0x01, 0x01 .....
Key 2
Encrypted value
Key 3
Encrypted value
Key 4
0x04, 0x04, 0x04, 0x04 .....
Key 5
0x05, 0x05, 0x05, 0x05 .....
Key 6
0x06, 0x06, 0x06, 0x06 .....
Key 7
0x07, 0x07, 0x07, 0x07 .....
Key 8
Encrypted value
Data Field 1
0xD1, 0xD1, 0xD1, 0xD1 .....
Data Field 2
0xD2, 0xD2, 0xD2, 0xD2 .....
Data Field 3
0xD3, 0xD3, 0xD3, 0xD3 .....
The cells that have "Encrypted value" in the factory setting can only be reprogrammed using
the WF Security Suite Programming Application. Think of it as a kind of activation of the
dongles that is needed before they can be used.
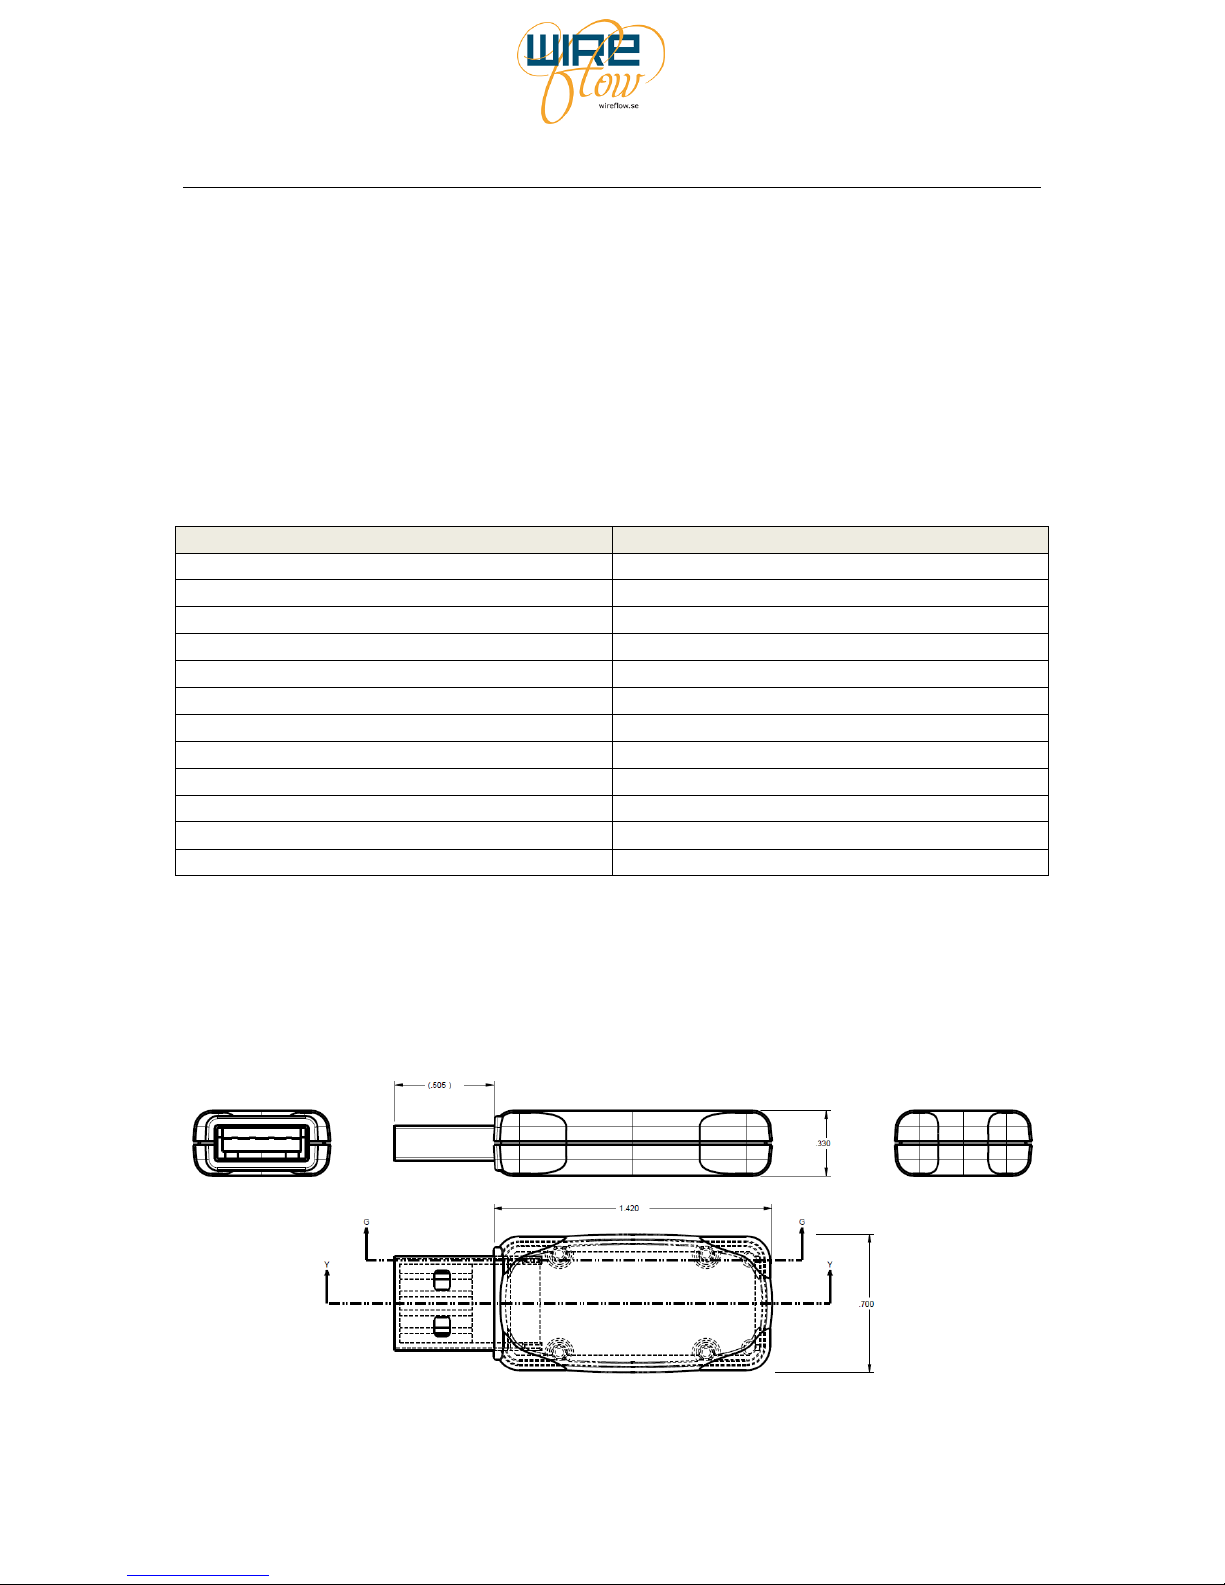
Dimensions
Page 12
WireFlow AB, WireFlow Security Suite
© WireFlow AB, 2014 AC0045-002 rev C 11
Electromagnetic Compatibility
The USB security dongles meets the requirements of the following EMC standards for
electrical equipment for measurement, control, and laboratory use:
SS EN 61326-1:2013 Electrical equipment for measurement
FCC Part 15 Emissions
CE Compliance
The USB security dongles meets the essential requirements of applicable European Directives
as follows:
2004/108/EC; Electromagnetic Compatibility Directive (EMC)
The WF 2007
The WF 2007 is the key to use if you want to protect a LabVIEW RT (Real Time) application.
It will work on any RT target such as cRIO, PXI or desktop targets as long as there is a free
USB slot.
The WF 2008
The WF 2008 will work on any LabVIEW targets such as standard PC/MAC or Linux
machine with a spare USB slot. It will also work on for example a PXI controller running
Windows.
Page 13
WireFlow AB, WireFlow Security Suite
© WireFlow AB, 2014 AC0045-002 rev C 12
Security Suite Programming Application
When receiving your dongles from WireFlow they have to be programmed with your specific
secret key(s). The Programming application is the tool to help you manage this.
This chapter will guide you through the steps of that process.
Requirements
LabVIEW 2011 runtime, download here
NI-VISA (version >=5.4), download here
Installation and licensing
The Security Suite Programming Application may be downloaded from www.wireflow.se.
Run the installer and follow the online instructions for installation.
The setup file doesn’t include LabVIEW 2011 runtime or the required NI-VISA driver but
they can be found on NI’s webpage for download (if you have LabVIEW 2011 or later
installed they are probably already installed).
Besides installing the application, you will also need to install the WF USB dongle device
driver for Windows.
The device driver is an .inf file that can be found on your computer in the folder:
C:\ProgramData\WireFlow\WF Security Suite\Device driver\Windows Device
driver
The device driver .inf file can also be downloaded from www.wireflow.se.
Page 14
WireFlow AB, WireFlow Security Suite
© WireFlow AB, 2014 AC0045-002 rev C 13
Follow the installation instruction located together with the .inf file.
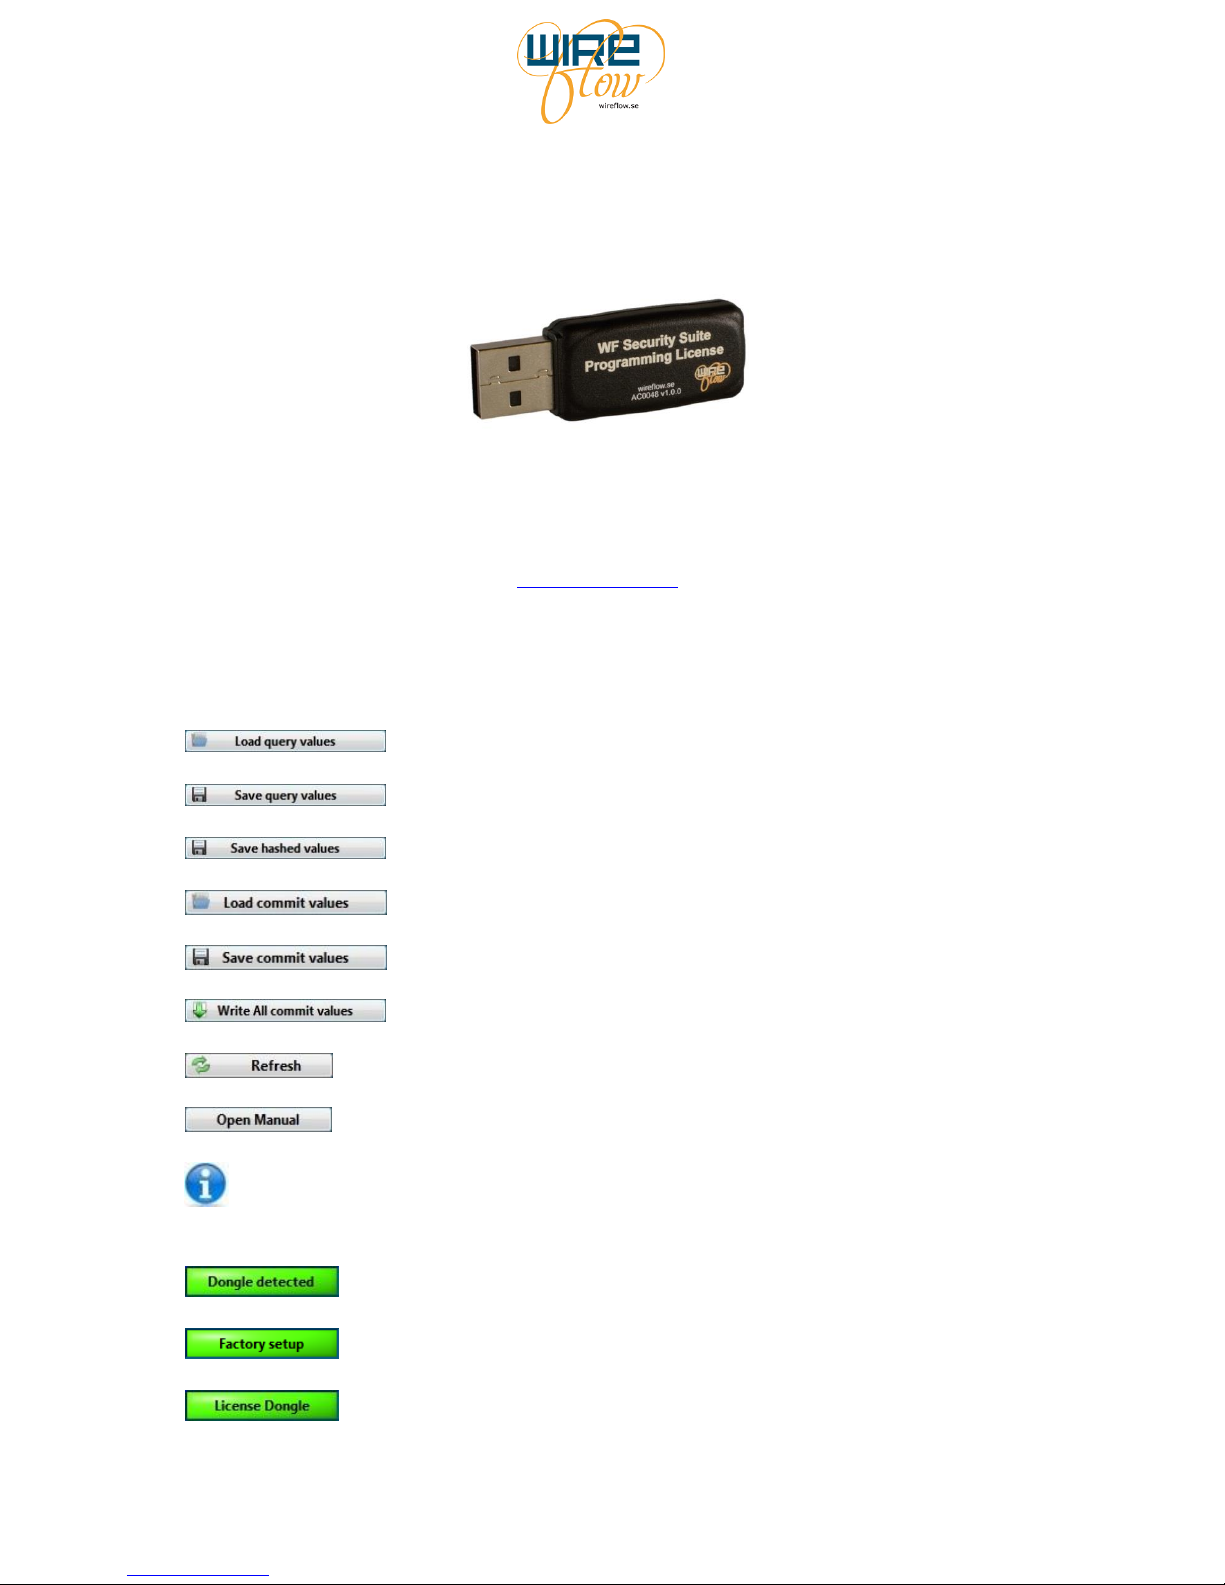
To be able to program your dongles with new keys you will have to acquire a license for the
tool. The license will come in the form of a USB dongle (what else :-) as seen in the picture
below.
There are different options for the License dongle depending which USB HW you want to
program. Either you buy a license where you will be able to program WF 2007, WF 2008 or
you buy the option to program both the WF 2007 and WF 2008. You will only be able to
program the type of dongles that you acquired license for.
For pricing information please go to www.wireflow.se
Description of the front panel objects
Loads query values from file.
Saves current query values to file
Save current hashed values to file
Load commit values from file
Saves current commit values to file
Write all current commit values to the dongle
Makes a forced refresh on all dongles.
Opens this manual
Gives you information about the Programming Application and
inserted dongles. Use this information if you need to create a
trouble report.
Indicates if a dongle (WF2007, WF2008) is detected.
Indicates that the detected dongle has factory default values
Lit when a (black) License Dongle is detected in the system
Page 15
WireFlow AB, WireFlow Security Suite
© WireFlow AB, 2014 AC0045-002 rev C 14
Lit when there is a correct license on the License Dongle to
program the detected dongle (WF2007, WF2008)
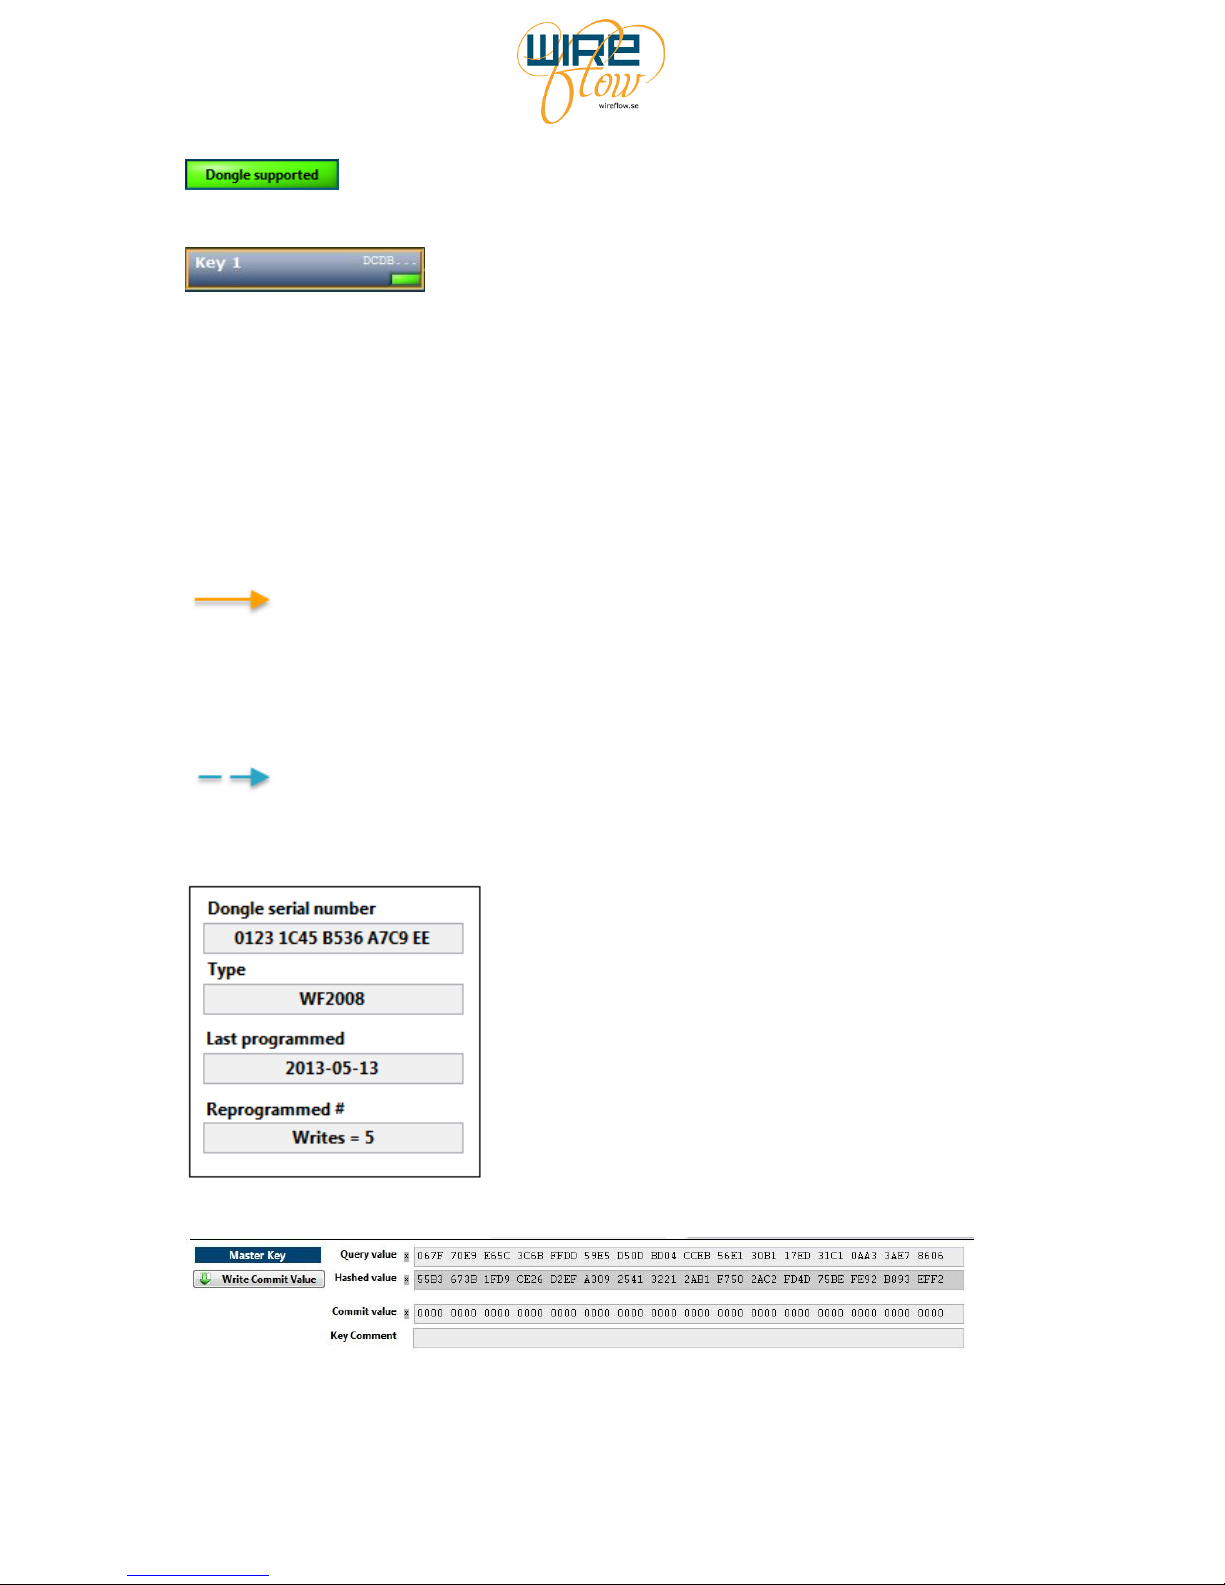
Each of these boxes represent a memory cell in the crypto chip. In
this case it is the Key 1 cell. The DCDB... indicates the two first
bytes of the in total 32 byte long so-called Query value. The green
LED indicates that the Query value is matched to the content of
the cell. This means that when LED is green we know the value
of the cell, i.e. the query value. If LED is off, we do not know the
content of the cell. We cannot read the content. We can only
provide a query value and then check if it is a match or not. You
may notice that the box has an orange outline. This indicates that
you may write a new data to the cell. Precondition for this is that
you have a correct query value for the parent cell.
This is a "write-arrow". It indicates which key/box that must have
a green LED in order to be able to write a new value into the cell.
Note that the Master key is very important. As long as you know
the master key you can re-program the dongle. If you lose the
Master key you can no more re-program the dongle.
This is a "read-arrow". It indicates which key/box that must have
a green LED in order to be able to read the value from the cell.
Shows information on the detected dongle
The dongle management field is located in the lower part of the application. It is here that you
can analyse and re-program the 32 bytes in a specific cell.
Page 16

WireFlow AB, WireFlow Security Suite
© WireFlow AB, 2014 AC0045-002 rev C 15
It’s also where you can see the hashed value of the current Query value. This value should be
used in your application if you are using asymmetric keys.
Using the program
Since the program cannot read data cells from the dongles, but only query and check values it
is important to know the content of the dongle to be able to re-program the dongle. Therefore
make sure to always keep track of the values you program into a dongle. You can use the
Save commit values button to save your programmed values to file.
Factory setting
When a dongle is shipped from WireFlow it has a factory setting, please see chapter The USB
Hardware.
When a dongle is detected by the WF programming application it will always check for the
factory setting. If a factory default value is detected then the program will automatically fill in
this value into the Query value field. The program also knows how to decrypt the three cells
that are encrypted in the factory setting. The only way to decrypt the cells that are encrypted
in the factory setting is to use the WF Programming Application to decrypt it.
Managing a dongle
In the dongle management field in the lower part of the application, you can see the text
Master Key in the top left corner.
This indicates that it is the Master Key that is now selected. To select another cell, just click
on the desired box in the memory overview layout.
To check if a specific cell has a specific value you should enter the 32 byte value in the Query
field (and press Return). Now check if the green LED in the corresponding box turns on or
off. If it is on then you have the correct value in the Query field.
In the Hashed value field you can see the hashed value of the current Query value. The hashed
value should be used instead of the Query value when using asymmetric keys.
To write a new value to a cell you must first make sure that the cell has an orange border
around the box. You will get this by entering the correct Query value of the parent key. Just
follow the orange write-arrow backwards to find the parent key.
When you have the orange border make sure to select the cell that you want to write to. Now
fill in the desired data in the Commit value. Press the Write Commit value button to write to
the key.
The Key comment can be used for descriptive text. This will not be programmed into the
dongle. It is a text only used by this program. The comment will be stored in the configuration
files when pressing Save query values or Save commit values.
Page 17
WireFlow AB, WireFlow Security Suite
© WireFlow AB, 2014 AC0045-002 rev C 16
Configuration files
When you have programmed a dongle the way you want, it is possible to store this
configuration in a configuration file.
To be sure to save the data for all fields, you should fill in data for all cells in the Commit
field. When this is done you can save all commit data to file by pressing Save commit values.
If you are going to create several dongles with this setup then you just insert a new dongle
(with factory setting). The tool will notice that it is a with factory setting and will
automatically fill in the correct Query values and turn on all the green LED's.
Now press Load commit values and then press Write All to program a new dongle identical to
the one you did when you saved the configuration file.
Note that the query file format is identical to the commit file format. This means that you can
do a Save commit values and then read the same file with Load query values. This feature can
be used to copy data from one dongle to another etc.
The WF USB Security dongle driver
This easy-to-use LabVIEW driver is used to add security functions to LabVIEW applications.
Requirements
LabVIEW (version >= 2011)
NI-VISA (version >=5.4)
VI Package Manager (for installation)
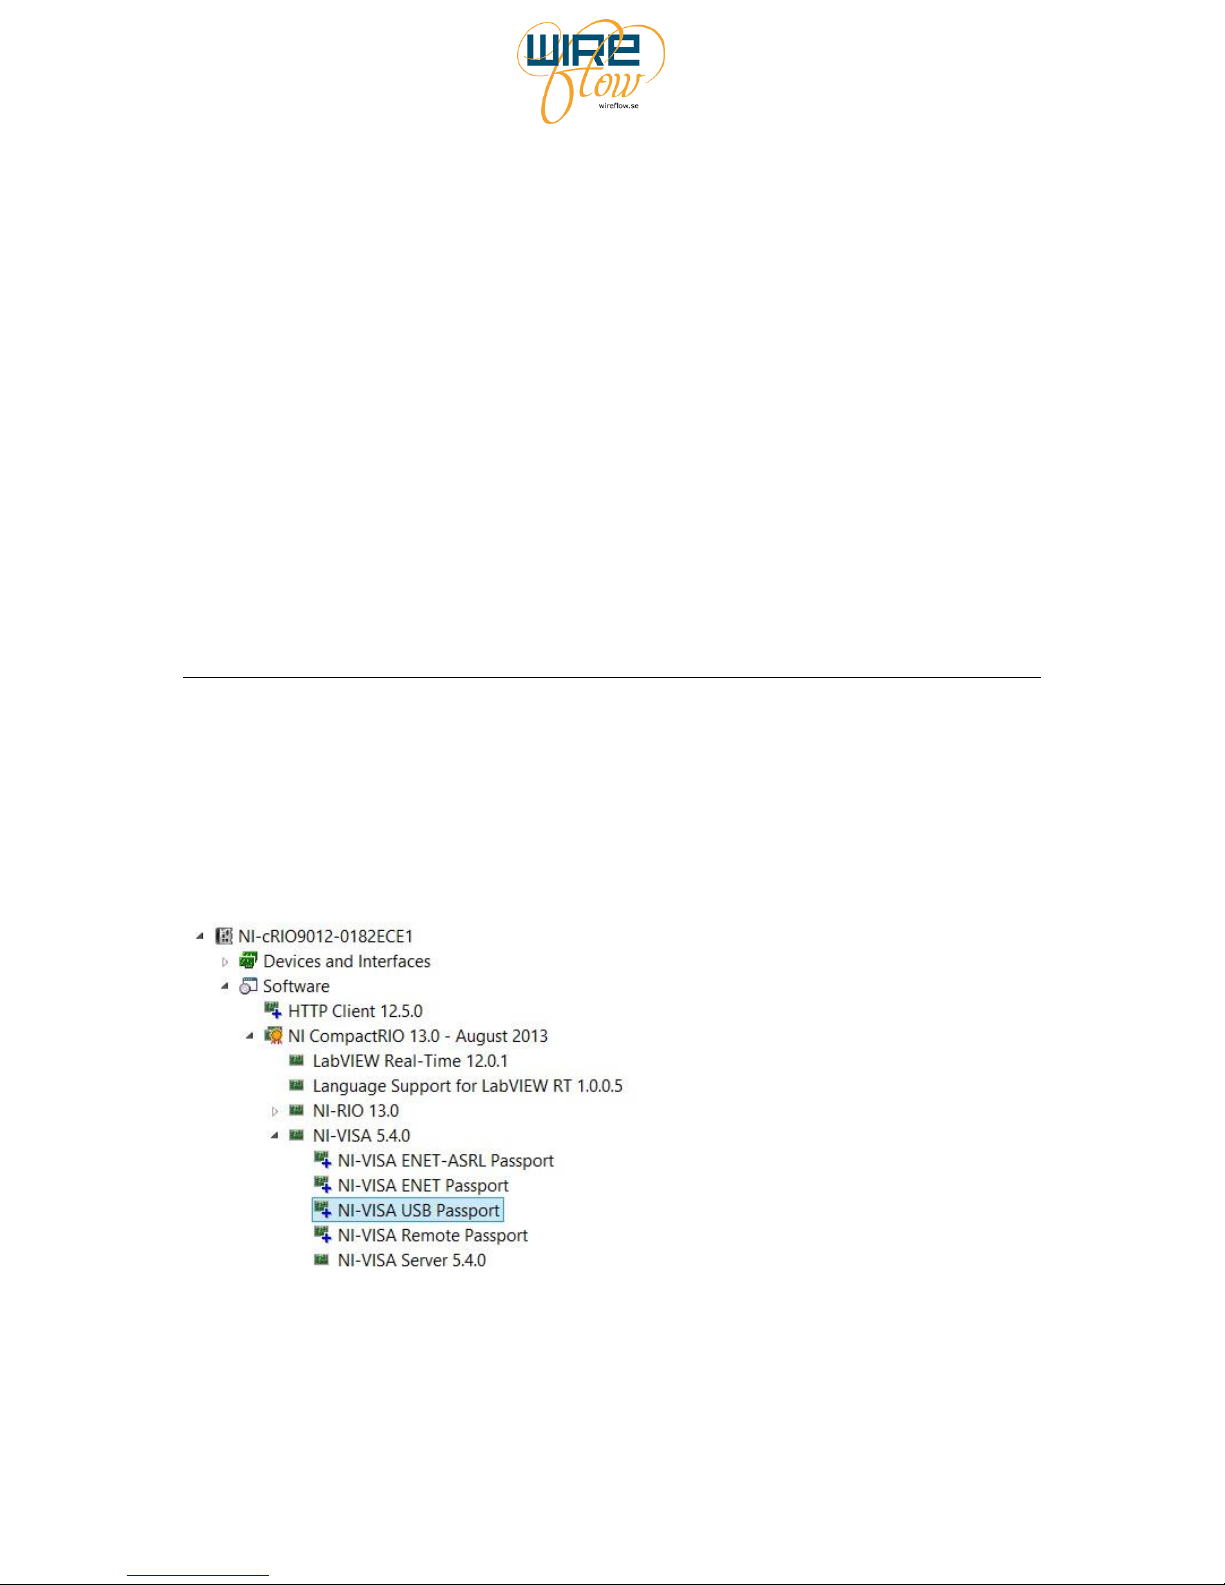
NI-VISA USB Passport (Needed for RT targets only)
Installation
The WF USB Security dongle driver may be downloaded from www.wireflow.se. For the
installation you will need the VI Package Manager which may be downloaded from
www.ni.com or from jki.net. The installation procedure is quite straightforward. Just follow
the online instructions.
Page 18
WireFlow AB, WireFlow Security Suite
© WireFlow AB, 2014 AC0045-002 rev C 17
Note that the WF USB Security dongle driver uses functions included in the WF
Authentication module, so you must install that driver also. It may also be downloaded
www.wireflow.se.
Device driver for Windows
To be able to run the code against the USB dongles on Windows platform you also need to
install the WF USB dongle device driver for Windows.
The device driver is an .inf file that can be found on your computer in the folder:
C:\ProgramData\WireFlow\WF Security Suite\Device driver\Windows Device
driver
The device driver .inf file can also be downloaded from www.wireflow.se.
Follow the installation instruction located together with the .inf file.
Installed items
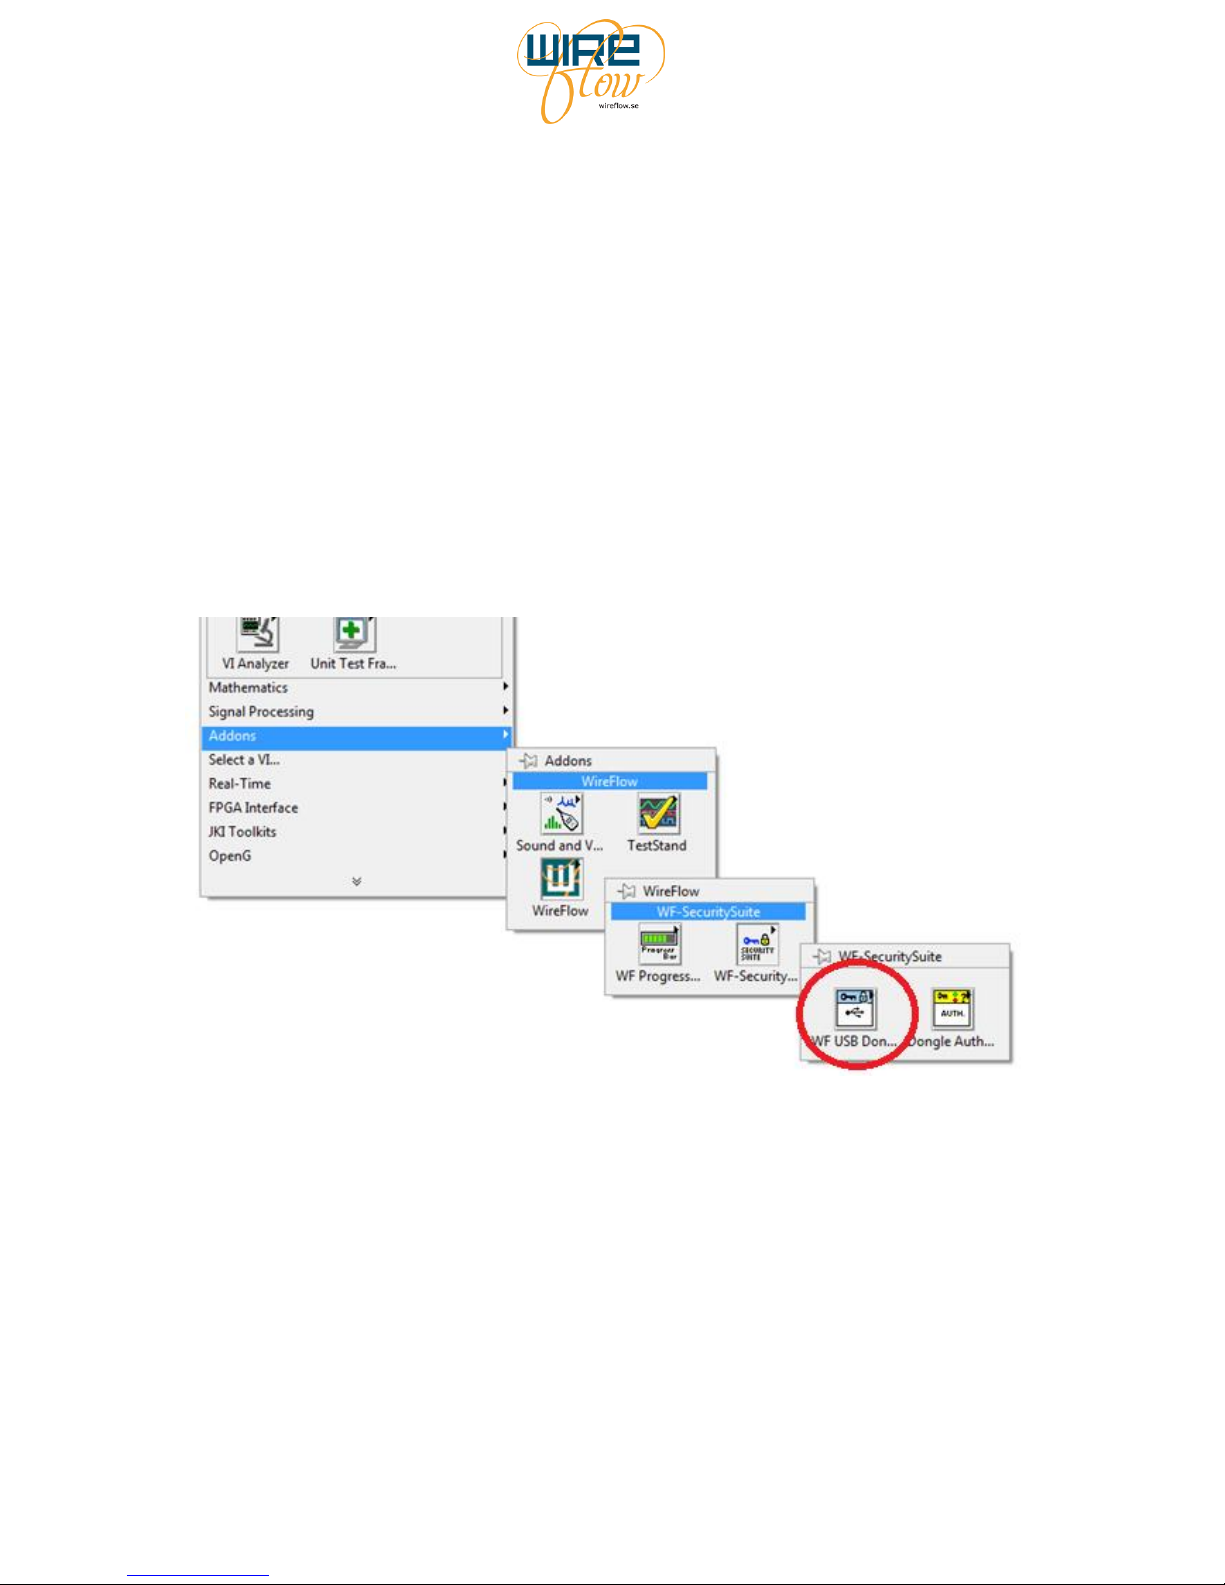
The driver VIs are found in the functions palette:
The user's manual is installed and found under the menu >Help >WireFlow
Some developers tools are found under the menu >Tools >WireFlow
Examples are found under the menu >Help > Find Examples...
To find the examples select the Search tab and then perform a search for the keywords
“dongle” or “WireFlow”
The basic VIs
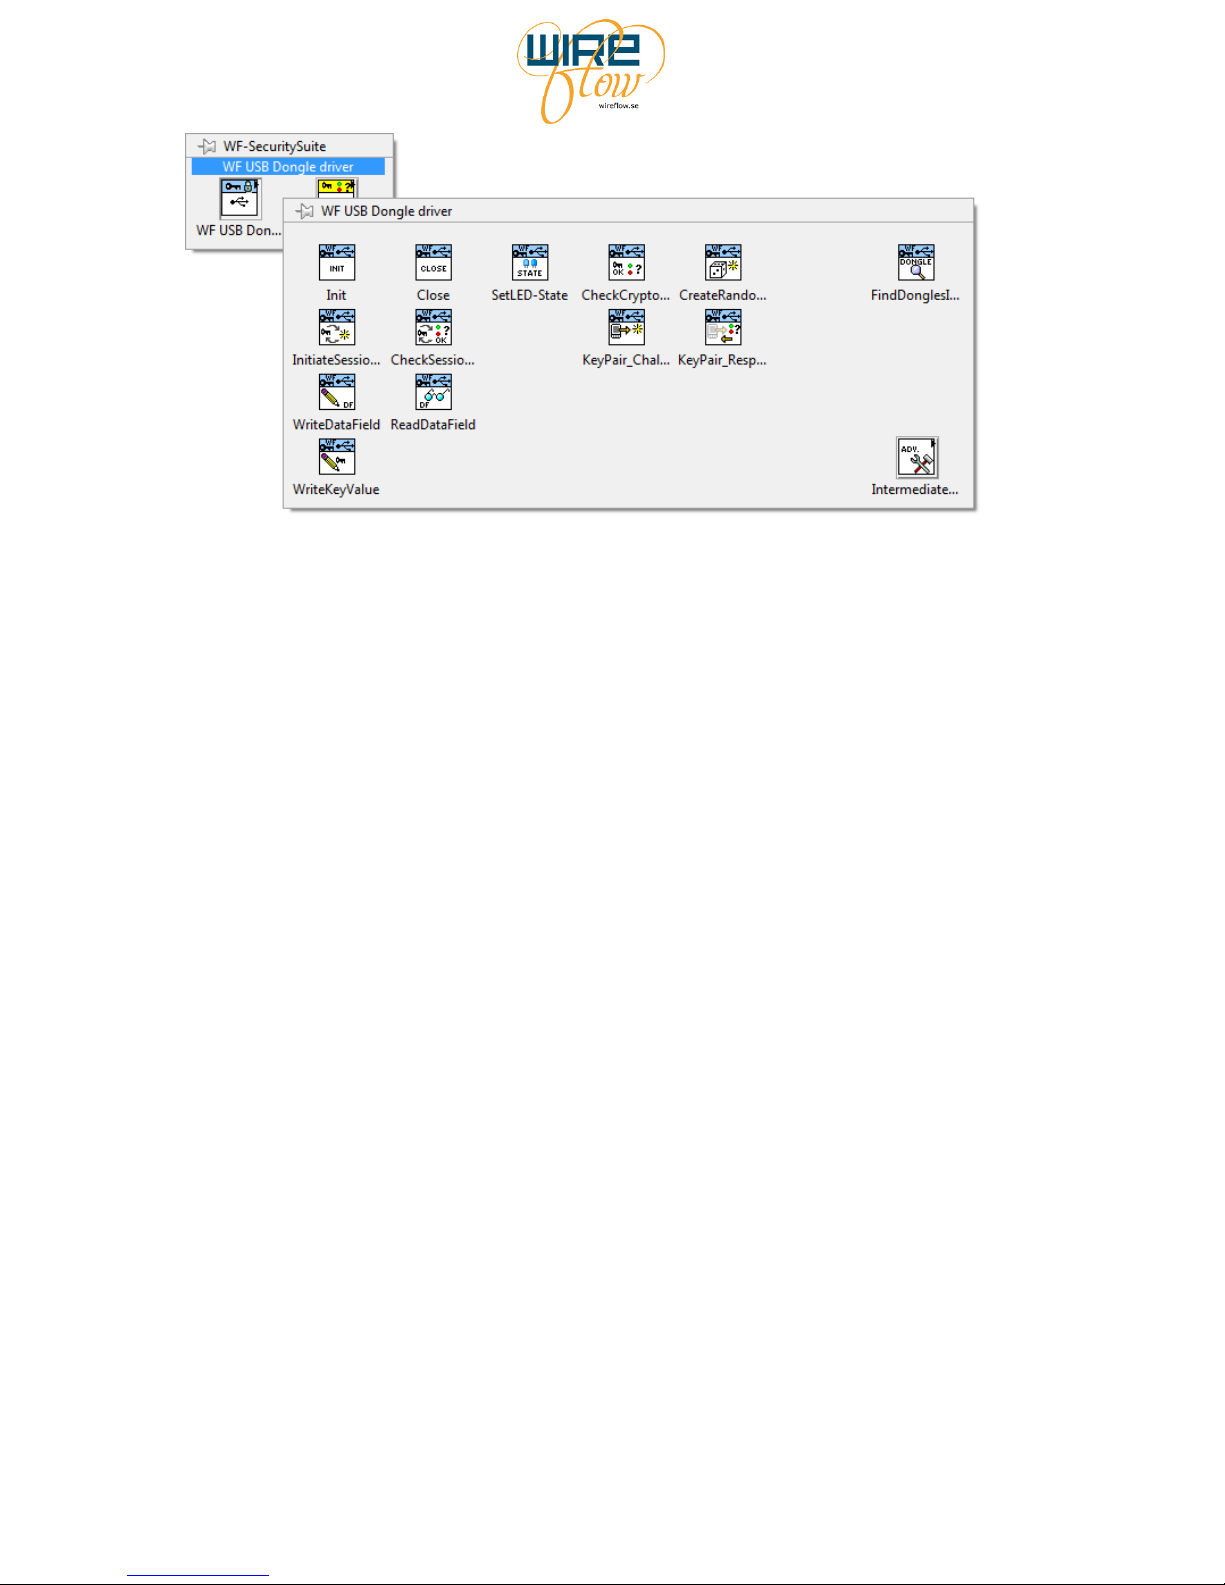
The basic VIs are found in the tools palette:
Page 19
WireFlow AB, WireFlow Security Suite
© WireFlow AB, 2014 AC0045-002 rev C 18
There are two VIs for connecting and disconnecting to a dongle (Init and Close).
There are two VIs for writing and reading to the data fields (WriteDataField and
ReadDataField).
There are VIs for writing and checking key values (WriteKeyValue and
CheckCryptoKey). Remember that key values cannot be read, only checked.
There is one VI for changing the behaviour of the internal LED in the HW called
SetLED-State.
There are two VIs to initiate and check a Session Key, i.e. a key only used in the
session.
There are two VIs to be used for remote/offline challenge response, e.g. to validate a
communication link
There is one VI to create cryptographically safe random number.
Finally there is one VI called FindDonglesInSystem which can be used for the rare
case that your application should need to use multiple dongles in the same system.
Page 20
WireFlow AB, WireFlow Security Suite
© WireFlow AB, 2014 AC0045-002 rev C 19
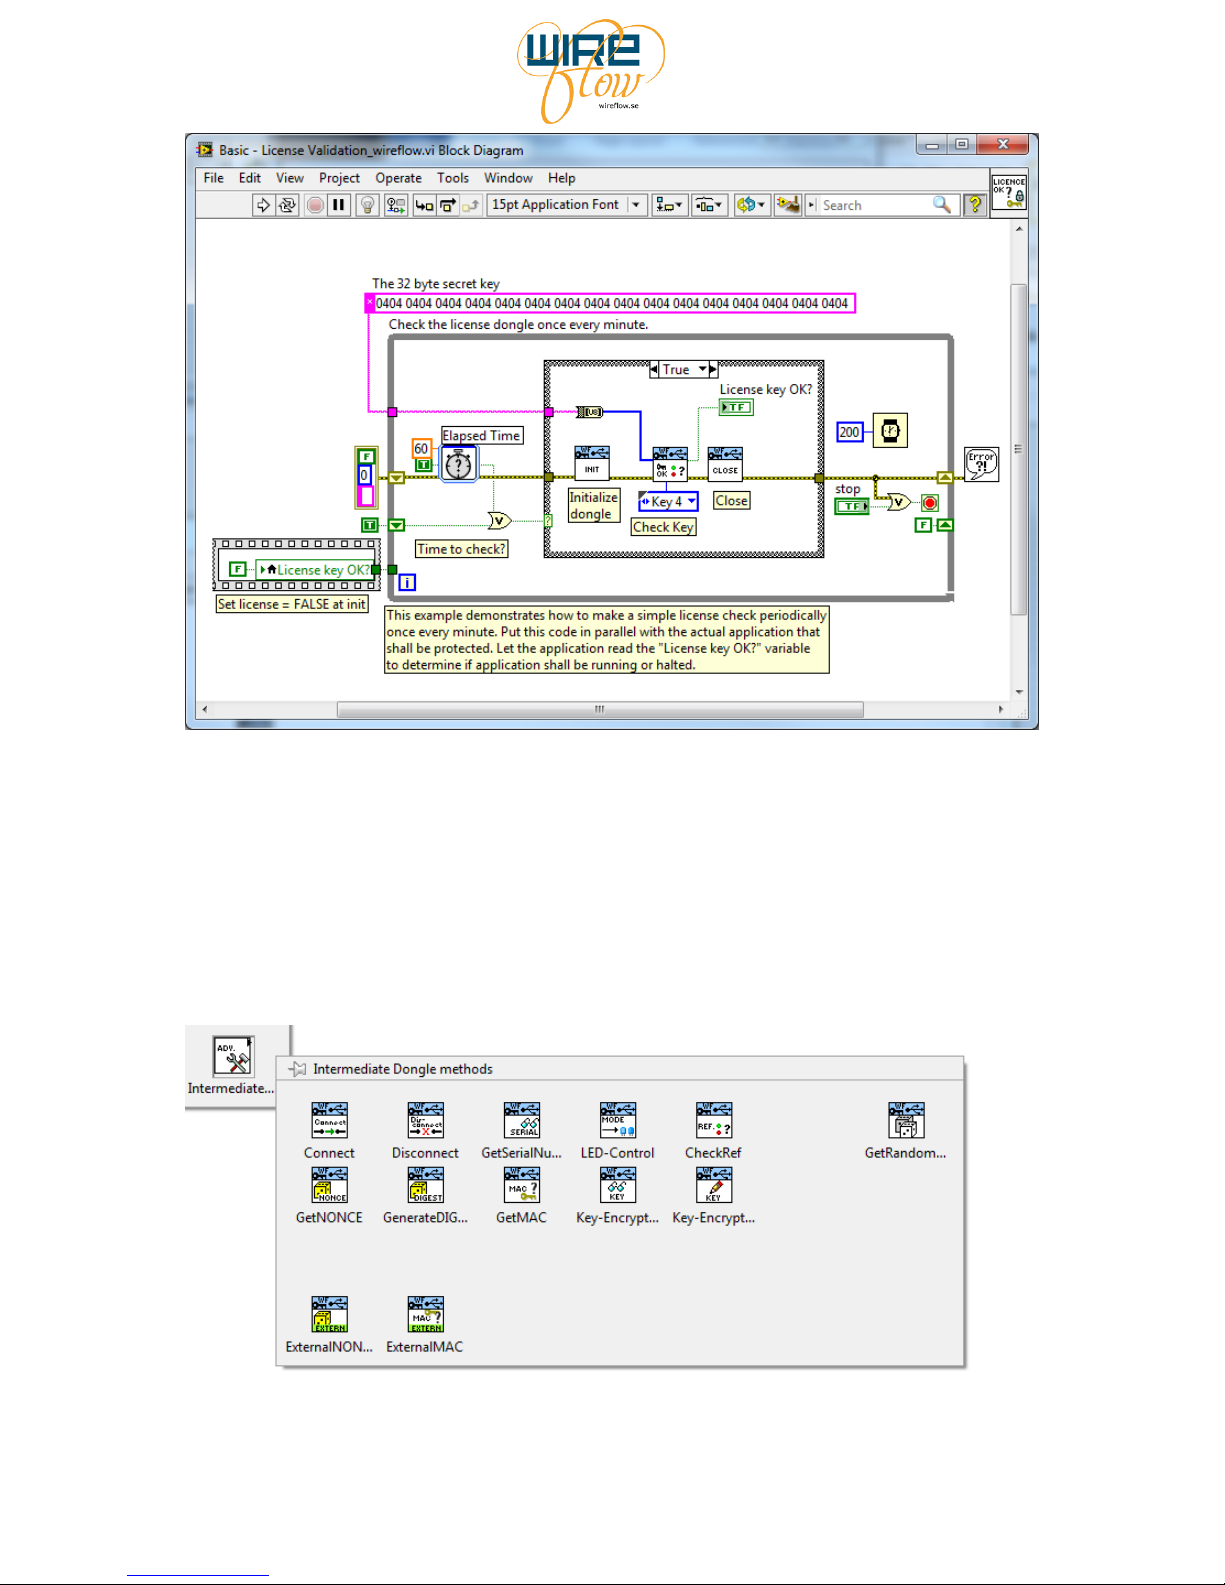
The diagram above shows how easy it can be to implement a check that a dongle with the
correct key is inserted into the system. Just do; Init, CheckCryptoKey and Close.
Please also study the other basic examples found under >Help > Find Examples... They will
give examples on how to implement user identification, demo time expiration etc.
The intermediate VIs
The intermediate VIs are found in this palette:
Page 21
WireFlow AB, WireFlow Security Suite
© WireFlow AB, 2014 AC0045-002 rev C 20
These VIs are available for users that need to do more advanced functions. With these VIs
you can for example manage systems with multiple dongles. You can check if a dongle is still
active etc.
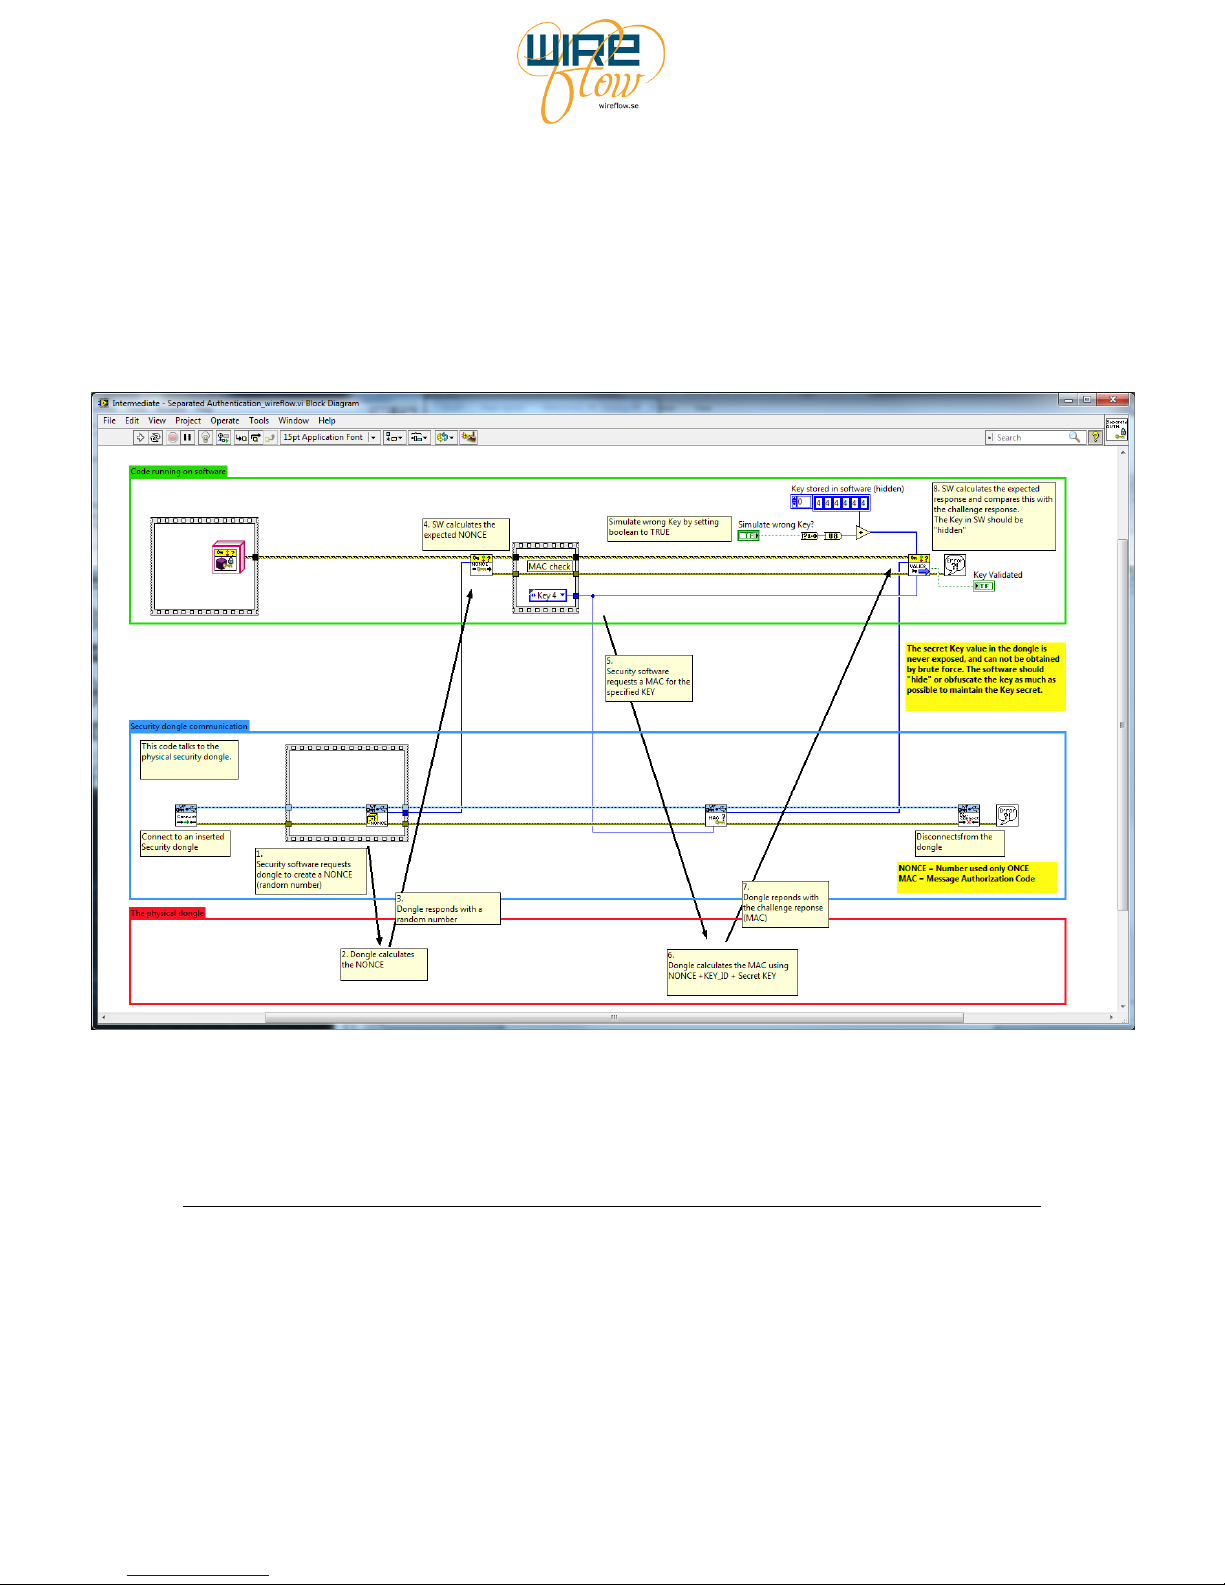
You can also use these VIs together with VIs from the WF Authentication module library to
create advanced applications that separate the authentication functions from the USB dongle
communication. By doing like this it is for example possible to check that a specific dongle is
inserted on a specific computer elsewhere. It can for example be used for user identification
on remote machines etc.
The following example illustrates how this kind of application can be implemented.
To gain more knowledge on the intermediate VIs please read the VI info for each VI and
study the intermediate examples available under >Help > Find Examples...
The WF Authentication module
The Authentication module is responsible for the encoding/decoding as well as the calculation
of expected results for a Key check.
Although this driver is able to run stand-alone it is designed to be used with hardware from
the WF Security Suite. The standard user of the WireFlow security Suite will not use these
VIs directly. Instead he will only use these VIs indirect via the more easy to use WF USB
Security dongle driver
Page 22
WireFlow AB, WireFlow Security Suite
© WireFlow AB, 2014 AC0045-002 rev C 21
Requirements
LabVIEW (version >= 2011)
VI Package Manager (for installation)
Installation
The WF Authentication module may be downloaded from www.wireflow.se. For the
installation you will need the VI Package Manager which may be downloaded from
www.ni.com or from jki.net. The installation procedure is quite straight forward. Just follow
the online instructions.
Installed items
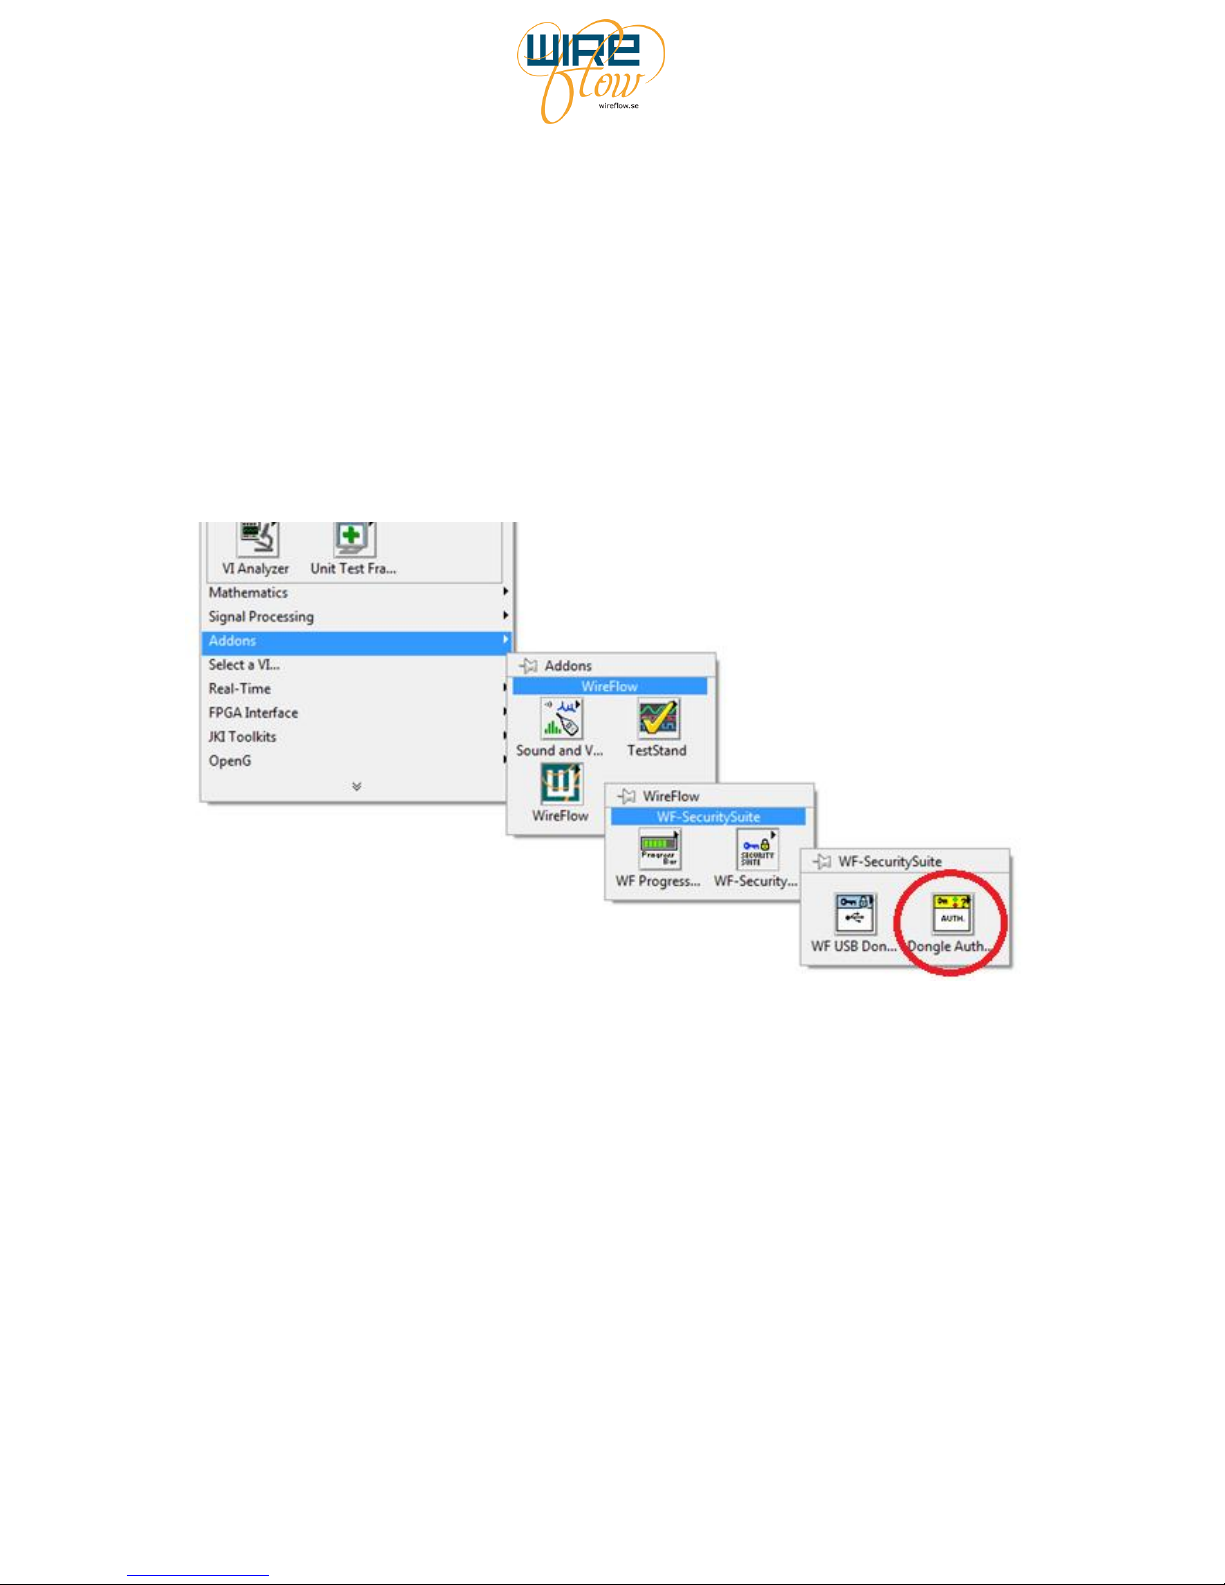
The module VIs are found in the functions palette:
The user's manual is installed and found under the menu >Help >WireFlow
Examples are found under the menu >Help > Find Examples...
To find the examples select the Search tab and then search on the keyword dongle or
WireFlow
Page 23
WireFlow AB, WireFlow Security Suite
© WireFlow AB, 2014 AC0045-002 rev C 22
The VIs
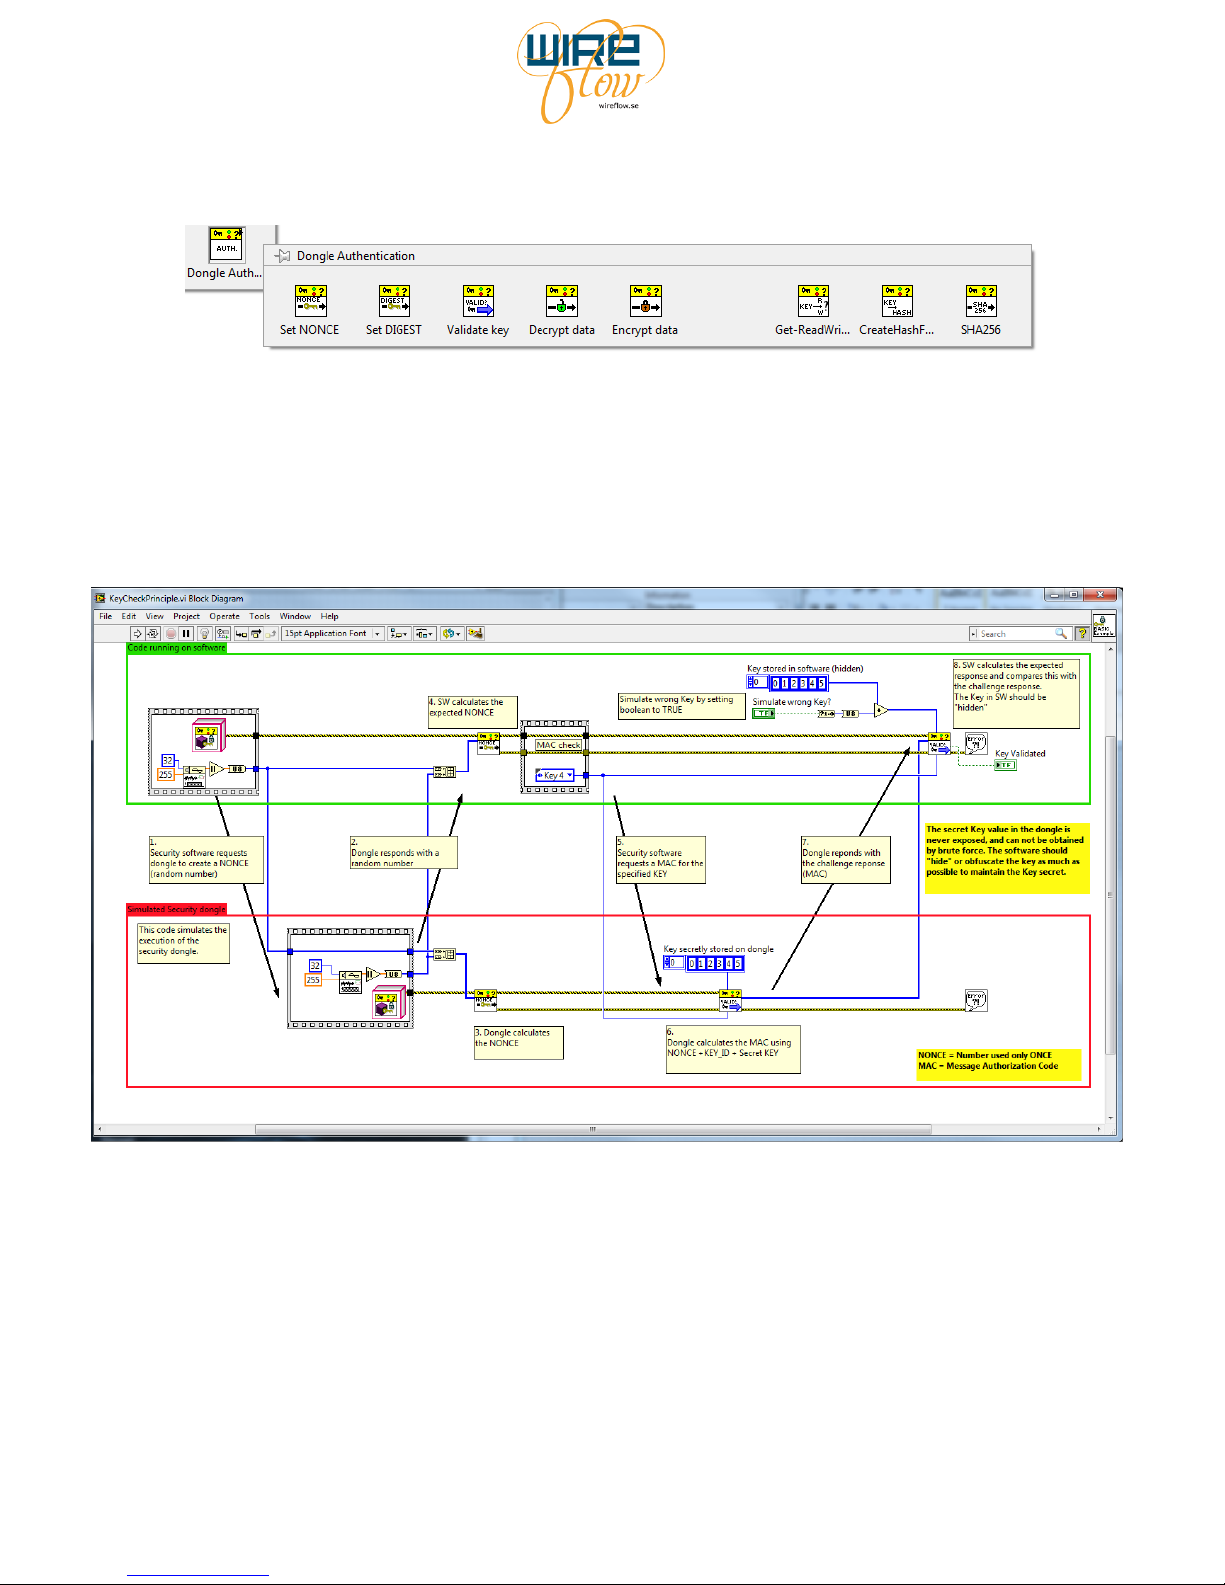
The VIs are found in the tools palette:
As mentioned before these VIs are normally not used directly by the application programmer,
instead they are used as subVIs for the WF USB Security dongle driver.
To learn how to use these VIs directly please read the VI info for each VI and study the
example available under >Help > Find Examples...
The following advanced example shows how the VIs are used to communicate with a
simulated hardware dongle.
 Loading...