

Page 1

Wired 4DVD
User’s Guide
Page 2
COPYRIGHT 1999 By Wired Inc. All Rights Reserved
Information in this manual is subject to change without notice. The software described
in this manual is furnished under license and may be used or copied only in accordance
with the license agreement. It is unlawful to copy the software except as specified in the
license agreement. No part of this manual may be reproduced or transmitted in any
form or by any means, electronic or mechanical, including photocopying or scanning,
for any purpose, without the express written permission of Wired Inc.
Macrovision Copyright Notice
This product incorporates copyright protection technology that is protected by
method claims of certain U.S. patents and other intellectual property rights owned by
Macrovision Corporation and other rights owners. Use of this copyright protection
technology must be authorized by Macrovision Corporation, and is intended for home
and other limited viewing uses only, unless otherwise authorized by Macrovision
Corporation. Reverse engineering or disassembly is prohibited.
Other Acknowledgements
Wired Inc, Wired 4DVD, and Wired Stream are trademarks of Wired Inc.
REALmagic, REALmagic Hollywood Plus, REALmagic In it, REAL Overlay are trademarks
of Sigma Designs, Inc. Sigma Designs and the Sigma Designs logo are registered
trademarks of Sigma Designs, Inc. Dolby, AC-3, Pro Logic, and the double-D symbol are
trademarks of Dolby Laboratories.
REALmagic Hollywood Plus is manufactured under license from Dolby Laboratories.
Copyright 1992 Dolby Laboratories, Inc. All rights reserved.
All other product and brand names are the property of their respective holders.
Manual by Mike Evangelist, Cornerstone Communications - [email protected]
4/16/99 - rev 8
2
Page 3

Wired 4DVD
Introduction . . . . . . . . . . . . . . . . . . . . . . . . . . . . . . . . . . . . . . . . . . . . . . . 5
Technical Support . . . . . . . . . . . . . . . . . . . . . . . . . . . . . . . . . . . .5
System Requirements . . . . . . . . . . . . . . . . . . . . . . . . . . . . . . . . .6
Technology Overview . . . . . . . . . . . . . . . . . . . . . . . . . . . . . . . . . . . . . . . . 7
MPEG-1 and MPEG-2 . . . . . . . . . . . . . . . . . . . . . . . . . . . . . . . .7
DVD . . . . . . . . . . . . . . . . . . . . . . . . . . . . . . . . . . . . . . . . . . . . . .7
Dolby Digital Surround Sound (AC-3) . . . . . . . . . . . . . . . . . . . .7
Dolby Pro Logic Surround Sound . . . . . . . . . . . . . . . . . . . . . . .8
Supported File Formats . . . . . . . . . . . . . . . . . . . . . . . . . . . . . . . .8
Installation
In/Out Connectors . . . . . . . . . . . . . . . . . . . . . . . . . . . . . . . . . . .10
Monitor Connection . . . . . . . . . . . . . . . . . . . . . . . . . . . . . . . . .10
Audio Connections . . . . . . . . . . . . . . . . . . . . . . . . . . . . . . . . . .12
TV Monitor Connections . . . . . . . . . . . . . . . . . . . . . . . . . . . . .13
Software Installation . . . . . . . . . . . . . . . . . . . . . . . . . . . . . . . . . . . . . . . 14
What gets installed . . . . . . . . . . . . . . . . . . . . . . . . . . . . . . . . . .14
Using DVD Station
Running DVD Station for the First Time . . . . . . . . . . . . . . . . . . . . . . . . 15
Auto Calibration . . . . . . . . . . . . . . . . . . . . . . . . . . . . . . . . . . . .15
Selecting Your Geographic Region . . . . . . . . . . . . . . . . . . . . . .16
Playing Discs . . . . . . . . . . . . . . . . . . . . . . . . . . . . . . . . . . . . . . . . . . . . . . 18
The Basics . . . . . . . . . . . . . . . . . . . . . . . . . . . . . . . . . . . . . . . . .18
Playing MPEG Files . . . . . . . . . . . . . . . . . . . . . . . . . . . . . . . . . . . . . . . . . 19
Reference
The DVD Station Controller . . . . . . . . . . . . . . . . . . . . . . . . . . . . . . . . . . 21
Player Controls . . . . . . . . . . . . . . . . . . . . . . . . . . . . . . . . . . . . .21
Display Panel . . . . . . . . . . . . . . . . . . . . . . . . . . . . . . . . . . . . . .22
Volume Control . . . . . . . . . . . . . . . . . . . . . . . . . . . . . . . . . . . . .23
DVD Navigation Buttons . . . . . . . . . . . . . . . . . . . . . . . . . . . . .23
DVD Menu Controller . . . . . . . . . . . . . . . . . . . . . . . . . . . . . . .25
DVD Station Function Buttons . . . . . . . . . . . . . . . . . . . . . . . . .25
Secondary Controls . . . . . . . . . . . . . . . . . . . . . . . . . . . . . . . . . .26
3
Page 4

The Number Pad . . . . . . . . . . . . . . . . . . . . . . . . . . . . . . . . . . . .27
The Compact Controller . . . . . . . . . . . . . . . . . . . . . . . . . . . . . .28
Sizes Menu . . . . . . . . . . . . . . . . . . . . . . . . . . . . . . . . . . . . . . . . . . . . . . . . 29
Preferences . . . . . . . . . . . . . . . . . . . . . . . . . . . . . . . . . . . . . . . . . . . . . . . 30
Play List Panel . . . . . . . . . . . . . . . . . . . . . . . . . . . . . . . . . . . . .30
Settings Panel . . . . . . . . . . . . . . . . . . . . . . . . . . . . . . . . . . . . . .32
DVD Options Panel . . . . . . . . . . . . . . . . . . . . . . . . . . . . . . . . .34
Setting the DVD Region Code . . . . . . . . . . . . . . . . . . . . . . . . .36
Configuration Options . . . . . . . . . . . . . . . . . . . . . . . . . . . . . . . . . . . . . . 36
Auto Calibration . . . . . . . . . . . . . . . . . . . . . . . . . . . . . . . . . . . .37
Adjust Borders . . . . . . . . . . . . . . . . . . . . . . . . . . . . . . . . . . . . .37
Advanced Color Adjustments . . . . . . . . . . . . . . . . . . . . . . . . . .39
Select Screen . . . . . . . . . . . . . . . . . . . . . . . . . . . . . . . . . . . . . . .42
Index . . . . . . . . . . . . . . . . . . . . . . . . . . . . . . . . . . . . . . . . . . . . . . . . . . . . 43
4
Page 5
Introduction
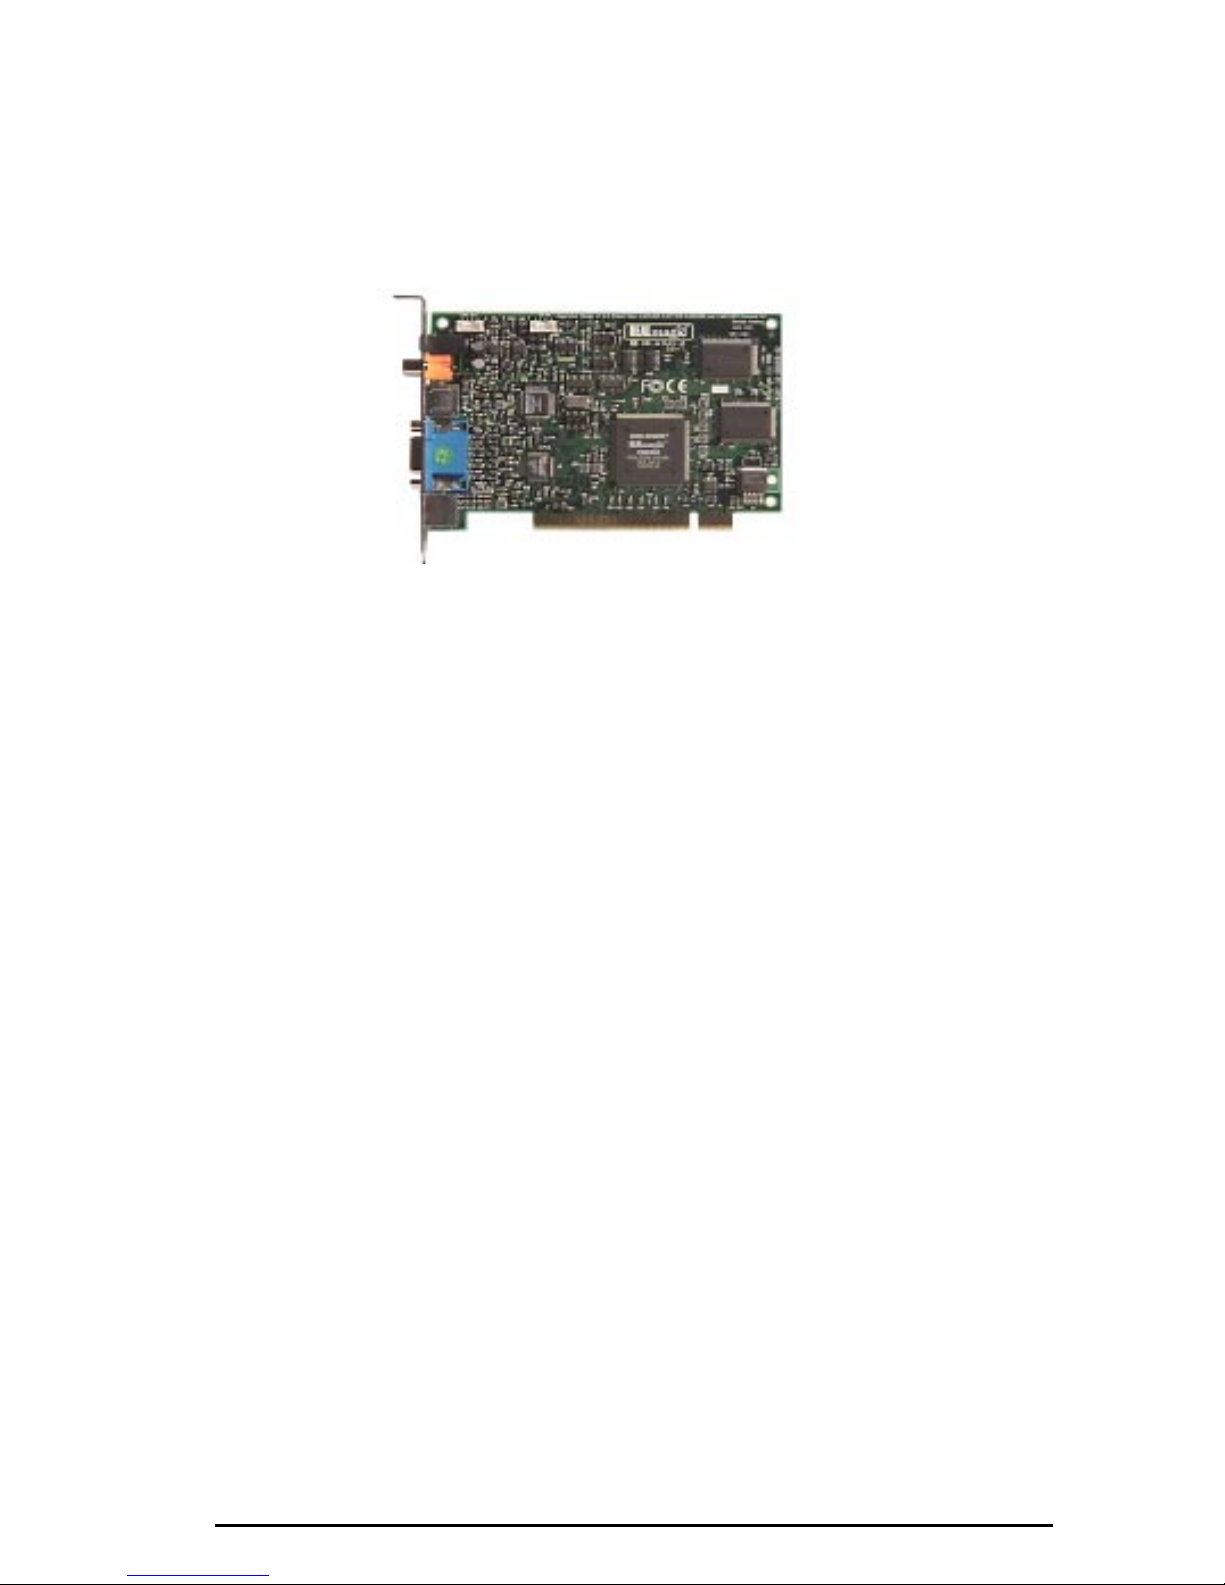
Congratulations on purchasing your new Wired 4DVD card. Your Wired 4DVD
transforms your computer into a full-function DVD player, and provides you with
uncompromising high performance hardware MPEG-2 digital video playback
capability.
The Wired 4DVD also has a digital audio output which can be connected to an
external decoder for Dolbyª Digital or DTSª surround sound.
Please refer to the Read Me First file on the installation disc for important
information not available when this manual was printed.
Technical Support
Support for Wired 4DVD is available online at
mail at
www.wiredinc.com
.
and via e-
Introduction 5
Page 6

System Requirements
For proper operation, the Wired 4DVD card requires:
¥ A Power Macintosh running at 100 MHz or higher
¥ Mac OS version 8.0 or higher (8.5.1 recommended)
¥ An available PCI expansion slot
¥ 10 MB of available RAM
¥ DVD-ROM or DVD-RAM drive
¥ An external amplifier and speakers is recommended for best sound.
6 Introduction
Page 7

Technology Overview
MPEG-1 and MPEG-2
MPEG stands for Moving Picture Experts Group. It refers to a method of data
compression optimized for video and audio data. By analyzing the changes
between video Òframes,Ó an MPEG ÒencoderÓ is able to reduce the file size of the
compressed video data significantly. This remarkably efficient compression
method allows full-screen and full-motion video, plus CD-quality audio to be
stored in a relatively small size file. Once the data has been compressed,
however, it must be ÒdeÓ-compressed before it can be used.
Your card incorporates specialized hardware to decompress MPEG data at a very
high speed, which allows MPEG ÒstreamsÓ to play back at a data transfer rate of
500 Kilobits to 15 Megabits per second. MPEG-2 video has a resolution of 720 x
480 in 24-bit (16.8 million) colors at 30 frames per second (fps) for NTSC, and 720
x 576 at 25 fps for PAL. MPEG-1 video has a resolution of 352 x 240 in 24-bit (16.8
million) colors at 30 fps for NTSC, and 352 x 288 at 25 fps for PAL. The MPEG
standard is a fully open standard and has been embraced by the computer and
entertainment communities as the current standard of digital video on both
television and personal computers.
DVD
DVD is a revolutionary storage medium that is currently capable of storing up to
18 gigabytes (GB) of data on a disc the size of a standard CD. This is enough to
store an entire movie encoded in the MPEG-2 format on a single disc. For video
the maximum bit rate is 10.8 Megabits per second.
Dolby Digital Surround Sound (AC-3)
Dolby Digital Surround sound is the audio compression standard for DVD in the
U.S. Also known as AC-3, Dolby Digital Surround sound is designed specifically to
code multi-channel digital audio. It incorporates six discrete digital audio
channels to provide a full immersion surround sound system that is similar to
that of a movie theatre. The six channels include left and right front, left and right
back, center, and subwoofer. The frequency range of the main channels is 20 Hz
to 20 kHz (+/- 0.5 dB). The subwoofer channel range is 20 Hz to 120 Hz (+/- 0.5
dB). The Dolby Digital Surround Sound requires a Dolby Digital receiver/
amplifier to decode the signal.
To achieve Dolby Digital sound, connect your card to a Dolby Digital amplifier
using the optional S/PDIF connector. Although this connector looks like a
standard RCA jack, it carries six channels of digital audio to your digital amplifier.
Technology Overview 7
Page 8

Dolby Pro Logic Surround Sound
Dolby Pro Logic Surround Sound uses the standard analog stereo signal to
multiplex surround sound information, and requires a Dolby Pro Logic receiver/
amplifier to decode the signal. Pro Logic Surround Sound differs from Dolby
Digital Surround Sound by using the same audio signals for both the front and
back speakers on the left and right channels.
Supported File Formats
Besides playing standard DVD-Video discs inserted in a DVD-ROM drive, the
Wired 4DVD card can also play MPEG files in a variety of formats.
DVD
DVD files have various file extensions such as IFO and VOB. The VOB files
contain the actual video and/or audio data, whereas the IFO files contain
navigation information. DVD files are up to full CCIR601 resolution of 720 x 480
(576 for PAL) at 30 (25 for PAL) fps.
MPEG Files
MPG is the extension commonly used for files with MPEG-2 or MPEG-1
compressed full-motion video. System streams, Program streams, and Transport
streams are all supported, which are different ways of storing both audio and
video in one file. For MPEG-2 and MPEG-1 the video resolution is up to 720 x 480
(576 for PAL) at 30 (25 for PAL) frames per second with 16.8 million colors (full
CCIR601). These files may also include MPEG-compressed, AC-3 compressed, or
Linear PCM audio.
Elementary MPEG streams
The Wired 4DVD can also play MPEG encoded video-only bit stream and audioonly bit stream files, as well as AC-3 elementary audio bit stream files. These are
typically files with the extensions .mpa, .mpv, .vbs, .abs, or .ac3.
8 Technology Overview
Page 9
INSTALLATION
Follow the steps below to install the Wired 4DVD card into your computer.
!
Static electricity can damage your equipment. Do not take the board out of
its static protective bag until you are ready to work with it.
Turn off the power to the computer and disconnect the power cord.
1)
2)
Disconnect the monitor cable from your Macintosh.
Open your computer so you have access to the PCI expansion slots. (Refer to
3)
your MacÕs users manual for specific instructions.)
4)
Locate an available PCI slot.
Remove the slot cover screw and slot cover, if applicable.
5)
6)
Open the protective bag and remove the Wired 4DVD card
Insert the card into an
available PCI slot.
7)
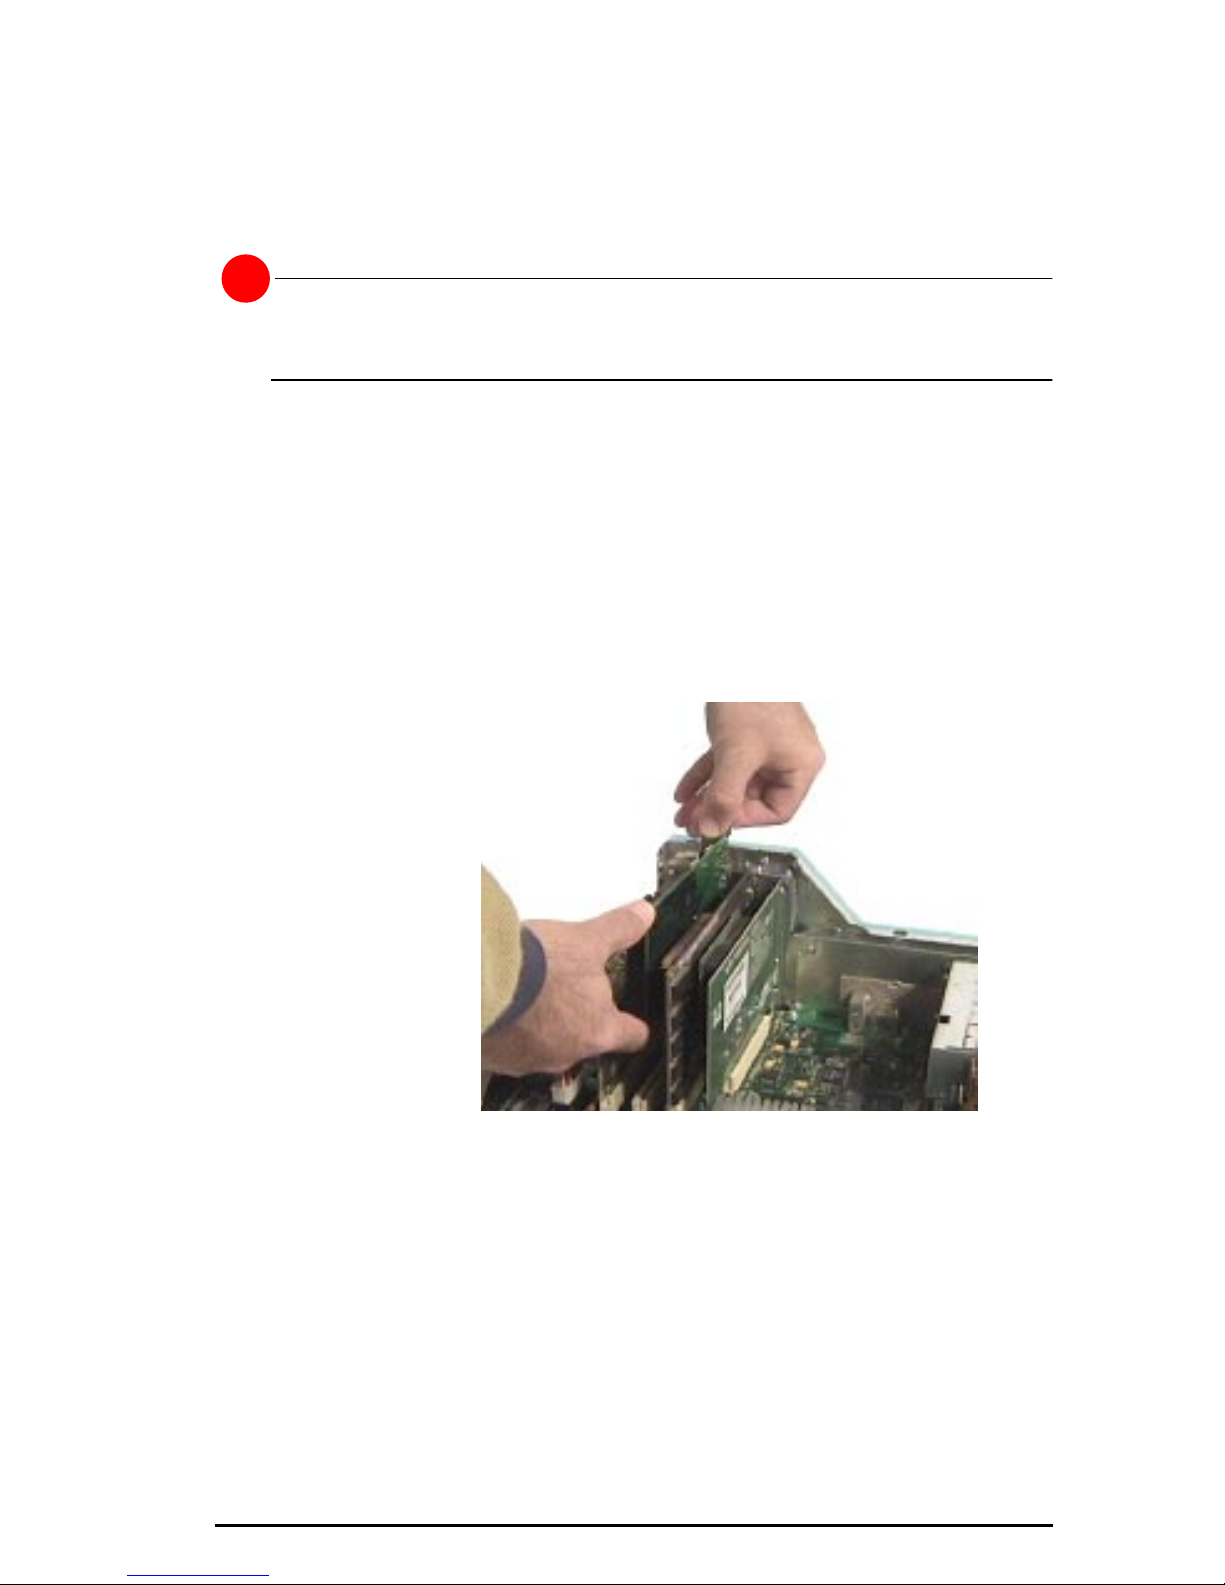
Insert the card into the PCI slot. Press down gently on the top edges of the
board to seat it securely in the socket.
Technology Overview 9
Page 10
8)
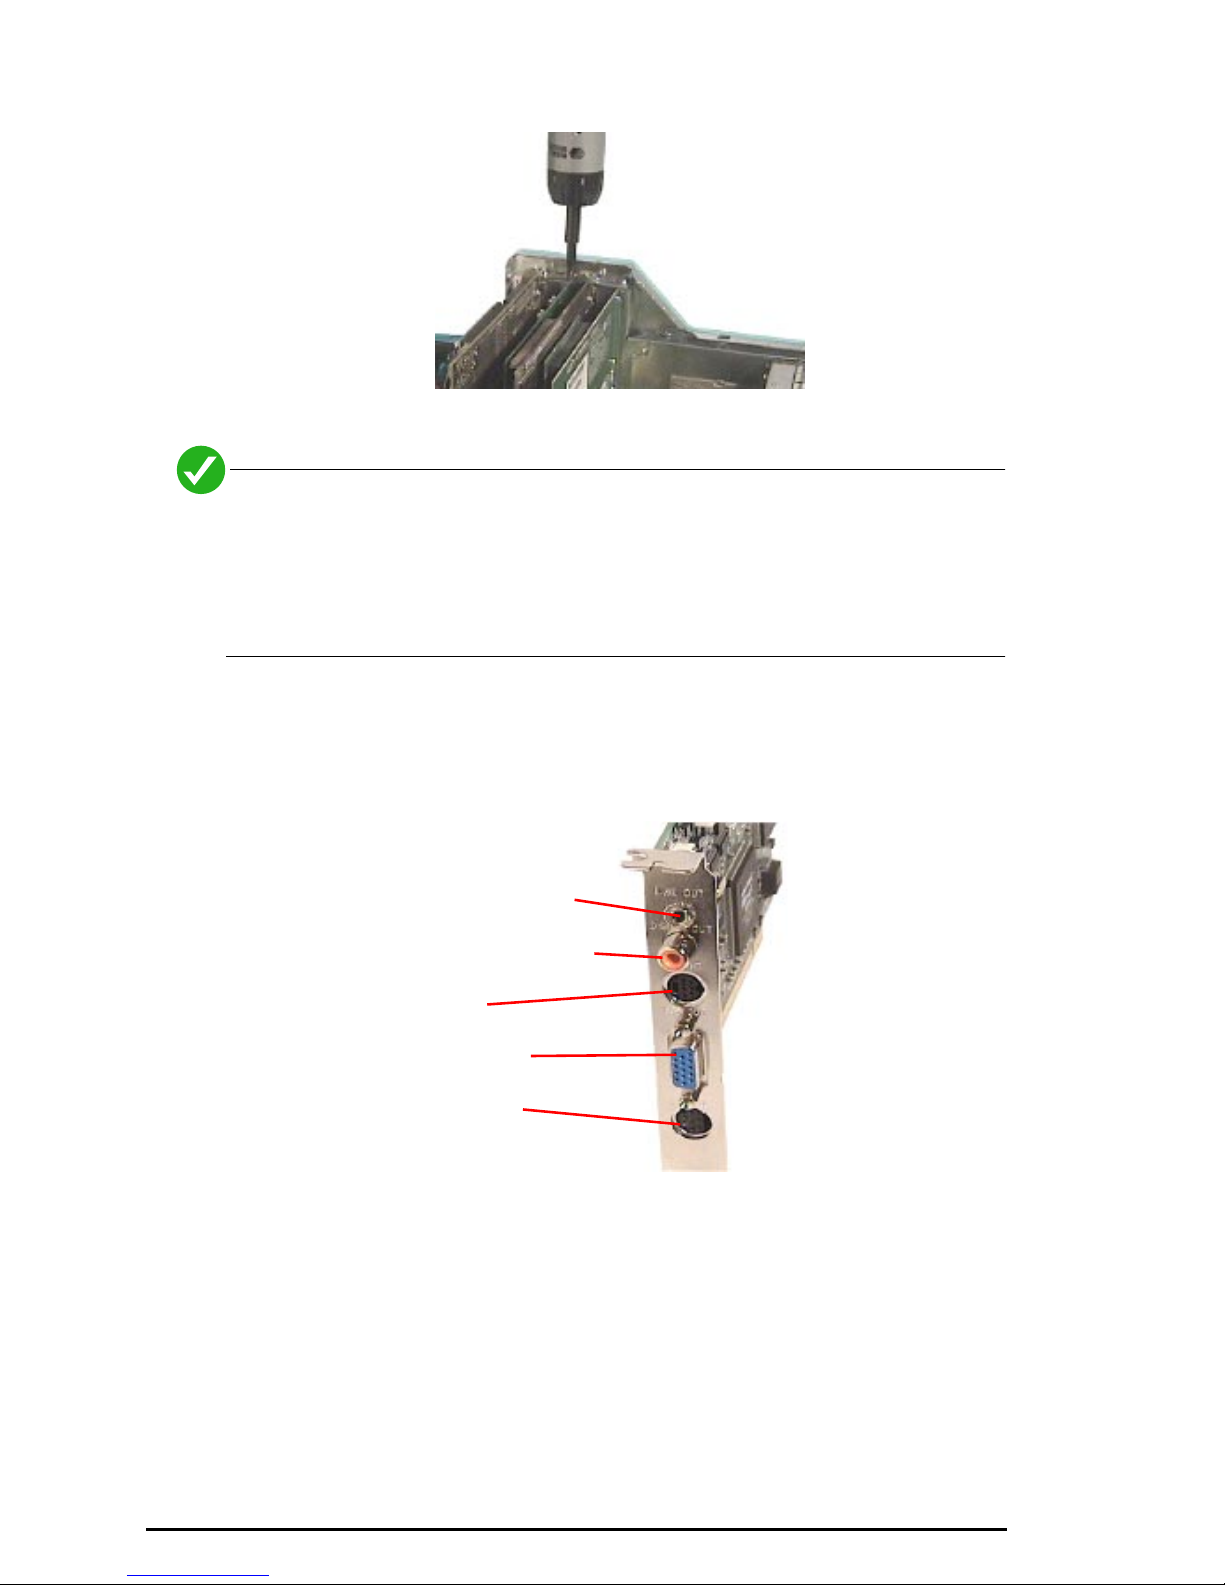
Secure the board using the screw removed earlier.
9)
Replace the cover of your Macintosh and reconnect the power cord.
If you install a DVD-ROM drive at the same time as the Wired 4DVD card,
remember to attach the CD-Audio cable from the motherboard of the
computer to the DVD-ROM drive. Otherwise, you will not be able to play
CD-Audio titles with the DVD-ROM drive. This will not affect the audio of
DVD-Video or DVD-ROM titles.
In/Out Connectors
This photo shows the various input and output connectors on the Wired 4DVD
card.
Monitor Connection
The Wired 4DVD card connects ÒbetweenÓ your monitor and the monitor port of
the Mac. This is accomplished by using a special Òpass thruÓ cable which
Stereo Line output
S/PDIF digital output
TV output
Monitor port
Monitor input
10 Technology Overview
Page 11
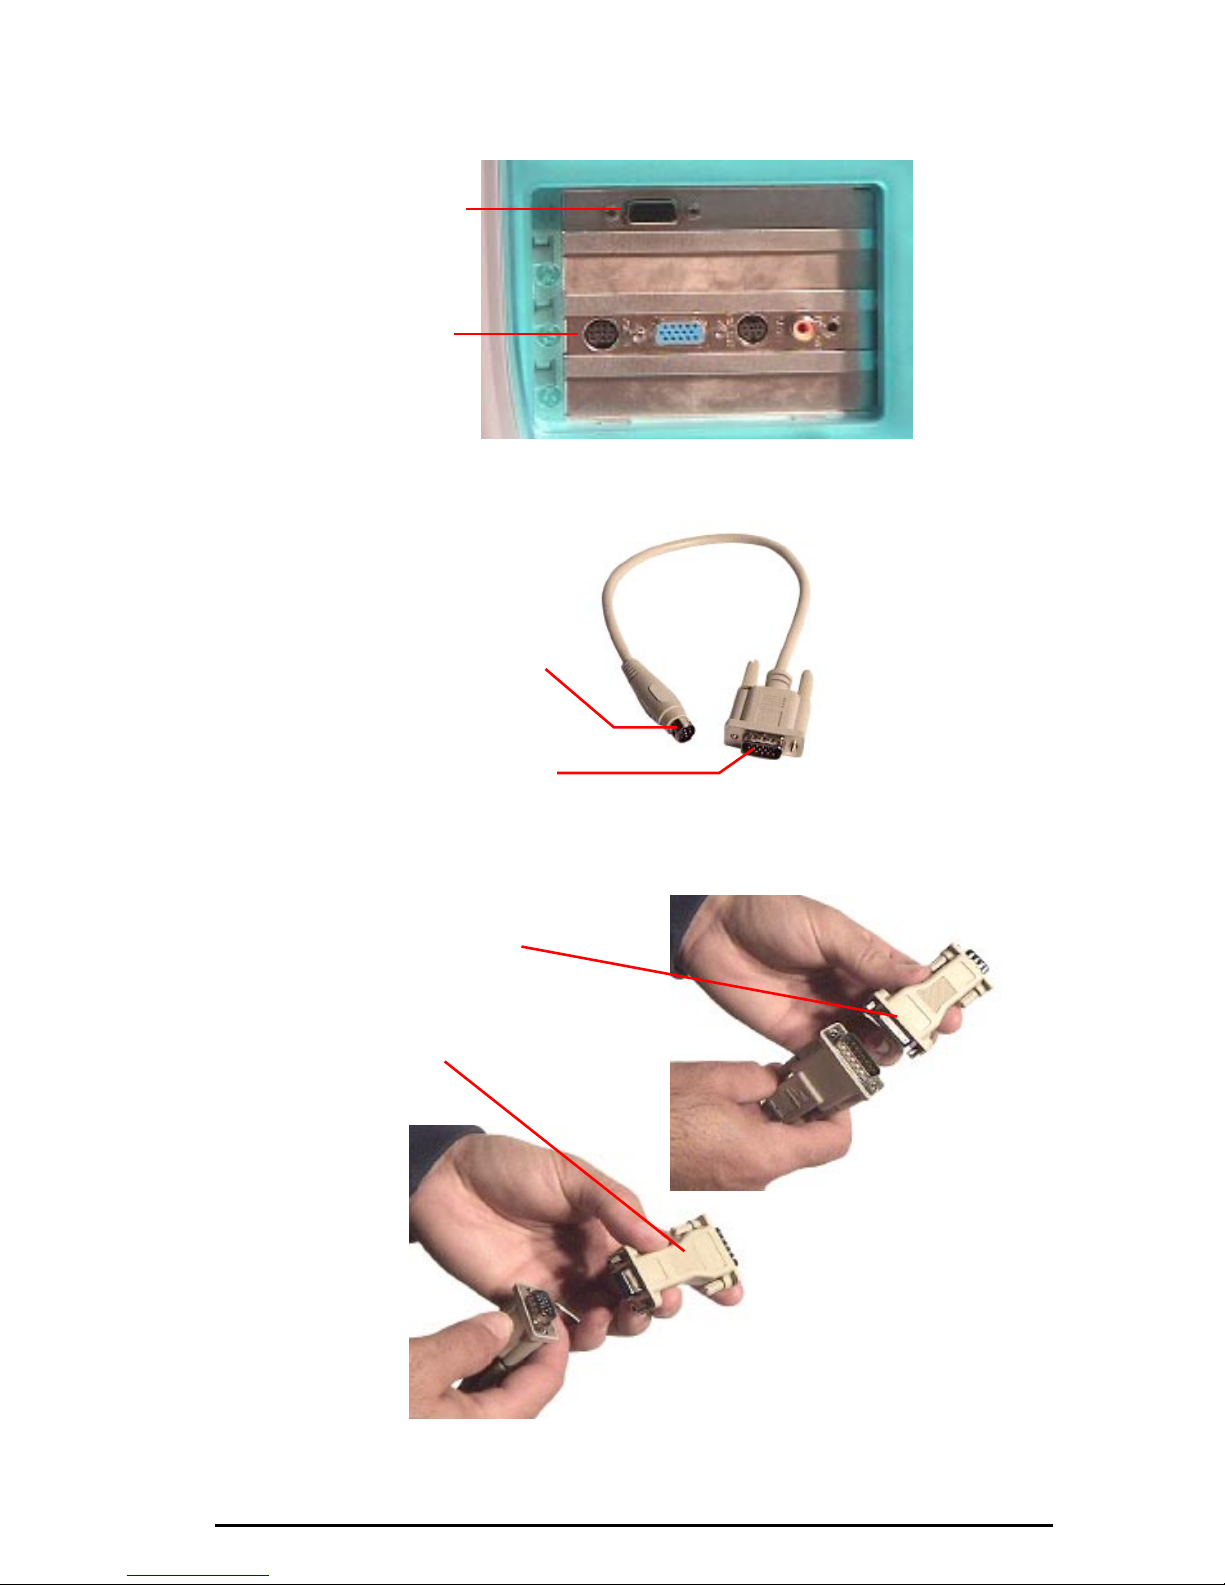
connects the output of your Mac to the input of the Wired 4DVD card. Your
monitor then connects directly to the Wired 4DVD card.
The MacÕs monitor
port (location and
appearance varies)
The video input of
the Wired 4DVD
The connectors on the pass-thru cable and the card are the newer ÒcompactÓ
VGA-style.
The Òpass thruÓ cable
This end goes to the
Wired 4DVD card.
This end connects to your
MacÕs monitor port.
If your system uses the larger Òmac-styleÓ monitor connectors, you can use the
supplied adapters to convert them to the right size.
Connect this adapter
to your monitor cable.
And this one to the
pass-thru cable.
Technology Overview 11
Page 12
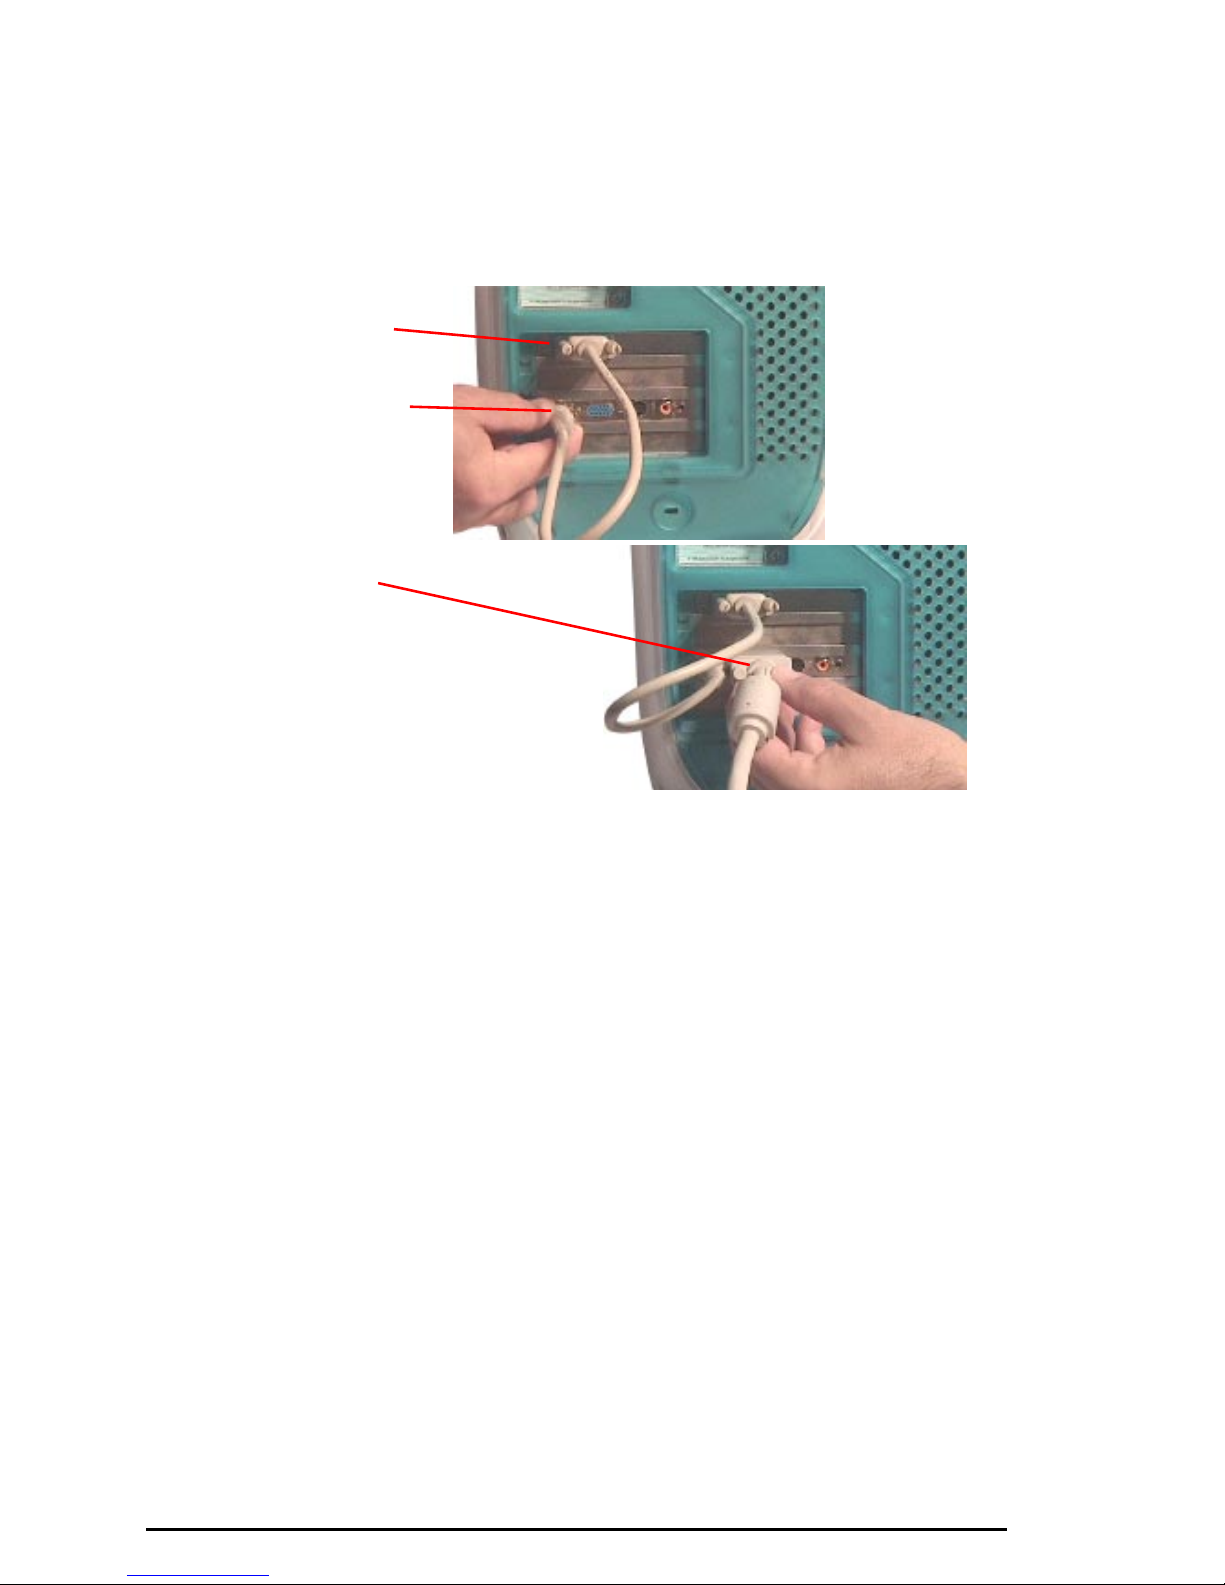
To connect your monitor, follow these steps:
1)
Attach the larger end of the pass-thru cable to the monitor port of your Mac or
video card.
Attach the other end of the pass-thru cable to the video input connector at the
2)
back of the Wired 4DVD card.
Connect the passthru cable to the
MacÕs monitor port
and then to the
Wired 4DVD card.
Connect the cable
from your computer
monitor to the
4DVD card.
Connect the cable from your monitor to the monitor output of the card.
3)
Audio Connections
In addition to being able to play its sound directly through the MacÕs built-in
speaker (and thereby any attached sound system) the Wired 4DVD features two
separate audio outputs for specialized configurations:
¥ The Stereo mini-jack output
¥ The S/PDIF digital audio connector.
The
stereo mini-jack
by virtually any stereo receivers or amplified speakers. It also contains the Pro
Logic Surround Sound encoding that allows you to achieve surround sound by
attaching this signal to a Pro Logic receiver.
The
S/PDIF connector
external sound system which features a Dolby Digital and/or DTS decoding
system.
outputs a standard analog stereo signal that can be used
is used to send digital audio signals directly to an
12 Technology Overview
Page 13
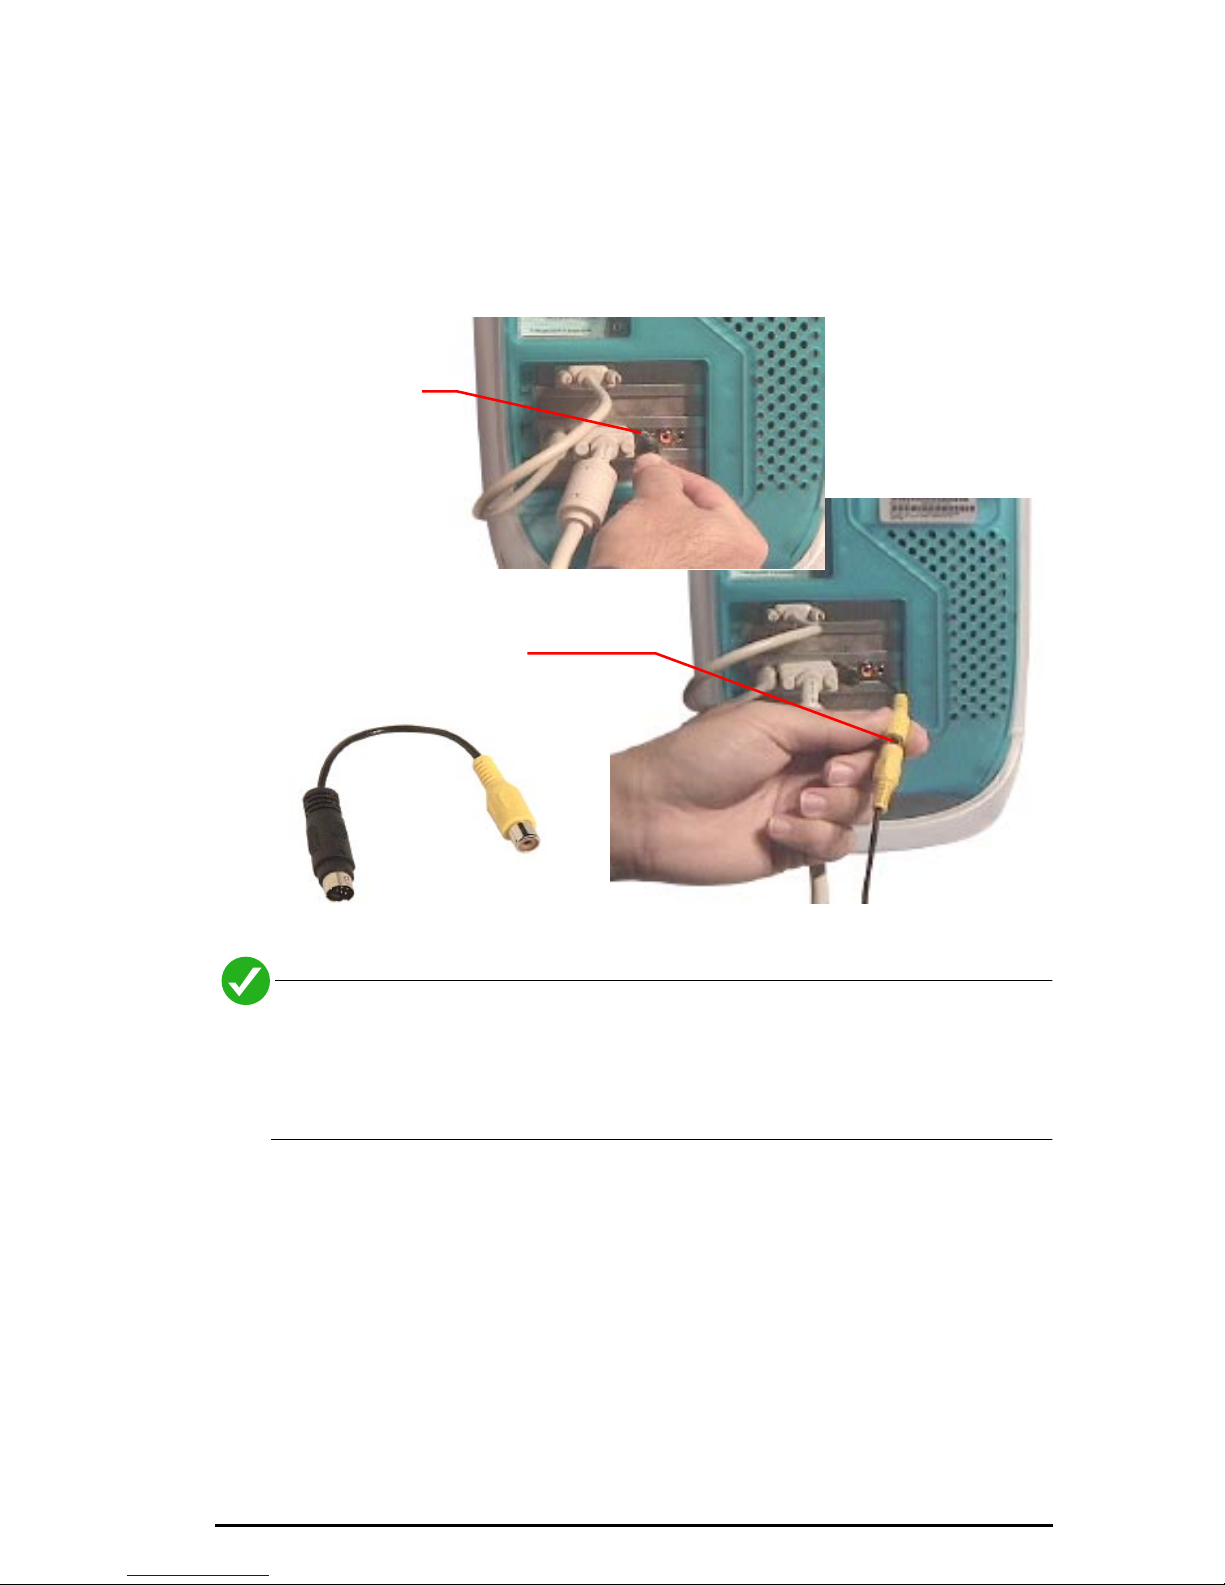
TV Monitor Connections
The Wired 4DVD can be connected to an external TV monitor or video projector.
If your TV has an S-video connector, you can connect it directly to the S-video
output of the card.
If your TV uses the more common RCA-type connector, you will need to use the
supplied adapter to connect it.
S-video cables
plug directly in
to the Wired
4DVD card.
Use the adapter if your TV
has RCA inputs.
Due to the copyright protection circuit in use by this product, please do not
connect any recording device, such as a VCR, to the Composite Video Out
or the S-Video Out connectors of the card. For best playback, make sure
the DVD title is played directly from the card onto a TV, not through a VCR.
Technology Overview 13
Page 14
Software Installation
This chapter describes the software installation procedure for the Wired 4DVD
card.
1)
Insert the Wired 4DVD Software installer disc in your CD drive.
Double-click the
2)
3)
Follow the on-screen instructions to complete the software installation.
Wired 4DVD Installer
application.
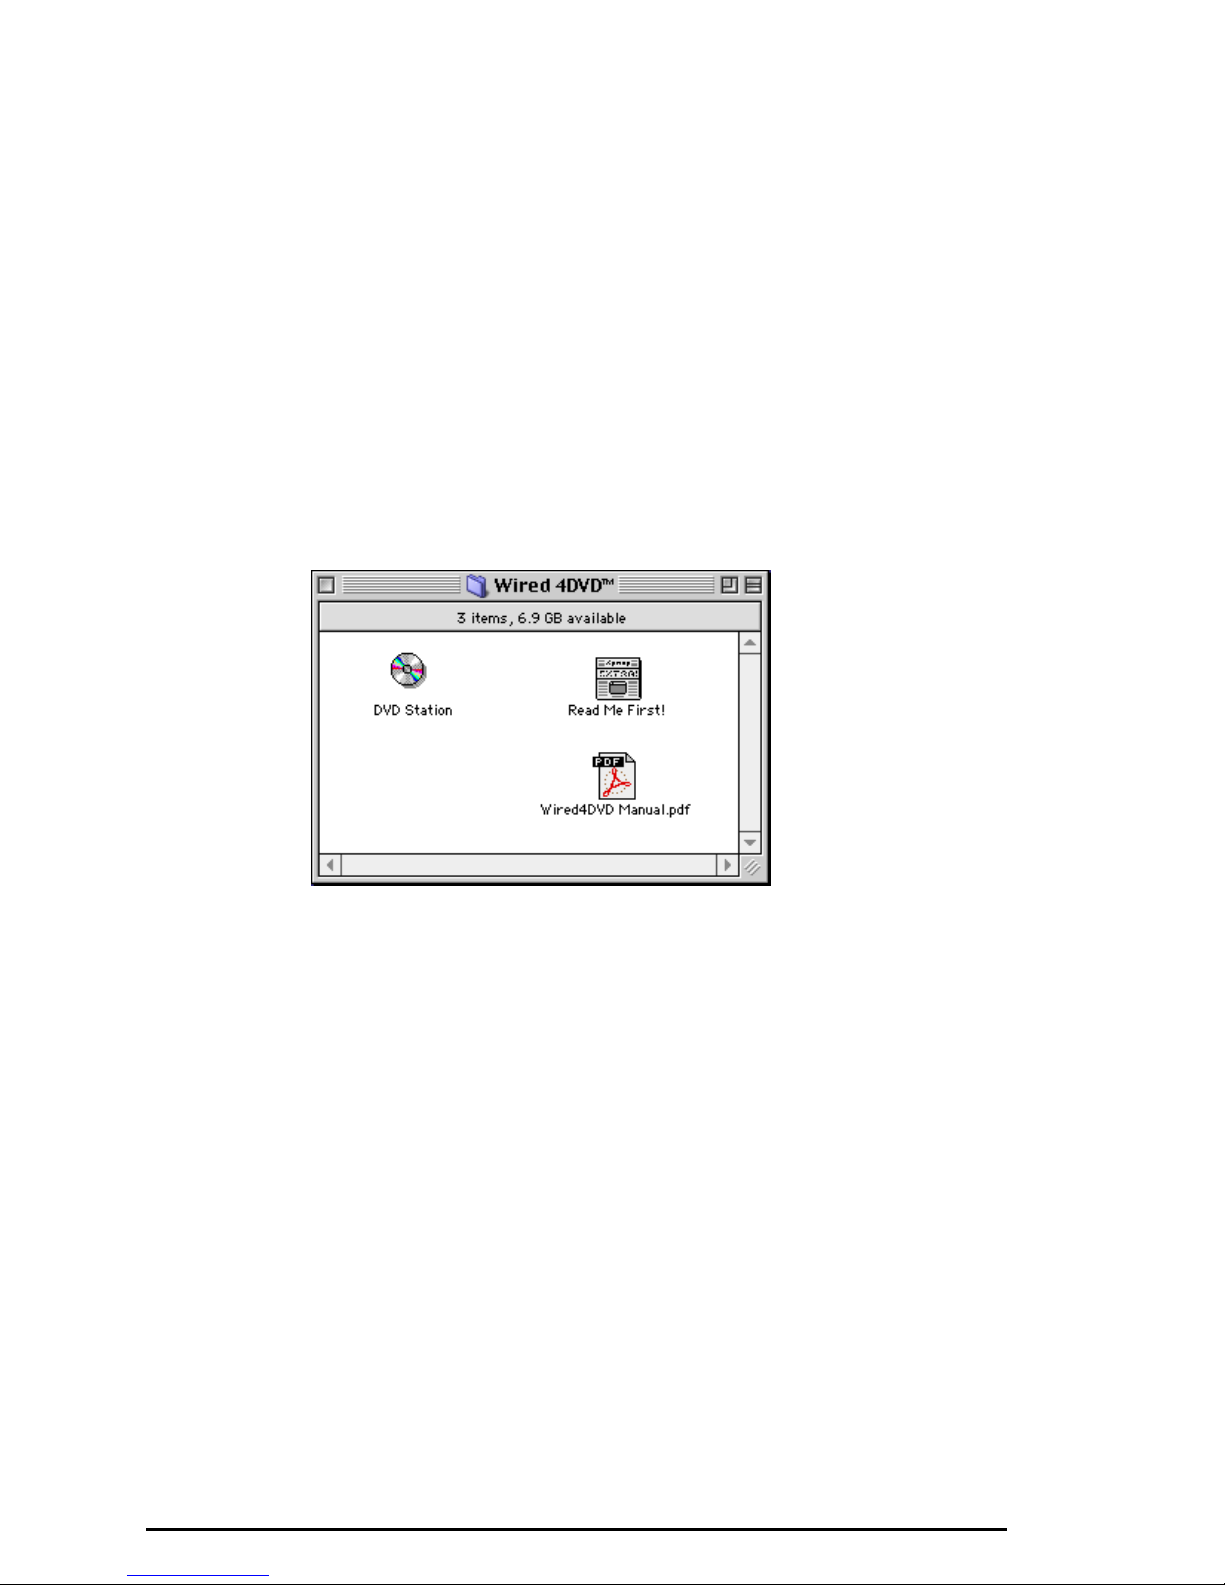
What gets installed
The installer places the following files on your hard drive:
¥ The DVD Station application, in the Wired 4DVDª folder
¥ This user guide, in Adobe Acrobat format, in the Wired 4DVDª folder
¥ The Wired4DVDLib file in your Extensions folder
Proceed to the next section for detailed information on the operation of the DVD
Station software.
14 Software Installation
Page 15
USING DVD STATION
DVD Station is a versatile application that allows you to play a variety of DVD,
MPEG, and CD formats. This section describes how to use DVD Station to play
full-length feature films recorded in the DVD format, and data CDs containing
MPEG files and also Audio CDs. DVD Station will automatically detect the format
of the disc in your DVD drive and identify the file type in the Display Panel. DVD
Station can also detect MPEG files in your CD-ROM and hard drives.
Running DVD Station for the First Time
The first time you run DVD Station you will be prompted to run the Auto
Calibration and Region Selection procedures. Each is described below.
Auto Calibration
In order to be able to display the signal from the Wired 4DVD card on your
computer monitor, the system must be ÒcalibratedÓ. This is an automatic process
that tests the signal from your computerÕs monitor port and adjusts the output of
the Wired 4DVD accordingly.
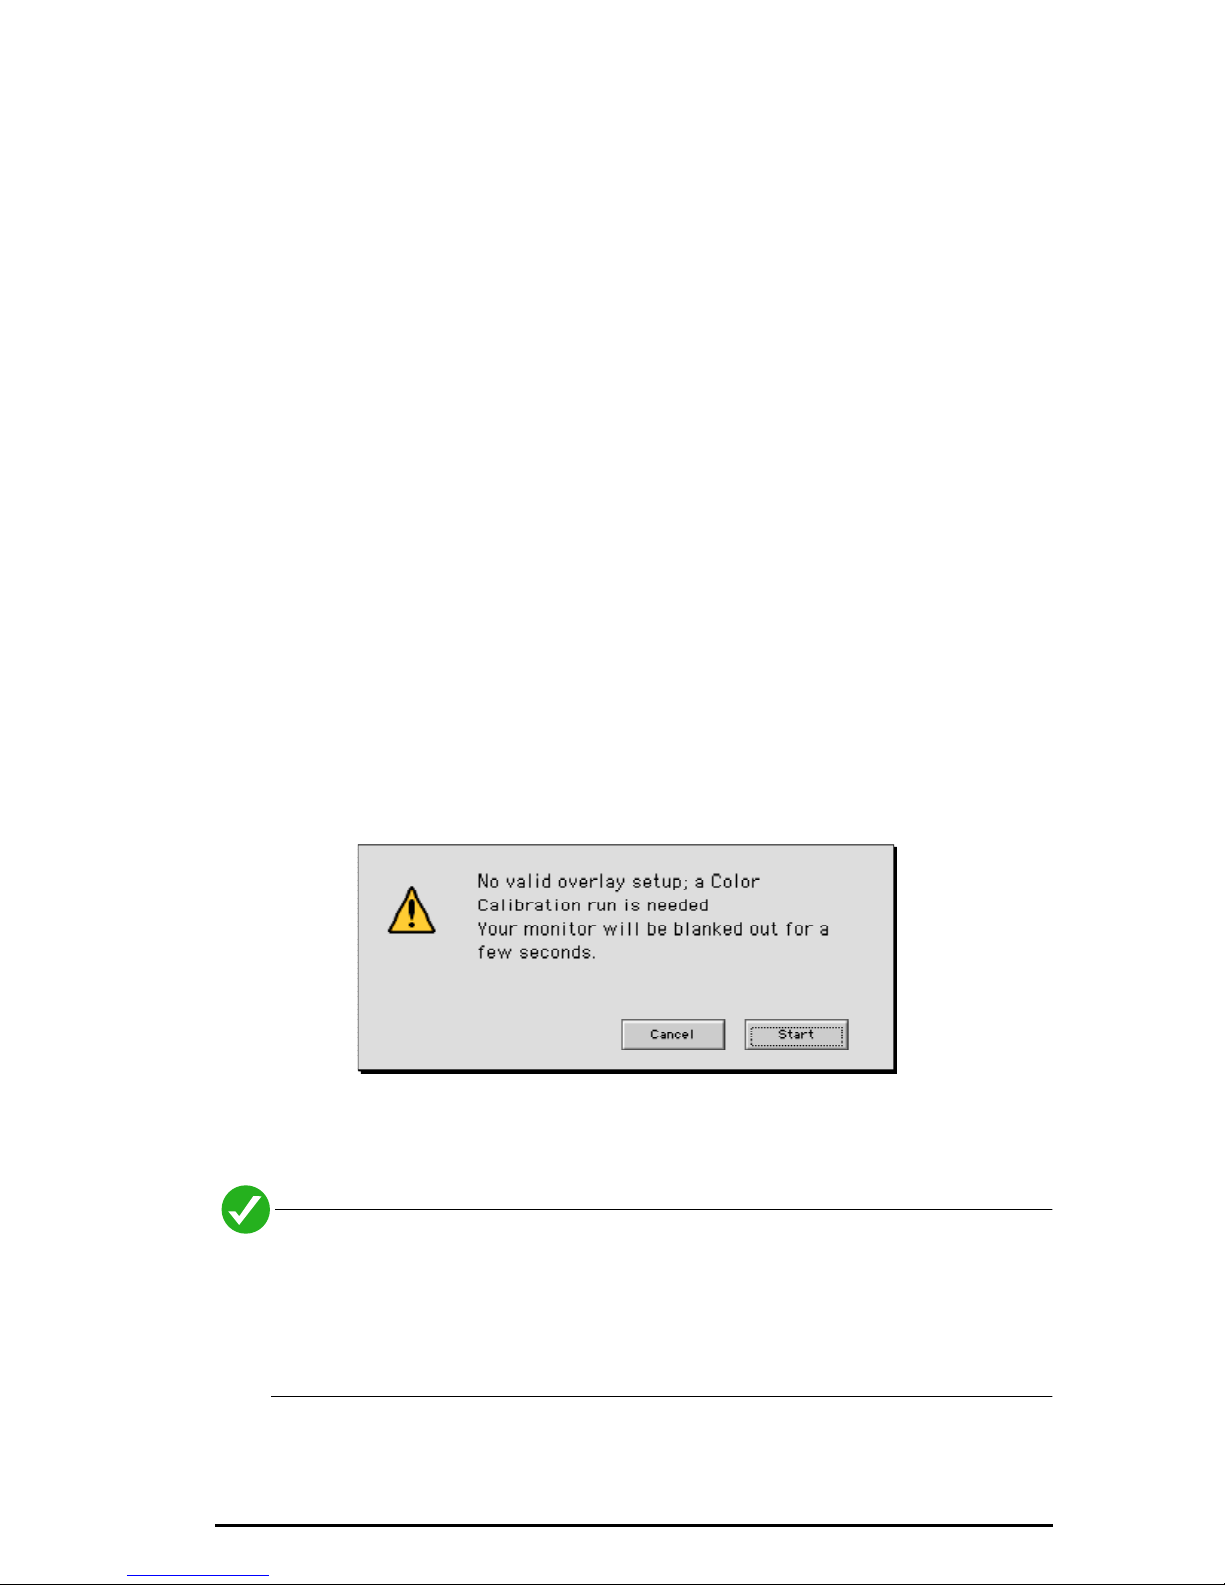
If the current resolution and color depth of your monitor has not been calibrated
before, this dialog will appear when you launch DVD Station.
Just click
flash and show various shapes during the calibration process.
The calibration is specific to one resolution and color depth setting of your
monitor; if you change either setting and then run DVD Station, you will
again be prompted to Auto Calibrate. DVD Station retains the calibration
data for each resolution/color combination, so if you switch back, you
wonÕt need to recalibrate.
Start
and the calibration will be done automatically. The screen will
Running DVD Station for the First Time 15
Page 16
Selecting Your Geographic Region
The DVD standard includes a feature called
Region Coding
which allows the
publishers to specify in which parts of the world a particular disc can be played.
Before you can play a DVD, the Wired 4DVD card must be set to your geographic
region.
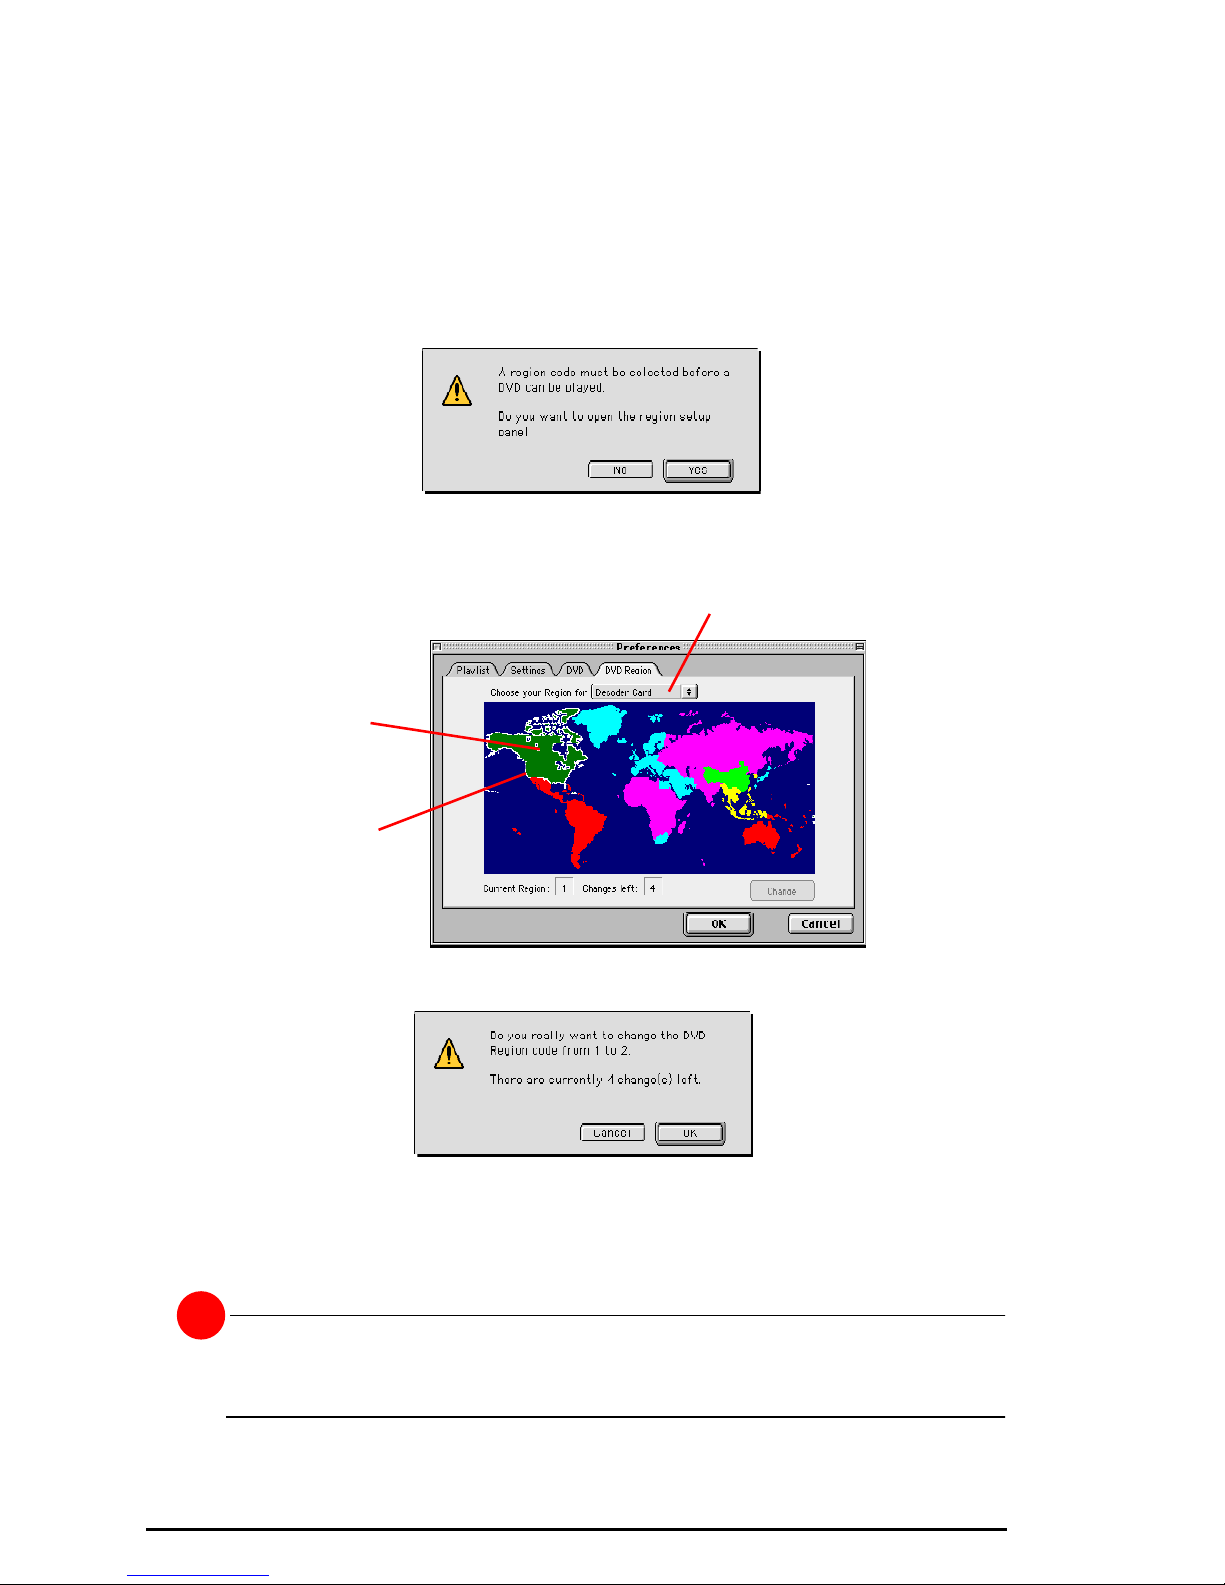
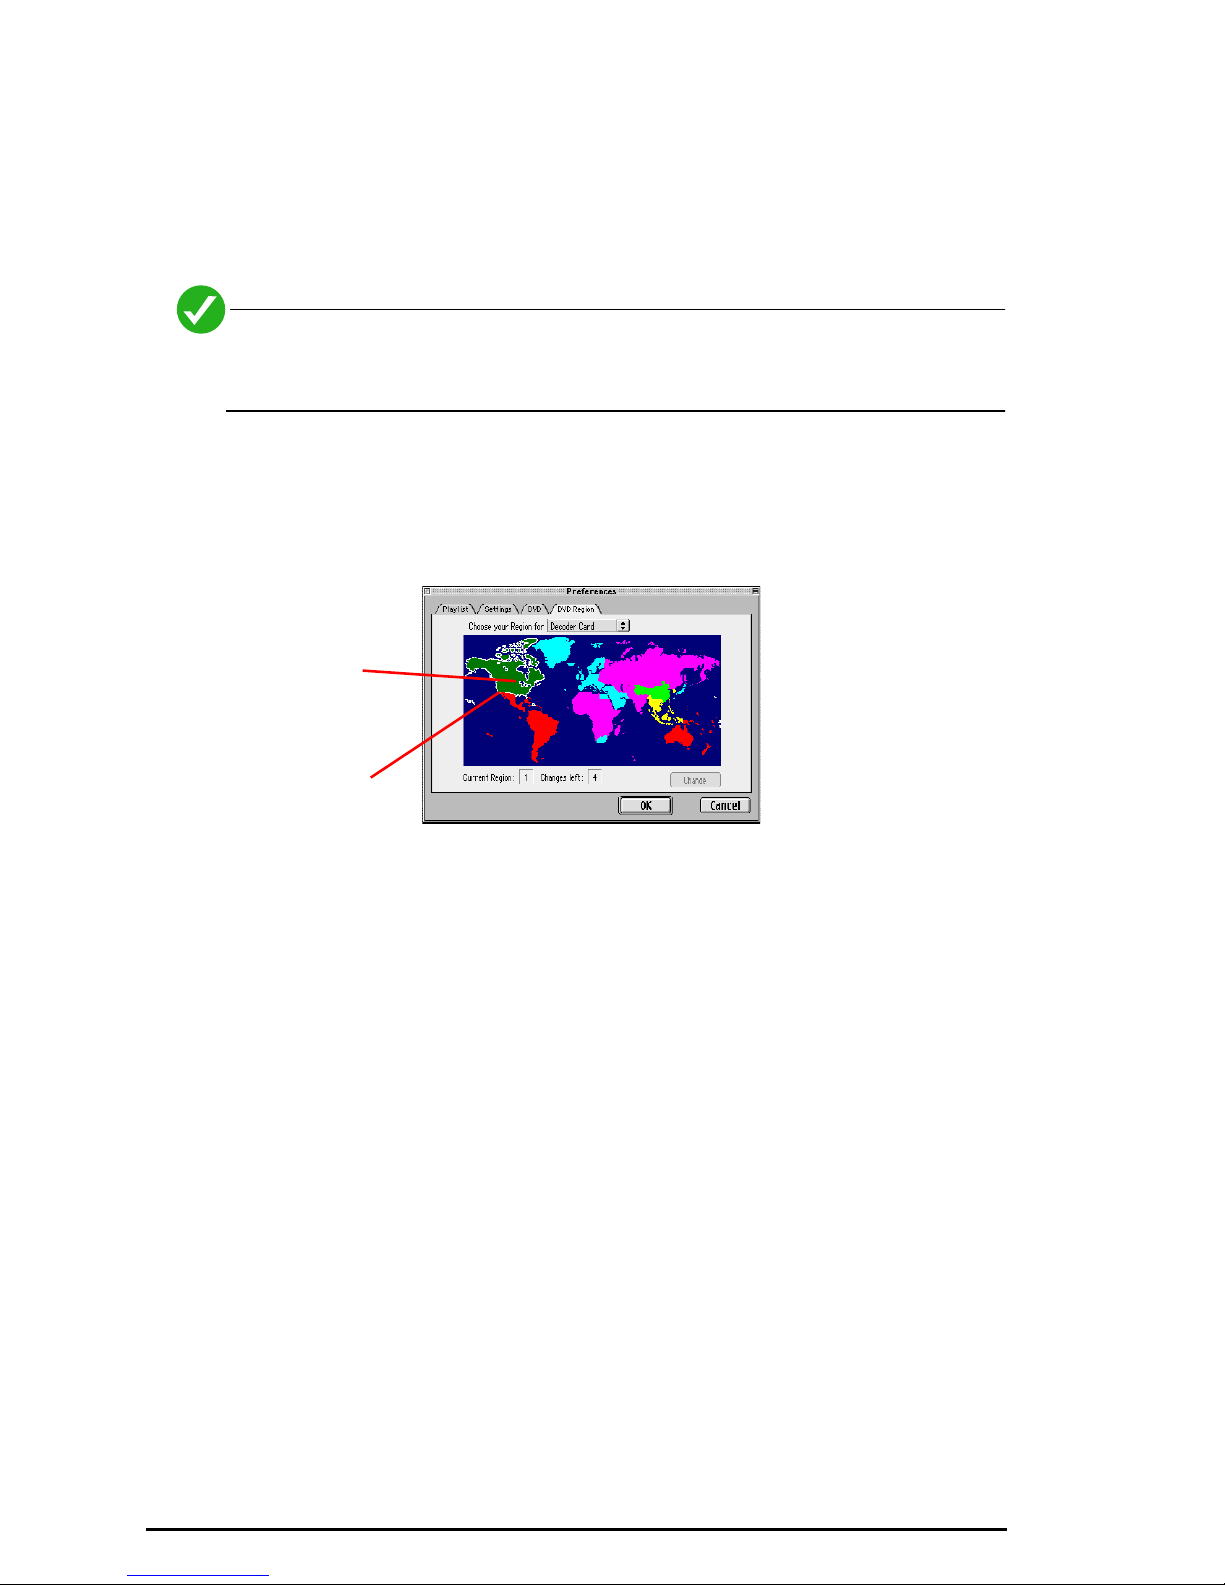
If the region code for the Wired 4DVD has not been previously set, this dialog
will appear when you run DVD Station.
1)
Click
Yes
and the DVD Region panel of the Preferences dialog will open.
Be sure the Wired 4DVD card is
selected in the menu.
Click on your
region, and
click Change.
The currently
active region
is outlined in
white.
2)
Click on your location on the map and click
A confirmation dialog will appear. If you want to proceed, click OK to set the
3)
Change
.
region.
4)
Click OK to close the Preferences dialog.
!
The region can only be set five (5) times. After the fifth time you will no
longer be able to change the region.
16 Running DVD Station for the First Time
Page 17
Setting the Region For the DVD Drive
Some newer DVD drives also require setting the region code for the drive itself.
This can also be accomplished using the DVD Region panel of DVD Station.
!
If your drive supports region coding, it comes from the factory with no
region code set. If you attempt to insert a DVD-Video disc that is not
enabled for all regions, and you havenÕt selected a region, you will get an
error message saying the disc is unreadable and asking if you want to
initialize it. (the exact message will vary depending on the make of drive
and the driver software used.)
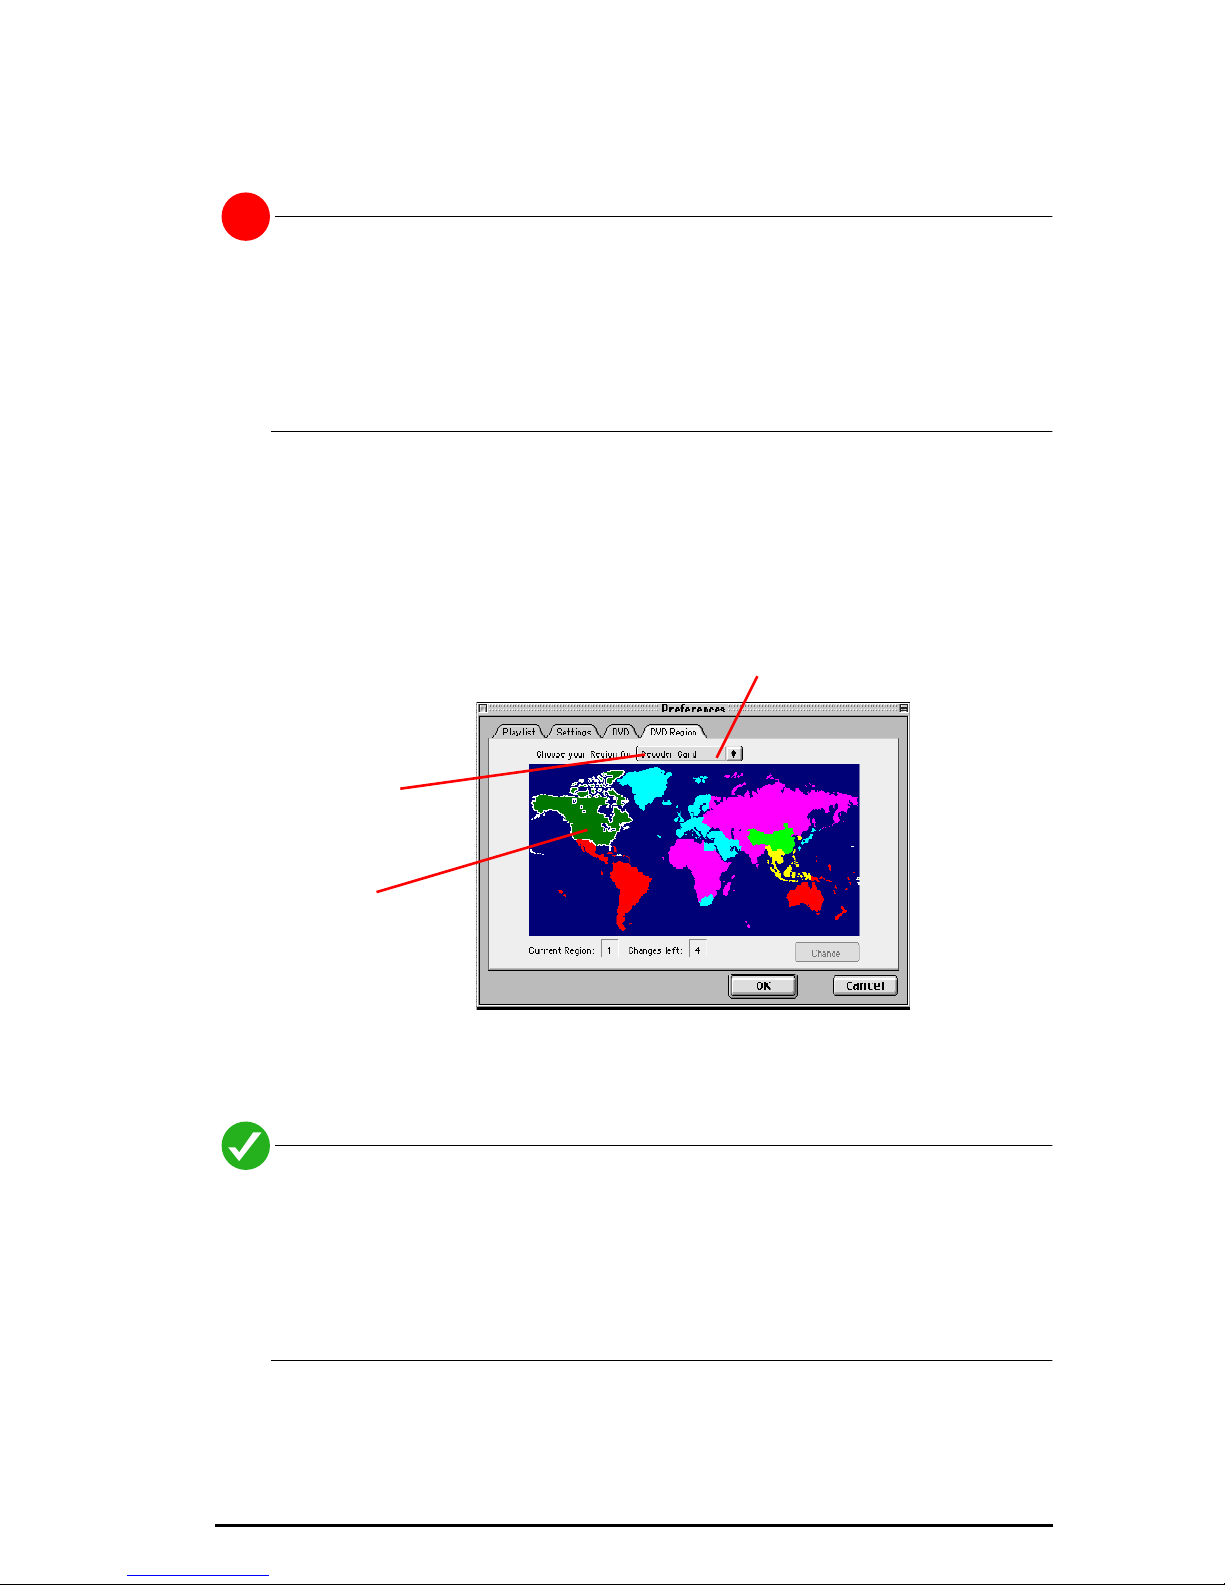
To set the initial region code of the drive:
1)
Open the DVD Region panel of the Preferences dialog
2)
Choose your DVD drive from the pop-up menu and click on the desired
region.
Only devices which support region
setting will be enabled in the menu.
Select the
DVD drive
from this
menu, and
select the
desired
region on the
map.
3)
Click
Change
4)
Click OK again to close the Preferences dialog.
After the initial region selection for a drive, you will only be able to change
the driveÕs region code if you have a DVD from the new region inserted in
the drive when you attempt to change the region. For example, if your
drive is set to Region 1 (North America) and you want to change it to
Region 2 (Europe) you must have a Region 2 disc in the drive in order to
make the change. The limit of five (5) changes applies to drive also.
and click OK in the confirmation dialog.
Running DVD Station for the First Time 17
Page 18
Playing Discs
DVD Station is designed to be very easy to use, and has controls which are
probably already familiar (if youÕve ever used a VCR, CD player or DVD player).
Before we get into the details of DVD Stations many cool features, letÕs start with
the basics.
The Basics
If all you want to do is play a disc, hereÕs what you do:
1)
Load an AudioCD or DVD into your DVD-ROM drive.
Start DVD Station by double-clicking its icon in the Finder.
2)
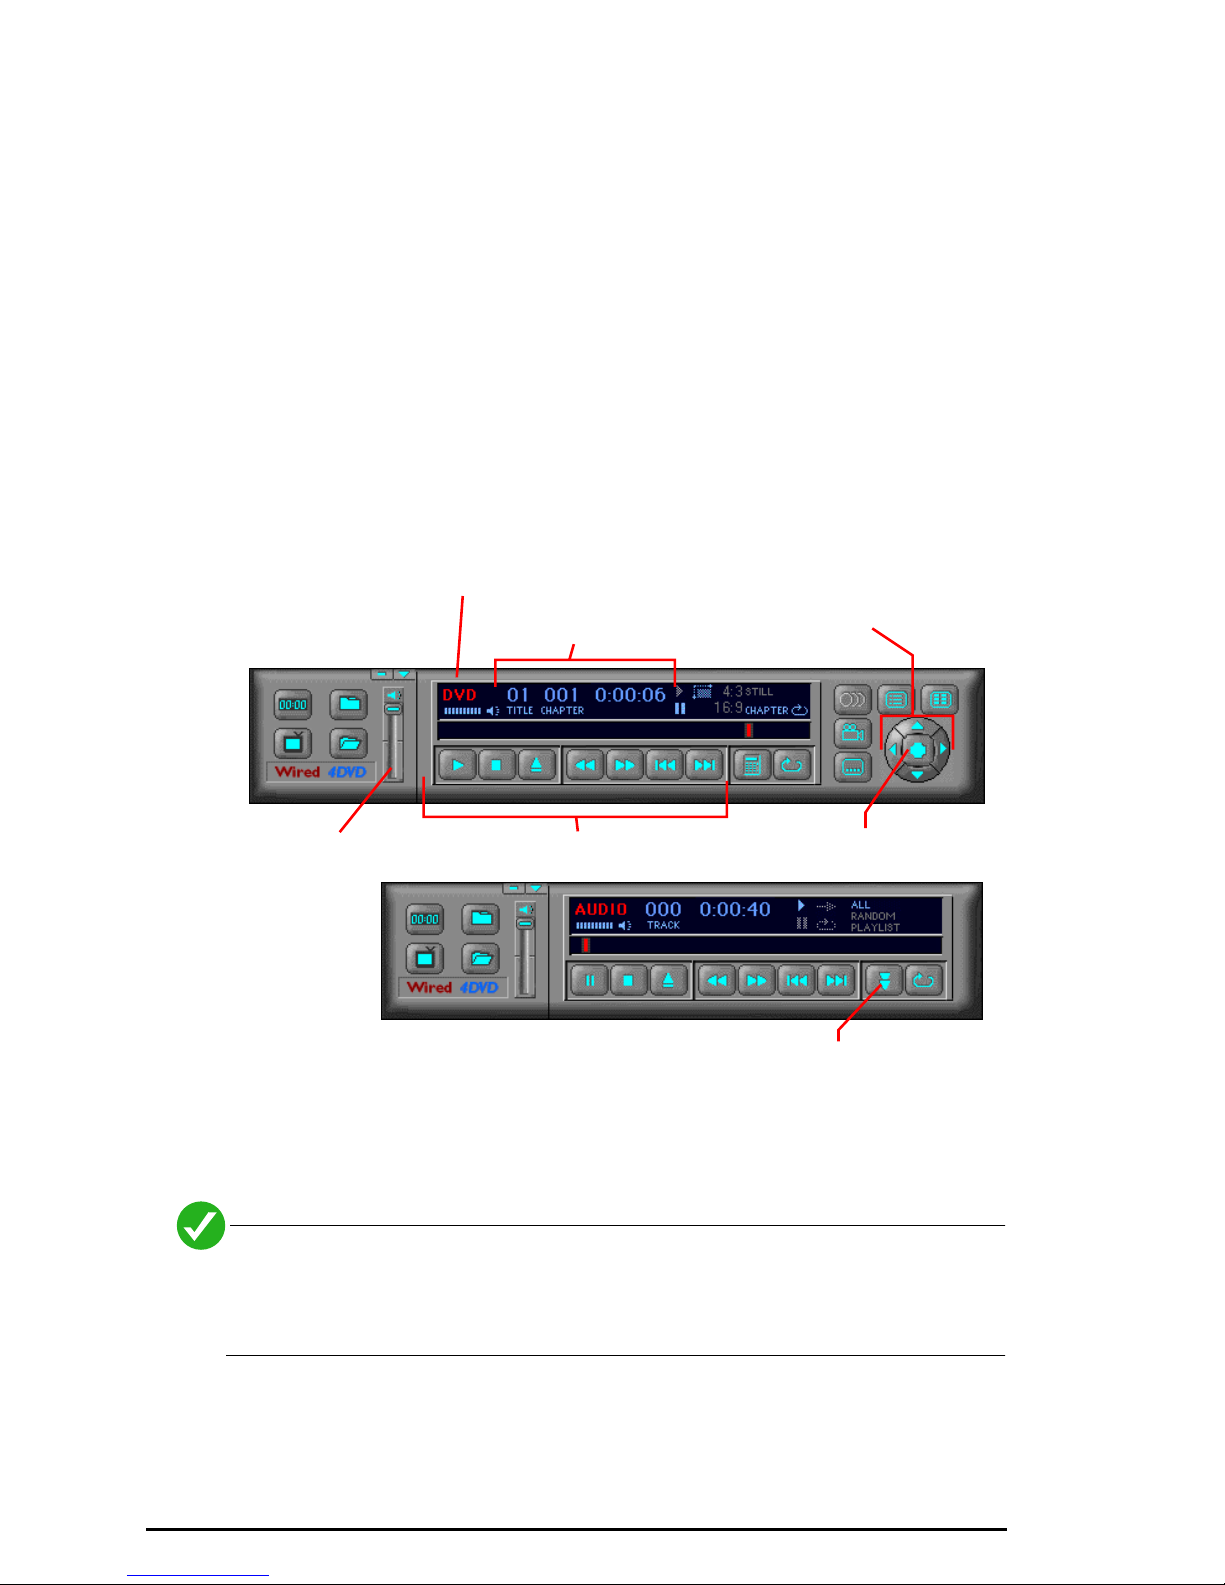
DVD Station will detect which type of disc youÕve inserted and display the appropriate
controller. The two controllers have the same basic controls, but each adds special
controls as appropriate to their specific tasks.
Program type
DVD
controller
AudioCD
controller
3)
Click the
Volume control
Play
button to start playing the disc.
Position indicators
Playback controls
DVD navigation buttons
OK button
Play mode
If itÕs an AudioCD, the disc will start playing. If itÕs a DVD, the playback window will
appear on your monitor and the video will begin playing.
If the Autoplay feature is turned ON in the preferences dialog, an inserted
disc will start playing as soon as DVD Station is opened and anytime a
new DVD disc is inserted while DVD Station is running.
4)
Adjust the sound level as desired using the Volume Control slider.
You can skip to other tracks or scan quickly forward or backwards using the
5)
standard ÒVCR-typeÓ controls.
18 Playing Discs
Page 19
The DVD controller has additional buttons which allow you to navigate through a DVDVideo title. When you are viewing a DVDÕs menu, you can use the up, down, left and
right arrow buttons on the controller to move the selection from one on-screen button
to the next. Click the center ÒOKÓ button to confirm you choice.
6)
Continue reading for complete explanations of all the features and functions of
DVD Station.
Playing MPEG Files
Besides playing audio and video discs, DVD Station can play MPEG files directly
from your hard drive. These can be individual MPEG audio or video streams,
multiplexed MPEG streams or ÒIFOÓ or ÒVOBÓ files from a DVD. It can even
assemble a Òplay listÓ of different files to be played in sequence (see ÒPlay List
PanelÓ on page 30 for details).
To play an individual MPEG file:
Start DVD Station by double-clicking its icon in the Finder.
1)
2)
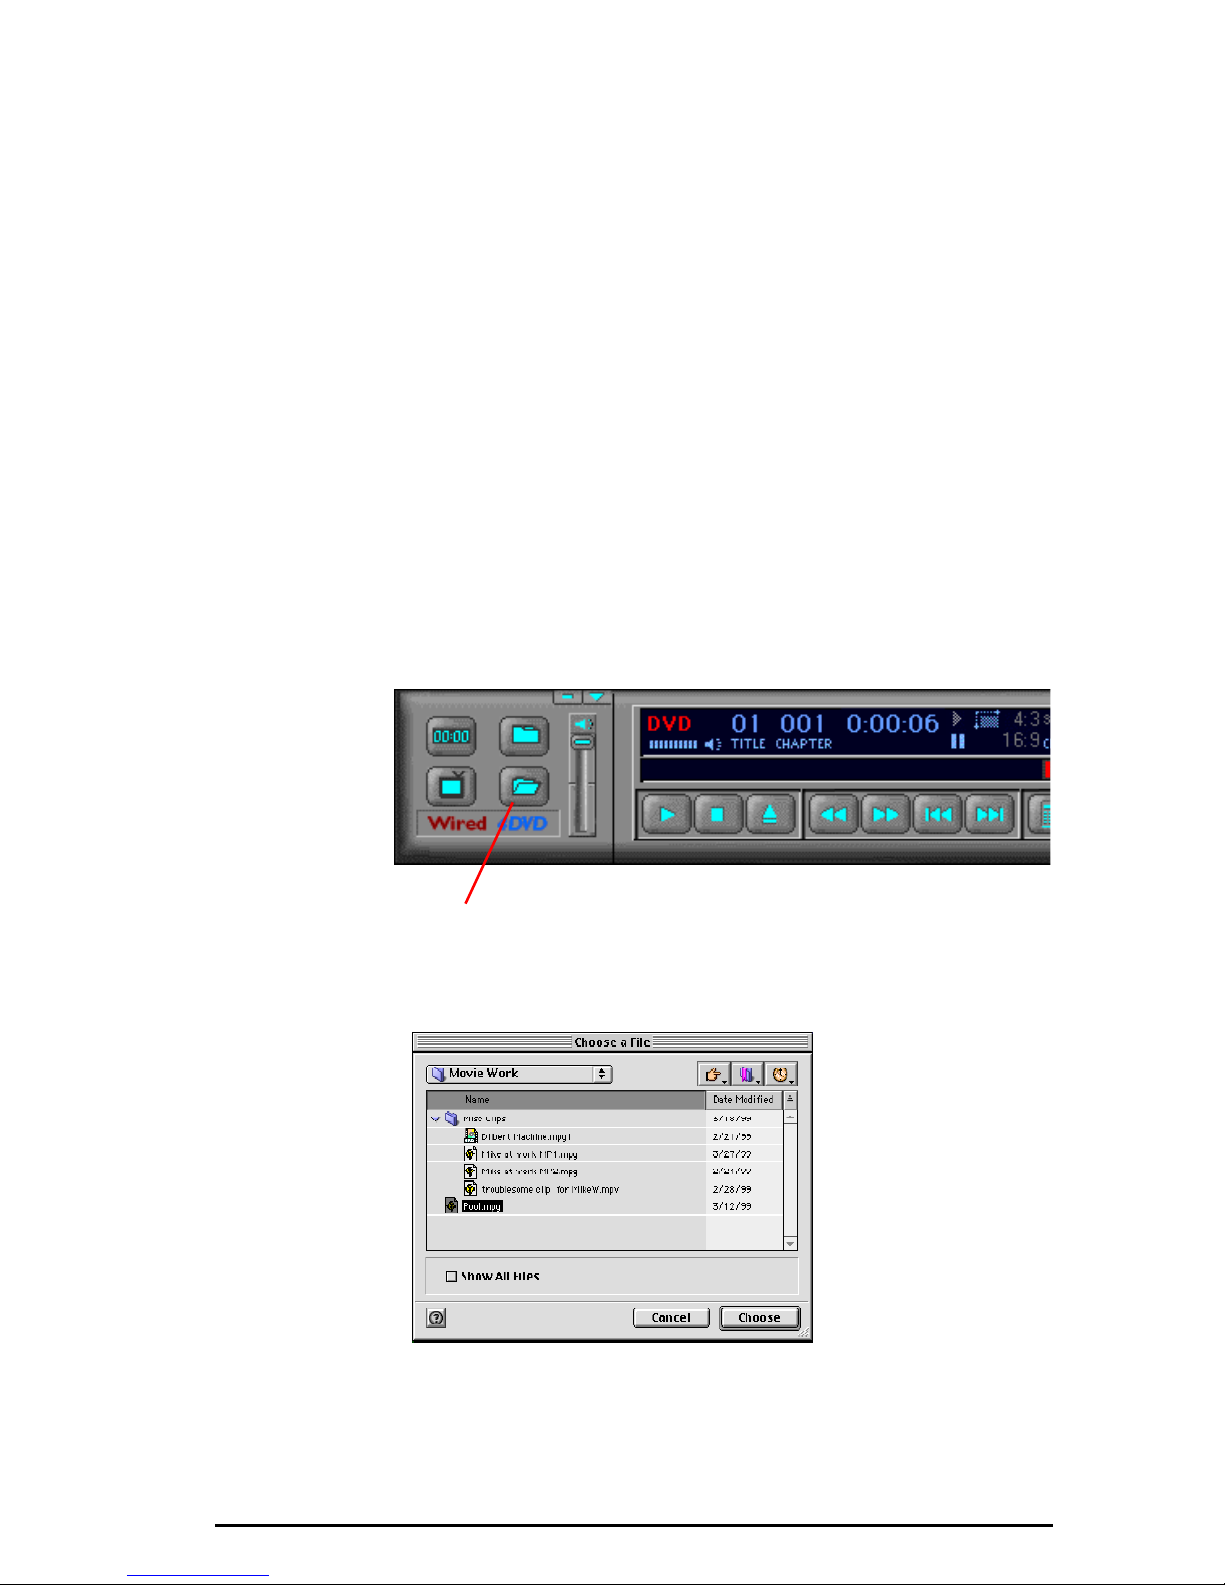
Click the
from the
File Open
File menu
button in the controller, or select the
.
Open
command
File Open button
3)
Using the standard file selection dialog which appears, select an MPEG file from
your drive, and click
Choose
.
Playing MPEG Files 19
Page 20
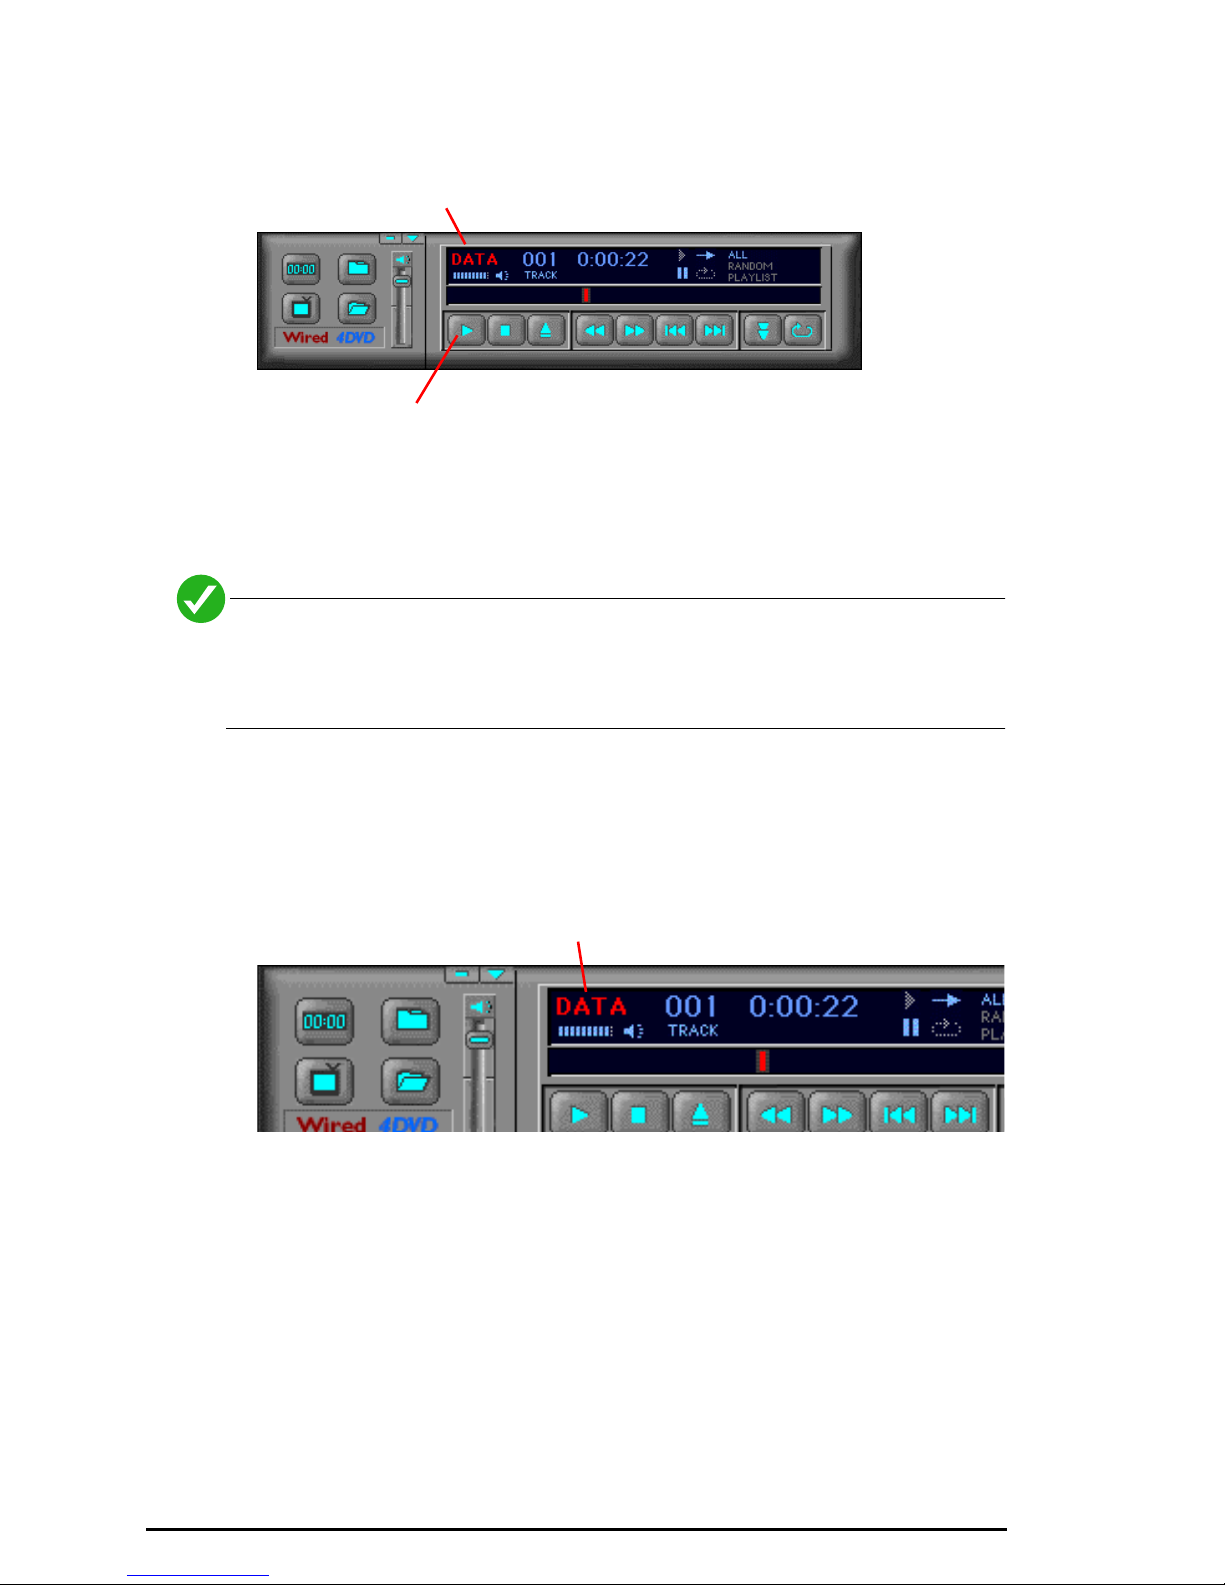
4)
If you selected an MPEG file, the controller will indicate
Data
as the program
type.
DATA indicates that you have
selected a Þle for playback.
Click Play to play the Þle.
5)
Click the
Play
button to start playing the file.
All the normal control buttons work essentially the same as when you play a disc.
6)
To view a different file, simply repeat the process.
If you select a VIDEO_TS.IFO file from a Video_TS directory (either on a
hard disk or on a DVD), DVD Station will switch to DVD playback mode
and you can play it as if it were a DVD disc.
Switching Back to Playing DVDs
If you want to play an inserted DVD, instead of a currently selected file, just click
the Program Type indicator to toggle between DVD and DATA modes.
Click here to switch between
DATA and DVD modes.
20 Playing MPEG Files
Page 21
REFERENCE
The DVD Station Controller
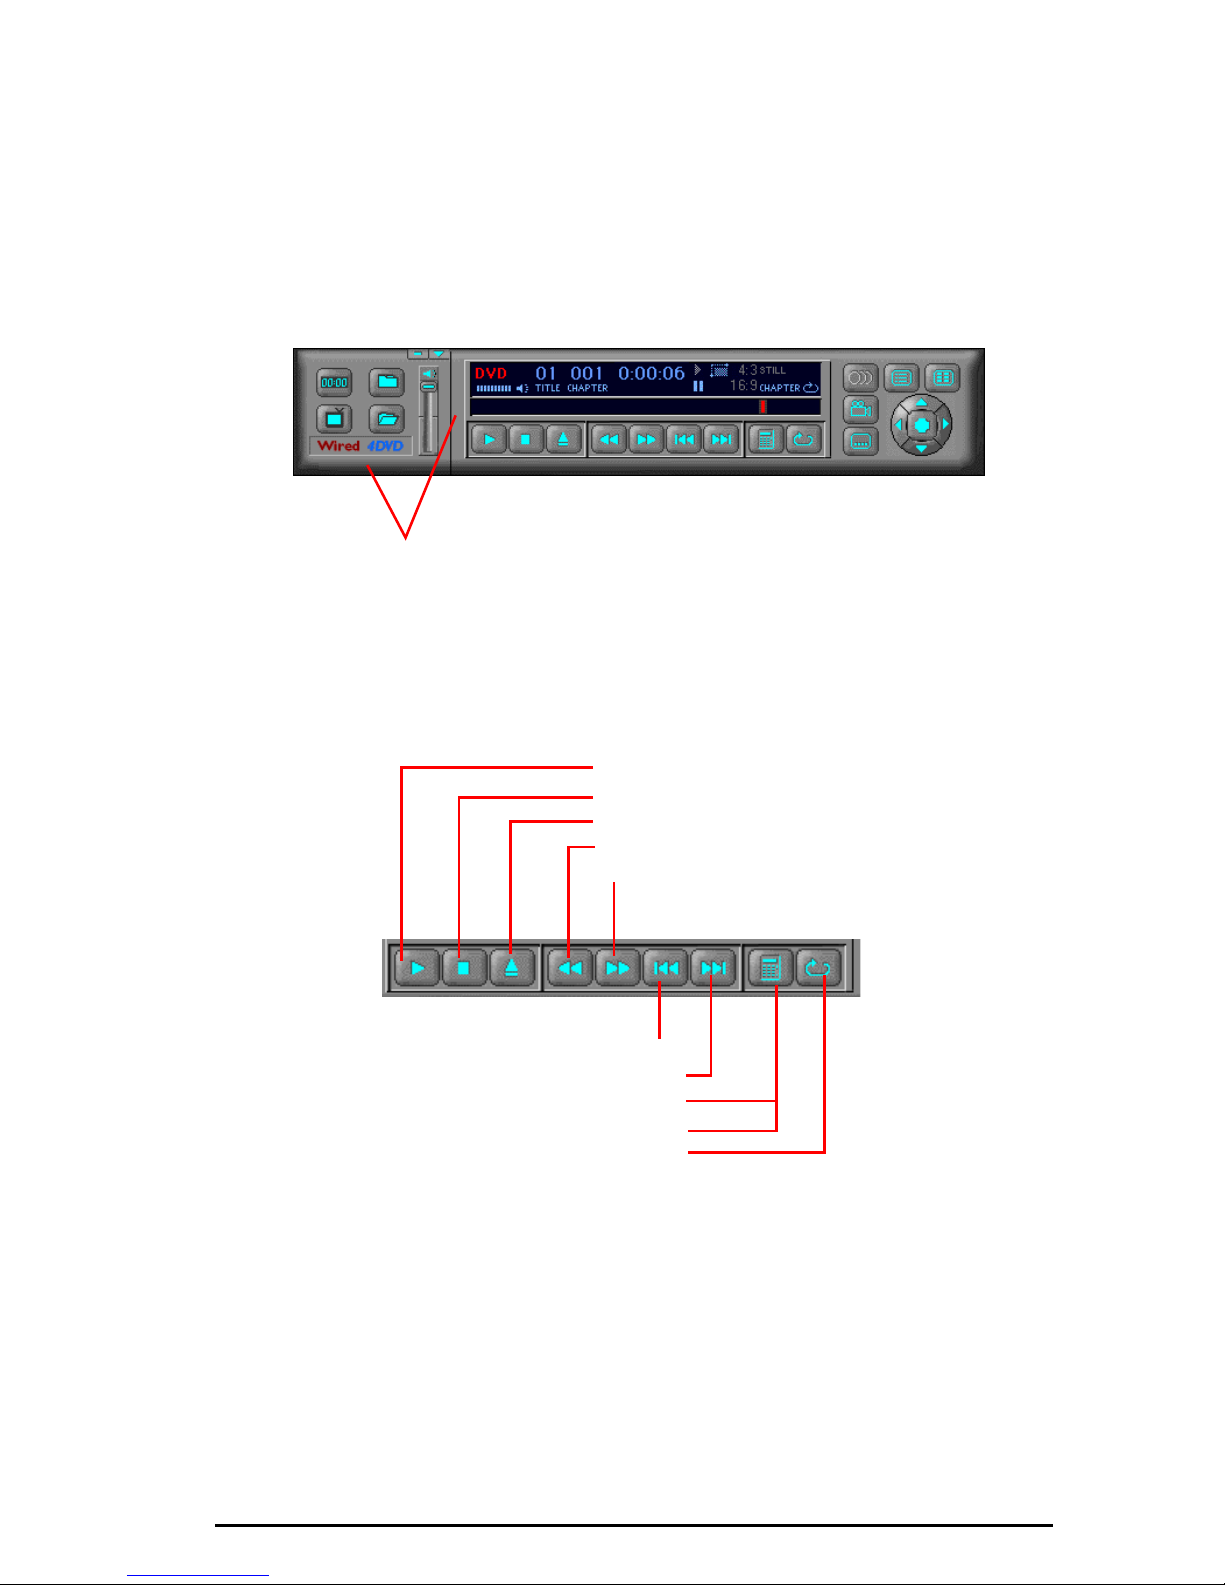
This section of the manual explains each of the controls and indicators in the
DVD Station Controller.
You can ÒgrabÓ the controller by
its edges to move it around on
your screen.
Player Controls
DVD Station
has controls similar to those of a VCR.
Play/Pause
Stop
Eject
Rewind
Fast Forward
Previous Track
Next Track
Number Pad (for DVDs)
or Play Mode (for AudioCDs)
Repeat Mode
Play/Pause button. Click this button to start playing the active disc or file. Click
again to pause.
Stop button. Click this button to stop play. If youÕre playing a DVD, the stop
button will close the program window too.
Eject button. Click this button to eject an inserted disc, or to open the driveÕs
tray if no disc is currently inserted.
The DVD Station Controller 21
Page 22
Rewind button. Click this button to play the current track backwards at 12x
speed, click again for 50x speed, and click again to resume normal playback. For
files, clicking the button jumps back a fixed amount.
Fast Forward button. Click this button to fast forward the current playing track
at 12x speed, click again for 50x speed, and click again to resume normal
playback. For files, clicking the button jumps forward a fixed amount.
Previous Track button. Click this button to skip to the previous track on the
disc, or to the previous item in a playlist.
Next Track button. Click this button to skip to the next track on the disc, or to
the next item in a playlist.
Number Pad button (DVDs). Click this button to display the numeric keypad
for jumping directly to specific chapter or titles of a DVD. (See ÒThe Number
PadÓ on page 27 for details.)
Play Mode button (Audio CDs or MPEG files). Click this button to select from
three play modes: All, Random, and Play List. The Display Panel will show which
play mode is currently active. The default play mode is All. To select Play List,
you must first create a play list. (See ÒPlay List PanelÓ on page 30 for details.)
Selecting Random will cause DVD Station to play the tracks in random order.
The Random setting works only with Audio CDs.
Repeat Mode button. Click this button to toggle between Play Once and
Continuous Play modes. Click once to repeat the current chapter, and twice to
repeat the title. For MPEG files the repeat mode button toggles between play
one and loop, when using playlists, the repeat mode determines whether the
entire playlist is played once or the entire playlist is repeated.
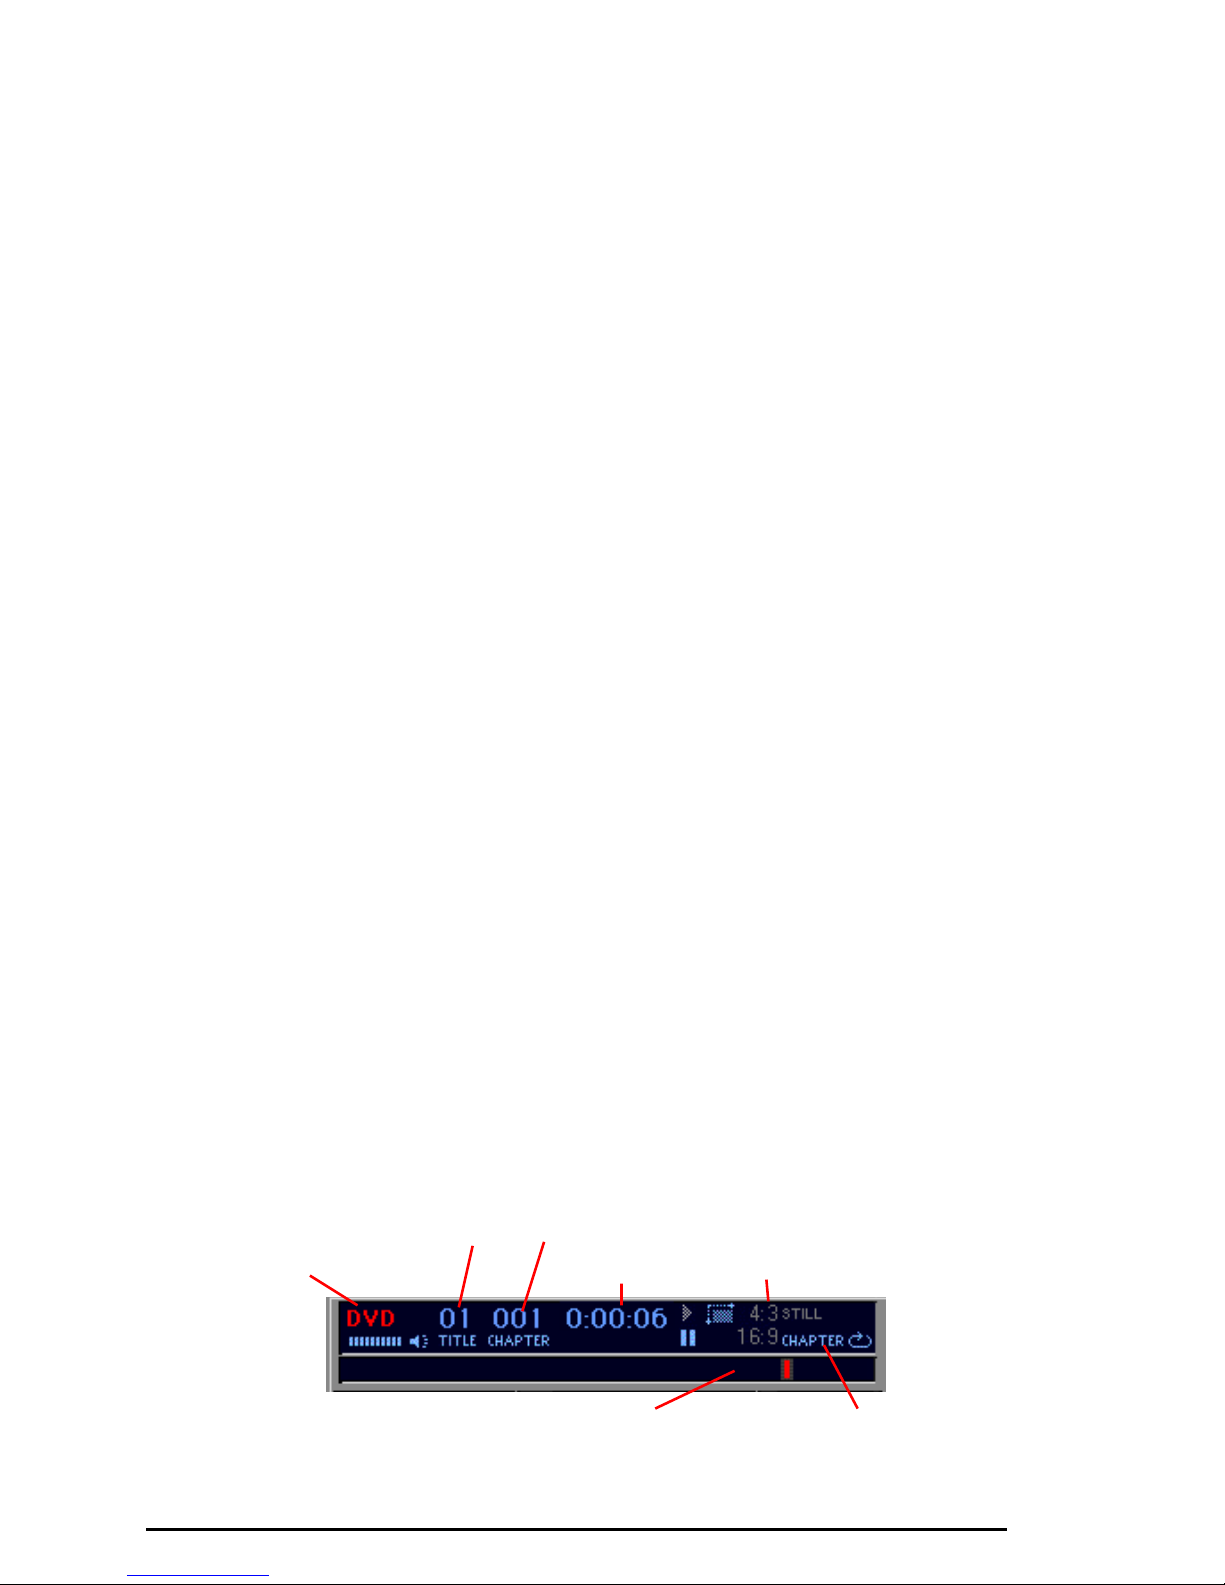
Display Panel
The Display Panel provides specific information about the current video or audio
track, such as its track number, play time, and aspect ratio.
A progress bar at the bottom indicates the progression of the clip as it plays. You
can click on the Progress Bar to jump to a particular part of the track being
played.
Depending on the type of disc you are playing, additional information may
appear.
Program Type
Current track & Chapter
Time
Aspect Ratio
22 The DVD Station Controller
Play ModeProgress Bar
Page 23
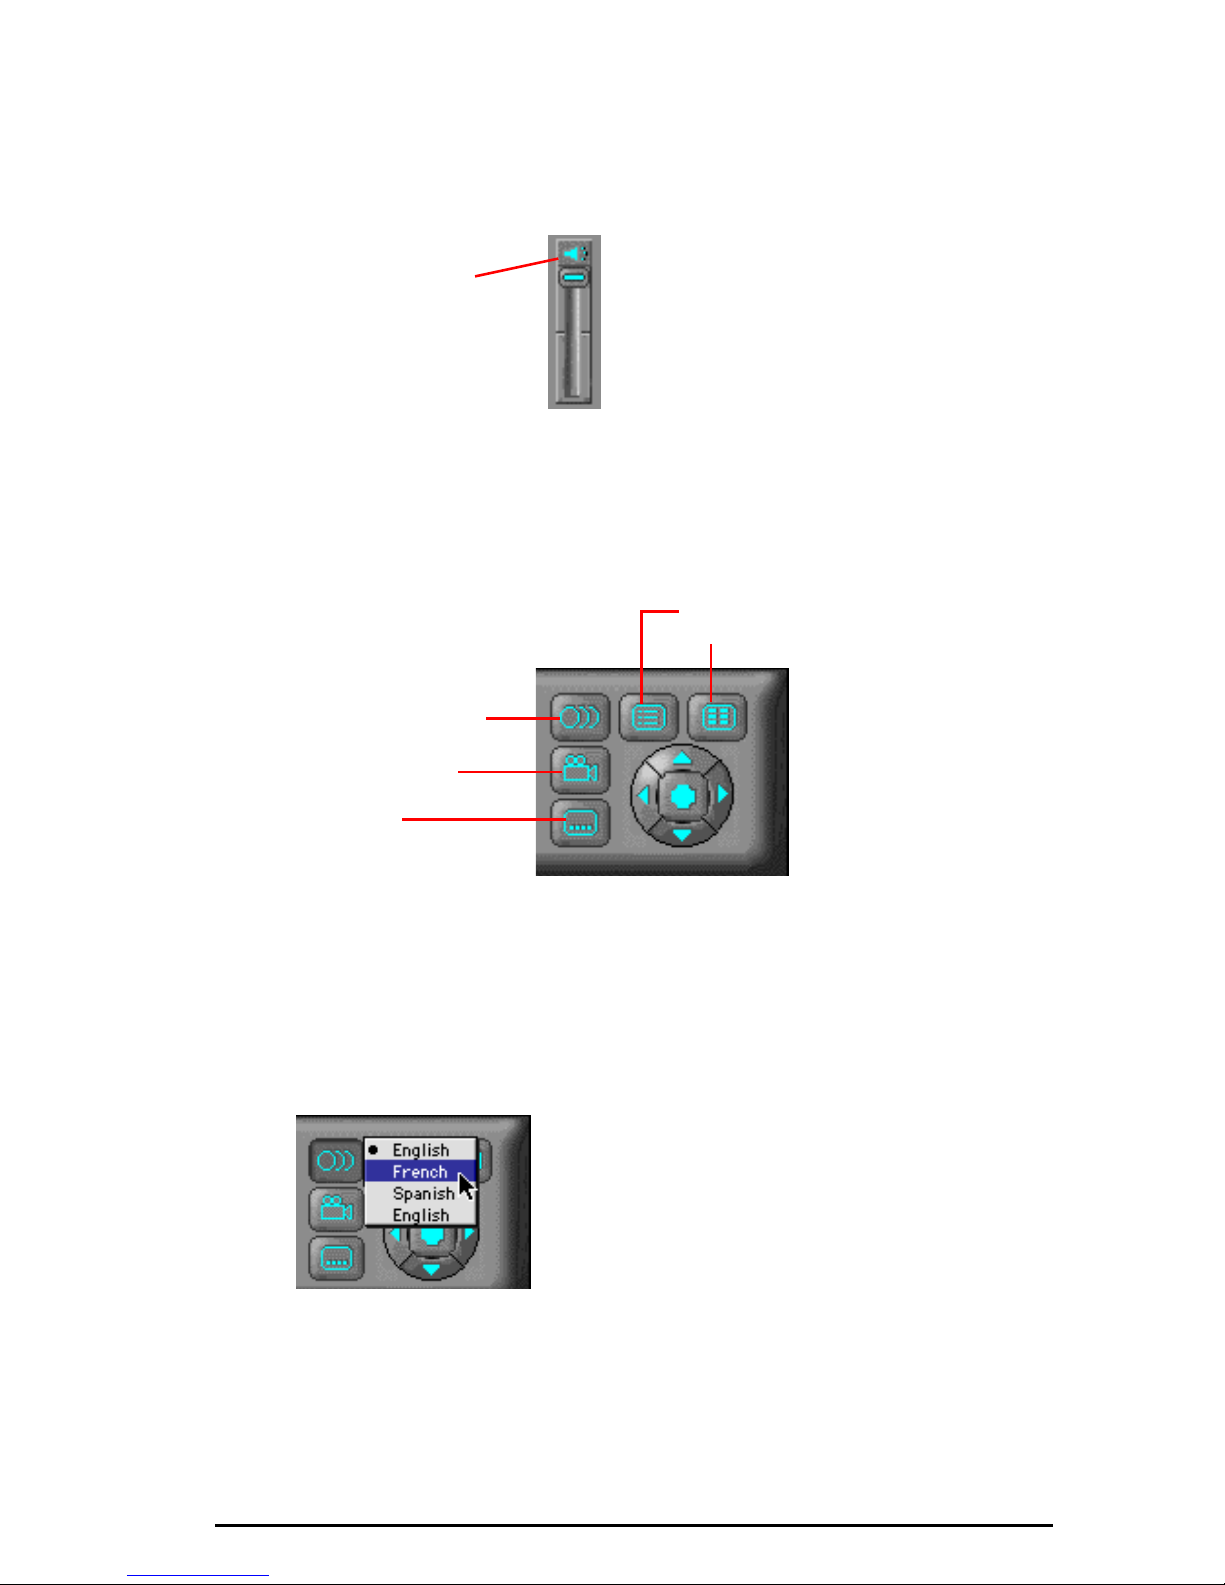
Volume Control
The Volume Control increases or decreases the audio level. With the mouse,
move the lever up and down to adjust the volume. Click the Mute Sound Button
to mute the audio. To un-mute the audio, click the Mute Sound Button again.
Click here to
mute the
sound
DVD Navigation Buttons
There are five DVD Navigation buttons and a joystick controller on the right-hand
side of the DVD Station. Use the mouse to click on the button to activate the
desired function.
Menu Button
Title Button
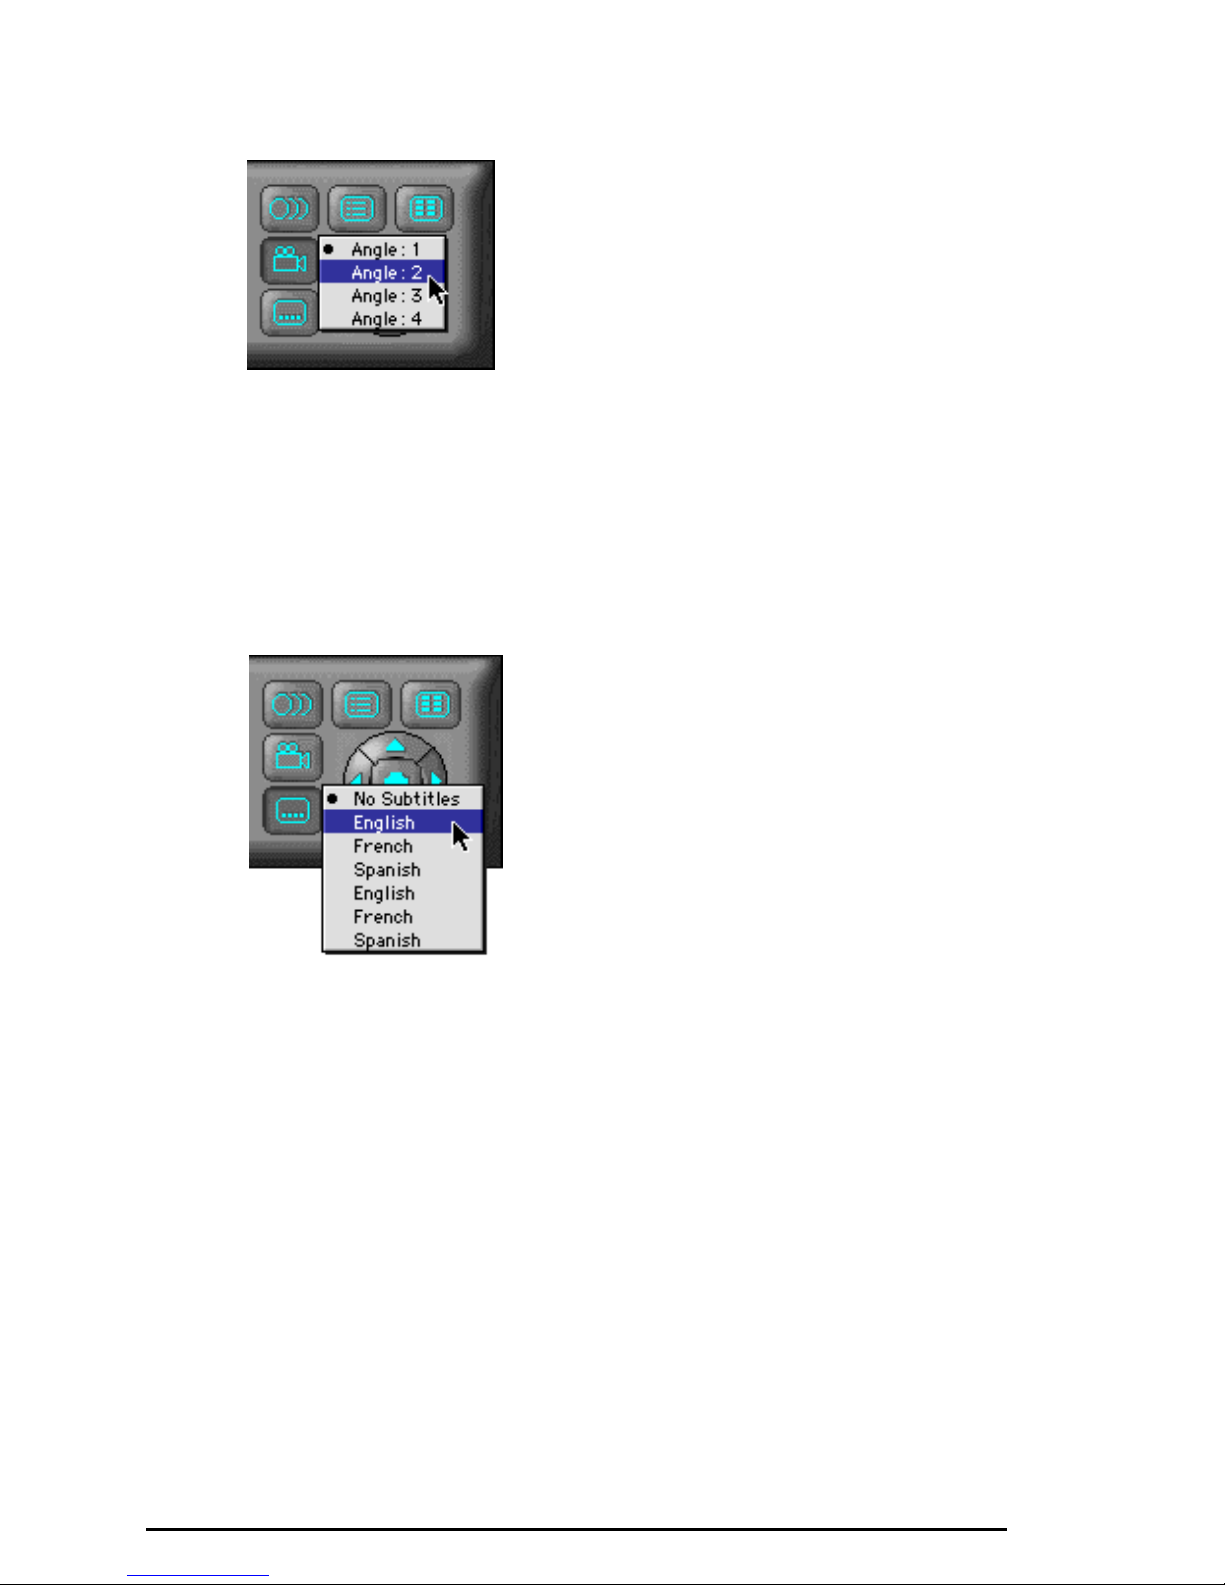
Language Button
Camera Angle
Subtitles
Language Button
This operation only functions with a DVD movie disc that contains multiple
language soundtracks. Press the Audio Soundtrack Language Selector during
play. Click and select the language you want. In this example English is the
selected language. The language selected is momentarily displayed in the upperright corner of your movie window.
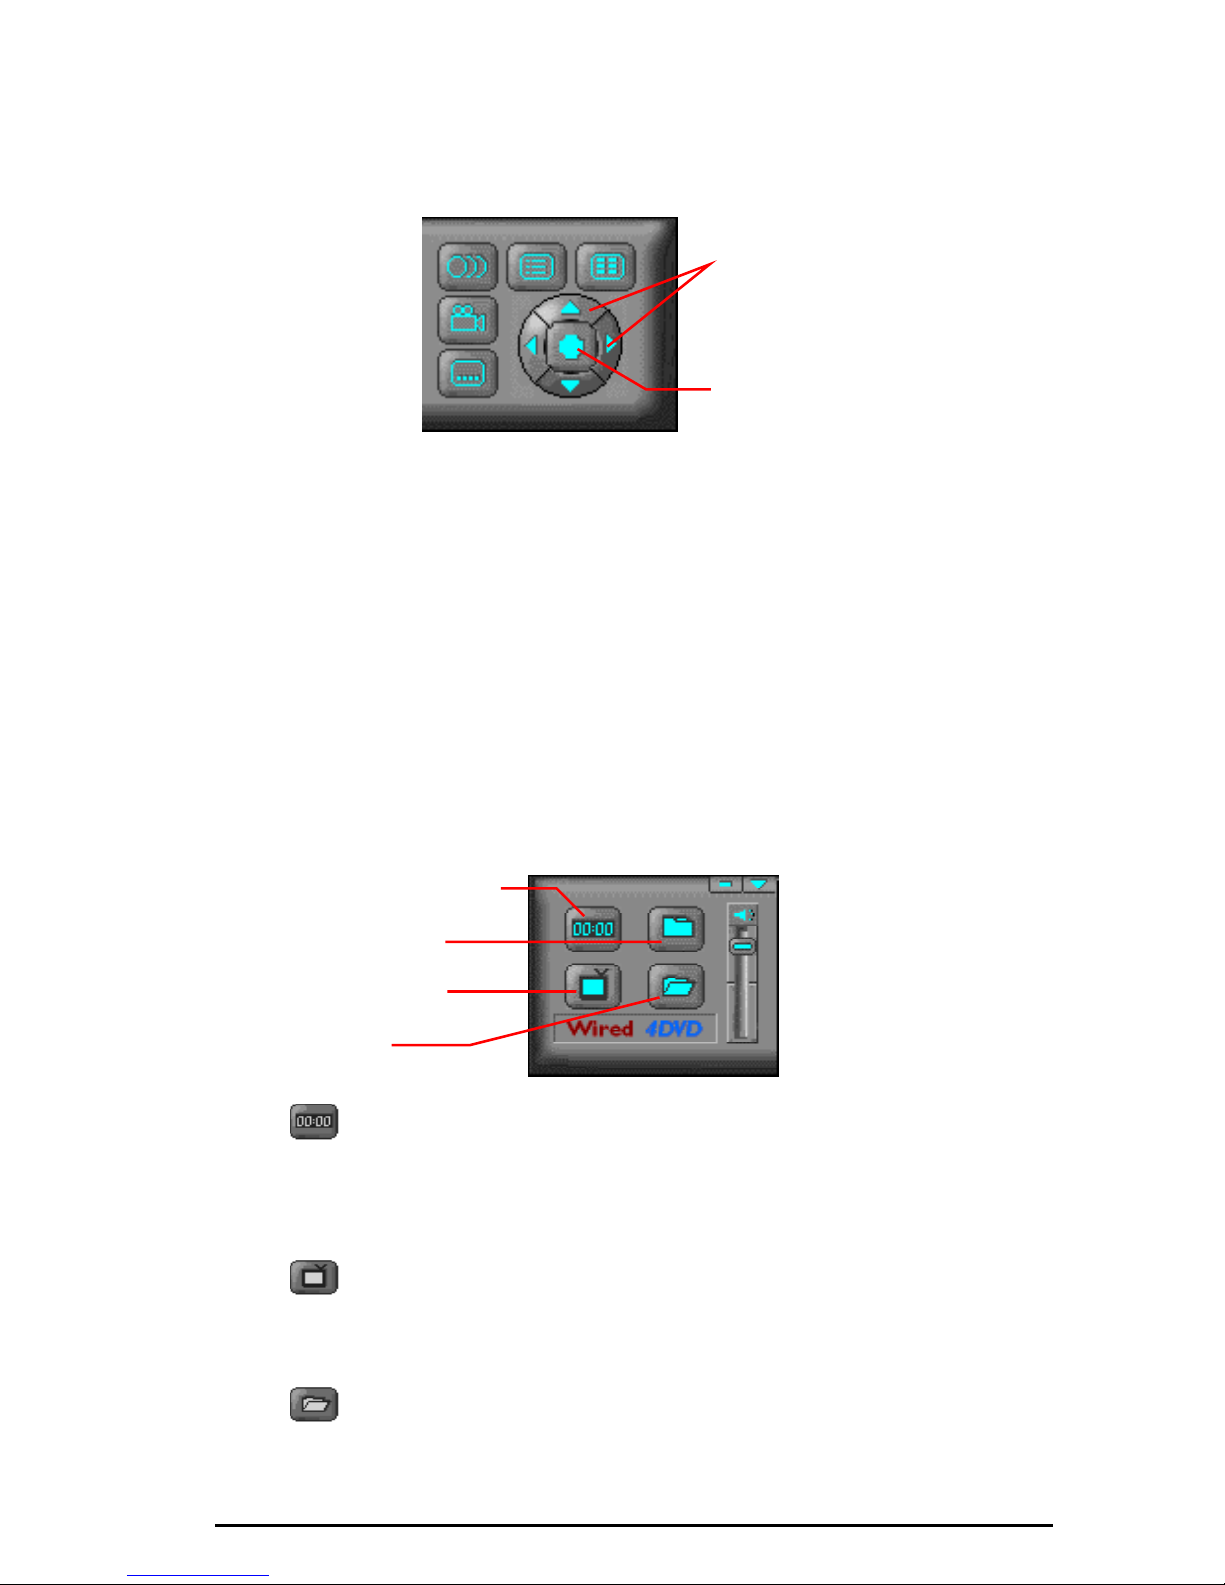
Camera Angle Selector
This operation only functions with a DVD movie disc that contains multiple
camera angles. Press the Camera Angle Selector during play. Move the mouse UP
or DOWN to highlight the camera angle you wish to view. Click on the angle you
The DVD Station Controller 23
Page 24
wish to view. The camera angle number is momentarily displayed in the upperright cornet of your movie window.
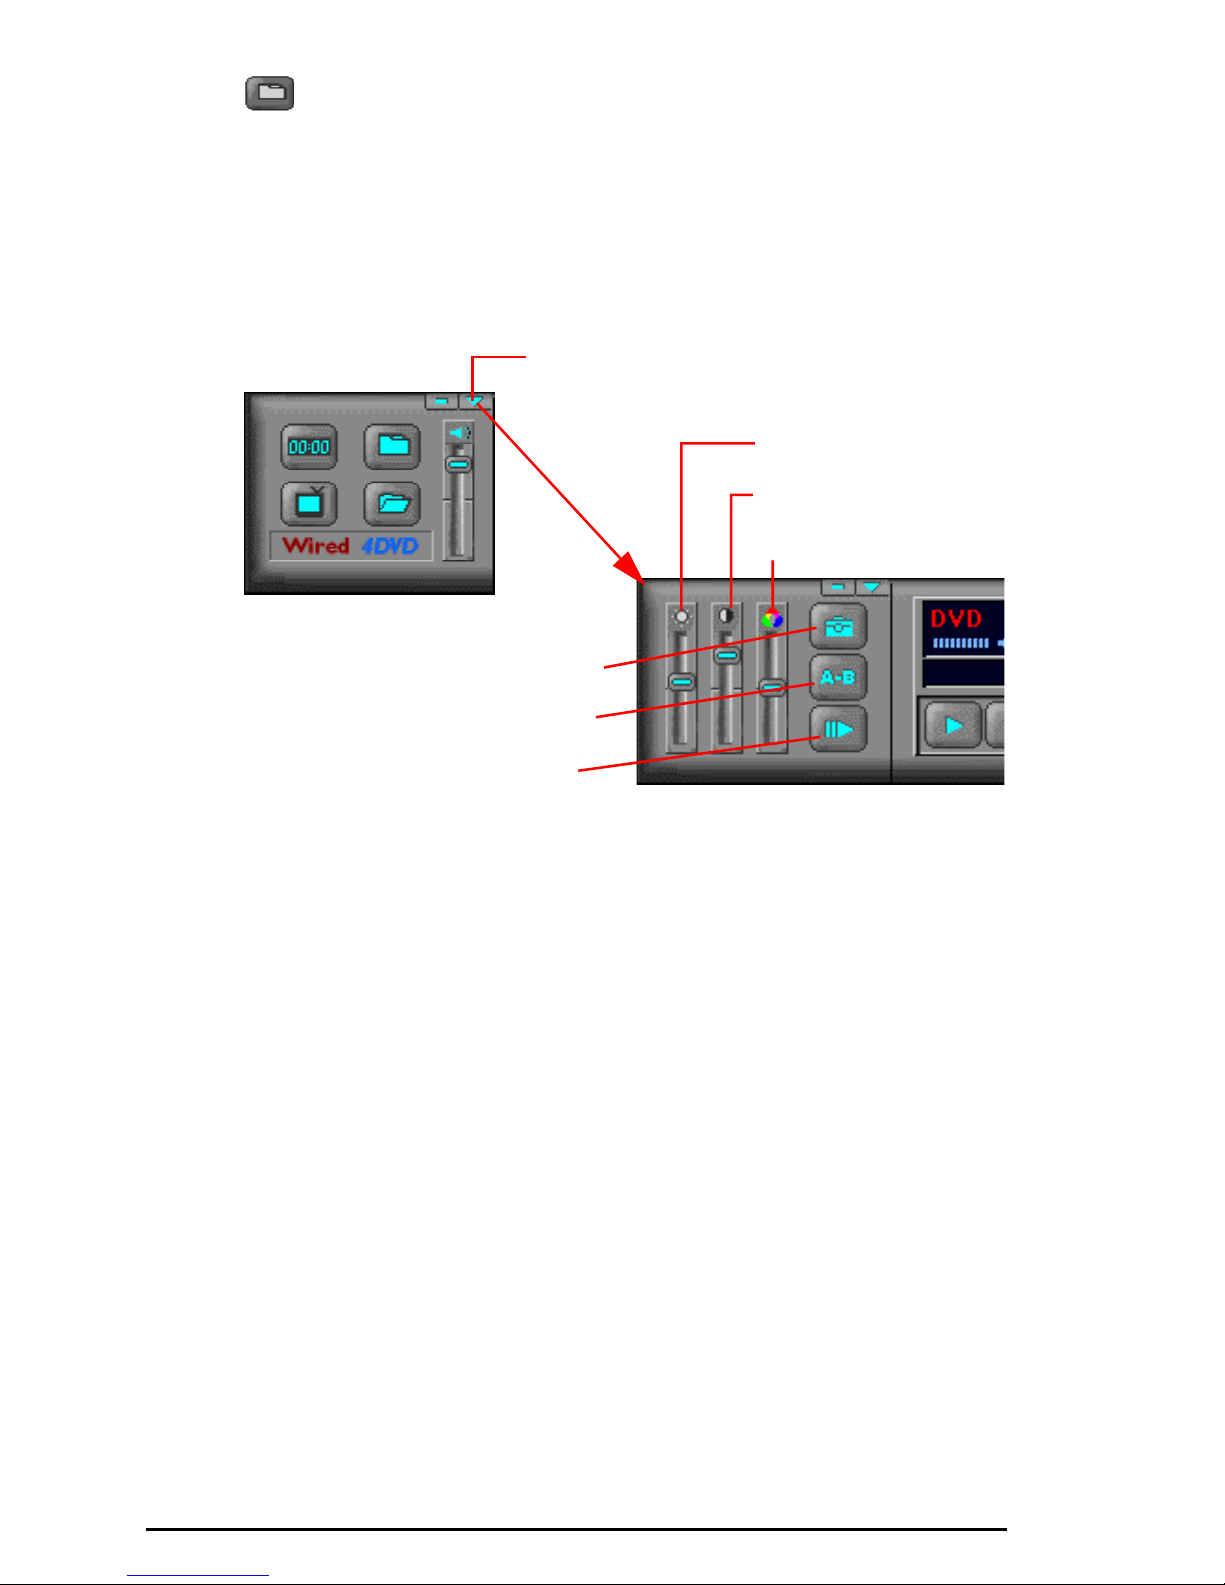
Subtitle Selector
This operation only functions with a DVD disc that contains multiple language
subtitles or closed captions.
Press the Subtitle Selector during play. If you select a new subtitle, the language
is momentarily displayed in the upper-right corner of your movie window. If the
menu is divided, the first section provides normal subtitles for the selected
language; the second section contains subtitles with extra functions.
Menu Selector
This button usually displays the ÒmainÓ menu of a DVD-Video disc The exact
functionality is set by the producer of the particular disc.
Title Selector
This button usually displays the ÒtitleÓ menu of a DVD-Video disc The exact
functionality is set by the producer of the particular disc.
24 The DVD Station Controller
Page 25
DVD Menu Controller
The joystick controller is a group of five buttons nested together. The joystick is
used to navigate around the possible choices offered in the DVD menus.
Click on the UP, DOWN, LEFT, or RIGHT arrows to highlight the option you wish
to select, and click the OK button in the center of the joystick to select the
highlighted item.
Using the Keyboard
You can also navigate a DVD menu using the keyboard. Use the left, right, up
and down arrow keys to move the on-screen highlight, and use the Return key
to confirm your choice.
Use the arrow
buttons to select
different options on
a DVDÕs menus.
Click the OK
button to conÞrm
your choice.
DVD Station Function Buttons
The four function buttons on the left of the controller are shortcuts to
miscellaneous functions of DVD Station.
On-screen Display
Preferences
Video mode
Open
Clicking the On-screen Display button displays the title, chapter, and
playtime of the current DVD if playing a DVD disc, or displays the file name, track
(if playing from a playlist), and playtime of the current clip if playing MPEG files.
Clicking the button again disables this feature.
Clicking the Video Mode button will switch the video display from the
computer monitor to a connected TV Monitor, or back again. The video window
on the computer monitor will close when displaying on the TV.
Clicking the Open File button allows you to open and play MPEG files
from your hard disk, DVD-ROM, or CD-ROM drive. See ÒPlaying MPEG FilesÓ on
page 19 for details.
The DVD Station Controller 25
Page 26
Clicking the Preferences Dialog button brings up the DVD Station
Preferences window.
Secondary Controls
The Secondary controls perform additional functions within DVD Station. You
can access the secondary controls by clicking the downward-facing triangle
above the volume control.
Click here to reveal the
Secondary Controls
Brightness
Contrast
Color Saturation
Image Capture
Segment play
Slow Motion
Picture Control sliders
Move the sliders to adjust the Brightness, Contrast, and Color Saturation of the
on-screen video window or the TV output. (DVD Station saves separate settings
for the on-screen video window and the output to the external TV monitor, so
you can adjust the appearance of each to your taste.)
Image Capture
Click the Image Capture button capture a still image of the current video frame
to the Clipboard. You can then paste it into another program for saving or
printing.
This feature does not work with DVD Video titles that are copy protected.
Segment Play (A-B)
This feature lets you loop playback between any two points in a movie. While the
movie is playing, click the button when the movie reaches the point where you
want the ÒloopÓ to start. Let the movie continue to play until it reaches the end of
the segment you want and click the button again. The movie will now loop
between the two points until you press another button (for example: Rewind or
Stop).
26 The DVD Station Controller
Page 27
Slow Motion Play
Click this button to play back the movie at half speed. Click the button again to
play at one eighth speed. Click again to return to normal speed.
Audio is muted when Slow Motion is selected.
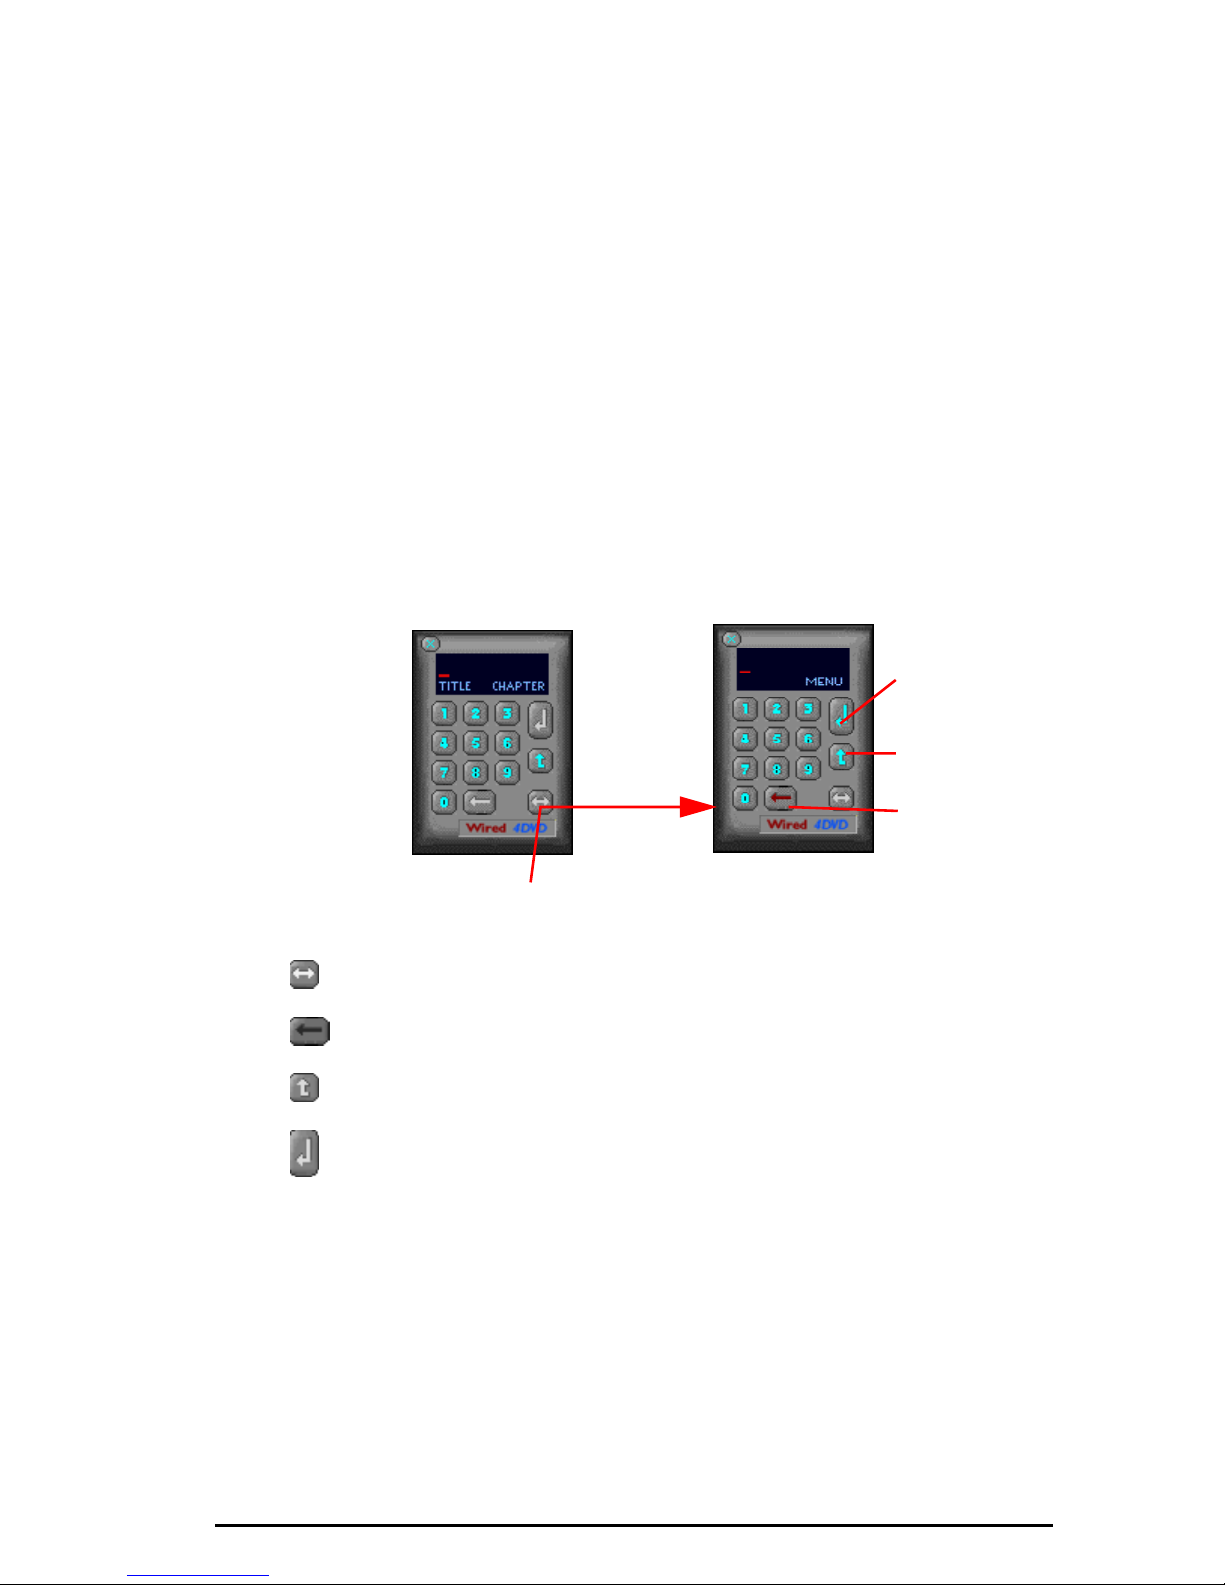
The Number Pad
If DVD Station detects that a DVD movie disc is in the drive, it will display the
Number Pad button in place of the Mode button. Clicking on this button will
display a floating 10-key keypad that will allow you to interact with some DVD
movie titles that have menu selections and other options.
There are two number pads, one for selecting Titles or Chapters, the other for
selecting menus.
You can simply enter the desired number by click the keypad with the mouse,
and click the Enter button to confirm your entry.
The Title/Chapter keypad The Menu keypad
Enter your
selection
Toggle between
the two keypads
Click on this button to toggle between the two keypads.
Use this button to make corrections.
This button returns to the previous menu.
Click on this button will execute whatever option you have chosen.
Return to
previous menu
Backspace
The DVD Station Controller 27
Page 28
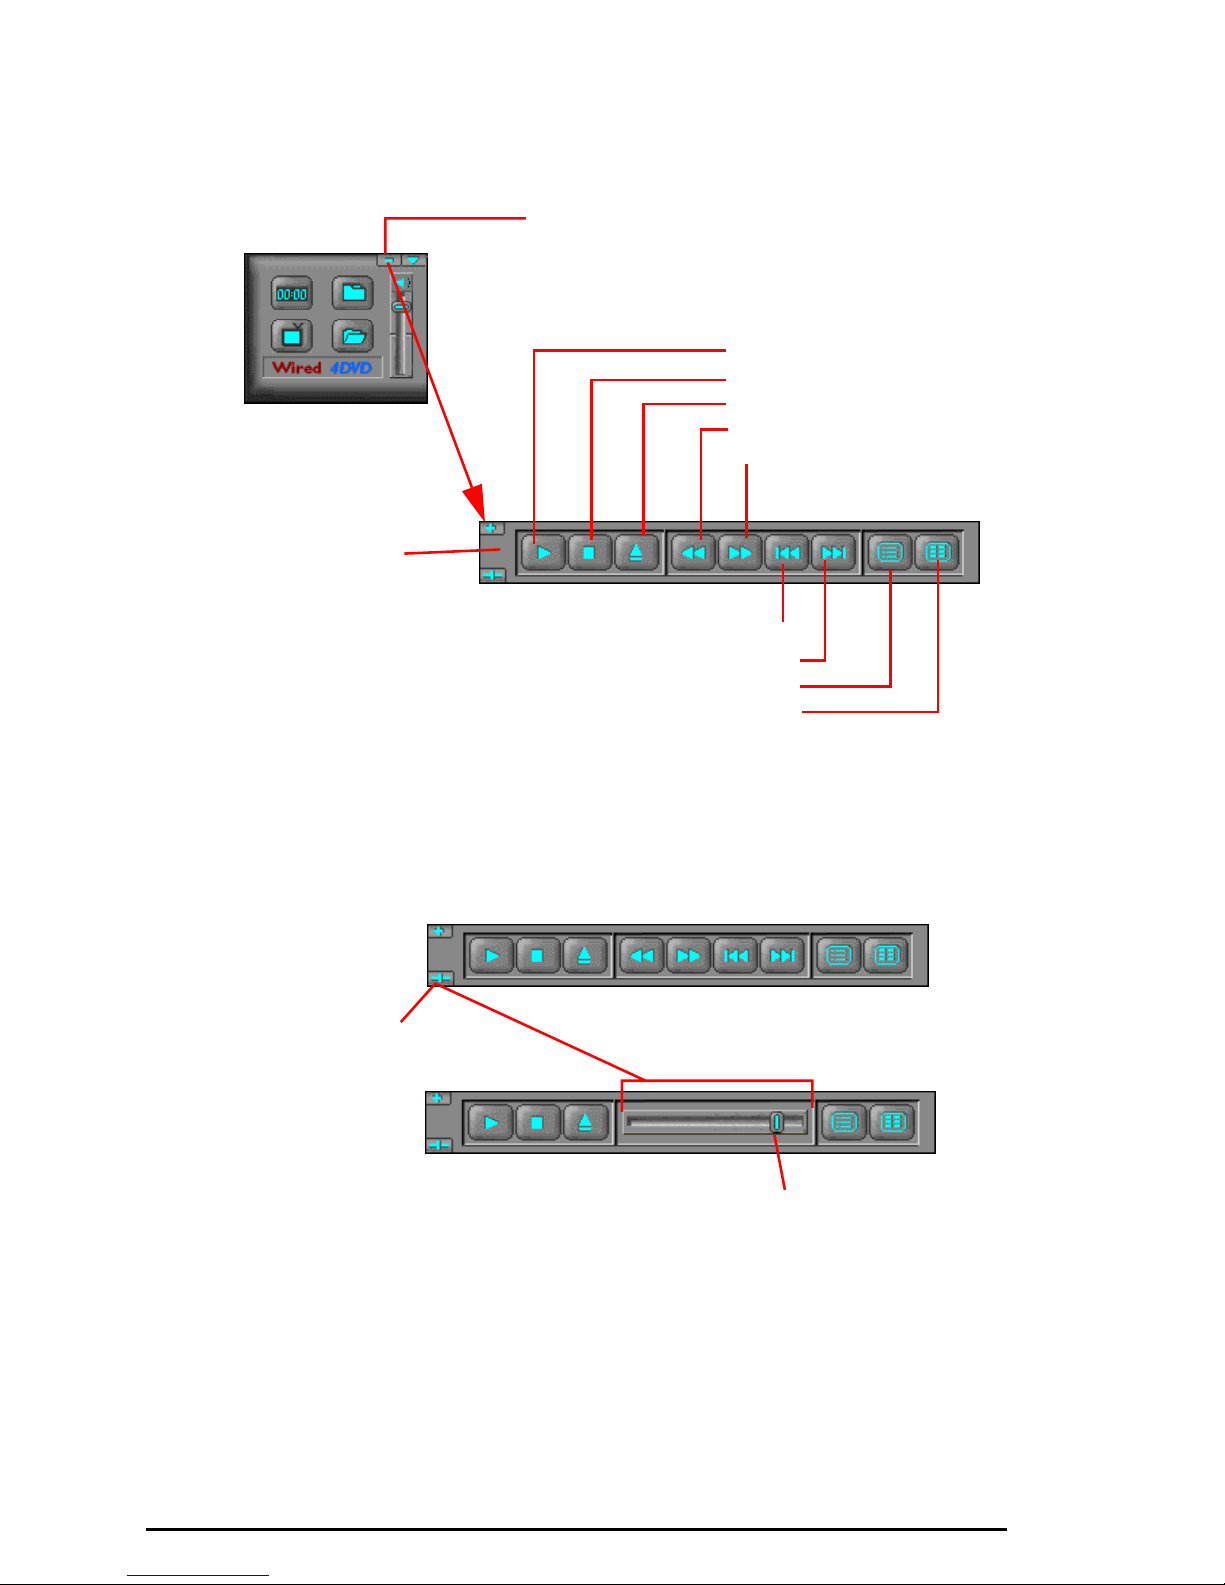
The Compact Controller
Besides the standard controller, DVD Station features a compact controller with
only the basic functions that takes up less space on the screen.
Grab here to
move the
controller on
your screen.
Click here to reveal the
Secondary Controls
Play/Pause
Stop
Eject
Rewind
Fast Forward
Previous Track
Next Track
DVD Menu
DVD Title
¥ To switch to the compact controller, click the minus symbol Ò-Ó above the volume
control slider.
¥ To restore the standard controller, click the plus symbol Ò+Ó.
¥ To access the position slider which lets you easily ÒscrollÓ to any part of the movie,
click the slider icon.
Click here to
show the
position
slider.
Drag the slider to jump to a
different part of the movie
28 The DVD Station Controller
Page 29
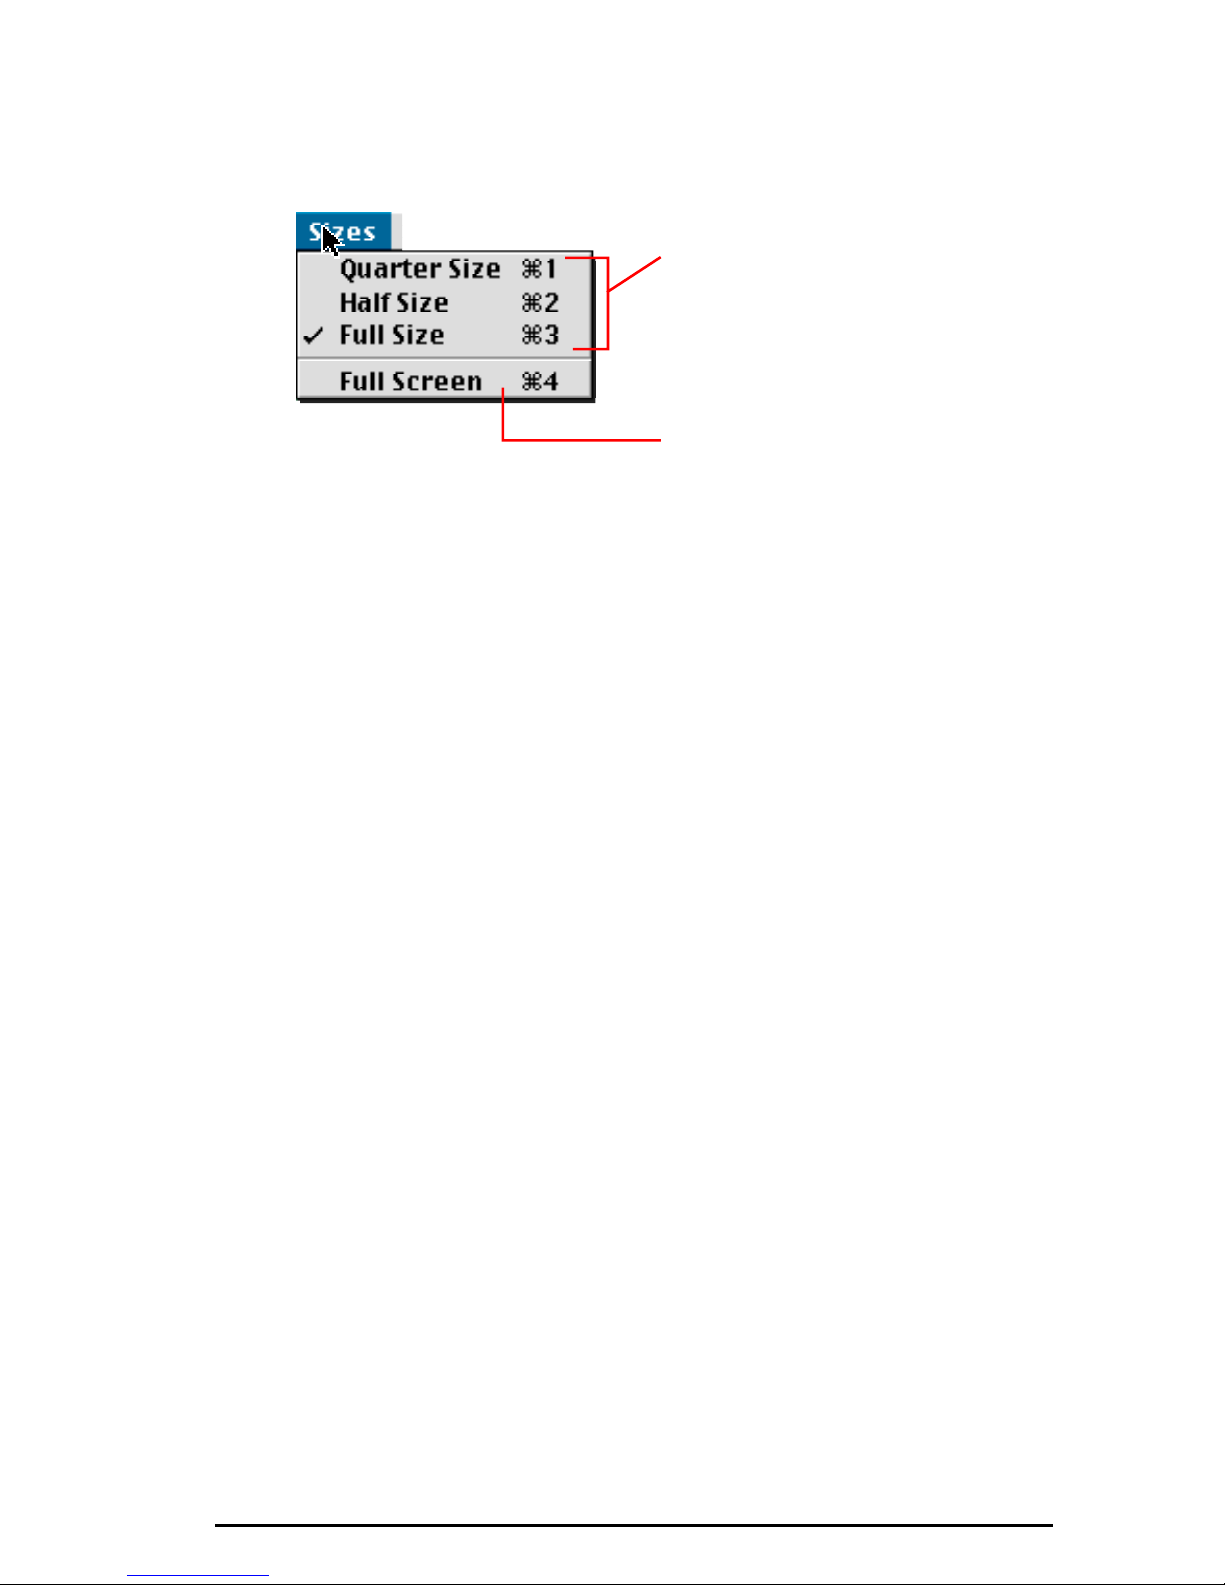
Sizes Menu
The Sizes menu lets you specify one of four preset sizes for the on-screen video
window on your computer screen. It has no effect on the TV output.
These options show the
video in a window on your
Mac monitor, so you can
still see your other
applications and the
menu bar.
Full screen mode Þlls the
entire Mac monitor and
hides the menu bar.
¥ You can resize the on-screen video window manually by clicking and dragging in its
lower-right corner.
¥ You can move the
on-screen video window anywhere on your Mac monitor by
clicking within the window and dragging it to a new location.
¥ You can easily switch from window mode to full screen mode, and back again, by
double-clicking anywhere within the on-screen video window.
Sizes Menu 29
Page 30
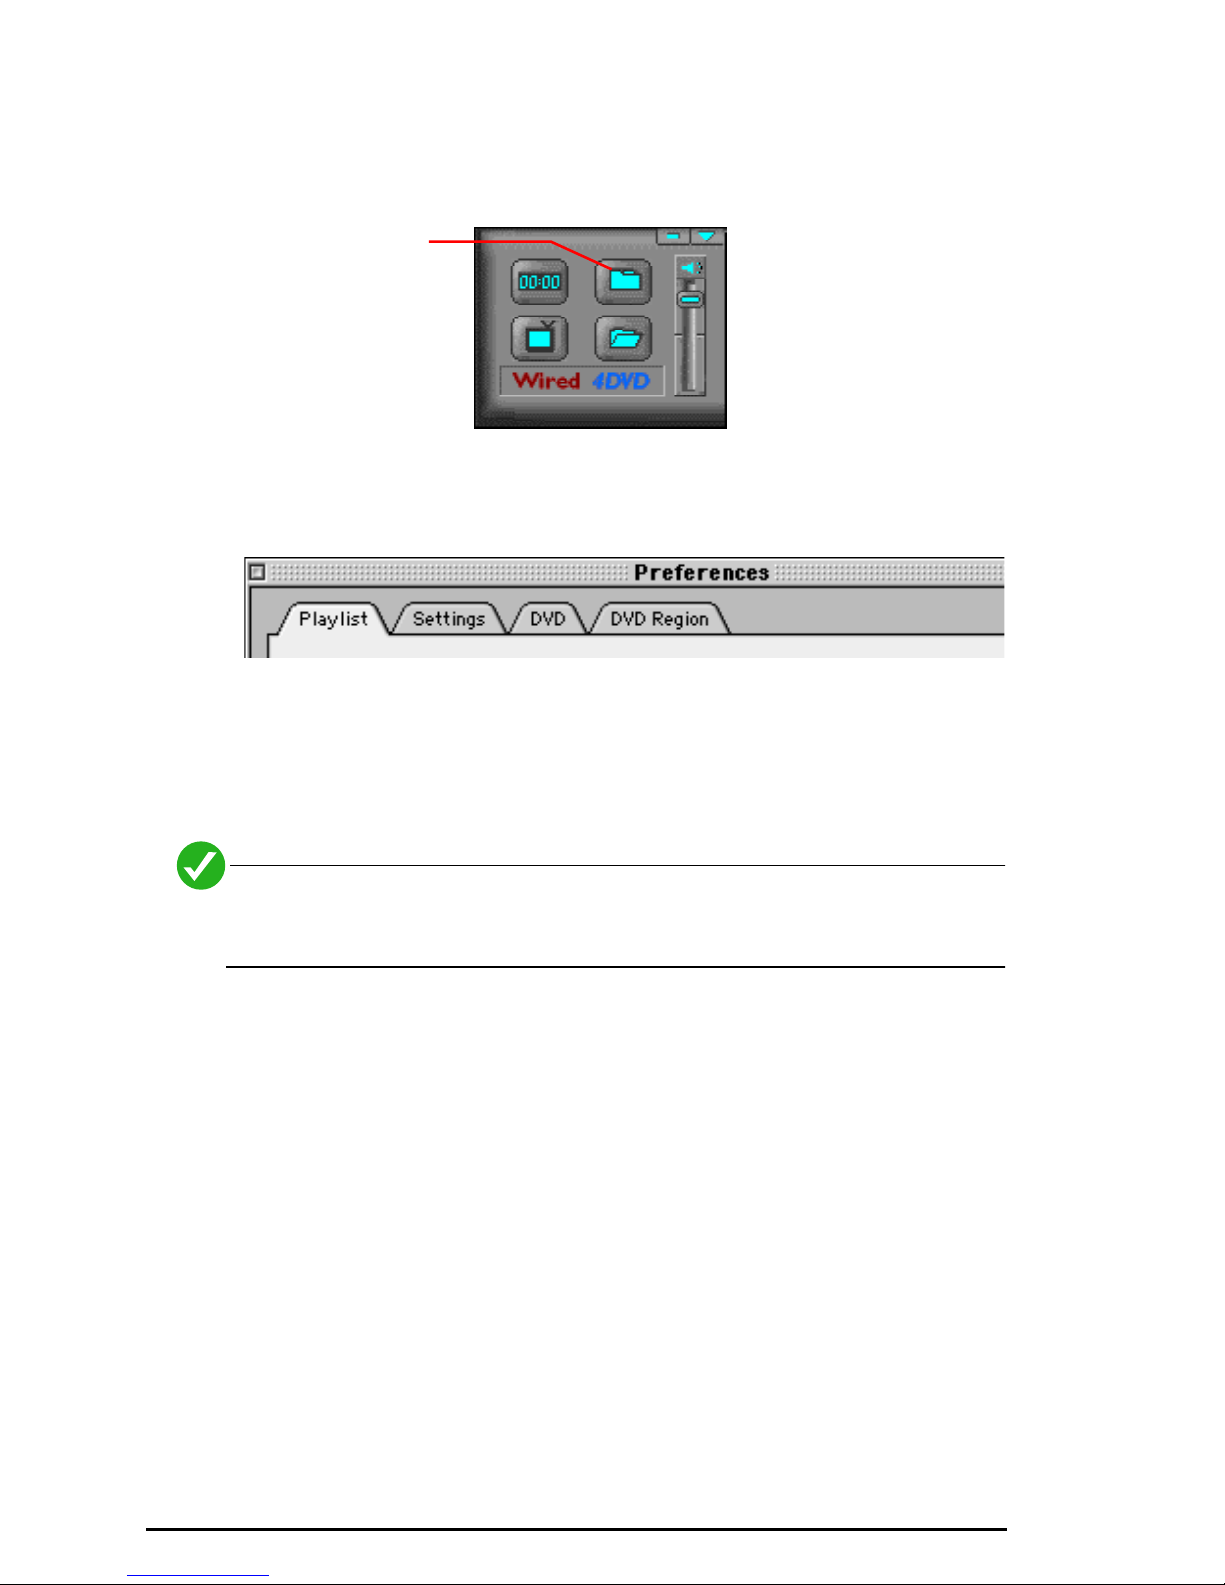
Preferences
Click on the Preferences button in the controller or choose the Preferences
command from the DVD Station Edit men to open the Preferences window.
Click to open the
Preferences
window.
The Preferences window has numerous settings, grouped on four panels. To
switch between the different panels, just click on the tabs at the top edge of the
window.
Play List Panel
The Play List feature allows you to create a list of your favorite MPEG clips to be
played in sequence. Since the card is capable of playing both MPEG-1 and MPEG2 files, you may choose to play MPEG-1 and MPEG-2 files from any available drive.
Files located on network volumes may not play properly due to speed
limitations of your network.
To create a Play List:
1) Open the Preferences window. The Playlist panel will appear; it has three sub-
panels:
¥ The Volume List displays all the volumes on your system.
¥ The Title List window displays the filenames of MPEG clips DVD Station was able to
locate on the hard disk, DVD-ROM, or CD-ROM drive.
30 Preferences
Page 31
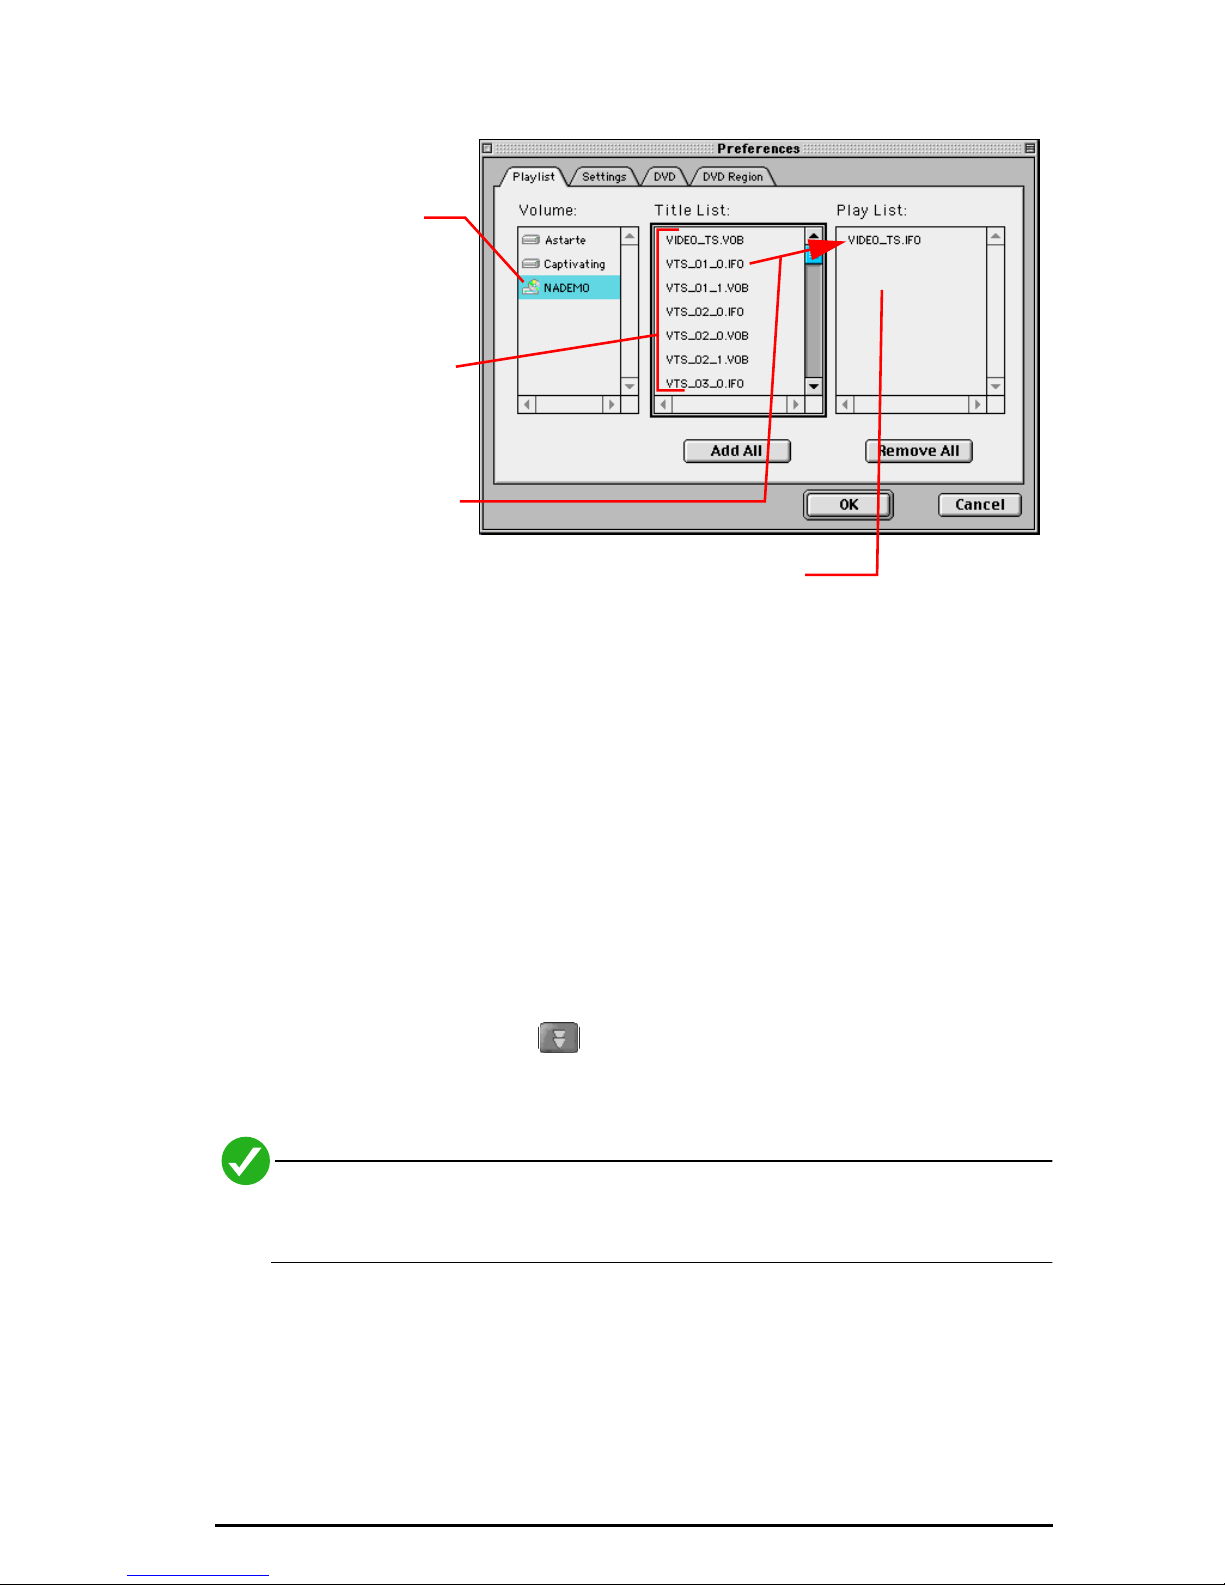
¥ The Play List window displays the clips that are currently on the Play List.
Click on the
desired drive.
DVD Station will
scan for
playable Þles
and add them to
the Title list.
Drag the desired
Þle(s) to the Play
List.
You can also drag-and-drop Þles
from the Finder onto the Play List.
2) Click on the desired volume in the Volume List. DVD Station will scan the
volume looking for compatible files and add them to the Title list.
3) Select the clipÕs name that you wish to add to the Play List from the Title List
window and drag it to the Play List window.
¥ To move all of the clips in the Title List to the Play List, click the Add All button.
¥ To clear the Play List, click the Remove All button.
¥ To remove a clip from the Play List, click on the clipÕs title and drag it back to the Title
List box, or click on its title and press the Delete key.
¥ To change a clipÕs playing order, drag and re-position its icon in the Play List box.
4) Click OK when you have finished adding, removing, and/or changing the order
of the clips in the Play List.
5) Click the Play Mode button in the controller window until the word Play
List is highlighted in the Display Panel. C lick Play to play all the clips in the Play
List.
Files that you add to the Play List are remembered by DVD Station, so you
can reuse the list when you relaunch the application.
Preferences 31
Page 32
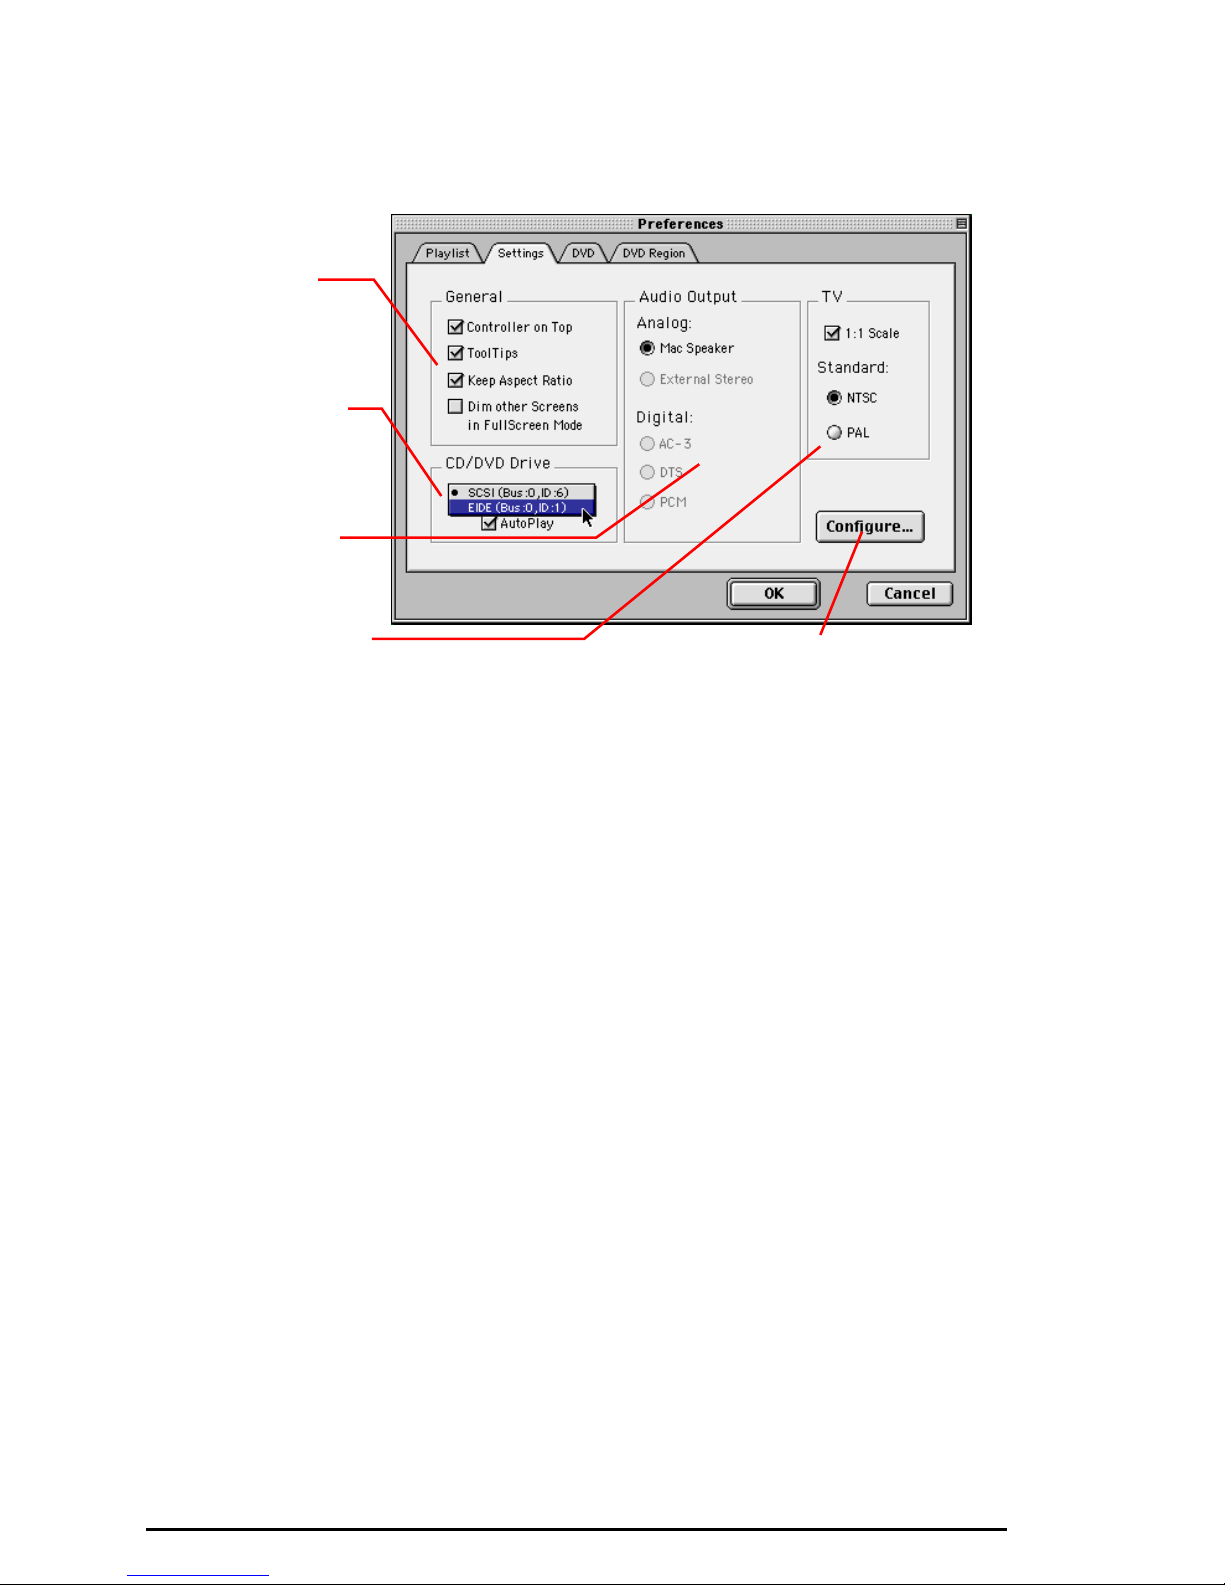
Settings Panel
The Setting Panel lets you specify your preference for the overall behavior of
DVD Station.
Check the
desired
options.
Specify your
preferred drive
if you have
multiple DVD
drives
Set audio
output options
Set up the TV
output
See ÒConÞguration OptionsÓ on
page 36 for details.
Controller on Top
Always displays the controller on top of the on-screen video window.
ToolTips
Enables pop-up ToolTips that display the function of each DVD Station button.
Keep Aspect Ratio
Maintains the movieÕs correct aspect ratio (either 4:3 or 16:9) when re-sizing the
Program window. Prevents distortion of the movie.
Dim other Screen in Full Screen Mode
If you have more than one monitor connected to your Mac, this option will dim
all other monitors when you switch to full screen mode.
CD/DVD Drive
If you have more than one DVD drive in your system, choose the preferred drive
from this menu.
AutoPlay
If the Autoplay feature is turned ON in the preferences dialog, an inserted disc
will start playing as soon as DVD Station is opened and anytime a new DVD disc
is inserted while DVD Station is running.
32 Preferences
Page 33

Audio Output
The Audio Output setting allows you to choose between analog or digital audio
output.
¥ The analog output can be directed to the the MacÕs built-in sound circuitry or to the
mini-jack on the Wired 4DVD card.
¥ If you choose digital output, you can specify your preferred format (AC-3, DTS or
PCM). If a disc you are playing has the format you selected, then that data will be
directed to the digital output of tthe Wired 4DVD card. If it does not have the chosen
format, then the next available format will be used instead.
TV 1:1 Ratio
Wired 4DVD is able to convert between PAL and NTSC. This means that if you
have a PAL movie, Wired 4DVD is able to play it properly on NTSC monitors, and
NTSC clips can be played properly on PAL monitors.
If the 1:1 Ratio feature is enabled, the output to the TV is scaled to maintain a 1:1
output ratio. Normally, if NTSC clips (720 x 480 resolution) are played on a PAL
monitor (720 x 576 resolution), the resulting image is squeezed vertically. With
the 1:1 ratio selected, the 720 x 480 NTSC frame will be scaled to 720 x 576 to fill
the PAL television screen. The same applies in reverse. A PAL image output to a
NTSC television will be cropped on the top and bottom of the image to fit into
the NTSC size. With 1:1 ratio selected, the PAL image will be scaled down to 720
x 480 to fit the full frame on the NTSC television.
TV Standard
Select PAL or NTSC, depending on what format TV monitor you are using.
Configure
The Configure... button opens the Overlay Configuration dialog.
See ÒConfiguration OptionsÓ on page 36 for details.
Preferences 33
Page 34
DVD Options Panel
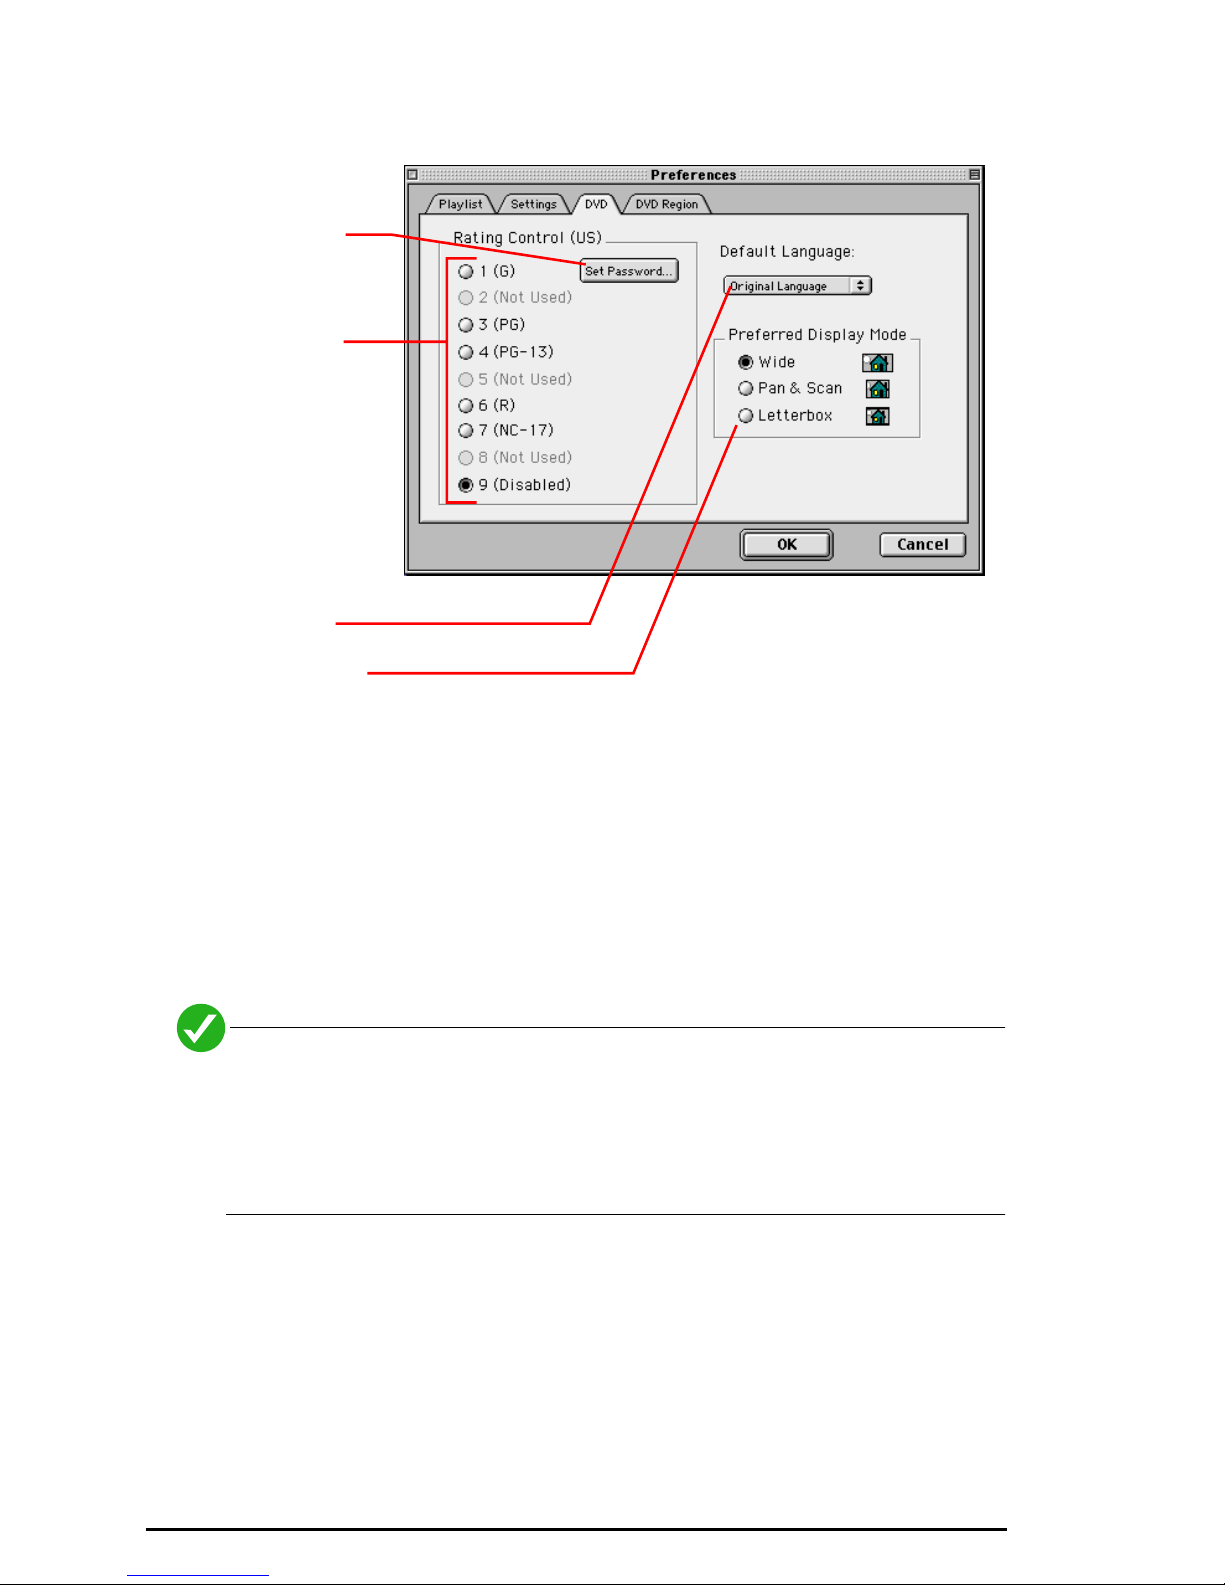
Click on the DVD tab to display the DVD StationÕs DVD settings.
Set a password
to prevent
unauthorized
changed.
Select the
desired rating
level.
Specify your
preferred
language and
video format
Rating Control
Some DVD movie titles support a voluntary movie rating system. With a rated
title, this feature allows you to play an edited version of the movie, with violent
and other objectionable scenes removed. For instance, a title may come with R,
PG-13, and PG-rated versions of the same movie.
To change the rating level, click on the desired level. If you have activated the
Password Protection feature, you will have to enter your password before you
can change the rating.
This feature has no effect on titles that do not support the Parental
Lockout feature. Most DVD movie titles do not use this voluntary rating
system. You cannot rely upon this feature to prevent your children from
viewing objectionable titles. The only way to prevent children from playing
such movies is to physically keep those movies out of reach of children.
Password Protection
To enable the Password Protection feature:
34 Preferences
Page 35
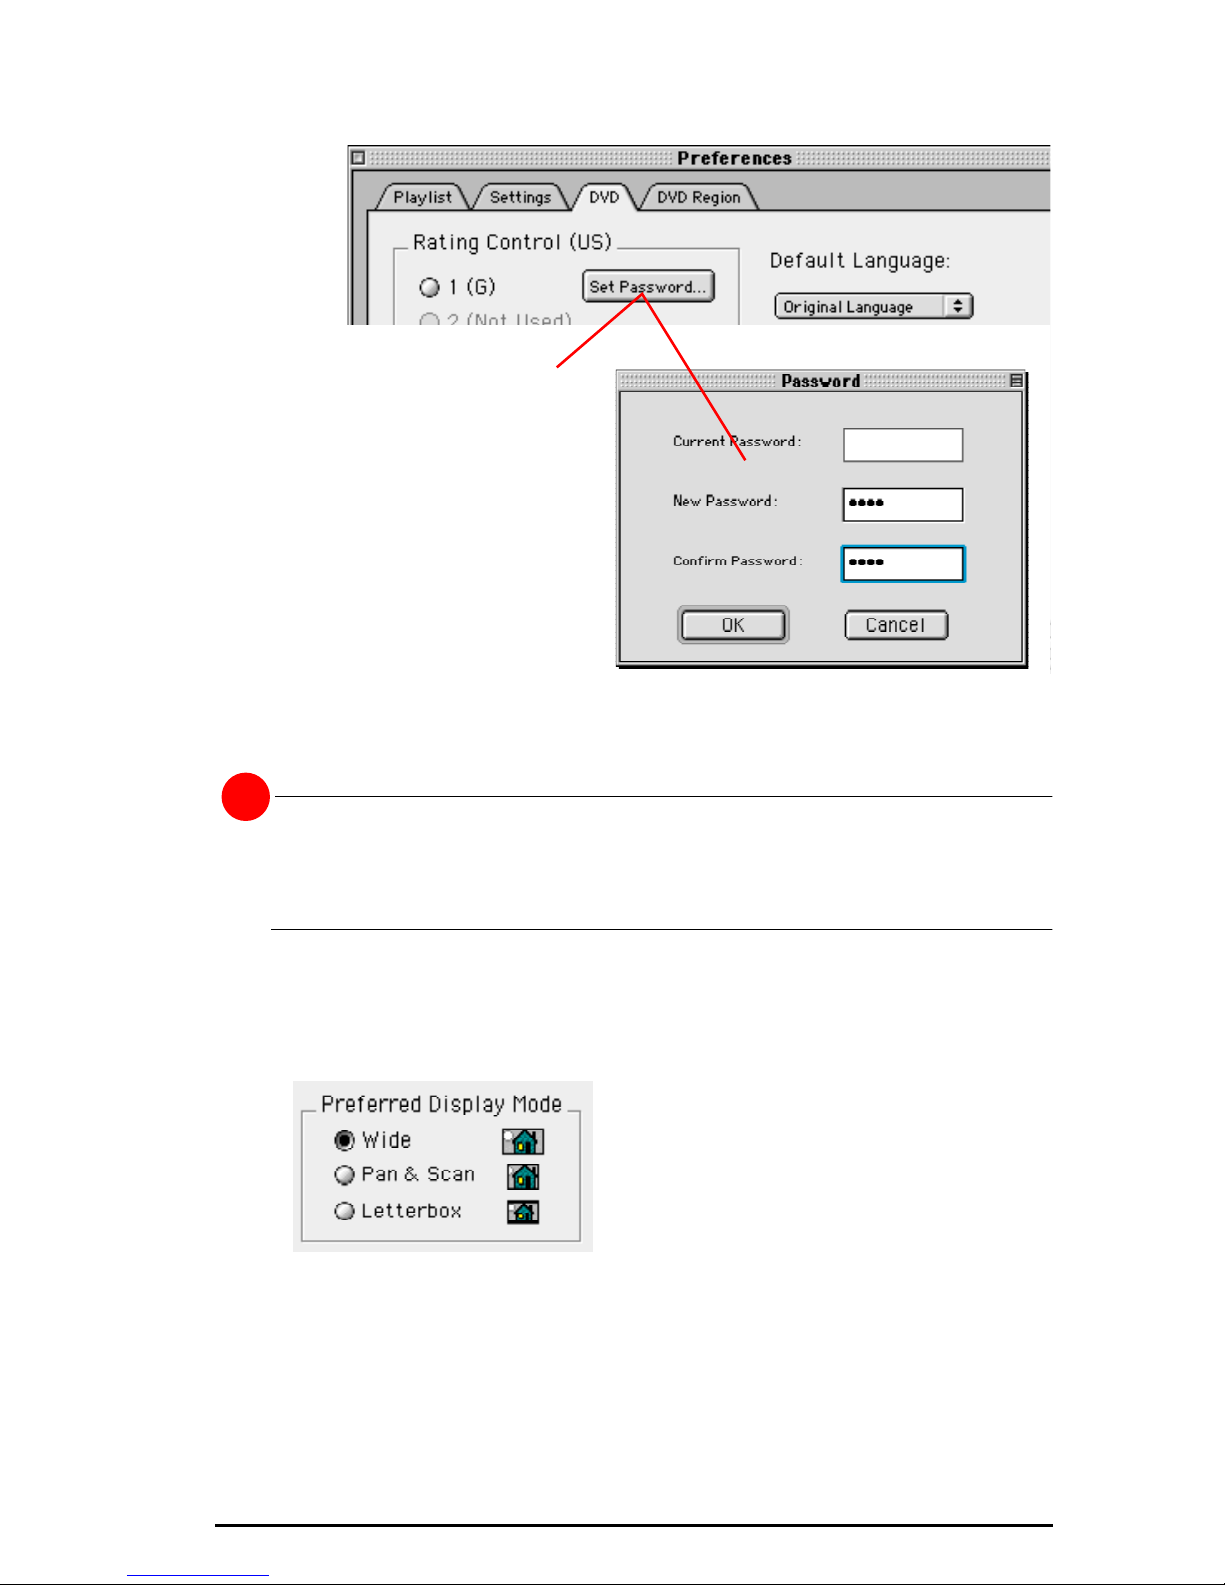
1) Click the Password button and enter a password.
Click to set a password.
2) Enter a password into the New box and again in the Confirm box.
3) Click OK to enable the password.
!
Make sure the password is something you can remember or record it at a
secret place. If you forget the password, you must reinstall the DVD Station
software to enter a new password.
Preferred Display Mode
The Preferred Display Mode lets you specify how you would like to view movies
which are recorded in widescreen format.
Wide - Shows the entire recorded movie frame in the on-screen video window.
Pan & Scan - Crops the left and right edges of the movie frame as needed to fit
the image on a standard 4:3 aspect ratio window.
Letterbox - Shows the entire recorded frame, but puts it in a standard 4:3 format
window, with black horizontal bars at the top and bottom.
Preferences 35
Page 36
Default Language
Most DVD movies support multi-lingual audio. You can specify your preferred
language using the Default Language menu. If the chosen default language is not
available on that DVD movie title, DVD Station will use the default language on
that particular DVD movie disc, which may differ depending on the origin of the
disc.
Changes to the default language will not take effect until you stop the
currently playing DVD and start it over.
Setting the DVD Region Code
You can change the region code of your system if you relocate to somewhere
with a different region code.
Click on your
region, and
click Change.
The currently
active region
is outlined in
white.
(See ÒSelecting Your Geographic RegionÓ on page 16 for more
information.)
Configuration Options
The Auto Calibration procedure that runs the first time you launch DVD Station
normally does a great job of setting up the overlay window and its borders so it
lines up exactly with the frame of the Program window. It also sets the ÒkeyÓ
color to a value that works well on most systems.
36 Configuration Options
Page 37
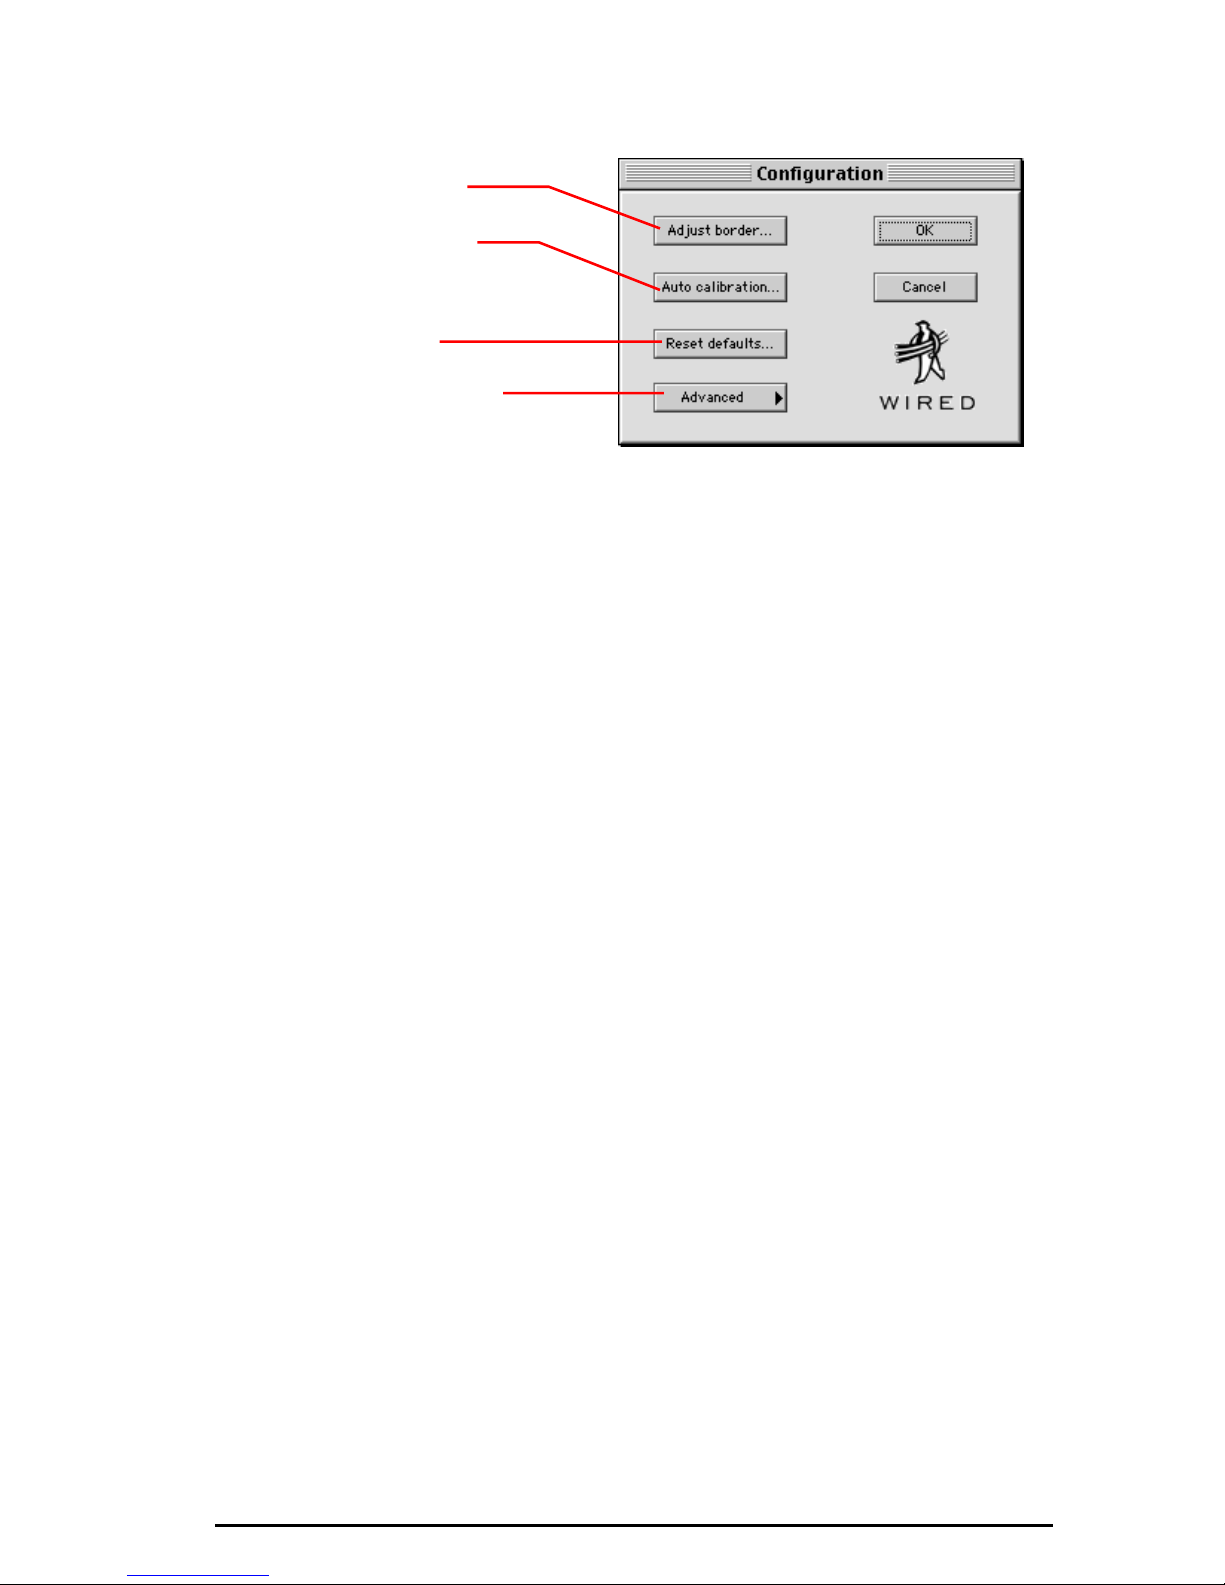
The configuration dialog lets you recalibrate anytime, as well as giving you access
to manual settings for the borders and key color.
Adjust the borders of the
Program window
Run the calibration
procedure
Reset the overlay to
factory defaults
Access the Advanced
Color Adjustment window.
Auto Calibration
If you notice the video getting out of alignment (in relation to the window
frame), you can run the auto calibration procedure whenever you like.
1) Open the Preferences dialog.
2) Click on the Settings tab and then click the Configure... button.
The Configuration dialog will appear.
3) Click Auto Calibration... to run the calibration procedure.
Adjust Borders
If you see a colored border around the video in the Program window, even after
using the Auto Calibration function, you can adjust the border manually.
1) Open the Preferences dialog.
2) Click on the Settings tab and then click the Configure... button.
The Configuration dialog will appear.
3) Click Adjust Borders....
Configuration Options 37
Page 38
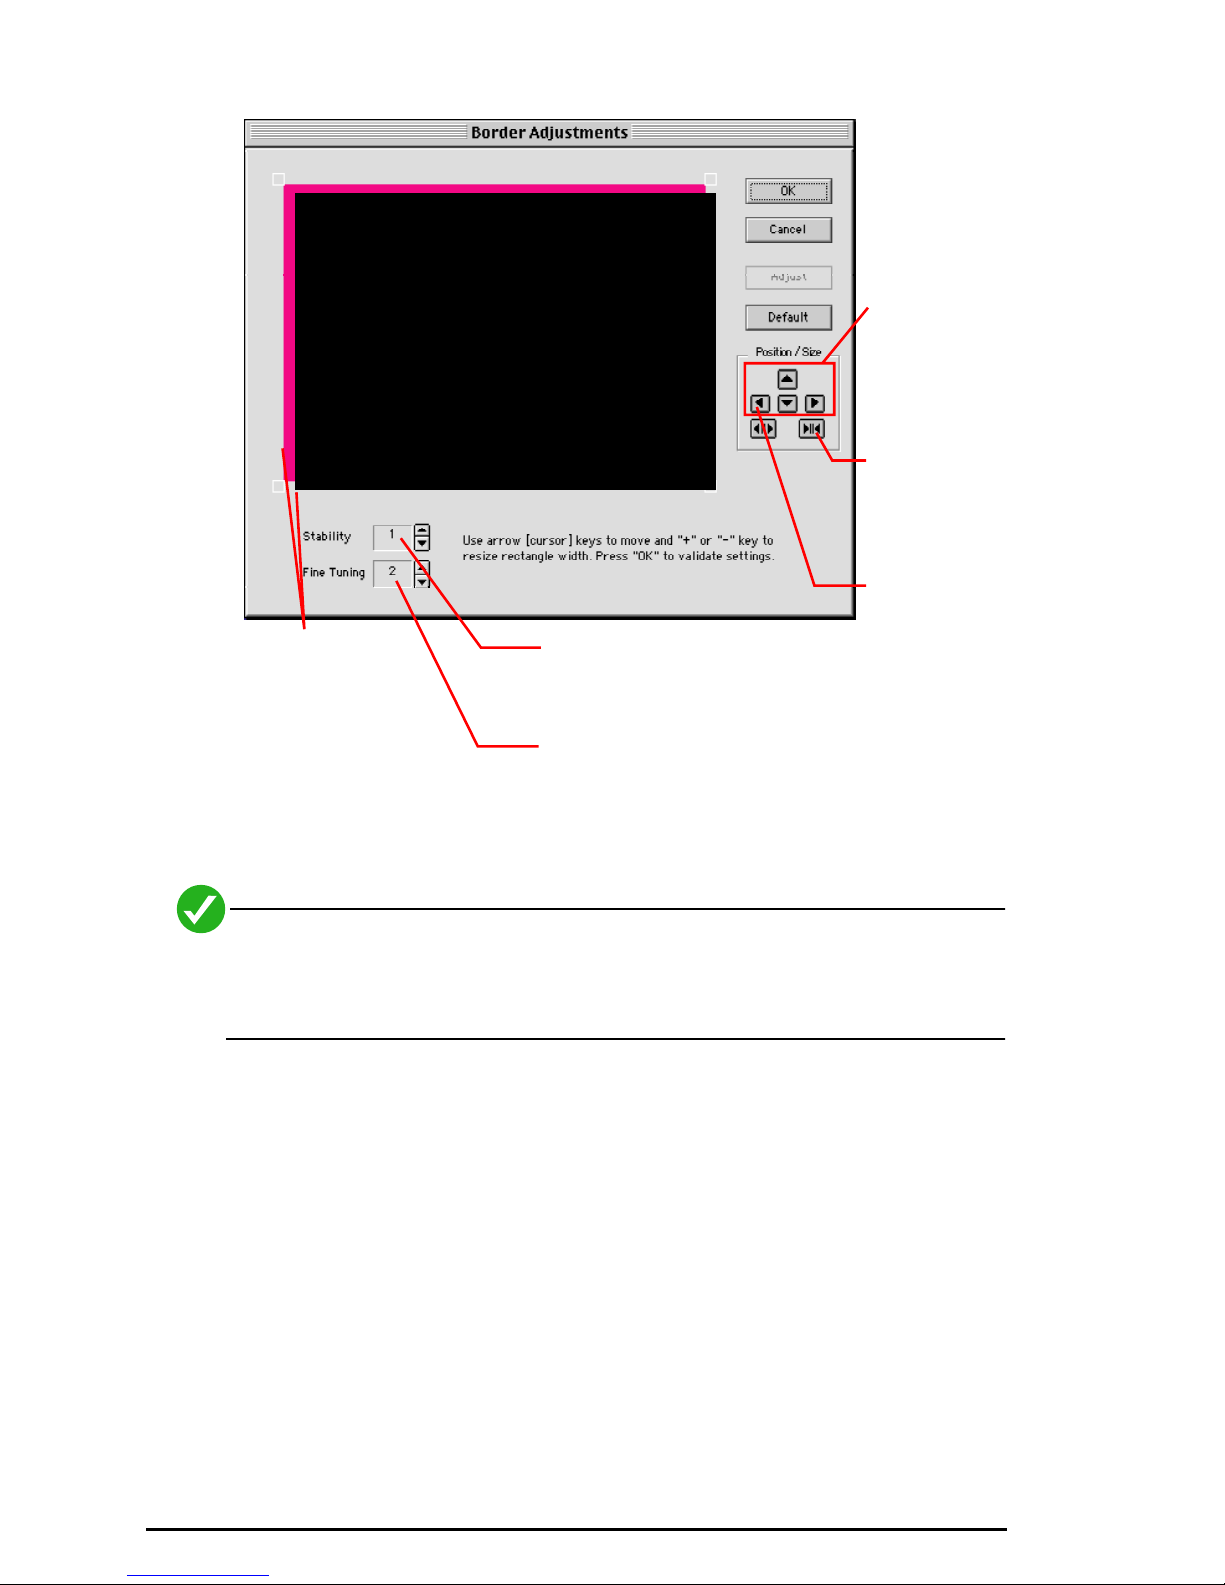
This dialog will appear.
When properly
adjusted the top
rectangle should
exactly cover the
lower, colored
rectangle.
If the video image on the
computer screen ÒjittersÓ, adjust
this setting to stabilize it.
Fine tunes the horizontal
placement of the adjustment.
Use these
arrows to
move the
overlay box.
Click to
decrease the
width of the
overlay
rectangle
Click to
increase the
width.
4) Use the control arrow to move the overlay rectangle so it exactly lines up with
the left edge and top edge of the colored rectangle beneath it at
Holding down the Shift key while clicking any of the movement buttons
increases the movement by 10 times; very handy if you have a long ways to
move it.
5) Then use the increase and decrease buttons to change the width of the overlay
to exactly match the colored rectangle.
6) Click OK when done.
38 Configuration Options
Page 39
Advanced Color Adjustments
By default, DVD Station uses a a dark green color as the chroma key color. You
might prefer to use a different color if the default color conflicts with one of your
application programs. When there is a conflict, you will see MPEG video
displayed ÒthroughÓ parts of other applications.
Follow the steps below to set your own chroma key color if:
¥ You want to use a different chroma key color, or
¥ You are not able to view any MPEG video on your VGA screen, or
¥ If the VGA graphics seems to Òbleed throughÓ the MPEG video
If you are not able to view MPEG video at all, there are several things you
should try before changing the chroma key color: make sure that the
monitor is connected to the card, powering off the computer and try again
after restarting, or double check the Border Adjust and Color Calibration
procedures.
1) Start DVD Station.
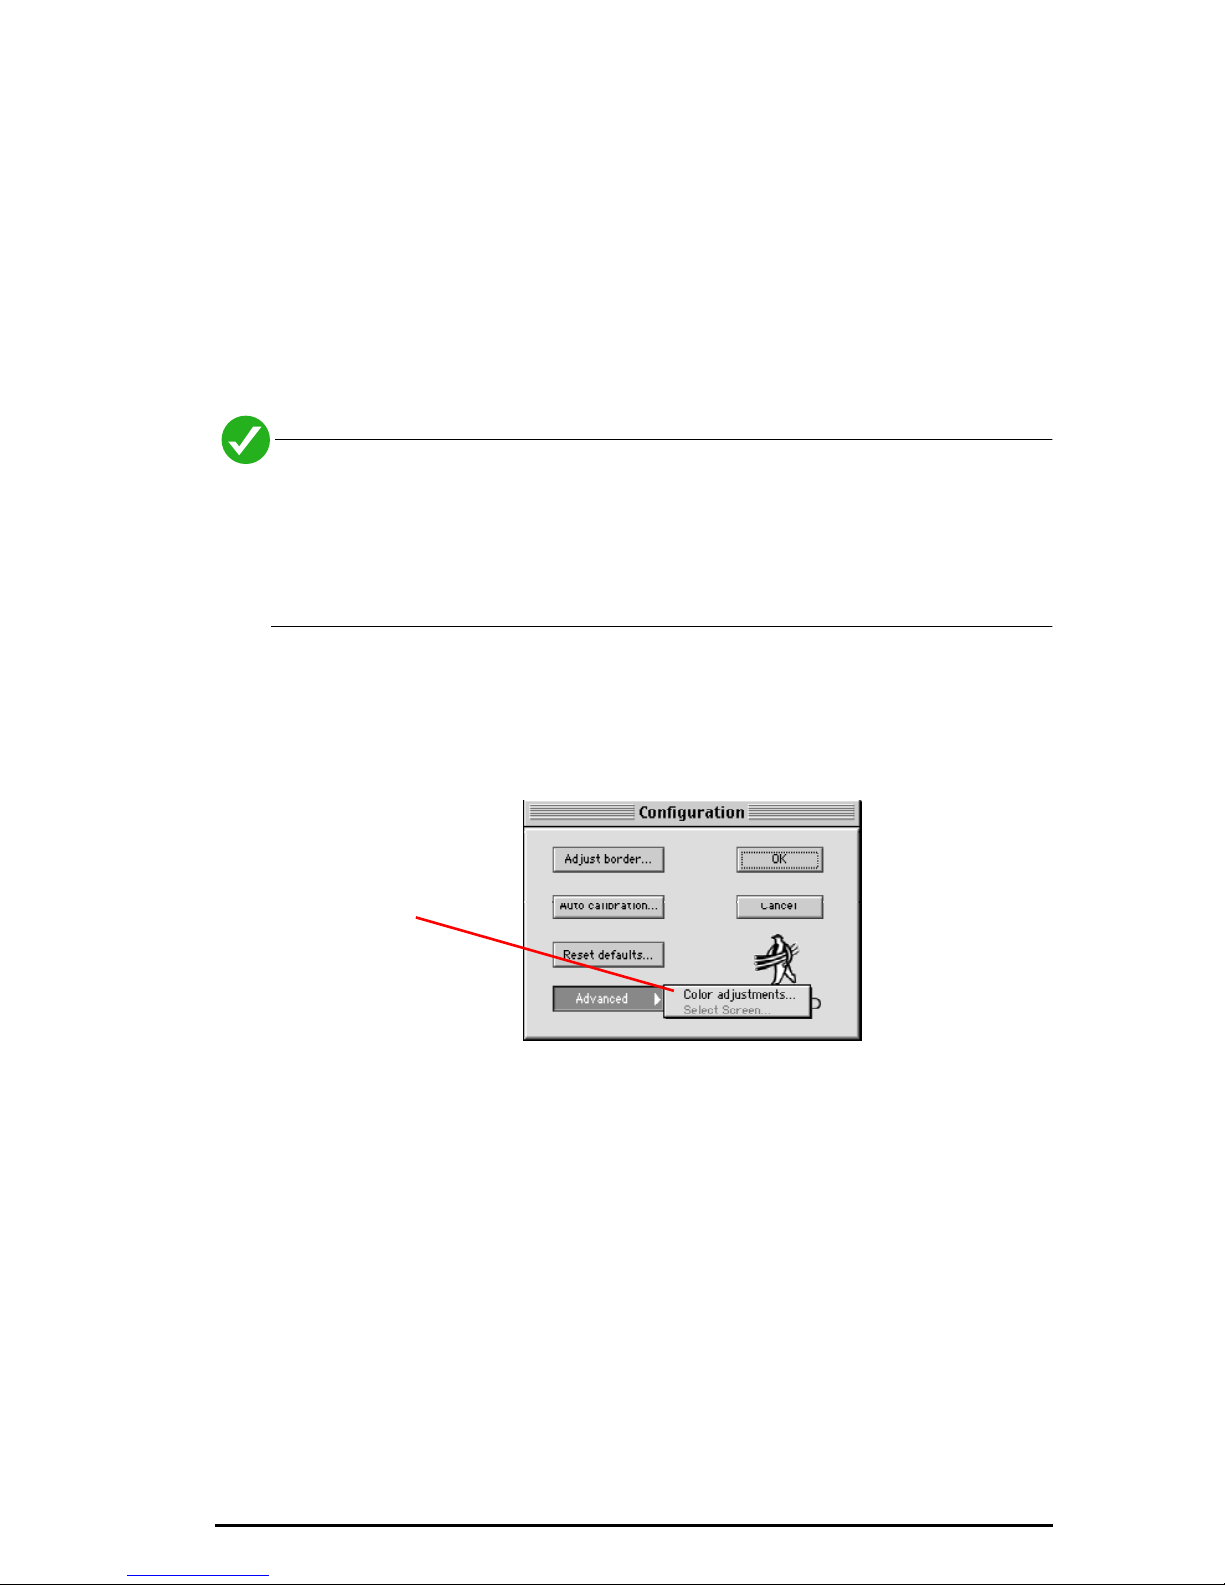
2) Click on the Settings tab and then click the Configure... button.
The Configuration dialog will appear.
Select this
option to set a
key color
manually.
3) Chose Color Adjustments from the Advanced pop-up menu.
Configuration Options 39
Page 40
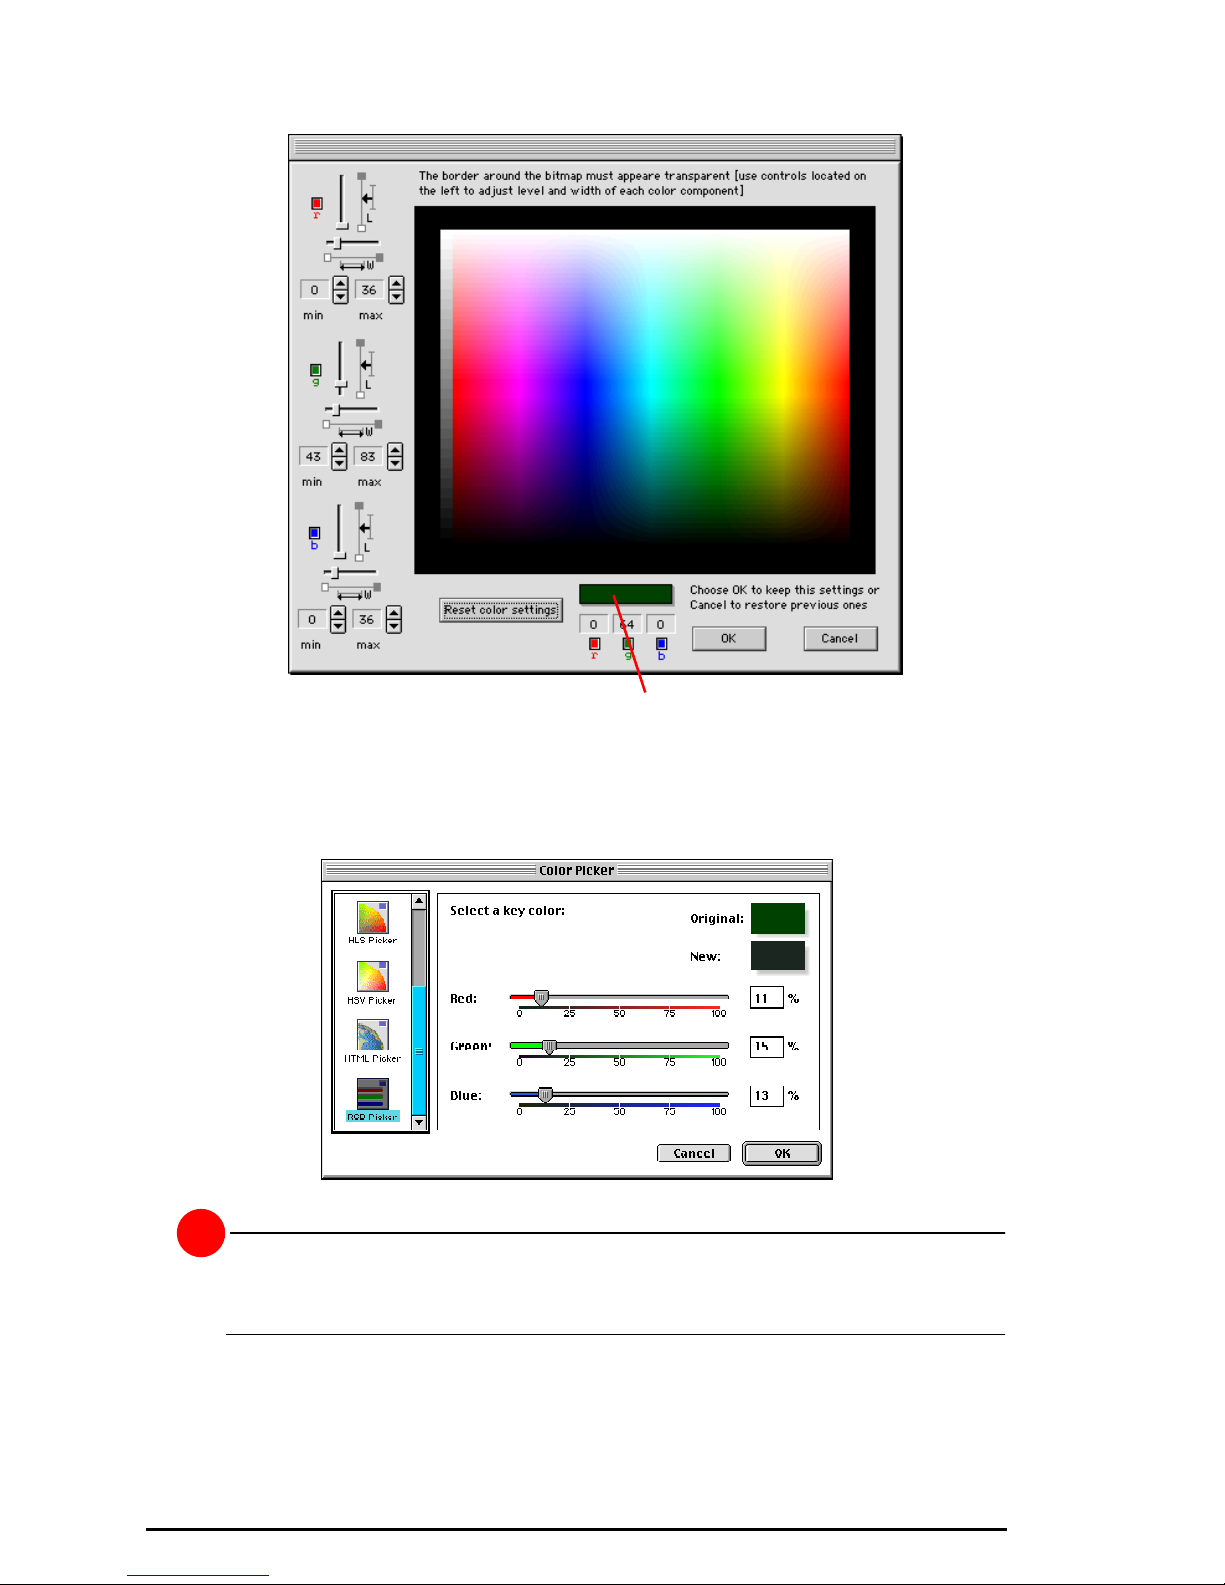
4) This dialog will appear.
Click here to change the key color.
5) Click on the rectangular sample of the current key color (see above).
6) A standard Macintosh color picker will be displayed. Choose a new color and
click OK.
!
DonÕt pick a commonly used color, or you will see the DVD video bleeding
through into your other applications.
40 Configuration Options
Page 41
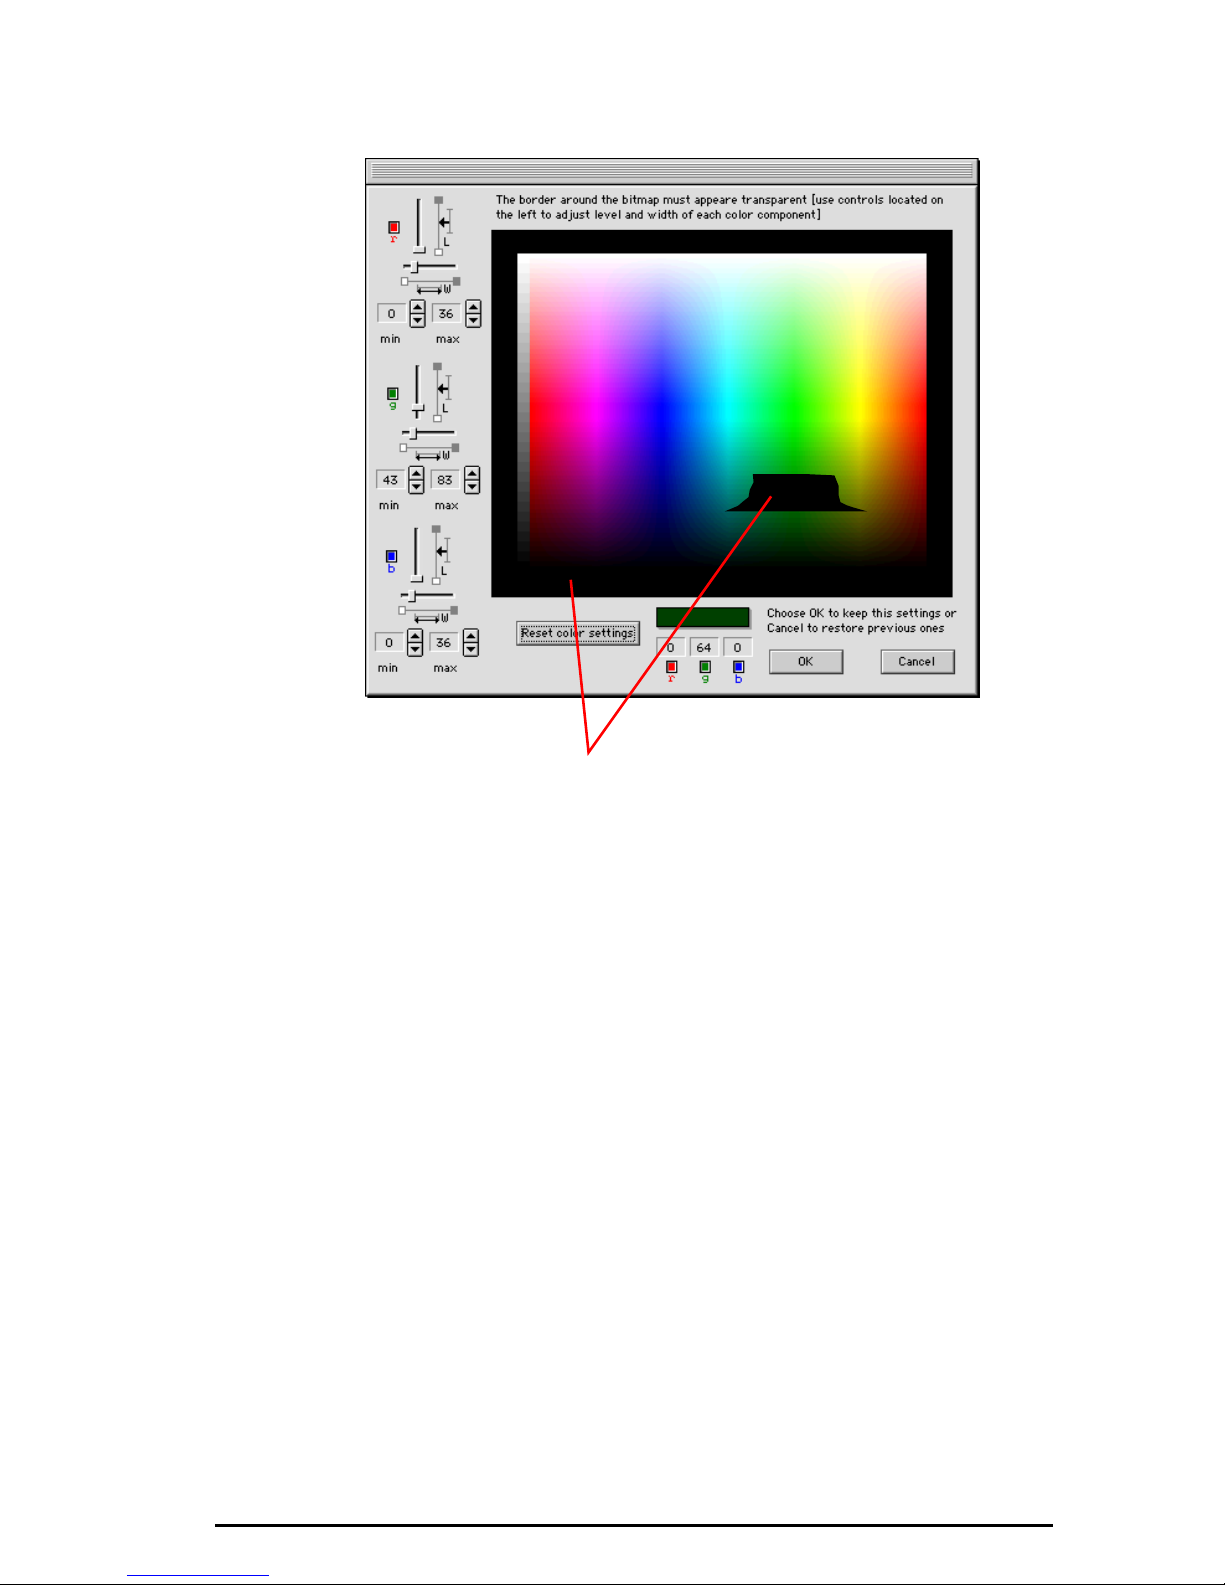
7) Black should appear in the border surrounding the color chart. There should
also be a ÒholeÓ in the color chart where black will also show through.
Black should appear in the border, and in a
ÒholeÓ somewhere in the color spectrum
(the shape of the hole will vary.)
8) If black does not appear in BOTH the border and the Òhole,Ó then you must
adjust the R, G, and B values with the sliders until you can see it in both
regions. Do this by adjusting the width (W) and length (L) slider bars of each
color to make the black appear both inside and outside of the color chart.
Adjusting these sliders can easily make a very large hole in the color chart that displays
the video. Once you can see black in both the inside and the outside area, you should
adjust the sliders to reduce the size of the hole so that it is about 40 x 40 pixels, which is
roughly the size of a standard icon. Making the hole too small will cause video ÒjitteringÓ
and Òbleeding.Ó Making the hole too large will cause MPEG video to play ÒthroughÓ
areas within a larger range around the chroma key color.
9) Click OK to confirm your choice, then click OK to close the Configuration
dialog and OK to close the Preferences dialog.
Configuration Options 41
Page 42
Select Screen
If you have more than one monitor connected to your Macintosh, youÕll need to
use the Select Screen command to specify which monitor is connected to the
Wired 4DVD card.
1) Start DVD Station.
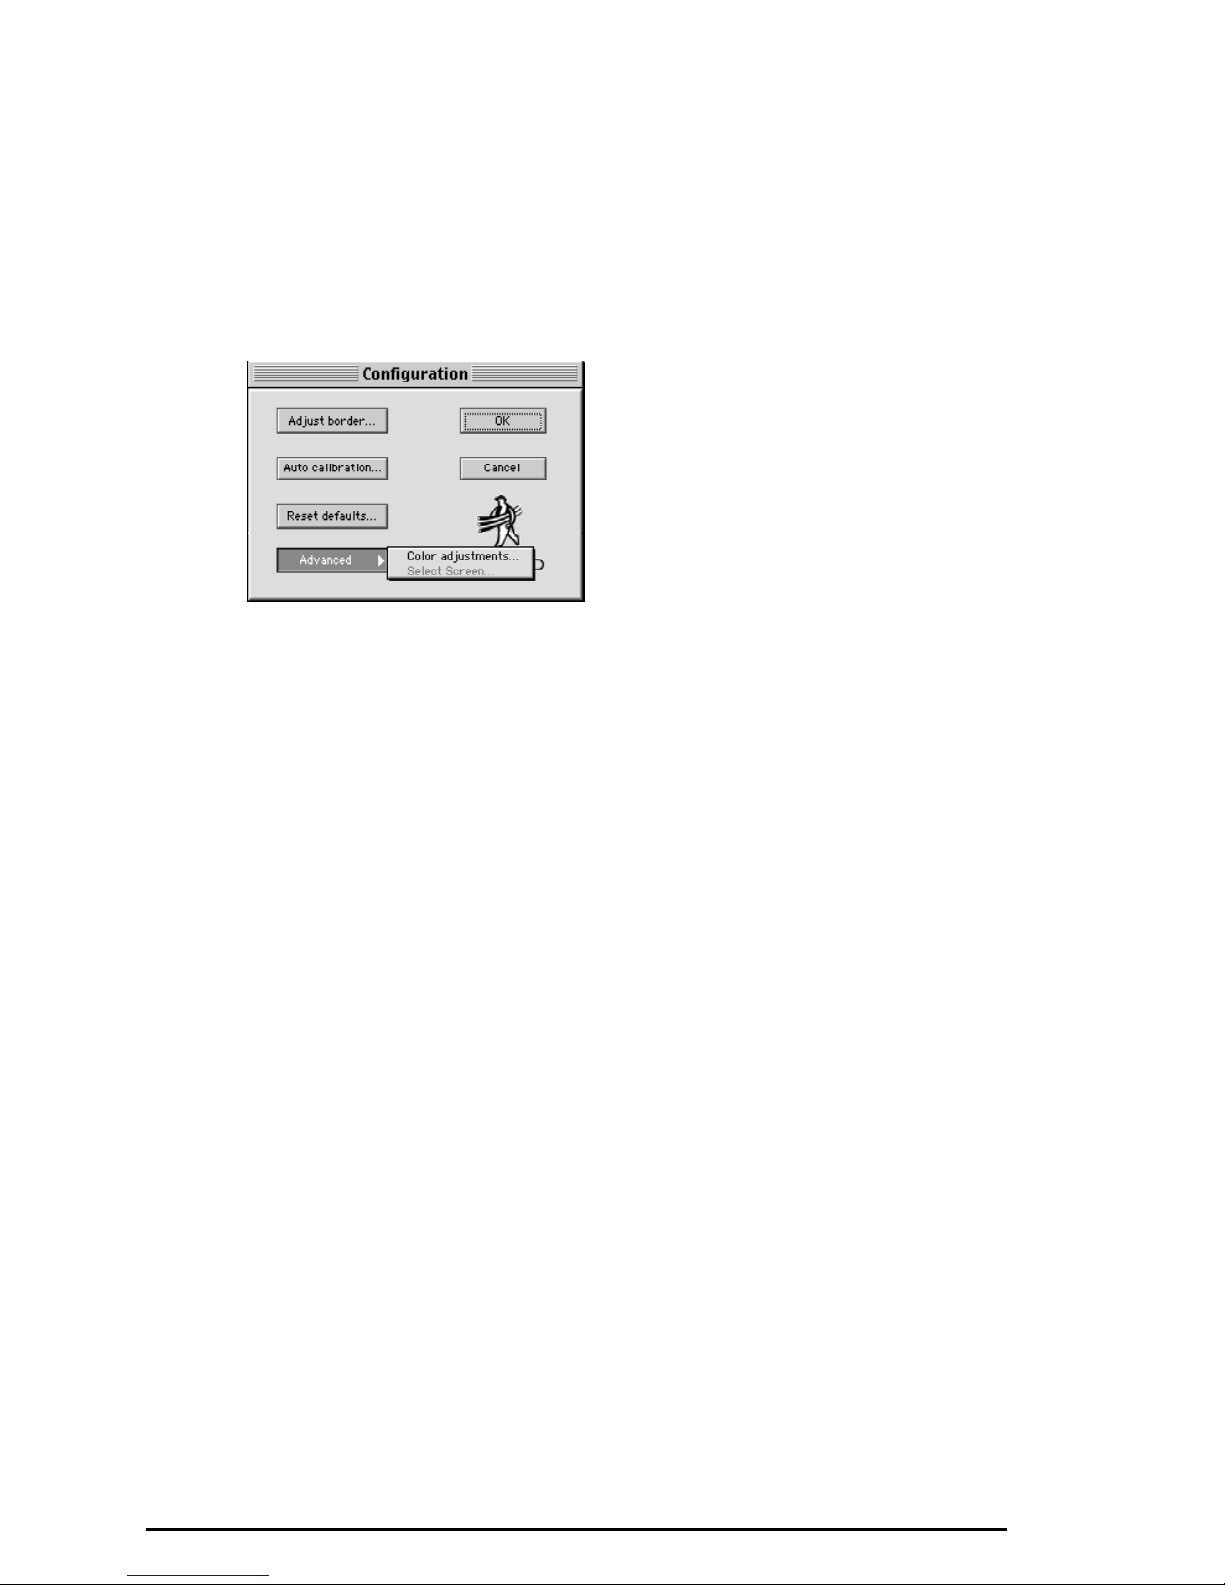
2) Click on the Settings tab and then click the Configure... button.
The Configuration dialog will appear.
3) Choose Select Screen from the Advaanced pop-up menu.
4) In the dialog that appears, select the monitor that is connected to the Wired
4DVD card.
42 Configuration Options
Page 43

Index
A
Adjust Borders 37
Advanced Color Adjustments 39
All 22
Amplifier 7
Audio Connections 12
Auto Calibration 15, 37
AutoPlay 32
C
Camera Angle Selector 23
CD/DVD Drive 32
Chroma key 39
chroma key 39
Color Calibration 39
Compact Controller 28
Compression 7
Configure 33
Continuous Play 22
Controller on Top 32
D
Data transfer rate 7
Decompression 7
Default Language 36
Dim other Screen 32
Discrete digital audio channels 7
Display button 25
Display Panel 22
Dolby Digital Surround Sound 7
Dolby Pro Logic 8
DVD 7, 8
DVD Menu Controller 25
DVD Navigation Buttons 23
DVD Options Panel 34
DVD Region Code 36
DVD-Video 10
F
Fast Forward 22
File Formats 8
fps 7
Frames per second 7
Function Buttons 25
I
Image Capture 26
Installation 9
Introduction 5
K
Keep Aspect Ratio 32
key color 39
L
Language 36
Language Button 23
Letterbox 35
M
Macrovision Copyright Notice 2
Menu Selector 24
Moving Picture Experts Group 7
MPEG 7
MPEG-2 7
MPG Files 8
N
Next Track 22
E
Eject 21
Encoder 7
Index 43
O
On-screen Display 25
Open File 25
Open File button 25
Options Dialog button 26
Page 44

P
Pan & Scan 35
Parental Lockout 34
Pass-through Cable 12
pass-thru cable 11
Password Protection 34
Picture Control sliders 26
Play List 22, 30
Play Mode 22
Play Mode button 31
Player Controls 21
Playing Discs 18
position slider 28
Preferences 26, 30
Preferred Display Mode 35
Previous Track 22
Pro Logic Surround Sound 12
R
Random 22
Receiver 7
Rewind 22
Secondary Controls 26
Segment Play 26
Select Screen 42
Setting the Region 17
Sizes Menu 29
Slow Motion Play 27
Static electricity 9
Stop 21
Subtitle Selector 24
System Requirements 6
T
Technical Support 5
Technology Overview 7
Title Selector 24
ToolTips 32
V
Video Connection 10
Video Mode 25
Volume Control 23
S
S/PDIF 7, 12
W
Wide 35
44 Index
 Loading...