


www.
WiQ
uest.com
WiQuest Wireless USB 4-Port Hub
Users Guide
Version 0.1
WiQuest Communications, Inc. WQST110RDK-HUB-USB4 UG
915 Enterprise Blvd, Suite 200
Allen, Texas 75013

Wireless 4-Port USB Hub Users Guide
WQST110RDK-HUB-USB4 UG Revision 0.1, July 24, 2006
CONTENTS :
RIGHTS..........................................................................................................................................................................................2
REGULATORY NOTICES........................................................................................................................................................ 3
INTRODUCTION..........................................................................................................................................................................4
1 WQST110RDK-HUB-USB4 FEATURES ........................................................................................................................4
1.1 HARDWARE FEATURES ...............................................................................................................................................4
1.2 SYSTEM REQUIREMENTS............................................................................................................................................4
2 INSTALLING THE WQST110RDK-HUB-USB4 WIRELESS USB HUB DRIVER AND SOFTWARE.................................. 4
2.1 INSTALLING THE WQST110RDK-HUB-USB4 WIRELESS USB DRIVER.................................................................4
2.2 INSTALLING THE USB DRIVERS AND THE EVK CONTROL CENTER (ECC)...............................................................5
2.3 CONNECT THE WQST110RDK-HUB-USB4 WIRELESS USB HUB HARDWARE ..............................................10
3 EVK CONTROL CENTER (ECC)......................................................................................................................................13
3.1 RUNNING THE EVK CONTROL CENTER APPLICATION .............................................................................................14
3.2 SELECT THE HOST INTERFACE ...................................................................................................................................14
3.2.1 SELECT THE DEVICE IDENTIFIER (ADDRESS) AND TIME FREQUENCY CODE # ........................................................14
3.2.2 TRANSMIT WINDOW...................................................................................................................................................15
3.2.3 RECEIVE WINDOW.....................................................................................................................................................17
4 APPENDIX A: TROUBLESHOOTING..................................................................................................................................19
4.1 THE WIRELESS USB HUB IS NOT FUNCTIONAL ......................................................................................................19
4.2 I CAN’T CONNECT TO THE WIRELESS USB HUB.....................................................................................................19
915 Enterprise Blvd, Suite 200
Allen, Texas 75013
www.WiQuest.com
1

Wireless 4-Port USB Hub Users Guide
WQST110RDK-HUB-USB4 UG Revision 0.1, July 24, 2006
Rights
Rights to use this documentation are set forth in the License Agreement included with the WQST110RDK-HUB-USB4 Wireless
USB Hub module.
© WiQuest Communications, Inc. 2006. All rights reserved.
All right, title and interest, copyrights, patents, know-how, trade secrets, and other intellectual property relating to this publication
and to the WQST110RDK-HUB-USB4 product are proprietary products of WiQuest Communications, Inc. (“WiQuest”). Any
and all other trademarks, product names, and other intellectual property rights are the sole property of their respective owners.
If this guide is distributed with software that includes an end user agreement, this guide, as well as the software describe in it, is
furnished under license and may be used in accordance with the terms of such license. Except as permitted by such license, no
part of this guide may be reproduced, stored in a retrieval system, or transmitted, in any form, or by any means, electronic,
mechanical, recording, or otherwise, without the prior written permission of WiQuest Communications, Inc. Please note that the
content in this guide is protected under copyright law even if it is not distributed with software that includes an end user license
agreement.
The content of this guide is furnished for information al use only and does not form part of any quotation or contract. It is subject
to change without notice, and should not be construed as a commitment by WiQuest Communications, Inc. WiQuest
Communications, Inc. assumes no responsibility or liability for any errors or inaccuracies that may appear in the information
content contained in this guide.
Microsoft and Windows are either registered trademarks or trademarks of Microsoft Corporation in the United States and/or
other countries. WiQuest™ and WiDV™ are registered trademarks of WiQuest Communications, Inc.. No right, license, or
interest to such trademark is granted hereunder.
www.WiQuest.com
2

Wireless 4-Port USB Hub Users Guide
WQST110RDK-HUB-USB4 UG Revision 0.1, July 24, 2006
Regulatory Notices
This equipment may only be operated indoors. Operation
outdoors is in violation of 47 U.S.C. 301 and could subject the
operator to serious legal penalties.
This device complied with Part 15 of the FCC Rules.
Operation is subject to the following two conditions: (1) This
device may not cause harmful interference, and (2) this device
must accept any interference received, including interference
that may cause undesired operation.
THIS DEVICE MUST BE INSTALLED IN A LOCATION THAT IS NOT
ACCESIBLE TO THE GENERAL PUBLIC. INSTALL THE DEVICE SO
THAT THE ANTENNA IS MORE THAN 20 cm FROM UNSUSPECTING
PERSONNEL. FAILURE TO INSTALL THIS DEVICE AS DESCRIBED
WILL RESULT IN A FAILURE TO COMPLY WITH FCC RULES FOR RF
EXPOSURE AND IS DISCOURAGED. ONLY ANTENNAS APPROVED
WITH THE DEVICE MAY BE USED. THIS DEVICE MAY NOT BE COLOCATED WITH OTHER TRANSMITTERS WITHOUT FURTHER
APPROVAL BY THE FCC.
www.WiQuest.com
3

Wireless 4-Port USB Hub Users Guide
WQST110RDK-HUB-USB4 UG Revision 0.1, July 24, 2006
Introduction
This document outlines how to install the WiQuest USB drivers and software of the WiQuest WQST110RDK-HUB-USB4.
One of the most important parts of this document is the driver and software installation procedure. Make sure to follow the stepby-step procedures. These procedures are proven to work. If followed, the setup, installation, and evaluation will go smoothly.
1 WQST110RDK-HUB-USB4 Features
The WQST110RDK-HUB-USB4 Wireless USB Hub Reference Design allows for flexibility, quick prototyping, and easy
integration into existing or new embedded platforms.
The WQST110RDK-HUB-USB4 package also includes Windows-based USB drivers and a diagnostic utility which allows
users to evaluate transmitter PSD and to test overall transceiver performance.
1.1 Hardware Features
The Wireless USB Hub includes the following hardware features:
• Integrated, high-speed, 480Mbps, Universal Serial Bus (USB) 2.0 interfaces, 4 Type A female, 1 Type B female
• WiMedia standard data rates from 53.3 and 480 Mbps
• WiQuest extended data rate of 1024 Mbps
• 5V 3A Wall Brick powered
• Integrated antenna
• Wireless USB Hub enclosure
1.2 System Requirements
The WQST110 ECC drivers and software require the following minimum system configuration
• Platform: 750 MHz PC
• Media Reader: CD-ROM
• Operating System: Windows XP
2 Installing the WQST110RDK-HUB-USB4 Wireless USB Hub Driver and Software
First, install the software and drivers. After installing the software and drivers, connect the hardware.
DO NOT connect the WQST110RDK-HUB-USB4 until the drivers and software have been installed.
2.1 Installing the WQST110RDK-HUB-USB4 Wireless USB Driver
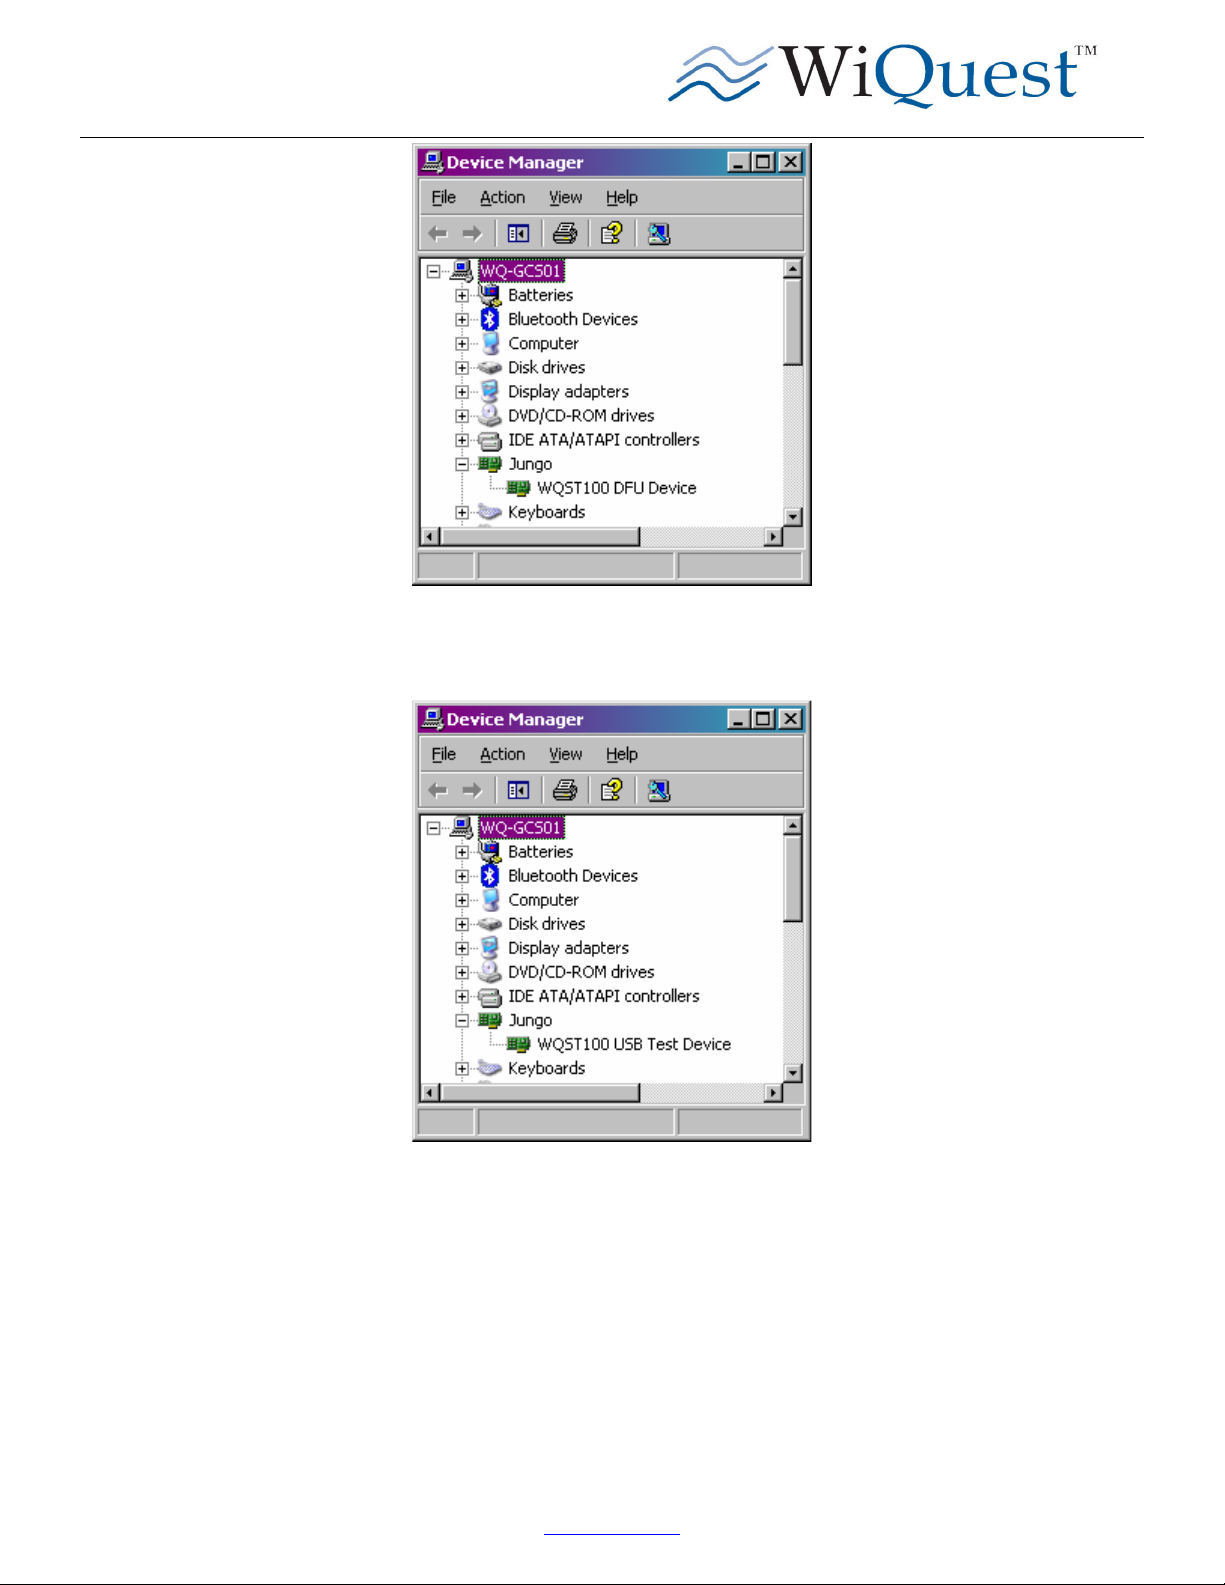
NOTE: From a driver perspective, the Wireless USB Hub represents two separate and unique USB devices. At least two drivers
must be installed on the PC. The installed driver is tied to a PC’s particular USB port, so you will need to install the drivers for
each port where the Wireless USB Hub might be installed. The WQST110 Wireless USB driver will always be loaded and at
least one other driver will be loaded when the EVK Control Center application is executed. The drivers installed are:
WQST110 DFU Device:
www.WiQuest.com
4
Wireless 4-Port USB Hub Users Guide
WQST110RDK-HUB-USB4 UG Revision 0.1, July 24, 2006
Figure 1- DFU Device Driver
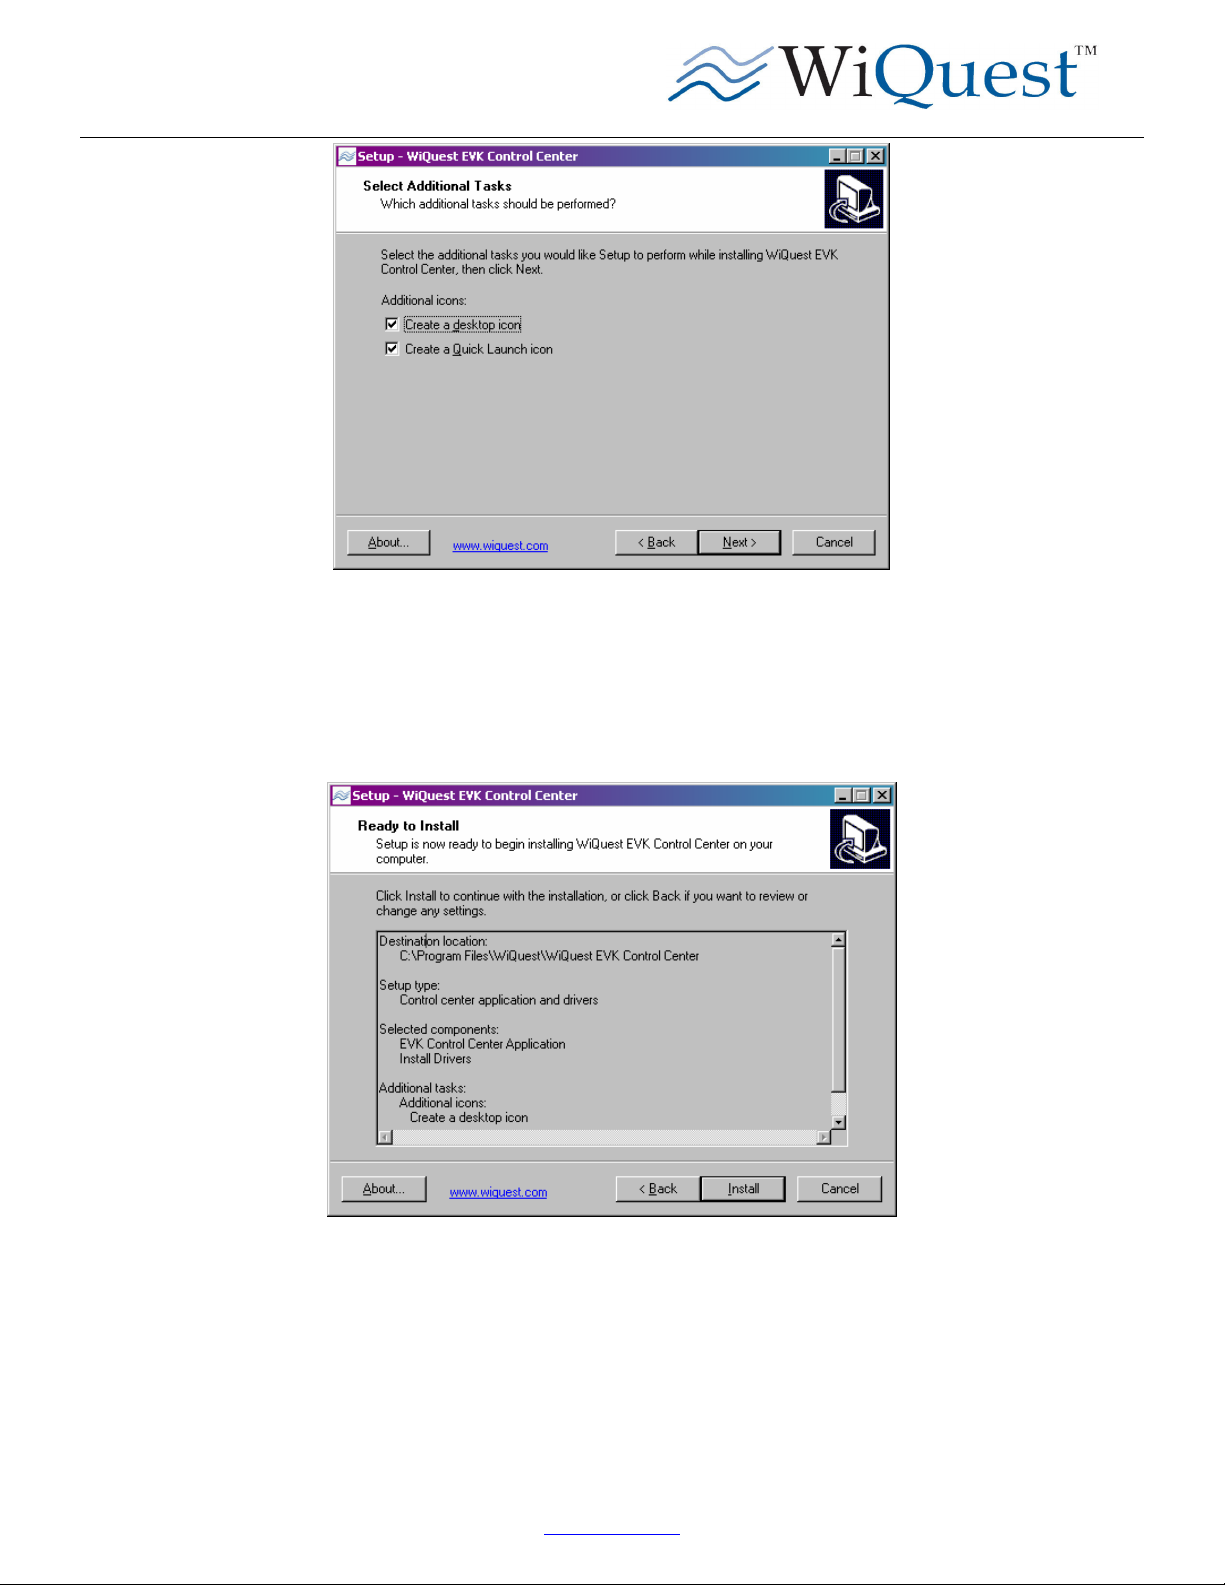
WQST110 USB Test Device:
Figure 2 - WQST110 USB Test Device
2.2 Installing the USB Drivers and the EVK Control Center (ECC)
Step 1
From the WQST110RDK-HUB-USB4 CD, run the EVKCCCCSetup.exe.
Once the “wqevksetup.exe” file is executed the user is prompted to select a language option as shown in Figure 3 - Select Setup
Language. Click “OK” once a language for the installer has been selected.
www.WiQuest.com
5

Wireless 4-Port USB Hub Users Guide
WQST110RDK-HUB-USB4 UG Revision 0.1, July 24, 2006
Figure 3 - Select Setup Language
Step 2
The WiQuest EVK Control Center Setup wizard will start as shown in shown in Figure 4 - Setup - WiQuest EVK Control Center.
Note: It is recommended that all user applications be closed while running the install shield; this will ensure that any
open work is not unexpectedly closed or destroyed.
Click “Next” to continue with the install process.
Figure 4 - Setup - WiQuest EVK Control Center
Step 3
Read and accept the license agreement as shown in Figure 5 - Accept License Agreement.
Once the “I accept the agreement” radio button is selected, click “Next” to continue the setup.
www.WiQuest.com
6

Wireless 4-Port USB Hub Users Guide
WQST110RDK-HUB-USB4 UG Revision 0.1, July 24, 2006
Figure 5 - Accept License Agreement
Step 4
An information window is shown with instructions for this installation. Follow the instructions and click “Next” to continue the
install process.
Figure 6 - Information Window
Step 5
The install wizard allows you to select where to install the WiQuest EVK Control Center and driver files. If desired, change the
installation directory and click “Next” to continue the installation.
www.WiQuest.com
7

Wireless 4-Port USB Hub Users Guide
WQST110RDK-HUB-USB4 UG Revision 0.1, July 24, 2006
Figure 7 - Select Destination Location
Step 6
Next, the wizard will ask you to select whether you want to install the Application, Drivers, or Both. It is recommended that you
install both at this time. Select “Control center application and drivers” as shown in Figure 8 - Select Components and click “Next”
to continue the installation.
Figure 8 - Select Components
Step 7
The install wizard allows you to create desktop and quick launch icons. The desktop and quick launch icons will allow the user to
quickly start the ECC application. Select both and click “Next” to continue.
www.WiQuest.com
8
Wireless 4-Port USB Hub Users Guide
WQST110RDK-HUB-USB4 UG Revision 0.1, July 24, 2006
Figure 9 - Select Additional Tasks
Step 8
The next window shows the destination location for the installation, as well as the components and installation tasks indicated in
the previous steps. Verify the selections. If they are correct, click “Install” to install the selected items; otherwise click the “Back”
button to correct any mistakes.
Figure 10 - Ready to Install
The installer will now install the application and copy the necessary drivers to the installation directory. This may take
a few minutes.
Step 9
Once the driver has finished installing the EVK Control Center, click “Finish” to exit the installer.
www.WiQuest.com
9

Wireless 4-Port USB Hub Users Guide
WQST110RDK-HUB-USB4 UG Revision 0.1, July 24, 2006
Figure 11 - Click Finish to exit the installer.
2.3 Connect the WQST110RDK-HUB-USB4 Wireless USB Hub hardware
After installing the drivers and software, it is now time to install the hardware. Plug the WQST110RDK-HUB-USB4 into a USB
port on the PC.
The PC will make a sound indicating the detection of new hardware and will display a dialog box for installing the new
hardware.
Select “No, not this time” if it asks to connect to live update for the driver. Click “next” to continue.
Figure 12 - Select No, not this time.
Select “Install from a list or specific location (Advanced)” when it says insert the cd or floppy disk. Click “next” to continue.
www.WiQuest.com
10
Wireless 4-Port USB Hub Users Guide
WQST110RDK-HUB-USB4 UG Revision 0.1, July 24, 2006
Figure 13 - Install from a list or specific location
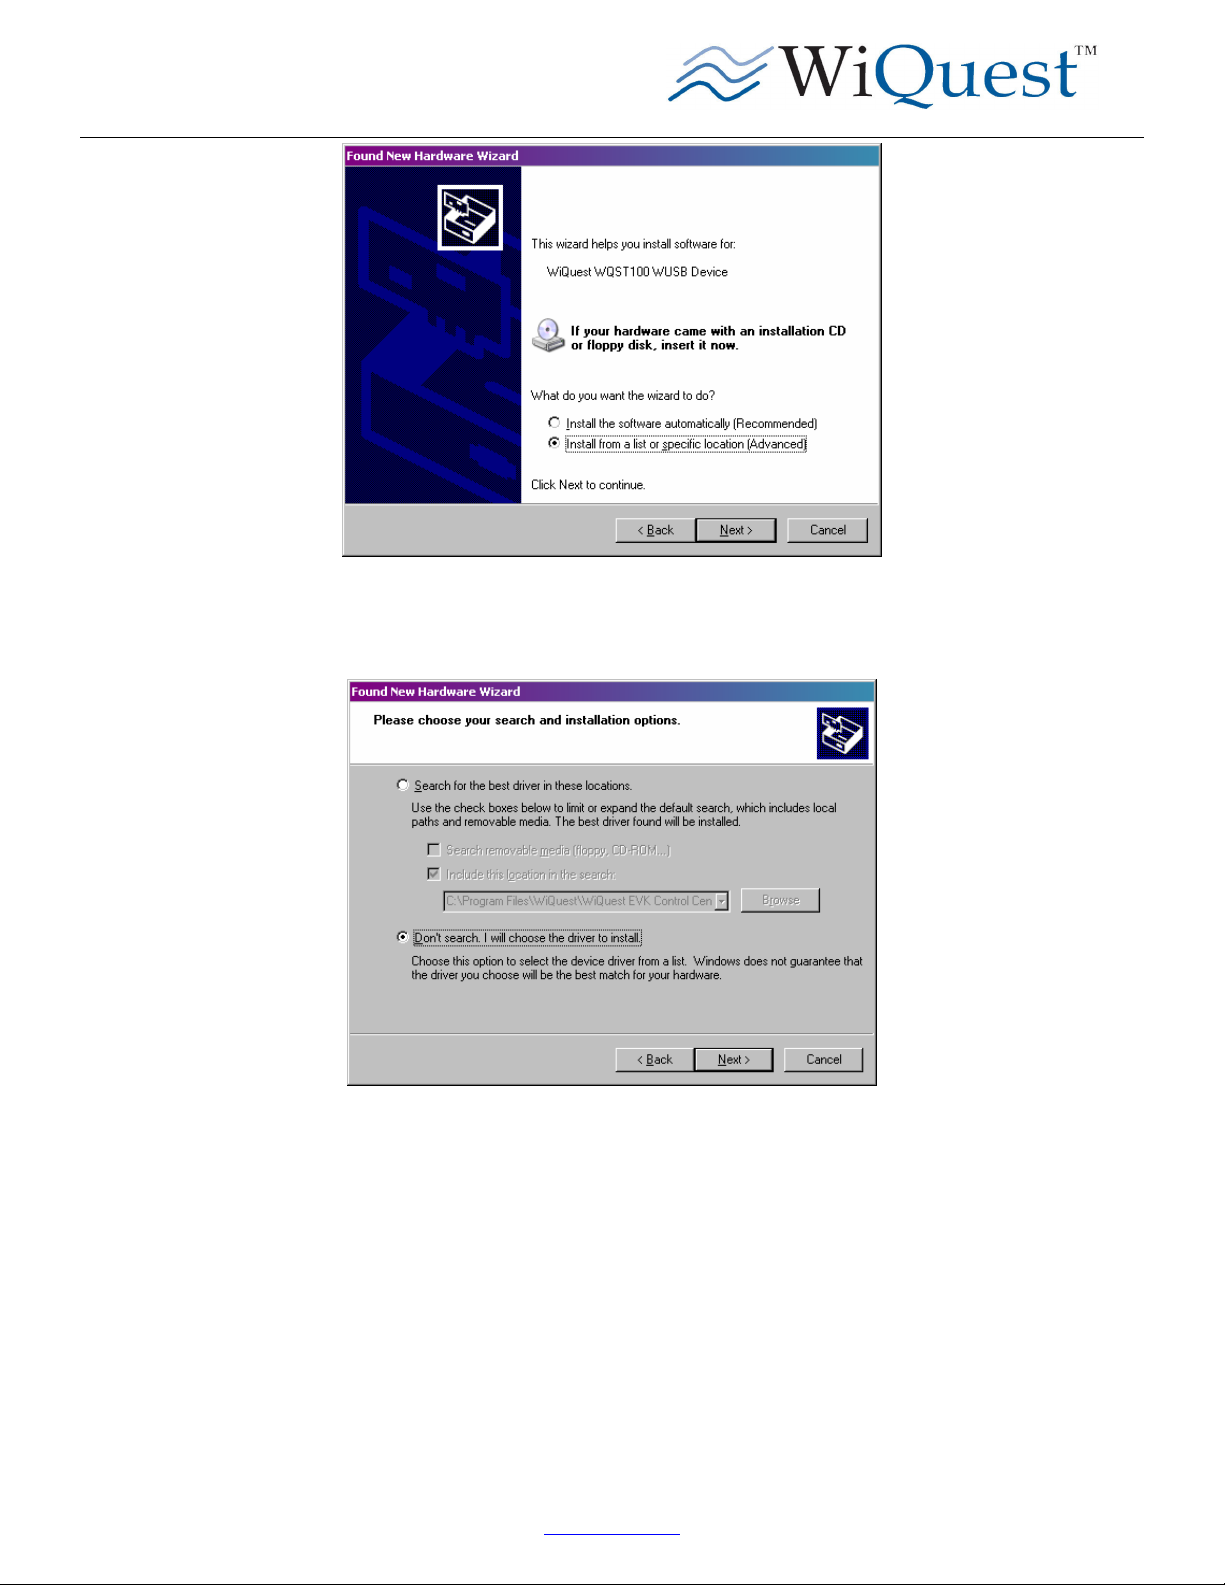
Select “Don’t search. I will choose the driver to install” when it asks you to choose your search and installation options. Click
“next” to continue.
Figure 14 - Don't search, I will choose the driver to install
Click “Have Disk” when asks you to select the devices driver you want to install.
www.WiQuest.com
11

Wireless 4-Port USB Hub Users Guide
WQST110RDK-HUB-USB4 UG Revision 0.1, July 24, 2006
Figure 15 - Choose "Have Disk"
Select the path to the driver directory under the installation directory you chose during the installation (Defaults to: C:\Program
Files\WiQuest\WiQuest EVK Control Center\driver ) Click “OK” to continue.
Figure 16 - Enter the path to the driver directory.
Select “WQST110 DFU Device” when it asks the 2nd time for the device driver to install. Click “next” to continue.
Figure 17 - Select WQST110 DFU Device
www.WiQuest.com
12

Wireless 4-Port USB Hub Users Guide
WQST110RDK-HUB-USB4 UG Revision 0.1, July 24, 2006
If it asks to overwrite a file, select click “yes.”
Figure 18 - Select "yes" if asked to overwrite a file
When it says “Completing the Found New Hardware Wizard,” select “finish.”
Figure 19 - Click finish to complete installing the driver
The drivers are now installed for the port the WQST110RDK-HUB-USB4 is currently connected to. If you wish to use the
Wireless USB Hub on additional ports, you will have to complete this process for each port.
It is recommended that you reboot at this time. This may not be required, but could be in some situations.
NOTE: The first time you use EVK control center, windows may detect a new driver, select the driver directory in the installation
directory if this occurs. (Default is: C:\Program Files\WiQuest\WiQuest EVK Control Center\driver )
3 EVK Control Center (ECC)
The EVK Control Center (ECC) allows the user to perform the following:
• Transmit/receive data packets at several Modulation / Data Rates – Requires radio control driver
As previously stated, when you run the radio functions the first time, you may be prompted to install the appropriate driver. If
Windows does not automatically find the correct driver, you may direct the new hardware wizard to find the driver in the driver
www.WiQuest.com
13

Wireless 4-Port USB Hub Users Guide
WQST110RDK-HUB-USB4 UG Revision 0.1, July 24, 2006
directory in the directory you chose to install the test app in (if you kept the default location, it is: C:\Program
Files\WiQuest\WiQuest EVK Control Center\driver ).
3.1 Running the EVK Control Center Application
Double-click the “WiQuest EVK Control Center” icon on your desktop, or select Start -> All Programs -> WiQUest EVK Control
Center -> WiQuest EVK Control Center to start ECC.
3.2 Select the Host Interface
Once the EVK Control Center has started, select “Target”, “Host Interface” and click on “USB”. This will ensure that the USB
interface is used. See Figure 20 for details.
Figure 20 – Target Menu
3.2.1 Select the Device Identifier (Address) and Time Frequency Code #
EVK Control center supports changing the Device Identifier and Time Frequency Code (TFC#). Select Target -> Properties from
the main window to see current setting and to change it.
By default, most units are configured with a device identifier of “café" and a TFC of 6. To change the TFC, type in the desired
value and click apply. (Note: TFCs 1 through 7 are supported. The Device Identifier is a four digit hexadecimal number.) Click
the “X” button to close the Device Settings window.
Figure 21 - Device Settings, TFC, Device Identifier
www.WiQuest.com
14

Wireless 4-Port USB Hub Users Guide
WQST110RDK-HUB-USB4 UG Revision 0.1, July 24, 2006
3.2.2 Transmit Window
The transmit window controls transmission of data packets from the WQST110RDK-HUB-USB4. Figure 22 illustrates the
features and functions outlined below.
The transmit window is started by selecting Target -> Tx Window in the main program. (See Figure 20)
Figure 22 - Transmit Window
Transmit Configuration Options
The Transmit window provides the following options:
1. Transmit stream # - Fixed at Tx stream # 0
2. Destination Device Id - 4 byte identifier of the destination device.
a. Use the default broadcast Id is 0xFFFF
3. Payload Length - Length of data packet to transmit is fixed at 4095 bytes.
4. Payload Type - The type of payload type is fixed at random.
www.WiQuest.com
15

Wireless 4-Port USB Hub Users Guide
WQST110RDK-HUB-USB4 UG Revision 0.1, July 24, 2006
5. Modulation - Physical layer transmit modulation to use for the packet. The supported modulations are as follows:
a. 53.3 Mbps
b. 480 Mbps
c. 1024 Mbps
6. Ack Policy – The ack policy is fixed at “No Ack.”
7. Access Category - MAC MBOA access categories. PCA1.
Transmit Modes
1. Continuous - Transmit packets with the selected settings continuously
NOTE: Per FCC regulations, an intentional radiator may only transmit when communicating with an associated receiver.
This continuous transmit mode is for evaluation purposes only.
FCC 47 CFR Section 15.517 (a)(5)
A communications system shall transmit only when the intentional radiator is sending
information to an associated receiver.
In end-user applications, this is handled through handshaking, acknowledgements, negotiation of the communication
channel, and other mechanisms that ensure the transmitter is active when communicating with a receiver.
Transmit Statistics
Provides feedback information on the current transmit state for each transmit stream and for the entire WQST110.
Operational Instructions
To transmit continuous pseudo-random data at 53.3Mbps, open the transmit window, select 53.3 Mbps as the modulation, and
click Transmit to start the transmitter.
www.WiQuest.com
16

Wireless 4-Port USB Hub Users Guide
WQST110RDK-HUB-USB4 UG Revision 0.1, July 24, 2006
3.2.3 Receive Window
The receive window displays information on all received packets. If you have two WQST110RDK-HUB-USB4 devices, or
another WQST110 or WQST110-based device, you can use this window to configure the receiving device (MUST BE
INSTALLED ON A SEPARATE PC).
Figure 23 illustrates the features and functions of the Receive Window.
The receive window is split up into different sections. The multiple receive stream window provides details on the current receive
stream. The system statistics section provides detailed statistics on the selected receive stream and for the entire system. By
default the receive stream is 0.
NOTE: TWO WQST devices are required to do receive testing. One for transmit, and one for receive. The drivers must
be installed on separate PCs – two PCs are required as well.
Figure 23 - Receive Window
www.WiQuest.com
17

Wireless 4-Port USB Hub Users Guide
WQST110RDK-HUB-USB4 UG Revision 0.1, July 24, 2006
RX Settings
1. Receive Stream # - The active receive stream number.
2. Rx Mode - For the selected receive stream, the receiver can be placed into different verification modes.
a. Basic Verification - All received frames have their FCS value verified.
b. Fw CRC Verification -All received frames have their firmware computed checksum verified. This is in addition to
the basic verification.
3. Stream # Filter - For the current selected stream, frames can be filtered in by the transmit stream number. All received
data frames that are from the specified transmit stream # are classified to the current selected receive stream.
4. Destination Id Filter - For the current selected stream, frame can be filtered in by the 16-bit destination identifier. All
received data frames with the specified destination Id are classified to the selected receive stream.
System Statistics
This section displays errors for the entire system. The exceptions are:
• Pkts processed by MAC - Number of received frames that the WQST110 sees.
• Pkts processed by FW - Number of received frames that the test firmware sees.
• Burst Preamble - Number of received frames with a burst preamble.
Stream Statistics
Displays statistics for the selected receive stream, including information from the MAC header, payload size, modulation etc.
PHY Error Statistics Enable
1. HCS - Enable counting of HCS errors.
2. TFC - Enable counting of TFC errors.
3. Rate Unsupported - Enable counting of rate unsupported errors.
4. Band Group - Enable counting of band group errors.
Operational Instructions
With two PCs, each with a WQST110 HUB, Double-click on the “ECC” icon. To open the receive window click on “Target” and
select “Rx Window”, configure the receive settings. Click “update” to clear all statistics.
www.WiQuest.com
18

Wireless 4-Port USB Hub Users Guide
WQST110RDK-HUB-USB4 UG Revision 0.1, July 24, 2006
4 Appendix A: Troubleshooting
Below is a list of commonly asked questions. Before calling technical support, please look through these issues to see if they
help solve your problem.
4.1 The Wireless USB Hub is not functional
1. Check to see that the power LED is illuminated and that the Wireless USB Hub is installed correctly.
2. If your PC has a sound card, turn up the volume and plug in the USB cable. Do you hear an enumeration sound? If not,
the USB driver is not installed correctly; it is recommended to reinstall the USB driver again.
4.2 I can’t connect to the Wireless USB Hub.
1. Check to see that the power LED is illuminated and that the Wireless USB Hub is installed correctly.
2. If the LED is illuminated and the USB port is operational, check to insure that the driver is installed:
a. On your desktop, right click on the My Computer icon and select properties, right click on hardware, and then
right click on device manager. Alternatively, you can right-click MyComputer in the Start menu, or start -> run ->
“devmgmt.msc”.
b. With the Wireless USB Hub connected, check to see if there is a “Jungo” device, with a “WQST110 DFU
Device.” If you see a Jungo icon and the WQST110 device under that icon, then the driver is installed correctly
and the problem is related to the ECC application. If the Jungo icon is not displayed the problem is related to
the driver, and it is recommended that you reinstall the drivers.
ommon Problems and Solutions
www.WiQuest.com
19
 Loading...